Toshiba Mobile Communications Quality Management Division CN10-J03 CDMA TS003 Cellphone User Manual T001 Basic indb
Toshiba Corporation, Mobile Communications Co., Quality Management Division CDMA TS003 Cellphone T001 Basic indb
Manual

TS003
Basic Manual
366
T003
English Simple Manual
(簡易英語版)
English Simple Manual
(簡易英語版)
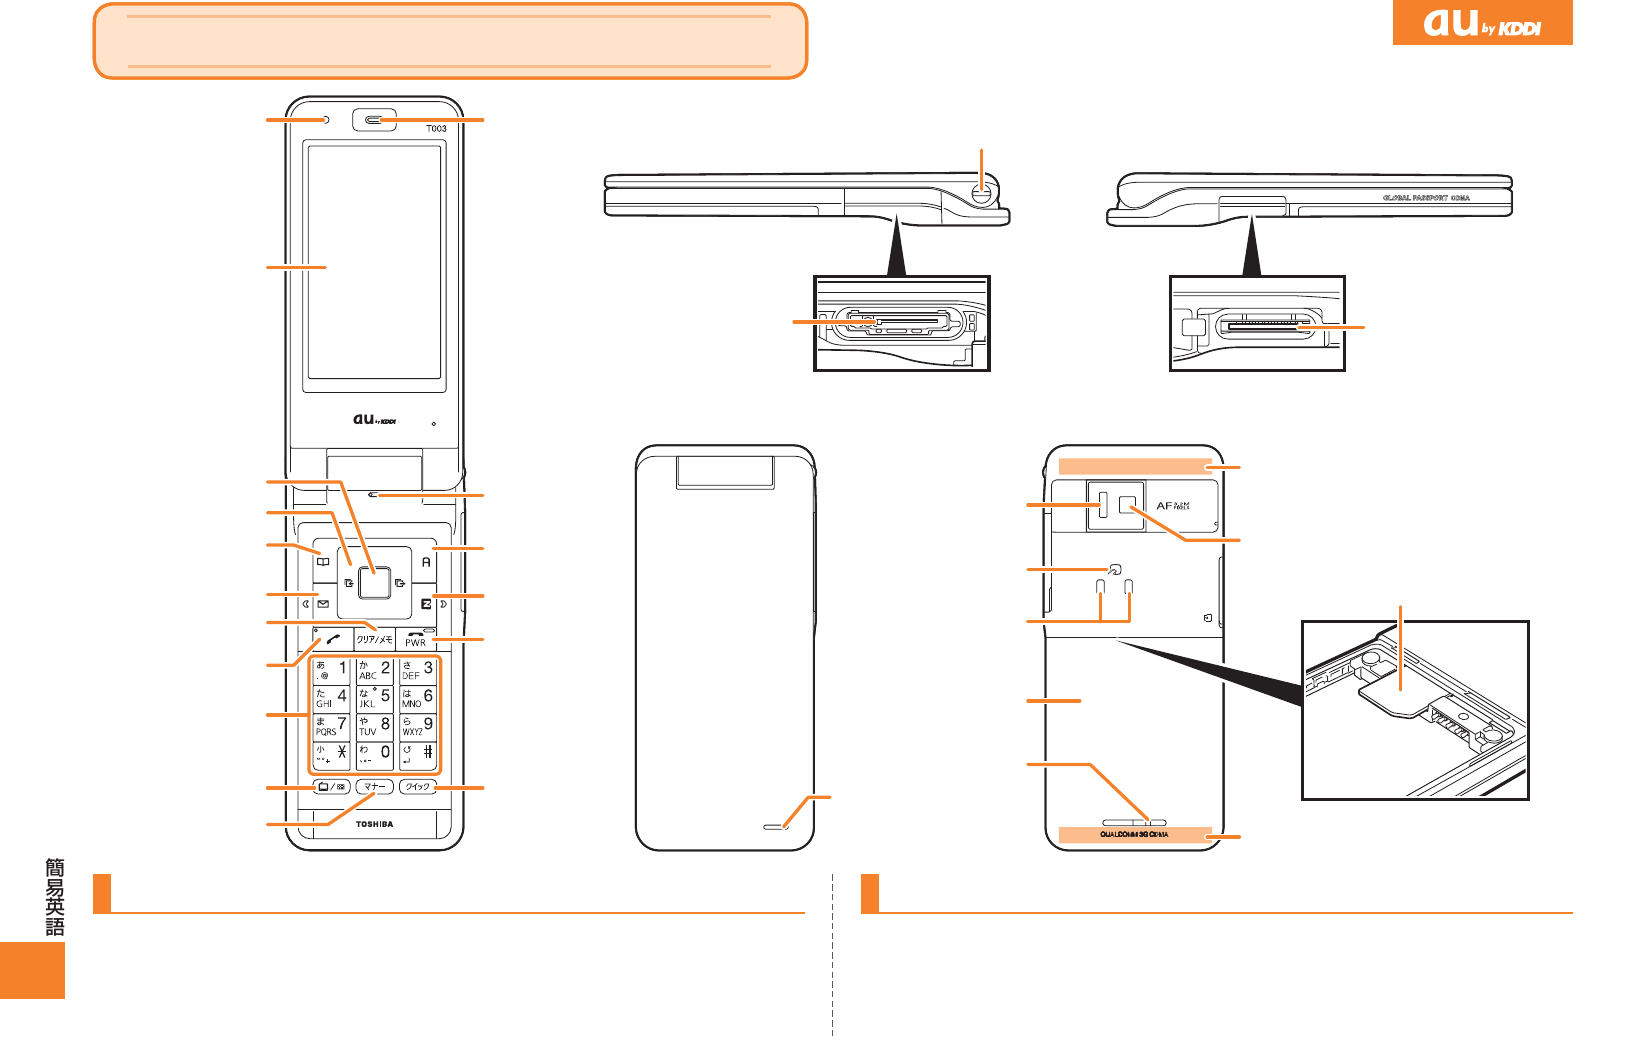
Memory card slot
FeliCa mark
Camera (lens)
Power terminal
Infrared port
Battery pack/
Battery pack cover
Incoming LED/
Camera lamp/
Charge indicator
Send key
EZ key
Phone book key/
Soft key 1
Manner key
Earpiece
Microphone
Mail key
EZapps key/
Soft key 2
Clear key/
Memo key
Warp function key
Customize key
Display
Center key
Lux Sensor
Keypad,
key,
key
Power key/
End key
External connection jack
Hand strap eyelet
Quick key
au IC-Card
Built-in antenna
Speaker
Built-in antenna
Turning Power On and Off
● Turning Power On
Hold down F for at least a few seconds.
● Turning Power Off
Hold down F for at least a few seconds.
Switching the Screen to English
From the stand-by screen: Press c. ▶Press 3. ▶Press 5.
▶Press 2.
KD50_16_04_digest_E&C-memo.indd 366 09.7.29 2:36:04 PM
1
8
Getting Ready
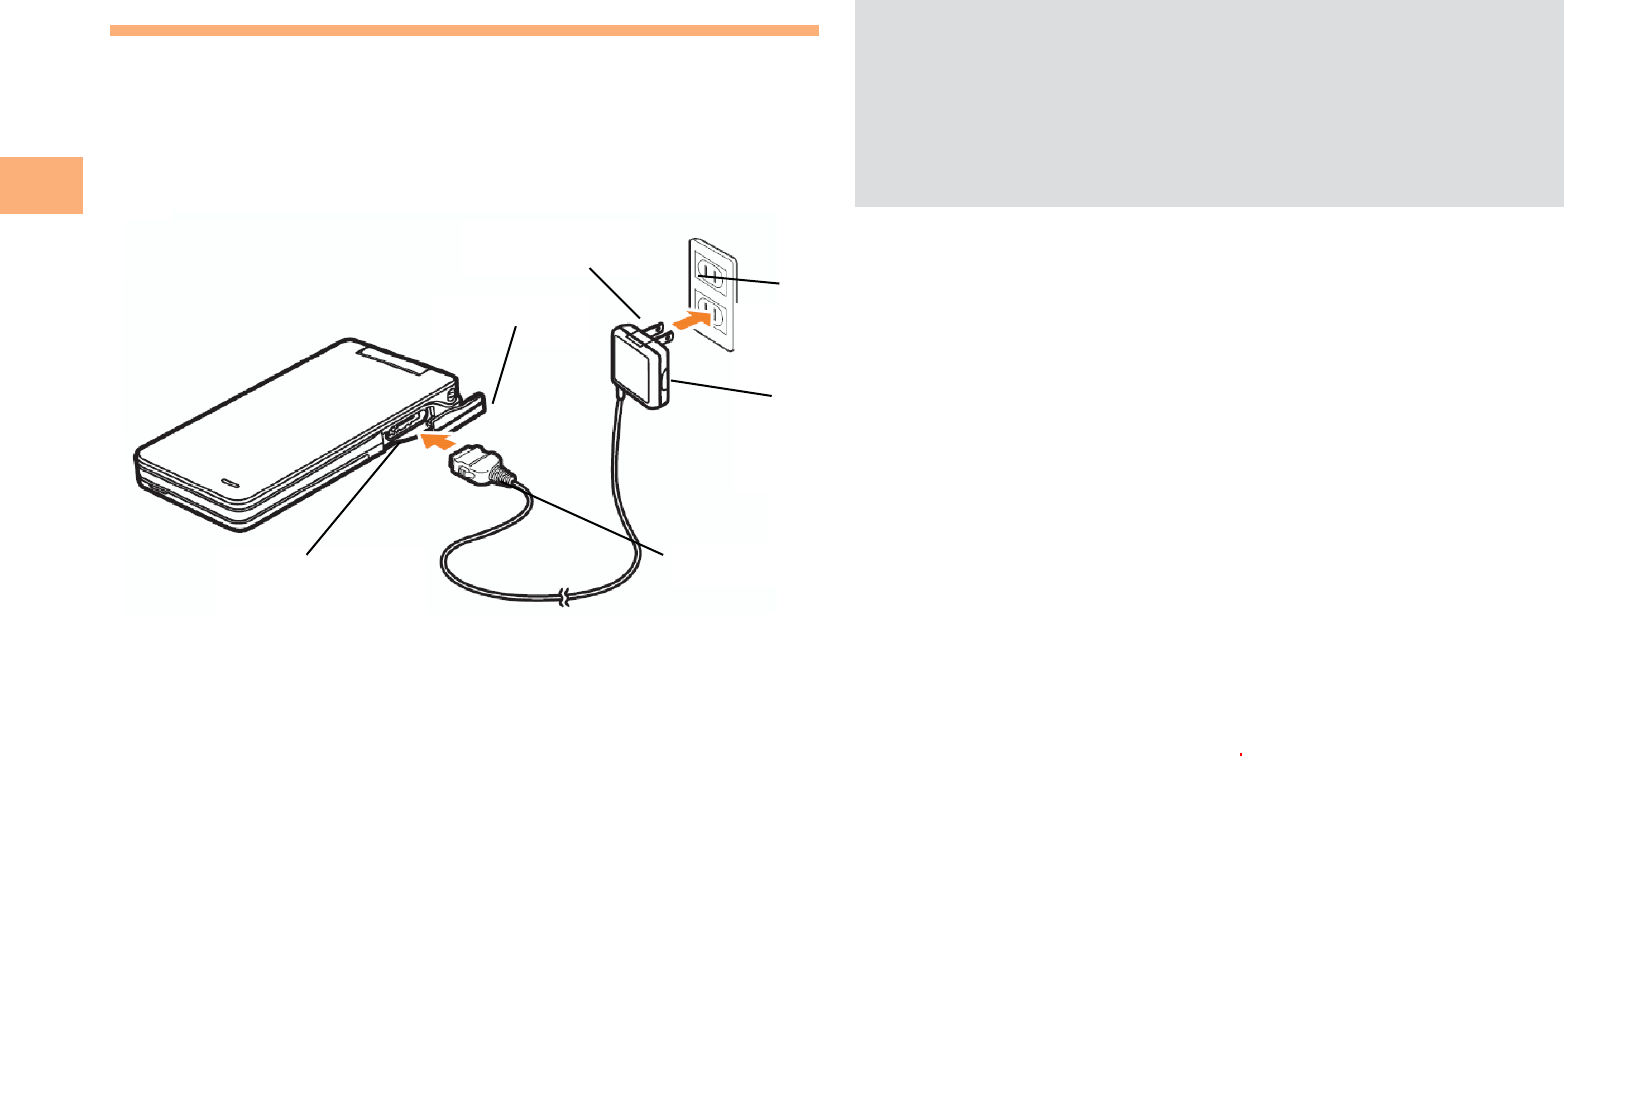
Charging the Battery Pack
The battery pack is not fully charged at the time of purchase.
Be sure to charge the battery pack before using the cell
phone for the first time.
An AC adapter is not included. Purchase a common AC
adapter 01/02 (sold separately).
Connect the common AC adapter 01/02 to the
cell phone with the battery pack attached.
Open the cover of the external connection jack. Check
the shape of the connector of the common AC adapter
01/02, and plug it straight into the external connection
jack.
Unfold the power plug of the common AC
adapter 01/02 and plug it into a 100 V AC power
outlet.
Confirm that the charge indicator lights.
Charging: The charge indicator lights.
Charging finished: The charge indicator goes out.
•
➡
•
➡
➡
•
•
Be sure to close the cover of the external connection
jack when charging is finished.
Do not pull or twist the cover of the external
connection jack forcibly.
Be sure to use the common AC adapter 02 (sold
separately) when charging overseas.
•
•
•
Common
AC adapter
01/02
100 V AC
power outlet
Power
plug
Charge indicator
Connector
External
connection jack
Common
AC adapter
01/02
100 V AC
power outlet
Power
plug
Charge indicator
Connector
External
connection jack
External
connection
j
ack
J
ac
k
cover 100V AC
power out let
Common AC
adapter 01/02
Connector
Power plu
g
2
100V AC
power out let
Common AC
adapter 01/02
Connector
J
ack cover
Power plug
External
connection jack
10
Getting Ready
Hiding/Redisplaying the
Alert Window
When the alert window is displayed on
the standby screen, you can temporarily
hide it by pressing K (Back) and then
display the Main menu by pressing [.
To redisplay the hidden alert window,
press B when the standby screen is
displayed.
Turning On Power
Hold down S for at least one second.
You cannot receive or make calls if (out of range
indicator) is displayed.
Turning Off Power
When the standby screen is displayed, hold down S for
at least one second.
Switching the Display Language
to English
You can switch the display language for function names
and other items to English.
When the standby screen is displayed, press [.
Use E to select
機能
(Function) and then
press [ (選択 [Select]).
Use G to select
画面表示
(Screen Display) and
then press [ (選択 [Select]).
■
•
■
➡
➡
Use G to select Set Language and then press
[ (選択 [Select]).
Use G to select English and then press
[ (Set).
Initial Setup of E-mail and EZweb
To use e-mail and EZweb, you need to apply for an EZweb
subscription. If you did not apply for an EZweb subscription
at the time of purchase, contact an au shop or the au
Customer Service Center.
Also, before use, you need to configure initial settings. Your
e-mail address is assigned automatically in the initial setup.
When the standby screen is displayed, press L.
Press [ (OK).
After a short while, your e-mail address is displayed.
Press [ (OK).
The initial settings are complete.
You can also configure initial settings by pressing mM
or jJ.
Checking Your Phone Number
and E-mail Address
When the standby screen is displayed, press [
and then 0.
➡
➡
➡
➡
•
Alert windowAlert window
3

15
Making and Answering Calls
Making and Answering Calls
Making a Call
When the standby screen is displayed, use 0
to 9 to enter a phone number.
When calling to a fixed-line phone, you also need to enter
the area code.
Press Q.
To end the call, press S.
After you enter a phone number, you can add 184 or
186 to the phone number as follows:
Press {[ (Call).
Use gG to select Add Special No. and then press
{[ (OK).
Use gG to select 184 or 186 and then press
{[ (Add).
184: When you do not want to inform the other party of
your phone number.
186: When you want to inform the other party of your
phone number.
•
➡
•
•
➡
➡
➡
Making an International Call
au International Call Service
Available without any additional application
Example: To call 212-123-△△△△ in the USA
Press 005345.
↑
International access code
Press 1.
↑
Country code (USA)
Press 212.
↑
Area code
Press 123△△△△.
↑
Phone number
Press Q.
Calling charges for this service are added to monthly
cell phone calling charges and billed together.
Check the country code at the au Customer Service
Center.
For charges, refer to au MOBILE PHONE SERVICE
GUIDE or au Customer Service Center.
■
➡
➡
➡
➡
•
•
•
4
16
Making and Answering Calls
001 KOKUSAI MOBILE TALK
Application required.
For inquiries, contact the KDDI Customer Service Center.
0077-7160
(toll-free; open 9:00 to 20:00 everyday including
weekends and national holidays)
Charges for 001 KOKUSAI MOBILE TALK are charged
separately from monthly au telephone charges.
Check the country code at the au Customer Service
Center.
For charges, refer to au MOBILE PHONE SERVICE
GUIDE or au Customer Service Center.
■
•
•
•
001
↑
KDDI international
access code
↑
Country
code
(USA)
↑
Area code
↑
Phone number
010 212 123
-
XXXX1001
↑
KDDI international
access code
↑
Country
code
(USA)
↑
Area code
↑
Phone number
010 212 123
-
XXXX1
Answering a Call
To answer a call, press Q.
To end the call, press S.
Display When a Call is Received
The phone number of the caller appears.
If the caller's phone number and name are in the phone
book, the name is also displayed.
When the phone number of the caller is not displayed, one
of the following indicators may appear.
Indicator Meaning
ID Unsent The caller did not send a Caller ID.
Payphone The call is from a pay phone.
Not Support The call is from a phone that does not
support Caller ID.
Missed Call Notification
If you did not answer a call, and Missed Call are displayed
to let you know that you missed a call.
To check the caller's phone number, use F to select
Missed Call and then press [ (Select). You can then return
the call (see page 17).
•
■
■
5

20
Global Function
Global Function
The T001 supports Global Passport CDMA services.
You can use your T001 overseas without any additional
application.
Setting the Area
When the standby screen is displayed, press [.
Use E to select Tool and then press [ (Select).
Use G to select Global Function and then press
[ (Select).
Precautions are displayed.
Check the precautions and then press [ (OK).
Use G to select Area Setting and then press
[ (Select).
Use G to select Overseas and then press
[ (Select).
Use G to select YES and then press [ (OK).
➡
➡
➡
➡
➡
➡
Calling Japan from Overseas
When the standby screen is displayed, use 0
to 9 to enter a phone number.
Press [ (Call).
Use G to select Voice Call and then press
[ (OK).
Use G to select Call to Japan and then press
[ (OK).
Press [ (Call).
Some functions are not available when Area Setting is
not set to Japan.
Manually update and set the PRL (preferred roaming
list) before traveling abroad.
When you make an international call from Japan to a
Global Passport CDMA-compatible cell phone, you
can do it in the same way as making domestic calls
within Japan.
To obtain (download) the PRL, you need to subscribe
to EZweb and make initial settings (see page 10) while
in Japan.
➡
➡
➡
➡
•
•
•
•
6
21
Character Input
Character Input
Character Entry Modes
When a character entry screen is displayed, you can select
a character entry mode if you press K (ChrTyp).
Menu Items
漢あ : Kanji conversion mode
カナ : Double-byte katakana mode
aA : Double-byte alphanumeric mode
12 : Double-byte number mode
カタカナ
: Single-byte katakana mode
abAB
: Single-byte alphanumeric mode
1234
: Single-byte number mode
Use E to select a character entry mode and then
press [ (Select).
Entering Alphanumeric Characters
You can use the keys 1 to 0 to enter characters. More
than one character is assigned to each key.
The following table shows the key assignment for entering
characters.
■
Number of Times to Press the Key
key123456789101112
:1.@−_/:∼?,!1
:2abcABC2
:3defD E F3
:4ghiG H I4
:5jklJKL5
:6mnoMN O6
:7pqrsP Q RS7
:8tuv T U V8
:9wxyzWX Y Z 9
:00Inputs symbols
:*Inputs symbols (switches an unconfirmed
character between uppercase and lowercase).
:;Adds a line break and displays characters in the
opposite order.
When you change your e-mail address, you cannot use
the characters in
■
for the account name (part of the
address to the left of @).
7

22
Character Input
Entering Two or More Characters
Assigned to the Same Key
After you enter the first character, press C and then enter
the next character.
Deleting Characters
To delete one character at a time, move the cursor to the
character you want to delete and then press R. To delete
all characters to the right of the cursor, hold down R for
at least one second. If there are no characters to the right of
the cursor, holding down R will delete all the characters.
Starting a New Line
Press ;.
Certain functions such as c-mail do not support
entering new lines.
Entering E-mail Addresses
E-mail Address Compatible Characters
Before you enter an e-mail address, switch to the Single-
byte alphanumeric mode.
When changing your e-mail address, you can enter up
to 30 single-byte alphanumeric and symbol characters
for the account name (part to the left of @). Note the
following:
- Uppercase characters cannot be used.
- Period (.) or zero (0) cannot be used as the first
character.
■
■
■
•
■
•
•
How to Enter E-mail Addresses
Example: Entering "taro.23@toshiba.co.jp"
Enter "taro.23".
t : Press 8 once.
a : Press 2 once.
r : Press 7 three times.
o : Press 6 three times.
. : Press 1 once.
2 : Press 2 once and then ;.
3 : Press 3 once and then ;.
Enter "@".
@: Press 1 twice.
Enter "toshiba" and then press [ (OK).
t : Press 8 once.
o : Press 6 three times.
s : Press 7 four times.
h : Press 4 twice and then C.
i : Press 4 three times.
b : Press 2 twice and then C.
a : Press 2 once.
Press J (SubMenu).
Use G to select Phrase and then press
[ (OK).
Use G to select Internet and then press
[ (Select).
Use G to select .co.jp and then press
[ (Select).
".co.jp" is entered.
■
➡
➡
➡
➡
➡
➡
8

24
Phone Book
Phone Book
Saving a Phone Book Entry
When the standby screen is displayed, hold down
K for at least one second.
Use G to select [Name] and then press
[ (Select).
Enter a name and then press [ (OK).
The [Reading] for the name is entered automatically.
Use G to select [Phone No.1] and then
press [ (Select).
Enter a phone number and then press [ (OK).
If the phone number is for a fixed-line phone, enter the
phone number starting with the area code.
Use G to select a phone number type and
then press [ (Select).
Follow the next step to enter an e-mail address. If
you do not want to enter an e-mail address, press
J (Reg).
Use G to select [E-mail Address1] and then
press [ (Select).
Enter an e-mail address and then press
[ (OK).
Use G to select an e-mail address type and
then press [ (Select).
Press J (Reg).
➡
➡
➡
➡
•
➡
•
➡
➡
➡
➡
The phone book can store up to 1,000 entries.
The cell phone automatically saves an entry to the
lowest available memory number from 000 to 999.
You can save five phone numbers and five e-mail
addresses for each phone book entry.
You can also assign a group No., and enter birthday,
address, and other information.
Dialing from the Phone Book
When the standby screen is displayed, press K.
Use E to select the entry containing the
phone number you want to dial and then press
[ (Detail).
Use G to select the phone number and then
press [ (Select).
Use G to select Voice Call and then press
[ (OK).
Editing Phone Book Entries
When the standby screen is displayed, press K.
Select an entry and press [ (Detail).
Press K (Edit).
Edit the contents and then press J (Reg).
Use G to select Overwrite and then press
[ (OK).
•
•
•
•
➡
➡
➡
➡
➡
➡
➡
9

25
Phone Book
Saving a Phone Number from the
Incoming or Outgoing History
Example: Saving a phone number from the incoming history
to the phone book
When the standby screen is displayed, press D
and use G to select the phone number you want
to save.
Press J (SubMenu).
Use G to select Reg to Adrs Book and then
press [ (OK).
Use G to select Register New and then press
[ (Select).
Use G to select a phone number type and
then press [ (Select).
For details on saving a phone book entry, see page
24.
➡
➡
➡
➡
•
10
27
Mail
Mail
Using E-mail
To use e-mail, you need to apply for an EZweb subscription.
If you did not apply for an EZweb subscription at the time of
purchase, contact an au shop or the au Customer Service
Center. Also, before use, you need to configure initial
settings.
You can send and receive e-mail with other cell phones
that support e-mail, and with PCs. In addition to text
messages of up to 5,000 double-byte (or 10,000 single-
byte) characters, you can also send photos and movies by
e-mail.
The packet communication charge for sending and
receiving e-mail applies to the amount of data sent
and received.
You can send an e-mail message to up to 30 different
addresses at one time.
You can send up to 1,000 e-mail messages per day (a
message with multiple recipients is counted as more
than one message).
Sending and receiving e-mail messages that include
attachment data may take a while.
•
•
•
•
Creating and Sending E-mail Messages
When the standby screen is displayed, press L.
Use G to select Create New and then press
[ (Select).
Use G to select Address and then press
[ (Select) twice.
Use G to select Address Book and then press
[ (Select).
Use E to select a phone book entry and then
press [ (Detail).
Use E to select an address and then press
[ (Select).
Press K (OK).
Use G to select Subject and then press
[ (Select).
Enter a subject and then press [ (OK).
You cannot enter single-byte katakana characters or a
new line in a subject.
Use G to select Text and then press
[ (Select).
Enter text and then press [ (OK).
You cannot enter single-byte katakana characters.
Press K ( Send).
➡
➡
➡
➡
➡
➡
➡
➡
•
➡
➡
•
➡
11

28
Mail
Reading Received E-mail Messages
When you receive an e-mail message, E-mail
appears on the standby screen.
Use F to select E-mail and then press
[ (Select).
Press [ (Select).
: Indicates a read message.
: Indicates an unread message.
Use G to select the new message and then
press [ (Select).
Reading an E-mail Message from the E-mail Menu
When the standby screen is displayed, press L to display
the E-mail menu, use G to select Inbox and then press
[ (Select).
For subsequent operations, see "Reading Received E-mail
Messages" above.
Reading an E-mail Message with
an Attached Photo or Movie
Example: Viewing an attached photo
Display the e-mail message that has an attached
photo (above).
Use G to select the file name and then press
[ (Select).
➡
➡
•
•
➡
■
➡
Use G to select the file name and then press
[ (Receive).
Press [ (Play).
Selecting the file name or pressing {[ (Receive)
may be unnecessary for some files to be displayed,
depending on the file size.
Replying to Received E-mail Messages
When the standby screen is displayed, press L.
Use G to select Inbox and then press
[ (Select).
Press [ (Select).
Use G to select the message you want to
reply to and then press [ (Select).
Press K (Reply).
"Re:" is prefixed to the subject, and the text of the
message is quoted.
Refer to "Creating and Sending E-mail
Messages" (page 27) for subsequent
operations.
➡
➡
•
➡
➡
➡
➡
➡
12

30
Mail
Using C-mail
C-mail is a service that uses phone numbers as addresses
to exchange messages between au cell phones that
support c-mail. A c-mail message can contain up to 50
double-byte (or 100 single-byte) characters.
The c-mail send charge applies when sending c-mail.
C-mail Safety Block
C-mail safety block is a function that allows you to reject
c-mails that include URLs (http://△△△, https://△△△) or
phone numbers in the c-mail message text.
C-mail safety block is valid by default. Cancel the setting if
you want to receive c-mails that include URLs and phone
numbers in the message text.
Creating and Sending C-mail Messages
When the standby screen is displayed, hold down
L for at least one second.
Use G to select Create New and then press
[ (Select).
Enter text and then press [ (OK).
Use G to select [Address] and then press
[ (Edit).
Use G to select Quote Adrs Book and then
press [ (OK).
•
■
➡
➡
➡
➡
Use E to select a phone book entry and then
press [ (Detail).
Use E to select an address and then press
[ (Select).
Press K (Send).
Reading Received C-mail Messages
When you receive a c-mail message, C-mail
appears on the standby screen.
Use F to select C-mail and then press
[ (Select).
Press [ (Select).
: Indicates a read message.
: Indicates an unread message.
Use G to select the new message and then
press [ (View).
Reading a C-mail Message from the C-mail Menu
When the standby screen is displayed, hold down L for
at least one second to display the C-mail menu, use G to
select Inbox and then press [ (Select).
For subsequent operations, see "Reading Received C-mail
Messages" above.
➡
➡
➡
➡
➡
•
•
➡
■
13
367
HOWEVER CAUSED AND ON ANY THEORY OF LIABILITY, WHETHER
IN CONTRACT, STRICT LIABILITY, OR TORT (INCLUDING NEGLIGENCE
OR OTHERWISE) ARISING IN ANY WAY OUT OF THE USE OF THIS
SOFTWARE, EVEN IF ADVISED OF THE POSSIBILITY OF SUCH
DAMAGE.
FCC Notice
This device complies with part 15 of the FCC Rules. Operation is subject
to the following two conditions: (1) This device may not cause harmful
interference, and (2) this device must accept any interference received,
including interference that may cause undesired operation.
Note:
This equipment has been tested and found to comply with the limits for a
Class B digital device, pursuant to part 15 of the FCC Rules. These limits
are designed to provide reasonable protection against harmful interference
in a residential installation. This equipment generates, uses, and can radiate
radio frequency energy and, if not installed and used in accordance with
the instructions, may cause harmful interference to radio communications.
However, there is no guarantee that interference will not occur in a particular
installation. If this equipment does cause harmful interference to radio or
television reception, which can be determined by turning the equipment off
and on, the user is encouraged to try to correct the interference by one or
more of the following measures:
- Reorient or relocate the receiving antenna.
- Increase the separation between the equipment and receiver.
- Connect the equipment into an outlet on circuit different from that to which
the receiver is connected.
- Consult the dealer or an experienced radio/TV technician for help and for
additional suggestions.
Warning
The user is cautioned that changes or modifications not expressly approved by
the manufacturer could void the user’s authority to operate the equipment.
FCC RF EXPOSURE INFORMATION
Warning! Read this information before using your phone.
In August 1996, the Federal Communications Commission (FCC) of the
United States, with its action in Report and Order FCC 96-326, adopted
an updated safety standard for human exposure to radio frequency
electromagnetic energy emitted by FCC regulated transmitters. Those
guidelines are consistent with the safety standard previously set by both U.S.
and international standards bodies. The design of this phone complies with
the FCC guidelines and these international standards.
Specific Absorption Rate (SAR) for Wireless Phones
The exposure standard for wireless handsets employs a unit of measurement
known as the Specific Absorption Rate, or SAR. The SAR limit set by the
FCC is 1.6 W/kg.
The tests are performed in positions and locations (e.g., at the ear and worn
on the body) as required by the FCC for each model. The highest SAR value
for this model handset when tested for use at the ear is 1.32 W/kg and when
worn on the body, as described in this user guide, is 0.898 W/kg.
Body-worn Operation
This device was tested for typical body-worn operations with the back of
the phone kept 0.59 inches (1.5 cm) from the body. To comply with FCC
RF exposure requirements, a minimum separation distance of 0.59 inches
(1.5 cm) must be maintained between the user’s body and the back of the
phone, including the antenna. All beltclips, holsters and similar accessories
used by this device must not contain any metallic components. Body-worn
accessories that do not meet these requirements may not comply with FCC
RF exposure limits and should be avoided.
Turn off your phone before flying
You should turn off your phone when boarding any aircraft. To prevent possible
interference with aircraft systems, U.S. Federal Aviation Administration (FAA)
regulations require you to have permission from a crew member to use your
phone while the plane is on the ground. To prevent any risk of interference,
FCC regulations prohibit using your phone while the plane is in the air.
KD50_16_03_kiyaku.indd 367 09.8.28 6:48:47 PM
14