Toshiba TEC FV4TBT1 Barcode Printer User Manual
Toshiba TEC Corporation Barcode Printer
User Manual

B‐FV4TSERIESPrinter
Owner’sManual
B-FV4T-GS12-QM-R / B-FV4T-GS14-QM-R
B-FV4T-TS12-QM-R / B-FV4T-TS14-QM-R
i
FCCComplianceStatement
ThisequipmenthasbeentestedandfoundtocomplywiththelimitsforaClassA
digitaldevice,pursuanttoPart15oftheFCCRules.Theselimitsaredesignedto
providereasonableprotectionagainstharmfulinterferenceinaresidential
installation.Thisequipmentgenerates,uses,andcanradiateradiofrequencyenergy
and,ifnotinstalledandusedinaccordancewiththeinstructions,maycauseharmful
interferencetoradiocommunications.However,thereisnoguaranteethatthe
interferencewillnotoccurinaparticularinstallation.Ifthisequipmentdoescause
harmfulinterferencetoradioortelevisionreception,whichcanbedeterminedby
turningtheequipmentoffandon,theuserisencouragedtotrytocorrectthe
interferencebythefollowingmeasures:
Reorientorrelocatethereceivingantenna.
Increasetheseparationbetweentheequipmentandthereceiver.
Connecttheequipmentintoadifferentoutletonadifferentcircuit.
ConsultthedealeroranexperienceRadio/TVtechnicianforhelp.
Thisunitwastestedwithshieldedcablesontheperipheraldevices.Shieldedcables
mustbeusedwiththeunittoinsurecompliance.Theuseriscautionedthatany
changesormodificationsnotexpresslyapprovedbyToshibaTECCorporationcould
voidtheuser’sauthoritytooperatetheequipment.
ii
LiabilityDisclaimer
Toshi baTECCorporationtakesstepstoassurethatthecompany’spublished
engineeringspecificationsandmanualsarecorrect;however,errorsdooccur.
Toshi bareservestherighttocorrectanysucherrorsanddisclaimsanyresulting
liability.InnoeventshallToshi baoranyoneelseinvolvedinthecreation,production,
ordeliveryoftheaccompanyingproduct(includinghardwareandsoftware)beliable
foranydamageswhatsoever(including,withoutlimitation,damagesforlossof
businessprofits,businessinterruption,lossofbusinessinformation,orother
pecuniaryloss)arisingoutoftheuseofortheresultsofuseoforinabilitytouse
suchproduct,evenifToshi bahasbeenadvisedofthepossibilityofsuchdamages.
Caution
Anychangesormodificationsnotexpresslyapprovedbythepartyresponsiblefor
compliancecouldvoidtheuser'sauthoritytooperatetheequipment.
iii
Precautions for the handling of Wireless
Communication Devices
This product is classified as “wireless equipment for stations of low-power data
transmissions systems” under the Wireless Telegraphy Act, and does not
require a radio transmission license. The law prohibits modification of the
interior of this product.
Regulatory Information
This product must be installed and used in strict accordance with the
manufacturer’s instructions as described in the user documentation that comes
with the product. This device complies with the following radio frequency and
safety standards.
Standards below are certified under the operation with the provided antenna.
Do not use this product with other antennas.
Europe - EU Declaration of Conformity
Hereby, TOSHIBA TEC, declares that B-FV4D series are in compliance with
the essential requirements and other relevant provisions of Directive
1999/5/EC.
USA-Federal Communications Commission (FCC)
NOTE: This equipment has been tested and found to comply with the limits for
a Class A digital device,
pursuant to part 15 of the FCC Rules. These limits are designed to provide
reasonable protection against
harmful interference when the equipment is operated in a commercial
environment. This equipment generates,
uses, and can radiate radio frequency energy and, if not installed and used in
accordance with the instruction
manual, may cause harmful interference to radio communications. Operation
of this equipment in a residential
area is likely to cause harmful interference in which case the user will be
required to correct the interference at
his own expense.
iv
CAUTION:
This device complies with Part 15 of the FCC Rules.
Operation is subject to the following two conditions:
(1) this device may not cause harmful interference, and
(2) this device must accept any interference received, including interference
that may cause undesired operation.
Any changes or modifications not expressly approved by the grantee of this
device could void the user's authority to operate the equipment.
RF EXPOSURE WARNING:
This equipment must be installed and operated in accordance with provided
instructions and the antenna(s) used for this transmitter must be installed to
provide a separation distance of at least 20 cm from all persons and must not
be co-located or operating in conjunction with any other antenna or transmitter.
End-users and installers must be provide with antenna installation instructions
and transmitter operating conditions for satisfying RF exposure compliance.
v
Canada - Industry Canada (IC)
This device complies with Canada licence-exempt RSS standard(s).
Operation is subject to the following two conditions:
(1) this device may not cause interference, and
(2) this device must accept any interference, including interference that may
cause undesired operation of the device.
Cet appareil est conforme avec Industrie Canada exemptes de licence RSS
standard(s).
Son fonctionnement est soumis aux deux conditions suivantes :
(1) cet appareil ne doit pas causer d'interférence et
(2) cet appareil doit accepter toute interférence, notamment les
interférences qui peuvent affecter son fonctionnement.
Radio Frequency (RF) Exposure Information
The radiated output power of the Wireless Device is below the Industry
Canada (IC) radio frequency exposure limits. The Wireless Device should be
used in such a manner such that the potential for human contact during normal
operation is minimized.
This device has been evaluated for and shown compliant with the IC Specific
Absorption Rate (“SAR”) limits when operated in portable exposure conditions.
Informations concernant l'exposition aux fréquences radio (RF)
La puissance de sortie émise par l’appareil de sans fil est inférieure à la limite
d'exposition aux fréquences radio d'Industry Canada (IC). Utilisez l’appareil de
sans fil de façon à minimiser les contacts humains lors du fonctionnement
normal.
Ce périphérique a également été évalué et démontré conforme aux limites
d'exposition aux RF d'IC dans des conditions d'exposition à des appareils
mobiles (antennes sont supérieures à 20 cm à partir du corps d'une personne).
Approved Countries/Regions for use for the devices
This equipment is approved to the radio standard by the specific
countries/regions. Please ask TOSHIBA TEC authorized dealer or service
engineer.
Precaution for Use
vi
This product communicates with other devices by radio. Depending on the installation
location, orientation, environment, etc., its communication performance may deteriorate or
devices installed near by may be affected.
Bluetooth® devices operate within the same radio frequency range and may interfere with
one another. If you use Bluetooth® devices simultaneously, you may occasionally experience
a less than optimal network performance or even lose your network connection.
If you should experience any such problem, immediately turn off your
Bluetooth® device.
Keep away from a microwave.
Communication performance may deteriorate or a communication error may
occur due to the radio emitted from a microwave.
Do not use the product on a metal table or near a metal object.
Communication performance may be deteriorated.
* Bluetooth® is a registered trademark owned by Bluetooth SIG, Inc.
vii
Contents
1Introduction .....................................................................................................1
1.1Features.................................................................................................1
1.2Unpacking .............................................................................................2
1.3UnderstandingYourPrinter ..................................................................3
1.3.1FrontView..................................................................................3
1.3.2RearView...................................................................................4
1.3.3InteriorViewI ............................................................................5
1.3.4InteriorViewII ...........................................................................6
1.4PrinterLights .........................................................................................7
1.4.1StatusLights ...............................................................................7
1.4.2SystemMode .............................................................................8
2GettingStarted...............................................................................................9
2.1AttachingPower....................................................................................9
2.2TurningOn/OffthePrinter..................................................................10
2.2.1TurnOnthePrinter ..................................................................10
2.2.2TurnOffthePrinter..................................................................11
2.3LoadingMedia.....................................................................................11
2.3.1PreparingMedia.......................................................................11
2.3.2PlacingMediaRoll....................................................................12
2.3.3TestingMediaFeed ..................................................................16
2.3.4MediaTypes.............................................................................17
2.4LoadingRibbon ...................................................................................19
2.4.1PreparingRibbon .....................................................................19
2.4.2PlacingRibbonRoll ..................................................................20
3PrinterOperation ...........................................................................................24
3.1MediaSensorCalibration....................................................................24
3.2SelfTestandDumpMode ...................................................................25
3.2.1SelfTest ....................................................................................25
3.2.2DumpMode.............................................................................27
3.3RestoreYourPrintertoFactorySettings.............................................27
3.4MediaSensing.....................................................................................28
3.4.1TransmissiveSensor .................................................................28
3.4.2ReflectiveSensor......................................................................29
4Maintenance ..................................................................................................30
4.1Cleaning...............................................................................................30
4.1.1Printhead..................................................................................30
viii
4.1.2MediaHousing .........................................................................31
4.1.3Sensor ......................................................................................32
4.1.4PlatenRoller.............................................................................33
4.2ReplacingRTCBattery .........................................................................34
5Troubleshooting .............................................................................................35
5.1PrinterProblems .................................................................................35
5.2MediaProblems ..................................................................................35
5.3RibbonProblems.................................................................................36
5.4OtherProblems...................................................................................37
6Specifications .................................................................................................39
6.1Printer .................................................................................................39
6.2MediaandRibbon...............................................................................40
6.3BarCode..............................................................................................41
6.4ElectricalandOperatingEnvironment................................................43
6.5PhysicalDimension .............................................................................43
6.6Interfaces ............................................................................................44
6.6.1USB...........................................................................................44
6.6.2Ethernet ...................................................................................45
6.6.3RS‐232C ....................................................................................46
6.6.4Centronics ................................................................................46
1IntroductionToshi b a B‐FV4TOwner’sManual
1
1Introduction
ThankyouforpurchasingaToshi baB‐FV4Tprinter.Thismanualprovidesinformation
abouthowtosetupandoperateyourprinter,loadthemediaandtheribbon,and
solvecommonproblems.
1.1Features
VariousConnectivityOptionsUSB,Ethernet,RS‐232C,Centronics
EasyOperationOne‐buttondesignforeasycontrol
HighPrintResolution203dpiforGSmodels,300dpiforTSmodels
FastPrintSpeedMax6inches/secforGSmodels,max4inches/secforTS
models
HighCapacity5‐inchdiametermediarollandthe300‐meterribbonallowyou
toprintlabelswithoutfrequentlyreplacingthemediaandribbon
ExternalMemoryTheextraUSBportallowsyoutouseaUSBflashdrivefor
storage
AccessoriesItiseasiertocompletetaskswithaccessories:fullcutter,partial
cutter,peeler,externalmediastand
1IntroductionToshi b a B‐FV4TOwner’sManual
2
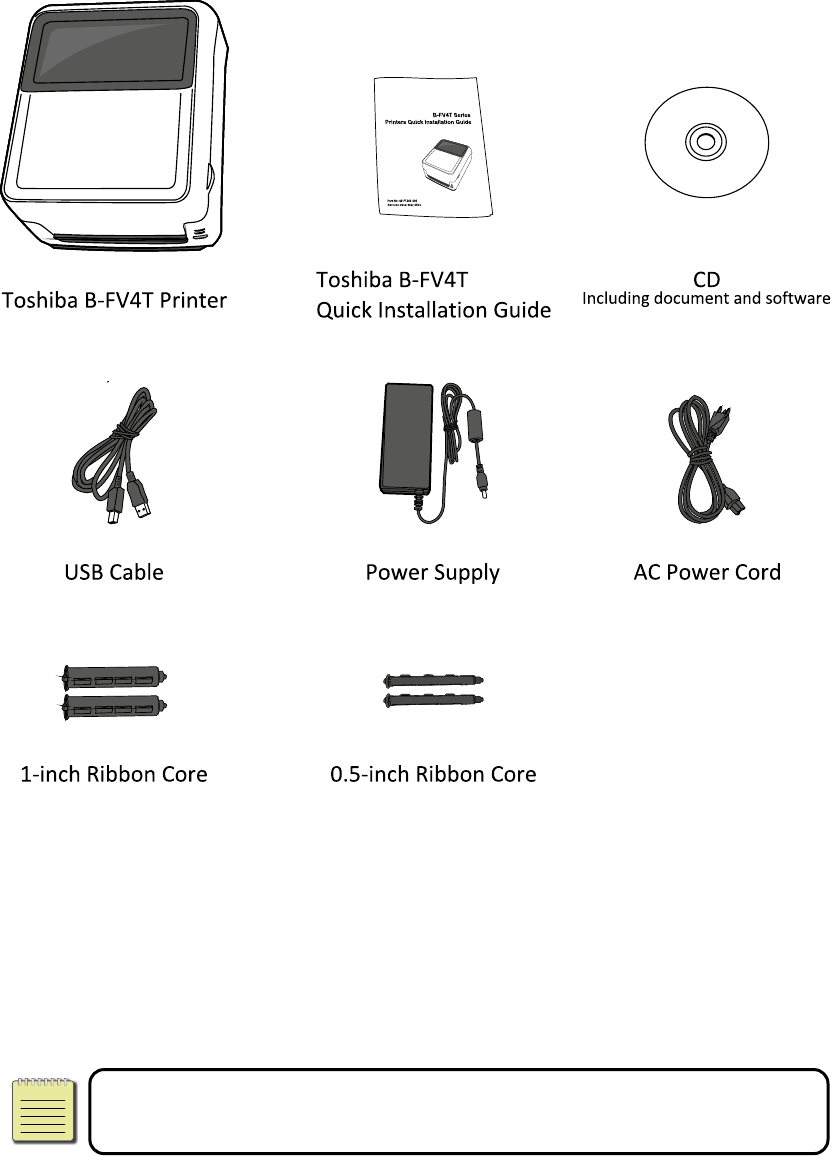
1.2Unpacking
Makesureallofthefollowingitemsareincludedinyourpackage.
Whenyoureceivetheprinter,openthepackageimmediatelyandinspectfor
shippingdamage.Ifyoudiscoveranydamage,contacttheshippingcompanyandfile
aclaim.Toshi baisnotresponsibleforanydamageincurredduringshipping.Saveall
packagematerialsfortheshippingcompanytoinspect.
NoteIfanyitemismissing,pleasecontactyourlocaldealer.
1IntroductionToshi b a B‐FV4TOwner’sManual
3
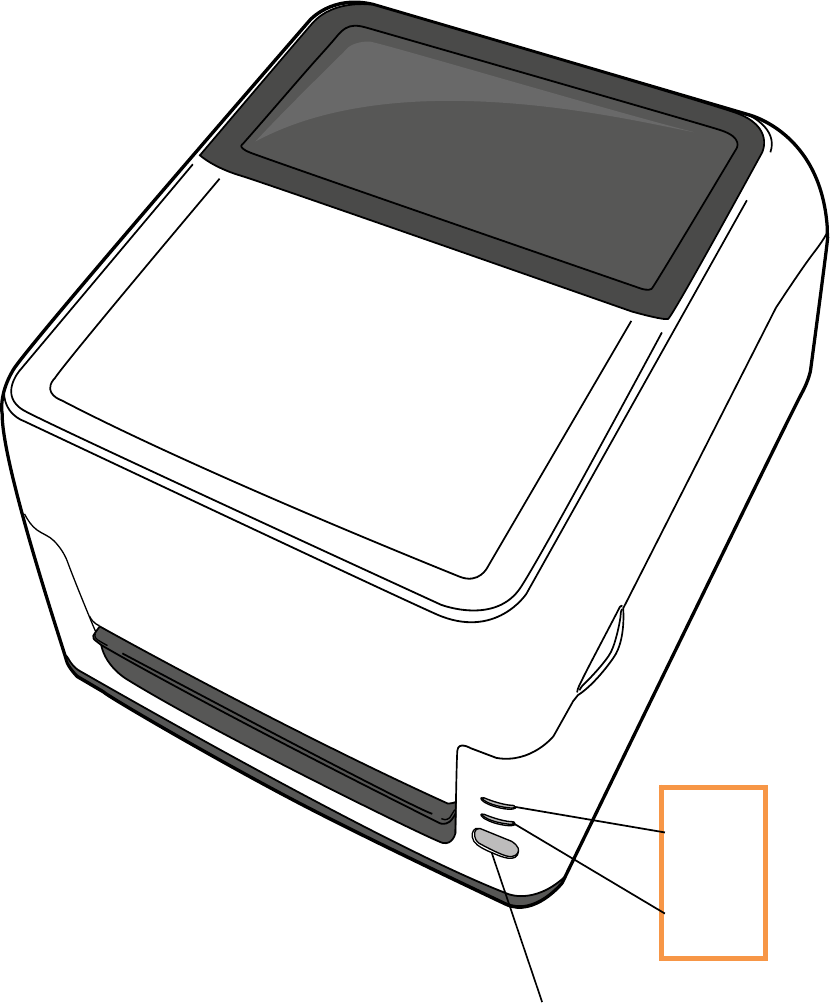
1.3UnderstandingYourPrinter
1.3.1 FrontView
LED2
LED1
FEEDButton
1IntroductionToshi b a B‐FV4TOwner’sManual
4
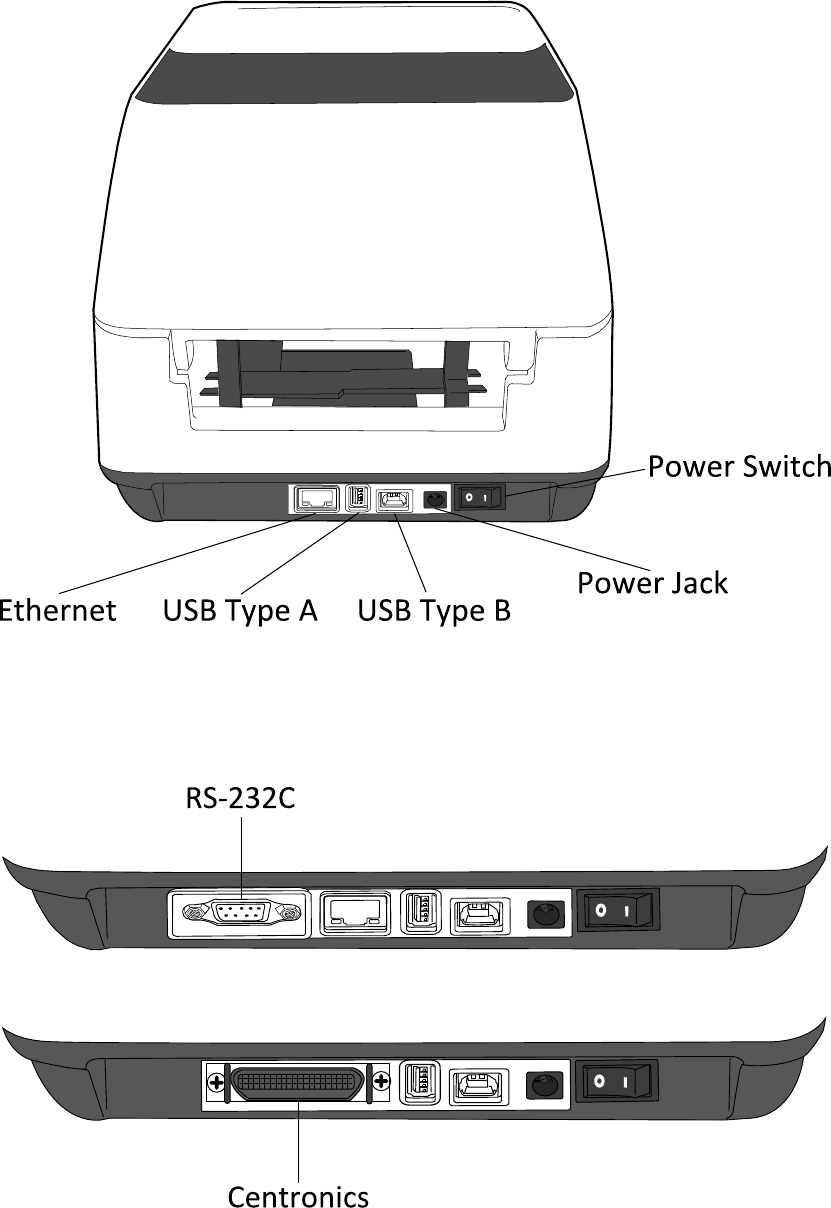
1.3.2 RearView
OptionalInterfaces

1IntroductionToshi b a B‐FV4TOwner’sManual
5
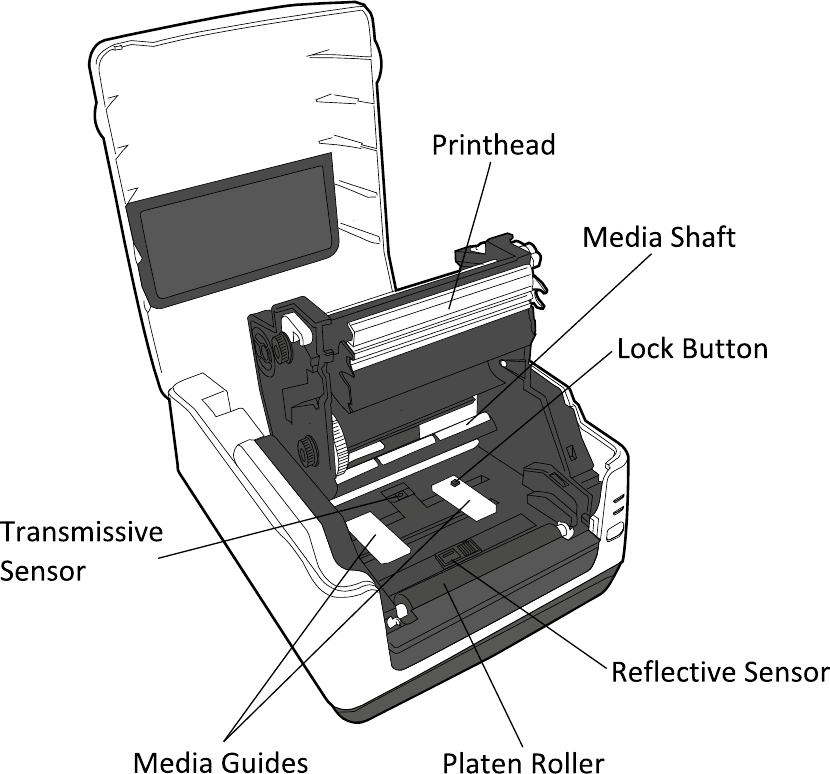
1.3.3 InteriorViewI
1IntroductionToshi b a B‐FV4TOwner’sManual
6
1.3.4 InteriorViewII

1IntroductionToshi b a B‐FV4TOwner’sManual
7
1.4PrinterLights
1.4.1 StatusLights
Statuslightscanhelpyoucheckprinter’scondition.Thefollowingtablesshowthe
blinkingspeedofstatuslightsandtheconditionstheyindicate.
SymbolBlinkingSpeedBlinkingInterval
BlinkingFast0.5Second
Blinking1Second
BlinkingSlowly2Seconds
LED1LED2Description
OffOffTheprintermoduleisopenedwhentheprinteristurned
on.
GreenOffIntheonlinemode.
GreenOffTheprinteristransmittingdata.
GreenOffInapausestate.
GreenGreenTheprinteriswritingdatatotheflashorUSBmemory.
GreenGreenTheUSBmemoryisbeinginitialized.Theprocesstakes
about15seconds.
OrangeGreenPaperjam.
OrangeOrangeRibbonendorribbonerror(forthermaltransfermodels).
OrangeRedThemediaisoutwhentheprintdataissenttotheprinter.
OrangeRedPaperend.
RedGreenCommunicationerror(RS‐232C)
RedGreenCuttererror(withoptionalcutter).
FlashROMontheCPUboarderrororUSBmemoryerror
AneraseerroroccurredwhenformattingtheUSBmemory.
RedGreen
UnabletosavefilesduetoinsufficientUSBmemory.
RedGreenCommanderror.
RedOrangeHeadhightemperatureerror.
RedOrangeTheprintheadisbroken.

1IntroductionToshi b a B‐FV4TOwner’sManual
8
RedRedCover(ThermalHead)openerror.
RedRedTheRTCbatteryislow.(Iftheprinterhasabuilt‐inRTC)
1.4.2 SystemMode
Thesystemmodeconsistsofstatuslightcolorcombinations.Itcontainsalistof
commandsforyoutoselectandrun.
Toenterthesystemmodeandrunthecommand,dothefollowing:
1. Turnofftheprinter.
2. PressandholdtheFEEDbutton,andturnontheprinter.
3. Bothstatuslightswilllightupsolidorangeforafewseconds.Next,theyturnto
greenshortly,andthenturntoothercolors.
4. Whenstatuslightsshowthecolorcombinationyouneed,releasetheFEED
buttonimmediately.
5. PresstheFEEDbuttontorunthecommand.
Thefollowingtableisthecommandlistofthesystemmode.
LED1LED2Command
GreenRedTransmissiveSensorCalibration(Section3.1)
GreenOrangeReflectiveSensorCalibration(Section3.1)
RedRedRestorethePrintertoFactorySettings(Section3.3)
RedOrangeTPCLAutoCallCancellation
RedGreenDisableCheckingRTCBatteryCharge
OrangeRedDisableBASICMode
OrangeGreenSelfTestandDumpMode(Section3.2)
NoteForinformationaboutTPCLAutoCallandBASICMode,please
refertoB‐FV4Ttechnicalmanual.
2GettingStartedToshi b a B‐FV4TOwner’sManual
9
2 GettingStarted
Thischapterdescribeshowtosetupyourprinter.
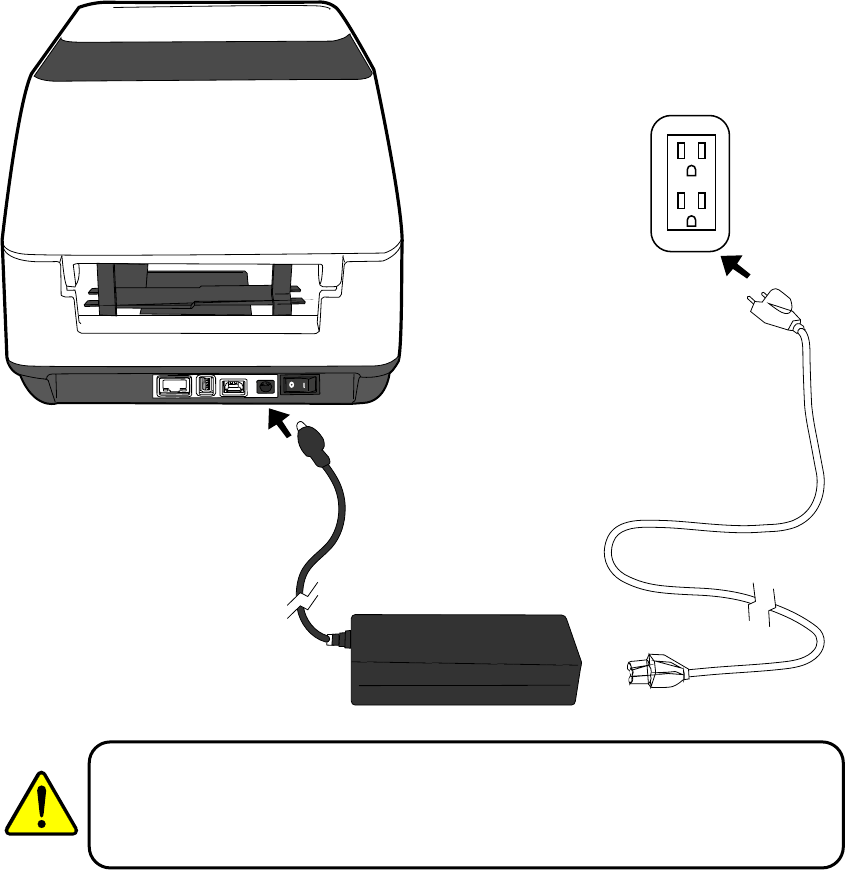
2.1AttachingPower
1. MakesurethepowerswitchissettotheOFFposition.
2. Insertthepowersupply’sconnectorintotheprinterpowerjack.
3. InserttheACpowercordintothepowersupply.
4. PlugtheotherendoftheACpowercordintothewallsocket.
WarningDonotplugtheACpowercordwithwethands,oroperatethe
printerandthepowersupplyinanareawheretheymaygetwet.Serious
injurymayresultfromtheseactions!
2GettingStartedToshi b a B‐FV4TOwner’sManual
10
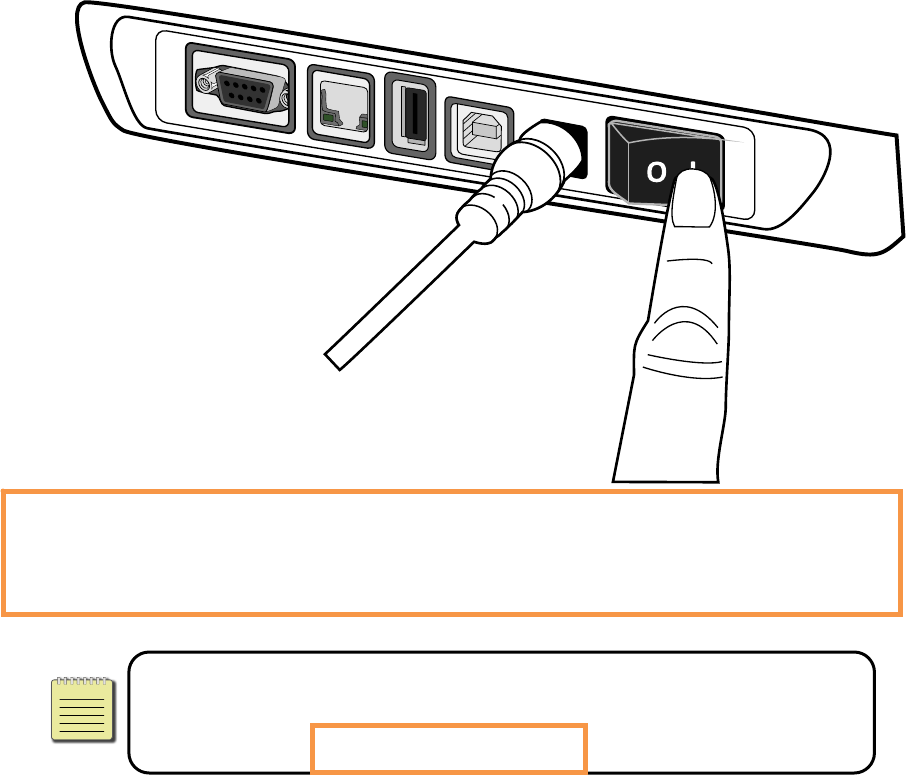
2.2TurningOn/OffthePrinter
Whentheprinterisconnectedtothehost(thecomputer),itisgoodtoturnonthe
printerbeforeturningonthehost,andturnoffthehostbeforeturningoffthe
printer.
2.2.1 TurnOnthePrinter
1. Toturnontheprinter,turnonthePowerSwitchasbelow.The“I”istheON
position.
2. Bothstatuslightswilllightupsolidorangeforafewseconds,andthenLED2goes
out,whileLED1turnstosolidgreen.
NoteIfyouconnecttheprintertothenetworkorinsertaUSBdrive
beforeturningontheprinter,itwilltakelongerfortheprintertoenter
theonlinemode(LED1lightsupsolidgreen)afteryouturniton.
2GettingStartedToshi b a B‐FV4TOwner’sManual
11
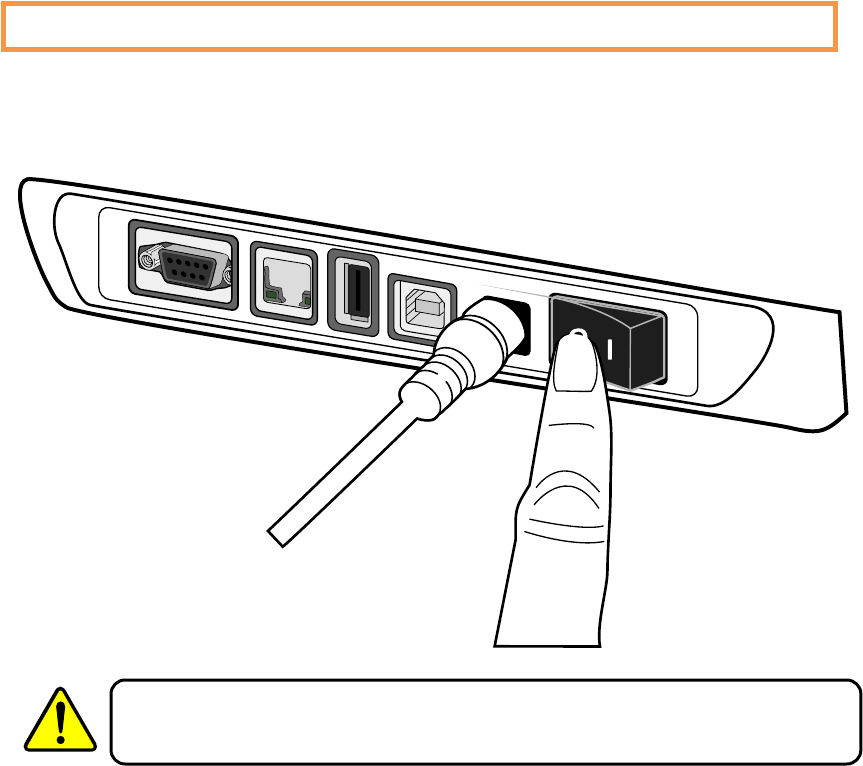
2.2.2 TurnOffthePrinter
1. MakesureLED2isoffandLED1issolidgreenbeforeturningofftheprinter.
2. Toturnofftheprinter,turnoffthePowerSwitchasbelow.The“O”istheOFF
position.
WarningDonotturnofftheprinterduringdatatransmission.
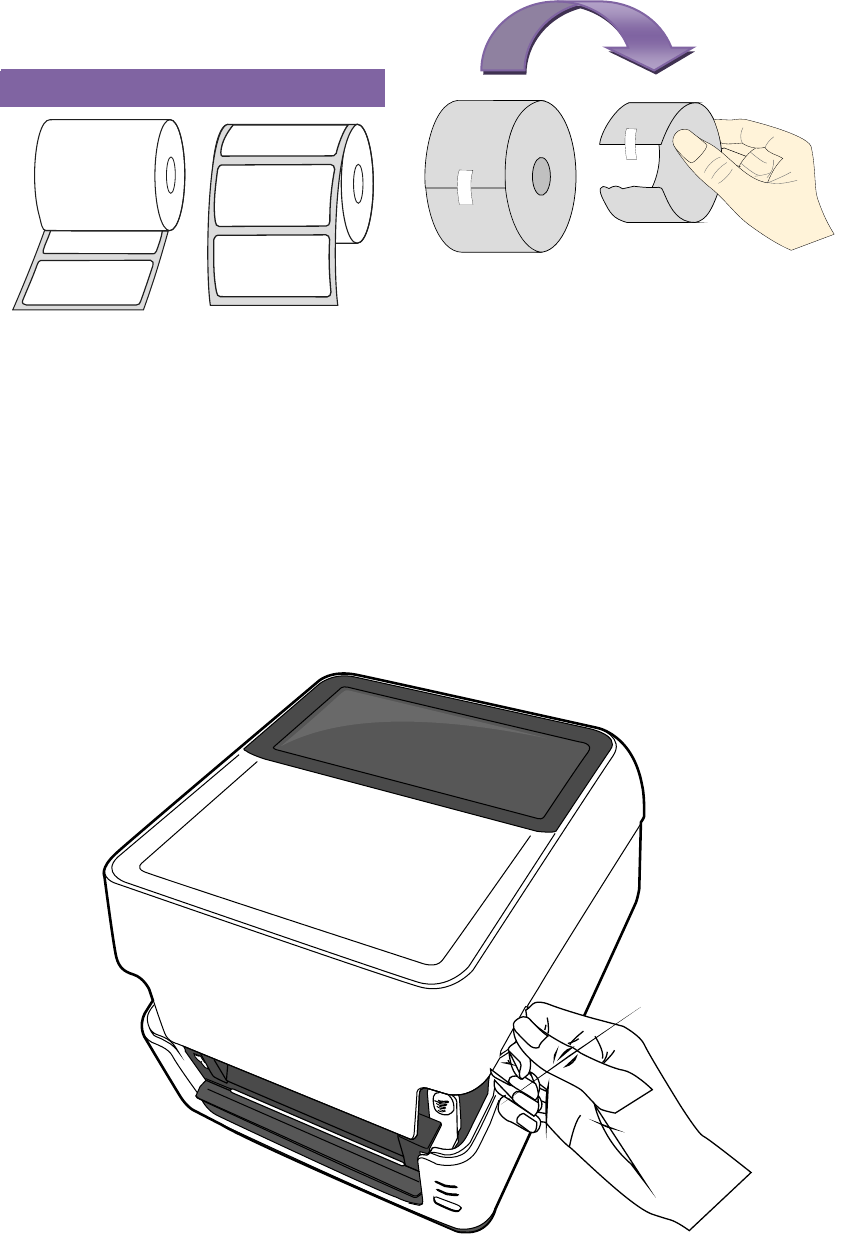
2.3LoadingMedia
Therearevarioustypesandsizesforthemediaroll.Loadtheapplicablemediato
satisfyyourneed.
2.3.1 PreparingMedia
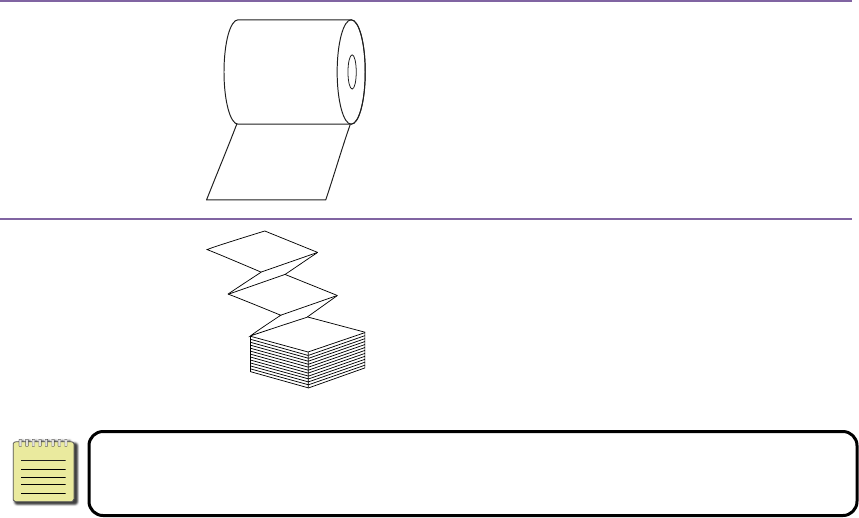
Theinsidewoundandoutsidewoundmediarollcanbeloadedintotheprinterthe
sameway.Incasethemediarollisdirtyduringshipping,handlingorstorage,remove
theoutsidelengthofthemedia.Ithelpsavoiddraggingadhesiveanddirtymedia
2GettingStartedToshi b a B‐FV4TOwner’sManual
12
betweentheprintheadandplatenroller.
InsideWoundOutsideWound
2.3.2 PlacingMediaRoll
1. Openthetopcoveroftheprinter.
2GettingStartedToshi b a B‐FV4TOwner’sManual
13
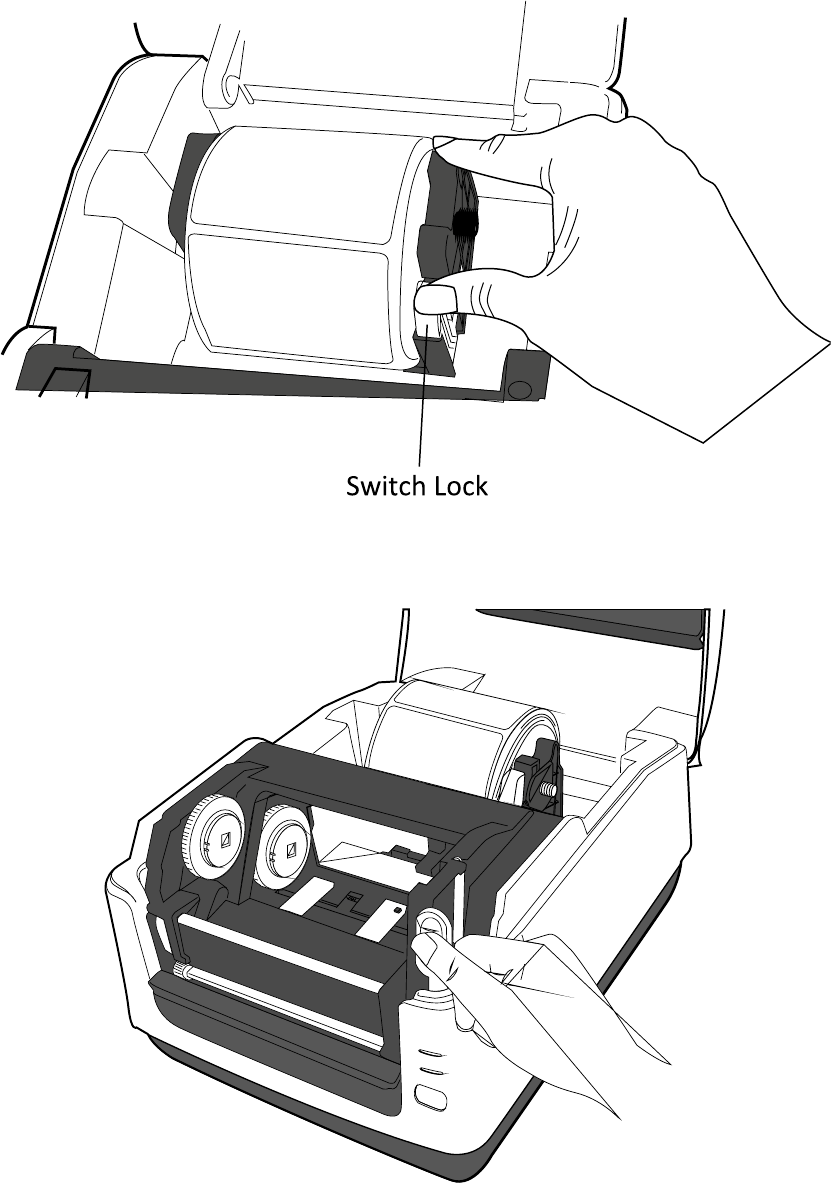
2. PresstheswitchlockontheMediaRollHolderstoslidethemoutward,andplace
themediarollbetweentheholders.Adjustthemediarollsoitsprintsideisfacing
up,andmakesureitisclampedtightlybytheholders.
3. PushtheModuleReleaseLatchtoopentheprintermodule.
2GettingStartedToshi b a B‐FV4TOwner’sManual
14
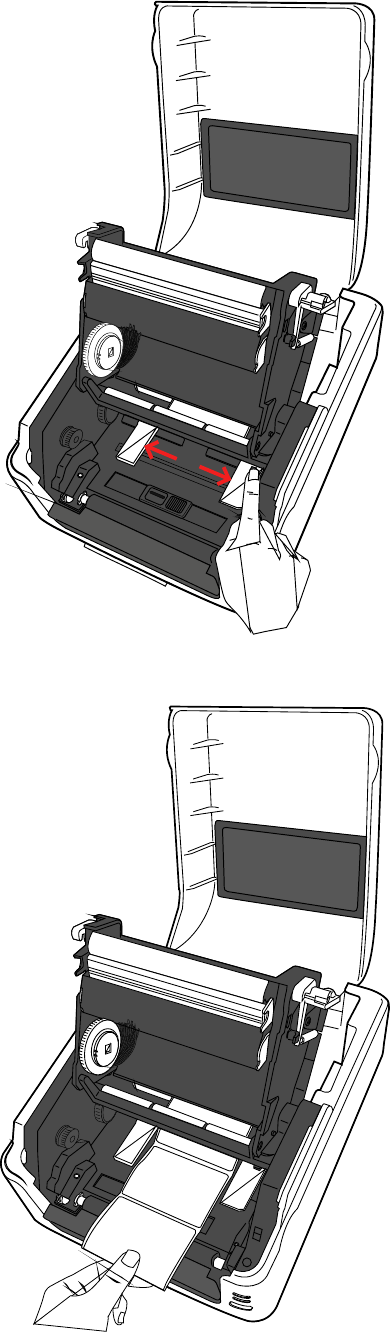
4. PresstheLockbuttonontheMediaGuidestoslidethemoutward.
5. Pullthemediauntilitreachesoutoftheprinter.
2GettingStartedToshi b a B‐FV4TOwner’sManual
15
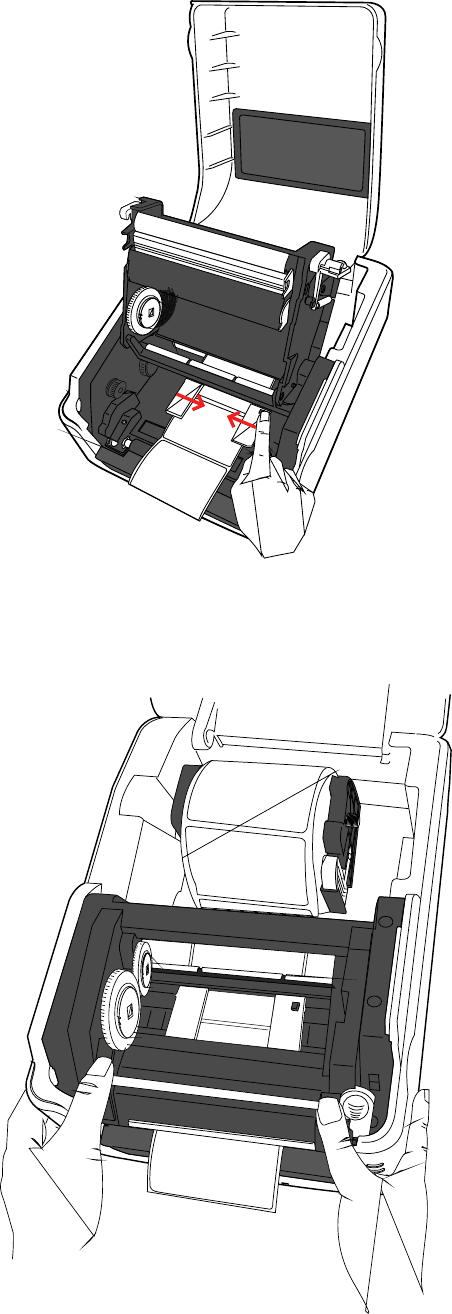
6. PutthemediaundertheMediaShaftandcenteritbetweentheMediaGuides.
7. Closetheprintermoduleandpressdownfirmlyatitsbothsides,untilyouheara
click.
2GettingStartedToshi b a B‐FV4TOwner’sManual
16
2.3.3 TestingMediaFeed
Ifyouneedtotestthemediafeed,dothis:
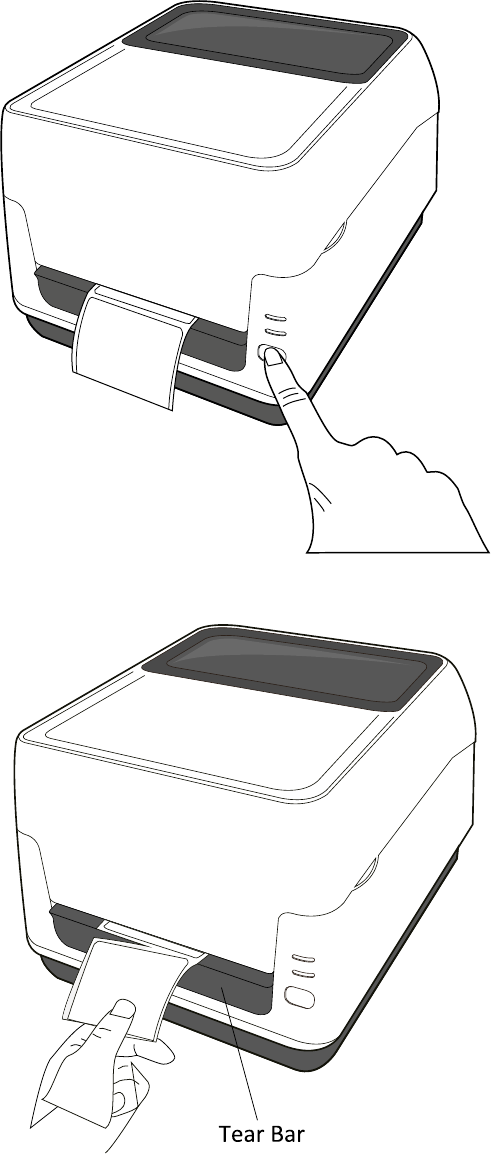
1. Turnontheprinter,andpresstheFEEDbuttontofeedalabeloutoftheprinter.
2. Totearthemedia,pullthemediagapagainsttheTearBar.
2GettingStartedToshi b a B‐FV4TOwner’sManual
17
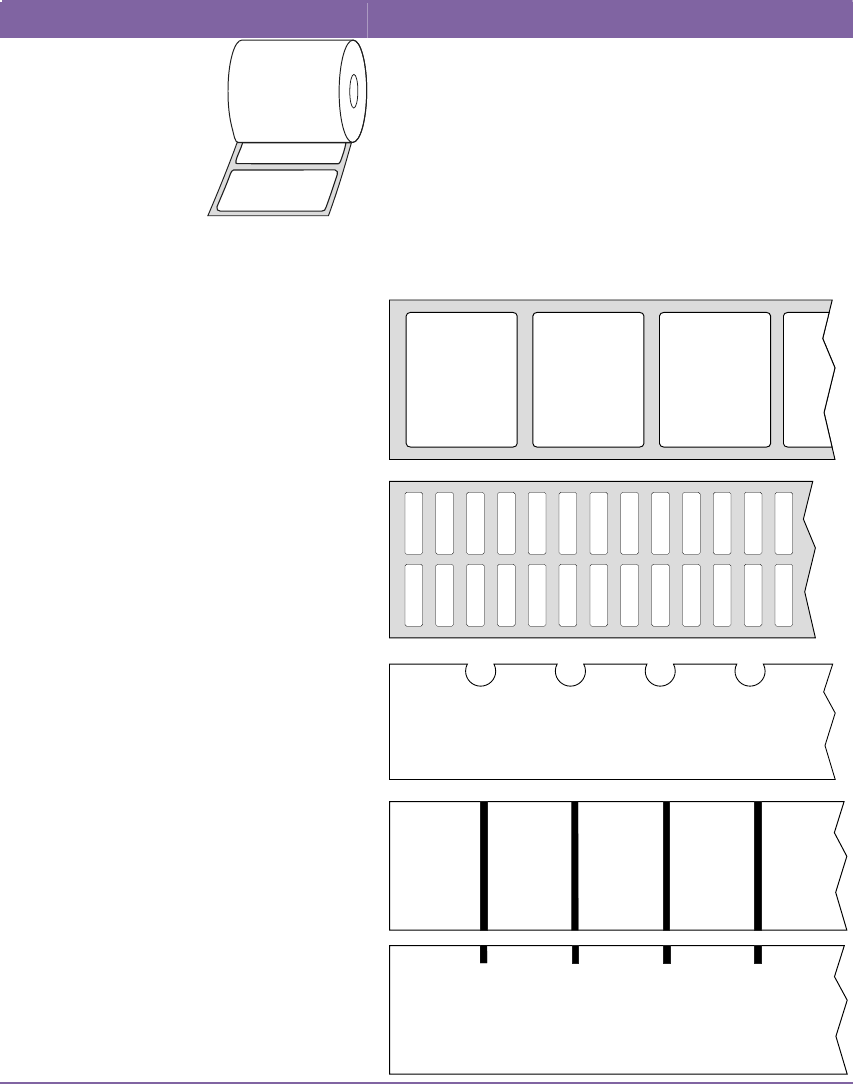
2.3.4 MediaTypes
Yourprintersupportsvariousmediatypes,includingnon‐continuousmedia,
continuousmedia,andfanfoldmedia.Thefollowingtableprovidesdetailsabout
them.
MediaTypeLooksLikeDescription
Non‐Continuous
Media
Non‐continuousmediaisthetypicalmediafor
barcodeprinting.Labelsandtagsaremadeof
variousmaterials,suchaspaper,fabricor
cardstock,andareseparatedbygaps,holes,
notchesorblackmarks.Manylabelsare
self‐adhesivewithliners,whilesomeare
linerless.
2GettingStartedToshi b a B‐FV4TOwner’sManual
18
Continuous
Media
Continuousmediadoesnothavegaps,holes,
notchesorblackmarks.Itallowsyoutoprint
dataanywhereonthemedia.Acuttermaybe
usedforsplittinglabels.Mostlyitisusedfor
directthermalprinting.
FanfoldMediaFanfoldmediaisincontinuousform,butitcan
beusedasnon‐continuousmedia,becauseits
labelsareseparatedbyfolds.Somefanfold
mediaalsohasblackmarksorliners.
NoteIfyouareusingthermaltransfermode,pleasecontinuetoSection
2.4,“LoadingRibbon.”
2GettingStartedToshi b a B‐FV4TOwner’sManual
19
2.4LoadingRibbon
Ribbonsareonlyrequiredforthermaltransferprinting.Youcanuseawax,wax‐resin
orresinribbon.Thetypeoftheribbonandthemediashouldmatchtoeachotherto
gettheproperprintquality.Theribbonneedstobewiderthanorequaltothemedia
toprotecttheprintheadfromwear.
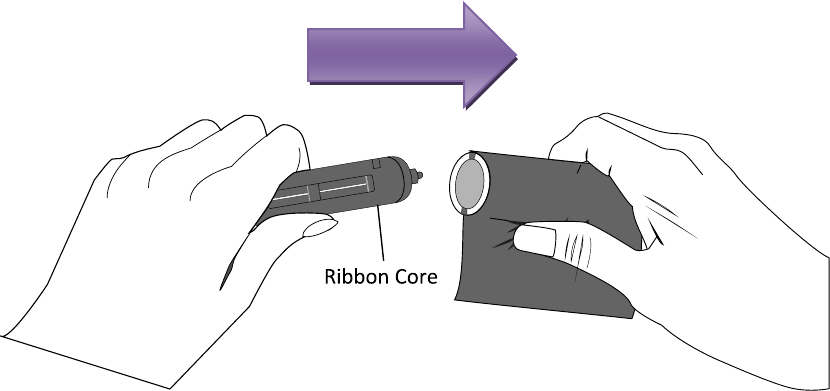
2.4.1 PreparingRibbon
Removethewrappingandtheprotectivefilmoftheribbon.Youwillfindtwopairsof
ribboncoresintheprinterpackage.Oneofthemisfor0.5‐inchinnerdiameter
ribbonandtheotherisfor1‐inch.Installtheapplicablepairintotheribbonsupply
rollandtake‐uproll.

2GettingStartedToshi b a B‐FV4TOwner’sManual
20
2.4.2 PlacingRibbonRoll
1. Openthetopcoveroftheprinter.
2. PushtheModuleReleaseLatchtoopentheprintermodule.
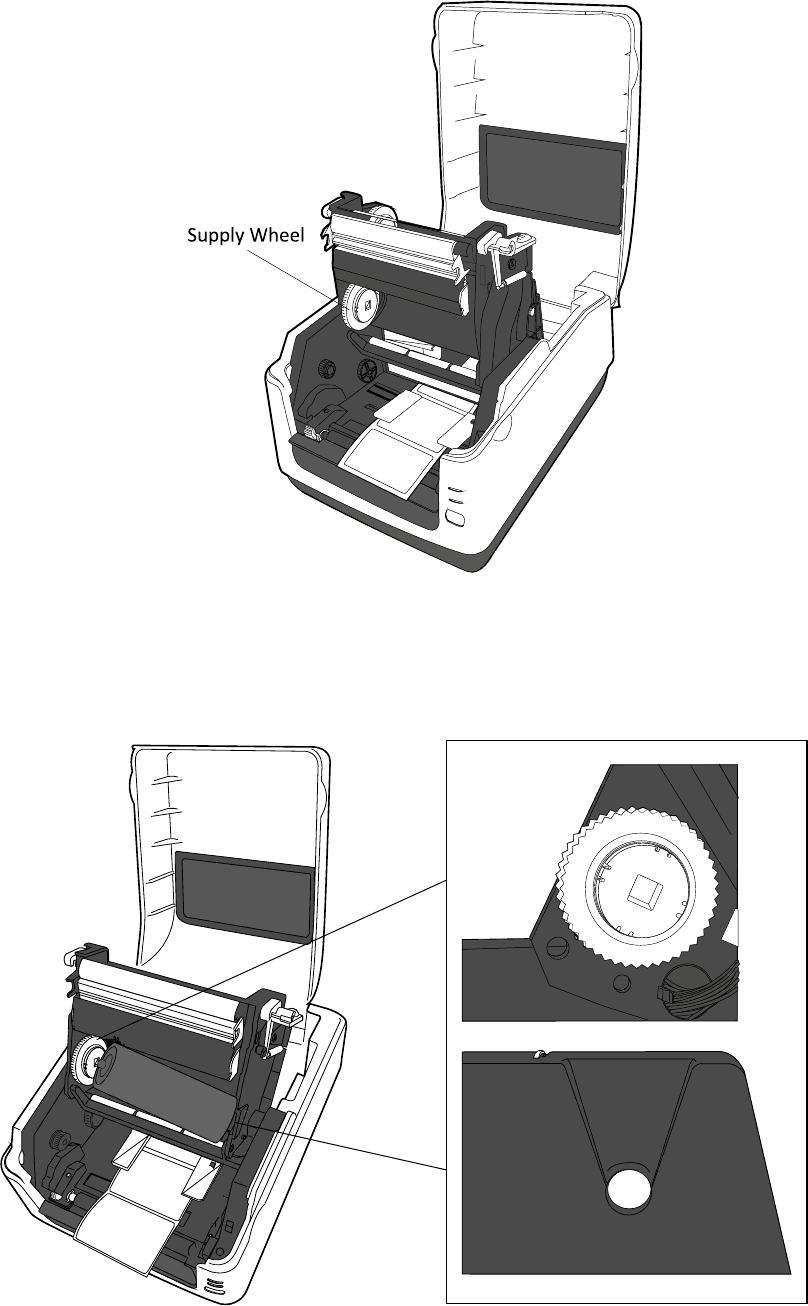
2GettingStartedToshi b a B‐FV4TOwner’sManual
21
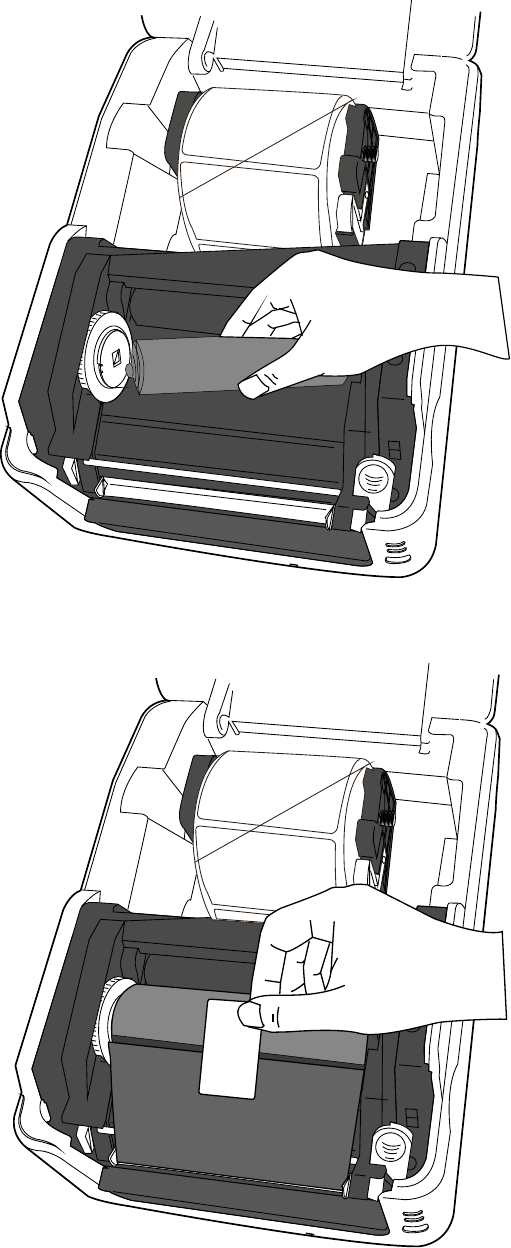
3. LifttheprintermoduletorevealtheSupplyWheel.
4. Dothefollowingtoinstallbothrolls:
Toloadthesupplyroll,alignthenotchesontheleftsideandpresstherolltothe
supplyhub,andthenpresstherightsideoftherolltothehole.
2GettingStartedToshi b a B‐FV4TOwner’sManual
22
Toloadthetake‐uproll,alignthenotchesontheleftsideandpresstherollto
thetake‐uphub,andthenpresstherightsideoftherolltothehole.
5. Pulltheribbonfromthesupplyrollandtapeitonthetake‐uproll.
2GettingStartedToshi b a B‐FV4TOwner’sManual
23
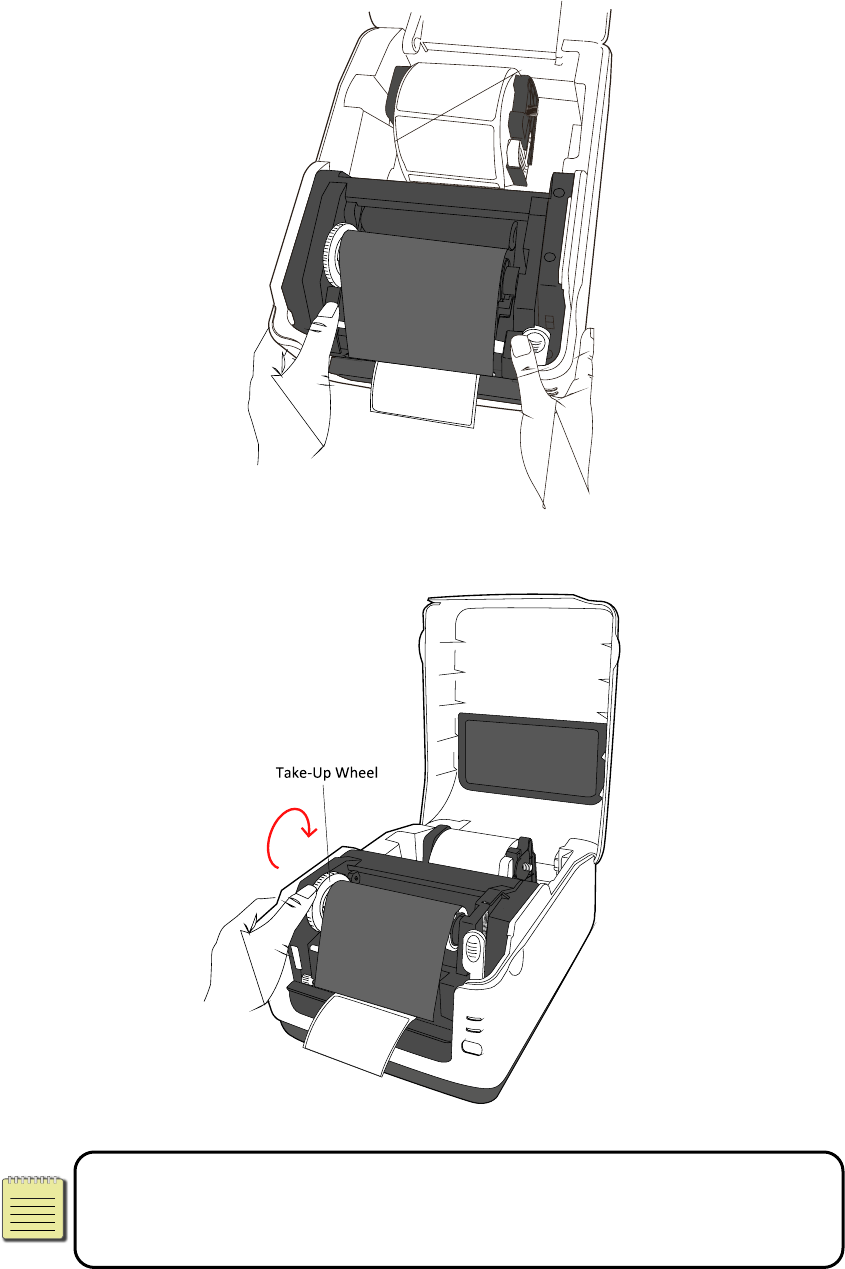
6. Closetheprintermoduleandpressdownfirmlyatitsbothsides,untilyouheara
click.
7. RotatetheTake‐UpWheeltostraightentheribbonandreduceitswrinkles.
NoteForthesupplyhub,theribbonwinddirectioncanbecoatedsidein
(CSI)orcoatedsideout(CSO);forthetake‐uphub,thewinddirectionmust
beCSO.

3PrinterOperationsToshi b a B‐FV4TOwner’sManual
24
3PrinterOperation
Thischapterprovidesinformationaboutprinteroperation.
3.1MediaSensorCalibration
Youwillwanttheprintertoworkproperlybeforestartingyourprintjobs.Todothis,
youneedtocalibratethemediasensor.Toshi ba B‐FV4Tprovidestransmissiveand
reflectivesensorcalibration.Takethefollowingstepstousethem.
1. Makesurethemediaisproperlyloaded,theprintermoduleisclosed,andthe
printer’spowerswitchissettotheOFFposition.
2. PressandholdtheFEEDbutton,andturnontheprinter.
3. Bothstatuslightswilllightupsolidorangeforafewseconds.Next,theyturnto
greenshortly,andthenturntoothercolors.Dooneofthefollowingtoselectthe
sensor:
Ifyouwanttocalibratethetransmissivesensor,whenLED1turnstogreenand
LED2turnstored,releasetheFEEDbuttonimmediately.
Ifyouwanttocalibratethereflectivesensor,whenLED1turnstogreenandLED
2turnstoorange,releasetheFEEDbuttonimmediately.
4. PresstheFEEDbutton.Theprinterwillfeed3‐4labelsoutandstop.

3PrinterOperationsToshi b a B‐FV4TOwner’sManual
25
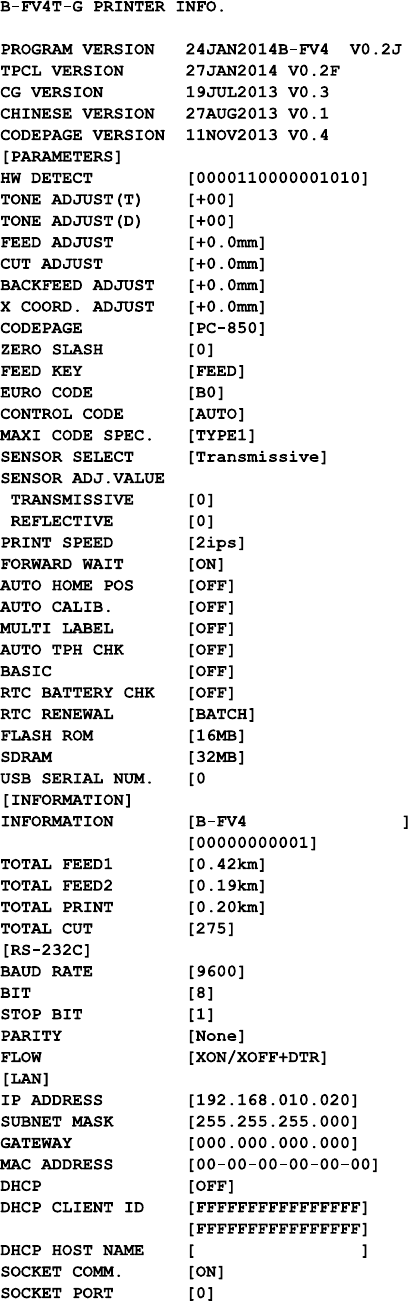
3.2SelfTestandDumpMode
Theprintercanrunaselftesttoprintaconfigurationlabel,whichhelpsyou
understandcurrentsettingsoftheprinter.
3.2.1 SelfTest
1. Turnofftheprinter.
2. PressandholdtheFEEDbutton,andturnontheprinter.
3. Bothstatuslightswilllightupsolidorangeforafewseconds.Next,theyturnto
greenshortly,andthenturntoothercolors.WhenLED1turnstoorangeandLED
2turnstogreen,releasetheFEEDbutton.
4. PresstheFEEDbutton.Theprinterwillprintaconfigurationlabel.
3PrinterOperationsToshi b a B‐FV4TOwner’sManual
26
Yourconfigurationlabelshouldlooklikethis:

3PrinterOperationsToshi b a B‐FV4TOwner’sManual
27
3.2.2 DumpMode
TheprinterwillentertheDumpmodeafterrunningaselftest.Inthismode,
charactersareprintedinhexadecimalcodes,allowingusersandengineerstodebug
thesystem.
Toreturntotheonlinemode:
Turnofftheprinter,andturnitonagain.
3.3RestoreYourPrintertoFactorySettings
Someproblemscanbesolvedbyrestoringtheprintertoitsfactorysettings.Dothe
followingtoresetyourprinter.
1. Turnofftheprinter.
2. PressandholdtheFEEDbutton,andturnontheprinter.
3. Bothstatuslightswilllightupsolidorangeforafewseconds.Next,theyturnto
greenshortly,andthenturntoothercolors.Whenbothlightsturntored,release
theFEEDbuttonimmediately.
4. PressandholdtheFEEDbuttonfor3secondsandreleaseit.Bothstatuslights
willblinkredthreetimes,andturntosolidorangeforafewseconds.Afterthat,
LED2goesoutwhileLED1turnstosolidgreen.
NoteInstep4,ifyoudonotholdtheFEEDbuttonlongenough,LED2
willblinkorangethreetimeswhileLED1goesout.Itmeanstheprinter
isnotreset.
3PrinterOperationsToshi b a B‐FV4TOwner’sManual
28
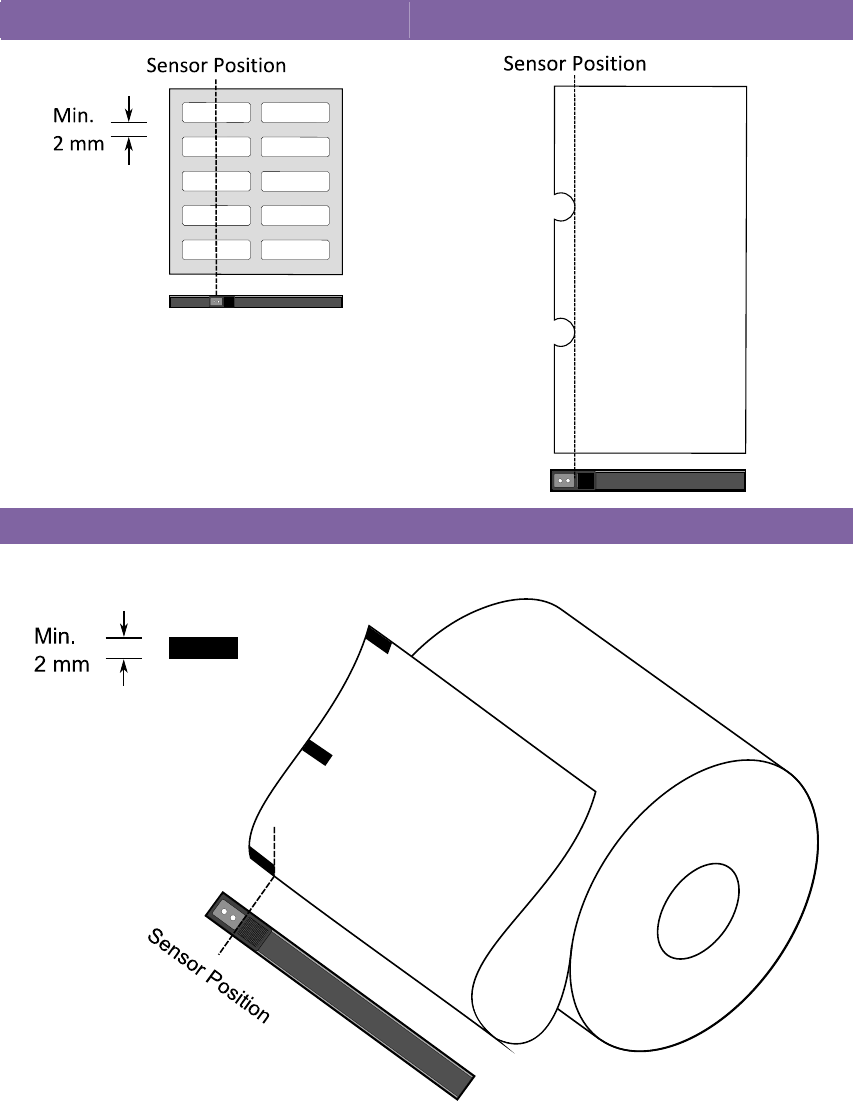
3.4MediaSensing
Therearetwomediasensortypes:transmissiveandreflective.Theyareusedfor
detectingspecificmediatypes.
3.4.1 TransmissiveSensor
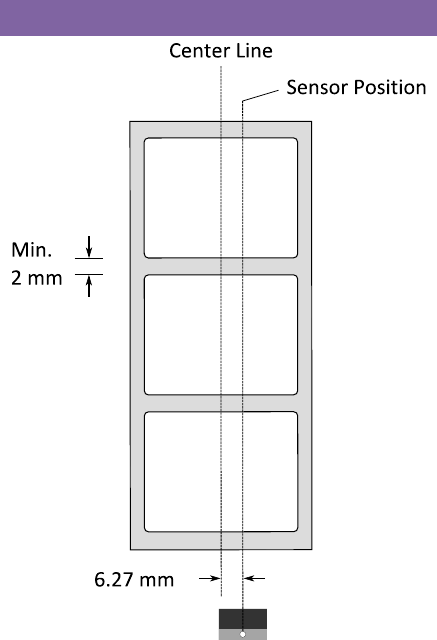
Thetransmissivesensorisfixedandplacednearthecenterofthemediapath.Itis
usedfordetectinggapsacrosstheentirewidthofthelabel.
SingleColumn
3PrinterOperationsToshi b a B‐FV4TOwner’sManual
29
3.4.2 ReflectiveSensor
Thereflectivesensorismovablewithintheentirewidthofthemedia.Itdetectsgaps,
notchesandblackmarksnotlocatedatthecenterofthemedia.
MultiColumnsNotch
BlackMark
Flipthemediasotheblack‐marksideisfacingdowntoalignwiththesensor.

4MaintenanceToshi b a B‐FV4TOwner’sManual
30
4Maintenance
Thischapterdescribesroutinecleaningprocedure.
4.1Cleaning
Tomaintainprintqualityandprolongtheprinter’slife,youneedtoperformsome
routinemaintenance.Dailymaintenanceshouldbedoneforhighvolumeprinting,
andweeklyforlowvolumeprinting.
WarningAlwaysturnofftheprinterbeforecleaning.
4.1.1 Printhead
Itisessentialtokeepprintheadcleanifyouwantthebestprintquality.Westrongly
recommendthatyoucleantheprintheadwhenyouloadanewmediaroll.Ifthe
printerisoperatedincriticalenvironment,ortheprintqualitydeclines,youneedto
cleantheprintheadmorefrequently.
Keepinmindthesethingsbeforeyouclean:
Keepthewaterawayincaseofcorrosiononheatingelements.
Ifyoujustfinishprinting,waituntiltheprintheadcoolsdown.
Donottouchtheprintheadwithbarehandsorhardobjects.
Cleaningsteps:
1. Moistenasoftclothoracottonswabwithethylalcohol.
2. Gentlywipetheprintheadinonedirection.Thatis,wipeitonlyfromlefttoright
orviceversa.Donotwipeback‐and‐forth,incasedustordirtattachestothe
4MaintenanceToshi b a B‐FV4TOwner’sManual
31
printheadagain.
NotePrintheadwarrantybecomesvoidifprinthead’sserialnumberis
removed,altered,defected,ormadeillegible,undereverycircumstance.
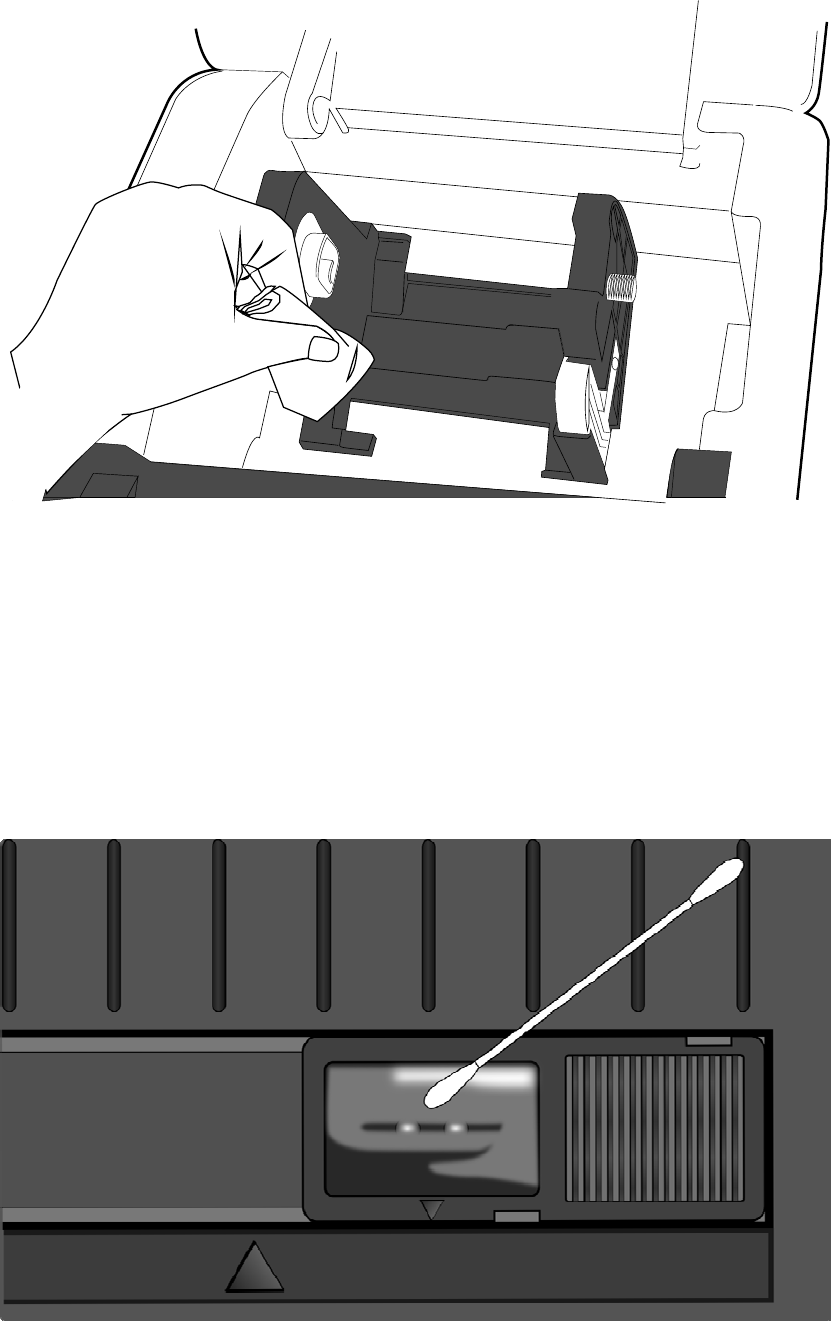
4.1.2 MediaHousing
Useasoftclothtocleanthedust,dirtordebrisbuiltupontheMediaRollHolders,
MediaGuidesandmediapath.
1. Moistenasoftclothwithethylalcohol.
2. WipetheMediaRollHolderstocleandust.
3. WipetheMediaGuidestocleandustanddirt.
4. Wipethemediapathtocleanpaperdebris.
4MaintenanceToshi b a B‐FV4TOwner’sManual
32
4.1.3 Sensor
Mediasensorsmaynotbeabletodetectthemediacorrectlyifitbecomesdirty.
1. Moistenasoftclothoracottonswabwithabsoluteethylalcohol.
2. Gentlybrushsensorstoremovethedustaway.
3. Useadryclothtocleantheresidue.
4MaintenanceToshi b a B‐FV4TOwner’sManual
33
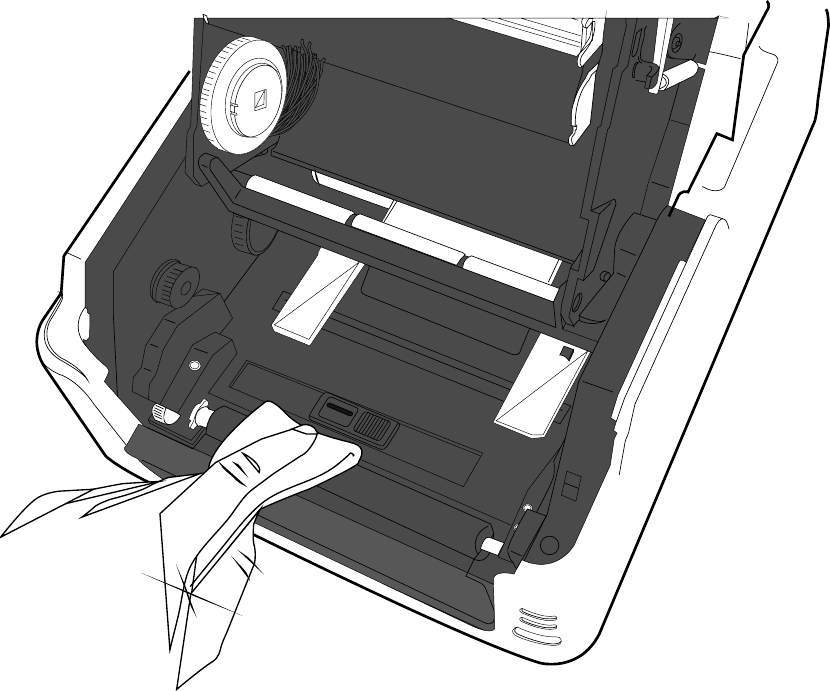
4.1.4 PlatenRoller
Theplatenrollerisalsoimportantforprintquality.Dirtyplatenrollermaydamage
theprinthead.Cleantheplatenrollerrightawayiftheadhesive,dirtordust
accumulatesonit.
1. Moistenasoftclothwithabsoluteethylalcohol.
2. Gentlywipetheplatenrollertoremovethedustandadhesive.
4MaintenanceToshi b a B‐FV4TOwner’sManual
34
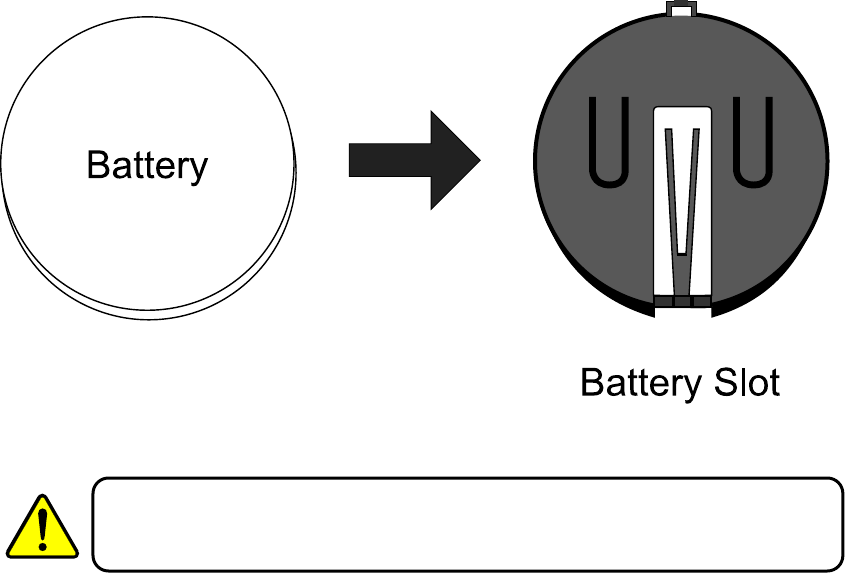
4.2ReplacingRTCBattery
Ifyourprinterhasabuilt‐inreal‐timeclock(RTC),youwillfindtheRTCbatteryonthe
mainboard.TheRTCbatterykeepstheRTCrunningwhentheprinteristurnedoff,so
theRTCcankeeptrackofthecurrenttime.YoucanchecktheRTCbatterycharge
fromthestatuslights.IftheRTCbatteryisloworout,youneedtoreplaceitwitha
newone.
TakethefollowingstepstoreplaceyourRTCbattery:
1. Turnontheprinter.
2. Locatethebatteryonthemainboard.
3. Removetheoldcoinbatteryandinstallanewone.
4. Turnofftheprinter.
WarningRiskofexplosionifbatteryisreplacedbyanincorrecttype.
Disposeofusedbatteriesaccordingtotheinstructions.
5TroubleshootingToshi b a B‐FV4TOwner’sManual
35
5Troubleshooting
Thischapterprovidestheinformationaboutprinterproblemsandsolutions.
5.1PrinterProblems
Theprinterisnotturnedon
DidyouattachtheACpowercord?
Makesurethepowersupply’sconnectorisinsertedintotheprinterpowerjack.
Checkthepowerconnectionfromthewallsockettotheprinter.Testthepower
cordandthesocketwithotherelectricaldevices.
Disconnecttheprinterfromthewallsocket,andconnectitagain.
Theprinterdoesnotfeedthemediaout
Themediaisnotloadedcorrectly.SeeSection2.3,“LoadingMedia”toreload
themedia.
Ifthereisapaperjam,clearit.
Iaccidentallypressthefeedbuttonwhiletheprintermoduleisopened
ClosetheprintermoduleandpresstheFEEDbutton.
5.2MediaProblems
Themediaisout
Loadanewmediaroll.
Thepaperisjammed
Opentheprinterandclearthejammedpaper.
MakesurethepaperisheldproperlybytheMediaGuides.
Theprintingpositionisnotcorrect
Didyouusethecorrectmediatypeforprinting?
5TroubleshootingToshi b a B‐FV4TOwner’sManual
36
Themediaisnotloadedcorrectly.SeeSection2.3,“LoadingMedia”toreload
themedia.
Themediasensorneedstobecalibrated.SeeSection3.1,“MediaSensor
Calibration”tocalibratethesensor.
Themediasensorisdirty.Cleanthemediasensor.
Nothingisprinted
Themediaisnotloadedcorrectly.SeeSection2.3,“LoadingMedia”toreload
themedia.
Theribbonisnotloadedcorrectly.SeeSection2.4,“LoadingRibbon”toreload
theribbon.
Theprintdatamightnotbesentsuccessfully.Makesuretheinterfaceisset
correctlyintheprinterdriver,andsendtheprintdataagain.
Theprintqualityispoor
Theprintheadisdirty.Cleantheprinthead.
Theplatenrollerisdirty.Cleantheplatenroller.
Adjusttheprintdarkness,orlowertheprintspeed.
Themediaisincompatiblefortheribbon.Usethecompatiblemediainstead.
Themediaisincompatiblefortheprinter.UseToshi ba‐approvedmediaroll
instead.
5.3RibbonProblems
Theribbonisout
Loadanewribbonroll.
Theribbonisbroken
Checktheprintdarknessandadjustitifitistoohigh,andtakethefollowing
stepstofixthebrokenribbon:
5TroubleshootingToshi b a B‐FV4TOwner’sManual
37
1. Unloadtheribbonsupplyrollandtake‐uprollfromtheprinter.
2. Pulltheribbonfromthesupplyrollsoitoverlapsthebrokenendofthetake‐up
roll.
3. Tapetheoverlappedpartstogether.
4. Reloadbothrollsintotheprinter.
Theribbonis“printedout”withthemedia
Theribbonisnotloadedcorrectly.SeeSection2.4,“LoadingRibbon”toreload
theribbon.
Theprintheadtemperatureistoohigh.Reloadtheribbonandprinta
configurationlabeltocheckthesettings(seeSection3.2,“SelfTestandDump
mode”).Iftheprintdarknessisveryhigh,adjustitinprinterpreference,orreset
yourprinter(seeSection3.3,“RestoreYourPrintertoFactorySettings”).
Theribboniswrinkled
1. Makesuretheribbonisloadedcorrectly.
2. RotatetheTake‐UpWheeltostraightentheribbon.
5.4OtherProblems
Therearebrokenlinesintheprintedlabel
Theribboniswrinkled.Adjustorreloadtheribbon.Or,printafewlabelsuntil
thewrinkledpartgoesaway.
Theprintheadisdirty.Cleantheprinthead.
AnerroroccurredwhenwritingdatatotheUSBmemory
DidyouinserttheUSBdrive?
MakesuretheUSBdriveispluggedtightlyintotheport.
TheUSBdrivemightbebroken.Replaceitwithanotherone.
TheprinterisunabletosavefilesduetoinsufficientUSBmemory
5TroubleshootingToshi b a B‐FV4TOwner’sManual
38
DeletethefilesonyourUSBdrivetofreesomespace,orreplaceyourUSBdrive
withanemptyone.
Thecutterisexperiencingissues
Ifthereisapaperjam,clearit.
Thecutterhasbecomeloose.Fixthecutterinpositionandtightenit.
Thecutterbladeisnotsharpanymore.Replaceyourcutterwithanewone.
Theprintheadtemperatureisextremelyhigh
Theprintheadtemperatureiscontrolledbytheprinter.Ifitisextremelyhigh,
theprinterwillstopprintingautomatically,untiltheprintheadiscooldown.
Afterthat,theprinterwillresumeprintingautomatically,ifthereisany
unfinishedprintjob.
Theprintheadisbroken
Contactyourlocaldealerforassistance.

B‐FV700‐BLTH‐QM‐R
‐39‐
6Specifications
Thischapterprovidesspecificationsfortheprinter.
6.1Printer
ModelB‐FV4T‐GS12‐QM‐RB‐FV4T‐GS12‐CN‐R B‐FV4T‐TS12‐QM‐RB‐FV4T‐TS12‐CN‐R
PrintmethodDirectThermalandThermalTransfer
Resolution203dpi(8dots/mm)300dpi(12dots/mm)
MediaAlignmentCentered
OperationModeStandard:Continuousmode,Tear‐offmode
Optional:Cuttermode,Peelermode
MediaSensor:GapSensor(Transmissive,Fixed)
I‐MarkSensor(Reflective,Movable)
HeadOpenSwitch
Sensor
RibbonSensor
PrintSpeed
2,3,4,5,6inches/sec
(50.8,76.2,101.6,127,152.4mm/sec)
2&3ipsforpeeloffmode
2,3,4inches/sec
(50.8,76.2,101.6mm/sec)
2&3ipsforpeeloffmode
PrintDarknessDarknesslevel:‐10~+10
Default:0
MaxPrintableAreaLength999mmxWidth108mmLength999mmxWidth105.7mm
Non‐PrintableAreaPitchDirection‐Top:1mm,Bottom:1mm(excludingliner)
WidthDirection‐Left:1mm,Right:1mm(excludingliner)
PrintRatioAverageprintratiowithin15%orless(wholeprintlayoutarea)
Fullwidthwith1mmpitchisrequired
InterfaceUSB(TypeAandTypeB),Ethernet
OptionalInterfaceRS‐232C,Centronics(SPPMode)
AccessoriesPeeler,FullCutter,PartialCutter,RTC,ExternalMediaStand
On‐BoardMemory
StandardMemory(FlashROM):16MB
UserMemory:2MB
StandardMemory(SDRAM):32MB
ExternalMemoryUSB:Max16GB
Panel2LED,1Button
LED1stLED:RedandGreen(VariousCombinations:Orange)
2ndLED:RedandGreen(VariousCombinations:Orange)
FontStandard:SeetheTECCommandReference
Extended:DownloadwithPrinterUtility

B‐FV700‐BLTH‐QM‐R
‐40‐
6.2MediaandRibbon
PropertiesDescription
MediaSizeContinuousMode
Length:8~997mm(includingliner10~999mm)
Width:22.4~115mm(includingliner25.4~118mm)
Tear‐OffMode
Length:8~997mm(includingliner10~999mm)
Width:22.4~115mm(includingliner25.4~118mm)
Peel‐OffMode
Length:23.4~150.4mm(includingliner25.4~152.4mm)
Width:22.4~115mm(includingliner25.4~118mm)
CutMode
Length:19.4~993mm(includingliner25.4~999mm)
Width:22.4~115mm(includingliner25.4~118mm)
MaxRollDiameterSize:127mm(5inches)
MaxRollDiameterSizeforExternalMediaStand:216mm(8.5
inches)
MediaTypeThermalTransferLabel
ThermalTransferTag
DirectThermalLabel
DirectThermalTag
RollPaper(InsideWoundorOutsideWound)
FanfoldPaper
RibbonSizeLength:100m(φCoreSize:0.5inch),Max300m(φCoreSize:1
inch)
Width:40~110mm
RibbonTypeWax,Wax‐Resin,Resin
CoatedSideInorCoatedSideOut

B‐FV700‐BLTH‐QM‐R
‐41‐
6.3BarCode
ProgrammingLanguageTPCLNon‐TPCL
OneDimensionalBar
Code
JAN8/EAN8
JAN13/EAN13
UPC‐E
EAN13+2digits
EAN13+5digits
CODE128(withautocode
selection)
CODE128(withoutauto
codeselection)
CODE93
UPC‐E+2digits
UPC‐E+5digits
EAN8+2digits
EAN8+5digits
UPC‐A
UPC‐A+2digits
UPC‐A+5digits
UCC/EAN128
POSTNET
RM4SCC
KIXCODE
USPSIntelligentmail
barcode
MSI
Interleaved2of5(ITF)
CODE39(standard)
NW7
CODE39(fullASCII)
Industrial2of5
UPC‐A
UPC‐E
JAN/EAN
CODE39
CODE93
CODE128
GS1‐128(UCC/EAN128)
CODABAR(NW‐7)
ITF
Industrial2of5
MSI
UPCadd‐oncode
POSTNET
GS1DataBar
Omnidirectional
GS1DataBarTruncated
GS1DataBarStacked
GS1DataBarStacked
Omnidirectional
GS1DataBarLimited
GS1DataBarExpanded
GS1DataBarExpanded
Stacked
TwoDimensionalBar
Code
QRCode
PDF417
MicroPDF
DataMatrix(ECC200)
(FNC1supported)
MaxiCode
QRCode
PDF417(including
MicroPDF)
DataMatrix(ECC200)
GS1DataMatrix
MaxiCode
CompositeSymbolGS1DataBar(Truncated)
GS1DataBarStacked
GS1DataBarStacked
Omnidirectional
GS1DataBarLimited
GS1DataBarExpanded
GS1DataBarExpanded
Stacked
UPC‐A
UPC‐E
EAN‐13Composite
(CC‐A/CC‐B)
EAN‐8Composite
(CC‐A/CC‐B)
UPC‐AComposite
(CC‐A/CC‐B)
UPC‐EComposite
(CC‐A/CC‐B)
GS1DataBarComposite
(CC‐A/CC‐B)

B‐FV700‐BLTH‐QM‐R
‐42‐
EAN‐13
EAN‐8
UCC/EAN‐128withCC‐A
orCC‐B
UCC/EAN‐128withCC‐C
GS1DataBarTruncated
Composite(CC‐A/CC‐B)
GS1DataBarStacked
Composite(CC‐A/CC‐B)
GS1DataBarExpanded
StackedComposite
(CC‐A/CC‐B)
GS1DataBarExpanded
Composite(CC‐A/CC‐B)
GS1DataBarStacked
Omnidirectional
Composite(CC‐A/CC‐B)
GS1DataBarLimited
Composite(CC‐A/CC‐B)
GS1‐128Composite
(CC‐A/CC‐B/CC‐C)

B‐FV700‐BLTH‐QM‐R
‐43‐
6.4ElectricalandOperatingEnvironment
PropertiesRange
PowerSupplyVoltage:AC100V~240V±10%(fullrange)
Frequency:50‐60Hz±5%
PowerConsumption90W
TemperatureOperating:5~40°C
Storage:‐40~60°C
HumidityOperating:25~85%RH(non‐condensing)
Storage:10~90%RH(non‐condensing)
6.5PhysicalDimension
DimensionSizeandWeight
SizeW221mmxD279.3mmxH182.8mm
Weight2.45kg(excludingmediaandaccessories)
B‐FV700‐BLTH‐QM‐R
‐44‐
6.6Interfaces
ThissectionprovidesinformationaboutIOportspecificationsfortheprinter.
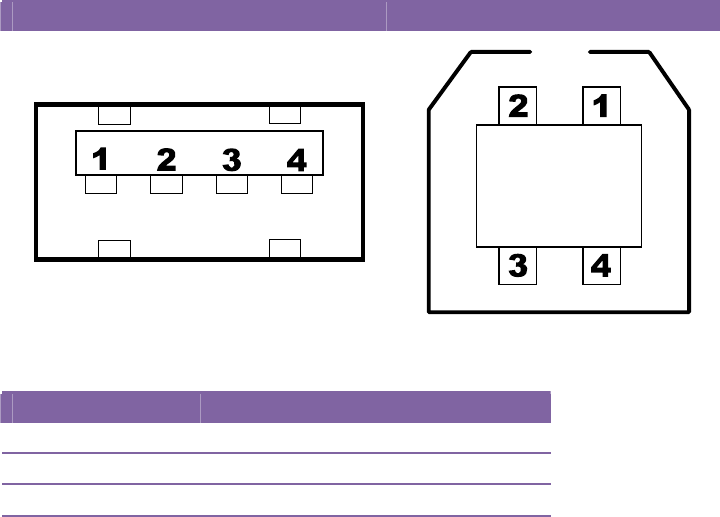
6.6.1 USB
TherearetwocommonUSBconnectors.Typically,typeAisfoundonhostsandhubs;typeBisfoundon
devicesandhubs.Thefigurebelowshowstheirpinouts.
TypeATypeB
PinSignalDescription
1VBUS+5V
2D‐ Differentialdatasignalingpair‐
3D+Differentialdatasignalingpair+
4GroundGround
B‐FV700‐BLTH‐QM‐R
‐45‐
6.6.2 Ethernet
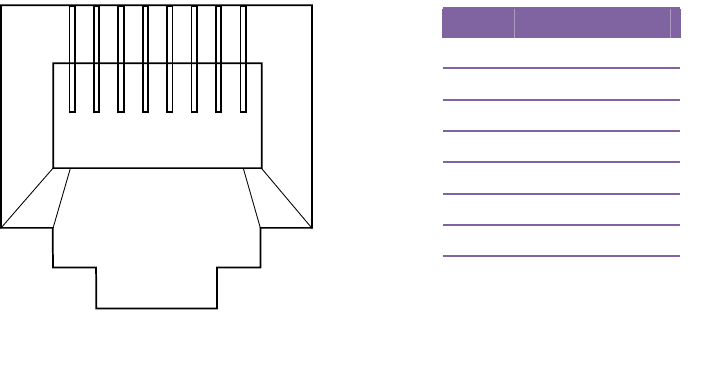
TheEthernetusesRJ‐45cable,whichis8P8C(8‐Position8‐Contact).Thefigurebelowshowsitspinout.
12345678
PinSignal
1Transmit+
2Transmit‐
3Receive+
4Reserved
5Reserved
6Receive‐
7Reserved
8Reserved

B‐FV700‐BLTH‐QM‐R
‐46‐
6.6.3 RS‐232C
TheRS‐232ContheprinterisDB9female.Ittransmitsdatabitbybitinasynchronousstart‐stopmode.
Thefigurebelowshowsitspinout.
1
2
3
4
5
6
7
89
PinSignalDescription
1N/AShortedtoPin6
2RxDReceive
3TxDTransmit
4N/ANoConnection
5GNDGround
6N/AShortedtoPin1
7RTSRequesttoSend
8CTSCleartoSend
9+5VReservedforKDU(keyboarddeviceunit)
NotePin9isreservedforKDU.Donotconnectitifyouareusinga
computerasthehost.
Host(DB9) Printer(DB9)
SignalDescriptionPinPin DescriptionSignal
RxDReceive23TransmitTxD
TxDTransmit32ReceiveRxD
DTRDataTermi nalReady41DataSetReadyDSR
GNDGround55GroundGND
DSRDataSetReady66DataTer minalReadyDTR
RTSRequesttoSend78CleartoSendCTS
CTSCleartoSend8
7RequesttoSendRTS
6.6.4 Centronics
The36‐pinCentronicsontheprinterusesparallelcommunication,andcomplieswithIEEE1284
compatibilitymode(alsocalledSPP,StandardParallelPort).Thefigurebelowshowsitspinout.
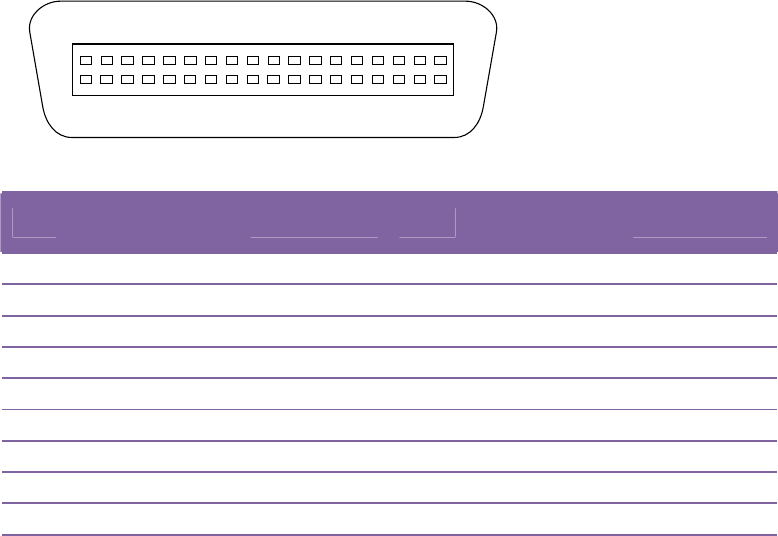
B‐FV700‐BLTH‐QM‐R
‐47‐
118
19
36
PinSignal
DirectionSignalPinSignal
DirectionSignal
1ToPrinter/STROBE11FromPrinter BUSY
2ToPrinterData112FromPrinter PE
3ToPrinterData213FromPrinter +5V
4ToPrinterData314‐15 ‐ NC
5ToPrinterData416‐17 GroundGND
6ToPrinterData518‐ NC
7ToPrinterData619‐30 GroundGND
8ToPrinterData731‐ NC
9ToPrinterData832FromPrinter /FAULT
10FromPrinter/ACK33‐36 ‐ NC
B‐FV700‐BLTH‐QM‐R
‐48‐
InstallationManualfortheB‐FV704D‐BLTH‐QM‐RBluetoothInterface
1.APPLICABLEMODEL
ThisoptionalmoduleistheBluetoothinterface,whichisdesignedforthefollowingmodels:
B‐FV4DSeries
Remark:
This optional module complies with Bluetooth V2.1 + EDR standards.
Note:
This optional module and the B-FV700-WLAN-QM-R Wireless LAN Interface option cannot be installed at the
same time.
2.PACKINGLIST
Allthefollowingpartsaresuppliedwiththeoption.Makesureyouhavealltheitemsshownlisted
below.
WARNING!
1. Carefully read and follow all the instructions in this manual. Failure to do so could create
safety hazards such as fire or electric shocks.
Instructionsinthismanualmustbefollowedwheninstallingoptionkitsoraddingcablesto
avoidsystemfailuresandtoinsurecorrectperformanceandoperation.
Failuretofollowthemanual’sinstructionsoranyunauthorizedmodifications,substitutionor
changetothisproductwillvoidtheproductwarranty.
2.Beforeinstallingthisoption,besuretoturnoffthepowerswitchanddisconnectthepoweradapterconnectorfromthe
printer.
3.Take carenottotraporpinchyourfingersorhandswiththecovers.
4.Beforeinstallingthisoption,removethemediafromtheprinter.
1
2

B‐FV700‐BLTH‐QM‐R
‐49‐
BluetoothInterface(1pc.)
M‐3P‐TiteScrew(2pcs.)
InstallationManual(1copy)
RFCertificationLabel

6SpecificationsToshi b a B‐FV4TOwner’sManual
‐50‐
3.INSTALLATIONPROCEDURE
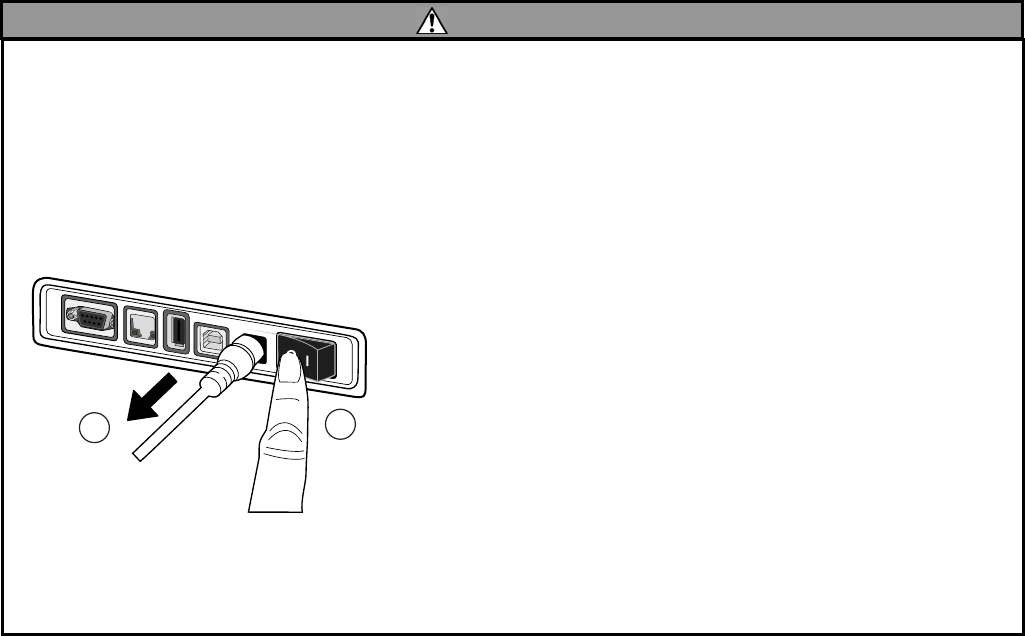
1)Turnofftheprinterpower,disconnectthepowerplugfromtheACoutlet,and
disconnecttheACadapterfromtheprinter.
2)Placetheprinteronthesoftclothtopreventscratchingthesurfaceoftheprinter,
andremovethe4screwsprovidedattheBottomCover.
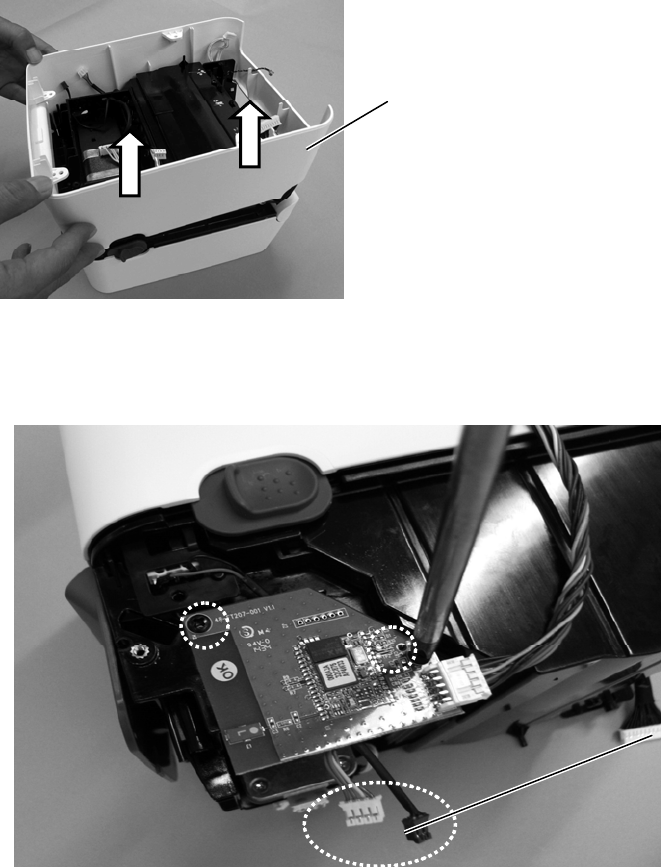
3) Remove the Bottom Cover by removing the 6 connectors from the main board.
Connectorstobedetached
BottomCover
6SpecificationsToshi b a B‐FV4TOwner’sManual
‐51‐
4)RemovethePrinterCover.
5)SecuretheBluetoothInterfacewiththe2screwsprovided(M‐3P‐Titescrews).
Note:
When securing the interface, prevent the two harnesses from being trapped between the
interface board and the printer frame.
PrinterCover
Harnesses
6SpecificationsToshi b a B‐FV4TOwner’sManual
‐52‐
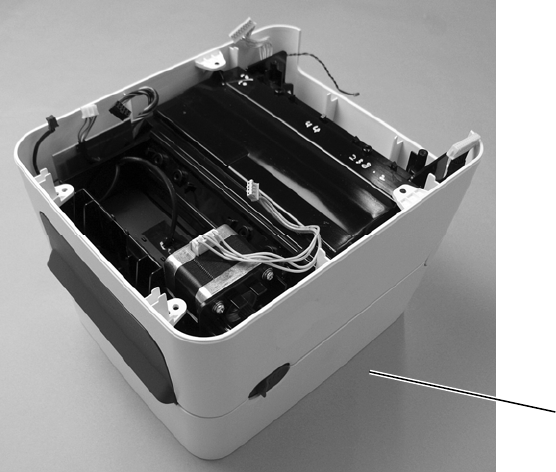
6) Attach the Printer Cover.
Note: When fitting the Printer Cover, prevent the harness from being trapped between the
covers.
PrinterCover
6SpecificationsToshi b a B‐FV4TOwner’sManual
‐53‐
7) Connect the harness connector to the connector “J15” (black) on the main board.
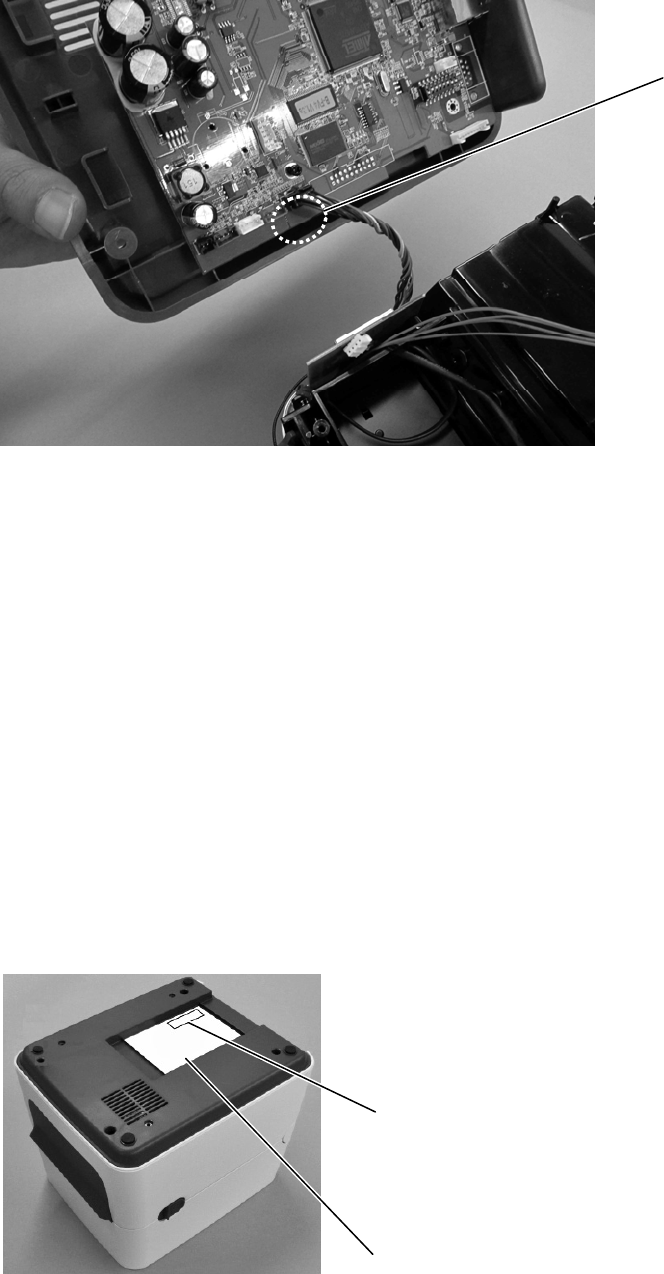
8) Return the 6 connectors to the original positions, which were removed in Step 3.
9) Fix the Bottom Cover by securing the 4 screws which were removed in Step 2.
Note: When fitting the Bottom Cover, prevent the harness from being trapped between the
covers.
10) Peel off the backing sheet of the RF Certification Label and attach it to the position as
shown below.
Connector“J15”(black)
RFCertificationLabel
RatingLabel

6SpecificationsToshi b a B‐FV4TOwner’sManual
‐54‐
Note:
Be sure not to cover the contents described on the rating label when the RF Certification Label
is attached to the upper right corner.
11) Close the Top Cover.
The installation is now completed.
PRINTEDINTAIWAN
R141023P5200‐TTEC
EO2‐38103
Feb.2015
©2015TOSHIBATECCORPORATION AllRightsReserved
1‐11‐1,Osaki,Shinagawa‐ku,Tokyo141‐8562,JAPAN