Toshiba Strata Cix Programming Manual Vol. 2
2014-12-11
: Toshiba Toshiba-Strata-Cix-Programming-Manual-121632 toshiba-strata-cix-programming-manual-121632 toshiba pdf
Open the PDF directly: View PDF ![]() .
.
Page Count: 248 [warning: Documents this large are best viewed by clicking the View PDF Link!]
- Contents
- Chapter 1 - Overview
- Chapter 2 - eManager
- Chapter 3 - Voice Mail Configuration
- Chapter 4 - Voice Processing
- Chapter 5 - Fax Server
- Chapter 6 - Automatic Speech Recognition (ASR)
- Chapter 7 - Unified Messaging (UM)
- Chapter 8 - Text-to-Speech (TTS)
- Chapter 9 - Interactive Voice Response (IVR)
- Chapter 10 - Advanced Integrations and Applications
- Chapter 11 - Token Programming
- Chapter 12 - System Reports
- Chapter 13 - Maintenance/Troubleshooting
- Index

Strata CIX
Programming Manual
Volume 2
Stratagy ES Voice Mail Application
Release 5
®
Publication Information
Toshiba America Information Systems, Inc.
Telecommunication Systems Division
Publication Information
Toshiba America Information Systems, Inc., Telecommunication Systems Division, reserves the right,
without prior notice, to revise this information publication for any reason, including, but not limited to,
utilization of new advances in the state of technical arts or to simply change the design of this document.
Further, Toshiba America Information Systems, Inc., Telecommunication Systems Division, also reserves
the right, without prior notice, to make such changes in equipment design or components as engineering or
manufacturing methods may warrant.
CIX-MA-PRGM2-VA
Version A1, January 2007
Our mission to publish accurate, complete and user accessible documentation. At the time of printing the
information in this document was as accurate and current as was reasonably possible. However, in the
time required to print and distribute this manual additions, corrections or other changes may have been
made. To view the latest version of this or other documents please refer to the Toshiba FYI web site.
Toshiba America Information Systems shall not be liable for any commercial losses, loss of revenues or
profits, loss of goodwill, inconvenience, or exemplary, special, incidental, indirect or consequential
damages whatsoever, or claims of third parties, regardless of the form of any claim that may result from the
use of this document.
THE SPECIFICATIONS AND INFORMATION PROVIDED HEREIN ARE FOR INFORMATIONAL
PURPOSES ONLY AND ARE NOT A WARRANTY OF ACTUAL PERFORMANCE, WHETHER
EXPRESSED OR IMPLIED. THE SPECIFICATIONS AND INFORMATION ARE SUBJECT TO CHANGE
WITHOUT NOTICE. ACTUAL PERFORMANCE MAY VARY BASED ON INDIVIDUAL
CONFIGURATIONS, USE OF COLLATERAL EQUIPMENT, OR OTHER FACTORS.
© Copyright 2007
This document is copyrighted by Toshiba America Information Systems, Inc. with all rights reserved. Under
the copyright laws, this document cannot be reproduced in any any form or by any means—graphic,
electronic, or mechanical, including recording, taping, photocopying, without prior written permission of
Toshiba. No patent liability is assumed, however, with respect to the use of the information contained
herein.
Trademarks
Strata, SmartMedia, SD (Secure Digital) and CIX are registered trademarks of Toshiba Corporation.
VCS (Video Communcation Solution), VCSManager, eManager, My Phone Manager and Info Manager are
registered trademarks of Toshiba America Information Systems, Inc.
Windows and Microsoft are registered trademarks of Microsoft.
Trend Micro and PC-cillin are registered trademarks of Trend Micro Inc.
Norton Anti-Virus is a registered trademark of Symantec Corp.
McAfee and Virusscan are registered trademarks of McAfee, Inc.
Trademarks, registered trademarks, and service marks are the property of their respective owners.
Strata Video Communication Solution General End User Information
The Strata Video Communication Solution is registered in accordance with the provisions of Part 68 of the
Federal Communications Commission’s Rules and Regulations.
FCC Requirements
Means of Connection: The Federal Communications Commission (FCC) has established rules which
permit the Strata CIX system to be connected directly to the telephone network. Connection points are
provided by the telephone company—connections for this type of customer-provided equipment will not be
provided on coin lines. Connections to party lines are subject to state tariffs.
Incidence of Harm: If the system is malfunctioning, it may also be disrupting the telephone network. The
system should be disconnected until the problem can be determined and repaired. If this is not done, the
telephone company may temporarily disconnect service. If possible, they will notify you in advance, but, if
advance notice is not practical, you will be notified as soon as possible. You will be informed of your right to
file a complaint with the FCC.
Service or Repair: For service or repair, contact your local Toshiba telecommunications distributor. To
obtain the nearest Toshiba telecommunications distributor in your area, log onto www.toshiba.com/taistsd/
pages/support_dealerlocator.html or call (800) 222-5805 and ask for a Toshiba Telecom Dealer.
Radio Frequency Interference
Warning: This equipment generates, uses, and can radiate radio frequency energy and if not installed and
used in accordance with the manufacturer’s instruction manual, may cause interference to radio
communications. It has been tested and found to comply with the limits for a Class A computing device
pursuant to Subpart J of Part 15 of FCC Rules, which are designed to provide reasonable protection
against such interference when operated in a commercial environment. Operation of this equipment in a
residential area is likely to cause interference, in which case, the user, at his/her own expense, will be
required to take whatever measures may be required to correct the interference.

TOSHIBA AMERICA INFORMATION SYSTEMS, INC. (“TAIS”)
Telecommunication Systems Division License Agreement
IMPORTANT: THIS LICENSE AGREEMENT (“AGREEMENT”) IS A LEGAL AGREEMENT BETWEEN YOU (“YOU”) AND TAIS. CAREFULLY READ THIS LICENSE AGREEMENT. USE OF ANY
SOFTWARE OR ANY RELATED INFORMATION (COLLECTIVELY, “SOFTWARE”) INSTALLED ON OR SHIPPED WITH A TAIS DIGITAL SOLUTIONS PRODUCT OR OTHERWISE MADE AVAILABLE TO
YOU BY TAIS IN WHATEVER FORM OR MEDIA, WILL CONSTITUTE YOUR ACCEPTANCE OF THESE TERMS, UNLESS SEPARATE TERMS ARE PROVIDED BY THE SOFTWARE SUPPLIER. IF
YOU DO NOT AGREE WITH THE TERMS OF THIS LICENSE AGREEMENT, DO NOT INSTALL, COPY OR USE THE SOFTWARE AND PROMPTLY RETURN IT TO THE LOCATION FROM WHICH YOU
OBTAINED IT IN ACCORDANCE WITH APPLICABLE RETURN POLICIES. EXCEPT AS OTHERWISE AUTHORIZED IN WRITING BY TAIS, THIS SOFTWARE IS LICENSED FOR DISTRIBUTION
THROUGH TAIS AUTHORIZED CHANNELS ONLY TO END-USERS PURSUANT TO THIS LICENSE AGREEMENT.
1. License Grant. The Software is not sold; it is licensed upon payment of applicable charges. TAIS grants to you a personal, non-transferable and non-exclusive right to use the copy of the Software
provided under this License Agreement. You agree you will not copy the Software except as necessary to use it on one TAIS system at a time at one location. Modifying, translating, renting, copying,
distributing, printing, sublicensing, transferring or assigning all or part of the Software, or any rights granted hereunder, to any other persons and removing any proprietary notices, labels or marks from the
Software is strictly prohibited except as permitted by applicable law; you agree violation of such restrictions will cause irreparable harm to TAIS and provide grounds for injunctive relief, without notice,
against you or any other person in possession of the Software. You and any other person whose possession of the software violates this License Agreement shall promptly surrender possession of the
Software to TAIS, upon demand. Furthermore, you hereby agree not to create derivative works based on the Software. TAIS reserves the right to terminate this license and to immediately repossess the
software in the event that you or any other person violates this License Agreement. Execution of the Software for any additional capabilities require a valid run-time license.
2. Intellectual Property. You acknowledge that no title to the intellectual property in the Software is transferred to you. You further acknowledge that title and full ownership rights to the Software will remain
the exclusive property of TAIS and/or its suppliers, and you will not acquire any rights to the Software, except the license expressly set forth above. You will not remove or change any proprietary notices
contained in or on the Software. The Software is protected under US patent, copyright, trade secret, and/or other proprietary laws, as well as international treaties. Any transfer, use, or copying of the
software in violation of the License Agreement constitutes copyright infringement. You are hereby on notice that any transfer, use, or copying of the Software in violation of this License Agreement constitutes
a willful infringement of copyright.
3. No Reverse Engineering. You agree that you will not attempt, and if you employ employees or engage contractors, you will use your best efforts to prevent your employees and contractors from
attempting to reverse compile, reverse engineer, modify, translate or disassemble the Software in whole or in part. Any failure to comply with the above or any other terms and conditions contained herein
will result in the automatic termination of this license and the reversion of the rights granted hereunder back to TAIS.
4. Limited Warranty. THE SOFTWARE IS PROVIDED “AS IS” WITHOUT WARRANTY OF ANY KIND. TO THE MAXIMUM EXTENT PERMITTED BY APPLICABLE LAW, TAIS AND ITS SUPPLIERS
DISCLAIM ALL WARRANTIES WITH REGARD TO THE SOFTWARE, EITHER EXPRESS OR IMPLIED, INCLUDING, BUT NOT LIMITED TO, THE WARRANTY OF NON-INFRINGEMENT OF THIRD
PARTY RIGHTS, THE WARRANTY OF YEAR 2000 COMPLIANCE, AND THE IMPLIED WARRANTIES OF MERCHANTABILITY AND FITNESS FOR A PARTICULAR PURPOSE. THE ENTIRE RISK AS
TO THE QUALITY AND PERFORMANCE OF THE SOFTWARE IS WITH YOU. NEITHER TAIS NOR ITS SUPPLIERS WARRANT THAT THE FUNCTIONS CONTAINED IN THE SOFTWARE WILL MEET
YOUR REQUIREMENTS OR THAT THE OPERATION OF THE SOFTWARE WILL BE UNINTERRUPTED OR ERROR-FREE. HOWEVER, TAIS WARRANTS THAT ANY MEDIA ON WHICH THE
SOFTWARE IS FURNISHED IS FREE FROM DEFECTS IN MATERIAL AND WORKMANSHIP UNDER NORMAL USE FOR A PERIOD OF NINETY (90) DAYS FROM THE DATE OF DELIVERY TO
YOU.
5. Limitation Of Liability. TAIS’ ENTIRE LIABILITY AND YOUR SOLE AND EXCLUSIVE REMEDY UNDER THIS LICENSE AGREEMENT SHALL BE AT TAIS’ OPTION REPLACEMENT OF THE MEDIA OR
REFUND OF THE PRICE PAID. TO THE MAXIMUM EXTENT PERMITTED BY APPLICABLE LAW, IN NO EVENT SHALL TAIS OR ITS SUPPLIERS BE LIABLE TO YOU FOR ANY CONSEQUENTIAL,
SPECIAL, INCIDENTAL OR INDIRECT DAMAGES FOR PERSONAL INJURY, LOSS OF BUSINESS PROFITS, BUSINESS INTERRUPTION, LOSS OF BUSINESS INFORMATION/DATA, OR ANY
OTHER PECUNIARY LOSS OF ANY KIND ARISING OUT OF THE USE OR INABILITY TO USE THE SOFTWARE, EVEN IF TAIS OR ITS SUPPLIER HAS BEEN ADVISED OF THE POSSIBILITY OF
SUCH DAMAGES. IN NO EVENT SHALL TAIS OR ITS SUPPLIERS BE LIABLE FOR ANY CLAIM BY A THIRD PARTY.
6. State/Jurisdiction Laws. SOME STATES/JURISDICTIONS DO NOT ALLOW THE EXCLUSION OF IMPLIED WARRANTIES OR LIMITATIONS ON HOW LONG AN IMPLIED WARRANTY MAY LAST, OR
THE EXCLUSION OR LIMITATION OF INCIDENTAL OR CONSEQUENTIAL DAMAGES, SO SUCH LIMITATIONS OR EXCLUSIONS MAY NOT APPLY TO YOU. THIS LIMITED WARRANTY GIVES YOU
SPECIFIC RIGHTS AND YOU MAY ALSO HAVE OTHER RIGHTS WHICH VARY FROM STATE/JURISDICTION TO STATE/JURISDICTION.
7. Export Laws. This License Agreement involves products and/or technical data that may be controlled under the United States Export Administration Regulations and may be subject to the approval of the
United States Department of Commerce prior to export. Any export, directly or indirectly, in contravention of the United States Export Administration Regulations, or any other applicable law, regulation or
order, is prohibited.
8. Governing Law. This License Agreement will be governed by the laws of the State of California, United States of America, excluding its conflict of law provisions.
9. United States Government Restricted Rights. The Software is provided with Restricted Rights. The Software and other materials provided hereunder constitute Commercial Computer Software and
Software Documentation and Technical Data related to Commercial Items. Consistent with F.A.R. 12.211 and 12.212 they are licensed to the U.S. Government under, and the U.S. Government’s rights
therein are restricted pursuant to, the vendor’s commercial license.
10. Severability. If any provision of this License Agreement shall be held to be invalid, illegal or unenforceable, the validity, legality and enforceability of the remaining provisions hereof shall not in any way
be affected or impaired.
11. No Waiver. No waiver of any breach of any provision of this License Agreement shall constitute a waiver of any prior, concurrent or subsequent breach of the same or any other provisions hereof, and no
waiver shall be effective unless made in writing and signed by an authorized representative of the waiving party.
12. Supplier Software. The Software may include certain software provided by TAIS suppliers. In such event, you agree that such supplier may be designated by TAIS as a third party beneficiary of TAIS with
rights to enforce the Agreement with respect to supplier’s software.
YOU ACKNOWLEDGE THAT YOU HAVE READ THIS LICENSE AGREEMENT AND THAT YOU UNDERSTAND ITS PROVISIONS. YOU AGREE TO BE BOUND BY ITS TERMS AND CONDITIONS. YOU
FURTHER AGREE THAT THIS LICENSE AGREEMENT CONTAINS THE COMPLETE AND EXCLUSIVE AGREEMENT BETWEEN YOU AND TAIS AND SUPERSEDES ANY PROPOSAL OR PRIOR
AGREEMENT, ORAL OR WRITTEN, OR ANY OTHER COMMUNICATION RELATING TO THE SUBJECT MATTER OF THIS LICENSE AGREEMENT.
Toshiba America Information Systems, Inc.
Telecommunication Systems Division
9740 Irvine Boulevard
Irvine, California 92618-1697
United States of America
DSD 020905
5932

T
Toshiba America Information Systems, Inc.
Telecommunication Systems Division
End-User Limited Warranty
Toshiba America Information Systems, Inc., (“TAIS”) warrants that this telephone equipment manufactured by
Toshiba (except for fuses, lamps, and other consumables) will, upon delivery by TAIS or an authorized TAIS
dealer to a retail customer in new condition, be free from defects in material and workmanship for twenty-four (24)
months after delivery, except as otherwise provided by TAIS in the TAIS warranty accompanying the products or
posted on TAIS’s website. Products which are not manufactured by Toshiba but are purchased from Toshiba, will
be subject to the warranty provisions provided by the equipment manufacturer, unless TAIS notifies the end-user
of any additional warranty provisions in writing.
This warranty is void (a) if the equipment is used under other than normal use and maintenance conditions, (b) if
the equipment is modified or altered, unless the modification or alteration is expressly authorized by TAIS, (c) if
the equipment is subject to abuse, neglect, lightning, electrical fault, or accident, (d) if the equipment is repaired
by someone other than TAIS or an authorized TAIS dealer, (e) if the equipment’s serial number is defaced or miss-
ing, or (f) if the equipment is installed or used in combination or in assembly with products not supplied by TAIS
and which are not compatible or are of inferior quality, design, or performance.
The sole obligation of TAIS or Toshiba Corporation under this warranty, or under any other legal obligation with
respect to the equipment, is the repair or replacement of such defective or missing parts as are causing the malfunc-
tion by TAIS or its authorized dealer with new or refurbished parts (at their option). If TAIS or one of its autho-
rized dealers does not replace or repair such parts, the retail customer’s sole remedy will be a refund of the price
charged by TAIS to its dealers for such parts as are proven to be defective, and which are returned to TAIS through
one of its authorized dealers within the warranty period and no later than thirty (30) days after such malfunction,
whichever first occurs.
Under no circumstances will the retail customer or any user or dealer or other person be entitled to any direct,
special, indirect, consequential, or exemplary damages, for breach of contract, tort, or otherwise. Under no circum-
stances will any such person be entitled to any sum greater than the purchase price paid for the item of equipment
that is malfunctioning.
To obtain service under this warranty, the retail customer must bring the malfunction of the machine to the atten-
tion of one of TAIS’ authorized dealers within the applicable warranty period and no later than thirty (30) days
after such malfunction, whichever first occurs. Failure to bring the malfunction to the attention of an authorized
TAIS dealer within the prescribed time results in the customer being not entitled to warranty service.
THERE ARE NO OTHER WARRANTIES FROM EITHER TOSHIBA AMERICA INFORMATION SYSTEMS,
INC., OR TOSHIBA CORPORATION WHICH EXTEND BEYOND THE FACE OF THIS WARRANTY. ALL
OTHER WARRANTIES, EXPRESS OR IMPLIED, INCLUDING THE WARRANTIES OF MERCHANTABILITY,
FITNESS FOR A PARTICULAR PURPOSE, AND FITNESS FOR USE, ARE EXCLUDED.
No TAIS dealer and no person other than an officer of TAIS may extend or modify this warranty. No such modifi-
cation or extension is effective unless it is in writing and signed by the Vice President and General Manager, Tele-
communication Systems Division.
WARRANTIES FOR NON-TOSHIBA BRANDED THIRD
PARTY PRODUCTS
A valuable element of Toshiba’s product strategy is to offer our customers a complete product portfolio. To
provide this value to our customers at the most optimal prices, we offer both Toshiba-branded and third-
party manufactured products that support our Toshiba Strata CIX product portfolio. Similar to other
resellers of software, hardware and peripherals, these third-party manufactured products carry warranties
independent of our Toshiba limited warranty provided with our Toshiba-branded products. Customers
should note that third-party manufacturer warranties vary from product to product and are covered by the
warranties provided through the original manufacturer and passed on intact to the purchaser by Toshiba.
Customers should consult their product documentation for third-party warranty information specific to third-
party products. More information may also be available in some cases from the manufacturer’s public
website.
While Toshiba offers a wide selection of software, hardware and peripheral products, we do not specifically
test or guarantee that the third-party products we offer work under every configuration with any or all of the
various models of the Toshiba Strata CIX. Toshiba does not endorse, warrant nor assume any liability in
connection with such third party products or services. If you have questions about compatibility, we
recommend and encourage you to contact the third-party software, hardware and peripheral product
manufacturer directly.

Strata CIX Programming Vol.2 01/07 i
Contents
Chapter 1 – Overview
System Administrators........................................................................................................................ 1-1
Basic Features.................................................................................................................................... 1-1
User Agents ................................................................................................................................. 1-1
Voice Messaging.......................................................................................................................... 1-2
Automated Attendant ................................................................................................................... 1-2
Telephone Answering .................................................................................................................. 1-2
Fax Tone Detection...................................................................................................................... 1-3
Multiple System Languages......................................................................................................... 1-3
Feature Groups .................................................................................................................................. 1-3
Enabling Feature Groups............................................................................................................. 1-3
Fax Server (feature to be added later)......................................................................................... 1-3
Automatic Speech Recognition (ASR) Automated Attendant (AA) .............................................. 1-4
Unified Messaging (UM)............................................................................................................... 1-4
Text-To-Speech (TTS) ................................................................................................................. 1-5
System Software ................................................................................................................................ 1-6
Windows XP................................................................................................................................. 1-6
Diagnostic Programs.................................................................................................................... 1-6
eManager Software...................................................................................................................... 1-6
System Integration.............................................................................................................................. 1-7
Proprietary Integration.................................................................................................................. 1-7
Centralized Voice Mail ................................................................................................................. 1-7
Maintenance....................................................................................................................................... 1-8
Trace and Log Utilities ................................................................................................................. 1-8
Chapter 2 – eManager
Log on to eManager ........................................................................................................................... 2-2
eManager Profile ................................................................................................................................ 2-3
Backup Database Utility............................................................................................................... 2-7
Restore Database Utility .............................................................................................................. 2-8
Options ............................................................................................................................................... 2-8
Select Equipment ............................................................................................................................... 2-8
MAS Licensing.................................................................................................................................... 2-9
Access Main MAS Licensing Screen ........................................................................................... 2-9
Upload Licenses......................................................................................................................... 2-10
Issue Licenses ........................................................................................................................... 2-10
Activate Licenses ....................................................................................................................... 2-10
Delete Licenses.......................................................................................................................... 2-11
View Licenses ............................................................................................................................ 2-11
View Current Licenses ............................................................................................................... 2-11

Contents
ii Strata CIX Programming Vol.2 01/07
Logout of eManager ......................................................................................................................... 2-12
eManager Main Screen .................................................................................................................... 2-12
Program Menu.................................................................................................................................. 2-13
Help Topics....................................................................................................................................... 2-13
Help Topics/Context Help .......................................................................................................... 2-13
About CIX eManager.................................................................................................................. 2-13
Client PC .......................................................................................................................................... 2-14
How to Prepare the Client PC....................................................................................................2-14
Load Voice Mail Application Software on Client PC................................................................... 2-14
Run eManager from Network (Client) PC .................................................................................. 2-14
Chapter 3 – Voice Mail Configuration
Configuration Menu Screens.............................................................................................................. 3-2
Access the Configuration Menu Screens..................................................................................... 3-2
Exit the Configuration Menu Screens........................................................................................... 3-2
Refresh Configuration Screen...................................................................................................... 3-2
Update Voice Mail Database .............................................................................................................. 3-2
Configure Voice Ports......................................................................................................................... 3-2
Main Menu.......................................................................................................................................... 3-3
Change System Date/Time ................................................................................................................ 3-4
Holidays.............................................................................................................................................. 3-4
Add Holidays................................................................................................................................ 3-5
Delete Holiday.............................................................................................................................. 3-5
Copy To........................................................................................................................................ 3-5
Configuration Wizard.......................................................................................................................... 3-6
Use Configuration Wizard ............................................................................................................ 3-6
User Setup Wizard ............................................................................................................................. 3-6
Use User Setup............................................................................................................................ 3-6
Telephone Systems............................................................................................................................ 3-7
Add Integration Group................................................................................................................ 3-10
Delete Integration Group............................................................................................................ 3-10
Add or Delete Switch Type......................................................................................................... 3-11
Answer Methods............................................................................................................................... 3-12
Add Answer Methods................................................................................................................. 3-13
Delete Answer Methods............................................................................................................. 3-13
Voice Ports ....................................................................................................................................... 3-14
Add Voice Port Definition ........................................................................................................... 3-15
Display Voice Port Status........................................................................................................... 3-15
Serial Ports....................................................................................................................................... 3-16
Add Serial Port Definition........................................................................................................... 3-17
Notification Groups........................................................................................................................... 3-18
Add Notification Group............................................................................................................... 3-19
Delete Notification Group........................................................................................................... 3-19
Port Statistics.................................................................................................................................... 3-20
Add Port Statistics Group........................................................................................................... 3-21
Delete Port Statistics Group....................................................................................................... 3-21
Scheduler ......................................................................................................................................... 3-22
Add Scheduled Action................................................................................................................ 3-23
Delete Scheduled Action............................................................................................................ 3-23
Language.......................................................................................................................................... 3-24

Contents
Strata CIX Programming Vol.2 01/07 iii
Change System Language Setting ............................................................................................ 3-25
Change Mailbox Language Setting............................................................................................ 3-25
Edit Prompts............................................................................................................................... 3-25
Voice Menu....................................................................................................................................... 3-26
Add Voice Command ................................................................................................................. 3-27
Delete Voice Command ............................................................................................................. 3-27
Parameters....................................................................................................................................... 3-28
Methods for Modifying the Parameters ...................................................................................... 3-29
Modify Parameters..................................................................................................................... 3-30
Add Parameters ......................................................................................................................... 3-30
Delete Parameters ..................................................................................................................... 3-30
Chapter 4 – Voice Processing
User Agent(s) ..................................................................................................................................... 4-1
Voice Mail Menu........................................................................................................................... 4-2
Defined User Agents.................................................................................................................... 4-2
Class of Service (COS) ...................................................................................................................... 4-3
Inherit Function ............................................................................................................................ 4-3
Explore Function .......................................................................................................................... 4-4
Create COS for Mailboxes ........................................................................................................... 4-4
Edit COS for Mailboxes................................................................................................................ 4-4
User Mailbox....................................................................................................................................... 4-5
Reserved Mailboxes..................................................................................................................... 4-5
Create User Mailbox .................................................................................................................... 4-5
Modify User Mailbox..................................................................................................................... 4-6
Delete User Mailbox..................................................................................................................... 4-6
Copy Mailbox ............................................................................................................................... 4-6
User Mailbox Reports................................................................................................................... 4-7
Mailbox Editor Menu........................................................................................................................... 4-7
Refresh Function.......................................................................................................................... 4-7
Lock Function............................................................................................................................... 4-8
Reset Function............................................................................................................................. 4-8
Mailbox Search Function.............................................................................................................. 4-8
Mailbox Editor Screens....................................................................................................................... 4-9
Mailbox Header............................................................................................................................ 4-9
User Mode.................................................................................................................................. 4-12
Auto Attendant ........................................................................................................................... 4-16
Unified Messaging...................................................................................................................... 4-20
Notify.......................................................................................................................................... 4-23
Chains/Groups/Fax .................................................................................................................... 4-31
ASR Auto Attendant................................................................................................................... 4-36
Info ............................................................................................................................................. 4-39
Menus ........................................................................................................................................ 4-41
Auto (Scheduling)....................................................................................................................... 4-43
Distribution List (System).................................................................................................................. 4-48
Create Distribution List............................................................................................................... 4-49
Modify Distribution List............................................................................................................... 4-49
Delete Distribution List ............................................................................................................... 4-49
Direct Send Voice............................................................................................................................. 4-50
Create/Modify Direct Send Voice User Agent............................................................................ 4-50

Contents
iv Strata CIX Programming Vol.2 01/07
Direct Send Fax................................................................................................................................ 4-51
Create/Modify Direct Send Fax User Agent............................................................................... 4-51
Chapter 5 – Fax Server
Chapter 6 – Automatic Speech Recognition (ASR)
ASR AA Version 5 Software Features................................................................................................ 6-1
ASR AA with Continuous Speech Processor ..................................................................................... 6-2
Hardware/Software Requirements............................................................................................... 6-2
Prior to Installing................................................................................................................................. 6-2
ASR Installation.................................................................................................................................. 6-3
Automatic Directory Synchronization for ASR AA Feature Group...................................................... 6-8
Chapter 7 – Unified Messaging (UM)
Feature Description ............................................................................................................................ 7-2
Voice File Compression...................................................................................................................... 7-2
UM Synchronization ........................................................................................................................... 7-2
IMAP4 .......................................................................................................................................... 7-2
Message Disposition Notification (MDN)...................................................................................... 7-3
Components ....................................................................................................................................... 7-3
Server Components ..................................................................................................................... 7-3
Client Components....................................................................................................................... 7-3
Installation .......................................................................................................................................... 7-6
Server Installation............................................................................................................................... 7-6
Client PC Installation .......................................................................................................................... 7-9
Using Outlook 2000/98............................................................................................................... 7-10
Using Outlook XP/2002/2003..................................................................................................... 7-11
SMTP Dedicated Gateway Server.................................................................................................... 7-13
Installation.................................................................................................................................. 7-13
Configuration.............................................................................................................................. 7-14
Record Voice Messages (Using Windows Sound Recorder) ........................................................... 7-15
Send WAV File as Voice Message................................................................................................... 7-16
Chapter 8 – Text-to-Speech (TTS)
Hardware/Software Requirements ..................................................................................................... 8-1
Installation .......................................................................................................................................... 8-2
Prior to Installing .......................................................................................................................... 8-2
Server Installation............................................................................................................................... 8-2
Client PC Programming...................................................................................................................... 8-4
Chapter 9 – Interactive Voice Response (IVR)
IVR User Agents................................................................................................................................. 9-1
Create IVR User Agents............................................................................................................... 9-2
Delete IVR User Agents.............................................................................................................. 9-3
Edit/Modify IVR User Agents........................................................................................................ 9-3
Answer Methods................................................................................................................................. 9-3
Voice Ports ......................................................................................................................................... 9-3
IVR Alias Editor .................................................................................................................................. 9-4
Edit IVR Alias ............................................................................................................................... 9-4
Run IVR Alias............................................................................................................................... 9-5

Contents
Strata CIX Programming Vol.2 01/07 v
Chapter 10 – Advanced Integrations and
Applications
CIX Integration.................................................................................................................................. 10-1
AMIS Networking.............................................................................................................................. 10-5
AMIS User Agents...................................................................................................................... 10-5
AMIS Node................................................................................................................................. 10-8
Destination System Number ...................................................................................................... 10-9
Configuring Voice Mail for AMIS ................................................................................................ 10-9
Testing AMIS........................................................................................................................... 10-11
AMIS Operation........................................................................................................................ 10-11
Private/Urgent Message Handling ........................................................................................... 10-12
Notification ............................................................................................................................... 10-12
AMIS User Agent Reports........................................................................................................ 10-13
VPIM Networking............................................................................................................................ 10-13
VPIM User Agents.................................................................................................................... 10-13
VPIM Operation........................................................................................................................ 10-16
Chapter 11 – Token Programming
Using the Token Programming Language........................................................................................ 11-1
Users Mode Screen’s Extension Field ....................................................................................... 11-1
Auto Screen’s Extension Field ...................................................................................................11-1
Notify’s Template Editor Parameter Field .................................................................................. 11-1
Singular Tokens................................................................................................................................ 11-2
Replaced or Variable Tokens ........................................................................................................... 11-4
Defined Tokens ................................................................................................................................ 11-7
Chapter 12 – System Reports
Data Retention.................................................................................................................................. 12-1
Report Types.................................................................................................................................... 12-1
Report Elements............................................................................................................................... 12-2
Reports............................................................................................................................................. 12-2
Run/Print/Save/E-mail Report....................................................................................................12-2
Port Information and Statistics ................................................................................................... 12-2
Mailbox Information and Statistics ............................................................................................. 12-6
System Information .................................................................................................................. 12-10
Custom Reports.............................................................................................................................. 12-11
Report Templates..................................................................................................................... 12-11
Create Voice Mailbox Template............................................................................................... 12-11
Edit Voice Mailbox Template.................................................................................................... 12-12
Create Voice Mail AMIS/VPIM Template ................................................................................. 12-12
Edit AMIS/VPIM Template ...................................................................................................... 12-12
Run/Print/Save/E-mail Report.................................................................................................. 12-12
Chapter 13 – Maintenance/Troubleshooting
Backup Procedure............................................................................................................................ 13-1
Restore Procedure ........................................................................................................................... 13-2
Utilities/Tools .................................................................................................................................... 13-3
VM Port Status........................................................................................................................... 13-3
VM Tracer/Tracer Files .............................................................................................................. 13-3

Contents
vi Strata CIX Programming Vol.2 01/07
IVR Alias Editor.......................................................................................................................... 13-6
Run IVR Alias............................................................................................................................. 13-6
ASR Sync................................................................................................................................... 13-6
SES Restart...................................................................................................................................... 13-7

Strata CIX Voice Mail Programming 01/07 1
Introduction
This Programming Manual provides detailed step-by-step instructions for programming the Voice
Mail Processing Application. It is intended for qualified Service Technicians (Installers) and
System Administrators.
Organization
This manual is divided into the following chapters:
•Chapter 1 – Overview covers the qualifications of an Installer/System Administrator and
provides details on the Stratagy ES software’s Feature Groups and hardware.
•Chapter 2 – eManager gives information on access levels, passwords, toolbars and a chart of
the configuration menu. Instructions on starting up the system and accessing the Voice Mail
Administration are also provided.
•Chapter 3 – Voice Mail Configuration describes each of the menu options and gives detailed
instructions on using the screen functions.
•Chapter 4 – Voice Processing provides detailed information on creating/modifying and
deleting mailboxes (e.g., COS, user, Distribution List, AMIS, and Direct Send Voice).
•Chapter 5 – Fax Server (chapter to be added later).
•Chapter 6 – Automatic Speech Recognition (ASR) covers how the ASR feature operates and
how to install the required hardware/software.
•Chapter 7 – Unified Messaging (UM) covers how the UM feature operates and how to install
the required hardware/software.
•Chapter 8 – Text-to-Speech (TTS) covers how the TTS feature operates and how to install the
required hardware/software.
•Chapter 9 – Interactive Voice Response (IVR) provides information on how the IVR feature
operates and how to create/delete/modify IVR user agents.
•Chapter 10 – Advanced Integrations and Applications covers procedures for enabling and
testing SMDI, AMIS, and VPIM for the Stratagy ES.
•Chapter 11 – Token Programming provides detailed instructions for customizing and
administering the Stratagy ES system. A complete list of tokens and descriptions are included.
•Chapter 12 – System Reports covers running, viewing, saving and printing reports.
•Chapter 13 – Maintenance/Troubleshooting contains instructions on Backup, Restore,
VM Tracer functions.
•Index

Introduction
-2 Strata CIX Voice Mail Programming 01/07
Conventions
This manual uses these conventions:
Conventions Description
Note
Elaborates specific items or references other information. Within
some tables, general notes apply to the entire table and numbered
notes apply to specific items.
Important! Calls attention to important instructions or information.
CAUTION! Advises you that hardware, software applications, or data
could be damaged if the instructions are not followed closely.
WARNING!Alerts you when the given task could cause personal injury or
death.
Arial Bold Represents telephone buttons.
Courier Shows a computer keyboard entry or screen display.
“Type” Indicates entry of a string of text.
“Press” Indicates entry of a single key. For example: Type prog then
press Enter.
Arial Bold Represents LCD displays, tokens or custom IVR functions. For
example: M( ).
Italics Represents parameter and menu/screen field names, and book
titles. For example: hot_box parameter, Extension field.
Plus (+)
Shows a multiple PC keyboard or phone button entry. Entries
without spaces between them show a simultaneous entry.
Example: Esc+Enter. Entries with spaces between them show a
sequential entry. Example: # + 5.
Tilde (~) Means “through.” Example: 350~640 Hz frequency range.
!Denotes the step in a one-step procedure.
!Denotes a procedure.
Start > Settings > Printers Denotes a progression of buttons and/or menu options on the
screen you should select.
See Figure 10 Grey words within the printed text denote cross-references. In the
electronic version of this document (Library CD-ROM or FYI
Internet download), cross-references appear in blue hypertext.

Introduction
Strata CIX Voice Mail Programming 01/07 3
Related Documents/Media
Note Some documents listed here may appear in different versions on the CD-ROM, FYI, or in
print. To find the most current version, check the version/date in the Publication
Information on the back of the document’s title page.
•Strata CIX General Description
•Strata CIX Application and Documentation Library CD-ROM
•Strata CIX Installation and Maintenance Manual
•Strata CIX Stratagy Voice Processing User Guide
•Strata CIX Stratagy Voice Processing Quick Reference Guide
•Strata CIX Stratagy Voice Processing System Administrator Guide
For authorized users, Internet site FYI (http://fyi.tsd.toshiba.com) contains all current voice
processing documentation and enables you to view, print, and download current publications.
This page is intentionally left blank.

Strata CIX Voice Mail Programming 01/07 1-1
Overview
Overview 1
This chapter covers the qualifications of Installers and System Administrators and provides an
overview of basic features and Feature Groups.
System Administrators
Service Technicians install, upgrade, and maintain the Stratagy ES system. System Administrators’
functions vary by company.
Your company will assign all or some System Administrator functions to an employee who knows
your telephone system, organizational structure, and the needs of your customers and employees.
The Toshiba Dealer’s Technical Service Representative will perform the remaining functions.
System Administrator functions may include:
•Initial setup (assisting the Installer with defining your company’s configuration and
customization requirements)
•Customizing mailboxes
•Generating reports
•Performing system shutdown and restart
•Backing up the system
Basic Features
Stratagy ES provides User Agents, Voice Messaging, Automated Attendant and Telephone
Answering as standard features with Fax Server (feature to be added later), ASR AA, UM, TTS/
Email and IVR as options.
See Chapter 4 – Voice Processing for more details.
User Agents
Stratagy ES is a system capable of numerous applications. Most applications are performed by
software objects that hold properties and privileges for various functions. These objects are called
User Agents. Similar to the User ID concept in the DOS-based Stratagy systems, a User Agent can
be used to define a Class of Service, a system distribution list, an IVR application, a user mailbox,
an AMIS Gateway or Proxy mailbox, a Voice Profile Internet Mail (VPIM) Gateway or Proxy
mailbox and the Direct Send Voice or Fax (feature to be added later) function. It is the properties
of the User Agent that determines its identity.
Throughout this manual, you will see various forms of User Agents, most notably in a voice
mailbox identity. Once a User Agent is created and defined as a mailbox, the system software, voice
prompts, and eManager Administration screens refer to it as a mailbox and not a User Agent. To
better understand this concept, consider a User Agent to be a template that can be used to form
numerous applications.

Overview
Basic Features
1-2 Strata CIX Voice Mail Programming 01/07
Voice Messaging
Voice messaging features enable users to create, send, receive and save voice messages. Users can
access their messages from any touchtone telephone and perform many voice messaging functions
(e.g., play, edit, delete, or forward messages). Stratagy ES users can also use many of the same
functions for an optional fax messaging application (feature to be added later).
Automated Attendant
The Stratagy ES system’s Automated Attendant application can be set up to solve various
answering requirements.
Answer Company Lines
Callers do not have to wait when the operator is busy with other calls. Company lines are answered
quickly and courteously by customized, automated greetings. If callers have a rotary phone or do
not know the extension, they are directed to an operator for assistance; or, if the Stratagy ES is
equipped with ASR AA, the caller can say the user’s name and the ASR AA feature directs the call
to the appropriate extension.
Available All of the Time
Callers can reach the Stratagy ES from any touchtone telephone 24-hours-a-day, 365-days-a-year.
Call Routing
Once a call is answered by voice mail, callers are routed to the extension, department, etc., they
enter. If the extension number is not known, a company directory can be used by entering the first
few letters of a user’s name on the dial pad. If Stratagy ES is equipped with ASR AA, callers can
also say the user’s name and be routed to the extension they want.
Stratagy ES can also be set up to direct rotary callers to an operator for assistance. Additionally, if
the line is unanswered or busy, the call can be routed to another extension or to the company
operator.
If all extensions are unavailable, callers can hold or hang up. If they hold, they are placed in a queue.
They are then periodically told of their position in the queue and can be offered options to hold for
the next available assistant, leave a message or dial another extension.
If a fax tone is detected, voice mail automatically transfers the call to a fax machine connected to a
telephone system extension.
Provides Callers with Information
Callers can receive prerecorded information such as the company address, directions, product
specifications, service offerings and price information (also described as an Audiotex feature).
Telephone Answering
Stratagy ES offers comprehensive message taking capabilities by providing telephone answering
when an individual is busy or unavailable.
Up to seven greetings per mailbox can be recorded and scheduled to play at various times of the
day. This ensures coverage 24-hours-a-day, 7-days-a-week.
When extensions are busy or do not answer, the system plays the appropriate busy or personal
greeting and offers the caller the choices of leaving a message, calling another extension, holding,
call queuing, or receiving assistance.
See Chapter 4 – Voice Processing for more details.

Overview
Feature Groups
Strata CIX Voice Mail Programming 01/07 1-3
Overview
Fax Tone Detection
Whenever voice mail detects a fax CNG tone at the caller menu, it automatically loads mailbox 994
(default fax box). Mailbox 994 acts as a system fax box that keeps all the incoming faxes that do
not address a specific mailbox number. This mailbox can also be programmed to transfer fax calls
to an external fax machine.
Note Ports configured for ASR AA cannot perform Fax Tone Detection.
Multiple System Languages
Stratagy ES can be configured with any number of different audio prompt files and communicate
in different languages on different ports simultaneously. American English comes as a standard
prompt option.
Feature Groups
Feature Groups are software components that can perform discretely or in conjunction with other
Feature Groups. For example, some Fax Server (feature to be added later) features work in
conjunction with Unified Messaging.
A majority of the Feature Groups within the Stratagy ES software are implemented using an
advanced technology, such as ASR and TTS.
Feature Groups provide specific functionality. For example, the ASR Automated Attendant (ASR
AA) Feature Group provides a set speech enabled automated attendant function.
This section will include some detail on the technology of Feature Groups.
Enabling Feature Groups
Feature Groups are enabled by purchasing a license for the feature group through the Toshiba FYI
site at http://fyi.tsd.toshiba.com. Once you have purchased the license, follow the detailed
instructions in “MAS Licensing” on page 2-9 to activate the license.
Fax Server (feature to be added later)
Note See Chapter 5 – Fax Server for complete details on this feature.
The Voice Mail Application provides a comprehensive set of fax capabilities to use either from the
phone or from the user’s PC. Some of the functions available will be:
•Send a fax message
•Fax Mail – immediate retrieval
•Fax Mail – send/retrieve
•Fax on Demand/Fax Back
•Fax Broadcasting – custom IVR application enabling single or multiple fax documents to be
transmitted to a single or multiple list of clients that are stored in a database.
•Client Fax Printer Driver available with the UM Feature Group
•UM used in conjunction with the fax server will provide a Fax Viewer that enables the fax to be
read from the user’s PC.
The Fax Server is supported by software called SoftFAX. When licensed for the Fax Feature Group,
two channels of Fax will be available for each eight channels of voice.

Overview
Feature Groups
1-4 Strata CIX Voice Mail Programming 01/07
Automatic Speech Recognition (ASR) Automated Attendant
(AA)
Note See Chapter 6 – Automatic Speech Recognition (ASR) for complete details on this
feature.
Automatic Speech Recognition (ASR) is the term for recognizing human speech. It is used to create
a more natural way of interacting with machines.
The ASR AA Feature Group supports up to 250 names in its directory, and comes with a User Login
and Quick Message feature.
The ASR Feature Group comes with two channels of ASR resources.
Important!
•Ports that are configured for ASR AA can only accept inbound voice mail integration using
Simplified Message Desk Interface (SMDI). Dual Tone Multi-frequency (DTMF) in-band
integration is not supported on these ports. If DTMF integration is necessary, additional ports
not configured for ASR Auto Attendant are required.
•Ports configured for ASR AA cannot perform Fax Tone Detection.
The Stratagy ES’ Media Application Server provides the processing power required for the ASR
Feature Group, no additional speech-related hardware is required. A maximum capacity of eight
channels of ASR can be invoked simultaneously.
Unified Messaging (UM)
Note See Chapter 7 – Unified Messaging (UM) for details on this feature.
Stratagy ES integrates with e-mail servers to insert voice messages into an e-mail client in-box.
Stratagy ES provides two Unified Messaging client solutions, Microsoft® Outlook® Integration
and Internet Protocol (IP) Integration.
For a complete Unified Messaging solution, the Voice Mail Application must also be equipped with
the Fax Server Feature Group (feature to be added later) and boards, if required.
Microsoft Outlook Integration
Stratagy ES has a proprietary integration designed to work with Microsoft Outlook. With this
proprietary integration, voice messages are displayed along with e-mail messages in the Outlook
Inbox screen.
When a voice message is selected, a Toshiba designed edit screen is automatically presented that
enables voice playback through the multimedia speakers of the user’s PC, or if desired, through the
user’s telephone.
When a fax message (fax feature to added later) is selected, a preloaded fax viewer software is
launched with the fax image loaded. The fax viewer software can be any Tagged Image File Format
(TIFF) format compatible software of the user’s choice.
This integration does not require Microsoft Exchange as the e-mail server. Any e-mail
server/service that is compatible with the Simple Message Transport Protocol (SMTP), Post Office
Protocol version 3 (POP3) or Internet Message Access Protocol 4 (IMAP4) Internet protocols is
supported.

Overview
Feature Groups
Strata CIX Voice Mail Programming 01/07 1-5
Overview
Internet Message Access Protocol 4 (IMAP4) Synchronization
If IMAP4 is selected, the following occurs:
•If a user logs into his/her voice mail via the TUI and deletes a message, Stratagy uses IMAP to
identify and delete the message in the e-mail server. This also deletes the messages from the
user’s e-mail client inbox screen if the messages were displayed on it at the time.
If a user logs into his/her voice mail via the TUI and listens to a message in the NEW folder, the
corresponding message in the e-mail server or e-mail client inbox is flagged as “read” or
“seen.” This includes messages that are marked by Stratagy as Pending and kept in the New
Message folder. Messages marked as Deleted are not actually deleted until the user logs out
from his or her UM-enabled mailbox.
•If Stratagy voice messages are deleted in the e-mail client, the corresponding messages in the
Stratagy system are deleted or saved to a Personal message folder of the user’s voice mailbox.
Whether the message is deleted or moved to a Personal Folder is a configurable option within
each mailbox. If the Message Transport Scheme field on the Mailbox Editor Unified Messaging
Tab screen is set to IP Standard, this synchronization is performed periodically via the Stratagy
Scheduler feature. If that field is set to SES Proprietary, the update is performed realtime.
Internet Protocol Integration
Stratagy ES sends voice messages to any e-mail service that supports the SMTP and POP3 Internet
protocols. With this integration any e-mail client that supports SMTP/POP3 (e.g., Eudora Pro™,
Netscape Messenger) receives Stratagy ES voice messages as e-mail messages with audio (voice
messages) file attachments. Though not as proficient as the Microsoft Outlook Integration, the
Internet Protocol (IP) Integration provides limited Unified Messaging capabilities for users who
want to use an e-mail client other than Microsoft Outlook. IMAP4 synchronization is also available
using this method of Unified Messaging.
Message Disposition Notification (MDN)
Stratagy adds a Message Disposition Notification (MDN) request when it sends a voice message to
the e-mail server. When the user opens up a voice message (sent by Stratagy), a MDN is sent to
Stratagy voice mail. As soon as Stratagy receives the MDN, it deletes or saves the messages in the
user’s mailbox. Whether the message is deleted or saved is a configurable option within each
mailbox. Some e-mail servers may not support MDN protocol or may label it in some other manner.
Check their documentation for Return Receipt operation across the Internet.
Text-To-Speech (TTS)
Note See Chapter 8 – Text-to-Speech (TTS) for details on this feature.
TTS is the term for converting text to computer-generated speech output. It is used in applications
where the customer either does not want to use the disk space or does not have the required disk
space to record every necessary variable in a database. This is particularly effective for speaking
e-mail messages using the telephone user interface.
The TTS/Email Feature Group enables e-mail messages to be read back to users via the Telephone
User Interface (TUI) and requires voice mail to be equipped with the UM Feature Group.
TTS/Email capabilities are delivered in a host-based configuration. The Media Application Server
provides the processing power for TTS.

Overview
System Software
1-6 Strata CIX Voice Mail Programming 01/07
System Software
Stratagy ES’s flexibility is provided by the Windows® XP operating system and the voice mail
software. The following provides a brief overview of the system software.
Important! Older Stratagy ES software is not supported on Windows XP.
Windows XP
This multi-tasking operating system controls all processing functions through the use of Windows-
based menus and icons that provide administration, configuration, diagnostics, system monitoring,
and reporting functions.
Diagnostic Programs
On-line diagnostic tests for Windows XP and voice mail run continuously to detect and report errors
in operation. The tests run in the background and do not interfere with normal system operation.
Other diagnostic tests can be run upon demand, either from a directly-connected or remote terminal.
eManager Software
The eManager Administration program uses a Graphical User Interface (GUI) and is composed of
the configuration screens and other administrative menus for the system.
System configuration consists of eleven screens—Telephone System Integration, Answer Methods,
Voice Ports, Serial Ports, Notification Port Groups, Statistical Port Groups, Scheduler, Language,
Parameters, and Voice Menu. These screens serve as the basis for configuring and programming the
voice mail basic system operating procedures.
Voice Mail configuration consists of ten screens—Mailbox, Mailbox COS, Distribution List, IVR,
AMIS Gateway and Proxy, VPIM Gateway and Proxy, Direct Send Voice and Direct Send Fax (not
supported at this time).
In addition to the configuration screens, you can also run reports using preprogrammed templates
and reports—Port Statistics, Port Group Statistics, All Port Statistics, Mailbox Call Statistics,
Mailbox Usage, Mailbox Info/Status, Mailbox Message Statistics, System Information, Mailbox
Template, and AMIS/VPIM Template.
eManager software can also be installed on a separate Windows 2000/ME/98 or Windows NT
computer for remote administration over a network. Remote Access Service (RAS) capability
enables administration via a Local Area Network (LAN) connection.
The eManager Administration software program is preloaded on every system and is composed of
the administrative and configuration menus for the system. Operating software, voice prompts, and
database access utilities are all stored on the Media Application Server’s hard drive.
Administrative Menus
A series of voice processing menus enable an Installer or System Administrator to customize:
•Enable and disable configuration and mailbox features
•Define and configure features
•View status of voice ports
•Define and generate system reports
•Define telephone system integration
•Program user mailboxes

Overview
System Integration
Strata CIX Voice Mail Programming 01/07 1-7
Overview
Configuration Wizard
The Configuration Wizard guides the Administrator through the Stratagy ES basic operation setup.
It includes:
•Configure the System Database – specifies telephone systems, set up voice lines and answering
methods for Automated Attendant and designate holidays.
•Configure User Agents Database – creates Class of Service (COS) and user mailboxes.
System Integration
The following is a partial list of the system integrations supported by the Voice Mail Application.
Proprietary Integration
The Proprietary Integration between the Stratagy ES software and a Strata CIX system only requires
the IP network connection between the two systems.
If a company has a Toshiba Strata CIX phone system and Toshiba Strata 2000- or 3000-series
digital phones, this proprietary integration provides interoperability between the Stratagy ES and
the Strata CIX.
•Soft Key Control of Voice Mail – Working in conjunction with the LCD digital telephones of
the Strata CIX, voice mail integration provides a visual display of the voice mailbox user menu.
Menu navigation can be accomplished by use of the soft keys adjacent to the various menu
options on the display.
•Call Record – By using a programmable feature key called Record on the digital telephones of
the Strata CIX, users have the ability of recording live telephone conversations directly into
voice mailboxes on the Voice Mail Application.
Note Once the Record button is pressed, the Record LED flashes rapidly and there is
approximately a one second interval (in extreme busy conditions, up to five seconds)
before the recording starts and the Record LED changes to the in-use interval flash rate.
A secondary feature key can be programmed to pause/resume the recording.
This integration requires both the Strata CIX and the Stratagy ES be properly configured to work
with each other.
Centralized Voice Mail
The Stratagy ES Voice Mail Application can be configured to service environments such as,
enterprise-modeled businesses with multiple office locations and office suites.
Companies with multiple Strata CIX systems networked together using Toshiba’s StrataNet can be
supported by one Stratagy ES for all voice mail requirements.
Note Call Record and Soft Key Control of Voice Mail features are not available across the
StrataNet network nodes.
To take this capability one step further, each mailbox can also be configured to perform a separate
set of transfer commands than those defined for the CIX the Stratagy ES is connected to locally.
This means that calls can be transferred to cell phones and home offices, while the Voice Mail
Application still maintains control in order to provide alternate call routing options or voice
messaging features in case of an unsuccessful transfer.

Overview
Maintenance
1-8 Strata CIX Voice Mail Programming 01/07
Maintenance
Toshiba Voice Mail Application hardware and software base platforms are easily maintained by a
Toshiba authorized dealer. Procedures for backing up, restoring and maintaining the system,
Feature Groups, and call processing database information are efficient and easily performed by
trained administrators and technical personnel.
Trace and Log Utilities
These features are used to analyze the voice mail functions and system operation for development
and troubleshooting.
Voice mail traces system behavior without shutting down the system. The Trace function starts at
system startup time and logs the information related to each individual call, mailbox, port, thread
and message.
The Log function provides four types of data: user mailbox log in/log out, messages, abnormal
events and ckdb (check database) results.

Strata CIX Voice Mail Programming 01/07 2-1
eManager
eManager 2
eManager™ is a powerful Microsoft® Windows®-based telephone system management tool used
to program, maintain and upgrade the Strata CIX Digital Business Telephone System and
Stratagy ES Voice Mail System. eManager normally resides on the Media Application Server
(MAS) with the Stratagy ES and ACD applications or loaded on a Server with network access to
CIX and the applications on the MAS.
The Client’s PC (see “Client PC” on page 2-14 for specifications) must have Microsoft® Internet
Explorer 6.00 or above. The user connects to eManager with the browser in the same manner as
connecting to any Website.
Note At this time eManager only supports Windows IE. Other browsers are not supported.
eManager uses a variety of networking and software technologies as follows:
•Local Area Network (LAN) – System Administrators can connect their PC to
Strata CIX via a network interface jack or modem. eManager views the Strata CIX system and
Stratagy ES as a LAN providing a stable environment in which to program and access data.
•Windows Management Instrumentation (WMI) – enables query-based information retrieval
and event notification. WMI is an access mechanism which enables eManager to access,
monitor, command and control Strata CIX and Stratagy ES.
•Virtual Web Server and Manager – creates a virtual World Wide Web environment in
Strata CIX and Stratagy ES. This technology enables eManager to view Strata CIX and
Stratagy ES as service providers providing services for the system administrator.
•Microsoft Internet Explorer® browser access – Virtual Web Service enables System
Administrators to access Strata CIX and Stratagy ES using the Internet Explorer browser.
•eManager Graphical User Interface (GUI) – Sophisticated programming tasks are just a
click-of-the-mouse away with eManager’s GUI.
•Mobile Access – enables System Administrators to program, maintain, and/or upgrade a
Strata CIX and Stratagy ES from any mobile location with an Internet connection—without
ever leaving the office.
•Internet Access – eManager uses Microsoft IP technology to enable access to your Strata CIX
and Stratagy ES as easy as browsing the World Wide Web.
•Internet Explorer – provides a stable environment in which to program, maintain and
upgrade your Strata CIX and Stratagy ES.
eManager’s tight integration of the above technologies provide System Administrators with
convenient, stable, user friendly and comprehensive access to Strata CIX/Stratagy ES system
information.
eManager can connect directly to your Strata CIX Digital Business Telephone System/Stratagy ES
Voice Mail System via Network Interface (located on the Strata CIX’s processor board). Mobile
System Administrators can access a Strata CIX/Stratagy ES system from any location that
provides Internet access.

eManager
Log on to eManager
2-2 Strata CIX Voice Mail Programming 01/07
Log on to eManager
1. From Microsoft Internet Explorer window, type
http://<PC Name>/emanager and press Enter.
The eManager window displays (shown right).
2. Type the User Name (default is Administrator) in
the User Name field. Press Tab.
3. Type the password (default is password) in the
Password field.
Note For security reasons, if you haven’t changed
the default password you should change it
now.
4. Click Login. The Select CIX
System screen displays (shown
at right).
5. Select the StrataCIX Network
Domain from the left hand
portion of the screen and click
Connect. The eManager Main
Menu displays (see “eManager
Main Screen” on page 2-12).
...or if no Network Domains
appear in the window, you must
go to the eManager Profile
windows to add them.
Important! If the Stratagy Voice
Mail System is not
running, you receive a
warning that you cannot connect to the MAS (Media Application Server) and log
onto the voice mail portion of the eManager program. Check the Strata CIX
Programming Manual Volume 2 for Stratagy ES Voice Mail System for instructions
on starting Stratagy ES.
The following options are available at login from the Select CIX screen:
•eManager Profile
•Login Accounts
•Equipment Editor
•Classes Setup
•DB Utility
•Options
•Select Equipment
•MAS Licensing
•Logout
7457
7334
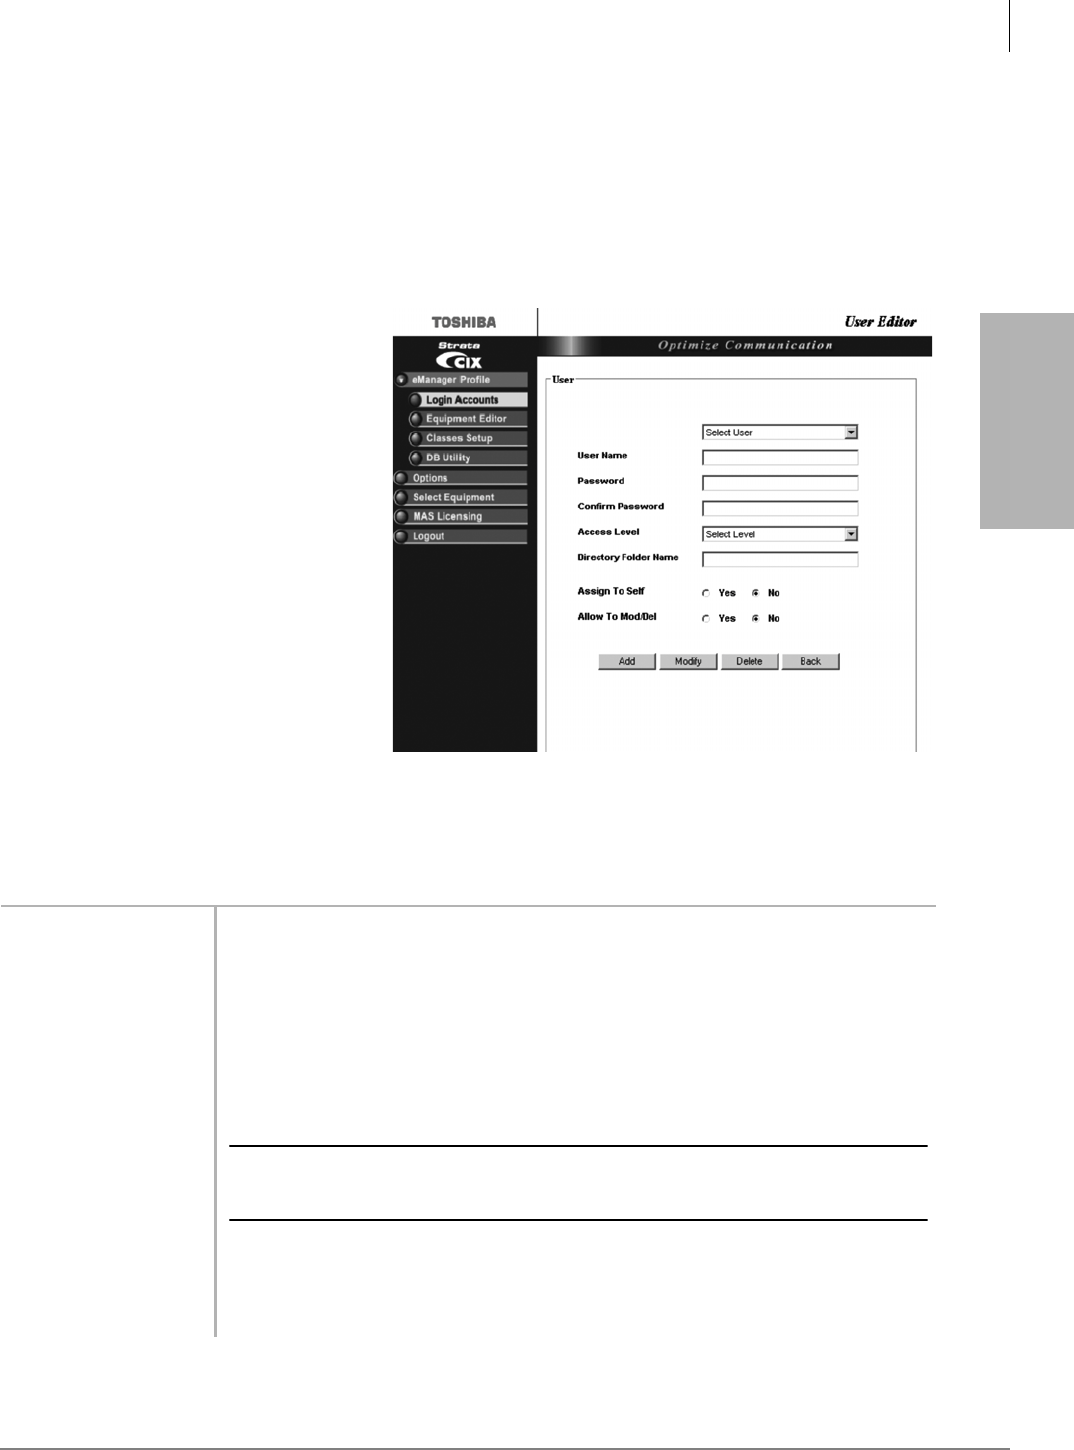
eManager
eManager Profile
Strata CIX Voice Mail Programming 01/07 2-3
eManager
eManager Profile
The eManager User’s Profile database creation and initialization is only required the first time you
logon to eManager or to use the screens to make revisions later on.
Step 1: Login Accounts
This screen is for administrating (adding/deleting/modifying) access levels and users for the
eManager (CIX/voice mail) system.
1. Log on to eManager.
2. Click on eManager Profile >
Login Accounts from the
menu.The User Editor screen
displays (shown right).
3. If this is the first time you
have accessed this screen,
select Administrator from the
drop-down menu
...or select the appropriate
user’s name from the list.
4. Fill in the appropriate fields
based on the descriptions
found in Table on page 2-3.
5. Click Add, Modify, or Delete.
6. To exit the screen and return to
the previous screen, click
Back.
Table 2-1 Login Accounts Screen Fields
FIELD DESCRIPTION
User Name Enter the new User name. The initial user name of the administrator is Administrator.
Possible values: Alphanumeric characters.
Note The administrator user name cannot be changed.
Password Enter the new password. The initial password is password. This password can be
changed by the administrator or user. The password is case sensitive.
To protect User Passwords, open Internet Explorer and go to Tools > Internet Options >
Content > Autocomplete. Uncheck User Names and Password on forms, then click on
Clear Passwords.
CAUTION! Be sure to change the default password to protect the system from
unauthorized access. Record all your passwords that use Internet
Explorer.
Possible values: Alphanumeric characters.
Confirm Password Repeat password entered in Password field.
Possible values: Alphanumeric characters.

eManager
Login Accounts
2-4 Strata CIX Voice Mail Programming 01/07
Access Levels Multiple users can access the program at one time. There are four access levels:
•Level 1: Complete access to all system administrative functions. Creates and deletes
all other access levels.
•Level 2: Given privileges by Level 1. Can assign department levels. Only Level 1 that
created Level 2 can delete or reset the password.
•Level 3: Takes care of departmental administration. This level can be assigned the
following responsibilities for specified mailboxes: define class of service; set up user's
Options, Auto schedule and Notify screens; and report generating capabilities.
•Level 4: The single client/user has access to only his/her personal objects.
Note Access to menu functions vary by access level. Functions that are disabled appear
grayed out on the menu.
Directory Folder Name If left blank, system uses the user’s name from the first field.
Assign to Self Assigns equipment control to this user.
Allowed to Mod/Del Allows this user to modify or delete equipment.
Table 2-1 Login Accounts Screen Fields
FIELD DESCRIPTION

eManager
Equipment Editor
Strata CIX Voice Mail Programming 01/07 2-5
eManager
Step 2: Equipment Editor
This screen is for adding, modifying or deleting equipment. If you enter the information for both
the CIX and SES Media Application Server as one piece of equipment, the menu you view will be
a blended menu of both CIX and Stratagy options (see “Program Menu” on page 2-13).
If you want the option of viewing only CIX programming or only Stratagy ES programming, you
need to enter the equipment separately in this screen. For example: For CIX only, leave the IP
Address for the SES blank and for Stratagy only, leave the CIX fields blank.
1. Log on to eManager.
2. Click on eManager
Profile > Equipment
Editor from the
menu.The Equipment
Editor screen displays
(shown right).
3. To add a Domain name,
click Add and enter the
name in the pop-up
box. Click OK
Note The creation of a
domain name is
not mandatory. A
piece of
equipment can be added directly to the root (network).
...or to rename a Domain, select it from the drop-down menu and click Rename. Type the name
in the pop-up box. Click OK
...or to delete a Domain name, select it from the drop down menu and click Delete.
4. In the Equipment section, fill in the appropriate fields based on the descriptions shown in Table
below.
5. Click Add, Modify, or Delete.
6. To cancel your entries and clear the screen, click Clear.
Table 2-2 Equipment Editor Screen Fields
FIELD DESCRIPTION
Name Name designating the equipment. For example: CIX999.
Possible values: alphanumeric characters
CIX
IP Address Enter the IP Address of the CIX system. For example: 192.168.254.253 (default).
Format: xxx.xxx.xxx.xxx
Community Enter the Community password.
Possible values: Alpha characters
Default: communityName
Confirm Community Re-enter the Community password.
SES
IP Address Enter the IP Address of the SES. For example: 192.168.254.252 (default).
Format: xxx.xxx.xxx.xxx
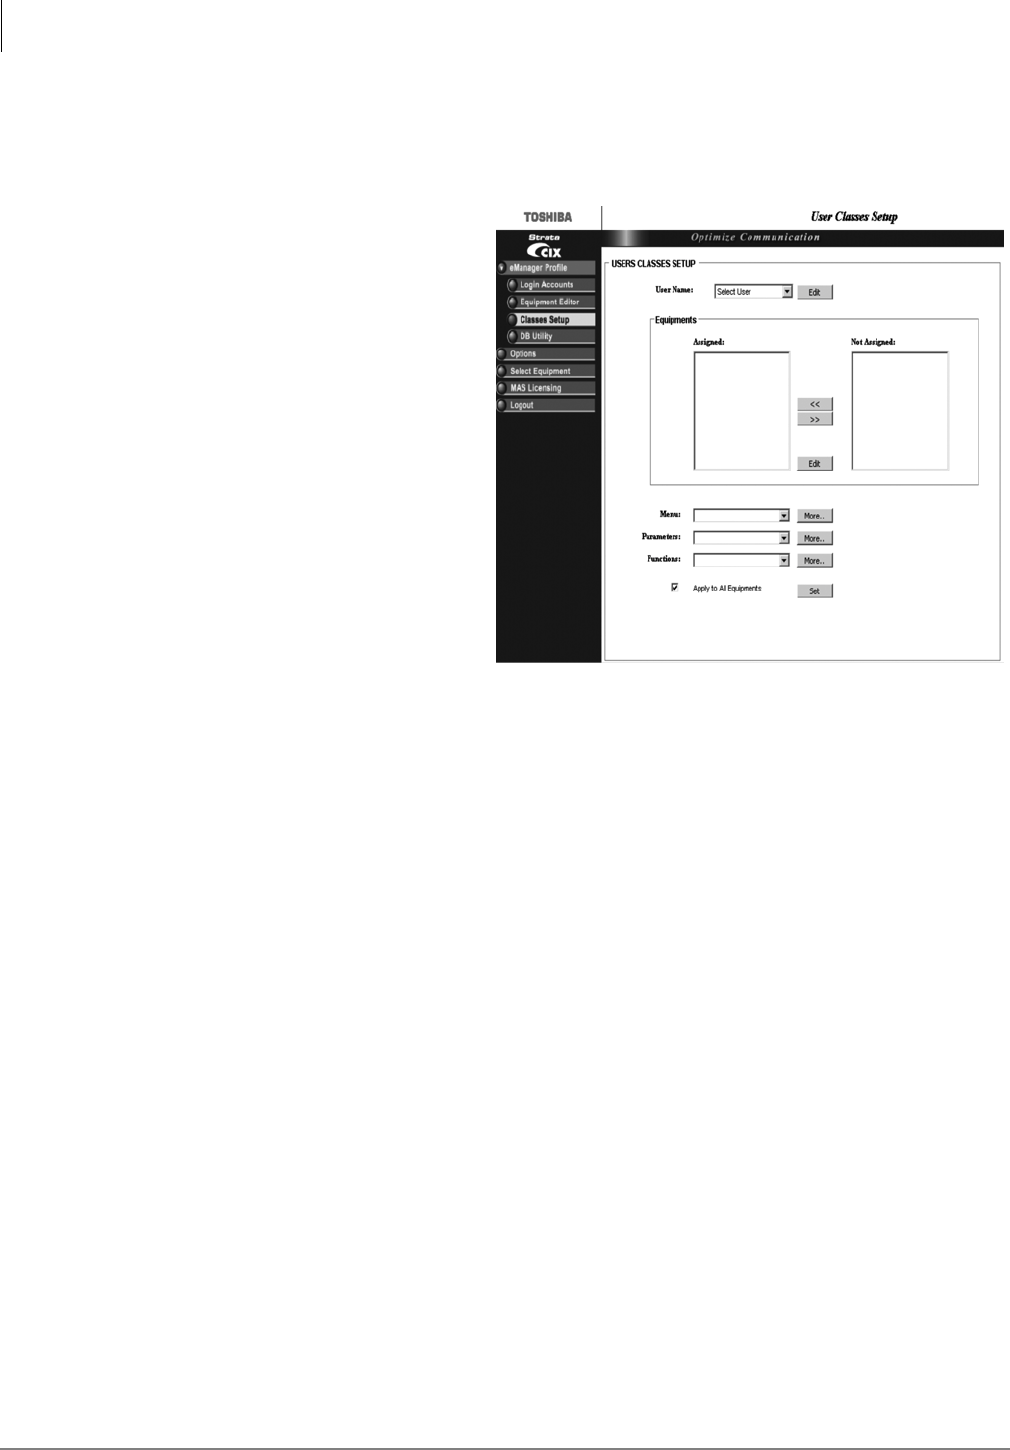
eManager
Classes Setup
2-6 Strata CIX Voice Mail Programming 01/07
Step 3: Classes Setup
Assigns equipment, menus, parameters, and functions to each user.
1. Logon to eManager.
2. Click on eManager Profile > User
Classes Setup from the menu.The
User Classes Setup screen displays
(shown right).
3. To edit a User Name, select a User
Name from the drop-down menu
and click Edit. The Login
Accounts screen displays.
When you are finished making
your changes, click Back and you
are returned to this screen.
4. In the Equipments section, you
can assign or not assign specific
equipment by highlighting the
item and clicking the arrow
buttons on the screen.
The designated equipment moves
from one box to the other based on
the arrow you selected.
5. If you want to edit the equipment, click Edit in the Equipments box and the Equipment Editor
screen displays.
6. In the Menu, Parameters and Functions fields you can assign one of the default levels to the
User Name or click More and modify the list(s) for the individual user.
Menus: Options that have an arrow (!) next to them can be expanded further. If you uncheck
an option it will be grayed out for this user in eManager menu.
Parameters: A list is displayed showing the CIX commands/parameters that are available along
with the permission given (H – hide, R – read, W – write). For example, if you change an
option from W to R the user can only read but not write to that parameter.
Functions: A list is displayed showing the functions available. Uncheck a function when you do
not want it available to the user.
After making the changes to the list, click Save As and type a name for the new list in the pop-
up box. Click Back.
7. When you are finished making the changes to the screen and want to apply these specifications
to all equipment, check the field “Apply to All Equipments” and click Set
...or uncheck the “Apply to All Equipments” field and highlight the equipment in the Assigned
box that applies to the revised defaults. Click Set.
In this manner, you can set different defaults for different pieces of equipment.
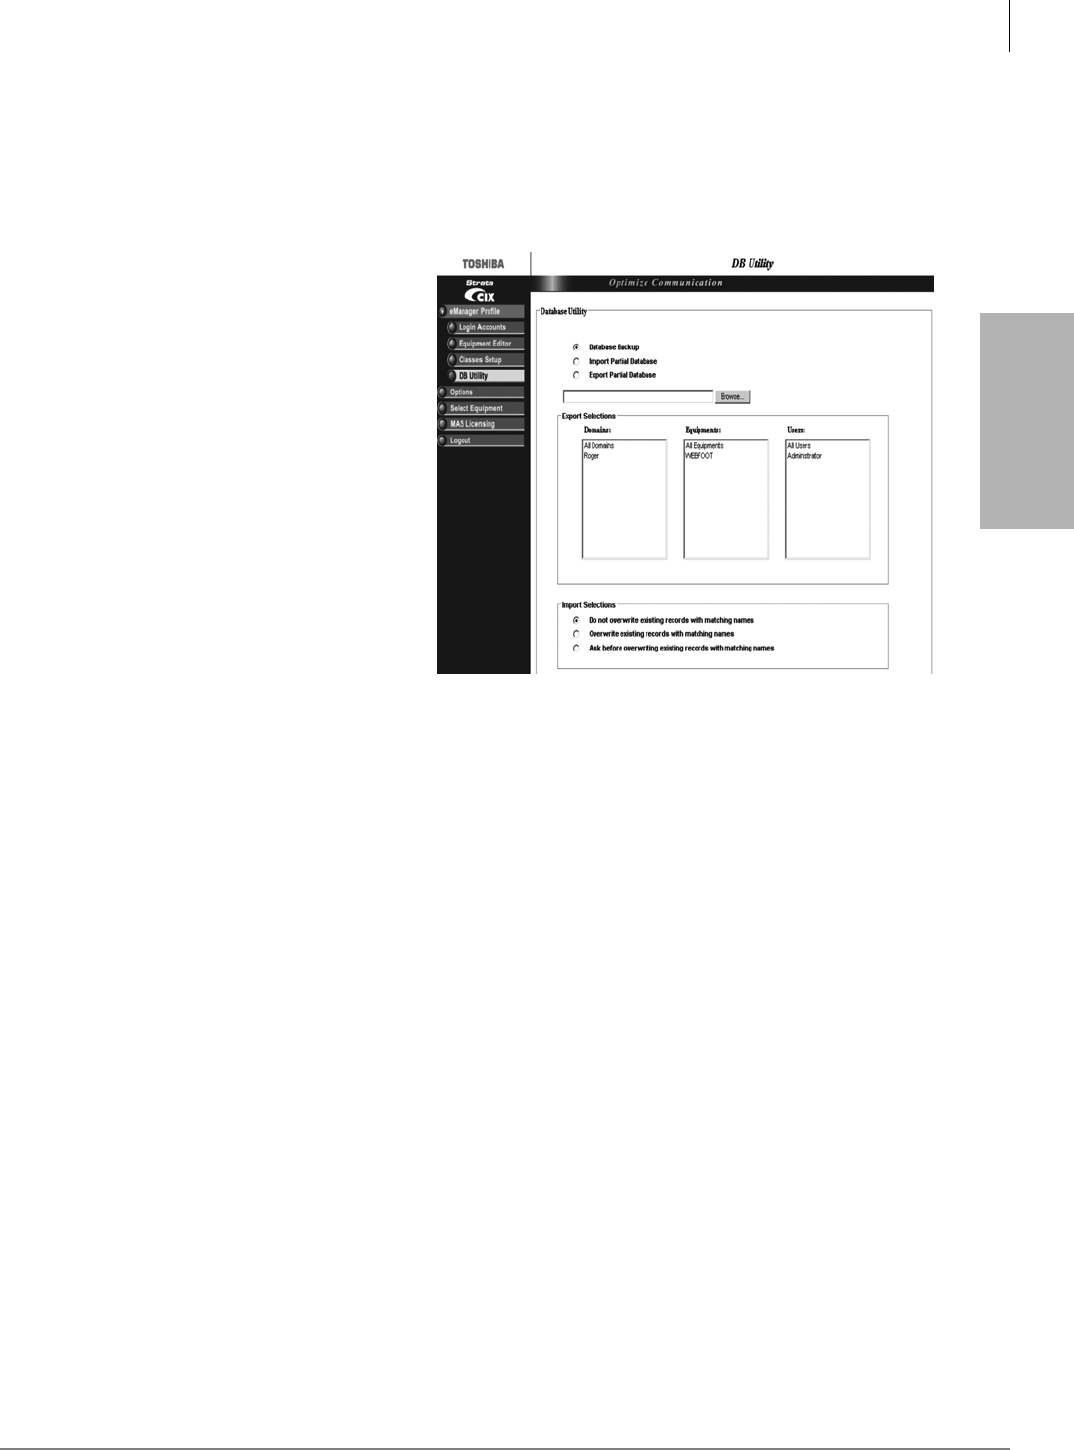
eManager
DB Utility
Strata CIX Voice Mail Programming 01/07 2-7
eManager
Step 4: DB Utility
This function allows you to back up your eManager database.
‰ To access the screen
1. Logon to eManager.
2. Click on eManager Profile > DB
Utility from the menu.The DB
Utility screen displays (shown
right).
‰ To backup the profile database
1. Check Database Backup.
2. Type into the Browse field
C:backup and click Submit.
‰ To import a partial profile database
1. Check Import Partial Database.
2. Click Browse and find the database
you want to import.
3. At the bottom of the screen, select
an option from the Import
Selections list.
4. Click Submit.
‰ To export a partial profile database
1. Check Export Partial Database.
2. Type c:\export.xls in the Browse field.
3. Highlight the items in the Export Selections box that you want to export.
4. Click Submit.
Backup Database Utility
This procedure backs up the eManager Profile database.
1. Locate and select the eManager program directory on your hard drive. The Backup/Restore
screen displays.
Note The default location for backup/restore program is: C:\eManager\bin\BackupRestore.exe.
2. Click Connect.
3. In the Backup/Restore File Name field, type a file and pathname (e.g., c:\backup.bak).
4. Click Backup. The system creates a backup database and the screen displays the progress.
5. When the backup is complete, click Disconnect and close the screen.
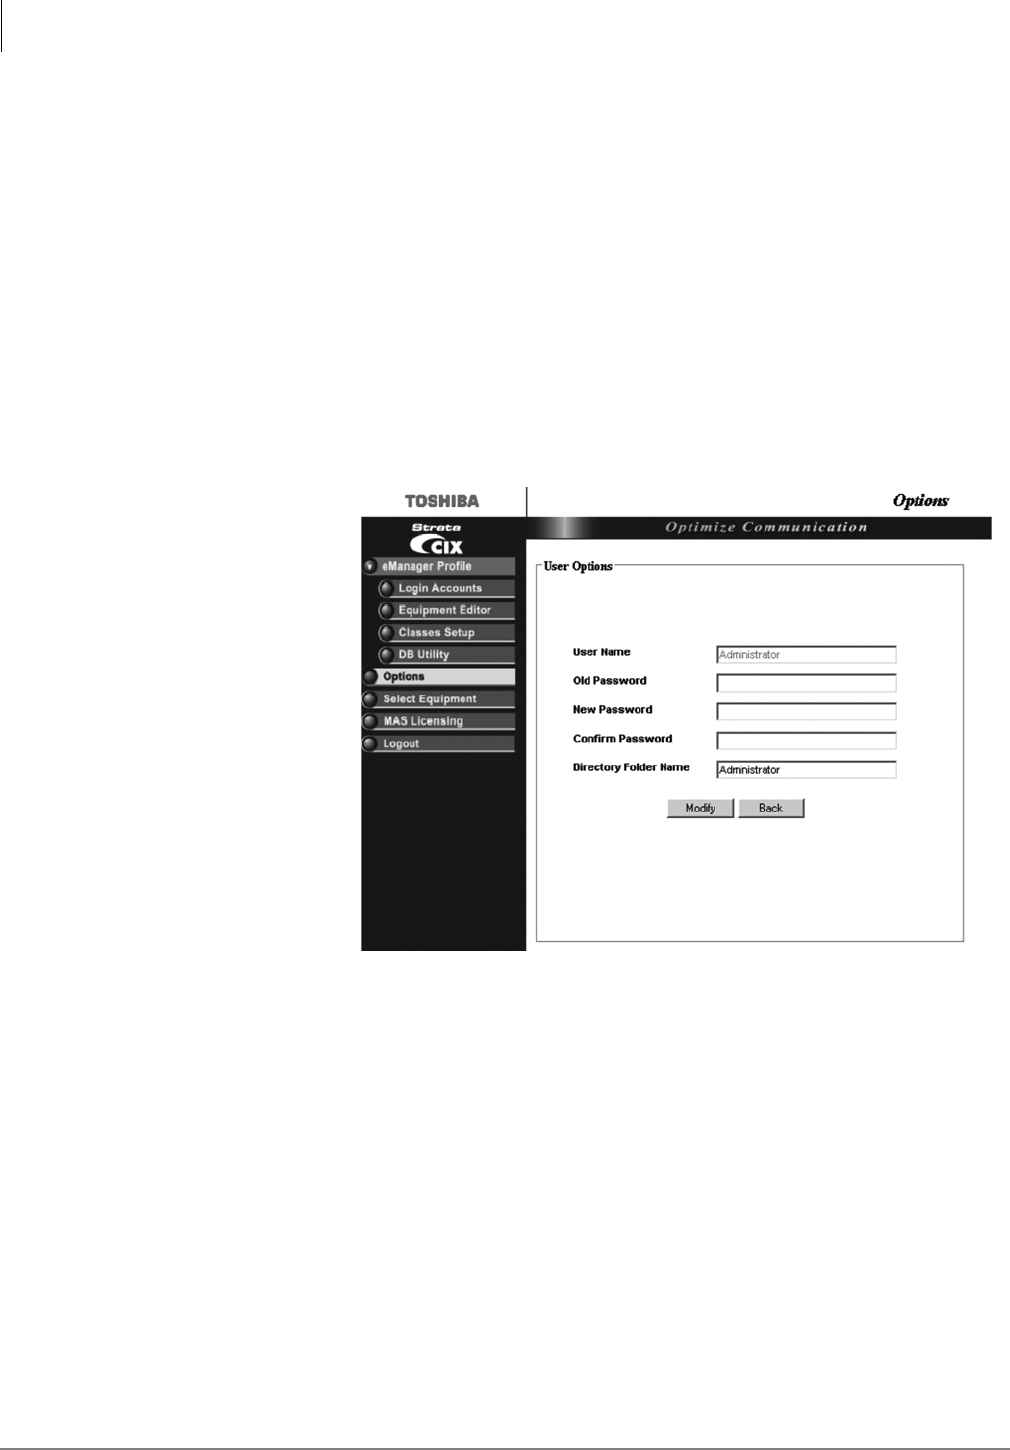
eManager
Options
2-8 Strata CIX Voice Mail Programming 01/07
Restore Database Utility
Important! Everything must be closed, including eManager, to do a restore.
1. Locate and select the eManager program directory on your hard drive. The Backup/Restore
screen displays.
Note The default location for backup/restore program is: C:\eManager\bin\BackupRestore.exe.
2. Click Browse to select a backup file to restore.
3. Click Restore. The system restores the database and displays the progress on the screen.
4. When the restore is complete, click Disconnect and close the screen.
Options
This function allows you to update the password and personal directory folder name.
1. From the Login
Manager menu,
click Options. The
Options screen
displays (shown
right).
2. Type old and new
passwords in
respective fields
and confirm.
3. (Optional) Type a
new directory
folder name in the
next field.
4. Click Modify to
save the changes.
Select Equipment
!Click Select Equipment and the Select CIX screen displays (see Step on page 2-2).
7336

eManager
MAS Licensing
Strata CIX Voice Mail Programming 01/07 9
MAS Licensing
See Chapter 10 in the Strata CIX Programming Manual Volume 1 for CIX Licensing.
This option enables you to manage, issue and activate MAS licenses in the eManager server host.
It is required that administrators should be able to manage licenses for all applications in the MAS.
Access Main MAS Licensing Screen
!From the Login Manager Menu, click MAS Licensing. The screen below displays.
The upper part of the screen is a list of MAS License Container files stored in the eManager
server in the <eManager entry point>\Licenses.folder. The following columns are shown:
•Generation Time – date and time assigned by the FYI application when it creates the
container file.
•File Name – specified by the administrator when the container file was created in eManager
using the Upload button.
•MAS Serial Number – defined in the header of the container file.
•Local Status
•Local MAS – The MAC address in this container file is the same as the local MAS
host MAC address (where the eManager server is running).
•Issued in Local MAS – Same as “Local MAS” but the licenses in this container have
been issued already. eManager stores a log of the issued container files.
•Remote MAS – The MAC address in this container file is different than the local
MAS host MAC address (where the eManager server is running). This file could be
viewed, uploaded to other MAS, but it cannot be issued in the local MAS host.
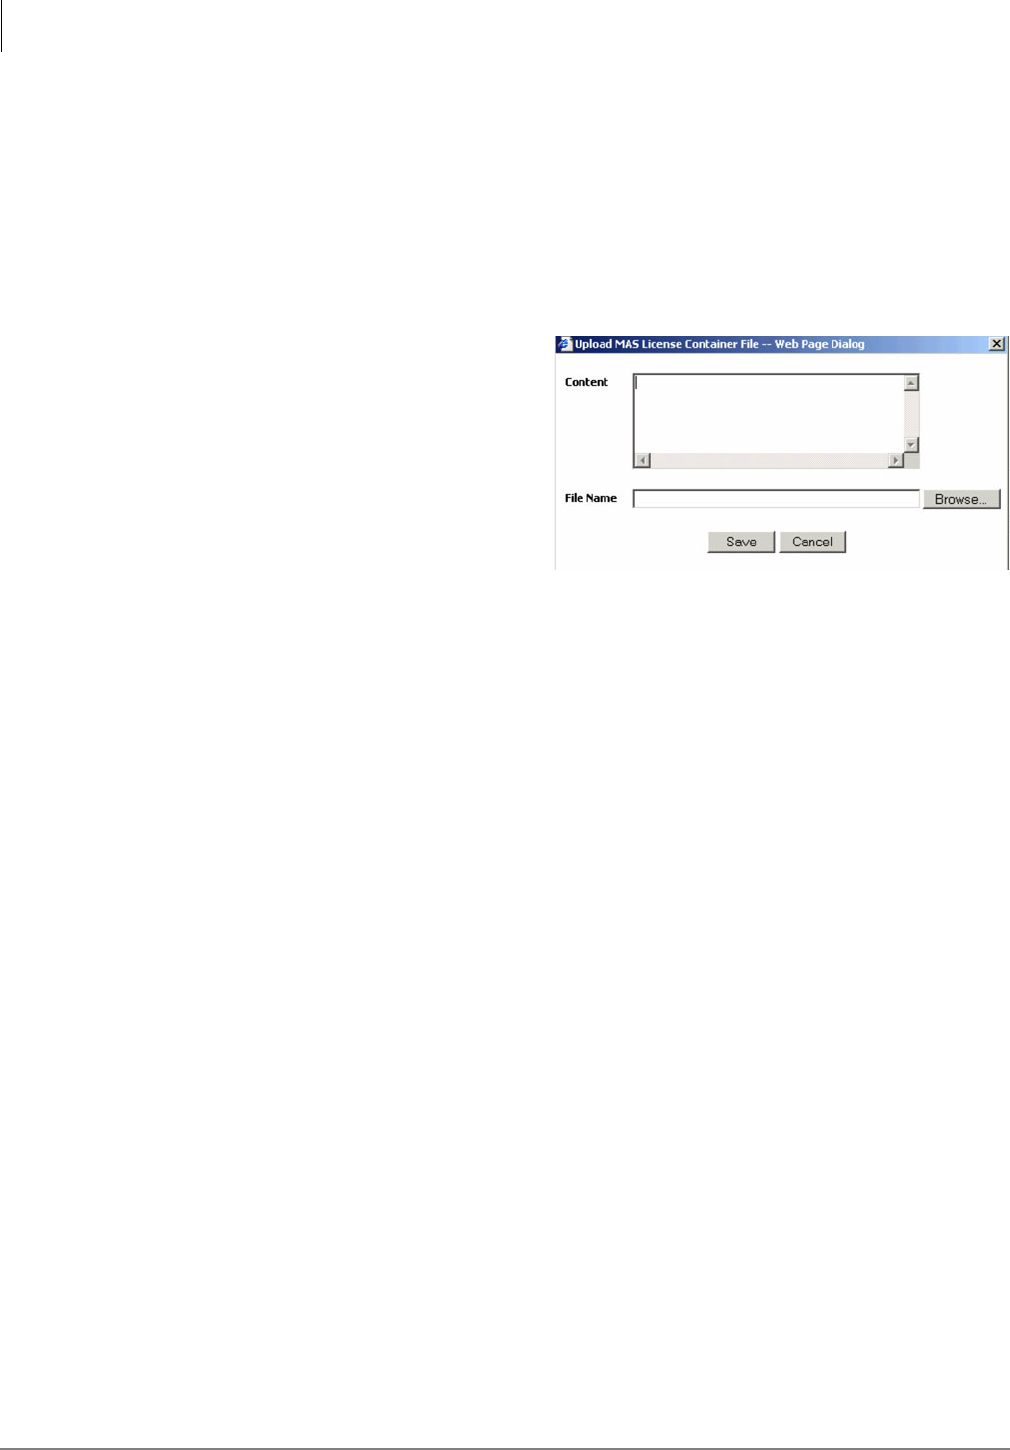
eManager
MAS Licensing
2-10 Strata CIX Voice Mail Programming 01/07
Upload Licenses
Note The Upload button is enabled if no file is selected, otherwise disabled.
The MAS License Container File is an XML file generated by the FYI application. The FYI GUI
presents this file in a text box, where the Administrator can copy and paste the content either directly
to a text box provided by the eManager GUI or to a file which may be transported to another PC
and its content pasted into eManager at a later time. In order to be able to copy and paste directly,
both applications should be accessed from the same client machine.
If uploaded using this function, use the following procedure.
1. From the MAS Licensing screen, click
Upload. The Upload MAS License
Container File screen displays (shown
right).
2. If the file is stored in the local client PC,
click Browse. Select the Container file.
The file’s contents and file name are
copied into the fields of the Upload
screen
...or go to FYI and open the MAS
License Container File in a text file such as Notepad. Copy and paste the displayed file in the
Content portion of the Upload MAS license screen shown here. The File Name field is blank.
Note If you chose to fill in the File Name before you copied/pasted the file, the file name
remains in the field after pasting the file.
3. If the file name was filled in automatically, change the file name so that it is unique to the file.
If you copy/pasted the file into this screen, you need to enter a unique file name.
Note File names must conform with the Windows filenames and conventions. If the file you
uploaded does not have an .xml extension, you must add it before saving the file.
4. Click Save.
Issue Licenses
Note The file you selected must be “Local” or “Issued in local MAS” to use this feature. Any
file with a local status of Remote MAS must be issued from the controlling server.
!From the MAS Licensing screen, select a file and click Issue Licenses. eManager parses the
selected container file, extracts each license for the different applications and services and
delivers the licenses. This process can take several minutes depending upon the number of
applications installed.
Activate Licenses
!To activate the licenses, click Activate Licenses. A warning box displays telling you that the
MAS operating system will be shut down and rebooted. The MAS attempts to shut down and
reboot immediately.
Important! During the activation process, the MAS cannot be processing calls. Any current
connection being processed by the MAS is disconnected. In order not to disrupt daily
activity in your customer’s business, you can choose to do the activation process
unattended during the evening/early morning hours by scheduling the procedure
using the Windows scheduling process.
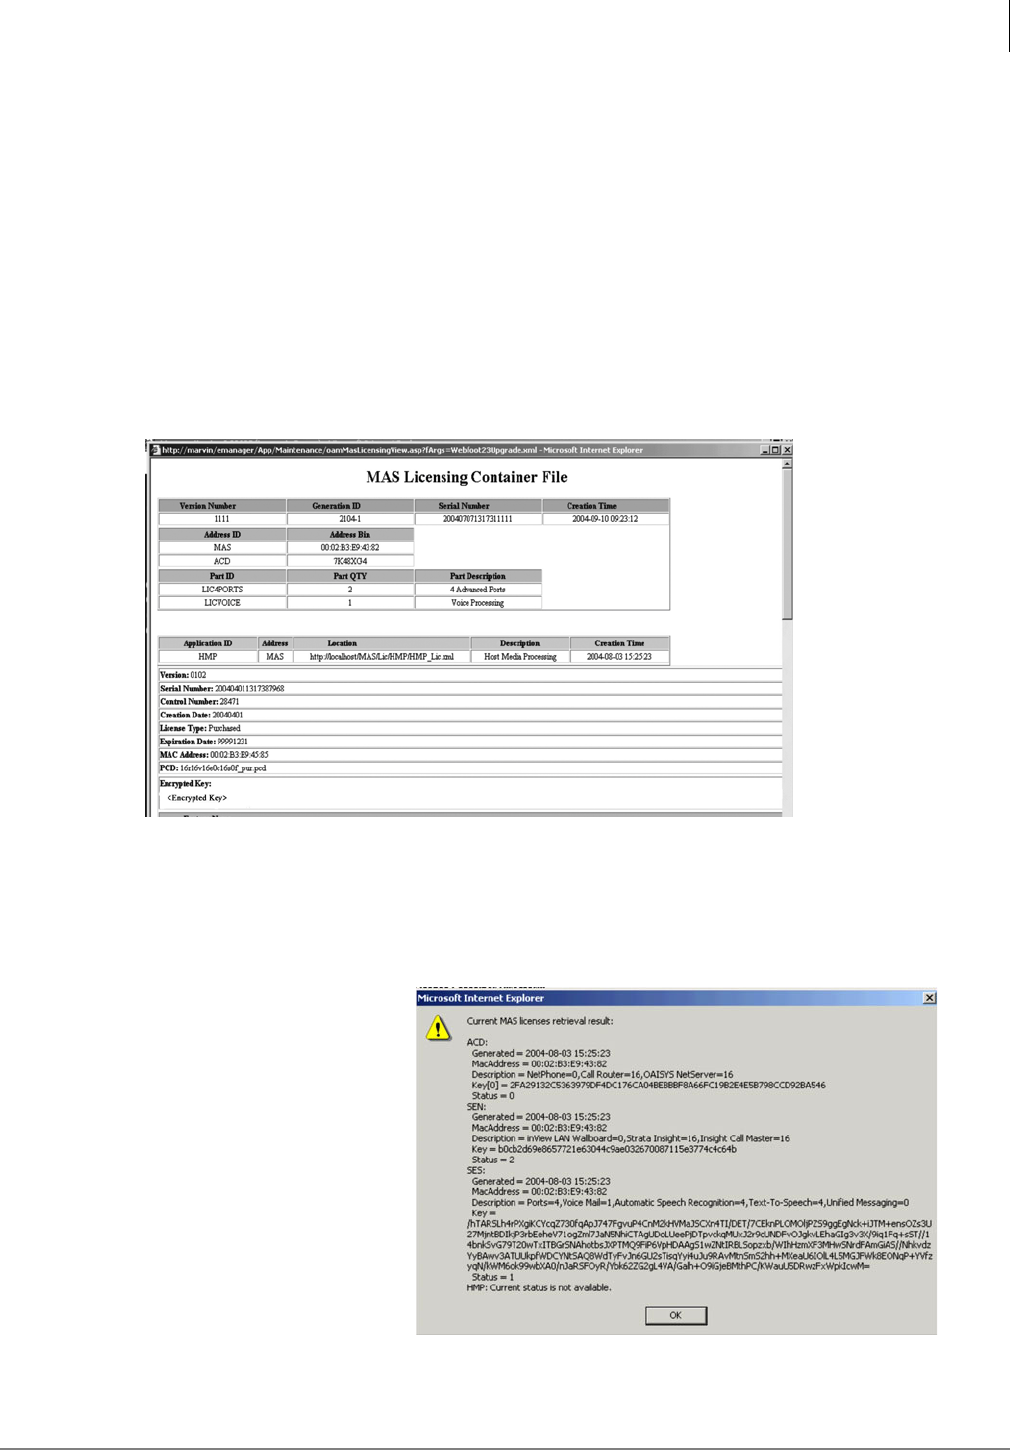
eManager
MAS Licensing
Strata CIX Voice Mail Programming 01/07 11
Delete Licenses
Note You can delete more than one file at a time by highlighting the files.
1. From the MAS Licensing screen, highlight a Container file(s).
2. Click Delete. A pop-up box displays and you are asked to confirm your deletion.
3. Click OK.
View Licenses
Note The View button is enabled when one file is highlighted, disabled when none or more than
one is highlighted.
1. From the MAS Licensing screen, highlight a Container file.
2. Click View. The MAS Licensing Container File displays (sample shown below).
View Current Licenses
1. From the MAS Licensing screen, make sure that none of the listings in the License Container
Directory is highlighted.
Note To remove a highlight, press Ctrl and click the highlighted item.
2. Click View Current Licenses.
eManager checks the status of the
license activation through each
application’s licensing interface
and displays the results (sample
shown right).
3. When finished, click OK.
Status Values Shown on Screen
•0 – New license was issued, but
not activated yet.
•1 – The license activation during
the startup procedure was
successful.
•2 – The license activation during the startup procedure failed.
eManager
Logout of eManager
2-12 Strata CIX Voice Mail Programming 01/07
Logout of eManager
!From the eManager Menu, click Logout to exit eManager.
eManager Main Screen
After you start eManager, log in and connect to the CIX, the main screen (shown below) displays.
Verify the information on this screen. It contains the System type and Software version.
Notes
•You can verify the Strata CIX system type and the software version on the Title screen shown
above.
•The software version is organized as follows:
bExample: AR3.00.MJ033.00
bA = Country code (USA, Canada, Mexico).
bR3.00 = CIX Release 1.01
bMJ0xx.00 = Strata CIX software version.
Program Menu
7593
Software
Versions
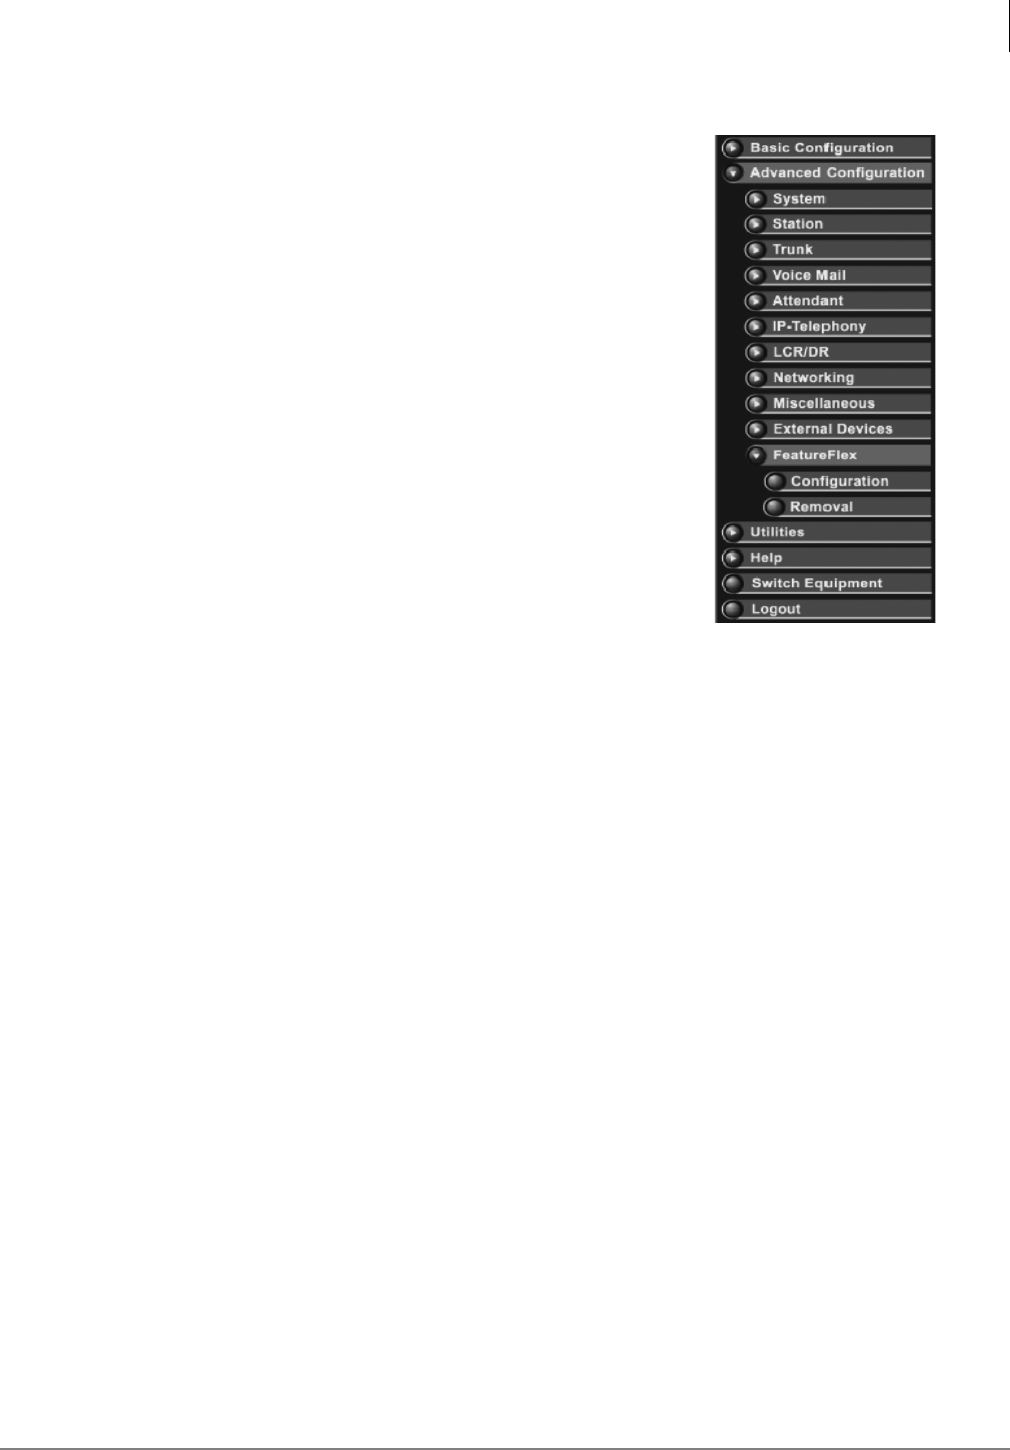
eManager
Program Menu
Strata CIX Voice Mail Programming 01/07 13
Program Menu
The Program Menu is the primary tool used to navigate through
eManager. Click the Expand or Collapse buttons at the left to expand or
collapse the Program menu.
The Program menu consists of three possible configurations—only CIX
options, only Stratagy ES options or a blend of both. What you see
depends upon the equipment you are connected to using the Select CIX
screen (see “Equipment Editor” on page 2-5). The figure to the right
shows a blended menu.
The menu is divided into the following subjects:
Note The FeatureFlex options on the menu display only when you
are connected to the Media Application Server.
•Basic Configuration (see Chapter 3 – Voice Mail Configuration)
•Advanced Configuration (see Chapter 3 – Voice Mail Configuration)
•Utilities (for Reports see Chapter 12 – System Reports, for Tools see
below)
•Help (see “Help Topics” on page 2-13)
•Switch Equipment – Takes you back to
•Logout (see “Logout of eManager” on page 2-12)
Help Topics
Help Topics/Context Help
!From the eManager Main menu, click Help > Help Topics or Context Help. A help screen
displays with the following options: Contents, Index, and Search.
About CIX eManager
!From the eManager Main menu, click Help > About CIX eManager. A screen displays with
software version numbers.
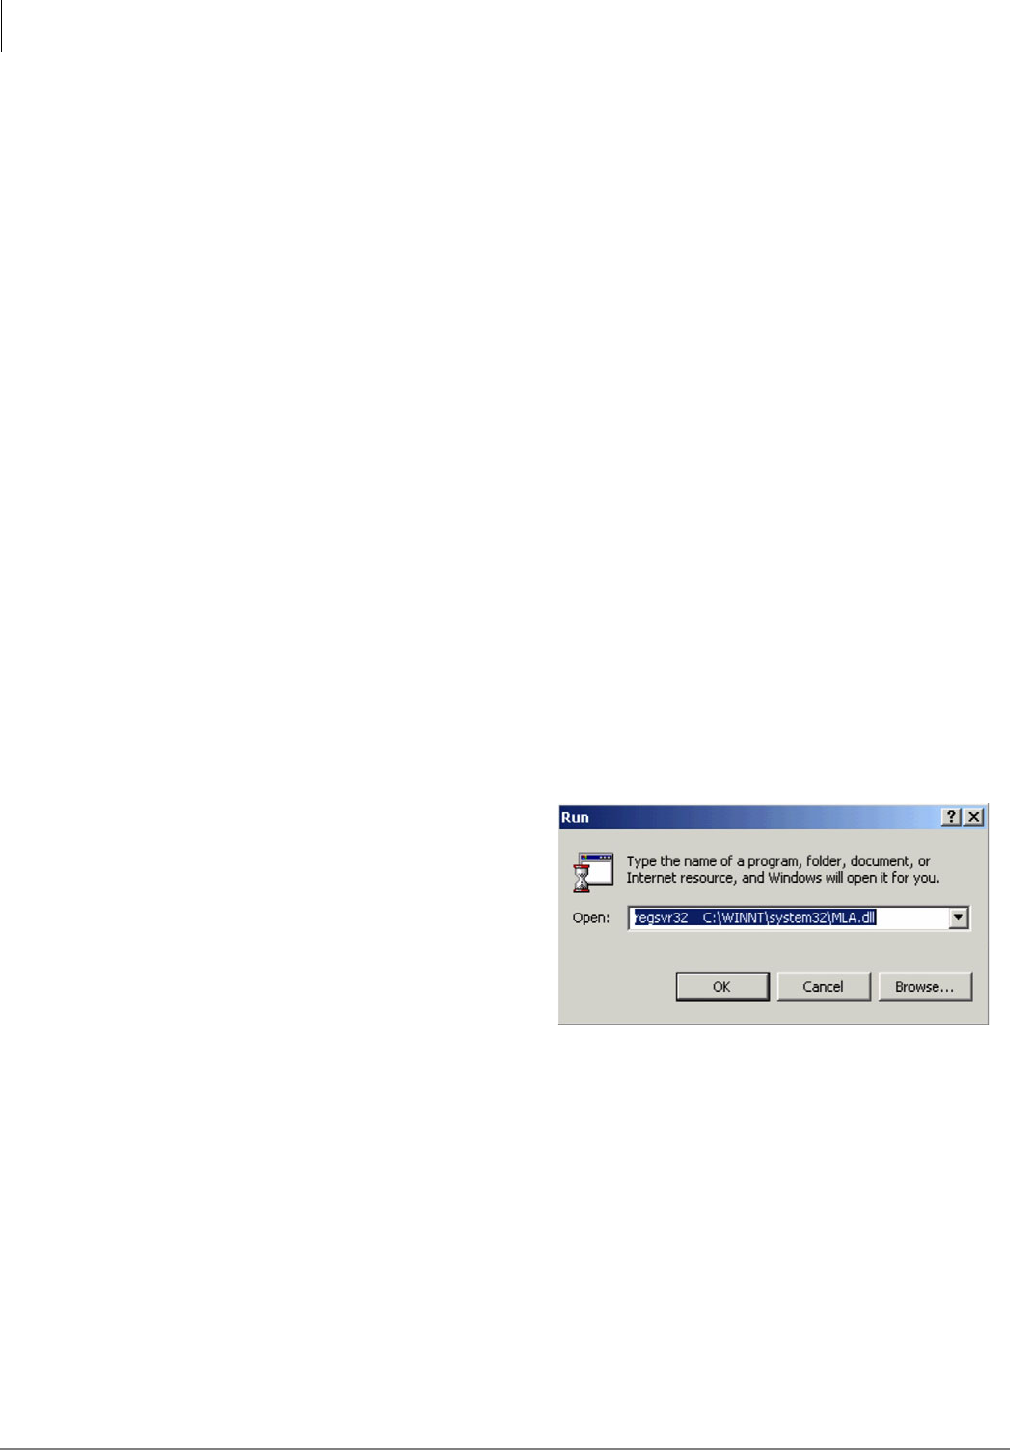
eManager
Client PC
2-14 Strata CIX Voice Mail Programming 01/07
Client PC
eManager can be loaded on a client PC with network access to the voice mail application on the
Stratagy ES MAS. Minimum requirements for the client PC are:
•Windows 2000 Pro SP4, Windows XP Pro SP1
•512MB RAM
•Pentium 400 MHz processor
•1.6GB of free hard disk storage
•CD-ROM drive
•38.4 Kbps baud modem (optional for remote maintenance through telephone network)
•3.5” 1.44MB floppy disk drive
•SVGA card and color monitor
•mouse
•keyboard
•10BaseT Network Interface Card (optional for remote connection through a Local Area
Network (LAN)/Wide Area Network (WAN))
There is a separate installation package (CD-ROM) provided to the client for installing the Dongle
driver. A preprogrammed USB RainBow SuperPro Dongle is used to access the eManager at a
client PC via IE Browser (not at the eManager Server).
How to Prepare the Client PC
1. Install the Rainbox Technologies, Inc. Sentinel Driver.
2. Install the MLA.dll by copying the file to the target PC (System32 folder recommended).
3. Register the MLA.dll by clicking Start >
Run and browsing for the regsvr32 file
(shown right).
4. Click OK.
Load Voice Mail Application
Software on Client PC
1. Uninstall StrataCIXAdmin.
1. Insert the CD-ROM Disk into the PC
drive. The Software Menu displays.
2. Select Stratagy ES Administration. The Welcome screen displays.
3. Accept the defaults on the following screens by clicking Next.
4. When the installation is complete, click Finish.
5. Restart the Stratagy ES Server.
Run eManager from Network (Client) PC
!Type IE//http://<PC Name>/eManager (example: http://WEBFOOT/eManager) and press
<Enter>. The Welcome screen displays.

eManager
Client PC
Strata CIX Voice Mail Programming 01/07 15
Anti-Virus Software
When a system has access to the internet anti-virus protection is recommended. Refer to Table 2-1
for the list of approved applications.
Table 2-1 Anti-Virus Software
Application Configuration Notes
PC-cillin™ Internal Security 2005 Should not be run in batch mode when running any other applications.
Symantec’s Norton Anti-Virus™ 2005 Script blocking option must be un-checked.
McAfee® Virusscan® 2005 Ver. 9.0 Script blocking option must be un-checked.
This page is intentionally left blank.

Strata CIX Voice Mail Programming 01/07 3-1
Voice Mail
Configuration
Voice Mail Configuration 3
This chapter covers the Stratagy ES Configuration screens. You are given instructions on accessing
and exiting the menus, and saving entered data. In addition, procedures for using each of the
configuration options are given in detail.
These menus are available only to personnel with Administrator access level or higher. Changes
made in these screens are not active until the voice mail system is restarted using the Stratagy ES
Server Control Service.
The Configuration is divided into two sections – Basic and Advanced.
The Basic Configuration menu consists of the following voice mail options:
•Date and Time (System)
•Holidays
•Voice Mail Configuration (Configuration Wizard)
•User Setup (telephone wizard)
The Advanced Configuration menu consists of the following voice mail options:
•Telephone Systems
•Answer Methods
•Voice Ports
•Serial Ports
•Notification Groups
•Port Statistics
•Scheduler
•Language
•Voice Menu
•Parameters

Voice Mail Configuration
Configuration Menu Screens
3-2 Strata CIX Voice Mail Programming 01/07
Configuration Menu Screens
Access the Configuration Menu Screens
1. From eManager’s main menu, select either Basic or Advanced Configuration.
2. Click on one of the selections under Basic/Advanced Configuration and the screen displays.
Exit the Configuration Menu Screens
1. Click Submit from any of the screens. A dialog screen states that the changes will take effect
the next time the Stratagy ES software is restarted. Click OK. The screen remains open.
...or Cancel. The screen remains open.
2. Click on another selection from the eManager Main menu on the left.
Refresh Configuration Screen
1. Click Submit. A dialog screen asks if you want to update the configuration data in the voice
server.
2. Click OK. The changes will be made the next time the Stratagy ES software is restarted. the
sc re en re m ai ns op en .
Update Voice Mail Database
Changes made to the eManager Configuration screens are not implemented in the Stratagy ES
software database until you click Submit on the individual Configuration screen and restart the
voice mail system.
Configure Voice Ports
There are three screens that are required to properly configure voice mail voice ports for answering
calls: Telephone Systems, Answer Methods, and Voice Ports. Starting with the Telephone Systems
option, each screen builds upon the data of the previous screen. Configure the screens in the order
listed here:
1. Telephone Systems – Defines the attributes and functionality of telephone systems that are
connected to the voice mail system.
2. Answer Methods – Links the Telephone System Integration Group to an User Agent mailbox
that supplies the Primary greeting heard by the caller and defines the number of rings the
system must wait before it answers an incoming call on the voice port.
3. Voice Ports – Assigns the Answer Method along with an extension number to the Voice Port.
Voice Mail
Configuration
Voice Mail Configuration
Main Menu
Strata CIX Voice Mail Programming 01/07 3-3
Main Menu
The eManager program menus enable you to (see Figure 3-1 for a complete list of menu items):
•Manage User Agents (create, modify, delete)
•Configure the voice mail system (voice ports, serial ports, system parameters, etc.)
•Run reports
Figure 3-1 eManager Menu Structure
Date and Time
Holidays
Voice Mail Configuration
User Setup
Tools
Back to eManager Log in Screen.
MENU
System
Basic Configuration
Mailbox
Mailbox COS
Distribution List
IVR
AMIS Gateway
AMIS Proxy
VPIM Gateway
VPIM Proxy
Direct Send Voice
Direct Send Fax
User Mode
Auto Attendant
Chains/Groups/Fax
Menus
Info
Auto
Notify
Unified Messaging
ASR Auto Attendant
Utilities
VM Port Status
VM Tracer
VM Tracer File
IVR Alias Editor
Run IVR Alias
ASR Sync
Log Out
Help Help Topics
Context Help
About CIX eManager
Voice Mail
Advanced Configuration
Reports
VM Phone Systems
VM Ans Methods
VM Voice Ports
VM Serial Ports
VM Notifications
VM Port Statistic
VM Scheduler
VM Language
VM Parameters
Voice Menu
Port Statistics
Port Grp Statistics
All Port Statistics
Mbx Call Statistics
Mbx Usage
Mbx Info/Status
Mbx Msg Statistics
System Information
Mailbox Template
AMIS/VPIM Template
Switch Equipment
Voice Mail Configuration
Change System Date/Time
3-4 Strata CIX Voice Mail Programming 01/07
Change System Date/Time
The Date/Time function changes the system clock at the server.
1. From the eManager Main
menu, click Basic
Configuration > Date and
Time. The Change system
clock screen displays
(shown at right).
2. Using the calendar button,
select a new date.
3. Using the spin button,
select a new time
...or type a time in using
hh:mm:ss format.
4. Click on another Main menu selection to close out of this screen.
Holidays
There is no limit to the number of holidays that can be added to the table. Holidays defined in this
screen can be used in the Auto (Scheduling) and Notify screens of a mailbox.
The Holidays screen (see Figure 3-1) displays the programmed holidays for the system.
Figure 3-1 Holidays Screen with Sample Data
The left side of the screen has a drop-down menu where you can create/select up to 9 holiday lists—
MS Holidays List and Tenant 1~8 Holidays List. Also displayed are the dates of the current year’s
holidays. A “+” sign next to a date designates a recurring holiday date (e.g., July 4).
The right side of the screen includes a drop-down calendar and the Add, Delete and Copy to
functions.
7327

Voice Mail
Configuration
Voice Mail Configuration
Holidays
Strata CIX Voice Mail Programming 01/07 3-5
Add Holidays
1. From eManager Main menu, click Basic Configuration > Holidays. The Holidays screen
displays (see Figure 3-1).
2. On the left side of the screen, select from the drop-down menu the list to which you want to add
a holiday.
3. In Add or Delete Holidays section, click the down arrow. A pop-up calendar displays.
4. You can use the arrows in the top left/right corner of calendar to scroll through month/year
...or you can click on the month (e.g., May) to select a month from the menu and click on a year
(e.g., 2007) to select a year.
5. Click on desired date. A dialog box displays asking if you want to set the date for every year.
6. Click Yes. The date is set for every year. The date displays in the left section of the screen in
chronological order. A “+” is placed next to it to indicate it is a recurring date.
...or click No. The date is set for the selected year. The date displays in the left section of the
screen in chronological order.
7. Click Submit. Your changes are saved and the screen remains open. A dialog box displays. The
changes are added to the voice mail database the next time voice mail service is shutdown and
restarted.
Delete Holiday
1. From eManager Main menu, click Basic Configuration > Holidays. The Holidays screen
displays (see Figure 3-1).
2. On the left side of the screen, select from the drop-down menu the list to which you want to
delete a holiday.
3. Highlight the desired date on the screen.
4. Click Delete. A dialog box displays asking you to confirm the deletion.
5. Click Yes.
6. Click Submit. Your changes are saved and the screen remains open. The changes are added to
the voice mail database the next time voice mail service is shutdown and restarted.
Copy To
1. From eManager Main menu, click Basic Configuration > Holidays. The Holidays screen
displays (see Figure 3-1).
2. On the left side of the screen, select from the drop-down menu the list you want to copy.
3. Click Copy To. A pop-up box displays showing the lists available.
4. Highlight the desired list.
5. Click Copy Now. Your changes are saved and the screen remains open. The changes are added
to the voice mail database the next time voice mail service is shutdown and restarted.

Voice Mail Configuration
Configuration Wizard
3-6 Strata CIX Voice Mail Programming 01/07
Configuration Wizard
The Configuration Wizard guides you through the voice mail basic operation setup. It includes:
•Configure the System Database - specifies telephone systems, set up voice lines and answering
methods for AA and designate holidays.
•Configure User Agents Database
The set of screens are user friendly. If you choose to bypass the screens at log in, you can always
access the Configuration Wizard later through the Configuration Menu.
When the Configuration Wizard program starts, it reads the current configuration of the Stratagy
ES software into memory. As data is entered, the program stores the data until the following
specified intervals:
•Clicking Next on the Update System Configuration screen.
•Clicking Create on the Create Classes of Service screen.
•Clicking Create on the Create Mailboxes screen.
Use Configuration Wizard
1. From the eManager Main menu, click Basic Configuration > Voice Mail Configuration. The
Configuration Wizard screen displays.
2. Follow the prompts on the screens. When the Configuration Wizard process is complete, click
Finish.
User Setup Wizard
The User Setup wizard provides the creation of extensions and mailboxes for telephone users and
typical setup scenarios to associate the extensions and mailboxes.
The following basic options are available on the screen:
•Create Primary Extension with mailbox
•Create Primary Extension sharing the same mailbox
•Create mailboxes and route them to the same extension
•Create Primary Extensions without mailboxes
•Create mailboxes without extensions
To access more advanced features, click “More options.” The following selections display:
•Create Primary Extensions
•Assign Mailbox Numbers to Extensions
•Create mailboxes and assign extensions for Auto Attendant
•Assign User Names to mailboxes and extension LCD screen
Use User Setup
1. From the eManager Main menu, click Basic Configuration > User Setup. The User Setup
screen displays.
2. Click the box in front of the option. A dialog box displays. Fill in the fields and click Create.
3. You can choose another selection or exit the wizard.
Note Options that create Primary Extensions require you to select the type of extension from a
drop-down menu. If you select “Any Type,” the wizard scans all types of station interface
cards for available spots, and on an LIPU card it prefers to create an IPT-L type Primary
Extension.
Voice Mail
Configuration
Voice Mail Configuration
Telephone Systems
Strata CIX Voice Mail Programming 01/07 3-7
Telephone Systems
The Stratagy ES supports multiple telephone system integrations. Each integrated system includes
a set of integration characteristics, such as integration dial codes and integration patterns to support
either DTMF or SMDI.
Note Each Stratagy ES system has been pre-configured at the factory for out-of-box operation
with a Toshiba Strata CIX telephone system. This includes the required programming for
CTX Proprietary Integration, Reserved Mailboxes (e.g., 990, 998, etc.), and the factory
recorded company and instructional greetings for mailbox 990.
The Telephone Systems screen (see Figure 3-2, Table 3-2) enables a user to define all telephone
systems which are either directly connected to the Stratagy ES MAS or are host telephone systems
of one or more mailbox owners.
Important! When configuring voice ports, you must enter the data in the following order:
Telephone System Integration, Answer Methods, and Voice Ports. See “Configure
Voice Ports” on page 3-2.
Figure 3-2 Telephone Systems Tab Screen with Sample Data
Arrows re-order sequence o
f
integration pattern lines.
7275
Displays when Integration
Type is set to SMDI.

Voice Mail Configuration
Telephone Systems
3-8 Strata CIX Voice Mail Programming 01/07
Table 3-2 Telephone Systems Tab Screen Fields
FIELD DESCRIPTION
Integration Group Name Alphanumeric field. Underscores are allowed. If you type in more than one word, the
Stratagy ES adds an underscore between words when it updates.
Note The Integration Group Name, once entered and saved in this screen, is
automatically added to the Telephone System Integration Name drop-down
menu in the Answer Methods screen.
Switch Type Designates the telephone system switch type.
Important! If you accidently enter only spaces in this field, voice mail does not
reject it. Instead, voice mail accepts the invalid pure space name and
uses it as a switch type.
Defaults to Strata CIX. Possible values are: Strata CIX, <Create/save Switch Type>.
Integration Type Defaults to CTX Proprietary.
Important! For Strata CIX, do not change the default on this field.
Possible values are: DTMF, SMDI and CTX Proprietary. If you choose SMDI, the
Serial Port and Max. Ext. Length fields to the right on the screen must be filled in.
Serial Port — Defaults to blank. Possible values are: COM1~COM2.
Max. Ext. Length — Maximum number of digits the connecting switch expects to
receive, specifically for message notification. Standard is 10. Some switches are
limited to seven digits.
Possible values: 1~10
Note The Stratagy ES will send the number of digits specified here. If the actual
mailbox extension number has a smaller quantity of digits than this value,
voice mail will insert the appropriate quantity of digits.
Example: Max. Ext. Length = 10
Mailbox/Ext. Number = 3752
Voice mail sends 0000003752.
Line Type This field designates the line type as IP Proprietary.
Defaults to IP Proprietary (cannot be changed).
Integration Pattern If your telephone system supports integration, this selection controls the definition of
its integration. Perform this step only to refine, verify, or modify the integration of the
Stratagy ES system with your telephone system.
Notes
©This field is not applicable to the Strata CIX.
©Integration patterns support only Analog Integration.

Voice Mail
Configuration
Voice Mail Configuration
Telephone Systems
Strata CIX Voice Mail Programming 01/07 3-9
Integration Dial Codes Voice mail controls certain actions on your telephone system by using defined
telephone system dial codes. To define the dial codes, you must modify a telephone
system dial code parameter(s).
With this option, preset dial codes for other manufacturers’ systems can be enabled
or modified. The following fields display on the screen:
©Dial code to put a caller on transfer hold
©Dial code to use when there is no transfer dial tone
©Dial code to return to caller after Ring No Answer
©Dial code to return to caller after Busy
©Dial code to use after call screening reject
©Dial code to connect the caller to the extension
©Number of milliseconds to wait for dial tone detection
©Number of milliseconds delay after flash hook
©Which DTMF tone to listen to for answer detection
©Which DTMF tone to listen to for hangup detection
©What to dial AFTER dialing the user ID extension
©What to dial BEFORE dialing the user ID extension
©What to dial when the system first starts up
©What to dial when the system performs a shutdown
©What to dial when a port goes off-hook
©Number of minimum milliseconds to define CPM silence
©Number of minimum milliseconds to define CPM sound
©Message lamp ON
©Message lamp OFF
©Trunk access code
©Number of milliseconds to use for Flash time
©CIX/CTX IP Address — Enter IP address assigned to the Strata CIX (LCTU)
©Simple Network Management Protocol (SNMP) Community — Enter the
community name that has been assigned in the target Strata CIX.
©IPU IP Address — change address to the one assigned to the Strata CIX (LIPU))
Note If an LIPX is installed, enter the IP of the LIPU.
Table 3-2 Telephone Systems Tab Screen Fields (continued)
FIELD DESCRIPTION

Voice Mail Configuration
Telephone Systems
3-10 Strata CIX Voice Mail Programming 01/07
Add Integration Group
1. From the eManager Main menu on the left, click Advanced Configuration > Systems > VM
Phone Systems. The Voice Mail Telephone Systems screen displays (see Figure 3-2).
2. Click Add Group. The Add New Telephone Systems screen displays.
3. Type a new Integration Group name and click OK.
4. Select the Switch Type from the drop-down menu.
Note If you select <Create/Save/Delete Switch Type>, the Create/Save/Delete Switch Type
screen displays and you need to type the name for the new switch type and click OK. The
new switch type is saved with the settings that appear on the screen at the time it is saved.
The name is added to the drop-down menu for the Switch Type field.
5. Select an Integration Type from the drop-down menu. For Strata CIX, select CTX Integration.
Note For Strata CIX skip to Step 8.
6. Select the Serial Port from the drop-down menu.
7. Double-click the Max. Ext. Length field and using the spin-button, select a number from 1~10.
Note The standard is 10.
8. (Analog Integrations Only) Modify Dial Codes and Integration Patterns, as required. To change
the sequence of integration patterns, highlight the line and use the Move arrows to the right of
the screen.
For Strata CIX only, scroll down to the bottom of the Integration Dial Codes list to locate three
parameters: Call Agent IP Address, Simple Network Management Protocol (SNMP)
Community, LIPU IP Address (MAS).
•Change the “Call Agent IP Address” to the IP address that has been assigned to the Strata
CIX (LCTU).
•Enter the SNMP Community name that has been assigned in the target Strata CIX.
•Verify/change the “IPU IP Address” that has been assigned to the Strata CIX (LIPU).
Note If an LIPX is installed, enter the IP of the LIPU.
9. Click Submit. Your changes are saved and the screen remains open. A dialog box displays.
10.Click OK. The changes are added to the voice mail database the next time voice mail is shut
down and restarted.
Delete Integration Group
1. From the eManager Main menu on the left, click Advanced Configuration > Systems > VM
Phone Systems. The Voice Mail Telephone Systems screen displays (see Figure 3-2).
2. From the drop-down menu, select the Integration Group Name you want to delete.
3. Click Delete Group. A dialog box asks you to confirm the deletion.
Important! When you delete a group, references to it in the Answer Methods screen are
removed. References in User Agent or COS must be removed manually by you. After
deletion, validate Answer Method, User Agent, and COS definitions, otherwise, Auto
Attendant (AA) and notification does not work properly.
4. Click OK. The Telephone Systems screen displays without the deleted group in the windows.
The changes are added to the voice mail database the next time voice mail service is shutdown
and restarted.

Voice Mail
Configuration
Voice Mail Configuration
Telephone Systems
Strata CIX Voice Mail Programming 01/07 3-11
Add or Delete Switch Type
1. From the Switch Type drop-down menu,
select the <Create/Save/Delete Switch Type>
option. The Create/Save/Delete Switch Type
screen displays (shown at right).
2. Add Switch Type: Type the name for the new
switch type and click OK. A pop-up box
displays. Click OK again. The name is added
to the drop-down menu for the Switch Type
field. Click Submit. The new switch type is
saved with the settings that appear on the
screen at the time it is saved.
...or to delete Switch Type: From the Switch Type field, select the switch type that you want to
delete. Click Delete. A dialog box asks you to confirm the deletion. Click OK. The Telephone
System Integration screen displays without the deleted group in the Switch Type drop-down
box. Click Submit. The changes are added to the database the next time voice mail service is
shutdown and restarted.
7187

Voice Mail Configuration
Answer Methods
3-12 Strata CIX Voice Mail Programming 01/07
Answer Methods
This function defines a method of answering calls in order to support multiple-system integration
groups within voice mail.
The Answer Methods screen (see Figure 3-3, Table 3-3) enables you to assign a name (e.g., IVR),
a Greeting User Agent and the Number Of Rings To Answer. The Telephone System Integration
name must be defined in the Telephone System Integration screen.
Important! When configuring voice ports, you must enter the data in the following order:
Telephone Systems, Answer Methods, and Voice Ports. See “Configure Voice Ports”
on page 3-2.
Figure 3-3 Answer Methods Screen with Sample Data
Table 3-3 Answer Methods Screen Fields
FIELD DESCRIPTION
Answer Method Name A label that is assigned to the Answer Method. This name is carried over to the
Voice Ports screen. Defaults to Default_Name. Max. 34 characters. Underscores
are allowed.
Example: IVR
Greeting User Agent User Agent/mailbox that answers the call after the Number Of Rings To Answer is
detected. Defaults to 990.
Number of Rings To
Answer
Number of rings the system waits before it answers an incoming call on the voice
port. Defaults to 1.
Telephone System
Integration Name
The integration group to which the answer method is linked.
7276

Voice Mail
Configuration
Voice Mail Configuration
Answer Methods
Strata CIX Voice Mail Programming 01/07 3-13
Add Answer Methods
1. From the eManager Main menu, click Advanced Configuration > Systems > VM Ans Methods.
The Answer Methods screen displays (see Figure 3-3).
2. Click Add. A blank line displays below the other entries.
3. Click in the Answer Method Name field and type a name. The entry cannot be longer than 34
alphanumeric characters. An underscore is allowed (e.g., Default_Name).
4. Using the drop-down menu, select an available Greeting User Agent. The drop-down list
contains all the User Agent numbers already referenced in the Answer Method lines as well as
an Add function.
5. (Optional) If you clicked Add in Step 4, a pop-up box displays asking you to enter a new
greeting user agent. Enter the User Agent number and click OK.
6. Using the spin button to the right of the Number of Rings To Answer field, select the number of
rings.
7. Using the drop-down menu, select an available Telephone System Integration Group.
8. Click Submit. Your changes are saved and the screen remains open. A dialog box displays.
9. Click OK. The changes are added to the voice mail database the next time voice mail service is
shutdown and restarted.
Delete Answer Methods
1. From the eManager Main menu, click Advanced Configuration > Systems > VM Ans Methods.
The Answer Methods screen displays (see Figure 3-3).
2. Highlight the Answer Method you want to delete.
3. Click Delete. You are asked to confirm the deletion. Click OK.
4. Click Submit. The changes are saved, the screen remains open for use, and the Answer Method
listing is removed from the screen. A dialog box displays.
5. Click OK. The changes are added to the voice mail database the next time voice mail service is
shutdown and restarted.
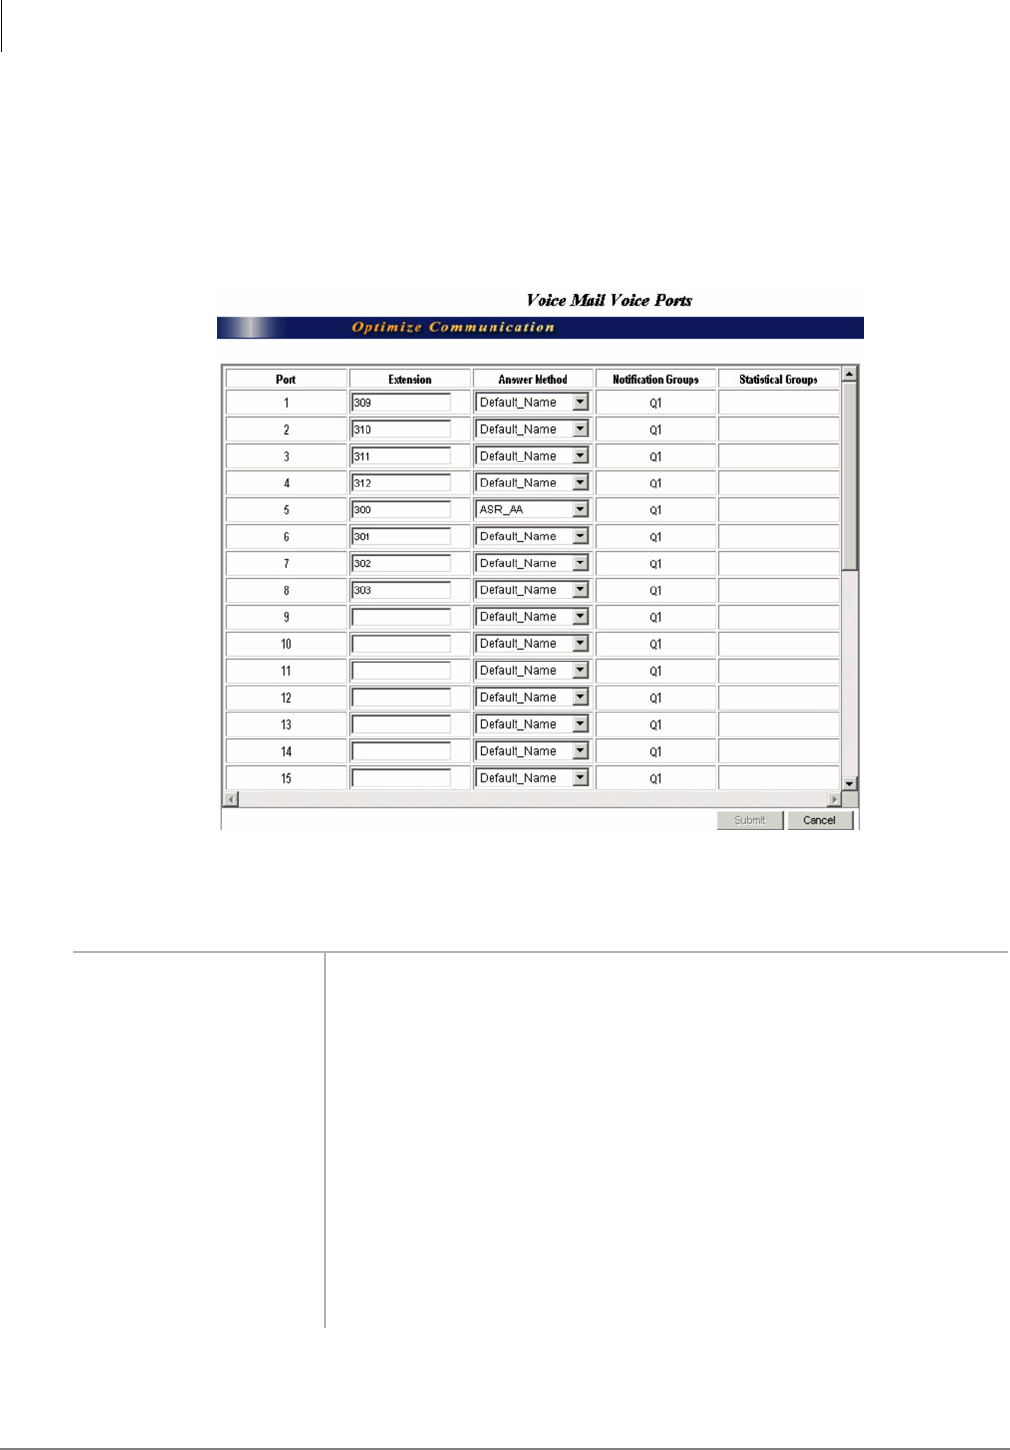
Voice Mail Configuration
Voice Ports
3-14 Strata CIX Voice Mail Programming 01/07
Voice Ports
The Voice Ports screen (see Figure 3-4, Table 3-4) enables you to assign the Answer Method and a
telephone system’s extension number for each voice mail voice port.
Important! When configuring voice ports, you must enter the data in the following order:
Telephone Systems, Answer Methods, and Voice Ports. See “Configure Voice Ports”
on page 3-2.
Figure 3-4 Voice Ports Screen with Sample Data
Table 3-4 Voice Ports Screen Fields
FIELD DESCRIPTION
Port (Display only) Displays actual port numbers based on voice card(s) installed.
Extension Specific telephone system’s extension or terminal number (e.g., Centrex application
= 0001). Voice mail uses this value for SMDI integration.
Important! Be careful when making your entry in this field. The voice mail system
does not validate your input.
Answer Method Indicates integration group connected, greeting mailbox, and number of rings
needed to answer calls. Defaults to Default_Name.
Notification Groups (Display only) Port assignment in a Notification Group. Voice mail obtains this value
from the information assigned in the Notification Groups Tab screen (see
“Notification Groups” on page 3-18).
Statistical Groups (Display only) Port assignment in a Statistical Group. Voice mail obtains this value
from the information assigned in Statistical Groups Tab screen (see “Port Statistics”
on page 3-20).
7287

Voice Mail
Configuration
Voice Mail Configuration
Voice Por ts
Strata CIX Voice Mail Programming 01/07 3-15
Add Voice Port Definition
1. From the eManager Main Menu, click Advanced Configuration > Systems > VM Voice Ports.
The Voice Ports screen displays (see Figure 3-4).
2. Type the extension number.
3. Using the drop-down menu, select the Answer Method.
4. Click Submit. Your changes are saved and the screen remains open. A dialog box displays.
5. Click OK. The changes are added to the voice mail database the next time voice mail service is
shutdown and restarted.
Display Voice Port Status
1. If you are logged on to eManager, click Utilities > Tools
> Port Status and the screen displays (shown at right).
2. To view statistics on an individual port (example screen
shown at right), double-click the port listing on the Voice
Ports Status screen.
3. Click Refresh to update the Statistics screen at any time
...or click Close to close the screen. The Voice Ports
Status screen remains on the desktop.
7228
7628

Voice Mail Configuration
Serial Ports
3-16 Strata CIX Voice Mail Programming 01/07
Serial Ports
Important! This screen is not required by the Strata CIX.
Serial ports in the Stratagy ES are used in three ways:
•Available – Serial ports not running within voice mail and available for Windows XP use.
Note Serial ports may be reported on this screen as “available” when in fact there is no
hardware installed on them. You must verify serial port hardware installation prior to
assigning the port’s functionality.
•SMDI – Serial ports used for voice mail SMDI.
•Resource – Serial ports available as a resource for Stratagy ES (e.g., IVR).
The Serial Ports screen (see Figure 3-5, Table 3-5) enables you to assign a COM port to a specific
application (e.g., IVR) or integration (e.g., SMDI).
Figure 3-5 Serial Ports Screen with Sample Data
Table 3-5 Serial Ports Screen Fields
FIELD DESCRIPTION
Port Name (Display only) Default is COM1.
Assign As Possible values are:
Available — Not in use by the Stratagy ES software.
SMDI — Defined in the Telephone System Integration screen.
Resource — Reserved under Resource Manager.
Note You cannot type entries into this field. Selection must be made from the
drop-down menu.
7288

Voice Mail
Configuration
Voice Mail Configuration
Serial Ports
Strata CIX Voice Mail Programming 01/07 3-17
Add Serial Port Definition
1. From the eManager Main Menu, click Advanced Configuration > Systems > VM Serial Ports.
The Serial Ports screen displays (see Figure 3-5).
2. Click Assigned As field. Drop-down menu button appears.
3. From the drop-down menu, select an entry.
Note You cannot type into this field.
4. Click in Telephone System or Resource Name field.
5. Type in a Resource Name
...or select a name from the drop-down menu. If the port is assigned to SMDI or Resource, you
must make an entry in this field.
6. Set Baud Rate, Data Bits, Parity Bits and Stop Bits for the serial port.
7. Repeat Steps 2~6 for each port.
8. Click in the Target Phone Number field. Type in the phone number.
9. Click Submit. Your changes are saved and the screen remains open. A dialog box displays.
10. Click OK. The changes are added to the voice mail database the next time voice mail service is
shutdown and restarted.
Telephone System or
Resource Name
Possible values are:
Blank — When Assigned As field reads Available, this field is blank.
Telephone System — If reserved as a SMDI in the Assigned As field, you must enter
a Telephone System name.
Resource Name — If reserved as a Resource in the Assigned As field, you must
enter a Resource Name.
Notes
©A drop-down menu is provided for this field.
©More than one port can be configured to the same Resource Name.
Serial Port Default Settings Settings are for the port highlighted.
Baud Rate Default is blank. Possible values are: 110, 300, 600, 1200, 2400, 4800, 9600,
14400, 19200, 38400, 56000, 57600, 115200, 128000, 256000.
Data Bits Default is blank. Possible values are: 7, 8.
Parity Bits Default is blank. Possible values are: none, odd, even, mark, space.
Stop Bits Default is blank. Possible values are 1, 1.5, 2.
Target Phone Number Modem phone number used when the application does not define its own dialed
number when making a call.
See screen for examples.
Table 3-5 Serial Ports Screen Fields (continued)
FIELD DESCRIPTION
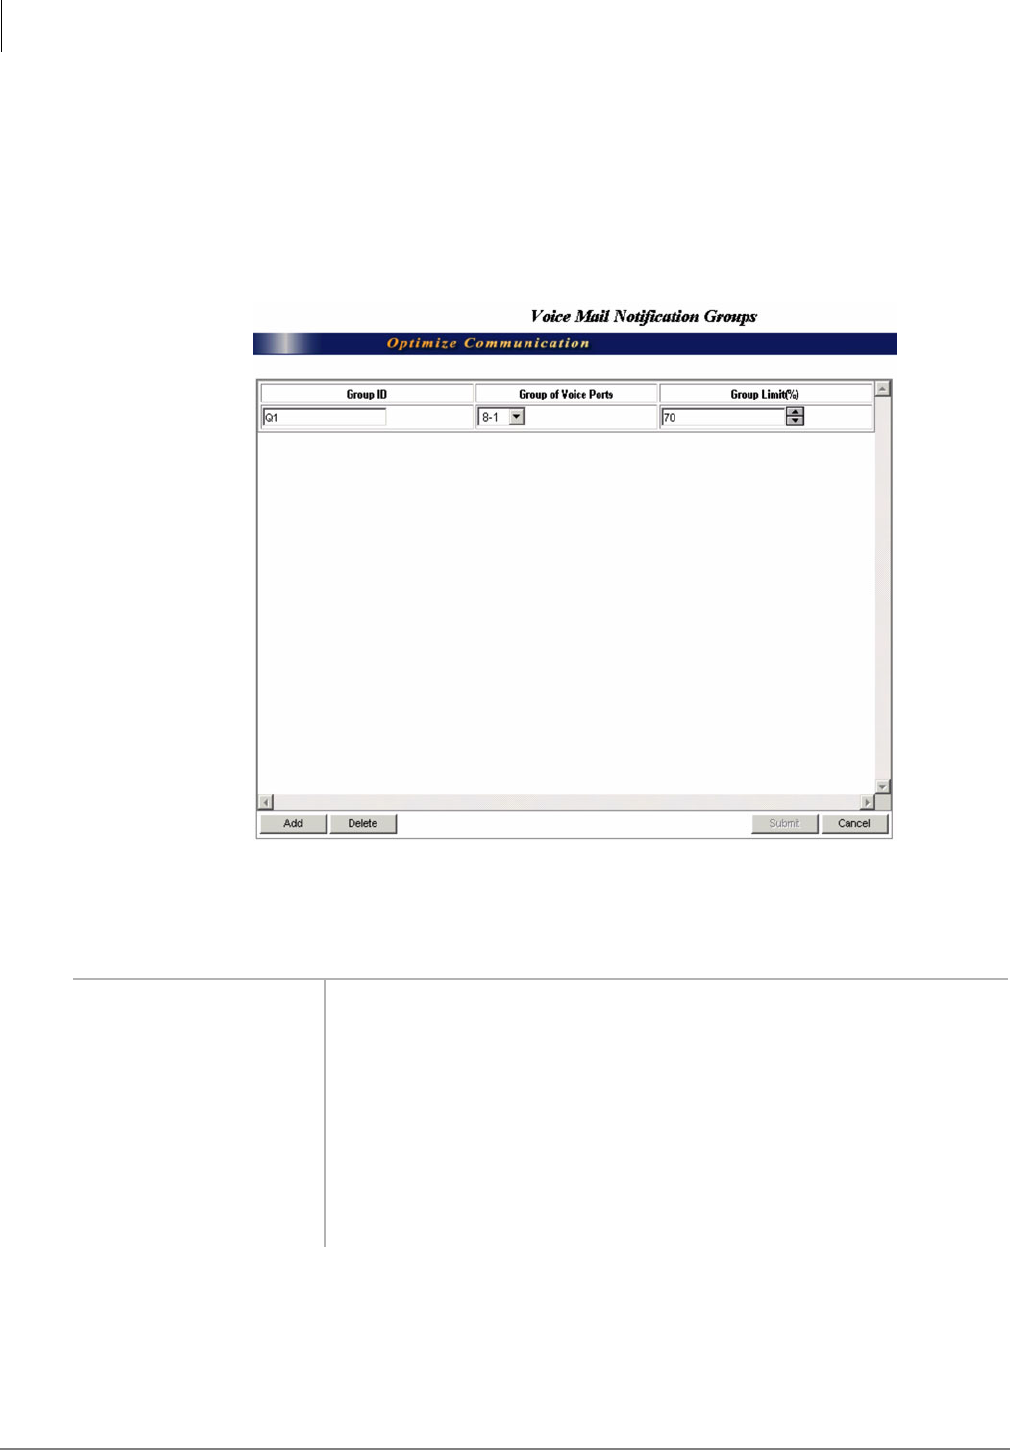
Voice Mail Configuration
Notification Groups
3-18 Strata CIX Voice Mail Programming 01/07
Notification Groups
Any port can be used for traditional notification purposes. Ports can also be grouped to restrict their
use to a specific application such as IVR, AMIS, etc. In voice mail, each port can be its own group
and a group name can be used to identify a notification group.
The Notification Groups screen (see Figure 3-6, Table 3-6) requires three entries: Group ID, Group
of Voice Ports, and Group Limit (%).
Figure 3-6 Notification Groups Screen with Sample Data
Table 3-6 Notification Groups Screen Fields
FIELD DESCRIPTION
Group ID Name of Notification Group. Can refer to specific application (e.g., IVR, AMIS).
Group of Voice Ports Defines ports that belong to the notification group ID (e.g., 1~10, 32, 43).
Group Limit (%) Defines the percentage of ports within a group that must be busy before outbound
notification is suspended.
Possible values are: 0~100.
Example:
IVR Notification Port Group has 10 ports.
Group Limit (%) field is set to 75%.
When eight ports of the IVR port group are busied by incoming calls, notification
requests for the group are suspended until the number of busy ports diminishes.
7289

Voice Mail
Configuration
Voice Mail Configuration
Notification Groups
Strata CIX Voice Mail Programming 01/07 3-19
Add Notification Group
1. From the eManager Main Menu, click Advanced Configuration > Systems > VM Notifications.
The Notification Groups screen displays (see Figure 3-6).
2. Click Add. A pop-up box displays.
3. Type the Group ID in the Group ID field for the new Notification Group and click OK.
Note The Group ID should be different than existing Group IDs.
4. In the Group of Voice Ports field, select a port group from the drop-down menu or click Add at
the bottom of the screen.
5. If you selected Add, a pop-up box displays asking you to type a new Group of Voice Ports into
the available field and click OK.
Note The Group should be numerical and an existing port number.
6. In the Group Limit (%) field, use the spin-button or typeover the number in the field to select
the percentage.
7. Click Submit. Your changes are saved and the screen remains open. A dialog box displays.
8. Click OK. The changes are added to the voice mail database the next time voice mail service is
shutdown and restarted.
Delete Notification Group
1. From the eManager Main Menu, click Advanced Configuration > Systems > VM Notifications.
The Notification Groups displays (see Figure 3-6).
2. Highlight the Group ID you want to delete.
3. Click Delete. A dialog box asks you to confirm the deletion.
Note Do not delete a group that is used in a User Agent Notification Record.
4. Click OK.
5. Click Submit. Your changes are saved and the screen remains open. A dialog box displays.
6. Click OK. The changes are added to the voice mail database the next time voice mail service is
shutdown and restarted.
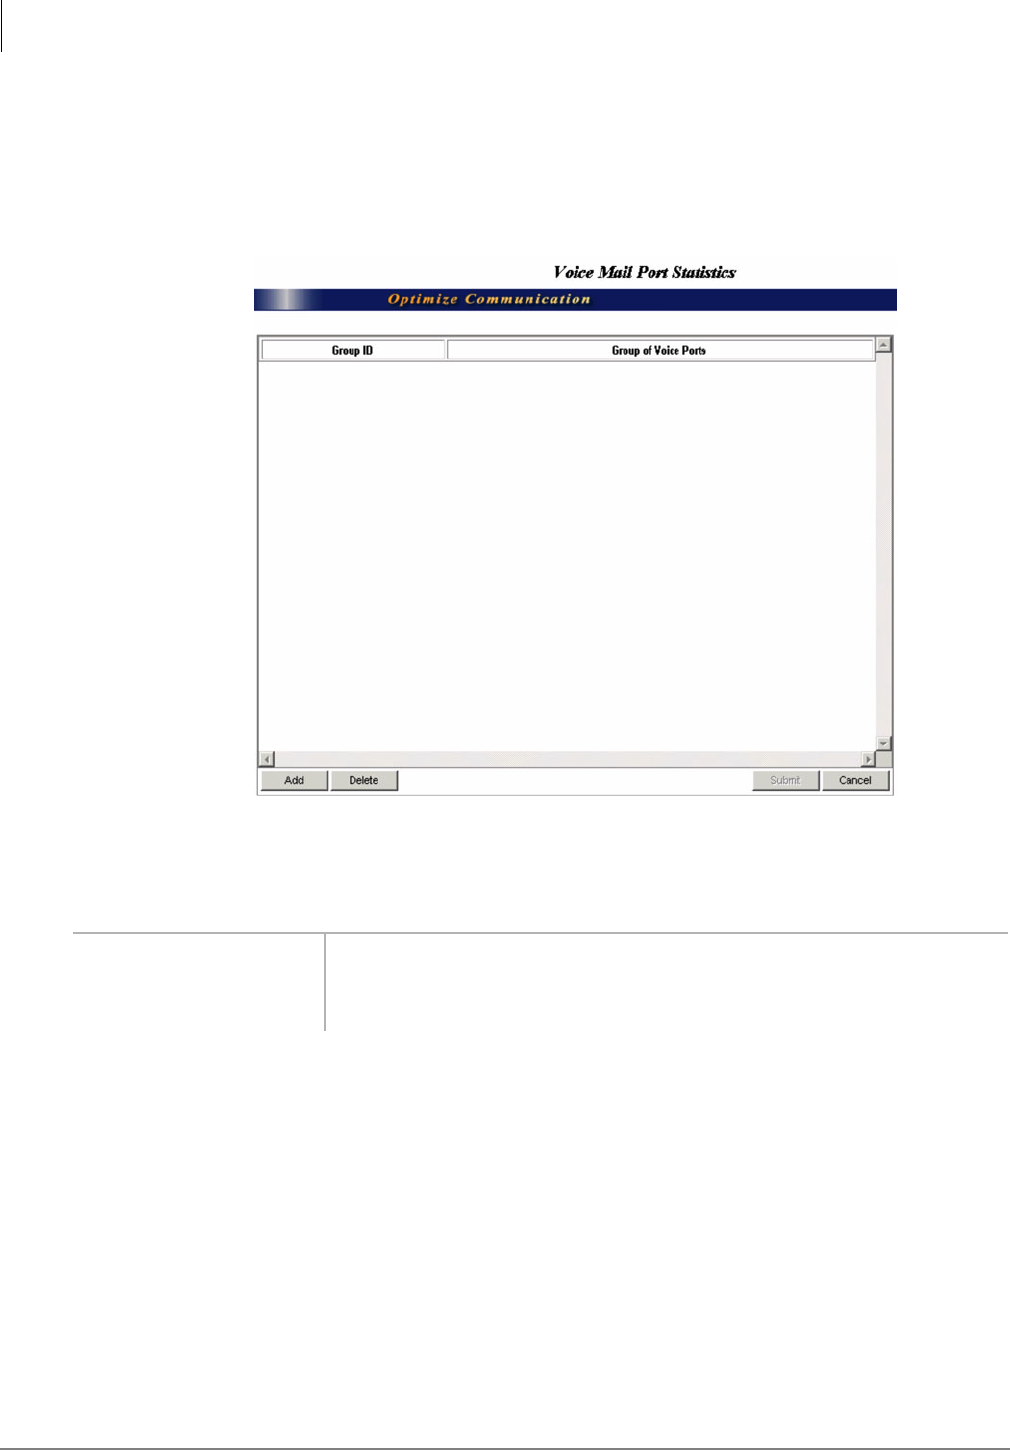
Voice Mail Configuration
Port Statistics
3-20 Strata CIX Voice Mail Programming 01/07
Port Statistics
The Port Statistics screen (see Figure 3-7, Table 3-7) provides reporting and troubleshooting tools
by displaying the number of calls handled by the ports.
This screen provides the groups and group ID information for the Port Group Statistics Report. See
“Port Group Statistics Report” on page 12-4.
Figure 3-7 Port Statistics Screen with Sample Data
Table 3-7 Port Statistics Screen Fields
FIELD DESCRIPTION
Group ID Any number starting with 1.
Group of Voice Ports Ports in the group.
Entry can be a single, multiple or a range of ports (e.g., 1~4, 10, 12).
7290
7290

Voice Mail
Configuration
Voice Mail Configuration
Port Statistics
Strata CIX Voice Mail Programming 01/07 3-21
Add Port Statistics Group
1. From the eManager Main Menu, click Advanced Configuration > Systems > VM Port Statistic.
The Port Statistics screen displays (see Figure 3-7).
2. Click Add. A blank line appears.
3. Double-click on Group ID field and type a Group ID.
4. In the Group of Voice Ports field, use the drop-down menu to select the ports or select Add. If
Add is selected a pop-up box asks you to enter the ports.
Note Entry can be a single, multiple or range of ports (e.g., 1-4, 10, 12).
5. Click Submit. Your changes are saved and the screen remains open. A dialog box displays.
6. Click Yes. The changes are added to the voice mail database the next time voice mail service is
shutdown and restarted.
Delete Port Statistics Group
1. From the eManager Main Menu, click Advanced Configuration > Systems > VM Port Statistic.
The Port Statistics screen displays (see Figure 3-7).
2. Highlight the Group ID you want to delete.
3. Click Delete. You are asked to confirm the deletion.
4. Click Yes.
5. Click Submit. Your changes are saved and the screen remains open. A dialog box displays.
6. Click Yes. The changes are added to the voice mail database the next time voice mail service is
shutdown and restarted.
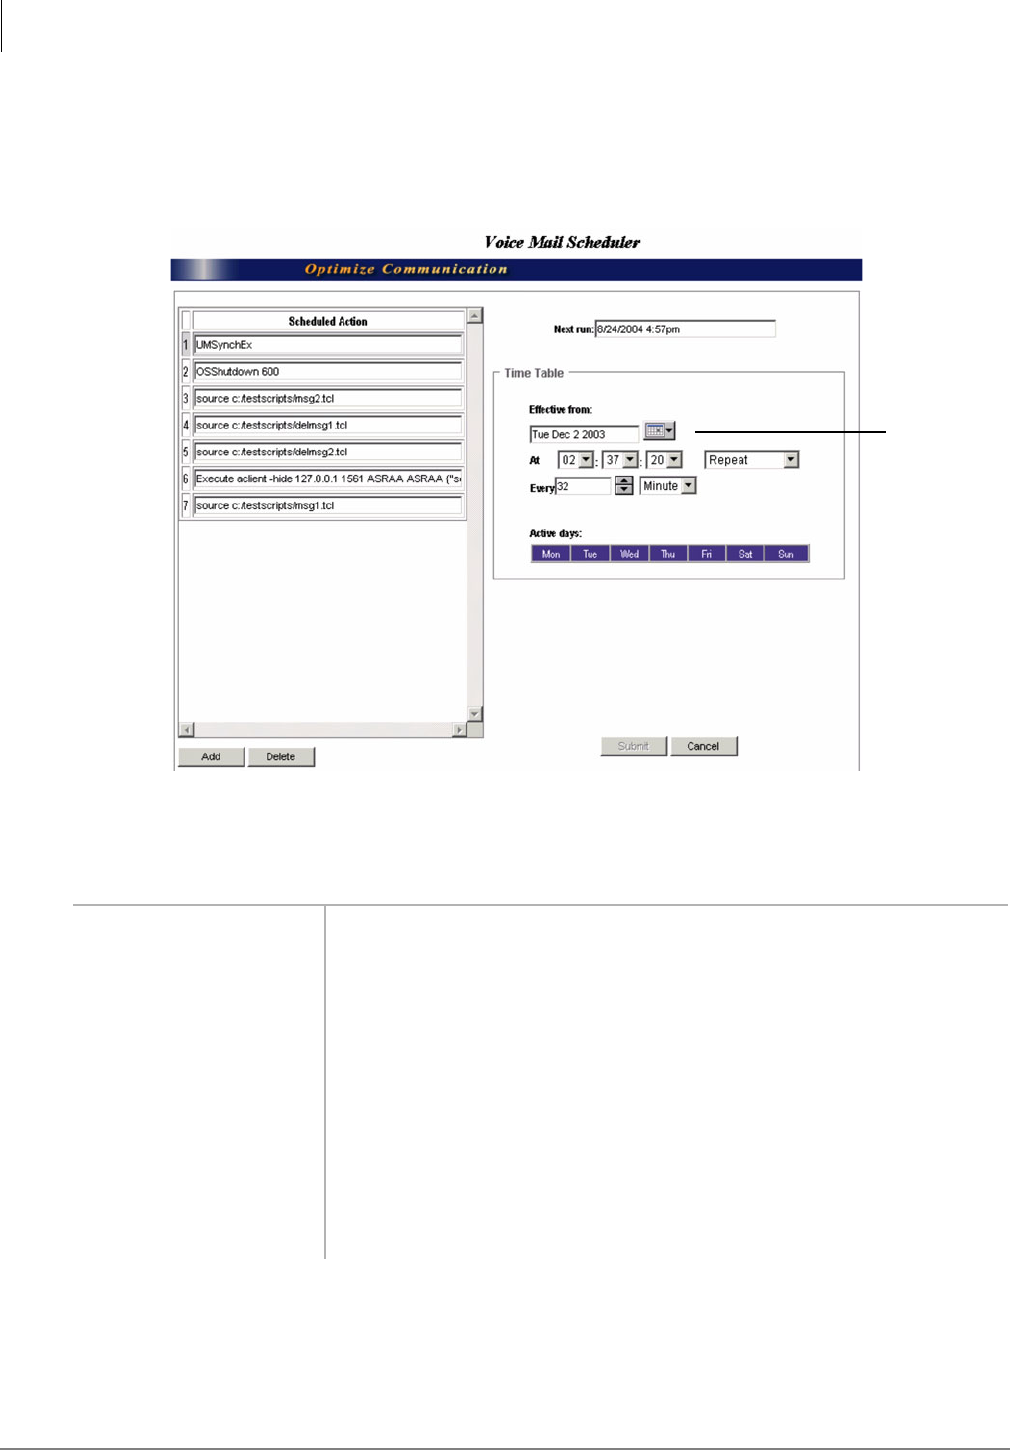
Voice Mail Configuration
Scheduler
3-22 Strata CIX Voice Mail Programming 01/07
Scheduler
The Scheduler screen (see Figure 3-8, Table 3-8) enables you to create/modify/delete scheduled
system tasks. You can set up automatic changes for each action to occur at a specified time, on
certain days of the week, and on a specified date.
Figure 3-8 Scheduler Screen with Sample Data
Table 3-8 Scheduler Screen Fields
FIELD DESCRIPTION
Scheduled Action Name of action to be executed. Action name must be a registered TCL command
name.
Next run (Display only) Date and time the next change occurs (mm/dd/yyyy hh:mm). Time is
expressed in military format (24-hour clock). If a record is disabled, this field
displays the word NEVER.
Timetable Section
Effective from Day of week and calendar date (mm/dd/yy) when the action is scheduled to start.
At Time in hh:mm:ss format. Designates whether action is to be Repeat or a One Time
Only action.
Every Number of times per minute, hour, day, week, month or year.
Active Days Days of the week to which the change is restricted.
Drop-down
calendar
7291

Voice Mail
Configuration
Voice Mail Configuration
Scheduler
Strata CIX Voice Mail Programming 01/07 3-23
Add Scheduled Action
1. From the eManager menu, click Advanced Configuration > Systems > VM Scheduler. The
Scheduler screen displays (see Figure 3-8).
2. Click Add. A blank line appears below the already scheduled actions.
3. Click on the blank line and type a name of the action to be executed.
Note The action name must be a registered TCL command name.
4. In the Timetable section, click drop-down arrow in the Effective from field. A drop-down
calendar displays.
5. Highlight a date on the calendar. Calendar closes and the date is listed in the Effective from
field.
6. Using the drop-down menu, select the time notation in the three At fields.
7. In the second section of the At field, use the drop-down menu to select either Repeat or One
Time Only. If you select Repeat, another field (On The) appears on the screen.
8. Using the drop-down menu, select the number of times you want the action to happen from the
first section (numeric) of the Every field.
9. Click on the second section of the field and use the drop-down menu to select the frequency of
the action. Possible values are: Minute, Hour, Day, Week, Month and Year.
10. (Optional) If you selected Repeat in the At field, you must now select a day of the month from
the drop-down menu in the On The field. Possible values are: 1st, 2nd, 3rd ... 31st.
11. Click on second portion of the On The field and use the drop-down menu to select the
frequency. Possible values are: Day of Month, Active Day in Month.
12. Highlight the days of the week in the Active Days field.
13. Click Submit. Your changes are saved and the screen remains open. A dialog box displays.
14. Click OK. The changes are added to the voice mail database the next time voice mail service is
shutdown and restarted.
15. Click the Scheduled Action number (e.g., “1” next to OSShutdown 600). The Next Run field
refreshes.
Delete Scheduled Action
1. From the eManager menu, click Advanced Configuration > Systems > VM Scheduler. The
Scheduler screen displays (see Figure 3-8).
2. Highlight the action.
3. Click Delete. You are asked to confirm the deletion.
4. Click OK.
5. Click Submit. Your changes are saved and the screen remains open. A dialog box displays.
6. Click OK. The changes are added to the voice mail database the next time voice mail service is
shutdown and restarted.
Note In order to maintain the validity of both Windows XP and voice mail data, a periodic soft
boot of the system is required. For that reason the OSShutdown routine cannot be deleted
from the Scheduler’s list of Scheduled Actions. If desired, the timetable for this action can
be extended to a date and time in the future.

Voice Mail Configuration
Language
3-24 Strata CIX Voice Mail Programming 01/07
Language
Voice mail can be configured to communicate in different languages (default is American
English).The Language screen (see Figure 3-9, Table 3-9) enables you to configure the new
languages for the voice mail. This includes:
•System prompts that give callers and users instructions for message recording and mailbox
management.
•Each mailbox can be assigned to one or more of the configured languages, so greetings and
instructions for message recording are spoken in the predefined language.
At present the two available languages are American English (system default) and French.
Important! American English is the standard language of the Stratagy ES software. Spanish
prompts are also available as an option (part number SES-SPANISH-SYS). Other
languages for system prompts, as well as the Voice Mail Soft Keys, is a custom
option that is available from Toshiba DSD’s Integrated Software Solutions Group.
Please contact a TSD Regional Sales Manager for more details.
Figure 3-9 Language Screen with Sample Data
Table 3-9 Language Screen Fields
FIELD DESCRIPTION
Language The name of the available languages.
Language Prompt Files Available prompt files already installed in the system.
Language Configuration Displays the active language for voice mail.
7292
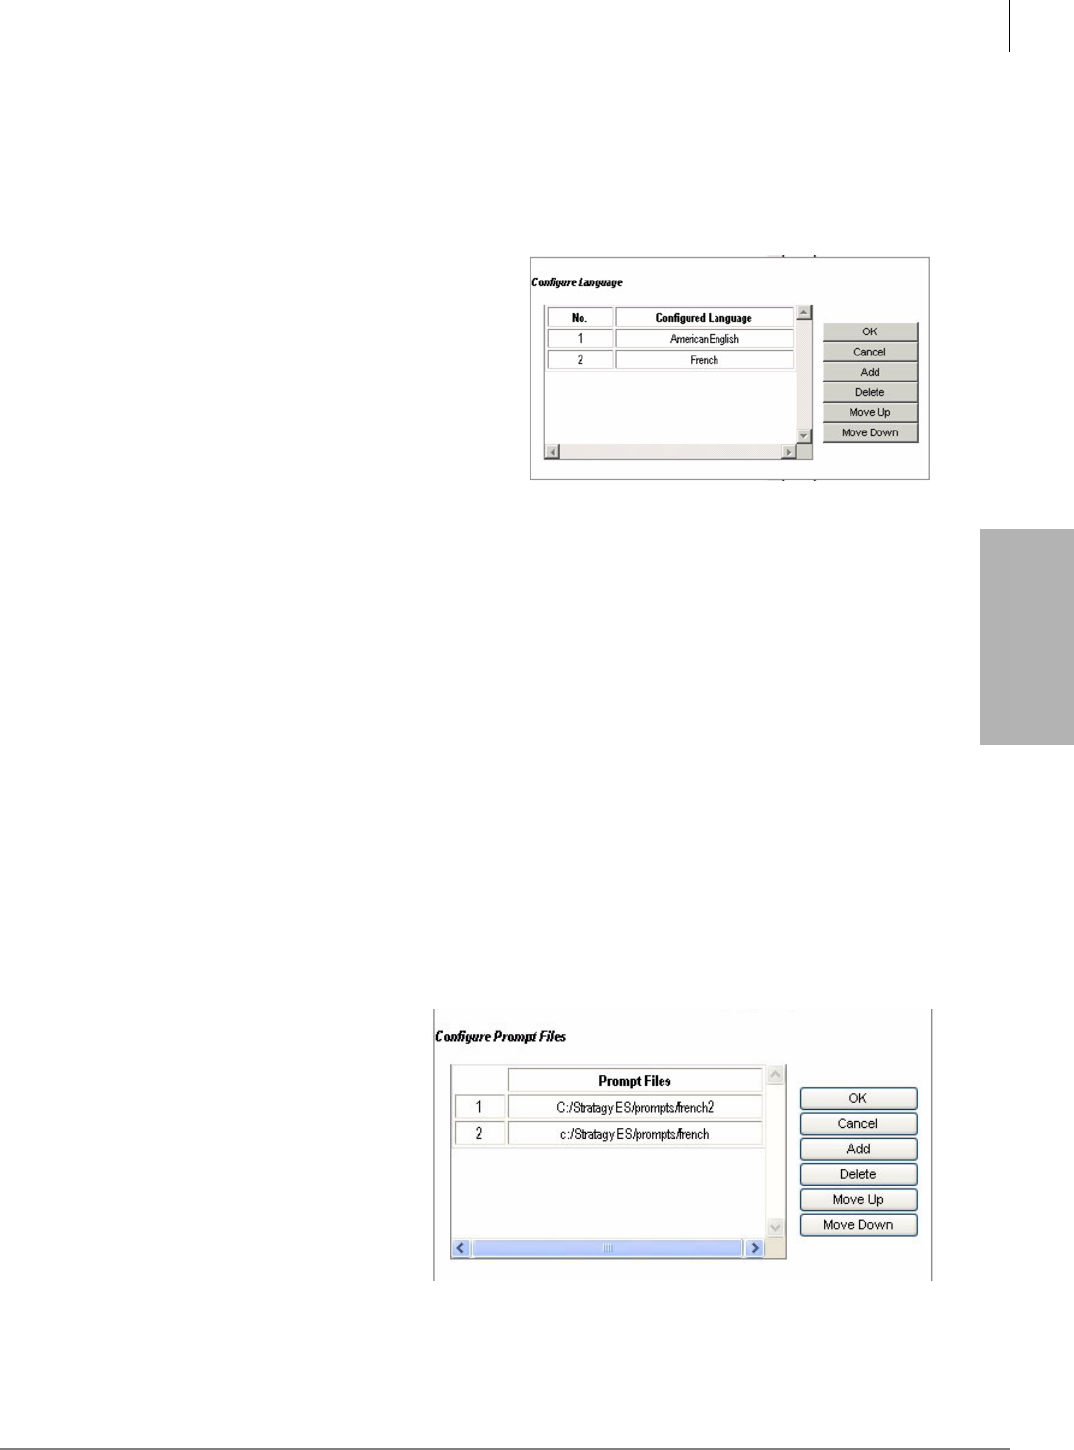
Voice Mail
Configuration
Voice Mail Configuration
Language
Strata CIX Voice Mail Programming 01/07 3-25
Change System Language Setting
Important! Prior to performing this procedure, you must set the sys_language_table parameter
to the correct language file.
1. From the eManager menu, click Advanced Configuration > Systems > VM Language. The
Language screen displays (see Figure 3-9).
2. Click Configure Language List. A dialog box
displays (shown right).
3. Click Add. The Add Language screen
displays.
4. From the drop-down menu, select the new
language and click OK. The dialog box
reappears.
5. Click Move Down/Move Up > OK. The
Language screen displays.
6. Click Submit. Your changes are saved and the screen remains open. A dialog box displays.
7. Click OK. The changes are added to the voice mail database the next time voice mail service is
shutdown and restarted.
Change Mailbox Language Setting
See “Chains/Groups/Fax” on page 4-31 for information on the required settings.
Edit Prompts
The Edit Prompts function enables you to configure the prompts so that specific languages are used
where needed in the system.
Important! Prior to performing this procedure, you must have a language prompt file saved in
the c:\stratagyes\prompts directory with a filename that defines the language. The
file must be saved with the .VOX extension.
1. From the eManager menu, click Advanced Configuration > Systems > VM Language. The
Language screen displays (see Figure 3-9).
2. Highlight a prompt file on the screen and click Edit Prompts. The Confirm Prompt File screen
displays (shown right).
3. Click Add. A dialog box displays.
4. Type in the name of your prompt
file and click OK.
5. You can now move the file up or
down in the list using the Move Up/
Down buttons.
6. Click OK and the new file appears
on the screen.
7. When finished, click Submit.
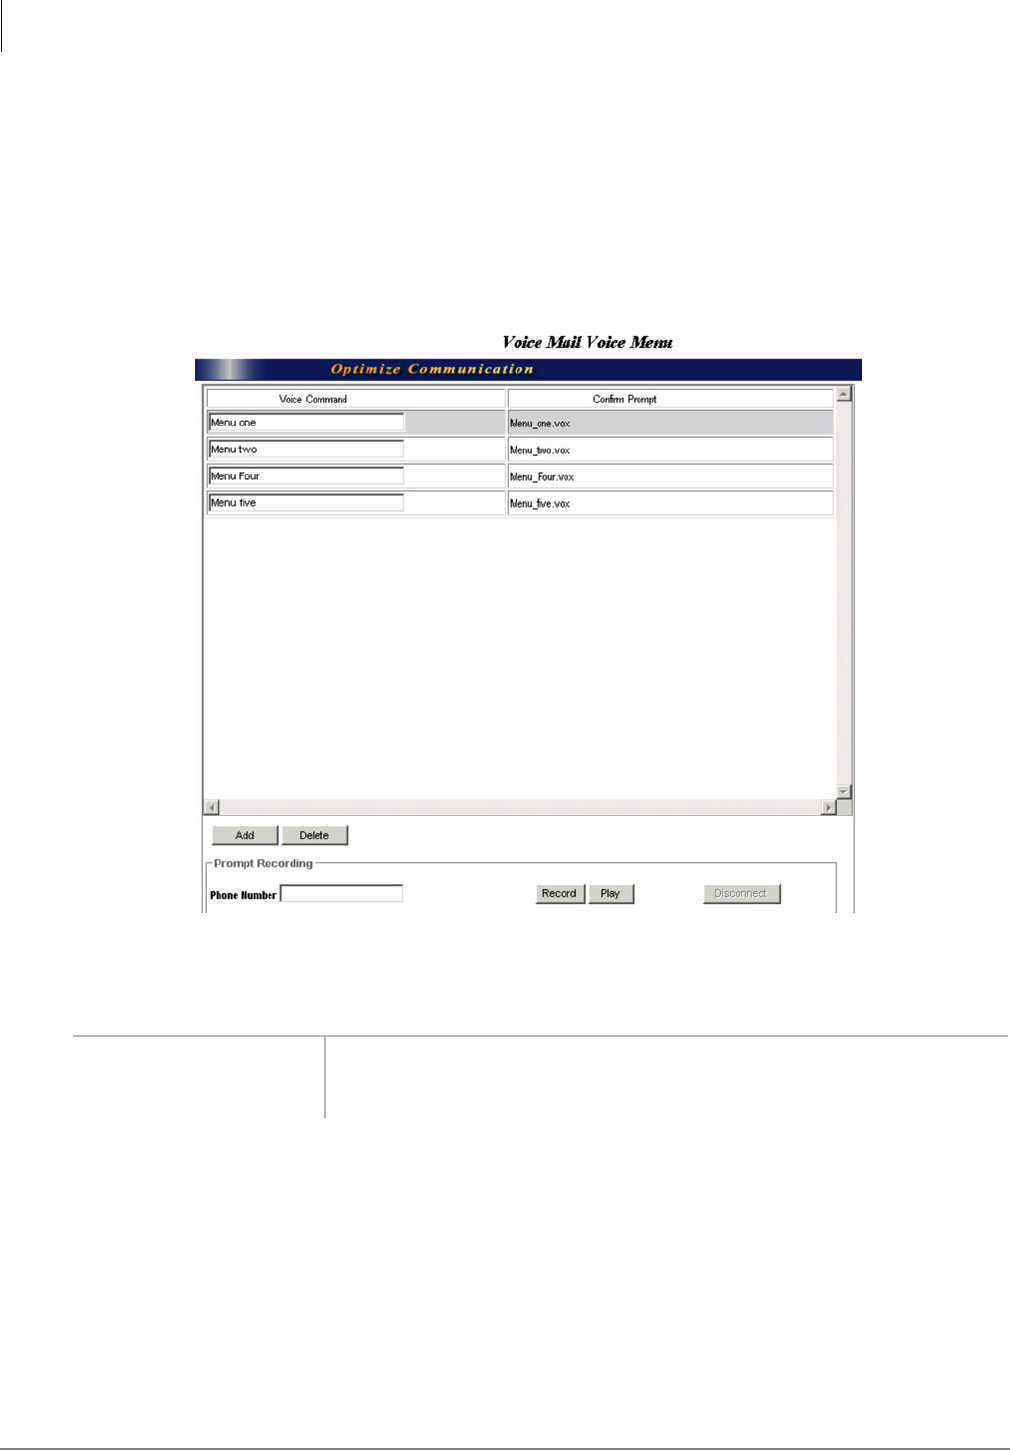
Voice Mail Configuration
Voice Menu
3-26 Strata CIX Voice Mail Programming 01/07
Voice Menu
This feature enables the use of speech enabled single-digit menus that exist in each mailbox.
The Administrator can add/delete voice commands for all the applications available in single digit
command menus under the mailbox editor, and record a confirmation recording through the
telephone for each command. The recordings are for verifying “voice commands” at runtime, and
do not play back unless the system is not confident about the match and wants to confirm the user’s
choice.
Note This screen works in conjunction with the Mailbox Menus screen.
Figure 3-10 Voice Menu Screen
Table 3-10 Voice Menu Screen Fields
FIELD DESCRIPTION
Prompt Recording Phone Number: Enter the extension number of the telephone that can be used for
recording the corresponding command. Once entered, this number remains
consistent for administration of other mailboxes.
7335

Voice Mail
Configuration
Voice Mail Configuration
Voice Menu
Strata CIX Voice Mail Programming 01/07 3-27
Add Voice Command
1. From the eManager Main menu, click Advanced Configuration > System > Voice Menu. The
Voice Menu screen displays (see Figure 3-10 on page 3-26).
2. Click Add and a box appears under the Voice Command column on the screen.
3. Type the voice command in the box.
4. Enter the applicable phone number in the Phone Number field.
5. Click Record and record the command’s confirm prompt.
Notes
•You are allowed to record multiple voice commands (voice synonyms).
•If the voice command recording is missing then the application can’t be triggered by speech
and the caller must use the keypad to trigger the application.
6. Click Disconnect when you are finished recording.
7. Click Play to verify what you have recorded.
8. Click Submit when you are finished.
9. Proceed to the Menus screen in Mailbox Editor to set the voice command for the application.
Important! Without setting the Menus screen, the voice command is invalid.
Delete Voice Command
1. From the eManager Main menu, click Advanced Configuration > System > Voice Menu. The
Voice Menu screen displays (see Figure 3-10 on page 3-26).
2. Highlight a voice command and click Delete.
3. Voice mail asks you to confirm the deletion. Click OK and the command is deleted.
Note If a user tries to remove a voice command from the voice menu, a warning message pops
up; the system won’t delete the voice command until it confirms it with the user.
4. Click Submit when you are finished. A pop-up box displays asking if you want to synchronize
the change(s) with ASR files now.
5. Click OK.
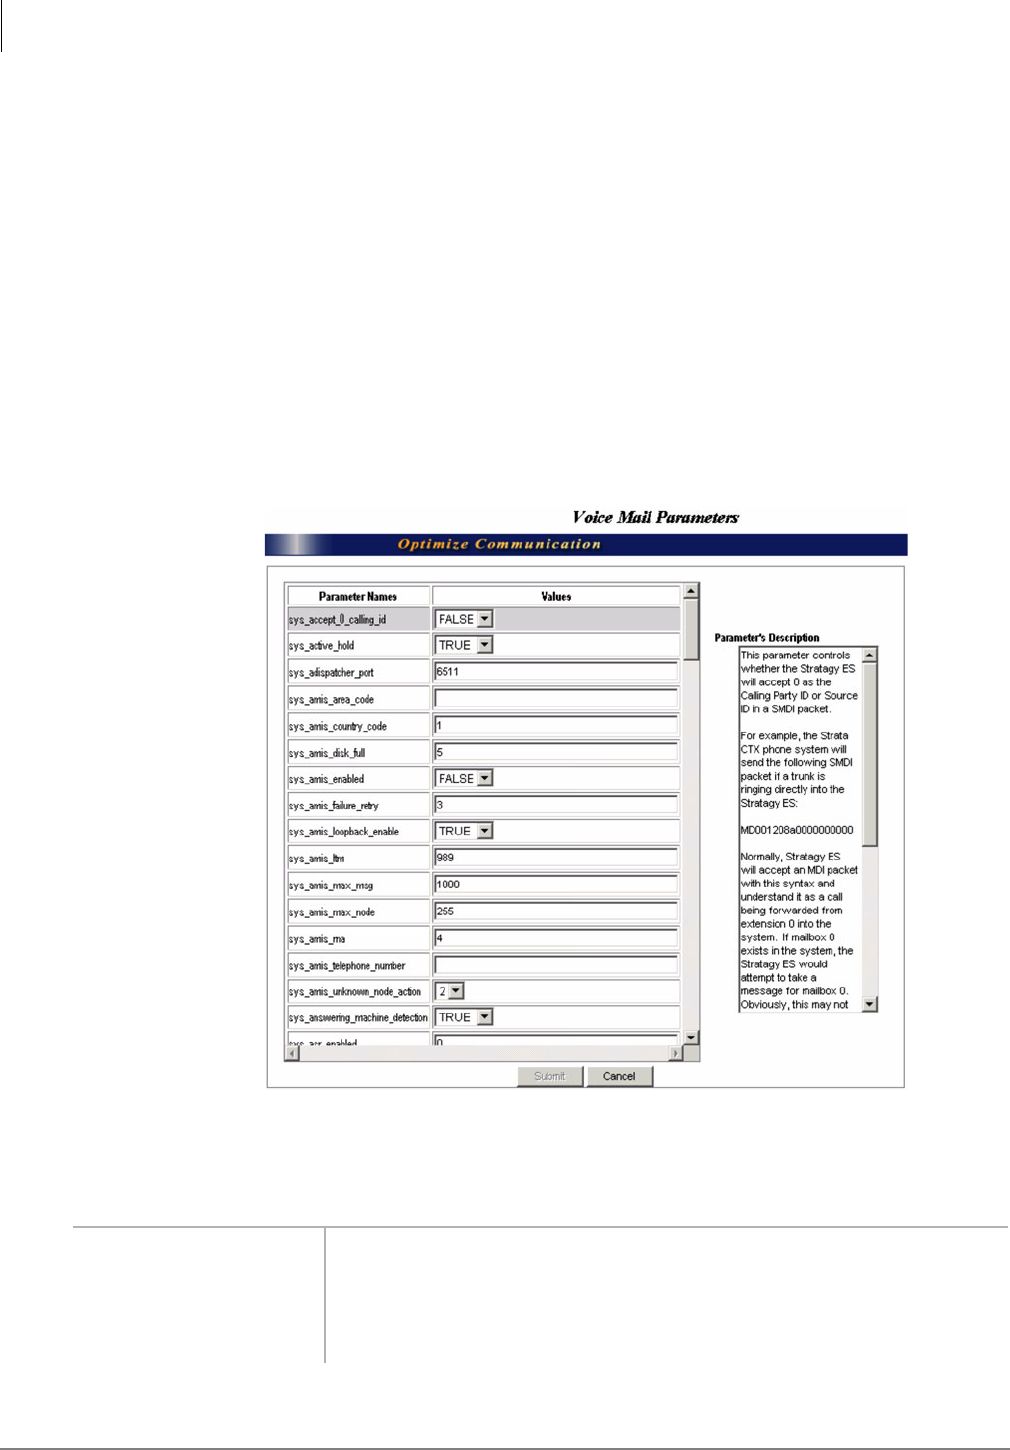
Voice Mail Configuration
Parameters
3-28 Strata CIX Voice Mail Programming 01/07
Parameters
The Parameters screen enables you to change voice mail’s system options and parameters, define
timeout values, and set AMIS, VPIM configurations.
Most voice mail system parameters do not require modification. Default values can be modified as
required and system parameters can be added or deleted.
Important!
•You must contact Toshiba Technical Support if you need to add or delete a parameter to/from
the Parameters List.
A parameter added to the system must be an already recognized system parameter and cannot
be created by the individual installer/technician. Deleting a parameter could cause the system
to fail if the parameter is tied into more than one operation.
•We recommend that you use the Windows XP Backup Utility (see “Backup Procedure” on page
13-1) to periodically preserve system data. Before making changes to this selection, ensure you
have a current backup.
Figure 3-11 Parameters Screen with Sample Data
Table 3-11 Parameters Screen Fields
FIELD DESCRIPTION
Parameter Names The name of the system parameter.
Values Current value. When the system is first started, the value is the system default.
Parameter Descriptions Gives a brief description of the highlighted parameter (left column), the possible
values, and the system default value for the parameter.
7293

Voice Mail
Configuration
Voice Mail Configuration
Parameters
Strata CIX Voice Mail Programming 01/07 3-29
Methods for Modifying the Parameters
To modify a parameter, you must double-click the parameter’s corresponding Values field.
Depending upon the parameter, the Stratagy ES places a cursor at the end of the line, or displays a
drop-down list or a dialog box.
Cursor in Field
A parameter that has many valid
values can be changed by placing
your cursor in the field. Typeover
the current value/information in
the field. Be sure to check Table
3-11 for the parameter’s valid
entries.
Drop-down List
A parameter that has set values
(e.g., true, false) can be changed
using the drop-down list
provided for the field. Select one
of the values in the list by
clicking on the value.
Dialog Box
Double-clicking on a parameter
field with element values (e.g.,
prompt file, etc.), produces a
dialog box for editing as well as
selection of the value.
Using the Dialog box, you can
select, add, delete or reposition
the value in the list (move up/
down).
Important! If you are deleting
an element value
from the box, make sure the correct value is highlighted before clicking Delete. You
are not asked to confirm the deletion.
7630
7631
7632

Voice Mail Configuration
Parameters
3-30 Strata CIX Voice Mail Programming 01/07
Modify Parameters
1. From the eManager Main menu, click Advanced Configuration > Systems > VM Parameters.
The Parameters screen displays (see Figure 3-11).
2. Locate the parameter in the list using the scroll bar.
3. Place your cursor in the field and modify the parameter (see “Methods for Modifying the
Parameters” on page 3-29).
4. Click Submit. Your changes are saved and the screen remains open. A dialog box displays.
5. Click OK. The changes are added to the voice mail database the next time voice mail service is
shutdown and restarted.
Add Parameters
1. From the Parameters screen (see Figure 3-11), right click anywhere in the Parameter Names or
Va l u e s fields. A pop-up box displays with the words “Add” and “Remove.”
2. Click Add. The Add a System Parameter screen displays.
3. Type the new parameter’s name and its appropriate value.
Note The required prefix “sys” is automatically added by the system.
4. Click OK. The parameter is saved and displays alphabetically in the parameter list on the
screen.
...or Cancel. The parameter is not saved and the dialog box closes.
Delete Parameters
1. From the Parameters screen (see Figure 3-11), right click anywhere in the Parameter Names or
Va l u e s fields. A pop-up box displays with the words “Add” and “Remove.”
2. Click Remove. The Delete the System Parameter screen displays.
3. Click OK. The parameter is deleted and is removed from the list on the screen.
...or Cancel. The parameter is not deleted and the dialog box closes.

Voice Mail
Configuration
Voice Mail Configuration
Parameters
Strata CIX Voice Mail Programming 01/07 3-31
Table 3-12 Parameter Definitions
Parameter Description
sys_accept_0_calling_id Accept or reject 0 as calling ID in integration packet.
Possible values:
True: Accept 0.
False: (default) Reject 0.
sys_active_hold Controls how a caller must select to hold for a busy extension.
Possible values:
True: (default) Caller must continue pressing * to hold for a busy
extension, enter another extension, or leave a message at the tone.
False: Caller selects * once to hold for a busy extension and the system
allows the caller to hold until the is either transferred, selects
another extension, or presses*again to leave a message.
sys_amis_area_code Area code of the resident Stratagy ES MAS. Single quotes are required.
Default: blank comment line
sys_amis_country_code Country code of the resident Stratagy ES MAS. Single quotes are required.
Default: comment line starting with 1 for North America.
sys_amis_disk_full Percentage of the hard drive that must be free in order for Stratagy ES MAS
to accept new AMIS messages. If free space is less than this figure, The
Stratagy ES MAS tells the calling AMIS system that the hard drive is full.
Default: 5 (percent)
sys_amis_enabled Whether Stratagy ES processes incoming AMIS calls.
Possible values:
True: Voice mail processes incoming AMIS calls.
False: (default) AMIS calls told that this node is not accepting network
calls.
sys_amis_failure_retry Number of retries after failure.
Possible values: 0~9 (default = 3)
sys_amis_loopback_enable Enables the AMIS loopback test feature.
Possible values:
True: (default) enables feature
False: disables feature
sys_amis_ltm User Agent number to use for the AMIS Loopback mailbox. User Agent other
AMIS nodes can use for testing the network. Any AMIS message to this User
Agent is sent back to the sender, if accessible from this voice mail system.
Possible values: valid User Agent number.
Default: 989
sys_amis_max_msg Maximum number of messages the AMIS system can receive.
Default: 1000
sys_amis_max_node Maximum number of remote nodes (Gateway and Proxy User Agents) that
can be in the network. If the actual number exceeds this value, some nodes
are inaccessible.
Possible values: 1~256 (default = 255)

Voice Mail Configuration
Parameters
3-32 Strata CIX Voice Mail Programming 01/07
sys_amis_rna Enables the ring no answer time-out to be increased to allow for slow
answers from AMIS systems.
Possible values: 1~10 (default = 4)
sys_amis_telephone_number Local telephone number of the resident Stratagy ES MAS. Single quotes are
required.
Default: blank comment line
sys_amis_unknown_node_action Whether voice mail accepts messages from unknown AMIS nodes.
Possible values:
1: Refuses to accept messages.
2: (default) Delivers this message even though replies are impossible.
sys_answering_machine Whether Stratagy performs answering machine detection on outgoing calls.
Possible values:
True: Stratagy performs answering machine detection on outgoing calls.
False: (default) Stratagy does not perform answering machine detection
on outgoing calls.
Note Do not modify the default value unless instructed to do so by Toshiba
personnel.
sys_asr_enabled Enables system to recognize human speech.
Possible values: 0 disabled (default), 1 (enabled)
sys_asr_login_aliases Aliases for the word Login. To be used in ASR Auto Attendant. Every alias to
be separated by a space and multiple words in an alias to be connected with
an underscore. Please also add an aslia.vox file in the
StratagyES\Scripts\ASR_AA_data\prompts directory.
Default: user_log_in mailbox_log_in log_me_in access_mailbox
mailbox_log_on user_log_on
sys_asr_sendmsg_aliases Aliases for the word send_message. To be used in ASR Auto Attendant.
Every alias to be separated by a space and multiple words in an alias to be
connected with an underscore. Please also add an alias.vox file in the
\StratagyES\Scripts\ASR_AA_data\prompts directory.
Default: quick_message
sys_begin_rec_prompt Whether the system says “Begin recording at the tone, ... or hang up” before
taking a message. This also affects the “to re-record press 2” and “to append
press 3” menu selections during the record menu that is given after a
recording.
Possible values:
True: (default) The system plays the above prompt.
False: The system does not play the above prompt. The caller only hears
a tone.
Table 3-12 Parameter Definitions (continued)
Parameter Description

Voice Mail
Configuration
Voice Mail Configuration
Parameters
Strata CIX Voice Mail Programming 01/07 3-33
sys_box_idx Specifies the digits that a caller must dial to launch the directory application.
The auto attendant compares dialed digits with this pattern before
attempting to select a user agent for transfer.
Note Voice mail builds an index file based on information given in the
Directory Name fields. It enables you to use one or more letters to
perform the search, matching all entries possible. For every mailbox
number that matches, the Stratagy ES plays the name recording–
which really may play any recording you want, if available.
Possible values: any valid digits
Default: 411
sys_cancel_busy_hold Whether the system allows callers to hold for busy extensions.
Possible values:
True: Callers cannot hold for busy extensions.
Calls proceed as if a Ring No Answer.
False: (default) Callers can hold for busy extensions.
sys_cng_tone Fax “CNG” tone in line tone construction format, which is described below.
There are four kinds of tones: single frequency, single frequency with
cadence, dual frequency and dual frequency with cadence. Each tone
description consists of a comma separated by a list of numbers.
Possible values:
Single Frequency: ID, F1, F1Dev, Leading_Edge
Dual Frequency: ID, F1, F2, F1Dev, F2Dev, Leading_Edge
Single w/cadence: ID, F1, F1Dev, On, OnDev, Off, OffDev, Repeat
Dual w/cadence: ID, F1, F2, F1Dev, F2Dev, On, OnDev, Off, OffDev, Repeat
where: ID Fax Carrier Tone (this should be 103)
F1, F2 Frequencies in Hz
F1Dev, F2Dev Frequency deviations in Hz
On Time the tone must be present (ms)
Off Time the tone must be absent (ms)
OnDev Allowable deviation in the on time (ms)
OffDev Allowable deviation in the off time (ms)
Leading_Edge If 1, signals the presence of the tone at its
leading edge, If 0, at its trailing edge.
Repeat The number of on-off cycles that must occur
before signalling the presence of the tone.
Default: 113, 1100, 100, 500, 100, 3000, 100, 1
sys_company_fax_number This telephone number is used when sending faxes to identify the source of
the fax.
Note This parameter is not currently supported.
Default: blank comment line
sys_company_name The name that will appear in the fax header for sent faxes. This field is
limited to 32 characters.
Note This parameter is not currently supported.
Default: blank comment line
Table 3-12 Parameter Definitions (continued)
Parameter Description

Voice Mail Configuration
Parameters
3-34 Strata CIX Voice Mail Programming 01/07
sys_connect_tone Determines whether voice mail beeps when completing a transfer.
Possible values:
True: Voice mail plays a beep when completing a transfer.
False: (default) Voice mail does not play a beep when completing a
transfer.
sys_default_user_agent User Agent used by the main application at startup.
Default: 990
sys_directory_min_digits Specifies the number of digits the caller has to enter before the directory
lookup application starts searching the directory.
Default: 3
sys_discard_SMDI_source Discards SMDI information for calling party ID when a message is sent from
998 or a Direct Send User Agent.
Possible values: True, False (default)
sys_dtmf_gate Before dialing any User ID extension, voice mail verifies that DTMF was
entered since the call last accessed the User ID (default is 991) specified in
the DONE chain of the initial User ID (default is 990).
This “gate” prevents the transfer of a dead/phantom call to the Operator on
those switches that do not have disconnect supervision. Voice mail does not
perform the “gate” action when the Extension field begins with the “@”
character.
Possible values:
True: (default) When prompted, the Caller must say “yes” to complete the
chain and transfer.
False: Caller does not have to say “yes” to complete the chain and
transfer.
sys_dtmf_interdigit_delay Time between digits in DTMF dialing in ms. units.
Default: 50
sys_fax_dl_init A token %A is replaced by this parameter, usually it is a dial code to access
an outside line.
Note This parameter is not currently supported.
Default: 9 (dial 9 and pause for two seconds)
sys_fax_fail_entry Specifies whether voice mail resends a fax if it detects a failure during
transmit.
Note This parameter is not currently supported.
Possible values:
0 no resent
1 resends starting from the first page
2 resends starting from the failure page
Default: 0
Table 3-12 Parameter Definitions (continued)
Parameter Description

Voice Mail
Configuration
Voice Mail Configuration
Parameters
Strata CIX Voice Mail Programming 01/07 3-35
sys_fax_max_retries Defines the maximum number or retries.
Note This parameter is not currently supported.
Possible values: 1, 0
Default: 1
sys_fax_num_rings The number of rings before voice mail determines the fax machine will not
answer.
Note This parameter is not currently supported.
Default: 3
sys_fax_requeue_interval Number of milliseconds to wait between retries for fax_max_retries.
Note This parameter is not currently supported.
Default: 300000 (ms)
sys_fixed_len0 Maximum number of digits voice mail expects when a caller dials a mailbox
number beginning with 0.
There is only one mailbox that can have zero as its first digit, and that is
Mailbox Number 0. If the value of this parameter is changed to 1, and a caller
dials 0 in a place where a mailbox number is expected, then voice mail
immediately accepts the 0 as the mailbox number and goes to the next
processing step. If the parameter’s value is left at 8, then a timeout or pound
sign (#) is required to terminate the mailbox number. This latter procedure is
compatible with earlier versions of Stratagy.
Possible values: 1~8
Default: 8
sys_fixed_len1 Maximum number of digits voice mail expects when a caller dials a mailbox
number beginning with 1.
When changing this value, make certain that it is still possible to log in and
send messages to all existing mailboxes that begin with this digit. For
example, if there are five-digit mailboxes that begin with this digit, then you
should not set the value of this parameter less than five. Check all
mailboxes, including users, guests, and reserved (411, 990, etc.)
Possible values: 1~8
Default: 8
sys_fixed_len2 Maximum number of digits voice mail expects when a caller dials a mailbox
number beginning with 2.
When changing this value, make certain that it is still possible to log in and
send messages to all existing mailboxes that begin with this digit. For
example, if there are five digit mailboxes that begin with this digit, then you
should not set the value of this parameter less than five. Check all
mailboxes, including users, guests, and reserved (411, 990, etc.)
Possible values: 1~8
Default: 8
Table 3-12 Parameter Definitions (continued)
Parameter Description

Voice Mail Configuration
Parameters
3-36 Strata CIX Voice Mail Programming 01/07
sys_fixed_len3 Maximum number of digits voice mail expects when a caller dials a mailbox
number beginning with 3.
When changing this value, make certain that it is still possible to log in and
send messages to all existing mailboxes that begin with this digit. For
example, if there are five digit mailboxes that begin with this digit, then you
should not set the value of this parameter less than five. Check all
mailboxes, including users, guests, and reserved (411, 990, etc.)
Possible values: 1~8
Default: 8
sys_fixed_len4 Maximum number of digits voice mail expects when a caller dials a mailbox
number beginning with 4.
When changing this value, make certain that it is still possible to log in and
send messages to all existing mailboxes that begin with this digit. For
example, if there are five digit mailboxes that begin with this digit, then you
should not set the value of this parameter less than five. Check all
mailboxes, including users, guests, and reserved (411, 990, etc.)
Possible values: 1~8
Default: 8
sys_fixed_len5 Maximum number of digits voice mail expects when a caller dials a mailbox
number beginning with 5.
When changing this value, make certain that it is still possible to log in and
send messages to all existing mailboxes that begin with this digit. For
example, if there are five digit mailboxes that begin with this digit, then you
should not set the value of this parameter less than five. Check all
mailboxes, including users, guests, and reserved (411, 990, etc.)
Possible values: 1~8
Default: 8
sys_fixed_len6 Maximum number of digits voice mail expects when a caller dials a mailbox
number beginning with 6.
When changing this value, make certain that it is still possible to log in and
send messages to all existing mailboxes that begin with this digit. For
example, if there are five digit mailboxes that begin with this digit, then you
should not set the value of this parameter less than five. Check all
mailboxes, including users, guests, and reserved (411, 990, etc.)
Possible values: 1~8
Default: 8
sys_fixed_len7 Maximum number of digits voice mail expects when a caller dials a mailbox
number beginning with 7.
When changing this value, make certain that it is still possible to log in and
send messages to all existing mailboxes that begin with this digit. For
example, if there are five digit mailboxes that begin with this digit, then you
should not set the value of this parameter less than five. Check all
mailboxes, including users, guests, and reserved (411, 990, etc.)
Possible values: 1~8
Default: 8
Table 3-12 Parameter Definitions (continued)
Parameter Description

Voice Mail
Configuration
Voice Mail Configuration
Parameters
Strata CIX Voice Mail Programming 01/07 3-37
sys_fixed_len8 Maximum number of digits voice mail expects when a caller dials a mailbox
number beginning with 8.
When changing this value, make certain that it is still possible to log in and
send messages to all existing mailboxes that begin with this digit. For
example, if there are five digit mailboxes that begin with this digit, then you
should not set the value of this parameter less than five. Check all
mailboxes, including users, guests, and reserved (411, 990, etc.)
Possible values: 1~8
Default: 8
sys_fixed_len9 Maximum number of digits voice mail expects when a caller dials a mailbox
number beginning with 9.
When changing this value, make certain that it is still possible to log in and
send messages to all existing mailboxes that begin with this digit. For
example, if there are five digit mailboxes that begin with this digit, then you
should not set the value of this parameter less than five. Check all
mailboxes, including users, guests, and reserved (411, 990, etc.)
Possible values: 1~8
Default: 8
sys_hub_count Number of times that a message can be forwarded automatically by
distribution lists and auto copy mailboxes. After this count is exceeded for a
message, it can not be distributed or copied. The purpose of this setting is to
limit the number of copies that can be created if there is a loop in the
distribution list or copy box structure. A loop can occur, for example, when
two distribution lists include each other as members.
Default: 2
sys_language_table Sets language name and language ID in system.
Possible values: American English (default)
sys_line_begin The number of the first line that voice mail should use for processing its calls.
Lines with numbers greater than this value will not be used by voice mail,
and will be available for use by other telephony programs (i.e., ACD). It must
be less than or equal to sys_line_end. If not specified, this field defaults to
blank.
sys_line_end The number of the last line that voice mail should use for processing its calls.
Lines with numbers greater than this value will not be used by Stratagy, and
will be available for use by other telephony programs. It must be less than or
equal to sys_line_end. If not specified, this field defaults to the largest
installed line number in the system.
sys_local_amis_node Gateway User Agent number that represents the local AMIS node.
Messages addressed to this node are delivered directly to the real local box
number instead of being shipped out on the network.
Possible values: valid User Agent number.
Default: blank comment line
Table 3-12 Parameter Definitions (continued)
Parameter Description

Voice Mail Configuration
Parameters
3-38 Strata CIX Voice Mail Programming 01/07
sys_local_trace Generates trace information in file form and if desired, displays the data on
the screen.
Syntax: {name filter {list} flags cycle}
where:
name Subdirectory where trace files are stored.
filter Type of trace information to be generated and specifies the
components for which the trace information will be generated.
Possible values are:
1 normal (general nature)
2 support (determines correct installation and
configuration of the Stratagy)
4 debug (intended for debugging—useful for software
developers)
-1 All data
list Specifies the list of trace producers. The trace producer is defined
in the format of “session/application/userID.” The “*” is the wild
character. For example, */*/* specifies all producers.
Note {} also specifies all producers.
flags Defines the action to be taken on the trace information generated.
Possible values are:
0 store only
1 store and display
2 neither store nor display
3 display only
cycle The number of days of history to keep for this trace.
Default: {C:/StratagyES/Message_Log -1 {} 0 5} {Displ -1 {} 3 5}
where:
C:/StratagyES/Message_Log = file name
-1 = all data
{} = all producers
0 = store only
5 = store for 5 days
Displ = display
-1 = all data
{} = all producers
3 = display only
5 = store for 5 days
sys_login_pound Determines whether prompt will say “finish by pressing the pound key” in
login process.
Possible values:
True: (default) Plays prompt, “finish by...”
False: Does not play prompt.
sys_max_call_scr_name_dur Defines the maximum duration for a recording caller’s name when call
screening is enabled on a mailbox.
Default: 5000 ms
Table 3-12 Parameter Definitions (continued)
Parameter Description

Voice Mail
Configuration
Voice Mail Configuration
Parameters
Strata CIX Voice Mail Programming 01/07 3-39
sys_max_guest_box Last mailbox number that can be used when creating a Guest Mailbox.
When used with the sys_min_guest_box parameter, they limit the number of
Guest Mailboxes that can be created.
Example: If this value is 90200, then the last Guest Mailbox that can be
created is Mailbox 90200.
Possible values: valid mailbox number larger than the sys_min_guest_box
parameter setting
Default: 90200
sys_max_prompt Number of times a prompt should repeat until deciding to hang up.
Possible values: 1~9
Default: 3
sys_max_sec_code_len Controls the maximum length security code that voice mail accepts as a new
security code when a user attempts to change it from a telephone.
Note Value must be greater than or equal to the minimum length security
code (i.e., sys_min_sec_code_len).
Possible values: 1~16
Default: 16
sys_max_silence Specifies maximum number of milliseconds in silence before recording is
terminated.
Default: 5000 ms
sys_maximum_box_length Maximum number of digits voice mail expects in the case that the maximum
number of digits voice mail expects for the beginning digit of that mailbox
number is not defined.
Default: 5
sys_min_guest_box Starting mailbox number that may be used when creating a Guest Mailbox.
When used with the sys_max_guest_box parameter, they limit the number of
Guest Mailboxes that can be created.
Examples: If this value is 90000, then the first Guest Mailbox that is created
is Mailbox 90000. The second guest has Mailbox 90001, etc.
Possible values: valid mailbox number smaller than sys_max_guest_box
parameter setting
Default: 90000
sys_min_sec_code_len Controls the minimum length security code that voice mail accepts as a new
security code when a suer attempts to change it from a telephone.
Note Value must be less than or equal to the maximum length security code
(i.e., sys_max_sec_code_len).
Possible values: 1~16
Default: 3
sys_minimum_message_length Minimum message length in milliseconds for the system to be able to
recognize the message.
Default: 1000 ms
sys_minimum_record_length Minimum record length in milliseconds.
Default: 100 ms
Table 3-12 Parameter Definitions (continued)
Parameter Description

Voice Mail Configuration
Parameters
3-40 Strata CIX Voice Mail Programming 01/07
sys_msg_recording_audio_type Sets the audio type for incoming messages. There are four different audio
types from which you can select.
Important! If you change this option on an active system, all previously
recorded messages are lost.
Notes
©The better the quality, the more disk space is taken by the recordings.
©In order to not have to install the Toshiba audio codec on a user PC, this
parameter must be set to 5.
Possible values:
2: Dialogic ADPCM at 6KHz sampling (3000 bps)
3: Dialogic ADPCM at 8KHz sampling (4000 bps)
4: PCM at 6KHz sampling (6000 bps)
5: PCM at 8KHz sampling (8000 bps)
Default: 3
sys_multiple_destination Sets control for destination entry while addressing a message.
Possible values:
0 - Users must press 04 to add multiple destinations for a
message prior to recording. (default)
1: Users can enter multiple destinations before recording a
message. Requires users press # at end of entries.
sys_nam_maxlen Maximum number of milliseconds for recording a user’s name. The name
recording is used for directory access and whenever voice mail tries to
identify the mailbox number.
Possible values: number of milliseconds
Default: 10000 (ms)
sys_name_announce Sets the name announcement at user log on.
Possible values:
True: System announces the user’s name at log-on time.
False: (default) System skips the name announcement at log-on time.
sys_name_recording_audio_type Sets the audio type for name recordings, list comments, and greetings.
There are four different audio types from which you can select.
Notes
©If you change this option on an active system, all previously recorded
messages are lost.
©The better the quality, the more disk space is taken by the recordings.
Possible values:
2: Dialogic ADPCM at 6KHz sampling (3000 bps)
3: Dialogic ADPCM at 8KHz sampling (4000 bps)
4: PCM at 6KHz sampling (6000 bps)
5: (default) PCM at 8KHz sampling (8000 bps)
sys_operator_ua Operators User Agent used by Auto Attendant.
Default: 0
Table 3-12 Parameter Definitions (continued)
Parameter Description

Voice Mail
Configuration
Voice Mail Configuration
Parameters
Strata CIX Voice Mail Programming 01/07 3-41
sys_page_ready_tone Tone from Page Terminal indicates ready to page.
Note This parameter is not currently supported.
Possible values:
Single Frequency: ID, F1, F1Dev, Leading_Edge
Dual Frequency: ID, F1, F2, F1Dev, F2Dev, Leading_Edge
Single w/cadence: ID, F1, F1Dev, On, OnDev, Off, OffDev, Repeat
Dual w/cadence: ID, F1, F2, F1Dev, F2Dev, On, OnDev, Off, OffDev, Repeat
where: ID Fax Carrier Tone (this should be 103)
F1, F2 Frequencies in Hz
F1Dev, F2Dev Frequency deviations in Hz
On Time the tone must be present (ms)
Off Time the tone must be absent (ms)
OnDev Allowable deviation in the on time (ms)
OffDev Allowable deviation in the off time (ms)
Leading_Edge If 1, signals the presence of the tone at its
leading edge. If 0, at its trailing edge.
Repeat The number of on-off cycles that must occur
before signalling the presence of the tone.
Default: 114, 1850, 1000, 75, 50, 75, 50, 2
sys_partial_q_ok Enables the Q( ) token to save the message even though all prompts are not
completed.
Tr u e : Q( ) token saves the messages.
False: Messages are not saved if prompts are not completed.
Possible values: true, false
Default: false (To enable, remove the starting # and set the value.)
sys_pending_threshold Threshold value determining message pending in seconds.
Default: 2 (secs.)
sys_play_skip Number of seconds message rewinds or skips forward during message
playback when a user presses*or #.
Possible values: number of seconds
Default: 5 (secs.)
sys_play_user_id Determines whether directory search feature plays mailbox number that it
finds.
Possible values:
True: (default) If name recording available, the caller hears mailbox
number and name recording. If name recording unavailable, the
caller hears only the mailbox number.
False: Mailbox number never plays. If name recording available, name
recording plays.
sys_prompt_files Default prompt file that voice mail should use on an incoming call. This
enables you to redefine the default language prompt file from English. It
does not preclude you from changing the prompt file during the call.
Possible values: valid prompt file. The brackets are required.
Default: {C:/StratagyES/prompts/english2 0}
Table 3-12 Parameter Definitions (continued)
Parameter Description

Voice Mail Configuration
Parameters
3-42 Strata CIX Voice Mail Programming 01/07
sys_rings_no_answer When a mailbox is transferring a call to an extension, it needs to know how
many ringback cycles to wait before signalling a no-answer. This value is
used if the mailbox doesn’t provide its own setting.
Default: 3
sys_security_code_suffix Defines the suffix used in constructing the default security code. The default
security code for a mailbox number is the mailbox number suffixed with the
value specified in this option.
For example: Assume that you specify the suffix value as 335, the default
security code for Mailbox 200 generated by the system would be 200335.
Default: 997
sys_sendfax_line_group The name of the notification port group to use when sending fax
transmissions. This applies to the user mode fax features, the SENDFAX
application and IVR programs that send faxes.
By creating a notification port group, then assigning that port group to this
configuration variable, you can limit fax transmissions to the member ports of
that group.
Note This parameter is not currently supported.
Default: Q1 (enables any line to be used)
sys_short_direct_send What voice mail plays when the Direct Message Mailbox Number (usually
998) is entered followed by the mailbox number.
Possible values:
True: “You entered” and the user’s name recording plays.
False: (default) Mailbox’s current greeting plays (as if received a Ring No
Answer).
sys_short_pause Duration of the short pause in ms.
Default: 500 (.5 secs.)
sys_skip_to_record Enables a caller to press # and skip over a user’s personal greeting and go
directly to recording a message.
Possible values:
True: A caller can press # during the user’s mailbox greeting to skip past
the greeting and the prompt to begin recording immediately.
False: Only the greeting is skipped and the prompt plays before recording
begins.
sys_smdi_tcpport Defines the port number that Stratagy SMDI/SMDI+ TCP server is listening
on.This value must match with the IP Port configured in the CIX for IP SMDI.
Default: 1000
sys_smtp_retry_count Defines the maximum number of retries for sending voice messages to the
E-mail server.
Default: 5
sys_smtp_retry_delay Number of milliseconds voice mail waits between retries for
sys_smtp_retry_count.
Default: 60 (milliseconds)
Table 3-12 Parameter Definitions (continued)
Parameter Description

Voice Mail Configuration
Parameters
Strata CIX Voice Mail Programming 01/07 3-43
Voice Mail
Configuration
sys_smtpserver_gateway Configures a dedicated SMTP Gateway server for SES UM to use. This
gateway can be running on the SES or another server in the network. Enter
the Gateway server’s Name or IP Address and Port Number.
Name;9875
Note The server name and the port number should be separated with a
blank, a comma, or a semicolon.
Default: blank
sys_smtpserver_host Stratagy ES hosts its own internal SMTP server in order to support the UM
feature. SMTP servers require host names to identify them in an SMTP
transmission. This parameter defines the host name for the Stratagy ES
SMTP server.
The host name is used as a part of the source address of an UM message
sent to an e-mail server. For example, if the sys_smtpserver_host parameter
is set to “stratagyes,” then an UM message from mailbox 200 would have a
source address of “200@stratagyes”.
In most cases using the computer name of the Stratagy ES server is
sufficient. However, Toshiba recommends that you confirm the appropriate
host name for the Stratagy ES SMTP server with your site System
Administrator.
Default: blank
sys_smtpserver_maxconn Defines the maximum number of connections allowed to this voice mail
SMTP server by client applications. If set to zero, then the server is not
available to the client.
UM client seats are fixed to mailboxes. This value can be used to limit net
work traffic, if necessary.
Default: 10
sys_smtpserver_types2accept Defines MIME types that this voice mail server accepts as voice messages.
Note There is no validation for this field.
Default: audio/x-wav audio/wav audio/microsoft-wave
sys_sofkey_length Sets softkey template ID length. Set this value to 3 if sofkeys are multilingual.
Possible values:
2 (set for Strata CTX Release 1.02 and earlier) (default)
3 (set for Strata CTX Release 1.03 or later)
sys_speakname_dir Defines the directory where the prompts are located for the Notification
Applications (e.g., MsgLampOn, MsgLampOff). Prompts play when the user
changes his/her message notification in the Change User Options menu.
Possible values: Any valid path/filename.
Default: C:/StratagyES/Prompts
sys_startup_apps Default: Snmp SOFTKEYNOTIFYDialogModuleInit
sys_statistics_interval Defines the time interval in milliseconds that the information page gets
updated.
Possible values: number of milliseconds
Default: 30000 (ms)
Table 3-12 Parameter Definitions (continued)
Parameter Description

Voice Mail Configuration
Parameters
3-44 Strata CIX Voice Mail Programming 01/07
sys_tape_length When a User selects option 1 (Play Messages), and then 78 (Continuous
Play) or 76 (Continuous Delete), this parameter specifies the number of
minutes to play or delete. Usually it is the length of one side of a tape that
might be used for recording a set of messages in a mailbox.
Possible values: 0~99
Default: 30
Note Setting the value to 0 disables both Continuous Play and Continuous
Delete.
sys_timestamp_forward Controls the date/time stamp the system uses on a forwarded message.
Possible values:
True: (default) Use the date/time that the message was forwarded.
False: Use the original date and time the message was first recorded.
sys_tmo_answer_prompt Delay in milliseconds to answer a call after line goes off-hook for SMDI.
Possible values: number in milliseconds
Default: 500 (ms)
sys_tmo_auto_record Specifies the length of pause time (in ms) during Auto Recording. If the Auto
Recording is paused longer than this, the recording is terminated.
Default: 60000 (ms)
sys_tmo_dir_interdigit Specifies the timeout in milliseconds that Stratagy waits between two
consecutive digits during Directory lookups.
Possible values: number of milliseconds
Default: 5000ms
sys_tmo_dtmf Amount of time in milliseconds voice mail waits to determine that the caller
has finished entering DTMF digits (provided the caller does not press #).
Possible values: number in milliseconds
Default: 1200 (ms)
sys_tmo_dtmf_login Amount of time in milliseconds voice mail waits to determine that the caller
has finished entering DTMF digits (provided that the caller does not press #)
when entering the mailbox number and security code during the log in
process.
Possible values: number in milliseconds
Default: 2000 (ms)
sys_tmo_dtmf_start_timeout Specifies the timeout in milliseconds that voice mail waits before receiving
the first digit.
Possible values: number in milliseconds
Default: 4000 (ms)
Table 3-12 Parameter Definitions (continued)
Parameter Description

Voice Mail Configuration
Parameters
Strata CIX Voice Mail Programming 01/07 3-45
Voice Mail
Configuration
sys_tmo_hold Number of milliseconds before voice mail attempts to transfer a caller after
the caller has pressed * to hold for a busy extension.
When a caller presses * to hold for a busy extension, voice mail plays a file
called C:\Stratagy\HOLD.VOX after which voice mail attempts to transfer the
caller again. If that file is missing, voice mail is silent for the number of
seconds specified by this parameter.
Note To have callers hear a specialty recording while on hold, record over
HOLD.VOX by accessing the System Administration Menu. See
System Administrator Guide for details.
Possible values: number in milliseconds
Default: 20000 (ms)
sys_tmo_host Name of machine where CIX Adaptability Service is running.
Default: localhost
sys_tmo_port Port on CIX that CIX Adaptability Service is using. This is defined in
AdaptabilityTsp.cnf.
Default: 4001
sys_tmo_interdigit_timeout Specifies the timeout (in units of 100 ms) that voice mail waits between two
consecutive digits.
Possible values: number of milliseconds
Default: 1200 (ms)
sys_tmo_menu Amount of time in milliseconds voice mail waits before repeating a choice
menu.
Possible values: number of milliseconds
Default: 2000 (ms)
sys_tmo_serial Maximum number of milliseconds voice mail waits for a response when
communicating with peripheral devices through a serial port. Otherwise,
voice mail could potentially wait forever.
Possible values: 2000~9000 (ms)
Default: 2000 (ms)
sys_tmo_sound Maximum amount of sound/dial tone time in milliseconds the system waits
before deciding to finish a recording and hang up.
Possible values: number of milliseconds
Default: 5000 (ms)
sys_tmo_voicehome_login Specifies the timeout in milliseconds for login to VoiceHome.
Possible values: number of milliseconds
Default: 10000 (ms)
sys_tsp_host Default: localhost
sys_tsp_port Default: 4001
sys_tts_playback_order See Table 8-1 on page 8-3 of Chapter 8 — Text-to-Speech (TTS) for complete
description of this Text-to-Speech (TTS) parameter.
Table 3-12 Parameter Definitions (continued)
Parameter Description

Voice Mail Configuration
Parameters
3-46 Strata CIX Voice Mail Programming 01/07
sys_um_directory suffix Text value to be appended to the From field when sending Unified
Messaging e-mails.
Default: None
sys_um_subject_fax_only Appears in Subject field on Message inbox to identify the type of message
received.
Note This parameter is not currently supported.
Default: Stratagy Fax Message
sys_um_subject_voice_only Appears in Subject field on Message inbox to identify the type of message
received.
Default: Stratagy Voice Message
sys_um_subject_voicefax Appears in Subject field on Message inbox to identify the type of message
received.
Note This parameter is not currently supported.
Default: Stratagy Voice Message
sys_um_unknown_name Configures a name for unknown senders in SES.
Anonymous, unspecified
Note Some anti-spam filters do not pass on e-mail from ambiguous
sources. Check with your e-mail administrator for acceptable entries.
Default: unknown
sys_voicehome_num_rings Set number of rings before Voice Home application hangs up to call.
Default: 4
sys_voicemail_pilot_number Defines the hunt group pilot for the voice mail ports. This parameter is used
in FeatureFlex scripts to direct calls to VM ports.
Default: blank
sys_vpim_enabled Voice Profile for Internet Mail (VPIM) is an industry standard protocol that
facilitates server-to-server message exchange between voice processing
systems from different manufacturers. VPIM can exchange both voice
messages as long as they are of the format dictated by the VPIM standard.
Possible values: 0 disabled (default), 1 (enabled)
Table 3-12 Parameter Definitions (continued)
Parameter Description

Strata CIX Voice Mail Programming 01/07 4-1
Voice Processing
Voice Processing 4
This chapter gives instructions on using the User Agent function for voice processing. It covers in
detail the Mailbox Editor Menu and how to create, modify and delete mailboxes (e.g., COS, user,
Distribution List, Direct Send Voice).
User Agent(s)
The Stratagy ES is a system capable of numerous applications. Most applications are performed by
software objects that hold properties and privileges for various functions. These objects are called
User Agents. Similar to the User ID concept in the DOS-based Stratagy ES systems, a User Agent
can be used to define a COS, a system distribution list, or a user mailbox. It is the properties of the
User Agent that determines it’s identity.
Once a User Agent is created and defined as a mailbox, the system software, voice prompts, and
Administration screens refer to it as a mailbox and not a User Agent. To better understand this
concept, consider a User Agent to be a template that can be used to form numerous applications.
The following User Agents are available:
•COS (see “Class of Service (COS)” on page 4-3 ).
•Mailbox (see “User Mailbox” on page 4-5 ).
•Distribution List (see “Distribution List (System)” on page 4-48 ).
•IVR
•AMIS Gateway and AMIS Proxy (see “AMIS Networking” on page 10-5 ).
•VPIM Gateway and VPIM Proxy (see “VPIM Networking” on page 10-13 ).
•Direct Send Voice (see “Direct Send Voice” on page 4-50 ).
•Direct Send Fax (see “Direct Send Fax” on page 4-51 ).
Note This feature is not currently supported.
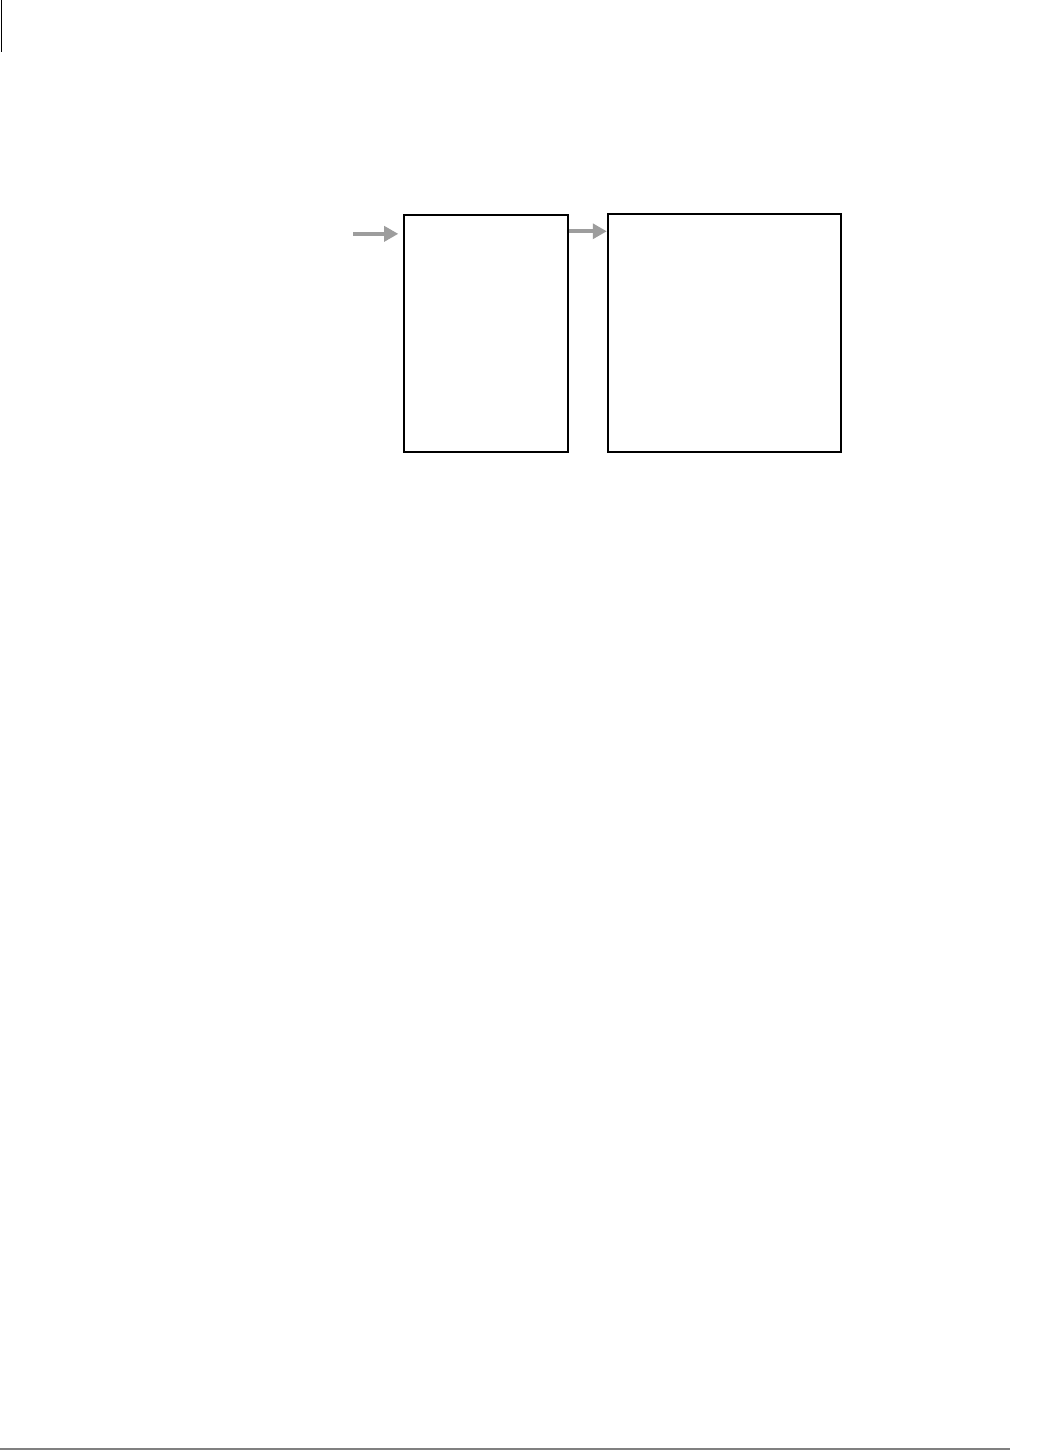
Voice Processing
User Agent(s)
4-2 Strata CIX Voice Mail Programming 01/07
Voice Mail Menu
The Voice Mail Menu is available from the eManager Menu, Advanced Configuration and offers
the following options:
Figure 4-1 eManager Menu — Voice Mail Submenu
Stratagy’s design revolves around user mailboxes. How a user mailbox has been customized
determines what a caller hears and is able to do. For example, if Mailbox 990 contains the initial
company greeting, a caller accessing Mailbox 990 hears the greeting recorded as the greeting for
Mailbox 990.
Defined User Agents
Stratagy ES comes with several defined User Agents. Each of the following User Agents have been
defined by Toshiba to perform a specific function.
User Agent 900: ASR Auto Attendant default User Agent – ASR Automated Attendant default
User Agent.
User Agent 988: Direct Send Fax –User Agent used to send fax messages to other voice mail
users. See the Stratagy ES User Guide for details on using this User Agent.
Note This feature is not currently supported.
User Agent 989: AMIS Loopback – User Agent used by other AMIS nodes for testing the
network. Any AMIS message directed to this User Agent is sent back to the sender, if accessible to
Stratagy. By default, the User Agent is disabled. See the voice mail system configuration parameter
sys_amis_ltm under “AMIS User Agents” on page 10-5 .
User Agent 998: Direct Send Voice – Direct Send Voice User Agent for all ports. Voice mail
records a message for a mailbox number without having to execute the Extension field and/or hear
the mailbox’s greeting. This is particularly useful for an Operator transferring directly to voice mail.
User Agents Mailboxes
Mailbox COS
Distribution List
IVR1
AMIS Gateway2
AMIS Proxy2
VPIM Gateway2
VPIM Proxy2
Direct Send Voice
Direct Send Fax3
Mailbox/COS Editor Menu:
User Mode Options
AA Options
Chains/Groups/Fax
Menus
Info (not on COS)
Auto
Notify
Unified Messaging
ASR Auto Attendant
7206
1. See Chapter 9 — Interactive Voice Response (IVR) for information on IVR User Agents.
2. See Chapter 10 — Advanced Integrations and Applications for information on AMIS and VPIM User
Agents.
3. See Chapter 5 — Fax Server for information on Direct Send Fax User Agents.

Voice Processing
Class of Service (COS)
Strata CIX Voice Mail Programming 01/07 4-3
Voice Processing
Class of Service (COS)
Stratagy ES has the ability to centrally manage the attributes of mailboxes with User Agents called
Class of Service (COS).
The COS design is based on a parent/dependent concept. The COS assignment within a mailbox
User Agent and any mailbox that references that number in the Class of Service field inherits the
feature set or properties of the parent COS and is considered a dependent.
Any changes to the parent COS affect the corresponding dependent mailboxes. However, any
change made to an individual dependent mailbox does not change other mailboxes belonging to the
COS. (See “Inherit Function” on page 4-3 for instructions on making changes to dependent
mailboxes.)
With a COS design, a feature belonging to a group of mailboxes can be modified by simply making
the change in the COS User Agent that is the master or parent of the group. If a mailbox has no COS
number, it is considered independent and is not affected by a COS.
The following rules apply to Classes of Service:
•Mailboxes can be taken out of COS by selecting the No COS selection in the Class of Service
field.
•Established mailboxes given a COS number after their creation only inherit changes that are
made after they have been included in the group.
•A COS User Agent cannot be deleted until its COS number has been removed from all
dependent mailboxes.
•If a COS is copied, the new (copied) COS inherits all attributes of the original COS but remains
independent from the original COS.
•If a dependent mailbox is copied, the new mailbox becomes a dependent mailbox and a part of
the COS group.
Inherit Function
When you right-click a Mailbox Editor screen field, a small
“Inherited” box displays. If the box is checked, the field has
inherited the setting from the COS parent’s mailbox (shown right).
If the box is unchecked, the field has not been inherited.
If you modify the value in an Inherited field, the Inherited check
mark is removed when you display the “Inherited” box. To change
the field back to the inherited value, right click on the field and
when the Inherited box displays, check the box.
Note See “Reset Function” on page 4-8 for instructions on resetting a group of fields to the
inherited features for the mailbox.
7209

Voice Processing
Class of Service (COS)
4-4 Strata CIX Voice Mail Programming 01/07
Explore Function
The Explore function assists you in selecting a COS parent by displaying the existing Class of
Services and the lineage between them. The function is accessed using the Explore button that
appears at the top right corner of the Mailbox and Mailbox COS screens.
Select COS Using Explore Button
1. From one of the aforementioned screens, click
Explore. The Select COS screen displays (shown
at right).
2. Highlight the COS and click OK. The COS parent
displays in the Class of Service field and the
mailbox inherits the COS settings.
Create COS for Mailboxes
1. From the eManager menu, click Advanced
Configuration > Voice Mail > Mailbox COS. The
Mailbox COS screens display.
Note Currently, only mailboxes can be assigned to
COS. Future development may include other
User Agents that can be governed by COS.
2. Click Create UA at the bottom of the screen. The Create User Agent screen displays.
3. Type a single User Agent number (e.g., 881), a range of numbers (e.g., 800-804) or a
combination of both separated by a comma or a space (e.g., 800-802, 881 888).
Note The number you enter must be unique. If the number already exists, the Stratagy ES
indicates that the User Agent could not be created.
4. (Optional) Type a COS number into the field or use the drop-down menu to select a pre-
existing COS number. The field defaults to No COS.
Note Since COS relationships can have several layers, confusion may occur if layers are not
properly planned out and maintained.
5. Click OK. The Creating dialog box displays while the program creates the User Agents. When
the process is complete, the screen indicates whether the creation of the User Agent(s) was
successful.
6. Click Exit. The Mailbox Editor tab screens display (see “Mailbox Editor Menu” on page 4-7 ).
7. Modify the screen fields and click Submit (see Figure 4-13 on page 4-9 through Figure 4-17 on
page 4-24). The changes are saved and the screen remains open.
Edit COS for Mailboxes
1. From the eManager Main menu, click Advanced Configuration > Voice Mail > Mailbox COS.
The Mailbox COS Editor tab screens display (see Figure 4-13 on page 4-9).
2. To the right of the Mailbox COS Editor screen, highlight the Mailbox listing for the mailbox
you want to edit
...or type the mailbox number in the mailbox header at the top of the screen and click Refresh.
The Mailbox COS Editor screen displays the data for the mailbox number.
3. Edit the mailbox fields.
4. Click Submit. The changes are saved and the screen remains open.
7207

Voice Processing
User Mailbox
Strata CIX Voice Mail Programming 01/07 4-5
Voice Processing
User Mailbox
Stratagy’s design revolves around user mailboxes. How a user mailbox has been customized
determines what a caller hears and is able to do. For example, if Mailbox 990 contains the initial
company greeting, a caller accessing Mailbox 990 hears the greeting recorded as the greeting for
Mailbox 990.
Reserved Mailboxes
Voice mail comes with several reserved mailboxes. Only Mailbox 999 cannot be assigned to
another mailbox number. Each of the following mailboxes performs a specific function.
Mailbox 0: Operator – For an after hours caller who is unable to direct his own call or does not
know the extension of the person he wants to reach.
Mailbox 987: IP Address – Plays the Stratagy ES MAS IP address to the caller.
Mailbox 990: Company Greeting – The salutation that lets the caller know which company he
called.
Mailbox 994: Fax Tone Detect – Mailbox voice mail “jumps” to when voice mail detects a carrier
tone originating from a remote fax machine.
Mailbox 995: ASR Auto Attendant COS – Mailbox voice mail uses for the default values when
creating a Company Greeting User Agent for an ASR Auto Attendant application other than 900
(see page 4-2).
Note This mailbox is located in the Mailbox COS option.
Mailbox 996: Guest Defaults – Mailbox voice mail uses for the default values when creating a new
Guest User ID. The field values are copied into a new Guest User ID upon initialization.
Note This mailbox is located in the Mailbox COS option.
Mailbox 997: Defaults Box – Mailbox voice mail uses for the default values when creating a new
mailbox. The field values are copied into a new mailbox upon initialization. See the System
Configuration parameter sys_default_user_agent on page 3-34.
Mailbox 999: System Administrator Mailbox – Enables the System Administrator to create
system lists, record and delete system announcements, record the busy-hold music or message,
manage User IDs, and review system status. See System Administrator Guide for details. This
mailbox has a pre-programmed extension of H for Hang-up. This enables (999) its use as a
disconnect code for telephone systems that provide this feature.
Create User Mailbox
1. From the eManager Main menu, click Advanced Configuration > Voice Mail > Mailbox. The
Mailbox Editor screen displays.
2. Click Create UA at the bottom of the screen. The Create User Agent screen displays.
3. Type a single User Agent number (e.g., 881), a range of numbers (e.g., 800-804) or a
combination of both separated by a comma or a space (e.g., 800-802, 881 888).
Note The number you enter must be unique. If the number already exists, the Stratagy ES
indicates that the User Agent could not be created.
4. (Optional) Type a COS number into the field or use the drop-down menu to select a pre-
existing COS number. The field defaults to No COS.
5. Click OK. The Creating dialog box displays while the program creates the User Agents. When
the process is complete, the screen indicates whether the creation of the User Agent(s) was
successful.

Voice Processing
User Mailbox
4-6 Strata CIX Voice Mail Programming 01/07
6. Click Exit. The Mailbox Editor Tab screens display (see “Mailbox Editor Menu” on page 4-7 ).
7. Modify the screen fields and click Submit (see Figure 4-13 on page 4-9 through Figure 4-17 on
page 4-24). The changes are saved and the screen remains open.
Modify User Mailbox
1. From the eManager Main menu, click Advanced Configuration > Voice Mail > Mailbox. The
Mailbox Editor tab screens display (see Figure 4-13 on page 4-9).
2. To the right of the Mailbox Editor screen, highlight the Mailbox listing for the mailbox you
want to edit
...or type the mailbox number in the mailbox header at the top of the screen and click Refresh.
The Mailbox Editor screen displays the data for the mailbox number.
3. Modify the mailbox fields.
4. Click Submit. The changes are saved and the screen remains open.
Delete User Mailbox
Important! Only available to Department level users or higher. Mailbox must be controlled by
user attempting to delete it.
1. From the eManager Main menu, click Advanced Configuration > Voice Mail > Mailbox. The
Mailbox Editor tab screens display (see Figure 4-13 on page 4-9).
2. Click Delete UA. A pop-up box displays.
3. Type a single User Agent number (e.g., 881), a range of numbers (e.g., 800-804) or a
combination of both separated by commas (e.g., 800-802, 881, 888) you want to delete in the
Range field.
Note Field defaults to the user agent on the screen at the time you click Delete UA.
4. Click OK.
5. Click Exit. The database is updated and the deleted user agents are removed from the list on the
right.
Copy Mailbox
This function copies a mailbox to one or more new mailboxes.
1. From the eManager Main menu, click Advanced Configuration > Voice Mail > Mailbox. The
Mailbox Editor screen displays (see Figure 4-13 on page 4-9).
2. To the right of the Mailbox Editor screen, highlight the Mailbox listing for the mailbox you
want to copy
...or type the mailbox number in the mailbox header at the top of the screen and click Refresh.
The Mailbox Editor screen displays the data for the mailbox number.
3. Click Copy UA. The Copy User Agent screen displays.
4. Type the new mailbox numbers you want to create in the To field. Click OK. The new
mailbox(es) are created.
5. Click Exit.
Voice Processing
Mailbox Editor Menu
Strata CIX Voice Mail Programming 01/07 4-7
Voice Processing
User Mailbox Reports
You can run standard reports on all user mailboxes. The available reports are: Mailbox Call
Statistics, Mailbox Usage Summary, Mailbox Info and Status, and Mailbox Message Statistics.
A customized report can also be run using a template and include any or all user mailboxes (see
“Custom Reports” on page 12-11 for instructions).
Figure 4-12 Mailbox Usage Summary Report
Statistics on an individual mailbox can be viewed on the Mailbox Editor’s Info Tab screen (see
“Info” on page 4-39 ).
Mailbox Editor Menu
There are two identical versions of the this menu: the Mailbox Editor Menu that displays user
mailboxes and the COS Mailbox Editor Menu that displays Classes of Service. Both versions have
the same tab screens and fields – User Mode, Auto Attendant, Chains/Groups/Fax, Menus, Info (not
on COS), Auto, Notify and Unified Messaging. Together these screens provide the basis for
programming all user, information, control and System Administrator mailboxes.
This section will refer to both screens as a Mailbox Editor Menu and only where differences exist
will references be made to the COS Mailbox Editor Menu.
Refresh Function
This function enables you to manually refresh the screen with the most up-to-date database
information.
!From the Mailbox Editor screen, click Refresh (bottom of screen). The screen displays the
current data for the mailbox.
7329
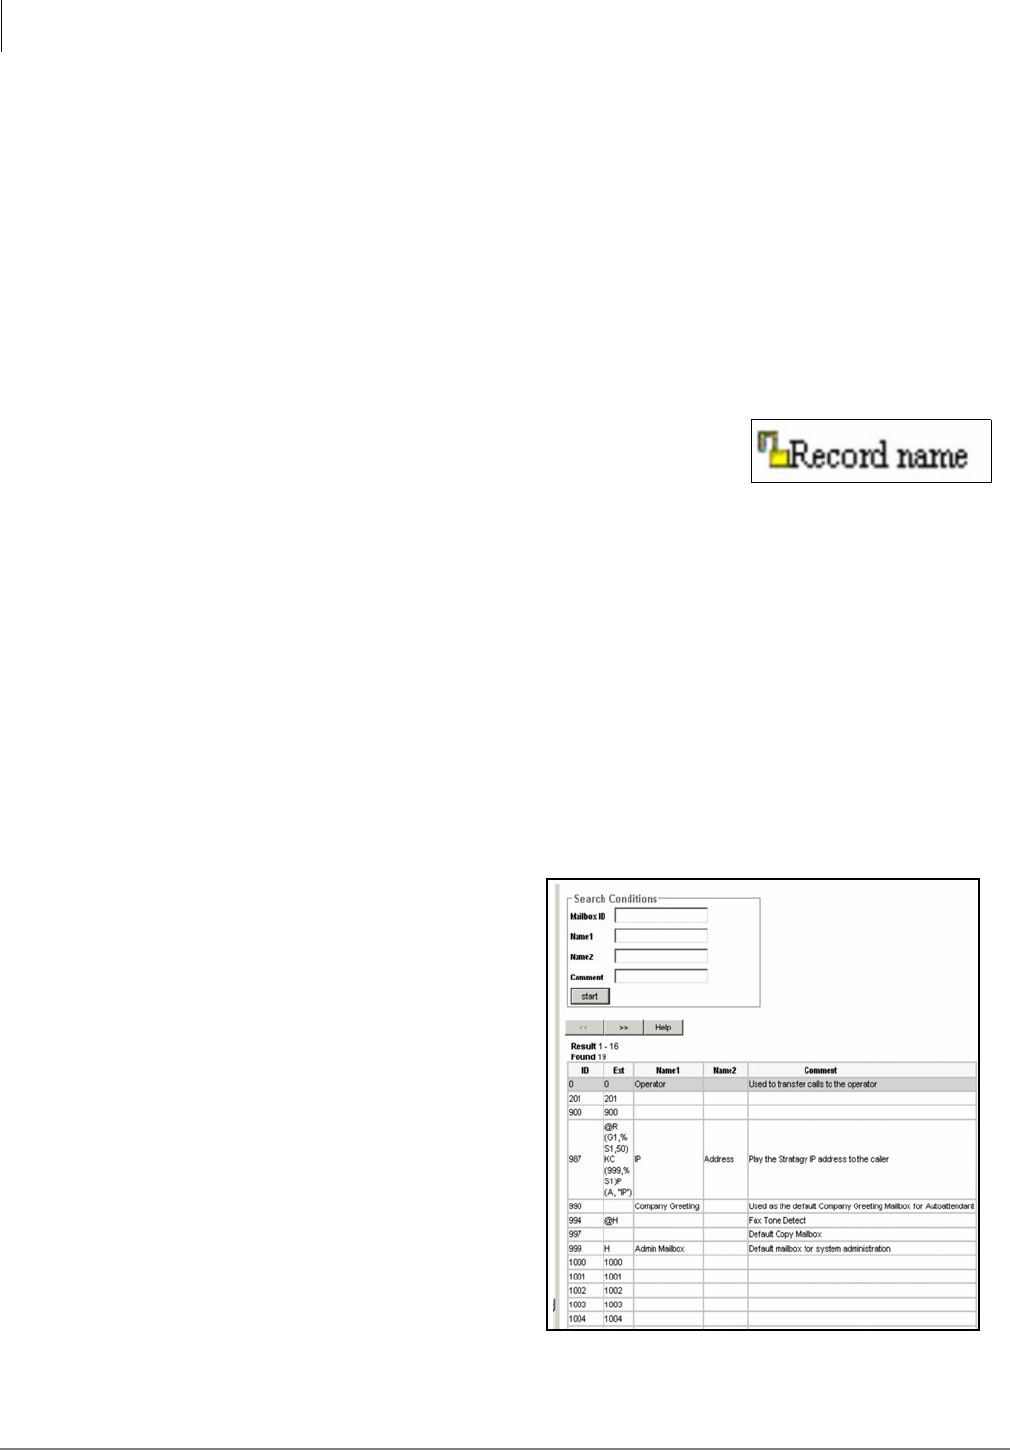
Voice Processing
Mailbox Editor Menu
4-8 Strata CIX Voice Mail Programming 01/07
Lock Function
Set fields on the Mailbox Editor screens can be locked so that users cannot enable/disable user
option features (e.g., call screening, DND, etc.) from his/her touchtone telephone.
The fields that can be locked on each mailbox is:
•Do Not Disturb
•Screen Calls
•Busy Greeting
•Record Name
•Selected Greeting
•Playback Volume
!To lock/unlock a field, click on the “Lock” icon (shown right)
next to the field and the lock closes or opens depending on its
initial state.
Reset Function
The Reset button on the bottom of the Mailbox Editor tab screens clears all inheritance overrides
and locks from the displayed mailbox. Overrides/locks are cleared from all tab screens within the
mailbox.
Mailbox Search Function
The display varies depending upon:
•Mailbox Editor – The COS Mailbox Editor only displays existing COS in the system while the
Mailbox Editor displays user mailboxes.
•Access Level – If you are assigned a department access level, your screen displays only the
mailboxes you have been assigned to administer.
Search for Mailbox
1. From the Mailbox Editor screen, move
that portion of the screen (far right
hand side) over by clicking and
holding the cursor on the right-hand
line. The Search screen displays
(shown at right) the following fields
for each mailbox: Mailbox, Name1,
Name2 and Comment.
2. Enter values in the Search Conditions
screen fields.
Note Fields left blank are considered
wildcards. If all fields are left
blank, the system retrieves all
mailboxes.
3. Click Start. System shows search
results in a list and displays the first
matching mailbox in the editor pane.
4. You can view the listing for any
existing mailbox using << >>.
721‘0
7330
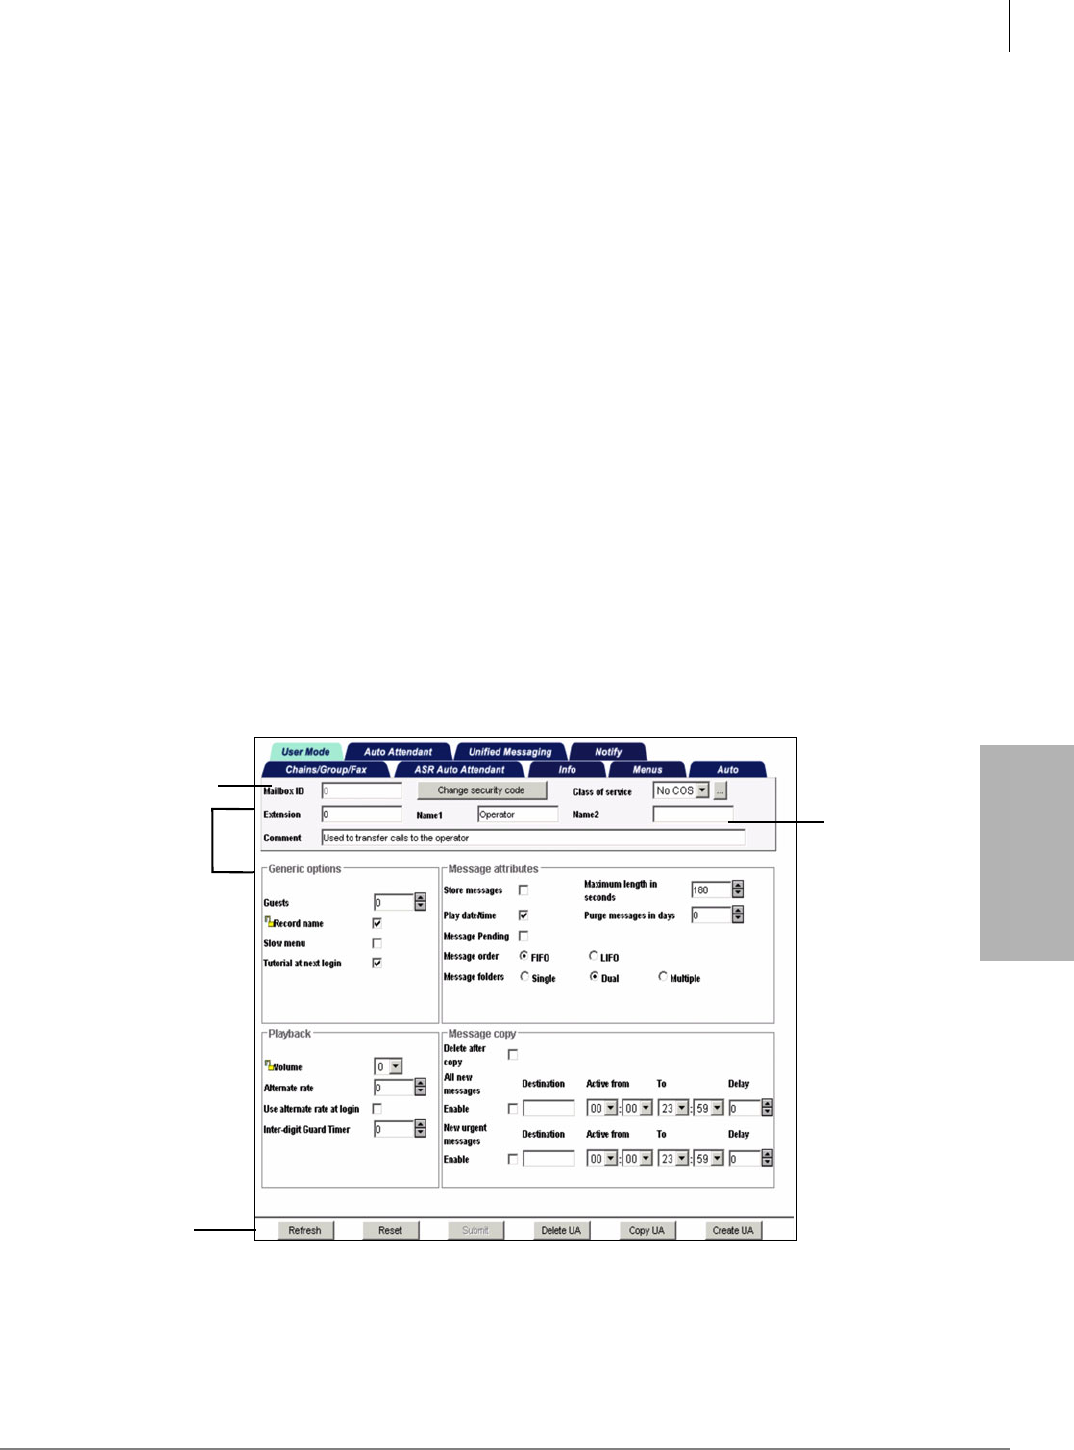
Voice Processing
Mailbox Editor Screens
Strata CIX Voice Mail Programming 01/07 4-9
Voice Processing
Access a Specific Mailbox from the Search Screen
!From the Search screen, double-click a mailbox listing. The desired mailbox displays on the
Mailbox Editor tab screen.
Mailbox Editor Screens
The Mailbox Editor consists of the following screens:
•User Mode Options (see Figure 4-14 and Table on page 4-12)
•Auto Attendant Options (see Figure 4-15 and Table on page 4-16)
•Unified Messaging (see Figure 4-16 and Table on page 4-20)
•Notify (see Figure 4-17 and Table on page 4-24)
•Chains/Groups/Fax (see Figure 4-18 and Table on page 4-31)
•ASR Auto Attendant (see Figure 4-19 and Table on page 4-37)
•Info (see Figure 4-20 and Table on page 4-39)
•Menus (see Figure 4-21 and Table on page 4-42)
•Auto (see Figure 4-22 and Table on page 4-44)
Mailbox Header
The first seven fields (i.e., Mailbox ID, Security code, Class of Service (COS), Extension, Name 1
and 2, and Comment) shown on the top of each Mailbox Editor screen (Figure 4-13) comprise the
message header for the Mailbox Editor screens.
The information in these fields (see Table on page 4-10) are shared among all the Mailbox Editor
screens.
Figure 4-13 Mailbox Editor Menu — Mailbox Header
7329
Function Buttons
Screen Tabs
Mailbox
Header
Explore
COS Button

Voice Processing
Mailbox Editor Screens
4-10 Strata CIX Voice Mail Programming 01/07
Table 4-1 Mailbox Editor Menu — Mailbox Header Screen Fields
FIELD DESCRIPTION
Mailbox ID Mailbox number. Usually associated with a telephone extension (for simplicity).
Employees without a telephone extension can have a mailbox from which they can
send and receive messages. Mailboxes can be used for special functions such as
directories or question and answer surveys.
Note This field displays at the top of all Mailbox Editor screens.
Possible values: 0~99999999 (must be unique).
Extension Programmed dial actions voice mail performs to transfer a call that has accessed
the mailbox (i.e., Do Not Disturb is Off). Includes transfer to a mailbox, a remote
number, or paging. Normally a simple extension number.
Required by a COS mailbox.
Note This field may be modified by the Auto Scheduler. Any changes to the field’s
value (including directly changing the value or reverting the value to the
parent’s COS) is only temporary, and lasts only until the next scheduled
change.
Default: value entered in Mailbox ID field.
Comment Notation or reminder about the function of the mailbox. This field is 16 characters
long. Default is a blank field. Only field not affected if changes are made to the COS
parent mailbox.
For example, a mailbox may be identified by function (extension, information box,
etc.) or contents (greeting, directory, etc.).
Name 1 The first of two names voice mail searches when a caller uses the directory (default
411). The field is 16 characters long. Entries can contain any alphabetical
characters. Digits 2~9 are allowed for entry by the System Administrator via a tone-
dialing telephone’s dial pad. They cannot contain spaces or digits 0 and 1.
For most companies, this is the mailbox user’s first name. For COS mailboxes, this
field is used as the mailbox identifier. For example, if you type “Special” in this field
and “Mailbox” in the Name 2 field, “Special Mailbox” appears in the BoxList Name
field and in the COS Explore list.
Notes
lIt is important that each user record his/her name.
lWhen the System Administrator enters a user’s name into the directory using
the telephone dial pad, the name is stored in the Options screen Directory
Name 1 and Name 2 fields as numeric digits. For administration clarity, it is
advisable to change the digits to their alpha equivalents.
The directory works as follows. If a caller wants to speak with Donna, the caller
would enter digits corresponding to these letters on the tone-dialing telephone (i.e.,
36662). For the first mailbox Directory Name field that matches the caller’s entry,
voice mail plays the name recording.
Depending upon the System Configuration parameter sys_directory_app_uid, voice
mail also plays the digits of the Mailbox ID field. If no name recording is available,
depending on the sys_directory_app_uid setting, voice mail does not present an
entry or play the digits of the Mailbox ID field.

Voice Processing
Mailbox Editor Screens
Strata CIX Voice Mail Programming 01/07 4-11
Voice Processing
Name 1 (continued) Since voice mail plays the name recording of all mailboxes that match a caller’s
entry for the company directory, you can use this capability as a general search and
playback system. The digit string used for directory searching is defined using the
sys_box_idx System Configuration parameter.
For details about the System Configuration parameters, see Chapter 3 — Voice Mail
Configuration. For users who do not wish to have their name accessible from the
directory, leave this field blank.
Note This field displays at the top of all Mailbox Editor screens.
Name 2 The second of two names voice mail may search when a caller uses the directory
(default 411). The field is 16 characters long. Entries can contain any alphabetical
characters. Digits 2~9 are allowed for entry by the System Administrator via a
tone-dialing telephone’s dial pad. They cannot contain spaces or digits 0 and 1.
For most companies, this is the mailbox user’s last name or another way to
reference this user, such as a variation in spelling (Cathy, Kathy) or a nickname
(Michael, Mike). It can also be used for the name of an additional user when a
mailbox is shared.
For COS, this field is used as the mailbox identifier (see “Name 1” on page 4-10 ).
For users who do not wish to have their name accessible from the directory, leave
this field blank.
Note This field displays at the top of all Mailbox Editor screens.
Security code Password (up to 16 digits long) that permits the user access to this mailbox. The
security code insures that only appropriate users can change a greeting, record a
custom busy message, listen to messages left for this mailbox, or change option
settings.
The initial value is the number of the new mailbox plus the value in the
sys_security_code_suffix (default 997) parameter.
For example, if a mailbox 234 is created, the default security code for the new
mailbox is 234997.
If the sys_security_code_suffix parameter is changed, only the mailboxes created
after rebooting the system have the new default security code. If the security code is
set to something that can not be entered from a telephone (such as an X), no one
can log into the mailbox.
The user can change the password to assure confidentiality. For added security, the
code does not display on the screen. You cannot view the security code; you can
only change it.
Class of service Indicates whether the mailbox is inherited from a COS parent and the COS parent’s
name. Field is 20 characters long.
To enter a COS in this field:
©Type a COS into the field.
©Highlight a COS on the drop-down menu provided. The menu contains a list of
all available COS. Choose “No COS” if the mailbox has no COS parent.
©Highlight a COS on the explore list using the Explore button (see Figure 4-14).
The list shows a detailed view of the available COS mailboxes in the system.
Table 4-1 Mailbox Editor Menu — Mailbox Header Screen Fields (continued)
FIELD DESCRIPTION

Voice Processing
Mailbox Editor Screens
4-12 Strata CIX Voice Mail Programming 01/07
User Mode
Figure 4-14 User Mode Tab Screen with Sample Data
Table 4-2 User Mode Tab Screen Fields
FIELD DESCRIPTION
Mailbox Header See “Mailbox Header” on page 4-9 for field definitions.
Generic Options
Guests Number of Guest Mailboxes the user can create. For each Guest Mailbox created,
the value decrements by 1. For example, if the Guests field was set to 5 and the
user created 3 Guest Mailboxes, Guests would now display 2.
Possible values:
1~99: Number of Guest Mailboxes the user can create.
0: (Default) User cannot use the Guest Mailbox feature
Record Name Whether the user can record his/her name for playback/identification to a caller.
Possible values:
On: (Default) User can record his/her name
Off: User cannot record his/her name.
Slow menu Defines whether voice mail pauses between mailbox menu choices when stating
them to the user (e.g. Main Menu options).
Possible values:
On: Add extra time between menu choices.
Off: (Default) Do not add extra time.
7295
Explore Button

Voice Processing
Mailbox Editor Screens
Strata CIX Voice Mail Programming 01/07 4-13
Voice Processing
Tutorial at next login Whether the mailbox plays the tutorial when the user logs in the next time.
Note Once the user logs in to his/her mailbox and hears the tutorial, the field is
turned off automatically.
Possible values:
On: (Default) Mailbox plays the tutorial
Off: Mailbox does not play the tutorial
Message Attributes
Store Messages Whether voice mail enables the mailbox to store messages. If this field is set to Off,
the mailbox plays information only and does not record messages.
Possible values:
On: (Default) This mailbox stores messages.
Off: This mailbox does not store messages.
Maximum length in
seconds
Maximum message length in seconds a caller is allowed when leaving a message.
Possible values: -0 (unlimited), 1~6000 (seconds)
Default: 180 (180 seconds = 3 minutes)
CAUTION! Setting this value to -1 (unlimited length) should be done with
extreme caution. If the Stratagy ES port does not properly detect
the abandonment of a call, it could remain off hook and recording
until there is no recording space left on the hard drive.
Purge Messages in
days
Number of days before a message is set for purging/deletion. Whenever a user
accesses his/her User ID and presses 1 to Play Messages, the system tells the
user how many messages will be automatically deleted when he/she exits the Main
Menu. This field is three-digits long.
CAUTION! Once a message is deleted by purging, there is no way to retrieve
it.
Possible values: 0 (purging disabled), 1~999 (days)
Default: 0
Play date/time During message playback, voice mail plays the date and time a message was
recorded.
Possible values:
On: (Default) The date and time plays before the message.
Off: The date and time does not play before the message.
Message Pending Messages that a user partially hears (two seconds or longer) are called Pending
messages and are processed differently than unheard (new) messages. They
remain in the new message folder but the Message Waiting LED is turned off and a
Return Receipt is sent, if applicable.
Possible values:
On: (Default) The system marks partially heard messages as Pending.
Off: The system does not mark partially heard messages as Pending. All
messages (partially heard and new) are stored in the new message folder,
the Message Waiting LED remains on and a Return Receipt is not sent, if
applicable.
Table 4-2 User Mode Tab Screen Fields (continued)
FIELD DESCRIPTION

Voice Processing
Mailbox Editor Screens
4-14 Strata CIX Voice Mail Programming 01/07
Message Order
(FIFO/LIFO)
Order in which voice mail plays back caller messages to the user.
Possible values:
FIFO: (Default) First-In First-Out. Voice mail plays the oldest messages first.
LIFO: Last-In First-Out. Voice mail plays the most recent message first.
Message folders
(Single/Dual/Multiple)
Number of folders voice mail uses to store the caller messages.
Possible values:
Single: One folder, no separate save folder.
Dual: (Default) New and Saved Message folders.
Multiple: New and Saved Message folders and up to seven personal folders that are
created by the mailbox user for the purpose of saving messages.
Playback
Volume Volume at which messages are played back to the user. This value can be set by the
user through the telephone, using the Play Message Controls.
Possible values: -4 (softest), 0 (normal) 4 (loudest)
Default: 0
Alternate rate Alternate speed voice mail uses while playing messages or prompts. While listening
to a message, the user can press ## to toggle between the two speeds.
Note Alternate rate can only be implemented while listening to a message. When
the user exits the Play Messages Menu, the system returns to default speed
unless the User alternate rate at login field is set On.
Possible values: 0 (normal), 1~10 (fastest)
Default: 0 (normal)
User alternate rate at
login
Whether the selected Alternate Rate applies at login.
Possible values:
On: (Default) Alternate Rate applies at login.
Off: Alternate Rate does not apply at login. Default speed applies.
Inter-digit Guard Timer Used to define the time delay between repetitive entries of the same digit pressed
by a user while playing messages. For example, users who press the digit 1 (i.e.,
111) in quick succession may cause the system to jump over messages and give
the users the perception of delayed messages.
Possible values: 0 (default)~1000 msec.
Note 0 default equals 50 msec.
Message Copy There are two types of new messages that can be copied to a specific destination
mailbox using this feature–all new or new urgent messages. Only one type of
message can be enabled at one time.
Delete after copy Deletes the message from the original target mailbox after copying the message to
the destination mailbox.
Possible values:
On: Deletes a message after copying to another mailbox.
Off: (Default) Does not delete a message after copying it to another mailbox.
All New Messages
Table 4-2 User Mode Tab Screen Fields (continued)
FIELD DESCRIPTION

Voice Processing
Mailbox Editor Screens
Strata CIX Voice Mail Programming 01/07 4-15
Voice Processing
Enable Copies all new messages to the destination mailbox.
Possible values:
On: Copies all new messages to another mailbox.
Off: (Default) Does not copy new messages to another mailbox.
Destination Mailbox that receives a copy of this mailbox’s messages.
Possible values: blank, valid mailbox
Default: blank (Message Copy is Off)
Active (From/To) Time frame, expressed in military time, when the copy request is active.
Possible values: 00:00~23:59
Default: 00:00~23:00
Delay Length of time voice mail delays after the normal message arrives at this mailbox
before copying the message to the destination mailbox.
Possible values: 0~999 (minutes)
Default: 0
New Urgent Message
Enable Copies an urgent message to the destination mailbox.
Possible values:
On: Copies urgent message to another mailbox.
Off: (Default) Does not copy a urgent message to another mailbox.
Destination Mailbox that receives a copy of this mailbox’s urgent messages.
Note Messages can be copied more than once. System parameter sys_hub_count
determines how many times a message can be copied.
Possible values: blank, valid mailbox
Default: blank (Message Copy is Off)
Active (From/To) Time frame, expressed in military time, when the copy request is active.
Possible values: 00:00~23:59
Default: 00:00~23:00
Delay Length of time voice mail delays after the urgent message arrives at this mailbox
before copying the message to the destination mailbox.
Possible values: 0~999 (seconds)
Default: 0
Table 4-2 User Mode Tab Screen Fields (continued)
FIELD DESCRIPTION
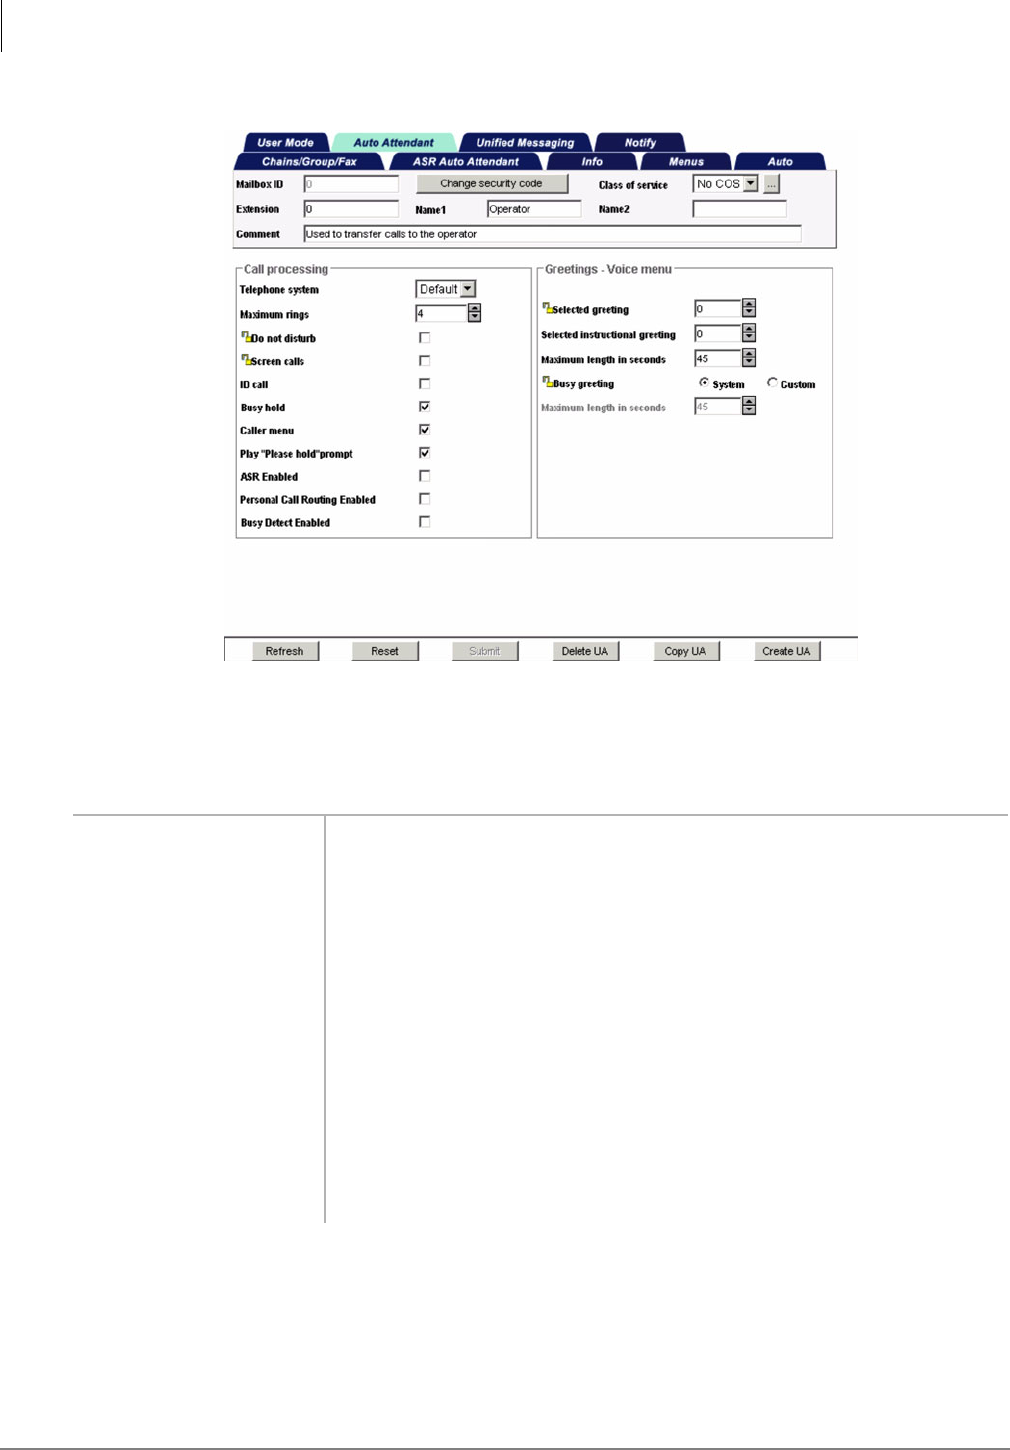
Voice Processing
Mailbox Editor Screens
4-16 Strata CIX Voice Mail Programming 01/07
Auto Attendant
Figure 4-15 Auto Attendant Tab Screen with Sample Data
Table 4-3 Auto Attendant Tab Screen Fields
FIELD DESCRIPTION
Mailbox Header See “Mailbox Header” on page 4-9 for field definitions.
Call Processing
Telephone System Telephone System Integration group to which mailbox belongs. Determines dial
codes used to:
©Call transfer
©Turn On/Off Message Waiting Lamp (MWL)
Note If the target destination for a mailbox is on a different phone system than the
voice mail is connected to, different transferring dial codes and progress
tones may be required. Use this field to define that phone system. Telephone
System Integration groups are added using the eManager’s Advanced
Configuration > Systems > VM Phone Systems option (see “Telephone
Systems” on page 3-7 ).
Select integration group from drop-down menu.
Default: Default (Strata CIX)
7296

Voice Processing
Mailbox Editor Screens
Strata CIX Voice Mail Programming 01/07 4-17
Voice Processing
Maximum rings When transferring a call to the mailbox, the number of rings voice mail waits before
determining a RNA status. This option only works when voice mail is controlling the
call transfer during a monitored, or supervised, transfer.
For example, if the telephone is not answered within four rings, voice mail can play
this mailbox’s greeting and take a message, or transfer the call to another extension
if an RNA chain is being used.
Note This field may be modified by the Auto Scheduler. Any changes to the field’s
value (including directly changing the value or reverting the value to the
parent’s COS) is only temporary, and lasts only until the next scheduled
change.
Possible values: 1~9 (Default = 4)
Do not disturb Whether voice mail transfers callers directly to a mailbox without ringing the user’s
phone. If Do Not Disturb is not locked, the user can toggle this feature On or Off
through the telephone.
If the intention of the mailbox is to offer recorded information, set Do Not Disturb to
On and lock the field.
Note This field may be modified by the Auto Scheduler. Any changes to the field’s
value (including directly changing the value or reverting the value to the
parent’s COS) is only temporary, and lasts only until the next scheduled
change.
Possible values:
On: Do Not Disturb is On. Calls to this mailbox are never transferred to an
extension. The greeting plays immediately.
Off: (Default) Do Not Disturb is Off.
Screen calls Whether voice mail asks the caller to record his/her name before attempting a
transfer to the user’s extension, enabling a user to accept, decline, or transfer the
call:
Possible values:
On: Voice mail asks the caller to record his name, and then attempts to reach the
user. If the user answers, voice mail plays that recording. The user can press:
1to accept the call. Voice mail connects the caller to the user.
2to reject the call and hang up. Voice mail reconnects to the caller and
plays the user’s mailbox greeting. Voice mail follows the procedures used
for the RNA chain.
3to transfer the call with an announcement. The user dials the extension to
transfer the call and hangs up. Voice mail plays “Your call is being
transferred to” and the name recording or the mailbox of the extension
where the call is being transferred. Voice mail transfers the caller to the
new extension.
4to transfer the call without announcement. The user dials the extension to
transfer the call and hangs up. Voice mail asks the caller to continue to
hold and transfers the caller to the new extension.
Off: (Default) Voice mail transfers the caller to the extension without inquiry.
Note This field may be modified by the Auto Scheduler. Any changes to the field’s
value (including directly changing the value or reverting the value to the
parent’s COS) is only temporary, and lasts only until the next scheduled
change.
Table 4-3 Auto Attendant Tab Screen Fields (continued)
FIELD DESCRIPTION

Voice Processing
Mailbox Editor Screens
4-18 Strata CIX Voice Mail Programming 01/07
ID call When a user answers a transferred call, voice mail plays the name recording of the
mailbox the caller dialed.
Possible values:
On: Voice mail plays the name recording of the mailbox accessed to reach the
extension. Used when more than one mailbox is assigned to the same
telephone extension.
Off: (Default) Voice mail plays a connection tone to the answering party.
Busy hold Whether a caller can press * to hold when the extension is busy.
Possible values:
On: The caller can press * to hold.
Off: (Default) The caller cannot hold.
Caller menu Whether voice mail presents a message menu to outside callers.
Possible values:
On: (Default) Before pressing # to send a message, outside callers can review,
re-record, append, add destinations, set urgent or private, or cancel.
Off: Outside callers can only press # to send a message.
Play “Please hold” prompt Whether voice mail plays “Please hold while I try to dial that extension...” while
transferring a call.
Possible values:
On: (Default ) Plays recording while transferring a call.
Off: Does not play recording.
ASR Enabled If this field is set to On, the mailbox user can use speech recognition features.
Possible values:
On: (Default) Plays recording while transferring a call.
Off: Does not play recording.
Personal Call Routing
Enabled
If this field is set to On, the mailbox user can use personal call routing features.
Possible values:
On: (Default) Plays recording while transferring a call.
Off: Does not play recording.
Busy Detect Enabled Important! This feature is available to iES32 users only and is not currently
supported.
If this field is set to On, the system uses DOAI to find out whether the extension is
busy or not.
Possible values:
On: (Default) Plays recording while transferring a call.
Off: Does not play recording.
Table 4-3 Auto Attendant Tab Screen Fields (continued)
FIELD DESCRIPTION

Voice Processing
Mailbox Editor Screens
Strata CIX Voice Mail Programming 01/07 4-19
Voice Processing
Greetings
Selected Greeting Which of seven mailbox greetings plays. This value can be set by the user through
the telephone unless this field is set to 0.
Each mailbox user can record up to seven custom greetings. The system default
greeting is “Please leave a message for [name],” as per the user’s name recording.
Note This field may be modified by the Auto Scheduler. Any changes to the field’s
value (including directly changing the value or reverting the value to the
parent’s COS) is only temporary, and lasts only until the next scheduled
change.
Possible values: 0, 1~7
Default: 0 (system greeting)
Selected Instructional
Greeting
Determines which of seven mailbox voice instructions play. Each mailbox user can
record up to seven custom instructional greetings.
This value can be set by the user through the telephone unless this field is set to 0.
The Instructional Greeting will only play when the mailbox has been defined in the
Answer Method screen as a Greeting User Agent.
This field may be modified by the Auto Scheduler. Any changes to the field’s value
(including directly changing the value or reverting the value to the parent’s COS) is
only temporary, and lasts only until the next scheduled change.
Possible values: 0,1~7
Default: 0 (no instructional greeting plays)
Maximum length in
seconds
Maximum greeting length (seconds) for each custom greeting recorded by the user.
Whether the user can change the current greeting.
Possible values: 0 (user cannot record or change greetings), 1~999
Default: 45
Busy Greeting Greeting caller receives when the extension is busy. This value can be set by the
user through the telephone unless Maximum length in seconds is set to 0. (See
“Manage Your Mailbox” in the Stratagy ES User Guide for more information.)
Possible values:
System:(Default) System busy greeting. Voice mail advises the caller that he/she
may hold for the extension by pressing *, dial another extension, or
leave a message by waiting for the tone. If the caller chooses to hold,
voice mail informs the caller of his/her position in the hold queue and
then plays 30 seconds of the Busy-Hold Music file before trying the
extension again. After each transfer attempt, the caller is given the
same options.
Custom:Custom busy greeting.
Maximum length in
seconds
Maximum greeting length (seconds) for the custom busy greeting recorded by the
user. Whether the user can change the busy greeting.
Possible values: 0 (user cannot record or change greeting), 1~999
Default: 45 (seconds)
Table 4-3 Auto Attendant Tab Screen Fields (continued)
FIELD DESCRIPTION
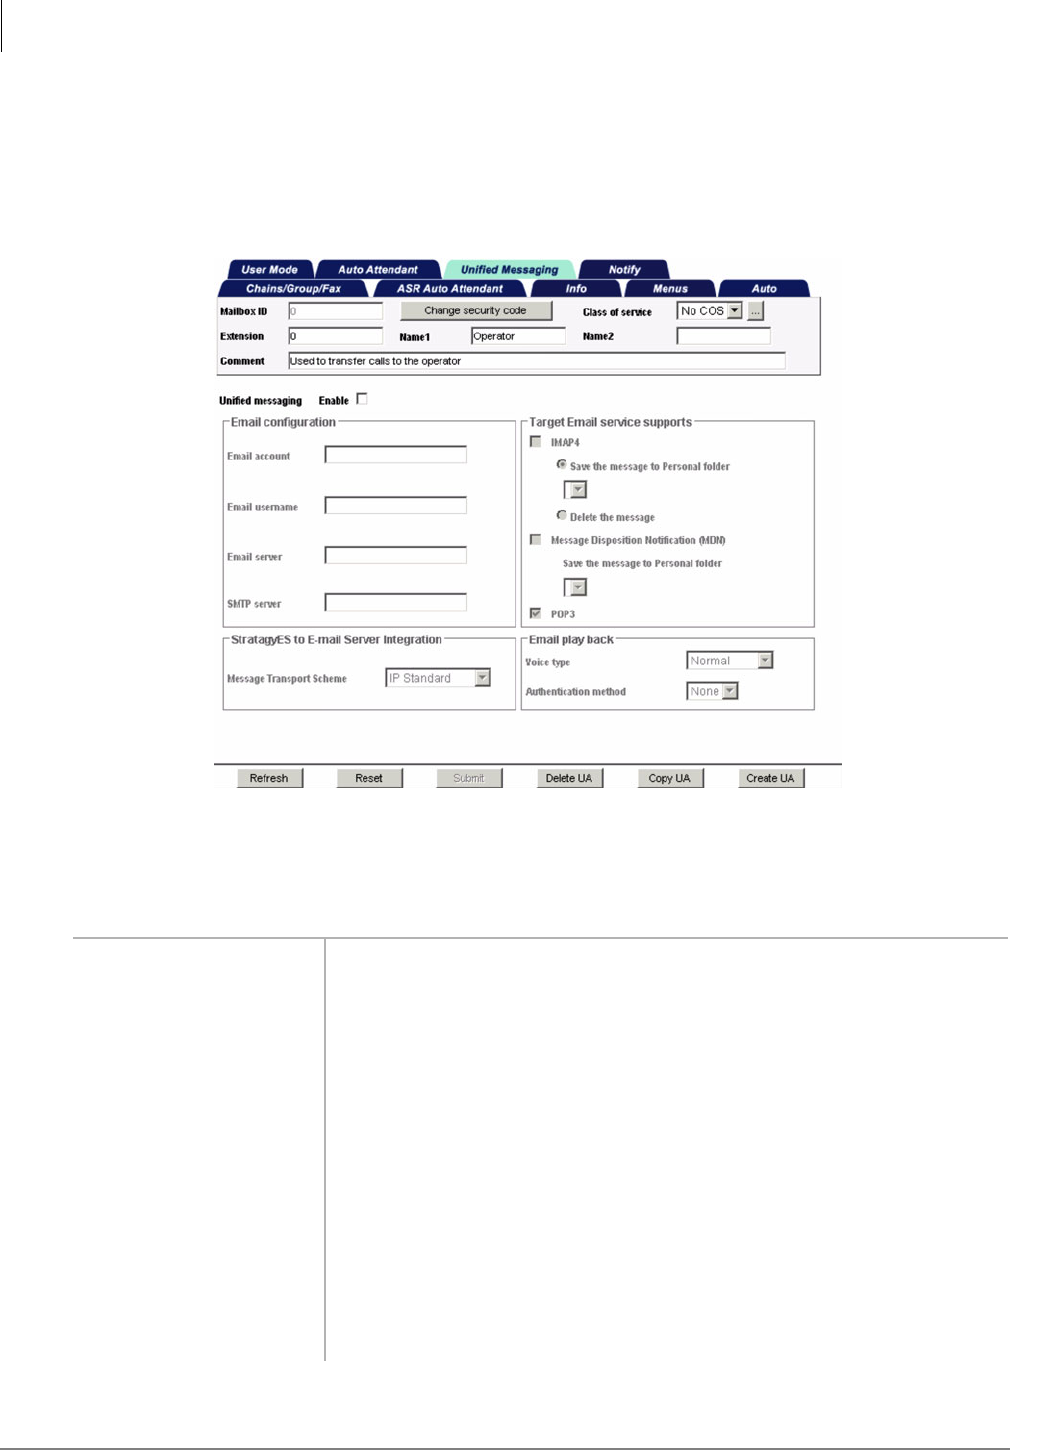
Voice Processing
Mailbox Editor Screens
4-20 Strata CIX Voice Mail Programming 01/07
Unified Messaging
The Stratagy ES provides Unified Messaging (UM) as an optional feature group. UM enables users
to retrieve their voice, and e-mail messages from within their e-mail client inbox screen.
The Unified Messaging Tab screen (see Figure 4-16 and Table ) enables you to program the feature
for the individual user mailboxes. See Chapter 7 – Unified Messaging (UM) for details.
Figure 4-16 Unified Messaging Tab Screen with Sample Data
Table 4-4 Unified Messaging Tab Screen Fields
FIELD DESCRIPTION
Mailbox Header See “Mailbox Header” on page 4-9 for field definitions.
Unified Messaging Enable/Disable the Unified Messaging for this mailbox.
Email configuration
Email account E-mail account number assigned by the server. Example: jdart@toshiba.com
Default: blank
Email username Alternative e-mail user name. If this field is filled in, voice mail uses it to log into the
e-mail server for IMAP4 and POP3 functions. If this field is left blank, voice mail
uses the user name preceding the @ of the existing Email account field.
Email server Identifies the network server providing POP3/IMAP4 services (IP Address or
Computer Name). Example: Exchange Server
Note In most installations the Email server and SMPT server are the same.
However, both fields still need to be filled in.
SMTP server Identifies the network server providing SMTP services. Example: Email Server
7297

Voice Processing
Mailbox Editor Screens
Strata CIX Voice Mail Programming 01/07 4-21
Voice Processing
Target Email service
supports
Sets the e-mail retrieve protocol.
Note You can only choose one protocol–IMAP4 or POP3.
IMAP4 Internet Message Access Protocol 4 (IMAP4) Synchronization. You can select
IMAP4 or POP3 but not both. If IMAP4 is selected, the following occurs:
©If a user logs into his/her voice mail via the TUI and deletes a message,
Stratagy uses IMAP to identify and delete the message in the e-mail server.
This also deletes the messages from the user’s e-mail client inbox screen if the
messages were displayed on it at the time.
If a user logs into his/her voice mail via the TUI and listens to a message in the
NEW folder, the corresponding message in the e-mail server or e-mail client
inbox is flagged as “read” or “seen.” This includes the messages that are marked
by Stratagy as Pending and kept in the New Message folder. Messages marked
as Deleted are not actually deleted until the user logs out from his or her
UM-enabled mailbox.
©If Stratagy voice messages are deleted in the e-mail client, the corresponding
messages in the Stratagy system are deleted or saved to a Personal message
folder of the user’s voice mailbox. Whether the messages is deleted or moved
to a Personal Folder is a configurable option within each mailbox. This
synchronization is performed periodically via the Stratagy Scheduler feature.
©IMAP4 will be used by the Stratagy ES software to access user’s e-mail
messages so that they can be read by the TTS feature.
Save the message
to Personal folder
(Default for IMAP4 field) Saves the message to a personal folder. Field defaults to 1
for users with dual or multiple message folders and to 0 for single queue users. To
use folders 2~8, the user’s mailbox must be set for multiple folders.
Note Message folders (single, dual, multiple) are set in the User Mode tab screen.
Delete the message Deletes the message.
Message Disposition
Notification (MDN)
Available only if Message Transport Scheme is set to IP Standard. Can be chosen
along with IMAP4 or POP3.
Stratagy adds a Message Disposition Notification (MDN) request when it sends a
voice message to the e-mail server. When the user opens up a voice/ message
(sent by Stratagy), a MDN is sent to Stratagy voice mail. As soon as Stratagy
receives the MDN, it deletes or saves the messages in the user’s mailbox. Whether
the message is deleted or saved is a configurable option within each mailbox.
Save the message
to Personal folder
(Default for MDN field) Saves the message to a personal folder. Field defaults to 1
for users with dual or multiple message folders and to 0 for single queue users. To
use folders 2~8, the user’s mailbox must be set for multiple folders.
For Dual and Multiple message folder users you can also set this field to 0. In this
case, the message becomes a “Pending “message (but still remains in the New
folder) when this feature is executed.
Note Message folders (single, dual, multiple) are set in the User Mode tab screen.
POP3 Post Office Protocol 3 (POP3) Default for Target Email Service. POP3 will be used
by the TTS feature to access and read e-mail messages to users. No UM
synchronization is provided by POP3.
Note Cannot be chosen if IMAP4 is already selected.
Table 4-4 Unified Messaging Tab Screen Fields (continued)
FIELD DESCRIPTION

Voice Processing
Mailbox Editor Screens
4-22 Strata CIX Voice Mail Programming 01/07
StratagyES to E-mail
Server Integration
Message Transport
Scheme
Type of message transport in use.
Possible values: SES Proprietary, IP Standard (Default)
Email play back
Voice type Indicates the TTS voice pitch to be used when reading e-mail messages.
Possible values: Normal (Default), Lower Pitch, Higher Pitch
Authentication method Indicates the authentication method to be used when accessing TTS.
Possible values:
None: (Default) No password encryption supported.
Only: Only sends e-mail password if Authenticated Post Office Protocol (APOP)
encryption is supported.
Try: Tries sending password if APOP encryption is supported, otherwise sends
password as text.
Note APOP is a POP3 setting that encrypts the user’s password and name.
Table 4-4 Unified Messaging Tab Screen Fields (continued)
FIELD DESCRIPTION

Voice Processing
Mailbox Editor Screens
Strata CIX Voice Mail Programming 01/07 4-23
Voice Processing
Notify
The Notify Tab screen (see Figure 4-17 and Table on page 4-24) enables you to program voice mail
to automatically call a user to notify him/her of messages. Each record represents one method of
notifying the user of new messages. The voice mail allows an unlimited number of notification
records for each mailbox.
Events (normal, relay, pickup, disk, and urgent) are based on the action that activates the
notification. Notification methods can be created in one of two ways. The voice mail provides a
number of preconfigured routines called “Templates” that can be triggered by one of the five
notification events. If the predefined Templates do not perform the desired action, you can custom
create notification Templates with the use of Token Programming Language and include message
waiting lights, beepers, pagers, other telephones (inside extensions or outside numbers), and office
paging systems.
By using available templates (predefined notification instructions), fields can be defined and
assigned to one or more mailboxes that require the same type of notification (for example, message
waiting lights). The Stratagy ES accommodates variable information, such as the mailbox’s
extension number when lighting a message light, to streamline notification set up.
Notification can occur based on the following:
•Days of the week
•Hours of the day
•Time interval between notifications (e.g., every 30 minutes)
•Number of times to repeat notification process (e.g., two times)
Templates
Templates are general notification actions which may be used for any number of Notify records and
mailboxes. By having mailboxes share templates, you can make changes to all notification records
for those mailboxes by simply changing one template.
Voice mail provides a group of preset templates covering notification methods for Toshiba
telephone systems, and paging applications. The paging Templates use the Variable field for the
callout number.
The Telephone System field in the Auto Attendant screen dictates the mechanism that will be
implemented for Notification Titles MsgLampOn and MsgLampOff. If the defined telephone
system uses DTMF integration, then Message Waiting LEDs will be managed by DTMF commands
from the Stratagy. If the telephone system uses SMDI integration, then the Message Waiting LEDs
will be managed by serial port commands.
Inband or DTMF Commands for message waiting light functionality can be modified in the
Configuration Properties, Telephone System Integration screen. Make sure that any modifications
that are made are performed using the Telephone System Integration Group to which the mailbox
is assigned.
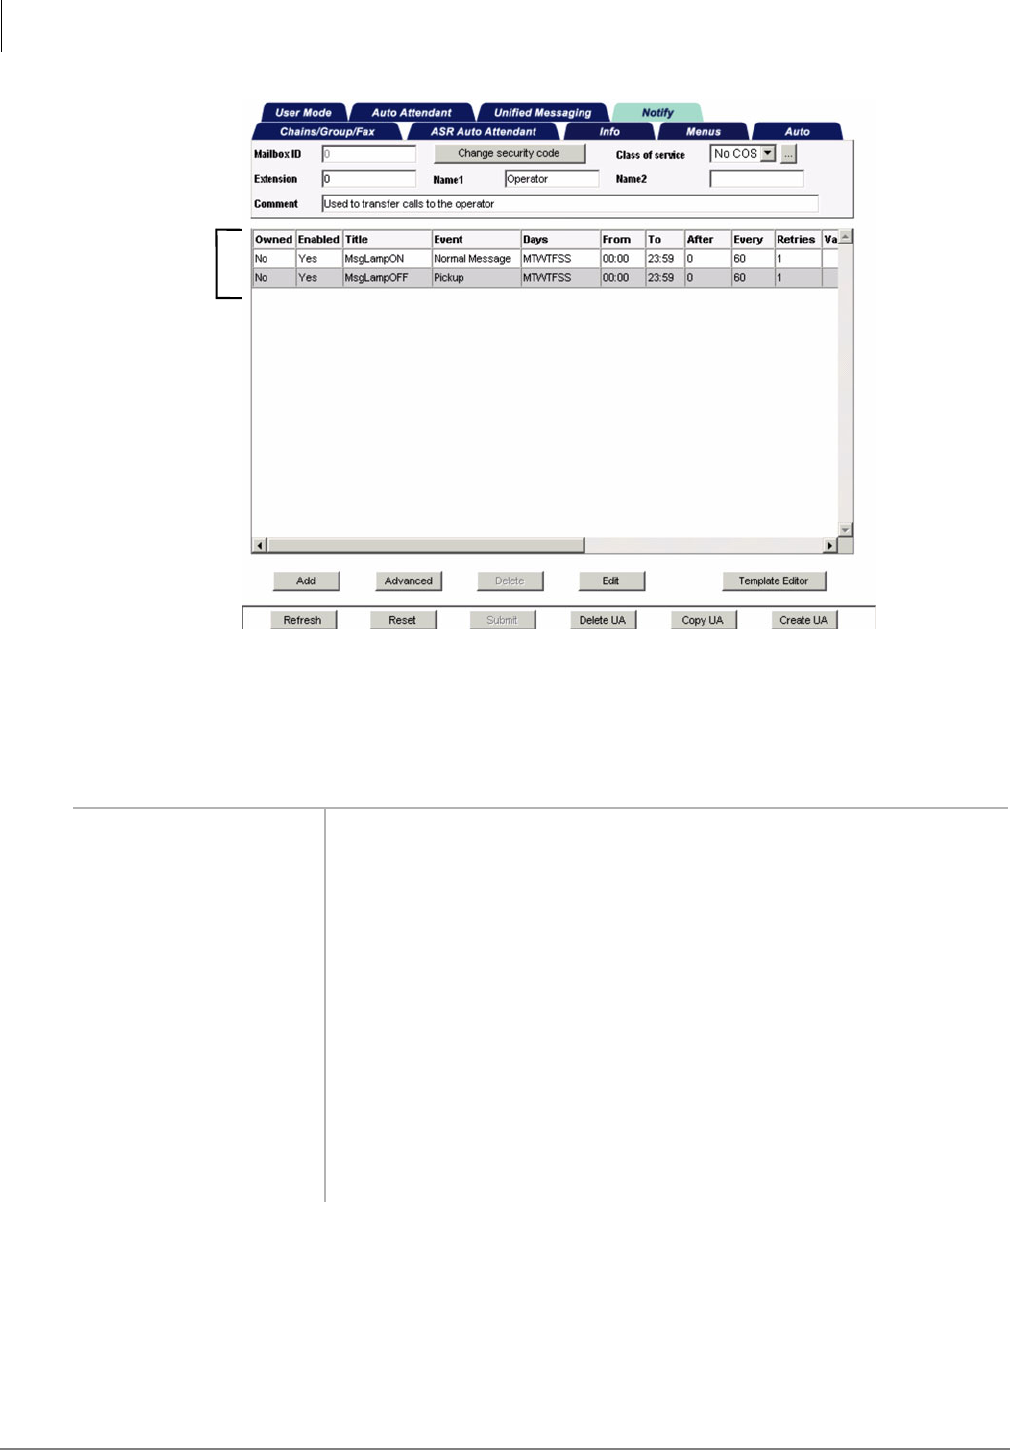
Voice Processing
Mailbox Editor Screens
4-24 Strata CIX Voice Mail Programming 01/07
Figure 4-17 Notify Tab Screen with Sample Data
Table 4-5 Notify Tab Screen Fields
FIELD DESCRIPTION
Mailbox Header See “Mailbox Header” on page 4-9 for field definitions.
Notify Record Summary Display only–One-line descriptions of existing notifications. Includes owned,
enabled, title, event, days, from, to, after, every, retries, and variable.
Notify Record Setup
Event Notification type for this record.
Possible values:
Normal Message: Notify user of new messages in his mailbox by lighting the
message light or calling a telephone number.
Notification begins when a message is left in the mailbox.
User notified of new messages in his mailbox by lighting the message light,
calling a home telephone, calling a cellular telephone, or calling any off-premise
location.
Notification ends when the user picks up messages or when the maximum
number of tries (Max Times) has been reached.
Record
Summary
7298

Voice Processing
Mailbox Editor Screens
Strata CIX Voice Mail Programming 01/07 4-25
Voice Processing
Relay: Notify user by relaying the caller’s telephone number to the user’s beeper
display.
Notification begins when a caller uses the relay paging feature to record a
telephone number. Voice mail prompts the caller to:
1. Press # while connected to the personal greeting of the mailbox.
2. Enter his/her telephone number and press #.
Voice mail stores the telephone number in the Method field token %R.
User notified when the caller’s telephone number is relayed to the user’s
beeper display or forwarded to a voice answered telephone.
Notification ends when the maximum number of tries (Maximum Times) has
been reached.
Pickup: Turn off a message waiting light after a user has retrieved messages from
his/her mailbox.
Notification begins after the user picks up all new messages and exits from the
Play Messages selection.
Notification ends when the maximum number of tries (Maximum Times) has
been reached. Therefore, be sure to enter 1 when you define Maximum Times.
Disk Space: Notify user (usually System Administrator) when available hard
drive space is low.
Notification begins when the available hard drive storage space reaches the
predefined limit. Notification ends when the maximum number of tries
(Maximum Times) has been reached.
There are four possible settings for this event–Disk Space <5%, Disk Space
<10%, Disk Space <20%, and Disk Space <30%. You can program one
notification record to warn you of disk low or if you want, you can program
multiple notification records to notify you at different stages of disk low. For
example, you can have voice mail notify you at 20%, 10% and again at 5%.
Urgent Message: Notify user of an urgent message in his/her mailbox.
Notification begins when a mailbox receives a message the caller marked as
urgent.
Notification ends when the maximum number of tries (Maximum Times) has
been reached.
Fax Failure Notify user that there was a fax Stratagy ES transmission error.
Fax Success Notify user that a Stratagy ES fax was transmitted successfully.
Note Fax Failure and Fax Success is best used with the EmailFaxNotify template
(see previous page).
Default: None
Table 4-5 Notify Tab Screen Fields (continued)
FIELD DESCRIPTION

Voice Processing
Mailbox Editor Screens
4-26 Strata CIX Voice Mail Programming 01/07
Title The title of the Template or application that performs notification. The voice mail
comes with six preconfigured Templates:
©AUTOMATICFAX — Transmits any new incoming fax messages of a mailbox to
an external fax device using the digits in the Variable field.
©MsgLampON — Turns on the message waiting lamp of a telephone.
©MsgLampOFF — Turns off the message waiting lamp of a telephone.
©PagerNotify — Calls a pager using the digits stored in the Variable field.
©TokenNotify — Allows the free use of tokens to perform custom notifications.
©VoiceHome — Calls a residence using the digits in the Variable field. Notifies
user that new messages have arrived in their mailbox.
©EmailNotify — E-mails the user at a valid e-mail address entered in the variable
field. Notifies user that voice messages are in his/her mailbox.
©EmailFaxNotify — E-mails the user at a valid e-mail address entered in the
variable field. Notifies user that a fax message has been sent. Use this title with
Fax Failure and Fax Success events.
©EmailNotifyUrgent — E-mails the user at a valid e-mail address entered in the
variable field. Notifies user that urgent voice messages are in his/her mailbox.
Default: None
Enabled Enable or disable the current Notify record.
Possible values:
Yes: Enable the record. Voice mail carries out the instructions defined by the
record.
No: (Default) Disable the current Notify record.
Important! Using Stratagy’s User Notification option for his/her mailbox, a user
can enable or disable an existing Notify record and modify the
contents of the record’s Variable field.
Table 4-5 Notify Tab Screen Fields (continued)
FIELD DESCRIPTION

Voice Processing
Mailbox Editor Screens
Strata CIX Voice Mail Programming 01/07 4-27
Voice Processing
Variable Value voice mail inserts in place of the %V in a Token Notify string. The Variable is
also used by the other Notify templates to insert pager or home phone numbers and
e-mail addresses. Typically, this is pager or similar value associated with the record
rather than the template.
The uses include:
©Enables notification templates to be used for many users.
©Enables field personnel to be notified at different destinations during the day or
week.
Important!
•Using Stratagy’s User Notification option for his/her mailbox, a user can enable or
disable an existing Notify record and modify the contents of the record’s Variable
field.
•For users that are in a remote node of Strata Net where the dialing plan is NOT
transparent, you must enter the node number plus the extension number in the
Variable field. For example, if to reach a remote node user you must dial :
10 = node number
3752 = user extension number
then enter 103752 in mailbox 3752’s Notification Variable field.
Possible values: any digit strings (e.g., telephone number, extension, Token
Programming Language) up to 17 characters long.
Default: blank
Active Days Days of the week to which notification is restricted. Highlighted days are active.
Days not highlighted are inactive.
Possible values: Mon~Sun
Default: All days
From Start notification time (hh:mm). Military format (24-hour clock); e.g., 5:30 p.m. is
represented as 17:30. Always less than To field. To specify 24 hours, set From at
00:00 and To at 23:59.
Possible values: 00:00~23:59 (Default = 00:00)
To End notification time (hh:mm). Military format (24-hour clock). Always more than
From field. To specify 24 hours, set From at 00:00 and To at 23:59.
Possible values: 00:00~23:59 (Default = 23:59)
Holidays always Whether voice mail uses the system “Holiday Table” in conjunction with the days
selected in Days of Week field. (See “Holidays” on page 3-4 for instructions on
assigning holidays.)
Possible values:
Ignored:(Default) Days defined in the Holiday table are not included in the selected
Active Days.
ActiveDays defined in the Holiday table are included with the selected Active Days
for this record. For example, if a holiday occurs on an inactive day the
record becomes active on that day(s).
Inactive:Holiday table is excluded from the selected Active Days. For example, if a
holiday occurs on a selected Active Day, the record becomes inactive
on that day.
Table 4-5 Notify Tab Screen Fields (continued)
FIELD DESCRIPTION

Voice Processing
Mailbox Editor Screens
4-28 Strata CIX Voice Mail Programming 01/07
Notify after Number of minutes before voice mail attempts the first notification to a user after
someone leaves a new message.
Possible values: 0~ 60 (minutes)
Default: 0 (immediately)
Continue every Number of minutes before voice mail re-attempts notification after the first
notification. For example, every 60 minutes means notify this user every hour after
the first notification.
Possible values: 0~60
Default: 60 (minutes)
Maximum times Number of notification attempts when new messages exist in this mailbox.
Voice mail counts only successful tries; i.e., successfully performing each action in
the Method field.
Possible values: 0~999
Default: 0 (Voice mail continues until the user has played every new
message.)
User mode accessible Whether the specific record can be accessed by the user via mailbox’s User Mode
Options Tab screen.
Possible values:
On: (Default) User can access record via mailbox’s user mode menu.
Off: User can not access record via mailbox’s user mode menu.
Notification Port
Group
Indicates the notification port group to be used when this record is executed.
Note Notification port groups are added using the Notification Port Groups option
(see “Notification Groups” on page 3-18 ).
Possible values: Available groups are in a drop-down menu for the field.
Default: blank
Table 4-5 Notify Tab Screen Fields (continued)
FIELD DESCRIPTION
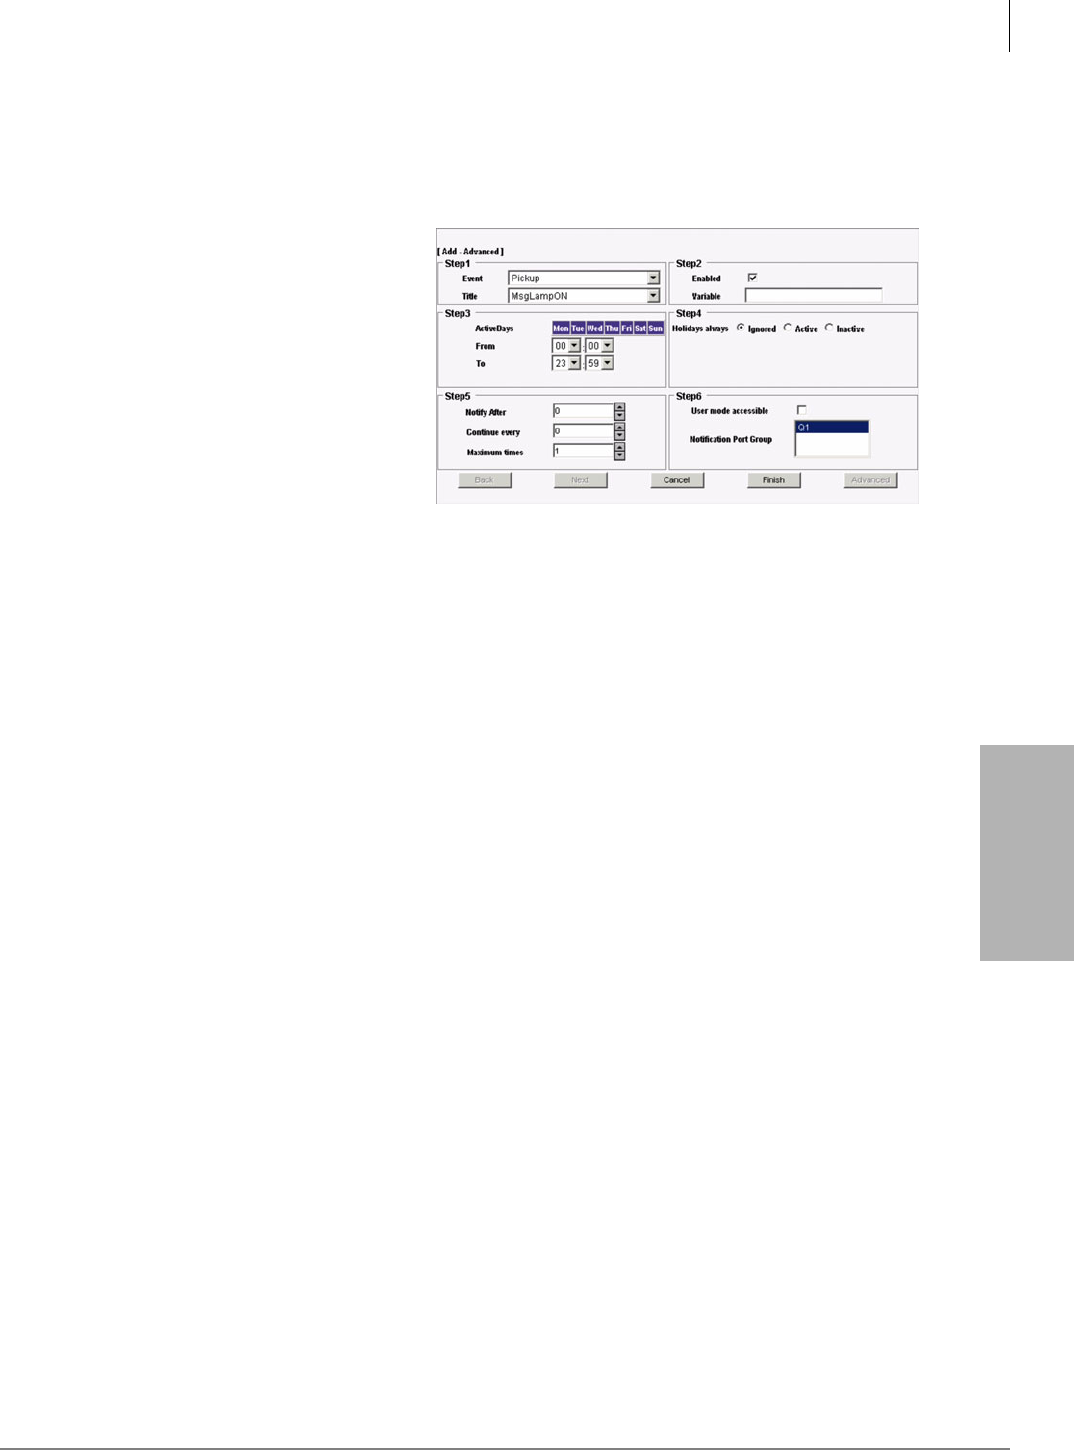
Voice Processing
Mailbox Editor Screens
Strata CIX Voice Mail Programming 01/07 4-29
Voice Processing
Add Notify Record
1. From the eManager Main Menu, click Advanced Configuration > Voice Mail > Notify tab
screen, the Notify screen displays.
2. Click Add. The Add screen displays.
3. You can now add the desired values
in the available parameter fields and
click Next to advance to the next
fields
...or you can click Advanced to
display all the fields at once (shown
right).
4. Click Finish when you have filled
in all the applicable fields. The
information is added to the record
line in the record summary section
of the screen.
5. Click Submit. The notify record is saved.
Modify Notify Record
1. From the eManager Main Menu, click Advanced Configuration > Voice Mail > Notify tab
screen, the Notify screen displays.
2. Highlight a record in the Notify record summary section of the screen.
3. Click Edit or Advanced.
Note Clicking Edit enables you to see a few fields at a time. Clicking Advanced displays all the
fields for the selected Notify record.
4. Make appropriate changes.
Note If you are using the Edit screens you need to click Next to advance to the next screen.
5. Click Finish. The changed information is added to the record line in the record summary
section of the screen.
6. Click Submit. The notify record is saved.
Delete Notify Record
Important! The mailbox must own the notify record in order to delete it.
1. From the eManager Main Menu, click Advanced Configuration > Voice Mail > Notify tab
screen, the Notify screen displays.
2. Highlight a record in the notify record summary section of the screen.
3. Click Delete. The notify record line disappears from the notify record summary section of the
screen.
7629

Voice Processing
Mailbox Editor Screens
4-30 Strata CIX Voice Mail Programming 01/07
Enable/Disable Notify Record
1. From the eManager Main Menu, click Advanced Configuration > Voice Mail > Notify tab
screen, the Notify screen displays.
2. Highlight a record in the notify record summary section of the screen.
3. Click Edit to display the notify record fields and navigate through the screens by clicking Next
until the Enabled field displays
...or click Advanced to see the entire notify record fields.
Note Click the Enabled field to enable/disable the record. If you are disabling the record, the
Next Change field changes to N/A.
4. Click Finish. The changed information is added to the record line in the record summary
section of the screen. Disabled records can be enabled at a later date.
5. Click Submit. The notify record is saved.
Template Editor
The Template Editor enables you to create new Templates by either renaming existing applications,
or by using Token Programming Language.
Add Template
1. From the eManager Main Menu, click Advanced Configuration > Voice Mail > Notify tab
screen, the Notify screen displays.
1. Click Template Editor. The Template Editor screen displays.
2. Click Add. The Add Template screen displays.
3. Type a new template name into the Tem plate Name field.
4. From the Application Name field drop-down menu, select an application.
5. Type a parameter in the Parameter field, if
required. If you chose the TokenNotify
application in Step , you must enter the token
string in this field. See Chapter 11 – Token
Programming for information on using tokens.
The screen at right is a sample template entry.
6. Click OK. The template is saved to the server
and the previous screen displays.
Edit Template
1. From the eManager Main Menu, click Advanced Configuration > Voice Mail > Notify tab
screen, the Notify screen displays.
2. Click Template Editor. The Template Editor screen displays.
3. From the Template Name field’s drop-down
menu, select a template and click Edit (shown
at right). The Edit Template screen displays.
4. From the Application Name field’s drop-
down menu, select an application.
Note You can only edit the Application Name
and Parameter fields.
5. Modify the parameter, if required.
6. Click OK. The changes to the template is saved to the server and the previous screen displays.
7231
7232
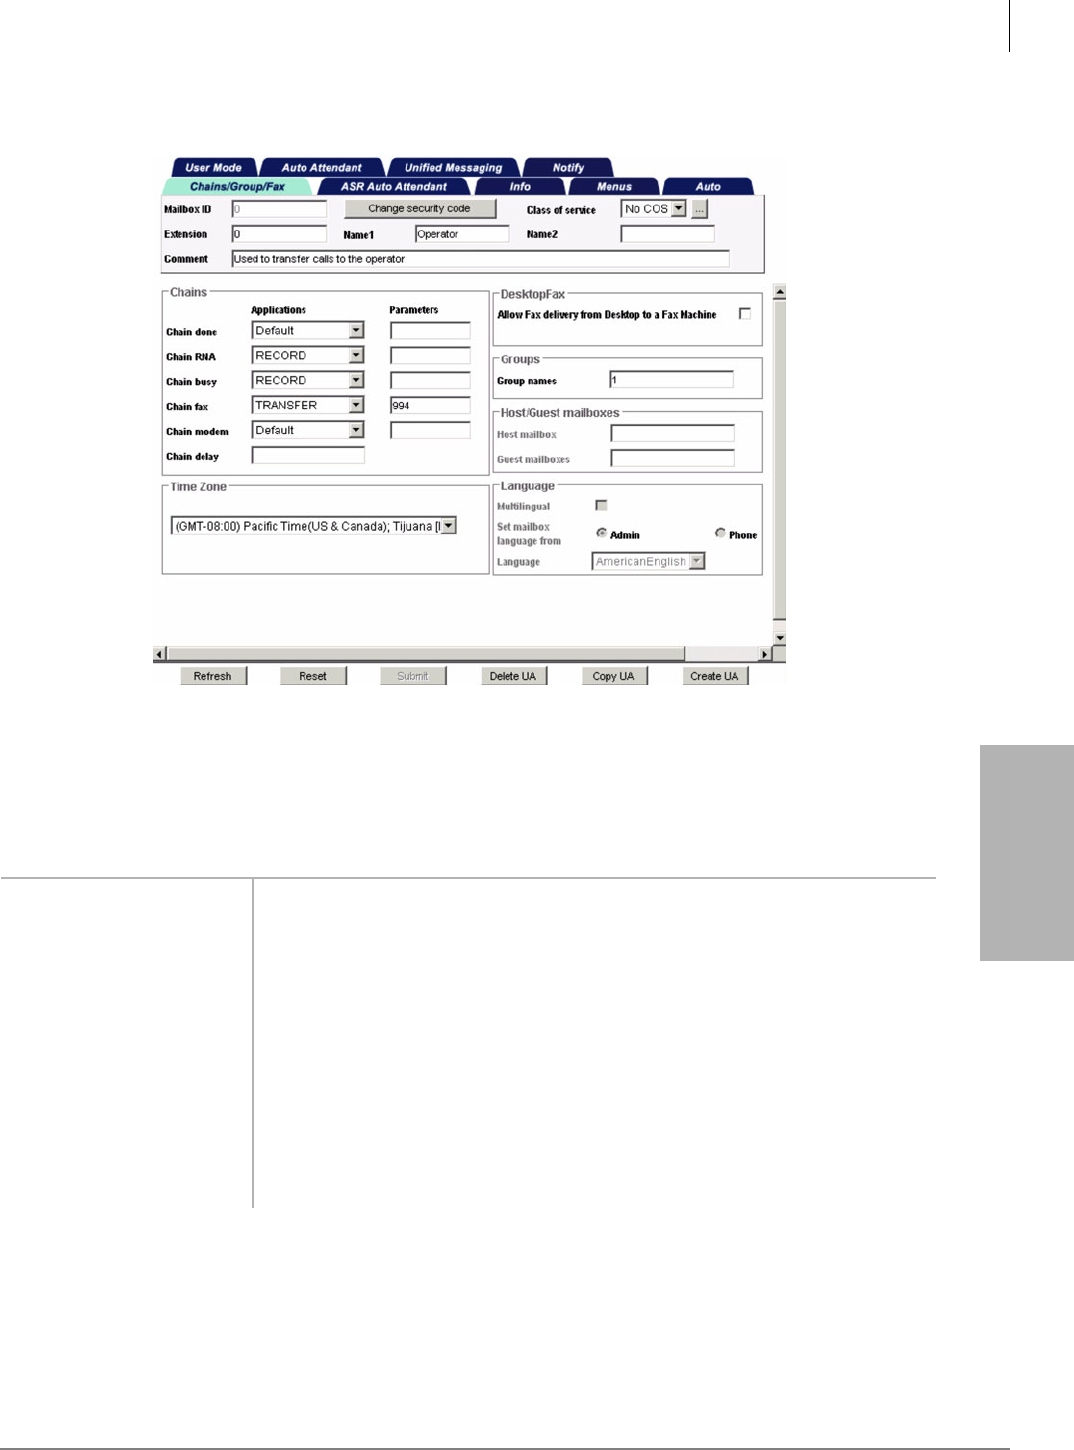
Voice Processing
Mailbox Editor Screens
Strata CIX Voice Mail Programming 01/07 4-31
Voice Processing
Chains/Groups/Fax
Figure 4-18 Chains/Groups/Fax Tab Screen with Sample Data
Note The Fax feature group is not currently supported.
Table 4-6 Chains/Groups/Fax Tab Screen Fields
FIELD DESCRIPTION
Mailbox Header See “Mailbox Header” on page 4-9 for field definitions.
Chains Chains are how we tell voice mail what to do with a caller when one of five specific
conditions apply: Done, RNA, Busy, Fax and Modem.
CAUTION! Avoid programming chains that create loops. If you create a loop
when programming voice mail with chains of mailboxes, all voice
mail ports become busy and you must reboot the system.
For normal voice mail operation, we recommend that you
program all chains to eventually end at System Administrator
Mailbox 999 (which defaults to disconnect, @H) and never
change the Mailbox 999 default.
Voice mail permits you to program chains, giving you the flexibility you need to
provide call routing solutions to many varied customer applications.
7666

Voice Processing
Mailbox Editor Screens
4-32 Strata CIX Voice Mail Programming 01/07
Conditions that create loops include:
lThe most common condition is usually triggered by no caller DTMF action
followed by a hang up.
For the following explanation assume that the reserved mailboxes are set to
their default values.
Operator Mailbox 0
Company Greeting Mailbox 990
System Administrator Mailbox 999
By default, if there is no caller DTMF action, all voice mail mailboxes return to the
Instructional Greeting for Mailbox 990. At sys_dtmf_gate, voice mail asks the caller
to say “yes” if he would like to transfer to the Operator. If voice mail detects any
verbal response, voice mail transfers the caller to the extension for the Operator
Mailbox 0. If there is no response, voice mail disconnects the caller. This is normal
operation for Stratagy.
Some applications require sys_dtmf_gate to be False, so there is no query from the
caller. But even if the gate is False, the Done chain for Operator Mailbox 0 is by
default set to the System Administrator Mailbox 999 (Mailbox 999 defaults to
disconnect, H).
lProgramming one or more mailbox Done chains to loop back to the same
mailboxes causes voice mail ports to lock up. For example; do not program
Mailbox 200 Done chain to Mailbox 200. And, do not program Mailbox 200
Done chain to Mailbox 201 and Mailbox 201 Done chain to Mailbox 200, etc.
Chain done Instructs voice mail where to send a caller who remains on the line after leaving a
message or after listening to an announcement only mailbox.
Possible values: <Default>, applications found in field’s drop-down menu.
Default: <Default> (returns to instructional greeting of mailbox that answers the
port)
Parameter Associated parameter for the Done application. This field can be a mailbox number
where voice mail sends the caller who remains on the line after leaving the
message or after listening to the announcement of this mailbox.
This field can contain alphanumeric characters. If set to blank, voice mail uses the
instructional greeting of the mailbox that answers the port.
Possible values: blank, mailbox number, variables required by application
Default: blank
Chain RNA Instructs voice mail where to send a caller when there is a RNA at this mailbox’s
extension. Defining an RNA chain enables voice mail to control extension hunting.
Possible values: RECORD, applications found in field’s drop-down menu
Default: RECORD
Parameter Associated parameter for the RNA application. This field can be a mailbox number
where voice mail sends the caller who remains on the line after returning from RNA
at this mailbox extension.
This field can contain alphanumeric characters. If set to blank, voice mail references
the current mailbox number if the application requires one to be defined.
Possible values: blank, mailbox number, variables required by application
Default: blank
Chain busy Instructs voice mail where to send a caller when this mailbox’s extension is Busy.
Possible values: RECORD, applications found in field’s drop-down menu
Default: blank
Table 4-6 Chains/Groups/Fax Tab Screen Fields (continued)
FIELD DESCRIPTION

Voice Processing
Mailbox Editor Screens
Strata CIX Voice Mail Programming 01/07 4-33
Voice Processing
Parameter Associated parameter for the Busy application. This field can be a mailbox number
where voice mail sends the caller when this mailbox’s extension is busy.
This field can contain alphanumeric characters. If set to blank, voice mail plays the
busy greeting for the mailbox and takes a message.
Possible values: blank, mailbox number, variables required by application
Default: blank
Chain fax Instructs voice mail where to send a fax call when a fax tone is detected while the
mailbox is active.
Examples:
©TRANSFER — transfers the call to a specified mailbox (default 994)
©RECEIVEFAX — stores the fax message in a specified mailbox
Default: TRANSFER
Parameter Associated parameter for the Chain Fax application. This field is the mailbox
number where voice mail sends the fax call when it detects fax tone.
This field can contain alphanumeric characters.
Possible values: another mailbox (up to eight digits)
Default: 994
Chain modem Important! This field and the associated parameter field are currently not
operational.
Instructs voice mail what application to run when a modem tone is detected.
Possible values: <Default>, values found in field’s drop-down menu
Default: <Default>
Parameter Associated parameter for the modem application. This field can be a mailbox
number where voice mail sends the call when a modem tone is detected.
This field can contain alphanumeric characters. If set to blank, voice mail plays the
busy greeting for the mailbox and takes a message.
Possible values: blank, another mailbox
Default: blank
Chain delay Number of tenths of seconds voice mail waits after playing this mailbox’s greeting
before continuing processing. Callers can enter DTMF to transfer processing to
another mailbox.
This field is three-digits long.
Possible values: 0~999 (milliseconds)
Default: 0 (no additional delay)
Table 4-6 Chains/Groups/Fax Tab Screen Fields (continued)
FIELD DESCRIPTION

Voice Processing
Mailbox Editor Screens
4-34 Strata CIX Voice Mail Programming 01/07
DesktopFax
Allow Fax Delivery
from Desktop to a
Fax Machine
Checking this box enables the mailbox user to send faxes out via voice mail fax
resources with the client fax printer driver.
Note This feature is not currently supported.
Groups Groups control which mailboxes a call can access. A user mailbox can belong to
multiple groups. Separate the group numbers by commas; e.g., 1,2,4,5.
Note Also restricts what mailboxes an AA can access.
To be able to access another mailbox, the caller mailbox must share at least one
group number with the currently accessed mailbox. If all groups are set to 0, then no
other mailbox may be accessed.
For example, assume the following:
Mailbox Group 1 Group 2 Group 3 Group 4
100 1 0 0 0
222 1 5 0 0
303 5 7 0 0
440 7 0 0 0
For the above example, Mailbox 100 may access Mailbox 222 only. Mailbox 222
may access Mailboxes 100 and 303. Mailbox 303 may access Mailboxes 222 and
440. Mailbox 440 may access Mailbox 303 only.
Groups are useful for isolating different departments in the same company or
different companies sharing one system. For example, suppose two companies
share the same President, Vice President, and Controller and you would want them
accessible to all companies; but each company has a different Human Resources
department that you may want to prevent caller access from one to the other.
Group names List the group numbers that the mailbox can access. Multiple group numbers can be
entered using commas (,) and dashes(-); e.g., 1, 23, 10-14. A group number string
can be a single digit or any string of digits up to eight digits long.
Possible values: 1~99999999
Default: 1
Host/Guest mailboxes
Host mailbox (Display Only) This field is blank if you are viewing a host mailbox. If you are viewing
a guest mailbox, this field displays the host’s mailbox number.
Guest mailboxes (Display Only) This field is blank if you are viewing a guest mailbox. If you are
viewing a host mailbox, this field displays the guests’ mailbox numbers.
Time Zone Enables you to set the time zone for individual mailboxes.
Messages that arrive for a configured mailbox are date and time stamped based on
the time zone defined here rather than the time zone configured in the Stratagy ES
operating system. Message playback and future delivery are based on this
selection.
Drop-down menu lists all global Time Zones, based on Greenwich Mean Time
(GMT).
Table 4-6 Chains/Groups/Fax Tab Screen Fields (continued)
FIELD DESCRIPTION

Voice Processing
Mailbox Editor Screens
Strata CIX Voice Mail Programming 01/07 4-35
Voice Processing
Language These fields are not active until the Language Configuration screen has been set for
a language other than American English (default).
Multilingual If this box is checked, this mailbox can have multiple language greetings and name
announcements.
Set Mailbox language Method to be used for setting language for prompts.
Admin If this box is checked, the language must be set in the eManager screens.
Phone If this box is checked, the language must be set using the telephone.
Language Selects the default language for this mailbox.
Possible values: American English, French
Table 4-6 Chains/Groups/Fax Tab Screen Fields (continued)
FIELD DESCRIPTION
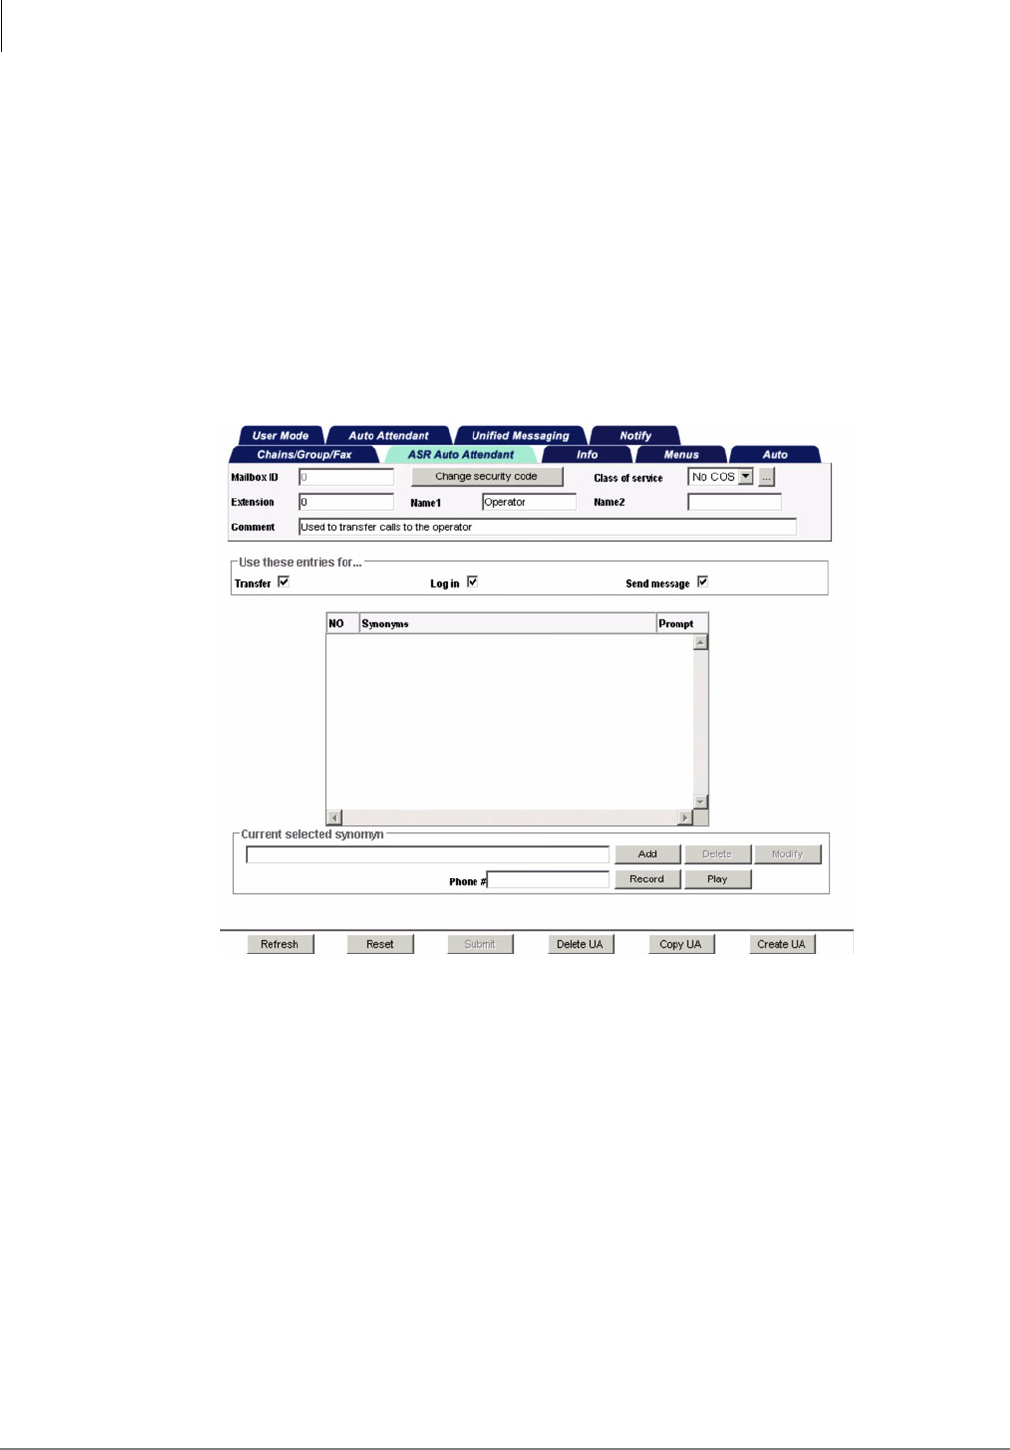
Voice Processing
Mailbox Editor Screens
4-36 Strata CIX Voice Mail Programming 01/07
ASR Auto Attendant
Stratagy ES provides Automatic Speech Recognition (ASR) Auto Attendant as an optional feature
group. ASR AA enables callers to speak a person’s name or a command to be transferred to an
extension, send a voice message, and/or login to a mailbox.
The ASR Auto Attendant Tab screen (see Figure 4-19 and Table ) enables you to configure the ASR
feature for individual user mailboxes and is broken into two sections:
•The top section configures which system functions can use speech recognition. All options are,
by default, enabled for use. See Chapter 6 – Automatic Speech Recognition (ASR) for details.
•The bottom section of the page provides the ability of adding synonyms for the main user name
for the mailbox. Also included in this section is an interface for making a recording that is
assigned to the synonym.
Figure 4-19 ASR Auto Attendant Tab Screen with Sample Data
7302

Voice Processing
Mailbox Editor Screens
Strata CIX Voice Mail Programming 01/07 4-37
Voice Processing
Table 4-7 ASR Auto Attendant Tab Screen Fields
FIELD DESCRIPTION
Mailbox Header See “Mailbox Header” on page 4-9 for field definitions.
Use these entries for: Assignment of ASR AA privileges. For example, the Log in setting would facilitate
users who wish to use ASR to log into their mailbox, but wish to restrict callers from
using the ASR feature to reach their extension, or leaving them a message.
Transfer By selecting this option a caller can speak the user's name and be transferred to the
assigned extension number of the mailbox.
Default: Enabled
Log in By selecting this option, a user may call into the system and speak one of the log in
commands, i.e. “Log me in,” “Log on,” “Access Mailbox,” to begin the mailbox log in
process.
Default: Enabled
Send message By selecting this option, a caller can record and send a direct message to the user
by speaking one of the available ASR commands, i.e. “Send Message,” “Direct
Message,” “Quick Message.”
Default: Enabled
Synonyms The synonym name entered should include the last name for quicker interpretation
by the speech application. However, a single name can be listed as well.
As a suggestion to make it simpler for a caller to decide on the proper name choice,
single name synonyms should be accompanied by a recording that gives some
additional information, such as “John Dart in the sales department”.
Notes
•If there is more than one mailbox that lists the same synonym, then the
Stratagy ES will give the caller the ability to choose the correct name by playing
the recording assigned to the synonym.
•There is no limit to the number of synonyms that can be created for any one
mailbox.
Prompt For display only.
Telephone handset — Indicates a recording exists and the synonym is active.
Red circle — Indicates that a recording does not exist and the synonym is not active.
Phone # Extension number for telephone to be used for recording the corresponding
synonym name. Once entered, this number remains consistent for administration
other mailboxes.

Voice Processing
Mailbox Editor Screens
4-38 Strata CIX Voice Mail Programming 01/07
Add Synonym
1. From the eManager Main Menu, click Advanced Configuration > Voice Mail > ASR Attendant
tab screen, the ASR Attendant screen displays.
2. Select the mailbox in which you want to add a synonym.
3. Type the synonym and phone number into the fields at the bottom of the screen.
4. Click Add. The synonym is added to the record portion of the screen. Until a recording is made,
a red circle displays in the prompt section of the screen.
5. Click Record. The telephone rings and a prompt is played saying “Record the synonym after
the tone, finish by pressing pound.”
6. Record the synonym and press #. The recording is stored in the prompts subdirectory of the
ASR AA application.
7. The red circle (stop sign) on the screen is replaced with a microphone icon.
8. Click Play to listen to the recording.
9. Click Submit to save the synonym.
Delete Synonym
1. From the eManager Main Menu, click Advanced Configuration > Voice Mail > ASR Attendant
tab screen, the ASR Attendant screen displays.
2. Select the mailbox you want to change.
3. Highlight the synonym on the screen you want to delete.
4. Click Delete. The synonym is removed.
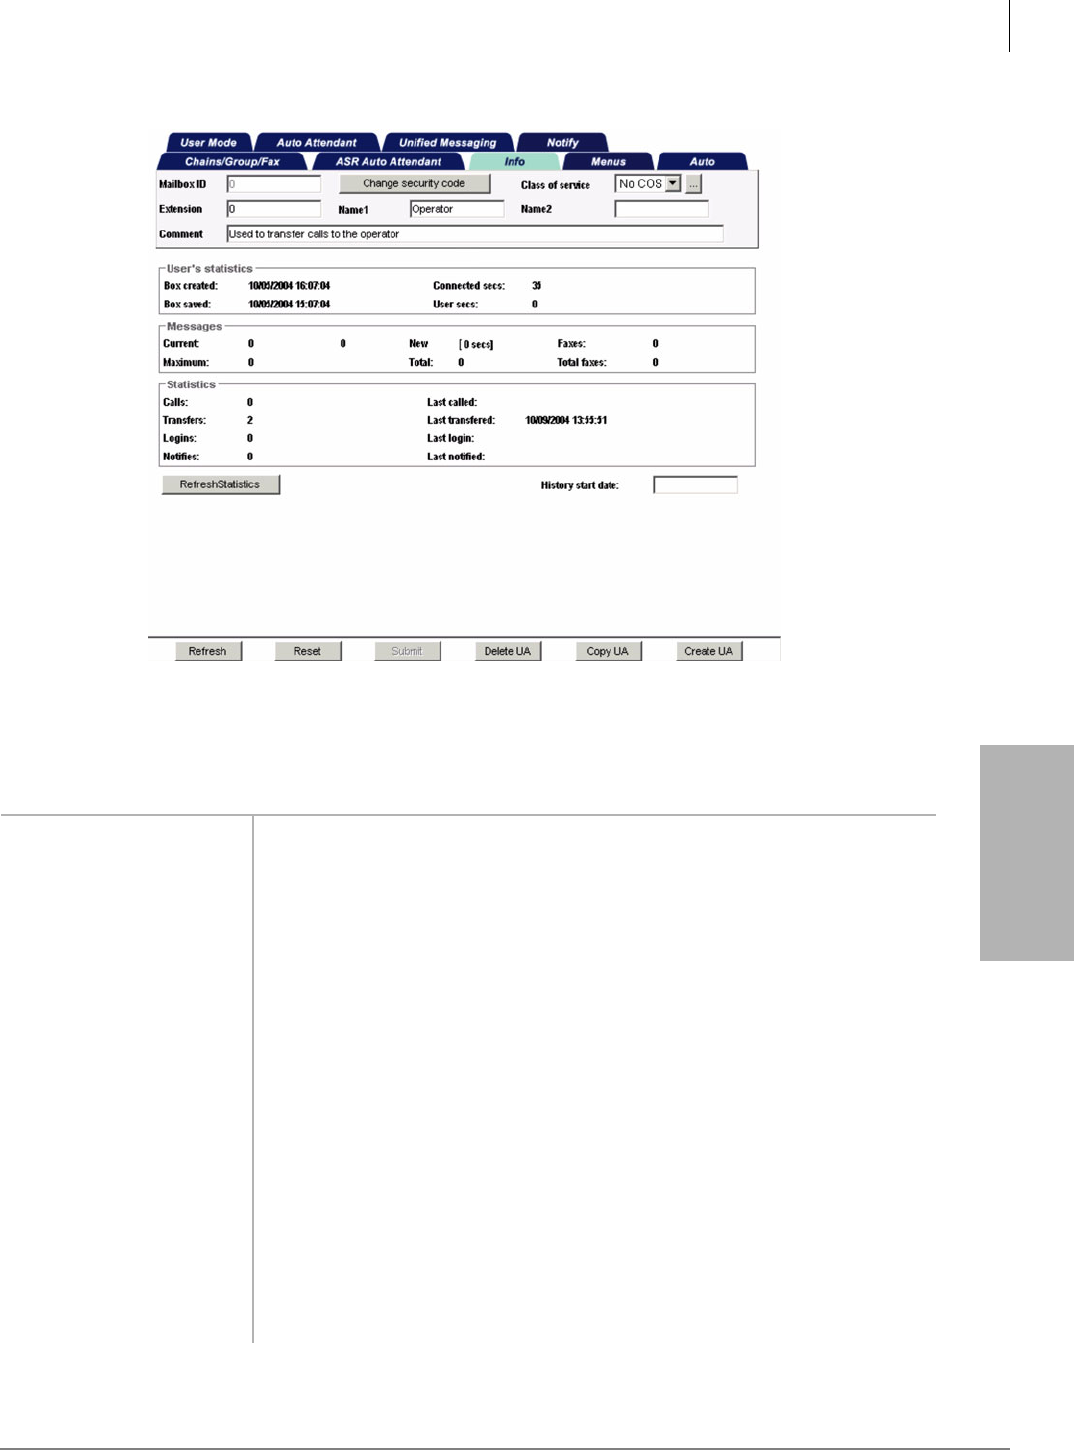
Voice Processing
Mailbox Editor Screens
Strata CIX Voice Mail Programming 01/07 4-39
Voice Processing
Info
Figure 4-20 Info Tab Screen with Sample Data
Table 4-8 Info Tab Screen Fields (Display only)
FIELD DESCRIPTION
Mailbox Header See “Mailbox Header” on page 4-9 for field definitions.
User Statistics Statistics (creation, saved and connect) for the mailbox.
Box created Date (mm/dd/yy) and time (hh:mm) this mailbox was originally created. Time is in
military format (24-hour clock).
Box saved Date (mm/dd/yy) and time (hh:mm) this mailbox was last updated. Time is in military
format (24-hour clock).
Connected secs. Number of seconds callers have been connected to this mailbox since it was
created.
User secs. Number of seconds users have been connected to this mailbox since it was created.
Messages Voice and fax message statistics for the mailbox.
Current Number of voice messages currently stored.
New Number of new voice messages and number of seconds for playback of these
stored messages.
Maximum Maximum number of messages (voice) stored at the same time since the mailbox
was created.
Total Number of voice messages stored since the mailbox was created.
7303

Voice Processing
Mailbox Editor Screens
4-40 Strata CIX Voice Mail Programming 01/07
Faxes Number of fax messages currently stored.
Note The Fax feature group is not currently supported.
Total Faxes Number of fax messages stored since the mailbox was created.
Note The Fax feature group is not currently supported.
Statistics Call, transfer, log in and notify statistics for the mailbox.
Calls Number of times the mailboxes was accessed by a caller since History Start Date
was selected.
Last called Date (mm/dd/yy) and time (hh:mm) of the last call. Time is in military format
(24-hour clock).
Transfers Number of times voice mail successfully completed a call transfer to the extension
associated with this mailbox since History Start Date was selected.
Last transferred Date (mm/dd/yy) and time (hh:mm) of the last transfer. Time is in military format
(24-hour clock).
Logins Number of times the mailbox user accessed the mailbox for message retrieval or
other mailbox functions since History Start Date was selected.
Last login Last time (date and time) this mailbox user accessed this mailbox for message
retrieval or other mailbox functions since statistics were last reset. Time is in military
format (24-hour clock).
Notifies Number of times this mailbox user was notified of new messages since History Start
Date was selected.
Last notified Last time (date and time) this mailbox user was notified of new messages. Time is in
military format (24-hour clock).
History start date Last time statistics were reset. Statistics can be reset by selecting reset after
running a System Report, using the Report option on the Main Menu, or by using
the System Administrator Mailbox option of Reset Mailbox Number.
If this field is left blank, tab screen reflects all statistics that has been collected.
Table 4-8 Info Tab Screen Fields (Display only) (continued)
FIELD DESCRIPTION
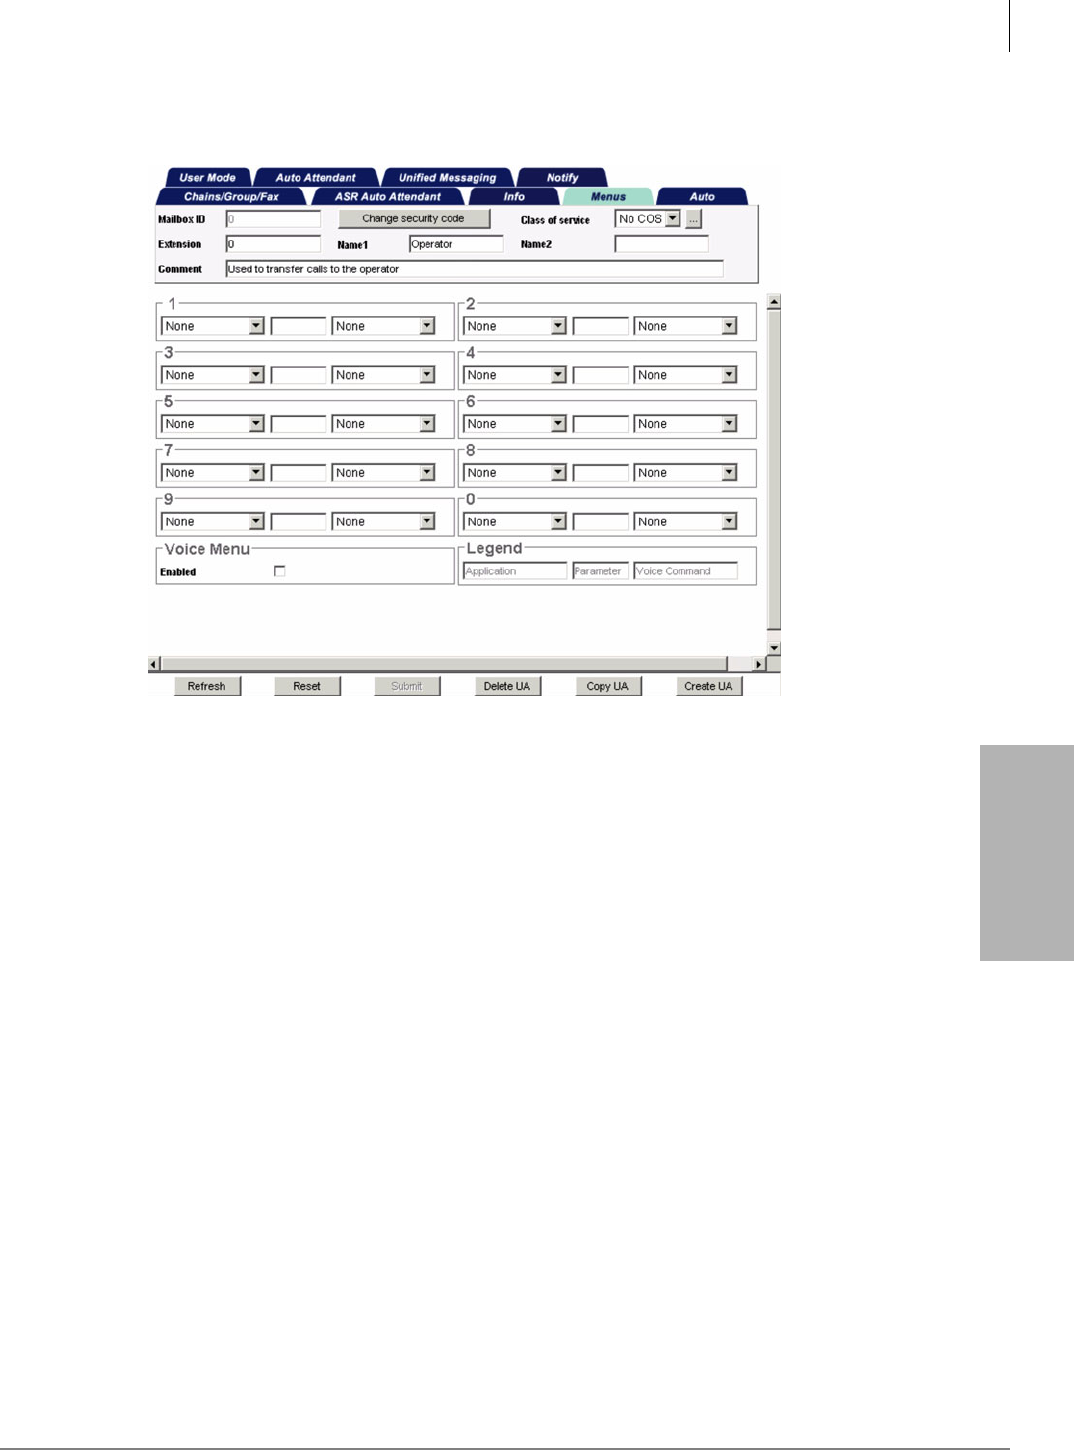
Voice Processing
Mailbox Editor Screens
Strata CIX Voice Mail Programming 01/07 4-41
Voice Processing
Menus
Figure 4-21 Menus Tab Screen with Sample Data
7304

Voice Processing
Mailbox Editor Screens
4-42 Strata CIX Voice Mail Programming 01/07
Table 4-9 Menus Tab Screen Fields
FIELD DESCRIPTION
Mailbox Header See “Mailbox Header” on page 4-9 for field definitions.
Menu Applications
One~Nine, Zero
Menu Applications define the destination the call is sent or the special application to
be executed when the caller presses 1 of the 10 possible menu options while
listening to the greeting of this mailbox. Menus can accommodate an unlimited
number of special applications.
Each mailbox may reference up to 10 single-digit menu selections. Each menu
selection may be assigned to a particular mailbox. If the caller dials an assigned
menu selection, voice mail executes the defined application. In voice mail to have a
single-digit selection send a caller to another extension, the application TRANSFER
is used. Voice mail processes unassigned menu digits normally. For example, if the
menu digit 0 is not defined and the caller dials 0, voice mail selects Mailbox 0
(typically, the operator).
A special function mailbox set up for customer service using menus can be defined
as follows. For Sales Assistance, press 1; for Product Information, press 2; for
Service, press 3; or press 0 for the operator. The menu set up would look like:
1:TRANSFER 222 2: TRANSFER 350 3: TRANSFER 516
4: 5: 6:
7: 8: 9:
0: TRANSFER 240
If the caller selects 1 (Sales Assistance), the call is transferred to Mailbox 222. If the
caller selects 2 (Product Information), the call is transferred to Mailbox 350. If the
caller selects 3, the call is transferred to Mailbox 516 (Service). If the caller selects 0
(Operator), the call is transferred to the customer service secretary at extension
240. If the caller presses a menu digit that does not contain a mailbox number, the
call is transferred to that mailbox (e.g., presses 7, caller is transferred to Mailbox 7).
Possible values: An existing application available from field’s drop-down menu.
Default: blank
Associated Parameter for
Menu Applications
One~Nine, Zero
Associated parameter for the Menu application. This field can contain alphanumeric
characters.
Possible values: blank, another mailbox
Default: blank
Voice Command Select from the drop-down list the voice command to execute this application.
Voice Menu If this option is checked, call screening is turned on. If not, call screening is disabled.
Default: Disabled (unchecked)

Voice Processing
Mailbox Editor Screens
Strata CIX Voice Mail Programming 01/07 4-43
Voice Processing
Auto (Scheduling)
The Auto (Scheduling) Tab Screen (see Figure 4-22 and Table on page 4-44) enables you to set up
automatic changes for each mailbox. You can set these changes to occur at a specific time, on
certain days of the week, or on a specified date. For example, based on your Auto definition, voice
mail can answer your company’s telephone during the day with your daytime (open) greeting and
during off-hours with your nighttime (closed) greeting. The Stratagy ES software allows an
unlimited number of auto scheduling records for each mailbox.
By defining Auto fields, you can schedule when a mailbox can change the:
•DND setting
•Call Screening setting
•Greeting number
•Voice Menu
•Destination defined in the Extension field
•Number of rings before taking a message for this extension
The following concepts are the keys to understanding how voice mail uses Auto Scheduling
records:
•Voice mail waits for the right date, time, and day, and then makes the specified changes.
•The changes remain in effect until you either disable the Auto Scheduling record or another
record with different options is scheduled to start.
•If the re-schedule information does not fall on a valid day, voice mail increments the Next
Change date until it falls on a valid day as defined by the Active Days field.
For example, to schedule a greeting to play on Thanksgiving Day each year you would set the
following fields to:
•Enabled—checked (On)
•Change On—11/25/99 (Thanksgiving Day in 1999)
•At—8:00
•And Every—12 Months
•Active Days: MTWTFSS
NNNYNNN
Voice mail checks for the next Thursday after 11/25/99 and displays Next Change:11/23/00,
which is the next day that meets the criteria specified in the record.
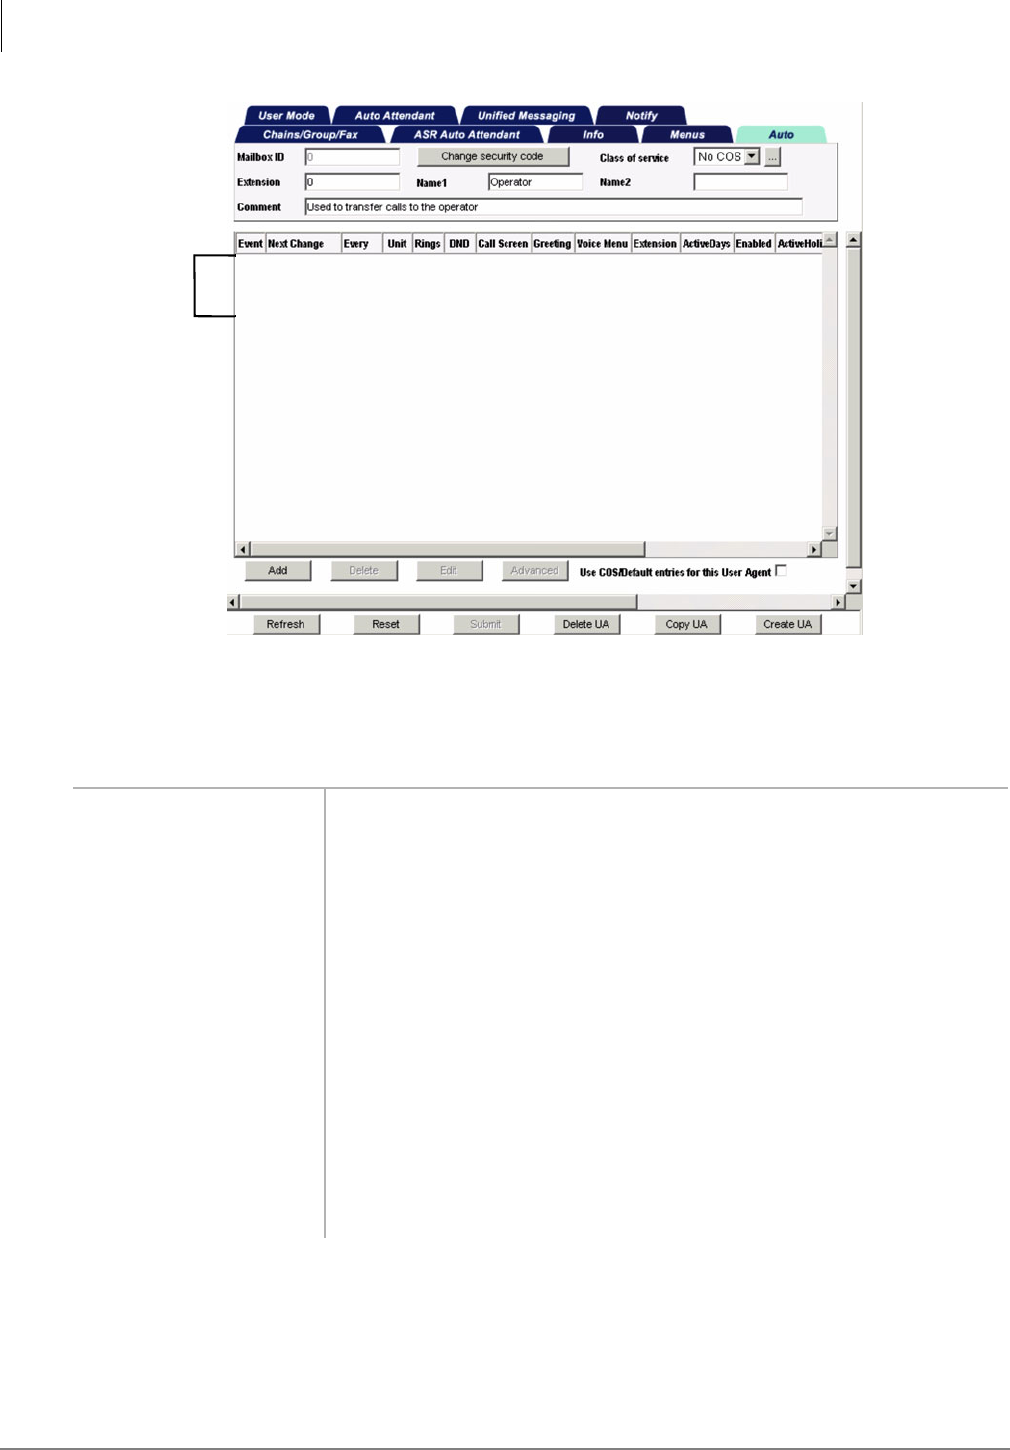
Voice Processing
Mailbox Editor Screens
4-44 Strata CIX Voice Mail Programming 01/07
Figure 4-22 Auto Tab Screen with Sample Data
Table 4-10 Auto Tab Screen Fields
FIELD DESCRIPTION
Mailbox Header See “Mailbox Header” on page 4-9 for field definitions.
Auto Scheduling Record
Summary
Display only–one-line descriptions of each existing Auto Scheduling record
Includes event, date, at time, every, rings, DND, call screen, greeting voice menu,
extension.
Auto Record Setup
Enabled Enable or disable the current Auto record (auto scheduling).
Possible values:
On (Default) Enable the record. Voice mail carries out the instructions defined
by the record.
Off Disable the current Auto Schedule record.
Use COS/Default
schedule entries for
this User Agent
Enable or disable the scheduling record from the COS parent.
Possible values:
On Mailbox inherits the scheduling record from the COS parent.
Off (Default) Mailbox does not inherit the scheduling record from the COS
parent.
7305
Record
Summary

Voice Processing
Mailbox Editor Screens
Strata CIX Voice Mail Programming 01/07 4-45
Voice Processing
When to apply changes
Change on Date (mm/dd/yyyy) of first scheduled change.
Default: system date
At Time (hh:mm) of first scheduled change. Military format (24-hour clock).
To guarantee that voice mail programs a holiday schedule after the open greeting
schedule, set the holiday greeting’s Change On/At time one minute after the regular
open greeting time in case the holiday and open greeting schedules take place on
the same day.
Default: system time
and Every Number of seconds, minutes, hours, days, weeks, months or years before this
change re-occurs at the time defined under Change On/At. For example, most
holiday greetings are set to occur every 12 months on the day specified.
Possible values: 0~999 (Default = 0)
Active days Number of days before this change re-occurs at the time defined under Change On/
At. Days that are highlighted are On; days not highlighted are Off.
Possible values: Mon, Tue, Wed, Thu, Fri, Sat, Sun
Default: all days selected (On)
Holidays always Indicates whether the holiday table will be used in conjunction with the selected
Active days. (See “Holidays” on page 3-4 for holiday assignments.)
Possible values:
Ignored:(Default) Days defined in the Holiday table are not included in the selected
Active Days for the record.
ActiveDays defined in the Holiday table are included with the selected Active Days
for this record. For example, if a holiday occurs on an inactive day the
record becomes active on that day(s).
Inactive:Holiday table is excluded from the selected Active Days. For example, if a
holiday occurs on a selected Active Day, the record becomes inactive
on that day.
Next change Display only–date and time the next change occurs (mm/dd/yyyy hh:mm). Time is
expressed in military format (24-hour clock). If an Auto Scheduling record is
disabled, this field displays N/A.
Changes to make
Extension New extension voice mail rings when this record is active. More specifically,
programmed dial actions voice mail performs after the change occurs to transfer a
call that has accessed the mailbox (i.e., Do Not Disturb is Off). For example, ring a
different extension after hours rather than during the day.
Valid entries: valid extension number, Token Programming Language
Default: blank
Rings When the change occurs, the maximum number of rings voice mail must wait when
transferring a call to this mailbox before determining a RNA.
Possible values: blank (uses system default), 1~9
Default: blank
Table 4-10 Auto Tab Screen Fields (continued)
FIELD DESCRIPTION

Voice Processing
Mailbox Editor Screens
4-46 Strata CIX Voice Mail Programming 01/07
Do not disturb Value for DND when the change occurs, even if the Auto Attendant Options Tab
screen’s Do Not Disturb is locked and On.
Possible values:
On: Voice mail plays the mailbox greeting to the caller without attempting to
ring the extension.
Off: Voice mail follows the dialing instructions provided in the Extension field.
Don’t Care: (Default) Feature remains unchanged.
Call screening Value for Call Screening when the change occurs, even if the Auto Attendant
Options Tab screen’s Screen calls field is locked and On.
Possible values:
On: Voice mail asks the caller to record his name, and then attempts to reach the
user. If the user answers, voice mail plays that recording. The user can press:
1to accept the call. Voice mail connects the caller to the user.
2to reject the call and hang up. Voice mail reconnects to the caller and
plays the user’s mailbox greeting. Voice mail follows the procedures used
for the RNA chain.
3to transfer the call with an announcement. The user dials the extension to
transfer the call and hangs up. Voice mail plays “Your call is being
transferred to” and the name recording or the mailbox number of the
extension where the call is being transferred. Voice mail transfers the
caller to the new extension.
4to transfer the call without announcement. The user dials the extension to
transfer the call and hangs up. Voice mail asks the caller to continue to
hold and transfers the caller to the new extension.
Off: Voice mail transfers the caller to the extension without inquiry.
Don’t Care: (Default) Feature remains unchanged.
Greeting Which of eight greetings–the system greeting or one of seven mailbox greetings–
this extension/mailbox plays when the change occurs. Plays even if Auto Attendant
Tab screen’s Selected Greeting is set to 0 (user cannot change greeting).
Possible values: 0, 1~7
Default: 0 (system greeting)
Instructional Greeting Which of seven mailbox custom voice instructions plays when the change occurs.
Plays even if Auto Attendant Tab screen’s Selected Instructional Greeting (voice
menu) is set to 0 (no instructional greeting plays).
The Instructional Greeting will only play when the mailbox has been defined in the
Answer Method screen as a Greeting User Agent.
Possible values: 0, 1~7
Default: 0 (no instructional greeting plays)
Table 4-10 Auto Tab Screen Fields (continued)
FIELD DESCRIPTION
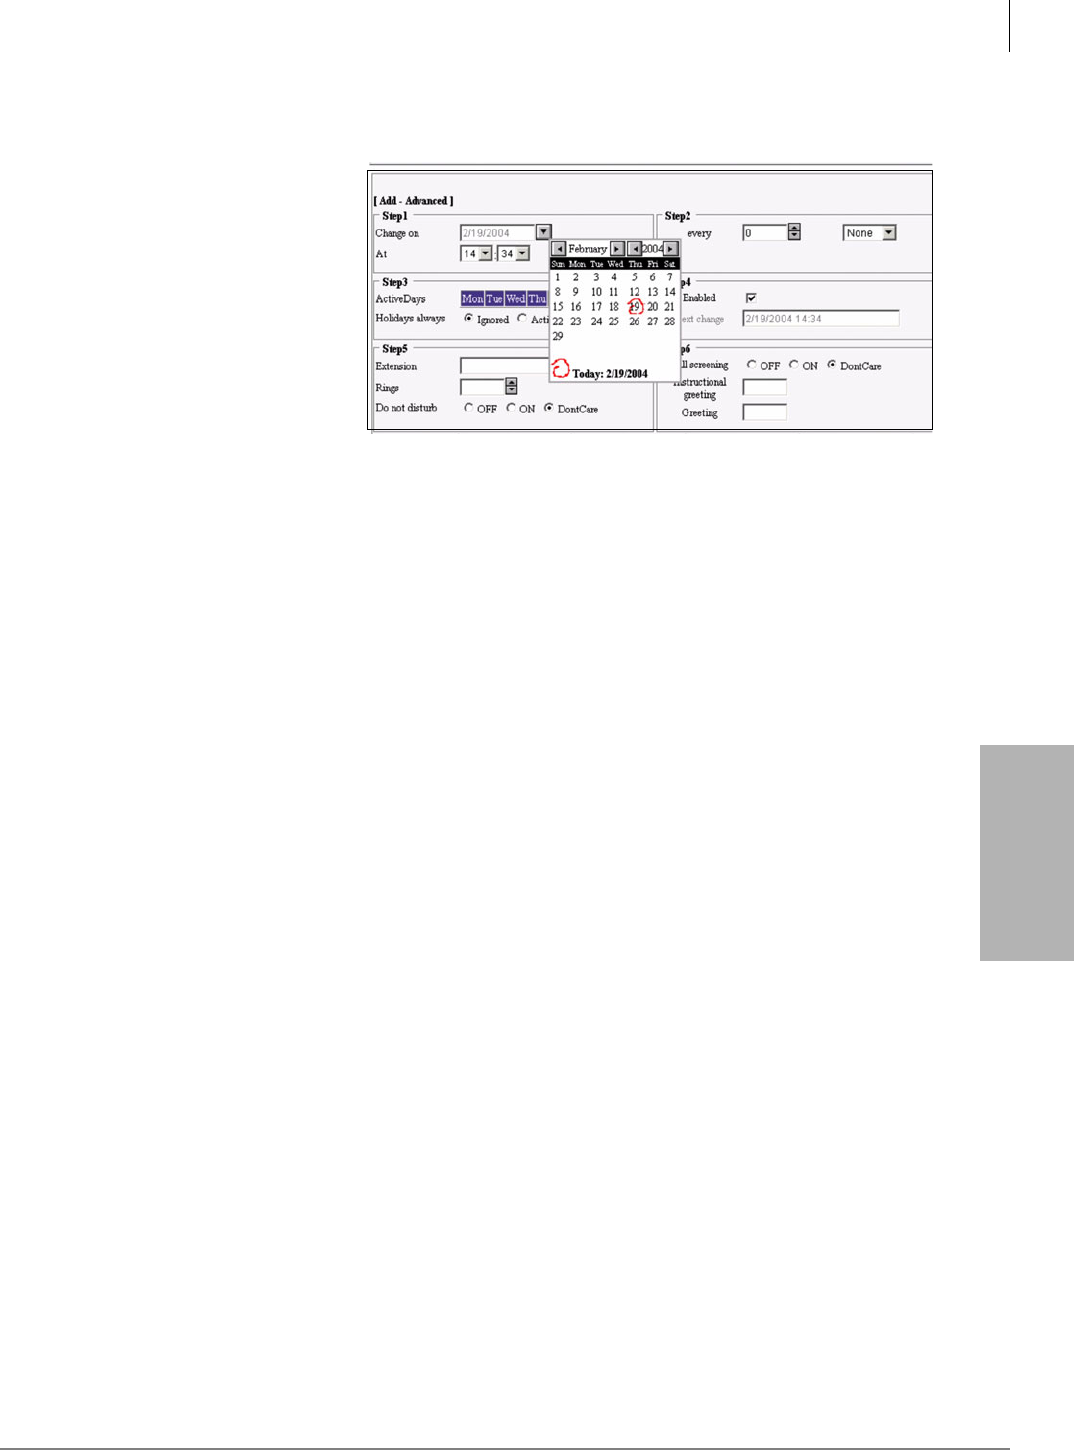
Voice Processing
Mailbox Editor Screens
Strata CIX Voice Mail Programming 01/07 4-47
Voice Processing
Create Auto Record
1. From the Auto tab screen, click Add. The Add screen displays.
2. You can now add the
desired values in the
available parameter fields
and click Next to advance
to the next fields
...or you can click
Advanced to display all the
fields at once (shown right).
Note For the Change on
field, a drop-down
calendar screen is
available (shown at
right).
3. Click Finish when you have filled in all the applicable fields. The information is added to the
record line in the record summary section of the screen. Verify that the date and time displayed
in the Next Change field is correct.
4. Click Submit. The auto record is saved.
Modify Auto Record
1. From the Auto tab screen, highlight a record in the auto record summary section of the screen.
2. Click Edit or Advanced.
Note Clicking Edit enables you to see a few fields at a time. Clicking Advanced displays all the
fields for the selected Auto record.
3. Make appropriate changes.
Note If you are using the Edit screens you need to click Next to advance to the next screen.
4. Click Finish. The changed information is added to the record line in the record summary
section of the screen.
5. Click Submit. The auto record is saved.
Enable/Disable Auto Record
1. From the Auto tab screen, highlight a record in the auto record summary section of the screen.
2. Click Edit to display the auto record fields and navigate through the screens by clicking Next
until the Enabled field displays
...or click Advanced to see the entire auto record fields.
Note Click the Enabled field to enable/disable the record. If you are disabling the record, the
Next Change field changes to N/A.
3. Click Finish. The changed information is added to the record line in the record summary
section of the screen. Disabled records can be enabled at a later date.
4. Click Submit. The auto record is saved.
Delete Auto Record
1. From the Auto tab screen, highlight a record in the auto record summary section of the screen.
2. Click Delete. The auto record line disappears from the auto record summary section of the
screen.
3. Click Submit. The information is saved.
7229
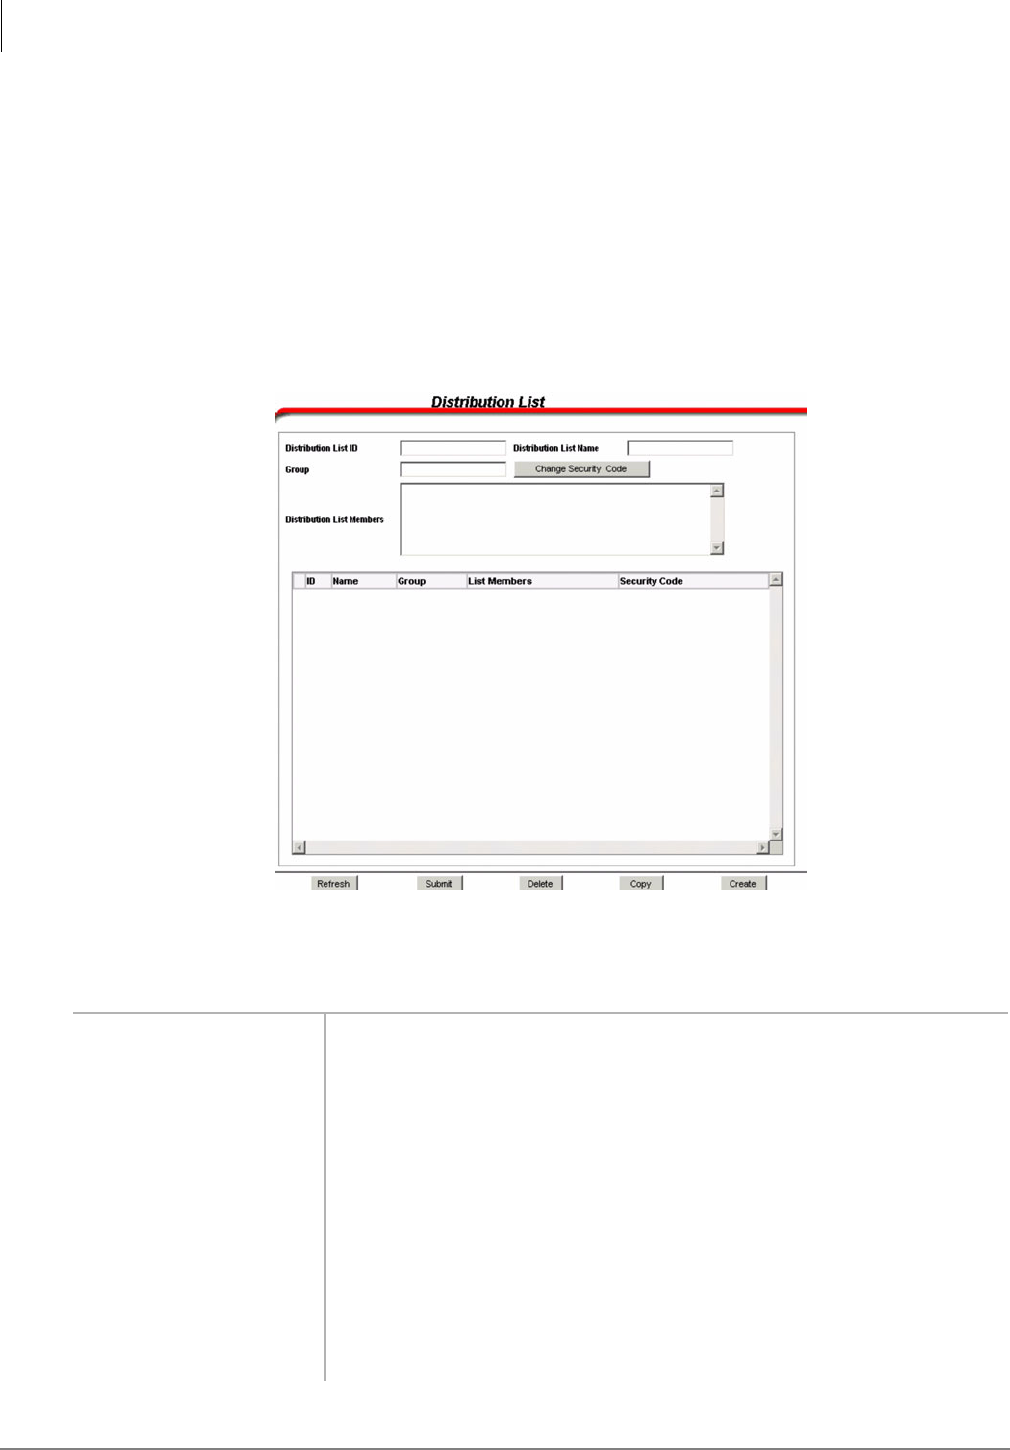
Voice Processing
Distribution List (System)
4-48 Strata CIX Voice Mail Programming 01/07
Distribution List (System)
System lists are created using the Distribution List Editor screen (see Figure 4-23 and Table ) and
are an excellent means of distributing interoffice memos to a large group of people in a timely
manner. The lists also eliminate the need of every user creating a similar personal list.You can
create as many system-wide lists as you need. Examples of such lists include all users in the system
or in a specific department and all company managers.
Note Messages can only be sent to Distribution Lists from within a mailbox. A Distribution List
cannot be dialed by outside callers.
Voice mail processes mail sent to mailing lists as a low-priority task. Therefore, it may take several
minutes to send the message to everyone on a large list, especially if the system is busy.
Figure 4-23 Distribution List Editor Screen
Table 4-11 Distribution List Editor Screen Fields
FIELD DESCRIPTION
Distribution List Number (Display Only) This field is filled in automatically by voice mail after you create a
Distribution List or highlight a list at the bottom of the screen.
Distribution List Name Enter a descriptive name for the list such as purchasing, expediting, code
committee, etc.
Group Group of User Agents defined in the Mailbox Editor, Chains/Groups Tab screen.
Groups control which mailboxes a user can access. See “Groups” on page 4-34 .
For example, if group number 2 is entered in this field and mailbox 3766 does not
belong to that group, then 3766 cannot use this Distribution List to send messages.
Default: 1
Distribution List Members Enter valid user mailbox number(s). Numbers can be separated using commas (,),
dashes (—) or spaces.
Possible values: Any valid mailbox number.
Default: blank
7306

Voice Processing
Distribution List (System)
Strata CIX Voice Mail Programming 01/07 4-49
Voice Processing
Create Distribution List
1. From eManager Main menu, click Advanced Configuration > Voice Mail > Distribution List.
The Distribution List screen displays.
2. Click Create. The Create User Agent screen displays.
3. Type a single User Agent number (e.g., 881), a range of numbers (e.g., 800-804) or a
combination of both separated by commas (e.g., 800-802, 881, 888).
Note The number you enter must be unique. If the number already exists, the Stratagy ES
software indicates that the User Agent could not be created.
4. Click OK. The Creating dialog box displays while the program creates the User Agents. When
the process is complete, the screen indicates whether the creation of the User Agent(s) was
successful.
5. Click Exit. The Distribution List Editor screen displays (see Figure 4-23 on page 4-48).
6. From the Distribution List Editor screen, type an identifying name (e.g., purchasing) in the
Distribution List Name field.
7. Type a group number (see “Chains/Groups/Fax” on page 4-31 ) in the list’s Group field.
Defaults to 1.
Note Multiple group numbers can be entered. Separate numbers by commas; e.g., 2,4,6.
8. Highlight the Distribution List Members field and type a single User Agent number (e.g., 881),
a range of numbers (e.g., 800-804) or a combination of both separated by commas (e.g., 800-
802, 881, 888).
Note This list represents all the mailboxes that are members of the list.
9. Click Submit. The data is saved and placed in the list portion of the screen.
Modify Distribution List
1. From the eManager Main menu, click Advanced Configuration > Voice Mail > Distribution
List. The Distribution List screen displays (see Figure 4-23 on page 4-48).
2. Highlight the Distribution List you want to modify. Voice mail automatically loads the
Distribution List data for the list you highlighted.
3. Modify the fields, as needed. See Table on page 4-48 for field descriptions.
4. When finished, click Submit. The data is placed in the list portion of the screen and saved.
Delete Distribution List
1. From the eManager Main menu, click Advanced Configuration > Voice Mail > Distribution
List. The Distribution List Editor screen displays (see Figure 4-23 on page 4-48).
2. Highlight the Distribution List you want to delete. Voice mail loads the Distribution List data
for the list you highlighted.
3. Click Delete. You are asked to confirm the deletion.
4. Click OK. A dialog box displays while the program deletes the distribution list. When the
process is complete, the screen indicates whether the deletion of the list was successful.
5. Click Exit. The list is removed from the screen.
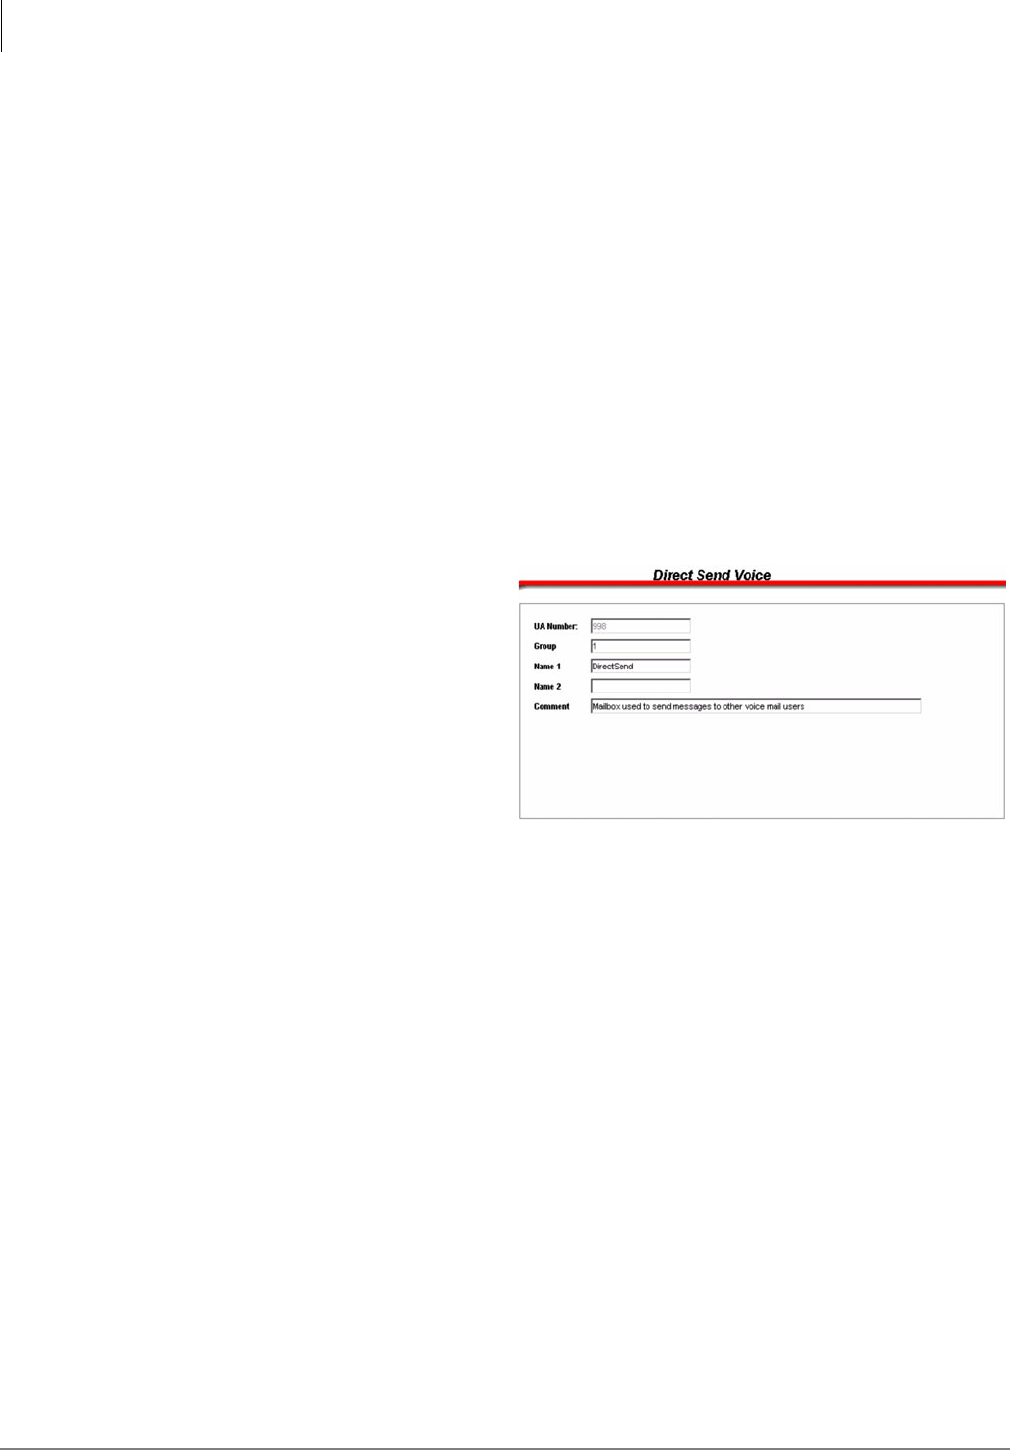
Voice Processing
Direct Send Voice
4-50 Strata CIX Voice Mail Programming 01/07
Direct Send Voice
The Direct Send Voice User Agent is used to enable callers to send a message directly to voice mail
user’s mailbox without first ringing the user’s phone.
Create/Modify Direct Send Voice User Agent
1. From the eManager Main menu, click Advanced Configuration > Voice Mail > Direct Send
Voice. The Direct Send Voice screen displays.
2. Click Create. The Create User Agent screen displays.
3. Type a single User Agent number (e.g., 881), a range of numbers (e.g., 800-804) or a
combination of both separated by commas (e.g., 800-802, 881, 888).
Note The number you enter must be unique. If the number already exists, the Stratagy ES
software indicates that the User Agent could not be created.
4. Click OK. The Creating dialog box displays while the program creates the User Agents. When
the process is complete, the screen indicates whether the creation of the User Agent(s) was
successful.
5. Click Exit. The Direct Send Voice User Agents screen displays.
6. Highlight the User Agent you just
created in the list to the right of the
screen.
7. Type the Group number to which the
User Agent belongs. See “Chains/
Groups/Fax” on page 4-31 for
instructions on creating group
numbers. Field defaults to 1.
8. Type an identifying name in the
Name 1/2 fields (shown right).
9. Type a comment in the Comment
field.
10.Click Submit. The data is saved.
11. Repeat Steps 2~10 for any other agents you created.
7340

Voice Processing
Direct Send Fax
Strata CIX Voice Mail Programming 01/07 4-51
Voice Processing
Direct Send Fax
Note The Fax feature group is not currently supported.
The Direct Send Fax User Agent is used to enable callers to send a fax directly to a voice mail user’s
mailbox without first ringing the user’s phone.
Create/Modify Direct Send Fax User Agent
1. From the eManager, click Advanced Configuration > Voice Mail > Direct Send Fax. The Direct
Send Fax screen displays.
2. Click Create. A pop-up box displays.
3. Type a single User Agent number (e.g., 881), a range of numbers (e.g., 800-804) or a
combination of both separated by commas (e.g., 800-802, 881, 888).
Note The number you enter must be unique. If the number already exists, the Stratagy ES
software indicates that the User Agent could not be created.
4. Click OK. The Creating dialog box displays while the program creates the User Agents. When
the process is complete, the screen indicates whether the creation of the User Agent(s) was
successful.
5. Click Exit. The new user agent is added to the UA ID list on the right of the screen.
6. Highlight the new user agent in the
list. The screen displays a new
entry screen with the new user
agent number in the UA Number
field (shown right).
7. Type the Group number to which
the User Agent belongs. See
“Chains/Groups/Fax” on page 4-31
for instructions on creating group
numbers. Field defaults to 1.
8. Type an identifying name in the
Name 1/2 fields.
9. Type a comment in the Comment field.
10.Click Submit. The data is saved.
7339
This page is intentionally left blank.

Strata CIX Voice Mail Programming 01/07 5-1
Fax Server
Fax Server 5
The Voice Over IP connection between the Strata CIX and the Media Application Server (MAS)
requires the use of the IP fax protocol, T.38, to guarantee continuity of fax transmissions over IP.
In the initial release of the Strata CIX and MAS, T.38 will not be available. Therefore we
recommend that if fax server features are required with the Strata CIX that either a Stratagy iES32
or a standalone Stratagy ES be selected for voice processing instead of the MAS.
Toshiba is currently working on T.38 in both the CIX and the MAS, and will make it available for
upgrade in a subsequent release of both systems.
This page is intentionally left blank.

Strata CIX Voice Mail Programming 01/07 6-1
Automatic Speech
Recognition (ASR)
Automatic Speech Recognition (ASR) 6
Automatic Speech Recognition (ASR) is the term for recognizing human speech. It is used to create
a more natural way of interacting with machines.
ASR functionality is dynamically allocated as a resource or channel to a voice port. This means that
a channel of ASR resources is only tied to a voice port for as long as the voice mail software dictates
its need. If the voice port no longer requires the channel or resource, it is freed up to be used by
another port. Therefore, to estimate the amount of ASR channels a system may require, you must
first estimate how many voice ports will simultaneously need access to ASR resources.
The ASR AA Feature Group is a speech enabled Automated Attendant Feature Group that supports
up to 250 names in its directory, and comes with a User Login and Quick Message feature. The ASR
AA Feature Group enables the user to call voice mail and:
•speak a user’s name to reach an extension
Note Stratagy ES can be configured to recognize variations of a user name such as Bill, Billy, or
William, and be directed to the proper mailbox. Synonym names are not included in the
250 name limit of the ASR AA. The mailbox user name and all synonyms for that user
name are counted as one.
•speak a command to log in to his/her mailbox
Note The system is pre-programmed for several commands to log into a mailbox.
They are: mailbox login, mailbox logon, user login, user logon, access mailbox, and log
me in. Additional phrases can be added, if desired.
•say “send message” or “quick message” to send a message to a user
•screen calls by voice prompts
•transfer a call to another mailbox by speaking the name of another user while the first user’s
personal greeting is playing
•speech enable single-digit menus in the mailbox.
ASR AA Version 5 Software Features
Version 5of the ASR Automated Attendant (AA) Feature Group includes the following features:
•An ASR AA administration page for mailbox users within the Mailbox Editor of the Stratagy
ES software, which provides:
•The ability of creating synonyms for a user's name. For example, a user with a name of John
Dart can also be assigned alternative names; e.g., Johnny, Jonathan, and if spoken by a
caller still routes to the proper mailbox.
•Option settings for assigning a mailbox’ ASR AA privileges; e.g., auto attendant transfer,
user log in, and direct messaging. For example, the Log in setting would facilitate users who
wish to use ASR to log into their mailbox, but wish to restrict callers from using the ASR
feature to reach their extension, or leaving them a message.

Automatic Speech Recognition (ASR)
ASR AA with Continuous Speech Processor
6-2 Strata CIX Voice Mail Programming 01/07
•Callers who press star (*) while listening to a user's personal greeting can initiate the mailbox
log in process.
•The ASR AA application coordinates with the Stratagy ES System Configuration table to
determine whether the entered mailbox number or security code is subject to the fixed-digit
parameters.
•Stratagy ES voice ports configured for ASR AA can now intercept incoming calls from fax
devices sending CNG fax tone and dispatch the call to the pre-configured mailbox for accepting
incoming fax messages.
•The mechanism to synchronize the voice mail database with that of the ASR engine directory
has now been embedded as a drop-down menu choice in the Administration screens.
ASR AA with Continuous Speech Processor
The ASR AA feature is only supported as a host-based application. The resident processor within
the Media Application Server provides the processing power for ASR, no additional speech-related
hardware is required.
The ASR AA Feature Group includes two channels of ASR resources. Additional ASR resources
can be purchased in two channel increments (up to a maximum of eight channels).
Processing is performed by Intel®’s Host Media Processing (HMP) software. All media
processing takes place on the host processor.
Important! Ports that are configured for ASR AA can only accept inbound voice mail integration
using Simplified Message Desk Interface (SMDI). Dual Tone Multi-frequency
(DTMF) in-band integration is not supported on these ports.
Hardware/Software Requirements
The following requirements apply for an ASR system:
•a license (part number MAS-FG-ASR-AA) for the feature group must be purchased through the
Toshiba FYI site at http://fyi.tsd.toshiba.com. Once you have purchased the license, follow the
detailed instructions in “MAS Licensing” on page 2-9 to activate the license.
•ScanSoft® software (This software is provided on the software CD-ROM that ships with each
system.)
Prior to Installing
•We recommend that you back up your database prior to starting any upgrade procedure.
•Make sure you have all the necessary parts and tools.
•Since all of the procedures require voice mail be out-of-service, coordinate with the customer a
time for voice mail to be taken off line.
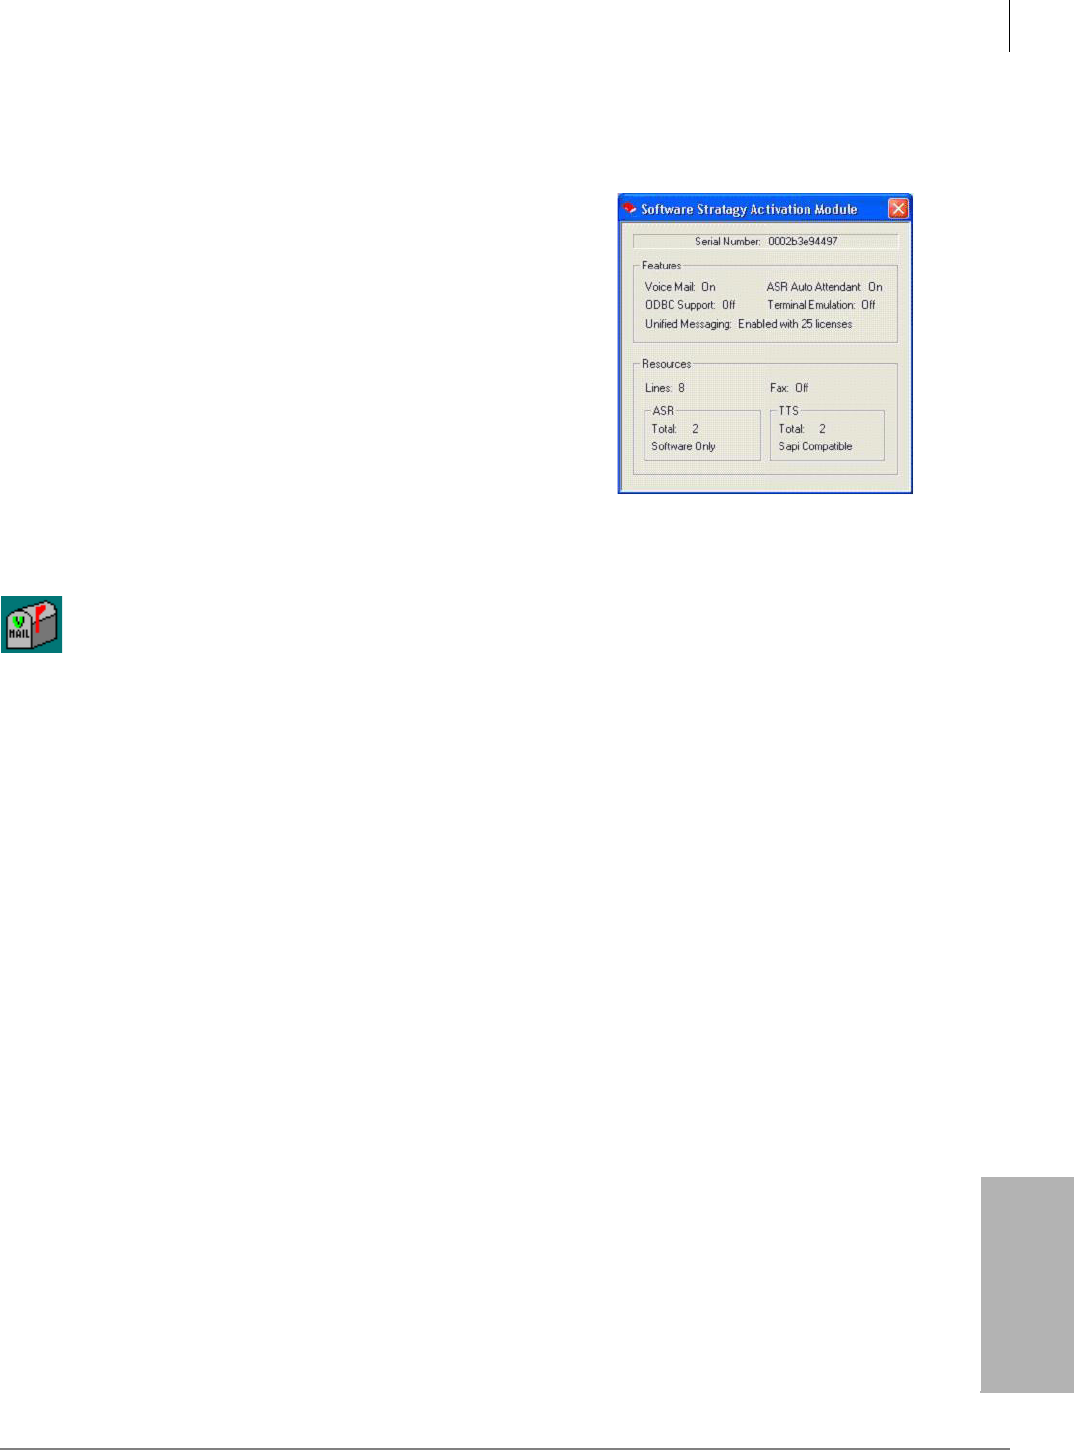
Automatic Speech Recognition (ASR)
ASR Installation
Strata CIX Voice Mail Programming 01/07 6-3
Automatic Speech
Recognition (ASR)
ASR Installation
Step 1: Verify SAM is Feature Activated
1. From the desktop, click Start > Programs > Stratagy
Enterprise Server Administration > SAM Query. The
Stratagy ES Activation Module screen displays (shown
at right).
2. Verify that the ASR settings display in the lower left-
hand corner.
Step 2: Stop Stratagy Enterprise Server
2. Click Stop. The screen displays “Stop Pending” and then “Stopped.”
Step 3: (Optional) Install Stratagy ES Update
If the latest software version of Stratagy ES is not resident on the Media Application Server’s hard
drive, you should load the voice mail software update and Administration.
!To verify the version of software currently installed, view the version.txt file in the voice mail
directory.
!From the Software Menu screen, select Software Component Update. The update prompts you
for the pathname etc. Accept the defaults. When the installation is complete, you are asked to
restart your computer.
Step 4: Install ScanSoft Software
This software is provided on the software CD-ROM that ships with each system.
1. Insert the Stratagy ES Software CD-ROM into the CD-ROM drive. The Software Menu screen
displays.
2. Select ScanSoft 6.5 Second Edition. The Welcome screen displays.
3. Follow the prompts until the Select Components screen displays. Select ScanSoft Runtime
(selecting Documentation is optional). Remove the check from ScanSoft SDK. Click Next.
4. Click Next to accept the default on all screens until the ScanSoft Configuration Tool screen
displays.
5. Select Dialogic CSP in the Integration Type field and click OK.
6. Click Finish.
7. Select ScanSoft March Update. Follow the prompts.
8. Click Finish. The setup is complete.
9. Reboot the server.
1. Click the StartStratagy icon on the desktop. The Stratagy Enterprise Server Control screen
displays.
7633

Automatic Speech Recognition (ASR)
ASR Installation
6-4 Strata CIX Voice Mail Programming 01/07
Step 5: Load ASR AA Software
Note Loading the ASR AA software creates Mailbox 900 and a scheduled automatic directory
synchronization in the Configuration Scheduler.
1. From the Software Menu screen, select ASR AA. The Welcome screen displays.
2. Click Next. The ASR Class of Service
id screen displays (shown right). The
screen defaults to mailbox 995.
Note Adding a COS id enables you to
create additional ASR user agents.
3. Click Next to accept the default on all
screens until the Select Components
screen displays. On the Select
Components screen, select the
appropriate ASR Auto Attendant
version. The screen choices are: ASR
Auto Attendant to work with voice
processing (default), ASR Auto
Attendant without Voice Processing.
Click Next.
4. Accept the defaults on the remaining screens. When the installation is complete, reboot the
server.
Step 6: Add Answer Method for Mailbox 900
1. Restart Stratagy ES
Admin.
2. From the eManager
Main menu, click
Advanced
Configuration > System
> VM Ans Methods.
The Answer Methods Tab screen displays (shown above).
3. Click Add. A blank line displays below the other entries.
4. Place the cursor in the Answer Method Name field and type ASR_AA. The entry cannot be
longer than 34 alphanumeric characters. An underscore is allowed (e.g., Default_Name).
5. Using the drop-down menu, select 900 as the Greeting User Agent.
6. Accept the defaults for the next two fields.
7. Click Submit. A dialog box displays.
8. Click OK. The changes are added to the voice mail database the next time voice mail service is
shutdown and restarted.
Step 7: Add Voice Port Definition for Mailbox 900
1. From the eManager Main Menu, click Advanced Configuration > System > VM Voice Ports.
The Voice Ports Tab screen displays.
2. Using the drop-down menu, select the ASR_AA in the Answer Method field.
3. Click Submit. A dialog box displays.
4. Click OK. The changes are added to the voice mail database the next time voice mail service is
shutdown and restarted.
7634
7326

Automatic Speech Recognition (ASR)
ASR Installation
Strata CIX Voice Mail Programming 01/07 6-5
Automatic Speech
Recognition (ASR)
Step 8: Modify Operator Mailbox
Note This enables the user to say “Operator help” at anytime during the speech recognition
process and reach the operator in case of difficulties.
1. From the eManager Main menu, click Advanced Configuration > Voice Mail > Mailbox. The
Mailbox Editor screen displays.
2. To the right of the Mailbox Editor screen, double-click the Mailbox listing for the “0” mailbox
...or type the mailbox number and click Refresh. The Mailbox Editor screen displays the data
for mailbox “0.”
3. From the User Mode Options screen, type “Help” in the Name2 field.
4. Click Submit. The changes are added to the voice mail database the next time voice mail
service is shutdown and restarted.
Step 9: Record Greetings for ASR AA
Note For more details on recording greetings, see the Strata CIX Stratagy ES User Guide.
1. Enter voice mail’s extension. The Stratagy ES answers.
2. Press *900.
3. Enter the security code (default is 900997) + #.
4. From the Main menu, press 3. The Manage Mailbox menu plays.
5. Press 1. The Change Your Greeting menu plays.
6. Enter the greeting number you want to change or add (1~7).
7. Press 2 to record the greeting (speak slowly and clearly). Press # when done. You are
prompted to record the company greeting.
8. (Optional) After recording, you can press:
Note You can repeat options 1~3 below as many times as you wish.
1Review recording. The complete greeting plays.
2Re-record. Press # when done. The system prompts you to record at the beep.
3Append recording. Press # when done. Appending a greeting enables you to add
information to the end of your already recorded greeting. The system prompts you to
record at the beep.
4Cancel recording. The greeting is canceled. The system returns to the previous menu.
9Save recording. Voice mail tells you that greeting (number) has been recorded and returns
to the previous menu. Again, you are given the option to review or record over the
greeting you have just recorded.
9. Press 9 to return to the previous menu. You are given the option to record another greeting.
10. Press 1 and select another greeting number (1~7).
11. Repeat Substeps 1~9 for any additional greetings you want to record. When you are finished
recording greetings, pressing 9 in Substep 9 takes you back to the Manage Mailbox menu.
Important! The last greeting selected or recorded is the greeting that callers hear as your
mailbox greeting.
12. Press 6. The Instructional Greeting Menu plays.
13. Repeat Substeps 1~9 as often as necessary to record the instructional greeting(s).
14. To return to the Main Menu, press 999. Voice mail plays the Main Menu options.

Automatic Speech Recognition (ASR)
ASR Installation
6-6 Strata CIX Voice Mail Programming 01/07
Step 10: Select Greetings
1. From the Mailbox Editor menu, access Mailbox 900.
2. Using the spin button on the Auto Attendant tab screen, select the greetings that will play for
the Selected greeting and Selected instructional greeting fields. (See Chapter 4 – Voice
Processing for instructions on the Mailbox Editor screens.)
3. (Optional) On the Auto tab screen, you can schedule the greetings to play on specified days and
times.
Step 11: (Optional) Speech Enable Single-digit Menus
Note Starting with Stratagy ES Release 5.0, users have the option of speech enabling single-
digit menu commands.
1. From the eManager Main menu, click Advanced Configuration > System > Voice Menu. The
Voice Menu screen displays.
2. Add the voice command(s) and recordings (see “Add Voice Command” on page 3-27 for
instructions).
3. From the eManager Main menu, click Advanced Configuration > Voice Mail > Mailbox. The
Mailbox Editor screen displays.
4. Access the individual user’s mailbox and click the Menus tab.
5. At the bottom of the screen, check Voice Menu Enabled field.
6. Starting with Menu 1, select the application required from the drop-down menu (i.e., transfer).
In the next field enter the mailbox number to which the call should be transferred, etc. In the
last field, select a voice command from the drop-down menu (entered in Step 2 above).
7. When you are finished adding voice commands to the Menu screen, click the Auto Attendant
screen and under Call Processing, check ASR Enabled.
8. Click Submit to save your changes.
Note The sys_asr_enabled parameter must be enabled in Step 12 below for this feature to work.
Step 12: (Optional) Add Aliases for Login and Sending
Messages
The ASR AA Feature Group enables the user to call voice mail and:
•speak a command to log in to his/her mailbox
Note The system is pre-programmed for several commands to log into a mailbox.
They are: mailbox login, mailbox logon, user login, user logon, access mailbox, and log
me in. Additional phrases can be added, if desired.
•say “send message” or “quick message” to send a message to a user
‰ To modify the User Login and/or Quick Message features
!Modify the system parameter settings shown in the table below. See “Modify Parameters” on
page 3-30 for instructions on modifying the settings for these ASR parameters.
Automatic Speech Recognition (ASR)
ASR Installation
Strata CIX Voice Mail Programming 01/07 6-7
Automatic Speech
Recognition (ASR)
Step 13: Synchronize the Stratagy ES Database with the ASR
Database
To complete the installation of the ASR Auto Attendant application it is necessary to synchronize
the Stratagy ES database with that of the ASR application.
1. From the eManager Main menu, click Advanced Configuration > Utilities > Tools.
2. Select ASR Sync. A dialog box is presented confirming your request for synchronization.
3. Click OK.
Step 14: Stop and Restart the Stratagy ES Server Service
Step 15: (Optional) Add User Name Synonym(s) for Mailbox(es)
Note ASR AA v.5 software must be installed for this step.
There is no limit to the number of synonyms that can be created for any one mailbox. The synonym
name entered should include the last name for quicker interpretation by the speech application.
However, a single name can be listed as well. If there is more than one mailbox that lists the same
synonym, then the Stratagy ES gives the caller the ability to choose the correct name by playing the
recording assigned to the synonym.
For synonym entries to become active, it is necessary to make a corresponding name prompt
recording. If a recording is not made, the synonym is ignored by the ASR application. After
synonyms have been added for a mailbox, it is necessary to synchronize the additional name(s) with
the ASR application before the new synonym(s) are recognized.
1. Select the desired mailbox.
2. Click on the ASR Auto Attendant tab (see “ASR Auto Attendant” on page 4-36 ).
3. In the provided box labeled “#Phone,” enter the extension number of the telephone that can be
used for recording the corresponding synonym name. Once entered, this number remains
consistent for administration of other mailboxes.
4. Type in the new synonym name.
5. Click Add. A new line becomes active.
Table 6-1 System Parameter Definitions
Parameter Description
sys_asr_enabled Enables system to recognize human speech.
Possible values: 0 disabled (default), 1 (enabled)
sys_asr_login_aliases
Aliases for the word Login. To be used in ASR Auto Attendant. Every alias to
be separated by a space and multiple words in an alias to be connected with
an underscore. Please also add an aslia.vox file in the
StratagyES\Scripts\ASR_AA_data\prompts directory.
Default: user_log_in mailbox_log_in log_me_in access_mailbox
mailbox_log_on user_log_on
sys_asr_sendmsg_aliases
Aliases for the word send_message. To be used in ASR Auto Attendant.
Every alias to be separated by a space and multiple words in an alias to be
connected with an underscore. Please also add an alias.vox file in the
\StratagyES\Scripts\ASR_AA_data\prompts directory.
Default: quick_message

Automatic Speech Recognition (ASR)
Automatic Directory Synchronization for ASR AA Feature Group
6-8 Strata CIX Voice Mail Programming 01/07
6. Click Record (located beneath the phone number entry). The Record button changes to a Stop
button. After a few moments, the defined telephone begins to ring.
7. Go off-hook on the telephone. A short tone should be instantly heard.
8. Record the name that corresponds with the synonym. When finished click Stop.
9. (Optional) Click Play to review the recording or Record to re-record, if necessary.
10. Once a name prompt has been recorded, the administration screen displays a telephone icon in
the Prompt column.
Note If the synonym name is added but a recording is not made, a red circle icon displays in the
Prompt column next to that name, indicating that a recording does not exist and the
synonym is not active.
11. When you are finished adding synonyms, select Tools > ASR Synch. This synchronizes the
voice mail database with the ASR database and makes the new synonyms active. A dialog box
is presented for confirmation.
12. Click OK.
Step 16: Verify System’s Basic Functions
Follow the instructions below to verify that the voice mail’s basic functions are working.
‰ To verify that each port works and voice playback and basic auto attendant function
!Dial the extension number for each port. Voice mail should (for each port) answer and play the
default company greeting (“Thank you for calling…”), greeting 1 in User ID mailbox 990.
Step 17: Check Stratagy ES Components Screen
1. Click Stratagy ES Components icon. The Stratagy ES Components screen displays.
2. Click Resource. Check that ASRHost is listed on the screen.
Automatic Directory Synchronization for ASR AA
Feature Group
With Automatic Directory Synchronization, the ASR AA receives user information from the voice
mail mailbox database. Only mailbox users who have their full names added to the User Mode
Options Name1 and Name2 fields and have recorded their names are added to the directory used by
the ASR AA.
After a new mailbox has been added in the Stratagy ES software, the Automatic Directory
Synchronization routine updates the ASR AA directory with the new entry. The ASR AA then
automatically translates the new name into an accurate phonetic pronunciation based on standard
English speech patterns.
The directories for voice mailboxes and the names directory of the ASR Automated Attendant are
two separate directories in the system. For the ASR AA to function properly, the names in both
directories must be synchronized.
When ASR AA V.5 software is installed on the Media Application Server, a routine is added to the
Scheduler table to automatically synchronize these two directories on a daily basis.

Strata CIX Voice Mail Programming 01/07 7-1
Unified Messaging
(UM)
Unified Messaging (UM) 7
The Unified Messaging (UM) Feature Group enables users of the Stratagy Enterprise Server to
retrieve their voice messages, along with their e-mail messages from within an e-mail client inbox
screen.
The Unified Messaging (UM) Feature Group requires the voice mail to communicate with multiple
client computers simultaneously, so that voice messages can be delivered from Stratagy ES to a
user’s desktop.
To enable the UM feature, the following must be present on the Client PC:
•Voice Mail Outlook Integration software (for Microsoft Outlook users)
•Toshiba Audio CODEC driver
In addition, the following remote upgrades must be electronically activated by Toshiba:
•The Unified Messaging Feature Group (MAS-FG-UM). The UM Feature Group includes five
free UM client seats.
•Additional UM client seats are offered in increments of 10, 25 or 50 (MAS-UM-10-SEATS,
MAS-UM-25-SEATS or MAS-UM-50-SEATS). Each seat allows Unified Messaging
privileges for one mailbox. These seats cannot be shared, which means each seat is permanently
assigned to a mailbox. So if 25 users want UM privileges, 25 seats will be required.
•In addition to the specified number of seats, an unlimited number of seats can be purchased
(MAS-UM-UNLIMITED).

Unified Messaging (UM)
Feature Description
7-2 Strata CIX Voice Mail Programming 01/07
Feature Description
When installed, the Stratagy ES exists as a peer Simple Message Transport Protocol (SMTP) server
on a network along with the e-mail server. When new voice messages arrive, the voice mail
generates an e-mail message that is sent to the e-mail server using the SMTP standard. The actual
content of the message is dependent on the UM integration scheme that is in use (see “Microsoft
Outlook Integration” on page 7-4 and “Internet Protocol Integration” on page 7-5 for details).
When the user logs in to his/her e-mail account, the voice messages display in that e-mail inbox.
To communicate with an e-mail server, the voice mail uses Internet Message Access Protocol
Version 4 (IMAP4), SMTP, or POP3 Internet standards. By integrating solely on the principles of
these standards, the voice mail can incorporate a UM solution with any e-mail server that supports
these same standards. In this day and age of the Internet, most e-mail server products, from
Microsoft Exchange to inexpensive shareware software, is compliant to these Internet standards.
Voice File Compression
Voice messages are transported to the e-mail client as .wav files. A .wav file consists of a voice file
with a header attachment that defines the voice compression algorithm that was used to record the
voice file.
Unified Messaging sends voice files with the same low frequency compression algorithm that is
used to store voice messages on the system’s hard drive. By default this compression algorithm is
Adaptive Delta Pulse Code Modulation (ADPCM) 32K or 4 bit x 8 kilohertz.
Using a low compression algorithm means that the bandwidth of the network should not be
adversely affected by the periodic transport of these .wav files. For example, a voice message
lasting one minute, which is double the time of an average message, creates a voice file just under
250K. Voice File compression can be changed using the sys_msg_recording_audio_type
parameter.
UM Synchronization
UM synchronization uses IMAP4 to provide users a synchronized message set (of voice messages)
both in their SES mailbox and in the e-mail server mailbox. When new voice messages are received,
Stratagy sends the referenced message (or the WAV file with the Internet Protocol Integration
method for UM) via SMTP to the e-mail server with a special identifier in the message.
This feature must be programmed in the Mailbox Editor, Unified Messaging tab screen.
IMAP4
When you select IMAP4 on the Unified Messaging screen, the following occurs:
•If a user logs into his/her voice mail via the TUI and deletes a message, Stratagy uses IMAP to
identify and delete the message in the e-mail server. This also deletes the messages from the
user’s e-mail client inbox screen if the messages were displayed on it at the time.
If a user logs into his/her voice mail via the TUI and listens to a message in the NEW folder, the
corresponding message in the e-mail server or e-mail client inbox is flagged as “read” or
“seen.” This includes messages that are marked by Stratagy as Pending and kept in the New
Message folder. Messages marked as Deleted are not actually deleted until the user logs out
from his or her UM-enabled mailbox.

Unified Messaging (UM)
Components
Strata CIX Voice Mail Programming 01/07 7-3
Unified Messaging
(UM)
•If Stratagy voice messages are deleted in the e-mail client, the corresponding messages in the
Stratagy system are deleted or saved to a Personal message folder of the user’s voice mailbox.
Whether the message is deleted or moved to a Personal Folder is a configurable option within
each mailbox. This synchronization is performed periodically via the Stratagy Scheduler feature.
Message Disposition Notification (MDN)
Note This feature is only for IP-standard users.
Stratagy adds a Message Disposition Notification (MDN) request when it sends a voice message to
the e-mail server. When the user opens up a voice message (sent by Stratagy), a MDN is sent to
Stratagy voice mail. As soon as Stratagy receives the MDN, it deletes or saves the messages in the
user’s mailbox. Whether the message is deleted or saved is a configurable option within each
mailbox.
Components
To program the Stratagy ES software for the Unified Messaging Feature Group, you must configure
two components — Server and Client. (See Step 4: Configure User Mailboxes for UM on page
7-7.)
Server Components
In the Stratagy ES software, you must configure a mailbox by:
•Designating the e-mail server location, as well as that mailbox user’s account information in the
e-mail server
•Setting a few UM System Parameters (see Step 5: Configure Voice Mail System Parameters on
page 7-7.)
Note Keep in mind that every mailbox within voice mail can be configured to communicate
with a different e-mail server.
Client Components
The Stratagy ES provides two solutions for UM, called Microsoft Outlook Integration and Internet
Protocol (IP) Integration. These two solutions depend on the e-mail client that a customer is using.
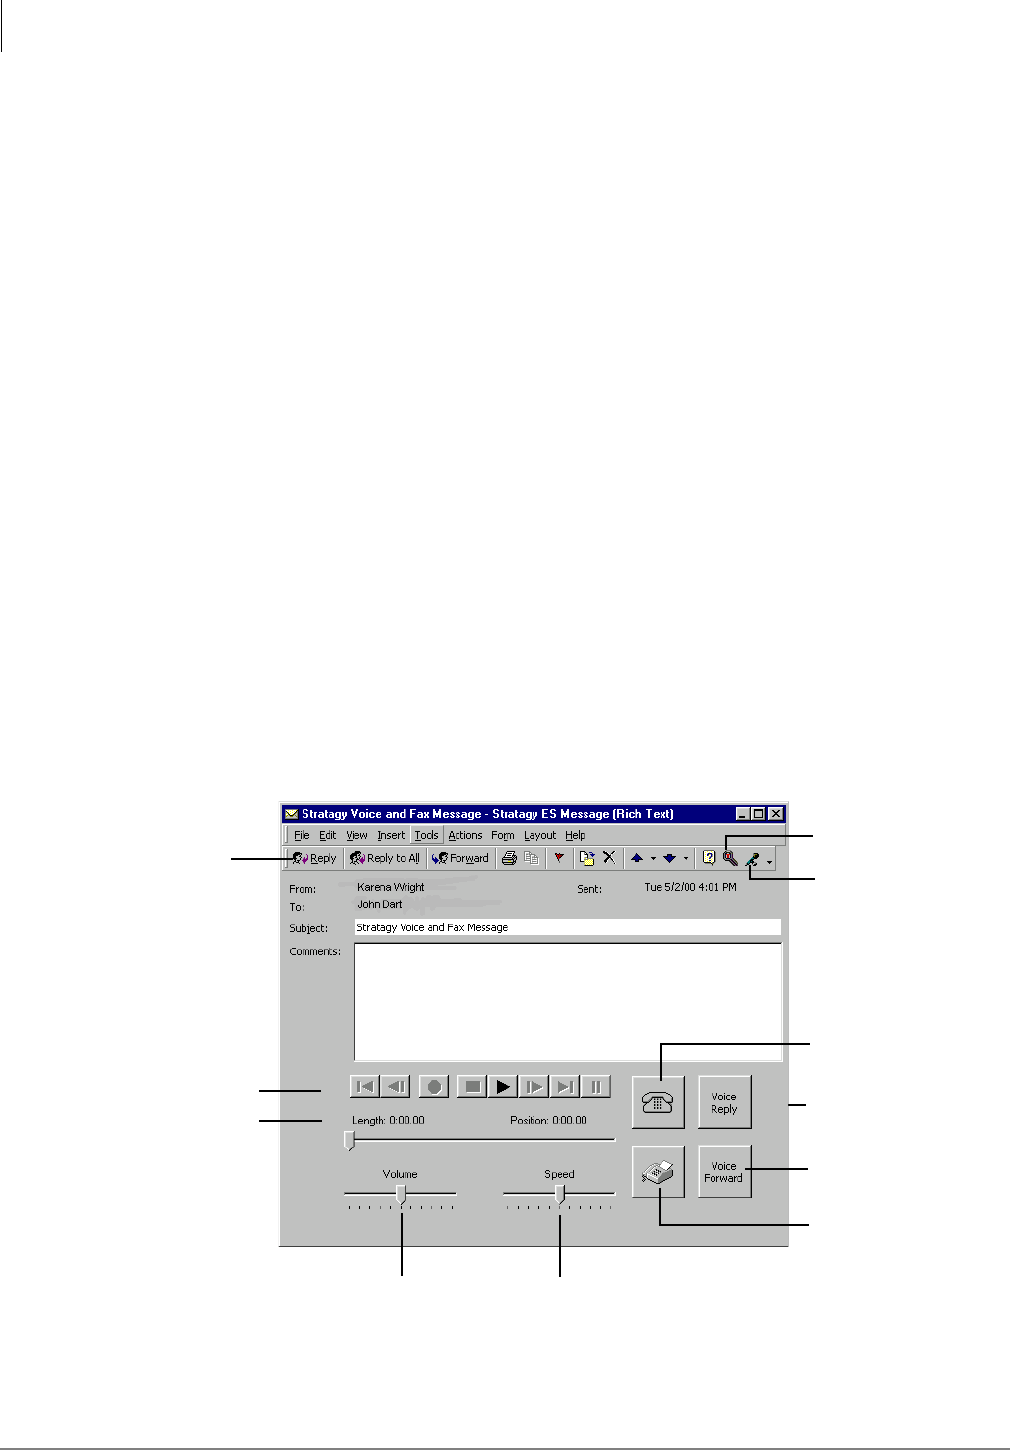
Unified Messaging (UM)
Components
7-4 Strata CIX Voice Mail Programming 01/07
Microsoft Outlook Integration
The Stratagy ES has a proprietary integration designed to work with Microsoft Outlook. With this
proprietary integration, the Stratagy ES can provide custom functionality, while remaining within
the Internet standards.
Note Though there is an Outlook integration for UM, this does not imply that Microsoft
Exchange must be the e-mail server. The Stratagy ES software works with any standards
compliant e-mail server. In fact, Outlook itself works with any standards compliant e-mail
server.
Here’s how it works. When the Stratagy ES receives a voice message, it sends a reference (header
information) of that message to the e-mail server, not the entire message containing the voice file.
This method cuts down on network traffic and e-mail server storage. When the user logs on to his/
her e-mail account, the referenced message is listed in the Inbox. When the user selects a voice mail
message, the proprietary integration, goes directly to the Stratagy ES and requests the message be
downloaded to the client, bypassing the e-mail server. Once the message has been successfully
downloaded, Outlook launches the voice mail proprietary Message Window or form.
Microsoft Outlook presents messages in screen images called Forms. Microsoft Outlook enables
developers to create custom Forms for specific types of messages. Toshiba uses this ability to create
a proprietary Form that launches exclusively when voice messages are selected. This Form (see
example below) contains feature buttons that enable a user to control the playback of voice
messages. The proprietary Form can be configured to play the voice messages either over the client
computer’s multimedia speakers, or for more privacy, the Stratagy ES can call a predefined
telephone number, so that messages can be played over the telephone’s handset.
Note When you listen to and delete a voice mail message by telephone, the e-mail listing is not
deleted from the Outlook screen. If you click on the screen listing, you are alerted that the
message has already been deleted by telephone. You must now delete it from the Outlook
screen.
Voice Reply
Voice Forward
Playback Slide
Multimedia
Buttons
Standard
Outlook
Toolbar
Telephone
Playback
Fax Viewer
Configure
Stratagy Voice
Mail Button
Record Stratagy
Voice Message
Button
Speed Slide
Volume Slide
Multimedia
Buttons
Volume Slide
5423
Unified Messaging (UM)
Components
Strata CIX Voice Mail Programming 01/07 7-5
Unified Messaging
(UM)
Important! Voice Mail proprietary Microsoft Outlook integration is only supported on Windows
NT Workstation, 2000, or higher, and Outlook 2000 or higher.
Due to the nature of the communication between the Stratagy ES software and the Outlook Client,
this solution may not be workable for some customer’s remote users. To encompass security
concerns, remote users will need to be set up in a Virtual Private Network (VPN). If this type of
connection is not available remote user’s mailboxes should be configured for Internet Protocol (IP)
integration. The IP Integration should be selected for users retrieving e-mail via Microsoft’s
Outlook Web Access.
Internet Protocol Integration
In addition to the Microsoft Outlook integration, the Stratagy ES software offers UM features to any
e-mail client that supports the Internet standards (e.g. Eudora Pro, Netscape Messenger). This is
called Internet Protocol (IP) Integration.
Since there is a wide range of Internet compliant e-mail clients, not all of the proprietary integration
features can be used. Though not as proficient as the Microsoft Outlook Integration, the Internet
Protocol Integration provides limited UM capabilities for users who wish to use an e-mail client
other than Microsoft Outlook.
Some of the more substantial differences between the Microsoft Outlook and Internet Protocol
integrations are:
Outlook Integration Internet Protocol Integration
Only a reference of a message is sent to the e-mail
server by the Stratagy ES. The actual message is
sent directly to the client PC.
The entire message is sent to the e-mail server by the
Stratagy ES.
Message selection launches voice mail proprietary
Form.
Message selection launches the e-mail client’s
standard message screen with an audio (voice
message) file attachment.
Provides embedded control keys for voice message
playback.
A separate multimedia program must be launched to
play the voice message.
Messages can optionally be played over a telephone. Messages can only be played over multimedia
speakers.
Provides an additional Address Book for Outlook that
synchronizes with voice mail mailbox directory.
Individual user must manually add addresses to an
Address Book.

Unified Messaging (UM)
Installation
7-6 Strata CIX Voice Mail Programming 01/07
Installation
The following steps comprise the UM installation.
Performed on the server:
•Step 1: Verify SAM is Feature Activated
•Step 2: Stop Stratagy Enterprise Server
•Step 3: (Optional) Install Stratagy ES Update
•Step 4: Configure User Mailboxes for UM
•Step 5: Configure Voice Mail System Parameters
Performed on the client PC:
•Step 6: Install Voice Mail Audio Codec
•Step 7: (Optional) Install Stratagy ES Proprietary Outlook Integration Software on Client PCs
•Step 8: Installing Stratagy ES Services in Microsoft Outlook
•Step 9: Configure Stratagy ES Proprietary Outlook Form
Server Installation
Step 1: Verify SAM is Feature Activated
1. From Windows XP, click Start > Programs > Stratagy Enterprise Server Administration > SAM
Query.
2. Verify that the Unified Messaging Feature Group and the
required number of Unified Messaging Client licenses
have been enabled (sample screen shown at right).
Step 2: Stop Stratagy Enterprise Server
2. Click Stop. The screen displays “Stop Pending” and then
“Stopped.”
Step 3: (Optional) Install Stratagy ES
Update
If the latest software version of the Stratagy ES is not resident on the Media Application Server’s
hard drive, you should load the voice mail update and Administration.
!To verify the version of software currently installed, view the version.txt file in the voice mail
directory.
!From the Software Menu screen, select Software Component Update. The update prompts you
for the pathname etc. Accept the defaults. When the installation is complete, you are asked to
restart your computer.
1. Click the StartStratagy icon on the desktop. The
Stratagy Enterprise Server Control screen displays.
7633
Unified Messaging (UM)
Server Installation
Strata CIX Voice Mail Programming 01/07 7-7
Unified Messaging
(UM)
Step 4: Configure User Mailboxes for UM
1. From the eManager Main menu, click Advanced Configuration > Voice Mail > Mailbox. The
Mailbox Editor screen displays.
2. Type the Mailbox number to be modified into the header of the screen and click Refresh.
3. Click Unified Messaging tab.
4. Check the Enable field.
5. Fill in remaining fields on the screen (see “Unified Messaging” on page 4-20 for an explanation
of all the fields.)
6. Configure additional mailboxes for UM as needed.
Step 5: Configure Voice Mail System Parameters
For UM to operate correctly, you must check the UM configuration parameter settings in the voice
mail system and modify their settings appropriately. See “Modify Parameters” on page 3-30 for
instructions on modifying the settings for the Unified Messaging parameters shown in Table 7-1.
Table 7-1 System Parameter Definitions
Parameter Description
sys_smtp_retry_count
Defines the maximum number of retries for sending voice messages to the E-
mail server.
Default: 5
sys_smtp_retry_delay
Number of milliseconds voice mail waits between retries for
sys_smtp_retry_count.
Default: 60 (milliseconds)
sys_smtpserver_gateway
Configures a dedicated SMTP Gateway server in SES. Enter the Gateway
server’s Name or IP Address and Port Number. (See “SMTP Dedicated
Gateway Server” on page 7-13 .)
Example: PCName;9875
lThe server name and the port number should be separated with a blank,
a comma, or a semicolon.
lKeep in mind that when you intend to use a custom TCP port for your
services, you should always pick a number greater than 1000.
lYou cannot use the default TCP port number of 25 for the Gateway
server if it resides in the same PC as the Stratagy ES (port 25 is being
used for Stratagy’s own SMTP server).
Default: blank
sys_smtpserver_host
Stratagy ES hosts its own internal SMTP server in order to support the UM
feature. SMTP servers require host names to identify them in an SMTP
transmission. This parameter defines the host name for the Stratagy ES
SMTP server.
The host name is used as a part of the source address of an UM message
sent to an e-mail server. For example, if the sys_smtpserver_host parameter
is set to “stratagyes,” then an UM message from mailbox 200 would have a
source address of “200@stratagyes”.
In most cases using the computer name of the Stratagy ES server is
sufficient. However, Toshiba recommends that you confirm the appropriate
host name for the Stratagy ES SMTP server with your site System
Administrator.
Default: blank

Unified Messaging (UM)
Server Installation
7-8 Strata CIX Voice Mail Programming 01/07
sys_smtpserver_maxconn
Defines the maximum number of connections allowed to this voice mail
SMTP server by client applications. If set to zero, then the server is not
available to the client.
UM client seats are fixed to mailboxes. This value can be used to limit net
work traffic, if necessary.
Default: 10
sys_smtpserver_types2accept
Defines MIME types that this voice mail server accepts as voice messages.
Note There is no validation for this field.
Default: audio/x-wav audio/wav audio/microsoft-wave
sys_um_directory suffix
Enables UM users to effectively use the same address (name) for both the
SES mailbox addresses and the e-mail address. Text value to be appended
to the From field when sending Unified Messaging e-mails.
Default: None
sys_um_subject_fax_only
Appears in Subject field on Message inbox to identify the type of message
received.
Note This parameter is not currently supported.
Default: Stratagy Fax Message
sys_um_subject_voice_only
Appears in Subject field on Message inbox to identify the type of message
received.
Default: Stratagy Voice Message
sys_um_subject_voicefax
Appears in Subject field on Message inbox to identify the type of message
received.
Note This parameter is not currently supported.
Default: Stratagy Voice and Fax Message
sys_um_unknown_name
Configures a name for unknown senders in SES.
Example: Anonymous, unspecified
Note Some anti-spam filters do not pass on e-mail from ambiguous sources.
Check with your e-mail administrator for acceptable entries.
Default: unknown
Table 7-1 System Parameter Definitions (continued)
Parameter Description

Unified Messaging (UM)
Client PC Installation
Strata CIX Voice Mail Programming 01/07 7-9
Unified Messaging
(UM)
Client PC Installation
Step 6: Install Voice Mail Audio Codec
When the Stratagy ES software sends a voice message to an e-mail client (i.e., Microsoft Outlook
or any other Internet compliant e-mail client), it sends the voice file as a .wav attachment. As was
discussed earlier in this chapter, voice mail’s default audio compression format is ADPCM 32KHz.
Most computers do not normally have a driver for this compression format, therefore, a new driver
must be installed on each client PC using voice mail’s UM.
1. Before beginning, close all open programs.
2. Insert the software CD-ROM in the target computer.
3. From the Software Menu, click SESAudioCodec. The
SESAudioCodec screen displays (shown at right).
4. Select a target directory on your computer for the
installation of temporary files for the install or just
click Finish to select the Temp directory as a default.
Voice mail extracts the appropriate files.
5. Click OK on the remaining screens.
Step 7: (Optional) Install Stratagy ES Proprietary Outlook
Integration Software on Client PCs
Important! Stratagy ES proprietary Outlook integration is only supported on Outlook 98 and
Outlook 2000 and Windows 98 or higher.
This step is only for users who want to use Microsoft Outlook for UM and whose PCs have a direct
network access to the Stratagy ES.
Installation
1. Insert the Software CD-ROM into the CD-ROM drive of the client computer. The Software
Installation Menu displays.
2. Click on the icon labeled SES Outlook Integration. The Welcome Screen displays.
3. Click Next. The Address Book Work Directory screen displays.
5613
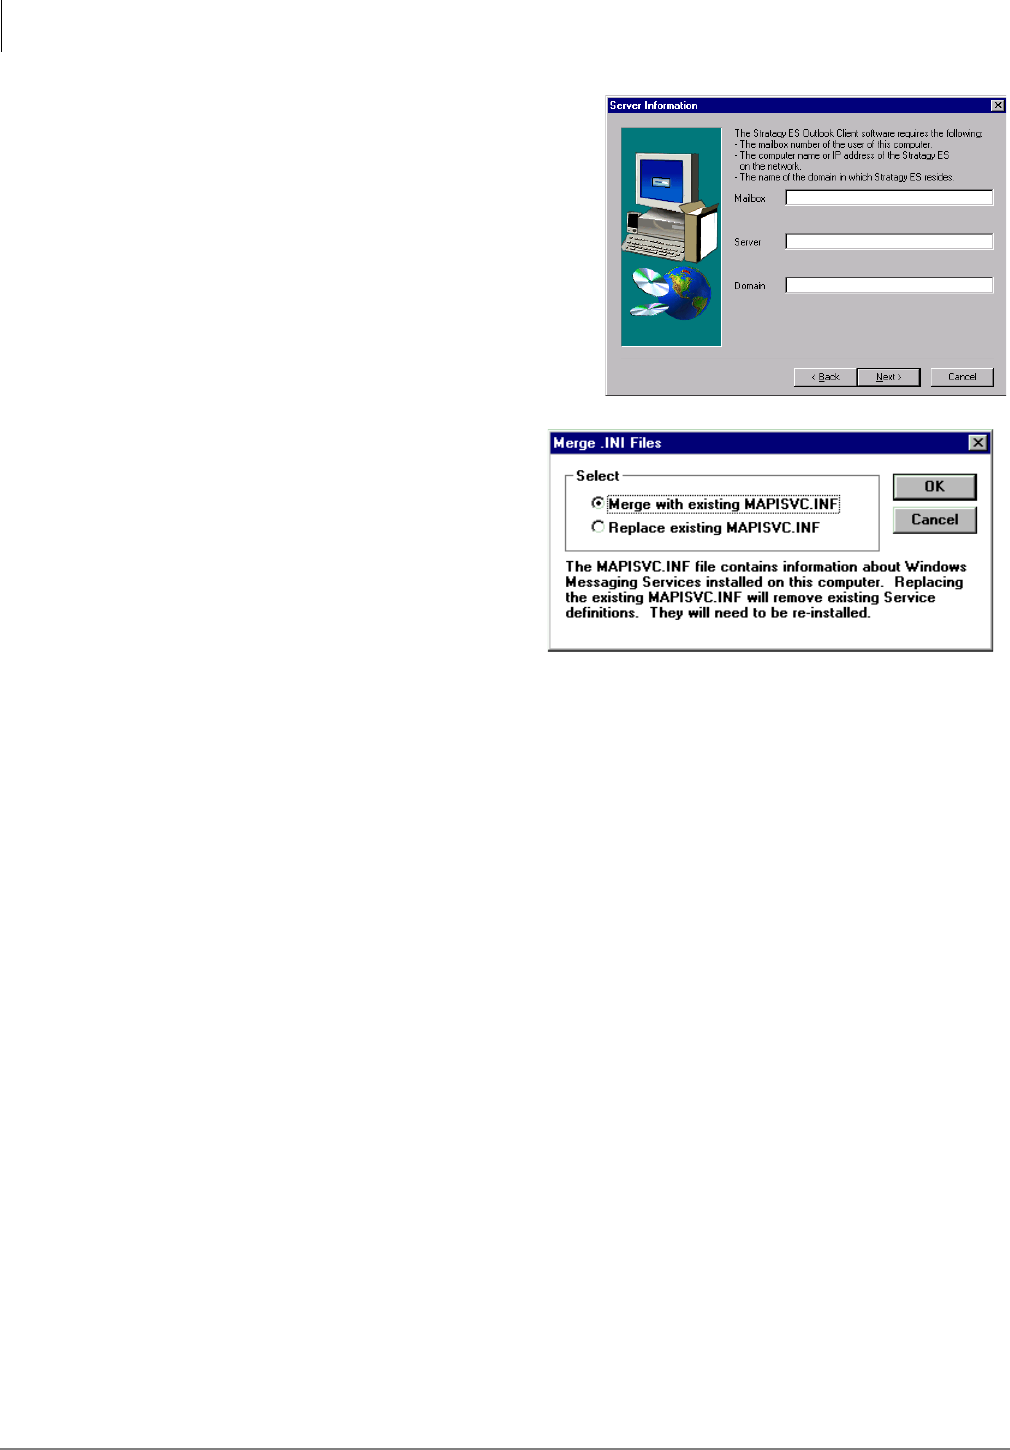
Unified Messaging (UM)
Client PC Installation
7-10 Strata CIX Voice Mail Programming 01/07
4. Click Next to accept the default folder. The
Server Information screen displays (shown at
right).
5. Type the Stratagy ES mailbox number of the
computer user in the Mailbox field.
6. Type the Stratagy ES computer name or IP
address in the Server field. This is required for
the Stratagy ES Outlook Integration to work
properly.
7. In the Domain field, type the name of the
Domain in which the Stratagy ES software
resides.
8. Click Next. The Merge .INI Files screen
displays (shown at right).
9. Select Merge with existing
MAPISVC.INF and click OK to merge
the files. The Warning: Opening
“Untitled” screen displays.
Important! Always select Merge for this
step.
10. Click Enable Macros.
Important! Always select Enable Macros for this step.
11. Restart Outlook.
Note During the Stratagy ES Outlook Integration software installation on some computers, an
error may appear stating that the MSVBVM60.dll file could not be found. This is typically
followed with an error stating that formpublish.exe could not be launched. To address this
issue locate and launch the vbrun60 file on the software CD-ROM.
Step 8: Installing Stratagy ES Services in Microsoft Outlook
Note If the IP Integration has been configured for the user, skip this step and go to the next step.
In order for Stratagy ES Unified Messaging to use Microsoft Outlook Integration more efficiently,
two Services need to be installed on each client PC. These two Services are the Stratagy ES Address
Book and the Stratagy ES Transport Provider.
Using Outlook 2000/98
Installing Stratagy ES Address Book
The Stratagy ES Address Book provides users an efficient means to address messages created with
the Stratagy ES Outlook Client for delivery to voice mail mailboxes.
Important! This Address Book can only be installed after the Stratagy ES Proprietary Outlook
Integration has been successfully installed.
1. From the Outlook menu click Tools > Services tab.
2. From the Services page, click Add. The Add Service to Profile box opens.
5922
56175617
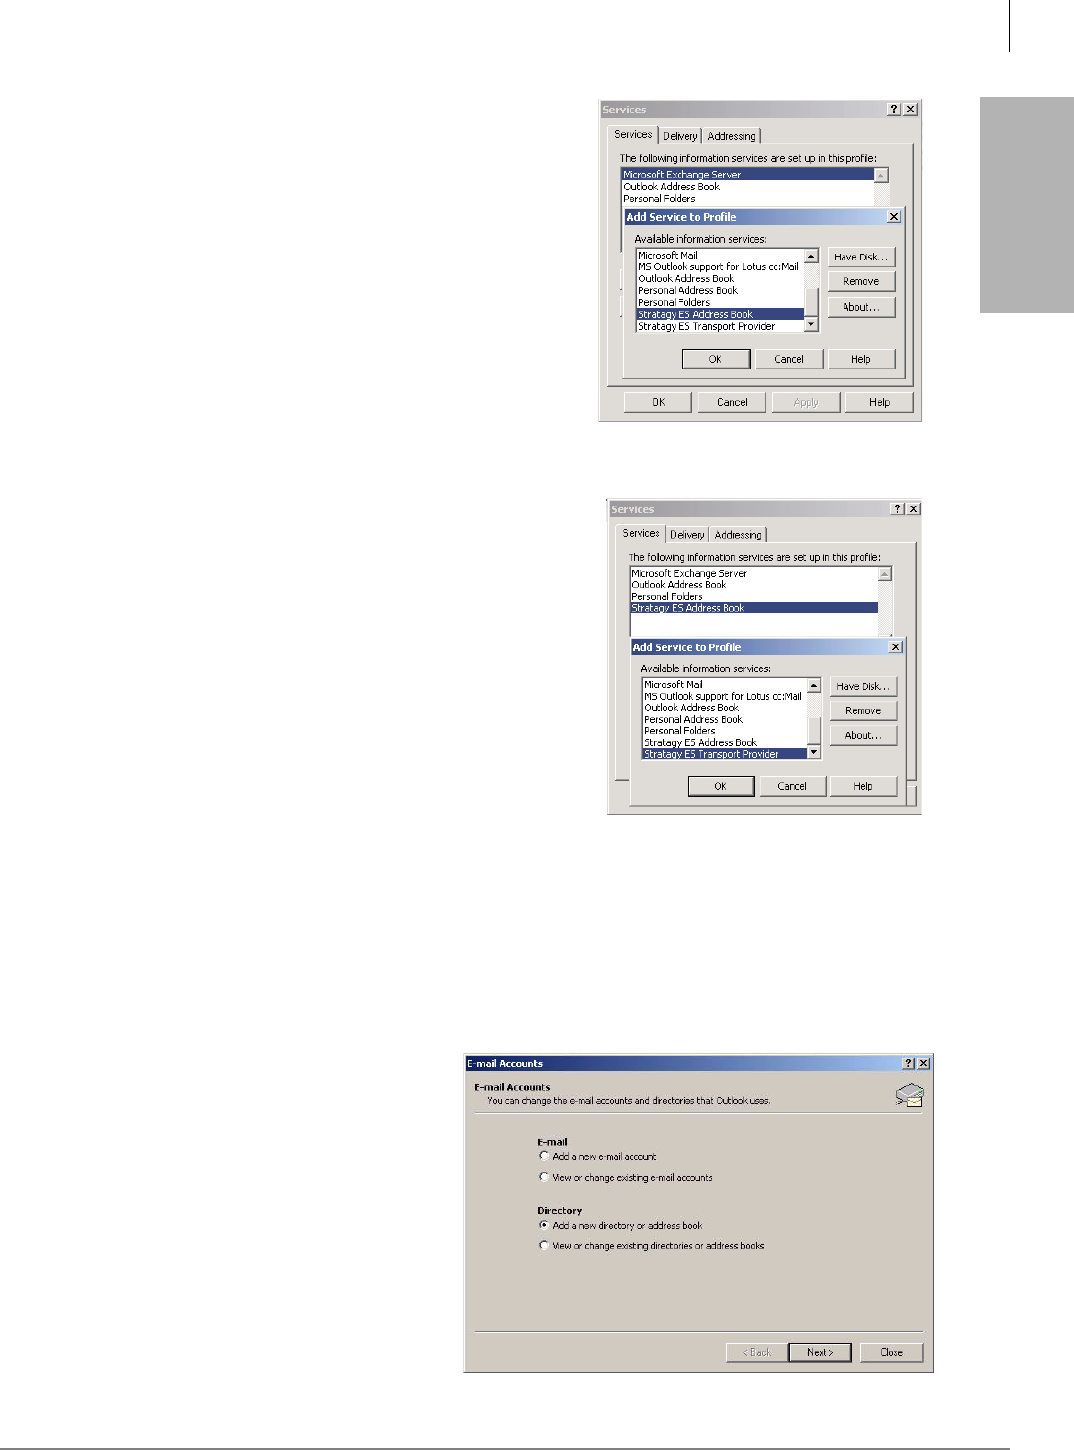
Unified Messaging (UM)
Client PC Installation
Strata CIX Voice Mail Programming 01/07 7-11
Unified Messaging
(UM)
3. In the Add Service to Profile list, scroll down and
highlight the Stratagy ES Address Book.
4. Click OK. A configuration page displays with the user
information greyed out because it was entered during
the installation of the CTX Proprietary Integration. The
only editable field is the selection of the method in
which the Stratagy ES Address Book should sort user
names.
5. Select either Name1 Name2 or Name2 Name1. These
values refer to the Name 1 and Name 2 fields in the
Mailbox Editor screens of Stratagy ES Administration.
6. Click OK, and the Stratagy ES Address Book appears
in the Services list.
Install Stratagy ES Transport Provider
1. Highlight the Stratagy ES Transport Provider in the
Add Service to Profile list.
2. Click OK. A configuration page is presented to confirm
the information that was entered during the installation
of the Stratagy ES Proprietary Integration in Step 7.
3. Click OK and the Stratagy ES Transport Provider
appears in the Services list.
Using Outlook XP/2002/2003
Installing Stratagy ES Address Book
The Stratagy ES Address Book provides users an efficient means to address messages created with
the Stratagy ES Outlook Client for delivery to voice mail mailboxes.
Important! This Address Book can only be installed after the Stratagy ES Proprietary Outlook
Integration has been successfully installed.
1. From the Outlook menu click Tools > E-mail Accounts.
2. From the E-mail Accounts screen
(shown right) under Directory, select
Add a new directory or address book.
Click Next.
3. From the Directory or Address Book
Type screen, select Additional Address
Books. Click Next.
4. From the Other Address Book Types
page, select Stratagy ES Address
Book. Click Next.
A configuration page displays with the
user information greyed out because it
was entered during the installation of
5956
5957
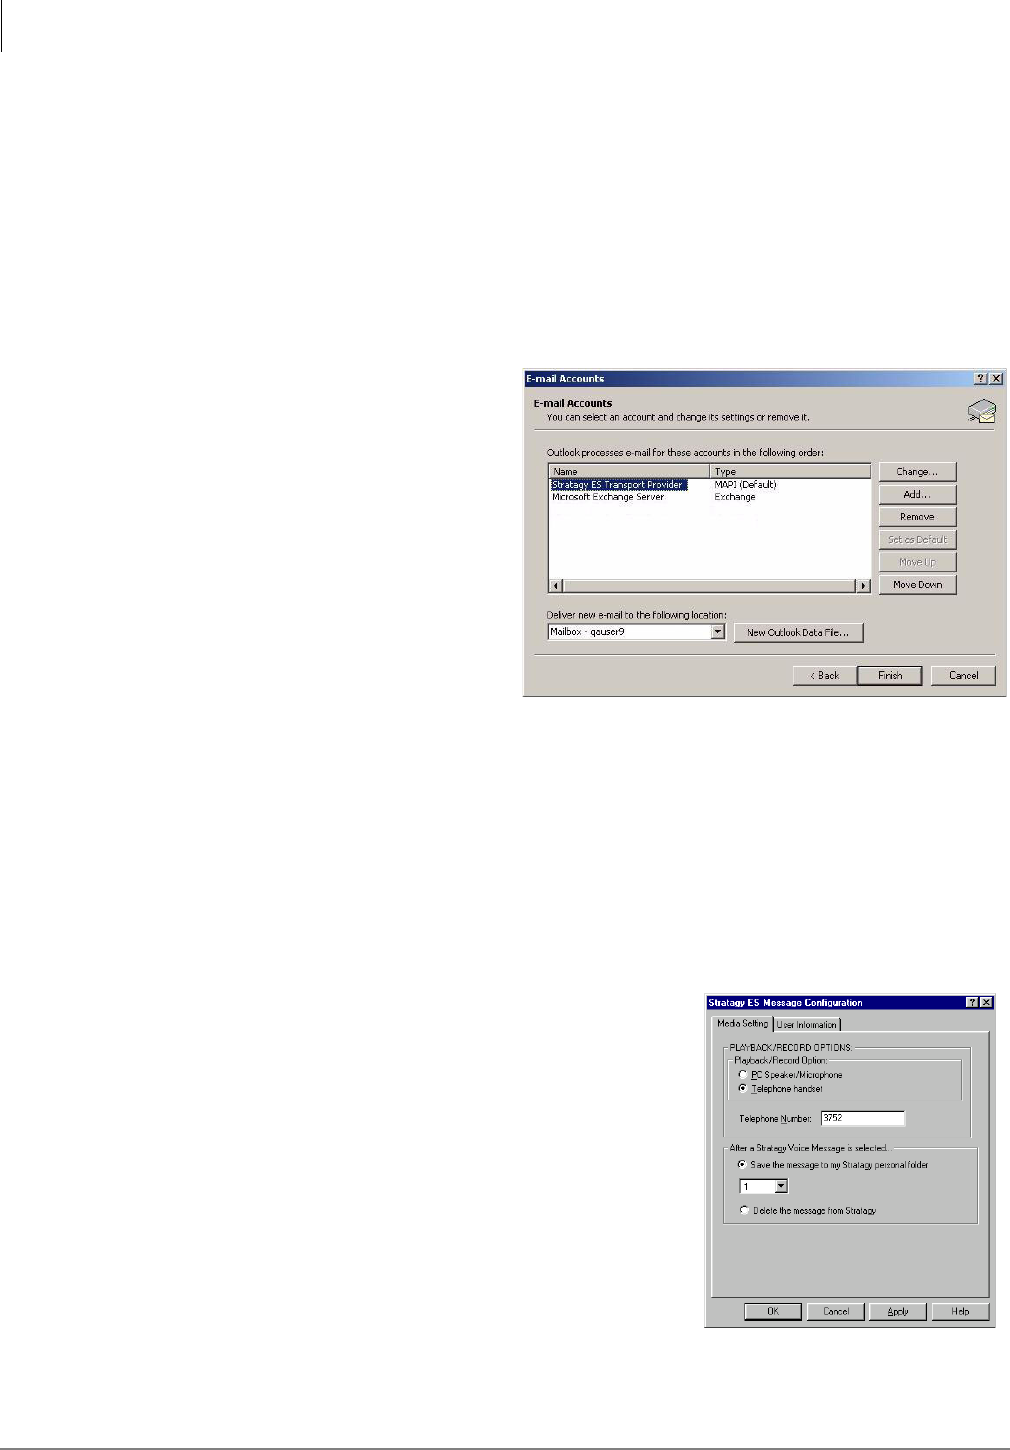
Unified Messaging (UM)
Client PC Installation
7-12 Strata CIX Voice Mail Programming 01/07
the Stratagy ES Proprietary Integration. The only editable field is the selection of the method in
which the Stratagy Address Book should sort user names.
5. Select either Name1 Name2 or Name2 Name1. These values refer to the Name 1 and Name 2
fields in the Mailbox Editor screens of Stratagy ES Administration.
6. Click OK. The Stratagy ES Address Book appears in the Directories and Address Book list.
Install Stratagy ES Transport Provider
1. From the E-mail Accounts screen under E-mail, select Add a new e-mail account. Click Next.
2. From the Server Type page, select Additional Server Types. Click Next.
3. Highlight the Stratagy ES Transport
Provider in the list on the Additional
Server Types page. Click Next.
A configuration page is presented to
confirm the information that was
entered during the installation of the
Stratagy ES Proprietary Integration in
Step 7.
4. Click OK and the Stratagy ES
Transport Provider appears in the
E-mail Accounts list (shown right).
MS Outlook 2003 Only
This procedure must be performed so that
message deletions do not display on your screen.
1. From the MS Outlook client, right click Toolbar > Advanced. The Advanced toolbar displays.
2. In the drop-down box, select Hide messages marked for deletion.
Step 9: Configure Stratagy ES Proprietary Outlook Form
Once the Stratagy ES Proprietary Form has been installed some final parameters need to be set to
complete the installation. These parameters can only be set up after the Proprietary Form is installed
(see Step 7: (Optional) Install Stratagy ES Proprietary Outlook Integration Software on Client PCs
on page 7-9).
1. On the client PC, launch Outlook.
2. From the Outlook main menu, click Tools.
3. Select Config Stratagy voice mail. The Voice Mail
Message Configuration screen displays (shown at right).
4. From the Media Setting tab screen, select a Playback/
Record Option.
•PC Speaker/Microphone – Incorporates the multimedia
properties of the client PC to playback and record
Voice Mail voice messages.
•Telephone handset – When a play command is issued
for a voice message within the Voice Mail Proprietary
Form, voice mail calls the number defined in the
Telephone Number field and proceeds to play the voice
message over the telephone handset.
5421
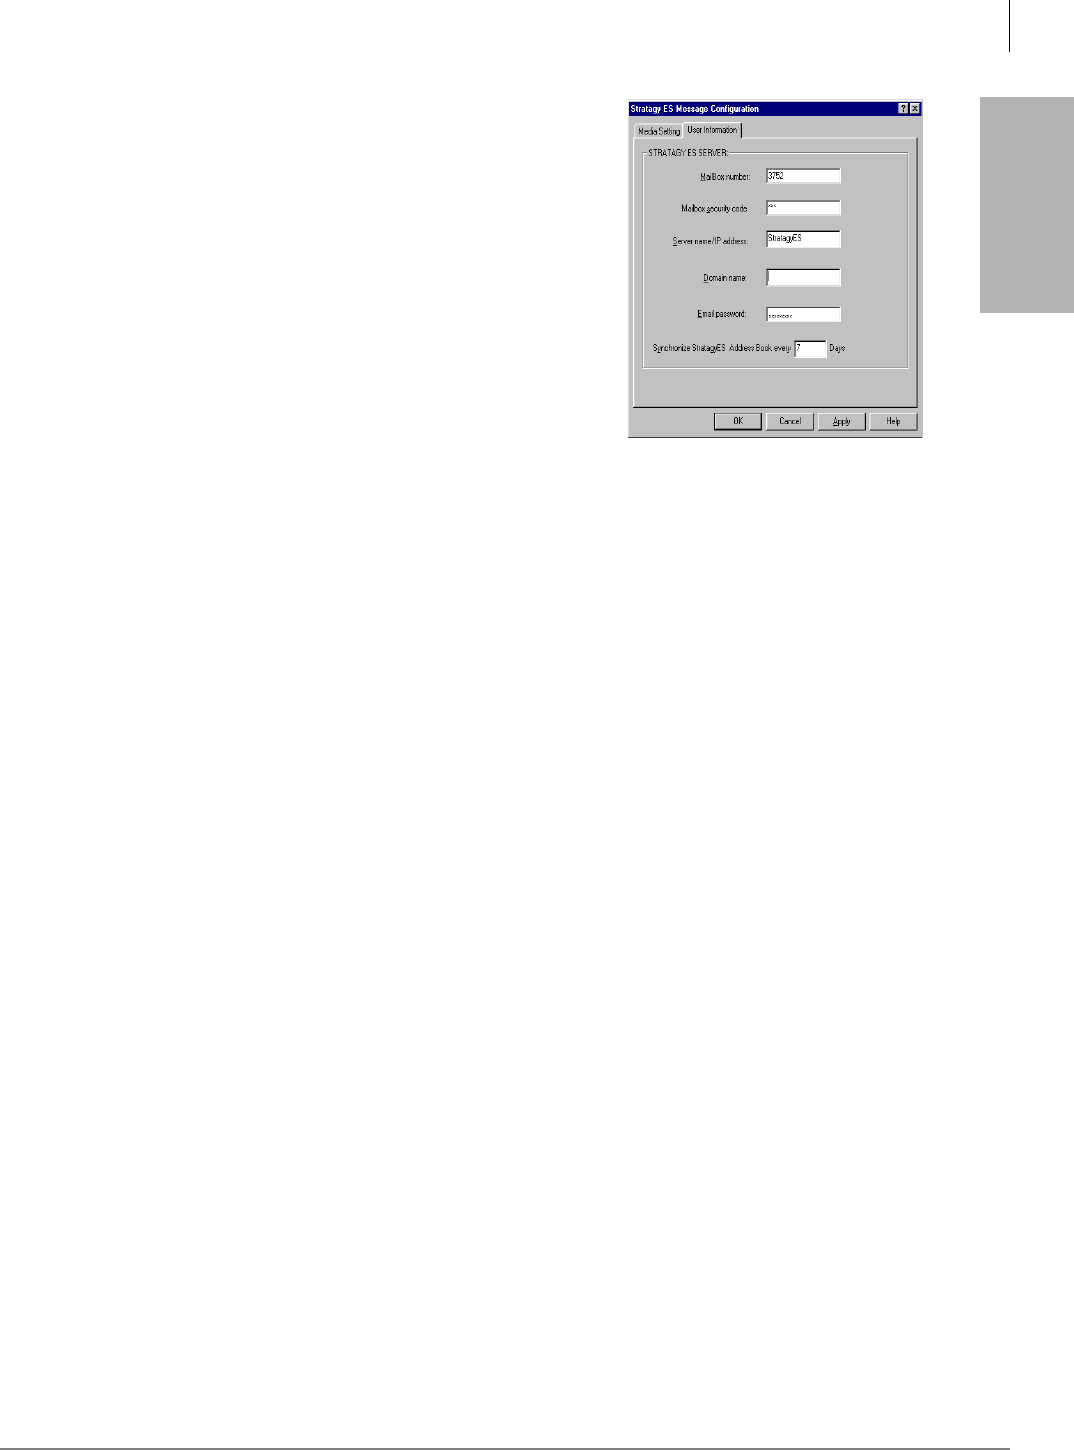
Unified Messaging (UM)
SMTP Dedicated Gateway Server
Strata CIX Voice Mail Programming 01/07 7-13
Unified Messaging
(UM)
5. Click on the User Information tab (shown at right).
Note Though the mailbox Server name/IP address number
and Server domain name is entered during the
installation process, these parameters display on this
screen and can be changed.
6. Verify the user mailbox number in the Mailbox number
field is correct.
7. Make sure the user enters his/her mailbox security code
before attempting to play a voice mail via the Outlook
Client.
8. Verify the Server Name/IP Address of the Media
Application Server.
9. Verify the “Domain Name” in which the Stratagy ES
software resides.
Note If the machines involved in the UM network belong to a workgroup, leave this field blank.
10. Skip the Email password field. If the user is going to be using the e-mail Text-to-Speech (TTS)
feature, they need to fill in this field. Follow-up with the user to make sure he/she fills in this
field. (See Step 8: Set E-mail Password on page 8-4.)
Notes
•Without the password, the TTS e-mail feature does not work.
•This password must match the E-mail Server (e.g., Exchange) account password for the TTS
feature to work.
11. In the Synchronize StratagyES Address Book every ___ Days field, the user should type the
interval (number of days) he/she wishes to have Outlook synchronize with the Stratagy ES
software for the latest directory updates. To disable automatic synchronization, type zero for
the number of days.
Note After the specified amount of days, an automatic synchronization takes place.
12. Click Apply.
SMTP Dedicated Gateway Server
An optional SMTP Gateway server that is dedicated to Stratagy ES Unified Messaging can be
configured to satisfy authentication constraint(s) that is required by the user’s e-mail server(s).
An SMTP Gateway may already be configured to operate on the end users e-mail network. If a
Gateway is not configured, the SMTP Server can be configured to reside on the Stratagy ES PC.
When the SMTP Server is configured on the Stratagy ES PC the default TCP port number of 25
cannot be used. Toshiba recommends using a TCP port number higher than 1000. See
“Configuration” on page 7-14 for details.
Installation
Note Skip these installation procedures if you already have the IIS Manager installed, as in the
case of a Media Application Server (MAS), and continue to the Configuration procedures.
!To open Internet Information Services (IIS) Manager
1. Click Start > Settings > Control Panel > Administrative Tools > Internet Services Manager.
2. Click Start > Run.
53391

Unified Messaging (UM)
SMTP Dedicated Gateway Server
7-14 Strata CIX Voice Mail Programming 01/07
3. Type mmc c:\winnt\system32\inetsrv\iis.msc and click OK.
You can install IIS or select additional components by using the Add/Remove Programs application
in the Control Panel.
!To install IIS
1. Click Start > Settings > Control Panel > Add/Remove Programs.
2. Select Add/Remove Windows Components and follow on-screen instructions to install, remove
or add components to IIS.
Configuration
!To configure the Stratagy ES
!Set the following parameters:
•sys_smtpserver_gateway parameter (see “sys_smtpserver_gateway” on page 7-7 )
•sys_um_unknown_name (see “sys_um_unknown_name” on page 7-8 )
!To install TCP Port for SMTP Gateway Server
1. From the IIS Manager, right-click Default SMTP
Virtual Server > Properties. The Default SMTP
Virtual Server Properties screen displays (shown
right).
2. Select the General Tab.
3. Click Advanced. The Advanced dialog box
displays.
4. Select [All Unassigned] and click Edit. The
Identification dialog box appears.
5. In the TCP port field, enter a custom TCP port
number for the dedicated SMTP Gateway Server for
Stratagy ES. Keep in mind that when you intend to
use a custom TCP port for your services, you should
always pick a number greater than 1000.
Note You cannot use the default TCP port number of
25 for the Gateway server if it resides in the same PC as the Stratagy ES (port 25 is being
used for Stratagy’s own SMTP server).
6. Click OK.
7. In the Advanced dialog box, click OK.
8. On the General tab, click Apply.

Unified Messaging (UM)
Record Voice Messages (Using Windows Sound Recorder)
Strata CIX Voice Mail Programming 01/07 15
Record Voice Messages (Using Windows Sound
Recorder)
This procedure explains one way in which to record a .wav file that can be sent into the voice mail
as a voice message. Other multimedia software can be used to perform this function provided that
this software provides a way to set the recording compression rate. To use Microsoft Sound
Recorder, perform the following:
1. From Windows XP, click Start > Programs > Accessories > either Multimedia (Windows XP)
or Entertainment (Windows 98 & Windows 2000) > Sound Recorder.
2. Click Record (red button) and record your message through the multimedia microphone
connected to your PC.
3. When finished recording, click on File and then Save As.
4. Select a folder in which to save the .wav file.
5. Enter a File name for the .wav file.
6. Click Change. The Sound Selection window displays.
7. From the Name field’s drop-down menu, select Stratagy ES Format. The attributes should
change to reflect the proper compression of 8.000 KHz, 4 Bit, Mono.
8. Click OK to close the Sound Selection window. The Save As window displays.
9. If the target folder information is correct, click Save.
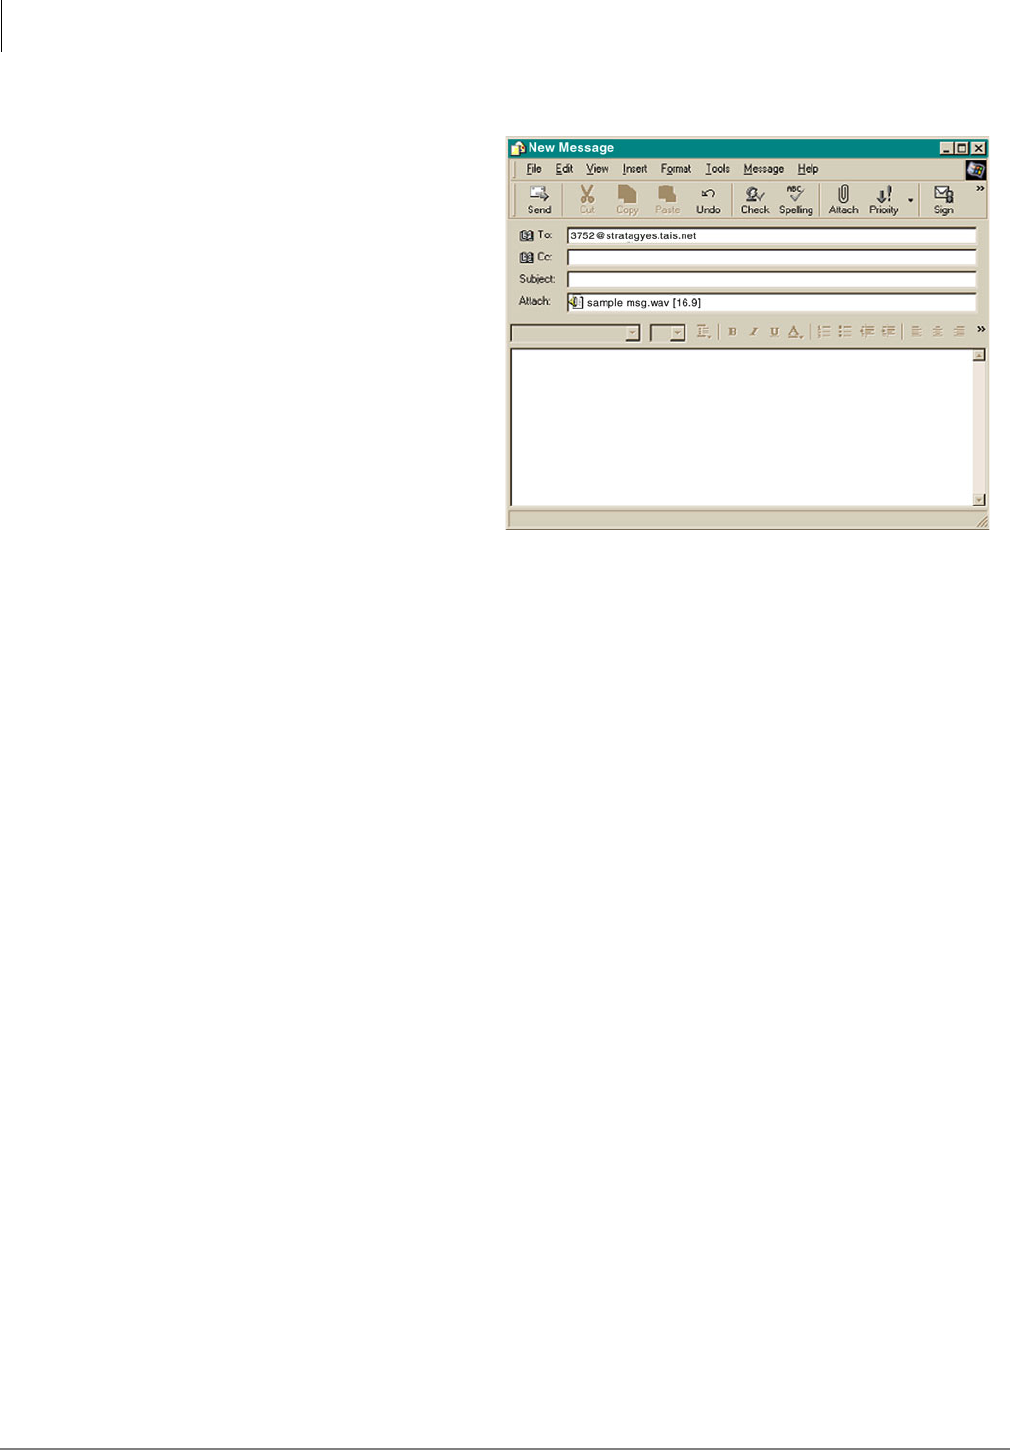
Unified Messaging (UM)
Send WAV File as Voice Message
7-16 Strata CIX Voice Mail Programming 01/07
Send WAV File as Voice Message
1. To send the .wav file into voice
mail as either a new, reply, or
forwarded voice message to a
mailbox, attach the .wav file to an
e-mail message (shown right).
2. Make sure that the address for the
message is correct. The addressing
convention for sending voice
messages into a Stratagy ES is
defined as <target mailbox
number>@<system computer
name.domain>.
Note As a quick tip, every time you
get a voice message from a
Stratagy ES voice mail user,
add that address to your
personal address book.
If other Stratagy ES mailbox addresses are entered in either the To:, cc:, or bcc: fields, those
mailboxes also receive your message.
5562

Strata CIX Voice Mail Programming 01/07 8-1
Text-to-Speech (TTS)
Text-to-Speech (TTS) 8
TTS is the term for converting text to computer-generated speech. It enables selected information
from a computer database or e-mail messages to be read back to users.
The TTS/Email Feature Group enables e-mail messages to be read back to users via the Telephone
User Interface (TUI). The TTS/Email Feature Group requires the Media Application Server be
equipped with the UM Feature Group and an e-mail password set.
Stratagy ES TTS/Email Feature Group employs the ScanSoft ETI-Eloquence™ TTS system. ETI-
Eloquence is a Speech Application Programming Interface (SAPI) compliant system from
ScanSoft®.
With the TTS/Email Feature Group, individual mailbox users that have e-mail addresses can have
their e-mail messages read to them. Each mailbox can be configured independently to query any
e-mail service compatible with SMTP/POP3/IMAP4 for messages. If messages are present, voice
mail announces how many e-mail messages there are and if any of them contain attachments.
This gives users that do not have immediate access to their local network, the Internet, or even a
computer, the ability to check for important e-mail messages from anywhere in the world. All that
is required is a telephone.
The TTS feature is a host-based application. TTS uses the Media Application Server’s resident
processor to provide the processing power required, no additional speech-related hardware is
required. This Feature Group includes the first two channels and has a maximum capacity of four
channels of TTS that can be invoked simultaneously.
Hardware/Software Requirements
The following requirements apply for TTS:
•a license (part number MAS-FG-TTS-ETI) for the feature group must be purchased through the
Toshiba FYI site at http://fyi.tsd.toshiba.com. Once you have purchased the license, follow the
detailed instructions in “MAS Licensing” on page 2-9 to activate the license.
•ScanSoft ETI-Eloquence software
Note The TTS provides up to eight channels of TTS resources.
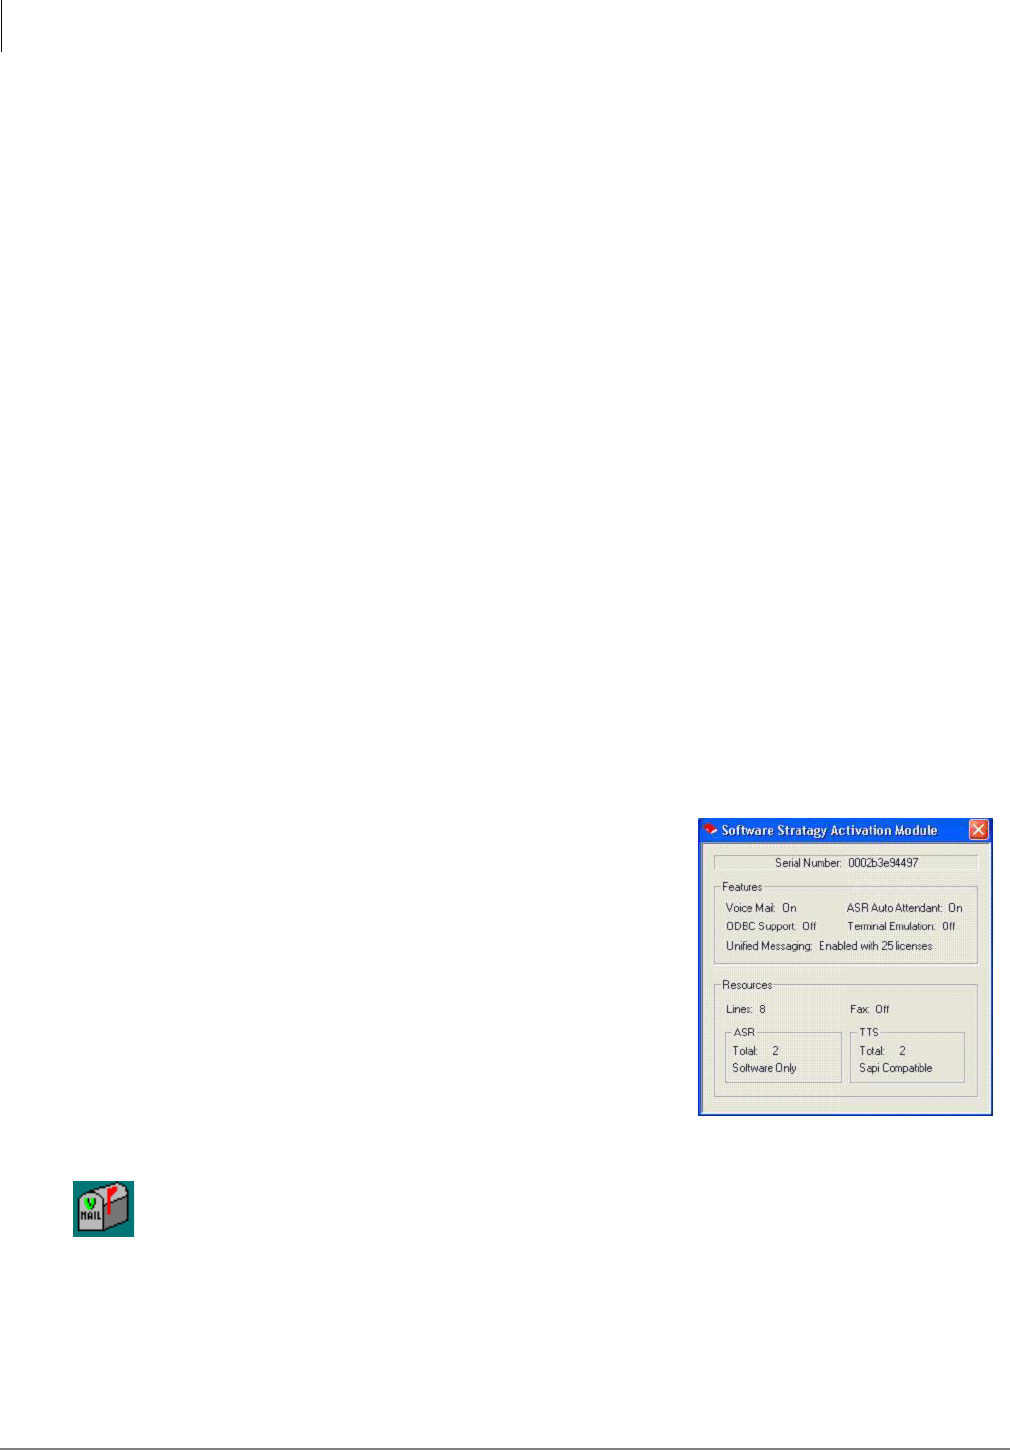
Text-to-Speech (TTS)
Installation
8-2 Strata CIX Voice Mail Programming 01/07
Installation
The following steps comprise the TTS installation.
Performed on the server:
•Step 1: Verify SAM is Feature Activated
•Step 2: Stop Stratagy Enterprise Server
•Step 3: (Optional) Install Stratagy ES Update
•Step 4: Install ScanSoft ETI-Eloquence Software
•Step 5: Verify System’s Basic Functions
•Step 6: Verify E-mail Settings in Mailbox Editor
•Step 7: (Optional) Change Playback Order
Performed on the client PC:
•Step 8: Set E-mail Password
Prior to Installing
•We recommend that you back up your database prior to starting any upgrade procedure.
•Make sure you have all the necessary parts and tools.
•Since all of the procedures require voice mail be out-of-service, coordinate with the customer a
time for voice mail to be taken off line.
Server Installation
Step 1: Verify SAM is Feature Activated
1. From the desktop, click Start > Programs > Stratagy
Enterprise Server Administration > SAM Query. The
Stratagy ES Activation Module screen displays (shown at
right).
2. Verify that the TTS settings display in the lower
right-hand corner.
Step 2: Stop Stratagy Enterprise Server
2. Click Stop. The screen displays “Stop Pending” and then “Stopped.”
1. Click the StartStratagy icon on the desktop. The Stratagy Enterprise Server Control screen
displays.
7663

Text-to-Speech (TTS)
Server Installation
Strata CIX Voice Mail Programming 01/07 8-3
Text-to-Speech (TTS)
Step 3: (Optional) Install Stratagy ES Update
If the latest software version of the Stratagy ES is not resident on the Media Application Server hard
drive, you should load the latest version of software, Administration and any accompanying
software component update.
!To verify the version of software currently installed, view the version.txt file in the voice mail
directory.
!From the Software Menu screen, select Software Component Update. The update prompts you
for the path name etc. Accept the defaults. When the installation is complete, you are asked to
restart your computer.
Step 4: Install ScanSoft ETI-Eloquence Software
1. From the Software Menu screen on the Stratagy ES CD-ROM, select ScanSoft.
Note If this is the first time installing this software, you may be asked to reboot before you can
use the new software.
2. From the ScanSoft submenu, select Eloquence TTS Common Software and follow the
instructions.
3. From the ScanSoft submenu, select Eloquence TTS US English Software and follow the
instructions.
4. From the ScanSoft submenu, select MS SAPI runtime library and follow the prompts.
5. Reboot.
Step 5: Verify System’s Basic Functions
Follow the instructions below to verify that the voice mail’s basic functions are working.
!To verify that each port works and voice playback and basic auto attendant function
!Dial the extension number for each port. Voice mail should (for each port) answer and play the
default company greeting (“Thank you for calling…”), greeting 1 in User ID mailbox 990.
Step 6: Verify E-mail Settings in Mailbox Editor
!You should verify that the Email server and Email play back fields on the Unified Messaging
Tab Screen (Mailbox Editor) have been configured with the proper e-mail settings. See
“Unified Messaging” on page 4-20 for details.
Step 7: (Optional) Change Playback Order
‰ To modify the TTS playback order
Modify the system parameter setting shown in the table below. See “Modify Parameters” on page
3-30 for instructions on modifying the settings for these TTS parameter.
Table 8-1 System Parameter Definition
Parameter Description
sys_tts_playback_order
System wide setting that determines the order in which the SES selects
email messages to be read to users via the TTS feature group. The possible
settings are:
0 = FIFO First In, First Out (Default)
1 = LIFO Last In, Last Out
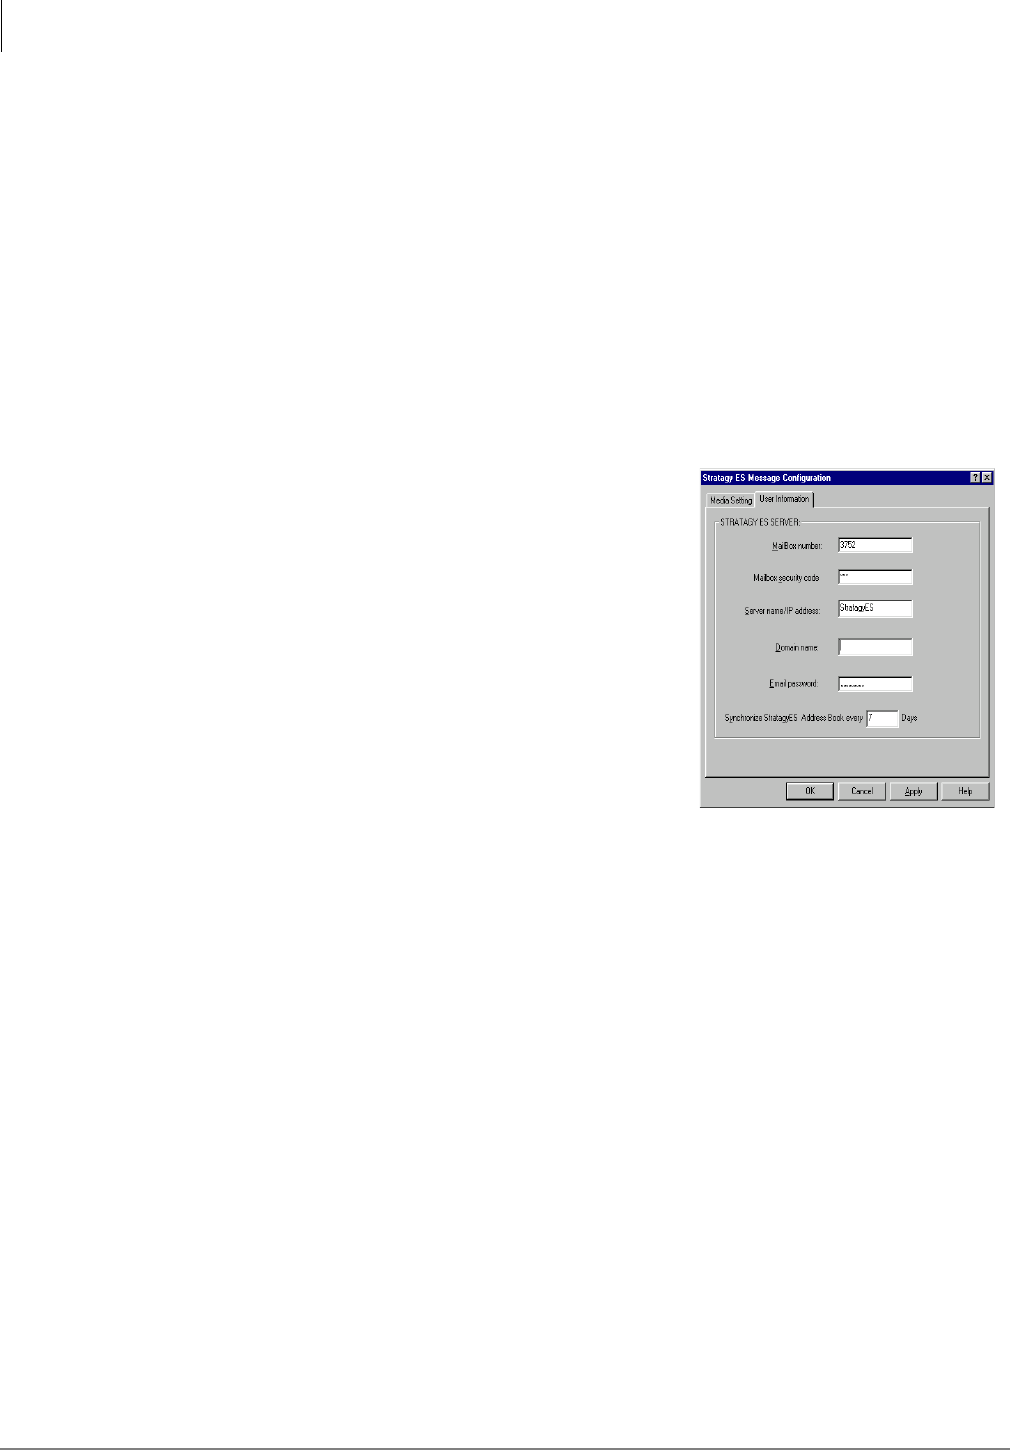
Text-to-Speech (TTS)
Client PC Programming
8-4 Strata CIX Voice Mail Programming 01/07
Client PC Programming
Step 8: Set E-mail Password
You need to set an e-mail password for each user wishing to use the TTS feature. Only one of the
following procedures is required.
Using Stratagy ES Proprietary Outlook Integration Software
Important! The Stratagy ES Proprietary Form must be installed before you start this procedure
(see Step 7: (Optional) Install Stratagy ES Proprietary Outlook Integration
Software on Client PCs on page 7-9).
1. On the client PC, launch Outlook.
2. From the Outlook main menu, click Tools.
3. Select Config Stratagy voice mail. The Stratagy ES Message Configuration screen displays.
4. Click on the User Information tab (shown at right).
5. Verify the user mailbox number in the Mailbox number
field is correct.
6. In the Email password field, enter the password that the
user enters to log into their e-mail service.
Notes
•Without the password, the TTS/Email feature does not
work.
•This password must match the e-mail server (e.g.,
Exchange) account password for the TTS feature to work.
5391
Text-to-Speech (TTS)
Client PC Programming
Strata CIX Voice Mail Programming 01/07 8-5
Text-to-Speech (TTS)
Using Internet Protocol Integration
This procedure enables you to update the Stratagy ES software with the user’s e-mail log on
password so that the system can retrieve e-mail messages and read them via Text-to-Speech.
To update the Stratagy ES with a user’s e-mail password, the Stratagy ES Remote User Password
Administration applet must be installed on the user’s computer.
‰ To install Stratagy ES Remote User Password Administration applet
Perform one of the following two procedures:
Procedure 1
1. Insert the Stratagy ES Software CD-ROM into the target user’s computer.
2. From the Main Menu, select
Remote User Password
Administration. The Stratagy
ES Remote User Password
Administration screen displays
(shown right).
3. Enter the Stratagy ES mailbox
number for the user.
4. Enter that mailbox’s security
code.
5. Enter the password that the user
enters to log into their e-mail
service.
6. Enter the computer name or IP address of the host Stratagy ES system on the local network.
7. Enter the computer name or IP address of the host SMTP server on the local network.
8. Click Send Update. The applet will securely send your e-mail password directly into the
Stratagy ES system.
Procedure 2
1. From the Internet Explorer, access the My Phone Manager application by typing http://<PC
Name>/MyPhoneManager (example: http://NETWORK/MyPhoneManager) and press
<Enter>.
2. Follow the instructions in the Program Administrator Manual for logging on to the program.
3. From the menu, click Voice
Mail Settings > Mailbox
Settings. The Mailbox
Settings screen displays
(shown right).
4. Type in your Email address,
username and password.
5. Click Apply.
6588
This page is intentionally left blank.

Strata CIX Voice Mail Programming 01/07 9-1
Interactive Voice
Response (IVR)
Interactive Voice Response (IVR) 9
The Interactive Voice Response (IVR) Feature Group can relay specific computer database
information to callers over the telephone based on an individual’s unique input from the touchtone
dial pad. Database information can reside on the IVR system’s hard drive or in an external database.
A voice mail IVR application script is customized so that callers can get the information they need
anytime that data is available. Information received from the database, can be spoken back to the
caller in a number of different ways: date, time, dollars and cents, numbers or predetermined
phrases.
This chapter gives instructions on using the IVR User Agent and IVR Alias Editor functions.
IVR User Agents
A User Agent is defined as an automated object in the system that represents and processes calls on
behalf of a user. For the IVR Application Suite, the IVR User Agent is defined as a company or
department who authorized an application to run.
Notes
•Only an Administrator or higher level user can create/delete/edit a User Agent.
•IVR User Agent is not Class of Service (COS) dependent.
Figure 9-24 IVR Screen
7307

Interactive Voice Response (IVR)
IVR User Agents
9-2 Strata CIX Voice Mail Programming 01/07
Create IVR User Agents
1. From the eManager Main menu, click Advanced Configuration > Voice Mail > IVR. The IVR
screen displays.
2. Click Create. The Create User Agent screen displays.
3. Type a single User Agent number (e.g., 881), a range of numbers (e.g., 800-804) or a
combination of both separated by commas (e.g., 800-802, 881, 888).
Note The number you enter must be unique. If the number already exists, Voice Mail
Administration indicates that the User Agent could not be created.
4. Click OK. The Creating dialog box displays while the program creates the User Agents. When
the process is complete the screen indicates whether the creation of the User Agent(s) was
successful.
5. Click Exit. The IVR User Agent screen displays (shown right).
6. (Optional) Click Comment field and type in comment.
7. (Option) Check “Application will answer call” box on the screen.
8. In the Application field, select the Application from the drop-down menu.
9. In the Language field, select the Language from the drop-down menu.
10. Click on Parameter field and enter the Parameter.
Note The file name can be entered with forward slashes (/) or backward slashes (\).
11. Click Submit. The data is saved. The IVR User Agent screen remains.
12. Repeat Steps 6~11 for any other agents you created.
Table 9-1 IVR Screen Fields
FIELD DESCRIPTION
User Agent Type a user agent number.
Comment (Optional) Any text that will help identify the user agent.
Application will answer call (Optional) When selected, this option indicates that this User Agent is assigned to
answer an incoming port in the Answer Methods screen (see “Answer Methods” on
page 3-12 ). This option also indicates that the associated IVR application must:
•Be programmed within its scripting to answer incoming calls.
•Successfully complete its load process before answering the port.
By not selecting this option, the system answers the port and then starts the loading
of the IVR application.
SES Application Select an application from the drop-down list.
Languages This option designates the language used for prompting. At present the only
language available is English.
Parameter The parameter consists of a file name and the file’s pathway. Example: source C:/
test/sample.tcl.

Interactive Voice
Response (IVR)
Interactive Voice Response (IVR)
Answer Methods
Strata CIX Voice Mail Programming 01/07 9-3
Delete IVR User Agents
1. From the eManager Main menu, click Advanced Configuration > Voice Mail > IVR. The IVR
screen displays.
2. Highlight the User Agent you want to delete.
3. Click Delete. The Delete User Agent screen displays.
4. Type the User Agent number.
5. Click OK. A pop-up box asks you if you want to continue.
6. Click OK > Exit. The User Agent is removed from the screen.
Edit/Modify IVR User Agents
1. From the eManager Main menu, click Advanced Configuration > Voice Mail > IVR. The IVR
screen displays.
2. Highlight the User Agent you want to modify.
3. Change the necessary data. Click Submit. The data is saved. The IVR User Agent screen is still
displayed.
Answer Methods
The IVR Answer Methods must be set. See “Answer Methods” on page 3-12 for procedures.
Voice Ports
The IVR Answer Methods must be assigned to a port and extension number. See “Voice Ports” on
page 3-14 for procedures.
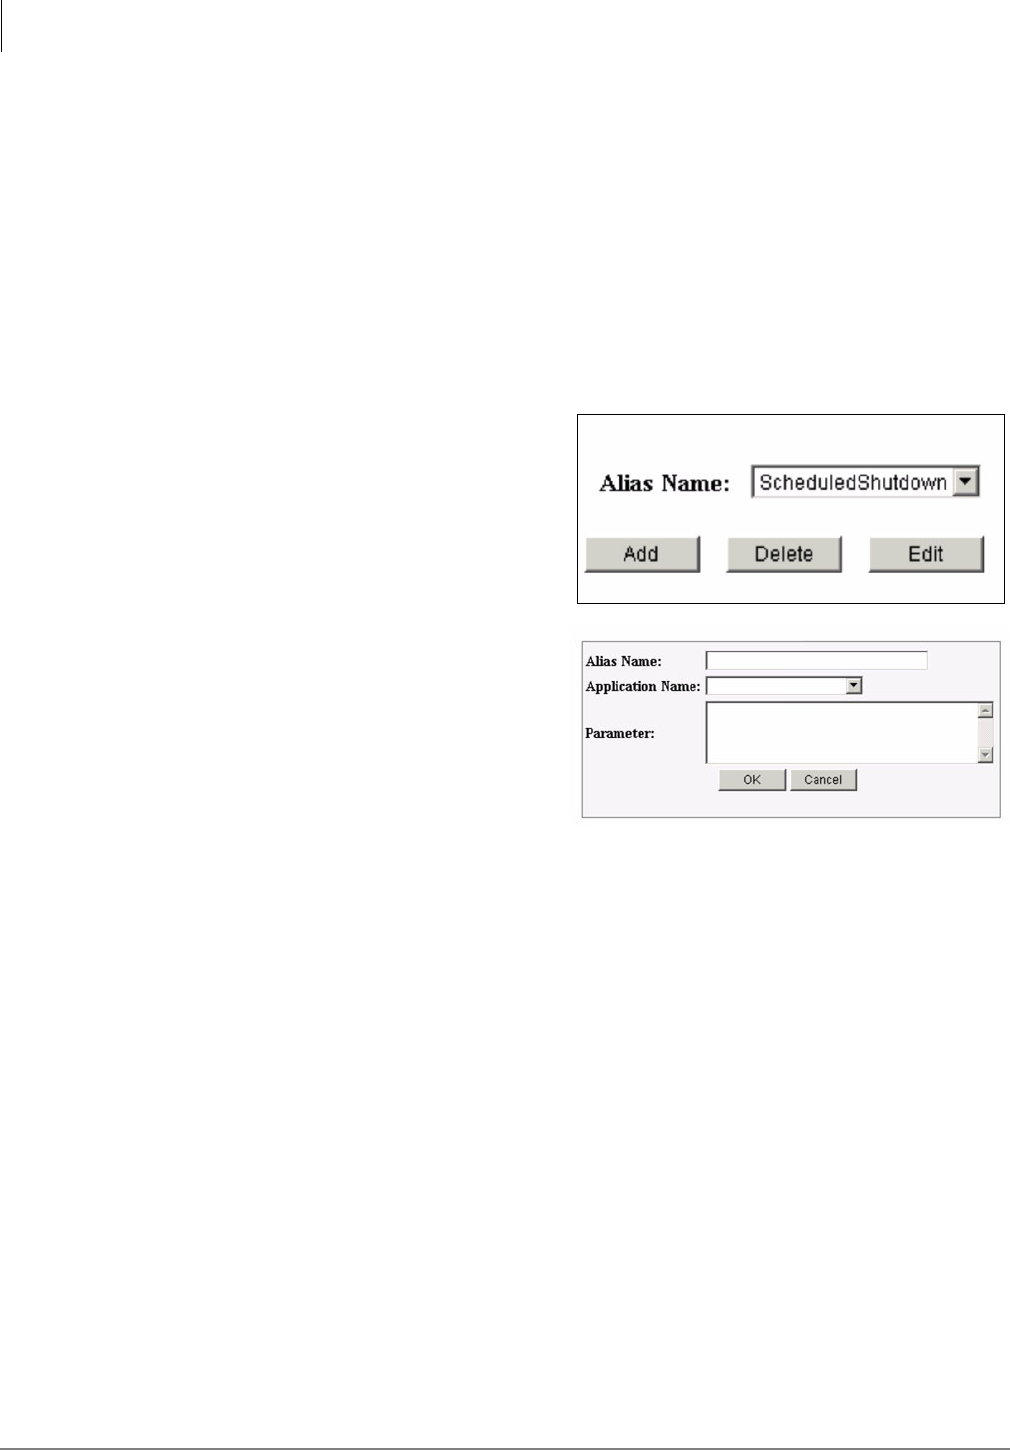
Interactive Voice Response (IVR)
IVR Alias Editor
9-4 Strata CIX Voice Mail Programming 01/07
IVR Alias Editor
To automatically run applications in the background when voice mail starts up, you must first define
the application as an IVR Alias using the Edit IVR Alias function and then activate the Alias in the
Run IVR Alias screens.
Applications can be added or deleted from the startup list whenever necessary. All functions and
screens are accessed using the eManager Tools Menu.
Edit IVR Alias
You can add, delete and edit IVR Alias Editors using this function.
Add IVR Alias Editor
1. From the eManager Main menu, click
Utilities > Tools > IVR Alias Editor. The
IVR Alias Editor screen displays (shown
right).
2. Click Add. The Add IVR Alias screen
displays (shown right).
3. Enter the following on the Add IVR Alias
screen:
•Type an Alias name.
•Select an Application Name from the
drop-down list provided for the field.
•Type the following:
sourcex [pathname]
4. Click OK. The IVR Alias Editor screen displays with the new Alias Editor added to the Alias
name list.
Delete IVR Alias Editor
1. From the eManager Main menu, click Utilities > Tools > IVR Alias Editor. The IVR Alias
Editor screen displays.
2. Select an IVR Alias name from the drop-down list. Click Delete. You are asked to confirm the
deletion.
3. Click OK. The IVR Alias Editor screen displays with the Alias Editor removed from the Alias
name list.
Edit IVR Alias Editor
1. From the eManager Main menu, click Utilities > Tools > IVR Alias Editor. The IVR Alias
Editor screen displays.
2. Select an IVR Alias name from the drop-down list. Click Edit. The IVR Alias screen displays.
3. Make the required changes to the Application Name and/or Parameter field.
4. Click OK. The data is saved and the IVR Alias Editor screen displays.
7240
7239
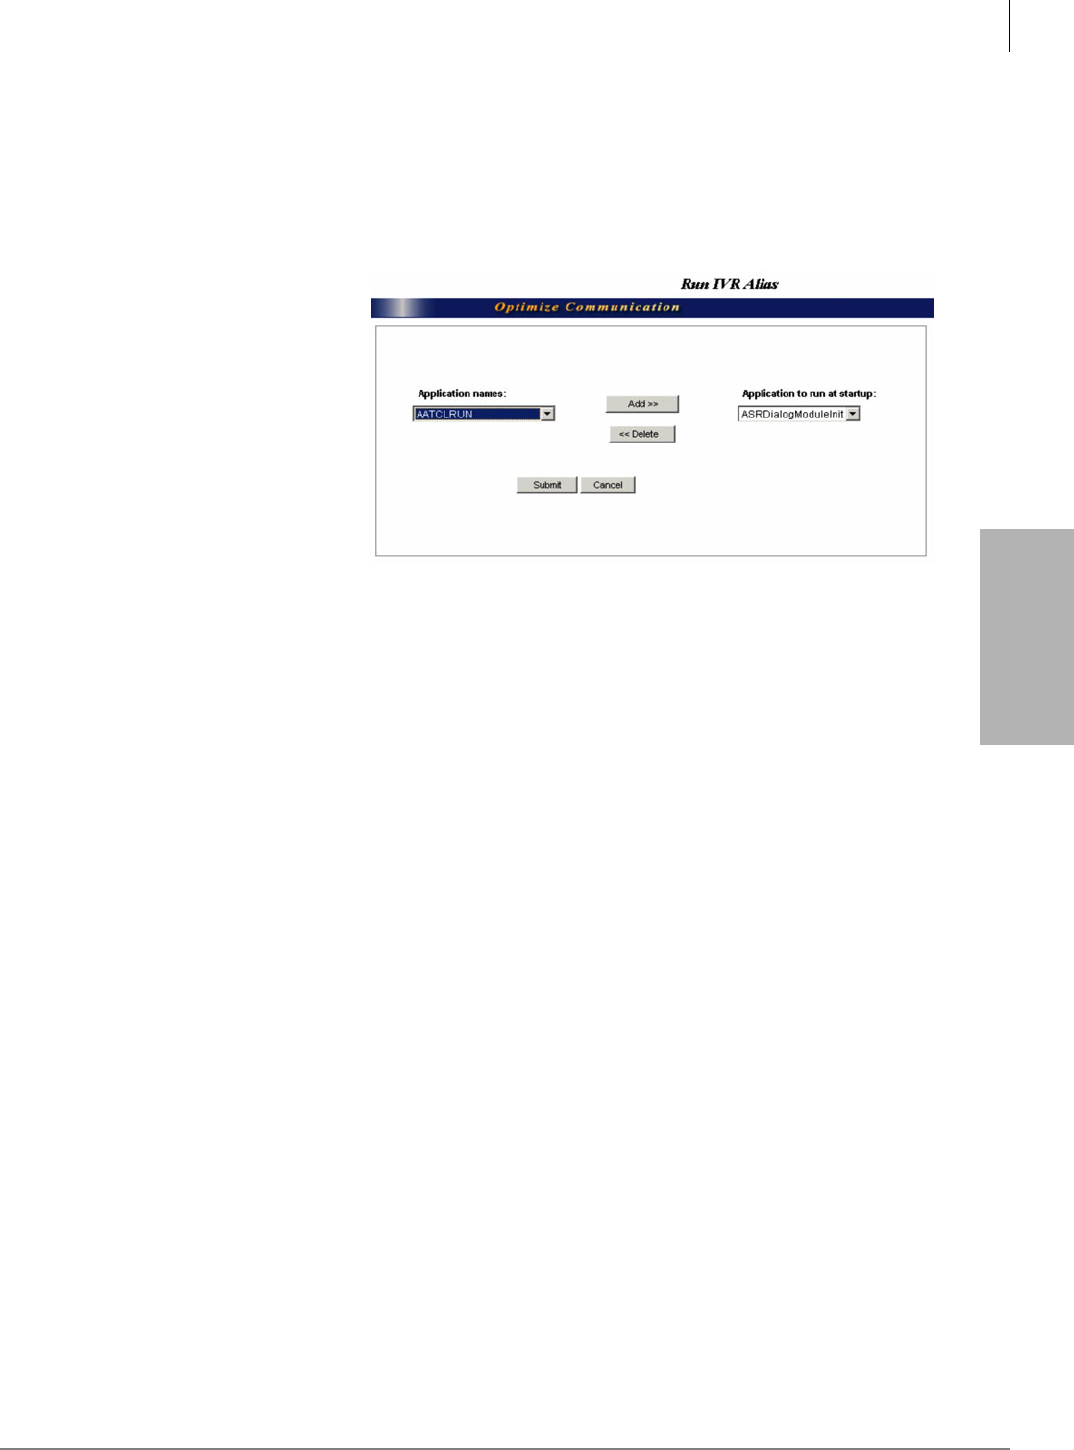
Interactive Voice
Response (IVR)
Interactive Voice Response (IVR)
IVR Alias Editor
Strata CIX Voice Mail Programming 01/07 9-5
Run IVR Alias
This function enables you to add or delete Application Names to/from a startup or “register list.”
Applications placed on this list automatically run on startup and continue to run until you shut down
the voice mail.
Add/Delete Application Names from Startup List
1. From the eManager Main
menu, click Utilities > Tools
> Run IVR Alias. The IVR
Alias screen displays
(shown at right).
Note The Application
Names list on the left-
hand side of the screen
is static and cannot be
added or deleted using
this screen. To add or
delete Application
Names, you must use
the IVR Alias Editor
function.
2. Select an Application Name from the list on the left. Click Add. The Application Name is
added to the startup list on the right of the screen.
...or select an Application Name from the drop-down list on the right-hand side of the screen
and click Delete. The name is removed from the startup list on the screen and replaced in the
Application Name list on the left.
3. When finished, click Submit. The data is saved and the IVR Alias screen remains open.
4. You must now shutdown and restart the voice mail for any deletion or addition to take effect.
7241
This page is intentionally left blank.

Strata CIX Voice Mail Programming 01/07 10-1
Advanced Integrations
and Applications
Advanced Integrations and
Applications 10
This chapter covers procedures for enabling and testing Simplified Message Desk Interface
(SMDI), Audio Messaging Interchange Specification (AMIS) for the voice mail, CTX Proprietary
Integration for the Stratagy ES/Strata CIX, and Voice Profile Internet Mail (VPIM) for the
Stratagy ES.
CIX Integration
With the Stratagy ES software application on the MAS and Strata CIX, all integration
communication is performed over the IP network connection between the two systems.
All Stratagy ES systems require a network connection to facilitate the integration.This section
provides the steps needed to configure the Stratagy ES for this integration.
Note For additional information, see “Proprietary Integration” on page 1-7 .
You can perform the two wizards—Configuration Wizard and User Setup—in the eManager/Basic
Configuration menu or you can follow the steps below to configure your Stratagy ES system.
Step 1: Program CIX for Integration
The following Strata CIX programs must be configured for Voice Mail to work with the CIX:
Set up Telephone Station Ports
•From eManager, click Advanced Configuration > Station > Assignments and configure Program
200 Station Assignments (or VMID Wizard) for the following:
•FB19 – VM ID sent to Voice Mail = mailbox number. This is usually the same as the PDN,
however, it can be different (do not include 91, or 92 Vmail integration codes).
•FB22 – Message Center (this is VM distributed hunt group pilot number
Optional Station Programming
•From eManager, click Advanced Configuration > Station > Assignments and configure Program
204 Station Assignments DKT Programming
•FB23 – Used for the Record to VM feature. Default setting is “Manual” and may be
changed to “Auto.”

Advanced Integrations and Applications
CIX Integration
10-2 Strata CIX Voice Mail Programming 01/07
•From eManager, click Advanced Configuration > Station > Phantom DN and configure Program
206 Stations Phantom DN Programming
•FB06 – VM ID sent to Voice Mail (if different from the owner). CIX sends the owners VM
ID if left blank.
•FB09 – Message Center
Voice Mail Ports Only
•From eManager, click Advanced Configuration > Station > Assignments and configure Program
260 Full IP Station Assignment (create VM extensions as IPT_L resources/VM ports)
•Enter equipment number (ex. 0101).
•FB3 – Assign ports as voice mail ports.
•FB15 – Display DN. This MUST be the same Pilot DN for VM distributed hunt group.
•From eManager, click Advanced Configuration > Station > Assignments and configure Program
204 Station Assignments DKT Programming
•FB05 – Tone First
•FB19 – Not Continuous.
•From eManager, click Advanced Configuration > Station > Hunt Group and configure Program
209 Station Programming Hunt Groups (Create Hunt Group)
•FB01 – Hunt Method = Distributed
•FB02 – Pilot Number = __________ (DN)
•FB05 – Multiple DN = Disable
•From eManager, click Advanced Configuration > Station > Assignments and configure Program
218 Station Programming Hunt Group Members
•Assign Vmail ports members in the newly created Hunt Group (Program 209)
CTX Proprietary Integration
•From eManager, click Advanced Configuration > System > VM Data and configure Program
579 System Voice Mail Data
Note Only use this FB for Centralized VM and QSIG.
•FB10 – Message Center Network DN used in Centralized Voice Mail across QSIG. This is
the call back number for Remote nodes for Message Waiting Light control across Nodes. If
entry must contain the Local Node ID and VM Pilot number; i.e., 103090, if the Network
table is not used.
•FB16 – Pilot Number of VM Hunt Group used for the “Transfer Direct to Voice Mail”
feature.
Voice Mail Port Data
•From eManager, click Advanced Configuration > System > VM Data and configure Program
580 Voice Mail Port Data
•FB00 – Enter VM Port DN from list.
•FB01 – Select VM Control = SMDI.
•FB02 – Enable A/D Tones.
•FB04 – Enable End-to-End Signaling
•FB07 – VM to VM Call Blocking (non-blocking = default)
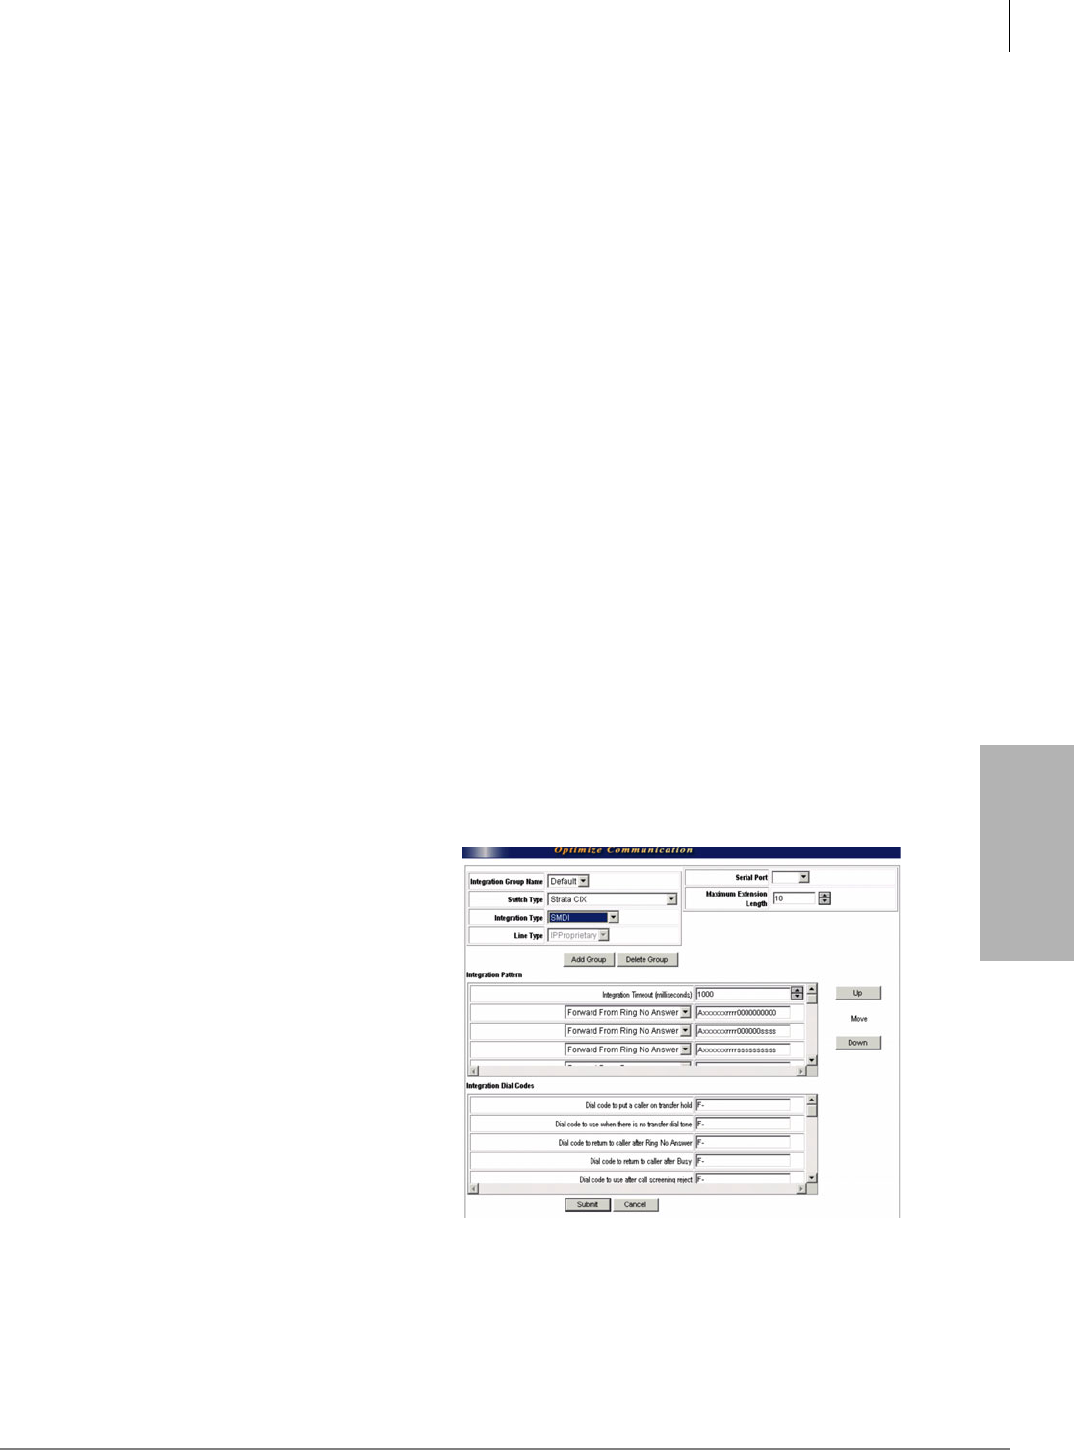
Advanced Integrations and Applications
CIX Integration
Strata CIX Voice Mail Programming 01/07 10-3
Advanced Integrations
and Applications
SMDI IP Integration
Assign LAN Device for SMDI
•From eManager, click Advanced Configuration > System > I/O Devices and configure Program
803 I/O Devices SMDI Integration
•FB00 – Set for SMDI Code 300
Note Do not use Code 301.
• FB01 – Select Device Connection to LAN (Set Device Port Number – 10)
Configure LAN Device
•From eManager, click Advanced Configuration > System > I/O Devices and configure Program
801 LAN Device
•FB00 – Select LAN port number defined in Program 803 (recommended 10)
•FB01 – Protocol (TCP)
•FB02 – PC Operation Type (Client)
•FB03 – Data Flow (Asynchronization)
•FB04 – Server Port Number (0 = default)
•FB06 – Client Port Number (1000)
•FB05~08 – Client IP (Enter the IP address of the MAS)
•FB07 – Read Retry No. (1 = default)
•FB08 – Write Retry No. (1 = default)
Step 2: Configure Telephone System Integration
1. Verify that the Stratagy ES system is up and functional.
2. Connect to the MAS with eManager.
3. From the eManager Main Menu select
Advanced Configuration > System >
VM Phone Systems. The Telephone
Systems screen displays (shown at
right).
4. In the Integration Group Name, Switch
Type, and Integration Type fields, leave
the default.
5. Scroll down to the bottom of the
Integration Dial Codes list to locate
three parameters: CIX/CTX IP
Address, Simple Network
Management Protocol (SNMP)
Community, LIPU IP Address (MAS).
6. Change the “CIX/CTX IP Address” to
the IP address that has been assigned to the Strata CIX (LCTU). Default is 192.168.254.253.
7. Enter the SNMP Community name that has been assigned in the target Strata CIX. Default is
communityName.
8. Verify/change the “IPU IP Address” that has been assigned to the Strata CIX (LIPU).
9. Click Submit.
7275

Advanced Integrations and Applications
CIX Integration
10-4 Strata CIX Voice Mail Programming 01/07
Step 3: Assign Telephone System Integration Group Name to
Answer Method
1. From eManager, click Advanced Configuration > System > VM Ans Methods.
2. Leave at Default or enter a new Answer Method name.
3. Leave at 990 or enter a new Greeting User Agent number.
4. Enter the desired number of rings that the Stratagy ES should wait before answering the port, or
leave this value at its default of 1.
5. Enter the Integration Group Name that was assigned in Step 1 for the Strata CIX.
6. Click Submit.
Step 4: Configure the Voice Ports Connected to Strata CIX
1. From eManager, click Advanced Configuration > System > VM Voice Ports.
2. In the Extension field, enter the extension number for the LIPU IPT VM ports originating from
the Strata CIX. For the integration to work properly, the extension numbers entered here must
exactly correspond with the extension numbers of the ports that are configured to the system.
3. Enter the Answer Method name that was created in Step , or leave at default.
Step 5: Set Stratagy ES Parameter
1. From eManager, click Advanced Configuration > System > VM Parameters.
2. Set Stratagy ES sys_voicemail_pilot_number parameter to the pilot number of the Voice Mail
Hunt group. See “sys_voicemail_pilot_number” on page 3-46 for more detailed information.
3. Set Stratagy ES sys_line_begin to the first voice mail port (should always be Port 1). Example:
If installing four port voice mail system, set this to 1.
4. Set Stratagy ES sys_line_end to be the last voice mail port to be used. Example: If installing a
four port voice mail system, this should be set to 4.
Step 6: Test Integration
After the integration has been enabled in voice mail and the CIX, initial testing can be done by
making test calls into voice mail. Program a Mailbox Number with default options. Use the default
System Greeting and default System Busy greetings for the mailbox.
1. Make a call into voice mail from an extension that is the same number as the Mailbox Number.
Voice mail should answer “Please enter your security code.”
Note If the system plays the Company Greeting, then the link is not working. Recheck the
installation.
2. Call forward a telephone All Calls. The System or Personal Greeting for the mailbox plays.
Note If the system plays the Company Greeting, then the link is not working. Recheck the
installation.
3. From another extension, call the forwarded telephone.
4. Call forward a telephone for Busy. Make the extension busy, then call the busy extension from
another telephone. The System Busy or Custom Greeting plays.
Note If the system plays the Company Greeting, then the link is not working. Recheck the
installation.

Advanced Integrations and Applications
AMIS Networking
Strata CIX Voice Mail Programming 01/07 10-5
Advanced Integrations
and Applications
5. If Steps 1, 2 and 3 were successful, make another call from an internal extension (that has a
mailbox number assigned on the system) to the forwarded extension, and leave a message.
6. Log on to the mailbox number that has the message. Play the message.
The header information for the message should include the mailbox number of the extension
that left the message.
If these tests are successful, the integration is working properly.
AMIS Networking
(AMIS) is the analog networking protocol that enables voice mail to pass voice messages to any
remote voice mail system that supports the AMIS protocol.
This section discusses the following:
•AMIS User Agents
•AMIS node
•Destination System Number
•Configuring voice mail for AMIS
•Testing AMIS
•AMIS operation
AMIS User Agents
Voice mail implements AMIS by using two specific User Agents – Gateway and Proxy – that
contain information and direction about a remote voice mail system or node (see Figure 10-25 and
Table on page 10-7). The node identifies itself to voice mail by a local telephone number (i.e.,
Destination System Number) that is sent to the receiving voice mail system during the transmission
process.
Remote User Agents, whether represented by Proxy User Agents or through Gateway User Agents,
can be members of distribution groups.
Messages are forwarded to, or received from, the remote locations via the Gateway or Proxy User
Agents. The Gateway and Proxy User Agents must be programmed for AMIS networking to operate
properly and involves defining the Edit AMIS Gateway/Proxy User Agent screen. Voice mail
processes the notification information in order to perform AMIS out-dialing and access the AMIS
network.
Gateway User Agents
Each system in the AMIS network must have a unique address called a node. The only requirements
for a node number is that it be one~eight digits long and be unique. For example, the voice mail
system’s Gateway User Agent might address the Dallas office as node “40,” while the voice mail
at Los Angeles might be “33.”
To send a message to another voice mail system user using a Gateway User Agent, you must enter
the voice mail system’s node number plus the addressee’s User Agent number.
For example, when a user in the Dallas office (node 40) sends a message to User Agent 200 in Los
Angeles (node 33), the destination address is: “33200.” Once the message is addressed and sent, the
local voice mail system (node 40) does the following:
1. Accesses its Gateway User Agent (node 40) and uses the information stored there to contact the
remote voice mail system (node 33).
2. Provides some handshake signals requesting User Agent 200.
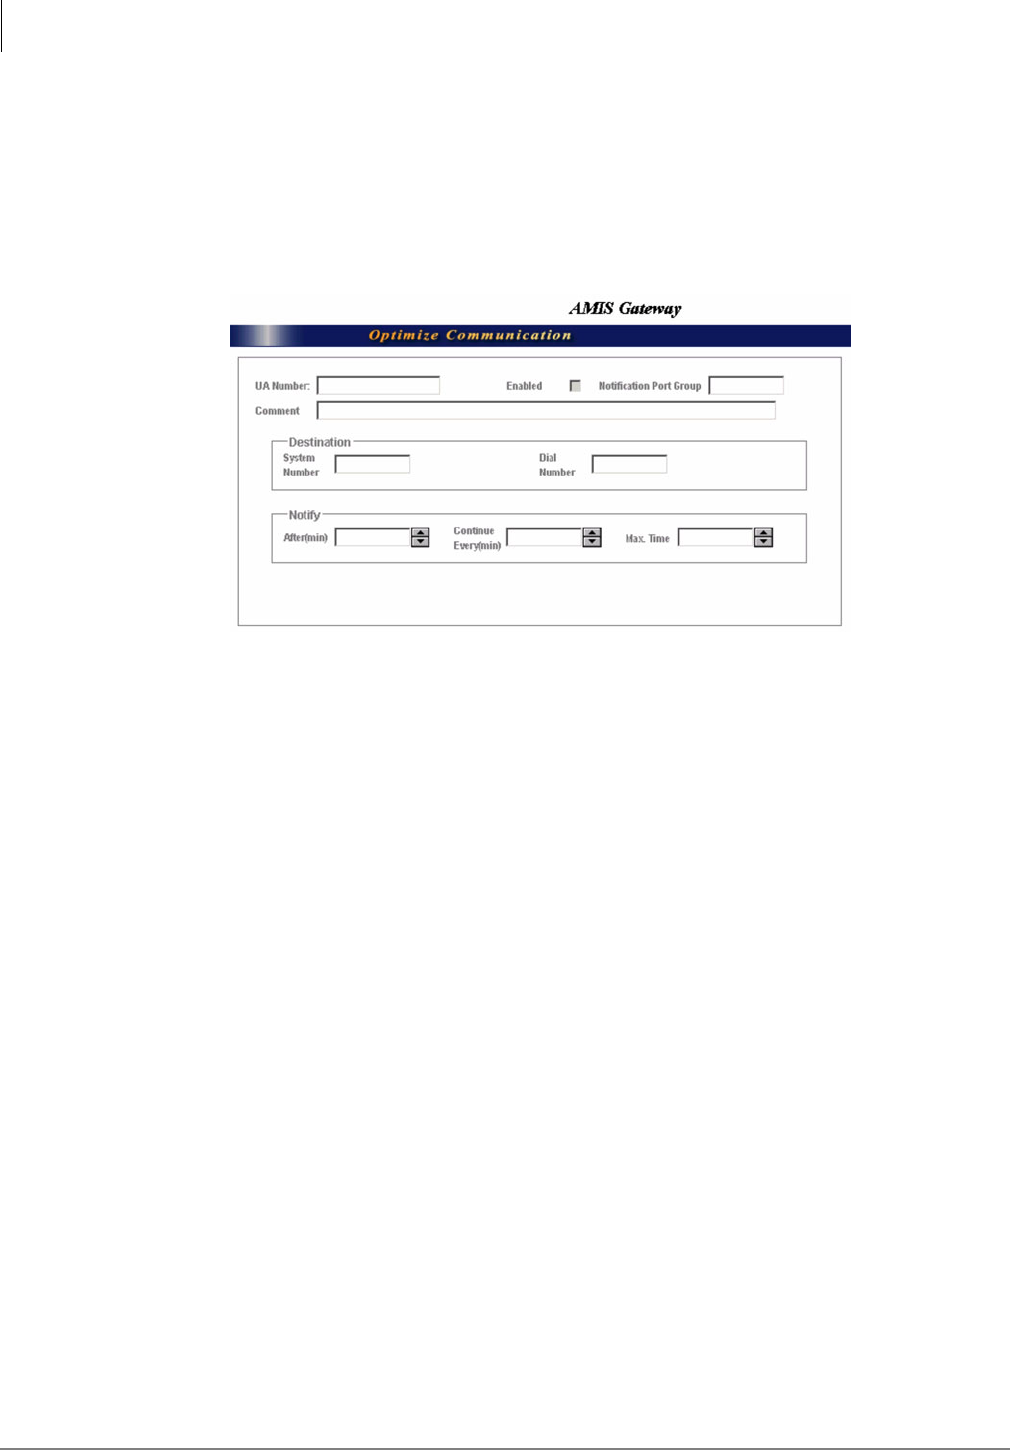
Advanced Integrations and Applications
AMIS Networking
10-6 Strata CIX Voice Mail Programming 01/07
3. Audibly transmits the message.
The remote system (node 33) receives the message and stores it in User Agent 200.
An exception occurs if the 33200 destination address also exists on the local voice mail system. The
user must follow the node number with “*” (e.g., 33*200) when entering the destination. This flags
the message as an AMIS message and the voice mail system delivers the message to Gateway User
Agent 33 at Los Angeles instead of Dallas mailbox 33200.
Figure 10-25AMIS GatewayScreens
Proxy User Agents
The Proxy User Agent represents a specific User Agent on a remote node and resides on the local
voice mail system. A voice mail user addresses a message to a Proxy User Agent in the same
manner as he/she would a local user. Once the message is addressed and sent, the Proxy User Agent
initiates the AMIS transfer. This gives the appearance to the local user that the remote user is part
of the local system.
For example, assume 2300 is an address on a voice mail system in Dallas. The same number also
resides as a Proxy User Agent on the local voice mail. When messages are left for Proxy address
2300 on voice mail, the system uses the information stored there to contact the Dallas voice mail
system, provides some handshake signals requesting address 2300, then audibly transmits the
message. The Dallas voice mail system would receive the message and store it in address 2300.
Important! It is not necessary for the remote address to match the Proxy User Agent number in
voice mail.
7308
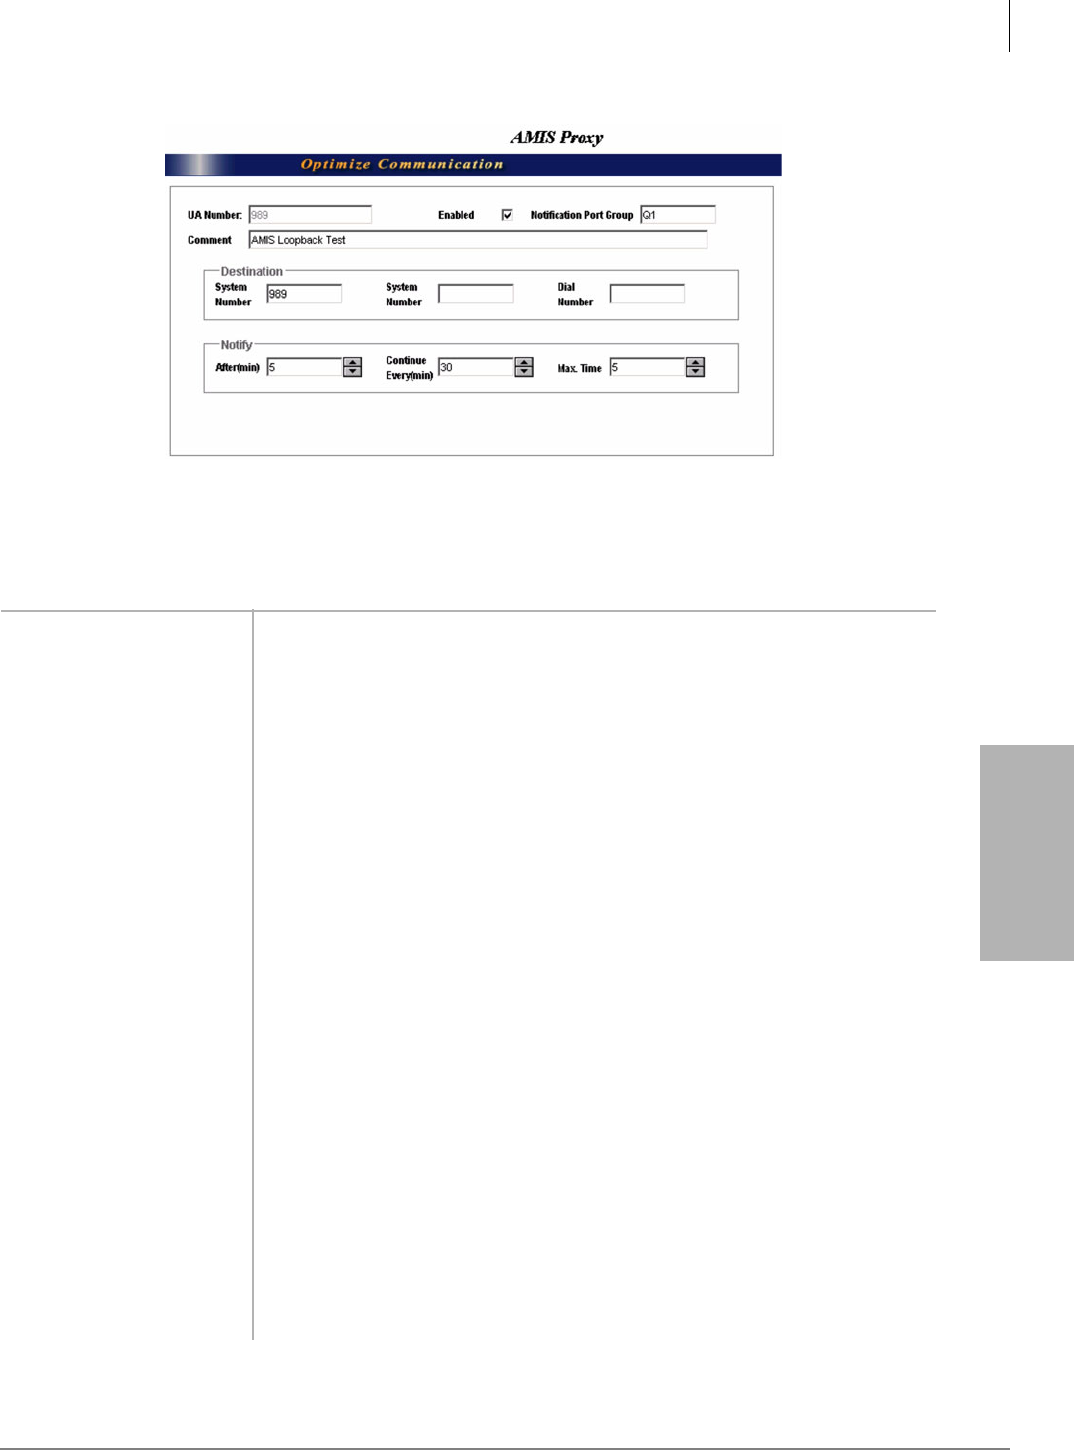
Advanced Integrations and Applications
AMIS Networking
Strata CIX Voice Mail Programming 01/07 10-7
Advanced Integrations
and Applications
Figure 10-26AMIS ProxyScreens
Table 10-1 Edit AMIS Gateway and AMIS Proxy Screen Fields
FIELD DESCRIPTION
UA Number (Display Only) User Agent Number. This field is filled in automatically by voice mail
when you create an AMIS User Agent.
Comment Notation, reminder, or name of remote node. Default is a blank field.
Enabled Enable or disable the current Gateway/Proxy User Agent by checking/unchecking
the box.
Default: Enabled
Destination System
Number
Telephone number remote node uses as identification. The format (including #
signs): 1#area code#telephone number#.
Example: 1#714#5551212#
Destination Dial Number The telephone number including the area code and any special digits (e.g., 9) for
dialing out.
Example: 917144833777
Destination Mailbox The mailbox on the remote system which an AMIS Proxy User Agent represents.
This number does not have to be the same as the Proxy User Agent that supports it.
Default: blank
Notification Port Group Select a Notification Port Group from the drop-down menu.
Note Notification port groups are added using the Notification Port Groups option
(see “Notification Groups” on page 3-18 ).
Possible values: Any available notification port group within the system.
Default: Q1
Notify After (min) Number of minutes after the message has been sent to the Gateway/Proxy User
Agent that voice mail should attempt to contact the remote node.
Default: 0 (Gateway), 5 (Proxy)
7309

Advanced Integrations and Applications
AMIS Networking
10-8 Strata CIX Voice Mail Programming 01/07
AMIS Node
An AMIS node is a voice mail system in an AMIS network. Each node in the network is identified
in two ways. First, there is a unique node number (the Gateway’s User Agent’s number) that must
be used as part of the message address when sending, forwarding or replying to a message. Second,
the nodes use the Destination System Number, which is part of the AMIS protocol, to identify
themselves to each other during AMIS connections.
Continue Every (min) Number of minutes between each retry attempt to contact the remote node.
Default: 1 (Gateway), 30 (Proxy)
Notify Max Time Number of times Stratagy should attempt to contact the remote node.
Default: 5
Table 10-1 Edit AMIS Gateway and AMIS Proxy Screen Fields (continued)
FIELD DESCRIPTION
Advanced Integrations and Applications
AMIS Networking
Strata CIX Voice Mail Programming 01/07 10-9
Advanced Integrations
and Applications
Destination System Number
The Destination System Number consists of a country code (the digit “1” in North America), area
code, and seven-digit phone number. This number not only identifies the calling system, but can
also be used by the administrator to configure the local system to enable message replies.
Configuring Voice Mail for AMIS
There are two steps to configuring voice mail to act as an AMIS node:
1. Set the voice mail AMIS system parameters.
2. Create Gateway User Agents for each remote system with which voice mail communicates and
Proxy User Agents for each remote user that wishes to have a local address.
Step 1: Set AMIS Parameters
For AMIS to operate correctly, you must check the AMIS configuration parameter settings in the
voice mail system and modify their settings appropriately. See “Modify Parameters” on page 3-30
for instructions on modifying the settings for the AMIS parameters shown in Table .
Table 10-2 AMIS Parameters
Parameter Description
sys_amis_area_code Area code of the resident voice mail system. Single quotes are required.
Default: blank comment line
sys_amis_country_code Country code of the resident voice mail system. Single quotes are required.
Default: comment line starting with 1 for North America.
sys_amis_disk_full Percentage of the hard drive that must be free in order for voice mail to
accept new AMIS messages. If free space is less than this figure, voice mail
tells the calling AMIS system that the hard drive is full.
Default: 5 (percent)
sys_amis_enabled Whether voice mail processes incoming AMIS calls.
Possible values:
True: Voice mail processes incoming AMIS calls.
False: (default) AMIS calls told that this node is not accepting network
calls.
sys_amis_failure_retry Number of retries after failure.
Possible values: 0~9 (default = 3)
sys_amis_loopback_enable Enables the AMIS loopback test feature.
Possible values:
True: (default) enables feature
False: disables feature
sys_amis_ltm User Agent number to use for the AMIS Loopback mailbox. User Agent other
AMIS nodes can use for testing the network. Any AMIS message to this User
Agent is sent back to the sender, if accessible from this voice mail system.
Possible values: valid User Agent number.
Default: 989
sys_amis_max_msg Maximum number of messages the AMIS system can receive.
Default: 1000
Advanced Integrations and Applications
AMIS Networking
10-10 Strata CIX Voice Mail Programming 01/07
Step 2: Create/Modify AMIS Gateway and/or Proxy User Agents
1. From the eManager screen, click Advanced Configuration > Voice Mail > AMIS Gateway or
AMIS Proxy. The appropriate screen displays.
2. Click Create. The Create User Agent screen displays.
3. From the Create screen, enter a single User Agent number (e.g., 881), a range of numbers (e.g.,
800-804) or a combination of both separated by commas (e.g., 800-802, 881, 888).
Note The number you enter must be unique. If the number already exists, Voice Mail
Administration indicates that the User Agent could not be created.
4. Click OK. The Creating dialog box displays while the program creates the User Agents. When
the process is complete, the screen indicates whether the creation of the User Agent(s) was
successful.
5. Click Exit. The AMIS Gateway or AMIS Proxy screen displays (see Figure 10-25 on page
10-6).
6. Highlight the User Agent number in the list to the right of the screen. The user agent is
displayed on the active screen.
7. (Optional) Click Comment field and type in a comment.
Note Comment should consist of GATEWAY or PROXY USER AGENT and any other
identifying information.
8. Check “Enabled” box on the screen.
9. In the Destination System Number field, type the Destination System Number.
sys_amis_max_node Maximum number of remote nodes (Gateway and Proxy User Agents) that
can be in the network. If the actual number exceeds this value, some nodes
are inaccessible.
Possible values: 1~256 (default = 255)
sys_amis_rna Enables the ring no answer time-out to be increased to allow for slow
answers from AMIS systems.
Possible values: 1~10 (default = 4)
sys_amis_telephone_number Local telephone number of the resident voice mail system. Single quotes are
required.
Default: blank comment line
sys_amis_unknown_node_action Whether voice mail accepts messages from unknown AMIS nodes.
Possible values:
1: Refuses to accept messages.
2: (default) Delivers this message even though replies are impossible.
sys_local_amis_node Gateway User Agent number that represents the local AMIS node.
Messages addressed to this node are delivered directly to the real local box
number instead of being shipped out on the network.
Possible values: valid User Agent number.
Default: blank comment line
Table 10-2 AMIS Parameters (continued)
Parameter Description

Advanced Integrations and Applications
AMIS Networking
Strata CIX Voice Mail Programming 01/07 10-11
Advanced Integrations
and Applications
Note The Destination System Number is the telephone number the remote node uses as
identification. The format (including # signs): 1#area code#telephone number#.
Example1#714#5551212#
10.In the Destination Dial Number field, type the telephone number including the area code and
any special digits (e.g., 9) for dialing out. Example: 917145833777
11. (For AMIS Proxy User Agent only) In the Destination Mailbox field, accept the default or type
in a different User Agent. Default is User Agent 998.
12. In the Notification Port Group field, accept the default or type in a different port group. Default
is Q1.
Note See Chapter 3 – Voice Mail Configuration for instructions on creating Notification Port
Groups.
13. Using the spin button, set the Notify After(min), Continue Every(min) and Notify Max Time
fields.
14. Click Submit. The data is saved.
15. Repeat Substeps 6~14 above for any other agents you created.
Testing AMIS
One method of testing AMIS involves using the AMIS Loopback User Agent (default 989). Once
enabled using the sys_amis_ltm parameter, this User Agent can be used by other AMIS nodes for
testing the network. Voice mail sends any AMIS message to this User Agent back to the sender,
assuming the sending system is accessible from the voice mail system.
A line monitor can be used to analyze AMIS transmissions. However, to validate AMIS completely,
an in-depth knowledge of AMIS Analog Protocol is required.
AMIS Operation
Note AMIS messages can only be sent from mailboxes.
AMIS networking operation consists of the following steps:
Send Message Over AMIS Network
1. The user logs into his/her mailbox.
2. From the Main Menu, the user presses 2 for the Send Messages menu.
3. The user specifies the destination address as one of the following:
•node + mailbox number – if the address is a unique combination of the Gateway mailbox
and destination mailbox.
•node + * + mailbox number – if the address is not a unique combination of the Gateway
mailbox and destination mailbox.
•Proxy User Agent number – if addressing the message to a Proxy User Agent.
where:
NODE = up to eight digits
remote address = up to 16 digits
4. The user records the message and presses # to stop recording.
5. The user presses # again to send the message to the specified node.

Advanced Integrations and Applications
AMIS Networking
10-12 Strata CIX Voice Mail Programming 01/07
Once the message has been sent, voice mail dials the remote Destination System Number. The
message is placed in the remote mailbox and the user is returned to the Main Menu. If the
transmission fails, voice mail retries up to nine times before returning the message back to the user
for one of the following reasons:
•Remote node does not answer
•Remote node is busy
•Message is too long
•Node’s phone number is incorrect
•Mailbox number does not exist
•Mailbox not accepting messages
•Mailbox is full
•Protocol error
Private/Urgent Message Handling
Because AMIS does not support Special Delivery Options, the voice mail proprietary options such
as “private” or “urgent” are striped off when the message is sent via AMIS. These messages at the
receiving mailbox are handled as normal messages.
However by using the Notify record, voice mail can use the “urgent” option to determine the timing
of the AMIS transmission. For example, normal messages can be delivered after 5:00 p.m. and the
urgent messages immediately.
Notification
Each remote node is represented by a Gateway mailbox in the local node. The node number is the
mailbox number. When a message is addressed to a remote node, it is placed in the Gateway
mailbox, with information in its header that identifies the remote box number, and the fact that it is
an AMIS-deliverable message.
A notify task is started to deliver messages to the remote site. There can be several notification tasks
for a Gateway mailbox. For each notification task, a maximum of nine messages can be transmitted.
The number of messages that can be stored in the Gateway mailbox is set by the system maximum.
If a notify task was started as the result of an urgent message being placed in the Gateway mailbox,
it is only allowed to deliver the urgent message to the remote node. The urgent status is stripped
from the message when it is sent.

Advanced Integrations and Applications
VPIM Networking
Strata CIX Voice Mail Programming 01/07 10-13
Advanced Integrations
and Applications
AMIS User Agent Reports
A customized report (Figure 10-27) can be run using a template (see “Reports” on page 12-2 for
instructions).
Figure 10-27 AMIS User Agent Report with Sample Data
VPIM Networking
VPIM is an industry standard protocol that facilitates server-to-server message exchange between
voice processing systems from different manufacturers. VPIM can exchange both voice messages
as long as they are of the format dictated by the VPIM standard.
VPIM User Agents
Voice mail implements VPIM by using two specific User Agents – Gateway and Proxy – that
contain information and direction about a remote voice mail system or node (see Figure 10-28 and
Table 10-1 on page 10-14). The node identifies itself to voice mail by a local telephone number (i.e.,
Destination System Number) that is sent to the receiving voice mail system during the transmission
process.
Figure 10-28VPIM Gateway Screens
7238
7310
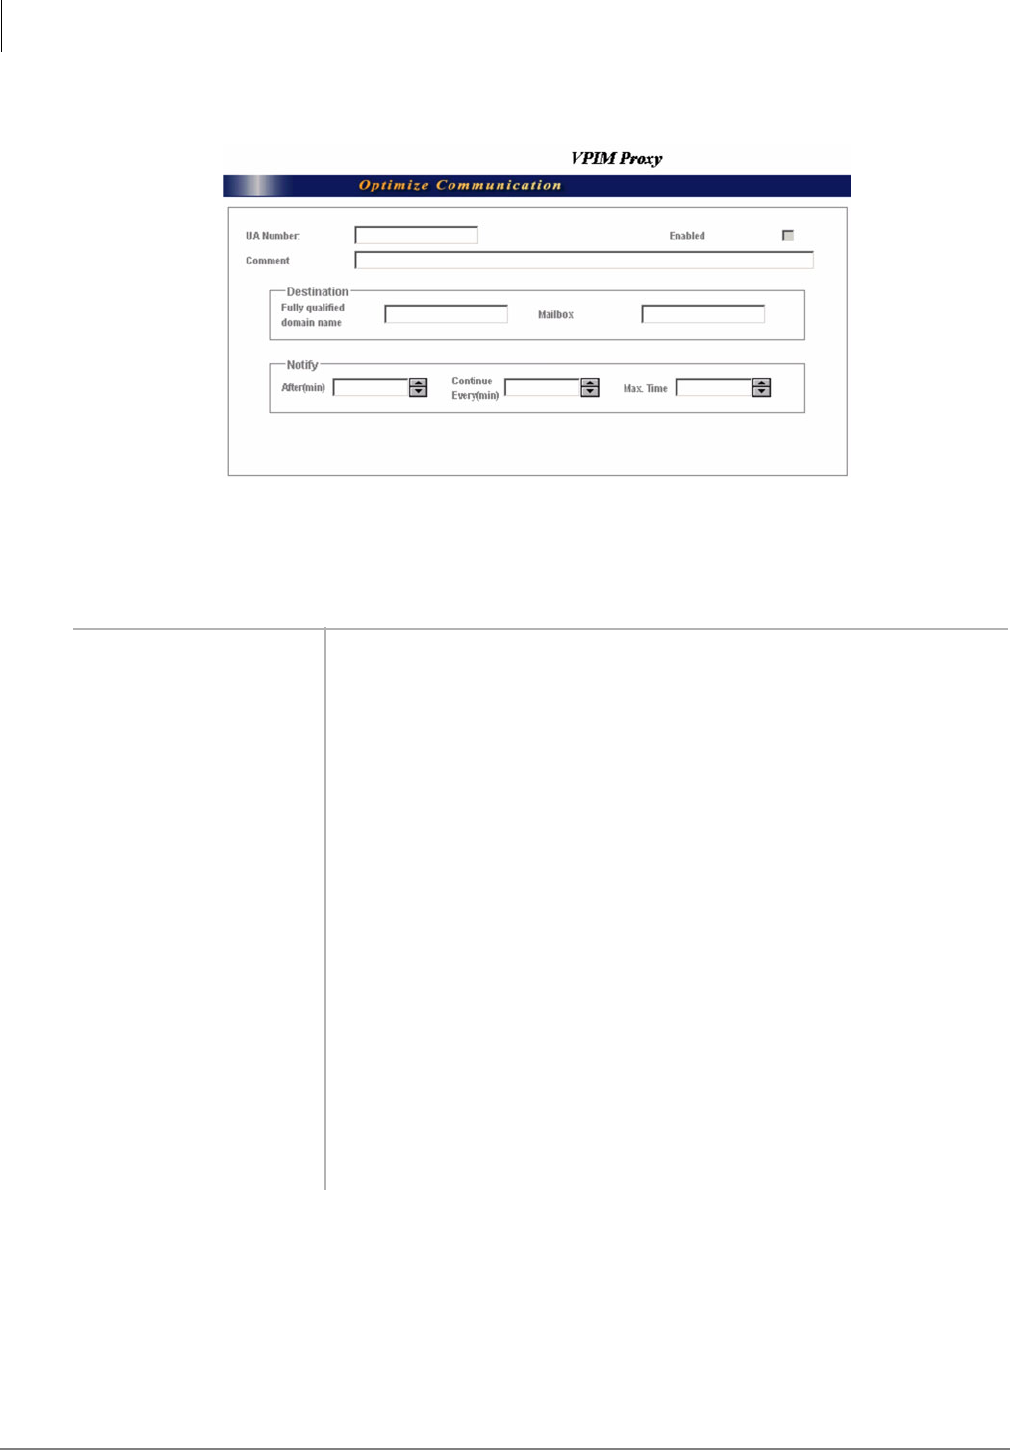
Advanced Integrations and Applications
VPIM Networking
10-14 Strata CIX Voice Mail Programming 01/07
Figure 10-29VPIM Proxy Screens
Table 10-1 Edit VPIM Gateway and VPIM Proxy Screen Fields
FIELD DESCRIPTION
UA (Display Only) User Agent Number. This field is filled in automatically by voice mail
when you create a VPIM User Agent.
Comment Notation, reminder, or name of remote node. Default is a blank field.
Enabled Enable or disable the current Gateway/Proxy User Agent by checking the box.
Default: Enabled
Destination’s fully qualified
domain name
The Fully Qualified Domain Name of the remote VPIM mail server
(i.e., stratagyes.tais.toshiba.com).
Destination Mailbox The mailbox on the remote system which a VPIM Proxy User Agent represents. This
number does not have to be the same as the Proxy User Agent that supports it.
Default: blank
Notify After (min) Number of minutes after the message has been sent to the Gateway User Agent
that voice mail should attempt to contact the remote node.
Default: 0
Continue Every (min) Number of minutes between each retry attempt to contact the remote node.
Default: 1
Notify Max Time Number of times Stratagy should attempt to contact the remote node.
Default: 5
7236

Advanced Integrations and Applications
VPIM Networking
Strata CIX Voice Mail Programming 01/07 10-15
Advanced Integrations
and Applications
Step 1: Set VPIM Parameter
For VPIM to operate correctly, you must enable the VPIM configuration parameter setting,
sys_vpim_enabled, in the voice mail system. See “Modify Parameters” on page 3-30 for
instructions on modifying the setting for the VPIM parameter.
Important! If both the “local” and “remote” systems are Stratagy ES, you must have the
sys_vpim_enabled parameter set to 1 for enable.
Step 2: Create/Modify VPIM Gateway and/or Proxy User Agents
1. From the eManager screen, click Advanced Configuration > Voice Mail > VPIM Gateway or
VPIM Proxy. The appropriate screen displays.
2. Click Create. The Create User Agent screen displays.
3. From the Create screen, enter a single User Agent number (e.g., 881), a range of numbers (e.g.,
800-804) or a combination of both separated by commas (e.g., 800-802, 881, 888).
Note The number you enter must be unique. If the number already exists, Voice Mail
Administration indicates that the User Agent could not be created.
4. Click OK. The Creating dialog box displays while the program creates the User Agents. When
the process is complete, the screen indicates whether the creation of the User Agent(s) was
successful.
5. Click Exit. The VPIM Gateway or VPIM Proxy screen displays (see Figure 10-28 on page
10-13).
6. Highlight the User Agent number in the list to the right of the screen. The user agent is
displayed on the active screen.
7. (Optional) Click Comment field and type in a comment.
Note Comment should consist of GATEWAY or PROXY USER AGENT and any other
identifying information.
8. Check “Enabled” box on the screen.
9. In the Destination’s fully qualified domain name field, type the destination.
10. (For VPIM Proxy User Agent only) In the Destination Mailbox field, type in a different User
Agent.
11. Using the spin button, set the Notify After(min), Continue Every(min) and Notify Max Time
fields.
12. Click Update. The data is saved. The Edit VPIM User Agent screen closes.
13. Repeat Substeps 6~12 above for any other agents you created.

Advanced Integrations and Applications
VPIM Networking
10-16 Strata CIX Voice Mail Programming 01/07
VPIM Operation
Note VPIM messages can only be sent from mailboxes.
VPIM networking operation consists of the following steps:
Send VPIM Message Using Proxy Mailbox
1. The user logs into his/her mailbox.
2. From the Main Menu, the user presses 2 for the Send Messages menu.
3. The user enters the Proxy User Agent number as the destination address.
4. The user records the message and presses # to stop recording.
5. The user presses # again to send the message to the specified UA. The message is sent out as an
e-mail through the Internet and saved in the mailbox designated in the Destination Mailbox
field of the VPIM Proxy User Agent.
Send VPIM Message Using Gateway Mailbox
1. The user logs into his/her mailbox.
2. From the Main Menu, the user presses 2 for the Send Messages menu.
3. The user enters the Gateway User Agent number + the mailbox number at the remote server as
the destination address.
4. The user records the message and presses # to stop recording.
5. The user presses # again to send the message to the specified UA. The message is sent out as an
e-mail through the Internet and saved in the designated mailbox at the remote server.

Strata CIX Voice Mail Programming 01/07 11-1
Token Programming
Token Programming 11
Stratagy ES’s Token Programming Language consists of commands, or tokens, that instruct
Stratagy ES what actions to perform. The tokens that are generally used are simple and perform
standard expected actions such as dialing an extension.
The Token Programming Language gives the system versatility. Its capabilities include, but are not
limited to:
•Confirming digits entered by a caller
•Relaying messages to digital pagers
•Controlling message waiting lights
•Simple database searches
The Token Programming Language uses three types of tokens: singular, defined, and replaced. For
a detailed description of each token, see Tables 11-1~11-3.
Using the Token Programming Language
The Token Programming Language may be used in the following Mailbox Editor Menu’s
screens/fields:
Users Mode Screen’s Extension Field
Typically the Users Mode screen’s Extension field contains the actual telephone station/extension
number for the corresponding mailbox. It may contain tokens. Or, it may be empty.
Auto Screen’s Extension Field
The default value for the Auto record’s Extension field is the value in the User Mode screen’s
Extension field. However, it may contain tokens. When the Auto record is active, voice mail uses
this Extension field rather than the Users Mode screen’s Extension field.
Notify’s Template Editor Parameter Field
Programmers who wish to use Tokens to perform custom notifications must create a new template.
In the Add Template screen, the Token programming can be entered in the Parameter field.
To program the Extension or Parameter fields, enter a series of commands, or tokens, that instruct
voice mail what actions to perform. A field would, therefore, contain TokenTokenToken...Token,
where Token defines how to perform the actions.

Token Programming
Singular Tokens
11-2 Strata CIX Voice Mail Programming 01/07
Singular Tokens
Singular Tokens are single character commands that perform a single action that cannot be
modified. For example, the token 1 performs the action of playing DTMF 1.
Important! All tokens must be capitalized. Tokens entered in lower case are ignored.
Table 11-1 Singular Tokens
Token Syntax Description
@@
Suppress normal process–prevents Stratagy ES from normally processing an
Extension field.
©Normally when Stratagy ES evaluates an Extension field, Stratagy ES plays the
“Please hold...” prompt to the caller, puts the caller on transfer hold, and then
evaluates the tokens in the field. If the first character in the field is the @ token,
however, Stratagy ES immediately begins processing the next token without
performing the transfer procedure.
11Plays DTMF tone 1.
22Plays DTMF tone 2.
33Plays DTMF tone 3.
44Plays DTMF tone 4.
55Plays DTMF tone 5.
66Plays DTMF tone 6.
77Plays DTMF tone 7.
88Plays DTMF tone 8.
99Plays DTMF tone 9.
00Plays DTMF tone 0.
**Plays DTMF tone *.
##Plays DTMF tone #.
AAPlays DTMF tone A.
BBPlays DTMF tone B.
CCPlays DTMF tone C.
DDPlays DTMF tone D.
- (dash) -Short pause–pauses 0.5 (one-half) second
, (comma) ,Long pause–pauses two seconds
EEEarth recall–performs an earth recall. This is used in place of the hookflash (the F
token) on some switches.
FF
Hookflash–performs a hookflash. The length of the hookflash specified under the
Telephone System Dial Codes option # Number of 1/100 seconds to use for flash time.
(See Chapter 3 — Voice Mail Configuration.)
HH
Go on hook–immediately hangs up. If entered after an extension number, performs
an immediate hang-up without waiting for system tone cadences. This is called a Blind
Transfer.
Token Programming
Singular Tokens
Strata CIX Voice Mail Programming 01/07 11-3
Token Programming
UU
Return to transferring mailbox if Extension field number busy–if entered after a
number in the Extension field, performs a partially supervised transfer. If ringing is
returned, the system hangs up for a blind transfer. If busy is returned, the Stratagy ES
retrieves the call to be processed by the transferring mailbox.
XX
Remember event–message waiting light control–creates the file LIGHT.ON in the
mailbox’s directory. Used with the Y and Z tokens to control Stratagy ES’s processing
of tokens, particularly in situations where Stratagy ES should perform an action once
regardless of the number of times the tokens are attempted.
A message waiting light that uses the same codes to turn on the light as it does to turn
off the light; i.e., a toggle.
YY
Forget event — message waiting light control–deletes the LIGHT.ON file in the
mailbox’s directory.
A message waiting light that uses a different code to turn off the light than to turn on
the light.
ZZ
Test event — message waiting light control–tests for the existence of the LIGHT.ON
file in the mailbox’s directory. If the file is there, immediately stops processing the rest
of the tokens for this mailbox.
Table 11-1 Singular Tokens (continued)
Token Syntax Description

Token Programming
Replaced or Variable Tokens
11-4 Strata CIX Voice Mail Programming 01/07
Replaced or Variable Tokens
Replaced or Variable Tokens are specified with a preceding % sign and cause Stratagy ES to replace
the token given with the value associated with the token. For example, The token %M would be
replaced with the current number of messages for the current mailbox being accessed.
Important! All tokens must be capitalized. Tokens entered in lower case are ignored.
Table 11-2 Replaced Tokens
Token Description
%% Substitute a %.
%C
Replaces with the current port number.
Syntax %C
%D
Hard drive space remaining–replaces itself with the value that represents the percent of free hard
drive space at the time it is used.
Syntax %D
Example P(%D,N)
Says (plays) the percentage of free hard drive space as a number.
%E
Extension field–replaces with the contents of the current mailbox’s Extension field.
Syntax %E
%F
Mailbox’s Directory Name 1, Directory Name 2, or Comment field–replaces with the contents of the
Users Mode Options screen’s Directory Name 1, Directory Name 2, or Comment field for the mailbox.
Syntax %F(n[,uid])
where:
n Number representing one of the following Users Menu fields.
1Directory Name 1
2Directory Name 2
3Comment
uid Valid mailbox. Defaults to current mailbox if not specified.
Example %F(3)
Replaces with the contents of the Users Mode Options screen’s Comment field for the current
mailbox.
%K
Value held in the Calling Party ID buffer.
Syntax %K
%M
Number of messages–replaces with the total number of messages for the current mailbox.
Syntax %M
%N
Number of new messages–replaces with the number of new messages for the current mailbox.
Syntax %N

Token Programming
Replaced or Variable Tokens
Strata CIX Voice Mail Programming 01/07 11-5
Token Programming
%P
Previously accessed mailbox–replaces with the mailbox previously accessed
Syntax %P
Example
If while accessing Mailbox 100 a caller enters 222, then while Mailbox 222 is accessed %P has the
value 100.
%R
Relay page DTMF–replaces with the DTMF digits entered by the caller who invoked RELAY paging
notification. Used mostly for sending a telephone number directly to a User’s pager/beeper from his
mailbox.
Syntax %R
%S0~%S19
Store value–Stratagy ES has twenty storage tokens (variables) that enable you to input, modify,
retrieve, and output values. Upon each new call, all the variables are initialized to null (no defined
value).
%S0 storage token 0 %S10 storage token 10
%S1 storage token 1 %S11 storage token 11
%S2 storage token 2 %S12 storage token 12
%S3 storage token 3 %S13 storage token 13
%S4 storage token 4 %S14 storage token 14
%S5 storage token 5 %S15 storage token 15
%S6 storage token 6 %S16 storage token 16
%S7 storage token 7 %S17 storage token 17
%S8 storage token 8 %S18 storage token 18
%S9 storage token 9 %S19 storage token 19
Each port has a unique set of twenty %S tokens which do not conflict. Therefore, two different ports
may use the same %S token without disrupting each other’s value.
Syntax %S0,%S1,%S2,%S3,%S4,%S5,%S6,%S7,%S8,%S9,%S10,%S11,%S12,
%S13,%S14,%S15,%S16,%S17,%S18,%S19
%T
Connect time–replaces with the current connect time, i.e., the total number of seconds that the port/
call has been active.
Syntax %T
%U
Mailbox–replaces with the current mailbox number.
Syntax %U
%V
Variable–replaces with the value of the current Notify record’s Variable field. Useful for defining
notification templates for mailboxes that perform the same type of notification with a difference only in
the telephone number that Stratagy ES should dial, e.g., pager/beeper telephone numbers.
Syntax %V
%W
Current day of the week–replaces with the current day of the week, where:
1 Sunday5 Thursday
2 Monday6 Friday
3 Tuesday7 Saturday
4 Wednesday
Syntax %W
Table 11-2 Replaced Tokens (continued)
Token Description

Token Programming
Replaced or Variable Tokens
11-6 Strata CIX Voice Mail Programming 01/07
%X
Transfer hold codes–replaces with the value of the Telephone System Dial Codes that puts a caller
on transfer hold (# Dial code to put a caller on transfer hold). See Chapter 4 — Voice Processing.
Syntax %X
%Y
Current date–replaces with the current date (mmddyyyy). This is the same format used in the P( )
token for dates.
Syntax %Y
Example P(%Y,D)
Says the current date: month, day, year.
%Z
Current time–replaces with the current time in 24-hour format (hhmm). This is the same format used
in the P( ) token for time.
Syntax %Z
Example P(%Z,T)
Says the current time in 24-hour format: hours, minutes.
LEN[ ]
Length–replaces with the total number of characters in the %Sn variable.
Syntax LEN[%Sn]
where:
%Sn One of the %S storage variables (range: 0~19).
Example P(LEN[%S1],N)
Says the number of characters in %S1 as a number.
Table 11-2 Replaced Tokens (continued)
Token Description

Token Programming
Defined Tokens
Strata CIX Voice Mail Programming 01/07 11-7
Token Programming
Defined Tokens
Defined Tokens are expressed with left and right parentheses surrounding one or more definitions
that determine how the token should work. For example, the Goto token G( ) only takes one
definition. Stratagy ES immediately “goes to” the mailbox specified for processing. For G(123),
Stratagy ES continues processing at Mailbox 123.
Strings that contain a space, comma or quotes, must be enclosed with quotes (e.g., “9,%S1”) or
Stratagy ES may misread the token.
Important! All tokens must be capitalized. Tokens entered in lower case are ignored.
Table 11-3 Defined Tokens
Token Description
G( )
Go to mailbox–immediately continues processing at the mailbox specified. Stratagy ES continues
standard processing at the mailbox per the mailbox processing diagram.
Syntax G(uid)
where:
uid mailbox
Example G(299)
Goes to Mailbox 299.
H( )
Hang-up process–defines the specified uid as the uid that Stratagy ES processes when it detects a
hang-up condition. This is useful for performing cleanup and/or exit routines when a caller hangs up.
Syntax H(uid)
where:
uid Valid mailbox
I( ) If conditional–if the relationship between the first string and the second string is true, then continue
processing at the mailbox specified by uid. Otherwise, processing continues with the next token.
Syntax I(string,relationship,string,uid)
where:
string Any quoted set of characters, numbers, and/or variables.
relationship Either >, <.=,! which test for greater than, less than, equal, or not equal.
uid Valid mailbox. Can be a variable.
Examples
I("111",<,"222",1000)
Immediately continues processing at Mailbox 1000.
I("111",>,"222",1000)
Does not continue processing at Mailbox 1000 and instead continues with the next token.
I("%S1",=,"1234",2000)
Continues processing at Mailbox 2000 only if %S1 has the value 1234.
I("%S1",=,"SPANISH",2000)
Continues processing at Mailbox 2000 only if %S1 = SPANISH.

Token Programming
Defined Tokens
11-8 Strata CIX Voice Mail Programming 01/07
J( )
Receive fax–the J( ) token enables you to receive faxes as mailbox messages, to store the fax as a
file to be used for Fax Back or Fax on Demand and for later transmission with the T( ) token.
See Chapter 5 — Fax Server for details about fax programming.
Note This token is not currently supported.
Syntax J(file)
J(boxID)
where:
file File name where you want the fax stored.
boxID Mailbox number where the received fax is stored as a message.
KB( )
Plays a tone on the channel.
Syntax KB(freq,ms)
where:
freq Frequency of the tone.
ms Duration (in milliseconds) of the tone.
KC( )
Compare security code–the KC( ) token compares value of sec to the security code for the mailbox.
If equal, processing continues with the next token. Otherwise, processing proceeds to the value
defined in the Done chain.
Syntax KC(uid,sec)
where:
uid Valid mailbox. Can be a variable.
sec Value to be compared with the security code. Can be a variable.
Example KC(375,23456)
Compares 23456 with the value of Mailbox 375’s security code. If equal, processes the next token.
Otherwise, proceeds to the value defined in the Done chain.
KD( )
Delete mailbox message–deletes the message in the specified message queue from the mailbox.
Syntax KD(msg,msgq[,uid])
where:
msg Message number. Can be a variable.
msgq Message queue. Can be a variable.
U Urgent Message Queue
N New Message Queue
S Saved Message Queue
uid Valid mailbox. Can be a variable. Defaults to current mailbox if not specified.
Example KD(2,U)
Deletes message number 2 in the Urgent Message Queue for the current mailbox.
Table 11-3 Defined Tokens (continued)
Token Description

Token Programming
Defined Tokens
Strata CIX Voice Mail Programming 01/07 11-9
Token Programming
KI( )
Position of substring in string–the KI( ) token searches string for the first occurrence of substring.
The result of the search is the position of the substring within the string, and it is stored as the
variable.
Syntax KI(substring,string,%Sn)
where:
substring Any alphanumeric substring. Can be a variable.
string Any alphanumeric string. Can be a variable.
%Sn One of the %S storage variables (range: 0~19).
Example KI(”d”,”abcdefg”,%S0)
Searches string “abcdefg” for the first occurrence of substring “d,” and places the value of the position
of the substring within the string in storage variable 0. The result is the %S0 variable containing 4,
because “d” is the fourth character in the string.
KL( )
Log caller into mailbox–immediately logs caller into the mailbox.
Note Cannot be used in the Notify Menu.
Syntax KL(uid)
where:
uid Valid mailbox.
Example KL(239)
Logs the caller into Mailbox 239
KR( )
Creates a recording–if the destination is an existing mailbox, Stratagy ES inserts the recording into
that mailbox as a new message. Otherwise, the destination is assumed to be the name of an existing
file and the recording is placed there.
Syntax KR(dest)
where:
dest Destination–mailbox or file (valid DOS file name). Can be a variable.
Example KR(532)
Inserts the recording in Mailbox 532 as a new message.
KT( )
Directs calls to a designated User ID when DSS function is active (dss_active = true), the DSS port is
assigned in the “answering” mailbox, and the Night Transfer on the DSS console is On.
Syntax: KT(XXX)G(YYY)
where:
XXXBox number used when Night Transfer is On.
YYYBox number used when Night Transfer is Off.
Table 11-3 Defined Tokens (continued)
Token Description

Token Programming
Defined Tokens
11-10 Strata CIX Voice Mail Programming 01/07
KV( )
Delete record from a database–for the file specified, deletes the first record with the value in that field
(if any).
If file ends with .DBF, Stratagy ES assumes it is in dBase format. Otherwise, Stratagy ES assumes it
is the name of an ASCII file with columns separated by commas.
Syntax KV(file,field,value)
where:
file dBase file (.DBF) or ASCII file with columns separated by commas (comma delimited). Valid
DOS file name. Can be a variable.
field dBase file field name or ASCII file column number. (1 is the value of the field before the
comma.) Can be a variable.
value Any alphanumeric string. Can contain %S variables.
Example KV(xyz.dbf,client,”abc”)
For dBase file xyz.dbf, deletes the first record where the field named client contains the string “abc.”
L( )
Switch system language–immediately changes the system prompts to use the specified file (usually
the specified file’s name indicates the language). All system prompts change, including User mode
prompts.
Syntax L(language_file)
where:
language_file File name in the Stratagy ES directory that represents a Stratagy ES system
language file which has the DOS suffix .IDX.
Examples
L(ENGLISH)
Uses the ENGLISH.IDX system prompt file in the C:\Stratagy ES directory.
L(SPANISH)
Uses the SPANISH.IDX system prompt file in the C:\Stratagy ES directory.
Table 11-3 Defined Tokens (continued)
Token Description

Token Programming
Defined Tokens
Strata CIX Voice Mail Programming 01/07 11-11
Token Programming
M( )
Audiotex menu–the M( ) token enables you to specify fast single-digit entry for audiotex menu
selections. While Stratagy ES processes this token, it plays (or says) the specified greeting while
waiting for a single DTMF digit to be pressed by the caller. When the caller presses the single DTMF
digit, Stratagy ES looks up the menu selection that matches and continues processing at the specified
mailbox. Therefore, this eliminates the normal delay for determining completed DTMF entry.
Note While this Token is active, no other digits, except the defined menu selections, is recognized.
Syntax M(Gn,count,delay)
where:
Gn mailbox’s greeting number (range: 1~7).
count Number of times to play the greeting.
delay Time (in 10ths of seconds) to wait after each saying of the greeting.
Example M(G1,2,20)
Plays greeting 1 up to two times with a 2-second delay after each time the greeting plays, waiting for
the caller to press a DTMF.
©If the caller presses 5, Stratagy ES immediately continues processing at the mailbox specified in
the Menu 5 field.
©If the caller makes no selection, Stratagy ES continues processing at the next token.
©If the caller makes an invalid selection, Stratagy ES continues processing at the Done chain.
Table 11-3 Defined Tokens (continued)
Token Description

Token Programming
Defined Tokens
11-12 Strata CIX Voice Mail Programming 01/07
N( )
Update database record–the N( ) token enables you to update the values of a database record. It
searches a file for the first record that has s-value in s-field. It updates the record by placing n-value in
r-field, and then saves that record back to the database.
Syntax N(file,s-field,s-value,r-field,n-value[,r-field,
n-value...])
where:
file dBase file (.DBF) or ASCII file with columns separated by commas (comma delimited).
Valid DOS file name. Can be a variable.
s-field Search dBase file field name or ASCII file column number. (1 is the value of the field
before the comma.) Can be a variable.
s-value Search alphanumeric string. Can contain %S variables.
r-field Replacement dBase file field name or ASCII file column number to update.
n-value New alphanumeric string. Can contain %S variables.
Examples
Suppose an ASCII file contains a listing of dealers, available parts, and orders on those parts. You
could use the R( ) token to obtain information about how many parts the dealer wants to order and
then use the N( ) token to update the database.
R(G1,%S1,40)
G1 Plays greeting 1: “Please enter your dealer number.”
%S1 Stores the caller’s entry in variable %S1.
40 Waits 4 seconds (40 ÷ 10 = 4) for DTMF after playing the greeting.
R(G2,%S2,20)
G2 Plays greeting 2: “Please enter the number of telephones you want to order.”
%S2 Stores the caller’s entry in variable %S2.
20 Waits 2 seconds (20 ÷ 10 = 2) for DTMF after playing the greeting.
R(G3,%S5,20)
G3 Plays greeting 3: “Please enter the number of key systems you want to order.”
%S5 Stores the caller’s entry in variable %S5.
20 Waits 2 seconds (20 ÷ 10 = 2) for DTMF after playing the greeting.
N(ORDERS.DOC,5,%S1,9,%S2,12,%S5)
©Searches ORDERS.DOC for the first record that has the value of %S1 in field 5.
©Replaces the current value of field 9 with %S2.
©Replaces the current value of field 12 with %S5.
©Saves the record back to the database.
Table 11-3 Defined Tokens (continued)
Token Description

Token Programming
Defined Tokens
Strata CIX Voice Mail Programming 01/07 11-13
Token Programming
O( )
Timed on-hook–an on-hook condition for the specified amount of time. Depending upon the value of
tenths, you can effect a flash, or even a hang-up condition. This is useful for generating an
intermediate hang-up condition during token processing without terminating the actual continued
token processing.
Syntax O(tenths)
where:
tenths Time in tenths of seconds.
Example O(60)
Goes on-hook for 6 seconds (60 ÷ 10 = 6).
P( )
Play–the P( ) token enables you to communicate information in a variety of ways to a caller or to a
user when used in a Notify record’s Method field. While Stratagy ES is playing, the skip (*, #) and
volume (8, 0) keys on the telephone work.
Syntax Prepeat(item)
where:
repeat Number of times to play the item. If omitted, defaults to 1.
item Each item causes Stratagy ES to say specific information. The items are defined as
follows:
where:
A, string Alphanumeric string string.
D Percentage of remaining disk space.
G[n, uid] Greeting n of the current mailbox or mailbox uid.
M[, uid] Total number of messages and number of new messages for the current mailbox or
mailbox uid.
Mn[, uid] Message n in the Saved Message Queue, if enabled, of the current mailbox or mailbox
uid.
MNn[, uid] Message n in the New Message Queue of the current mailbox or mailbox uid.
MSn[, uid] Message n in the Saved Message Queue of the current mailbox or mailbox uid.
MUn[, uid] Message n in the Urgent Message Queue of the current mailbox or mailbox uid.
nn,V System prompt nn.
R DTMF digits entered by a caller who has invoked relay paging (used only in the Notify
record Method field).
%Sn DTMF digits currently represented by the variable %Sn, where n is a number from 0 to 9.
This is most effective for repeating the DTMF entered by a caller for confirmation.
%Sn, N DTMF digits currently represented by the variable %Sn, as a number where the range is
assumed to be between 0 and 999 million.
%Sn, D DTMF digits currently represented by the variable %Sn, as a date, where the format is
assumed to be either mmddyy (which assumes a year in the 1900s) or mmddyyyy.
%Sn, T DTMF digits currently represented by the variable %Sn, as a time of day, where the
format is assumed to be hhmm.
%Sn, $ DTMF digits currently represented by the variable %Sn, as a dollar amount, where the
last two digits are assumed to be cents.
%Sn, F The same as %Sn, $ except Stratagy ES uses francs and centimes.
%Sn, P The same as %Sn, $ except Stratagy ES uses pesos and centavos.
Table 11-3 Defined Tokens (continued)
Token Description

Token Programming
Defined Tokens
11-14 Strata CIX Voice Mail Programming 01/07
P( )
(continued)
U[, uid] “Name and extension” recording for the current mailbox or mailbox uid. If there is no
recording, Stratagy ES says the current mailbox digits or mailbox digits uid.
V Digits in the Notify record’s Variable field.
X, file Voice file defined by file.
Examples
P(G1)
Stratagy ES plays greeting 1 for the current mailbox. This enables you to record and play any prompt.
P(06261994,D)
Stratagy ES says “June twenty-sixth, nineteen ninety-four.”
P(06261994,$)
Stratagy ES says “Sixty-two thousand six hundred nineteen dollars and ninety-four cents.”
Q( )
Question and answer (Voice Forms)–the Q( ) token enables you to ask a caller a series of questions
and store all the caller’s responses as a single message or multiple messages in the current mailbox.
Record each question as a greeting. Stratagy ES plays each question/greeting with a tone, records a
response, and then plays the next question/greeting until all the specified questions/greetings have
been played.
You can ask the caller up to 20 questions. To play more than seven questions (using greetings 1 to 7
for the current mailbox), use questions from other mailboxes by specifying which mailbox’s greeting to
access with a # sign followed by the uid. For example, G7#123 would use greeting 7 from Mailbox
123.
Syntax Q(Gn,...,E...)
where:
Gn Greeting number (range: 1~7).
E Groups the responses to the previous greetings as a single message.
... Additional greetings or groupings.
Examples
Q(G1,G2,G3,G4,G5,G6,G7,G1#9000,G2#9000)
Stratagy ES asks nine questions as recorded in the specified greetings (seven greetings from the
current mailbox and two greetings from Mailbox 9000), records nine responses, and stores the
responses as one message.
Q(G1,G2,E,G3,E)
Stratagy ES groups the responses to greetings 1 and 2 as one message and the response to greeting
3 as a different message.
Table 11-3 Defined Tokens (continued)
Token Description

Token Programming
Defined Tokens
Strata CIX Voice Mail Programming 01/07 11-15
Token Programming
R( )
Read DTMF from a caller–the R( ) token enables you to obtain caller information while prompting
the caller with the specified recorded greeting. The token plays the greeting specified for the current
mailbox and enables the caller to make DTMF entry which is stored in the specified %S variable.
Stratagy ES interrupts the greeting as soon as the caller enters the first DTMF tone. If there is no
caller DTMF entry, Stratagy ES initializes the %S variable to empty, i.e., ””.
Syntax R(Gn,%Sm,delay)
where:
Gn Greeting number for the current mailbox (range 1~7).
%Sm One of the %S storage variables (range: 0~19).
delay Time in tenths of seconds to wait for DTMF after playing the greeting (range: 0~99). If
omitted, defaults to 0.
Example
To prompt and have a caller enter a telephone number and have Stratagy ES store that telephone
number to be used later, you could:
Record in greeting 1: “Enter your telephone number. Finish by pressing the # sign.”
Use R(G1,%S6,20):
G1 Plays greeting 1.
S6 Stores the caller’s entry in variable %S6.
20 Waits 2 seconds (20 ÷ 10 = 2) for DTMF after playing the greeting.
S( )
Serial port access–the S( ) token gives Stratagy ES access to serial ports. By communicating over
serial ports, Stratagy ES can access other computers and store and/or retrieve information from
remote databases.
Once an S( ) token has been executed, the serial port is locked for exclusive access by the current
mailbox. The lock is removed only when Stratagy ES finishes executing the mailbox's Extension field.
This enables several related S( ) tokens to be executed while the port is locked.
To properly use this token, the physical serial port must have certain configuration parameters
defined. These parameters are grouped together under “Serial Port Descriptions” of the Stratagy ES
System Configuration options (Chapter 3 — Voice Mail Configuration).
Syntax S(port,S,%Sn,termination,length,timeout)
where:
port Logical serial port (1 or 2) mapped onto a physical port number by the Stratagy ES
System Configuration parameter serial_port1 for logical port 1 or serial_port2 for logical
port 2 (Chapter 3 — Voice Mail Configuration).
S String sent out on the specified port. It may contain any alphanumeric characters, %S
variables, and the following special characters:
\A Attention (bell sound), or Ctrl+G
\N Newline, or Ctrl+J
\R Return, or Ctrl+M
\T Tab, or Ctrl+I
\\ Backslash, the actual \ character
%Sn One of the %S storage variables (range: 0~19), which stores any response from the
serial port. If omitted, Stratagy ES does not wait for a response.
Table 11-3 Defined Tokens (continued)
Token Description

Token Programming
Defined Tokens
11-16 Strata CIX Voice Mail Programming 01/07
S( )
(continued)
length Maximum number of characters to expect as input on the serial port. If the maximum
number of characters is received, processing continues immediately with whatever
characters that were received placed in the %Sn variable. If this option is omitted, it
defaults to the maximum length of %Sn (128 characters).
termination List of characters that defines when Stratagy ES should stop reading from the serial
port for storing in the specified %Sn variable. If omitted, defaults to “\N\R” as specified
under “S”. The terminating character, if any, is not part of %Sn.
timeout Maximum time (tenths of seconds) Stratagy ES waits for input on the serial port when
reading into the %Sn variable. When the timeout expires, Stratagy ES continues
processing with the next token. Whatever characters, if any, received up to that point are
placed in the %Sn variable. If this option is omitted, the default is the value of the
Stratagy ES System Configuration parameter sys_tmo_serial (Chapter 3 — Voice Mail
Configuration).
Example S(1,”GET INFO”,%S1,”\N”,80,40)
where:
1 Logical serial port.
”GET INFO” String sent out of port by Stratagy ES.
%S1 Store response in %S1 variable.
\N Newline (Line feed)
80 Maximum number of characters expected as input from serial port.
40 Four-second time out waiting for input from serial port.
T( )
Transmit fax–performs fax transmissions to either a specified telephone number or to a connected
call. For a two-call fax back, use the two-option syntax. For a one-call fax on demand, use the three-
option syntax.
Note This token is not currently supported.
If Stratagy ES has a free fax port available, transmission begins shortly on that port. Otherwise, the
request will be queued for transmission along with any other such requests. Normally you will install
your fax software so that if a transmission fails (for instance, if the remote fax is busy), then the
request will be retried automatically at a later time, up to a maximum number of retries.
Syntax T(file,string)
T(file,"",tokens)
where:
file File name of the fax you want to transmit. Valid DOS file name.
string DTMF digits representing the telephone number to dial to connect to the fax device that
accepts the transmission. It can contain %S storage variables. If it is the empty string,
i.e., ””, then Stratagy ES waits until a call rings into the fax port.
"" Empty string. Stratagy ES implements the defined tokens.
tokens Stratagy ES implements the defined tokens to transfer the call to the Stratagy ES so fax
transmission can begin. Typically it would be P(G1), which plays greeting 1: “Start your
fax machine at the tone.”
Table 11-3 Defined Tokens (continued)
Token Description

Token Programming
Defined Tokens
Strata CIX Voice Mail Programming 01/07 11-17
Token Programming
T( )
(continued)
Examples
T(FAX1.TXT,"9,%S1")
Causes Stratagy ES to fax the specified file to the caller’s fax number previously obtained and stored
in %S1.
FAX1.TXT Name of the file to transmit.
9 Dials 9 for an outside line.
, Pauses (2 seconds).
%S1 Dials the DTMF digits stored in %S1.
T(FAX2.TXT,"","P(G1)")
Transfers call to fax/modem extension and transmits the specified file.
FAX2.TXT Name of the file to transmit.
" " Empty string. Stratagy ES implements the defined tokens.
P(G1) Plays greeting 1:”Start your fax machine at the tone.”
Note Use two backslashes \\ to signify one backslash \. For example, to specify the file name
C:\Stratagy ES\NEW.TXT, use C:\\Stratagy ES\\NEW.TXT.
CAUTION! When creating applications using the J( ), T( ), and >( ) tokens, you must use the
identical syntax for file identification. Otherwise, fax transmission or reception
may fail.
Table 11-3 Defined Tokens (continued)
Token Description

Token Programming
Defined Tokens
11-18 Strata CIX Voice Mail Programming 01/07
V( )
Search for value–the V( ) token searches the specified file, in the specified field, for the value given
by item. If Stratagy ES finds the value, Stratagy ES stores the contents of the second field into
variable %Sn. If Stratagy ES does not find the value, the token terminates and returns to the Done
state.
If file ends with .DBF, Stratagy ES assumes it is in dBase format. Stratagy ES assumes field names
instead of field numbers and invokes dBase file processing (including record locking, if specified).
Otherwise Stratagy ES assumes that it is the name of an ASCII file with columns separated by
commas.
There may be several pairs of fields and %Sn values, and Stratagy ES will retrieve them.
Syntax V(file,field,item,field,%Sn[,field,%Sn...])
where:
file dBase file (.DBF) or ASCII file with columns separated by commas (comma delimited). Valid
DOS file name. Can be a variable.
field dBase file field name or ASCII file column number. (1 is the value of the field before the
comma.) Can be a variable.
item An alphanumeric string. Can contain %S variables.
%Sn One of the %S storage variables (range: 0~19).
Examples
A caller enters his customer number to hear his credit line:
@R(G1,%S1,20)
G1 Plays greeting 1: “Please enter your customer number.”
%S1 Stores the caller’s entry in variable %S1.
20 Waits 2 seconds (20 ÷ 10 = 2) for DTMF after playing the greeting.
@V(credit.doc,1,%S1,2,%S2)
©Searches CREDIT.DOC for customer number %S1 in field 1.
©Stores the contents of field 2 in variable %S2.
P(G2)P(%S2,$)
P(G2) Plays Greeting 2: “Your credit line is”
P(%S2,$) Says the value stored in %S2 as a dollar amount: “five thousand dollars.”
Table 11-3 Defined Tokens (continued)
Token Description

Token Programming
Defined Tokens
Strata CIX Voice Mail Programming 01/07 11-19
Token Programming
W( )
Wait (pause) for event–general wait token that enables Stratagy ES to wait for confirmation of
specific events. It is useful for confirming dial tone and for notification to confirm that the appropriate
answer has occurred. If the event does not occur, Stratagy ES terminates all remaining token
processing.
Syntax W(n)
W(n,P)
W(n,V)
W(n,T)
where:
n Wait (pause) for n tenths of a second.
n, P Wait up to n rings for a pager/beeper to answer.
n, V Wait up to n rings for a voice to answer.
n, T Wait up to n seconds to hear a dial tone.
Example W(3,P)
Waits up to 3 rings for a paging/beeping system to answer. You can use this to confirm that the paging
company answered before playing DTMF to the paging company for pager notification of messages.
X( )
Creates a zero length file called file.
Syntax X(file)
where:
file Valid DOS file name.
Example X(NEW.TXT)
Creates zero length file NEW.TXT.
Y( )
Deletes file.
Syntax Y(file)
where:
file Valid DOS file name. Can be a variable.
Example Y(OLD.TXT)
Deletes the file OLD.TXT.
Z( )
Execute Done chain mailbox–checks for the existence of file. If the file exists, Stratagy ES executes
the Done chain mailbox. If the file does not exist, the system processes additional tokens.
Syntax Z(file)
where:
file Valid DOS file name. Can be a variable.
Example Z(CHECK.TXT)
Stratagy ES checks if the file CHECK.TXT exists. The file exists, and Stratagy ES executes the RNA
chain mailbox.
Table 11-3 Defined Tokens (continued)
Token Description

Token Programming
Defined Tokens
11-20 Strata CIX Voice Mail Programming 01/07
+( )
Addition–enables you to perform modifications to values for calculation and control. Ideal for
controlling limits and loops.
Syntax +(%Sn[,item])
where:
%Sn One of the %S storage variables (range: 0~19).
item Positive or negative value or another %S variable. Defaults to 1 if not specified.
=( )
Equate–gives the specified storage variable the value specified. The value may be a sting or a
numeric and should be quoted. The four-option syntax enables substring assignments.
Syntax =(%Sn,item)
=(%Sn,item,start,end)
where:
%Sn One of the %S storage variables (range: 0~19).
item Any alphanumeric string. Can contain %S variables.
start Starting character position for assigning a portion of item.
end Ending character position to assign when used with start.
Examples
=(%S1,"FRENCH")
Gives %S1 the value of “FRENCH”.
=(%S1,"FRENCH",3,5)
Gives %S1 the value of ENC (E is the start character and C is the end character).
=(%S1,%S2,1,3)
where %S2 = 7530414. Extracts prefix of the telephone number in %S2 (the first through third
number) and gives %S1 the value of 753.
?( )
Exists in file–searches the specified file for the specified item. Stratagy ES searches the file on a
line-by-line basis and the item is found when it matches an entire line within the file. If the item is
found, processing continues at the mailbox specified; if not, processing continues with the next token.
One use of this token is to control the use of a fax-on-demand feature (not currently supported). If you
find that someone is having a document faxed repeatedly to a phone number (perhaps the phone
number of someone who does not want your fax), you can enter such numbers into a file, then
program Stratagy ES to check an entered fax number against those in the file and, if found, branch to
a mailbox which plays a greeting saying that the entered phone number is invalid and then hang up. If
the entered number were not found in the file, then processing would continue normally and the fax
would be sent to the requester.
Note Use two backslashes \\ to signify one backslash \. For example, to specify the file name
C:\Stratagy ES\NEW.TXT, use C:\\Stratagy ES\\NEW.TXT.
Syntax ?(item,fsile,uid)
where:
item Any alphanumeric string. Can contain %S variables.
file ASCII text file specified by a DOS file name. Can be a variable.
uid Valid mailbox.
Table 11-3 Defined Tokens (continued)
Token Description

Token Programming
Defined Tokens
Strata CIX Voice Mail Programming 01/07 11-21
Token Programming
<( )
Start Incremental fax–enables you to have a caller request multiple fax documents and then to
transmit the requested documents with one call.
Note This token is not currently supported.
The <( ) token must be used with the >( ) token. To fax multiple documents, first initiate the process
with this token and as the caller requests faxes, add the requested document using the >( ) token.
The fax is sent automatically after the caller hangs up.
See Chapter 5 — Fax Server for details about fax programming.
Syntax <(string)
where:
string DTMF digits representing the telephone number that should be dialed. Can contain %S
variables. If it is the empty string, i.e., ””, then Stratagy ES waits until a call rings into the fax port.
>( )
Add incremental fax–enables you to transmit more than one requested document with one call.
Before using this token, you must first start incremental faxing with the <( ) token. See the <( ) token
for details.
Note This token is not currently supported.
See Chapter 5 — Fax Server for details about fax programming.
Note Use two backslashes \\ to signify one backslash \. For example, to specify the file name
C:\Stratagy ES\NEW.TXT, use C:\\Stratagy ES\\NEW.TXT.
CAUTION! When creating applications using the J( ), T( ), and >( ) tokens, you must use the
identical syntax for file identification. Otherwise, fax transmission or reception
may fail.
Syntax >(file)
where:
file File name of the fax you want to transmit. Valid DOS file name.
¦( )
Append variables to file–writes all twenty %S variables (%S0~%S19) to the specified file. If the file
already exists, the variable values are appended to the file; otherwise, the file is created. The values
are separated by commas and terminated by a new line.
Note Use two backslashes \\ to signify one backslash \. For example, to specify the file name
C:\Stratagy ES\NEW.TXT, use C:\\Stratagy ES\\NEW.TXT.
Syntax ¦(file)
where:
file Valid DOS file name.
Table 11-3 Defined Tokens (continued)
Token Description

Token Programming
Defined Tokens
11-22 Strata CIX Voice Mail Programming 01/07
[( )
Read %S variables state–reads the values of all twenty %S variables (%S0~%S19) from the
specified file. The format expected is a one line, comma delimited, ASCII file where the first value is
%S0, the second is %S1, etc.
When the [( ) token is used with the ]( ) token, you can read, modify, and write (remember) %S
variables.
Notes
•Use two backslashes \\ to signify one backslash \. For example, to specify the file name
C:\Stratagy ES\NEW.TXT, use C:\\Stratagy ES\\NEW.TXT.
•To avoid potential simultaneous access errors: within the same mailbox, if you read with the [( )
token, write with the ]( ) token.
Syntax [(file)
where:
file ASCII file with columns separated by commas (comma delimited). Valid DOS file name. Can
be a variable.
]( )
Write %S variables state–writes the values of all twenty %S variables (%S0~%S19) to the specified
file. Typically, you would use this with the [( ) token which reads the %S variables.
Notes
•Use two backslashes \\ to signify one backslash \. For example, to specify the file name
C:\Stratagy ES\NEW.TXT, use C:\\Stratagy ES\\NEW.TXT.
•To avoid potential simultaneous access errors: within the same mailbox, if you read with the [( )
token, write with the ]( ) token.
Syntax ](file)
where:
file ASCII file with columns separated by commas (comma delimited). Valid DOS file name. Can
be a variable.
^( )
Change port volume–changes the volume of the current port to the specified level.
Notes
©The Stratagy ES system configuration parameter gain_norm sets the starting volume of all the
ports (Chapter 3 — Voice Mail Configuration).
©For the user, the current port volume can be set through the Mailbox Editor Menu User Mode
Options Tab screen’s Playback Volume field and by the user with the Play Message Controls
(Chapter 4 — Voice Processing).
Syntax (n)
where:
n Volume of current port
(range: -8~8). -8 is the softest
0 is the default initial volume
8 is the loudest.
Table 11-3 Defined Tokens (continued)
Token Description

Token Programming
Defined Tokens
Strata CIX Voice Mail Programming 01/07 11-23
Token Programming
{}
Input file–the {} token enables you to use an external file to be read for input of additional tokens.
Note Use two backslashes \\ to signify one backslash \. For example, to specify the file name
C:\Stratagy ES\NEW.TXT, use C:\\Stratagy ES\\NEW.TXT.
Syntax {file}
where:
file ASCII text file containing valid Stratagy ES tokens. Valid DOS file name.
Table 11-3 Defined Tokens (continued)
Token Description
This page is intentionally left blank.

Strata CIX Voice Mail Programming 01/07 12-1
System Reports
System Reports 12
The Stratagy ES system offers you a wide variety of reporting options. You can choose a predefined
or customized report and you can view, print and/or save the report to file.
This chapter covers all reporting options and provides instructions on using the Reports menu.
Data Retention
Voice mail maintains data log information for up two months. After that date, the system
automatically moves the data to a compressed summary log file that can be programmed to be kept
archived for up to one year.
Report Types
You can generate a variety of reports that provide information about the voice mail system and user
mailboxes. There are two types of menus available:
The Reports option contains a predefined set of comprehensive reports covering statistics for ports,
calls, messages, system information, and mailbox information. The reports are:
•Individual Port Statistics
•Port Group Statistics
•All Port Statistics
•Mailbox Call Statistics
•Mailbox Usage Summary
•Mailbox Info and Status
•Mailbox Message Statistics
•System Information
The Reports option also provides custom reports that enable you to customize a report for:
•Mailboxes
•AMIS Gateway and Proxy Mailboxes
•VPIM Gateway and Proxy Mailboxes

System Reports
Report Elements
12-2 Strata CIX Voice Mail Programming 01/07
Report Elements
Each report displays the date it was run (i.e., Generated At) and the period of time that it covers (i.e.,
Report Period From/To).
Using buttons at the top of the screen, reports can be viewed, printed, saved to a disk, or e-mailed
using the Microsoft Internet Explorer program. The reports can be run in either Excel or HTML
format.
Reports
Predefined reports fall into the following categories:
•Port Information and Statistics
•Mailbox Information and Statistics
•System Information.
This section gives instructions on running, printing and saving a report as well as descriptions on
all the reports.
Run/Print/Save/E-mail Report
1. From the eManager Menu, click Utilities > Reports. The report options display.
2. Select the desired report. For reports that have From/To fields, you can enter the dates you need
using a calendar drop-down box. If a date is left blank, the report covers the data from the
beginning data log period to the current time.
The reports that do not have any From/To fields, provide real time statistics of a mailbox at the
moment that the report was generated.
3. From the Format field, select HTML or Excel.
4. Click Run. The report displays on the screen.
5. (Optional) Click Print to print a report. The printer instructions display.
6. (Optional) Click Email to email the report. The Microsoft Internet Explorer screen displays.
7. (Optional) Click Back to return to the report entry screen. You can then change the format or
the report dates and rerun the report.
8. When you are finished, you can save the report to disk, or simply close the window.
Port Information and Statistics
This group of reports contains the statistical information for each configured voice port. The group
consists of the following reports:
•Individual Port Statistical – Shows the number of incoming/outgoing calls for each port, number
of seconds each port was busy, and the number of seconds each port was disabled by voice mail
(due to failure).
•Port Group Statistics – Contains the activities for a group of ports. Enables you to monitor two
or more Telephone System Integrations sharing a single port.
•All Port Statistical – Provides total number of incoming and outgoing calls for the entire system,
the total number of times the system could not perform the outgoing notification because of the
minimum percentage of free ports that were not available. Enables you to better configure the
number of reserved outgoing ports for notification.
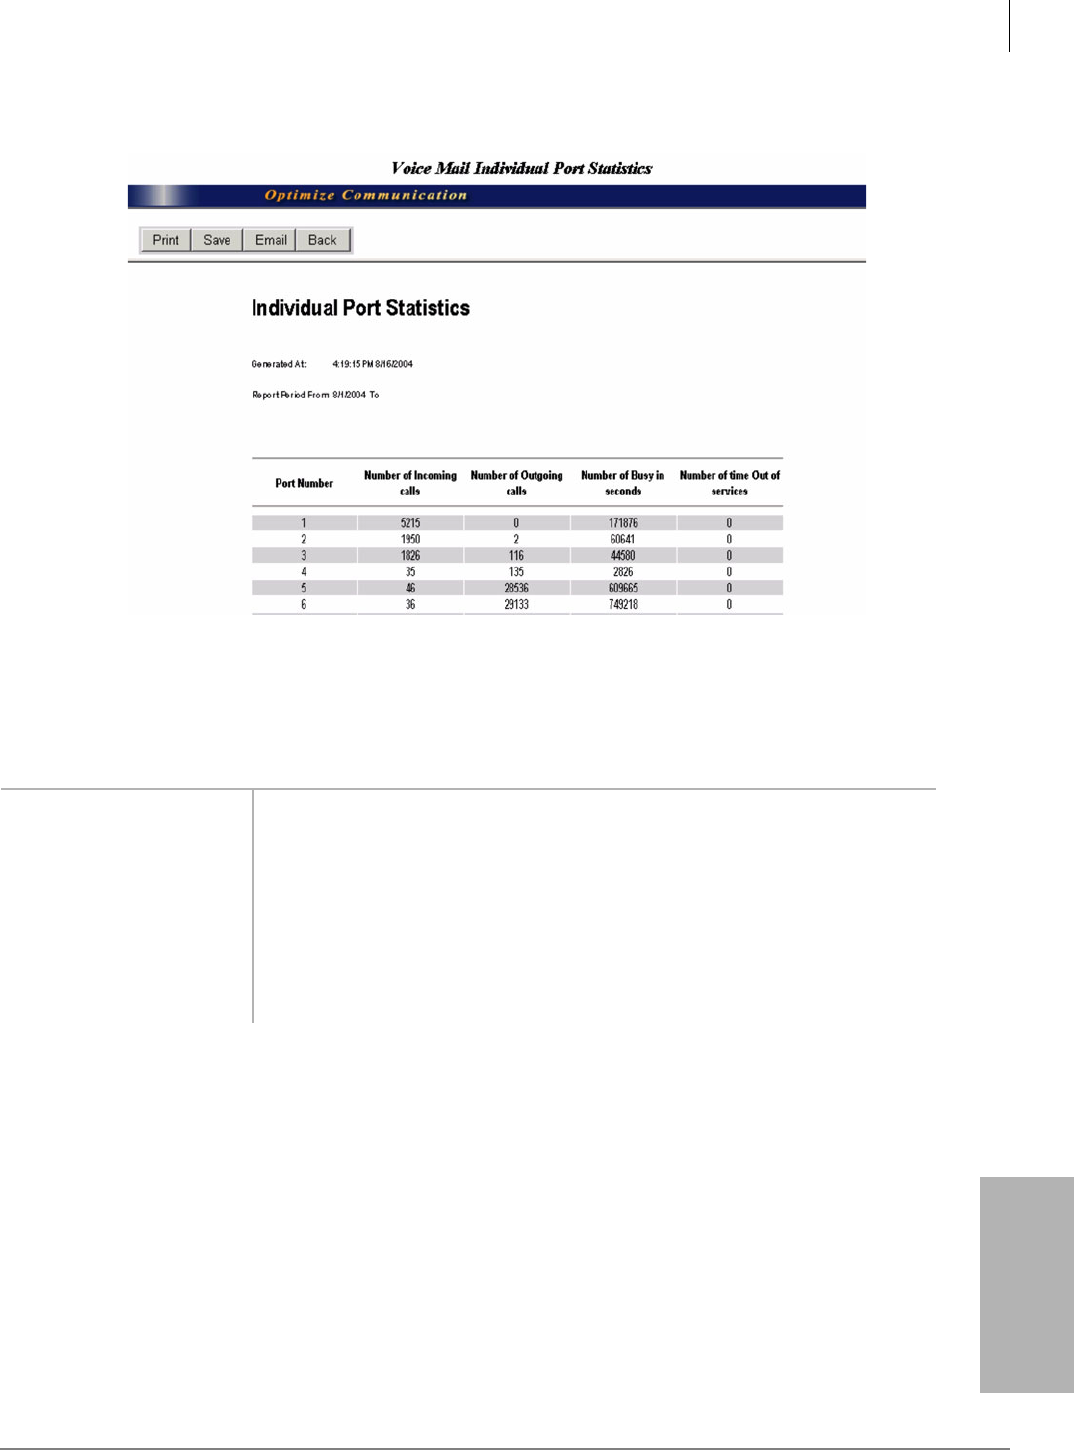
System Reports
Reports
Strata CIX Voice Mail Programming 01/07 12-3
System Reports
Individual Port Statistics Report
Figure 12-30 Individual Port Statistics Report Screen
Table 12-1 Individual Port Statistics Report Fields
FIELD DESCRIPTION
Port Number Assigned port number. Range 1~64.
Number of Incoming Calls Total number of incoming calls for port for this time period.
Number of Outgoing Calls Total number of outgoing calls for port for this time period.
Number of Busy in
Seconds
Total number of seconds port was found busy.
Number of Times Out of
Service
Total number of times port was placed out-of-service by the system due to failure.
7317

System Reports
Reports
12-4 Strata CIX Voice Mail Programming 01/07
Port Group Statistics Report
Figure 12-31 Port Group Statistics Report Screen
Table 12-2 Port Group Statistics Report Fields
FIELD DESCRIPTION
Group Name Group number assigned in Statistical Port Group Configuration (see “Port Statistics”
on page 3-20 ).
Note To run this report you must have defined the port groups in the Statistical Port
Group screen.
Ports Ports belonging to this group.
Number of Incoming Calls Total number of incoming calls for group for time period.
Number of Outgoing Calls Total number of outgoing calls for group for time period.
Simultaneously Busy in
Seconds
List of ports that are busy at the same time in this group. Report displays:
©0 Ports — Total idle time (in seconds) for all available ports.
©1 Ports — Total busy time in seconds for one port during the time period.
©2 Ports — Total busy time in seconds for two ports during the time period.
©3 Ports, etc. — Total busy time in seconds for xx ports during the time period.
7464
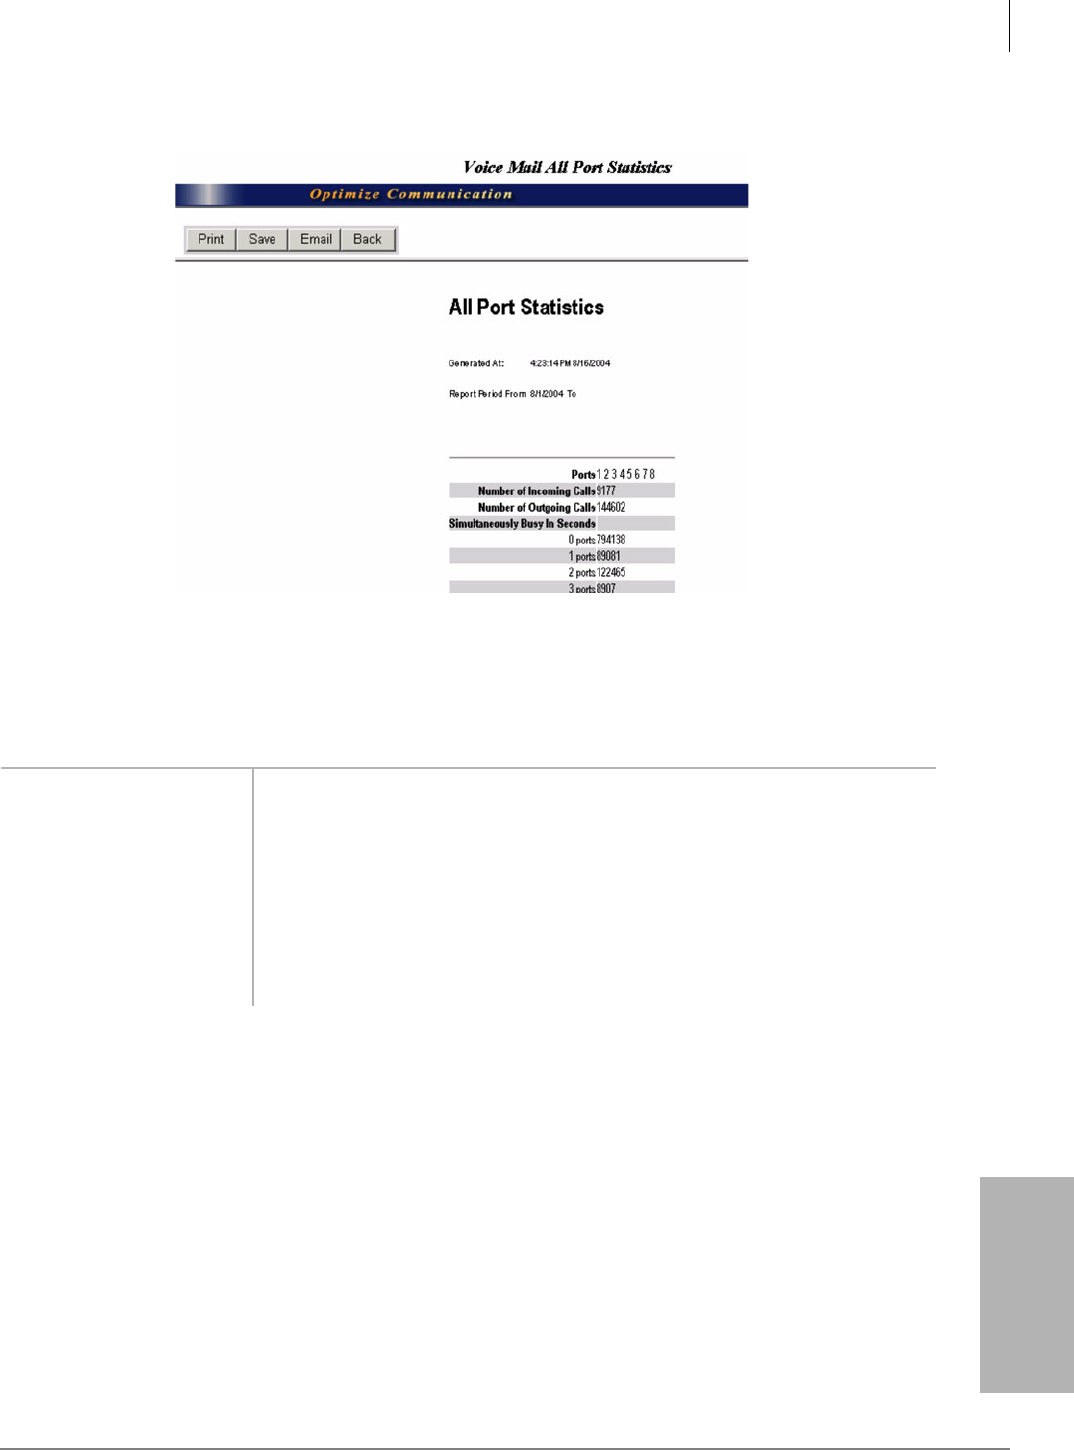
System Reports
Reports
Strata CIX Voice Mail Programming 01/07 12-5
System Reports
All Port Statistics Report
Figure 12-32All Ports Statistical Report Screen
Table 12-3 All Ports Statistical Report Fields
FIELD DESCRIPTION
Number of Incoming Calls Total number of incoming calls for the entire system during time period.
Number of Outgoing Calls Total number of outgoing calls for the entire system during time period.
Simultaneously Busy in
Seconds
List of ports that are busy at the same time. Report displays:
©0 Ports — Total idle time (in seconds) for all available ports.
©1 Ports — Total busy time in seconds for one port during the time period.
©2 Ports — Total busy time in seconds for two ports during the time period.
©3 Ports, etc. — Total busy time in seconds for xx ports during the time period.
7318

System Reports
Reports
12-6 Strata CIX Voice Mail Programming 01/07
Mailbox Information and Statistics
This group of reports contains the statistical information for each configured voice mail mailbox.
The group consists of the following reports:
•Mailbox Calling Statistics – Provides calling statistics. Useful for monitoring call processing
statistics of all mailboxes in the system.
•Mailbox Usage Summary – Contains statistics for individual mailbox usage. Total time
(minutes) a mailbox is logged on to the system and total time (minutes) a mailbox is accessed
from the caller Main Menu.
•Mailbox Info and Status – Provides individual mailbox information and status in detail.
•Mailbox Message Statistics – Contains essential information related to a mailbox’s messages.
Mailbox Calling Statistics Report
Figure 12-33 Mailbox Calling Statistics Report Screen
Table 12-4 Mailbox Calling Statistics Report Fields
FIELD DESCRIPTION
Mailbox Mailbox number.
No Answer Number of times messages left in the mailbox due to no answer.
Busy Number of times messages left in the mailbox due to busy.
Transfer to Operator Number of times callers were transferred to the operator for assistance, either due
to time out or caller pressing “0.”
Transfer to Extension Number of times the callers entered another mailbox or extension.
Abandons Number of times callers hung up after reaching the mailbox extension without
leaving a message, transferring to an operator or calling another extension.
7319
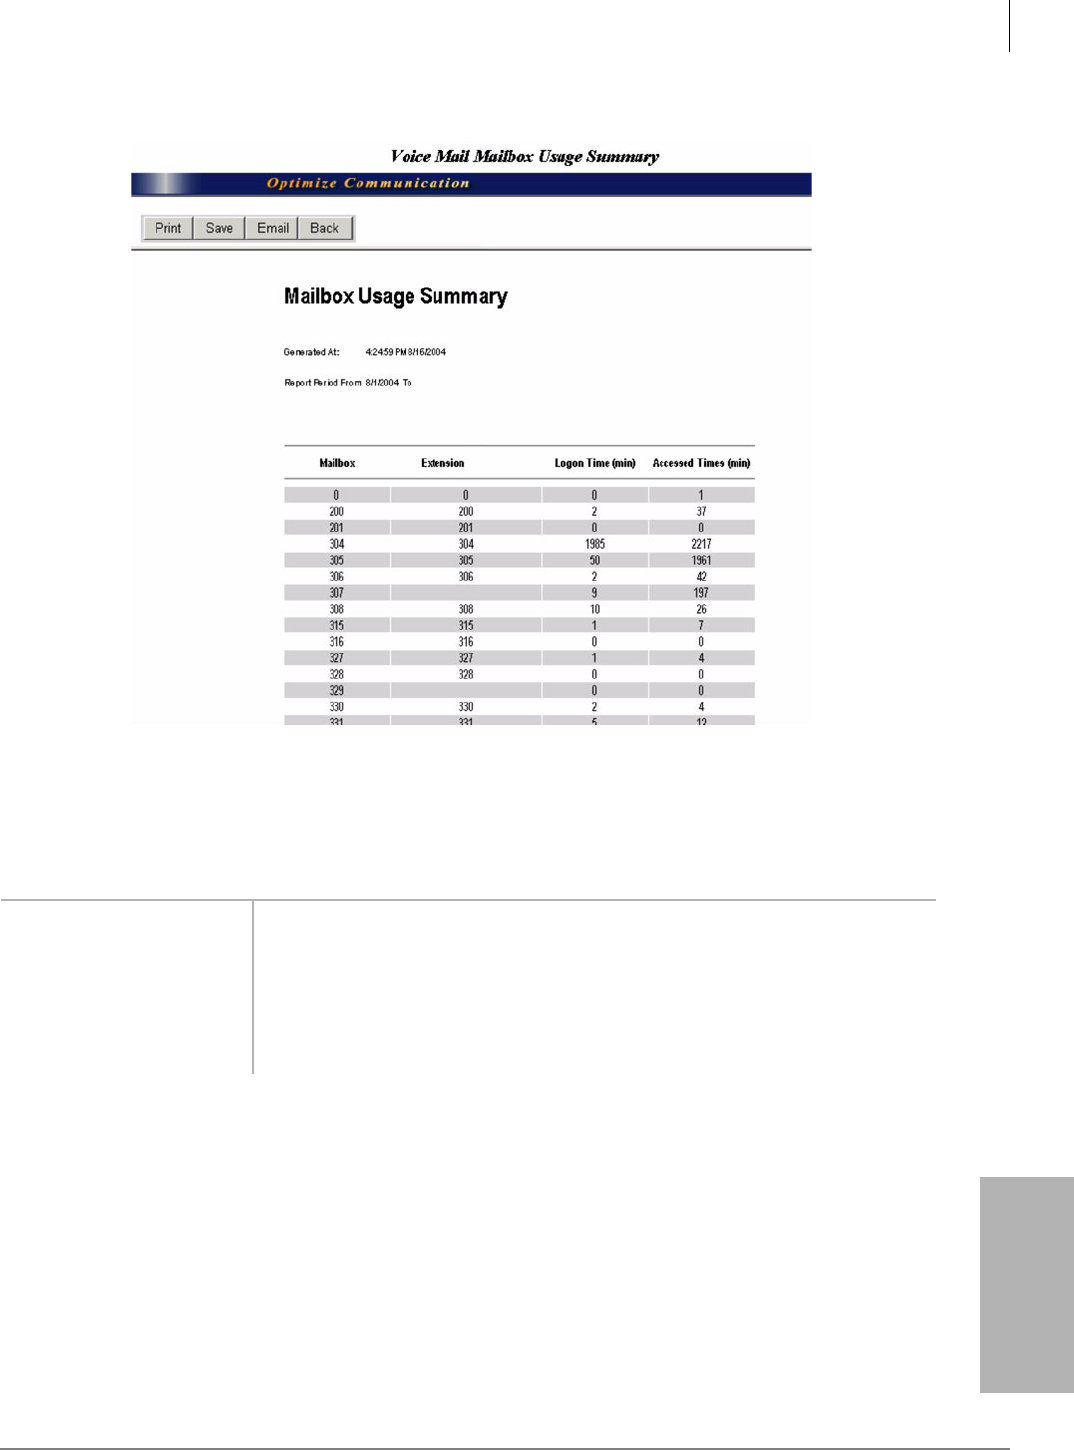
System Reports
Reports
Strata CIX Voice Mail Programming 01/07 12-7
System Reports
Mailbox Usage Summary Report
Figure 12-34 Mailbox Usage Summary Report Screen
Table 12-5 Mailbox Usage Summary Report Fields
FIELD DESCRIPTION
Mailbox List of mailboxes in the system.
Extension Associated extension for the mailbox.
Logon Time (min) Total time in minutes this mailbox has been logged in.
Accessed Time (min) Total time in minutes this mailbox has been accessed by a caller or transferred to
another extension.
7320

System Reports
Reports
12-8 Strata CIX Voice Mail Programming 01/07
Mailbox Info and Status Report
Figure 12-35 Mailbox Info and Status Report Screen
Table 12-6 Mailbox Info and Status Report Fields
FIELD DESCRIPTION
Mailbox Mailbox number.
Name 1 Directory Name 1.
Name 2 Directory Name 2.
COS Name/number of the COS for the mailbox.
Name Record Yes/No — Indicates whether a name recording exists for the mailbox.
Default Security Code Yes/No — Indicates whether the default security code was changed.
Mailbox Creation Indicates the date/time when the mailbox was created.
Format: MM/DD/YY HH/MM/SS.
Last Log On Indicates the date/time when the last log-on occurred for the mailbox.
Format: MM/DD/YY HH/MM/SS
Mailbox Comment Mailbox comment line.
7321
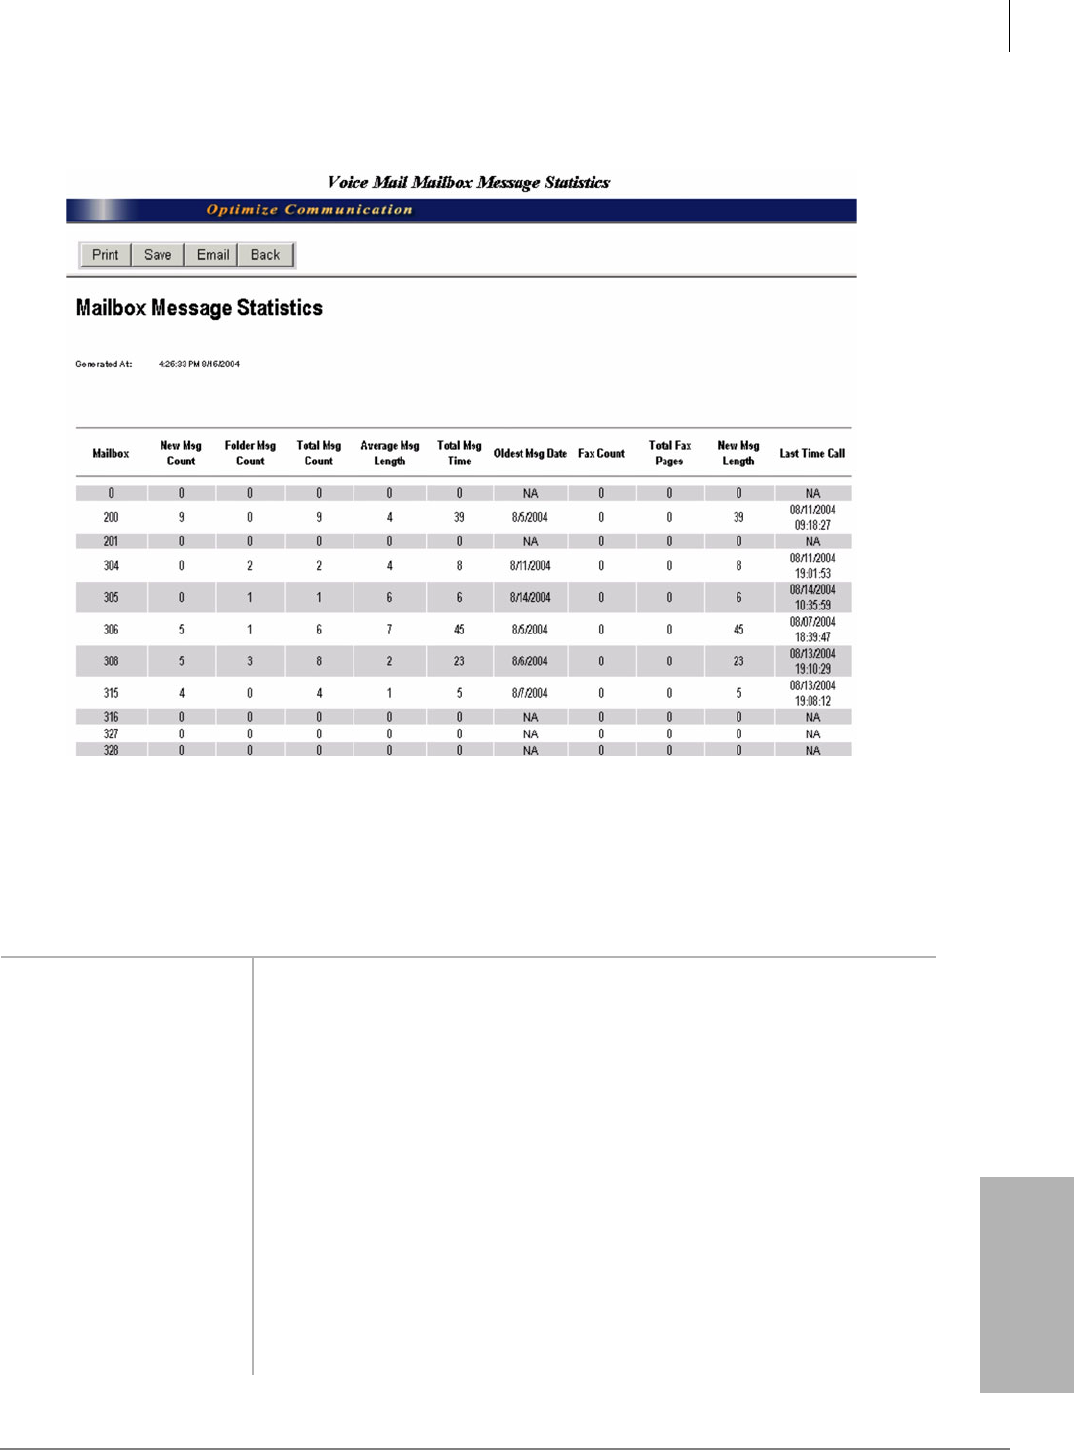
System Reports
Reports
Strata CIX Voice Mail Programming 01/07 12-9
System Reports
Mailbox Message Statistics Report
Figure 12-36 Mailbox Message Statistics Report Screen
Table 12-7 Mailbox Message Statistics Report Fields
FIELD DESCRIPTION
Mailbox Mailbox number.
New Msg Count Total number of new messages.
Folder Msg Count Total number of messages in all folders.
Total Msg Count Total number of all messages (i.e., new, saved, folders).
Average Msg Length Average message length.
Total Msg Time Total times in seconds of all messages.
Oldest Msg Date Date of the oldest message.
Fax Count Total number of fax messages.
Total Fax Count Total number of fax pages.
New Msg Length Message length of new messages.
Last Time Call Time when last call received.
7322
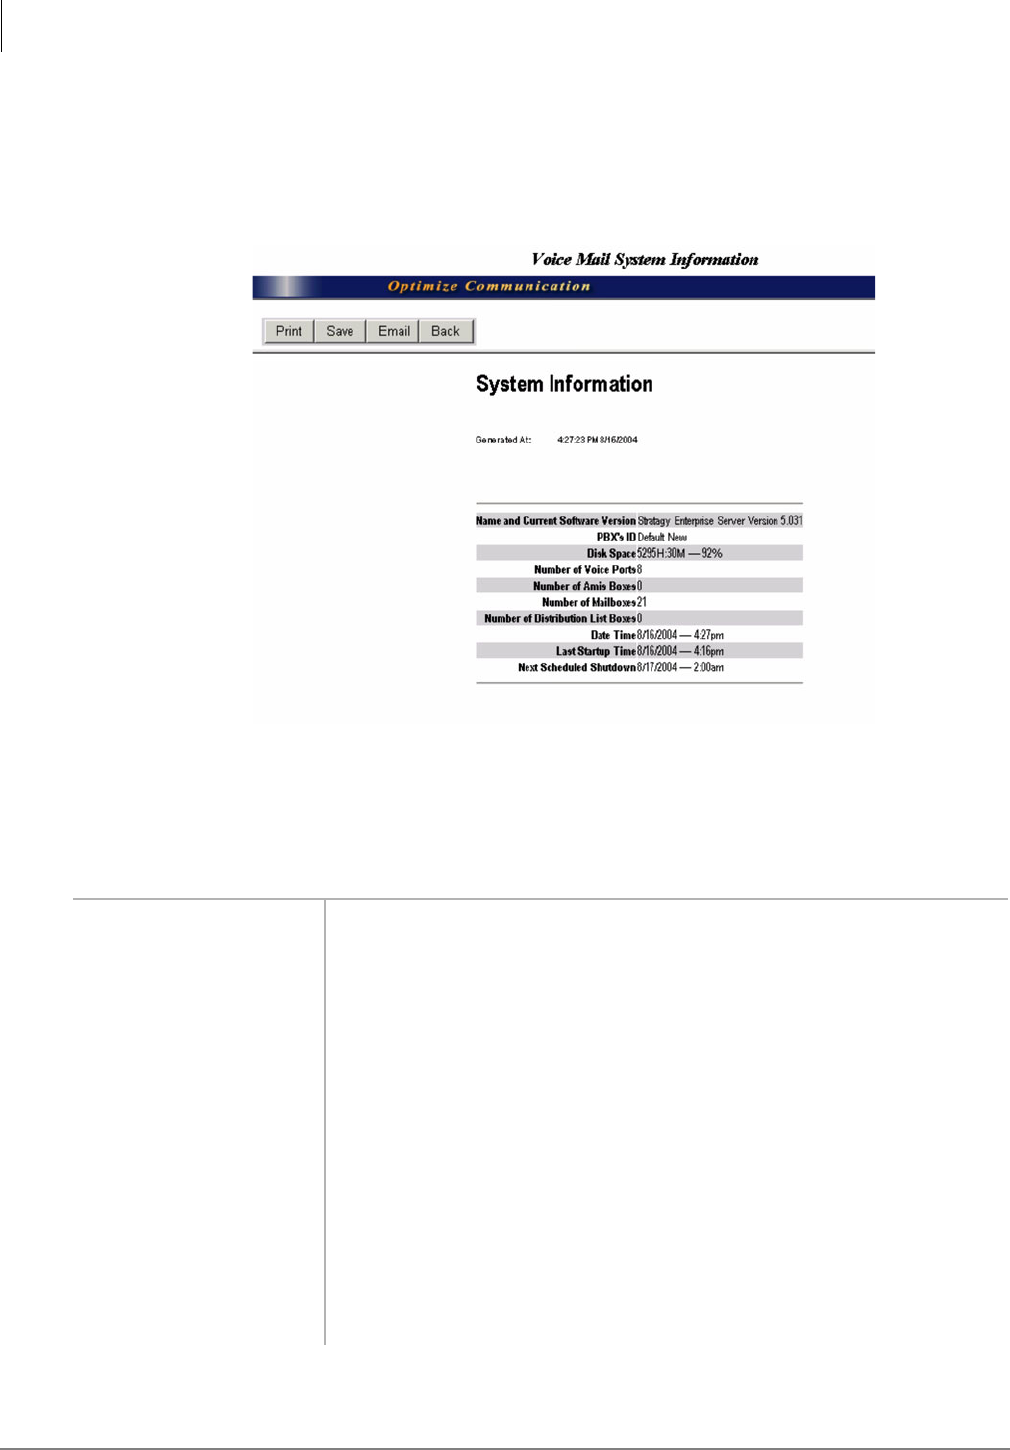
System Reports
Reports
12-10 Strata CIX Voice Mail Programming 01/07
System Information
This report contains the general system status, usage information and statistical data.
System Information Report
Figure 12-37 System Information Report Screen
Table 12-8 System Information Report Fields
FIELD DESCRIPTION
Name and Current
Software Version
Product name and software release version.
PBX’s ID PBX’s Integration Group names programmed in System Configuration (see
“Parameters” on page 3-28 ).
Disk Space Amount of available disk space.
Number of Voice Ports Number of voice ports (see “Voice Ports” on page 3-14 ).
Number of Amis Boxes Number of AMIS boxes (see “AMIS Networking” on page 10-5 ).
Number of Mailboxes Total mailboxes in system.
Number of Distribution List
Boxes
Number of system distribution lists (see “Distribution List (System)” on page 4-48 ).
Date Time Current system date/time. Format MM/DD/YY HH:MM.
Last Startup Time Date system last started up. Format MM/DD/YY.
Next Scheduled Shutdown Next scheduled shutdown for system (date/time).
7323
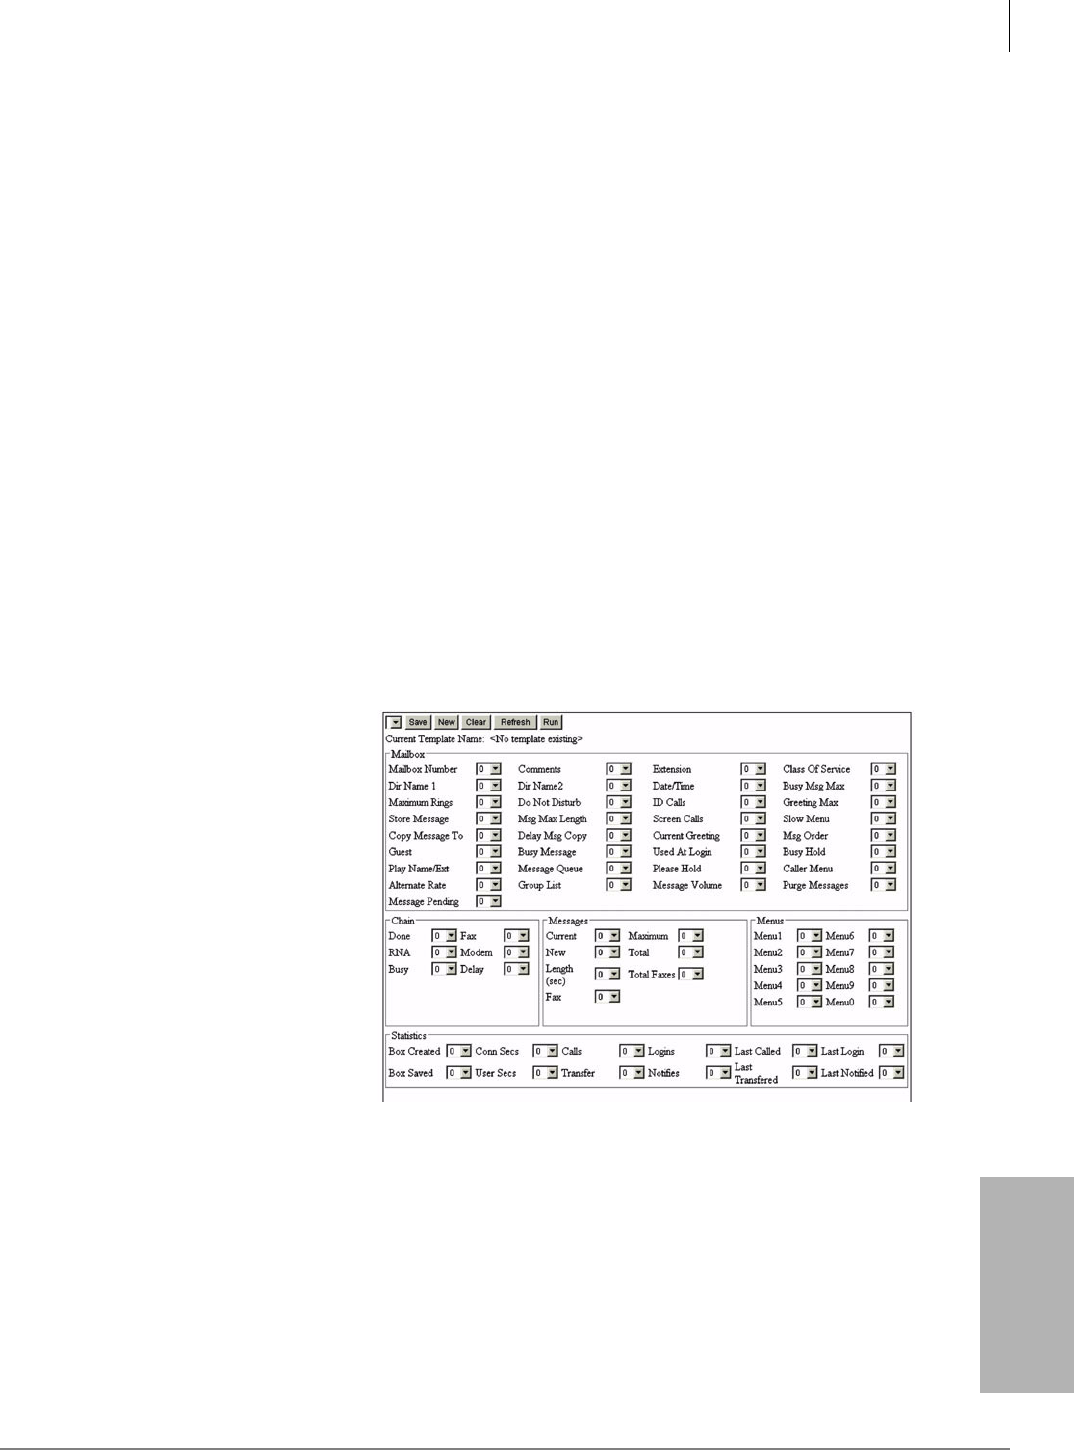
System Reports
Custom Reports
Strata CIX Voice Mail Programming 01/07 12-11
System Reports
Custom Reports
You can customize a report by creating/editing and deleting a report template. The available custom
reports are: Mailbox, AMIS, VPIM.
Report Templates
The voice mail system uses the report template to define the contents of a report. To define the
contents, you must:
•Select the report fields from the Report Template screen that will appear on the report. Using the
drop-down list for the field, select a number. The number marks the field for inclusion and
designates the column order (e.g., 1 is far-left column) that the field will appear in when the
report is run.
•Specify the User mailboxes that will be included in the report.
•Designate the statistic start/end dates. Information for that period of time will be contained in
the report.
•You must choose a report format from the drop-down list. Available formats are HTML and
Excel.
Once a report template is created, you can run reports using the template (see “Run/Print/Save/E-
mail Report” on page 12-12 ). After running a report, you can view, print, e-mail or save the report
to a file.
Create Voice Mailbox Template
1. From the eManager Menu,
click Utilities > Reports >
Mailbox Template. The
Template screen displays
(shown right).
2. From the Template screen,
click New. A pop-up box
displays.
3. Type the template name into
the field. Click OK. The
Template screen displays
with the name displayed in
the drop-down box at top left.
4. Number the Report fields in
the column order you want
them to appear on the report.
Maximum number of columns is 10.
For example, if you want a report listing the Mailbox Number, Maximum Rings, Dir Name 1
from left to right, the values for these fields would be:
Mailbox Number: 1
Dir Name 1: 3
Maximum Rings: 2
See Chapter 4 – Voice Processing for report field definitions.
5. Click Save. The template is saved.
7198

System Reports
Custom Reports
12-12 Strata CIX Voice Mail Programming 01/07
Edit Voice Mailbox Template
1. From the eManager Menu, click Utilities > Reports > Mailbox Template. The Template screen
displays.
2. Use the drop-down menu to select an existing Template Name.
3. Edit the template and click Save. The template is saved.
Create Voice Mail AMIS/VPIM Template
1. From the eManager Menu,
click Utilities > Reports >
AMIS/VPIM Template.
The Template screen
displays (shown at right).
2. Click New. A pop-up box
displays.
3. Type the template name
into the field. Click OK.
The Template screen
displays with the name displayed in the drop-down box at top left.
4. Number the Report fields in the column order you want them to appear on the report.
Maximum number of columns is 9. See “AMIS Networking” on page 10-5 and “VPIM
Networking” on page 10-13 for report field definitions.
5. Click Save. The template is saved.
Edit AMIS/VPIM Template
1. From the eManager Menu, click Utilities > Reports > AMIS/VPIM Template. The Template
screen displays.
2. Use the drop-down menu to select an existing Template Name.
3. Edit the template and click Save. The changes you made are saved.
Run/Print/Save/E-mail Report
When you run a report, voice mail compiles the report according to the report template and user
mailboxes you selected. The reports are compiled in columns, displaying each column’s title across
the top of the page. Mailboxes are listed in increasing order.
You can view, print, e-mail or save the report to a file on a floppy disk.
1. From the eManager Menu, click Utilities > Reports > Edit/Run Voice Mail (Mailbox or AMIS/
VPIM) Template. The Template screen displays.
2. Select the Template Name from the drop-down menu. Click Run. A pop-up box displays.
3. For AMIS/VPIM: Select the User Agent Type (Gateway or Proxy) from the drop-down list.
...or
For Mailbox: Enter the Statistic Start/End dates using a calendar drop-down box. If a date is left
blank, the report covers the data from the beginning data log period to the current time.
4. Type user IDs in the First User ID and Last User ID fields. These fields default to 0 and
99999999 respectively.
5. From the Format field, select HTML or Excel.
7199

System Reports
Custom Reports
Strata CIX Voice Mail Programming 01/07 12-13
System Reports
6. Click OK. The report displays on the screen.
7. (Optional) Click Print to print a report. The printer instructions display.
8. (Optional) Click Email to email the report. The Microsoft Internet Explorer screen displays.
9. (Optional) Click Back to return to the report entry screen. You can then change the format or
the report dates and rerun the report.
10.When you are finished, you can save the report to disk, or simply close the window.
This page is intentionally left blank.

Strata CIX Voice Mail Programming 01/07 13-1
Maintenance/
Troubleshooting
Maintenance/Troubleshooting 13
This chapter discusses how to backup and restore the Stratagy ES software.
Stratagy ES systems store configuration and messages through a combination of registry settings
and database/audio files. To properly backup and restore one of these systems, both elements must
be backed up and subsequently restored to the target system. This document outlines the steps
required to transfer the configuration, greetings and messages from one system to another.
Backup Procedure
Step 1: System Backup
‰ To back up the folders containing the database/voice files
1. From the Stratagy ES desktop, map to a Network Drive of a network server. This will be the
destination of the backup files.
2. Create a new StratagyES folder on the network drive.
3. Open My Computer on the Stratagy system.
4. On the C: drive open the StratagyES folder.
5. Hold down the Ctrl key on the keyboard and click Database > Messages > Persistence
folders, until all three are highlighted. Right-click on one of the folders and select Copy from
the pop-up menu.
6. Right-click on the StratagyES folder that you created on the network drive and select Paste.
7. Files should begin copying to the network drive. When completed, the StratagyES folder on the
network drive should contain the Database, Messages and Persistence folders, along with their
contents.
Step 2: Back Up Registry Key
1. From the Start Menu, click Run.
2. Enter REGEDT32 and then click OK.
3. In HKEY_LOCAL_MACHINE, click on SOFTWARE/TAIS.
4. Highlight the TAIS Key.
5. From the menu, select Registry > Save Key.
6. Select the networked drive that was set up in the previous step, opening the Stratagy ES folder.
Save the registry key in this folder. Give it an obvious name such as StratagyRegBackup.

Maintenance/Troubleshooting
Restore Procedure
13-2 Strata CIX Voice Mail Programming 01/07
Step 3: Backup Default Configuration On New System
To provide a contingency against corrupted data from the original system making the new system
unbootable, it is a good idea to back up the original configuration of the new system.
1. Open My Computer on the replacement Stratagy system and open the C: drive.
2. Create a new folder on C: and name it SESBackup.
3. Open the C:\StratagyES folder.
4. Hold down the Ctrl Key and click Database > Messages > Persistence folders, until all three
are highlighted. Right-click on one of the folders and select Copy from the pop-up menu.
5. Find the SESBackup folder that you created, right-click on it and select Paste.
6. When completed, the SESBackup folder should contain the Database, Messages and
Persistence folders, along with their contents.
Step 4: Back Up Default Registry Key
1. Run REGEDT32 (click Start > Run > REGEDT32 > OK) on the new system.
2. Open HKEY_LOCAL_MACHINE/Software/TAIS.
3. Highlight the TAIS Key.
4. From the menu, select Registry >Save Key.
5. Select the SESBackup folder. Save the registry key in this folder. Give it an obvious name such
as StratagyRegBackup.
Restore Procedure
Step 1: System Restore
‰ To restore the database/voice files
1. On the target Stratagy system, use the Stratagy ES Control to stop the Stratagy Service.
2. Stop the Dialogic Service: Click Start > Programs > Dialogic System Software > Dialogic
Configuration Manager-DCM > and finally the Red Stop button on the toolbar.
3. On the target Stratagy system, map to the network computer drive containing the Stratagy ES
Registry and database files.
4. Open the StratagyES folder on the network drive and, while holding down the Ctrl key,
highlight the Database, Messages and Persistence folders.
5. Right-click on one of the folders and select Copy from the pop-up menu.
6. On the target Stratagy system, Open My Computer and drill down to the StratagyES folder.
7. Right-click in the StratagyES folder and select Paste from the pop-up menu.

Maintenance/Troubleshooting
Utilities/Tools
Strata CIX Voice Mail Programming 01/07 13-3
Maintenance/
Troubleshooting
Step 2: Restore Registry Information
1. On the target Stratagy ES system, run REGEDT32.
2. Open HKEY_LOCAL_MACHINE/Software/TAIS.
3. Highlight the TAIS Key.
4. From the menu, select Registry > Restore.
5. Open the C:\StratagyES folder on the local hard drive, highlight your registry backup file and
click Open.
Utilities/Tools
Note This option is available only to Prime and Administrator levels.
The Tools menu consists of 6 options – Port Status, Tracer, Tracer File, IVR Alias Editor, Run IVR
Alias, and ASR Sync.
VM Port Status
See “Display Voice Port Status” on page 3-15 for information on using this option.
VM Tracer/Tracer Files
VM Tracer is a diagnostic tool that is designed to assist you in troubleshooting Stratagy ES’s
activity. It is a program that records events such as digits dialed in, digits dialed out, mailbox access,
port activity and more. When troubleshooting problems with Stratagy ES’s functionality, running
the Trace program should always be one of your first options.
It is automatically turned on when the Stratagy ES Server is started (see “Log on to eManager” on
page 2-2 ) and logs data until the Stratagy ES Server is shut down.
The Trace Data screen (Figure 13-1) consists of three elements: date/time, producer name list and
message text. You can view, save, or print the data. Trace files that are not saved cannot be
recaptured.
Figure 13-1 Voice Mail Tracer Data Screen
7460

Maintenance/Troubleshooting
Utilities/Tools
13-4 Strata CIX Voice Mail Programming 01/07
View, Save Trace Data
1. From eManager, click Utilities > Tools > VM Tracer. The VM Tracer screen displays.
2. (Optional) To save the Trace file, click Save or SaveAs Text. Type in the file name and
destination.
Note Trace files that are not saved are lost. Trace continues to run until the Stratagy ES Server is
shut down.
Retrieve Tracer File
1. From eManager, click Utilities > Tools > VM Tracer File. The Browser screen displays.
2. Find and select the tracer file and click Open. The file displays on your screen.
Trace Filters
There are four Trace filters available:
•normal – general nature (Tracer screen defaults to normal)
•support – determines correct installation and configuration of Stratagy ES
•debug – intended for debugging (useful for software developers)
•advanced – limits the trace data displayed on the screen by specifying producer list attributes
(see “Advanced Filter” on page 13-4 ).
The filters are available from the Filter menu at the top of the Voice Mail Tracer screen. The active
option appears with the radio button selected and only that trace data displays on the screen.
Advanced Filter
From the Advanced Filter screen, you can add, remove or edit a Producer on the display list. You
can override the Producers list entirely and display all trace data or you can select specific producers
from the list to appear on the Trace Data screen.
Table 13-1 Voice Mail Tracer Data Screen Fields
FIELD DESCRIPTION
Date/Time Date/Time message was generated.
Producer Name List List includes:
•Identifies session that generated message.
•Application components name within session.
•User Agent ID.
Message Text Brief description of message.
Maintenance/Troubleshooting
Utilities/Tools
Strata CIX Voice Mail Programming 01/07 5
Add Producer
1. From the Voice Mail Tracer screen, click Filter.
The Advanced Filter screen displays (shown at
right).
2. Click Add. The Trace Producer screen displays
(shown at right).
3. Type the User Agent. For example, 205.
4. Under Color, click Text
...or Background. The Color screen
displays (shown at right).
Note Changing the color(s) for a Producer
assists you in quickly reading the
Trace Data screen.
5. Click on a color and click OK. The sample
color appears in the Color/Solid block.
6. Click OK and the Trace Producer screen
closes. */*/205 displays in the Advanced
Filter screen, Line/UA/Application box
with a check mark next to it. If you selected special colors, the listing also displays in your
color selection.
7. Click OK. The Advanced Filter screen closes and only trace data generated by producer */*/
205 will display on the Trace Data screen.
7461
7462
7463
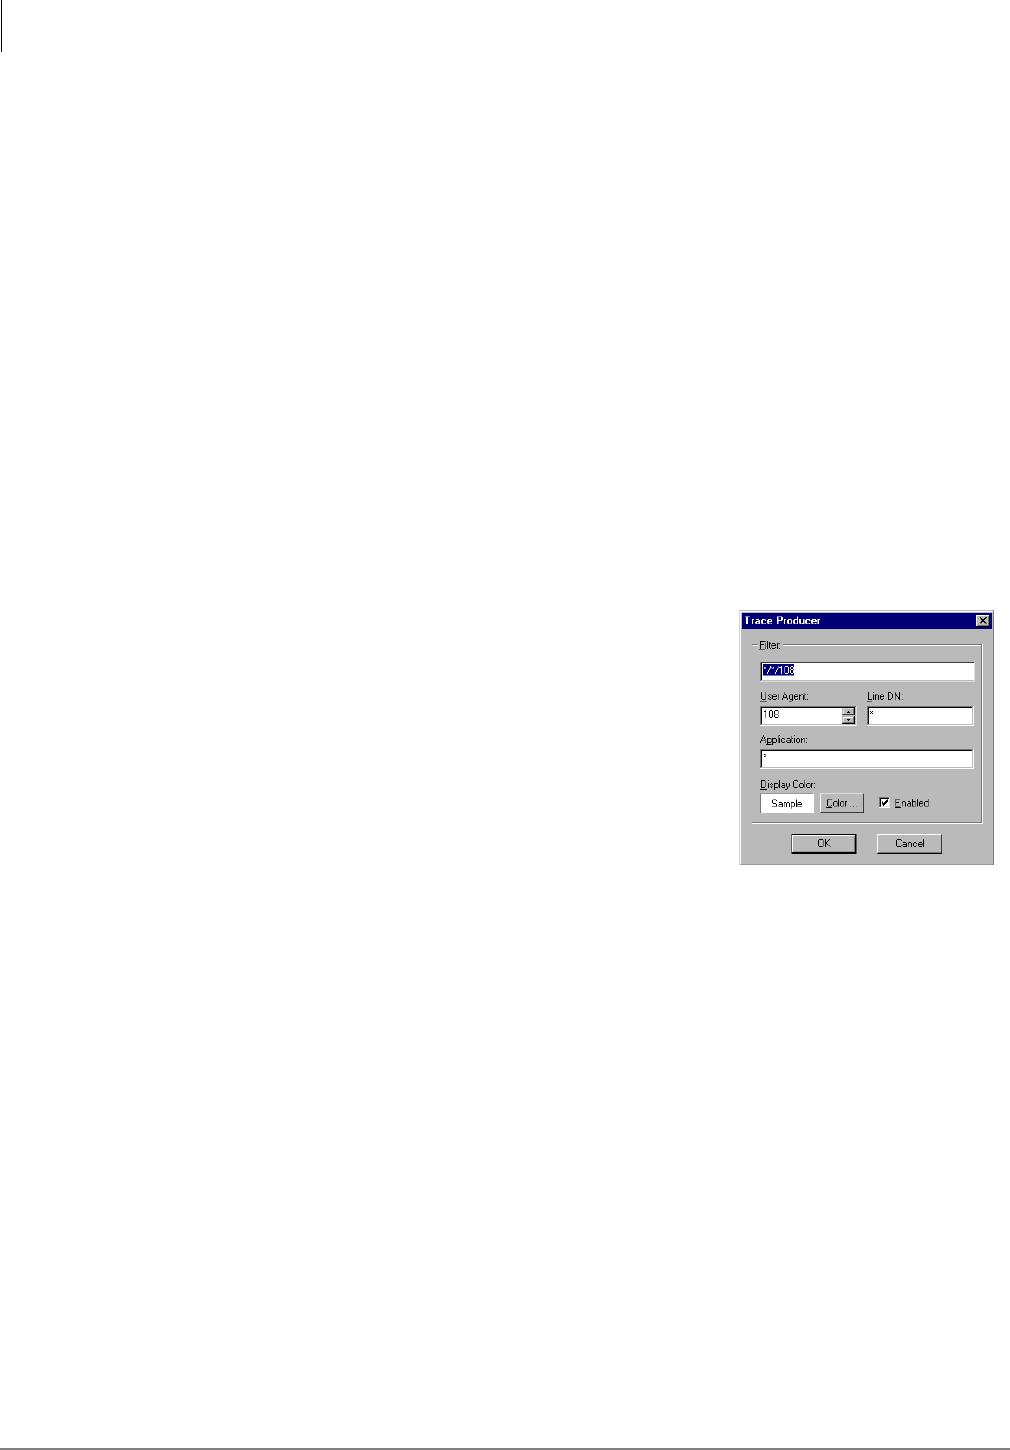
Maintenance/Troubleshooting
Utilities/Tools
13-6 Strata CIX Voice Mail Programming 01/07
Override Advanced Filter Producer List
1. From the Voice Mail Tracer screen, click Filter. The Advanced Filter Screen displays (see page
13-5).
2. From the Advanced Filter screen, select Display Trace Messages For All Producers at the top
of the screen.
3. Click OK. The Advanced Filter screen closes and trace data generated by all producers will
display on the Trace Data screen.
Select Specific Producers to Display
1. From the Voice Mail Tracer screen, click Filter. The Advanced Filter Screen displays (see page
13-5).
2. Remove the check mark from in front of any producer who want to eliminate from the trace.
3. Click OK. The Advanced Filter screen closes and trace data for the producer you removed the
check mark from will no longer display on the Trace Data screen.
Edit Producer
1. From the Voice Mail Tracer screen, click Filter. The Advanced Filter Screen displays (see page
13-5).
2. Highlight the Producer and click Edit or double-click on the
producer in the list. The Trace Producer screen displays
(shown at right).
3. Make any changes you need. Click OK. The Advanced Filter
screen displays.
4. Click OK. The Advanced Filter screen closes and the changes
are saved.
Remove Producer
1. From the Voice Mail Tracer screen, click Filter. The Advanced
Filter Screen displays (see page 13-5).
2. Highlight the Producer and click Remove. The Producer is removed from the list.
Important! No confirmation is requested. Make sure you want to delete the Producer before
clicking Remove.
3. Click OK. The Advanced Filter screen closes and the changes are saved.
IVR Alias Editor
See “IVR Alias Editor” on page 9-4 for details on using this function.
Run IVR Alias
See “Run IVR Alias” on page 9-5 for details on using this function.
ASR Sync
This mechanism synchronizes the voice mail database with that of the ASR engine directory. See
Chapter 6 – Automatic Speech Recognition (ASR) for instructions on using this option.
4496
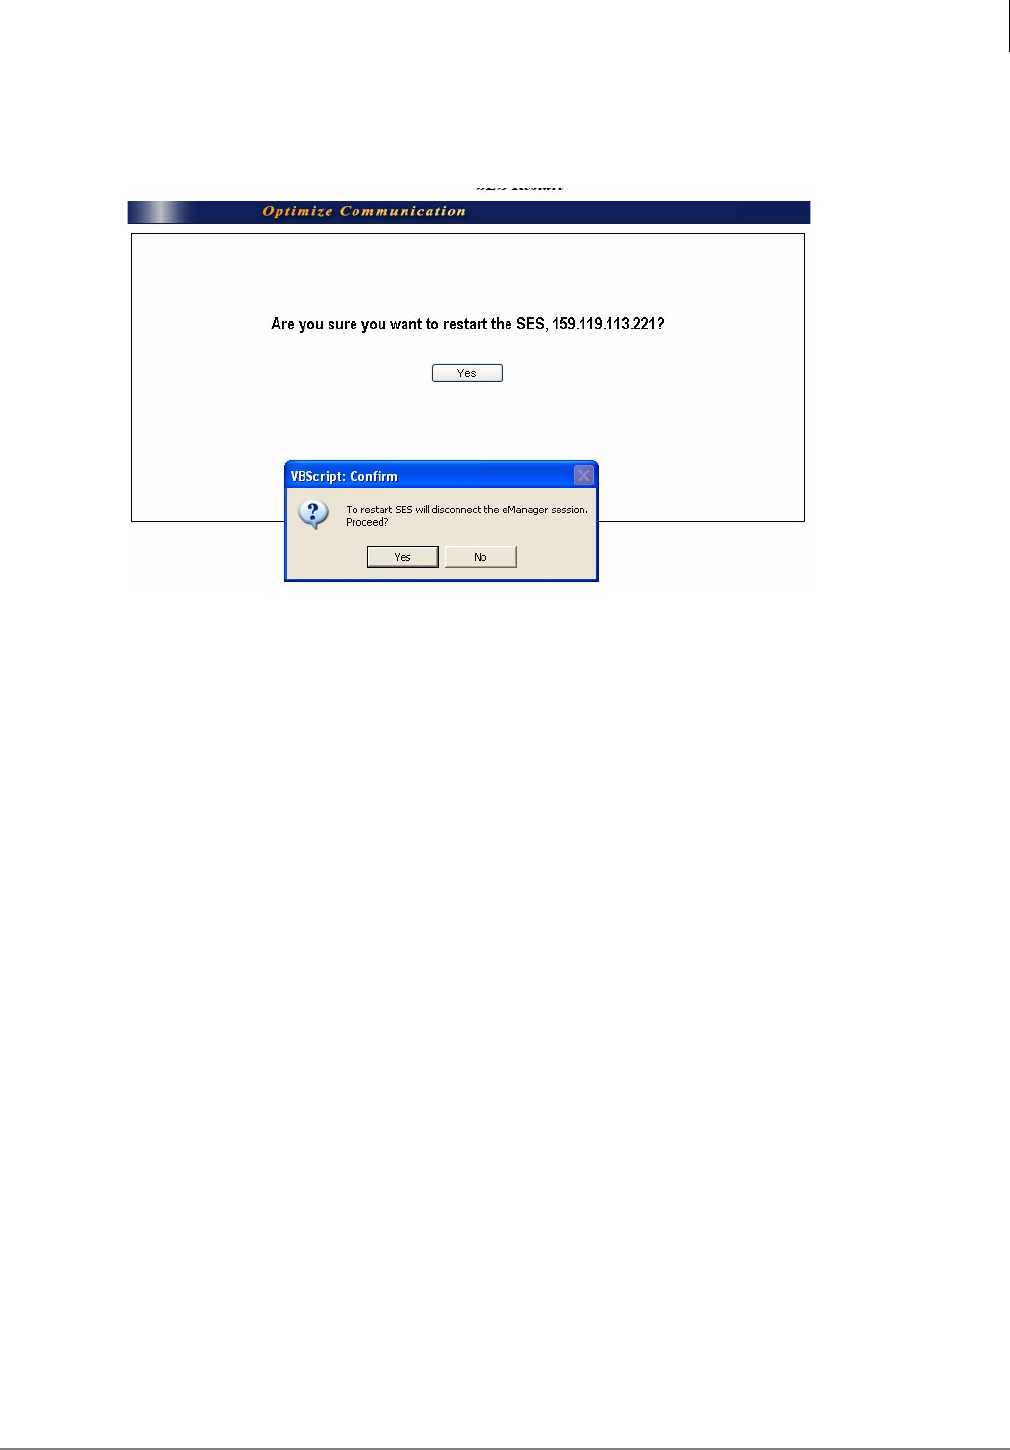
Maintenance/Troubleshooting
SES Restart
Strata CIX Voice Mail Programming 01/07 7
SES Restart
1. To restart Stratagy, from eManager click Utilities > Operations > SES Restart. A dialog screen
displays asking you to confirm the restart (shown below).
2. Click Yes and a warning/confirmation box displays telling you that by restarting SES you will
disconnect the eManager session.
3. To continue, click Yes. To cancel the process, click No.
This page is intentionally left blank.

Strata CIX Programming Vol.2 01/07 IN-1
Index
Index
A
accept_0_calling_id parameter,3-31
active_hold parameter,3-31
all port statistics report,12-5
AMIS
configuring Stratagy for AMIS,10-9
destination system number,10-9
gateway user agent,10-5
mailbox 989,4-2
node,10-8
notification,10-12
operation,10-11
parameters,10-9
private/urgent message handling,10-12
proxy user agent,10-6
reports,10-13
templates
create,12-12
edit,12-12
testing AMIS,10-11
user agents,10-5
amis_area_code parameter,3-31, 10-9
amis_country_code parameter,3-31, 10-9
amis_diskfull parameter,3-31, 10-9
amis_enabled parameter,3-31, 10-9
amis_failure_retry parameter,3-31, 10-9
amis_loopback_enable parameter,3-31, 10-9
amis_ltm parameter,3-31, 10-9
amis_max_msg parameter,3-31, 10-9
amis_max_node parameter,3-31, 10-10
amis_rna parameter,3-32, 10-10
amis_telephone_number parameter,3-32, 10-10
amis_unknown_node_action parameter,3-32, 10-10
answer methods,3-12, 3-14, 9-3
add,3-13
remove,3-13
answering machine parameter,3-32
ASR,1-4
answer method mailbox,6-4
automatic directory synchronization,6-8
continuous speech processor,6-2
installation
host-based,6-3
load software,6-4
modify operator mailbox,6-5
prior to upgrading,6-2
record greetings,6-5
voice port definition,6-4
auto (scheduler) screen,4-43
auto attendant options screen,4-16
auto record
create,4-47
delete,4-47
enable/disable,4-47
modify,4-47
B
backup,13-1
begin_rec_prompt parameter,3-32
box_idx parameter,3-33
busy hold,4-18
C
call processing,4-16
busy hold,4-18
caller menu,4-18
do not disturb,4-17
ID call,4-18
maximum rings,4-17
please hold prompt,4-18
screen calls,4-17
call record,1-7
call screening,4-46
caller menu,4-18
cancel_busy_hold parameter,3-33
chains,4-31
class of service
(see COS)
client PC,2-14, 8-4
cng_tone parameter,3-33

Index
D~I
IN-2 Strata CIX Programming Vol.2 01/07
company greeting,4-5
company_fax_number parameter,3-33
configuration
AMIS,10-5
voice ports,3-2
configuration menu
access,3-2
answer methods,3-12
configuration wizard,3-6
exit,3-2
holidays,3-4
language,3-24
notification port groups,3-18
port statistics,3-20
serial ports,3-16
telephone system integration,3-7
update database,3-2
voice ports,3-14
configuration wizard,3-6
connect_tone parameter,3-34
COS,4-11
explore function,4-4
inherit function,4-3
mailbox,4-3
create,4-4
edit,4-4
CTX proprietary integration,1-7
D
data retention,12-1
default_user_agent parameter,3-34
defaults box
user ID 997,4-5
defined tokens,11-7
direct send fax user agent,4-2
direct send voice,4-50
direct send voice mailbox
mailbox 998,4-2
directory
names,4-10~4-11
directory_min_digits parameter,3-34
discard_SMDI_source parameter,3-34
distribution list,4-48
create,4-49
delete,4-49
modify,4-49
do not disturb,4-17, 4-46
dtmf_gate parameter,3-34
E
e-mail,4-20
authentication method,4-22
notification,4-26
password,8-4
POP3 server,4-20
SMTP server,4-20
voice type,4-22
ETI-Eloquence,8-1, 8-3
explore function,4-4
extension,4-10
F
fax chain,4-33
fax failure,4-25
fax success,4-25
fax tone detect,4-5
server,1-3
fax_fail_entry parameter,3-34
fax_max_retries parameter,3-35
fax_requeue_interval parameter,3-35
feature groups
fax,1-3
TTS,1-5
unified messaging,1-4
FIFO,4-14
fixed_len0 ~ 9 parameter,3-35
G
gateway user agent,10-5
greetings,4-46, 6-5
busy,4-19
instructional,4-19, 4-46
maximum length,4-19
selected,4-19
groups,4-34
guests
defaults,4-5
mailboxes,4-34
number,4-12
user ID 996,4-5
H
holidays,3-4, 4-27, 4-45
add,3-5
delete,3-5
hub_count parameter,3-37
I
ID call,4-18
individual port statistics report,12-3
info screen,4-39
inherit function,4-3
installer,1-1

Index
L~M
Strata CIX Programming Vol.2 01/07 IN-3
Index
integration
add integration group,3-10
centralized voice mail,1-7
delete integration group,3-10
dial codes,3-9
group name,3-8
patterns,3-8
proprietary,1-7
switch type,3-8
type,3-8
IP address
mailbox 0,4-5
IVRalias editor,9-4
edit,9-4
run,9-5
configuring,9-1
user agents
create,9-1
delete,9-3
edit/modify,9-3
L
language,3-24, 4-35
LIFO,4-14
line type,3-8
local_amis_node parameter,3-37, 10-10
local_trace parameter,3-38
lock function,4-8
log on,2-2
log utilities,1-8
login_pound parameter,3-38
M
mailbox
0 IP address,4-5
0 operator,4-5
989 AMIS loopback,4-2
990 company greeting,4-5
994 fax tone detect,4-5
996 guest defaults,4-5
997 Defaults Box,4-5
998 direct send voice mailbox,4-2
999 system administrator mailbox,4-5
copy,4-6
COS,4-3
editor
auto (scheduler),4-43
auto attendant options,4-16
chains/groups screen,4-31
field descriptions,4-9
header,4-9
info,4-39
lock function,4-8
menu,4-7
menus,4-41
notify,4-23
refresh function,4-7
reset function,4-8
user mode options,4-12
extension,4-10
ID,4-10
reserved,4-5
search function,4-8
security code,4-11
templates,12-11
user,4-5
create,4-5
delete,4-6
modify,4-6
user mailbox reports,4-7
mailbox calling statistics report,12-6
mailbox info and status report,12-8
mailbox message statistics report,12-9
mailbox usage summary report,12-7
main menu,3-3
maintenance,1-8
max_call_scr_name_dur parameter,3-38
max_guest_box parameter,3-39
max_prompt parameter,3-39
max_sec_code_len parameter,3-39
max_silence parameter,3-39
maximum_box_length parameter,3-39
menus screen,4-41
messages,4-39
copy,4-14
folders,4-14
maximum length,4-13
order,4-14
pending,4-13
play date/time,4-13
purge,4-13
store,4-13
urgent,4-15
min_guest_box parameter,3-39
min_sec_code_len parameter,3-39
minimum_message_length parameter,3-39
minimum_record_length parameter,3-39
modem
chain,4-33
msg_recording_audio_type parameter,3-40
multiple system languages,1-3

Index
N~P
IN-4 Strata CIX Programming Vol.2 01/07
N
nam_maxlen parameter,3-40
name_announce parameter,3-40
name_recording_audio_type parameter,3-40
networking (see AMIS)
notification port groups,3-14, 3-18
add,3-19
delete,3-19
notification type
disk space,4-25
fax failure,4-25
fax success,4-25
normal,4-24
pickup,4-24
port out of service,4-25
relay,4-24
urgent message,4-25
notify menu
templates,4-23
notify record
add,4-29
delete,4-29
enable/disable,4-30
modify,4-29
notify screen,4-23
notify templates,4-23, 4-30
O
operator
mailbox,6-5
mailbox 0,4-5
operator_ua parameter,3-40
P
page_ready_tone parameter,3-41
parameter
play_user_id,3-41
parameters
accept_0_calling_id,3-31
active_hold,3-31
amis_area_code,3-31, 10-9
amis_country_code,3-31, 10-9
amis_diskfull,3-31, 10-9
amis_enabled,3-31, 10-9
amis_failure_retry,3-31, 10-9
amis_loopback_enable,3-31, 10-9
amis_ltm,3-31, 10-9
amis_max_msg,3-31, 10-9
amis_max_node,3-31, 10-10
amis_rna,3-32, 10-10
amis_telephone_number,3-32, 10-10
amis_unknown_node_action,3-32, 10-10
answering machine,3-32
begin_rec_prompt,3-32
box_idx,3-33
cancel_busy_hold,3-33
cng_tone,3-33
company_fax_number,3-33
connect_tone,3-34
default_user_agent,3-34
directory_min_digits,3-34
discard_SMDI_source,3-34
dtmf_gate,3-34
fax_fail_entry,3-34
fax_max_retries,3-35
fax_requeue_interval,3-35
fixed_len0 ~ 9,3-35
hub_count,3-37
local_amis_node,3-37, 10-10
local_trace,3-38
login_pound,3-38
max_call_scr_name_dur,3-38
max_guest_box,3-39
max_prompt,3-39
max_sec_code_len,3-39
max_silence,3-39
maximum_box_length,3-39
min_guest_box,3-39
min_sec_code_len,3-39
minimum_message_length,3-39
minimum_record_length,3-39
msg_recording_audio_type,3-40
nam_maxlen,3-40
name_announce,3-40
name_recording_audio_type,3-40
operator_ua,3-40
page_ready_tone,3-41
partial_q_ok,3-41
pending_threshold,3-41
phone_number,3-32, 10-10
play_skip,3-41
prompt_file,3-41
rings_no_answer,3-42
security_code_suffix,3-42
sendfax_line_group,3-42
short_direct_send,3-42
short_pause,3-42
smtp_retry_count,3-42, 7-7
smtp_retry_delay,3-42, 7-7
smtpserver_host,3-43, 7-7
smtpserver_maxconn,3-43, 7-8

Index
R~S
Strata CIX Programming Vol.2 01/07 IN-5
Index
smtpserver_types2accept,3-43, 7-8
speakname_dir,3-43
startup_apps,3-43
statistics_interval,3-43
subject_fax_only,3-46, 7-8
subject_voice_only,3-46, 7-8
subject_voicefax,3-46, 7-8
sys_language_table,3-37
sys_multiple_destination,3-40
sys_softkey_length,3-43
sys_vpim_enabled,3-46
timestamp_forwards,3-44
tmo_answer_prompt,3-44
tmo_dir_interdigit,3-44
tmo_dtmf,3-44
tmo_dtmf_login,3-44
tmo_hold,3-45
tmo_host,3-45
tmo_interdigit_timeout,3-45
tmo_menu,3-45
tmo_port,3-45
tmo_serial,3-45
tmo_sound,3-45
tmo_start_timeout,3-44
tmo_voicehome_login,3-45
unknown_node_action,3-32, 10-10
partial_q_ok parameter,3-41
password,8-4~8-5
pending_threshold parameter,3-41
phone_number parameter,3-32, 10-10
play_skip parameter,3-41
play_user_id parameter,3-41
playback
alternate rate,4-14
volume,4-14
please hold prompt,4-18
POP3 server,4-20
port group statistics report,12-4
port statistics,3-20
ports
information and statistics,12-2
programming
tokens,11-1
prompt_file parameter,3-41
proprietary integration,1-7
proxy user agent,10-6
R
record voice messages using Windows sound
recorder,7-15
refresh function,4-7
remote access,1-6, 2-14, 4-10, 7-5
replaced or variable tokens,11-4
reports,12-1~12-2
AMIS,10-13
custom,12-11
data retention,12-1
elements,12-2
mailbox information and statistics,12-6
port information and statistics,12-2
run,12-12
run/print,12-2
system information,12-10
templates,12-11
types,12-1
user mailbox,4-7
reserved mailboxes,4-5
reset function,4-8
restore,13-2
rings_no_answer parameter,3-42
S
SAM
ASR upgrade,6-3, 8-2
SAPI,8-1
scheduler,3-22
add scheduled action,3-23
delete scheduled action,3-23
screen calls,4-17
screens
answer methods,3-12
field descriptions,3-12
autofield descriptions,4-44
auto attendant
field descriptions,4-16
chains/groups/fax
field descriptions,4-31
holidays,3-4
infofield descriptions,4-39
integrated messaging
field descriptions,4-20, 4-37
mailbox header
field descriptions,4-10
menus
field descriptions,4-42
notification port groups,3-18
field descriptions,3-18
notify
field descriptions,4-24
port statistics,3-20

Index
S~S
IN-6 Strata CIX Programming Vol.2 01/07
scheduler,3-22
field descriptions,3-22, 4-48, 10-7
serial ports,3-16
field descriptions,3-16
statistical port groups
field description,3-20
telephone system integration,3-7
field descriptions,3-8, 3-28
user mode options
field descriptions,4-12, 9-2
voice ports,3-14
field descriptions,3-14
security code,4-11
security_code_suffix parameter,3-42
selected
greetings,4-19
instructional greeting,4-19
sendfax_line_group parameter,3-42
serial ports,3-16
add definition,3-17
assign resource,3-16
settings,3-17
SES restart,13-7
short_direct_send parameter,3-42
short_pause parameter,3-42
singular tokens,11-2
SMDI,3-16~3-17
assign serial ports,3-16
max. ext. length,3-8
serial integration
testing,10-4
SMDI integration,10-3
SMTP server,4-20
smtp_retry_count parameter,3-42, 7-7
smtp_retry_delay parameter,3-42, 7-7
smtpserver_host parameter,3-43, 7-7
smtpserver_maxconn parameter,3-43, 7-8
smtpserver_types2accept parameter,3-43, 7-8
soft keys,1-7
speakname_dir parameter,3-43
Speech Application Protocol Interface (see SAPI)
startup_apps parameter,3-43
statistical port groups,3-14
add,3-21
delete,3-21
statistics,4-40
statistics_interval parameter,3-43
Strata CIX,1-7
Stratagy ES administration
access,2-2
answer methods,3-12
client version,2-14
configuration menu,3-2
configuration wizard,3-6
exit,2-12
holidays,3-4
main menu,3-3
notification port groups,3-18
port statistics,3-20
serial ports,3-16
system date/time,3-4
telephone system integration,3-7
voice ports configuration,3-14
Stratagy ES remote user password administration
applet,8-5
subject_fax_only parameter,3-46, 7-8
subject_voice_only parameter,3-46, 7-8
subject_voicefax parameter,3-46, 7-8
switch type,3-8
add,3-11
delete,3-11
sys_language_table parameter,3-37
sys_multiple_destination parameter,3-40
sys_softkey_length parameter,3-43
sys_vpim_enabled parameter,3-46
system
AMIS networking,10-5
change date/time,3-4
integration,1-7
maintenance,1-8
time,3-4
token programming,11-1
system administrator
mailbox 999,4-5
system administrators,1-1
system distribution list,4-48
system information report,12-10
system parameters,3-28
add,3-30
definitions,3-31
delete,3-30
modify,3-30
system reports,12-1~12-2
custom,12-11
data retention,12-1
elements,12-2
mailbox information and statistics,12-6
port information and statistics,12-2
run,12-12
run/print,12-2
system information,12-10
templates,12-11
types,12-1

Index
T~T
Strata CIX Programming Vol.2 01/07 IN-7
Index
T
telephone system integration,3-7, 4-16
templates,4-23, 4-30, 12-11
AMIS,12-12
mailbox
create,12-11
edit,12-12
text-to-speech (see TTS)
time zones,4-34
timestamp_forwards parameter,3-44
tmo_answer_prompt parameter,3-44
tmo_dir_interdigit parameter,3-44
tmo_dtmf parameter,3-44
tmo_dtmf_login parameter,3-44
tmo_dtmf_start_timeout parameter,3-44
tmo_hold parameter,3-45
tmo_host parameter,3-45
tmo_interdigit_timeout parameter,3-45
tmo_menu parameter,3-45
tmo_port parameter,3-45
tmo_serial parameter,3-45
tmo_sound parameter,3-45
tmo_voicehome_login parameter,3-45
token programming language,11-1
auto’s extension field,11-1
defined tokens,11-7
notify’s method field,11-1
programming tokens,11-2
replaced or variable tokens,11-4
singular tokens,11-2
user’s extension field,11-1
using,11-1
tokens
defined
+( ) addition,11-20
<( ) starts incremental fax,11-21
=( ) equate,11-20
>( ) adds incremental fax,11-21
?( ) exists in file,11-20
[( ) read %S variables,11-22
]( ) write %S variable,11-22
^( ) change port volume,11-22
{ } input file,11-23
|( ) append variables,11-21
G( ) go to user ID,11-7
H( ) hang up process,11-7
I( ) if conditional,11-7
J( ) receive fax,11-8
KB( ) plays tone,11-8
KC( ) compare security code,11-8
KD( ) delete mailbox message,11-8
KI( ) position of substring,11-9
KL( ) log in caller,11-9
KR( ) creates a recording,11-9
KT( ) forwards calls,11-9
KV( ) delete record,11-10
L( ) switch system language,11-10
M( ) audiotex menu,11-11
N( ) update record,11-12
O( ) timed on-hook,11-13
P( ) play,11-13~11-14
Q( ) question and answer,11-14
R( ) read DTMF from a caller,11-15
S( ) serial port access,11-15~11-16
T( ) transmit fax,11-16~11-17
V( ) search for value,11-18
W( ) wait for event,11-19
X( ) creates zero length file,11-19
Y( ) deletes file,11-19
Z( ) execute done chain,11-19
replaced
%C replaces port number,11-4
%D hard drive space remaining,11-4
%E extension field,11-4
%F user ID’s directory name,11-4
%K value held in calling party ID,11-4
%M number of messages,11-4
%N number of new messages,11-4
%P previously accessed user ID,11-5
%R relay page DTMF,11-5
%S0 ~ %S19 store value,11-5
%T connect time,11-5
%U user ID,11-5
%V variable,11-5
%W current day of week,11-5
%X transfer hold codes,11-6
%Y current date,11-6
%Z current time,11-6
LEN[ ] length,11-6
singular
- short pause,11-2
# plays DTMF tone,11-2
* plays DTMF tone,11-2
, long pause,11-2
@ suppress normal process,11-2
0 ~ 9 plays DTMF tone,11-2
A ~ D plays DTMF tone,11-2
E earth recall,11-2
F hookflash,11-2
H go off hook,11-2
U return to transferring user ID,11-3

Index
U~V
IN-8 Strata CIX Programming Vol.2 01/07
X remember event,11-3
Y forget event,11-3
Z test event,11-3
tools menu
system date/time,3-4
Trace,13-3
data screen,13-3
trace,1-8
filters,13-4
advanced,13-4
retrieve file,13-4
view,save data,13-4
troubleshooting
trace,13-3
TTS,1-5, 8-1
continuous speech processor,8-1
installation
host-based,8-2
prior to upgrading,8-2
tutorial,4-13
U
unified messaging,1-4, 7-1
client components
Internet Protocol integration,7-5
Microsoft Outlook integration,7-3
configure system parameters,7-7
configure user mailboxes,7-7
feature description,7-2
install audio codec,7-9
installation,7-6
record voice messages using Windows sound
recorder,7-15
server components,7-3
Stratagy ES proprietary outlook form
configure,7-12
install,7-9
voice file compression,7-2
unknown_node_action parameter,3-32, 10-10
user agent
988 direct send fax user agent,4-2
AMIS,10-5
definition,1-1
direct send voice,4-50
distribution list,4-48
greeting,3-12
IVR,9-1
menu,4-2
MVP,4-1
user ID
996 guest defaults,4-5
997 defaults box,4-5
user mode options screen,4-12
user statistics,4-39
users menu
directory names,4-10~4-11
security code,4-11
V
voice ports,9-3
add definition,3-15
configure,3-2, 3-14
display status,3-15
voice processing,4-1
Voice Profile Internet Mail (see VPIM)
VPIM,10-13
gateway user agent,10-13, 10-15
operation,10-16
proxy user agent,10-13, 10-15
user agents,10-13
vpim,3-46
THIS IS THE LAST PAGE OF THE DOCUMENT.
