Trane Zn510 Controller Users Manual
Tracer to the manual 9748aa02-8805-42e3-9683-a3fccef26ba7
2015-01-21
: Trane Trane-Zn510-Controller-Users-Manual-236293 trane-zn510-controller-users-manual-236293 trane pdf
Open the PDF directly: View PDF ![]() .
.
Page Count: 32
WSHP-IOP-2
May 1998
Installation, Operation,
and Programming
Tracer™ ZN510 Controller

Literature
History
© 1998, American Standard Company
Installation, Operation,
and Programming WSHP-IOP-2
Library Service Literature
Product Section Unitary
Product Water-Source Heat Pumps
Model 000
Literature Type Installation, Operation,
and Programming
Sequence 1
Date April 1998
File No. SL-UN-000-WSHP-IOP-2-0498
Supersedes New
Related Literature
zCNT-IOP-1 ZN510 1 Controller:
Installation, Operation, and Pro-
graming
zWSHP-PD-1 Water-Source Heat
Pump Controller Product Data
Sheet
zWMCA-PD-1 ZN510 Loop Con-
troller Product Data sheet
zWSHP-IOP-3 ZN510 Water-
Source Heat Pump Controller
Installation, Operation, and Pro-
gramming Guide
zWMCA-IOP-1 ZN510 Controller
Installation, Operation, and Pro-
gramming Guide
The Trane Company has a policy of continuous product improvement and it reserves the right to change
specifications and design without notice.

Table of Contents
Start-up Procedure 4
Power-up Sequence 5
Unit Identification Tag 6
Unit Operation 7
General Information 7
Communication 7
Power 8
Binary Outputs 8
Analog Outputs 9
Binary Inputs 9
Analog Inputs 12
Zone Sensors 15
Heating or Cooling Control
Mode Operation
18
Single or Dual Compressor
Operation
19
Data Sharing 20
Configuration 21
Troubleshooting 22
Diagnostics 27
ZN510 Controller Replacement 28
Wiring Diagram 29
Hardware Specifications 31
Appendix 33

4
Start-up
Procedure
Installation of New Units
1. Follow all instruction for
installation of water source
heat pumps as detailed in the
IOM (Installation Operation
Maintenance manual).
2. Disconnect power or disable
the circuit breaker to unit.
3. Run communication link wire to
field terminal strips 14 and 16.
(See wiring diagram in the
unit).
4. Install zone sensor to low
voltage control terminals 1
through 6. (See wiring diagram
in the unit and zone sensor
submittals).
5. Verify that water connections
have been made to unit, then
ensure that water is circulating
through the unit.
6. Reapply power.
7. Check for STATUS GREEN LED
operation to ensure power and
communication has been made
to the ZN510™.
Peel IDENTIFICATION TAG from unit
and place in the ZN510 IOP, on a
copy of Sheet 6 of this document, or
on building plans for future location
use. The actual room location on the
tag may be hand written.
Zone Sensor Placement
Zone sensor location is an important
element of effective room control
and comfort.
The best sensor location is typically
on a wall, remote from the HVAC unit.
Readings at this location assure that
the desired setpoint is achieved
across the space, not just near the
unit itself. It may be necessary to
subdivide the zone with multiple
units to ensure adequate control
and comfort.
The following are typical areas
where the zone sensor should not
be mounted:
zNear drafts or “dead spots”
(e.g., behind doors or corners)
zNear hot or cold air ducts
zNear radiant heat (e.g., heat
emitted from appliances or the
sun)
zNear concealed pipes or
chimneys
zOn outside walls or other non-
conditioned surfaces
zIn air flows from adjacent zones
or other units

5
Power Up
Sequence
Power Up Sequence
When 24 VAC power initially is
applied to the ZN510 controller, the
following sequence occurs:
1. All outputs are controlled off.
2. The controller reads all inputs
to determine their initial values.
Note: Because the space tempera-
ture can be hardwired to the con-
troller or communicated, the
controller waits for several minutes
to check for the presence of a com-
municated value.
3. A random start time is hard
coded on every board and
cannot be disabled. The board
generates a random time delay
between 0 and 25 seconds.
Once this time expires, the
power up control wait time (if
configured) will wait for 120
seconds. The power up control
wait allows ample time for a
communicated request to
arrive. If the power up control
wait time expires, and the
controller does not receive a
communicated occupancy
command, the unit assumes
stand alone operation.
4. Normal operation begins.

6
Unit
Identification
Tag
Unit Identification Tag
The unit identification tag is factory
mounted and provided for easy
identification of an installed unit. It
contains model number, tagging,
and location information. See
Figure 1.
The top portion of the unit
identification tag remains
permanently affixed to the unit for
identity purposes. The bottom
portion of the tag provides pertinent
information that is removable to be
placed on building plans or in the
ZN510 IOP on page 33. This provides
identification history about the unit’s
location for quick reference.
These tags provide information
about unit location, unit serial
number, and NID (neuron
identification number). The NID is
similar to the serial number of the
unit but is specific to the
identification of the ZN510 Board.
The location identification is a
customer defined, clear English
description, of the unit’s physical
location. This is a 27 character
description of the location. For
example, if the location identification
for a unit is “Conference Room 101”,
the ZN510 and Rover (the Trane
Comm 5 service tool) will recognize
this clear English description so
maintenance can be performed on
the appropriate unit. If location
identification is not defined, it will
default to the unit serial number. This
provides some information so the
user has multiple references to the
unit. The blank location is provided
for field modification in case the unit
is moved from the initial location.
Figure 1: Unit Identification Tag
Note: Fold and tear carefully along dashed
removable line.

7
General Information
The ZN510 controller is a
microprocessor-based direct digital
controller that controls a variety of
water source heat pump equipment
including:
zStandard efficiency horizontal
and vertical units up to 10 tons.
zHigh efficiency horizontal and
vertical units.
zConsole water source heat
pumps.
ZN510 is designed to provide
accurate and reliable zone
temperature control by using
custom proportional integral (PI)
algorithms. The controller is factory
installed and configured to support:
zSingle fan speed.
zUp to two compressors.
zReversing valve.
z2-position outdoor air damper
or generic binary output.
Peer-to-peer communication across
controllers is possible even when a
building automation system is not
present. ZN510 is also adaptable as
a standalone system.
Communication
The ZN510 controller communicates
via Trane’s Comm5 protocol.
Typically, a communication link is
applied between unit controllers and
a building automation system.
Communication is also possible
with Trane’s service tool Rover™.
ZN510 provides a total of six 1/4-inch
quick-connect terminals for
connection to the Comm5
communication link. These
connections include:
zTwo terminals (TB2-1, TB2-2)
are provided for direct con-
nection of Rover to the ZN510
Board or provided as spare ter-
minals.
zTwo terminals (TB2-3, TB2-4)
are connected to the field
terminal strip (1TB1-14,
1TB1-16) for connection to the
communication link (daisy
chain).
zTwo terminals (TB2-5, TB2-6)
are connected to the field
terminal strip (1TB1-5, 1TB1-6)
which should be connected to
the zone sensor communication
jack. This provides direct
connect of Rover to the commu-
nication link without having to
connect directly to the ZN510
board or provided as spare ter-
minals.
zThe field terminal strip 1TB1
provides screw terminations for
all field connections.
Figure 2: Communication connections
COMM COMM COMM
TB2-1
TB2-2
TB2-3
TB2-4
TB2-5
TB2-6
Zone
Sensor
Communication
Link
Space
Communication
Connection
1TB1-14
1TB1-16
1TB1-5
1TB1-6
20 pole low voltage
terminal strip screw
connections for
field hook-up
Figure 3: Communication Wiring
Unit Operation

8
Power
The ZN510 controller is powered by 24
VAC. A total of two 1/4-inch quick-
connect terminals are provided for 24
VAC connection to the board. See
Figure 4 for ZN510 power requirement.
Note: Power for field installed ancil-
lary devices is not available from the
board. It must be tapped at trans-
former. See Table 21 for excess power
available.
Factory Supplied Transformer
24VAC
Line
Voltage
Figure 4: Power Connections
Binary Outputs
The ZN510 uses five of its binary
outputs to control heat pump units.
Outputs are load side switching triacs.
The triac acts as a switch by either
making or breaking the circuit
between the load (reversing valve,
damper, contactor, relay) and ground.
See Figure 5 for the configuration of
the five binary outputs.
2-Position Damper Actuator or
Generic Binary Output
Binary output 6 (BOP 6) is factory
configured to control a normally
closed 2-position outdoor air damper.
It may be field modified to control a
generic output for control by a
building automation system. If set up
as a generic output, the controller
does not use BOP 6 as part of the
normal control. A building automation
system must issue commands to
control the generic binary output.
Note:
zDuring occupied mode, the
outdoor air damper is closed
when the fan is controlled off.
zDuring unoccupied mode, the
outdoor air damper normally
remains closed.
z2-position damper must not
exceed 10 VA power output from
board.
J1-1
Binary Outputs
Figure 5: Binary outputs
.
Table 1: BOP 6 control of a 2-position outdoor air damper
Model Fan Operation Outdoor Air Damper
Occupied On or cycling
Off
Open
Closed
Occupied warm up or
cool down On or cycling Closed
Occupied standby On or cycling Closed
Unoccupied Cycling Closed
Diagnostic present Diagnostic dependent Closed
BOP 1 (Fan)
BOP 2 (Reversing Valve)
BOP 3 (Not available)
BOP 5 (Compressor 1)
BOP 6 (Compressor 2)
BOP 7
J1-2
J1-3
J1-4
J1-5
J1-6
J1-7
24VAC
Unit Operation
1TB1-17
1TB1-18
Field installed
2 position
damper actuator
BOP 4 (Not Used)

9
Unit Operation
Analog Outputs ZN510 does not use analog outputs.
Binary Inputs
The ZN510 controller has three
available binary inputs (BI). These
inputs are factory-configured for
the following functions:
zBI 1= Low temperature
detection (freezestat) (Circuit 2).
zBI 2 = Condensate overflow.
zBI 3 = Occupancy or generic
binary input.
Each binary input may be
configured as not used depending
on options selected. BI 3 is
configured as a normally open
occupancy input, but may be field
modified for generic binary input
which is only supported by a build-
ing automation system.
Note:
The diagnostic functions related to
binary inputs such as low tempera-
ture detection and condensate
overflow are fixed sequences.
Each binary input associates an
input signal of 0 VAC with open
contacts and 24 VAC with closed
contacts. See Figure 6 for typical
binary input configurations for the
heat pump.
Figure 6: Binary inputs.
BI 1
J2-1
J2-2
J2-3
J2-4
J2-5
J2-6
Field Wired
Occupancy Input
BI 2BI 3
Binary Inputs
Condensate Overflow
Low Temperature
Detection (Circuit 2)
Table 2: Binary input configurations
Binary Input Description Configuratio
n
Contact
Closure
Contact
Open
BI 1 Low Temperature
Detection (Cir 2)
Normally
closed Normal Diagnostic
BI 2 Condensate Overflow Normally
closed Normal Diagnostic
BI 3 Occupancy Normally open Unoccupied Occupied
Generic Normally open Normal Normal
Note:
See Page 10 for specific information concerning BI 1, BI 2 and BI 3.
Output Overrides
The ZN510 controller includes a
manual output test function. Use this
feature to manually exercise the
outputs in a defined sequence. The
purpose of the test sequence, is to
verify output and end device
operation. Use the manual output
test to:
zVerify output wiring and
operation without using Trane’s
service tool, Rover.
zForce compressor operation,
allowing the technician to use
refrigerant gauges or other test
equipment to verify unit
operation.
The test sequence resets unit
diagnostics and attempts to restore
normal unit operation prior to
testing the outputs. If the diagnostics
remains after a reset, the status LED
indicates the diagnostic condition is
still present and has affected the
manual output test. See
Troubleshooting section for Green
LED and Testing Heat Pump
Configurations on page 21 & 22.

10
Unit Operation
Low Temperature Detection
The low temperature detection
diagnostic protects the heat
exchanger by using an analog
leaving water temperature sensor to
protect refrigerant circuit 1 and a
binary low temperature detection
device to protect refrigerant circuit
2. Each individual refrigerant circuit
is disabled when the low
temperature condition exists for that
circuit.
For two compressor units, the
controller responds to low
temperature detection by allowing
the fan to operate, while disabling
the compressor for the faulty circuit.
The compressor for the normal
circuit continues to operate. The
outdoor air damper also operates
normally.
All unit operation is disabled when
the heat pump shuts down both
circuits, due to low temperature
conditions. See Table 3 for more
information.
Table 3: ZN510 response to low temperature detection diagnostic
Description Fan
Operation Compressor Operation Damper
Operation
Low Temperature Detection
(Circuit 1) Enabled Circuit 1-Disabled
Circuit 2-Normal Operation
Normal
operation
Low Temperature Detection
(Circuit 2) Enabled Circuit 1-Normal Operation
Circuit 2-Disabled
Normal
operation
Low Temperature Detection
(Circuits 1 and 2) Disabled Circuit 1-Disabled
Circuit 2-Disabled Closed
Note:
zThe low temperature detection device automatically resets when the heat exchanger temperature returns to
normal. However, you must manually reset the low temperature detection diagnostic to clear the diagnostic and
restart the unit. Refer to page 28 on how to reset a unit.
zIf BOP 6 is configured as a generic binary output, the state of the output is not affected by the low temperature
detection diagnostic or by other diagnostics.
Condensate Overflow
A condensate overflow switch
detects the condensate condition.
The condensate overflow switch is a
normally closed device. This switch
is physically connected to the binary
input 2 (BI 2). When the
condensation reaches the trip point,
the binary input detects the
diagnostic condition. A condensate
overflow signal generates a
diagnostic which disables the fan,
disables all compressors, and closes
the 2-position outdoor air damper
(when present). The condensate
overflow diagnostic does not affect
the generic binary output (when
present).
Note:
The condensate overflow switch,
located in the condensate pan, auto-
matically resets when the conden-
sation returns to normal levels.
However, you must manually reset
the controller’s condensate over-
flow diagnostic to clear the diagnos-
tic and restart the unit. Refer to page
28 on how to reset a unit.
Occupancy
ZN510 uses the occupancy binary
input for two occupancy-related
functions. For standalone
controllers (any unit not receiving a
communicated occupancy request,
typically from a building automation
system), the occupancy binary input
determines the unit’s occupancy
based on the hardwired signal.
Typically, the signal is a dry set of
binary contacts which is either
connected to a switch or timeclock
contacts.
When a hardwired occupancy signal
is open, the unit switches to
occupied mode (if the occupancy
input is configured as normally
open). When a hardwired
occupancy signal is closed, the
controller switches to Unoccupied
mode.

11
Unit Operation
In Occupied mode, the controller
operates according to the occupied
setpoints. In Occupied Standby
Mode, the unit controller operates
according to the Occupied Standby
setpoints. When the controller
receives a communicated
unoccupied request, the controller
operates according to the
unoccupied setpoints regardless of
the state of the hardwired
occupancy input.
If neither the binary input nor the
communicated input is used to
select the occupancy mode, the
controller defaults to occupied
mode because the occupancy binary
input (if present) typically is
configured as normally open
without an occupancy device
connected.
Table 4: Normally open hardwired input configuration (BI 3)
Description Communicated Request Hardwired State Result
Standalone NA Open = Occupied Occupied
Standalone NA Closed = Unoccupied Unoccupied
Communicating Occupied Open = Occupied Occupied
Communicating Unoccupied Open = Occupied Unoccupied
Communicating Occupied Standby Open = Occupied Occupied Standby
Communicating Occupied Closed = Occupied Standby Occupied Standby
Communicating Unoccupied Closed = Occupied Standby Unoccupied
Communicating Occupied Standby Closed = Occupied Standby Occupied Standby
Generic Binary Input
Building automation systems can
monitor the status of the generic
binary input. This input does not
affect controller operation.
High and Low Pressure
Switches
The high and low pressure cutout
switches are wired in series with the
compressor contactor in the unit.
The ZN510 controller detects the
state of each switch circuit by
monitoring the controller’s
compressor triac outputs. If either
the high pressure switch (HPC) or
the low pressure switch (LPC) switch
opens, a fault condition occurs. This
open circuit prevents the
compressor contactor from
energizing keeping the compressor
from running. The controller
automatically detects the fault
condition by measuring the
compressor triac output signal.
By default, when the HPC or LPC
switches detect a high or low
pressure condition in the refrigerant
circuit, the special input detects the
diagnostic and disables all
compressor operation for that
circuit. The unit fan continues to
operate, if only one circuit is
disabled in a two compressor unit.
When the HPC/LPC diagnostic is
present on both circuits, the ZN510
shuts off the unit fan and disables
unit operation. See Figure 7 for high
and low pressure switch.
When the refrigerant circuit returns
to normal, the HPC and the LPC
switches automatically reset. The
high or low pressure cutout
diagnostic may need to be manually
reset to clear the diagnostic and
enable compressor operation for the
fault circuit.
Note:
If configured for normally closed, all states are opposite of Table 4.

12
Unit Operation
12 456 73
Analog Inputs
The ZN510 controller has five
available analog inputs (AI). These
inputs are factory-configured for the
following functions:
zZone = Space temperature.
zSet = Local setpoint.
zFan = Fan mode input.
zAI 1 = Leaving water tem-
perature (Circuit 1).
zAI 2 = Discharge air tem-
perature.
See Figure 8 for analog inputs.
Figure 7: High and low pressure switch
Note:
The ZN510 controller includes an automatic diag-
nostic reset function that allows the controller to
automatically recover after a high or low pres-
sure cutout diagnostic. After 30 minutes the con-
troller will reset the diagnostics. Most
diagnostics occur due to intermittent water tem-
perature or flow problem. The “smart reset” may
eliminate many service calls.
J3-4
AI 2
J3-3
J3-2
AI 1
J3-1
TB3-5
TB3-4
TB3-3
TB3-2
TB3-1
Discharge Air
Sensor
Leaving Water
Sensor (Circuit)
Zone
Setpoint
Fan
Analog Inputs
Zone Sensor
Figure 8: Analog inputs.
(1TB1-1)
Ground
(1TB1-2)
(1TB1-3)
(1TB1-4)
Binary Outputs
24 VAC
HPC LPC
Compr 2
Compr 1

13
Unit Operation
Space Temperature
ZN510 controls the space
temperature according to the active
space temperature, the active
heating/cooling setpoint, and the
space temperature control
algorithm. The ZN510 controller
receives the space temperature
from either a wired zone sensor or
as a communicated value. When
neither a zone sensor nor
communicated space temperature is
present, the ZN510 controller
generates a space temperature
failure diagnostic.
Note:
The ZN510 controller cannot oper-
ate without a valid space tempera-
ture value (either hardwired or
communicated).
The space temperature input can
communicate timed override ON or
CANCEL requests to the ZN510
controller. If the ON button is
temporarily pressed, the zone
sensor sends a signal to the
controller. This signal is then
interpreted as a timer override
request which places the unit into
occupied.
The controller uses the timed
override request (while the zone is
unoccupied) as a request to switch
to the Occupied Bypass mode
(occupied bypass). This Occupied
Bypass mode lasts for the duration
of the occupied bypass time,
typically 120 minutes.
or
The controller’s Occupancy mode is
determined from either a system
level controller or another peer
controller.
The CANCEL button cancels the timed
override request and returned the
unit to unoccupied mode. If the
CANCEL button is temporarily
pressed, the zone sensor sends a
signal to the controller. This signal is
then interpreted as a timed override
cancel which places the unit into
unoccupied.
Local Setpoint
The local setpoint analog input is
designed as the local (hardwired)
setpoint input. This input cannot be
used for any other function. The
local input is a resistance input
intended for use with Trane zone
sensors.
If neither a hardwired nor
communicated setpoint is present,
the controller uses the stored default
setpoints:
zOccupied setpoints:
In the occupied mode, the unit
attempts to maintain the space
temperature at the active
occupied heating or cooling
setpoint based on the measured
space temperature, the active
setpoint, and the proportional/
integral control algorithm.
zOccupied standby setpoints:
In occupied standby mode, the
controller uses the occupied
standby cooling and heating
setpoints. Because the occupied
standby setpoints typically
cover a wider range than the
occupied setpoints, the ZN510
controller reduces the demand
for heating and cooling the
space. Also, the outdoor air
damper is normally closed
during occupied standby mode
to further reduce the heating
and cooling demands.
zUnoccupied setpoints:
In unoccupied mode, the unit
attempts to maintain the space
temperature at the stored unoc-
cupied heating or cooling
setpoint based on the measured
space temperature, the active
setpoint, and the proportional/
integral control algorithm,
regardless of the presence of a
hardwired or communicated
setpoint.
Once a valid setpoint is established
(through the hardwired input or
through communication) and when
neither a local setpoint or
communicated setpoint is present,
the controller generates a setpoint
failure diagnostic.
When a setpoint failure diagnostic
occurs, the controller operates using
the default heating and cooling
setpoints. These setpoints are
factory-configured, but may be
changed using the Trane service
tool, Rover.
The ZN510 controller uses the
following validation sequence for
the setpoints:
1. Check for a communicated
setpoint. If present, validate this
setpoint.
2. Check for a hardwired setpoint
and validate the setpoint.
3. Use the default setpoint and
validate this setpoint.
Fan Mode Input
The fan mode analog input (Fan) is
designed to operate as the fan mode
switch input. This input cannot be
used for any other function. The fan
switch on a Trane zone sensor
generates the fan mode signal.
The ZN510 controller detects the
unique resistance corresponding to
each position of the fan switch. By
measuring the resistance, the
controller determines the requested
fan mode.

14
The ZN510 controller receives the
fan mode from either a wired zone
sensor or as a communicated valve.
When neither a zone sensor nor
communicated fan mode are
present, the ZN510 controller will
default unit operation to AUTO.
Note:
zA building automation system
can also generate a fan mode
request and communicate this
request to the controller.
zIf the ZN510 controller does not
receive a hardwired or commu-
nicated request for the fan
mode, the unit recognizes the
fan input as AUTO and the fan
operates according to the
default configuration.
Fan Off Delay
When the heating output is
controlled off, the ZN510
automatically runs the fan ON for an
additional 30 seconds to give the fan
time to blow off any residual heat.
Possible
Fan Modes
Heat Pump
(1-speed)
OFF Fan Off
AUTO
Continuous: (Field
Modified)
zIn occupied mode, the
fan runs continuously.
In unoccupied mode,
the fan cycles OFF
when no heating or
cooling is required.
AUTO
Cycling: (Factory Default)
zThe fan cycles ON and
OFF with compressor
operation.
Unit Operation
Leaving Water Temperature
ZN510 uses analog input 1 (AI 1) as
the leaving water temperature input
for use with a thermistor. This input
(AI 1) is automatically assigned as a
leaving water temperature input. As
explained in the binary input
section, the leaving water
temperature input protects the heat
exchanger (circuit 1) from low
temperatures. The second heat
exchanger, present in units with two
compressors is protected with a
binary low temperature detection
device. Based on the application of
the unit, circuit operation is
terminated when the leaving water
temperature falls below 35 F or
20 F. This is set when the unit is
ordered.
The ZN510 controller compares the
measured leaving water
temperature to the leaving water
temperature low limit value to
determine a fault condition. When
the measured leaving water
temperature is less than the leaving
water temperature low limit, the
controller generates a Low Temp
Detect diagnostic. If the Leaving
Water Temp Sensor fails to open or
close the controller generates a
Leaving Water Temp Failure
diagnostic. This disables unit
operation.
Note:
A low temperature detection failure
diagnostic for compressor 1 may
require you to manually reset the
unit to restore compressor opera-
tion.
Similarly, the ZN510 controller uses
a binary low temperature detection
device (fixed low limit trip point) to
lock-out circuit 2 when a fault condi-
tion is detected.
See the Diagnostics section on page
28 for information about the
automatic diagnostic reset function.
Filter Maintenance Timer
The controller’s filter maintenance
timer is based on the unit fan’s
cumulative run hours. The controller
compares the fan run time against
an adjustable fan run hours limit
(maintenance required setpoint
time, stored in the controller) and
recommends unit maintenance (i.e.
changing the filter).
Use Rover or BAS system to edit the
maintenance required setpoint time.
Once the setpoint limit is exceeded
the controller generates a filter
maintenance timer diagnostic.
When the maintenance required
setpoint time is zero, the controller
disables the diagnostic feature.
Discharge Air Temperature
Analog input 2 (AI 2) is used as the
discharge air temperature input for
use with a 10,000 ohm thermistor.
Typical factory placement of the
thermistor is at the discharge area of
the unit. The discharge air
temperature sensor does not affect
unit operation. The measured
temperature is for information only
to be read by the building
automation system or for
troubleshooting unit operation with
Rover.
Once a valid discharge air
temperature signal has been
established by the thermistor or
communicated and the value is no
longer present, the controller
generates a discharge air
temperature failure diagnostic. This
will not disable unit operation. If the
sensor returns with a valid
temperature, the diagnostic
automatically clears

15
Zone Sensor
Zone Sensor
The ZN510 controller accepts the
following zone sensor inputs:
zSpace temperature mea-
surement.
zLocal setpoint (internal or
external on the zone sensor).
zFan switch. (Optional)
zTimed override (ON and CANCEL).
zCommunication Jack.
If both hardwired and
communicated space temperature
values exist, the controller ignores
the hardwired space temperature
input and uses the communicated
value.
Internal and External Setpoint
Adjustment
Zone sensors with an internal or
external setpoint adjustment
provide the ZN510 controller with a
local setpoint (50 to 85 F or 10 to 29.4
C). The internal setpoint adjustment
is concealed under the zone sensor’s
cover. To reveal the adjustable
setpoint wheel, remove the zone
sensor cover. The external setpoint
(when present) is exposed on the
zone sensor’s front cover.
When the hardwired setpoint
adjustment is used to determine the
setpoints, all unit setpoints are
calculated based on the hardwired
setpoint values, the configured
setpoints, and the active mode of
the controller.
Setpoint Operation
The controller has three methods of
heating and cooling setpoints
operation. See Table 5 for the
methods of setpoint operation.
Table 5: Methods of setpoint operation.
Method Situation used
Zone Sensor
(with an adjustable hardwired
setpoint)
A hardwired, adjustable setpoint is connected to the controller. Local setpoints are
enabled in the unit configuration. No communicated setpoint is present.
Communicated source
A setpoint is communicated to the unit controller (typically from a building automation
system or a peer controller). If both a hardwired setpoint and a communicated setpoint
exist, the controller uses the communicated value. The configuration feature for enabling
or disabling the local setpoint does not affect the setpoint handling when communicated
setpoints are used. The communicated setpoint always takes priority over the hardwired
setpoint, even when the local setpoint is enabled.
Stored default setpoints
The controller uses the locally stored default heating and cooling setpoints when neither
a local hardwired setpoint or communicated setpoint is present. When a building
automation system is present, the controller uses the default setpoints when no setpoint
is communicated to the controller and no hardwired setpoint exists. The controller uses
stored default setpoints when only a local setpoint exists, but the local setpoint is
disabled in the configuration of the controller. The controller always uses the stored
default (unoccupied) setpoints in unoccupied mode.

16
Zone Sensor
Table 6: Zone Sensor Options
Part Number:
X13510628010
Description:
zSpace temperature (0.2 C
resolution).
zInternal setpoint.
zCommunication jack.
zVertical case with Trane logo
Part Number:
X13510606010
Description:
zSpace temperature (0.2 C
resolution).
zExternal setpoint.
zCommunication jack.
zVertical case with Trane logo
5
4
3
2
1
ADJUSTABLE
SETPOINT
R7 1K
RT1
10K OHM @
25 °C ± 2°C
VR1 200
ZONE
SIGNAL (COMMON)
CSP
COMM HIGH (+ )
COMMUNICATIONS
JACK
MJ 1
COMM LOW (-)
5
4
3
2
1
ADJUSTABLE
SETPOINT
R7 1K
RT1
10K OHM @
25 °C ± 2°C
VR1 200
ZONE
SIGNAL (COMMON)
CSP
COMM HIGH (+ )
COMMUNICATIONS
JACK
MJ 1
COMM LOW (-)
Zone Sensor Features
Fan Switch (Optional)
The zone sensor fan switch provides
the controller with an occupied (and
occupied standby) fan request signal
of OFF or AUTO. If the fan control
request is communicated to the
controller, the controller ignores the
hardwired fan switch input and uses
the communicated value. The zone
sensor fan switch signal can be
enabled or disabled through
configuration in the ZN510
controller.
ON or CANCEL Buttons
Momentarily pressing the ON button
during unoccupied mode places the
controller in occupied bypass mode
for 120 minutes. You can adjust the
number of minutes in the unit
controller configuration using
Trane’s service tool, Rover. The
controller remains in occupied
standby mode until the override
timer expires or until the CANCEL
button is pressed.
Communication Jack
Use the RJ-11 communication jack
as the connection point from Rover
to the communication link (when the
communication jack is wired to the
communication link at the
controller). By accessing the
communication jack via Rover,
entrance to all controllers on the link
may be gained.

17
Zone Sensor Specifications
Part Number:
X13510606020
Description:
zSpace temperature (0.2 C
resolution).
zExternal setpoint.
zON and CANCEL buttons.
zCommunication jack.
zVertical case with Trane
logo.
Part Number:
X13510635010
Description:
zSpace temperature (0.2 C
resolution).
zExternal setpoint.
zFan Switch (OFF and
AUTO).
zON and CANCEL buttons.
zCommunication jack.
zVertical case with Trane
logo.
ON

18
Heating or
Cooling Control
Mode Operation
Heating or Cooling
Operation
For both single and dual compressor
operation, the ZN510 controller
cycles the compressor(s) on and off
to meet heating or cooling zone
demands. The controller uses the
unit capacity and pulse width
modulation (PWM) logic along with
minimum on/off timers to determine
the operation for compressor 1.
With a dual compressor unit, if the
desired conditions are not met by
controlling only the first
compressor, the controller runs
compressor 1 continuously and
controls compressor 2 according to
PWM logic along with the minimum
on/off timers. See Table 6 for heat
pump heating or cooling operation.
Certain heat pump configurations
may use one or two compressors for
cooling control. Heat pumps use
reversing valve control to switch
between heating and cooling. The
controller supports cooling only
configurations and heat pump
configurations.
For heat pump configurations, the
unit’s reversing valve is energized in
cooling and de-energized in heating.
For cooling, the reversing valve
output is energized simultaneously
with the compressor (compressor 1
in two compressor applications).
The reversing valve remains
energized until the controller turns
on the compressor for heating,
simultaneously de-energizing the
reversing valve. The reversing valve
only changes state when the
controller turns on compressor 1.
When a power failure occurs, the
reversing valve output defaults to
the heating (de-energized) state. To
reduce noise due to refrigeration
migration after compressor
shutdown, the controller does not
immediately operate the reversing
valve. The reversing valve changes
state only when the compressor
controls on, except when the
controller is in off mode.
For cooling only configurations, no
reversing valve is present and the
controller uses the compressor
stages for cooling.
Compressor Minimum
ON/OFF Timers
zWhen fan mode = OFF, Com-
pressor minimum ON timers are
ignored.
zWhen fan mode = AUTO, Com-
pressor minimum OFF timers are
observed.
zThe diagnostic reset ignores the
compressor timers ON and OFF.
zA communicated compressor
disabled or unoccupied signal
ignores minimum ON times.
Table 7: Heat pump heating or cooling operation*
Unit
Capacity
0% Between
0 and 50%
Between
50 and 100% 100%
Single compressor Compressor OFF
continuously.
Compressor output is controlled according to pulse width
modulation (PWM) logic between 0 and 100%. The
controller calculates the compressor on/off times based
on PWM logic and heating/cooling capacities. The
compressor is controlled on for longer periods as the
capacity increases and shorter periods as the capacity
decreases.
Compressor ON
continuously.
Dual (Two) compressors Both compressors
OFF continuously.
#1: ON PWM.
#2: OFF continuously.
#1: ON continuously.
#2: ON PWM.
Both compressors ON
continuously.
*Note: No diagnostics present.

19
Single and Dual
Compressor
Operation
Other Modes
Occupancy Operation
Unoccupied operation normally is
associated with evening hours when
the space is vacant. In unoccupied
mode, the controller always uses the
default unoccupied heating and
cooling setpoints stored in the
controller. As the unit goes
unoccupied, the compressors ON
timers are ignored and the
compressors are disabled.
When ZN510 controls the space to
unoccupied mode, the occupant
may have the ability to request
timed override through the Trane
zone sensor’s ON button. Based on
the controller or system setup, the
controller interprets the request and
initiates the occupied setpoint
operation. During a timed override,
the controller applies the occupied
heating and cooling setpoint, but
reports the effective occupancy
mode as occupied bypass mode. In
the occupied bypass mode, a
building automation system can
detect whether the occupancy mode
was overrode.
Morning Warm Up
The damper (field installed or for the
console product) remains closed
during morning warm up until the
space temperature is within two
degrees of the effective heating
setpoint. The 2-position outdoor air
damper normally is open during the
occupied mode when the controller
turns on the unit fan. The damper is
normally closed during:
zoccupied mode when the fan is
OFF.
zwarm up/cool down mode.
zoccupied standby mode.
zunoccupied mode.
zcertain diagnostic conditions.
ZN510 keeps the 2-position outside
air damper closed on a transition
from unoccupied mode to occupied
mode as part of the morning warm
up sequence.

20
Data Sharing
Master Controller
ZN510 can send or receive data
(such as setpoint, heat/cool mode,
fan request and space temperature)
to and from other controllers on the
communication link, with or without
a building automation system. This
includes applications where
multiple unit controllers share a
common space temperature sensor,
both for standalone and building
automation applications.
The master controller (the unit
controller with the hardwired zone
sensor) in peer-to-peer
communication can send its zone
temperature to one or more slave
controllers which allows the slave
controllers to track each other’s
zone temperature. For these
applications, Rover is used in set up
of the controller.
See Figure 9 for Master/Slave
setpoint operation for peer-to-peer
set up.
Setpoint Operation
Controllers sharing information
peer-to-peer can share a variety of
data, including the heating/cooling
setpoint (communicated from a
master to a slave).
The standalone master controller
derives its setpoint from either the
local hardwired setpoint input or
from its default setpoints. Peer-to-
peer applications often require the
use of one hardwired setpoint to be
shared across two or more
controllers. This can be achieved by
wiring the adjustable setpoint
(typically included as a part of the
Trane zone sensor module) to the
controller defined as the master.
Trane’s service tool, Rover may be
used to set up the master and one or
more slaves to share that setpoint.
For this application, each
communicating controller uses the
same setpoint.
ON
CANCEL
ZONE SET
COM M MU NI CA TIO N
24V
SERVICE
ZONE SENSOR
POWER
BINARY
INP UT S
FAN
(Actual Size 4.0"x5.5")
ANALOG INPUTS
AI 2AI 1
J2-1
J2-2
J2-3
J2-4
J2-5
J2-6
1234567
J1
BINARY
OUTPU TS
TB2-1
TB2-2
TB2-3
TB2-4
TB2-5
TB2-6
TB3-1
TB3-2
TB3-3
TB3-4
TB3-6
J3-1
J3-2
J3-3
J3-4
TEST
SW2
SW1
TB1-1
TB1-2
GND
GND GND
STATUS
COMM
U6
Comfort Link(tm) 10
X13650607-01 A
NID:
12-34 -56-78- 9A-BC
COMM COMM COMM
98 0010155
ECHELON
FTT-10A
ComfortLink 10
Slave Controller Slave Controller
Note:
Each controller derives it’s effective
setpoint and default setpoints
(including deadbands between set-
points) from the setpoint input
(hardwired or communicated). To
make sure the peer-to-peer setpoint
application results in identical set-
points for each communicating con-
troller, each controller must have
exactly the same default setpoints.
Simplified Peer-to-Peer (Master/
Slave) Setup
To simplify setting up master/slave
applications, the controller provides
information that groups all
necessary shared data into one
communication variable. This
master/slave variable includes the
following information:
zSpace temperature.
zSetpoint.
zHeating/cooling mode.
zOccupancy.
zFan status.
zUnit control algorithm capacity.
This information is communicated
from the master to the slave to
ensure similar unit operation.
Use Rover, Trane’s service tool, to
set up peer-to-peer applications.
Refer to the Rover product literature
for more information on setting up
applications.
Master Controller
Zone Sensor
Communication Link
Figure 9: Master/slave setpoint operation for peer-to-peer setup

21
Configurable Parameters
Rover, Trane’s service tool, uses the
unit type “heat pump” to determine
and download unit configuration
information, such as the default
analog inputs, the default binary
inputs, and the default binary output
configurations. See Table 7 for
default configurations for heat
pumps.
Table 8: Heat pump heating or cooling operation.
Unit Type Heat pump
Cooling Source Compressor
Heating Source Compressor (none for cooling only units)
Compressors 1 (2 for 2-compressor units)
Binary Outputs
BOP 1: Fan on (normally open)
BOP 2: Reversing valve (normally open)*
BOP 3: Not used
BOP 4: Compressor 1 (normally open)
BOP 5: Compressor 2 (normally open)**
BOP 6: Outdoor Air Damper (normally open)***
Binary Inputs
BI 1: Low temperature detection, circuit 2 (normally closed)*
**
BI 2: Condensate overflow (normally closed)†
BI 3: Occupancy (normally open)
Analog Inputs
Zone: Space temperature (0.0 F calibration)
Set: Setpoint (0.0 F calibration)
Fan: Fan mode
AI 1: Leaving water temperature
AI 2: Discharge air temperature
Fan
Fan operation (heating): Cycling
Fan operation (cooling): Cycling
Fan speed default (heating): On/high
Fan speed default (cooling): On/high
Fan switch (hardwired): Enabled
Setpoints
Unoccupied cooling setpoint: 85 F
Occupied standby cooling: 78 F
Occupied cooling setpoint: 74 F
Occupied heating setpoint: 71 F
Occupied standby heating: 67 F
Unoccupied heating setpoint: 60 F
Cooling setpoint high limit: 115 F
Cooling setpoint low limit: 40 F
Heating setpoint high limit: 115 F
Heating setpoint low limit: 40 F
Thumbwheel set point: Enabled
Occupied Bypass
Timer 120 minutes
Leaving Water
Temperature
Low Limit
Unit specific (20 F ground source or 35 F standard)
Location Identifier Unit specific (maximum of 30 characters)
Configuration
The heating and cooling setpoint
high and low limits only apply to the
occupied and occupied standby
setpoints. These limits never apply
to the unoccupied setpoints.
The leaving water temperature low
limit is used for freeze protection of
circuit 1 on heat pumps. Circuit 2 is
protected by a binary low
temperature detection device
(freezestat) with a fixed trip point.
* BOP 2, BI1: Not used on cooling only units.
** BOP 5: Not used on signal compressor unit.
*** Configured but not required.
† Optional model number dependent
The occupied bypass time is used for timed
override applications. The timed override
timer is maintained in the unit controller.
When the timed override is applicable, the
controller reports “Occupied Bypass” as its
effective occupancy mode.

22
Table 10: Green LED activity
Green LED Activity Description
LED on continuously. Power on (normal operation).
LED blinks (one blink). Manual output test mode (2-second hold), No
diagnostics present.
LED blinks (two blinks). Manual output test mode (2-second hold),
One or more diagnostics are present.
LED blinks (1/4 second on,
1/4 second off for 10 seconds.
“Wink” mode.
This feature allows the identification of a
controller. By sending a request from a device,
such as Rover, Trane’s service tool or ZN510
Loop Controller, a request to the controller
can be made to “wink” a notification that the
controller received the signal. When the zone
sensor ON button is held for 10 seconds
“Wink” mode is sent from Comfort Link
Controller.
LED off.
zPower off.
zAbnormal condition.
zTest button is pressed.
Green Status LED
The green LED normally indicates
whether the controller is powered
on (24 VAC).
Yellow Service LED
Table 11: Yellow LED activity
Yellow LED Activity Description
LED off continuously. The controller is not detecting any communication.
(Normal for standalone applications).
LED blinks. The controller detects communication. (normal for
communicating applications, including data sharing).
LED on continuously. Abnormal condition.
Troubleshooting
!Warning! Service Button
The black Service button on the ZN510 board allows the user to send a service pin message, which allows
efficient identification of the unit's location. However, if the Service button is held for more than 10
seconds, the ZN510 will shut down the software application and disable the unit's operation. The only
method to restore the unit is through the use of Rover service tool. We strongly suggest that this function
only be exercised under the strict direction of factory service personnel.
Red Service LED
Table 9: Red LED activity
Red LED Activity Description
LED off continuously when power is applied to the
controller. Normal operation.
LED on continuously, even when power is applied to
the controller.
Someone is pressing the service button or the controller has
failed.
LED flashes once every second. Use Rover, Trane’s service tool, to restore the unit to normal
operation or unconfigured.

23
Manual Output Testing the Heat
Pump Configurations
The procedure for testing heat pump
configurations is:
1. Press and hold the Test button
for at least three seconds to
start the test mode.
2. The test sequence resets
diagnostics and turns off all
outputs.
3. Press the Test button several
more times (no more than once
per second) to advance through
the test sequence.
Testing the Heat Pump
Configurations
The outputs are not subject to
minimum times during the test
sequence. However, the test
sequence only permits one step per
second which limits output time.
All outputs are exercised regardless
what timer they are or are not
configured for. For example, single
compressor heat pumps function
the same as two compressor units.
For single compressor units, the
cool 2 and heat 2 steps control the
appropriate binary outputs, but do
not affect unit operation.
Reversing valve and damper
outputs cycle independent of
configuration.
Pump Operation for
Systems with ZN510
Loop Controller
During Unoccupied, the pumps will
be OFF but should be energized to
test compressor operation. The user
must override the pumps either at
the ZN510 Loop Controller or by
pushing the ON button of the zone
sensor. This will send the units to an
occupied bypass, which will turn the
pumps on prior to operating
manual output test.
Table 12: Test sequence
Step Fan
BOP 1
Reversing Valve
BOP 2
Compr 1
BOP 4
Compr 2
BOP 5
Damper
BOP 6
1. Off Off Off Off Off Closed
2. Fan on (At the beginning of step 2, the
controller attempts to clear all diagnostics). On Off Off Off Closed
3. Reversing Valve On On Off Off Closed
4. Cool 1 On On On Off Closed
5. Cool 2 OnOn OnOnClosed
6. Compressor(s) off
This stage helps avoid compressor cooling
and heating in sequential steps by turning the
compressors off prior to changing the
reversing valve state.
On Off Off Off Closed
7. Heat 1 On Off On Off Closed
8. Heat 2 On Off On On Closed
9. Outdoor air damper On Off Off Off Open
10. Exit
After the outdoor air damper step, the test
sequence performs the exit step. This
initiates a reset and attempts to return the
controller to normal operation.
Troubleshooting

24
Troubleshooting
Questionable Unit
Operation
Table 13: Fan output does not energize
Probable Cause Explanation
Random start observed. After power up, the controller always observes a random start from 0 to 25
seconds. The controller remains off until the random start time expires.
Power up control wait.
When power up control wait is enabled (non-zero time), the controller remains
off until one of two conditions occurs:
zThe controller exits power up control wait once it receives commu-
nicated information.
zThe controller exits power up control wait once the power up control
wait time expires.
Cycling fan operation.
When configured to cycle with capacity, normally the unit fan cycles off with
heating or cooling. The heating/cooling sources cycle on or off periodically with
the unit fan to provide varying amounts of capacity to the space.
Unoccupied operation.
Even when the controller is configured for continuous fan operation, the fan
normally cycles with capacity during unoccupied mode. While unoccupied, the
fan cycles on or off with heating/cooling to provide varying amounts of heating
or cooling to the space.
Fan mode off. When a local fan mode switch determines the fan operation, the off position
controls the unit fan off.
Requested mode off.
The desired operating mode (such as off, heat and cool) can be communicated to
the controller. When off is communicated to the controller, the unit controls the
fan off. There is no heating or cooling.
Diagnostic present. A specific list of diagnostics affects fan operation. See Diagnostics section on
page 27.
No power to the controller.
If the controller does not have power, the unit fan does not operate. For the
ZN510 controller to operate normally, it must have an input voltage of 24 VAC.
When the green LED is off continuously, the controller does not have sufficient
power or has failed.
Unit configuration. The controller must be properly configured based on the actual installed end
devices and application.
Manual output test.
The controller includes a manual output test sequence that may be used to verify
output operation and associated output wiring. However, based on the current
step in the test sequence, the unit fan may not be on. Refer to the manual output
overrides on page 9.
Unit wiring. The wiring between the controller outputs and the fan relays and contacts must
be present and correct for normal fan operation.

25
Troubleshooting
Questionable Unit
Operation
Table 14: Compressor(s) not running
Probable Cause Explanation
Normal operation. The controller compressor(s) turn on and off to meet the unit capacity
requirements.
Requested mode off.
The desired operating mode (such as off, heat and cool) can be communicated to
the controller. When off is communicated to the controller, the unit shuts off all
unit compressor(s).
Communicated disable.
Numerous communicated requests may disable the compressor, including a
compressor enable input. Depending on the state of the communicated request,
the unit may disable the compressor.
Manual output test.
The controller includes a manual output test sequence that may be used to verify
output operation and associated output wiring. However, based on the current
step in the test sequence, the compressor(s) may not be on. Refer to the manual
output overrides on page 9.
Diagnostic present.
A specific list o f diagnostics affects compressor operation, depending whether
the unit is configured as heat pump. For more information, see the Diagnostics
section on page 27.
Unit configuration.
The controller must be properly configured based on the actual installed end
devices and application. When the unit configuration does not match the actual
end device, the compressor may not work correctly.
No power to the controller.
If the controller does not have power, the compressor does not operate. For the
ZN510 controller to operate normally, a voltage input of 24 VAC must be applied.
When the green LED is off continuously, the controller does not have sufficient
power or has failed.
Unit wiring. The wiring between the controller outputs and the compressor contacts must be
present and correct for normal compressor operation.
Table 15: Outdoor air damper stays open
Probable Cause Explanation
Normal operation.
The controller opens and closes the outdoor air damper based on the controller’s
occupancy mode and fan status. Normally, the outdoor air damper is open
during occupied mode when the fan is running and closed during unoccupied
mode. Refer to the outdoor air damper section on page 8.
Manual output test.
The controller includes a manual output test sequence that may be used to verify
output operation and associated output wiring. However, based on the current
step in the test sequence, the outdoor air damper may not open. Refer to the
manual output overrides on page 9.
Unit configuration.
The controller must be properly configured based on the actual installed end
devices and application. When the unit configuration does not match the actual
end device, the outdoor air damper may not work correctly.
Unit wiring. The wiring between the controller outputs and the compressor contacts must be
present and correct for normal damper operation.

26
Troubleshooting
Questionable Unit
Operation
Table 16: Outdoor air damper stays closed
Probable Cause Explanation
Normal operation.
The controller opens and closes the outdoor air damper based on the controller’s
occupancy mode and fan status. Normally, the outdoor air damper is open
during occupied mode when the fan is running and closed during unoccupied
mode. Refer to the outdoor air damper section on page 8.
Warm up and cool down.
The controller includes both a morning warm-up and cool down sequence to
keep the outdoor air damper closed during the transition from unoccupied to
occupied. This is an attempt to bring the space under control as quickly as
possible.
Requested mode off.
The desired operating mode (such as off, heat and cool) can be communicated to
the controller. When off is communicated to the controller, the unit closes the
outside air damper.
Manual output test.
The controller includes a manual output test sequence that may be used to verify
output operation and associated output wiring. However, based on the current
step in the test sequence, the outdoor air damper may not be open. Refer to the
manual output overrides on page 9.
Diagnostic present.
A specific list o f diagnostics affects outdoor air damper operation, depending
whether the unit is configured as heat pump. For more information, see the
Diagnostics section on page 27.
Unit configuration.
The controller must be properly configured based on the actual installed end
devices and application. When the unit configuration does not match the actual
end device, the outdoor air damper may not work correctly.
No power to the controller.
If the controller does not have power, the compressor does not operate. For the
ZN510 controller to operate normally, a voltage input of 24 VAC must be applied.
When the green LED is off continuously, the controller does not have sufficient
power or has failed.
Unit wiring. The wiring between the controller outputs and the outdoor air damper must be
present and correct for normal outdoor air damper operation.

27
Diagnostics
Table 17: ZN510 controller diagnostics
Diagnostic Fan Other Outputs
Condensate overflow Off Compressors: Off
Damper: Closed
Low temp detect - Crt 1 Enabled
Compressor 1: Off
Compressor 2: See note below.
Damper: See note below.
Low temp detect - Crt 1 Enabled
Compressor 1: See note below.
Compressor 2: Off
Damper: See note below.
Low temp detect - Crt 1 and 2 Off
Compressor 1: Off
Compressor 2: Off
Damper: Closed
High/low press cutout - Crt 1 Enabled
Compressor 1: Off
Compressor 2: See note below.
Damper: See note below.
High/low press cutout - Crt 2 Enabled
Compressor 1: See note below.
Compressor 2: Off
Damper: See note below.
High/low press cutout - Crt 1 and 2 Off
Compressor 1: Off
Compressor 2: Off
Damper: Closed
Space temperature failure* Off Compressor(s): Off
Damper: Closed
Leaving water temp failure Enabled
Compressor 1: Off
Compressor 2: See note below.
Damper: See note below.
Discharge air temp failure* Enabled Compressor(s): No action
Damper: No Action
Maintenance required
(example: Filter Status) Enabled Compressor(s): No action
Damper: No Action
Local setpoint failure* Enabled Compressor(s): Enabled
Damper: Enabled
Local fan mode failure* Enabled Compressor(s): Enabled
Damper: Enabled
Invalid unit configuration Disabled Compressor(s): Disabled
Damper: Disabled
High/low pressure cutout and low temperature detection diagnostics for heat pump configurations isolate
each circuit and independently disable compressor operation. For single compressor units, these diagnostics cause
the compressor to shut down, the unit fan to be controlled off, and the outdoor air damper to be closed (when
present).
When BOP 6 is configured as a generic binary output, BOP 6’s state is unaffected by all unit diagnostics.
* Note: Non-latching diagnostics automatically reset when the input is present and valid.

28
Diagnostics
Translating Multiple
Diagnostics
The controller senses and records
each diagnostic independently of
the diagnostics. It is possible to have
multiple diagnostics present
simultaneously. The diagnostics are
reported in the order they occur.
Resetting Diagnostics
1. Automatically by the controller.
2. By initiating a manual output
test at the controller.
3. By cycling power to the
controller.
4. Through a building automation
system such as ZN510 Loop
Controller.
5. Through Rover, Trane’s service
tool.
6. Through any communicating
device with the ability to access
the controller’s alarm reset
input.
Automatic Diagnostic Reset
The ZN510 controller includes an
automatic diagnostic reset function.
This function attempts to
automatically recover a unit when
the following diagnostics occur:
zLow temperature detection,
Circuit 1
zLow temperature detection,
Circuit 2
zLow temperature detection,
Circuit 1 and 2
zHigh/low pressure cutout,
Circuit 1
zHigh/low pressure cutout,
Circuit 2
zHigh/low pressure cutout,
Circuit 1 and 2
When one or more of these special
diagnostics occurs, the controller
responds to the diagnostic as
defined in the table 17 on page 27.
After the controller detects the first
special diagnostic (listed on page
27), the unit waits 30 minutes before
invoking the automatic diagnostic
reset function. The automatic
diagnostic reset function clears all
special diagnostics and attempts to
restore the controller to normal
operation. The controller resumes
normal operation until another
diagnostic occurs.
If a special diagnostic occurs within
24 hours after an automatic
diagnostic reset, the diagnostic
must be manually reset.
Cycling Power
When the 24 VAC power to the
controller has been turned off, the
unit cycles through a power up
sequence. By default, the controller
attempts to reset all diagnostics at
power up. Diagnostics present at
power up and those that occur after
power up are handled according to
the table on page 27.
Building Automation System
(CLC)
Some building automation systems
can reset diagnostics in the ZN510
controller. The ZN510 Loop
Controller can reset diagnostics in
the ZN510 Controller. For complete
information, refer to the building
automation system product
literature.
Rover Service Tool
Trane’s service tool, Rover, can reset
diagnostics in the ZN510 controller.
For complete information about
Rover, refer to the Rover product
literature.
Alarm Reset
Any device that can communicate
alarm reset information can reset
diagnostics in the ZN510 controller.
ZN510 Controller Replacement
1. Disconnect power or disable
the circuit breaker to unit.
2. Remove bad or questionable
ZN510 Controller.
3. Install controller in the unit with
the heatsink placement at the
top of the control box. (See
page 32).
4. Connect the power to the ZN510
ONLY. (TB1-1 & TB1-2 on ZN510)
5. Connect Rover and properly
configure the controller, unless
a previously configured board
is purchased.
6. Power down.
7. Connect the remaining input
and output wiring to the
controller.
8. Reapply power.
9. Complete sequence 7 and 8
above in the installation section
of this manual.
10. Refer to BAS manual for
instructions on how to install
the new ZN510 into BAS
system.

29
Wiring Diagram

30
Wiring Diagram

31
5 1/2”
4”
Heat sink is mounted to the top
of the control box
Hardware
Specifications
Specifications
Operating Environment
32 to 140 F (0 to 60 C)
5 to 95% non-condensing
Storage Environment
-40 to 185 F (-40 to 85 C)
5 to 95% non-condensing
Power Requirements
18 to 32 VAC (24 VAC nominal)
50 or 60 Hz
300 mA
Agency Listings
UL and CUL 916 Energy
Management System
Agency Compliance
IEC 1000-4-2 (ESD), IEC 1000-4-4
(EFT), IEC 1000-4-5 (Surge), FCC Part
15, Class A.
Input/Output Summary
zThree binary inputs.
zSix binary outputs only five are
used.
zFive analog inputs.
zTimed override ON and CANCEL.
zComm5 communication.
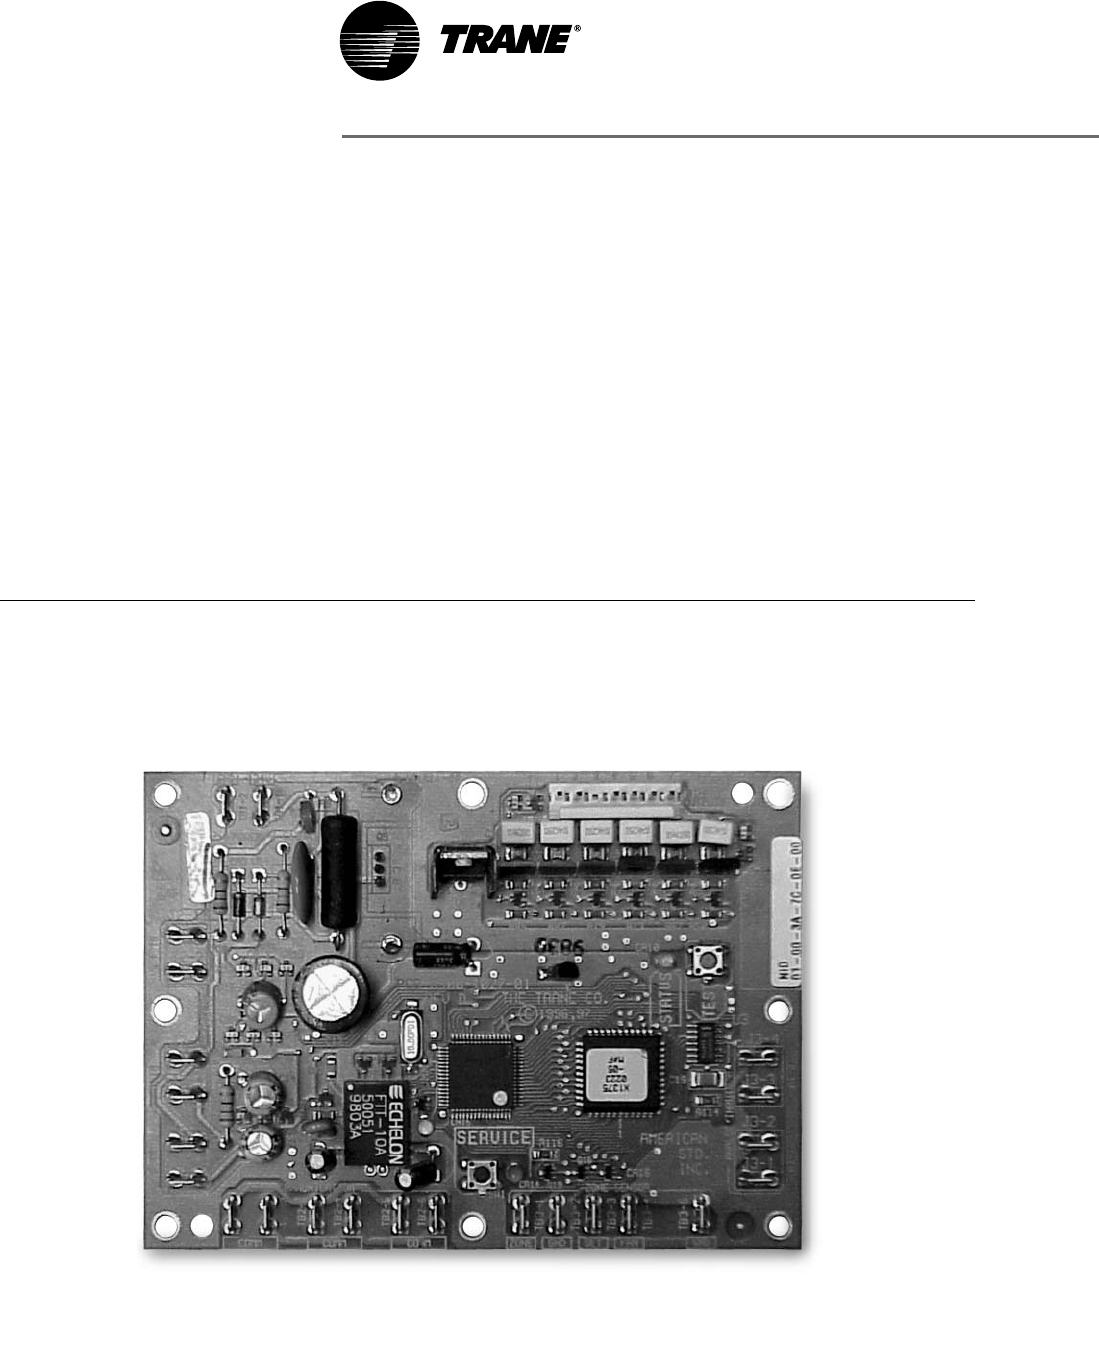
Board Dimensions
Height: 4” (102 mm)
Width: 5-1/2” (140 mm)
Depth: 2-1/4” (57mm)
Figure 10: ZN510 Circuit Board

32
Hardware
Specifications
Table 20: Analog Inputs
Description Term i nal s Function Range
Zone TB3-1 Zone temperature input 5 to 122 F (-15 to 50 C)
Ground TB3-2 Analog ground NA
Set TB3-3 Setpoint input 40 to 115 F (4.4 to 46.1 C)
Fan TB3-4 Fan switch input OFF = 4821 to 4919 Ohms
AUTO = 2297 to 2342 Ohms
Ground TB3-6 Analog ground NA
Analog Input 1 J3-1 Leaving water
temperature
-40 to 212 F (-40 to 100 C)
J3-2 Analog ground NA
Analog Input 2 J3-3 Discharge air temperature -40 to 212 F (-40 to 100 C)
J3-4 Analog ground NA
Table 19: Binary Outputs
Description Te r m i n a l s Output
Rating Load Energized Load De-energized
Binary Output 1 J1-1 12 VA 1 VAC RMS (typical) 24 VAC RMS (typical)
Binary Output 2 J1-2 12 VA 1 VAC RMS (typical) 24 VAC RMS (typical)
Binary Output 3 J1-4 NOT USED
Binary Output 4 J1-5 12 VA 1 VAC RMS (typical) 24 VAC RMS (typical)
Binary Output 5 J1-6 12 VA 1 VAC RMS (typical) 24 VAC RMS (typical)
Binary Output 6 J1-7 12 VA 1 VAC RMS (typical) 24 VAC RMS (typical)
Table 18: Binary Inputs
Description Te r m i n a l s Function
Binary Input 1 J2-1 24 VAC
J2-2 Input
Binary Input 2 J2-3 24 VAC
J2-4 Input
Binary Input 3 J2-5 24 VAC
J2-6 Input
