Tranzeo Wireless Technologies FMXLJD35UY Wireless Networking Device User Manual users manual
Tranzeo Wireless Technologies, Inc Wireless Networking Device users manual
UserManual.wiki
>
Tranzeo Wireless Technologies
>
FMXLJD35UY User Manual
users manual
Navigation menu
Upload a User Manual
Namespaces
Wiki Guide
HTML
PDF
Info
Views
User Manual
Discussion / Help
Navigation

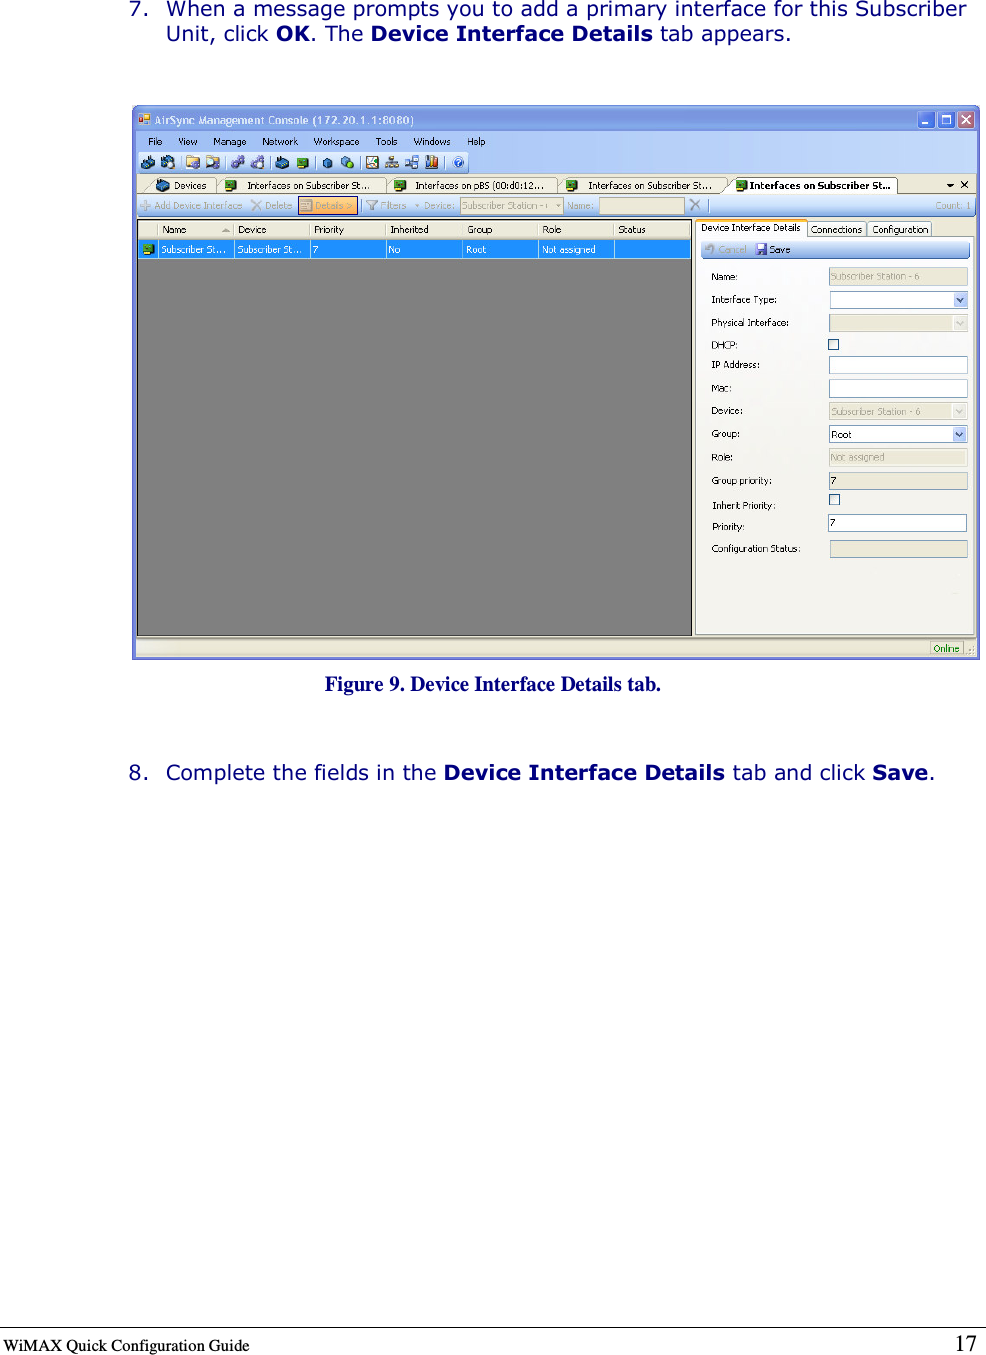
![WiMAX Quick Configuration Guide 4 Document Revision Level Revision Date Description Version 1.0.0 October 2008 Preliminary Release Version 1.0.1 Dec. 2008 Updated configuration recommendations Document Conventions This guide uses the following typographic conventions: Convention Description Bold Text on a window, other than the window title, including menus, menu options, buttons, and labels. Italic Variable. screen/code Text displayed or entered on screen or at the command prompt. boldface screen font Information you must enter is in boldface screen font. < italic screen > Variables appear in italic screen font between angle brackets. [ ] Default responses to system prompts are in square brackets. This guide uses icons to draw your attention to certain information. Warnings are the most critical. Icon Meaning Description Note Notes call attention to important and/or additional information. Tip Tips provide helpful information, guidelines, or suggestions for performing tasks more effectively. Caution Cautions notify the user of adverse conditions and/or consequences (e.g., disruptive operations). WARNING Warnings notify the user of severe conditions and/or consequences (e.g., destructive operations).](https://usermanual.wiki/Tranzeo-Wireless-Technologies/FMXLJD35UY/User-Guide-1053002-Page-4.png)
![WiMAX Quick Configuration Guide 7 4. In the left pane, under Administration, click Initial configuration. The Initial Base Station Configuration page appears. Figure 2. Initial Base Station configuration page. 5. Change the Bridge IP Address to match the IP address schema of your network. The IP address must be on the same subnet as the AirSync server. 6. Complete the remaining fields on the screen. The Frequency [khz] and Channel bandwidth [MHz] settings must match the settings that you will configure later for the Subscriber Unit. 7. When finished, click Apply to save your settings. The Saving Settings screen appears, with a Reboot button for rebooting the Pico Base Station. You must reboot to apply your settings. 1.3 Step 2: Configure the Subscriber Unit After configuring the Pico Base Station, use the procedures in the following sections to configure the Subscriber Unit.](https://usermanual.wiki/Tranzeo-Wireless-Technologies/FMXLJD35UY/User-Guide-1053002-Page-7.png)