Tranzeo Wireless Technologies FMXLJD35UY Wireless Networking Device User Manual users manual
Tranzeo Wireless Technologies, Inc Wireless Networking Device users manual
users manual

i AirSync 2.2 Quick Configuration Guide – Tranzeo pBS
Tranzeo
WiMAX
Pico Base Station and Subscriber Unit
Quick Configuration Guide
Copyright © 2008 Tranzeo Wireless Technologies
ALL RIGHTS RESERVED
Notice:
No part of this publication may be reproduced or transmitted in any form or by any means,
electronic or mechanical, including photocopying and recording, or stored in a database or retrieval system
for any purpose without the express written permission of Tranzeo.
Tranzeo reserves the right to make changes to this document at any time without notice and assumes no
responsibility for its use.
Proximetry and Airsync are trademarks of Proximetry, Inc., in the USA and other countries. Windows is a
registered trademarksof Microsoft Corporation. All other brand or product names are or may be trademarks
or service marks of and are used to identify products or services of their respective owners.

WiMAX Quick Configuration Guide ii
Table of Contents
PREFACE ............................................................................................3
Document Revision Level........................................................................................................4
Document Conventions............................................................................................................4
QUICK CONFIGURATION....................................................................5
1.1 Configuration Checklist................................................................................................. 5
1.2 Step 1: Configure the Pico Base Station.........................................................................5
1.3 Step 2: Configure the Subscriber Unit............................................................................7
1.3.1 Log in to the Configurator................................................................................................. 8
1.3.2 Specify Wireless Settings.................................................................................................. 9
1.3.3 Specify Network Setup Settings ...................................................................................... 12
1.4 Step 3: Configure the Subscriber Unit in AirConsole................................................... 14
1.5 Step 4: Test the Subscriber Unit Connectivity.............................................................. 19
1.6 Step 5: Monitor the Network ....................................................................................... 24
AirSync 2.2 Quick Configuration Guide – Tranzeo pBS 3
Preface
This guide provides all the information you need to configure the Tranzeo Pico Base
Station (pBS) and TR-WMX WiMAX Subscriber Unit to enable end-to-end WiMAX
connectivity using AirSync. If you prefer detailed instructions, please refer to the
Proximetry AirSync Practical User’s Guide.
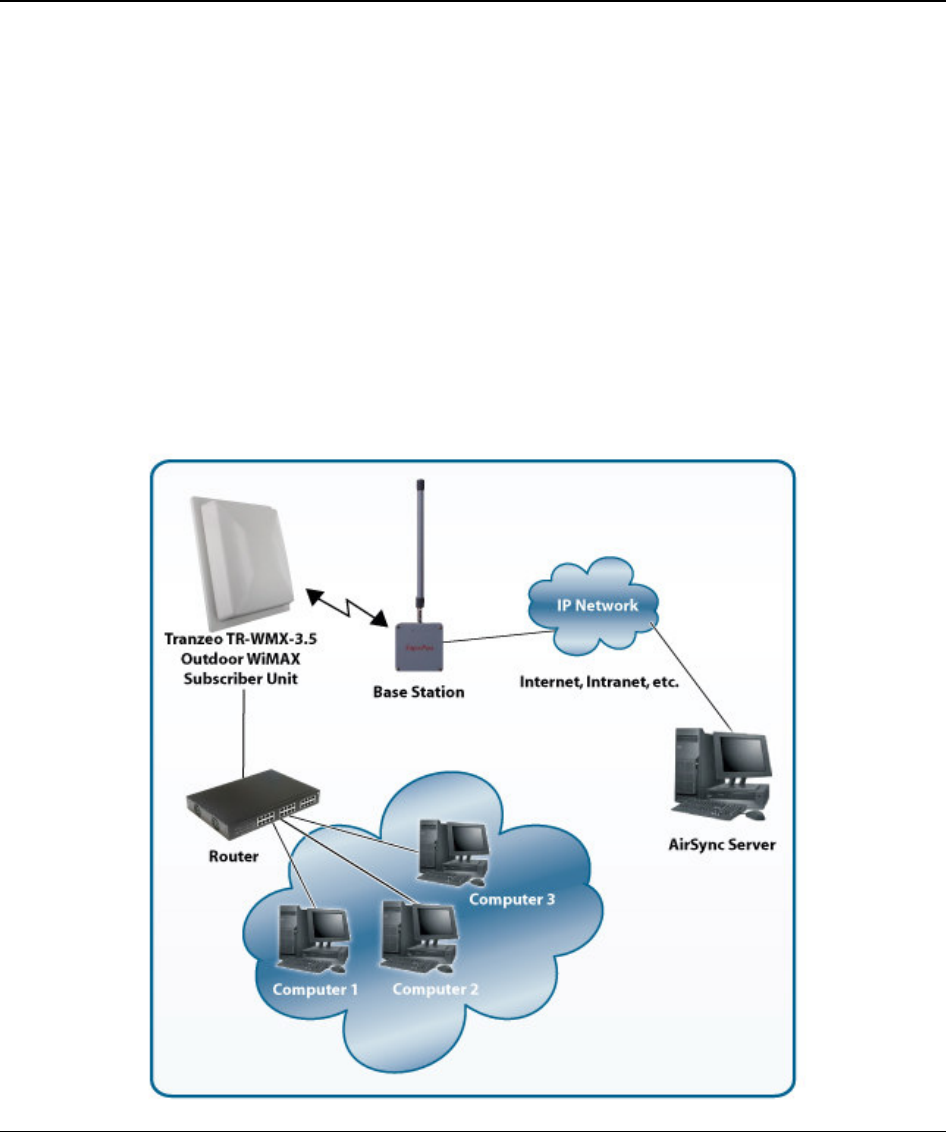
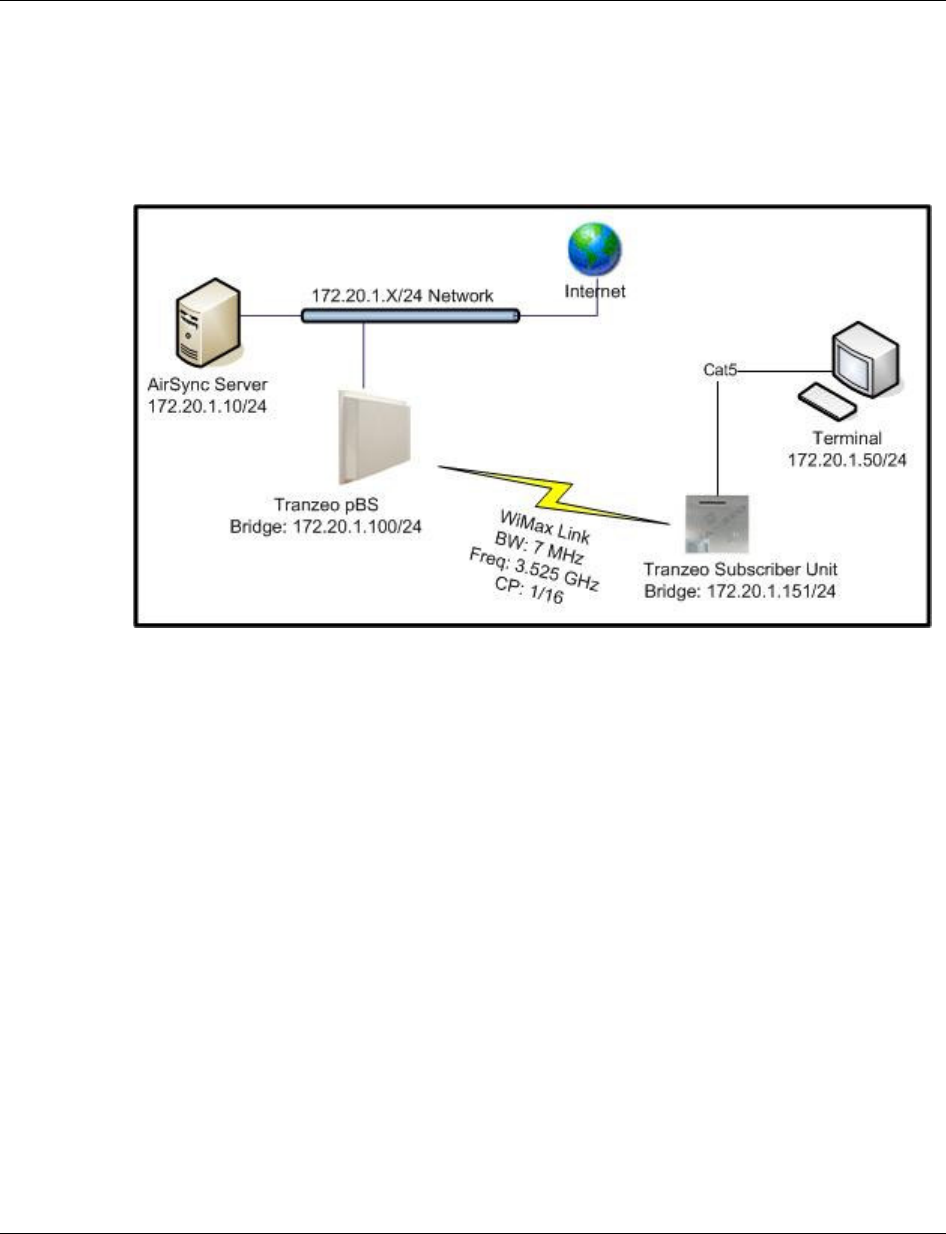
The following figure shows an example of a configuration where the Subscriber Unit is
connected to the uplink (WAN) interface on an Ethernet router, hub, or switch. In this
configuration, the Subscriber Unit communicates wirelessly with a Base Station using
its WiMAX interface, while communicating at 10/100 Mbps with the attached Ethernet
device. The Subscriber Unit also receives its power from the Ethernet connection,
eliminating the need to run a power cable to the Subscriber Unit. In this way, the
Ethernet device serves as the bridge between the attached computers and the
Subscriber Unit.

WiMAX Quick Configuration Guide 4
Document Revision Level
Revision Date Description
Version 1.0.0 October 2008 Preliminary Release
Version 1.0.1 Dec. 2008 Updated configuration recommendations
Document Conventions
This guide uses the following typographic conventions:
Convention Description
Bold Text on a window, other than the window title, including menus,
menu options, buttons, and labels.
Italic Variable.
screen/code Text displayed or entered on screen or at the command prompt.
boldface screen font Information you must enter is in boldface screen font.
< italic screen > Variables appear in italic screen font between angle brackets.
[ ] Default responses to system prompts are in square brackets.
This guide uses icons to draw your attention to certain information. Warnings are the
most critical.
Icon Meaning Description
Note Notes call attention to important and/or additional
information.
Tip Tips provide helpful information, guidelines, or suggestions
for performing tasks more effectively.
Caution Cautions notify the user of adverse conditions and/or
consequences (e.g., disruptive operations).
WARNING Warnings notify the user of severe conditions and/or
consequences (e.g., destructive operations).

WiMAX Quick Configuration Guide 5
Quick Configuration
1.1 Configuration Checklist
The following checklist identifies the steps for configuring your WiMAX network.
Please check each step as you complete it.
Step 1: Configure the Pico Base Station.
Step 2: Configure the Subscriber Unit.
Step 3: Configure the Subscriber Unit in AirConsole.
Step 4: Test the Subscriber Unit Connectivity.
Step 5: Monitor the Network.
1.2 Step 1: Configure the Pico Base Station
Before the Pico Base Station is installed, use the following procedure to configure it.
To configure the Pico Base Station, your PC’s IP address must be on the same
subnet (192.168.0.xxx, where xxx is a number from 1 to 253) as the Pico Base
Station, and the PC’s netmask must be set to 255.255.255.0.
The Pico Base Station is configured with a default 192.168.0.254 IP address
common to all Pico Base Stations. Therefore, do not simultaneously connect
multiple un-configured Pico Base Stations to a common Local Area Network (LAN)
and try to access them using the 192.168.0.254 IP address. Prior to AirSync
installation the “Bridge IP Address” of the Pico Base Station must be changed
from 192.168.0.254 to an alternate value that matches the IP schema of your
network if multiple Pico Base Stations will be managed by a single AirSync
installation.

WiMAX Quick Configuration Guide 6
1. Use an Ethernet cable to connect the Ethernet port labeled PC on the PoE
adapter to a network-interface card (NIC) in a PC or network hub. Then
connect the other Ethernet port on the PoE adapter to the Pico Base Station.
2. Launch a Web browser on a computer that is on the same subnet
(192.168.0.nnn) as the Pico Base Station.
3. In the address bar, type http://192.168.0.254 and click the Go button in
your browser. The default username is admin and the default password is
default. After you login, the Base Station Information Page appears.
Figure 1. Base Station information page.
WiMAX Quick Configuration Guide 7
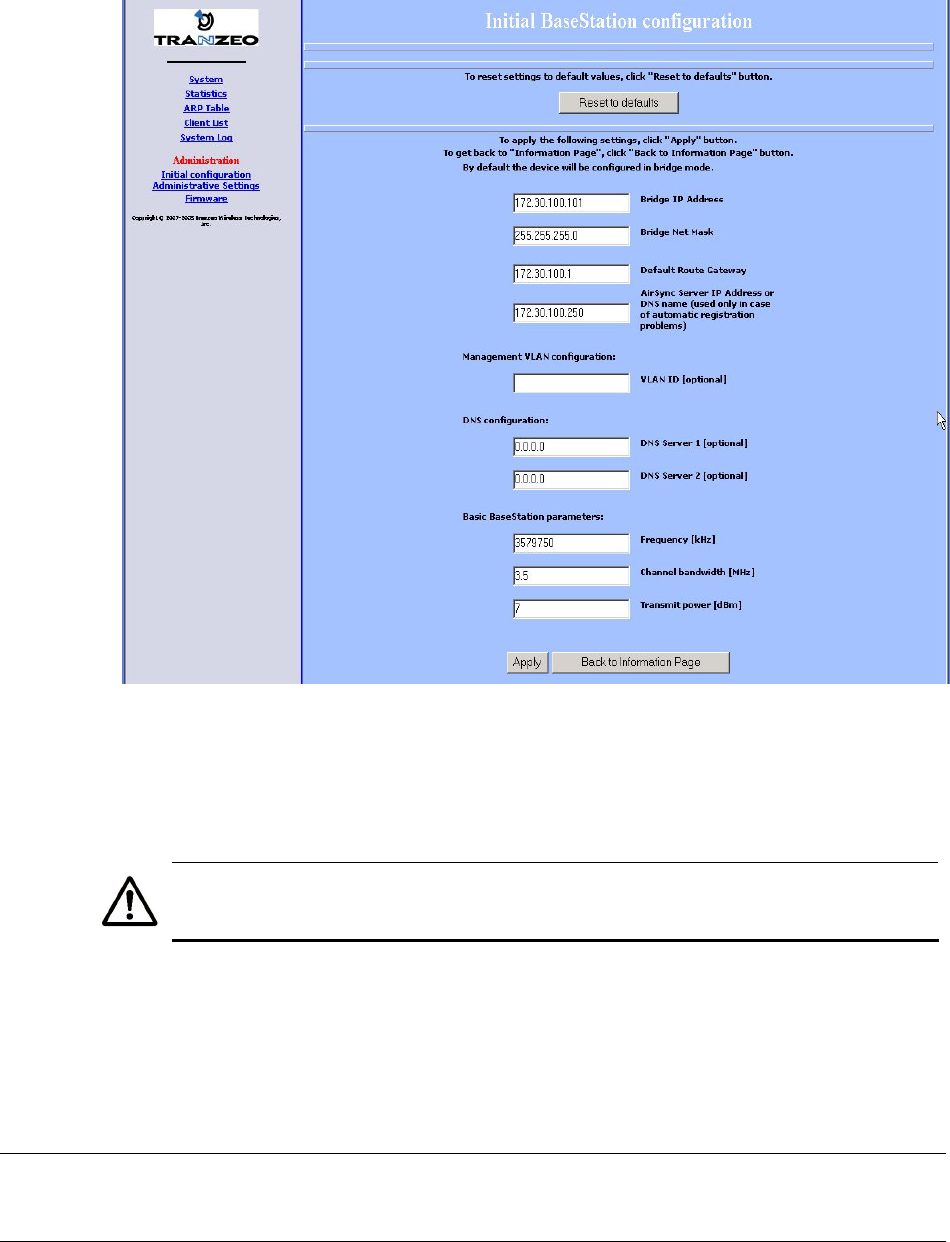
4. In the left pane, under Administration, click Initial configuration. The
Initial Base Station Configuration page appears.
Figure 2. Initial Base Station configuration page.
5. Change the Bridge IP Address to match the IP address schema of your
network. The IP address must be on the same subnet as the AirSync server.
6. Complete the remaining fields on the screen.
The Frequency [khz] and Channel bandwidth [MHz] settings must match the
settings that you will configure later for the Subscriber Unit.
7. When finished, click Apply to save your settings. The Saving Settings screen
appears, with a Reboot button for rebooting the Pico Base Station. You must
reboot to apply your settings.
1.3 Step 2: Configure the Subscriber Unit
After configuring the Pico Base Station, use the procedures in the following sections
to configure the Subscriber Unit.
WiMAX Quick Configuration Guide 8
1.3.1 Log in to the Configurator
Your Subscriber Unit provides a Web-based Configurator for performing advanced
configuration activities. After you install your Subscriber Unit, use the following
procedure to launch the Configurator.
1. Use an Ethernet cable to connect the Ethernet port labeled PC on the PoE
adapter to a network-interface card (NIC) in a PC or network hub. Then
connect the other Ethernet port on the PoE adapter to the Subscriber Unit.
The Subscriber Unit’s Ethernet port is equipped with an auto-sensing Ethernet
port that allows both regular and cross-over cables to be used.
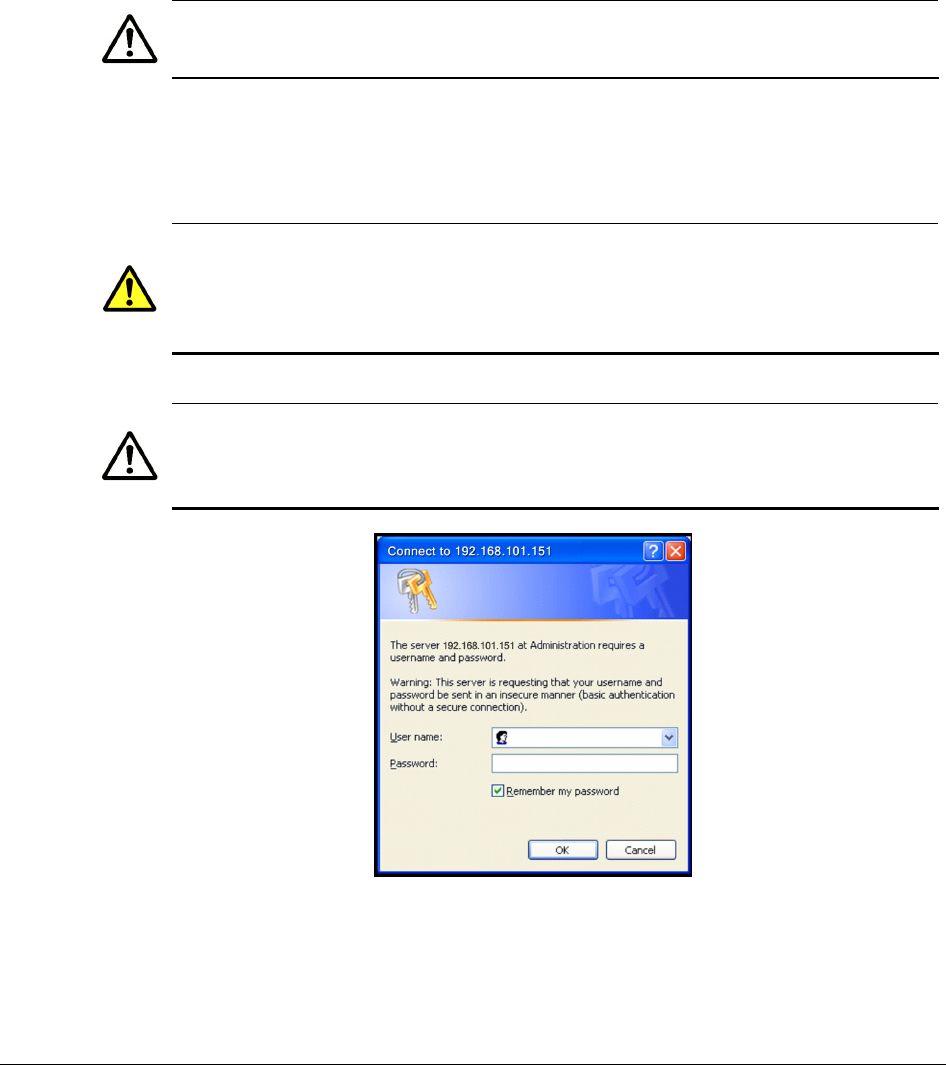
2. Start your Web browser and point it to one of the following default IP
addresses: http://192.168.101.151 or http://192.168.0.1. The Login
page in Figure 3 appears, with your cursor in the User name field.
The default IP address is the same for all TR-WMX subscriber units. Therefore, do
not simultaneously connect multiple unconfigured TR-WMX subscriber units to a
common Local Area Network (LAN) and try to access them using the default IP
address.
To connect to the Configurator, your PC’s IP address must be on the same subnet
(192.168.101.xxx, where xxx is a number from 1 to 253) as the Subscriber Unit,
and the PC’s netmask must be set to 255.255.255.0.
Figure 3. Login page.
3. Enter the default username admin and default case-sensitive password
default in the appropriate fields.
WiMAX Quick Configuration Guide 9
For security, every typed password character appears as a bullet (•). For
additional security, we recommend you change the default password in the
Administrative Settings screen.
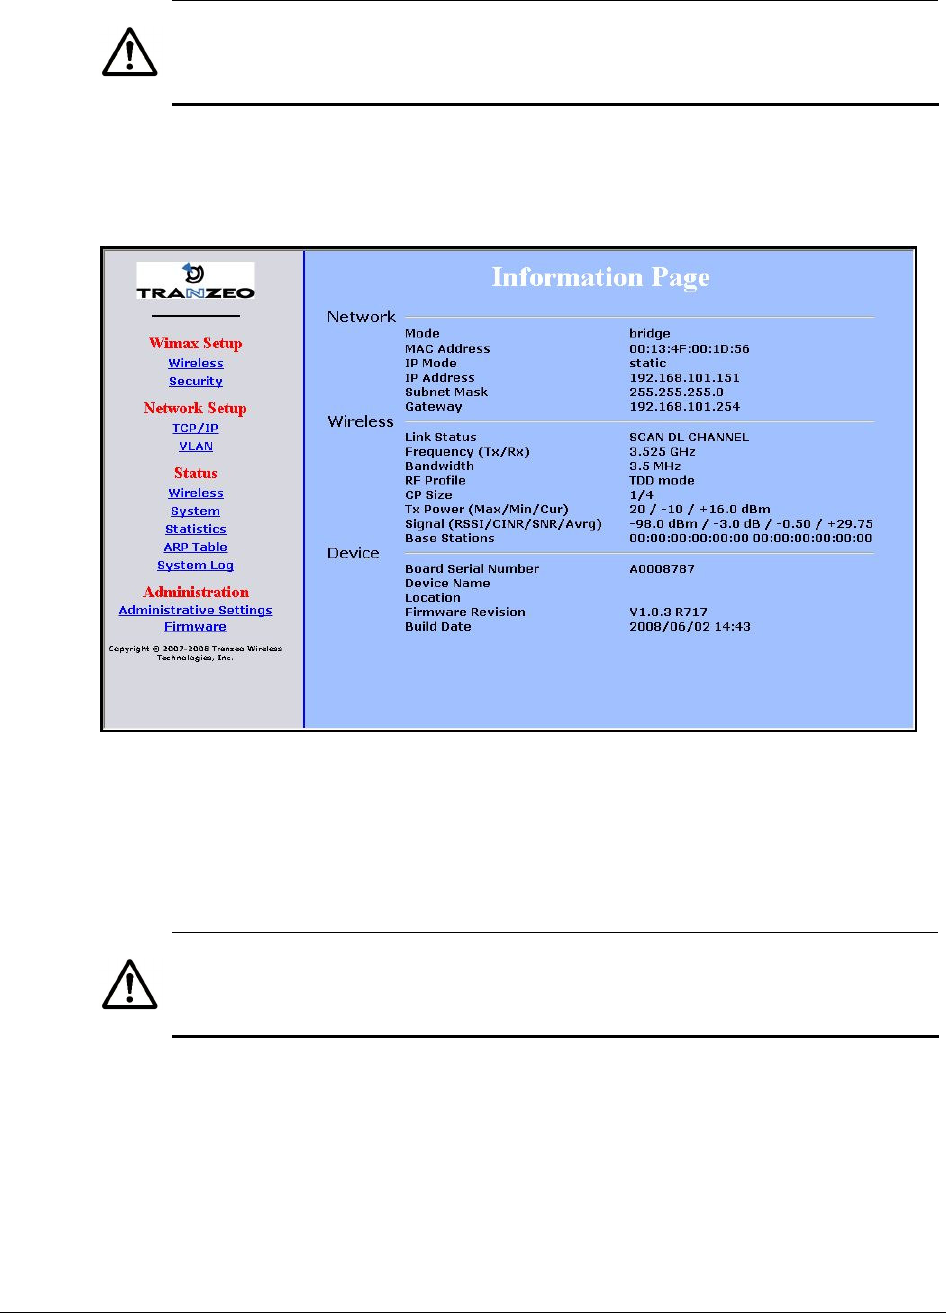
4. Click the OK button to log in. The Information Page appears (see Figure 4).
This read-only page displays network, wireless and device information about
your installation.
Figure 4. Information page.
1.3.2 Specify Wireless Settings
After logging in to the Configurator, use the following procedure to set the Subscriber
Unit’s wireless settings.
The default configuration settings for most parameters should work well for the
majority of installations. Only those settings that should be confirmed or adjusted
as part of the quick-start instructions are described in this section.
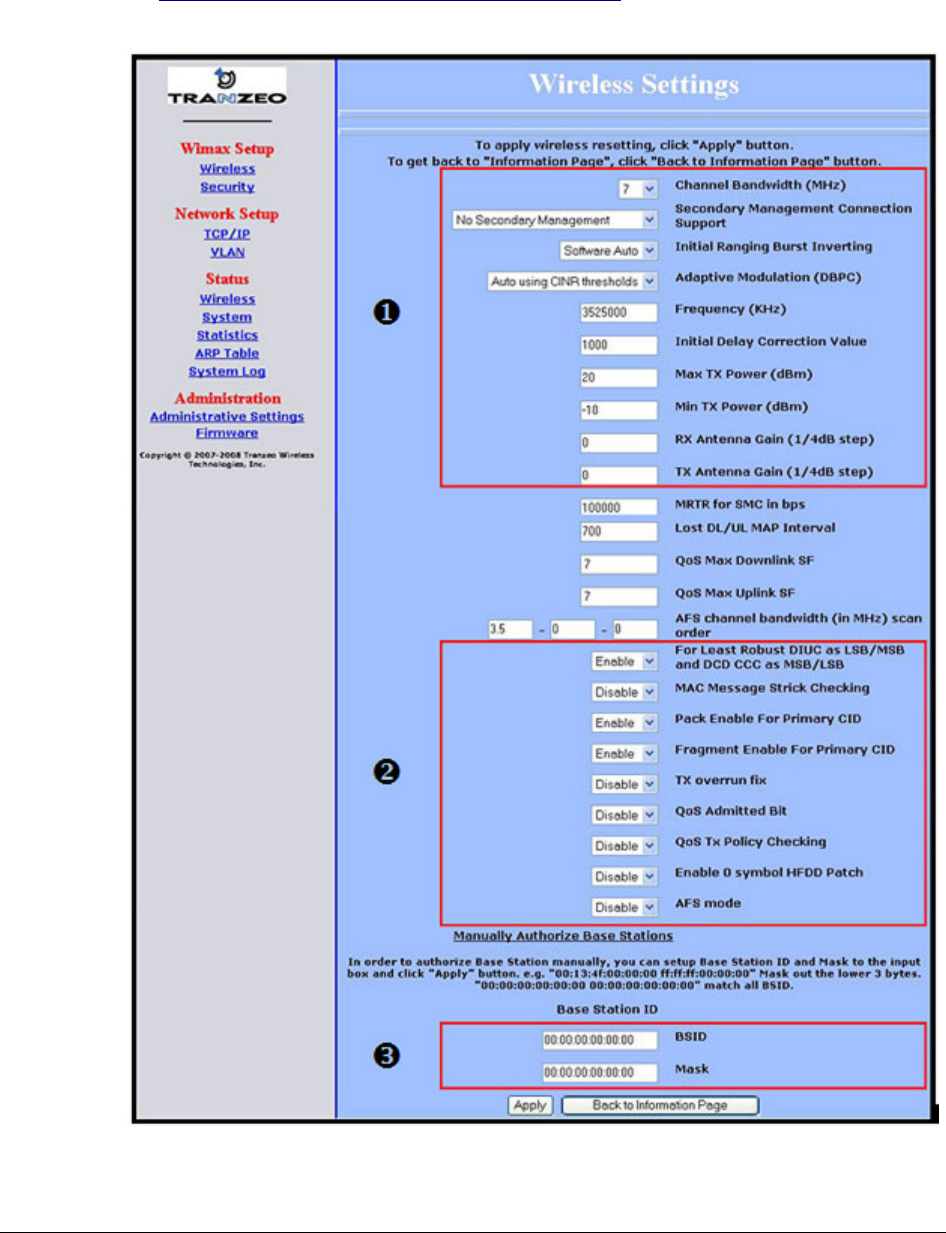
1. In the left pane, under WiMAX Setup, click Wireless. The Wireless Settings
page appears (see Figure 5).
2. Set the three groups of parameters as indicated in
3.
4. Table 1 and Figure 5. These values must match the ones you entered for the
Pico Base Station.
WiMAX Quick Configuration Guide 10
5. Click the Apply button. A page tells you that your configuration changes
have been saved, but will not be applied until you reboot the Subscriber Unit.
6. Do not reboot the Subscriber Unit at this time. Instead, proceed to “Specify
Network Setup Settings” on page 12.
Figure 5. Wireless Settings page.

WiMAX Quick Configuration Guide 11
Table 1. Wireless Settings
Parameter Choose This Setting
Group Parameters in Figure 5
Channel Bandwidth (MHz) For the 3.65GHz pBS operation select 3.5MHz (default)
or 7MHz, whichever best suits your application’s
bandwidth needs and is allowed by your license. The
Pico Base Station must be set to the same bandwidth.
Secondary Management
Connection Support
Confirm that the default setting (Secondary
Management) is disabled. If not, select No Secondary
Management.
Initial Ranging Burst Inverting Confirm that the default setting (Software Auto) is
selected. If not, select it.
Adaptive Modulation (DBPC) Confirm that the default setting (Auto using CINR
thresholds) is selected. If not, select it.
Frequency (KHz) Sets the frequency, in kHz. For 3.65GHz operation the
SU range is 3650000 – 3675000 in increments of
250kHz. Default is 3650000 (3.65 GHz). Since the pBS
supports frequencies from 3650000-3675000, only use
frequencies in that range.
Initial Delay Correction Value Confirm that the default setting (1000) is selected. If
not, select it. This parameter maybe adjusted over a
range of 0 to 1000.
Max EIRP (dBm) Do not exceed the max EIRP allowed by your license,
which is 30dBm/1MHz. At calculation of maximum
antenna gain GA use the following formula: GA = 20 +
LC - PT + R, where LC is cable loss, PT is output power at
antenna port taken at 1 MHz resolution bandwidth, R is
bandwidth correction factor: 5.44 for 3.5MHz
bandwidth and 8.45 for 7 MHz bandwidth.
The Max Tx Power value cannot exceed 20dBm.
Default setting is 15dBm.
Min Tx Power (dBm) Confirm that the default setting (-10) is selected. If
not, select it.
Rx Antenna Gain (1/4dB step) Confirm that the default setting (0) is selected. If not,
select it. This can be adjusted to match the gain of the
antenna used, however the default setting of 0 will
enable connectivity in all cases.
Tx Antenna Gain (1/4dB step) Confirm that the default setting (0) is selected. If not,
select it. This can be adjusted to match the gain of the
antenna used, however the default setting of 0 will
enable connectivity in all cases.

WiMAX Quick Configuration Guide 12
Parameter Choose This Setting
Group Parameters in Figure 5
For Least Robust DIUC as
LSB/MSB and DCD CCC as
MSB/LSB
Confirm that the default setting (Enable) is selected. If
not, select it.
MAC Message Strict Checking Confirm that the default setting (Disable) is selected. If
not, select it.
Pack Enable for Primary CID Confirm that the default setting (Enable) is selected. If
not, select it.
Fragment Enable for Primary CID Confirm that the default setting (Enable) is selected. If
not, select it.
Tx Overrun Fix Confirm that the default setting (Disable) is selected. If
not, select it.
QoS Admitted Bit Confirm that the default setting (Disable) is selected. If
not, select it.
QoS Tx Policy Checking Confirm that the default setting (Disable) is selected. If
not, select it.
Enable 0 Symbol HDD Patch Confirm that the default setting (Disable) is selected. If
not, select it.
AFS mode Confirm that the default setting (Disable) is selected. If
not, select it.
Group Parameters in Figure 5
BSID and Mask Use the standard format for MAC addresses (six 2-digit
hexadecimal numbers separated by colons) to enter
the Pico Base Station ID. Example:
“12:34:56:78:9a:bc”. You can enter up to 8 Pico Base
Station addresses, separating each by pressing the
Enter key. To match a range of BSIDs, in the mask
field use 0 to allow any or f in the digit corresponding
to the BSID value to match. To match any BSID, utilize
a setting of all zeros for both the BSID and Mask:
"00:00:00:00:00:00 00:00:00:00:00:00".
1.3.3 Specify Network Setup Settings
After specifying wireless settings, use the following procedure to specify the network
setup settings.
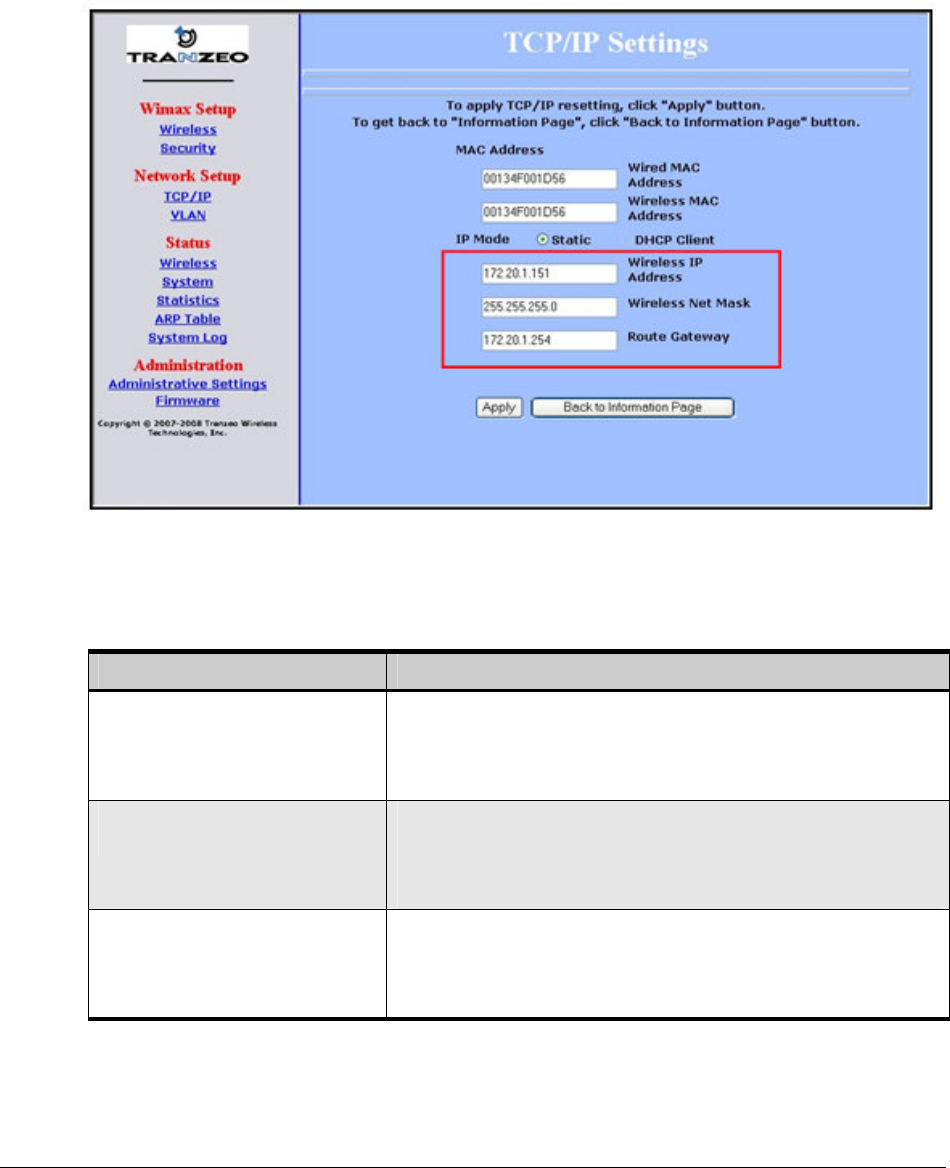
1. In the left pane, under Network Setup, click TCP/IP. The TCP/IP Settings
page appears (see Figure 6).
WiMAX Quick Configuration Guide 13
2. When the Subscriber Unit is set to unmanaged mode (No Secondary
Management set on the Wireless page) the IP Mode will be displayed as
static on the TCP/IP page. Confirm IP mode is static and set the parameters
in Table 2 (these parameters are highlighted in orange in Figure 6).
Otherwise, skip to step 3 on the next page.
Figure 6. TCP IP Settings page.
Table 2. TCP/IP Settings
Parameter Choose This Setting
Wireless Management IP
Address
Secondary management mode: This value is set
automatically and the field is unavailable.
Unmanaged mode: Set this parameter to an unused value
in the subnet to which the Pico Base Station is connected.
Wireless Management Net
Mask
Secondary management mode: This value is set
automatically and the field is unavailable.
Unmanaged mode: Set this value to match that of the
subnet to which the Pico Base Station is connected.
Management Route Gateway Secondary managed mode: This value is set automatically
and the field is unavailable.
Unmanaged mode: Set this value to be the router on the
subnet to which the Pico Base Station is connected.
3. Click the Apply button. When the next page appears, click the Reboot
button to reboot the Subscriber Unit and put your saved settings into effect.

WiMAX Quick Configuration Guide 14
Rebooting disconnects the Subscriber Unit and any connections currently running.
It may take 60 seconds before the Subscriber Unit is running and accessible again.
The Status LED flashes while the unit reboots and goes ON when the unit
completes the reboot process.
1.4 Step 3: Configure the Subscriber Unit in AirConsole
To configure the Subscriber Unit in AirConsole:
1. Using the server where AirSync and AirConsole have been installed, click the
Windows Start button, point to All Programs, point to AirSync, point to
AirConsole, and click AirConsole.
2. Once the AirSync Management Console window appears, go to Manage
menu and then click Devices. On the Devices tab, click Details, this will
show the details pane on the right side of the Pico Base Station. After a few
minutes, the Pico Base Station should register with AirSync automatically.
3. In the right pane, click the Connections tab. Connection information for the
selected Pico Base Station appears. Question marks mean the detected
Subscriber Unit has not been added to the AirSync server; if this happens, do
not worry, as you will add the device later in this procedure.
If the Subscriber Unit does not appear in the connections tab under the Base
Station after a few minutes, the link timing may require adjustment. The default
settings described above enable connectivity for wireless links. However, for
conducted testing two parameters may need to be adjusted. First adjust the
“Magic wavesat synchronization parameter” available through Interfaces tab in
AirConsole for the Base Station’s bs_ofdm0 interface using the RNG_GRP sub-tab.
Use values ranging from 236-690, then click Send to adjust these on the Base
Station. Values of 236,536, and 583 for this parameter are appropriate for
conducted tests with respective channel bandwidths of 3.5MHz, 7MHz, and
10MHz. Keep in mind adjusting this parameter will cause the Base Station to
reboot. Second, adjust the “Initial Delay Correction Value” through the Subscriber
Unit Wireless Settings web page, and reboot the CPE to apply this change. Use
values ranging from 0-1000, with a value of 120 for this parameter appropriate for
conducted testing.

WiMAX Quick Configuration Guide 15
Figure 7. AirSync Management Console Window.
4. Record the Subscriber Unit’s MAC address shown and the serial number
included with the Subscriber Unit. You will need them later when you
configure the Subscriber Unit.
MAC Address (shown in screen above): ____________________
Serial Number (included in the Subscriber Unit box): __________
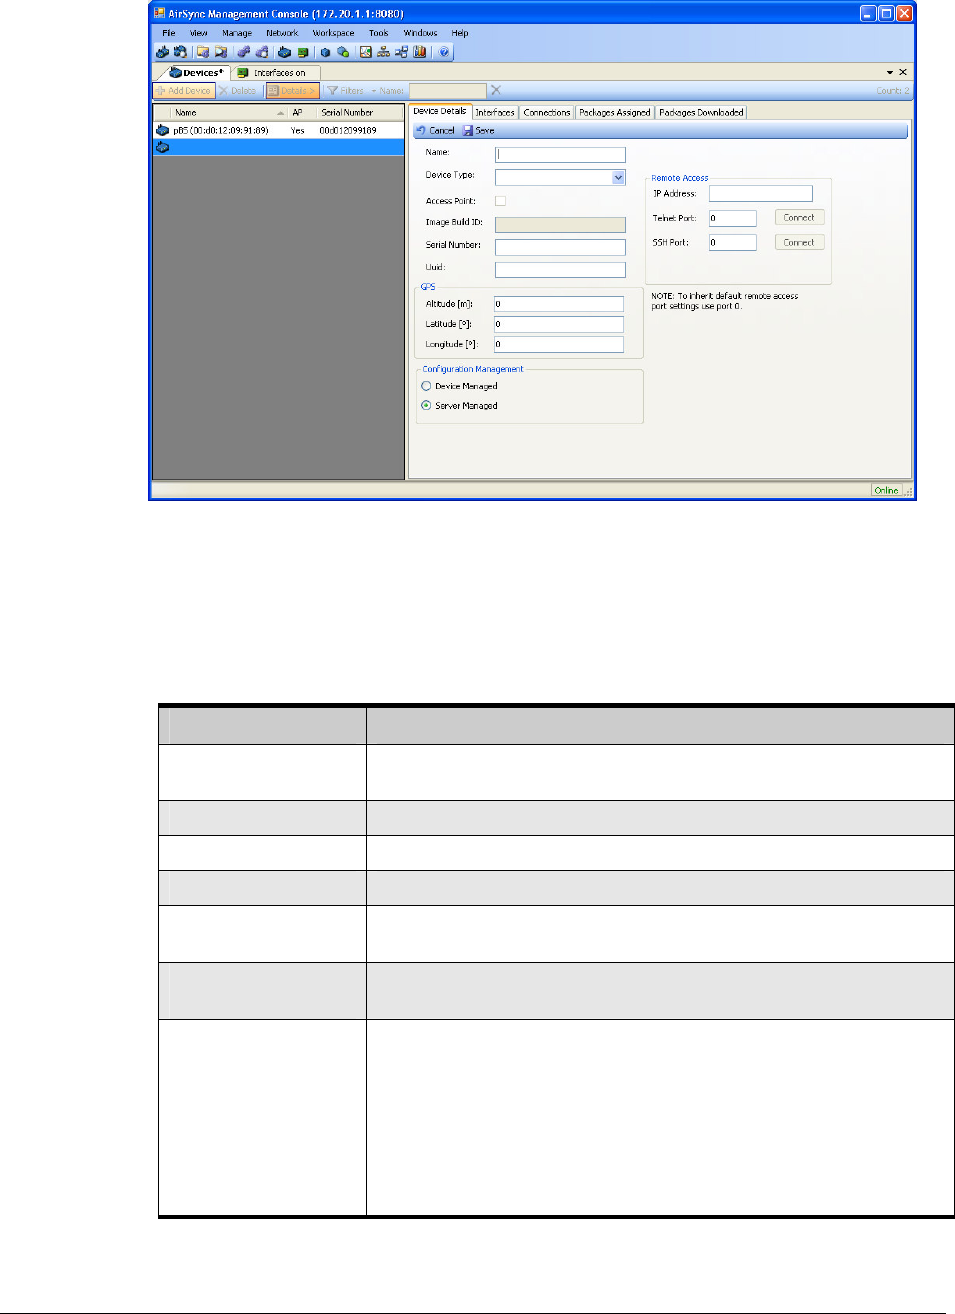
5. At the AirSync Management Console, click Add Device. The Device Details
tab appears on the right.
WiMAX Quick Configuration Guide 16
Figure 8. Device Details tab.
6. Complete the fields in the Device Details tab and click Save.
Table 3. Fields in the Device Details Tab
Parameter Description
Name Enter a meaningful name for the Subscriber Unit (e.g., the
location where the Subscriber Unit will be installed).
Device Type Select Tranzeo TR-WMX or appropriate device.
Serial Number Enter the Subscriber Unit serial number recorded on Step 3.
Uuid Enter a unique UUID number.
GPS Optional: Enter the altitude, latitude, and longitude where the
Subscriber Unit will be installed.
Configuration
Management
Accept the default setting.
Remote Access IP Address = enter the Subscriber Unit’s IP address.
A configuration graphical user interface (GUI) is available at
the IP address using the default username admin and default
password default. The Subscriber Unit must be set to the
proper frequency and channel bandwidth to connect to the
Pico Base Station using the subscriber station’s Web-based
GUI. The frequency and the channel bandwidth must match
the values entered before for the Pico Base Station.
WiMAX Quick Configuration Guide 17
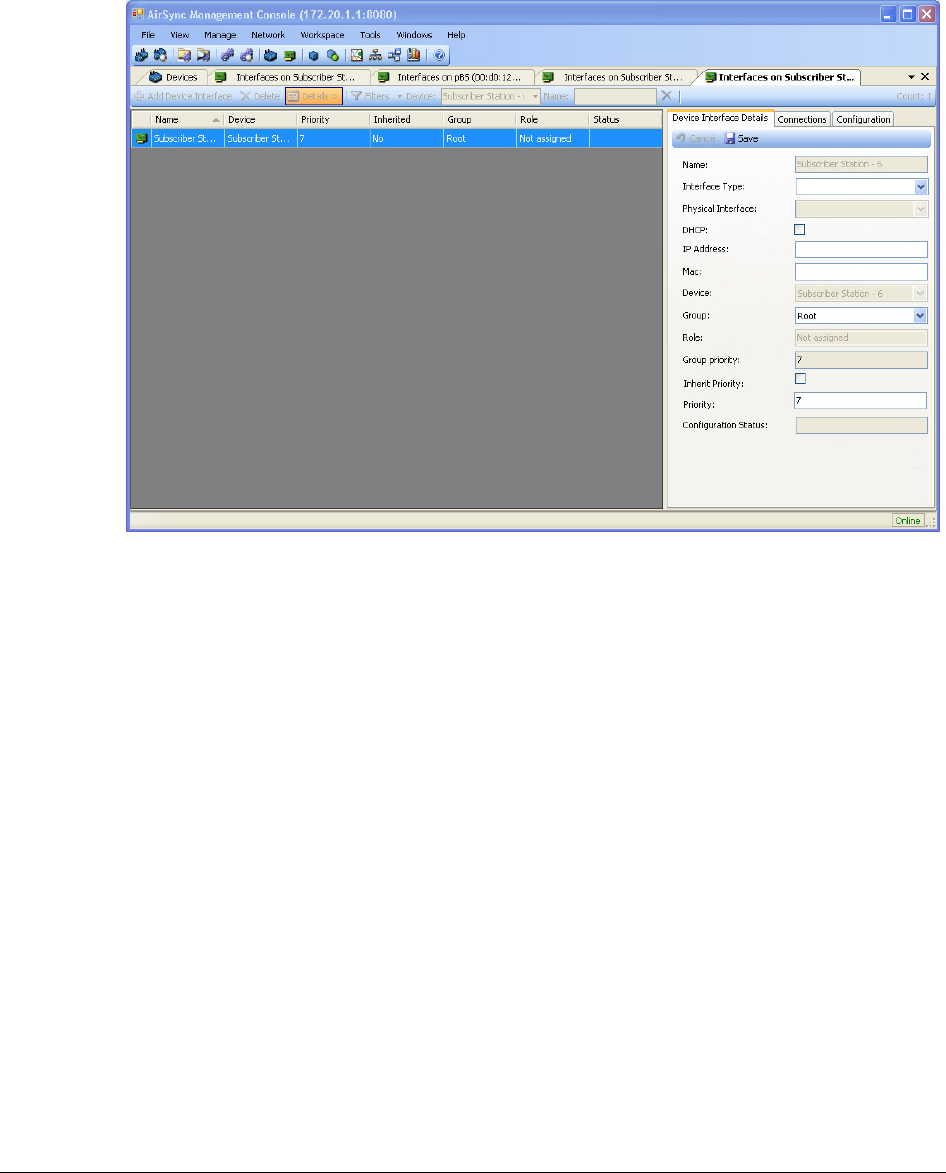
7. When a message prompts you to add a primary interface for this Subscriber
Unit, click OK. The Device Interface Details tab appears.
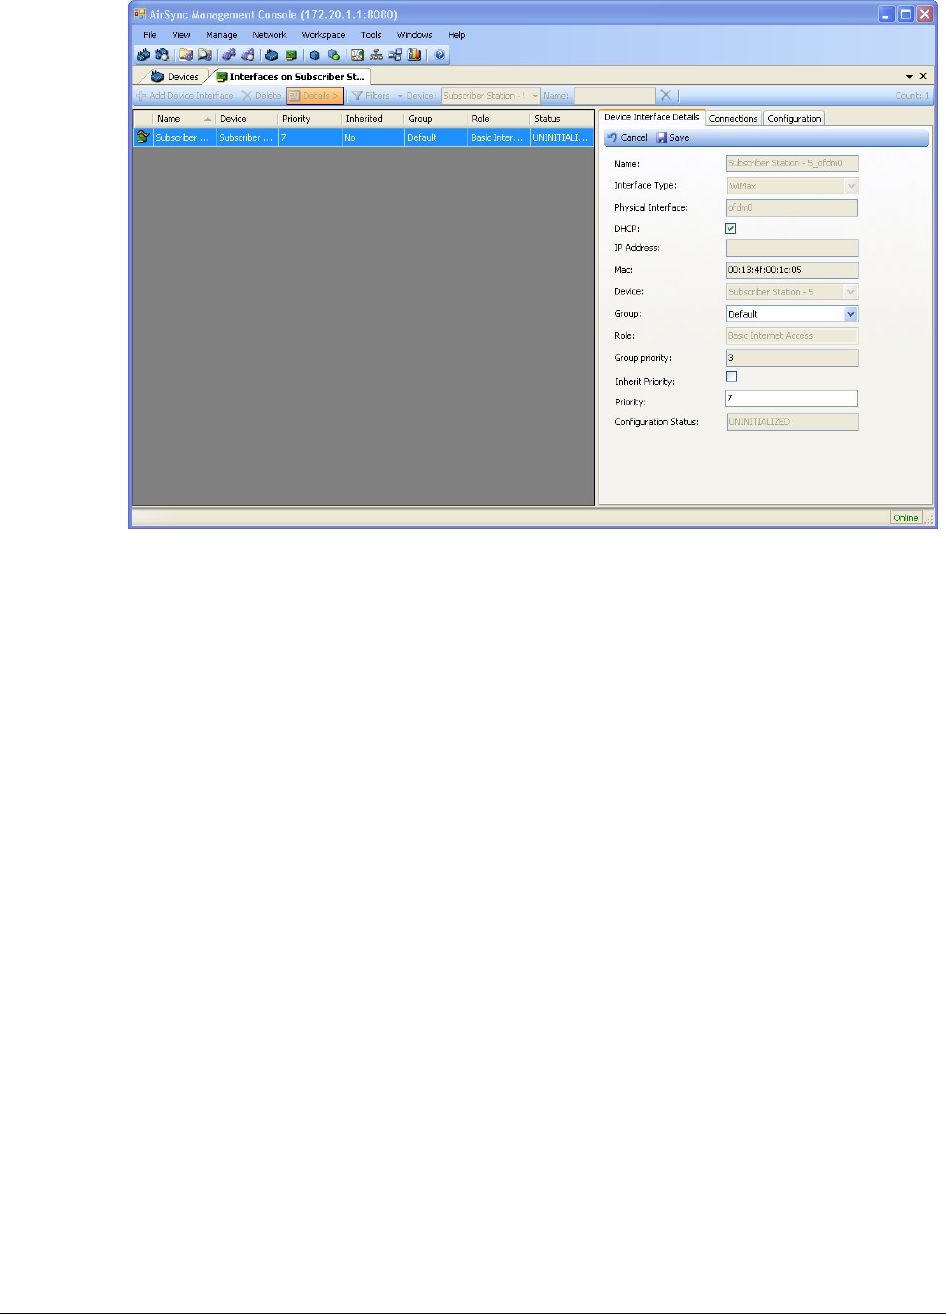
Figure 9. Device Interface Details tab.
8. Complete the fields in the Device Interface Details tab and click Save.

WiMAX Quick Configuration Guide 18
Table 4. Fields in the Device Interface Details Tab
Remember that Tranzeo Subscriber Units are not managed by AirSync. Therefore,
manually assigned IP Addresses must be entered in the IP Address field.
Parameter Description
Interface Type Select WiMax. Once you select and Interface type the
physical interface will be active. The default ofdm0 is fine.
DHCP Check to have AirSync fill up this information automatically.
This option only works if AirSync manages the device. Since
the Subscriber Unit device is not managed by AirSync please
do not check this box. Instead manually enter the static IP
address to be used in the IP Address field.
IP Address Enter a static IP address for the Subscriber Unit. Only
available when DHCP is not checked.
Mac Enter the Subscriber Unit MAC address using a : separated
format (Aa:Bb:Cc:Dd:Ee:Ff:00).
Group Add the Subscriber Unit to the group Default. The
Subscriber Unit will inherits permissions from the group if
the Inherit Priority checkbox is selected.
WiMAX Quick Configuration Guide 19
1.5 Step 4: Test the Subscriber Unit Connectivity
To test the Subscriber Unit connectivity, perform the following procedure.
1. Using the computer connected to the Subscriber Unit, confirm that the
subscriber’s computer can access the LAN resource and any desired
destination (e.g., the Internet). The subscriber’s computer must be
configured with the same subnet as the Subscriber Unit and a default
gateway that matches the Subscriber Unit IP address.
Figure 10. An example of a typical network configuration.
2. If the LAN resources cannot be accessed, click the Devices tab, select the
Pico Base Station device, and verify that the device has no warning triangle
and that all the rows appear in white in the Interfaces tab in the right pane.
If the Subscriber Unit appears in red, the link between the Pico Base Station
and Subscriber Unit is down. If this is the case then check the
Configuration tab under Manage, Device Interfaces and select the
bs_ofdm0 device interface to confirm that the frequency and bandwidth are
set up properly in the Pico Base Station (RADIO_GRP sub-tab). Also confirm
that the frequency and bandwidth are set up properly in the Subscriber Unit
using the Subscriber Unit’s Web-based GUI.
WiMAX Quick Configuration Guide 20
Figure 11. Configuration subtab on Device Interfaces Details tab.
The figure above shows the default values to configure the Pico
Base Station to be connected to a single Subscriber Unit. If you wish
to connect more than one Subscriber Unit please modify the Frame
Length to 10 or 20 ms. 10ms is the recommended value. Although
the latency will increase, the supported throughput will increase. In
addition change the Minimum Size of First Burst value under the
MAC_GRP tab. The recommended burst size values are shown below
in Table 5: Minimum Size of First Burst for multiple Subscriber
Units.
Table 5: Minimum Size of First Burst for multiple Subscriber Units.
Number of
Subscriber Units
Minimum Size
of First Burst
1 25
2 27
3 28
4 30

WiMAX Quick Configuration Guide 21
5 31
6 33
7 34
8 36
9 37
10 39
11 40
12 42
13 43
14 45
15 46
16 48
17 49
18 51
19 52
20 54
21 55
22 57
23 58
24 60
25 61
26 63
27 64
28 66
29 67
30 69
31 70
3. From the Devices tab, click the Pico Base Station row in the left pane on
which the device name appears. Then, in the right pane, click the
Connections tab.
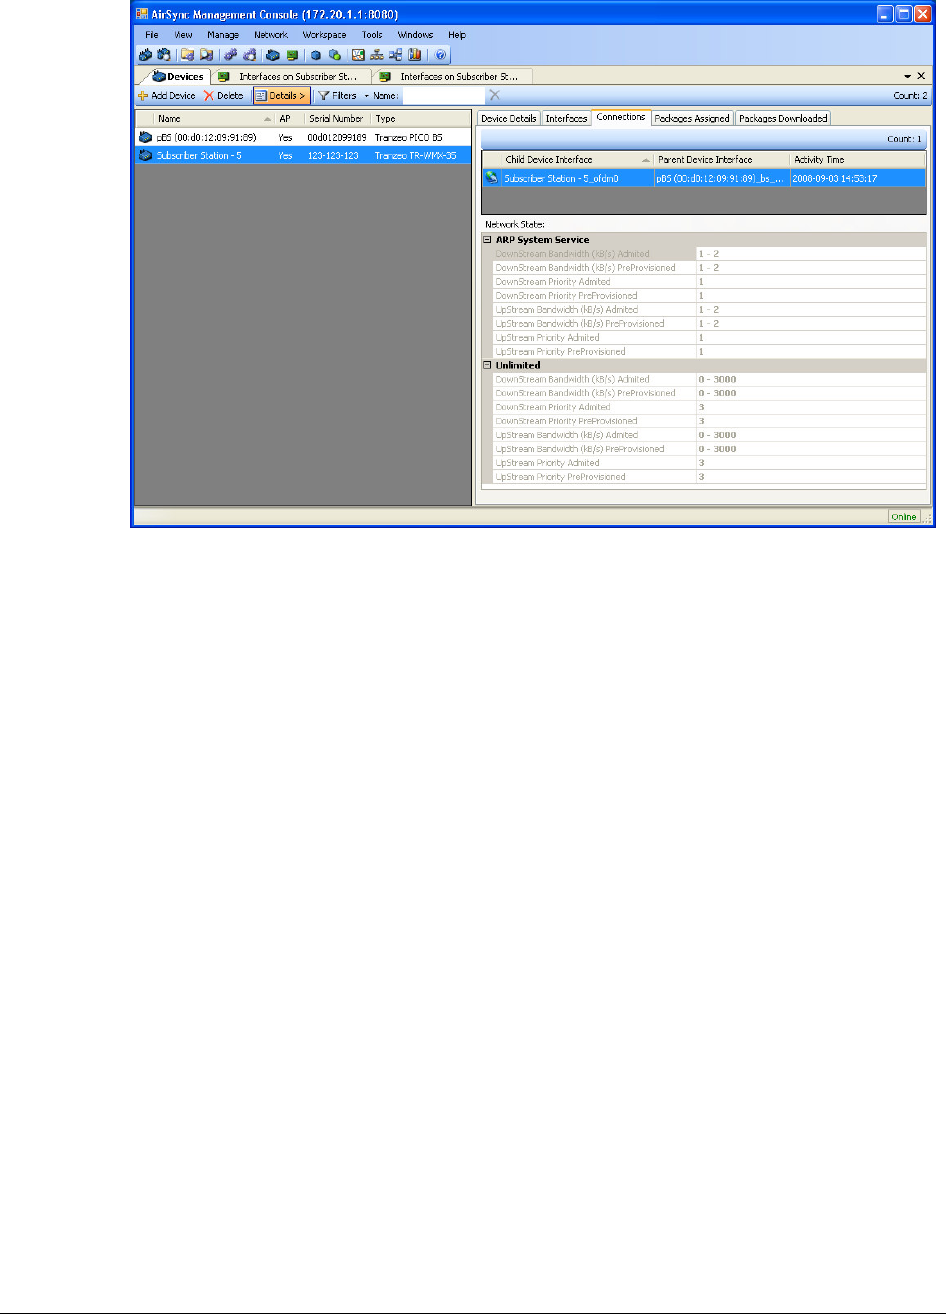
4. In the Connections tab, click the Subscriber Unit. If the row appears in
white, as in the following example, you will see the services flow assigned to
the Subscriber Unit.
WiMAX Quick Configuration Guide 22
Figure 12. Connections subtab on Devices tab.
If there are no services flows, check that the Subscriber Unit is assigned
properly to the group called Default. To do so, click the Devices tab in the
left pane; then, in the Devices tab on the left, right-click the subscriber
station whose group you want to confirm and select Show Interfaces from
the shortcut menu. In the right pane, click Edit and use the Group drop-
down list to select the appropriate group.
WiMAX Quick Configuration Guide 23
Figure 13. Device Interfaces details tab.

WiMAX Quick Configuration Guide 24
1.6 Step 5: Monitor the Network
After confirming that the subscriber’s computer can access the LAN resources, use
the following procedure to monitor the network.
1. In the Devices tab, right-click the Subscriber Unit and choose Show
Statistics from the shortcut menu. A box appears with statistics for
monitoring the network.
Figure 14. Statistics tab.
2. Using the statistics box, edit the parameters and see the real-time
performance results of the Subscriber Unit.
The AirSync Server icons indicate the status of each device. For example:
= the device does not have a working agent.
= the device is down and the AirSync Server cannot ping it.
Congratulations! You have now completed the configuration for the
Tranzeo TR-WMX WiMAX Subscriber Unit and attaching it to the Pico
Base Station.
For more information, please visit www.tranzeo.com.

WiMAX Quick Configuration Guide 25
Compliance Information
This device complies with Part 90Z of the FCC Rules. Operation is subject to the
following two conditions: (1) This device may not cause harmful interference, and (2)
This device must accept any interference received, including interference that may
cause undesired operation.
This equipment has been tested and found to comply with the limits for Part 90Z of
the FCC Rules. These limits are designed to provide reasonable protection against
harmful interference in a residential installation. This equipment generates and can
radiate radio frequency energy and, if not installed and used in accordance with the
instructions, may cause harmful interference to radio communications. However,
there is no guarantee that interference will not occur in a particular installation. If this
equipment does cause harmful interference to radio or television reception, which can
be determined by turning the equipment off and on, the user is encouraged to try to
correct the interference by one or more of the following measures.
Reorient or relocate the receiving antenna
Increase the separation between the equipment and receiver
Connect the equipment into an outlet on a circuit different from that to which the
receiver is connected
Consult the dealer or an experienced radio/TV technician for help
To reduce potential radio interference to other users, the antenna type and its gain
should be so chosen that the equivalent isotropically radiated power (EIRP) is not
more than that required for successful communication.
Any changes or modification to said product not expressly
approved by Tranzeo Wireless Technologies Inc. could void the
user's authority to operate this device.

WiMAX Quick Configuration Guide 26
As per Part 1.1307 of the FCC Rules, for safety reasons, people should not work in a
situation where RF exposure limits could be exceeded. To prevent this situation, the
users should consider the following rules:
- Install the antenna so that there is a minimum of 6.7 cm (2.6 in) of distance
between the antenna and people.
- Do not turn on power to the device while installing the antenna.
- Do not connect the antenna while the device is in operation.
- Do not co-locate or operate the antenna used with the device in conjunction with
any other antenna or transmitter.
The product requires professional installation. Professional installers must ensure that
the equipment is installed following local regulations and safety codes.