Trimble 66400 PDA User Manual JunoSeries v1 Rev1
Trimble Navigation Ltd PDA JunoSeries v1 Rev1
Trimble >
Contents
- 1. Users Manual 1
- 2. Users Manual 2
Users Manual 2

CHAPTER
4
Juno Series User Guide 51
Connecting to an Office Computer 4
In this chapter:
Connection management
software
Connecting the handheld to a
computer
Managing the connection using
the Windows Mobile Device
Center
Managing the connection using
ActiveSync technology
Installing software onto the
handheld
Connect the Juno series handheld to an office
computer to transfer information, settings, and
files from one device to the other, or to install
software onto the handheld.
You can connect the handheld to a computer
using the USB cable or a Bluetooth wireless link.
To protect your data, Trimble recommends that
you regularly copy important data to an office
computer.

4 Connecting to an Office Computer
52 Juno Series User Guide
Connection management software
To install software onto a Windows Mobile powered device, or to copy files between
the handheld and a computer, you must connect the device to an office computer. If
the computer is running:
•the Windows Vista® operating system, use the Windows Mobile Device Center
to manage the connection.
•the Windows® XP or 2000 operating system, use ActiveSync technology to
manage the connection.
Note – You must install the Windows Mobile Device Center or ActiveSync technology onto
the computer before you connect the handheld.
This connection management software also enables you to synchronize office
applications on an office computer with the handheld.
CCAUTION – The available space on the handheld is small compared to an office computer.
To avoid accidentally synchronizing the handheld with a large amount of data on the
office computer, Trimble recommends that you either connect to the handheld without
forming a partnership, or that you limit the information types and amount of data that
is synchronized.
CCAUTION – Synchronizing data is designed to keep the same data on both the office
computer and the handheld. Exercise care when resynchronizing applications after
deleting data from one computer, as resynchronizing will delete the same information
from the other computer.
For more information see one of the following:
•Managing the connection using the Windows Mobile Device Center, page 54
•Managing the connection using ActiveSync technology, page 55.
Installing the Windows Mobile Device Center
The Windows Vista operating system includes a basic connectivity driver for Windows
Mobile powered devices. This driver allows you to transfer files from the handheld to
an office computer.
To install software onto a Windows Mobile powered device, you must install Windows
Mobile Device Center 6 onto an office computer.
A copy of the Windows Mobile Device Center is provided on the Juno Series Getting
Started Disc. Alternatively, go to
www.microsoft.com/windowsmobile/devicecenter.mspx to download the latest
version from the Microsoft website.
Juno Series User Guide 53
Connecting to an Office Computer 4
Installing ActiveSync technology
A copy of ActiveSync technology is provided on the Juno Series Getting Started Disc.
Alternatively, go to www.microsoft.com/windowsmobile/activesync/default.mspx to
download the latest version from the Microsoft website.
Connecting the handheld to a computer
To connect the Juno series handheld to a computer:
1. Make sure that the handheld and the computer are switched on.
2. Make sure you have installed the appropriate connection management software
onto the computer (see Connection management software, page 52).
3. To form a connection, do one of the following:
–Use the handheld's integrated Bluetooth radio to establish a wireless serial
link to a Bluetooth-enabled computer. For more information, see
Connecting to an office computer to use ActiveSync technology, page 89.
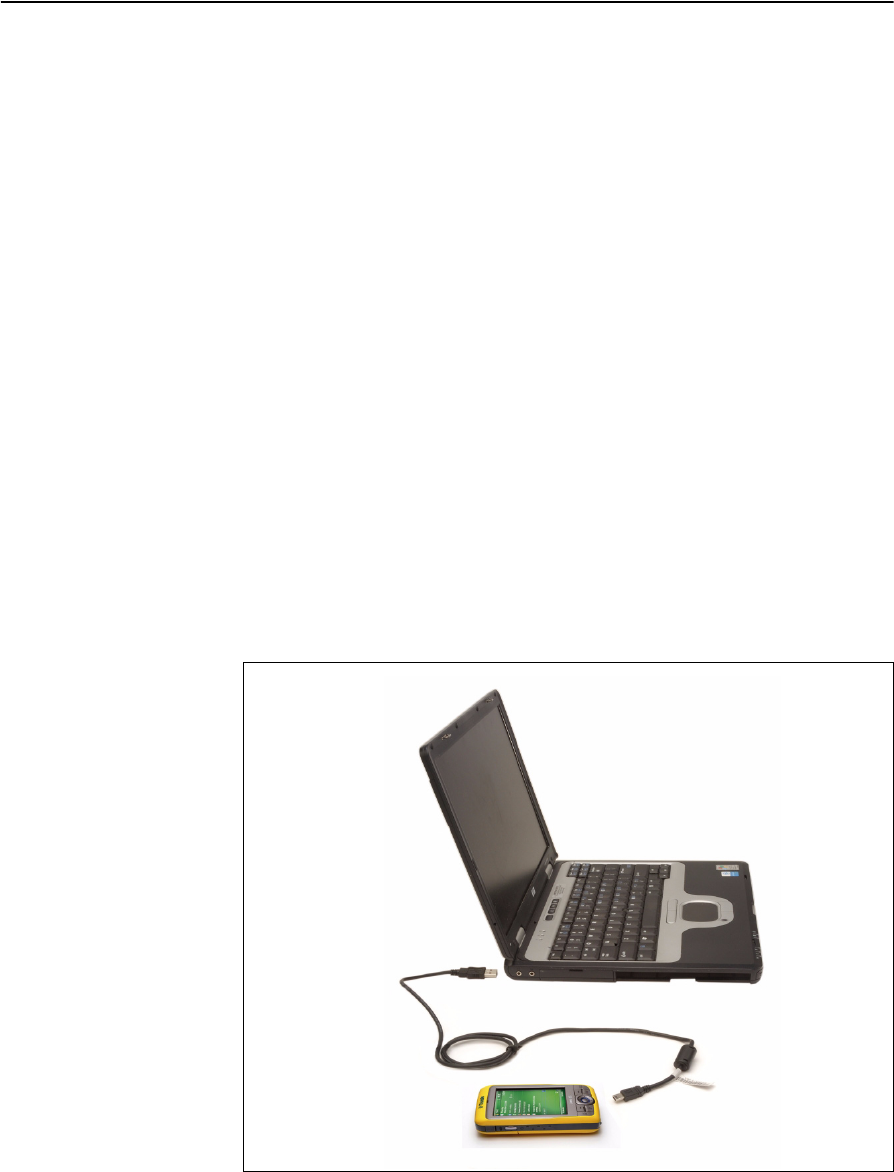
–Use a USB connection:
a. Connect the USB data cable to the USB port on the handheld.
b. Connect the other end of the USB data cable to a USB port on the
computer.
When the handheld and the computer are connected, you can manage the
connection through a window that appears on the office computer. See one of
the following:
4 Connecting to an Office Computer
54 Juno Series User Guide
–Managing the connection using the Windows Mobile Device Center,
page 54
–Managing the connection using ActiveSync technology, page 55
Managing the connection using the Windows Mobile Device
Center
1. Connect the handheld to the computer (see page 53).
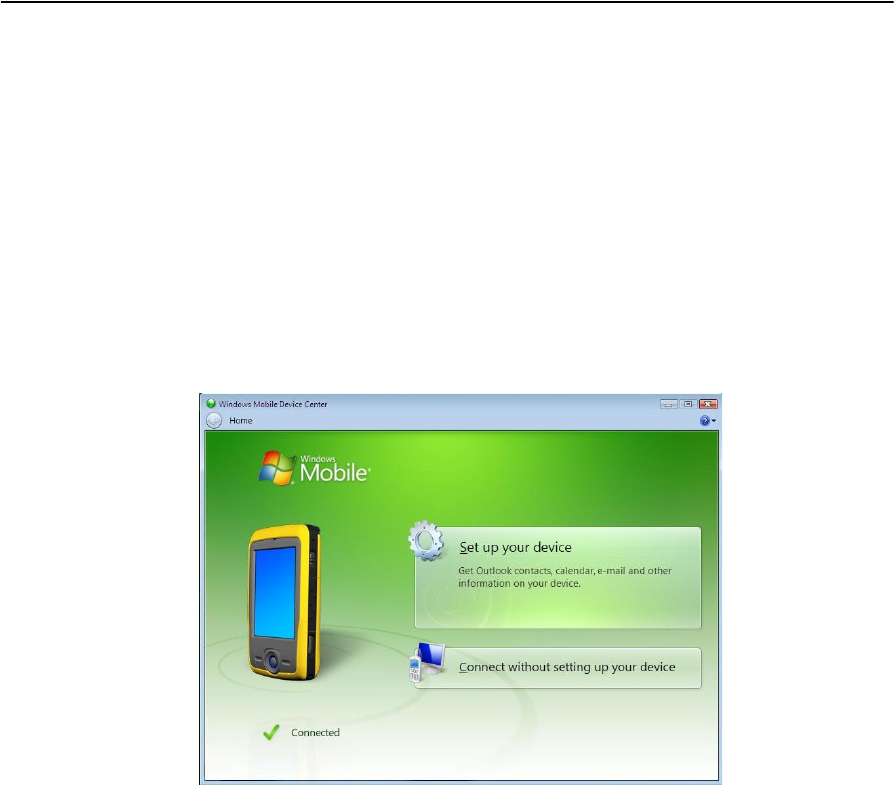
2. If the Autoplay window appears, close the window.
3. The Windows Mobile Device Center window displays the message Connected:
Note – If the connection is not made automatically, check that the connection is enabled in
the Windows Mobile Device Center software and on the handheld. For more information,
see Troubleshooting, page 99.
4. Do one of the following:
–To synchronize files and data between the handheld and a computer, click
Set up your device and then follow the instructions on screen.
–To transfer data between the handheld and the computer without
synchronizing the devices, click Connect without setting up your device.
5. To transfer files between the computer and the handheld, click File
Management. A Windows Explorer-type window appears, displaying files stored
on the handheld. Copy and paste files to other locations on the computer, or
from the computer to the handheld.
6. To install software onto the handheld, see Installing software onto the handheld,
page 57.
7. To uninstall software from the handheld, click Programs and Services and then
click Add/Remove Programs.
Juno Series User Guide 55
Connecting to an Office Computer 4
BTip – If the Add/Remove Programs option does not appear below Programs and Services,
click More. The Add/Remove Programs option appears.
For more information, refer to the Windows Mobile Device Center Help.
BTip – If the GPS Pathfinder Office software is installed on the office computer, you can
configure the Connection Manager utility in the GPS Pathfinder Office software to
automatically detect when you connect a Juno series handheld to the computer. This
enables you to automatically transfer data from the TerraSync software, differentially
correct the data, and then export it to a GIS. For more information, refer to the GPS
Pathfinder Office Software Help.
Managing the connection using ActiveSync technology
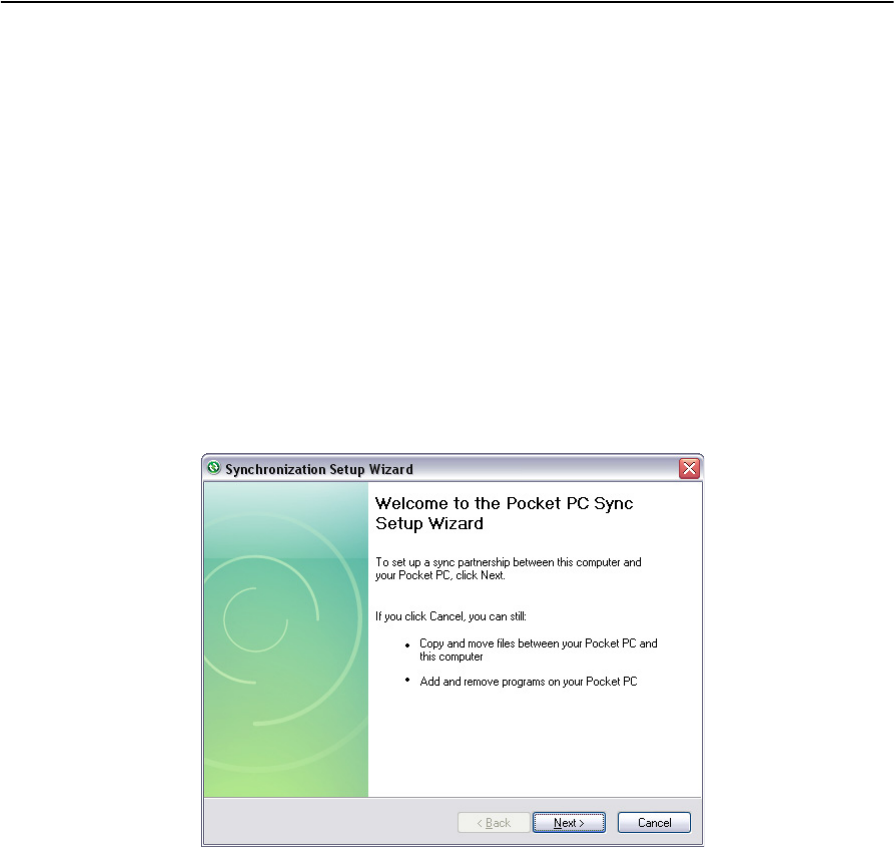
1. Connect the handheld to the computer (see page 53). The Synchronization Setup
Wizard appears:
Note – If the connection is not made automatically, check that the connection is enabled in
the ActiveSync software and on the handheld. For more information, see Troubleshooting,
page 99.
2. Do one of the following:
–To synchronize files and data between the handheld and a computer, click
Next and then follow the instructions in the Synchronization Setup Wizard.
–To transfer data between the handheld and the computer without
synchronizing the devices, click Cancel to close the wizard.
4 Connecting to an Office Computer
56 Juno Series User Guide
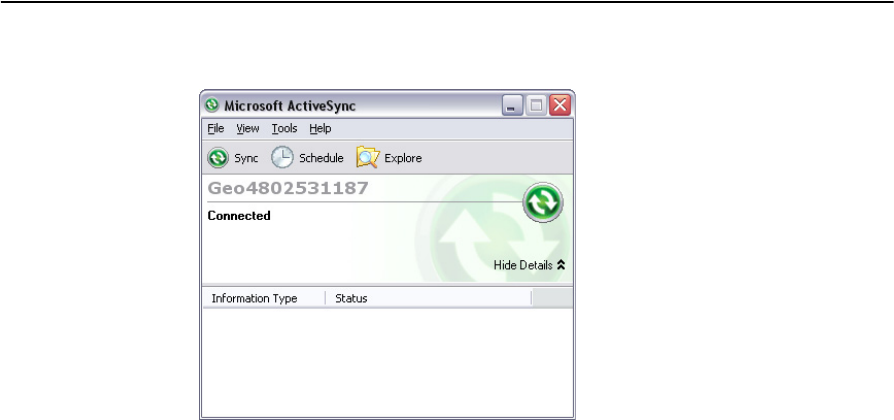
3. The Microsoft ActiveSync window displays the message Connected:
4. To transfer files between the computer and the handheld, click Explore. A
Windows Explorer-type window appears, displaying files stored on the
handheld. Copy and paste files to other locations on the computer, or from the
computer to the handheld.
5. To install software onto the handheld, see Installing software onto the handheld,
page 57.
6. To uninstall software from the handheld, select Add/Remove Programs from the
Tools menu. Clear the check box beside the program you want to remove and
then click OK.
For more information, refer to the ActiveSync Help.
BTip – If the GPS Pathfinder Office software is installed on the office computer, you can
configure the Connection Manager utility in the GPS Pathfinder Office software to
automatically detect when you connect a Juno series handheld to the computer. This
enables you to automatically transfer data from the TerraSync software, differentially
correct the data, and then export it to a GIS. For more information, refer to the GPS
Pathfinder Office Software Help.

Juno Series User Guide 57
Connecting to an Office Computer 4
Installing software onto the handheld
Before you begin, refer to the installation instructions provided with the software.
Some software installations are specifically designed to run on a Windows Mobile
powered device. To install software that has a Windows Mobile installation setup:
1. Connect the handheld to a computer (see page 53).
2. Copy the installation files to a folder on the handheld.
3. Browse to the folder on the handheld. Tap and hold the installation setup file
and then select Run.
4. If prompted after installation, perform a soft reset of the handheld (see page 30).
To install software that is provided on a CD, or as an installation setup that runs on an
office computer:
1. Connect the handheld to a computer (see page 53).
2. If the software is provided on a CD, insert the software CD into the office
computer.
3. Run the installation setup.
4. If prompted, select the install option for a Windows Mobile powered device.
Once the software is installed on the computer, it is automatically transferred to
the handheld.
Note – If a memory card is inserted in the handheld, the card appears as an installation
location option. Trimble recommends that you install software to the handheld’s storage
memory, not to a memory card. If you install software to a card and then remove the card
from the handheld, the software will not be available for use.
5. If prompted after installation, perform a soft reset of the handheld (see page 30).

4 Connecting to an Office Computer
58 Juno Series User Guide

CHAPTER
5
Juno Series User Guide 59
Using the GPS receiver 5
In this chapter:
Supported GPS field software
Configuring the GPS field
software to connect to the
receiver
Using the GPS field software
Ensuring the accuracy of your GPS
data
Differential GPS explained
Outputting NMEA data
The Juno series handheld includes an integrated
GPS receiver that enables you to collect GPS data
for incorporating into a GIS or for managing
assets.
The Global Positioning System (GPS) is a
satellite-based positioning system consisting of a
constellation of operational NAVSTAR satellites
that orbit the earth every 12 hours. This system
provides worldwide, all-weather, 24-hour time
and position information.
Note – To receive signals from GPS satellites, the
handheld must have a clear view of the sky. GPS
positions may not always be available, particularly
in or near buildings, in vehicles, or under tree
canopy.

5 Using the GPS receiver
60 Juno Series User Guide
Supported GPS field software
You can use the Juno series handheld with any of the software products described
below.
TerraSync software
You can install version 3.30 or later of the TerraSync software on a Juno series
handheld. Use the software to collect and maintain GIS and GPS data.
To install the TerraSync software, either insert the TerraSync Software CD in the
CD-ROM drive of a computer and use the menus provided, or run the downloaded
setup file. To obtain an installation code for installation, you must register your copy of
the software online. Detailed installation instructions are provided in the TerraSync
Software Getting Started Guide.
ESRI ArcPad software and the Trimble GPScorrect extension
You can install version 7.1.0 or later of the ESRI ArcPad software on a Juno series
handheld. Use the software to collect and maintain GIS and GPS data. Detailed
installation instructions for ESRI ArcPad software are provided in the ArcPad
documentation.
To be able to differentially correct ArcPad GPS data, install version 2.42 or later of the
Trimble GPScorrect extension for ESRI ArcPad software on a Juno series handheld.
You must install the ArcPad software before you install the GPScorrect extension.
Note – Make sure your version of the GPScorrect extension is compatible with the version
of ArcPad software you are using. For more information, go to
www.trimble.com/gpscorrect_ts.asp, click Support Notes and then search for the Mapping
and GIS Product Compatibility List Support Note.
To install the GPScorrect extension, either insert the Trimble GPScorrect Extension for
ESRI ArcPad Software CD in the CD-ROM drive of a computer and use the menus
provided, or run the downloaded setup file. Detailed installation instructions are
provided in the Trimble GPScorrect Extension Getting Started Guide.
GPS Controller software
You can install version 2.21 or later of the GPS Controller software on a Juno series
handheld. Use the software to configure and monitor the status of the internal GPS
receiver.
To install the GPS Controller software, go to www.trimble.com/support.shtml. Click
GPS Controller and then click Downloads. Click the link for the version you want to
install and then follow the instructions in the Installation wizard.
Juno Series User Guide 61
Using the GPS receiver 5
Other GPS field applications
You can use the Juno series handheld with a custom application developed using
version 2.32 or later of the Trimble GPS Pathfinder Tools Software Development Kit
(SDK).
You can also use the Juno series handheld with any GPS field software that accepts
NMEA messages.
Configuring the GPS field software to connect to the receiver
The first time you use GPS field software on the handheld, you may need to configure
the software to connect to COM4, which is the GPS port on the handheld.
Connecting to the COM port
Details of how to configure different types of GPS field software to connect to the GPS
COM port are as follows:
Using the GPS field software
Depending on the GPS field software you have installed, you can use the software to
view satellite reception, configure logging settings, and collect features. For more
information, refer to the rest of this chapter and the documentation for the GPS field
software.
GPS field software Configuration details
GPS Controller Run GPS Controller. The software automatically activates the
integrated GPS receiver on COM4.
TerraSync Run Terrasync. The software automatically activates the integrated
GPS receiver on COM4.
ArcPad with the
GPScorrect extension
When the Trimble GPScorrect extension is installed, the extension
automatically configures the ArcPad software to use the integrated
GPS receiver on COM4 using the Trimble GPScorrect protocol.
To connect to GPS, tap the GPS button and then tap Yes.
To configure a real-time DGPS source, or to view status information,
run the GPScorrect extension. To do this, tap the GPScorrect button
in the Trimble toolbar.
ArcPad 7 without the
GPScorrect extension
1. In ArcPad, tap the GPS drop-down menu and then select
GPS Preferences from the drop-down menu. Tap the GPS tab.
2. In the Protocol field, select NMEA 0183.
3. In the Port field, select COM4.
4. Tap OK.
5. Tap the GPS button and then tap Yes.
NMEA application Configure the software to connect to GPS on COM4 and then use the
Connect or Activate GPS command.
5 Using the GPS receiver
62 Juno Series User Guide
Starting the GPS field software
•Tap / Programs and then select the GPS field software, for example GPS
Controller.
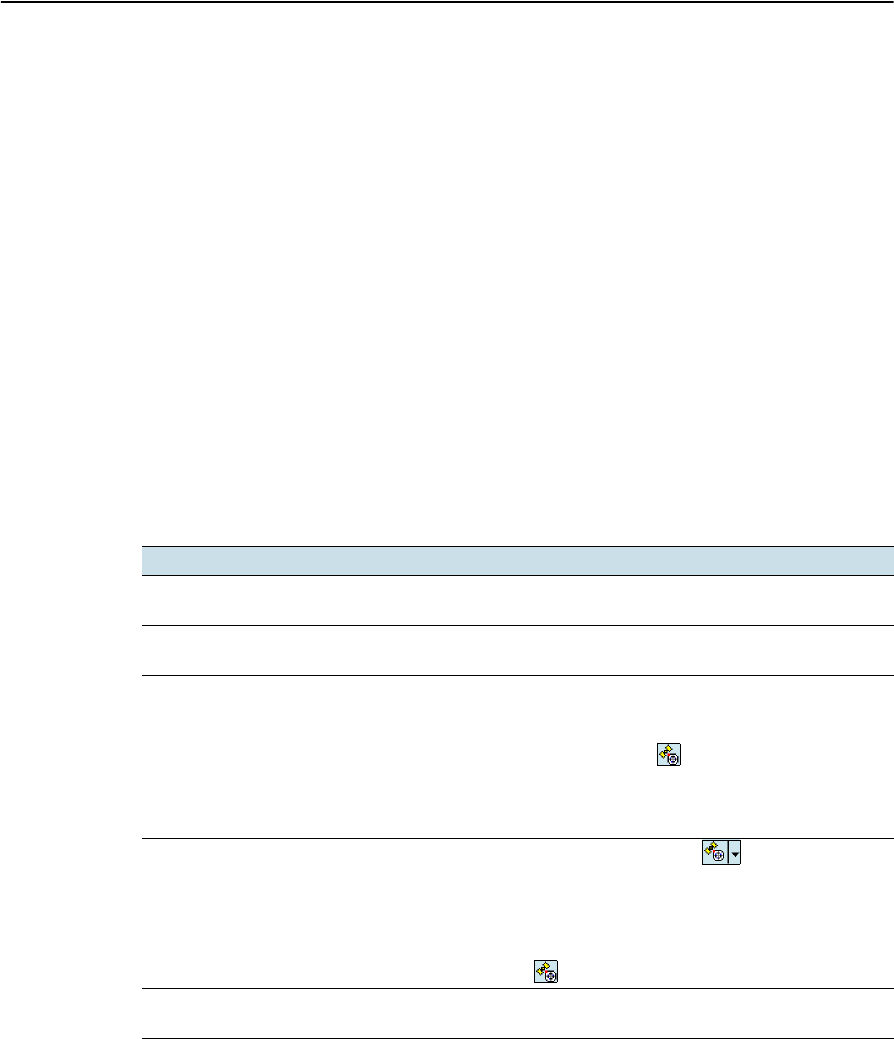
When you first open any Trimble GPS field software, the Skyplot section is displayed.
Viewing available GPS satellites
Use the graphical Skyplot section or the Satellite Info
section in the Trimble GPS field software to view
detailed GPS information.
Note – To receive signals from GPS satellites, the
handheld must have a clear view of the sky. GPS positions
may not always be available, particularly in or near
buildings, in vehicles, or under tree canopy.
Resetting the GPS receiver
Trimble GPS field applications all have options to reset
the receiver to:
•delete the almanac
•delete information stored on the last known position
•restart the receiver
•reset the GPS receiver to factory default settings
Ensuring the accuracy of your GPS data
The Juno series handheld has an integrated GPS receiver that provides accurate
positioning with real-time or postprocessed differential correction of between two and
five meters.
The accuracy that you obtain from your Juno series handheld is affected by a number
of factors, including whether the data is differentially corrected in real-time or after
data collection, and the availability of GPS satellites in the sky when you collect the
data.
The list below identifies the most important settings and techniques that you can use
in the field to improve the accuracy of your data:
1. If you are using TerraSync software to collect data, use accuracy-based logging.
For more information, see page 63.
2. Use real-time differential SBAS corrections. For more information, see
page 64.Plan GPS data collection around the times of the day when satellite
geometry is best. For more information, see page 65.
Juno Series User Guide 63
Using the GPS receiver 5
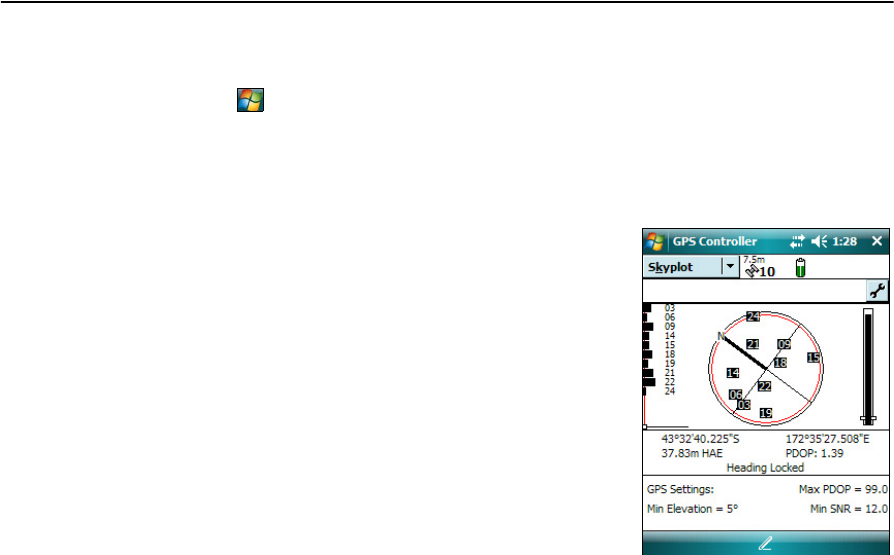
Using accuracy-based logging
If you are using the TerraSync software, use accuracy-based logging to ensure that only
GPS positions that meet the specified estimated accuracy are logged. GPS positions
that do not meet your accuracy requirements are not logged.
Note – Accuracy estimates for streaming (dynamic) GPS positions may not be as good as
those for static GPS positions.
To configure accuracy-based logging in the TerraSync software:
1. In the Setup section of the TerraSync software, tap
Logging Settings. The Logging Settings form
appears.
2. Tap the Setup button below the Accuracy
Settings field. The Accuracy Settings form appears.
3. In the Accuracy Value For Display/Logging fields,
select the parameters that will be used to
determine the estimated accuracy:
–Select whether to use the horizontal or
vertical accuracy of the current GPS position.
–Select In the field to use the current
estimated accuracy (recommended if you are
using a real-time correction source), or select Postprocessed to use the
predicted estimated accuracy that will be achieved after the field data has
been postprocessed.
4. If you selected Postprocessed, select the estimated distance to the base station
that will be used for postprocessing from the Postprocessing Base Distance field.
If you will use more than one base station (during H-Star processing), specify
the estimated distance to the closest base station.
5. Set the Use Accuracy-based Logging field to Yes. The settings fields for
accuracy-based logging appear.
6. In the Apply Accuracy-based Logging To field, select the feature types that you
want to log only if the GPS positions meet your required accuracy.
7. In the Required Accuracy field, select the estimated accuracy that is required
before GPS positions are logged.
8. Tap OK.
Note – Accuracy settings do not affect GPS positions that are used for navigation. GPS
positions are still calculated by the GPS receiver and are available for navigation.
5 Using the GPS receiver
64 Juno Series User Guide
Connecting to a real-time differential correction source
Use a real-time differential GPS (DGPS) source to give you better accuracy as you
collect data. For more information about how real-time differential GPS works, see
Differential GPS explained, page 65.
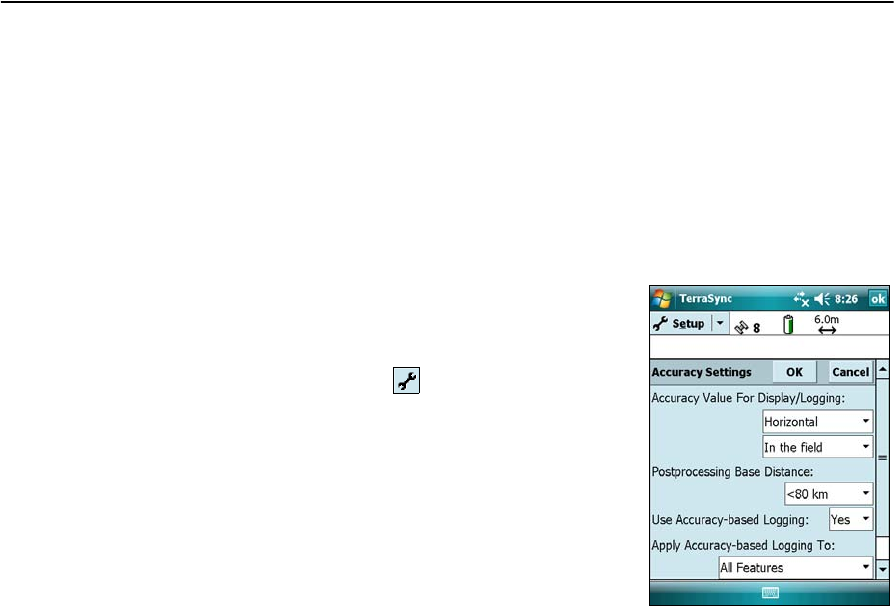
Using SBAS corrections
The Juno series handheld has an integrated receiver that uses Satellite Based
Augmentation Systems (SBAS) correction messages to improve the accuracy and
integrity of GPS data.
The SBAS tracking mode is Auto. In Auto mode, the receiver tracks or locks onto the
most powerful satellite signal. The GPS receiver can track two SBAS satellites at the
same time in Auto mode. It uses corrections from only one SBAS satellite at a time, but
tracking two satellites can improve the availability of SBAS real-time corrections. For
example, if you are working in environments where obstacles may block the direct line
of sight to the SBAS satellite, there is less chance of signal loss if you are tracking more
than one SBAS satellite.The receiver tracks SBAS satellites according to your
geographical location:
•Wide Area Augmentation System (WAAS) satellites are tracked in the
Continental United States including Alaska, and parts of Canada and Mexico.
•European Geostationary Navigation Overlay Service (EGNOS) satellites are
tracked in Europe.
•MTSAT Satellite-based Augmentation System (MSAS) satellites are tracked in
Japan.
Note – If you have other Trimble GPS field software installed, configure real-time
correction settings in that application instead of the GPS Controller software.
To use SBAS corrections:
1. In the GPS field software, open the Real-time
section and tap the Setup button .
2. In the Choice 1 field, select Integrated SBAS.
3. In the Choice 2 field, specify whether to use
uncorrected positions, or to stop using GPS
positions, if corrections are not available.
4. Tap OK.
Juno Series User Guide 65
Using the GPS receiver 5
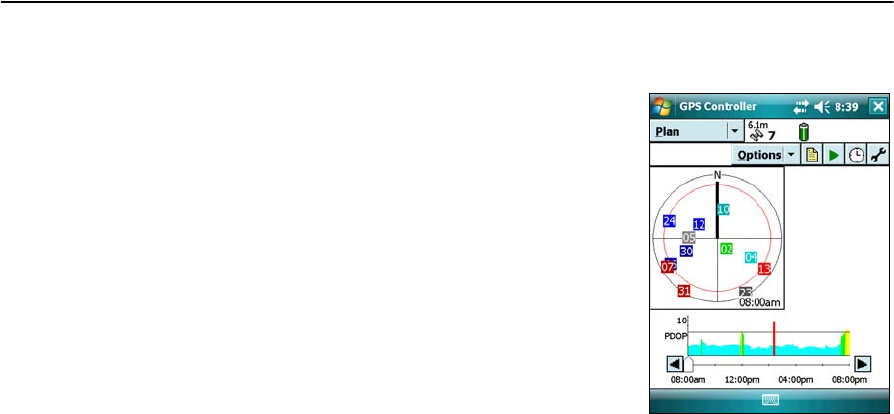
Planning a data collection session
To maximize productivity, plan GPS data collection
around the times of the day when satellite geometry is
best. The GPS Controller software includes a Plan
section with an animated skyplot and DOP (satellite
geometry) graph for your position for the next 12 hours.
In the Plan section, you can check the planning skyplot
as you play a session, then use the timeline to zoom in
on times when geometry is poor.
Note – If you have other Trimble GPS field software
installed, use the planning feature in that application
instead of the GPS Controller software.
Differential GPS explained
Use differential GPS to correct errors in your collected data. Differential GPS (DGPS)
requires one or more additional receivers, called base stations or reference stations,
which are located at known points. Data collected at the base stations is used to
determine GPS measurement errors and compute corrections to these errors. An
unlimited number of mobile GPS receivers, called rovers, collect GPS data at unknown
locations within the vicinity of the base station. Errors common at both the base
station and the rover receiver are corrected with DGPS either in real time or during
postprocessing.
Real-time DGPS
In real-time DGPS, the base station calculates and broadcasts the error for each
satellite as each measurement is received, enabling you to apply corrections while in
the field and collect accurate GPS data. DGPS corrections are available from a variety
of public and commercial sources. They can be generated and broadcast in real-time
by privately or self-owned GPS base stations, or by a wide range of government
agencies.
Real-time DGPS corrections can be used on the Juno Series handheld from Satellite
Based Augmentation Systems (SBAS) such as WAAS in the US and EGNOS in Europe.
SBAS uses multiple base stations to calculate the DGPS corrections that are then
delivered to the user from a Geostationary satellite.
Factors that affect real-time DGPS accuracy include how often the corrections are
updated, how far you are from the base station, and whether the coordinate system
used by the correction source matches the coordinate system used by the GPS receiver.

5 Using the GPS receiver
66 Juno Series User Guide
Postprocessed DGPS
In postprocessed DGPS, the collected GPS data is transferred to an office computer,
and measurements from the base station are downloaded. You can postprocess GPS
data collected with Trimble GPS field software using:
•the GPS Pathfinder Office software version 4.10 (with the latest updates) or
later.
•the Trimble GPS Analyst extension for ESRI ArcGIS software version 2.10 (with
the latest updates) or later.
Factors that affect the accuracy of postprocessed DGPS include the type of receiver
and antenna used at the base station, the distance between the base station and the
location where the rover data was collected, the accuracy of the base station position,
and the logging interval at the base station.
For more information, refer to the documentation provided with the postprocessing
software.
Postprocessed real-time DGPS
The accuracy of positions using the Juno series handheld is within 2 to 5 meters,
whether it is corrected in real-time or postprocessed. The accuracy cannot be
improved beyond this by postprocessing real-time SBAS corrected positions.
However, if your data files contain autonomous (uncorrected) positions as well as
real-time corrected positions, Trimble recommends that you postprocess the data.
During postprocessing, you can choose whether to correct only autonomous positions,
or all positions.
For more information about GPS and DGPS, go to www.trimble.com/gps and review
the All About GPS tutorial.
Outputting NMEA data
You can use the Juno series handheld’s integrated GPS receiver with any GPS field
software that accepts NMEA messages.
If you connect to the GPS receiver using Trimble GPS field software, by default the
NMEA output is switched off.
Note – You can only configure NMEA data output using the GPS Controller software. The
software is provided free from the Trimble website. For more information, see GPS
Controller software, page 60.

Juno Series User Guide 67
Using the GPS receiver 5
To enable NMEA data to be output:
1. In the GPS Settings form, set the NMEA Output
field to On.
2. Tap the Setup button that appears next to the
NMEA Output field. The NMEA Output Settings
appears.
3. Configure the NMEA message output settings.
4. Tap OK.
For more information, refer to the GPS Controller Help.

5 Using the GPS receiver
68 Juno Series User Guide

CHAPTER
6
Juno Series User Guide 69
Getting Connected 6
In this chapter:
General wireless connection
information
Options for connecting wirelessly
to other devices and networks
Bluetooth wireless connections
explained
The Juno series handheld includes an integrated
wireless LAN radio and an integrated Bluetooth
radio, and provides a number of options for
connecting to networks and other devices. In
addition, the Juno SC handheld includes an
integrated cellular modem for sending and
receiving data.
This chapter describes how to enable the radios,
and the main connectivity options available.
Use the table on page 75 to identify the wireless
connection type you want to make and then
follow the steps provided to connect to that
device.
You can use the handheld’s integrated wireless
LAN radio to connect to the Internet or a
corporate network using a wireless LAN (Local
Area Network) connection.
Alternatively, you can use Bluetooth wireless
technology to connect to the Internet using a
cellular phone, or to other Bluetooth-enabled
devices such as, a laser rangefinder, or a barcode
scanner.
The cellular modem in the Juno SC handheld can
be used to communicate between field and office
and send e-mail messages using a data
connection from your local cellular provider.
6 Getting Connected
70 Juno Series User Guide
General wireless connection information
The Juno series handheld has an integrated wireless LAN radio compliant with IEEE
802.11 b/g and an integrated Bluetooth radio. The Juno SC handheld also has a cellular
modem. To use the wireless LAN, Bluetooth radio, or cellular modem, you need to turn
it on (see Turning on and turning off the integrated radios below).
Turning on and turning off the integrated radios
You can use the Wireless Manager application to turn on and turn off the Juno series
handheld’s wireless LAN radio and/or Bluetooth radio (see page 70).
You can use the Modem Control application to turn on and turn off the Juno SC
handheld’s cellular modem (see page 71).
You can also turn on or turn off the Bluetooth radio from within the Bluetooth
application (see Turning on and turning off the Bluetooth radio from within the
Bluetooth application, page 73).
To make the Juno series handheld visible to other Bluetooth-enabled devices and
enable them to connect, see page 74.
Using the Wireless Manager
You can use the Wireless Manager application to turn on and turn off the Juno series
handheld’s wireless LAN radio and/or Bluetooth radio. You can turn on and turn off
both radios at the same time, or control each radio individually.
To open the Wireless Manager, do one of the following:
•Tap the Wi-Fi icon or the Bluetooth icon in the Today screen.
•Tap , , or in the title bar and then tap Wireless Manager.
•Tap / Settings /Connections /Wireless Manager.
Turn on the wireless LAN radio and/or Bluetooth radio to be able to connect to other
devices or networks.
Turn off the wireless LAN radio and/or Bluetooth radio to prevent the handheld from
sending or receiving wireless signals.
BTip – To conserve power, turn off the wireless LAN radio and/or the Bluetooth radio when
not in use.
Juno Series User Guide 71
Getting Connected 6
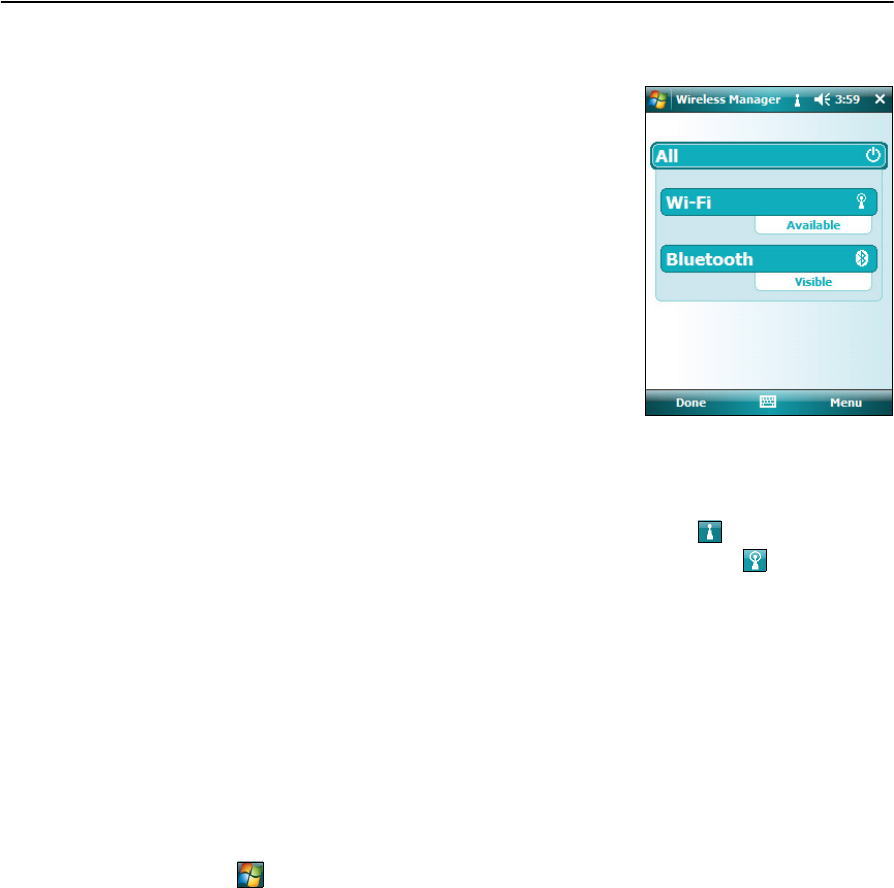
To turn on or turn off the radios using the Wireless Manager
1. Open the Wireless Manager (see above).
2. Do one of the following:
–Tap All at the top of the screen to turn on
both radios, or to turn off both radios if they
are already on.
–Tap Wi-Fi or Bluetooth to turn on the radio
that you want to use, or to turn off the radio
if it is already on.
The status fields below the Wi-Fi button and the
Bluetooth button change from Off when the
radios are turned on and show the current state of
the radio. The Wi-Fi status field shows Connecting
or Available, and the Bluetooth status field shows On or Visible.
3. Tap Done to exit the Wireless Manager.
After you turn on the wireless LAN radio, the wireless LAN icon appears in the title
bar to indicate that the wireless LAN radio is enabled. A second icon appears if a
wireless LAN network is detected, and a Notification for the detected network may
appear in the left softkey.
Using the Modem Control
You can use the Modem Control application to turn on and turn off the Juno SC
handheld’s cellular modem, enter a PIN for the SIM card, or change the dial string to
connect with the cellular network.
To open the Modem Control, do one of the following:
•Tap the Modem Control indicator in the Today screen.
•Tap / Settings /Connections /Modem Control.
Turn on the cellular modem to be able to connect to a cellular network.
Turn off the cellular modem to prevent the handheld from sending or receiving
wireless signals.
BTip – To conserve power, turn off the cellular modem when not in use.
To turn on or turn off the modem using the Modem Control
1. Open the Modem Control (see above)
2. The modem’s current status will show on the top line, as Modem Power On or
Modem Power Off.
3. To change the status from On to Off, tap the line Modem Power On. The status
will then change to Modem Power Off.
4. Tap Exit to close the Modem Control.
6 Getting Connected
72 Juno Series User Guide
After you turn on the cellular modem, the Modem Status icon will change from to
indicate the type of network coverage. For more information, see Modem status
indicators, page 37.
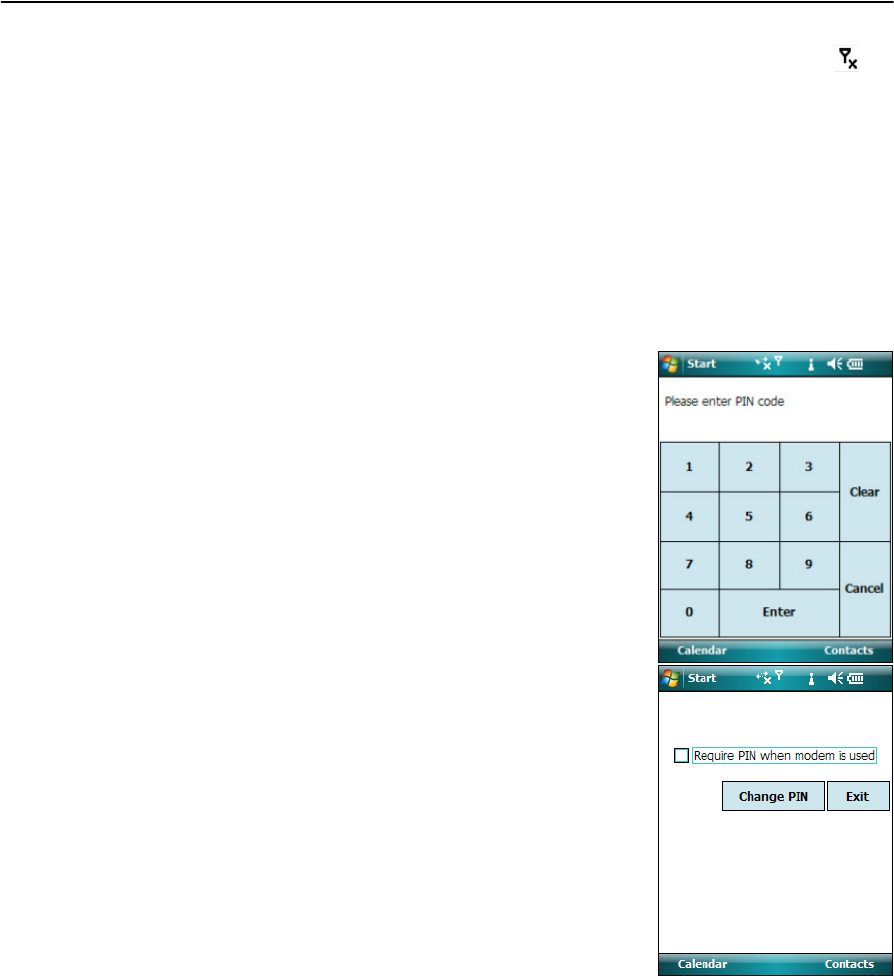
Setting a PIN
You can help to keep data secure by configuring your SIM card with a PIN (personal
identification number). You will need to enter the PIN each time the modem is turned
on.
Most SIM cards are preset with a PIN that is assigned by your wireless service provider.
You will need to enter this PIN first.
To set a PIN:
1. Open the Modem Control (see above).
2. Tap PIN Settings.
3. Enter the preset PIN assigned by your wireless
service provider.
4. Tap OK.
To add a PIN:
•Select the Require PIN when phone is used check box.
You are to enter a PIN (see page 72).
To change a PIN:
1. Tap Change PIN.
2. Enter the current PIN before entering the new PIN.
Juno Series User Guide 73
Getting Connected 6
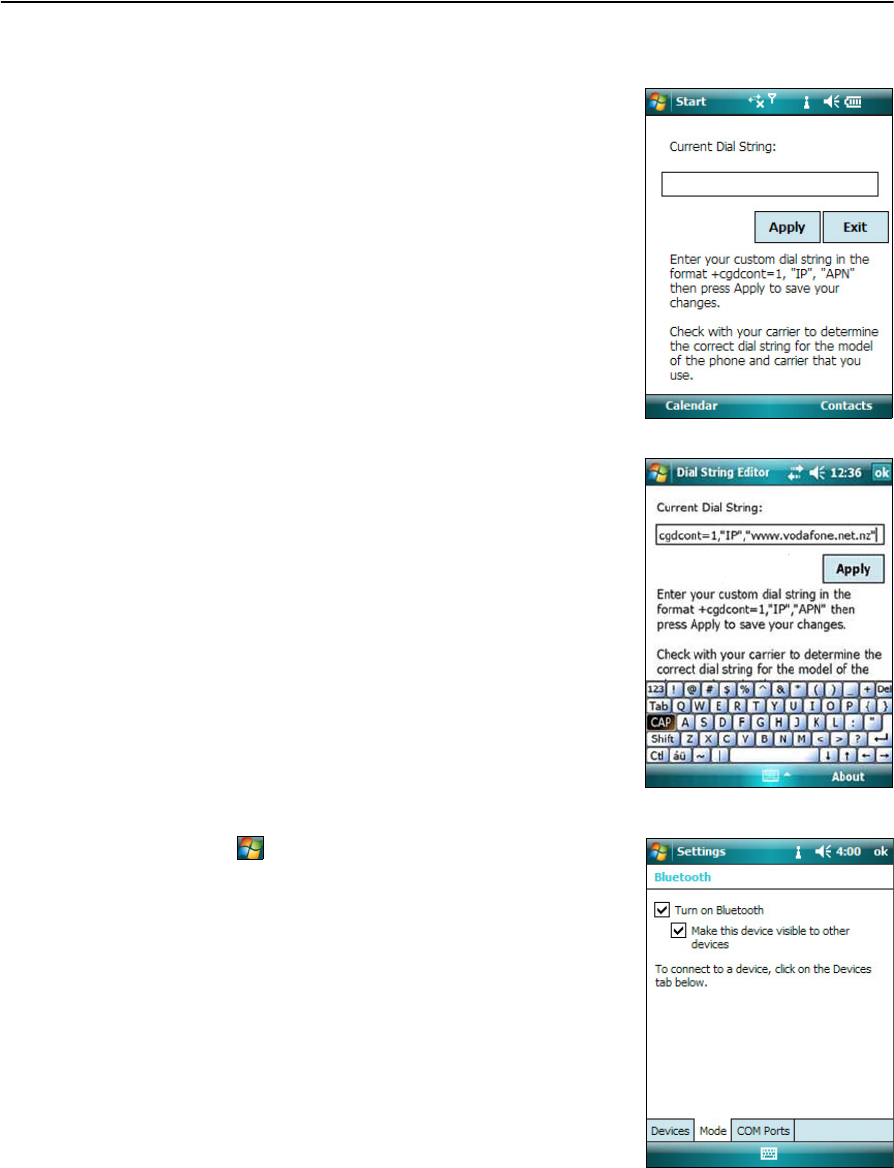
Dial string editor
Some carriers do not require a custom dial string to
establish an Internet connection. Your service provider
can provide you with specific connection details, which
may include:
•A username and password.
•The carrier’s access point name (APN).
•The “phone number” required to establish a
connection.
•Any additional required dial string.
To configure the dial string settings:
1. Enter the custom dial string in the format
+cgdcont=1,"IP","APN" where APN is the access
point name of your carrier.
2. Tap Apply to save your changes.
3. Tap OK to close the Dial String Editor.
When you set up a new Internet connection, the custom
dial string that you have just saved is sent to the modem
when you attempt to connect to the Internet.
Turning on and turning off the Bluetooth radio
from within the Bluetooth application
1. Tap / Settings / Connections /Bluetooth.
2. Tap the Mode tab.
3. Select the Turn on Bluetooth check box to turn on
the radio, or clear this check box to turn off the
radio.
4. Tap OK.
Note – If the integrated Bluetooth radio is deactivated, the
message Problem with Bluetooth hardware may appear
when you try to turn on the Bluetooth radio or discover
devices.

6 Getting Connected
74 Juno Series User Guide
Making the handheld visible (discoverable) to other Bluetooth devices
To allow other Bluetooth-enabled devices to connect to the Juno series handheld, or if
the handheld will not connect to or pair with another device you are attempting to
connect to, you must make the handheld visible (this is sometimes referred to as
“discoverable”).
To make the handheld visible to other devices:
1. Tap / Settings / Connections /Bluetooth.
2. Tap the Mode tab.
3. Select the Turn on Bluetooth check box, if it is not already selected. This enables
the integrated Bluetooth radio.
4. Select the Make this device visible to other devices check box.
5. Tap OK.

Juno Series User Guide 75
Getting Connected 6
Options for connecting wirelessly to other devices and
networks
The Juno series handheld has an integrated wireless LAN radio and an integrated
Bluetooth radio that you can use to connect to other devices and networks. In
addition, the Juno SC handheld includes an integrated cellular modem for data
connections.
A wireless LAN access point or the Juno SC handheld’s integrated cellular modem can
be used to connect to the Internet (at broadband speeds) or a corporate network to:
•browse the Internet or an Intranet
•send and receive e-mail and instant messages
•access files on the network
Wireless LAN Access points are also known as “hotspots”. Wireless LAN is often
referred to as Wi-Fi.
You can use Bluetooth wireless technology to connect to other Bluetooth-enabled
devices that are within range (typically within 5 m to 10 m of the handheld). You can
connect to:
•Bluetooth-enabled devices such as cellular phones to access the Internet and
receive data
•computers and other handheld devices to exchange files
•other devices such as a GeoBeacon receiver, laser rangefinder or barcode
scanner
The following table lists devices you can connect to using the handheld, and where to
find detailed information on how to achieve these connections.
Connection method To... See...
Wireless LAN Connect to a wireless LAN access point page 76
Juno SC cellular modem Connect to a cellular network page 77
Bluetooth wireless
technology
Connect to another Bluetooth-enabled device (paired and non-paired
connections)
page 79
Connect to a Bluetooth-enabled phone for Internet access page 82
Connect to a Bluetooth-enabled serial device page 87
Connect to an office computer to use ActiveSync technology page 89
Beam files to or from another device page 92
Wireless LAN or
Bluetooth wireless
technology or Juno SC
cellular modem
Access a corporate network through your Internet connection page 93
6 Getting Connected
76 Juno Series User Guide
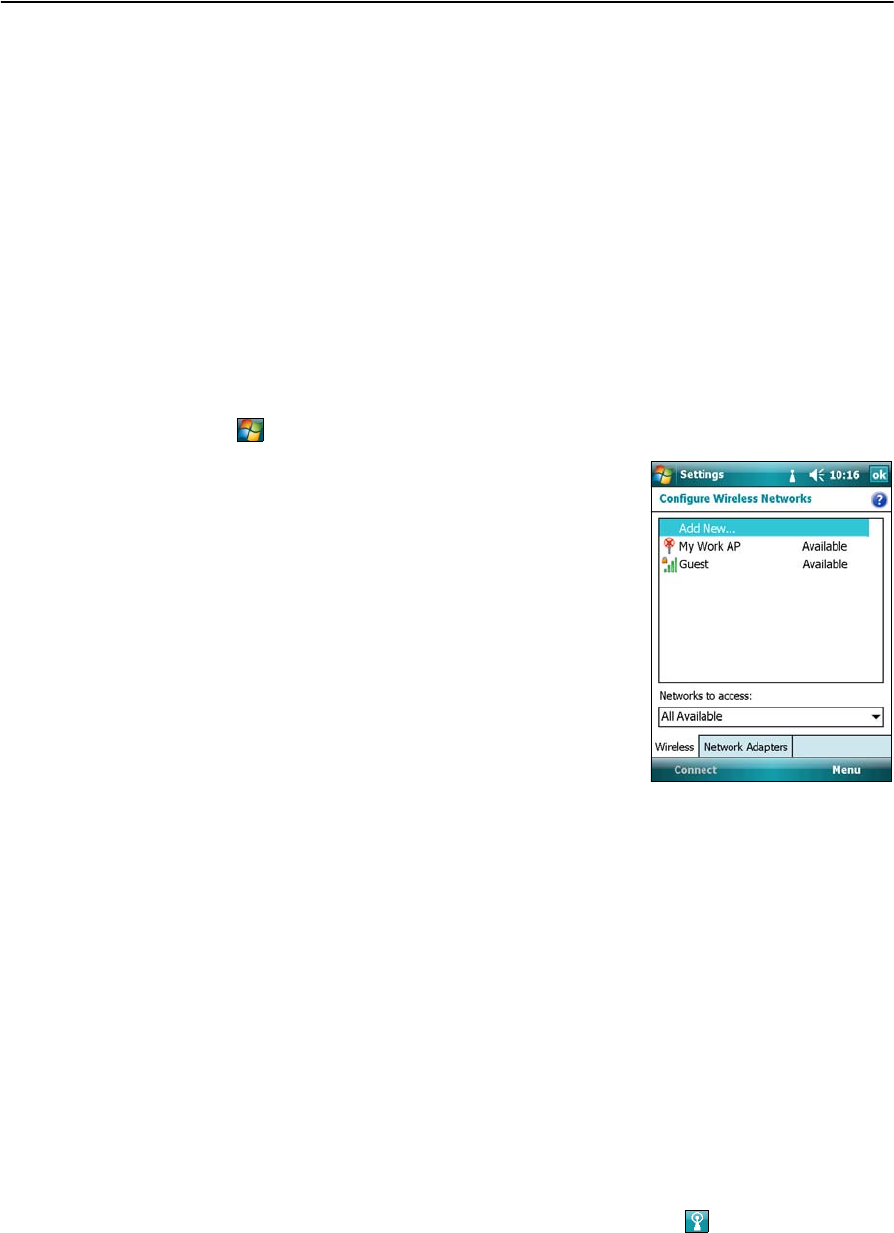
Connecting to a wireless LAN access point
To connect to a wireless LAN access point, you must:
1. Set up the wireless LAN connection
2. Connect to the wireless LAN network or access point.
Note – If you have installed a personal certificate on the handheld, you do not need to set
up the wireless connection manually as described in Step 1. To connect to the network or
access point go to Step 2: Connecting to the network or access point.
Step 1: Setting up the wireless LAN connection
1. Make sure that the Juno series handheld’s wireless LAN radio is enabled (see
page 70).
2. Tap / Settings /Connections /Network Cards.
3. Select the Wireless tab.
Any networks that you have already configured
are displayed in the list of preferred networks.
4. To add a new network, tap Add New. To change
the settings for an existing network, tap the
network.
5. Enter the name of the network and other
connection details and then tap Next.
6. To use authentication, select the authentication
method from the Authentication list.
7. To use data encryption, select an encryption
method from the Data encryption list.
8. To automatically use a network key, select the check box for The key is
automatically provided. Otherwise, enter the network key.
9. Tap Next.
10. For increased security, select the Use IEEE 802.1x network access control check
box and then configure additional authentication information.
11. Tap Finish.
Step 2: Connecting to the network or access point
1. Disconnect the USB data cable as the handheld prioritizes a USB connection
over a wireless LAN connection.
2. Bring the handheld within range of the network or access point.
When a wireless LAN is detected, the access point icon on the title bar is
animated, and a notification message appears on the left softkey.

Juno Series User Guide 77
Getting Connected 6
If the access point icon or the notification does not appear, use the Wireless
Manager to turn off and then turn back on the wireless LAN radio. When the
wireless LAN radio is turned on, any networks or access points within range are
detected and the icon and notification appear.
3. Tap the access point icon on the title bar or tap Notification on the left softkey.
A popup message shows the available networks.
4. Select the network you want to connect to and then tap OK on the left softkey.
5. Select The Internet (or work via a VPN) or Work and then tap Connect on the left
softkey.
6. If a Network Log On screen appears, enter your user name, password, and
domain information and then tap OK on the left softkey.
When the handheld is connected to the network or access point, the wireless
LAN connected icon appears in the title bar.
7. Start using the program you want to use, for example Windows Explorer Mobile
or Internet Explorer.
Note – To disconnect from the network or an access point at any time, turn off the
handheld’s wireless radio. To do this, tap the wireless LAN connected icon in the title
bar, select Wireless Manager and then tap the Wi-Fi button.
BTip – To delete a wireless LAN connection, tap and hold the connection in the
Wireless tab of the Network Cards screen and then select Delete.
Connecting to a cellular network from the modem
Use the Juno SC handheld’s cellular modem to connect to a cellular network and
access the Internet or a company network. Use this type of connection to access a
background map server, or for Internet and e-mail access.
Note – The Juno SC handheld’s cellular modem can only be used to transmit data, and
does not have voice functionality or the ability to send SMS, MMS, or text messages
(Multimedia Messaging Service). It is recommended to request the data-only plan from
your service provider and have a “voice restriction” placed on your line.
To connect to a cellular network, you must:
1. Configure the connection to the network.
2. Connect to the cellular network.
Note – Before you begin the steps below, Trimble recommends that you confirm that the
modem can access the Internet directly. If necessary, contact your service provider and
confirm whether you must enter a user name, password, and domain details when
connecting.
6 Getting Connected
78 Juno Series User Guide
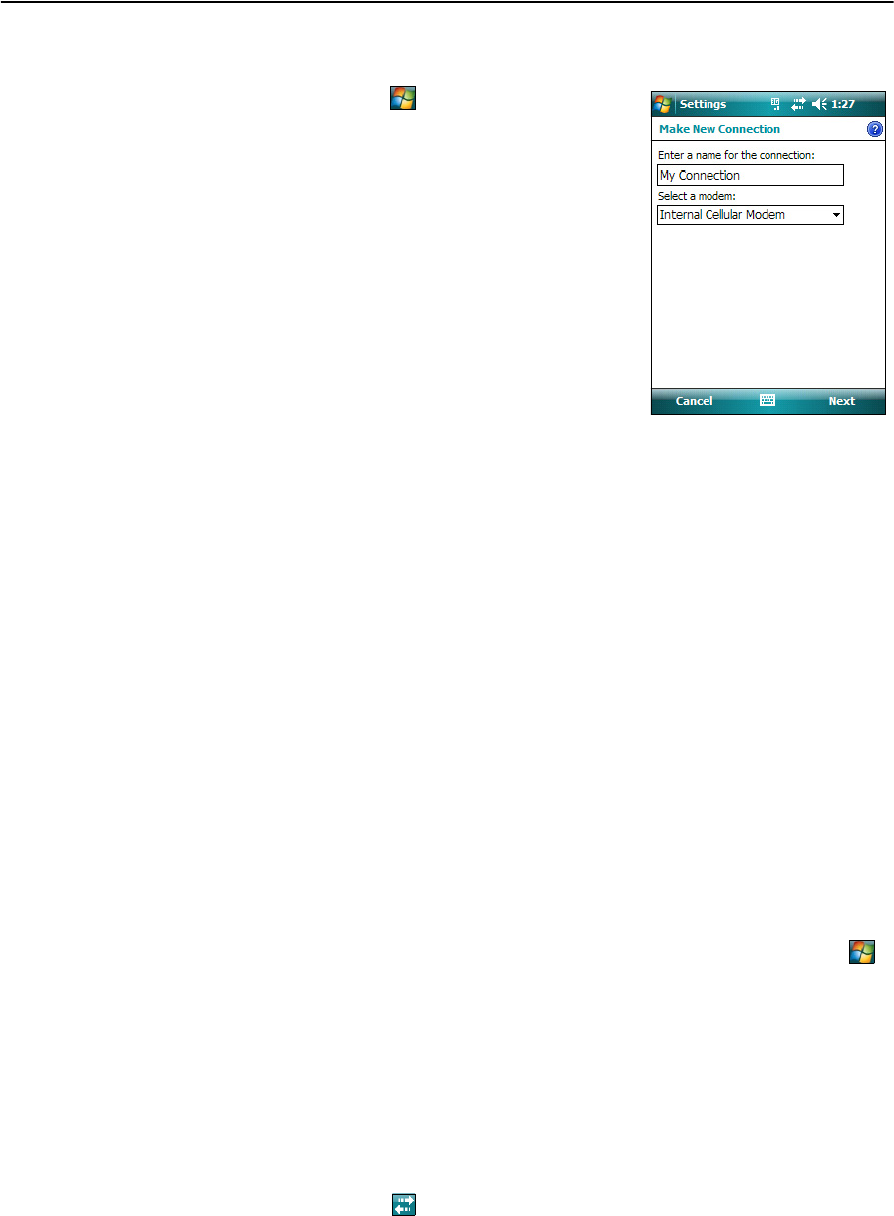
Step 1: Configuring the connection to the network
1. On the handheld, tap / Settings /
Connections /Connections.
2. Below My ISP, tap Add a new modem connection.
3. Enter the name for the connection.
4. From the Select a Modem dropdown list, select
HC-25 MODEM and then tap Next on the right
softkey.
5. Enter the GPRS access number for the Internet.
Two of the common GPRS access numbers for
GSM networks are *99***1# and *99#. If these
access numbers do not work, contact the cellular
service provider to obtain the appropriate number to use.
6. Tap Next on the right softkey.
7. Unless the phone provider confirmed that you must enter the user name,
password, and domain settings to access the Internet, tap Finish on the right
softkey without entering any information on this screen.
Otherwise:
a. Enter the required information.
b. If the service provider has told you that you need to change the baud rate
or other settings for the connection, tap Advanced, configure these
settings and then tap OK in the top right corner of the screen.
c. Tap Finish on the right softkey.
You are returned to the Connections screen.
You have now configured the connection.
Step 2: Connecting to the Internet using the cellular network
1. On the handheld, go to the Connections screen, if it is not already open (tap /
Settings / Connections /Connections).
2. Below My ISP, tap Manage existing connections.
3. Tap and hold the connection you want to use and then select Connect.
4. Unless the service provider already confirmed that you must enter the user
name, password, and domain settings, to access the Internet, tap OK on the left
softkey without entering any information on this screen. Otherwise, enter the
required information and then tap OK on the left softkey.
5. The Connectivity icon in the title bar appears as the connection is being
made. After the connection is made, you are returned to the My ISP screen. Tap
OK in the top right corner of the screen to close the My ISP screen.

Juno Series User Guide 79
Getting Connected 6
6. Tap OK in the top right corner to close the Connections screen.
7. Tap in the top right corner to close the Settings screen.
To check the connection status at any time, tap the Connectivity icon in the title
bar.
To end the connection at any time, tap the Connectivity icon in the title bar and
then tap Disconnect.
The Modem Status Indicator in the Today screen indicates the signal strength and
connectivity status within the cellular network. For more information, see page 37.
To connect to a corporate network or Intranet, see page 94.
To send and receive e-mail messages, see Messaging, page 48.
Connecting to a Bluetooth-enabled device
To use another Bluetooth-enabled device with the Juno series handheld, you must
form a Bluetooth connection between the two devices, during which you select the
type of service to use for the connection. This defines how the devices will
communicate with each other.
After forming the Bluetooth connection between the devices you may need to
configure settings for the connection such as the COM port for the field software to
use, or the number for the phone to dial. You must then connect to the other device
using the appropriate software application.
To connect the Juno series handheld to another Bluetooth-enabled device, you can use
either a paired connection or a non-paired connection.
Note – If you are connecting to a phone, skip this section and go to Connecting to a
Bluetooth-enabled phone for Internet access on page 82, where the pairing step is
described as part of the procedure for connecting to a phone.
Trimble recommends using a paired connection, if pairing is supported by the other
device, as a paired connection creates a more secure connection and makes
reconnecting to the device easier. For more information, see Pairing with a Bluetooth-
enabled device below.
Some devices do not support paired connections. Use a non-paired connection if the
device does not have a keyboard, and if you know that the device does not
automatically exchange a pre-programmed passkey during pairing. For more
information, see Setting up a connection to a non-paired device, page 81.
To connect the Juno series handheld to the other device, do one of the following:
•Pair with a Bluetooth-enabled device (see below)
•Set up a connection to a non-paired device (see page 81)
6 Getting Connected
80 Juno Series User Guide
Pairing with a Bluetooth-enabled device
Pairing the handheld with another Bluetooth-enabled device creates a permanent
security bond between the devices, which helps to exchange information securely
between the devices. The paired relationship is established when two devices create
and exchange a link key. Once the relationship is established, the handheld and the
other Bluetooth device only need to have their Bluetooth radios turned on to exchange
information; they do not need to be visible to other devices.
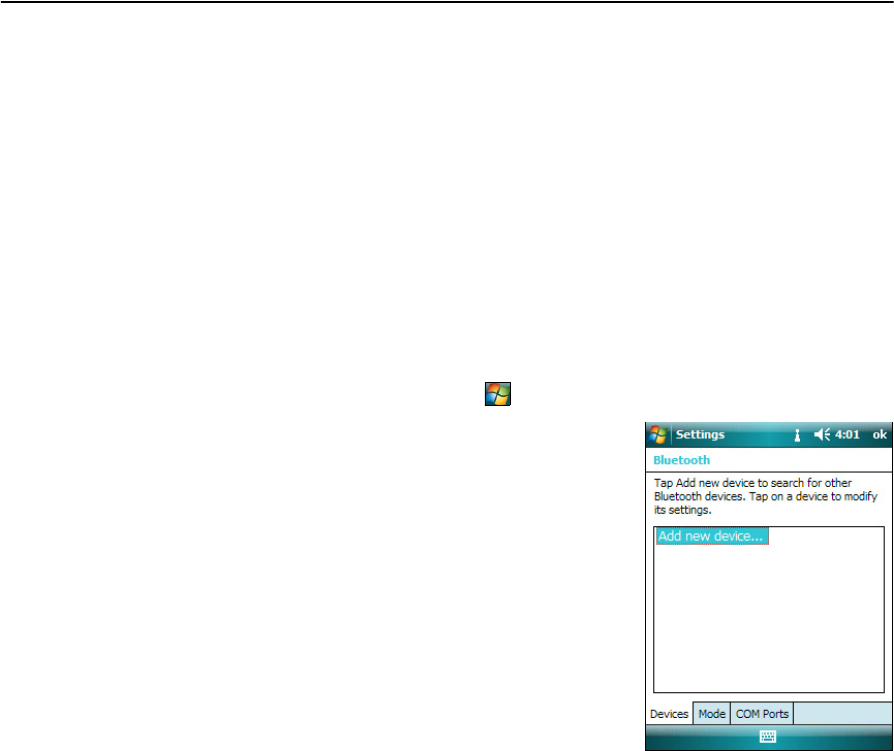
To pair with a Bluetooth device:
1. Make sure that the handheld and the Bluetooth device you want to pair with are
within five meters of each other, and that the Bluetooth radio in each device is
turned on.
2. On theJuno series handheld, tap / Settings / Connections / Bluetooth.
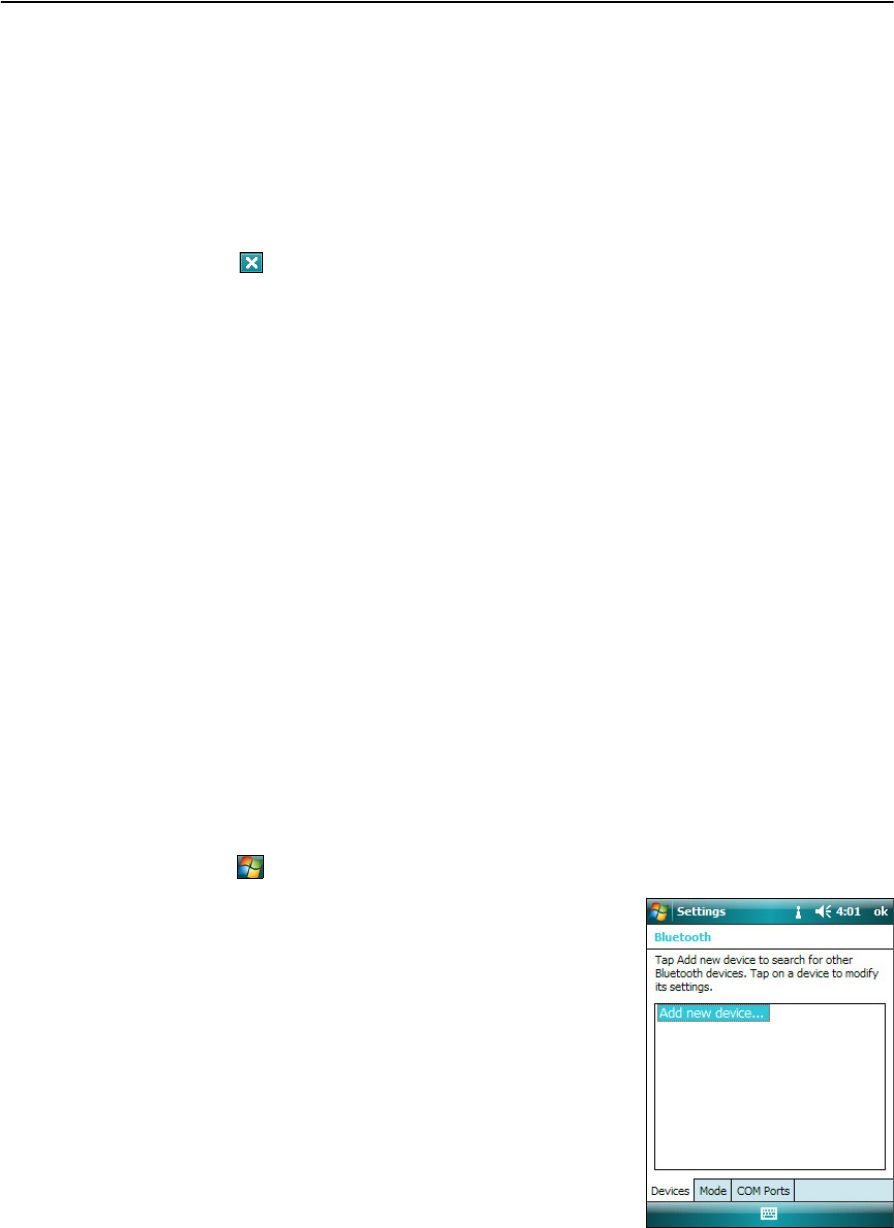
3. In the Devices tab, tap Add new device. The
handheld searches for other Bluetooth devices
and displays them in the list.
If the device you are trying to connect is not
displayed in the list, ensure that the device is on
and within range and then tap Refresh to search
for devices again.
4. Tap the name of the device you want to pair with
and then tap Next on the right softkey.
5. In the Passcode field, enter a passcode of between
1 and 16 characters. If you are connecting to:
–a device with a keypad, enter a passcode of
your choice.
–a device without a keypad, but you know that the device has a
pre-programmed passcode that will be exchanged, enter that passcode on
the Juno series handheld.
Note – Trimble recommends that you enter only numbers, as some devices do not support
passcodes that include letters.
6. Tap Next on the right softkey.
7. When prompted, enter the same passcode on the other device.
On the handheld, the Partnership Settings screen appears.
8. If required, change the name of the device in the Display Name field.
9. Select the service(s) you want to use with this device. For example, if you are
connecting to:
–a Bluetooth-enabled phone to connect to the Internet, select Dialup
Networking (DUN).
–a serial device, such as a laser rangefinder, select Serial Port.
Juno Series User Guide 81
Getting Connected 6
–a computer to access ActiveSync technology, select ActiveSync.
Note – For more information on the types of devices that the Juno series handheld can
connect to, and the supported Bluetooth services, see Connecting to a Bluetooth device as a
client, page 95.
10. Tap Finish on the right softkey.
11. Tap OK in the top right corner of the screen to close the Bluetooth application.
12. Tap in the top right corner to close the Settings screen.
You have now created a partnership between theJuno series handheld and the other
Bluetooth-enabled device so that they can communicate. To start using the
connection, you must complete the configuration steps for that type of connection and
then connect to the device. For more information, see:
•Connecting to a Bluetooth-enabled phone for Internet access, page 82
•Connecting to a Bluetooth-enabled serial device, page 87
•Connecting to an office computer to use ActiveSync technology, page 89
BTip – You only need to pair the handheld with a device before you connect to the device
for the first time.
Setting up a connection to a non-paired device
Setting up a connection to a non-paired device enables you to connect to a device that
does not allow you to enter a passcode on the device, or that does not automatically
exchange a pre-programmed passkey during pairing.
To set up a non-paired connection to a Bluetooth-enabled device:
1. Make sure that the handheld and the Bluetooth device you want to connect to
are within five meters of each other, and that the Bluetooth radio in each device
is turned on.
2. Tap / Settings / Connections /Bluetooth.
3. In the Devices tab, tap Add new device. The
handheld searches for other Bluetooth devices
and displays them in the list.
4. Tap the name of the device you want to connect
to and then tap Next on the right softkey.
The Enter Passcode screen appears.
5. Tap Next without entering a passcode.
6. If prompted to add the device to your device list,
tap No.
The Partnership Settings screen appears.
7. If required, change the name of the device in the
Display Name field.

6 Getting Connected
82 Juno Series User Guide
8. Select the service(s) you want to use with this device. For example, if you are
connecting to:
–a Bluetooth-enabled phone to connect to the Internet, select Dialup
Networking (DUN).
–a serial device, such as a laser rangefinder, select Serial Port.
–a computer to access ActiveSync, select ActiveSync.
Note – For more information on the types of devices that the Juno series handheld can
connect to, and the supported Bluetooth services, see Connecting to a Bluetooth device as a
client, page 95.
9. Tap Finish on the right softkey.
10. Tap OK in the top right corner of the screen to close the Bluetooth application.
11. Tap in the top right corner to close the Settings screen.
You have now created a partnership between theJuno series handheld and the other
Bluetooth-enabled device so that they can communicate. To start using the
connection, you must complete the configuration steps for that type of connection and
then connect to the device. For more information, see:
•Connecting to a Bluetooth-enabled phone for Internet access or real-time
corrections (including VRS networks), page 89
•Connecting to a Bluetooth-enabled serial device, page 87
•Connecting to an office computer to use ActiveSync technology, page 89
Connecting to a Bluetooth-enabled phone for Internet access
If your model of Juno series handheld does not contain an integrated cellular modem,
you can use the handheld’s Bluetooth radio to connect to a Bluetooth-enabled cellular
phone and then connect to the Internet. Use this type of connection to access a
background map server, or for Internet and e-mail access.
Note – Some cellular phones support the Bluetooth PAN (Personal Area Networking)
service as well as the Bluetooth DUN (Dialup Networking) service. Because DUN
connections are more common, this section assumes you are making a dialup network
connection with the Bluetooth-enabled phone.
To connect to a Bluetooth-enabled phone using a Bluetooth DUN (Dialup Networking)
connection, you must:
1. Connect the Juno series handheld to a Bluetooth-enabled phone and then
configure the connection to the dialup network.
2. Connect to the Internet using the dialup network.
3. Configure the software to use the connection. For example, you must configure
the GPS field software to use map data received from the Internet source, or you
must set up the Messaging application to send and receive e-mail using the
connection.
Juno Series User Guide 83
Getting Connected 6
Note – Before you begin the steps below, Trimble recommends that you confirm that the
phone can access the Internet directly. If necessary, contact the cellular phone provider
and confirm whether you must enter a user name, password, and domain details when
connecting an external device to the phone using Bluetooth dialup networking.
Step 1: Connecting the handheld to the phone and configuring the
connection to the dialup network
1. Make sure that the handheld and the Bluetooth device you want to connect to
are within five meters of each other, and that the Bluetooth radio in each device
is turned on. For more information, see Turning on and turning off the
integrated radios, page 70.
2. On the handheld, tap / Settings / Connections /Connections.
3. Below My ISP, tap Add a new modem connection.
4. Enter the name for the connection.
5. From the Select a Modem dropdown list, select
Bluetooth and then tap Next on the right softkey.
6. If the phone you want to connect to is:
–listed, go to Step 7 below.
–not listed:
a. Tap Add new device. The handheld
searches for other Bluetooth devices and
displays them in the list.
If the handheld’s integrated Bluetooth
radio is turned off, it is now automatically
turned on.
b. From the list of available devices, select the device you want to connect
to and then tap Next on the right softkey.
c. To pair with the phone, enter a passcode of your choice that you will
easily remember onto the handheld and then tap Next on the right
softkey.
d. When prompted by the phone, enter the same password and then
accept the connection.
e. On theJuno seriess handheld, in the Partnership Settings screen, make
sure that Dialup Networking (DUN) is selected and then tap Finish on
the right softkey.
You have now created a partnership between the Juno series handheld and
the phone so that they can communicate.
7. From the My Connections list, select the phone that you want to configure the
connection to.

6 Getting Connected
84 Juno Series User Guide
8. Enter the GPRS access number for the Internet.
Two of the common GPRS access numbers for cellular phones on GSM
networks are *99***1# and *99#. If these access numbers do not work, contact
the cellular phone provider to obtain the appropriate number to use.
Note – You do not need to set up dialling rules or change the Internet connection settings
on the phone. The connection settings you enter on the handheld are passed to the phone
to use for this connection.
9. Tap Next on the right softkey.
10. Unless the phone provider confirmed that you must enter user name, password,
and domain settings to access the Internet, tap Finish on the right softkey
without entering any information in this screen.
Otherwise:
a. Enter the required information.
b. If the phone provider has told you that you need to change the baud rate or
other settings for the connection, tap Advanced, configure these settings
and then tap OK in the top right corner of the screen.
c. Tap Finish on the right softkey.
You are returned to the Connections screen.
You have now configured the dialup networking connection.
Step 2: Connecting to the Internet using the dialup network
1. On the handheld, go to the Connections screen, if it is not already open (tap /
Settings / Connections /Connections).
2. Below My ISP, tap Manage existing connections.
3. Tap and hold the connection you want to use and then select Connect.
4. Unless the phone provider confirmed that you must enter user name, password,
and domain settings to access the Internet, tap OK on the left softkey without
entering any information in this screen. Otherwise, enter the required
information and then tap OK on the left softkey.
5. If the phone prompts for confirmation to connect to the Internet, accept the
connection.
The phone dials the configured GPRS access number and then connects to the
Internet.
A Connectivity notification appears on the handheld as the connection is being
made.
After the connection is made you are returned to the My ISP screen.
Juno Series User Guide 85
Getting Connected 6
To confirm that the Juno series handheld is connected to the phone, or to check
the status of the connection at any time, tap the Connectivity icon in the
title bar. The notification shows the name of the current connection, and the
time elapsed since the connection was made. To hide the notification, tap Hide.
Note – If you have an active wireless LAN connection, the connectivity icon appears as
instead.
6. Tap OK in the top right corner of the screen to close the My ISP screen.
7. Tap OK in the top right corner to close the Connections screen.
8. Tap in the top right corner to close the Settings screen.
To check the connection status at any time, tap the or icon in the title bar.
To end the connection at any time, tap the or icon in the title bar and then tap
Disconnect.
To connect to a corporate network or Intranet, see page 93.
To send and receive e-mail messages, see Messaging, page 48.
Step 3: Configuring the GPS field software to use data received from the
Internet source
Now that you have connected the Juno series handheld to the Internet using a
Bluetooth-enabled cellular phone, you must configure the software to use the
connection to receive data.
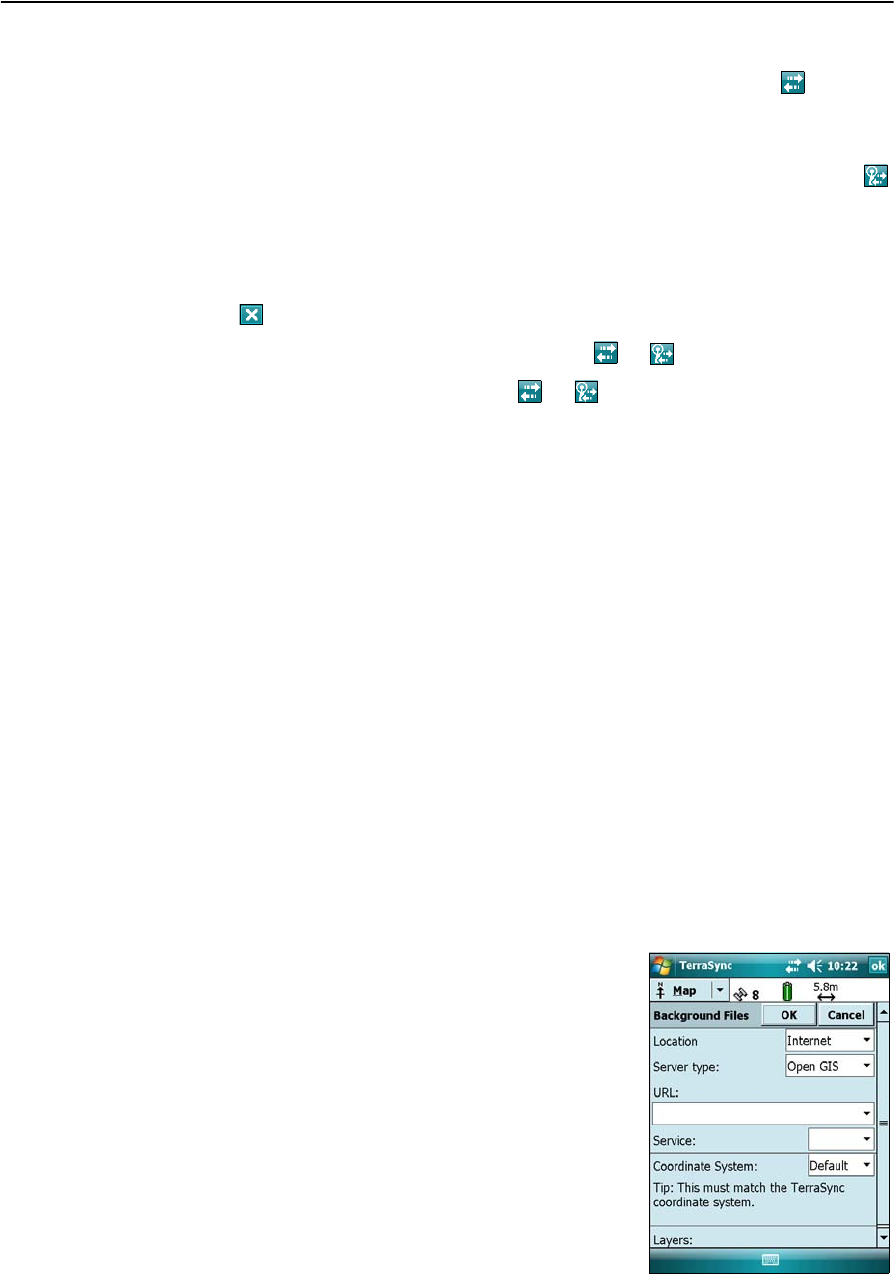
Downloading background map files from an Internet map server
1. Make sure that the coordinate system selected in the TerraSync software
matches the coordinate system of the map server.
2. In the Map section of the TerraSync software, pan or zoom to make sure that the
area for which you want a background image is displayed on the map.
If the map server covers the area you are in, it will provide a background image
that matches the current map extents.
3. Tap Layers and then select Background files. The
Background Files form appears.
4. In the Location field select Internet and then use
the fields that appear to specify the Map Server
type, the URL of the server, the service, and the
layers from that service that you want to
download.
5. Tap OK to close the Background File form and
download the selected background map.

6 Getting Connected
86 Juno Series User Guide
This may take some time. When a download is in progress, an icon appears in
the top left corner of the map. Once the background file is downloaded, the
hourglass icon appears until the downloaded image is rendered and becomes
visible.
If you pan or zoom beyond the extents of the downloaded image, new images are
downloaded automatically and displayed in the background of the map.
To stop automatic downloading of background files, either clear the address of the
map server from the URL field, or set the Location field to Default and then clear the
check box next to any files.
Reconnecting to the Internet
To reconnect to the Internet at any time after setting up the connection, repeat the
steps listed under Step 2: Connecting to the Internet using the dialup network on
page 84.
Juno Series User Guide 87
Getting Connected 6
Connecting to a Bluetooth-enabled serial device
Use Bluetooth wireless technology to receive data from a Bluetooth-enabled serial
device, such as a laser rangefinder.
To connect to a Bluetooth-enabled serial device, you must:
1. Connect to the Bluetooth-enabled serial device.
2. Configure the COM port on the handheld to use for the connection.
3. If necessary, configure the GPS field software to use data received from the serial
device.
Step 1: Connecting to the Bluetooth-enabled serial device
Connect the handheld to the Bluetooth-enabled device, selecting the Serial Port
service if it is not already selected (see Connecting to a Bluetooth-enabled device,
page 79).
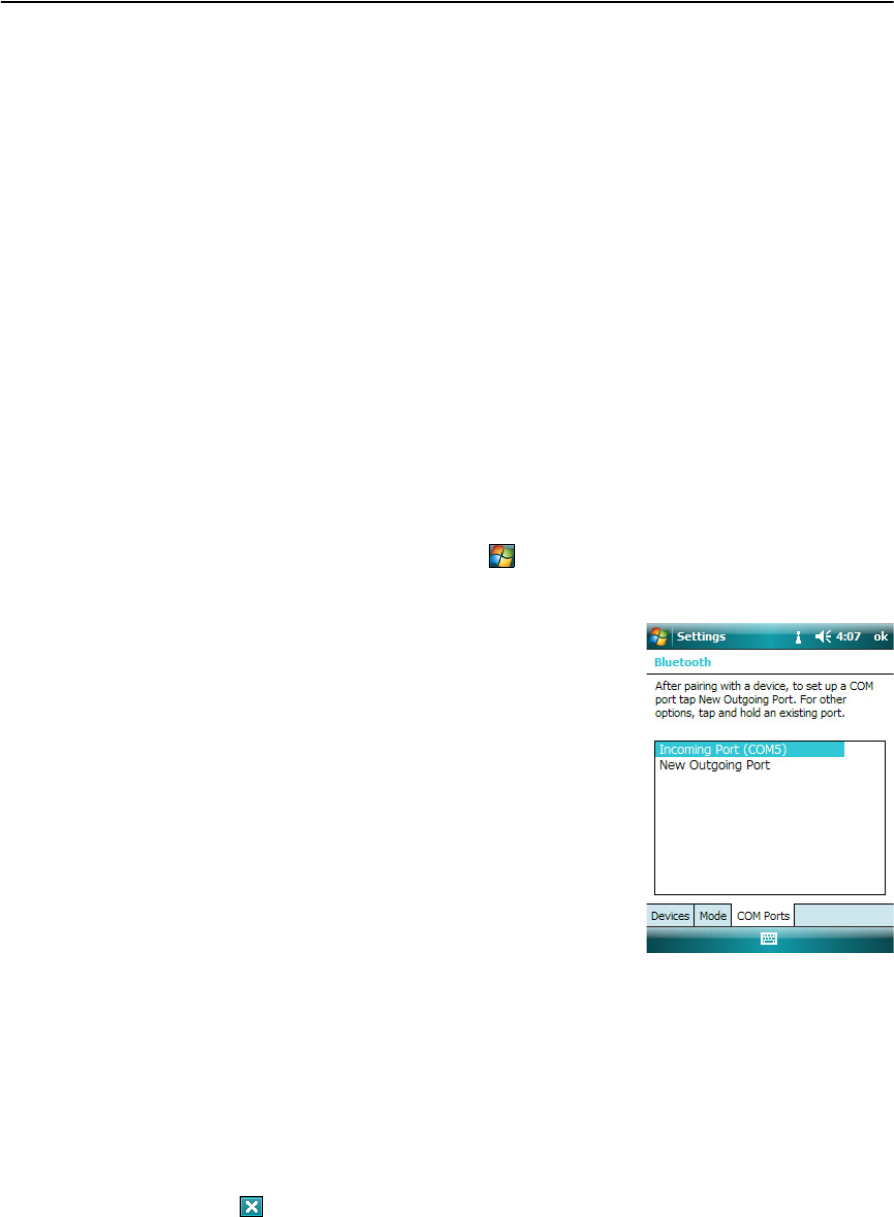
Step 2: Configuring the COM port to use on the handheld
1. On the Juno series handheld, tap / Settings / Connections /Bluetooth.
2. Tap the COM Ports tab.
3. Tap New Outgoing Port.
4. Select the device you want to set up the
connection to and then tap Next on the right
softkey.
5. Select the COM port on the Juno series handheld
to use for the connection.
The Juno series handheld has four COM ports
(COM6, COM7, COM8 and COM9) available for
connections out to Bluetooth-enabled serial
devices.
6. Do one of the following:
–To communicate with any device, for example if you have formed this
connection without pairing to a device, clear the Secure Connection check
box.
–To communicate only with devices with which the handheld has a
Bluetooth partnership, select the Secure Connection check box.
7. Tap Finish on the right softkey.
8. Tap OK in the top right corner to close the Bluetooth application.
9. Tap in the top right corner to close the Settings screen.
6 Getting Connected
88 Juno Series User Guide
Step 3: Configuring the GPS field software to use data from the serial
device
Once you configure the connection between the Juno series handheld and the
Bluetooth-enabled serial device, you must configure the software to use the
connection to receive data.
To use a Bluetooth-enabled external sensor such as a laser rangefinder or a barcode
scanner in TerraSync software, see below.
Using data from an external source in the TerraSync software
To configure the TerraSync software to use data from an external source, for example, a
laser rangefinder or barcode scanner:
1. Start the TerraSync software and then open a data file.
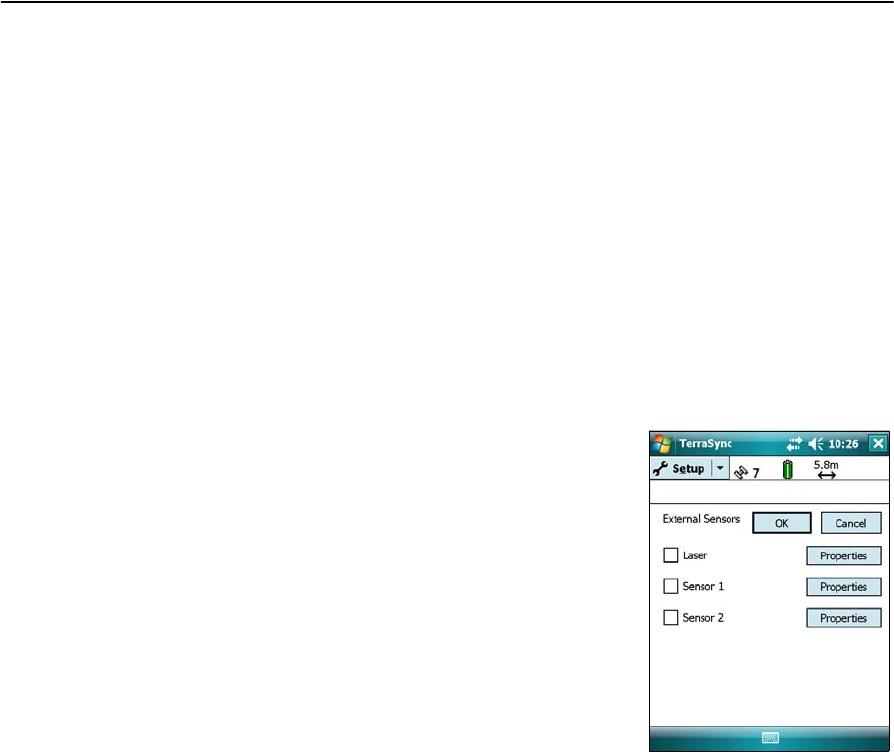
2. In the Setup section, tap External Sensors. The
External Sensors form appears.
3. If you are connecting to:
–a laser rangefinder, select the Laser check
box and then tap the Properties button
beside the Laser check box. The Laser
Properties form appears.
–a barcode scanner or other external sensor,
select the Sensor 1 or Sensor 2 check box and
then tap the Properties button beside the
appropriate check box. The Sensor Properties
form appears.
4. If you are connecting to a barcode scanner or other external sensor, enter a
name for the connection in the Name field.
5. From the Port drop-down list, select the name of the COM port that you selected
in the Bluetooth application when you set up the connection to the device.
6. Tap OK to confirm the sensor settings and return to the External Sensors form.
7. Tap OK to confirm the settings and return to the main screen of the Setup
section.
8. The external sensor is now setup for use and can be used to add data as
attributes into an open file in TerraSync. The device is automatically connected
and disconnected when data files in TerraSync are opened and closed.
To check the status of the connection, select the Comms subsection in the
Status section of the GPS field software.
Juno Series User Guide 89
Getting Connected 6
Connecting to an office computer to use ActiveSync technology
Instead of using a USB or serial cable to physically connect to an office computer, you
can use Bluetooth wireless technology to connect to ActiveSync technology or the
Windows Mobile Device Center on a Bluetooth-enabled office computer.
Note – Not all Bluetooth devices and Bluetooth management software support ActiveSync
connections. Check with the manufacturer of the office computer for compatibility.
Note – The exact steps required may vary depending on the office computer.
To connect to a office computer to use ActiveSync with a Bluetooth connection, you
must:
1. Set up the connection to the computer.
2. Connect to ActiveSync using Bluetooth wireless technology.
Step 1: Setting up the connection to the computer
1. From the Bluetooth user interface on the office computer, make sure that the
computer allows itself to be discovered by other Bluetooth devices.
2. Configure the ActiveSync software on the office computer to connect to the
correct Bluetooth port. The steps required depend on the operating system
installed on the office computer. If the office computer is using:
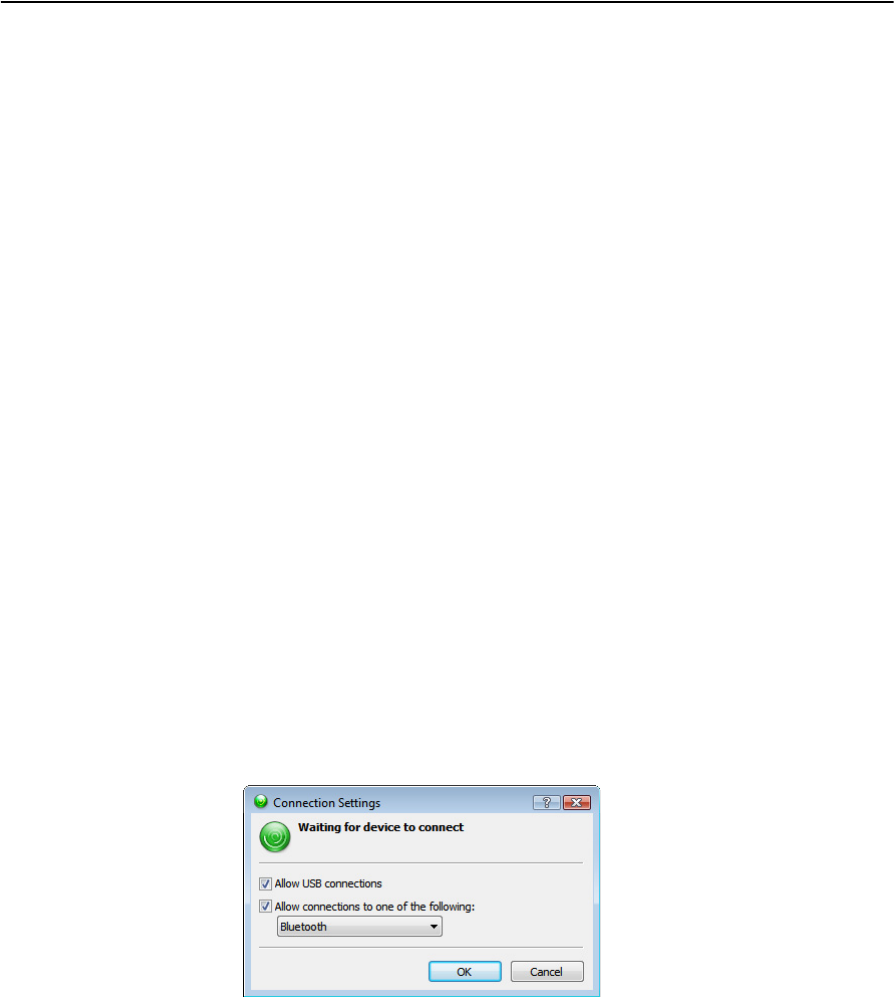
•the Windows Vista operating system:
a. From the Start menu on the office computer, select Control Panel /
Hardware and Sound / Windows Mobile Device Center.
The Connection Settings dialog appears:
b. Select the Allow connections to one of the following check box.
c. From the list, select Bluetooth and then click OK.
•the Windows XP or 2000 operating system:
a. From the Bluetooth user interface on the office computer, identify the
virtual COM port of the host Bluetooth Serial Port or Local Service and
ensure that this is enabled. In this example, the virtual COM port is COM5.
b. Start the ActiveSync software on the office computer.
c. Select File / Connection Settings.
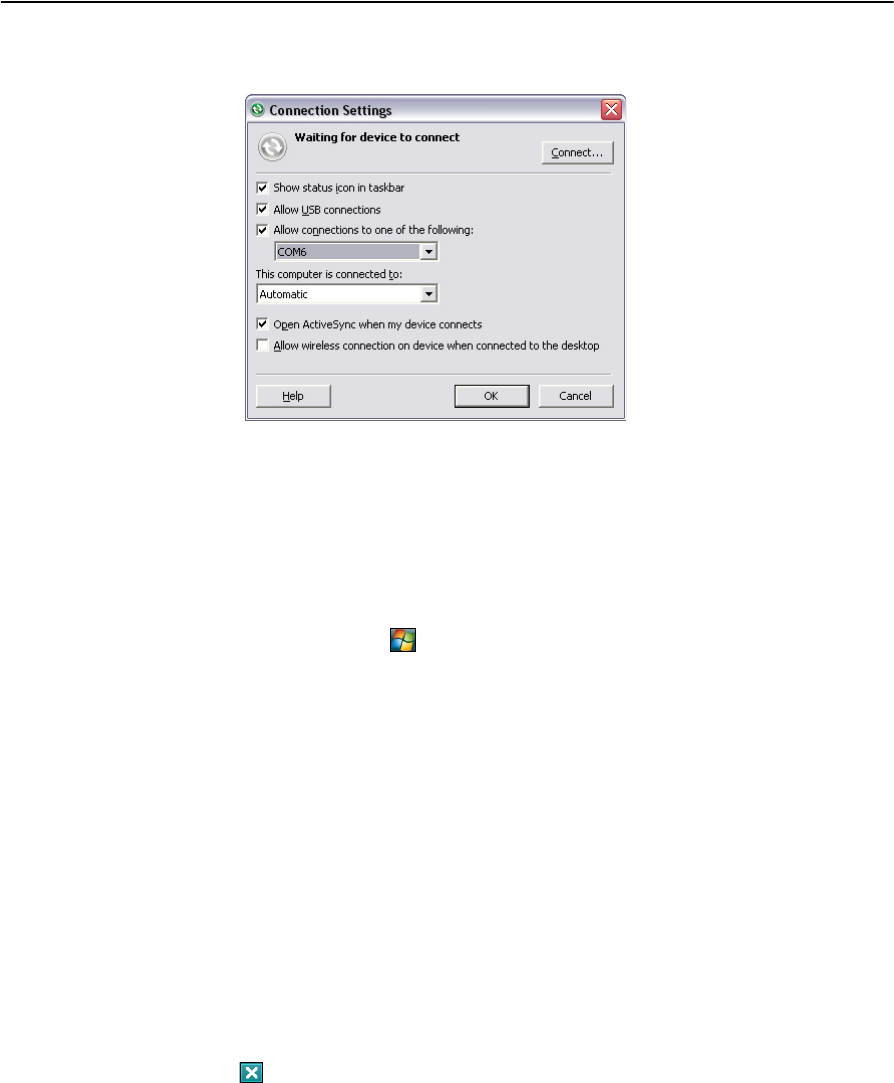
6 Getting Connected
90 Juno Series User Guide
The Connection Settings dialog appears:
d. Select the Allow connections to one of the following check box.
e. From the list, select the COM port that you selected in Step a and then click
OK.
Note – Before you try to form a Bluetooth connection from the Juno series handheld to the
office computer, you must correctly configure the Bluetooth host serial port and ActiveSync
technology on the office computer.
3. On the handheld, tap / Settings / Connections /Bluetooth.
4. In the Devices tab, tap Add new device. The handheld searches for other
Bluetooth devices and displays them in the list.
5. Tap the name of the computer you want to connect to and then tap Next on the
right softkey.
6. When prompted, enter a passcode of your choice that you will easily remember
on the handheld.
7. Enter the same passcode on the office computer.
8. On the handheld, select the ActiveSync check box in the list of services provided
by the computer and then tap Finish on the right softkey.
You have now created a partnership between the Juno series handheld and the
office computer so that they can communicate.
9. Tap OK in the top right corner to close the Bluetooth application.
10. Tap in the top right corner to close the Settings screen.
To connect to ActiveSync, see Step 2 on the following page.
Juno Series User Guide 91
Getting Connected 6
Step 2: Connecting to ActiveSync using Bluetooth wireless technology
1. On the Juno series handheld, tap / Programs / ActiveSync.
2. Tap Menu and then select Connect via Bluetooth.
On the Juno series handheld, a message box shows the status of the connection
as it is made.
3. When the connection to the office computer is successful, you are returned to
the ActiveSync application on the handheld.
4. Tap to close.
The connectivity icon in the status bar shows , or if WLAN is connected.
To check the status of the ActiveSync connection, tap the connectivity icon in
the title bar.
To disconnect, tap / Programs / ActiveSync on the handheld and then select
Menu / Disconnect.
6 Getting Connected
92 Juno Series User Guide
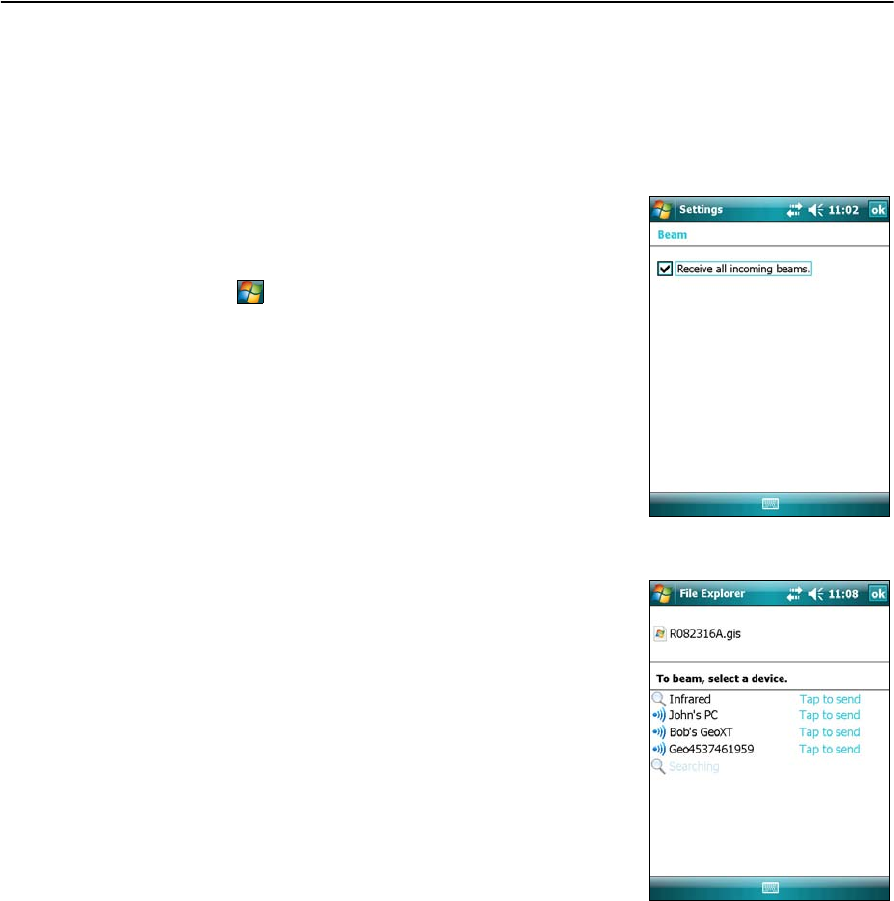
Beaming files to or from another device
You can beam files, contacts, tasks, and appointments between the handheld and
another device.
To receive beamed files from another device:
1. Make sure that the Juno series handheld’s
integrated Bluetooth radio is turned on (see
page 73).
2. Tap / Settings / Connections/ Beam.
3. Select the Receive all incoming beams check box
and then tap OK.
4. When another device attempts to beam a file,
you are prompted to accept the file. To receive
the file, tap Ye s.
Note – All incoming files are automatically saved in the
My Documents folder on the handheld.
To send beamed files to another device:
1. Make sure that the Juno series handheld’s
integrated Bluetooth radio is turned on
(see page 73).
2. On the Juno series handheld, open File Explorer
and go to the file you want to send.
3. Tap and hold the file and then select Beam File.
The handheld scans for nearby devices.
4. Tap the device you want to send the file to. The
file is sent to the device.
A message reports Done or Failed, depending on
the outcome of the file transfer.
Juno Series User Guide 93
Getting Connected 6
Accessing a corporate network through your Internet connection
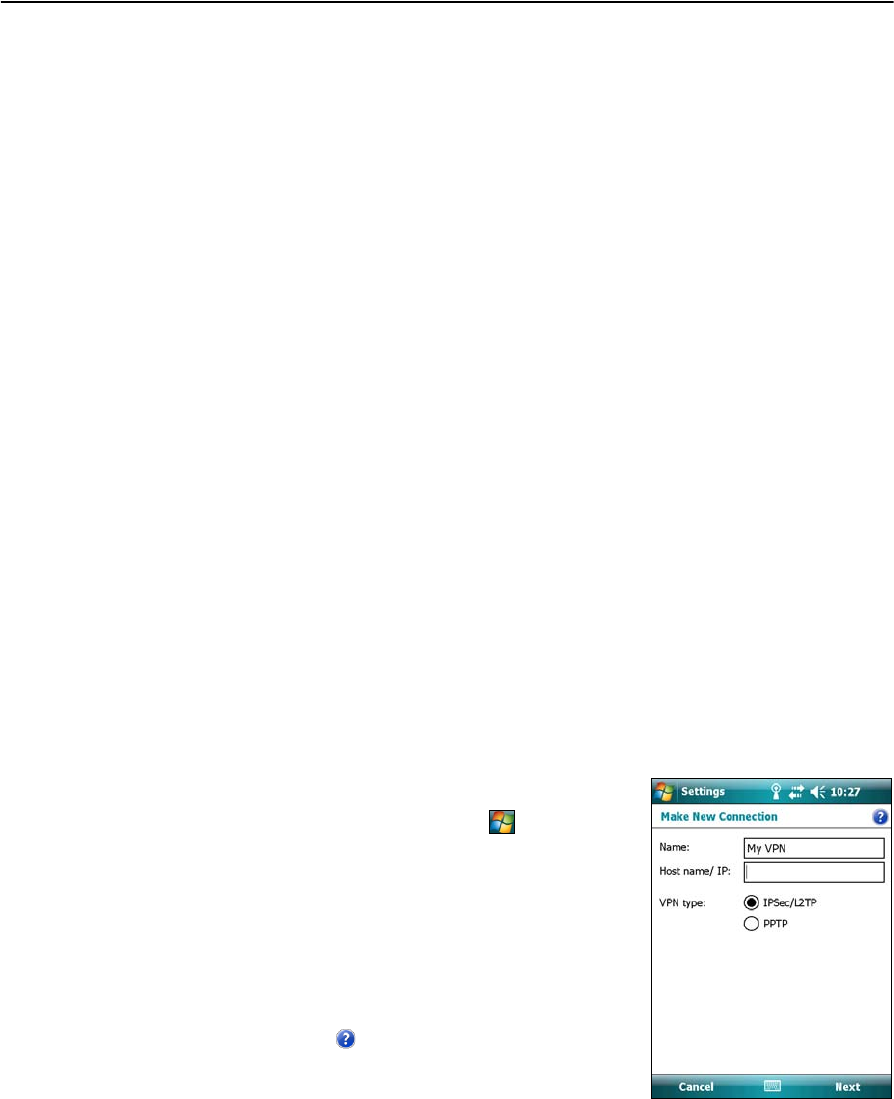
Use a Virtual Private Network (VPN) connection to access a corporate network or
Intranet.
Before you begin, obtain the following information from your network administrator:
•user name and password
•domain name
•host name or IP address of the VPN server
To access a corporate network through your Internet connection, you must:
1. Set up an Internet connection on the handheld.
2. Set up a VPN connection.
3. Connect to the corporate network or Intranet.
Step 1: Setting up an Internet connection on the handheld
Do one of the following:
•Set up a wireless LAN connection to an access point. For more information, see
page 76.
•Connect to the Internet using the internal cellular modem (Juno SC version
only). For more information, see page 77.
•Connect to the Internet using a Bluetooth-enabled phone. For more
information, see page 82.
Step 2: Setting up a VPN connection
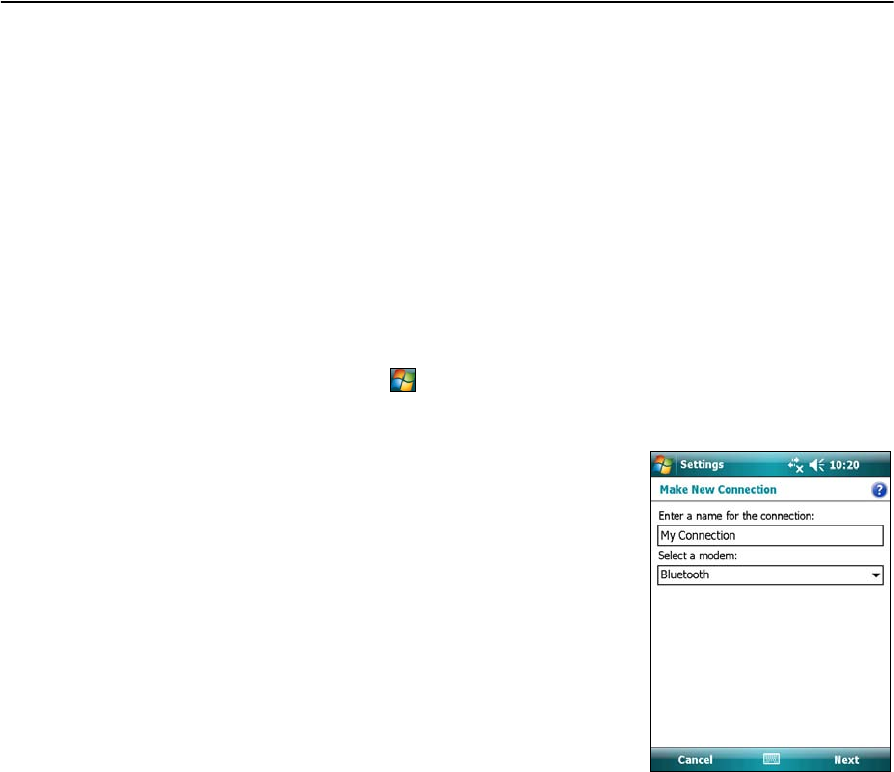
1. On the Juno series handheld, tap / Settings /
Connections / Connections.
2. From the My Work Network list, tap Add a new VPN
server connection.
3. Follow the instructions in the Make New
Connection wizard.
To view additional information for any screen in
the wizard, tap .
4. Tap Finish.
6 Getting Connected
94 Juno Series User Guide
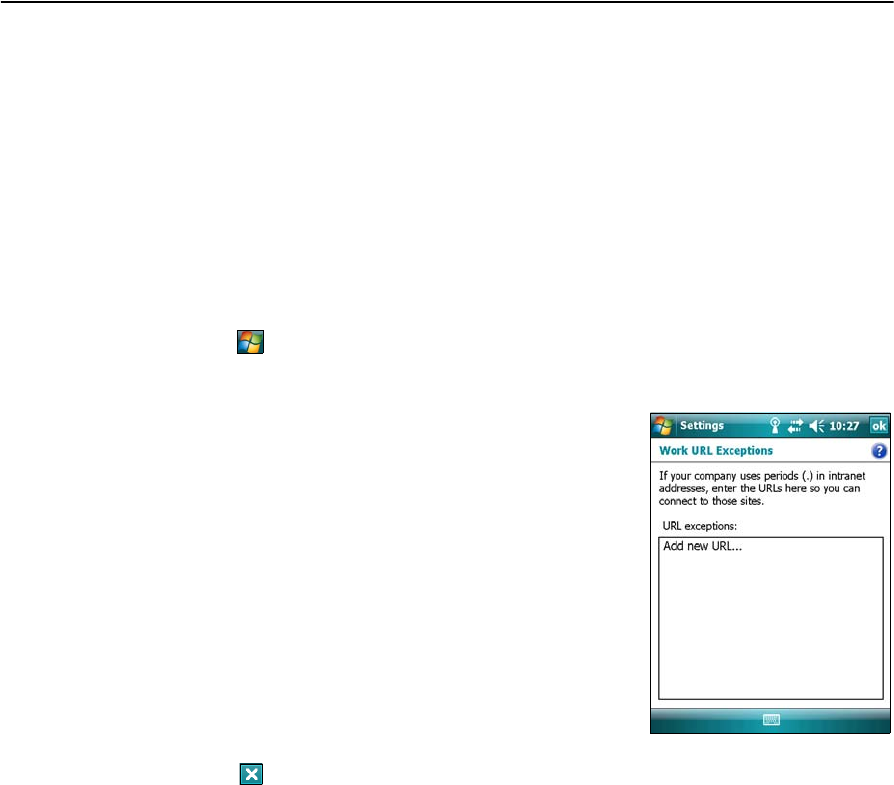
Step 3: Connecting to the corporate network or Intranet
To connect to the corporate network or Intranet, simply start using Internet Explorer.
The Windows Mobile operating system automatically controls whether the VPN
connection is used, depending on whether the URL contains a period. For example, the
URL www.trimble.com contains periods, and so the connection to this web site is
made without using the VPN connection. However, an address to a network computer
or file server that does not contain periods automatically starts the VPN connection.
If you need to use the VPN connection to access URL addresses that contain periods,
specify exceptions for the addresses that are within the corporate network. To do this:
1. Tap / Settings / Connections / Connections.
2. Tap the Advanced tab.
3. Tap Exceptions. The Work URL Exceptions screen
appears.
4. Tap Add new URL.
5. Enter the URL and then tap OK in the top right
corner of the screen.
6. Repeat Step 4 and Step 5 as required.
7. Tap OK in the top right corner of the screen to
return to the Advanced tab of the Connections
screen.
8. Tap OK in the top right corner of the screen to
close the Connections screen.
9. Tap to close the Settings screen.

Juno Series User Guide 95
Getting Connected 6
Bluetooth wireless connections explained
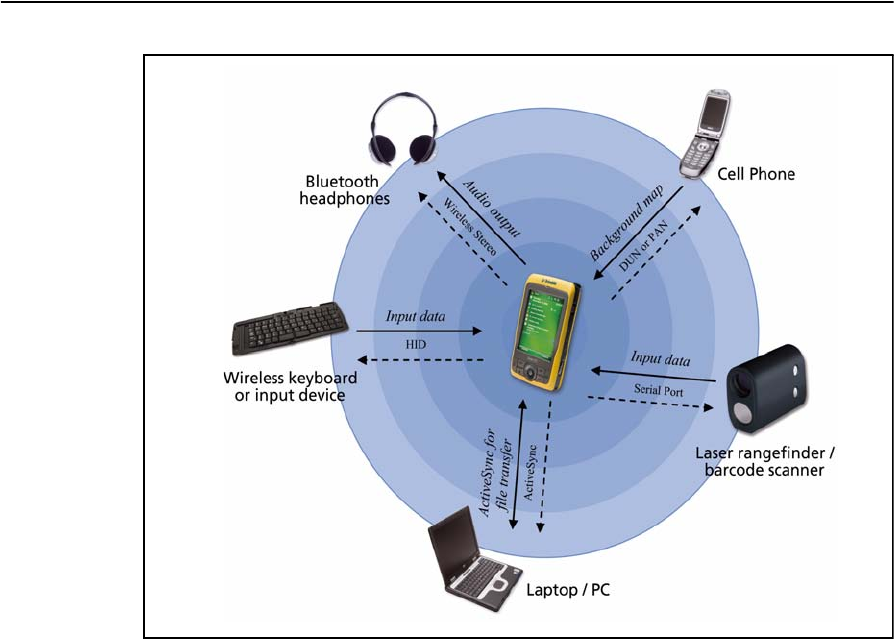
The Juno series handheld has an integrated Bluetooth radio that you can use to
establish a wireless connection to other Bluetooth devices that are within range.
Using a Bluetooth connection, you can communicate with devices such as cellular
phones, office computers, other handhelds, and Bluetooth-enabled laser rangefinders
and barcode scanners. You can also communicate with peripheral devices that use
Bluetooth adaptors instead of serial or USB connections.
The Juno series handheld can act as a Bluetooth client device or a Bluetooth host
device, and can act as both at the same time. The concepts of client and host devices
are explained in detail below.
Connecting to a Bluetooth device as a client
You can use the Juno series handheld as client device, which uses services offered by
Bluetooth host devices that are within range. In general the host device provides
information to the client device, but in some cases the client initiates the connection
and also provides information to the host device.
The services used by a Juno series handheld when connecting as a Bluetooth client are:
A client can connect to a number of different services provided by different hosts. The
number of active connections at any one time affects the speed of the connections.
Figure 6.1 shows the handheld connected to different types of host devices using
Bluetooth wireless technology.
Service Description
Dialup Networking
(DUN)
Connects the handheld to a cellular phone or modem for dial-up
network or Internet access.
Personal Area
Networking (PAN)
Connects to Bluetooth network access points or phones that support the
Personal Area Network/Network Access (PAN) profile.
Serial Port Emulates an RS-232 serial (COM) port on the handheld.
ActiveSync Enables an ActiveSync connection to a computer.
Input Device (HID) Connects the handheld to a physical input device, such as a keyboard.
Wireless Stereo Connects to Bluetooth A2DP (Advanced Audio Distribution Profile)
headphones.
6 Getting Connected
96 Juno Series User Guide
Figure 6.1 Juno series handheld Bluetooth client connections
In Figure 6.1, the dashed arrows indicate the client device—that is, the Juno series
handheld—connecting to host devices. The Bluetooth profile (or service) used for the
connection is shown between the arrows, for example, the DUN service is used for a
connection to a cell phone, and the Serial Port service is used for a serial connection
to a barcode scanner or laser rangefinder.
The solid arrows indicate the flow of information between devices. For example, when
the Juno series handheld connects as a client to:
•a cellphone, the handheld uses the DUN or PAN host service provided by the
phone to access the Internet and background map data.
•a laptop computer or office computer, the devices use the ActiveSync service to
exchange information to and from either device.
•Bluetooth headphones, the handheld uses the Wireless Stereo host service
provided by the headphones to play audio files and system sounds.

Juno Series User Guide 97
Getting Connected 6
Providing Bluetooth services as a host
You can use the Juno series handheld as a Bluetooth host device, which provides
services to Bluetooth client devices that are within range.
Host services provided by the Juno series handheld are:
To provide a host service, you must turn on the Bluetooth radio and make both devices
visible to other devices (see page 70 and page 74).
When a client device connects to the Serial Port service provided by the Juno series
handheld, applications on the handheld can use the pre-defined host serial port on
COM5 to provide host services to the client device.
Service Description
Serial Port Emulates an RS-232 serial (COM) port on the handheld.

6 Getting Connected
98 Juno Series User Guide

CHAPTER
7
Juno Series User Guide 99
Troubleshooting 7
In this chapter:
Power issues
Backlight issues
Touch screen issues
Keypad issues
Memory card issues
Connection issues
GPS receiver issues
Real-time DGPS issues
Use this section to identify and solve common
problems that may occur when using the Juno
series handheld. Please read this section before
you contact technical support.
7 Troubleshooting
100 Juno Series User Guide
Power issues
Backlight issues
Problem Cause Solution
The handheld does not
turn on.
The battery is flat. Recharge the battery (see page 25).
The screen is blank. The handheld is turned
off.
Press the Power button to turn on the handheld.
The handheld has locked
up.
Reset the handheld (see Resetting the handheld,
page 30).
The handheld is not
charging.
The internal temperature
has risen above the
allowed maximum for
charging the battery.
Do one or all of the following:
• Turn off the integrated radios before charging the
handheld.
• Suspend the handheld before charging.
• Remove the handheld from any external heat
sources (for example, sunlight). The handheld will
automatically start charging again when the
internal temperature has dropped below the range
for charging the battery.
The USB cable provides
only a minimal charge
when an active
connection to the
computer is formed.
Recharge the battery using the AC adaptor or the
vehicle adaptor.
The battery power
percentage bar does not
appear in the Power
control.
The battery has 0%
power.
Recharge the battery (see page 25). Once the battery
level is above 0%, the battery power percentage bar
reappears. Tap / Settings / System / Power / Battery
to view the level of power remaining in the battery.
The charge level of the
battery drops when the
handheld is turned off.
The handheld was left in
Suspend mode or was left
fully charged for a long
duration.
Before storing the handheld, completely shut down the
handheld (see Turning on and turning off the
handheld, page 29). Then store the handheld as
recommended (see Storage, page 18).
Problem Cause Solution
The backlight does not
come on when you tap
the screen or press a
button.
The backlight is not set to
turn on in the Backlight
control.
Tap / Settings / System / Backlight to view the
Backlight control, and make sure that:
•the Turn on backlight when a button is pressed or
the screen is tapped check box is selected.
• the brightness is not set to Dark in the Configure
tab.
The screen is blank or
hard to see.
The backlight is off. Tap the screen or press a button.
The backlight level needs
to be adjusted.
Tap / Settings / System / Backlight to view the
Backlight control and then adjust the slider in the
Configure tab.
Juno Series User Guide 101
Troubleshooting 7
Touch screen issues
Keypad issues
Memory card issues
Problem Cause Solution
The touch screen
does not respond to
stylus taps.
The touch screen is
incorrectly aligned.
Realign the screen (see page 46).
The touch screen is locked. To unlock the touch screen, tap Unlock in the menu bar of
the Today screen.
The handheld has locked
up.
Reset the handheld (see Resetting the handheld, page 30).
The screen is blank. The handheld is turned
off.
Press the Power button to turn on the handheld.
The battery is flat. Recharge the battery (see page 26).
The handheld has locked
up.
Reset the handheld (see Resetting the handheld, page 30).
The screen is hard to
see.
The backlight level needs
to be adjusted.
Open the Backlight control and then adjust the backlight
level (see Backlight, page 47).
The backlight is off. Tap the screen to turn on the backlight.
You are unable to see parts
of an application windows
when the screen is in
landscape orientation.
Some applications are designed for portrait orientation
only. To view the entire application window, change the
screen display to portrait.
The selected display theme
does not have enough
contrast.
Select the High-Contrast display theme. Tap / Settings /
Personal / Today, select the High-Contrast theme and then
tap OK.
Problem Cause Solution
Pressing the
application key does
not activate the
function shown on
the softkey above it.
The hardware application
key has been programmed
to run another program or
to perform another action.
Do one of the following:
• Tap the touchscreen softkey to activate the function
shown on the softkey.
• Re-program the application key to perform the same
action as the touchscreen softkey. To do this, tap /
Settings / Personal / Buttons, select the button to
reprogram and then select <Left Softkey> or <Right
Softkey>.
Problem Cause Solution
The handheld does not
recognize a memory card.
The handheld does not
support SDIO (SD
input/output) cards.
Use a microSD or microSDHC memory card.
Files on the memory card
are not visible or are not
able to be opened.
Files have been encrypted
on another device and have
a .menc file extension.
Remove encryption from the files (see Encrypting files
on memory cards, page 33).
7 Troubleshooting
102 Juno Series User Guide
Connection issues
ActiveSync technology
Problem Cause Solution
ActiveSync
technology will not
connect to the
handheld.
The connection is not
initiated automatically.
Disconnect the USB cable from the computer and then
reconnect the handheld to the computer. Alternatively, in the
ActiveSync software on the office computer, select
File /Connection Settings and then tap Connect.
ActiveSync does not
recognize the Juno
series handheld.
Restart the office computer.Disconnect the USB cable from the
handheld, reset it (see Resetting the handheld, page 30) and
then reconnect the handheld to the computer.
An incompatible version
of ActiveSync software
is installed.
ActiveSync version 4.5 and later is compatible with the Juno
series handheld. If version 4.5 or later of the ActiveSync
software is not installed on the office computer, you can install
it from the Juno Series Getting Started Disc.You can also
download the latest version from the Microsoft website at
www.microsoft.com/windowsmobile/activesync/default.mspx.
The connection is not
enabled in ActiveSync
on the computer.
In the ActiveSync software on the office computer, click
File /Connection Settings. If you are using:
• the support module, make sure that the Allow USB
connections check box is selected from the drop-down list.
• a Bluetooth connection, make sure that the correct port for
Bluetooth is selected. Then open the Bluetooth control on
the handheld. In the Devices tab, tap the partnership and
in the services list make sure that the ActiveSync check box
is selected.
The connection is not
enabled in ActiveSync
on the handheld.
On the handheld, tap / Programs / ActiveSync / Menu /
Connections. Make sure that the Synchronize all PCs using this
connection check box is selected, and that the correct option is
selected.
The handheld
connection settings
conflict with network
settings or VPN client
software.
If you are using the USB data cable, use the USB to PC utility to
change the connection method the handheld uses to connect
to ActiveSync on the computer. Tap / Settings /
Connections / USB to PC Utility. Clear the Enable advanced
network functionality check box.
The handheld stops using the default RNDIS method to
connect to the ActiveSync software.
Juno Series User Guide 103
Troubleshooting 7
Windows Mobile Device Center
Network connections
Problem Cause Solution
Windows Mobile Device
Center will not connect
to the handheld.
The connection is not
initiated automatically.
Disconnect the USB cable from the computer and then
reconnect the handheld to the computer.. Alternatively, in
the Windows Mobile Device Center software on the office
computer, select Mobile Device Settings /Connection
Settings.
The Windows Mobile
Device Center software
does not recognize the
Juno series handheld.
Restart the office computer. Disconnect the USB cable from
the handheld, reset it (see Resetting the handheld,
page 30) and then reconnect the cable to the handheld.
The connection is not
enabled in Windows
Mobile Device Center
on the computer.
In the Windows Mobile Device Center software on the
office computer, click Mobile Device Settings / Connection
Settings. If you are using:
• the USB data cable, make sure that the Allow USB
connection check box is selected from the drop-down
list.
• a Bluetooth connection, make sure that the correct
port for Bluetooth is selected. Then open the Bluetooth
control on the handheld. In the Devices tab, tap the
partnership and in the services list make sure that the
ActiveSync check box is selected.
The connection is not
enabled on the
handheld.
On the handheld, tap / Programs / ActiveSync / Menu /
Connections. Make sure that the Synchronize all PCs using
this connection check box is selected, and that the correct
option is selected.
The handheld
connection settings
conflict with network
settings or VPN client
software.
If you are using the USB data cable, use the USB to PC
utility to change the connection method the handheld uses
to connect to the Windows Mobile Device Center on the
computer. Tap / Settings / Connections / USB to PC
Utility. Clear the Enable advanced network functionality
check box.
The handheld stops using the default RNDIS method to
connect to the Windows Mobile Device Center.
Problem Cause Solution
The bluetooth
connection with the
cellular phone suddenly
ends.
If you change the proxy
settings of the
handheld while
connected to a cellular
phone, the cellular
phone ends the
connection.
Make any changes to proxy settings before connecting to a
mobile device.
Unable to connect to
another Juno series
handheld.
Data encryption settings
are set incorrectly.
When setting up a peer-to-peer ad-hoc network with a
WEP encryption, set a Network Key, rather than leaving the
key blank to be provided automatically.

7 Troubleshooting
104 Juno Series User Guide
Bluetooth wireless technology
Problem Cause Solution
The handheld cannot
discover a nearby
Bluetooth device.
The device is out of
range.
Move the devices closer to each other and then scan
again.
Bluetooth wireless
technology is not
enabled on one or both
devices.
Make sure that the Bluetooth radio is turned on, on both
the handheld (see page 73) and the other Bluetooth
device.
The device has not been
made Discoverable.
Make sure that the Bluetooth device has been made
Discoverable.
The COM port that you
assigned to a serial port
service is not available in
your application.
The application cannot
recognize ports if they
are added after the
application opens.
Exit from the application, add the port and then run the
application again.
The Bluetooth
connection fails while in
use.
The Bluetooth device has
moved out of range.
Move the devices closer to each other. The devices should
reconnect automatically. If they do not, select the
Bluetooth device in the Devices tab. Tap and hold the
device name and then select Delete. Tap New to discover
the device again.
The Bluetooth radio has
lost the connection.
Turn off the Bluetooth radio on the handheld and then
turn on the Bluetooth radio (see page 73).
Bluetooth file transfer
interrupts the
connection.
When you transfer large image or data files, other
Bluetooth connections may stop responding. To avoid
problems, close other Bluetooth connections before
transferring large files.
Juno Series User Guide 105
Troubleshooting 7
Wireless LAN connections
Problem Cause Solution
The “New Network
Detected” notification
does not appear
automatically.
The wireless LAN radio is
off.
Tap the wireless icon in the Today screen or go to the
Wireless Manager and make sure wireless LAN is on.
The handheld is out of
range of the network.
Move to within range of the network, then tap /
Settings /Connections /Network Cards and then setup the
connection.
The handheld cannot
connect to a secure site.
The date on the
handheld is incorrect.
Check that the handheld has the date set correctly on the
Today screen. If the date is incorrect, tap the clock icon on
the Today screen and then adjust the date and time.
You cannot configure an
Internet connection.
Within range of more
than one network, you
are not connecting to
the network you would
prefer to use.
The radio is connecting
to the first network
signal it has received.
Tap / Settings /Connections /Network Cards. Tap and
hold the network you would prefer to use and then select
Connect.
The “New Network
Detected” notification
appears but the menu
bar and soft key options
are not displayed.
Some applications are
not fully compatible
with all features of the
Windows Mobile 6
operating system.
Use the application buttons on the keypad, as they map to
the soft keys in the menu bar:
• To dismiss the notification, press the right application
button on the keypad.
• To connect to the network, press the left application
button.
Alternatively, select a Windows Mobile application from
the Start menu, such as the Today screen or File Explorer,
and the menu bar and soft keys will be displayed correctly.
7 Troubleshooting
106 Juno Series User Guide
GPS receiver issues
Problem Cause Solution
The handheld is not
receiving GPS positions.
The integrated GPS
receiver is not activated.
Use the Connect or Activate GPS command in the GPS
field software to open the GPS COM port and activate
the integrated GPS receiver. For more information, see
Using the GPS receiver, page 59.
The GPS COM port is
already in use. Only one
application at a time can
have the port open.
Do the following:
• Exit the software that is using the GPS COM port
and then retry in your application.
• Check that a GPS application is not running in the
background. Tap / Settings / Memory, select
Running Programs, and then select and close any
GPS applications you are not using..
The GPS field software is
using the wrong GPS COM
port.
Connect to COM4.
Not enough satellites are
visible.
Move to a location where the receiver has a clear view
of the sky and ensure the antenna is not obstructed.
Wait for real-time is
selected in the GPS field
software and the
integrated receiver is
waiting to receive
real-time corrections.
If you are collecting data for postprocessing, clear the
wait for real-time selection.
Check that the real-time correction source is setup
correctly (see Connecting to a real-time differential
correction source, page 64).
NMEA data includes
autonomous positions.
The integrated GPS
receiver outputs
autonomous positions
when real-time
corrections are
unavailable.
Configure the NMEA application to filter out non-DGPS
positions.

Juno Series User Guide 107
Troubleshooting 7
Real-time DGPS issues
Problem Cause Solution
The handheld is not
receiving SBAS
real-time corrections
The SBAS satellite is
obstructed from view.
Check the location of the SBAS satellite in the Skyplot section
of the GPS field software, and if possible move to a different
location.
You are outside the
WAAS, EGNOS, or MSAS
coverage area.
Wide Area Augmentation System (WAAS) satellites are
tracked in the Continental United States including Alaska,
and in southern parts of Canada.
European Geostationary Navigation Overlay Service (EGNOS)
satellites are tracked in Europe.
MTSAT Satellite-based Augmentation System (MSAS)
satellites are tracked in Japan.

7 Troubleshooting
108 Juno Series User Guide
Juno Series User Guide 1
Symbols
.menc files 33
A
AC power adaptor
connecting 27
included component 17
safety 8
access point 75
accessing DGPS corrections from the Internet 77, 82
accessing online help 36
accessories 17
accuracy
improving 62–65, 65–66
Accuracy Settings form 63
accuracy-based logging 63
ActiveSync
connecting to the handheld 55
installing onto a computer 53
pre-installed software 38
synchronizing 55
troubleshooting 102, 103
USB support module connection 53
ActiveSync service 89–91, 95
adjusting screen display 39
Adobe Reader software 38
alarms 44
animated skyplot 65
antenna
external 17
appointments 38
ArcPad software
connecting to GPS 61
installing 60
supported versions 60
Australia, notices to users 5
B
backing up data 51
backlight
reducing brightness to save power 28
settings 47
troubleshooting 100
turning off to save power 47
barcode scanner 88, 96
base stations 65
baseball cap with antenna sleeve 17
battery
charging 25, 27
conserving 28
included component 17
inserting 26
low battery indicators 28
power level 28
recycling 6
removing 26
safety 9
troubleshooting 106, 107
beaming files 92
Bluetooth client services 95
Bluetooth radio
conserving power 28
safety 7
Bluetooth wireless technology
ActiveSync service 89–91, 95
cellular phone connection 82–??
client device 95
client services 95
computer connection 89–91
connecting without pairing 81–82
Dialup Networking (DUN) service 77, 82, 95, 96
host device 95, 97
host services on the handheld 97
Input Device (HID) service 95
Internet connection 82–85
pairing with a device 80–81
Personal Area Networking (PAN) service 77, 82,
95, 96
Serial Port service 87, 95, 96, 97
troubleshooting 104
Wireless Stereo service 95, 96
bonding with a device See pairing with a device
browsing the Internet 38
buttons, customizing 43
C
Calculator software 38
Calendar software 38
Index

Index
2 Juno Series User Guide
carry case 17
cautions
accidentally synchronizing data 52
deleting files from the flash disk 32
resetting to factory default settings 31
characters, entering special 41
checking battery power level 28
cleaning the handheld 18
ClearType font smoothing 46
client device 95
client services 95
clock icon 44
comments 19
communicating with a desktop computer 51
computer, connecting to
Bluetooth wireless connection 53, 89
using USB support module connection 53
configuring
GPS field software 61
mail service 49
NMEA data output 66
connecting to
a barcode scanner 88
a Bluetooth-enabled cellular phone 82–??
a Bluetooth-enabled device 79–82
a computer 53–56, 89–91
a laser rangefinder 88
a VRS network 82–??
an Internet server 82–??
Bluetooth network access points 95
Bluetooth-enabled headphones 95
corporate network 93
e-mail server 49
GPS receiver 61
Intranet 93
laser rangefinder 96
Connection Manager Utility 55, 56
connectors
external GPS antenna 18
conserving power 28
Contacts software 38
context-sensitive help 36
corporate network, connecting to 93
customizing
application keys 42
notifications 45
softkeys 42
sounds 45
Today screen 43
D
data collection, planning 62, 65
data logging
accuracy-based 63
decrypting files 33
deleting
almanac 62
e-mail messages 48, 49
files 32
wireless LAN connection 77
desktop computer, connecting to 54, 55
device lock 24
DGPS corrections
receiving from an SBAS 64
Dialup Networking service 95
disabling encryption 33
displaying the input panel 40
documentation feedback 19
DOP graph 65
DUN service 95, 96
E
EGNOS satellites 64, 107
electrostatic discharge 10, 18
e-mail See Messaging
enabling encryption 33
encrypted files 33
entering
information onto the handheld 40
special characters 41
text 40
Europe, notices to users 5
Excel Mobile software 38
external antenna 17
external antenna port 18
external power kit 17
F
factory default settings, resetting to 31
feedback 19
File Explorer software 38
file viewers 38
flashing LED
red 27

Juno Series User Guide 3
Index
G
GeoBeacon receiver 17, 96
GPS
about 59
field software 60, 61
satellite signals 59, 62
troubleshooting 106
GPS Controller software
connecting to GPS 61
mission planning 65
GPS field software
configuring 61
supported 16, 60
GPS Pathfinder Office software 55, 56
GPS Pathfinder Tools SDK 16, 61
GPS receiver
resetting 62
green LED 27
ground plane 17
H
handheld 29
handwriting recognition 40
hard reset 30
Help 36, 38
HID service 95
hiding the keyboard 41
host device 97
host services 97
hotspot See access point
I
idle time 29
IMAP4 mail service 49
Inbox See Messaging 48
Input Device service 95
input panels 40
installing
ActiveSync 53
GPS field software 60
software 54, 56, 57
Windows Mobile Device Center 52
integrated GPS receiver 59
international adaptor kit 17
Internet Explorer software 38
Intranet, connecting to 93
J
Juno series handheld
automatic power off 29
caring for 18
companion CD 17
copying files to 52
included components 17
integrated SBAS receiver 64
locking and unlocking 44
microphone 42
parts 22
resetting 30
storing 18
stylus 39
K
keyboard (on-screen) 40
keypad 24
keys, larger on the screen 41
L
laser rangefinder 88, 96
LED indicator 27
Letter Recognizer 40, 41
lock the screen 24
locking the handheld 44
low battery indicators 28
M
mail service, setting up 49
maintenance 18
Make New Connection wizard 93
managing files 38
meetings, arranging 38
memory
backing up data 32, 51
program memory 31
storage memory 31
memory card
electrostatic discharge 10
encrypted files 33
inserting 32, 34
installing software to 57
removing 32
troubleshooting 101
warnings 9, 32

Index
4 Juno Series User Guide
menu bar 36
messages
Problem with Bluetooth hardware 73
Messaging software 38, 49
Messenger software 38
microphone 42
Microsoft Exchange software 48
Microsoft Outlook software 48
Microsoft Transcriber software 41
mission planning 65
modes
Flight 7
MP3 files 38
MSAS satellites 64, 107
N
navigation using GPS data 63
network, connecting to a 93
New Zealand, notices to users 5
NMEA
compatible GPS field software 61
connecting applications to GPS 61
NMEA messages 67
Notes software 38
notices to users
Australia and New Zealand 5
Europe 5
notifications, customizing 45
null modem cable 17
O
Office Mobile software 38
online help, accessing 36
optional accessories 17
orientation of screen 46
outputting NMEA data 66
P
pairing with a device 80–81
PAN service 95, 96
password settings 44
PC, connecting to 51
Personal Area Networking service 95
Pictures and Videos software 38
planning GPS data collection 62, 65
playing a recording 42
POP3 mail service 49
postprocessing 63, 66
pouch 17
power
automatic power off 29
charging battery 25, 27
conserving 47
troubleshooting 106, 107
PowerPoint Mobile software 38
preferences 35
pre-installed software 38
Problem with Bluetooth hardware message 73
Program 31
programs, pre-installed 38
Q
Quick Start Guide 17
R
radio use, safety 7
range pole 17
real-time
differential correction 64–??, 65
external correction source 87
SBAS corrections 64
troubleshooting 106
receiving
beamed files 92
e-mail messages 38, 48
recording notes 41
recycle bin 32
red LED 27
removing encryption from files 33
required accuracy 63
resetting
GPS receiver 62
the handheld 30
restoring lost data 31
S
safety
AC power adaptor 8
battery 9
memory card use 9
radio use 7
satellite geometry 65
SBAS satellites
troubleshooting 107

Juno Series User Guide 5
Index
using 64
screen protectors 17
SD memory cards 32
SDHC memory cards 32
SDIO memory cards 32
Search software 38
searching
for files on the handheld 38
the Internet 38
sending
beamed files 92
e-mail messages 38, 48
error report 19
instant messages 38
serial clip 17
Serial Port
service 95
Serial Port service 87, 96, 97
setting a password 44
setting the time 44
setting up
VPN connection 93
Skyplot 62
skyplot 65
SMTP mail service 49
soft reset 30
software
ActiveSync 38
Adobe Reader 38
Calculator 38
Calendar 38
Contacts 38
Excel Mobile 38
File Explorer 38
Help 38
installing 57
Internet Explorer 38
Messaging 38
Messenger 38
Notes 38
Office Mobile 38
Pictures and Videos 38
PowerPoint Mobile 38
pre-installed 38
Search 38
Tasks 38
uninstalling 54, 56
Windows Live 38
Windows Media 38
Word Mobile 38
sounds, customizing 45
special characters, entering 41
spreadsheets, working with 38
Start button 36
Start menu 36
status indicators 37
Storage 31
storage space 31
storing the handheld 18
streaming GPS positions 63
stylus 39
stylus kit 17
support 19
support module
included component 17
supported GPS field software 60
Suspend mode 18
switching keyboards 41
synchronizing
e-mail messages 48
information 54, 55
T
Tasks software 38
technical support 19
TerraSync data files, receiving by e-mail 49
TerraSync software
automatically transferring data 55, 56
connecting to GPS 61
installing 60
supported versions 60
text editor 38
text entry 40
text size on screen 46
time zone, setting 44
title bar 36
Today screen 36
touch screen
aligning 46
care of 18
orientation 46
text size 46
troubleshooting 101
tracking
appointments 38
contacts 38
tasks 38
Transcriber software 41
transferring files to a computer 54, 56
Trimble GPScorrect extension
connecting to GPS receiver 61
installing 60

Index
6 Juno Series User Guide
supported versions 60
troubleshooting
ActiveSync 102, 103
backlight 100
battery 106, 107
Bluetooth wireless technology 104
GPS 106
memory card 101
power 106, 107
real-time 106
touch screen 101
wireless LAN 103, 105
Turn off device if not used for checkbox 29
turning on and off
handheld 18, 29
U
unlocking the handheld 44
USB connection to a computer 53, 102, 103
V
vehicle
power adaptor 17
vehicle power adaptor
connector 27
viewing files 38
Virtual Private Network (VPN) 93
W
WAAS satellites 64, 107
warnings
AC adaptor 8, 25
battery 9, 25
memory card slot 10, 32, 34
static electricity 10, 32, 34
wi-fi See wireless LAN
Windows Error Reporting 19
Windows Live Messenger 38
Windows Live software 38
Windows Media software 38
Windows Mobile
help 36
parts of the screen 36
themes 43
Windows Mobile Device Center
connecting to the handheld 54
installing 52
synchronizing 54
wireless 28
wireless LAN
troubleshooting 103, 105
wireless LAN radio
conserving power 28
safety 7
Wireless Manager 71
Wireless Stereo service 95, 96
Word Mobile software 38
World Wide Web 38
write messages 38
writing on the screen 40