Trimble 98850 TRIMBLE PRO SERIES RECEIVER User Manual Trimble Pro Series Receivers User Guide
Trimble Navigation Ltd TRIMBLE PRO SERIES RECEIVER Trimble Pro Series Receivers User Guide
Trimble >
Contents
- 1. Users Manual 1
- 2. Users Manual 2
Users Manual 1
Version 1.00
Revision A
March 2012 F
USER GUIDE
Trimble® Pro Series Receivers
Safety
Introduction
Parts of the receiver
Charging the battery
Turning on and turning off the receiver
Connecting to a field computer
Deactivating and reactivating the
Bluetooth radio
Additional receiver options
Using the receiver with a backpack or
range pole
Caring for and storing the receiver

2 Pro Series Receivers User Guide
Trimble Navigation Limited
10355 Westmoor Drive
Suite #100
Westminster, CO 80021
USA
www.trimble.com
Legal Notices
Copyright and Trademarks
© 2012, Trimble Navigation Limited. All rights reserved.
Trimble and the Globe and Triangle logo are trademarks of Trimble
Navigation Limited, registered in the United States and in other
countries. Floodlight, Tempest, and Tornado are trademarks of
Trimble Navigation Limited.
All other trademarks are the property of their respective owners.
Microsoft, Windows, and Windows Vista are either registered
trademarks or trademarks of Microsoft Corporation in the United
States and/or other countries.
The Bluetooth word mark and logos are owned by the Bluetooth
SIG, Inc. and any use of such marks by Trimble Navigation Limited
is under license.
Release Notice
This is the March 2012 release (Revision A) of the Trimble Pro Series
Receivers User Guide. It applies to version 1.00 of the Trimble Pro
series receiver (Pro 6H and Pro 6T receivers), model / 型号 : 98850.
Limited Warranty Terms and Conditions
Product Limited Warranty
Subject to the terms and conditions set forth herein, Trimble Navigation
Limited (“Trimble”) warrants that for a period of (1) year from date of
purchase this Trimble product (the “Product”) will substantially
conform to Trimble's publicly available specifications for the Product
and that the hardware and any storage media components of the
Product will be substantially free from defects in materials and
workmanship.
Product Software
Product software, whether built into hardware circuitry as firmware,
provided as a standalone computer software product, embedded in flash
memory, or stored on magnetic or other media, is licensed solely for use
with or as an integral part of the Product and is not sold. The terms of
the end user license agreement, as included below, govern the use of the
Product Software, including any differing limited warranty terms,
exclusions and limitations, which shall control over the terms and
conditions set forth in the limited Product warranty.
Warranty Remedies
If the Trimble Product fails during the warranty period for reasons
covered by this limited warranty and you notify Trimble of such failure
during the warranty period, Trimble will repair OR replace the
nonconforming Product with new, equivalent to new, or reconditioned
parts or Product, OR refund the Product purchase price paid by you, at
Trimble’s option, upon your return of the Product in accordance with
Trimble's product return procedures then in effect.
How to Obtain Warranty Service
To obtain warranty service for the Product, please contact your Trimble
dealer. Alternatively, you may contact Trimble to request warranty
service at +1-408-481-6940 (24 hours a day) or email your request to
trimble_support@trimble.com. Please be prepared to provide:
– your name, address, and telephone numbers;
– proof of purchase;
– a copy of this Trimble warranty
– a description of the nonconforming Product including the model
number; and
– an explanation of the problem.
The customer service representative may need additional information
from you depending on the nature of the problem.
Warranty Exclusions and Disclaimer
This Product limited warranty shall only apply in the event and to the
extent that (i) the Product is properly and correctly installed, configured,
interfaced, maintained, stored, and operated in accordance with
Trimble's applicable operator's manual and specifications, and; (ii) the
Product is not modified or misused. This Product limited warranty shall
not apply to, and Trimble shall not be responsible for, defects or
performance problems resulting from (i) the combination or utilization
of the Product with hardware or software products, information, data,
systems, interfaces, or devices not made, supplied, or specified by
Trimble; (ii) the operation of the Product under any specification other
than, or in addition to, Trimble's standard specifications for its products;
(iii) the unauthorized installation, modification, or use of the Product;
(iv) damage caused by: accident, lightning or other electrical discharge,
fresh or salt water immersion or spray (outside of Product
specifications); or exposure to environmental conditions for which the
Product is not intended; (v) normal wear and tear on consumable parts
(e.g., batteries); or (vi) cosmetic damage. Trimble does not warrant or
guarantee the results obtained through the use of the Product or
Software, or that software components will operate error free.
NOTICE REGARDING PRODUCTS EQUIPPED WITH TECHNOLOGY
CAPABLE OF TRACKING SATELLITE SIGNALS FROM SATELLITE BASED
AUGMENTATION SYSTEMS (SBAS) (WAAS, EGNOS, AND MSAS),
OMNISTAR, GPS, MODERNIZED GPS OR GLONASS SATELLITES, OR
FROM IALA BEACON SOURCES:TRIMBLE IS NOT RESPONSIBLE FOR
THE OPERATION OR FAILURE OF OPERATION OF ANY SATELLITE
BASED POSITIONING SYSTEM OR THE AVAILABILITY OF ANY
SATELLITE BASED POSITIONING SIGNALS.
THE FOREGOING LIMITED WARRANTY TERMS STATE TRIMBLE’S ENTIRE
LIABILITY, AND YOUR EXCLUSIVE REMEDIES, RELATING TO THE TRIMBLE
PRODUCT. EXCEPT AS OTHERWISE EXPRESSLY PROVIDED HEREIN, THE
PRODUCT, AND ACCOMPANYING DOCUMENTATION AND MATERIALS
ARE PROVIDED “AS-IS” AND WITHOUT EXPRESS OR IMPLIED WARRANTY
OF ANY KIND, BY EITHER TRIMBLE OR ANYONE WHO HAS BEEN
INVOLVED IN ITS CREATION, PRODUCTION, INSTALLATION, OR
DISTRIBUTION, INCLUDING, BUT NOT LIMITED TO, THE IMPLIED
WARRANTIES OF MERCHANTABILITY AND FITNESS FOR A PARTICULAR
PURPOSE, TITLE, AND NONINFRINGEMENT. THE STATED EXPRESS
WARRANTIES ARE IN LIEU OF ALL OBLIGATIONS OR LIABILITIES ON THE
PART OF TRIMBLE ARISING OUT OF, OR IN CONNECTION WITH, ANY
PRODUCT. BECAUSE SOME STATES AND JURISDICTIONS DO NOT ALLOW
LIMITATIONS ON DURATION OR THE EXCLUSION OF AN IMPLIED
WARRANTY, THE ABOVE LIMITATION MAY NOT APPLY TO YOU.
Limitation of Liability
TRIMBLE'S ENTIRE LIABILITY UNDER ANY PROVISION HEREIN SHALL BE
LIMITED TO THE AMOUNT PAID BY YOU FOR THE PRODUCT. TO THE
MAXIMUM EXTENT PERMITTED BY APPLICABLE LAW, IN NO EVENT
SHALL TRIMBLE OR ITS SUPPLIERS BE LIABLE FOR ANY INDIRECT,
SPECIAL, INCIDENTAL, OR CONSEQUENTIAL DAMAGE WHATSOEVER
UNDER ANY CIRCUMSTANCE OR LEGAL THEORY RELATING IN ANYWAY
TO THE PRODUCTS, SOFTWARE AND ACCOMPANYING DOCUMENTATION
AND MATERIALS, (INCLUDING, WITHOUT LIMITATION, DAMAGES FOR
LOSS OF BUSINESS PROFITS, BUSINESS INTERRUPTION, LOSS OF DATA, OR
ANY OTHER PECUNIARY LOSS), REGARDLESS OF WHETHER TRIMBLE HAS
BEEN ADVISED OF THE POSSIBILITY OF ANY SUCH LOSS AND REGARDLESS
OF THE COURSE OF DEALING WHICH DEVELOPS OR HAS DEVELOPED
BETWEEN YOU AND TRIMBLE. BECAUSE SOME STATES AND
JURISDICTIONS DO NOT ALLOW THE EXCLUSION OR LIMITATION OF
LIABILITY FOR CONSEQUENTIAL OR INCIDENTAL DAMAGES, THE ABOVE
LIMITATION MAY NOT APPLY TO YOU.
PLEASE NOTE: THE ABOVE TRIMBLE LIMITED WARRANTY PROVISIONS
WILL NOT APPLY TO PRODUCTS PURCHASED IN THOSE
JURISDICTIONS (E.G., MEMBER STATES OF THE EUROPEAN ECONOMIC
AREA) IN WHICH PRODUCT WARRANTIES ARE THE RESPONSIBILITY
OF THE LOCAL DEALER FROM WHOM THE PRODUCTS ARE ACQUIRED.
IN SUCH A CASE, PLEASE CONTACT YOUR TRIMBLE DEALER FOR
APPLICABLE WARRANTY INFORMATION.
Official Language
THE OFFICIAL LANGUAGE OF THESE TERMS AND CONDITIONS IS
ENGLISH. IN THE EVENT OF A CONFLICT BETWEEN ENGLISH AND OTHER
LANGUAGE VERSIONS, THE ENGLISH LANGUAGE SHALL CONTROL.
Notices
Class B statement- Notice to users This equipment has been tested and
found to comply with the limits for a Class B digital device pursuant to
Part 15 of the FCC Rules. Operation is subject to the following two
conditions: (1) this device may not cause harmful interference, and (2)
this device must accept any interference received, including interference
that may cause undesired operation.
This equipment generates, uses, and can radiate radio frequency energy
and, if not installed and used in accordance with the instructions may
cause harmful interference to radio communication.
However, there is no guarantee that interference will not occur in a
particular installation. If this equipment does cause harmful
interference to radio or television reception, which can be determined
by turning the equipment off and on, the user is encouraged to try to
correct the interference by one or more of the following measures:
– Reorient or relocate the receiving antenna.
– Increase the separation between the equipment and the receiver.
– Connect the equipment into an outlet on a circuit different from that
to which the receiver is connected.
– Consult the dealer or an experienced radio/TV technician for help.
Changes and modifications not expressly approved by the manufacturer
or registrant of this equipment can void your authority to operate this
equipment under Federal Communications Commission rules.

Pro Series Receivers User Guide 3
The radios in this device have been designed and manufactured to not
exceed stipulated emission limits for exposure to radio frequency (RF)
energy as required by the Federal Communications Commission of the
U.S. Government 47 C.F.R. § 2.1091 and 2.1093.
The external antenna connector provided in this device is for GNSS
antennas only.
Canada
This digital apparatus does not exceed the Class B limits for radio noise
emissions from digital apparatus as set out in the radio interference
regulations of the Canadian Department of Communications.
Le présent appareil numérique n'émet pas de bruits radioélectriques
dépassant les limites applicables aux appareils numériques de Classe B
prescrites dans le règlement sur le brouillage radioélectrique édicté par
le Ministère des Communications du Canada.
Antenna Statement
Under Industry Canada regulations, this radio transmitter may only
operate using an antenna of a type and maximum (or lesser) gain
approved for the transmitter by Industry Canada. To reduce potential
radio interference to other users, the antenna type and its gain should be
so chosen that the equivalent isotropically radiated power (e.i.r.p.) is not
more than that necessary for successful communication.
Conformément à la réglementation d'Industrie Canada, le présent
émetteur radio peut fonctionner avec une antenne d'un type et d'un gain
maximal (ou inférieur) approuvé pour l'émetteur par Industrie Canada.
Dans le but de réduire les risques de brouillage radioélectrique à
l'intention des autres utilisateurs, il faut choisir le type d'antenne et son
gain de sorte que la puissance isotrope rayonnée équivalente (p.i.r.e.) ne
dépasse pas l'intensité nécessaire à l'établissement d'une
communication satisfaisante.
Licence exempt
This device complies with Industry Canada licence-exempt RSS
standard(s). Operation is subject to the following two conditions:
(1) this device may not cause interference, and
(2) this device must accept any interference, including interference that
may cause undesired operation of the device.
Le présent appareil est conforme aux CNR d'Industrie Canada
applicables aux appareils radio exempts de licence. L'exploitation est
autorisée aux deux conditions suivantes :
(1) l'appareil ne doit pas produire de brouillage, et
(2) l'utilisateur de l'appareil doit accepter tout brouillage radioélectrique
subi, même si le brouillage est susceptible d'en compromettre le
onctionnement.
Europe
This product has been tested and
found to comply with all
requirements for CE Marking and
sale within the European
Economic Area (EEA). It is classified and marked as being Class 2 Radio
Equipment under 2000/299/EC, as Bluetooth and wireless LAN
approvals are country specific. Please consult your local distributor for
more information.
EU – Restrictions for Use in the 2.4GHz band
This device may be operated indoors or outdoors in all countries of the
European Community using the 2.4GHz band, except where noted
below.
– In Norway, this unit may not be operated within 20 km of Ny
Alesund
The Trimble Pro series has Bluetooth approval in most EU countries and
satisfies the requirements for Radio and Telecommunication Terminal
Equipment specified by European Council Directive 1999/5/EC. These
requirements provide reasonable protection against harmful
interference when the equipment is operated appropriately in a
residential or commercial environment.
A copy of the CE Declaration of Conformity for the Trimble Pro series
can be accessed from http://www.trimble.com/support.shtml.
Australia and New Zealand
This product conforms with the regulatory requirements of the
Australian Communications Authority (ACA) EMC and
Radiocommunications framework, thus satisfying the
requirements for C-Tick Marking and sale within Australia and
New Zealand.
Taiwan – Battery Recycling Requirements
The product contains an internal Lithium-ion battery.
Taiwanese regulations require that waste batteries are recycled.
廢電池請回收
Japan
This device has been granted two designation numbers by Ministry of
Internal Affairs and Communications: according:
Ordinance concerning Technical Regulations Conformity Certification
etc. of Specified Radio Equipment (特定無線設備の技術基準適合証
明等に関する規則 )
Article 2 clause 1 item 19
Approval nos: 202WWSM11569471 and T: D 11-0025 202.
This device should not be modified (otherwise the granted designation
numbers will be invalid).
Korean Communications Commission (KCC)
This product conforms with the regulatory requirements of the Korean
Communications Commission (KCC), thus satisfying the requirements
for KCC Marking and sale within Korea.
방송통신위원
이 제품은 한국 방송통신위원회 (KCC) 의 규제요건에 부합하므로
KCC 마크 표시 및 한국내 판매 요건을 충족합니다
1. 인증받은자의 상호 : Trimble Navigation Ltd.
2. 모델명 :98850
3. 제조사 : Flextronics
4. 송신주파수 :B/T 2402~2480 MHz
5. 수신주파수 :B/T 2402~2480 MHz
6. 출력 : B/T 0.02 mW
7. 사용자 안내문구
8. 당해무선설비기기는 운용중 전파혼신 가능성이 있으므로 인명
안
전과 관련된 서비스는 할수 없음 .
Notice to Our European Union Customers
For product recycling instructions and more information, please go to
www.trimble.com/ev.shtml.
Recycling in Europe: To recycle Trimble WEEE (Waste Electrical
and Electronic Equipment, products that run on electrical
power.), Call +31 497 53 24 30, and ask for the "WEEE Associate".
Or, mail a request for recycling instructions to:
Trimble Europe BV
c/o Menlo Worldwide Logistics
Meerheide 45
5521 DZ Eersel, NL

Safety
4 Pro Series Receivers User Guide
Safety
Before you use the Trimble® Pro series receiver, ensure that you have read and
understood all safety requirements.
CWARNING – This alert warns of a potential hazard which, if not avoided, could result in
severe injury or even death.
CCAUTION – This alert warns of a potential hazard or unsafe practice that could result in
minor injury or property damage or irretrievable data loss.
Note – An absence of specific alerts does not mean that there are no safety risks involved.
Bluetooth radio use
The Pro series receiver is shipped with Bluetooth® wireless technology activated. To
prevent the receiver from emitting radio signals, turn off the receiver.
Note – You may need to deactivate the Bluetooth radio in the receiver if the country in
which you are working does not approve the use of Bluetooth wireless technology. If you are
unsure about whether the Pro series receiver’s radios are approved for use in your country,
check with your Trimble reseller.
Use the Radio Activation Manager software to deactivate the Bluetooth radio, or to
reactivate the radio if it has have been deactivated. For more information, see
Deactivating and reactivating the Bluetooth radio, page 15.
Exposure to radio frequency radiation from Bluetooth transmitters
This device is approved as a portable device with respect to Radio Frequency (RF)
exposure compliance. The radiated output power of the internal wireless radio
transmitters is less than 100 milliwatt, which results in exposure levels far below the
FCC radio frequency exposure limits, even when operated in close proximity to the
body. The internal wireless radios operate within guidelines found in international
radio frequency safety standards and recommendations, which reflect the consensus
of the international scientific community. Trimble therefore believes the internal
wireless radios are safe for use by users. The level of electromagnetic energy emitted is
hundreds of times lower than the electromagnetic energy emitted by wireless devices
such as mobile phones. However, the use of wireless radios may be restricted in some
situations or environments, such as on aircraft. If you are unsure of restrictions, you are
encouraged to ask for authorization before turning on the wireless radios.

Pro Series Receivers User Guide 5
Introduction
Introduction
The Pro Series Receivers User Guide describes how to use a Trimble® Pro series Pro 6H
receiver or a Pro series Pro 6T receiver.
The Pro series receivers are high-performance GNSS receivers. They have an integrated
antenna and receiver, a user-removable battery, and Bluetooth® wireless technology
for connectivity with field computers.
Both the Pro 6H and Pro 6T receivers are compatible with Trimble Floodlight™ satellite
shadow reduction technology for improved productivity in conditions where sky view
is obstructed by buildings, trees, or landscape features.
The Floodlight satellite shadow reduction technology is provided as standard with the
Pro 6H receiver. For the Pro 6T receiver, you will need to purchase the Floodlight
satellite shadow reduction technology option. For more information, see Additional
receiver options, page 15.
What’s in the box?
When you receive a Pro series receiver, check that you have received all the
components. The standard components are:
Inspect all contents for visible damage (scratches or dents). If any components appear
damaged, notify the shipping carrier. Keep the shipping and packaging material for the
carrier’s inspection.
Getting Started Disc
The Trimble Pro Series Getting Started Disc provides several software utilities that can
be installed on office computers running the following Microsoft operating systems:
•Windows® XP Home, Professional, and Tablet PC Edition
•Windows Vista® operating system
•Windows 7 operating system
For more information on the:
•Radio Activation Manager software, see Deactivating and reactivating the
Bluetooth radio, page 15.
•Option Activation software, see Activating Floodlight technology and NMEA
output options, page 16.
•Pro series receiver
•AC adaptor
•International AC adaptor kit
•Rechargeable Lithium-ion battery
•Quick Start Guide
•Getting Started Disc
•USB data cable
•Null modem cable
•A sheet of device ID labels

Introduction
6 Pro Series Receivers User Guide
Accessories
The following optional accessories are available:
For more information, go to the Trimble website at www.trimble.com.
Software used with the Pro series receiver
You can use the Pro series receivers with compatible Mapping and GIS field and office
software. For version numbers and a complete list, see the Product Compatibility List.
Further information
For more information on:
•Trimble Floodlight satellite shadow reduction technology, go to
http://www.trimble.com/mappingGIS/floodlight-tb.aspx.
•Trimble training courses, go to www.trimble.com/training.html.
Technical assistance
Go to the Trimble technical support website http://www.trimble.com/technical-
support.aspx, for the latest support information, including:
•support notes detailing support issues
•documentation
•the latest files available for download
•Tempest™ antenna1
•Tornado™ antenna2
•Backpack
•Replacement Lithium-ion battery
•12V vehicle adaptor
•Spare AC adaptor
•Spare international AC adaptor kit
1Compatible with the Pro 6T receiver (L1 only).
2Compatible with the Pro 6H receiver (L1/L2).
Pro Series Receivers User Guide 7
Parts of the receiver
Parts of the receiver
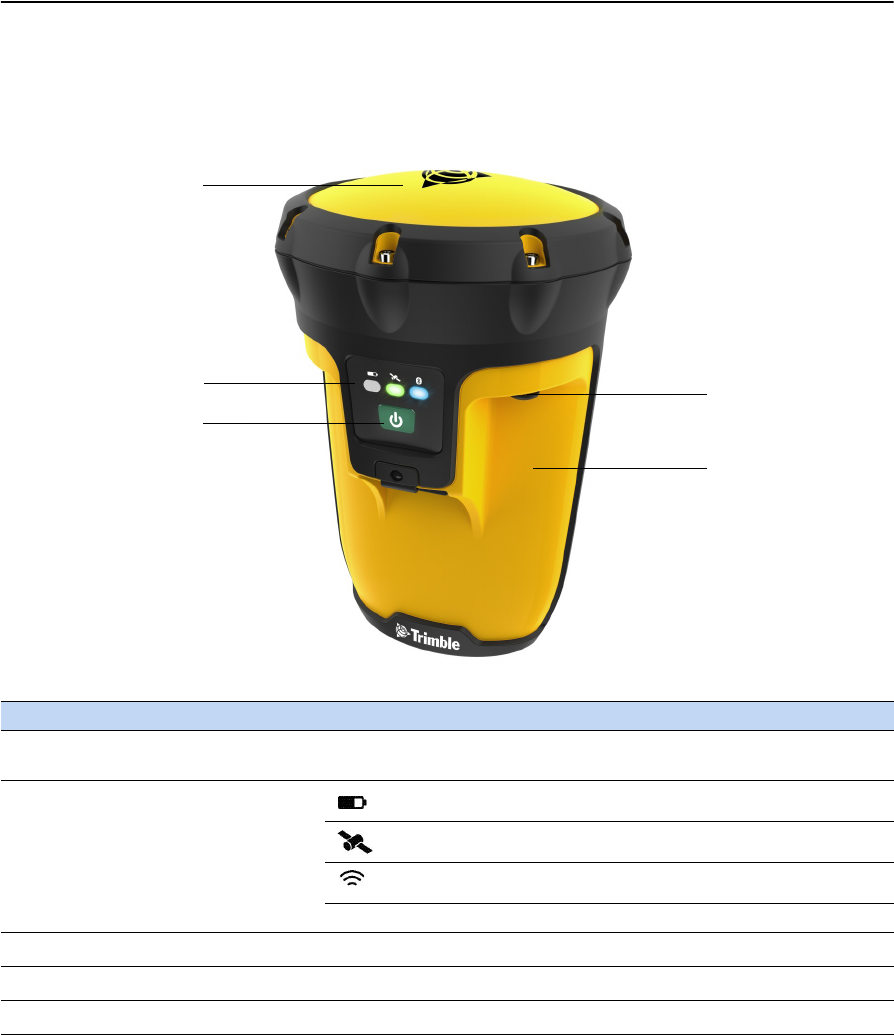
The following diagrams show the main parts of the Pro series receiver.
Item Feature Description
cIntegrated GNSS receiver
and antenna
High performance GNSS receiver.
dLED status lights Power/battery status
GNSS receiver status
Bluetooth radio status
For more information, see LED status information, page 12.
ePower button Press briefly to turn on or turn off the receiver.
fExternal antenna connector Connect to the optional external antenna.
gIntegrated Bluetooth radio Cable-free connections to Bluetooth-enabled field computers.
c
d
ef
g
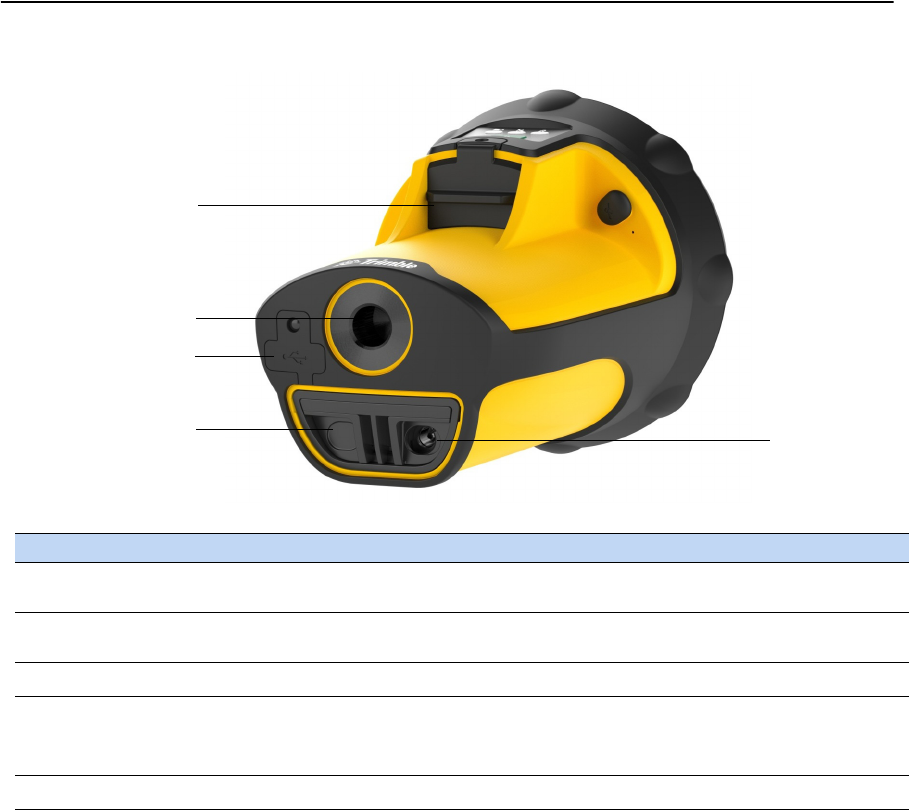
Parts of the receiver
8 Pro Series Receivers User Guide
Item Feature Description
cDE9 serial port (with cover) Serial (COM) connection to a field computer if you are not using a
wireless Bluetooth connection.
dScrewthread socket Screwthread socket for fitting the receiver to a range pole using a
screwthread adaptor.
eMini-USB socket (with cover) For USB connection to an office computer.
fRechargeable Lithium-ion
battery
Removable battery.
All-day operation with GNSS and Bluetooth wireless technology.
Power/battery LED on the front of the unit shows battery status.
gPower connector Connect to DC power to charge the battery.
c
d
e
fg

Pro Series Receivers User Guide 9
Charging the battery
Charging the battery
The Pro series receiver contains a removable rechargeable Lithium-ion battery.
Additional battery packs can be carried and quickly changed in the field.
Note – Charge the battery completely before using the receiver for the first time. If the
battery has been stored for longer than six months, charge it before use. Trimble
recommends charging the battery for at least five hours at typical room temperature to
recharge it fully.
When fully charged, the battery provides enough power for a full working day (8 hours)
using the internal GNSS antenna and Bluetooth wireless technology.
Note – Cold temperature consume additional battery power and so shorten battery life
between charges.
Battery safety
CWARNING – Do not damage the rechargeable Lithium-ion battery. A damaged battery
can cause an explosion or fire, and can result in personal injury and/or property damage.
To prevent injury or damage:
- Do not use or charge the battery if it appears to be damaged. Signs of damage include,
but are not limited to, discoloration, warping, and leaking battery fluid.
- Do not expose the battery to fire, high temperature, or direct sunlight.
- Do not immerse the battery in water.
- Do not use or store the battery inside a vehicle during hot weather.
- Do not drop or puncture the battery.
- Do not open the battery or short-circuit its contacts.
CWARNING – Avoid contact with the rechargeable Lithium-ion battery if it appears to be
leaking. Battery fluid is corrosive, and contact with it can result in personal injury and/or
property damage.
To prevent injury or damage:
- If the battery leaks, avoid contact with the battery fluid.
- If battery fluid gets into your eyes, immediately rinse your eyes with clean water and
seek medical attention. Do not rub your eyes!
- If battery fluid gets onto your skin or clothing, immediately use clean water to wash off
the battery fluid.
CWARNING – Charge and use the rechargeable Lithium-ion battery only in strict
accordance with the instructions. Charging or using the battery in unauthorized
equipment can cause an explosion or fire, and can result in personal injury and/or
equipment damage.
To prevent injury or damage:
- Do not charge or use the battery if it appears to be damaged or leaking.
- Charge the Lithium-ion battery only in a Trimble product that is specified to charge it. Be
sure to follow all instructions that are provided with the battery charger.
- Discontinue charging a battery that gives off extreme heat or a burning odor.
- Use the battery only in Trimble equipment that is specified to use it.
- Use the battery only for its intended use and according to the instructions in the product
documentation.
Charging the battery
10 Pro Series Receivers User Guide
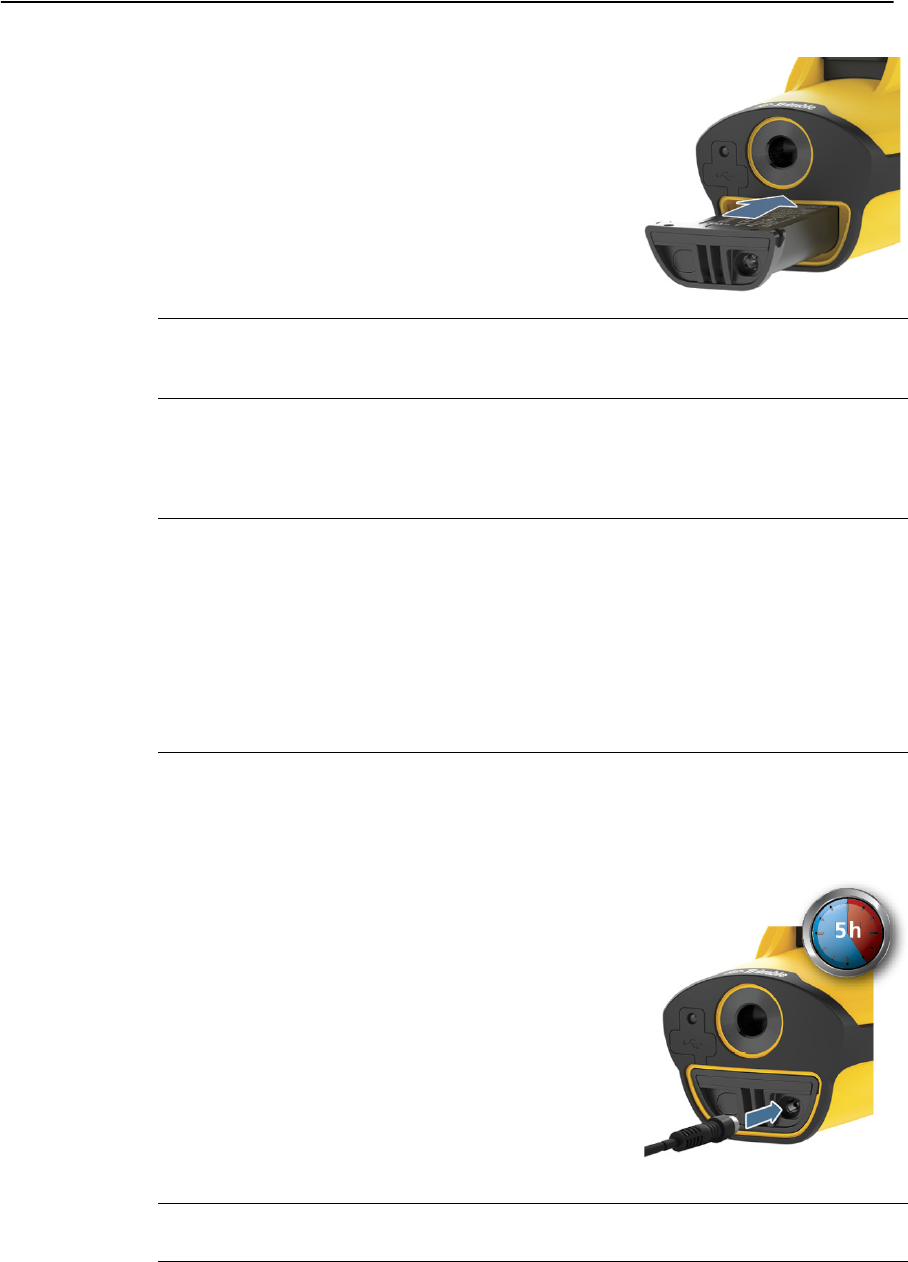
Inserting the battery
The Pro series receiver has a replaceable Lithium-ion
battery.
To insert the battery into the receiver:
1. Slide the battery into the cavity with the label
facing upwards.
2. Push the battery in until it clicks into place.
CCAUTION – Make sure that the battery is fully inserted and that both the left and right
latches are fully engaged. If the battery is not properly inserted, it may fall out if the
device is dropped.
Charging the battery
CWARNING – To use AC adaptors safely:
- Use only AC adaptors intended for the Pro series receiver. Using any other external
power source can damage your product and may void your warranty.
- Make certain that the input voltage on the adaptor matches the voltage in your
location.
- Make certain that the adaptor has prongs compatible with your outlets.
- AC adaptors are designed for indoor use only. Avoid using the AC adaptor in wet
outdoor areas.
- Unplug the AC adaptor from power when not in use.
- Do not short the output connector.
The battery takes approximately four hours to charge fully. You can charge the battery
while it is in the receiver or, if you have a spare battery, you can charge it out of the
receiver. The battery has its own LED that shows the status of the battery.
To charge the battery:
1. Turn off the receiver.
2. Connect one end of the AC adaptor cable to the
receiver or directly to the battery and the other
to an AC power outlet. An international adaptor
kit is provided with the receiver.
Note – Trimble recommends that you charge the battery
at or below normal room temperature (0 to 30 °C / 32 to
86 °F ).
3. Leave the battery to charge. It may take up to
five hours for the battery to charge completely.
CWARNING – When the battery is charged outside the receiver, the contacts may become
very hot and there is a risk that you could burn yourself on the exposed metal.
Pro Series Receivers User Guide 11
Charging the battery
When the battery is charging, the Power LED on the receiver is solid orange. When
fully charged, the Power LED is green.
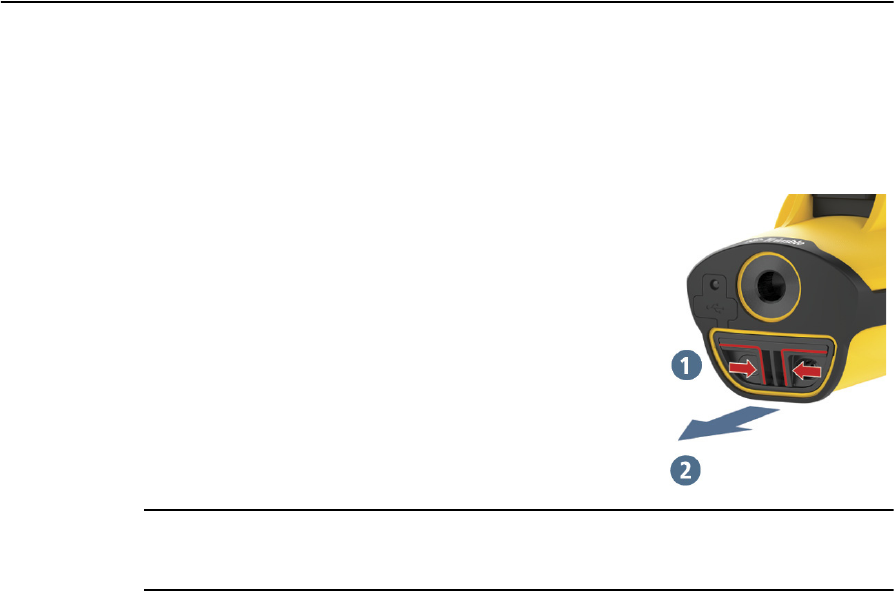
Changing the battery
If you have a spare battery, you can carry it with you and
change it in the field.
To change the battery :
1. Turn off the receiver (press and briefly hold the
Power button).
• Firmly press the ridges on both sides of the
battery (1) and then pull the battery out of the
cavity (2).
2. Insert the new battery (see page 10).
CCAUTION – The receiver is not sealed from water and dust when the battery is removed.
Trimble recommends only removing the battery for short periods of time and only
removing the battery indoors or from inside the protection of a vehicle.

Turning on and turning off the receiver
12 Pro Series Receivers User Guide
Turning on and turning off the receiver
To turn on and turn off the receiver, briefly press the Power button.
When you first receive the Pro series receiver, the Bluetooth radio is activated by
default. If the receiver is turned on, the Bluetooth radio is on and ready to be used. If
the Bluetooth radio is deactivated, the Bluetooth LED will not be lit after startup, and
you must first activate the radio. For more information, see Deactivating and
reactivating the Bluetooth radio, page 15.
On startup, the three LEDs on the front panel lights up briefly. If they do not light up,
make sure that the battery is installed correctly and is charged. After startup, the LED
patterns show status information about the receiver.
LED status information
During operation, the LEDs provide the following status information:
Note – During normal charging, the battery may become hotter than the maximum
temperature allowed (40 °C or 104 °F). If this happens, charging is automatically
suspended until the battery cools and then charging automatically restarts. During this
time the Power LED changes to solid red. It may take about one hour for the battery to cool.
If this does not resolve the issue, perform a hard reset of the receiver.
Performing a hard reset of the receiver
If the Power LED or GNSS LED shows solid red, some kind of fault has occured. To
resolve the issue, press and hold the Power button for 8 seconds. After a reset, the
receiver automatically restarts.
Removing and replacing the battery also performs a hard reset.
If a hard reset does not resolve the issue, contact your Trimble reseller.
LED Color Mode Status
Power Green Solid External power is connected and the battery is fully
charged.
Red Solid There is a charging fault.
Red Slow flash There is less than 10% of battery power remaining.
Amber Solid The battery is charging.
GNSS Green Slow flash Generating positions.
Orange Fast flash GNSS is operating but is not generating positions
due to too few positions or poor satellite geometry.
Red Solid There is a fault.
Bluetooth Blue Solid Activated and connected.
Blue Off Bluetooth is deactivated.

Pro Series Receivers User Guide 13
Connecting to a field computer
Connecting to a field computer
You can connect the Pro series receiver to a field computer that is running GNSS field
software using:
•Bluetooth wireless technology
•the null-modem cable or the USB cable provided with the receiver
Connecting to a field computer using Bluetooth wireless technology
If the Bluetooth LED does not light when you turn on the receiver, then the Bluetooth
radio is deactivated. If your country of use allows the use of Bluetooth wireless
technology, use the Bluetooth Manager software to reactivate the Bluetooth radio. For
more information, see Deactivating and reactivating the Bluetooth radio.
To establish a Bluetooth wireless connection to the field computer, refer to the
documentation provided with your field computer. Use the default passkey “0000”.
Once connected, use the GNSS field software to configure the connection (see
Configuring the connection in the GNSS field software, page 14).
Multiple Bluetooth connections
You can connect to both Bluetooth ports on the receiver but you cannot have more
than one TSIP connection.
Connecting to a field computer using a cable
1. Do one of the following:
–Connect one end of the null-modem cable to the receiver and connect the
other end of the cable to the field computer.

Connecting to a field computer
14 Pro Series Receivers User Guide
–Connect one end of the USB cable to the receiver and connect the other
end of the cable to the field computer.
2. Once connected, use the GNSS field software to configure the connection (see
below).
Configuring the connection in the GNSS field software
Once connected, do the following:
1. Open the GNSS field software on the field computer.
2. Select the COM port being used on the field computer for the connection.
3. If required, select TSIP or NMEA. Use the GNSS field software to configure the
NMEA messages you want to use.
Note – You can only use NMEA messages if the Pro series receiver has the NMEA option
activated. For more information, see Additional receiver options, page 15.
4. Connect to the receiver in the GNSS field software.
For more information, refer to the documentation for your GNSS field software.
If the field computer does not have any GNSS field software installed, you can
download a free copy of the GPS Controller software from the Trimble website and
then use that to select the COM port and configure NMEA message options. For more
information, go to http://www.trimble.com/support.shtml and then select GPS
Controller from the list of products.

Pro Series Receivers User Guide 15
Deactivating and reactivating the Bluetooth radio
Deactivating and reactivating the Bluetooth radio
The Pro series receiver is shipped with Bluetooth wireless technology activated. Use
the Radio Activation Manager software to:
•Deactivate the Bluetooth radio on a Pro series receiver if the country in which
you are working does not approve the user of Bluetooth wireless technology.
•Reactivate the Bluetooth radio if it has been deactivated.
A copy of the Radio Activation Manager software is provided on the Pro Series Getting
Started Disc. The latest copy of the software is also available for download from the
Trimble website. Go to www.trimble.com/support.shtml, click the link for your receiver
type, click Downloads, click Pro Series receivers and then click Radio Activation Manager.
To use the Radio Activation Manager software:
1. Insert the Trimble Pro Series User Guide Disc into the CD drive of an office
computer. It should run automatically.
2. Click Install USB to Serial Drivers and then follow the instructions in the USB
Serial Driver wizard to install the USB drivers provided onto the office computer.
3. Return to the splash screen of the CD and then click Install Radio Activation
Manager. Follow the instructions in the Radio Activation Setup wizard to install
the Radio Activation Manager software onto the office computer.
4. Connect the receiver to the office computer using the USB cable provided with
the receiver.
5. Navigate to the location where you installed the Radio Activation Manager
software and run it. Follow the instructions in the software to deactivate or
reactivate the Bluetooth radio.
Additional receiver options
Two options are available for use with the Pro series receiver:
•The Trimble Floodlight satellite shadow reduction technology, which can
increase the accuracy and likelihood of generating positions in environments
affected by satellite shadow including canopy and near buildings.
For more information, go to www.trimble.com/mappingGIS/floodlight-tb.aspx.
•The NMEA Output option, which enables you to use the Pro series receiver with
any GNSS field software that accepts NMEA messages.
The Floodlight satellite shadow reduction technology is provided as standard with the
Pro 6H receiver.
For the Pro 6T receiver, you will need to purchase the Floodlight satellite shadow
reduction technology option. To purchase this option, contact your Trimble reseller.
The NMEA option must be purchased for both the Pro 6H receiver and the Pro 6T
receiver if required. To purchase this option, contact your Trimble reseller.
Additional receiver options
16 Pro Series Receivers User Guide
Both the Floodlight satellite shadow reduction technology option and the NMEA
Output option must be activated on your receiver using the Option Activation Wizard.
The wizard can either automatically retrieve an activation file over the Internet, or you
can copy the file manually to the device using an external storage card or a USB cable.
The activation wizard uses the file to determine which options to activate on the
receiver.
Activating Floodlight technology and NMEA output options
To activate these options using the Option Activation wizard, do the following:
1. Insert the Trimble Pro Series User Guide Disc into the CD drive of an office
computer. It should run automatically.
2. Click Install USB to Serial Drivers and follow the instructions in the USB Serial
Driver wizard to install the USB drivers provided onto the office computer.
3. Connect the receiver to the office computer using the USB cable provided with
the receiver.
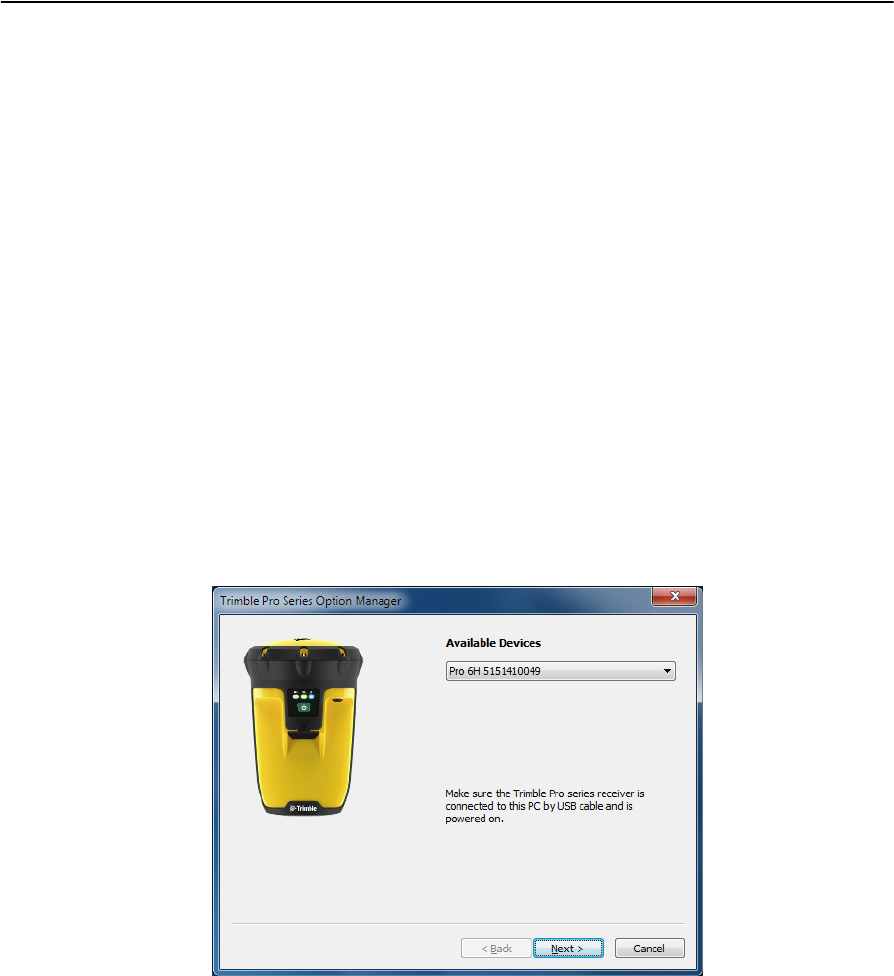
4. Return to the CD splash screen and then click Install Option Manager. A screen
similar to the following appears:
5. Click Next. The current activation state of the receiver options is shown.
6. To activate any of these options, click Next.
7. If you have received an activation file from your Trimble reseller, select Manually
activate purchased options. Otherwise select Automatically check and activate
purchased options.
8. Click Next.
The Option Activation Wizard shows the status of the option activation.
9. When the activation is complete, click Finish and then restart your device to
complete the activation process.

Pro Series Receivers User Guide 17
Using the receiver with a backpack or range pole
Using the receiver with a backpack or range pole
The receiver can be fitted on a backpack or on top of a range
pole.
1. Screw the receiver onto the top of an extension pole
fitted on the backpack or the top of the range pole.
2. Make sure the receiver is not obscured by the user's
head, hat brim, etc.
Caring for and storing the receiver
Servicing
If the receiver requires servicing, contact your support provider.
Cleaning
Keep the outer surface, the external antenna port, and the serial port free of dirt and
dust.
To clean the Pro series receiver receiver, wipe it with a clean dry cloth.
Storage
If you are not going to use the receiver for some time, charge the battery to
approximately 30% and then turn off the receiver.
To use the receiver after storage, turn on the receiver and then:
1. Fully recharge the battery in the receiver, see Charging the battery, page 10.
2. Check that the Bluetooth radio is activated and on, see Turning on and turning
off the receiver, page 12.