Tsuen Shing DBM1001RX Winnie The Pooh Baby Phone User Manual users manual 2
Tsuen Shing Enterprises Limited Winnie The Pooh Baby Phone users manual 2
Contents
- 1. users manual 1
- 2. users manual 2
users manual 2
The Quick Reference guide is given to provide basic operation of the unit.
Please completely read the user’s guide to take advantage of all the features
this unit has to offer.
QUICK REFERENCE GUIDE
1
Lights when the
power is on
Built-In Mic
detects sounds
Slide to turn the unit
On or Off
Slide to select a
Channel to
transmit the sound
Insert a 6V Adapter
Antenna
Lights when the
power is on
Lights when sound
is received
Speaker
Rotate to turn the
unit on and adjust
the volume
Lights when the
batteries are low
Slide to select a
Channel to
receive the sound
SIMPLIFIED OPERATION
1. For the Monitor (Transmitter), connect the AC adapter (included) to the DC 6V IN
jack. For the Receivers, connect the AC adapter (included) to the DC 6V IN jack or
insert batteries. Place the transmitter in the same room as the child. Point the micro-
phone toward the crib or play area. Place the receiver(s) in the room where you will
be or if using batteries, connect to your belt using the belt clip.
2. Slide the POWER switch on the transmitter to the ON position; the POWER indicator
will light.
3. Slide the CHANNEL switch on the transmitter to the 1 or 2 position.
4. Slide the CHANNEL switch on one or both of the receivers to the 1 or 2 position to
match the transmitter’s setting made in step 3.
5. Rotate the Power/VOLUME control on one or both receivers counterclockwise until a
click is heard; the POWER indicator will light. Then, adjust the volume as desired.
When a sound is heard, the SOUND LEVEL indicators will light (the more lights, the
louder the sound) and the sound will be heard through the speaker(s). Rotate the
Power/VOLUME control clockwise until a click is heard to turn the unit off; the
POWER indicator will turn off.

Dear Customer,
Please read this manual thoroughly before operating the unit to become more famil-
iar with it and obtain the performance that will bring you continued enjoyment for
many years. Keep these instructions handy for future reference.
PLEASE KEEP ALL PACKAGING MATERIAL FOR AT LEAST 90
DAYS IN CASE YOU NEED TO RETURN THIS PRODUCT TO
YOUR PLACE OF PURCHASE OR MEMOREX.
For future reference, record the serial number of the unit printed on the rear of the
cabinet.
Serial Number _______________________________________
2
FCC INFORMATION
Warning: Modifying, tampering and/or adjusting this unit or replacement of any
transmitter component (crystal, semiconductor, etc.) in this unit could result in a
violation of the rules.
RF EXPOSURE
This Baby Monitor contains a low power transmitter. When the power is on, it send
out radio frequency (RF) signals. In August 1996, the Federal Communications
Commissions (FCC) adopted RF exposure compliance guidelines with safety lev-
els for wireless devices.
IMPORTANT NOTE: To adhere to the FCC RF exposure compliance require-
ments, no change to the antenna or the unit is permitted. Any change to the anten-
na or the unit could result in the system exceeding the RF exposure requirements.
IMPORTANT
To maintain compliance with the FCC’s RF exposure guidelines hold the transmit-
ter and antenna at least 1 inch (2.5 centimeters) away from your face, with anten-
na pointed up and away from your face. Ensure that the antenna is at least 1 inch
(2.5 centimeters) from your body when using your Baby Monitor’s transmitter. Use
only the supplied antenna. Unauthorized antennas, modifications or attachments
could damage the transmitter and may violate FCC regulations.
Warning: Changes or modifications not expressly approved by the party respon-
sible for compliance could void the user’s authority to operate the equipment.

3
INFORMATION:
This equipment has been tested and found to comply with the limits for a Class B digital
device, pursuant to Part 15 of the FCC Rules. These limits are designed to provide
reasonable protection against harmful interference in a residential installation. This
equipment generates, uses and can radiate radio frequency energy and, if not installed
and used in accordance with the instructions, may cause harmful interference to radio
communications. However, there is no guarantee that interference will not occur in a
particular installation. If this equipment does cause harmful interference to radio or
television reception, which can be determined by turning the equipment off and on, the
user is encouraged to try to correct the interference by one or more of the following
measures:
• Reorient or relocate the receiving antenna.
• Increase the separation between the equipment and receiver.
• Connect the equipment into an outlet on a circuit different from that to which the
receiver is connected.
• Consult the dealer or an experienced radio/TV technician for help.
ADDITIONAL PRECAUTIONS
• Non-Use Periods: When the units are
not in use, unplug the AC adapters
from the wall outlets and remove the
batteries from the units until they are
ready to be used again.
• Adapters: Make sure cords are free of
any entanglements and are not in
areas where people might come in con-
tact with them. Please use only those
AC adapters that are included with the
product. Do not use AC adapters which
are damaged or which have frayed or
worn cords.
• Positioning: Do not place the unit in
cribs, playpens or anywhere within the
child's reach. Keep adapter cords out
of child’s reach. Do not place the units
or adapters where a child could use
them as a step.
• Safety: Please be careful when locat-
ing the monitor and camera that the
cord is situated in an area that will elim-
inate the chance of tripping over the
cord. Also, make sure the antenna is in
an area that will eliminate the possibility
of poking your eye, etc.
IMPORTANT SAFETY INSTRUCTIONS
WARNING
Choking Hazard–Small Parts and Packaging Materials. Not for
children under 8 years.
• All materials for fastening or packing purposes are not
part of the unit and should be discarded for children’s
safety.
• Please keep all information for future reference.
• This is not a toy.
CAUTION! ELECTRONICALLY OPERATED PRODUCT: Not recommended
for children under 8 years old. As with all electric products, precautions
should be observed during handling and use to prevent electric shock.
0-8
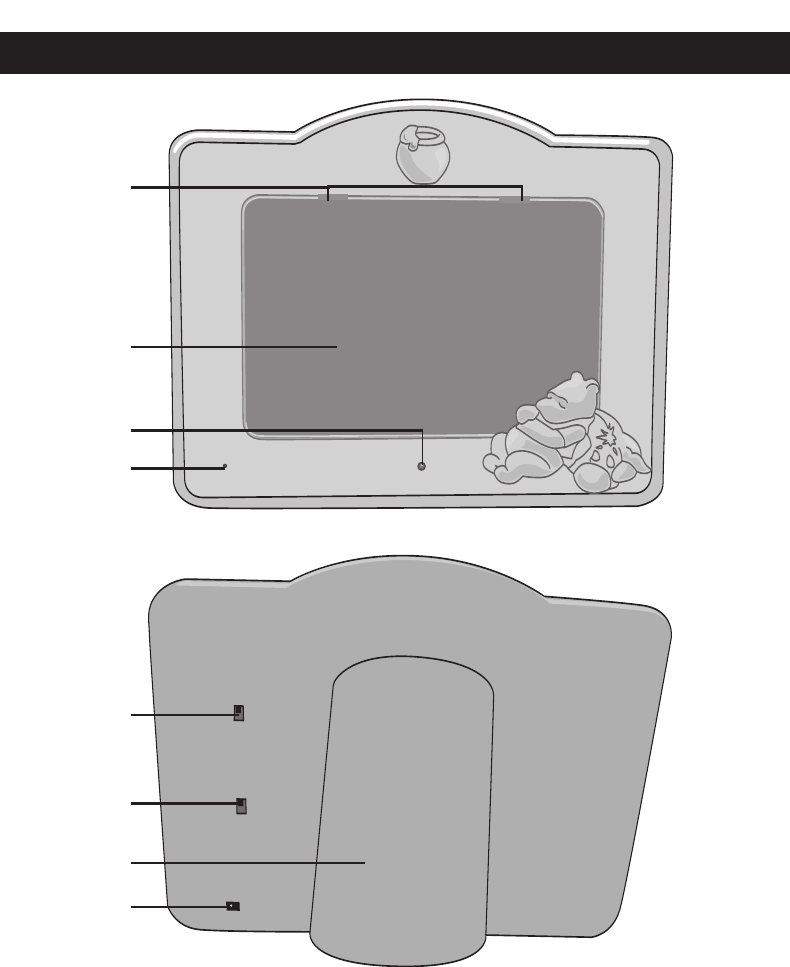
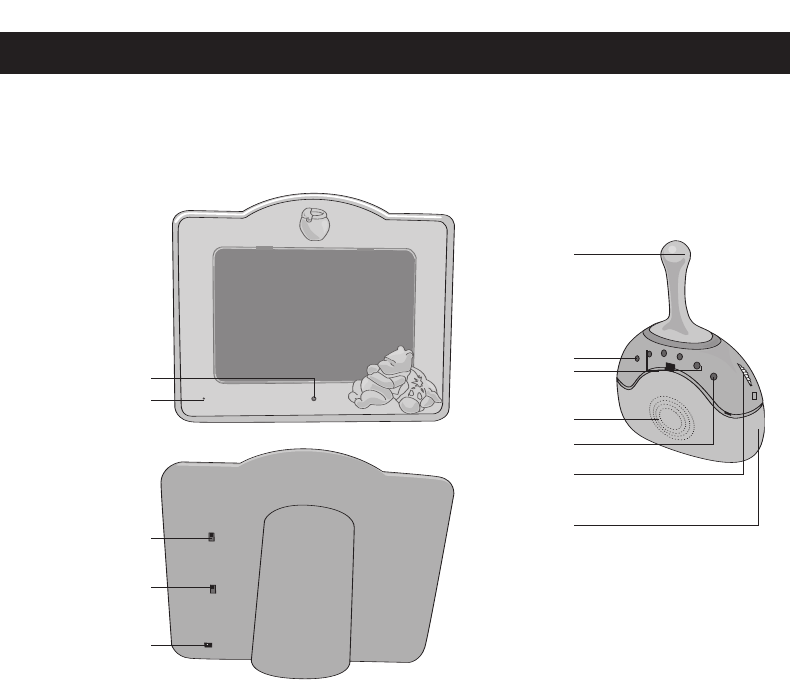
1. Photo Frame Tabs
2. Photo Frame
3. POWER Indicator
4. MIC
5. POWER Switch
6. CHANNEL Switch
7. Stand
8. DC 6V IN Jack z
LOCATION OF CONTROLS
4
4
2
1
3
5
6
8
7
TRANSMITTER
5
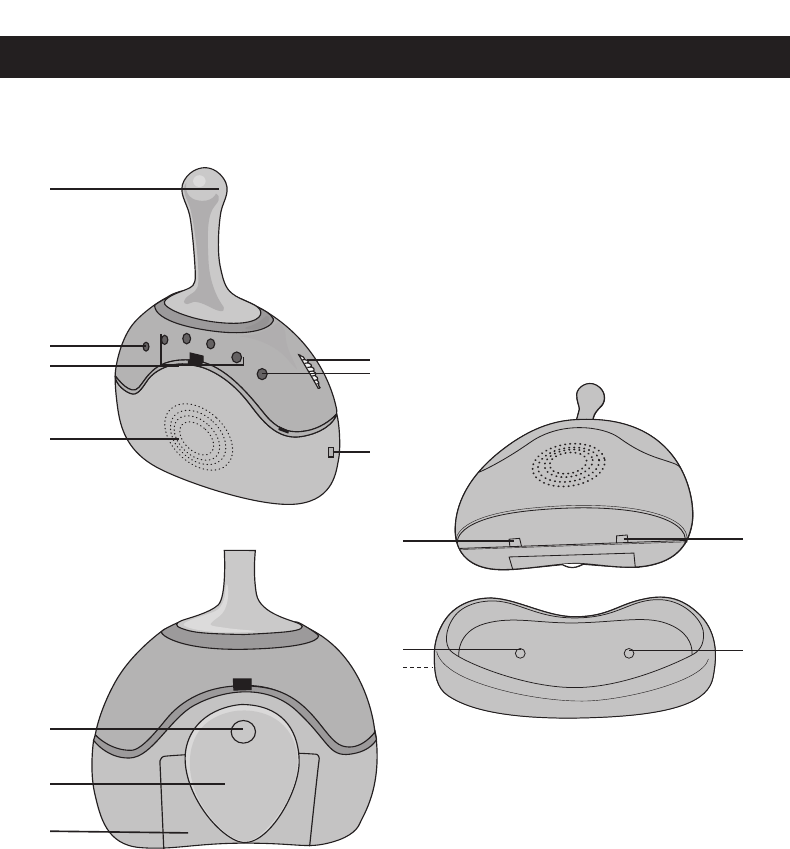
1. Antenna
2. POWER Indicator
3. SOUND LEVEL Indicators
4. Speaker
5. Power/VOLUME Control
6. BATT LOW Indicator
7. CHANNEL Switch
8. Release Button
9. Belt Clip
10. Battery Compartment
11. Metal Contact Plates
12. Metal Contact Pins
13. DC 6V IN Jack Z(Side of
Cradle)
LOCATION OF CONTROLS (CONTINUED)
9
10
8
2
1
3
4
6
5
7
11 11
12
13 12
RECEIVERS
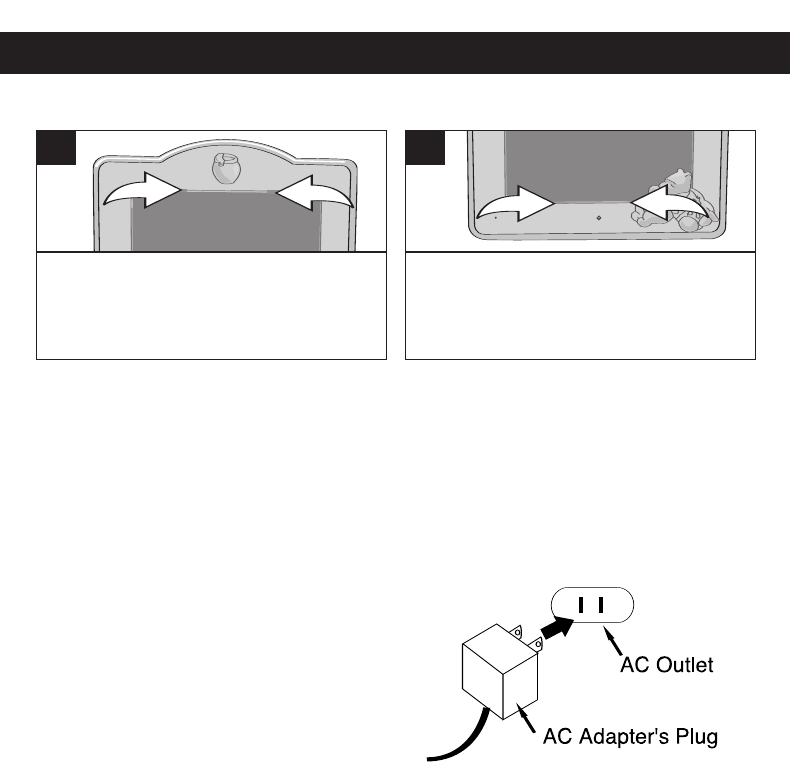
INSERTING A PICTURE
NOTE: If the photo/picture size does not fit the frame, you can use the transparent
frame to trace the frame size and cut the photo/picture with scissors.
The transmitter is designed to operate on AC household current only. The receivers are
designed to operate on AC household current or DC (batteries).
AC OPERATION
TRANSMITTER
Tooperate the unit using AC power, connect
an AC adapter (included) to an AC outlet hav-
ing 120V,60Hz AC only.Plug the small end
into the DC 6V jack on the rear of the unit and
connect the other end into the AC outlet.
RECEIVER
To operate the unit using AC power, connect
an AC adapter (included) to an AC outlet hav-
ing 120V, 60Hz AC only. Plug the small end into the DC 6V jack ON THE SIDE OF THE
CRADLE and connect the other end into the AC outlet. Place the Receiver onto the
Receiver’scradle and make sure the metal contact plates on the Receiver are proper-
ly in contact with the metal contact pins on the Receiver’s cradle. The batteries are
automatically disconnected when the AC adapter is used.
CAUTION:Use only the supplied AC adapter(s) for AC operation. When not using AC
power, disconnect the AC adapter from the wall outlet by pulling the plug (not the cord).
Do not touch the AC adapter with wet hands. Fully insert the plug without exposing any
part of the blade. SPECS: DC6V z
IMPORTANT: If the unit is has no power, or if the monitor is on a different channel than
the transmitter,the red SOUND LEVEL indicators will not light up. Please ensure at
least one red light is lit to indicate the unit is operating properly.
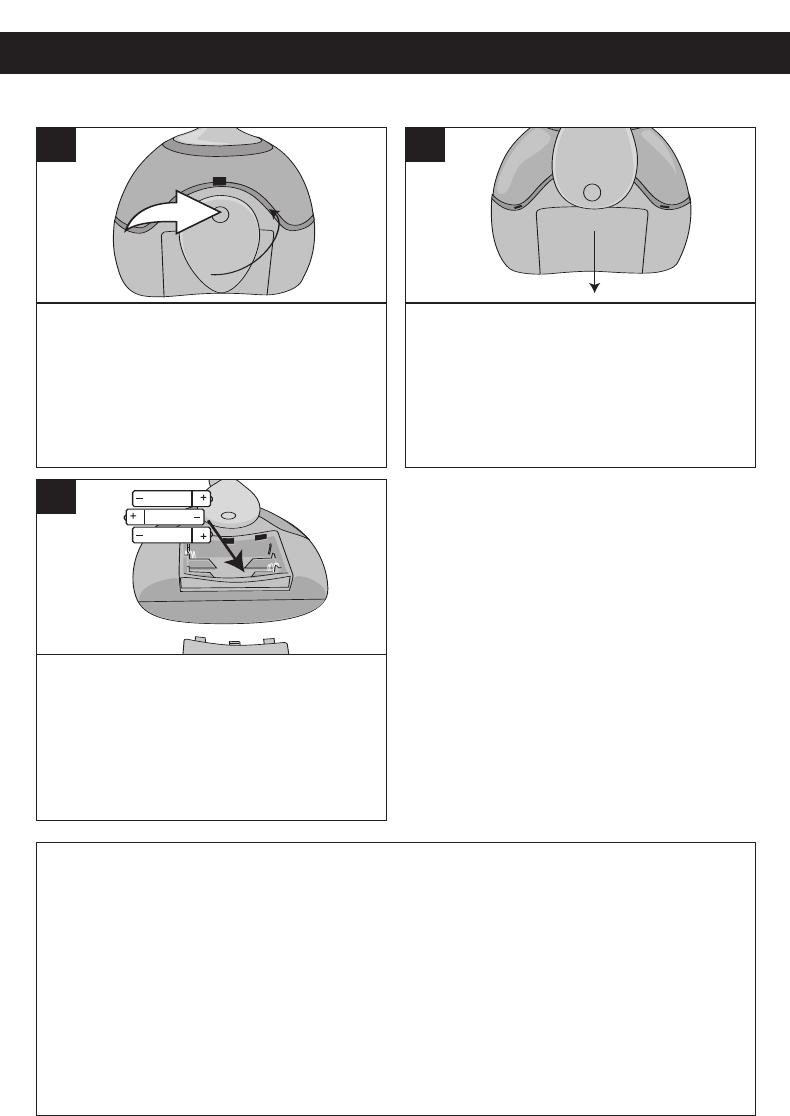
PREPARATION
6
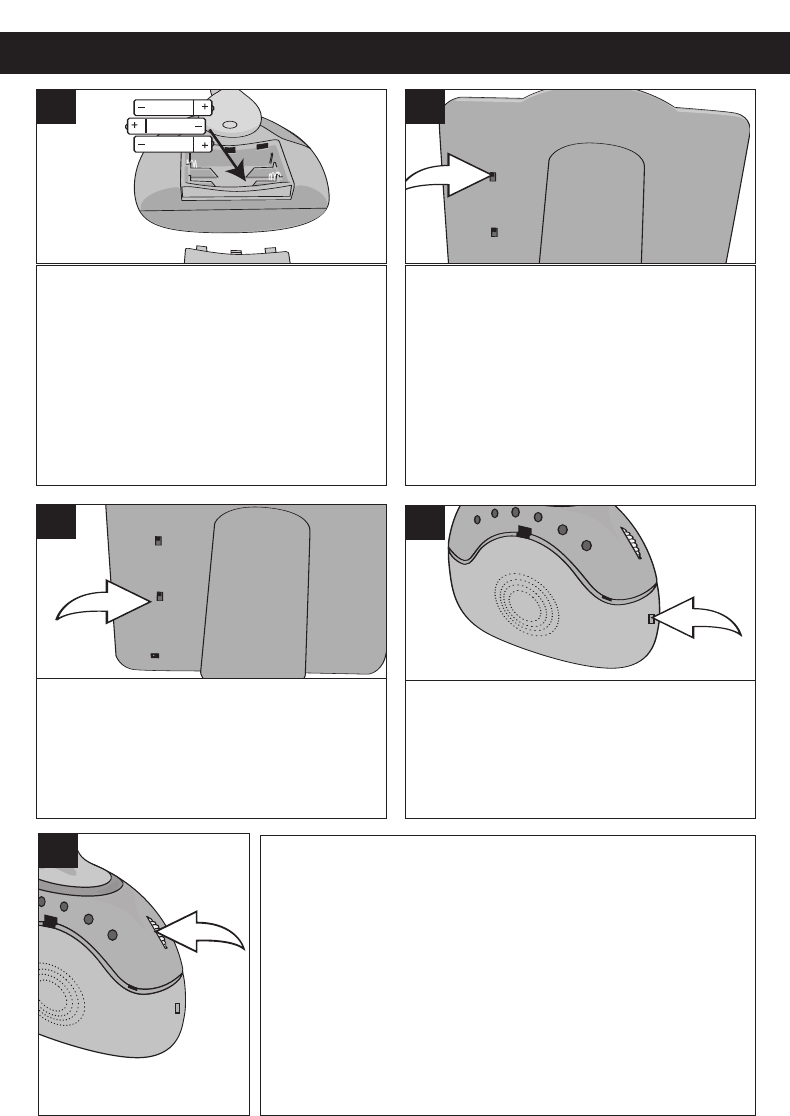
Press in on the two Frame Tabs and
slightly lift the transparent frame out.
1
Insert a picture, then replace the
transparent frame, by positioning the
two tabs at the bottom of the frame, and
insert properly into the unit.
2
PREPARATION (CONTINUED)
7
BATTERY PRECAUTIONS
Follow these precautions when using batteries in this device:
1. Use only the size and type of batteries specified.
2. Be sure to follow the correct polarity when installing the batteries as indicated in the
battery compartment. Reversed batteries may cause damage to the device.
3. Do not mix different types of batteries together (e.g. Alkaline, Rechargeable and
Carbon-zinc) or old batteries with fresh ones.
4. If the device is not to be used for a long period of time, remove the batteries to pre-
vent damage or injury from possible battery leakage.
5. Do not try to recharge batteries not intended to be recharged; they can overheat
and rupture. (Follow battery manufacturer’s directions.)
Press and hold the Release button,
then rotate the belt clip
counterclockwise.
1
Slide out the battery compartment in the
direction of the arrow.
2
Insert three (3) AAA size batteries,
following the diagram.
Replace the battery compartment and
rotate the belt clip until it locks in
place.
3
INSTALLING BATTERIES (FOR RECEIVERS)
NOTES:
The BATT LOW indicator will light
when batteries are low and need
replacing.
OPERATION
8
Connect the unit with the AC adapter
and/or insert batteries as shown on
pages 6 & 7. Place the transmitter in
the same room as the child. Point the
microphone toward the crib or play
area. Place the receiver(s) in the room
where you will be or if using batteries,
connect to your belt using the belt clip.
1
Slide the POWER switch on the
transmitter to the ON position; the
POWER indicator will light.
2
Slide the CHANNEL switch on the
transmitter to the 1 or 2 position.
3
Slide the CHANNEL switch on one or
both of the receivers to the 1 or 2
position to match the transmitter’s
setting made in step 3.
4
5Rotate the Power/VOLUME control on one or both receivers
counterclockwise until a click is heard; the POWER indicator will
light. Then, adjust the volume as desired. When a sound is heard,
the SOUND LEVEL indicators will light (the more lights, the louder
the sound) and the sound will be heard through the speaker(s).
Rotate the Power/VOLUME control clockwise until a click is heard
to turn the unit off; the POWER indicator will turn off.
NOTES:
•Toturn offthe Transmitter, slide the POWER switch to the OFF
position; the Power indicator on the Transmitter will turn off.
•See note on the bottom of page 6 if the SOUND LEVEL
indicators do not light.

TROUBLESHOOTING GUIDE
9
PROBLEM SOLUTION
Static or buzzing is heard through the
receiver.
Make sure the CHANNEL switch on the transmitter
and the receivers are set to the same channel.
Receiver is out of range of the transmitter. Move
closer.
Transmitter's POWER indicator is not
lit.
Make sure the POWER switch is set to the ON
position.
Make sure the unit is connected to the AC adapter.
Receiver's POWER indicator is not lit. Make sure the Power/Volume control is set to ON.
Make sure the unit is connected to the AC adapter.
If using battery power, make sure batteries are insert-
ed correctly.
You hear sounds other than the ones
from your baby's room.
Change channels as you may be hearing the sounds
from another baby monitor close by or from a cordless
phone using the same frequency.
High-pitch squeal coming from
receiver.
The transmitter and receiver are too close; move away
from each other.
If you experience a problem with this unit, check the chart below before calling
for service.

Power Requirements:
Transmitter ...................................................................................DC 6V IN
Receiver.....................................DC 6V IN, (DC 4.5V 3 x "AAA" Batteries)
Receiver Power Output............................................................................150mW
Frequency CH 1................................................................................49.830 MHz
Frequency CH 2................................................................................49.860 MHz
Transmitting Distance ......................................................95 meters (Open area)
Specifications are subject to change without notice.
SPECIFICATIONS
10