Twin Star TS-1806 SOUND SYSTEM User Manual Manual
Twin-Star International Inc. SOUND SYSTEM Manual
Manual
Operation Instruction
Wiring
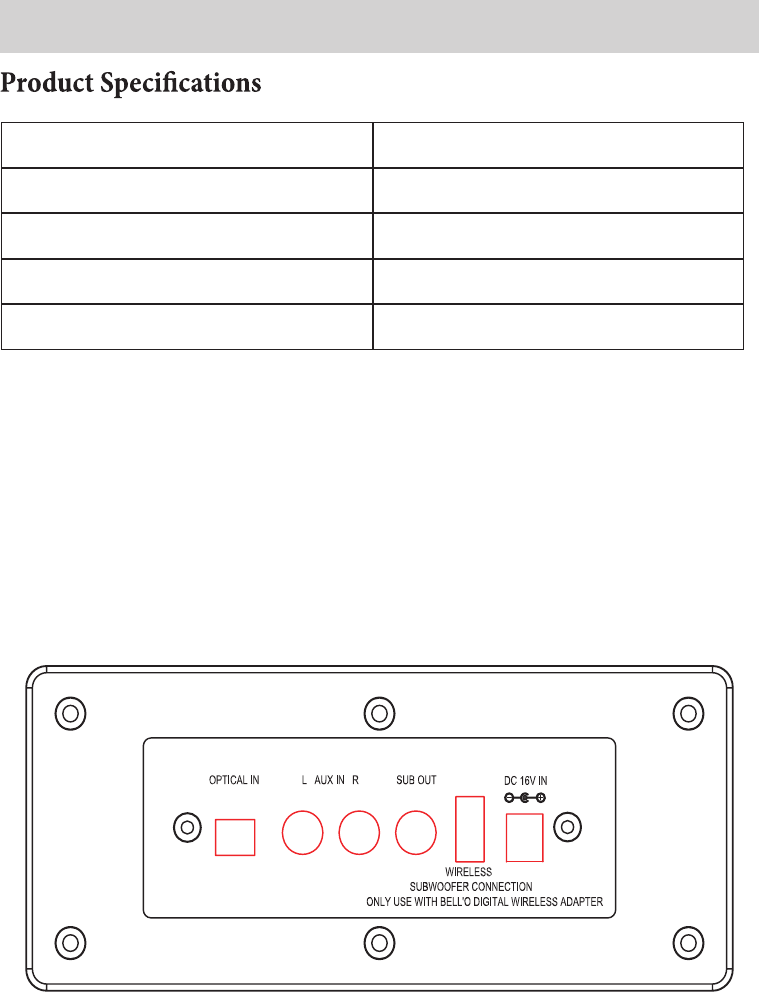
1. L AUX IN R - RCA plug AUX IN for connecting to an audio source
2. DC 16V IN - Connect the power supply
3. SUB OUT - Subwoofer output for connecting to a subwoofer
4. OPTICAL IN - Input the console using Optical cable
5. Wireless subwoofer connection (USB) port:
Will power and support transmit bass from optional Bell'O Digital wireless RF USB
Dongle to Bello digital Wireless RF Subwoofer.
Adapter Input AC100-240V, 50/60Hz
Adapter Output DC16V/ 3.0A
Power Consumption 40 Watts
Standby Power Consumption < 1 W
Peak Music Power Output 200 W
Operation Instruction
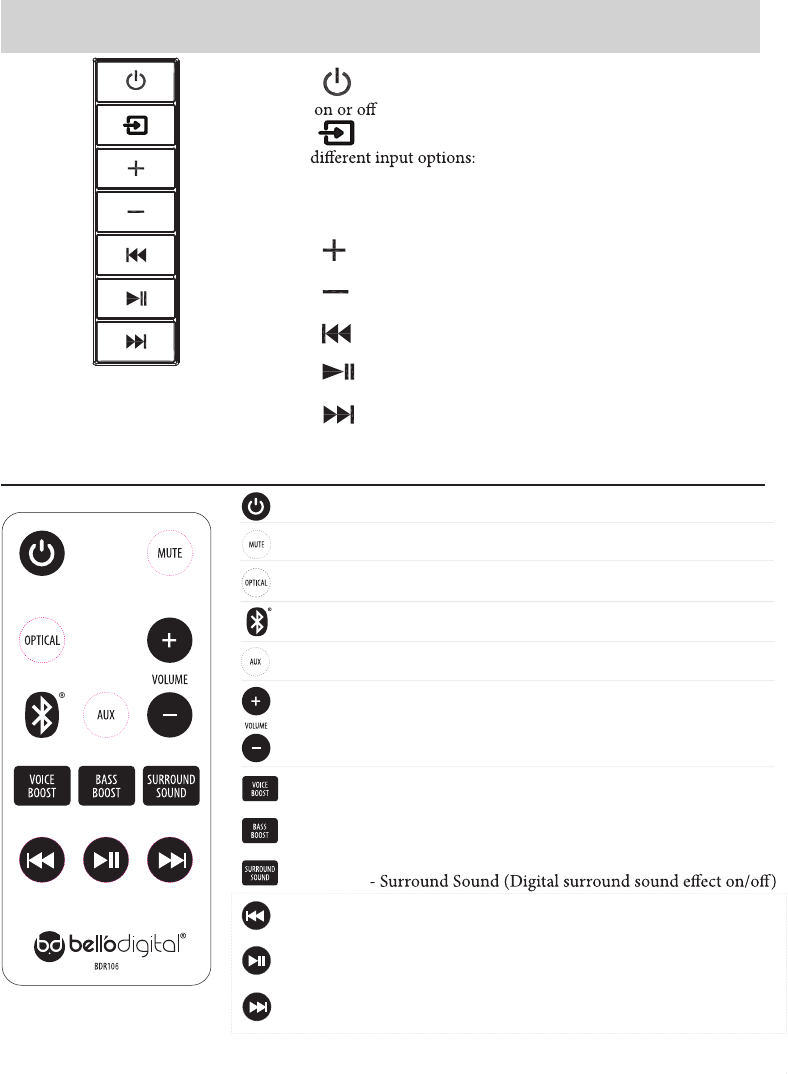
1. Button - Turns the unit
2. Button - To scroll through the
BT - Bluetooth
AU - AUX Input
OP - Optical Input
3. Button – volume increase
Control Panel
Remote Control
- Power / Standby
- Mute
- Optical in
- Bluetooth (Hold down to pair for 3 seconds)
- AUX Input
- Volume Increase
- Volume Decrease
- Voice Boost (Enhances dialog in noisy envoronments)
- Bass Boost (Enhances the bass sound)
- Back (Previous)
- Play/Pause
- Forward (Next)
Works with Bluetooth devices only.
Note: A short delay in response
is normal.
LED Display Function
Light Flash
OP
BT
AU
00-30
00-30
ON/OFF
ON/OFF
ON/OFF
b
PL
F
4. Button - volume decrease
5. Button- Previous song
6. Button- Play/Pause
7. Button- Next song

Operation Instruction Continued
Select an input: Use the Button on the control panel to scroll through the inputs, or
select the input on the remote control.
Bluetooth Pairing Process:
1) Make sure your wireless device is ready for pairing. If you are unsure how to do this, check
the manual that came with your device.
2) To start the pairing process:
Control Panel:
or
Remote:
Pairing: when it is paired.
NOTE: Only 1 device can play through the sound shelf at a time. Please disconnect the
other device if you cannot connect.
DISPLAY MESSAGES
BT - Bluetooth mode
speaker.
Operation Instruction Continued
Learning Function
(Note: Remote must send infrared signals). Any unused button on your TV remote control can
be used to control the Sound Shelf. For example, when you connect your TV to the Sound Shelf
using the RCA Stereo cables or Digital Fiber Optic Cable the TV volume and mute will no
longer be controlled by the remote that came with it. Some TV remotes also come with extra
Some of the programmable functions need to be selected from the remote control as noted
below.
To start the learning function:
• Press POWER and VOL + together for 3 seconds to learn mode. SEL
• Select the function to learn on the control panel or remote.
Point your TV remote
shelf and hold down the button you want it learn from.
simultaneously beeps 2 times. SEL
You can now select the next function to learn or end the process by pressing the POWER
butting an VOL+ for 3 seconds.
V + Volume up [control panel or remote control]
V - Volume down [control panel or remote control]
MT Mute [control panel or remote control]
ON Power [control panel or remote control]
SO Source [control panel ]
OP Optical [remote control]
BL Bluetooth [remote control]
AU Aux [remote control]
BA Track Back [remote control]
FO Track Forward [remote control]
PL Play [remote control]
VB Voice Boost [remote control]
BB Bass Boost [remote control]
SU Surround [remote control]
Note: It is able to learn most IR protocols, not all can be programmed.
This device complies with part 15 of the FCC Rules.
Operation is subject to the following two conditions:
(1) This device may not cause harmful interference, and (2) this device must accept any
interference received, including interference that may cause undesired operation.
Note: This equipment has been tested and found to comply with the limits for a Class B
digital device, pursuant to Part 15 of the FCC Rules. These limits are designed to provide
reasonable protection against harmful interference in a residential installation.
This equipment generates, uses and can radiate radio frequency energy and, if not installed
and used in accordance with the instructions, may cause harmful interference to radio
communications.
However, there is no guarantee that interference will not occur in a particular installation.
If this equipment does cause harmful interference to radio or television reception,
which can be determined by turning the equipment off and on, the user is encouraged to
try to correct the interference by one or more of the following measures:
Reorient or relocate the receiving antenna.
Increase the separation between the equipment and receiver.
Connect the equipment into an outlet on a circuit different from that to which the receiver
is connected.Consult the dealer or an experienced radio/TV technician for help.
Warning: Changes or modifications to this unit not expressly approved by the part
responsible for compliance could void the user’s authority to operate the equipment.
FCC Radiation Exposure Statement
This equipment complied with FCC radiation exposure limits set forth for an uncontrolled
environment. This equipment should be installed and operated with minimum distance 20cm
between the radiator & your body.
Waring