Twinhead MPCT0168 Tablet PC User Manual T10Y User s Manual 081003
Twinhead International Corporation Tablet PC T10Y User s Manual 081003
UserManual.wiki
>
Twinhead
>
MPCT0168 User Manual
>
User Manual 1
Contents
1.
User Manual 1
2.
User Manual 2
User Manual 1
Navigation menu
Upload a User Manual
Namespaces
Wiki Guide
HTML
PDF
Info
Views
User Manual
Discussion / Help
Navigation


![21LCD Screen 10.4” XGA (1024x768) TFT LCD LED Backlight Luminance: 165 nit (minimum), 240 nit (typical) Contrast ratio: 120 (minimum), 250 (typical) Luminance uniformity: 60% (minimum) Image retention (After image): 60 sec Light Sensor Built in ambient light sensor to adjust the brightness of LCD. This will be performed automatically while in battery mode, and can be enabled/ disabled through setting in the BIOS. Screen Rotation This Tablet PC uses G sensor to switch Landscape/Portrait mode automatically when the machine turns. It works for 0º - 90º - 180º - 270º, and can be enabled/ disabled through the [HDDprotection software]. Default setting is enabled.](https://usermanual.wiki/Twinhead/MPCT0168.User-Manual-1/User-Guide-1028142-Page-25.png)
![23 To lock/unlock the touch screen To lock: 1. Manually (FN + SAS key) 2. Automatically (after some idle time presetting by user) To unlock: Manually (FN + SAS key) *If you want to lock the touch screen automatically, you need to follow following instruction: (1) Double click the HDD protection icon to launch HDD protection application. (2) Select [Setting] [Option] (3) You will find [Lock Touch Function Time] section on the bottom. Select [Enable] to activate this function. You can also adjust the idle time in this section.](https://usermanual.wiki/Twinhead/MPCT0168.User-Manual-1/User-Guide-1028142-Page-27.png)

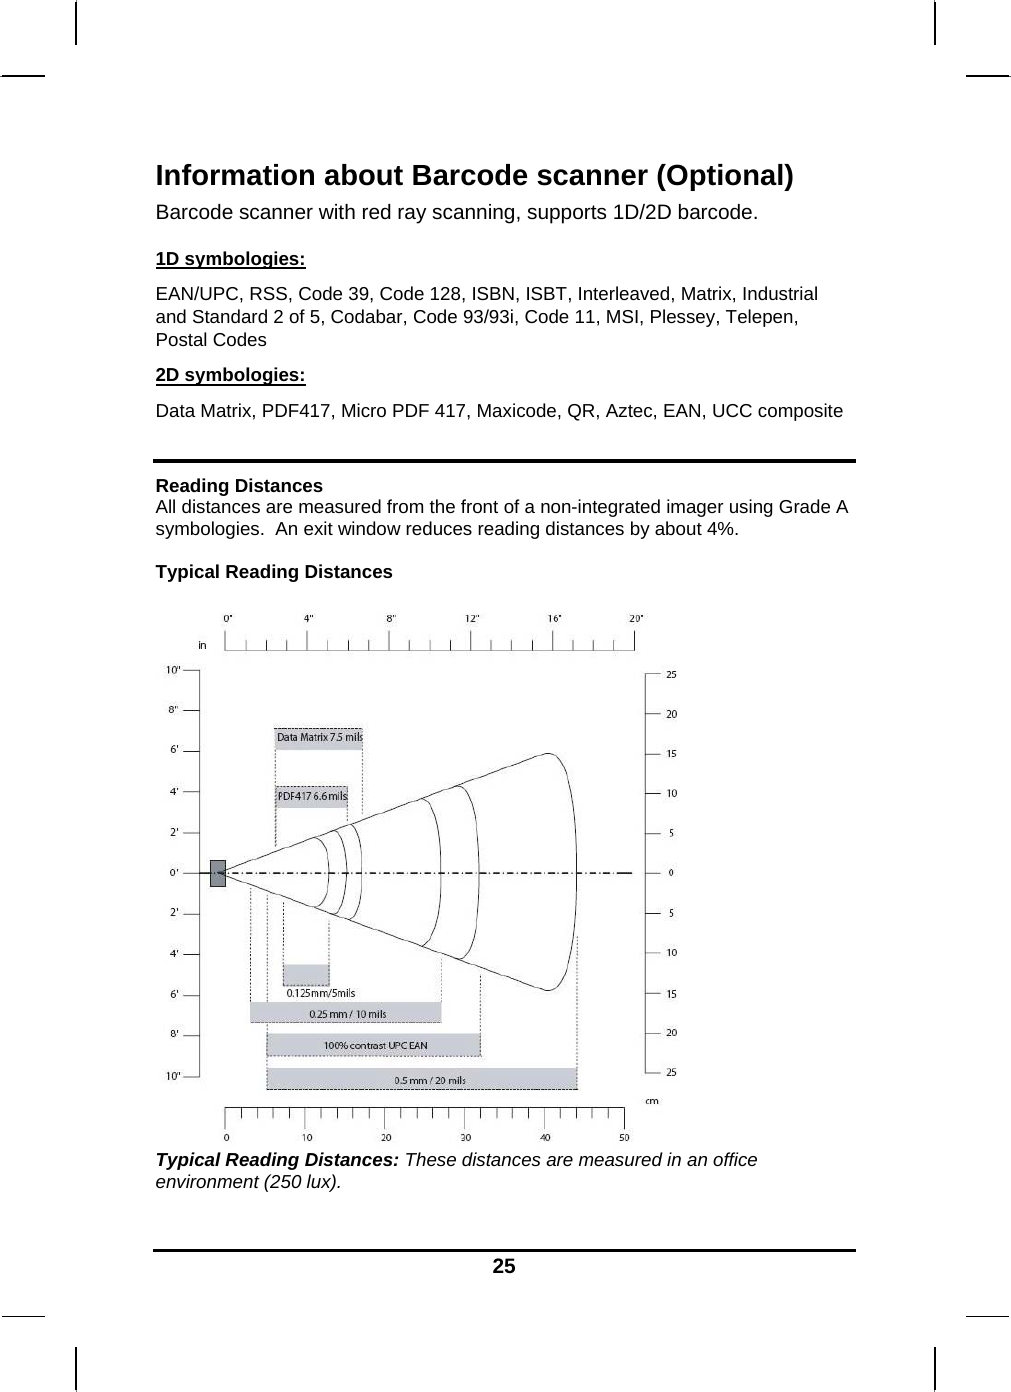

![27How to use the Barcode Scanner: Please click on [Barcode] folder shown on Desktop. Then click on [EA 15Demo] program to execute Barcode scanner software. Then press button on handle to turn on built-in barcode scanner, and it will be ready to read when there is a red light beam emitting from the device, and complete the reading when the light is off.. Barcode scanner will be power down after certain time set by user if no more activities. (button on handle)](https://usermanual.wiki/Twinhead/MPCT0168.User-Manual-1/User-Guide-1028142-Page-31.png)