Twinhead MPCT10L1 Tablet PC User Manual T10L UserMan Part 1
Twinhead International Corporation Tablet PC T10L UserMan Part 1
Twinhead >
Contents
- 1. (T10L) UserMan-Part 1
- 2. (T10L) UserMan-Part 2
(T10L) UserMan-Part 1

T
T1
10
0L
L
M
MC
CA
A
U
Us
se
er
r’
’s
s
M
Ma
an
nu
ua
al
l

ii
Table Of Contents
CHAPTER 1
GETTING STARTED 1
Getting Started ................................................................................... 2
Inventory ............................................................................................. 3
Safety and Maintenance .................................................................... 4
Checklists ........................................................................................... 5
Features .............................................................................................. 6
Where to Look For Information ........................................................ 8
Quick Start .......................................................................................... 8
Loading Windows ............................................................................ 10
Adjusting the Volume ...................................................................... 11
Adjusting the Brightness ................................................................ 11
Turning off Your MCA...................................................................... 12
CHAPTER 2
GETTING STARTED 13
Hardware and Software ................................................................... 14
Front View ......................................................................................... 15
Right View ......................................................................................... 16
Bottom View ..................................................................................... 17
Power Indicators .............................................................................. 18
Buttons.............................................................................................. 19
Function Keys .................................................................................. 20
Touch Pen ......................................................................................... 21
Disk Drives........................................................................................ 21
LCD Screen ....................................................................................... 23
Touch Screen ................................................................................... 24
Information about Fingerprint function ......................................... 26
Information about Barcode scanner .............................................. 27
How to use the Barcode scanner ................................................... 29
Information about RFID reader ....................................................... 30
Information about Camera function ............................................... 32
Communication Components ......................................................... 33
Information about 3G function........................................................ 34
Information about Bluetooth function ........................................... 35

iii
CHAPTER 3
MAKING CONNECTIONS 36
Making Connections ........................................................................ 37
CHAPTER 4
POWER MANAGEMENT 38
Power Management ......................................................................... 39
When to Replace the Battery .......................................................... 41
Heat Considerations ........................................................................ 41
CHAPTER 5
DOCKING STATION CONNECTORS 42
Docking Station Connectors-Front & Left side............................. 43
Docking Station Connectors-Right side ........................................ 44
Docking Station Connectors-Top side........................................... 45
Mechanical Specification ................................................................ 46
APPENDIX A
STATEMENTS 47
Statements ........................................................................................ 48
European Notice............................................................................... 49
Safety Compliance ........................................................................... 57
Battery Disposal............................................................................... 57
CAUTION FOR ADAPTER................................................................ 58
BATTERY CAUTION......................................................................... 58
REGULATORY INFORMATION(INTEL WIFI) .................................. 60

C
Ch
ha
ap
pt
te
er
r
1
1
I
In
nt
tr
ro
od
du
uc
ct
ti
io
on
n

2
Getting Started
Congratulations on your purchase of a MCA. The mobile clinical
assistant (MCA) is a category of mobile computing platform
developed by Intel® to be a new usage model that is customized for
healthcare-specific use at the point of care, supporting the workflow
of nurses and clinicians. This mobile clinical assistant (MCA)
integrates technology from Intel® Health.
With your MCA you will be able to organize and access important
clinical information anywhere, anytime. In addition, you will be able to
use the biometric fingerprint reader or authenticate your badge with the
RFID reader.
This Manual contains all the information you need to set up and use
your MCA. It describes all the features of the MCA in an easy-to-read
yet thorough manner.
The Intel® Health brand signals the company’s specialization in healthcare and
commitment to the healthcare industry while drawing on Intel’s rich heritage as a
technology innovator. Intel is a trusted name associated with innovation, reliability,
quality, and speed — attributes that resonate with key decision makers in the
healthcare sector.
Intel and the Intel logo are trademarks of Intel Corporation in the U.S. and other
countries.

3
Inventory
This MCA is designed for years of productive and pleasurable
computing. Use this section to keep details of your purchase. This
information will be required should you need to make repairs to your
MCA during the warranty period. Update this section when you add
new options.
DATE OF PURCHASE:
PLACE OF PURCHASE:
DEALER'S NAME:
DEALER'S ADDRESS:
TELEPHONE:
E-MAIL ADDRESS/WWW:
CONTACT PERSON:
MODEL NUMBER:
SERIAL NUMBER:

4
Safety and Maintenance
You can use your MCA under a wide range of environmental
conditions. However, to ensure long use and continued high
performance, consider the following factors when setting up your
MCA:
• Follow all warnings and instructions noted in this documentation
and in the Windows Help program.
• The first time you use your MCA, we recommend that you
carefully read the Making Connections section of this manual
and initialize the battery to ensure optimum battery performance.
• Unplug the MCA from the power outlet before cleaning. Use a
damp cloth for cleaning. Do not use aerosols, solvents, or strong
detergents.
• Slots and openings in the system cabinet are for ventilation
purposes. Do not block or cover these openings or the system
could overheat. Do not use or store the MCA near a source of
heat or dust.
• On the base or rear panel of this MCA, there is a label with
information on the power requirements of this system. These
requirements must be followed. If you are unsure of your local
power supply, consult your dealer or local Power Company.
• Do not step on or place anything on the power cord.
• If you use the MCA with an extension cord, ensure that the total
ampere ratings of all the devices sharing the extension do not
exceed the rating of the extension cord or the rating of the wall
outlet.
• Never push foreign objects into the MCA through any of the slots
or openings. Dangerous voltages are present, which could cause
electric shock or fire, or damage sensitive components.
Cleaning the MCA
To clean the MCA, wipe its surface gently using a soft cotton cloth
slightly dampened with alcohol or disinfecting products.
The device’s outer surfaces (plastic shell, seal, touch panel, buttons,
docking base connector, barcode scanner window, etc) can resist
(80% or less) Alcohol, bleach, iodine and common hospital
disinfectants.

5
Checklists
After opening the package, carefully inspect the contents. If any of
the items is missing or appear damaged, contact your dealer. The
shipping carton should contain the following:
STANDARD
• A MCA with a hard disk drive
• Two standard batteries
• An AC adapter with power cord
(I.T.E. AC power or Medical AC power)(Option)
• User's Manual (Installed in Hard Disk)
• Driver CD (Installed in Hard Disk)
OPTIONS
The following items are normally optional, but some vendors may
include them in the standard package. Some items may not be
available in some countries, or some vendors may choose not to
carry all the items.
• Additional battery
• 3G module
• RFID reader
• Barcode scanner
• 2 mega pixels camera module
• Docking station
Caution: When purchasing any of the accessories
listed above, purchase only those accessories that
are approved for use with your MCA. The above
accessories are proprietary items. Your system
vendor can obtain these approved accessories. If
you use items that are not approved for use with
this MCA, you may cause your MCA to malfunction, or
to emit or receive electro-magnetic radiation in
excess of local regulations. For non-proprietary
accessories such as PC cards or printers, ensure
that the accessory functions properly in your MCA
before making the purchase. Your system vendor may
be able to recommend reliable brands and models.

6
Features
Software Included
Widows® XP Tablet PC Edition which includes:
• Microsoft® Internet Explorer
• Microsoft® Outlook Express
• Microsoft® Windows Media Player
Windows Vista® Business (Optional)
High performance Processors
IIntel® Intel PineView-M N450 CPU or above (FSB 667MHz)
Smart Display
Automatic screen orientation & brightness adjustment
Smart Touch
Fingertip & stylus accessible, automatically timing control & palm rejection
implemented
Comprehensive Network Connection
PAN: Bluetooth 2.1
LAN: Wireless LAN 802.11 /b/g/n
MAN: 3G module (optional)
Versatile Integration
RFID Reader, Barcode Scanner, Fingerprint Reader, Webcam and
Microphone Array
Unburdened Consideration
Slim, light weight, no noise (fanless), and “grip & go” ergonomic handle
Rugged Enhancement
Sustainable from the free drop (3 feet height) and severe ingress level
(IP54)

7
Flexible Battery Supply
Long power supply up to 4.5 hrs
Extended Access Control
3 user programmable keys available to define
Rugged Standard
Drop Resistant:
26 drops of 36 inches to plywood over concrete with unit on
2 units to pass.
Water Sealing:
Rain chamber to operate at no less than 40 PSIG and no less than 4
in/hr. 10 min per axis, 6 axes, Unit is non-operating.
Environmental
Tablet PC & Docking Station
Operating Environment Temperature: 0℃~50℃
Storage Environment Temperature: -20℃~60℃
Transportation Environment Temperature: -20℃~75℃
Operating Humidity: 10% ~ 90%
Power Supply
* Operating Temperature 0℃ to 40℃ with no deracinating
* Storage temperature -25℃ to +70℃
* Relative humidity 10% to 95% non-condensing
* Cooling Convectional - non vented case
8
Where to Look For Information
About Your MCA
This User’s Manual describes the key elements of your MCA. New
users can find a simple step-by-step orientation in the Quick Start
section of this chapter.
About Windows
Windows Online Help, found on the Start menu, offers extensive Windows
assistance. Welcome to Windows offers an online orientation for new
Windows users. Find it in:
Start/Programs/Accessories/System Tools.
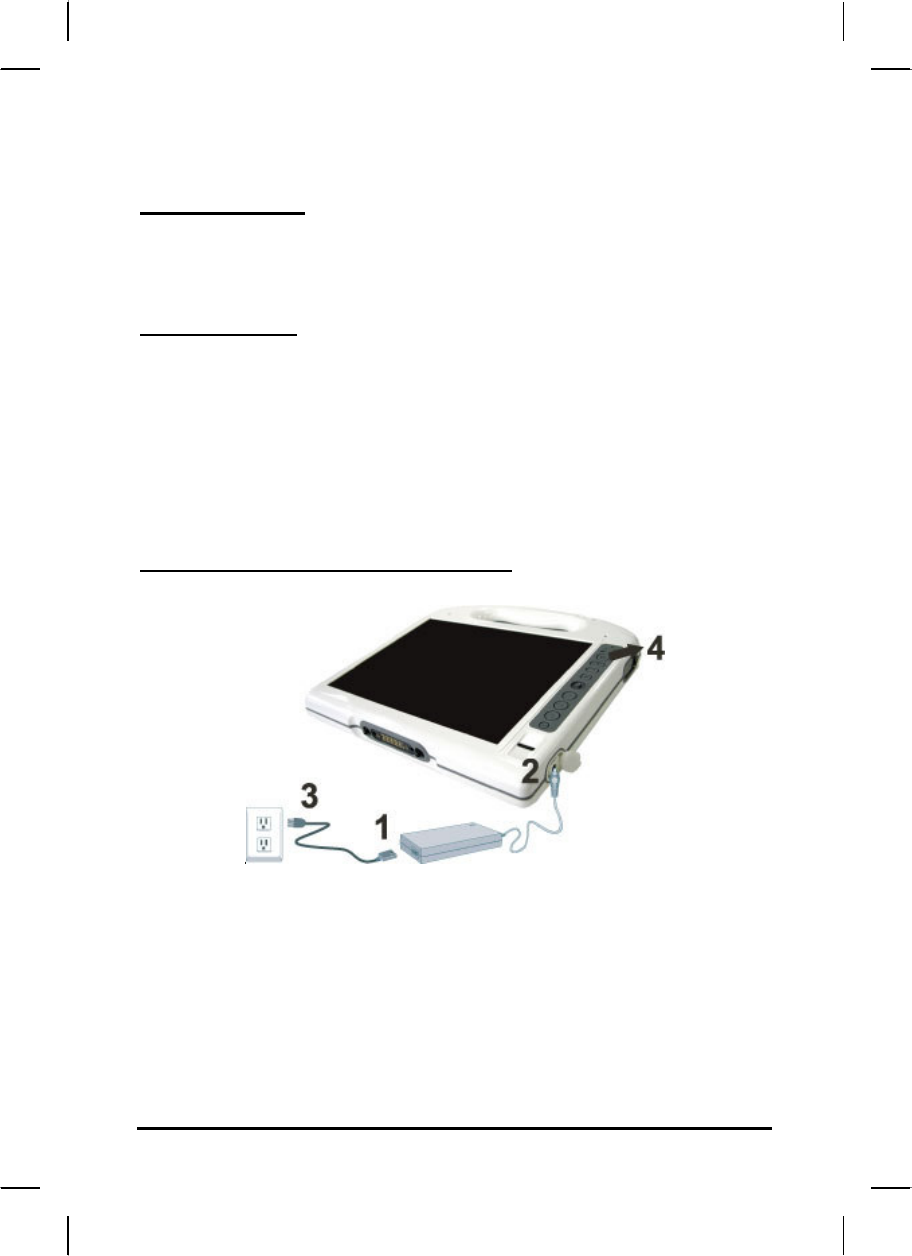
Quick Start
Turning on the MCA for the First Time
1. Connect the power cord to the AC/ DC adapter.
2. Connect the AC/ DC adapter to the DC power port on the right hand
side of your MCA.
3. Connect the power cord to an AC outlet.
4. Press the power button to turn on the power.
9
AC Adaptor features:
I.T.E. AC power
Input:100V-240V,50Hz-60Hz
Output: 65W, 19V
Medical AC power
Input:100V-240V,47Hz-63Hz
Output: 78W , 18V
Manufacturer: Ault Korea CO., LTD.
Model: JMW180KA1800F02
Type: Medical Power Supply
INPUT: AC 100 - 240V, 50 - 60Hz, 1.5A~0.75A
OUTPUT: +18VDC at 4.33A
Note: The battery is not fully charged. Allow
your battery to fully charge before using it
(i.e., before disconnecting AC power).
Calibrating the battery before use is also
highly recommended. Refer to Chapter of Power
Management, for further information.
Warning: The operator not to touch a part and
the patient simultaneously.
10
Loading Windows
The following section is for installing the Windows operating system
only. If you are installing a different operating system, please check
with your vendor for installation details.
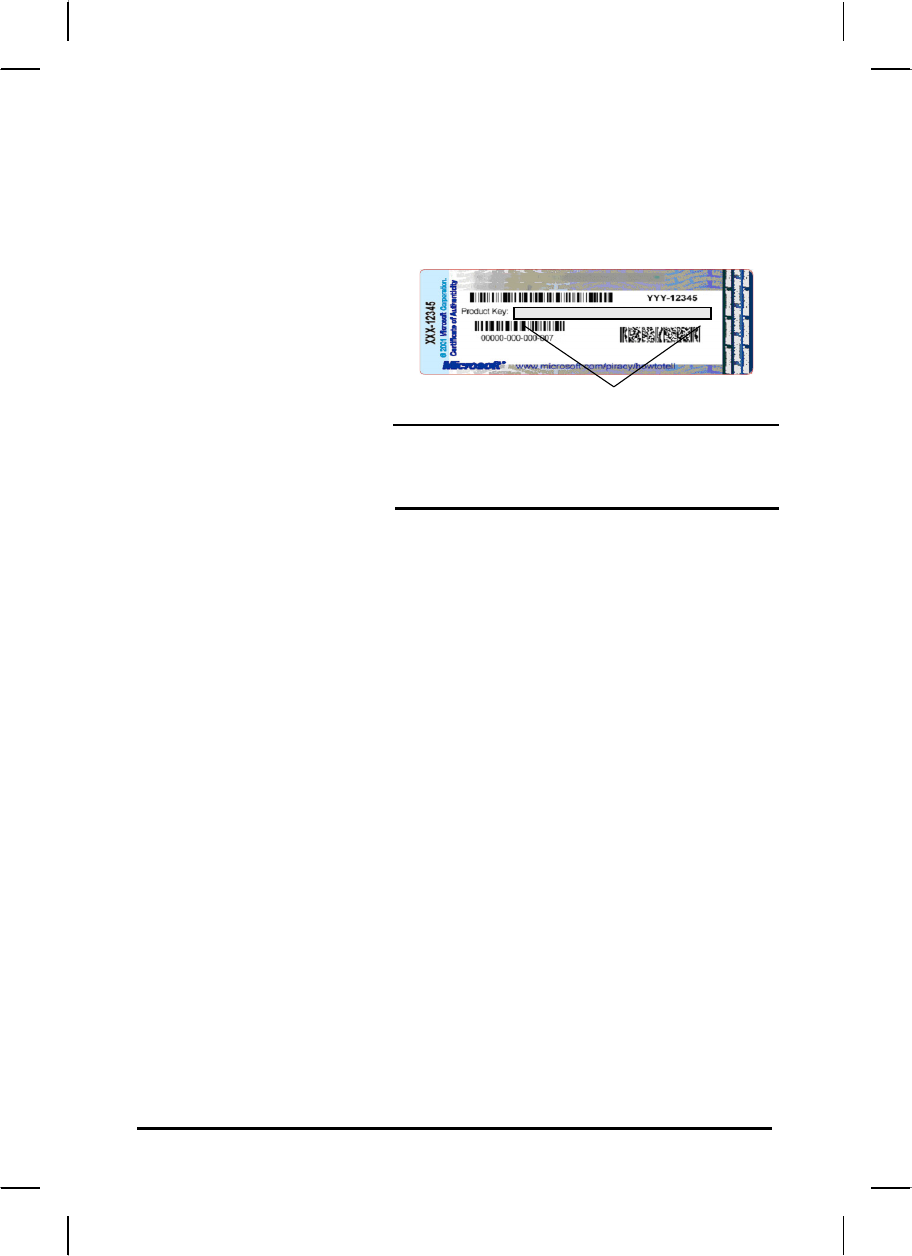
P ro d u c t k e y n u m b e r
Your MCA will begin
loading Windows once
you turn on the power.
Wait a few seconds for
Windows setup to load.
The Windows setup will
prompt you for the
product key number,
shown to the right: Note: The product key is on a sticker
adhered inside of the battery
compartment of the MCA.
1. Type your name, and, if applicable, the name of your company.
2. Read the End User's License Agreement. Click Next to accept it.
3. Enter the product key number. You can find this on the
Certificate of Authenticity on a sticker attached to the MCA. Click
Finish.
4. The Start Wizard will prompt you to set the date, and your local
time.
After the Start Wizard updates your system settings, the Welcome to
Windows screen will appear. You may disable this feature by
clearing the check box labeled show this screen each time
Windows starts.
Some software comes preloaded with Windows. New users can
familiarize themselves with this software by selecting Programs from
the start menu, then clicking on programs to run them.
11
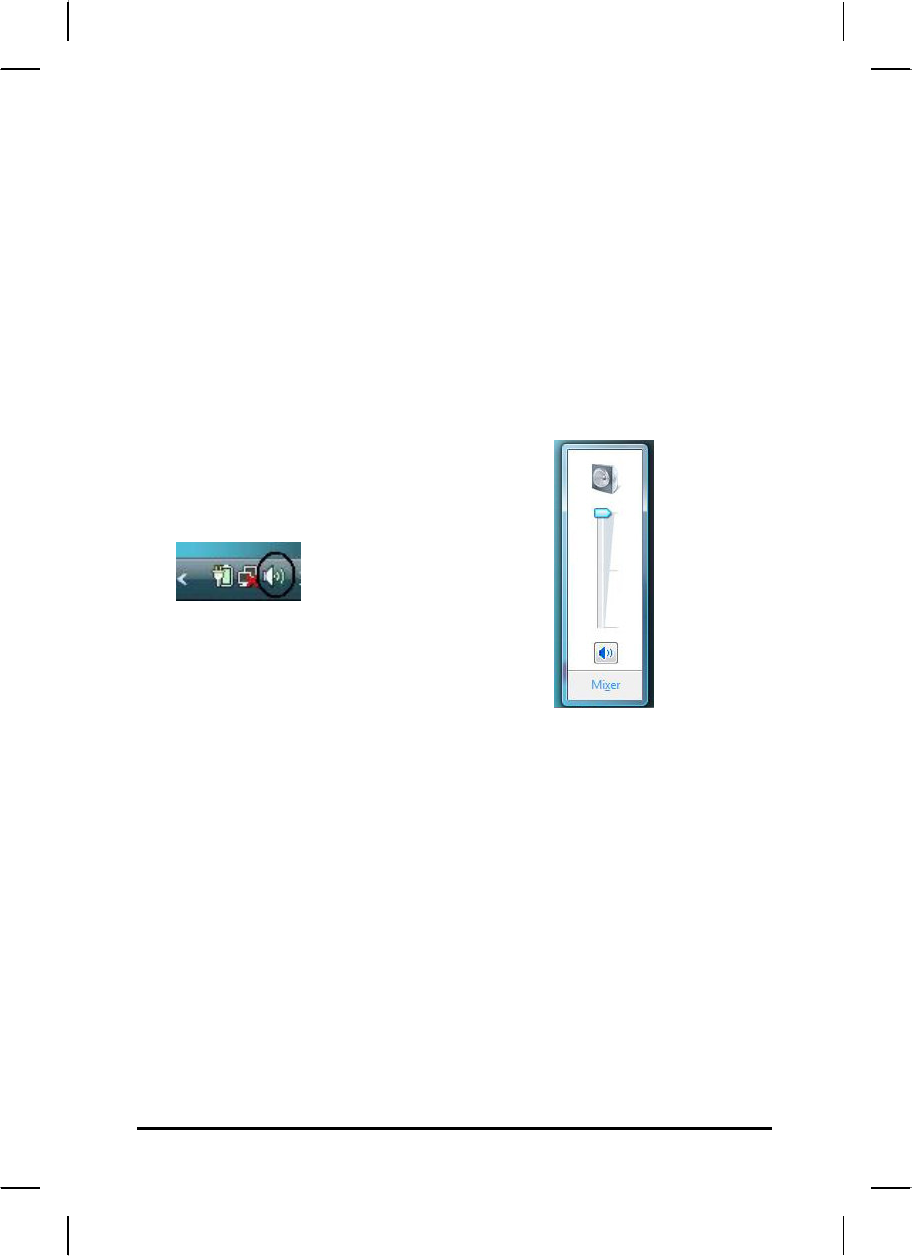
Adjusting the Volume
You can adjust the volume with hot key:
• Fn On + Navigation Key with pressing it upward: volume up
• Fn On + Navigation Key with pressing it downward: volume down
Alternatively, you can adjust
the volume with the Windows
volume control applet located
on the taskbar.
Adjusting the Brightness
Use the following hot key combinations to adjust the LCD panel
brightness:
• Fn On + Navigation Key toward left: decreases the brightness
• Fn On + Navigation Key toward right: increases the brightness
12
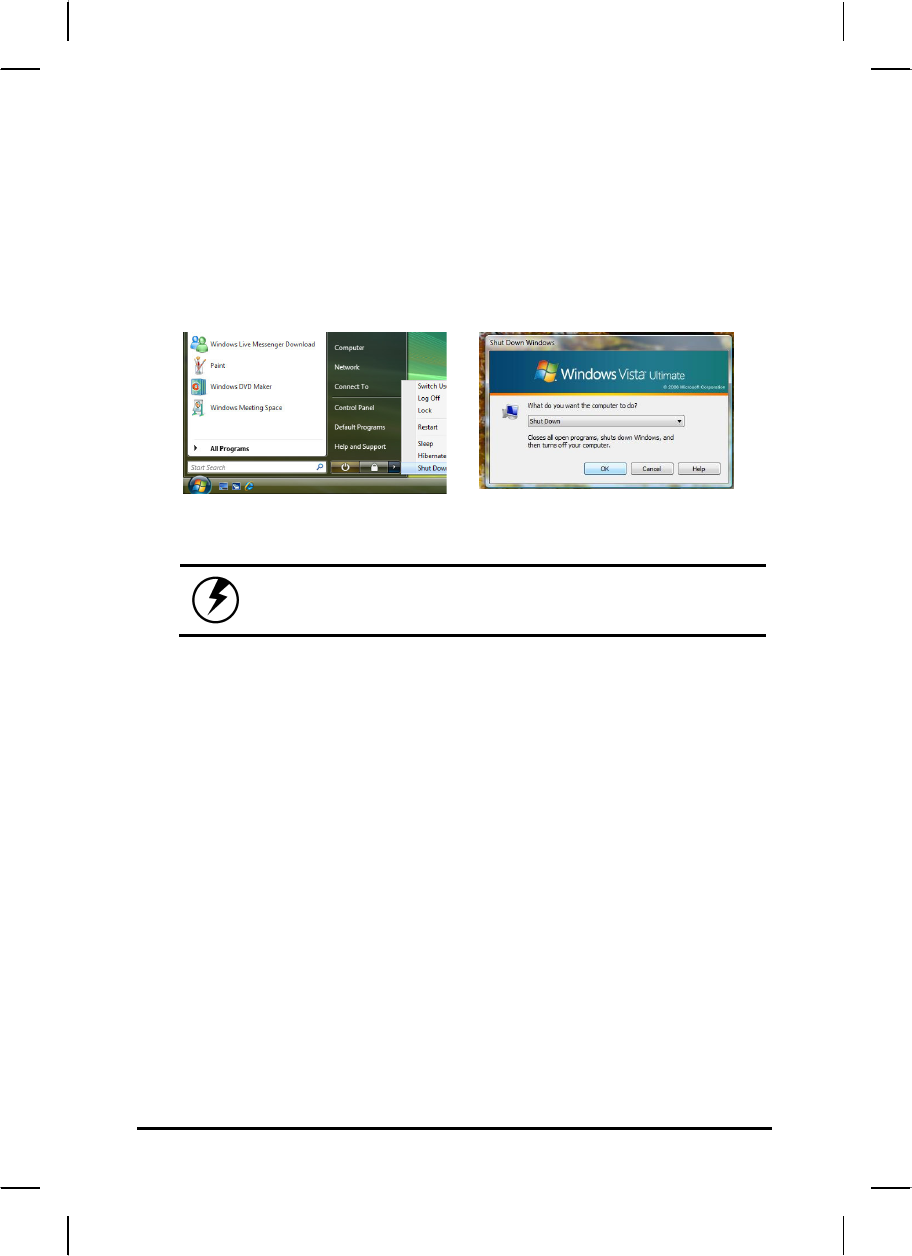
Turning off Your MCA
Turning off the MCA properly is important to maintaining your MCA.
1. On the Start menu, click
Shut Down.
2. Click the radio button next to
Shut Down in the Shut Down
Windows screen, and then click
OK.
If you are going to be away from the MCA for a short period, there are
ways of conserving power without shutting down the system.
Warning: Shutting off the MCA improperly may
result in data loss.

C
Ch
ha
ap
pt
te
er
r
2
2
G
Ge
et
tt
ti
in
ng
g
S
St
ta
ar
rt
te
ed
d

14
Hardware and Software
This chapter introduces the different components and controls of your MCA,
including the hardware components, the software, and the audio and video
systems.
Getting Started
Before you begin using your MCA, read this chapter to familiarize yourself
with the main components installed in the system.
15
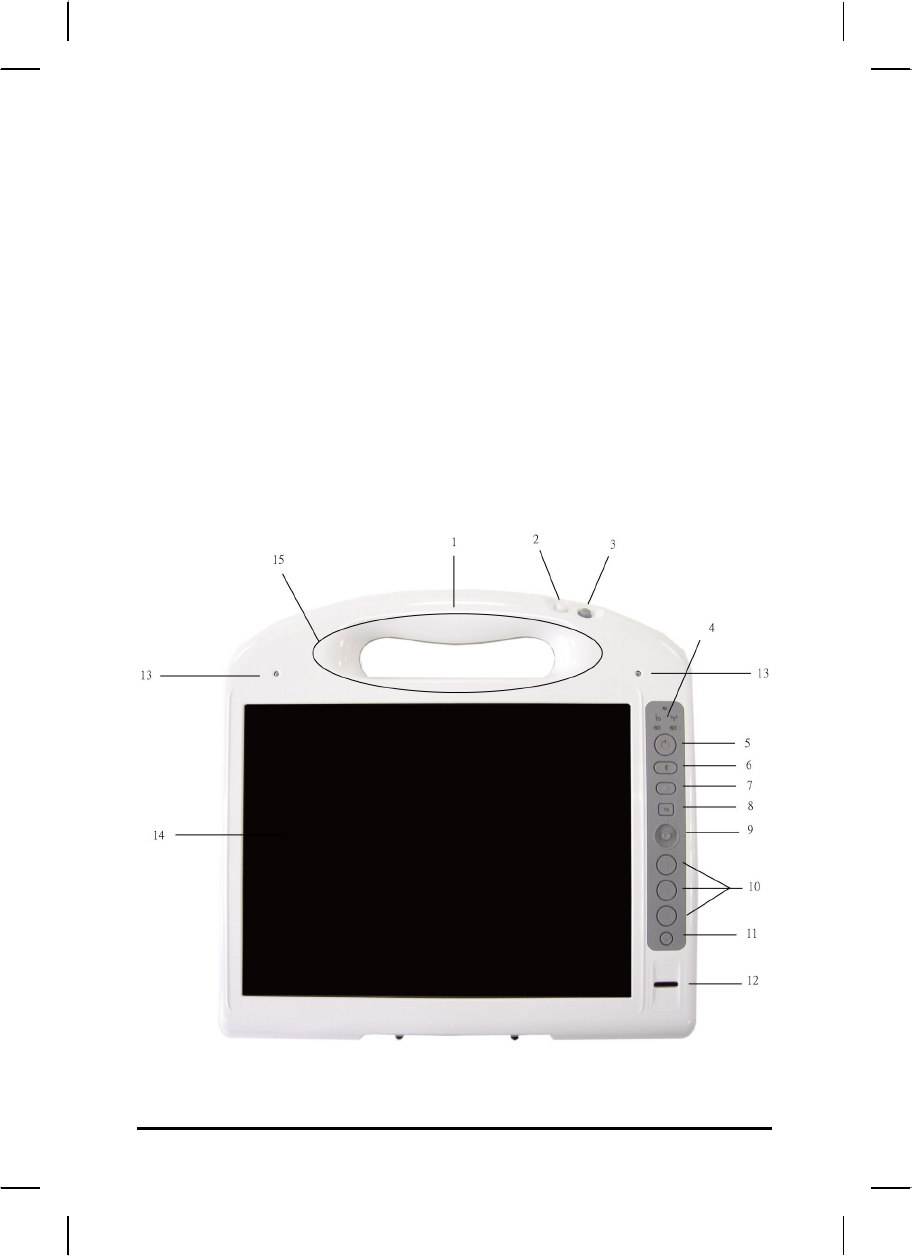
Front View
1. Tablet handle
2. RFID reader trigger
3. Barcode scanner trigger
4. Status indicator
5. Power button
6. Bluetooth On/Off button
7. Camera capture
8. Function key
9. Navigation & Enter key
10. User programmable keys
11. Security key
12. Finger printer scanner
13. Internal microphone array
14. Touch Screen panel
15. Internal RFID reader antenna
16
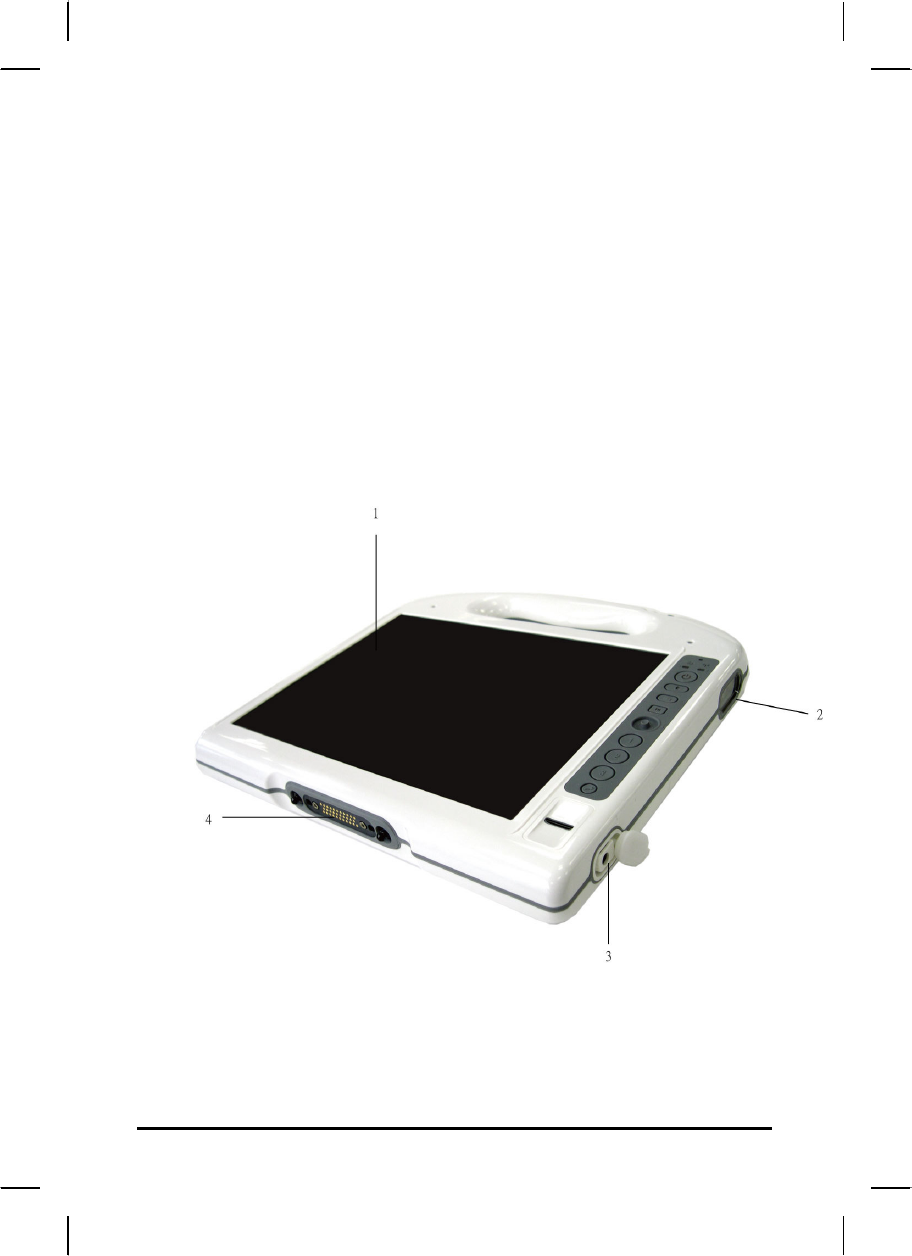
Right View
1. LCD panel
2. Barcode scanner sensor
3. DC power jack
4. Docking connector
17
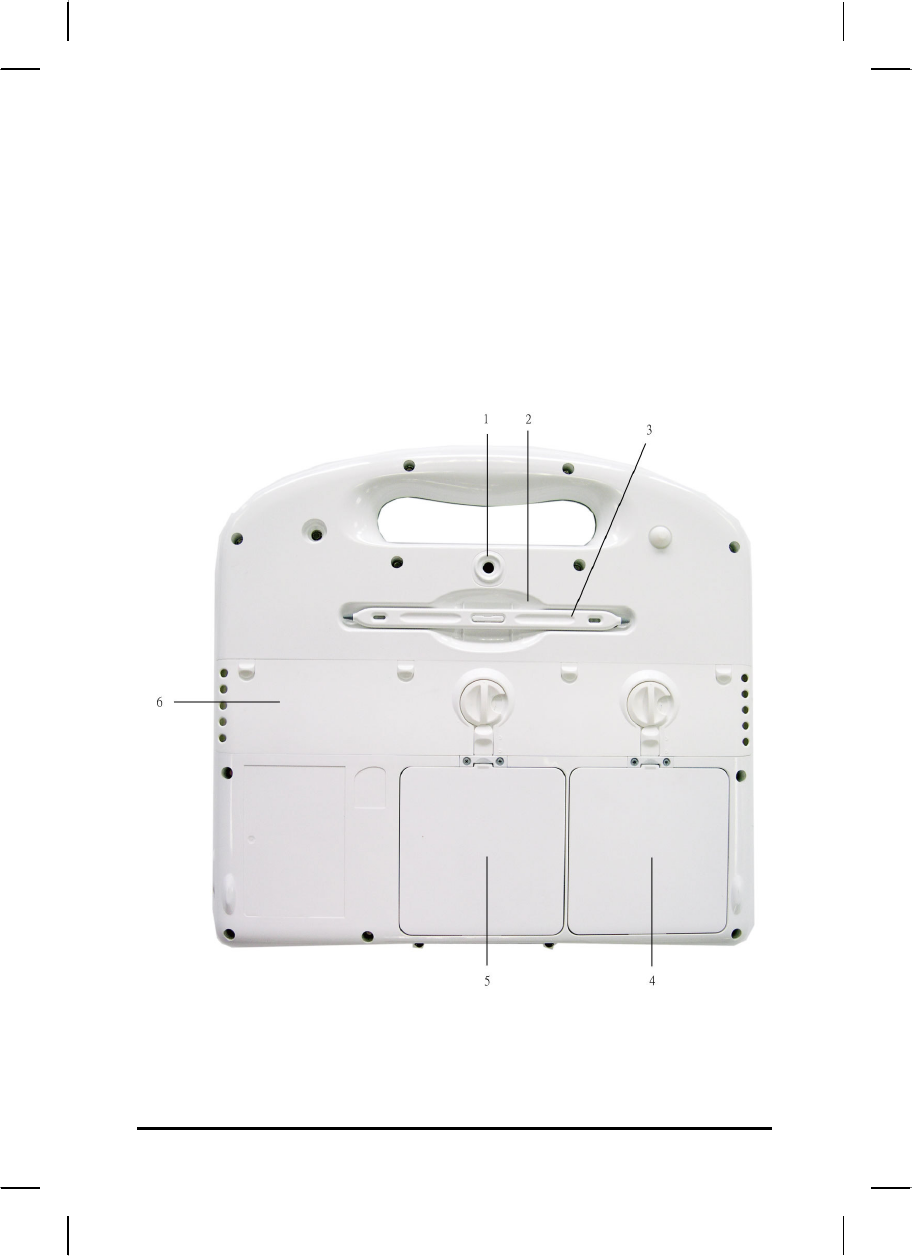
Bottom View
1. Camera lens
2. Touch pen holder
3. Touch pen
4. 1st battery
5. 2nd battery
6. Internal speaker
18
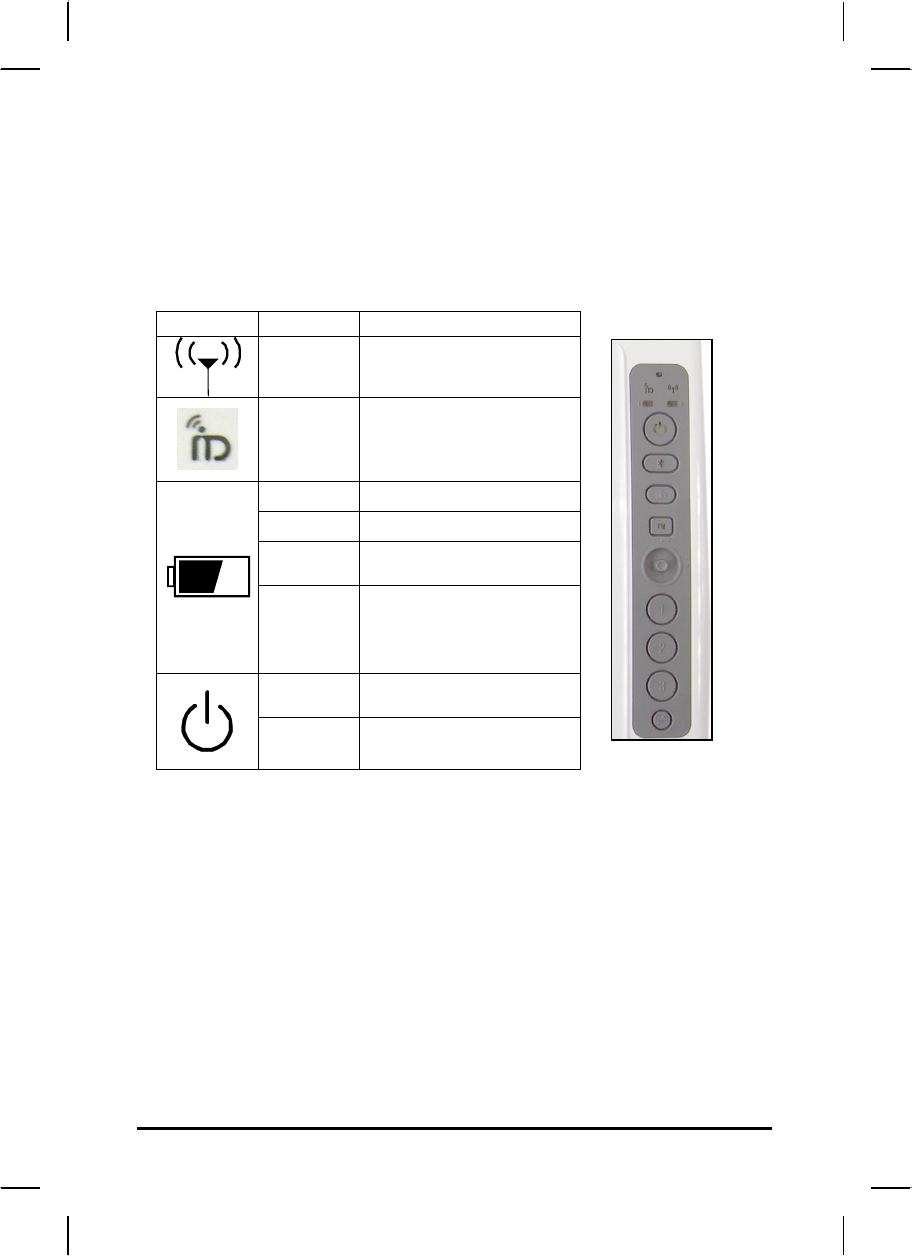
Power Indicators
The power indicators show which power source the system is using. They
also show battery status and low battery power alerts. The power indicators
remain active and viewable even when the LCD panel is closed.
Icon Light Description
Green Wireless LAN is in use
Green RFID is in use
Green Battery fully charged
Orange Battery charging
Red When battery capacity
is low than 10%
Flashing
Orange
When OTP (over
temperature protection)
of the battery is
activated
Green Power is on and the
battery is in use
Flashing
Green
Power is in suspend
mode

19
Buttons
The eleven hot keys are unique features of your MCA. The function as
follows:
Icon Function
Suspend/Power on-off button
The Power button turns system on and goes into
standby automatically. If the unit has been sitting
unused for a while. Press momentarily to turn on
the system or to exit from standby. Press and hold
for at least 3-4 seconds to turn off the system.
These settings can be changed.
RFID reader trigger
Through setting in Intel MCA SDK
(White button on handle).
Barcode scanner trigger (grey)
Through setting in Intel MCA SDK
(Grey button on handle).
Bluetooth On/Off button
Press to wakeup built-in Bluetooth module,
Bluetooth module will be power down after certain
time set by user if no more activities.
Camera Capture
Through setting in Intel MCA SDK
Function Button
Alternative definition for navigation, user
programmable and security button.
Navigation & Enter Key
5 ways button for Up/Down/Left/Right/Enter.
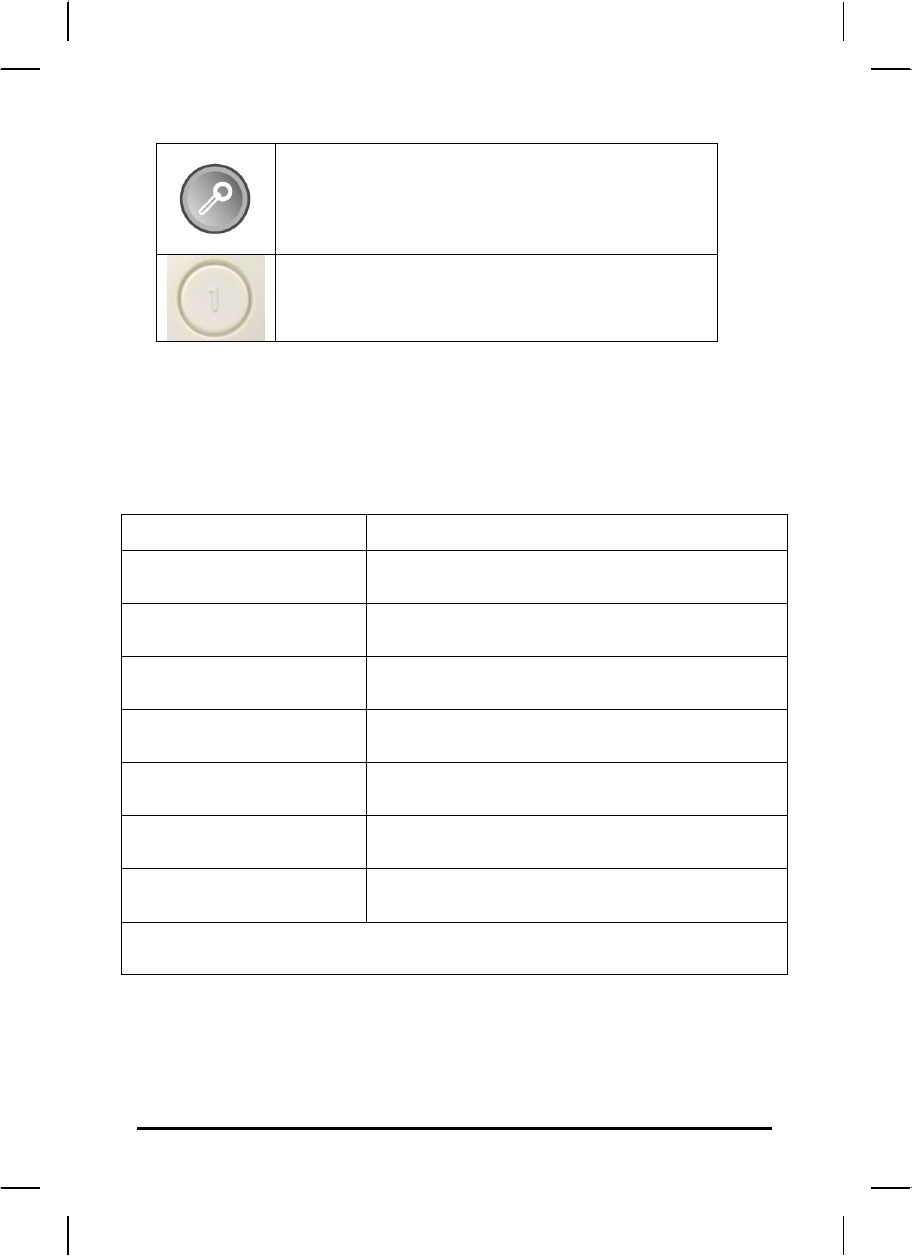
20
Security key
Similar function as pressing Ctrl+Alt+Delete on a
standard keyboard.
3 user programmable keys
Press to launch specific program defined by user
through Intel MCA SDK (software development kit)
Function Keys
Press the Fn key first and then press the function key.
Function key Description
Fn on + Down Volume down
Fn on + Up Volume up
Fn on + Left Brightness decrease
Fn on + Right Brightness increase
Fn on + button 3 Enable/ disable the 3G module
Fn on + button 2 To rotate screen 90 degree
Fn on + Enter key To unlock the docking station manually
*User may also choose to lock the touchscreen automatically after some idle
time. See page 23 for detailed setting.
21
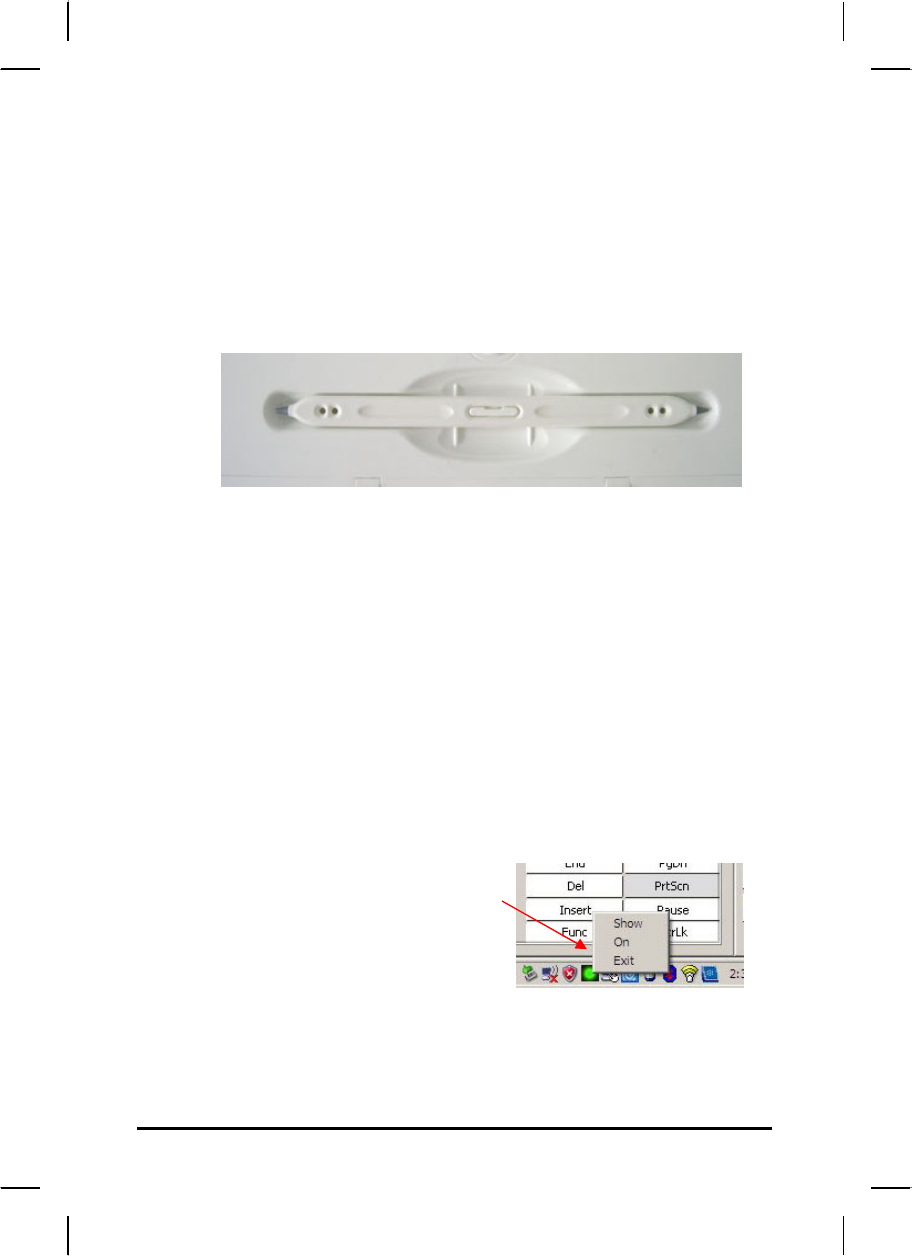
Touch pen
You can use the touch pen to replace a mouse when using a MCA. Store
the pen in the pen holder when not in use. To put the pen in the pen holder,
press it until it clicks into place. To remove the pen, press down on one end,
grab the other end, and remove from the holder.
Disk Drives
Your MCA comes with component for reading and writing (recording)
information.
Hard Disk Drive
The hard disk provides high-capacity storage and fast access. Windows OS
and most programs are stored here. Your MCA identifies the hard disk drive
as drive C. In order to protect your precious data, this MCA features a G-
sensor which ”parks” the hard drive when it senses a dropping motion.
Operation instructions on the HDD protection application.
Click the HDD protection icon to
launch HDD protection application.
You will see the program screen as:
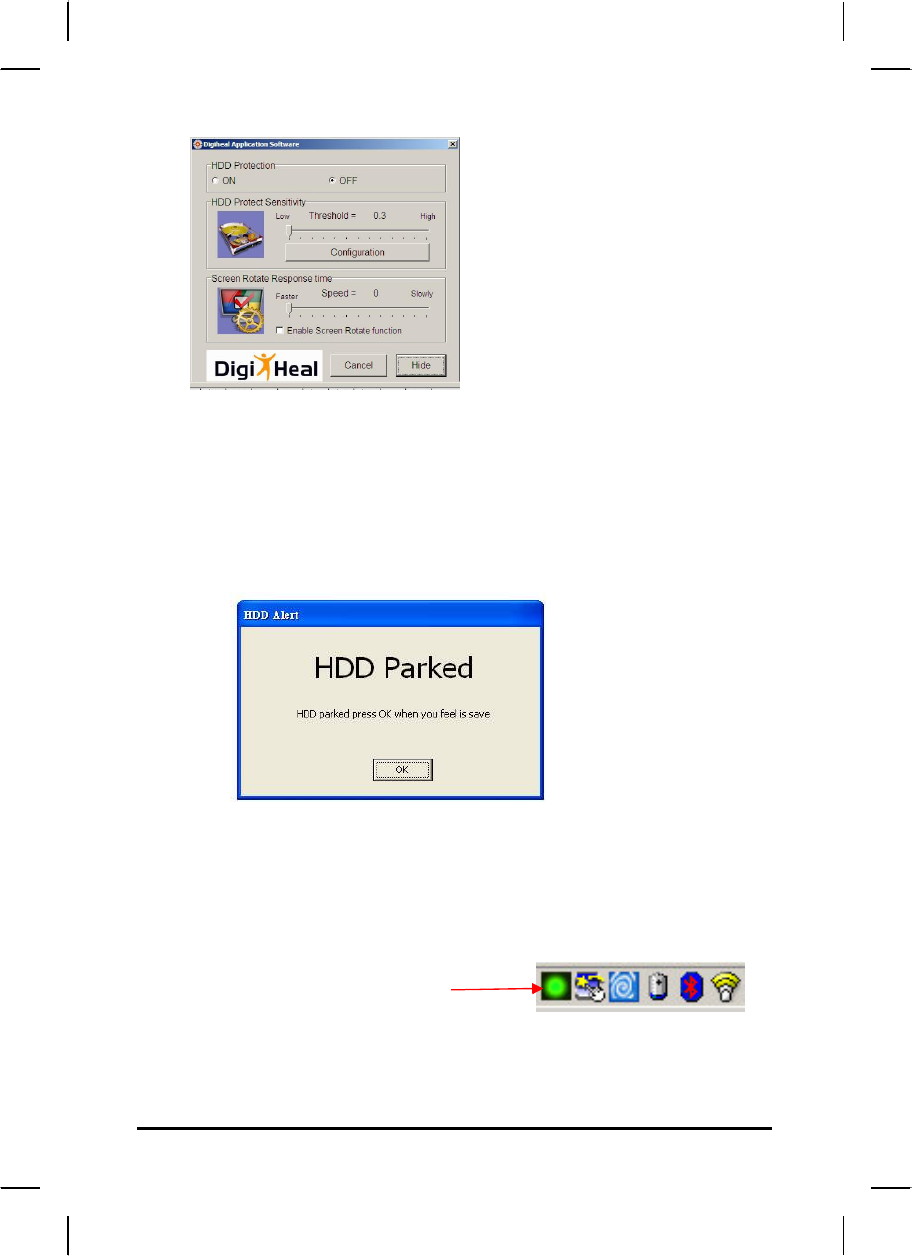
22
“HDD protection OFF” is checked as default. If you are using default
parameters, just click the “ON” tag under “HDD protection “to
activate hard disk protection function.
When HDD protection is activated, there will be a pop-up window
shown on the screen once a free fall or abrupt motion detected.
At this situation, all disk access requests will be blocked. Certain
application may detect some error if they set timer when accessing
files. But others are just waiting their disk I/O to complete. User may
release the hard disk by pressing OK button. Otherwise HDD will be
released automatically after some preset time period (5 seconds by
default) if no more free-fall or movements is detected.
You may also find the HDD protection
icon at the task bar.
When the icon shows green, it means that the HDD protection
function is on. When the icon shows red, it means that the HDD
protection function is off.
23
LCD Screen
10.4” XGA (1024x768) TFT LCD
LED Backlight
Luminance: 165 nit (minimum), 240 nit (typical)
Contrast ratio: 120 (minimum), 250 (typical)
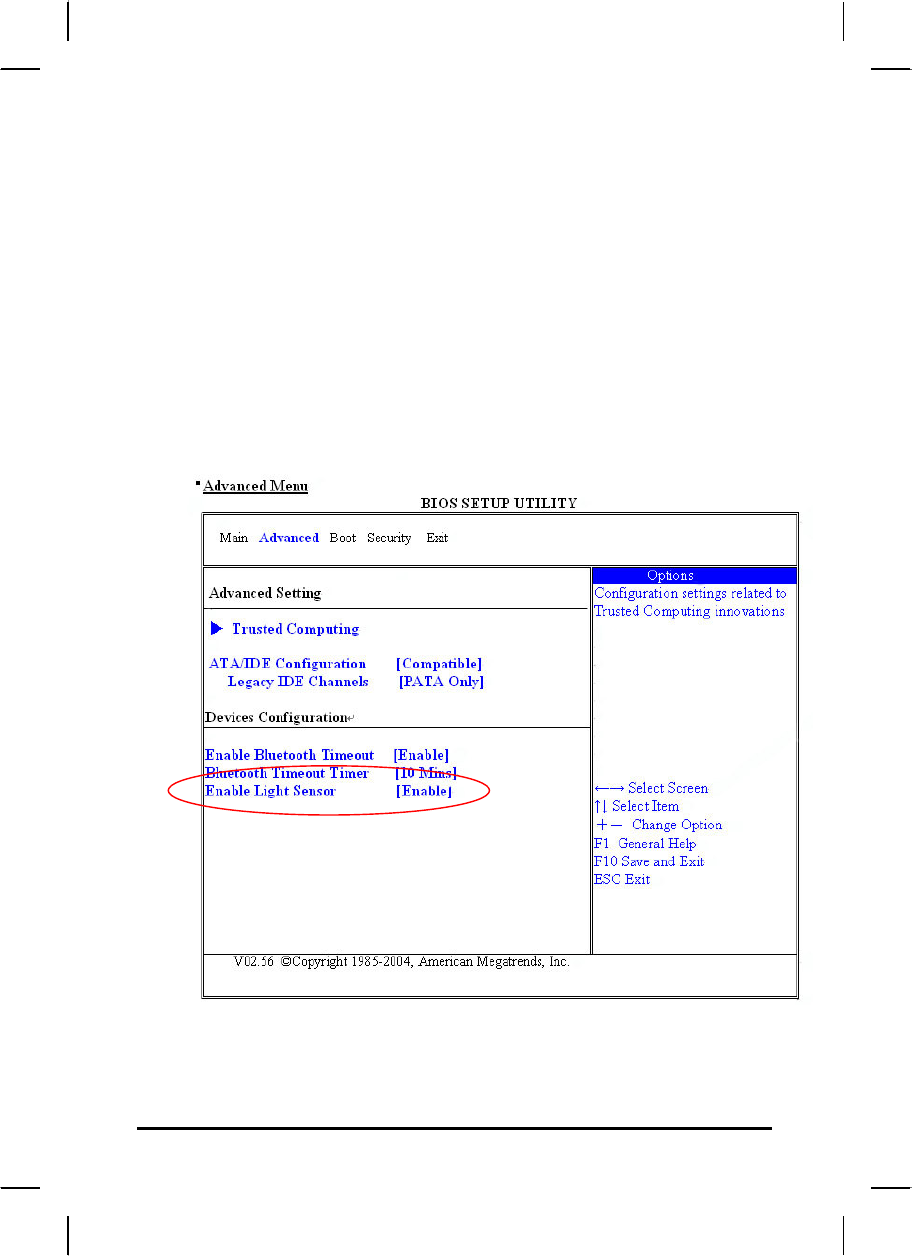
Light Sensor
The built in ambient light sensor is to adjust the brightness of LCD.
This will be performed automatically while in battery mode for saving
power, and can be enabled/ disabled through setting in the BIOS.

24
Touch Screen
Calibration software will be provided for use by users
Calibration and precision will be retained at least 72 hours of full time
use, except for below:
1. Frequently abnormal power the unit off
2. Reinstall the OS on the unit
3. Expose the unit to the environment which has great temperature
difference than the one performs the calibration
Palm rejection
This MCA features palm rejection function which refers to the touch
screen’s resistance to making the cursor jump when you inadvertently
touch the screen with the palm of your hand.
25
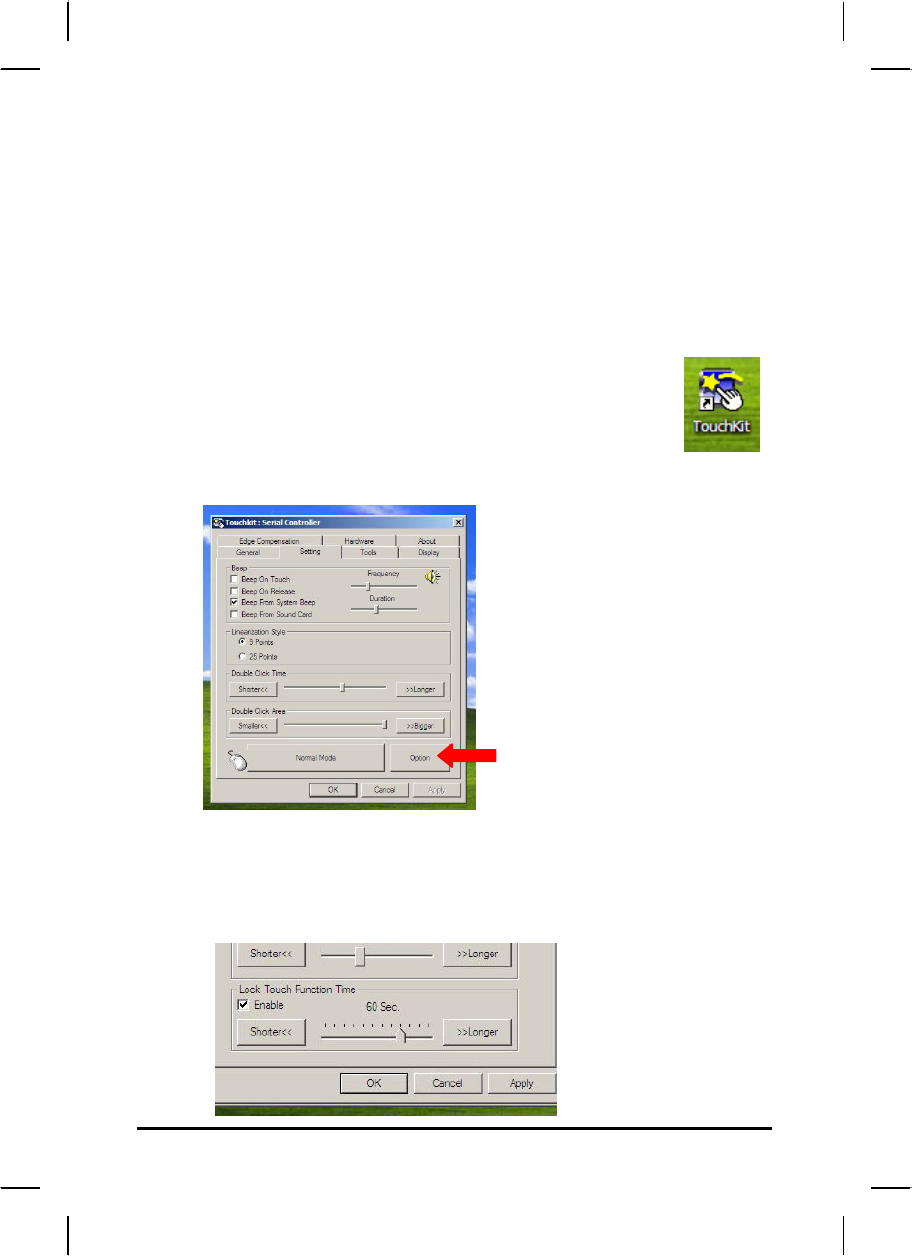
To lock/unlock the touch screen
(Factory Default: Lock Touch Function Time UNSELECTED)
To lock: 1. Manually (FN + SAS key)
2. Automatically (after some idle time presetting by user)
To unlock: Manually (FN + SAS key)
*If you want to lock the touch screen automatically, you need to
follow following instruction:
(1) Double click the Touchkit icon to launch Touchkit
application.
(2) Select [Setting] [Option]
(3) You will find [Lock Touch Function Time] section on the bottom.
Select [Enable] to activate this function. You can also adjust the
idle time in this section.
26
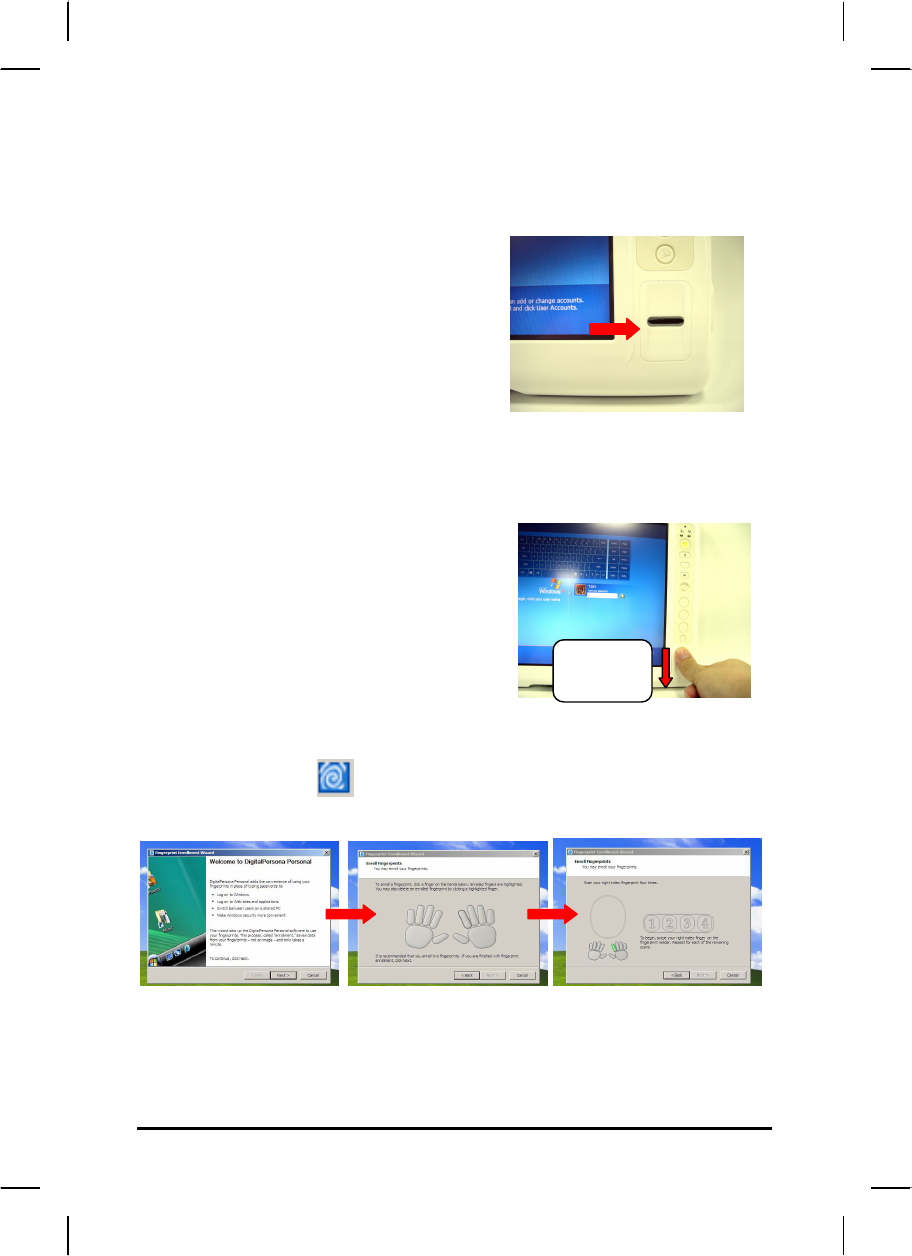
Information about Fingerprint function
With use of fingerprint authentication, you
can log on to Windows by only
authenticating fingerprints that have
previously been registered.
With fingerprint authentication, you can omit entering a user name and a
password by just sliding your finger onto the fingerprint sensor at the time
of logging in homepages or logging on Windows.
Tips:
*Hold your finger and scan at the same
angle each time.
*Don’t swipe too fast or too slow or it will
make a capture unsuccessful.
User will find an icon on Windows task bar.
Please double click on it to execute fingerprint software.
*Up to 10 sets of fingerprint data can be saved in the system. Users who
use fingerprint authentication can be added and deleted.
Sliding
Direction
27
Information about Barcode scanner
Barcode scanner with red light scanning, supports 1D/2D barcode.
1D symbologies:
EAN/UPC, RSS, Code 39, Code 128, ISBN, ISBT, Interleaved, Matrix, Industrial
and Standard 2 of 5, Codabar, Code 93/93i, Code 11, MSI, Plessey, Telepen,
Postal Codes
2D symbologies:
Data Matrix, PDF417, Micro PDF 417, Maxicode, QR, Aztec, EAN, UCC composite
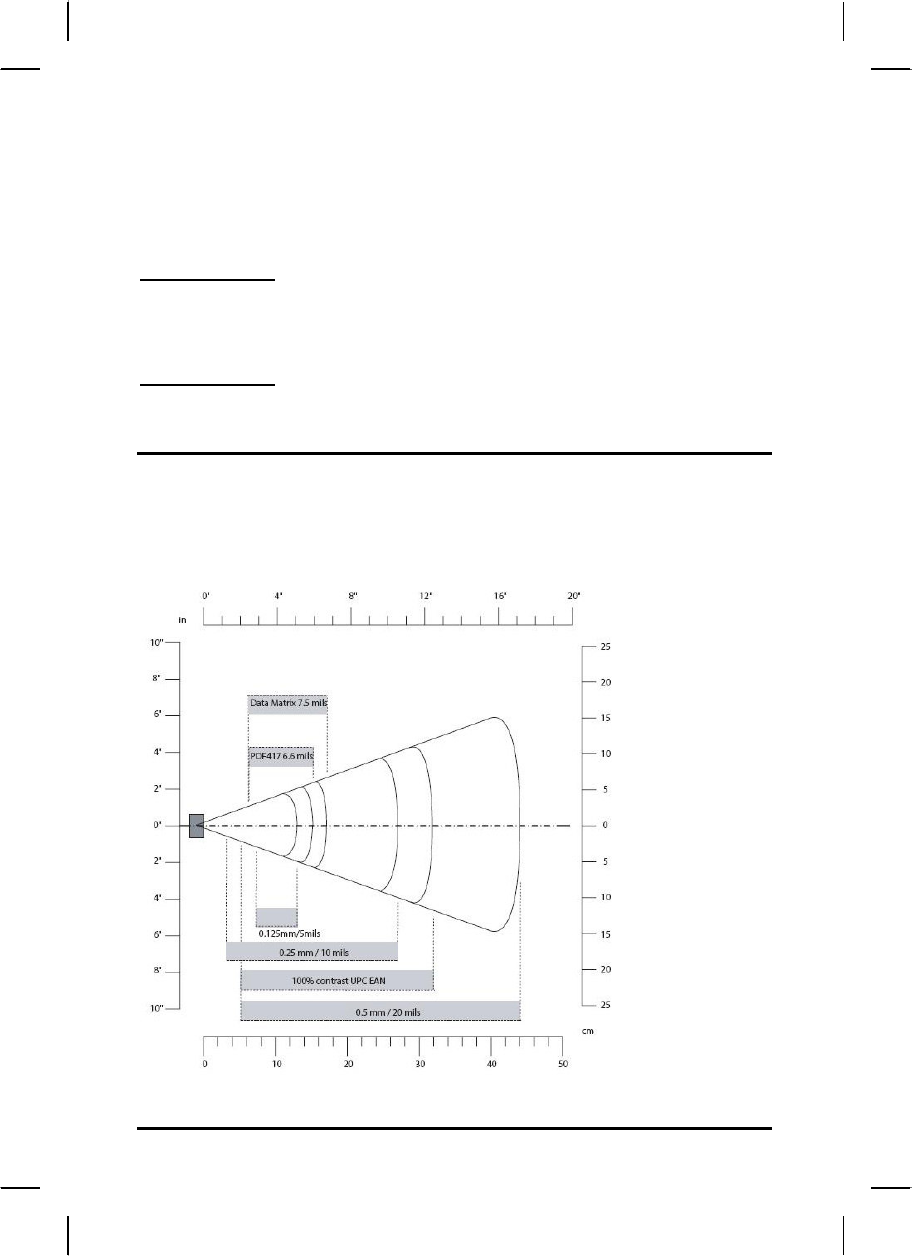
Reading Distances
All distances are measured from the front of a non-integrated imager using Grade A
symbologies. An exit window reduces reading distances by about 4%.
Typical Reading Distances
Typical Reading Distances: These distances are measured in an office
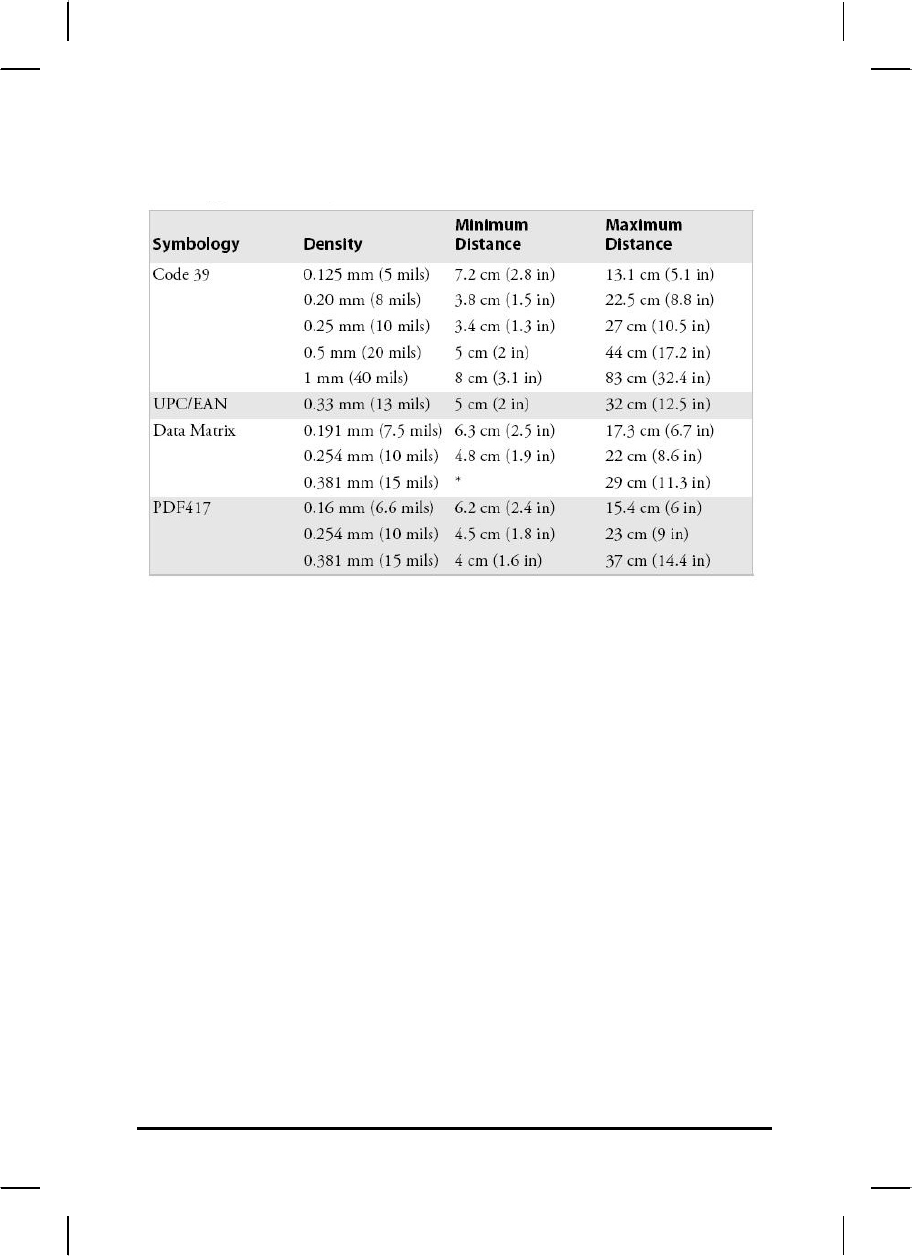
28
environment (250 lux).
Typical Reading Distances
*Minimum distance depends on symbology length and scan angle.