Twinhead TABLETPC Tablet Computer with 802.11b and Bluetooth User Manual Users manual part 2
Twinhead International Corporation Tablet Computer with 802.11b and Bluetooth Users manual part 2
Twinhead >
Contents
- 1. Users manual part 1
- 2. Users manual part 2
- 3. Users manual part 3
Users manual part 2

A
Ap
pp
pe
en
nd
di
ix
x
C
C
I
In
ns
st
ta
al
ll
la
at
ti
io
on
n
o
of
f
t
th
he
e
B
Bl
lu
ue
et
to
oo
ot
th
h
Appendix C — Installation of the Bluetooth
64
Setup for Windows 98SE/2000/ME/XP
For PCMCIA Bluetooth card (98SE/ME) or CF Bluetooth card
(98SE/2000/ME/XP), please install the driver before installing
Bluetooth software, the driver can be located in BTCF (for CF
Bluetooth) or BTPCMCIAMe (for PCMCIA Bluetooth) of the driver CD.
For PCMCIA Bluetooth card (2000/XP) or USB Bluetooth adapter
(98SE/2000/ME/XP), please install Bluetooth software before inserting
the Bluetooth device.
Install PCMCIA (under Win98SE/Me) and CF (under Win98SE/Me/2000/XP)
Bluetooth card driver
Please follow the steps below to install driver for PCMCIA Bluetooth card.
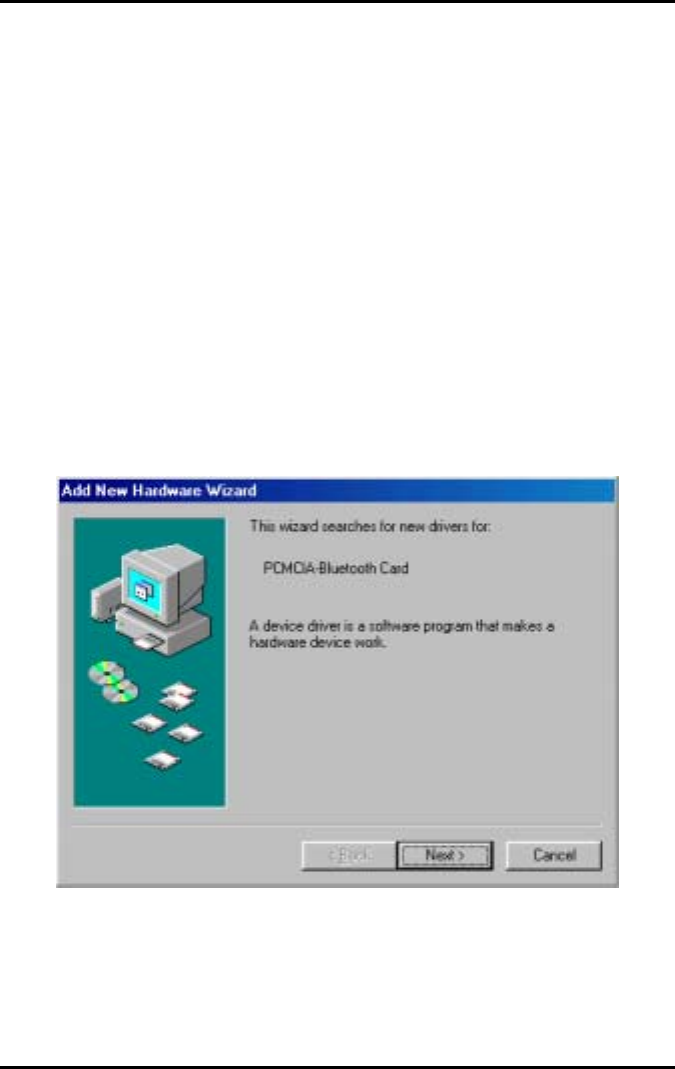
1. Insert the PCMCIA Bluetooth adapter in the PCMCIA slot of your
notebook and place the installation CD in the CD-ROM.
2. System will automatically detect the card. Select "Install the
software automatically (Recommended)" and click "Next".
Installation of the Bluetooth — Setup for Windows 98SE/2000/ME/XP
65
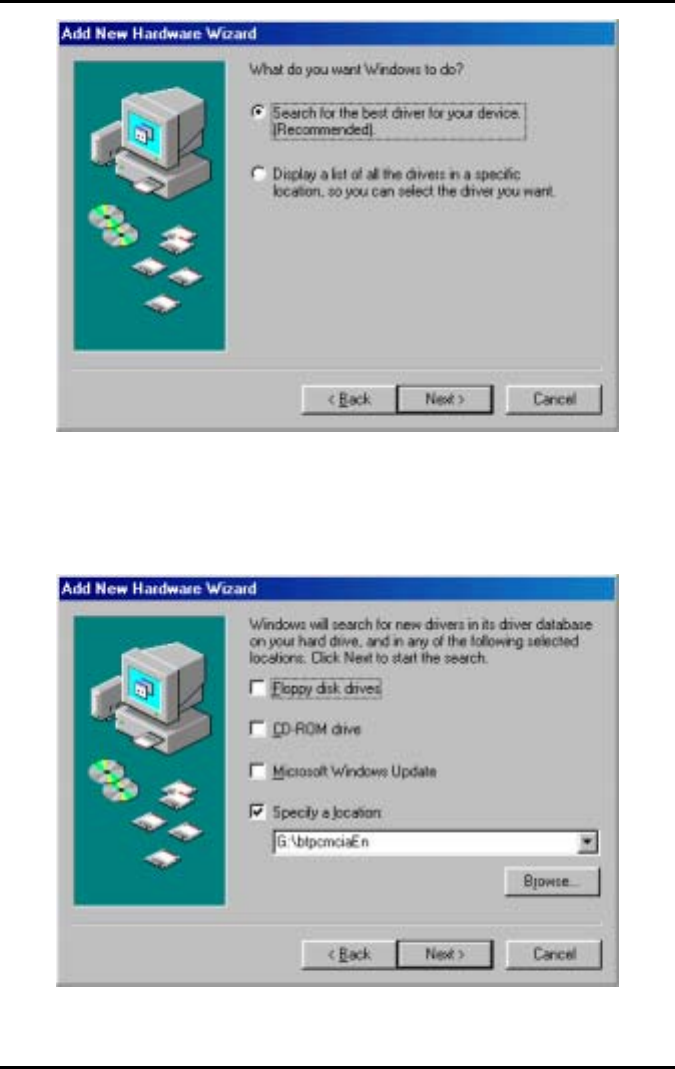
3. If the driver was not found automatically, please click "Install
from a list or specific location (Advanced)" and direct the system
to the BTPCMCIAMe directory on your CD-ROM for the
appropriate driver. (For CF card, direct the system to the BTCF
directory)
Appendix C — Installation of the Bluetooth
66
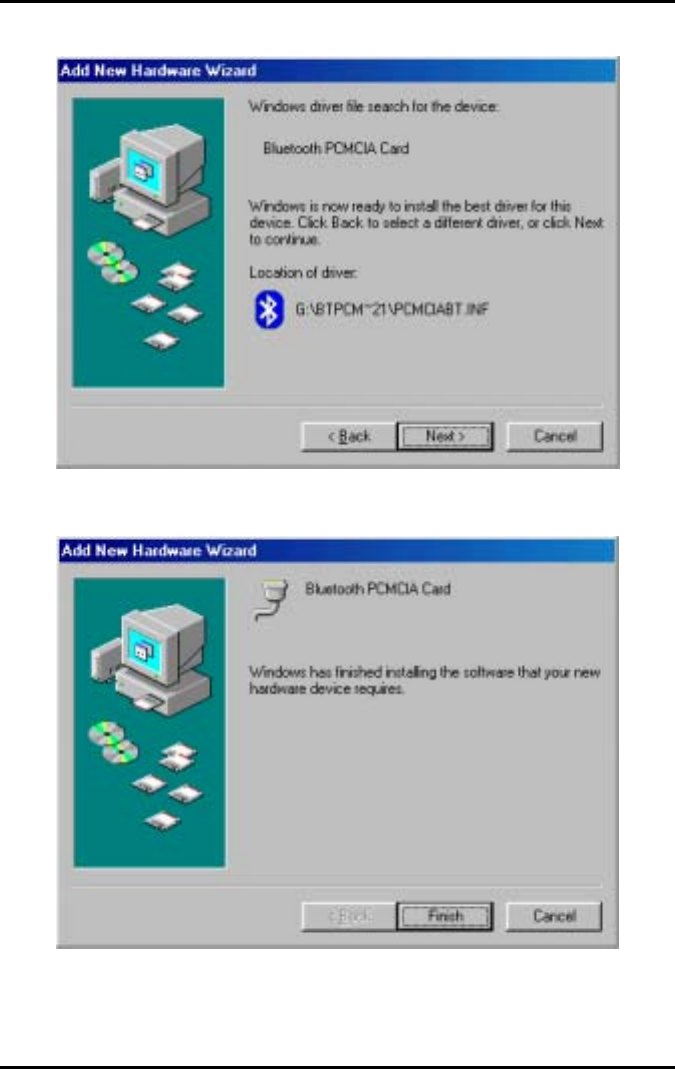
4. Press “Next” to continue installation.
5. Click the "Finish" button to complete the driver installation
process for PCMCIA Bluetooth Card.
6. The driver installation process of CF Bluetooth card is similar to
the PCMCIA Bluetooth card, please refer to the section above.
Installation of the Bluetooth — Setup for Windows 98SE/2000/ME/XP
67
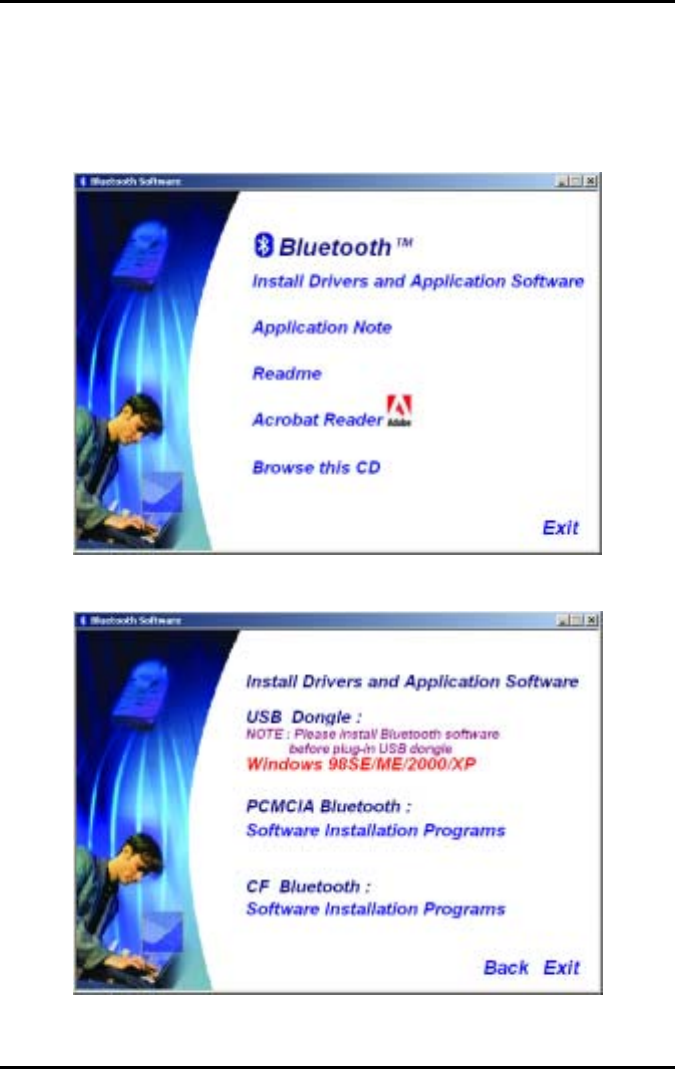
Installing Bluetooth software for Windows
Place installation CD into PC and the setup menu should launch
automatically.
If the setup menu does not launch automatically, use Windows Explorer to
navigate to the appropriate CD-ROM drive and run "Bsetup".
(1) Please select your device.
Appendix C — Installation of the Bluetooth
68
(3) Complete the following steps to install Bluetooth software:
(a) Exit all applications.
(b) InstallShield Wizard setup dialog box will automatically be displayed.
(c) Follow the instructions on screen:
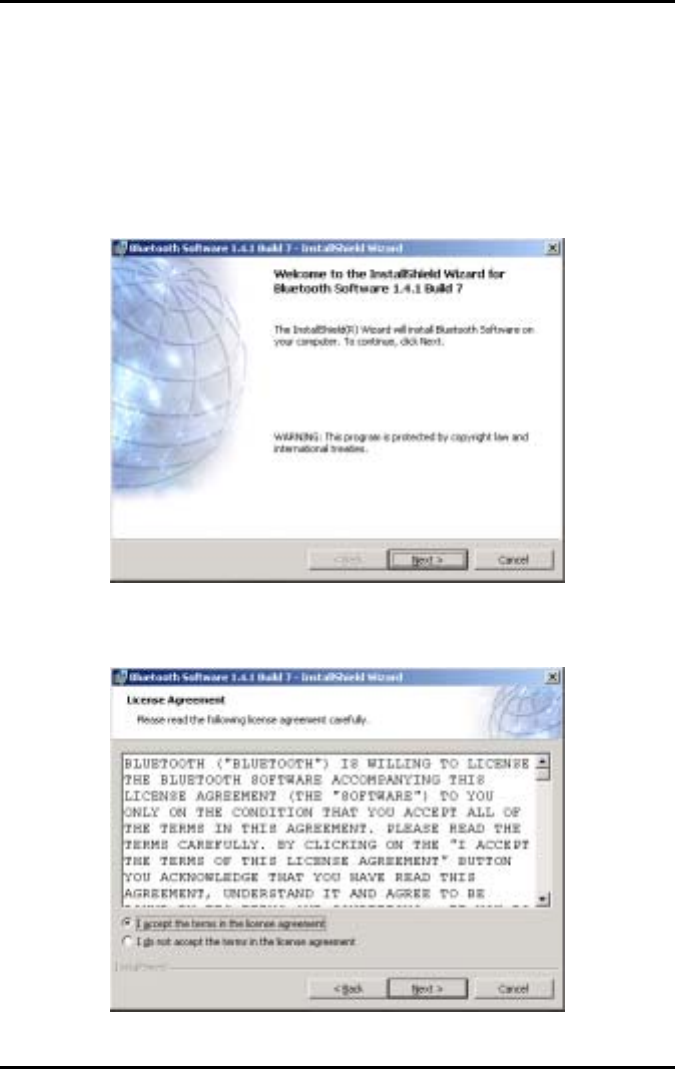
(d) On the Welcome screen, click the Next button.
(e) When the License Agreement screen is displayed, read the License
Agreement, then click the radio button to the left of "I accept the terms in
the license agreement" and click the Next button.
Installation of the Bluetooth — Setup for Windows 98SE/2000/ME/XP
69
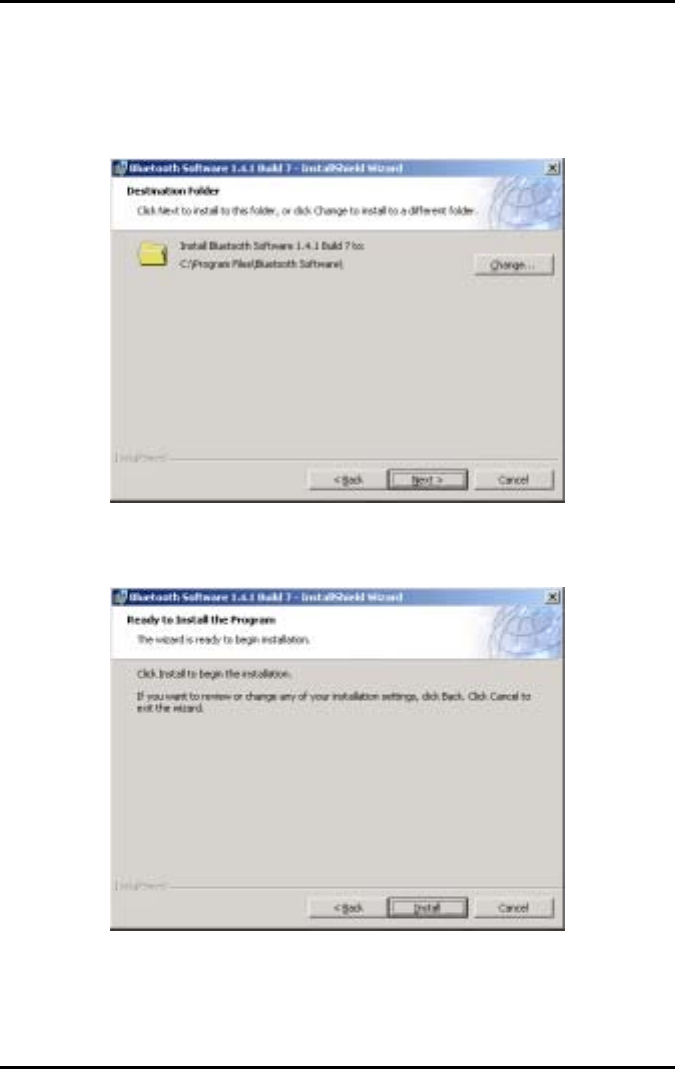
(f) You can choose the destination folder in your system, if you do not want
to change the destination folder please click “Next“. On the Destination
Folder screen, click the Change button to browse to a new destination
folder for the Bluetooth software. Otherwise, click the Next button to accept
the default folder.
(g) The system is ready to install the Bluetooth software. If you need to
review or change any settings, click the "Back" button. Click the "Cancel"
button to exit the Wizard. Otherwise, click the "Install" button.
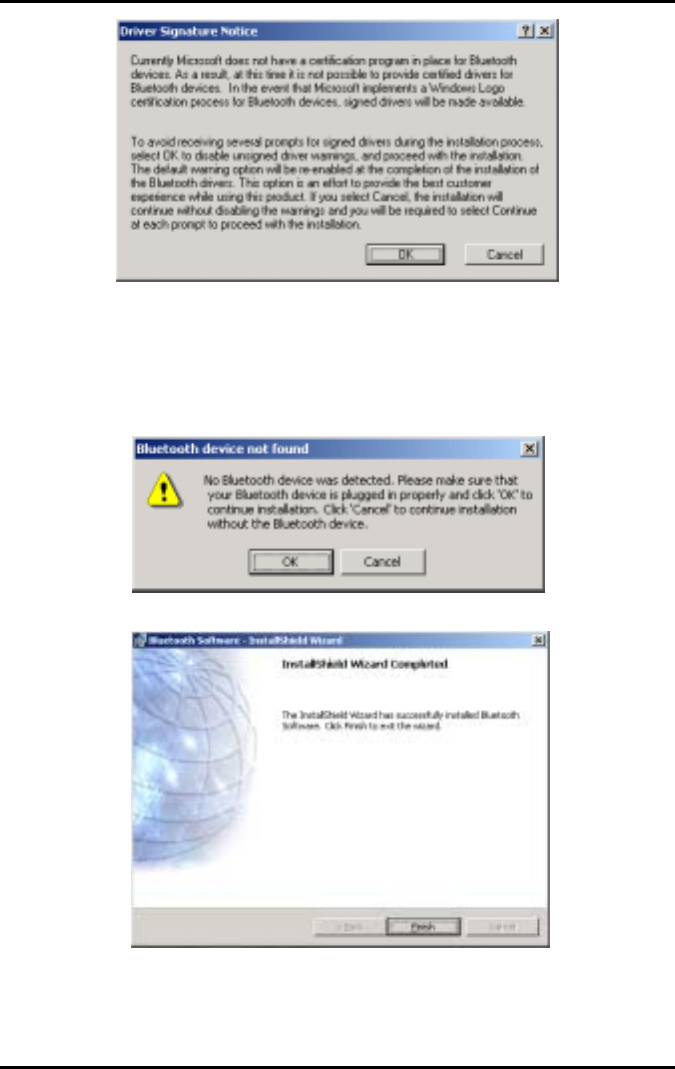
(h) For Windows 2000/XP users, system will popup a "Driver Signature
Notice", please click the "OK" button.
Appendix C — Installation of the Bluetooth
70
(i) During the installation of USB Bluetooth adapter, system will try to detect
your Bluetooth device, please make sure your Bluetooth device is plugged
in properly. If the USB Bluetooth adapter was not plugged in previously, a
message box as below will pop up, please plug it in now and click "OK" to
continue, or you can click "Cancel" to continue the installation without the
Bluetooth device.
(j) When the installation is completed, please click the "Finish" button.
(k) Click "Yes" to restart your computer. If you plan to restart later,
click "No".

Installation of the Bluetooth — Setup for Windows 98SE/2000/ME/XP
71
Appendix C — Installation of the Bluetooth
72
Application note for Windows 98SE/ME/2000/XP
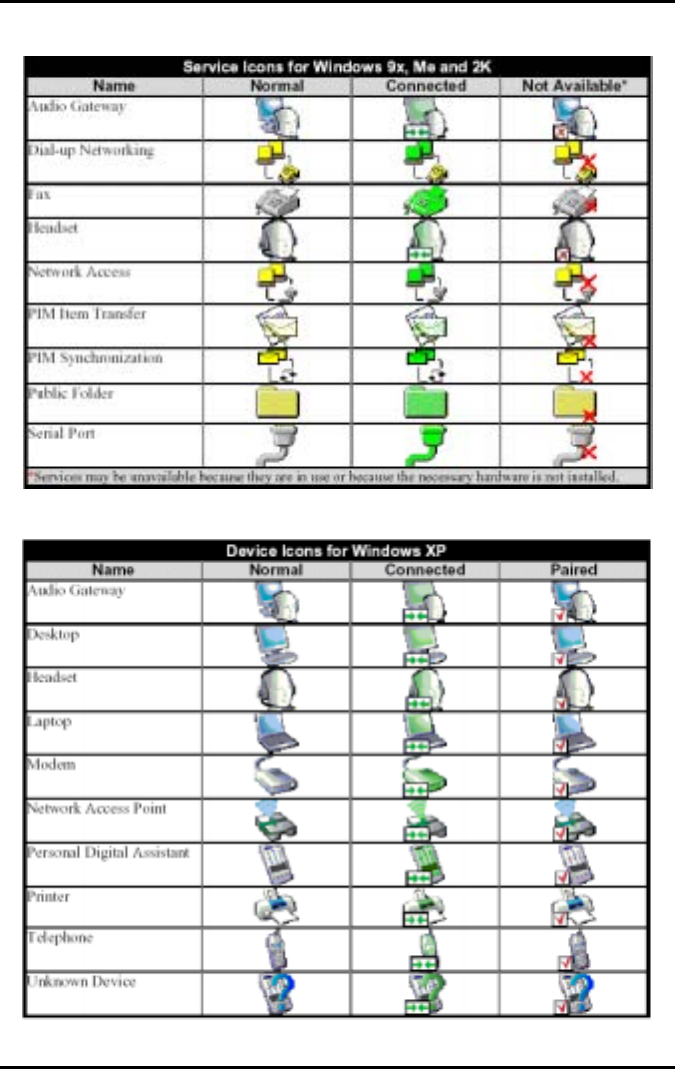
Icons used for Bluetooth devices and services
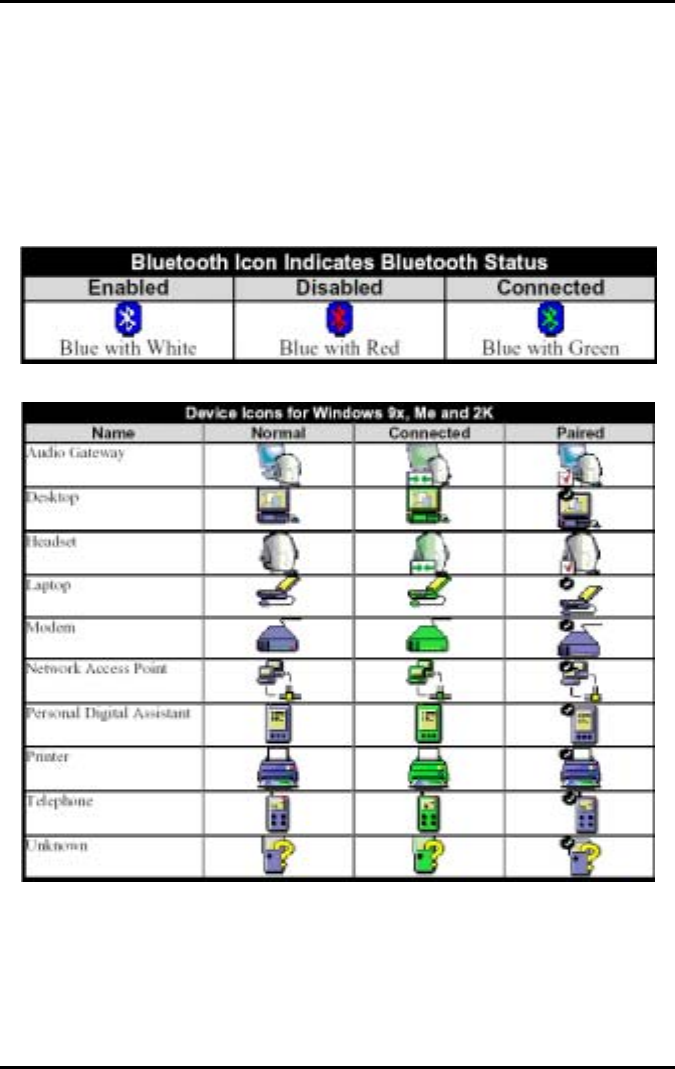
Bluetooth icons provide at-a-glance feedback about a device or service's
status by changing appearance.
The Bluetooth icon in the Windows system tray provides feedback about
Bluetooth status.
Basic Bluetooth Icon
Device Icons for Windows 98SE, Me and 2K
Installation of the Bluetooth — Application note for Windows 98SE/ME/2000/XP
73
Service Icons for Windows 98SE, Me and 2K
Device Icons for Windows XP
Appendix C — Installation of the Bluetooth
74
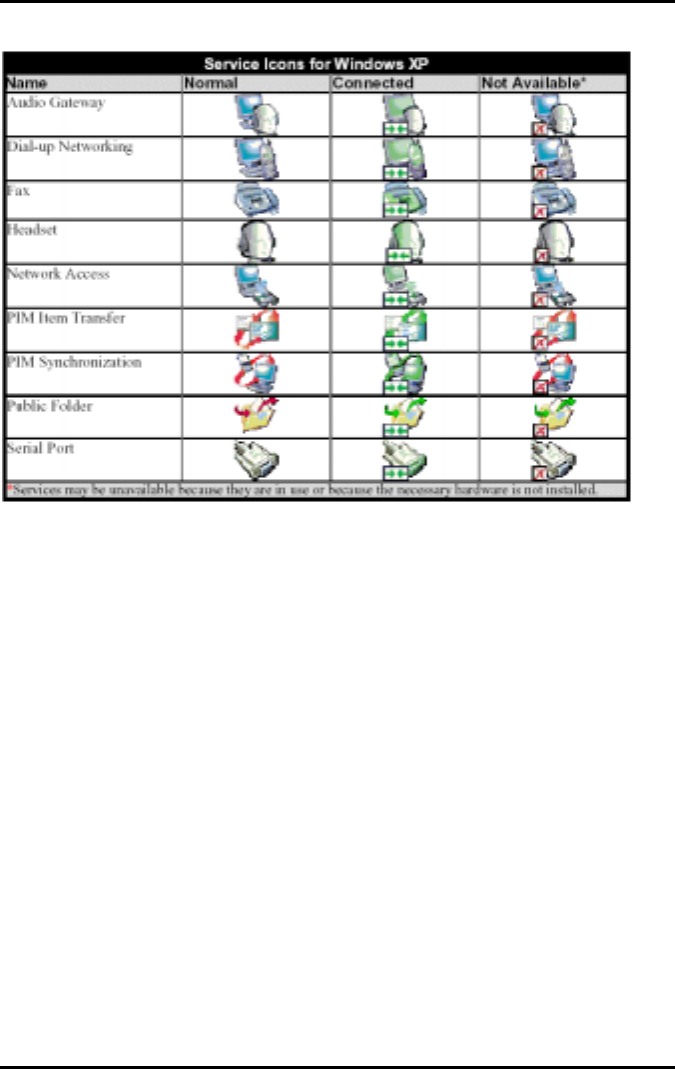
Service Icons for Windows XP
NOTE: Only available services are displayed in the menus
Installation of the Bluetooth — Network sharing setting for Windows
75
Network sharing setting for Windows
The Network Access service permits a Bluetooth enabled PC (client) to
access the Internet via another Bluetooth enabled PC (Server) that already
has an Ethernet connection.
Windows network sharing setting
PC to PC (Windows 2000 or Windows XP
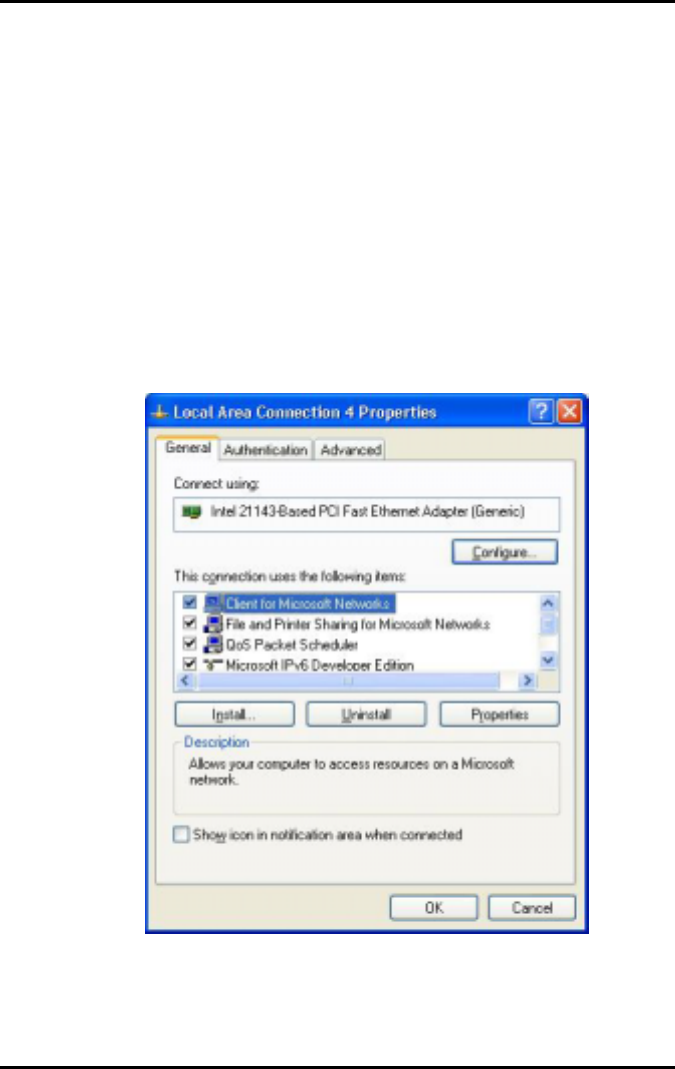
1. To enable Internet Connection Sharing on the server PC
2. Click on Start menu-->Settings -->Network and Dial-up
Connections and find your Local Area Connection (LAN) that is
connected to the Internet.
3. Right click the active LAN connection to open the "Properties"
dialog box.
Appendix C — Installation of the Bluetooth
76
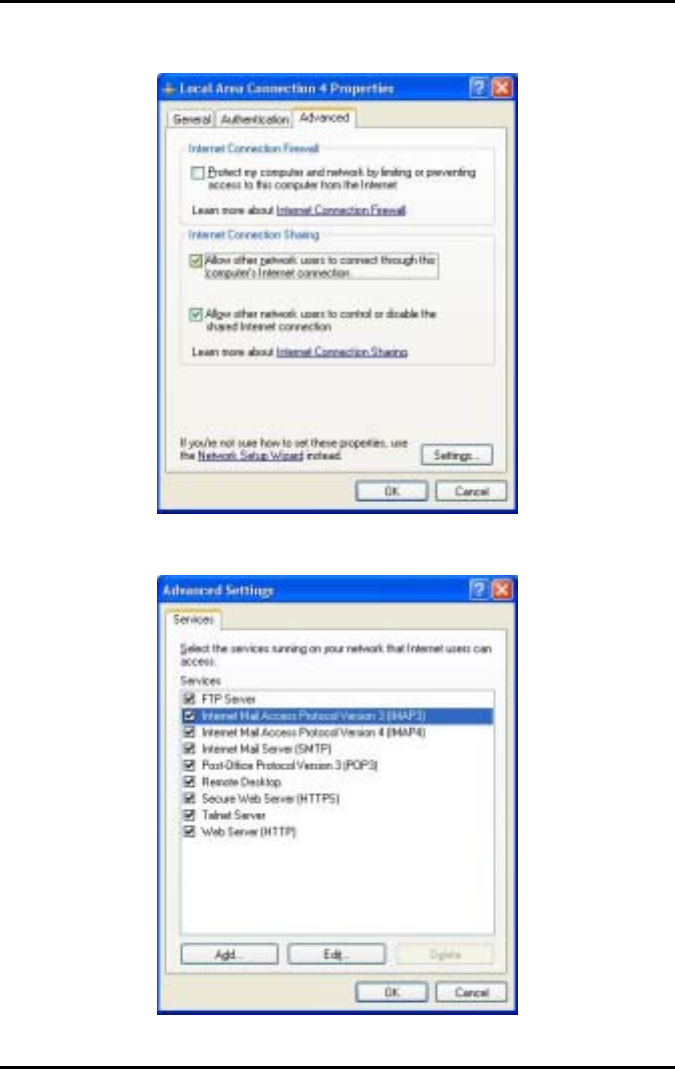
4. Click on "Advanced" tab and select the "Internet Connection
Sharing" checkbox to enable Internet sharing.
5. Click on "Settings..." button and select the services you wish to
provide other Bluetooth devices. Click "OK" to save the changes.
Installation of the Bluetooth — Network sharing setting for Windows
77
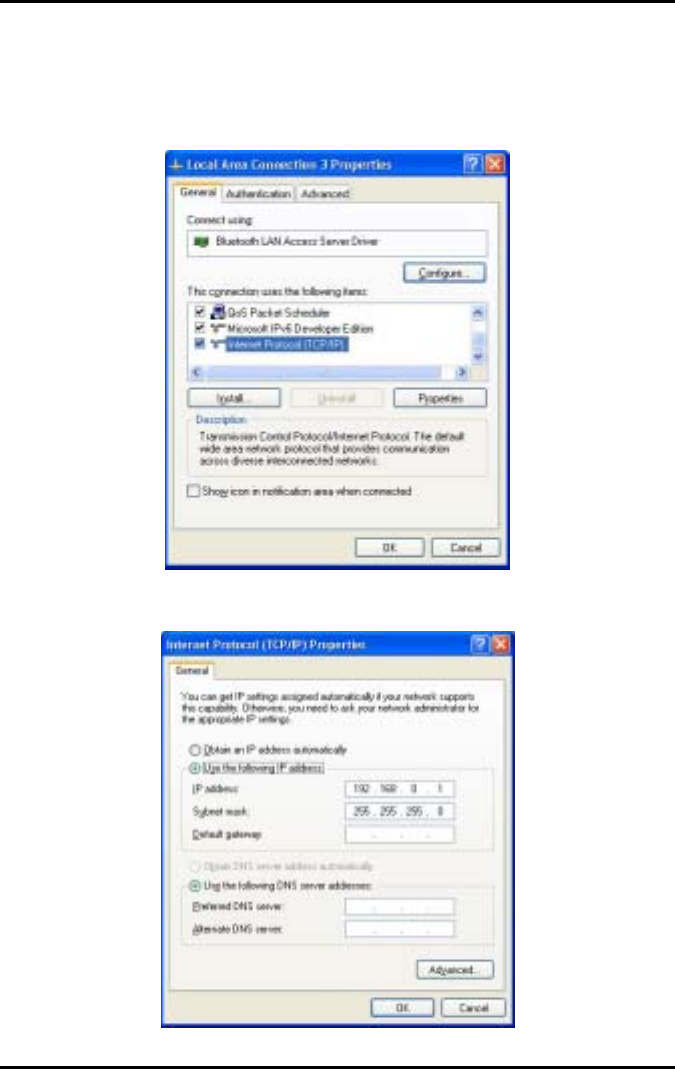
6. Go back to the "Network and Dial-up Connections" window, right
click the "Bluetooth LAN Access Server Driver" and select
"Properties".
7. Under "General" tab, click on "Internet Protocol (TCP/IP)" and
"Properties".
8. Under "General" tab, assign a virtual IP as shown in the picture
below. Then click "OK" to save the changes.
Appendix C — Installation of the Bluetooth
78
9. This allows the server PC to act as a DHCP server towards the
client PCs.
NOTE: For Win98SE and WinMe, please download and
install WinRoute (or similar program) on the Server
PC to allow DHCP service.
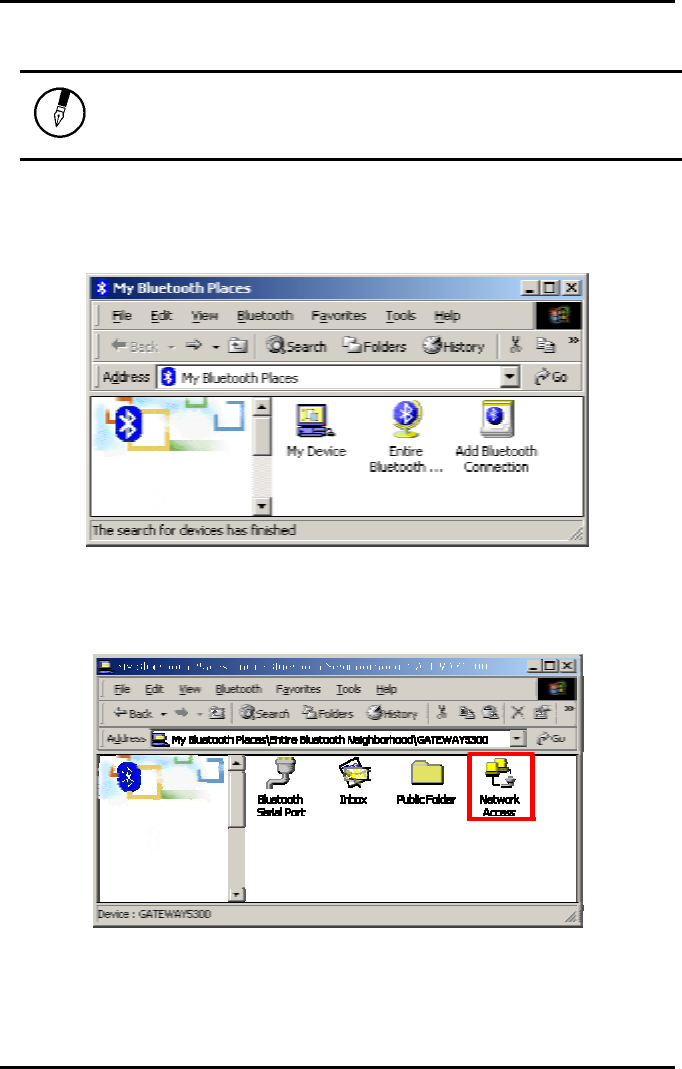
10. On the client PC, launch the Bluetooth software stack by clicking
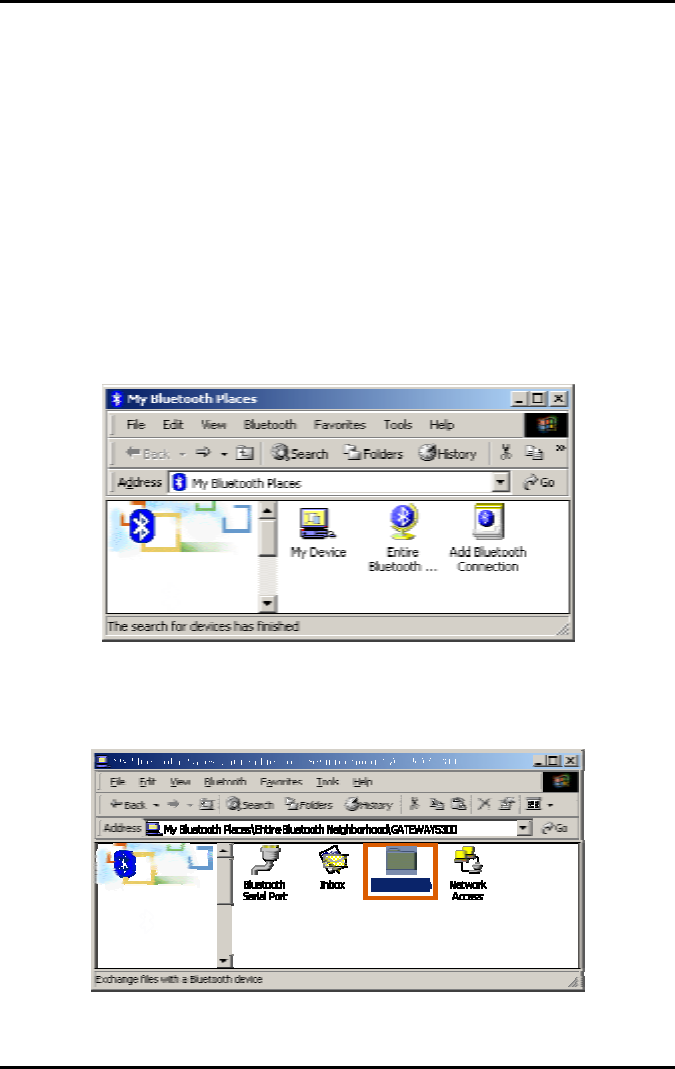
the "My Bluetooth Places" icon located on the desktop.
11. 11. Double click the "Entire Bluetooth Neighborhood" icon to
search for other Bluetooth devices nearby.
12. After searching is completed, locate the computer name of the
server PC and double click it to discover the Bluetooth services it
has to offer. (i.e. Bluetooth Serial Port, Dial-up Networking, File
Transfer, Network Access, etc.).
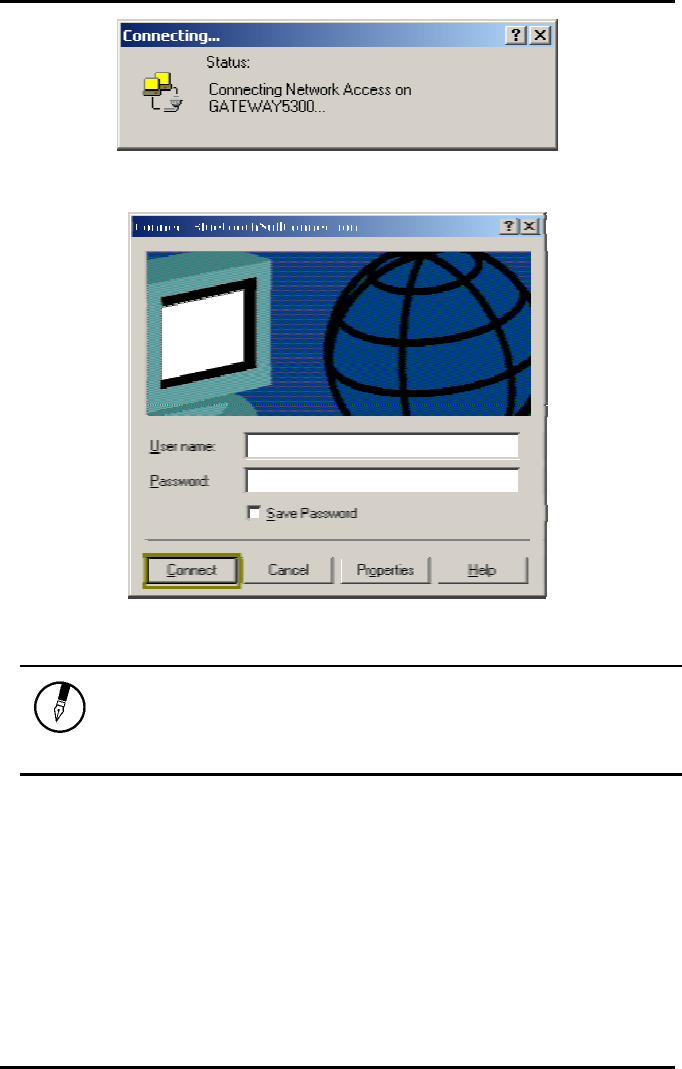
13. Click on the "Network Access" icon to connect to the shared
Internet connection on the server PC.
Installation of the Bluetooth — Network sharing setting for Windows
79
14. Click OK without entering any username or password. If one is
already present, click OK anyway and it will still connect.
15. Now you can access the Internet via Bluetooth
Note: If your PC accesses the Internet via a proxy
server, remember to configure the proxy setting of
you browser program in the client PC. Consult your
MIS personnel if you're not sure what to set.
Appendix C — Installation of the Bluetooth
80
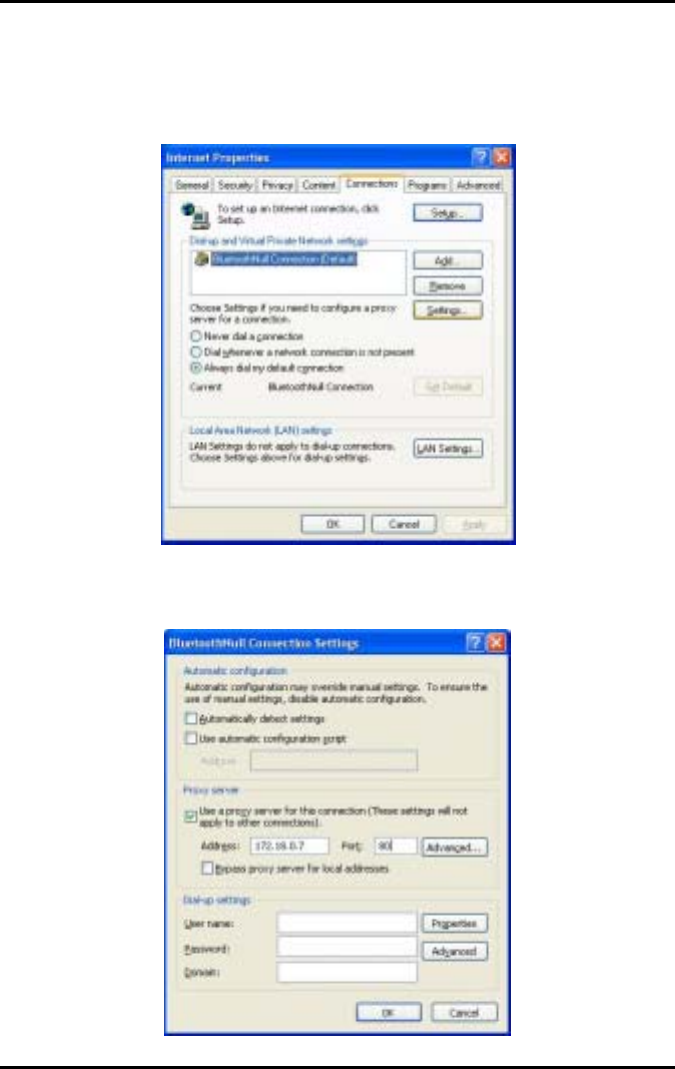
Proxy setup
1. To set up proxy, right click "Internet Explorer", select "Properties",
select "Connections" tab. Select "BluetoothNull Connection" and
click on "Settings...”
2. Select the "Proxy server" checkbox and enter the proxy address
of you company and Port number. Then click “OK” to save the
changes.
Installation of the Bluetooth — File transfer setting for Windows
81
File transfer setting for Windows
The File Transfer service allows one Bluetooth device to perform file
operations on the default File Transfer directory (and the folders and files it
contains) of another Bluetooth device.
File transfer setting for Windows
PC to PC
1. After successful USB adapter setup on two PCs, launch the
Bluetooth software stack on both PCs by clicking the "My
Bluetooth Places" icon located on the desktop.
2. On one PC only, double click on "Entire Bluetooth
Neighborhood" icon to search for other Bluetooth devices
nearby.
3. After searching is completed, locate the name of PC that you
wish to transfer the file to and double click it to discover the
Bluetooth services it has to offer (i.e. Bluetooth Serial Port, Dial-
up Networking, File Transfer, Network Access, etc.).
Appendix C — Installation of the Bluetooth
82
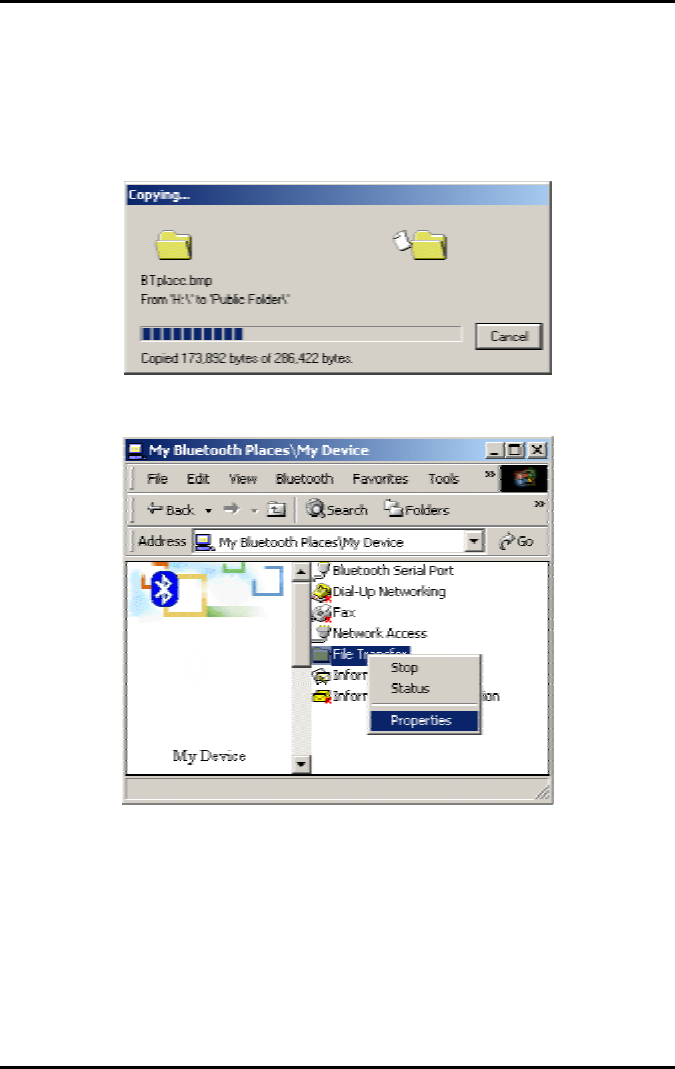
4. Double click the "Public Folder" icon to open the Bluetooth
shared folder on the other PC.
5. Locate the file you wish to transfer to that PC and drag it into the
"Public Folder" window.
6. At this time, a window will pop up to indicate that a file transfer
connection is being established, and then file transfer will begin.
7. The file will be opened once the transfer is completed, if the
"Start Automatically" checkbox is selected.

Installation of the Bluetooth — Dial-up networking setting for Windows
83
Dial-up networking setting for Windows
The Dial-up Networking service permits a Bluetooth client to use a modem
that is physically connected to a different Bluetooth device (the server).
After the Bluetooth wireless connection is established the client can use the
server's modem as if it were a local device on the client.
To establish a Dial-up Networking session:
Dial-up networking setting for Windows
Connections are initiated from the client:
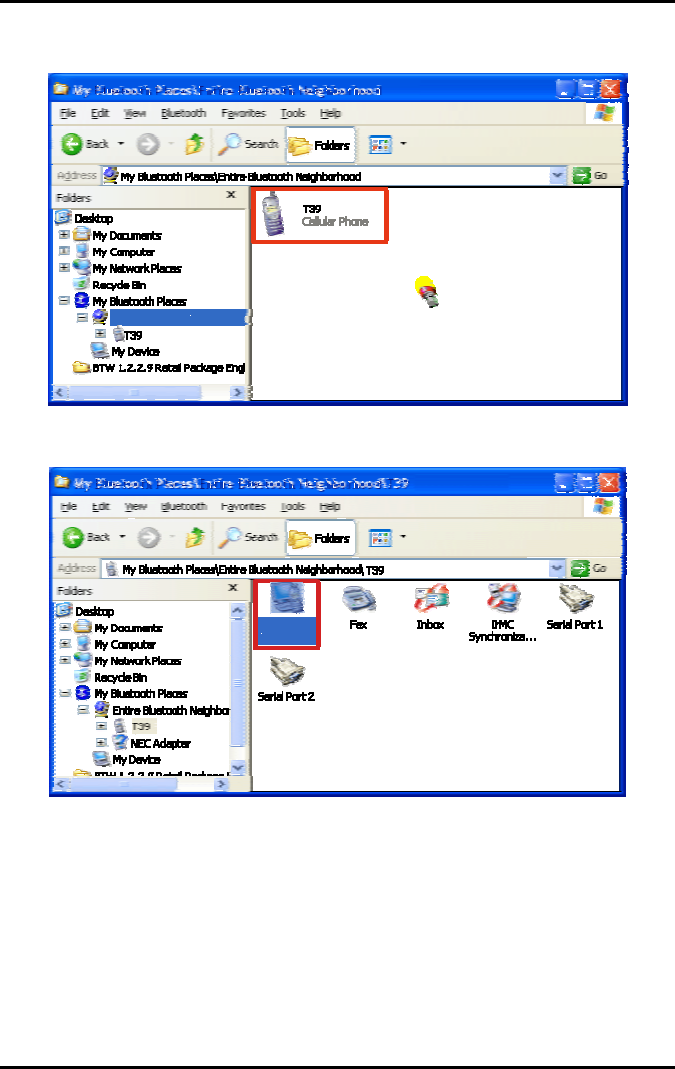
1. On the client, in the Folders pane of "My Bluetooth Places",
select "Entire Bluetooth Neighborhood".
2. In the right pane of "Entire Bluetooth Neighborhood", right-
click anywhere except on a device name and select “Refresh”
from the pop-up menu.
3. In the Folders pane of "My Bluetooth Places", right-click the
server that will provide the Dial-up Networking Service and
select Discover Available Services from the pop-up menu to
Appendix C — Installation of the Bluetooth
84
update the available services list. The available services will be
displayed in the right pane of "My Bluetooth Places".
4. In the right pane of "My Bluetooth Places", double-click "Dial-up
Networking".
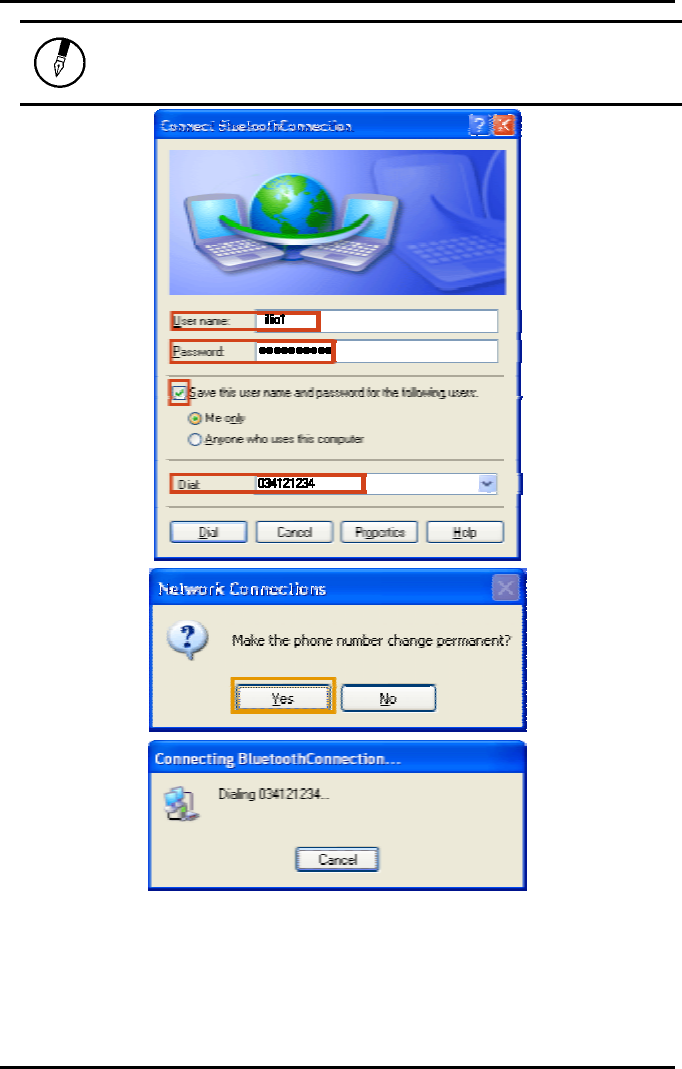
5. In the “Connect To” dialog box, type in your user name,
password, and the phone number to be dialed, and then click
the "Dial" button.
6. Select the "Save password" checkbox and the dialog box will
not appear for subsequent connections to the same phone
number. You can now open a web browser and connect to the
Internet.
Installation of the Bluetooth — Dial-up networking setting for Windows
85
Note: When using the GPRS Dial up function, you do
not have to type in the user name or password.

Appendix C — Installation of the Bluetooth
86
To close a Dial-up Networking connection
1. On the client, in the Folders pane of "My Bluetooth Places",
select (highlight) the device that is providing the Dial-up
Networking service.
2. In the right pane of "My Bluetooth Places", right-click "Dial-up
Networking" and then select "Disconnect Dial-up Networking"
from the pop-up menu.
FAX setting
The Fax service allows a Bluetooth client to wirelessly send a fax using a
device that is physically attached to a Bluetooth server.
FAX setting for Windows
To send a Fax
Connections are initiated from the client:
1. On the client, in the Folders pane of "My Bluetooth Places",
select "Entire Bluetooth Neighborhood".
2. In the right pane of "Entire Bluetooth Neighborhood", right-click
anywhere except on a device name and select Refresh from the
pop-up menu.
3. In the Folders pane of "My Bluetooth Places", right-click the
server that will provide the Fax service and select "Discover
Available Services" from the pop-up menu to update the
available services list. The available services will be displayed in
the right pane of "My Bluetooth Places".
4. In the right pane of "My Bluetooth Places", double-click Fax.
After the Fax connection is established, open or create the
document to be faxed and use the "Print" or "Send to Fax
Recipient" option available in most applications. The Fax
connection closes automatically when the transmission is
completed.

Installation of the Bluetooth — PIM Item Transfer setting
87
PIM Item Transfer setting
Overview
The Bluetooth PIM Item Transfer application allows this computer to send
and receive Personal Information Manager items to-and-from a remote
Bluetooth device. Item transfer can be accomplished several ways:
To send, receive or exchange business cards:
1. From Windows Explorer, My Bluetooth Places, right-click the
PIM Item Transfer service on a remote device and select the
appropriate option.or In the Windows system tray, right-click the
Bluetooth icon, select Quick Connect Business Card Exchange,
select a device from the list, select the appropriate option from
the shortcut menu, and then click OK.
2. From Windows Explorer, My Bluetooth Places, highlight the PIM
Item Transfer service on a remote device, and then, from the
Bluetooth menu on the Windows menu bar, select the
appropriate action.In addition to the business card options listed
above, you can also send Notes (*.vnt), Email (*.vmg) and
Calendar (*.vcs) items from this menu.
3. From within a supported Personal Information Manager, select
one or more items and then, from the PIM's File menu, select
Send to Bluetooth.Whether sent items are accepted by the
remote device is determined by how the remote device's PIM
Item Transfer service is configured.
Close a PIM Item Transfer Connection
This application closes the open connection automatically when its task is
complete.
Configure PIM Item Transfer
The Bluetooth Configuration Panel > Client Applications > PIM Item
Transfer > General tab provides options to configure:
• Click the application name to change it, highlight the existing
name and enter the new name.
• Enable or disable secure connection. To enable secure
connection, place a checkmark in the box.
• How your business card is handled when it is requested by a
remote device. The Send My Business Card options are: