Tyco Safety Canada 00NB9001 Receiver User Manual Users guide
Digital Security Controls Ltd. Receiver Users guide
UserManual.wiki
>
Tyco Safety Canada
>
00NB9001 User Manual
>
Users guide
Contents
1.
Users guide
2.
Installation guide
Users guide
Navigation menu
Upload a User Manual
Namespaces
Wiki Guide
HTML
PDF
Info
Views
User Manual
Discussion / Help
Navigation
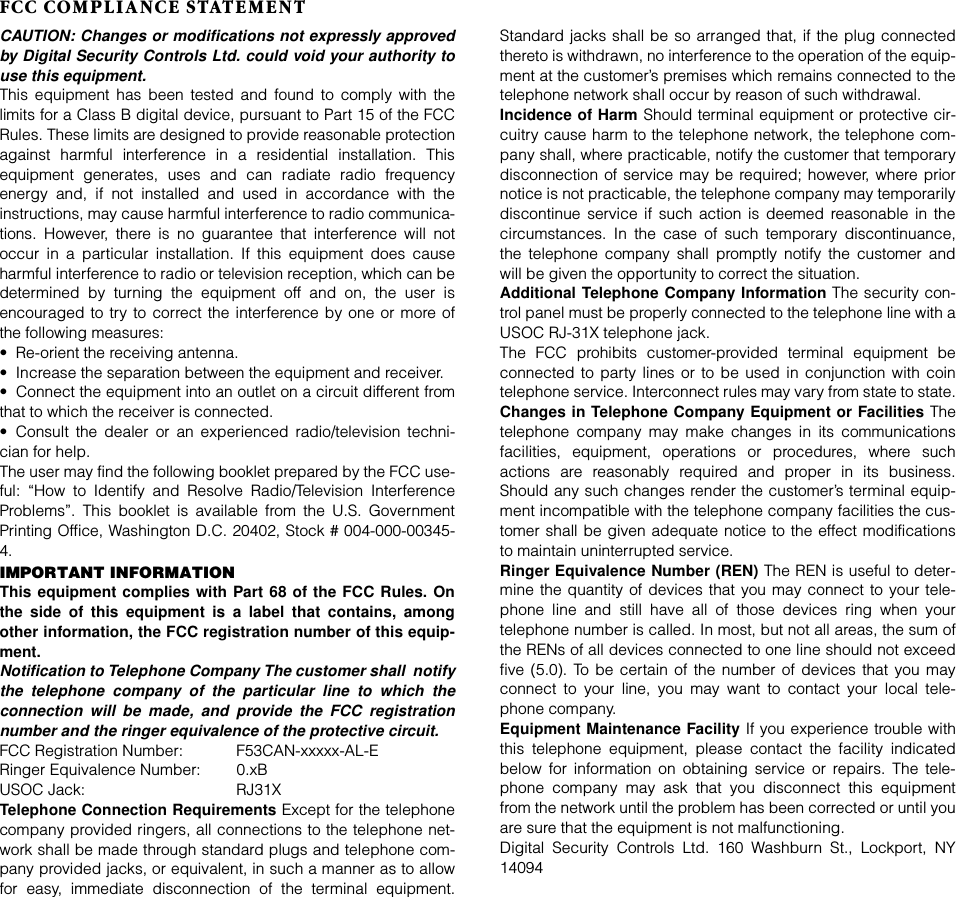
![Quick Reference GuideThe following chart lists the basic functions of your system, and the keys to press for each function. Refer to the listed page number for more information.NOTE: Some functions may not be available on your system. Ask your installer formore information.To do this: Press this: Page:Turn on system (Away): [access code], leave through entry/exit door 9OR press (if enabled)Turn on system (Stay):........................ [access code], do not leave premises 12OR press (if enabled)Turn off system:................................. [access code] 10Turn on system (No Entry Time): ........ [access code] 13Turn on system (Quick, if enabled): .... (from Ready state) 12Turn on rest of system (if Stay armed): OR press (if enabled) 12Exit premises when system on: .......... OR press (if enabled) 14Turn off zones (Bypass): ..................... [two-digit zone number(s)], to exit 18Test system ........................................ [master code] 20Send Fire message: ............................ (press & hold for 2 seconds, if enabled) 17Send Auxiliary message: .................... press & hold for 2 seconds, if enabled) 17Send Panic message: ......................... (press & hold for 2 seconds, if enabled) 17Silence fire alarm: .............................. [access code] 15Silence intrusion alarm: ..................... [access code] 16Turn door chime on/off: ...................... to toggle on or off 22OR press (if enabled)Check alarm memory: ....................... 16Check troubles .................................. 19Set time and date:............................. [master code] 21](https://usermanual.wiki/Tyco-Safety-Canada/00NB9001.Users-guide/User-Guide-89976-Page-3.png)
![4About This GuideThis NT9010 User’s Guide is for anybody using a NT9010 Security System. The NT9010 has many useful features. Read this guide thoroughly to learn how to use your security system. Ensure that all users of this system are equally instructed in its use. Important information about fire and burglary alarms is in section 3 on page 15. Read this section carefully!This guide provides step-by-step instructions for each function. Each key you need to press will be indicated by its symbol (e.g. ). For some functions, you will need to enter your access code (indicated by [access code]). To program other access codes, or to perform advanced functions, you will need to enter or your master code (indicated by [master code]). You can also use the master code to turn the system on and off.The NT9010 control unit and its lights and functions are described on pages 2 and 3. The Quick Reference Guide inside the front cover shows you the commands required to access basic system functions, and the page number each function is described on.See the Glossary on page 28 to learn more about words used in this manual. Fill out the “System Information” page with all of your zone information and access codes, and store this manual in a safe place for future reference.](https://usermanual.wiki/Tyco-Safety-Canada/00NB9001.Users-guide/User-Guide-89976-Page-8.png)
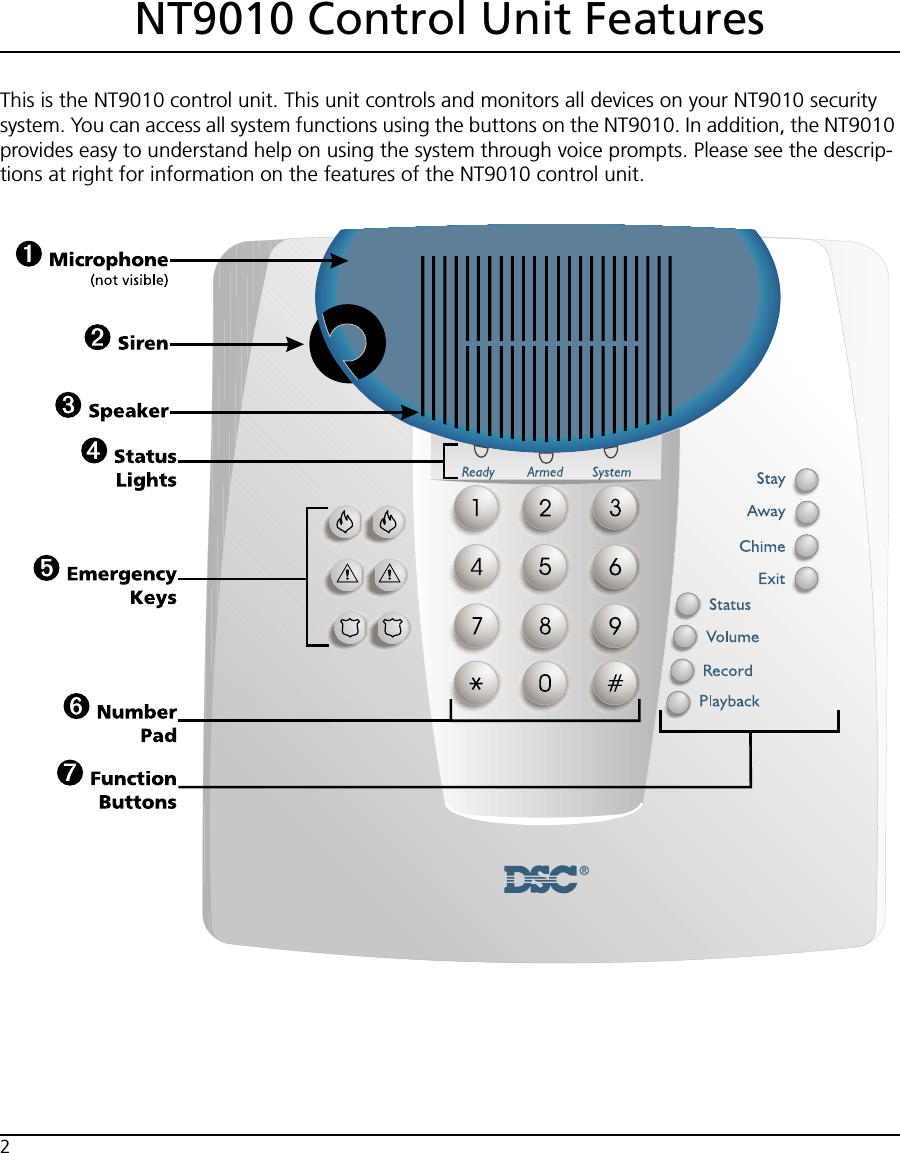
![7Section 2: Using Your NT9010 SystemOperating the System from the NT9010 Control UnitThe NT9010 control unit provides easy to understand help on using the system through voice prompts.If the system asks you to enter an access code, use the number pad on the unit to enter your 4- or 6-digit code.You can check the current status of your system by pressing and holding the Sta-tus button for two seconds. The NT9010 will announce whether the system is cur-rently on (armed), or off (disarmed), if any zones are currently open or bypassed (turned off), and if there are any trouble conditions currently present on the sys-tem.Operating the System from a TelephoneIf your installer has connected your NT9010 system to an incoming telephone line, you can access the system using a local telephone (a telephone on your premise). You may also be able to use the system from a remote telephone (a telephone not on your premise), if your installer has turned on this feature.Even though you can use a telephone to operate your system, the telephone will not automatically display or indicate system status or zones in alarm. Therefore, it is essential that you check the NT9010 control unit regularly for any changes in system status.CAUTION: For the security of your codes, DO NOT use a telephone with a redial button to arm or disarm your system.Local Telephone AccessUse this procedure to call your NT9010 system from a telephone that is on the same telephone line. No dial-in is necessary.1. Pick up the telephone handset - you will hear a dial tone. 2. Enter your 3-digit Telephone Access Code. The dial tone will stop and the sys-tem will announce:“Hello.”3. The system may also say:“Enter your access code.”If so, enter your [access code]. 4. The system announces one or more messages to advise you of its status. Follow the voice prompts to use the system functions.](https://usermanual.wiki/Tyco-Safety-Canada/00NB9001.Users-guide/User-Guide-89976-Page-11.png)
![8Remote Telephone Access1. From any touch-tone telephone, dial the number of your premises. If you have more than one telephone line, call the number of the line on which your NT9010 has been installed. 2. After one ring, hang up. Wait 10 seconds then call again. On the second call, the system will answer after one or two rings and announce:“Hello.”3. Enter your 3-digit Telephone Access Code within 10 seconds. If you wait longer than 10 seconds, the system will automatically hang up. 4. The system will then prompt:“Enter your access code.”Enter your [access code] within 20 seconds. If you wait longer than 20 seconds, the system will hang up. The system will also hang up if 3 incorrect access codes are entered.5. Once you have entered an access code, the system will announce one or more messages to advise you of its status. Follow the voice prompts to use the sys-tem functions.NOTE: There is only one “Telephone Access Code”. It is programmed by your installer. It is not the same as your 4- or 6-digit system access code, which you also enter on your system keypad. More than one system access code may be programmed for use by different users of your system (see “Programming Access Codes” on page 21).Receiving Incoming CallsIf you are accessing the NT9010 system over a local telephone at the same time as someone calls you, the system will announce:“Attention, you have an incoming call. To receive the call, press pound now.”To answer the incoming call, press . If you do not press , you can continue to use the system. Recording and Playing Voice MemosYou can record a voice memo on the NT9010 control unit, so that you or another person can listen to it later. To record a voice memo:1. Press and hold the Record function button for two seconds. The NT9010 says “Record memo now.”2. Speak into the microphone (located in the top left corner of the unit). When you have finished recording, press . The green Ready light flashes to indicate a new memo has been recorded.To listen to a voice memo:1. Press and hold the Playback function button for two seconds. Once the memo has been played, the green Ready light stops flashing, however the memo remains in memory until a new one is recorded, or until the NT9010 loses all power. 2. If the memo is not for you, you can press to stop the playback. If you press before the playback finishes, the Ready light will continue to flash.](https://usermanual.wiki/Tyco-Safety-Canada/00NB9001.Users-guide/User-Guide-89976-Page-12.png)
![10Tur ning Off Your System1. If you are outside, enter through the entry/exit door. The keypad beeps to remind you to turn off the system.NOTE: Entering by any other door will immediately cause an alarm. If you are inside, go to the keypad (the keypad will not beep). 2. Enter your [access code]. If you have entered from outside, you must enter the correct access code before the keypad stops beeping. If you do not enter a valid access code during this time, the system will sound an alarm.NOTE: If you have entered the wrong code the keypad will sound one long beep - try again to enter the correct code.As soon as you enter the correct code, the red (Armed) light turns OFF and the keypad stops beeping. 3. If no alarms occurred while the system was on and there are no trouble condi-tions present, the NT9010 will announce: “System is off. No alarms in mem-ory.”.If an alarm occurred while the system was on, the NT9010 will announce: “Sys-tem is off. There are (number) alarms in memory: {Zone XX}.” See “Checking Alarms in Memory” on page 16.CAUTION: If you return and find that an alarm has occurred while you were away, it is possible that an intruder may still be on the premises. Go to a nearby safe location, and call your central station or the local authorities to investigate. The alarm memory is cleared each time the system is turned on, so any alarms showing have occurred only during the last time the sys-tem was on.Other Ways to Tur n Your System On There are two basic methods for turning on your security system. •Away: Use this method when everyone will be away from the premises. See below.•Stay: Use this method when one or more people will stay on the premises. See page 12.You can also use any of these methods to turn on your system (see pages 10 to 11): •Quick Arming: Turn on your system without having to enter an access code. Your installer must turn on this feature before it will work.•“No Entry” Arming: Turn on your system with no entry time - use this method when no one else will be entering the premises.•Automatic Arming: The system will turn itself on at pre-set times. Your installer must turn on this feature before it will work.NOTE: When turning on your system from a remote telephone, the system will automatically be in Stay mode. (See “Turning On Your System While You Are At Home (Stay Mode)” on page 12.)](https://usermanual.wiki/Tyco-Safety-Canada/00NB9001.Users-guide/User-Guide-89976-Page-14.png)
![Turning Your System On (Arming) and Off (Disarming)11Tur ning On Your System When Everyone is Away (Away Mode)When you turn on your system using the Away method, both interior zones (e.g. motion detectors) and perimeter zones (e.g. door and window contacts) will be active and will cause an alarm to sound when opened.1. Check that your system is ready (green Ready light is ON).2. Enter your [access code]. As you enter each digit, the keypad sounder beeps. If you entered the access code incorrectly, the keypad sounder buzzes steadily for two seconds. Re-enter your access code correctly.When you enter a valid access code:• The keypad sounds fast beeps.• The red (Armed) light turns ON.• The exit time begins and the keypad beeps once every second until the end of the exit time. The keypad beeps quickly for the last 10 seconds of the exit time.3. Exit the premises through the entry/exit door. Doing this tells the system that you are away, and the system turns on all the interior zones.At the end of the exit time, all keypad lights, except the red (Armed) light, turn OFF. The system is now on.NOTE: If the system announces that any zones are bypassed, or if the orange (System) light is ON, there are one or more zones not turned on. See “Turning Off Part of Your System (Bypassing Zones)” on page 18. If you turn on the system with a zone bypassed or a trouble present, your security pro-tection is reduced.Away ButtonYou may also be able to quickly turn on your system in Away mode using the “Away” button on your keypad. If your installer has programmed this button, press and hold it for two seconds to turn on the system in Away mode. What to do if the Siren Sounds Immediately After You ExitYour installer will tell you if this feature has been enabled on your system. In order to reduce false alarms, the system will notify you of an improper exit when turning on the system in the Away mode. If you do not securely close the entry/exit door during the exit time, the keypad will emit one continuous beep and the siren will sound. If this occurs:1. Re-enter the premises.2. Enter your [access code] to turn off the system. You must do this before the entry time ends.3. Turn the system on again, making sure to close the entry/exit door properly. (See “Turning On Your System When Everyone is Away (Away Mode)”.)](https://usermanual.wiki/Tyco-Safety-Canada/00NB9001.Users-guide/User-Guide-89976-Page-15.png)
![12Tur ning On Your System While You Are At Home (Stay Mode)Use the Stay mode when you want to stay on the premises, but prevent unautho-rized entry from outside. The system will only turn on the perimeter zones (e.g. door and window contacts), and will leave the interior zones off (e.g. motion detectors) so that you will be free to move around inside.1. Check that your system is ready (green Ready light is ON)2. Enter your [access code]. As you enter each digit, the keypad sounder beeps. If you entered the access code incorrectly, the keypad sounder buzzes steadily for two seconds. Re-enter your access code correctly.When you enter a valid access code:• The keypad sounds fast beeps.• The red (Armed) light turns ON.• The exit time begins and the keypad beeps once every second until the end of the exit time. The keypad beeps quickly for the last 10 seconds of the exit time.3. DO NOT leave through the entry/exit door. This tells the system that you are staying, and the system automatically turns off the interior zones.At the end of the exit time, all keypad lights, except the red (Armed) and orange (System) lights, turn OFF. The system is now on.Re-activate bypassed zonesTo turn on the rest of the system when it is in Stay mode:1. Press . The interior zones are now on. NOTE: When you have turned on the interior zones, you will not be able to enter areas protected by motion detectors, or open doors and windows. To access these areas, you must enter your [access code] and turn off the sys-tem.Stay ButtonYou may also be able to quickly Stay arm your system using the “Stay” function button on your keypad. If your installer has programmed this button, press and hold it for two seconds to turn your system on in Stay mode. Tur ning On Your System With No Access Code (Quick Arm)Your installer will tell you if the Quick Arm method will work on your system. Using this method, you can quickly turn on your system without having to enter an access code.1. Check that the system is ready (green Ready light is ON)2. Press . • The keypad sounds fast beeps.• The red (Armed) light turns ON.• The exit time begins and the keypad beeps once every second until the end of the exit time.](https://usermanual.wiki/Tyco-Safety-Canada/00NB9001.Users-guide/User-Guide-89976-Page-16.png)
![Turning Your System On (Arming) and Off (Disarming)133. Go out through the entry/exit door. The system will be in Away mode. If you do not exit, the system will be in Stay mode.NOTE: Pressing will only turn on the system. To turn the system off, you must enter a valid [access code]. See “Turning Off Your System” on page 10.Turing On Your System with No Entry TimeIf you want to turn on the system, and no one else will be entering, you can remove the entry time from zones that normally have one. If somebody enters through any zone, the system will sound an instant alarm.1. Check that your system is ready (green Ready light is ON)2. Press , then your [access code]. • The red (Armed) light flashes as a reminder that the system is on and has no entry time. • The keypad sounds fast beeps.3. The system is now in Stay mode.Tur ning On Your System Automatically (Automatic Arming)Your installer may have set up your system to turn on at a pre-set time. If auto-matic arming has been set up, when the system reaches the pre-set autoarm time, the keypad buzzers will sound for one minute. During this one-minute warning time, you may be able to stop automatic arming by entering your [access code]. Ask your installer for more information.Your installer may have set up the system so that users with a master code can change the autoarm time at the keypad. If so, master users will be able to turn the automatic arming function on or off, and program the time at which the system will automatically turn on each day.To turn automatic arming on or off:1. Press , then [master code]. 2. Press to turn automatic arming on or off. The keypad will beep 3 times when auto-arm is turned ON, and once when it is turned OFF.3. When you are finished, press .To change the autoarm time:1. Press , then [master code]. 2. Press . 3. Enter the autoarm time using the 24Hr format (0000 - 2359). For example, to set the time for 1:00pm, enter (1300).5. When you are finished, press twice.NOTE: The system must have the correct time and date in order for the autoarm feature to work. Please see“Setting the Time and Date” on page 21.](https://usermanual.wiki/Tyco-Safety-Canada/00NB9001.Users-guide/User-Guide-89976-Page-17.png)

![15Section 4: Dealing With Alarms and EmergenciesIf you return and the siren is on, do not enter, but contact the local author-ities from a nearby safe location.Read this section carefully so that you will know what to do if your system goes into alarm. Your installer will tell you if fire detection equipment has been installed and enabled on your system. NOTE: A fire alarm always has priority over an intrusion (burglary) alarm.Fire Alarms A pulsing siren means a fire alarm. If there is a fire, or if you are not sure, fol-low your evacuation plan immediately (see “Fire Escape Planning” on page 23). The system may also announce the label for the zone(s) that triggered the alarm, if programmed by the installer.If remote monitoring is enabled, the system will send a fire message to the central station. Your installer may have set up the keypad Fire keys and other fire equip-ment to send a fire alarm message to the central station as soon as they are acti-vated. Your installer may have set up other equipment (e.g. smoke detectors) to have a 30 second delay before sending the alarm message to the central station. Your installer will inform you how the equipment on your system operates. Equipment that has been set up with a 30 second delay (e.g. smoke detectors) gives you time to correct the problem before a false alarm is sent to the central station. If there is no fire condition, to silence the fire alarm:1. Press within 30 seconds of the beginning of the alarm. The fire alarm and communication to the central station will be delayed for 90 seconds to give you time to clear the smoke detector. 2. If the detector still detects smoke after 90 seconds, the alarm will sound again. If there is no smoke, the system will return to normal.3. If you do not press within the 30 second delay time, the system will send a fire message to the central station (if remote monitoring is enabled on your sys-tem). To silence the fire alarm after the 30 second delay has expired, enter your [access code].NOTE: If you suspect that a fire message has been transmitted, but there is no fire condition, call the central station to avoid an unnecessary response.NOTE: Your installer may have programmed the system to operate differ-ently than described above. Ask your installer for more information regarding your system’s operation.](https://usermanual.wiki/Tyco-Safety-Canada/00NB9001.Users-guide/User-Guide-89976-Page-19.png)
![16Intrusion (Burglary) AlarmsA steady siren means an intrusion alarm. The system may also announce the label for the zone(s) that triggered the alarm, if programmed by the installer.To silence the alarm:1. Enter your [access code]. 2. If the alarm was unintentional, call your central station or local authorities immediately to avoid an unnecessary response.3. Check the alarm memory to see which zone caused the alarm.Once the source of the alarm has been corrected, the system will return to the Ready state. Central Station Talk/Listen-inIf your installer has set up remote monitoring on your system, the talk/listen-in fea-ture may also be available. If an alarm, or other programmed event occurs on your system, this feature allows a central station operator to listen to what is happening on the premises. The operator may also be able to talk to whoever is present, depending on the type of event that has occurred. Ask your installer for more information on this feature and how it works.Checking Alarms in MemoryThe alarm memory announcement tells you which zone (detector) caused the alarm. The alarm memory is cleared each time the system is turned on. Any alarms announced by the system have only occurred the last time the system was on.CAUTION: If you return and find that there was an alarm while you were away, it is possible that an intruder may still be on the premises. Go to a nearby safe location, and call your central station or the local authorities to investigate.If an alarm occurred while the system was turned on, the NT9010 will announce: “There are (number) alarms in memory: {Zone XX}.”.1. To cancel the alarm memory announcement, press .2. After the announcement is over, the system will return to the Ready state, but the orange (System) light will be ON. To listen to alarms in memory again, press . The NT9010 will announce the zones that were in alarm.](https://usermanual.wiki/Tyco-Safety-Canada/00NB9001.Users-guide/User-Guide-89976-Page-20.png)
![Dealing With Alarms and Emergencies17Calling for Help The NT9010 has three pairs of emergency keys. Using these keys you can send an immediate Fire, Auxiliary or Panic message to your central station.IMPORTANT:The Fire, Auxiliary and Panic keys will NOT function unless turned ON by the installer. If your installer has turned these keys ON, and enabled audible feedback, holding down the keys for two seconds will cause the keypad sounder to beep indicating that the alarm input has been accepted and transmission to the central station is underway.From the NT9010 Control UnitPress both keys for two seconds to send a Fire message, and to trigger a fire alarm on the system.Press both keys for two seconds to send an Auxiliary message.Press both keys for two seconds to send a Panic message.From Your Local TelephoneIf local telephone access is available on your system, you can also:• send a Fire message and trigger a fire alarm by pressing and holding for 2 sec-onds the [1] button on your telephone• send an Auxiliary message by pressing and holding for 2 seconds the [2] button on your telephone• send a Panic message by pressing and holding for 2 seconds the [3] button on your telephoneNOTE: In the U.S.A., do not program the Aux keys for use in medical emer-gencies as per UL requirements.](https://usermanual.wiki/Tyco-Safety-Canada/00NB9001.Users-guide/User-Guide-89976-Page-21.png)
![18Section 5: Using Advanced FunctionsThis section describes how to perform more specialized functions: turning off spe-cific detectors (bypassing zones), turning the door chime on or off, checking sys-tem troubles, and testing your system. Tur ning Off Part of Your System (Bypassing Zones)Sometimes, you may need to temporarily turn off a detector:• if you will need to go into a protected area while the system is turned on • or, if a detector is temporarily out of service but you need to turn on the system This is called “bypassing”. When you bypass a detector, it will not turn on the next time you turn on your system. Detectors (zones) cannot be bypassed once the system is on. Bypasses on detec-tors are automatically cancelled each time the system is turned off. You must bypass the detectors again, if required, before you turn the system on again. NOTE: Bypassed detectors will not be able to sound an alarm - this reduces your level of security. If a detector is not working, call a service technician immediately so that the problem can be resolved and your system returned to proper working order.NOTE: For security reasons, your installer may program the system to pre-vent you from turning off certain detectors (for example, smoke detectors).NOTE: If you have 24-hour zones on your system, they will stay bypassed until you turn off the bypass using the steps below (ask your installer for more information).1. Start with the system turned off. Press .2. If the system asks for your [access code], enter it now.3. Enter the two-digit number (01-32) of the detector you want to turn off (bypass) . The system will announce the zones (detectors) that are bypassed: “There are (number) zones bypassed: {Zone XX}, etc...To exit, press [#].”TIP: To find out the number of a detector, check in “System Information” on page 30.3. To turn a detector back on, enter the two-digit number of the zone (01-32). The system will announce the zones (detectors) which are bypassed: “There are (number) zones bypassed: {Zone XX}, etc...To exit, press [#].”4. When you are finished turning off detectors, press .5. The next time you turn on your system, the bypassed detectors will not turn on. When you turn your system off again, the detectors will return to normal (they will not be bypassed).](https://usermanual.wiki/Tyco-Safety-Canada/00NB9001.Users-guide/User-Guide-89976-Page-22.png)
![Using Advanced Functions19Checking Trouble ConditionsYour system continuously checks for a number of possible trouble conditions. If one of these trouble conditions occur:• the orange (System) light will be ON until the trouble is fixed• the keypad will beep twice every 10 seconds until you press any key• the NT9010 will say “System Trouble” when announcing the status of the sys-temNOTE: A Trouble condition reduces the level of security your system is designed to provide. Call your installing company for service.To listen to an announcement of the troubles that are present, press . To exit the trouble announcement, press .Here is a list of the various trouble conditions that your system might announce: Announcement: Problem and how it should be addressed:“Service is required” If this message is announced, call for service.“AC Power Trouble.” Electrical power to the system has been interrupted. Check your fuse box or circuit breaker to ensure that the electricity supply for the system is on. If this does not correct the problem, call for service. The NT9010 may go to sleep to conserve the backup battery if the AC power is out for more than 30 seconds. If this happens, you can “wake up” the unit by pressing and holding for 2 seconds. “Phone line trouble.” Your system has detected a problem with the telephone line. If this problem does not correct itself, or happens frequently, call for service.“Communication trou-ble.”Your system has been unsuccessful in communicating an event to your central station. If you hear this message, call for service immediately.“ Zone Fault, press [5].”Your system has detected a fault on one or more zones (detec-tors). Press , and the system will announce which zones have a fault. If you are unsure of how to clear a zone fault, call for service.“Zone tamper, press [6].”Your system has detected a tamper on one or more zones (detectors). Press and the system will announce which zone(s) have tampers. If you are unsure how to clear the zone tamper, call for service.“Device low battery, press [7].”Your system has detected that one or more of the wireless detectors on the system has a low battery. Press , and the sys-tem will announce which devices have a low battery. Change the relevant batteries. See page 25 for instructions. If this does not correct the problem, call for service.“The time and date are incorrect.”If all power to the system is interrupted (AC and battery), the system clock and date will need to be reset. See “Setting the Time and Date” on page 21. If you are unsure of the cause of the system power failure, call for service.](https://usermanual.wiki/Tyco-Safety-Canada/00NB9001.Users-guide/User-Guide-89976-Page-23.png)
![20Te s t in g Yo u r SystemTest your system every week. Report any problems immediately to your installation company. NOTE: Perform system tests during off-peak hours, such as early morning or late evening. 1. If your system has remote monitoring, call the central station to tell them that you are testing your system.2. Begin with the system turned off. Press [Master Code] . The system sounds the siren and turns on all keypad lights for two seconds. When the sounder and keypad test is complete, press .3. To test each area of your system, open each door and window in turn, or walk in motion detector areas. 4. Press and hold the Status button for two seconds. The system will announce all open zones.5. If the system has any fire zones, activation will cause the alarm to sound in a pulsed mode. To silence the alarm, press .CAUTION: Do not use an open flame or burning materials to test a smoke or heat detector. Contact your installer for information on safe methods of testing detectors.6. When you are finished testing the system, inform your central station. If the system did not work properly, contact your installer.NOTE: Some features described above will not be functional unless enabled by your installer. Ask your installer which features are functional on your system.Allowing Computer Access to Your SystemFrom time to time, your installer may need to send information to, or retrieve information from your security system. Your installer will do this by having a com-puter call your system over the telephone line. You may need to prepare your sys-tem to receive this “downloading” call. To do this:1. Press [Master code] . This allows downloading for a limited period of time. During this time, the system will answer incoming downloading calls. For more information on this feature, please ask your installer.](https://usermanual.wiki/Tyco-Safety-Canada/00NB9001.Users-guide/User-Guide-89976-Page-24.png)
![21Section 6: Customizing Your SystemThis section describes how to customize your system to your needs. Refer to this section for detailed instructions on: programming access codes, setting the time and date, and adjusting the keypad sounders and lights. Programming Access CodesThe master code (code 40) can be used to program system options, arm and dis-arm the system and program other access codes. You can program up to 32 addi-tional access codes (01 through 32). Other access codes, such as system supervisory and duress codes, are available. Contact your installer for more infor-mation.1. Press [Master Code]. The red (Armed) light turns on and the orange (Sys-tem) light flashes.2. Enter the two-digit number of the access code you want to program (01-32 for access codes, 40 for master code). If an access code already exists for the code number you have selected, it will be replaced by the new code.3. Enter the new [code]. Access codes must be four digits unless otherwise indi-cated by your installer. Enter digits 0 through 9 only. NOTE: Do not use the fac-tory default or obvious codes such as [1111] or [1234]. 4. To exit access code programming, press .5. Record your new codes on the “System Information” page in this booklet. Erasing a code:1. Press [Master Code]2. Enter the number of the code you want to erase [01 to 32]. The Master code cannot be erased. 3. To erase the code, press .4. To exit access code programming, press .Setting the Time and DateYou should make sure that your system has the correct time and date. This is important for the auto-arm feature to function correctly, and for accurate report-ing of events.1. Press [Master Code] . 2. The system announces the current time and date. To change the time, press , then enter the Time in Hours and Minutes using the 24-Hour format (00:00 to 23:59).3. To change the date, press , then enter the Date in Months, Days and Years (MM DD YY).4. To exit programming, press .](https://usermanual.wiki/Tyco-Safety-Canada/00NB9001.Users-guide/User-Guide-89976-Page-25.png)
![22Tur ning the Door Chime On or OffIf your installer has enabled the door chime feature, your NT9010 will beep when-ever designated doors or windows are opened or closed. The NT9010 may also announce the zones that were opened or closed, if programmed. Your installer has programmed which doors and windows will activate the door chime.1. Press to turn the door chime feature ON The keypad will beep 3 times.2. Press again to turn the door chime feature OFF The keypad will sound one long beep.Changing NT9010 Speaker LoudnessYou can select from 3 different volume levels for NT9010 announcements - high, medium and low.1. Press and hold the Volume function key for 2 seconds. The NT9010 announces the current volume level.2. To change the volume level, press and hold the Volume function key again. The NT9010 announces the next volume level option.3. Repeat step 2 until you find a volume setting you like.Changing Telephone Prompt LoudnessIf you will be using a telephone to access your system, you can change the volume of the telephone prompts. You can select from three different telephone volume levels.1. Press [Master Code] . The NT9010 announces the telephone volume level: “ Phone volume is low. To change volume, press [1]. To exit, press '#'.” 2. To change the volume, press . 3. When you have selected the volume level you want, press to exit.](https://usermanual.wiki/Tyco-Safety-Canada/00NB9001.Users-guide/User-Guide-89976-Page-26.png)

![30System InformationFill out the following information for future reference and store this guide in a safe place.For ServiceCentral Station Information:Account #: ______________________________ Telephone #: ____________________________Installer Information:Company: _______________________________ Telephone #: ____________________________Access CodesYour Master Code is: ____________________________Additional Access Codes:System Information[F] FIRE _____________________________________[A] AUXILIARY ______________________________[P] PANIC ___________________________________The Exit Time is_______________________seconds.The Entry Time is _____________________seconds.Code # Access Code Code # Access Code Code # Access Code Code # Access Code01 09 17 2502 10 18 2603 11 19 2704 12 20 2805 13 21 2906 14 22 3007 15 23 3108 16 24 32](https://usermanual.wiki/Tyco-Safety-Canada/00NB9001.Users-guide/User-Guide-89976-Page-34.png)