Tyco Safety Canada 07WS4916 Wireless Smoke Detector User Manual 29034617R008 WS4916 INIS EN FR
Digital Security Controls Ltd. Wireless Smoke Detector 29034617R008 WS4916 INIS EN FR
UserManual.wiki
>
Tyco Safety Canada
>
07WS4916 User Manual
User Manual
Navigation menu
Upload a User Manual
Namespaces
Wiki Guide
HTML
PDF
Info
Views
User Manual
Discussion / Help
Navigation
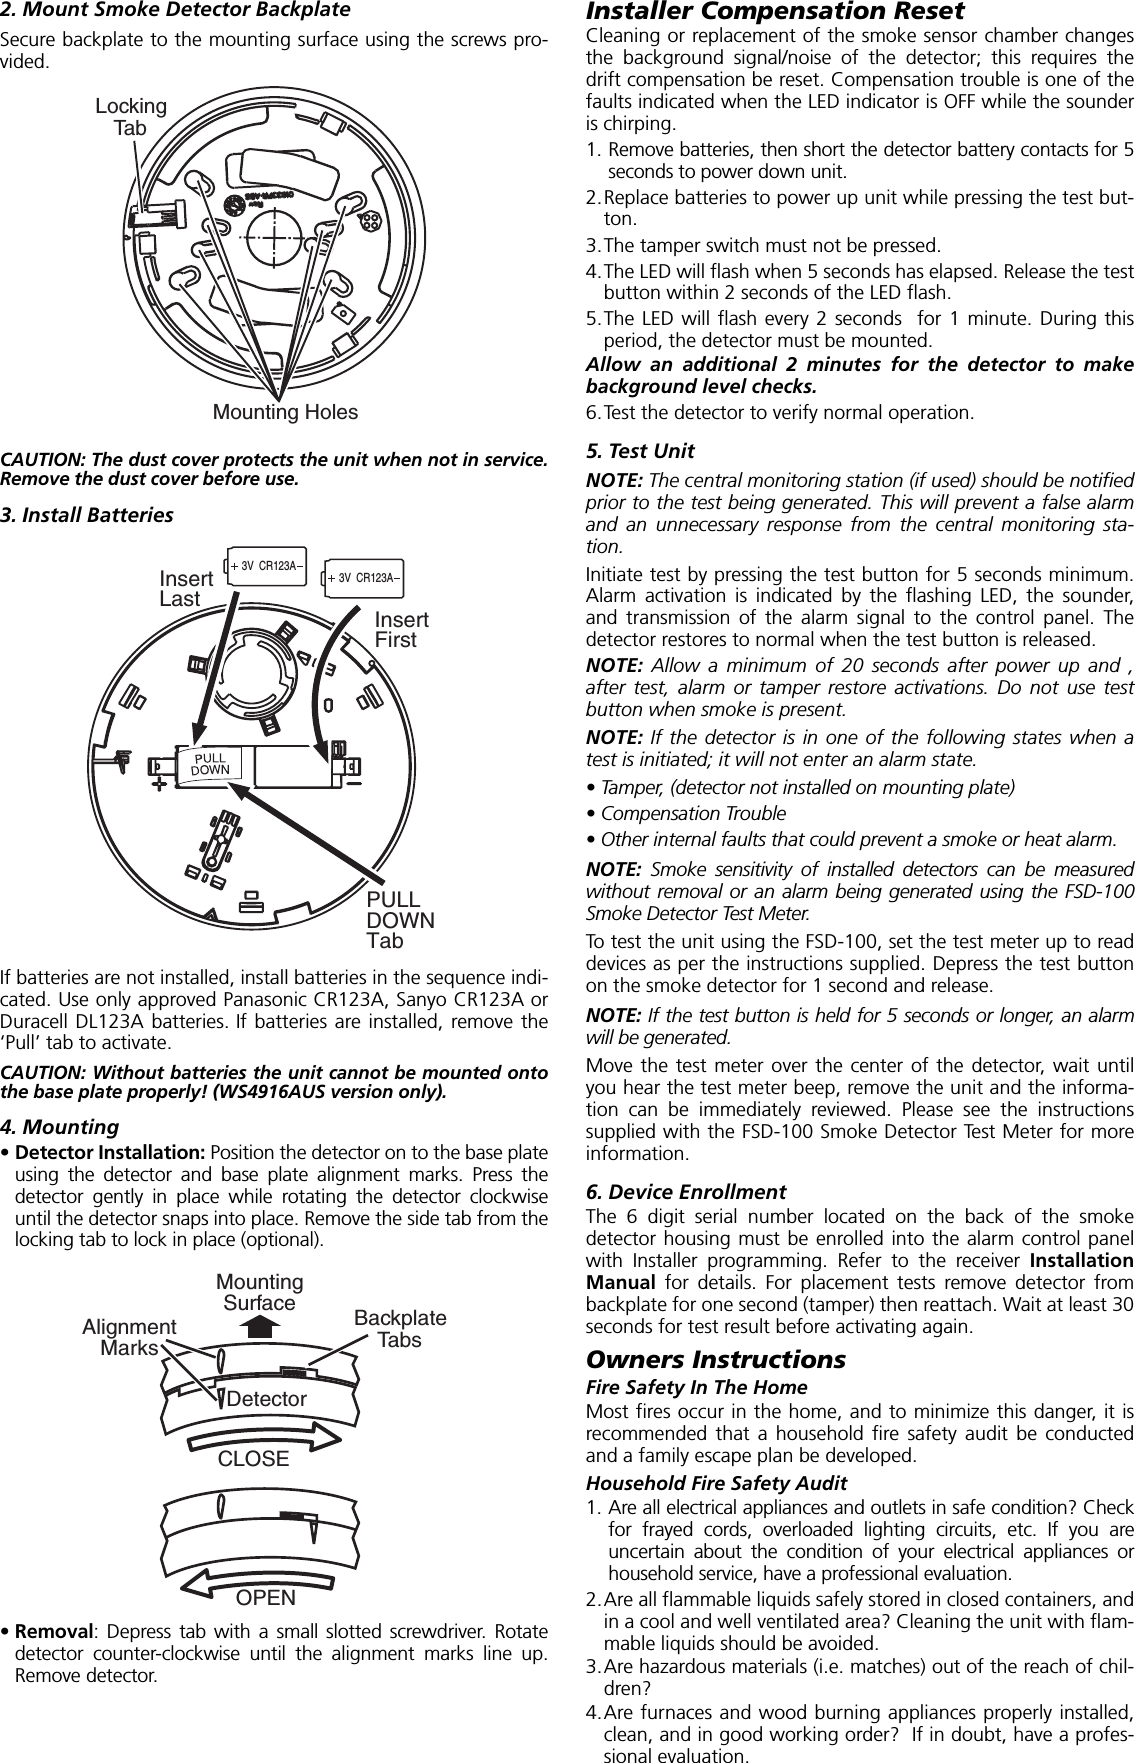
![WS4916 Series Wireless Smoke DetectorInstallation and Operating InstructionsRead this instruction sheet thoroughly before installation and use of the WS4916 Wireless Smoke DetectorIntroductionThe WS4916 is a wireless photoelectric smoke detector with afixed temperature heat detector and an internal piezoelectricalarm. Three version are available: US version (UL), Canadian ver-sion (ULC) and an International version (EU).OperationApproximately every 7 to 8 seconds the unit tests for a smoke orheat alarm condition. During this sequence the unit also performsself diagnostics, and checks for tampers and faults. During normaloperation the LED will flash every 50 seconds and the sounder willnot sound.Smoke AlarmThe smoke detector will go into alarm when the signal levelexceeds the 'alarm' threshold and automatically restore when thesignal level falls below the alarm 'restore' threshold. During analarm the LED will flash 1/second and the sounder will sound theevacuation temporal pattern (UL, EU) or continuous beeps (ULC).The smoke detector has a preset warning threshold at 75% of thealarm threshold. If the signal level stays above this threshold, butbelow the alarm threshold, for more than 120 seconds, the detec-tor will go into the 'warning' state. If the signal level falls belowthe early warning 'restore' threshold, the detector will restore toits normal state automatically. If the signal level rises above thealarm threshold, the detector will go into alarm. The LED will flashand the sounder will chirp every 50 seconds when in the warningstate.NOTE: This feature is intended to provide a warning if the envi-ronment is persistently close to the alarm threshold and providemore time to investigate and either escape or correct the situa-tion.Smoke - Drift CompensationThe detector automatically compensates for long-term environ-mentally induced changes to maintain a constant smoke sensitiv-ity. When the drift compensation has reached its high or low limitof adjustment, the detector will go into the trouble state.Heat AlarmThe heat detector will go into alarm when the heat signal levelexceeds the heat alarm threshold (135ºF/57ºC); and will automat-ically restore when the heat signal level falls below the heat alarmthreshold (restore). During an alarm the LED will flash 1/secondand the sounder will sound the evacuation temporal pattern (UL,EU) or continuous beeps (ULC).TamperThe removal of the detector from the mounting plate initiates a'tamper' transmission. The tamper condition is restored after thedetector is mounted on the plate.Wireless TransmissionsA supervisory message is transmitted at 64 minute intervals (12minutes in EU model) to the control panel. If the signal is notreceived the control panel determines that the detector is missing.The detector transmits the following:•Alarm / Alarm Restore - (heat or smoke alarm). Transmitted attime of occurrence.•Tamper / Tamper Restore - (tamper switch activated) 10 secondmaximum delay on restore before transmission. •Low Battery - (battery voltage falls below threshold). The batteriesare tested & transmitted at the time of a supervisory or other trans-missions.•Trouble - (detector fault or sensor compensation limit reached).Troubles are transmitted at the time of occurrence (one troubleper supervisory interval).BatteriesThe WS4916 is powered by two, 3VDC lithium batteries.Do NOT use batteries other than those listed.The low battery threshold is set so the batteries will provide notless than 14 days of operation and at that point the detector willsend a 'low battery' signal. If the battery is still low 7 days afterfalling through the low battery threshold, the horn will 'chirp'once every 48 seconds until battery failure. During the first 7 daysafter low battery detection, (non-chirp period), if the detector istested or goes into alarm, the horn will 'chirp' once the test oralarm is restored and remain 'chirping' until battery failure.Installation InstructionsInstallationThe WS4916 Series wireless Smoke detector shall be installed andused within an environment that provides the pollution degreemax 2 and overvoltages category II in NON HAZARDOUS LOCA-TIONS, indoor only. The equipment is designed to be installed bySERVICE PERSONS only; [SERVICE PERSON is defined as a personhaving the appropriate technical training and experience neces-sary to be aware of hazards to which that person may be exposedin performing a task and of measures to minimize the risks to thatperson or other persons.]1. Smoke Detector PlacementOn smooth ceilings, detectors may be spaced 9.1m (30 feet) apartas a guide. Other spacing may be required depending on ceilingheight, air movement, the presence of joists, uninsulated ceilings,etc. Consult National Fire Alarm Code NFPA 72 Chapter 11, CAN/ULC-S553-02 or other appropriate national standards for installa-tion recommendations. •Do NOT locate smoke detectors at the top of peaked or gabledceilings; the dead air space in these locations may prevent theunit from detecting smoke. Avoid areas with turbulent air flow,such as near doors, fans or windows. Rapid air movement aroundthe detector may prevent smoke from entering the unit.•Do NOT locate detectors in areas of high humidity.•Do NOT locate detectors in areas where the temperature risesabove 38ºC (100ºF) or falls below 5ºC (41ºF).Install Smoke detectors inaccordance with NFPA 72,Chapter 11.“Smoke detectors shall beinstalled outside of eachsleeping area in theimmediate vicinity of thebedrooms and on eachadditional story of thefamily living unit, includ-ing basements andexcluding crawl spacesand unfinished attics. Innew construction, asmoke detector also shallbe installed in each sleep-ing room.”LED/Test ButtonPiezo SounderAlignment Marks29034617R008](https://usermanual.wiki/Tyco-Safety-Canada/07WS4916/User-Guide-849544-Page-1.png)