Tyco Safety Canada 09WT5500 Wireless Security System Keypad User Manual WT5500
Digital Security Controls Ltd. Wireless Security System Keypad WT5500
UserManual.wiki
>
Tyco Safety Canada
>
09WT5500 User Manual
User Manual
Navigation menu
Upload a User Manual
Namespaces
Wiki Guide
HTML
PDF
Info
Views
User Manual
Discussion / Help
Navigation

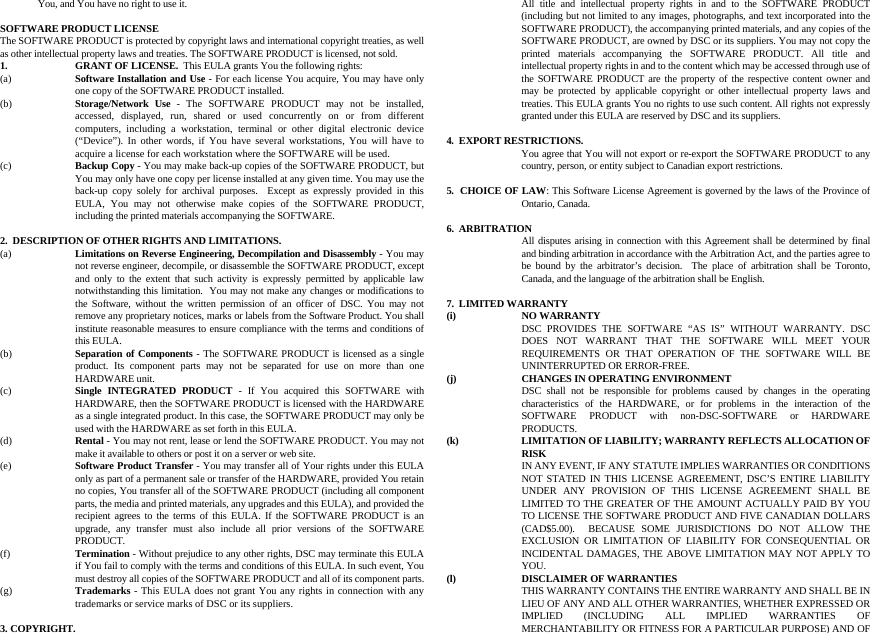
![2. Enter keypad programming by pressing 4 > 8 > Installer Code > 4. 3. Enter Section 998 at the keypad that was programmed. The keypad will now broadcast the label programming tothe PC9155. The PC9155 will then program the labels in others WT5500 keypads that have been enrolled by wayof the RF link. NOTE: This operation may take several minutes.4. When the keypad is finished press the # key to exit.NOTE: Label broadcast from this keypad is only compatible with other WT5500 keypads.Language Programming Hold the (<>) keys for 2 seconds to enter language programming. Scroll to the desired language and press 4 toselect.NOTE: If Section 077, Option 4 is turned off, language programming can only be performed whilein installers programming.Enrolling the KeypadThe WT5500 must be configured in tandem with the PC9155 in order for the system to function as desired.1. Turn on the PC9155 unit. The panel will be alert to any keypad enrollment activity for a period of two minutes. Notethat the unit’s Ready and AC LEDs will be activated for this two-minute period.2. A WT5500 must be turned on during this two-minute period for it to be assigned to the PC9155. 3. Simultaneously press and hold the * and # keys; by doing so you force the keypad to broadcast its ESN (electronicsecurity number). The keypad will intermittently flash its Ready and AC LEDs (one second on, one second off). Thisindicates that the keypad is in enrollment mode.4. When the keypad has been successfully enrolled - this should take less than 30 seconds - on the system, the mes-sage ‘Enrollment Successful’ will be displayed on the keypad LCD for five seconds. The Ready and AC LEDs willreturn to their ready state.Any additional keypads to be added to this system can be enrolled in the same manner as described above. The sys-tem will add each keypad to the next available slot, and this slot number will be displayed on the keypad’s LCD dis-play once the keypad has been successfully enrolled.Programming Labels 1. Use this section to assign a meaningful name (e.g. Front Door, Hallway, etc) to each zone.2. Enter keypad programming by pressing 4 > 8 > Installer Code > 4. Enter the 3-digit section number for thelabel to be programmed.3. Use the arrow keys (<>) to move the cursor underneath the letter to be changed. 4. Press the number keys 1 through 9, corresponding to the letter you require. For example, pressing number key 2once will display the letter D; pressing it again will display the letter E; pressing it a third time will display the letterF, and so on.5. When the required letter or number is displayed use the arrow keys (<>) to scroll to the next letter.6. When you are finished programming the Zone Label, press Q. Scroll to ‘Save’ and press Q again.7. Repeat Steps 2 through 5 until all Labels are programmed.ASCII CharactersChanging Brightness/ContrastLCD Keypads1. Press [4][6][Master code].2. Use the arrow keys (<>) to scroll to either Brightness Control or to Contrast Control.3. Press 4 to select the setting you want to adjust.4. a) Brightness Control: There are multiple backlight levels. Use the arrow keys (<>) to scroll to the desired level.5. b) Contrast Control: There are 10 different display contrast levels. Use the arrow keys (<>) to scroll to the desiredcontrast level.6. To exit, press #.Changing the Buzzer LevelLCD Keypads1. Press [4][6][Master Code].2. Use the arrow keys (<>)to scroll to Buzzer Control.3. Use the arrow keys (<>) to scroll to the desired buzzer level among the 21 available selections.4. To exit, press #.Keypad EnrollmentEnter keypad programming by pressing 4 > 8 > Installer’s Code > 000.[0] Partition / Slot Assignment[1]-[5] Function Key Assignment[1] - A, B, C, 1 [4] - J, K, L, 4 [7] - S, T, U, 7 [0] - Space[2] - D, E, F, 2 [5] - M, N, O, 5 [8] - V, W, X, 8[3] - G, H, I, 3 [6] - P, Q, R, 6 [9] - Y, Z, 9,0Digit Option Valid Range Default1st Partition Assignment (0=Global Keypad) 0 to 8 1 I_____I2nd Slot Assignment 1 to 8 LED,ICON=1/LCD=8 I_____IFunction Key Button Valid RangeDefault Function[1] Function Key 1 Assignment 00 to 32 03 Stay Arm I_____I_____I[2] Function Key 2 Assignment 00 to 32 04 Away Arm I_____I_____I[3] Function Key 3 Assignment 00 to 32 06 Chime On/Off I_____I_____I[4] Function Key 4 Assignment 00 to 32 14 Bypass I_____I_____I](https://usermanual.wiki/Tyco-Safety-Canada/09WT5500/User-Guide-1055096-Page-3.png)
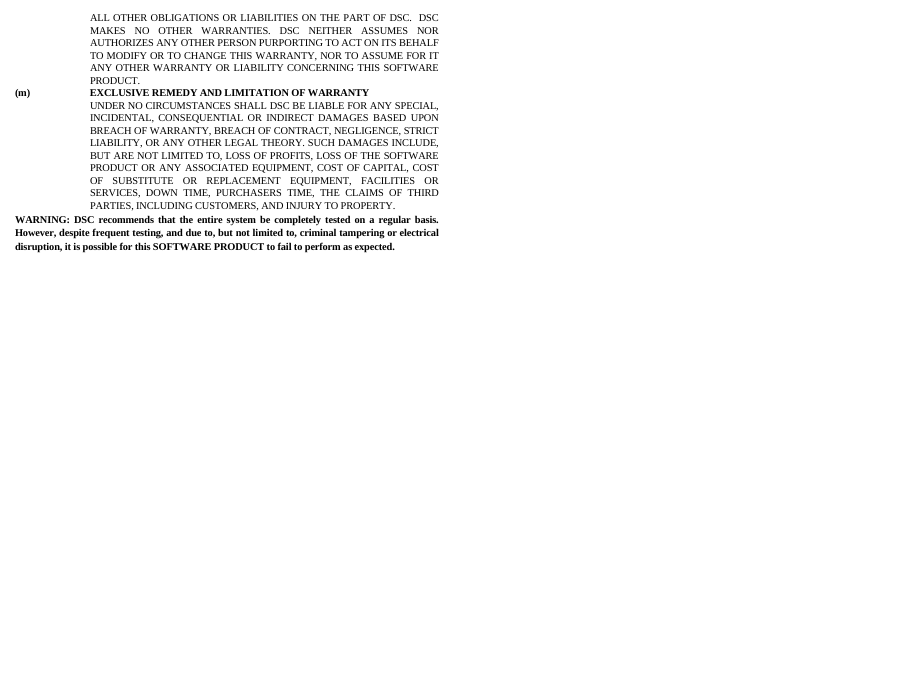
![Keypad Function KeysPlease see your system installation manual for a complete list of all the function key options available for your system.Keypad ProgrammingEnter keypad programming by pressing 4 > 8 > Installer Code > 4[001]-[034] Zone Label 1 to 34 E.g. For Zone 1 enter section 001, for Zone 2 enter section 002, etc. Default: ‘Zone _01’ - ‘Zone _34’[065] Fire Alarm Label (28 Characters) (WT5500 Only)Default:’Fire_Zone’[066] Fail to Arm Event Message (WT5500 Only)Default: ‘System_Has_Failed_to_Arm’[067] Alarm When Armed Event Message (WT5500 Only)Default: ‘Alarm_Occurred_While_Armed_ < >’[068] Command Output 1 LabelDefault: ‘Command_0/P_1’[069] Command Output 2 LabelDefault: ‘Command_O/P_2’[074] First Keypad Options [075] Second Keypad Options[076] Third Keypad Options[5] Function Key 5 Assignment 00 to 32 16 Quick Exit I_____I_____I[00] - Null [08] - Bypass Mode [16] - Quick Exit[01] - For Future Use [09] - For Future Use [17] - Activate Stay/Away Zones[02] - For Future Use [10] - For Future Use [25] - Instant Stay Arm[03] - Stay Arm [11] - For Future Use [33] - Night Arm[04] - Away Arm [12] - For Future Use[05] - No Entry Arm [13] - Command Output 1[06] - Chime On/Off [14] - Command Output 2[07] - For Future Use [15] - For Future UseSection Zone Label[001] to [034] 1 to 34 I_____I_____I_____I_____I_____I_____I_____I_____I_____I_____I_____I_____I_____I__I_____I_____I_____I_____I_____I_____I_____I_____I_____I_____I_____I_____I_____I__[065] I_____I_____I_____I_____I_____I_____I_____I_____I_____I_____I_____I_____I_____I_____II_____I_____I_____I_____I_____I_____I_____I_____I_____I_____I_____I_____I_____I_____I[066] I_____I_____I_____I_____I_____I_____I_____I_____I_____I_____I_____I_____I_____I_____I_____I__I_____I_____I_____I_____I_____I_____I_____I_____I_____I_____I_____I_____I_____I_____I_____I__[067] I_____I_____I_____I_____I_____I_____I_____I_____I_____I_____I_____I_____I_____I_____I_____I__I_____I_____I_____I_____I_____I_____I_____I_____I_____I_____I_____I_____I_____I_____I_____I__[068] I_____I_____I_____I_____I_____I_____I_____I_____I_____I_____I_____I_____I_____I_____I_____I__I_____I_____I_____I_____I_____I_____I_____I_____I_____I_____I_____I_____I_____I_____I_____I__[069] I_____I_____I_____I_____I_____I_____I_____I_____I_____I_____I_____I_____I_____I_____I_____I__I_____I_____I_____I_____I_____I_____I_____I_____I_____I_____I_____I_____I_____I_____I_____I__DefaultOption ON OFFON I____I 1 [F]ire Key Enabled [F]ire Key DisabledON I____I 2 [A]uxiliary Key Enabled [A]uxiliary Key DisabledON I____I 3 [P]anic Key Enabled [P]anic Key DisabledOFF I____I 4 Quick Arm Prompt ON Quick Arm Prompt OFFOFF I____I 5 Quick Exit Prompt ON Quick Exit Prompt OFFOFF I____I 6 Bypass Options Prompt ON Bypass Options Prompt OFFOFF I____I 7 User Initiated Call-up Prompt ON User Initiated Call-up Prompt OFFOFF I____I 8 Hold Key [P] Prompt ON Hold Key [P] Prompt OFFDefaultOption ON OFFON I____I 1 Local Clock Display ON Local Clock Display OFFOFF I____I 2Local Clock Displays 24-hr Time Local Clock Displays AM/PMOFF I____I 3 Auto Alarm Scroll ON Auto Alarm Scroll OFFOFF I____I 4Language Selection Available From Any Menu Language Selection Available in Installer’sON I____I 5 Power LED Enabled Power LED DisabledON I____I 6 Power LED Indicates AC Present ON Power LED Indicates AC Present OFFOFF I____I 7 Alarms Displayed While Armed Alarms Not Displayed While Armed OFF I____I 8 Auto-Scroll Open Zones ON Auto-Scroll Open Zones OFFDefaultOption ON OFF](https://usermanual.wiki/Tyco-Safety-Canada/09WT5500/User-Guide-1055096-Page-5.png)
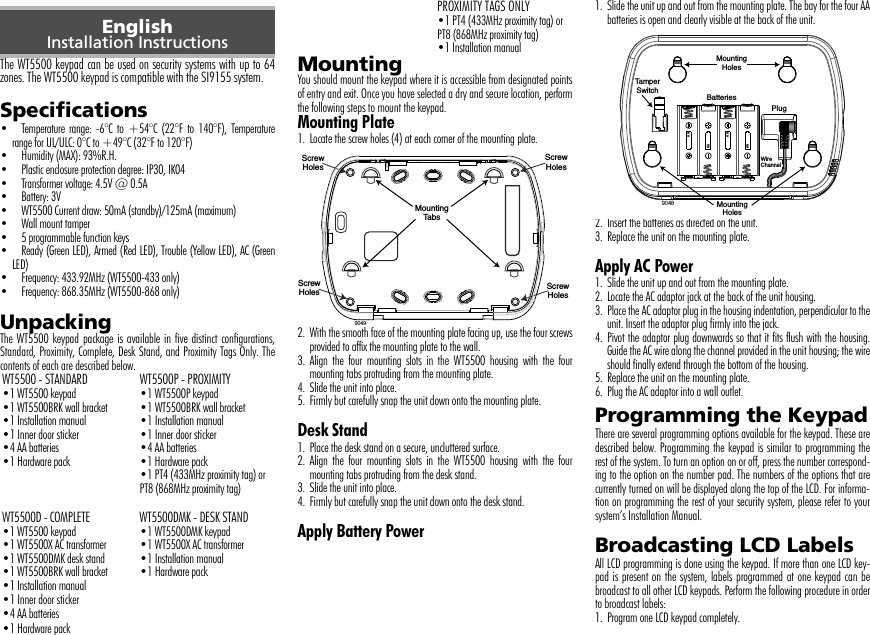
![[077] LCD MessageDefault: ‘_ _ _ _ _ _ _ _ _’[078] Download LCD Message Duration Default: 003 I_____I_____I_____I (Valid entries are 000-255), 000=Unlimited Message Disp.This number represents the number of times the downloaded message is cleared by pressing any key after the message has timedout.[100] CO Detector Alarm LabelDefault: ‘CO_Alarm_Evacuate_A[101] System Label Default: ‘System’[120] Partition 1 Command Output #1 Default: ‘Command_O/P_1’[121] Partition 1 Command Output #2 Default: ‘Command_O/P_2’[997]View Software Version [998]Global Label Broadcast [999]Reset Keypad Programming to Factory DefaultsKeypad LED SymbolsIMPORTANT - READ CAREFULLY: DSC Software purchased with or without Products andComponents is copyrighted and is purchased under the following license terms:· This End-User License Agreement (“EULA”) is a legal agreement between You (thecompany, individual or entity who acquired the Software and any related Hardware) andDigital Security Controls, a division of Tyco Safety Products Canada Ltd. (“DSC”), themanufacturer of the integrated security systems and the developer of the software and anyrelated products or components (“HARDWARE”) which You acquired. · If the DSC software product (“SOFTWARE PRODUCT” or “SOFTWARE”) is intended tobe accompanied by HARDWARE, and is NOT accompanied by new HARDWARE, Youmay not use, copy or install the SOFTWARE PRODUCT. The SOFTWARE PRODUCTincludes computer software, and may include associated media, printed materials, and“online” or electronic documentation. · Any software provided along with the SOFTWARE PRODUCT that is associated with aseparate end-user license agreement is licensed to You under the terms of that licenseagreement. · By installing, copying, downloading, storing, accessing or otherwise using the SOFTWAREPRODUCT, You agree unconditionally to be bound by the terms of this EULA, even if thisEULA is deemed to be a modification of any previous arrangement or contract. If You do notagree to the terms of this EULA, DSC is unwilling to license the SOFTWARE PRODUCT toON I____I 1 Chime Enabled for Zone Openings Chime Disabled for Zone OpeningsON I____I 2 Chime Enabled for Zone Closings Chime Disabled for Zone ClosingsOFF I____I 3 Late to Open Prompts ON Late to Open Prompts OFFON I____I 4 For Future Use For Future UseOFF I____I 5 For Future Use For Future UseON I____I 6 Power Save Mode ON Power Save Mode OFFOFF I____I 7 For Future Use For Future UseOFF I____I 8 For Future Use For Future Use[077] I_____I_____I_____I_____I_____I_____I_____I_____I_____I_____I_____I_____I_____I_____I_____I__I_____I_____I_____I_____I_____I_____I_____I_____I_____I_____I_____I_____I_____I_____I_____I__Section Label[100] I_____I_____I_____I_____I_____I_____I_____I_____I_____I_____I_____I_____I_____I___Section Partition Label[101] 1 I_____I_____I_____I_____I_____I_____I_____I_____I_____I_____I_____I_____I_____I___Section Partition Label[120] 1 I_____I_____I_____I_____I_____I_____I_____I_____I_____I_____I_____I_____I_____I_Section Partition Label[121] 1 I_____I_____I_____I_____I_____I_____I_____I_____I_____I_____I_____I_____I_____I__Symbol DescriptionReady Light (green) If the Ready light is on, the system is ready for arming.Armed Light (red) If the Armed light is on, the system has been armed successfully.System Trouble Indicates that a system trouble is active.AC Indicates that AC is present at the keypad.](https://usermanual.wiki/Tyco-Safety-Canada/09WT5500/User-Guide-1055096-Page-6.png)