UCB Medical Devices AVA ava User Manual 15 2AHK9 AVA
UCB Medical Devices S.A. ava 15 2AHK9 AVA
15_2AHK9-AVA_User Manual
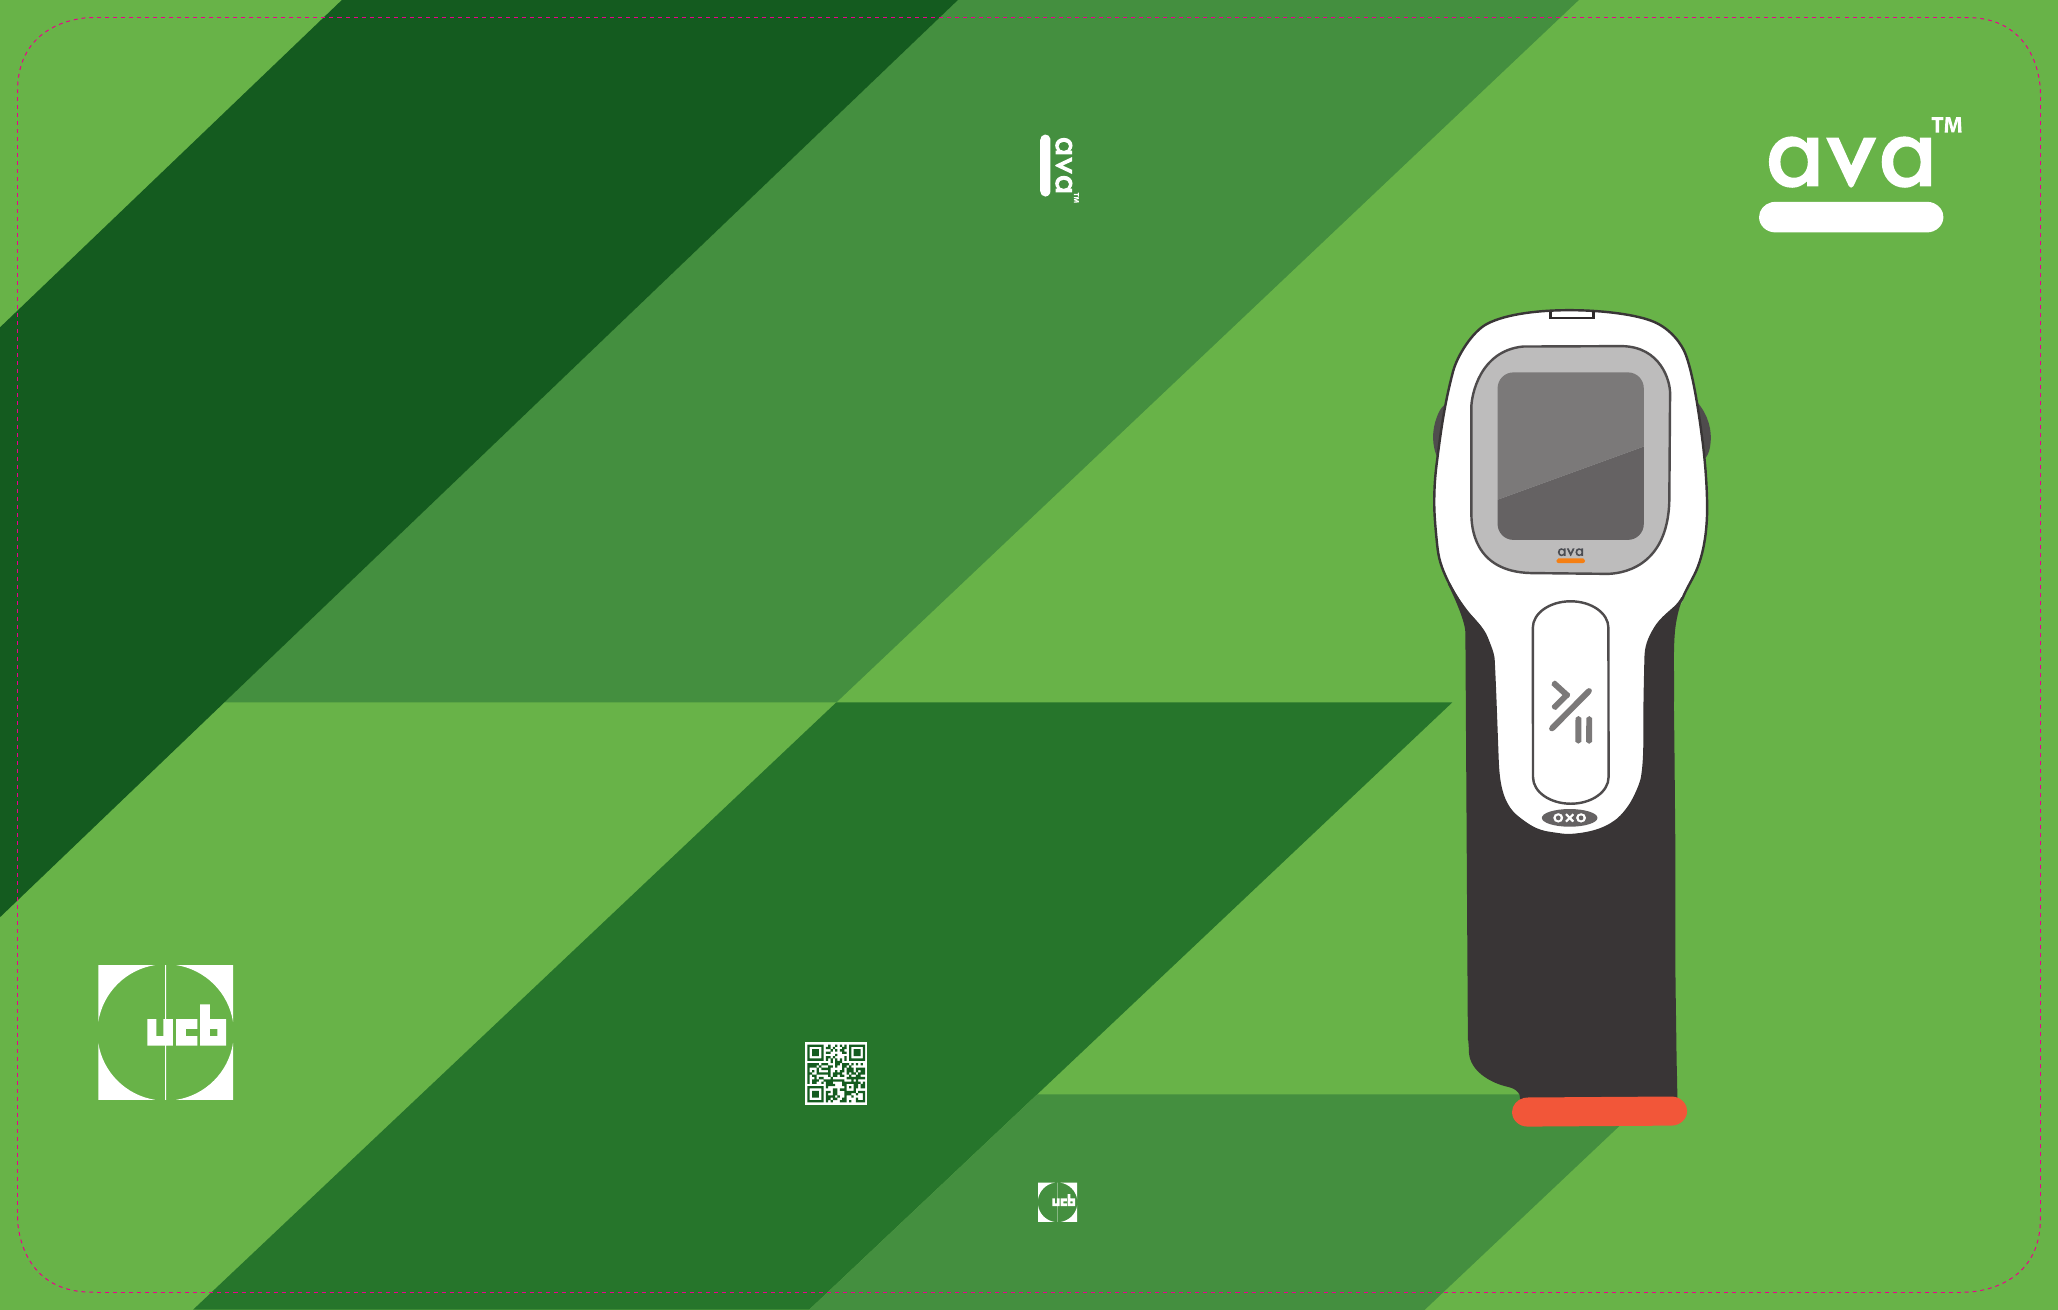
User
Manual
User Manual Ref: q-011957 v. 4.0, June 2016
Ref: q-011957 v. 4.0, June 2016
CIMZIA is a registered trademark of
the UCB Group of Companies
2
Contents
Chapter 1: Important information about ava 5
Important information 6
ava set up 10
Additional important information 10
Chapter 2: Getting to know ava 11
ava 12
CIMZIA medication cassette 14
ava’s medication dosing 16
Changing your CIMZIA dosing 19
ava accessories 20
ava operating environment 23
Storing ava 23
Cleaning ava 24
Battery saving mode 25
Chapter 3: Learning to use ava 27
Training cassette 28
Using the training cassette 30
Chapter 4: Injecting CIMZIA with ava 43
Preparing your CIMZIA medication cassette 44
Setting up for your CIMZIA injection 46
Selecting and preparing your injection site 48
Giving your CIMZIA injection 50
Disposal of Used Medication Cassettes 59
Optional Actions During an Injection: 62
Pausing your injection 62
103
Immunity test Test level Compliance level /
performance criterion
Electromagnetic
environment - guidance
Conducted RF
ETSI EN 301 489-1
ETSI EN 301 489-3
IEC 60601-1-2
IEC 61000-4-6
10Vrms
150kHz – 80 MHz
(AM, modulation depth 80%,
sinusoidal audio signal of 1
kHz)
10Vrms
CT for transmitters, CR for
receivers
None
Radiated RF
ETSI EN 301 489-1
ETSI EN 301 489-3
IEC 60601-1-2
ISO 11608-1
ISO 11608-4
IEC 61000-4-3
10 V/m
26 MHz -2700 MHz
(1 kHz, modulation depth
80%)
10 V/m
CT for transmitters, CR for
receivers
None
NOTE: These guidelines may not apply in all situations. Electromagnetic propagation
is affected by absorption and reflection from structures, objects and people.

3
CIMZIA Injection speed settings 63
Chapter 5: More information about ava 65
Viewing the injection log 66
Charging the battery 70
Chapter 6: Troubleshooting 73
Removing a cassette if the needle cap
is lost or if needle is severely bent 74
What to do if ava has problems identifying
a cassette by the Radio Frequency Identification (RFID) 75
Warning message priority 76
High priority alarms 77
Medium priority alarms 79
Low priority alarms 80
Instructions 86
Cassette Warnings 89
Other Non-Alarm Screens 91
Chapter 7: Technical Information about ava 95
Technical data 96
Explanation of ava symbols 97
Electromagnetic Compatibility Tables 98
Guidance and manufacturer’s declaration
– electromagnetic emission 99
Guidance and manufacturer’s declaration
– electromagnetic immunity 101

4
This page is intentionally left blank.

1
Chapter 1:
Important
information
about ava
This section contains important
information you must be aware
of before starting to use ava.
1

6 Chapter 1: Important information about ava
Important information
Make sure you read and understand these ava instructions.
Read these instructions for use before you start using ava to
inject. However, only use ava to inject your medication after you,
or someone you know, has received training from your healthcare
provider.
ava must only be used in the way described in these instructions.
Always follow the warnings and cautions in the instructions or on
the device itself.
ava is an electromechanical device and should be handled with care.
WARNING: ava is an injection device for delivering a fi xed dose of
CIMZIA. It is for use by one person only. DO NOT share the device
or allow anyone else to inject themselves with it, as doing so may
result in injury. DO NOT use ava if it does not appear to be working
properly and DO NOT attempt to repair a faulty ava.
ava must only be used with pre-fi lled cassettes of CIMZIA as
prescribed by your healthcare provider.
CIMZIA medication cassettes are single-use only and must be
discarded in a biohazards (sharps) container immediately after use.
DO NOT re-use a cassette.

7
Contact your healthcare provider when you need more CIMZIA
medication cassettes.
Be sure to store the CIMZIA medication cassettes properly:
• Store CIMZIA medication cassettes in the refrigerator between
36ºF to 46ºF ( 2ºC to 8ºC).
• Keep this medication out of sight and reach of children.
• DO NOT freeze CIMZIA.
• Protect CIMZIA medication cassettes from light. Store CIMZIA
medication cassettes in the carton they came in.
• The CIMZIA medication cassette contains a glass syringe.
DO NOT drop or crush the cassette.
DO NOT use CIMZIA medication cassette if:
• Any name other than CIMZIA is on the carton and/or cassette
label.
• The expiration date on each cassette or its outer carton has
passed.
• The carton is torn or the tamper evident seal is missing or broken
when you receive it.
• The cassette has been frozen or if it has been left in direct
sunlight.
• The CIMZIA solution in the cassette is not clear to colorless to
light yellow, if it looks cloudy, or if it has large or colored particles
in it.
• The red medication level indicator is not right at the top of the
cassette.
8 Chapter 1: Important information about ava
DO NOT shake the cassette before use.
Keep your ava and CIMZIA medication cassettes out of the sight
and reach of children.
Be sure to store ava properly:
• Store ava in its closed storage case to limit exposure to dirt, dust,
liquid and other substances.
• Keep ava at room temperature between 68ºF to 77ºF
(20ºC to 25ºC).
• DO NOT freeze ava or place it in the refrigerator.
WARNING: Do not operate ava near strong electromagnetic sources
like an x-ray machine in a medical facility or a security machine
at an airport. However, using your ava near common-household
electronic devices should not be a problem.
The expected lifetime for ava under normal
use is up to 3 years, after which it must be
replaced. When it is nearing its end of life, ava will
automatically show the message ‘Device is nearing
end of life!’. As soon as you see this message,
contact your healthcare provider or local helpline
for a replacement device.
!
Device
is nearing
end of life!
9
After another 10 injections when the message
above first appears, ava will stop working and
display the warning ‘Device at end of life!’.
ava contains no harmful or toxic components. The device does not
contain any personal information.
However, ava is considered biohazardous waste and must not be
disposed of in household waste.
Dispose of your used ava according to your community guidelines,
observing all Federal, State and local regulations or contact the
helpline for information on safe disposal of ava.
WARNING: ava should be handled with care.
DO NOT drop. If ava is dropped, check that no
broken parts are visible. Turn ava on. If you see
an ‘Error! Do not use. Helpline code’ warning
message - DO NOT use it. Make a note of the four
digit Helpline Code number and contact your local
helpline for support.
CAUTION: Avoid spilling liquid on your ava. Never rinse or put ava
under water. If ava has been exposed to liquid, wipe it with a clean,
dry cloth, turn it on and check for error messages.
!
Device at
end of life!
!
Error!
Do not use.
Helpline code
xxxx

10 Chapter 1: Important information about ava
ava set up
Your new ava device needs to be set up by your healthcare
provider. Please make sure to schedule an appointment with
your healthcare provider to have your medication dose set up
in ava. You should also receive training on the correct use at
the same time.
DO NOT forget to bring ava to your appointment.
You can practice using ava even before your healthcare provider
has set up ava for you. The training cassette can be used at any
time before or after the medication dose has been set up.
Additional important information
The use of ava is not approved or recommended for the following
circumstances:
• users less than 18 years of age
• users who are legally blind
• users who are unable to self-inject as determined
by a health care provider
Your healthcare provider will determine if you are able to use ava.
Ask your health care provider if you are not sure.

2
Chapter 2:
Getting to
know ava
This section is a guide to ava and
CIMZIA medication cassettes, showing
the controls and the names of the main
parts. You will also fi nd information on
how to take care of your ava and
CIMZIA medication cassettes.
2
12 Chapter 2: Getting to know ava
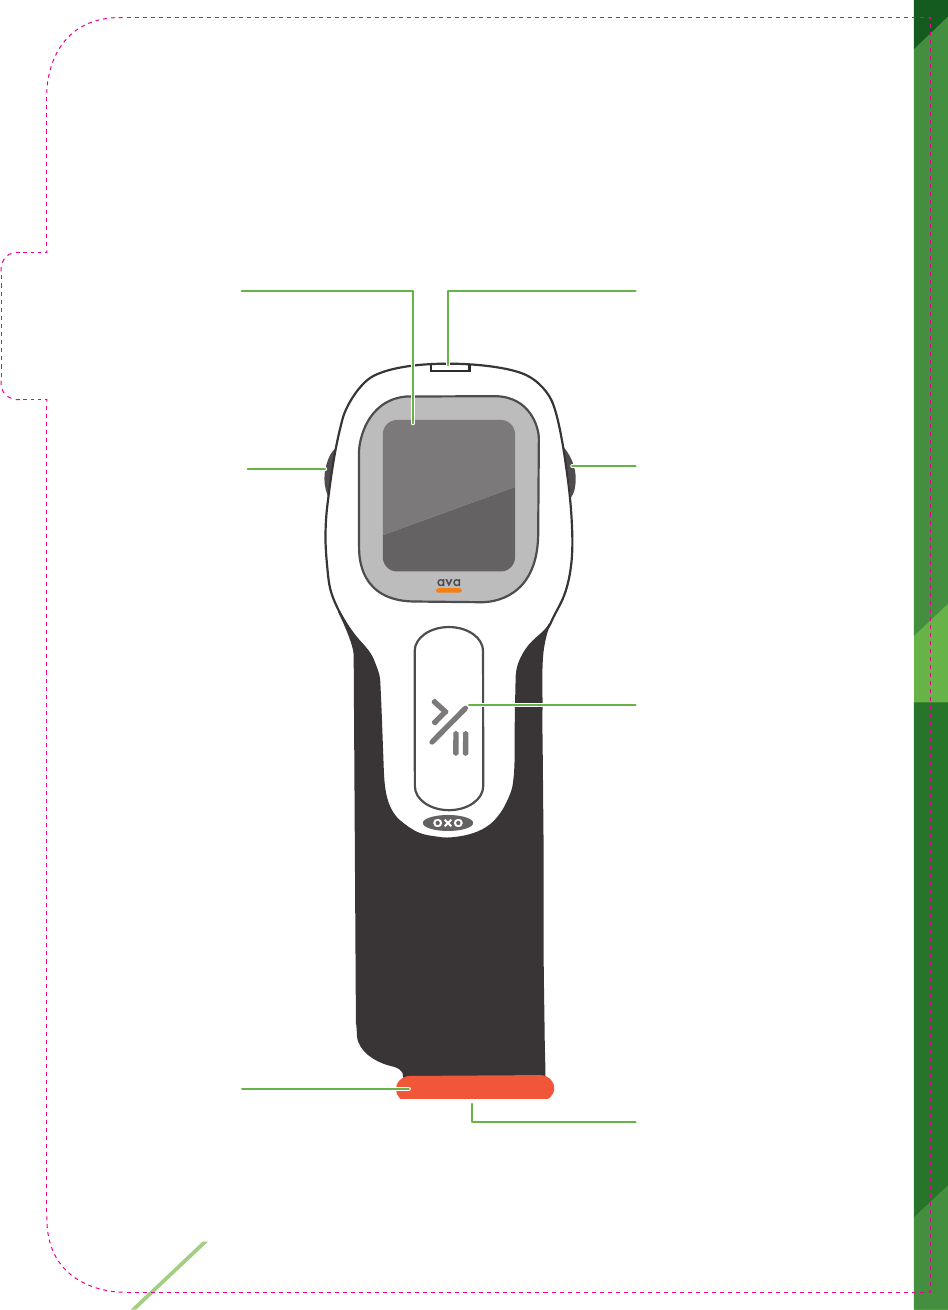
ava
Use this illustration to identify the controls and the names of
ava’s parts.
Cassette/
Injection Port
On/Off
(Power)
Button
Start/Pause
Button
Skin Sensor
Scroll wheel
Information
Screen
Micro-USB
Port

13
Information screen
ava’s screen will display step-by-step instructions and any advice
or warning messages.
Scroll wheel
This wheel lets you adjust the speed of your injection.
Skin sensor
The skin sensor detects when the injection port is fully in contact
with your skin.
Micro-USB Port
This is where you connect the battery charger or your computer
to view your injection log.
On/Off (Power) Button
Use this button to turn ava on or off.
Start/Pause button
Pressing this button will begin administering an injection. It can
also be used to pause and re-start the delivery of CIMZIA during
an injection.
Cassette/Injection port
This is where the CIMZIA, or training cassette, is loaded and
where the needle comes out during a CIMZIA injection.
14 Chapter 2: Getting to know ava
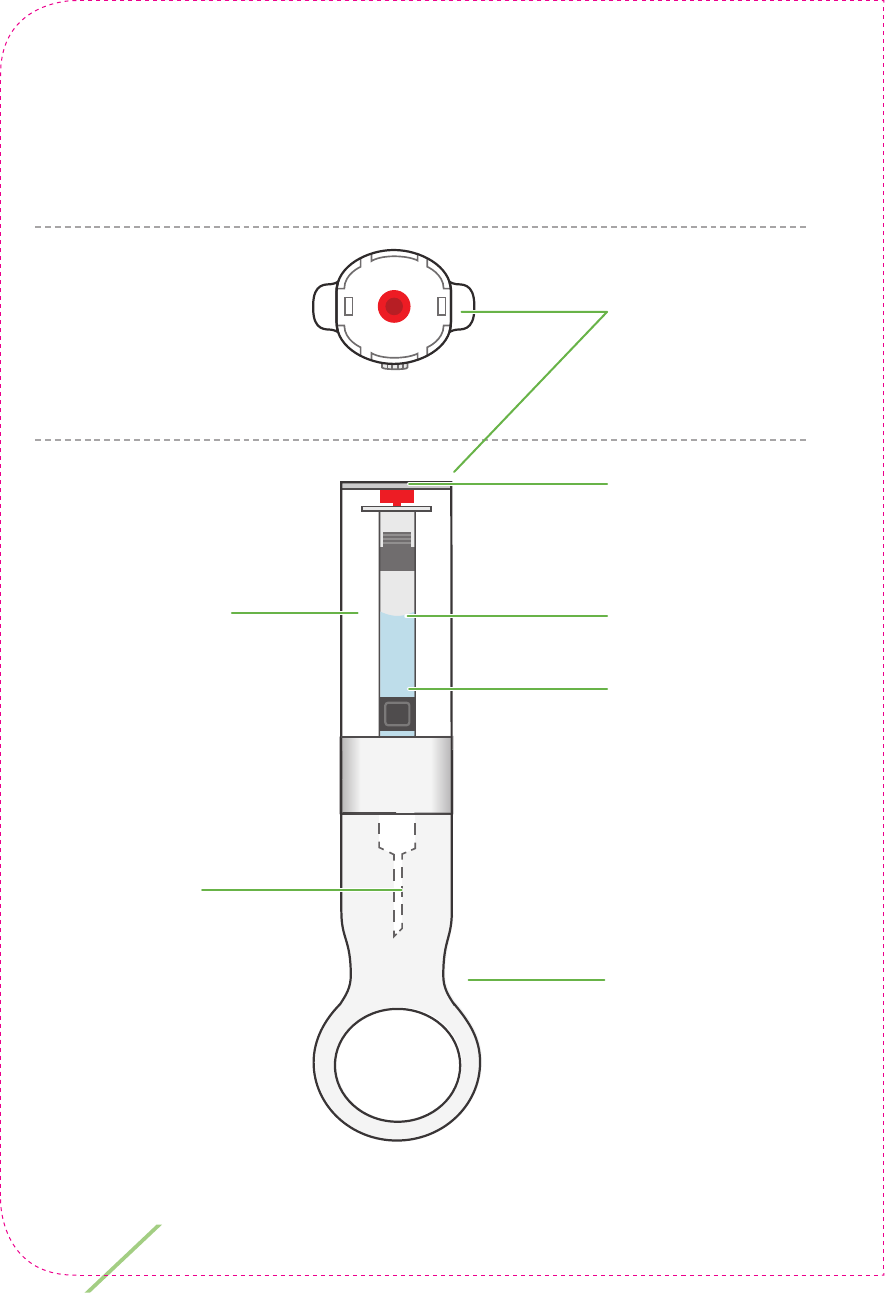
CIMZIA medication cassette
This illustration shows a CIMZIA medication cassette for
use with ava.
Needle cap
Syringe
Medication
information
chip
Side view
Top view
Medication
level indicator
End cap
Cassette body
Needle
(inside cap)

15
Cassette body
This plastic cassette body contains the glass syringe of CIMZIA.
Needle (inside cap)
The single-use needle is safely covered by the needle cap until you
are ready to inject.
Medication level indicator
This red plastic indicator enables you to see the level of CIMZIA in
a cassette. When the syringe is full the indicator is at the top of the
syringe. When the syringe is empty the indicator is at the bottom of
the syringe.
Medication information chip
This microchip enables ava to identify the type of cassette and
check other information about it.
Needle cap
This part covers the needle whenever it is not inside ava ready for
an injection.
Keep the needle cap to remove the cassette after an injection.
16 Chapter 2: Getting to know ava
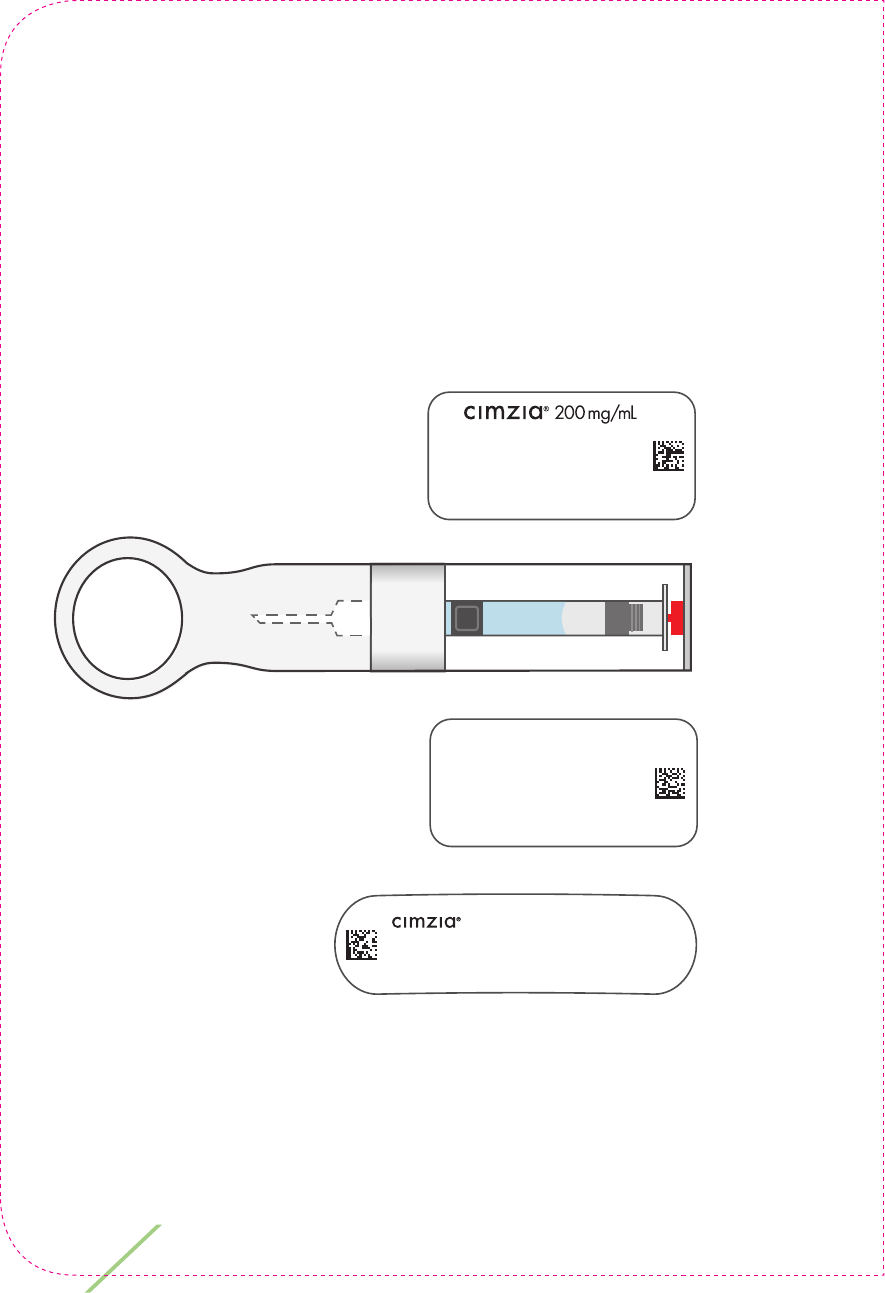
ava’s medication dosing
ava delivers your medication from CIMZIA medication cassettes
as shown below.
This illustration also shows the labels you will see on your CIMZIA
medication cassettes.
LOT:
EXP:
Part#
xxxxxx
CIA79918A
certolizumab pegol
Store at 36° to 46°F (2° to 8°C).
Do not freeze. Protect from
light. Single use.
Mfd. by UCB Inc.,
Smyrna, GA, USA
CIA79917A
CIA79919A
NCD 50474-xxxx-xx Rx Only
injection 200mg/mL cassette
certolizumab pegol
Each medication cassette contains 1mL of
Cimzia. For subcutaneous injection use only.
Use only with the Cimzia ava device.
17
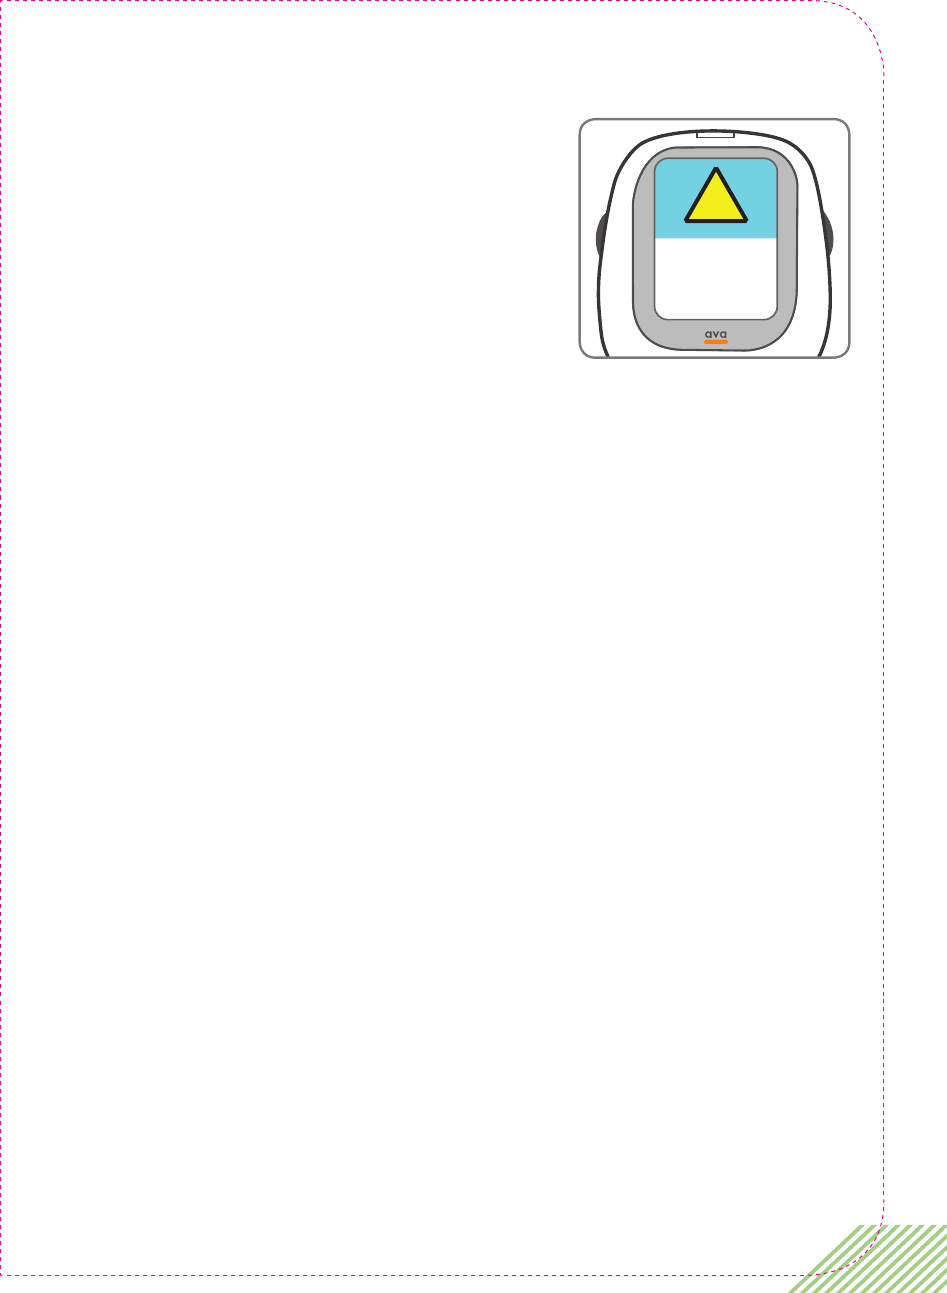
ava can only be used with CIMZIA
medication cassettes. However, before
ava accepts CIMZIA medication cassettes
it must be set up by your healthcare
provider according to your prescribed
dose of CIMZIA. This is indicated by the
following screen.
If you have not done so already, take an appointment with
your healthcare provider to have your new ava set up for
you. Remember to bring ava to your appointment.
In the meantime, you can practice using ava with the training
cassette that is provided in your ava storage case. See Chapter 3
for more information.
Your healthcare provider will set up ava according to your
prescription.
If your healthcare provider prescribes the loading doses, ava
is programmed to deliver your loading dose injections at weeks
0, 2 and 4 and then automatically switches to the maintenance
dosing regimen which has been selected by your healthcare
provider for you.
The loading dose regimen consists of two injections given every 2
weeks at the start of your CIMZIA treatment (week 0) and then at
week 2 and the final loading dose injections are given at week 4.
!
Consult your
physician to
set device
dosage!
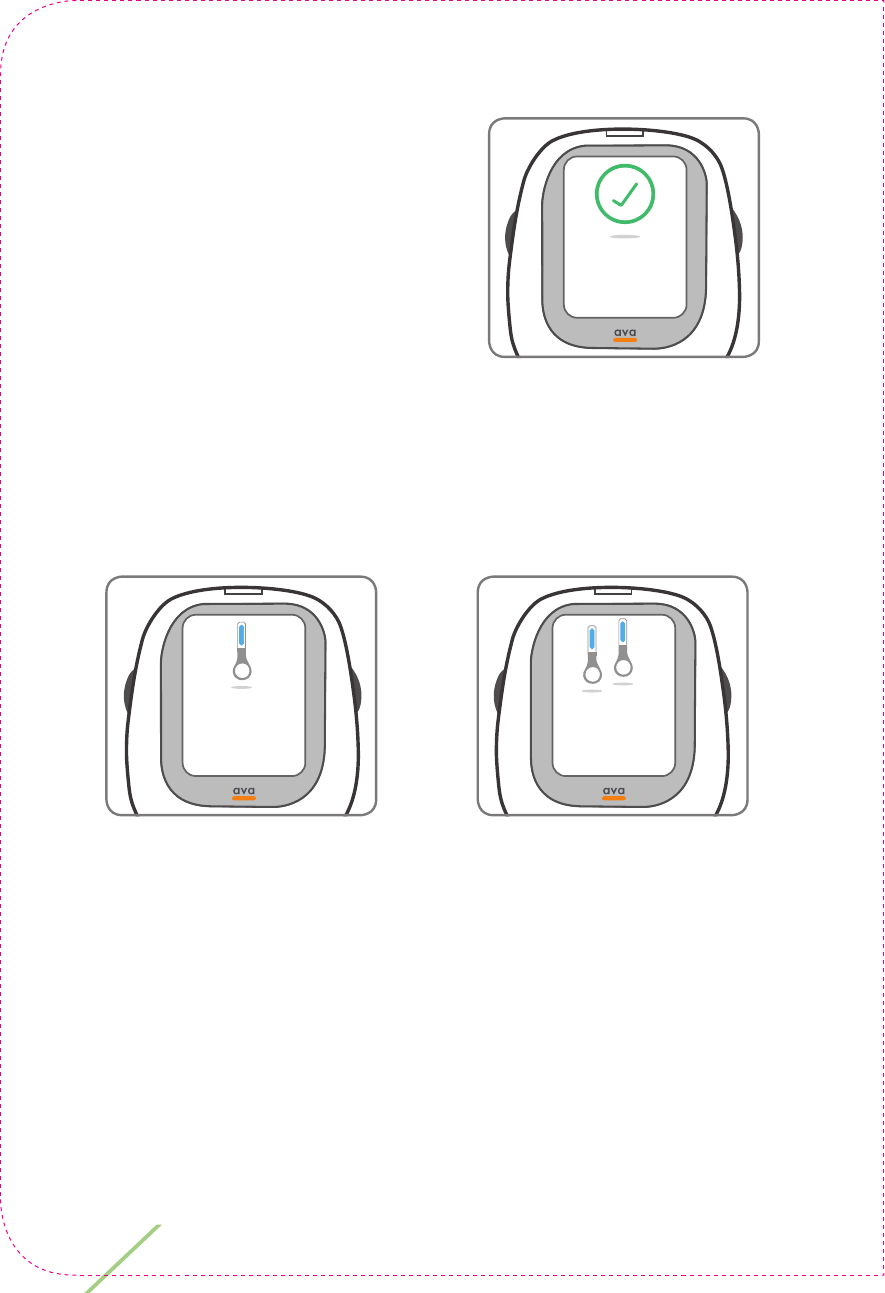
18 Chapter 2: Getting to know ava
Once the last injection of your
loading dose has been delivered
at week 4, ava indicates this by
displaying the message ‘Loading
dose complete.’.
This message will be followed by either ‘You are on maintenance
dose 1 inj. every 2 weeks.’ or ‘You are on maintenance dose 2 inj.
every 4 weeks.’ depending on which maintenance dose has been
selected for you.
Loading dose
complete.
You are on
maintenance
dose 2 inj.
every 4 weeks.
You are on
maintenance
dose 1 inj.
every 2 weeks.

19
Changing your CIMZIA dosing
In case your healthcare provider needs to change your dose,
ava will need to be set up again. Please make sure you bring ava
to your next appointment where your healthcare provider will
set up ava for your new medication dosing.
20 Chapter 2: Getting to know ava
ava accessories
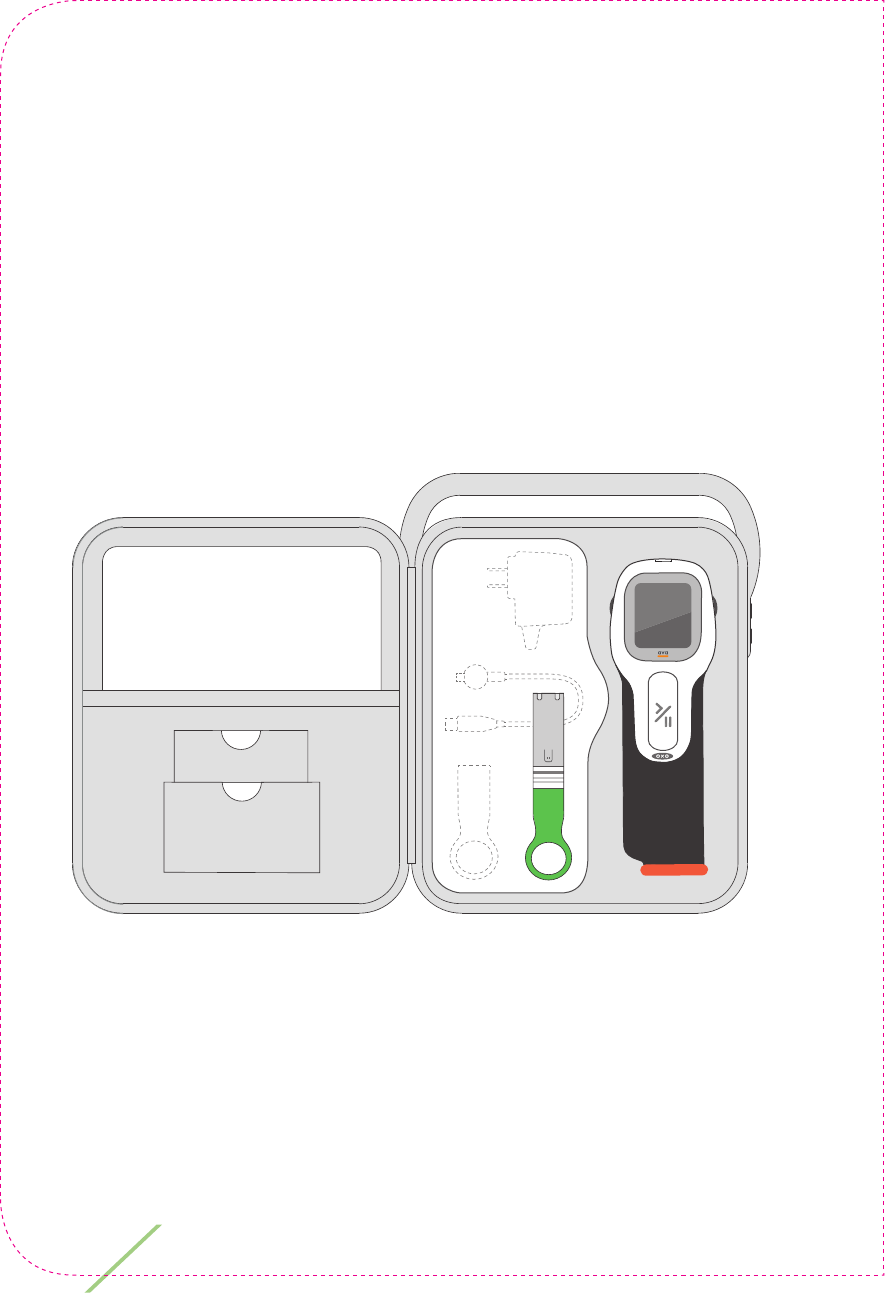
ava is supplied with a storage case containing additional items
you will fi nd useful. When not in use, keep ava and accessories
securely inside the storage case to protect them from dust or
accidental damage. Keep ava with all accessories out of the sight
and reach of children. All of ava’s accessories are designed for
the life of the product.
Storage Case
The storage case has an internal compartment which is
covered by a lid. To open the lid, slide a fi nger under the
small lever and lift. The charger, USB cable and spare
needle caps are placed under this internal lid.
LBL4_CIM_
PS6
21
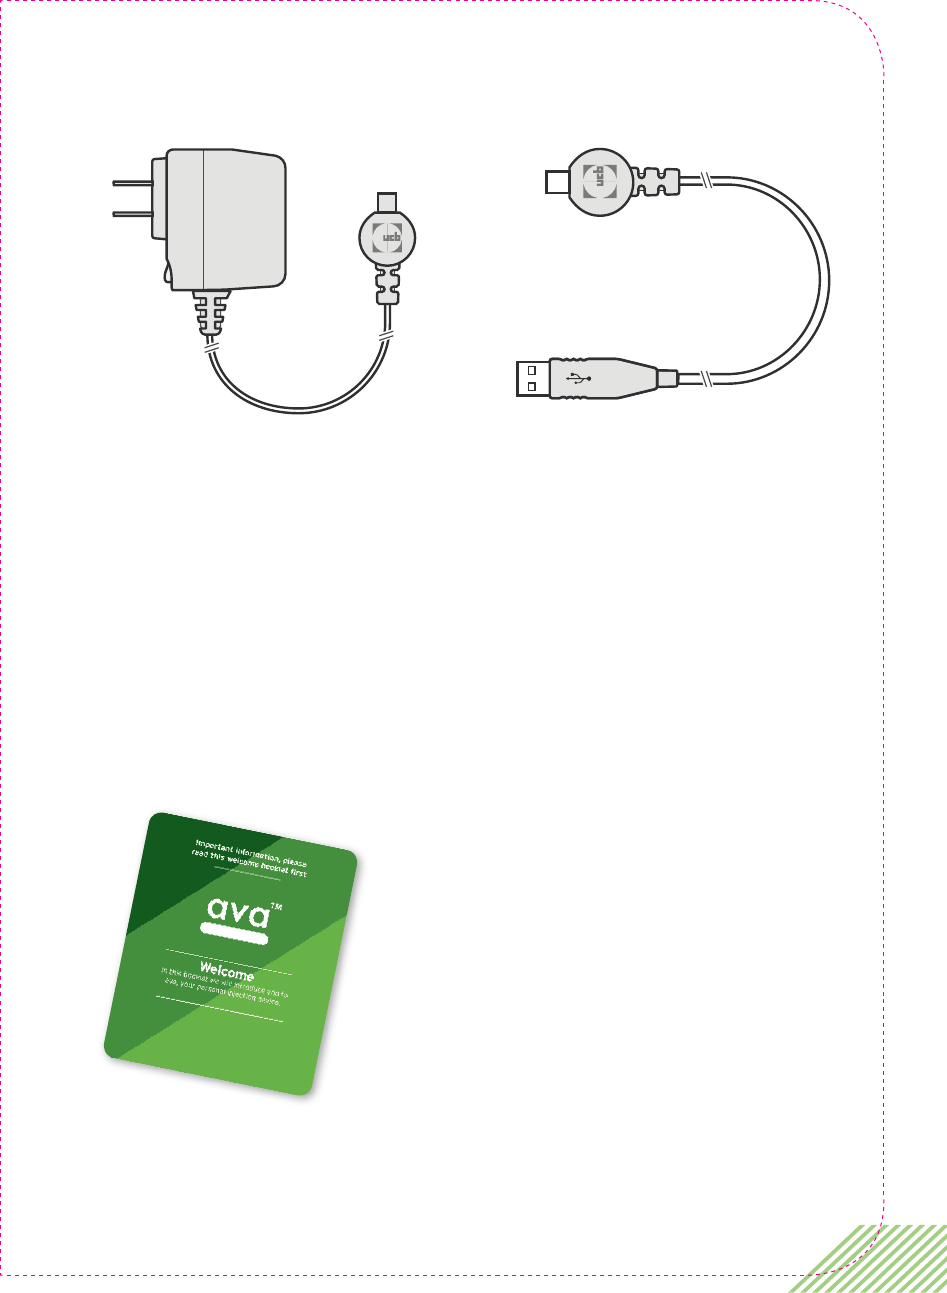
An electrical battery charger
Charge ava only with this battery
charger. When charging ava
make sure to keep the cable
out of reach of children and
keep it secure to avoid the
risk of tripping over it.
The Storage Case contains
A USB cable
Use this USB cable to connect
ava to your computer to view
your injection log. When viewing
the injection log make sure to
keep the cable out of reach of
children and keep it secure to
avoid the risk of tripping over it.
ava welcome booklet
A booklet introducing you to ava.
22 Chapter 2: Getting to know ava
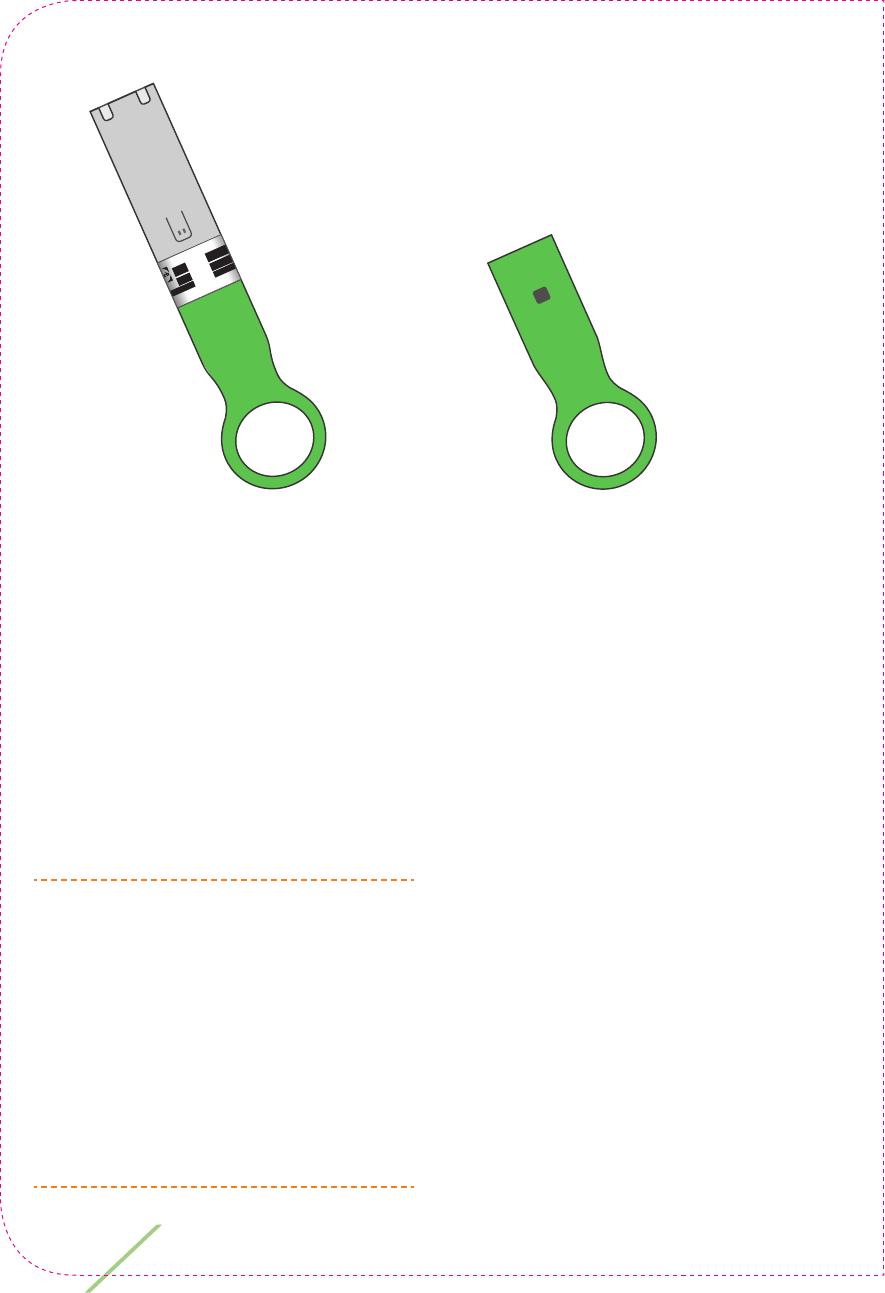
A training cassette
Use this training cassette to help
you practice injections with ava.
The training cassette is reuseable
and does not contain a needle or
medication. It can be used at any
time and as often as you like,
even before ava has been set up
for your medication dose.
CAUTION: Never replace the
training cassette by a CIMZIA
medication cassette! Your
medication cassettes must be
stored between 36°F to 46°F
(2°C - 8°C) and must never
be transported inside of the
storage case.
Two spare needle caps
These are extra caps to remove
used cassettes from ava in case
you dispose of the needle cap
from the medication cassette.
The helpline support number
is 1-800-xxx-xxxx.
ava Training Cassette
For training purposes only.
Contains no needle or medication.
CIA79968A
LBL4_CIM_
PS6
ava Training Cassette
For training purposes only.
Contains no needle or medication.
ava Training Cassette
For training purposes only.
Contains no needle or medication.
spare
needle
cap
x2

23
ava operating environment
When operating ava make sure you observe the following
environmental requirements.
Operating
temperature
41°F to 104°F (5°C to 40°C)
Humidity 15 – 90% relative humidity, non-condensing
Atmospheric
Pressure
700 hPa to 1060 hPa
It is recommended to avoid using ava in direct sunlight as the
display may be more difficult to read.
WARNING: This medical equipment is not intended for use in
oxygen-rich environments.
Storing ava
When you are not using ava or you are travelling, it is recommended
that you store it, together with the accessories, inside the storage
case. This will help prevent ava from being exposed to dust and dirt
and getting damaged. Use the handle to carry the storage case.
Be sure to store ava properly:
• Store ava in its closed storage case to limit exposure to dirt, dust,
liquid and other substances.
• Keep ava at room temperature between 68ºF to 77ºF
(20ºC to 25ºC).
• DO NOT freeze ava or place it in the refrigerator.

24 Chapter 2: Getting to know ava
Cleaning ava
If needed, you may clean the exterior surface of ava with a solution
of mild soap and water using a damp cloth. You may also clean it
with a commercially available, alcohol based, colorless disinfectant.
CAUTION: Do not use a scouring powder or an abrasive sponge as
it will damage the surface.
DO NOT attempt to clean the inside of the cassette port.
DO NOT insert your finger or any objects other than a cassette into
the cassette port.
DO NOT clean ava while there is a cassette inserted into the
cassette port.
CAUTION: Avoid spilling liquid on your ava. Never rinse or put ava
under water. If ava has been exposed to liquid, wipe it with a clean,
dry cloth, turn it on and check for error messages.
The helpline support Number is 1800-xxx-xxx.

25
Battery saving mode
If ava is inactive for 60 seconds, the screen will dim automatically
to preserve battery. Pressing any button will restore the normal
screen brightness and you can continue the procedure.
If left inactive for 3 minutes, ava will automatically turn off,
unless you have not completed your injection. You will need to
re-start any procedure from the beginning, if the device turns off.

26 Chapter 2: Getting to know ava
This page is intentionally left blank.

3
Chapter 3:
Learning to
use ava
This section teaches you how to use
ava with a training cassette that does
not contain a needle or medication.
By using a ‘training cassette’, you
can get used to operating ava.
This section does not cover the safety
precautions you have to take when
injecting CIMZIA. You can fi nd that
information in Chapter 4, “Injecting
CIMZIA with ava”.
3
28 Chapter 3: Learning to use ava
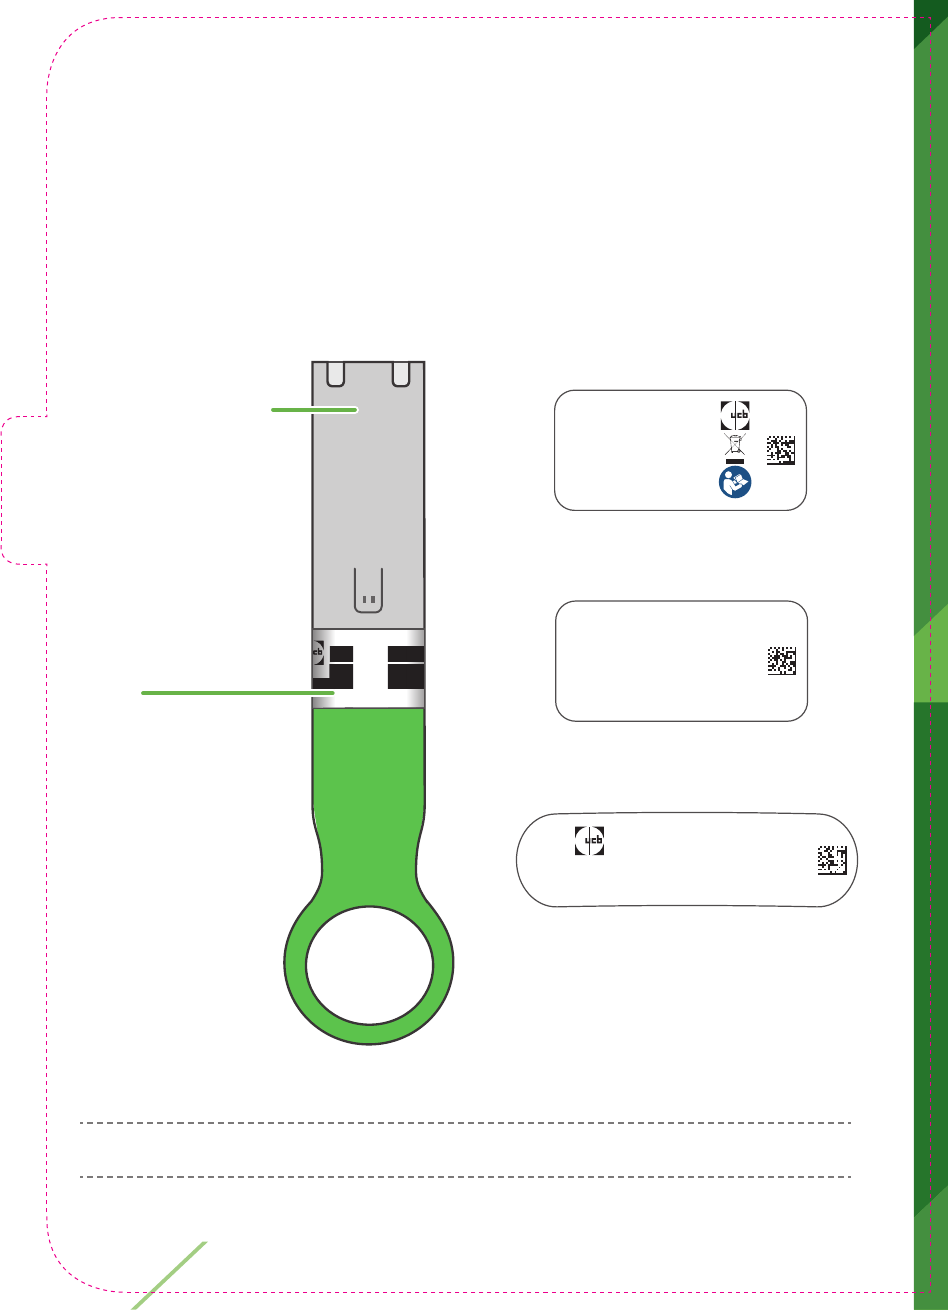
Training cassette
There is a training cassette included in your ava kit to help you
practice injections. The training cassette has no needle or
medicine. When it is time to inject your medicine, use the CIMZIA
medication cassettes only, not the training cassette.
NOTE: The training cassette is reuseable. DO NOT discard.
For training
purposes
only.
Contains no
needle or
medication.
CIA79970A
Batch no.:
xxxxxxxxxxxx
UCB Inc.
CIA79969A
1950 Lake Park Dr.
Smyrna, GA
ava Training Cassette
ava Training Cassette
For training purposes only.
Contains no needle or medication.
CIA79968A
Body label 1
For training
purposes
only.
Contains no
needle or
medication.
CIA79970A
Batch no.:
xxxxxxxxxxxx
UCB Inc.
CIA79969A
1950 Lake Park Dr.
Smyrna, GA
ava Training Cassette
ava Training Cassette
For training purposes only.
Contains no needle or medication.
CIA79968A
Cap label
Body label 2
For training
purposes
only.
Contains no
needle or
medication.
CIA79970A
Batch no.:
xxxxxxxxxxxx
UCB Inc.
CIA79969A
1950 Lake Park Dr.
Smyrna, GA
ava Training Cassette
ava Training Cassette
For training purposes only.
Contains no needle or medication.
CIA79968A
Training
Cassette:
contains no
needle and no
medication
ava Training Cassette
For training purposes only.
Contains no needle or medication.
CIA79968A
LBL4_CIM_
PS6
ava Training Cassette
For training purposes only.
Contains no needle or medication.
ava Training Cassette
For training purposes only.
Contains no needle or medication.
Cassette body
Cap

29
Your training cassette has
• no needle
• no medicine inside.
You can use it to practice injecting with ava. It can be used
• before your healthcare provider has set up your medication dose
on ava
• after your medication dose has been set up
• as often as you would like
• Make sure you keep the training cassette. DO NOT throw it away.
NOTE: When using the training cassette you are practicing the
injection steps without actually injecting any medication. The
screens you will see on the display when using the training cassette
are the same you will see when using your cassettes containing
medication.
Using this training cassette will teach you how ava guides you
through the injection process.
The training cassette cap is colored bright green and the cassette
body is gray.
WARNING: See Chapter 4 for full injection instructions using a
CIMZIA medication cassette.
If you drop the training cassette, check the cassette to make sure
there are no broken parts before inserting into ava.
30 Chapter 3: Learning to use ava
Using the training cassette
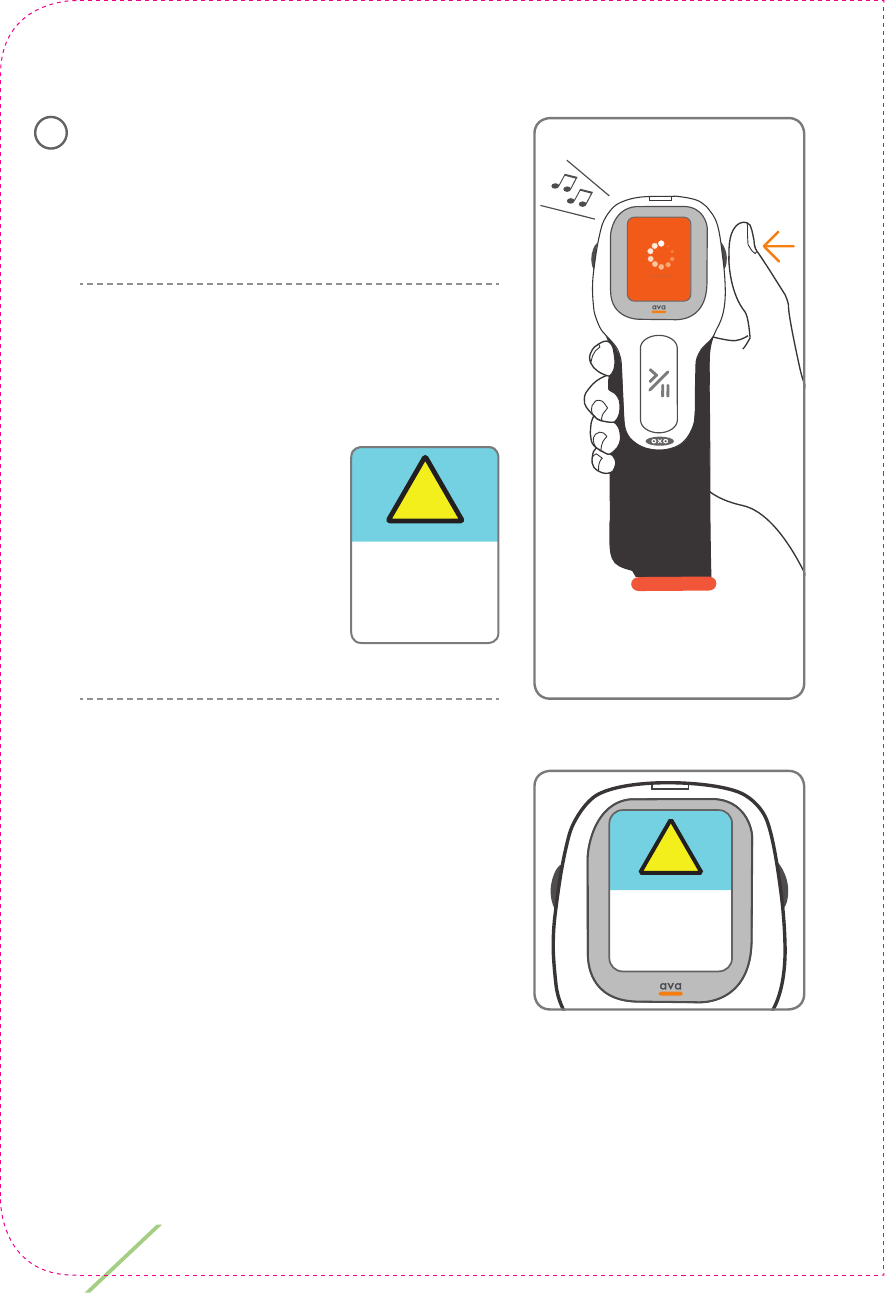
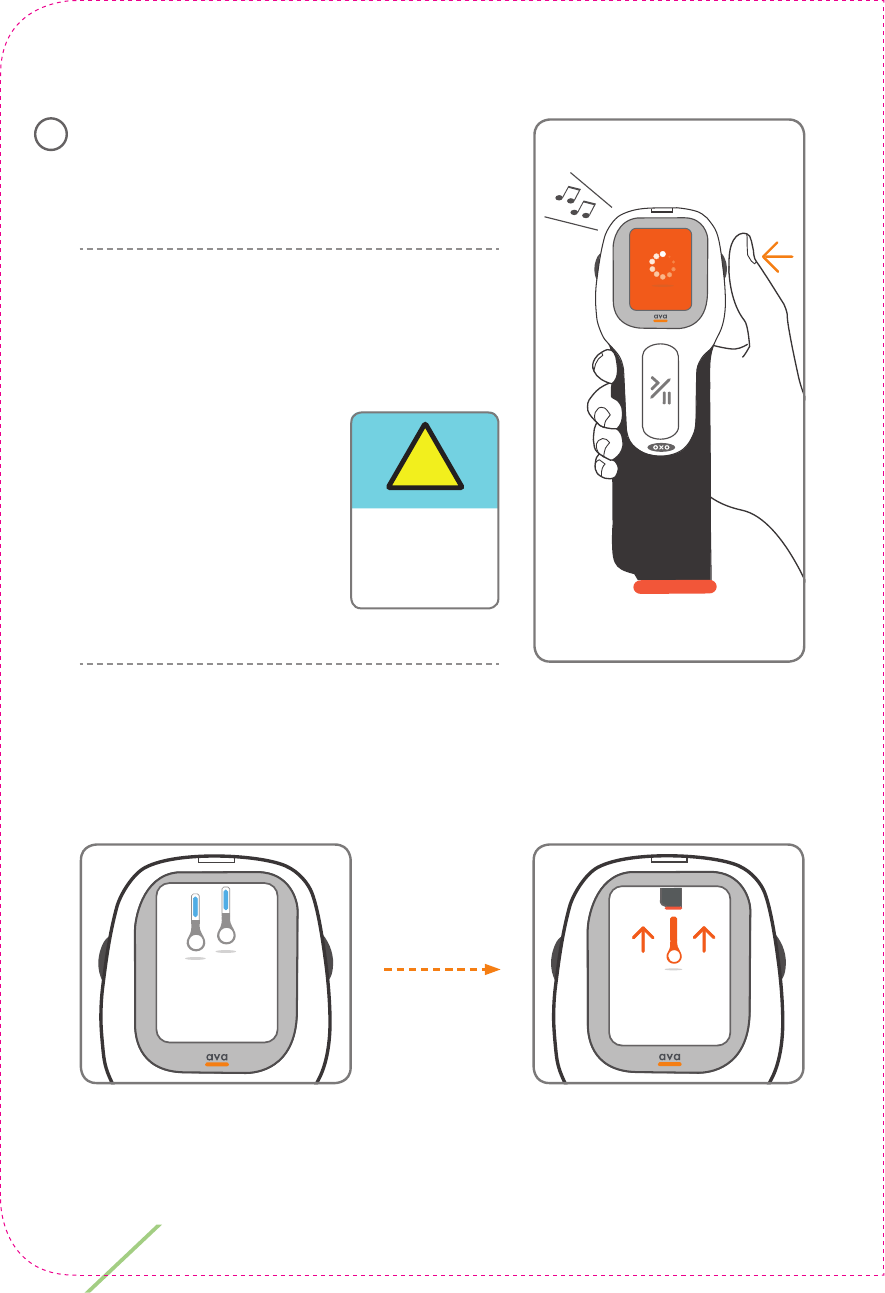
Turn on ava by holding down the
‘On/Off ’ button for 1 second, or until
the screen lights up and you hear a
sound.
NOTE: ava should arrive with the
battery charged, but, if ava does not
turn on, or it displays the message
‘Low battery. Please charge
battery.’, the battery
will need charging
before you start.
See Chapter 5 for
instructions on how
to re-charge the
battery.
If your healthcare provider has not
set up your device, you will see the
following message.
You can still insert the training
cassette to practice the injection
process.
1
!
Low battery!
Please charge
battery.
!
Consult your
physician to
set device
dosage!
31
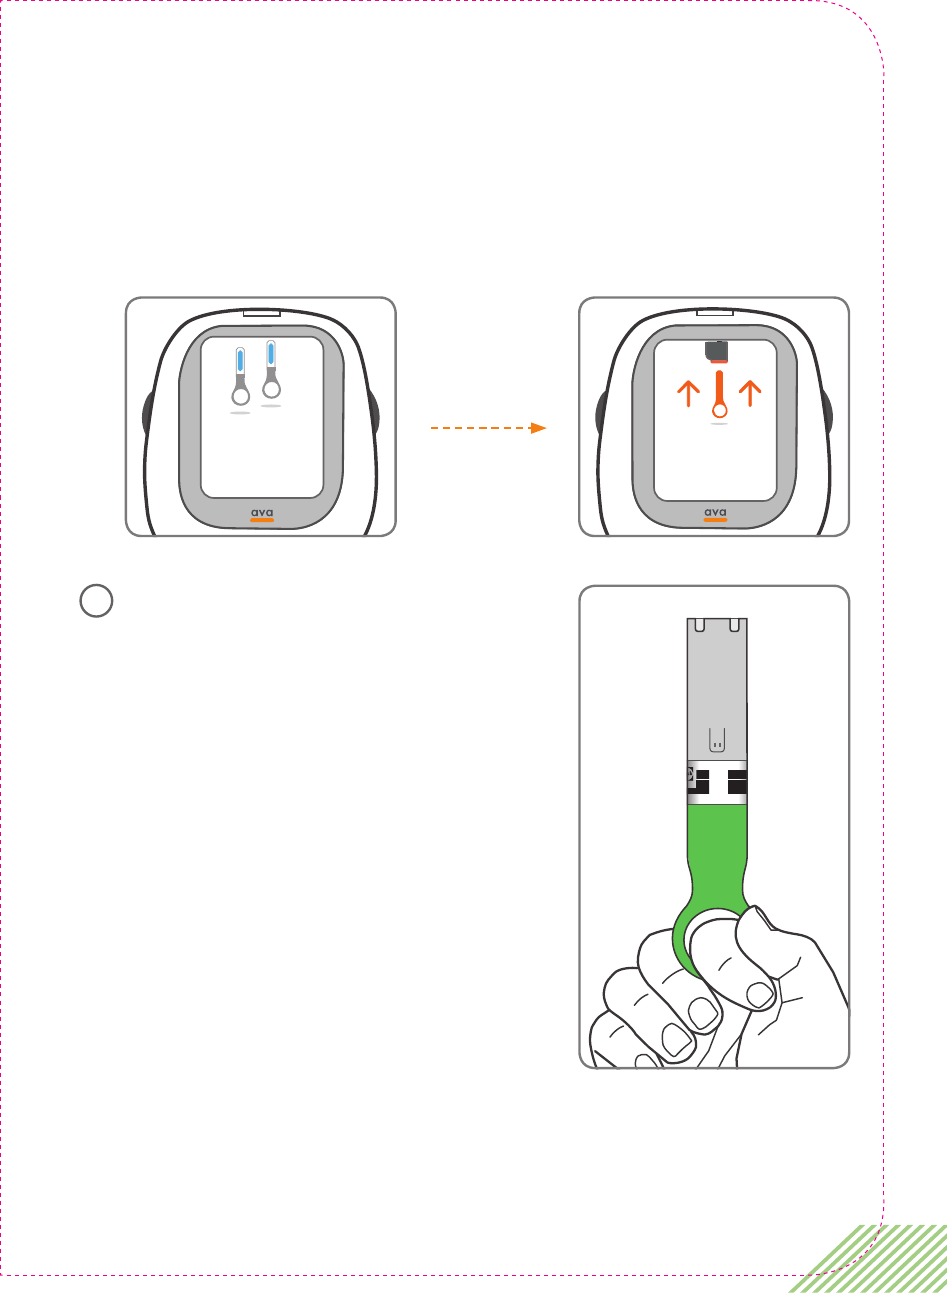
The message ‘Inspect and then insert medication.’ will be
displayed. If ava has been used before it will also briefl y show
your current dose and schedule. For example, if you are on the
loading dose you will see the following messages.
Take the training cassette from
the storage case. DO NOT try to
remove the green cap
You are on
loading dose
2 inj. every
2 weeks.
Inspect and
then insert
medication.
ava Training Cassette
For training purposes only.
Contains no needle or medication.
CIA79968A
LBL4_CIM_
PS6
ava Training Cassette
For training purposes only.
Contains no needle or medication.
ava Training Cassette
For training purposes only.
Contains no needle or medication.
2
32 Chapter 3: Learning to use ava
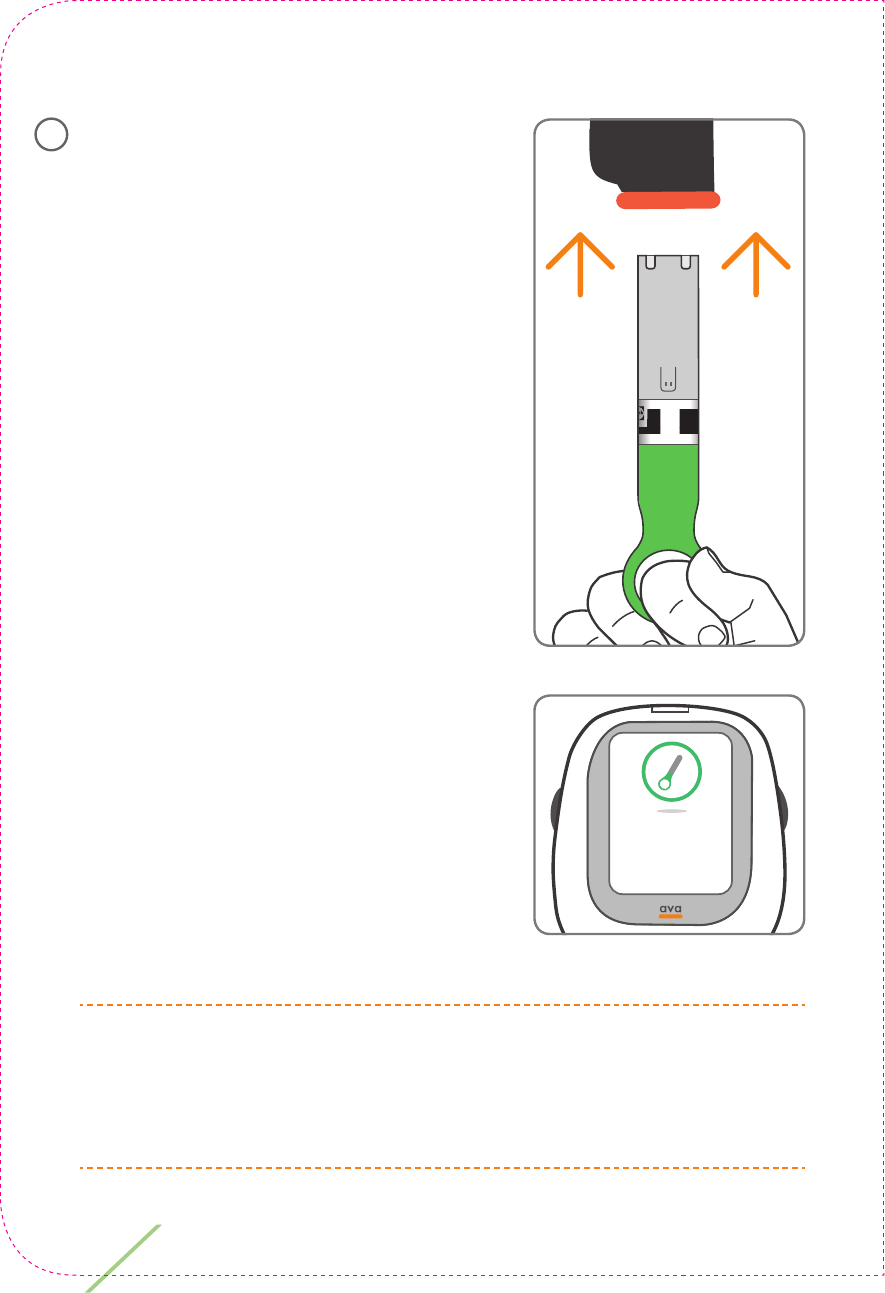
Push the fl at end of the training
cassette fi rmly into the cassette port
of ava until you hear a click.
DO NOT twist the training cassette;
it is shaped so that it can only be
inserted the correct way.
DO NOT keep any other medication
cassettes near ava while using the
training cassette.
Let go of the cap.
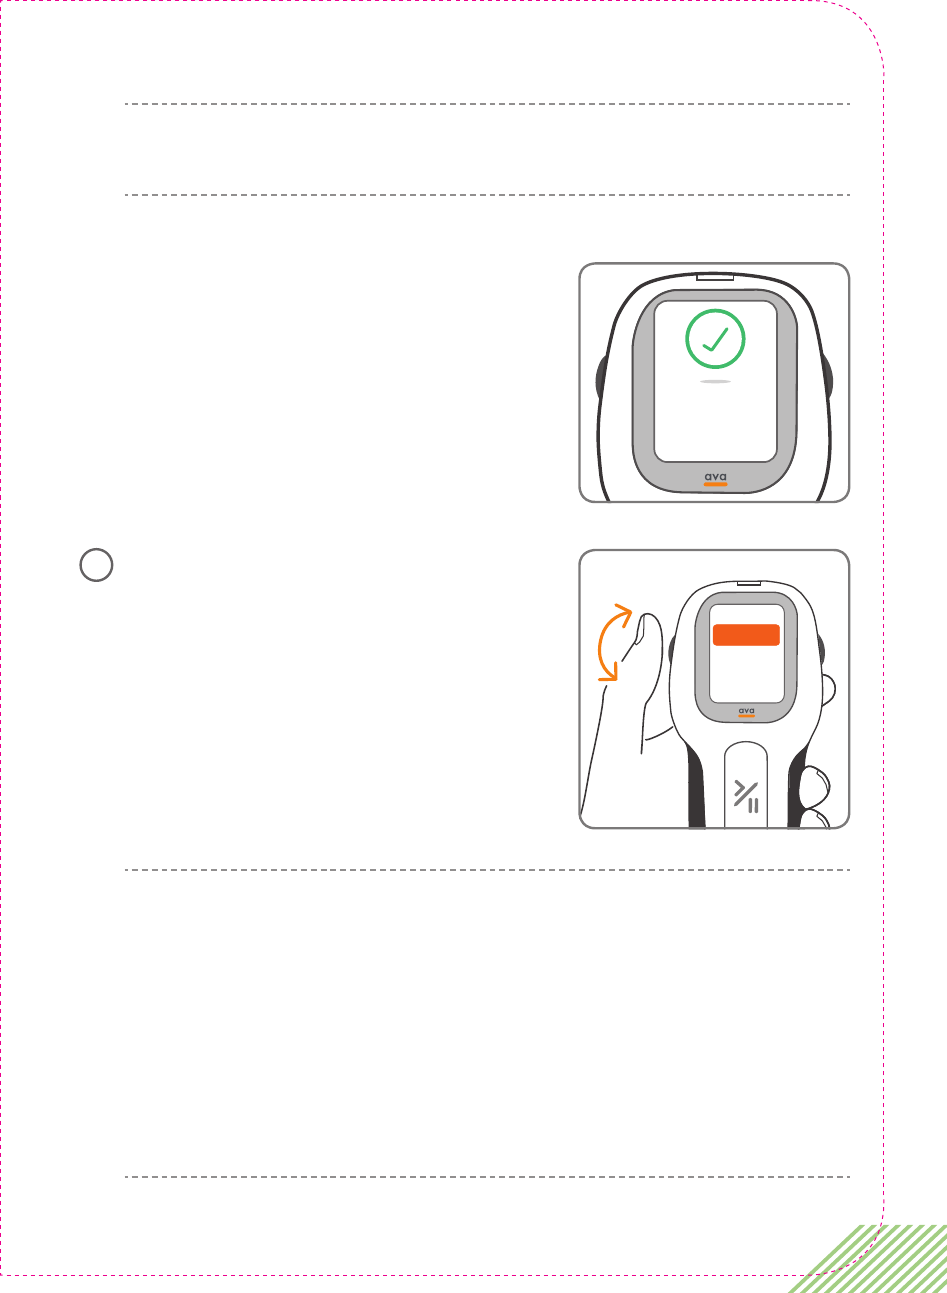
ava will now check the training
cassette and will display the message
‘You are in training mode’.
WARNING: If you do not see this message turn off ava by
holding down the power button and remove the cassette. Make
sure you are using a training cassette. Go back to Step 1 on
page 30.
ava Training Cassette
For training purposes only.
Contains no needle or medication.
CIA79968A
LBL4_CIM_
PS6
ava Training Cassette
For training purposes only.
Contains no needle or medication.
ava Training Cassette
For training purposes only.
Contains no needle or medication.
3
You are in
training mode.
33
NOTE: You are now in training mode. ava will behave as if you
had inserted a real medication cassette.
ava will now check the cassette
and display ‘Medication cassette
accepted’.
After a short pause, ava will
automatically pull the cassette
further in.
The currently selected injection
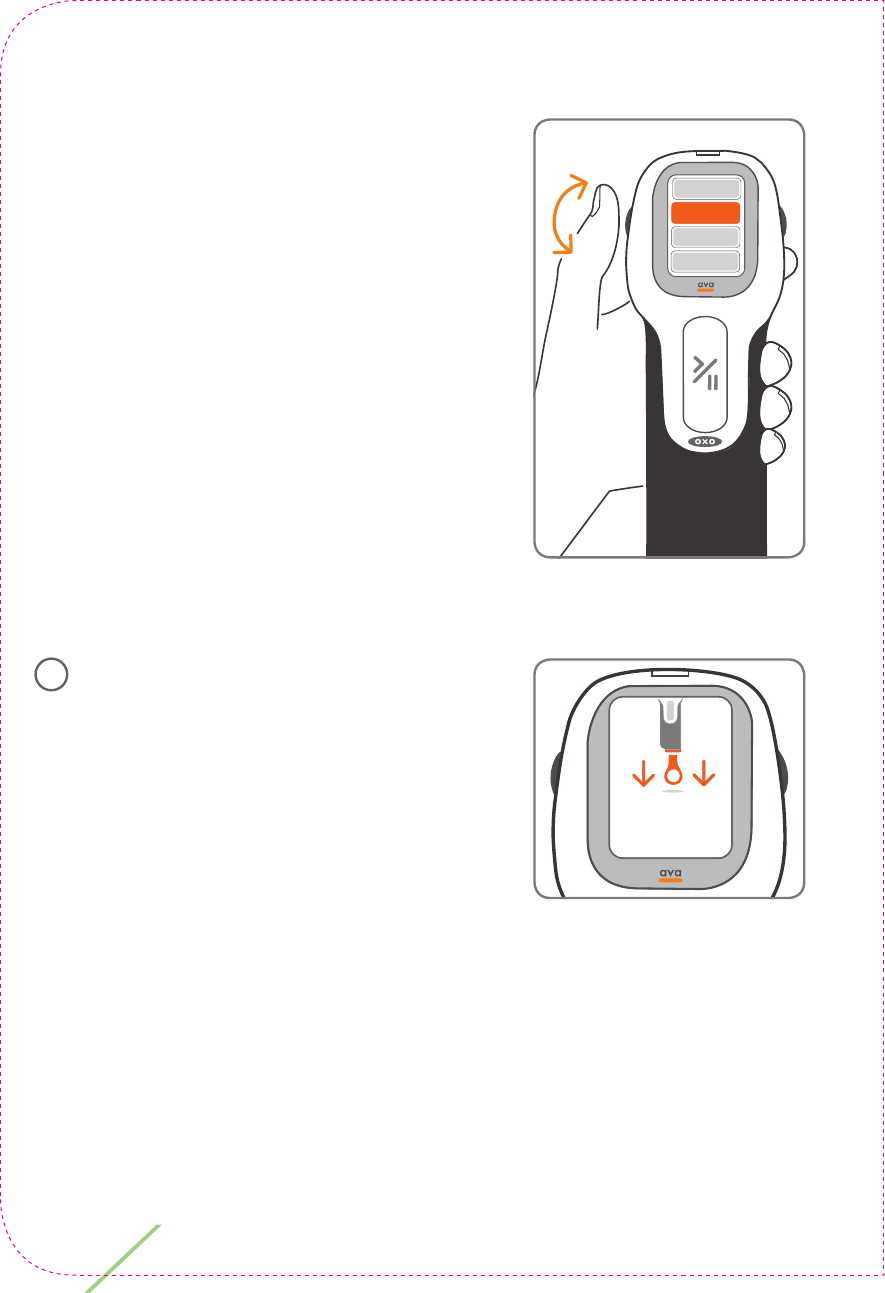
speed is briefly displayed. You can
change this setting using the ‘scroll
wheel’ on the side of ava to any of
the four available settings.
NOTE: The injection speed can only be changed when a
cassette is inserted into the cassette/injection port. You can
only adjust the injection speed before performing or when
pausing your injection.
This setting controls the speed at which medication is injected.
This setting does not change the speed of the needle being
inserted, just the speed at which CIMZIA is injected.
Medication
cassette
accepted.
slowest
This is your
current speed
setting.
4
34 Chapter 3: Learning to use ava
You can practice changing the speed
by rotating the scroll wheel on the
side of the device. The screen will
update to show the four available
speeds. Rotate the wheel to see
how the highlighting moves from
one speed to another. If you want
to change the speed, scroll until the
highlight shows the new speed and
leave it there for five seconds. The
new speed has been set and will be
kept for future injections, or until you
choose to change it again.
The ‘Remove and save the needle
cap.’ message is displayed.
fast
fastest
slow
slowest
Remove and
save needle
cap.
5
35
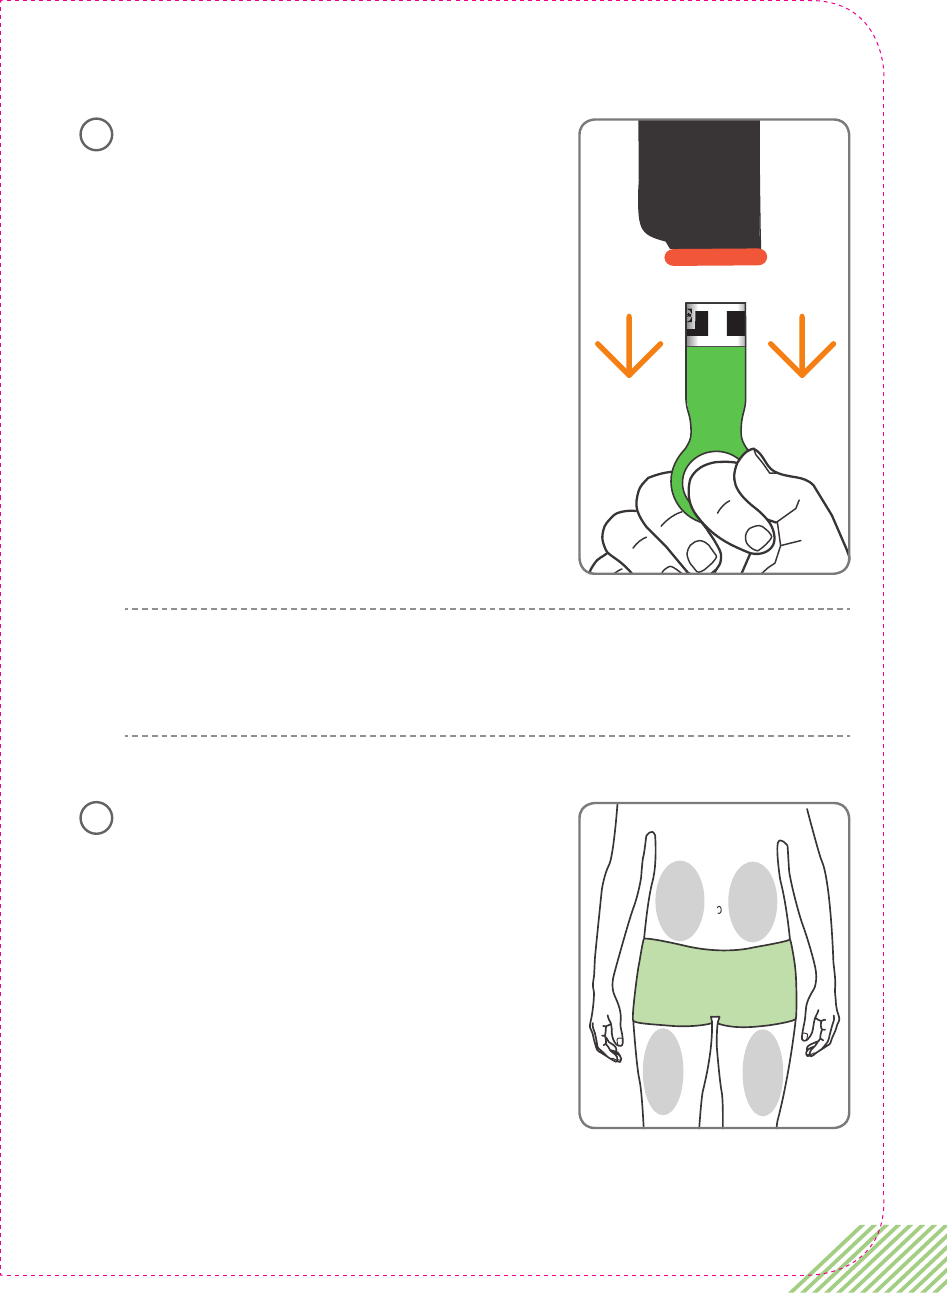
When you are ready, remove the cap
by pulling it fi rmly downwards.
NOTE: KEEP THE CAP. This is important as you will need it to
remove the Training cassette after the simulated injection.
DO NOT throw the green cap into the sharps container.
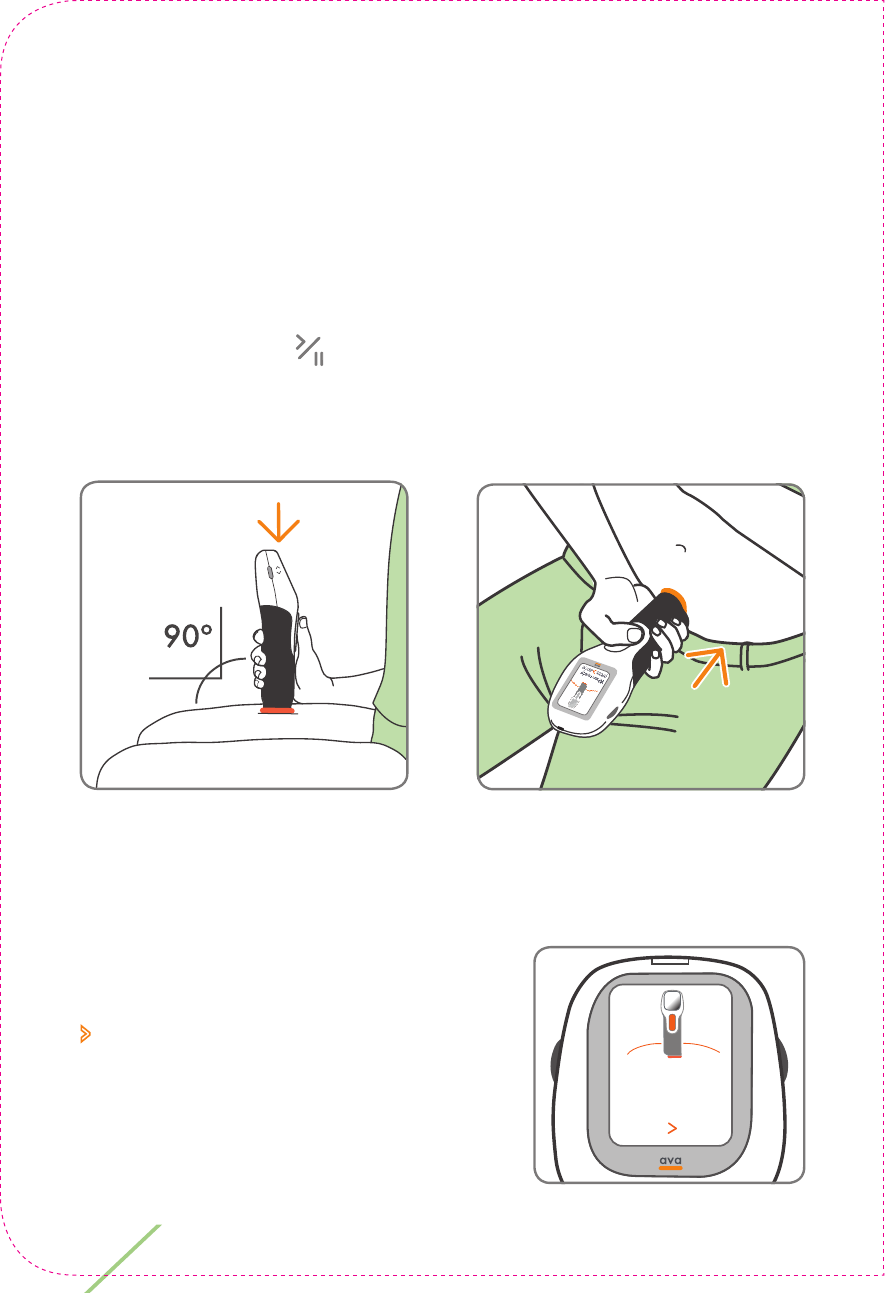
Choose a place on your stomach or
your upper thighs (as shown in the
diagram) to practice using ava. Your
healthcare provider will help you
identify suitable sites to inject.
ava Training Cassette
For training purposes only.
Contains no needle or medication.
CIA79968A
LBL4_CIM_
PS6
ava Training Cassette
For training purposes only.
Contains no needle or medication.
ava Training Cassette
For training purposes only.
Contains no needle or medication.
6
7
36 Chapter 3: Learning to use ava
Find a comfortable position sitting down to give your injection.
Try to relax the muscles around the injection site as this will
make injecting more comfortable.
Place the orange skin sensor against your skin at the cleaned
injection site, with ava’s screen facing you so you can see it.
The ‘Start/Pause’ button must be in a position where you
can use it comfortably without moving your ava. These
diagrams show how to position ava.
Position ava at a right angle on your skin to ensure the
injection is done correctly
When ava senses contact with your
skin the message ‘When ready press
> once’ is displayed.
When ready
press once.
37
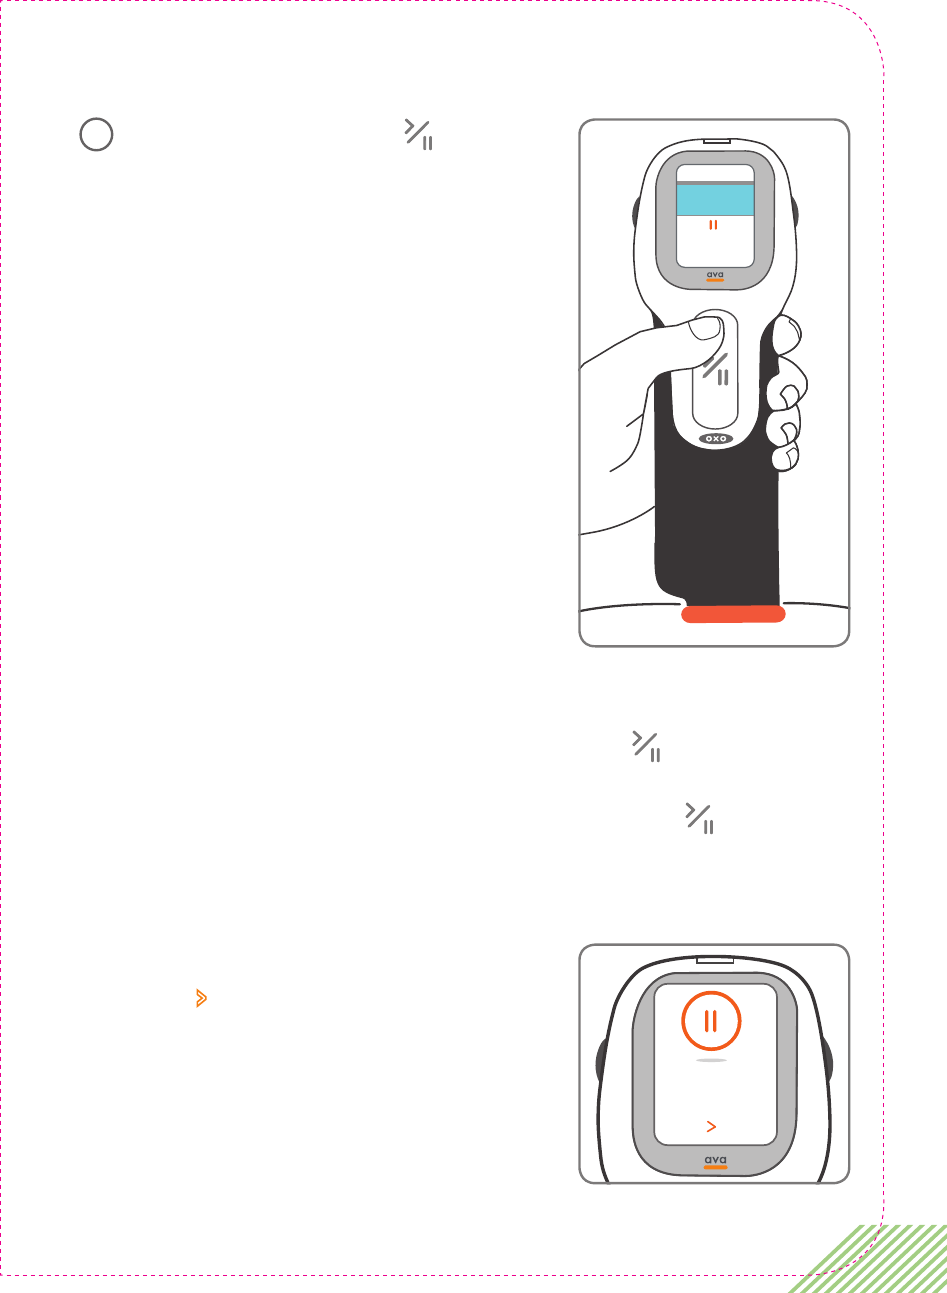
Press the ‘Start/Pause’ button;
you will hear the motor inside ava
move the cassette and the simulated
training injection will begin. The
screen will display an indicator to
show the progress of the injection.
Hold ava firmly against your skin the
entire time.
If you need to pause during an injection, for example to change
the injection speed, press the ‘Start/Pause’ button at any
time, DO NOT remove ava from your skin. If this were a CIMZIA
medication cassette , pressing the ‘Start/Pause’ button
would pause the flow of medication, but it would leave the
needle in the skin.
The message ‘Pausing. When ready
press > once’ will be displayed.
Press to
pause
injection.
8
Pausing
When ready
press once.
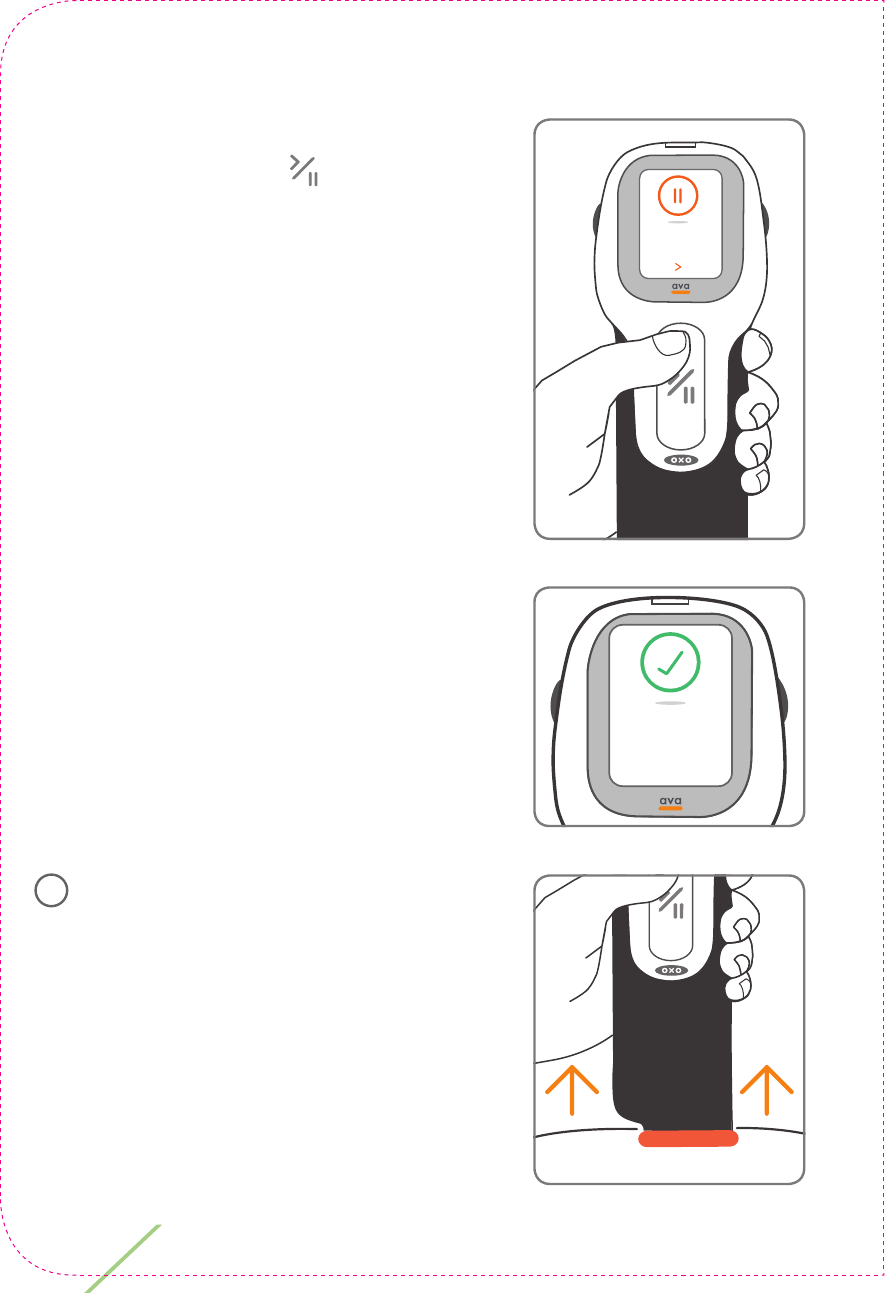
38 Chapter 3: Learning to use ava
When you are ready to re-start, press
the ‘Start/Pause’ button again to
complete the injection.
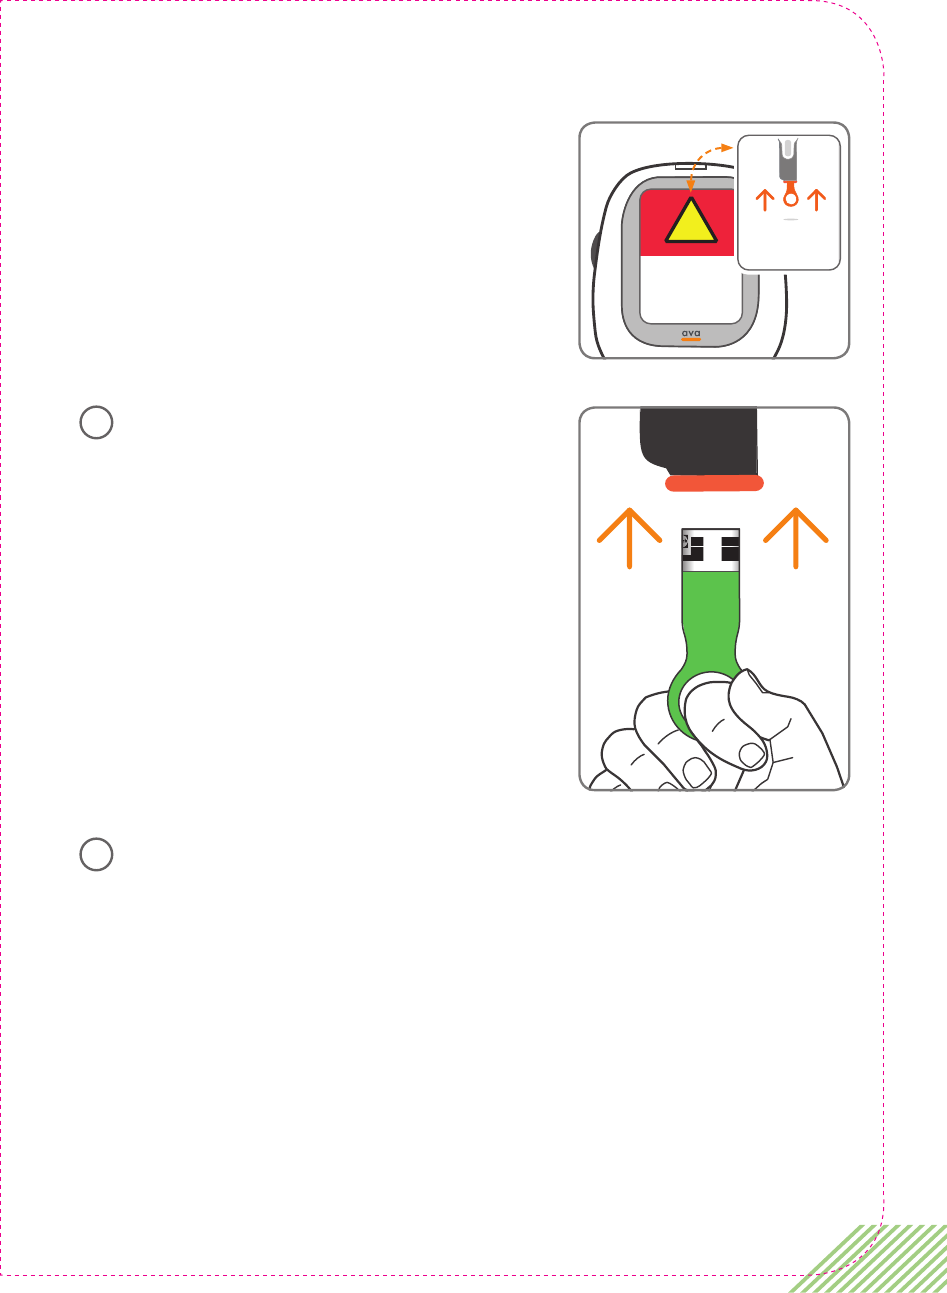
When the training injection is
complete, the message ‘Injection
complete. Please remove from skin.’
will be shown on the screen.
Remove ava from your skin.
Pausing
When ready
press once.
Injection
complete.
Please remove
from skin.
Press to
pause
injection.
9
39
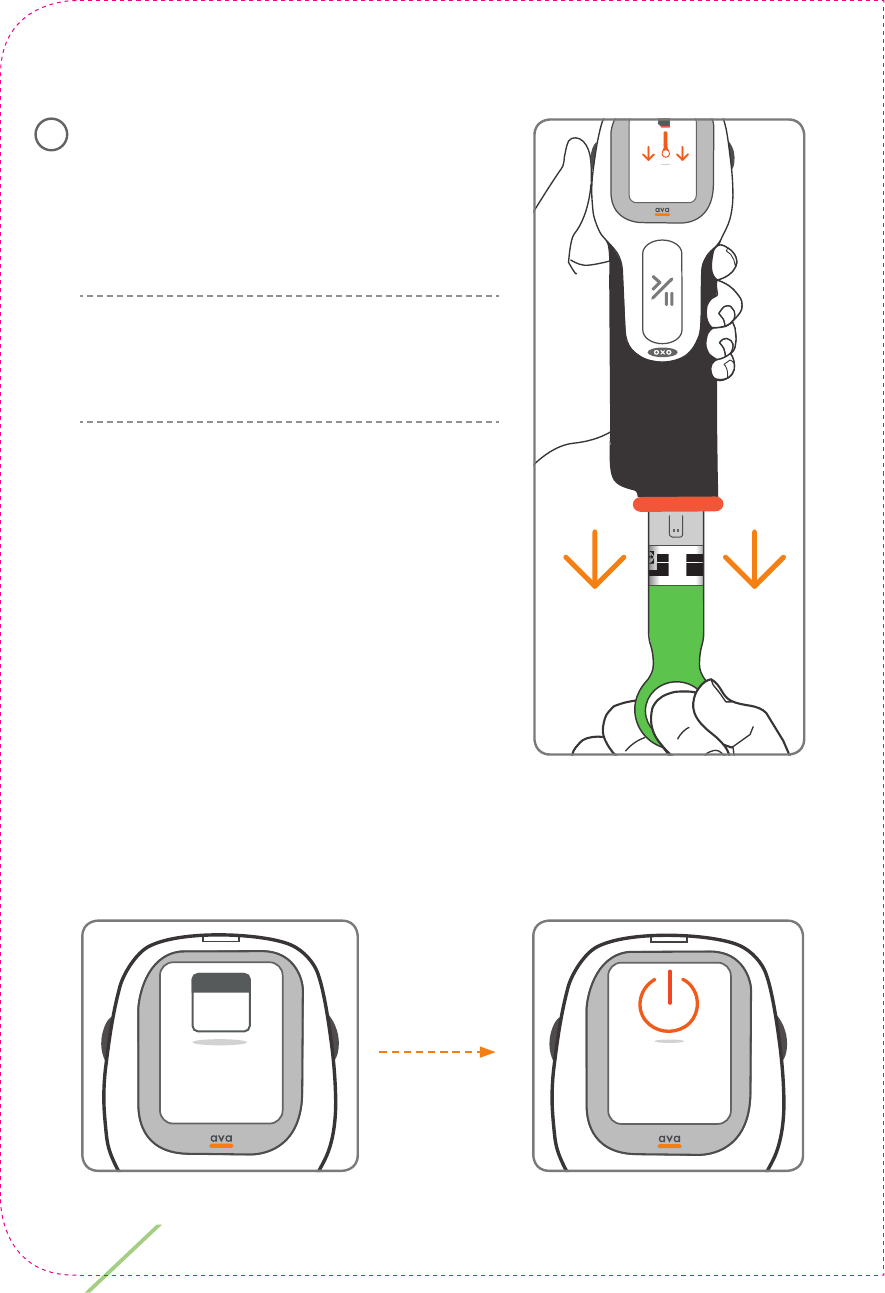
The messages ‘Needle uncapped!
Handle with care!’ and ‘Please
replace needle cap.’ will be displayed
until the cap is replaced.
Insert the cap.
Let go of the cap while ava will release and eject the training
cassette.
!
Needle
uncapped!
Handle with
care!
Please replace
needle cap.
ava Training Cassette
For training purposes only.
Contains no needle or medication.
CIA79968A
LBL4_CIM_
PS6
ava Training Cassette
For training purposes only.
Contains no needle or medication.
ava Training Cassette
For training purposes only.
Contains no needle or medication.
10
11
40 Chapter 3: Learning to use ava
When the message ‘Remove and
discard used cassette.’ appears on
the information screen, pull out
the training cassette.
NOTE: Unlike medication cassettes,
the training cassette can be re-used
at any time.
ava will show your next injection date unless it is a new
device which has never injected any medication, followed
by a ‘Please turn off the device.’.
ava Training Cassette
For training purposes only.
Contains no needle or medication.
CIA79968A
LBL4_CIM_
PS6
ava Training Cassette
For training purposes only.
Contains no needle or medication.
ava Training Cassette
For training purposes only.
Contains no needle or medication.
Remove and
discard used
medication.
12
Please turn
o the device.
Sunday
31
December
Your next
injection date.
41
NOTE: Your next injection date will only be shown if you have
already completed an injection with a medication cassette.
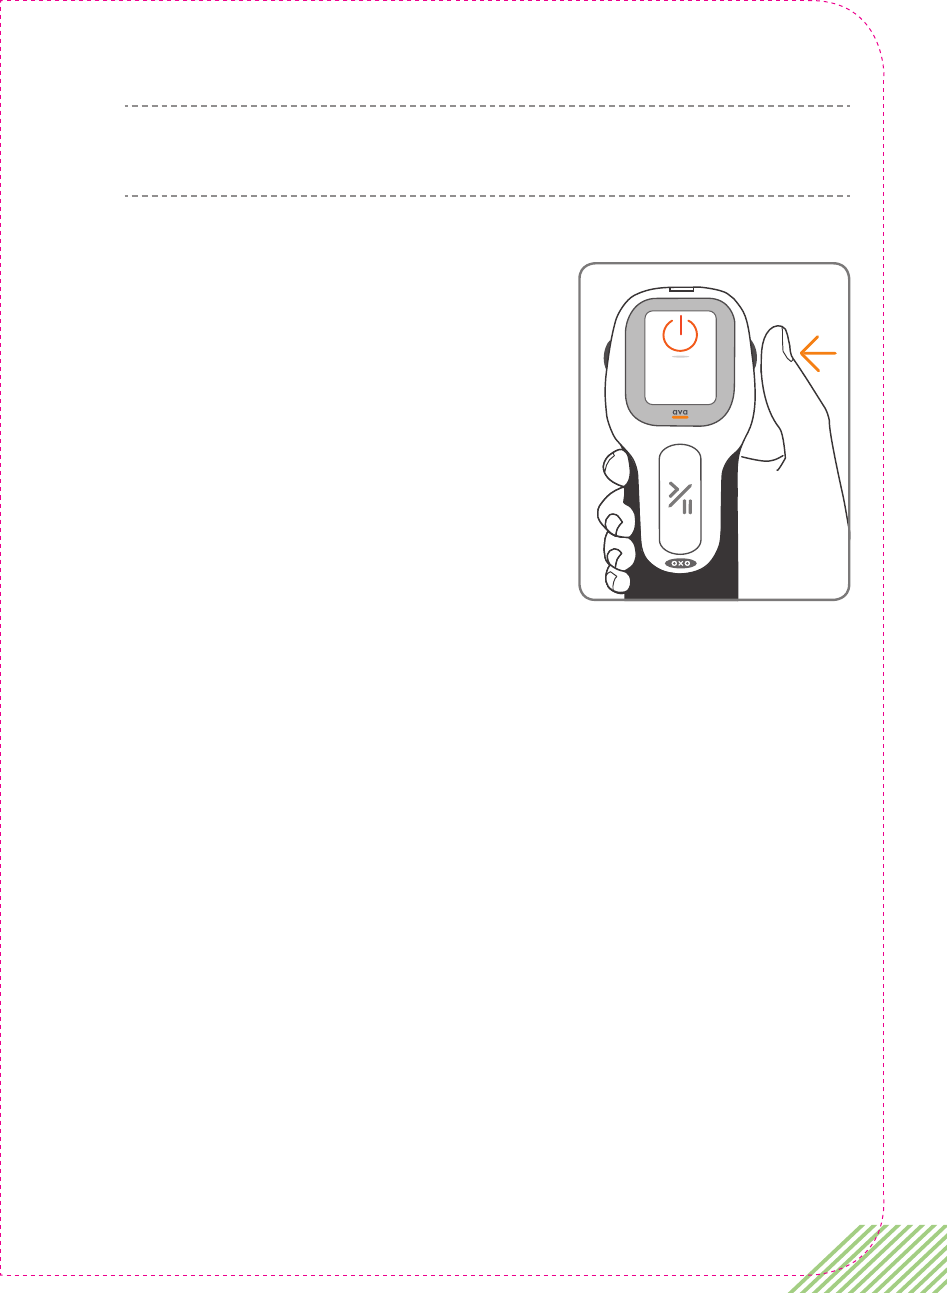
Press the ‘On/Off’ power button until
ava turns off.
You have successfully completed a training injection.
If you want to use the training cassette again for more
practice, re-start ava and repeat the training.
Please turn
o the device.

42 Chapter 3: Learning to use ava
This page is intentionally left blank.

4
Chapter 4:
Injecting
CIMZIA
with ava
This section is a step-by-step guide
to injecting CIMZIA with ava, from
preparation to completion.
Read through the whole chapter
before injecting CIMZIA with ava.
4

44 Chapter 4: Injecting CIMZIA with ava
Preparing your CIMZIA
medication cassette
NOTE: ava will have to be set up by your healthcare provider for
your medication dosing before you can inject CIMZIA.
Make sure that you also have received injection training by your
healthcare provider before injecting CIMZIA on your own.
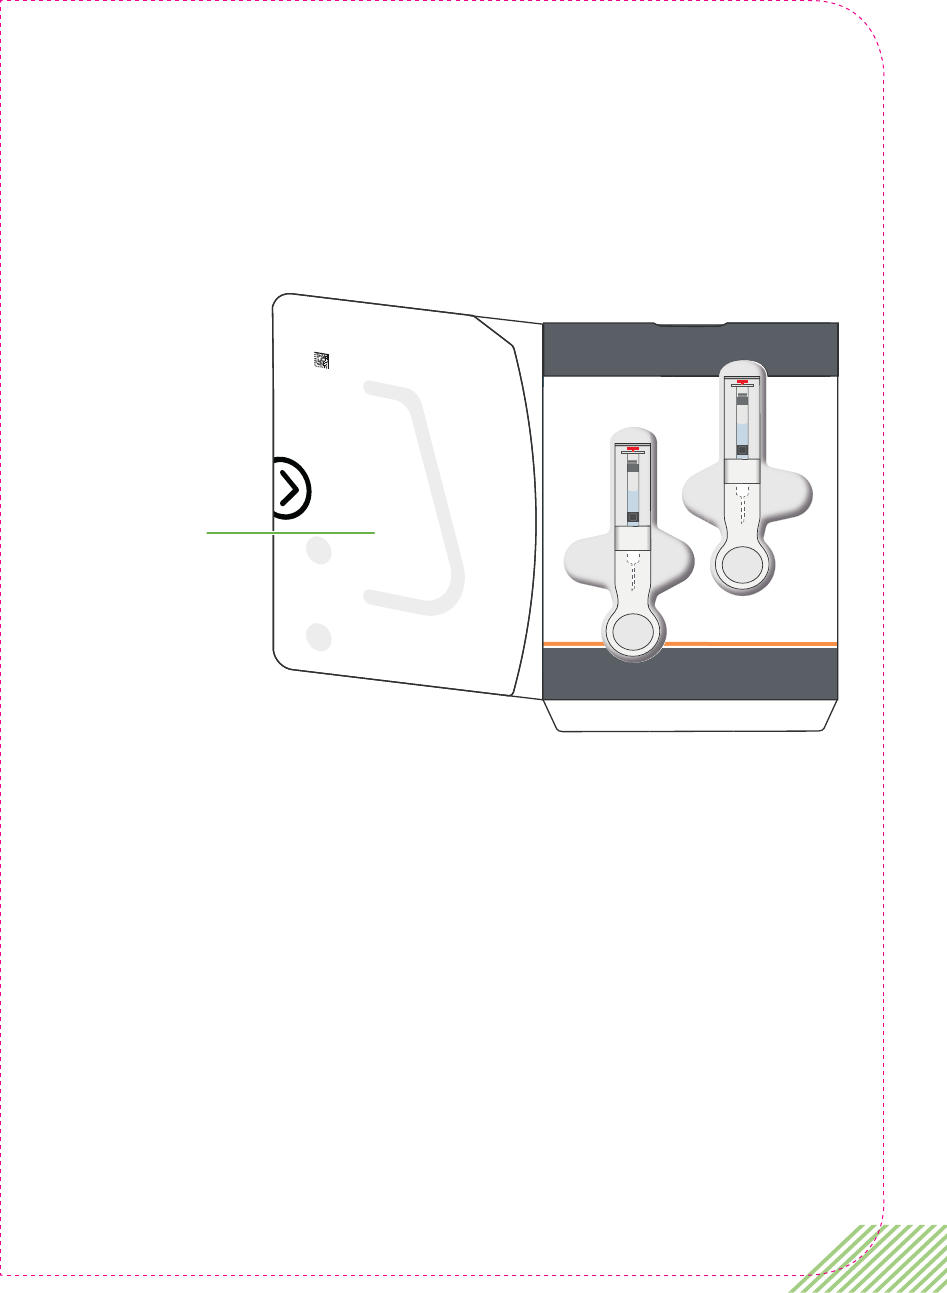
The following are the supplies you will need to give your
CIMZIA injection:
• ava device.
• 1 CIMZIA medication cassette. You may need 2 CIMZIA medication
cassettes to give higher doses.
• 1 or 2 alcohol wipes (located in your CIMZIA pack).
• 1 or 2 clean cotton balls or gauze pads.
• 1 puncture-resistant sharps disposal container. See Step 19
"Disposal of Used Medication Cassettes" on page 59.
If you do not have everything you need, ask your healthcare provider.
45
CIMZIA comes in a carton containing 2 medication cassettes.
Use a new medication cassette for each injection.
These instructions are for 1 injection only. Your healthcare provider
will have prescribed a particular dose of CIMZIA for you. This may
mean that you may need more than one injection at a time to
deliver your prescribed dose. If required, ava will tell you if you
need to perform a second injection and will guide you through
this process.
2 alcohol swabs
2 alcohol
wipes

46 Chapter 4: Injecting CIMZIA with ava
Setting up for your CIMZIA injection
Take the carton containing CIMZIA medication cassettes out of
the refrigerator. Check the expiration date on the medication
cassette carton and label.
If the expiration date has passed, do not use the cassette.
Call your pharmacist for questions about the expiration date.
DO NOT use if the tamper evident seal is missing or broken
on the carton when you receive it. If this is the case, contact
your pharmacist.
Remove the medication cassette
from the box and let it warm to
room temperature. This will take
30 to 45 minutes. DO NOT warm
the medication cassette in any other
way. If you are not using the second
medication cassette, put the carton
containing the remaining medication
cassette back in the refrigerator.
If any condensation appears on the outside of the cassette, wipe
it off with a clean dry cloth to avoid getting moisture into ava.
DO NOT try to remove the needle cap.
DO NOT try to remove the syringe that is inside the medication
casette.
1
30 to 45
minutes
2
47
Find a clean, fl at work surface, such as a table.
Inspect the liquid in the medication cassette to check that it
is clear to pale yellow and free from particles. DO NOT inject
the medicine if it is cloudy or discolored. Call your healthcare
provider or pharmacist if you have any questions about your
CIMZIA medication cassette.
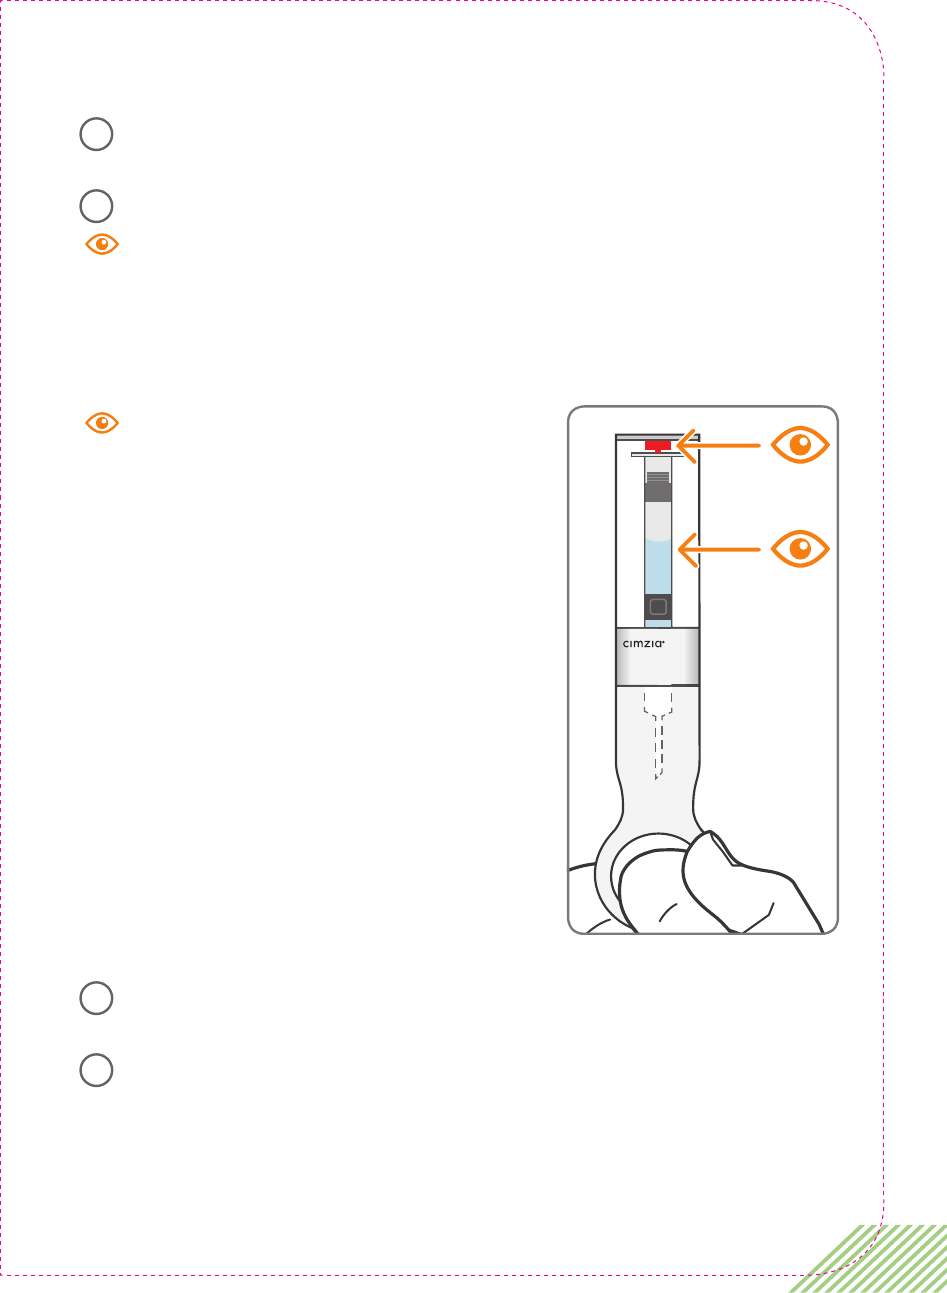
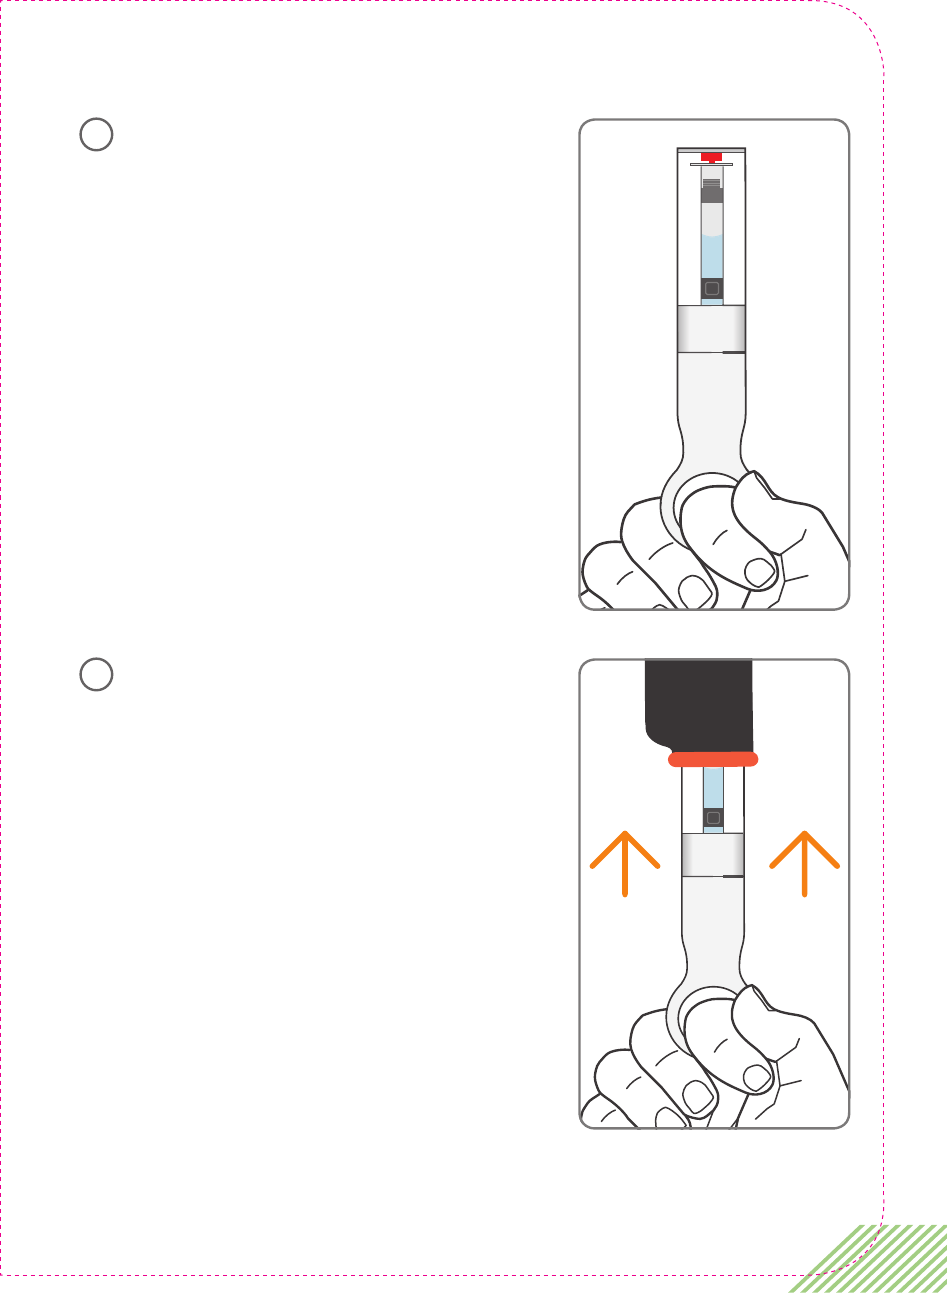
Inspect the cassette and make
sure that the red medication level
indicator is at the top of the syringe
within the cassette body, as shown
here.
The cassette may contain air
bubbles. This is normal. DO NOT
try to remove air bubbles before
injection. Injecting CIMZIA which
contains air bubbles is harmless.
Gather all the supplies you will need for an injection.
Wash your hands with soap and warm water and dry
thoroughly with a clean towel.
3
4
LBL3_CIM_
PS_6
Rx Only
LBL3_CIM_
PS_6
CIA79919A
NCD 50474-xxxx-xx Rx Only
injection 200mg/mL cassette
certolizumab pegol
Each medication cassette contains 1mL of
Cimzia. For subcutaneous injection use only.
Use only with the Cimzia ava device.
Rx Only
5
6
48 Chapter 4: Injecting CIMZIA with ava
Selecting and preparing
your injection site
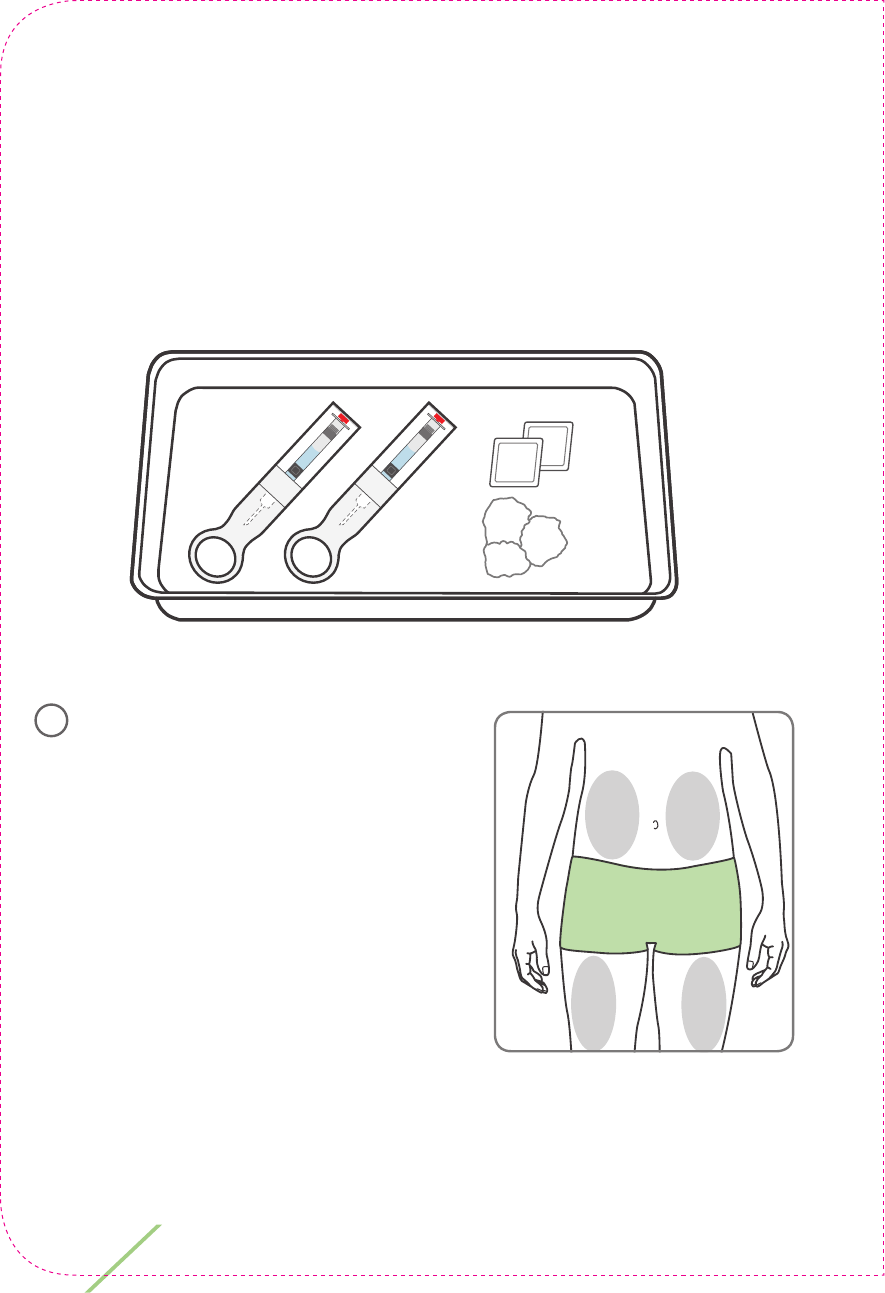
Prepare the supplies you need for your injection on a clean surface:
medication cassette(s) warmed to room temperature, alcohol wipe
(located in the CIMZIA pack) and cotton balls.
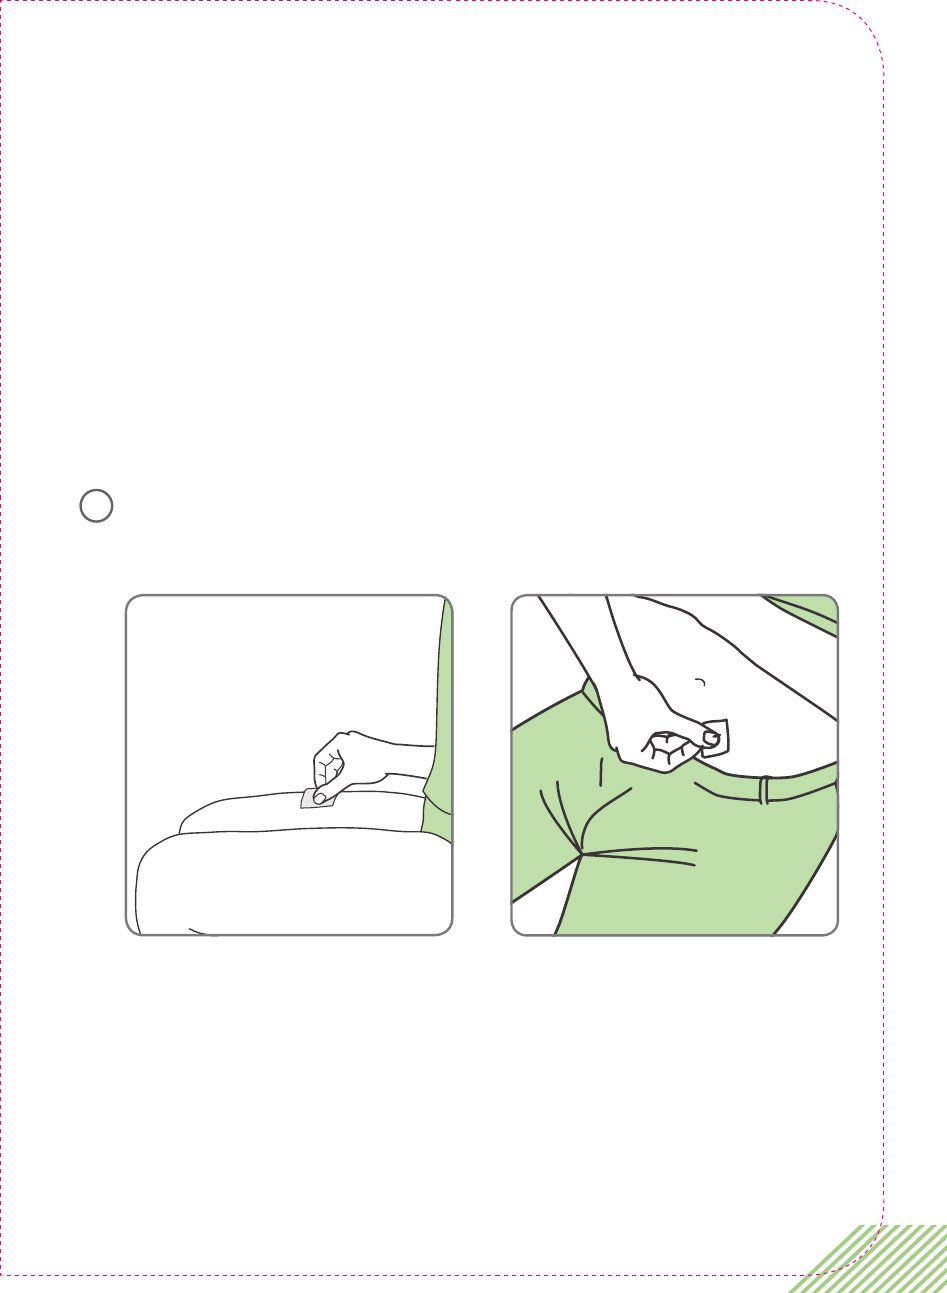
Choose your injection site(s) on
your stomach or upper thighs
(see Figure).
• Choose a new injection site
each time you use a CIMZIA
medication cassette.
• Each new injection should be
given at least 1 inch from the site
you used before. If you choose
your stomach, avoid the 2 inches
around your belly button (navel).
7
ALCOHOL
SWAB
ALCOHOL
SWAB
49
• DO NOT inject into areas where your skin is tender, bruised,
red or hard, or where you have scars or stretch marks.
• Change injection sites between your stomach and upper
thighs to reduce the chance of having a skin reaction.
• You may want to write down the site you use for injection
to help you remember to use a different site each time you
inject.
Clean your injection site with an alcohol wipe. Let the area dry
completely.
8
50 Chapter 4: Injecting CIMZIA with ava
Giving your CIMZIA injection
Turn on ava by pressing the ‘On/Off’
button for 1 second, or until the screen
lights up and you hear the sound.
NOTE: ava should arrive with the
battery charged, but, if ava does not
turn on, or it displays the message
‘Low battery. Please charge
battery!’, the battery
will need charging
before you start.
See Chapter 5 for
instructions on how
to re-charge the
battery.
ava will show you your current dose and frequency. Then the
message ‘Inspect and then insert medication.’ will be shown.
9
!
Low battery!
Please charge
battery.
(example screen only.) Your ava may show a different dose.
Inspect and
then insert
medication.
You are on
loading dose
2 inj. every
2 weeks.
51
Take the CIMZIA medication cassette
which you have let warm up to room
temperature for 30 to 45 minutes.
If any condensation appears on the
outside of the cassette, wipe it off
with a clean dry cloth to avoid getting
moisture into ava.
DO NOT try to remove the
needle cap.
Push the fl at end of the medication
cassette fi rmly into the cassette port
of ava until you hear a click.
DO NOT twist the medication
cassette; it is specially shaped to
ensure it is correctly inserted.
DO NOT keep other other medication
cassettes near ava while injecting.
Let go of the needle cap.
LBL3_CIM_
PS_6
Rx Only
10
LBL3_CIM_
PS_6
Rx Only
11
step 10
52 Chapter 4: Injecting CIMZIA with ava
ava will check the medication
cassette and display the message
‘Medication cassette accepted.’ if it
is correct.
After a short pause, ava will
automatically pull the cassette further
in and release the needle cap.
After ava has pulled in the medication
cassette, the currently selected
injection speed is briefly displayed.
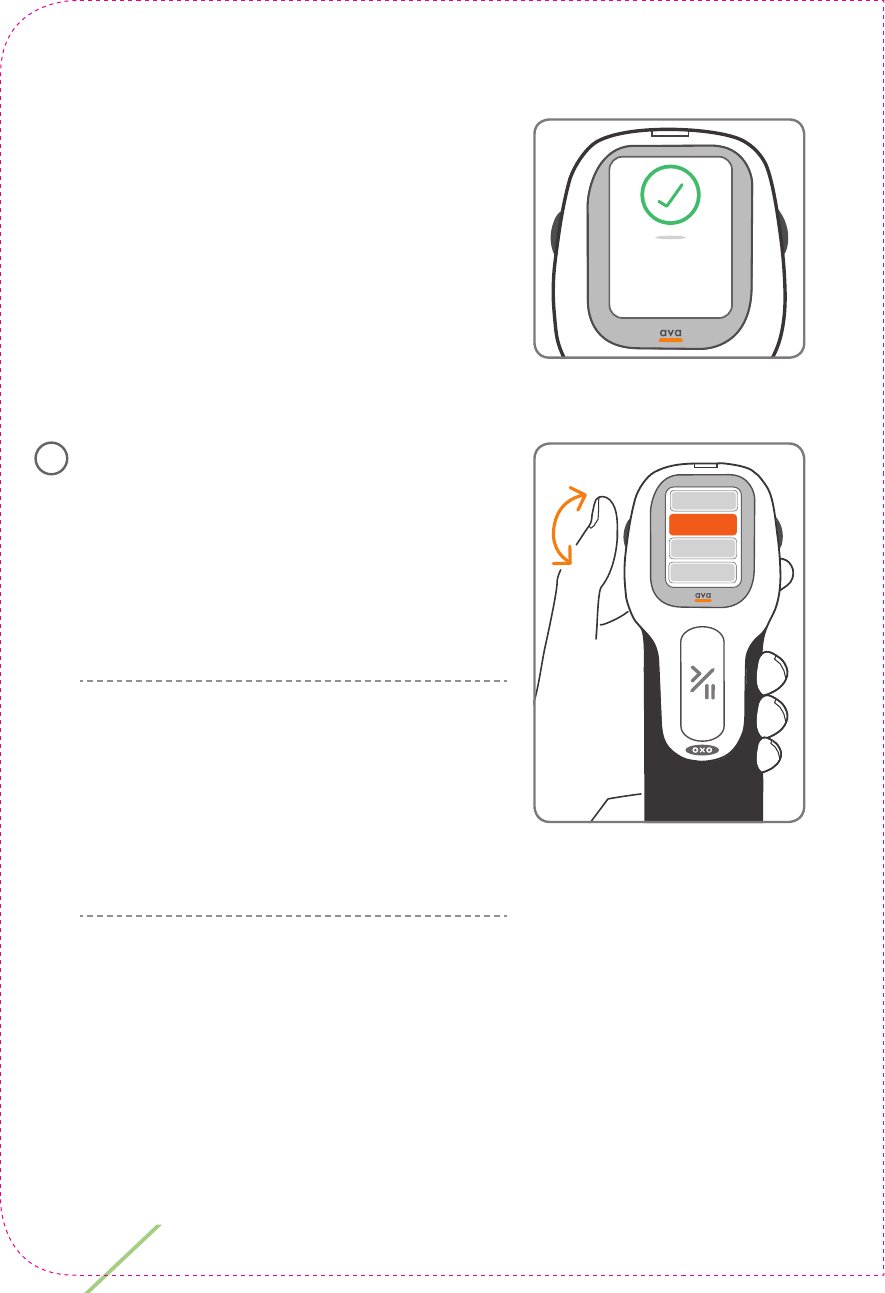
You can change this setting using the
‘scroll wheel’ on the side of your ava
to any of the four available settings.
NOTE: The injection speed can only
be changed when a cassette is
inserted into the cassette/injection
port. You can only adjust the
injection speed before performing or
when pausing your injection.
This setting controls the speed at which medication is injected.
This setting does not change the speed of the needle being
inserted, just the speed at which CIMZIA is injected. See
"CIMZIA Injection speed settings" on page 63 for more
information.
Medication
cassette
accepted.
fast
fastest
slow
slowest
12
53
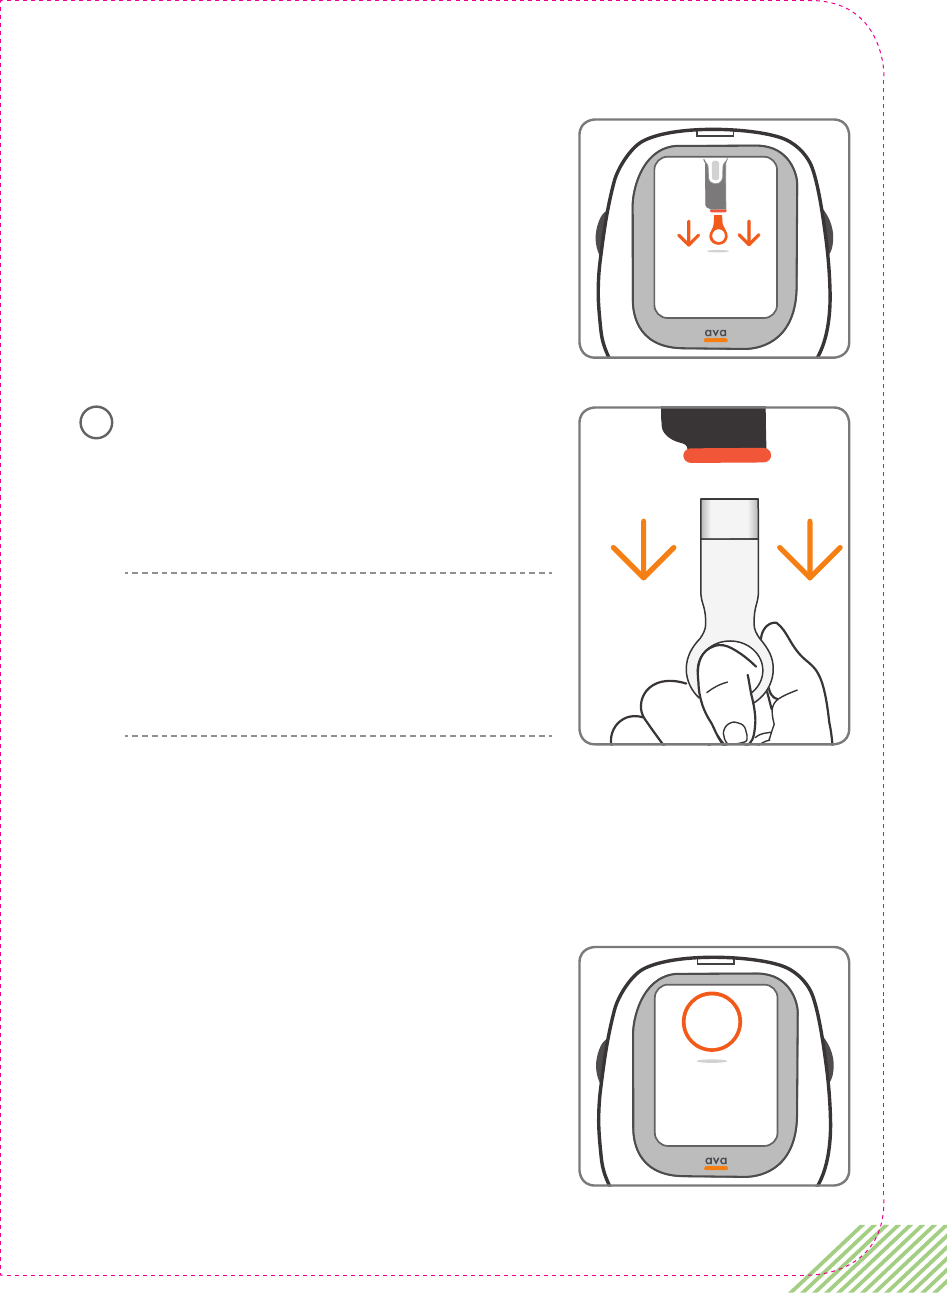
The ‘Remove and save needle cap.’
message is displayed.
Only remove the needle cap when
you are ready to inject.
When you are ready, remove the
needle cap by pulling it fi rmly
downwards.
NOTE: KEEP THE NEEDLE CAP. This
is important because you will need
it to remove the empty medication
cassette after injecting.
Only remove the needle cap when you are ready to inject.
To ensure the sterility of your medication cassette complete
your injection within 5 minutes.
However, there is no need to rush
your injection; 5 minutes will allow
you plenty of time to begin injecting.
The remaining time is displayed on
the information screen.
Remove and
save needle
cap.
LBL3_CIM_
PS_6
Rx Only
13
5
Please inject
within
5 minutes.
ref from 35
54 Chapter 4: Injecting CIMZIA with ava
Find a comfortable position sitting down to give your injection.
Try to relax the muscles around the injection site as this will
make injecting more comfortable.
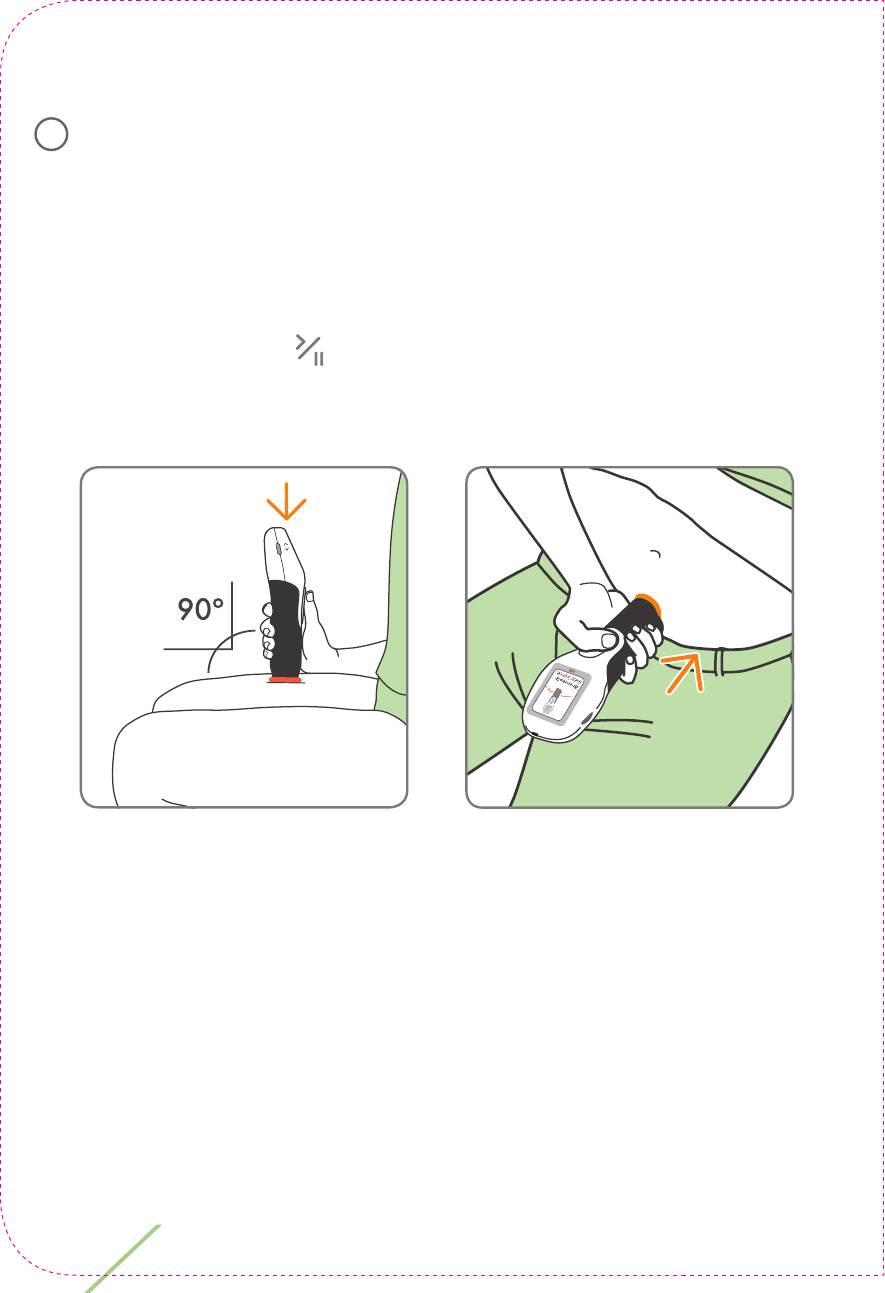
Place the orange skin sensor against your skin at the cleaned
injection site, with ava’s screen facing you so you can see it.
The ‘Start/Pause’ button must be in a position where you
can use it comfortably without moving your ava. This diagram
shows how to position ava.
Position ava at right angle on your skin to ensure the injection
is done correctly.
DO NOT try to inject through your clothing. ava must be placed
on clean dry skin.
DO NOT try to trigger the skin sensor in any other way other
than as instructed above.”
14
55
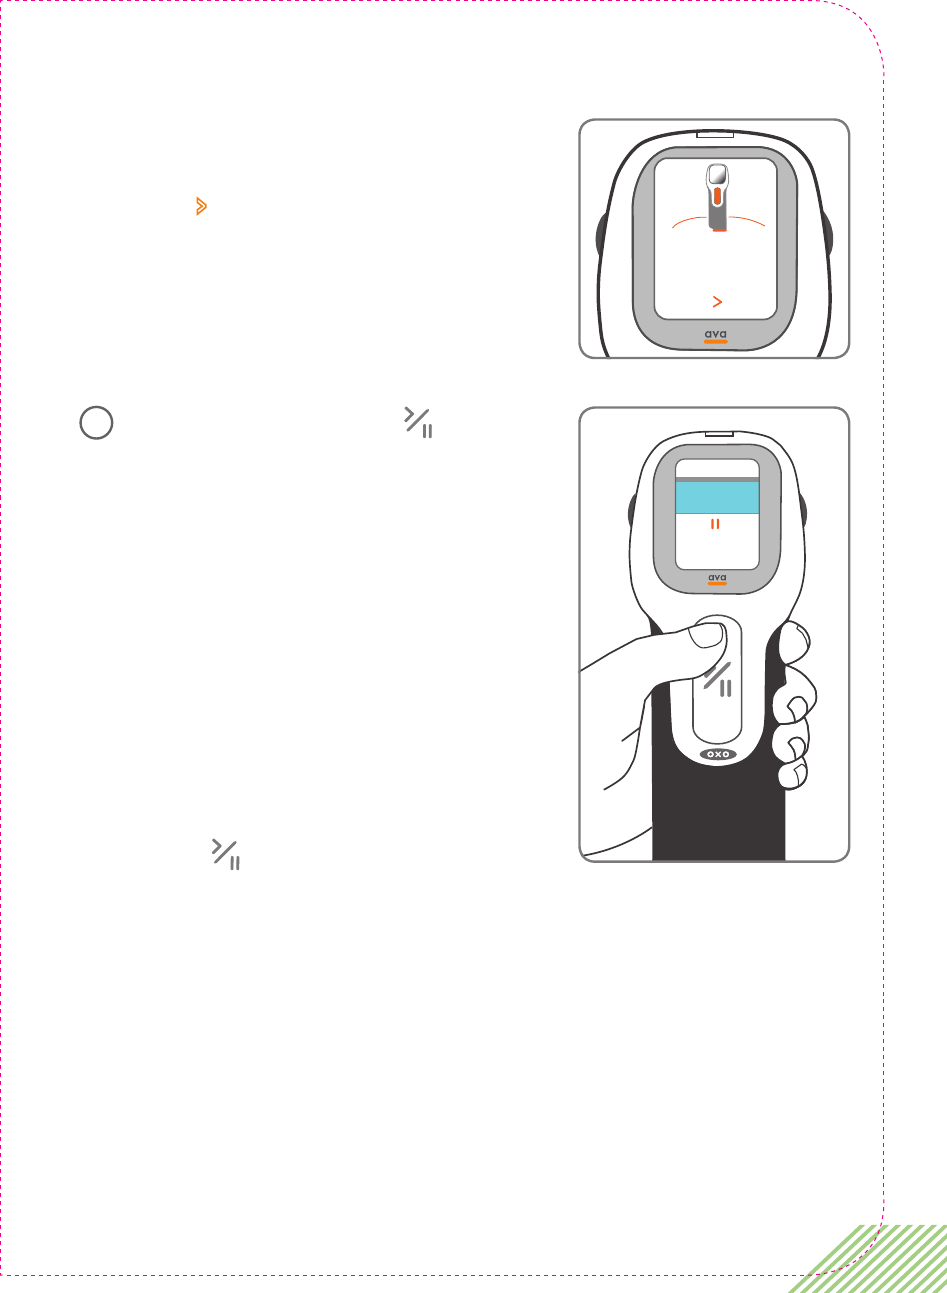
When ava senses contact with
your skin the message ‘When ready
press > once’ is displayed.
Press the ‘Start/Pause’ button.
You will hear the motor inside ava
move the cassette and the injection
will begin. The screen will display an
indicator to show the progress of the
injection. Throughout the injection
process, continue to hold ava firmly
against your skin the entire time.
You can temporarily pause the flow
of medication by pressing the ‘Start/
Pause’ . DO NOT remove ava from
the skin during a pause. Refer to
"Optional Actions During an Injection:
Pausing your injection" on page 62
for more information.
When ready
press once.
Press to
pause
injection.
15
56 Chapter 4: Injecting CIMZIA with ava
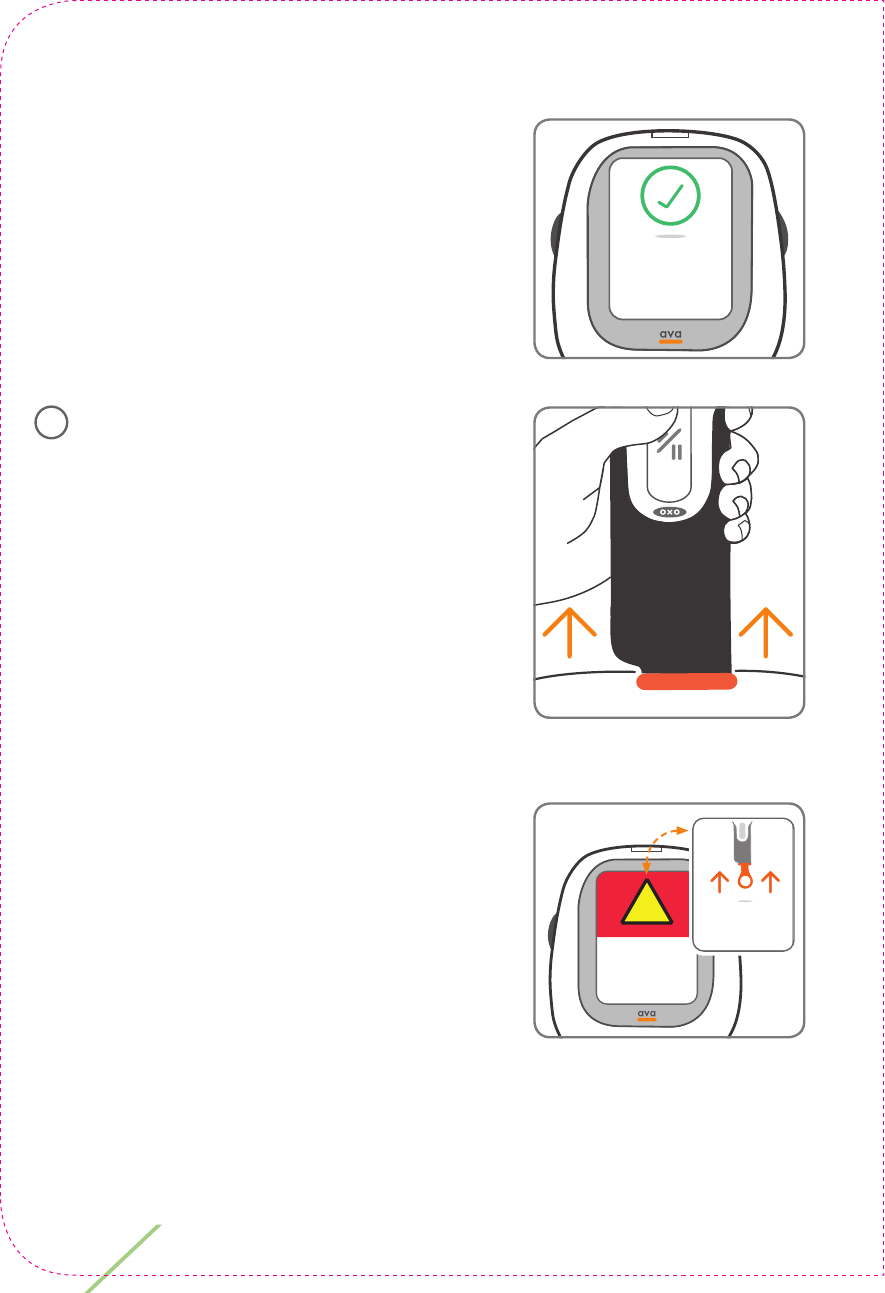
When the injection is complete, the
message ‘Injection complete. Please
remove from skin.’ will be shown on
the screen.
Remove ava from your skin.
Place a dry cotton ball or gauze pad
over the injection site for several
seconds. Do not rub the injection
site. Do not use an alcohol wipe as it
may cause stinging. If there is a little
bleeding cover the injection site with
a small bandage.
The messages ‘Needle uncapped!
Handle with care!’ and ‘Please
replace needle cap’ will be displayed
until the cap is replaced.
Injection
complete.
Please remove
from skin.
Press to
pause
injection.
16
!
Needle
uncapped!
Handle with
care!
Please replace
needle cap.
57
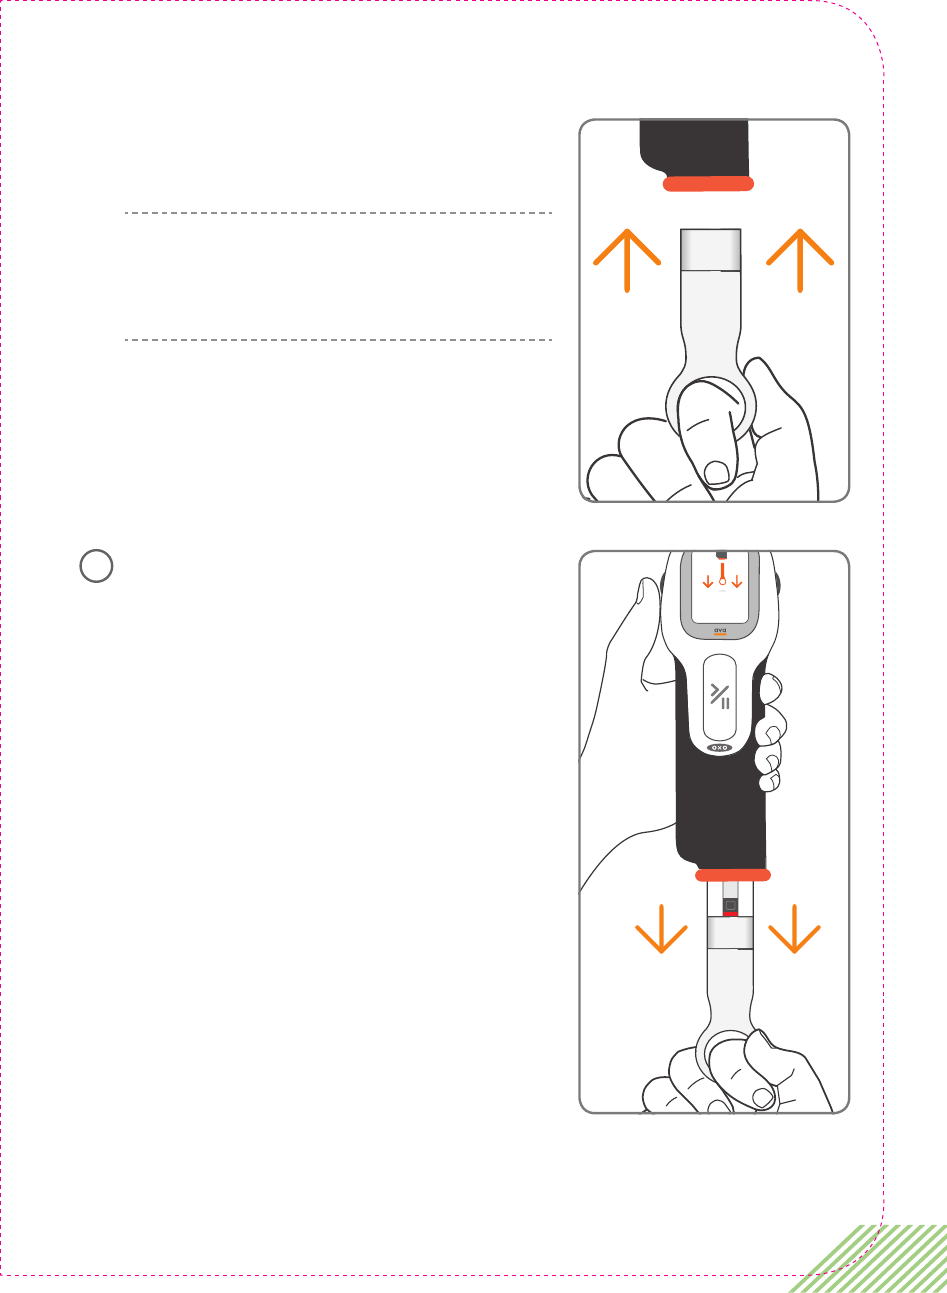
Insert the needle cap.
NOTE: If you threw away your needle
cap, you can use one of the spare
needle caps that come with your ava.
Let go of the needle cap. ava
will release and eject the empty
medication cassette.
When the message ‘Remove and
discard used cassette.’ appears
on the information screen, pull out
the CIMZIA medication cassette.
LBL3_CIM_
PS_6
Rx Only
LBL3_CIM_
PS_6
Rx Only
Remove and
discard used
medication.
17
58 Chapter 4: Injecting CIMZIA with ava
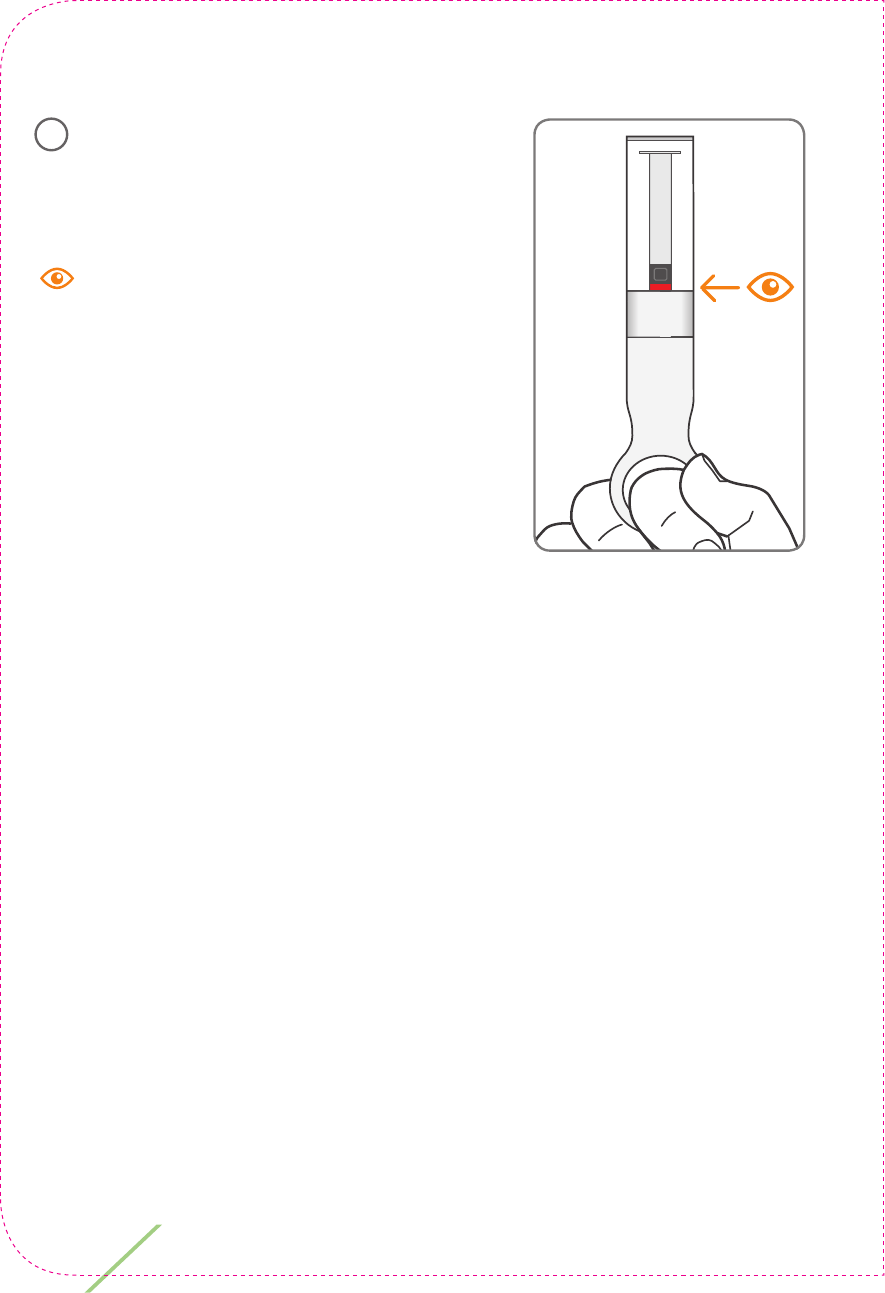
Inspect the used cassette to make
sure that all of the CIMZIA has been
injected.
Make sure that the red medication
level indicator is at the bottom of the
syringe within the cassette body.
LBL3_CIM_
PS_6
Rx Only
18
59
Disposal of Used Medication
Cassettes
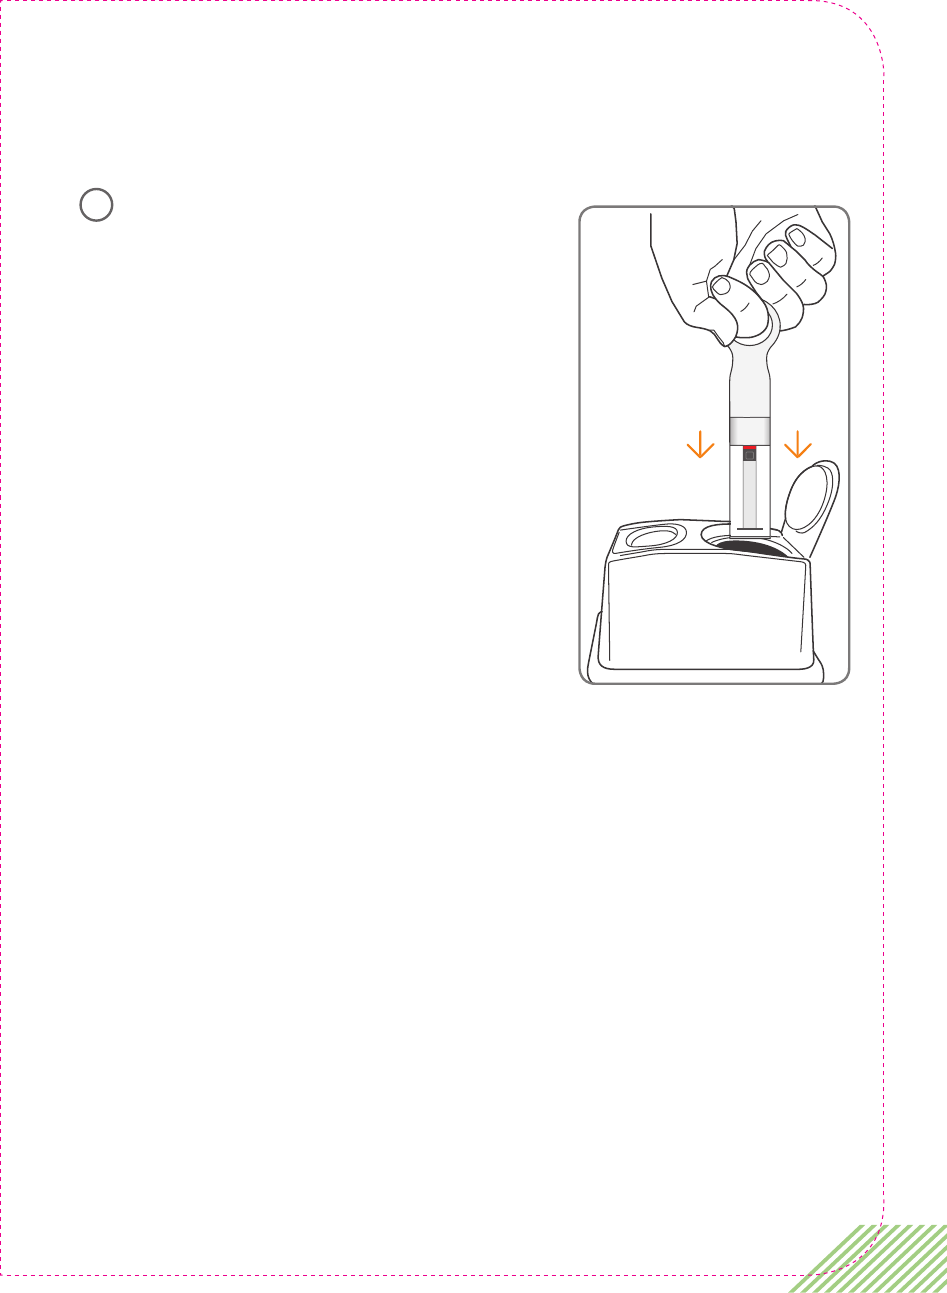
Follow these instructions for disposal
of your medication cassettes with
needles attached:
• Put your used medication cassettes
in an FDA-cleared sharps disposal
container right away after use.
• DO NOT throw away (dispose
of) medication cassettes in your
household trash.
• If you do not have an FDA-cleared
sharps container, you may use a
household container that:
- Is made of heavy duty plastic.
- Can be closed with a tight fi tting,
puncture-resistant lid, without sharps being able to come
out.
- Upright and stable during use.
- Leak-resistant.
- Properly labeled to warn of hazardous waste inside the
container.
• When your sharps disposal container is almost full, you will
need to follow your community guidelines for the right way
to dispose of your sharps disposal container. There may be
state or local laws about how you should throw away used
needles and syringes. For more information about safe sharps
LBL3_CIM_
PS_6
Rx Only
19
60 Chapter 4: Injecting CIMZIA with ava
disposal, and for specific information about sharps disposal
in the state that you live in go to FDA’s website at
www.fda.gov/safesharpsdisposal.
• DO NOT recycle your used sharps disposal container.
If you have completed all your doses, go to step 20.
If your prescribed dose requires a second injection, go to step 10
on page 51.
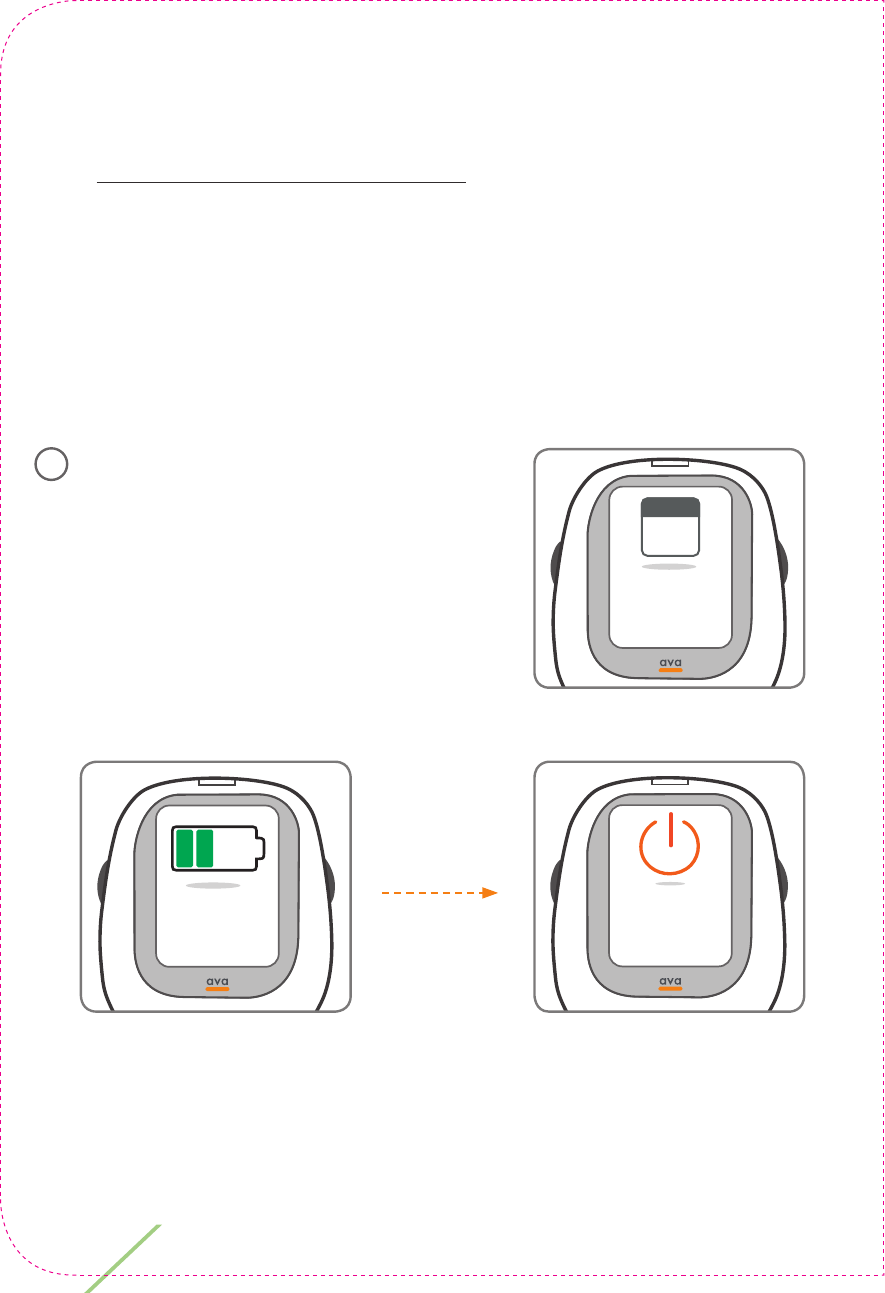
When you have completed injecting
your prescribed full dose of CIMZIA
ava will display your next injection
date followed by how much battery
charge you have left. Finally, ava
will notify you to please turn off the
device.
Sunday
31
December
Your next
injection date.
20
Please turn
o the device.
Enough
battery for
next injection.
61
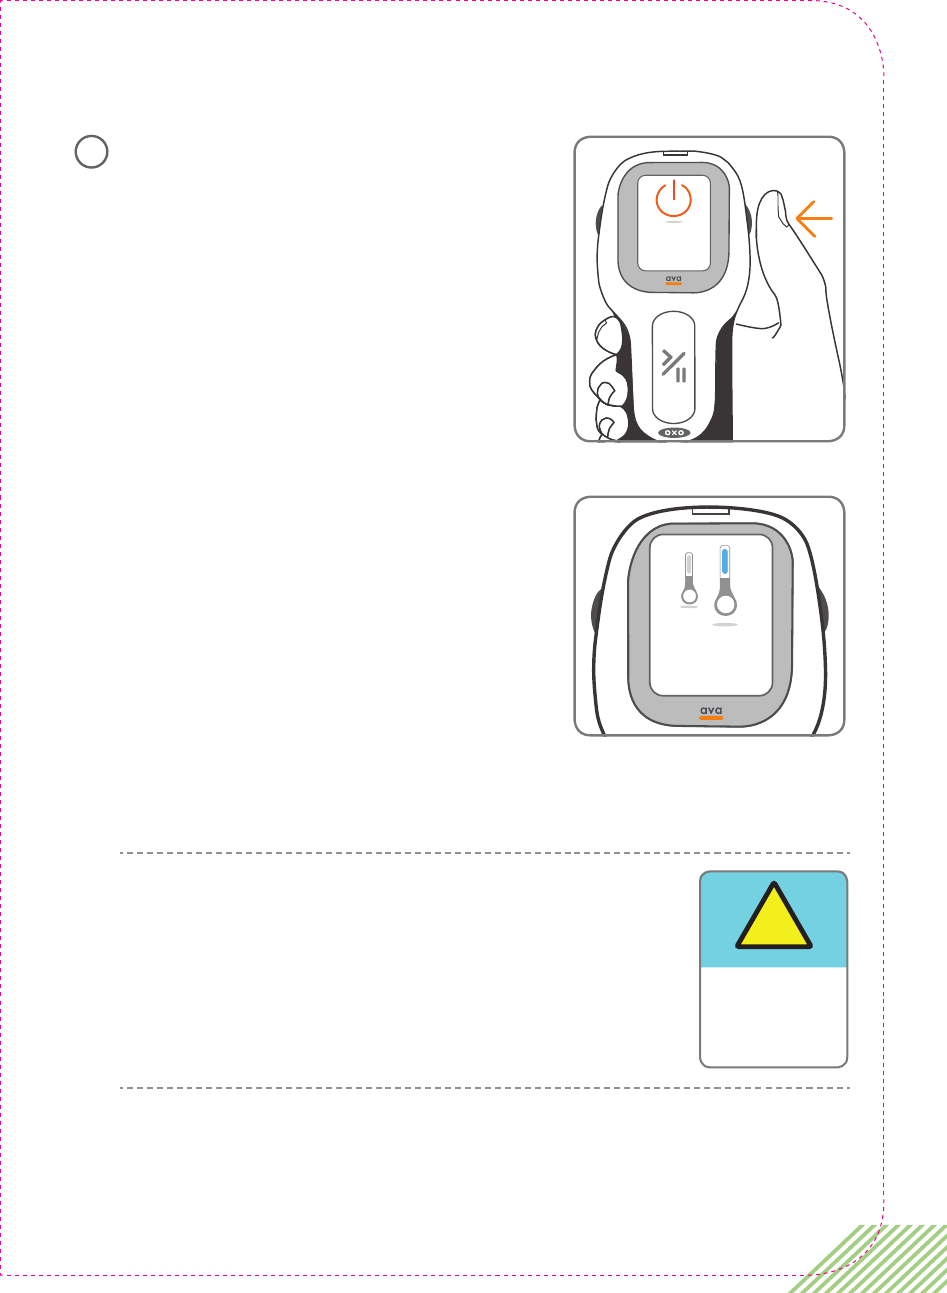
Press the ‘On/Off ’ power button to
turn off ava.
If your prescribed dose requires you
to administer a second injection, the
message ‘You have 1 injection left.’
will be displayed.
Repeat the procedure, starting at
step 10 on page 51, to deliver a
second injection.
NOTE: If you do not do this immediately, the
warning message ‘Your dosage is incomplete!’
will be displayed.
This is repeated until you administer the second
injection.
You have successfully completed the injection.
Please turn
o the device.
21
You have 1
injection left.
!
Your dosage
is incomplete!
62 Chapter 4: Injecting CIMZIA with ava
Optional Actions During
an Injection:
Pausing your injection
If you need to pause during an injection of CIMZIA, for example to
change the injection speed, press the ‘Start/Pause’ button at
any time. DO NOT remove ava from your skin, because pressing
the ‘Start/Pause’ button pauses the flow of medication, but it
leaves the needle in the skin.
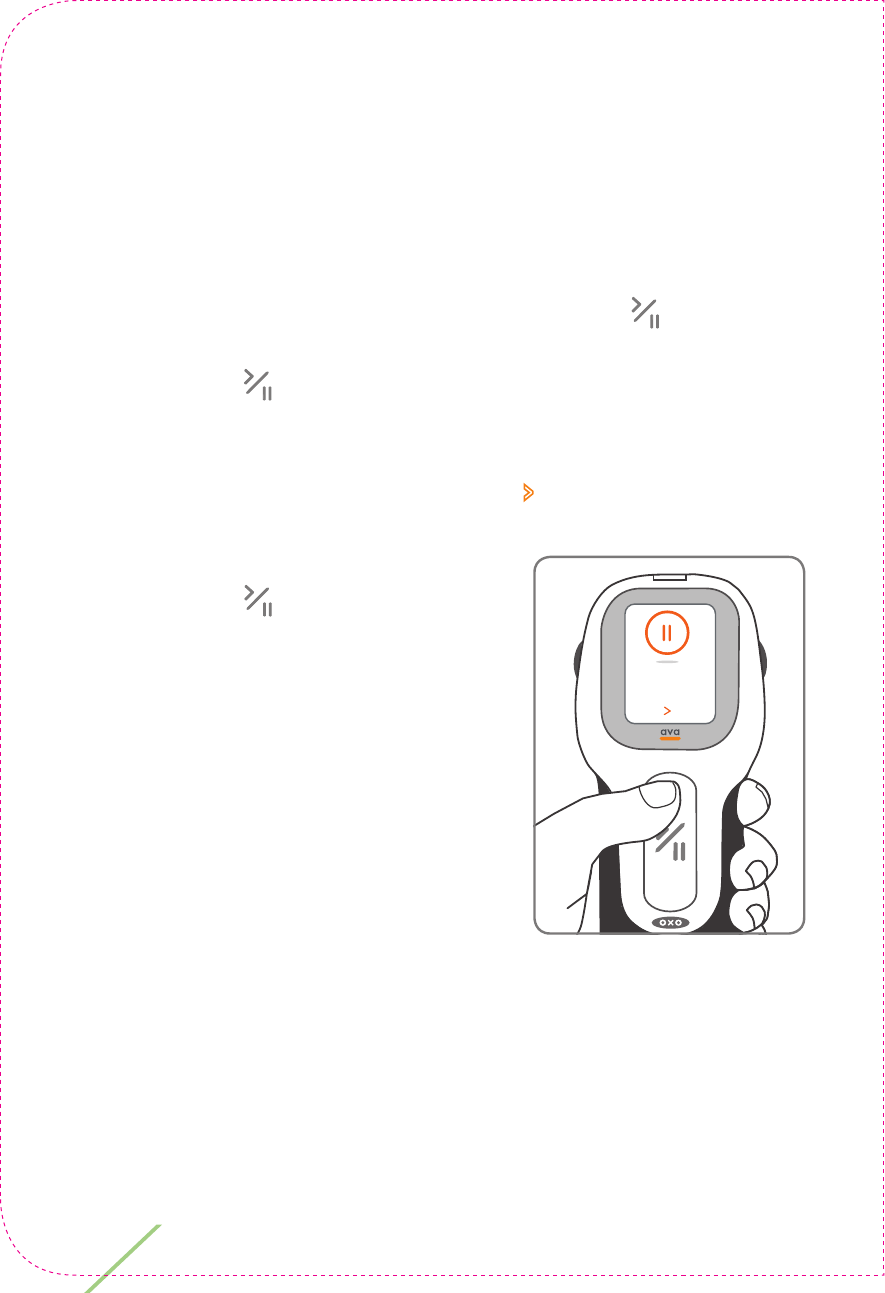
The message ‘Pausing. When ready press > once’ will be displayed.
When you are ready to re-start, press
the ‘Start/Pause’ button again to
complete the injection.
Pausing
When ready
press once.
63
CIMZIA Injection speed settings
ava can be set to inject CIMZIA at any one of four different speeds.
This setting does not change the speed of the needle being
inserted, just the speed at which CIMZIA is injected. Decide on the
best setting for your personal preference. The medication injection
time varies approximately between 7 to 18 seconds assuming the
CIMZIA medication cassette has warmed up to room temperature.
By default, the injection speed is set to ‘fast’ when you initially
receive ava.
NOTE: The injection speed can only be changed while a CIMZIA
medication cassette is inserted into the cassette/injection port.
You can only adjust the injection speed before performing or when
pausing your injection.
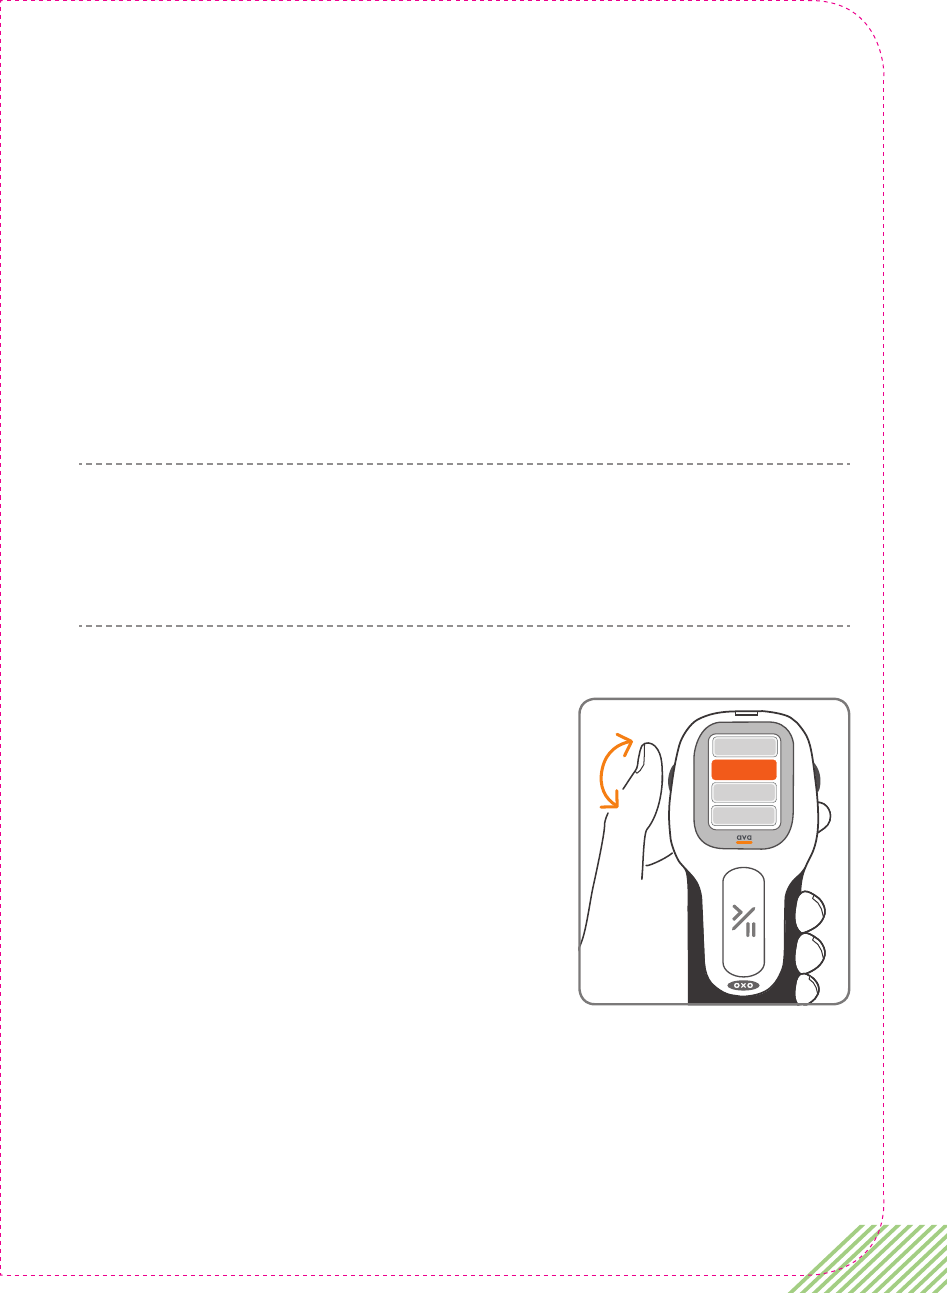
When a CIMZIA medication cassette is
inserted, the injection speed is briefly
displayed. You can change this injection
speed setting by rotating the ‘scroll
wheel’ on the side of ava.
Rotating the scroll wheel highlights each
of the four available speed settings. Don’t
press the wheel, just turn it.
Rotate the wheel until the new speed is highlighted and leave it
there for five seconds. The new setting will flash and be kept for
future injections, or until you choose to change it again.
fast
fastest
slow
slowest

64 Chapter 4: Injecting CIMZIA with ava
This page is intentionally left blank.

5
Chapter 5:
More
information
about ava
The section tells you about viewing
your injection log and how to charge
the battery.
5

66 Chapter 5: More information about ava
Viewing the injection log
ava automatically records your injection history and this
‘injection log’ can be seen by connecting ava to a computer.
NOTE: You can only view your injection log; the information in the
injection log fi le cannot be changed.
Treatment should not be altered based on the information
contained in the injection log. Dosing changes can only be made by
your healthcare provider.
Please make sure that you take ava with you every time you see
you healthcare provider as it facilitates review of the injection log
and is useful in case your healthcare provider decides to change
your medication dosing.
67
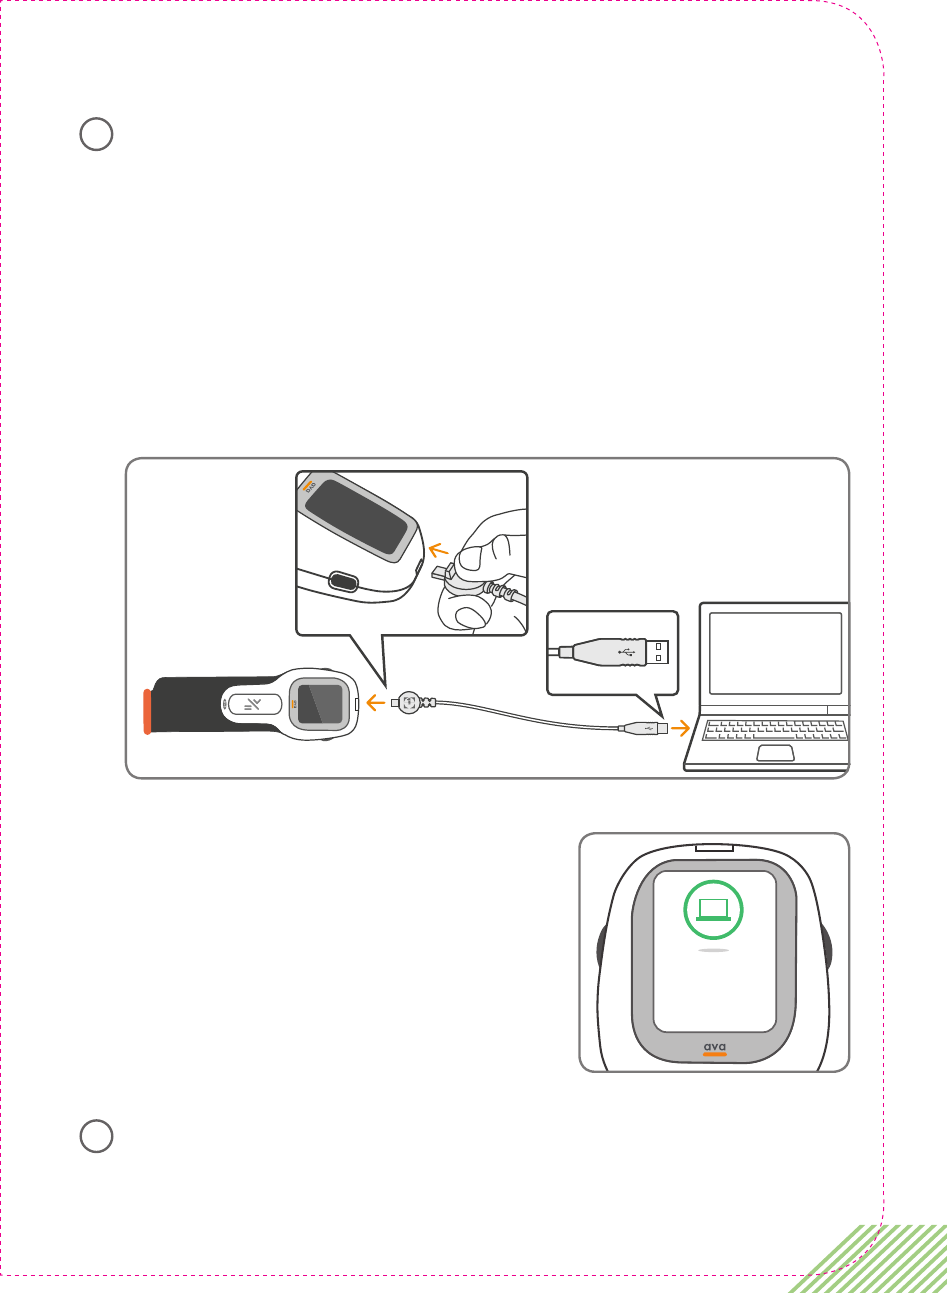
Using the supplied USB cable, plug the smaller end into the
micro-USB port on the top of ava. Use the small tab on the
micro-USB to orient it correctly for easy insertion to into ava.
With the tab and the UCB logo facing the information screen,
keep it parallel to the plastic housing. This is the same port that
you normally use to charge the battery. DO NOT twist or bend
the UCB connector once it is plugged into ava. Plug the other
end into a free USB port on your computer. When ava is
connected to your computer, it will behave like a USB drive.
ava will switch on automatically
and display this screen.
When you connect ava to a computer for the first time, it may
take about a minute to appear as a drive on your computer.
1
You are in
PC mode.
2
68 Chapter 5: More information about ava
If needed, your computer will automatically install the
necessary driver before connecting to ava as a USB drive.
When the computer recognizes ava, the name ‘ava’ will appear
automatically in the list of connected devices.
Wait for AVA_LOG.html fi le to appear in the directory, then
open it by double clicking on it.
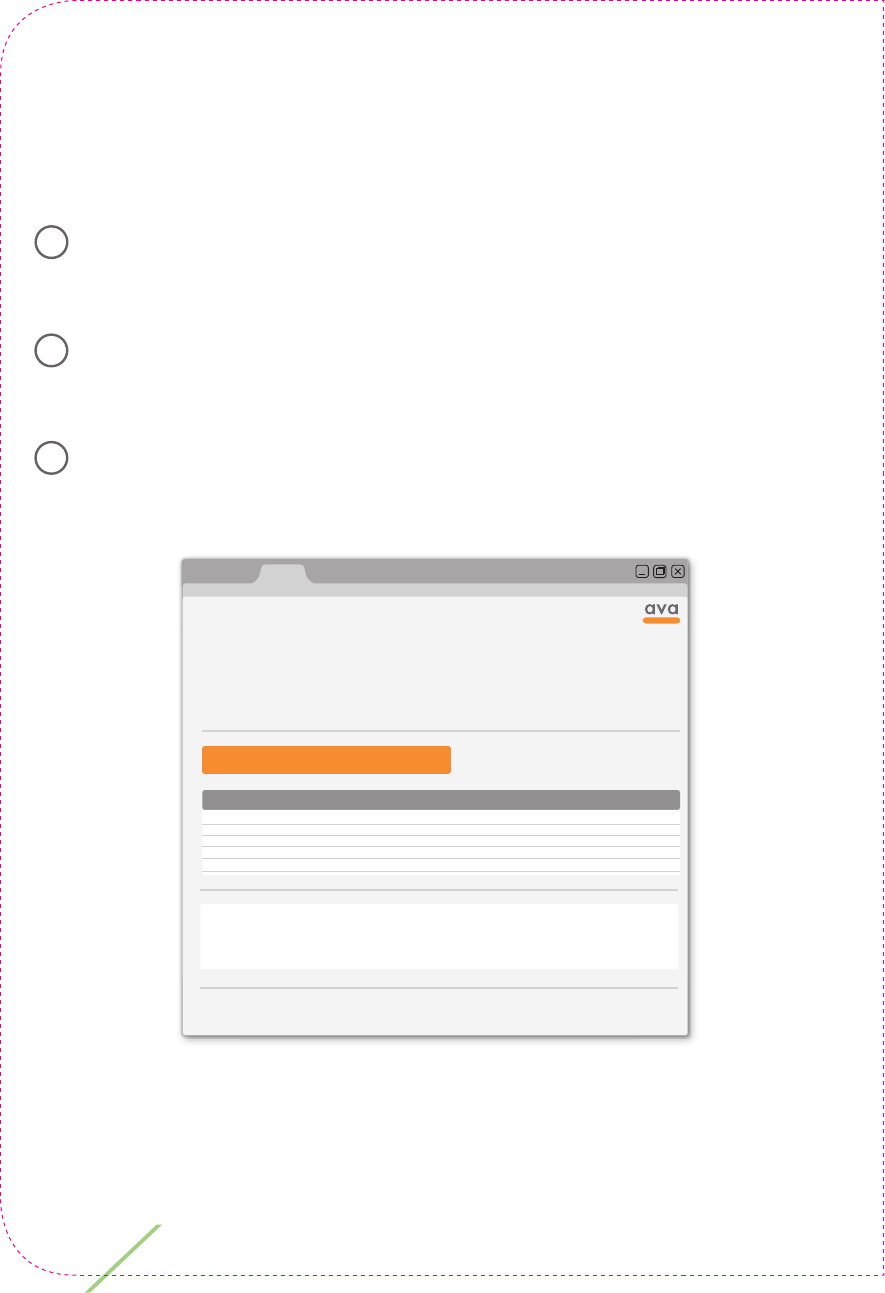
Your injection log will open in your internet browser, and will
show an overview of your injection history (in date order) like
this example.
Your computer does not have to be connected to the internet
to access your injection log. Without an internet connection,
your injection log will simply not show the ava logo in the top
right corner.
3
4
5
Your Injection Log
Your current prescription: Cimzia®
Your current regimen: Maintenance Dose: 2 injections every 4 weeks
Device serial number: 332500AF
Remaining number of injections you can perform with ava: 118
Next injection date is: 27 Jan 2015 Last update: 31 Dec 2014
Injection due on Injection made on Injection Status Code(s) Drug Regimen Interrupted Injections
30 Dec 2014
30 Dec 2014
02 Dec 2014
02 Dec 2014
02 Dec 2014
20 Dec 2014
20 Dec 2014
02 Dec 2014
02 Dec 2014
02 Dec 2014
Delivered
Delivered
Delivered
Incomplete
Incomplete
---
---
---
C
---
Mnt.4wk
Mnt.4wk
Mnt.4wk
Mnt.4wk
Mnt.4wk
0
0
0
0
0
Code descriptions:
A: Low battery
B: USB plugged during injection
C: Injection ow constricted
D: Injection timed out
Code descriptions:
A: Low battery
B: USB plugged during injection
C: Injection ow constricted
D: Injection timed out
Drug regimen key
Ldg.2wk = Loading Dose: 2 injections every 2 weeks
Mnt.2wk = Maintenance Dose: 1 injection every 2 weeks
Mnt.4wk = Maintenance Dose: 2 injections every 4 weeks
End of log
AVA_LOG.html

69
When you are finished, close your web browser and unplug ava
from your computer.
ava will turn off automatically. The injection log provides
information regarding your next injection date and lists your
previously administered injections.
An explanation of the different columns of the injection log is
provided below.
Injection due on
This is the date when you should be making your next injection.
Injection made on
ava records the actual date when you make your next injection.
Injection dates which are more than 3 days before your scheduled
injection due date or 3 days after this date are displayed in orange
instead of black font.
Injection status
Delivered: This means that the entire content of your CIMZIA
medication cassette has been injected successfully.
Incomplete: This means that not the entire content of the CIMZIA
syringe has been injected. You only have received a partial dose.
If applicable, ava may add a code to an injection entry depending
on whether during an injection the battery was low (A) or the
USB cable was plugged in (B), there was a problem with the flow
of medication (C) or the injection was not performed within the
allotted time of 5 minutes and has timed out (D).
70 Chapter 5: More information about ava
Charging the battery
ava is powered by a rechargeable battery and it is important that
you always have enough charge to complete an injection. Do not
try to replace the battery. The battery does not need replacing
during the lifetime of ava.
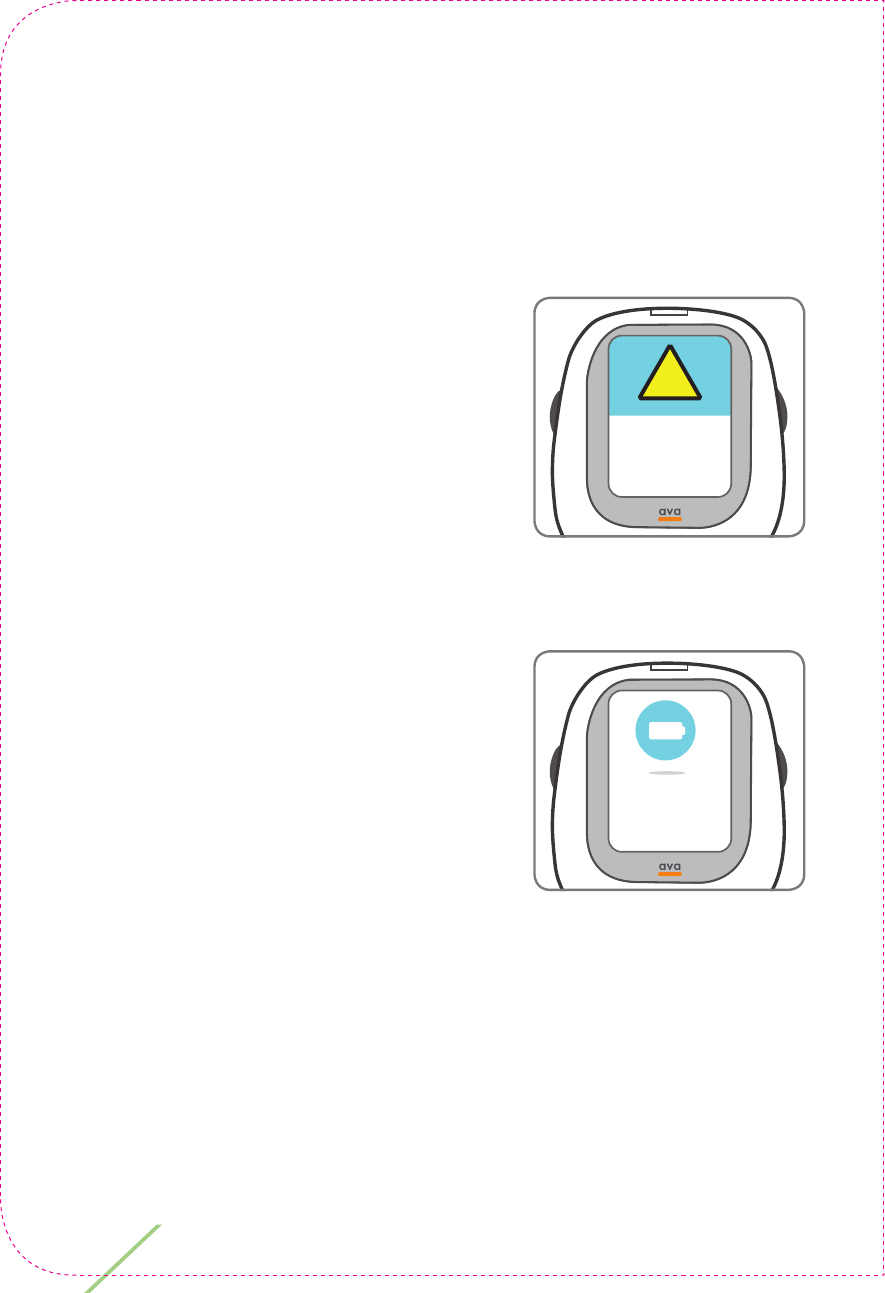
If ava’s battery does not have sufficient
charge to complete an injection the
message ‘Low battery! Please charge
battery.’ will be displayed. You will not
be allowed to start an injection until the
battery has been charged.
If ava does not turn on, the battery
probably needs to be charged.
If at the end of injecting the battery is
completely empty, ava will show ‘Low
battery! Please charge battery.’.
!
Low battery!
Please charge
battery.
Low battery!
Please charge
battery.
71
To charge ava, plug the provided
charger into a power outlet and
connect the other end to the
micro-USB port on the top of ava.
DO NOT twist or bend the USB
connector once it is plugged into
ava.
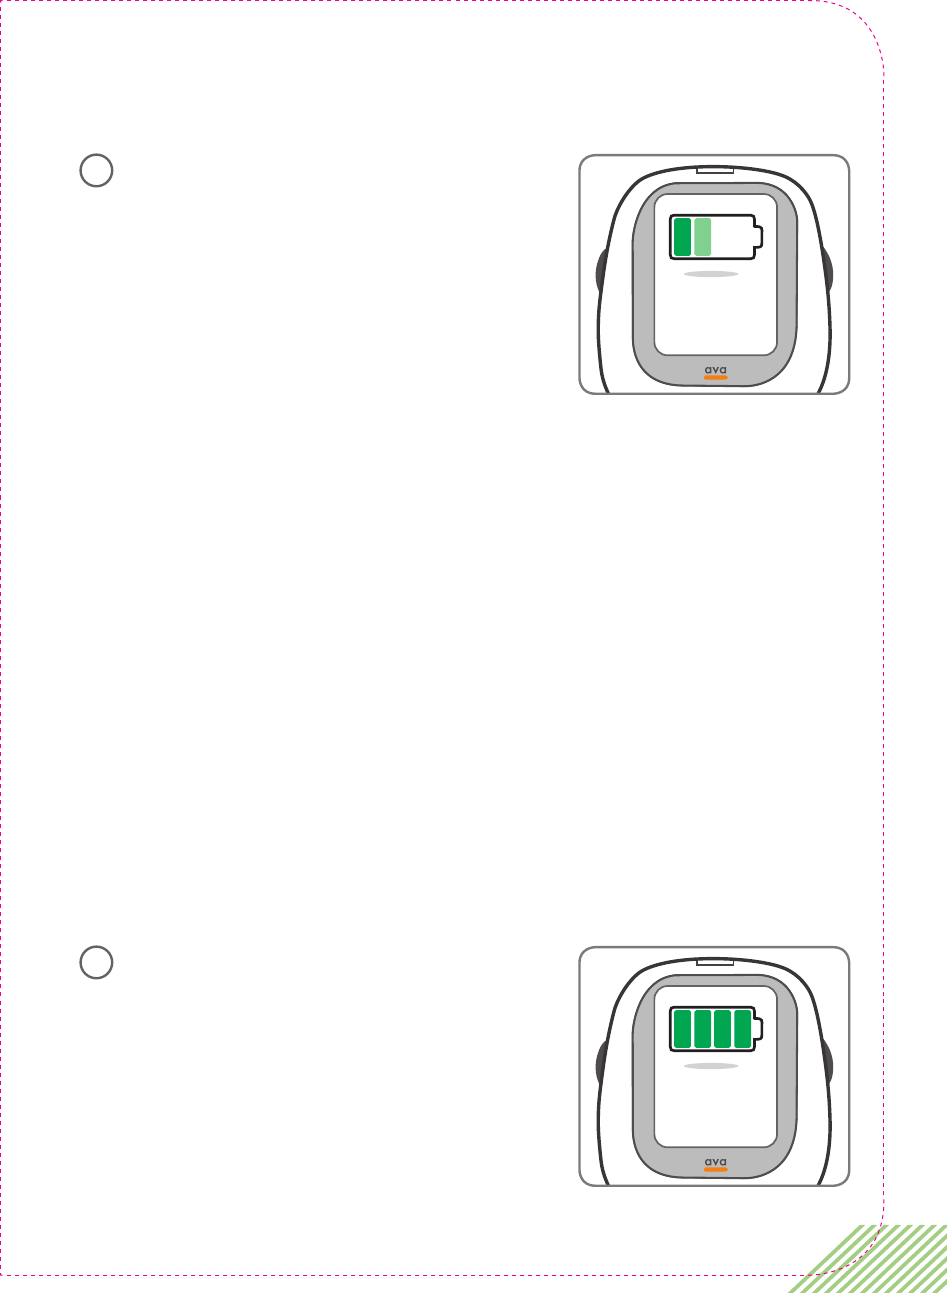
ava will turn on and show the status of the battery and begin
charging. If possible, DO NOT disconnect the charger before the
battery is fully charged.
Only use the provided charger to charge ava.
In case ava does not display the “Charging...” screen, make
sure the charger is connected to a live electrical outlet and the
micro-USB plug is connected to ava. If ava still does not charge,
call your local helpline for a replacement charger.
It takes approximately 2-3 hours to fully charge.
When the battery is fully charged, the
message ‘Battery full. Please unplug
charger.’ will be displayed.
Unplug the charger. ava will turn off
automatically.
Charging...
1
Battery full,
please unplug
charger.
2
72 Chapter 5: More information about ava
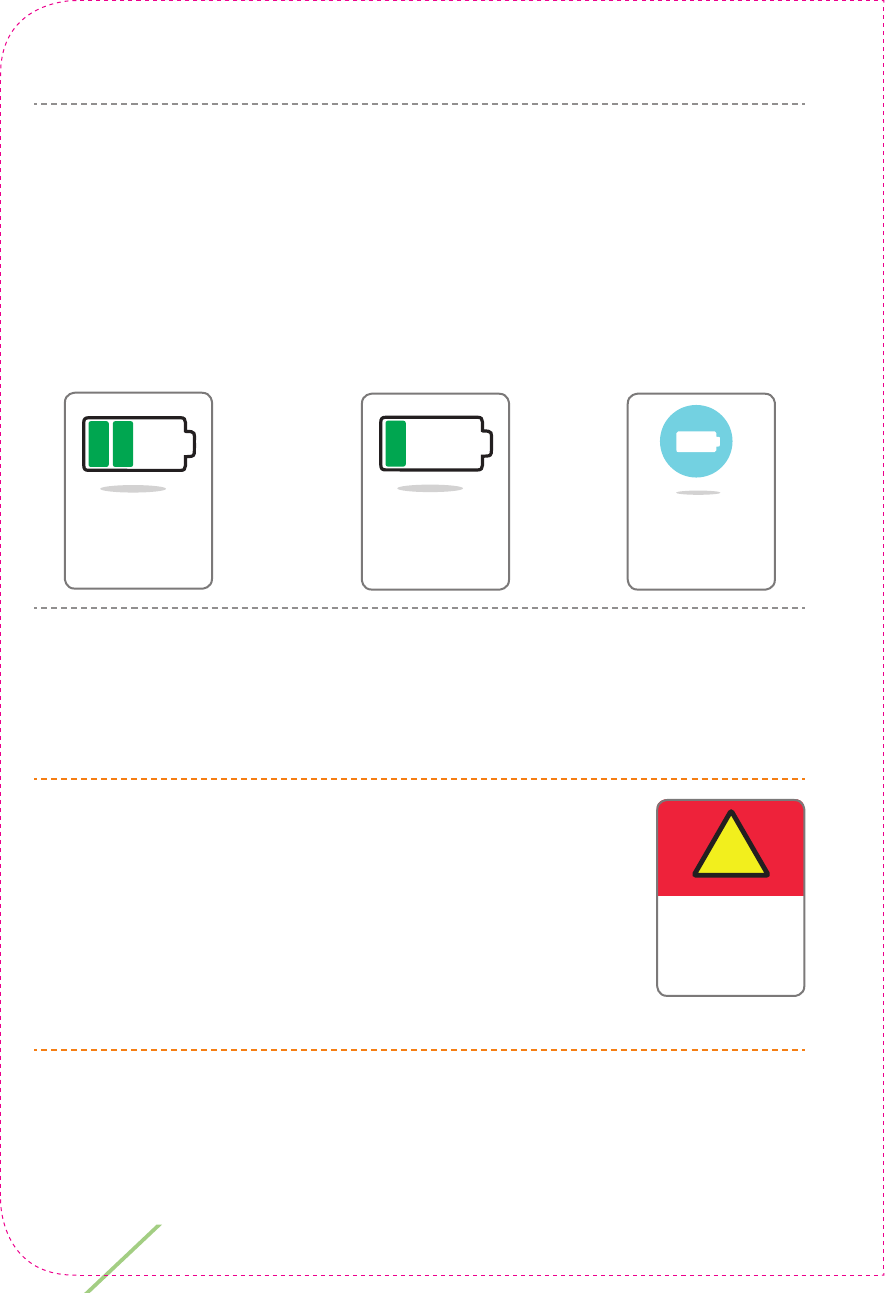
NOTE: ava will show the battery status every time an injection is
completed. It will display the message ‘Enough battery for next
injection.’ or, if you need to charge ava before your next injection,
the message ‘Not enough battery to inject.’ will be displayed.
At the end of injecting, if your battery is completely empty, ava will
show ‘Low battery! Please charge battery.’.
Not enough
battery to
inject.
Enough
battery for
next injection.
Low battery!
Please charge
battery.
If you charge the battery and ava still doesn’t turn on, call helpline
at 1-800-xxxxx
WARNING: DO NOT try to charge ava during an
injection. If you connect ava to charge during the
injection process ava will stop the injection and
will display the message ‘USB cable connected!
Unplug immediately!’. You will not be able to
progress with the injection until you unplug
the charger.
!
USB cable
connected!
Unplug
immediately!

6
Chapter 6:
Troubleshooting
In this section you can fi nd information on
how to troubleshoot problems and you can
fi nd an explanation of all the warnings
and cautions which ava may display.
6

74 Chapter 6: Troubleshooting
Removing a cassette if
the needle cap is lost or if
needle is severely bent
Following an injection the needle cap is required to remove the
used cassette from ava. If you have accidentally lost the original
needle cap of your cassette you can use one of the spare needle
caps. There are two green spare needle caps which you can fi nd
in the storage case.
You can also use the spare needle cap to remove a medication
cassette in case the needle is bent and is not allowing you to use
the original medication cassette cap.
DO NOT attempt to remove a cassette by any other means due to
the risk of an acccidental needle stick injury.
NEVER insert any foreign objects such as tools or fi ngers into the
cassette port.
spare
needle
cap
x2
Spare needle cap

75
What to do if ava has problems
identifying a cassette by the Radio
Frequency Identification (RFID)
If you have a problem with ava identifying an inserted cassette,
make sure you do not have any other cassettes (medication
cassette or training cassette) immediately next to ava. You may
also find it helpful to use ava away from or temporarily turn off
household appliances which might cause interference such as
television sets, radios, microwaves or mobile phones etc. Generally,
a distance of a few feet from potentially interfering appliances
should be sufficient to avoid any problems.
Always make sure you are not using ava near strong sources of
magnetic and electromagnetic radiation such as x-ray machines at
airports or hospital equipment.
76 Chapter 6: Troubleshooting
Warning message priority
When using ava you may see warning messages displayed. To help
you to understand importance of these messages the following
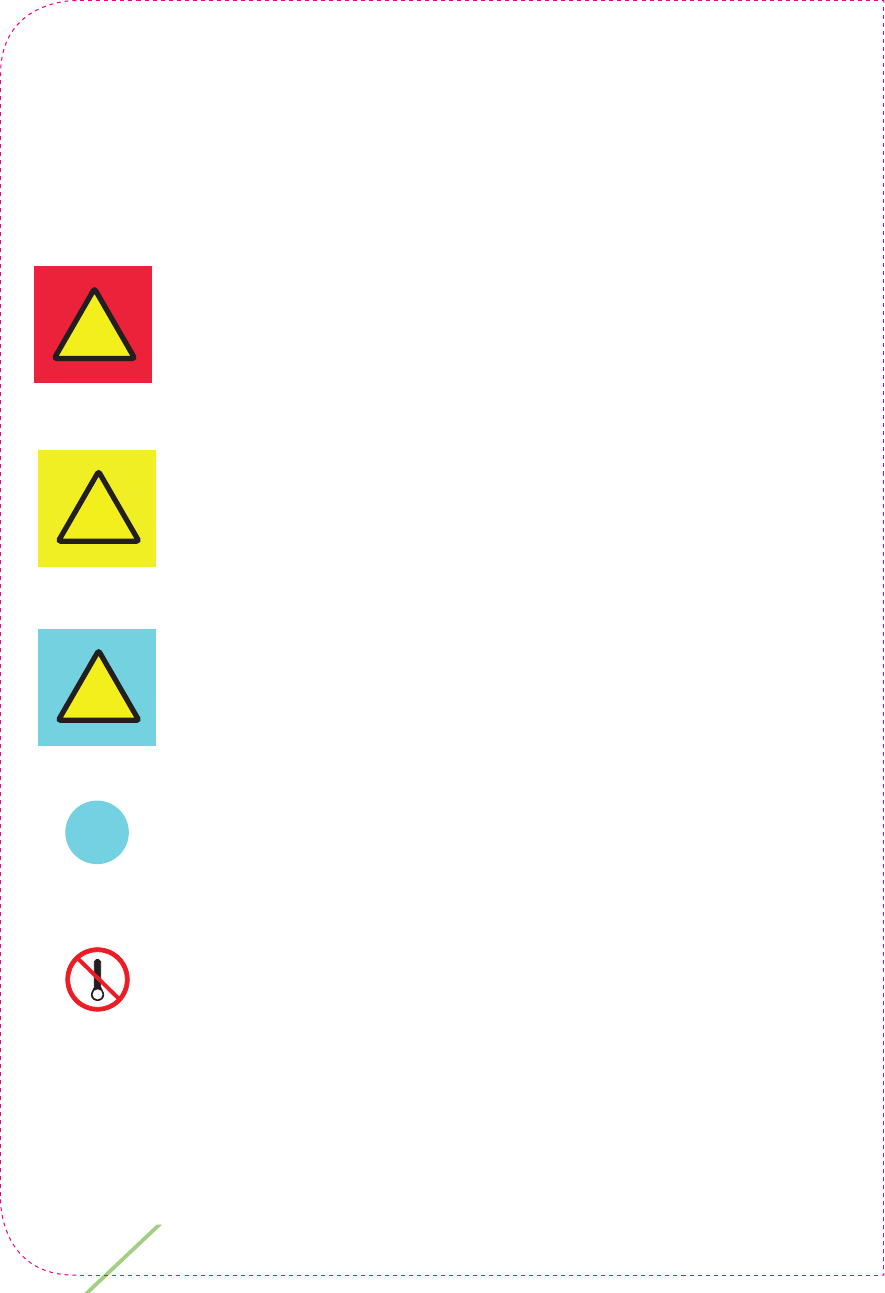
symbols have been used:
!
Messages with this symbol are High Priority Alarms
and may represent a danger and must be acted upon
immediately.
Messages with this symbol are Medium Priority
Alarms and in most cases require you to consult with
your physician before proceeding.
Messages with this symbol are Low Priority Alarms
providing instructions of important next steps which
need to be performed.
Messages with this symbol are instructions which
must be completed.
Messages with this symbol indicate medication
cassette actions which are not possible or allowed.
These symbols indicate the alarm priority and will be shown
together with additional instructions.
!
!
!
77
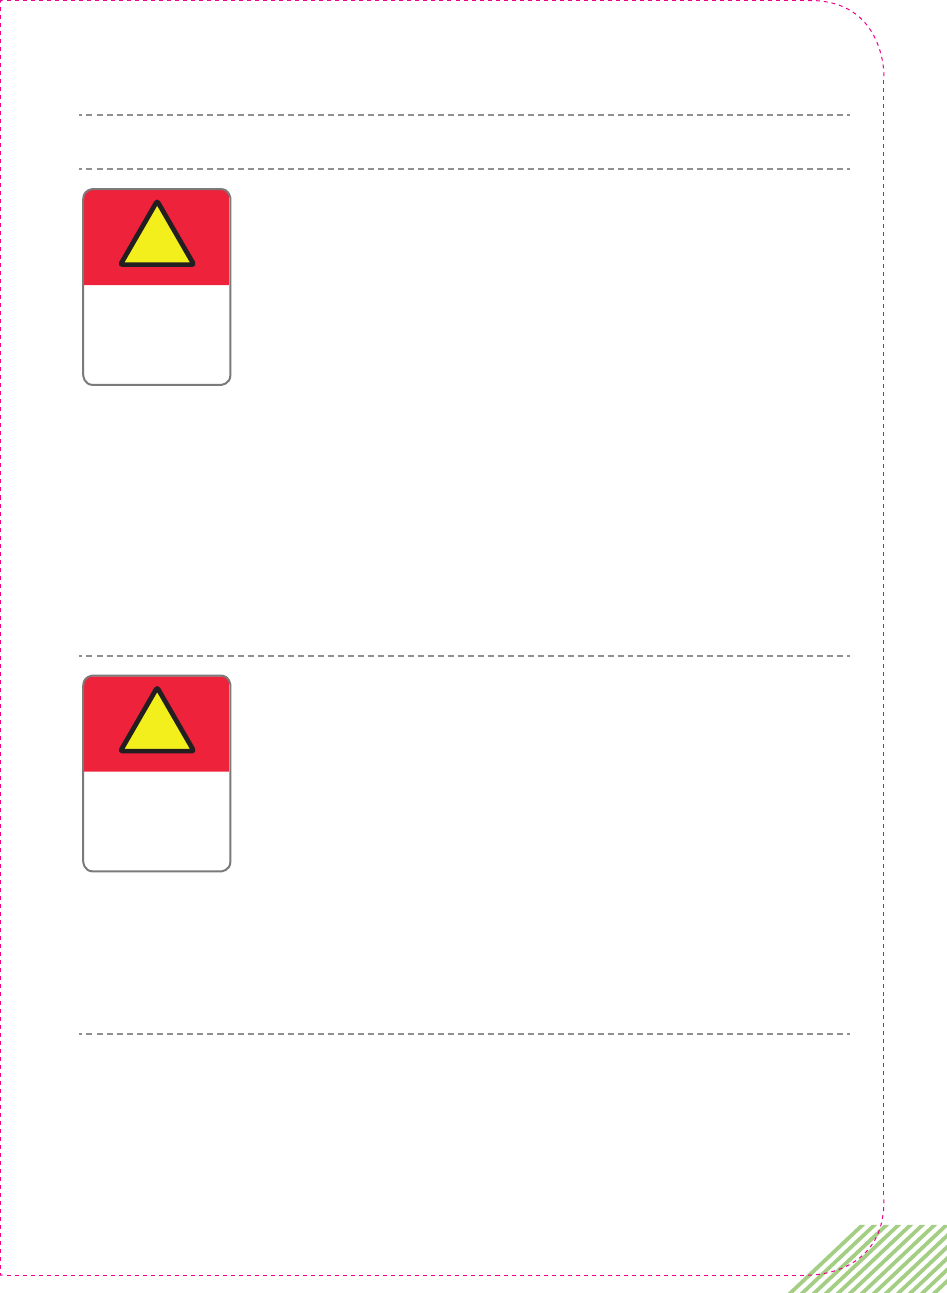
High priority alarms
MESSAGE EXPLANATION
As a patient you should never attempt to enter
this menu nor try to modify the setting of your
medication dose. If you encounter this message
by error, simply turn off ava by pressing the power
button for 3 seconds.
This message signifies that you are about to enter
the dose setting mode on ava. This set up menu is
intended only for your healthcare provider and is
used to set up your specific medication dose in ava.
If you accessed this message by mistake, press the
On/Off (Power) button until ava turns off
ava has a self-test procedure to make sure it is
working properly before use. This warning shows
that an error was detected during this test.
For your own safety ava will not allow you to
proceed. A four digit ‘error helpline code’ will be
displayed.
Contact your local helpline for support and tell
them the 4-digit error code.
!
Entering dose
setting mode.
Only for
physician!
!
Error!
Do not use.
Helpline code
xxxx
78 Chapter 6: Troubleshooting
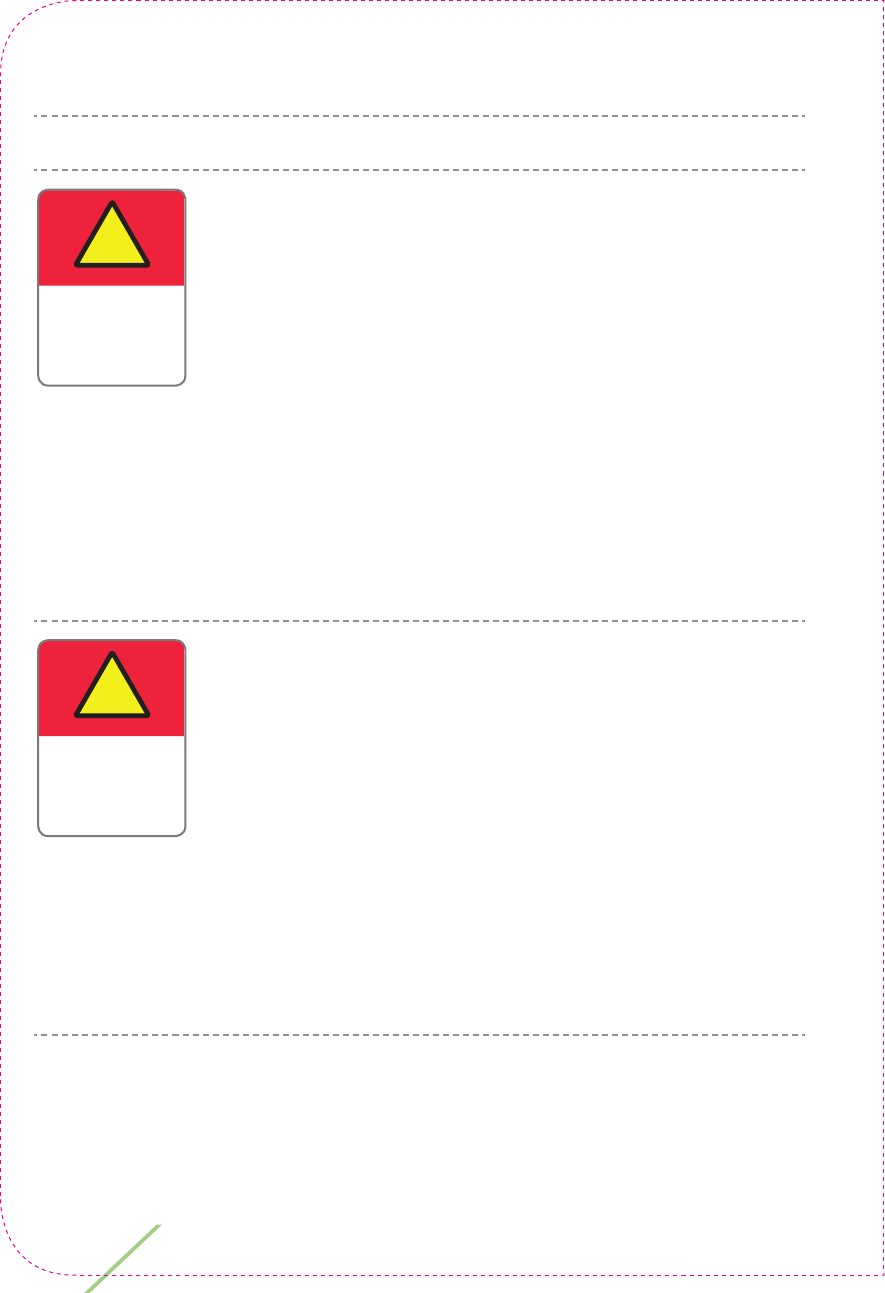
MESSAGE EXPLANATION
Following a partial or completed injection the
needle cap has not yet been replaced. Although
the needle is safely retracted inside ava, it remains
exposed inside the device until the needle cap is
replaced. Handle with care, until you have replaced
the needle cap to avoid accidental needle stick
injury. DO NOT attempt to insert a finger inside of
the cassette port.
If you have interrupted an injection and delivered
only a partial dose, you should try to complete your
injection before replacing the needle cap.
This warning will be displayed if you connect ava
to the electrical charger or to your PC during an
injection.
You must immediately unplug the micro-USB
cable from the charging port before proceeding to
minimize the risk of electric shock.
You cannot finish your injection while ava is
connected to the charger or a computer. Unplug
the micro-USB cable and then finish your injection.
!
Needle
uncapped!
Handle with
care!
!
USB cable
connected!
Unplug
immediately!
79
Medium priority alarms
MESSAGE EXPLANATION
If for some reason during your loading dose
regimen you have not been using ava for more than
70 days to inject CIMZIA, you will see this message.
Consult with your physician how to proceed with
your CIMZIA injections.
ava uses an internal calendar to keep track of when
your next injection is due. If you turn on ava more
than 3 days before your next injection is due, ava
will display this message to warn you that it is too
soon to inject and performing an injection now may
result in an overdose of CIMZIA.
This warning does not stop you from injecting;
however, you should always consult with your
physician before performing an out-of-schedule
injection.
!
Incorrect
medication
dosing interval!
!
Injecting
ahead of
scheduled
date!
80 Chapter 6: Troubleshooting
Low priority alarms
MESSAGE EXPLANATION
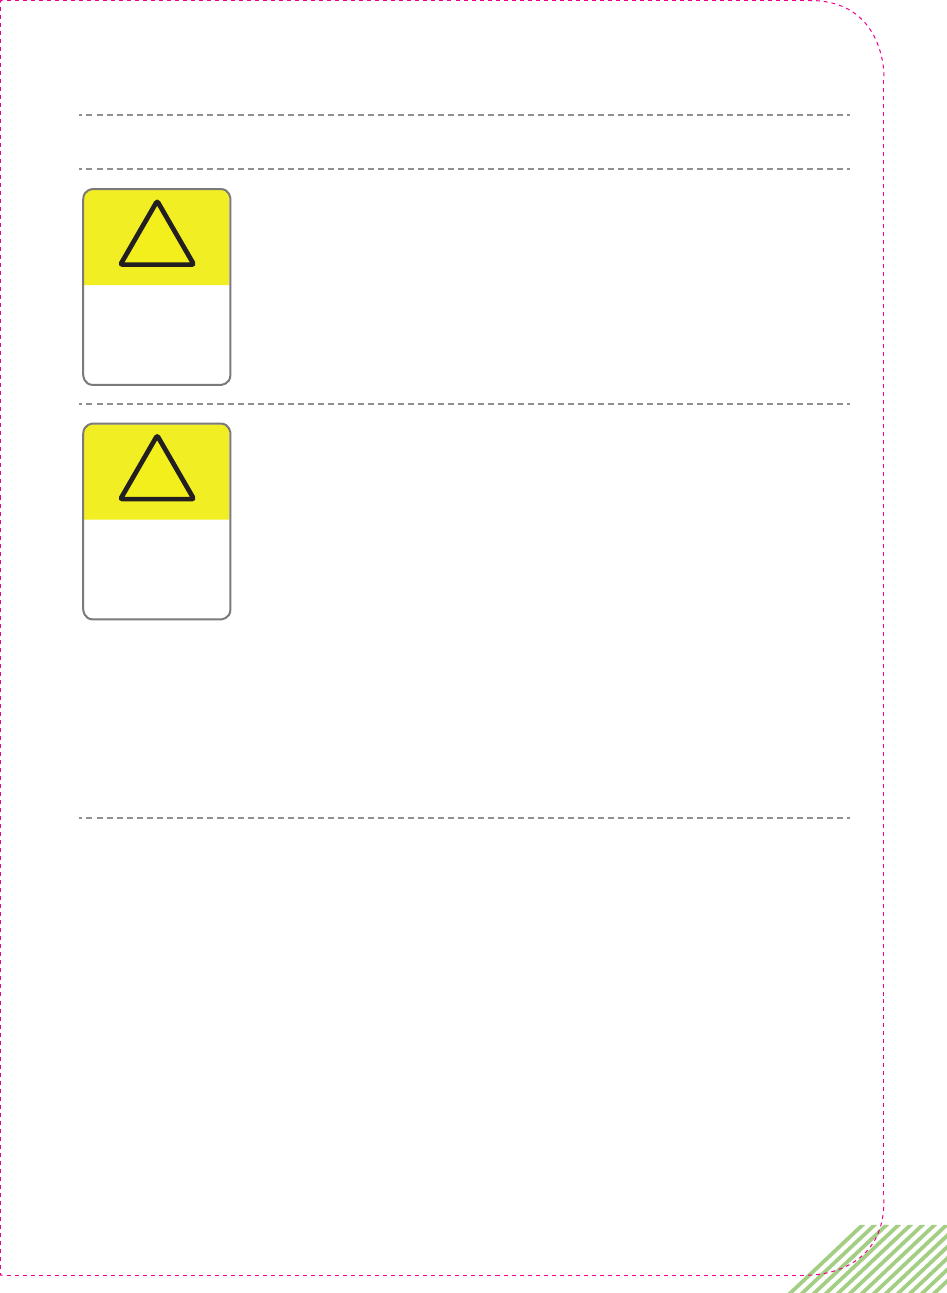
This message indicates that ava has detected
a ‘needle injection error’. This may be due to a
blocked needle, frozen CIMZIA or other reason.
DO NOT try to inject using this cassette. Replace
the needle cap and remove the cassette. Dispose of
it in your biohazard (sharps) container.
You can inject with a different cassette.
When you first receive ava the medication dose
corresponding to your specific prescription has not
been set up yet in ava. Contact your healthcare
provider to have ava set up for the exact amount
of CIMZIA you should take. When you see your
healthcare provider make sure you bring ava along.
You should also receive injection training at the
same time.
In the meantime, to practice the injection process
with ava you can proceed to insert the training
cassette. However, you will not be able to inject
your medication until your specific medication dose
has been set.
!
Cassette
error!
Refer to user
manual!
!
Consult your
physician to
set device
dosage!
81
MESSAGE EXPLANATION
When this warning is displayed ava must be
replaced and no more injections can be made with
this device.
ava has been designed to be used for up to 3 years
and it has been programmed to prevent use after
this time.
Contact your healthcare provider or local helpline
for a replacement device.
ava can operate within the temperature range of
5°C – 40°C (41°F – 104°F) at 15 – 90% relative
humidity. Outside of these temperatures ava will
display this message.
If you see this message store ava at the appropriate
operating temperature. Allow enough time until ava
has reached the normal operating temperature. This
can be checked by turning ava on. This message
should not be displayed before proceeding.
!
Device at
end of life!
!
Device is
out of
temperature
range!
82 Chapter 6: Troubleshooting
MESSAGE EXPLANATION
When ava first displays this warning it can still be
used for another 10 injections (plus any use of the
training cassette) before it must be replaced.
ava has been designed to be used for up to 3 years
and it has been programmed to prevent use after
this time. To ensure your safety and reduce the risk
of device failure, ava will soon have to be replaced.
You may also see the warning ‘Please replace
device by calling helpline’.
After another 10 injections ava will stop working
and display the warning ‘Device at end of life.
Please do not use’.
Contact your healthcare provider or local helpline
for a replacement device.
ava displays this message if you insert a cassette
too soon after you have turned ava on.
!
Device
is nearing
end of life!
!
Early
medication
insertion!
83
MESSAGE EXPLANATION
If skin contact is lost during an injection, ava
automatically stops the injection and withdraws
the needle.
Not all the CIMZIA will have been injected and this
warning indicates that your injection is not complete.
If an injection is interrupted due to loss of skin
contact, small amounts of medication may be
lost. Multiple interrupted injections may lead to a
medication underdose.
To complete your injection, choose a new injection
site and follow the instructions given in "Chapter 4:
Injecting CIMZIA with ava" on page 43.
This warning indicates that ava has found a
technical problem with the cassette. Replace the
needle cap and remove the cassette from ava.
Once the cassette has been removed ava will
automatically carry out a self-test. In case there is a
problem with ava, the high-priority alarm message
‘Error! Do not use. Helpline code’ will be shown.
Provide the error code to the helpline. If ava
does not show an error code, ask the helpline for
instructions how to proceed.
!
Injection
not complete!
Reposition
on skin.
!
Insertion
error!
Refer to user
manual.
84 Chapter 6: Troubleshooting
MESSAGE EXPLANATION
ava contains a rechargeable battery. This message
indicates ava needs recharging. Only use the
charger which is supplied with your ava kit to
recharge the device.
Please refer to "Chapter 5: More information about
ava" on page 65 for more information.
This warning indicates that you must complete
your injection immediately. ava's battery is
almost empty and you must inject before it needs
charging.
This message indicates that you have missed your
previous scheduled dose.
ava automatically records your injection history
and when your next dose is due. You need to
consult with your healthcare provider how to
correct your dosing.
In case you see this screen please contact your
local helpline for a replacement device.
!
Low battery!
Please charge
battery.
!
Low battery!
Please inject
immediately!
!
Scheduled
injection date
missed!
!
Software
error!
85
MESSAGE EXPLANATION
For patients whose full dose requires two injections,
this warning is displayed when you have not yet
completed your full dose. You have only injected one
of the two required medication cassettes and need
to proceed injecting with the remaining medication
cassette to complete your prescribed dose.
!
Your dosage
is incomplete!
86 Chapter 6: Troubleshooting
Instructions
MESSAGE EXPLANATION
This message advises you to contact your
healthcare provider.
This message indicates that you have missed your
previous scheduled dose.
ava automatically records your injection history and
when your next dose is due. You need to consult with
your healthcare provider how to correct your dosing.
This message informs you not to hold on to the
needle cap of the cassette while inserting or
removing the cassette from ava.
This message indicates that the internal battery is
empty and needs to be recharged.
ava must be charged before it can be used. Make
sure you only use the charger supplied with ava.
Refer to "Charging the battery" on page 70 for
help with charging ava.
!
Consult your
physician!
!
Follow
physician’s
instructions
for dosing!
!
Let go of
needle cap!
Low battery!
Please charge
battery.
87
MESSAGE EXPLANATION
This message is displayed if you turn on ava too far
in advance of your next injection due date.
ava will also show you your next date for injection.
You may want to inject anyway, if your healthcare
provider has given you specific instruction to inject
your next dose early.
DO NOT inject unless you have received specific
instructions to do so.
Otherwise, make a note of the date of your next
injection (shown on ava’s screen). Next, turn off ava.
ava has been designed to be used for up to 3 years
and it has been programmed to prevent use after
this time. To ensure your safety and to reduce the
risk of device failure, ava will have to be replaced
when this message appears.
Contact your healthcare provider or local helpline
for a replacement device.
!
Contact your
physician.
Only inject
if instructed.
!
Please
replace device
by calling
helpline.
88 Chapter 6: Troubleshooting
MESSAGE EXPLANATION
This message advises you to read the relevant
information in the user manual.
This message indicates that the needle cap has
been removed. The needle is still retracted inside
ava and remains exposed inside the device until the
needle cap is replaced. Handle with care, until you
have replaced the needle cap.
Please read
instructions
in user
manual.
!
Please replace
needle cap.
89
Cassette Warnings
MESSAGE EXPLANATION
This warning indicates that the CIMZIA medication
cassette has passed its expiration date. ava displays
this warning to prevent you from injecting expired
medication and will reject the cassette.
Remove the cassette and contact your healthcare
provider.
This message indicates that this is a used cassette
(for example; the needle cap has been removed
before). For your safety, ava will not allow the use
of any cassette where the needle cap has been
removed before as the needle is no longer sterile.
ava will eject the cassette. Remove it and discard it
in a sharps container.
This warning indicates that ava does not recognize
the cassette you have loaded as one containing
CIMZIA.
Please contact your healthcare provider to obtain
the correct medication for you.
ava will reject the cassette. Remove the cassette
and return it to your pharmacist.
Medication
has expired.
Do not use.
This is a used
medication.
Do not use.
This is not your
medication.
Do not use.
90 Chapter 6: Troubleshooting
MESSAGE EXPLANATION
This message indicates that the cassette which
has been inserted is not an authentic CIMZIA
medication cassette.
ava must only be used with genuine CIMZIA
medication cassettes.
Contact your local helpline for advice. The
helpline may instruct you to keep the cassette for
investigation by the manufacturer.
ava will reject the cassette. Remove it from ava.
This warning is displayed if ava has been left for
more than 5 minutes after the needle cap has been
removed and before an injection was started. With
the needle cap removed, the needle’s sterility seal
has been broken and it is important that you inject
as soon as possible. ava will no longer accept this
cassette.
Insert the needle cap and remove the cassette from
ava. Put the cassette in your biohazard (sharps)
container.
Medication
not authentic.
Do not use.
Time to inject
exceeded.
Do not use.
91
Other Non-Alarm Screens
MESSAGE EXPLANATION
When starting ava, one of the following three
screens will be displayed to remind you which
dose and frequency (regimen) ava is set to use.
The first time ava is used you will not see any of
these screens because ava still needs to be set up
by your healthcare provider.
The dose and frequency displayed must correspond
to your current prescription. If you believe the
displayed dose does not correspond to your current
prescription contact your healthcare provider.
This particular message is displayed if you are on
Loading Dose (2 injections every 2 weeks).
NOTE: If your healthcare provider prescribed
the loading dose to you, ava will automatically
transition from the loading dosing when completed
to your prescribed maintenance dose.
This particular message is displayed to indicate
ava is set to the Maintenance Dose (1 injection
every 2 weeks).
You are on
loading dose
2 inj. every
4 weeks.
You are on
maintenance
dose 1 inj.
every 2 weeks.
92 Chapter 6: Troubleshooting
MESSAGE EXPLANATION
This particular message is displayed to indicate ava
is set to the Maintenance Dose (2 injections every
4 weeks).
This message is displayed to inform you when your
loading dosing is complete. During loading dosing
you have administered 2 injections every 2 weeks
at weeks 0, 2 and 4.
Now your loading dosing has finished and ava
automatically transitions to your prescribed
maintenance dosing as set up by your healthcare
provider.
This message indicates that you have finished
injecting and should now turn off ava to preserve
battery life.
If you do not turn it off, ava will automatically turn
off after 3 minutes.
You are on
maintenance
dose 2 inj.
every 4 weeks.
Loading dose
complete.
Please turn
o the device.
93
MESSAGE EXPLANATION
This screen indicates the date that your next
injection is due.
The date displayed depends on when you last
injected and your prescribed dose and dosing
frequency.
This picture shows a sample date – yours will vary.
Sunday
31
December
Your next
injection date.

94 Chapter 6: Troubleshooting
This page is intentionally left blank.

7
Chapter 7:
Technical
Information
about ava
7
96 Chapter 7: Technical Information about ava
Technical data
Model Name ava
Dimensions H : 203 [mm], W: 68 [mm], D: 56 [mm]; H: 8 [in.], W: 2.68
[in.], D: .2.2 [in.]
Weight 245 g; 8.6 oz.
Serial Number Unique 8 alphanumeric digit identifying each individual
device
Power Supply Internally powered, rechargeable Lithium Ion Battery,
3.7V DC, 1620 mAh minimum
Battery Charger Emerson / Artesyn DA12-M, 90 - 264V~ 0.15 A @240V
(max), 47 / 63 Hz, output : 5V DC, 2.0 A (max)
or
Friwo Fox 12 Medical, Type FW8000MUSB/05
100-240V~,0.15 A@ 240V (max), 50-60 Hz, output: 5V DC,
2.2 A (max)
Classification Ingress Protection IP 52 (ava is protected only against
occasional liquid droplets but it is not protected against
water spillage)
Applied part type BF
Electromagnetic
Compatibility
Electromagnetic compatibility in accordance with
EN60601-1-2 (see EMC tables)
Operating Environment 5°C – 40°C (41°F – 104°F) at 20 – 90% relative humidity
Pressure Limits Atmospheric pressure limits: ava can be used between
700 to 1060 hPa, at ambient pressure between 700 to
1060 hPa
Storage Conditions -20°C – 60°C (-4°F – 140°F) at no humidity requirement
Dose Accuracy nominal injectable volume 1.0 ml
min. volume 0.95 ml
Warranty ava does not have any user serviceable parts. Opening
or attempting to disassemble ava will void any device
warranty.
This medical equipment complies with the following international standards:
ISO 60601 and ISO 11608
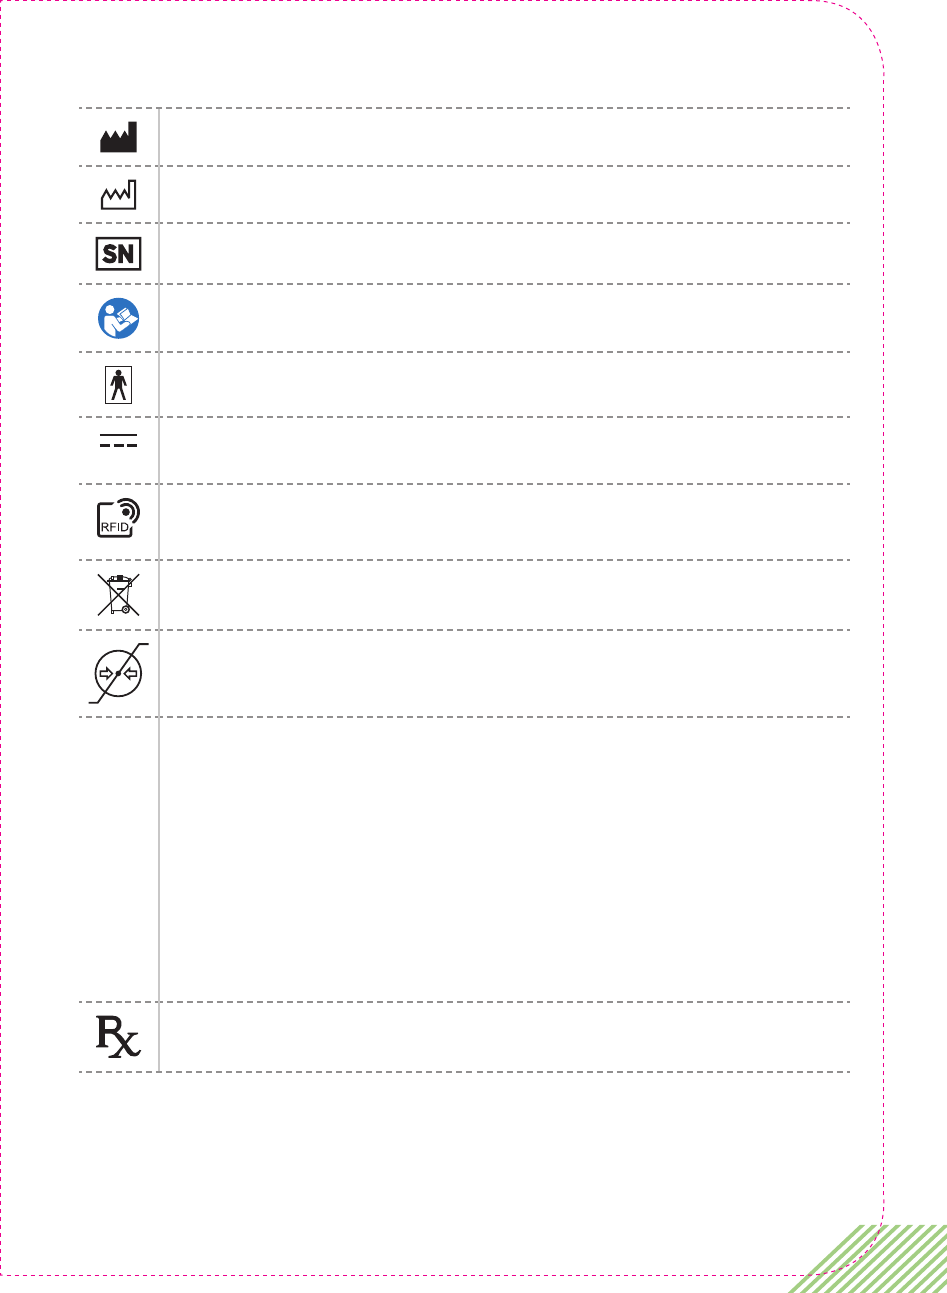
97
Explanation of ava symbols
Manufacturer of ava
Manufacturing date of ava
Serial number
Refer to instruction manual
Applied part type BF (electrical isolation)
Direct current (d.c.), ava requires 5V direct current to recharge the
battery.
RFID tag
ava identifies cassettes via an RFID (radio frequency identification) chip.
Dispose of safely according to your local regulations
This symbol denotes the atmospheric pressure limits of ava under which it
can be used.
IP52 Level of ingress protection. This rating describes how well ava is protected
against dust and liquids entering the interior of the device.
The first digit of the IP rating describes the level of protection against
solid particles entering through the housing of ava into the device. The
rating of 5 means that the ingress of dust is not entirely prevented.
The second digit of the IP rating describes the protection against the
ingress of liquids into ava. The two (2) rating means that ava is only
protected against drops of water. Avoid spilling any liquid onto ava.
Make sure you keep ava dry storing it inside the storage case and only use
a damp cloth if ava needs cleaning.
Prescription only
98 Chapter 7: Technical Information about ava
Electromagnetic Compatibility Tables
Medical electrical equipment requires special precautions regarding EMC
(electromagnetic compatibility) and needs to be used in accordance to the EMC
information provided below.
Portable or mobile RF communications equipment (e.g., mobile phones, pagers…)
can affect ava.
ava is intended for use in the electromagnetic environment specified below. The user
should ensure that ava is used in such an environment.
Wireless Functionality Radio Frequency Identification (RFID) nominal frequency
13.56MHz +/-423,75 kHz subcarriers
Effective
Radiofrequency
Radiated Power Output
200 mW
Operating Range < 1 cm outside of ava
Modulation On-Off Keying (OOK)
Bandwidth of Receiving
Section
~ 846 kHz
Wireless Quality of
Service Requirement
RFID reader provides Received Signal Strength Indicator
(RSSI). In case of single RFID read or write failure ava
automatically performs a retry.
Wireless Security
Measures
Critical information on the cassette RFID chip is AES128
encrypted with CTR mode of operation.
ava complies with the
applicable EMC and
telecommunications
standards
ETSI EN 300 330-2 V1.6.1
ETSI EN 301 489-1,
ETSI EN 301 489-3,
FCC Part 15 (10-01-2014 Edition)
99
Guidance and manufacturer’s declaration
– electromagnetic emission
Emissions test Compliance Electromagnetic environment - guidance
RF emissions CISPR 11
ETSI EN 301 489-1
ETSI EN 301 489-3
IEC 60601-1-2
EN 55022
Group 1 The device uses RF energy only for
its internal function. Therefore, its RF
emissions are very low and are not likely
to cause any interference in nearby
electronic equipment.
RF emissions CISPR 11
ETSI EN 301 489-1
ETSI EN 301 489-3
IEC 60601-1-2:2014
EN 55022
Class B The device is suitable for use in all
establishments, including domestic
establishments and those directly
connected to the public low-voltage power
supply network that supplies building used
for domestic purposes.
FCC Title 47 CFR Part
15, subpart B and C
15B: Class B This device complies with Part 15 of the
Federal Communications Commission
(FCC) Rules. The FCC ID for this device is
reported on the device label. Operation is
subject to the following two conditions:
• This device may not cause harmful
interference.
• This device must accept any
interference received, including
interference that may cause undesired
operation.
• Changes or modifications not expressly
approved by the party responsible
for compliance could void the user’s
authority to operate the equipment.
Harmonic emissions
ETSI EN 301 489-1
ETSI EN 301 489-3
IEC 60601-1-2
EN 61000-3-2
Applicable for
the battery
charger
connected
to the device,
covered by
Telecom
Requirements
Battery Charger < 75 watt. No limits apply.
Therefore the charger is in compliance
with Harmonic requirements.
100 Chapter 7: Technical Information about ava
Emissions test Compliance Electromagnetic environment - guidance
Voltage fluctuations
and flicker
ETSI EN 301 489-1
ETSI EN 301 489-3
IEC 60601-1-2
EN 61000-3-3
Applicable for
the battery
charger
connected
to the device,
covered by
Telecom
Requirements
Device’s charger is assumed not to
generate Voltage Fluctuations and Flicker
and is therefore deemed to comply
without testing. EN 61000-3-3, clause 6.1.
“Tests need not be made on equipment
which is unlikely to produce significant
voltage fluctuation and flicker.”
Electromagnetic
compatibility and
radio spectrum
matters
ETSI EN 300 330-2
V1.6.1
13.56 MHz RFID
device
Transmitter
technical
characteristics:
Product Class 1
Receiver
classification:
Receiver Class 3
13.56 MHz RFID device.
The device is equipped with a RFID
R/W circuit operating on passive tags
at a frequency of 13.56 MHz and is
therefore classified as an inductive
application, of which the parameters
to comply with are described in the
Electronic Communication Committee
recommendation ERC/REC 70-03.
Information to the User (FCC Title 47 CFR Part 15.105 (b))
Note: This equipment has been tested and found to comply with the limits for a Class
B digital device, pursuant to part 15 of the FCC Rules. These limits are designed
to provide reasonable protection against harmful interference in a residential
installation. This equipment generates, uses and can radiate radio frequency
energy and, if not installed and used in accordance with the instructions, may cause
harmful interference to radio communications. However, there is no guarantee that
interference will not occur in a particular installation. If this equipment does cause
harmful interference to radio or television reception, which can be determined
by turning the equipment off and on, the user is encouraged to try to correct the
interference by one or more of the following measures:
• Reorient or relocate the receiving antenna.
• Increase the separation between the equipment and receiver.
• Connect the equipment into an outlet on a circuit different from that to
which the receiver is connected.
• Consult the dealer or an experienced radio/TV technician for help.

101
Guidance and manufacturer’s declaration
– electromagnetic immunity
Immunity test Test level Compliance level /
performance criterion
Electromagnetic
environment - guidance
Electrostatic discharge (ESD)
ETSI EN 301 489-1
ETSI EN 301 489-3
IEC 60601-1-2
ISO 11608-1
ISO 11608-4
IEC 61000-4-2
±2, ±4, ±6 and ±8 kV contact
discharge
±2, ±4, ±8, ±10, ±13 and ±15
kV air discharge
±8 kV contact discharge
±15 kV air discharge
None
Fast Transient / burst
ETSI EN 301 489-1
ETSI EN 301 489-3
IEC 60601-1-2
IEC 61000-4-4
±2 kV for power supply lines
±1 kV for input/output lines
TT for transmitters,
TR for receivers
Mains power quality
should be that of a typical
commercial or hospital
environment.
Surges
ETSI EN 301 489-1
ETSI EN 301 489-3
IEC 60601-1-2
IEC 61000-4-4
±1 kV; ±2 kV
Common mode
TT for transmitters,
TR for receivers

102 Chapter 7: Technical Information about ava
Immunity test Test level Compliance level /
performance criterion
Electromagnetic
environment - guidance
Voltage dips and
interruptions
ETSI EN 301 489-1
ETSI EN 301 489-3
IEC 60601-1-2
IEC 61000-4-11
Reduction of the supply
voltage of 100% for 20 ms
Reduction of the supply
voltage of 60% for 200 ms
Reduction of the supply
voltage of 100% for 5000
ms
CT for transmitters, CR for
receivers for ETSI
EN 301 489 series
CT for SRD class 1
transmitters, CR for SRD
class 1 receivers for ETSI EN
301 489 Series
TT for SRD class 2 or class
3 transmitters, TR for SRD
class 2 or class 3 receivers
for ETSI EN 301 489 series
TT for transmitters,
TR for receivers
Mains power quality
should be that of a typical
commercial or hospital
environment.
Power frequency magnetic
field
IEC 60601-1-2
IEC 61000-4-8
3 A/m 3 A/m Power frequency magnetic
fields should be at levels
characteristic of a typical
location in a typical
commercial or hospital
environment.