UNION COMMUNITY AC1100RF Access controller User Manual AC7000 UserGuide 1 0
UNION COMMUNITY Access controller AC7000 UserGuide 1 0
UserManual.wiki
>
UNION COMMUNITY
>
AC1100RF User Manual
User Manual
Navigation menu
Upload a User Manual
Namespaces
Wiki Guide
HTML
PDF
Info
Views
User Manual
Discussion / Help
Navigation


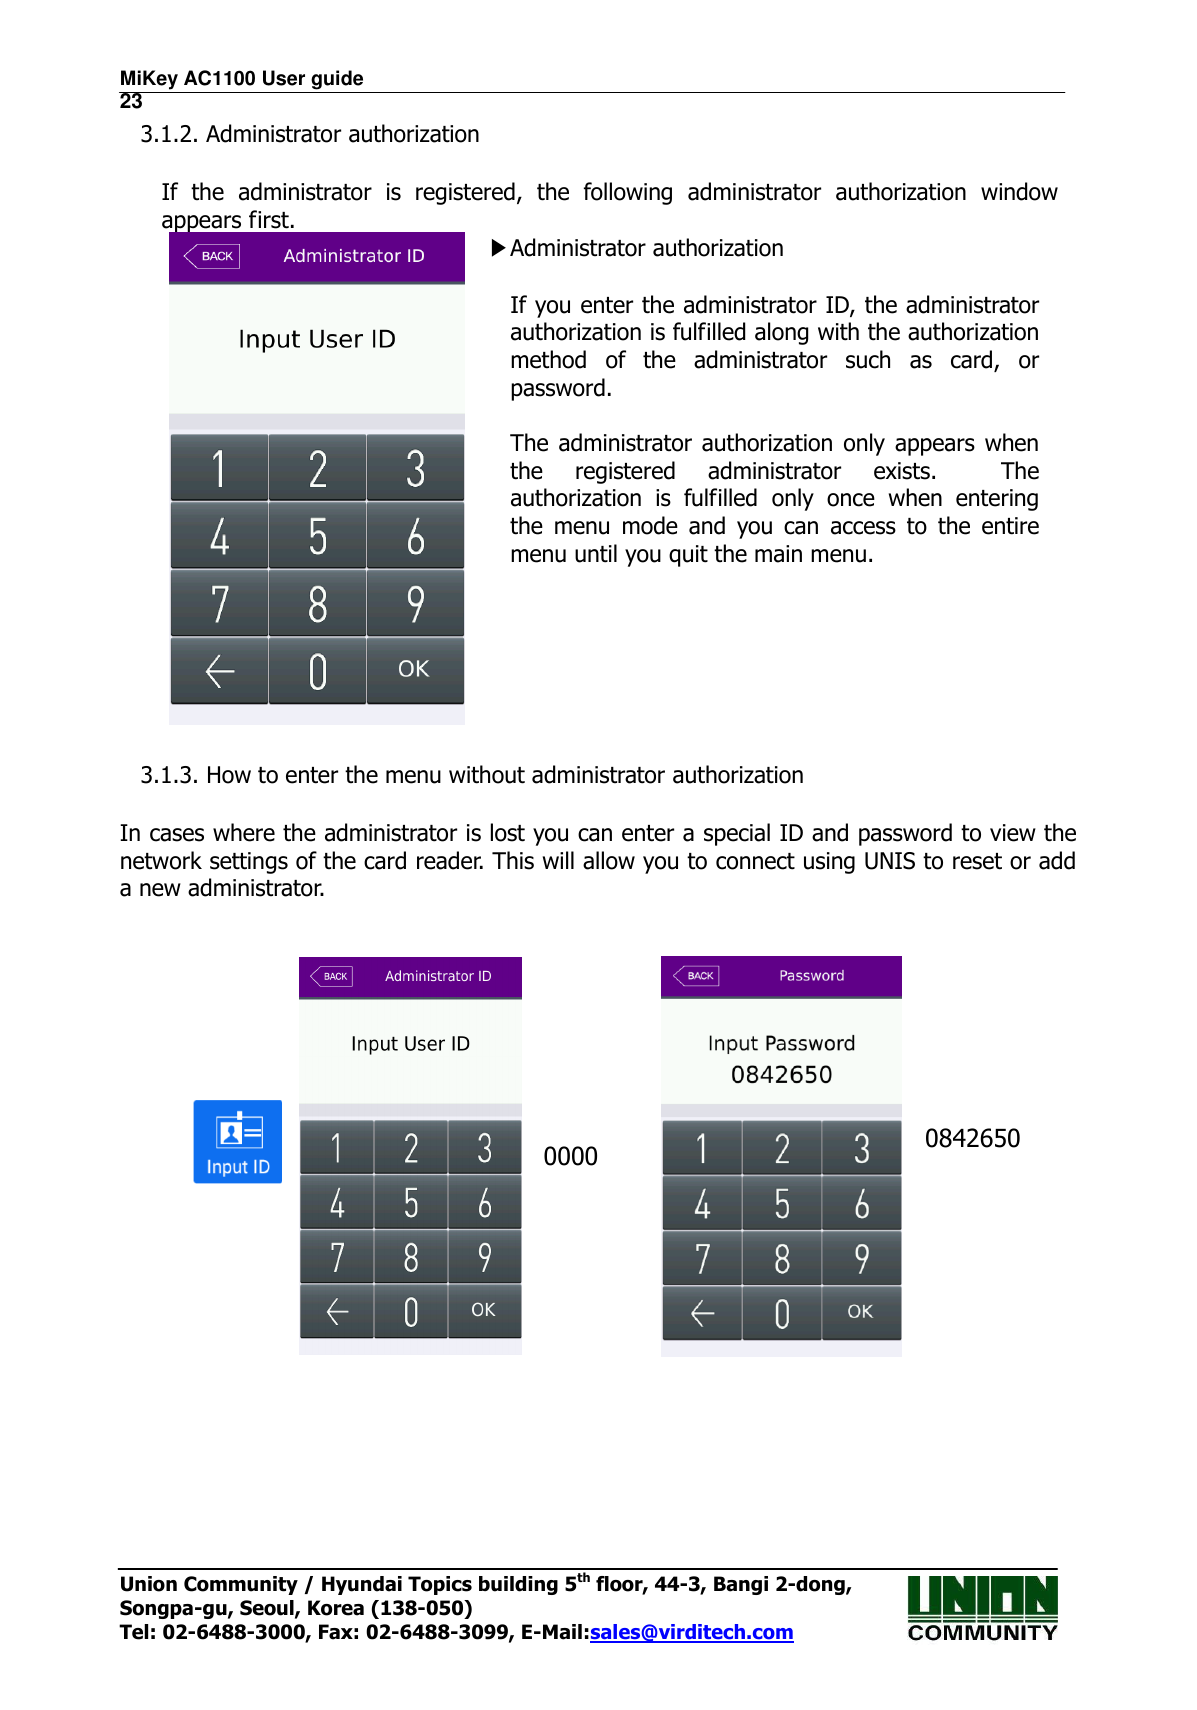
![MiKey AC1100 User guide 22 Union Community / Hyundai Topics building 5th floor, 44-3, Bangi 2-dong, Songpa-gu, Seoul, Korea (138-050) Tel: 02-6488-3000, Fax: 02-6488-3099, E-Mail:sales@virditech.com 3. Environment setting 3.1. Checks before setting the environment 3.1.1. Entering the admin menu If you press the [ ] icon at the main window, you can enter the administrator menu as follows. You can enter the subdivision menu by selecting each button. Once in the administrator menu, if you need to soft reboot the device, touch the RED circled area, and then select the reboot icon in the middle, this will initiate a reboot.](https://usermanual.wiki/UNION-COMMUNITY/AC1100RF/User-Guide-3070847-Page-22.png)
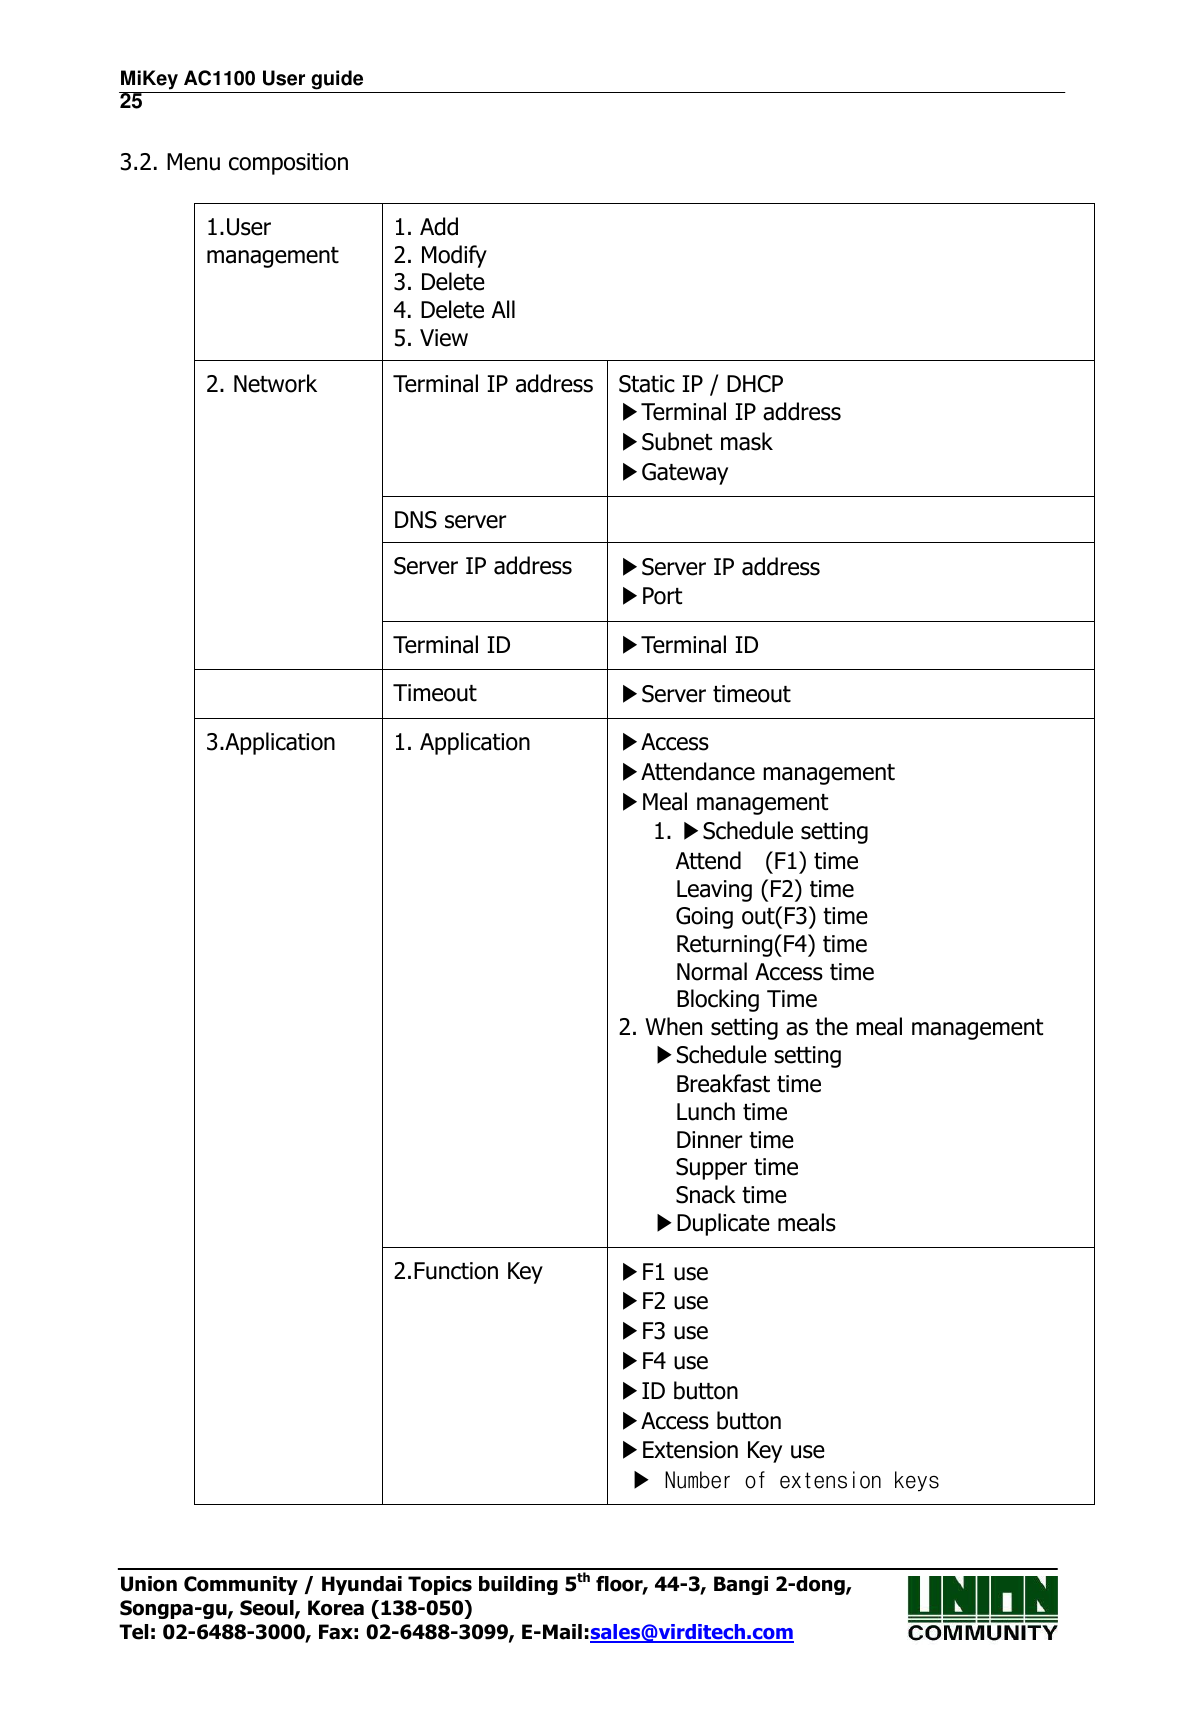
![MiKey AC1100 User guide 24 Union Community / Hyundai Topics building 5th floor, 44-3, Bangi 2-dong, Songpa-gu, Seoul, Korea (138-050) Tel: 02-6488-3000, Fax: 02-6488-3099, E-Mail:sales@virditech.com The server IP and network information will be displayed. You can now connect your card reader terminal directly to your PC. Setup your PC network card with the same Server IP and Gateway settings. After you successfully connect with UNIS you can change/delete the administer user as needed. Method #2 (USB port is service port.) Entering admin mode when you have lost the administrator ID 1) On USB device, create folder /CR/ 2) On your PC create an empty file with no extension and name it ‘factory’ 3) Copy ‘factory’ file from PC to USB /CR/ folder 4) Plug USB into the card reader 5) Card Reader tamper must be Open (Cover open and off) 6) Successful user must authenticate and open the door, during the door open period, press the admin icon and it will bypass admin entry requirements. 3.1.5. How to save the set values In each menu of the administrator mode, press the OK button to save changes. To cancel and not save, press the [BACK] icon at the top left. If there is no touch or key press the menu will timeout after 60 seconds of no activity.](https://usermanual.wiki/UNION-COMMUNITY/AC1100RF/User-Guide-3070847-Page-24.png)
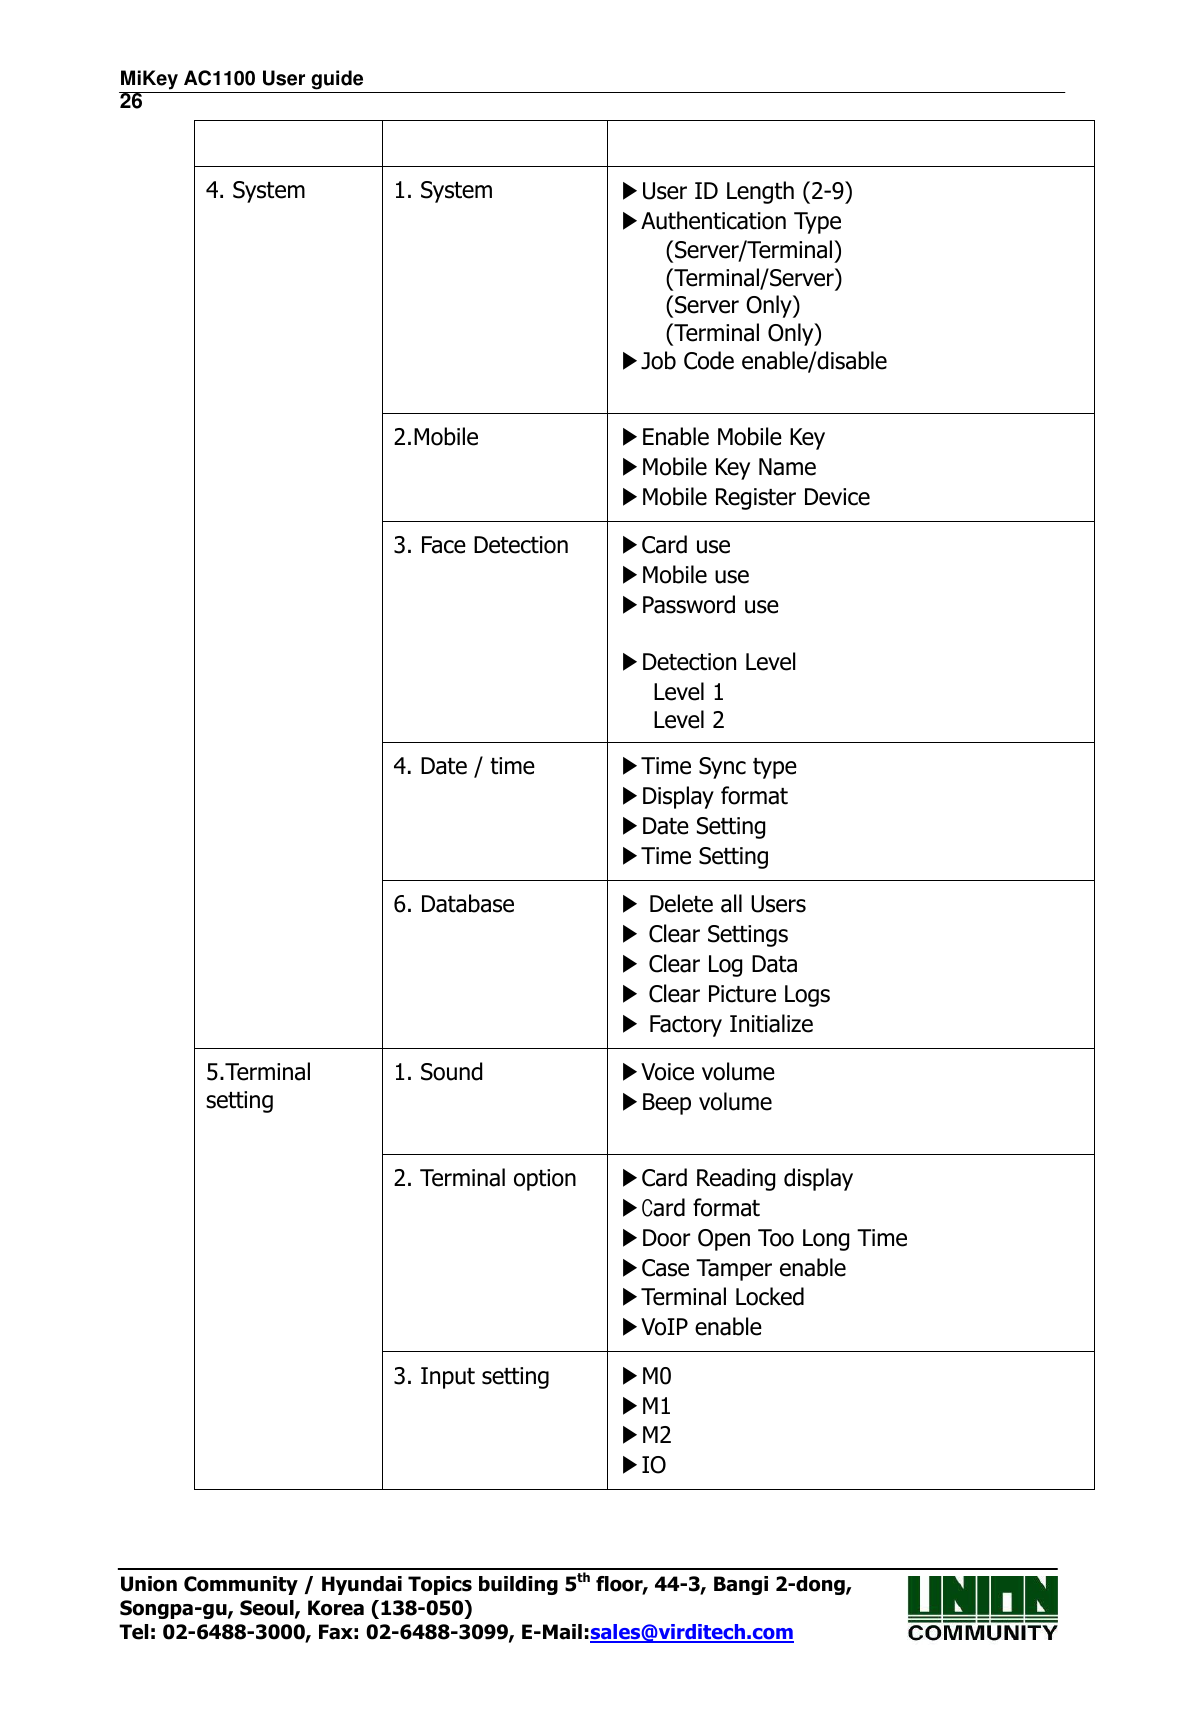
![MiKey AC1100 User guide 28 Union Community / Hyundai Topics building 5th floor, 44-3, Bangi 2-dong, Songpa-gu, Seoul, Korea (138-050) Tel: 02-6488-3000, Fax: 02-6488-3099, E-Mail:sales@virditech.com 5. Log ▶Log information View Log 6. About ▶About Legal 8. SD card 1. Export ▶User data ▶Event log ▶System option ▶Export All ▶Picture data 2. Import ▶User data ▶System option 3. Other ▶Theme Background import Language file import ▶F/W upgrade 3.3. User management When you select the [User Settings] at the main menu, the following window appears. The number of all the users is shown at the top of screen including administrators. Select [Add] button to add the new user, [Modify] button to modify the user, [Delete] button to delete the specific user, [Delete All] button to delete all the users, and [View] button to inquire the registered user list.](https://usermanual.wiki/UNION-COMMUNITY/AC1100RF/User-Guide-3070847-Page-28.png)
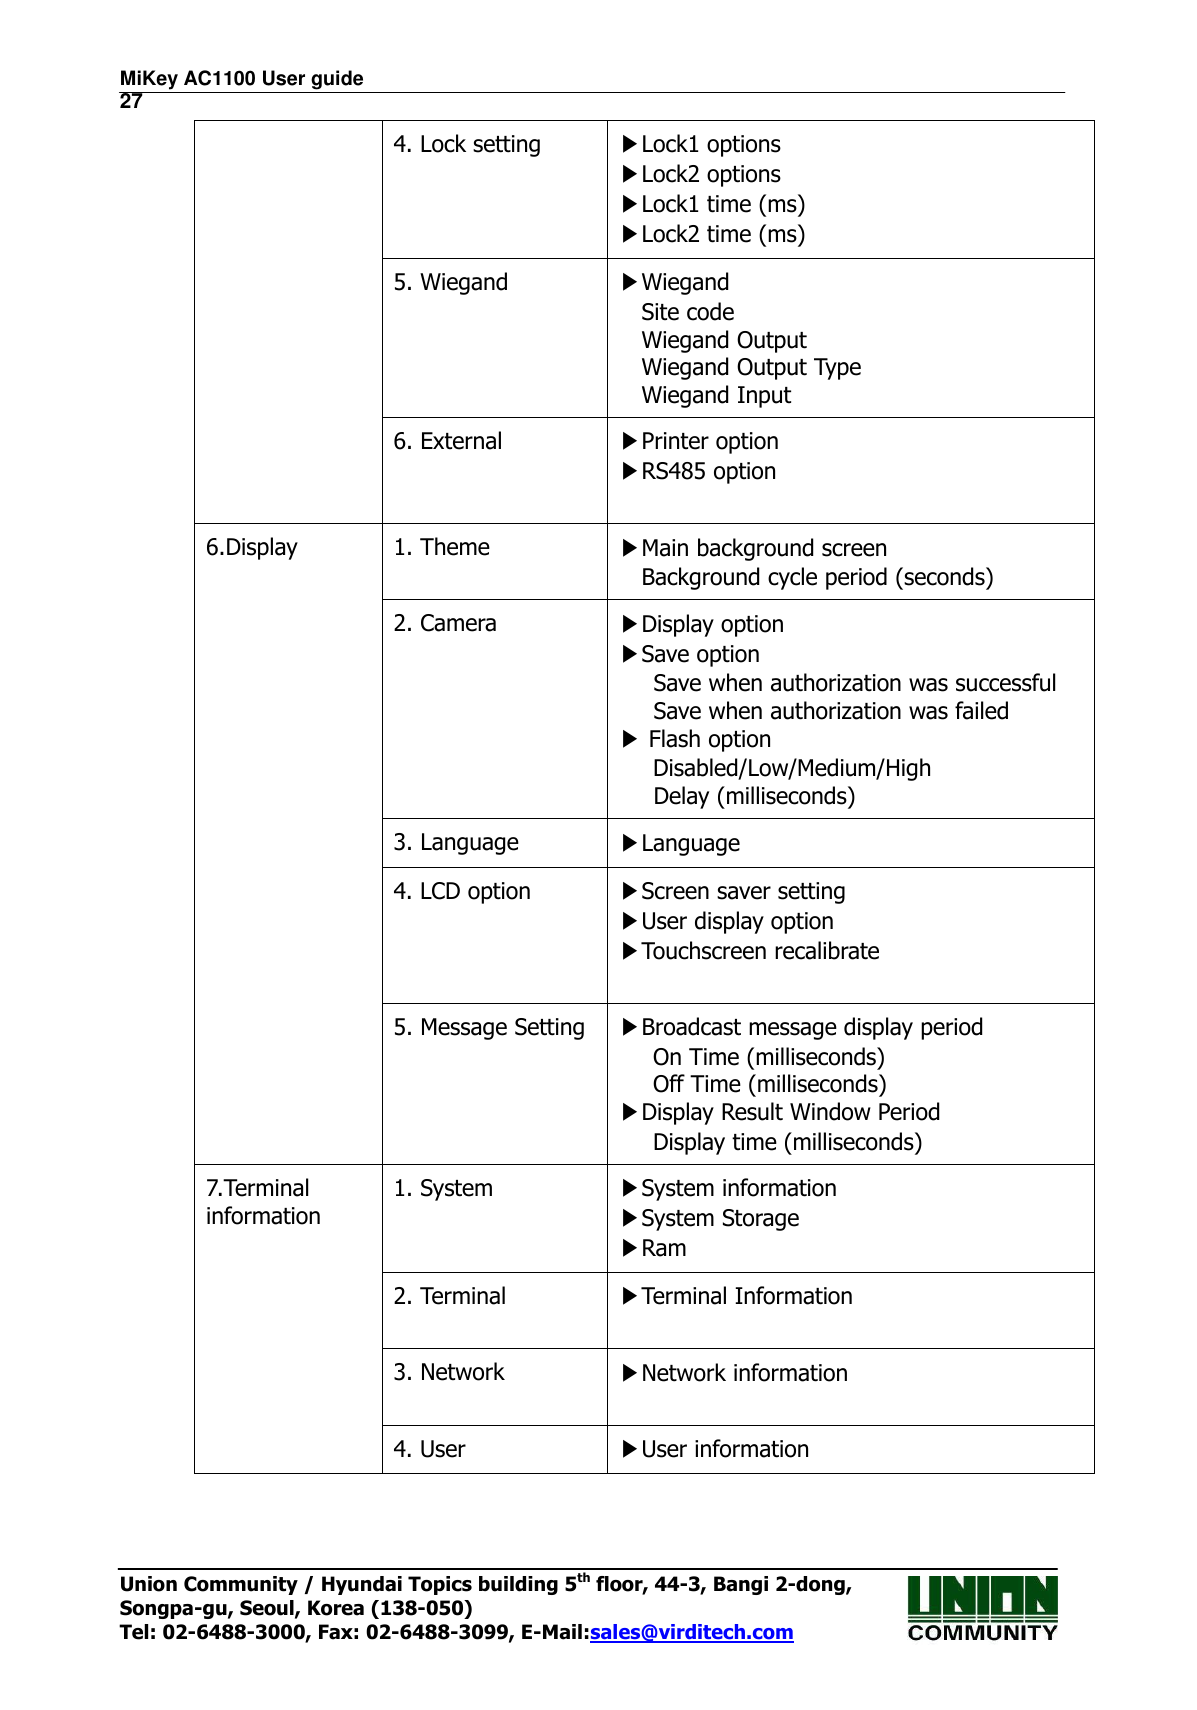
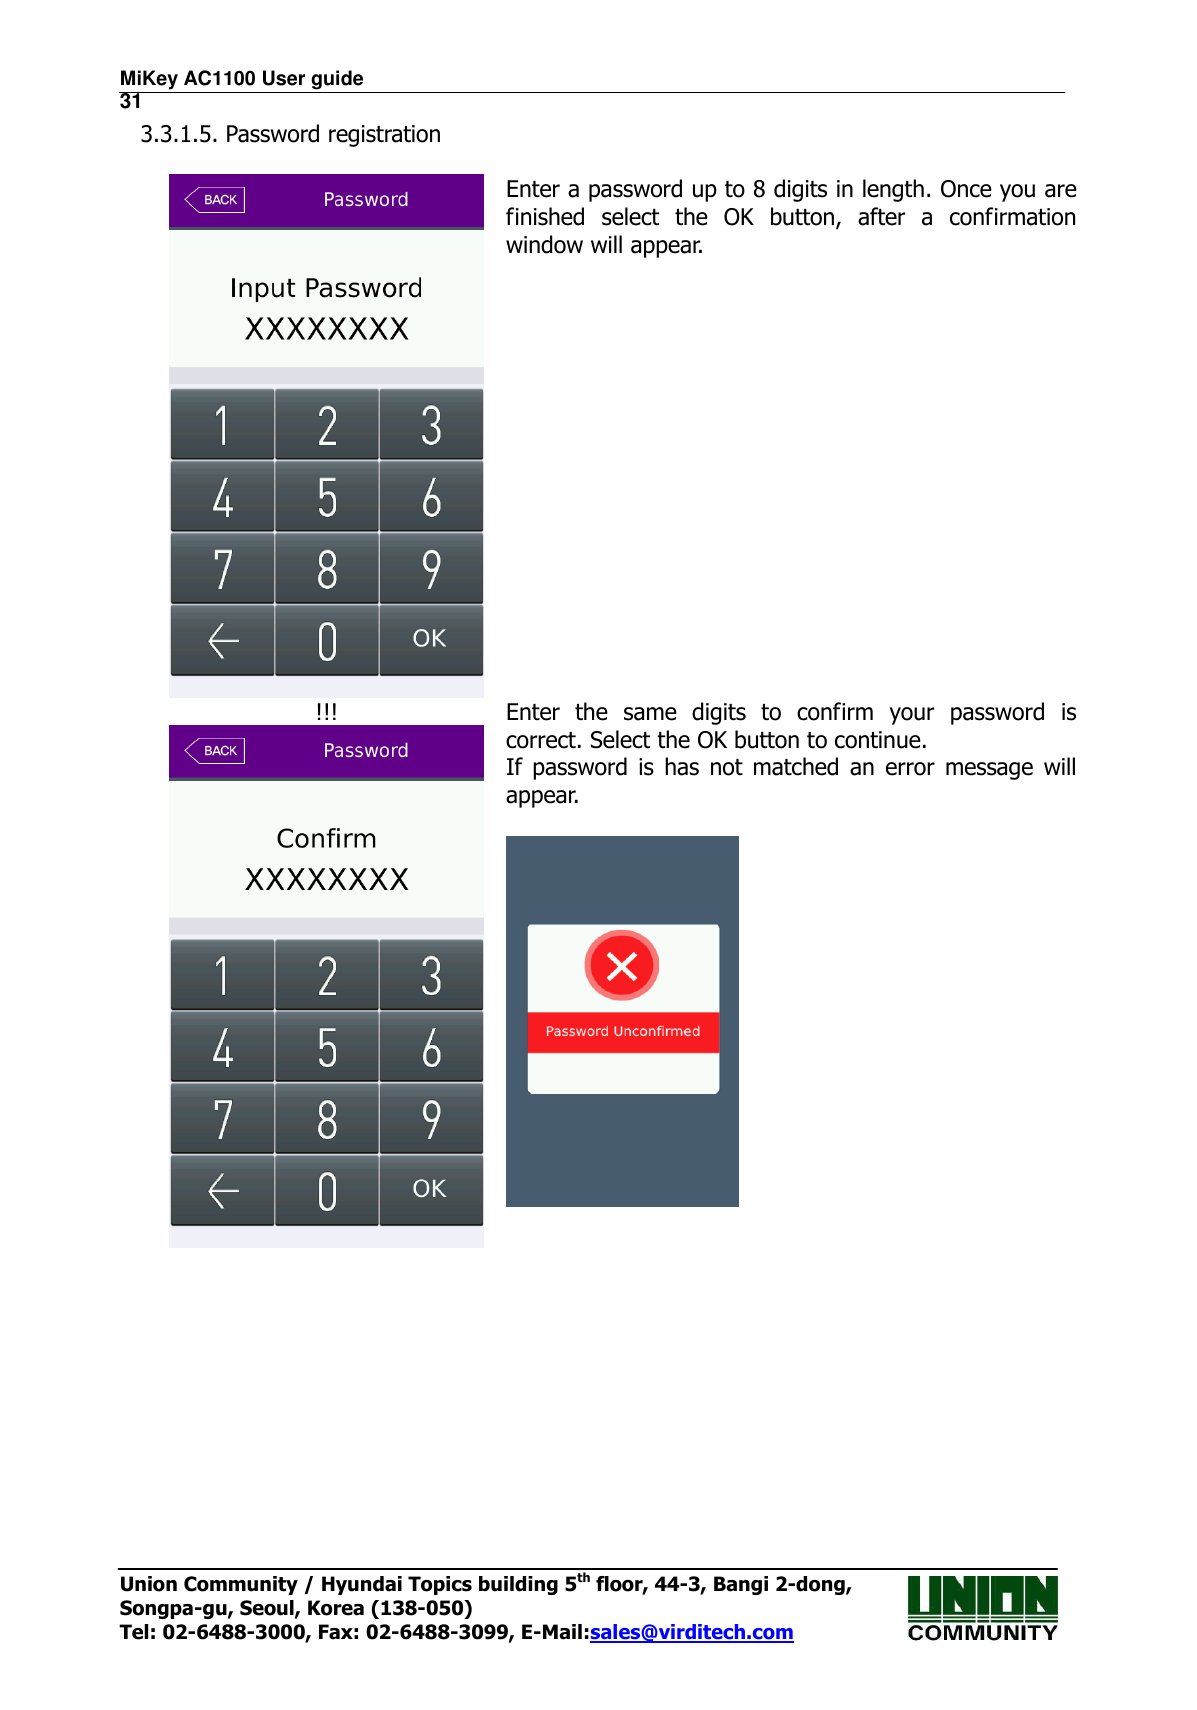
![MiKey AC1100 User guide 29 Union Community / Hyundai Topics building 5th floor, 44-3, Bangi 2-dong, Songpa-gu, Seoul, Korea (138-050) Tel: 02-6488-3000, Fax: 02-6488-3099, E-Mail:sales@virditech.com 3.3.1. Adding User If you select [User Settings]->[Add] in the main menu, the following screen appears Input the user ID to be registered and select [OK] button. In this case, the ID which can be registered is shown on the screen automatically, so you can register conveniently. If you want to change ID, delete the previous value by selecting the button and input the new value. Click [Back] button to cancel and go back. If you enter ID which is already registered, a failure message appears, and if the ID is not already registered, the following screen appears. The icons in the left side mean as follows. :Password Registration (X: none, O: Registered) : Card Registration (X: none,1~5) : User ID to be registered User Type: This selection will NOT appear until a card or password is registered for the user. : User (normal) : User (administrator) button: Registration of picture](https://usermanual.wiki/UNION-COMMUNITY/AC1100RF/User-Guide-3070847-Page-29.png)
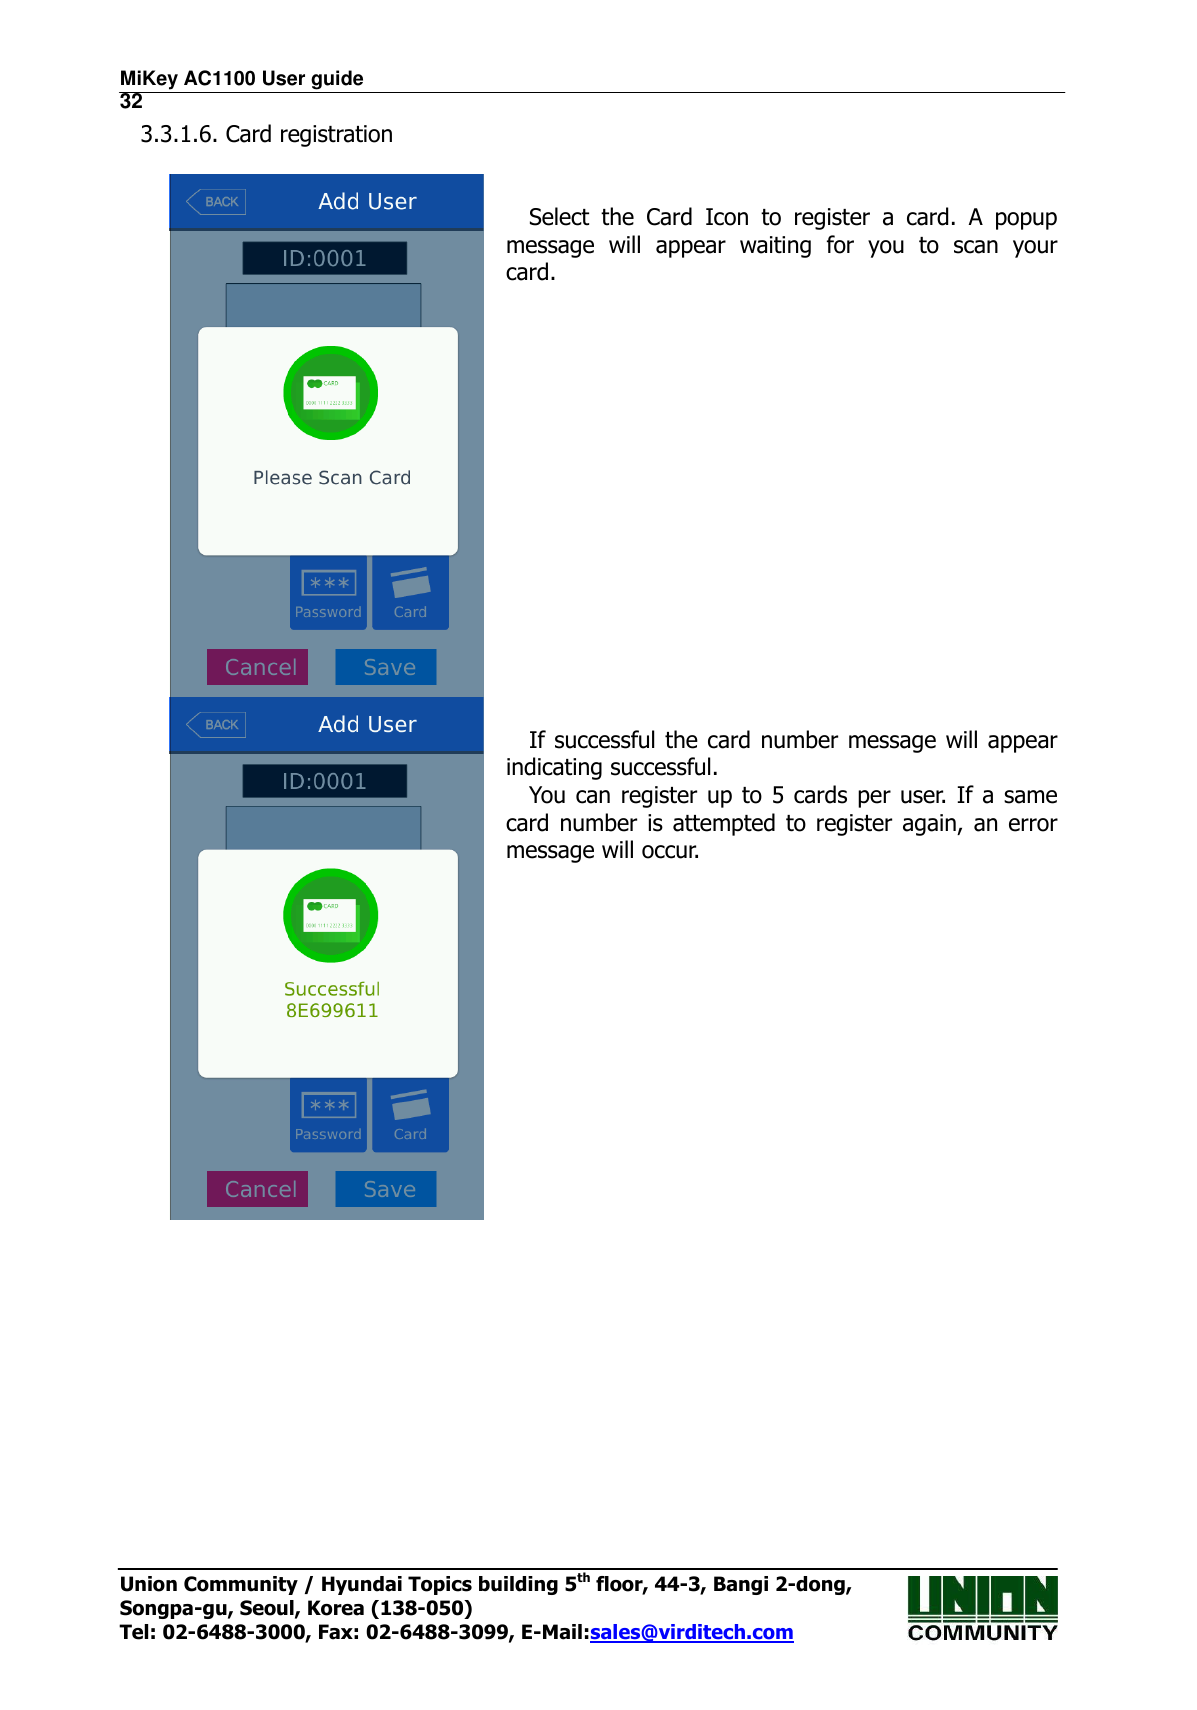
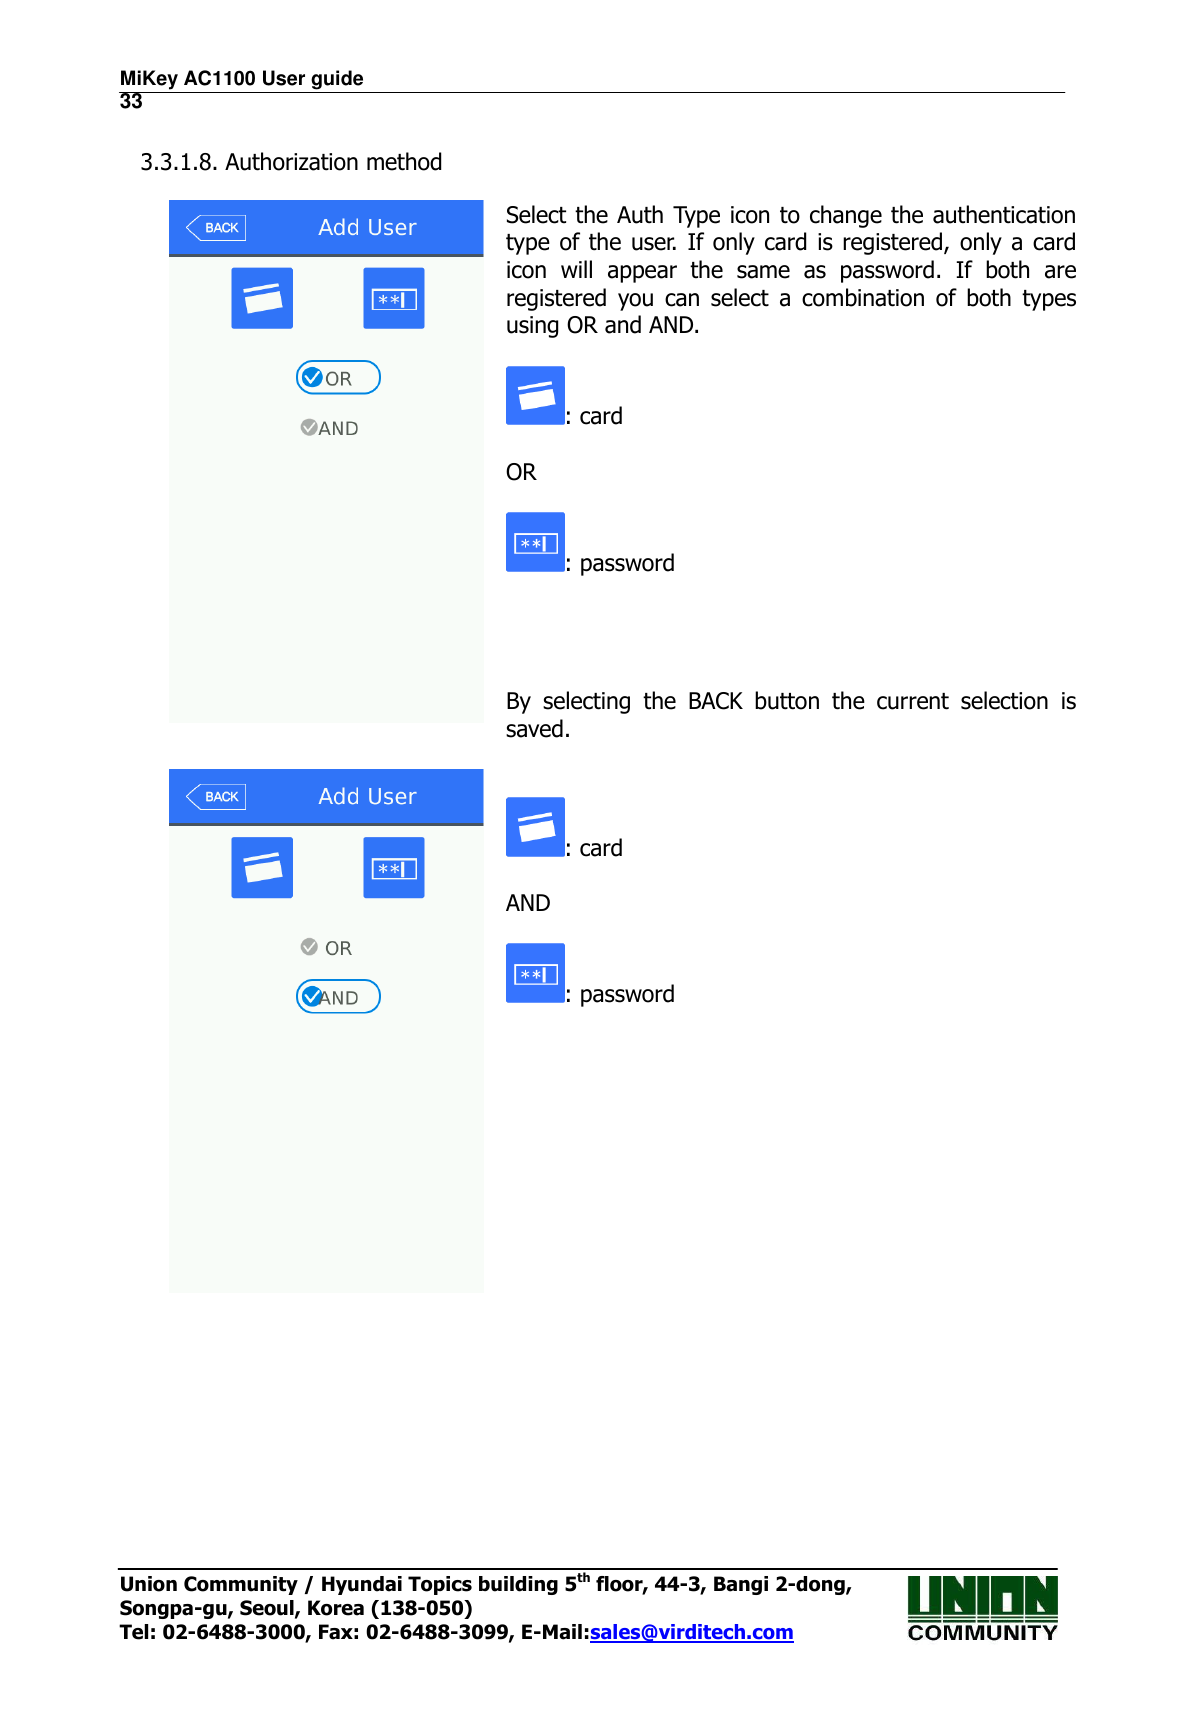
![MiKey AC1100 User guide 30 Union Community / Hyundai Topics building 5th floor, 44-3, Bangi 2-dong, Songpa-gu, Seoul, Korea (138-050) Tel: 02-6488-3000, Fax: 02-6488-3099, E-Mail:sales@virditech.com You can register a card with [Card] button, a password with the [Password] button, and change the authentication type. The default user will be a standard user and not an administrator. ※ Users who are only registered as an administrator can change the settings of the terminal and can register/modify/delete the information of all the saved users. Take caution when registering an administrator. 3.3.1.1. Photo registration Take a picture by selecting [ ] button at the [Add user] screen. Keep selecting the picture image until you are satisfied with the current picture that has been taken.](https://usermanual.wiki/UNION-COMMUNITY/AC1100RF/User-Guide-3070847-Page-30.png)
![MiKey AC1100 User guide 34 Union Community / Hyundai Topics building 5th floor, 44-3, Bangi 2-dong, Songpa-gu, Seoul, Korea (138-050) Tel: 02-6488-3000, Fax: 02-6488-3099, E-Mail:sales@virditech.com : password only : card only 3.3.1.9. Save Select the [Save] button to save all user data when completed or select [Cancel] or [BACK] button to return, the user is not saved. LCD messages which can appear during the registration procedure. If user is not saved correctly this message will appear.](https://usermanual.wiki/UNION-COMMUNITY/AC1100RF/User-Guide-3070847-Page-34.png)
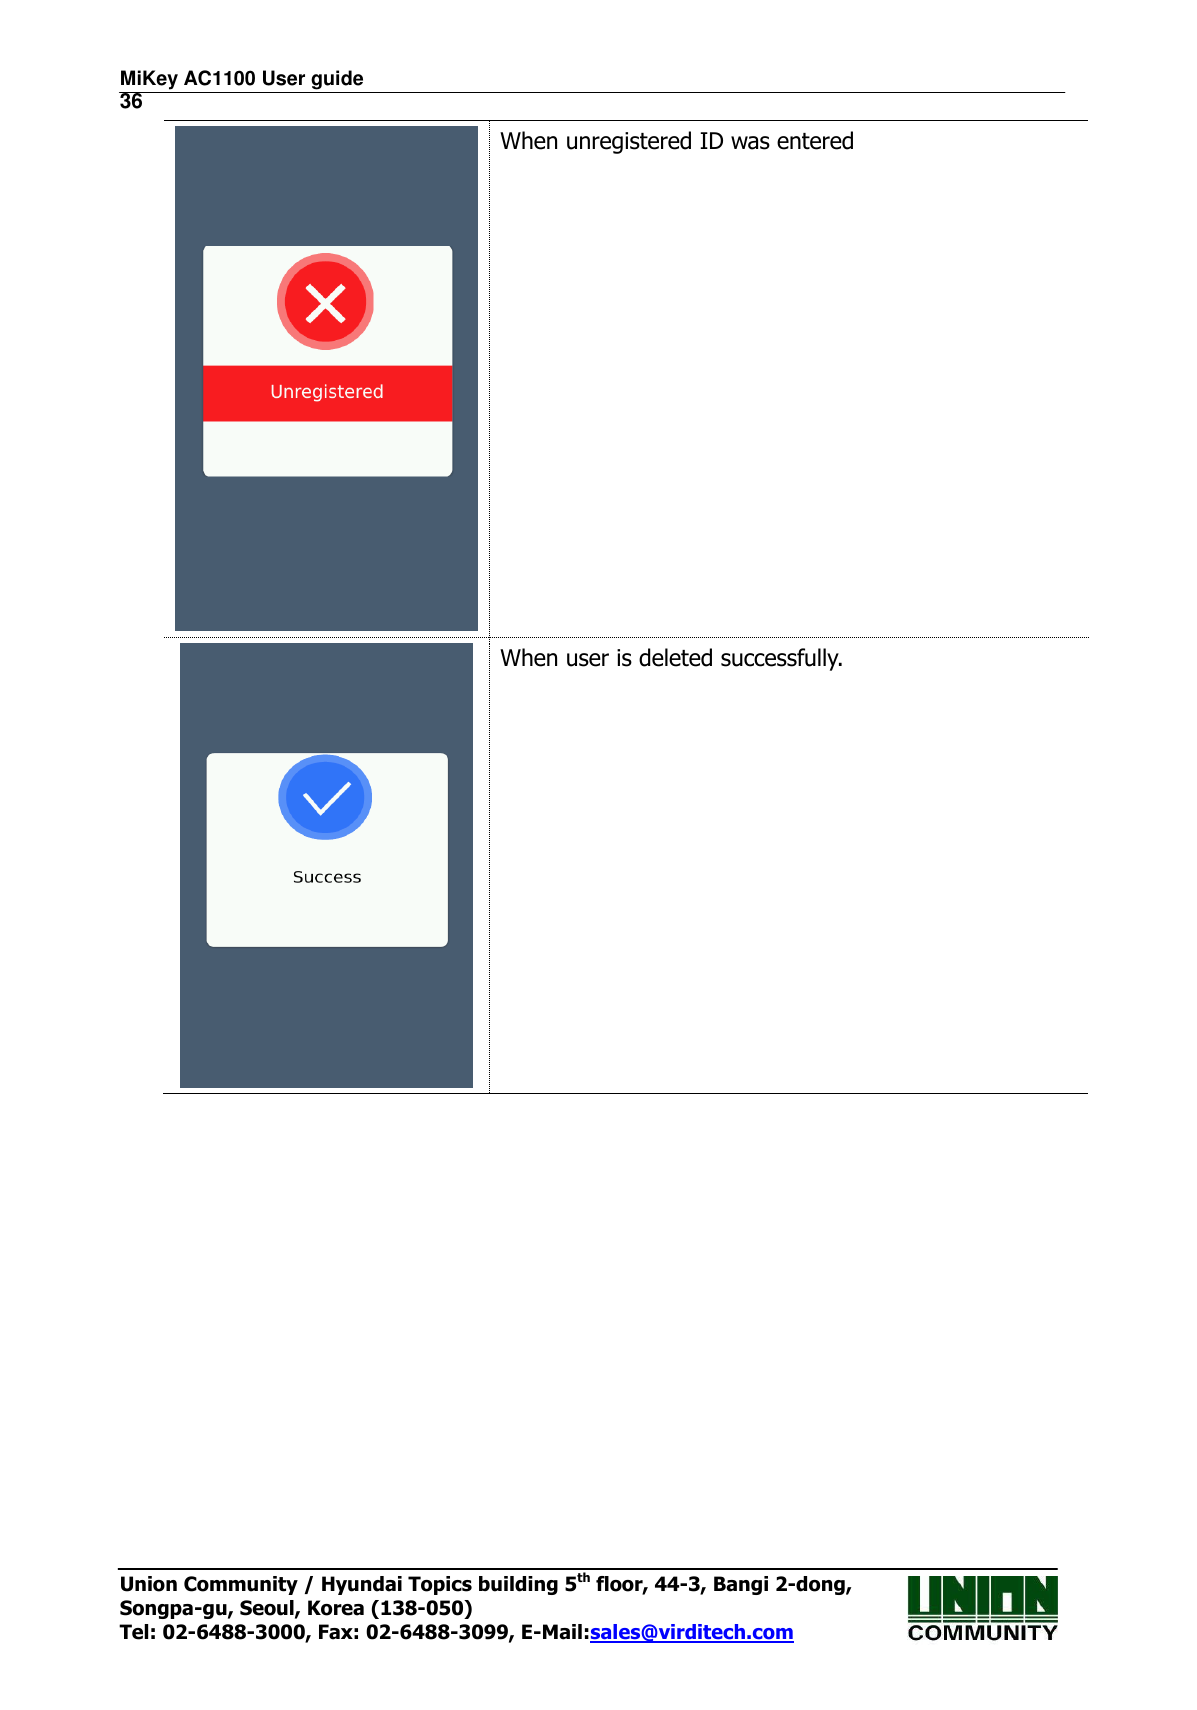
![MiKey AC1100 User guide 35 Union Community / Hyundai Topics building 5th floor, 44-3, Bangi 2-dong, Songpa-gu, Seoul, Korea (138-050) Tel: 02-6488-3000, Fax: 02-6488-3099, E-Mail:sales@virditech.com 3.3.2. Deleting User The following window appears if you select [User Settings]->[Delete] at the main menu. Input the user ID to be deleted and select [OK] button. Select [BACK] button to cancel and return. If you entered an invalid/unregistered ID, an error message will appear. If you entered a valid/registered ID a confirmation window will appear. Please note if connected to the server, the user is not deleted from the server. You should synchronize and make sure the user is deleted in the server and the terminal. Once the user is deleted it cannot be recovered. Confirmation Window. Select YES to continue to delete. Select NO to cancel the deletion.](https://usermanual.wiki/UNION-COMMUNITY/AC1100RF/User-Guide-3070847-Page-35.png)
![MiKey AC1100 User guide 37 Union Community / Hyundai Topics building 5th floor, 44-3, Bangi 2-dong, Songpa-gu, Seoul, Korea (138-050) Tel: 02-6488-3000, Fax: 02-6488-3099, E-Mail:sales@virditech.com 3.3.3. Modify User The following window appears if you select the [User Setting] -> [Modify] in the main menu. Input the user ID to be modified and Select [OK] button. Select [BACK] button to cancel and return. If you entered an invalid/unregistered ID, an error message will appear. . If you entered a valid/registered ID, the same menu as ‘add user’ will appear. Follow the same steps in the ‘add user’ section to change any current user settings The icons in the left side mean as follows. :Password Registration (X: none, O: Registered) : Card Registration (X: none,1~5) : User ID to be registered User Type: This selection will NOT appear until a card or password is registered for the user. : User (normal) : User (administrator) button: Registration of picture](https://usermanual.wiki/UNION-COMMUNITY/AC1100RF/User-Guide-3070847-Page-37.png)
![MiKey AC1100 User guide 38 Union Community / Hyundai Topics building 5th floor, 44-3, Bangi 2-dong, Songpa-gu, Seoul, Korea (138-050) Tel: 02-6488-3000, Fax: 02-6488-3099, E-Mail:sales@virditech.com 3.3.4. Delete all Users If you select the [User Settings] ->[Delete all] in the main menu, the following window appears. Confirmation Window. Select YES to continue to delete all users Select NO to cancel the deletion.](https://usermanual.wiki/UNION-COMMUNITY/AC1100RF/User-Guide-3070847-Page-38.png)
![MiKey AC1100 User guide 39 Union Community / Hyundai Topics building 5th floor, 44-3, Bangi 2-dong, Songpa-gu, Seoul, Korea (138-050) Tel: 02-6488-3000, Fax: 02-6488-3099, E-Mail:sales@virditech.com 3.3.5. View If you select the [User management] -> [View] from the main menu, all the registered users can be viewed. User view area will show you a summary list of the users. User name, ID, Card number and authentication type will appear for each user. You can select a user for modification or deletion. Select this area to toggle the User’s Delete status Select this area to select the user for modification Slide up or down in the RED box area to view more or less users](https://usermanual.wiki/UNION-COMMUNITY/AC1100RF/User-Guide-3070847-Page-39.png)
![MiKey AC1100 User guide 40 Union Community / Hyundai Topics building 5th floor, 44-3, Bangi 2-dong, Songpa-gu, Seoul, Korea (138-050) Tel: 02-6488-3000, Fax: 02-6488-3099, E-Mail:sales@virditech.com The maximum amount of users displayed is 50. You can slide up or down in the box area (see above) to move up and down the list. If more than 50 users (maximum display) a forward icon will appear. If you select this, the next 50 users will display. Select to move to the previous 50 users. ▶ [ID]: Select the user ID area to move directly to the specific user’s modification window. See above picture ▶ [Del]: If you select this area, a checkbox will appear. Select the ‘Delete’ button to delete the selected users. If you wish to delete all users see section ‘Delete All Users’ ▶ [Delete Button]: Once you select all the users you wish to delete, select the ‘Delete’ button to delete the selected users If you select [BACK] button on the top, you can move to the previous ‘3.3 User management] menu. ▶If you input the User ID by clicking [ID search] button, the user is searched like in the left picture. If you select the [BACK] button in this window, you can move to the ‘3.3. User management’ menu. ▶ [ID Button Search]: Select this and an ID input number window will appear. Enter the ID of the user you wish to view. After you select the ID, only the user id you selected will appear in the view area.](https://usermanual.wiki/UNION-COMMUNITY/AC1100RF/User-Guide-3070847-Page-40.png)
![MiKey AC1100 User guide 41 Union Community / Hyundai Topics building 5th floor, 44-3, Bangi 2-dong, Songpa-gu, Seoul, Korea (138-050) Tel: 02-6488-3000, Fax: 02-6488-3099, E-Mail:sales@virditech.com 3.4. Network Settings The networks settings area allows you to setup IP addresses, gateways, subnet mask, DHCP or static settings, Terminal ID Number or wireless settings. When selecting DHCP ensure that your network has a properly enabled DHCP server available. Also you should give time for the terminal to acquire the DHCP address; usually this can take from 1-60 seconds. While in this menu if you press the DONE button the server will be disconnected and the link will be reconnected to the server. You can re-initiate the network connection by entering this menu and pressing done. Ethernet Setup Procedure: 1) Setup Static OR DHCP 2) If Static then set the terminal IP/Subnet Mask and Default Gateway. 3) Set the Server IP Address, PORT and Terminal ID 4) If using Wireless go to Wireless Options and Press “Available Networks” until your router appears in the available network window. 5) Press/Select the station you wish to connect to, it should be highlighted. 6) Go to wireless advance settings to set the Security Level/Rate or Channel. 7) Press OK. Pressing OK will disconnect the current connection and then try to re-establish a new link from the setup parameters that were just entered. At anytime select the Back button to cancel and not save any changes. ▶Basic setting: Same with the window at the left side. Select the method [Static IP] if the static IP is allocated from the connected network, and select [DHCP] if the IP is allocated from the DHCP server in the connected network. If you selected [Static IP], set the IP address, subnet mask, and gateway. And if you selected [DHCP], you will not have to set the IP, Gateway or Subnet. ▶ [Port]: The port value of the authorization server (server) is ‘9870’, and if you change](https://usermanual.wiki/UNION-COMMUNITY/AC1100RF/User-Guide-3070847-Page-41.png)
![MiKey AC1100 User guide 42 Union Community / Hyundai Topics building 5th floor, 44-3, Bangi 2-dong, Songpa-gu, Seoul, Korea (138-050) Tel: 02-6488-3000, Fax: 02-6488-3099, E-Mail:sales@virditech.com the value, you should change the server program with the same value, so be cautious. ▶ [Terminal ID]: The terminal ID number uniquely identifies the terminal on the server program network. For every terminal on the server network you should program a different terminal number. This value should be 1-8 digits in length ▶ [Timeout]: The default timeout is 5 seconds. When using server authentication, this period is the time in which the terminal will wait for a response from the server before timing out. The value is from 5 to 30 seconds. For static IP usage you must program the Terminal IP, Subnet Mask and Default Gateway. If DHCP is selected, these values cannot be programmed and will be grayed out. The port number must match the port number that is programmed in the Authentication Server. If you touch the item you want to change, the keypad appears at the bottom. Select the button to backspace/return to delete the current entry. Select the OK button when finished the entry in the field. If you want to apply the changes, select [OK] button, and return to the previous menu by selecting [BACK] button.](https://usermanual.wiki/UNION-COMMUNITY/AC1100RF/User-Guide-3070847-Page-42.png)
![MiKey AC1100 User guide 43 Union Community / Hyundai Topics building 5th floor, 44-3, Bangi 2-dong, Songpa-gu, Seoul, Korea (138-050) Tel: 02-6488-3000, Fax: 02-6488-3099, E-Mail:sales@virditech.com 3.5. Application 3.5.1. Application mode If you select the [Application] in the main menu, the following window appears. In the application mode, you can select the [Access Control/ Attendance management/ Meal management] according to the purpose. 3.5.1.1. Modes Normal Access Mode It is the screen appearing when you select the Access. Select [OK] button to apply the changes, or select [BACK] button to cancel and return. An Access Control application is normally used for providing access to a secure area, function keys are not needed unless extra tracking of the user is needed. If the system is setup for Access Control and Function keys are used for authentication the user is required to touch the mode function key before entering their ID or card.](https://usermanual.wiki/UNION-COMMUNITY/AC1100RF/User-Guide-3070847-Page-43.png)
![MiKey AC1100 User guide 44 Union Community / Hyundai Topics building 5th floor, 44-3, Bangi 2-dong, Songpa-gu, Seoul, Korea (138-050) Tel: 02-6488-3000, Fax: 02-6488-3099, E-Mail:sales@virditech.com Time and Attendance Select [OK] button to apply the changes, or select [BACK] button to cancel and return. Time schedules should be programmed when using this mode. Time and Attendance Application is for systems that require tracking of employee’s work time. If the system is setup for Time and Attendance, for authentication the user is required to touch the function key before entering their ID or Card. Meal Management It is the screen appearing when selecting the meal management. You can set the time period of each meal type. And if the setting is not needed, set ‘00:00-00:00’. ▶Allow duplicate: If it is unchecked ( ), each user can authorize once in the one meal, but if it is checked ( ), the multiple authorization is possible regardless of the previous authorizations. Select [OK] button to apply the changes, or select [BACK] button to cancel and return. ▶Schedule setting (00:00~23:59): You can set the time for each authorization mode and if you do not need the function, set ’00:00 00:00’.](https://usermanual.wiki/UNION-COMMUNITY/AC1100RF/User-Guide-3070847-Page-44.png)
![MiKey AC1100 User guide 45 Union Community / Hyundai Topics building 5th floor, 44-3, Bangi 2-dong, Songpa-gu, Seoul, Korea (138-050) Tel: 02-6488-3000, Fax: 02-6488-3099, E-Mail:sales@virditech.com During the set time periods, the mode will change automatically to the time period setting. If a function key is pressed during the time period, the function key will change to the new mode, after 15 seconds the system will revert back to the current time setting mode. i.e , if Period mode = Leaving mode, Function key -> Enter mode is pressed, after 15 seconds the mode will change back to Leaving mode. The time periods should not be overlapped, but if they are overlapped, the application order is Attend->Leave->Out->In->Access. If the time is set between 23:00~01:00, it means from 23:00 to the 01:00 the following day. ▶Blocking time: This function prevents the same user to authorize again in the set time. There is no restriction if it is set 0, but if it is set larger than 0, the user can authorize again when the set time (sec) is passed from the previous authorization. It can be set up to 86,400 seconds (24 hours). 3.5.2. Function keys The following window appears if you select the [Application] -> [Function key] in the main menu.](https://usermanual.wiki/UNION-COMMUNITY/AC1100RF/User-Guide-3070847-Page-45.png)
![MiKey AC1100 User guide 46 Union Community / Hyundai Topics building 5th floor, 44-3, Bangi 2-dong, Songpa-gu, Seoul, Korea (138-050) Tel: 02-6488-3000, Fax: 02-6488-3099, E-Mail:sales@virditech.com ▶ Basic setting : Same with the window at the left side ▶F1-F4 Key Access button used to change the authorization mode such as attendance and leaving, and if you select the F1-F4 Key, the authorization mode is changed to the mode. Only the checked buttons will appear on the main window. Note: Only maximum 2 function keys will appear on the main window, any additional function keys will appear in the extended key window. ▶ In some cases additional function keys are needed in addition to the four main function keys. The administrators will setup the terminal for this operation. Up to 60 additional function keys are available. The extra function keys will appear in the extended view window from the main window. 4 – 60 extended keys can be selected. Select the [OK] button to save the value or select [BACK] button to cancel and return.](https://usermanual.wiki/UNION-COMMUNITY/AC1100RF/User-Guide-3070847-Page-46.png)
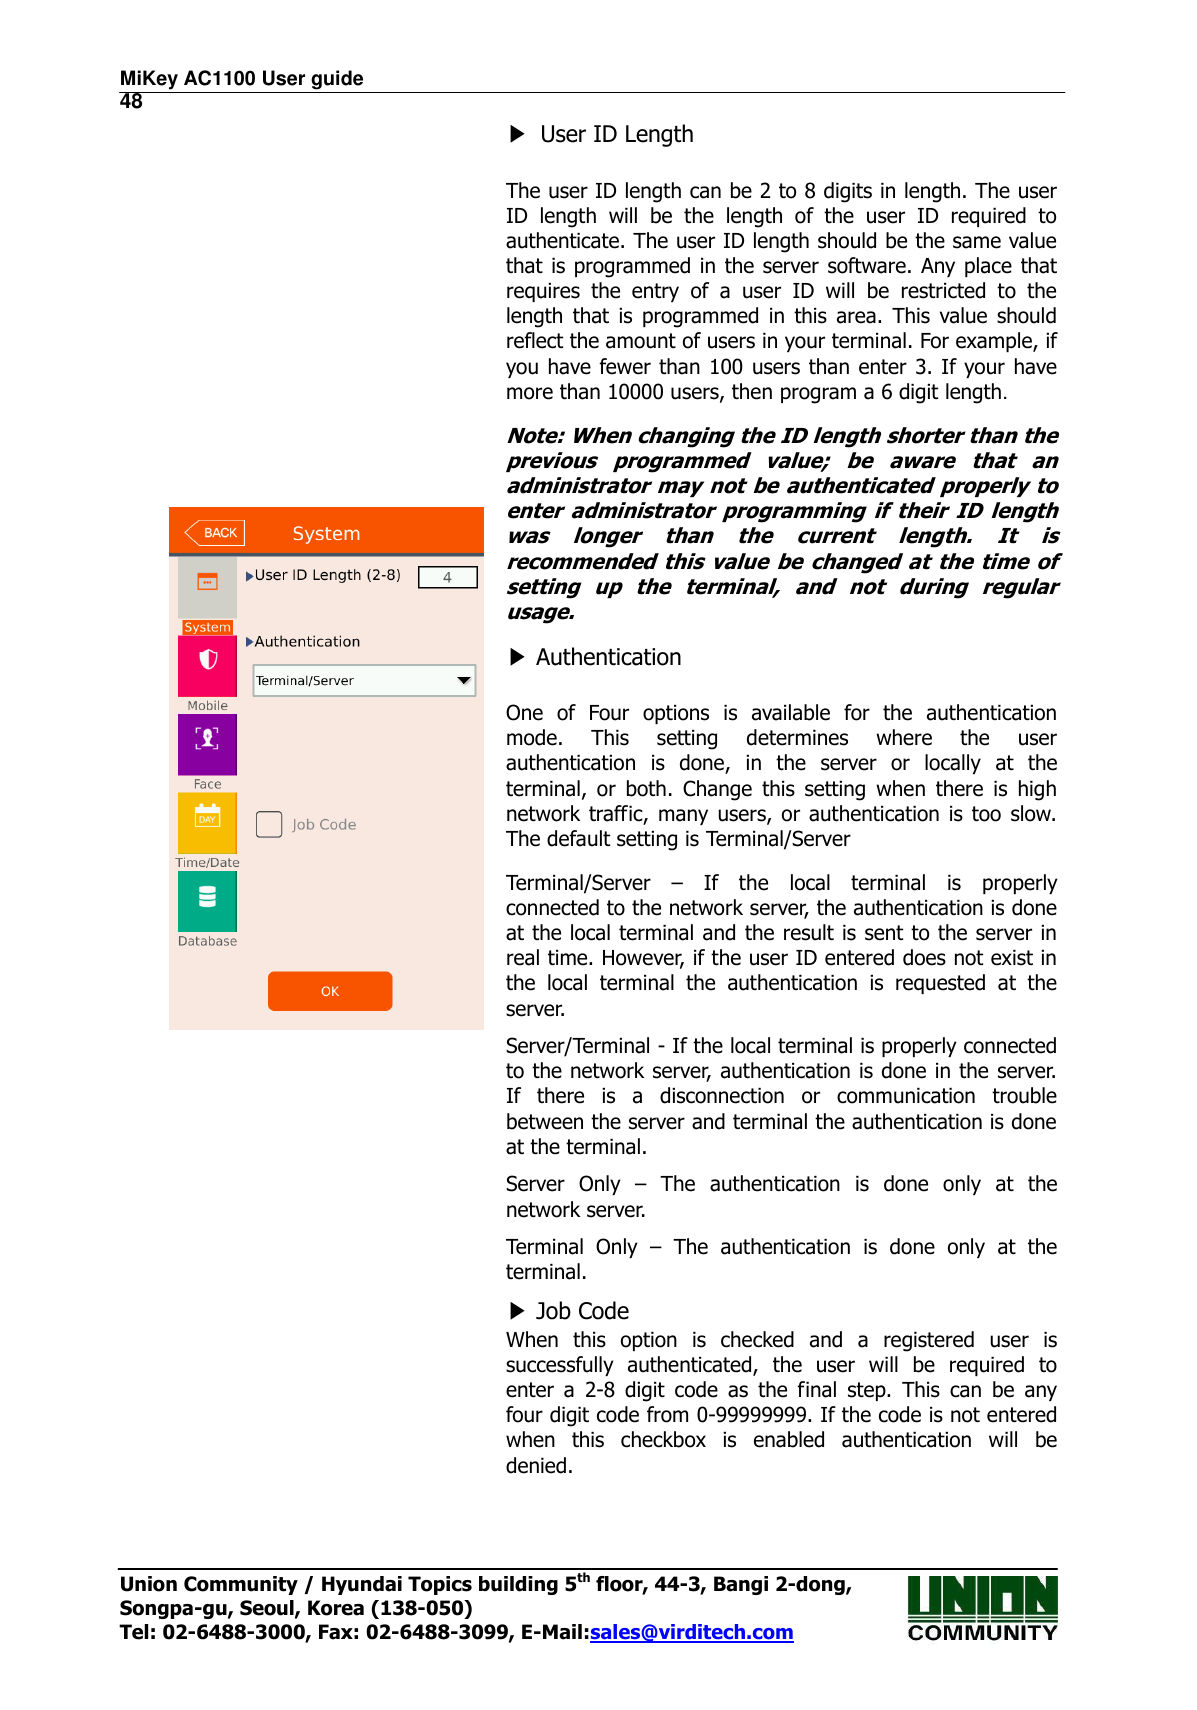
![MiKey AC1100 User guide 47 Union Community / Hyundai Topics building 5th floor, 44-3, Bangi 2-dong, Songpa-gu, Seoul, Korea (138-050) Tel: 02-6488-3000, Fax: 02-6488-3099, E-Mail:sales@virditech.com 3.6. System 3.6.1. System The following window appears if you select the [System] -> [System] in the main menu.](https://usermanual.wiki/UNION-COMMUNITY/AC1100RF/User-Guide-3070847-Page-47.png)
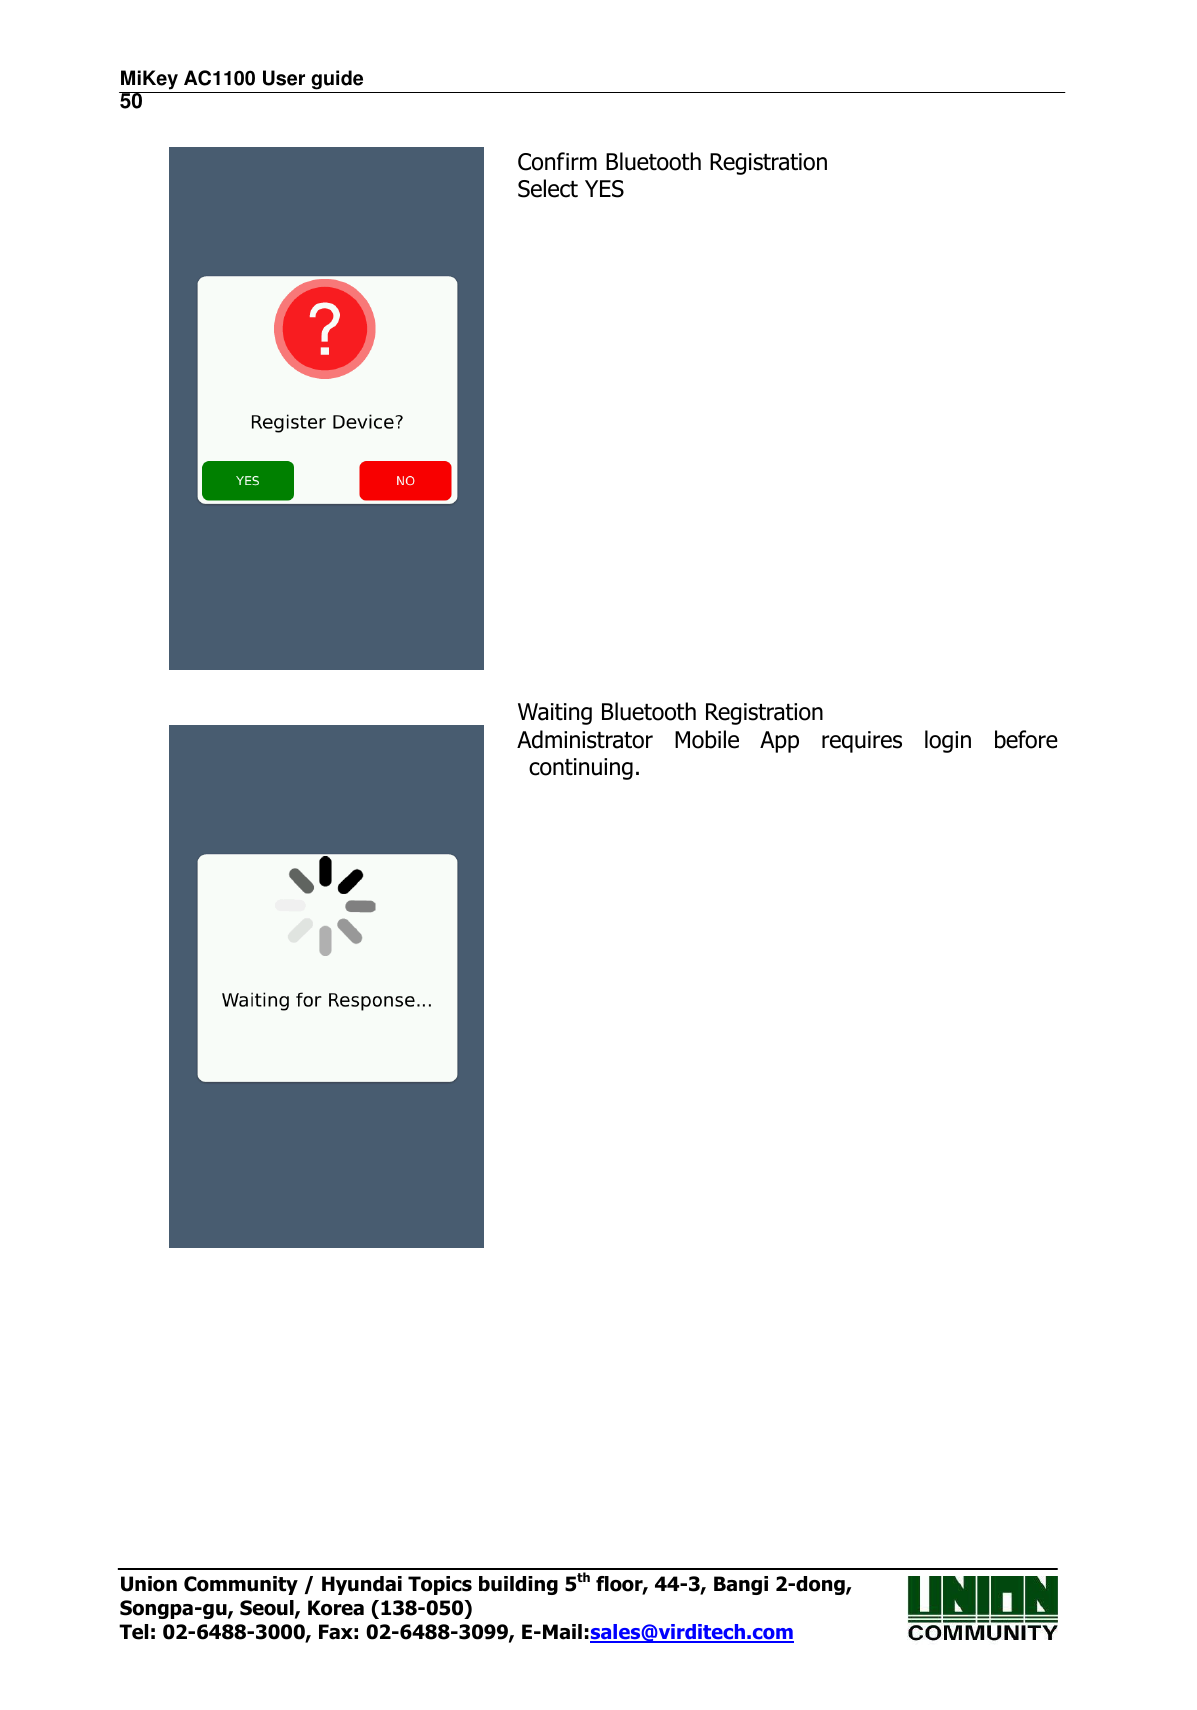
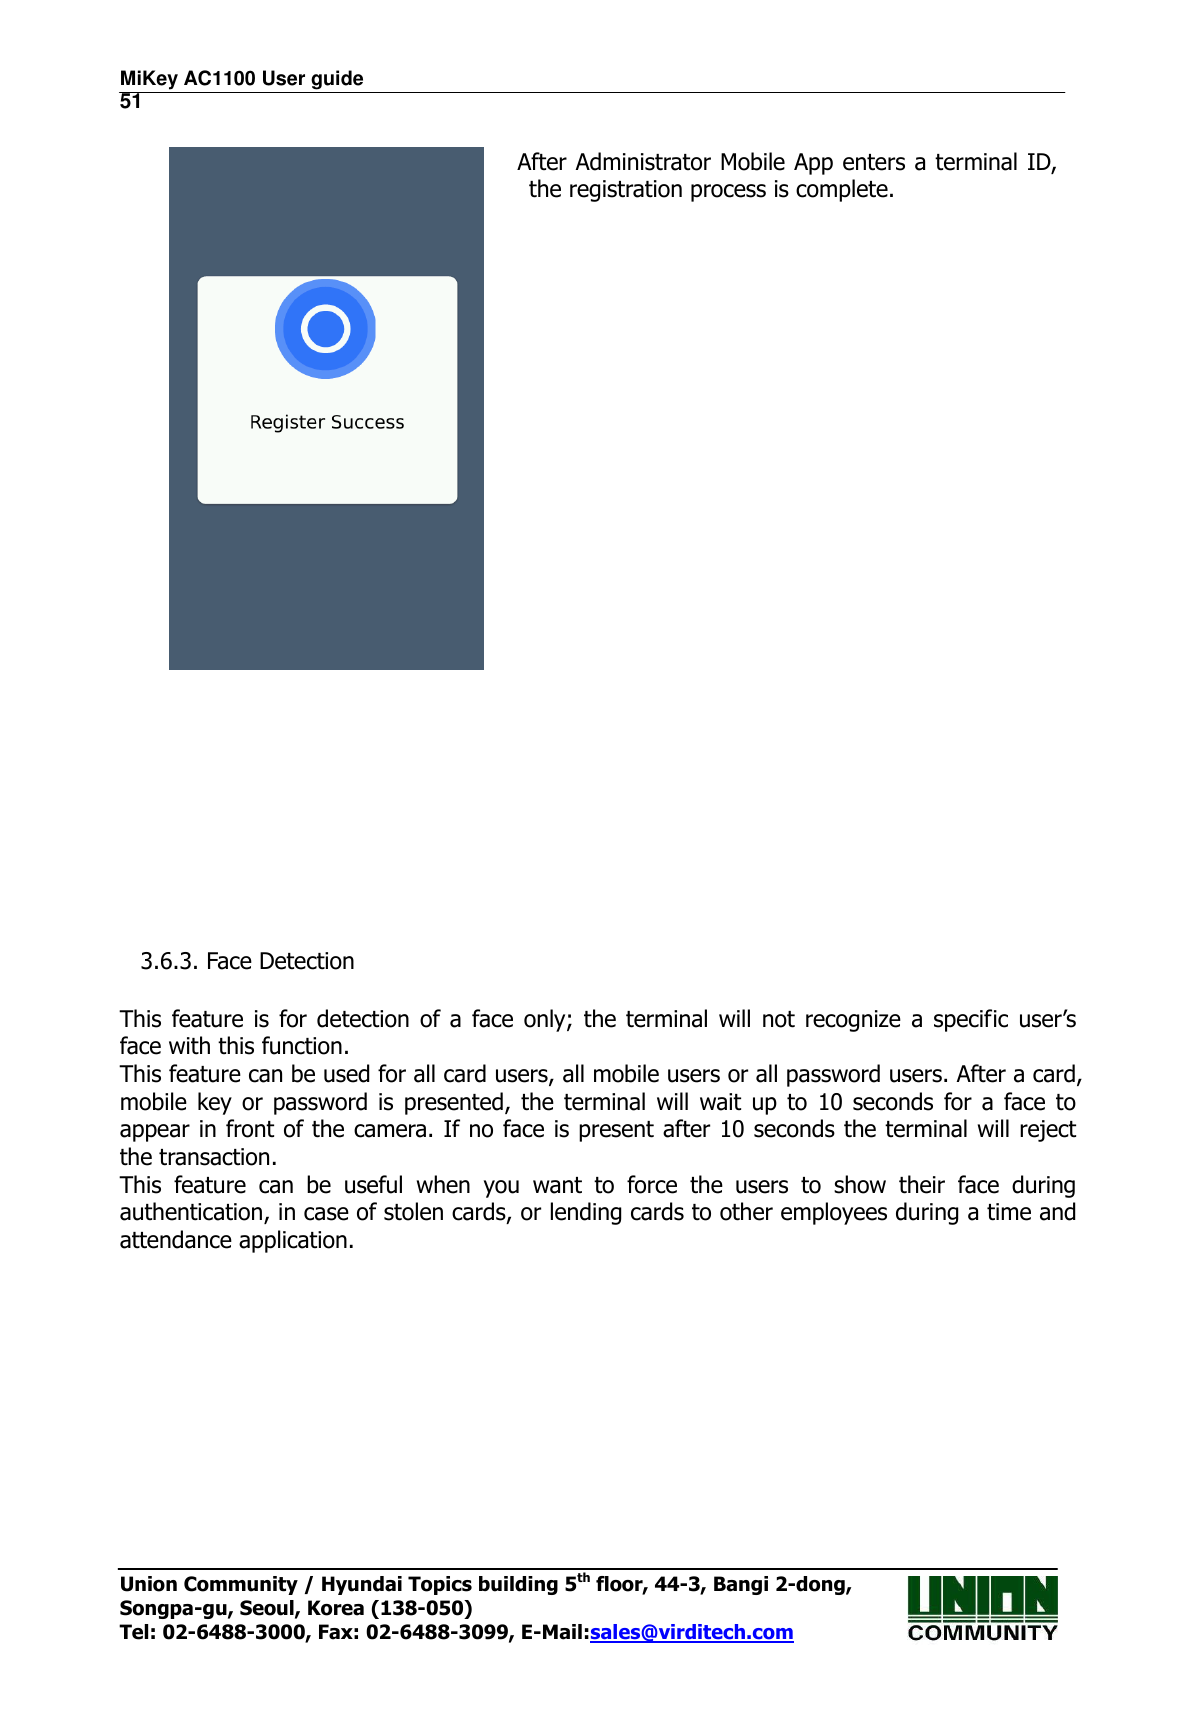
![MiKey AC1100 User guide 49 Union Community / Hyundai Topics building 5th floor, 44-3, Bangi 2-dong, Songpa-gu, Seoul, Korea (138-050) Tel: 02-6488-3000, Fax: 02-6488-3099, E-Mail:sales@virditech.com 3.6.2. Mobile Key The following window appears if you select the [System] -> [Mobile] in the main menu. Basic system setup can be used to setup the card reader using smart phone administrator application or when using mobile key authentication with the smart phone user application. By default mobile key is enabled. If you do not require any Bluetooth mobile function you can select to disable. Mobile Key Name – this is read-only field and is created automatically after registering the card terminal with the administrator smartphone application. Registering Bluetooth Device 1) Select Add terminal (admin mobile app) 2) Select the terminal (admin mobile app) 3) Select Register Device button – this menu 4) Select login id or password if enabled. (mobile app) 5) Select terminal id (admin mobile app) 6) Complete. If mobile key is disabled, all mobile options will not be visible.](https://usermanual.wiki/UNION-COMMUNITY/AC1100RF/User-Guide-3070847-Page-49.png)
![MiKey AC1100 User guide 52 Union Community / Hyundai Topics building 5th floor, 44-3, Bangi 2-dong, Songpa-gu, Seoul, Korea (138-050) Tel: 02-6488-3000, Fax: 02-6488-3099, E-Mail:sales@virditech.com Select the checkbox for authentication types required for a picture during authentication. Card, Mobile Key, Password. By default this feature is disabled. Detection Level When one of the checkboxes above is selected, this defines the detail of facial detection. 1) Level 1 – Basic face , faster 2) Level 2 – Detail face , may take slightly longer Select the [OK] button to save the value or select [BACK] button to cancel and return.](https://usermanual.wiki/UNION-COMMUNITY/AC1100RF/User-Guide-3070847-Page-52.png)
![MiKey AC1100 User guide 53 Union Community / Hyundai Topics building 5th floor, 44-3, Bangi 2-dong, Songpa-gu, Seoul, Korea (138-050) Tel: 02-6488-3000, Fax: 02-6488-3099, E-Mail:sales@virditech.com 3.6.5. Time/Date If you select the [System] -> [Date/Time] in the main menu, the following window appears. ▶ Time Sync: This is how terminal time/date is updated. - Auto/Server – updated from the server. No need to set Date/Time below. - Manual – set the time/date from this menu and the server will not update the time/date. Note: When connecting with the Bluetooth/mobile key application, the terminal time/date is always updated. ▶ Time Format: The Date/Time Display Format will change the way the date and time is displayed on the main screen. Only English Language allows the selection of different formats. All other languages will only have Enable/disable, and the date will appear in their locale format. There are six choices: 1) Short form day (three letters), Short form month (three letters), DD, YYYY, HH:MM AM/PM (Thu, Mar 24 2009 08:19AM – no 24hour time, use AM/PM) 2) Short form day(three letters), same as 1, except use 24 hour time display 3) MM-DD-YY HH:MM AM/PM (03-24-09 08:19AM) 4) MM-DD-YY HH:MM (24 hour time) (03-24-09 23:44) 5) YYYY-MM-DD HH:MM AM/PM (2009-04-24 08:19AM) 6) YYYY-MM-DD HH:MM (24 hour time) (2009-04-24 23:44) Setting Date/Time only required if set to ‘Manual’ in the time sync area. ▶ Set Date ▶ Set Time Touch the area where the time is displayed. A number pad will appear. Enter the time in the format HH:MM:SS. (24 hour) For example current time is 11:14:00pm, enter ‘2’ ‘3’ ’1’ ’4’ ‘0’ ’0’ and then press OK when finished. If a number is invalid or there is no entry, pressing OK will do nothing. Select the [OK] button to save the value or select [BACK] button to cancel and return.](https://usermanual.wiki/UNION-COMMUNITY/AC1100RF/User-Guide-3070847-Page-53.png)
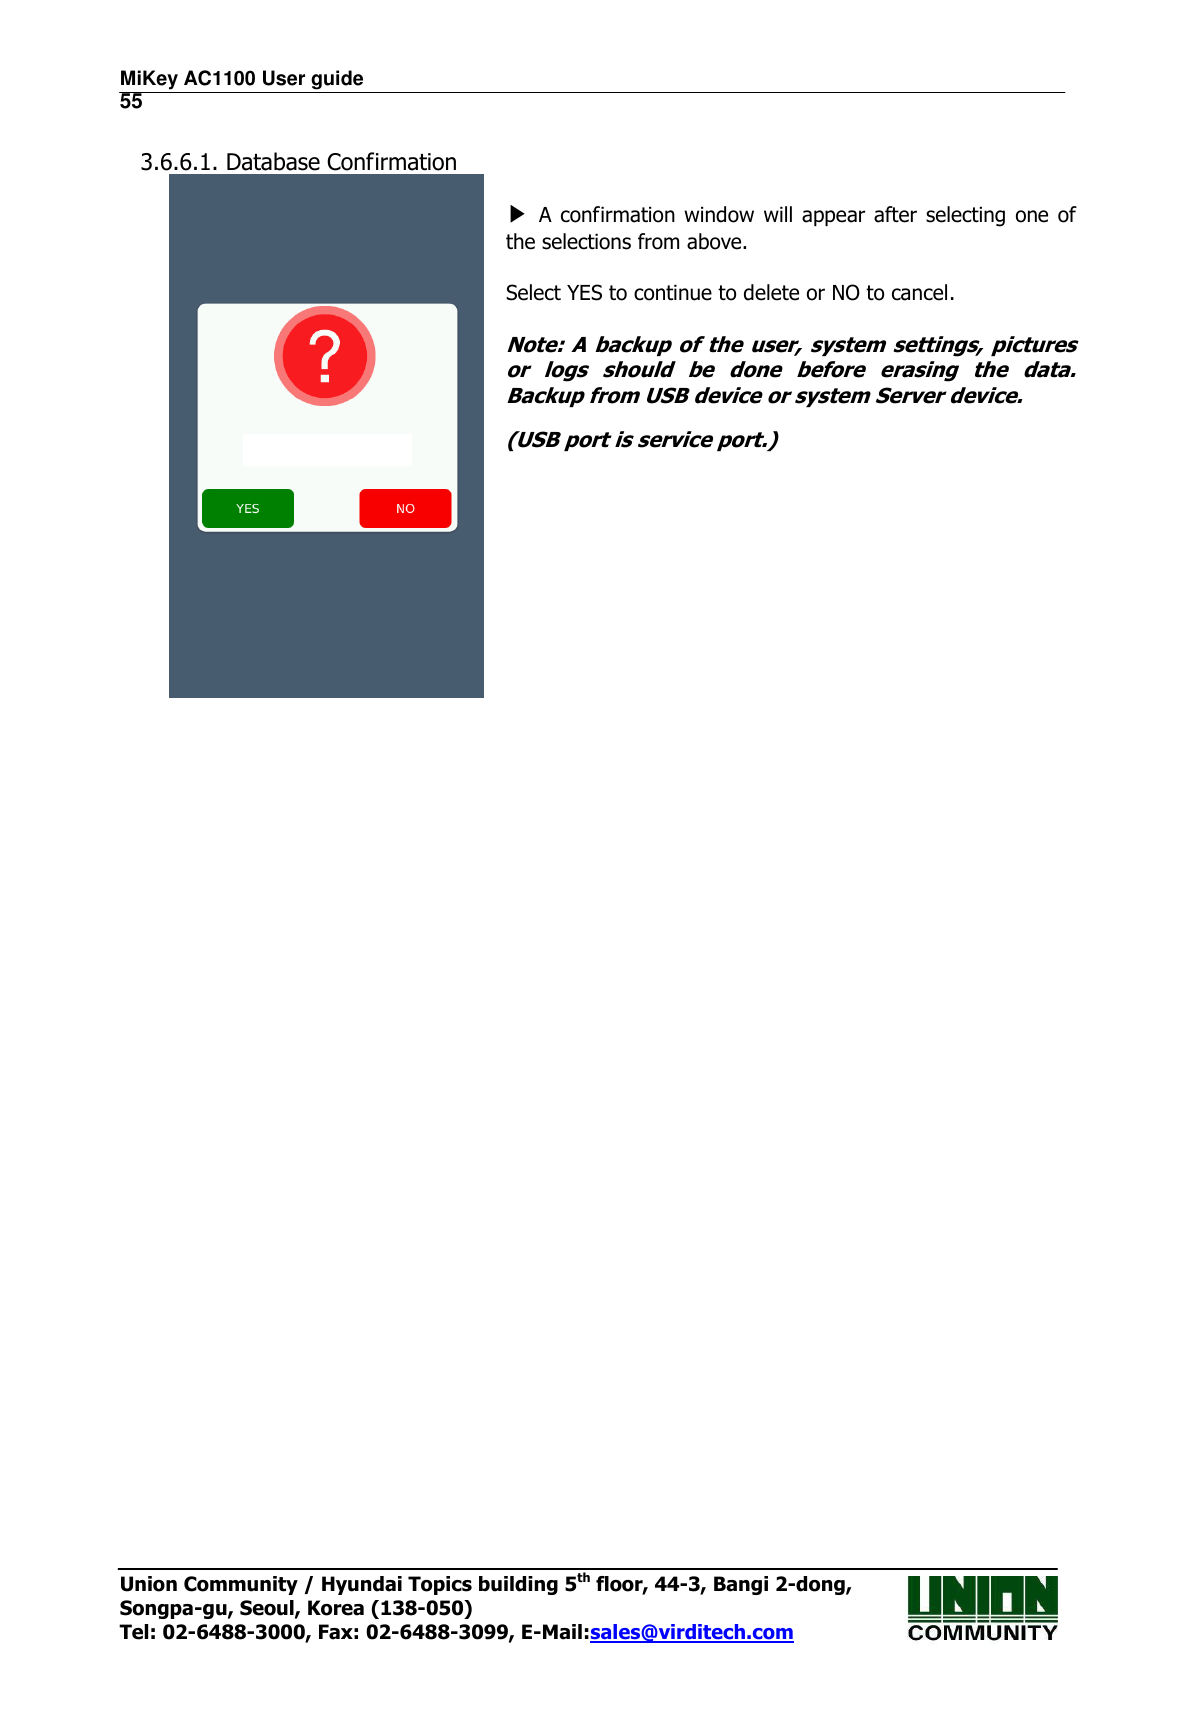
![MiKey AC1100 User guide 54 Union Community / Hyundai Topics building 5th floor, 44-3, Bangi 2-dong, Songpa-gu, Seoul, Korea (138-050) Tel: 02-6488-3000, Fax: 02-6488-3099, E-Mail:sales@virditech.com 3.6.6. Database If you select the [System]->[Database] in the main menu, the following window appears. ▶ Delete All Users: This option will allow you to delete all users in the system. ▶ Clear Settings: This option will clear/delete all the terminal settings. The factory settings will be used. User, log data and pictures will not be deleted. ▶ Clear Log Data: This option will clear/delete all the log data in the terminal. This will not delete picture log data or terminal settings. ▶ Clear Picture Logs: This option will clear/delete all the picture log data. The terminal can hold up to 70,000 pictures (user pictures + log pictures). If you need more user database pictures you can delete the picture logs. ▶ Factory Init: This option will reset the terminal settings, delete all the picture logs, delete all users and all log information. Select the [OK] button to save the value or select [BACK] button to cancel and return.](https://usermanual.wiki/UNION-COMMUNITY/AC1100RF/User-Guide-3070847-Page-54.png)
![MiKey AC1100 User guide 56 Union Community / Hyundai Topics building 5th floor, 44-3, Bangi 2-dong, Songpa-gu, Seoul, Korea (138-050) Tel: 02-6488-3000, Fax: 02-6488-3099, E-Mail:sales@virditech.com 3.7. Terminal settings 3.7.1. Sounds If you select the [Terminal] -> [Sound] in the main menu, the following window appears. ▶Voice volume Scroll from side to side in to select the appropriate voice setting. A voice will be played after releasing the selector to determine the volume. Slide all the way to the left to disable voice prompts. Default is OFF. 4 Voices are used 1) You are authorized (Success) 2) Please Try Again (Failed) 3) Enter your Card 4) Enter your ID This value determines sound level of: - Error tone wave - Success tone wave - KeyPress tone wave - Other sound effect tones If Voice volume if OFF, then all sound effect tones will follow beep volume setting value ▶Beep volume Scroll from side to side to select the beep volume. Selectable area from 4 types. Default is 2 0 (off) 1 (low) 2 (medium) 3 (high) ▶User voice If the user wishes to change the voice played when the authorization is successful or failed, you can import new voices using USB function. See USB section (USB port is service port.) Select the [OK] button to save the value or select [BACK] button to cancel and return. If you want to set another item, select the menu you want to change at the left side.](https://usermanual.wiki/UNION-COMMUNITY/AC1100RF/User-Guide-3070847-Page-56.png)
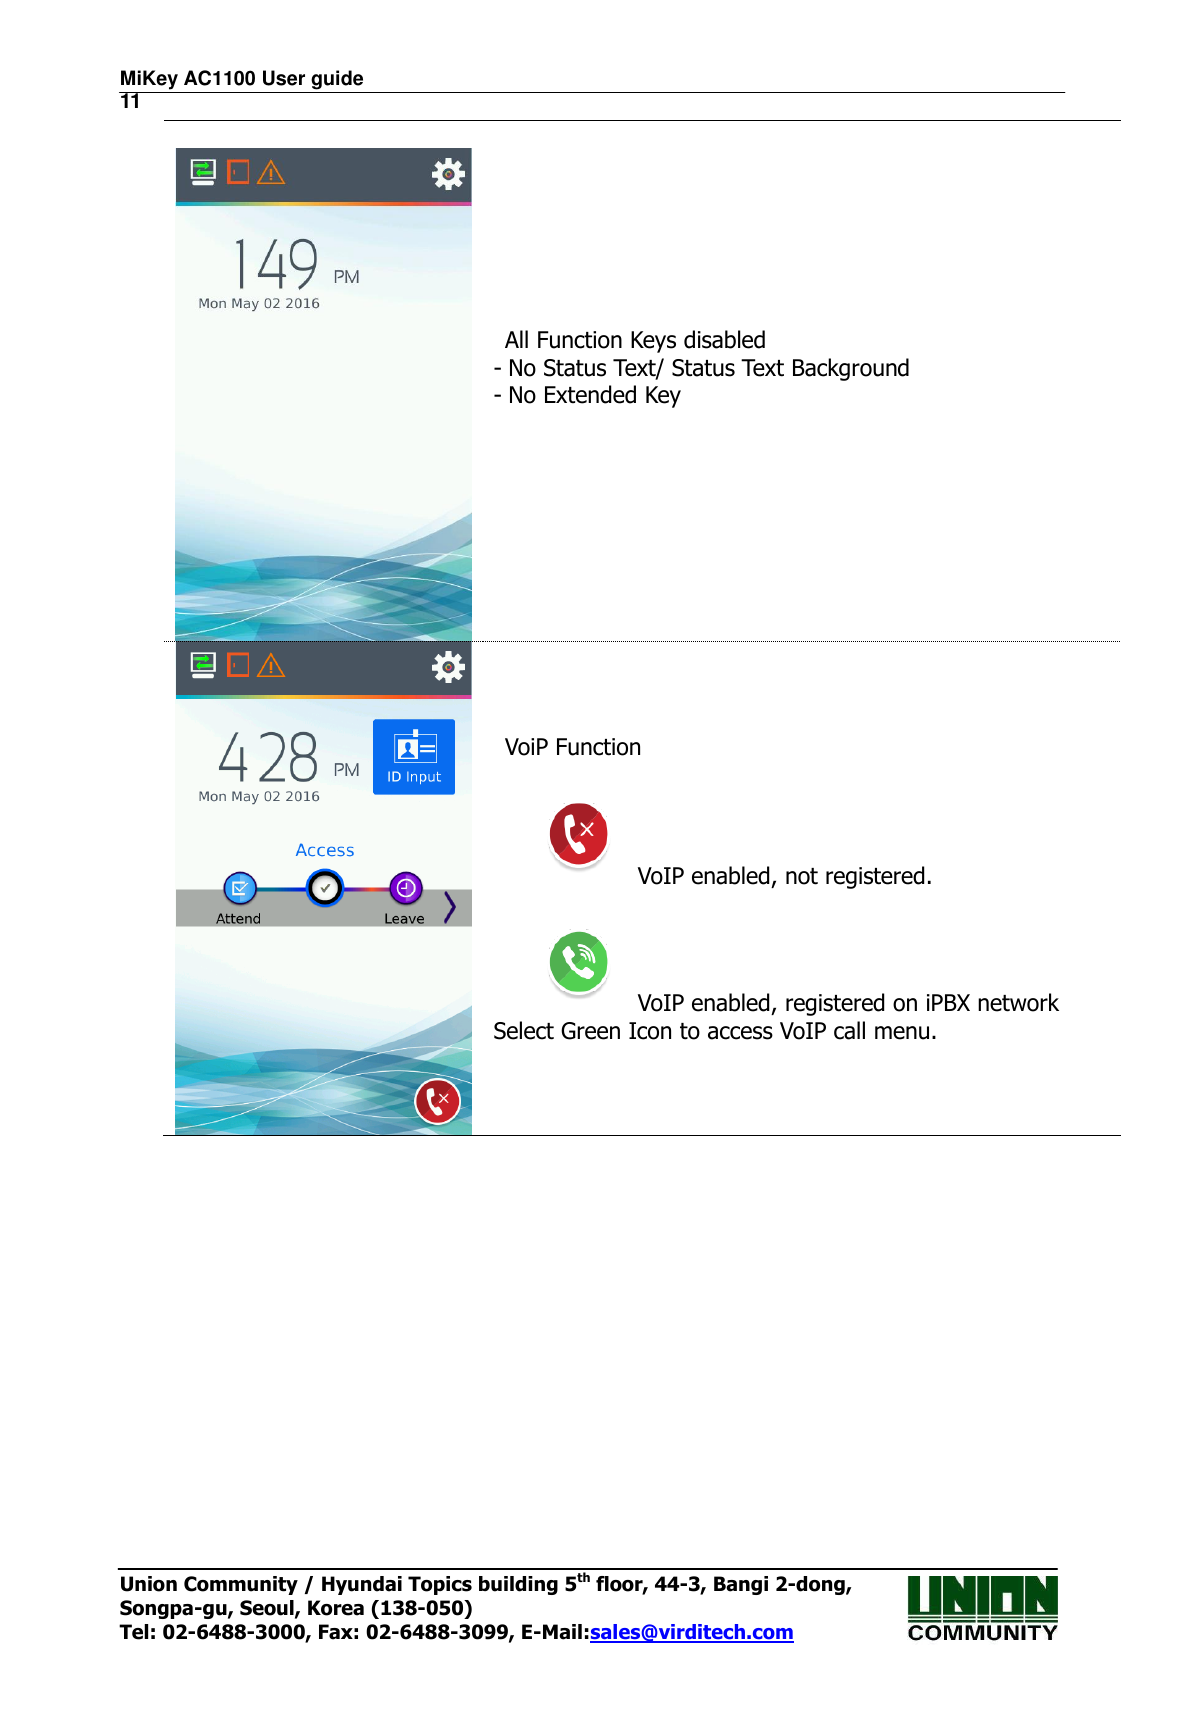
![MiKey AC1100 User guide 57 Union Community / Hyundai Topics building 5th floor, 44-3, Bangi 2-dong, Songpa-gu, Seoul, Korea (138-050) Tel: 02-6488-3000, Fax: 02-6488-3099, E-Mail:sales@virditech.com 3.7.2. Terminal option If you select the [Terminal]->[Terminal option] in the main menu, the following window appears. ▶ Card Reader If you scan/touch your card to the terminal, the terminal will beep and display the card number. The card number depends on the card format selected from the Card Format option below. Default is Standard ▶Warn door open (sec) 0-99 Default 0 - disabled This function will produce a warning tone after the set time when the door remains open after an access to the terminal. To use the function, the lock must be able to be monitored if it is opened or closed, and the monitoring pin of the lock also should be connected with M0, and set for Door Monitor NO or NC. ▶ Case Tamper If this option is enabled and the case tamper on the back of the terminal is ‘opened’ (terminal removed from the wall), an error sound will be heard every 5 seconds when the main window is displayed. During administrator programming this sound does not occur. Also, if a case tamper occurs the status icon for ‘trouble’ will always be displayed on the main window. See Icon list for details. Default enabled. ▶ Lock terminal This function enables the administrator to lock or unlock the terminal directly on the terminal, not on the server program. If it is checked ( ), the main window will display ‘Locked’ status. No authentication is possible during this time. Default disabled ▶ VoIP Voice Over IP enabled. Default is disabled. ▶Card format](https://usermanual.wiki/UNION-COMMUNITY/AC1100RF/User-Guide-3070847-Page-57.png)
![MiKey AC1100 User guide 58 Union Community / Hyundai Topics building 5th floor, 44-3, Bangi 2-dong, Songpa-gu, Seoul, Korea (138-050) Tel: 02-6488-3000, Fax: 02-6488-3099, E-Mail:sales@virditech.com Card format determines how the card data is converted once it is read from the terminal. Note: If you change the card format, you must re-register all card users in the device. When registering a user in the terminal, this value should be set, considered first. Also we registering a user from the server, the card format at the server must match the terminal format. The card number is converted according to the following settings. RFcard EX) Card number (5byte): 08h 01h 16h 1Dh D6h Card format Card number Expression Standard 02207638 (3+5)digits decimal [022(16h)+07638(1DD6h)] Hexadecimal 0801161DD6 10digits hexadecimal 10 Digit Decimal 0018226646 Posterior 4byte: 10digits decimal (01161DD6h) 3,5 Digit Decimal 02207638 Same with [Standard] SCcard example) card number(4byte): 52h 9Dh 06h E3h Card format Card number Expression Standard 529D06E3 8 digits hexadecimal Hexadecimal E3069D52 8 digits hexadecimal with changing the order of byte 10 Digit Decimal 1386022627 hexadecimal 529D06E3: 10 digits decimal 3,5 Digit Decimal 3808861522 hexadecimal E3069D52: 10 digits decimal Select the [OK] button to save the value or select [BACK] button to cancel and return. 3.7.3. Terminal Input](https://usermanual.wiki/UNION-COMMUNITY/AC1100RF/User-Guide-3070847-Page-58.png)
![MiKey AC1100 User guide 59 Union Community / Hyundai Topics building 5th floor, 44-3, Bangi 2-dong, Songpa-gu, Seoul, Korea (138-050) Tel: 02-6488-3000, Fax: 02-6488-3099, E-Mail:sales@virditech.com If you select the [Terminal] -> [Input] in the main menu, the following window appears. The Terminal has the ability to monitor the physical lock and/or door state when the door is open and closed, or terminal can be used to monitor status of another external device. See the installation guide for details how to connect. ▶ Default Setting : M0-M2 not used, IO (Inside Open) The inputs accept a relay input either Normally Closed or Normally Open. You should program the input according to your relay activation type. (NC or NO). It is recommended that not more than one of the same option is used. For example do not program M0 for Door Monitoring and M1 for Door Monitoring. Normal Connection M0 – door monitor M1 – lock monitor open M2 – lock monitor closed These are the available types of monitoring options: Disabled – If you do not use the input for anything select this options Door Monitor (NC/NO) – if you are connecting a door monitoring device select this option. The terminal will monitor when the door is opened and closed. Lock Monitor (NC/NO) – if you are connecting a lock that can be monitored when the lock is opened select this option. If the lock has an error opening the terminal will sound an error tone. (Normally used for Motor Lock Monitoring when lock is opening) Lock Monitor 2 (NC/NO) – When using a motor lock use this option to monitor the motor lock closing status. Only use this selection for motor lock monitoring. Inside Open (NC/NO) – if you would like to connect a Request to Exit device, door open button select this option. Usually if the terminal is on the outside of the door, this door open button or Request to Exit is connected inside the door. The button is pressed the terminal will unlock the door. Host (NC/NO) – This option is used to disable the terminal from access. In applications where you have an external controller or terminal that should be accessed first before the card reader you can use this option. If input is not activated, the terminal will not accept card, mobile or id input; when the signal from the external device is de-activated the terminal will allow access. This can be used in situations where the guard terminal is the master terminal, when the guard approves the access, then the output will trigger the card reader to allow authentication. Fire Monitor (NC/NO) – If you have an external device that has a fire output, the terminal will monitor when the device detects a fire alarm. The terminal will show a fire icon and](https://usermanual.wiki/UNION-COMMUNITY/AC1100RF/User-Guide-3070847-Page-59.png)
![MiKey AC1100 User guide 60 Union Community / Hyundai Topics building 5th floor, 44-3, Bangi 2-dong, Songpa-gu, Seoul, Korea (138-050) Tel: 02-6488-3000, Fax: 02-6488-3099, E-Mail:sales@virditech.com give an audible warning tone; if any doors are connected to the terminal the terminal will open the doors. When this signal is activated, the server software will also be notified of the fire signal to alert other terminals connected on the network. Wiegand Mode (NC/NO) – If using wiegand output, this input can be used to verify the external controller acknowledged the card data that was sent on the wiegand output. i.e Card Scanned at terminal, card data sent to external controller using standard wiegand output, the terminal will wait until the external controller sets this input high or low to acknowledge the card was accepted by the controller. Select the [OK] button to save the value or select [BACK] button to cancel and return. 3.7.4. Terminal Lock If you select the [Terminal] -> [Lock settings] in the main menu, the following windows appear. See the installation guide for details how to connect a lock to the terminal.](https://usermanual.wiki/UNION-COMMUNITY/AC1100RF/User-Guide-3070847-Page-60.png)
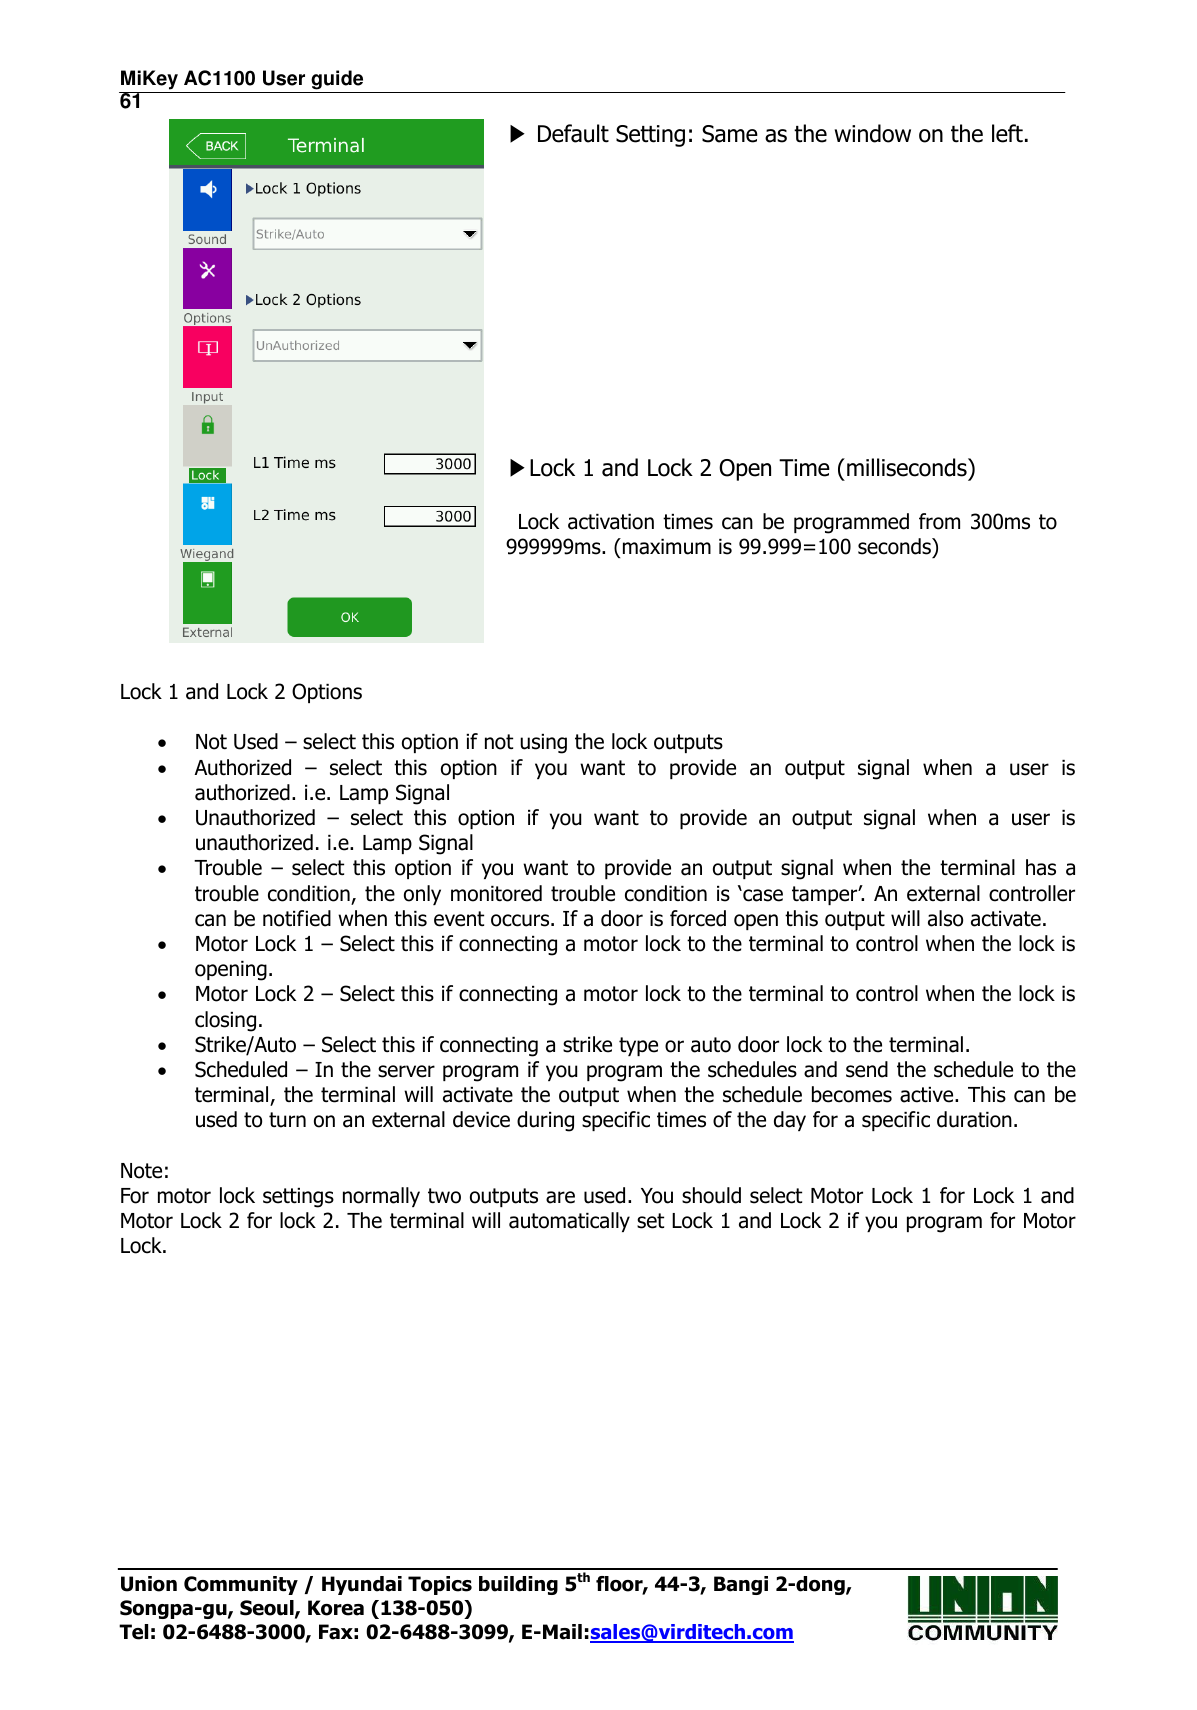
![MiKey AC1100 User guide 62 Union Community / Hyundai Topics building 5th floor, 44-3, Bangi 2-dong, Songpa-gu, Seoul, Korea (138-050) Tel: 02-6488-3000, Fax: 02-6488-3099, E-Mail:sales@virditech.com 3.7.5. Terminal Wiegand If you select the [Terminal]->[External device] in the main menu, the following window appears. ▶ Default Setting: Same as the window on the left. ▶Site code It sets the sitecode value sent in Wiegand output below. When the authorization is successful, the data of the following format is sent to the Wiegand port of the terminal. ▶Wiegand Input Standard wiegand is 26 or 34 bit. The terminal is always waiting for wiegand input, up to 34 bits. Use Terminal option, card reading to view the card number received at the wiegand input. If the format of the data is incorrect it must be setup using the server program. ▶Wiegand Output This is only used when connecting the terminal to an external controller to notify the controller with card data or user id that was used. Standard wiegand output is 26 or 34 bit. If any other format is needed, the setup must be done using the server program. Wiegand Output type can be set for User ID, Card Number or Unique ID. None General case. It does not use Wiegand out port. 26bit Sending “Sitecode[1byte] + User ID[2 byte]”, set the user ID less or equal than 4 digits. Send example) In case of SiteCode:045(2Dh), UID:6543(198Fh) 1 00101101 0001 1001 10001111 0 34bit Sending “Sitecode[1 byte] + User ID[3 byte]”, set the user ID less or equal than 7 digits. But, if the user ID is 8 digits, ignore sitecode and send only the “User ID[4byte]”. Send example) SiteCode:001(1h), UID:123456(1E240h) 0 00000001 00000001 11100010 01000000 0 Custom When the server program sets the wiegand output to other value than the standard 26/34 bit, this is displayed. This type can only be selected and setup using the server program. Select the [OK] button to save the value or select [BACK] button to cancel and return.](https://usermanual.wiki/UNION-COMMUNITY/AC1100RF/User-Guide-3070847-Page-62.png)
![MiKey AC1100 User guide 63 Union Community / Hyundai Topics building 5th floor, 44-3, Bangi 2-dong, Songpa-gu, Seoul, Korea (138-050) Tel: 02-6488-3000, Fax: 02-6488-3099, E-Mail:sales@virditech.com 3.7.6. Terminal External If you select the [Terminal]->[External device] in the main menu, the following window appears. ▶ Default Setting: Same as the window on the left. See Installation Guide Section 11 for connecting a serial printer. ▶Printer Option Disabled – select this if not using T/A Ticket – if using Time and Attendance mode and require a printout every time authorization occurs. Meal Ticket – if using Meal Mode and require a printout every time authorization occurs. The printing format differs as per each setting. The final result (time/date, mode type, etc) will be printed. The printer used must be only SRP-350 serial type model. See Installation Guide Section 12 for connecting an RS485 bus. ▶RS485 Option Disable – select this if not using LC010/BLC – Select this when using Virdi LC010 or BLC015 external lock controller. Controller – Select this when using OSDP protocol to an external controller.](https://usermanual.wiki/UNION-COMMUNITY/AC1100RF/User-Guide-3070847-Page-63.png)
![MiKey AC1100 User guide 64 Union Community / Hyundai Topics building 5th floor, 44-3, Bangi 2-dong, Songpa-gu, Seoul, Korea (138-050) Tel: 02-6488-3000, Fax: 02-6488-3099, E-Mail:sales@virditech.com ▶RS485 Option If ‘controller’ is selected for the RS485 Option, a RS485 is required to connect to a RS485 protocol bus. You should select an appropriate id from 0-7,. Controller selection will work with a standard protocol called ‘OSDP’; this is a SIA Industry standard protocol. Select the [OK] button to save the value or select [BACK] button to cancel and return.](https://usermanual.wiki/UNION-COMMUNITY/AC1100RF/User-Guide-3070847-Page-64.png)
![MiKey AC1100 User guide 65 Union Community / Hyundai Topics building 5th floor, 44-3, Bangi 2-dong, Songpa-gu, Seoul, Korea (138-050) Tel: 02-6488-3000, Fax: 02-6488-3099, E-Mail:sales@virditech.com 3.8. Display settings 3.8.1. Theme If you select [Display] -> [Theme] in the main menu, the following window appears. ▶ Default Setting: Same as the window on the left. ▶The main background. Main background is displayed on the main window or when screen saver mode is enabled. Cycle forward or back through the available backgrounds. 15 factory set backgrounds are available to choose from. If you import your own background it will also be selectable from this area. See USB->Theme import. (USB port is service port.) ▶Cycle (seconds) Values from 0-255. This time in seconds is the interval in which the background will change to a new background. If 0 is programmed, then the background will remain at the current picture. If 255 is programmed the background picture will change everyday at midnight. Anytime between 0 and 255 is the number of seconds the background will change. If you have user background images, the terminal will cycle through only these images. If no user background images are in the terminal, the factory background images will be used. Select the [OK] button to save the value or select [BACK] button to cancel and return. If you would like to select another items, select the menu you want to change on the left side.](https://usermanual.wiki/UNION-COMMUNITY/AC1100RF/User-Guide-3070847-Page-65.png)
![MiKey AC1100 User guide 66 Union Community / Hyundai Topics building 5th floor, 44-3, Bangi 2-dong, Songpa-gu, Seoul, Korea (138-050) Tel: 02-6488-3000, Fax: 02-6488-3099, E-Mail:sales@virditech.com 3.8.2. Camera If you select the [Display] -> [Camera] in the main menu, the following window appears. ▶ Default Setting: Same as the window on the left ▶Display option - None ( no user picture is shown on result window) - Current Picture ( current user picture is taken and displayed on result window) - User Picture ( user database picture stored in the user picture is displayed) ▶Save success log If it is checked ( ), the camera image is captured as image log when the authorization was successful. ▶Save failed log When it is checked ( ), the camera image is captured as image log when the authorization was failed. Select the [OK] button to save the value or select [BACK] button to cancel and return. 3.8.2.1 Camera Flash Option The camera used for still pictures or face detection also has an optional flash to use during dark conditions. There is a built-in sensor to detect dark and light conditions. You can select to turn off the flash if you do not need it. Depending on the dark conditions you can set the flash to different levels of brightness. 1. Low 2. Medium 3. High. 4. Off/Not used Delay (milliseconds) is programmable from 200ms to 2000ms. This can also be referred to as exposure time. The amount of time required for the flash to turn on before taking the picture. Depending on the environment the administrator may need to adjust this exposure period.](https://usermanual.wiki/UNION-COMMUNITY/AC1100RF/User-Guide-3070847-Page-66.png)
![MiKey AC1100 User guide 67 Union Community / Hyundai Topics building 5th floor, 44-3, Bangi 2-dong, Songpa-gu, Seoul, Korea (138-050) Tel: 02-6488-3000, Fax: 02-6488-3099, E-Mail:sales@virditech.com 3.8.3. Language If you select the [Display]->[Language] in the main menu, the following window appears. ▶Default Setting: ‘English’ ▶Language If you change the language and select ‘OK’ button, the voice message and language are changed to the set language. Select [OK] button to apply the changes, or select [BACK] button to cancel and return. ※Supporting languages English, Korean, Japanese, Thai, Spanish-Portugal, Spanish-Spain, Farsi(Persian), Deutsch, Chinese, Taiwanese, Polish, Slovenian. 3.8.4. LCD option If you select [Display] -> [LCD option] in the main menu, the following window appears.](https://usermanual.wiki/UNION-COMMUNITY/AC1100RF/User-Guide-3070847-Page-67.png)
![MiKey AC1100 User guide 68 Union Community / Hyundai Topics building 5th floor, 44-3, Bangi 2-dong, Songpa-gu, Seoul, Korea (138-050) Tel: 02-6488-3000, Fax: 02-6488-3099, E-Mail:sales@virditech.com ▶ Default Setting: Same as the window on the left ▶Screen saver (min) (1 minute ~ 30minutes) Select the appropriate timeout you wish to use. If you do not want a screen saver after a timeout select ‘off’. ▶ If screen saver is not set to ‘off’, when this option is unchecked the normal background image will show with the time & date only when the screen saver timeout occurs. When this option is checked the LCD will turn off after the screen saver timeout. ▶LCD Brightness Adjust the brightness of the LCD with this setting. ▶User display option When a successful user is granted access this will be displayed on the main window, popup. - None - User ID - Key ID (Employee ID entered from the server program) - User Name ▶TouchScreen Calibrate – if the Touchscreen seems misaligned or not exactly to the users alignment you can readjust the calibration, a reboot will occur and guide you through the instructions. Select the [OK] button to save the value or select [BACK] button to cancel and return. 3.8.5. Message time settings If you select the [Display]->[Message time setting] in the main menu, the following window appears.](https://usermanual.wiki/UNION-COMMUNITY/AC1100RF/User-Guide-3070847-Page-68.png)
![MiKey AC1100 User guide 69 Union Community / Hyundai Topics building 5th floor, 44-3, Bangi 2-dong, Songpa-gu, Seoul, Korea (138-050) Tel: 02-6488-3000, Fax: 02-6488-3099, E-Mail:sales@virditech.com ▶ Default Setting: Same as the window on the left ▶Message display (ms unit) It sets the time for which the authorization result window to be displayed. 0~5000 is available for the value, and the authorization result window appeared and disappear for the duration. Because it is set in ms unit, if you want to set 2 seconds, you should set 2000 ▶Broadcast Message (ms unit) From the UNIS server program you can send a message to the main display. The message will flash on and off depending on the values for the ON time/OFF time. Message will be displayed from the time period set in the UNIS program. Select the [OK] button to save the value or select [BACK] button to cancel and return.](https://usermanual.wiki/UNION-COMMUNITY/AC1100RF/User-Guide-3070847-Page-69.png)
![MiKey AC1100 User guide 70 Union Community / Hyundai Topics building 5th floor, 44-3, Bangi 2-dong, Songpa-gu, Seoul, Korea (138-050) Tel: 02-6488-3000, Fax: 02-6488-3099, E-Mail:sales@virditech.com 3.9. Terminal information 3.9.1. System information If you select the [Terminal info] -> [System] in the main menu, the following window appears. ▶System info The hardware and firmware version of the terminal is shown. Card Reader status Camera status Bluetooth status BLE serial number ▶System Storage (using/all) Usage of system data. ▶Ram (use/total) Usage of DDRAM. Select another selection on the left side or CLOSE, BACK button to return to previous window.](https://usermanual.wiki/UNION-COMMUNITY/AC1100RF/User-Guide-3070847-Page-70.png)
![MiKey AC1100 User guide 71 Union Community / Hyundai Topics building 5th floor, 44-3, Bangi 2-dong, Songpa-gu, Seoul, Korea (138-050) Tel: 02-6488-3000, Fax: 02-6488-3099, E-Mail:sales@virditech.com 3.9.2. Terminal information If you select the [Terminal information] -> [Terminal] in the main menu, the following window appears. ▶Terminal information Displaying basic information about terminal setup Select another selection on the left side or CLOSE, BACK button to return to previous window.](https://usermanual.wiki/UNION-COMMUNITY/AC1100RF/User-Guide-3070847-Page-71.png)
![MiKey AC1100 User guide 72 Union Community / Hyundai Topics building 5th floor, 44-3, Bangi 2-dong, Songpa-gu, Seoul, Korea (138-050) Tel: 02-6488-3000, Fax: 02-6488-3099, E-Mail:sales@virditech.com 3.9.3. Network information If you select the [Terminal information]->[Network] in the main menu, the following window appears. ▶Network information Displaying basic information about network information. Select another selection on the left side or CLOSE, BACK button to return to previous window.](https://usermanual.wiki/UNION-COMMUNITY/AC1100RF/User-Guide-3070847-Page-72.png)
![MiKey AC1100 User guide 73 Union Community / Hyundai Topics building 5th floor, 44-3, Bangi 2-dong, Songpa-gu, Seoul, Korea (138-050) Tel: 02-6488-3000, Fax: 02-6488-3099, E-Mail:sales@virditech.com 3.9.4. User information If you select the [Terminal information]->[User] in the main menu, the following window appears. ▶User information - Registered Users: The number of users registered (including administrator) -Administrator Users: The number of the administrators registered. - Card: The number of cards registered Capacity: (Max means the maximum number ) Select another selection on the left side or CLOSE, BACK button to return to previous window.](https://usermanual.wiki/UNION-COMMUNITY/AC1100RF/User-Guide-3070847-Page-73.png)
![MiKey AC1100 User guide 74 Union Community / Hyundai Topics building 5th floor, 44-3, Bangi 2-dong, Songpa-gu, Seoul, Korea (138-050) Tel: 02-6488-3000, Fax: 02-6488-3099, E-Mail:sales@virditech.com 3.9.5. Log information If you select the [Terminal information] -> [Log] in the main menu, the following window appears. ▶Log Event Log: The number of logs saved in the terminal User Pictures: Number of registered user pictures Log Pictures: Number of log pictures Total Pictures: User and Log picture total Capacity: (Max means the maximum number ) ▶View Log Displays log time and authentication result Select ‘View Log’ to find search results. ▶ Log Search result Log search result shows the information such as the date, time, ID and access result (success or failure). If a picture is saved with the log, the picture is also shown. Select OR button to see the search information. Select another selection on the left side or CLOSE, BACK button to return to previous window.](https://usermanual.wiki/UNION-COMMUNITY/AC1100RF/User-Guide-3070847-Page-74.png)
![MiKey AC1100 User guide 75 Union Community / Hyundai Topics building 5th floor, 44-3, Bangi 2-dong, Songpa-gu, Seoul, Korea (138-050) Tel: 02-6488-3000, Fax: 02-6488-3099, E-Mail:sales@virditech.com 3.9.6. About If you select the [Terminal information] -> [About] in the main menu, the following window appears. ▶About Display legal information about software and firmware Select the text area and scroll up or down to view more Select another selection on the left side or CLOSE, BACK button to return to previous window.](https://usermanual.wiki/UNION-COMMUNITY/AC1100RF/User-Guide-3070847-Page-75.png)
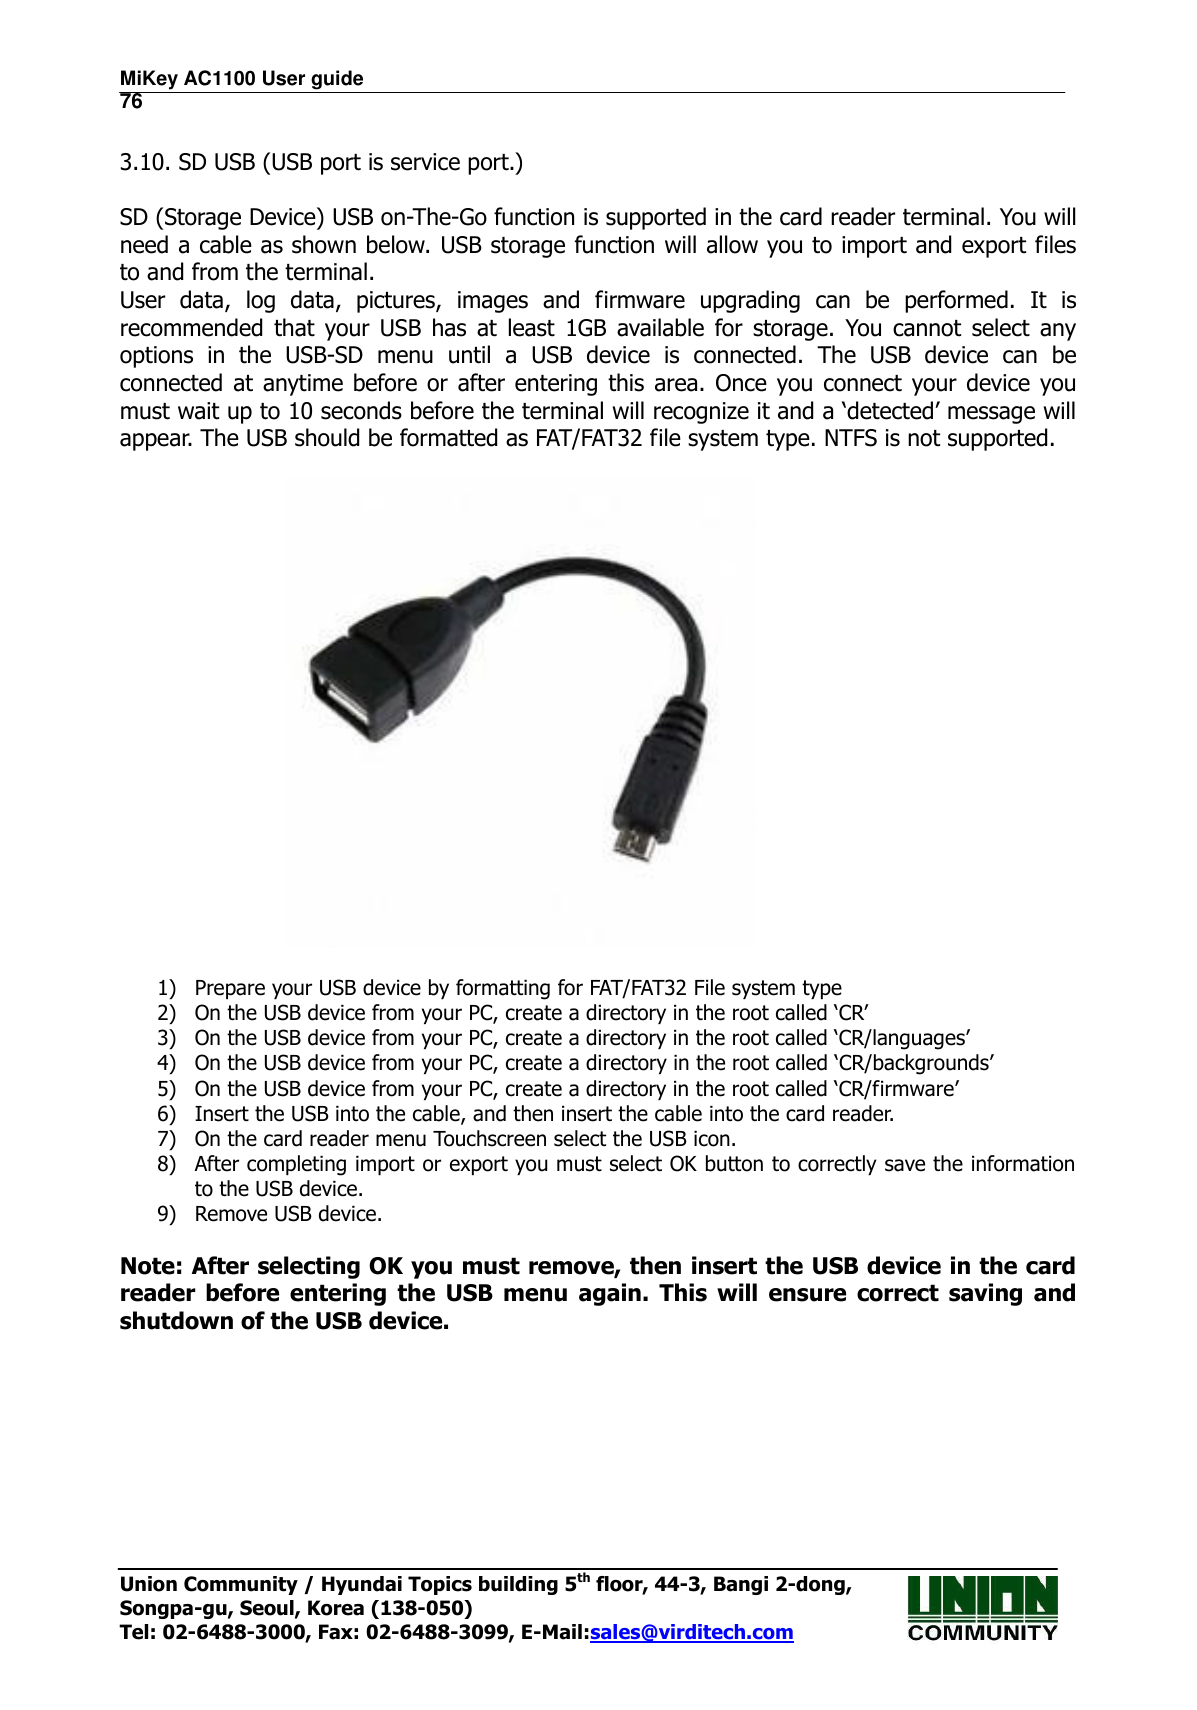
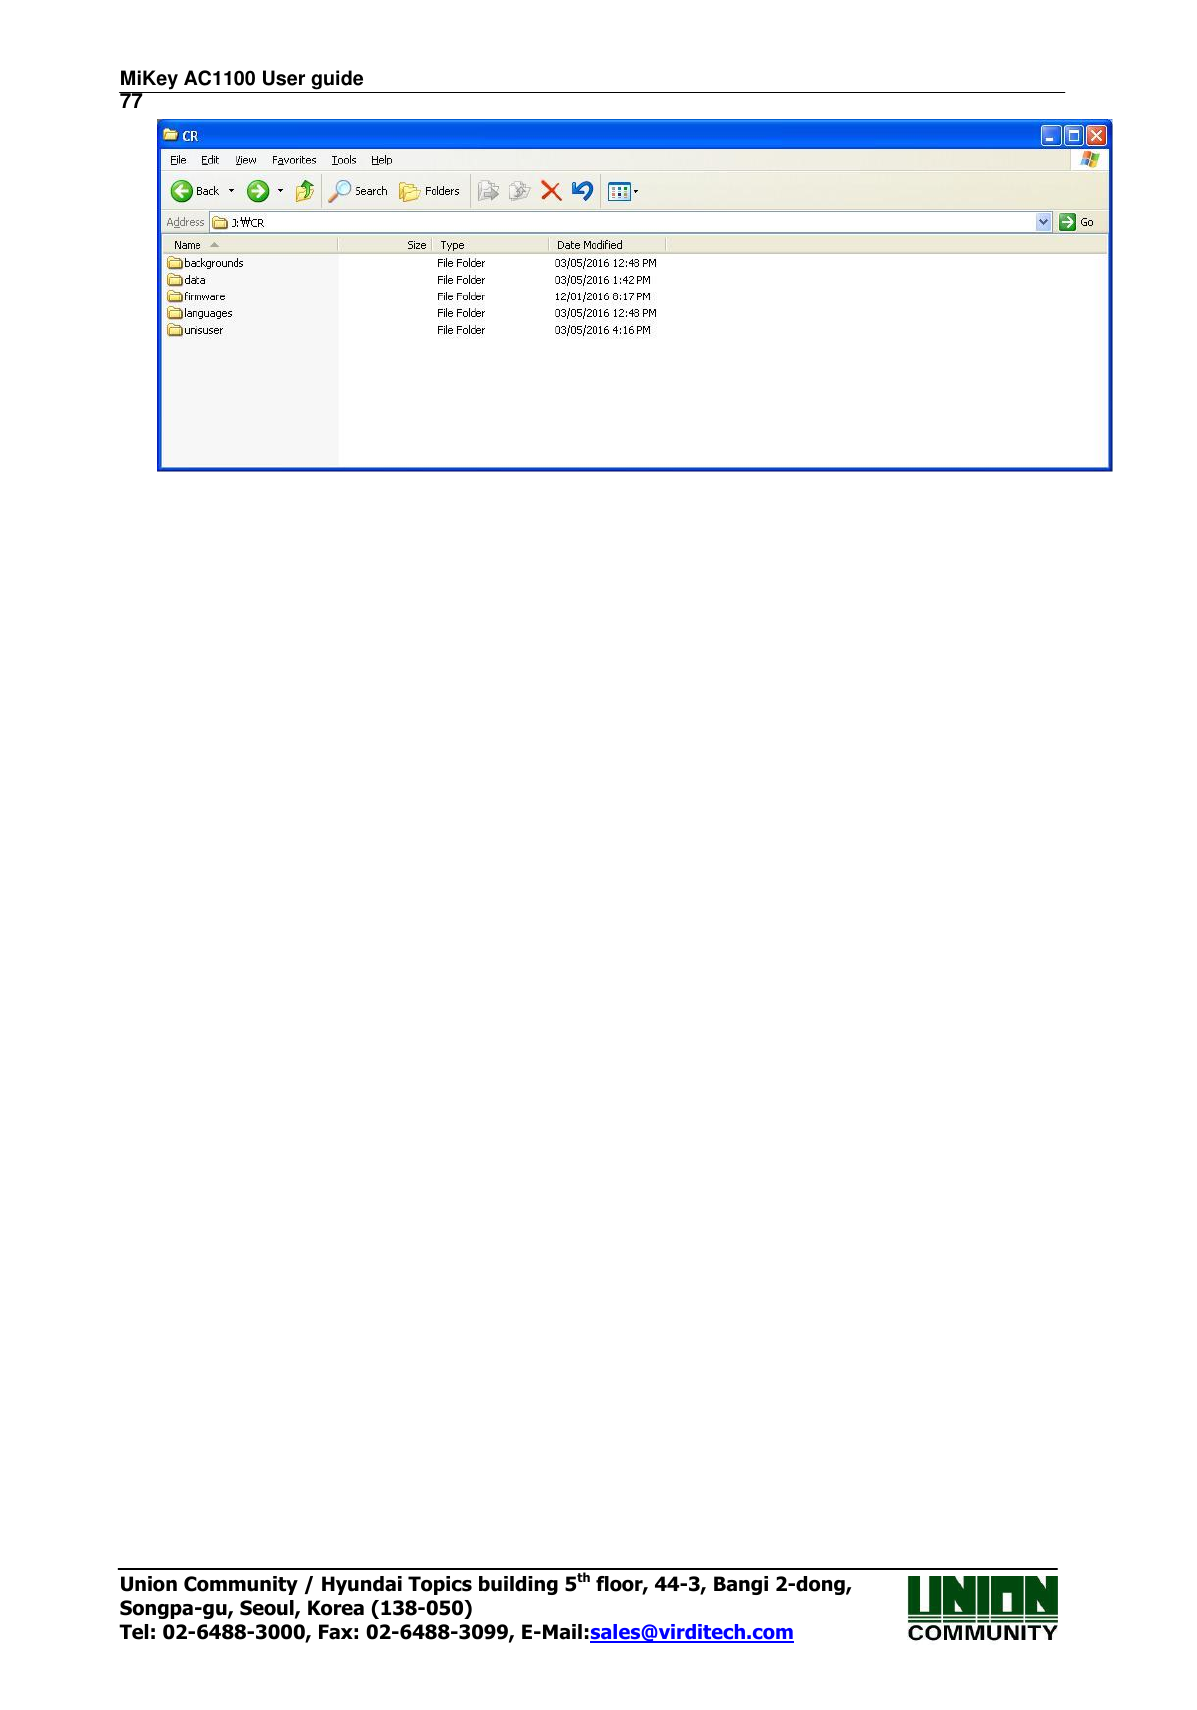
![MiKey AC1100 User guide 80 Union Community / Hyundai Topics building 5th floor, 44-3, Bangi 2-dong, Songpa-gu, Seoul, Korea (138-050) Tel: 02-6488-3000, Fax: 02-6488-3099, E-Mail:sales@virditech.com If you select the [SD USB] from the admin menu, the following screen appears. (USB port is service port.) No USB device Connected USB Device Connected with brand name USB Function (USB port is service port.) Import is used to importing user data or system options from another device. Export is used for saving user, event, system options or log picture data. After exporting you may import User data or System Options to another device. Other Special functions such as backgrounds, language files may be copied to the card reader terminal. F/W upgrade can also be performed from the USB device. If server program is connected is it recommended for speed and reliability to use the server program.](https://usermanual.wiki/UNION-COMMUNITY/AC1100RF/User-Guide-3070847-Page-80.png)
![MiKey AC1100 User guide 84 Union Community / Hyundai Topics building 5th floor, 44-3, Bangi 2-dong, Songpa-gu, Seoul, Korea (138-050) Tel: 02-6488-3000, Fax: 02-6488-3099, E-Mail:sales@virditech.com 4. How to use terminal The background image and composition of the main window can be changed according to the administrator’s setting. In addition, if the administrator set the screen saver time, the LCD screen will show only the background image with the time and date. Entering a card, touching the screen will change back to the main window. 4.1. Authorization mode change <Fig. 4-1> Press [F1], [F2] button on the screen changing the verification/logging mode. In order to select the mode other than the ones on the screen, such as ([F3], [F4], [Access]), press the button which is on the right side of the screen and the screen as per below will appear. Card Input part ID Input](https://usermanual.wiki/UNION-COMMUNITY/AC1100RF/User-Guide-3070847-Page-84.png)
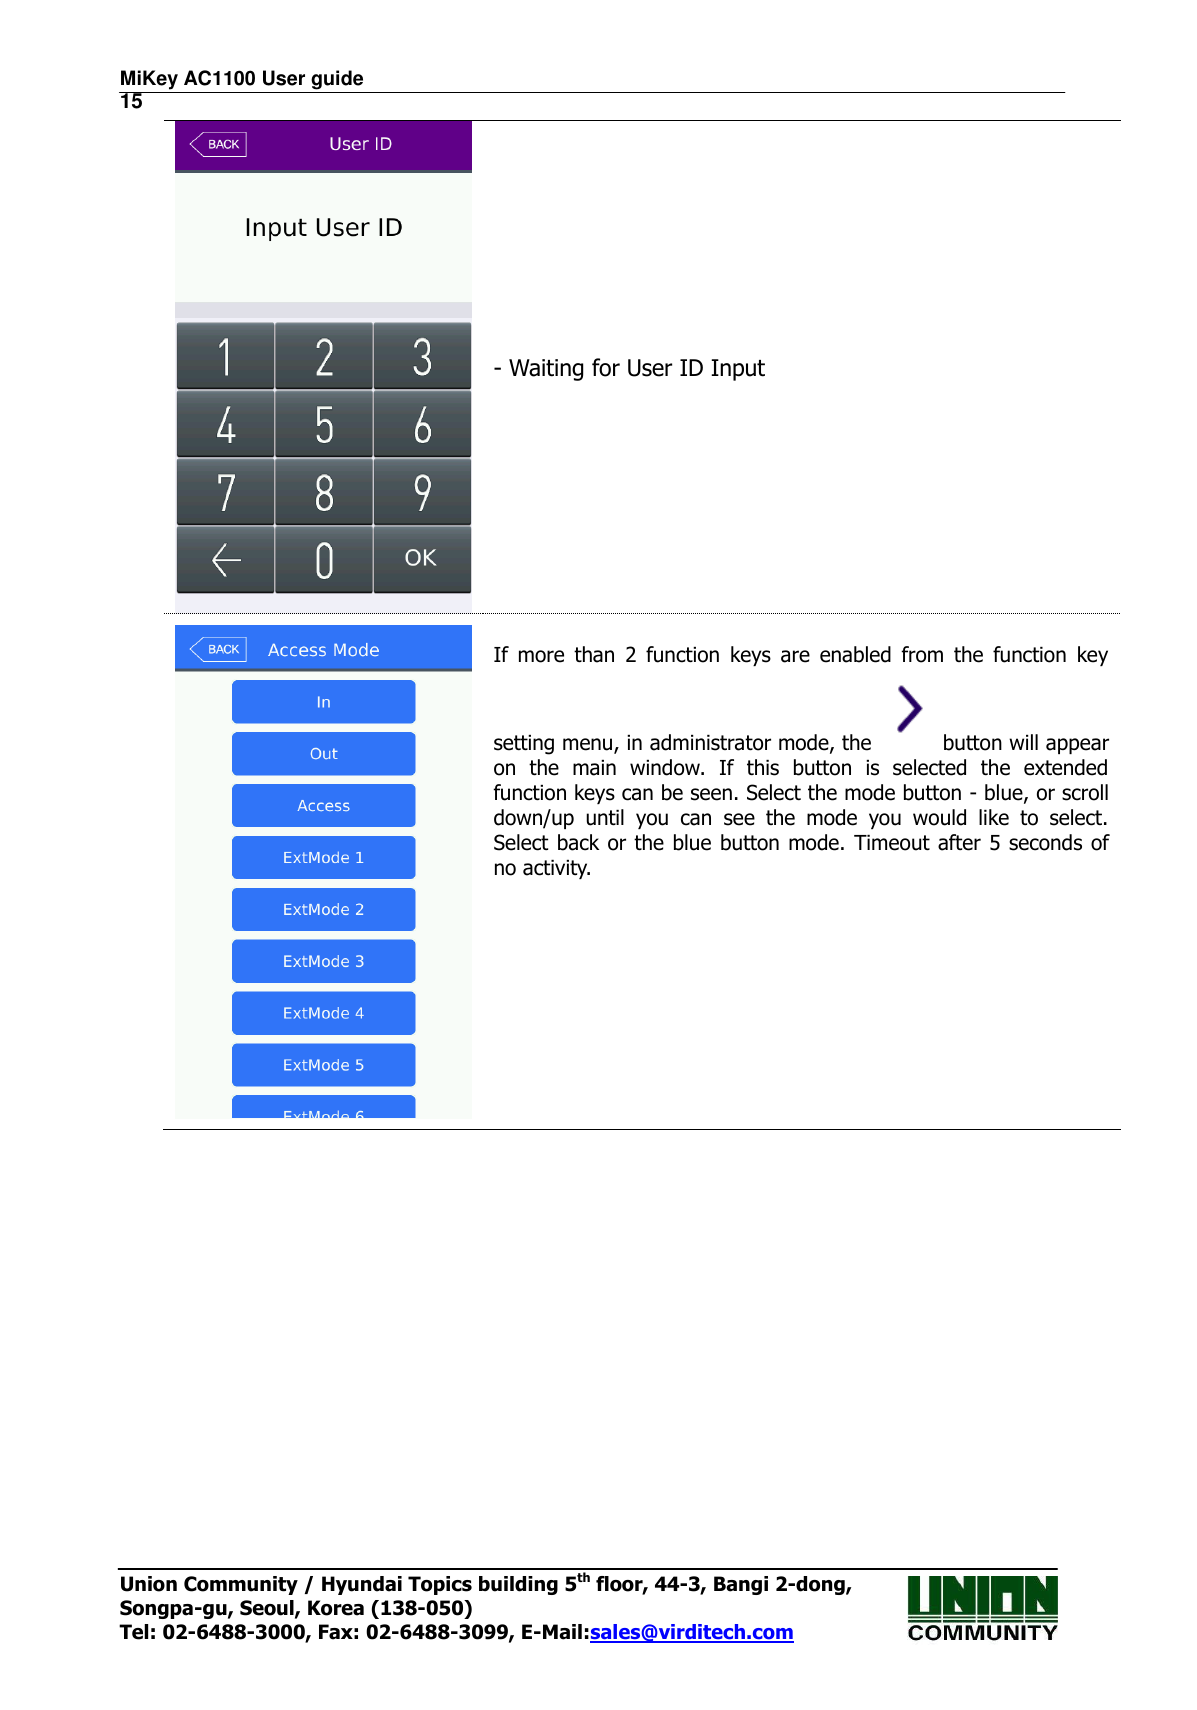
![MiKey AC1100 User guide 85 Union Community / Hyundai Topics building 5th floor, 44-3, Bangi 2-dong, Songpa-gu, Seoul, Korea (138-050) Tel: 02-6488-3000, Fax: 02-6488-3099, E-Mail:sales@virditech.com In the access mode selection screen, as shown in the left, select the preferable access mode button, which the screen will move to the selected access mode. 4.2. ID input If you select the [ID input] button on the main window, the following ID input window appears. Enter the user ID to be certified and select [OK] button, and then scan your card or enter your password according to the authorization method of the user.](https://usermanual.wiki/UNION-COMMUNITY/AC1100RF/User-Guide-3070847-Page-85.png)
![MiKey AC1100 User guide 86 Union Community / Hyundai Topics building 5th floor, 44-3, Bangi 2-dong, Songpa-gu, Seoul, Korea (138-050) Tel: 02-6488-3000, Fax: 02-6488-3099, E-Mail:sales@virditech.com 4.3. Authorization 4.3.3. Card authorization Touch/Scan the card on the area of the card reader as shown in <Fig. 4-1> 4.3.4. Password authorization Input your ID by selecting [ID input] button as follows and input password when the password input window appears. ](https://usermanual.wiki/UNION-COMMUNITY/AC1100RF/User-Guide-3070847-Page-86.png)