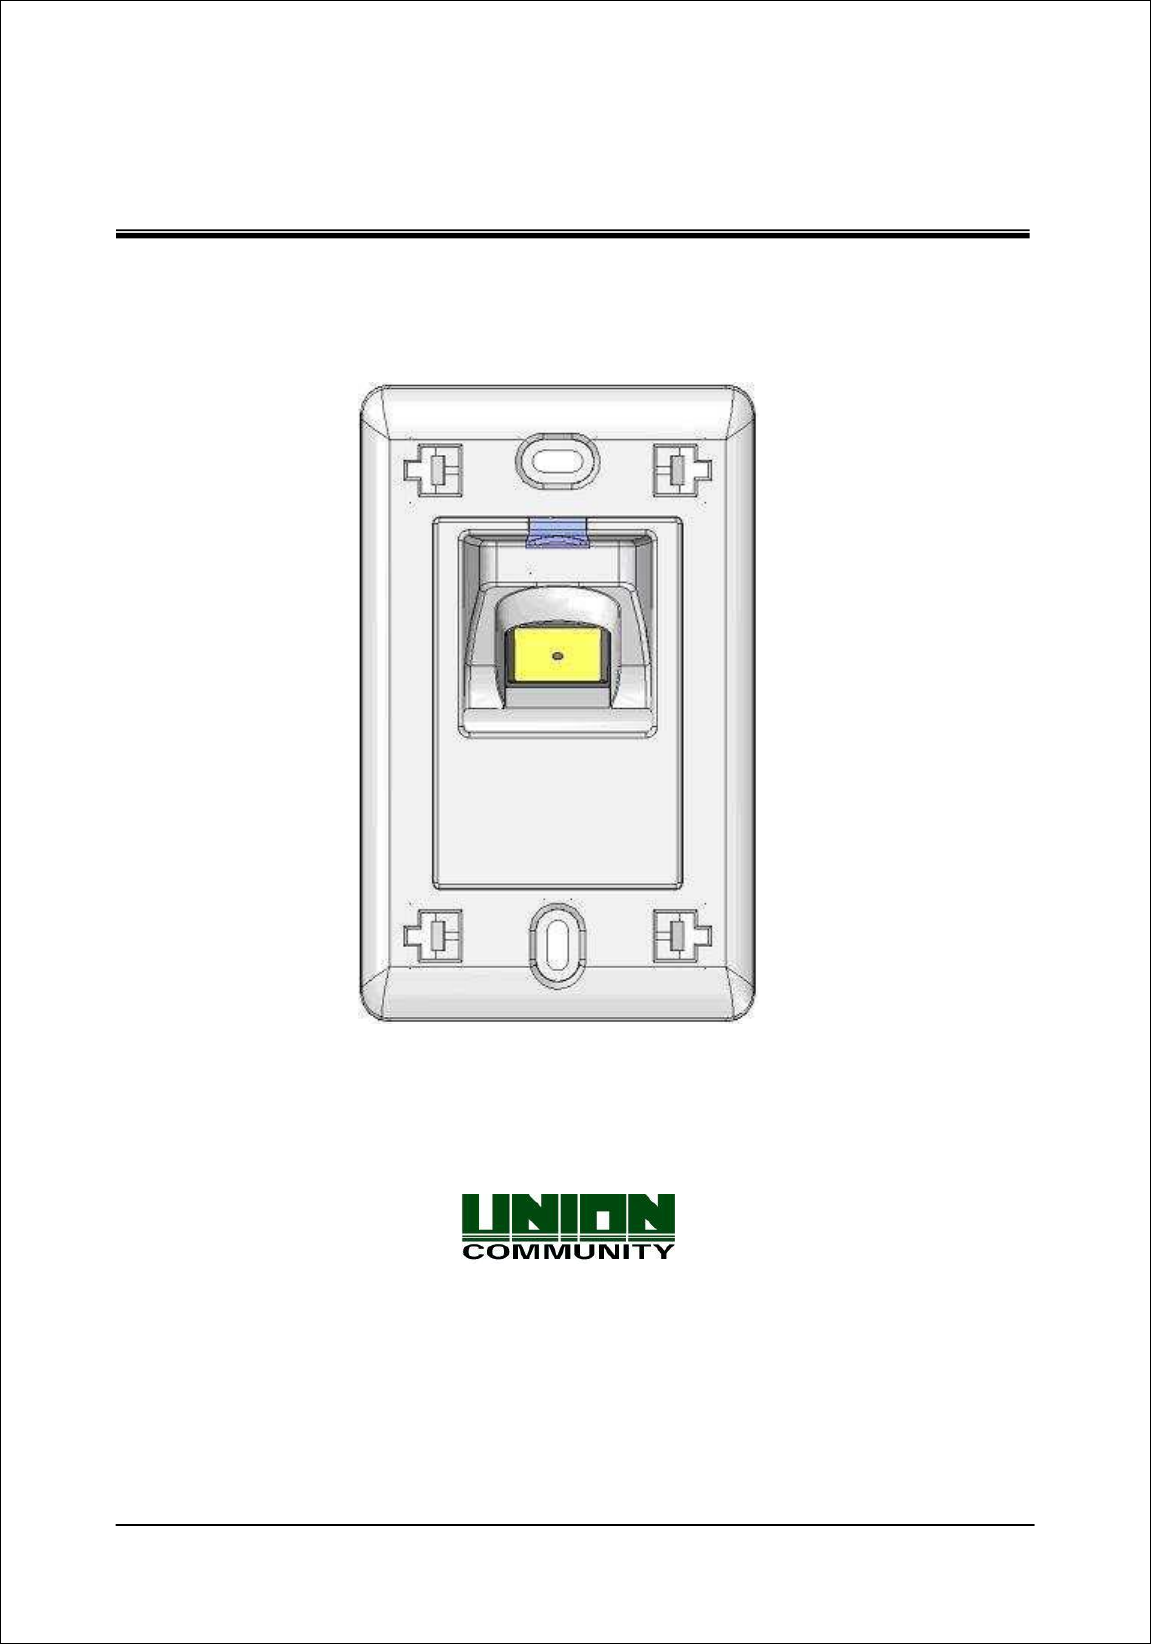
UNION COMMUNITY FMD-10 Flush Mount Door Lock User Manual Smart i UserGuide 1 00
UNION COMMUNITY Flush Mount Door Lock Smart i UserGuide 1 00
User Manual

Copyright 2014 Union Community Co., LTD.
FMD10-BLE User Guide
Version eng-1.06

FMD10 User Guide
Seoul, Songpa-gu, Bangi-dong 44-3 Hyundai Topics Bldg 9F (138-050)
Tel : 02-6488-3000 , Fax : 02-6488-3099, E-Mail :sales@unioncomm.co.kr
http://www.virditech.com
<Revision History>
Version
Date
Description
Firmware Version
1.00
2014-08-06
Initial Release
10.61.00-000.16
1.01
2014-08-07
Changed default values
1.06
2015-10-19
FMD10-BLE changes
20.62.00-000
< Glossary >
Admin, Administrator
- As a user who can enter into the terminal menu mode, he can register/modify/delete
terminal users and change the operating environment by changing settings.
- If there is no administrator for a terminal, anyone can change the settings, so it is
recommended to register at least one administrator.
- Caution is required with registration and operation because an administrator has the
right to change critical environmental settings of the fingerprint recognition unit.
Authentication Method
- Various Kinds of authentication including FP (fingerprint) authentication, RF (Card)
authentication, or a combination of these methods.
Ex) Card or FP: Card or fingerprint is used for authentication.
Bell Button
- Used to activate a bell/device/door phone that is externally connected to the device.

FMD10 User Guide
Seoul, Songpa-gu, Bangi-dong 44-3 Hyundai Topics Bldg 9F (138-050)
Tel : 02-6488-3000 , Fax : 02-6488-3099, E-Mail :sales@unioncomm.co.kr
http://www.virditech.com
Table of Contents
<Revision History> ................................................................................................... 2
< Glossary > .............................................................................................................. 2
Table of Contents ..................................................................................................... 3
1. Read Before Using ............................................................................................... 4
1.1. Safety precautions ...................................................................................... 4
1.2. Specification ................................................................................................ 5
1.3. Device description ....................................................................................... 6
1.4. LED operation .............................................................................................. 6
1.5. Door Bell Key Operation ............................................................................. 7
1.6. Buzzer sound during operation .................................................................. 7
1.7. Correct fingerprint registration and input methods ................................. 7
2. Introduction .......................................................................................................... 9
2.1. Description ................................................................................................... 9
2.2. Features ....................................................................................................... 9
2.2. Configuration ............................................................................................. 10
2.2.1. Standalone Configuration ................................................................... 10
3. Environment Settings ........................................................................................ 11
3.1. Parameters ................................................................................................. 11
4. How to use the terminal ..................................................................................... 13
4.2. Authentication ........................................................................................... 13
4.2.1. Fingerprint authentication ................................................................... 13
4.2.2. Card authentication ............................................................................ 13
4.2.3. Successful Authentication ................................................................... 13
4.2.4. Door Bell Operation ............................................................................ 13

FMD10 User Guide
Seoul, Songpa-gu, Bangi-dong 44-3 Hyundai Topics Bldg 9F (138-050)
Tel : 02-6488-3000 , Fax : 02-6488-3099, E-Mail :sales@unioncomm.co.kr
http://www.virditech.com
1. Read Before Using
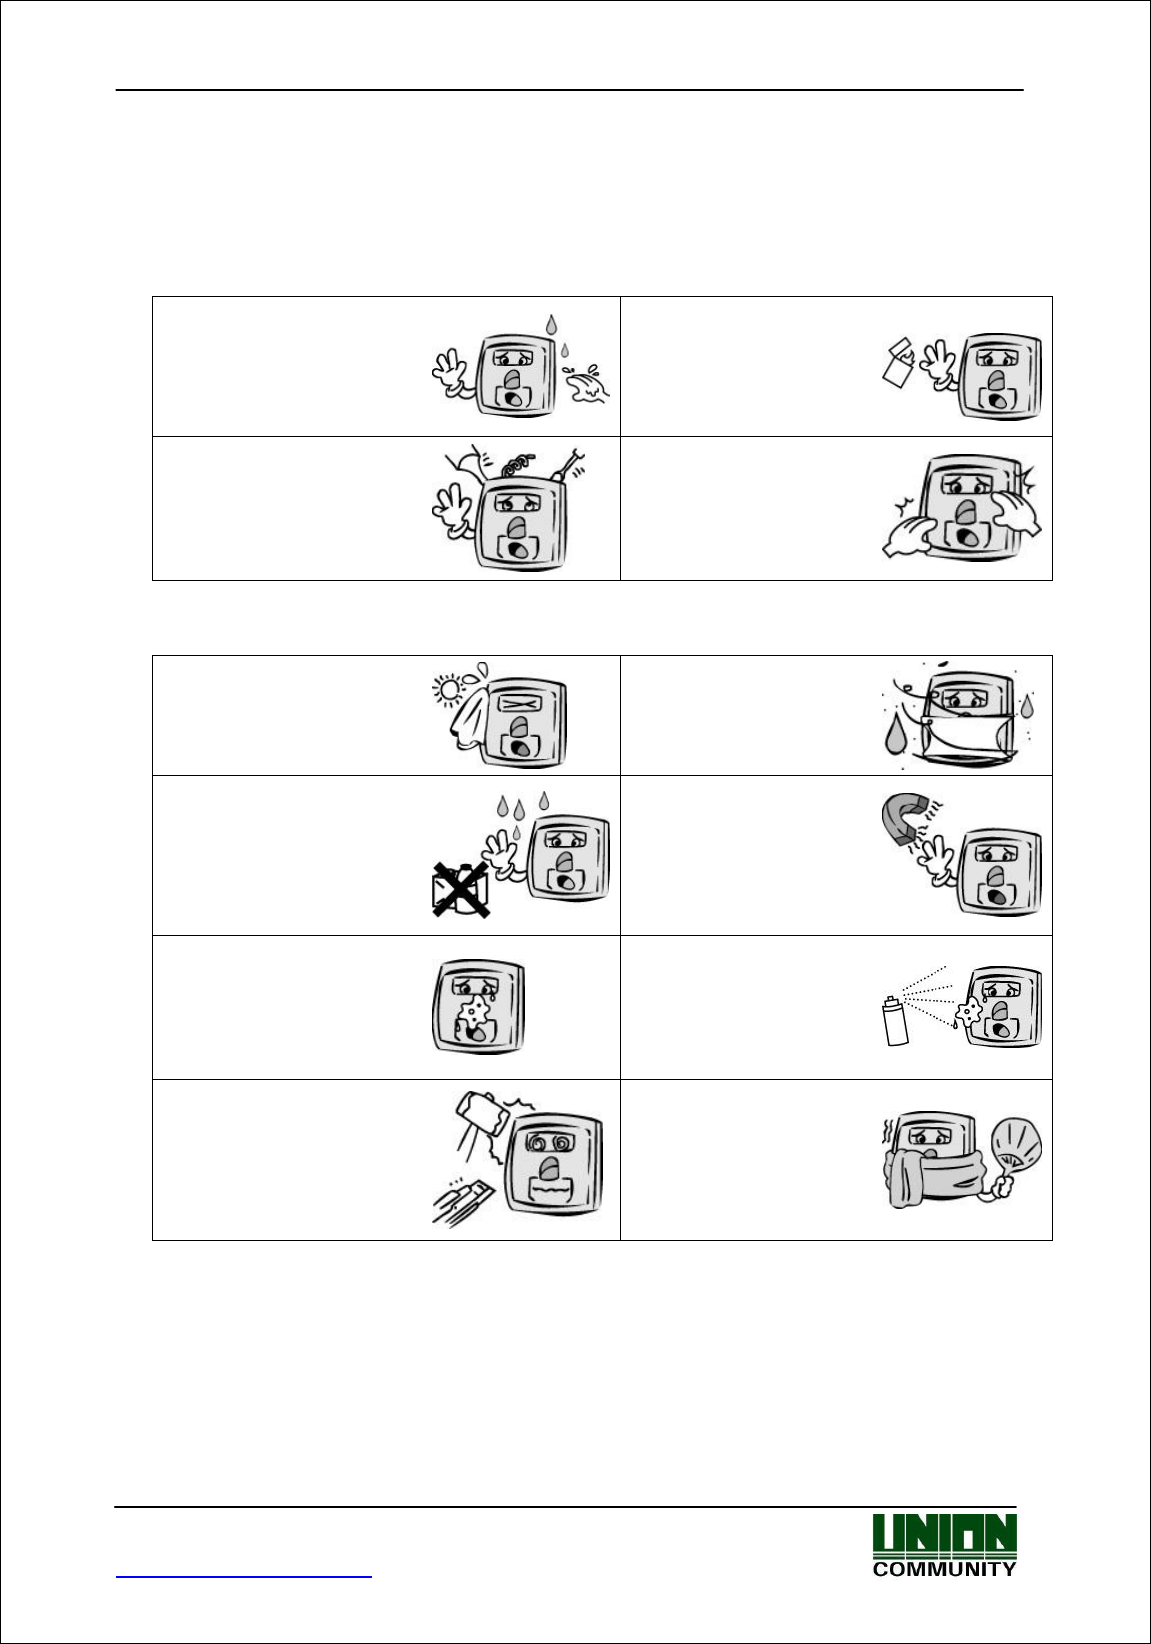
1.1. Safety precautions
Warning
Handling with wet hands or
allowing liquid to flow into it
is not advised.
-> it may cause an electric
shock or damage.
Do not place a fire source
near the unit.
It may cause a fire.
Do not disassemble, repair,
or modify the unit.
-> It may cause an electric
shock, fire or damage.
Keep out of reach of
children.
-> It may cause an
accident or damage.
- If the above warnings are ignored, it may result in death or serious injury.
Cautions
Keep away from direct
sunlight
-> It may cause
deformation or color
change.
Avoid high humidity or
dust
-> The unit may be
damaged.
Avoid using water,
benzene, thinner, or alcohol
for cleaning
-> It may cause an electric
shock or fire.
Do not place a magnet
close to the unit.
-> The unit may break
down or malfunction.
Do not contaminate the
fingerprint input area.
-> Fingerprints may not be
well recognized.
Avoid using insecticides
or flammable sprays near
the unit.
-> It may result in
deformation or color
change.
Avoid impacts or using
sharp objects on the unit.
-> The unit may be
damaged and broken.
Avoid severe temperature
changes.
-> The unit may be
broken.
- If the above cautions are ignored, it may result in property loss or human injury.
※ Under no circumstances will Union Community be responsible for accidents or damages
caused by inappropriate use of the product caused by not referring to the user manual.

FMD10 User Guide
Seoul, Songpa-gu, Bangi-dong 44-3 Hyundai Topics Bldg 9F (138-050)
Tel : 02-6488-3000 , Fax : 02-6488-3099, E-Mail :sales@unioncomm.co.kr
http://www.virditech.com
1.2. Specification
ITEM
SPEC
REMARK
CPU
32Bit RISC CPU(400MHz)
RTC
CPU RTC / Lithium Battery
Time/Date for Logs
Bell Key
Capacitive Touch Sensor
Activate Bell Output
LED
3 Colors (Red, Green, Blue)
Buzzer
Audible feedback buzzer
MEMORY
64M SDRAM
4M NOR Flash
1,000 User
(1,000 Finger)
Fingerprint Sensor
Optical
Authentication Speed
<1 sec.
Scan Area / Resolution
13.2 * 15.2 mm / 500 DPI
260*300
FRR / FAR
0.1% / 0.001%
Temperature /
Humidity
Operating Current
Standby: 80mA
Maximum: 250mA
AC / DC Adapter
INPUT : Universal AC 100 ~ 250V
OUTPUT : DC 12V
UL, CSA, CE Approved
Communication Port
Bluetooth: Bluetooth v2.1 + EDR
Class 2 Output Power
B-UNIS Smartphone
application
RS-485
BLC015/LC010
Wiegand Out
Standard 26/34 bit
Wiegand
Lock
Lock Normally Closed/Open
Door Lock
Monitoring
M0, M1 Inputs
Door monitoring
Inside Open
IO
Exit Button Input
Bell Output
Bell A/B
Max Current = 60mA
Door phone/bell
output
Card Reader
125KHz RF (optional)
13.56MHz SC
SIZE
72mm * 111mm * 41.4mm

FMD10 User Guide
Seoul, Songpa-gu, Bangi-dong 44-3 Hyundai Topics Bldg 9F (138-050)
Tel : 02-6488-3000 , Fax : 02-6488-3099, E-Mail :sales@unioncomm.co.kr
http://www.virditech.com
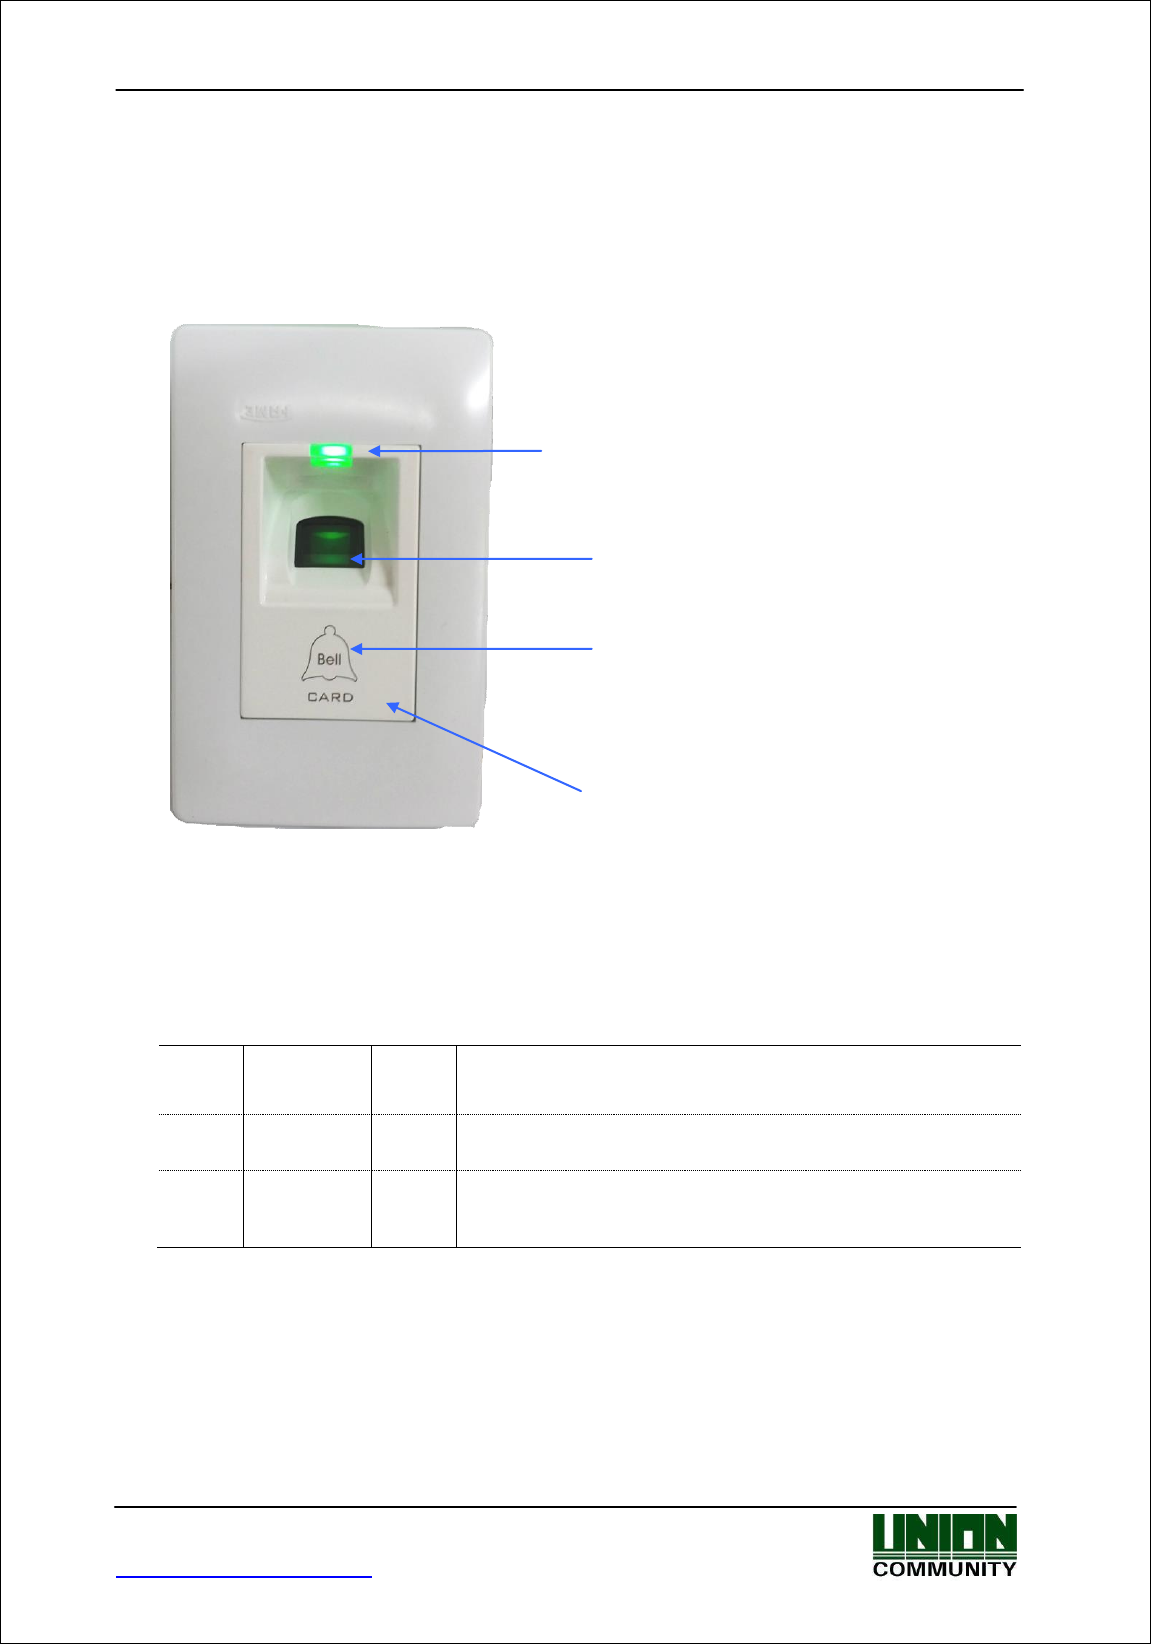
1.3. Device description
1.4. LED operation
●
Failure
Red
Light off : Normal
Light on : When authentication is failed
●
Success
Green
Light on: Card or Fingerprint successful authentication.
Will turn on for the door open period duration.
●
Status
Blue
Flickering : Bluetooth connection status ( if enabled)
Light on: When “LED always on” is set in the terminal
settings.
3 Color LED
(Red, Green, Blue)
Fingerprint Sensor
Card input area
Capacitive Touch Bell Button

FMD10 User Guide
Seoul, Songpa-gu, Bangi-dong 44-3 Hyundai Topics Bldg 9F (138-050)
Tel : 02-6488-3000 , Fax : 02-6488-3099, E-Mail :sales@unioncomm.co.kr
http://www.virditech.com
1.5. Door Bell Key Operation
Normal Operation
When pressed beep sound is emitted and the bell output will
activate ( Door Bell Operation)
Initialize Parameters
1) Apply Power
2) Within 1 second press and hold the bell key for 2 seconds
BLE Register Mode
When registering the device with the mobile application press
and hold the Door Bell Key for 5 seconds.
1.6. Buzzer sound during operation
“beep”
Pressing Bell
button or a
reading a card
When a button is pressed or a card is being read
When fingerprint input is completed, allowing the user to
remove his fingerprint
“beep beep”
Failed
Authentication failed or wrong user input
“beep,beep
beep”
Successful
Authentication successful or settings for the current
user are completed.
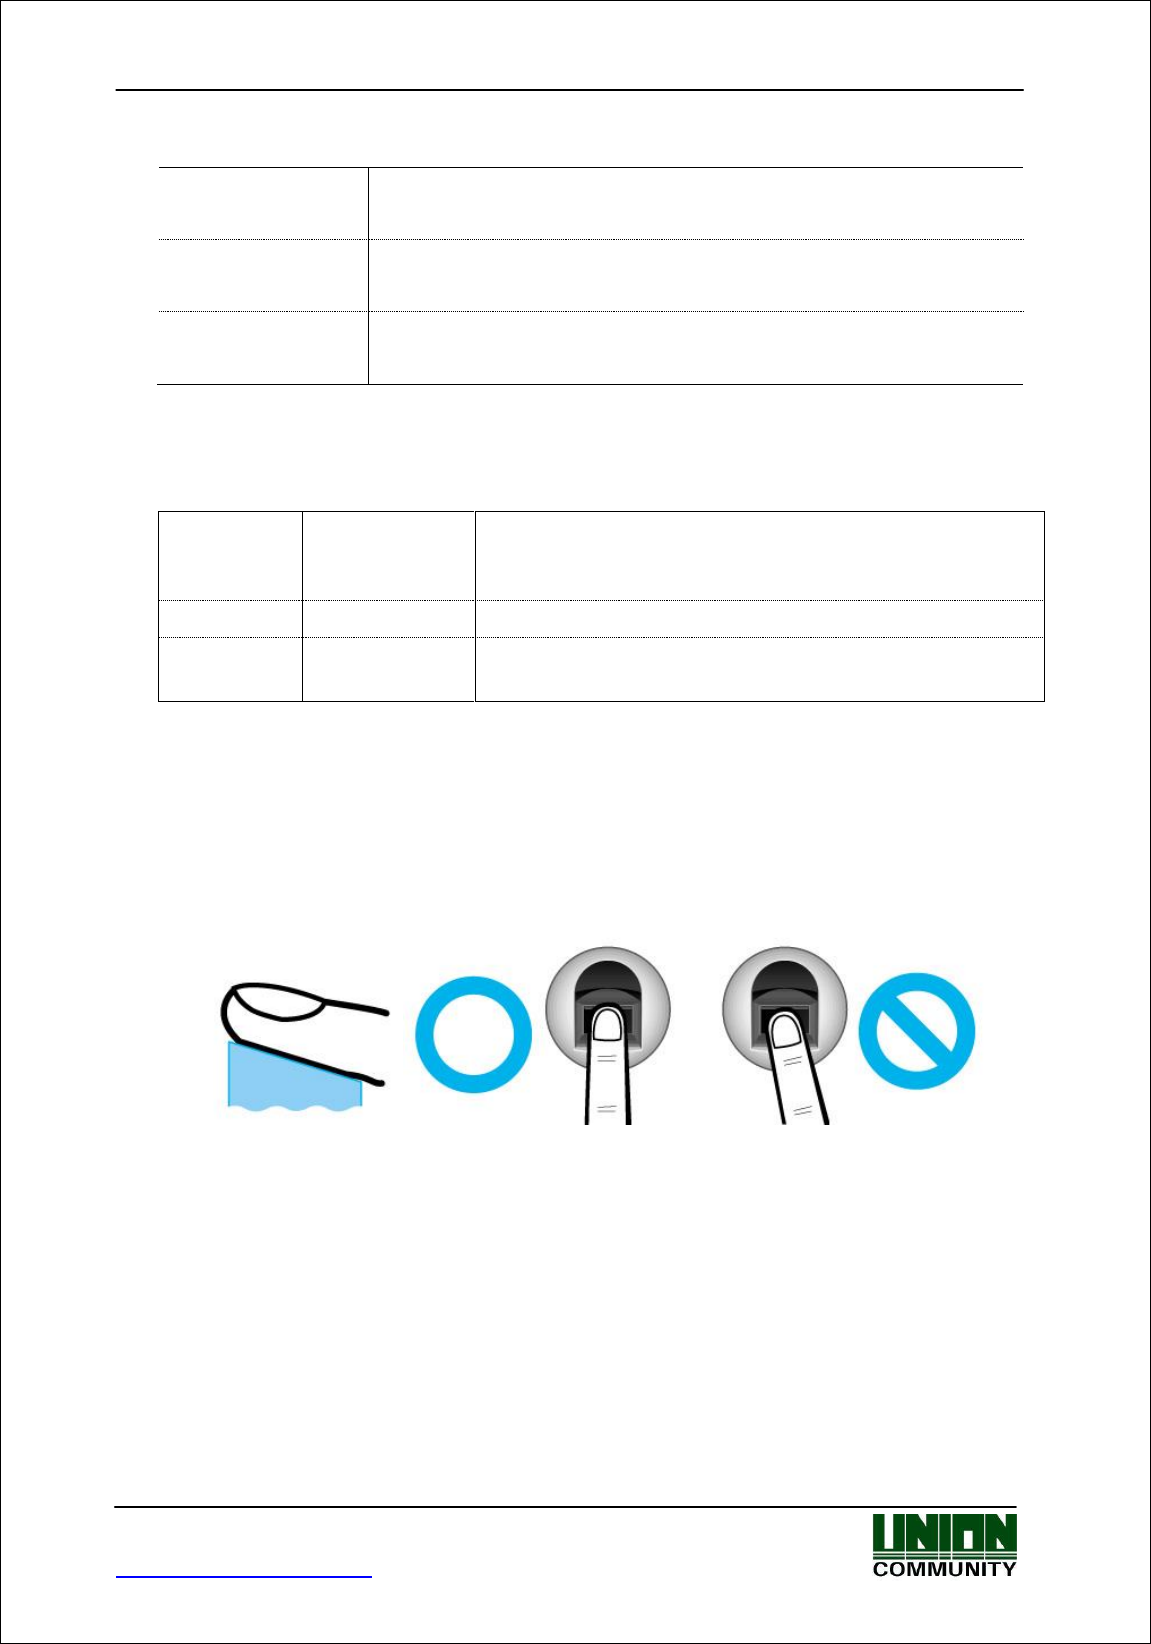
1.7. Correct fingerprint registration and input methods
Correct fingerprint registration methods
Place your index finger on the window just as you do with a finger stamp.
Finger tip touching is not an appropriate registration or input method.
Make sure the center of your finger touches the window.
Use your index finger.
The index finger guarantees an accurate and stable fingerprint input.
* Check if your fingerprint is unclear or damaged.
It is difficult to recognize fingerprints on dry, wet, unclear, or injured fingers.
Use another finger in this case.

FMD10 User Guide
Seoul, Songpa-gu, Bangi-dong 44-3 Hyundai Topics Bldg 9F (138-050)
Tel : 02-6488-3000 , Fax : 02-6488-3099, E-Mail :sales@unioncomm.co.kr
http://www.virditech.com
Cautions about fingerprint condition
Depending on the user’s fingerprint condition, some fingerprints may not be used or
may cause an inconvenience.
If the fingerprint is damaged or very unclear, then it cannot be recognized.
Please use a password instead in this case.
When a finger is dry, breathe on the finger for smooth operation.
For kids, it may be tricky or impossible to use the unit because their fingerprints
are too small or very unclear. It is recommended to register their fingerprints every
six months.
For the elderly, it may not be possible to register their fingerprints if there are too
many fine lines on the fingerprints.
It is recommended that you register more than 2 fingerprints.

FMD10 User Guide
Seoul, Songpa-gu, Bangi-dong 44-3 Hyundai Topics Bldg 9F (138-050)
Tel : 02-6488-3000 , Fax : 02-6488-3099, E-Mail :sales@unioncomm.co.kr
http://www.virditech.com
2. Introduction
2.1. Description
FMD10 is a flush mount access control device. It can be used in small/medium business
applications or residential access control. FMD10 will provide access into a secured area
using a registered fingerprint or card. A door bell feature is available for connecting the FMD10
to a door phone or door bell for visitors.
FMD10 communicates using Bluetooth Low Energy (BLE) Technology to the UNIS-B Plus or
imKey mobile application for mobile key access and/or administrative functions.
2.2. Features
Bluetooth v4.0 Communication
- Simple setup using UNIS-B Plus smartphone application
Log management
Firmware upgrade
User Management
Optical Fingerprint Sensor
Auto Sensing - Simple authentication process without any key input
Live Finger Detection (LFD) – Programmable LFD level for detecting real/fake
fingerprints.
Card Reader
Smart card reader (standard) or optional 125KHZ RF reader.
Door Bell
- Capacitive touch key for activating an externally connected door phone/bell for
visitors.

FMD10 User Guide
Seoul, Songpa-gu, Bangi-dong 44-3 Hyundai Topics Bldg 9F (138-050)
Tel : 02-6488-3000 , Fax : 02-6488-3099, E-Mail :sales@unioncomm.co.kr
http://www.virditech.com
2.2. Configuration
2.2.1. Standalone Configuration
Please see the B-UNIS SmartApp User Guide for setup and connection information
Establish Bluetooth connection to B-UNIS smartphone application
- B-UNIS Password: 9999
- Basic setup when released from a factory
NOTE: If the B-UNIS Password is lost and you cannot connect to the FMD10 you should
factory initialize the device see 1.5. Door Bell Key Operation
● FMD10
B-UNIS

FMD10 User Guide
Seoul, Songpa-gu, Bangi-dong 44-3 Hyundai Topics Bldg 9F (138-050)
Tel : 02-6488-3000 , Fax : 02-6488-3099, E-Mail :sales@unioncomm.co.kr
http://www.virditech.com
3. Environment Settings
3.1. Parameters
Setup parameters are set from the B-UNIS Smartphone application:
Terminal/Device Name: 1-30 characters
This is the FMD10 name for identifying the device from the Bluetooth
Default: FMD10_99999999
Buzzer Sound: ON/OFF
This is to control the buzzer output
Default: ON
Bluetooth Status LED: Enable/Disable
If enabled the blue LED will flicker when successfully connected to the B-UNIS application
Default: ON
Blue LED: Enable/Disable
If enabled the blue LED will always be on and if connected to the B-UNIS application the blue LED will
turn off. If Bluetooth status LED is enabled, the blue LED will flicker when connected.
Default: ON
LFD Level: Off/Low/Medium/High
Live Finger Detection for fingerprint detection. This feature can be used for higher security applications
when the user would like to protect against fake fingerprints. If the level is too high some registered
users may take longer for fingerprint authentication.
Default: Off
Logon Password: 1-16 characters
This password is used for logging into the B-UNIS application via the smartphone.
Default: 9999
Door Status #1: Disabled/Normally Open/Normally Closed
If a monitoring device (door lock) is connected to the M0 input on the FMD10, this value should be set
according to the external device settings. (NO or NC)
Default: Disabled
Door Status #2: Disabled/Normally Open/Normally Closed/Fire Normally Open/Fire Normally Closed
If a monitoring device is connected to the M1 input on the FMD10, this value should be set according to
the external device settings, if connected to an external fire system and a fire is detected, the FMD10
will open the door. (NO or NC).
Default: Disabled
Door Open Time: 1-60 seconds
This is the lock activation period. If a lock is connected to the lock output, the lock will open for this
period.
Default: 3
Bell Touch Key: 100-5000ms (0=disabled)
If the bell key is used for a door bell, this is the period in which the bell button must be pressed for. If 0
is set the bell touch key is disabled.
Default: 5000ms
Bell Activation Period: 0-60 seconds
If the Bell touch key is pressed, this is the period in which the bell output will activate. 0 = disabled.
Default: 1 second

FMD10 User Guide
Seoul, Songpa-gu, Bangi-dong 44-3 Hyundai Topics Bldg 9F (138-050)
Tel : 02-6488-3000 , Fax : 02-6488-3099, E-Mail :sales@unioncomm.co.kr
http://www.virditech.com
Card Format:Hexa Reversed, Hexa Normal, Decimal, Decimal_2
When a card is scanned this setting determines the encoding format of the card.
Default: Hexa Reversed
Wiegand Output: Disabled/26 bit/34 bit
If the FMD10 is connected to an external controller using the Wiegand outputs, this is the format of the
User ID sent to the external controller using wiegand. Note: Only a successful authentication will send
the user id via wiegand
Default: Disabled
Wiegand SiteCode: 0-255 decimal
If wiegand output is enabled, this is the 3 digit ID code sent before the user id on the wiegand output
( i.e 2551234) this is 255 and user ID=1234.
Default: 0
Lock Function:
LOCAL= Set this option if connecting your lock device on the FMD10 device. (Default setting)
BLC015/LC010 = Set this option if connecting your lock to the LC010 or BLC015.
485ID = (Unsupported, Do not use) Set this option, and then set ID from 0-7 if using the 485A/B
connected to an external controller.
Note: For all devices externally connected to the FMD10 (locks, monitoring, wiegand, etc). Please see
the FMD10 Installation and Wiring Diagram.
When setting for BLC015/LC010, the lock output and the Inside Open on the FMD10 will not operate. In
this case the lock should only be connected to the BLC015/LC010.
1:N Level: valid entries from 3-9
This option represents the security level between the captured fingerprint (from the sensor window),
and the fingerprints stored in the terminal. This level represents the terminal level, not individual users.
Possible values are from 3-9.The higher the value, the higher the security level, which means more
comparisons are done on the fingerprint data. If user’s fingerprints are failing during authentication you
should lower this value.
1:1 Level: valid entries from 1-9
This option represents the matching security level in the device between the captured fingerprint (from
the sensor window) and the stored fingerprint in the database for that user. This value is used when the
card & fingerprint authentication type is used. Instead of comparing the captured fingerprint with all the
database fingerprints, only the user’s fingerprint is compared. Possible values are from 1-9. The higher
the value level, the higher the security level; however authentication matching may fail since more
matching is done on the fingerprint data.

FMD10 User Guide
Seoul, Songpa-gu, Bangi-dong 44-3 Hyundai Topics Bldg 9F (138-050)
Tel : 02-6488-3000 , Fax : 02-6488-3099, E-Mail :sales@unioncomm.co.kr
http://www.virditech.com
4. How to use the terminal
4.2. Authentication
4.2.1. Fingerprint authentication
When you place your finger on the fingerprint sensor, the light of the sensor will turn on
and the buzzer will beep indicating a successful fingerprint scan. You should not remove
your finger until the beep is heard. If there are no registered users in the FMD10, the
fingerprint light will not turn on.
4.2.2. Card authentication
Swipe a card on the card input area.
4.2.3. Successful Authentication
When a registered card or fingerprint is detected the FMD10 can activate a lock output for
a programmable period of time to open the door. The beeper will indicate a successful entry
and the LED will light up green color for the door open period.
4.2.4. Door Bell Operation
If the bell button is pressed for the bell touch period, the bell output will activate for a
programmable period of time (Bell Activation Period). The device will annunciate a ‘ding-dong’
sound and the LED will flash.
If a fingerprint or card is used during the Bell Activation Period, the bell will immediately
turn off.
If a fingerprint or card is used the bell button will not accept any button presses until the
door open duration has expired

FCC Information
This device complies with part 15 of the FCC Results. Operation is subject to the
following two conditions :
(1) This Device may not cause harmful interface, and
(2) This device must accept any interference received, including interference that
may cause undesired operation.
Note: This equipment has been tested and found to comply with the limits for CLASS B digital
device, pursuant to Part 15 of FCC Rules. These limits are designed to provide reasonable
protection against harmful interference when the equipment is operated in a commercial
environment This equipment generates, uses and can radiate radio frequency energy and, if not
installed and used in accordance with the instructions, may cause harmful interference to radio
communications. However, there is no guarantee that interference will not occur in a particular
installation. If this equipment does cause harmful interference to radio or television reception,
which can be determined by turning the equipment off and on, the user is encouraged to try
correct the interference by one or more of the following measures:
1.1. Reorient or relocate the receiving antenna.
1.2. Increase the separation between the equipment and receiver.
1.3. Connect the equipment into an outlet on a circuit different from that to which receiver is
connected.
1.4. Consult the dealer or experienced radio/TV technician for help.
WARNING
Changes or modifications not expressly approved by the manufacturer could void the
user’s authority to operate the equipment.
Contains FCC ID: 2AEEY-PBLN51822M