UNION COMMUNITY SMART-I fingerprint terminal User Manual users manual
UNION COMMUNITY fingerprint terminal users manual
users manual
Copyright 2000 By Union Community Co., LTD.
Smart-i. User Guide
Version eng-1.01

Smart-i 사용자 가이드 2
㈜유니온커뮤니티 / 서울시 송파구 방이동 44-3 현대토픽스 빌딩 3층 (138-050)
Tel : 02-6488-3000 , Fax : 02-6488-3099, E-Mail :sales@unioncomm.co.kr
http://www.unioncomm.co.kr
<Revison History>
Version Date Description Firmware Version
1.01 2012-08-30 Initial Release 10.51.00-000.13
< Glossary >
Admin, Administrator
- As a user who can enter into the terminal menu mode, he can register/modify/delete
terminal users and change the operating environment by changing settings.
- If there is no administrator for a terminal, anyone can change the settings, so it is
recommended to register at least one administrator.
- Caution is required with registration and operation because an administrator has the
right to change critical environmental settings of the fingerprint recognition unit.
Authentication Method
- Various Kinds of authentication including FP(fingerprint) authentication, RF(Card)
authentication, or a combination of these methods.
Ex) Card or FP: Card or fingerprint is used for authentication.
Function Keys
- [F1], [F2], [F3], [F4] are used to get in the menu and each key represents each
authentication mode.

Smart-i 사용자 가이드 3
㈜유니온커뮤니티 / 서울시 송파구 방이동 44-3 현대토픽스 빌딩 3층 (138-050)
Tel : 02-6488-3000 , Fax : 02-6488-3099, E-Mail :sales@unioncomm.co.kr
http://www.unioncomm.co.kr
Table of Contents
<Revison History>.................................................................................................... 2
< Glossary >..............................................................................................................2
Table of Contents ..................................................................................................... 3
1. Before use............................................................................................................. 4
1.1. Safety precautions ...................................................................................... 4
1.2. Terminal description....................................................................................5
1.3. LED signal during operation.......................................................................5
1.4. Function key information during operation .............................................. 5
1.5. Voice information during operation ........................................................... 6
1.6. Buzzer sound during operation.................................................................. 6
1.7. Correct fingerprint registration and input methods ................................. 6
2. Introduction .......................................................................................................... 8
2.1. Features ....................................................................................................... 8
2.2. Configuration............................................................................................... 9
2.2.1. Standalone Configuration (AP Mode) ................................................... 9
2.2.2. Network Configuration .......................................................................... 9
2.3. Specifications ............................................................................................ 10
3. Environment Settings ........................................................................................ 11
3.1. Check items before setting the environment.......................................... 11
3.1.1. Entering menu .................................................................................... 11
3.1.2. How to enter menu without admin authentication............................... 11
3.2. Menu Configuration................................................................................... 12
4. How to use the terminal ..................................................................................... 12
4.1. Changing authentication mode................................................................ 12
4.2. Authentication............................................................................................12
4.2.1. Fingerprint authentication ................................................................... 12
4.2.2. Card authentication ............................................................................ 12

Smart-i 사용자 가이드 4
㈜유니온커뮤니티 / 서울시 송파구 방이동 44-3 현대토픽스 빌딩 3층 (138-050)
Tel : 02-6488-3000 , Fax : 02-6488-3099, E-Mail :sales@unioncomm.co.kr
http://www.unioncomm.co.kr
1. Before use
1.1. Safety precautions
Warning
Handling with wet hands or
allowing liquid to flow into it
is not advised.
-> it may cause an electric
shock or damage.
Do not place a fire source
near the unit.
It may cause a fire.
Do not disassemble, repair,
or modify the unit.
-> It may cause an electric
shock, fire or damage.
Keep out of reach of
children.
-> It may cause an
accident or damage.
- If the above warnings are ignored, it may result in death or serious injury.
Cautions
Keep away from direct
sunlight
-> It may cause
deformation or color
change.
Avoid high humidity or
dust
-> The unit may be
damaged.
Avoid using water,
benzene, thinner, or alcohol
for cleaning
-> It may cause an electric
shock or fire.
Do not place a magnet
close to the unit.
-> The unit may break
down or malfunction.
Do not contaminate the
fingerprint input area.
-> Fingerprints may not be
well recognized.
Avoid using insecticides
or flammable sprays near
the unit.
-> It may result in
deformation or color
change.
Avoid impacts or using
sharp objects on the unit.
-> The unit may be
damaged and broken.
Avoid severe temperature
changes.
-> The unit may be
broken.
- If the above cautions are ignored, it may result in property loss or human injury.
※
Under no circumstances will Union Community be responsible for accidents or damages
caused by inappropriate use of the product caused by not referring to the user manual.
Smart-i 사용자 가이드 5
㈜유니온커뮤니티 / 서울시 송파구 방이동 44-3 현대토픽스 빌딩 3층 (138-050)
Tel : 02-6488-3000 , Fax : 02-6488-3099, E-Mail :sales@unioncomm.co.kr
http://www.unioncomm.co.kr
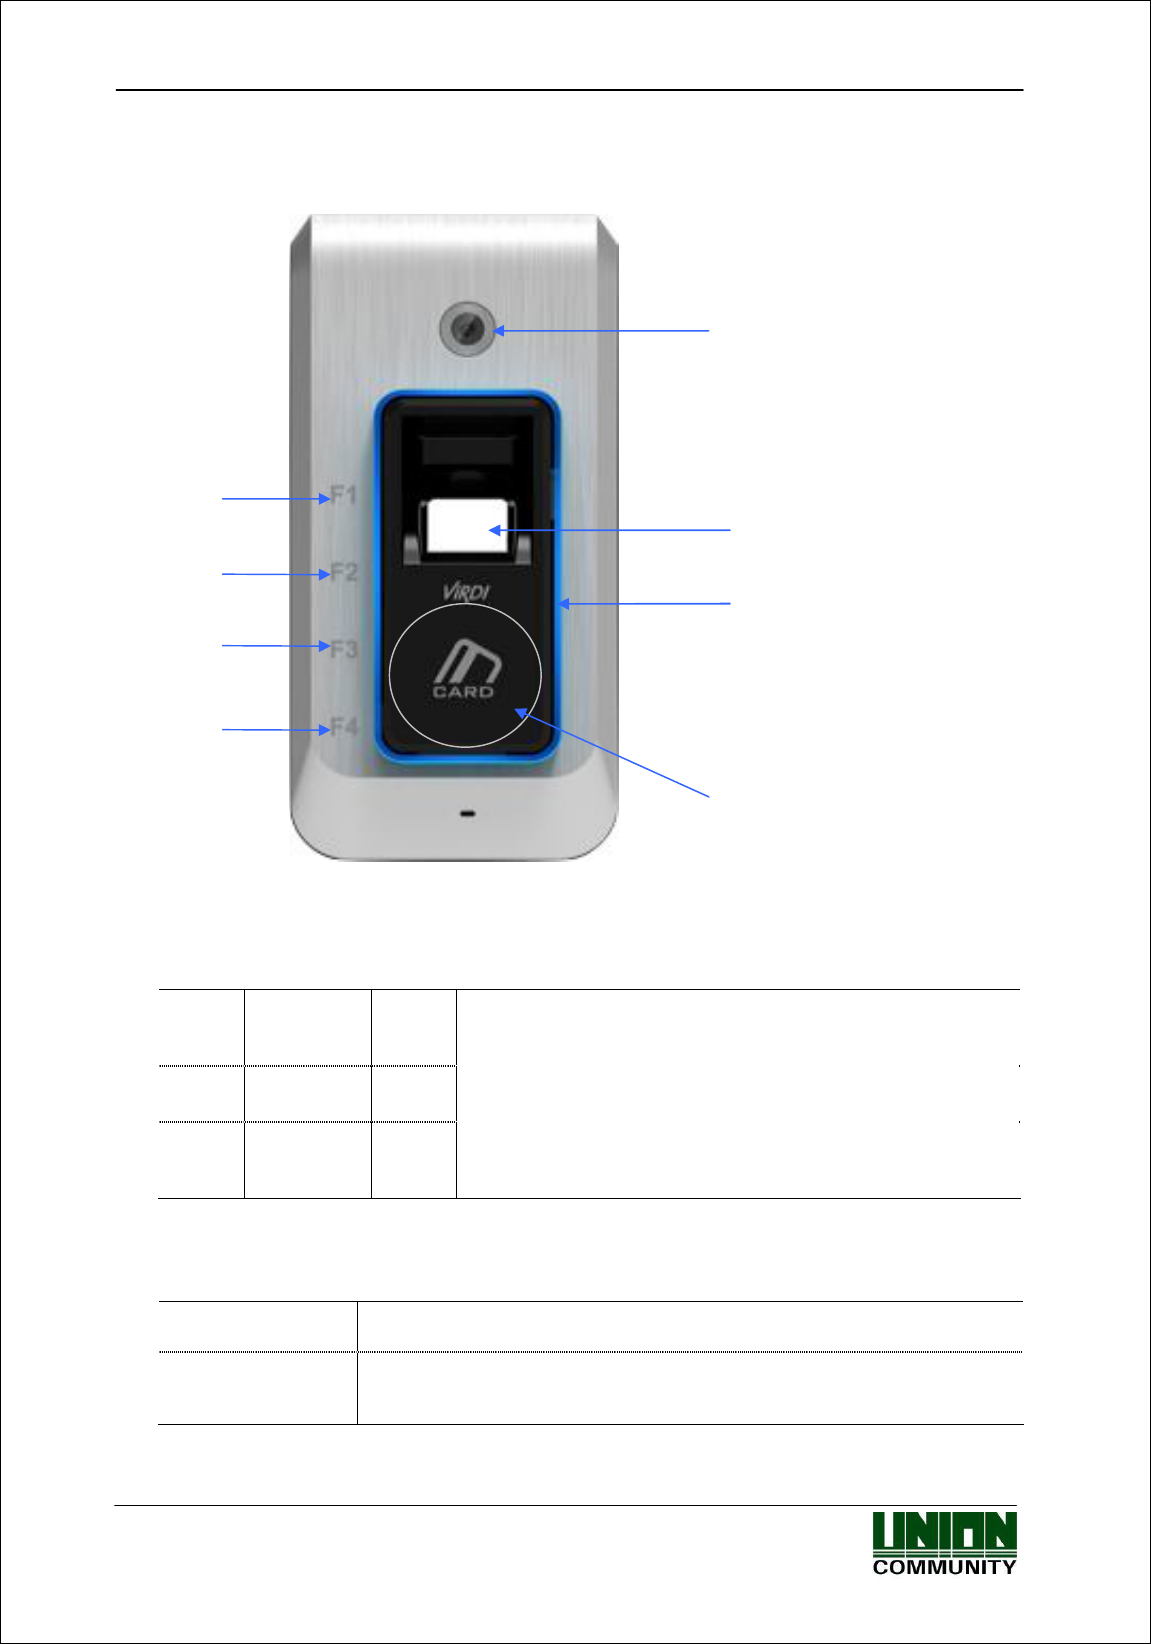
1.2. Terminal description
1.3. LED signal during operation
● Abnormal Red
Light off : Normal
Flickering : When the lid is open
Light on : When authentication is failed
● Success Green
Light on : When authentication is successful
● Condition Blue
Flickering : Waiting for a card or FP to be read
Light on :
When “LED always on” is set in the terminal
settings.
1.4. Function key information during operation
[F1]~[F4] - Keys are used to modify the authentication mode
[F4~hold it down] - It means holding [F4] down longer than 4 sec.
- It is used to enter menu.
3 Color LED (R/G/B)
Fingerprint Sensor
Card Area
Camera
Touch Key
IN
Return
Out
Egression
Smart-i 사용자 가이드 6
㈜유니온커뮤니티 / 서울시 송파구 방이동 44-3 현대토픽스 빌딩 3층 (138-050)
Tel : 02-6488-3000 , Fax : 02-6488-3099, E-Mail :sales@unioncomm.co.kr
http://www.unioncomm.co.kr
1.5. Voice information during operation
Action Voice Information
Enter fingerprint using the fingerprint input
window “Please enter your fingerprint.”
Authentication successful “You are authorized.”
Authentication failed “Please try again.”
1.6. Buzzer sound during operation
“ppig”
Pressing a key
or a reading a
card
When a button is pressed or a card is being read
When fingerprint input is completed, allowing the user to
remove his fingerprint
“ppibig” Failed Authentication failed or wrong user input
“ppiriririck” Waiting Waiting for fingerprint input
“ppiiiick” Successful Authentication successful or settings for the current user
are completed.
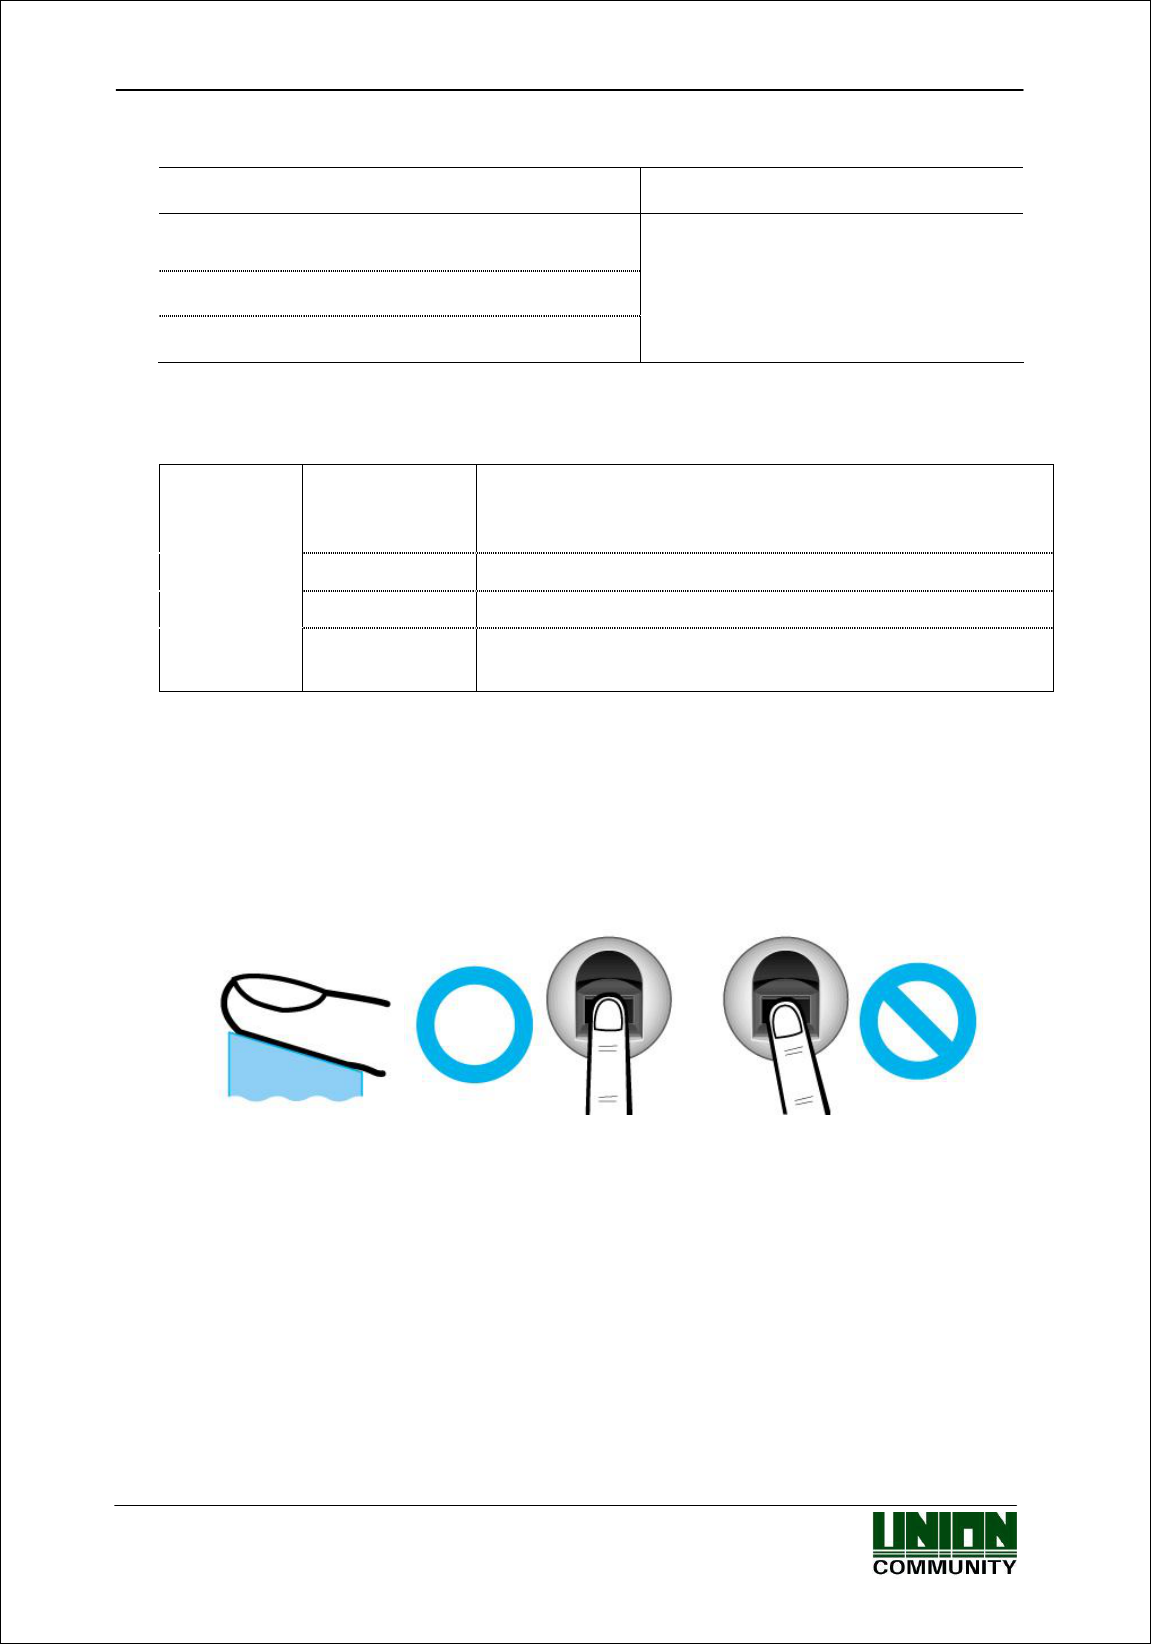
1.7. Correct fingerprint registration and input methods
Correct fingerprint registration methods
Place your index finger on the window just as you do with a finger stamp.
Finger tip touching is not an appropriate registration or input method.
Make sure the center of your finger touches the window.
Use your index finger.
The index finger guarantees an accurate and stable fingerprint input.
* Check if your fingerprint is unclear or damaged.
It is tricky to recognize fingerprints on dry, wet, unclear, or injured fingers.
Use another finger in this case.

Smart-i 사용자 가이드 7
㈜유니온커뮤니티 / 서울시 송파구 방이동 44-3 현대토픽스 빌딩 3층 (138-050)
Tel : 02-6488-3000 , Fax : 02-6488-3099, E-Mail :sales@unioncomm.co.kr
http://www.unioncomm.co.kr
Cautions about fingerprint condition
Depending on the user’s fingerprint condition, some fingerprints may not be used or
may cause an inconvenience.
If the fingerprint is damaged or very unclear, then it cannot be recognized.
Please use a password instead in this case.
When a finger is dry, breathe on the finger for smooth operation.
For kids, it may be tricky or impossible to use the unit because their fingerprints
are too small or very unclear. It is recommended to register their fingerprints every
six months.
For the elderly, it may not be possible to register their fingerprints if there are too
many fine lines on the fingerprints.
It is recommended that you register more than 2 fingerprints.

Smart-i 사용자 가이드 8
㈜유니온커뮤니티 / 서울시 송파구 방이동 44-3 현대토픽스 빌딩 3층 (138-050)
Tel : 02-6488-3000 , Fax : 02-6488-3099, E-Mail :sales@unioncomm.co.kr
http://www.unioncomm.co.kr
2. Introduction
2.1. Features
IP65 Outdoor Rating – Die Cast Casing : The terminal can be installed outdoor.
Understated Design
- Simple and understated design with minimum interface reflected without LCD
- Pursuit of convenience and luxury from simplicity
WiFi Direct Communications
- Installation is simply done using WiFi and settings of keypad and LCD can be done
using
a smartphone without extra device.
- Interworking with Unis server, it can be used as various management systems such
as Access Control, T&A and so on.
Interworking Smartphone application
- No need to interwork with PC
- Functions of enrolling users and searching for logs are provided by a smartphone
application.
1.3 Mega Pixel Camera
- The camera is used to save image logs and check them.
Convenient Auto Sensing function
- Simple authentication process without any key input; simple fingerprint touching is
sufficient.
Simply authentication using fingerprints
- Due to Biometrics fingerprint recognition technology. It is not necessary to carry a
password, card, or key, etc., or to worry about robbery. This improves the level of
security.
Smart-i 사용자 가이드 9
㈜유니온커뮤니티 / 서울시 송파구 방이동 44-3 현대토픽스 빌딩 3층 (138-050)
Tel : 02-6488-3000 , Fax : 02-6488-3099, E-Mail :sales@unioncomm.co.kr
http://www.unioncomm.co.kr
2.2. Configuration
2.2.1. Standalone Configuration (AP Mode)
- In a case of Smart-I performs AP function
- A smartphone is connected to terminal AP, and communicate.
- Name of default AP: smartiAP_Serial No., Password:1234567890 [WEP64:Shared]
- Terminal network set value
IP: 192.168.0.1, Subnet Mask: 255.255.255.0, Gateway:192.168.0.1
- Basic setup when released from a factory
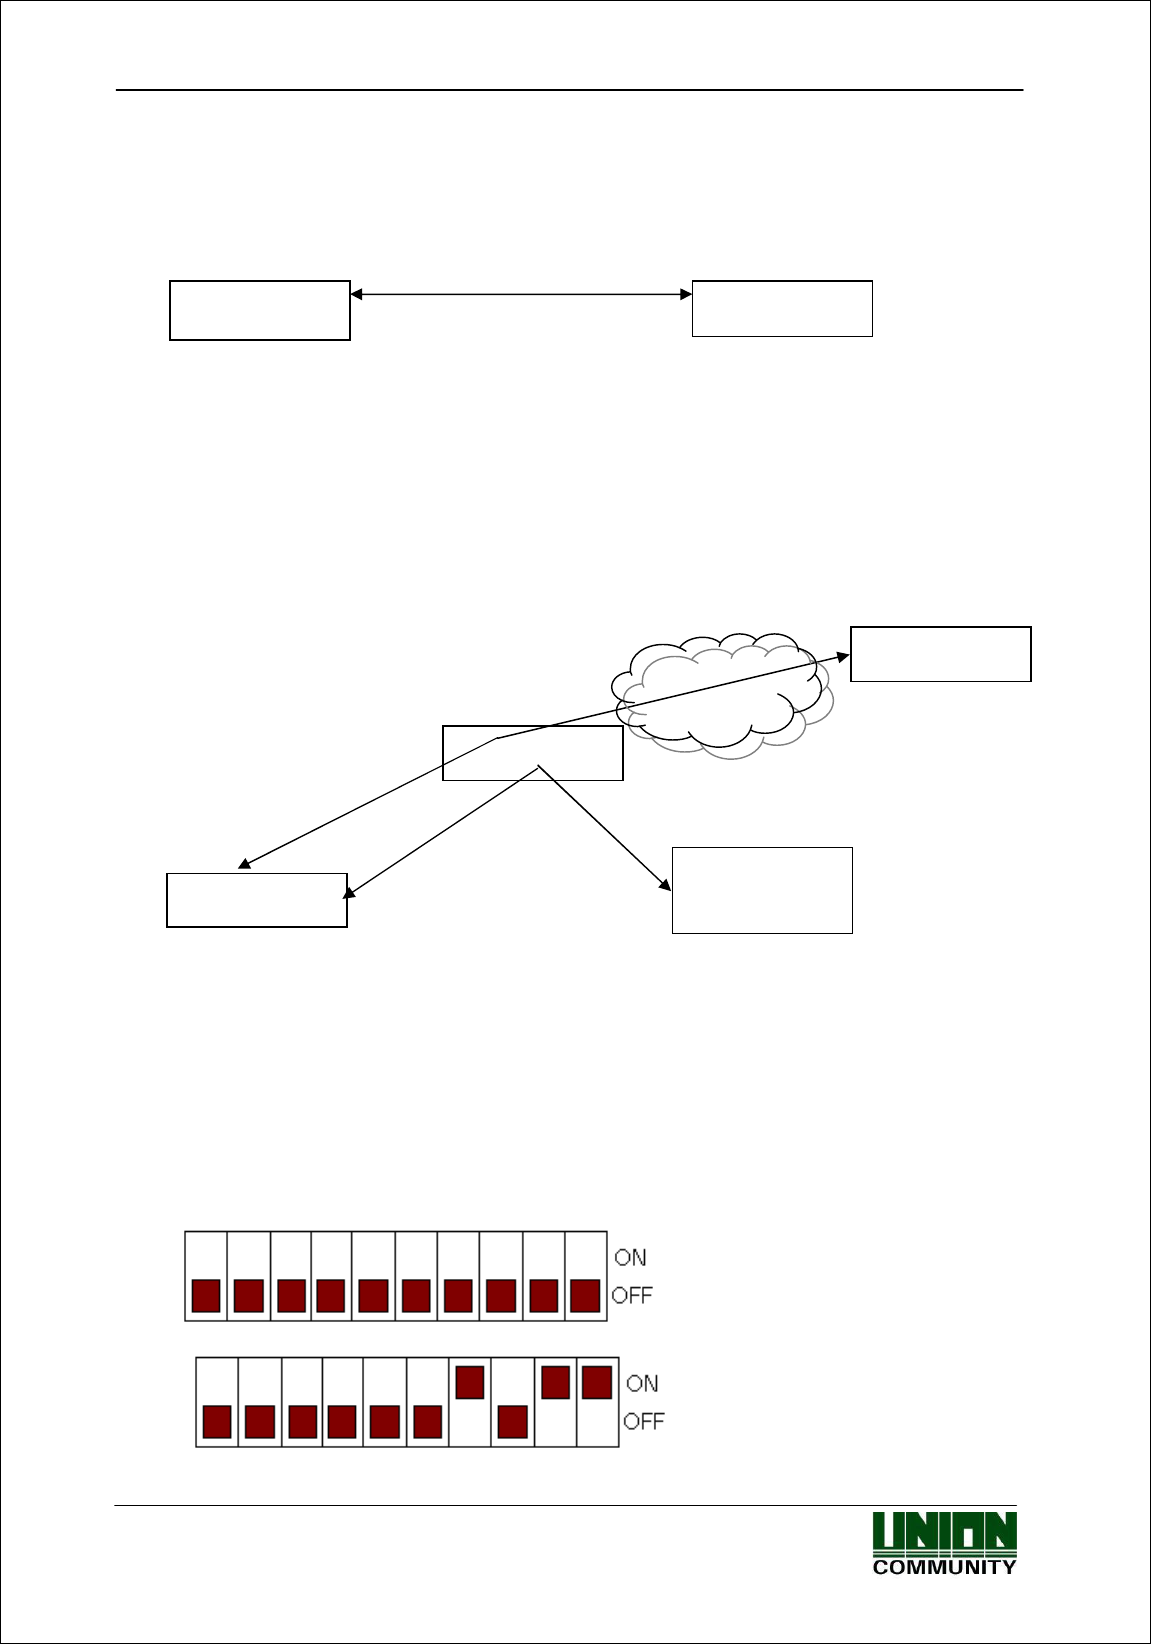
2.2.2. Network Configuration
- In a case of Smart-I has already connected to specific AP
- A smartphone connects to the same AP and communicates with the terminal
- Name of default AP: unisSvrAP, password: 1234567890 [WPAPSK_AES]
(It can be modified on smartphone application)
- Server AP setup above can be modified in terminal settings menu of
smartphone application.
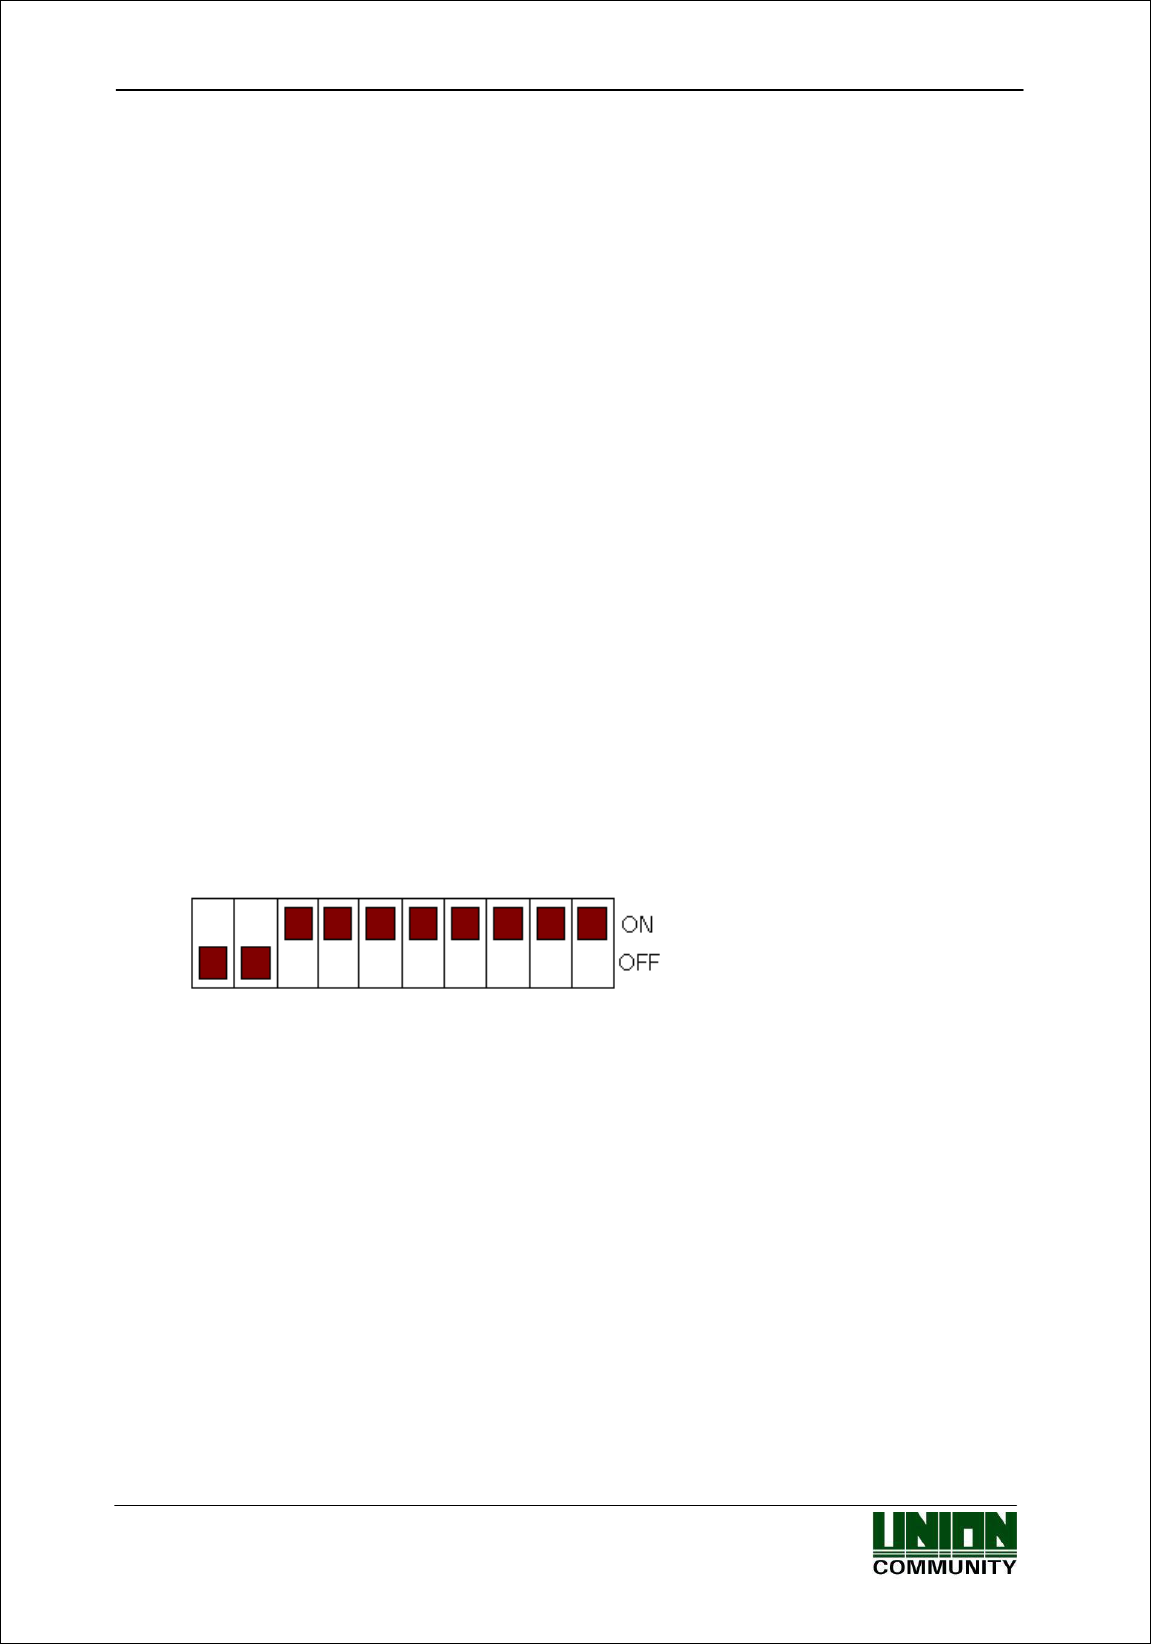
- IP address of the terminal is automatically given when connected to AP,
if you want a static IP address, you can use DIP switch (No.3 – No. 10)
on the back of the terminal like the picture below to modify.
Default: DHCP (Auto IP)
Static IP: xxx.xxx.xxx.11
AP
● Smart-i
i
-
UNIS
(Smart Phone)
UNIS Server
Internet
WAN/LAN
● Smart-i
i
-
UNIS

Smart-i 사용자 가이드 10
㈜유니온커뮤니티 / 서울시 송파구 방이동 44-3 현대토픽스 빌딩 3층 (138-050)
Tel : 02-6488-3000 , Fax : 02-6488-3099, E-Mail :sales@unioncomm.co.kr
http://www.unioncomm.co.kr
2.3. Specifications
ITEM SPEC REMARK
CPU 32Bit RISC CPU(400MHz)
Weatherproof Figure IP65
Camera 1.3M Pixel
Touch Key 4key (F1~F4)
LED 3 Colors (Red, Green, Blue)
Voice Message & Beep
8M SDRAM
MEMORY
4M + 256M FLASH
1,000 User
(1,000 Finger)
1,000,000 Log
(10,000 Image Log)
Fingerprint Sensor Optical
Authentication Speed <1 sec.
Scan Area / Resolution
15 * 17mm / 500 DPI
FRR / FAR 0.1% / 0.001%
Temperature /
Humidity
-20 ~ 50 /
Lower than 90% RH
INPUT : Universal AC 100 ~ 250V
OUTPUT : DC 12V
AC / DC Adapter
UL, CSA, CE Approved
Wifi:KCC-CRM-WWW-WIZFI210
Smartphone
application or
UNIS server
communication
Communication Port
Wiegand Out External device
communication
Card Reader 125 kHz RF
SIZE 68.0mm * 138.0mm * 41.3mm
Smart-i 사용자 가이드 11
㈜유니온커뮤니티 / 서울시 송파구 방이동 44-3 현대토픽스 빌딩 3층 (138-050)
Tel : 02-6488-3000 , Fax : 02-6488-3099, E-Mail :sales@unioncomm.co.kr
http://www.unioncomm.co.kr
3. Environment Settings
3.1. Check items before setting the environment
3.1.1. Entering menu
▶ [Hold (F4) down] (Blue LED light flickering) Admin authentication (Red &
Green LED lights on) Menu mode
When you hold [F4] down longer than 4 sec, you enter menu.
At this moment, if a registered admin exists, blue LED light is flickering and it is waiting
for administrator authentication.
When card or FP authentication is successful, you enter menu, red and green LED lights
are on in order to classify menu mode.
Press [F4] or do not press any button for longer than 10 sec, it will automatically go back
from menu mode to waiting for authentication mode.
3.1.2. How to enter menu without admin authentication
This is how to enter menu when a registered admin card is lost or when admin is away so FP
authentication is not possible.
① Remove the bracket on the back of the terminal and keep the lid open.
② DIP switch No. 3 to No. 10 on the back of the terminal should be “ON” as below.
< Image 3-1>
③ Keep this condition above, and hold [F4] down longer than 4 sec. Buzzer sound will
go off and then you can enter menu.
▶ Keep DIP switch “OFF” after modifying set value.

Smart-i 사용자 가이드 12
㈜유니온커뮤니티 / 서울시 송파구 방이동 44-3 현대토픽스 빌딩 3층 (138-050)
Tel : 02-6488-3000 , Fax : 02-6488-3099, E-Mail :sales@unioncomm.co.kr
http://www.unioncomm.co.kr
3.2. Menu Configuration
- [Fn~ long] means hold a key down for longer than 4 sec.
Checking
terminal mode
[F1~ long]
Blue LED light on for 1 sec : AP Mode
Green LED light on for 1 sec : Network Mode
Waiting for
Authentication
Mode
Rebooting terminal [F2~ long] (Buzzer sound) Rebooting terminal
(Try it when smartphone application
cannot connect to the terminal.)
Changing
terminal mode
(AP Network)
[F1~ long]
(Buzzer sound) Rebooting terminal
after changing mode
Delete logs [F2~ long]
(Buzzer sound) Delete all logs including
images on the terminal.
Initializing set value [F3~ long]
(Buzzer sound) Change all set values on the
terminal to default and go to AP Mode.
Users and logs are not deleted.
Menu Mode
[F4~ long]
Admin
Authentication
Factory Initialization Place a finger on the fingerprint sensor
and
[F4~long] (Buzzer sound) Delete all Set value,
users, logs on the terminal and
go back to AP Mode.
4. How to use the terminal
4.1. Changing authentication mode
Press a key to change authentication mode.
Start a shift [F1], Finish a shift [F2], Start a break [F3], Return from a break [F4]
4.2. Authentication
4.2.1. Fingerprint authentication
When you place your fingerprint on the fingerprint sensor, light of the sensor is on as
buzzer sound goes off, and then it receives the fingerprint. Do not remove your finger until
buzzer sound goes off after light of the sensor is off completely. Light of the sensor is not
on if there are no registered users.
4.2.2. Card authentication
Swipe a card on the card input area.
G
G
G
G
G
G
G
G
G
G
G
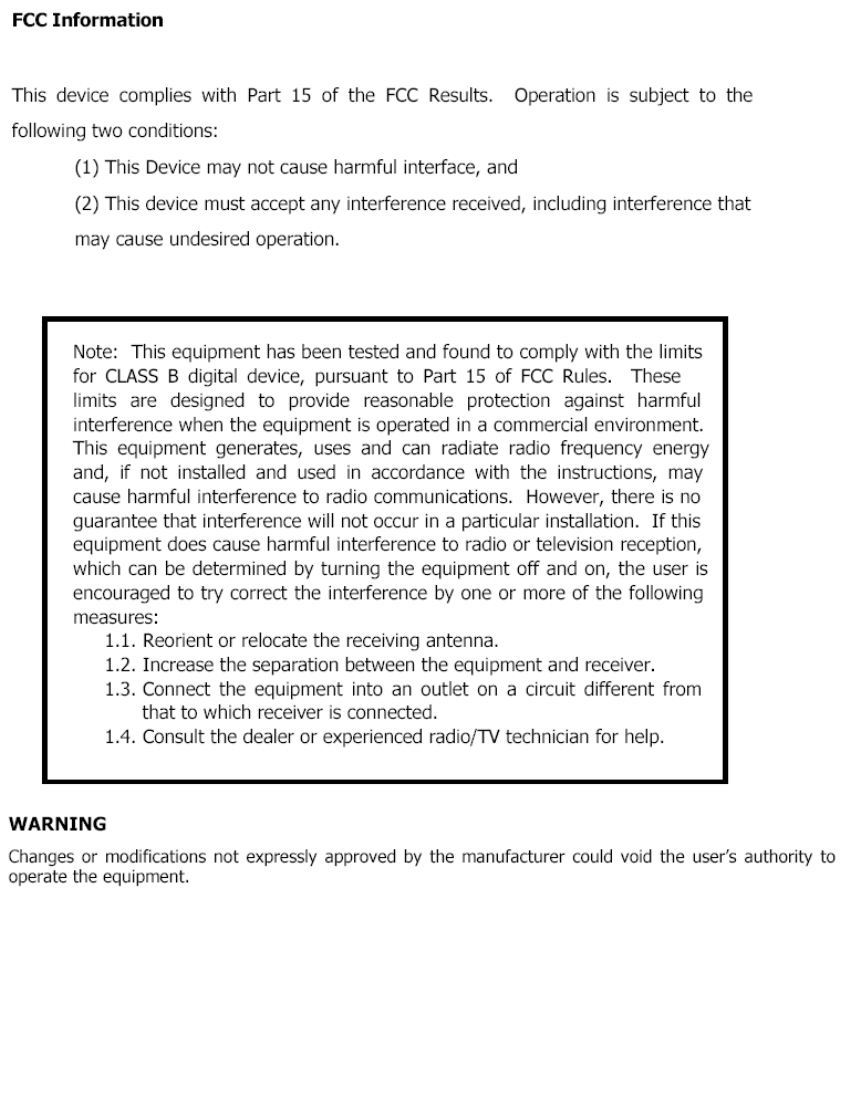
"CAUTION: Exposure to Radio Frequency Radiation.
Antenna shall be mounted in such a manner to minimize the potential for human
contact during normal operation. The antenna should not be contacted during
operation to avoid the possiblility of exceeding the FCC radio frequency exposure
limit.