UNION COMMUNITY T1RF Fingerprint Access Controller User Manual AC7000 UserGuide 1 0
UNION COMMUNITY Fingerprint Access Controller AC7000 UserGuide 1 0
UserManual.wiki
>
UNION COMMUNITY
>
T1RF User Manual
User Manual
Navigation menu
Upload a User Manual
Namespaces
Wiki Guide
HTML
PDF
Info
Views
User Manual
Discussion / Help
Navigation
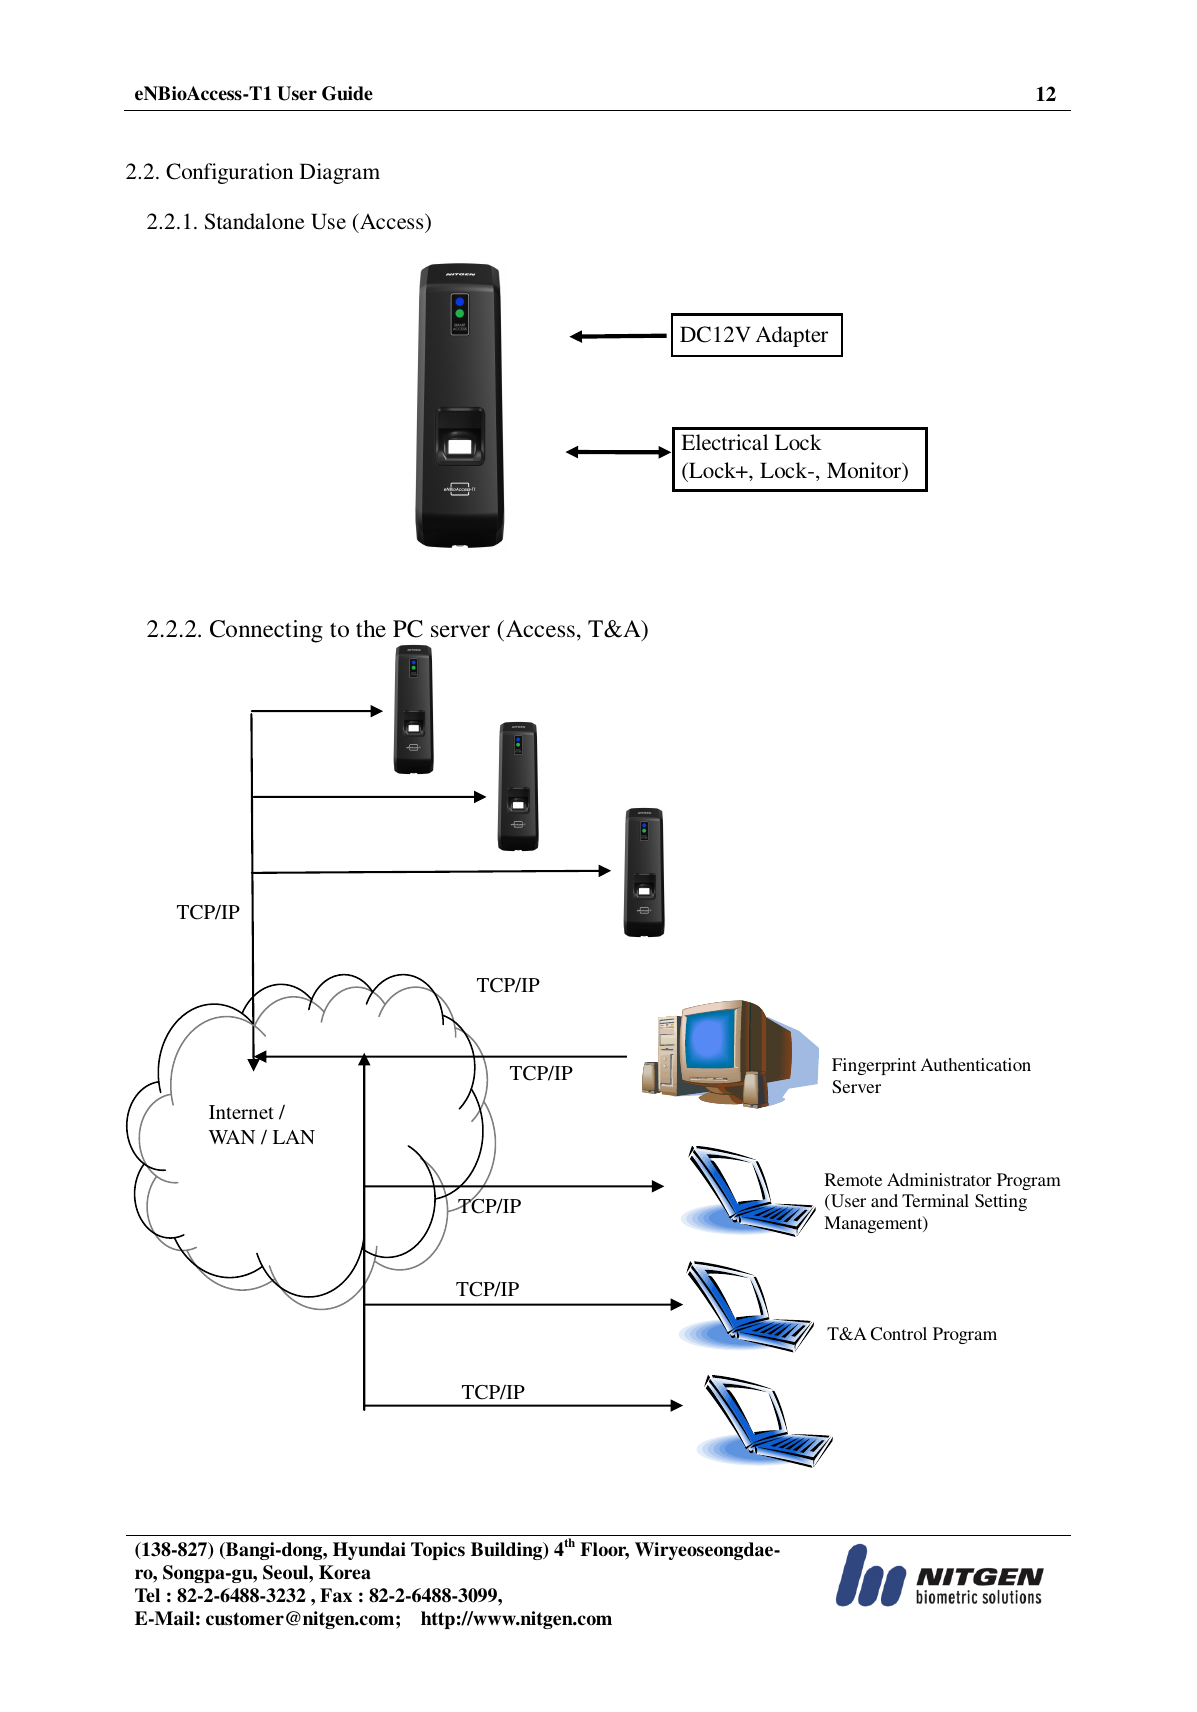
![eNBioAccess-T1 User Guide 14 (138-827) (Bangi-dong, Hyundai Topics Building) 4th Floor, Wiryeoseongdae-ro, Songpa-gu, Seoul, Korea Tel : 82-2-6488-3232 , Fax : 82-2-6488-3099, E-Mail: customer@nitgen.com; http://www.nitgen.com 3. Environment Setting 3.1. Checkpoints before environment setting 3.1.1. To run iAccess Plus (Mobile App) Search “iAccess Plus” at the smartphone app store to install a mobile app. Press “iAccess Plus” icon installed on your smartphone to run the program. The initial screen will appear. After 2-3 seconds, it will automatically go to the Intro menu. 3.1.2. To enter the administrator menu Select View] button on the [Terminal List] screen, and the connection window will appear. If no administrator is registered, you can access the terminal without entering your ID and password on the login window. If any administrator has been registered, you can access the terminal using the proper administrator authentication scheme. If your ID is entered, attempt 1:1 Authentication. If your ID is not entered, attempt 1:N Authentication. If you have successfully logged in the terminal, the screen goes to the User Management screen.](https://usermanual.wiki/UNION-COMMUNITY/T1RF/User-Guide-4184219-Page-14.png)
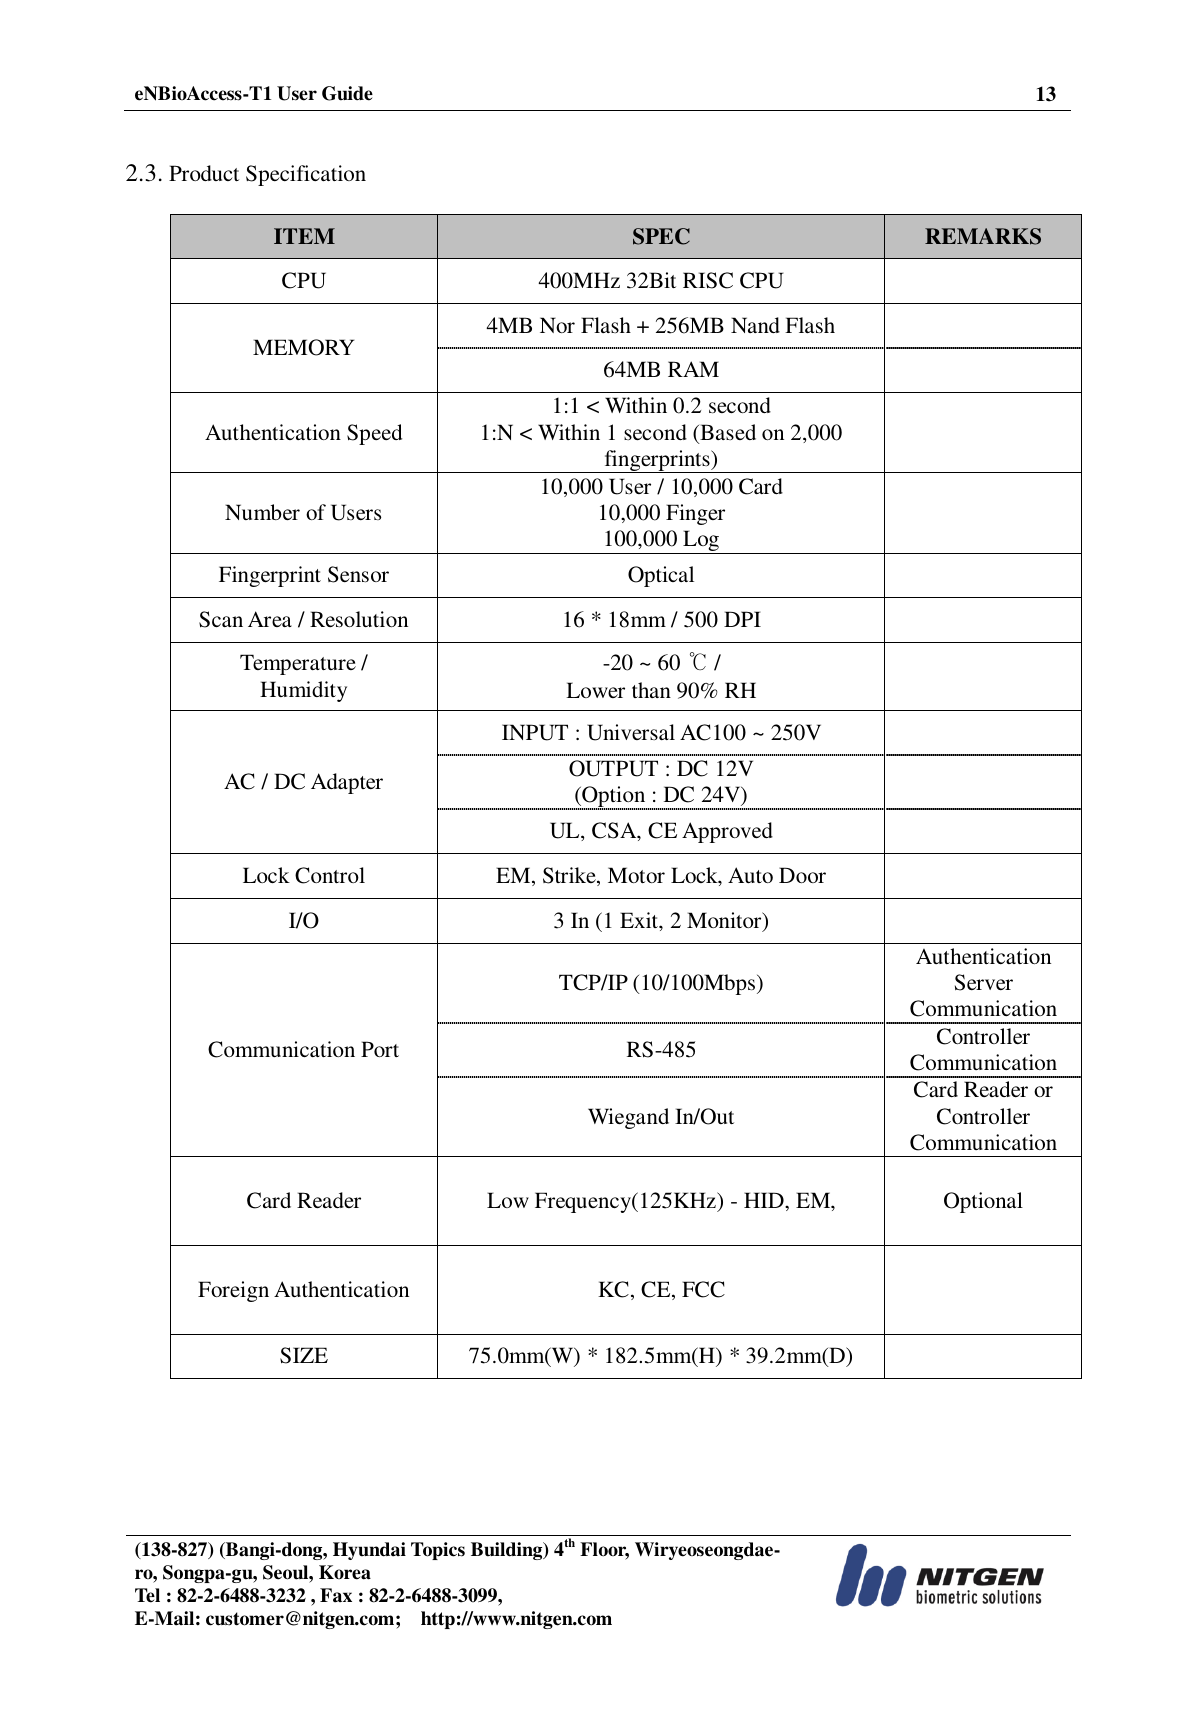
![eNBioAccess-T1 User Guide 15 (138-827) (Bangi-dong, Hyundai Topics Building) 4th Floor, Wiryeoseongdae-ro, Songpa-gu, Seoul, Korea Tel : 82-2-6488-3232 , Fax : 82-2-6488-3099, E-Mail: customer@nitgen.com; http://www.nitgen.com 3.2. User Management 3.2.1. Add User Select [Add] on the [User Management] screen, and the following screen will appear. Enter your registration information on the Add User screen. When the information is completely entered, select the [Save] button in the top right of the screen. Once the user information has been correctly entered, the fingerprint is ready to be entered in either the terminal or the card. If the set authentication scheme is completely registered, the screen returns to the User Management screen. 3.2.2. Delete Select [Edit] on the [User Management] screen, and the following screen will appear. To delete all users, press the [Delete All] button. To delete part of users, select any delete target users, and press the [Delete] button. (When the network mode is set, the [Delete All] button is disabled.)](https://usermanual.wiki/UNION-COMMUNITY/T1RF/User-Guide-4184219-Page-15.png)
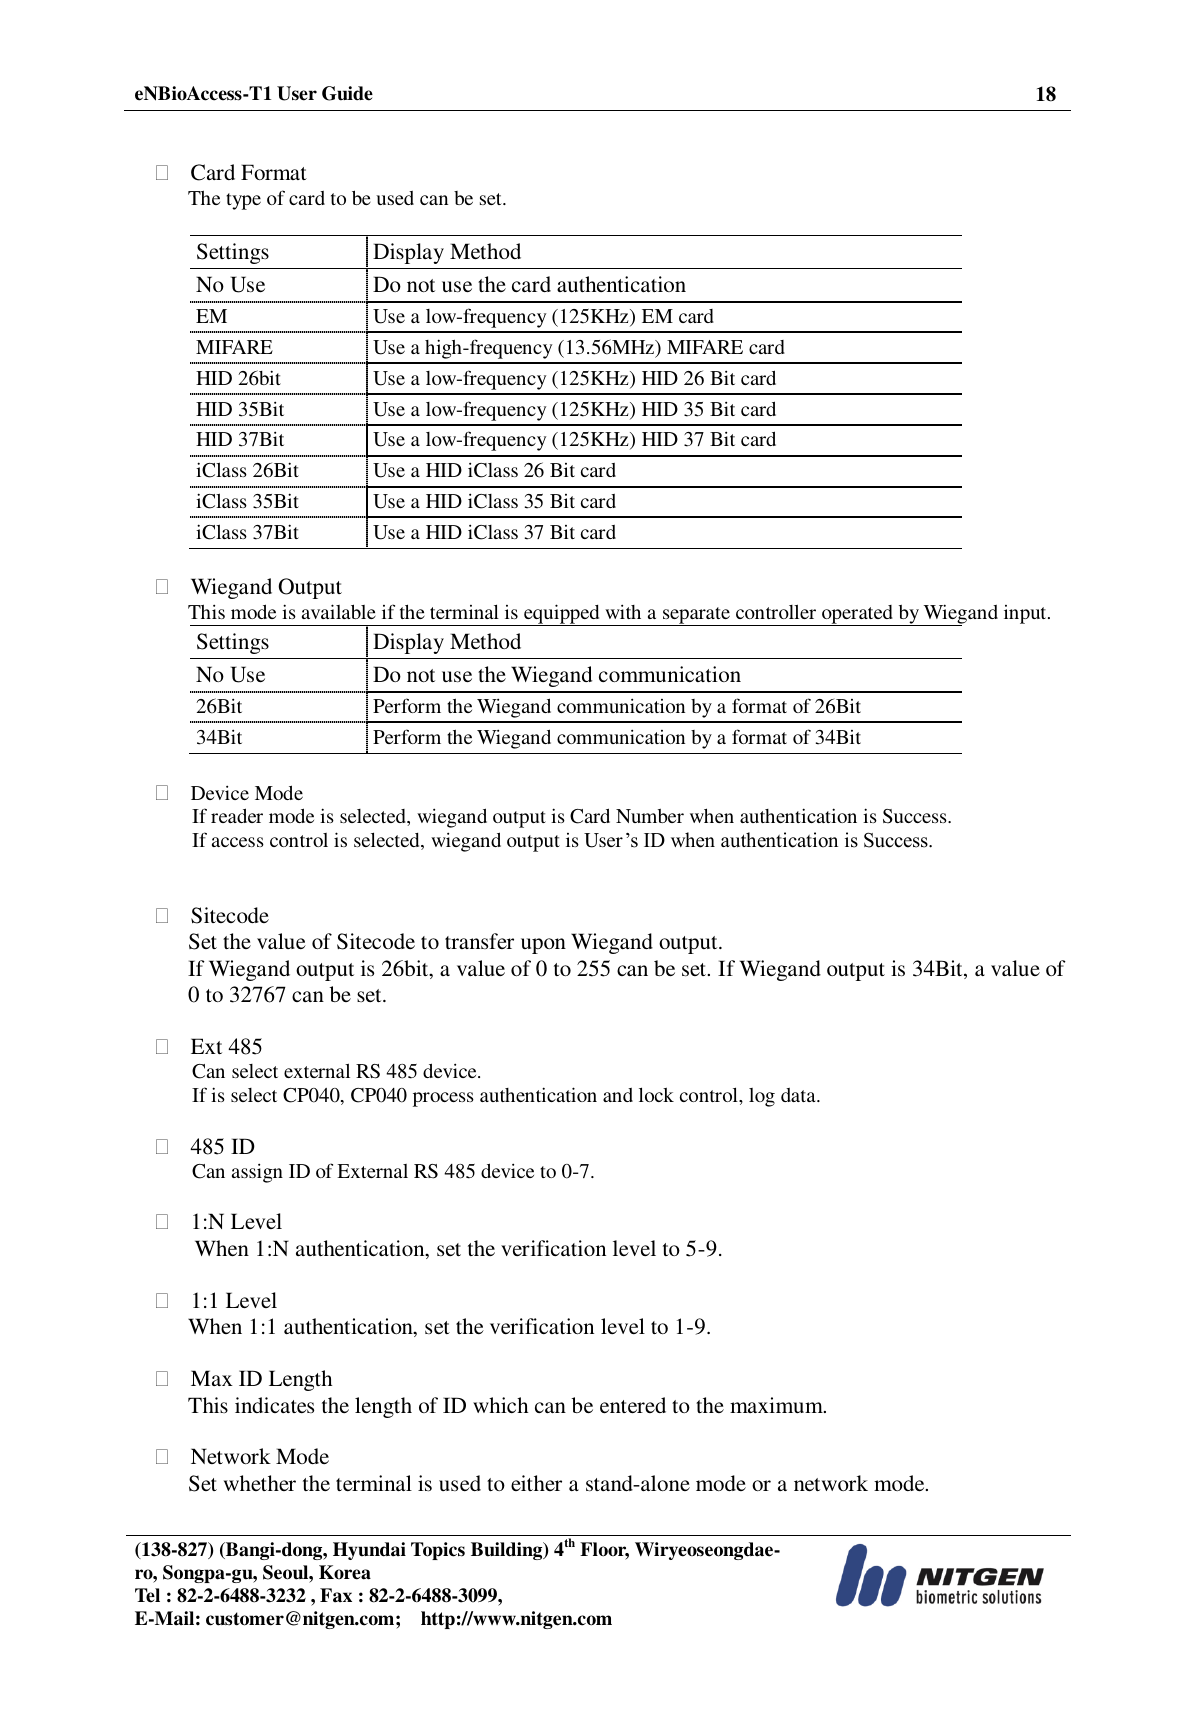
![eNBioAccess-T1 User Guide 16 (138-827) (Bangi-dong, Hyundai Topics Building) 4th Floor, Wiryeoseongdae-ro, Songpa-gu, Seoul, Korea Tel : 82-2-6488-3232 , Fax : 82-2-6488-3099, E-Mail: customer@nitgen.com; http://www.nitgen.com 3.3.3. Change Click the user to change on the [User Management] screen, the screen will go to the [User Details] screen. When you select the [Save] button after modifying the items except the ID, if there is any additional authentication means, the terminal becomes the input standby status and carries out additional registration. When the change is completed, the screen returns to the User Management screen.](https://usermanual.wiki/UNION-COMMUNITY/T1RF/User-Guide-4184219-Page-16.png)
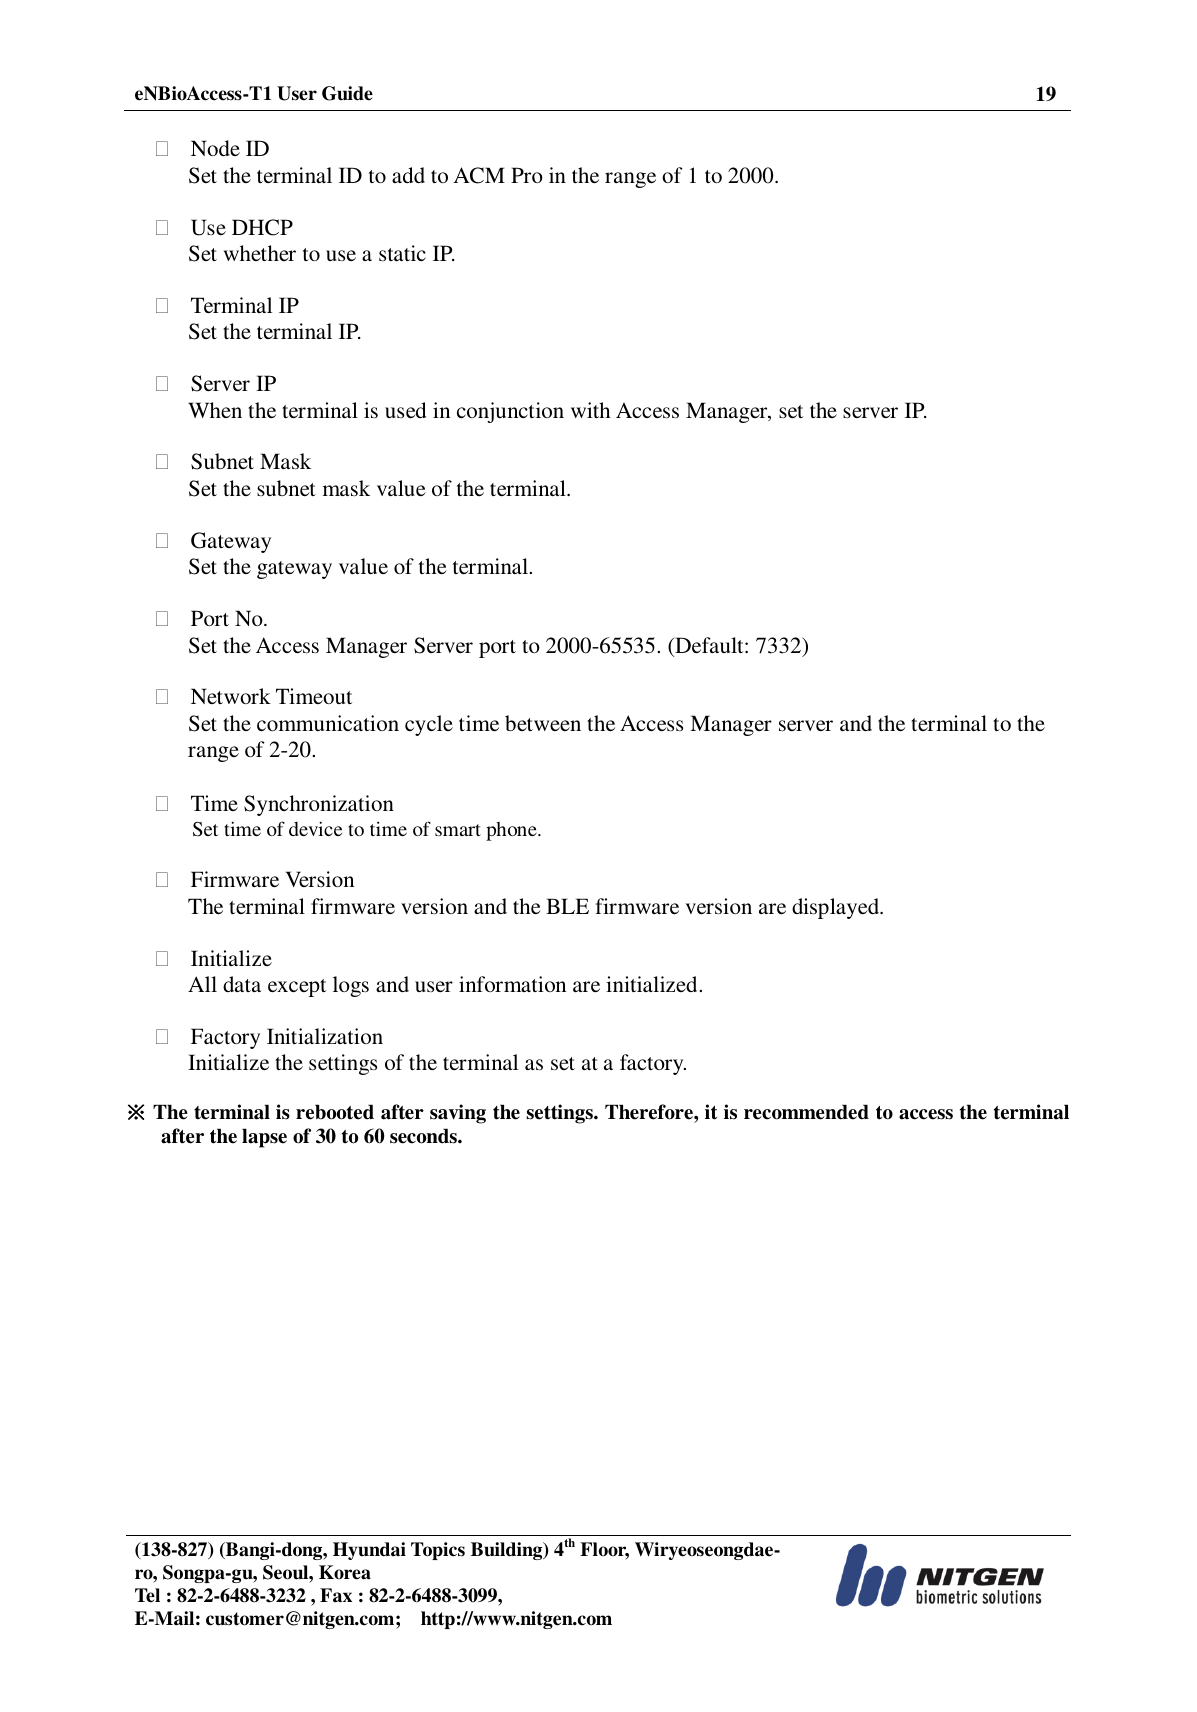
![eNBioAccess-T1 User Guide 17 (138-827) (Bangi-dong, Hyundai Topics Building) 4th Floor, Wiryeoseongdae-ro, Songpa-gu, Seoul, Korea Tel : 82-2-6488-3232 , Fax : 82-2-6488-3099, E-Mail: customer@nitgen.com; http://www.nitgen.com 3.3. Terminal Setting 3.3.1. Setting via “iAccess Plus” Select [Setting] on the bottom right, and the following screen will appear. To change the terminal settings, press the [Edit] button on the top right to switch to the edit mode. When the terminal settings are finished, press the [Save] button to save the changes and exit the setting. Terminal Name The name of the terminal will be displayed. LFD Level The fake fingerprint is likely to be recognized. Therefore, the higher level of security application may be used. The higher security level may need the longer time to verify the fingerprints of some registered users. The security level for the stage of 0-3 is supported. Door Open Status 1 Set when connecting external contacts. Settings Display Method No Use No external lock is used. Normal open When the power is applied, the lock is open. Normal close When the power is applied, the lock is closed. Door Open Interval The unlock time can be set from 0.1 to 20 seconds.](https://usermanual.wiki/UNION-COMMUNITY/T1RF/User-Guide-4184219-Page-17.png)
![eNBioAccess-T1 User Guide 25 (138-827) (Bangi-dong, Hyundai Topics Building) 4th Floor, Wiryeoseongdae-ro, Songpa-gu, Seoul, Korea Tel : 82-2-6488-3232 , Fax : 82-2-6488-3099, E-Mail: customer@nitgen.com; http://www.nitgen.com 5.5. When the authentication is successful but the door does not open Check that the access is controlled by the time zone. 5.5. When the user is not registered This product is set by default to operate as a network mode. If the connection is abnormal in the network mode, the user cannot be registered. Check the network connection status. 5.6. When the product is unstable or does not work Select the terminal in the terminal management menu of Access Manager Professional, click the right mouse button, and select the [terminal Restart] item. Then, the terminal will restart. If the server management program is being used, try to run the server again. If the terminal does not normally work after checking all of the above, please contact our Customer Support Team.](https://usermanual.wiki/UNION-COMMUNITY/T1RF/User-Guide-4184219-Page-25.png)