UNION COMMUNITY T1RF Fingerprint Access Controller User Manual AC7000 UserGuide 1 0
UNION COMMUNITY Fingerprint Access Controller AC7000 UserGuide 1 0
User Manual
(05836) (Munjeong-dong, Daemyung VALEON) 12th Floor, 127, Beobwon-ro,
Songpa-gu, Seoul, Korea
Tel : 82-2-6488-3232 , Fax : 82-2-6488-3099,
E-Mail: customer@nitgen.com; http://www.nitgen.com
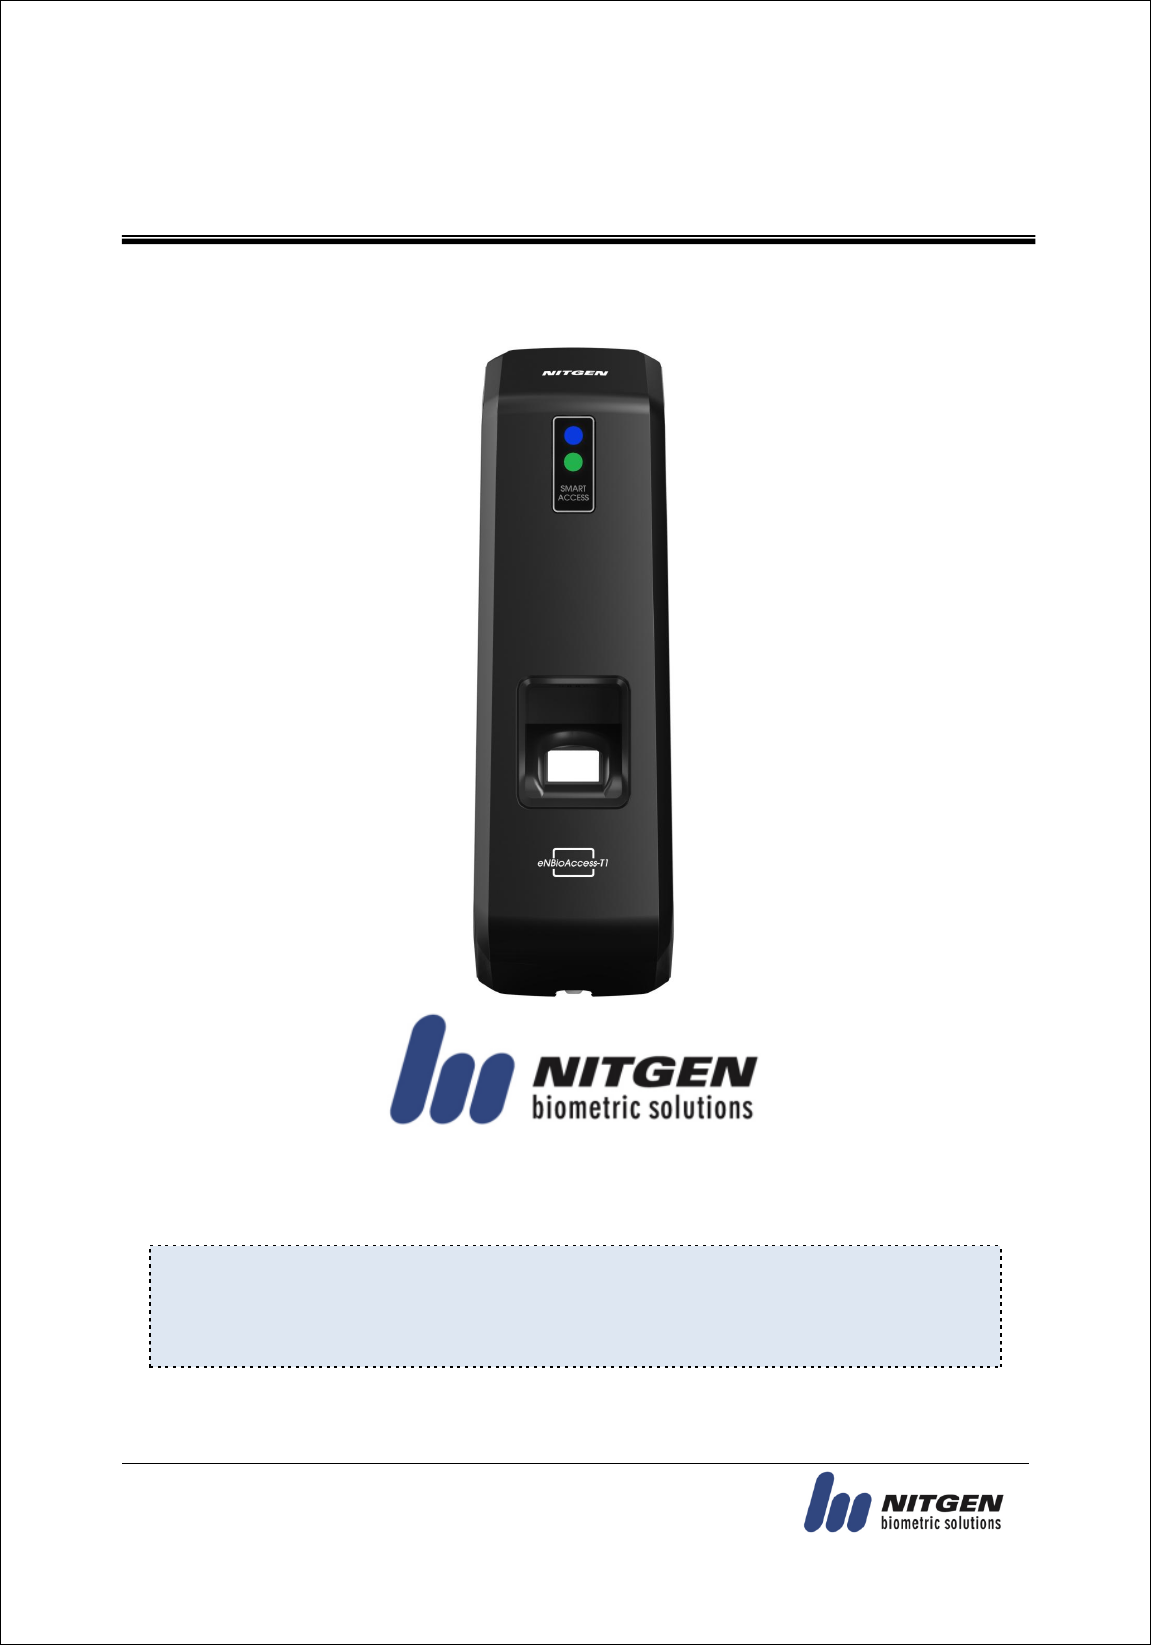
eNBioAccess-T1 User Guide
Version Eng-1.6
© Copyright 2013, NITGEN Co., Ltd.
All rights reserved
It is strictly prohibited to compile, duplicate or publish part or whole of this manual prior written
consent of NITGEN.
The specification of this product may be changed without prior notice to improve its functionality.
The logo of NITGEN&COMPANY is a registered trademark of NITGEN Co., Ltd.
Other names or trademarks are registered trademarks of their respective owners.

eNBioAccess-T1 User Guide
2
(05836) (Munjeong-dong, Daemyung VALEON) 12th Floor, 127, Beobwon-ro,
Songpa-gu, Seoul, Korea
Tel : 82-2-6488-3232 , Fax : 82-2-6488-3099,
E-Mail: customer@nitgen.com; http://www.nitgen.com
<Revison History>
Version
Date
Description
Firmware Version
1.0
2016-3-30
Initial Release
2_000_0014
1.1
2016-4-08
Change Wordings and Add Notes
2_000_0015
1.2
2016-7-08
Add RS485 function
2_000_0023
1.4
2016-7-15
Change Door Open interval
2_000_0025
1.5
2016-9-12
Change Door Open interval
2_000_0026
1.6
2016-10-17
Add scope of RS485 ID
2_000_0027
eNBioAccess-T1 User Guide
3
(138-827) (Bangi-dong, Hyundai Topics Building) 4th Floor, Wiryeoseongdae-
ro, Songpa-gu, Seoul, Korea
Tel : 82-2-6488-3232 , Fax : 82-2-6488-3099,
E-Mail: customer@nitgen.com; http://www.nitgen.com
<Product Descriptions>
The NITGEN access control system of eNBioAccess-T1 is the optimized product by organically
combining the globally recognized core technologies of NITGEN, such as a fingerprint recognition
algorithm, optical sensors, embedded design technology, and software application technology.
This product is designed with maximum consideration for the efficiency of operation so that stand-
alone terminals can be monitored and managed comprehensively and systematically from a remote
place via a network.
High-tech Biometric
Technology
Ergonomic Design
Easy Management
Software

eNBioAccess-T1 User Guide
4
(138-827) (Bangi-dong, Hyundai Topics Building) 4th Floor, Wiryeoseongdae-
ro, Songpa-gu, Seoul, Korea
Tel : 82-2-6488-3232 , Fax : 82-2-6488-3099,
E-Mail: customer@nitgen.com; http://www.nitgen.com
<Glossaries>
Administrator (Admin)
- The administrator can access to the terminal menu mode. He/she has the authority to
add/modify/delete terminal users and to change the operating environment by changing
settings.
- If there is no registered administrator in the terminal, anybody can access to the terminal menu
and change settings. It is recommended that more than one administrator will be
necessarily registered in the terminal.
- The administrator has the authority to change critical environmental settings of the fingerprint
reader. So, special attention is required to its registration and operation.
1:1 Authentication
- The user fingerprint is verified after entering User ID or Card.
- Only User ID or the user fingerprint registered to the card is compared. This is called One-to-
One Authentication.
1:N Identification
- The user is searched only by the fingerprint.
- The same fingerprint as the input fingerprint is identified among the registered fingerprints
without User ID or Card entered. This is called One-to-N Identification.
Authentication Level
- As a level used for fingerprint authentication, it is displayed in Step 1 to 9. Authentication
cannot be allowed before the degree of match between two fingerprints is higher than the set
authorization level.
- The higher authentication level may ensure the higher security. But it requires the relatively
high concordance rate. When authenticating User ID, it high likely to deny authentication.
- 1:1 Level: Authentication level applied when 1:1 authentication
- 1:N Level: Authentication level applied when 1:n authentication
LFD (Live Finger Detection): Fake fingerprint prevention function
- The LFD allows only actual fingerprints to be entered, except for any fake fingerprints made
of rubber, paper, film, and silicon and the like.

eNBioAccess-T1 User Guide
5
(138-827) (Bangi-dong, Hyundai Topics Building) 4th Floor, Wiryeoseongdae-
ro, Songpa-gu, Seoul, Korea
Tel : 82-2-6488-3232 , Fax : 82-2-6488-3099,
E-Mail: customer@nitgen.com; http://www.nitgen.com
Table of Contents
<Revison History> ............................................................................................................... 2
<Product Descriptions> ....................................................................................................... 3
<Glossaries> ......................................................................................................................... 4
Table of Contents ................................................................................................................. 5
1. Before Getting Started ..................................................................................................... 7
1.1. Safety Notes ..................................................................................................................................... 7
1.2. Product Details ................................................................................................................................ 8
1.3. LED signals displayed during operation ......................................................................................... 9
1.4. Buzzer guide announced during operation ..................................................................................... 9
1.5. How to register and enter correct fingerprint ................................................................................. 9
2. Product Descriptions ..................................................................................................... 11
2.1. Product Features .............................................................................................................................11
2.2. Configuration Diagram ................................................................................................................. 12
2.2.1. Standalone Use (Access) ....................................................................................................... 12
2.2.2. Connecting to the PC server (Access, T&A) .......................................................................... 12
2.3. Product Specification ..................................................................................................................... 13
3. Environment Setting ...................................................................................................... 14
3.1. Checkpoints before environment setting ....................................................................................... 14
3.1.1. To run iAccess Plus (Mobile App) ......................................................................................... 14
3.1.2. To enter the administrator menu ............................................................................................. 14
3.2. User Management .......................................................................................................................... 15
3.2.1. Add User ............................................................................................................................... 15
3.2.2. Delete ................................................................................................................................... 15
3.3.3. Change.................................................................................................................................. 16
3.3. Terminal Setting............................................................................................................................. 17
3.3.1. Setting via “iAccess Plus” ..................................................................................................... 17
3.3.2. To set the terminal IP via Access Manager ............................................................................. 20
4. How to Use Terminal ..................................................................................................... 23
4.1. Authentication................................................................................................................................ 23
4.1.1. Fingerprint Authentication ..................................................................................................... 23
4.1.2. Card Authentication .............................................................................................................. 23
4.1.3. Multi Authentication ............................................................................................................. 23
5. Troubleshooting ............................................................................................................. 24

eNBioAccess-T1 User Guide
6
(138-827) (Bangi-dong, Hyundai Topics Building) 4th Floor, Wiryeoseongdae-
ro, Songpa-gu, Seoul, Korea
Tel : 82-2-6488-3232 , Fax : 82-2-6488-3099,
E-Mail: customer@nitgen.com; http://www.nitgen.com
5.1. When the fingerprint authentication time is too long or fails ....................................................... 24
5.2. When the fingerprint is not entered well ....................................................................................... 24
5.3. When the RF card authentication fails .......................................................................................... 24
5.4. When the network is not connected ............................................................................................... 24
5.5. When the authentication is successful but the door does not open ............................................... 25
5.5. When the user is not registered ..................................................................................................... 25
5.6. When the product is unstable or does not work ............................................................................ 25
eNBioAccess-T1 User Guide
7
(138-827) (Bangi-dong, Hyundai Topics Building) 4th Floor, Wiryeoseongdae-
ro, Songpa-gu, Seoul, Korea
Tel : 82-2-6488-3232 , Fax : 82-2-6488-3099,
E-Mail: customer@nitgen.com; http://www.nitgen.com
1. Before Getting Started
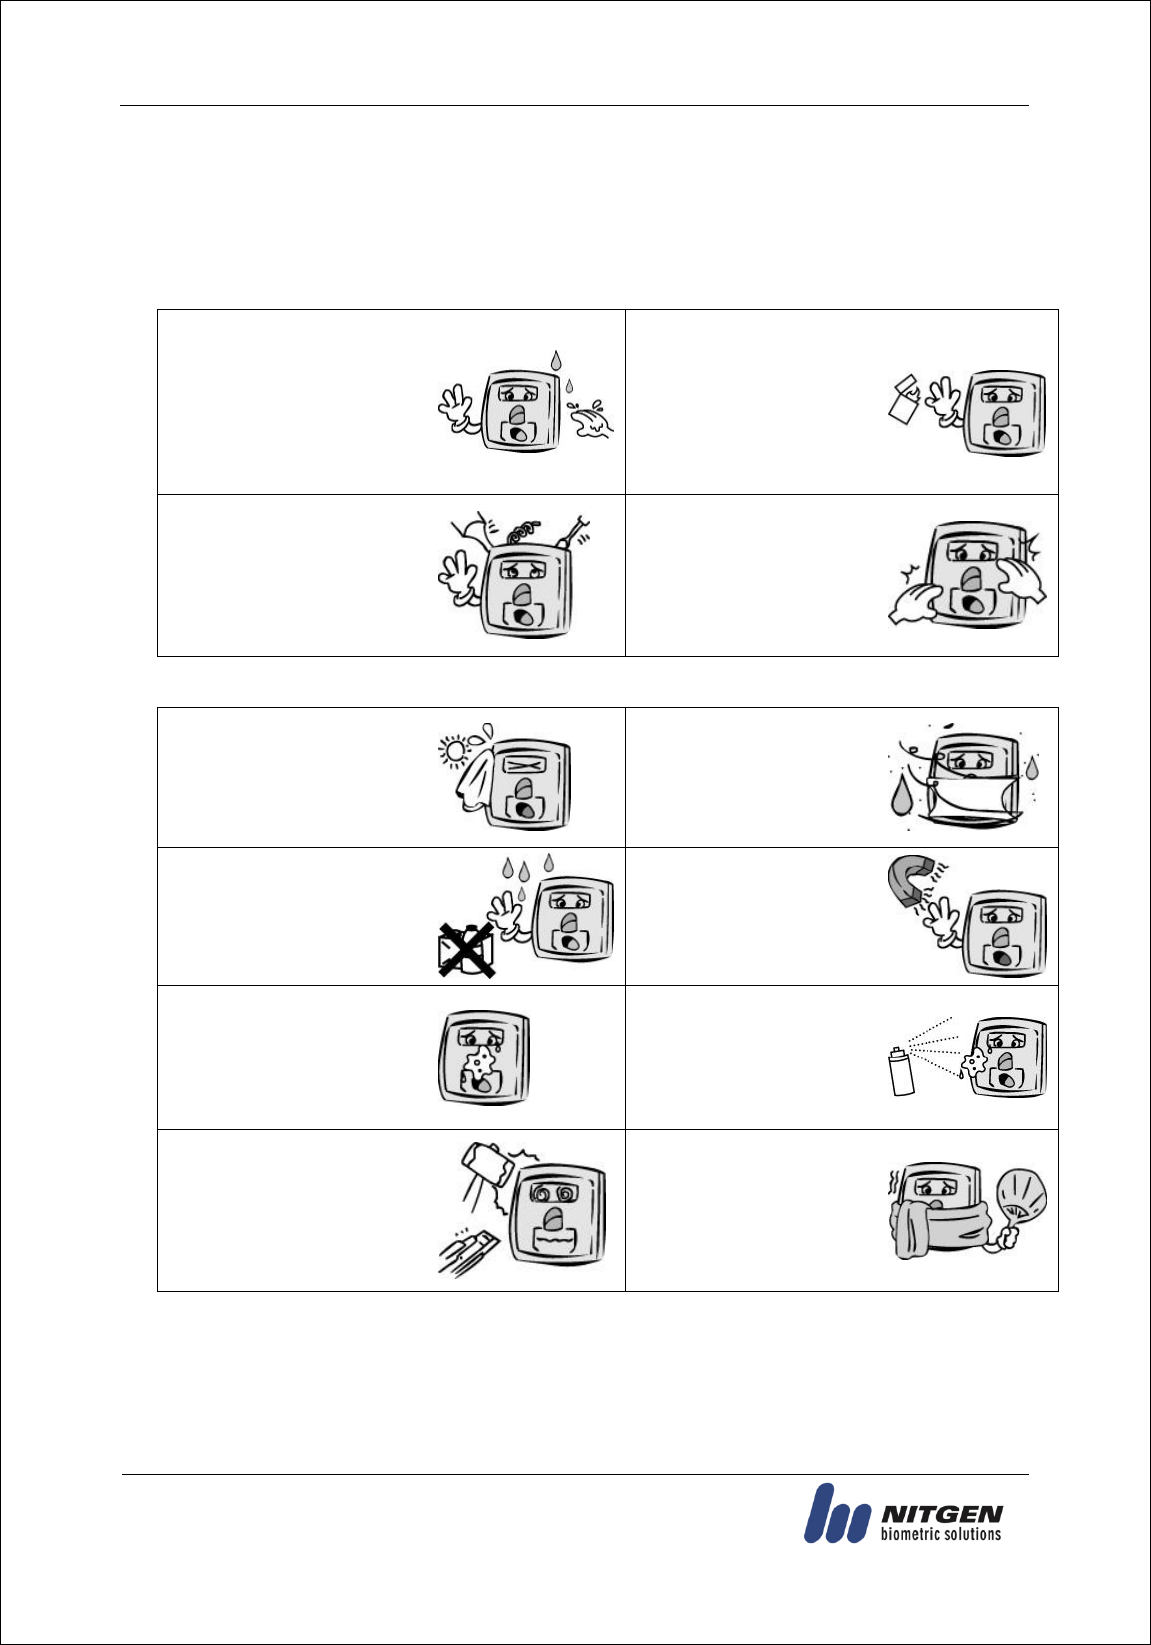
1.1. Safety Notes
Warning
Do not operate the terminal
with wet hands, and pay
attention not to let any liquid
such as water enter inside the
terminal.
→ Otherwise, malfunction
or electric shock may be
caused.
Keep the terminal away
from inflammables.
→ Otherwise, it may cause
a fire.
Do not disassemble, repair or
remodel the terminal at your
disposal.
→
Otherwise, it may cause
malfunction, electric shock, or
a fire.
Do not allow children to
touch the terminal
carelessly. → Otherwise, it
may cause safety accidents
of children or malfunction.
- Non-compliance of safety notes may cause death or serious injury for users.
Cautions
Do not install the terminal in a
place exposed to direct
sunlight.
→ Otherwise, it may cause
malfunction, deformation and
discoloration.
Do not install the terminal
in humid or dusty places.
→ Otherwise, it may cause
malfunction.
Do not clean this terminal by
sprinkling water, nor wipe it
with benzene, thinner, and
alcohol.
→ Otherwise, it may cause
electric shock or a fire.
Keep the terminal away
from magnets.
→ Otherwise, it may cause
failure and malfunction.
Keep the fingerprint input
section clean.
→ Otherwise, the fingerprint
cannot be recognized
correctly.
Do not spray insecticides or
inflammables on the
terminal.
→ Otherwise, it may cause
deformation and
discoloration.
Keep the terminal away from
shock or sharp objects.
→ Otherwise, it may damage
the terminal and result in
malfunction.
Do not install the terminal
in a place where there is a
severe change in
temperature.
→ Otherwise, it may cause
malfunction.
- Non-compliance of safety notes may cause personal injury or property damage for users.
※ We are not responsible for any accidents and damage that may arise from non-compliance of the
information in this manual.
eNBioAccess-T1 User Guide
8
(138-827) (Bangi-dong, Hyundai Topics Building) 4th Floor, Wiryeoseongdae-
ro, Songpa-gu, Seoul, Korea
Tel : 82-2-6488-3232 , Fax : 82-2-6488-3099,
E-Mail: customer@nitgen.com; http://www.nitgen.com
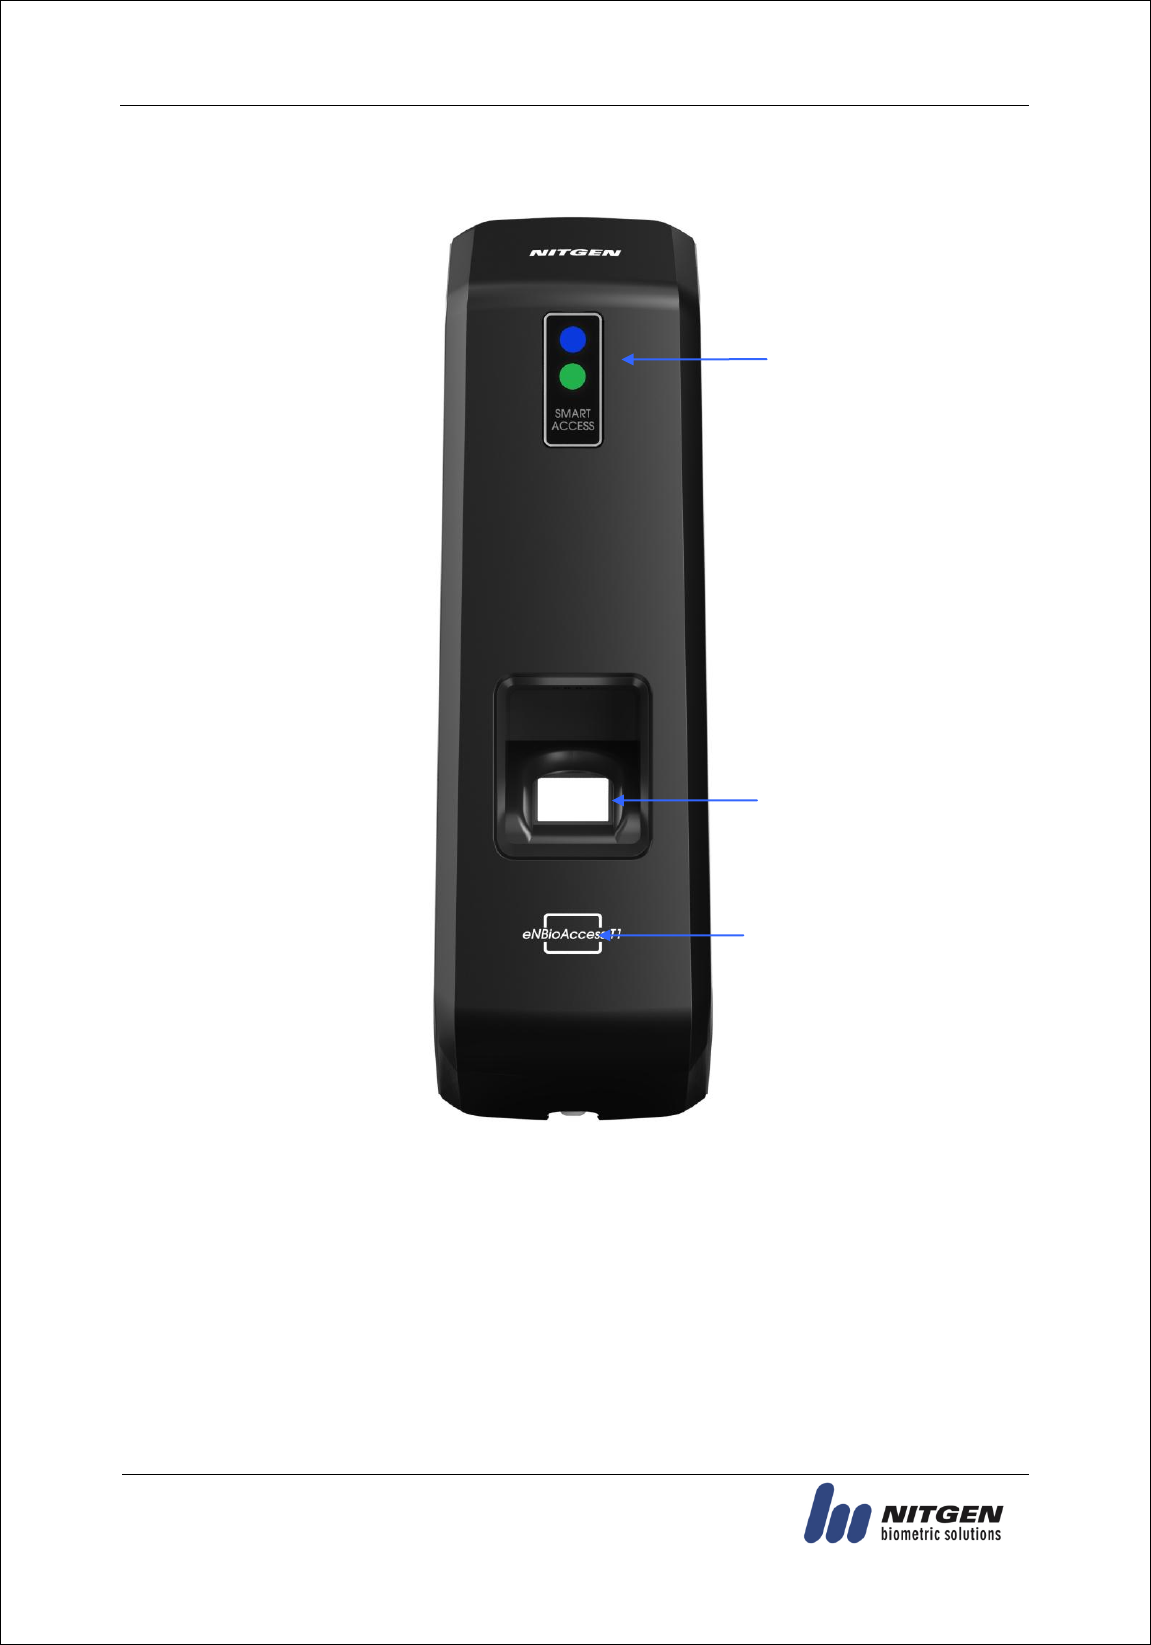
1.2. Product Details
Card Sensor
Fingerprint
Sensor
Status LED

eNBioAccess-T1 User Guide
9
(138-827) (Bangi-dong, Hyundai Topics Building) 4th Floor, Wiryeoseongdae-
ro, Songpa-gu, Seoul, Korea
Tel : 82-2-6488-3232 , Fax : 82-2-6488-3099,
E-Mail: customer@nitgen.com; http://www.nitgen.com
1.3. LED signals displayed during operation
●
Lighting
: Normal status
Flickering
: When the input of fingerprint and card user is on standby
●
Lighting
: Light up for 1 second upon successful authentication.
Flickering
: Flicker at one second interval when FW is downloaded and when an
administrator application is entered.
●
Lights-out
: Normal status
Lighting
: Light up for one second when authentication fails.
Flickering
: Flicker for one second upon the warning status (forced opening, non-
connection of server, etc.).
1.4. Buzzer guide announced during operation
Ppik
When fingerprint
or card is read
When the card is read,
When the FP is entered in the FP window
Ppibik
When failure
If authentication fails or the user's input is wrong,
If the control and setting of the terminal fail
Ppiriririk
When input
standby
When it is notified that the input of fingerprint and card user
is on standby
Ppiririk
When success
If authentication is successful,
If the terminal is successfully booted,
If the control and setting of the terminal and successfully
completed
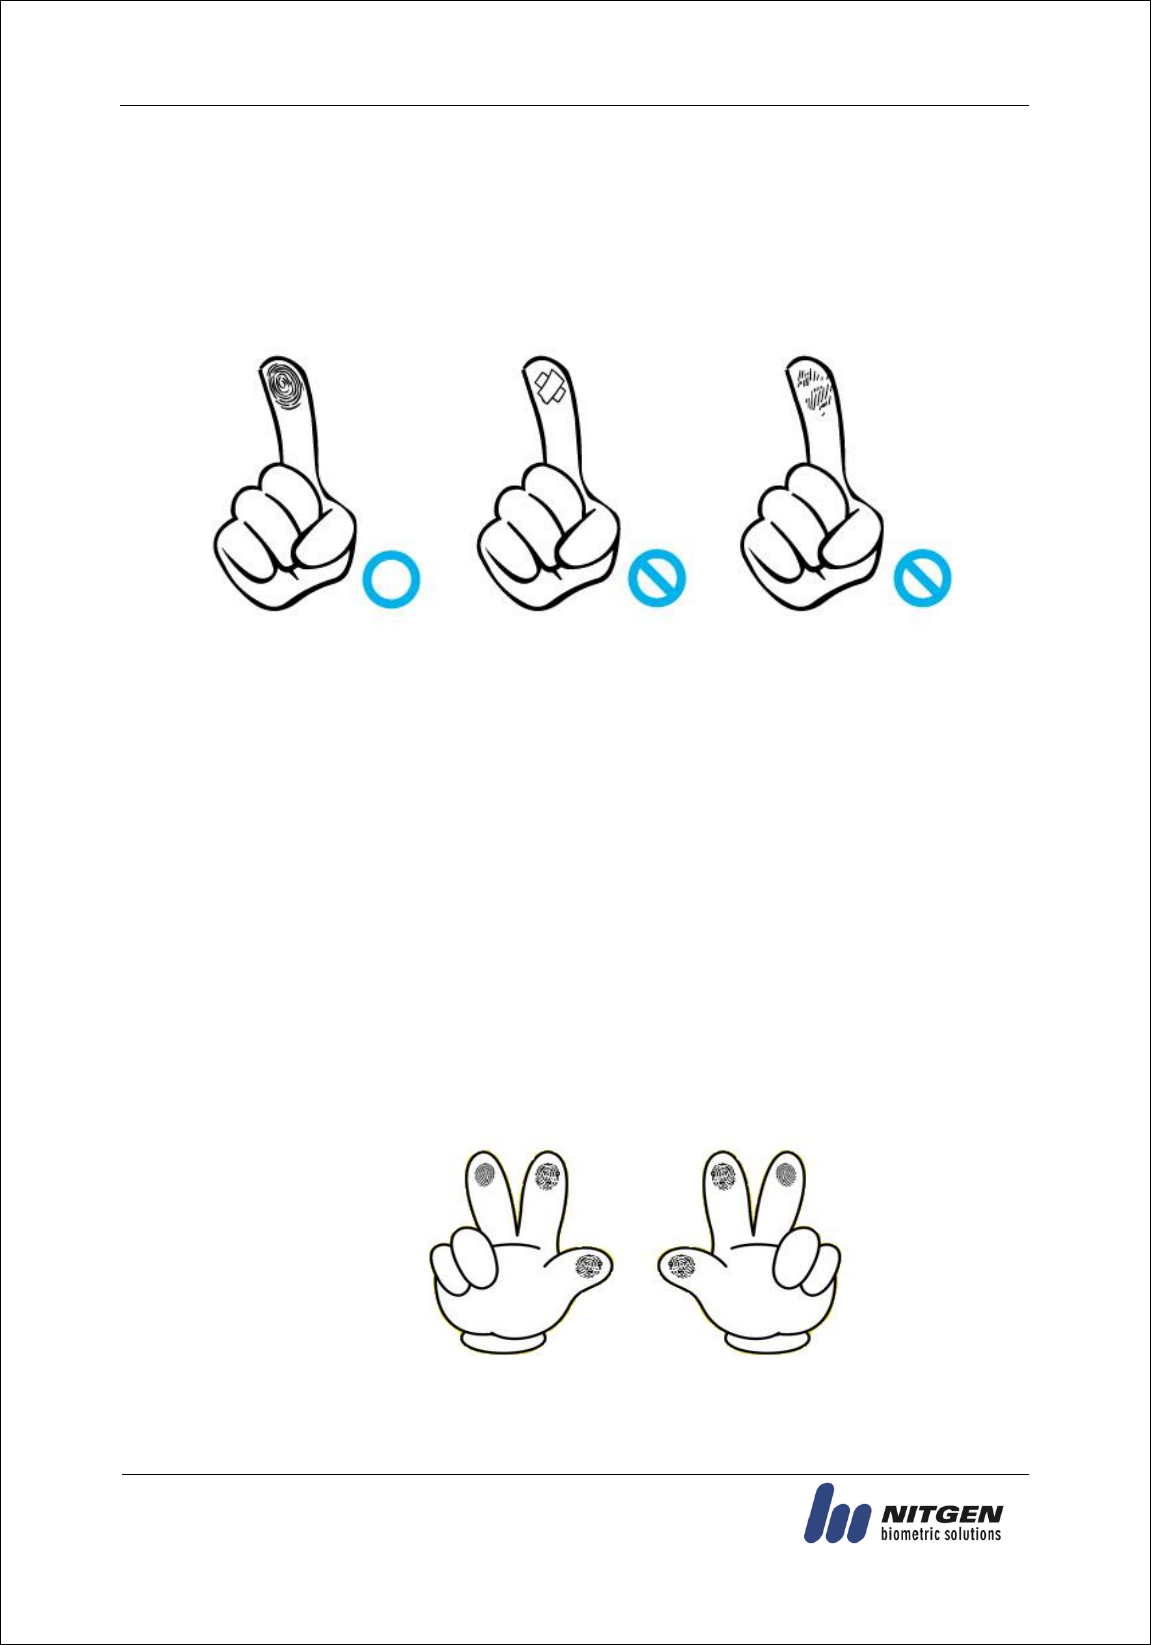
1.5. How to register and enter correct fingerprint
Correct fingerprint input method
Enter your fingerprint as if you take a thumbprint by using your forefinger if possible.
The fingerprint cannot be correctly registered and entered only by your fingertips.
The center of the fingerprint should be touched with the fingerprint input section.
eNBioAccess-T1 User Guide
10
(138-827) (Bangi-dong, Hyundai Topics Building) 4th Floor, Wiryeoseongdae-
ro, Songpa-gu, Seoul, Korea
Tel : 82-2-6488-3232 , Fax : 82-2-6488-3099,
E-Mail: customer@nitgen.com; http://www.nitgen.com
Enter the fingerprint of your forefinger if possible.
When using your forefinger, you can enter your fingerprint correctly and safely.
Make sure that the fingerprint is unclear or wounded.
Too dry, wet, blurry or wounded fingerprints are difficult to recognize. In this case, the
fingerprint of another finger should be registered.
Precautions subject to your fingerprint status
The availability of the fingerprint may vary subject to your fingerprint status.
This product consists of a fingerprint recognition system and cannot recognize the
damaged or unclear fingerprints. The fingerprint should be registered using the RF card.
If your hands are dry, you can blow your breath on the system to operate it more
smoothly.
For children, too small or unclear fingerprints may be difficult or impossible to use. They
need to register a new fingerprint every six months.
For seniors, the fingerprint with too many lines may not be registered.
It is recommended that you will register more than two fingerprints if possible.
In order to increase the fingerprint authentication rate, it is recommended to use six of
the ten fingers as illustrated below (both thumbs, forefingers, middle fingers).

eNBioAccess-T1 User Guide
11
(138-827) (Bangi-dong, Hyundai Topics Building) 4th Floor, Wiryeoseongdae-
ro, Songpa-gu, Seoul, Korea
Tel : 82-2-6488-3232 , Fax : 82-2-6488-3099,
E-Mail: customer@nitgen.com; http://www.nitgen.com
2. Product Descriptions
2.1. Product Features
Easy to verify your ID via fingerprint
- The use of the fingerprint recognition technology (Biometrics) can prevent forgetting your
password, losing your card or key, or avoid the risk of their theft. The use of personal
fingerprints enhances the security of authentication.
Waterproof and dustproof functions
- Acquired the IP65 level of waterproof and dustproof certification.
Various card options
- 125Kz-based EM and HID cards
Access control system using the local area network (LAN)
- The fingerprint reader communicates with the authentication server using a TCP/IP
protocol. Therefore, this terminal can be applied to the existing LAN and has easy
expandability. It ensures a fast speed by 10/100 Mbps Auto Detect and facilitates
management and monitoring via the network.
Mobile interlocking function
- By using Smartphone Bluetooth, the terminal can be set to Admin App (iAccess Plus).
eNBioAccess-T1 User Guide
12
(138-827) (Bangi-dong, Hyundai Topics Building) 4th Floor, Wiryeoseongdae-
ro, Songpa-gu, Seoul, Korea
Tel : 82-2-6488-3232 , Fax : 82-2-6488-3099,
E-Mail: customer@nitgen.com; http://www.nitgen.com
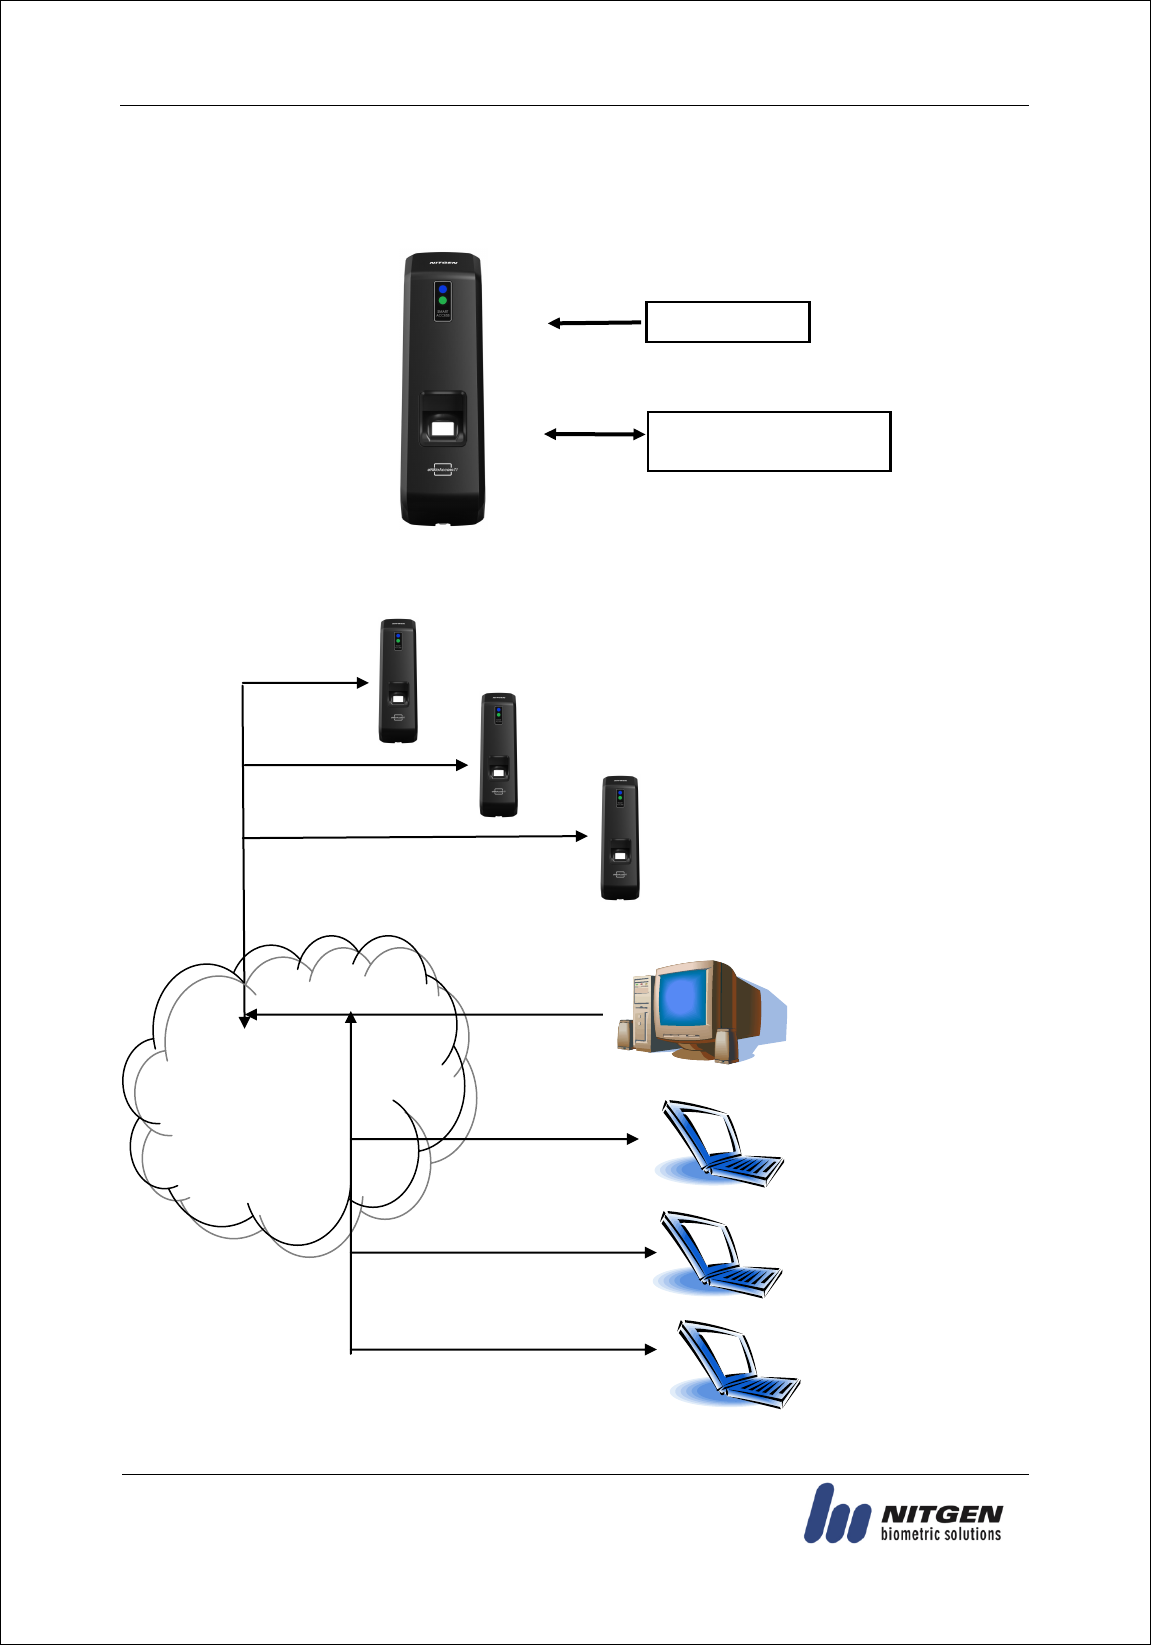
2.2. Configuration Diagram
2.2.1. Standalone Use (Access)
2.2.2. Connecting to the PC server (Access, T&A)
DC12V Adapter
Electrical Lock
(Lock+, Lock-, Monitor)
TCP/IP
T&A Control Program
Internet /
WAN / LAN
TCP/IP
Fingerprint Authentication
Server
TCP/IP
Remote Administrator Program
(User and Terminal Setting
Management)
TCP/IP
TCP/IP
TCP/IP

eNBioAccess-T1 User Guide
13
(138-827) (Bangi-dong, Hyundai Topics Building) 4th Floor, Wiryeoseongdae-
ro, Songpa-gu, Seoul, Korea
Tel : 82-2-6488-3232 , Fax : 82-2-6488-3099,
E-Mail: customer@nitgen.com; http://www.nitgen.com
2.3. Product Specification
ITEM
SPEC
REMARKS
CPU
400MHz 32Bit RISC CPU
MEMORY
4MB Nor Flash + 256MB Nand Flash
64MB RAM
Authentication Speed
1:1 < Within 0.2 second
1:N < Within 1 second (Based on 2,000
fingerprints)
Number of Users
10,000 User / 10,000 Card
10,000 Finger
100,000 Log
Fingerprint Sensor
Optical
Scan Area / Resolution
16 * 18mm / 500 DPI
Temperature /
Humidity
-20 ~ 60 ℃ /
Lower than 90% RH
AC / DC Adapter
INPUT : Universal AC100 ~ 250V
OUTPUT : DC 12V
(Option : DC 24V)
UL, CSA, CE Approved
Lock Control
EM, Strike, Motor Lock, Auto Door
I/O
3 In (1 Exit, 2 Monitor)
Communication Port
TCP/IP (10/100Mbps)
Authentication
Server
Communication
RS-485
Controller
Communication
Wiegand In/Out
Card Reader or
Controller
Communication
Card Reader
Low Frequency(125KHz) - HID, EM,
Optional
Foreign Authentication
KC, CE, FCC
SIZE
75.0mm(W) * 182.5mm(H) * 39.2mm(D)
eNBioAccess-T1 User Guide
14
(138-827) (Bangi-dong, Hyundai Topics Building) 4th Floor, Wiryeoseongdae-
ro, Songpa-gu, Seoul, Korea
Tel : 82-2-6488-3232 , Fax : 82-2-6488-3099,
E-Mail: customer@nitgen.com; http://www.nitgen.com
3. Environment Setting
3.1. Checkpoints before environment setting
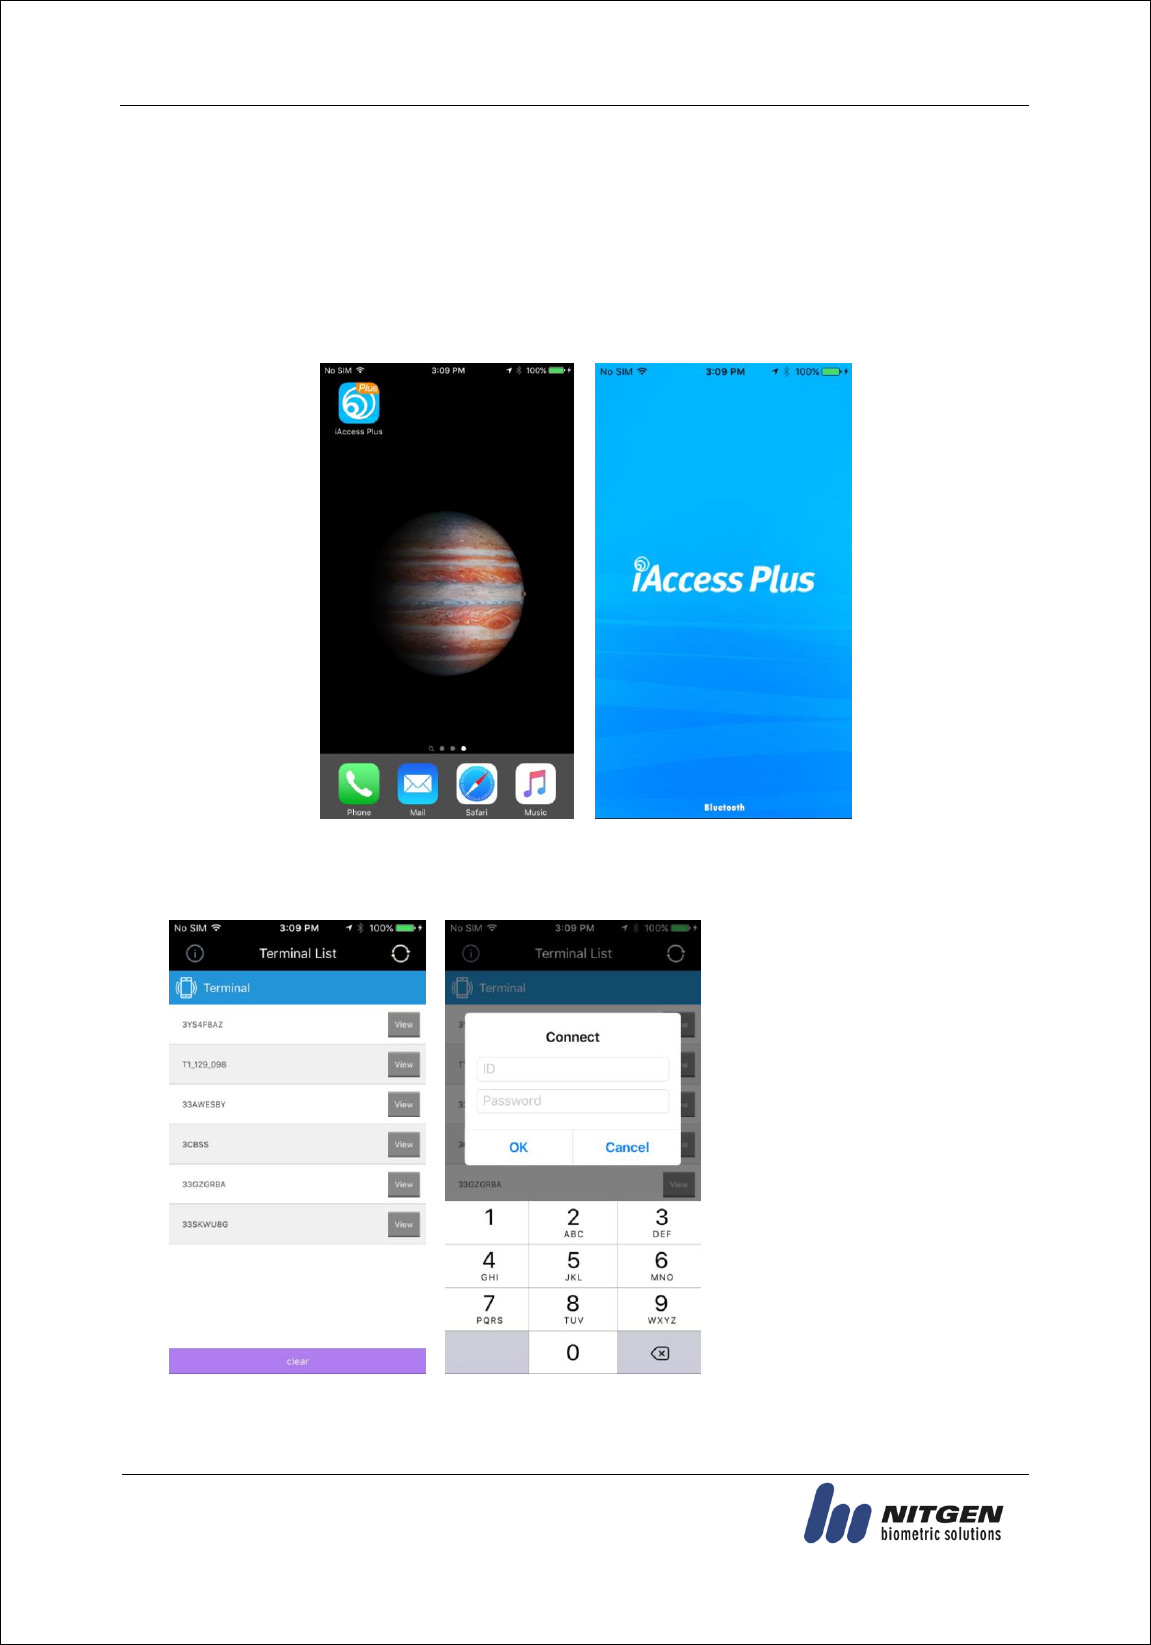
3.1.1. To run iAccess Plus (Mobile App)
Search “iAccess Plus” at the smartphone app store to install a mobile app. Press “iAccess Plus”
icon installed on your smartphone to run the program. The initial screen will appear. After 2-3
seconds, it will automatically go to the Intro menu.
3.1.2. To enter the administrator menu
Select View] button on the [Terminal List] screen, and the connection window will appear.
If no administrator is registered,
you can access the terminal without
entering your ID and password on
the login window.
If any administrator has been
registered, you can access the
terminal using the proper
administrator authentication
scheme.
If your ID is entered, attempt 1:1
Authentication. If your ID is not
entered, attempt 1:N
Authentication. If you have
successfully logged in the terminal,
the screen goes to the User
Management screen.
eNBioAccess-T1 User Guide
15
(138-827) (Bangi-dong, Hyundai Topics Building) 4th Floor, Wiryeoseongdae-
ro, Songpa-gu, Seoul, Korea
Tel : 82-2-6488-3232 , Fax : 82-2-6488-3099,
E-Mail: customer@nitgen.com; http://www.nitgen.com
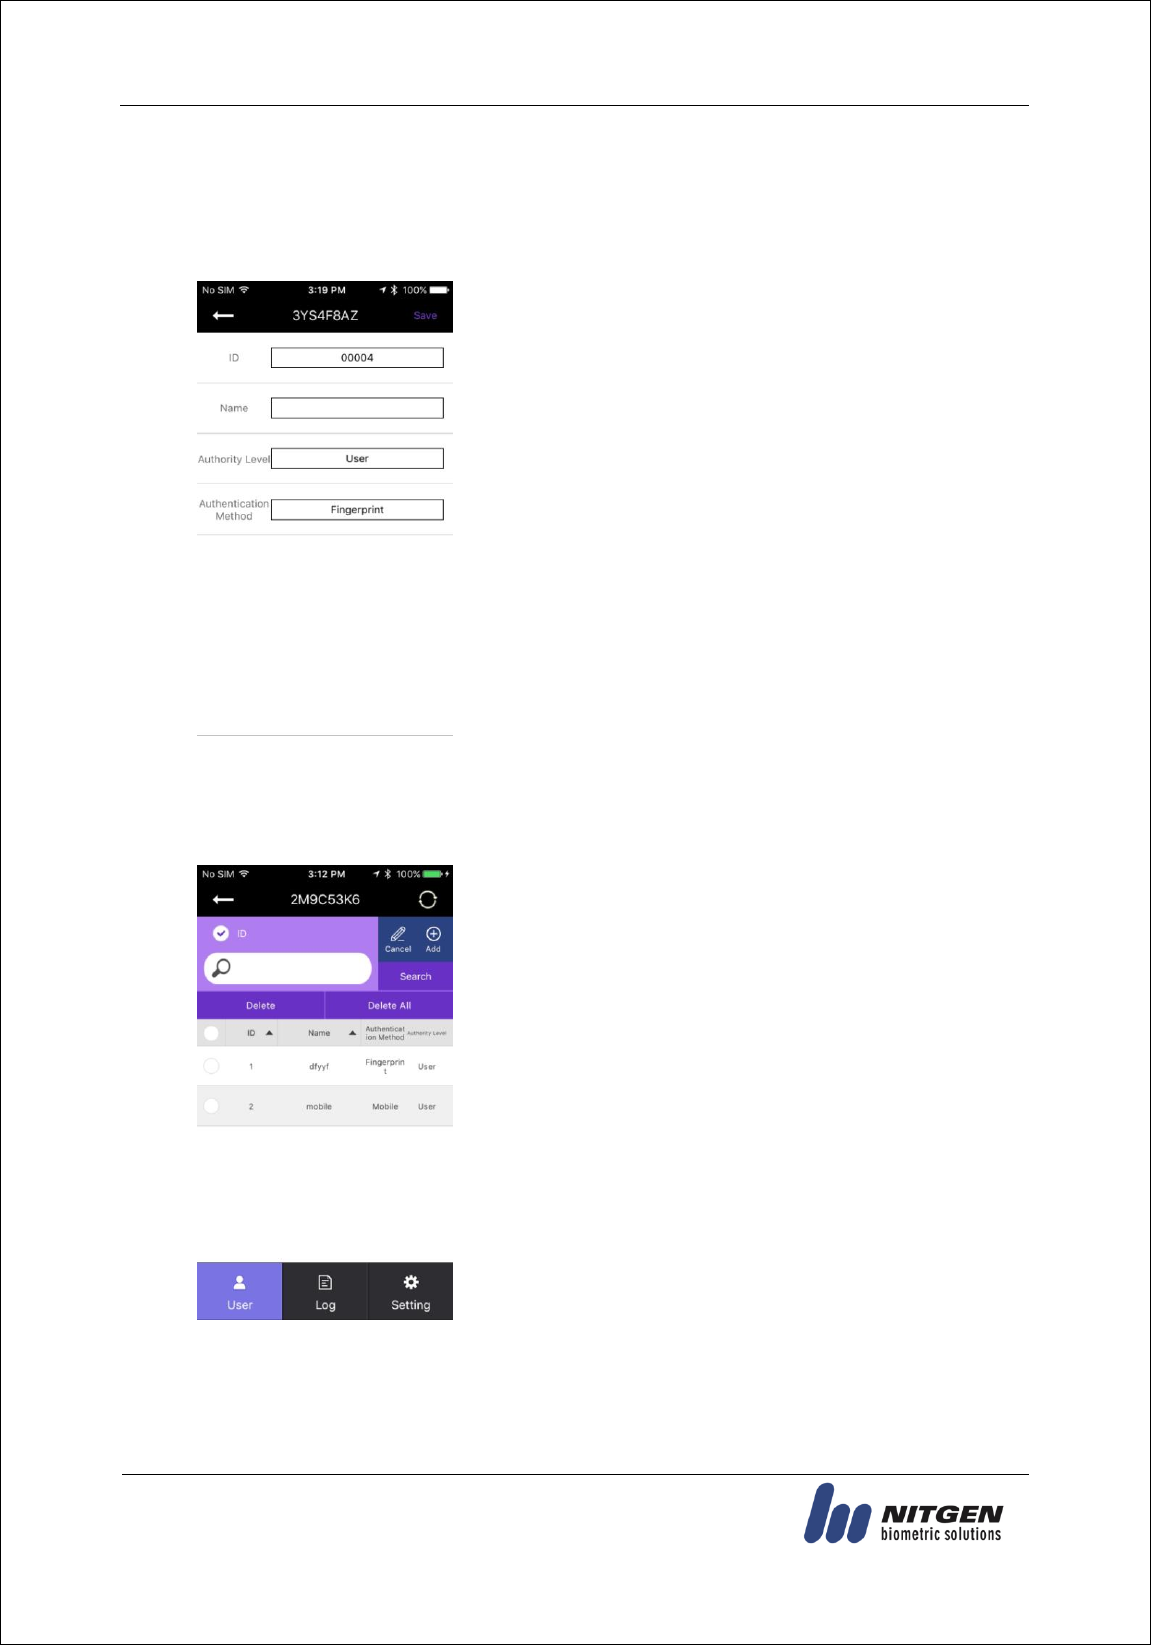
3.2. User Management
3.2.1. Add User
Select [Add] on the [User Management] screen, and the following screen will appear.
Enter your registration information on the Add User screen.
When the information is completely entered, select the [Save]
button in the top right of the screen.
Once the user information has been correctly entered, the
fingerprint is ready to be entered in either the terminal or the card.
If the set authentication scheme is completely registered, the screen
returns to the User Management screen.
3.2.2. Delete
Select [Edit] on the [User Management] screen, and the following screen will appear.
To delete all users, press the [Delete All] button. To delete part of
users, select any delete target users, and press the [Delete] button.
(When the network mode is set, the [Delete All] button is
disabled.)
eNBioAccess-T1 User Guide
16
(138-827) (Bangi-dong, Hyundai Topics Building) 4th Floor, Wiryeoseongdae-
ro, Songpa-gu, Seoul, Korea
Tel : 82-2-6488-3232 , Fax : 82-2-6488-3099,
E-Mail: customer@nitgen.com; http://www.nitgen.com
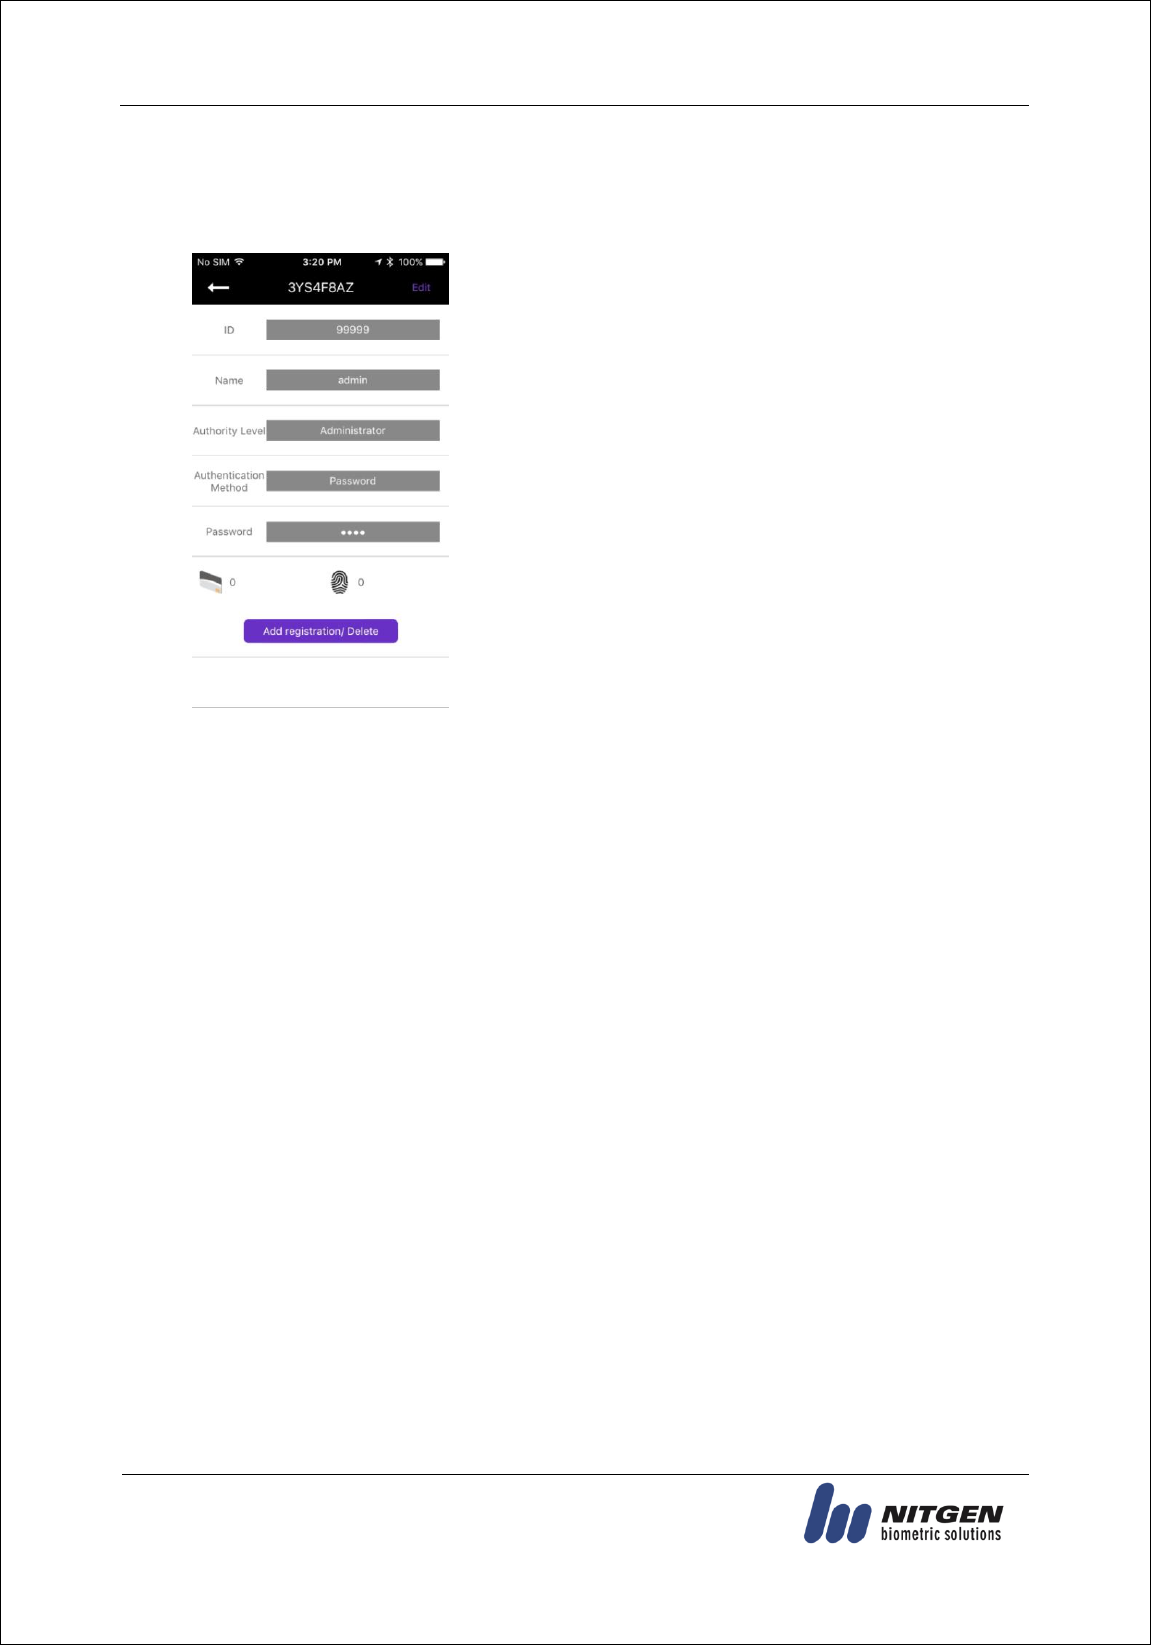
3.3.3. Change
Click the user to change on the [User Management] screen, the screen will go to the [User
Details] screen.
When you select the [Save] button after modifying the items
except the ID, if there is any additional authentication means, the
terminal becomes the input standby status and carries out
additional registration.
When the change is completed, the screen returns to the User
Management screen.
eNBioAccess-T1 User Guide
17
(138-827) (Bangi-dong, Hyundai Topics Building) 4th Floor, Wiryeoseongdae-
ro, Songpa-gu, Seoul, Korea
Tel : 82-2-6488-3232 , Fax : 82-2-6488-3099,
E-Mail: customer@nitgen.com; http://www.nitgen.com
3.3. Terminal Setting
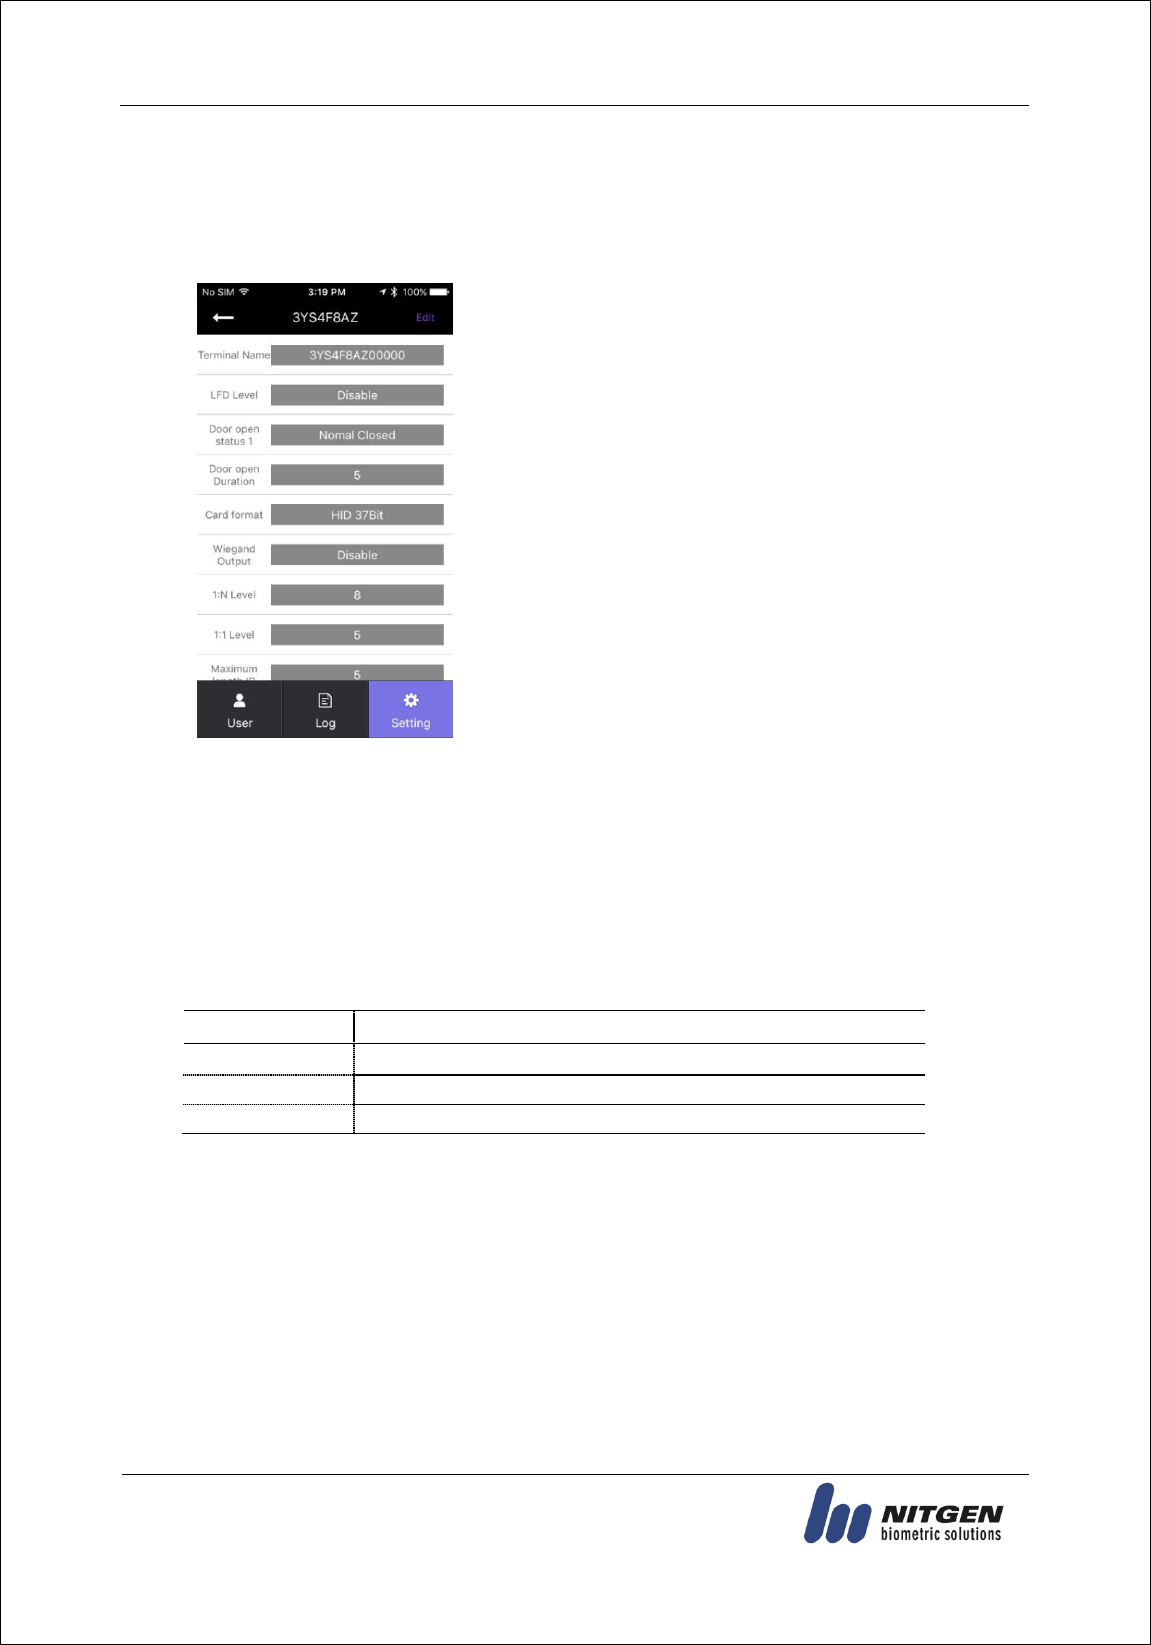
3.3.1. Setting via “iAccess Plus”
Select [Setting] on the bottom right, and the following screen will appear.
To change the terminal settings, press the [Edit] button on the top
right to switch to the edit mode.
When the terminal settings are finished, press the [Save] button to
save the changes and exit the setting.
Terminal Name
The name of the terminal will be displayed.
LFD Level
The fake fingerprint is likely to be recognized. Therefore, the higher level of security application may be
used. The higher security level may need the longer time to verify the fingerprints of some registered
users. The security level for the stage of 0-3 is supported.
Door Open Status 1
Set when connecting external contacts.
Settings
Display Method
No Use
No external lock is used.
Normal open
When the power is applied, the lock is open.
Normal close
When the power is applied, the lock is closed.
Door Open Interval
The unlock time can be set from 0.1 to 20 seconds.
eNBioAccess-T1 User Guide
18
(138-827) (Bangi-dong, Hyundai Topics Building) 4th Floor, Wiryeoseongdae-
ro, Songpa-gu, Seoul, Korea
Tel : 82-2-6488-3232 , Fax : 82-2-6488-3099,
E-Mail: customer@nitgen.com; http://www.nitgen.com
Card Format
The type of card to be used can be set.
Settings
Display Method
No Use
Do not use the card authentication
EM
Use a low-frequency (125KHz) EM card
MIFARE
Use a high-frequency (13.56MHz) MIFARE card
HID 26bit
Use a low-frequency (125KHz) HID 26 Bit card
HID 35Bit
Use a low-frequency (125KHz) HID 35 Bit card
HID 37Bit
Use a low-frequency (125KHz) HID 37 Bit card
iClass 26Bit
Use a HID iClass 26 Bit card
iClass 35Bit
Use a HID iClass 35 Bit card
iClass 37Bit
Use a HID iClass 37 Bit card
Wiegand Output
This mode is available if the terminal is equipped with a separate controller operated by Wiegand input.
Settings
Display Method
No Use
Do not use the Wiegand communication
26Bit
Perform the Wiegand communication by a format of 26Bit
34Bit
Perform the Wiegand communication by a format of 34Bit
Device Mode
If reader mode is selected, wiegand output is Card Number when authentication is Success.
If access control is selected, wiegand output is User’s ID when authentication is Success.
Sitecode
Set the value of Sitecode to transfer upon Wiegand output.
If Wiegand output is 26bit, a value of 0 to 255 can be set. If Wiegand output is 34Bit, a value of
0 to 32767 can be set.
Ext 485
Can select external RS 485 device.
If is select CP040, CP040 process authentication and lock control, log data.
485 ID
Can assign ID of External RS 485 device to 0-7.
1:N Level
When 1:N authentication, set the verification level to 5-9.
1:1 Level
When 1:1 authentication, set the verification level to 1-9.
Max ID Length
This indicates the length of ID which can be entered to the maximum.
Network Mode
Set whether the terminal is used to either a stand-alone mode or a network mode.

eNBioAccess-T1 User Guide
19
(138-827) (Bangi-dong, Hyundai Topics Building) 4th Floor, Wiryeoseongdae-
ro, Songpa-gu, Seoul, Korea
Tel : 82-2-6488-3232 , Fax : 82-2-6488-3099,
E-Mail: customer@nitgen.com; http://www.nitgen.com
Node ID
Set the terminal ID to add to ACM Pro in the range of 1 to 2000.
Use DHCP
Set whether to use a static IP.
Terminal IP
Set the terminal IP.
Server IP
When the terminal is used in conjunction with Access Manager, set the server IP.
Subnet Mask
Set the subnet mask value of the terminal.
Gateway
Set the gateway value of the terminal.
Port No.
Set the Access Manager Server port to 2000-65535. (Default: 7332)
Network Timeout
Set the communication cycle time between the Access Manager server and the terminal to the
range of 2-20.
Time Synchronization
Set time of device to time of smart phone.
Firmware Version
The terminal firmware version and the BLE firmware version are displayed.
Initialize
All data except logs and user information are initialized.
Factory Initialization
Initialize the settings of the terminal as set at a factory.
※ The terminal is rebooted after saving the settings. Therefore, it is recommended to access the terminal
after the lapse of 30 to 60 seconds.
eNBioAccess-T1 User Guide
20
(138-827) (Bangi-dong, Hyundai Topics Building) 4th Floor, Wiryeoseongdae-
ro, Songpa-gu, Seoul, Korea
Tel : 82-2-6488-3232 , Fax : 82-2-6488-3099,
E-Mail: customer@nitgen.com; http://www.nitgen.com
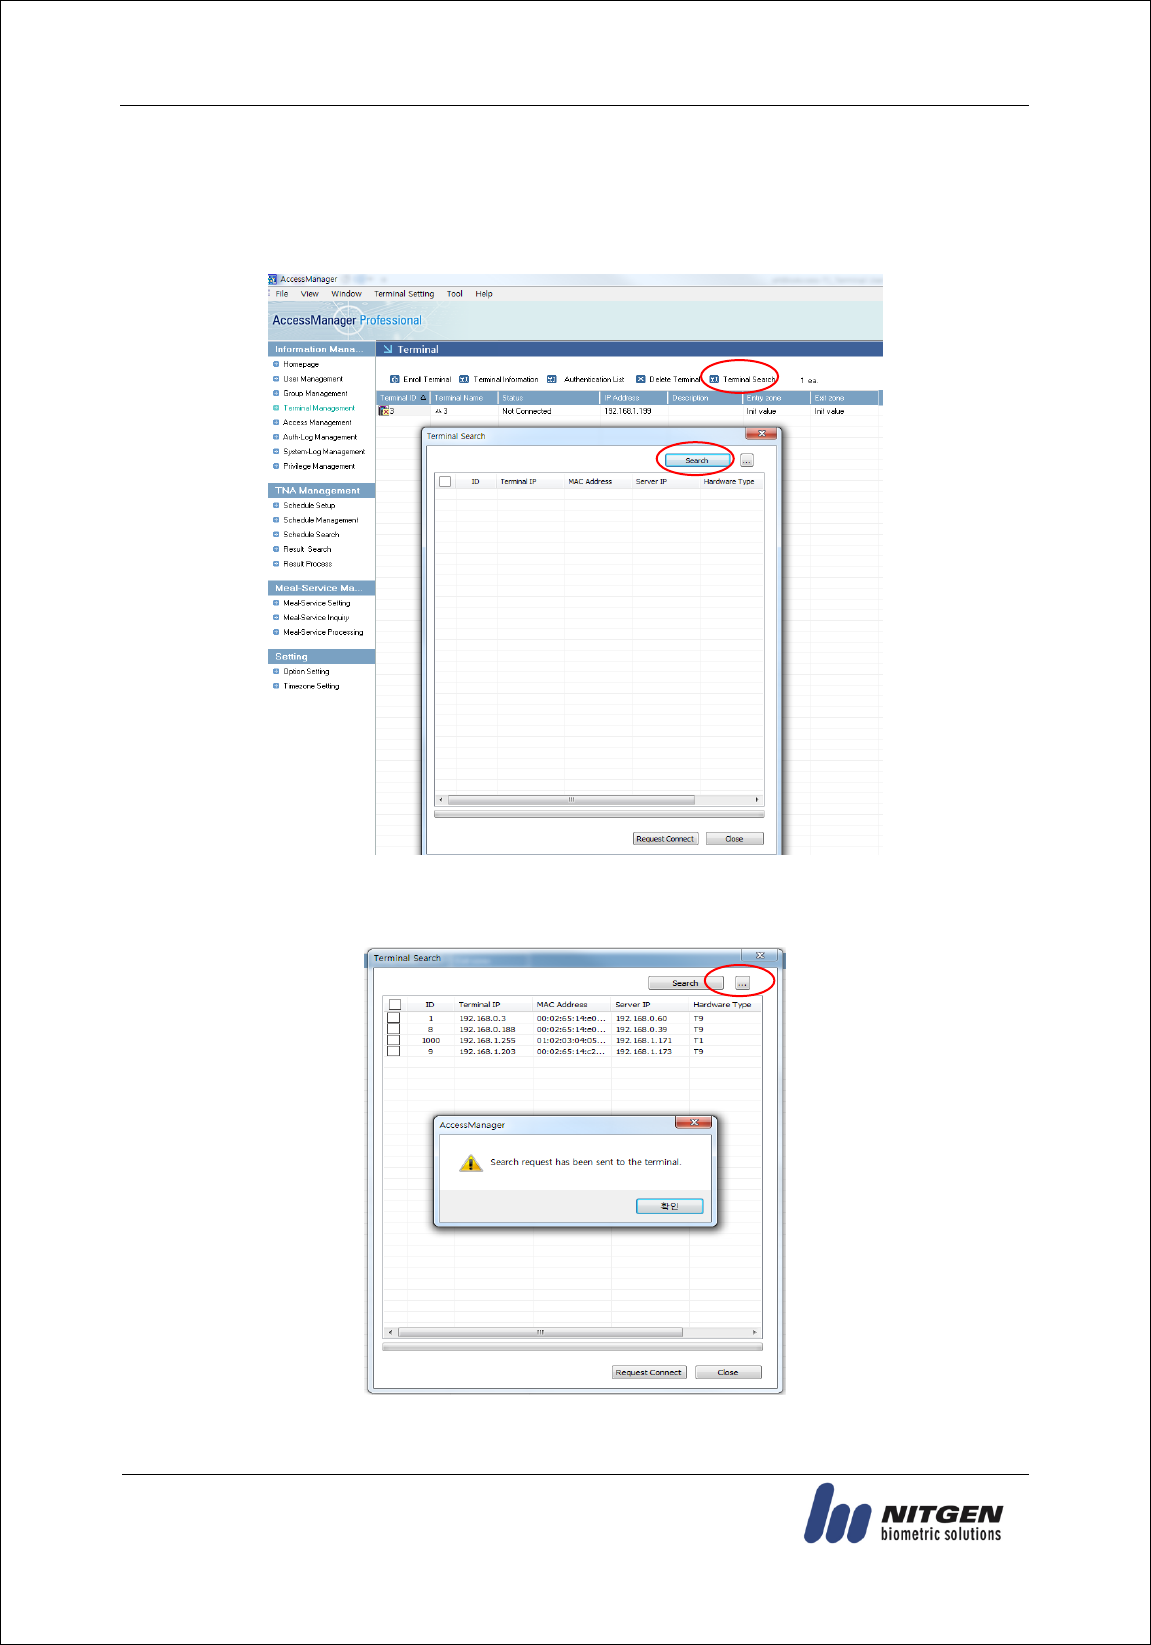
3.3.2. To set the terminal IP via Access Manager
By running terminal search items in the terminal management menu of Access Manager
Professional, perform the setting of terminal IP.
When clicking the Search button on the above screen, the unregistered terminals in Access
Manager Professional will appear as shown below.
eNBioAccess-T1 User Guide
21
(138-827) (Bangi-dong, Hyundai Topics Building) 4th Floor, Wiryeoseongdae-
ro, Songpa-gu, Seoul, Korea
Tel : 82-2-6488-3232 , Fax : 82-2-6488-3099,
E-Mail: customer@nitgen.com; http://www.nitgen.com
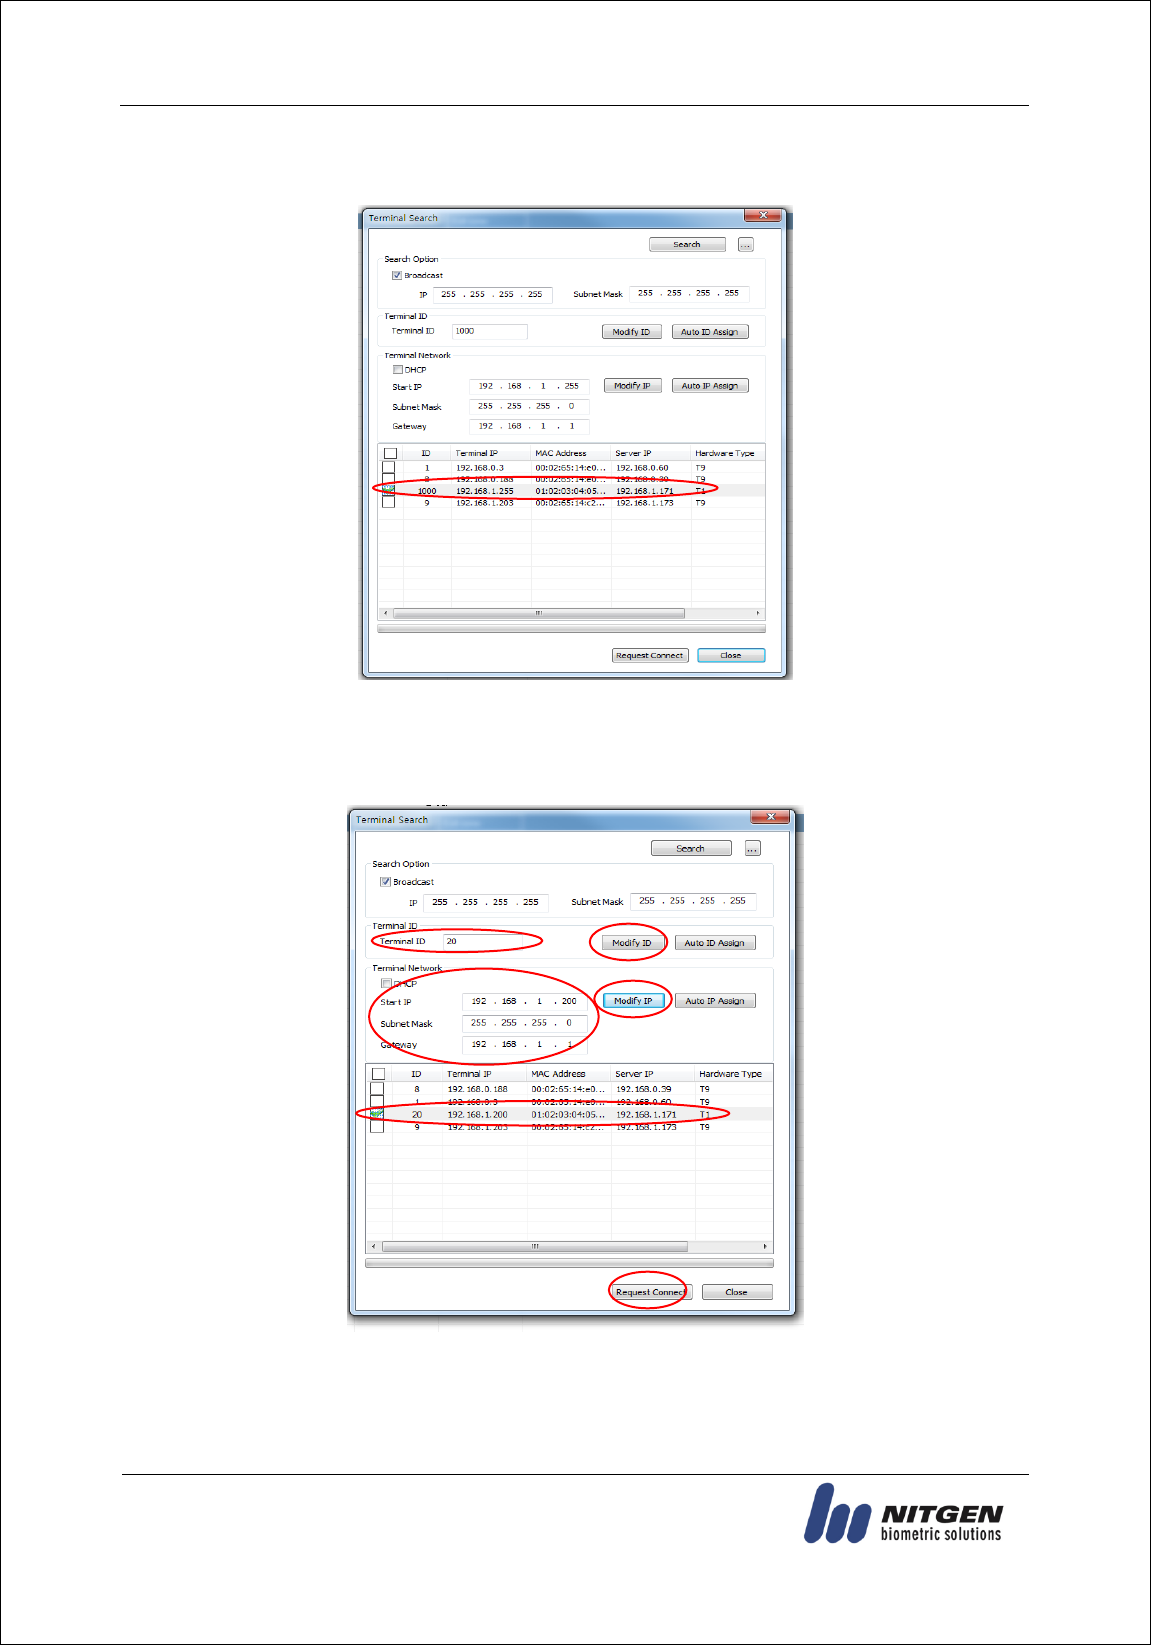
When clicking the “...” button, the detailed setting screen will appear as shown below.
To change the terminal ID and network settings, select the terminal to set, enter the change value,
and click the “ID Change” or “IP Change” button. Then, you can check that the terminal value is
changed.

eNBioAccess-T1 User Guide
22
(138-827) (Bangi-dong, Hyundai Topics Building) 4th Floor, Wiryeoseongdae-
ro, Songpa-gu, Seoul, Korea
Tel : 82-2-6488-3232 , Fax : 82-2-6488-3099,
E-Mail: customer@nitgen.com; http://www.nitgen.com
Set Terminal ID and Terminal Network and then click the “Request Connect” button at the bottom,
and the terminal will appear as the unregistered status on the Access Manager Professional screen
and the settings will be finished.
※ For more details, please refer to the Access Manager Professional Manual.

eNBioAccess-T1 User Guide
23
(138-827) (Bangi-dong, Hyundai Topics Building) 4th Floor, Wiryeoseongdae-
ro, Songpa-gu, Seoul, Korea
Tel : 82-2-6488-3232 , Fax : 82-2-6488-3099,
E-Mail: customer@nitgen.com; http://www.nitgen.com
4. How to Use Terminal
4.1. Authentication
4.1.1. Fingerprint Authentication
Place your finger on the fingerprint sensor. Then, the fingerprint sensor will light on and receive
fingerprint input. Keep your finger on the fingerprint sensor until the light turns off completely.
4.1.2. Card Authentication
Place the card on the card sensor of the terminal.
4.1.3. Multi Authentication
For users who have to be authenticated by the combination authentication methods such as
“Card and Fingerprint”, if the first input authentication method is successful, the remaining
authentication method is performed.

eNBioAccess-T1 User Guide
24
(138-827) (Bangi-dong, Hyundai Topics Building) 4th Floor, Wiryeoseongdae-
ro, Songpa-gu, Seoul, Korea
Tel : 82-2-6488-3232 , Fax : 82-2-6488-3099,
E-Mail: customer@nitgen.com; http://www.nitgen.com
5. Troubleshooting
5.1. When the fingerprint authentication time is too long or fails
When the terminal operates by the 1:N (Server) authentication in the network mode, if the
server is used for personal or business use, a server load may reduce the fingerprint
recognition rate and require the long fingerprint authentication time. It is recommended to
build a dedicated server.
Check that there are any scratches or foreign matters in your finger or FP sensor. If there are
foreign matters, wipe them with a dry cloth. If there is a large scratch, re-register another
fingerprint through the administrator.
If the fingerprint status is bad, lower the individual security level in the user information and
attempt 1:1 Authentication.
If the RF card registered by the user’s ID has been authenticated, when the fingerprint
authentication fails, whether the user exists or not is verified. Check that the user is a
registered user.
5.2. When the fingerprint is not entered well
Very dry or wet fingerprints may not be normally entered.
If the fingerprint is wet, wipe it with a dry towel. If the fingerprint is dry, blow your breath or
apply oil on your hands. Then, try to enter the fingerprint again.
5.3. When the RF card authentication fails
Check that the card possessed by users conforms to the card type set in the “RF Card Type” in the
“Option Setting” of the Access Manager program.
5.4. When the network is not connected
Check that the terminal is registered in the terminal management item in the information
management menu of Access Manager Professional.
If the terminal is not registered, check that it is set in the terminal search of Access Manager
Professional.
- Server IP of which Access Manager Professional is installed
- Check that the terminal ID is set up correctly.
- If DHCP is not used, check the relevant information.

eNBioAccess-T1 User Guide
25
(138-827) (Bangi-dong, Hyundai Topics Building) 4th Floor, Wiryeoseongdae-
ro, Songpa-gu, Seoul, Korea
Tel : 82-2-6488-3232 , Fax : 82-2-6488-3099,
E-Mail: customer@nitgen.com; http://www.nitgen.com
5.5. When the authentication is successful but the door does not open
Check that the access is controlled by the time zone.
5.5. When the user is not registered
This product is set by default to operate as a network mode.
If the connection is abnormal in the network mode, the user cannot be registered.
Check the network connection status.
5.6. When the product is unstable or does not work
Select the terminal in the terminal management menu of Access Manager Professional, click
the right mouse button, and select the [terminal Restart] item. Then, the terminal will restart.
If the server management program is being used, try to run the server again.
If the terminal does not normally work after checking all of the above, please contact our
Customer Support Team.

eNBioAccess-T1 User Guide
26
(138-827) (Bangi-dong, Hyundai Topics Building) 4th Floor, Wiryeoseongdae-
ro, Songpa-gu, Seoul, Korea
Tel : 82-2-6488-3232 , Fax : 82-2-6488-3099,
E-Mail: customer@nitgen.com; http://www.nitgen.com
FCC Information
This device complies with part 15 of the FCC Rules. Operation is subject to the following
two conditions :
(1) This Device may not cause harmful interface, and
(2) This device must accept any interference received, including interference that
may cause undesired operation.
Note: This equipment has been tested and found to comply with the limits for CLASS B
digital
device, pursuant to Part 15 of FCC Rules. These limits are designed to provide reasonable
protection against harmful interference when the equipment is operated in a commercial
environment This equipment generates, uses and can radiate radio frequency energy and, if
not installed and used in accordance with the instructions, may cause harmful interference to
radio communications. However, there is no guarantee that interference will not occur in a
particular installation. If this equipment does cause harmful interference to radio or television
reception, which can be determined by turning the equipment off and on, the user is
encouraged to try correct the interference by one or more of the following measures:
1.1. Reorient or relocate the receiving antenna.
1.2. Increase the separation between the equipment and receiver.
1.3. Connect the equipment into an outlet on a circuit different from that to which receiver is
connected.
1.4. Consult the dealer or experienced radio/TV technician for help.
WARNING
Changes or modifications not expressly approved by the manufacturer could void the
user’s authority to operate the equipment.
“CAUTION : Exposure to Radio Frequency Radiation.
This equipment should be installed and operated with a minumum distance of 20 cm
between the radiator and your body.