UTStarcom Korea Technologies CDM7026 Cellular/ PCS CDMA Phone User Manual 7026C EN 070425 indd
UTStarcom Korea Technologies Ltd. Cellular/ PCS CDMA Phone 7026C EN 070425 indd
UserManual.wiki
>
UTStarcom Korea Technologies
>
CDM7026 User Manual
Users Manual
Navigation menu
Upload a User Manual
Namespaces
Wiki Guide
HTML
PDF
Info
Views
User Manual
Discussion / Help
Navigation


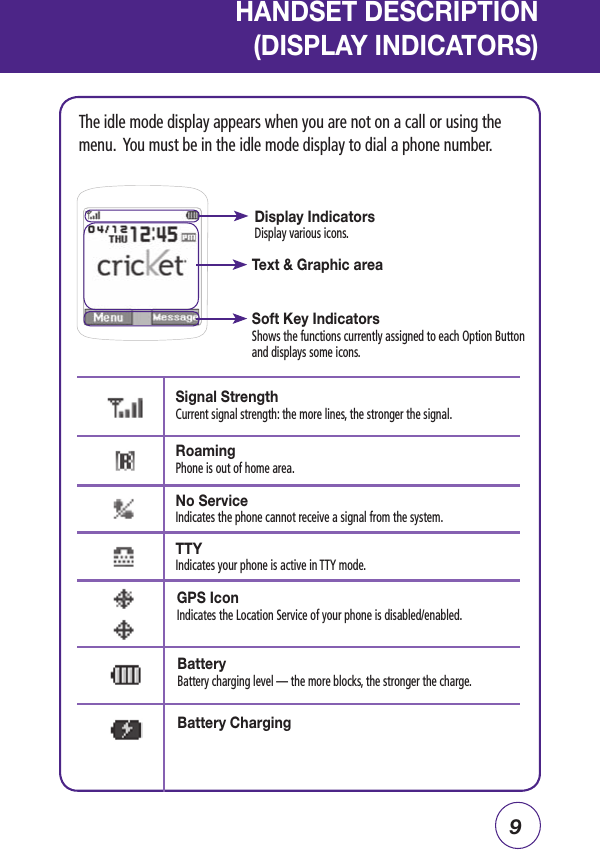
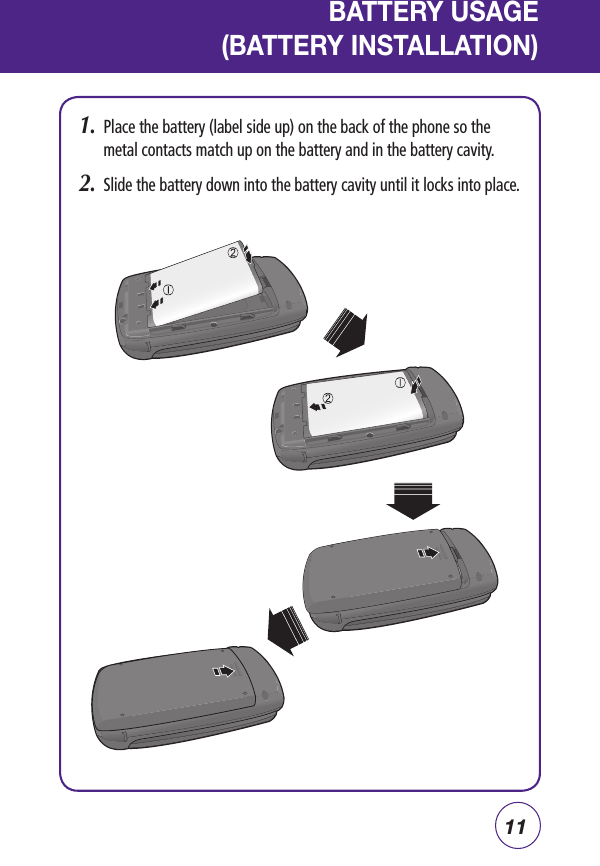
![8HANDSET DESCRIPTION (THE FUNCTION KEYS)Send Key Press to make or receive a call or in idle mode, press to access the All Calls list.NAVIGATION KEY In Idle Mode: Press for Contacts, for Schedule, for Voice Command and For Cricket Clicks.Within a Menu: Within a menu, use to scroll through menu or to select a function displayed on the screen.End Key Press to terminate a call or to return to idle mode. Press and hold to turn the phone on/off.Left Option ButtonPress to access Menu or function displayed on bottom line.CLR Key Press to clear a digit or press and hold to clear all digits from the display. Press to return to the previous page.Shift Key Enters the asterisk [*] character for calling features. In text entry mode, press to change the character input type. Press twice to display a plus sign (+) for international dialing. Press and hold to turn on/off Vibrate mode.Right Option ButtonPress to access the Message Menu or function displayed on bottom line.Space Key In text entry mode, press to accept the word and add a space. Press and hold to lock/unlock the phone.Side Volume Key Allows you to adjust the ringer volume in standby mode (with the flip open) or adjust the voice volume during a call. The volume key can also be used to scroll up or down to navigate through the different menu options. Press to ignore an incoming call and mute the ringer.0 Key In T9 Mode, press to see other word choices.](https://usermanual.wiki/UTStarcom-Korea-Technologies/CDM7026/User-Guide-798151-Page-8.png)


![17Your phone can be customized via the menu. Each function can be accessed by scrolling with the or by pressing the number that corresponds with the menu item.1. To access the menu in the idle mode, press [Menu].2. Press / to scroll through the menu items. Press / to scroll through the submenus for each menu item.3. To return to the previous page, press . To exit the current menu and return to the idle mode, press .4. Press to enter a function when its main page is displayed or press its assigned number to have direct access to the function.ContactsVoice CommandScheduleCricket ClicksACCESSING THE MENU](https://usermanual.wiki/UTStarcom-Korea-Technologies/CDM7026/User-Guide-798151-Page-17.png)
![20MAKING A CALL1. Enter a phone number.2. Press .3. To end a call, press .ANSWERING CALLS1. When your phone rings or vibrates, press to answer the incoming call. (Depending on your phone’s settings, you may also answer incoming calls by opening the phone or by pressing any digit key. See page 58 for details.)2. To end a call, press .BASIC FUNCTIONS To modify the phone number you have entered : • To erase one digit at a time press . • To erase the entire number, press and hold . Note • If “CALL FAILED” appears on the display or the line is busy, press or . • If you activate the “AUTO RETRY” function, the phone will automatically retry for the number of times you have selected. • When you place or receive a call from stored phone numbers, only the name will be displayed. • If “Enter Lock Code” appears on the display enter your 4-digit password to unlock your phone. • Your default password is the last 4 digits of your phone number.Note• To ignore incoming calls, press [Ignore].](https://usermanual.wiki/UTStarcom-Korea-Technologies/CDM7026/User-Guide-798151-Page-20.png)
![21BASIC FUNCTIONSSPEAKERPHONEThe speakerphone feature lets you hear audio through the speaker and talk without holding the phone.1. To activate the speakerphone while answering or calling modes, press .2. The phone returns to normal (SpeakerPhone Off) after ending a call or when the phone is turned off and back on.WAIT/PAUSE FEATUREPauses are used for automated systems (i.e., Voicemail, calling cards). Insert a pause after a phone number then enter another group of numbers. The second set of numbers is dialed automatically after the pause. This feature is useful for dialing into systems that require a code. 1. To insert a wait/pause, enter a phone number then press [Options]. Select either a P-Hard Pause (“P” appears) or a T-2Sec Pause (“T” appears).2. Press to dial or press [Done] to save phone number.• In Auto Answer Mode, a call is automatically answered after five seconds of ring tones.Note](https://usermanual.wiki/UTStarcom-Korea-Technologies/CDM7026/User-Guide-798151-Page-21.png)
![23BASIC FUNCTIONSADJUSTING VOLUMEAdjusts the volume of the ringer, key beep and earpiece.1. Press [Menu] then press for the “Settings” menu. Press “Sounds“ then press “Volume“. Select one of the following options:2. Adjust the volume by pressing or press / , then press to save the setting.• Ringer: Controls the ringer volume.• Key Tone: Controls the keypad volume.• Speakerphone: Controls the speakerphone volume.• Headset: Controls the earpiece volume.• Advanced: Controls the volume for Message alert, Voicemail alert, Alarms, and Power On/Off. • To adjust earpiece volume during a call, press up or down. • Press and hold down to turn off all sounds. • Press and hold up to return to normal mode. • In idle mode, press up/down to adjust the master volume. • Press and hold the key to turn vibrate mode on/off.Note](https://usermanual.wiki/UTStarcom-Korea-Technologies/CDM7026/User-Guide-798151-Page-23.png)
![24DURING A CALLMUTE (UNMUTE)If you press Mute during a call, the person you are speaking with cannot hear you or any sounds from your side of the conversation. However, you can still hear them. To activate Mute during a call, press [Mute].SPEAKER ONTo activate speakerphone during a call:1. Press [Options], then press .VOICE MEMOTo record a voice memo during a call:1. Press [Options], then press .CONTACTSTo view a phone number from your Contact list during a call:1. Press [Options], then press .• To deactivate, press [Unmute].• The phone will automatically unmute in Emergency Call or Callback Mode.](https://usermanual.wiki/UTStarcom-Korea-Technologies/CDM7026/User-Guide-798151-Page-24.png)
![25DURING A CALLRECENT CALLSTo select a phone number from your Recent Calls List during a call:1. Press [Options], then press .MESSAGINGTo send a text message (SMS) during a call:1. Press [Options], then press .](https://usermanual.wiki/UTStarcom-Korea-Technologies/CDM7026/User-Guide-798151-Page-25.png)

![28STORING A PHONE NUMBERThe phone book stores up to 500 entries.1. Enter phone number then press [Options], then press “Save”.2. Select “Create New“ or “Update Existing“. If “Create New“ is selected, the New Entry icon list appears. Press / to choose the type of number you are adding. Press to select.If “Update Existing” is selected, your contact list is displayed.Choose the entry to add the number to,then press . Select the type of number you are adding from the icon list, then press .3. Enter a name. To change the input mode, press [Options]. Press to enter information in other fields for the contact. Fields include Name, Mobile 1, Mobile 2, Home, Work, Fax, Email 1, Email 2, Group, Ringer, Memo. 4. To store the entry in your contact list, press [Done]. Select Yes and press . “Contact Saved“ will be displayed.• To select a group, scroll to Group field and press [Assign]. The group list will be displayed. Select a group and press .• To select a ringer for the contact, scroll to the Ringer field and press [Select]. To play a highlighted ringer, press [Play]. To select the ringer, press [Done].• To enter a note for the contact, scroll to the Memo field and enter your text. To change the input mode, press [Options].](https://usermanual.wiki/UTStarcom-Korea-Technologies/CDM7026/User-Guide-798151-Page-28.png)
![29ENTERING LETTERS,NUMBERS & SYMBOLSThe input mode will automatically be activated when it is necessary to enter letters and numbers. There are 4 available modes: Standard Alphabet mode (Abc), T9 Mode (T9Word), Numeric mode (123) and Symbol mode (Symbols). The input mode indicator appears on the lower portion of the display when letters and numbers are entered. To select the desired input mode, press [Options], then choose from the list on screen.KEYKEYPress to select the letter case: [Abc], [ABC], [abc] / [T9Word], [T9WORD], [T9word].Press to change mode.[T9Word][Abc] [123][Symbols]In T9 mode, press to view the next matching word if the highlighted word is not the word you intended. Press to accept a word and add a space.Press to delete a character to the left of the cursor.](https://usermanual.wiki/UTStarcom-Korea-Technologies/CDM7026/User-Guide-798151-Page-29.png)
![30ENTERING LETTERS, NUMBERS & SYMBOLSSTANDARD INPUT MODEUse the digit keys to enter letters, numbers and characters.1. Enter letters using the keypad. To change the input mode, press [Options]. Standard input mode is listed as Alphabet.2. To enter a space, press . The cursor will automatically move to the next column.3. Press each key until the desired letter appears.4. To delete one character, press . To delete the entire entry, press and hold .5. To change from lowercase to uppercase, press . Select Abc mode by pressing [Options], then Alphabet.When you select this mode, the Abc icon appears as a visual confirmation. - Find the key that corresponds to the letter you want to enter. - Press it as many times as needed for the letter to appear on the screen. - To enter the name “John”: Press [ ] J Press [ , , ] o Press [ , ] h Press [ , ] nE.G.](https://usermanual.wiki/UTStarcom-Korea-Technologies/CDM7026/User-Guide-798151-Page-30.png)
![31ENTERING LETTERS, NUMBERS & SYMBOLST9 INPUT MODET9 mode incorporates a built-in-dictionary to determine a word based on the entered characters. A word can be entered more quickly by pressing each key once per character.1. Select T9 mode by pressing [Options], then selecting “Entry Mode.”2. Press a digit key once to enter the character you want then enter all the characters to input the word you want.3. To view the next matching word, press .4. To accept the matching word then enter a space, press .To enter “Funfare” in T9 mode: - Press [Options] to select T9 mode. - Press , , until you see “Fun” highlighted. - Press to select “Fun”. - Press , , , and you will see “ease” highlighted. Press until you see "fare" highlighted. Press to select and add a space.E.G.To enter a compound word: • Enter the first part of the word then press to accept it without adding a space after it. • Enter the last part of the word then press to accept the word.Note](https://usermanual.wiki/UTStarcom-Korea-Technologies/CDM7026/User-Guide-798151-Page-31.png)
![32ENTERING LETTERS, NUMBERS & SYMBOLSNUMERIC MODEAllows you to enter numbers.1. Press [Options] and select “123“ for Numeric mode.2. To enter a number, press its digit key.SYMBOL MODEAllows you to enter symbols.1. Press [Options] and select “Symbol“ for Symbol mode.2. Select the symbol you want to enter with the , then press .](https://usermanual.wiki/UTStarcom-Korea-Technologies/CDM7026/User-Guide-798151-Page-32.png)
![33MAKING A CALL THROUGH THE CONTACT LISTONE-TOUCH/TWO-TOUCH DIALINGIdeal for frequently dialed numbers, this feature allows entries in your contact list to be dialed via the keypad with only one or two key presses. In order for One-Touch/Two-Touch Dialing to properly work, it must be enabled. To activate this function, press [Menu], , , ,then select On or Off using the . Press [Done].ONE-TOUCH DIALING2-9: Press and hold the corresponding memory number for more than 1 second.TWO-TOUCH DIALING10-99: Press and first digit and second digits of the memory number short and long respectively. • If no phone number is stored in the location entered, "Location is empty" will appear on the screen. • If One Touch Dial is set to Off: Enter the speed dial location number then press . • Location 1 is reserved for voicemail. Location 2-99 are unassigned. To assign a speed dial location, please see page 37.Note](https://usermanual.wiki/UTStarcom-Korea-Technologies/CDM7026/User-Guide-798151-Page-33.png)
![34CONTACTSStores up to 500 entries, each of which can be assigned to a group. Entries can be retrieved by name or group.CREATE NEWAdds a new entry.1. Press [Menu], then press “Contacts”, then "Create New".2. Fill in the fields as they are selected. Press / to select a field.3. To save the entry, press [Done]. To return to the previous page, press .See page 28 for more detailed information about storing a number.• If no name is saved for the contact, the primary phone number will be displayed in the contact list.Note• PHONE BOOK FIELDS: Name/Mobile1/Mobile2/Home/Work/Fax/ E-Mail1/E-Mail2/Group/Ringer/Memo.](https://usermanual.wiki/UTStarcom-Korea-Technologies/CDM7026/User-Guide-798151-Page-34.png)
![35CONTACTSFINDRetrieves an entry by name and calls the primary number by simply pressing . You can review all the entries stored in your contacts list or quickly find an entry by entering a name or its character string.1. Press [Menu], then press “Contacts”, then “Find”.2. The list of names in your contacts is displayed alphabetically.3. Enter a name or its character string or scroll through the list by pressing / .4. To edit the entry, press [Edit]. Press [Options] to “Create New”, “Send Message”, “Call” or “Erase”.5. To show the entry details, press . From the View Contacts screen press [Options] to “Send Message”, “Call”, or “Erase”.6. To call the selected number, press [Options] then select “Call” or press .GROUPSAllows you to classify phone entries into groups. Existing groups include No Group, Family, Friends, Work. A maximum of 30 groups is allowed.ADD NEW GROUP1. Press [Menu], then press “Contacts”, then “Groups”.2. Press [Add] to add a new group name. 3. Input a new group name.](https://usermanual.wiki/UTStarcom-Korea-Technologies/CDM7026/User-Guide-798151-Page-35.png)
![36CONTACTS4. To save it, press [Done].5. From the group list, press [Options] to “Rename”, “Change Ringer”, or “Erase”.CHANGE GROUP NAME1. Press [Menu], then press “Contacts”, then “Groups”.2. Select an existing group name. The only group name that cannot be changed is No Group.3. Press [Options], then scroll to Rename and press .4. Input a new group name.5. Press [Done] to save the setting.SEND TEXT MSG. GROUP1. Press [Menu], then press “Contacts”, then “Groups”.2. Select an existing group name that has phone numbers saved to it.3. Press [Options], then scroll to “Send Message” and press .4. Input your message. To add a graphic, sound or to use a preset message, press [Options] and select Add.5. To send the message, press [Send]. To save the message, press [Options], select “Save As Draft”, then press .](https://usermanual.wiki/UTStarcom-Korea-Technologies/CDM7026/User-Guide-798151-Page-36.png)
![37CONTACTSERASE GROUP1. Press [Menu], then press “Contacts”, then “Groups”.2. Select an existing group name. 3. Press [Options], then scroll to Erase and press .4. “Erase?” will be displayed. Select Yes and press to erase the group.SPEED DIALSIn idle mode, calls can be placed to numbers stored in speed dial by pressing & holding the location number on the key pad. For a 2-digit location number, press the first number, then press and hold the second number.1. Press [Menu], then press “Contacts”, then “Speed Dial”.2. To assign a phone number to a location, select the location then press [Assign].3. Scroll to the contact in the list.• “Unassigned” appears if the location is available.Note• Speed Dial must be activated. See page 59 for additional information.Note](https://usermanual.wiki/UTStarcom-Korea-Technologies/CDM7026/User-Guide-798151-Page-37.png)
![38CONTACTS4. If more than one number exists for the contact, press / to select the phone number for the speed dial location. The numbers will be displayed above the contact list.5. Press [Assign] to set the speed dial location. SERVICE NUMBERSYour Contacts list is preprogrammed with contact numbers for various services.1. Press [Menu], then press "CONTACTS".2. Press "Service Numbers".3. Select number then press .4. Press to call.](https://usermanual.wiki/UTStarcom-Korea-Technologies/CDM7026/User-Guide-798151-Page-38.png)
![40RECENT CALLSALL CALLSDisplays information about the most recent received, dialed and missed calls.1. Press [Menu], then press for the “Recent Calls” menu. Press “All Calls”. If the number is already stored in your contact list, only the name appears. If the number is not stored, the number appears.2. To view details, press .3. Press [Options] and select “Save“ to save it to your contact list or select “Erase“ to delete it.• Call details include type of call, date, time and phone number.Note• Save: To store the phone number in your contact list.• Send Msg.: To send a message to the highlighted phone number.• Details: To view the caller's information.• Lock/Unlock: To lock or unlock the highlighted phone number.• Erase: To erase the highlighted phone number.• Erase All: To erase all the phone numbers in the list.• After the 270th received, dialed or missed calls, the oldest call will automatically be erased from the history.Note](https://usermanual.wiki/UTStarcom-Korea-Technologies/CDM7026/User-Guide-798151-Page-40.png)
![41RECENT CALLSMISSED CALLSDisplays information about the 90 most recent missed calls.Place a call to a missed call number by simply pressing .1. Press [Menu], then press for the “Recent Calls” menu. Press “Missed Calls”. If the number is already stored in your contact list, only the name appears. If the number is not stored, the phone number appears.2. To view missed call details, press .3. Press [Options] and select “Save” to save it to your contact list or select “Erase” to delete it.• Call details include date, time and phone number.Note• Send Msg.: To send a message to the highlighted phone number.• Details: To view the caller's information.• Lock/Unlock: To lock or unlock the highlighted phone number.• Erase: To erase the highlighted phone number.• Erase All: To erase all the phone numbers in the list.• After 90 missed calls, the oldest call will be automatically erased from the history.Note](https://usermanual.wiki/UTStarcom-Korea-Technologies/CDM7026/User-Guide-798151-Page-41.png)
![42RECENT CALLSINCOMING CALLSDisplays information about the 90 most recently received calls.Place a call to a incoming call number by simply pressing .1. Press [Menu], then press for the “Recent Calls” menu. Press “Incoming calls“. If the number is already stored in your contact list, only the name appears. If the number is not stored, the number appears.2. To view incoming call details, press .3. Press [Options] and select “Save” to save it to your contact list or select “Erase” to delete it.• Call details include date, time and phone number.Note• Send Msg.: To send a message to the highlighted phone number.• Details: To view the caller's information.• Lock/Unlock: To lock or unlock the highlighted phone number.• Erase: To erase the highlighted phone number.• Erase All: To erase all the phone numbers in the list.• After 90 incoming calls, the oldest call will automatically be erased from the history.Note](https://usermanual.wiki/UTStarcom-Korea-Technologies/CDM7026/User-Guide-798151-Page-42.png)
![43RECENT CALLSOUTGOING CALLSDisplays information about the 90 most recently dialed numbers. Place a call to a outgoing call by simply pressing .1. Press [Menu], then press for the “Recent Calls” menu. Press “Outgoing Calls“. If the number is already stored in your contact list, only the name appears. If the number is not stored, the number appears.2. To view dialed call details, press .3. Press [Options] and select “Save” to save it to your contact list or select “Erase” to delete it.• Call details include type of call, date, time and phone number.Note• Send Msg.: To send a message to the highlighted phone number.• Details: To view the caller's information.• Lock/Unlock: To lock or unlock the highlighted phone number.• Erase: To erase the highlighted phone number.• Erase All: To erase all the phone numbers in the list.• After 90 dialed calls, the oldest call will automatically be erased from the history.Note](https://usermanual.wiki/UTStarcom-Korea-Technologies/CDM7026/User-Guide-798151-Page-43.png)
![44RECENT CALLSCALL TIMERSChecks the usage time and manages your calls within the limit you set. The 11 timers include (Last Call, All Calls, Incoming Calls, Outgoing Calls, Roaming Calls, Transmit KB, Received KB, Total KB, Last Reset, Lifetime Calls, Lifetime Data Counter):1. Press [Menu], then press for the “Recent Calls” menu. Press “Call Timers”.2. To reset the selected timer, press [Options], then select “Reset”. “Reset?” will be displayed. Select Yes and press . To reset all timers, press [Options], then select “Reset All”. “Reset All?” will be displayed. Select Yes and press .3. To return to the previous page, press .](https://usermanual.wiki/UTStarcom-Korea-Technologies/CDM7026/User-Guide-798151-Page-44.png)
![45SETTINGSCustomizes your phone and optimizes performance through a variety of settings.SOUND SETTINGSRINGER TYPERingerTo select a ringer type for incoming calls:1. Press [Menu], then press for the “Settings” menu. 2. Press “Sounds”, and “Ringer Type” then press “Ringer”.3. Select your desired ringer type by pressing / .4. Press [Done] to save the setting.• Press [Play] to play/stop the ringer.](https://usermanual.wiki/UTStarcom-Korea-Technologies/CDM7026/User-Guide-798151-Page-45.png)
![46SETTINGSMessagesThis setting allows you to select the alert type for text messages.1. Press [Menu], then press for the “Settings” menu. 2. Press “Sounds”, and “Ringer Type” then press “Messages”.3. Select your desired alert type by pressing / .4. Press [Done] to save the setting.VoicemailThis setting allows you to select the alert type for voicemail messages.1. Press [Menu], then press for the “Settings” menu. 2. Press “Sounds”, and “Ringer Type” then press “Voicemail”.3. Select your desired alert type by pressing / .4. Press [Done] to save the setting.• Press [Play] to play/stop the alert beep.• Press [Play] to play/stop the alert beep.](https://usermanual.wiki/UTStarcom-Korea-Technologies/CDM7026/User-Guide-798151-Page-46.png)
![47SETTINGSAlarm1. Press [Menu], then press for the “Settings” menu. 2. Press “Sounds”, and “Ringer Type” then press “Alarm”.3. Select your desired ringer type by pressing / .4. Press [Done] to save the setting.Roam Ringer1. Press [Menu], then press for the “Settings” menu. 2. Press “Sounds”, and “Ringer Type” then press “Roam Ringer”.3. Select “Normal” or “Distinctive”.4. Press [Done] to save the setting.• Press [Play] to play/stop the ringer.](https://usermanual.wiki/UTStarcom-Korea-Technologies/CDM7026/User-Guide-798151-Page-47.png)
![48SETTINGSVOLUMERingerTo adjust Ringer volume:1. Press [Menu], then press for the “Settings” menu. 2. Press “Sounds”, and “Volume” then press “Ringer”.3. Select one of the following settings by pressing / .4. Press [Done] to save the setting.Key ToneTo adjust Key tone volume:1. Press [Menu], then press for the “Settings” menu. 2. Press “Sounds”, and “Volume” then press “Key Tone”.3. Select one of the following settings by pressing / .4. Press [Done] to save the setting.• Silence All, Ringer Off, Vibrate, Level 1~5• Silence All, Level 1~5](https://usermanual.wiki/UTStarcom-Korea-Technologies/CDM7026/User-Guide-798151-Page-48.png)
![49SETTINGSSpeakerphoneTo adjust Speakerphone volume:1. Press [Menu], then press for the “Settings” menu. 2. Press “Sounds”, and “Volume” then press “Speakerphone”.3. Select one of the following settings by pressing / .4. Press [Done] to save the setting.HeadsetTo adjust Headset volume:1. Press [Menu], then press for the “Settings” menu. 2. Press “Sounds”, and “Volume” then press “Headset”.3. Select one of the following settings by pressing / .4. Press [Done] to save the setting.• Level 1~5• Level 1~5](https://usermanual.wiki/UTStarcom-Korea-Technologies/CDM7026/User-Guide-798151-Page-49.png)
![50SETTINGSAdvanced1. Press [Menu], then press for the “Settings” menu. 2. Press “Sounds”, and “Volume” then press “Advanced”.3. Select one of the following settings by pressing / .4. Press to highlight volume section. Then press / to adjust the volume level.5. Press [Done] to save the setting.• Messaging • Voicemail• Alarms • Power On/Off • Use Ringer• Separate](https://usermanual.wiki/UTStarcom-Korea-Technologies/CDM7026/User-Guide-798151-Page-50.png)
![51SETTINGSALERTSMinute BeepSounds an alert every minute during a call.1. Press [Menu], then press for the “Settings” menu. 2. Press “Sounds”, and “Alerts” then press “Minute Beep”.3. Select “On” or “Off”, then press [Done] to save the setting.RoamingSounds an alert when leaving a service area and entering a roaming service area.1. Press [Menu], then press for the “Settings” menu. 2. Press “Sounds”, and “Alerts” then press “Roaming”.3. Select “On” or “Off”, then press [Done] to save the setting.](https://usermanual.wiki/UTStarcom-Korea-Technologies/CDM7026/User-Guide-798151-Page-51.png)
![52SETTINGSConnectNotifies you that a call has been successfully placed.1. Press [Menu], then press for the “Settings” menu. Press “Sounds”, and “Alerts”, then press “Connect”.2. Select “On” or “Off”, then press [Done] to save the setting.Fade1. Press [Menu], then press for the “Settings” menu. Press “Sounds”, and “Alerts”, then press “Fade”.2. Select “On” or “Off”, then press [Done] to save the setting.TONE LENGTH1. Press [Menu], then press for the “Settings” menu. Press “Sounds”, and "Tone Length". 2. Select “Normal” or “Long”, then press [Done] to save the setting.](https://usermanual.wiki/UTStarcom-Korea-Technologies/CDM7026/User-Guide-798151-Page-52.png)
![53SETTINGSDISPLAY SETTINGSAllows you to customize the display.WALLPAPERImage1. Press [Menu], then press for the “Settings” menu. Press “Display”, then “Wallpaper” and then “Image”.2. Select 1. Preset Image., 2. Download Image, or 3. EMS Image. A list of images for the submenu will be shown. Press [View] to view the image full screen.3. Press [Done] to save the image as your wallpaper.Clock Format1. Press [Menu], then press for the “Settings” menu. Press “Display”, then “Wallpaper” and then “Clock Format”.2. The following options appear:3. Press [Done] to save the setting.• Digital Clock, Analog Clock, Dual Time Clock, Calendar](https://usermanual.wiki/UTStarcom-Korea-Technologies/CDM7026/User-Guide-798151-Page-53.png)
![54SETTINGSSCREENSAVERTime setting1. Press [Menu], then press for the “Settings” menu. Press “Display”, then “Screensaver” and then “Time Setting”.2. Select one of the following options:3. Press [Done] to save the time setting.Screensaver1. Press [Menu], then press for the “Settings” menu. Press “Display”, then “Screensaver” and then “Screensaver”.2. Select "On" or "Off" and press [Done]. If “On” is selected, choose one of the pre-installed images. Press [View] to view the image full screen.3. Press [Done] to save the image as your screensaver.• Off, 5sec, 10sec, 20sec, 30sec](https://usermanual.wiki/UTStarcom-Korea-Technologies/CDM7026/User-Guide-798151-Page-54.png)
![55SETTINGSBACKLIGHTBacklights the display and key pad for easy viewing in dark places.LCD1. Press [Menu], then press for the “Settings” menu. Press “Display”, “Backlight”, and then press “LCD”.2. Select one of the following options:3. Press [Done] to save the setting.Keypad1. Press [Menu], then press for the “Settings” menu. Press “Display”, “Backlight”, and then press “Keypad”.2. Select one of the following options:3. Press [Done] to save the setting.• 7sec, 15sec, 30sec, Always On, Always Off• 7sec, 15sec, 30sec, Always On, Always Off](https://usermanual.wiki/UTStarcom-Korea-Technologies/CDM7026/User-Guide-798151-Page-55.png)
![56SETTINGSGREETINGThe greeting can be up to 16 characters and is displayed on your phone’s screen in idle mode.1. Press [Menu], then press for the “Settings” menu. Press “Display”, then “Greeting”.2. Enter your greeting. To change the input mode, press [Options].3. Press [Done] to save the Greeting.CONTRASTTo adjust the display contrast:1. Press [Menu], then press for the “Settings” menu. Press “Display”, then “Contrast”.2. Select one of the following options:3. Press [Done] to save the setting.• Level 0 - Level 5](https://usermanual.wiki/UTStarcom-Korea-Technologies/CDM7026/User-Guide-798151-Page-56.png)
![57SETTINGSMENU STYLETo select how the Menu appears on your phone:1. Press [Menu], then press for the “Settings” menu. Press “Display”, then “Menu Style”.2. Select “Graphic” or “List”.3. Press [Done] to save the menu style.CALLABBREV. DIALThis function allows you to dial just the last 4 digits of the phone number, instead of all the digits. If you have several phone numbers that start with the same digits, you can enter the beginning numbers here so when you dial the phone, all you enter is the last 4 digits.1. Press [Menu], then press for the “Settings” menu. Press “Call“, then “Abbrev. Dial”.2. Select “Disable” or “Enable”, then press [Done] to save the setting.3. If Enable is selected, a blank screen will appear. Enter the digits that are common to several phone numbers you dial and press [Done].• You have 5 numbers you dial often that all begin with (516) 123. In the blank screen that appears when you select "Enable", type in 516123.• When you need to dial (516) 123-6652, simply press 6652 . Your phone will show it is dialing (516) 123-6652.](https://usermanual.wiki/UTStarcom-Korea-Technologies/CDM7026/User-Guide-798151-Page-57.png)
![58SETTINGSCONTACTS MATCHThis function will match your abbreviated dialed number with an entry from your phone's contact list. So when you dial the 4 digits, your phone will show the name of the contact you are dialing as well as the phone number.1. Press [Menu], then press for the “Settings” menu. Press “Call“, then “Contacts Match”.2. Select “Disable” or “Enable”, then press [Done] to save the setting.ANSWER MODETo select an answer mode:1. Press [Menu], then press for the “Settings” menu. Press “Call“, then “Answer Mode”.2. Select one of the following options:3. Press [Done] to save the setting.• Talk Key: Answers an incoming call by pressing only.• Any Key: Answers an incoming call by pressing any key except , , or .• Folder Open: Answers an incoming calls by simply opening the phone.](https://usermanual.wiki/UTStarcom-Korea-Technologies/CDM7026/User-Guide-798151-Page-58.png)
![59SETTINGSAUTO RETRYAutomatically redials a call up to 5 times after a set time interval.1. Press [Menu], then press for the “Settings” menu. Press “Call“, then “Auto Retry”.2. Select “On” or “Off”, then press [Done] to save the setting.TTY MODEYour phone is able to operate with a TTY (Teletypewriter) device in digital modes. This feature is system dependent and may not be available in all areas.1. Press [Menu], then press for the “Settings” menu. Press “Call“, then “TTY Mode”.2. Select one of the following options:3. Press [Done] to save the setting.SPEED DIALEnables you to dial numbers in your speed dial list by pressing and holding the 1 or 2 digit location number.1. Press [Menu], then press for the “Settings” menu. Press “Call“, then “Speed Dial”.2. Select “On” or “Off”, then press [Done] to save the setting.• TTY + Full• TTY + Talk• TTY + Hear• TTY Off](https://usermanual.wiki/UTStarcom-Korea-Technologies/CDM7026/User-Guide-798151-Page-59.png)

![61SETTINGSVR SETTINGSCHOICE LISTThe “Choice List” option will allow you to choose if the Command System prompts you with a list of potential matches. “On” will always present you with a best match list of names or numbers. When multiple matches are found, the system will prompt you to choose from a list of matches. If the Choice List is set to “Off”, the voice command system will select the best match.1. Press [Menu], then press for the “Settings” menu.Press “VR Settings”.2. Press “Choice List”.3. Select “Automatic”, “On” or “Off”.4. Press [Done] to save it.TRAIN VOICETrain Voice is the process of optimizing the voice recognition software to your voice. Train Voice requires that you make recordings of your voice, which are then used to customize the voice recognition system. This will take a few minutes and you should be in a quiet environment for optimum training.1. Press [Menu], then press for the “Settings” menu.Press “VR Settings”.2. Press “Train Voice”.](https://usermanual.wiki/UTStarcom-Korea-Technologies/CDM7026/User-Guide-798151-Page-61.png)
![62SETTINGS3. Select “Train Words” or “Train Digits”. You will be prompted to speak the words listed on the screen. Say each word as you are prompted.4. Press [Stop] to stop train voice.PROMPTThe prompts settings, “Mode” or “Timeout", will allow you to set how you are notified by the voice command system and the duration in which you can respond. To access “Prompts:”1. Press [Menu], then press for the “Settings” menu.Press “VR Settings”.2. Press “Prompt“.3. Select “Mode“ or “Timeout”.4. Press [Done] to save it.CALL ALERTThe “Call Alert” setting controls how you are notified when receiving a call. “Name + Ring” will first announce the name and then play the set ring tone. “Ring only” will play the set ring tone only. “Name Repeat” continuously states the name or number until the call is answered or incoming call alert ends.1. Press [Menu], then press for the “Settings” menu.Press “VR Settings”.• Mode: Select "Prompt" or “Tones Only”.• Timeout: Select “5 sec” or “10 sec”.](https://usermanual.wiki/UTStarcom-Korea-Technologies/CDM7026/User-Guide-798151-Page-62.png)
![63SETTINGS2. Press “Call Alert“.3. Select “Ring Only“, “Name+Ring“ or “Name Repeat”.4. Press [Done] to save it.SECURITY SETTINGSPrevents unauthorized use of your phone. The following settings can be restricted:LOCK PHONEPrevents the phone from being used without entering the password first.1. Press [Menu], then press for the “Settings” menu. Press “Security”. Enter your password.2. Press “Lock Phone”.3. Select “Lock”, “Unlock”, and “Power Up”. When the phone is locked, will appear in the top row of the display.4. Press [Done] to save the setting.• The default Lock code is the last 4 digit of your phone number.• Lock: Lock the phone now.• Power Up: Do not lock the phone now, but automatically lock when power is recycled.• Unlock: Do not lock the phone.](https://usermanual.wiki/UTStarcom-Korea-Technologies/CDM7026/User-Guide-798151-Page-63.png)
![64SETTINGSCHANGE LOCKChanges your 4-digit password.1. Press [Menu], then press for the “Settings” menu. Press “Security”. Enter your password.2. Press “Change Lock”.3. Enter your lock code. 4. “Enter New Lock Code” screen appears. Enter your new lock code. 5. “Enter New Lock Code Again” screen appears. Enter your new lock code again, then press [Done] to save the setting.LIMIT USEIncoming Calls1. Press [Menu], then press for the “Settings” menu. Press “Security”. Enter your password.2. Press “Limit Use”, then “Incoming Calls”.3. Select “Allow” or “Restricted”, then press [Done] to save the setting.• The default Lock code is the last 4 digit of your phone number.• The default Lock code is the last 4 digit of your phone number.](https://usermanual.wiki/UTStarcom-Korea-Technologies/CDM7026/User-Guide-798151-Page-64.png)
![65SETTINGSOutgoing Calls1. Press [Menu], then press for the “Settings” menu. Press “Security”. Enter your password.2. Press “Limit Use”, then “Outgoing Calls”.3. Select “Allow” or “Restricted”, then press [Done] to save the setting.ERASE CONTACTSTo erase all the names and phone numbers in your internal contact list:1. Press [Menu], then press for the “Settings” menu. Press “Security”. Enter your password.2. Press “Erase Contacts”.3. Select “Yes” or “No“, then press [Done].• The default Lock code is the last 4 digit of your phone number.• The default Lock code is the last 4 digit of your phone number.](https://usermanual.wiki/UTStarcom-Korea-Technologies/CDM7026/User-Guide-798151-Page-65.png)
![66SETTINGSDEFAULT SETTINGSPreference setting will be set to factory defaults.1. Press [Menu], then press for the “Settings” menu. Press “Security”. Enter your password.2. Press “Default Settings”.3. “Preference setting will be set to factory defaults" will be shown. Press [Next].4. Select “Yes” or “No”, then press [Done].RESET PHONEAll saved contents and preference setting will be reset to factory defaults.1. Press [Menu], then press for the “Settings” menu. Press “Security”. Enter your password.2. Press “Reset Phone”.3. “All saved contents and preference setting will be set to factory defaults" will be shown. Press [Next].4. Select “Yes” or “No”, then press [Done].• The default Lock code is the last 4 digit of your phone number.• The default Lock code is the last 4 digit of your phone number.](https://usermanual.wiki/UTStarcom-Korea-Technologies/CDM7026/User-Guide-798151-Page-66.png)
![67SETTINGSPHONE INFODisplays the information of your phone:PHONE NUMBERDisplays your MDN and MIN. 1. Press [Menu], then press for the “Settings” menu. Press “Phone Info“, then press “Phone Number“.2. The MDN and MIN will be displayed along with your service provider’s name.3. To return to the previous page, press .HELP1. Press [Menu], then press for the “Settings” menu. Press “Phone Info“, then press "Help".2. The indicator icons are displayed.3. To return to the previous page, press .VERSIONDisplays the PRL, SW Version, HW version:1. Press [Menu], then press for the “Settings” menu. Press “Phone Info“, then press "Help".2. The PRL, software and hardware version information is displayed.3. To return to the previous page, press .](https://usermanual.wiki/UTStarcom-Korea-Technologies/CDM7026/User-Guide-798151-Page-67.png)
![68SETTINGSADVANCED1. Press [Menu], then press for the “Settings” menu. Press “Phone Info“, then press "Advanced".2. The SID, Channel, Technology and Frequency information is displayed.3. To return to the previous page, press .ESN1. Press [Menu], then press for the “Settings” menu. Press “Phone Info“, then press "ESN".2. The Hex and Dec information is displayed.3. To return to the previous page, press .](https://usermanual.wiki/UTStarcom-Korea-Technologies/CDM7026/User-Guide-798151-Page-68.png)
![69SETTINGSPHONE SETTINGSLANGUAGESelects the language in which letters are displayed on the screen.1. Press [Menu], then press for the “Settings” menu. Press “Phone Settings”, then “Language”.2. Select “English” or “Spanish”.3. Press [Done] to save the language setting. AIRPLANE MODEAirplane Mode deactivates the wireless connectivity of your phone but allows you to continue using non-network functions like the Calendar and games.1. Press [Menu], then press for the “Settings” menu. Press “Phone Settings”, then “Airplane Mode”.2. Select “On”, “Off” or “Power Up”, then press [Done] to save the setting.• You cannot make or receive calls or text messages when Airplane Mode is On.Note](https://usermanual.wiki/UTStarcom-Korea-Technologies/CDM7026/User-Guide-798151-Page-69.png)
![70SETTINGSLOCATIONTo set the location function:1. Press [Menu], then press for the “Settings” menu. Press “Phone Settings”, then “Location”.2. Select “Location On” or “E911 Only”.3. Press [Done] to save the setting.SET MODETo set the mode function:1. Press [Menu], then press for the “Settings” menu. Press “Phone Settings”, then “Set Mode”.2. Select “Home Only”, “Automatic A”, or “Automatic B.”3. Press [Done] to save the setting.• If you have set Lock Mode for Location to “Lock”, you will need to enter your location lock code before you can enter this menu. The default value is the last 4-digits number of the phone number. Note• Location On: Your location is now available to the network.• E911 Only: Your location will be hidden from network & application except 911.• Home Only: Only within your home area or home affiliated area.• Automatic A: Scan the radio channels based on the Automatic A setting.• Automatic B: Scan the radio channels based on the Automatic B setting.](https://usermanual.wiki/UTStarcom-Korea-Technologies/CDM7026/User-Guide-798151-Page-70.png)
![72TOOLSVOICE MEMOVoice Memo allows you to record a reminder message that can be up to 60 seconds. To record a memo:1. Press [Menu], then press for the “Tools” menu. Press "Voice Memo".2. To record a voice memo, select “1. Record New“ and press [Record].3. You will see “Press Start to start recording“ on the screen. Press [Start] to begin recording your memo.4. To stop recording a voice memo, press [Stop]. Stopping the recording will automatically save the entry. The list is sorted by the date of the recording.5. To play voice memo, select the voice tag you want to play then press [Play]. To erase one or all voice memos, press [Options] to select one of the following options:• Erase• Erase All](https://usermanual.wiki/UTStarcom-Korea-Technologies/CDM7026/User-Guide-798151-Page-72.png)
![73TOOLSSCHEDULESets an event and reminds you of that event.ADD NEW CALENDAR1. Press [Menu], then press for the “Tools” menu. Press "Schedule".2. Press / / or to choose a date in the calendar, then press [Add]. 3. The New Event screen will be displayed. Enter the event name. Press to move to the next fields. In the Start Time field and End Time field, enter the time. Press for AM or PM. In the Start Date field and the End Date field, you can edit the date for the event. In the Contents field, enter any notes for the event. In the Notice field, enter when the alert should sound for the event (On Time, before 10 min, before 20 min, before 30 min). In the Snooze field, set the snooze time (5 min, 10 min, 15 min, 20 min). In the Ringer field, press [Change] to select a ringer for the event. Press [Done] when the ringer is selected.4. Press [Done] to save the event or to return to the calendar.5. The date of the event will be marked on your calendar.](https://usermanual.wiki/UTStarcom-Korea-Technologies/CDM7026/User-Guide-798151-Page-73.png)
![74TOOLSVIEW ADDED CALENDAR1. Press [Menu], then press for the “Tools” menu. Press "Schedule".2. Scroll to a date in the calendar and press to view the event for that day.3. Press [Options] to erase one event or all events in the calendar. “Erase?” and “Erase All?” will be displayed. Select “Yes”, then press .Press [View] to see the details for the event and to edit or erase the event.](https://usermanual.wiki/UTStarcom-Korea-Technologies/CDM7026/User-Guide-798151-Page-74.png)
![75TOOLSALARM CLOCK1. Press [Menu], then press for the “Tools” menu. Press “Alarm Clock”.2. Select Alarm 1, 2 or 3 to set a new alarm. To edit an existing alarm, select the alarm name. Press [Set].3. To save an alarm setting press [Done].• Set: Press / to select alarm on or off.• Time: Use the keypad to set a time for the alarm and to select “AM” or “PM”.• Repeat: Press / to select Daily/Once/Mon - Fri/Sat & Sun. • Snooze: Press / to select 5Min/10Min/15Min/20Min.• Ringer Type: Press [Change] to select a ringtone for the alarm sound.](https://usermanual.wiki/UTStarcom-Korea-Technologies/CDM7026/User-Guide-798151-Page-75.png)
![76TOOLSWORLD CLOCK1. Press [Menu], then press for the “Tools” menu. Press “World Clock”.2. The world map appears with the city, its date and time. Use the to select another city.• Press [Options] for 1. DST On or 2. Set Dual Time. DST stands for Daylight Savings Time.Note](https://usermanual.wiki/UTStarcom-Korea-Technologies/CDM7026/User-Guide-798151-Page-76.png)
![77TOOLSNOTEPADYour phone includes an internal notepad that can be used to compose and store reminders and notes.ADD NEW MEMOTo compose a memo (there is an 80-letter limit):1. Press [Menu], then press for the “Tools” menu. Press “Notepad”.2. To add a new memo, press [Add]. Input a new text memo.3. To save memo, press [Done].VIEW MEMOTo view a saved memo:1. Press [Menu], then press for the “Tools” menu. Press “Notepad”.2. The Notepad list of memos is displayed in the order they were saved. To add a new memo, press [Add]. Highlight a memo and press [Options] to 1. Edit, 2. Erase, or 3. Erase All.3. To view a memo, highlight it and press . Press [Erase] to erase the memo or press [Edit] to edit the text, then press [Done] to save the changes.](https://usermanual.wiki/UTStarcom-Korea-Technologies/CDM7026/User-Guide-798151-Page-77.png)
![78TOOLSCALCULATORTo access the calculator:1. Press [Menu], then press for the “Tools” menu. Press “Calculator”.2. Enter the number using your keypad and perform one of the following functions:3. Enter the numerical formula and press for Equals (=).4. To reset, press [AC].• Press for Multiplication (x).• Press for Division (÷).• Press for Subtraction (-).• Press for Addition (+).• Press for a decimal point.• Press for change the displayed number from positive (+) to negative (-) and vice versa.• Press to clear all numbers.• Press to select left parenthesis or right parenthesis.](https://usermanual.wiki/UTStarcom-Korea-Technologies/CDM7026/User-Guide-798151-Page-78.png)
![79TOOLSSTOPWATCHSimultaneously times up to ten different events. To operate the stop watch:1. Press [Menu], then press for the “Tools” menu. Press “Stopwatch”.2. To measure a time period:• To start, press [Start].• To stop a time period and continue measuring another one, press [Check].• To stop the second and continue measuring a third one, press [Check].• To measure up to ten time periods, repeat the above steps.• To stop the stop watch, press [Stop].• To review the results, press / .• To reset it, press [Reset].](https://usermanual.wiki/UTStarcom-Korea-Technologies/CDM7026/User-Guide-798151-Page-79.png)
![80TOOLSCONVERT UNITTo access the conversion tool:1. Press [Menu], then press for the “Tools” menu. Press “Convert Unit”.2. Select the desired type of measurement, and then press .3. To change the unit type (for example: m, cm), press / and use the keypad to enter the unit to convert. If you need to change the lower unit of measure (the unit you are converting into), press to highlight that area.• Length/Weight/Volume/Area/Temperature/Speed](https://usermanual.wiki/UTStarcom-Korea-Technologies/CDM7026/User-Guide-798151-Page-80.png)

![82MESSAGENEW MSGTo send a new message:1. Press [Message], then press “New Msg”.2. Under “TO”, input the phone number.3. Press . Under “Message”, input your message.4. If you want to add a graphic, sound or use a preset message, press [Options], then select "Add".5. To save the Message, press [Options], then select “Save As Draft”. Press [Options], then select “Priority”, select “Urgent” or “Normal”, then press [Done]. 6. To send the message, press [Send].By pressing [Options], you can choose from the following:• Recent Calls: Search for the phone number which is stored in the recent calls list.• Contacts: Search for the phone number which is stored in the contacts list.• Group List: Search the group which is stored in the contacts list.• Entry Mode: Change the text input mode for this field.• Graphics: Inserts simple graphic image in message.• Sound: Inserts sound in message.• Preset MSG: Inserts already written sentences in message.](https://usermanual.wiki/UTStarcom-Korea-Technologies/CDM7026/User-Guide-798151-Page-82.png)
![83MESSAGEINBOXThe Inbox manages received text/web alert messages. To access:1. Press [Message], then press “Inbox”.2. Select a message, then press . The message is displayed. To delete a message, press [Erase], then select “Yes” or “No”and press .By pressing [Options], you can choose from the following:• Forward: To forward the message.• Reply with copy: To reply to a received message and include the received message into the message.• Save Graphics: To save a picture.• Save Sound: To save a sound• Save Quick Text: Select to save received text message.• Lock/Unlock: To lock or unlock the message.• Add to Contacts: Select to save number to contacts.• Message Info: To show received message information.](https://usermanual.wiki/UTStarcom-Korea-Technologies/CDM7026/User-Guide-798151-Page-83.png)
![84MESSAGEOUTBOXManages sent messages.1. Press [Message], then press “Outbox”.2. Select a message, then press . The message is displayed.DRAFTSDraft Folder contains any draft messages or saved messages.If message composition is interrupted by a voice call or other interrupting event, the text of the current composition is automatically saved in the drafts folder.1. Press [Message], then press “Drafts”.2. Select a message then press . By pressing [Options], you can choose from the following:• Forward: To forward the message.• Resend: To resend the text message.• Lock/Unlock: To lock or unlock the message.• Add to Contacts: Select to save number to contacts.By pressing [Options], you can choose from the following:• Forward: To forward the message.• Resend: To resend the text message.• Lock/Unlock: To lock or unlock the message.• Add to Contacts: Select to save number to contacts.](https://usermanual.wiki/UTStarcom-Korea-Technologies/CDM7026/User-Guide-798151-Page-84.png)
![85MESSAGEVOICEMAILDisplays the number of voicemails and accesses them by pressing .CALL VOICEMAIL1. Press [Send] to dial voicemail”. From the idle screen, press then [Send] to direct dial voicemail.If the feature “Speed Dial” is enabled you can press and hold to speed dial voicemail.2. Listen to the system prompts to hear your messages.SETTINGSNOTIFICATION1. Press [Message], then press "Settings".Press "Notification".2. Select "MSG. & Icon" or "Only Icon" , then press [Done] to save the setting.AUTO SAVE1. Press [Message], then press "Settings".Press "Auto Save".2. Select "Auto Save”, "Prompt" or “Do Not Save”, then press [Done] to save the setting.](https://usermanual.wiki/UTStarcom-Korea-Technologies/CDM7026/User-Guide-798151-Page-85.png)
![86MESSAGEAUTO ERASE1. Press [Message], then press "Settings".Press "Auto Erase".2. Select "On" or "Off".3. Press [Done] to save the setting.AUTO VIEW1. Press [Message], then press "Settings".Press "Auto View".2. Select "On" or "Off" , then press [Done] to save the setting.ENTRY MODEChange the text input mode.1. Press [Message], then press "Settings".Press "Entry Mode".2. Select "T9 Word”, "ABC", “Abc”, or “123” then press [Done] to save the setting.• On: Oldest message erased from inbox automatically when box is full.• Off: Oldest message not erased from inbox automatically, user prompted when box is full.](https://usermanual.wiki/UTStarcom-Korea-Technologies/CDM7026/User-Guide-798151-Page-86.png)
![87MESSAGECALL BACK #1. Press [Message], then press "Settings".Press “Callback #”.2. Select "None”, "MDN", or “Custom” then press [Done] to save the setting.VOICEMAIL #1. Press [Message], then press "Settings".Press "Voicemail".2. “Enter the desired voicemail access number.” Default setting is *99.3. Press [Done] to save the setting.SIGNATURE1. Press [Message], then press "Settings".Press "Signature".2. To activate Signature, highlight “Custom” then press [Edit]. The signature input screen appears.3. Input your signature and press [Done] to save and exit.PRESET MSGS.1. Press [Message], then press "Settings".Press "Preset Msgs.".2. The text messages are displayed.](https://usermanual.wiki/UTStarcom-Korea-Technologies/CDM7026/User-Guide-798151-Page-87.png)
![88MESSAGE3. Press [Options], then select one of the following options:4. Select the text message, then press .• Add New: Write your own preset message and add to the list.• Send MSG: Send a message with the highlighted preset message inserted.• Erase: Erase the highlighted preset message.• Erase All: Erase all the preset messages.When the preset message screen is shown with the message:• Edit: Press [Edit] to edit the message.• Option: Press [Options] to 1. Send Msg., or 2. Erase.](https://usermanual.wiki/UTStarcom-Korea-Technologies/CDM7026/User-Guide-798151-Page-88.png)

![90CRICKET CLICKSCricket Clicks is a fun collection of features which you can access directly from your phone - download ringtones, games, graphics, and more. Charges apply.1. Press [Menu], then press for the “Cricket Clicks” menu. Press “Cricket Clicks“.2. You will see 3 icons - Cricket Clicks, Settings, Help. To download images, ringers, games, etc., select Cricket Clicks and press .3. Select from “Catalog“ and press . The server will launch. Browse through the catalog and press to select an application and price plan. Then follow the prompts to download the application. Repeat this process for each additional application.4. To exit Cricket Clicks, press .Settings: Select to Manage Apps. or Erase Downloads.Help: Select to learn more about Cricket Clicks and how to use it.](https://usermanual.wiki/UTStarcom-Korea-Technologies/CDM7026/User-Guide-798151-Page-90.png)


![116SAFETYaring device is relatively immune to interference noise. The hearing aid and wireless phone rating values are then added together. A sum of 5 is considered acceptable for normal use. A sum of 6 is considered for best use. In the above example, if a hearing aid meets the M2 level rating and the wireless phone meets the M3 level rating, the sum of the two values equal M5. This should provide the hearing aid user with “normal usage” while using their hearing aid with the particular wireless phone. “Normal usage” in this context is defined as a signal quality that is acceptable for normal operation. The M mark is intended to be synonymous with the U mark. The T mark is intended to be synonymous with the UT mark. The M and T marks are recommended by the Alliance for Telecommunications Industries Solutions (ATIS). The U and UT marks are referenced in Section 20.19 of the FCC Rules. The HAC rating and measurement procedure are described in the American National Standards Institute (ANSI) C63.19 standard.For information about hearing aids and digital wireless phone:• FCC Hearing Aid Compatibility and Volume Control http://www.fcc.gov/cgb/dro/hearing.html• GallaudetUniversity,RERC http://tap.gallaudet.edu/DigWireless.KS/DigWireless.htm• Self Help for Hard of Hearing People Inc. [SHHH] www.hearingloss.org/hat/TipsWirelessPhones.htm• The Hearing Aid Compatibility FCC Order http://hraunfoss.fcc.gov/edocs_public/attachmatch/ FCC-03-168A1.pdf](https://usermanual.wiki/UTStarcom-Korea-Technologies/CDM7026/User-Guide-798151-Page-116.png)