UTStarcom Korea Technologies FSUC800 CDMA Fixed Wireless Desk Phone User Manual 2004232 FCC Test Report R0 01 no IC
UTStarcom Korea Technologies Ltd. CDMA Fixed Wireless Desk Phone 2004232 FCC Test Report R0 01 no IC
Manual

Rhein Tech Laboratories, Inc. Client: UTStarcom
360 Herndon Parkway Model: FSU C800
Suite 1400 FCC ID: O6Y-FSUC800
Herndon, VA 20170 Standards: FCC Part 22
http://www.rheintech.com RTL WO#: 2004232
34 of 55
APPENDIX I: MANUAL
Please refer to the following pages.
CDMA FSU C800
USER GUIDE
i
_______________________________________
Trademark Statement: “‘UTStarcom’, ‘iPAS’, and the UTStarcom logo are
trademarks of UTStarcom, Inc.”
Copyright Statement: “©UTStarcom, Inc. 2004. All rights reserved. No
part of this publication may be reproduced in any form or by any means
without the prior written permission of UTStarcom, Inc.”
Warranty Language: “The contents of this manual, whether in whole or in
part, do not constitute any express or implied warranty with respect to any
products of UTStarcom, Inc., or its subsidiaries.”

Table of Contents
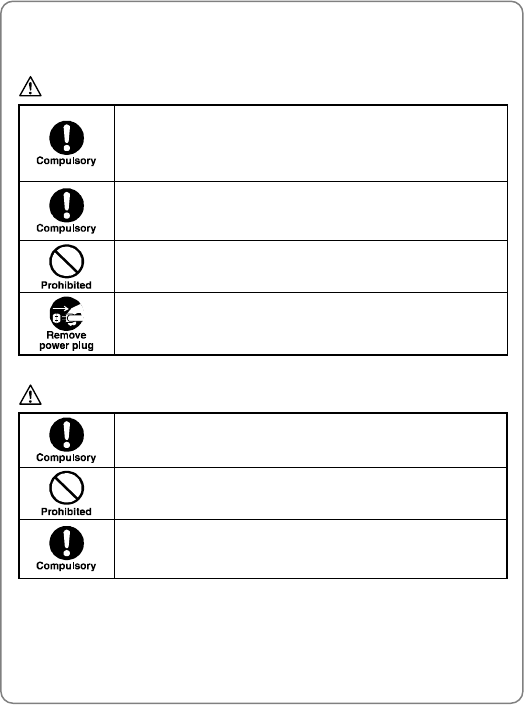
SAFETY PRECAUTIONS.................................................... 1
FCC RF EXPOSURE COMPLIANCE .......................................................1
HANDLING THE PHONE, BATTERY AND CHARGER .................................. 2
HANDLING THE PHONE ........................................................................3
HANDLING THE BATTERY ...................................................................... 5
HANDLING THE CHARGER .................................................................... 6
1. GETTING STARTED ....................................................... 7
1.1 PACKAGE CONTENTS.....................................................................7
1.2 PHONE DESCRIPTION .................................................................... 8
1.2.1 Front View........................................................................................8
1.2.2 Rear View ......................................................................................10
1.3 DISPLAY INDICATORS ...................................................................10
1.4 SAFETY INSTRUCTIONS ................................................................ 11
1.5 PROTOCOL SUPPORT ..................................................................12
1.6 FUNCTIONS, FEATURES AND SPECIFICATIONS ...............................12
1.6.1 Phone Functions............................................................................12
1.6.2 Phone Features .............................................................................13
1.6.3 Technical Specifications .................................................................14
2. BASIC OPERATIONS ................................................... 15
2.1 SWITCH THE PHONE ON/OFF .......................................................15
2.2 MAKE A CALL...............................................................................15
2.3 REDIAL A CALL.............................................................................15
2.4 STORE A PHONE NUMBER ............................................................15
2.5 ACCESS MENU/LIST OPTIONS ......................................................16
2.6 USE SHORTCUTS.........................................................................16
3. MENU OVERVIEW ........................................................ 17
ii
iii
4. MENU OPERATIONS .................................................... 21
4.1 PHONE BOOK ..............................................................................21
4.1.1 View Contacts................................................................................22
4.1.2 New Entry ......................................................................................22
4.1.3 Find Name .....................................................................................23
4.1.4 Groups...........................................................................................23
4.1.5 Delete All .......................................................................................23
4.1.6 Speed Dial .....................................................................................23
4.1.7 Memory State.................................................................................24
4.2 SHORT MESSAGE SERVICE (SMS) ...............................................25
4.2.1 Voice Mail ......................................................................................25
4.2.2 New Message................................................................................25
4.2.3 Inbox..............................................................................................27
4.2.4 Outbox...........................................................................................28
4.2.5 Delete Messages ...........................................................................28
4.3 RECENT CALLS............................................................................30
4.3.1 Incoming Calls ...............................................................................30
4.3.2 Outgoing Calls ...............................................................................30
4.3.3 Missed Calls ..................................................................................30
4.3.4 Delete Lists....................................................................................31
4.4 TOOLS ........................................................................................32
4.4.1 Schedule........................................................................................32
4.4.2 Alarm Clock....................................................................................33
4.4.3 Voice Memo...................................................................................34
4.5 SETTINGS ...................................................................................38
4.5.1 Sound ............................................................................................38
4.5.2 Display...........................................................................................41
4.5.3 Security..........................................................................................43
4.5.4 Call Setup ......................................................................................45
4.5.5 Dial Delay Time..............................................................................46
4.5.6 1x Data ..........................................................................................46
4.5.7 Network service .............................................................................48
4.5.8 Phone Info .....................................................................................49
5. DATA SERVICE............................................................. 51
5.1 HARDWARE CONNECTION ............................................................51
5.2 INTERNET....................................................................................51
5.2.1 Computer Configuration.................................................................51
5.3 DATA FAX .................................................................................... 60
5.3.1 Computer Configuration.................................................................60
5.3.2 Phone Configuration ......................................................................60
6. TEXT INPUT METHOD.................................................. 61
6.1 SWITCH INPUT METHOD...............................................................61
6.2 UPPERCASE/LOWERCASE LETTER................................................61
6.3 DIGIT ..........................................................................................61
6.4 SYMBOL ......................................................................................62
iv

Safety Precautions
SAFETY PRECAUTIONS
FCC RF Exposure Compliance
This PCS phone has been tested and complies with the Federal
Communications Commission (FCC) RF exposure limits for the General
Population/Uncontrolled exposure environment. In addition, it complies
with the following Standards and Guidelines:
z FCC 96-326, Guidelines for Evaluating the Environmental Effects of
Radio-Frequency Radiation
z FCC OET Bulletin 65 Edition 01-01 (2001) Supplement C, Evaluating
Compliance with FCC Guidelines for Human Exposure to Radio
Frequency Electromagnetic Fields
z ANSI/IEEE C95.1-1992, IEEE Standard for Safety Levels with
Respect to Human Exposure to Radio Frequency Electromagnetic
Fields, 3 kHz to 300 GHz
z ANSI/IEEE C95.3-1992, IEEE Recommended Practice for the
Measurement of Potentially Hazardous Electromagnetic Fields - RF
and Microwave
1

Safety Precautions
Handling the Phone, Battery and Charger
DANGER
Only use the battery and charger specified for the
phone. Failure to do so can result in damage to the
phone, electric shock or fire.
CAUTION
Do not store or operate the phone or charger in hot,
damp, or dusty areas, which can damage electrical and
mechanical components. Avoid prolonged exposure to
temperatures below 5°C or in excess of 35°C.
DANGER
Do not drop, shake or throw the phone or charger.
Rough handling can damage internal circuit boards and
the battery pack.
Do not use the phone in the vicinity of volatile gases.
Leave the area before using the phone. Failure to leave
the area can result in the risk of fire or an explosion.
Do not disassemble or modify the phone, charger, or
battery. Incorrect modifications, reassembly, or
tampering may result in malfunction or personal injury.
2
Safety Precautions
Handling the Phone
DANGER
Do not use the phone while operating a vehicle.
Observe local regulations for specialized areas
(hospital, aircraft, etc) when using the phone.
This phone has been tested and found to comply with
the limits for a Class B digital device, pursuant to Part
15 of the FCC Rules. These limits are designed to
provide reasonable protection against harmful
interference in a residential installation. This phone
generates, uses and can radiate radio frequency energy
and, if not installed and used in accordance with the
instructions, may cause harmful interference to radio
communications. However, there is no guarantee that
interference will not occur in a particular installation. If
this phone does cause harmful interference to radio or
television reception, which can be determined by
turning the phone off and on, the user is encouraged to
try to correct the interference by one or more of the
following measures:
- Reorient or relocate the receiving antenna
- Increase the separation between the phone and
receiver
- Connect the phone into an outlet on a circuit different
from that to which the receiver is connected
- Consult the dealer or an experienced radio/TV
technician for help
3
Safety Precautions
CAUTION
Changes or modifications not expressly approved by
UTStarcom, Inc. could void the user’s authority to
operate the phone.
The antennas used for this transmitter must be installed
to provide a separation distance of at least 20cm from
all persons and must not be co-located with or operated
in conjunction with any other antenna or transmitter.
Keep all storage media (magnetic cards, floppy disks,
credit cards, etc.) away from the phone. Close
encounters or contact can erase or damage the storage
media.
Keep all sharp metal objects (pins, nails, hairpins etc.)
away from the phone handset. The handset earpiece
contains a strong magnet that can attract and hold
metal objects. Remove any objects from the handset
earpiece before using, to avoid personal injury.
In case of emergency, key in the emergency number
(911 for example in US), then press the Talk key and let
the operator know your specific location. Don’t hang up
until you are told to do so.
4
Safety Precautions
Handling the Battery
DANGER
Do not dispose of the battery pack in a fire. It may
explode. Check with local waste management codes for
disposal instructions.
Do not force the battery pack into the phone. Improper
installation can cause malfunctions or damage the
battery pack. This may result in fire or personal injury.
Use caution in handling batteries in order not to short
the battery on conductive materials such as rings,
bracelets, and keys. The battery and/or conductor may
overheat and cause burns.
If the battery becomes too hot while recharging, it
should be removed immediately from the charger.
When clothes or skin are exposed to battery leakage,
rinse with clean water at once to prevent skin irritation.
Do not use a cracked, leaking or odor-emitting battery
pack near an open flame or high temperatures.
CAUTION
If a fully discharged battery is stored for a long period of
time, it may not be possible to recharge the battery.
Observe local waste management codes for proper
battery disposal instructions.
5
Safety Precautions
Handling the Charger
DANGER
Only use a power source that provides the appropriate
voltage (AC100~240 V) for the charger. An unsuitable
power source can result in damage to the charger,
electric shock or fire.
Do not use the charger if the power supply cord or plug
is damaged or frayed (exposed or broken wires, etc).
This can result in the risk of fire or electric shock.
Do not short circuit the charger connector jack. This may
result in fire or electric shock.
Immediately unplug the charger from the wall outlet in
the event that liquid is spilled into the unit to prevent fire
or electric shock.
CAUTION
Always unplug the charger from the wall outlet before
cleaning to avoid the risk of electric shock.
Do not place heavy objects on the cord to avoid
damage.
Always grip the power plug when removing the charger
from the wall outlet. Do not pull on the power supply
cord to avoid damage and the risk of electric shock.
6
Getting Started
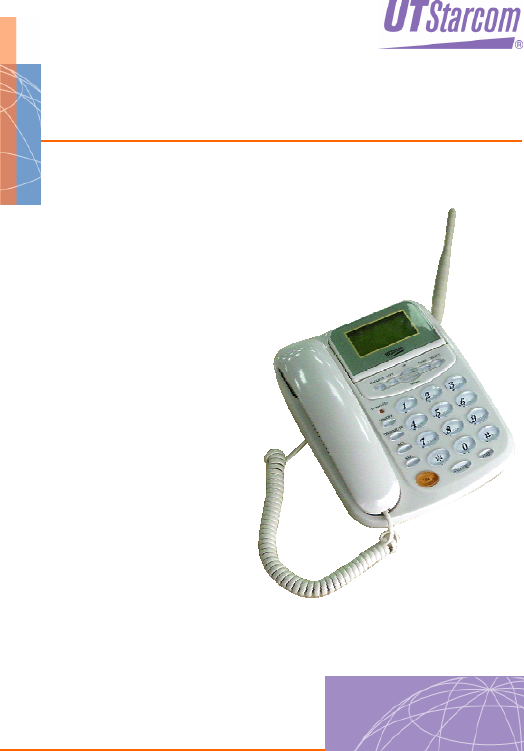
1. GETTING STARTED
1.1 Package Contents
Thank you for purchasing this phone. Please check the package contents
by comparing them with the following list. If you find anything missing or if
the documentation set is incomplete, contact your local phone dealer
immediately
z CDMA FSU C800 Phone
z Backup battery
z Power adapter
z Receiver
z Cord
z User Guide
7
Getting Started
1.2 Phone Description
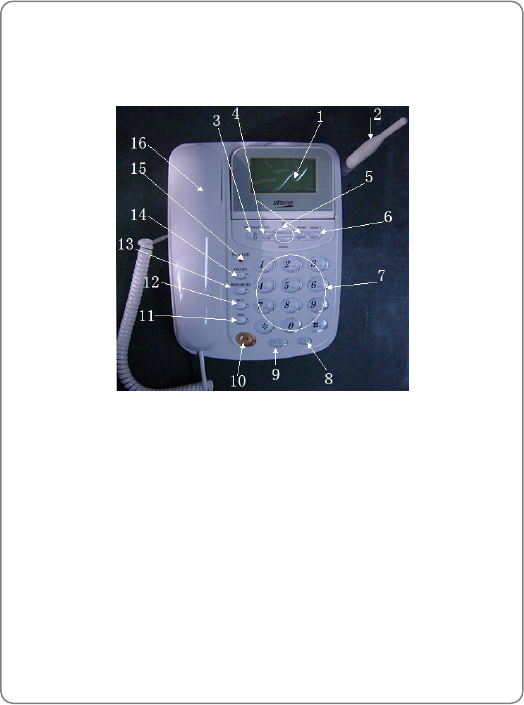
1.2.1 Front View
1. LCD Screen
2. Antenna
3. <BACK/CLR> key
This key is used to delete characters/digits or to return to the previous
menu level
4. <LEFT> and <RIGHT> keys:
These keys are used to move the cursor left or right or to perform
functions indicated on the screen
5. <UP> and <DOWN> keys:
These keys are used to scroll up and down through menu lists
8

Getting Started
6. <SELECT> key:
This key is used to select the highlighted menu option
7. Input keys:
These keys are used to enter digits, characters or symbols
8. <END> key:
This key is used to return to standby mode without changing menu
settings
9. <SND/RDL> key:
This key is used to make a call
10. <SPK> key:
This key is used to place a call on Speaker Phone
11. <SMS> key:
This key is used to access the Messages menu
12. <RCL> key:
This key is used to access the Recent Calls menu
13. <DND/MUTE> key
14. <ON/OFF> key
15. Power LED indicator
Lights when the power adapter is connected to the phone
16. Receiver
~ Note: This is only a brief introduction to the keypad functions.
Please refer to the contents of this user guide for detailed
descriptions and operations
9
Getting Started
1.2.2 Rear View
1. Antenna RF Connector
2. DC Power Jack
3. Power Switch
4. Serial Port Choice
5. Serial Port
1.3 Display Indicators
z Indicates digital mode. Indicates analog mode
z Shows the current signal strength. The higher the bar, the
stronger the signal
Strong Weak
z Indicates in calling mode. Indicates call connection failure
z Indicates in roaming mode
z Indicates the Alarm function is active
z Indicates a new short message has been received
10

Getting Started
z Indicates the DND (Don not Disturb) function is active
z Indicates the battery charge level. The higher the bar levels, the
greater the battery power
High Low
1.4 Safety Instructions
Basic safety precautions should always be followed to reduce risk when
using this product. Please read and follow all instructions marked on the
product
z To reduce the risk of electric shock - do not disassemble this product.
When the product is subsequently used, incorrect reassembly can
cause electric shock. When service is required, take the product to a
qualified service department
z Do not hold or make contact with the antenna while making a call
z Do not overload the wall outlets and the extension cord
z Do not use this product near water and never spill any liquid on the
product. This may result in the risk of fire or electric shock
z Do not place this product on an unstable location (cart, stand or table).
If it should fall from an unstable location, there is a risk of serious
product damage
z Do not cover the slots and openings on the product. They are provided
for ventilation and protection against overheating. Do not place this
product near a heater or radiator where proper ventilation is not
provided
z This product should only be operated from the type of power source
marked on the product. If you are not sure of the type of power
available, consult your dealer or local power company
11

Getting Started
z Never push objects of any kind into this product, since this may result
in a serious voltage short and may result in the risk of fire or electric
shock
z During thunderstorms, avoid using this product. There may be a
remote risk of an electric shock from lighting
z Disconnect the external power adapter and take out the back-up
battery when the product is not to be used for a long time
z Unplug this product from the wall outlet and obtain service from an
authorized service center under the following conditions:
- When the power supply plug is damaged or frayed
- If liquid has been spilled on, or into this product-or if this product has
been exposed to water or rain
- If this product does not work properly when the operating
instructions are followed
- If this product has been dropped or damaged
- If this product exhibits a distinct change in performance
1.5 Protocol Support
The phone supports IS-2000 Release 0, and is backward compatible with
IS95A/B. Software will be upgraded to support IS-2000 Release A, and
Release C in the future
1.6 Functions, Features and Specifications
1.6.1 Phone Functions
z High Quality Voice Service
- Making calls, receiving calls, call auto-answering and recording
- Vocoder: 13K QCELP, 8K EVRC
- Supports the speaker phone (hands-free) function
12

Getting Started
z Data Service
- Packet data service: Complies with IS707A.5, and supports
153kbps dual links for Internet
z Short Message Service (SMS)
- English and Spanish SMS: Supports write, read, send, receive,
delete, reply and forward of short messages
1.6.2 Phone Features
z Multi-language: English and Spanish
z Phone book: 200 entries
z Recent call record: Phone numbers of the last 28 incoming/outgoing
calls, and the call time
z Phone setup: Backlight, ring tone and volume, voice volume, key beep
volume
z Variety of alert sounds: Recharging prompt, low voltage, SMS prompt,
key beep, in-call minute alert
z Variety of ring tones: 6-chord polyphonic melodies
z Alarm clock and schedule
z Real time clock and calendar
z Incoming call display (requires network support)
z Abbreviated number dial / speed dial
z Call forward (unconditionally, if no answer, if busy) and call waiting
z Banner modification
z Do not disturb (DND) function, rejects incoming calls
z Emergency call
z Mute the microphone volume
13
Getting Started
1.6.3 Technical Specifications
Items Descriptions
RF Specifications
Air Interface IS-2000 1XRTT; backward compatible
with IS95A/B
Vocoder 13K QCELP, 8K EVRC
Frequency Range TX: 824~849MHz
RX: 869~894MHz
Frequency Accuracy <±300Hz
Receiver Sensitivity <-104dBm @FER 0.5%
Bandwidth 1.25MHz
Main Processor VIA CBP4.0
Maximum Data Rate 153.6Kbps
Environmental Requirements
Operating Temperature -10°C ~ +45°C
Storage Temperature -40°C ~ +66°C
Humidity 5 ~ 95%
Atmosphere Pressure 86 ~ 106kPa
Mechanical Size and Weight
Size 222 (L) x 175 (W) x 75 (H) mm
Weight 1000g
Safety Parameters
EMC/EMI Conforms to Internal/China standards,
complies with IS98D requirements
ESD Protected to 1.5KV
14

Basic Operations
2. BASIC OPERATIONS
2.1 Switch the Phone On/Off
Turn the “Power” button on the phone to “ON” or “OFF” to switch the
phone on or off
2.2 Make a Call
1. Pick up the receiver or press <SPK>
2. Key in the phone number
To delete the last entered digit, press <BACK/CLR>
3. Press <SND/RDL> or wait a moment (if the Dial Delay function is
active). The phone will begin to dial
4. After the call, hang up the receiver or press the <END> key
2.3 Redial a Call
1. Pick up the receiver or press <SPK>
2. Press <SND/RDL>. The most recently dialed phone number will be
dialed
2.4 Store a Phone Number
In standby mode, new entries can be added to the phone book
1. Enter the desired phone number and press <LEFT>
2. Enter the name according to the prompts and press <LEFT> to confirm
and complete the operation
~ Note: The name cannot be left blank. If blank, the phone will prompt
for an entry upon pressing <LEFT>
15

Basic Operations
2.5 Access Menu/List Options
A variety of options are available for the phone menu
1. In standby mode, press <LEFT>/<SELECT> to access the phone
menu
2. Press the <UP>/<DOWN> key to highlight the desired submenu, and
then press the <SELECT> key to access this submenu. You can also
access the submenu (option) by pressing its corresponding number
key
~ Note: To return to the previous menu level, press <BACK/CLR>
To return to standby mode without changing the menu settings,
press <END>
2.6 Use Shortcuts
In standby mode, these shortcuts access the following submenus or
options:
z Pressing <RIGHT> will access the View Contacts option
z Pressing <SMS> will access the Messages submenu
z Pressing <RCL> will access the Recent Calls submenu
z Pressing <UP> will access the Volume option
16
Menu Overview
3. MENU OVERVIEW
The entire menu layout is as shown below:
View Contacts
Add Number
Add Email
Add Address
Add URL
New Entry
Add Note
Find Name
No Group
Family
Friends
Colleagues
Business
Groups
Classmates
Delete All
Speed Dial
Contacts
(Phone Book)
Memory State
Voice Mail
New Address
New Message
Message
Messages
Inbox
17
Menu Overview
Outbox
Inbox
Outbox
Delete Messages
Delete All
Incoming Calls
Outgoing Calls
Missed Calls
Recent Calls
Delete Lists
New
List
Schedule
Clear
Alarm Clock
Memo List
Voice List
A
nswering 1
A
nswering 2
Tools
Voice Memo
A
nswering Rec.
A
nswering 3
In Contacts
Not in Contacts
Ringer
Alarm Clock
Ringer
Settings Sounds
Volume
Key Beep
18
Menu Overview
Handset
Handfree
Service Change
Minute Beep
Call Connect
Alert
Power On/off
Banner
7 Seconds
15 Seconds
30 Seconds
Backlight
Always off
English
Language
Español
no
Display
Hyphen
yes
Unlock
Lock
Lock Phone
On Power Up
Change Password
Security
Load Default
Off
After 3 Seconds
Auto Answer
Answering
Machine
Call Setup
Answering Sel. Default
19
Menu Overview
Answering 1
Answering 2
Answering 3
Enhanced
Voice Privacy
Standard
Dial Delay Time
Off
Fax In Once
Fax In Always
Data In Once
Data/Fax
Data In Always
9600
19200
115200
1x Data
Port Speed
230400
FWD If Busy
FWD If No Answer
Call Forward
FWD All Calls
Disable
Call Waiting
Enable
Enable
Network Service
CNIR
Disable
Phone Number
Phone Info.
SW Version
20
Menu Operations
4. MENU OPERATIONS
4.1 Phone Book
In standby mode, pressing <LEFT> will access the menu and display the
submenu list shown in the following figure:
1 Contacts
2 Messages
3 Recent Calls
4 Tools
5 Settings
Then, press <SELECT> or <1> to access the Contacts submenu and
display options shown in the following figure:
Contacts
1 View Contacts
2 New Entry
3 Find Name
4 Groups
5 Delete All
6 Speed Dial
7 Memor
y
State
21

Menu Operations
4.1.1 View Contacts
Select this option to view phone book entries:
Press <LEFT> <1> <1> to select View Contacts. The phone book entry
list will be displayed. Press <UP>/<DOWN> to browse through entries
z Press <SELECT> to view details of the highlighted entry. Then, you
can press <LEFT> to edit the entry
z Press <RIGHT> to display Erase, Delete All and Send Message
options
4.1.2 New Entry
Select this option to add new phone book entries:
Press <LEFT> <1> <2> to select New Entry and display the following
options:
New Entry
1 Add Number
2 Add Email
3 Add Address
4 Add URL
5 Add Note
Press the corresponding number key to select Add Number, Add Email,
Add Address, Add URL or Add Note. Follow the phone prompts to enter
the corresponding information, and then press <LEFT>. Enter the name
and press <LEFT> to confirm and complete the operation
22

Menu Operations
4.1.3 Find Name
Select this option to search for a phone book entry:
Press <LEFT> <1> <3> to select Find Name. Key in the name that you
are searching for, or the first character(s) of the name, and then press the
<LEFT> key. The phone will search through the records in the phone book,
and highlight the matched name
4.1.4 Groups
Select this option to view information of a group, add entries to a group or
create a new group:
Press <LEFT> <1> <4> to select Groups and display the group list. You
can perform the following operations:
z Press <LEFT> to create a new group. Enter the group name, and then
press the <LEFT> key to confirm and complete the operation
z Press the corresponding number key to display the entry list of a group.
If there are no entries in the group, the phone will prompt you. Press
<LEFT> to add entries to the group. Press <UP>/<DOWN> to highlight
the desired entry, and then press <SELECT>. Press <LEFT> to
confirm and complete the operation
z Press <UP>/<DOWN> to highlight the desired group. Press <RIGHT>
and press <1> or <2> to select Edit title or Erase group
4.1.5 Delete All
Select this option to delete all phone book entries:
Press <LEFT> <1> <5> to select Delete All. Then, press <LEFT> to
complete the deletion
4.1.6 Speed Dial
Select this option to assign a phone number in the phone book to one of
the 2-digit speed dial numbers (02~99) for greater convenience when
dialing:
23
Menu Operations
Press <LEFT> <1> <6> to select Speed Dial and display the speed dial
number list, as shown in the following figure:
Speed Dial
02: <empty>
03: <empty>
…
Options Cancel
z To assign a phone number, press <UP>/<DOWN> to highlight the
desired speed dial number and press <SELECT>. The phone book
entry list will be displayed. Press <UP>/<DOWN> to highlight the
desired entry, and then press <SELECT> to view the phone number of
the entry. When the desired phone number is displayed, press
<SELECT> to assign the phone number to the speed dial number
z To cancel a speed dial setting, press <UP>/<DOWN> to highlight the
target speed dial number. Press <LEFT> and then press <1> to select
Remove. Press <LEFT> to confirm and complete the operation
z To cancel all speed dial settings, press <LEFT> and then press <2> to
select Remove All. Press <LEFT> to confirm and complete the
operation
Use Speed Dial
In standby mode, key in a 2-digit speed dial number and press the <#>
key. The corresponding phone number will be displayed
4.1.7 Memory State
Select this option to view the phone book capacity (Total and Free):
Press <LEFT> <1> <7> to access the Memory State option
24

Menu Operations
4.2 Short Message Service (SMS)
The phone supports transmitting and/or receiving simple text or voice
messages
In standby mode, press <LEFT> to access the phone menu. Press <2> to
access the Messages submenu and display options shown in the
following figure:
1 Voice Mail
2 New Message
3 Inbox
4 Outbox
5 Delete Message
4.2.1 Voice Mail
Select this option to check voice messages
4.2.2 New Message
Select this option to send a new message:
Press <LEFT> <2> <2> to select New Message and display options
shown in the following figure:
25
Menu Operations
1 [New Address]
2 [Message]
Send Option
Press <1> to select New Address. Key in the receiver’s phone number
and press <LEFT>. Press <2> to select Message. Enter the message
contents and press <LEFT>. Press <LEFT> to send the message
To perform other operations, press <RIGHT> and select from Contact,
Priority, Callback and Save, as shown in the following figure:
1 [New Address]
2 [Message]
Close
1 Contact
2 Priority
3 Callback
4 Save
z Contact: Select this option to access the phone book entry list and
select the message receiver
z Priority: Select this option to set the message priority
z Callback: Select this option to set the Callback function
z Save: Select this option to save the message
26
Menu Operations
4.2.3 Inbox
Received messages are stored in the phone Inbox. A total of 200
messages can be stored in the Inbox and Outbox
There is an icon in front of each message: indicates the message has
not yet been read; indicates the message has been read. Messages
are listed chronologically, with the most recently received message
highlighted at the top of the list
When a new message is received, press <SELECT> to view the message
contents and details (the sender and received time).
Message From:
13332885955
XXXXXXXX…
Received at:
11:16:16 10/10/04
Send to Options
z To save the sender’s phone number, call the sender or erase the
message, press <RIGHT> and then select Save address, Call
him/her or Erase
z To forward or reply to the message, press <LEFT>, as shown in the
following figure:
27
Menu Operations
1 [New Address]
2 XXXXXXXXX…
3 13332885955
Send Option
4.2.4 Outbox
Sent messages are stored in the phone Inbox
Press <LEFT> <2> <4> to select Outbox; the sent message list will be
displayed. There is an icon in front of each message: indicates the
message sending succeeded; indicates the message sending failed.
Messages are listed chronologically, with the most recently sent message
highlighted at the top of the list
Press <UP>/<DOWN> to reach the desired message and press
<SELECT>. The message contents and details will be displayed
z To save the receiver’s phone number, call the receiver or erase the
message, press <RIGHT> and then select Save address, Call
him/her or Erase
z To forward or reply to the message, press <LEFT>
4.2.5 Delete Messages
Select this option to delete all received messages, sent messages, or to
delete all
Press <LEFT> <2> <5> to select Delete Messages and the options
shown in the following figure will be displayed:
28

Menu Operations
1 Inbox
2 Outbox
3 Delete All
Press the corresponding number key to select the desired option and
press <LEFT> to complete the deletion
29

Menu Operations
4.3 Recent Calls
The phone records missed, received and dialed calls as well as their call
durations
Press <LEFT> <3> to select Recent Calls, and the options shown in the
following figure will be displayed:
Recent Calls
1 Incoming Calls
2 Outgoing Calls
3 Missed Calls
4 Delete Lists
4.3.1 Incoming Calls
This option enables you to view the last 30 received calls
Press <LEFT> <3> <1> to select Incoming Calls and the incoming call
list will be displayed. Press <UP>/<DOWN> to reach the desired entry.
Press <LEFT>, to select: Details, Send Message, Delete or Delete All
4.3.2 Outgoing Calls
This option enables you to view the last 30 outgoing calls
Press <LEFT> <3> <2> to select Outgoing Calls, and the outgoing call
list will be displayed. Press <UP>/<DOWN> to reach the desired entry.
Press <LEFT>, to select: Details, Send Message, Delete or Delete All
4.3.3 Missed Calls
This option enables you to view the last 30 missed calls
Press <LEFT> <3> <3> to select Missed Calls, and the missed call list
will be displayed. Press <UP>/<DOWN> to reach the desired entry. Press
30

Menu Operations
<LEFT>, and then you can select Details, Send Message, Delete or
Delete All
4.3.4 Delete Lists
This option enables you to delete all call records
Press <LEFT> <3> <4> to select Delete Lists, and then press <LEFT> to
complete the deletion
31
Menu Operations
4.4 Tools
From this submenu, you can use the Schedule, Alarm Clock or Voice
Memo function
Press <LEFT> <4> to select Tools, and the options shown in the following
figure will be displayed:
Tools
1 Schedule
2 Alarm Clock
3 Voice Memo
4.4.1 Schedule
This option enables you to set daily schedules as well as alarm reminders
for these schedules
When a schedule’s preset alarm time expires, the phone will sound the
alarm; the schedule contents will be displayed. To dismiss the alarm and
return to standby mode, press any key
Press <LEFT> <4> <1> to select Schedule, and options shown in the
following figure will be displayed
1 New
2 List
3 Clear
32

Menu Operations
4.4.1.1 New
Select New to set a new schedule. A calendar will be displayed. Press
<UP>/<DOWN> or <LEFT>/<RIGHT> to reach the desired date, and then
press <SELECT>. Enter the schedule contents and press <LEFT>. Key
the alarm time for the schedule, and then press <LEFT> to confirm and
complete the operation
4.4.1.2 List
Select List to display the schedule list. Press <UP>/<DOWN> to highlight
the desired schedule entry
z To view contents of the schedule, press <RIGHT>
z To delete this schedule, press <LEFT>. Then, press <LEFT> again to
complete the deletion
4.4.1.3 Clear
This option enables you to delete all schedules
Select Clear and then press <LEFT> to complete the deletion
4.4.2 Alarm Clock
This function enables you to set the alarm for a specified time. Once
activated, the alarm indicator will be displayed
If the alarm function is active, the alarm will sound every day at the preset
time, and an alarm icon and the current time will be displayed. The alarm
will sound for 30 seconds unless you dismiss it. To dismiss the alarm and
return to standby mode, press any key
Press <LEFT> <4> <2> to select Alarm Clock, and the alarm setting
screen will be displayed. If the alarm function is activated, Alarm On will
be displayed; if the alarm function is deactivated, Alarm Off will be
displayed
33

Menu Operations
z To change the alarm time and activate the alarm function, press
<RIGHT>. Enter the alarm time in 24-hour format, and then press
<LEFT> to confirm and complete the operation
z When Alarm Off is displayed, you can press <LEFT> to activate the
alarm function without changing the alarm time
z When Alarm On is displayed, you can press <LEFT> to deactivate the
alarm function
4.4.3 Voice Memo
This option enables you to record voice memos and auto-answer
messages, or to listen to voice messages
Press <LEFT> <4> <3> to select Schedule, and the options shown in the
following figure will be displayed:
Voice Memo
1 Memo List
2 Voice List
3 Answering Rec.
4.4.3.1 Memo List
The phone can record 10 voice memos via the microphone or speaker
phone. Each voice memo can be up to 30 seconds in length
Press <LEFT> <4> <3> <1> to select Memo List; the voice memo list will
be displayed, as shown in the following figure:
34
Menu Operations
Memo List
1 Voice Memo 1
2 Voice Memo 2
…
New
Delete All
z To record a new voice memo, press <LEFT>. Press <LEFT> again to
start to record. Press <LEFT> to complete the record
z To delete all voice memos, press <RIGHT>, and then press <LEFT>
to complete the deletion
z To listen to or erase a voice memo, press <UP>/<DOWN> to highlight
the memo and press <SELECT>. Details of the memo will be
displayed. Press <LEFT> or <RIGHT> to play or erase the voice
memo
Record Start at:
2004-10-10 12:14:56
End at:
2004-10-10 12:15:26
Memo length: 30s
Play Erase
35
Menu Operations
4.4.3.2 Voice List
The phone can store up to 10 caller voice messages
If the auto-answer recording function is active, the phone will
automatically record the caller’s voice after the phone rings three times. A
maximum of 10 voice messages can be recorded. Each message can be
up to 30 seconds in length
Press <LEFT> <4> <3> <2> to select Voice List; the voice message list
will be displayed, as shown in the following figure:
Voice List
1 Voice Memo 1
2 Voice Memo 2
…
Delete All
z To listen to or erase a voice message, press <UP>/<DOWN> to
highlight the voice message and then press <SELECT>. Details of the
voice message will be displayed. Press <LEFT> or <RIGHT> to play
or erase the voice memo
z To delete all voice memos, press <RIGHT>, and then press <LEFT>
to confirm and complete the deletion
4.4.3.3 Answering Rec.
The phone can record three auto-answer voice messages. If the
auto-answer recording function is enabled, the phone will play the
auto-answer voice message when it is called
36
Menu Operations
Press <LEFT> <4> <3> <3> to select “Answering Rec.”; the voice
message list will be displayed, as shown in the following figure:
Answering Rec.
1 Answering 1
2 Answering 2
3 Answering 3
Press <UP>/<DOWN> to highlight the desired auto-answer message, and
press <SELECT>. The corresponding auto-answer message will be
played. To replace this message, press <LEFT> and record a new
auto-answer message. Press <LEFT> to complete the record
Now you can record.
Waiting
Record
37
Menu Operations
4.5 Settings
From this submenu, you can perform various phone settings
Press <LEFT> <5> to select Settings, and the options shown in the
following figure will be displayed:
Settings
1 Sounds
2 Display
3 Security
4 Call Setup
5 Dial Delay Time
6 1x Data
7 Network Service
8 Phone Info
4.5.1 Sound
This option enables you to customize the phone alert settings
Press <LEFT> <5> <1> to select Sound, and the options shown in the
following figure will be displayed:
Sounds
1 Ringer
2 Volume
3 Alert
38

Menu Operations
4.5.1.1 Ringer
This option enables you to specify ring tones for incoming calls and
alarms
Press <LEFT> <5> <1> <1> to select Ringer, and the options shown in
the following figure will be displayed
Ringer
1 In Contacts
2 Not In Contacts
3 Alarm Clock
MUSIC1
In Contacts
Select In Contacts to specify a ring tone for incoming calls from the
phone numbers that have been stored in the phone book
Press <UP>/<DOWN> to scroll through the ring tones and listen to a
sample of each. After highlighting the desired ring tone, press <SELECT>
to confirm and complete the operation
Not In Contacts
Select Not In Contacts to specify a ring tone for incoming calls from the
phone numbers that are not stored in the phone book
Press <UP>/<DOWN> to scroll through the ring tones and listen to a
sample of each. After highlighting the desired ring tone, press <SELECT>
to confirm and complete the operation
39
Menu Operations
Alarm Clock
Select In Contacts to specify an alarm tone for the alarm clock
Press <UP>/<DOWN> to scroll through the alarm tones and listen to a
sample of each. After highlighting the desired alarm tone, press
<SELECT> to confirm and complete the operation
4.5.1.2 Volume
This option enables you to set volumes for Ringer, Key Beep, Handset
(Receiver) and Handfree (Speaker Phone)
Volume
1 Ringer
2 Key Beep
3 Handset
4 Handfree
Med
Press <LEFT> <5> <1> <2> to select Volume, and the options shown in
the above figure will be displayed. Select the desired option. Press
<UP>/<DOWN> to scroll through the volume levels and listen to a sample
of each. After highlighting the desired volume level, press <SELECT> to
confirm and complete the operation
4.5.1.3 Alert
Users can enable or disable the alert. Options can be configured as
displayed in the following screen:
This option enables you to activate or deactivate Service Change, Minute
Beep, Call Connect and Power On/Off alert functions
40
Menu Operations
Alert
1 Service Change
2 Minute Beep
3 Call Connect
4 Power On/Off
Off
Press <LEFT> <5> <1> <3> to select Alert, and the options shown in the
above figure will be displayed. Select the desired option. Press
<UP>/<DOWN> to highlight On or Off, and then press <SELECT> to
confirm and complete the operation
4.5.2 Display
Press <LEFT> <5> <2> to select Display; options shown in the following
figure will be displayed:
Display
1 Banner
2 Backlight
3 Language
4 Hyphen
Welcome
41

Menu Operations
4.5.2.1 Banner
This option enables you to specify the text displayed in standby mode
Press <LEFT> <5> <2> <1> to select Banner. Enter the banner contents
(20 characters maximum), and then press <LEFT> to confirm and
complete the operation
The default banner is “welcome”
4.5.2.2 Backlight
If the Backlight function is active, the LCD screen will light when you press
keys or the phone receives a call or message
This option enables you to define how long the backlight will last after the
last keystroke, or to deactivate (Always off) the Backlight function
Press <LEFT> <5> <2> <2> to select Backlight. Press <UP>/<DOWN>
to highlight 7 Seconds, 15 Seconds, 30 Seconds or Always off, and
then press <SELECT> to confirm and complete the operation
4.5.2.3 Language
This option enables you to select the language of the phone’s text display
Press <LEFT> <5> <2> <3> to select Language. Press <UP>/<DOWN>
to highlight English or Español (Spanish), and then press <SELECT> to
confirm and complete the operation
4.5.2.4 Hyphen
If this function is active, when you dial a number with more than six digits,
a hyphen will be inserted before the last four digits; for remaining digits,
every three digits will be led by a hyphen
For example, “11234567890” will be displayed as “1-123-456-7890”
Press <LEFT> <5> <2> <4> to select Hyphen. Then, select no or yes to
deactivate or activate this function
42
Menu Operations
4.5.3 Security
Press <LEFT> <5> <3> to select Security. You will be prompted to enter
the security code. Key in the security code and press <SELECT>. If
correct, options shown in the following figure will be displayed:
Security
1 Lock Phone
2 Change Password
3 Load Default
Unlock
4.5.3.1 Lock Phone
If the phone is locked, you cannot operate the phone before entering the
security code
After accessing the Security option, press <1> to select Lock Phone.
Press <UP>/<DOWN> to highlight Unlock, Lock or On Power Up, and
then press <SELECT> to confirm and complete the operation
z Unlock: Select this option to deactivate phone lock function
z Lock: Select this option to lock the phone immediately. To unlock the
phone, press <RIGHT>. Enter the security code and press <SELECT>
z On Power Up: If this option is selected, after the phone is switched on,
the phone will prompt you to enter the security code
43
Menu Operations
4.5.3.2 Change Password
This option enables you to change the security code
After accessing the Security option, press <2> to select Change
Password
1. Enter a new security code, and then press <SELECT>
2. Enter the new security code again and press <SELECT> to confirm
and complete the operation
z The security code is “0000” by default
z If the new security code entered in step 2 is different from that entered
in step 1, when you press <SELECT>, the message Lock Code does
not match will be displayed
z To avoid any inconvenience, please remember the new security code
4.5.3.3 Load Default
This option enables you to restore the phone’s default settings
After accessing the Security option, press <3> to select Load Default.
The following settings will be restored:
Functions Default Settings
Alarm function Off
In contacts ring type Music 1
Not In Contacts Ring Type Music 2
Alarm Ring Type Music 3
Ring Volume Med
Key Beep Volume Med Low
Handfree Volume High Med
Handset Volume High Med
44
Menu Operations
Functions Default Settings
Power On/Off Alert On
Other Alerts Off
Banner Welcome
Backlight 7 Seconds
Language English
Hyphen No
Network Service Off
Security Code 0000
4.5.4 Call Setup
Press <LEFT> <5> <4> to select Call Setup, and the options shown in
the following figure will be displayed:
Call Setup
1 Auto Answer
2 Answering Sel.
3 Voice Privacy
Off
4.5.4.1 Auto Answer
Press <LEFT> <5> <4> <1> to select Auto Answer. Press
<UP>/<DOWN> to highlight Off, After 3 seconds or Answering
Machine, and then press <SELECT> to confirm and complete the
operation
z Off: Select this option to deactivate the Auto Answer function
45

Menu Operations
z After 3 seconds: If this option is selected, the phone will answer an
incoming call after three seconds of ringing
z Answering Machine: If this option is selected, an external answering
machine can be connected to the phone
4.5.4.2 Answer Sel.
This option enables you to specify auto-answer voice messages. You can
select from the default setting and three self-recorded voice messages
Press <LEFT> <5> <4> <2> to select Answer Sel. Press <UP>/<DOWN>
to highlight the desired option, and then press <SELECT> to confirm and
complete the operation
4.5.4.3 Voice Privacy
This function requires network support
Press <LEFT> <5> <4> <3> to select Voice Privacy. Press
<UP>/<DOWN> to highlight Enhanced or Standard, and then press
<SELECT> to confirm and complete the operation
4.5.5 Dial Delay Time
While making a call, if you press no keys for a certain period of time, the
dialed number will be called automatically. This option enables you to set
the time duration (seconds)
Press <LEFT> <5> <5> to select Dial Delay Time. Press <UP>/<DOWN>
to highlight the desired option, and then press <SELECT> to confirm and
complete the operation
~ Note: If 0 is selected, this function will be deactivated. While making
a call, you must press the <SND/RDL> key to call the dialed number
4.5.6 1x Data
Press <LEFT> <5> <6> to select 1x Data, and the options shown in the
following figure will be displayed:
46

Menu Operations
1x Data
1 Data/Fax
2 Port Speed
Off
4.5.6.1 Data/Fax
This option enables you the define the phone’s Data/Fax status
Press <LEFT> <5> <6> <1> to select Data/Fax. Press <UP>/<DOWN> to
highlight the desired option, and press <SELECT> to confirm and
complete the operation
z Off: Select this option to deactivate the Data/Fax function
z Fax In Once: If this option is selected, the next incoming call will be a
fax call
z Fax In Always: If this option is selected, all incoming calls will be fax
calls
z Data In Once: If this option is selected, the next incoming call will be a
data call
z Data IN Always: If this option is selected, all incoming calls will be
data calls
4.5.6.2 Port Speed
This option enables you change the phone’s port speed
Press <LEFT> <5> <6> <2> to select Port Speed. Press <UP>/<DOWN>
to highlight 9600, 19200 (for data and fax calls), 115299 (for Internet) or
230400, and then press <SELECT> to confirm and complete the
operation
z The default port speed is “115200”
47
Menu Operations
4.5.7 Network service
Press <LEFT> <5> <7> to select Network Service, and the options
shown in the following figure will be displayed:
Network Service
1 Call Forward
2 Call Waiting
3 CNIR
4.5.7.1 Call Forward
Through this option, the phone can be set to forward incoming calls to the
specified phone number. The Call Forward function requires network
support
Press <LEFT> <5> <7> <1> to select Call Forward, and the options
shown in the following figure will be displayed:
Call Forward
1 FWD If Busy
2 FWD If No Answer
3 FWD All Calls
z FWD If Busy: If this function is activated, when another call comes in
during a call, the incoming call will be forwarded to the specified phone
number
48

Menu Operations
z FWD If No Answer: If this function is activated, when there is an
incoming call that remains unanswered for a period of time, the call will
be forwarded to the specified phone number
z FWD All Calls: If this function is activated, all incoming calls will be
forwarded to the specified phone number
After accessing the Call Forward option, press <1>, <2> or <3> to select
FWD If Busy, FWD If No Answer or FWD All Calls. Then, you can
perform the following operations:
z To deactivate the selected function, press <1> to select Disable. The
phone will initiate a call to the network and display the outgoing
number
z To activate the selected function, press <2> to select Enable. Follow
the prompts to key in the forwarding number and press <LEFT>. The
phone will automatically make calling connections with the network
and will display the outgoing number
4.5.7.2 Call Waiting
Press <LEFT> <5> <7> <2> to select Call Waiting, and then press <1> or
<2> to deactivate or activate the Call Waiting function
z This function requires network support
4.5.7.3 CNIR (Calling Number Identification Restriction)
If this function is active, when you dial a call, your phone number will not
be displayed on the called party’s phone. This function requires network
support
Press <LEFT> <5> <7> <3> to select Call Waiting. Press
<UP>/<DOWN> to highlight Enable or Disable, and then press
<SELECT> to confirm and complete the operation
4.5.8 Phone Info
Press <LEFT> <5> <8> to select Phone Info, and the options shown in
the following figure will be displayed:
49

Menu Operations
Phone Info
1 Phone Number
2 SW Version
0.2.0
4.5.8.1 Phone Number
This option enables you to store the phone’s number
Press <LEFT> <5> <8> <1> to select Phone Number. Enter the phone
number, and press <LEFT> to confirm and complete the operation
4.5.8.2 SW Version
This option enables you to view the phone’s software information
After accessing the Phone Info option, press <UP>/<DOWN> to highlight
the SW Version option, the phone’s software version information will be
displayed in the lower message box
This option enables you to store the phone’s number
Press <LEFT> <5> <8> <1> to select Phone Number. Enter the phone
number, and press <LEFT> to confirm and complete the operation
50
Data Service
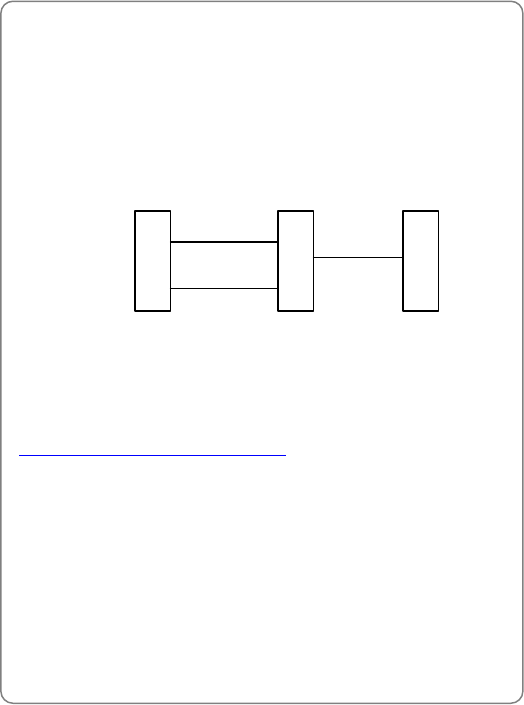
5. DATA SERVICE
The phone supports Data Service. Data or facsimile information can be
transmitted and received via a wireless path, by connecting the phone to a
notebook or desktop PC
5.1 Hardware Connection
Data Cable
Serial Port 2
C800
Switch
PC
Serial Port 0
5.2 Internet
5.2.1 Computer Configuration
Download the Automatic Configuration software from:
http://www.gpte.com.cn/product/p34.htm
Extract the files to a folder. Then, perform the following operations:
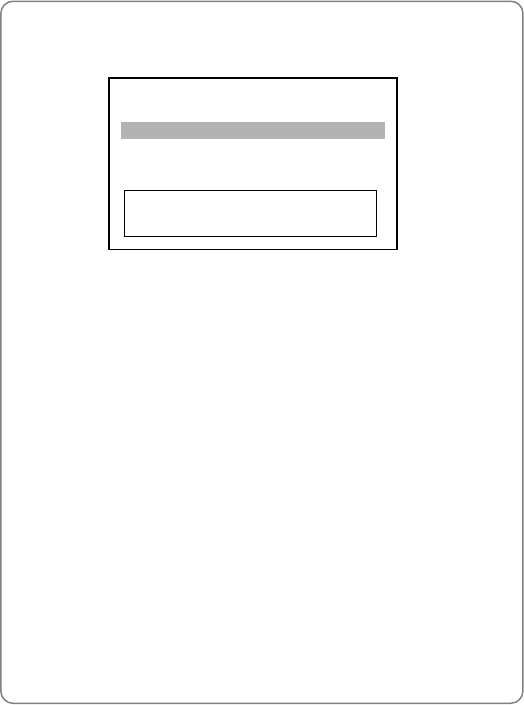
5.2.1.1 AirAccess Kit Installation
1. Double click “setup.exe” from the extracted folder; the “AirAccess Kit
Setup Wizard” window will be displayed:
51

Data Service
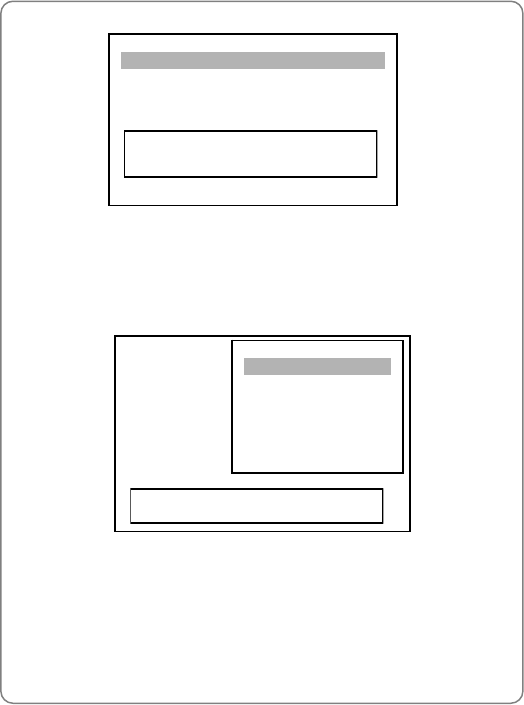
2. Follow the window prompt to click <Next>; the “Select Installation
Folder” window will be displayed:
52
Data Service
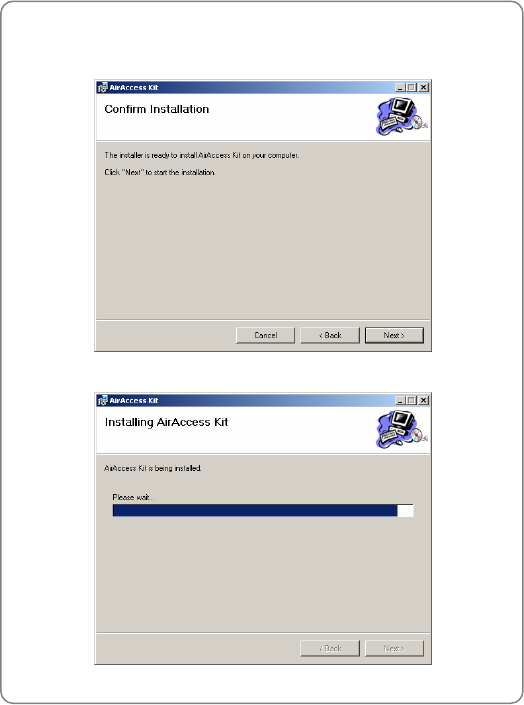
3. Click <Next> to accept the default installation folder. (Or, click
<Browse> to specify a different folder, and then click <Next>.) The
“Confirm Installation” window will be displayed:
4. Follow the window prompts, click <Next> to start the installation
53
Data Service
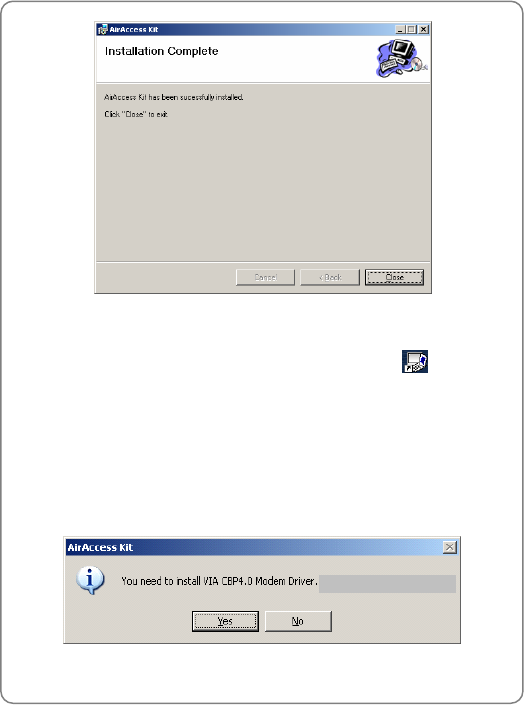
5. When the “Installation Complete” window is displayed, click <Close>
to complete the installation
After completing the installation, you can double click the “AirAccess
Kit” shortcut icon on the desktop to run AirAccess Kit
5.2.1.2 Modem Driver Installation
When you run AirAccess Kit for the first time, if the CBP4.0 Modem Driver
has not been installed on the computer, the executive program will prompt
you to install the CBP4.0 Modem Driver. The following window will be
displayed:
Would you like to do it now?
54
Data Service
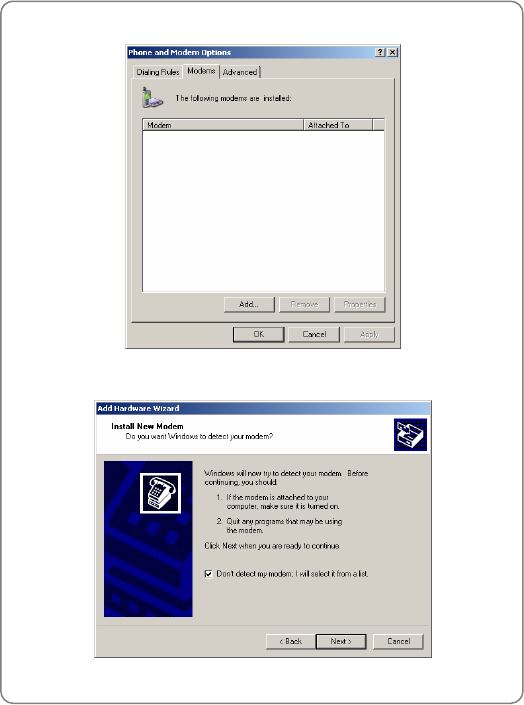
1. Click <Yes> to display the “Phone and Modem Options” window:
2. Click <Add> to display the “Add Hardware Wizard” window:
55
Data Service
3. Select “Don’t detect my modem. I will select it form a list”, and then
click <Next>
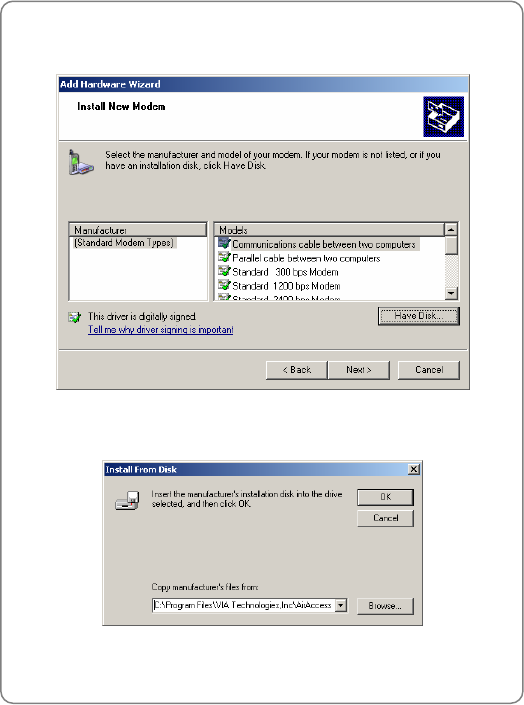
4. Click <Have Disk> to display the “Install From Disk” window
56
Data Service
5. Type the directory name of the AirAccess Kit installation folder or click
<Browse> to locate the directory. Then, click <OK> to display the
following window:
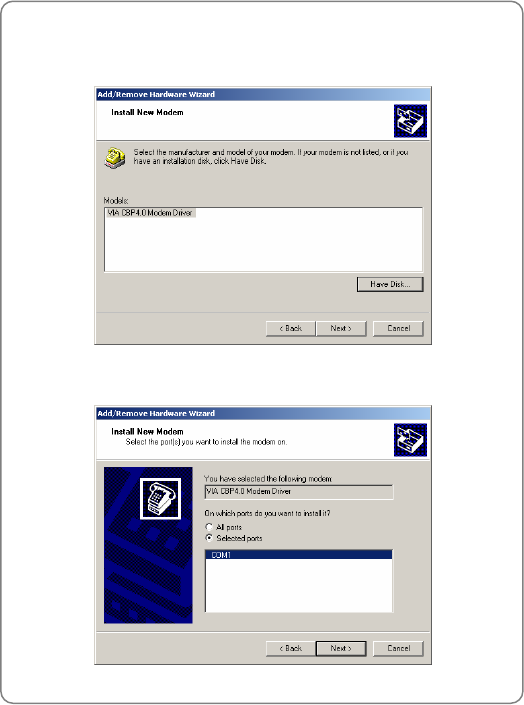
6. Click <Next> to display the following window:
57
Data Service
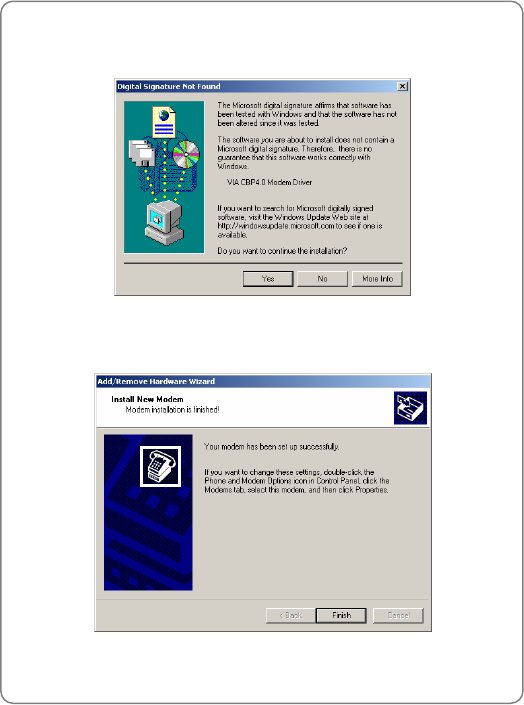
7. Select the desired port(s), and then click <Next> to start the
installation. The “Digital Signature Not Found” window will be
displayed:
8. Click <Yes> to continue the installation. The following window will be
displayed
58
Data Service
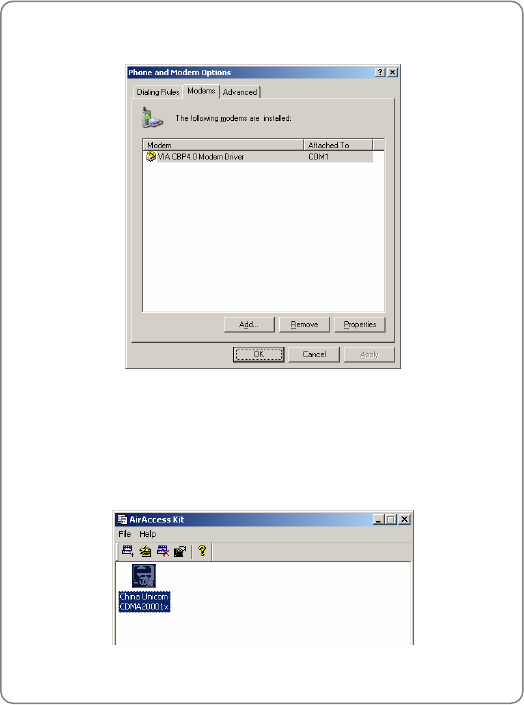
9. Click <Finish> to complete the installation. The installed modem will
be displayed in the “Phone and Modem Options” window:
10. Click <OK> to confirm and complete the operation
5.2.1.3 Dial-up Connection
After Modem Driver installation, the system will automatically establish a
dial-up connection icon. Double click the icon to dial up
59
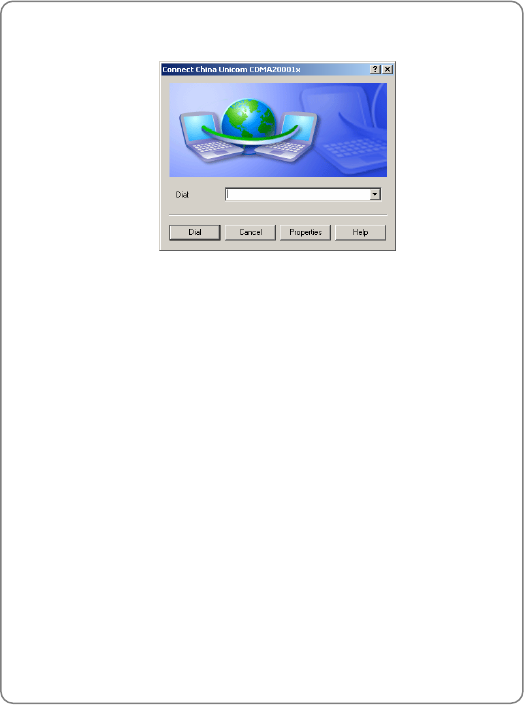
Data Service
Enter the Internet access number (for example T#777 or #777), and click
<Dial>
Then, enter the user name and password to access the network. When
connected, you can surf the Internet, send and receive E-mail, use Telnet,
FTP and more
5.3 Data Fax
Using the following configuration, you can use fax software to send and
receive digital G3 faxes
5.3.1 Computer Configuration
Install a standard 19.2 Kbps modem. Set the port rate to 19.2 Kbps,
instead of 115.2 Kbps
Install fax software (either WinFax or Faxpro is recommended). Ensure
the modem is properly configured
5.3.2 Phone Configuration
Switch the “SerialChoice” button on the phone to “InterNet”
From the phone menu, set the Port Speed option to 19200 (see “Port
Speed”)
To receive a fax, set the Data/Fax option to Fax In Once (see “Data/Fax”)
60
Text Input Method
6. TEXT INPUT METHOD
The phone supports three input methods, including Uppercase Letter,
Lowercase Letter and Digit in order to provide easy input for letters and
digits in text editing mode
6.1 Switch Input Method
When you enter text-editing mode, the last active input method is
displayed. Press <#> to switch between the input methods. The current
input method indicator will be displayed at the upper right side of the
screen and include:
Input Method Indicator
Uppercase Letter
A
BC
Lowercase Letter abc
Digit 123
6.2 Uppercase/Lowercase Letter
1. In Uppercase/Lowercase Letter input mode, press <2> ~ <9>
repeatedly until the intended letter on the key appears
2. After you have entered the intended letter, press the appropriate key to
input the next letter. If the next letter and current letter share the same
key, press <DOWN> and then enter the next letter; or simply wait for
one second to input again
3. To enter a space, press <0>
6.3 Digit
In Digit input mode, press the number keys <0> ~ <9> to enter the
corresponding digits
61

Text Input Method
6.4 Symbol
To enter symbols in text-editing mode, press <*>. The symbol list will be
displayed. Press <UP>/<DOWN> to highlight the intended symbol, and
then press <SELECT> to enter the selected symbol
62

China
Building 3,
Yile Industrial Park
No. 129, Wenyi Road,
Hangzhou 310012 PRC
+86-21-63910500
India
805 Signature Towers B,
South City I
Gurgaon,
Haryana 122001
+91-124-2805045
Japan
TT-2 Building 8th Floor,
3-8-1 Nihonbashi
Ningyo-cho, Chuo-ku, Tokyo,
Japan
+81-3-5643-8070
Europe
Campus Kronberg 7,
61476 Kronberg
Germany
+49-6173-946-3461
Latin America
2801 SW 149th Ave
Suite 100
Miramar, FL 33027, USA
954-447-3077
UTStarcom, Inc. USA
1275 Harbor Bay Parkway Alameda, CA 94502, USA
Tel. 510-864-8800 Fax. 510-864-8802
Copyright © 2004, UTStarcom, Inc. All rights reserved.
May not be reproduced without prior written permission.