UTStarcom Korea Technologies GF210 GSM 850/1900MHz MOBILE PHONE User Manual GF210 060922
UTStarcom Korea Technologies Ltd. GSM 850/1900MHz MOBILE PHONE GF210 060922
Manual
i
_______________________________________
Copyright Statement: “ 2006 UTStarcom, Inc. All rights reserved. No
part of this publication may be reproduced in any form or by any means
without the prior written permission of UTStarcom, Inc.”
Warranty Language: “The contents of this manual, whether in whole or in
part, do not constitute any express or implied warranty with respect to any
products of UTStarcom, Inc., or its affiliates.”
UTStarcom reserves the right to make changes and improvements to any
of the product described in this manual without prior notice. The screen
displays in this manual are for demonstration only and may differ slightly
from the actual product displays.
Doc. Code: 8810024500.0607

ii
Table of Contents
SAFETY PRECAUTIONS..................................................1
REGULATORY STATEMENT (R&TTE / WLAN IEEE 802.11B/G)..............1
CONSUMER NOTICE...............................................................................1
CE DECLARATION OF CONFORMITY .......................................................1
FCC RF EXPOSURE COMPLIANCE.........................................................2
HANDLING THE PHONE, BATTERY AND CHARGER ...................................3
HANDLING THE PHONE...........................................................................4
HANDLING THE BATTERY........................................................................6
HANDLING THE CHARGER ......................................................................7
1. GETTING STARTED.....................................................8
1.1 PACKAGE CONTENTS .......................................................................8
1.2 PHONE SPECIFICATIONS ..................................................................9
1.3 HANDSET DESCRIPTION.................................................................10
1.4 DISPLAY INDICATORS .....................................................................13
1.5 CHARGE THE BATTERY ..................................................................14
1.6 REPLACE THE BATTERY .................................................................16
1.7 INSTALL SIM CARD ........................................................................17
1.8 CONVENTIONS USED IN THIS MANUAL............................................18
1.9 ACCESS MENU/LIST OPTIONS ........................................................19
1.10 MENU TABLE................................................................................19
2. BASIC OPERATIONS..................................................22
2.1 SWITCH THE PHONE ON/OFF.........................................................22
2.2 MODE CHOICE...............................................................................23
2.3 MAKE A CALL.................................................................................23
2.3.1 Make a GSM Call............................................................................23
2.3.2 Make a WiFi Call.............................................................................24
2.4 USE SPEED DIAL ...........................................................................26
2.5 USE VOICE MAIL............................................................................26
2.6 ANSWER A CALL.............................................................................26
iii
2.7 REJECT A CALL..............................................................................27
2.8 ONLY ONE GSM CALL IN TALKING .................................................27
2.8.1 Adjust Earpiece Volume..................................................................27
2.8.2 In Call Operations............................................................................27
2.8.3 Call Waiting......................................................................................29
2.9 TWO GSM CALLS IN TALKING ........................................................30
2.9.1 Swap In Two Calls...........................................................................30
2.9.2 In Two Calls Operations..................................................................30
2.10 GSM CONFERENCE CALL............................................................31
2.11 ONLY ONE WIFI CALL IN TALKING ................................................34
2.11.1 Adjust Earpiece Volume.................................................................34
2.11.2 In Call Operations..........................................................................34
2.11.3 Call Waiting....................................................................................35
2.12 TWO WIFI CALLS IN TALKING .......................................................36
2.12.1 Swap In Two Calls.........................................................................36
2.12.2 In Two Calls Operations................................................................36
2.13 WIFI CONFERENCE CALL.............................................................37
2.14 STORE A PHONE NUMBER............................................................38
2.15 PROFILES SHORTCUT ..................................................................39
2.16 SILENT MODE SHORTCUT ............................................................39
2.17 KEYPAD LOCK..............................................................................40
3. PHONEBOOK.............................................................41
3.1 SEARCH ........................................................................................41
3.1.1 Edit...................................................................................................43
3.1.2 Delete..............................................................................................43
3.1.3 Copy................................................................................................43
3.1.4 Set Primary Number........................................................................44
3.1.5 Send Message.................................................................................44
3.1.6 Send Card........................................................................................44
3.2 NEW ..............................................................................................44
3.3 GROUP..........................................................................................46
3.3.1 Ringtones.........................................................................................46
3.3.2 Rename...........................................................................................46
3.4 MARK ............................................................................................47
3.4.1 Copy................................................................................................47
iv
3.4.2 Delete..............................................................................................48
3.4.3 Send Message.................................................................................48
3.4.4 Mark All............................................................................................49
3.4.5 Cancel Mark All................................................................................49
3.5 DELETE ALL...................................................................................49
3.6 COPIES ALL ...................................................................................49
3.7 SPEED DIAL...................................................................................50
3.8 STORAGE SETTING ........................................................................51
3.8.1 Store Location..................................................................................51
3.8.2 Memory Status.................................................................................51
4. CALL REGISTER........................................................52
4.1 MISSED CALLS ..............................................................................52
4.1.1 View.................................................................................................53
4.1.2 Extract Number................................................................................53
4.1.3 Send SMS........................................................................................53
4.1.4 Send MMS.......................................................................................53
4.1.5 Delete..............................................................................................54
4.1.6 Delete All..........................................................................................54
4.2 RECEIVED CALLS...........................................................................54
4.2.1 View.................................................................................................55
4.2.2 Extract Number................................................................................55
4.2.3 Send SMS........................................................................................55
4.2.4 Send MMS.......................................................................................55
4.2.5 Delete..............................................................................................55
4.2.6 Delete All..........................................................................................56
4.3 DIALLED NUMBERS........................................................................56
4.3.1 View.................................................................................................57
4.3.2 Extract Number................................................................................57
4.3.3 Send SMS........................................................................................57
4.3.4 Send MMS.......................................................................................57
4.3.5 Delete..............................................................................................57
4.3.6 Delete All..........................................................................................57
4.4 CALL TIMERS.................................................................................58
4.5 CALL COSTS ..................................................................................58
4.5.1 Last Call...........................................................................................59
4.5.2 All Calls............................................................................................59

v
4.5.3 Call Cost Settings............................................................................59
5. PROFILES..................................................................60
5.1 STANDARD.....................................................................................60
5.1.1 Activate............................................................................................60
5.1.2 Personalise......................................................................................61
5.2 OUTDOOR......................................................................................63
5.3 MEETING .......................................................................................64
5.4 SILENT ..........................................................................................64
5.5 USER DEFINE ................................................................................64
6. WIFI SETTINGS..........................................................65
6.1 NET PARAMETER ...........................................................................65
6.1.1 DHCP...............................................................................................65
6.1.2 IP Address.......................................................................................65
6.1.3 DNS.................................................................................................66
6.1.4 Network Information........................................................................66
6.2 SIGNAL PROTOCOL ........................................................................67
6.2.1 SIP...................................................................................................67
6.2.2 RTP..................................................................................................69
6.2.3 Voice Mail........................................................................................69
6.3 WIFI CONFIG.................................................................................69
6.3.1 AP Profile.........................................................................................70
6.3.2 AP Scan Channel............................................................................72
6.3.3 Auto Scan........................................................................................72
6.4 NET SEARCH .................................................................................73
6.5 NET SERVICE.................................................................................73
6.5.1 Call Waiting......................................................................................74
6.5.2 Call Transfer....................................................................................74
6.5.3 Heart Beat Interval...........................................................................74
6.5.4 Register Interval Time.....................................................................75
6.5.5 Caller-ID Block.................................................................................75
6.5.6 Redial on Busy................................................................................75
6.5.7 Reject Anonymous Incoming Call...................................................75
6.5.8 Personal Information.......................................................................75
6.6 MISC............................................................................................76

vi
6.6.1 Remote Update...............................................................................76
6.6.2 Remote server.................................................................................76
6.6.3 Parameter Provisioning Server.......................................................77
6.7 VENDER INFORMATION...................................................................77
6.8 WIFI TOOLS...................................................................................77
6.8.1 SNTP...............................................................................................78
6.8.2 Web Authentication..........................................................................78
6.8.3 Upgrade Server IP Address.............................................................78
7. MESSAGE..................................................................82
7.1 SMS (TEXT MESSAGE)..................................................................82
7.1.1 New..................................................................................................83
7.1.2 Inbox................................................................................................84
7.1.3 Outbox.............................................................................................89
7.1.4 Drafts...............................................................................................90
7.1.5 My Favorite......................................................................................91
7.1.6 Voicemail.........................................................................................93
7.1.7 Templates........................................................................................93
7.1.8 Settings............................................................................................95
7.1.9 Memory Status.................................................................................96
7.2 MMS.............................................................................................96
7.2.1 New..................................................................................................97
7.2.2 Inbox................................................................................................99
7.2.3 Outbox...........................................................................................102
7.2.4 Drafts.............................................................................................104
7.2.5 Settings..........................................................................................105
7.2.6 Memory Status...............................................................................107
8. SETTINGS................................................................108
8.1 DATE AND TIME............................................................................108
8.1.1 Date and Time...............................................................................108
8.1.2 Time Mode.....................................................................................108
8.1.3 Date Mode.....................................................................................109
8.2 DISPLAY SETTINGS ......................................................................109
8.2.1 Background...................................................................................109
8.2.2 Greeting.........................................................................................109
8.2.3 Backlight Level..............................................................................109
vii
8.2.4 Contrast..........................................................................................110
8.2.5 Brightness.......................................................................................110
8.3 CALL SETTINGS ...........................................................................110
8.3.1 Answer Mode..................................................................................110
8.3.2 Minute Minder.................................................................................111
8.3.3 Earphone Auto Answer...................................................................111
8.4 PHONE SETTINGS ........................................................................111
8.4.1 Choose Language..........................................................................111
8.4.2 Input method...................................................................................112
8.4.3 Shortcut..........................................................................................112
8.4.4 Auto Key Guard..............................................................................113
8.5 SECURITY SETTINGS ...................................................................113
8.5.1 PIN Protect.....................................................................................113
8.5.2 Phone Code....................................................................................115
8.5.3 SIM Change Notify.........................................................................116
8.5.4 Reset All..........................................................................................116
8.6 GSM SETTINGS...........................................................................118
8.6.1 GSM Number..................................................................................119
8.6.2 Call Divert.......................................................................................119
8.6.3 Auto Redial....................................................................................120
8.6.4 Call Waiting....................................................................................120
8.6.5 Show Caller ID...............................................................................121
8.6.6 Select Line.....................................................................................121
8.6.7 Network Options............................................................................121
8.6.8 Call Barring....................................................................................122
8.6.9 Fixed Dialling.................................................................................123
9. ORGANIZER.............................................................125
9.1 TOOLBOX.....................................................................................125
9.1.1 Alarm..............................................................................................125
9.1.2 Schedule........................................................................................126
9.1.3 Calculator.......................................................................................129
9.1.4 Notepad.........................................................................................130
9.1.5 Unit Convert...................................................................................131
9.1.6 World Time.....................................................................................132
9.1.7 Stopwatch......................................................................................132
9.2 GAMES ........................................................................................133
viii
9.2.1 Black Jack......................................................................................133
9.2.2 Tetris..............................................................................................134
9.3 MY FOLDER .................................................................................135
9.3.1 Pictures..........................................................................................135
9.3.2 Music.............................................................................................136
9.3.3 Memory Status...............................................................................138
10. WAP........................................................................138
10.1 HOME........................................................................................138
10.2 ENTER URL..............................................................................139
10.3 FAVORITES ................................................................................139
10.4 PUSH MESSAGE.......................................................................140
10.5 HISTORY....................................................................................141
10.6 SETTINGS..................................................................................142
10.6.1 Profiles.........................................................................................142
10.6.2 Data Connections........................................................................143
10.6.3 Cache..........................................................................................144
10.6.4 Cookies........................................................................................144
10.6.5 Display Settings...........................................................................145
10.6.6 Security........................................................................................145
10.6.7 Statistics.......................................................................................145
11. STK.........................................................................146
12. INPUT METHOD......................................................147
12.1 SWITCH INPUT METHOD.............................................................147
12.2 PIN YIN AND STOKE ...................................................................147
12.3 PREDICTIVE ENGLISH ................................................................147
12.4 LETTER .....................................................................................149
12.5 DIGIT.........................................................................................150
13. TROUBLESHOOTING.............................................151
Safety Precautions
1
SAFETY PRECAUTIONS
Regulatory Statement (R&TTE / WLAN IEEE
802.11b/g)
European standards dictate maximum radiated transmit power of 100mW
EIRP and frequency range 2.400-2.4835GHz; In France, the equipment
must be restricted to the 2.400-2.454GHz frequency range.
Consumer Notice
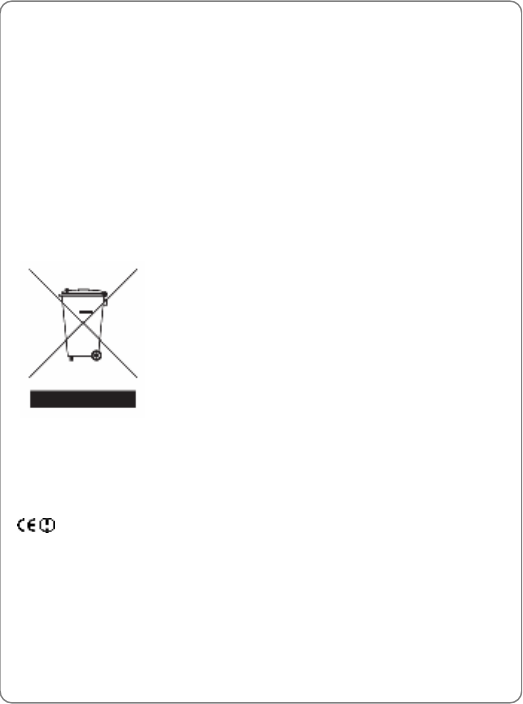
œ Note: Marking is in compliance with EU
Directive 2002/96/EC and EN50419.
This equipment is marked with this recycling
symbol. It means that at the end of the life of the
equipment you must dispose of it separately at an
appropriate collection point and not place it in the
normal domestic unsorted waste stream. This will
benefit the environment for all. (European Union
only)
CE Declaration of Conformity
For the following equipment: WiFi handset GF210
Is herewith confirmed to comply with the requirements set out in the
Council Directive on the Approximation of the Laws of the Member States
relating to Electromagnetic Compatibility (89/336/EEC), Low-voltage
Directive (73/23/EEC) and the Amendment Directive (93/68/EEC), the
procedures given in European Council Directive 99/5/EC and
89/3360EEC.
The equipment was passed. The test was performed according to the

Safety Precautions
2
following European standards:
l EN 300 328 V1.5.1 (2004-11)
l EN 301 489-17 V1.2.1 (2002-08)
l EN 50371: 2002
l EN 60950-1: 2001
FCC RF Exposure Compliance
This PCS phone has been tested and complies with the Federal
Communications Commission (FCC) RF exposure limits for the General
Population/Uncontrolled exposure environment. In addition, it complies
with the following Standards and Guidelines:
l FCC 96-326, Guidelines for Evaluating the Environmental Effects of
Radio-Frequency Radiation
l FCC OET Bulletin 65 Edition 01-01 (2001) Supplement C, Evaluating
Compliance with FCC Guidelines for Human Exposure to Radio
Frequency Electromagnetic Fields
l ANSI/IEEE C95.1-1992, IEEE Standard for Safety Levels with
Respect to Human Exposure to Radio Frequency Electromagnetic
Fields, 3 kHz to 300 GHz
l ANSI/IEEE C95.3-1992, IEEE Recommended Practice for the
Measurement of Potentially Hazardous Electromagnetic Fields - RF
and Microwave
œ Note: For body-worn operation, this phone has been tested and
meets FCC RF exposure guidelines when used with an accessory
that contains no metal and the positions of handset a minimum of
2.0cm from the body.Use of other accessories may not ensure
compliance with FCC RF exposure guidelines.
Below is the SAR Test Result:
Head Maximum Result: 0.902W/Kg
Body Maximum Result: 1.03W/Kg
Safety Precautions
3
Handling the Phone, Battery and Charger
DANGER
Only use the battery and charger specified for the
phone. Failure to do so can result in damage to the
phone, electric shock or fire.
CAUTION
Do not store or operate the phone or charger in hot,
damp, or dusty areas, which can damage electrical and
mechanical components. Avoid prolonged exposure to
temperatures below 5°C or in excess of 35°C.
DANGER
Do not drop, shake or throw the phone or charger.
Rough handling can damage internal circuit boards and
the battery pack.
Do not use the phone in the vicinity of volatile gases.
Leave the area before using the phone. Failure to leave
the area can result in the risk of fire or an explosion.
Do not disassemble or modify the phone, charger, or
battery. Incorrect modifications, reassembly, or
tampering may result in malfunction or personal injury.
Safety Precautions
4
Handling the Phone
This device complies with Part 15 of the FCC Rules. Operation is subject
to the following two conditions:
l This device may not cause harmful interference
l This device must accept any interference received, including
interference that may cause undesired operation
DANGER
This phone has been tested and found to comply with
the limits for a Class B digital device, pursuant to Part
15 of the FCC Rules. These limits are designed to
provide reasonable protection against harmful
interference in a residential installation. This phone
generates, uses and can radiate radio frequency energy
and, if not installed and used in accordance with the
instructions, may cause harmful interference to radio
communications. However, there is no guarantee that
interference will not occur in a particular installation. If
this phone does cause harmful interference to radio or
television reception, which can be determined by
turning the phone off and on, the user is encouraged to
try to correct the interference by one or more of the
following measures:
- Reorient or relocate the receiving antenna.
- Increase the separation between the phone and
receiver.
- Connect the phone into an outlet on a circuit
different from that to which the receiver is
connected.
- Consult the dealer or an experienced radio/TV
technician for help.
Observe local regulations for specialized areas
(hospital, aircraft, etc) when using the phone.
Safety Precautions
5
Do not use the phone while operating a vehicle.
CAUTION
Changes or modifications not expressly approved by
UTStarcom, Inc. could void the user’s authority to
operate the phone.
Keep all storage media (magnetic cards, floppy disks,
credit cards, etc.) away from the phone. Close
encounters or contact can erase or damage the storage
media.
Keep all sharp metal objects (pins, nails, hairpins etc.)
away from the phone handset. The handset earpiece
contains a strong magnet that can attract and hold
metal objects. Remove any objects from the handset
earpiece before using, to avoid personal injury.
In case of emergency, key in the emergency number
(911 for example in US), then press the Talk key and let
the operator know your specific location. Don’t hang up
until you are told to do so.
Safety Precautions
6
Handling the Battery
DANGER
Do not dispose of the battery pack in a fire. It may
explode. Check with local waste management codes for
disposal instructions.
Do not force the battery pack into the phone. Improper
installation can cause malfunctions or damage the
battery pack. This may result in fire or personal injury.
Use caution in handling batteries in order not to short
the battery on conductive materials such as rings,
bracelets, and keys. The battery and/or conductor may
overheat and cause burns.
If the battery becomes too hot while recharging, it
should be removed immediately from the charger.
When clothes or skin are exposed to battery leakage,
rinse with clean water at once to prevent skin irritation.
Do not use a cracked, leaking or odor-emitting battery
pack near an open flame or high temperatures.
CAUTION
If a fully discharged battery is stored for a long period of
time, it may not be possible to recharge the battery.
Observe local waste management codes for proper
battery disposal instructions.
Safety Precautions
7
Handling the Charger
DANGER
Only use a power source that provides the appropriate
voltage (AC100~240 V) for the charger. An unsuitable
power source can result in damage to the charger, fire
or electric shock.
Do not use the charger if the power supply cord or plug
is damaged or frayed (exposed or broken wires, etc).
This can result in the risk of fire or electric shock.
Do not short circuit the charger connector jack. This may
result in fire or electric shock.
Immediately unplug the charger from the wall outlet in
the event that liquid is spilled into the unit to prevent fire
or electric shock.
CAUTION
Always unplug the charger from the wall outlet before
cleaning to avoid the risk of electric shock.
Do not place heavy objects on the cord to avoid
damage.
Always grip the power plug when removing the charger
from the wall outlet. Do not pull on the power supply
cord to avoid damage and the risk of electric shock.
Getting Started
8
1. GETTING STARTED
1.1 Package Contents
Please check the package contents by comparing them with the following
list. If you find anything missing or if the documentation set is incomplete,
contact your local phone dealer immediately.
l Model GF210 (with one battery)
l Charger (one)
l User manual (one)
l Quick Start Guide (one)
l Certificate of quality (one)
Getting Started
9
1.2 Phone Specifications
Dimensions About 106.5 x 44.5 x 20 (L×W×H) mm
Weight Approximately 95g
Frequency GSM 850/1800/1900 or 900/1800’1900 MHz
WLAN 2.4GHz
Battery DC 3.6V 900mAh Li-ion battery
Charger
Input: 100~240V AC, 50~60Hz
Output: 5.2V DC, 600mA
Charger Weight Approximately 80g
Charging Time 3~4 hours
Standby Time GSM: Approximately 150~200 hours
WiFi: Approximately 50~70 hours
Talking Time GSM: Approximately 5 hours
WiFi: Approximately 3 hours
l Standby time refers to the state in which the phone is on continuously
without being used for calls, or moved to different service areas
l Talking time refers to the state in which the phone is continuously
used for calls. The actual talking time may differ from that achieved in
the lab environment.
l The standby time depends on the network conditions, phone usage,
surrounding area and mode choice. The phone consumes more
battery power under the following conditions:
- In areas with weak signals, with high or low temperatures, or when
used outside the service coverage area
- When the phone frequently searches for network signal due to
location changes
- When you talk on the phone for long periods of time
Getting Started
10
- The Alarm, Backlight or Vibration function is active
- Ring or listening volume is set to maximum
- Dual Attach mode is chosen for both GSM&WiFi signals, refer to
Section “2.2 Mode Choice”.
- When features such as SMS, MMS, Email, WAP and game are
being used for a long time
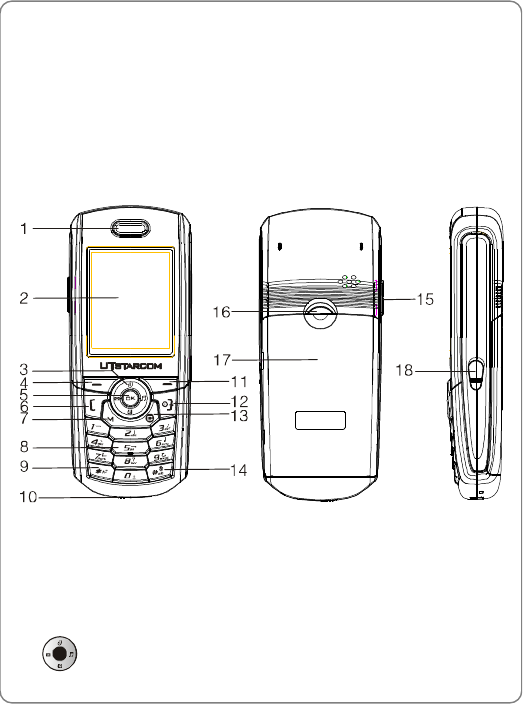
1.3 Handset Description
1. Earpiece
2. LCD Screen
3. Navigation Key:

Getting Started
11
This key is used to scroll up and down through menu lists, call log or
phonebook entries. It can also be used to move cursor when editing.
Up Key: Enter WAP menu list, refer to Section “10 WAP ”.
Down Key: Enter the contacts list, refer to Section “3 Phonebook “.
Left Key: Enter the new text message edit interface, refer to Section
“7.1.1 New “.
Right Key: Enter Profiles Menu list, refer to Section “ 5 Profiles “.
4. Left Soft Key:
This key is used to perform the function indicated on the screen above
it.
5. OK Key:
This key is used to enter the highlighted item you chose in the list. It
also can be used to display options in detail view. Press this key to
enter the main menu in standby state.
6. Talk Key:
This key is used to make or receive a call. When in dual attach mode,
this key is used to make a GSM call. It can also be used to access
dialled logs in standby state.
7. Mode Key
Press this key to enter My Folder menu in standby state. Press and
hold this key to enter Mode Choice menu in standby state. When in
dual attach mode, this key is used to make a WiFi call.
8. ~ Number Keypad:
These keys are used to enter numbers and characters.

Getting Started
12
9. * Key:
This key is used to key in “*” or pause symbol “P” (by pressing and
holding the key). It also can be used to lock the keypad in the main
menu state, refer to Section “2.17 Keypad Lock “.
10. Charging Socket
11. Right Soft Key:
This key is used to perform the function indicated on the screen above
it.
12. Power Key:
This key is used to switch the phone on and off, to end a call, or to
return to standby state.
13. Clear Key:
This key is used to clear the entered numbers and characters.
14. # Key/Lock Key:
This key is used to key in “#”. It also can be used to activate or exit the
Higher Silent Mode (by pressing and holding the key), refer to Section
“2.16 Silent Mode Shortcut “.
15. Side Key:
This key can be used as the navigation key to scroll through menu lists
and text. It also can be used to adjust keypad tone in standby state.
Press this key to stop the ring or vibration when there is an incoming call,
without rejecting the call, refer to Section “2.6 Answer a Call “.
16. Battery Cover Release Button
17. Battery Cover
Getting Started
13
18. Earphone Socket
œ Note: This is only a brief introduction to the keypad functions.
Please refer to the contents of this user manual for detailed
descriptions and operations.
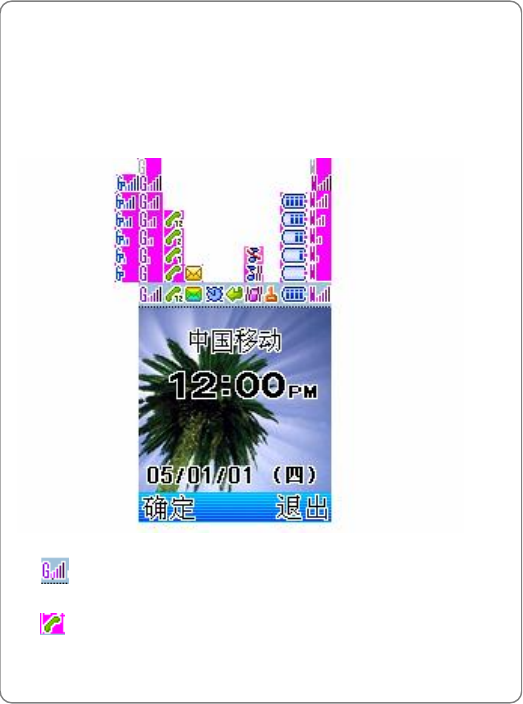
1.4 Display Indicators
1. Shows the current GSM signal strength. The higher the bar, the
stronger the signal.
2. Indicates a call is in progress.

Getting Started
14
3. (green)/ (yellow) Indicates a new SMS/ MMS has been
received.
4. Indicates one or more Alarm functions are active, refer to Section
“9.1.1 Alarm “.
5. Indicates the GSM Call Divert function is active, refer to Section
“8.6.2 Activate Call Divert ”.
6. / /
Means the Ring Mode is set to Vibrator. When the Higher Silent
Mode is active, this icon will be displayed.
Means the Ring Mode is set to Vibration and Ringing or Ring
after Vibration.
Means the Ring Mode is set to Mute.
7. Indicates the keypad is locked, refer to Section “2.17 Keypad
Lock“.
8. Indicates the battery charge level. The higher the bar, the greater
the battery power.
9. Shows the current WiFi signal strength. The higher the bar, the
stronger the signal.
10. Content Display Area: Shows phone numbers, characters, etc.
11. Soft key function display area: Shows the functions of the left soft key
and the right soft key .
1.5 Charge the Battery
When the battery power is low and needs recharging, the battery indicator
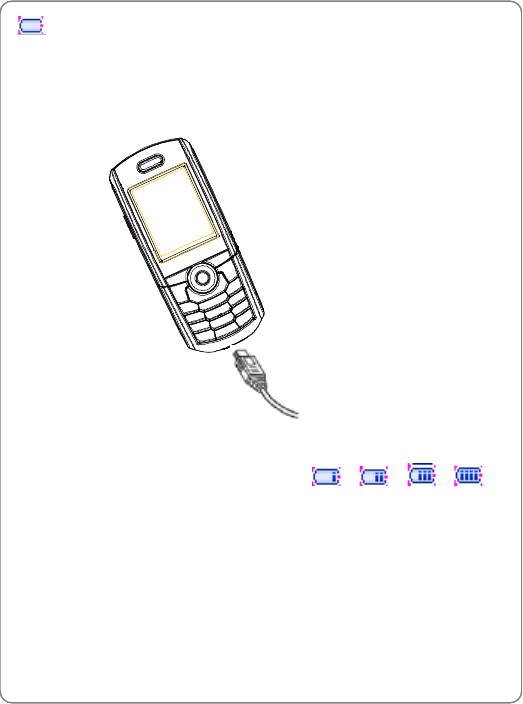
Getting Started
15
will flash continuously, and the phone will sound a low battery alarm
(if the Warning Tone is set to On, refer to Section “5.1.2 Personalise”),
reminding you that the battery is running low and the phone will be
switched off automatically. To charge the battery, follow the steps below:
1. Connect the charger to an AC wall outlet (100~240V).
2. Connect the lead from the charger to the charging socket of the phone.
The battery indicator bar starts to scroll ( à à à ). If
the phone is off, the text Charging appears on the LCD screen.
3. When the battery indicator bar stops scrolling, charging is complete.
The text “Full Charged!” appears on the LCD screen, if the phone is
off.
l The phone takes about 3~4 hours to charge and the exact time may
vary depending on the circumstances.
l Before its first use, charge your new battery for 4 hours with the phone
turned off.
Getting Started
16
l When the battery is being charged, it is normal that your charger and
phone become warm to the touch.
l If the phone is turned on while charging, you can still make and
receive calls as usual, but this will consume battery power, thus
extending the charging time.
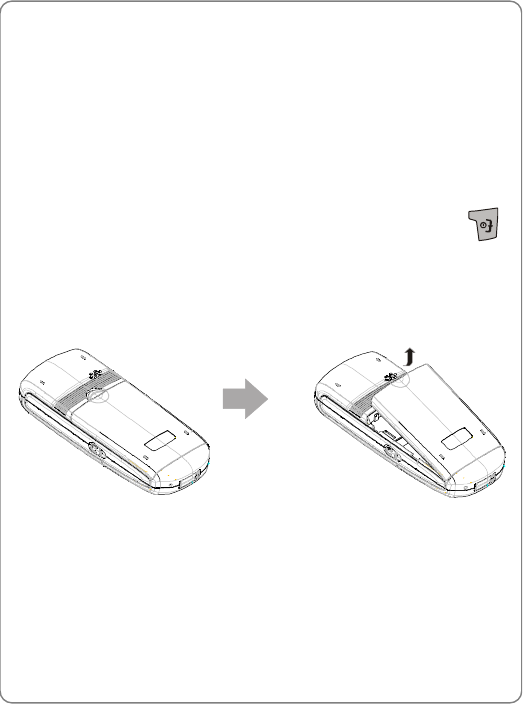
1.6 Replace the Battery
Since battery power is easily consumed, if you find the battery power
diminishes quickly after full charging, please replace your battery.
In standby state, switch the phone off by pressing and holding .
(Otherwise, some user settings will be lost.)
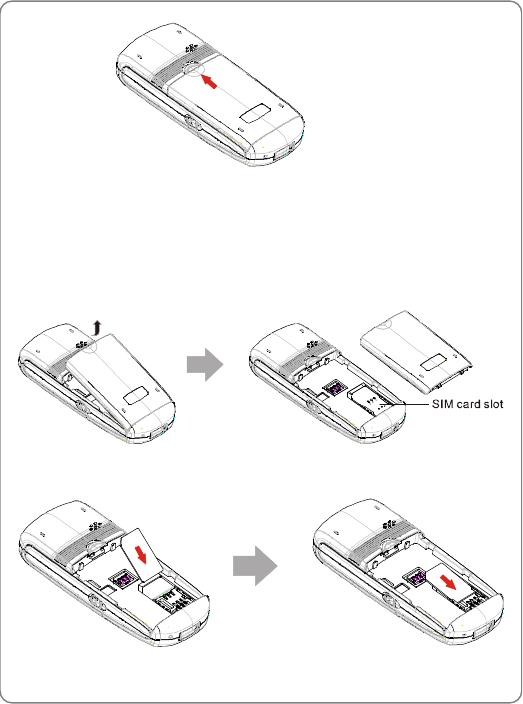
1. Remove the old battery
With the back of the phone facing you, push the battery release button
and lift the battery off in the direction of the arrow.
2. Install the new battery
Insert the battery into the back of the phone until it firmly clicks into
place. Do not reverse the direction.
Getting Started
17
1.7 Install SIM Card
The SIM Card (Subscriber Identity Module) contains the phone number
and the detailed information of the service programs, and can be used to
store telephone numbers and personal information.
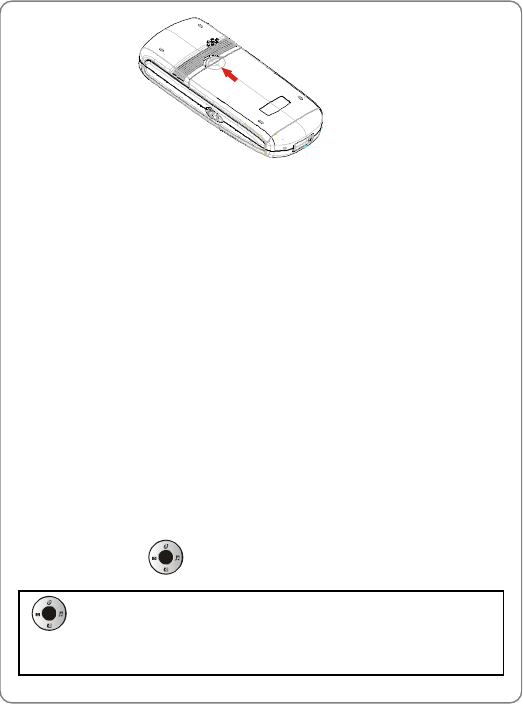
Step 1: Press the battery release button, and then take off the battery.
Step 2: Insert the SIM Card into the SIM Card slot. The location of the SIM
Card slot is shown in the illustration above.
Step 3: Reinstall the battery.
Getting Started
18
œ Notice: Never place the SIM Card within reach of the children.
œ Notice: The SIM Card can be installed only after the phone is
powered off and disconnected from all the accessories.
œ Notice: The SIM Card can be easily damaged by scratching or
bending, so be careful when using, inserting or taking off the SIM
Card.
1.8 Conventions Used in this Manual
l In this manual, “press the key” means to release the key after you
press it; “press and hold the key” means to press the key for more than
2 seconds before releasing it.
l The text displayed on the screen is indicated in bold in this manual, for
example Menu, The menu list options are indicated in bold&italics in
this manual, for example Settings.
l Most operations need to be performed in standby state. When Menu
appears above the left soft key, the phone is in standby state (refer to
the figure illustrated in Section “1.4 Display Indicators”)
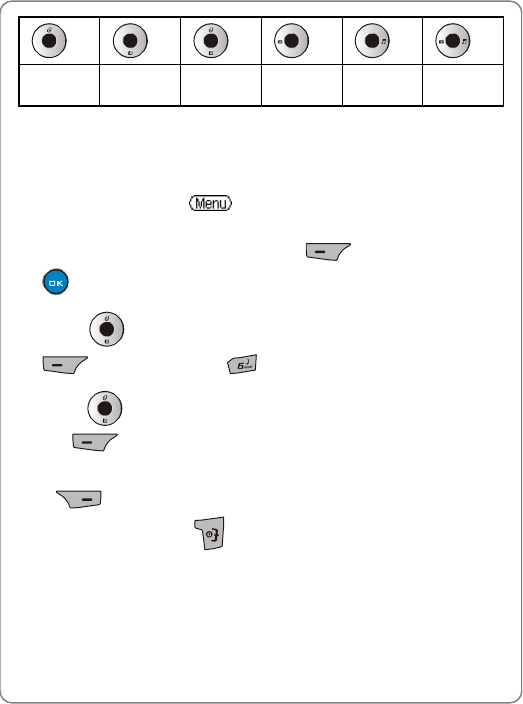
l Navigation key operations follow:
Press the “Up”, “Down”, “Left”, and “Right” directions on the
Navigation key to execute operations such as browsing, selecting,
adjusting and setup; key directions are as follows:
Getting Started
19
Up Down Up or
Down Left Right Left or
Right
1.9 Access Menu/List Options
A variety of options are available for the menus and lists, such as: Menu
and Go to.
For example, to access àSettingsàDate and Time, follow the
steps below:
1. In standby state, press the left soft key (Menu) or the OK key
to enter the main menu.
2. Press to reach Settings, and then press the left soft key
(Ok). Or press the key to enter Settings directly.
3. Press to highlight Date and Time, and then press the left soft
key (Ok).
œ Note: To return to the previous menu level, press the right soft key
(Cancel). To return to standby state without changing the
menu settings, press .
œ Note: If you stop operating the phone for two minutes, the phone will
return to standby state without changing the menu settings.
1.10 Menu Table
There are 9 submenus in the main menu.

Getting Started
20
Search
New
Group
Mark
Delete All
Copies All
Speed Dial
Phone Book
Storage Setting
Missed Calls
Received Calls
Dialled Numbers
Call Timers
Call Register
Call Costs
Standard
Outdoor
Meeting
Silent
Profiles
User Define
Net Parameter
Signal Protocol
WiFi Config
Net Search
Net Service
MISC
Vendor Information
WiFi Settings
WiFi Tools

Getting Started
21
SMS
Message MMS
Date and Time
Display Settings
Call Settings
Phone Settings
Security Settings
Settings
GSM Settings
Toolbox
Games Organizer
My Folder
Home
Enter URL
Favorites
PUSH Message
History
WAP
Settings
STK

Basic Operations
22
2. BASIC OPERATIONS
2.1 Switch the Phone On/Off
Press and hold the power key to switch the phone on/off.
If the Power On Code function is active, after switching on the phone,
enter the security code (with each input displayed as *) and press the left
soft key (Ok). If correct, the power-on animation will be displayed;
otherwise Code Error will be displayed (Refer to Section “8.5.2 Phone
Code”).
If a SIM card is inserted and the Power On PIN function is active, the
phone will request you to enter the PIN code after you switch on the
phone. Input it and press the left soft key (Ok) (Refer to Section
“8.5.1 PIN Protect”).
• The phone will search for the network signals according to the mode
choice. Then the phone enters standby state.
• If no SIM card is inserted into the phone, in Dual attach or Only GSM
mode, it displays Insert SIM. If the phone fails to search the network, it
displays Out of network. If the phone fails to acquire full service, it
tries to acquire limited service. And if the phone is able to acquire
limited service, it displays Limited Service. If GPRS service is
registered, the phone will automatically attach GPRS service.
• In Dual attach or Only WiFi mode, if the phone fails to search WiFi
network, it will search the network and manage to camp it every 3
minutes.
• In Dual attach or Only GSM mode, if no SIM card is inserted or the
phone fails to search GSM network, pressing the right soft key (SOS)
can setup an emergency call. Emergency call log will not be added to
dialled numbers.

Basic Operations
23
2.2 Mode Choice
Press and hold the key to enter Mode Choice menu in standby
state. Press key to highlight one option and then press the left soft
key (Ok) to confirm the choice. Wait for a while until Done is
displayed.
1) Dual Attach: In this mode, the phone searches both the GSM network
and the WiFi network.
2) Only GSM: In this mode, the phone only searches the GSM network.
3) Only WiFi: In this mode, the phone only searches the WiFi network.
œ Note: The menu lists, options and functions of the phone will vary
with the mode choice be changed.
2.3 Make a Call
2.3.1 Make a GSM Call
œ Note: Prior to making or receiving GSM calls, make sure that the
phone has acquired full GSM service and is in Dual Attach or in
Only GSM mode.
1. Key in the phone number.
• To delete the character or digit to the left of the cursor, press the
key. To delete all the numbers or characters, press and hold the
key. To move the cursor, press .

Basic Operations
24
• To call a phone number that includes an extension, press and hold the
key to enter a “P” pause between the main host phone number
and the extension.
• To make an international call, enter a “+” first (press and hold the
key until “+” appear on screen), then input the country code,
area code and the number to be dialled.
2. Press to call the number.
• To cancel the call attempt, press the right soft key (End). A
time display of 00:00:00 will appear. You can also press the key
to cancel the call; the phone will return to standby state.
• When the Auto Redial function is activated, if the number you dial is
busy or no answer, your phone will immediately redial the number. If it
is still busy or no answer, your phone will redial the number up to nine
more times until the call is connected.
3. When the call is connected, the call timer is displayed.
4. To end the call, press the right soft key (End) or the
key.
2.3.2 Make a WiFi Call
œ Note: Prior to making or receiving WiFi calls, the phone must be
connected to a wireless Access Point (AP) and registered with the
service network (See “AP Profile” on page 70 for detailed
instructions). And make sure that the phone is in Dual attach or
Only WiFi mode.
œ Note: The handset does not support GPRS when making a VoLAN
call.

Basic Operations
25
1.Key in the phone number.
• To delete the character or digit to the left of the cursor, press the
key. To delete all the numbers or characters, press and hold the
key. To move the cursor, press .
• To call a phone number that includes an extension, press and hold the
key to enter a “P” pause between the main host phone number
and the extension.
• To make an international call, you should input “+” first (press and hold
the key until “+” appears on screen), then input the country
code, area code and the number to be dialled.
2.Press the key to call the number; Press the key to call the
number by WiFi in Dual Attach mode.
• To cancel the call attempt, press the right soft key (End). A
time display of 00:00:00 will appear. You can also press the key
to cancel the call; the phone will return to standby state.
• When the Redial On Busy function is activated, if the WLAN number
you dial is busy or noon answers, your phone will immediately redial
the number. Your phone will redial the number up to nine more times
until the call is connected.
3.When the call is connected, the call timer is displayed.
4.To end the call, press the right soft key (End) or the key.

Basic Operations
26
2.4 Use Speed Dial
If you have assigned a phone number to one of the speed dial keys
~ , you can quickly call that phone number:
1. In standby state, press and hold the corresponding speed dial key to
automatically display the phone number.
2. Press to call the number.
l Press to call the number by GSM or press the key to
call the number by WiFi in Dual Attach mode.
l For details of speed dial settings, refer to Section “3.7 Speed Dial ”.
2.5 Use Voice Mail
If you have set a voicemail number, you can press the key in the
standby state to access the voicemail directly (Refer to Section “7.1.6
Voicemail”).
2.6 Answer a Call
l If the Answer Mode is set to Talk Key, press the left soft key
(Answer) or the key to answer an incoming call.
l If the Answer Mode is set to Any Key, press any key to answer an
incoming call except the right soft key , the key or the
side key .

Basic Operations
27
l When there is an incoming call, you may press the right soft key
(Mute) or the side key to stop the ring alert or the vibration
without picking up to call.
l To end an ongoing call, press the right soft key (End) or the
key.
2.7 Reject a Call
l When there is an incoming call, press the key to reject the call.
l After you press the right soft key (Mute) to mute an incoming
call, you can also press the right soft key (End) to reject an
incoming call.
l When there are missed calls (excluding rejected calls), the number of
missed calls will appear on the display. Press the left soft key
(View) to view the Missed Call Log.
2.8 Only One GSM Call In Talking
2.8.1 Adjust Earpiece Volume
Pressing the side key during a call can adjust the earpiece volume.
After completing the volume selection, press the right soft key
(Exit) and wait for two seconds to return to the active call.
2.8.2 In Call Operations
While in an active GSM call, press the left soft key (Options) to

Basic Operations
28
perform the following operations:
Hold/Resume
This option enables you to place the ongoing GSM call temporarily on
hold and then resume the call.
l The Hold function and the Resume function are a pair of
corresponding functions. Hold or Resume is determined by the status
of the current active call.
l To end the call on hold, press the right soft key (End) or the
key.
œ Note: You can only place an ongoing call on hold when the GSM
Call Waiting function is activated.
New Call
During a GSM call, this option enables you to connect to a third party and
place the ongoing call on hold.
After accessing this option, enter a new phone number or select a phone
number in the phonebook list, and then press the key to dial.
œ Note: Only when the GSM Call Waiting function is activated can you
make a new GSM call in addition to the ongoing call.
Send DTMF
This option enables you to send DTMF.
œ Note: You cannot send DTMF when a call is on hold.
Phonebook
This option enables you to enter the Phonebook submenu during an
active GSM call. Refer to Section “3 Phonebook”.
Send SMS

Basic Operations
29
This option enables you to send a text message during an active GSM call.
Refer to Section “7.1.1 New ”.
Notepad
This option enables you to edit and save a notepad during an active GSM
call.
Mute/Unmute
This option enables you to mute/unmute the ongoing call.
The Mute function and the Unmute function are a pair of corresponding
functions. Mute or Unmute is determined by whether the current active
call is mute or not.
2.8.3 Call Waiting
If the GSM Call Waiting function is activated and you receive another call
during a call, you will hear a waiting tone in the earpiece.
l To reject the incoming third party call and continue the current call,
press the right soft key (Reject) or the key.
l To hold the current call and answer the incoming third party call, press
the left soft key (Answer) or the key.
After answering the third party call, the phone displays the current call and
the call on hold simultaneously on the screen, you can perform the
following operations:
l Press to highlight the desired call and then press the key,
to swap between the current call and the call on hold.
l Another GSM call comes in, you can press the right soft key (Reject)
to reject this call; or you can press the left soft key (Replace),

Basic Operations
30
select a call and then press the left soft key (Ok) to replaced
the call with the new call.
l Press the key to end both calls.
2.9 Two GSM Calls In Talking
2.9.1 Swap In Two Calls
When there are active two GSM calls, the phone displays the two calls
simultaneously on the screen. Press the key to highlight the
desired call and then press the key, to swap between the current
call and the call on hold.
2.9.2 In Two Calls Operations
When there are two active GSM calls, press the left soft key
(Options) to display the following operations:
Swap
This option enables you to swap between the current call and the call on
hold.
Conference Call
This option enables you start GSM conference call.
New Call
This option enables you to make a new GSM call when there are two
GSM calls in talking.
œ Note: When there are two active GSM calls, ring off one line or start
a conference call before making a new GSM call. If you don’t, the
phone will prompt Please Ring Off One Line or Start Conference

Basic Operations
31
Call.
Send DTMF
This option enables you to send DTMF.
œ Note: You cannot send DTMF when the ongoing call is on hold.
Phonebook
This option enables you to enter the Phonebook submenu during an
active GSM call. Refer to Section “3 Phonebook”.
Send SMS
This option enables you to send a text message during an active GSM call.
Refer to Section “7.1.1 New ”.
Notepad
This option enables you to edit and save a notepad during an active GSM
call.
Mute/Unmute
This option enables you to mute/unmute the ongoing call.
The Mute function and the Unmute function are a pair of corresponding
functions. Mute or Unmute is determined by whether the current active
call is mute or not.
2.10 GSM Conference Call
œ Note: GSM Conference Call function requires network support. It
may vary depending on the network. Contact your local GSM
service provider for assistance.
• Up to 5 parties can be connected during a GSM conference call.
When GSM Conference Call function is started, press the left soft key
(Options) during an active GSM call to perform the following
operations:
Hold/Resume

Basic Operations
32
This option enables you to place the ongoing GSM call temporarily on
hold and then resume the call.
l The Hold function and the Resume function are a pair of
corresponding functions. Hold or Resume is determined by the status
of the current active call.
œ Note: You can only add a new party to a GSM conference call when
the GSM Call Waiting function is activated.
New Call
This option enables you to add a new party to the GSM conference call.
After accessing this option, enter a new phone number or select a phone
number in the phonebook list, and then press the key to dial.
œ Note: Only when the GSM Call Waiting function is activated can you
add a new party to a GSM conference call.
Private
This option enables you to talk with one party in private.
œ Note: If there is a line besides the conference call, please ring off
one line before starting to talk with one party in private.
End Conference Call
This option enables you to end the active conference call.
Send DTMF
This option enables you to send DTMF during conference call.
Phonebook
This option enables you to enter the Phonebook submenu during an
active GSM call. Refer to Section “3 Phonebook”.
Send SMS
This option enables you to send a text message during an active GSM call.

Basic Operations
33
Refer to Section “7.1.1 New ”.
Notepad
This option enables you to edit and save a notepad during an active GSM
call.
Mute/Unmute
This option enables you to mute/unmute the ongoing call.
The Mute function and the Unmute function are a pair of corresponding
functions. Mute or Unmute is determined by whether the current active
call is mute or not.
When a new GSM call comes in during GSM conference call, the
earpiece will sound a waiting tone.
l To reject the incoming new call and continue the current conference
call, press the right soft key (Reject) or the key.
l To hold the current conference call and answer the incoming call,
press the left soft key (Answer) or the key. There will
be two lines for talking: one line for the conference call, and another
line for the new incoming call.
œ Note: When there are two lines in talking and a new call comes in, to
answer the new call, you have to replace one talking line with the
new call.

Basic Operations
34
2.11 Only One WiFi Call In Talking
2.11.1 Adjust Earpiece Volume
Pressing the side key during a call can adjust the earpiece volume.
After completing the volume selection, press the right soft key
(Exit) and wait for two seconds to return to the active call.
2.11.2 In Call Operations
While in an active WiFi call, press the left soft key (Options) to
perform the following operations:
Hold/Resume
This option enables you to place the ongoing WiFi call temporarily on hold
and then resume the call.
l The Hold function and the Resume function are a pair of
corresponding functions. Hold or Resume is determined by the status
of the current active call.
l To end the call on hold, press the right soft key (End) or the
key.
œ Note: You can only place an ongoing call on hold when the WiFi Call
Waiting function is activated.
New Call
This option enables you to connect to a third party and place the ongoing
call on hold during a WiFi call.
After accessing this option, enter a new phone number or select a phone
number in the phonebook list, and then press the key to dial (press

Basic Operations
35
the key to dial in Dual Attach mode).
œ Note: You can only make a new WiFi call in addition to an ongoing
call when the WiFi Call Waiting function is activated.
Call Transfer
This option enables you to transfer the ongoing call to another phone
number after the connection succeeds.
After accessing this option, enter the phone number or select a phone
number in the phonebook list, and then press the key to transfer
(press the key to dial in Dual Attach mode).
œ Note: This option is only available during an incoming call.
Phonebook
This option enables you to enter the Phonebook submenu during an
active WiFi call. Refer to Section “3 Phonebook”.
Notepad
This option enables you to edit and save a notepad during an active WiFi
call.
Mute/Unmute
This option enables you to mute/unmute the ongoing call.
The Mute function and the Unmute function are a pair of corresponding
functions. Mute or Unmute is determined by whether the current active
call is mute or not.
2.11.3 Call Waiting
If the WiFi Call Waiting function is activated and you receive another call
during a call, you will hear a waiting tone in the earpiece.

Basic Operations
36
l To reject the incoming third party call and continue the current call,
press the right soft key (Reject) or the key.
l Place the current call on hold and answer the incoming third party call,
press the left soft key (Answer) or the key.
2.12 Two WiFi Calls In Talking
2.12.1 Swap In Two Calls
When there are two active WiFi calls, the phone displays the two calls
simultaneously on the screen. Press the key to highlight the
desired call and then press the key, to swap between the current
call and the call on hold.
2.12.2 In Two Calls Operations
When there are two active WiFi calls, press the left soft key
(Options) to perform the following operations:
Swap
This option enables you to swap between the current call and the call on
hold.
Conference Call
This option enables you start WiFi conference call.
Phonebook
This option enables you to enter the Phonebook submenu during an
active WIFI call. Refer to Section “3 Phonebook”.
Notepad

Basic Operations
37
This option enables you to edit and save a notepad during an active WiFi
call.
Mute/Unmute
This option enables you to mute/unmute the ongoing call.
The Mute function and the Unmute function are a pair of corresponding
functions. Mute or Unmute is determined by whether the current active
call is mute or not.
2.13 WiFi Conference Call
œ Note: WiFi Conference Call function requires network support. It
may vary depending on the network. Contact your local WiFi service
provider for assistance.
• Up to 3 parties can be connected during a WiFi conference call.
When WiFi Conference Call function is started, press the left soft key
(Options) during an active WiFi call to perform the following
operations:
Phonebook
This option enables you to enter the Phonebook submenu during an
active WIFI call. Refer to Section “3 Phonebook”.
Notepad
This option enables you to edit and save a notepad during an active WiFi
call.
Mute/Unmute
This option enables you to mute/unmute the ongoing call.
The Mute function and the Unmute function are a pair of corresponding
functions. Mute or Unmute is determined by whether the current active
call is mute or not.
End Conference Call
This option enables you to end the active conference call.
Basic Operations
38
2.14 Store a Phone Number
In standby state, new entries can be added to the phonebook.
1.Enter the desired phone number and press the left soft key
(Options).
2.Press the key to highlight Save and press the left soft key
(Ok).
3.Press the key to highlight Add New or Modify, then press the left
soft key (Ok).
Add New:
1) Press the key to highlight Name, Number, Group, Big Head
or Email Address, then press the Key.
2) Enter th (~)e name and edit telephone number13 , select group
category and a big head picture, then press the left soft key
(Save).
œ Note: If you select an entry stored in the SIM card or a non-blank
phone number location of an entry stored in the phone memory, the
phone will prompt “Replace?”. Press the left soft key
(OK) to update the record or the right soft key (Exit) to
cancel.
Modify:
The contacts list will be displayed after you access this option.

Basic Operations
39
1) Press to highlight the entry to which the new record is to be
added.
2) Press to highlight a blank number location and then press the
left soft key (Ok).
œ Note: If you select an entry stored in the SIM card or a non-blank
phone number location of an entry stored in the phone memory, as
the entry or location already has one phone number, the phone will
prompt updated?. Press the left soft key (Ok) to update the
record or the right soft key (Cancel) to cancel.
œ Note: The phone number and name of the newly added record
cannot be identical to those of an existing record. Otherwise, the text
Exists will be displayed after you enter the name and press the left
soft key (Ok).
2.15 Profiles Shortcut
In standby state, press to access the Profiles menu. Press
to highlight the desired option, and then press the left soft key
(Ok) to access the option.
For details of profile setup, refer to Section “5 Profiles”.
2.16 Silent Mode Shortcut
In standby state, press and hold key to active/exit the Silent
profiles. will be displayed.
l For detailed operations, refer to Section “5.1.2 Personalise ”.

Basic Operations
40
2.17 Keypad Lock
The keypad lock prevents the keys from being accidentally pressed,
resulting in unintentional operations.
l In main menu state, press the key to lock the keypad. The
indicator will be displayed
l To unlock the keypad, press the right soft key (Unlock) and
then press the key in standby state.
l When the keypad is locked, you can answer a call as usual. During the
call, you can operate the phone normally. However, the keypad will
automatically lock when the call ends, or if the call is rejected.
Phonebook
41
3. PHONEBOOK
àPhonebook
You can store frequently used phone numbers and names in the phone
memory and in the SIM card (if the SIM card is inserted).
The phone memory can store up to 500 entries. Each entry in the phone
memory may contain a name, 1~3 phone numbers, group category, a big
head and an email address.
The total amount of the entries can be stored in the SIM card depends on
the type of SIM card in use. Each entry in the SIM card may contain a
name and one phone number.
You can enter the phonebook in either of the following ways:
l In standby state, press the key.
l In standby state, press the left soft key (Menu) or the OK key
, press to scroll to Phonebook and then press the left soft
key (Ok).
From the phonebook menu, you can select from the following options:
3.1 Search
àPhonebookàSearch
After you access this option, the phonebook entry list will be displayed.
• You can access the Group list by pressing key when the
phonebook entry list is displayed.
Key in the first letter(s) or digit(s) of the name you are searching for. A
Phonebook
42
maximum of six letters/digits can be entered. All names starting with these
letter(s)/digit(s) will be displayed.
Enter letters or digits as follows:
1. Press ~ to enter the corresponding letter or digit labeled
on the respective key. For keys ~ , press the
corresponding key repeatedly until the intended letter/digit appears.
For example: if you press repeatedly, the following letters
and digit appear in turn:
a
→
b
→
c
→
2
2. After you have entered the intended letter/digit, press the appropriate
number key to input the next letter/digit. If the next letter/digit and
current letter/digit share the same key, wait for one second to input the
letter/digit again.
To delete the last entered letter/digit, press the key; to delete
all letters/digits, press and hold the key.
l When a matched name is highlighted, you can press key (GSM
call) or key (WiFi call) to call the primary phone number of the
entry.
l When an entry (name) is highlighted, press the key to see the
detailed information: name, phone number, etc. Press to
browse through the text.

Phonebook
43
When the entry details are displayed, you can press key (GSM
call) or key (WiFi call) to call the phone number.
When the phonebook entry list is displayed or the entry details are
displayed, you can press the left soft key (Options) to select
from the following options:
3.1.1 Edit
Change names, numbers, etc. of the entry by following the screen
prompts.
3.1.2 Delete
After this option is selected, “Delete?” will be displayed. Press the left soft
key (Ok) to confirm the deletion.
3.1.3 Copy
œ Before using this function, insert a SIM card to the phone.
After selecting this option, press to highlight Save Original (the
original entry will still be stored after copying) or Delete Original (the
original entry will be deleted after copying), and then press to
complete the operation.
• Because entries stored in the phone memory can have three phone
numbers whereas entries stored in the SIM card can only have one
phone number, when the entry is copied to the SIM card, the SIM card
will store multiple entries with the same name and different phone
numbers if the copied entry has more than one phone number.
• If you copy entries stored in the phone memory to the SIM card and the
SIM card’s memory is full, the phone prompts Memory Full, and vice

Phonebook
44
versa.
• If the copied entry is totally identical to an existing entry in the memory,
the phone prompts Exists.
3.1.4 Set Primary Number
After selecting this option, press to highlight one of the phone
numbers of the entry, and then press key to complete the
operation.
• If the entry has only one phone number, this phone number will be
taken as the primary number.
• The primary number is stored in the first phone number location.
3.1.5 Send Message
Sends message to the primary number of the entry.
After selecting this option, press to highlight Text Message or
MMS, and then press the left soft key or the key to continue
(Refer to the Section “7.1.1 New “and “ 7.2.1 New “).
3.1.6 Send Card
Send the entry’s information as a name card to somebody. The steps are
the same as “3.1.5 Send Message “.
3.2 New
à PhonebookàNew
Select this option to add new entries into the phonebook. The storage
location depends on the Storage Setting (Refer to Section “3.8.1 Store
Location”). After accessing this option:

Phonebook
45
Store in the phone memory
1. Press to highlight name, phone number, group category, big
head or email address, then press the key;
2. Edit the name, phone number (1~3) and email address, and select the
group category and a big head picture.
• When editing the name, you can enter a maximum of 20 alphanumeric
characters. When editing the phone number, you can enter a maximum
of 40 alphanumeric characters.
• At least one phone number should be entered; otherwise Number
Error will be displayed.
• If the name is not filled in, this contact will be displayed as No Name in
the phonebook list.
3. Press the left soft key (Save) to save the added entry.
• The phone will automatically reject any incoming caller whose number
is on the Blacklist. No response will be displayed.
Store in the SIM card memory
1.Press to highlight name or phone number, then press the
key.
2.Edit the name and the phone.
• The phone number cannot be left blank; otherwise Number Error will
be displayed.
• If the name is not filled in, this contact will be displayed as No Name in
the phonebook list.
3.Press the left soft key (Save) to save the added entry.

Phonebook
46
œ The phone number and name of the newly added record cannot be
identical to those of an existing record. Otherwise, the text Exists
will be displayed after you enter the phone number.
œ No more entries can be added if the phonebook memory is full.
When Add Entry is selected, the phone will remind you that the
phonebook memory is full, and vice versa.
In standby state, you can also add a new entry to the phonebook (Refer to
Section “2.14 Store a Phone Number “).
3.3 Group
à PhonebookàGroup
After accessing this option, press to highlight the desired group
category: Business, Family, Friend, VIP, SIM or Blacklist, and press
the left soft key (Options), you can select from the following
options:
3.3.1 Ringtones
Select this option to specify a ring tone for the particular group category.
Press to highlight and sample the ring tone options. Then press
the left soft key (Ok) to complete your selection.
3.3.2 Rename
Select this option to change the name of the particular group category.
When you access this option, edit the name of this group category
(maximum 9 alphanumeric characters), and then press the left soft key
(Ok) to complete the operation.
Phonebook
47
œ Note: When the Blacklist is highlighted, press the left soft key
(Ok) to view the blacklist. You cannot set a ring tone or set
a new name for the Blacklist group.
œ Note: When the SIM is highlighted, press the left soft key
(Options) to view the Ring option. You cannot set a new name for
the SIM group.
After accessing the Group option, press to highlight the desired
group category: Business, Family, Friend, VIP, SIM or Blacklist, and
then press the key to view the entry list of the highlighted group
category. Press to highlight the entry, and press the key to
view the details for the entry. Press the left soft key (Options),
and select Edit, Delete, Copy, Set Pri. Number, Send Message or Send
Card to continue.
3.4 Mark
à PhonebookàMark
After accessing this option, press to highlight the desired entry in
the phonebook list, and then press the key to mark/cancel the
entry.
After marking the desired entries, press the left soft key
(Options), you can select from the following options:
3.4.1 Copy
œ Before using this function, insert a SIM card to the phone. Ensure
that the phone and SIM card have enough memory to use this

Phonebook
48
function.
After selecting this option, press to highlight Copy to Handset or
Copy to SIM, and press the left soft key (Ok) or the key.
Then press to highlight Save Original (the original entry will still be
stored after copying) or Delete Original (the original entry will be deleted
after copying), and press to complete the operation.
• If some of the copied entries are totally identical to some existing
entries in the memory, the phone will not copy these entries.
• Entries stored in the phone memory can have up to three phone
numbers, while SIM card entries can only store one number. When an
entry with more than one phone number is copied to the SIM card, the
SIM card will store multiple entries with the same name and different
phone numbers.
• If the phone or SIM card has no enough memory to copy the marked
entries, the phone will prompts Place Full Copy ** when the copy
ends.
3.4.2 Delete
After this option is selected, “Delete?” will be displayed. Press the left soft
key (Ok) to confirm the deletion.
3.4.3 Send Message
Sends a message to the primary numbers of all the marked entries
(maximum 10 entries).
After selecting this option, press key to highlight Text Message or
MMS, and then press the left soft key or the key to continue

Phonebook
49
(Refer to the Section “7.1.1 New “and “7.2.1 New “).
3.4.4 Mark All
Mark all the entries in the phonebook list.
3.4.5 Cancel Mark All
Cancel to mark all the entries in the phonebook list.
3.5 Delete All
à PhonebookàDelete All
Delete all the entries in the phone memory or in the SIM card at once.
1. After accessing this option, press to highlight Handset or SIM
Card, and then press the left soft key (Ok).
2. Key in the password of the phone, and then press the left soft key
(Ok) to complete the operation.
3.6 Copies All
à PhonebookàCopies All
Copy all the entries in the phone memory to SIM card at once, or vice
versa.
œ Before using this function, insert a SIM card to the phone. Ensure
that the phone and SIM card have enough memory to use this
function.
After accessing this option, press to highlight Handset To SIM or
SIM To Handset, and then press the left soft key (Ok) or the
Phonebook
50
key to complete the operation.
• If some of the copied entries are totally identical to some existing
entries in the memory, the phone will not copy these entries.
• Entries stored in the phone memory can have up to three phone
numbers, while SIM card entries can only store one number. When an
entry with more than one phone number is copied to the SIM card, the
SIM card will store multiple entries with the same name and different
phone numbers.
• If the phone or SIM card does not have enough memory to copy the
marked entries, the phone will prompt Place Full Copy ** when the
copy ends.
3.7 Speed Dial
à PhonebookàSpeed Dial
Select this option to assign a phone number in the phonebook to one of
the speed dial keys ~ for greater convenience when
dialling (Refer to Section “2.4 Use Speed Dial”).
After you access this option, the setting status for key will be
displayed. Press to browse through the speed dial key settings.
l If no phone number is assigned to the key, Is empty will be displayed.
You can set the speed dial in either of the following ways:
1. Press the left soft key (Set) and enter a phone number, then
press the left soft key (Ok) or the key to complete the
operation.
2. Press the left soft key to access the contacts list (if there are no entries
in the phonebook, No Record will be displayed), select one entry and

Phonebook
51
select the desired phone number, and then press the left soft key
(Ok) or the key to complete the operation.
l If a phone number has been assigned to the key, the corresponding
name will be displayed. To change or cancel the setting for this key,
press the left soft key (Options), and then select Edit or
Cancel.
œ Note: If the record for a speed dial key is modified in the phonebook,
it will automatically be updated for the speed dial key function.
œ If the record for a speed dial key is deleted from the phonebook, it
will also be cancelled for the speed dial key function.
3.8 Storage Setting
à PhonebookàStorage Setting
3.8.1 Store Location
This option enables you to select the memory (Phone Memory or SIM
Card) for newly added entries.
œ If the current memory is full, newly added entries will be stored in the
other memory.
3.8.2 Memory Status
Select this option to view the number of records in handset or SIM card.
Call Register -> Missed Calls
52
4. CALL REGISTER
àCall Register
Your phone records missed, received and dialled calls as well as their call
durations and costs.
• You can access the Missed Calls, Received Calls, Dialled Numbers,
Call Timers and Call Costs list by pressing key after accessing
this option.
• In standby state, you can press to quickly access Dialled
Numbers.
4.1 Missed Calls
àCall RegisteràMissed Calls
This option enables you to view the last 20 missed calls.
After you access this option, the phone will display the list of the most
recent missed call: including the caller’s phone number or name (if the
number is stored in the phonebook). Press to view other missed
calls. Press the key to view the information of the highlighted
missed call.
œ Note: This function only works in networks that support the Caller ID
service; otherwise Unknow Number will be displayed in the missed
log. If the caller’s phone is set to block the caller’s number, Unknow
Number will also be displayed.
• When a log is highlighted, you can dial the caller’s phone number

Call Register -> Missed Calls
53
(Except for Unknow Numbers) by pressing (Press the
key to make a WiFi call when in dual attach mode).
• Only one missed log will be registered in the list for the same phone
number, no matter how many times this phone number called. However
an icon will be displayed besides the missed log with more than 2 calls
missed.
When a log is highlighted, press the left soft key (Options). The
following options will be available:
4.1.1 View
This option enables you to view the information about the missed log.
4.1.2 Extract Number
After you access this option, the caller’s phone number will be displayed.
You can edit the phone number, and then save or dial the edited number
(Refer to Section “2.14 Store a Phone Number” and Section “2.3 Make a
Call”).
œ Note: If Unknow Number is shown in the log, when you select
Extract Number, No Number will be displayed.
4.1.3 Send SMS
Send a text message to the caller’s phone number (Refer to Section
“7.1.1 New”).
œ Note: You cannot send a message when in Only WiFi mode.
4.1.4 Send MMS
Send a MMS to the caller’s phone number (Refer to Section “7.2.1 New”).
œ Note: You cannot send a message when in Only WiFi mode.

Call Register -> Received Calls
54
4.1.5 Delete
When you access this option, “Delete?” will be displayed. Press the left
soft key (Ok) to complete the deletion.
4.1.6 Delete All
When you access this option, “Delete All?” will be displayed. Press the
left soft key (Ok) to complete the deletion.
When the information of a call log is displayed, press the left soft key
(Options), and then select Extract Number, Send SMS, Send
MMS or Delete to continue.
4.2 Received Calls
à Call RegisteràReceived Calls
This option enables you to view the last 20 received calls.
After you access this option, the phone will display the list of the most
recent received call: including the caller’s phone number or name (if the
number is stored in the phonebook). Press to view other received
calls. Press the key to view the information of the highlighted
received call.
œ Note: This function only works in networks that support the Caller ID
service; otherwise Unknow Number will be displayed in the
received log. If the caller’s phone is set to block the caller’s number,
Unknow Number will also be displayed.
• When a log is highlighted, you can dial the caller’s phone number
(Except for Unknow Numbers) by pressing (Press the

Call Register -> Received Calls
55
key to make a WiFi call when in dual attach mode).
• Only one received log will be registered in the list for the same phone
number, no matter how many times this phone number called.
When a log is highlighted, press the left soft key (Options). The
following options will be available:
4.2.1 View
This option enables you to view the information about the received log.
4.2.2 Extract Number
After you access this option, the caller’s phone number will be displayed.
You can edit the phone number, and then save or dial the edited number
(Refer to Section “2.14 Store a Phone Number” and Section “2.3 Make a
Call”).
œ Note: If Unknown Number is shown in the log, when you select
Extract Number, No Number will be displayed.
4.2.3 Send SMS
Send a text message to the caller’s phone number (Refer to Section
“7.1.1 New”).
œ Note: You cannot send a message when in Only WiFi mode.
4.2.4 Send MMS
Send a MMS to the caller’s phone number (Refer to Section “7.2.1 New”).
Note: You cannot send a message when in Only WiFi mode.
4.2.5 Delete
When you access this option, “Delete?” will be displayed. Press the left
Call Register -> Dialled Numbers
56
soft key (Ok) to complete the deletion.
4.2.6 Delete All
When you access this option, “Delete All?” will be displayed. Press the
left soft key (Ok) to complete the deletion.
When the information of a call log is displayed, press the left soft key
(Options), and then select Extract Number, Send SMS, Send
MMS or Delete to continue.
4.3 Dialled Numbers
à Call RegisteràDialled Numbers
This option enables you to view the last 20 dialled calls.
After you access this option, the phone will display the list of the most
recent dialled call: including the caller’s phone number or name (if the
number is stored in the phonebook). Press to view other dialled
calls. Press the key to view the information of the highlighted dialled
call.
œ Note: If you dial a number that has been recorded in the Dialled Log,
the phone will update the log after the call ends.
• When a log is highlighted, you can call the dialled phone number by
pressing (Press the key to make a WiFi call when in dual
attach mode).
• Only one dialled log will be registered in the list for the same phone
number, no matter how many times this phone number is dialled.

Call Register -> Dialled Numbers
57
When a log is highlighted, press the left soft key (Options). The
following options will be available:
4.3.1 View
This option enables you to view the information about the dialled log.
4.3.2 Extract Number
After you access this option, the dialled phone number will be displayed.
You can edit the phone number, and then save or dial the edited number
(Refer to Section “2.14 Store a Phone Number” and Section “2.3 Make a
Call”).
4.3.3 Send SMS
Send a text message to the dialled phone number (Refer to Section “7.1.1
New”).
œ Note: You cannot send a message when in Only WiFi mode.
4.3.4 Send MMS
Send a MMS to the dialled phone number (Refer to Section “7.2.1 New”).
œ Note: You cannot send a message when in Only WiFi mode.
4.3.5 Delete
When you access this option, “Delete?” will be displayed. Press the left
soft key (Ok) to complete the deletion.
4.3.6 Delete All
When you access this option, “Delete All?” will be displayed. Press the
left soft key (Ok) to complete the deletion.
When the information of a call log is displayed, press the left soft key
Call Register -> Call Timers
58
(Options), and then select Extract Number, Send SMS, Send
MMS, Delete to continue.
œ Note: If the displayed dialled log is a WiFi call, you cannot send a
message to the phone number.
4.4 Call Timers
à Call RegisteràCall Timers
This option enables you to view the approximate duration of GSM calls,
WiFi calls, or to clear the timers of all calls.
After accessing this option, press to highlight GSM Call Duration
or WiFi Call Duration, and then press the left soft key or the key to
view the timers of the last call, dialled calls, received calls and all calls
(press to scroll). To clear the timers, press the left soft key
(Clear), enter the security code, and then press the left soft key
(Ok) to complete the operation.
To clear the timers of all calls, press to highlight Clear All, and
then press the left soft key (Ok), enter the security code and
press the left soft key (Ok) to complete the operation.
4.5 Call Costs
à Call RegisteràCall Costs
œ Call Costs function requires network support. It may vary depending
on the network. Contact your local service provider for assistance.

Call Register -> Call Costs
59
4.5.1 Last Call
This option enables you to view the approximate cost of the last call (The
cost will be shown in the method that you have set, refer to Section “4.5.3
Call Cost Settings”).
4.5.2 All Calls
This option enables you to view the approximate cost of all calls (The cost
will be shown in the method that you have set, refer to Section “4.5.3 Call
Cost Settings”).
4.5.3 Call Cost Settings
After accessing this option, the following options are available:
Call Cost Limits
This option enables you to activate/deactivate the Call Cost Limits
function.
If this function is activated, once the call cost reaches the limits, the
ongoing call will be stopped automatically.
Call Cost View
This option enables you to view the call cost limits, used costs and remain
costs.
Call Cost Method
This option enables you to set the method of call cost. As following:
1. After accessing this option, you select Units or Currency, and then
press the left soft key (Ok).
2. If select Currency, key in a unit price (press the key to enter a
decimal point), press the left soft key (Ok). Press the
key to highlight one kind of currency, and then press the left soft key

Profiles -> Standard
60
(Ok) to complete the operation.
œ Notice: When setting call cost method, you have to input the PIN 2
Code first. For specific information please consult your network
provider.
5. PROFILES
àProfiles
This submenu enables you to customize the phone’s ring settings to suit a
variety of environments.
When you access this submenu, the profile list will be displayed; the
current profile will be highlighted. You can customize each profile, and
activate the one that suits your environment. The phone will utilize all the
current profile’s settings.
Standard is the factory-preset profile.
• The Headset profile will be activated automatically when an earpiece is
plug into the earphone jack of the phone. After the earpiece is removed,
the phone will return to the former profile automatically.
• Press and hold the key to activate/cancel Silent profile in
standby state.
5.1 Standard
àProfilesàStandard
5.1.1 Activate
àProfilesàStandardàActivate
Select this option to activate the selected profile.
Profiles -> Standard
61
5.1.2 Personalise
àProfilesàStandardàPersonalise
This option enables you to change the selected profile’s settings,
including:
Ring Volume
Select this option to adjust the ring volume level for incoming calls, new
messages, alarm clock, etc.
There are five volume levels. Press to reach the desired volume
level, and press the left soft key (Ok) or the key to
complete the operation.
Ring Alert Mode
This option enables you to define how the phone will notify you of
incoming calls.
The available options include: Ascending, Ringing, Vibrator, Vibration
and Ring, Ring after Vibration and Mute. Press to reach the
desired ring mode, and press the left soft key (Ok) or the
key to complete the operation.
Ring Tone
This option enables you to select a special ring tone for incoming calls.
Press to scroll through the ring tones and listen to a sample of
each. After highlighting the desired ring tone, press the left soft key
(Ok) to complete the operation.
Profiles -> Standard
62
œ If there is no downloaded ring, the phone will prompt Folder Empty
when you select Downloaded Ring.
Message Alert
This option enables you to define how the phone will notify you of
incoming messages.
The available options include: Ringing, Vibration Ring, Vibrator, and
Mute. Press to reach the desired message alert mode, and press
the left soft key (Ok) or the key to complete the operation.
Message Tone
This option enables you to select a message tone for the incoming
messages.
Press to scroll through the message tones and listen to a sample
of each. After highlighting the desired tone, press the left soft key
(Ok) to complete the operation.
Alarm Tone
This option enables you to select a tone for the alarm clock.
Press to scroll through the tones and listen to a sample of each.
After highlighting the desired alarm tone, press the left soft key
(Ok) to complete the operation.
œ If there is no downloaded ring, the phone will prompt Folder Empty
when you select Downloaded Ring.
Schedule Tone

Profiles -> Outdoor
63
This option enables you to select a tone for the schedule clock.
Press to scroll through the tones and listen to a sample of each.
After highlighting the desired schedule tone, press the left soft key
(Ok) to complete the operation.
œ If there is no downloaded ring, the phone will prompt Folder Empty
when you select Download Ring.
Key Tone
This option enables you define how the phone will notify you of pressing
keys.
The available options include: Standard Keytone, Voice Keytone, Key
Music and Off. Press to reach the desired key tone, and press the
left soft key (Ok) or the key to complete the operation.
Warning Tone
If this warning tone is not set to Off, a warning tone will sound when the
battery power is low; In addition, a tone will sound when the phone is
registered with the service network.
The available options include: Warning Tone 1, Warning Tone 2,
Warning Tone 3 or Off. Press to reach the desired warning tone,
and press the left soft key (Ok) or the key to complete the
operation.
5.2 Outdoor
àProfilesàOutdoor

Profiles -> Meeting
64
This profile is suitable for outdoor environments. You can preset this
option to meet your needs by following the same steps specified in
Standard.
5.3 Meeting
àProfilesàMeeting
This profile is suitable for meeting environments. You can preset this
option to meet your needs by following the same steps specified in
Standard.
5.4 Silent
àProfilesàSilent
This profile is suitable for quiet environments . You can preset this option
to meet your needs by following the same steps specified in Standard.
5.5 User Define
àProfilesàUser Define
This profile can be tailored for other environments. You can preset this
option to meet your needs by following the same steps specified in
Standard. In addition, you can edit the name of this profile after selecting
the Rename option.

WiFi Settings -> Net Parameter
65
6. WIFI SETTINGS
àWiFi Settings
From this submenu, you can perform the following WiFi settings.
œ Note: After completing WiFi settings, switch the phone off and then
on, to apply the changed WiFi settings.
6.1 Net Parameter
àWiFi-SettingsàNet Parameter
This option enables you to set network parameters.
6.1.1 DHCP
• If the DHCP function is activated, the phone will obtain an IP address
automatically from the DHCP server.
After accessing this option, select Enable or Disable to activate or
deactivate DHCP.
6.1.2 IP Address
This option enables you to perform IP address settings.
œ Note: The IP Address is only available when DHCP is disabled.
Otherwise, when you select this option, Please disable DHCP will
appear on the display.
IP Address
Select this option to set the phone’s IP address.
After accessing this option, key in the IP address, and press the left soft
key (Save) to complete the operation.

WiFi Settings -> Net Parameter
66
Subnet Mask
Select this option to set the subnet mask.
After accessing this option, key in the subnet mask, and press the left soft
key (Save) to complete the operation.
Gateway IP Address
Select this option to set the gateway IP address.
After accessing this option, key in the gateway IP address, and press the
left soft key (Save) to complete the operation.
6.1.3 DNS
This option enables you to perform DNS settings.
DNS Server IP Address
Select this option to set the IP address of the local primary DNS server.
After accessing this option, key in the IP address, and press the left soft
key (Save) to complete the operation.
Priority
Select this option to set the priority.
You can select DHCP First or Local First.
6.1.4 Network Information
Select this option to view the network information. Press to browse
through the phone’s IP Address, Subnet Mask, Gateway IP Address,
DNS Address, Connected AP and MAC Address.

WiFi Settings -> Signal Protocol
67
6.2 Signal Protocol
From this option, you can set signal protocols.
6.2.1 SIP
This option enables you to set the SIP protocol. The following options are
available:
Outbound Proxy Mode
Select this option to set the outbound proxy mode.
After accessing this option, you can select IP or DNS.
Outbound Proxy Domain Name
Select this option to set the outbound proxy domain name.
After accessing this option, enter the outbound proxy domain name, and
press the left soft key (Save) to complete the operation.
Outbound Proxy IP Address
Select this option to set the outbound proxy IP address.
After accessing this option, key in the IP address, and press the left soft
key (Save) to complete the operation.
Outbound Proxy port
Select this option to set the outbound proxy port.
After accessing this option, key in the port number, and press the left soft
key (Save) to complete the operation.
Registrar Mode
Select this option to set the SIP registrar mode.
After accessing this option, you can select IP or DNS.

WiFi Settings -> Signal Protocol
68
Registrar Domain Name
Select this option to set the SIP registrar domain name.
After accessing this option, enter the domain name, and press the left soft
key (Ok) to complete the operation.
Register IP Address
Select this option to set the SIP register server IP address.
After accessing this option, key in the IP address, and press the left soft
key (Ok) to complete the operation.
Register Port
Select this option to set the SIP register server port.
After accessing this option, key in the port number, and press the left soft
key (Ok) to complete the operation.
Authentication String
Select this option to set the SIP authentication string.
After accessing this option, enter the authentication string, and press the
left soft key (Save) to complete the operation.
User Name
Select this option to set the SIP user name.
After accessing this option, enter the user name (1~32 alphanumeric
characters), and press the left soft key (Save) to complete the
operation.
Password

WiFi Settings -> WiFi Config
69
Select this option to set the SIP password.
After accessing this option, follow the prompt to enter the security code of
the phone and press the left soft key (Ok). Enter the SIP
password (0~32 alphanumeric characters), and press the left soft key
(Save) to complete the operation.
6.2.2 RTP
Select this option to set the RTP protocol.
After you access this option, the RTP Port option will be displayed.
RTP Port
This option enables you to set the RTP port.
After accessing this option, key in the RTP port number (10000~50000),
and press the left soft key (Save) to complete the operation.
6.2.3 Voice Mail
This option enables you to perform voice mail settings.
After you access this option, the Voice Mailbox Number option will be
displayed.
Voice MailBox Number
Select this option to set the voice mail access number.
After accessing this option, key in the access number, and press the left
soft key (Save) to complete the operation.
6.3 WiFi Config
àWiFi-SettingsàWiFi Config
From this option, you can perform the following WiFi configuration:
WiFi Settings -> WiFi Config
70
6.3.1 AP Profile
This option enables you to set up to four AP (Access Point) profiles. Each
time you switch on the phone, the phone will try to connect to one of these
APs according to their respective profile settings.
After you select this option, the AP profile list will be displayed. If the
security mode of an AP profile is set to WEP Key, the icon will be
displayed in front of the AP profile. If the security mode is set to WPA-PSK,
the icon will be displayed in front of the AP profile. If the security mode
is set to Open AP, no icon will be displayed in front of the AP profile.
Press to highlight the desired AP profile, and then press the left
soft key (Ok). The following options will be available:
SSID
This option enables you to save an AP’s SSID to the AP profile.
After accessing this option, enter the SSID (32 alphanumeric characters
maximum), and then press the left soft key (Save) to complete
the operation.
Security Mode
This option enables you to set the security mode for the AP profile.
After accessing this option, select Open AP, WEP KEY or WPA-PSK:
l If WEP KEY is selected, the phone will then display the option of WEP
Key Info (refer to “WEP Key Info”)
l If WPA-PSK is selected, the phone will then display the PSK-editing
screen (refer to “WPA-PSK Info”)
WEP Key Info
If the AP profile’s security mode is set to WEP Key, select this option to

WiFi Settings -> WiFi Config
71
set the WEP key. After accessing this option, observe the following
operations:
1. Select Auth Method, and then select the authentication method:
Open Key or Shared Key.
2. Select 64 bit or 128 bit according to the AP’s WEP key setting. Enter
the WEP key that the AP used, and press the left soft key
(Save).
- If 64 bit is selected, ensure that the WEP key consists of five ASCII
characters or ten hexadecimal characters
- If 128 bit is selected, ensure that the WEP key consists of 13 ASCII
characters or 26 hexadecimal characters
3. Select WEP Key Index. Enter the WEP key index (1-4), and then
press the left soft key (Save).
œ Note: The WEP key setting may be different due to AP settings.
œ Note: If an AP supports only a fixed hexadecimal WEP key, you
should enter the same WEP key in the phone.
œ Note: If an AP supports both ASCII and hexadecimal WEP keys, you
can enter either the ACSII WEP key or the hexadecimal WEP key in
the phone.
WPA-PSK Info
If the AP profile’s security mode is set to WPA-PSK, select this option to
set the WPA-PSK key.
After accessing this option, enter the WPA-PSK key and press the left soft
key (Save) to complete the operation.
l Ensure that the WPA-PSK key consists of 8-63 ASCII characters or 64
hexadecimal characters
Activate

WiFi Settings -> WiFi Config
72
Select this option to connect to the AP according to the AP profile setting.
• If the connection fails, the phone will try to connect to other AP profiles ’
APs.
• If the phone fails to connect to all these APs and the Auto Scan function
is active, the phone will try to search and connect to another available
open AP (Refer to Section “6.3.3 Auto Scan”).
6.3.2 AP Scan Channel
After accessing this option, select All Channels or User Define, and then
press the left soft key (Ok) or the key.
If selected User Define, please continue to key in the channel that you’d
like to define (maximum 6 bytes), press the left soft key (Save) to
complete the operation.
• Press the key twice to enter “+”.
6.3.3 Auto Scan
If the Auto Scan function is active, when the phone is switched on and
fails to connect to the APs specified in “AP Profile”, the phone will do a
scan for available APs and try to connect to one open AP of these
scanned APs.
After accessing this option, select Enable or Disable to activate or
deactivate the Auto Scan function.
œ Note: If the phone fails to connect to all the specified and scanned
APs, the phone will periodically retry AP connections.
œ Note: If the phone fails to register with the service network after the
AP connection, the phone will prompt you to try another AP.
WiFi Settings -> Net Search
73
6.4 Net Search
àWiFi-SettingsàNet Search
This option enables you to search available APs (10 maximum) for the
phone. APs can be defined and saved using the Net Search feature if APs
have broadcast turned on and the phone is within their ranges.
After accessing this option, select the Start option, the phone will start to
search for APs. Available APs will be listed according to the signal
strength. The strongest AP’s SSID will be highlighted at the top of the list.
Those without a lock icon next to the name are open APs; those with a
lock icon ( or ) are protected APs and you will need to supply their
WEP keys or WPA-PSKs to access them.
Press to highlight the desired SSID, and press the left soft key
(Ok). Press to highlight the desired AP profile, and press
the left soft key (Ok) to save the SSID to the AP profile.
You can then follow the prompt to set the security mode and/or the
encryption code (WEP key or WPA-PSK) and activate the AP profile. For
detailed operations, refer to Section “6.3.1 AP Profile”.
œ Note: If no AP has been found, the phone prompts No AP Found.
œ Note: If the desired AP has broadcast turned off, the AP can be
entered directly through a series of keystrokes on your phone.
(Refer to “6.3.1 AP Profile”).
6.5 Net Service
à WiFi-Settings àNet Service
œ Note: All the network services require the network support. Contact
your local service provider for assistance.

WiFi Settings -> Net Service
74
From this submenu, you can set the following network services.
6.5.1 Call Waiting
This option enables you to activate/deactivate the Call Waiting function.
After accessing this option, select Enable or Disable and then press the
left soft key (Ok) to complete the operation.
6.5.2 Call Transfer
If the call transfer function is activated, you can transfer an ongoing WiFi
call to another phone number.
After accessing this option, select from the following options:
Disable
Select this option to disable the call transfer function.
Blind
If this option is selected, you can directly transfer an ongoing call to
another phone number after the call successfully connects.
Consult
If this option is selected, you need to announce the transfer after the
transferred-to party answers your call. Then, press the left soft key
(Transfer) to transfer the intended call.
6.5.3 Heart Beat Interval
This option enables you to set the heart beat interval time.
After accessing this option, key in the interval time (0~999 seconds), and
then press the left soft key (Save) to complete the operation.

WiFi Settings -> Net Service
75
6.5.4 Register Interval Time
This option enables you to set the register interval time.
After accessing this option, key in the interval time (0~999 seconds), and
then press the left soft key (Save) to complete the operation.
6.5.5 Caller-ID Block
If this function is activated, when you make a call, your phone number will
not be displayed on the called party’s phone.
After accessing this option, select On or Off to activate or deactivate this
function.
6.5.6 Redial on Busy
If this function is activated, the phone will enable you to select to
automatically redial the last busy number that you tried to dial.
After accessing this option, select On or Off to activate or deactivate this
function.
6.5.7 Reject Anonymous Incoming Call
If this function is active, the phone will automatically reject anonymous
incoming calls.
After accessing this option, select On or Off to activate or deactivate this
function.
6.5.8 Personal Information
This function sets a caller ID name for the phone. After accessing this
option, enter the caller ID and press the left soft key (Save) to
complete the operation.

WiFi Settings -> MISC
76
6.6 MISC
From this submenu, you can perform the following operations:
6.6.1 Remote Update
This option enables you to perform a remote HTTP upgrade of the mobile
phone’s software. It’s a long progress.
When there are new configuration and software updated available, once
the phone has connected to the Internet successfully via the AP (Access
Point), the GF210 will need to be provisioned with the latest configuration
and software. If there is no key-press in 30 seconds, this process will start
automatically and will take several minutes to complete. During this time,
several status messages such as downloading, decompressing will be
displayed on the phone’s display. Once complete, the phone will reboot.
After remote HTTP upgrade, the phone will use the same process as
previously described for connecting to Access Points (Refer to Section
6.3).
œ Note: This option is only available under the guidance of a remote
server.
œ Note: Before starting this operation, please ensure the phone has
enough battery power or is connected to the charger.
œ Note: If errors occur during software downloading, the phone will
keep using the original software. Restart the phone and repeat
remote upgrade operations to update the phone’s software.
6.6.2 Remote server
This option enables you to set a remote server for the phone.
After accessing this option, enter the IP address or domain name of a
remote server, and then press (Save) to complete the operation.

WiFi Settings -> Vender Information
77
6.6.3 Parameter Provisioning Server
This option enables you to set the remote server parameters.
Server Mode
This option enables you to set the domain name of the server.
After accessing this option, press to select DNS or IP, and then
press (Ok) to complete the operation.
Server Domain Name
This option enables you to set the domain name of the server.
After accessing this option, enter the domain name of the server, and then
press (Save) to complete the operation.
Server IP
This option enables you to set the IP address of the server.
After accessing this option, enter the IP address of the server, and then
press (Save) to complete the operation.
6.7 Vender Information
Select this option to view the vendor information. Press to
highlight the desired option: Vendor Name, Enterprise, Model Name
and Version.
6.8 WiFi Tools
From this submenu, you can perform the following operations:

WiFi Settings -> WiFi Tools
78
6.8.1 SNTP
This option enables you to activate/deactivate the SNTP function.
After accessing this option, select Enable or Disable and then press the
left soft key (Ok) to complete the operation.
6.8.2 Web Authentication
Set this option when you use the phone in an area that requires web
authentication.
Script Files
This option enables you to select a script file for web authentication. Script
files may be different due to authentication methods. For detailed
information, contact the area’s network administrator.
After accessing this option, press to highlight one script file, and
then press the left soft key (Ok) to complete the operation.
Login
This option enables you to log in.
After accessing this option, the phone will connect with the effective URL
automatically, follow screen prompts to key in corresponding user name
and password, and then press the left soft key (Ok) to log in.
6.8.3 Upgrade Server IP Address
This option enables you to set the server’s IP address for local TFTP
update.
After accessing this option, edit the server’s IP address, and then press
the left soft key (Save) to complete the operation.

WiFi Settings -> WiFi Tools
79
Local TFTP Update
When there are new configuration and software updated available, once
the phone has connected to the Internet successfully via the AP (Access
Point), the GF210 will need to be provisioned with the latest configuration
and software. In addition to the remote HTTP Upgrade of the phone’s
software (Refer to Section 6.6), you can perform a local TFTP update of
the software as following:
1. Set the server’s IP address (refer to Section 6.8.3).
2. Click the file tftpserver.exe in PC.
3. Copy the file tftp.bin to C:\Program Files\Cisco Systems\Cisco TFTP
Server\
4. Write the file 430abvgd.defaultEnglish.bif into GF210 mobile phone
via the upgrade toll Flash430.
5. Double click the icon Cisco TFTP Server on PC desktop.
6. Press the key and the key of GF210 at the same time.
7. Press the left soft key (Next) of GF210 to continue, follow
the screen prompt to edit the server’s IP address (such as
172.021.025.100, you have to add “0” before “21” and “25” to
construct a 3-digit number).
8. Press the left soft key (Save) to continue, then press the
number key 1, 2, 3 or 4 to select a usable AP.
9. Finally, press the left soft key (Ok) to initiate the upgrade
process.
œ Note: The phone will spend a long time completing the upgrade
process. Please do not unplug the battery. When the upgrade
operation is complete, restart the phone
œ Note: If errors occur during software downloading, the phone will

WiFi Settings -> WiFi Tools
80
keep using the original software. Restart the phone and repeat
remote upgrade operations to update the phone software.
WiFi Settings -> WiFi Tools
81
[Hint]
Next
Server IP Add.:
***.***.***.***
Prev BackSearch
Prev
Next
Prev
Next
Back
AP Search:
1.*****
2.*****
3.*****
Press “Search” to search available APs
OK
GF210 Firmware
Upgrade
TFTP Server Add.:
***.***.***.***
OPEN AP SSID:
********
Next
GF210 Firmware
Upgrade GF210 Firmware
Upgrade
Prev
OPEN AP SSID:
********
GF210 Firmware
Upgrading
GF210 Firmware
Upgrading
TFTP Server Add.:
***.***.***.***
OPEN AP SSID:
********
[Hint]
AP link up
Download Completed
Wait to restart
OK
GF210 Firmware
Upgrading
TFTP Server Add.:
***.***.***.***
Erasing Flash
GF210 Firmware
Upgrade
TFTP Server Add.:
***.***.***.***
[Hint]
OPEN AP SSID:
********
35%
GF210 Firmware
Upgrading
TFTP Server Add.:
***.***.***.***
Dwnlding File
8280K bytes
OPEN AP SSID:
********
AP link up
TFTP Server Add.:
***.***.***.***
OPEN AP SSID:
********

Message -> SMS (Text Message)
82
7. MESSAGE
àMessage
This function enables you to read, edit, send and store SMS (Short
Message Service) and MMS (Multi-Media Message Service).
œ Note: The message service requires network support. Contact your
local service provider for assistance.
œ Note: To send a message, you have to store the correct message
center number in the phone first, please refer to the Section “7.1.8
Settings” and Section “7.2.5 Settings”.
When you have received messages in standby state, the screen of the
phone will show the indication symbol (green, SMS) / (yellow,
MMS) and the number of new messages.
You can press the left soft key (Read) to view the new messages, or
press the right soft key to exit and view the new messages later. If the
phone has received more than one new message, please choose the
messages that you want to read. The messages that have been read will
take on the icon, while the unread messages will take on the
icon.
The received messages will be saved in the SIM Card automatically, and
will be listed in the inbox list.
œ Note: If the indication symbol (SMS)/ ***(MMS) turns up, it
means that the message storage space in the SIM Card is full. You
have to delete some messages or transfer some messages to the
phone memory before receiving new messages.
7.1 SMS (Text Message)
àMessageàSMS

Message -> SMS (Text Message)
83
7.1.1 New
• You can send and receive text messages of lengthened text with this
phone by GSM network.
• The phone supports sending and piecing together text messages. It
can help you to send text messages of larger capacity by GSM network.
If the recipient’s phone supports piecing together text messages, it can
receive a integrated text message (one text message); if it does not
support piecing together text messages, the SMS message center will
partition the integrated text message into several text messages,
combine them in order before sending. The recipient’s phone will then
receive several text messages successively.
1. You can edit a new text message in either of the following two ways:
Common Way
After accessing this option in the SMS submenu, input the content of text
message.
Shortcut Way
In the standby state, directly press the key to enter the message
edit interface and input the content of text message.
• When editing the text message, you can insert phone numbers, email
addresses and templates to the content by pressing the left soft key
(Options) to select the option: Insert Contact and Insert
Template.
• After editing the text message, you can save it in the SMS Drafts or
save it as a template. If the Drafts list is full, the phone prompts Drafts
Full, Replace?; If the template list is full, the phone prompts Template
Full, Replace?. You can press the left soft key (Ok), select
one draft or template and then press the left soft key
(Replace) to complete the operation.

Message -> SMS (Text Message)
84
2. After editing the text message, press the left soft key
(Options) to select Send to send the text message to individual recipient.
• When in dual attach mode, please select Send By GSM or Send By
WiFi to send the text message by GSM network or by WiFi network.
3. Directly input or select the phone number of the recipient from the
phonebook list by pressing the left soft key (Contact).
• If you want to send the text message to multiple recipients (maximum
10 recipients) by GSM, press the key to highlight another
recipient location, and then repeat step 3.
• To delete a recipient from the list, press the key when it is
highlighted.
œ Note: If selecting to send the text message by WiFi, there will only
be one recipient.
4. Press the left soft key (Send) to send the text message.
œ Note: When you send messages using the SMS services, the
phone may prompt Sent. It only means that the phone has sent the
message to the SMS center number set in the phone, and it does
not mean that the message has been sent to the designated
destination. For more detailed information about the message
services, please consult your service provider. If the phone prompts
Send Failed, only * Sent, it means that several recipients did not
receive the text message you just sent.
7.1.2 Inbox
The phone will store the received text messages in the SMS Inbox folder.
Up to 100 messages can be stored in the Inbox.
• If there are no messages in the Inbox, when accessing this option, the
phone prompts Empty.

Message -> SMS (Text Message)
85
• If the number of messages stored in the Inbox surpasses 100, the
phone will renew the storage automatically.
• After accessing this option, press the key to enter SMS Outbox,
Drafts and My Favorite list.
After accessing this option, press the key to highlight the desired
text message, and then press the key to read the message. Press
the key to read other messages in Inbox.
After accessing this option, press the left soft key (Options) to
select from the following options:
Reply SMS
This option enables you to reply to the sender of the highlighted message.
Refer to Section “7.1.1 New”.
Reply MMS
This option enables you to reply to the sender of the highlighted message.
Refer to Section “7.2.1 New”.
œ Note: You cannot reply to MMS when in Only WiFi mode.
Delete
This option enables you to delete the highlighted message.
After accessing this option, the phone prompts Delete?, press the left soft
key (Ok) to complete the operation.
• Protected messages cannot be deleted.
Move to SIM/Phone
This option enables you to move the highlighted message to SIM
card/phone memory (depending on the storage place of the highlighted

Message -> SMS (Text Message)
86
messages).
After accessing this option, select Keep Original or Delete Original to
complete the operation.
Mark
This option enables you to manage the marked messages.
After accessing this option, press the key to highlight the desired
text messages and press the key to mark/cancel the messages.
Then press the left soft key (Options) to select Delete,
Protected, Unprotected, Move to SIM, Move to Phone, Mark All or
Cancel Mark All to continue.
Protected/Unprotected
• If the highlighted message is unprotected, the Protected option is
available; if the highlighted message is protected, the Unprotected
option is available.
• Protected messages cannot be deleted.
Select Protected to protect the text message; select Unprotected to
leave the text message unprotected.
Delete All of the Contact
This option enables you to delete all the messages sent by the same
sender.
After accessing this option, the phone prompts Delete?, press the left soft
key (Ok) to complete the operation.
• Protected messages cannot be deleted.
Delete Unprotected
This option enables you to delete all the unprotected.
After accessing this option, the phone prompts Delete Unprotected?,

Message -> SMS (Text Message)
87
press the left soft key (Ok) to complete the operation.
Delete All
This option enables you to delete all messages in the SMS Inbox.
After accessing this option, the phone prompts Delete All?, press the left
soft key (Ok) to complete the operation.
When reading or viewing a text message, press the left soft key
(Options) to select from the following operations:
Extract
This option enables you to extract the phone numbers, email addresses
or URLs from the text message.
After accessing this option, press the key to highlight the desired
item, and then press the left soft key (Ok) to continue. Refer to
according sections in this user manual for operations.
Reply SMS
This option enables you to reply to the sender of the highlighted text
message. Refer to Section “7.1.1 New”.
Reply MMS
This option enables you to reply message to the sender of the highlighted
text message. Refer to Section “7.2.1 New”.
œ Note: You cannot reply to MMS message when in Only WiFi
mode.
Forward
This option enables you to forward this text message to other recipient.
Refer to Section ”7.1.1 New”.

Message -> SMS (Text Message)
88
Delete
This option enables you to delete the highlighted text message.
After accessing this option, the phone prompts Delete?, press the left soft
key (Ok) to complete the operation.
• Protected text messages cannot be deleted.
Call Back
This option enables you to call back the sender’s phone number. Refer to
Section “2.3 Make a Call”.
Move to My Favorite
This option enables you to move the highlighted text message to My
Favorite list.
If My Favorite list is full, the phone prompts Full, Replace?, you can
press the left soft key (Ok), select one item in My Favorite list
and then press the left soft key (Replace) to complete the
operation.
Protected/Unprotected
• If the highlighted text message is unprotected, the Protected option is
available; if the highlighted text message is protected, the
Unprotected option is available.
• Protected text messages cannot be deleted.
• Select Protected to protect the text message; select Unprotected to
leave the text message unprotected.
Move to SIM/Phone
This option enables you to move the highlighted text message to SIM
card/phone memory (depending on the storage place of the highlighted
messages).
After accessing this option, select Keep Original or Delete Original to
complete the operation.

Message -> SMS (Text Message)
89
7.1.3 Outbox
The phone will store the sent text messages in the SMS Outbox folder. Up
to 100 messages can be stored in the Outbox (the integrated message is
calculated as the number of messages before piecing together).
• If there are no messages in the Outbox, the phone prompts Empty.
• If the number of messages stored in the Outbox surpasses 100, the
phone will renew the storage automatically.
After accessing this option, press the key to highlight the desired
text message, and then press the key to read the message. Press
the key can read other messages in Outbox.
After accessing this option, press the left soft key (Options) to
select from the following options:
Delete
This option enables you to delete the highlighted message.
After accessing this option, the phone prompts Delete?, press the left soft
key (Ok) to complete the operation.
Forward
This option enables you to forward the highlighted message to other
recipients. Refer to Section “7.1.1 New”.
Mark
This option enables you to manage the marked messages.
After accessing this option, press the key to highlight the desired
messages and press the key to mark/cancel the messages. Then

Message -> SMS (Text Message)
90
press the left soft key (Options) to select Delete, Mark All or
Cancel Mark All to continue.
View Recipient
This option enables you to view the recipient of the highlighted message.
Delete All
This option enables you to delete all messages in the SMS Inbox.
After accessing this option, the phone prompts Delete All?, press the left
soft key (Ok) to complete the operation.
When reading or viewing a message, press the left soft key
(Options) to select Delete, Forward or View Recipient to continue.
7.1.4 Drafts
Up to 10 drafts can be stored in the SMS Drafts.
• If there are no drafts in the Drafts, when accessing this option, the
phone prompts Empty.
• If the number of drafts stored in the Drafts surpasses 10, the phone
prompts Drafts Full, replace?. Select an existing draft to be replaced
and then press the left soft key (Ok) to complete the
operation.
After accessing this option, press the key to highlight the desired
draft, and then press the key to read the draft.
After accessing this option, press the left soft key (Options) to
select from the following options:
Send
This option enables you send the highlighted draft. Refer to Section “7.1.1
Message -> SMS (Text Message)
91
New”.
Delete
This option enables you to delete the highlighted draft.
After accessing this option, the phone prompts Delete?, press the left soft
key (Ok) to complete the operation.
Mark
This option enables you to manage the marked drafts.
After accessing this option, press the key to highlight the desired
drafts and press the key to mark/cancel the drafts. Then press the
left soft key (Options) to select Delete, Mark All or Cancel
Mark All to continue.
Delete All
This option enables you to delete all drafts in the Drafts.
After accessing this option, the phone prompts Delete All?, press the left
soft key (Ok) to complete the operation.
When reading or viewing a draft, you can edit the draft and then press the
left soft key (Options) to select Delete, Send or Save to
continue.
7.1.5 My Favorite
Up to 20 messages can be stored in My Favorite list.
• If there are no messages in My Favorite list, the phone prompts
Empty.
• If the number of messages stored in the My Favorite list surpasses 20,
the phone prompts Full, replace?. Select an existing message in My

Message -> SMS (Text Message)
92
Favorite list to be replaced and then press the left soft key
(Ok) to complete the operation. After accessing this option, press the
key to highlight the desired message, and then press the
key to read the message. Press the key to read other
messages in My Favorite.
After accessing this option, press the left soft key (Options) to
select from the following options:
Forward
This option enables you to forward the highlighted messages to other
recipient. Refer to Section “7.1.1 New”.
Reply SMS
This option enables you to reply to the sender of the highlighted message.
Refer to Section “7.1.1 New”.
Delete
This option enables you to delete the highlighted message.
After accessing this option, the phone prompts Delete?, press the left soft
key (Ok) to complete the operation.
Mark
This option enables you to manage the marked messages.
After accessing this option, press the key to highlight the desired
messages and press the key to mark/cancel the messages. Then
press the left soft key (Options) to select Delete, Mark All or
Cancel Mark All to continue.
Delete All

Message -> SMS (Text Message)
93
This option enables you to delete all messages in the My Favorite.
After accessing this option, the phone prompts Delete All?, press the left
soft key (Ok) to complete the operation.
• When reading or viewing a message, press the left soft key
(Options) to select Forward, Reply SMS or Delete to continue.
7.1.6 Voicemail
œ Note: For the specific services of voice mail, please consult your
network service provider.
Voicemail
You can access your voicemail in either of the following two ways:
• By selecting Voicemail option to directly dial the voicemail number,
you can access your voicemail.
• You can also press and hold the key in the standby state to
directly dial the voicemail number.
Voicemail Number
This option enables you to set your voicemail number. Directly input your
voicemail number in the edit interface, and then press the left soft key
(Ok) to save.
7.1.7 Templates
The phone has set 10 message templates for you, which feature various
everyday expressions.
After accessing this option, press the key to highlight the desired
template, and then press the key to read the template.

Message -> SMS (Text Message)
94
After accessing this option, press the left soft key (Options) to
select from the following options:
Add New Template
This option enables you to add a new template to the list.
After accessing this option, enter the content of the template, and then
press the left soft key (Save) to finish the operation.
œ Note: This option is only available when there are less than 10
templates in the list.
Edit
This option enables you to edit the highlighted template.
After accessing this option, edit the content of the template, and then
press the left soft key (Save) to finish the operation.
Send
This option enables you to send the highlighted template as a text
message. Refer to Section “7.1.1 New”.
Delete
This option enables you to delete the highlighted template.
After accessing this option, the phone prompts Delete?, press the left soft
key (Ok) to complete the operation.
Mark
This option enables you to manage the marked templates.
After accessing this option, press the key to highlight the desired
templates and press the OK key to mark/cancel the templates. Then
press the left soft key (Options) to select Delete, Mark All or
Cancel Mark All to continue.

Message -> SMS (Text Message)
95
Delete All
This option enables you to delete all templates in the list.
After accessing this option, the phone prompts Delete All?, then press
the left soft key (Ok) to complete the operation.
• When reading or viewing a template, you can edit the content of the
template, press the left soft key (Options) to select Send,
Save or Delete to continue.
7.1.8 Settings
The SMS settings will affect how you send, receive and view text
messages.
After accessing this option, select GSM SMS Setting or WiFi SMS
Setting, and then press the left soft key (Ok) to select from the
following operations:
• There are only two options in WiFi SMS Setting submenu: Validity
Period and Delivery Report.
Place of Storage
This option enables you to select the memory of newly received text
messages.
After accessing this option, select Phone or Card.
œ Note: If the current memory if full, newly received text messages will
be stored in the other memory location. If both memories are full,
when a new text message is received, the phone will replace the
current memory’s oldest unprotected text message with the newly
received text message.
œ Note: To avoid losing important messages, periodically erase
existing text messages.
Massage Center

Message -> MMS
96
œ Note: In order to send and receive text messages, the SMS service
center number has to be set. For specific information please consult
your service provider.
After accessing this option, enter the center number of SMS service, and
then press the left soft key (Ok) to complete the operation.
Message Lifetime
This option enables you to set the length of your messages’ storage
period in the SMS service center. Four options are available: 12 Hours, 1
Day, 1 Week or Maximum.
œ Note: This function needs network support.
Delivery Report
The delivery report will check whether the message you have sent has
correctly reached the destination.
When activated, when the recipient receives your message, the network
will send a message to inform you that your message has reached its
destination.
7.1.9 Memory Status
You can view the SMS storage status and the spaces occupation
conditions in the mobile phone and the SIM Card.
7.2 MMS
àMessageàMMS
œ Note: You can send MMS only by GSM network. Contact your local
service provider for assistance.
œ Note: The phone cannot send and receive MMS larger than 50K.

Message -> MMS
97
7.2.1 New
After accessing this option, press the key to highlight Subject,
Picture, Sound or Text, and then press the key to edit the subject
and text of the MMS, or select a picture or ring for the MMS.
Then press the left soft key (Options) to select from the
following options:
Preview
This option enables you to preview the newly created SMS.
Send
This option enables you to send the SMS.
After accessing this option, directly input or select the phone number of
the recipient from the phonebook list by pressing the left soft key
(Contact). And then press the left soft key (Send) to send.
• If you want to send the SMS to multiple recipients (maximum 10
recipients), press the key to highlight another recipient location,
and then repeat the operation.
• To delete a recipient from the list, press the key when it is
highlighted.
œ Note: When you send messages using the MMS services, the
phone may prompt MMS Sent. It only means that the phone has
sent the message to the MMS center number set in the phone, and
it does not mean that the message has been sent to the designated
destination. For more detailed information about the MMS services,
please consult your service provider. If the phone prompts MMS
Sent Error, it means that several recipients did not receive the MMS

Message -> MMS
98
you just sent.
Clear Subject/Picture/Sound/Text
This option enables you to clear the subject/picture/sound/text of the
MMS.
Page Timing
This option enables you to set the display time for the current page of
MMS (3~15 seconds).
Delete Page
This option enables you delete the current page of MMS.
Add Page
This option enables you to add a page to the MMS.
• When the MMS message contains more than one page, press the
key to scroll through every page.
Move Page
This option enables you to move the current page to another location.
After accessing this option, press the key to highlight a location
and then press the left soft key (Ok) to complete the operation.
Save
This option enables you to save the newly created MMS in MMS Drafts.
If the MMS Drafts list is full, the phone prompts Drafts Full, Replace?.
You can press the left soft key (Ok), select one MMS draft and
then press the left soft key (Replace) to complete the operation.
Text at Top/Bottom
This option enables you to set the display location of the text.

Message -> MMS
99
7.2.2 Inbox
The phone will store the received MMS messages in the MMS Inbox
folder. UP to 10 MMS messages can be stored in the Inbox.
• If there are no MMS messages in the Inbox, when accessing this
option, the phone prompts Empty.
• If the number of MMS messages stored in the Inbox surpasses 10, the
phone will renew the storage automatically.
• After accessing this option, press the key can enter MMS
Outbox and Drafts list.
After accessing this option, press the key to highlight the desired
MMS message. Press the key, the phone prompts Download
MMS?, press the left soft key (Ok) to download the MMS
message from the service center. Press the key to view the other
pages of the MMS message.
After accessing this option, press the left soft key (Options) to
select from the following options:
Reply SMS
This option enables you to reply to the sender of the highlighted MMS
message. Refer to Section “7.1.1 New”.
Reply MMS
This option enables you to reply to the sender of the highlighted MMS
message. Refer to Section “7.2.1 New”.
œ Note: You cannot reply to MMS when in Only WiFi mode.
Delete

Message -> MMS
100
This option enables you to delete the highlighted MMS message.
After accessing this option, the phone prompts Delete?, press the left soft
key (Ok) to complete the operation.
• Protected MMS messages cannot be deleted.
Mark
This option enables you to manage the marked MMS messages.
After accessing this option, press the key to highlight the desired
MMS messages and press the key to mark/cancel the MMS
messages. Then press the left soft key (Options) to select
Delete, Protected, Unprotected, Mark All or Cancel Mark All to
continue.
Protected/Unprotected
• If the highlighted MMS message is unprotected, the Protected option
is available; if the highlighted MMS message is protected, the
Unprotected option is available.
• Protected MMS messages cannot be deleted.
Select Protected to protect the MMS message; select Unprotected to
leave the MMS message unprotected.
Delete Unprotected
This option enables you to delete all the unprotected MMS messages.
After accessing this option, the phone prompts Delete Unprotected?,
press the left soft key (Ok) to complete the operation.
Delete All
This option enables you to delete all the messages in MMS Inbox.
After accessing this option, the phone prompts Delete All?, press the left

Message -> MMS
101
soft key (Ok) to complete the operation.
When reading or viewing a MMS message, press the left soft key
(Options) to select from the following operations:
Extract
This option enables you to extract the phone numbers, pictures, rings,
email addresses or URLs from the MMS message.
After accessing this option, press the key to highlight the desired
item, and then press the left soft key (Ok) to continue. Refer to
according sections in this user manual for operations.
Reply SMS
This option enables you to reply to the sender of the highlighted MMS
message. Refer to Section “7.1.1 New”.
Reply MMS
This option enables you to reply to the sender of the highlighted MMS
message. Refer to Section “7.2.1 New”.
œ Note: You cannot reply to MMS when in Only WiFi mode.
Replay
This option enables you to replay the MMS message.
Forward
This option enables you to forward this MMS message to other recipient.
Refer to Section ”7.2.1 New”.
Delete
This option enables you to delete the highlighted MMS message.
After accessing this option, the phone prompts Delete?, press the left soft

Message -> MMS
102
key (Ok) to complete the operation.
• Protected MMS messages cannot be deleted.
Call Back
This option enables you to call back the sender’s phone number. Refer to
Section “2.3 Make a Call”.
Protected/Unprotected
• If the highlighted MMS message is unprotected, the Protected option
is available; if the highlighted MMS message is protected, the
Unprotected option is available.
• Protected MMS messages cannot be deleted.
Select Protected to protect the MMS message; select Unprotected to
leave the MMS message unprotected.
Properties
This option enables you to view the properties of the MMS message.
7.2.3 Outbox
The phone will store the sent MMS messages in the MMS Outbox folder.
The phone will store up to 10 sent MMS messages in the MMS Outbox
folder.
• If there are no messages in the MMS Outbox, the phone prompts
Empty.
• If the number of messages stored in the MMS Outbox surpasses 10,
the phone will renew the storage automatically.
After accessing this option, press the key to highlight the desired
MMS message, and then press the key to view the message.
• When the MMS message contains more than one page, press the

Message -> MMS
103
key to scroll through every page.
After accessing this option, press the left soft key (Options) to
select from the following options:
Delete
This option enables you to delete the highlighted message.
After accessing this option, the phone prompts Delete?, press the left soft
key (Ok) to complete the operation.
View
This option enables you to view the MMS message.
Forward
This option enables you to forward the highlighted MMS message to other
recipients. Refer to Section “7.2.1 New”.
Mark
This option enables you to manage the marked MMS messages.
After accessing this option, press the key to highlight the desired
MMS messages and press the key to mark/cancel the messages.
Then press the left soft key (Options) to select Delete, Mark All
or Cancel Mark All to continue.
View Recipient
This option enables you to view the recipient of the highlighted message.
Delete All
This option enables you to delete all messages in the MMS Inbox.
After accessing this option, the phone prompts Delete All?, press the left

Message -> MMS
104
soft key (Ok) to complete the operation.
• When reading or viewing a MMS message, press the left soft key
(Options) to select Delete, Replay, Forward or Properties to
continue.
7.2.4 Drafts
Up to 5 drafts can be stored in the MMS Drafts.
• If there are no drafts in the MMS Drafts, the phone prompts Empty.
• If the number of drafts stored in the MMS Drafts surpasses 5, the
phone prompts Drafts Full, replace?. Select an existing draft to be
replaced and then press the left soft key (Ok) to complete the
operation.
After accessing this option, press the key to highlight the desired
MMS draft, and then press the key to view the draft.
• When the MMS draft contains more than one page, press the
key to scroll through every page.
After accessing this option, press the left soft key (Options) to
select from the following options:
View
This option enables you to view the MMS draft.
Send
This option enables you to send the highlighted MMS. Refer to Section
7.2.1 “New”.
Delete
This option enables you to delete the highlighted draft.

Message -> MMS
105
After accessing this option, the phone prompts Delete?, press the left soft
key (Ok) to complete the operation.
Mark
This option enables you to manage the marked MMS drafts.
After accessing this option, press the key to highlight the desired
MMS drafts and press the key to mark/cancel the drafts. Then
press the left soft key (Options) to select Delete, Mark All or
Cancel Mark All to continue.
Delete All
This option enables you to delete all drafts in the MMS Drafts.
After accessing this option, the phone prompts Delete All?, press the left
soft key (Ok) to complete the operation.
• When reading or viewing a draft, press the left soft key
(Options) to select Delete, Replay, Forward or Properties to
continue.
7.2.5 Settings
The MMS settings will affect how you send, receive and view MMS
messages.
Send Settings
Access this option and select from the following options:
1) Priority: Set the priority level of MMS messages. There are three
options available: High, Normal or Low.
2) Validity Period: Set the length of your MMS messages’ storage period
in the MMS service center. Five options are available: 1 Hour, 12
Hours, 1 Day, 1 Week or Max.

Message -> MMS
106
œ Note: This function needs network support.
3) Delivery Report: Activate/deactivate the delivery report function. If this
function is activated, after sending a MMS message, when the
recipient receives the MMS message, the network will send the
relevant message to inform you that your MMS message has reached
the destination correctly.
4) Read & Reply: Activate/deactivate the Read&Reply function. If this
function is activated, when the recipient reads the MMS message that
you sent, the network will send the receipt message to inform you that
your MMS message has been read.
5) Addr. Hiding: Activate/deactivate the address hiding function. If this
function is activated, when you send a MMS message, your phone
number will not be displayed on the recipient’s phone.
Receive Settings
Accessing this option and select from the following options:
1) Auto Download: Activate/deactivate the auto download function. If
this function is activated, when a new MMS message is received, the
phone will download the new MMS message from the MMS service
center automatically.
2) Allow Anon. Message: Activate/deactivate the anonymous message
function. If this function is activated, the phone will not bar anonymous
messages.
Connect Settings
This option enables you to set the MMS Server.
œ Note: In order to send and receive MMS messages, the MMS
server has to be set. For specific information please consult your
service provider.
After accessing this option, select MMS Server, enter the MMS service
center’s name and then press the left soft key (Ok) to complete
the operation.

Message -> MMS
107
7.2.6 Memory Status
You can view the MMS storage status and the spaces occupation
conditions in the mobile phone and the SIM Card.
Settings -> Date and Time
108
8. SETTINGS
àSettings
From this submenu, you can perform various phone settings.
8.1 Date and Time
àSettingsàDate and Time
8.1.1 Date and Time
This option enables you to set the phone’s date and time.
1. After accessing the option, key in a date from 2000-01-01 to
2090-12-31.
2. Enter the time from 00:00 to 12:59 (when the time mode is 12 Hour) or
00:00 to 23:59 (when the time mode is 24 Hour).
3. When the time mode is 24 Hour, press the left soft key (Ok)
to complete the operation. When the time mode is 12 Hour, press the
key to select am or pm, and then press the left soft key
(Ok) to complete the operation.
When you key in the date or time, you can press to move the
cursor and modify the number.
8.1.2 Time Mode
This option enables you to select the time mode. There are two options:
12 Hour or 24 Hour.

Settings -> Display Settings
109
8.1.3 Date Mode
This option enables you to select the date mode. There are three options:
D:M:Y, M:D:Y or Y:M:D.
8.2 Display Settings
àSettingsàDisplay Settings
After accessing this option, you can select from the following options:
8.2.1 Background
This option enables you to set the background picture.
After this option is selected, select Default PIC or Download PIC.
Press the key to highlight a picture, and then press the left soft
key (View) to view the picture.
Press the key to browse through other pictures. When the desired
picture is displayed, press the left soft key (Ok) to complete the
operation
œ Note: If there is no downloaded picture, the phone will prompt
Folder Empty when you select Download PIC.
8.2.2 Greeting
This option enables you to edit the power on greeting text (maximum 16
bytes).
8.2.3 Backlight Level
This option enables you to set the time that the LCD screen and keypad
will light when you press keys or the phone receives a call or a message.
Settings -> Call Settings
110
Choices include: Off, 10 Seconds, 30 Seconds and 60 Seconds.
8.2.4 Contrast
This option enables you to specify the contrast level for the LCD screen.
There are 10 contrast levels. Press to increase or to
decrease the contrast. The screen display will reflect the contrast setting.
After reaching the desired contrast level, press the left soft key
(Select) or the key to complete the operation.
8.2.5 Brightness
This option enables you to specify the brightness level for the LCD
screen.
There are 10 brightness levels. Press to increase or to
decrease the brightness. The screen display will reflect the brightness
setting. After reaching the desired brightness level, press the left soft key
(Select) or the key to complete the operation.
8.3 Call Settings
àSettingsàCall Settings
After accessing this option, you can select from the following options:
8.3.1 Answer Mode
This option enables you to select how to answer an incoming call.
After you access this option, the following will be available:
Accept Key Answer

Settings -> Phone Settings
111
Press the left soft key (Answer), the key or the key
to answer an incoming call.
Any Key Answer
Press any key to answer an incoming call except the right soft key
, the key and the side key .
8.3.2 Minute Minder
This option enables you to activate/deactivate the minute minder.
If this function is activated, the phone will sound a reminder tone at the
50th second of each minute during an active call.
8.3.3 Earphone Auto Answer
This option enables you to activate/deactivate the earphone auto answer
function.
If this function is activated, when an earpiece is plugged into the phone,
the phone will automatically answer an incoming call.
8.4 Phone Settings
àSettingsàPhone Settings
After accessing this option, you can select from the following options:
8.4.1 Choose Language
This option enables you to select the language of the phone’s text display.
After accessing this option, select English or Chinese, and then press
the left soft key (Ok) to complete the operation.
Settings -> Phone Settings
112
8.4.2 Input method
This option enables you to select the input method when editing text.
After accessing this option, press the key to highlight Predictive
English, Letter, Pin Yin or Stroke, then press the key to
select/cancel the highlighted input method, and then press the left soft
key (Change) to complete the operation.
8.4.3 Shortcut
This option enables you to select some shortcuts for the Go To menu list.
1. After accessing this option, press the key to highlight a blank
shortcut location.
2. Press the left soft key (Add) or the key to enter the
Select list, press the [up-down] key to highlight an option.
3. Press the left soft key (Ok) or the key to enter the
selected menu list, press the key to highlight an option.
4. Then press the left soft key (Ok) or the key to complete
the operation.
After accessing this option, press the key to highlight an existing
shortcut, and then press the left soft key (Options) to select
from the following options:
Select

Settings -> Security Settings
113
This option enables you to use the function of the shortcut.
Modify
This option enables you to modify the existing shortcut.
Delete
This option enables you to delete the existing shortcut.
Delete All
This option enables you to delete all the existing shortcuts.
8.4.4 Auto Key Guard
This option enables you to activate/deactivate the auto key guard
function.
If this function is activated, the phone will lock the keypad automatically
after a while (from 10 to 300 seconds, as set) when you press keys or the
phone receives a call or a message.
8.5 Security Settings
àSettingsàSecurity Settings
After accessing this option, you can select from the following options:
8.5.1 PIN Protect
œ Note: To access this option, the SIM card needs to be properly
inserted. If you have any questions, contact your local service
provider for assistance.
To protect your SIM card against unauthorized use, you can select from
the following options:
PIN Protect
This option enables you to activate/deactivate the PIN Protect function.
If this function is activated and the SIM card is inserted, the PIN code will

Settings -> Security Settings
114
need to be entered each time you switch on the phone.
1. After selecting this option, select On or Off to activate or deactivate.
2. If select On, the phone will display Input PIN Code, enter the correct
PIN code and press the left soft key (Ok) to complete the
operation.
œ Note: If you enter the PIN code incorrectly three times, your SIM
card will be locked. To unlock the SIM card, you must enter the PUK
(Personal Unblocking Key) code. If no PUK code is supplied with
your SIM card, contact your service provider.
œ Note: If you enter the PUK code incorrectly ten times, your SIM card
will be disabled, and all the keystrokes will become invalid except for
pressing and holding the Power key to switch off the phone. Contact
your service provider for assistance.
œ Note: SIM card functions may vary depending on the service
provider. If the Power On PIN cannot be deactivated, contact your
service provider for assistance.
Change PIN Code
œ Before changing the PIN code, you must first activate the Power On
PIN Function.
Select this option to change the security PIN/PIN2 code of the SIM card.
After selecting this option, select PIN code or PIN2 code, and then
observe the following steps:
1. When Input PIN/PIN2 is displayed, enter the PIN/PIN2 code and press
the left soft key (Ok).
2. Enter the new PIN/PIN2 code in the input box of Input New PIN/PIN2,
and then press the key to highlight the input box of Confirm
New PIN/PIN2.
3. Enter the new PIN/PIN2 code again, then press the left soft key

Settings -> Security Settings
115
(Ok) to complete the operation.
œ Note: To avoid any inconvenience, please remember the new
PIN/PIN2 code.
œ Note: If you enter the PIN code incorrectly three times, your SIM
card will be locked. To unlock the SIM card, you must enter the PUK
(Personal Unblocking Key) code. If no PUK code is supplied with
your SIM card, contact your service provider.
œ Note: If you enter the PUK code incorrectly ten times, your SIM card
will be disabled, and all the keystroke will become invalid except for
pressing and holding the Power key to switch off the phone. Contact
your service provider for assistance.
œ Note: If you enter the PIN2 code incorrectly three times, the PIN2
code will be locked.
8.5.2 Phone Code
To protect your phone against unauthorized use, you can select from the
following options:
Protect Handset
œ Note: The initial default phone code is “1234”.
If this function is activated, the phone code will need to be entered each
time you switch on the phone.
1. After accessing this option, select On or Off to activate or deactivate.
2. If select On, the phone will display Enter Please, enter the correct
phone code and press the left soft key (Ok) to complete the
operation.
Change Code
Select this option to change the phone code. Observe the following steps:

Settings -> Security Settings
116
1. When Input Code is displayed, enter the phone code, and press the left
soft key (Ok). Enter New will be displayed
2. Enter a new phone code (0~6 digits long, using numbers 0~9) in the
input box of Enter New, and then press the key to highlight the
input box of Confirm New Code.
3. Enter the new phone code again, and then press the left soft key
(Ok) to complete the operation.
l If the new security code entered in step 3 is different from that entered
in step 2, when you press the left soft key (Ok), Code Error
will be displayed.
œ Note: To avoid any inconvenience, please remember the new
phone code.
8.5.3 SIM Change Notify
This option enables you to activate/deactivate the SIM card change notify
function.
If this function is activated, the phone will notify you when the SIM card is
changed.
8.5.4 Reset All
Select this option to restore your phone’s default settings, such as the
profile, settings, etc.
When you access this option, Restore Factory? will be displayed. Press
the left soft key (Ok) to complete the operation.
This operation will not delete the phonebook entries or call logs.
Settings -> Security Settings
117
Phone Default Settings
Functions Default Settings
Profiles Standard
Speed Dial Setting Empty
Phonebook Group (Ring Tone) Forget
Security Code 1234
Time Mode 24 Hour
Date Mode D:M:Y
Handset Protect Off
Background Tree
Answer Mode Accept Key Answer
Minute Minder On
Earphone Auto Answer Off
Backlight 10 Second
Contrast 3
Brightness 8
Language English
Auto Key Guard Off
Power On PIN Off
SIM Change Notify Off
GSM Auto Redial Off
Caller ID Set By Network
Network Options Automatic
Select Line Line One
Fixed Dialling Off

Settings -> GSM Settings
118
Profiles Default Settings
Profile
options Standard
Outdoor
Meeting
Silent User
Define
Ring
Volume 4 5 1 1 4
Ring Alert
Mode Ringing Vibration
and Ring Vibration Mute Ringing
Ringing
Tone Forget Forget Forget Forget Forget
Message
Alert
Mode Ringing Vibration
and Ring Vibration Mute Ringing
Message
Tone 01 01 01 01 01
Alarm
Tone Forget Forget Forget Forget Forget
Schedule
Tone Forget Forget Forget Forget Forget
Key Tone Standard
Keytone Standard
Keytone Standard
Keytone Standard
Keytone
Standard
Keytone
Warning
Tone On On Off Off On
8.6 GSM Settings
àSettingsàGSM Settings
œ Note: Before accessing this option, please insert a SIM card to the
handset. Otherwise the phone prompts SIM not ready.
After accessing this option, you can select from the following options:

Settings -> GSM Settings
119
8.6.1 GSM Number
This option enables you to store and view the number of your GSM card.
1. After accessing this option, select Number 1 or Number 2.
2. Enter the number (maximum 20 bytes), and press the left soft key
(Ok) to continue.
3. Edit the name of this GSM number (maximum 14 bytes), and press the
left soft key (Save) to complete the operation.
8.6.2 Call Divert
œ Note: This function requires network service support. Contact your
GSM service provider for assistance.
This option enables you to forward incoming calls to a specified phone
number or the voice mail center number (it cannot be an extension
number or a long distance call number).
Activate
1. After accessing this option, select Unconditional, Busy, No Answer,
Unreachable, All Data Calls or All Fax Calls.
2. To switch on the function, select Activate.
3. Select Voice Mail Center or Number (If the call divert item you
selected is All Data Calls or All Fax Calls, no choice needs to be
selected, enter a phone number directly as step 4).
4. Enter a number or select on number in the phonebook list, and then
press the left soft key (Ok) to continue.
5. Wait for a while, the phone will display whether the function has been
activated successfully or not (If the call divert item you selected is No
Answer, before completing the operation, please key in the waiting
time, from 5 to 30 seconds).
• You can switch on multiple Call Divert items simultaneously.

Settings -> GSM Settings
120
Cancel
1. After accessing this option, select Unconditional, Busy, No Answer,
Unreachable, All Data Calls or All Fax Calls.
2. To switch off the function, select Cancel.
3. Wait for a while, the phone will display whether the function has been
successfully canceled or not.
View Status
1. After accessing this option, select Unconditional, Busy, No Answer,
Unreachable, All Data Calls or All Fax Calls.
2. To check whether you have switched on the function, select View
Status.
3. Wait for a while, the phone will display the status of the function.
Cancel All
After accessing this option, select Cancel All to close all the Call Divert
options.
8.6.3 Auto Redial
This option enables you to activate/deactivate the auto redial function.
If this function is activated, your phone will make 10 dial attempts after the
first dial attempt failed, in effort to make contact to a certain phone
number.
After accessing this option, press the key to highlight On or Off,
and then press the left soft key (Ok) to complete the operation.
8.6.4 Call Waiting
œ Note: This function requires network service support. Contact your
GSM service provider for assistance.

Settings -> GSM Settings
121
If this function is activated, you will be informed by network when you
receive a new incoming GSM call during an active GSM call.
1. After accessing this option, select Activate to switch on the call waiting
function, select Cancel to switch off the call waiting function, select
View Status to check whether you have switched on the call waiting
function or not.
2. Wait for a while, the phone will display the information of the operation.
8.6.5 Show Caller ID
œ Note: This function requires network service support. Contact your
GSM service provider for assistance.
If this function is activated, the GSM number will be shown on the phone
of the person you called.
After accessing this option, select On to activate this function, select Off
to cancel this function, select Set By Network to activate or deactivate as
the network preset. And then press the left soft key (Ok to
complete the operation.
8.6.6 Select Line
This option enables you to select a line for GSM calls.
After accessing this option, press the key to highlight Line 1 or
Line 2, and then press the left soft key (Ok) to complete the
operation.
8.6.7 Network Options
This option enables you to select a GSM network service for your phone.
After accessing this option, select Automatic (the phone will select a
network according to the conditions of the Cellular Networks in the area
where you are) or select Manual (you can select a network which has

Settings -> GSM Settings
122
signed a roaming agreement with you registered network provider), and
then press the left soft key (Ok) to complete the operation.
8.6.8 Call Barring
œ Note: This function requires network service support. Contact your
GSM service provider for assistance.
If this function is activated, you can bar the phone from dialling and
receiving some calls.
On
1. After accessing this option, select All Outgoing, Outgoing
International, All Incoming, or Incoming When Abroad.
2. To switch on the function, select On.
3. Enter the network password of this function, and then press the left soft
key (Ok) to continue.
4. The phone will display whether the function has been activated
successfully or not.
• You can switch on multiple Call Barring items simultaneously.
Off
1. After accessing this option, select All Outgoing, Outgoing
International, All Incoming, or Incoming When Abroad.
2. To switch off the function, select Off.
3. Enter the network password of this function, and then press the left soft
key (Ok) to continue.
4. The phone will display whether the function has been canceled
successfully or not.
Status
1. After accessing this option, select All Outgoing, Outgoing
International, All Incoming, or Incoming When Abroad.

Settings -> GSM Settings
123
2. To check whether you have switched on the function, select Status.
3. Wait for a while, the phone will display the status of the function.
Cancel All
1. After accessing this option, select Cancel All to close all the Call
Barring options.
2. Enter the network password of this function, and then press the left soft
key (Ok) to continue.
3. The phone will display whether all Call Barring have been canceled
successfully or not.
8.6.9 Fixed Dialling
œ Note: This function needs the support of SIM Card and the local
network service provider. For detailed operation, please consult
your GSM network service provider.
This option enables you to limit the call-out numbers in the fixed dialling
list.
On
1. After accessing this option, to switch on the function, select On.
2. Enter the PIN2 code of the GSM card, and then press the left soft key
(Ok) to continue.
3. Wait for a while, the phone will display whether the function has been
switched on successfully or not.
OFF
1. After accessing this option, to switch off the function, select Off.
2. Enter the PIN2 code of the GSM card, and then press the left soft key
(Ok) to continue.
3. Wait for a while, the phone will display whether the function has been
switched off successfully or not.

Settings -> GSM Settings
124
Fixed Dialling List
Add a fixed dialling number by observing the following steps:
1. After accessing this option, select Fixed Dialling List.
2. Enter the PIN2 code of the GSM card, and then press the left soft key
(Ok) to continue.
3. Press the key to highlight a number location, and then press
the key to continue.
4. Edit the number or select a number in the phonebook list, and then
press the left soft key (Ok) to complete the operation.
œ Note: The maximum amount of numbers that can be added into the
fixed dialling list depends on the type of the SIM card in use and the
network.
œ Note: If you enter the PIN2 code incorrectly three times, the PIN2
code will be locked.

Organizer -> Toolbox
125
9. ORGANIZER
àOrganizer
9.1 Toolbox
àOrganizeràToolbox
The phone includes numerous practical tools such as:
9.1.1 Alarm
This option enables you to set the alarm for a specified time. Once
activated, the alarm indicator will be displayed.
l When the preset alarm time expires, the phone will sound the alarm;
an alarm icon and the current time will be displayed. The alarm will
sound for 30 seconds unless dismissed.
l To dismiss the alarm and return to standby state, press any key.
l If the alarm time expires during a call, the alarm will not sound.
l You can set multiple alarms.
To set an alarm:
1. After accessing this option, select Alarm 1, Alarm 2 or Alarm 3.
2. Press the key to highlight the setting items, and then select the
following:
Alarm On/Off: Press the key to activate/deactivate the alarm.
Time: Enter the time in 24-hour time format (When you key in the time,
you can press to move the cursor and modify the number).

Organizer -> Toolbox
126
Lazy Mode On/Off: Press the key to activate/deactivate the lazy
mode of the alarm (If this function is activated, the alarm will repeat 3
times at 5-minute intervals after the original alarm time expires).
Repeat: Press the key to choose the repeat type of the alarm (If
the repeat type is Once, it will take the nearest time you set. After the
clock has rung once, the alarm will turn off automatically. If the repeat type
is Daily, the alarm will ring everyday at the time you set. If the repeat type
is Option, please press the key to highlight a day, and then press
the key to select/cancel the days that you’d like the alarm to ring at
the time you set).
3. Press the left soft key (Ok) to complete the operation.
9.1.2 Schedule
This option enables you to view the calendar (from 2000.01.01 to
2099.12.31) and add memos to the date.
• Press the key to move the cursor to select the date. It will not be
a loop.
• The current date (as set on your phone) is framed in red. Dates with
added memos are highlighted in yellow.
• In standby state, if the memo prompt time expires, the schedule tone
will sound.
• If the memo time expires during an active call, or when the phone is
receiving a new message or connecting to the network, the schedule
tone will not sound.
After selecting a date, press the left soft key (Options) to view
Organizer -> Toolbox
127
the following:
See Today Memo
This option enables you to view the memos set for today.
• If no memo has been added to today, the phone prompts List Empty.
Add New Memo
This option enables you to add new memo to the selected date.
1. After accessing this option, press the key to highlight the
schedule time, content or remind On/Off, and then press the key
to continue.
2. Enter the schedule time in 24-hour time format (When you key in the
time, you can press to move the cursor and modify the number).
Edit the content of the memo. Press the key to
activate/deactivate the remind tone.
3. Press the left soft key (Ok) to complete the operation. If you
press the right soft key , the phone prompts Save?, you can
press the left soft key to save the added memo or press the
right soft key to cancel the operation.
See All Memos
This option enables you to view all the memos.
• If no memo has been added, the phone prompts List Empty.
Select Date
This option enables you to go to the date you selected.
After accessing this option, edit the date and then press the left soft key

Organizer -> Toolbox
128
(Ok), the phone will display the calendar and highlight the date.
When view today’s memos or all memos, please press the key to
highlight one memo (The icon is displayed ahead of the memos that
are overdue. The icon is displayed ahead of the memos that have the
schedule tone deactivated. The icon is displayed ahead of the memos
that have not expired). And then press the left soft key (Options)
to select from the following options:
Examine
This option enables you to view the detailed information of the memo.
• When one memo is highlighted in the schedule list, press the key
to view the detailed information about the memo.
Modify
This option enables you to modify the schedule time and the content of
the memo, and enables you to activate/deactivate the schedule tone of
the memo. Refer to “Add New Memo” for operation.
Delete
This option enables you to delete the memo.
After accessing this option, the phone prompts Delete?, press the left soft
key (Ok) to complete the operation.
Delete All
This option enables you to delete all the memos.
After accessing this option, the phone prompts Delete All?, press the left
soft key (Ok) to complete the operation.
Add Memo
This option enables you to add a new memo to the same date of the

Organizer -> Toolbox
129
memo. Refer to “Add New Memo” for operation.
Move
This option enables you to move the memo to another date.
After accessing this option, edit the date that you want to move the memo
to, and press the left soft key (Ok) to complete the operation.
Copy
This option enables you to copy the memo to another date.
After accessing this option, edit the date that you want to copy the memo
to, and press the left soft key (Ok) to complete the operation.
• When viewing the detailed information of the memo, press the left soft
key (Options) to select Modify, Delete, Add New, Move or
Copy to continue.
9.1.3 Calculator
This function enables you to add, subtract, multiply and divide.
1. The screen will initially display the number “0”. Enter the first number to
be calculated.
- To enter a minus sign, press key (only the first number can
be made negative); to enter a decimal point, press key
2. Press , , or to enter the plus, minus, division
or multiplication signs respectively.
3. Enter the second number.
- To enter “0”, press and ; “0.0” will be displayed
4. Press the key to display the calculation result.

Organizer -> Toolbox
130
• To conduct further calculations from this result, repeat steps 2~4.
5. When starting a new calculation, if the result from the last calculation is
not “0”, press the key to initialize.
l To delete the character you just entered, press the key. To
erase all entered characters, press and hold the key.
l A maximum of 9 digits (including minus sign and decimal point) can be
entered at one time.
l If the formula violates mathematical principles (for example, 5/0.),
Error will be displayed.
l If the absolute value of the calculation result exceeds 999,999,999,
Overflow will be displayed.
9.1.4 Notepad
The phone can store up to 15 notes.
After accessing this option, press the key to highlight a note, and
then the left soft key (Options) to select the following options:
• If no note exists in the notepad list, there will be only one option: Edit.
• If several notes exist in the notepad list and the highlighted note is
blank, there will be two options: Edit and Delete All.
• If several notes exist in the notepad list and the highlighted note is not
blank, there will be four options: Edit, Send Message, Delete and
Delete All.
Edit
This option enables you to edit a new note.

Organizer -> Toolbox
131
After accessing this option, edit the content of the note (maximum 120
bytes), and then press the left soft key (Save) to complete the
operation.
Send Message
This option enables you to send the note as SMS or MMS (Refer to
Section “7.1.1 New” and Section “7.2.1 New”).
Delete
This option enables you to delete the note.
After accessing this option, the phone prompts Delete?, press the left soft
key (Ok) to complete the operation.
Delete All
This option enables you to delete all the notes.
After accessing this option, the phone prompts Delete All?, press the left
soft key (Ok) to complete the operation.
9.1.5 Unit Convert
This function enables you to conduct unit conversion among different
units on the 7 measurements of currency, cubage, area, mass, length,
temperature and power.
1. After accessing this option, press the left soft key (Unit) to
shift among the 7 measurements of currency, cubage, area, mass,
length, temperature and power.
2. After selecting one measurement, press the key to select now
unit, and then press the key to select a unit for the converted
value.
Organizer -> Toolbox
132
3. Press the key to move the cursor to the input box of converted
value, and key in the value.
4. Press the key to select to unit, and then press the key to
select a unit for the outcome value. The phone will display the outcome
value simultaneously.
l To enter a decimal point, press key. To delete the character you
just entered, press the key. To erase all entered characters,
press and hold the key.
l A maximum of 11 digits (including decimal point) can be entered at
one time.
l If the outcome value exceeds 999,999,999, Data Overflow will be
displayed.
9.1.6 World Time
This function enables you to view the current time of different cities, states,
regions or countries in 24 different time zones.
After accessing this option, press the key to display another time
zone, and press the key to display other cities, states, regions or
countries.
9.1.7 Stopwatch
This function allows you to time up to five events at once.
1. After accessing this option, press the left soft key (Start).
Organizer -> Games
133
2. Press the left soft key (Timing) to start timing an event, then
press the right soft key (Stop) to stop timing. The records of
time are shown under the total time.
3. After the timing is stopped, press the left soft key (CleanUp)
to clear all the records.
9.2 Games
àOrganizeràGames
The phone provides 2 small games for you.
9.2.1 Black Jack
The player with cards valued closer to 21 wins. If your value exceeds 21,
you lose.
After you access this option, the following will be available:
Start
After accessing this option, please select New Game to start a new game,
select Resume to resume the latest game.
Press to move the cursor to the desired chips, and press the left
soft key to start the game. Press , , or
to hit, stand, split or double. Press the key to insure.
To quit the game, press the right soft key , and then press the left
soft key (Ok).
Top Score

Organizer -> Games
134
This option enables you to view the records of the game.
Help
Select this option to view the rules of the game. Press to scroll
through the rules.
9.2.2 Tetris
After you access this option, the following will be available:
Start Game
Select this option to start the game.
The screen is divided into two regions: game region and tip region. The
square object is the standard Tetris object. Each line, when filled, will be
erased and gets scored. When the objects reach the top of the screen,
objects cannot fall down and the game will be over. The current score and
the shape of incoming object will be shown in the tip region.
To quit the game, press the right soft key , and then press the left
soft key (Ok).
Game Level
This option enables you to set the game level. There are nine options.
Top Score
This option enables you to view the top three scores of the game.
Help
Select this option to view the rules of the game. Press to scroll
through the rules.

Organizer -> My folder
135
9.3 My folder
àOrganizeràMy Folder
This function enables you to manage the downloaded pictures and rings
in My Folder.
In standby state, press the key to directly enter My Folder.
9.3.1 Pictures
This option enables you to manage your downloaded pictures.
After accessing this option, the phone will display the picture list. Press
the key to highlight the desired picture, and then press the
key to preview.
• If no downloaded pictures have been stored, the phone prompts
Folder Empty.
When a picture is highlighted, press the left soft key (Options) to
select from the following operations:
Send MMS
This option enables you to send this picture by MMS (Refer to section
“7.2.1 New”).
Set Wall Paper
This option enables you to set this picture as the background of the
standby display.
Delete
This option enables you to delete this picture.
After accessing this option, the phone prompts Delete?, press the left soft
key (Ok) to complete the operation.

Organizer -> My folder
136
Rename
This option enables you to change the name of the picture.
After accessing this option, edit a new name for the picture, and then
press the left soft key (Ok) to complete the operation.
Protect
This option enables you to protect the picture from being deleted.
• After the picture is protected, this option is Unprotect. Selecting
Unprotect enables you to cancel protecting the picture.
Delete Unprotect
This option enables you to delete all the unprotected pictures in My
Folder.
After accessing this option, the phone prompts Delete?, press the left soft
key (Ok) to complete the operation.
Property
This option enables you to view the picture properties.
• When previewing a picture, press the left soft key (Options)
to select Send MMS, Set Wall Paper, Delete, Rename,
Protect/Unprotect, Property to continue.
9.3.2 Music
This option enables you to manage your downloaded rings.
After accessing this option, the phone will display the ring list. Press the
key to scroll through the ring list and listen to a sample of each.
• If no downloaded ring tone has been stored, the phone prompts Folder
Empty.
When a ring is highlighted, press the left soft key (Options) to

Organizer -> My folder
137
select from the following operations:
Set As Incoming Call Tone
This option enables you to set this ring as the incoming call tone.
Set As Group Tone
This option enables you to set this ring as the tone of a group category.
After accessing this option, press the key to highlight a group
category, and then press the left soft key (Ok) to complete the
operation.
Send MMS
This option enables you to send this ring by MMS (Refer to section “7.2.1
New”).
Delete
This option enables you to delete this ring.
After accessing this option, the phone prompts Delete?, press the left soft
key (Ok) to complete the operation.
Rename
This option enables you to change the name of the ring.
After accessing this option, edit a new name for the ring, and then press
the left soft key (Ok) to complete the operation.
Protect
This option enables you to protect the ring from being deleted.
• After the ring is protected, this option is Unprotect. Selecting
Unprotect enables you to cancel protecting the ring.
Delete Unprotect
This option enables you to delete all the unprotected rings in My Folder.

WAP -> Home
138
After accessing this option, the phone prompts Delete?, press the left soft
key (Ok) to complete the operation.
Property
This option enables you to view the ring properties.
9.3.3 Memory Status
This option enables you to view the occupied space and free space in My
Folder.
10. WAP
àWAP
œ Note: This function requires network support, and the service
subscription. For availability and subscription to this function,
contact your local service provider.
œ Note: The handset does not support GPRS when making a VoLAN
call.
œ Note: You must set the network configuration before connecting with
the network (refer to section “10.6 Settings”).
• In standby state, press the key can access the main menu of
WAP by shortcut.
10.1 Home
• You can set the most frequently visited website as the home page in
order to access the website quickly.
If your phone is in connection with the network, after accessing this option,
the phone will display the network connecting animation and then display

WAP -> Enter URL
139
the home page. Press the left soft key (Options) to select
Refresh, Back, Stop, Disconnect, Image, Enter URL, Add to favorites,
Set as homepage, History, Favorites, Home, Certificate or Main Menu
to continue.
• If no home page has been set, the phone prompts No home page is
configured when accessing this option.
10.2 Enter URL
1. After accessing this option, press the key to highlight the input
box, and then press the key.
2. Enter a URL and the name of the URL, press the left soft key
(Ok).
3. Press the left soft key (Options) to select from the following
options:
Standard phrases
This option enables you to select some standard phrases to speed up
the input process, such as http://, www, com and so on.
Add To Favorites
This option enables you to add the entered URL to favorites list.
Set as Homepage
This option enables you to set the entered URL as home page.
10.3 Favorites
This option enables you to manage the URLs in the favorites list.
After accessing this option, press the key to highlight the desired

WAP -> PUSH Message
140
URL, and then press the OK key to load this URL.
When an URL is highlighted, press the left soft Key (Options) to
select from the following options:
Load URL
This option enables you to load the URL.
Edit
This option enables you to edit the URL (Refer to section “10.2 Enter
URL”)
Add New
This option enables you to add a new URL to the favorites list (Refer to
section “10.2 Enter URL”).
Delete
This option enables you to delete the URL.
After accessing this option, the phone prompts Delete?, press the left soft
key (Ok) to complete the operation.
Delete All
This option enables you to delete all the URLs in the favorites list.
After accessing this option, the phone prompts Delete All?, press the left
soft key (Ok) to complete the operation.
10.4 PUSH Message
• The phone can receive PUSH messages (service messages) sent by
your service provider. If there are none, the phone prompts PUSH
inbox is empty.
This option enables you to manage the PUSH messages that your phone
received.

WAP -> History
141
After accessing this option, press the key to highlight the desired
PUSH message, and then press the key to read the content of the
PUSH message.
When a PUSH message is highlighted, press the left soft key
(Options) to select from following options:
Read Message
This option enables you to read the content of the PUSH message.
Load URL
This option enables you to load the URL that sent the PUSH message.
Add To Favorites
This option enables you to add the URL that sent the PUSH message to
the favorites list.
Delete
This option enables you to delete the PUSH message.
After accessing this option, the phone prompts Delete?, press the left soft
key (Ok) to complete the operation.
Delete All
This option enables you to delete all the PUSH messages.
After accessing this option, the phone prompts Delete All?, press the left
soft key (Ok) to complete the operation.
10.5 History
• The phone can store the web pages you have visited. If none, when
accessing this option, the phone prompts History is empty.
This option enables you to manage the URLs in the history list.

WAP -> Settings
142
After accessing this option, press the key to highlight the desired
URL, and then press the key to load the URL.
When a URL is highlighted, press the left soft key (Options) to
select from following options:
Load URL
This option enables you to load the URL.
Delete
This option enables you to delete the URL.
After accessing this option, the phone prompts Delete?, press the left soft
key (Ok) to complete the operation.
Delete All
This option enables you to delete all the URLs in the history list.
After accessing this option, the phone prompts Delete All?, press the left
soft key (Ok) to complete the operation.
10.6 Settings
œ Note: The implementation of network setting requires network
support. Contact your local service provider for assistance.
This option enables you to perform various network settings.
10.6.1 Profiles
After accessing this option, press the key to highlight the desired
profiles, and then press the left soft key (Options) to select from
the following options:
WAP -> Settings
143
Set As Active
This option enables you to activate the profiles.
Edit
This option enables you to edit the information of the profiles.
After accessing this option, press the key to highlight the desired
input box, and then press the key. Edit the information, and press
the left soft key (Ok) to complete the operation.
Add New
This option enables you to add a new profile.
After accessing this option, press the key to highlight the desired
input box, and then press the key. Enter the information, and press
the left soft key (Ok) to complete the operation.
Delete
œ Note: The activated profiles cannot be deleted.
This option enables you to delete the profiles.
After accessing this option, the phone prompts Delete?, press the left soft
key (Ok) to complete the operation.
10.6.2 Data Connections
After accessing this option, press the key to highlight the desired
data connection, and then press the left soft key (Options) to
select from the following options:

WAP -> Settings
144
Edit
This option enables you to edit the information of the data connection.
After accessing this option, press the key to highlight the desired
input box, and then press the key. Edit the information, and press
the left soft key (Ok) to complete the operation.
Add New
This option enables you to add a new data connection.
After accessing this option, press the key to highlight the desired
input box, and then press the key. Enter the information, and press
the left soft key (Ok) to complete the operation.
Delete
œ Note: The activated profile’s data connection cannot be deleted.
This option enables you to delete the profiles.
After accessing this option, the phone prompts Delete?, press the left soft
key (Ok) to complete the operation.
10.6.3 Cache
This option enables you to activate/deactivate cache function or clear
cache.
10.6.4 Cookies
This option enables you to activate/deactivate cookies function or clear
cookies.

WAP -> Settings
145
10.6.5 Display Settings
After accessing this option, select from the following options:
Graphics
This option enables you to activate/deactivate the graphics display
function.
Scroll Speed
This option enables you to select the speed for scroll. Four options are
available: Slow, Medium, Fast, Page.
Reset Settings
After accessing this option, the phone prompts Reset Settings?, press the
left soft key (Ok) to complete the operation.
10.6.6 Security
This option enables you to activate/deactivate the security warning
function and view the security certificate.
10.6.7 Statistics
This option enables you to view the statistics of total sent and total
received.

STK -> Settings
146
11. STK
àSTK
Your SIM Card may have provided some additional services, and you can
use these services according to this function list. This function list will be
shown only when it is supported by your SIM Card. The names and
contents of the functions are determined by the services that are
available.
œ Note: For whether you can use the SIM Card services, prices and
other information, please consult your SIM Card distributor, such as
network operator, service provider and other distributors. Using
these services may require sending messages or making calls, and
you may have to pay the charges.
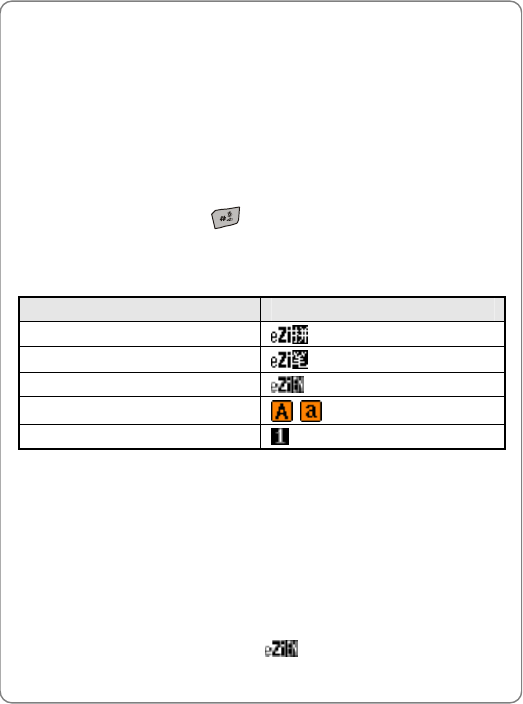
Input Method
147
12. INPUT METHOD
This phone supports Pin Yin, Stroke, English, Letter and Digit input
methods, in order to provide easy input for letters and digits in text edit
interface.
12.1 Switch Input Method
In text edit interface, press to switch between the activated input
methods (Refer to Section “8.4.2 Input method”) and the Digit input
method. The current input method indicator will be displayed at the upper
right corner of the screen.
Input Method Indicator
Pin Yin
Stroke
Predictive English
Letter
Digit
12.2 Pin Yin and Stoke
These two input methods are only used for inputting Chinese characters.
12.3 Predictive English
The phone supports intelligent English input and word association,
speeding up the input process.
Switch the input method to English; will be displayed at the upper
right corner of the screen.

Input Method
148
1. To enter letters, press ~ one time for the letters
labeled on the respective key; a word matching the input letters will be
displayed automatically.
• When you enter the first letter of any English word, “>” will be displayed
(except and ). As you input letters, the phone will
automatically associate the matched English words.
• If the letter input does not correspond with any English word in the
phone’s dictionary, the key press will have no response.
• Press the key repeatedly to delete letters from right to left.
2. Select a word and change upper/lower case: If the word displayed is
not desired, press to scroll through other word alternatives.
Press to switch between upper and lower cases; press once to
capitalize the initial letter; press twice to capitalize all letters; press
three times to return letters to lower case.
3. Enter the selected word: Press the left soft key (Ok) or the
key to confirm the selected word.
4. Enter a space: When no word is waiting to be selected, press
to enter a space.
5. Enter symbols: When no word is waiting to be selected, press the
key to display the symbol list. Press the Key to highlight the
intended symbol, and then press the left soft key (Ok) or the
key to confirm the selected symbol. When no word is waiting to
Input Method
149
be selected, press the key repeatedly can also enter a common
symbol.
• Press to switch input methods; press to move the cursor.
Press the key to delete the character to the left of the cursor.
Press and hold the key to delete all characters.
12.4 Letter
Switch to Letter input method; (lower case)/ (upper case) will be
displayed at the upper right corner of the screen.
1. Enter a letter: Press ~ to enter the corresponding letter
labeled on the respective key. To input a letter, press the
corresponding key repeatedly until the letter appears.
For example: if you press repeatedly, the following letters
appear in turn: a-b-c (lower case) or A-B-C (upper case).
• Press the key to delete the letter
2. Enter the next letter: After you have entered the intended letter, press
any other key on the keypad to input the next letter. If the next letter
and current letter share the same key, wait for a moment until the
cursor moves to the right side of the current letter, and then enter the
next letter.
3. Enter a space: Press to enter a space.
4. Enter symbols: After you have entered the intended letter, press the
key to display the symbol list. Press the Key to highlight

Input Method
150
the intended symbol, and then press the left soft key (Ok) or
the key to confirm the selected symbol. When no word is waiting
to be selected, press the key repeatedly can also enter a
common symbol.
• Press to switch input methods; press to move the cursor.
Press the key to delete the character to the left of the cursor.
Press and hold the key to delete all characters.
12.5 Digit
Switch to digit input method; will be displayed in the upper right
corner of the screen.
To enter digits, press the corresponding number keys ~ .
Press to switch input methods.
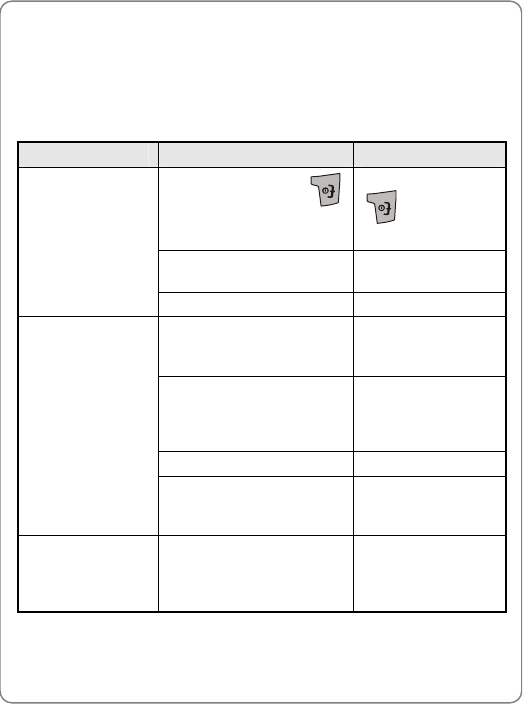
Troubleshooting
151
13. TROUBLESHOOTING
When using this phone, if you run into malfunctions, please refer to the
following troubleshooting techniques before requesting help:
Symptom Diagnosis Solution
Have you pressed
and held it for more than 2
seconds?
Press and hold
for more than
2 seconds.
Is the battery connector
reversed? Insert the
connector correctly.
The phone
cannot be
switched on
Is the battery low? Charge the battery.
Is there sufficient GSM
signal strength When in
only GSM mode?
Move to another
place for better
signal strength.
Is the phone in Only WiFi
mode? Choose Only GSM
mode or Dual
Attach mode
instead.
Is the keypad locked? Unlock the keypad.
Cannot make a
GSM call
Is the phone number
correct? Enter the correct
number to make
the call.
Cannot make a
WiFi call
Is the phone in Only GSM
mode? Choose Only WiFi
mode or Dual
Attach mode
instead.
Troubleshooting
152
Symptom Diagnosis Solution
Is the phone connected to
an AP and registered with
the service network when
in Only WiFi mode?
Ensure the phone’s
WiFi settings are
correct when in
Only WiFi mode.
Is the phone outside of
the AP’s range or is there
sufficient WLAN signal
strength when in Only
WiFi mode?
Move closer to the
AP for better signal
strength when in
Only WiFi mode.
Have you pressed
to make a WiFi call when
in Dual Attach mode?
Press to
make a WiFi call
when in Dual
Attach mode.
Is the keypad locked? Unlock the keypad.
Is the phone number
correct? Enter the correct
number to make
the call.
Is the ring mode of the
current profile set to
Vibration or Mute?
Select different ring
mode or different
profile.
No ring
Have you activated the
Silent profiles by pressing
and holding in
standby state?
In standby state,
press and hold
again.
Strong
interference noise
during call; or call
Is there an obstacle
nearby that is preventing
signals from passing?
Move to another
area.

Troubleshooting
153
Symptom Diagnosis Solution
interrupted Is there data download
via the AP, which affects
your phone’s signal
quality?
Connect to another
AP or stop the data
download.
Is the charger properly
connected to the phone? Connect the
charger and phone
correctly.
The battery
cannot be
charged (The
battery indicator
bar does not
scroll)
Is the charger connected
to a 100-240V AC wall
outlet?
Connect the
charger to a
100-240V AC wall
outlet correctly.
How to know the
GF210 phone’s
IP address and
MAC Address?
Have you accessed the
Network Information
option?
Refer to Section
“6.1.4 Network
Information”
Is SSID broadcasting
disabled on your AP? Enable your AP’s
SSID broadcasting.
Net Search didn't
find my AP
Is the phone within range
of your AP? Move to your AP’s
range.
If the malfunction symptoms are not listed in the above table, or the
corresponding solution is invalid, please contact your local service
provider.
For Technical Support and Assistance please visit the website at:
http://userforums.utstar.com (Free Registration Required)
You can find the latest User Manual at:
http://www.utstar.com/Solutions/Phones/WiFi/