UltraVision Security Systems CMD2A-F2 ultrawideband surveillance system User Manual UltraSensor manual 2 17 09
UltraVision Security Systems, Inc. ultrawideband surveillance system UltraSensor manual 2 17 09
User Manual
UltraVision Security, Inc. • Salem, New Hampshire 03079 USA • Tel 866.374.9732 • 603.685.0303 • Fax 603.898.1840
www.UltraVisionSecurity.com • info@UltravisionSecurity.com
Rev 031109
1
UltraSensor Security System User Manual
Table of Contents
Product Overview..........................................................................................................................................................2
Server-24.......................................................................................................................................................................4
Server-8.........................................................................................................................................................................5
USB connection ...................................................................................................................................................6
Ethernet connection .............................................................................................................................................6
Installation Guide ..........................................................................................................................................................7
Ethernet Cable Installation...................................................................................................................................7
CMD Cable Assembly .......................................................................................................................................11
Wire Diagram ....................................................................................................................................................12
Configuration Manager Software................................................................................................................................14
Start-up ..............................................................................................................................................................14
Create /Edit Users..............................................................................................................................................16
Change Password...............................................................................................................................................17
Delete User ........................................................................................................................................................17
Configure Sensors..............................................................................................................................................18
Delete a sensor...................................................................................................................................................19
Configure System ..............................................................................................................................................20
Set Map Scale ....................................................................................................................................................21
Configure Sensor using Monitor Screen............................................................................................................21
Configure Contacts ............................................................................................................................................22
Contact Closure Detail.......................................................................................................................................23
Monitor Screen ..................................................................................................................................................23
View Log File....................................................................................................................................................25
Configure Alarm Mass Threshold (Sensitivity).................................................................................................26
Logout................................................................................................................................................................26
Software Updates...............................................................................................................................................26
Sensor Specifications...................................................................................................................................................27
Integrating the CMD-Server 24 with your network.....................................................................................................28
Changing the CMD-Server IP address...............................................................................................................28
Accessing the CMD-Server over a WAN..........................................................................................................29
Integrating the CMD-Server 8 with your network.......................................................................................................30
Changing the CMD Server-8 IP address............................................................................................................30
Accessing the CMD-Server over a WAN..........................................................................................................30
Remote Switch Device................................................................................................................................................32
Installation .........................................................................................................................................................32
Running the Application....................................................................................................................................33
Removing the Application .................................................................................................................................35
Dry contact switch specifications for Server-8............................................................................................................36
Dry contact switch specifications for Server-24..........................................................................................................37
Problem Solving..........................................................................................................................................................38
Install MS .NET framework and Java .........................................................................................................................39
Allow a remote PC to fully communicate with a Server-8..........................................................................................40
Release 10.9 Notes ......................................................................................................................................................41
Upgrade Process ................................................................................................................................................41
Graphical User Interface (GUI) Changes...........................................................................................................41
Server Changes ..................................................................................................................................................42
Technical Support........................................................................................................................................................44
Contact information.....................................................................................................................................................44
®
UltraVision Security, Inc. • Salem, New Hampshire 03079 USA • Tel 866.374.9732 • 603.685.0303 • Fax 603.898.1840
www.UltraVisionSecurity.com • info@UltravisionSecurity.com
Rev 031109
2
Product Overview
The CMD-2 motion sensor can be used in a wide variety of applications. The primary purpose of the
sensor is to detect motion and provide additional information about the moving target. The sensor is
designed to take advantage of one of the primary features of its technology, which is its ability to see
through earth, concrete and other standard building materials. Other motion sensors need a window
onto the world, the CMD-2 does not, and it can be completely buried where it is protected from
tampering and from the environment.
One application of the CMD-2 is to protect buildings and premises from entry by unknown persons
or vehicles. Used in conjunction with CCTV systems the CMD-2 can establish a powerful barrier to
identify and track unknown intruders long before they enter a building. Sensors may be placed almost
one quarter mile from the security center, giving the phrase ‘detection beyond the fence’, whole new
meaning. Longer distances are possible with fiber optic or wireless Ethernet connection. Because the
CMD-2 is buried, intruders cannot see or disable the sensor. False alarms are minimal.
The sensor can be buried up to eight inches beneath the surface of earth, roads or walkways. The
material covering the sensor can be concrete, granite, earth, bricks, etc. The only limitation is that the
sensor cannot be covered with sheet metal or a dense metal mesh material.
The radial range of the sensor is 22 to 25 feet (6.5 to 8 meters) and it covers an elliptical pattern on
the ground (or approximates a hemisphere in 3D). It is able to detect motion from any direction.
Therefore with a fifty foot diameter of coverage multiple sensors can form a ring or fence around a
facility. When a sensor detects motion an alarm signal is generated and recorded. As an option, a
designated CCTV camera can point in the direction of that sensor and record the target and its
activity.
Each sensor is powered through its Ethernet connection (standard CAT-5 burial cable). The
connecting cable from the sensor to a concentrator box (CB-06) and then to the server can be up to
400 feet (123 M) long. Longer cable distances requires daisy-chaining concentrator boxes (CB-06).
Up to four concentrator boxes can be daisy chained resulting in a total cable distance from server to
sensor of 1200 feet (393M). A separate power cable is required for daisy-chained concentrator boxes
(hubs). See the attached diagrams for these two connection methods. Note that Ethernet has a
limitation of 300 feet (91 meters)maximum between hubs. The use of remote power sources can
increase the distance to any desired range.
The two connection methods of daisy-chain and direct connection can be used together in a single
security system. The limitations are defined by the number of sensors that can be powered by the
server. Three standard servers are available; they are designed to control, monitor and power up to
8, 24 and 48 CMD sensors. Custom systems can be designed as required.
UltraVision Security, Inc. • Salem, New Hampshire 03079 USA • Tel 866.374.9732 • 603.685.0303 • Fax 603.898.1840
www.UltraVisionSecurity.com • info@UltravisionSecurity.com
Rev 031109
3
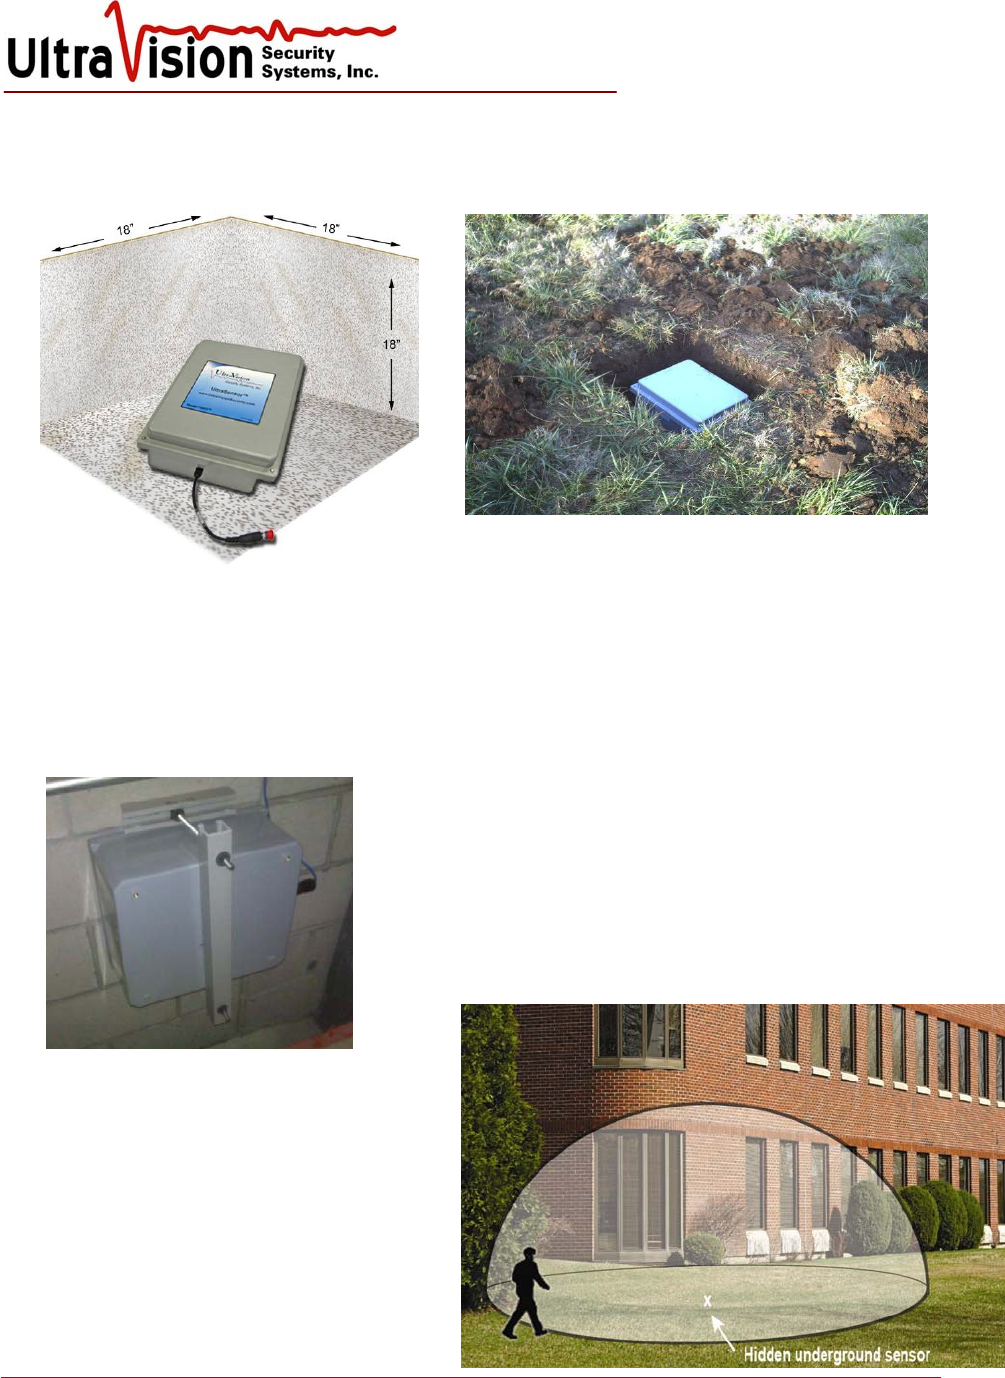
The following diagram shows how these sensors are buried in a typical installation. Signal and power
to the sensor is supplied from a buried Ethernet wire which goes to the server at the security
command and control console.
A hole is dug approximately 18 inches by 18 inches (45cm x 45cm) by about eighteen inches (45 cm)
deep. A four inch (10 cm) layer of sand is placed in the hole and the sensor is placed on top of the
sand. The sensor is then covered with sand about one inch 2.5 cm) deep. Earth (topsoil) is then used
to fill the hole completely or if the sensor is under pavement then asphalt or concrete is used to fill
the hole to the existing grade. Note that highly conductive soils such as wet clay covering the sensor
can reduce the detection range.
The sensor can be wall mounted
as shown.
The resulting side view of the installation
complete with detection field is shown
(right).The detection hemisphere has a
diameter of 50 feet (15m).
UltraVision Security, Inc. • Salem, New Hampshire 03079 USA • Tel 866.374.9732 • 603.685.0303 • Fax 603.898.1840
www.UltraVisionSecurity.com • info@UltravisionSecurity.com
Rev 031109
4
In very cold regions or where clay soils may prohibit drainage of water from the CMD installation,
then holes should be drilled another two feet into the soil and then filled with pea gravel to permit
better drainage. This type of installation will also provide better protection from freeze-thaw cycles
over time.
Server-24
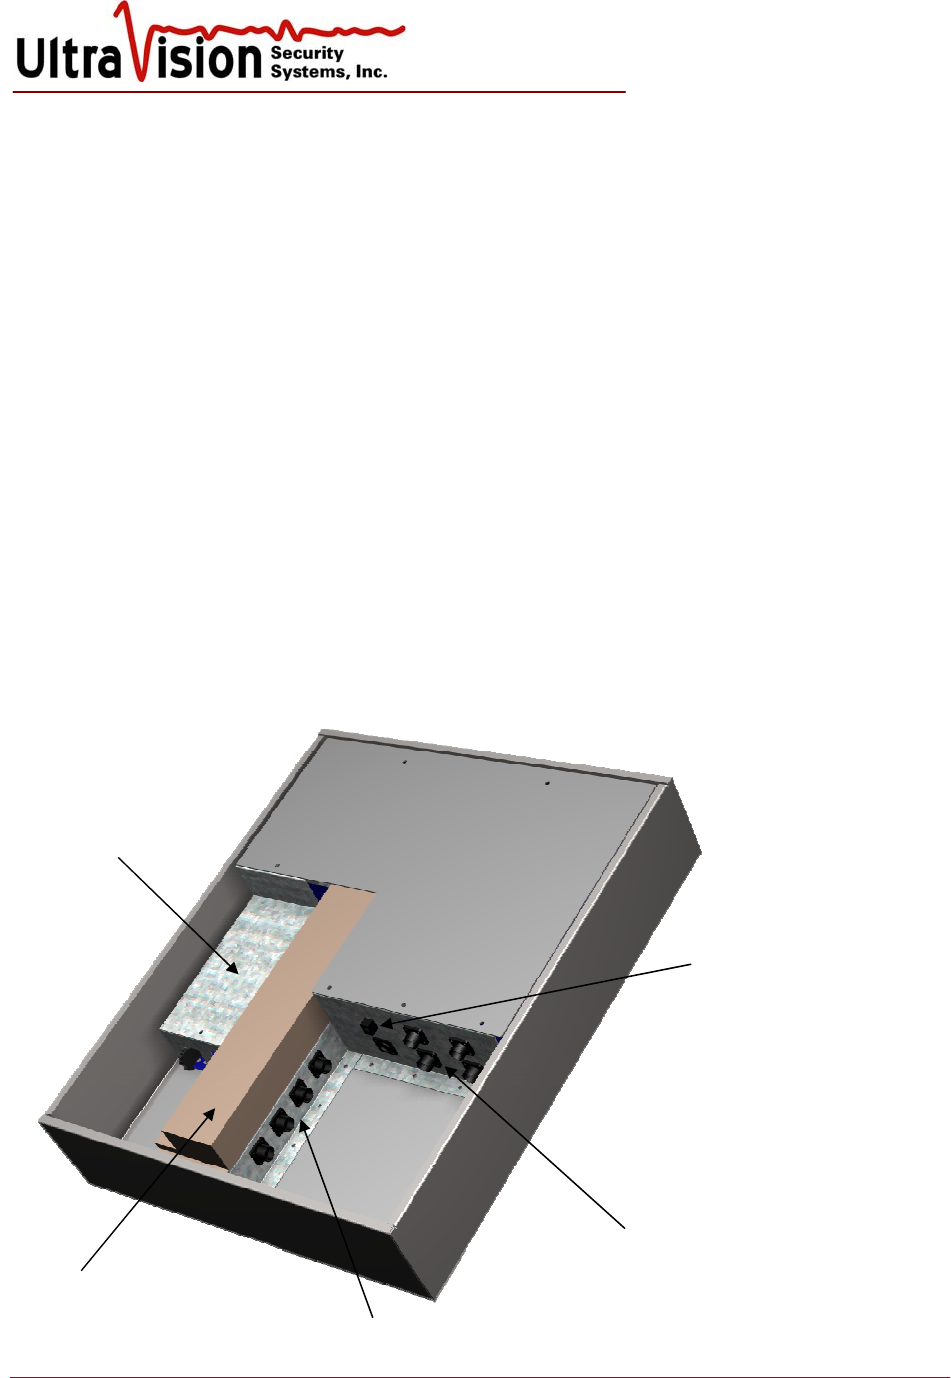
The CMD Server box provides the power and Ethernet connections to the CMD sensors. Up to 24
sensors can be connected to and powered from the basic server (shown below). Other servers are
available with additional capacity and dry switches. Dry contact connections are provided for each
sensor so that alarms can be turned on and/or CCTV camera presets can be utilized. The server also
provides the gateway to the security network - and the Internet. It is lockable and made of steel,
designed for wall mounted applications.
The server logs all alarms and monitors the sensor ‘heartbeat’ to insure each one is working. The
internet connection allows users with the proper password to access the information from any
location.
The following diagram shows the primary connections that can be made to the Server.
AC Power
Direct Connections (4)
Daisy Chain Connections (2)
Dry Switch
Connections (24)
Internet Connection
UltraVision Security, Inc. • Salem, New Hampshire 03079 USA • Tel 866.374.9732 • 603.685.0303 • Fax 603.898.1840
www.UltraVisionSecurity.com • info@UltravisionSecurity.com
Rev 031109
5
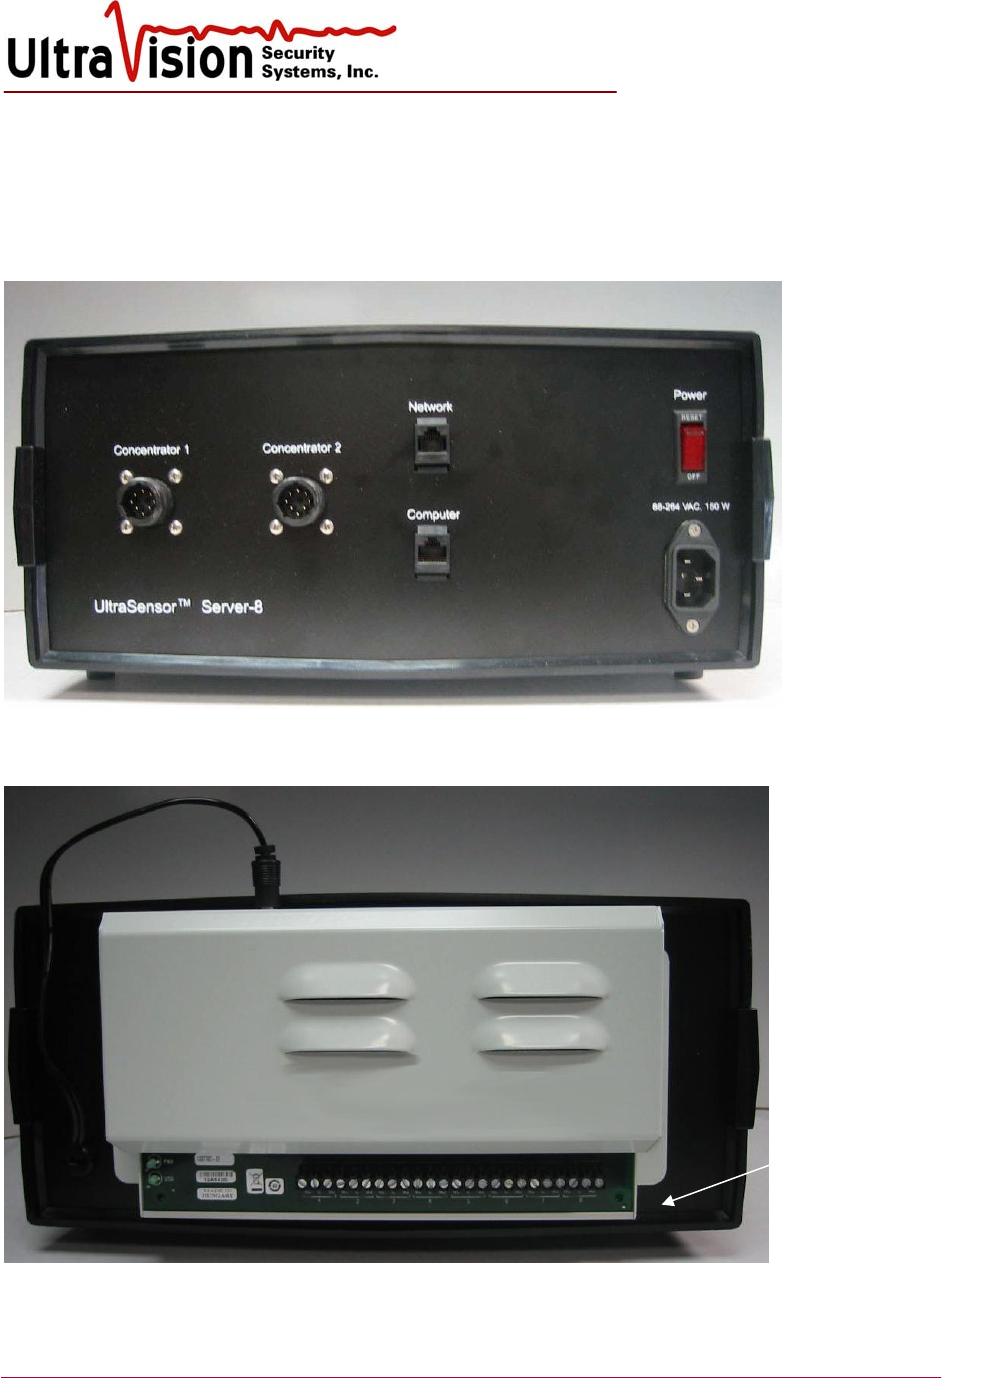
Server-8
The CMD Server-8 is a laptop computer system that connects up to 8 sensors to collect and log data.
This version of the Server is more compact and appropriate for smaller security installations. The
CMD Server-8 includes a laptop with all the software needed to run the system.
Front view
Back view
Dry switch
contacts- 8 sets
UltraVision Security, Inc. • Salem, New Hampshire 03079 USA • Tel 866.374.9732 • 603.685.0303 • Fax 603.898.1840
www.UltraVisionSecurity.com • info@UltravisionSecurity.com
Rev 031109
6
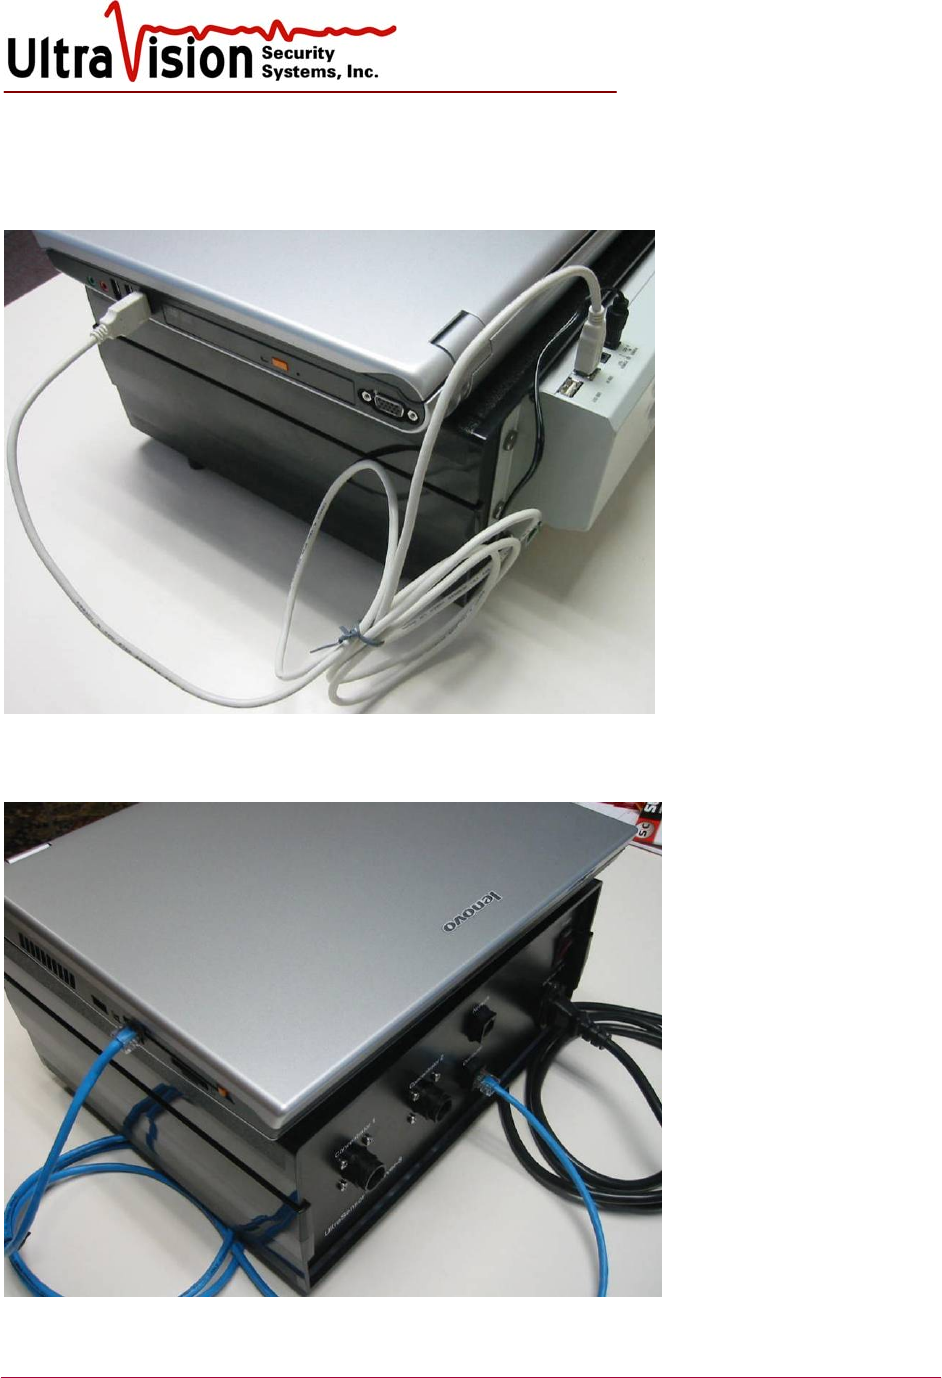
USB connection
Ethernet connection
UltraVision Security, Inc. • Salem, New Hampshire 03079 USA • Tel 866.374.9732 • 603.685.0303 • Fax 603.898.1840
www.UltraVisionSecurity.com • info@UltravisionSecurity.com
Rev 031109
7
Installation Guide
Ethernet Cable Installation
Standard CAT5 Ethernet cable is used to make all connections from the sensors to the concentrator
boxes and from the concentrator boxes to the Server.
Buriable Ethernet cable should be used in all cases where conduit is not available. This type of cable
is rugged, waterproof and rodent proof.
If conduit is available then CAT5 plenum Ethernet cable can be used. Plenum cable has solid wires
which carry the signal and power over longer distances than stranded wire cables. Note that when
installing the solid wire plenum cable it is very important not to get kinks in the cable. The cable
should be carefully unrolled during installation. Kinks in the wire can cause breaks and internal
signal reflections which will degrade the signal from the sensor.
The Ethernet cable may be buried at any depth desired. Typically the depth should be 3 to 4 inches (8
to 10 cm) to avoid most problems that may come from changes to the ground surface. In addition to
trenching there are specialized tools to make cable installation fast and less disruptive to the ground
surface. Companies who install fiber optic cable for Internet applications have this equipment.
Typically once the cable run length is measured it is best to add another 5% to the measured length.
This extra distance will take care of small variations that might have been missed.
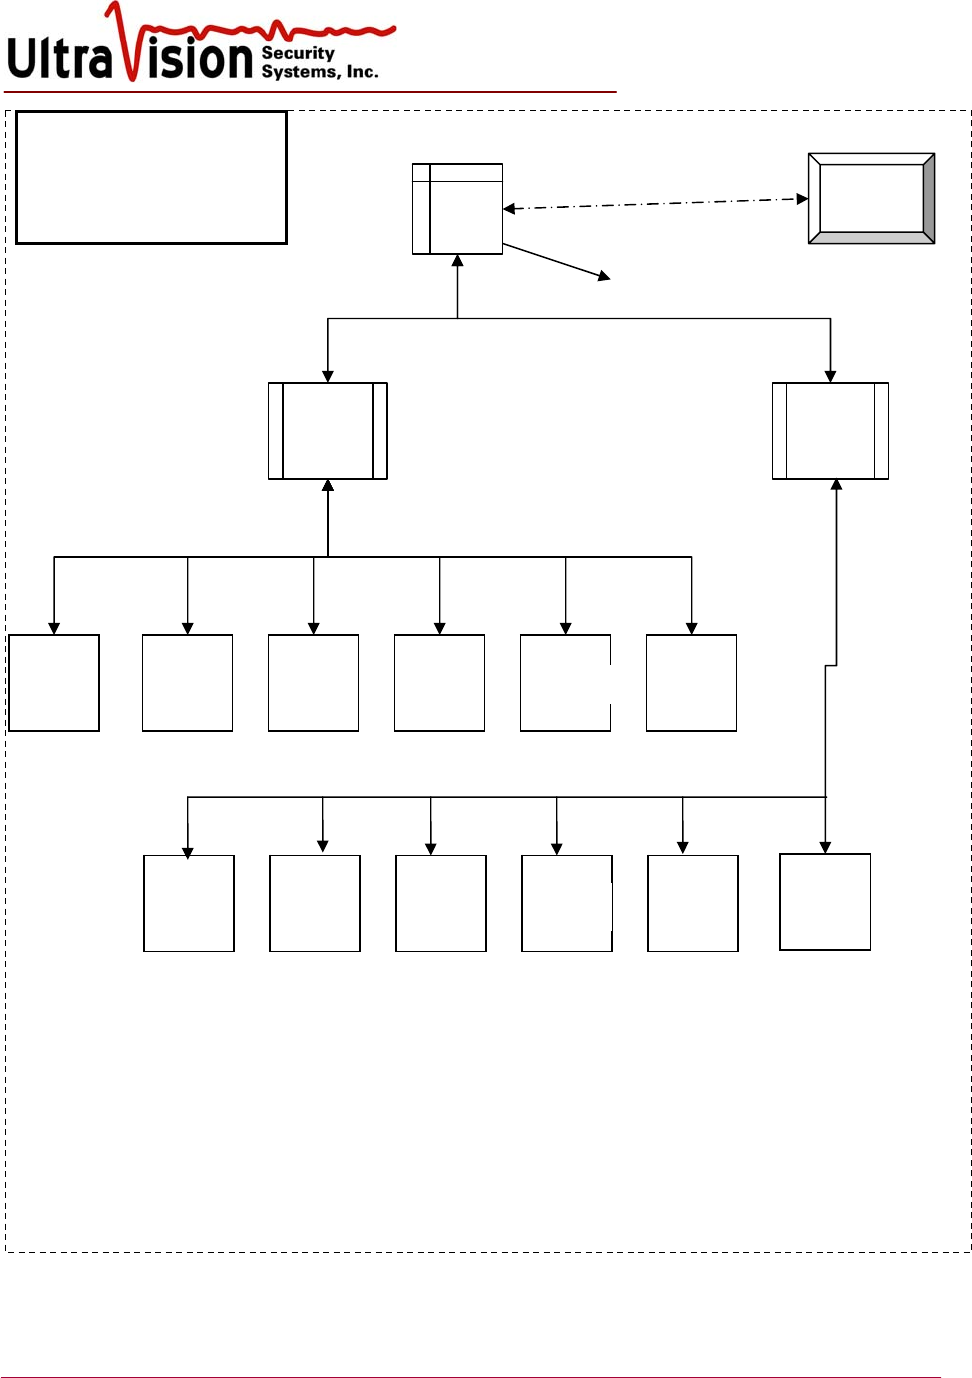
The following diagram shows the direct connection method of connecting Concentrator hubs to the
Server and defined cable length limitations. Cable length limits are due to Ethernet transmission
limits and power transmission limits.
UltraVision Security, Inc. • Salem, New Hampshire 03079 USA • Tel 866.374.9732 • 603.685.0303 • Fax 603.898.1840
www.UltraVisionSecurity.com • info@UltravisionSecurity.com
Rev 031109
8
SERVER
and system
CB-06 to CMD
Max distance 67m
Concentrator Box
Connect 1 to 6
CMDs CB-06 to CMD
Max distance 67m
Server to
CB
-
06
Server to
CB
-
06
Concentrator
Box
Network
or Internet
Laptop
CB-06
CMD
NOTES:
Each UltraSensor (CMD) has a separate Ethernet cable that connects it to the CB-06
Concentrator Box. Power is supplied through the Ethernet cable.
Each Concentrator Box (CB-06) has a separate Ethernet cable that connects it directly to the
SERVER and power, all through the Ethernet cable (POE).
The SERVER also has a dry switch output (twisted pair) for each CMD sensor
A maximum of 6 CB-06 boxes and 24 CMD may be connected. (8 CMDs max for Server8)
Maximum cumulative cable distance from the SERVER to any CMD sensor is 150m (465 feet)
Wireless and F/O may be used in place of Ethernet cable . Power is then supplied from an
indirect source.
UltraSensor™
Security system using
direct connection to
each concentrator box
Dry switch output for each CMD
CB06
CMD CMD CMD CMD CMD
CMD CMD CMD CMD CMD
C
MD
UltraVision Security, Inc. • Salem, New Hampshire 03079 USA • Tel 866.374.9732 • 603.685.0303 • Fax 603.898.1840
www.UltraVisionSecurity.com • info@UltravisionSecurity.com
Rev 031109
9
Server to
CB-06
SERVER
and system
p
owe
r
CB-06 to
CB-06
CB-06 to
CB-06
CB-06 to
CB-06
UltraSensor™
Security system using
daisy-chain connection of
concentrator boxes
Laptop
CB-06
Network
or Internet
NOTES:
Each UltraSensor (CMD) has a separate Ethernet cable that connects it to the CB-06 Concentrator Box.
Power is supplied through the Ethernet cable (POE).
Each Concentrator Box (CB-06) has a separate Ethernet cable AND a power cable (both parallel cables
shown by dashed line) that connects it to another CB-06 Box and finally to the SERVER and Power
The SERVER also has a dry switch output (twisted pair) for each CMD sensor.
A maximum of 4 CB-06 Boxes can be in a single daisy-chain from the SERVE .
Maximum cumulative cable distance from the SERVER to any CMD sensor is 1,200 feet (390m).
CB-06
CB-06
CB
-
06
CB-06 to CMD
Max distance 67m
CB-06 to CMD
Max distance 67m
CMDs
Connect 0 to 6
CMD sensors
Connect 0 to 6
CMD sensors
Connect 0 to 6
CMD sensors
Connect 1 to 6
CMD sensors
Dry switch output
for each CMD
CMDs
CMDs
CMDs
UltraVision Security, Inc. • Salem, New Hampshire 03079 USA • Tel 866.374.9732 • 603.685.0303 • Fax 603.898.1840
www.UltraVisionSecurity.com • info@UltravisionSecurity.com
Rev 031109
10
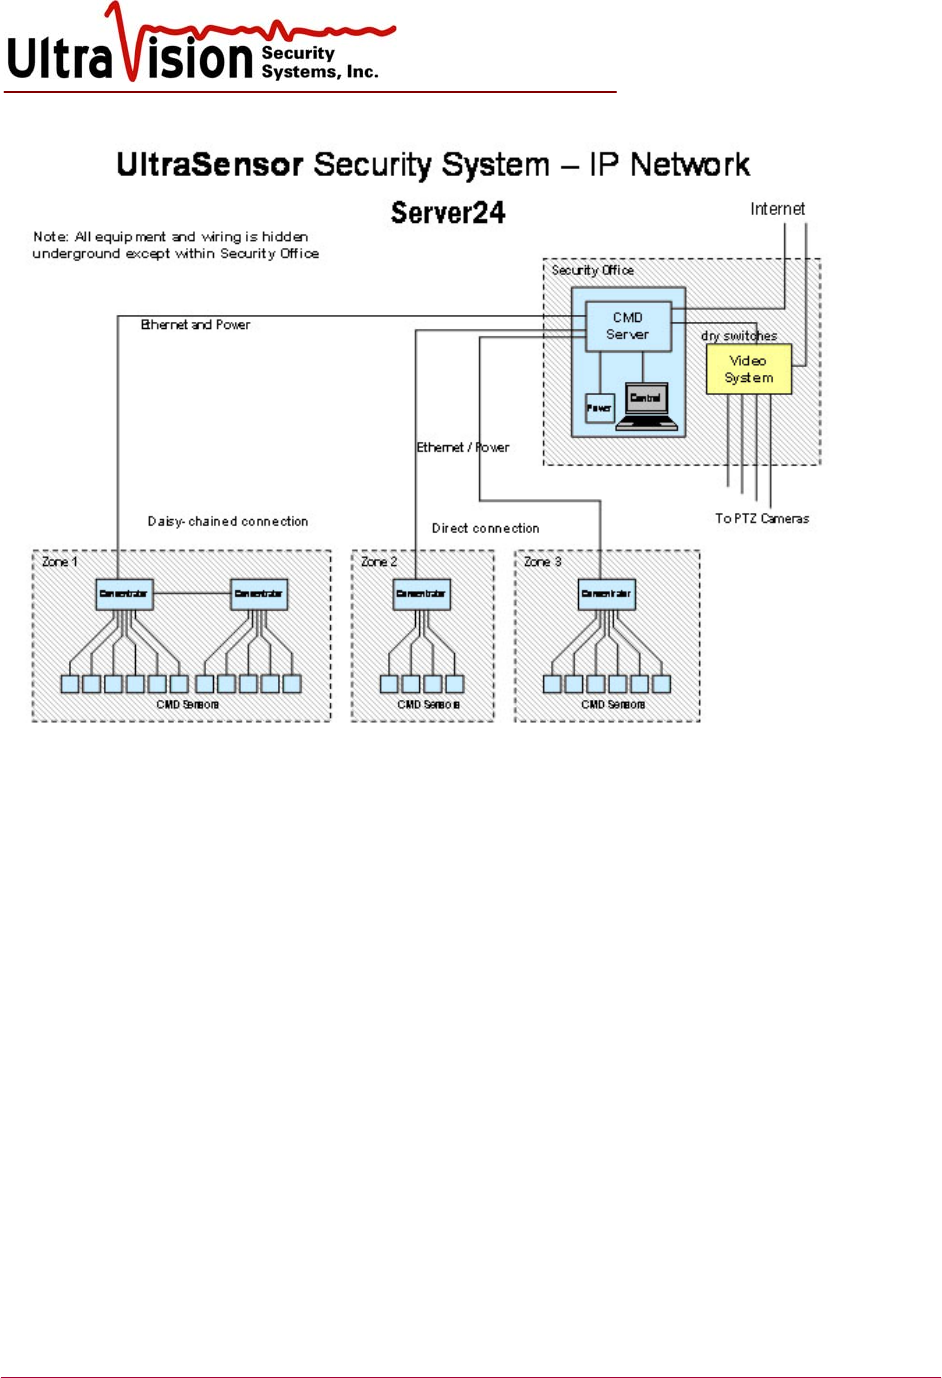
The diagram above shows a typical installation and how the devices are connected. The devices
colored blue are supplied by UltraVision. The units shown are:
• CMD motion sensors (21)
• Concentrator Hubs (4)
• CMD Server (1)
A Concentrator hub can have up to six sensors connected. Servers are available in three standard
sizes; 1. CMD Laptop Server can have up to two hubs connected and a maximum of 8 sensors
all direct connected.
2. CMD Server 24 can deploy 24 sensors.
3. CMD Server 48 can deploy 48 sensors.
4. Servers can be customized depending upon customer requirements.
The above limits are defined by power limits supplied through the server. When power is supplied
from independent sources, the sensor limit for each server is 250. Dry switches may be added as
required.
The dry switch outputs from the server can be connected to CCTV cameras in order to drive them to
their preset locations. The dry switch outputs can also be used to sound alarms, turn on lighting and
perform any other operation required in a standard security system.
UltraVision Security, Inc. • Salem, New Hampshire 03079 USA • Tel 866.374.9732 • 603.685.0303 • Fax 603.898.1840
www.UltraVisionSecurity.com • info@UltravisionSecurity.com
Rev 031109
11
CMD Cable Assembly
Cable is not supplied. Please follow the recommended specifications when sourcing the cable.
Cable Specifications:
Direct burial Direct burial, plenum CAT 5 or better grade, at least 4 twisted pairs
Protected burial
(conduit) CAT 5 or better plenum, at least 4 twisted pairs
Power cable 16 gauge, 3 conductor, shielded direct-burial (ref #8302S)
Tools:
Follow manufacturer’s instructions for assembling and using the DMC crimping tool M22520/1-01
and turret M22520/1-02.
Set up tool for gauge of wire and pins being used. For the most common 24 gauge wire, position
turret for 20 (red cylinder) and black wire size dial to 24.
To attach 9 pin Clipper connectors to cable ends:
1. Strip off approx 50mm (2”) of cable’s outer jacket.
2. Take note of wire colors and twisted pairs. Note: Your cable will have its own color
combinations. What is important is that it is wired the same on both ends and twisted pairs
stay together.
3. The backshell comes in 3 pieces, all in one bag. Assemble the two major pieces together (they
can only join one way) placing the washer between them. Tighten firmly. Excess force
will distort the washer.
4. Feed the cable through the assembled backshell, entering the compression nut end.
5. Strip off 4mm (5/32) of each wire. Place a pin into the hole of the crimping tool on the side
that has the yellow OSHA sticker. Insert a stripped wire into the pin.
6. Squeeze the handles of the crimping tool noting that it has a ratchet action. You must
complete the crimping action all the way so the handle will release.
Repeat steps 5 & 6 for all 8 wires.
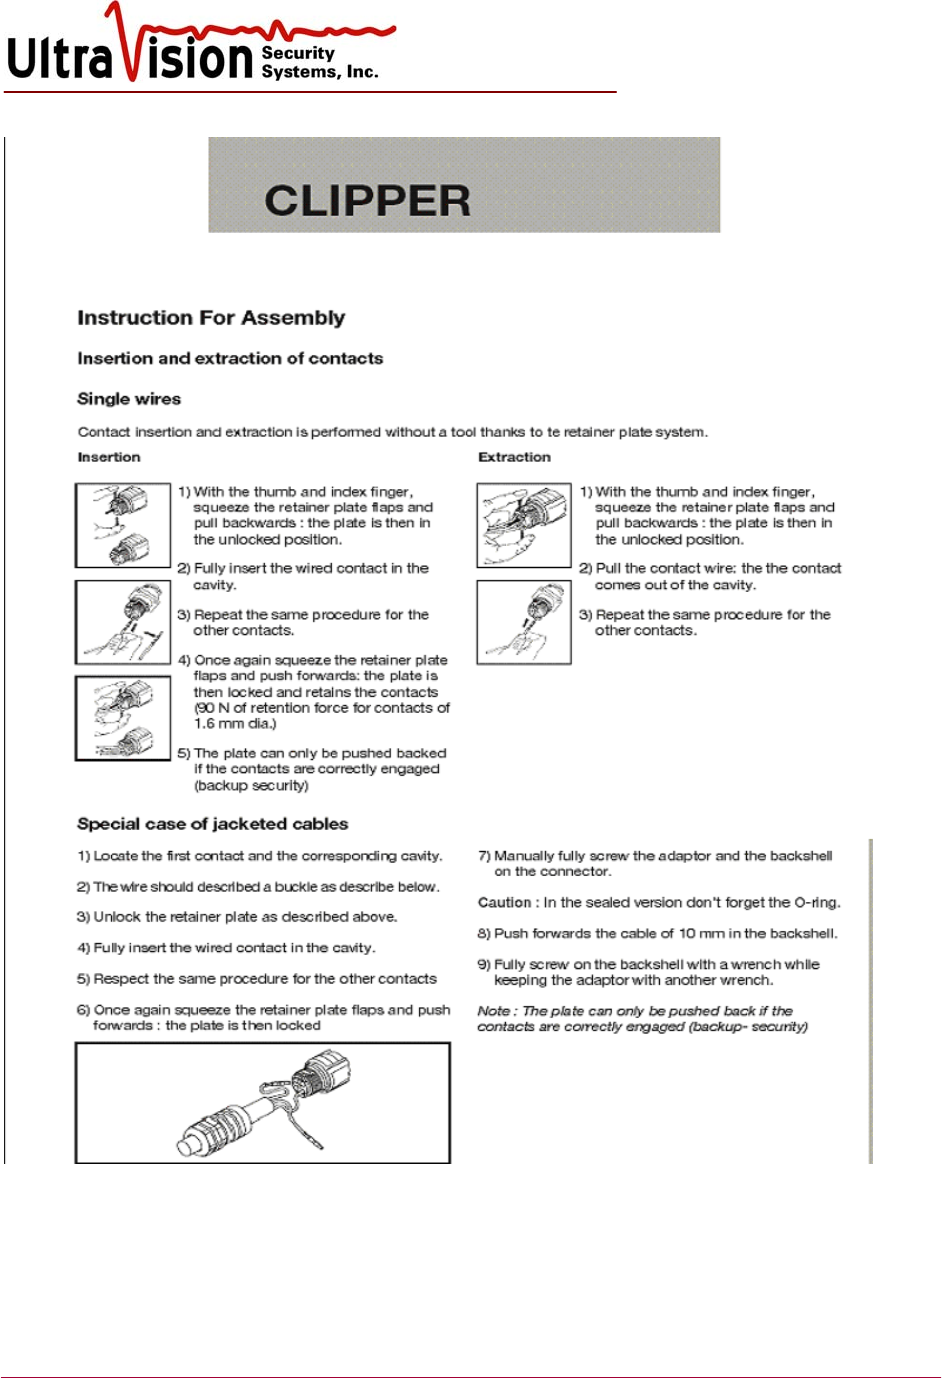
7. Release the red section from the black section of the Clipper connector by referring to the
Clipper Assembly instructions (Page 16).
8. The 2 pieces do not need to be fully separated, just the red part slightly extracted.
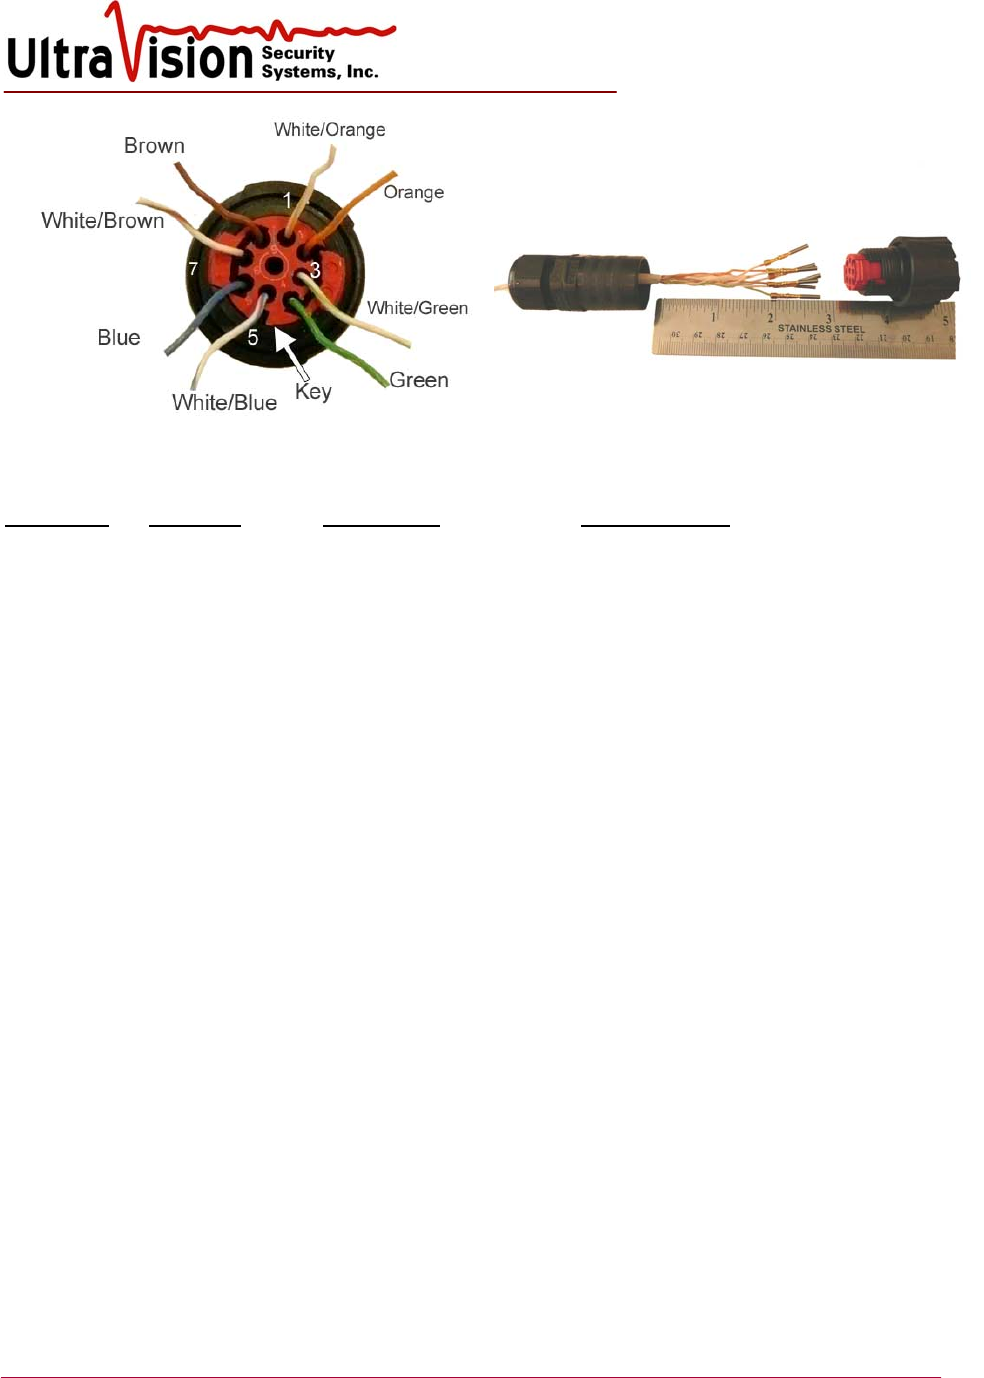
9. Insert pins noting the pin numbering/labeling on the red section
UltraVision Security, Inc. • Salem, New Hampshire 03079 USA • Tel 866.374.9732 • 603.685.0303 • Fax 603.898.1840
www.UltraVisionSecurity.com • info@UltravisionSecurity.com
Rev 031109
12
Wire Diagram
CB – Server CB - CMD Twisted Pairs UVSS cable color
ETXD-P ETXD-P 1 ------------------------------------- 1 White/Orange
ETXD-N ETXD-N 2 ------------------------------------- 2 Orange
ERXD-P ERXD-P 3 ------------------------------------- 3 White/Green
ERXD-N ERXD-N 4 ------------------------------------- 4 Green
48-55V RELAY-0 5 ----------------------------------- 5 White/Blue
48-55V RELAY-1 6 ----------------------------------- 6 Blue
GND 12-15V 7 ----------------------------------- 7 White/Brown
GND GND 8 ----------------------------------- 8 Brown
9 ----------- Not Used ----------- 9
Power Wire Diagram (for daisy-chained concentrator boxes)
48-55V Pos 1----------------------------------------1 Red
48-55V Neg 2----------------------------------------2 Black
GND 3----------------------------------------3 Blue
Shield 4----------------------------------------4 Shield
10. Squeeze tabs and return red section into black.
11. Screw backshell onto connector. It may be easier to temporarily connect to a CMD box while
installing the backshell.
12. Tighten compression nut of backshell to complete Clipper connector installation.
13. Using a multimeter or similar device, verify continuity of cable. Pin 1 of one end connects to
pin one of the other end, pin 2 to 2, pin 3 to 3, etc. Since the pins are not clearly numbered on
the Clipper connector, it is helpful to use the inner keyed tabs surrounding the pin holes or the
one indented pin for a reference.
If CB to CMD exceeds 110’/33m, crimp the pin 5 wire (wht/blu) with pin 7 (wht/brn), then crimp
the pin 6 wire (blu) with pin 8 (brn) at both ends. Do not use pins 5 and 6.
UltraVision Security, Inc. • Salem, New Hampshire 03079 USA • Tel 866.374.9732 • 603.685.0303 • Fax 603.898.1840
www.UltraVisionSecurity.com • info@UltravisionSecurity.com
Rev 031109
13
UltraVision Security, Inc. • Salem, New Hampshire 03079 USA • Tel 866.374.9732 • 603.685.0303 • Fax 603.898.1840
www.UltraVisionSecurity.com • info@UltravisionSecurity.com
Rev 031109
14
Configuration Manager Software
The configuration and operational software and user screens are the same for all server types.
The UVSS UltraSensor Configuration Manager Software/Laptop Server is capable of powering,
configuring, and monitoring up to eight UltraSensors and two Concentrator Boxes. (If more than 8
relay contacts are required, a FGRMA24 should be used in place of a FGRMA8.) Prior to powering
up any equipment, please make sure that all System components have been properly installed and
connections made. Please note the following:
• If two Concentrator Boxes are used in the System, any combination of UltraSensors may be
mixed on either Concentrator Box. Up to six Sensors are managed by one Concentrator Box.
• To return to the Windows desktop while the UltraSensor software is running, you can
minimize the UltraSensor program by pressing the Windows flag icon and “D”
simultaneously.
• If the graphic map of your facility did not come pre-installed, create a jpg image file of the
facility and save it to c: Inetpub\wwwroot\Images. Recommended image size is 460 x 680
pixels/inch.
Start-up
1. After all connections are made, power up the CMD Server-8 module (black box), using the
power switch on the front of the unit; then turn on the laptop. Upon laptop power up, double-
click the UltraVision icon to enable Windows XP loading. In the Windows Start Menu or
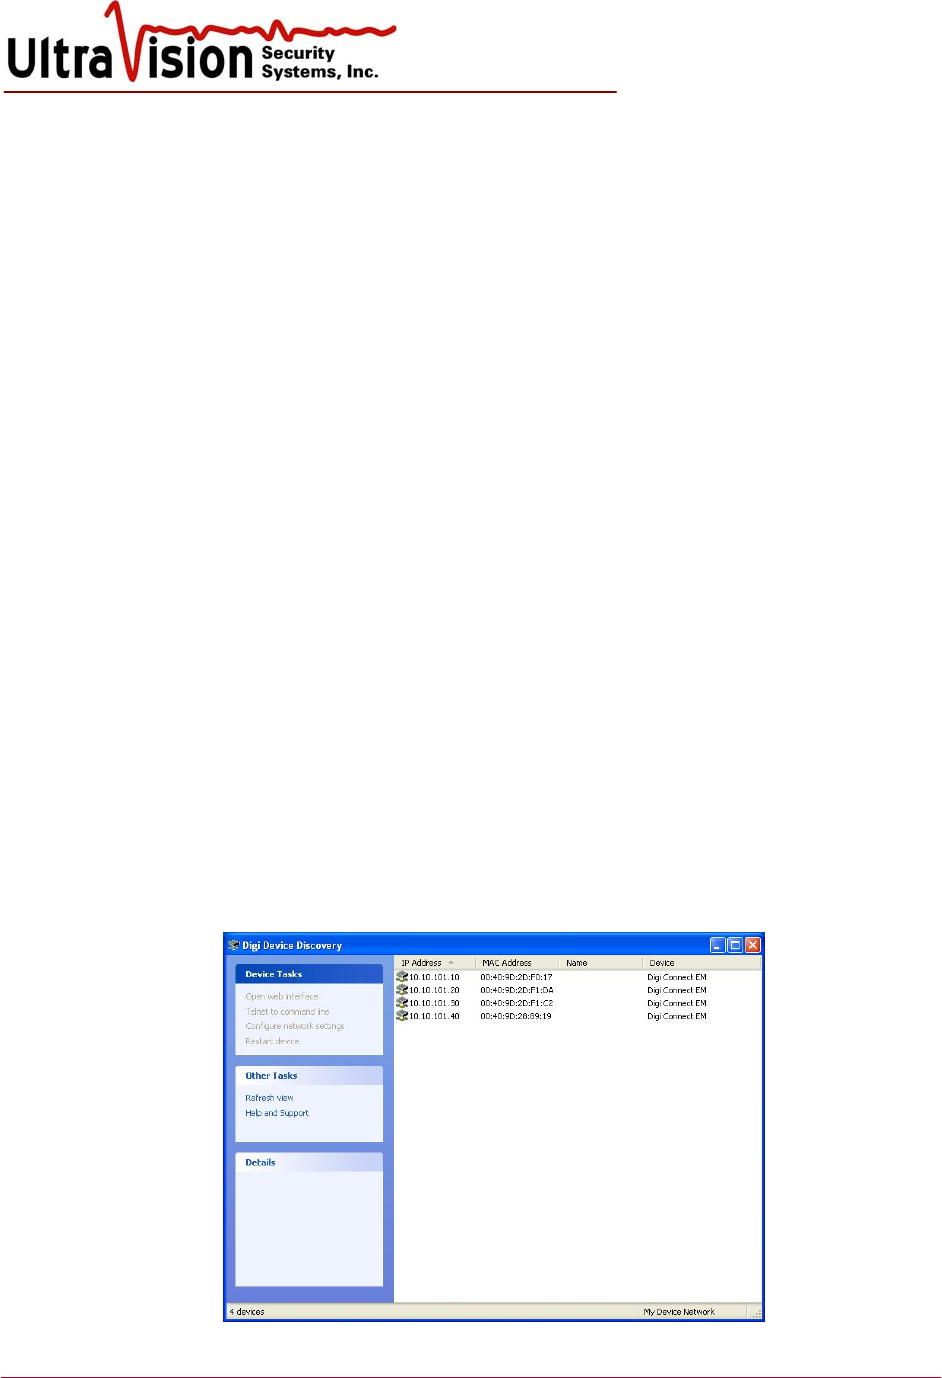
Desktop, select Digi Discovery. Verify all sensor IP’s are present. (Sensors take 30 seconds to
appear after powered on) Check cables and connections if any are missing. Close Digi
Discovery when finished.
UltraVision Security, Inc. • Salem, New Hampshire 03079 USA • Tel 866.374.9732 • 603.685.0303 • Fax 603.898.1840
www.UltraVisionSecurity.com • info@UltravisionSecurity.com
Rev 031109
15
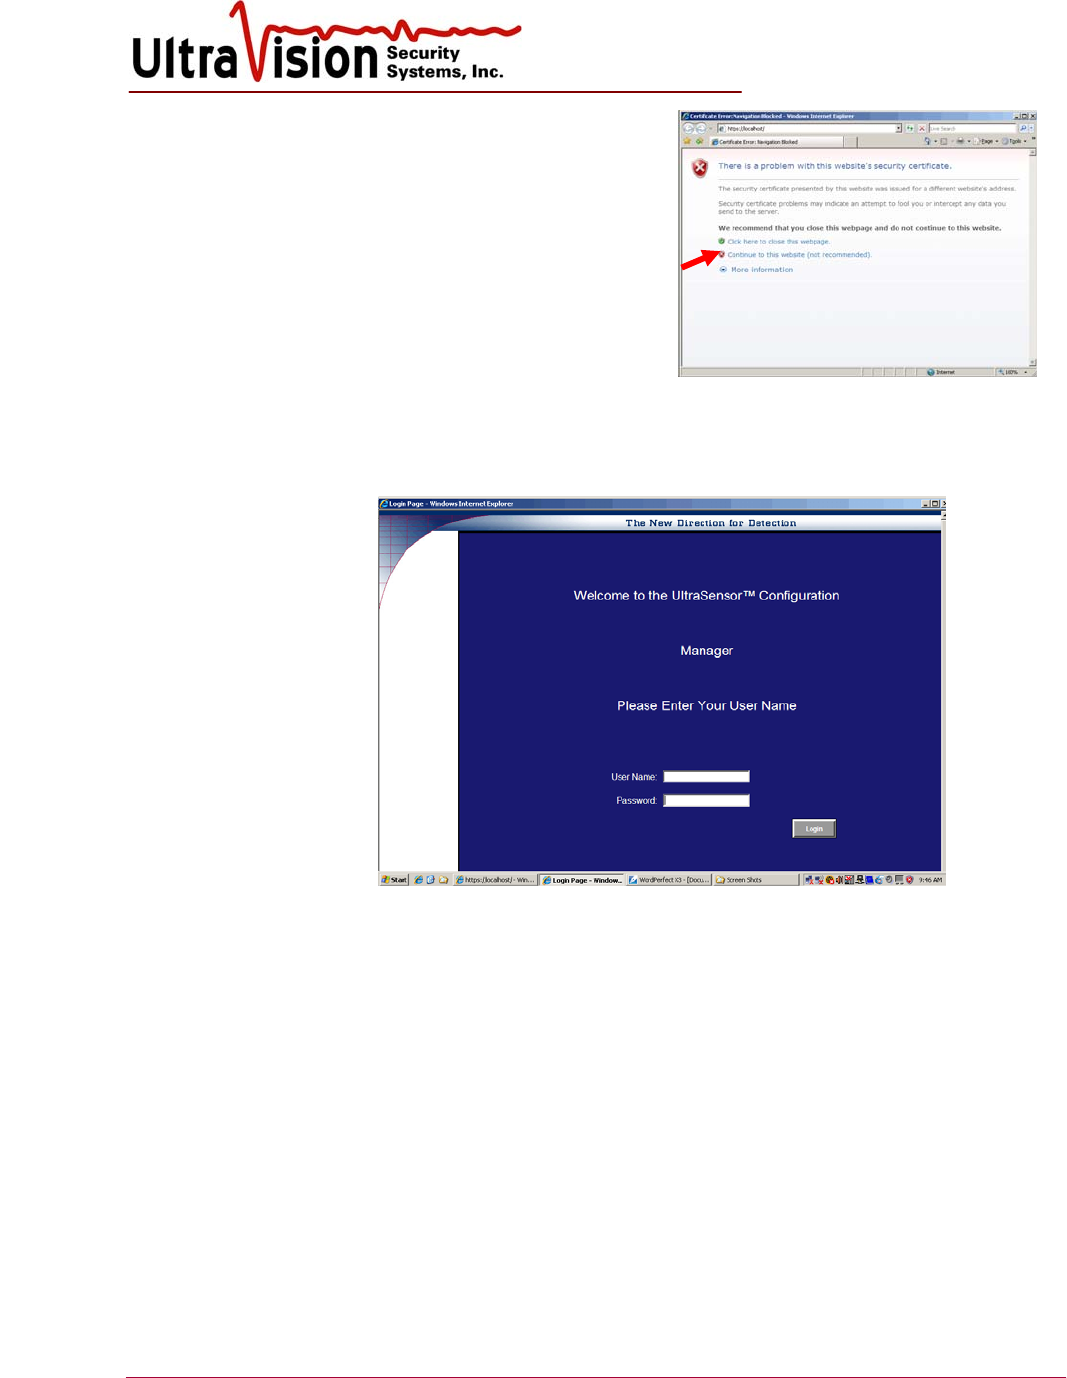
2. Double-click the Internet Explorer icon on the
desktop. You may see a Certificate Error page
pop up. If that happens, simply click
“Continue to this website…”
3. On the Log-in screen, User is Admin and the password is generic11.. (The password is the
word generic, the numeral 1 twice and a period twice.) Additional users may be added and
password changed after initial log-in. Left click Log-in.
User name:
admin
Password:
generic11..
UltraVision Security, Inc. • Salem, New Hampshire 03079 USA • Tel 866.374.9732 • 603.685.0303 • Fax 603.898.1840
www.UltraVisionSecurity.com • info@UltravisionSecurity.com
Rev 031109
16
Create /Edit Users
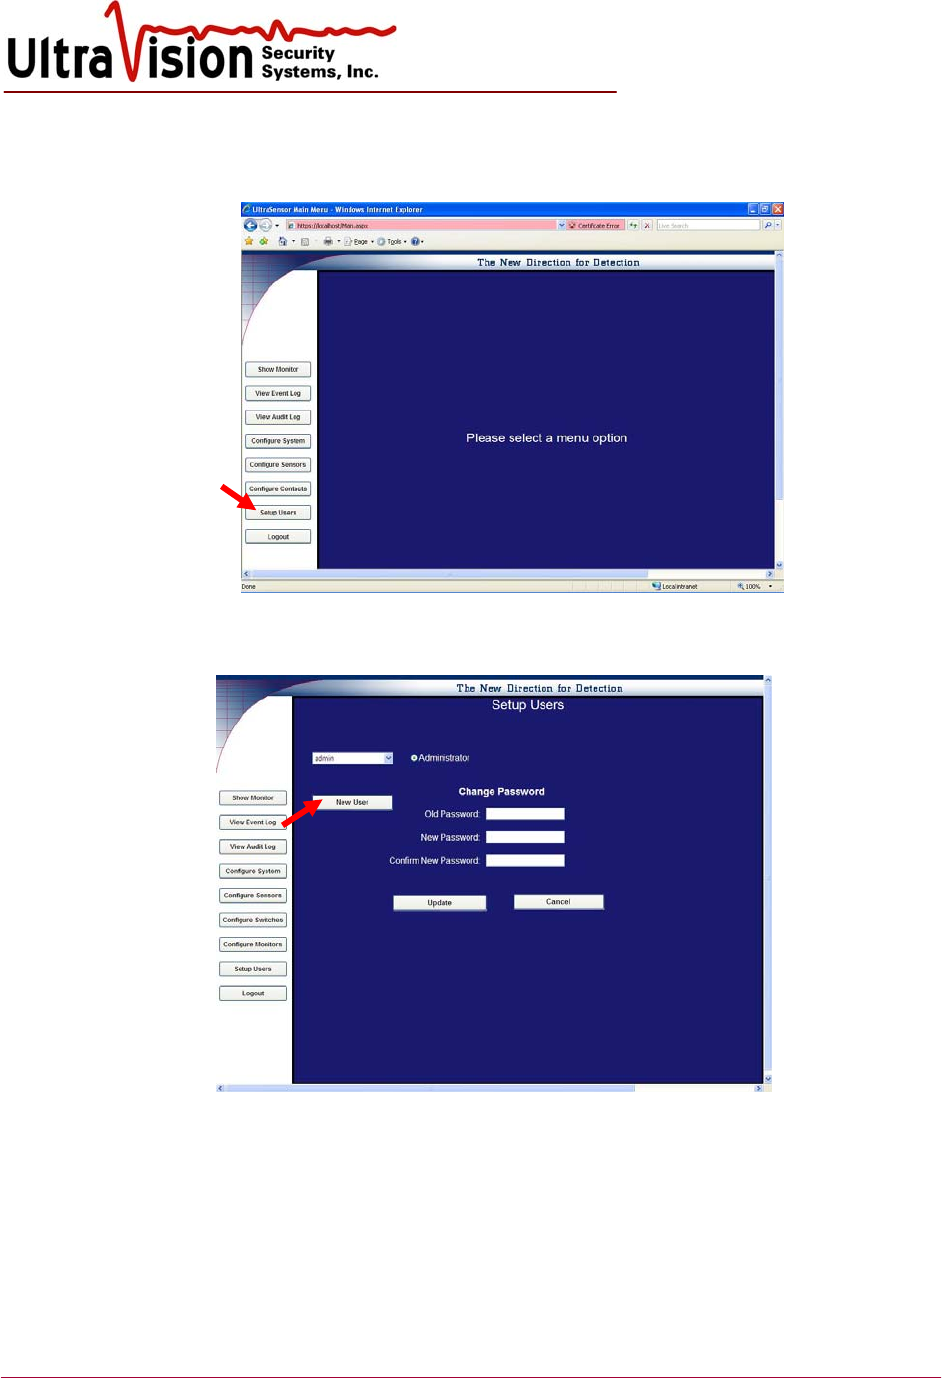
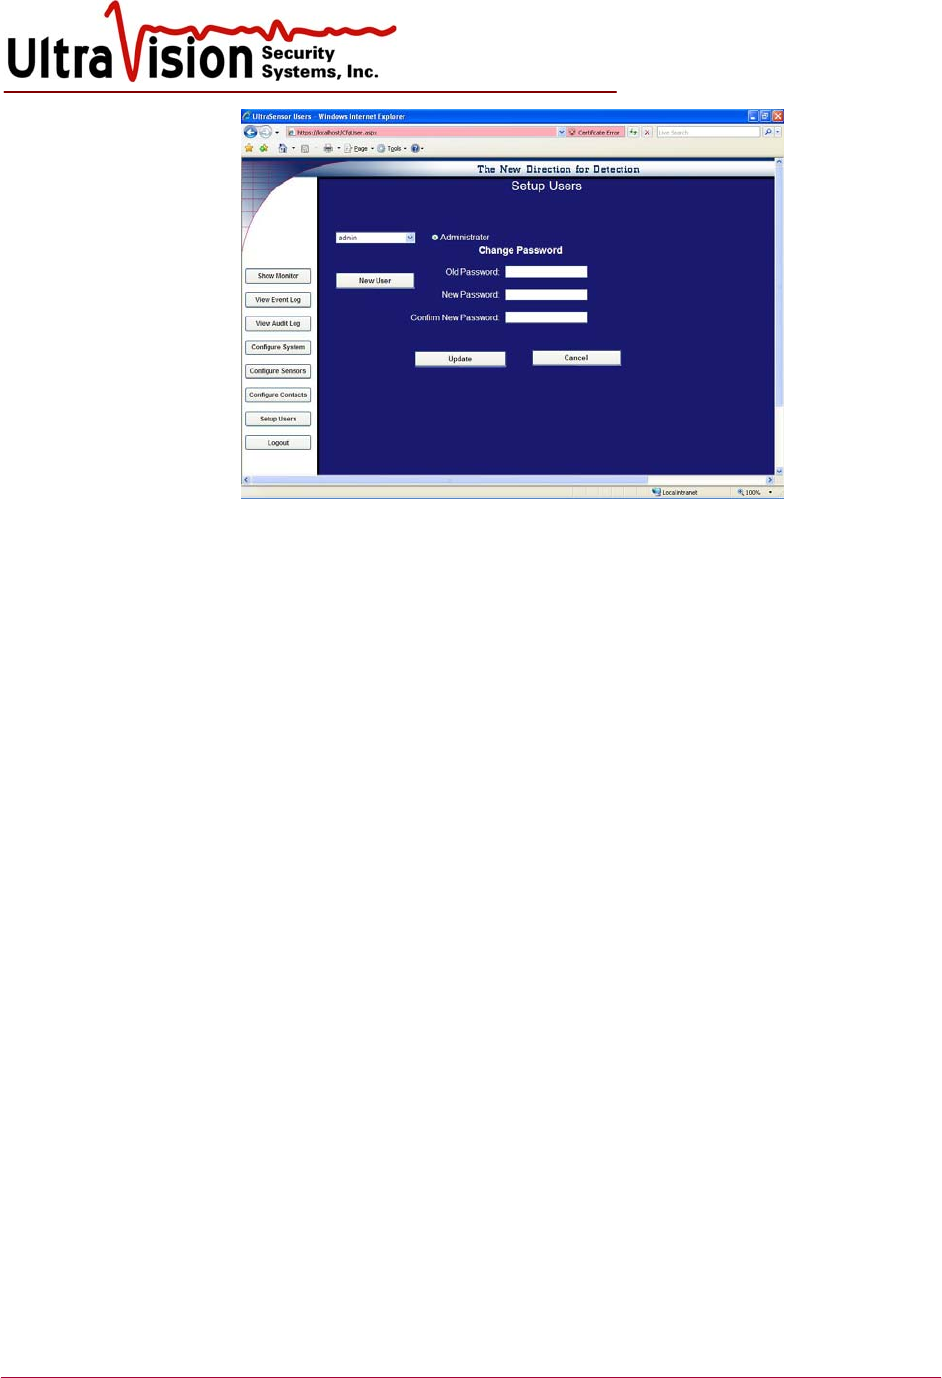
1. Upon successful log-in, the Option Menu will be displayed. Select Setup Users.
2. This page is used to change password or add a new user. Select New User to add a user.
Select
Setup
Users
UltraVision Security, Inc. • Salem, New Hampshire 03079 USA • Tel 866.374.9732 • 603.685.0303 • Fax 603.898.1840
www.UltraVisionSecurity.com • info@UltravisionSecurity.com
Rev 031109
17
3. Select Administrator or Guard. [Guard will have access only to the Monitor Screen and
Event log. Administrator can add/delete Users, configure Sensors and View Log File.]
4. Type in the new User Name, their Password, repeated in Confirm Password.
Passwords must have at least seven characters with at least one non-alpha-numeric.
5. Select Create User.
6. Configuration Manager will confirm that User has been successfully added.
7. Click Continue to return to Create User screen. Continue to add Users or, if finished, select
another screen from the menu on the left.
Change Password
1. Password change may only be done by Administrator-level users and it is done through the
Setup Users menu selection.
2. Select User from dropdown list.
3. Enter old password
4. Enter new password. Password parameters must be at least seven characters and at least one
non-alpha-numeric character. Confirm password by re-typing.
5. Click Update.
Delete User
1. In the setup user screen, select the user in the pull down list to be deleted.
2. Click the Delete User button.
3. A confirmation page will open.
UltraVision Security, Inc. • Salem, New Hampshire 03079 USA • Tel 866.374.9732 • 603.685.0303 • Fax 603.898.1840
www.UltraVisionSecurity.com • info@UltravisionSecurity.com
Rev 031109
18
Configure Sensors
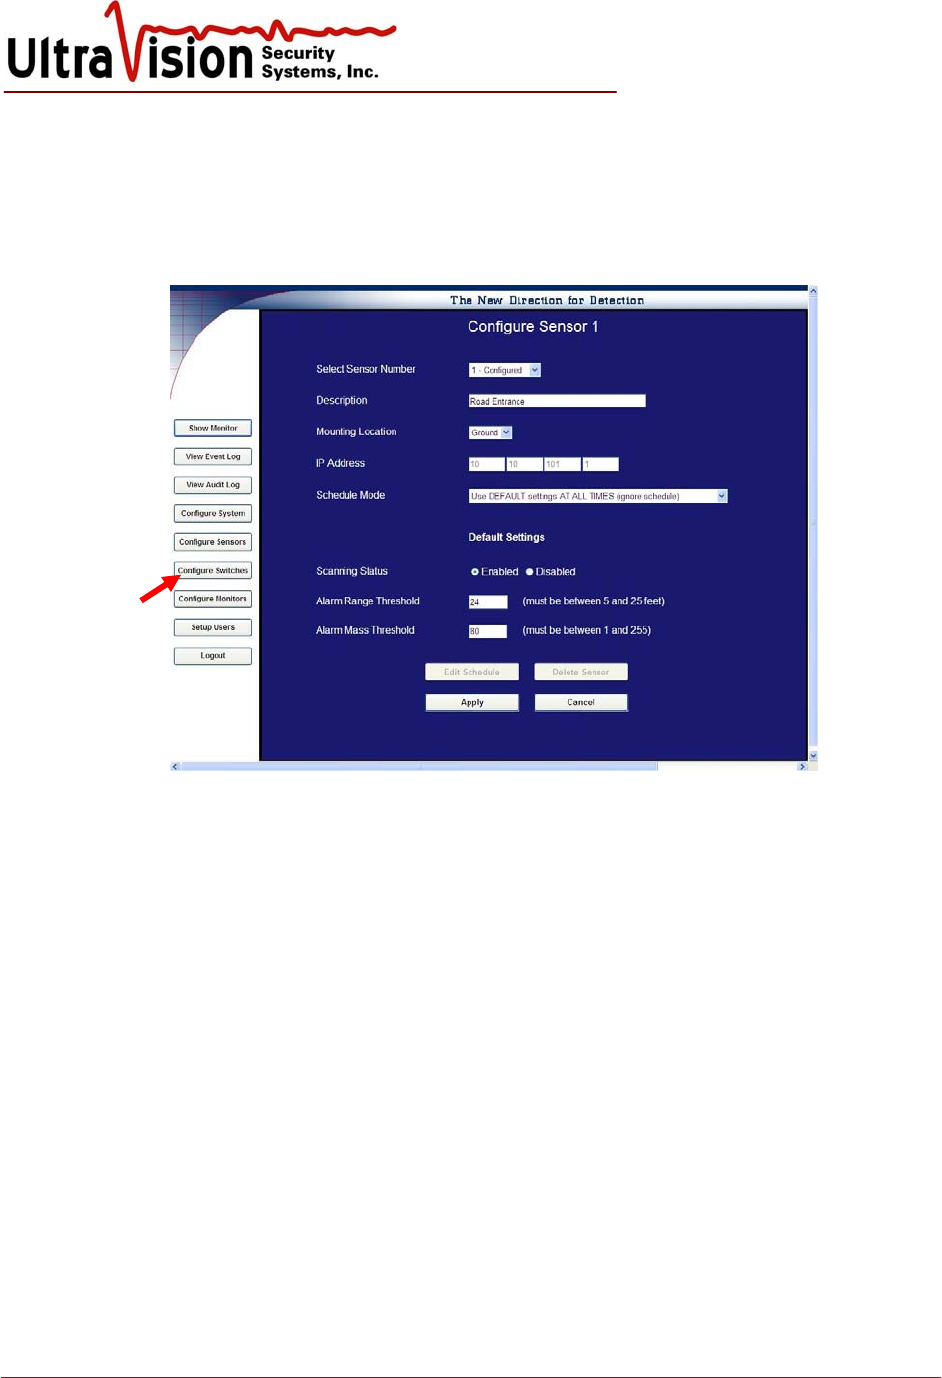
1. From Menu Screen, click Configure Sensors.
2. From the drop down box at the top of the screen, select the number of the Sensor to be
configured. The Sensor number is the last digit of the Sensor IP address.
(ex. 10.10.101.25 is sensor #25)
3. Enter the text Description of the Sensor (e.g., north walkway, front garden, southwest
perimeter, etc.)
4. Select either Wall or Ground for Mounting Location.
5. Correct IP address will be automatically entered by the System.
6. Select Schedule Mode. Using drop down box select timed settings for this sensor or “always
on” as default.
a. Use DEFAULT Settings AT ALL TIMES (ignore schedule)
i. For Scanning Status, Select Enabled.
ii. Enter Alarm Range Threshold. [Minimum 5 foot/1.5 meter, maximum 25
feet/ 7.6 meters.]
iii. Enter Alarm Mass Threshold. [A setting of 1 will detect all possible motion,
255 the least. 60-75 is a “normal” setting.]
iv. Click Apply. Message asks to confirm this step, if correct click “Yes.”
v. Repeat procedure for additional sensors
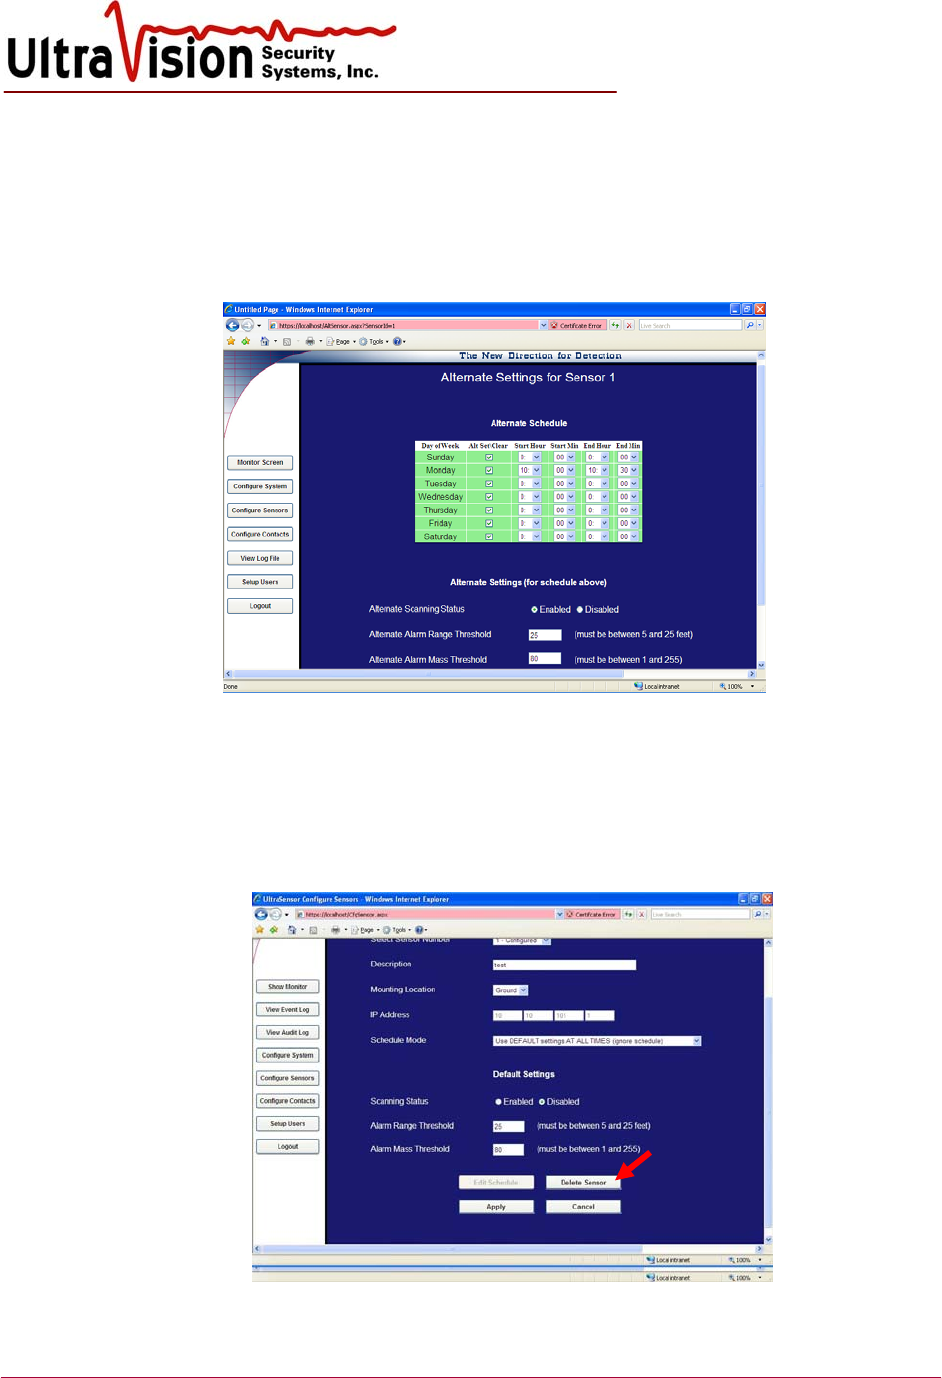
b. Use ALTERNATE settings as SCHEDULED, otherwise DEFAULT
i. Select Enable and set alarm range threshold and alarm mass threshold as
above.
ii. Click Apply, then Yes to confirm.
iii. Return to Configure page for same sensor and select Edit Schedule. Note:
Select Alternate schedule mode and Apply before edit schedule.
iv. Use the Alternate settings table so turn sensors on and off to a schedule.
UltraVision Security, Inc. • Salem, New Hampshire 03079 USA • Tel 866.374.9732 • 603.685.0303 • Fax 603.898.1840
www.UltraVisionSecurity.com • info@UltravisionSecurity.com
Rev 031109
19
v. Using the appropriate drop down boxes set the Start Hour and Minute and the
Stop Hour and Minute. Setting can cross midnight – i.e. 11 PM Monday
evening Start and 3 AM Tuesday morning Stop.
vi. Enter the Alternate Scanning status, Alternate Alarm Range Threshold and
Alternate Alarm Mass Threshold to be applied to the Alternate Schedule table.
Apply.
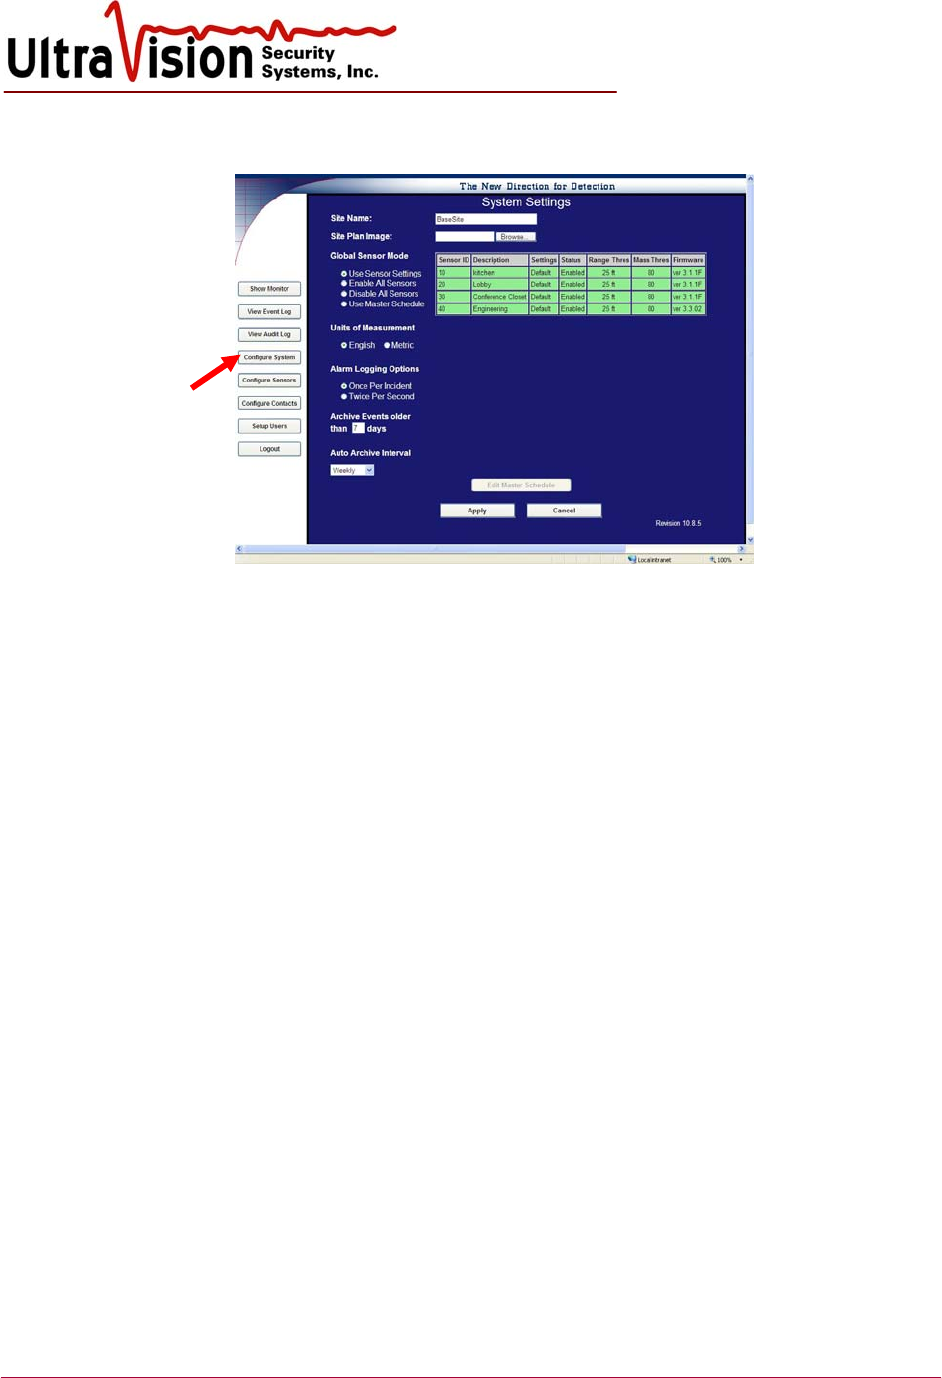
Delete a sensor
1. To delete a configured sensor, change the scanning status to Disabled.
2. Click Apply.
3. Delete Sensor button is now active. Click to delete selected sensor.
UltraVision Security, Inc. • Salem, New Hampshire 03079 USA • Tel 866.374.9732 • 603.685.0303 • Fax 603.898.1840
www.UltraVisionSecurity.com • info@UltravisionSecurity.com
Rev 031109
20
Configure System
1. Select Configure System.
2. Assign a Site name.
3. Load the Site plan image. Use the browse button to locate a .jpg image of your site.As noted
in the startup section, a site plan image file should be saved to the computer in the default file
location: c:\Inetpub\wwwroot\images.
4. Global Sensor Mode
a. Use sensor settings – Uses individual sensor settings
b. Enable all sensors – Turn on all sensors
c. Disable all sensors – Turn off all sensors
d. Use Master schedule – Use the master schedule to control the sensors
5. Select Units of measurement – English (standard US feet) or Metric (meters).
6. Select Alarm Logging Options – twice per second or once per incident.
a. Choosing once per incident will display and log sensor activity upon state change
only. After activation, if the state does not change for a period of 10 seconds, a Sensor
will revert to a “no motion” state. (Contact UVSS for custom settings faster or slower
than 10 seconds.)
b. Choosing twice per second will display and log the greatest amount of detail. All
activity from every sensor will be recorded twice per second.
7. Archive events days. Enter the age of events to archive by entering the number of days old
from 1 to 31. Archived events will be saved in a comma delimited file in c:\uvss directory.
8. Auto Archive interval. Select weekly, bi-weekly or monthly.
9. Select Apply to save settings.
After Sensors and Contacts are Configured (see below) you can return to Configure System at any
time to view System Summary or Contact Summary.
UltraVision Security, Inc. • Salem, New Hampshire 03079 USA • Tel 866.374.9732 • 603.685.0303 • Fax 603.898.1840
www.UltraVisionSecurity.com • info@UltravisionSecurity.com
Rev 031109
21
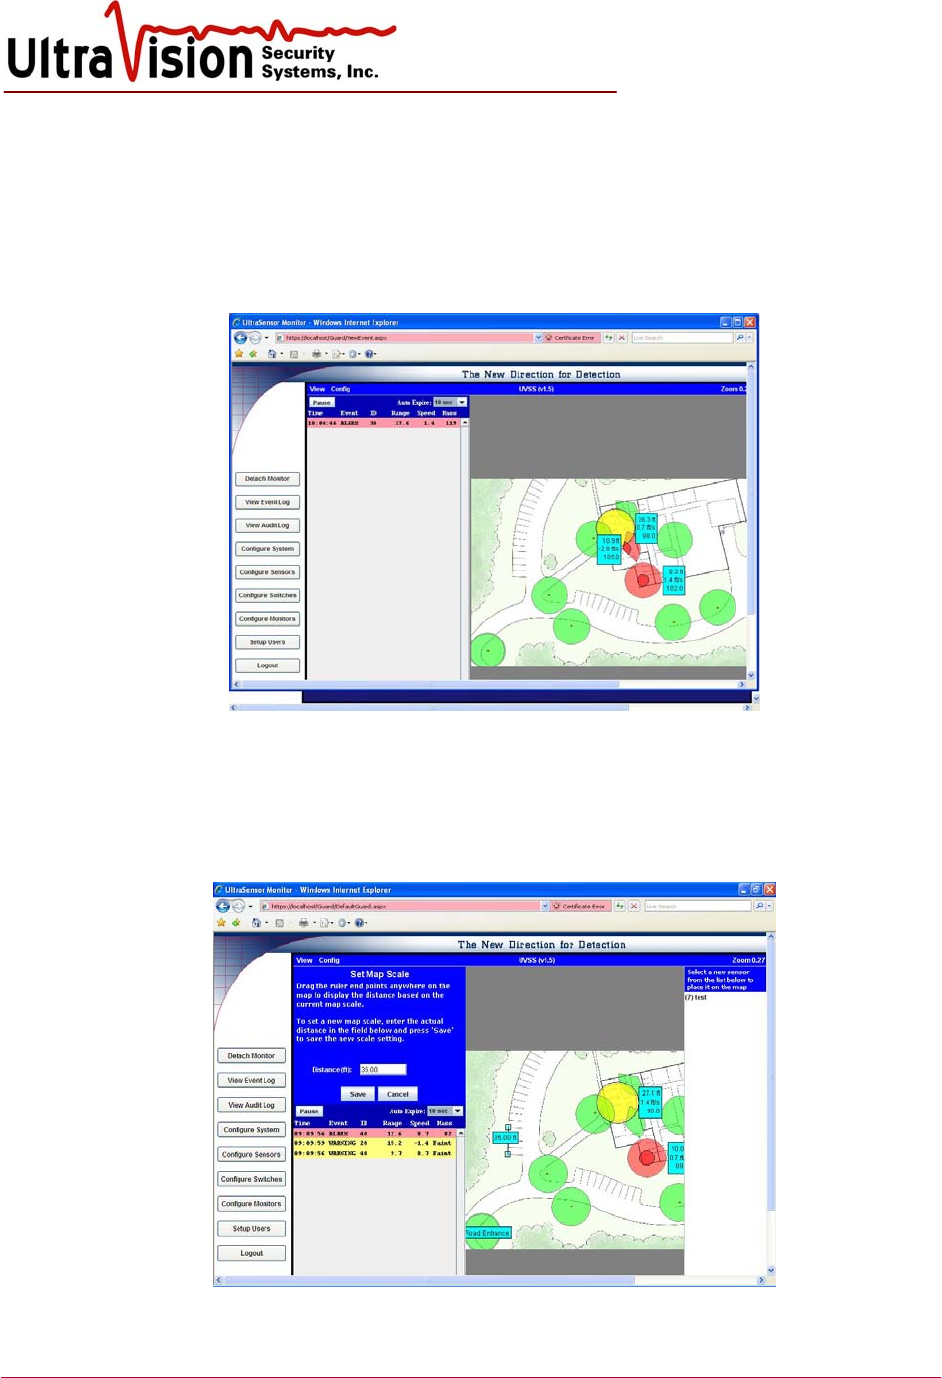
Set Map Scale
Follow steps for Configure System above to connect to the site plan image file.
Select Monitor Screen. The selected site plan should appear. Click Config/ Set Map scale in the
upper tool bar. Enter a distance (ft) for configuring the map. The distance will show on the map
image. Move the distance boxes until the distance matches a known measurement. Save.
Configure Sensor using Monitor Screen
Configure sensors for Range and Mass Threshold by selecting Config / Edit Sensor from the top
toolbar. Double-click on the sensor you wish to change. Enter new values. Save.
For a more complete list of configuration settings, see the Configure Sensor section.
UltraVision Security, Inc. • Salem, New Hampshire 03079 USA • Tel 866.374.9732 • 603.685.0303 • Fax 603.898.1840
www.UltraVisionSecurity.com • info@UltravisionSecurity.com
Rev 031109
22
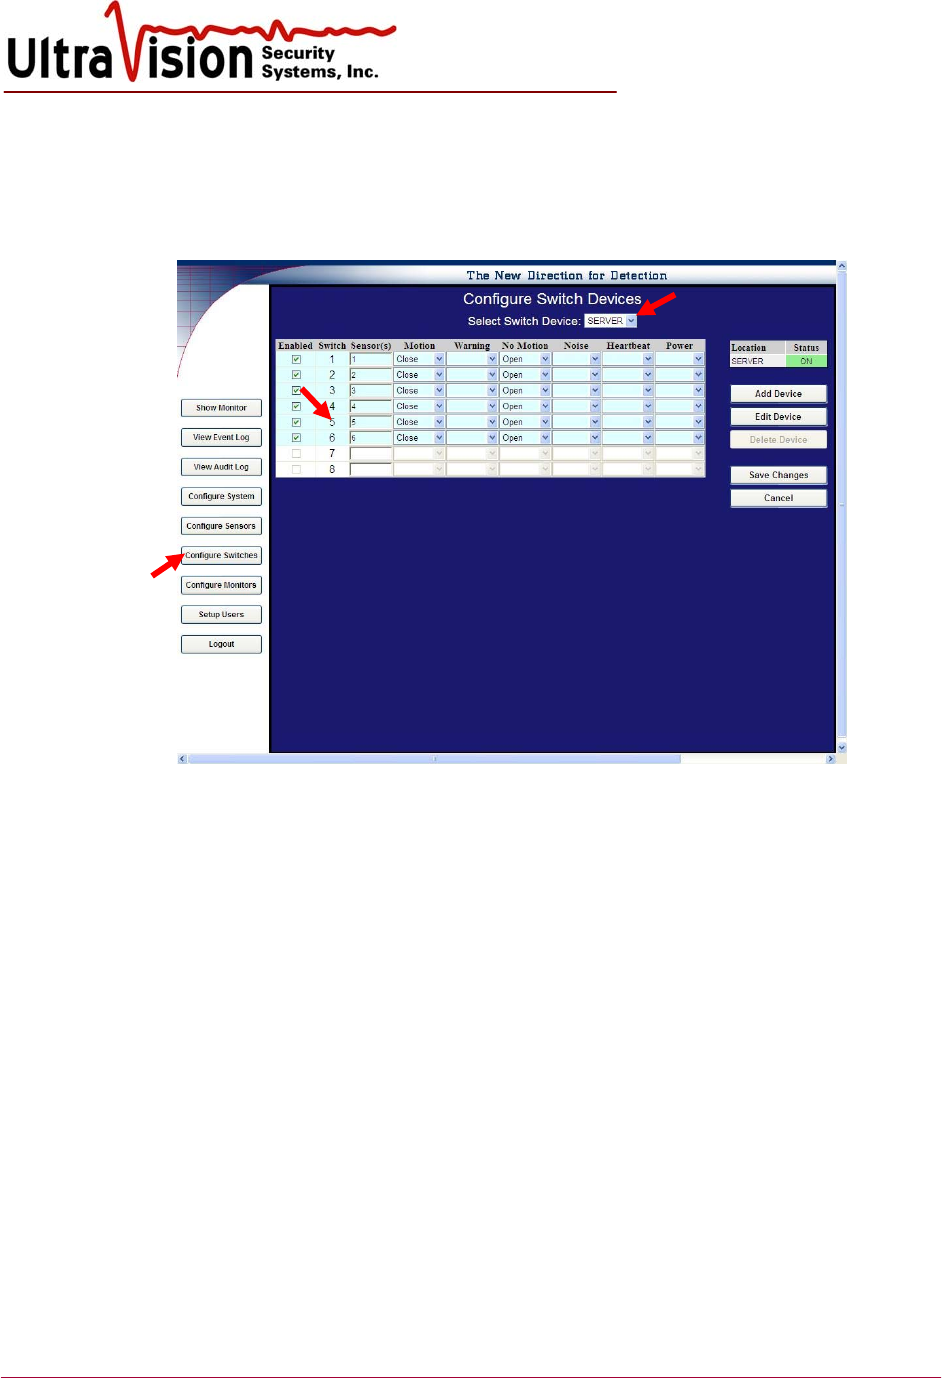
Configure Contacts
1. To configure the output performance of an individual Sensor, select Configure Contacts.
2. Select the device from the Select Dry contact Device pull down list.
3. Enter the sensor number to the Sensor column (ex 5,10,etc). Entries can either be a single
sensor (ex:5) or in multiples (ex: 5,10,20). Tab or Enter to activate columns to set
configurations. The contact switch chosen is independent of the sensor number. “ALL” can be
used when any sensor can activate the same switch.
4. The number of sensors is dependent on the device settings. Add Device allows you to add a
new switching device. Enter the location, access code and number of settings. Save.
5. Edit Device is used to change the access code or number of contacts.
6. Use the drop down boxes to configure each sensor depending on the input requirements of
integrated alarm or CCTV panels when alarm notification is desired. Each condition is
described on the next page of this manual. Example: Choose the opposite condition for “No
Motion” when the Sensor is not detecting motion. In this example, the contact will “close” on
intrusion detection and remain “open” when no motion is detected.
7. After configuring individual contacts, select Save changes. You will be asked to confirm the
current Sensor configuration. If correct select Yes.
8. Repeat this process for as many sensors and contact closures as required.
9. To delete a device, select the device from the Select Dry contact Device pull down list. The
Delete Device button is activated. Select and confirm.

UltraVision Security, Inc. • Salem, New Hampshire 03079 USA • Tel 866.374.9732 • 603.685.0303 • Fax 603.898.1840
www.UltraVisionSecurity.com • info@UltravisionSecurity.com
Rev 031109
23
Contact Closure Detail
• Motion – motion detected by an UltraSensor that meets the alarm threshold criteria defined
on the Configuration page will be indicated by a red icon on the Monitor Screen and recorded
in the Log. It will also cause the chosen contact to open or close, as selected, sending a signal
to associated systems (CCTV, access control, etc.).
• Warning – is an indication of motion within the full extent of the UltraSensor detection range
but greater than the alarm range parameters set on the Configuration page. Icon will become
yellow. Setting “warning” to open or close will cause the chosen contact to activate associated
systems. Recommended setting is ignore except in high security applications where
recognition of any motion within range of the UltraSensor is desirable.
• No-Motion – an absence of motion within the full range of an UltraSensor will be indicated
by a green icon on the Monitor Screen. No-motion will cause the chosen contact to open or
close, as selected, sending a signal to an associated systems (CCTV, access control, etc.). If
Motion is set to open, set “No-motion” to closed. If Motion is set to closed, set “No-motion”
to open.
• Noise – the occurrence of RF interference with performance of an UltraSensor will be
indicated by a blue icon on the Monitor Screen and recorded in Log. Setting noise to either
open or closed will cause the activation of an associated system to create another level of
awareness.
• Heartbeat – UltraSensor communicates with the Server twice per second and upon initial
power up “heartbeat” is displayed on the User Interface and recorded in the System log.
Succeeding “heartbeats” are not logged nor displayed. If a Sensor loses communication with
the System (cut cable, power loss, Sensor malfunction, etc.), a visual indication will be
generated on the Monitor Screen (orange icon with “X”) and recorded in the Log. Setting
“heartbeat” to open or close will cause an activation of a contact upon initial power up only.
Heartbeat is the opposite of “power.” Recommended setting for heartbeat is ignore.
• Power – an absence of individual Sensor power will generate a visual indication on the
Monitor screen (orange icon with “X”) and be recorded in the Log. Setting “power” to close
or open will cause an activation of the contact upon power loss only.
The choice of open or closed will be based upon the required input status of the associated system.
Individual contacts may be programmed for multiple non-conflicting functions. For example when
integrating with a CCTV system, Contact #1 can be set to open on No-motion, close on Motion, and
close on Warning to activate a camera to record any motion from a given UltraSensor. Operational
conditions like Power and Heartbeat would normally not call for camera activation and should be
linked to other contacts to create operator or monitor awareness.
Monitor Screen
UltraVision Security, Inc. • Salem, New Hampshire 03079 USA • Tel 866.374.9732 • 603.685.0303 • Fax 603.898.1840
www.UltraVisionSecurity.com • info@UltravisionSecurity.com
Rev 031109
24
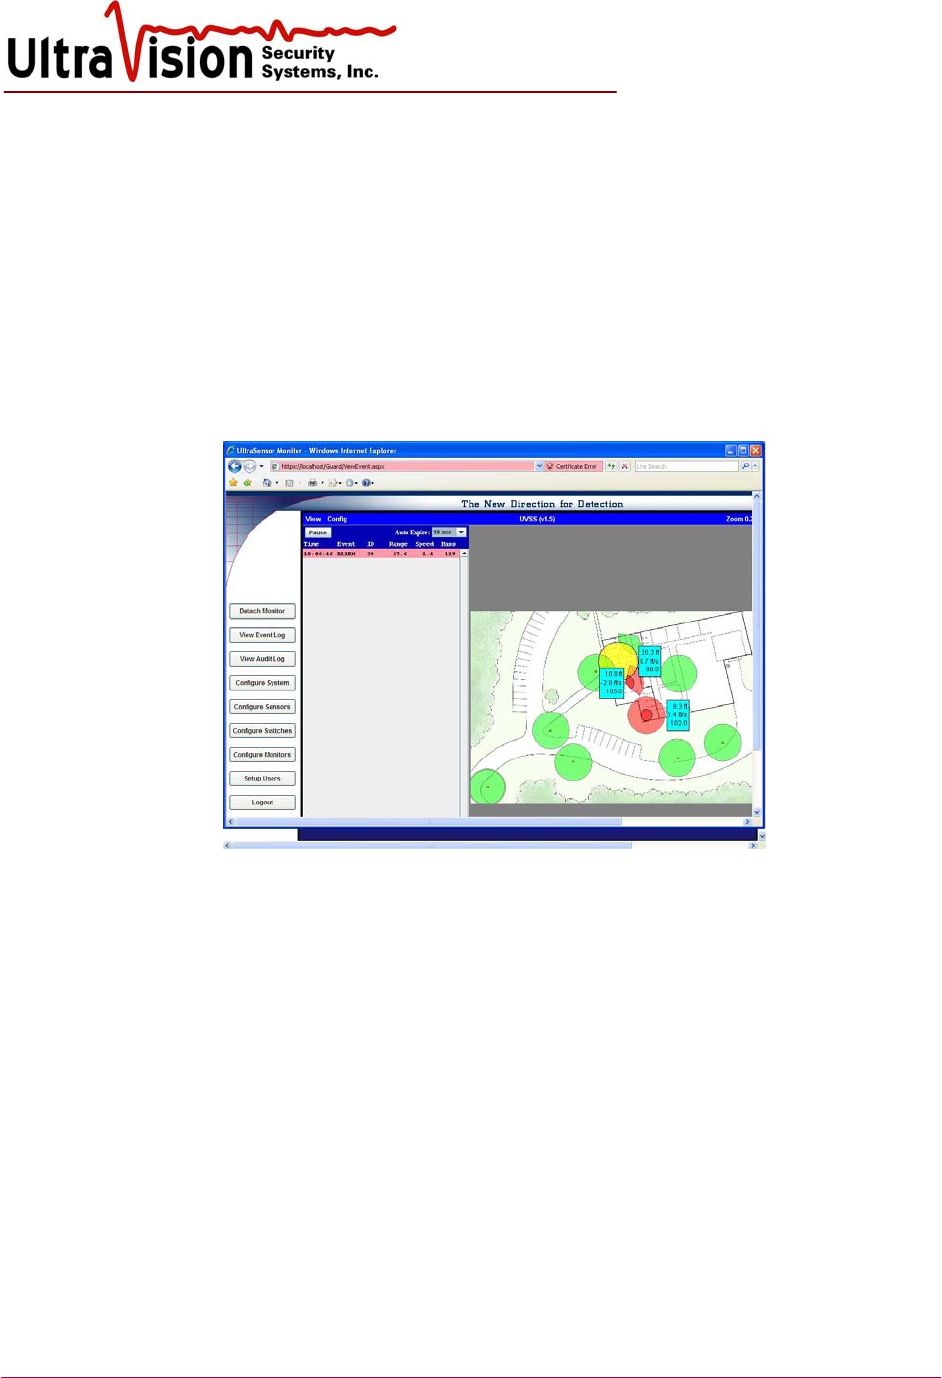
1. Once Sensors have been placed on the facility graphic and configured, Users may monitor
Sensor activity by viewing the Monitor Screen. Select Monitor Screen from the menu. A
graphic representation of the facility with Sensors in approximate locations will be displayed.
2. The circle surrounding each Sensor displays the approximate total detection area of each
Sensor. Colored circle icons indicate as follows:
a. Green – No motion
b. Yellow – Motion detected outside of alarm threshold
c. Red – Motion detected inside of alarm threshold (contact activation)
d. Orange – Loss of sensor communications (trouble)
e. Grey – Sensor configured as disabled.
f. Blue – Excessive environmental “noise”
3. As shown above, the Monitor Screen also shows a mini-log of current Sensor activity.
UltraVision Security, Inc. • Salem, New Hampshire 03079 USA • Tel 866.374.9732 • 603.685.0303 • Fax 603.898.1840
www.UltraVisionSecurity.com • info@UltravisionSecurity.com
Rev 031109
25
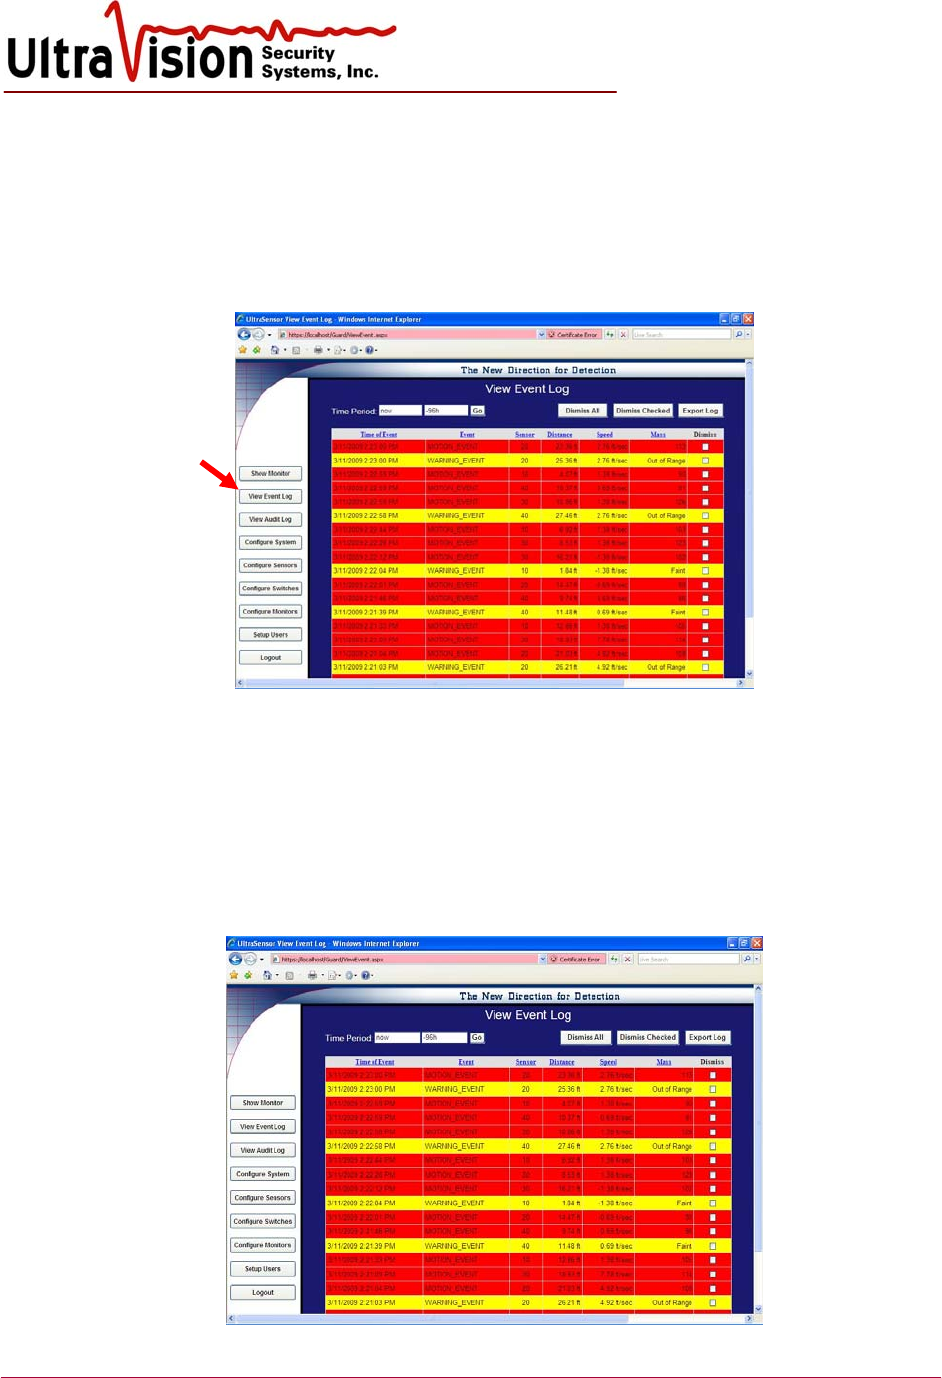
View Log File
1. Viewing Log activity is available to Administrator level users only.
2. To view Log Activity, click on View Log File from Menu Screen.
3. All administrative activity will be displayed on a white background, warning events on a
yellow background, alarm events on a red background and heartbeats on a green background.
4. Alarms may be Archived or Dismissed.
Only Administrative Level users may Archive or Dismiss events.
a. Select Archive Events to clear and move the dated events in the log, as specified in
the configure system screen, into a comma delimited file located within the c:\uvss
directory.
b. Select Dismiss Events to dismiss/delete all events by selecting Dismiss All Events or
individually by checking the event(s) then selecting Dismiss Checked. You will be
asked to confirm when dismissing events.

UltraVision Security, Inc. • Salem, New Hampshire 03079 USA • Tel 866.374.9732 • 603.685.0303 • Fax 603.898.1840
www.UltraVisionSecurity.com • info@UltravisionSecurity.com
Rev 031109
26
Configure Alarm Mass Threshold (Sensitivity)
In order to adjust your system to detect people and ignore small animals such as birds,
a number must be determined for each sensor Alarm Mass Threshold.
The actual detection of a moving person will determine the setting for each individual sensor.
Use the following steps:
1. On the Configure System screen, set the Alarm Logging Option to “twice per second”.
2. Set the Alarm Mass Threshold setting at 10 for each sensor.
3. Have a person walk to and over each sensor at a normal walking speed. Note the time that
each sensor is passed. Do this for every sensor.
4. Go to View Log File. Note the lowest Mass reading for each sensor. This number will
probably be different for each sensor. This is normal as each sensor might be buried under
different materials or at different depths.
5. Subtract 10 from the lowest Mass reading for each sensor and enter this number as the Alarm
Mass Threshold number for that sensor.
6. Once all the sensors are configured, return to the Configure System screen and set the Alarm
Logging Option to “once per incident”.
Note: This is a good starting point to having each sensor detecting people and ignoring false
alarms from smaller objects. The Mass Threshold can be further optimized as the user’s
familiarity with the system is increased.
Logout
1. From any screen, a User may logout by selecting Logout from the menu at the left of the
screen.
2. The User will be asked to confirm logout. If correct, select Yes.
Software Updates
Periodically, UVSS will add new features or enhancements to the software. To take advantage of
these changes, please contact tech support at: techsupport@ultravisionsecurity.com
3/11/09 Version 10.9 Server software released. See Release 10.9 Notes page 41 for more information.
UltraVision Security, Inc. • Salem, New Hampshire 03079 USA • Tel 866.374.9732 • 603.685.0303 • Fax 603.898.1840
www.UltraVisionSecurity.com • info@UltravisionSecurity.com
Rev 031109
27
Sensor Specifications
Both the CMD1 and the CMD2 sensors have similar specifications. The primary difference is the
CMD2 is water resistant for outdoor use and is larger in size.
1. Power ‘on-off’ operable through a standard computer network.
2. Motion detection of human size objects or larger will trigger the alarm, smaller objects are
eliminated through the “mass threshold” setting.
3. Detection range is user selectable from 5 to 25 foot (1.5 -8m) radius when buried in earth six
to twelve inches (15-30 cm).
4. Transmitter Frequency Range: 200 to 600 MHz.
5. POE power and communications. Standard IP compatibility.
6. Power, user supplied 240/120 VAC to the network hub, POE is 48 VDC from computer to
concentrator box, then 12 VDC to sensors.
7. Alarm amplitude sensitivity is factory set and user adjustable, little or no drift.
8. Automatic self-adjusting for changing background noise.
9. Laptop on the security network controls the operating parameters (alarm range and sensitivity
level) and monitors operation and communication established, through continuous polling.
10. Dry switch output that closes on alarm condition can connect to cameras and other alarm
devices.
11. Operating Temperature Range -10 degrees to 55 degrees C.
12. The CMD2 is watertight to a depth of one meter.
13. All sensor software is upgradeable through the Internet.
Rev 031109
28
Integrating the CMD-Server 24 with your network
The CMD-Server 24 communicates to clients (laptops and PCs) via a Netgear FVS318 router.
Specifically, using a web browser like Microsoft’s Internet Explorer and entering an IP address
will allow you to become a client of the CMD-Server. The IP address of the CMD-Server is
preset to a value of 10.10.0.11 at manufacturing time. However, this can be changed to another
value if the preset address is not compatible with your existing network. If there is no existing
network, the user must purchase a router and configure it to be compatible with the CMD-
Server’s preset IP address, or configure the CMD-Server to be compatible with the router if a
different set of IP addresses is desired.
Changing the CMD-Server IP address
Warning: This procedure should only be attempted by qualified network administrators.
Changing parameters other than those describe in this document can result in a non-functioning
product that must be reset by UltraVision’s Support personnel.
For this procedure you will need a router configured with a subnet of 10.10.0.0 and a subnet
mask of 255.255.255.0 as well as a computer with either a compatible static IP address or a
dynamic one if the router and the computer are setup to use DHCP (note that some systems ship
with a separate Netgear model FVS114 router preconfigured to these settings). Next, connect
both the CMD-Server and computer to the LAN side of the router. On the computer, run Internet
Explorer and login to the CMD-Server router (Netgear model FVS318) by typing
https://10.10.0.11:8080 . It is very important that you include the reference to port 8080 in your
command-line, otherwise you will access the CMD-Server UltraSensor Security System instead
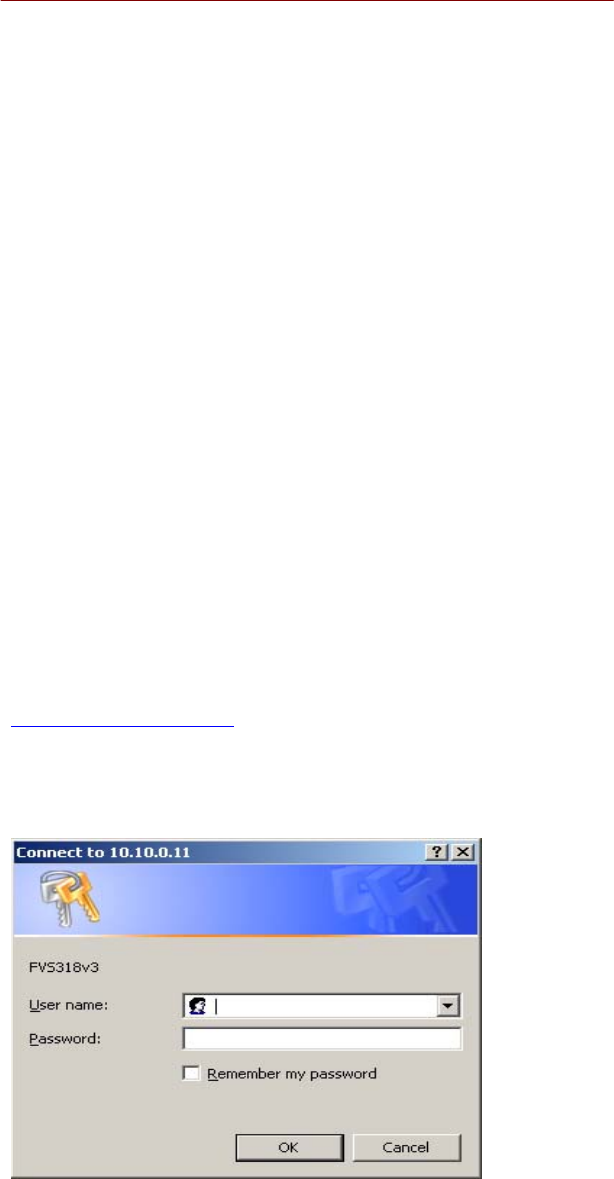
of the Netgear router located inside the CMD-Server. If you entered the command correctly, you
should see a small dialog box prompting you for a username and password as shown below:
The default username is admin and the
password is generic11.. . You should now
have access to the full web interface of the
Netgear router.
Rev 031109
29
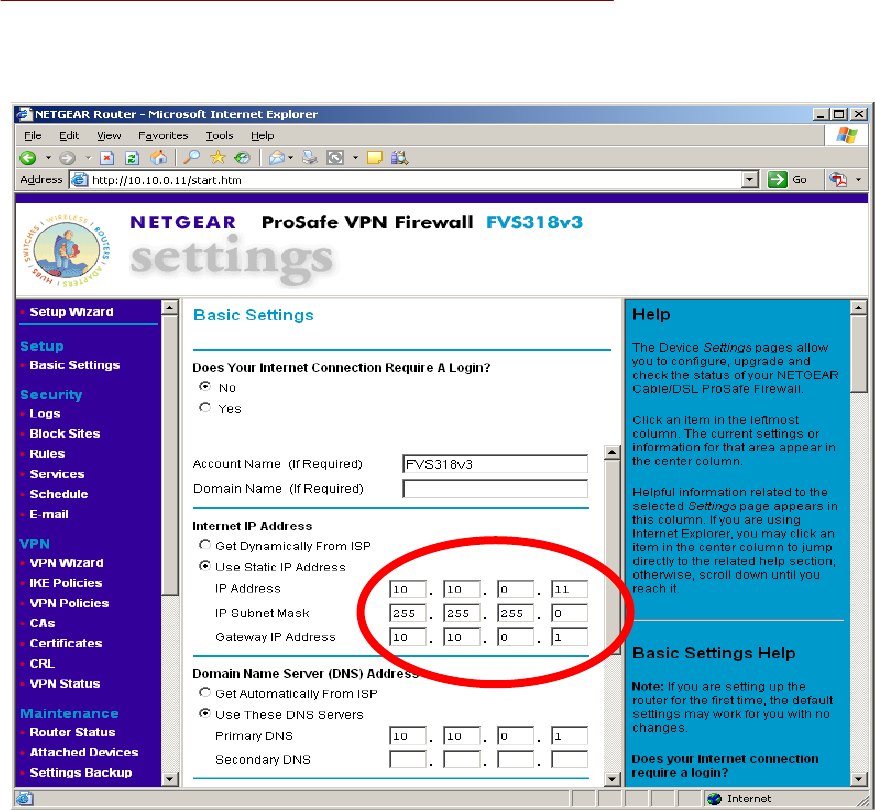
Change the IP address, select Basic Settings from the left menu bar and enter the parameters in
the main window that will make the CMD-Server compatible with your network:
Accessing the CMD-Server over a WAN
The CMD-Server can be accessed from anywhere in the world if the LAN to which it is
connected is configured to allow in-coming traffic. There are generally two ways that this can be
done. The easiest (but less secure) approach is to setup the router that communicates with your
ISP (Internet Service Provider) to use Port Forwarding of all HTTPS services so they are sent to
the IP address of the CMD-Server. A much more secure, but significantly more difficult
approach is to use VPN tunneling. The instructions for implementing a VPN tunnel go beyond
the scope of this document. For detailed information please visit your router manufacturer’s
website and consult with your network administrator on the best approach for your needs.

Rev 031109
30
Integrating the CMD-Server 8 with your network
The CMD Server 8 communicates via a Netgear FVS114 router. Using a web browser like
Microsoft’s Internet Explorer and entering an IP address will allow you to view and control the
server 8 as though you were physically at its keyboard. The IP address of the Server-8 is preset
to a value of 10.10.0.10 at manufacturing time. However, this can be changed to another value if
the preset address is not compatible with your existing network. If there is no existing network,
the user must purchase a router and configure it to be compatible with the CMD Server-8’s
preset IP address, or configure the CMD Server-8 to be compatible with the router if a different
set of IP addresses is desired.
Changing the CMD Server-8 IP address
Warning: Changing parameters other than those described in this document can result in a non-
functioning product.
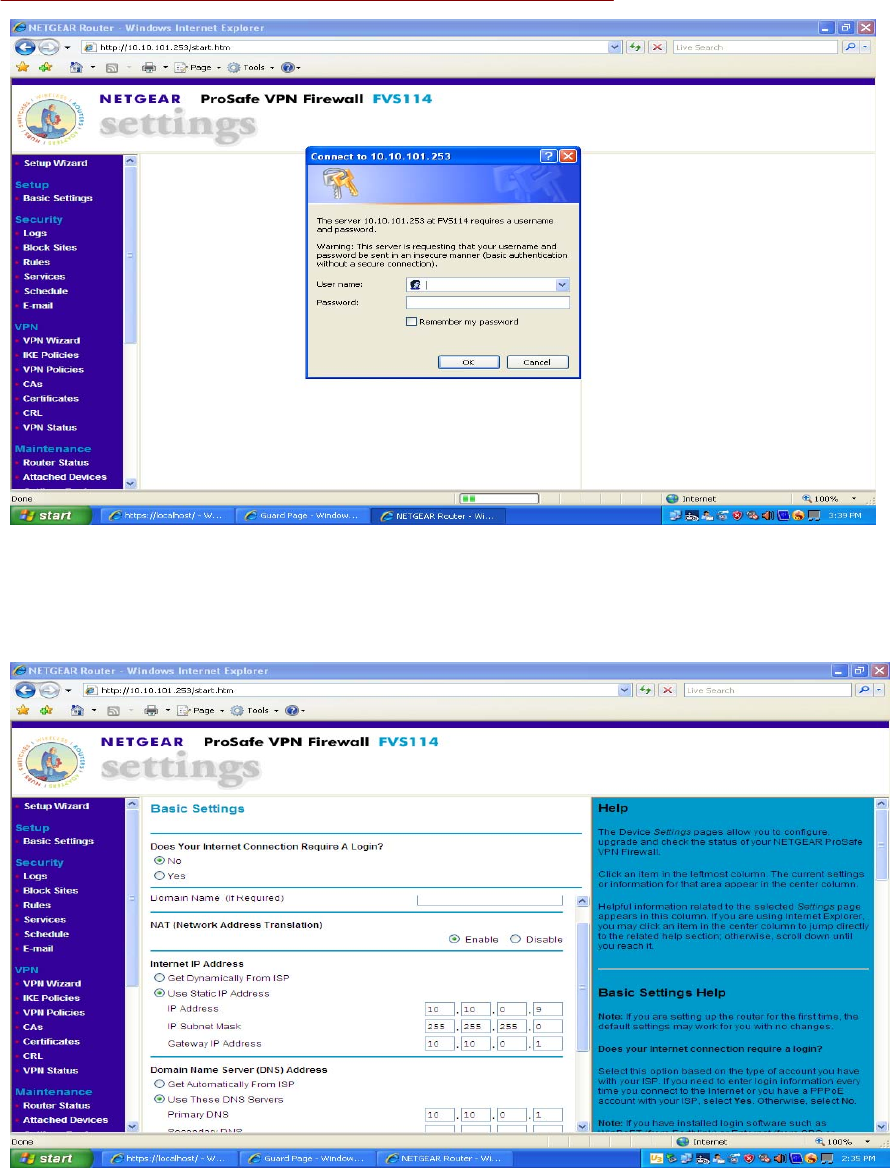
On the CMD Server-8 laptop, open a web browser and type http://10.10.101.253. You should
receive a login window like the one shown on the next page. Enter the username “admin” and
password “password” (typed without quotation marks). Select “Basic Settings” on the left
column if they are not already displayed in the center column. Scroll down to “use static IP
address” and enter your network address parameters. (The Server-8 is preconfigured with an
IP=10.10.0.10, Mask=255.255.255.0, GW=10.10.0.1 and DNS Primary=10.10.0.1) When
finished, select Logout at the bottom of the left column. Connect the CMD Server-8 Network
connector to your network. At another computer on this same network, open a web browser and
type the UVSS default https://10.10.0.10 or the new IP that was previously entered. The Server-8
display should now be visible.
Accessing the CMD-Server over a WAN
The CMD-Server can be accessed from anywhere in the world if the LAN to which it is
connected is configured to allow in-coming traffic. There are generally two ways that this can be
done. The easiest (but less secure) approach is to setup the router that communicates with your
ISP (Internet Service Provider) to use Port Forwarding of all HTTPS services so they are sent to
the IP address of the CMD-Server. A much more secure, but significantly more difficult
approach is to use VPN tunneling. The instructions for implementing a VPN tunnel go beyond
the scope of this document. For detailed information please visit your router manufacturer’s
website and consult with your network administrator on the best approach for your needs.
Rev 031109
31
Rev 031109
32
Remote Switch Device
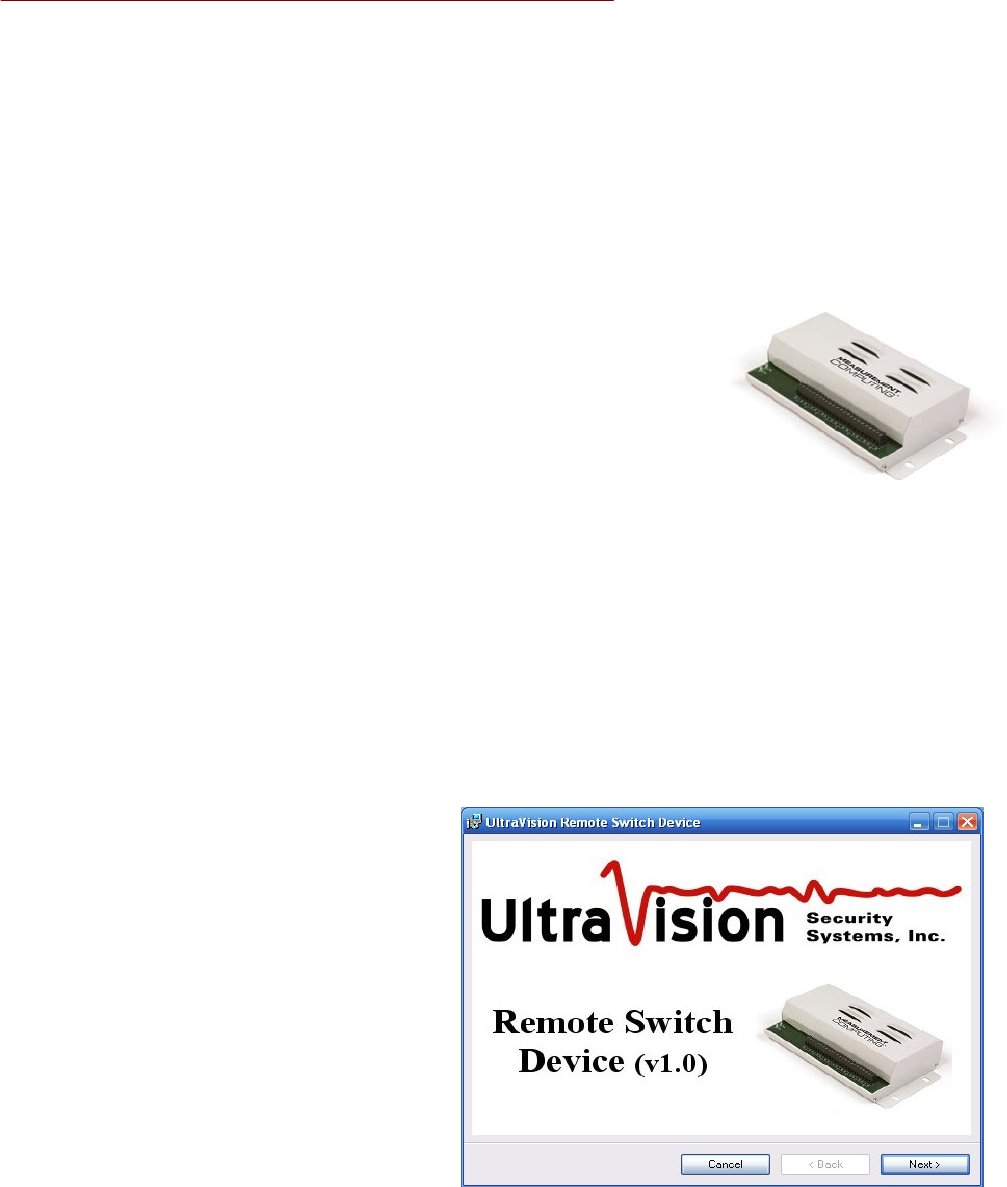
The UltraVision Remote Switch Device application software supports the integration of remote
dry contact switches, such as those manufactured by Measurement Computing, with the
UltraVision Sensor Servers. This allows users to control a wide array of hardware components,
such as alert lights, audible alarms and security cameras, automatically when one or more
UltraSensors detects a change in an area being monitored. Remote switches may be physically
installed anywhere when connected to the company network or to the internet.
The UltraVision Remote Switch Device application can be executed on
any Windows XP or Windows Vista PC and can control up to 48
switches using one or more contact devices manufactured by
Measurement Computing (USB-ERB08 or USB-ERB24). During normal
operation, the application resides in the Windows system tray,
automatically changing the switch settings as directed by the associated
UltraVision Sensor Server. Users can use the application GUI to monitor
current switch settings, manually change switch settings and/or change
server settings.
Installation
The UltraVision Remote Switch Device application can be installed using the following
procedure:
z Insert the UltraVision Remote Switch Device Installation CDROM into the CD tray on a
Windows XP or Windows Vista PC
z In most Windows PC operating
environments the installation
program will be automatically
executed when the CDROM is
loaded by the operating system. If
not, use the Windows File Explorer
to open the device folder associated
with the CDROM and double-click
on setup.exe file to start the
installation program.
z When the installation program is
started, it will display a banner page
indicating the version of the
software being installed, press Next
to work through the installation
steps
Rev 031109
33
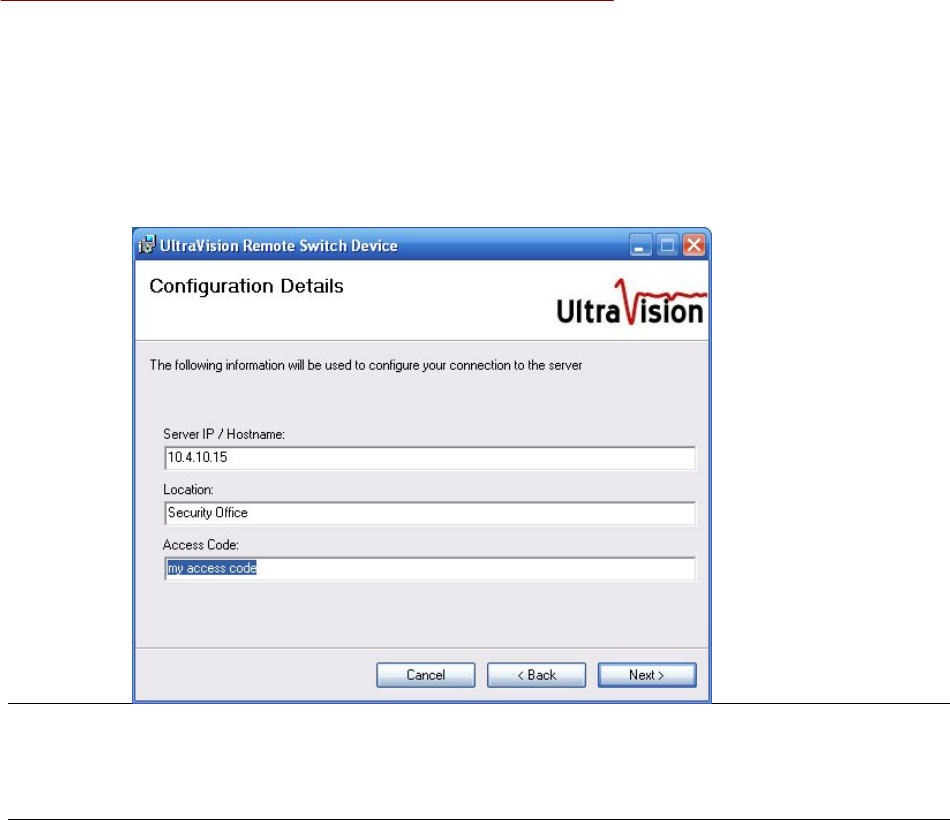
z When prompted to enter the Configuration Details, enter the Server IP or Hostname
associated with the UltraVision Sensor Server running on your network. The Location
and Access Code fields must correspond to those assigned to one of the Remote Contact
Devices configured on the UltraVision Sensor Server using the Configure Contacts
page. (See the UltraVision Sensor Server Administration Guide for more details.)
NOTE: It is safe to leave any or all of the fields empty during installation if you don't know
the information (or no Remote Contact Devices have been configured on the server yet). In
that case, the Remote Switch Device application will simply not connect to any server until you
enter the configuration information.
z Press Next to complete the installation steps
Running the Application
When initialized, the UltraVision Remote Switch Device application searches for all
Measurement Computing switch devices connected to the PC via USB cables. Due to the nature
of the driver provided by Measurement Computing, the USB devices must be connected to the
PC before the Remote Switch Device is executed. If not, you'll need to exit the Remote Switch
Device and restart it before it will find the Measurement Computing devices.
The Measurement Computing USB-ERB08 and USB-ERB24 devices are easily connected to any
Windows PC using a standard USB cable. Once connected and powered up, the Windows O/S
will automatically recognize and load any drivers required for that device. In most Windows
environments you will hear an audible alert from Windows when it has successfully loaded the
USB device driver.
After the USB device has been successfully connected to the PC, select the following entry from
Rev 031109
34
the Windows Start Menu:
Programs => UltraVision => UltraVision Remote Switch Device
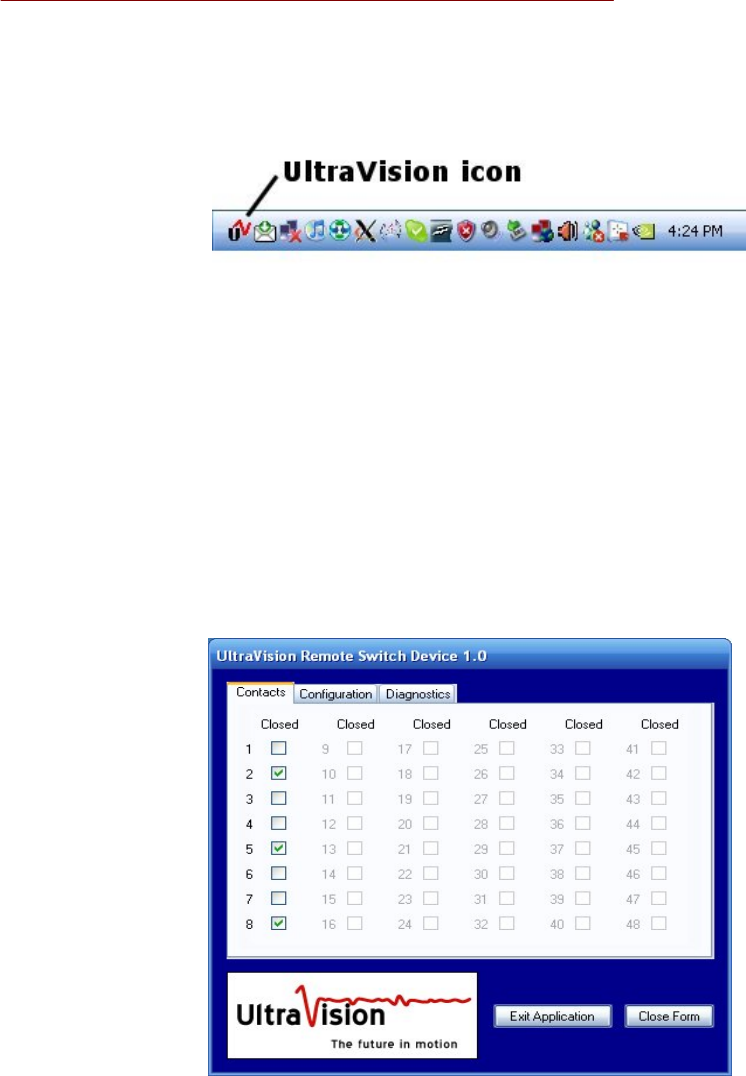
Upon successful execution, the UltraVision icon will be visible in the Windows system tray (the
set of icons in the lower-right corner of the Windows Desktop):
Whenever that icon is present, the Remote Switch Device is active and, if configured properly,
will be automatically updating any Measurement Computing switches as directed by the
UltraVision Sensor Server.
At any time while the application is running, you can double-click on the icon in the system tray
to open the application's Graphical User Interface (GUI). The GUI allows you to:
z Monitor and/or alter the current state of each switch
z Modify the server configuration information
z Monitor the application log and/or flash the LED on the Measurement Computing device
When the application GUI is launched, it will initially display a list of all the switches currently
being controlled, as seen here:
The Contacts tab not only shows the current state of each switch being controlled, it also allows
you to manually change the state of each switch simply by toggling the associated checkbox.
This feature can be used to test switch settings or as part of a standard operating procedure that
requires the operator to set or reset a switch for various reasons.
Rev 031109
35
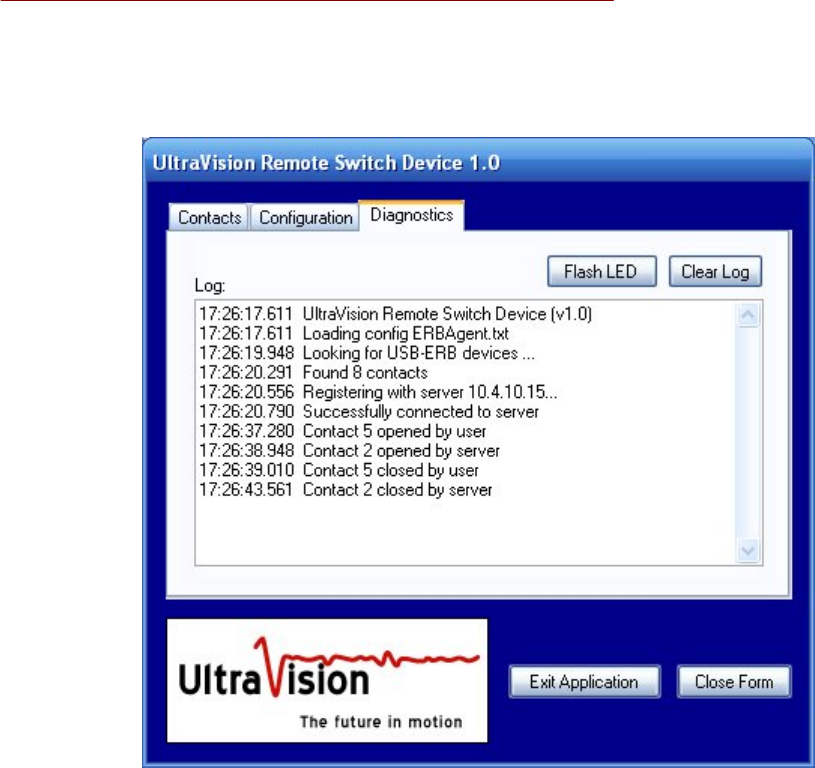
If all of the entries are disabled, then either no Measurement Computing device was found
connected to the PC or the server configuration information is incomplete or incorrect. In that
case, select the Diagnostics tab to view the log and determine the cause of the problem.
Removing the Application
The UltraVision Remote Switch Device application is easily removed from the system using the
following procedure:
z If the application is currently running, double-click on the icon in the system tray to open
the application GUI and press Exit Application to stop the application
z Select Settings => Control Panel from the Windows Start Menu
z Double-click Add or Remove Programs in the Control Panel window
z Select Change or Remove Programs from the left menu and select UltraVision
Remote Switch Device from the list of currently installed programs
z Press Remove to remove the application
Rev 031109
36
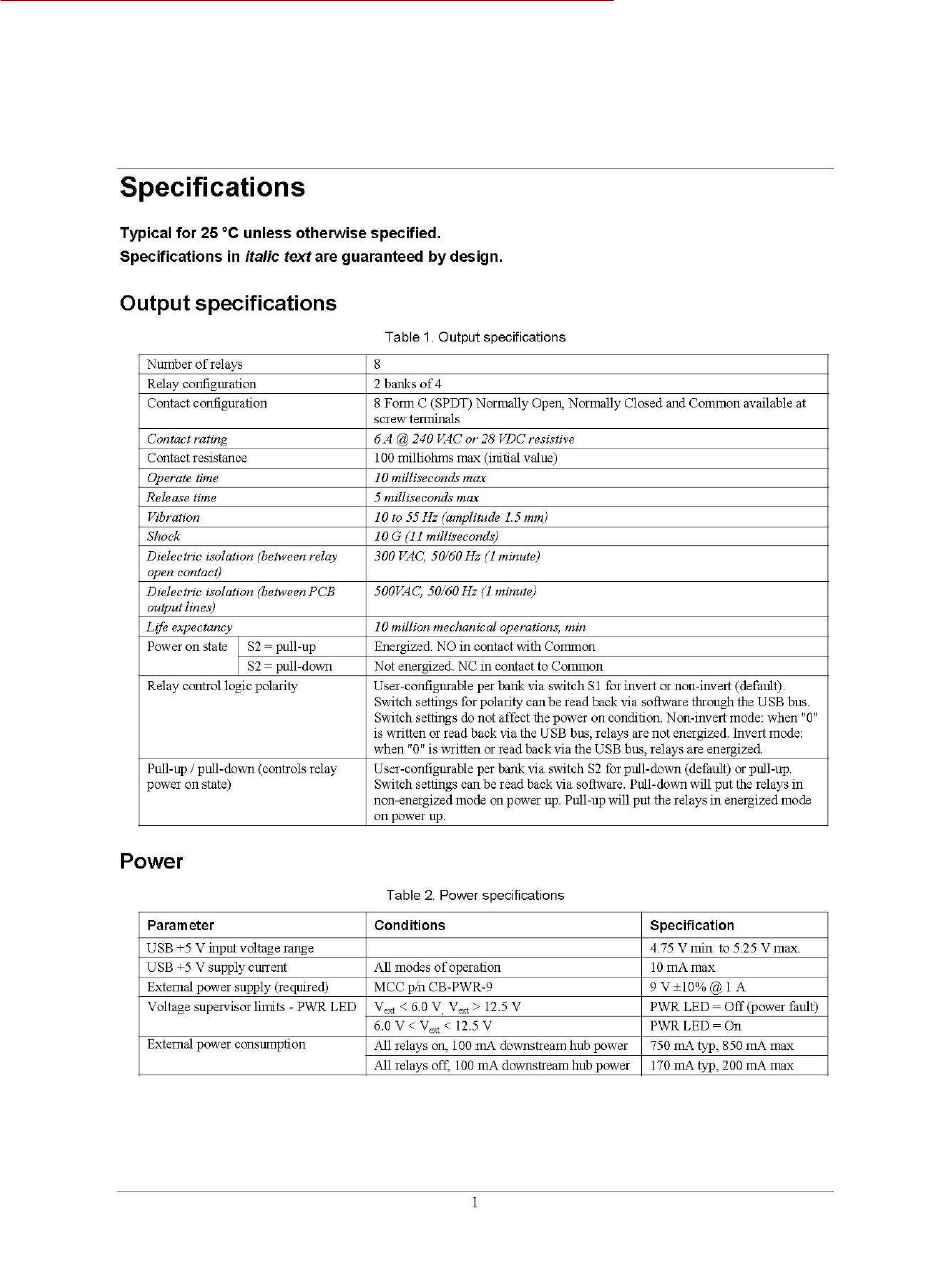
Dry contact switch specifications for Server-8
Rev 031109
37
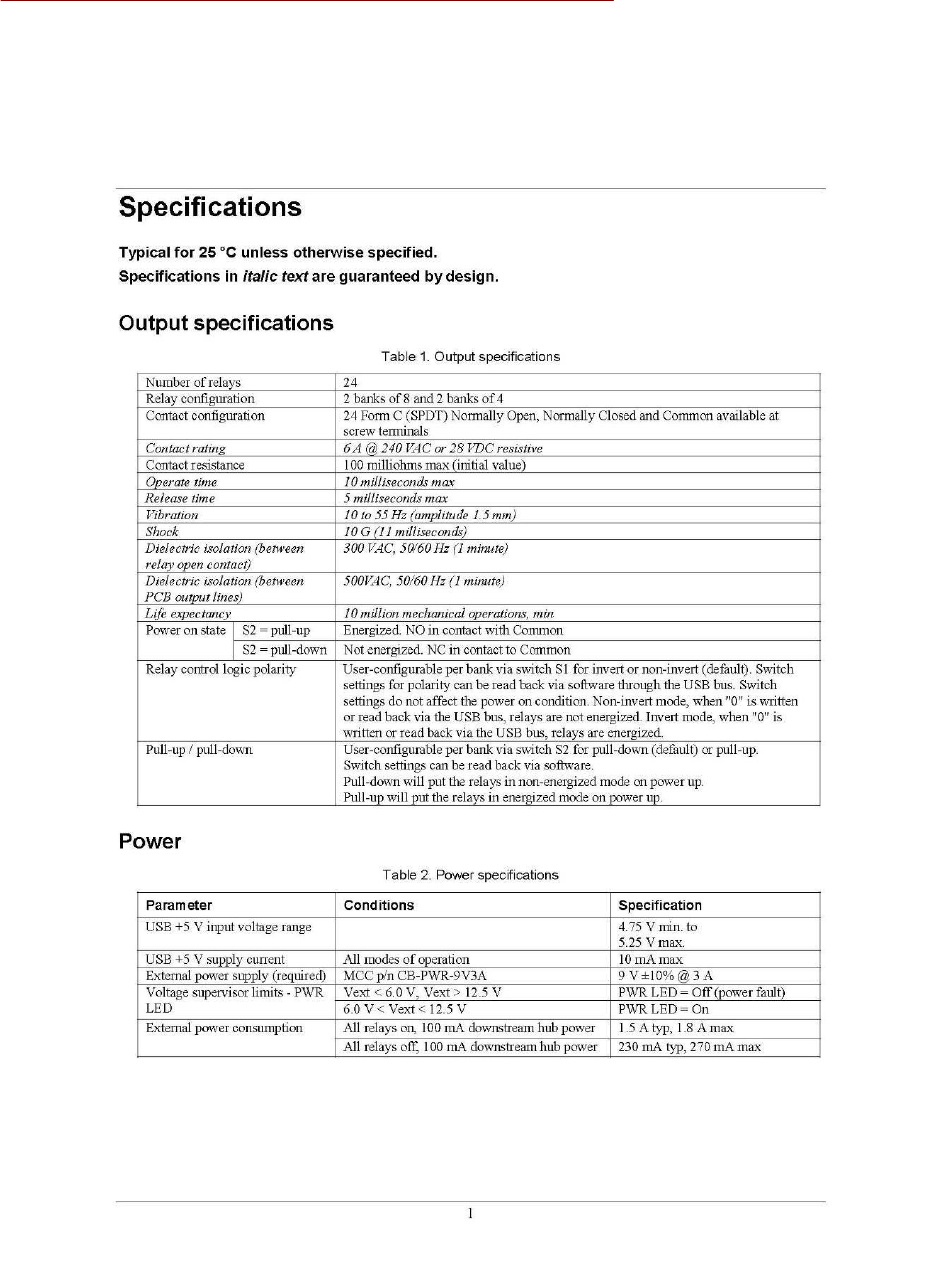
Dry contact switch specifications for Server-24

Rev 031109
38
Problem Solving
If application’s monitor display shows sensors as an orange dot with an “X” AND Digi
Discovery can detect the sensors;
Stop and restart the II service by going to the Windows Start Menu (Press Window Pane Key on
keyboard) then selecting stop IIS. A command window will flash on the display. You may see
Internet Explorer error messages but ignore them; they will be continuous until this next step.
In the Windows Start Menu select start IIS. A command window will flash on the display.
Answer OK to any Internet Explorer error messages that you received. Icons should return to
appropriate colors but sensors may take up to 3 minutes to start responding.
If the database becomes corrupt, you can reinstall the program. Please note that all
records, map and sensor configurations will be deleted. A new install should only be done
when all other attempts to repair the database fail.
Update application by going to the Windows Start Menu (Press Window Pane Key on keyboard)
then selecting update script. A command window will be displayed. Select option 3 for full
installation. When it finishes scrolling, select option 2 to exit.

Rev 031109
39
Install MS .NET framework and Java
Use these instructions to install MS .NET framework and Java on a Server 24 running
UltraSensor 10.7 or higher.
To use an UltraSensor Server laptop on the web you need to configure it for DHCP so it will find an IP
address and then change it back to a specific IP to reuse as the UltraSensor Server.
You get to the IP address window by going to:
Start
Settings
Network Connections
Local Area Connection
Properties
Highlight Internet Protocol (TCP/IP)
Select Properties
These should be the current IP addresses to use for setting it back as a Server,
IP Address 10.10.101.254
Subnet Mask 255.255.255.0
Default Gateway 10.10.101.253
DNS Server 10.10.101.253
Alternate DNS is blank
Select “Obtain IP address automatically” for both top and bottom of window
(This will blank out the numbers above)
“OK” all the way out
Now you should be able to get on the network.
Here’s the link to install Microsoft .NET framework.
http://www.microsoft.com/downloads/details.aspx?familyid=333325fd-ae52-4e35-b531-
508d977d32a6&displaylang=en
On that page, select “.NET Framework 3.5 full package”
(Most others listed will only change the bootstrap)
It’s OK to chose RUN
Accept all questions, it will place the files where it wants.
To install Java:
Go to www.java.com
Select FREE JAVA DOWNLOAD

Rev 031109
40
Allow a remote PC to fully communicate with a Server-8
This resolves 2 symptoms exhibited by the remote PC:
1) The site map area is all red
2) Remote switch bank will not work
At the Server-8 PC:
1) Log out of the UltraSensor application
2) Stop the service by going to START and select ‘Stop UltraSensor’
3) Open an Internet Explorer window (it will fail to find the local site)
4) In the URL area type www.routerlogin.net
5) Log in using “admin” for user name, “password” for password, without quotation marks then
select OK
6) On the left column, select “Services”
To correct the map issue;
A) Select “Add custom service”
B) In the NAME field type “MapViewer” without quotation marks
C) If not already displayed use the dropdown menu to select TCP for TYPE (not TCP/UDP)
D) Type “2201” without quotation marks in both the START AND FINISH PORT fields
E) Select APPLY (Will display all services in a table)
To correct the switch bank issue (optional, you don’t need to use a remote switch bank)
A) Select “Add custom service”
B) In the NAME field type “SwitchBank” without quotation marks
C) If not already displayed use the dropdown menu to select TCP for TYPE (not TCP/UDP)
D) Type “2200” without quotation marks in both the START AND FINISH PORT fields
E) Select Apply (Will display all services in a table)
7) Select “Rules” on the left column
8) Under “Inbound Services”, select “ADD”
9) Scroll through “Service” menu, select MapViewer
10) For Action use dropdown menu to select “Allow Always”
11) For LAN type in 10.10.101.254
12) For WAN use dropdown menu to select ANY
13) Start and Finish IPs should be all zeros
14) For LOG use dropdown menu to select NEVER
15) Select APPLY
16) Should see new entry in table (HTTPS will also be there and must remain)
If you have a remote switch bank, repeat steps 8 through 16 but select “SwitchBank” instead of
“MapViewer” in step 9.
Scroll down left column to select Logout and Yes to close window. Go to START to Start
UltraSensor.

Rev 031109
41
Release 10.9 Notes
Version 10.9
Upgrade Process
Execute the Upgrade.cmd script contained in the top-level directory of the distribution package
to upgrade any version 10.4 or greater server to the current version. Distribution packages are
cumulative, so there is no need to upgrade to each version. Simply run the upgrade script for
the latest version to upgrade any previous version.
When the Upgrade.cmd script is executed, it will allow you to:
• upgrade just the server functionality (retaining current database data and user
configuration),
• upgrade the server and database (retaining user configuration), or upgrade everything
(losing all data and setting the server to factory default settings).
Summary
The following significant changes were made to the UltraVision Sensor Server:
• Added the UltraSensor Switch API
• Added the UltraSensor Monitor API
• Enhanced Audit Log archiving and pruning mechanisms
• Enhanced the incident processing logic in the server to better filter false motion alarms.
Each of these changes are discussed in more detail below.
Graphical User Interface (GUI) Changes
The following specific changes were made to the web-based Guard and Administrator Console
used to monitor and control the UltraVision Sensor Server:
• Added the Configure Monitors page to the Administrator Console to allow
administrators to configure remote monitor accounts. Remote monitor accounts allow
client applications to monitor server activity using the new UltraSensor Monitor API
(see below for details). This page also allows administrators to see a list of all active
monitor connections.
• Added the Online Event Retention and Archive Log Retention properties to the
Configure System page to allow administrators to specify how long event records should
be retained in the database and how long archive event logs should be retained in the file
system, respectively. This gives administrators better control over how database and file
system resources are used on the server.
• Removed the Auto Archive Interval property from the Configure System page which
was made obsolete by the archive process changes described below.

Rev 031109
42
• Added the Archived Logs button to the View Audit Log page to allow administrators to
view the list of Audit Log archive files currently stored on the server. The new Audit
Log Archive page also allows administrators to export a CSV file containing all archived
audit records for a given day.
• Modified the View Audit Log and View Event Log displays to limit the number of rows
displayed in the GUI table and exported to a CSV file. This prevents users from
accidentally trying to display more rows than the database, web server and browser are
capable of handling.
Server Changes
The following specific changes were made to the server functionality and configuration
mechanisms:
• Fixed a bug that was preventing switch actions based on the POWER event from
triggering properly.
• Added support for the UltraSensor Switch API that allows client applications to receive
switch state changes as defined on the Configure Switches administrator page. Client
applications using this API must specify a valid Switch ID (e.g., location) and Access
Code as defined on the Configure Switches page in order to start receiving state changes
as events are processed by the server.
• Added support for the UltraSensor Monitor API that allows client applications to
monitor server activity, including server property changes, target data and event data.
Client applications using this API must specify a valid Monitor ID and Access Code as
defined on the new Configure Monitors page in order to access the server.
• Fixed a problem with the maintenance task that prevented it from properly archiving and
pruning the Audit/Event log on some systems. Event records are now automatically
deleted from the database when they are older than the number of days specified by the
Online Event Retention property on the Configure System page. The Online Event
Retention property determines how far back in time Operators and Administrators can
view Event Log or Audit Log records using the View Event Log and View Audit Log
pages.
• The Audit Log is now archived to individual CSV files on a daily basis in the
c:\uvss\archive directory on the server. The daily files make it easier for administrators
to find past events for a given time period. Furthermore, the format of the archive files is
now the same as that used when exporting the Audit Log from the GUI, making it easier
to post-process the CSV files. Archive files are automatically removed from the file
system when they are older than the number of days specified by the Archive Log
Retention property on the Configure System page.

Rev 031109
43
• Added support for the LogViewMaxRows and LogExportMaxRows configuration
properties in the c:\uvss\blogic.ini file to control the maximum number of events that can
be displayed in the GUI event table and exported to CSV files, respectively. The
properties can be optionally specified as part of the [GUI] category, as in the following
example:
[GUI]
LogViewMaxRows=1000
LogExportMaxRows=5000
• Added support for the MOTION_COUNT_FILTER and
MOTION_RANGE_FILTER configuration properties in the c:\uvss\blogic.ini file to
fine-tune the algorithm used to filter out false alarms.
a.) If MOTION_COUNT_FILTER is an integer greater than 1 (default value is 2),
then the server will wait for a consecutive number of motion events before generating
an alarm. This prevents alarms from being generated for spurious motion events.
b.) If MOTION_RANGE_FILTER is a decimal value greater than zero (default
value is 0), then the difference between the first motion event range and last motion
event range (as determined by the MOTION_COUNT_FILTER) must be greater than
or equal to the MOTION_RANGE_FILTER value (specified in feet) in order for an
alarm to be generated. This prevents alarms from being generated unless two or more
consecutive motion events occur with a “decreasing” range (i.e., target moving
towards the sensor).
- For example, suppose MOTION_COUNT_FILTER is specified as 2 and the
MOTION_RANGE_FILTER is specified as 0.5 feet.
- If the first motion event occurred at a range of 10 feet and the second
consecutive motion event occurred at a range of 9 feet, then an alarm would be
generated.
- If the second consecutive motion event occurred at a range of 9.6 feet, then an
alarm would not be generated at that time. However, if the 3rd consecutive motion
event occurred at a range of 9.2 feet, then the alarm would be generated.
• Added support for the INCIDENT_DEBUG configuration variable which allows
technical support staff to log incident processing information for a given sensor. For
example, if the INCIDENT_DEBUG variable is set to “3”, then only the incident
processing information for Sensor 3 will be output to the server log. The amount of
debug information generated could be quite large, so this configuration variable should
be used only when actively trouble-shooting event filtering problems.
• All server logs have been moved from the c:\uvss directory to the c:\uvss\logs directory
to better organize the server runtime directory.
• Created a new daily maintenance log in c:\uvss\logs to assist with trouble-shooting
maintenance issues.

Rev 031109
44
Thank you for purchasing our product.
Technical Support
Email: techsupport@ultravisionsecurity.com
Contact information
UltraVision Security Systems, Inc.,
16 Northwestern Drive, Salem NH 03079 USA
www.UltraVisionSecurity.com
info@UltraVisionSecurity.com
Tel: 866-374-9732
603-685-0303
Fax: 603-898-1840