UniData Communication Systems SQ-3000 VoIP Phone User Manual 1
UniData Communication Systems Inc. VoIP Phone 1
User manual

User Manual
This manual includes product specifications and instructions on WiFi phone operation. This manual must be read before operating the product.
A WiFi phone access point is required to use this product. Usage of the WiFi access point provided in the full package is recommended.
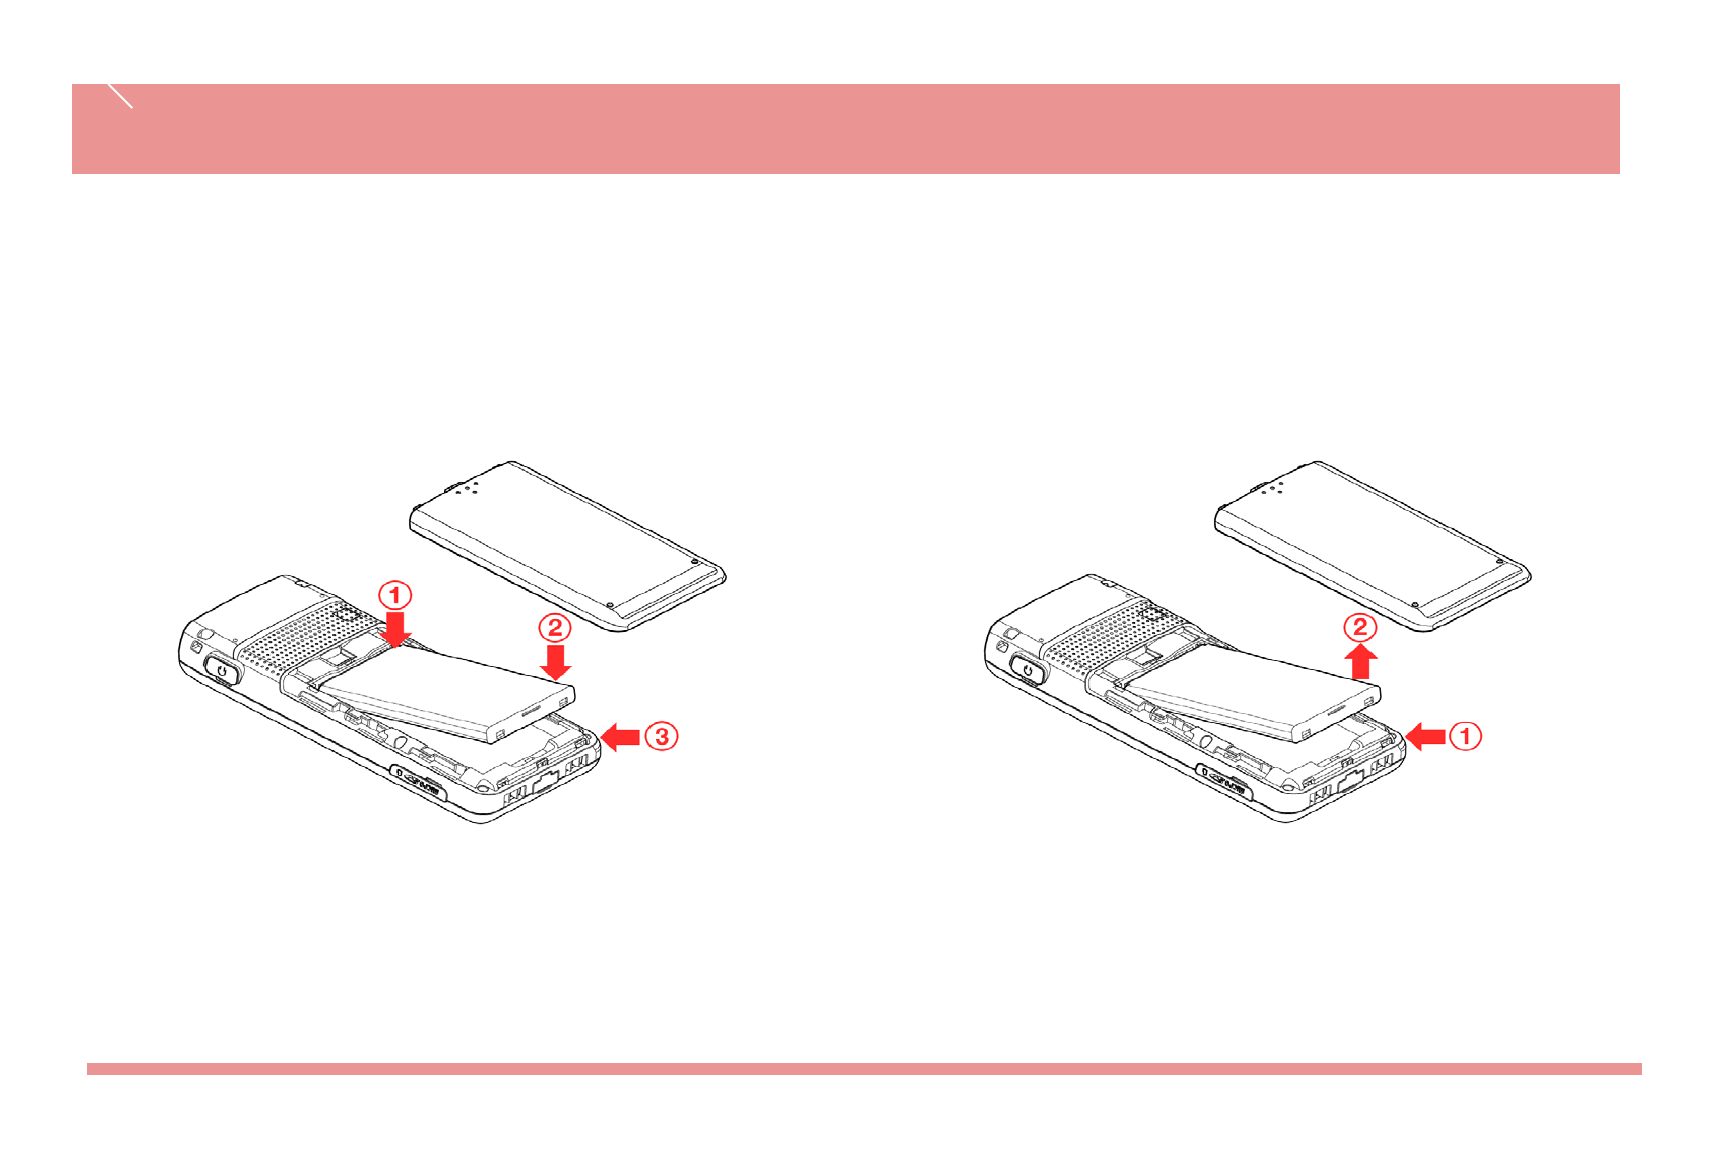
Battery Replacement
Use ones authorized by the company when you replace batteries, following the figure below.
Battery installation method Battery removal
If battery is inserted upside down, WiFi phone will not work. Please turn off the power before removing battery from WiFi phone.
(a sudden power off can cause troubles)
Battery Replacement
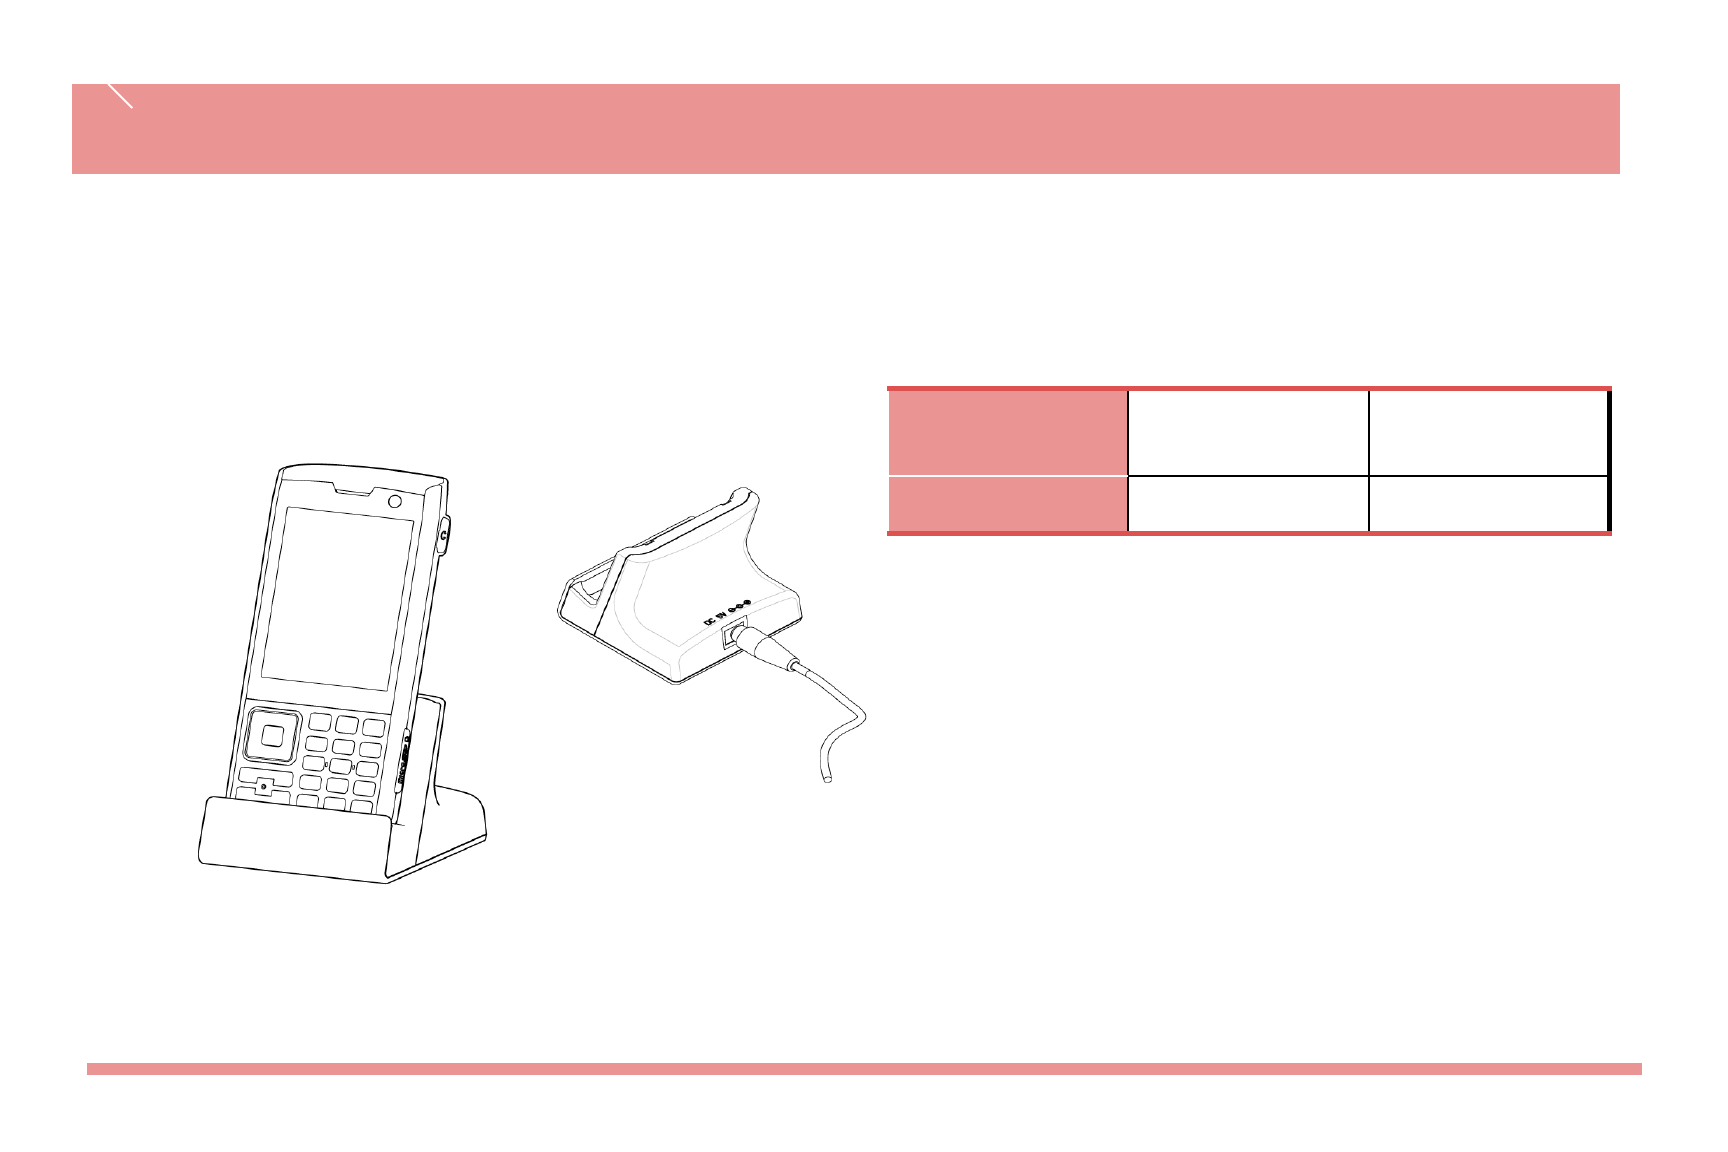
Charge the battery
Charge the battery after purchasing the product as it is not fully charged.
Charging with the desktop charger
※Lamp on the charger flickers? Separates the battery from the
charger, and then, re-fits into the charger. It still flickering? Then, cleans
a charging terminal and charges the battery. (When the lamp doesn‟t
stop flickering, apply to the service center.
Features Charging Charging
Complete
Charging Lamp RED GREEN
Time Taking to Charge / Battery Life

Time Taking to Charge / Battery Life
※Battery life varies with the environment temperature,
battery age and movement of the user.
-Battery life is not permanent
-Hours of usage
-Lithium ion polymer
-WiFi
Model Standard Model
Charging time 3 hours 30 minutes
Battery life
(continuous
calling)
Voice 6 hours
Video 3 hours
Time Taking to Charge / Battery Life
Successive use time and standby time of batteries are the
estimates of the company‟s laboratory, which can be different from
the figures in manual depending on the patterns they are used

Insert a micro SD card
Insert / Remove the microSD card
The brands may be fully compatible with this device :
Sandisk, LG, Samsung, Memorette, Transcend
Use Only compatible micro SD cards approved by UniDATA for use with this device. UniDATA uses approved industry standards
for memory cards, but some brands may not be fully compatible with this device. Incompatible cards may damage the card and
the device corrupt data stored on the card.
The phone supports microSD cards up to 16GB.
1. Open the side cover of the microSD.
2. Insert the card into the microSD card slot with the contact surface facing down, and press it until it locks into place.
3. Close the side cover.
Remove the micro SD card
1. Make sure that no application is currently accessing the microSD memory card.
2. Open the side cover of the microSD.
3. Press the microSD card slightly in to release lock, and pull the card out.
Important : Do not remove the memory card in the middle of an operation when the card is being accessed.
Removing the card in the middle of an operation may damage the memory card as well as the device, and data stored on the
card may be corrupted.
You can remove or replace the microSD card during phone operation without switching the device off.

If you want to turn on the power,
keep pressing for 3 seconds or more. If you want to turn off the power, keep
pressing for 3 seconds or more.
If abnormal works take place, or the power button does not work while using WiFi phone, start the
phone after removing and inserting the battery. Turn on the power after waiting for 5 seconds or
more when you restart the phone
Power On / Off
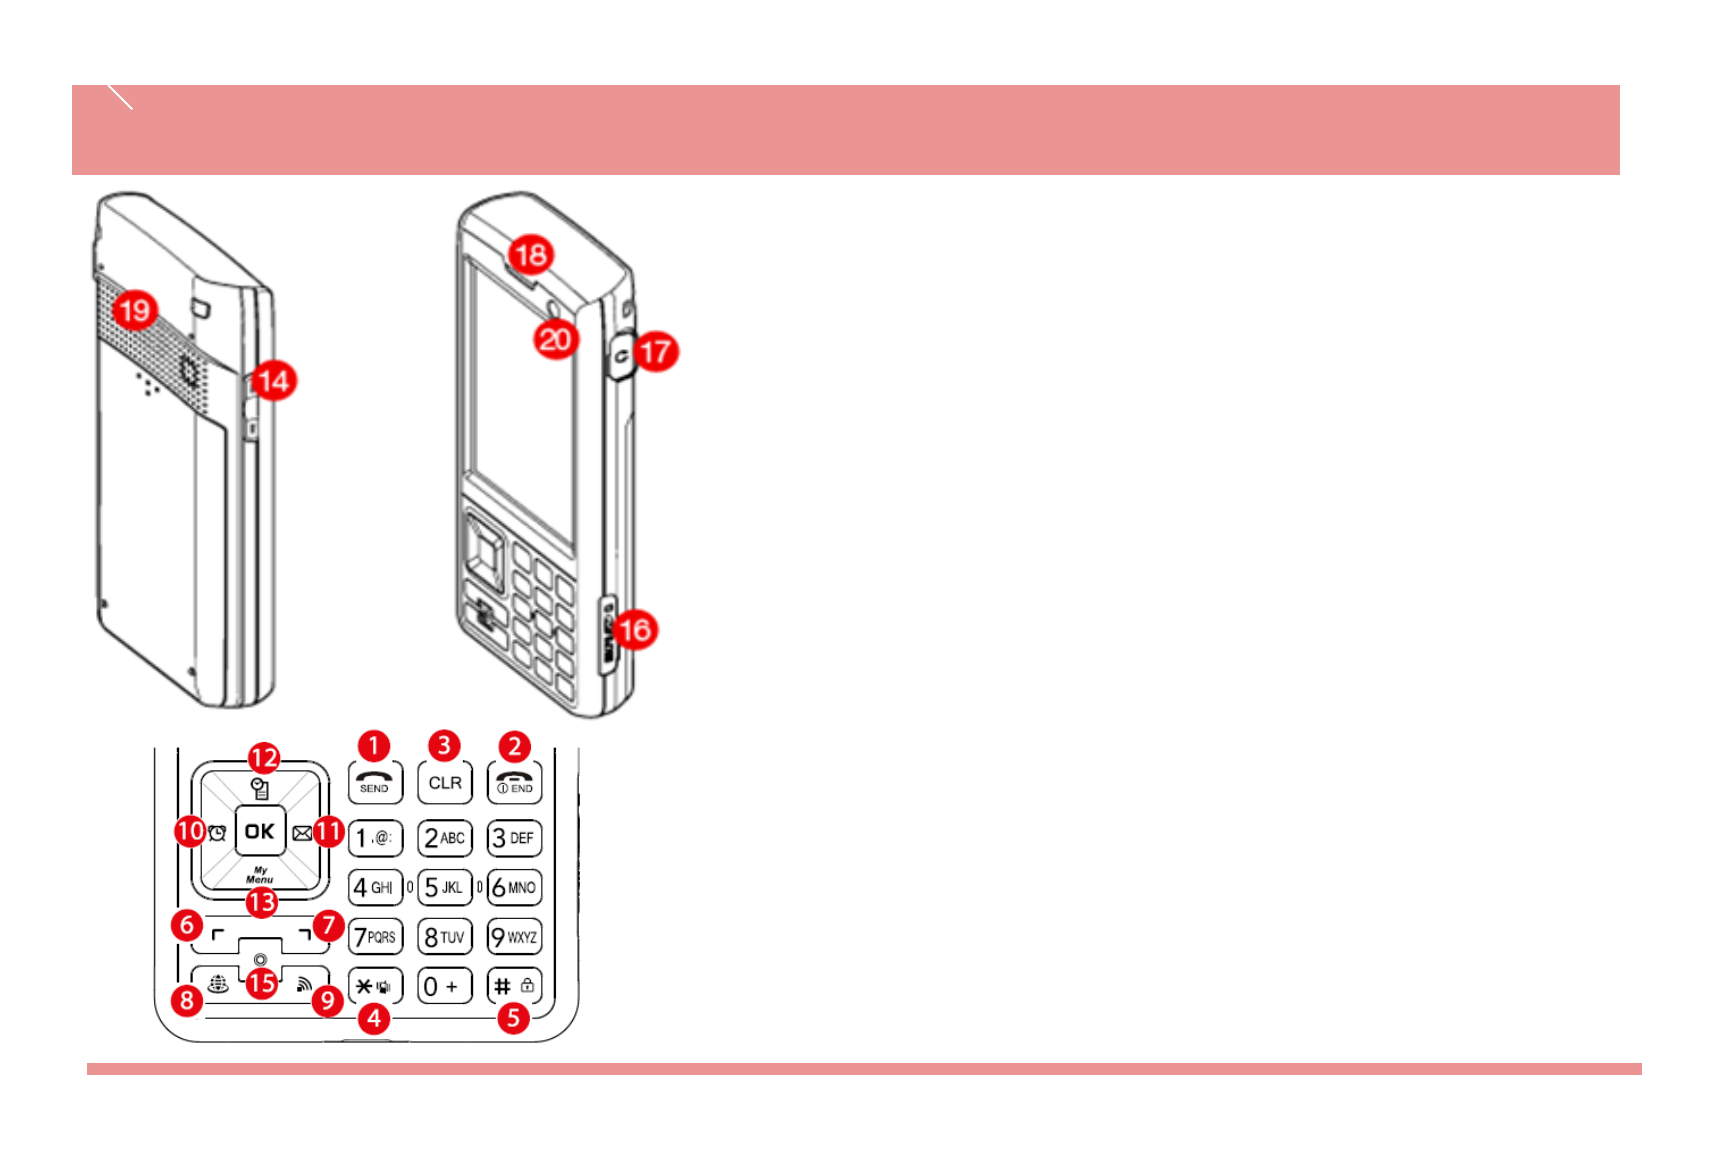
Names & Function of Device Parts
1 Send Key
Used for receiving and making
calls
6 Left Selection Key
7 Right Selection Key
2 End Key
Used for end a call and to
switch the power ON/OFF
8
9 AP Search Key
10 Alarm Shortcut
11 Using Message function
3 Clear Key
Removing characters or
moving to previous screen.
12 Calender
13 Using user-defined funcion
14 Volume Control
4 Vibrate
Press and hold to vibrate
when you receive a call
15 MIC
16 Micro SD Insert hole
5 Key Lock
Lock and unlock the keypad.
17 Earphone
18 Earpiece
19 Speaker
20 Camera

Signal strength
Out of call coverage
Call trial or connection
Call not available
You have selected the sound setting to bell
Setting to mute, displayed when the volume is set to “0”
Vibration Mode
Silent Mode
An Alarm is set
You have one or more unread messages in the Inbox folder
Setting to call forwarding service
Remaining battery life
Full Shortage Empty
Being connected to network
Shows that the keys are locked. Key operation is disabled
MicroSD card is being accessed
Display Indicators
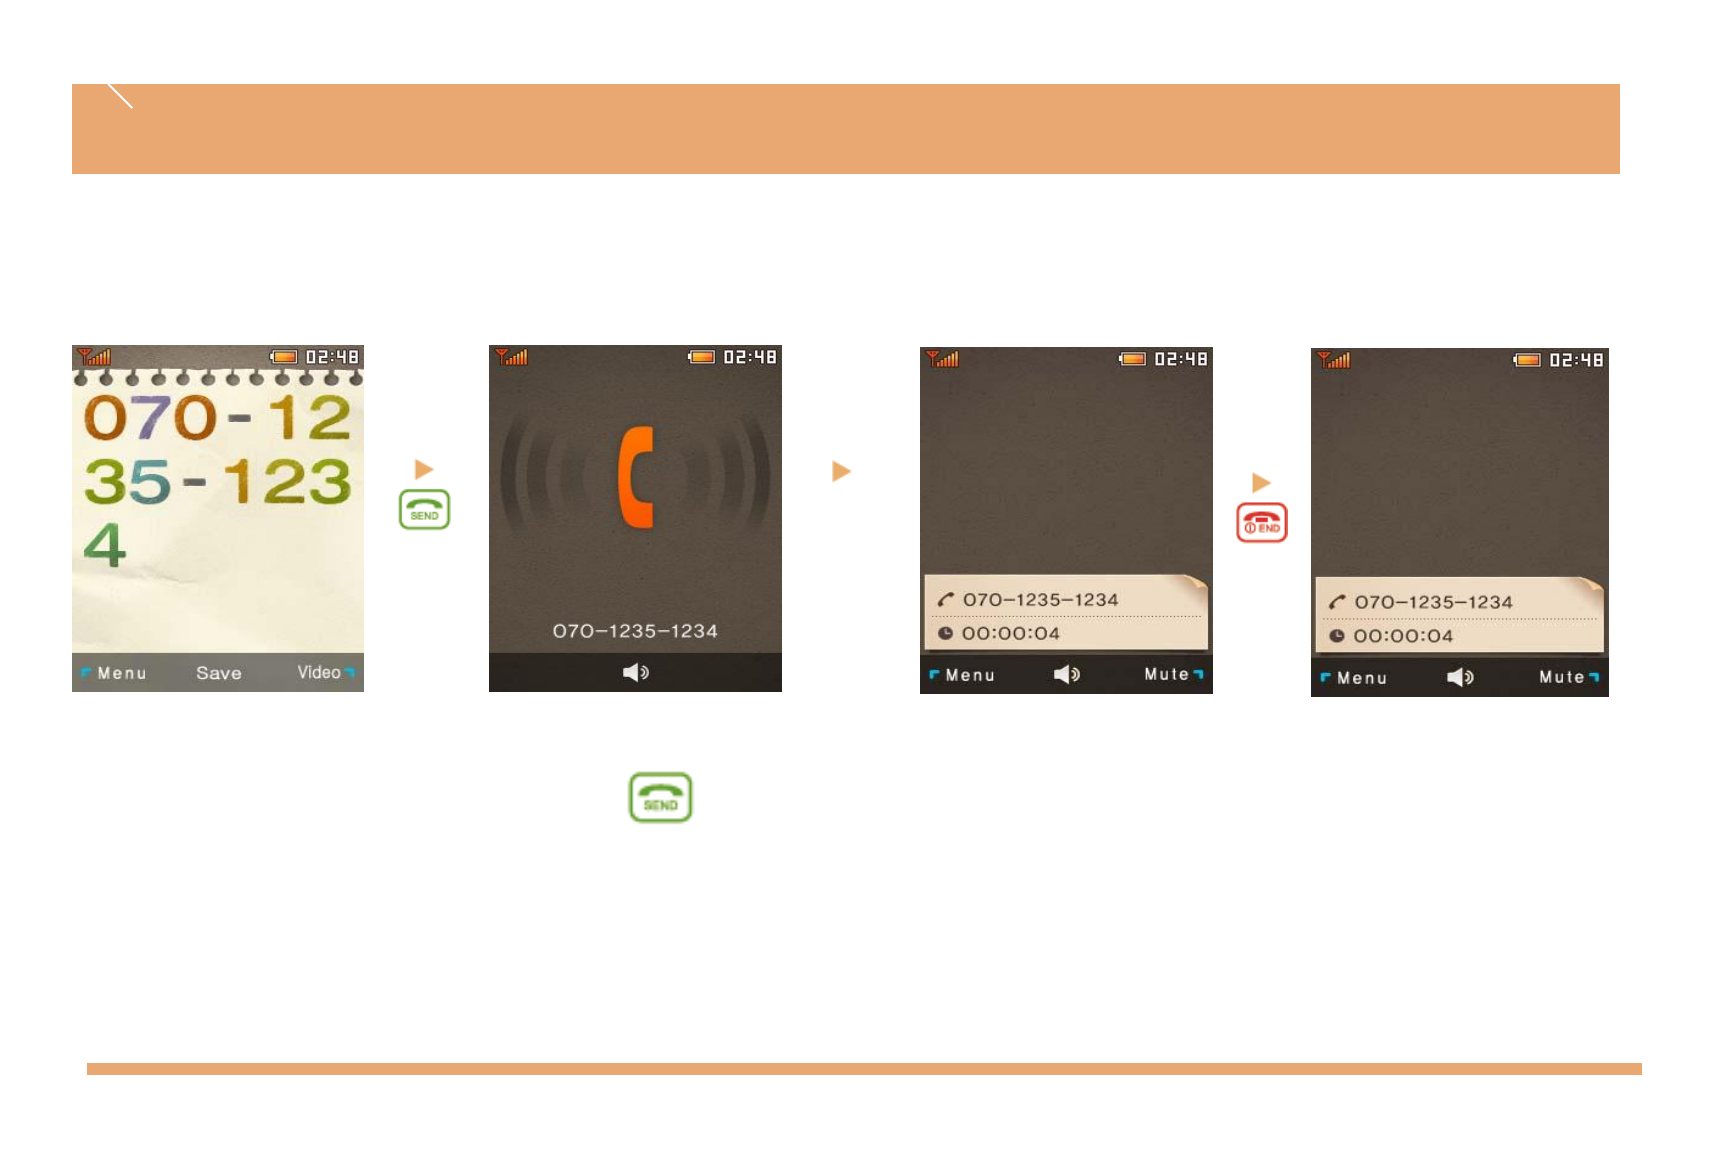
Voice Calls
Call
Connect
In standby, enter the numeric keys and then press key
※Call quality may become reduced with increased distance away from the access point.
Calling Method
Call
connect
In standby, enter the numeric keys and then press .
※Call quality may become reduced with increased distance away from the access point.
Calling Method
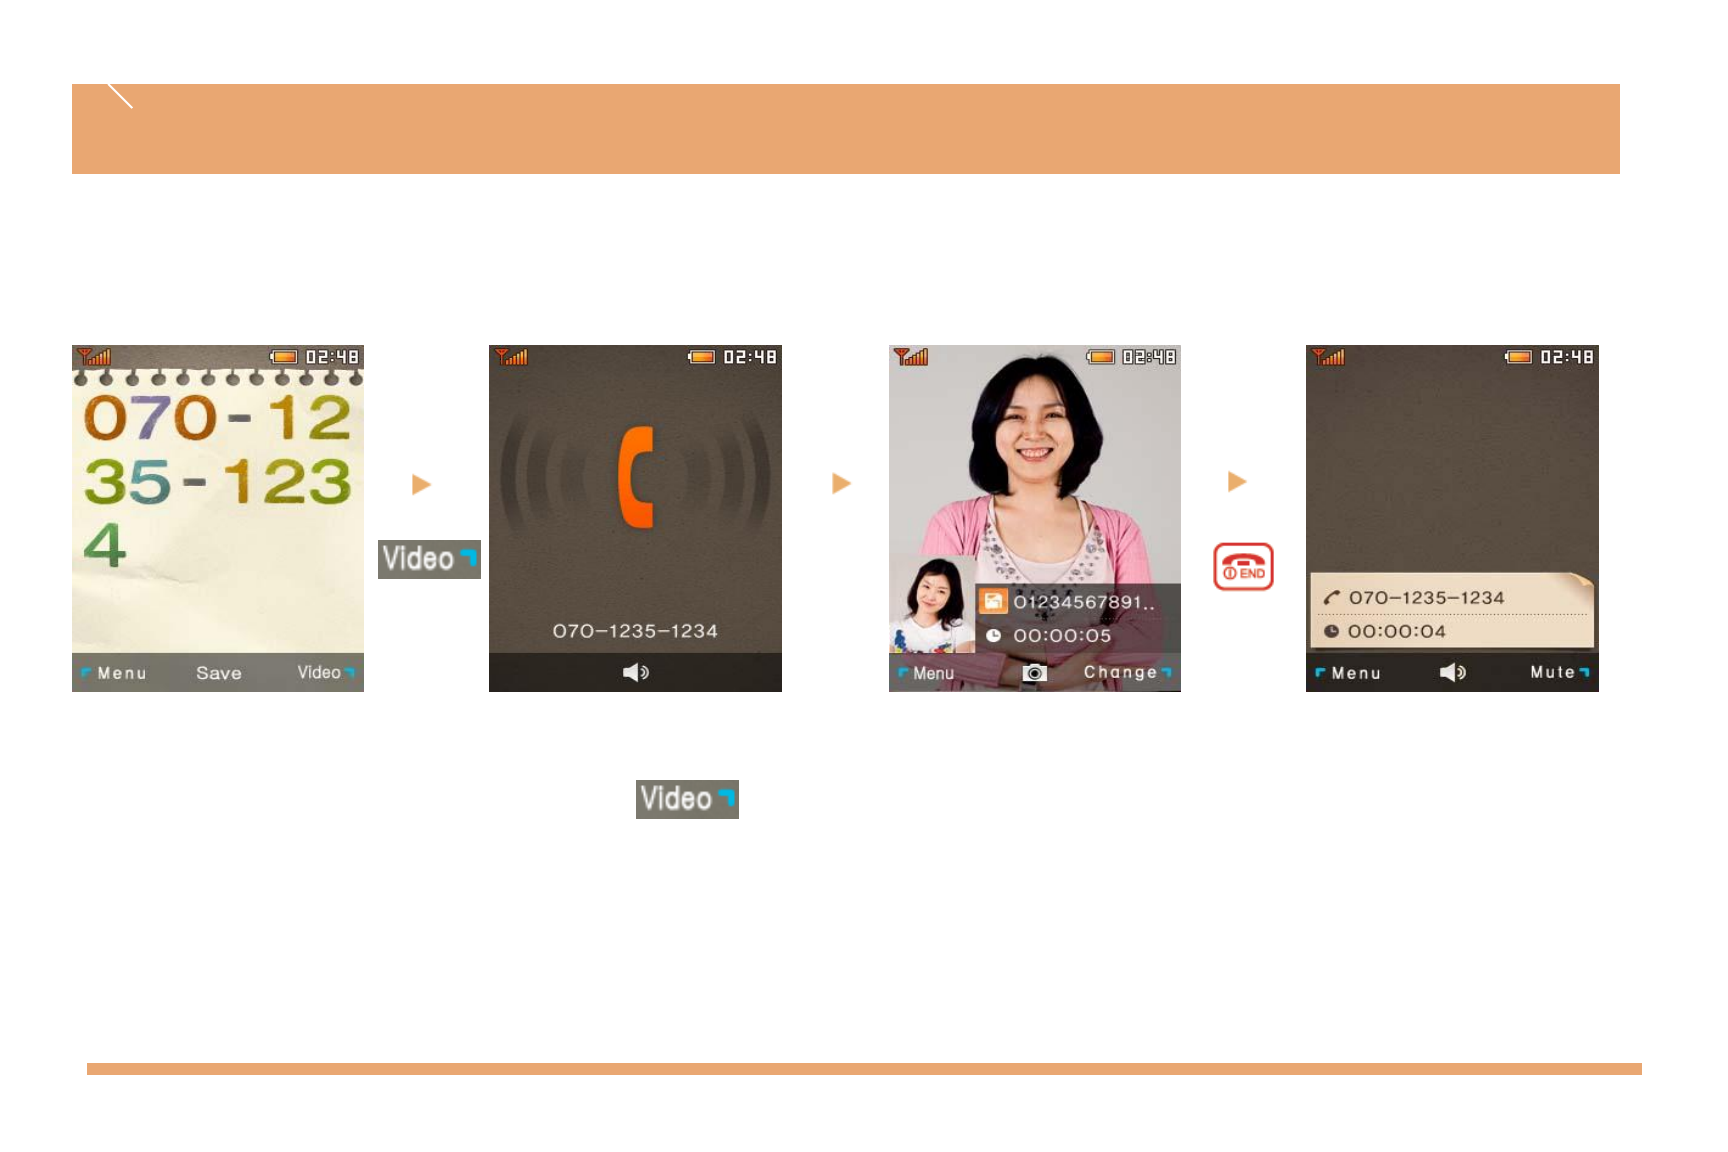
Video Calls
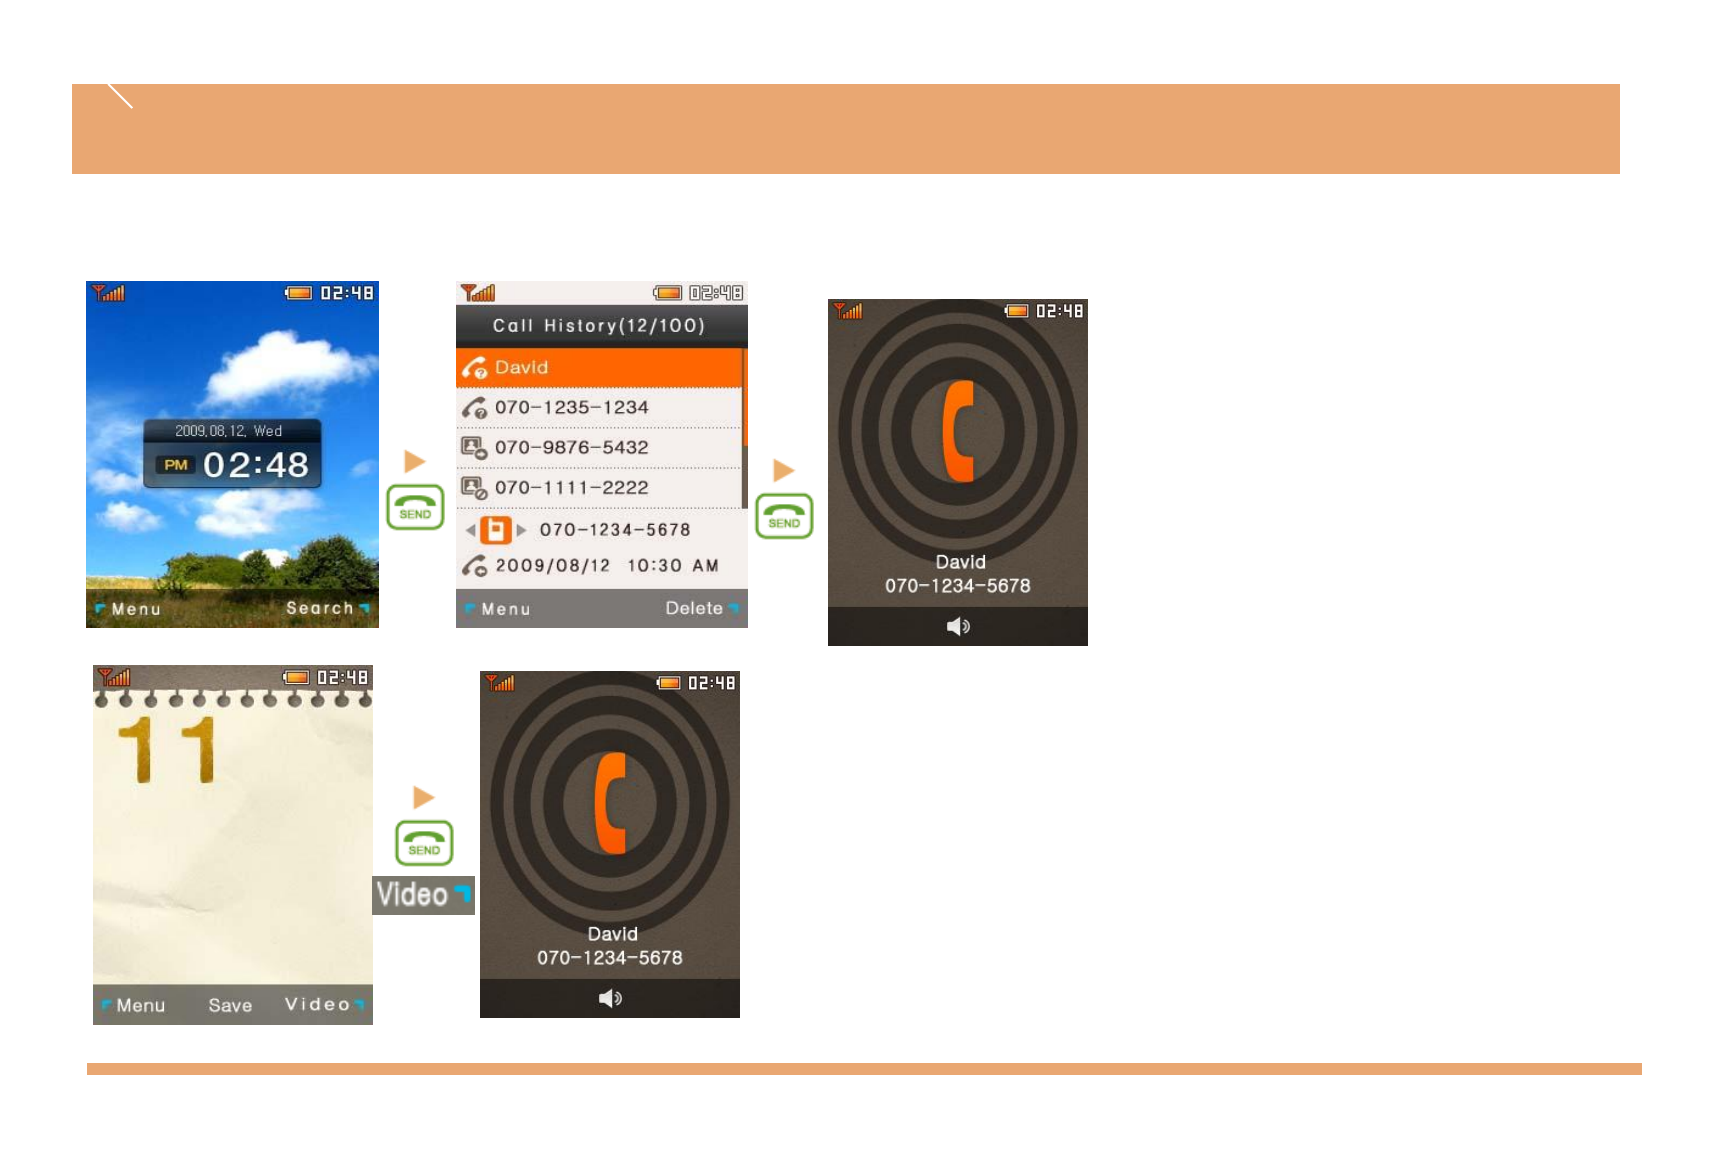
Redialing recently used numbers
You can make voice or video calls by
dialing recently used numbers (incoming,
outgoing, missed, received/sent text
messages). During stand-by, press the
SEND key and then select the phone
number you want to call.
- Select VIDEO in the menu if you want to
make a video call.
Speed dialing
You can speed dial saved numbers to
make calls quickly and easily.
During stand-by, press the speed dial
number and then press the SEND key to
make a call.
- Press the VIDEO key to make a video
call.
Calling Method
Call logs

Number
Key
Auto-search
Press a part of the number you want to call to auto-
search the phonebook and display the results. Select a
phone number and press the OK key.
- Press the VIDEO key to make a video call.
Calling Method
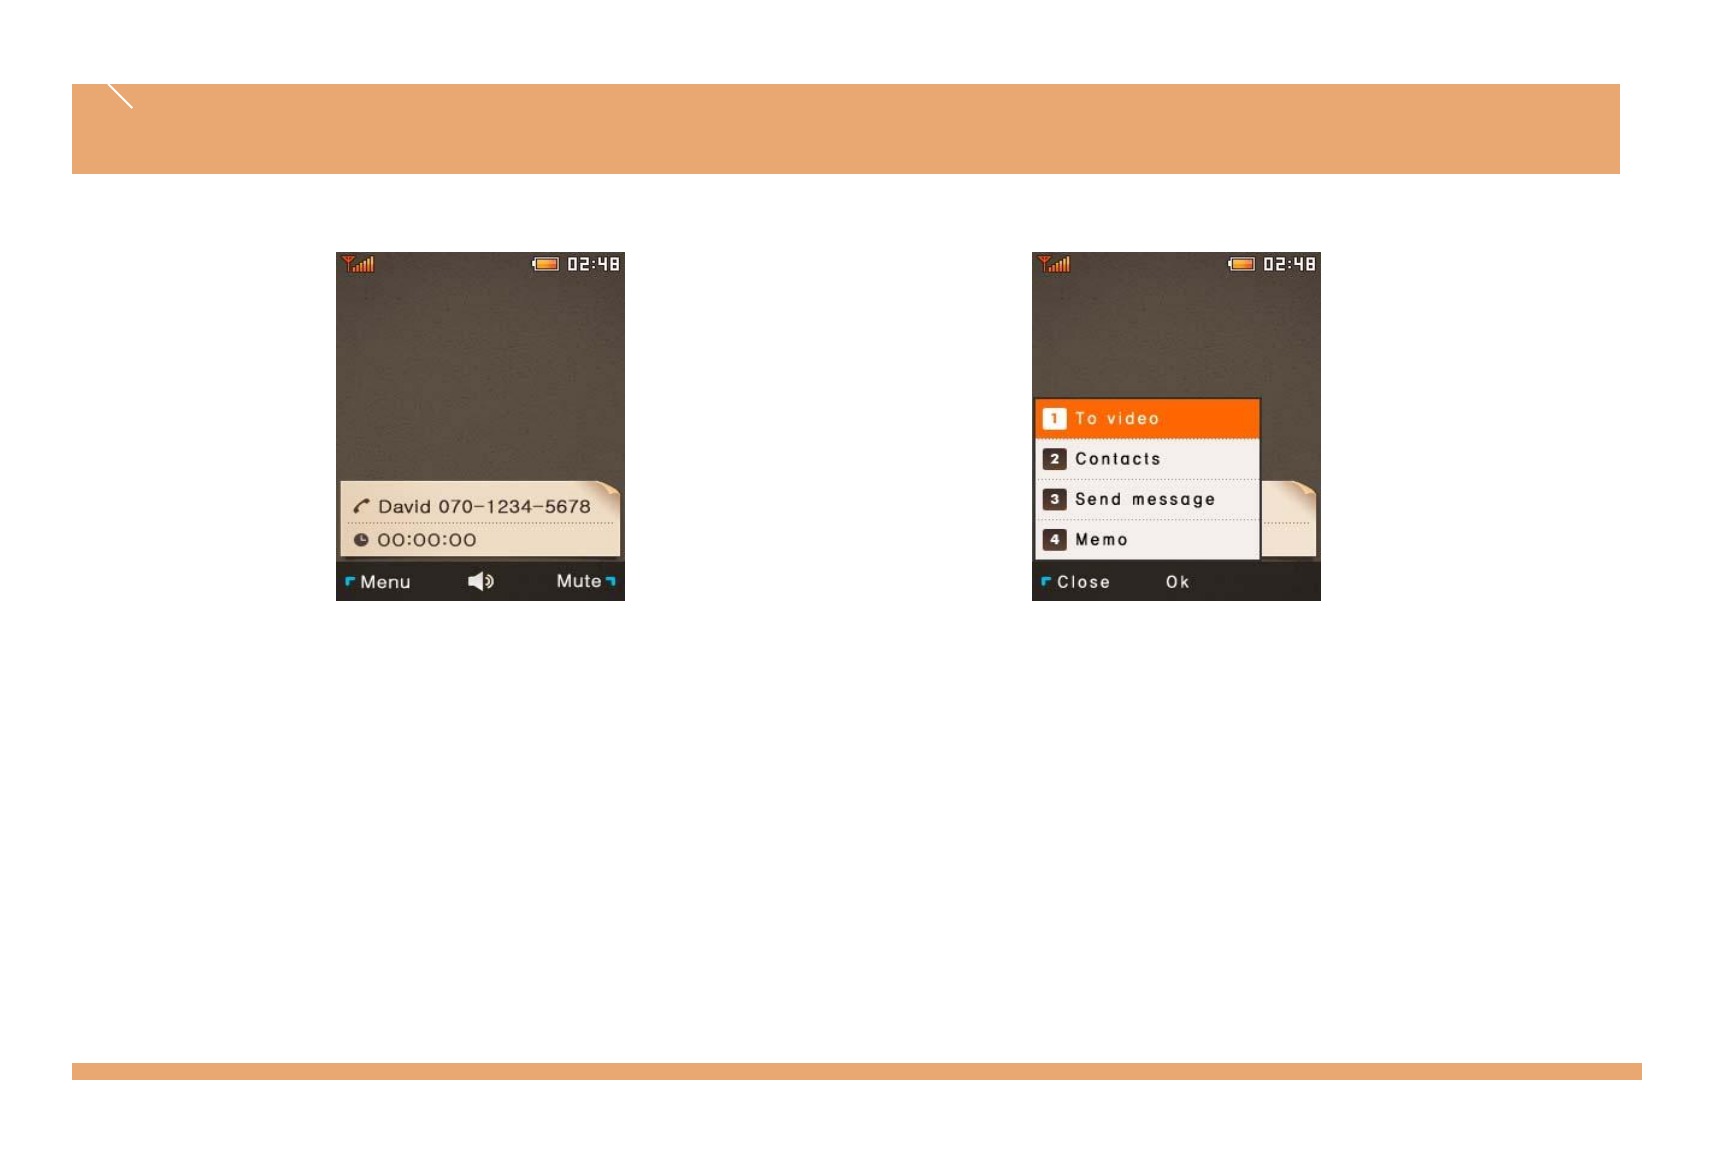
Making a voice call
•Refer to page 21-24.
Taking a voice call
Press the SEND key to take an incoming
call.
Press the END key to reject an incoming
call.
Using the menu during a voice call
Convert to video call: Convert the current voice call
to a video call without ending the call.
Phone book: Search the phone book.
Send message: Send a message during a call
without ending it.
Memo: Write and save a message during a call.
( ): This function stops your caller from hearing
your voice temporarily. The caller's voice can still
be heard.
Using the Menu During a Voice Call
Making a video call
•Refer to page 21-24.
Taking a video call
Press the ( ) key when the message
“Incoming video call” is displayed.
Press the ( ) key to reject the incoming
call.
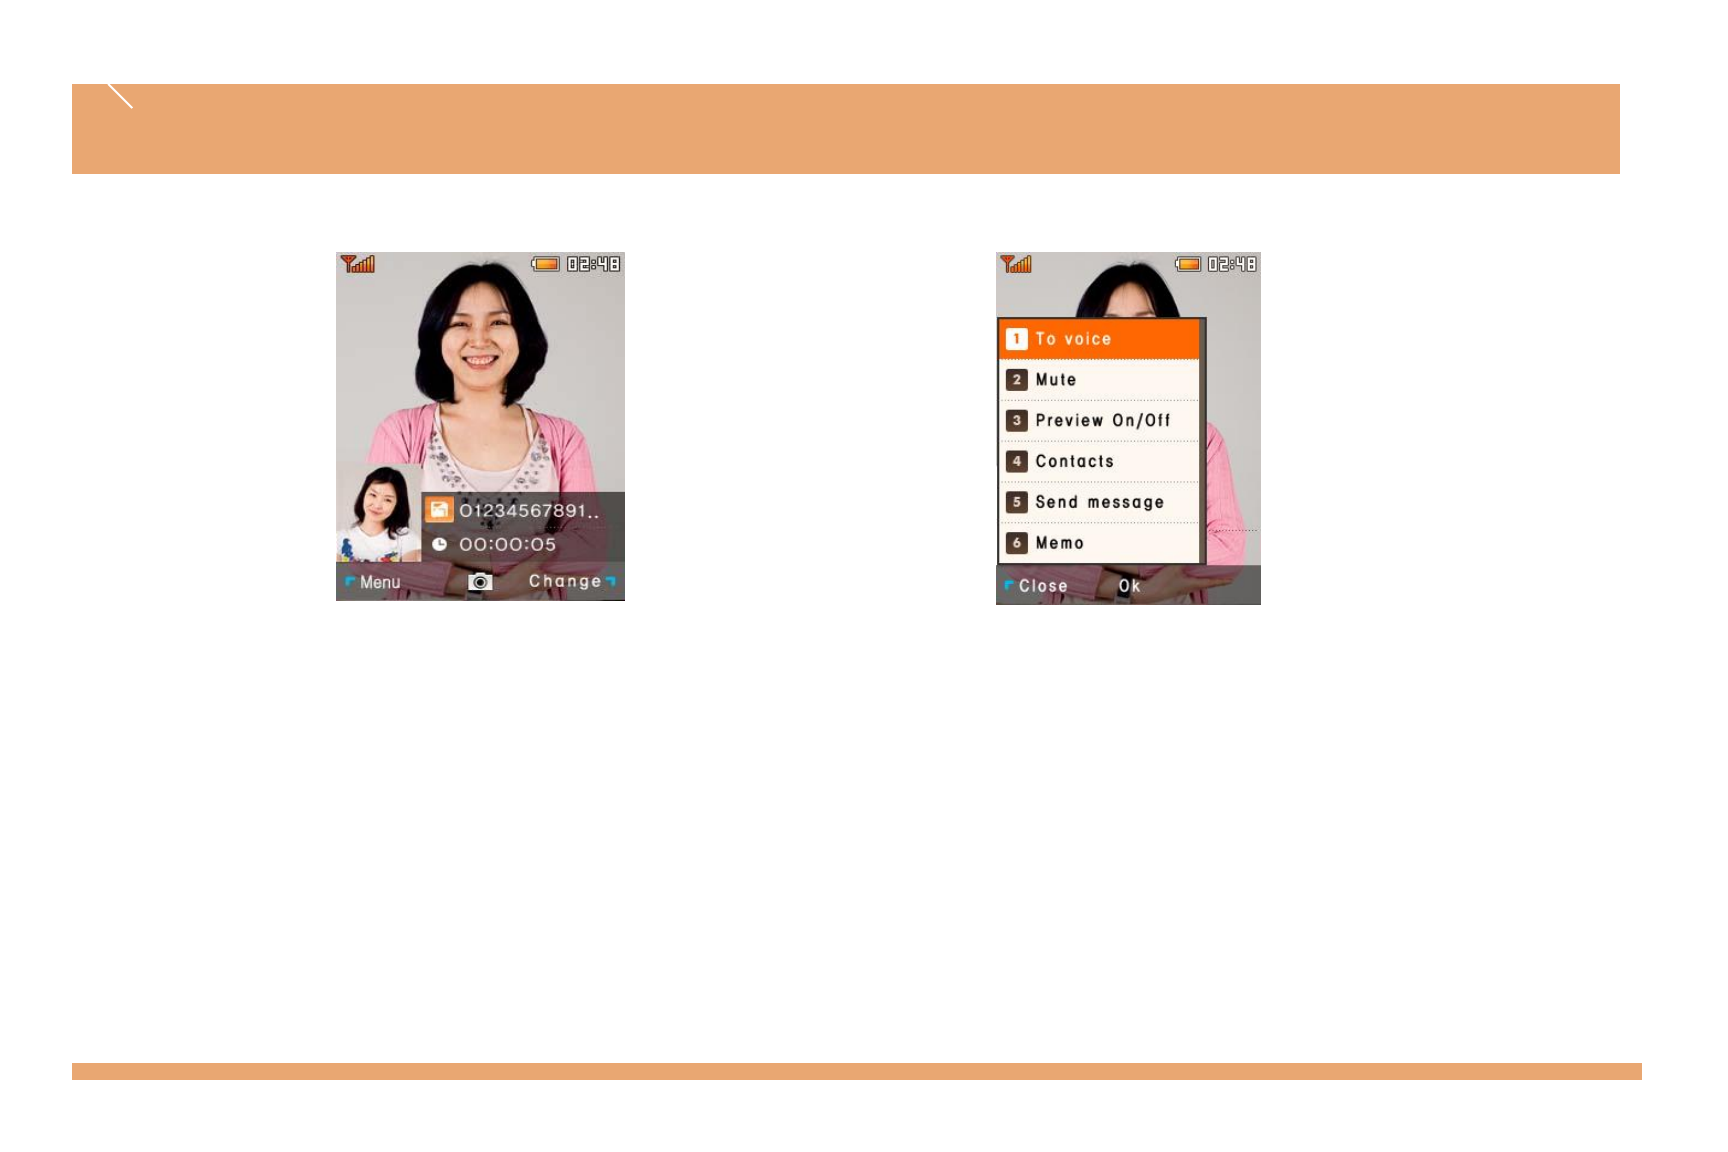
Using the menu during a video call
Convert to voice call: Converts the current video call to a voice call
without ending it.
View my picture: Turns off your picture and displays your caller's
picture only. (Changes to 'Hide my picture' when your picture is in
display.)
Phone book: Searches the phone book.
Send message: Sends a text message without ending the current
call.
Memo: Write and save a memo during a call.
( ): Select a photo or video to display.
Using the Menu During a Voice Call
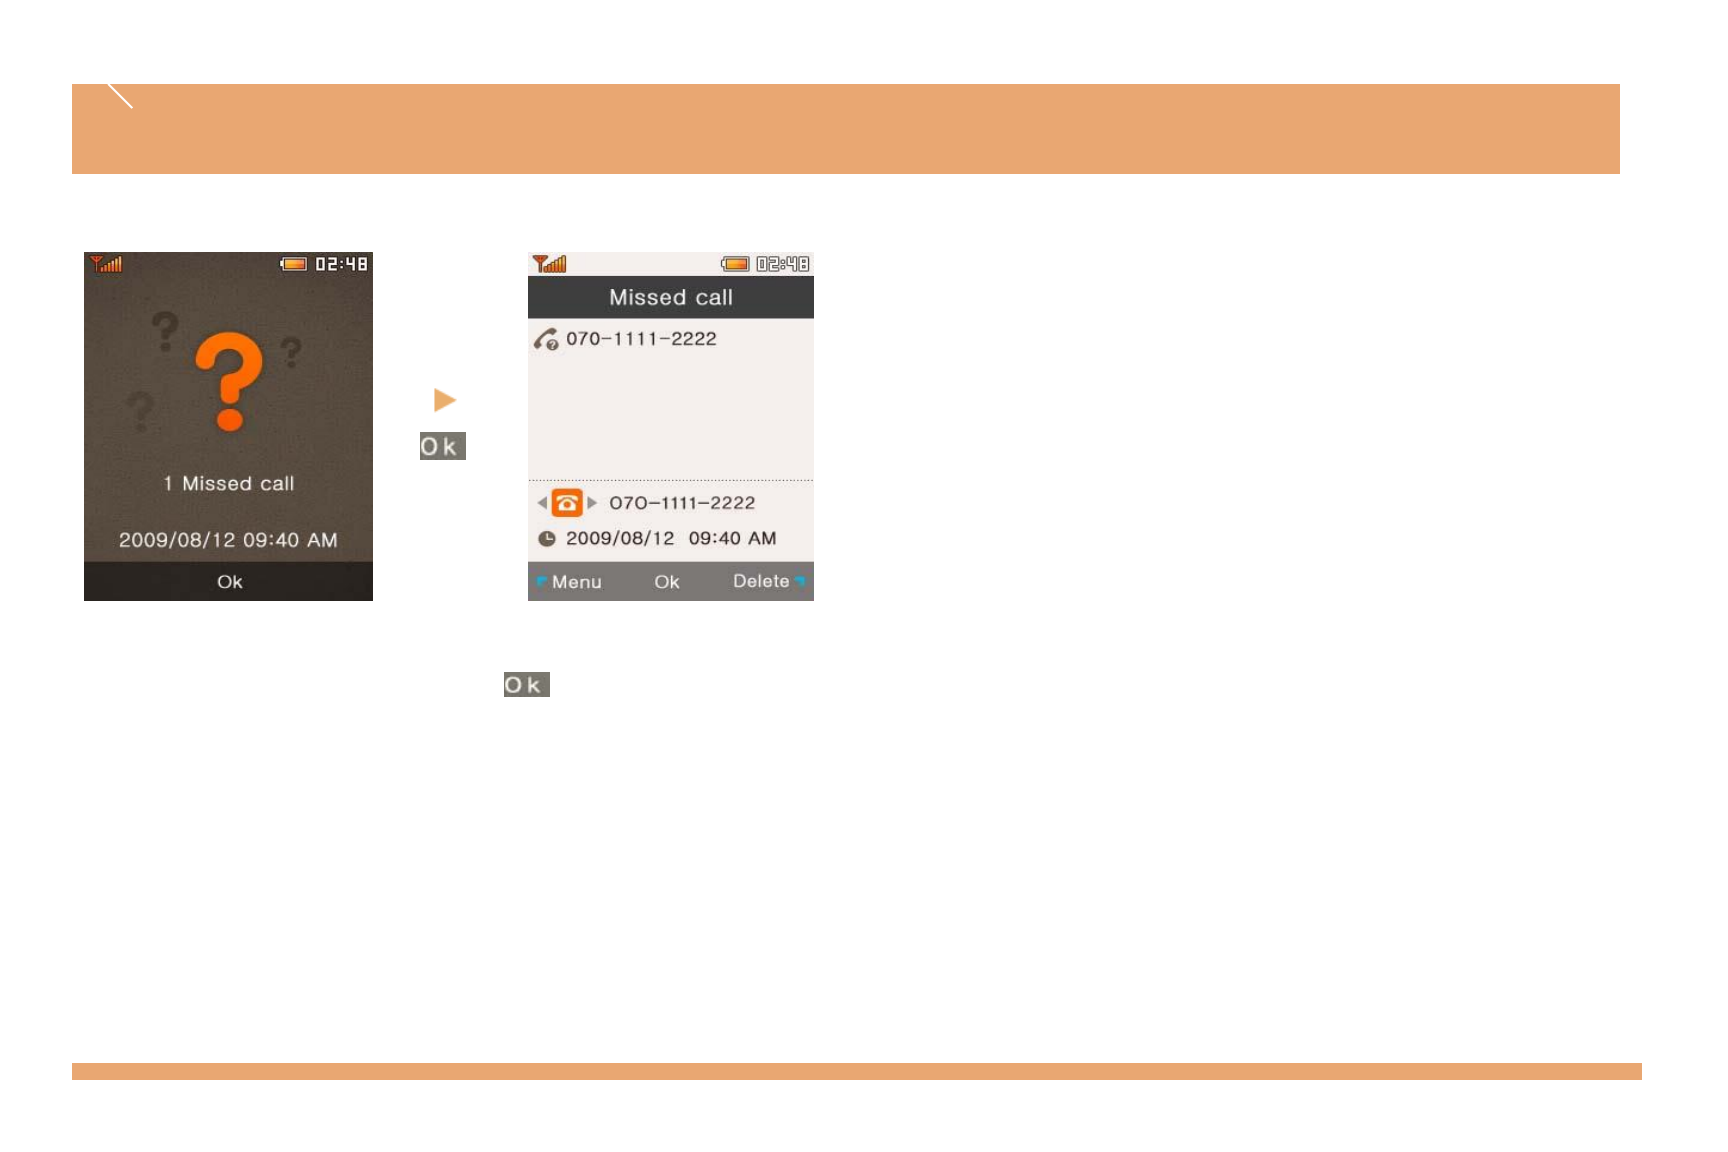
If you have missed call, press , and the last one of those
calls will be answered.
To see calls arrived in your absence from the call list, press
or and .
Missed call
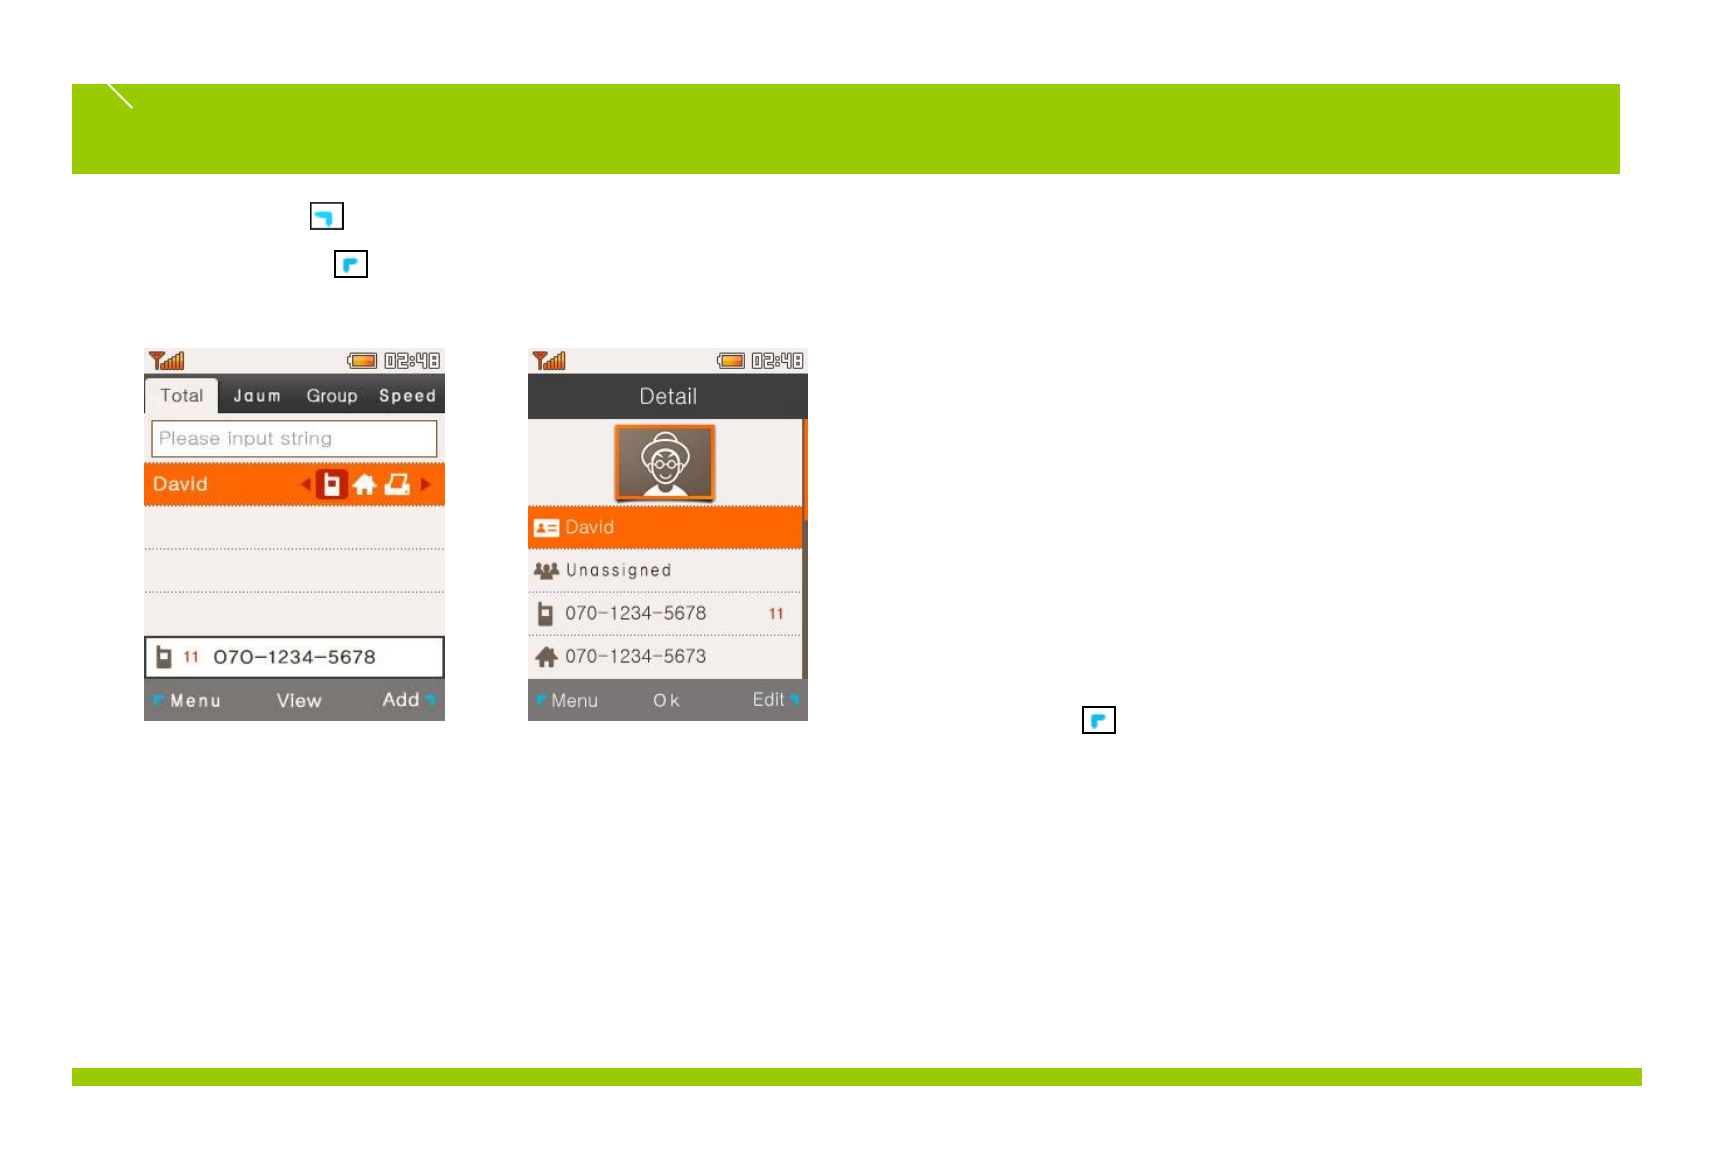
Right select key for shortcut
Left selection key ( Menu > Contacts > Search contacts )
Enter a part of a name, phone number or e-mail address to search for a phone number.
Search all: Search by a part (more than 1 character) of a name,
phone number or e-mail address.
Search by letter or digits: Enter letters or digits, then all names
starting with these letters/digits will be displayed..
Search by group: Select a group to search in (unspecified,
standard groups, custom groups).
Shortcut key search: Enter a set shortcut number to search for
a phone number.
Enter the name of the person you want to call and press the
View key to call a number saved in the phone book.
Press the ( ) key to edit the saved details.
Press the ( Send ) key to call a found number.
You can search for phone numbers just by pressing ‘Search‟
in standby mode. If you want to call at the phone number
selected, press .
Phone Book
2. Phone number search –video call
1. Press the to make a video call from the phone book
you selected.
- The phone number selected must be compatible with video
calling.
- A video call will be converted to a voice call if the dialed
number does not support video calling or if the video call
receiver is in an area where video calls cannot be made.
3. Add new contacts –from phonebook
1. Press and select > Add contacts on the Phone Book
Menu.
Phone Book
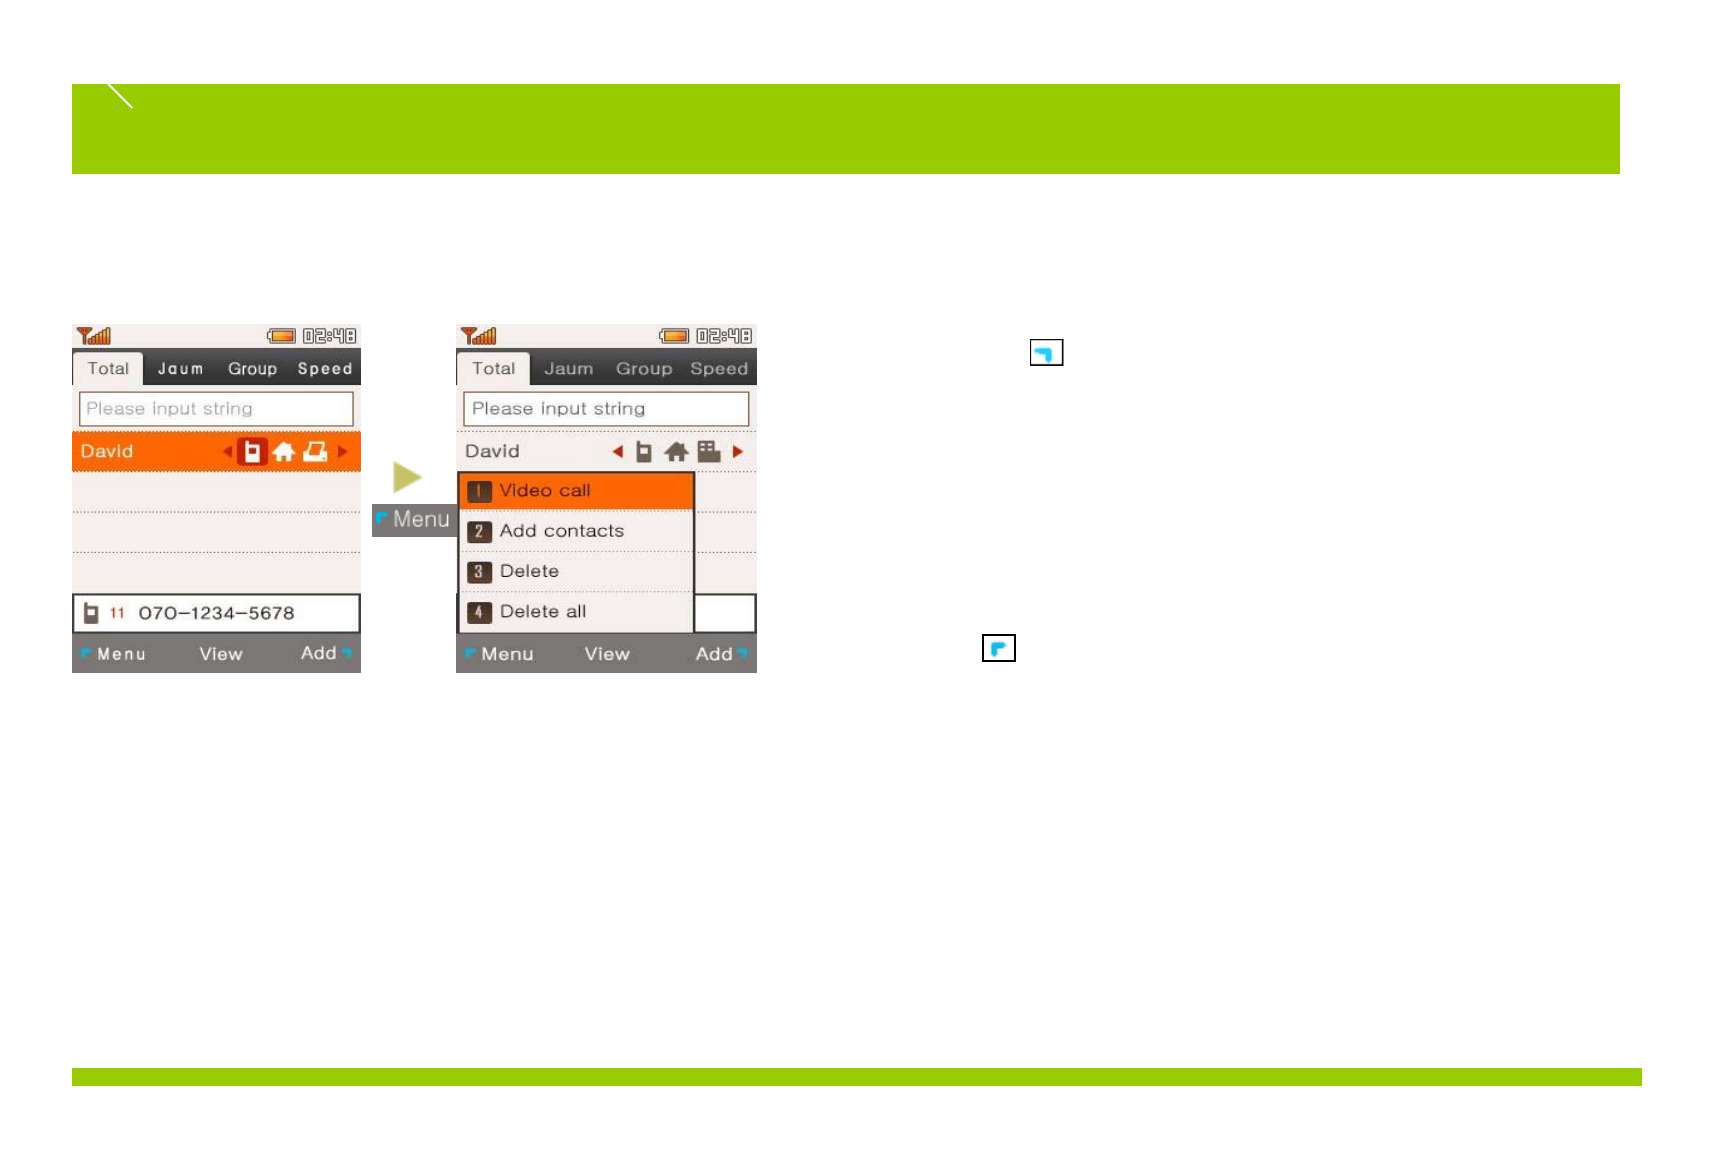
1. Phone Number Search - Menu (for a saved number)
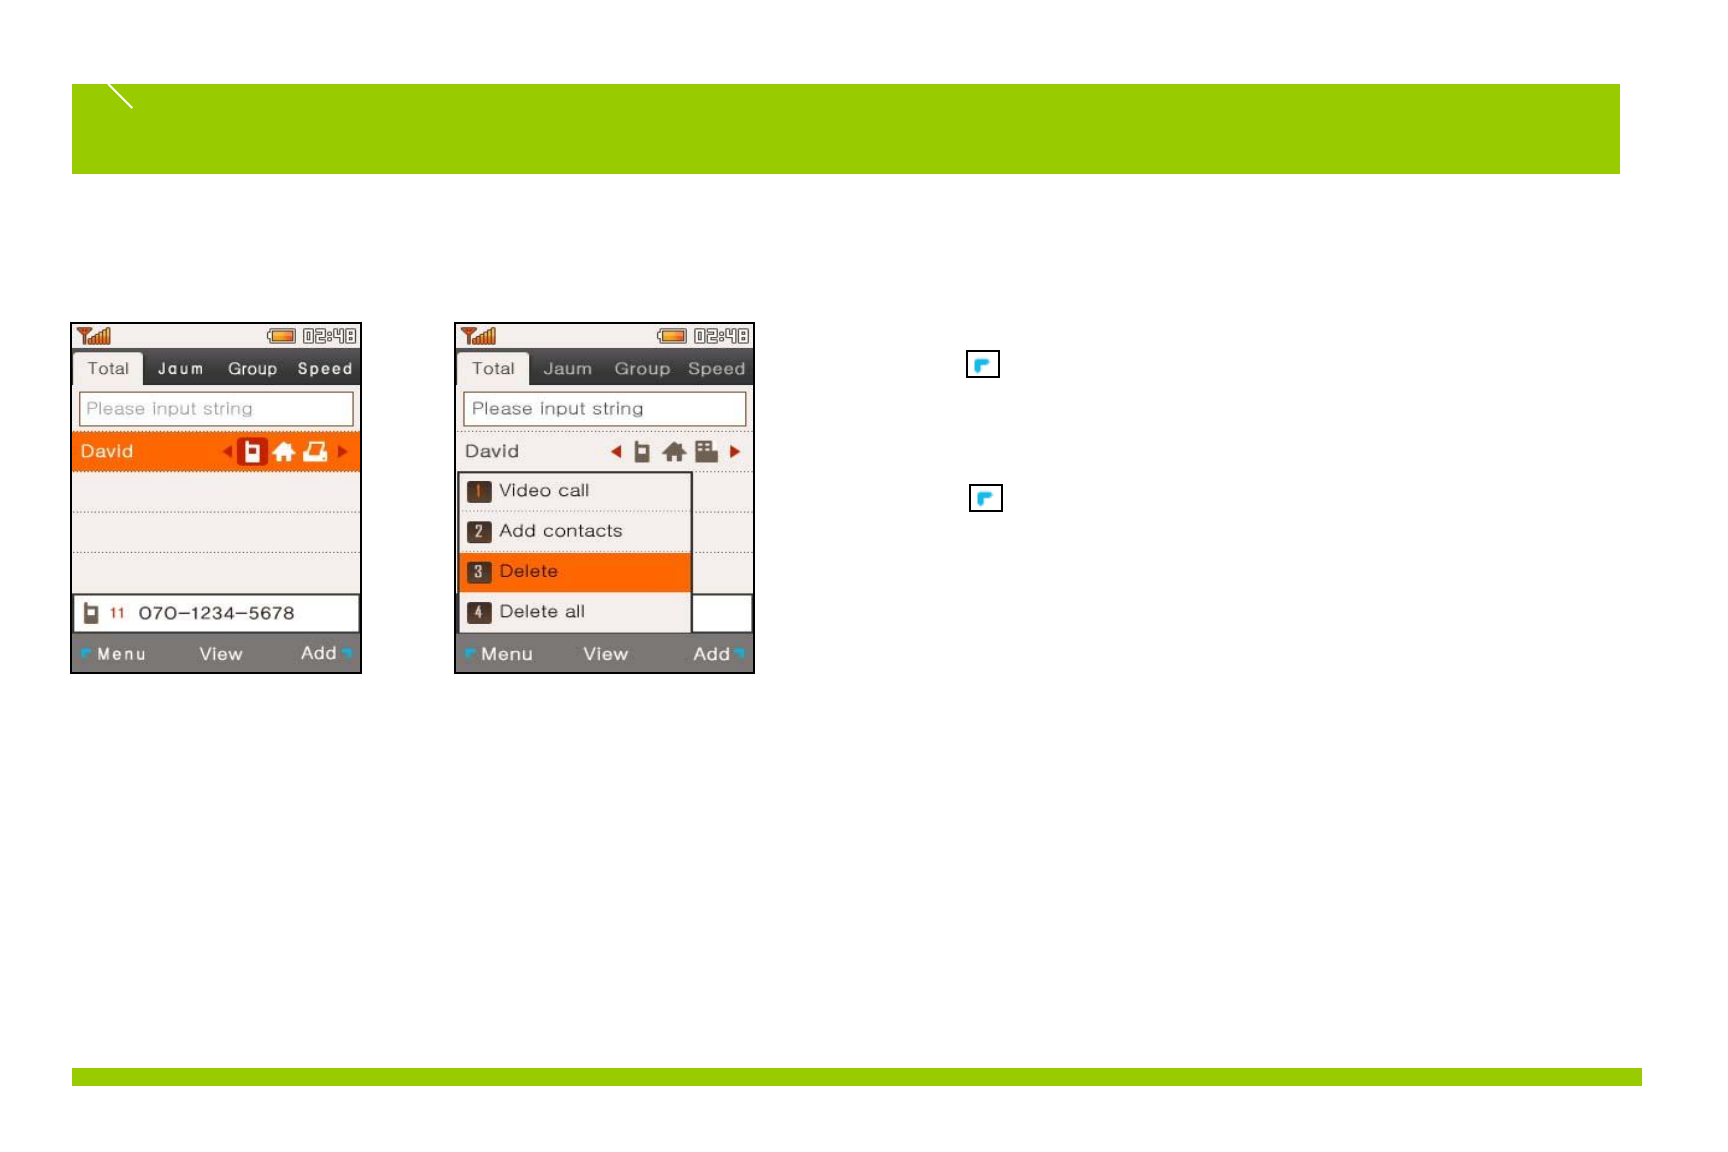
4. Phone Number Search -Delete
Press and select > Delete on the Phone Book menu.
Delete a selected number.
5. Phone Number Search –Delete All
Press and select > Delete all on the Phonebook menu.
Press „Yes‟ after entering the password to delete all saved numbers.
- Take note that if you select Delete All, all stored phone numbers stored
will be deleted.
Check again before deleting as deleted phone numbers cannot be
recovered.
Phone Book
1. Phone Number Search - Menu (for a saved phone number)
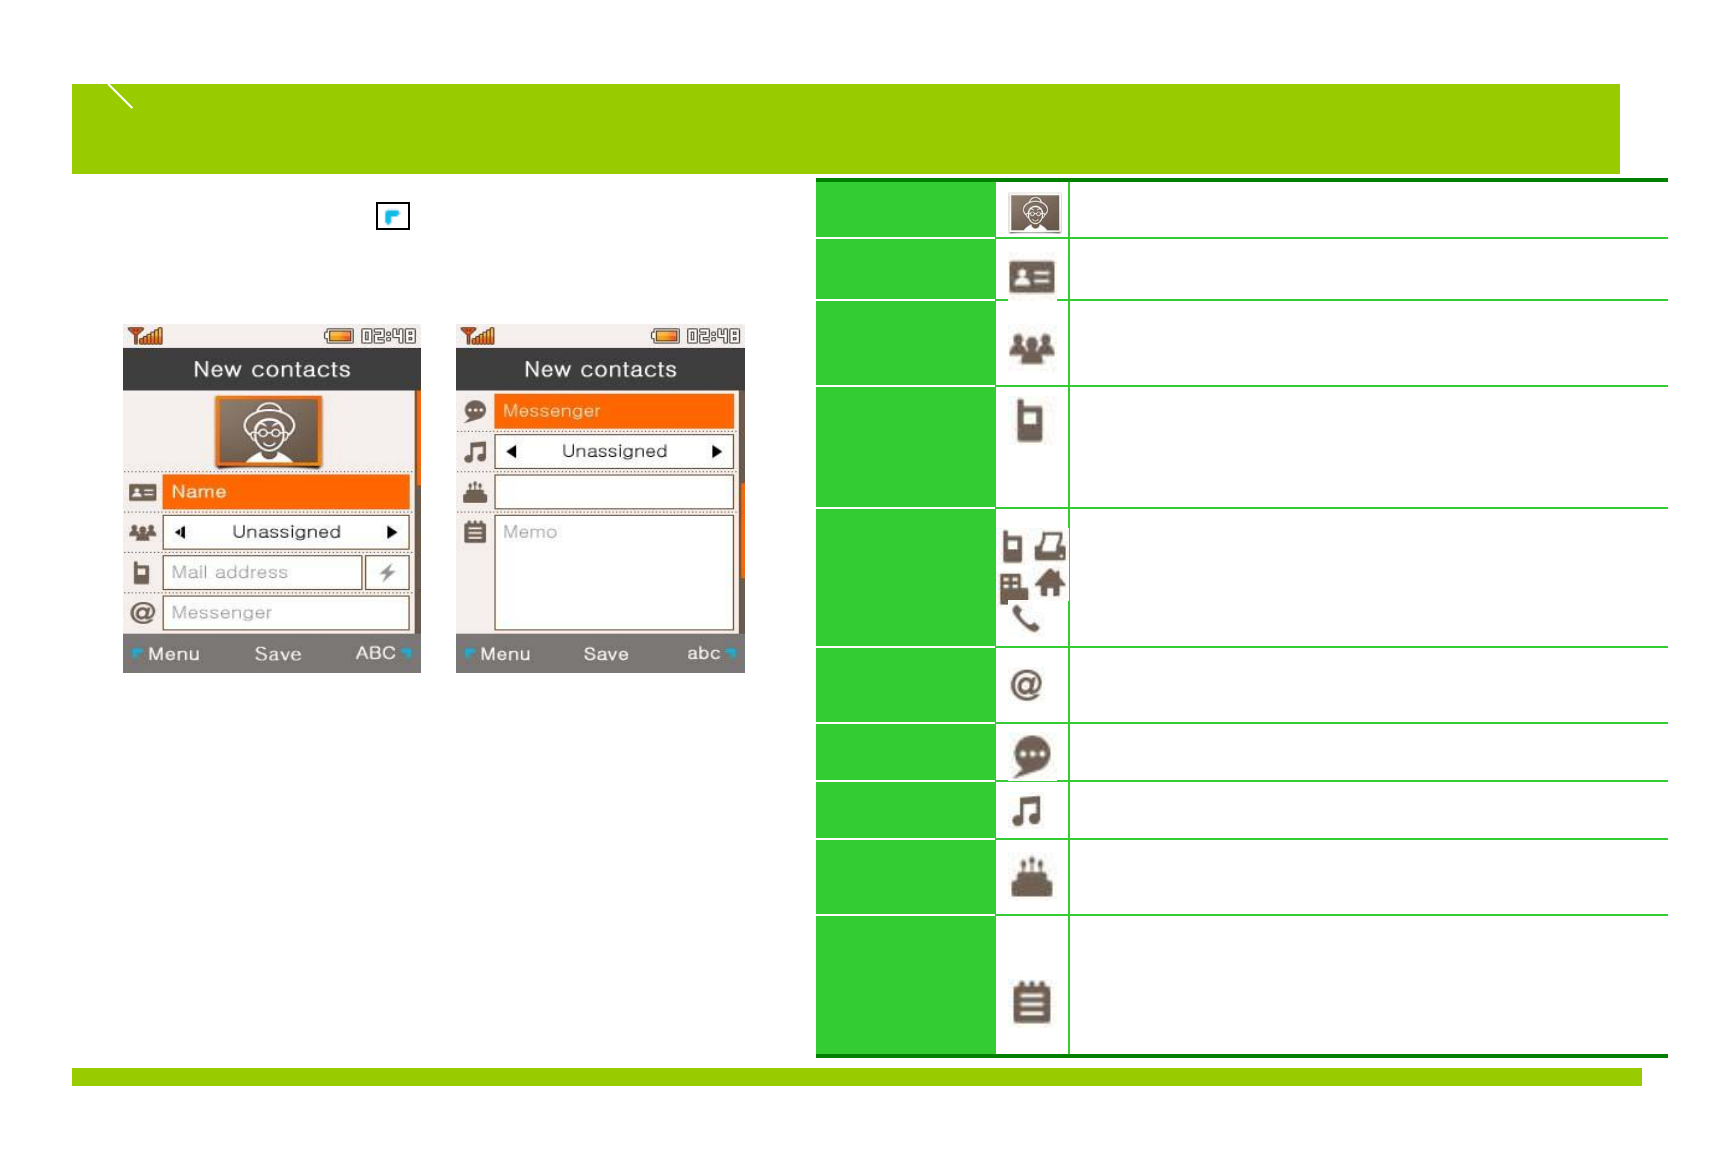
Image Save a picture. (Press and select)
Name Save a name. (Up to 16 alphabet characters)
Group Assign a group.
Press ( ) to add a group.
Phone
Number Save a phone number.
Select a main phone number and phone number type.
Press the shortcut key to assign a speed dial number.
Add number Add a new number.
Up to 5 phone numbers can be saved.
(Select an icon and press OK to save)
E-Mail
Address Save an e-mail address.
Messenger Save messenger details.
Bell Sound Assign a ring tone.
Birthday Save a birthday. (Can be saved on the scheduler)
Memo Save a memo.
Up to 34 Korean characters and 65 alphabet
characters can be saved.
2. Add new contacts ( Menu >
Contacts > Add contacts )
Add new phone number and other details.
Up to 1,000 phone numbers can be saved.
※Each type of phone number can be selected. If more
than 2 phone numbers are to be saved, one phone
number must be selected as the main phone number.
Phone Book
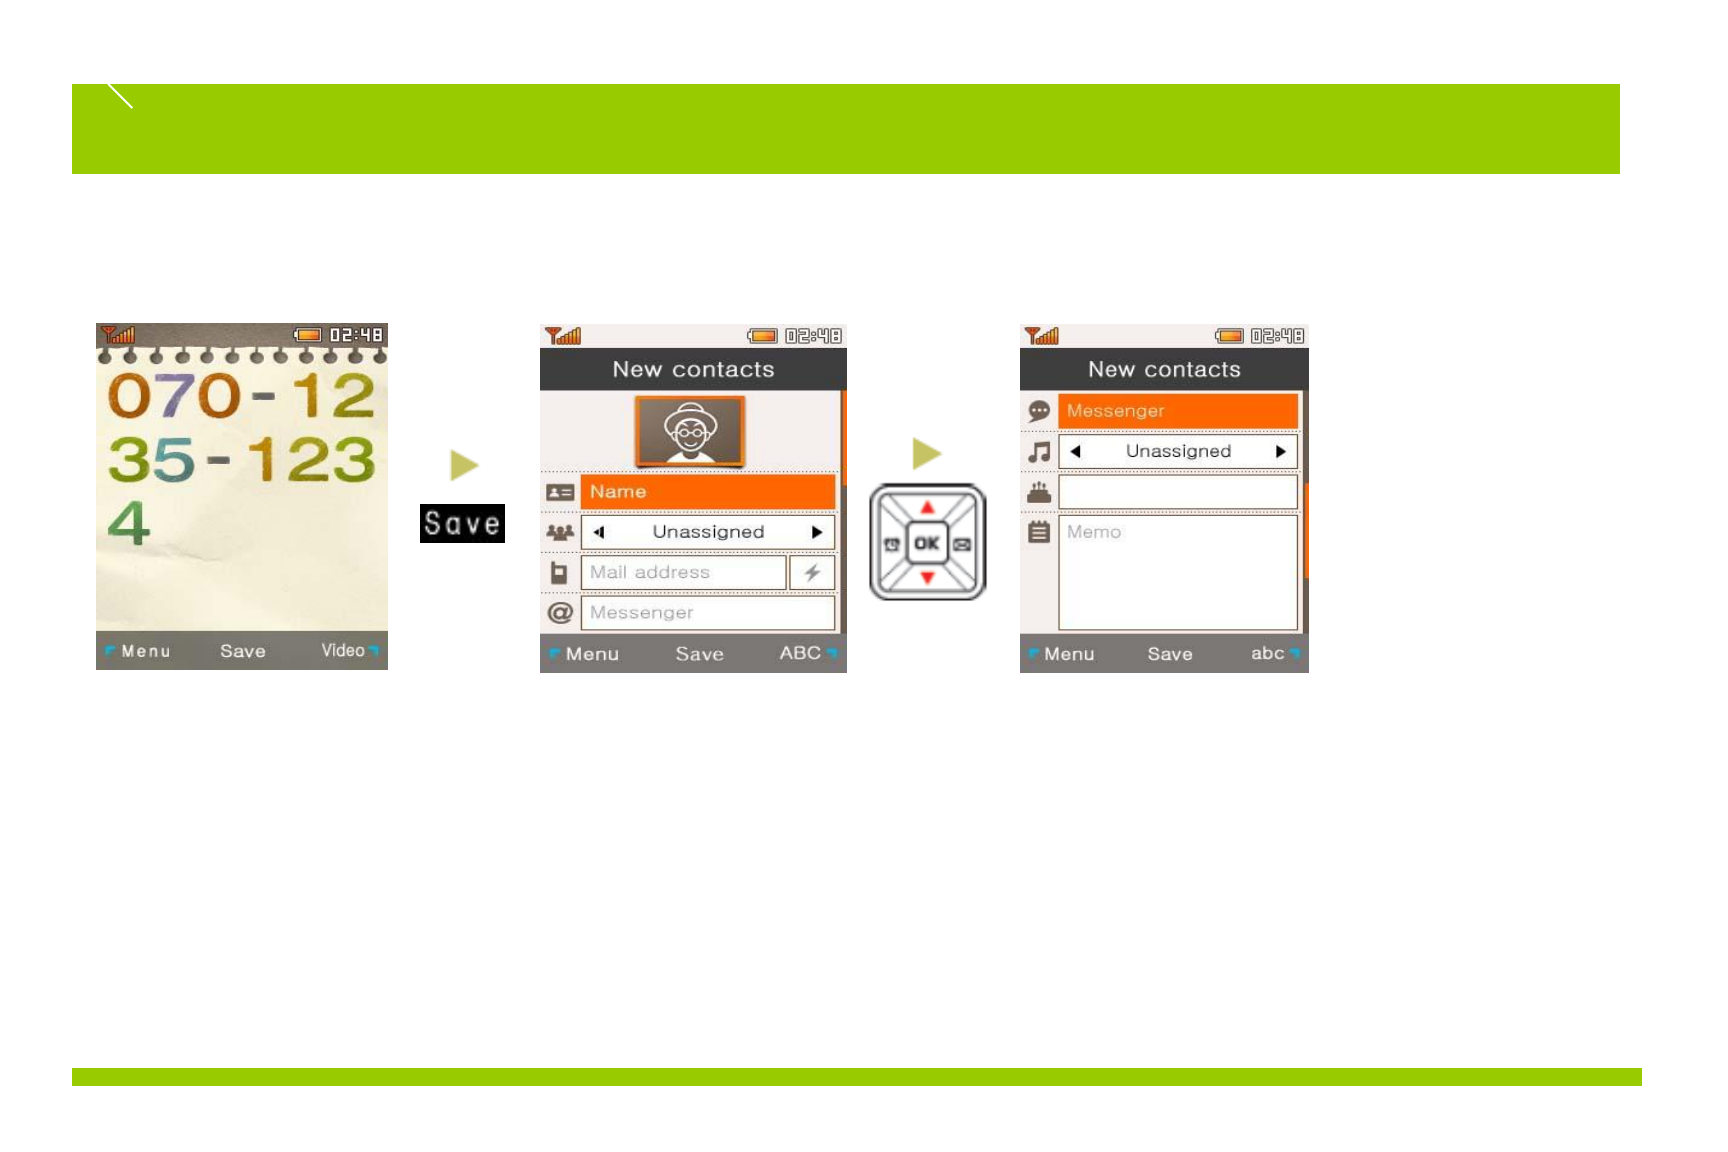
You can add new number in standby mode.
Dial a phone number and press SAVE during stand-by to save phone numbers.
Phone Book
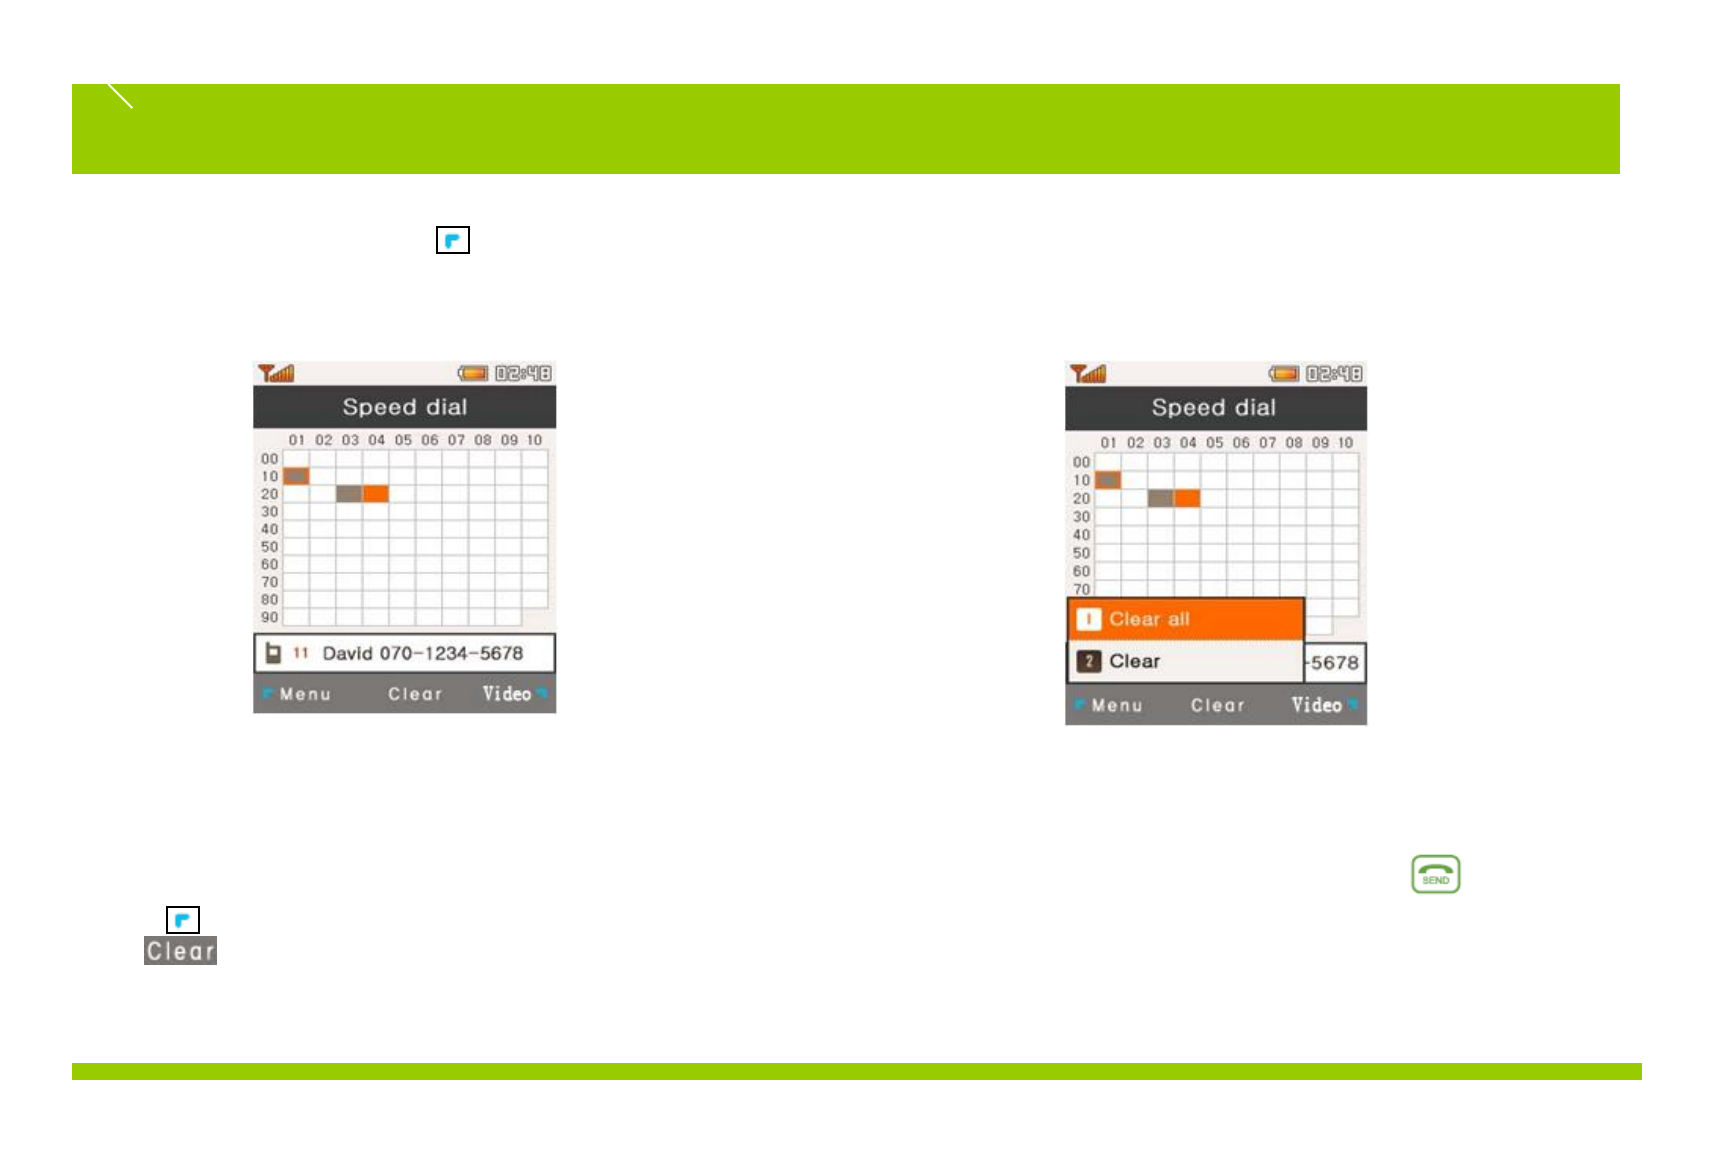
3. To set speed dial, select ( Menu > Contacts > Speed dial )
Set speed dial numbers for phone numbers saved in the phone book that are frequently called (up to 99 speed dial numbers can be saved).
1. Select a speed dial number and press SET.
2. Search for a phone number in the phone book.
3. Select a phone number and press SELECT to
complete the setting.
View Speed Dial Number List: Displays a list of
saved speed dial numbers.
Clear All: Clears all saved speed dial numbers.
※Select a speed dial number and press to
make a call.
Phone Book
> Move : Moves a phone number to a different speed dial number.
: Clears an assigned speed dial number.
Phone Book
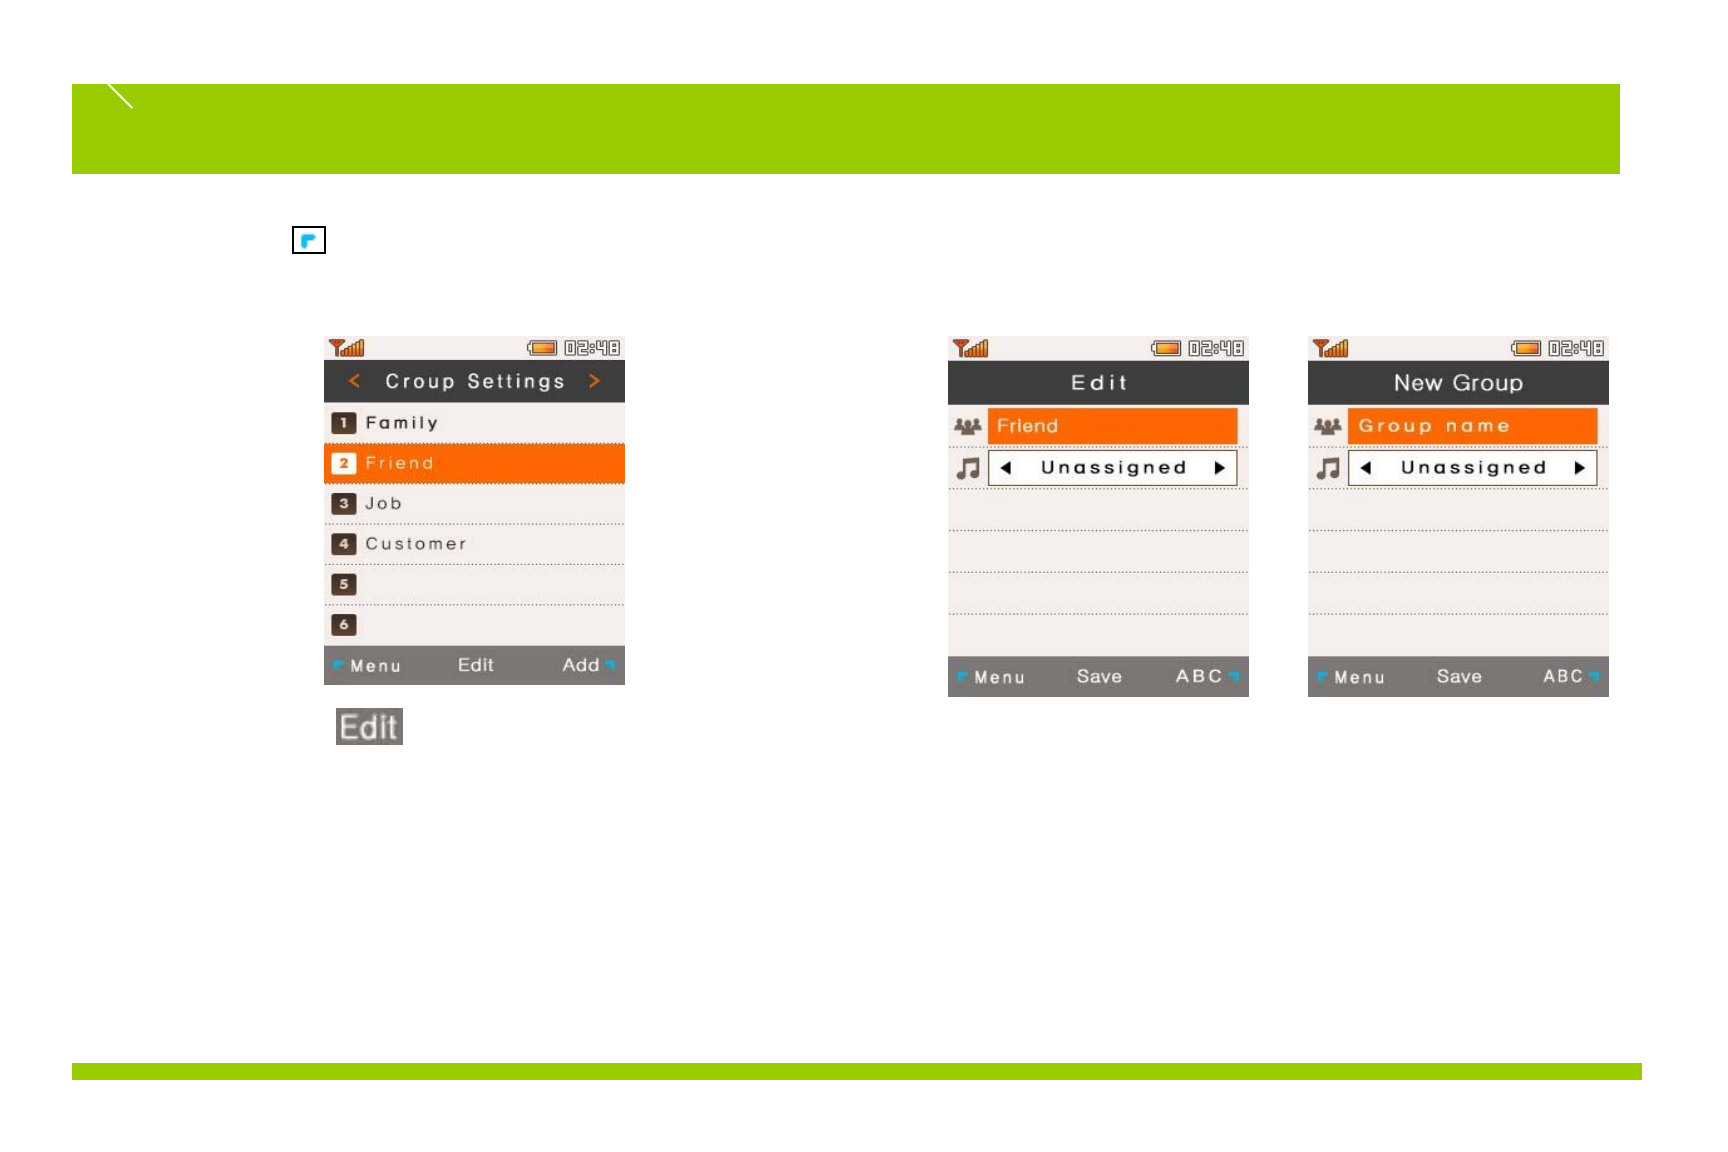
Group Settings ( Menu > Contacts > Group Settings )+ Edit
a group to assign a phone number to or add a new group.
Select a group to edit and change the group name
and ring tone.
Up to 30 groups can be set.
Group name: Enter a group name (12 Korean characters, 24 alphabet
characters)
Group ring tone: Assign a ring tone to a group.
※Incoming call from a phone number assigned to a group will sound
the selected ring tone. However, the group ring tone will be ignored if
another ring tone is assigned in the phone book.
Phone Book

Left selection key ( Menu) > Settings > Information)
You can see the setting information of WiFi phones.
Basic Info.
My phone number, Firmware version, MAC
address
Wifi Info.
Displays the access point or wired/wireless router the WiFi
phone is connected to.
SSID, Signal Strength, BSSID, Security, Channel, Beacon
Interval
Network info.
Displays the IP address, netmask, gateway and
DNS address.
Wifi Info.
Displays the access point or wired/wireless router the WiFi
phone is connected to.
SSID, Signal Strength, BSSID, Security, Channel, Beacon
Interval
Settings
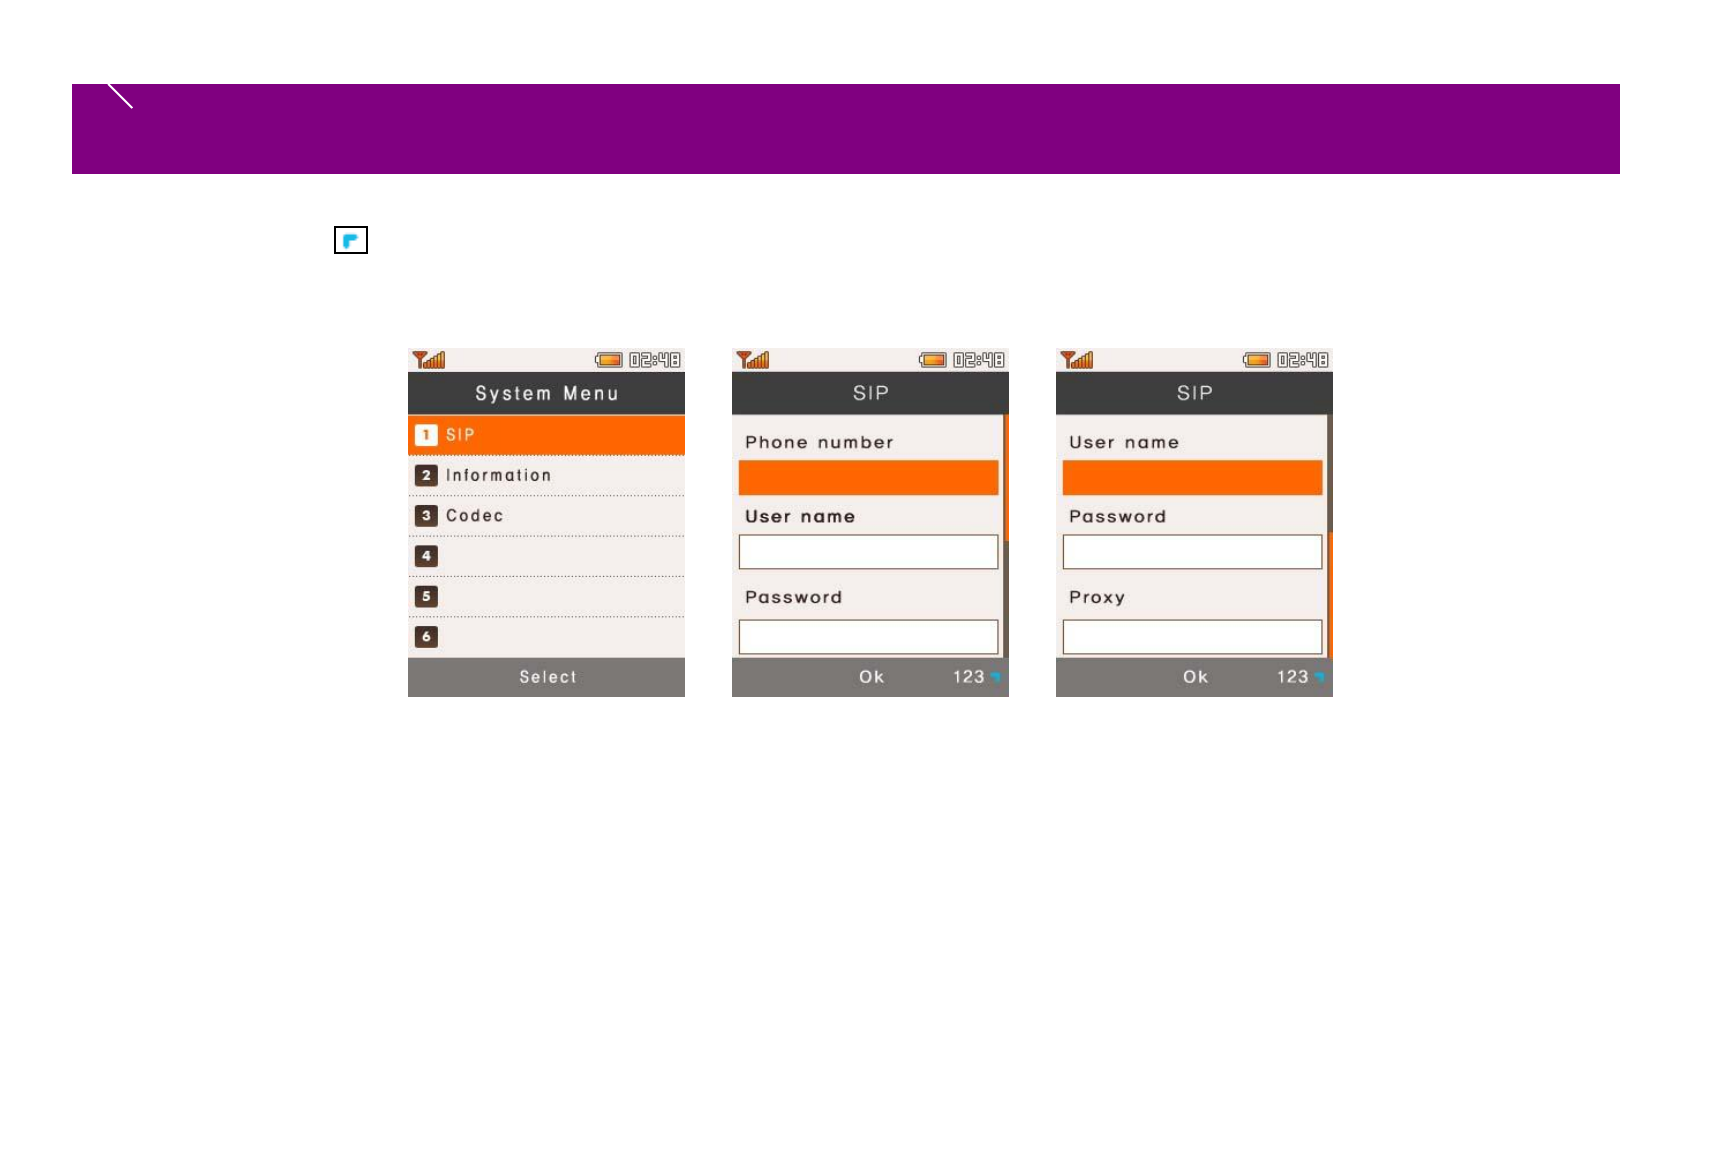
Left selection key ( Menu) > Settings > System > SIP )
You can see the setting information of WiFi phones.
Settings
Sip Account.
If you select SIP, the following options will appear:
•Phone number –Enter your registered phone number from SIP server
•User name –Enter your authorized user ID
•Password –Enter your authorized password
•Proxy –Enter the address of SIP server
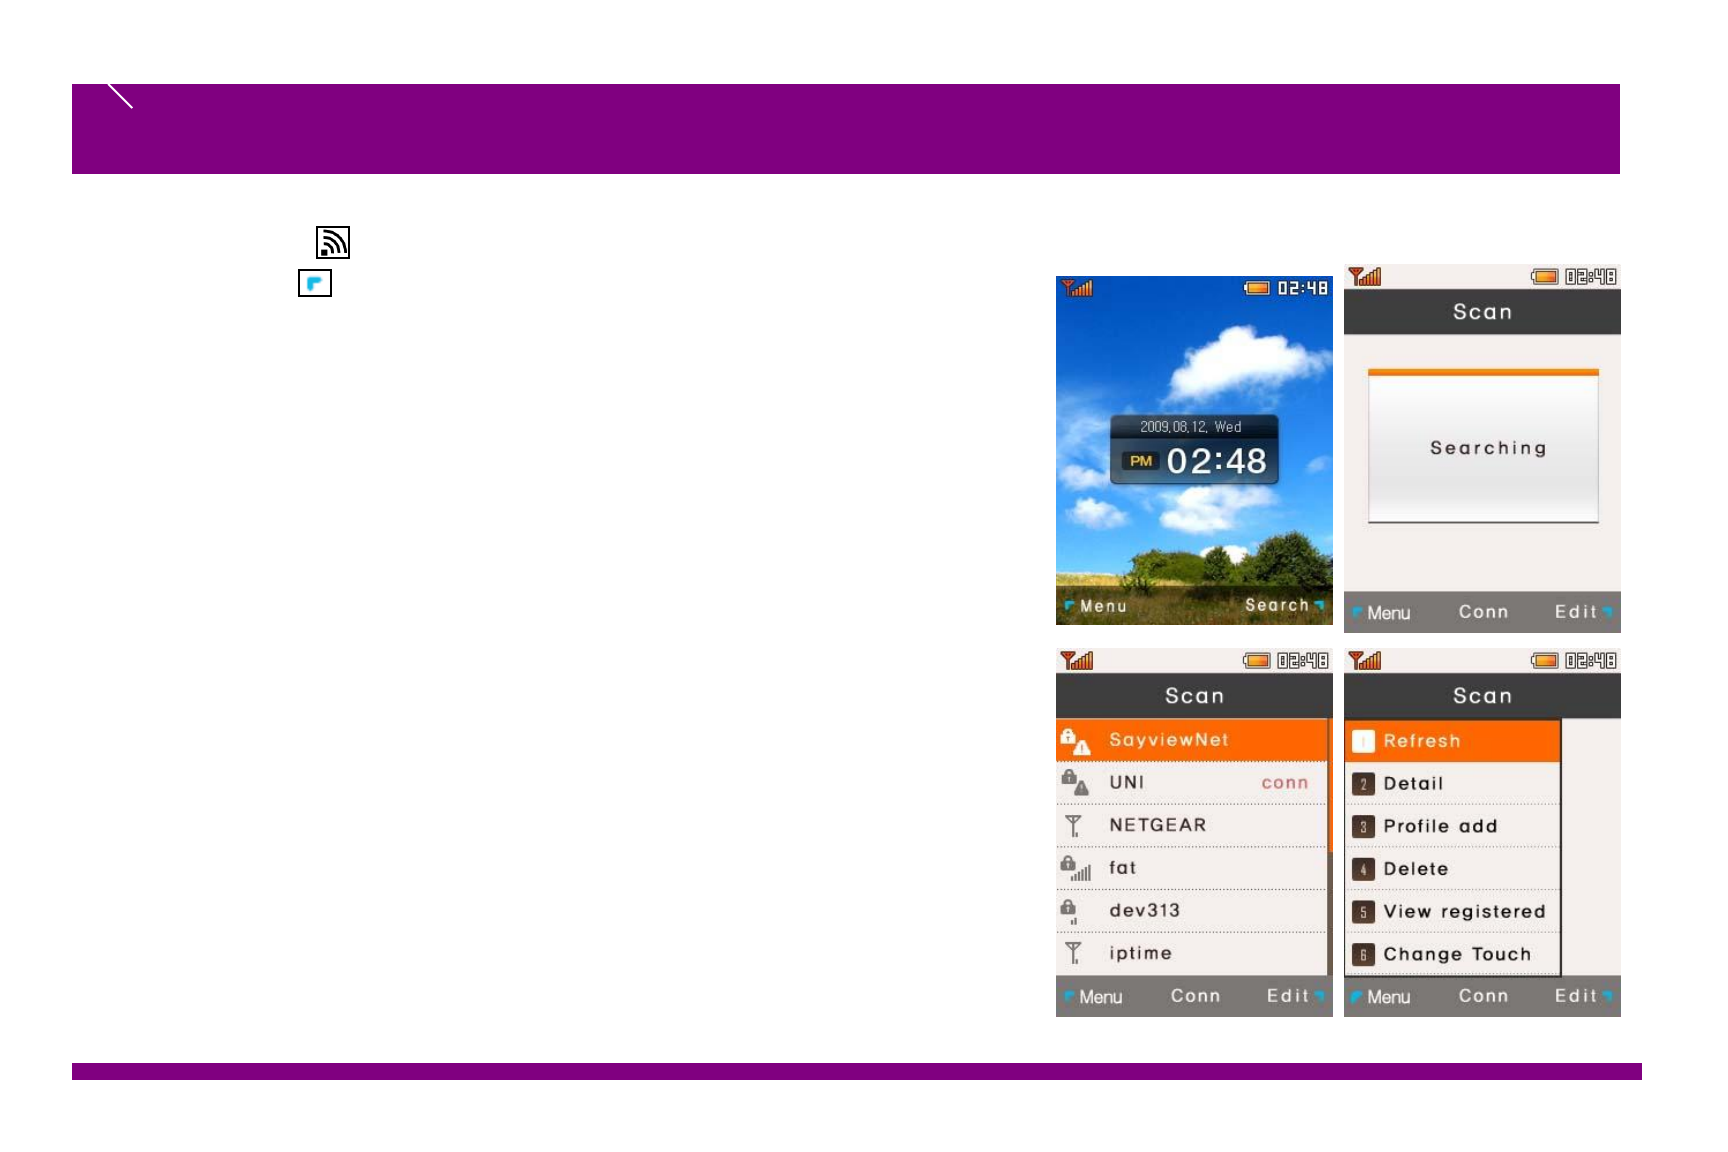
Press the short key to set Wi-Fi
Left selection key ( Menu) > Setting > Wi-Fi )
Wi-Fi Settings
Wi-Fi Settings.
If you select Wi-Fi, the following display will appear:
1. Display registered Wi-Fi profile (Top)
•If there is no registered Wi-Fi, a default profile will appear
- SayviewNet is a default profile.
-SQ-3000 can registered Wi-Fi up to 4
- Default Profile 1 + Registered from User 3
2. Display scanned AP list. (Bottom)
•Display strength signal and SSID of scanned AP
•Hidden AP will not display

Wi-Fi Settings
Wi-Fi Settings.
There are 3 ways to register AP
1. Add profile from Menu
Select menu > Profile add
SSID setting : Enter SSID name
Security setting : You can configure security to use.
Networking setting : You can set Network DHCP or manually
2. Add profile from AP list
Select add
SSID setting : SSID will set to automatically.
Security setting : You can configure security to use
Networking setting : You can set Network DHCP or manually
3. Add profile to Temp
Select OK or Temp
Security setting : You can configure security to use
Networking setting : You can set Network DHCP or manually
If you add profile to temp, it does not mean to registered. You should connect to this AP manually every time when you connect to AP
Wi-Fi Menu lists
•Refresh : Refresh the scanned AP
•Detail : Detail information of selected AP
•Profile add : Add new profile.
•Delete : Delete selected item ( It displays on the menu when you select registered AP list )
•View registered : See registered Access Point ( It displays on the menu when you select registered AP list )
•Change touch : It shows Access Point that you searched as icons. And you can drag the icon to connect access point.
Specification
Product Specification
Certified
Company UniDATACommunication Systems INC
Device Name Wireless Data Communication system
wireless appliance
Model SQ-3000
Citification
Number
Manufacture UniDATA Communication Systems INC
Manufacture
country Republic of Korea
Frequency
Band
802.11b/g 2412MHz ~ 2462MHz
802.11a 5745MHz ~ 5825MHz (11a)
5180MHz ~ 5240MHz (11a -Non DFS)
Operating
Channel
802.11b/g Ch 11
802.11a 11a : Ch 5
11a-Non DFS : Ch 4
Transmission
Output
(Peak Value)
802.11b/g 2412MHz ~ 2462MHz (11b/g) 16.78 dBm
802.11a 5745MHz ~ 5825MHz (11a): 13.14dBm
5180MHz ~ 5240MHz (11a -Non DFS): 16.33 dBm
Dimensions 125(L) x 58(W) x 17(T)
Weight 135g
Temperature
Range Operation: 32 to 122°F (0°C~50°C)
Relative
humidity 10%~80%
Battery 3.7V/, 1450mAh
This equipment may occur crossed electronic
wave and can not offer the service that
regarding men’s safety
FCC ID: SQMSQ-3000
This device complies with Part 15 of the FCC Rules. Operation is subject to the following two conditions:
(1) This device may not cause harmful interference.
(2)This device must accept any interference received, including interference
that may cause undesired operation. Any changes or modifications (including the antennas) made to this device
that are not expressly approved by the manufacturer may void the user's authority to operate the equipment.
FCC RF Radiation Exposure Statement: This equipment complies with FCC RF radiation exposure limits set forth for an uncontrolled
environment. This device and its antenna must not be co-located or operating in conjunction with any
other antenna or transmitter. This equipment has been tested and found to comply with the limits for a class B digital device, pursuant
to part 15 of the FCC Rules. These limits are designed to provide reasonable protection against harmful interference in a residential
installation.
This equipment generates, uses and can radiate radio frequency energy and, if not installed and used in accordance with the
instructions, may cause harmful interference to radio communications.
However, there is no guarantee that interference will not occur in a particular installation.
If this equipment does cause harmful interference to radio or television reception, which can be determined by turning the equipment
off and on, the user is encouraged to try to correct the interference by one or more of the following measures:
---Reorient or relocate the receiving antenna.
---Increase the separation between the equipment and receiver.
---Connect the equipment into an outlet on a circuit different from that to which the receiver is connected
---Consult the dealer or an experienced radio/TV technician for help.