UniData Communication Systems WIP-5000 Wireless IP Phone User Manual Microsoft PowerPoint UserGuide v1 0 0
UniData Communication Systems Inc. Wireless IP Phone Microsoft PowerPoint UserGuide v1 0 0
Users Manual


Table of Contents
1. Safety Information ………………………………………………………………….
1.1 Emergency Services Warning ……………………………………...
1.2 Explosive Gas Warning ……………………………………………..
1.3 Battery Disposal Warning …………………………………………...
1.4 Battery Safety Notices ……………………………………………….
1.5 Regulatory Compliance Standards …………………………………
2. Package Contents ………………………………………………………………….
3. Overview ……………………………………………………………………………..
4. How the Key works …………………………………………………………………
5. Accessory ……………………………………………………………………………
5.1 Guidelines for Use of Accessory …………………………………...
5.2 Available Accessory …………………………………………………
5.3 AC Power Adapter …………………………………………………...
5.4 USB Cable ……………………………………………………………
5.5 Inserting Battery ……………………………………………………...
5.6 Releasing Battery …………………………………………………….
5.7 Charging Battery with Desktop Charger …………………………..
5.8 Charging Battery without Desktop Charger……………………….
6. Tips for using Battery ………………………………………………………………
6.1 Releasing Battery …………………………………………………….
7. Icons on Display …………………………………………………………………….
8. Inputting Characters ( Dial Pad ) …………………………………………………
9.Application ……………………………………………………………………………
9.1 Outbound Call ………………………………………………………..
9.2 Inbound Call …………………………………………………………..
9.3 Phone Book Menu ……………………………………………………
9.3.1 Add new Entry …………………………………………………
9.3.2 Call from Phone Book …………………………………………
9.3.3 Edit Group ………………………………………………………
9.3.4 Delete all ………………………………………………………..
9.4 Message Menu ……………………………………………………….
9.4.1 Received Message Box ……………………………………….
9.4.2 Write Message …………………………………………………
9.4.3 Temporary Box …………………………………………………
9.4.4 Sent Message Box …………………………………………….
9.4.5 Delete All ……………………………………………………….
1
1
1
1
1
1
2
3
4
5
5
5
5
6
6
6
6
7
8
8
9
10
11
11
12
13
13
14
15
17
18
18
20
22
24
25
PDF created with FinePrint pdfFactory Pro trial version http://www.pdffactory.com

Table of Contents
9.5 Call Log menu ………………………………………………………..
9.5.1 Show more Information ………………………………………
9.5.2 Call from Call Log ……………………………………………..
9.6 Presence menu ………………………………………………………
9.6.1 User regist ……………………………………………………..
9.6.2 User list …………………………………………………………
9.6.3 Block regist …………………………………………………….
9.6.4 Block list ………………………………………………………..
9.6.5 Status …………………………………………………………..
9.7 Setup Menu …………………………………………………………..
9.7.1 Bell / Vibration …………………………………………………
9.7.1.1 Ring type ………………………………………………
9.7.1.2 Mode …………………………………………………..
9.7.1.3 Volume …………………………………………………
9.7.2 Caller ID ………………………………………………………..
9.7.3 Contrast ………………………………………………………...
9.7.4 Security …………………………………………………………
9.7.5 Information ……………………………………………………..
9.7.6 Time …………………………………………………………….
10. FAQ …………………………………………………………………………………..
11. Glossary …………………………………………………………………………….
12. Menu Construction ……………………………………………………………….
13. Contact Us ………………………………………………………………………….
27
28
28
29
29
30
30
31
31
32
32
33
34
34
35
35
36
37
39
42
43
45
48
PDF created with FinePrint pdfFactory Pro trial version http://www.pdffactory.com


1. Safety Information
These safety warnings apply to the Wireless IP Phone WIP-5000. Please read the following sections
before Installing or using your WIP-5000.
1.1 Emergency Services Warning
This phone will not be able to access emergency services during a power outage because of reliance on
utility power for normal operation. Alternative arrangements should be made for accessing emergency
services.
1.2 Explosive Gas Warning
The use of the WIP-5000 in hazardous environments where high level of explosive gasmay be present
is not recommended. Check with the site safety engineer before using any type of wireless device in
such an environment.
1.3 Battery Disposal Warning
Do not dispose of the battery pack in fire or water. The batterymay explode if placed in the fire.
1.4 Battery Safety Notices
These Battery safety notices apply to the batteries that are approved by the WIP-5000 manufacturer.
vDo not disassemble, crush, puncture, or incinerate the battery pack.
vTo avoid risk of fire, burns, or damage to your battery pack, donot allow a metal object to touch
the battery contacts.
vHandle a damaged or leaking battery with extreme care. If you come in contact with the
electrolyte, wash the exposed area with soap and water. If the electrolyte has come in contact
with your eye, flush the eye with water for 15 minutes and seek medical attention
vDo not charge the battery pack if the ambient temperature exceeds 40 degrees Celsius.
vDo not keep the battery pack in temperatures above 60 degrees Celsius.
vWhen discarding a battery pack, contact your local waste disposal provider regarding local
restrictions on the disposal or recycling of batteries.
vTo obtain a replacement battery, contact your local dealer. Use the batteries that are provided
by WIP-5000 manufacturer only.
vUse the power supply that is provided by WIP-5000 manufacturer only.
1.5 Regulatory Compliance Standards
WIP-5000 does not comply with any standards. Use only as a MarketingSample.
Page 1
Safety Information
WIP-5000 User Guide
PDF created with FinePrint pdfFactory Pro trial version http://www.pdffactory.com
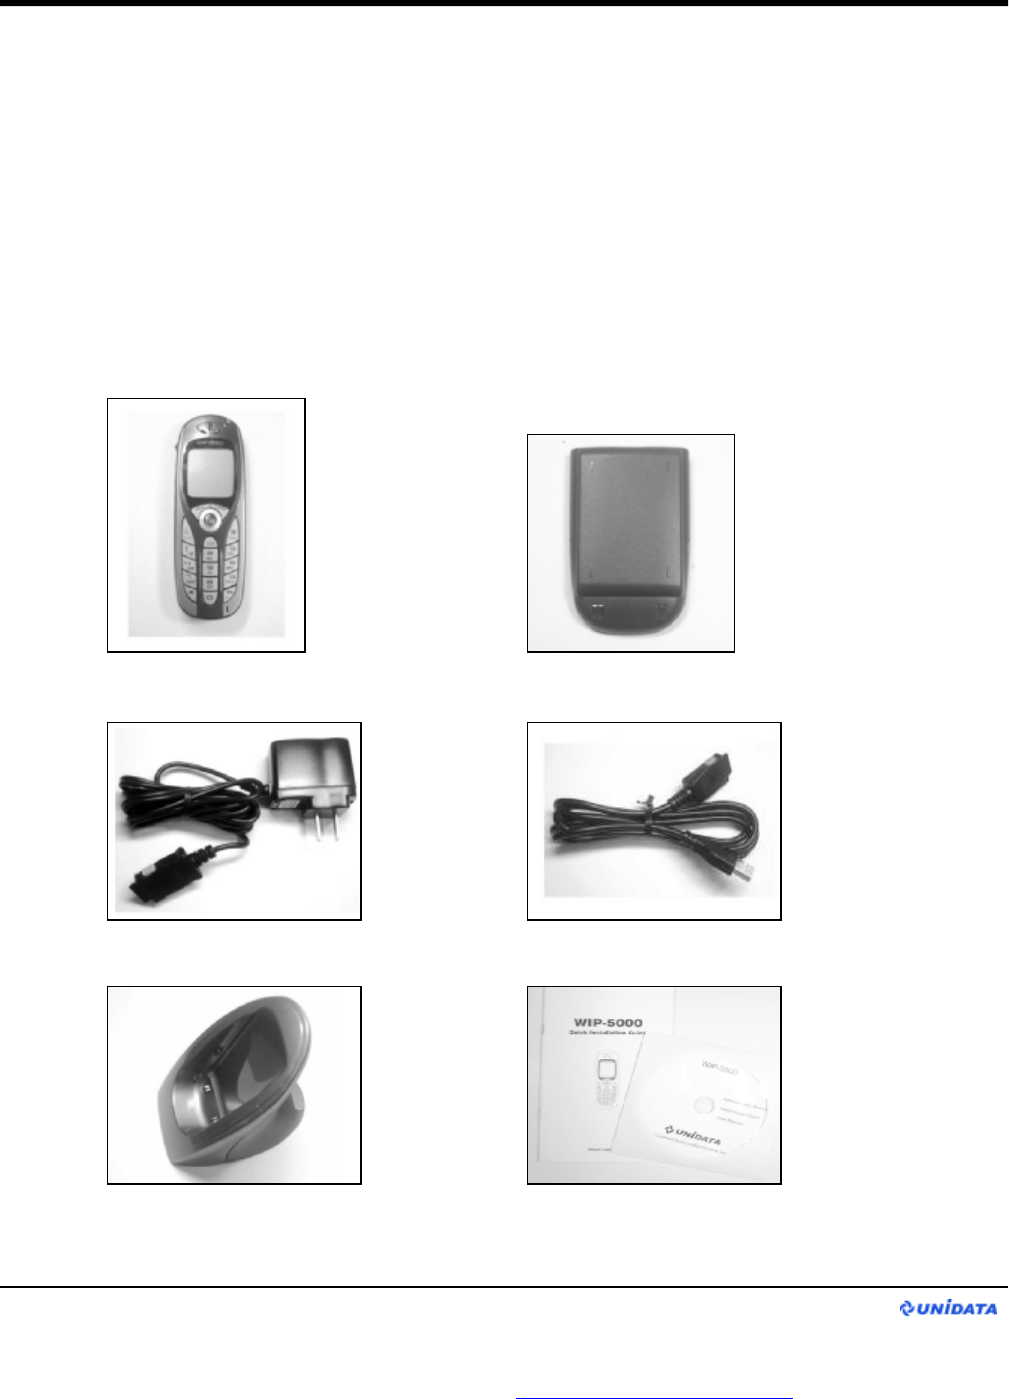
2. Package Contents
The following items are included in your phone package
•One phone body
•One extended battery
•One DC 5V 750mA Adapter
•One USB Cable
•One Desktop Charger
•One Quick Installation Guide
•One CD Manual
Adapter
Extended Battery
USB Cable
Desktop Charger Quick Installation Guide and CD Manual
Phone Body
Package Contents
WIP-5000 User Guide
Page 2
PDF created with FinePrint pdfFactory Pro trial version http://www.pdffactory.com
3. Overview
The side and front views of the WIP-5000 are depicted in Figure 1 below
Figure 1. WIP-5000 side view andfront view
Overview
WIP-5000 User Guide
1. HEADSET JACK
2. VOLUME UP
3. VOLUME DOWN
4. LOCK
5. LEFT SOFT
6. RIGHT SOFT
7. MULTI FUNCTION KEY
8. CLEAR
9. SEND
10. END
11. DIAL PAD
Page 3
PDF created with FinePrint pdfFactory Pro trial version http://www.pdffactory.com

4. How the Key works
How the Key works
WIP-5000 User Guide
VOLUME UP Pressing the VOLUME UP key will increases volume of handset,
headset or ringer
VOLUME DOWN Pressing the VOLUME DOWN key will decreases volume of handset,
headset or ringer
LOCK Pressing the LOCK key will lock your phone or to unlock
LEFT SOFT Use it for entering menu, editing something, saving phone number,
and changing character input
RIGHT SOFT Use it for searching, going back to previous screen, shortcut to
Presence menu, and muting
MULTI FUNCTION KEY Multiple Function Key have multiple functions.
1. Menu browsing
1)Pressing the key to LEFT direction changes the display to the
previous screen.
2)Pressing the key to RIGHT direction changes the display to the
next screen for the item you selected in either menu or setup
3) Pressing the key to UP or DOWN direction allows you to scroll
up or down the menu or setup screen.
2. Editing
1) Pressing the key to LEFT direction moves the cursor to left.
2) Pressing the key to RIGHT direction moves the cursor to the right.
In text input menu such as write message that allow space input.
CLEAR In text editing, deletes one character (backspace).While browsing menu,
goes back to the previous menu.
SEND Places and answers calls.
.
END During a call, it disconnects the call.While browsing menu, it exits menu.
Power ON: holding it down till 'Loading…' message shows up.
Power OFF: holding it down for a second or longer.
DIAL PAD It is for dialing just like the normal telephone and entering alphanumeric
characters when text editing for names and numbers.
Also, it can be used for quick menu browsing
Page 4
PDF created with FinePrint pdfFactory Pro trial version http://www.pdffactory.com
5. Accessory
5.1 Guidelines for Use of Accessory
Follow these guidelines in using accessories with your Wireless IP Phone WIP-5000.
•When disconnecting the power cord of any accessory, grasp by the plug, not the cord and pull.
•Keep the accessories away from children.
•Use only charger, batteries, accessories that are approved by the Wireless IP Phone
WIP-5000 manufacturer. Using unapproved charger, batteries, and accessories
may be dangerous, and may invalidate the warranty on your phone.
5.2 Available Accessory
•Extended Battery
•AC Adapter
•Desktop Charger
•USB Cable .
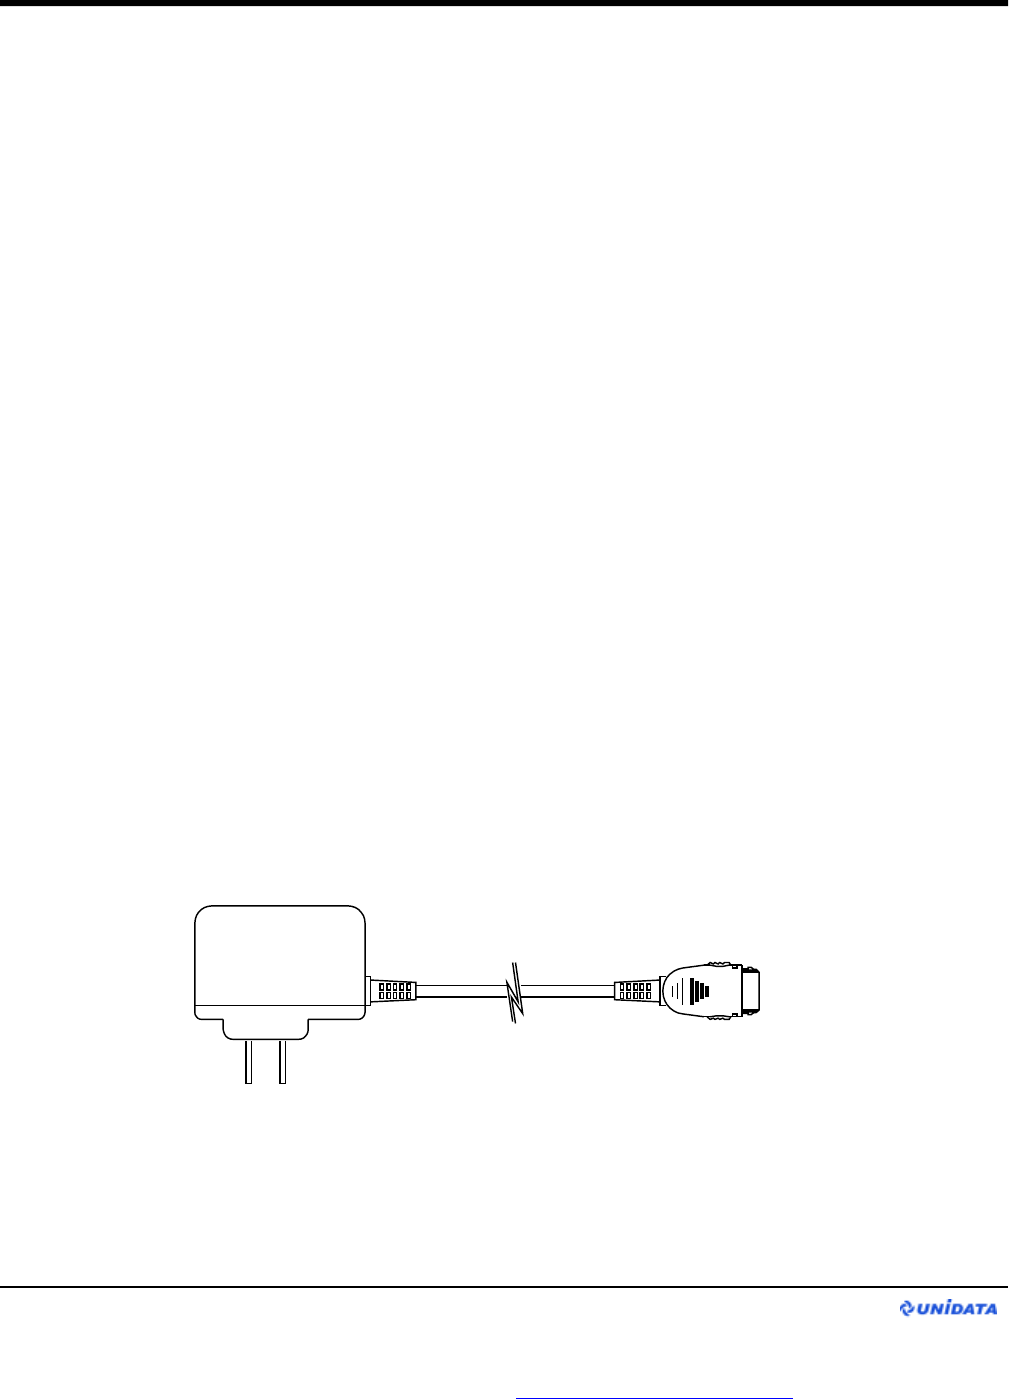
5.3 AC Power Adapter
The AC Adapter as shown in Figure 1 enables you to charge your phone battery quickly.
To use the adapter, plug it into a wall outlet, and insert the connector into the base of
your WIP-5000 or the back of the desktop charger. You can use the phone while battery charging.
Figure 1. AC Adapter
Accessory
WIP-5000 User Guide
Page 5
PDF created with FinePrint pdfFactory Pro trial version http://www.pdffactory.com
5.4 USB Cable
The USB Cable as shown in Figure 2, connects your phone to the PC, enables you to
either configure or to charge the phone. When configuring the phone, make sure that your
PC and the phone are connected directly to each other by the USBcable.
Figure 2. USB Cable
5.5 Inserting Battery
Place the battery into the battery bay on the back side of the phone and push up towards
the release button until it clicks.
5.6 Releasing Battery
Take the battery off from the phone by pressing the release button and pull out the battery
towards the bottom of the phone.
Note : For more information about releasing battery, refer to page 8.
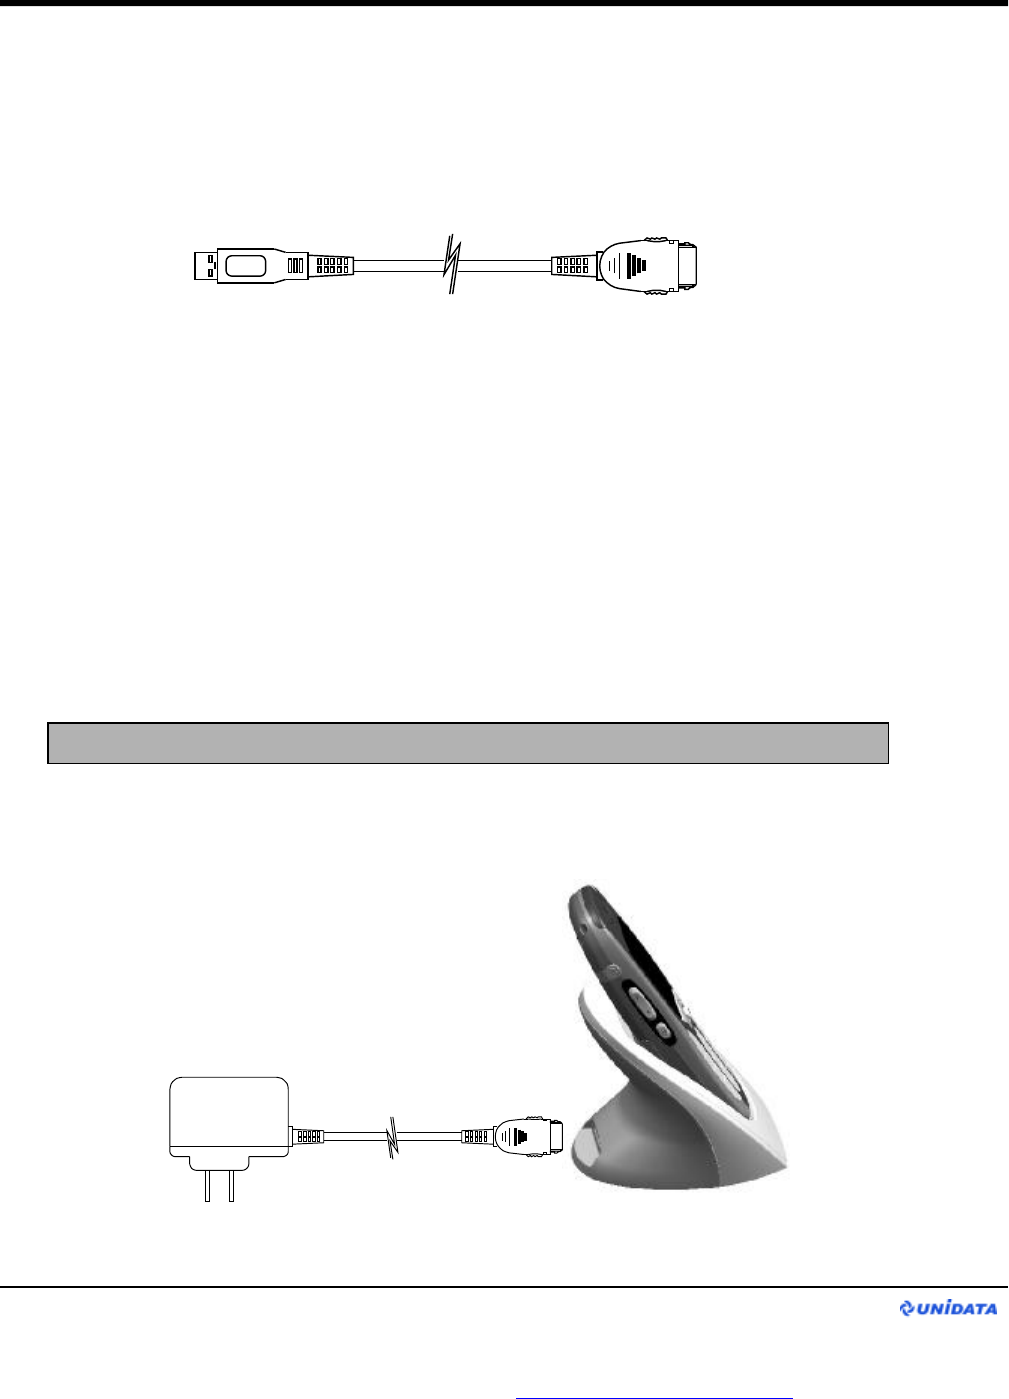
5.7 Charging Battery with Desktop Charger
Figure 3. Charging with AC Adapter
Accessory
WIP-5000 User Guide
Page 6
PDF created with FinePrint pdfFactory Pro trial version http://www.pdffactory.com

Note : It is also possible to charge the phone by using the USB cableinstead of the
AC adapter as shown in Figure 4.
Figure 3. Charging USB Cable
Step 1. Plug the AC adapter into a wall outlet, and insert the connector into back of the
battery charger.
Step 2. Insert the phone into the upper compartment of the charger as shown in Figure 3.
5.8 Charging Battery without Desktop Charger
Step 1. Plug the AC adapter into a wall outlet
Step 2. Remove the protective connector cover of the phone.
Step 3. Insert the AC adapter connector into base of the phone.
Note : It is also possible to charge a phone by using the USB cable instead of the
AC adapter.
Accessory
WIP-5000 User Guide
Page 7
PDF created with FinePrint pdfFactory Pro trial version http://www.pdffactory.com
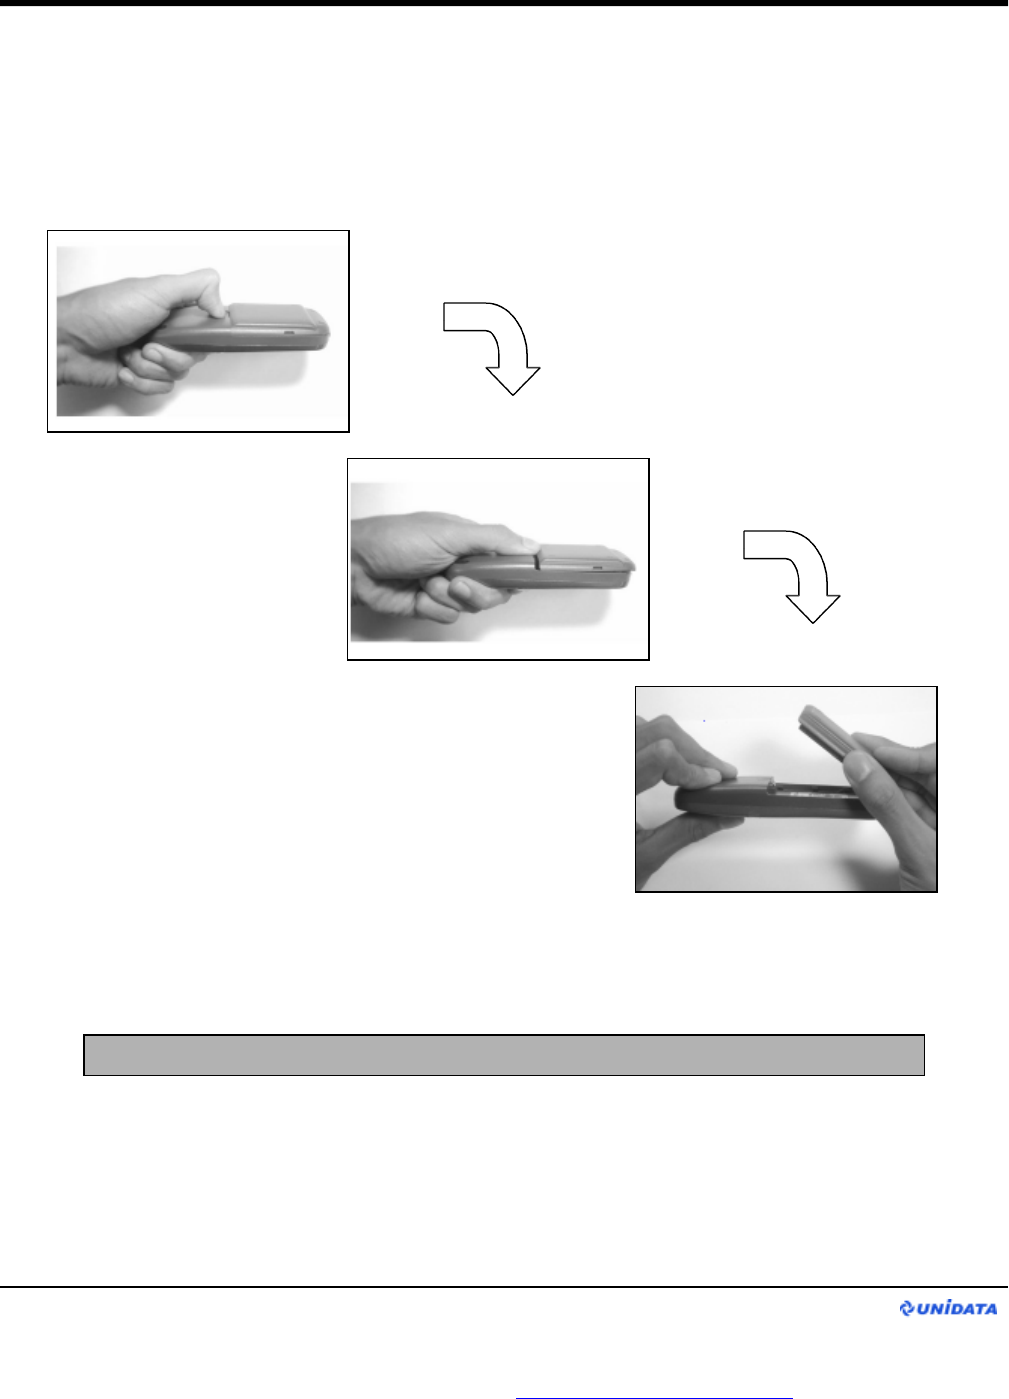
6. Tips for using battery
6.1 Releasing battery
1. Push the button right
above the battery.
2. After pushing the button,
release the battery pack
from the phone body
3. Now you can lift up from the
phone body.
Note : Before separating a battery from the phone, check if the phoneis powered off.
Tips for using battery
WIP-5000 User Guide
Page 8
PDF created with FinePrint pdfFactory Pro trial version http://www.pdffactory.com
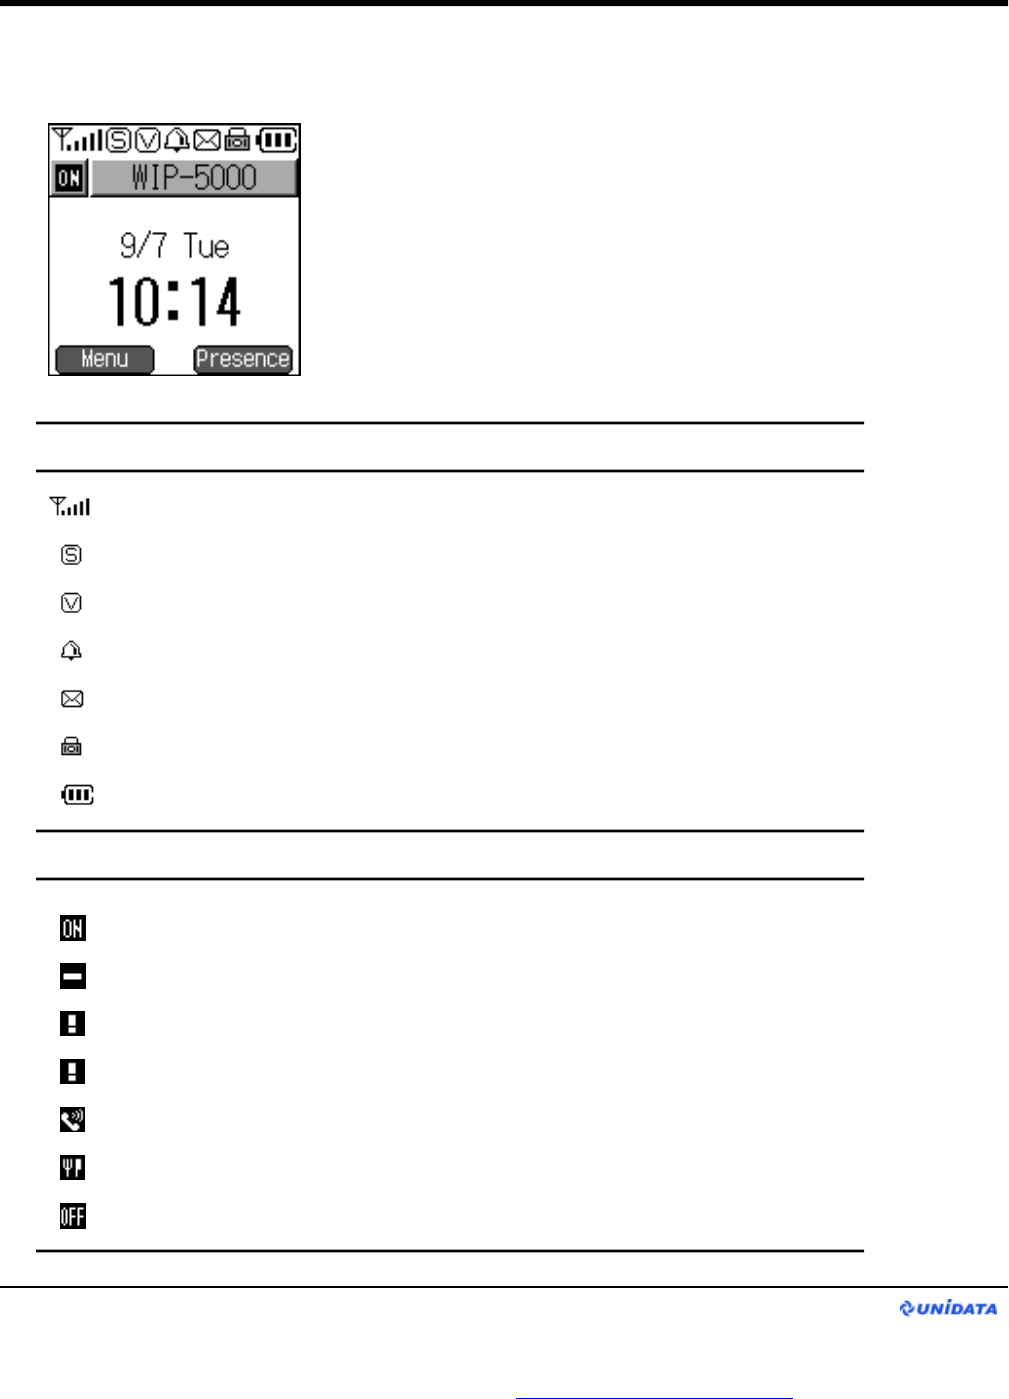
7. Icons on Display
Indicate Signal Strength.
Indicate lamp mode is on. LED blinks when there is an incoming call.
Indicate vibration mode is on. It gets displayed when ring modeis set to vibration.
Indicate alarm is on. It gets displayed when alarm clock setup is on.
Indicate that there is/are new message(s) that has not been read.
Indicate key lock. While this mode is on, pressing keys will donothing.
Indicate Battery Life.
Status message of idle mode display
Standard feature icons
Icons on Display
WIP-5000 User Guide
Indicates user is online.
Indicates user is busy.
Indicates user is going to be right back.
Indicates user is away for a while.
Indicates user is on the phone.
Indicates user is out to lunch.
Indicates user is offline.
Page 9
PDF created with FinePrint pdfFactory Pro trial version http://www.pdffactory.com

Inputting Characters
WIP-5000 User Guide
8. Inputting Characters ( Dial Pad )
>
=~
<}
+|Z S
){YR
(’XVQOLIFC
’_WUPNKHEB
&^9T7MJGDA
%]z8s65432
$[-yvrolifc
;?spacexuqnkheb,
#!@wtpmjgda/
:
#
.
*
0
0
9
9
8
8
7
7
6
6
5
5
4
4
3
3
2
2
1
1
F
O
N
T
Key
Dial Pad
Dial pad is formed with integer 0~9, *, and # and used for inputting 3 or 4 alphabet letters and
some symbols. Once a Dial key has been pressed, pressing it again while the rectangular cursor
keeps blinking will change the current input to the next letter assigned for that specific key. See the
table below for the Dial key assignment. Note that after the rectangular cursor blinks couple of
times, it will change into a vertical bar cursor. Alphabet letters are lowercase by default.
Let’s try entering “Hello 2004”
Step. 1 For “H”: Press ‘4’seven times.
Step. 2 For “e”: Press ‘3’three times.
Step. 3 For “l”: Press ‘5’four times.
Step. 4 For “l”: Press ‘5’four times.
Step. 5 For “o”: Press ‘6’four times.
Step. 6 For “space”: Press ‘0’three times + Multi Function Key rightdirection.
Step. 7 For “2”: 2
Step. 8 For “0”: 0
Step. 9 For “0”: 0
Step. 10 For “4”: 4
Note : This dial pad system is for bootrom menu only.
Page 10
PDF created with FinePrint pdfFactory Pro trial version http://www.pdffactory.com
9. Application
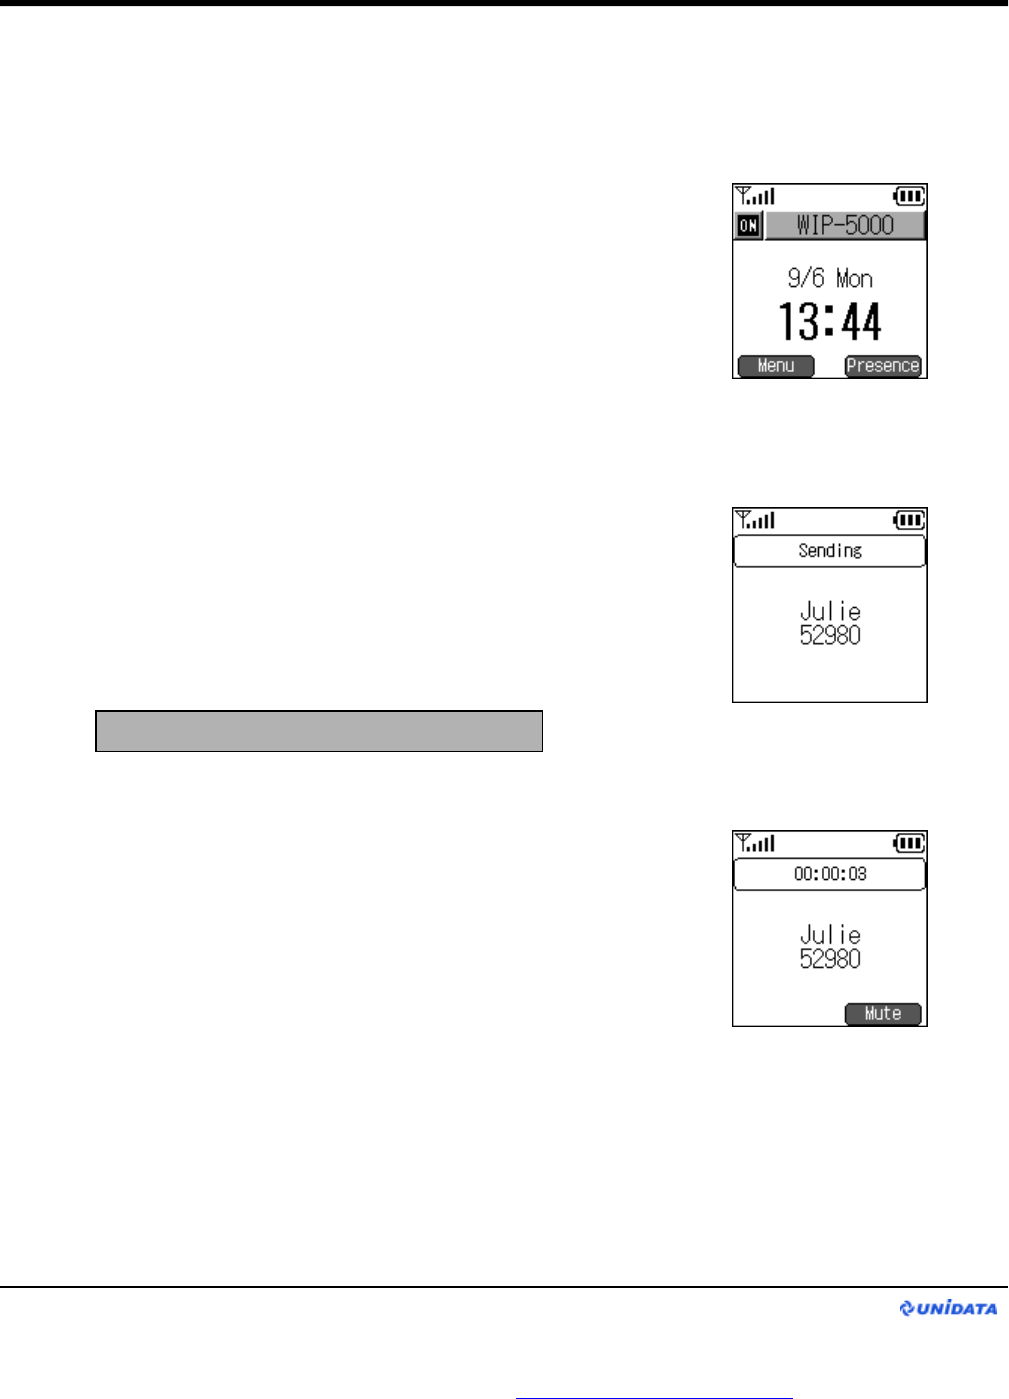
9.1 Outbound Call
Step.1
Once registered, you can make calls to
others that are registered to the same SIP Server.
Note : If fails to reach, there is no indication.
Step.2
Dial number & press Send Key. If your call reach the
other party, you will hear ring back tone and it says
“Sending”on the top of the screen as shown in the
picture on the right.
Step.3
If Callee receive your call, timer start activating on the
top of the screen as shown in the picture on the right.
Application
WIP-5000 User Guide
Page 11
PDF created with FinePrint pdfFactory Pro trial version http://www.pdffactory.com
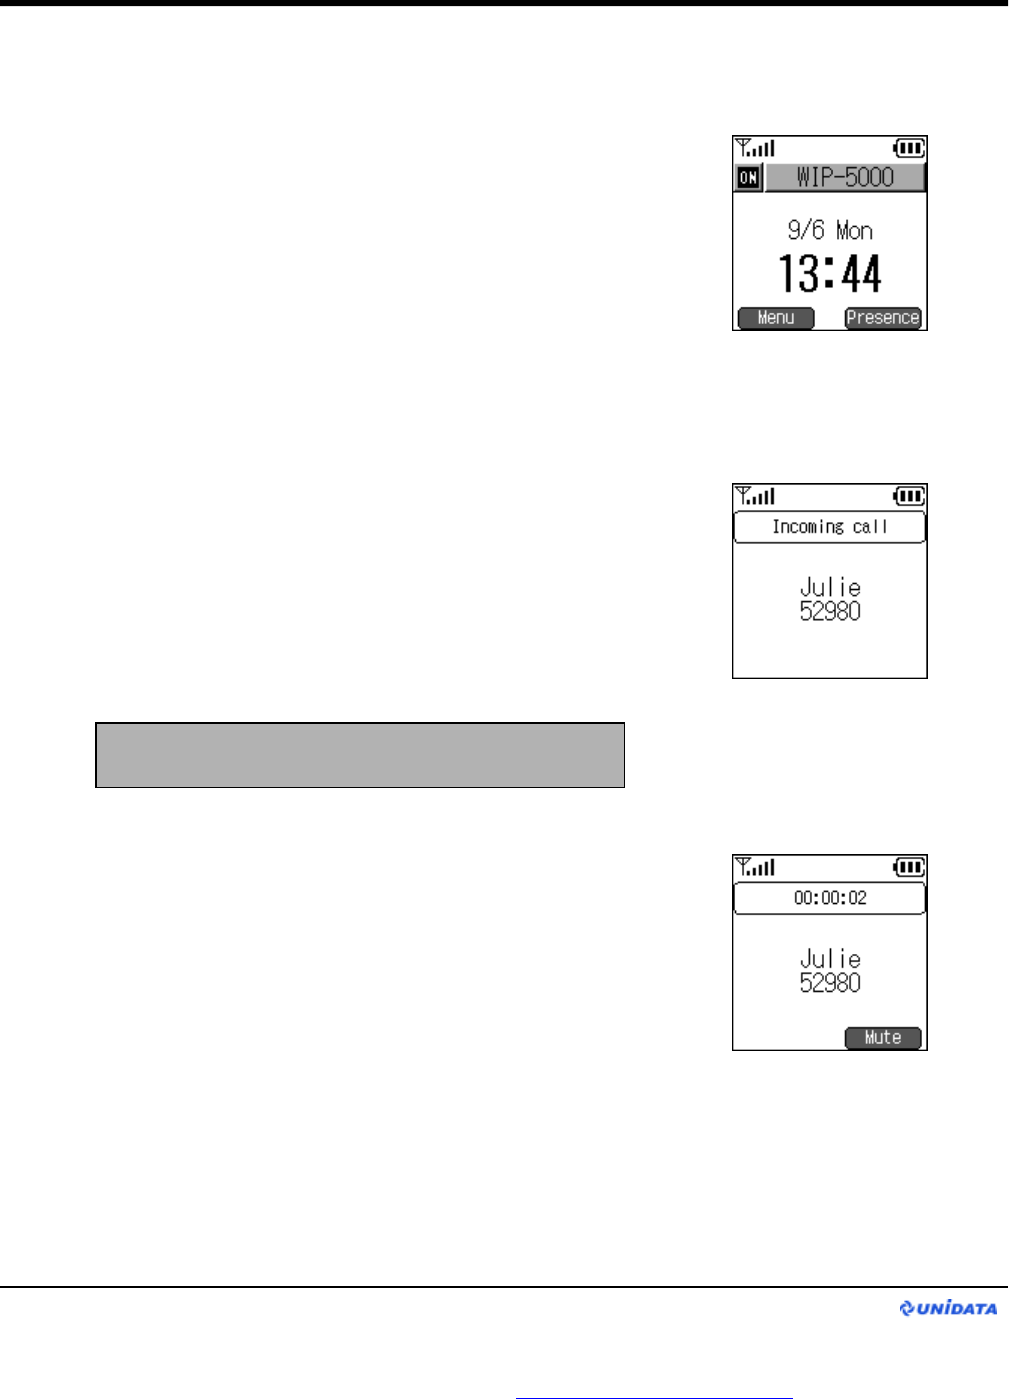
9.2 Inbound Call
Step.1
Once registered, you can also receive calls.
Step.2
If someone calls you, it says "Incoming call" on the top of
the screen and displays caller ID.
(caller's phone number and name).
To answer a call press Send Key.
To decline a call press End Key.
Step.3
If you receive a call, timer start activating on the top of
the screen as shown in the picture on the right.
Application
WIP-5000 User Guide
Note : The name will be displayed if that number is
saved in phone book with the name.
Page 12
PDF created with FinePrint pdfFactory Pro trial version http://www.pdffactory.com

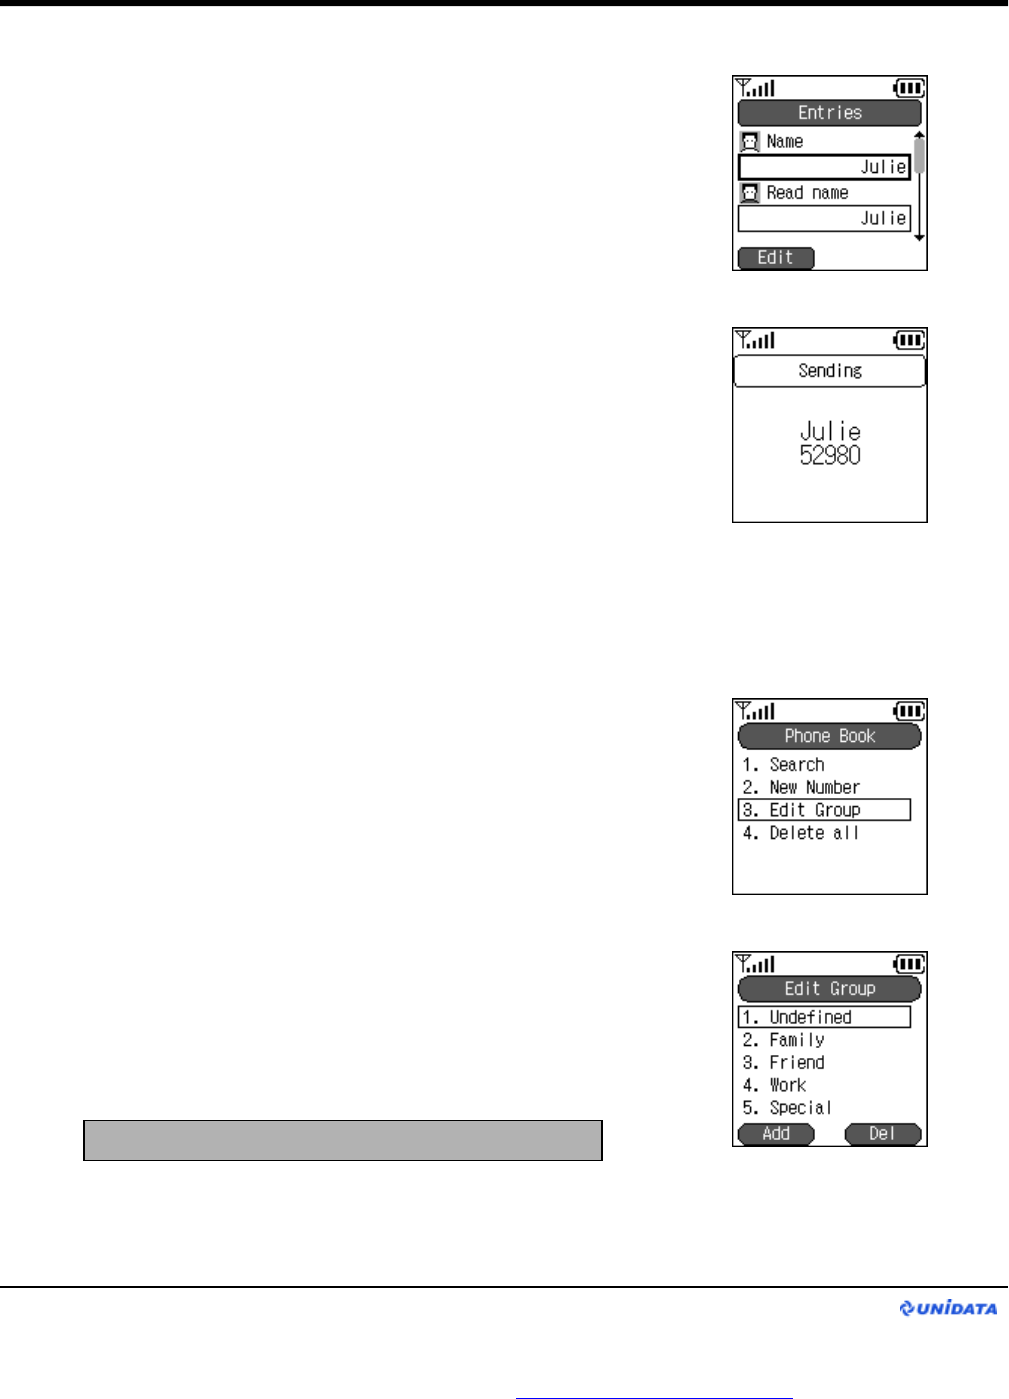
9.3 Phone Book Menu
9.3.1 Add New Entry
Note : For the Name input box, user can change the
Input to upper/lower case letter, digit, and
special character by using Left Soft Key.
Step.1
Use Left Soft Key to enter the menu from idle screen.
Then you will see the screen just like the 2nd picture.
Select “Phone Book”by pressing the linked number (1) or
press Enter Key to enter.
Step.1
From Phone Book menu, press the linked
number (2) or move to “New Number”and press
Enter Key to enter.
Step.2
Input information: Name →Read Name →
Phone Number →Group →Index. After done
inputting information you need, press Enter Key to
save. It is not required to fill everything out but
the Phone number is essential.
Application
You can store info such as phone number of your family, friends and others. It must have
at least one stored number in the phone book to search.
WIP-5000 User Guide
Page 13
PDF created with FinePrint pdfFactory Pro trial version http://www.pdffactory.com
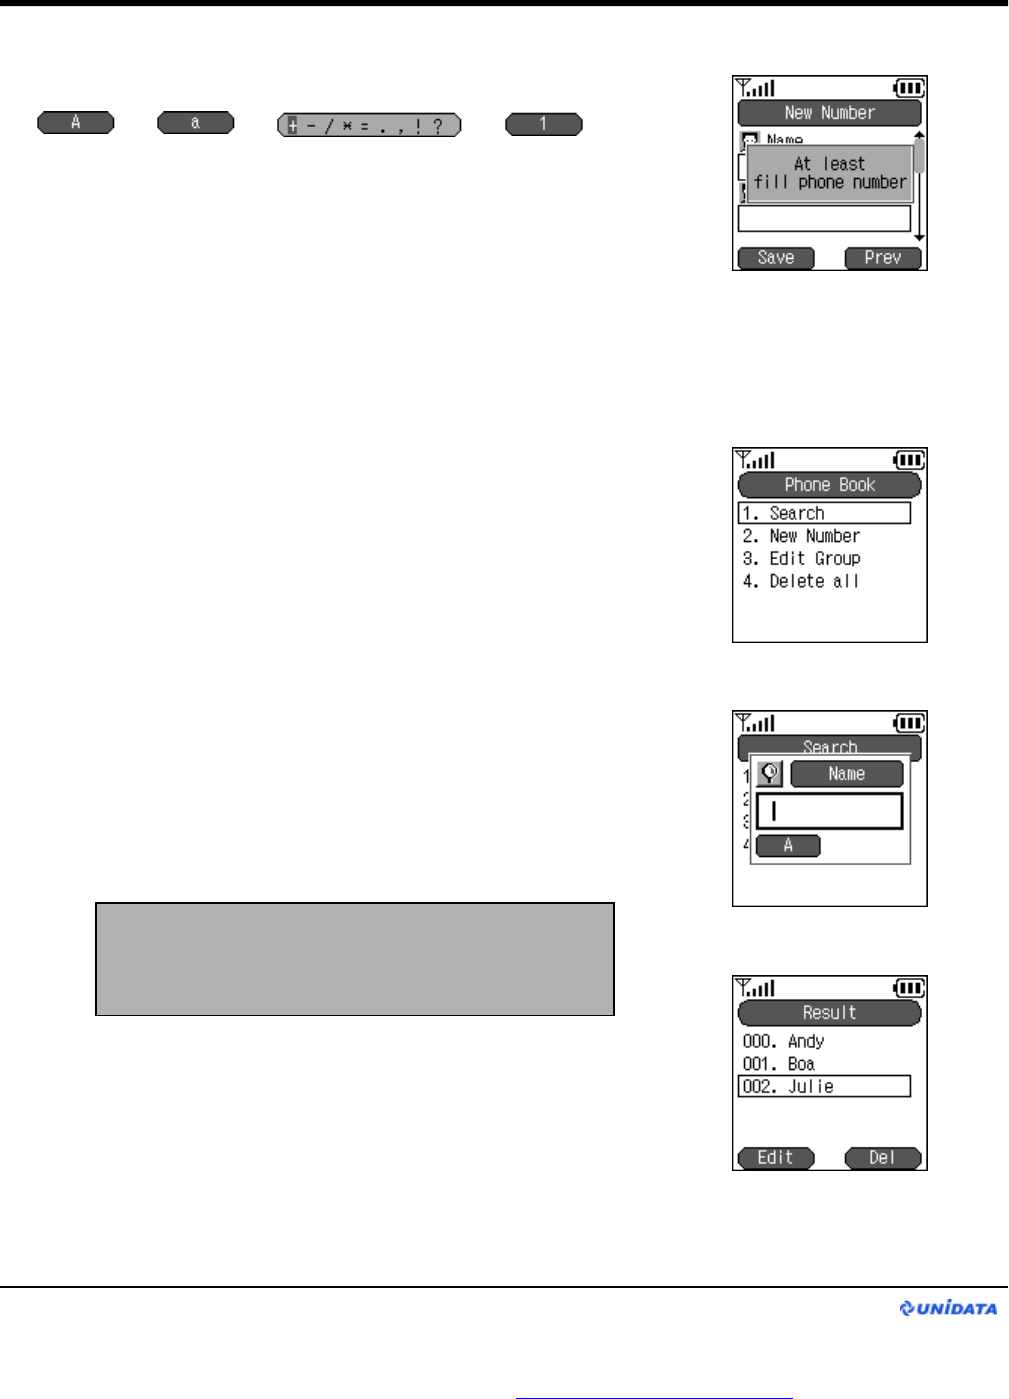
▷▷▷
If you press Enter Key to save without entering any datum,
<Warning> message pops up.
9.3.2 Call From Phone Book
Step.1
From Phone Book menu, press the linked number (1)
or move to “Search”and press Enter Key to enter.
Step.2
There are 4 ways to search the number.
①By Index
②By Name
③By Phone Number
④By Group
Result will look like the second picture on the right.
Calling from the Phone Book is another way to make a call instead of dialing from idle screen.
So as to do, you need to search phone number stored in Phone Book by following the steps below.
For example, let’s say that one person is Kim, and second
person is Kimberly. They both have ‘K’in their name. So
if you don’t want to enter whole name to search one
person by Name, you can just input one letter ‘K’then
press Enter Key. Result will show Kim and Kimberly.
Note : If you didn’t input the exact information
whichever way among the above, phone will
search the name or number that contains the
input character that you entered.
Application
WIP-5000 User Guide
Page 14
PDF created with FinePrint pdfFactory Pro trial version http://www.pdffactory.com
Step.3
Select Julie and press Enter Key then it will show Julie’s
information: Read Name, Phone Number, Group and
Index.
Step.1
From Phone Book menu, press the linked number (3) or
move to “Edit Group”and press Enter Key to enter.
9.3.3 Edit Group
Step.4
Press Send Key or Enter Key wherever the focus at can
make a call to the person.
Step.2
Undefined is default group, which cannot be edited or
deleted. you can add a group by using Left Soft Key;
delete a group by using Right Soft Key; and edit a group
by pressing Enter Key.
Application
This section explains you how to add, delete or edit group.
Note : Maximum 10 groups can be made.
WIP-5000 User Guide
Page 15
PDF created with FinePrint pdfFactory Pro trial version http://www.pdffactory.com
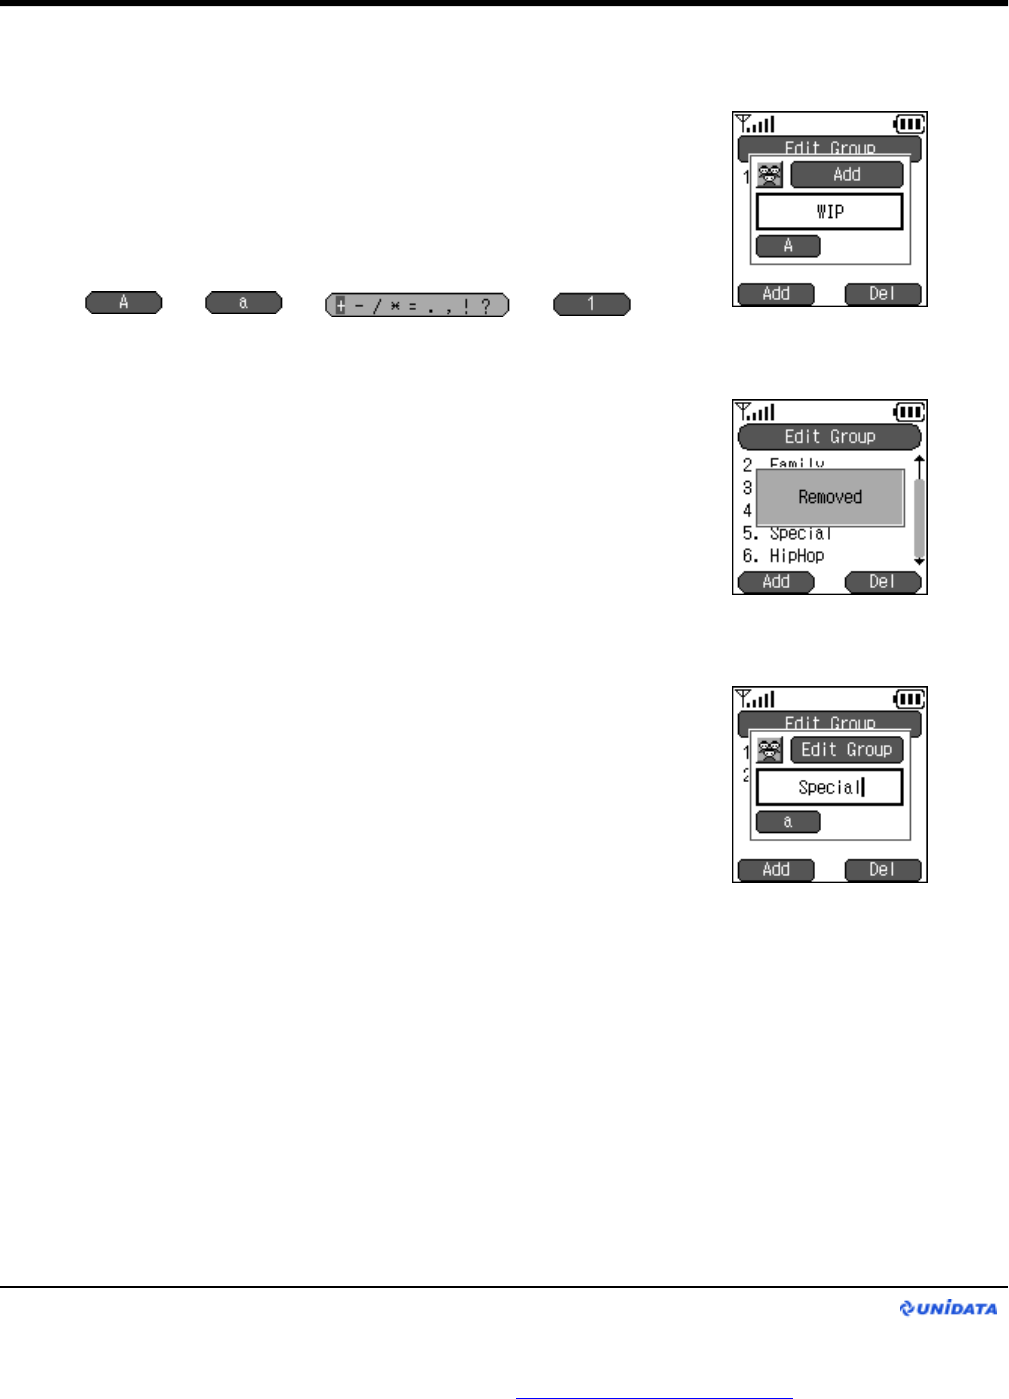
Step.3
The picture on the right shows adding a group named as
“WIP”. Press Enter Key to save a new group and it goes
back to Phone Book menu.
* User can change the inputs by using Left Soft Key.
▷▷▷
Step.4
Select a group you want to remove and press Right Soft Key.
* Removed dialog will disappear in a second; it goes back to
Phone Book menu.
Step.5
Select a group you want to edit and press Enter Key.
Change the name of group as refer to step 3.
Press Enter Key again to save and it goes back to Phone
Book menu.
Application
WIP-5000 User Guide
Page 16
PDF created with FinePrint pdfFactory Pro trial version http://www.pdffactory.com
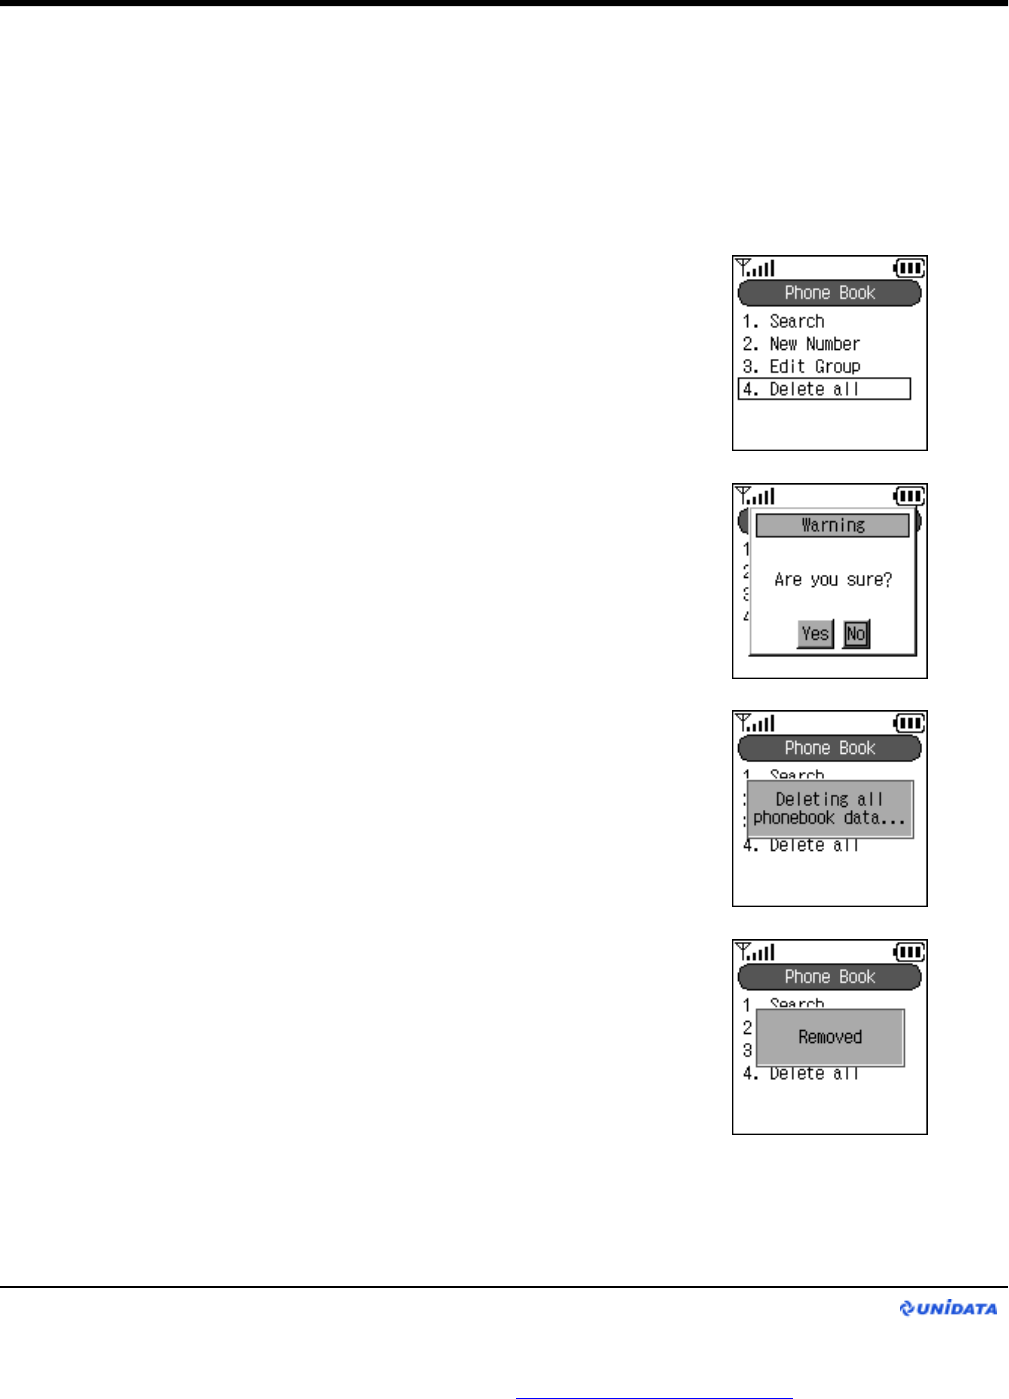
9.3.4 Delete all
Step.1
From Phone Book menu, press the linked number (4) or
move to “Delete all”and press Enter Key to enter.
Step.2
Phone will ask you to make confirmation. Use ◁▷key to
choose “Yes”or “No”.
Step.3
Selecting “Yes”will show the process of deleting the entire
Phone Book datum.
In a second, “Removed”dialog shows and it goes back to
Phone Book menu.
Application
This function deletes all the phone numbers that are stored in Phone Book but the groups that
have created don’t get deleted.
WIP-5000 User Guide
Page 17
PDF created with FinePrint pdfFactory Pro trial version http://www.pdffactory.com
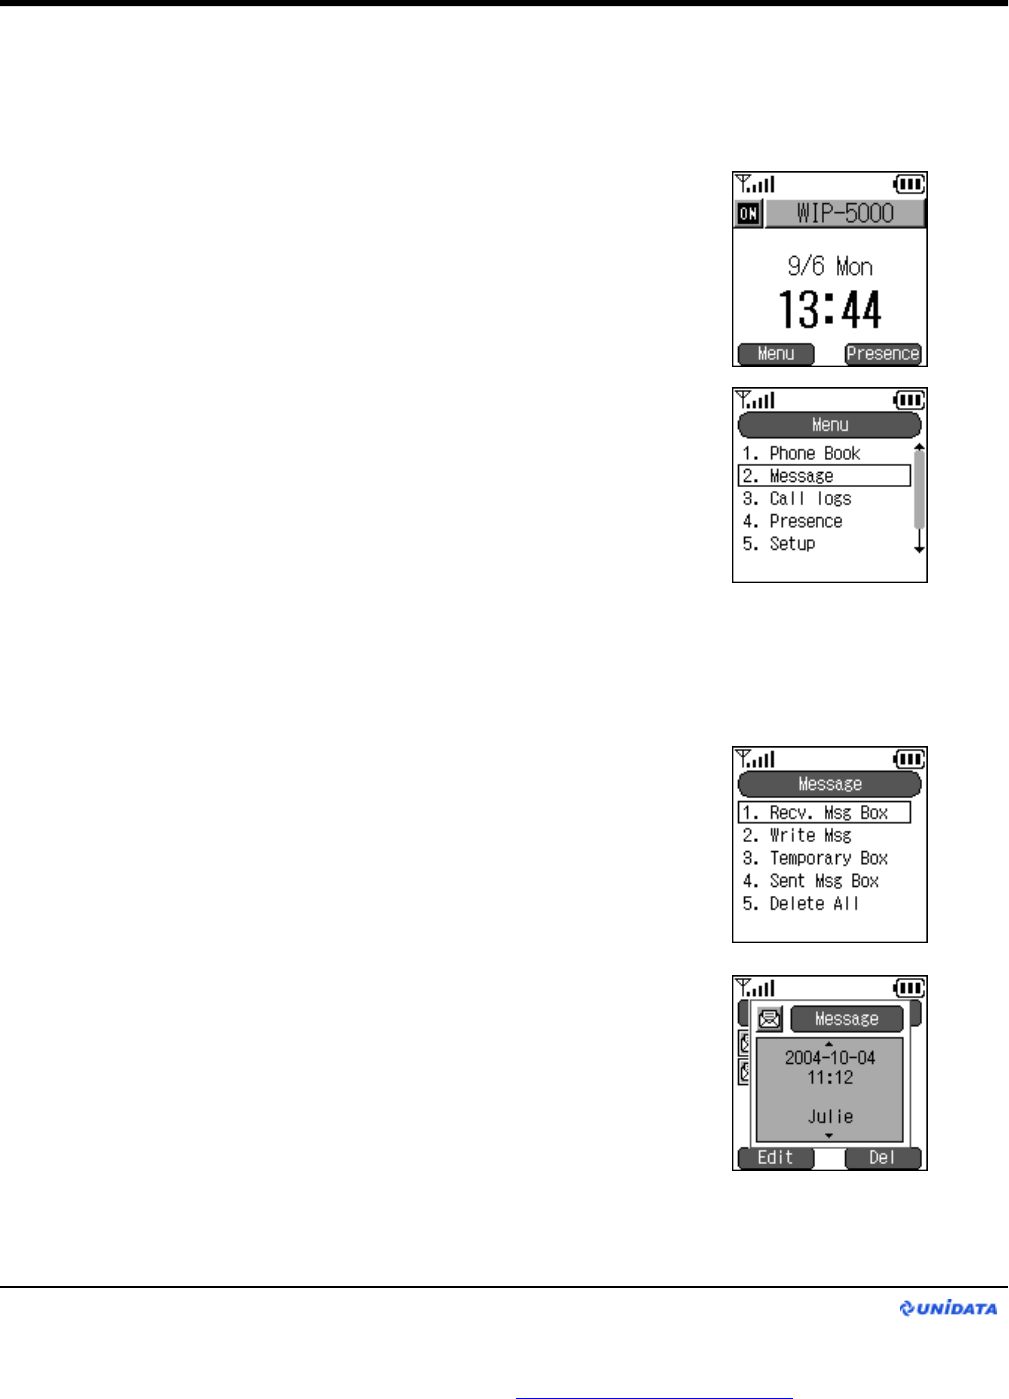
9.4 Message Menu
Message is used for short communication by transmitting words toeach others.
Step.1
Use Left Soft Key to select the menu from the idle screen.
Then screen like the second picture on the right will shows up.
Press the linked number (2) or move to “Message”and press
Enter Key to enter.
9.4.1 Received Message Box
Step.1
From Message menu, press the linked number (1) or move to
“Recv. Msg Box”and press Enter Key to enter.
When the message comes, screen will look like the second
picture on the right.
Application
All the messages you received gets stored in here. If you want to see old/new messages check
the “Received Message Box”.
WIP-5000 User Guide
Page 18
PDF created with FinePrint pdfFactory Pro trial version http://www.pdffactory.com
Step.4
If you wish to edit the Received Message, press Left Soft Key.
Then your screen will be look like the second picture on the right.
Use △▽key to change the input field. After done editing, press
Right Soft Key if you wish to re-send edited message.
▷▷▷
Step.3
From Step 2, select the message you want to read in larger
window and press Enter Key then screen will look like picture on
the right.
ØIf you do nothing but stay still, a message will automatically
moves up and down.
ØYou can see the entire message manually by using △▽key.
* Message contains the date, time, phone number, and contents.
Application
WIP-5000 User Guide
Step.2
If there are unread messages, it will show the dialog how many
unread messages are left.
Right after that dialog disappears, it will show the list of unread
messages.
ØIf you don’t press Enter Key and stay still, message
automatically moves left and right to show entire messages in one
line. When you press △or ▽key to move the focus to next
message, next message will do the same action.
ØYou can see the entire message manually by using ◁▷key.
Page 19
PDF created with FinePrint pdfFactory Pro trial version http://www.pdffactory.com
Step.5
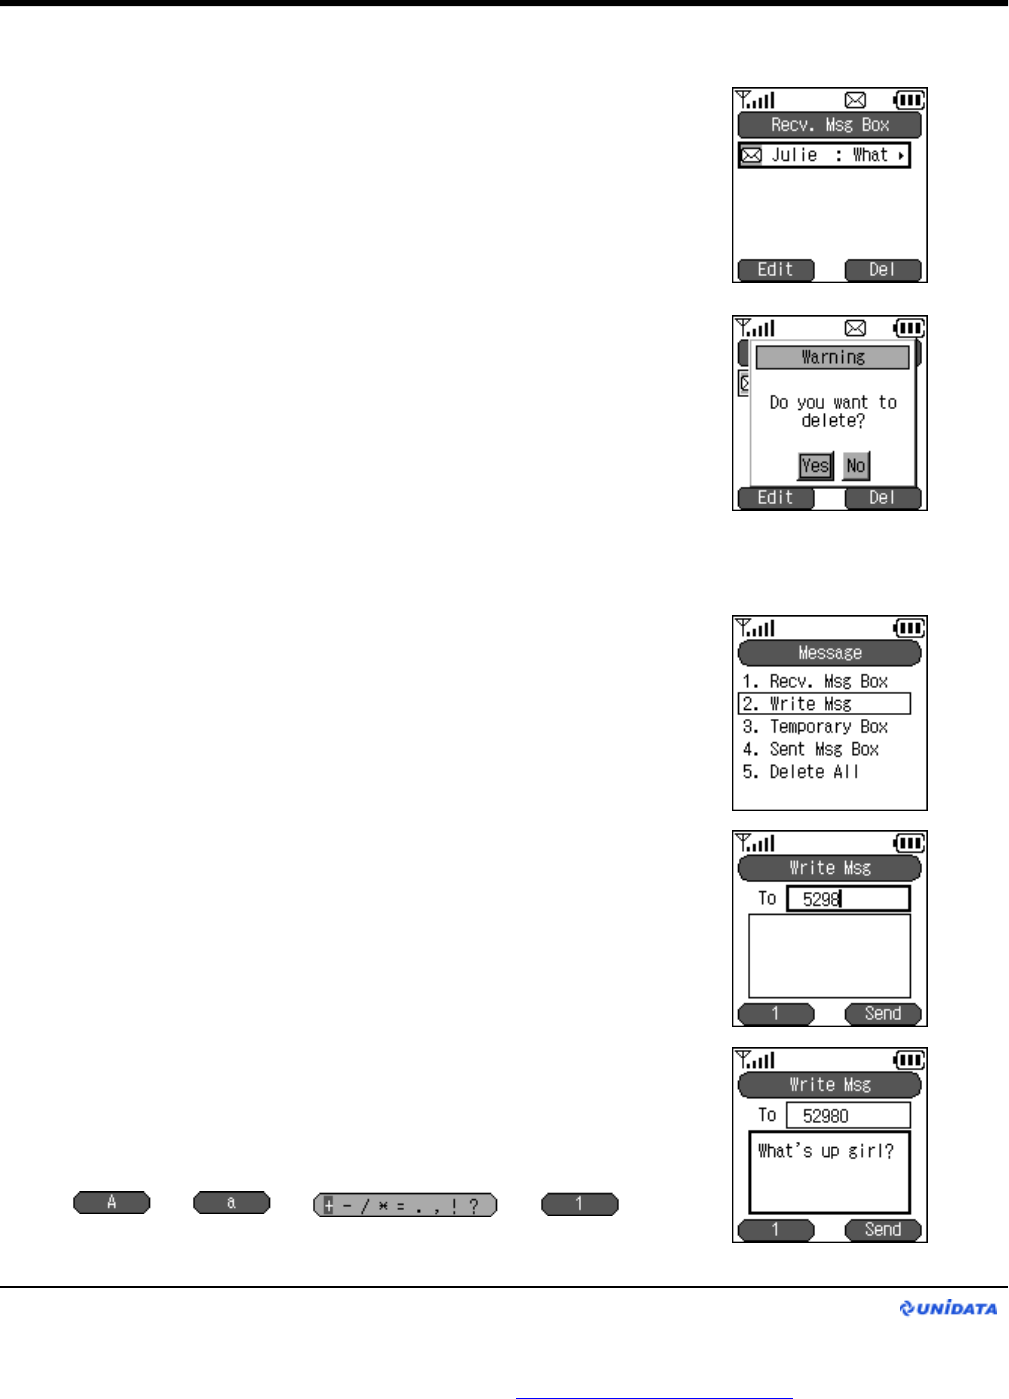
If you wish to delete the Temporary message, press Right Soft key.
Then your screen will be look like the second picture on the right,
which ask you to delete it or not. Select “Yes”by using ◁▷key
and press Enter Key to delete.
9.4.2 Write Message
You can write and send a message in here.
Step.1
From Message menu, press the linked number (2) or move
to “Write Msg”and press Enter Key to enter.
Step.2
Enter the number that you want to send a message to.
Application
Step.3
Use dial pad and Left Soft Key to write a message.
* Hold down a Clear button clears the whole text.
▷▷▷
WIP-5000 User Guide
Page 20
PDF created with FinePrint pdfFactory Pro trial version http://www.pdffactory.com
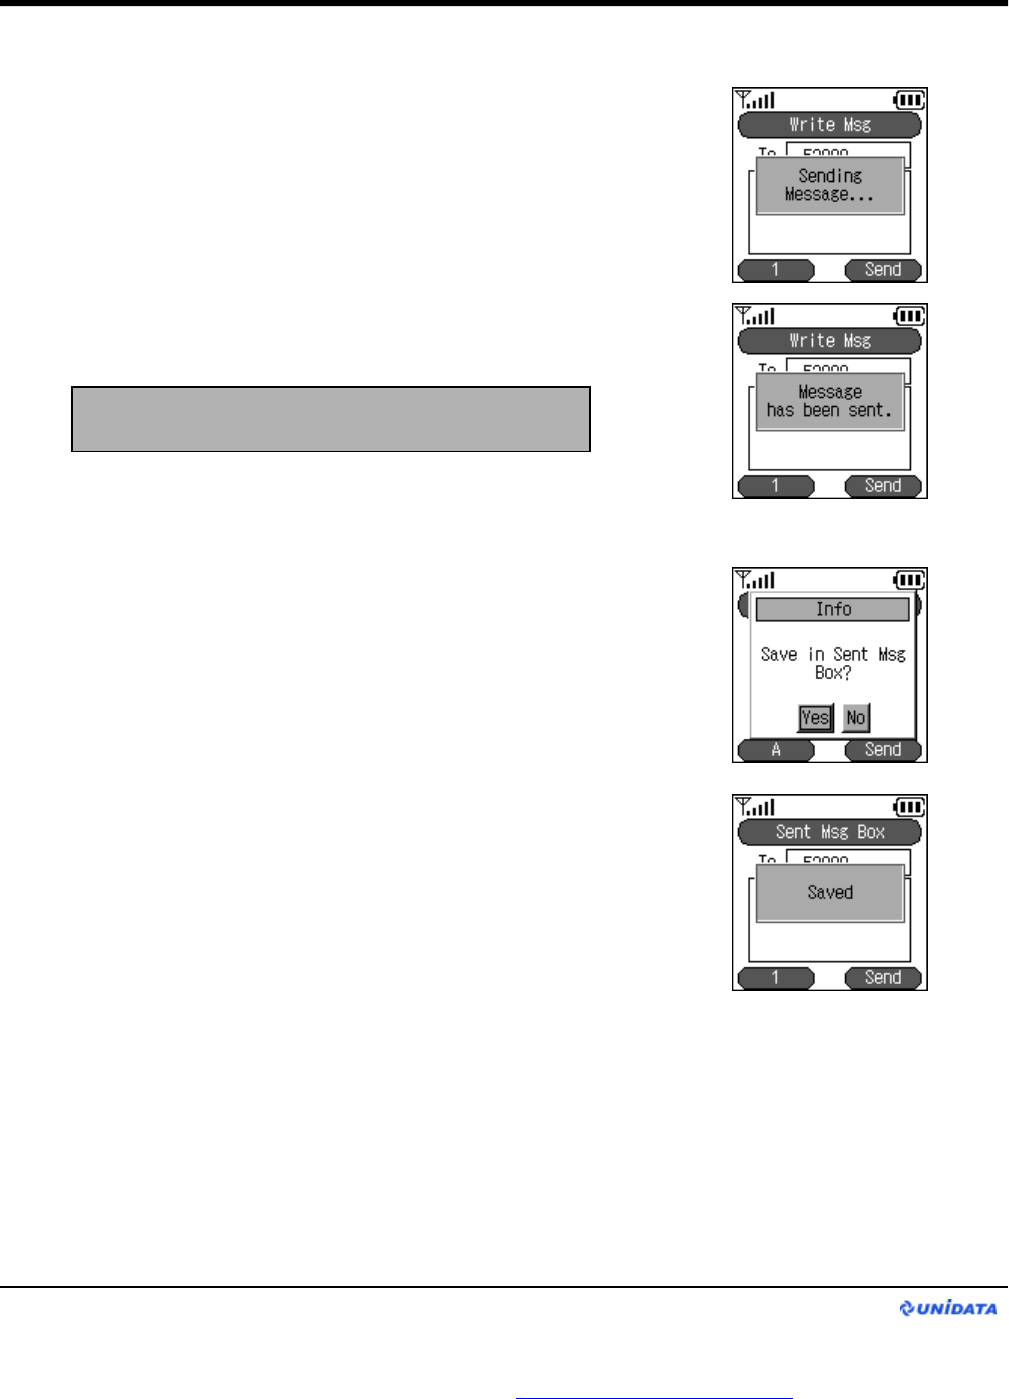
Step.4
Press Right Soft Key to send a message.
It shows the process of sending a message. .
In a second, “Message has been sent.”dialog shows.
Step.5
After “Message has been sent.”message shows, it asks
you to save.
If you wish to save the message. Select “Yes”by using
◁▷key and press Enter Key to save.
Application
Note : If you input wrong number, the warning
message “failed”would pops up.
WIP-5000 User Guide
Page 21
PDF created with FinePrint pdfFactory Pro trial version http://www.pdffactory.com
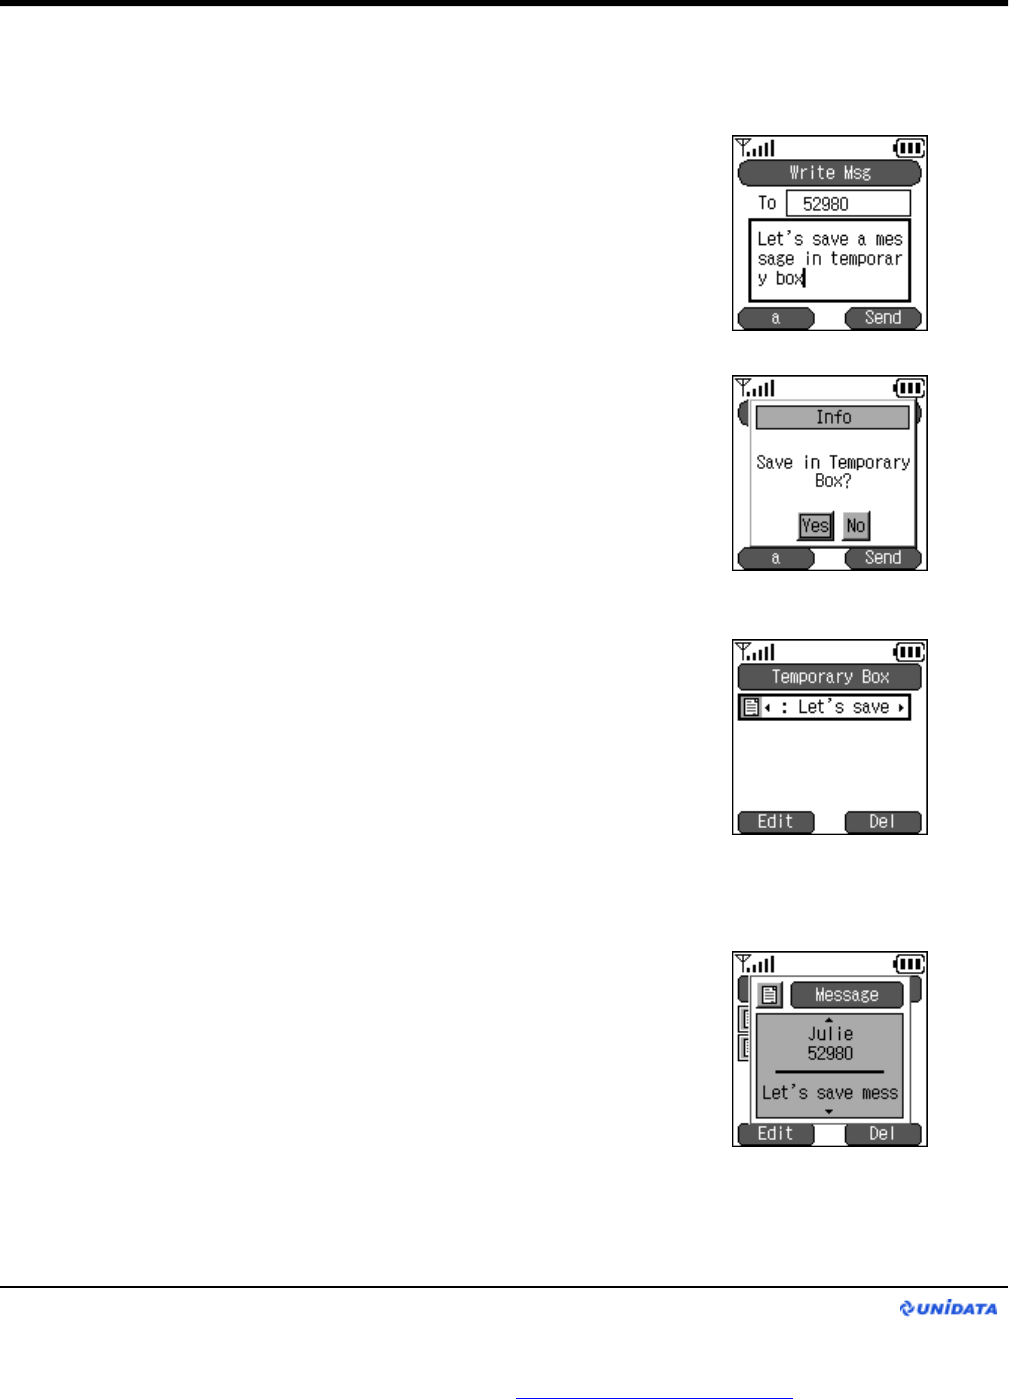
9.4.3 Temporary Box
Step.1
When you don’t want to send message at that moment and save
the message for the later use, press End Key.
Then your screen will be look like the second picture on the right,
which ask you to save it or not.Select “Yes”by using ◁▷key
and press Enter Key to save.
Step.2
From Message menu, press the linked number (3) or move to
“Temporary Box”and press Enter Key to enter.
ØIf you don’t press Enter Key and stay still, message
automatically moves left and right to show entire messages in
one line. If you press △or ▽key to move the focus to next
message, Next message will do the same action.
ØYou can see the entire message manually by using △▽key.
Application
Step.3
From Step 2, select the message you want to read in larger
window and press Enter Key then screen like picture on the right
shows up.
ØIf you do nothing but stay still, a message will automatically
moves up and down.
ØYou can see the entire message manually by using △▽key.
* Message contains the date, time, phone number, and contents
WIP-5000 User Guide
Page 22
PDF created with FinePrint pdfFactory Pro trial version http://www.pdffactory.com
▷▷▷
Step.6
If you wish to delete the Temporary message, press
Right Soft key.
Then your screen will be look like the second picture on the
right, which ask you to delete it or not. Select “Yes”by using
◁▷key and press Enter Key to delete.
Step.4
If you wish to edit the Temporary Message, press
Left Soft key.
Then your screen will be look like the second picture on the
right. Use △▽key to change the input field. After done
editing, press Right Soft Key if you wish to re-send edited
message.
Application
WIP-5000 User Guide
Page 23
PDF created with FinePrint pdfFactory Pro trial version http://www.pdffactory.com
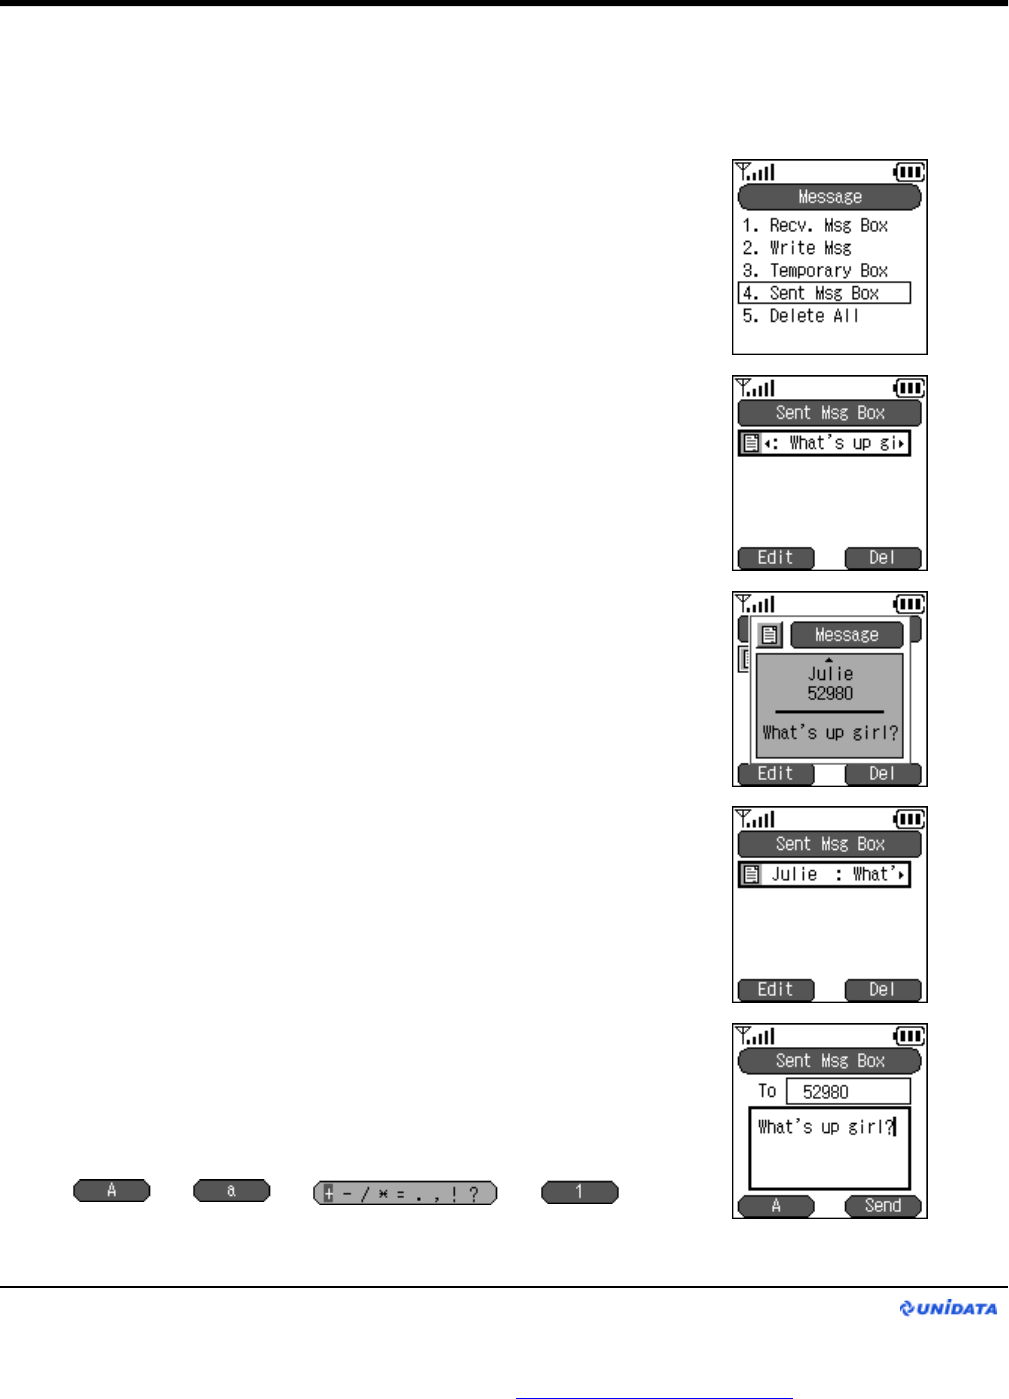
9.4.4 Sent Message Box
All the sent messages you saved gets stored in here.
▷▷▷
Step.1
From Message menu, press the linked number (4) or move
to “Sent Message Box”and press Enter Key to enter.
Step.2
ØIf you don’t press Enter Key and stay still, message
automatically moves left and right to show entire messages in
one line. If you press △or ▽key to move the focus to next
message, Next message will do the same action.
ØYou can see the entire message manually by using ◁▷ key.
Step.3
From Step 2, select the message you want to read in larger
window and press Enter Key then screen like picture on the right
shows up.
ØIf you do nothing but stay still, a message will automatically
moves up and down.
ØYou can see the entire message manually by using ◁▷ key.
* Message contains the date, time, phone number, and contents
Step.4
If you wish to edit the Sent Message, press Left Soft Key.
Then your screen will be look like the second picture on the
right. Use △▽key to change the input field. After done
editing, press Right Soft Key if you wish to re-send a
message just edited.
Application
WIP-5000 User Guide
Page 24
PDF created with FinePrint pdfFactory Pro trial version http://www.pdffactory.com
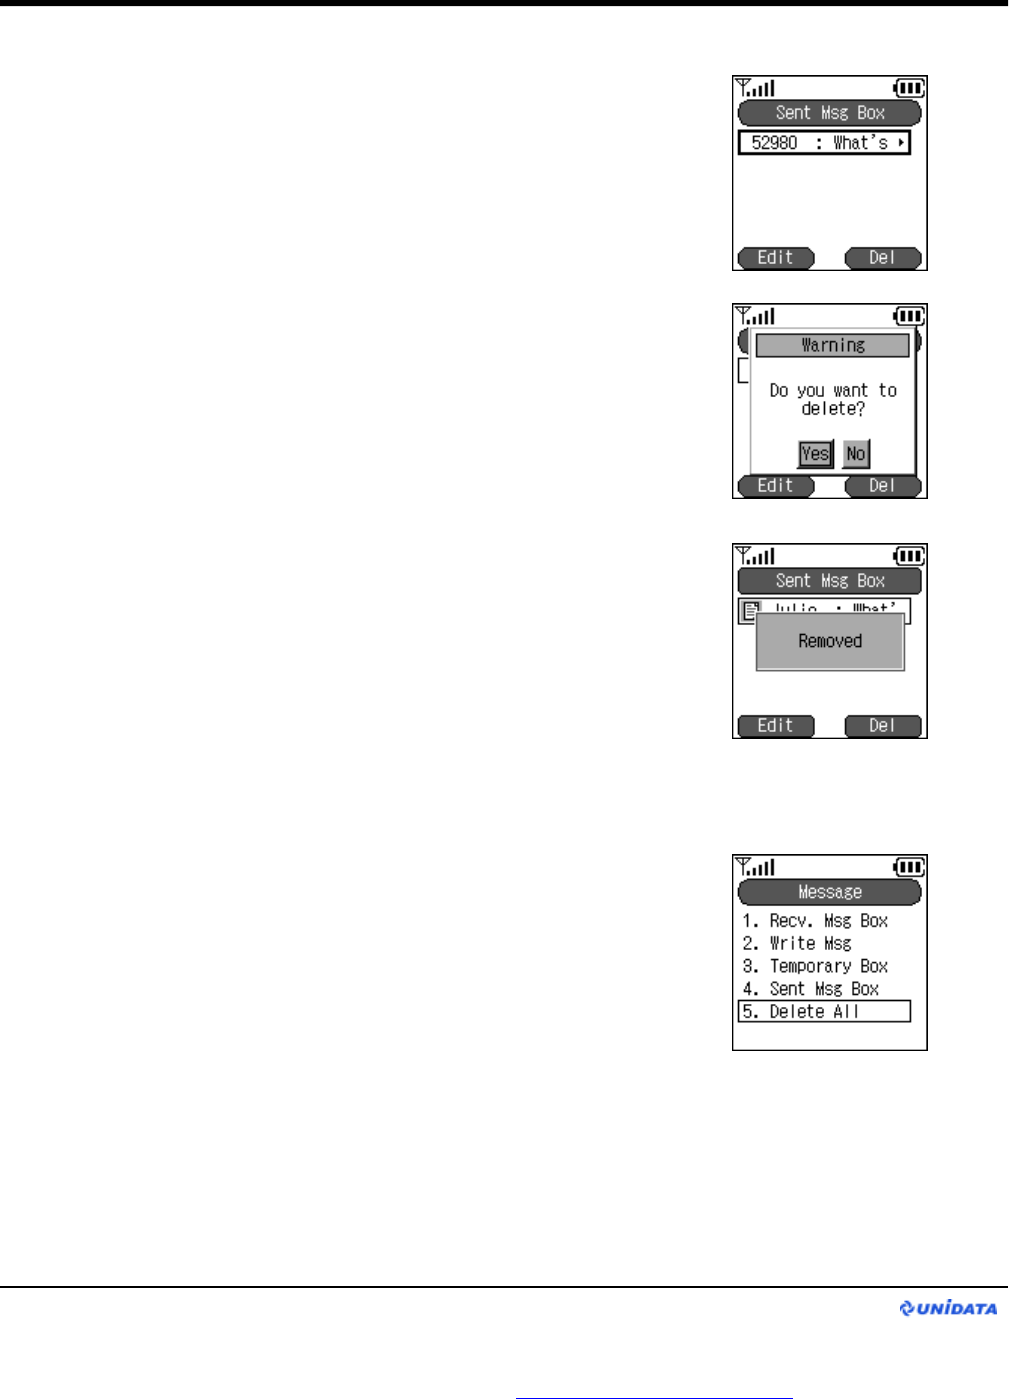
Step.5
If you wish to delete the Sent Message, press Right Soft Key. .
Then your screen will be look like the second picture on the
right, which ask you to delete it or not. Select “Yes”by using
◁▷key and press Enter Key to delete.
9.4.5 Delete All
Step.1
From Message menu, press the linked number (5) or move to
“Delete All”and press Enter Key to enter.
Application
WIP-5000 User Guide
Page 25
PDF created with FinePrint pdfFactory Pro trial version http://www.pdffactory.com

Step.2
1. Press the linked number (1) or move to “Recv. Msg Box”
and press Enter Key to delete everything inside of Recv. Msg
Box
2. Press the linked number (2) or move to “Temporary Box”
and press Enter Key to delete everything inside of Temporary
Box.
3. Press the linked number (3) or move to “Sent Msg Box”
and press Enter Key to delete everything inside of Sent Msg
Box. .
Step.3
When user selects one of three menus, your screen will be
look like the first picture on the right, which ask you to delete it
or not. Select “Yes”by using ◁▷key and press Enter Key
to delete.
Selecting “Yes”will show the process of deleting the entire
messages.
Application
WIP-5000 User Guide
Page 26
PDF created with FinePrint pdfFactory Pro trial version http://www.pdffactory.com
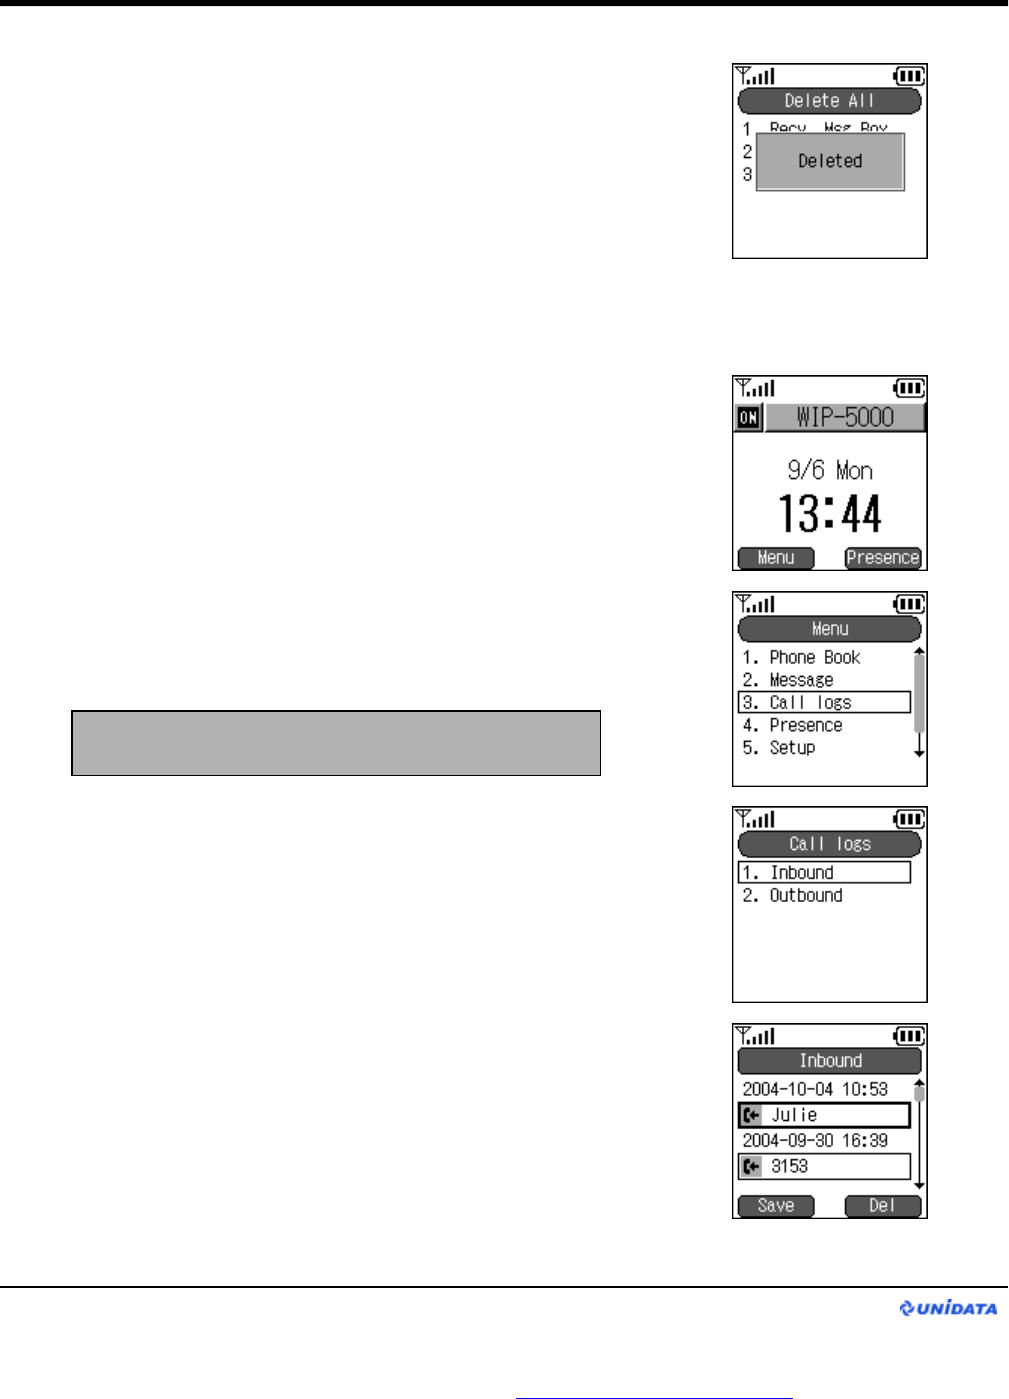
In a second, “Deleted.”dialog shows.
9.5 Call Log Menu
This menu keeps the history of Inbound and Outbound calls.
Step.1
Using Left Soft Key to select the menu from the idle screen.
Then your screen will be look like the second picture on the right.
Press the linked number (3) or move to “Call logs”and press
Enter Key to enter.
Step.2
There are Inbound and Outbound menu under Call logs menu.
Press the linked number (1) or move to “Inbound”and press
Enter Key to enter.
Then you can see the inbound calls. If the Name is given to that
number, it will display the Name. If not, it will display just number.
* Above the name/number, it has date and the time of inbound
call.
Application
Note : You can also enter Call logs menu by using
MultiFunction Key left or right at Idle mode.
WIP-5000 User Guide
Page 27
PDF created with FinePrint pdfFactory Pro trial version http://www.pdffactory.com
Step.3
Press the linked number (2) or move to “Outbound”and press
Enter Key to enter.
Just like the Inbound call, it displays name / number user has
called.
* Above the name / number, it has date and the time of inbound
call.
9.5.1 Show More Information
Step.1
Press Enter Key on the name / number that you want to get more
information then Information pop-up window will show up like the
picture on the right. You can see all the information by pressing
△▽key or it automatically moves up and down if you stay still.
Information contains: Name, Number, and Duration how long
you were on the phone.
9.5.2 Call from Call Log
Step.1
From the Call logs screen, press Send Key on the name / number
that you want to call again then it will automatically dial the
number.
If the name is given to that number, name gets displayed above
the number. .
Application
: Missed Call
: Outbound Call
: Received Call
WIP-5000 User Guide
Page 28
PDF created with FinePrint pdfFactory Pro trial version http://www.pdffactory.com
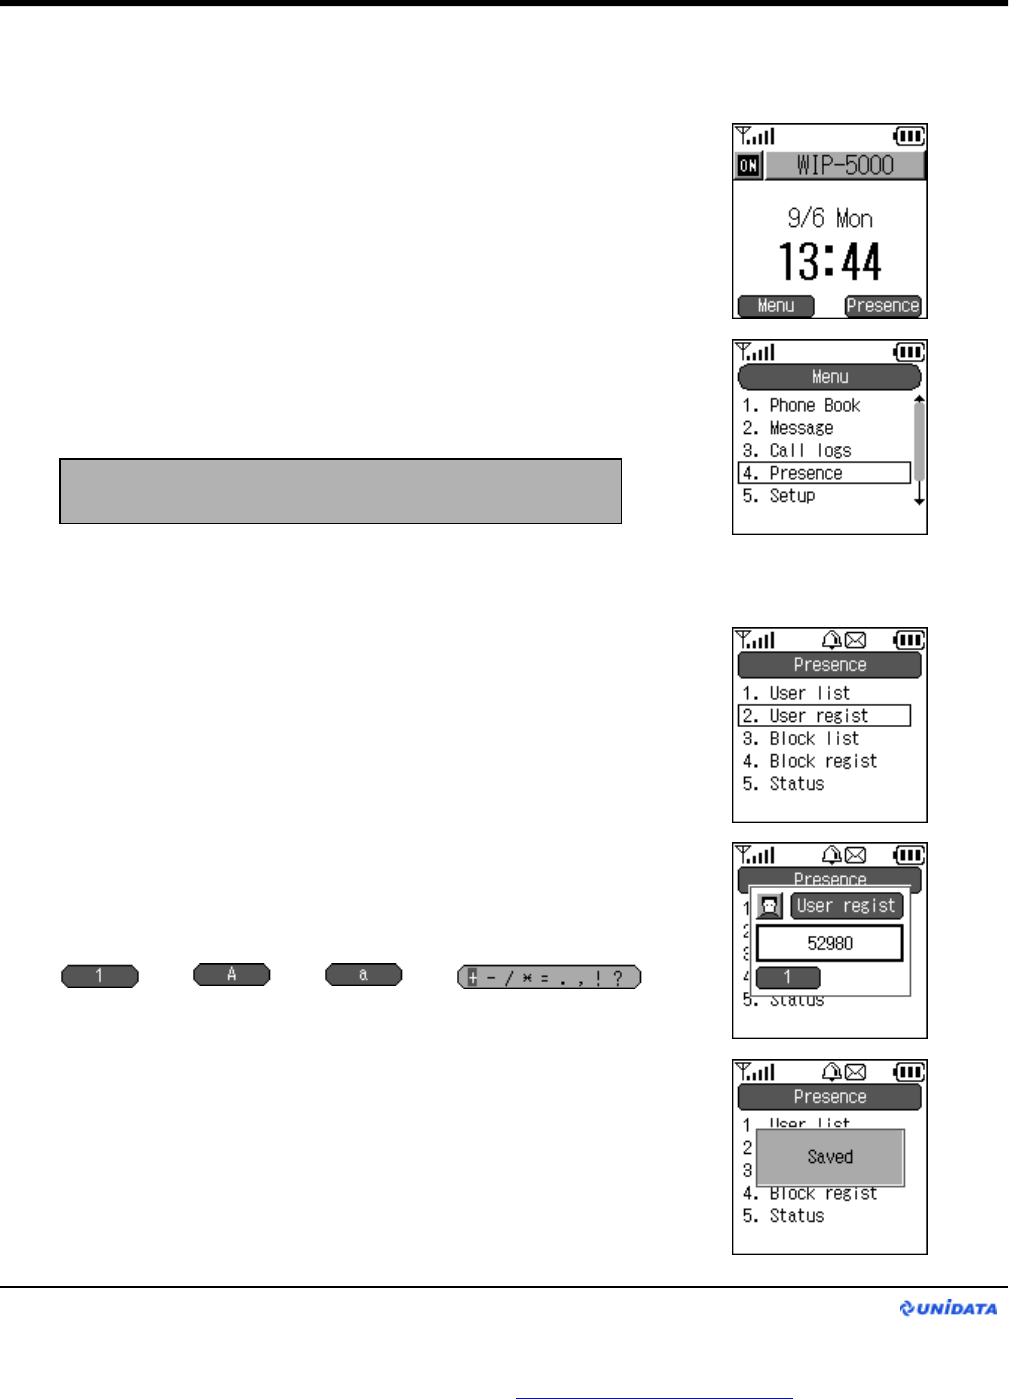
9.6 Presence Menu
Step.1
Use Left Soft Key to select the menu from the idle screen.
Then screen like the second picture on the right will shows up.
Press the linked number (4) or move to “Presence”and press
Enter Key to enter.
9.6.1 User regist
Step.1
To add a friend, press the linked number (2) or move to “User
regist”and press Enter Key to enter.
Step.2
Use dial pad and Left Soft Key to enter your friend’s Alias.
▷▷▷
Application
WIP-5000 User Guide
Note : You can reach “Presence”menu directly by using
Right Soft Key from idle screen.
Page 29
PDF created with FinePrint pdfFactory Pro trial version http://www.pdffactory.com
If user entered the same Alias. Message that says, “Already
registered”shows up and goes back to input field.
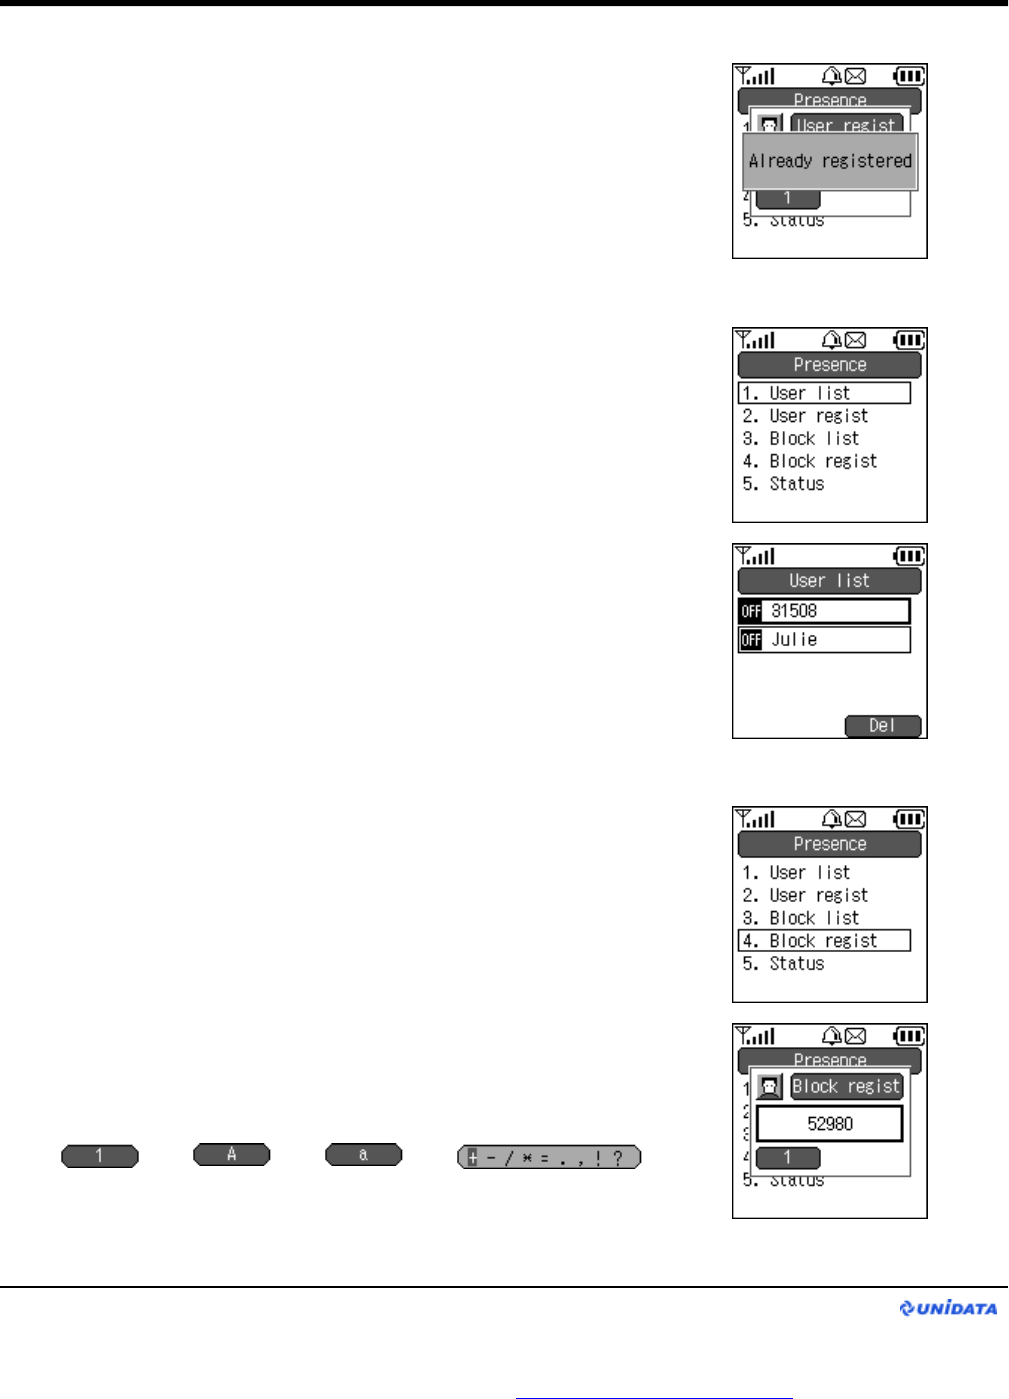
9.6.2 User List
Step.1
To see the list of friends, Press the linked number (1) or move to
“User list”and press Enter Key to enter.
Step.2
It shows list of all friends and you can see the their status.
To delete a User list, press Right Soft Key.
Pressing Enter Key makes a call.
Application
9.6.3 Block regist
Step.1
To block a friend, press the linked number (4) or move to “Block
regist”and press Enter Key to enter.
If you block friends, the status of your friends wouldn’t appear at
user list anymore.
Step.2
Use dial pad and Left Soft Key to enter your friend’s Alias.
▷▷▷
WIP-5000 User Guide
Page 30
PDF created with FinePrint pdfFactory Pro trial version http://www.pdffactory.com
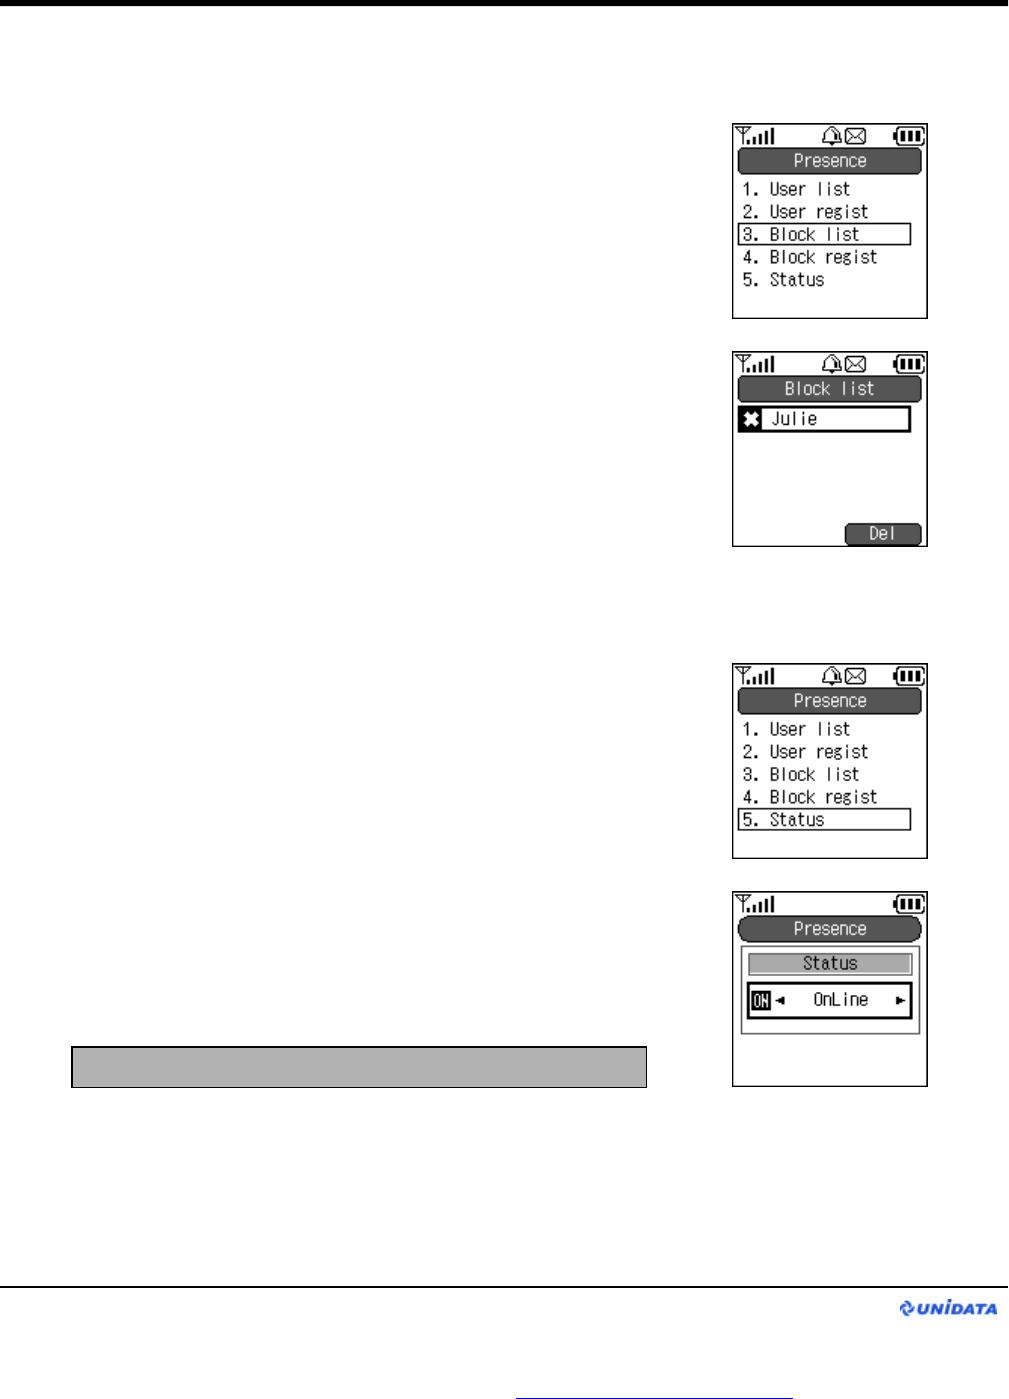
9.6.5 Status
Step.1
To see the current status, press the linked number (5) or move
to “Status”and press Enter Key to enter.
Step.2
User can set the status by using ◁▷key and then press
Enter Key to apply.
Note : For description of status message, Refer to page 9.
9.6.4 Block List
Application
Step.1
To see the list of blocked friends, press the linked number
(3) or move to “Block list”and press Enter Key to enter.
Step.2
It shows list of all blocked friends.
To delete a Block list, press Right Soft Key.
Pressing Enter Key shows you detail information of blocked
friend.
WIP-5000 User Guide
Page 31
PDF created with FinePrint pdfFactory Pro trial version http://www.pdffactory.com
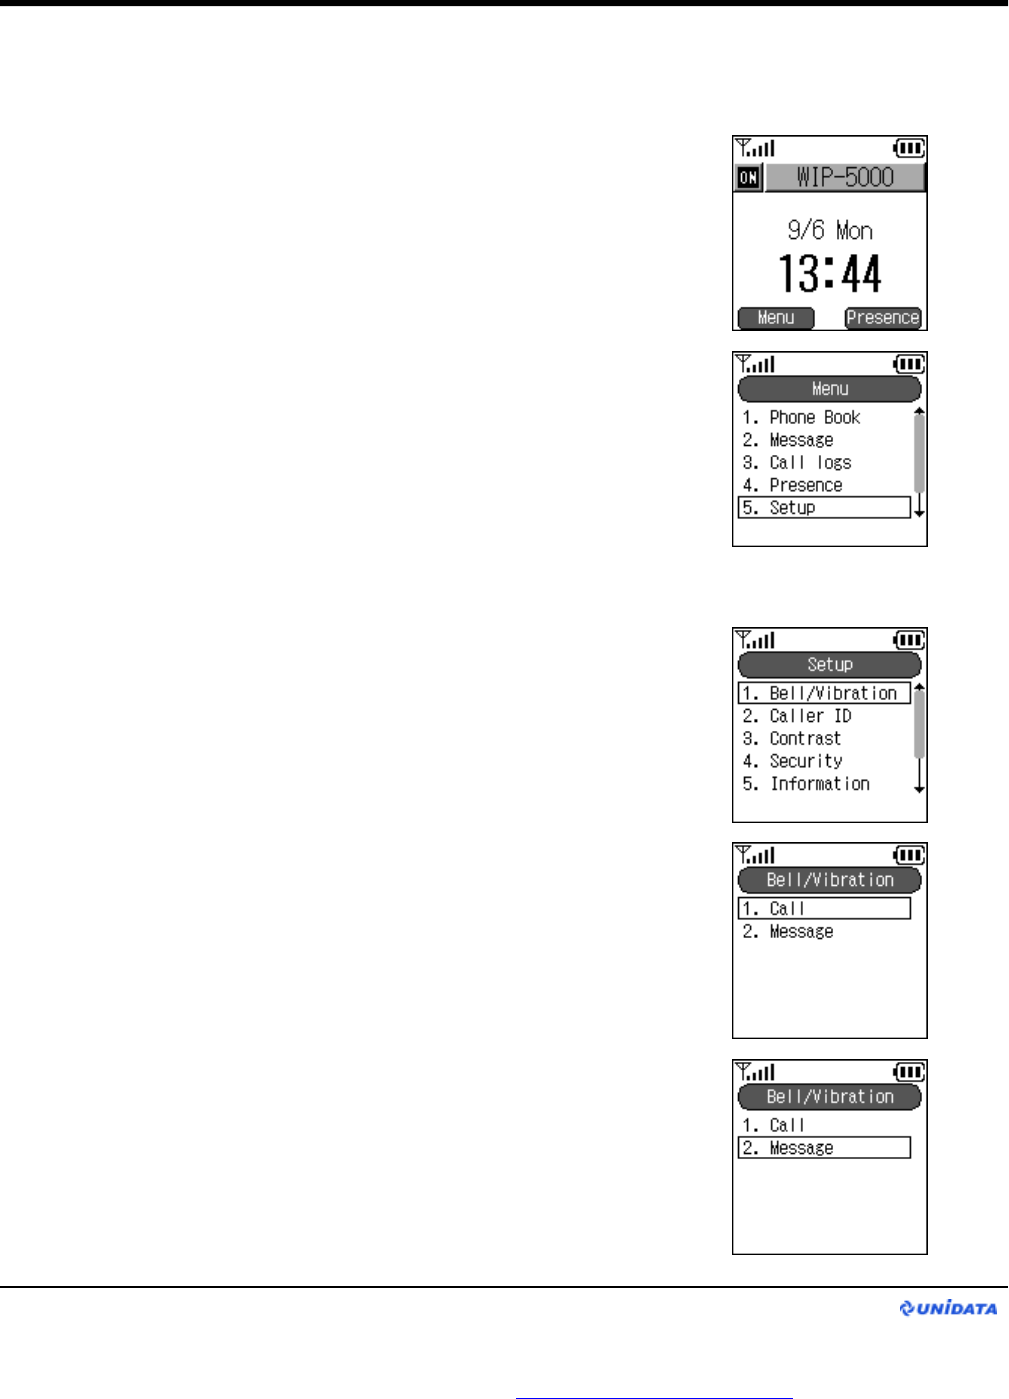
9.7 Setup Menu
Step.1
Use Left Soft Key to select the menu from the idle screen.
Then your screen will be look like the second picture on the
right. Press the linked number (5) or move to “Setup”and press
Enter Key to enter.
9.7.1 Bell / Vibration
Step.1
From Setup menu, press the linked number (1) or move to
“Bell / Vibration”and press Enter Key to enter.
Step.2
User can set the Bell / Vibration for Call and Message.
Press the linked number (1) or move to “Call”and press
Enter Key to enter.
Press the linked number (2) or move to “Message”and press
Enter Key to enter. There is no division between Ext. and Int.
like Call has.
Application
WIP-5000 User Guide
Page 32
PDF created with FinePrint pdfFactory Pro trial version http://www.pdffactory.com
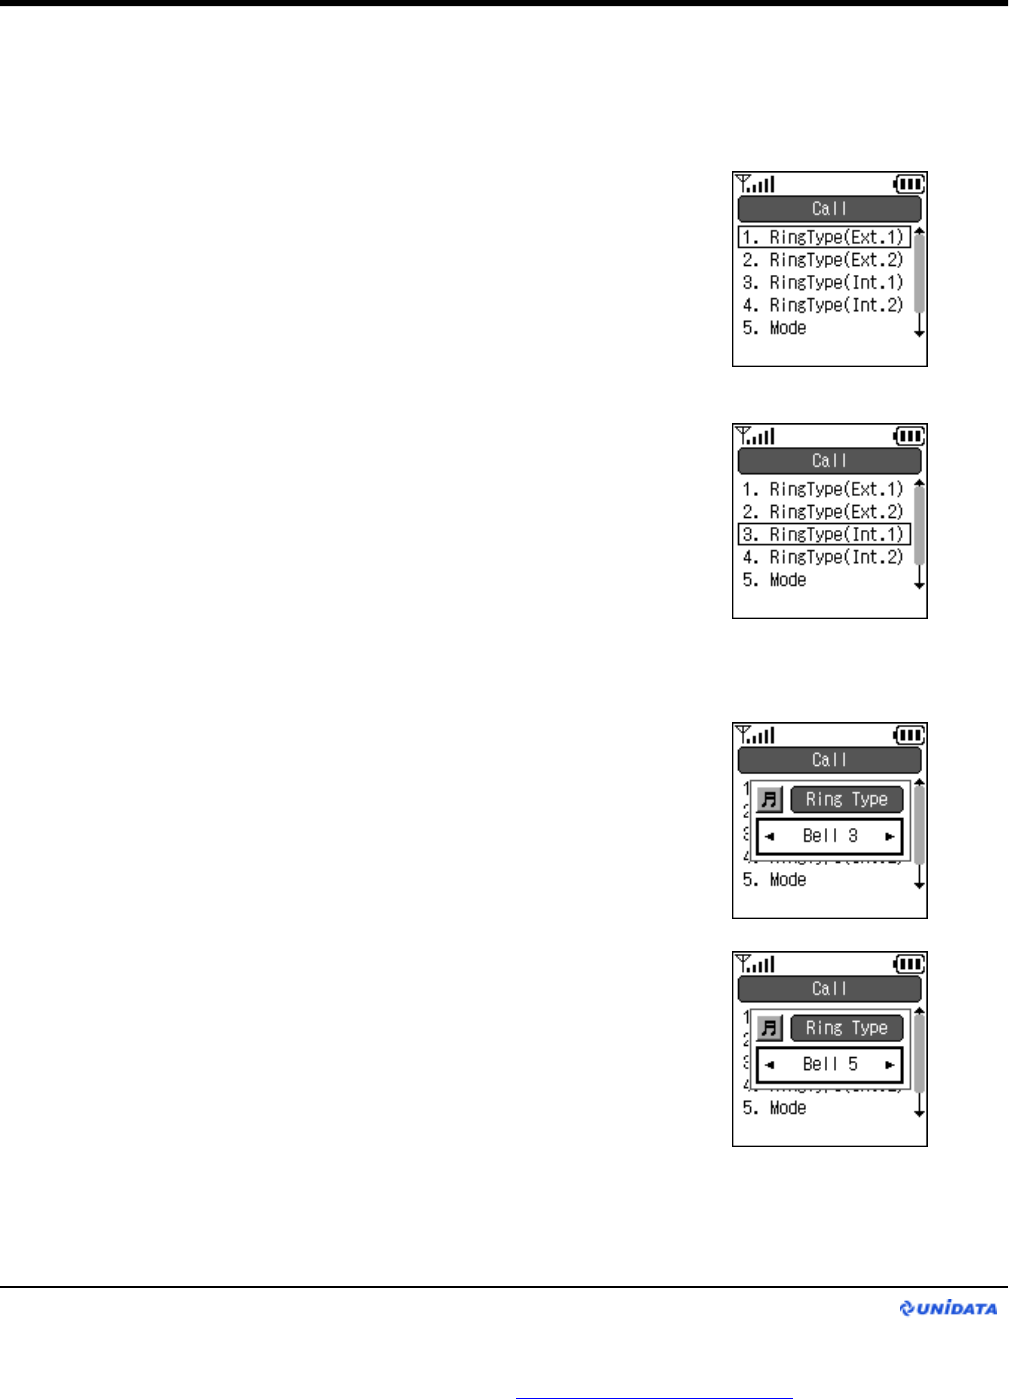
9.7.1.1 Ring Type
You can change the ring type of your phone for incoming call in here.
Step.1
There are two modes for each Ring Type.
If you want to change external telephone ring type, press the
linked number (1) or move to “Ring Type (Ext.)”and press
Enter Key to enter.
If you want to change internal telephone ring type, press the
linked number (3) or move to “Ring Type (Int.)”and press
Enter Key to enter.
Step.2
User can set the Ring Type by using ◁▷key and then press
Enter Key to apply.
* There are total 16 types of Ring.
Application
WIP-5000 User Guide
Page 33
PDF created with FinePrint pdfFactory Pro trial version http://www.pdffactory.com
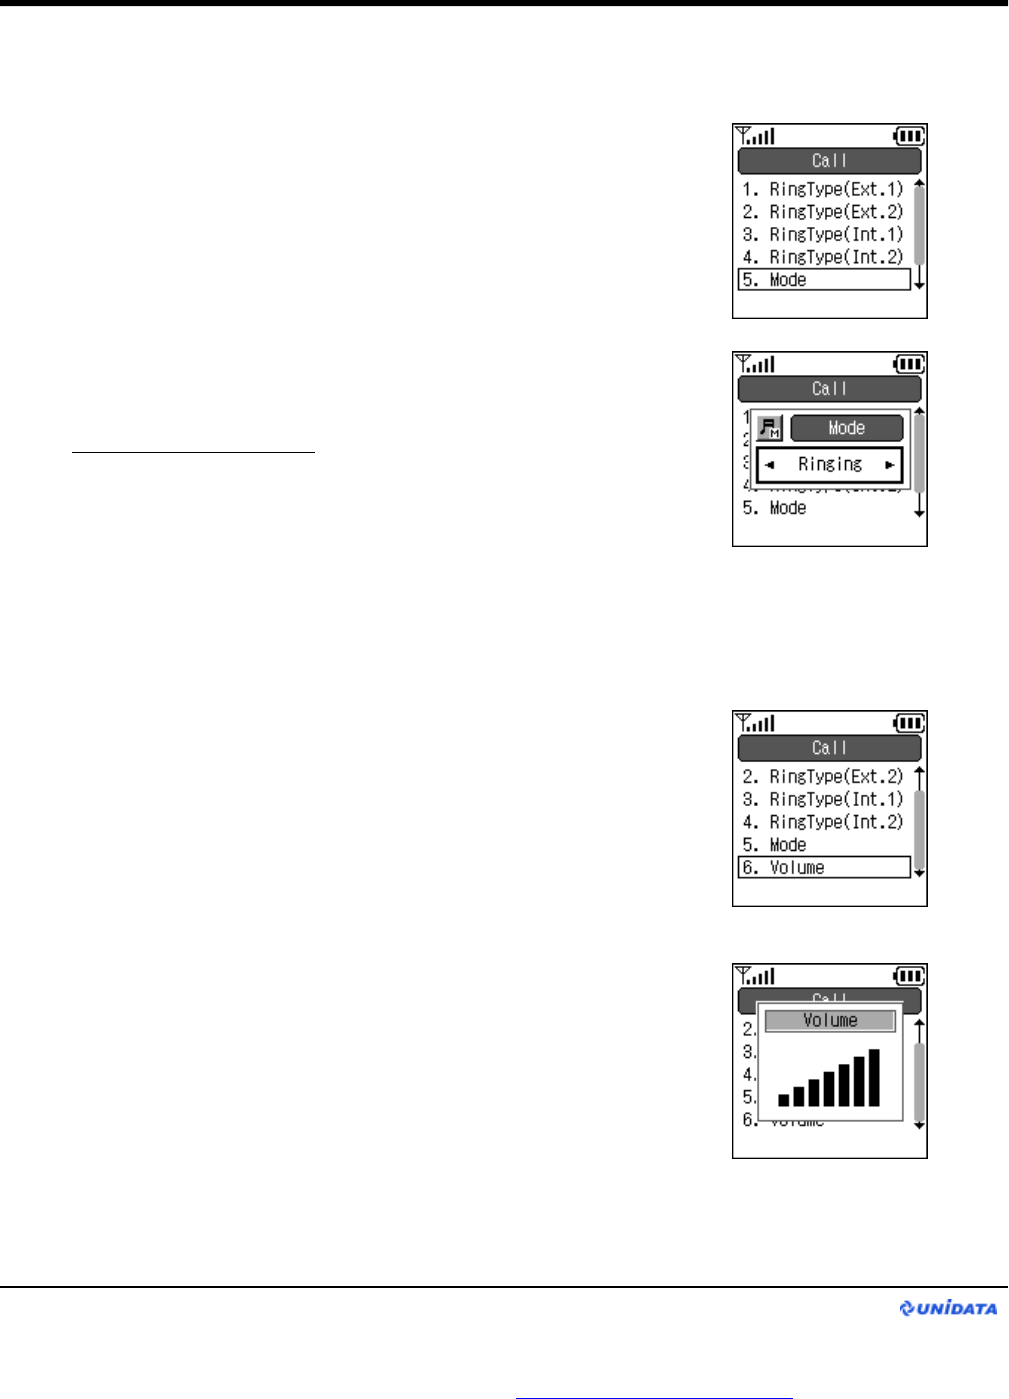
9.7.1.2 Mode
Step.1
From Call menu, press the linked number (5) or move to
“Mode”and press Enter Key to enter.
Step.2
User can set the Mode by using ◁▷key and then press
Enter Key to apply.
There are 4 types of modes
Ringing : phone rings when it gets phone call.
Vibration : phone vibrates when it gets phone call.
Ring + Vibration : combination of Ringing and Vibration.
Lamp : phone blinks the LED.
9.7.1.3 Volume
Step.1
From Call menu, press the linked number (6) or move to
“Volume”and press Enter Key to enter.
Step.2
User can set the Volume by using ◁▷key and then press
Enter Key to apply.
Application
WIP-5000 User Guide
Page 34
PDF created with FinePrint pdfFactory Pro trial version http://www.pdffactory.com
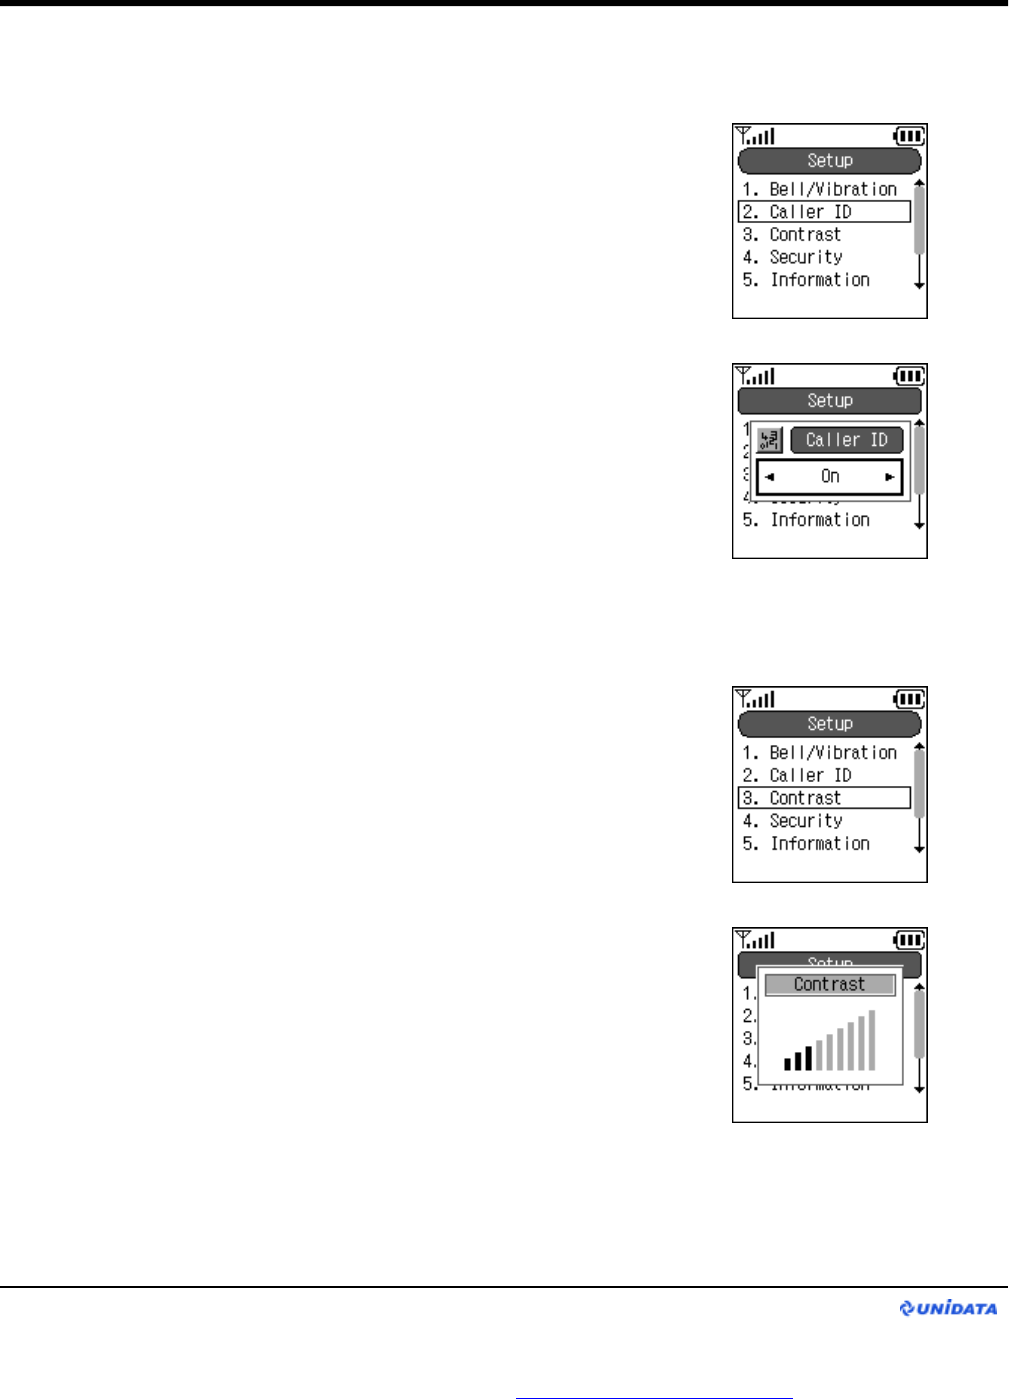
9.7.2 Caller ID
Step.1
From Setup menu, press the linked number (2) or move to
“Caller ID”and press Enter Key to enter.
Step.2
Use ◁▷key to change the Caller ID On / Off and press
Enter Key to apply.
On : Other person can see your Display name / Alias
Off : Other person cannot see your Display name / Alias
9.7.3 Contrast
Step.1
From Setup menu, press the linked number (3) or move to
“Contrast”and press Enter Key to enter.
Step.2
Use ◁▷key to change the Contrast and press Enter Key to
apply.
Application
WIP-5000 User Guide
Page 35
PDF created with FinePrint pdfFactory Pro trial version http://www.pdffactory.com

9.7.4 Security
You can change an admin and user password under this menu.
Step.1
From Setup menu, press the linked number (4) or move to
“Security”and press Enter Key to enter.
Step.2
1. Press the linked number (1 or 2) or move to (“Admin Pwd”
or ”User Pwd”) and press Enter Key to enter. User Pwd has
same procedure as Admin Pwd.
2. After step 1, it asks to enter Old Password.
(Default password is ‘0000’).
3. If user entered wrong password, screen will look like the third
picture on the right.
4. If user entered correct password, it will ask user to enter New
Password.
Application
WIP-5000 User Guide
Page 36
PDF created with FinePrint pdfFactory Pro trial version http://www.pdffactory.com
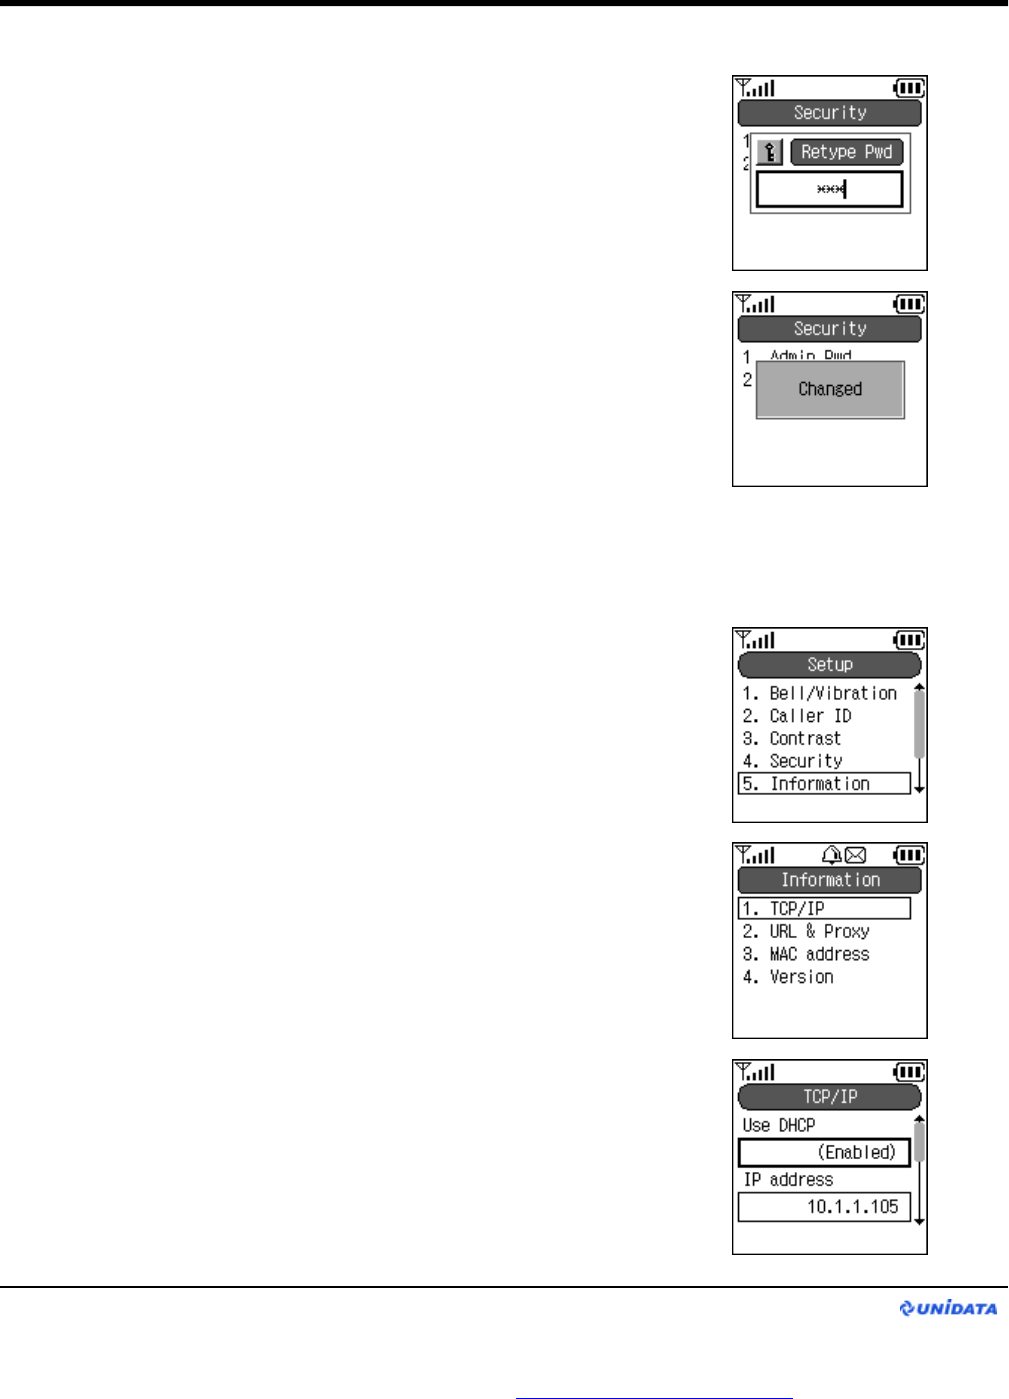
5. User needs to enter password one more time to confirm the
new password.
6. Press Enter Key to apply new password then “Changed”
dialog pops up and disappears after few seconds.
9.7.5 Information
Step.1
Press the linked number (5) or move to “Information”and press
Enter Key to enter.
Step.2
From Information menu, press the linked number (1) or move to
“TCP/IP”and press Enter Key to enter.
It shows information of DHCP mode, IP address, Netmask,
Gateway, and DNS.
Application
This menu is where you can see information about phone’s SIP, Network, MAC address, and
Bootrom / software version.
WIP-5000 User Guide
Page 37
PDF created with FinePrint pdfFactory Pro trial version http://www.pdffactory.com
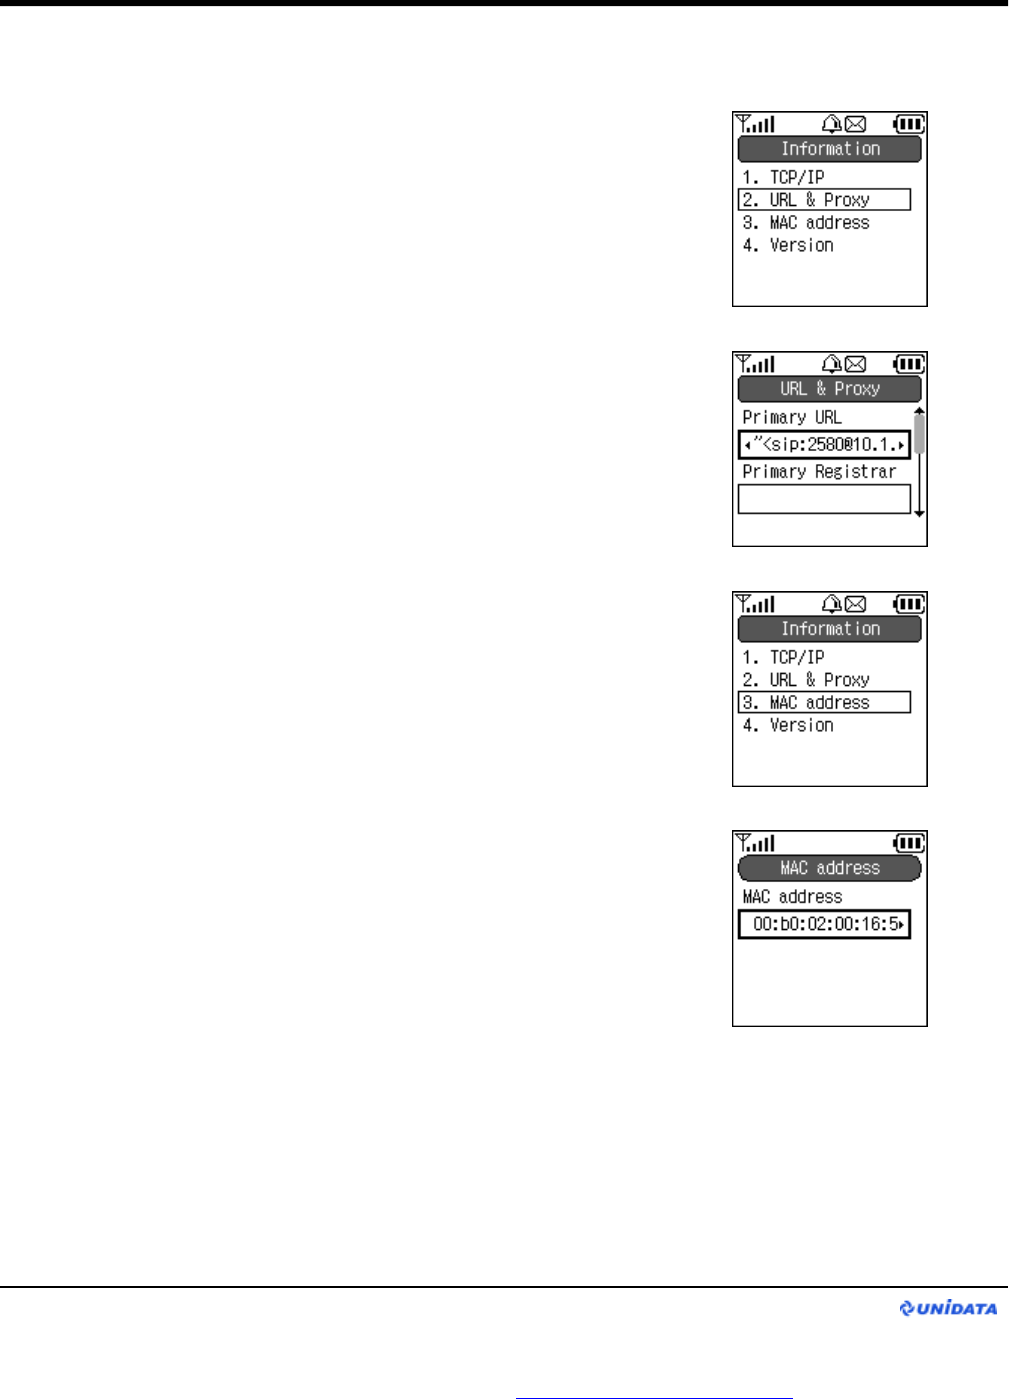
Step.3
From Information menu, press the linked number (2) or move to
“URL & Proxy”and press Enter Key to enter.
It shows Server Information : Display Name, User Info, SIP URL,
Registra and Outbound proxy.
Step.4
From Information menu, press the linked number (3) or move to
“MAC address”and press Enter Key to enter.
It shows the MAC Address.
Application
WIP-5000 User Guide
Page 38
PDF created with FinePrint pdfFactory Pro trial version http://www.pdffactory.com
Step.5
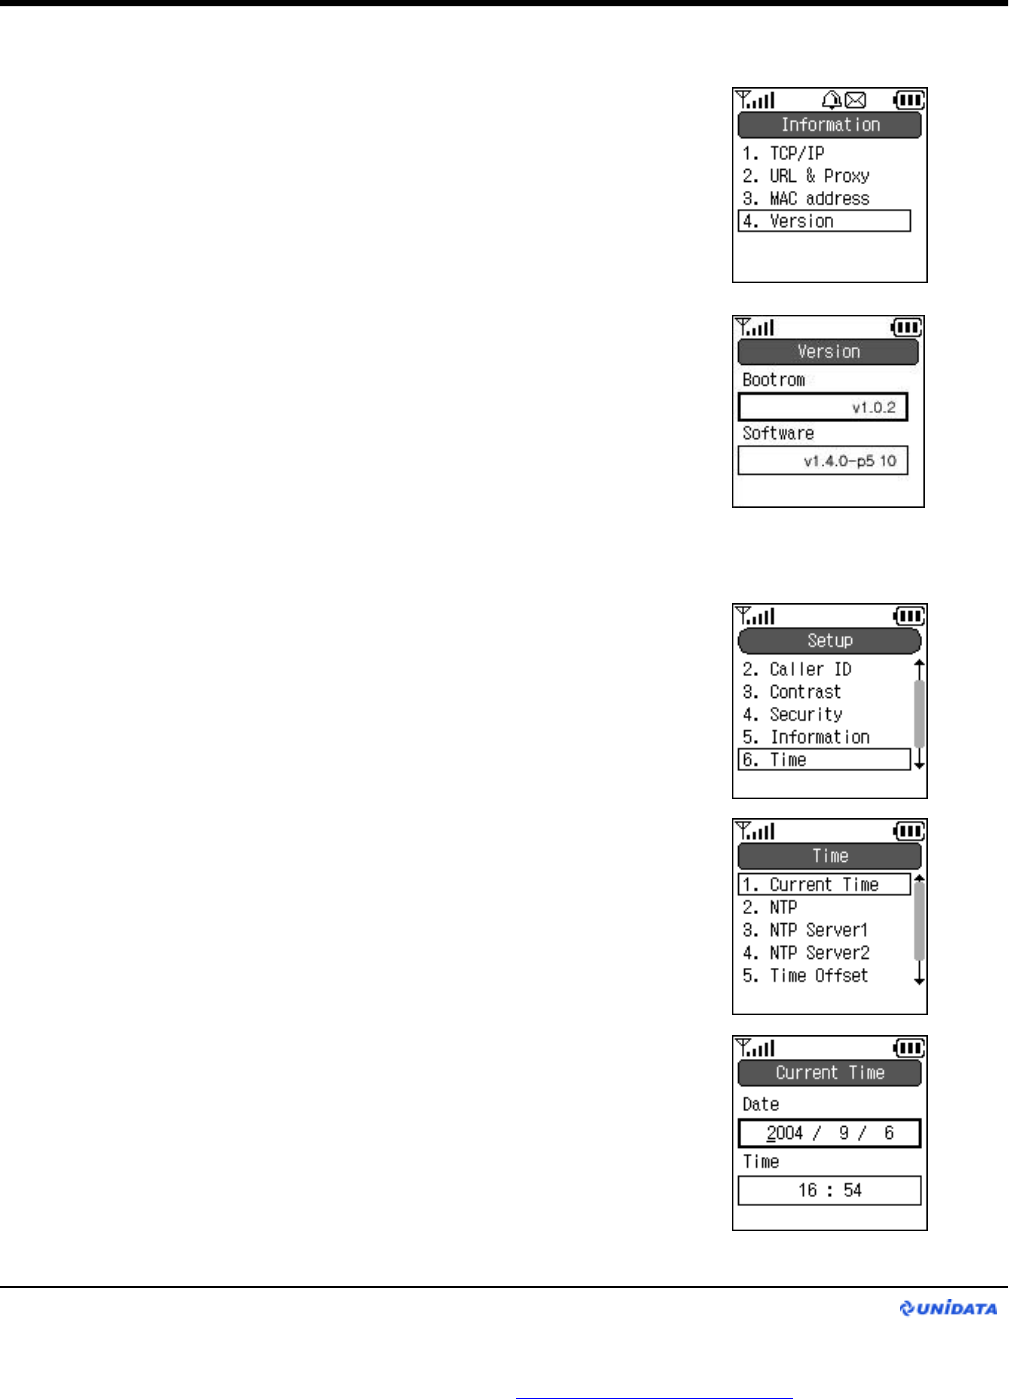
From Information menu, press the linked number (4) or move to
“Version”and press Enter Key to enter.
It shows the Bootrom / Software Version.
9.7.6 Time
Step.1
From Setup menu, press the linked number (6) or move to “Time”
and press Enter Key to enter.
Step.2
From Time menu, press the linked number (1) or move to
“Current Time”and press Enter Key to enter.
It shows Current Date and Time.
Application
WIP-5000 User Guide
Page 39
PDF created with FinePrint pdfFactory Pro trial version http://www.pdffactory.com
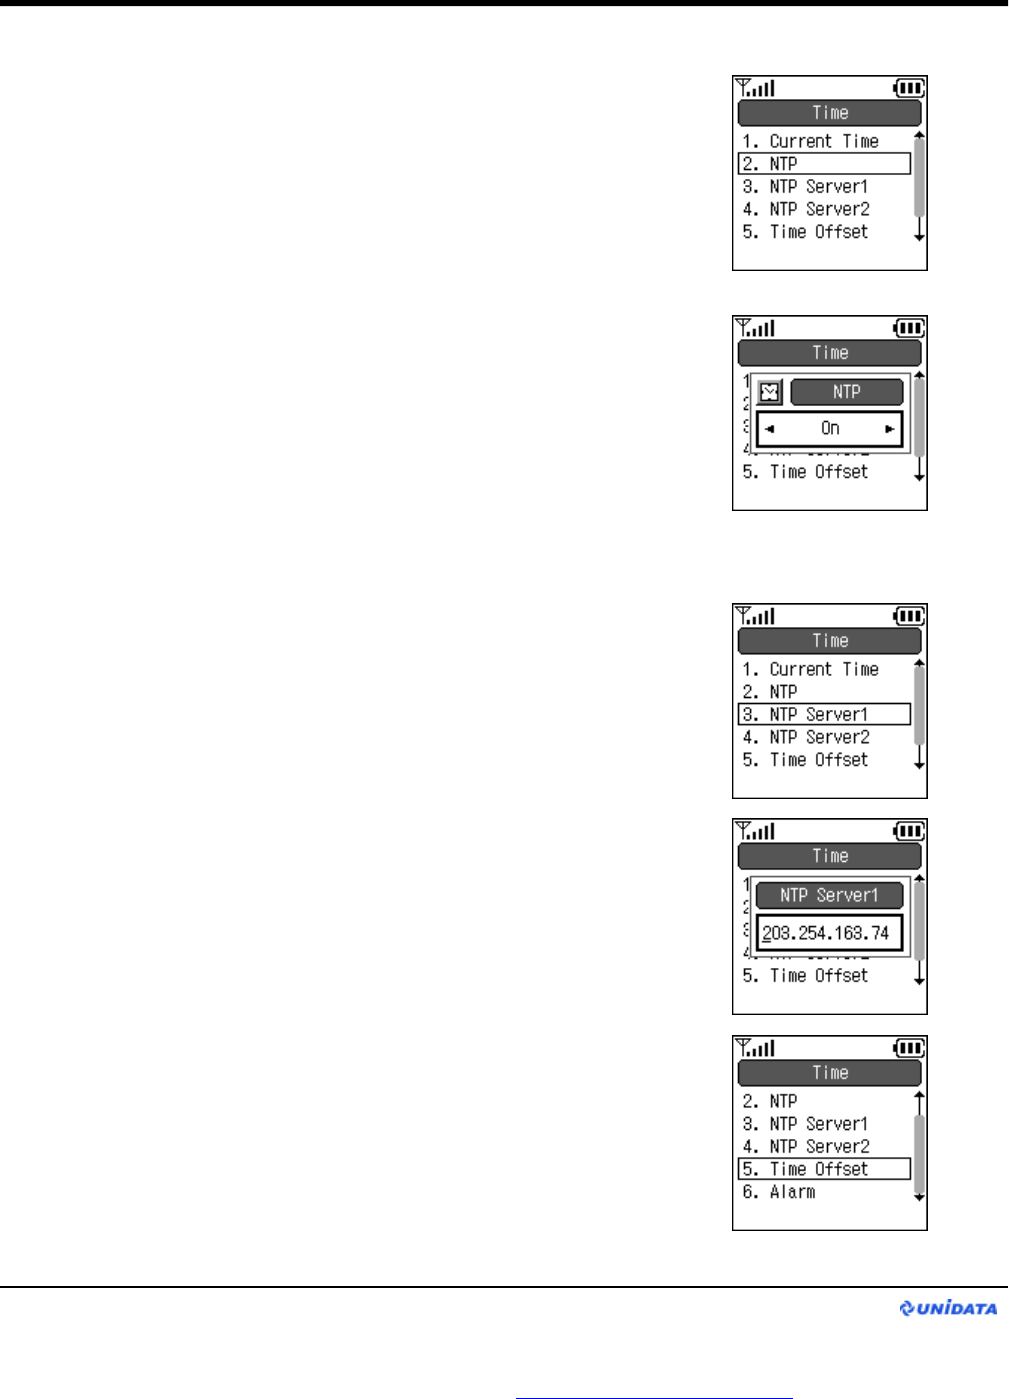
Step.3
From Time menu, press the linked number (2) or move to “NTP”
and press Enter Key to enter.
Use ◁▷key to change the NTP On/Off and press Enter Key to
apply.
NTP ON : WIP-5000 gets the date and time from the NTP server.
NTP OFF : WIP-5000 displays the date and time which has set in
Current Time.
User can change the time server and On/Off the NTP mode
through the web browser but Web Server function must be on.
Step.4
Press the linked number (3 or 4) or move to “NTP Server 1 or 2”
and press Enter Key to enter. Procedure of setting NTP Server2 is
same as NTP Server1.
Use Dial Pad to enter Time Server IP address.
Application
WIP-5000 User Guide
Page 40
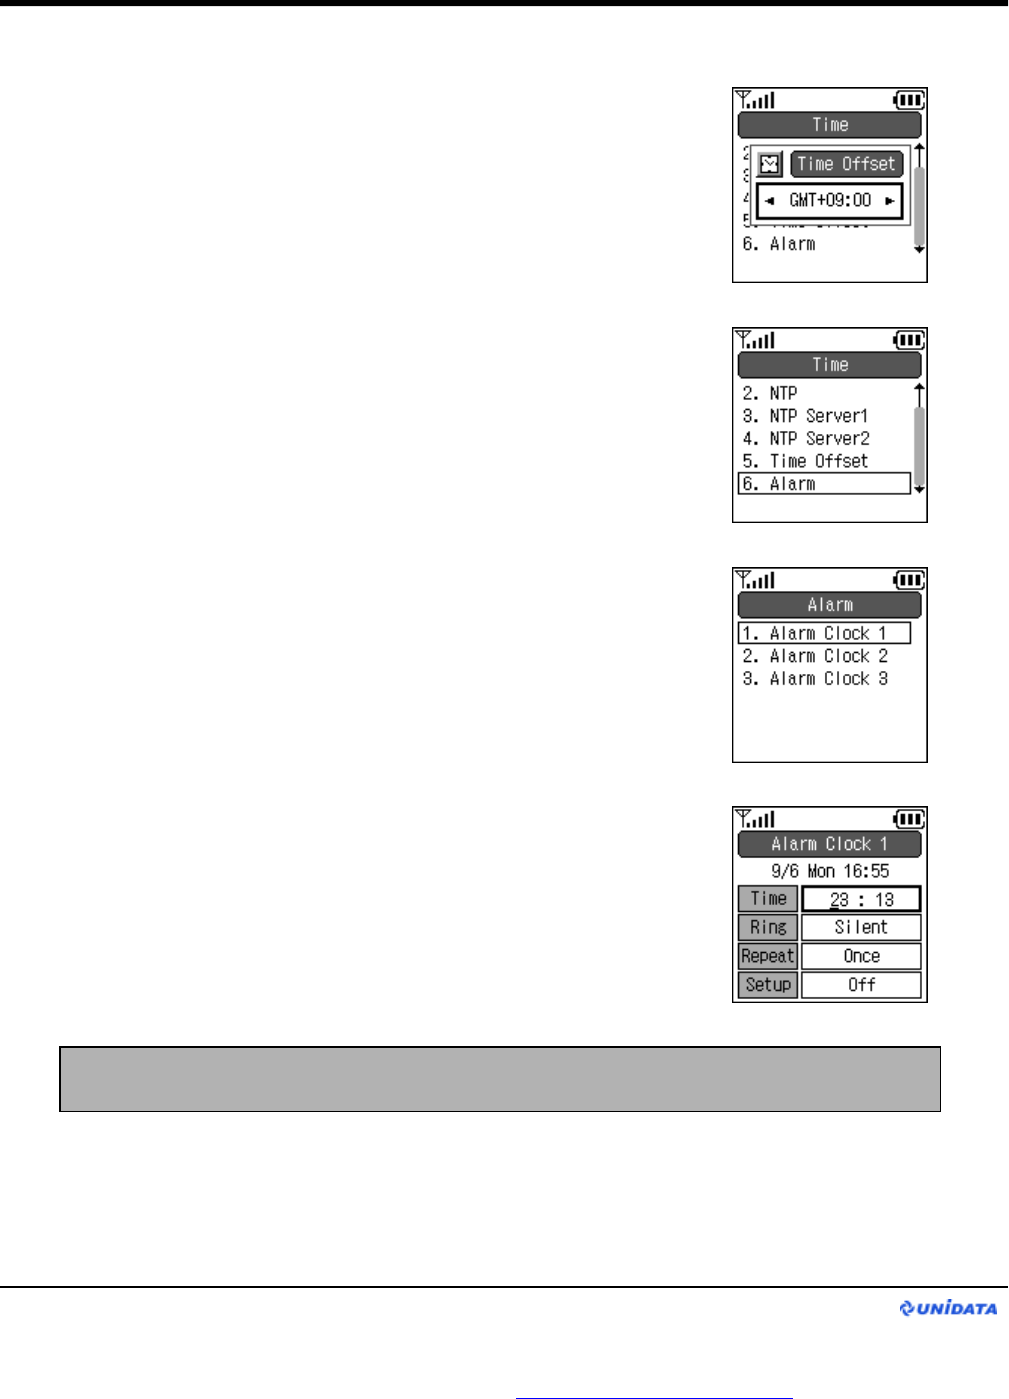
Step.5
From Setup menu, press the linked number (5) or move to “Time
Offset”and press Enter Key to enter.
PDF created with FinePrint pdfFactory Pro trial version http://www.pdffactory.com
Application
WIP-5000 User Guide
Page 41
Step.6
Use ◁▷key to change the Time Offsetand press Enter Key to
apply.
Step.7
From Time menu, press the linked number (5) or move to
“Alarm”and press Enter Key to enter.
Press the linked number (1 / 2 / 3) or move to “Alarm Clock
1 / 2 / 3”and press Enter Key to enter.
Use the Multi Function key to change each fields (Time, Ring,
Repeat, Setup)
After user change setup to “On”and save the setting by
pressing Enter Key, icon will appear on the top middle.
Information : Admin menu is for network administrator only. For the details please refer to
WIP-5000 administrator-guide
PDF created with FinePrint pdfFactory Pro trial version http://www.pdffactory.com

WIP-5000 User Guide
10. FAQ
FAQ
Q. Does WIP-5000 support Layer 2 roaming while on the phone?
A. Yes, WIP-5000 can roam between access points with same ssid while user ison the phone.
Q. Does WIP-5000 support Layer 3 roaming while on the phone?
A. Yes, WIP-5000 can roam to different network while user is on the phone but another different network
configuration must be set before in the Admin > Network > Config menu.
Q. Which codecs does the WIP-5000 support?
A. WIP-5000 supports G.711 and G.729 codecs.
Q. What does the warning message: “Manual Config selection can’t move to other Config. Will
you continue?”mean?
A. When user selects aconfig other than Auto from Admin > Network > Manual Restart menu, WIP-5000
keeps connection with thatconfig only. To make WIP-5000 able to roam, please select Auto.
Q. How do you change the SIP port?
A. There are two types of SIP port you can change.
Destination Port
①Go to Admin > SIP > Primary Server.
②Press “Edit”Soft Key and then enter SIP server address with ':' and port.
ex) xxx.xxx.xxx.xxx:5061 You just need to add colon with port number.
Source Port
①Enter your WIP-5000's ip address with 8080 port on the web browser.
ex) http://xxx.xxx.xxx.xxx:8080
②Click “Configuration”and then “Open Sip”.
③Change the Sip Port number.
④Click the “CHANGE VALUE”button.
Q. Where can I purchase a new battery?
A. Please contact WIP-5000 manufacturer.
Q. Why antenna signal is unstable and voice sound is not clear?
A. This could happen if user is far away from access point or user is at basement, tunnel,
mountains, place surrounded. These factors could effect antenna signal.
Q. Does WIP-5000 supports out-of-band DTMF?
A. Yes. You can set up SIP INFO method by setting DTMF type entry to 1, and also you can set up
RFC 2833 by setting DTMF type entry to 2.
Page 42
PDF created with FinePrint pdfFactory Pro trial version http://www.pdffactory.com

WIP-5000 User Guide Glossary
Page 43
11. Glossary
802.1x
As the IEEE standard for access control for wireless and wired LANs, 802.1x provides a means of
authenticating and authorizing devices to attach to a LAN port. This standard defines the Extensible
Authentication Protocol (EAP), which uses a central authentication server to authenticate each user on
the network.
AP (Access Point)
A transceiver that makes a connection between wired network and one or more wireless devices.
DHCP (Dynamic Host Configuration Protocol)
Automatically gets an IP address assigned to a device when it logs onto the network.
SIP
SIP is the real-time communication protocol for Voice over IP (VoIP), and it supports multimedia
communications. SIP performs basic call-control tasks, such as session set up and tear down and
signaling for features such as hold, caller ID and call transferring. With SIP, most of the intelligence for
call setup and features resides on the SIP device or user agent,such as an IP phone or a PC with voice
or instant-messaging software.
MD5 (Message Digest 5)
A secure hashing function that converts an arbitrarily long datastream into a digest of fixed size (128 bit).
NAT (Network Address Translation)
Sharing one incoming IP address by creating new multiple IP address to each devices.
Roaming
Movement from one AP coverage area to another with a wireless device without disconnection.
SSID
It’s an identifier when wireless device tries to connect to the WLAN through AP. It’s like a name that
differentiate WLAN environments. Therefore both AP and wirelessdevice must have the same SSID in
order to connect to a certain WLAN.
TCP/IP
A protocol that makes smooth communication between LANs and WANsthrough computers. TCP/IP is
made up with TCP plus IP protocol. TCP (Transmission Control Protocol) guarantees data transmission
between server and client. IP (Internet Protocol) is the computer address.
TFTP
A protocol, which allows files to be transferred from a host to a client.
TLS (Transport Layer Security)
An IETF standardized protocol that provides data integrity and privacy between two communications. It
allows client-server applications to communicate and is designed to prevent eavesdropping.
PDF created with FinePrint pdfFactory Pro trial version http://www.pdffactory.com

Page 44
WIP-5000 User Guide Glossary
UAM(Universal Access Method)
It is a login process using HTTP or HTTPS protocol (http over SSL, which tunnels the http packet to ssl
channel) through web browser for user ID and password input fromhtml page, so that users can access
the service.
uPnP (Universal Plug and Play)
uPnP is an architecture for peer-to-peer network connectivity of PCs and intelligent devices or appliances,
particularly within the home. uPnP builds on Internet standards and technologies, such as TCP/IP, HTTP,
and XML, to enable these devices to automatically connect with one another and work together to make
networking particularly home networking possible for more people.
USB (Universal Serial Bus)
It is a connection between a PC and a peripheral that transmit data. USB 1.1 provides data rate of
12Mbps and new USB 2.0 is 40 times faster, which makes 480Mbps data rate. It supports Plug & Play
and supply power.
VoIP (Voice over IP)
A term used in IP Telephony for a set of facilities for managingthe delivery of voice information
using the Internet Protocol(IP), which means sending voice information in digital packets.
WEP (Wired Equivalent Privacy)
Data encryption method used to protect the transmission between 802.11 wireless clients and APs.
However, it used the same key among all communicating devices. WEP's problems are well-
known, including an insufficient key length and no automated method for distributing the keys.
PDF created with FinePrint pdfFactory Pro trial version http://www.pdffactory.com

12. Menu Construction
1.Phone Book 1. Search By Index
By Name
By PhoneNum
By Group
2. New Number
3. Edit Group
4. Delete All
2. Message 1. Recv. Msg Box
2. Write Msg
3. Temporary Box
4. Sent Msg Box
5. Delete All Recv. Msg Box
Temporary Box
Sent Msg Box
3. Call logs 1. Inbound
2. Outbound
4. Presence 1. User list
2. User regist
3. Block list
4. Block regist
5. Status
5. Setup 1. Bell / Vibration Call Ring Type ( Ext.1 )
Ring Type ( Ext.2 )
Ring Type ( Int.1 )
Ring Type ( Int.2 )
Mode
Volume
Message Ring Type
Mode
Volume
2. Caller ID
3. Contrast
4. Security Admin Pwd
User Pwd
Menu Construction
WIP-5000 User Guide
Page 45
PDF created with FinePrint pdfFactory Pro trial version http://www.pdffactory.com

5. Information TCP / IP
URL & Proxy
MAC address
Version
6. Time Current Time
NTP
NTP Server1
NTP Server2
Alarm Alarm Clock 1
Alarm Clock2
Alarm Clock3
7. Language
6. Admin 1. Network Current Conf Basic Info
WLAN
WEP
Authentication
TCP / IP
SIP Outb Proxy
NAT Traversal
IP Diffserv
Coder
Jitter BufSize
Current Site
Site Scan
Config Config1 Basic Info
WLAN
WEP
Authentication
TCP / IP
SIP Outb Proxy
NAT Traversal
IP Diffserv
Coder
Jitter Buf Size
Manual Restart
Ping
2. SIP Alias
Primary Server
Secondary Server
Authorization
Expires
3. Upgrade Program
Configuration
Menu Construction
WIP-5000 User Guide
Page 46
PDF created with FinePrint pdfFactory Pro trial version http://www.pdffactory.com

4. Factory Default
8. Web Server
9. Syslog
10. Certs Manager View RootCA
View PrivateCA
Down RootCA
Down PrivateCA
Menu Construction
WIP-5000 User Guide
Page 47
PDF created with FinePrint pdfFactory Pro trial version http://www.pdffactory.com
THIS DEVICE COMPLIES WITH PART 15 OF THE FCC RULES.
Operation is subject to the following two conditions; (1) this device may not
cause harmful interference, and (2) this device must accept any interference
received, including interference that may cause undesired operation.
CAUTION:
Changes or modifications not expressly approved by the party responsible
for compliance could void the user’s authority to operate the equipment.

13. Contact Us
Please contact the below addresses for any questions
you have about UniData Communication Systems, Inc.
sales@UDCSystems.com
webmaster@UDCSystems.com
human@UDCSystems.com
sales@UDCSystems.com
Contact Us
WIP-5000 User Guide
Page 48
UniData Communication Systems, Inc.
2F, OhSung-Bldg, 82-15, NonHyun-Dong,
GangNam-Gu, Seoul, 135-010, Korea
Tel : 02-3443-3390
Fax : 02-3443-7103
http://www.udcsystems.com
PDF created with FinePrint pdfFactory Pro trial version http://www.pdffactory.com