Unical DM150HS DECT 6.0 Cordless Telephone with 3G Cell Phone User Manual
Unical Enterprises Inc DECT 6.0 Cordless Telephone with 3G Cell Phone Users Manual
Unical >
Users Manual

3
Included items
1. Base station
2. Handset
3. Handset charging cradle
4. Belt clip
5. Ni-cad rechargeable battery for handset
6. AC Adaptor for base
7. AC Adaptor for handset
8. Telephone cord (1.8 m)
9. LAN cable (1.8 m)
10. GPS Antenna
11. User guide
12. Warranty card
13. Quick start guide

4
Contents
Included items ........................................... 3
Get ready ............................6
Set up the base .......................................... 6
Base ������������������������������������������������������������������6
Locating Your Base Station ����������������������������7
Power backup battery (Optional) ����������������7
Prepare the handset ................................ 8
Handset ������������������������������������������������������������8
Tone table ���������������������������������������������������������8
Install the battery ��������������������������������������������9
Charge the battery .................................... 9
Cradle ����������������������������������������������������������������9
Base power on �������������������������������������������������9
Handset registration .............................. 10
Register ��������������������������������������������������������� 10
Cellular Activation ...................................10
GO! ..................................... 11
Make a wireless CEL call ........................ 11
Make a landline TEL call ......................... 11
Make a Handset to Handset INTERCOM
call ............................................................... 11
Make a call using an analog PHONE ... 12
Handset/Base setup menu .................... 12
Using the Menus ������������������������������������������� 12
Call Log menu - Use Enter/F1 button to
change levels ������������������������������������������������ 13
Phone book menu - Use Enter/F1 button to
change levels ������������������������������������������������ 14
Message menu ���������������������������������������������� 14
Function menu ���������������������������������������������� 15
Handset Setup menu ����������������������������������� 15
Base Setup menu ������������������������������������������ 17
Enter names and characters ................ 18
More features ..................19
Volume and Hands-free ......................... 19
Set earpiece volume ������������������������������������� 19
Hands-free call ���������������������������������������������� 19
Caller ID ..................................................... 19
Caller ID information ���������������������������������� 19
Call log ....................................................... 20
Check the log ������������������������������������������������ 20
Dial a number ���������������������������������������������� 20
Save a number to Phone book ������������������� 20
Using redial ............................................... 21
Call from redial log �������������������������������������� 21
Using Speed dial ...................................... 21
Calling options ........................................ 21
Pause ������������������������������������������������������������� 21
Mix dial ���������������������������������������������������������� 21
In-Call operations .................................... 21
Place a call on Hold ������������������������������������� 21
Mute a call ����������������������������������������������������� 21
Transfer a call ������������������������������������������������ 22
Set up a conference call ������������������������������� 22
Page and Intercom .................................. 23
Page ���������������������������������������������������������������� 23
Intercom �������������������������������������������������������� 23
Barge-in .................................................... 23
Use Barge-In �������������������������������������������������� 24
Dual-line calling ...................................... 24
HomeConnex Series Terminal �������������������� 24
Intercept Ring ������������������������������������������������ 24
Make or Receive two separate calls: ���������� 25
Phone book ............................................... 25
Add New Entry ���������������������������������������������� 25
Edit Record ���������������������������������������������������� 26
View the Phone book ����������������������������������� 26
Copying Phone book ������������������������������������ 26
Messages .................................................. 27
Short Message Service (SMS) ��������������������� 27
Voice messages �������������������������������������������� 29
5
Setup Detail .....................30
Area code ..................................................30
Add/remove a "1" ����������������������������������������� 30
Add/remove area code ������������������������������� 30
Power backup .......................................... 30
Using LAN for Internet connection ..... 31
Factory reset ............................................. 31
Precautions .....................32
About battery usage ������������������������������������ 32
Important safety instructions ............. 33
Important Electrical Considerations �������� 34
Range ������������������������������������������������������������ 34
Telephone Line Problems ��������������������������� 35
Radio Interference ��������������������������������������� 35
Cordless Telephone Privacy ������������������������ 35
Installation Considerations ������������������������ 35
Telephone Line Outlets ������������������������������� 36
Connecting the Telephone Cords �������������� 36
Applying Power to the base station ���������� 36
I.C. Notice ................................................. 36
RADIO EQUIPMENT �������������������������������������� 36
General information ......37
FCC Rules Compliance ............................ 38
6
Get ready
Set up the base
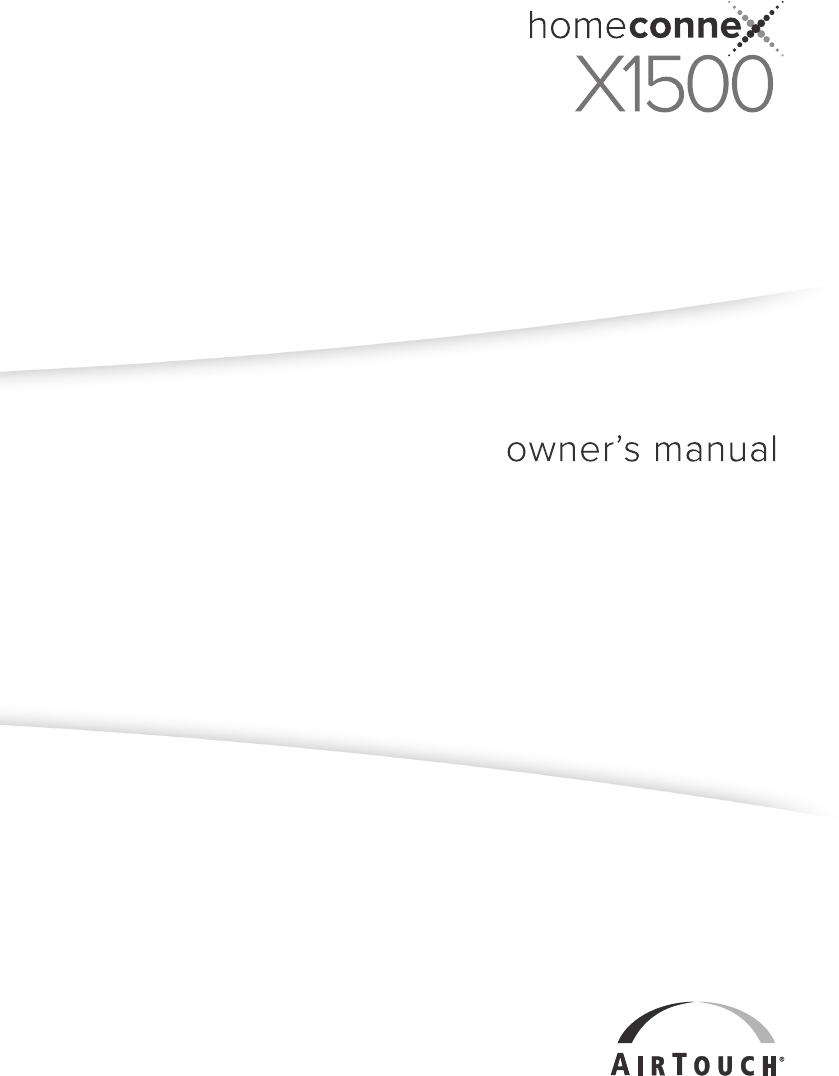
Base
DC9.5V
OFF BATT
ON
TEL LINE
INIT
GPS ANT
PHONE LAN
1
2
3
9
6
5
4
12
13
14
15
10
11
8
7
1. PAGE/REG key
2. IN-USE LED
3. PWR/BAT LED
4. LAN port (RJ-45)
5. PHONE port (SLIC)
6. TEL LINE port (PSTN)
7. GPS ANT
8. DC 9.5V jack
9. INIT button (Factory Reset)
10. Adjustable Stand
11. Cellular Antenna
12. Cordless Antenna
13. SIM Card Slot (inside the cover)
14. Battery Compartment
15. Power Switch (inside the cover)
7
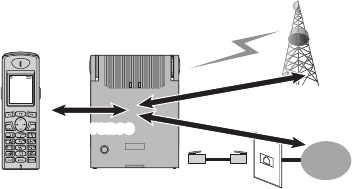
Locating Your Base Station
Some important considerations:
• Chargethehandsetfor12–15hoursbeforeusingit.
• Placethebasestationwhereanadequatecellularsignalcanbereceived.
• Keepthebasestationandhandsetawayfromsourcesofelectricalnoise,suchasmotors,
fluorescentlighting,ormicrowaveovens.
Your HomeConneX X1500 is a two line phone that can employ both cellular service and
conventional landline service and operates like a two line phone. If you retain your landline
service and want the X1500 to operate as a conventional cordless telephone for landline
service,thenconnectthetelephonelinecordtotheTELLineportofthebasestationand
the other end to the telephone wall jack like any conventional cordless telephone. (This
connectionisrequiredonlyifyouwantX1500tooperateasatwowayphonebetweenTEL
and CEL or TEL only conventional cordless telephone.)
1 Connect the telephone line cord to the TEL LINE port and to a telephone wall jack. (This
connectionisrequiredonlyifyouwanttousethephonewithyourlandlineservice.)
2 Set the base station* on a desk or table.
* Base station can be placed in a vertical or horizontal position�
3 Connect the GPS Antenna to the GPS Antenna Jack on the side of the Base unit by pushing
the connector into the jack. Place the other end of the GPS antenna in a convenient
location.BecausetheAntennaendismagnetized,youcanaffixittoanymetalitem.
TheGPSantennaisusedforany911call,tohelpemergencyresponderstolocatethe
customer's position if he/she can't speak or give the 911 operator his/her location.
4 Find the base AC Adaptor (the larger Adaptor) and connect it to the DC 9.5V jack on the
baseandtoastandardwallACoutlet(100~240V,50/60Hz).
Power backup battery (Optional)
You can purchase an optional Li-ion battery from your AirTouch agent store for your X1500
base station (Model Number LIB150). Place this battery inside the X1500 base station battery
compartmentandwhenfullycharged,incaseofpoweroutage,thebasestationcanoperate
up to 40 minutes (depending on the battery condition) and provides automatic seamless hands
o in case you are having a conversation so that the conversation will not be interrupted.
1 Verify power is disconnected from the base station.
2 Open the battery cover on the back of the base station.
3 Verify that the connector is properly aligned with the jack and install and connect
thebattery.
4 Slide the switch to the "on" position to enable the battery backup function.
5 Replace the cover.
Note:
• Batterynotincluded.
• Batteryisnotrequiredtooperatetheproduct.
• RedPWR/BATLEDonbasestationislitwhilethebasestationisoperatingwithbackuppower.
• ThebatterypowerisactivatedautomaticallywhencurrentfromtheACAdaptorisinterrupted;
unpluggingtheACAdaptordoesnotturnoffpowertothephonewhenthebatteryisconnected.
• Besuretoremovethebatterywhendisconnectingpower.
8
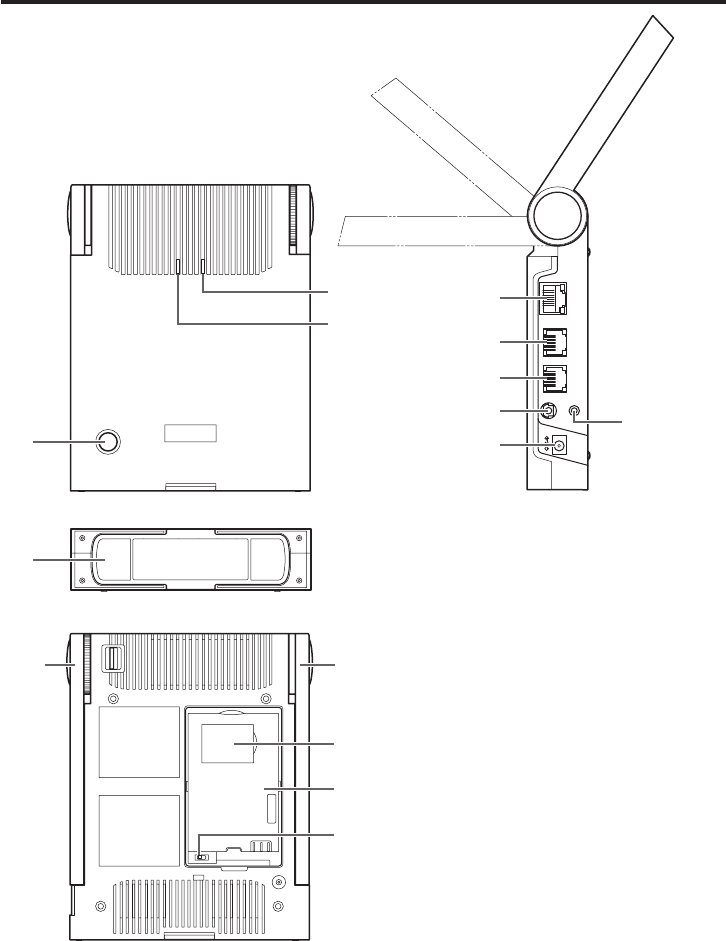
1. Earpiece
2. Color LCD
3. CEL (F1)
makes CEL call when CEL is shown
4. UP
5. SEND/FLASH
6. PB
shows Phone book list
7. DOWN
8. RDL/P
for Redial or Pause
9. Mic
10. Menu (F2)
calls setup Menu items
11. TEL (F3)
makes TEL call when TEL is shown
12. CID shows Caller ID list
13. END
terminatesCEL,TELorINTERCOMcalls
14. Numerical keys
15. SPEAKER
16. INTCOM
makes call to another handset
17. Headset Jack
18. Handset speaker
19. Belt clip
20. Battery compartment
Tone table
•Error tone
•Confirmation tone
•Low battery tone
•Keytone
Prepare the handset
Handset
2
1
3
17
4
5
7
6
8
9
10
12
11
18
19
20
13
15
16
14
9
Install the battery
1 Open the cover.
2 Verify that the connector is properly aligned with the jack and connect the battery.
3 Close the cover.
Notes:
• Theconnectorisdesignedtoeasilytthejackinonlyonedirection.Donotuseexcessiveforce.
•PutthehandsetonthecradleiftheStandbyscreenisnotdisplayedonceyouconnectthe
battery.
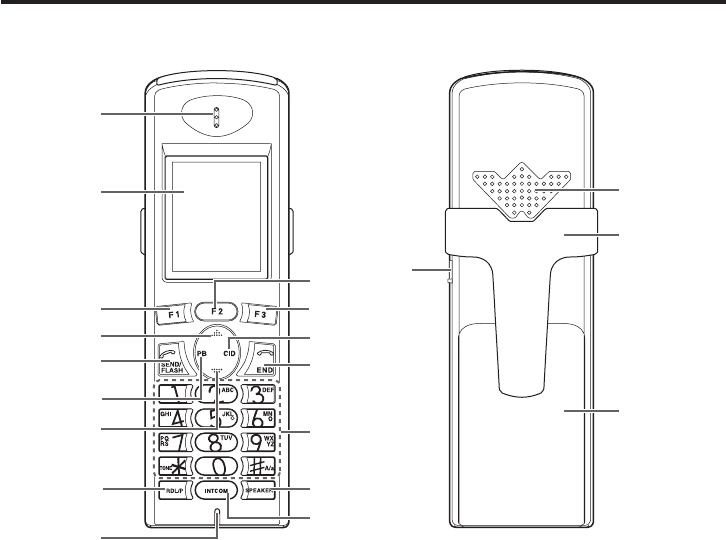
Chargethebattery
Cradle
1 Find the handset AC Adaptor (the smaller Adaptor). Connect the AC Adaptor to the DC
5.0Vjackonthecradleandtoastandard(100~240V,50/60Hz)walloutlet.
2 Setthecradleonadeskortable,thensetthehandsetonthecradlewiththekeypad
facing forward.
3 Allowthebatterytochargefor12–15hours.
Note: Chargethebatteryfrequently.Leavingthebatteryunchargedforaprolongedperiodcan
adverselyaectbatterychargingcapacity.Ifthishappens,replacethebattery.WhileHandset
isinChargerCradlethepowerindicator"on"willshowthatitischargingatalltimes,evenafter
thebatteryisfullycharged.Tochecktheactualbatterychargelevel,removetheHandsetfrom
cradleandcheckthepowerindicatorintheupperrightcorneroftheLCD.
A power indicator in the upper right corner of the LCD
shows how much battery life remains.
Note:Useonlytherechargeablebatterypacksuppliedwithyourhandset.
(Call 877 833-7388 opt. 2 to order new batteries)
Base power on
Whenpoweredonforthefirsttime,thebasestationandthehandsetgothroughan
initializationsequence.
The handset and base are registered at the factory. When both handset and base are powered
on,theywillimmediatelyfindeachotherandconfirmtheregistrationautomatically.During
theinitializationprocess,thehandsetrstshows”Searching”andwhenitsuccessfullyndsthe
basethatitisregisteredto,thenthehandsetwillshow”X1500HSS1”onthehandsetdisplay.
Additionalhandsetscanberegisteredtothebaseandwilldisplay"X1500HSS2,3,4,etc.,upto6."
Full charge Low charge
1. Chargingcontacts
2. DC 5.0V jack
1
2

10
Iftheydon'tfindeachother,referto"Handsetregistration"below.
Note:DonotusethephoneuntiltheinitializationsequenceiscompleteandtheHandsetshows
X1500HSS1.
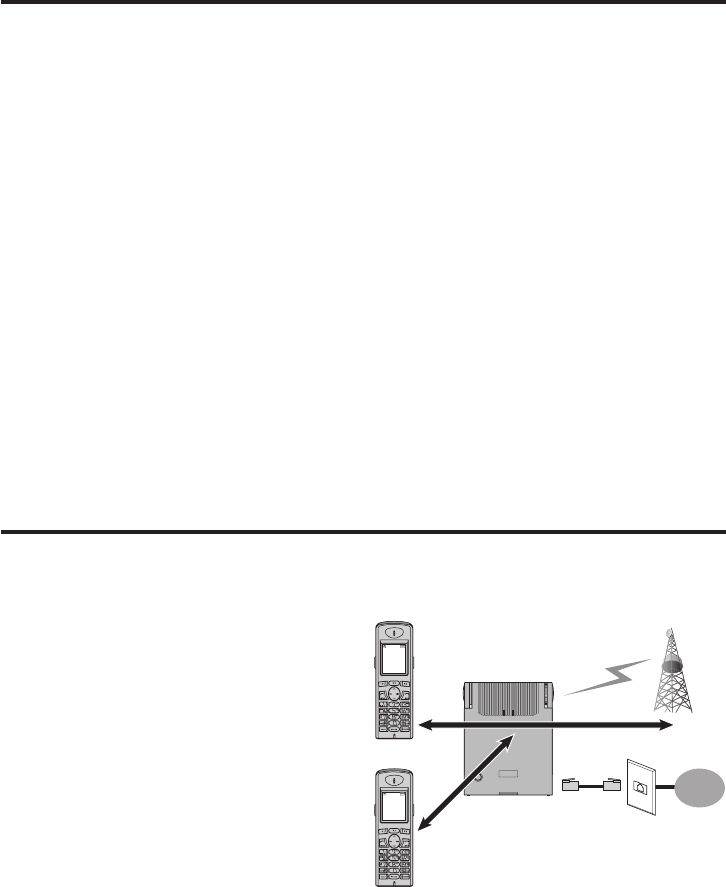
Handsetregistration
Youcanregisteruptosixhandsetstothebasestation,includingtheonepresetregisteredhandset
in the package. Each new handset must be electronically registered with the base station.
Note: The handset included in this package is pre-registered at the factory with the base
station.YoudonotneedtoperformthefollowingRegistrationprocedure.However,ifit
becomesderegistered,usethisprocedure.
Register
1 Onthehandset,pressMenu (F2),scrolltoHandset Setup and press Enter (F1).
2 Scroll to Registration and press Enter (F1).
3 The display shows New Register. Press Enter F1 again. The display will show Please Wait.
4 Press and hold PAGE/REGforvesecondsuntilIN-USERightGreenLED on base station blinks.
5 Then press F1 (Enter) on the handset. A "Please Wait" message appears and a few
secondslater,theHandsetwillfindthebaseanddisplay"Select.."and"BaseID:"
Example,01:9C:AO:00:B8(yourindividualbaseIDwillvary,butwillbeinthisformat).
6 AfterHandsetdisplaysSelect..andBaseID,pressF1again.A"PleaseWait"message
appears while the Base and Handset are paired.
Registrationtakesjustafewseconds.Whenregistrationiscompleted,youhearatone
and"X1500HSS1,orX1500HSS2,etc."appearsontheLCDscreenontheHandsetbeing
registered.
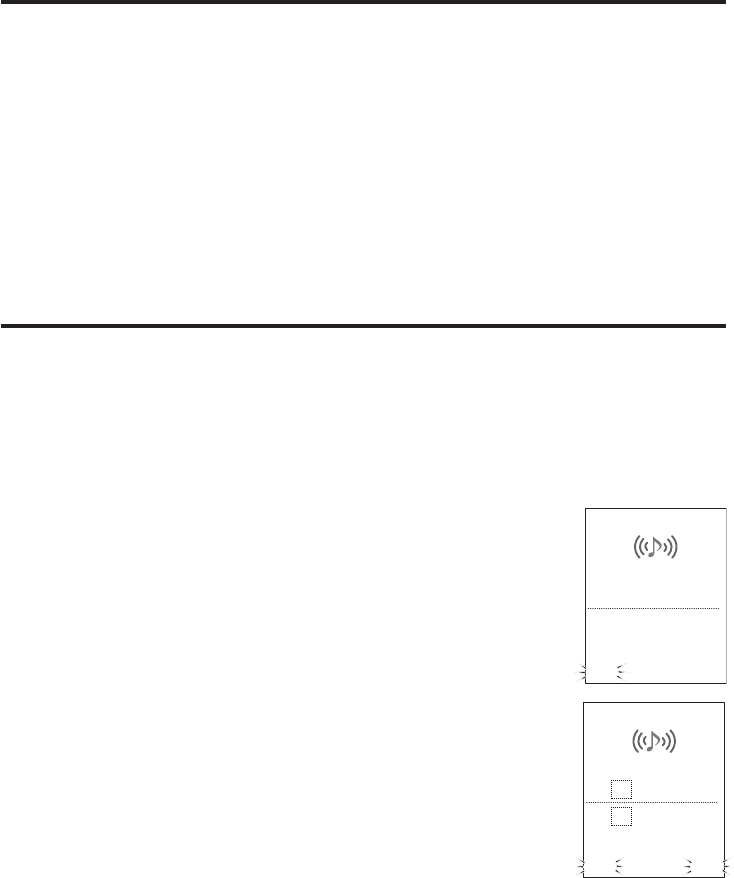
Standby Screen
Whenthesequenceiscomplete,theStandbyScreenappearsasshown
in the picture on the right. This screen is always visible when the phone
isidle.Atthebottomofthescreenthetextindicateswhichservicelines
are active. CELiswirelessservice,andTEL is landline service.
The CELindicatormaytakeuptotwominutestoappear,depending
on cellular signal conditions in your area.
The handset displays CEL for cellular service and TEL for conventional
landline only if you subscribe to these services and activate the
cellular service (CEL) or plug your X1500 base TEL LINE to telephone wall jack with a
telephone cord and you are a current customer for landline service.
Ifyouhaveconnectedwithyourcellularserviceprovider,thedateandtimemaybeset
automatically.
Cellular Activation
Dependingonyourcarrierofchoiceforyourwirelessservices,youmayhaveadifferent
distinctive activation method for your X1500.
HANDSET 1
01/01 10:10
CEL Menu TEL

11
GO!
Make a wireless CEL call
To make
a call
1 Enter number
2 Press CEL (F1)
- OR -
1 Press CEL (F1)
2 Enter number
To end
the call
Press END
- OR -
Place the handset on the cradle
To
answer
a call
Indicates CEL when CEL rings
Press CEL (F1)
- OR -
Press SEND/FLASH
Note: CELbuttondoesnotappearifyouare
notsubscribingtocellularservice.However,
some carriers network automatically
establishes a link to your X1500 and CEL
buttonappearsregardlessofyoursubscription
tothenetwork.Inthiscase,thedialtonewill
be heard when you press CEL button but when
youtrytodialout,thenetworkoperatorwill
announcethatyourcallwillnotgothrough
sinceyouarenotsubscribingtotheservice.
Make a Handset to
Handset INTERCOM call
To make
a call
1 Press INTCOM
2 Select Handset to call
3 Press SEND
To
answer
acall
Handset indicates INTERCOM
when intercom rings
Press F1 (Answer)
- OR -
Press SEND
To end
thecall
Press END
- OR -
Place the handset on the cradle
Make a landline TEL call
To make
a call
1 Enter number
2 Press TEL (F3)
- OR -
1 Press TEL (F3)
2 Enter number
To end
the call
Press END
- OR -
Place the handset on the cradle
To
answer
a call
Indicates TEL when TEL rings
Press TEL (F3)
- OR -
Press SEND/FLASH
Note:Ifthereisnodialtonewhenpressing
TEL (F3),thephoneisnotconnectedtothe
landline network.

12
MakeacallusingananalogPHONE
WhenananalogphonesetisconnectedtothePHONEport,youcanmakeaphonecallas
follows.
Call
received Wireless call Landline call Handset (Intercom)
To make
a call
1 Takeanexistingphone
handset and
2 Dial #01 and number
1 Takeanexistingphone
handset and
2 Dial #00 and number
1 Takeanexistingphone
handset and
2 Dial 3 and then the
number of the X1500
Handset that you want
totalkwith.Ex:Dial
3 + 1 to talk with X1500
Handset 1.
Dial 31 to 36 for calling
anX1500Handset,1to6.
To end
the call Hang up the SLIC phone handset
Handset/Base setup menu
YoucansetuptheX1500HandsetmenutoprovideCIDdialing,BaseandHandsetsettings,
Phonebookediting,SMSreadingandwriting.
• CallLog -ShowsCalls,Answer,CIDlog,andMakecall,SavetoPhonebook.
• Phonebook -ShowsPhonebook,Makecalls,orAdd,EditPhonebook
• Message -ReadorWriteSMS,SetupandRetrieveVoicemail
• Function -Scheduler
• HandsetSetup -GeneralHandsetRingandTone,Display,AudioVolume,HACsetting
Registration
• BaseSetup -GeneralCELStatus,TELSetup,Router,BaseLAN3GdataSetupfeatures
Using the Menus
BASIC ACTIONS
Open the menu Press F2 (Menu)* key on the handset.
Move the cursor Press the s or ▼ key. A selected menu item is highlighted.
(Thisactioniscalled“scrolling”throughoutthisguide.)
Select an item Press F1 (Enter)* to select the menu item.
Return to the
previous screen Press F3 (Back).*
Close the menu Press END.
* Usingthesoftkeys
By pressing F1/F2/F3,youcanselectthefeatureshowndirectlyaboveitonthedisplay.

13
Call Log menu - Use Enter/F1 button to change levels
1st Level Menu 2nd Level Menu 3rd Level Menu Detail
All Call
List to Select All Call Log.
Following log can be listed by
Left or Right key
- All Call
- Missed call
- Answered Call
- Dialed Call
- Blocked Call
- Delete All
Edit Number
To freely edit the phone number of call log
record and make CEL TEL call.
- Add 1 for long distance
- Delete Area code
-Appendextensionnumber
Call Back Immediately place callback to the number of
call log record.
Send SMS To edit the SMS message and send it to the
number of call log record.
Save to Phone book To store the phone number of the call log
record to Phone book.
Detail Tolookatdetailsofthecall,includingCIDand
phone number.
Delete Record Delete selected call log record.
Missed Call List to Select Missed Call Log
Edit Number
To show the “Missed Call“ list and to operate…
“EditNumber,”“CallBack,”“SendSMS,”“Saveto
Phonebook,”“Detail”and“DeleteRecord.”
Call Back
Send SMS
Save to Phone book
Detail
Delete Record
Answered Call List to Select Answered Call
Log
Edit Number
Toshowthe“AnsweredCall”listandtooperate
…“EditNumber,”“CallBack,”“SendSMS,”“Saveto
Phonebook,”“Detail”and“DeleteRecord.”
Call Back
Send SMS
Save to Phone book
Detail
Delete Record
Dialed Call List to Select Dialed Call Log
Edit Number
Toshowthe“DialedCall”listandtooperate…
“EditNumber,”“CallBack,”“SendSMS,”“Saveto
Phonebook,”“Detail”and“DeleteRecord.”
Call Back
Send SMS
Save to Phone book
Detail
Delete Record
Blocked Call
List to Select Blocked Call Log
Blocked Call can be set on
your phone book
Edit Number
Toshowthe“BlockedCall”listandtooperate…
“EditNumber,”“CallBack,”“SendSMS,”“Saveto
Phonebook,”“Detail”and“DeleteRecord.”
Call Back
Send SMS
Save to Phone book
Detail
Delete Record
Delete All
Missed Call Confirm? Deleteallofthe“MissedCall”recordsintheCall
Log.
Answered Call Confirm? Deleteallofthe“AnsweredCall”records.
Dialed Call Confirm? Deleteallofthe“DialedCall”records.
Blocked Call Confirm? Deleteallofthe“BlockedCall”records.
All Call Confirm? Delete all of the call log records including
Missed / Answered / Dialed / Blocked Calls.
14
Phone book menu - Use Enter/F1 button to change levels
1st Level Menu 2nd Level Menu 3rd Level Menu Detail
View Records
Dial Out CEL ---- Make a phone call using this number via CEL
line.
Dial Out TEL ---- Make a phone call using this number via TEL
line.
Send SMS New Message EdittheSMSmessage,thensenditusingthis
Phone book record.
Edit Record ---- Edit the content of this Phone Book record.
Add Entry ---- Edit and add new Phone Book entry.
Delete Record Confirm To Delete? Delete this Phone book entry.
Copy Record to Handset 1~6
(Excludingself)
Copy this Phone book entry to one of the other
Handset Phone books.
Add Entry
Name,NumberDefaultLine,
DistinctiveRing,SpeedDial,
and Block
--- Edit and add new Phone Book entry.
Speed Dial 0~9 ---- Viewspeeddialphonenumberstoredin0–9
speed dial entries.
Memory Status Total Records 100
Available XX ----
ViewthemaximumnumberofPhonebook
recordsthatcanbeused,andreportthecurrent
number of Phone book records stored.
Delete All Confirm Empty Delete all Phone book Records.
Copy all records
to Confirm Please Wait Copying Copy all Phone book Records to one of the
other Handset Phone books.
Message menu
1st Level Menu 2nd Level Menu 3rd Level Menu Detail
Inbox
View View View SMS message.
Edit New Message Edit and forward the SMS message or Edit and
Save edited message.
Call Back SMS Number
Appears
You can make CEL/TEL phone call to the number
of the SMS message.
Reply New Message Edit new SMS message to reply to the sender of
the original message.
Delete Confirm to Delete? Delete one SMS message.
Delete All Confirm to Delete? DeleteallSMSmessagesinInbox.
Outbox
View SMS Message
Appears View SMS message.
Edit SMS Message
Appears
Edit and forward the SMS message or Edit and
Save edited message.
Call Back SMS Message
Number Appears
You can make CEL/TEL phone call to the number
of the SMS message.
Resend ---- ResendtheSMSmessageinOutbox.
Delete ---- Delete one SMS message.
Delete All ---- DeleteallSMSmessagesinOutbox.
DraftBox
Edit New Message EditandsendtheSMSmessage,orEditand
Save edited message.
Delete Confirm to Delete? Delete one SMS message.
Delete All Confirm to Delete? DeleteallSMSmessagesintheDraftBox.
15
1st Level Menu 2nd Level Menu 3rd Level Menu Detail
Write Message
Send SMS
Input Number Send edited SMS message to the number you
enter.
From Phone book Send edited SMS message to the number in the
Phone book.
Save ----
SaveSMSmessagetotheDraftBox.Youcan
findthesavedmessagefromtheDraftBox
menu,thencontinueeditingandfinallysend
the message.
Voice Message
CEL Voice Mail ---- Make phone call to the number stored in the
“CELVMNumber.”
TEL Voice Mail ---- Make phone call to the number stored in the
“TELVMNumber.”
Setup
CEL VM Number Enter the phone number of the CEL Voice Mail
retrieval center.
TEL VM Number Enter the phone number of the TEL Voice Mail
retrieval center.
Function menu
1st Level Menu 2nd Level Menu 3rd Level Menu Detail
Scheduler ---- View monthly Scheduler.
Handset Setup menu
1st Level Menu 2nd Level Menu 3rd Level Menu Detail
General
Unit Name Input Name
Yourphonearriveswiththename“Handset-1”
pre-assigned to the base station. Each
handsetreceivesanumber(1–6)intheorder
of registration. You can change the name
and number assigned to a handset (up to 10
characters).
Area Code
Area Code 1
Area Code 2
Area Code 3
Enter up to three area codes. With local area
codesstored,thephonecandistinguish
between local and long distance calls.
Date And Time
Time
Date
Date Format
The date and time automatically synchronize
with the cellular network when the base station
is powered on. If the time and date do not
automaticallysynchronizewiththenetwork,it
must be set manually.
Language
English,
Français
Español,
Português
Select handset menu language.

16
1st Level Menu 2nd Level Menu 3rd Level Menu Detail
Ring and Tone
ExternalCall
TEL Ring
CEL Ring
Ring Volume
You can set different ring tones for CEL (wireless)
calls and TEL (landline) calls. You can set the
ringer volume from menu. There are 18 choices
of ring tones.
Internal Call Ring Tone
Ring Volume
You can set different ring tones for Internal
calls. You can set the ringer volume from menu.
There are 18 choices of ring tones.
Ring Effect Distinctive Ring
You can enable or disable the Distinctive Ring
feature stored in each Phone book entry. When
OFFisselected,theRingTonefor“ExternalCall”
is used.
Ring Effect (cont’d) Night Volume
You can set the volume for the ringer to a lower
level for nighttime between 9 p.m. and 6 a.m.
based on the phone’s internal clock.
Alert Tone
KeyTone
Low Battery
On Cradle Tone
YoucanselectKeyPressToneON/OFF,
LowBatterywarningtoneON/OFF,and
“OnCradle”tonevolumeHigh/Low/Off,which
makes a tone when you place the handset on
the cradle.
Display
Wallpaper
Palm Tree
Sunflower
Moon
Earth
Dog
Lightning
Select one of the pre-stored pictures to be
displayed in the background of the standby
screen.
Color Scheme
Black
Green
Red
Blue
Select one of the Color Schemes for the Menu
screen.
Setting
Contrast
On Cradle
Brightness
Screen Saver
Backlight Time
Select1–8LCDContrastlevel,screen
brightnessFull/Dim/OFFwhen"oncradle,”
screen saver selection Wallpaper/Clock/Normal
whenoncradlestate,and10-40Secondsbefore
Backlight times out to OFF.
Audio Volume
Earpiece
Speaker
Headset
Audio Level Displays Select1–5forEarpiecevolume,1–5for
Speakervolume,and1-8forHeadsetvolume.
HAC New Register ----
Youcanregisteruptosixhandsetstothe
basestation,includingtheonehandsetin
the package. Each new handset must be
electronically registered with the base station.
The handset included in this package is pre-
registered at the factory with the base station.
Ifitbecomesderegistered,reregister
thehandset.
Registration Use T-Coil
Use TTY
Normal or T-Coil
Normal or Use TTY
• Ifyouhaveahearingaidequippedwith
a telecoil (T-coil) feature and if you have
problemswithnoiseontheline,tryturning
on T-coil mode.
• X1500isdesignedtoconvertreceivedcallsto
textthatyoucanreadonyourTTYdevice.
• TTYisavailableonlywheninTELline(PSTN).

17
Base Setup menu
1st Level Menu 2nd Level Menu 3rd Level Menu Detail
General
Default Connection CEL
TEL
Select CEL or TEL to use in the dialing screen
and when SEND/FLASH key pressed.
Barge-In On
Off Select ON/OFF whether to use Barge-In feature.
CEL Setup
CEL Number 877-833-7388 Use this feature to see your cellular telephone
number.
Signal Level ----
View strength of the CEL radio wave. You should
place the Base in an area with the best signal
level location.
TEL LINE Dial Mode Tone
Pulse
Select matching TEL Line type Tone/Pulse you
are using.
Router
3G Data Network Enable
Disable
Configure each DHCP server parameter used in
the LAN port of the BASE.
DHCP Server Setup
Enable
Start Address
End Address
Net Mask
Primary DNS
Secondary DNS
Gateway
Lease Time In SEC
LAN IP Setup
3G Data Network
IP Address
Net Mask
Configure IP Address and Subnet Mask setting
used in the LAN port of the Base.

18
Enter names and characters
Use the keypad to choose the characters you want. Use the #A/a key in the lower right area
of the Handset to switch the letters from capital to lower case as needed.
Charactertableforenteringnames
Numberoftimeskeypressed
keys 123456789
1space 1 . ,: ; ' " (
) < > & % ! ? ¡ ¿
2A B C 2
3D E F 3
4G H I 4
5JKL 5 ^ { } \ [
~ ] | €
6M N O 6
7P Q R S 7
8T U V 8
9W X Y Z 9
00 + - * / = # _ $
£ ¥ @ Δ ¤ § Φ
• UsePB to scroll to the left or the A key to scroll to the right.
• PressDelete (F2) to erase a character.
• # A/aKeyselectsUppercaseorLowercaseinputsetting.
19
More features
VolumeandHands-free
Duringaconversationonthehandset,theearpiecevolumecanbeadjustedorthehands-
free speaker can be selected.
Set earpiece volume
Duringacall,presss for higher or ▼ for lower volume.
Hands-free call
Duringacall,pressSPEAKER key.
Duringacall,ifyouwanttoswitchbackfromSpeakertotheEarpiecetocontinue
conversation,pressSPEAKER again.
Caller ID
CallerIDfeaturerequiresyoursubscriptionthroughyourserviceprovider.CallerIDfeatures
helps identify either by number or by the name of the caller the programmed or registered
identityofthecallerorcalled.WhenCallerIDisactive,yourphonemaydisplaythecaller’s
name and phone number if the landline or cellular service supports this feature.
Note:CallerIDandCallWaitingareusuallyincludedwithcellularcallingplans,butlandlinesmay
requireaseparatesubscription.Checkwithyourserviceproviderfordetails.
Caller ID information
SINGLE CEL OR TEL CALL
InStandby,CallerIDnormallyshowsnewandtotalcallsreceived.
Onasingleincomingcall,CallerIDshowsthetimeanddate,the
caller’sname,andthenumber.CEL or TEL blinks depending on the
typeofcall–cellularserviceorlandline.
SIMULTANEOUS CEL AND TEL CALLS
Whenbothlandlineandcellularservicesareactive,thephonecan
receive both types of calls at the same time or very close together.
Whenthathappens,CallerIDinformationforbothcallsappearson
the display and the call arriving first is on top.
CALL WAITING
Ifyoureceiveanothercallduringacallinprogress,informationfor
both calls appears on the display.
Press SEND/FLASH to answer the new call. Press SEND/FLASH again to return to the first call.
David
01234567890
CEL TEL
CEL
David
John Smith
CEL
Ring
CEL TEL
Ringing
TEL
Ring
20
Calllog
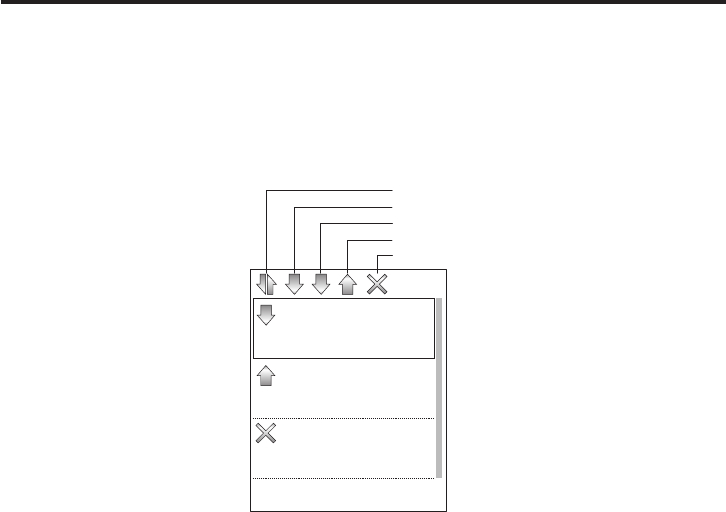
Check the log
The Caller ID log lists the name associated with the Caller ID data. If the data received does
nothavepropernameinformation,thephonenumberislistedinstead.
Press CID to view the Caller ID log. The newest entry appears on the display.
Press ▼ to scroll through the log from newest to oldest. Press s to scroll through the log
from oldest to newest. The log holds up to 200 (100 each for CEL and TEL) calls.
Dial a number
1 Scroll to a displayed name/number and press Enter (F1) twice.
The number appears on the display. If the number’s area code is the same as an area
codestoredinthephone'smemory(see“Areacode”onpage30),theareacodemay
notappear.Iftheareacodeisrequiredfordialing,press# to add the area code to the
beginningofthenumber.Ifthenumber1isalsorequiredfordialing,press* to add 1
to the beginning of the number.
2 Press
CEL (F1) or TEL (F3) to make the call.
Save a number to Phone book
1 Scroll to a displayed name/number and press Enter (F1).
2 Scroll to Save To Phone book and press Enter (F1).
3 Enter the name (up to 16 characters) and press ▼.
* You cannot leave the name blank�
* See "Enter names and characters" on page 18�
“Number?”appearsonthedisplay.
4 Change the settings (Number,Default Line,Distinctive Ring,andBlock) if necessary.
– Scroll through the submenu: s or ▼
– Select menu item: PB or CID
5 Press Enter (F1) to confirm.
John Smith
01/02.12:10
Enter Back
TEL
David
01/02.11:00
TEL
Jane
01/01.10:20
TEL
All calls
Blocked calls
Ans
wered calls
Missed calls
Dialed calls

21
Usingredial
Each handset holds the last 10 numbers dialed. Each number can have up to 32 digits.
Call from redial log
1 Press RDL/P to recall the last dialed number.
2 Press
CEL (F1) or TEL (F3) to redial the number.
UsingSpeeddial
1 Set up keys 0–9 with numbers in the Phone book for speed dial.
2 Pressandholdtheappropriatenumberkey,thenpressCEL (F1) or TEL (F3).
Ifyouneedtoaddorremovethenumber1ortheareacodeforproperdialinginyourarea,
see“Add/removea1”or“Add/removeareacode”onpage30.
Callingoptions
Pause
Whileenteringaphonenumber,pressRDL/P to add a 0.5 second pause. The pause is added
as the digits are transmitted when dialing. Press RDL/P again to make the pause longer. The
letter P appears in the number each time you enter the pause.
Mix dial
If your phone is set to pulse dialing and you need to send DTMF tones during a call (to use
anautomatedresponsesystem,forexample),youcantemporarilyswitchtotonedialing
after the call connects.
1 Make your call normally.
2 Onceyourcallconnects,press* on the handset to temporarily switch to tone dialing.
Whenthecallends,thephoneautomaticallyreturnstopulsedialingmode.
In-Call operations
Place a call on Hold
• PressHOLD (F1) to place a call on hold.
• PressBACK (F3) to return to the call.
Mute a call
• PressMUTE (F3) to temporarily cut off the microphone.
• PressUNMUTE (F3) to return to the call.
0123456789
CEL Menu TEL
22
Transfer a call
You can transfer calls from handset to handset.
This function works for both cellular and landline calls.
HANDSET TO HANDSET TRANSFER
1 Duringacall,pressINTCOM,scrolltothehandsetyouwant,andpressEnter (F1).
The handset involved in the transfer operation begins beeping and a message appears
on the LCD.
Ifthereisnoanswerwithin30seconds,thepageandthetransferarecancelledandyou
return to the call.
2 Press
Enter (F1)onthehandsetreceivingthepage.Thecallisnowonhold,andthe
parties with the handsets can speak.
3 Press END on the handset that started the transfer. The call is now transferred to the
receiving handset.
Onthereceivinghandset,youcanpressEND to reject the transfer. Then the call returns
to the handset that started the transfer.
4 Press END to end the call.
Unattendedtransfer
You can also transfer an active call to another handset without announcing before
transferring the call. At step 1,whenyouheartheringtone,hangupyourphoneby
pressing END and the call will be transferred.
Set up a conference call
Conference calling lets you make a call with
two parties. The phone places the second
call with the service (cellular or landline)
that is not being used. The Conference
feature is available only with the handset.
1 Make a normal call to the first person.
2 Press
HOLD (F1),scrolltoMake TEL Call (or Make CEL Call),andpressEnter (F1).
3 Enterthenumberofthenextparty,andtheX1500Handsetdialsthenumber
automatically.
4 Press
CONF (F3) to connect all parties.
5 Todropapartyfromtheconferencecall,pressCEL DROP or TEL DROP. Press END to
drop all parties and end the call.
PSTN
Handset
Conference
Base
CEL
TEL
HANDSET 1
01/01 00:00
CEL Menu TEL
Conference
23
PageandIntercom
ThePagefeatureletsyoulocatethehandsetifitismisplaced,butitalsocanbeanswered
by the handset.
* During page/intercom, if another incoming call is received, page/intercom action will be canceled�
* Page/intercom ring tone and volume cannot be changed�
Page
1 Press PAGE/REG on the base station.
Alltheregisteredhandsetsbeepforupto60seconds,andHANDSET LOCAT... appears
on the display.
2 Tostopthepage,presseitherEnd (F1) or End (F3)onanyhandset,orpressPAGE/REG
on the base station.
Intercom
1 Whenthelineisnotinuse,pressINTCOM,scrolltothehandsetyouwanttotalkto,and
press Enter (F1).
The handset beeps for up to 60 seconds and Paging Handset 1 appears on the display.
2 Toanswer,pressEnter (F1) to connect with Intercom.
DuringanIntercomconnection,useMutetoturnoffthemicrophoneonthehandset.
Barge-in
WhetheryourhandsetisinthemiddleofacallonCELorTEL,thisfeatureallowsanyoneof
the other registered handsets to the same X1500 base station to join the call. Before using
theBarge-Infeature,pleasereadthefollowingprocedures.
• TheX1500comeswiththeBarge-In
feature set to "off." It must be activated
before use.
• Ifpowertothebasestationisinterrupted,
Barge-In must be reactivated.
• Thefirsthandsettoplacethecallisthe
“master”andfullycontrolsthecall.Other
registered handsets that join the call are
“slaves”andcanonlyjoinorexitthecall.
Note:RememberthatwithBarge-Inactivated,privacymaybecompromised.Anyregistered
handsetcanjointhecall,andthereisnoindicationthatanotherhandsethasjoinedthecall.
PSTN
Handset 1
Base
CEL
TEL
HANDSET 1
01/01 00:00
CEL Menu TEL
Handset 2
HANDSET 1
01/01 00:00
CEL Menu TEL
TALKTALK
TALK
BARGE-IN
24
Use Barge-In
1 Verify that Barge-In is activated. Then use one handset to place a call.
2 Afterthecallisanswered,pressCEL (F1) or TEL (F3) on any handset to join the call.
Dual-linecalling
YourX1500ismulti-handsetscapableandwithPHONEconnection(Ref:Page12),activated
cellularservice(CEL)andconnectiontoconventionallandlineservice(TEL),therearemultiple
callconfigurations.AnexampleofitistwocordlesshandsetsrespectivelycallingthroughTEL
andCELandlateron,forbothofthemtobetiedtogetherinaconferencemode.
HomeConnex Series Terminal
TheHomeConnexSeriesTerminalisa
two-linephonethatoffersuniquecalling
features because it can be used to make or
receive both CEL and TEL calls.
Andyoucanmakeconferencecalls,using
CEL,TELandextraHandsets.
Intercept Ring
1 DuringacallusingTEL,ifthebase
receivesaCELincomingcall,thehandset
notifies the user with an INTERCEPT RING
for the incoming call.
2 IfCELispressedtoanincomingCELcall,
the TEL call is placed on hold and the CEL
call is now active.
3 Press the Flip (F1) button to merge and
talk to both the CEL and TEL calls.
PSTN
Handset
Conference
Base
CEL
TEL
HANDSET 1
01/01 00:00
CEL Menu TEL
Conference
PSTN
Handset
Incoming to
INTERCEPT RING
Base
CEL
TEL
HANDSET 1
01/01 00:00
CEL Menu TEL
Incoming to
INTERCEPT RING
TALK
TALK
PSTN
Handset
SEND to switch
Base
CEL
TEL
HANDSET 1
01/01 00:00
CEL Menu TEL
SEND to switch
Waiting Tone
TALK
TALK
PSTN
Handset
SEND to switch
Base
Switch
CEL / TEL
CEL
TEL
HANDSET 1
01/01 00:00
CEL Menu TEL
SEND to switch
Waiting Tone
TALKTALK
Waiting Tone
25
Make or Receive two separate calls:
1 When a call comes in on TEL or Handset
makes call from TEL.
2 IfyouhaveanotherHandset,itcan
make a CEL call or it can answer the
incoming CELcall.
Phone book
Use the Phone book to store up to 100 names and numbers.
Add New Entry
1 WhileinthePhonebookmenu,selectAdd Entry to add a new entry.
You can specify the following items.
2 Enter the name (up to 16 characters).
* You cannot leave the name blank�
* see “Enter names and characters” on page 18�
3 Enter the number (up to 32 digits).
* You cannot leave the number blank�
4 Select Default Line* (CEL/TEL/Off).
* You can assign the primary line, either CEL or TEL� The line assigned will be selected as the
default line when you press SEND/FLASH�
5 Select Distinctive Ring (01 ~ 18/Off ).
* This feature allows you to assign a designated ring tone to a stored Phone book number�
When a call is received from one of these numbers, X1500 uses the distinctive ring assigned
to that particular caller so that you can identify the call without answering it�
6 Select Speed Dial* (0 ~ 9/Off).
* You can assign one phone number to each of the 10 dial keys (0~9)� To display the
registered number, press and hold the registered number dial key until the phone number
is displayed�
7 Select Block* (On/Off).
* This feature allows you to reject calls from specific phone numbers that you do not want
to answer� When a call from the registered phone number is received, the X1500 rings for a
short time�
* The blocked number is logged in "Blocked Call" in the Call Log menu�
8 Press
Enter (F1) to confirm the entry and you will hear a confirmation tone.
PSTN
Handset 1
Base
CEL
TEL
HANDSET 1
01/01 00:00
CEL Menu TEL
Handset 2
HANDSET 1
01/01 00:00
CEL Menu TEL
TALKTALK
TALK
TALK
Name
John Smith
Enter DEL Back
Add Entry
Number
0123456789
Default Line
CEL
26
Edit Record
1 WhileviewingthePhonebookentry,scrolltothenameyouwanttoeditandpress
Enter (F1).
2 Select
Edit Record and press Enter (F1).
3 You can edit Name/Number/Default Line/Distinctive Ring/Speed Dial/Block with new
entry the same way.
View the Phone book
Press PB to display the Phone book entries.
You can search for names by initial. Press the keypad 2 - 9,or0 that corresponds to the first
letter you are searching for (see the character table below).
Charactertableforsearchingnamesbyinitial
Numberoftimeskeypressed
keys 1 2 3 4
2A B C —
3D E F —
4G H I —
5JKL —
6M N O —
7P Q R S
8T U V —
9W X Y Z
0other — — —
Copying Phone book
Ifyouhavemorethanonehandset,youcantransferPhonebookentriesfromonehandset
to another without re-entering names and numbers. You can transfer one Phone book entry
at a time or all Phone book entries at once.
Note:DefaultLine,DistinctiveRing,SpeedDialandBlockforPhonebookitemsarenotcopied.
Alex
Alicia
Bob. M
Brian
Britney
Enter Back
View Records
Push PB from Standby
James Jordan
Jane
Janet
Jeffery
Katherine
Enter Back
J
View Records
Push 5 (J)
Katherine
Kim. H
Kyle
Lewis
Lisa
Enter Back
K
View Records
Push 5 again (K)

27
One by one
1 WhileviewingthePhonebookentry,scrolltothenameyouwanttotransferandpress
Enter (F1).
2 Select
Copy Record To and press Enter (F1).
3 Scroll to the handset (Handset1 ~ Handset6) you want to transfer the entry to and press
Enter (F1).Afterthetransferhascompleted,Succeedisdisplayedwithaconrmationtone.
All
1 Press
Menu (F2),selectPhone book and press Enter (F1).
2 WhileinthePhonebookmenu,selectCopy All Record To and press Enter (F1).
3 Scroll to the handset (Handset1 ~ Handset6) that you want to transfer the entry to
and press Enter (F1).Afterthetransferhascompleted,Succeed is displayed with a
confirmation tone.
Messages
Note:Youmusthaveasubscriptiontousethesemessageservices.Checkwithyourservice
providerfordetails.
Short Message Service (SMS)
Thisfeature–availableonlywithcellularservice–letsyousendandreceivetextmessagesto
other SMS enabled cellular phones through the CEL connection at the handset. Check with
your service provider for availability.
WRITE A NEW MESSAGE
1 Press
Menu (F2),scrolltoMessage,andpressEnter (F1).
2 Scroll to Message and press Enter (F1).
3 Scroll to Write Message and press Enter (F1).
4 Usethekeypadtowriteamessageupto160characterslong,includingspacesand
specialcharacters.(See“Enternamesandcharacters”onpage18.)
5 Whenyoufinishwriting,pressEnter (F1). The new message submenu appears with
Send SMS and Save.
If the phone receives a call or someone initiates a call on another handset while you are
writingamessage,themessageisautomaticallystoredinSavedmessages.Youcanaccess
themessagelater,editthemessage,ifnecessary,andthensendthemessagebyfollowing
the steps below.
Note:Ifthereisanincomingcallwhiletheuserisinthemidstofformulatingatextmessage,the
handsetyieldstheprioritytotheincomingcall.However,oncethecallisterminated,youcango
backtoMessageintheMenuandthedraftedtextwillbedisplayedagain.

28
SEND A NEW MESSAGE
1 Writeamessage,thenpressEnter (F1). Send SMS and Save appear.
2 Scroll to Send SMS and press Enter (F1). Submenu appears.
3 You can send a message to the recipient by entering the phone number or selecting
from the Phone book.
From Phone book
Select
From Phone book and press Enter (F1),scrolltotheentryyouwant,andpress
Enter (F1).
Byenteringthephonenumber
Select
Input Number and press Enter (F1),entertherecipient'sphonenumber,and
press Enter (F1).
Note:VerifythattheCELlineisnotinusebeforesendingthemessage.
Afterthemessageissent,aconfirmationtoneisheard.
4 The message is stored in Outbox for easy viewing later.
SAVE A NEW MESSAGE TO DRAFT BOX
Note:Upto20newmessagescanbesavedinyourX1500.
1 Afterwritingamessage,pressEnter (F1).
2 Scroll to Save and press Enter (F1). The message is stored in Draft Box for easy viewing
later.
EDIT SAVED MESSAGES IN DRAFT BOX
1 Press
Menu (F2),scrolltoMessage,pressEnter (F1).
2 Scroll to Draft Box and press Enter (F1).
3 Scroll to the message you want to edit and press Enter (F1).
4 Select
Edit and press Enter (F1).
RECEIVE A MESSAGE
WhentheX1500receivesatextmessage,youheararingtoneandanenvelopeicon
appears on the display. The message goes to the InBox.
CHECK THE INBOX FOR READ AND UNREAD (NEW) MESSAGES
ReadandUnReadMessagesaredistinguishedbyicons,ReadMessagesaredisplayedwith
while UnRead Messages are displayed with .
1 Press
Menu (F2),scrolltoMessage,andpressEnter (F1).
2 ScrolltoInboxandpressEnter (F1).
3 Scroll to UnRead Messages and press Enter (F1). The phone number from which the
message originated displays.
4 Press
Enter (F1) again to read the message.
IfyouhavenoUnReadMessages,anerrortonesounds.
- OR -
5 Scroll to Read Messages and press Enter (F1). The phone number from which the
message originated displays.
6 Scroll to the message you want to read and press Enter (F1).
29
WhenyouexittheUnreadMessageslist,anymessagesthathavenotbeenviewedare
automatically stored in the Read Messages list. Be sure to view all UnRead Messages before
exitingtheUnReadMessagelist.
REPLY TO MESSAGES
1 Whilereadingamessage,pressEnter (F1).
2 Scroll to Reply and press Enter (F1).
Write a reply the same way as you write a new message and press SEND to send Reply.
Voice messages
The X1500 works with both cellular and landline voicemail.
SET UP VOICEMAIL
1 Press
Menu (F2),scrolltoMessage and press Enter (F1).
2 Scroll to Voice Message and press Enter (F1).
3 Scroll to Setup and press Enter (F1).
4 Scroll to CEL VM Number and press Enter (F1).
* Select
TEL VM Number to enter setup for TEL�
5 Usethekeypadtoenterthevoicemailnumberforyourlandlineservice,thenpress
Enter (F1). A beep confirms your entry.

30
Setup Detail
Area code
1 Press
Menu (F2).
2 Scroll to Handset Setup and press Enter (F1).
3 Press
Enter (F1) again to enter General menu.
4 Scroll to Area Code and press Enter (F1).
5 Usethekeypadtoentertheareacodenumber,thenpressEnter (F1).
Ifyoumakeamistake,pressDelete (F3) to erase the last digit entered.
6 Press
Enter (F1) to set the code.
Add/remove a "1"
Withareacodesstoredinmemory,the* and #keyshaveauniquefunctioninphone
memory dialing.
Ifyouneedtoadda1to10–digitphonenumberforproperdialinginyourarea,press*.
Press *againtodeletethenumber1.WhenretrievinganumberfromtheCallerIDlog,use
the * key to add or remove a 1. This feature is not available when using Redial.
Add/remove area code
Ifyouneedtoaddtheareacodetoa7–digitnumber,press# to display the area code list.
Scroll to the correct area code and press Enter (F1). At this point you can also press * to
addthenumber1,ifnecessary.
Toremovetheareacode,press*toremovethenumber1(ifpresent),thenpress#.
Note:WhendialingnumbersfromtheCallerIDlog,areacodesstoredinthephonearenot
accessible. Press #andusethekeypadtoaddtheareacode.Thisfeatureisnotavailablewhen
usingRedial.
Power backup
Powerbackupforthebasestationisanoptionalfeature(notrequiredtooperatethis
product) that allows the base station to operate for up to 40 minutes (depending on battery
condition) even if AC power is disrupted. If you install batteries for the Power backup
feature you can check the condition of the batteries while they are installed.
Notes about Power backup
• Replacebatterieseveryyear.
• Therearenoindicatorstoinformyouwhenthephoneisoperatingunderregularpower
or backup power.
• IfyoudisconnecttheACpowerAdaptor,Powerbackupstartsautomatically.
• Aftereverypoweroutage,checkthebatteriesandreplacethemasnecessary.
• ActualoperatingtimeusingPowerbackupvariesdependingontheconditionofthe
batteries.

31
UsingLANforInternetconnection
The X1500 supports 3G wireless dialup. The LAN port can be connected to a PC for Internet
access. Usually X1500 would be set as Internet Gateway. Use Ethernet to connect to PC or
Laptop,oruseanoptionalWi-Fidevice,availablefromanauthorizedretailerorAirTouch,Inc.
Defaultsetting
LAN IP setting
IP 192.168.1.1
Subnet mask 255. 255. 255.0
DHCP Server setting
DHCP Server Enable
IP Start 192.168.1.10
IP End 192.168.1.32
Subnet mask 255. 255. 255.0
Primary DNS 192.168.1.1
Secondary DNS 192.168.1.1
Default Gateway 192.168.1.2
DHCP Lease period 86400 sec
IfyouwanttochangeLANsettings,usethefollowingmenupaths:
MENU > Base setting > Router > LAN IP Setup
MENU > Base setting > Router > DHCP Server Setup
Factory reset
Occasionally,youmayneedtorestoreyourdevicesettingstofactorysetting.Thiscanbe
useful when your device is not performing properly.
Notes:
• AfteryourX1500isreset,thedeviceisrestoredtoitsdefaultsettings-asitwaswhenyoufirst
purchasedit,excepthandsetregistrationandactivationofservice.
• Factoryresetdoesn'tclearhandsetmemorysuchasPhonebook,CallLogandSMSdata.
Toreset,pressandholdINIT button for more than 5 seconds.

32
Precautions
Beforeyoureadanythingelse,please
observe the following precautions.
Warning!
AirTouchCommunications,Inc.DOESNOT
representthisunittobewaterproof.Toreduce
theriskoffire,electricalshock,ordamageto
theunit,DONOTexposethisunittorainor
moisture.
About battery usage
This product contains a Li-ion battery and
a Nickel-Metal-Hydride Battery. There is a
risk of fire and burns if the battery packs are
handled improperly.
WARNING:Dangerofexplosionifbattery
pack is incorrectly replaced.
• Useonlythebatteryforthedevicefor
which it is specified.
• Donotuseadamagedbattery.
• Donotattempttoopenorservicethe
battery pack.
• Donotdisassemble,crush,deform,
puncture,shred,orshortexternalcontacts
or circuits.
• Recycleordisposeofusedbatteries
according to local regulations or reference
guide supplied with your product.
• Donotuseabatterythatappears
damaged,deformed,ordiscoloredorone
thathasanyrustonitscasing,overheats,
or emits a foul odor.
Handlebatterypackscarefully
• Donotdisposeofinfireorwater.Donot
exposeabatterypacktotemperatures
higher than 60˚C (140˚F).
• Keepthebatteryordevicedryandaway
fromwateroranyotherliquid,asthismay
cause a short circuit.
• Keepmetalobjectsawaysotheydon’t
come in contact with the battery or its
connectors,asthismayleadtoshort
circuit during operation.
• Alwayskeepthebatteryoutofthe
reachofbabiesandsmallchildren,to
avoid swallowing of the battery. Consult
a doctor immediately if battery is
swallowed.
If battery leaks:
• Donotallowtheleakingfluidtocomein
contact with skin or clothing. If already
incontact,flushtheaffectedarea
immediately with clean water and seek
medical advice.
• Donotallowtheleakingfluidtocomein
contactwitheyes.Ifalreadyincontact,
DO NOT rub; rinse with clean water
immediately and seek medical advice.
• Takeextraprecautionstokeepaleaking
battery away from fire as there is a danger
ofignitionorexplosion.
Theexclamationpointinsidean
equilateraltriangleisintended
to alert the user to the presence
of important maintenance
(servicing) instructions in the
literature accompanying the
appliance.

33
Importantsafety
instructions
Whenusingyourtelephoneequipment,
these basic safety precautions should
alwaysbefollowedtoreducetheriskoffire,
electricalshock,andinjurytopersons:
1 Read and understand all instructions.
2 Follow all warnings and instructions
marked on the product.
3 Unplug this product from the wall
outlet before cleaning. Use a dry cloth
forcleaning,withoutliquidoraerosol
cleaners.
4 Do not use this product near water.
Donotusenearabathtub,washbowl,
kitchensink,laundrytub,orneara
swimming pool.
5 Do not place this product on an unstable
cart,stand,ortable.Thetelephonemay
fall,causingseriousdamagetotheunit.
6 Slots and openings in the cabinet and
the back or bottom are provided for
ventilation. To protect the product from
overheating,theseopeningsmustnotbe
blocked or covered. This product should
never be placed near or over a radiator
or heat register. This product should not
be placed in a built-in installation unless
proper ventilation is provided.
7 This product should be operated only
from the type of power source indicated
on the label. If you are not sure of the
typeofpowersupplytoyourhome,
consult your dealer or local power
company.
8 Do not allow anything to rest on the
power cord. Do not place this product
where the cord will be damaged by
people or pets walking on it.
9 Do not overload wall outlets and
extensioncords,asthiscanresultinthe
risk of fire or electrical shock.
10 Never push objects of any kind into this
productthroughcabinetslots,asthey
may touch dangerous voltage points or
short out parts that could result in a risk
offireorelectricshock.Neverspillliquid
of any kind on the product.
11 Toreducetheriskofelectricshock,do
not disassemble this product. Take it
toqualifiedservicepersonnelwhen
serviceorrepairworkisrequired.
Openingorremovingcoversmayexpose
you to dangerous voltages or other
risks. Incorrect reassembly can cause
electric shock when the appliance is
subsequentlyused.
12 Unplug this product from the wall outlet
andtakeittoqualifiedservicepersonnel
under the following conditions:
A When the power supply cord is
damaged or frayed.
B Ifliquidhasbeenspilledintothe
product.
C Iftheproducthasbeenexposedto
rain or water.
D If the product does not operate
normally when following the
operating instructions. (Adjust only
those controls that are covered by
the operating instructions. Improper
adjustment of other controls may
result in damage and will often
requireextensiverepairworkbya
qualifiedtechnician.)
E If the product has been dropped or
the cabinet has been damaged.
F Iftheproductexhibitsadistinct
change in performance.
13 Do not use the telephone to report a gas
leak in the vicinity of the leak.
34
ADDITIONAL BATTERY SAFETY PRECAUTIONS
Caution:Toreducetheriskoffireorinjury
topersonsfromthebattery,readandfollow
these instructions:
1 Use only the battery pack specified in
the owner's manual.
2 Do not dispose of the battery pack in
fire.Thecellmayexplode.Checkthe
Nickel Metal Hydride battery disposal
package insert for disposal instructions.
3 Do not open or mutilate the battery
pack. Released electrolyte is corrosive
and may harm the eyes or skin. It may
betoxicifswallowed.
4 Exercisecareinhandlingthebattery
in order to not short the battery with
conductivematerialsuchasrings,
bracelets,andkeys.Thebatteryor
conductor may overheat and cause
burns.
5 Charge the battery pack provided with
or identified for use with this product
only in accordance with the instructions
and limitations specified in the owner's
manual provided for this product.
6 Observe proper polarity orientation
between the battery pack and battery
charger.
SAVETHESEINSTRUCTIONS!
Important Electrical Considerations
Unplug all electrical appliances when you
know an electrical storm is approaching.
Lightning can pass through your household
wiring and damage any device connected
toit.Thisphoneisnoexception.
The FCC Wants You To Know
Changes or modifications to this product
notexpresslyapprovedbyAirTouchCom.
Inc.,oroperationofthisproductinany
way other than as detailed by the owner's
manual,couldvoidyourauthorization
to operate this product. Our telephone
complies with Part 68 of the FCC Rules.
Youmust,uponrequest,providetheFCC
registration number and the REN to your
telephone company. Both numbers are on
the base station unit.
Note: You must not connect your phone to:
• Coin-operatedsystems
• Mostelectronickeytelephonesystems
This device complies with FCC rules for
operating on the CDMA band. Operation
is subject to the following two conditions:
(1) This device may not cause harmful
interference,and(2)Thisdevicemust
acceptanyinterferencereceived,including
interference that may cause undesired
operation. Privacy of communications may
not be assured when using this phone.
Toassureusersafety,theFCChas
established criteria for the amount of radio
frequencyenergyvariousproductsmay
produce depending on their intended
usage. This product has been tested and
foundtocomplywiththeFCC'sexposure
criteria.Forbodywornoperation,theFCC
RFexposureguidelineswerealsometwhen
used with the accessories supplied with
or designed for this product. Use of other
accessories may not ensure compliance
withFCCRFexposureguidelinesandshould
be avoided.
Range
Your new phone is designed to achieve the
maximumpossiblerangebytransmitting
and receiving according to the highest FCC
specifications. We have rated this phone to
operateatamaximumdistancewiththe
qualificationthattherangedependsupon
the environment in which the telephone is
used.Manyfactorslimitrange,anditwould
be impossible to include all the variables in
ourrating.TheMaximumRangeratingof
this phone is meant to be used as a means
of comparison against other range claims.
35
Telephone Line Problems
The FCC has granted the telephone
company the right to disconnect service in
the event that your phone causes problems
onthetelephoneline.Also,thetelephone
company may make changes in facilities
and services which may affect the operation
ofyourunit.However,yourtelephone
company must give sufficient notice in
writing prior to such actions to allow you
time for making necessary arrangements to
continue uninterrupted service. If you are
havingtroublewithyourtelephoneservice,
you must first disconnect your phone to
determine if it is the cause of your problem.
Ifyoudeterminethatitisthecause,you
must leave it disconnected until the trouble
has been corrected.
Radio Interference
Radio interference may occasionally cause
buzzing and humming in your handset
or clicking noises in the base station.
Thisinterferenceiscausedbyexternal
sourcessuchasTV,refrigerator,vacuum
cleaner,fluorescentlighting,orelectrical
storm. Your unit is NOT DEFECTIVE. If these
noisescontinueandaretoodistracting,
please check around your home to see
what appliances may be causing the
problem.Inaddition,werecommendthat
the base station not be plugged into a
circuit that also powers a major appliance
because of the potential for interference.
Be certain that the antenna on the unit
isfullyextendedwhennecessary.Inthe
unlikely event that you consistently hear
other voices or distracting transmissions
onyourphone,youmaybereceivingradio
signals from another cordless telephone or
another source of interference. If you cannot
eliminatethistypeofinterference,youneed
tochangetoadifferentchannel.Finally,
it should be noted that some cordless
telephonesoperateatfrequenciesthatmay
cause interference to nearby TVs and VCRs.
Tominimizeorpreventsuchinterference,
the base station of the cordless telephone
should not be placed near or on top of a
TVorVCR.Ifinterferenceisexperienced,
moving the cordless telephone farther away
from the TV or VCR will often reduce or
eliminate the interference.
Cordless Telephone Privacy
Cordless telephones are radio devices.
Communication between the handset and
base station of your cordless telephone is by
means of radio waves which are broadcast
over the open airways. Because of the
inherentphysicalpropertiesofradiowaves,
your communications can be received by
radio receiving devices other than your
owncordlesstelephoneunit.Consequently,
any communications using your cordless
telephone may not be private.
Installation Considerations
SELECTING A LOCATION
Before choosing a location for your new
phone,therearesomeimportantguidelines
you should consider:
• Thelocationshouldbeclosetoboth
a phone jack and a continuous power
outlet. (A continuous power outlet is an
AC outlet which does not have a switch to
interrupt its power.)
• Keepthebasestationandhandsetaway
from sources of electrical noise such as
motors or fluorescent lighting.
• Besurethereissufficientspacetofully
extendthebasestationantenna.
• Thebasestationcanbeplacedonadesk
or tabletop or mounted on a standard
telephone wall plate.
• Youshouldchargeyournewphone
for12–15hoursbeforecompletingthe
installation or using the handset.

36
Telephone Line Outlets
There are two types of phone outlets:
Modular Jack
Mostphoneequipmentavailablenowuses
modular jacks. Phone cords are fitted with a
molded plastic connector which plugs into
this type of jack. If you do not have modular
phonejacks,contactyourlocaltelephone
company for information about their
installation.
Hardwired Jack
Someequipmentiswireddirectlytoa
phonejack,andthesetypesofinstallations
requireamodularjackconverter.Thistype
ofinstallationisnotdifficult;however,you
should contact your telephone dealer or
a telephone supply store for advice about
the proper Adaptor or converter for your
particular situation.
Connecting the Telephone Cords
Consider these safety guidelines before
connecting the telephone cords:
Caution:
• Neverinstalltelephonewiringduringan
electrical storm.
• Nevertouchuninsulatedtelephonewires
or terminals unless the telephone line has
been disconnected.
• Usecautionwheninstallingormodifying
telephone lines.
Applying Power to the base station
ThisphonerequiresanACoutletwithouta
switchtointerruptpower,andtheincluded
AC Adaptor. To relieve strain on the DC
plug when the phone is placed on a desk
ortable,wrapthepowercordaroundthe
strain relief notch on the bottom of the base
station.
Note: Place the power cord so that it does
notcreateatrippinghazardorwhereitcould
becomefrayedandcreateafireorother
electrical hazards.
FCCRadiationExposureStatement:
ThisequipmentcomplieswithFCCradiation
exposurelimitssetforthforuncontrolled
environment.Thisequipmentshouldbe
installed and operated with minimum
distance of 20cm between the radiator and
your body.
This transmitter must not be co-located or
operating in conjunction with any other
antenna or transmitter.
I.C. Notice
TERMINAL EQUIPMENT
Notice: Thisequipmentmeetsthe
applicable Industry Canada Terminal
EquipmentTechnicalSpecifications.This
is confirmed by the registration number.
The abbreviation IC before the registration
number means that registration was
performed based on a Declaration of
Conformity indicating that Industry Canada
technical specifications were met. It does
not imply that Industry Canada approved
theequipment.
Notice: TheRingerEquivalenceNumber
(REN)forthisterminalequipmentismarked
ontheequipmentitself.TheRENassigned
toeachpieceofterminalequipment
indicatesthemaximumnumberofterminals
allowed to be connected to a telephone
interface. The termination on an interface
may consist of any combination of devices
subjectonlytotherequirementthatthe
sumoftheRingerEquivalenceNumbersof
allthedevicesdoesnotexceedfive.
RADIO EQUIPMENT
The term "IC" before the radio certification
number means only that Industry Canada
technical specifications were met.

37
General information
This phone complies with FCC Rules Parts 15 and 68.
AC Adaptor Information
Base
(Larger Adaptor)
Input voltage 100~240V,50/60Hz0.5A
Output voltage 9.5VDC,1500mA
Charger
(Smaller Adaptor)
Input voltage 100~240V,50/60Hz0.18A
Output voltage 5V,DC200mA
Battery Information Ni-MH,2.4V,800mAh
Frequency CDMA 800/1900 MHz EV-DO Handset/ Base
Weight Handset 4.9 oz. (without battery)
7.3 oz. (with battery)
Base 1 lb. 13.7 oz.
Dimensions
(height × width × depth)
Handset 6-3/4”×2”×1-1/4”
Base 3-1/4”×7-3/4”×7-7/8”
FCC ID Number LZXDM1500C/ LZXDM150HS
Note: This FCC ID numbers are approved under the name of Unical Enterprises Inc.
AirTouch Communications Inc. has a business partnership with Unical Enterprises Inc.
Specifications,features,andavailabilityofoptionalaccessoriesareallsubjecttochange
without prior notice.
Approvedpatents:6,766,175/6,987,988/7,072,675/7,010,311/7,146,180Patentspending:
11/234.297,11/542.804,11/593.725,11/141.819
Operation is subject to the following two
conditions:
(1) This device may not cause harmful
interference,and(2)Thisdevicemust
acceptanyinterferencereceived,including
interference that may cause undesired
operation. Privacy of communications may
not be assured when using this phone.

FCC Rules Compliance
§15.21Correspondingwarning:Changesormodificationsnotexpresslyapprovedbythe
partyresponsibleforcompliancecouldvoidtheuser'sauthoritytooperatetheequipment.
§15.105 Corresponding warning:
Note:ThisequipmenthasbeentestedandfoundtocomplywiththelimitsforaClassB
digitaldevice,pursuanttopart15oftheFCCRules.Theselimitsaredesignedtoprovide
reasonable protection against harmful interference in a residential installation. This
equipmentgenerates,usesandcanradiateradiofrequencyenergyand,ifnotinstalled
andusedinaccordancewiththeinstructions,maycauseharmfulinterferencetoradio
communications.However,thereisnoguaranteethatinterferencewillnotoccurina
particularinstallation.Ifthisequipmentdoescauseharmfulinterferencetoradioor
televisionreception,whichcanbedeterminedbyturningtheequipmentoffandon,
the user is encouraged to try to correct the interference by one or more of the following
measures:
• Reorientorrelocatethereceivingantenna.
• Increasetheseparationbetweentheequipmentandreceiver.
• Connecttheequipmentintoanoutletonacircuitdifferentfromthattowhichthe
receiver is connected.
• Consultthedealeroranexperiencedradio/TVtechnicianforhelp.TechnicalSpecifications.
This is confirmed by the registration number. The abbreviation IC before the registration
number means that registration was performed based on a Declaration of Conformity
indicating that Industry Canada technical specifications were met. It does not imply that
IndustryCanadaapprovedtheequipment.
Notice: TheRingerEquivalenceNumber(REN)forthisterminalequipmentismarkedon
theequipmentitself.TheRENassignedtoeachpieceofterminalequipmentindicatesthe
maximumnumberofterminalsallowedtobeconnectedtoatelephoneinterface.The
termination on an interface may consist of any combination of devices subject only to the
requirementthatthesumoftheRingerEquivalenceNumbersofallthedevicesdoesnot
exceedfive.