Unication Co WS302 Digital Media Adapter User Manual
Unication Co Ltd Digital Media Adapter Users Manual
UserManual.wiki
>
Unication Co
>
WS302 User Manual
Users Manual
Navigation menu
Upload a User Manual
Namespaces
Wiki Guide
HTML
PDF
Info
Views
User Manual
Discussion / Help
Navigation
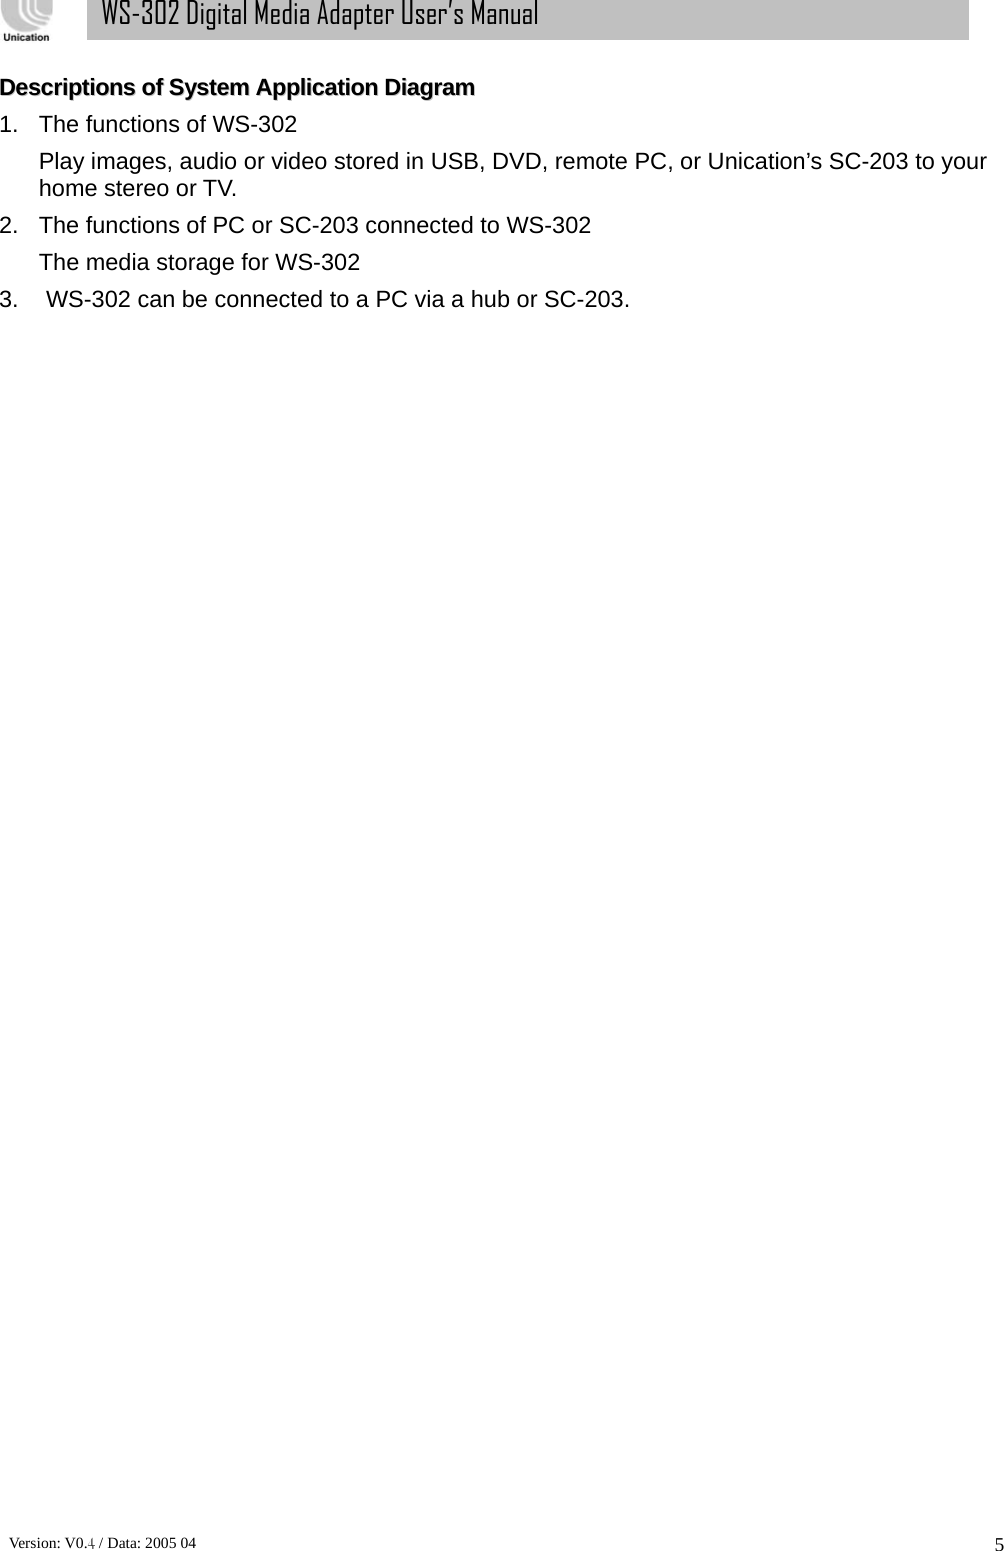
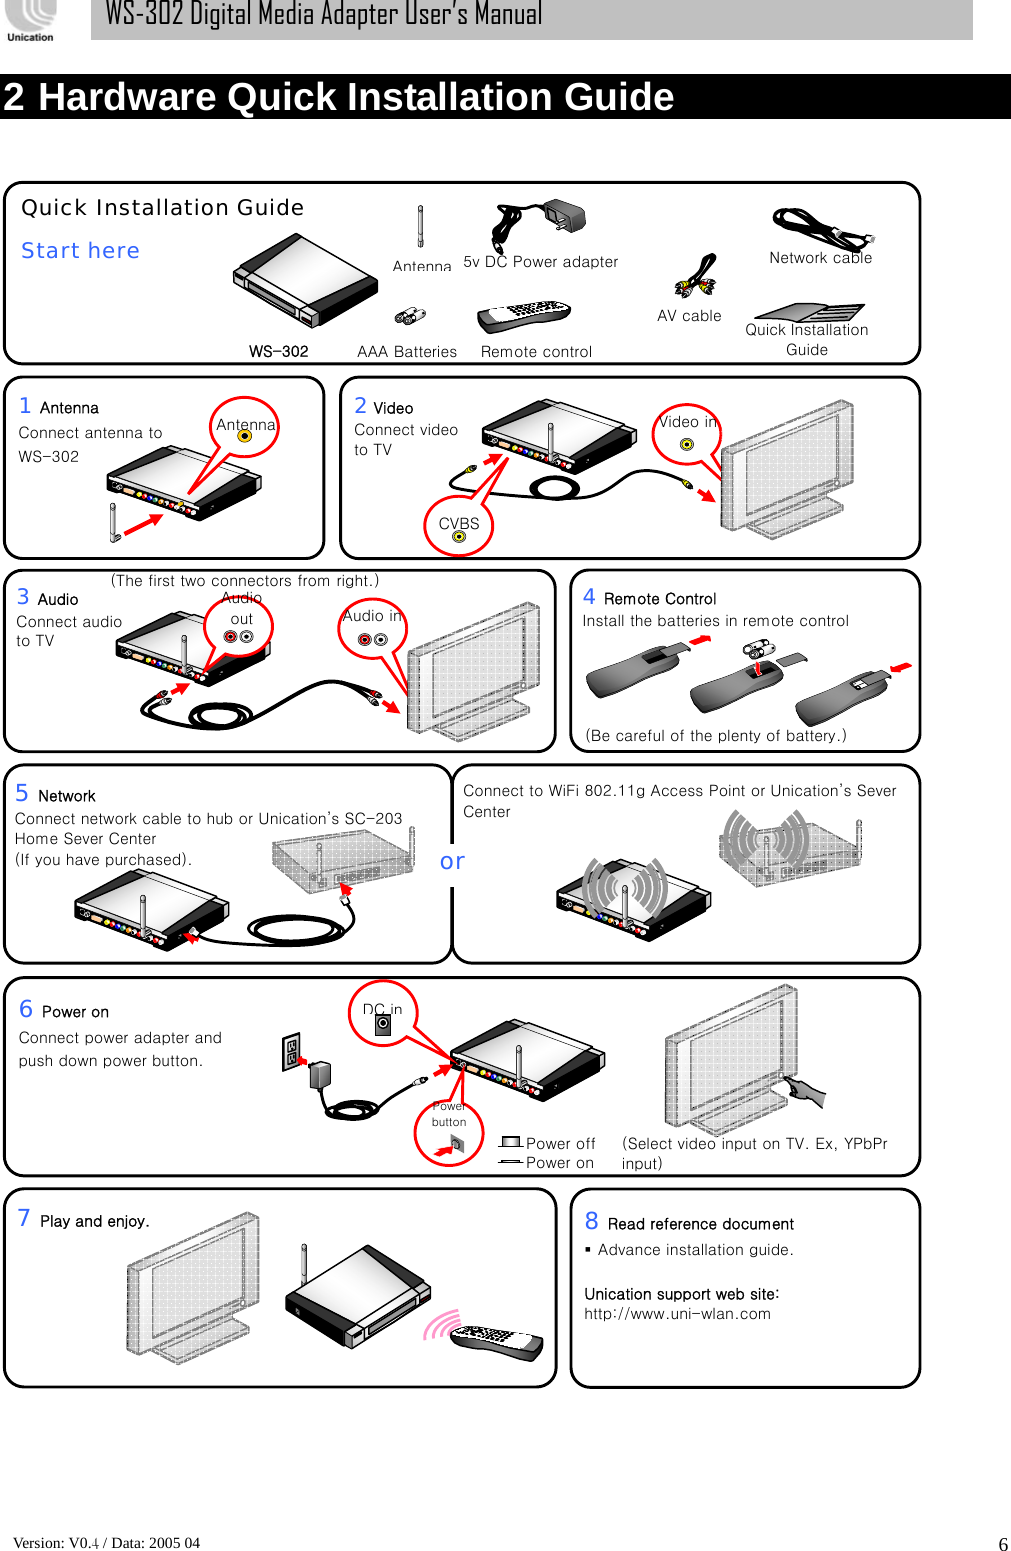
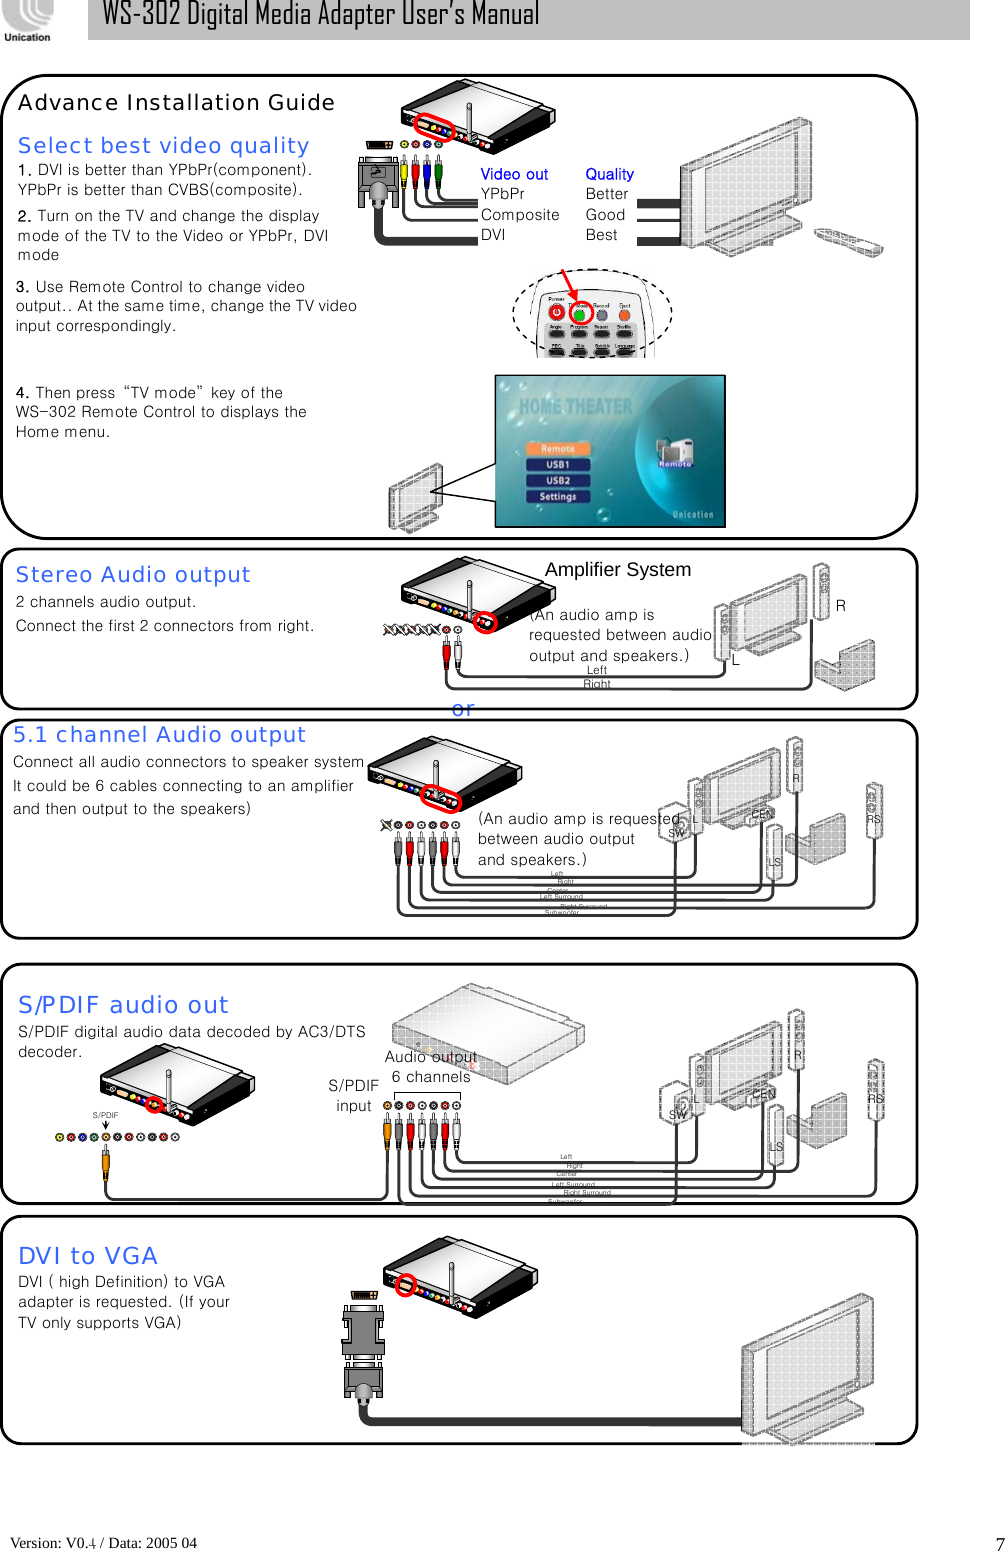
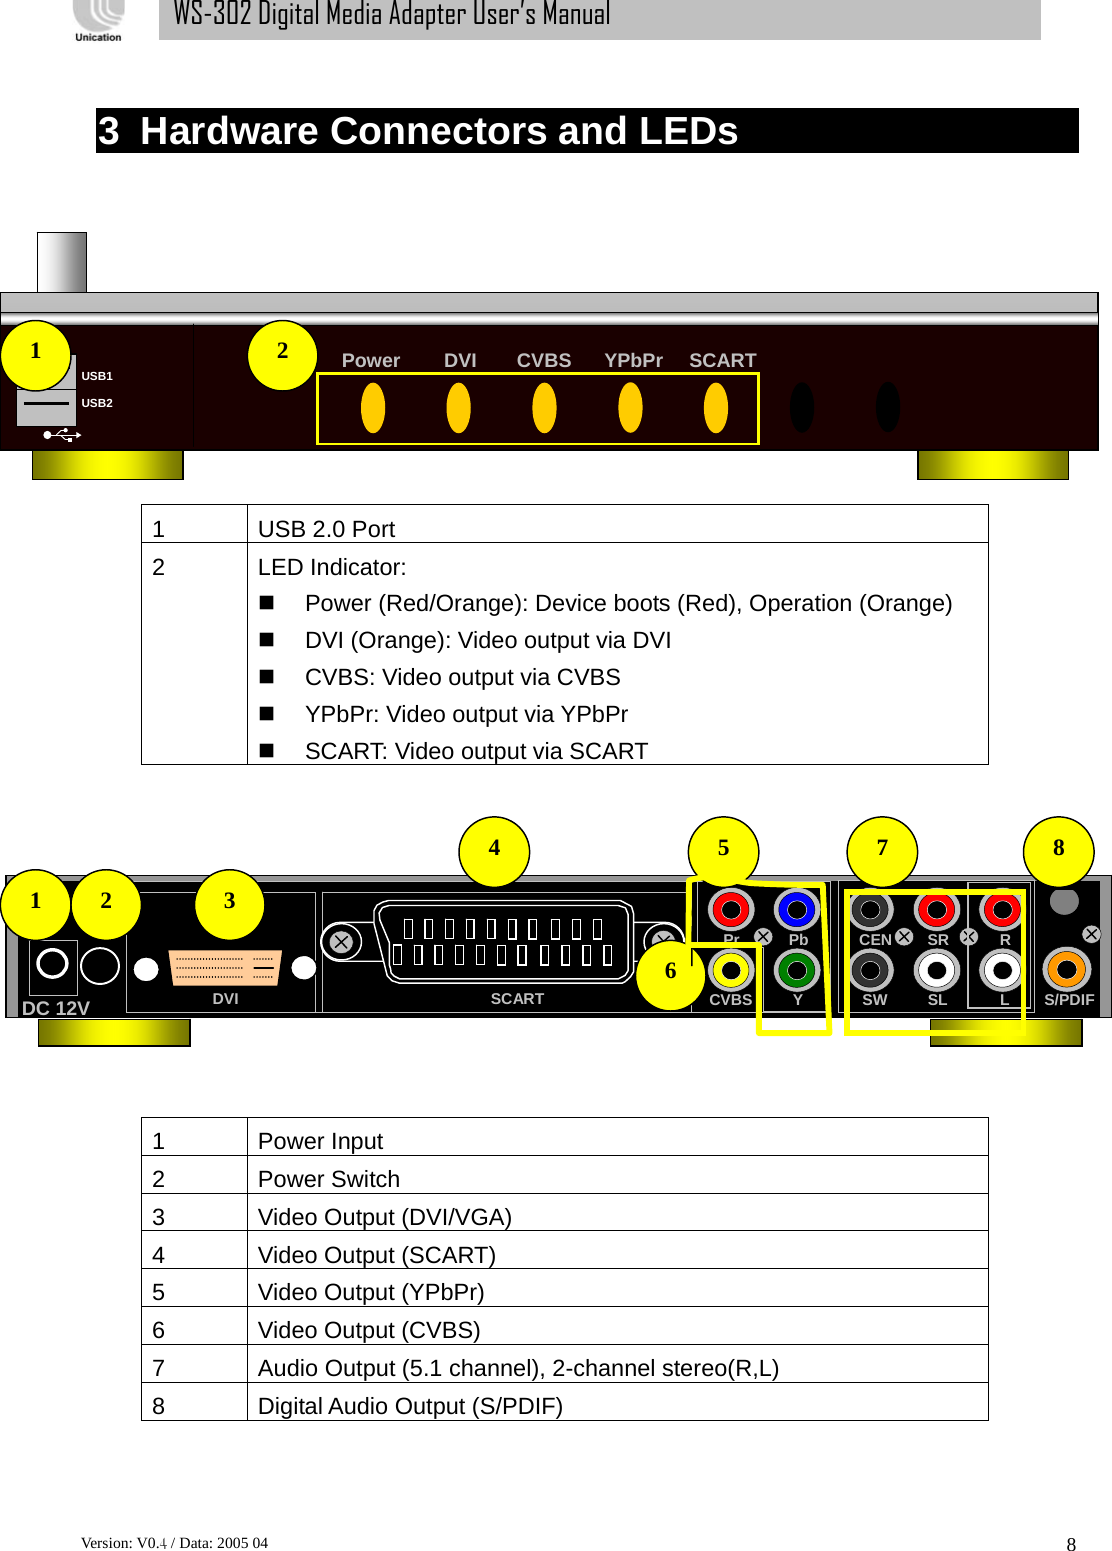
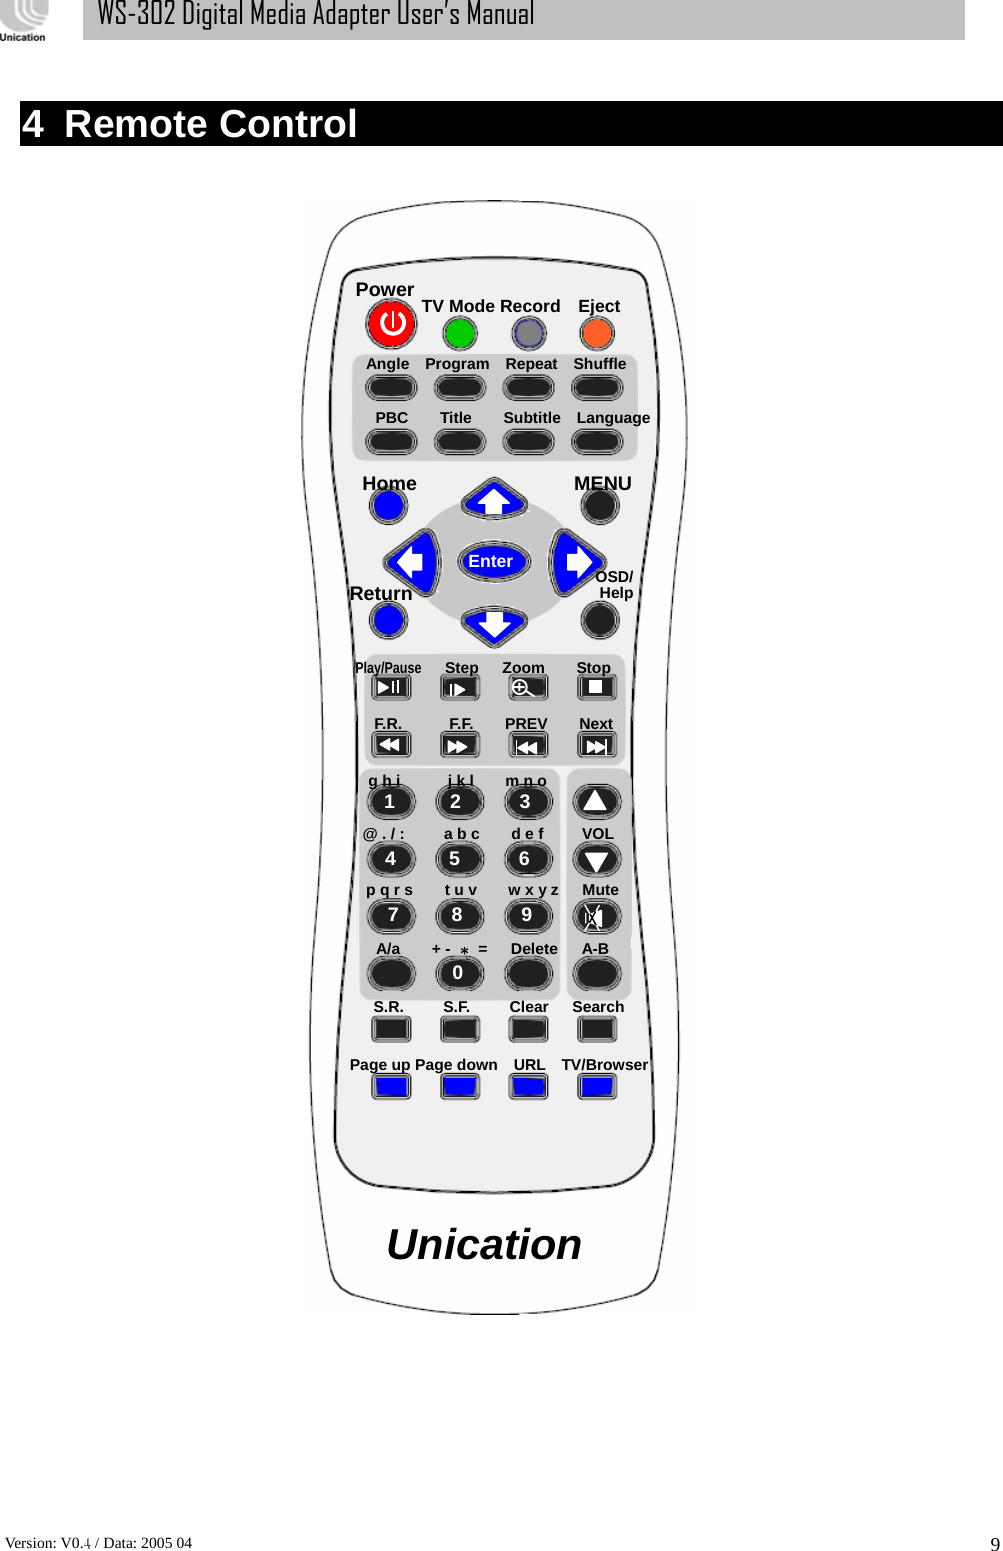
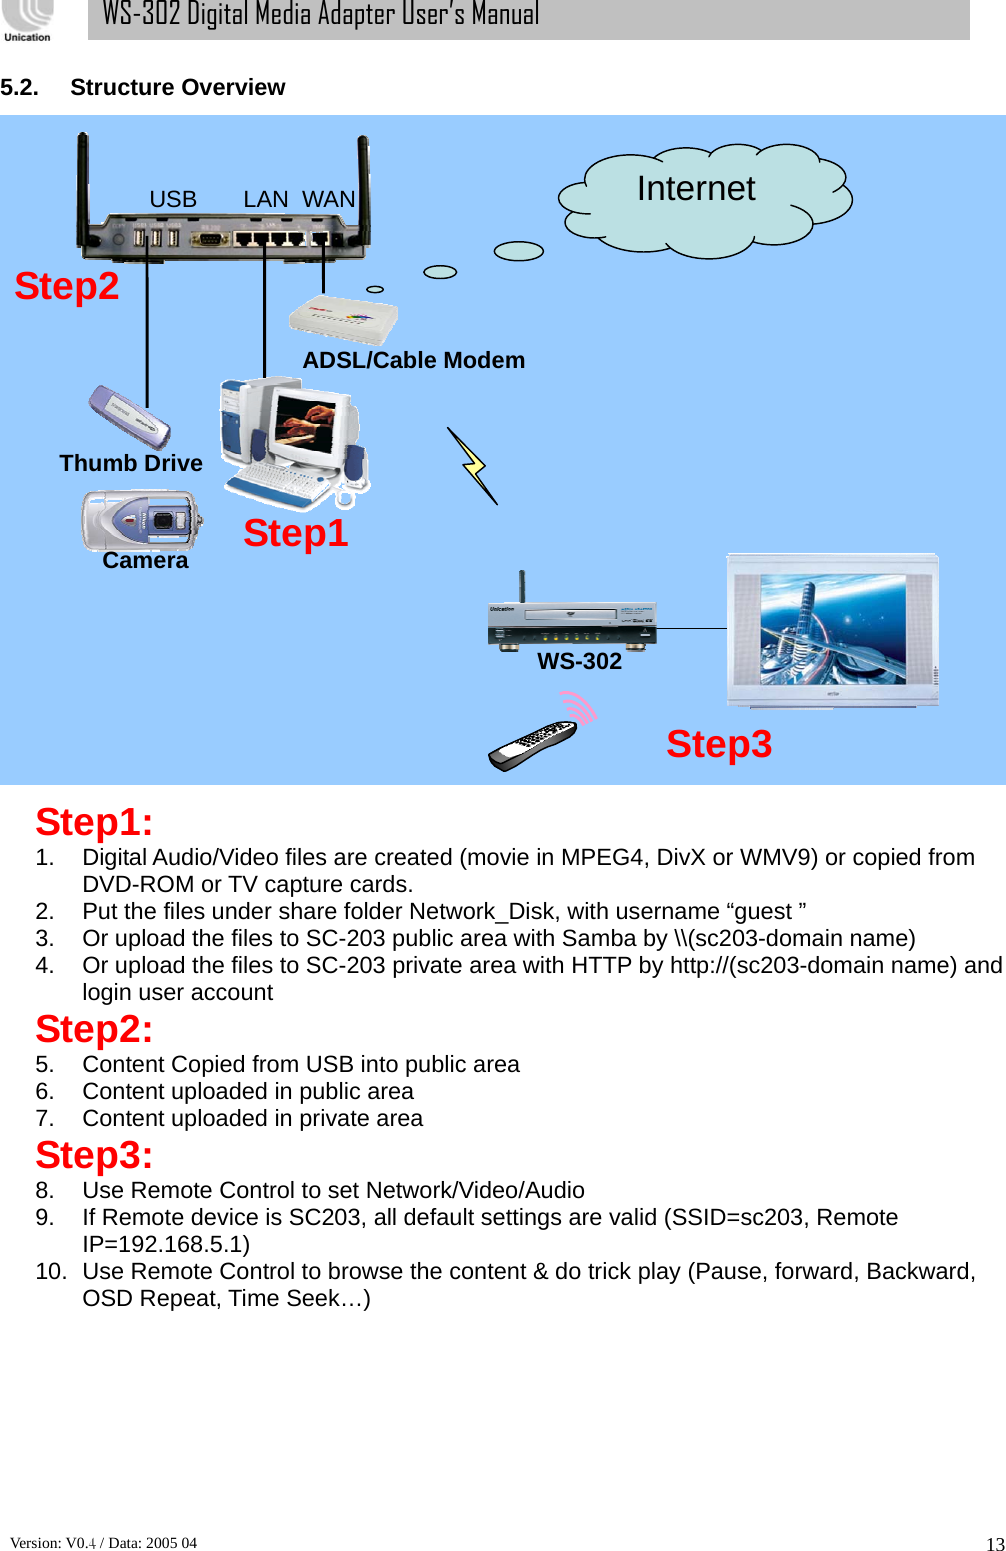
![Version: V0.4 / Data: 2005 04 14WS-302 Digital Media Adapter User’s Manual 5.3. Play the Media Files Stored in the SC-203 for the first time 1. Make sure you have WS-302 connected to SC-203 via wired LAN or wireless LAN after Network Settings completed. 2. You need to enter the IP address of your device and SC-203 or Remote PC (More detail please refer to chapter 5.5.4 Settings) 3. In SC-203, place the media files in the shared “network_disk” folder. 4. In the Home Menu, select “Remote” then press [Enter]. 5. Select one of the Remote Devices, then press [Enter]. Enter Enter](https://usermanual.wiki/Unication-Co/WS302/User-Guide-682951-Page-14.png)
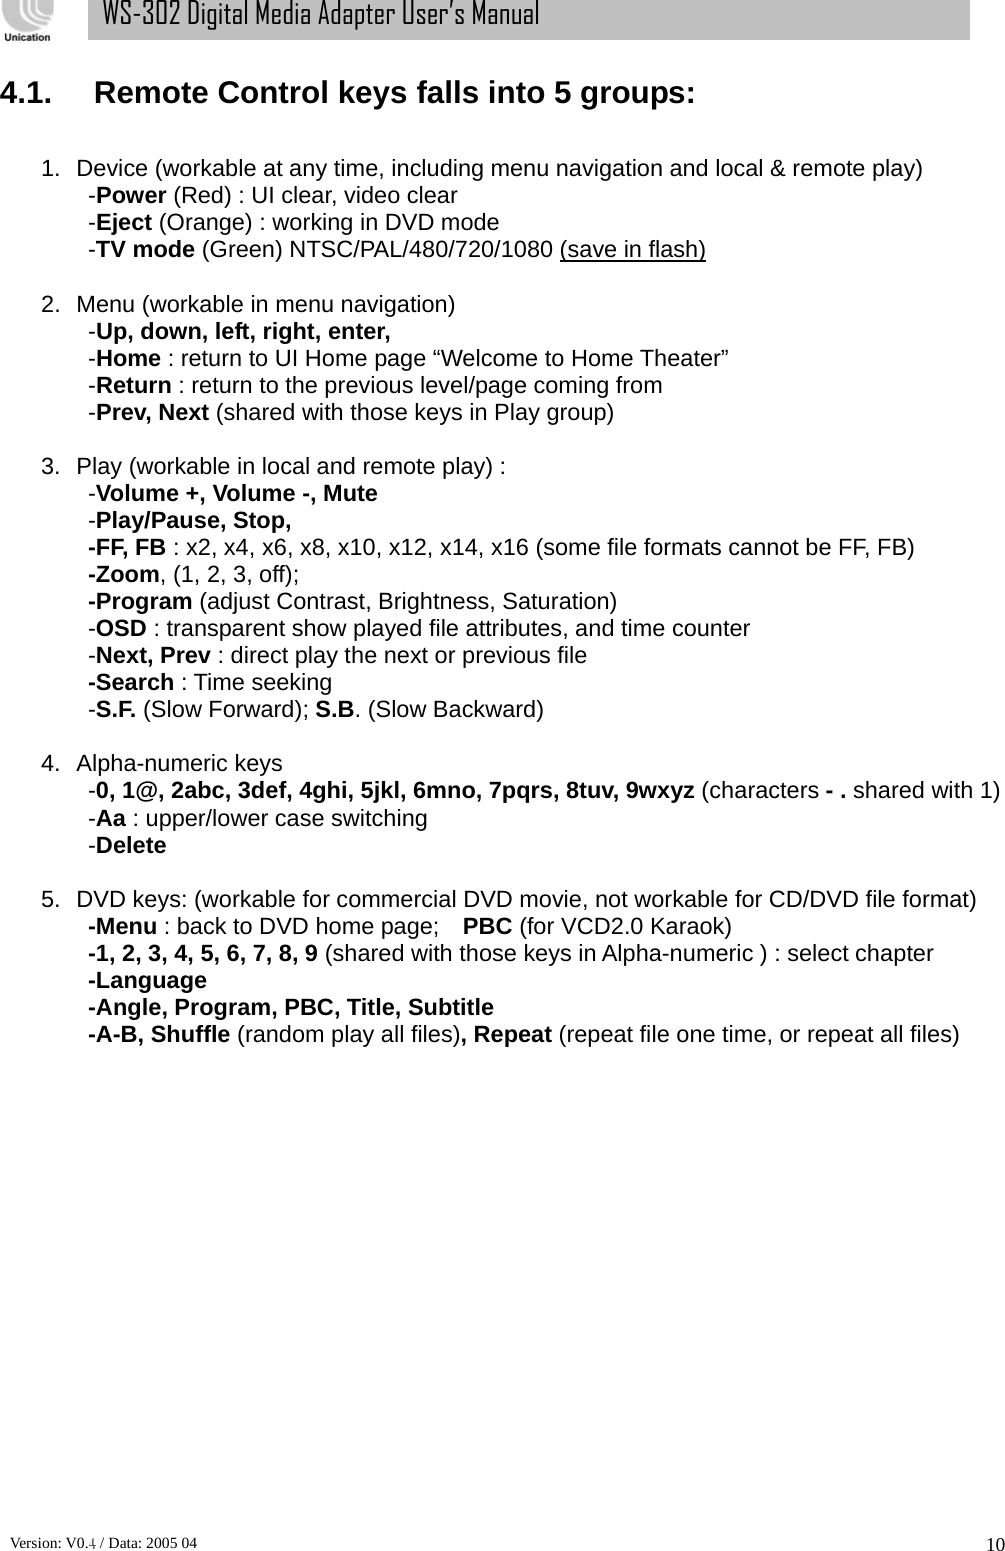
![Version: V0.4 / Data: 2005 04 15WS-302 Digital Media Adapter User’s Manual 6. If you want to hear music, select “Audio” then press [Enter]. 7. Use Remote to select the file then press [Enter] to start playing your choice of file. Enter Enter](https://usermanual.wiki/Unication-Co/WS302/User-Guide-682951-Page-15.png)
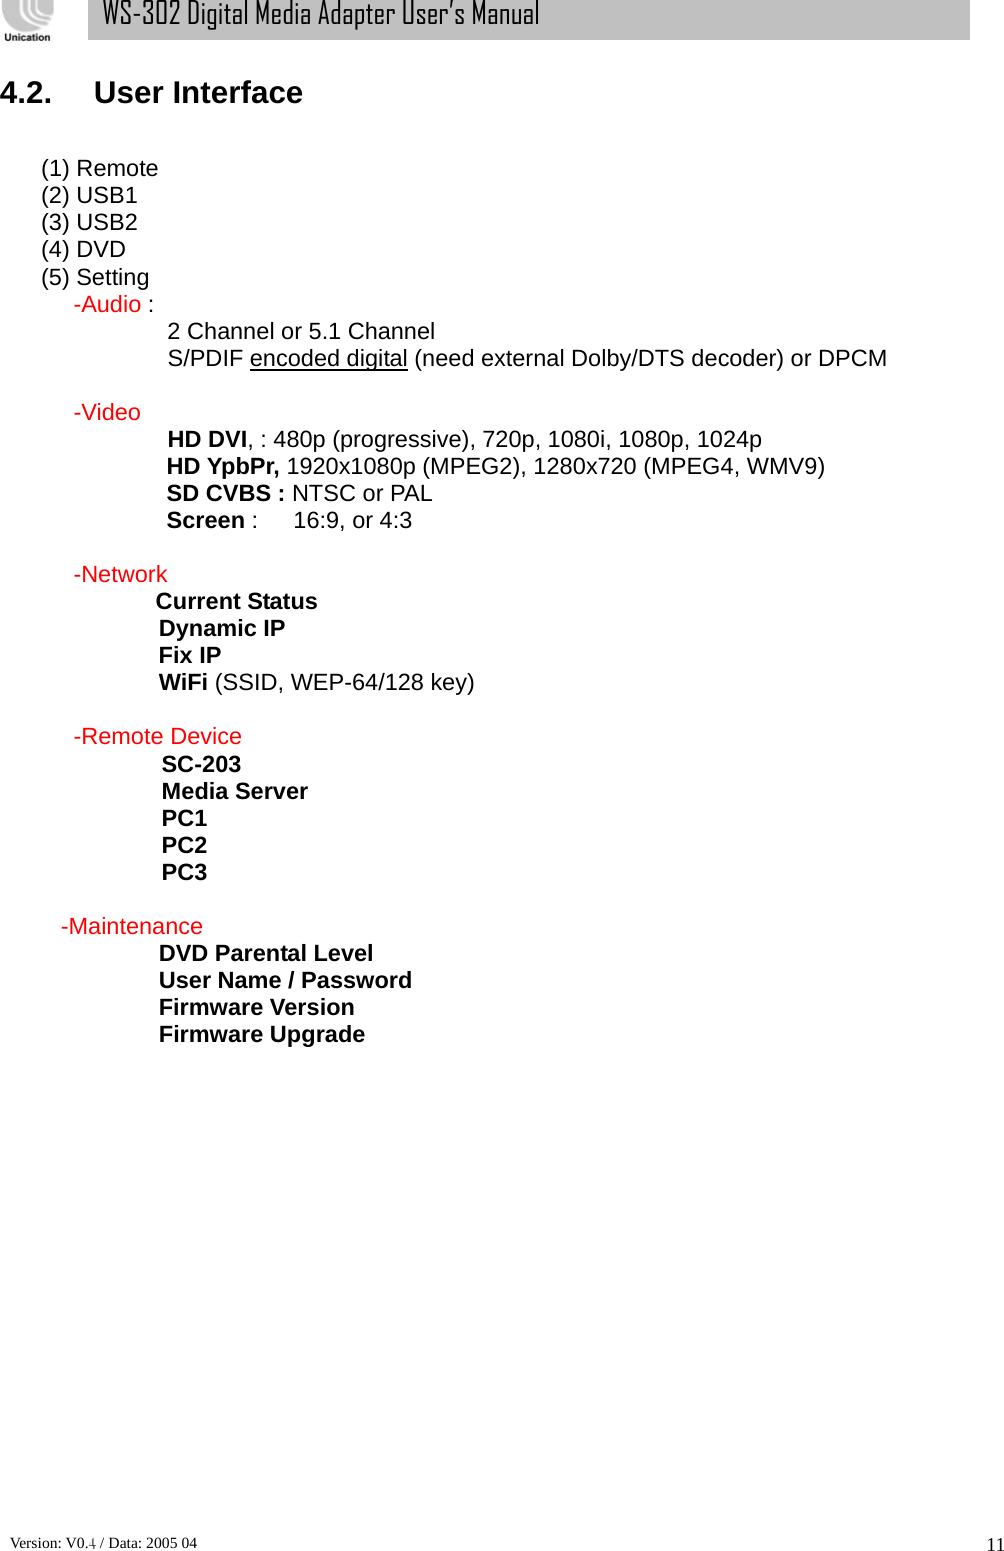
![Version: V0.4 / Data: 2005 04 16WS-302 Digital Media Adapter User’s Manual 5.4. Play the Media Files Stored in the PC for the first time 1. Make sure you have the WS-302 connected to PC with wired cable or WiFi via SC-203 or a hub after Network Settings. 2. In the remote PC, create a folder called “network_disk” and share it to the user whose user name is “guest” and the password is “guest” 3. In the remote PC, place the media files in the “network_disk” folder. 4. In the Home Menu, select “Remote” then press “Enter” press [Enter]. 5. Select the PC you want to connect then press [Enter] 6. Follow the step 5 of the “Play the Media Files Stored in the SC-203 for the first time” section to play the music, see the last page. Enter Enter](https://usermanual.wiki/Unication-Co/WS302/User-Guide-682951-Page-16.png)
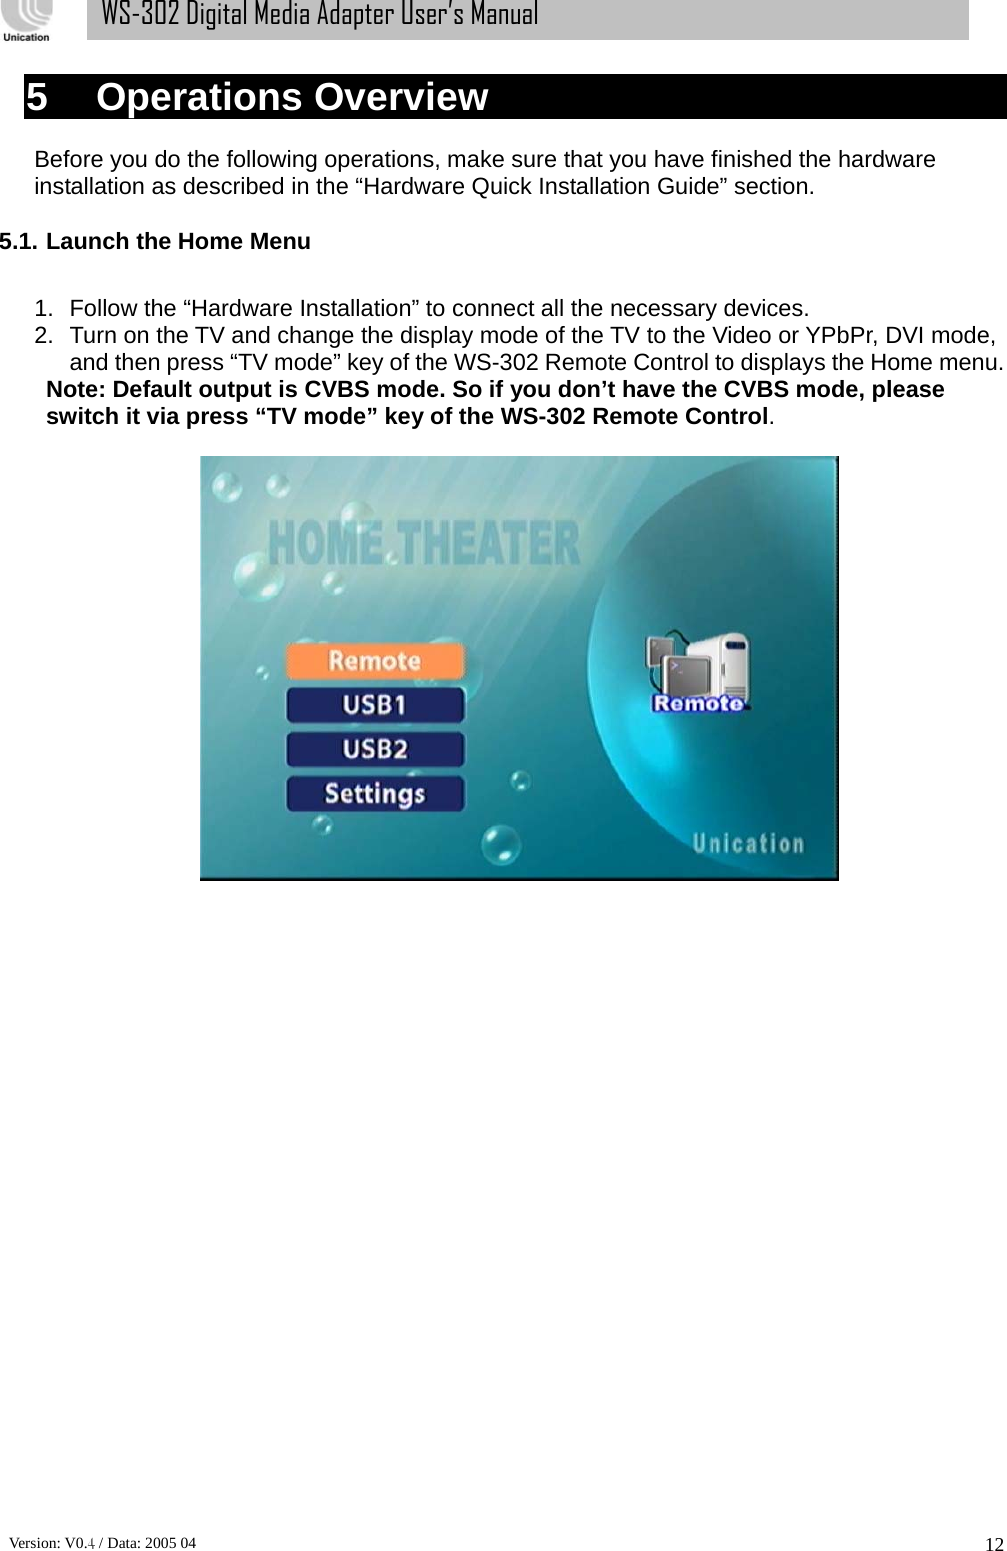
![Version: V0.4 / Data: 2005 04 17WS-302 Digital Media Adapter User’s Manual 5.5. Play the USB Media Files 1. Plug in the USB storage device in the USB slot. (USB1 or USB 2 slot),. 2. Turn on your TV and change the display mode to “Video”, which displays the Home Menu on the TV screen. 3. Use the WS-302 Remote Control or button to select USB1 or USB2. 4. Press [Enter], then the Audio/ Video/Pictures menu appears. 5. Use the Remote Control or button to select Audio, Video, or Pictures media files, let’s say you select the “Pictures” and then press [Enter] when “Pictures” is highlighted. 6. You will see a list of all image files and folders that contains the image files. 7. Use the Remote Control or button to select the file then press enter to view the image Press (Next) or (PREV) to view the next or the previous image file respectively. Enter Enter](https://usermanual.wiki/Unication-Co/WS302/User-Guide-682951-Page-17.png)
![Version: V0.4 / Data: 2005 04 18WS-302 Digital Media Adapter User’s Manual 6 WS-302 User Interface (Complete UI Operations) Note: You can launch the Home Menu from any screen by pressing Home or Return key of the WS-302 Remote Control. You can launch the Home Menu from any screen by pressing Home or Return key of the WS-302 Remote Control. During the initial startup, the WS-302 displays the setup screen. Press [Enter] on the remote control to enter the Remote screen.](https://usermanual.wiki/Unication-Co/WS302/User-Guide-682951-Page-18.png)
![Version: V0.4 / Data: 2005 04 19WS-302 Digital Media Adapter User’s Manual 6.1. Remote 1. Make sure you have WS-302 connected to SC-203 (test) via wired LAN or wireless LAN after Network Settings. Currently the SC-203 server is the Online Service available on channel 2. 2. In the remote PC, create a folder called “leo” and share it to the user whose user name is “guest” and the password is “guest” 3. In the remote PC, place the media files in the “leo” folder. Audio 4. Play the Audio Files. In the SC203 (test) Menu, press “Enter” on the remote control to play the audio files. Once you enter the Audio menu, there are many audio files. Use the selection arrows to navigate to the track you wish to play. Once you have located the appropriate track, high light it and press [Enter] or [Play] on the remote control. The track will begin playing on your stereo or television speakers.](https://usermanual.wiki/Unication-Co/WS302/User-Guide-682951-Page-19.png)
![Version: V0.4 / Data: 2005 04 20WS-302 Digital Media Adapter User’s Manual Video 5. Play the Video. In the SC203 (test) Menu, press “Enter” on the remote control to play the Video files. Video (Continued) Using the Remote Control with Video files Enter – Click Enter to play your highlighted media files. PLAY/PAUSE – Pause the video and to resume playing the video. (VOL) – To increase the volume. (VOL) – To decrease the volume. MUTE – To silence the audio portion of the video. FF – To fast forward through the video. FR – To fast backward through the video. REPEAT – To repeat the video. 6. Play the Pictures. In the SC203 (test) Menu, press [Enter] on the remote control to play the pictures. Pictures (Continued) Slideshow - To start playing a pictures (include photos) slideshow, highlight a folder and press the [Play] button. The first picture will be displayed and then followed by the next pictures in the folder. All pictures in the folder will be displayed. Supported Pictures formats - JPEG (The JPEG format is the Internet and digital picture format standard used by most digital cameras), GIF (Older format still widely available on the internet for pictures, web pages, and clip art), and PNG (Portable Network Graphics standard created in response to limitations in the GIF file format). Enter](https://usermanual.wiki/Unication-Co/WS302/User-Guide-682951-Page-20.png)
![Version: V0.4 / Data: 2005 04 21WS-302 Digital Media Adapter User’s Manual 7. In the SC203 (test) Menu, use the selection arrows to navigate to the Return and press “Enter” or press [Return] on the remote control to Return the preceding menu. 8. Once you enter the Audio menu, you can view your list of audios. Use the or to navigate to the folder you wish to view. Highlight the functions icon, and press [Enter] to view the audio folder. 9. Below are the on-screen Prev Page – View the previous page on the Audio menu Enter](https://usermanual.wiki/Unication-Co/WS302/User-Guide-682951-Page-21.png)
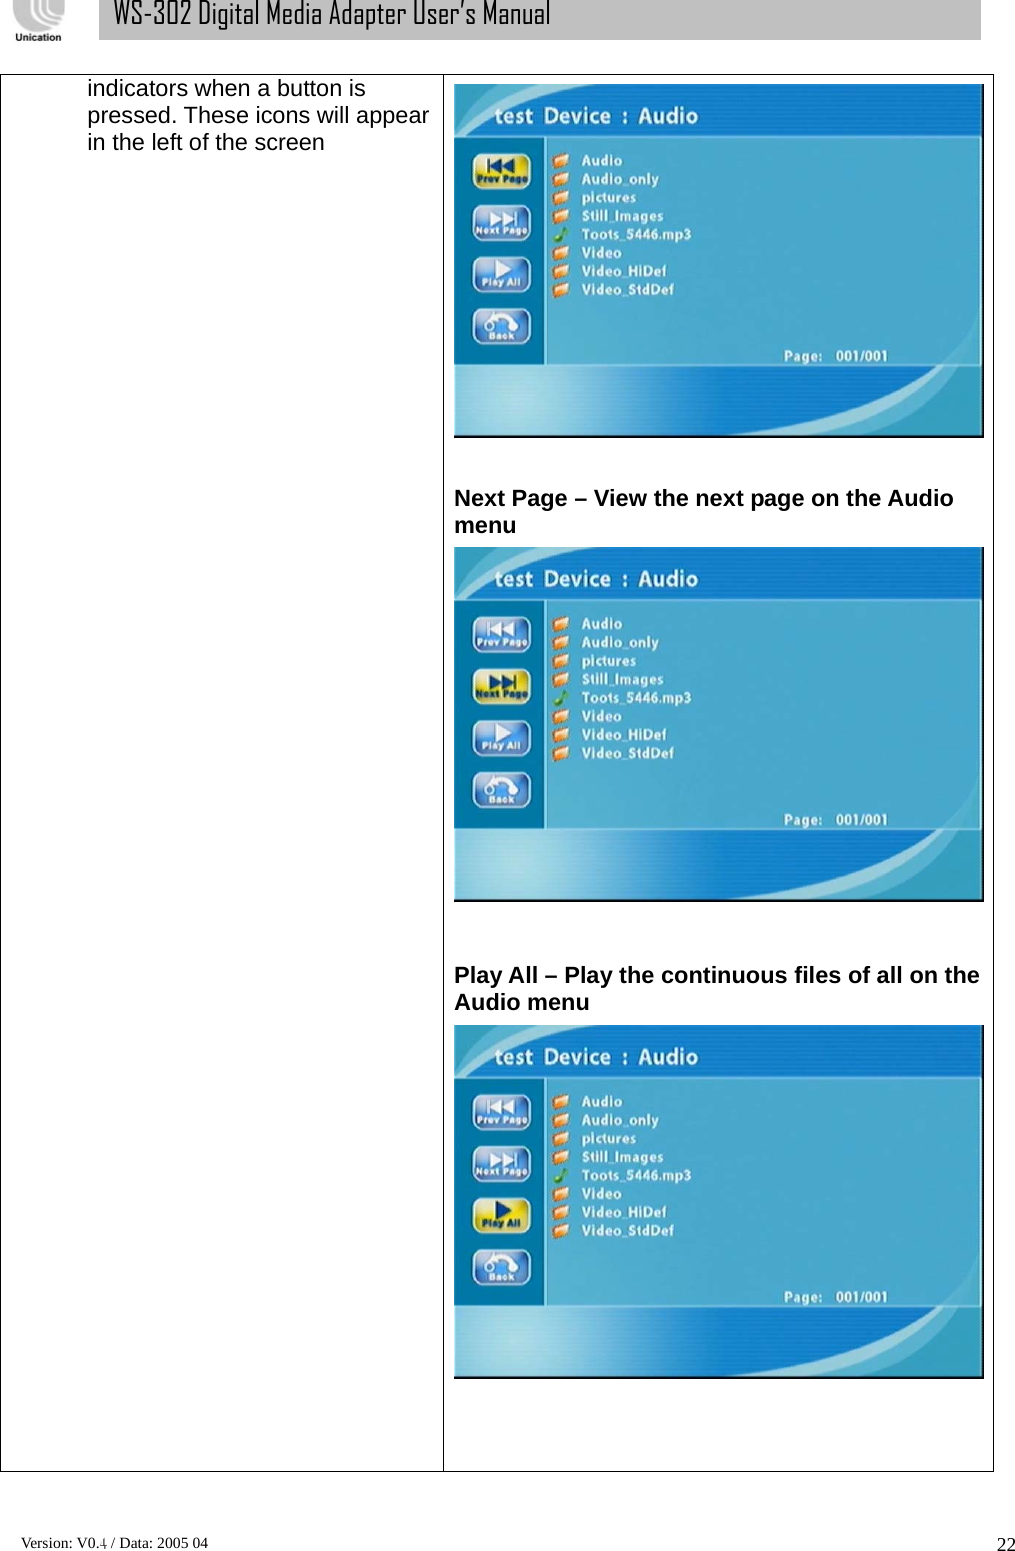
![Version: V0.4 / Data: 2005 04 23WS-302 Digital Media Adapter User’s Manual Back – Back to the last page 6.2. USB1 1. Make sure you insert the USB storage device connected to the usb port of WS-302’s front panel. 2. During the initial startup, the WS-302 displays the setup screen of USB1. Press [Enter] on the remote control to enter the USB1 screen. 3. Then you can reference the Remote’s operations to using. 4. Once you enter the Audio menu, you can view your list of audios. Use the or to navigate to the folder you wish to view. Highlight the functions icon, and press [Enter] to view the audio folder. 5. Below are the on-screen indicators when a button is pressed. These icons will appear in the left of the screen 6. The “Video”, “Pictures” folders have the same operations as above. Enter](https://usermanual.wiki/Unication-Co/WS302/User-Guide-682951-Page-23.png)
![Version: V0.4 / Data: 2005 04 24WS-302 Digital Media Adapter User’s Manual 7. Or press [Return] on the remote control to Return the preceding menu.](https://usermanual.wiki/Unication-Co/WS302/User-Guide-682951-Page-24.png)
![Version: V0.4 / Data: 2005 04 25WS-302 Digital Media Adapter User’s Manual 6.3. USB2 WS-302 supports 2 USB storage devices to play. You can reference the USB1’s operations to use. 6.4. Settings Basically, you don’t need to change default settings except to enter the IP address of your device and SC-203 or Remote PC. If you want to change the configuration of your setup you can press [Enter] on the screen of the Settings button. The following describe to change the different settings: Home screen Æ Settings Æ Network](https://usermanual.wiki/Unication-Co/WS302/User-Guide-682951-Page-25.png)
![Version: V0.4 / Data: 2005 04 26WS-302 Digital Media Adapter User’s Manual To check your Ethernet network settings or Wireless network settings if it is correct. Home screen Æ Settings Æ Network Æ Network Status Home screen Æ Settings Æ Network Æ Network Status Æ Ethernet To see the Ethernet Status: Home screen Æ Settings Æ Network Æ Network Status Æ Ethernet (press [Enter]). Ex. ( IP : 192.168.5.100 Netmask: 255.255.255.0 Gateway: 192.168.5.1 ) It means you can access Intranet via the Ethernet (LAN) network.](https://usermanual.wiki/Unication-Co/WS302/User-Guide-682951-Page-26.png)
![Version: V0.4 / Data: 2005 04 27WS-302 Digital Media Adapter User’s Manual To see the WiFi Status: Home screen Æ Settings Æ Network Æ Network Status Æ Wireless (press [Enter]). There is no value on WiFi Status. It means you can’t access Intranet via the Wireless (WiFi) network. To configure Ethernet Setting: You can select “Auto” to auto acquired a IP or select “Manual” to configure manually or select “Disable” to disable the Ethernet’s function: Home screen Æ Settings Æ Network Æ Ethernet Setting Select Auto to configure Ethernet automatically. Home screen Æ Settings Æ Network Æ Ethernet Setting Æ Auto.](https://usermanual.wiki/Unication-Co/WS302/User-Guide-682951-Page-27.png)
![Version: V0.4 / Data: 2005 04 28WS-302 Digital Media Adapter User’s Manual Select Manual to configure Ethernet manually. Home screen Æ Settings Æ Network Æ Ethernet Setting Æ Manual. Home screen Æ Settings Æ Network Æ Ethernet Setting Æ Manual. (press [Enter]). z IP: Enter the IP address of the WS-302z Netmask: Enter the subnet mask of the WS-302 z Gateway: Enter the IP address of the router on your network Ps. IP and Gateway are the same subnetmask, so they are alike. (all 192.168.5.x) Note: They can’t be the same Select Disable to stop Ethernet configurations. Home screen Æ Settings Æ Network Æ Ethernet Setting Æ Disable. (press [Enter])](https://usermanual.wiki/Unication-Co/WS302/User-Guide-682951-Page-28.png)
![Version: V0.4 / Data: 2005 04 29WS-302 Digital Media Adapter User’s Manual To configure WiFi Setting: You can select “Auto” to auto acquired a IP or select “Manual” to configure manually or select “Disable” to disable the WiFi’s function or select “Encryption” to protect WiFi to avoid Intruder: Select Auto to configure WiFi automatically. Home screen Æ Settings Æ Network Æ WiFi Setting Æ Auto. Select Manual to configure WiFi manually. Home screen Æ Settings Æ Network Æ WiFi Setting Æ Manual. SSID: Enter the SSID (Service Set Identifier, or the name of the wireless network) by pressing [Enter] on the remote control when the field is highlighted. The on-screen keyboard will appear and you can manually enter an SSID Which one to use: Fix IP is used for peer to peer wireless networks that do not contain a router or an access point. DHCP is used for networks with an access point or router.](https://usermanual.wiki/Unication-Co/WS302/User-Guide-682951-Page-29.png)

![Version: V0.4 / Data: 2005 04 31WS-302 Digital Media Adapter User’s Manual Select Disable to stop WiFi configurations. Home screen Æ Settings Æ Network Æ WiFi Setting Æ Disable. (press [Enter]) Select Encryption to protect WiFi configurations. Home screen Æ Settings Æ Network Æ WiFi Setting Æ Encryption. (press [Enter])](https://usermanual.wiki/Unication-Co/WS302/User-Guide-682951-Page-31.png)
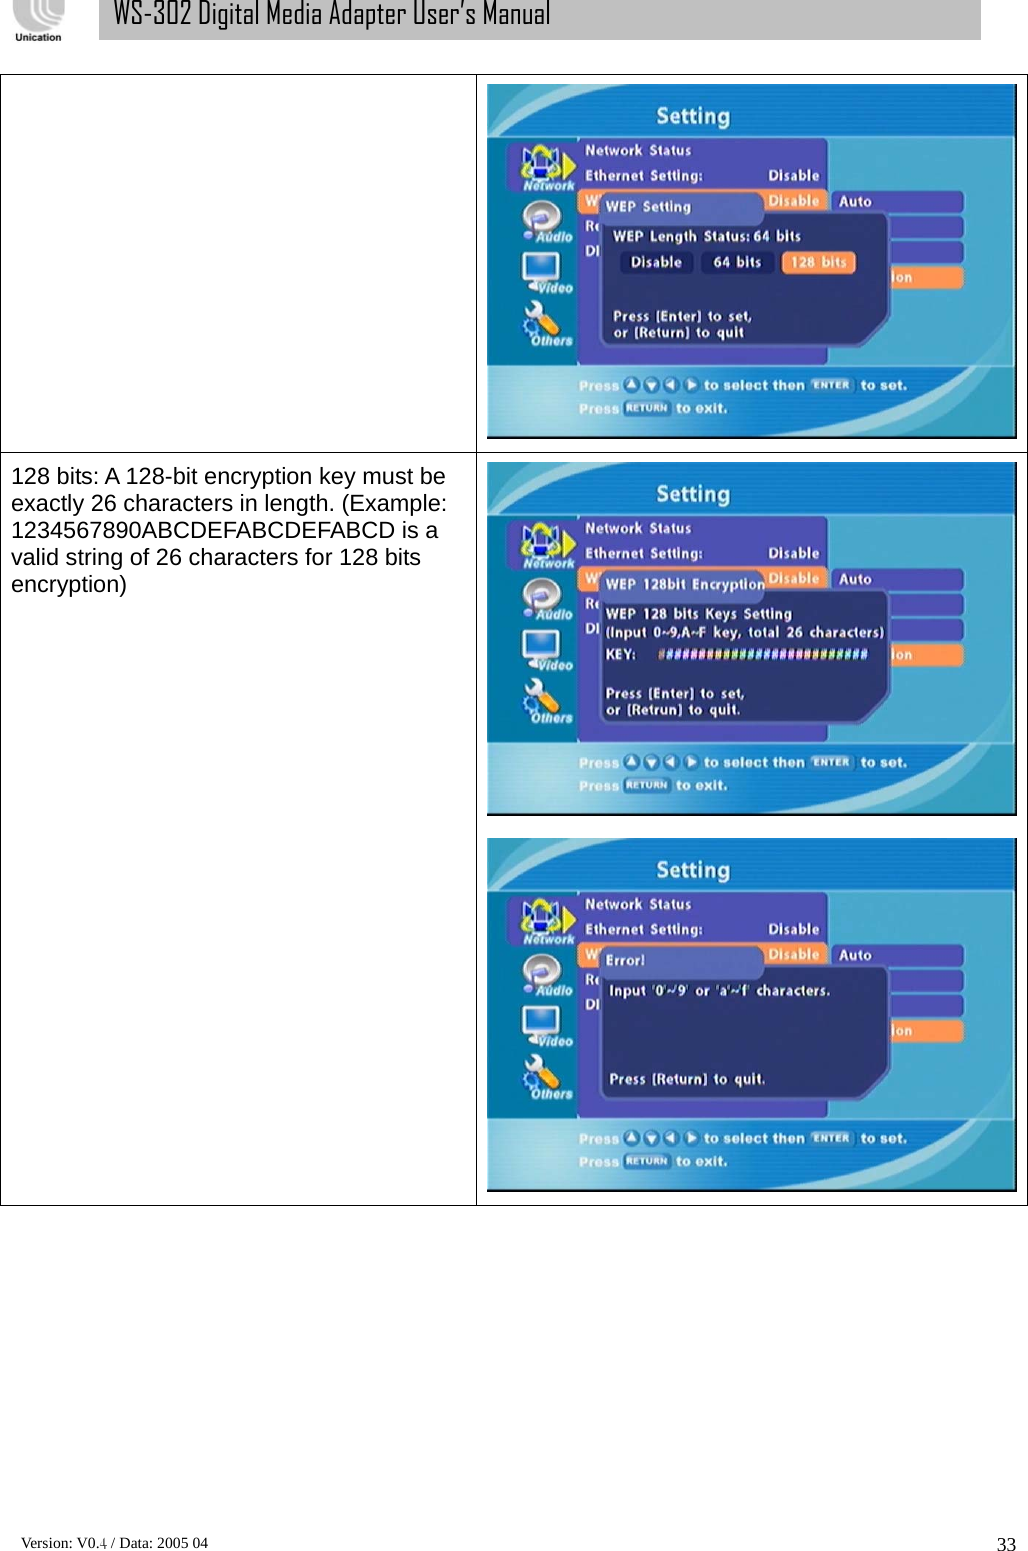
![Version: V0.4 / Data: 2005 04 32WS-302 Digital Media Adapter User’s Manual WEP (Wired Equivalent Privacy): An industry standard encryption technology used by 802.11b wireless devices. There are three options configurable under this setting, Disable, 64 bits, and 128 bits. To toggle between the options, press the [Enter] button when WEP is highlighted. Key: To connect to an encrypted wireless device, the key you enter here must match the key of the device exactly. Press the [Enter] button on the remote control with this field highlighted to enter a key. The on-screen keyboard will be displayed and you can enter the key. Keys must be entered in a specific hexadecimal format. Numbers 0 through 9 and letters A through F are used and the number of characters depends upon the encryption type. 64 bits: A 64-bit encryption key must be exactly 10 characters in length. (Example: 1234567890 is a valid string of 10 characters for 64 bits encryption)](https://usermanual.wiki/Unication-Co/WS302/User-Guide-682951-Page-32.png)
![Version: V0.4 / Data: 2005 04 34WS-302 Digital Media Adapter User’s Manual Select Remote Device Setting to setup Remote. Home screen Æ Settings Æ Network Æ Remote Device Setting Æ Device1. (press [Enter]) Remote Content Devices: Setup your remote device its connection name, host name (IP address), shared path name, user name , and password. When done, press [Enter]. Note: 1. Make sure you have WS-302 connected to other device via wired LAN or wireless LAN after Network Settings. 2. Then select a channel (Device1 – Device5) to configure. 3. In the remote device(SC-203), create a folder called “network_disk” (Default folder) and share it to the user whose user name is “guest” and the password is “guest”](https://usermanual.wiki/Unication-Co/WS302/User-Guide-682951-Page-34.png)
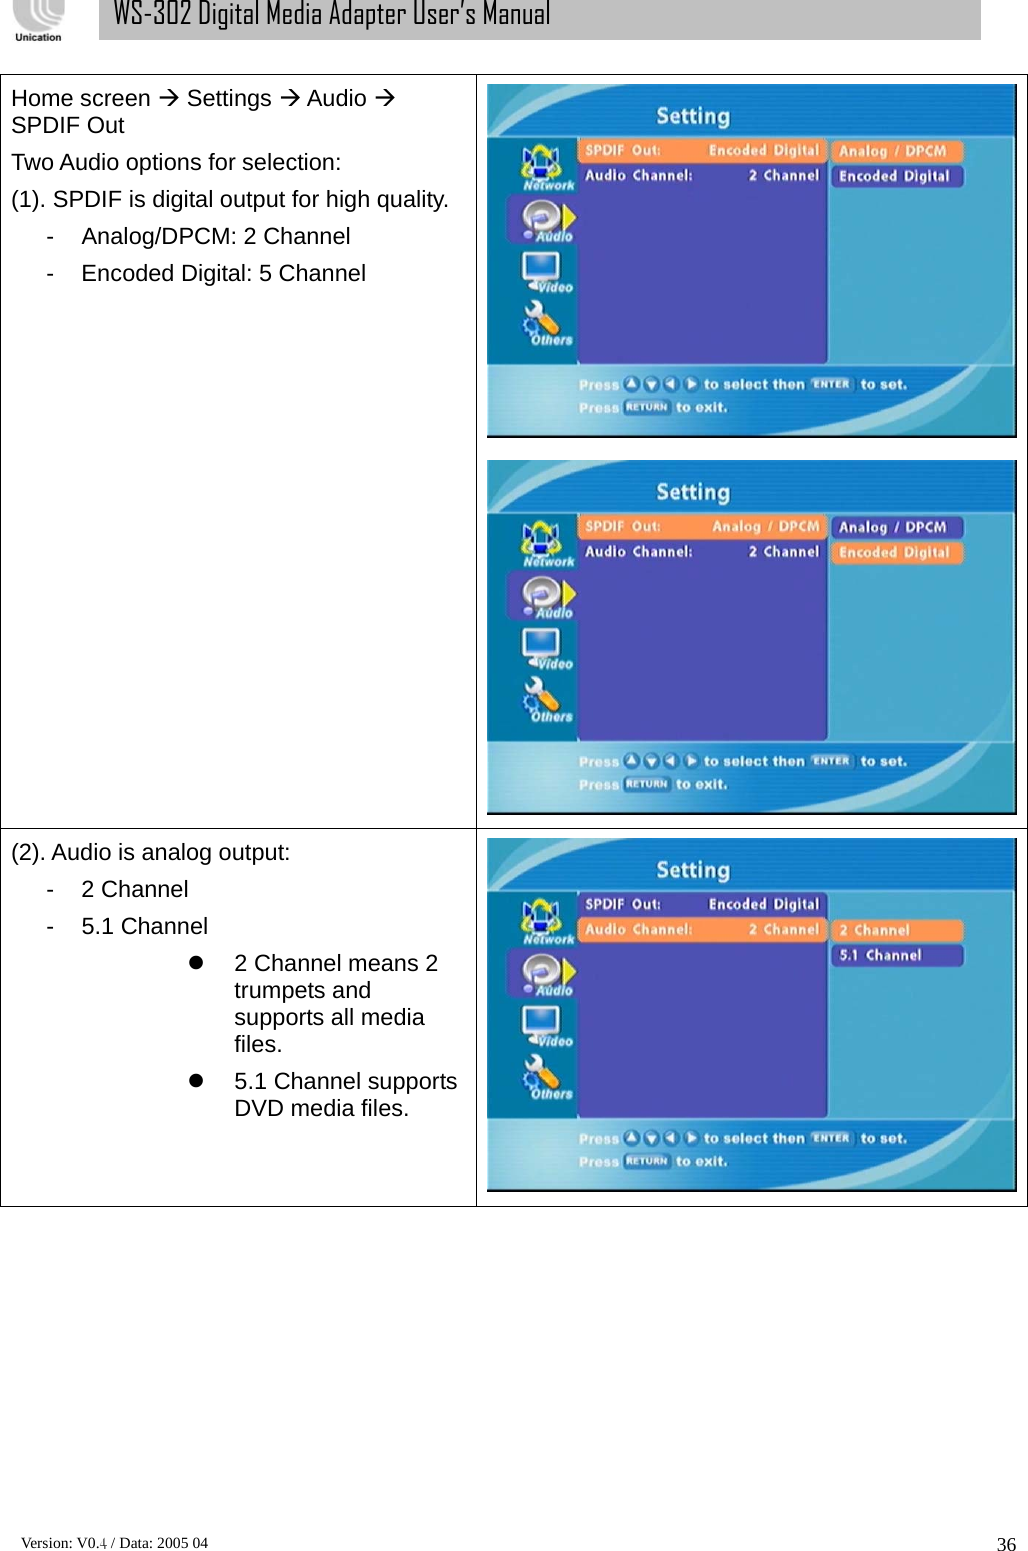
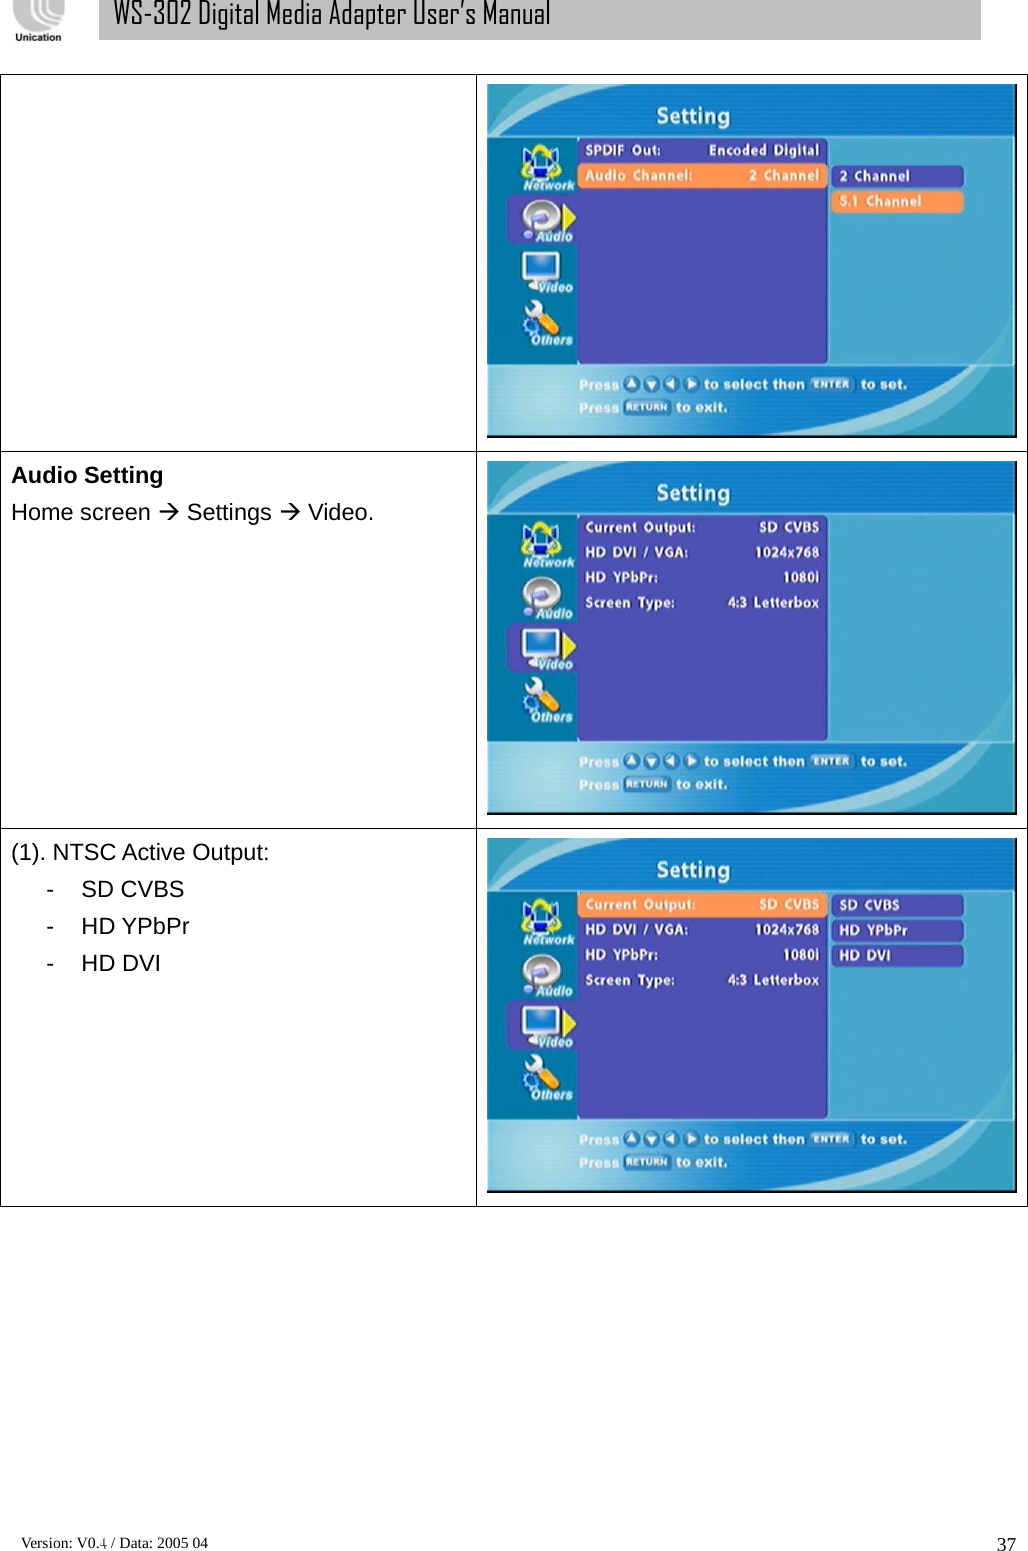
![Version: V0.4 / Data: 2005 04 35WS-302 Digital Media Adapter User’s Manual Select DNS Setting to setup Remote. Home screen Æ Settings Æ Network Æ Remote Device Setting Æ Device1. (press [Enter]) DNS Setting: Enter the IP address of the domain name server. If your WS-302 use DNS (Domain Name Service) to Internet. Audio Setting Home screen Æ Settings Æ Audio.](https://usermanual.wiki/Unication-Co/WS302/User-Guide-682951-Page-35.png)