Unicorn Information System PVR HDD Multimedia Player User Manual
Unicorn Information System Co., Ltd. HDD Multimedia Player
Users Manual
Unicorn Information System
1
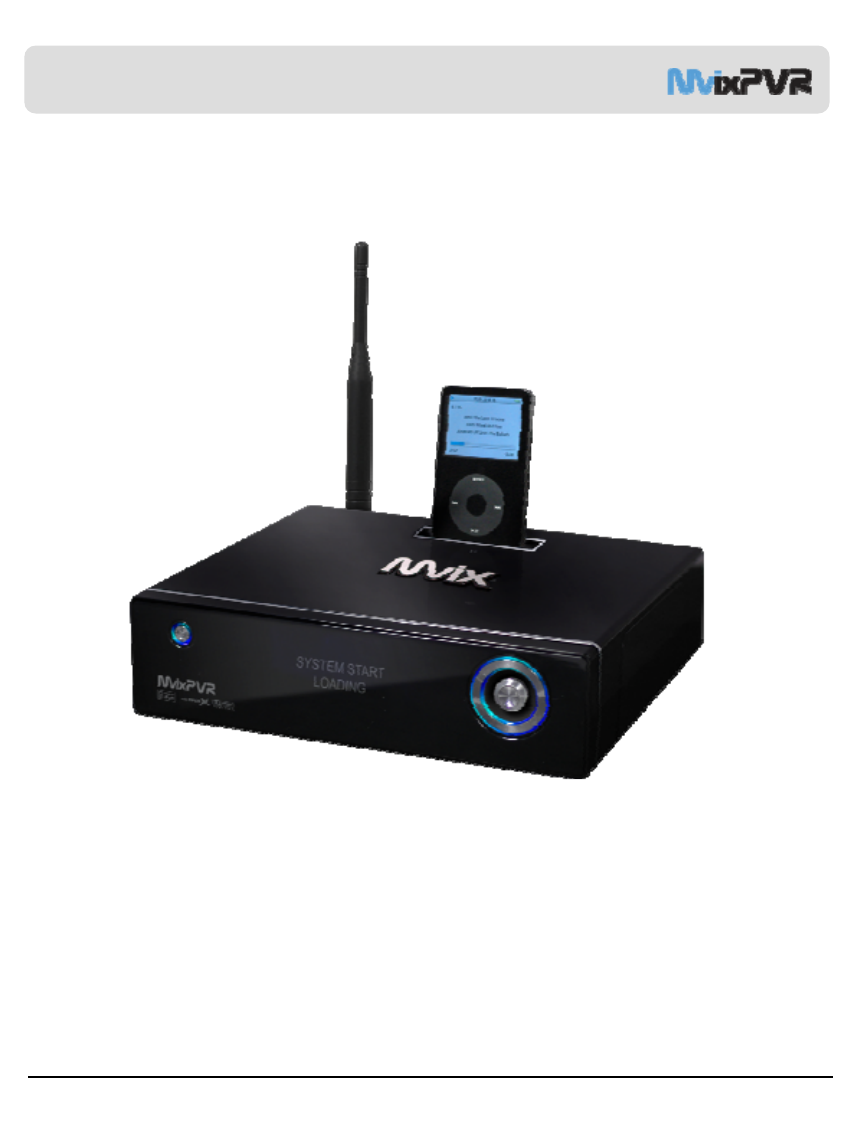
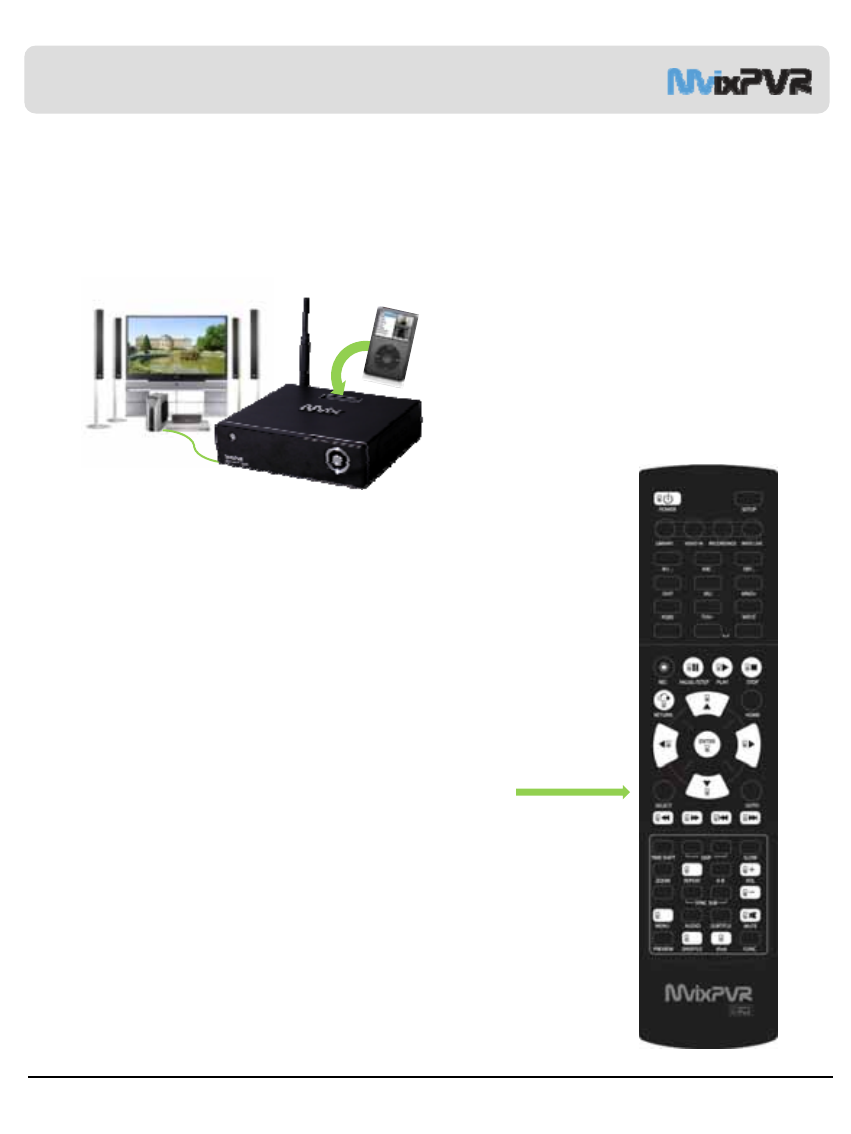
MVIX PVR Player
Ver 2.0
User Guide
www.mvix.net
Unicorn Information System
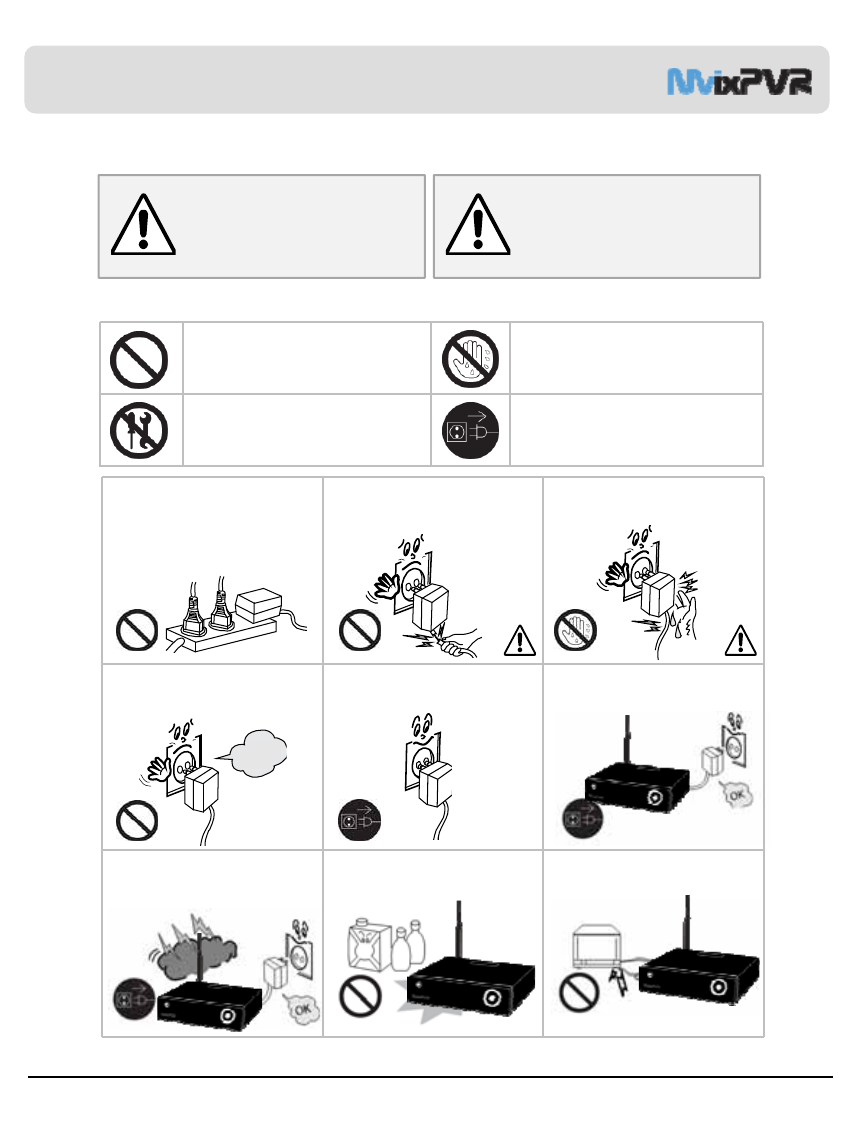
Safety Notes
2
Warning Caution
Act prohibited Contact by wet hand
prohibited
Modification prohibited Power plug to be separated
from power outlet
○Instructions
The following are to protect safety of user and to prevent damages to property.
Use product properly after carefully reading the following contents.
Do not connect a number of power
plugs at the same time. (This may
generate heat or cause fire.)
Do not forcefully pull out power cord.
(Breakage of power cord may cause
fire and electric shock.)
Do not insert of pull out power plug
with wet hand. (This may cause
electric shock.)
Do not insert power plug if it fits
loose to power outlet. (This may
cause fire or electric shock.)
Make sure to turn off power switch
and pull out power plug when moving
product.
Do not place plant pots, cups or
objects filled with chemical or water,
etc. on top of product. (This may
cause breakdown of product.)
Clean the outside of product by
wiping it with lightly wet or dry towel.
(Using detergent for grease removal,
thinner or heavily wet towel, etc. may
cause breakdown of product.)
Product must not be disassembled,
repaired or modified. Take caution
not to have foreign substances
inserted into products. (This may
cause breakdown of product or
electric shock.)
Do not forcefully bend the connected
power cord or have it pressed down
by heavy objects. (This may cause
fire or electric shock.)
Violating instructions
may lead to serious
injury or death.
Violating instructions
may lead to slight
injury or damage to
product.
Wall out
Is loose
Unicorn Information System
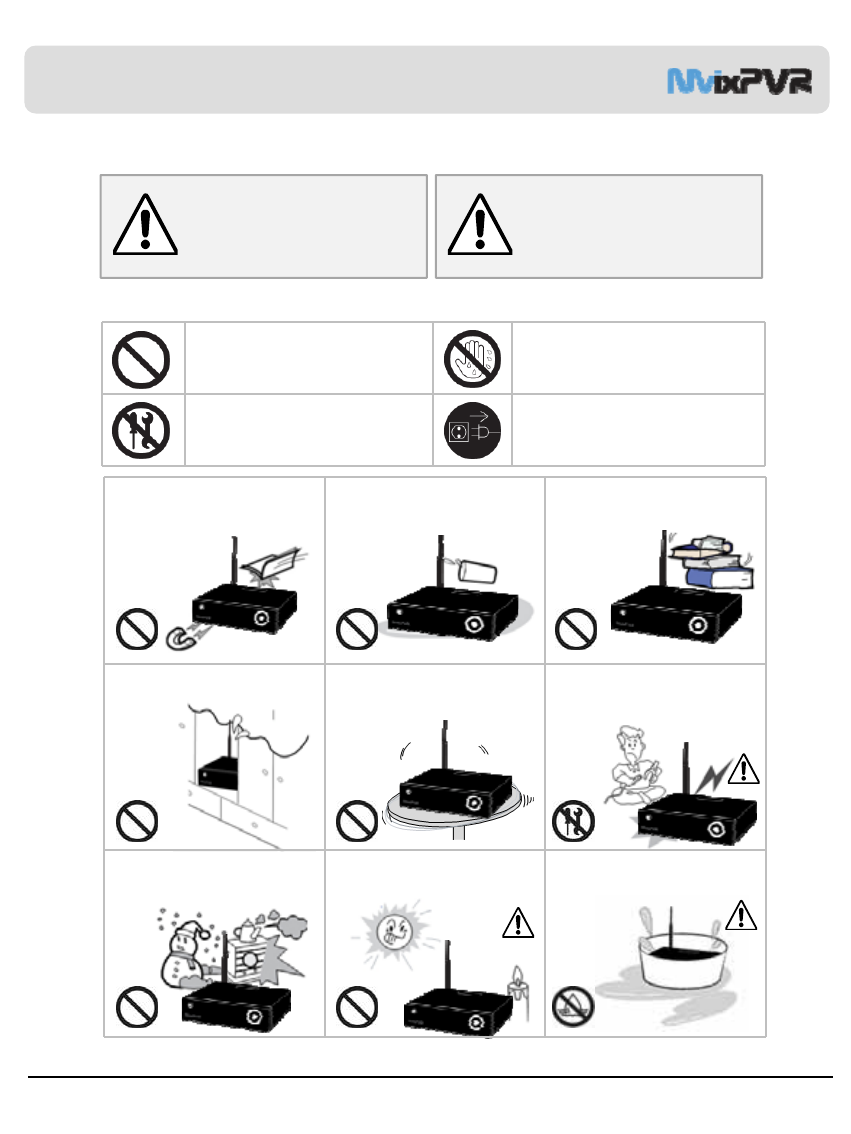
Do not drop objects on top of product
or exert impact to product. Keep
product away from severe vibration
or magnetic objects.)
Do not place plant pots, cups or
containers filled with chemical or
water, etc. on top of product. (This
may cause fire/ electric shock.
Falling of the objects may also cause
injury.)
Do not place heavy objects on top of
product. (Falling of objects may
cause injury.)
Do not cover up product or install it in
places with poor ventilation, such as
a wall closet, etc.
Install product in level and stable
place. (Otherwise, product may not
operate normally.)
Product must not be disassembled,
repaired or modified. Take caution
not to have foreign substances
inserted into products. (This may
cause breakdown of product or
electric shock.)
Do not install product in places
where temperature is too high (35˚ or
higher)/ too low (5˚ or less) or
humidity is high.
Do not install product under direct
sunlight or near objects of heat, such
as lit candle, cigarette or fire, etc.
Do not place product in water. (This
may cause breakdown of product or
electric shock.)
Safety Notes
3
Violating instructions
may lead to serious
injury or death.
Violating instructions
may lead to slight
injury or damage to
product.
The following are to protect safety of user and to prevent damages to property.
Use product properly after carefully reading the following contents.
Warning Caution
○Instructions
Act prohibited Contact by wet hand
prohibited
Modification prohibited Power plug to be separated
from power outlet

Unicorn Information System
4
Table of Contents
Safety Notes 2
About Product 6
Notes 8
Specifications 9
Components 11
Hardware Installation 12
Connection 14
Remote Control Functions 17
Chapter 1. PVR Setting
1) HDD Formatting 20
2) Language/ Resolution/ Time Setting in Wizard 23
3) Network Setting in Wizard 24
Summary of Main Menus 25
Chapter 2. Major Functions
1) MEDIAPLAY 26
1-1 Music 26
1-2 Photo 27
1-3 Movie 28
1-4 Network Share Folder and MvixFTS 30
1-5 My List Function 33
2) DIGITAL RECORDER 34
2-1 Video In Recording 34
2-2 Usage of Recording 35
2-3 Time Shift 35
3) RECORDINGS LIBRARY 36
3-1 Play Recorded Title 36
3-2 Sort Recorded Title 37
3-3 Change Name of Recorded Title 38
3-4 Edit Recorded Title 38
3-5 Delete Recorded Title 42

Unicorn Information System
Table of Contents
Chapter 3. For Advanced Users
1) Timer 43
1-1 Add Preset Recording 43
1-2 Delete Timer 45
1-3 Timer Status Change 45
1-4 Timer History 46
2) File Manager 47
2-1 Copy Function 47
3) Mvix Live Function 49
Search Movies in You Tube 50
Picasa Function 51
4) UPnP Server Function (LCD/ iPod Update) 55
Chapter 4. Media Environment Setting
1) Language Setting 57
2) Audio Setting 58
3) Video Setting 59
4) REC Setting 60
5) Network Setting 62
5-1 Wired Network 62
5-2 Wireless Network 63
6) System Setting 64
7) Other Settings 65
Chapter 5. MvixFTS Use and Share
1) MvixFTS Installation 68
2) Windows XP Share Folder Setting 69
3) Change/ Give Power for Windows XP Share Folder (Copy Function) 70
4) Windows Vista Share Folder Setting 71
5) Change/ Give Power for Windows Vista Share Folder (Copy Function) 74
Chapter 6. iPod Expanded Connection Control 75
5
Unicorn Information System
6
About Product
PVR Function
Using MvixPVR, you can record a film you are watching on real-time basis with a single remote control
button. Also, while record is in progress, you can check the film being recorded. Using Recording library
menu, you can view title of the film being recorded. By playing the title of the recorded film, you can view the
film per stage in slow motion with the Slow key on the remote control. This function is convenient to use
when watching sports with fast actions.
The new MvixLIVE function has been created to use the massive media data that exist in the Internet, such
as You Tube media files and Picasa serviced by Goggle, etc. We will provide you with better and greater
service through continuous update.
MvixPVR supports time shift function. The film you are watching can be temporarily stopped on a real-time
basis. The time shift function will allow you to stop watching a the TV show at any point (for a unexpected
reasons) and allow you to continue where you stopped at a later stage so as to ensure that you do not miss
out on the TV show. During time-shifting mode you can also rewind or use slow motion in progress. (Time
shift does not create recorded file.)
MvixPVR supports scheduler function that executes recoding by automatic booting on the preset date and
time, even when the product function has been stopped..
MvixPVR supports the basic function to easily edit video content. You can simply cut, separate, split, merge
and copy video content by using the buttons on the remote control.
MvixPVR supports UPnP server functions. MvixPVR supports free DDNS so that you can connect to the
internal HDD of the PVR not only from your local PC, but also from any PC with a Internet connection. This
function can be used from an external device that supports UPnP client.
The built in iPod dock makes it possible to use your iPod on the MvixPVR. When using a iPod that that
supports TV-OUT function you can easily display your iPod video content on your TV. Ipod recording and
charging functions are also supported. The MvixPVR remote also controls many of the iPod functions.
※Unicorn Information System does not hold responsibilities for recording commercial broadcasting
contents and showing them for illegal/ commercial purposes rather than personal/ non-
commercial use or trading the recorded contents illegally. Note that the person recording the
contents shall wholly assume civil accountability/ criminal responsibility.
Unicorn Information System
About Product
7
Multimedia library
High Resolution HD-level File Play: MvixPVR supports the max. of 1920X1080 interface scan to provide clear and
high resolution picture quality.
Supporting Diverse Movie Format Types
MvixPVR supports a variety of HD files, such as TP, TS and TRP files, but also MPEG, Divx (3/4/5), Xvid, DAT, ISO,
DVD (VOB, IFO) and MKV / WMV / ASF / MOV (if using MvixFTS), etc. You can conveniently enjoy watching movies
anywhere as long as you have access to a display device, such as TV, etc. (supporting SD-level film play for MKV).
Convenient Copy
MvixPVR allows you to copy a recorded media file (with FAT32 partition) to a network-connected PC. Also, you can
copy files by high-speed from PC to MvixPVR HDD or to USB storage device connected to MvixPVR.
Supporting Diverse Music Files
MvixPVR supports a variety of music sources, such as MP3, OGG, WAV, WMA, AC3 and DTS, etc. As the player
supports fast rewind/ forward functions, you can quickly find the desired part you require for listening.
Digital Photo Album
MvixPVR supports the upgraded JPEG and BMP image files. The entire family can enjoying watching the files
through TV, etc. Also, vertically photographed filed can be rotated in screen for viewing without requiring
modification.
Network-shared File Play
Files shared on a network can be played through wired/ wireless means without having to move them to the
MvixPVR hard disk..
Supporting USB Host
MvixPVR supports 2 USB2.0 hosts. By connecting USB external storage devices, you can easily add additional
storage to the MvixPVR and play the files on the external USB devices. A USB type memory card reader, etc. can
also be used.
Supporting High Resolution HDMI
Built in with HDMI terminal for digital signal output, MvixPVR enables you to enjoy video content with better picture
quality..
5.1CH Audio Output and Down Mix Function
MvixPVR provides 5.1CH AC3 audio and DTS, etc. Also, down mix function lets you play 2CH audio through TV, etc.
without requiring an additional decoding device, such as amplifier, etc. (optical, coaxial).
Unicorn Information System
8
Notes
1 Contents with copyright, such as music sources or media contents, etc., are protected pursuant to the related laws and
regulations, such as Copyright Act, etc. The legal responsibilities in violating copyright or intellectual property right by using
this product shall be assumed by the user.
2 Make sure to check CODEC of the file to be played. This product does not support media files of all CODEC types. Only the
playable CODEC files must be used. Change media file or CODEC that is not supported into the supported file by using
specific utilities, etc. Even if CODEC is playable, the file may not be successfully played according to file characteristics or
user environment.
3 When removing USB after connection to a PC, make sure to protect data and prevent erroneous operation of product by
removing safety device. Also, make sure to turn off power of product when connecting or disconnecting separate storage
devices to USB host of product. Otherwise, it may cause erroneous operation of product.
4 For hard disk, use 3.5” SATA type HDD. It must be formatted by the format method used by product. So, make sure to
complete formatting when using product for the first time. Format erases all data. Make sure to back up.
5 This product uses a Windows PC and network sharer function. Network sharer may not operate normally due to error in
Windows program or user environment. Unicorn Information System is not liable for this.
6 Save data stored in this product separately in a safe location. Unicorn Information System does not assume responsibilities
for loss of or damage to the stored data.
7 Do not drop or exert impact to product. This may cause breakdown of product.
8 Protect inside of product from metallic objects or combustible foreign substances, etc. This may cause fire or breakdown of
product.
9 Do not randomly disassemble, modify or repair product. This may cause breakdown of product. After-sale service will be
provided at cost for breakdowns caused by random disassembly, modification or repair.
10 Keep product not to be in contact with water or liquid. Also, do not use product in a humid area. This may cause fire, electric
shock or breakdown of product.
11 Do not clean the surface of product with chemical substances or detergents. This may damage the surface of product.
12 Do not expose product to high heat or direct sunlight. Long-term storage or use in high temperature may cause breakdown
or disable successful file play. Make sure to use product in a well-ventilated area.
13 Do not leave product near highly magnetic objects. This may lead to data loss and breakdown of product.
14 Connect all cables when power to MvixPVR and TV is turned off. Mvix can be used as a multimedia player and a mobile
disk when connected to PC. However, both functions cannot be used simultaneously.
15 Product may not operate successfully if used for a long period of time or used in areas with harmful elements. If buffering
occurs, stop operation and restart product. Or rebooting is also recommended.
Unicorn Information System
9
Specifications
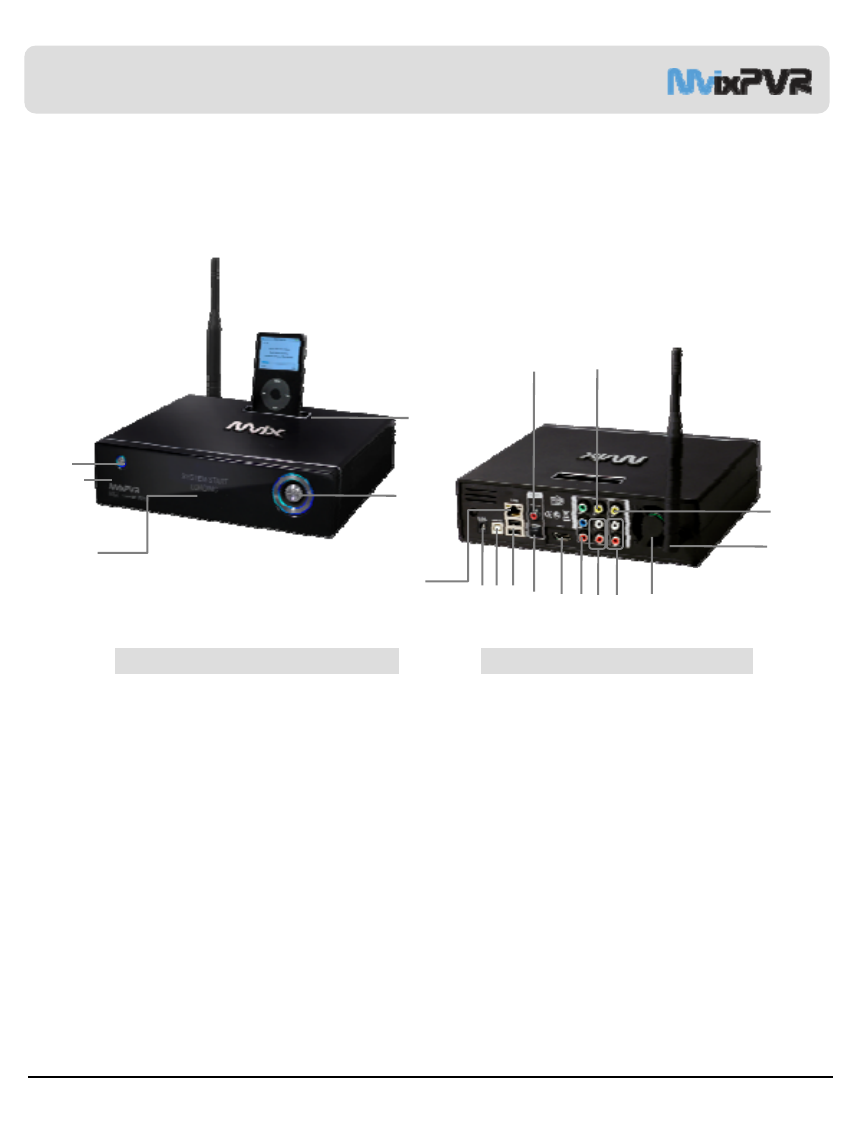
Titles of Parts
Front
①Direction key (up/ down/ left/ right)
②Direction key OK (press)
③Direction key OK (press by 3 seconds or
longer -> move to HOME)
④LCD status window
⑤Power button
⑥IR reception part
iPod expand connections
Back
①Wireless antenna
②Optical terminal
③10/100Mbps LAN port
④USB2.0 A-type 2-port host
⑤Stereo RCA terminal
⑥Component terminal
⑦Composite terminal
⑧HDMl terminal
⑨Input composite terminal
⑩Input stereo RCA terminal
⑪Fan
⑫USB 2.0 A-type slave
⑬Power
⑦
⑭Coaxial terminal
②
⑤
①
⑥③
②
⑦
④①
③⑬⑫④⑧⑥⑤⑩
⑨
⑦
⑪
⑭
Unicorn Information System
10
Specifications
Specifications
Product Name MvixPVR
Operating System Linux
File Format Recording Partition : UDF (UNIX file system)
File Partition : FAT32 / NTFS
Recording
Mode HQ, SP,LP,EP,SLP
Encoding
(Recording) Video MPEG II (PAL 720x576, 352x576 / NTSC 720x480, 352x480)
Audio MPEG II (48KHz Stereo 256Kbps / 192Kbps)
Supported Files &
Formats
Video
MPEG2 HD(ts,tp), Divx HD(avi), Xvid HD(avi), MPEG1/2 (dat,mpg.vob.ifo.iso), Divx (avi),
Xvid(avi), MKV(NOT H.264),
(MvixFTS use : MKV(H.264 720P), RMVB, MOV,WMV)
Audio MP3, WMA, ACC, OGG, WAV, AC3,
DTS decoding including down-mixing, DTS pass through
Image BMP, HD JPEG/JPG,GIF,PNG,TIFF/TIF(Progressive JPEG not supported)
Video Input Composite,
Video Output Composite, Component, and HDMI 1.1 With CEC
Audio Output Analog Stereo RCA
Digital Coaxial, Optical
TV System NTSC, PAL, or HDMI AUTO
Hi-Def Decoding HD COMPONENT Y, Pb, Pr (480, 720,1080) / HD HDMI (480, 720,1080i)
WMV, ASF, AVI and MP4 formats
Audio Decoding MPEG-1 and MPEG-2 Layers I, II and III (MP3), MPEG-2 BC multi-channel layers I, II and III, MPEG-2 and
MPEG-4 AAC-LC,WMA9 and WMA9 Pro decoding
Networking Wire Ethernet (10/100) LAN via RJ-45 Port
Wireless Wireless LAN
Network Security Wireless: WEP, WPA,
Network Protocol
Wireless : IEEE802.11b/g, 5dBi antenna (SMA type)
Wire : 10/100Mbps Fast Ethernet (RJ45)
TCP/IP (DHCP client mode, Manual IP mode)
Hard-Disk Type 3.5” Internal SATA Ⅰ/Ⅱ(Not included)
USB Interface USB2.0 host, USB2.0 Slave
Power Adapter : Input : AC 100V-240V, 50/60Hz Out put : DC 12V, 3A
DC In : 12V
Dimension 225mm(W) X 200mm(H) X 59mm(D)
Unicorn Information System
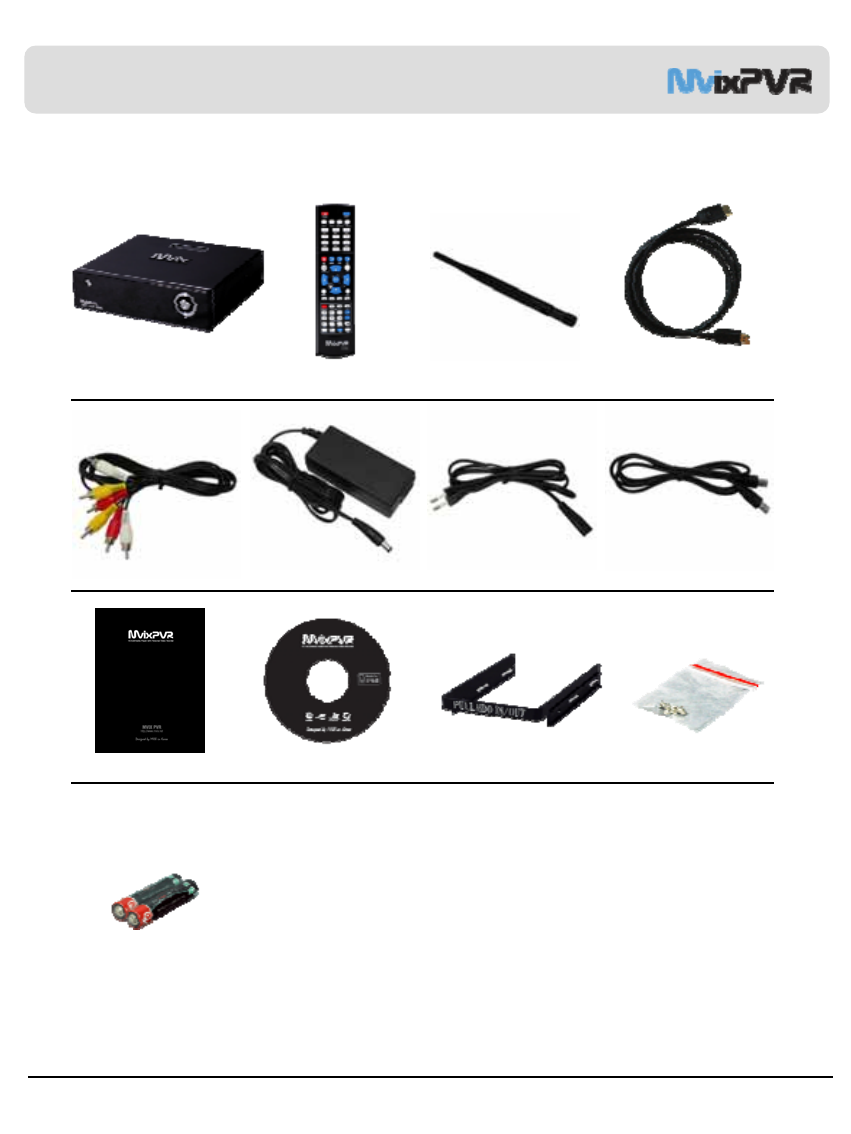
MvixPVR R2 Remote Control 5dBi Antenna HDMI Cable
A/V Cable Power Adaptor Power Cable USB Cable
User Manual Driver CD HDD Guard HDD Fixing Screw
AAA Battery
11
Components
Unicorn Information System
12
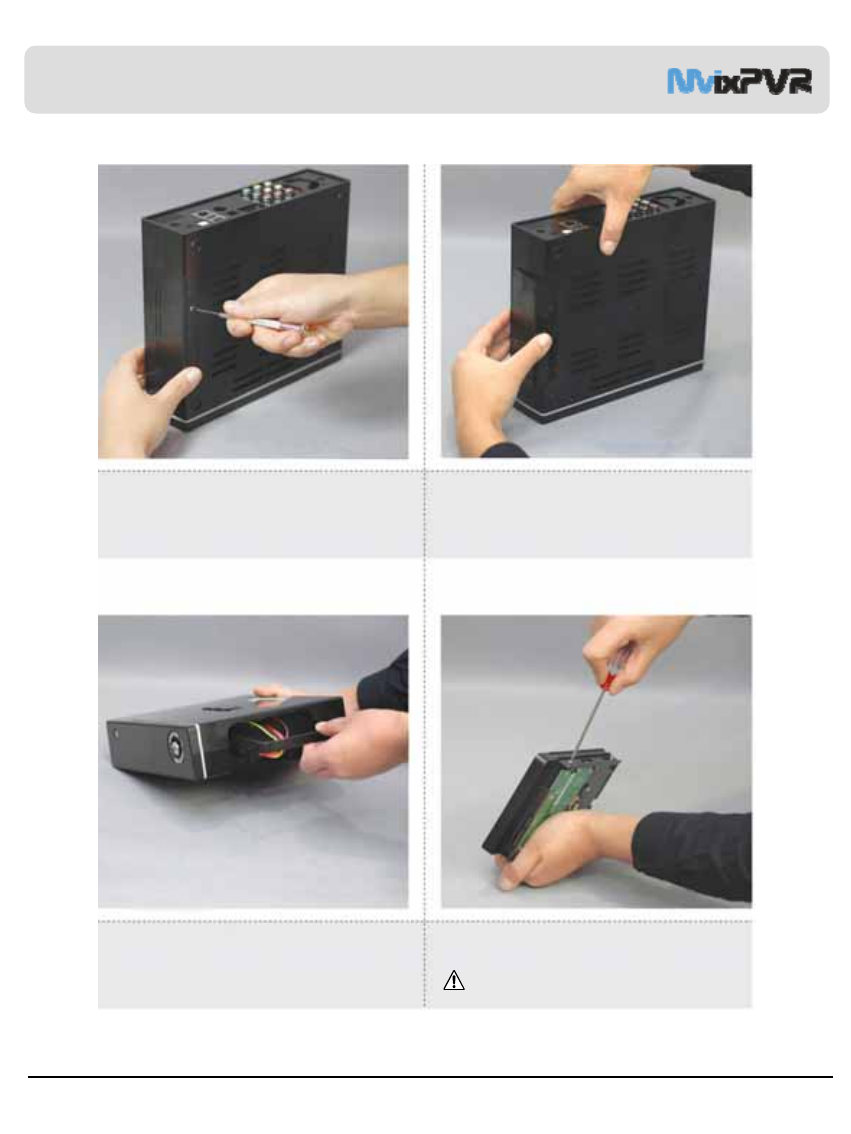
Hardware Installation
1. As shown above, unfasten the HDD cover screw
and open the HDD cover on the side of product.
2. Remove the HDD cover on the side of product by
pressing it down in the middle as shown in the picture.
3. Separate the HDD guard from the main body of
MvixPVR.
4. Connect the HDD guard and SATA HDD as shown
In the picture. Fasten screws.
HDD connection terminal must be on the left.
Unicorn Information System
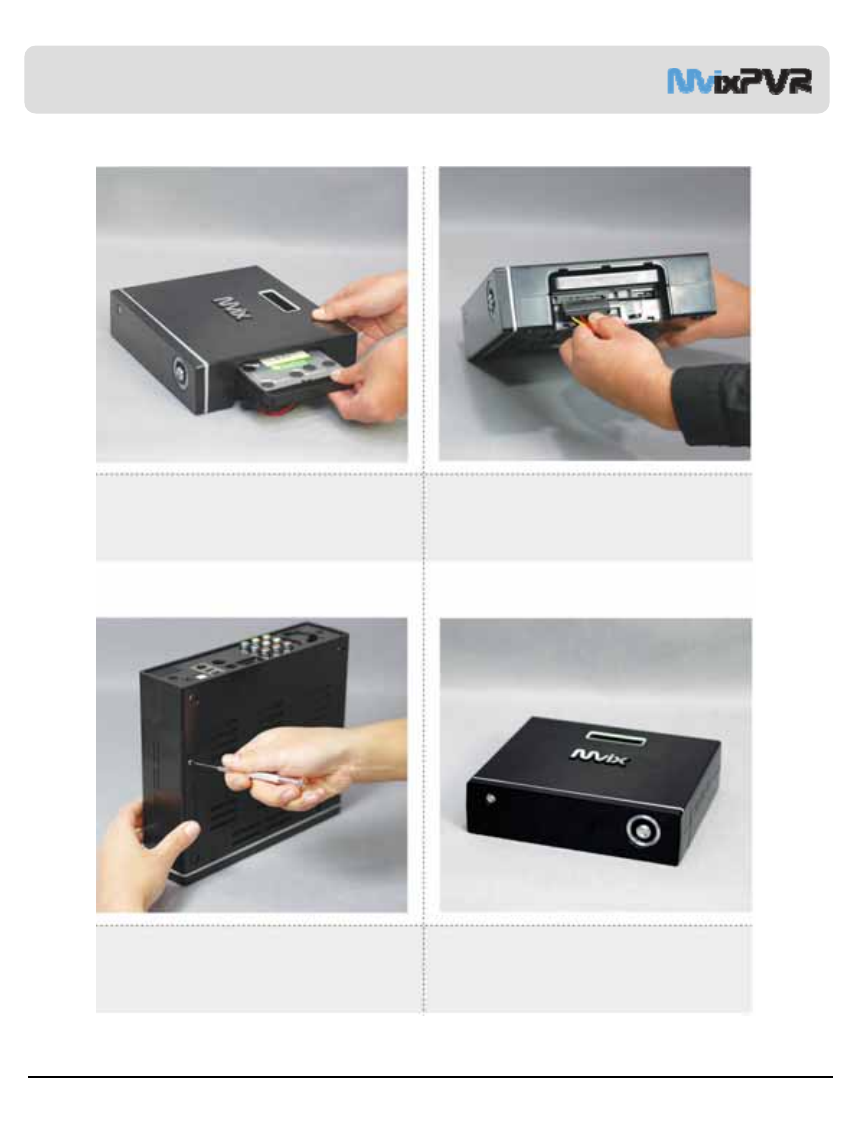
13
Hardware Installation
5. As shown above, slowly push the HDD guard
together with the SATA HDD into the main body of
MvixPVR.
6. Install power cable and SATA cable to the mounted
hardware.
7. When hardware mounting is completed, close the
cover and fasten the screw by rotating it in
clockwise direction.
8. Hardware installation of the MvixPVR has been
completed.
Unicorn Information System
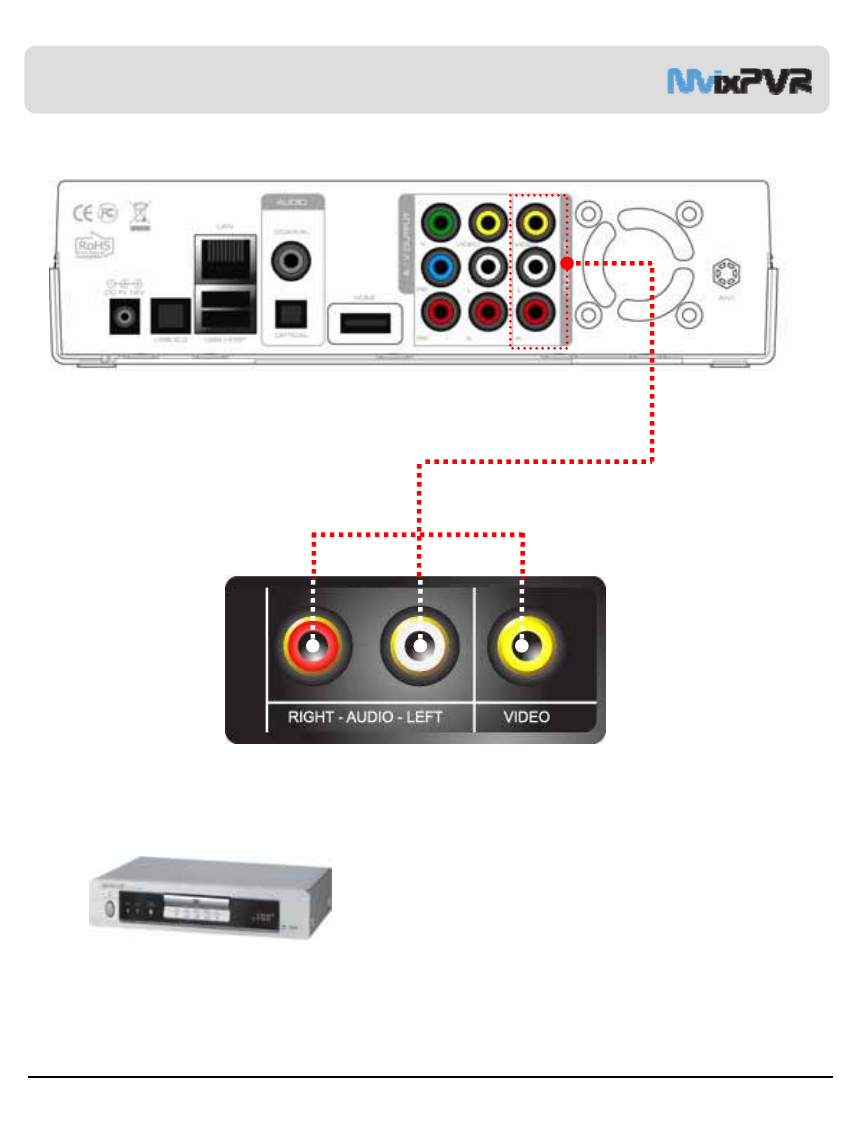
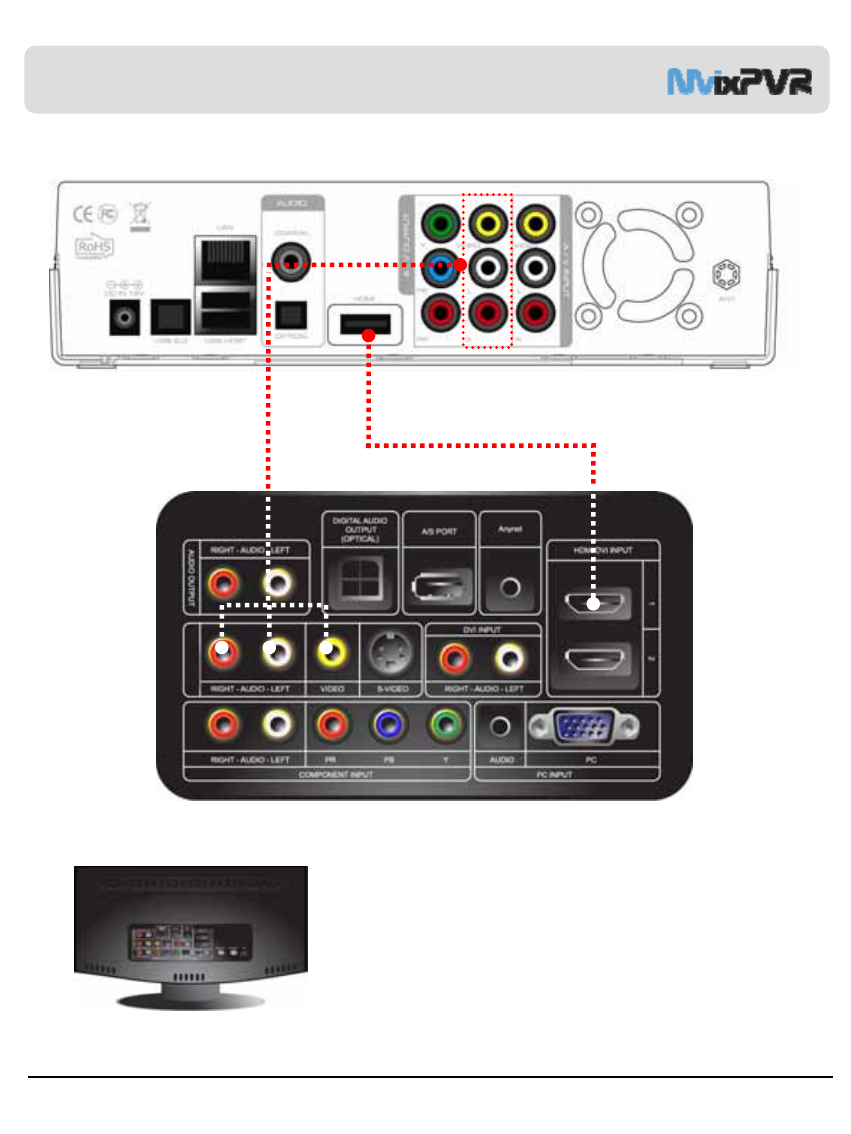
<IP Set Top Box or Other Digital Set Top Box>
Composite Output Device Connection to Video In (Video IN)
IPTV Set Top Box Input Device Connection
Only composite connection input is possible. Therefore, composite
input terminal must be connected to Mvix in the set top box. In set top
box, connect yellow cable for video signal as well as red and white
cables for audio signal output. Then, to A/V INPUT terminal at the
back of Mvix, connect yellow, red and white cables accordingly.
Bypass Support (Composite => Power Off => Composite)
Even when Mvix power is turned off, signals sent into A/V Input are still
transmitted. Bypass function of MvixPVR can be activated only when
using composite input and output. If Mvix power is on, all outputs to
HDMI/ component/ composite are supported.
14
Connections
INPUT
Unicorn Information System
Composite Cable Connection
Connect yellow cable for video signal to the terminal located at the back of side of TV.
Then, select external input of TV. Connect the remaining red and white terminal cables
to the left/ right and audio output terminal at the back of the device. Then, connect red
and white cables to the left/ right terminal of DTV input or component audio input
located at the back of digital TV.
HDMI Cable Connection
Connect HDMI cable to HDMI terminal at the back of product. Connect the
remaining cable terminal to HDMI terminal at the back of digital TV
※Make sure to carefully distinguish between input and output terminals.
HDMI and Composite Output Connection
15
Connections
INPUT
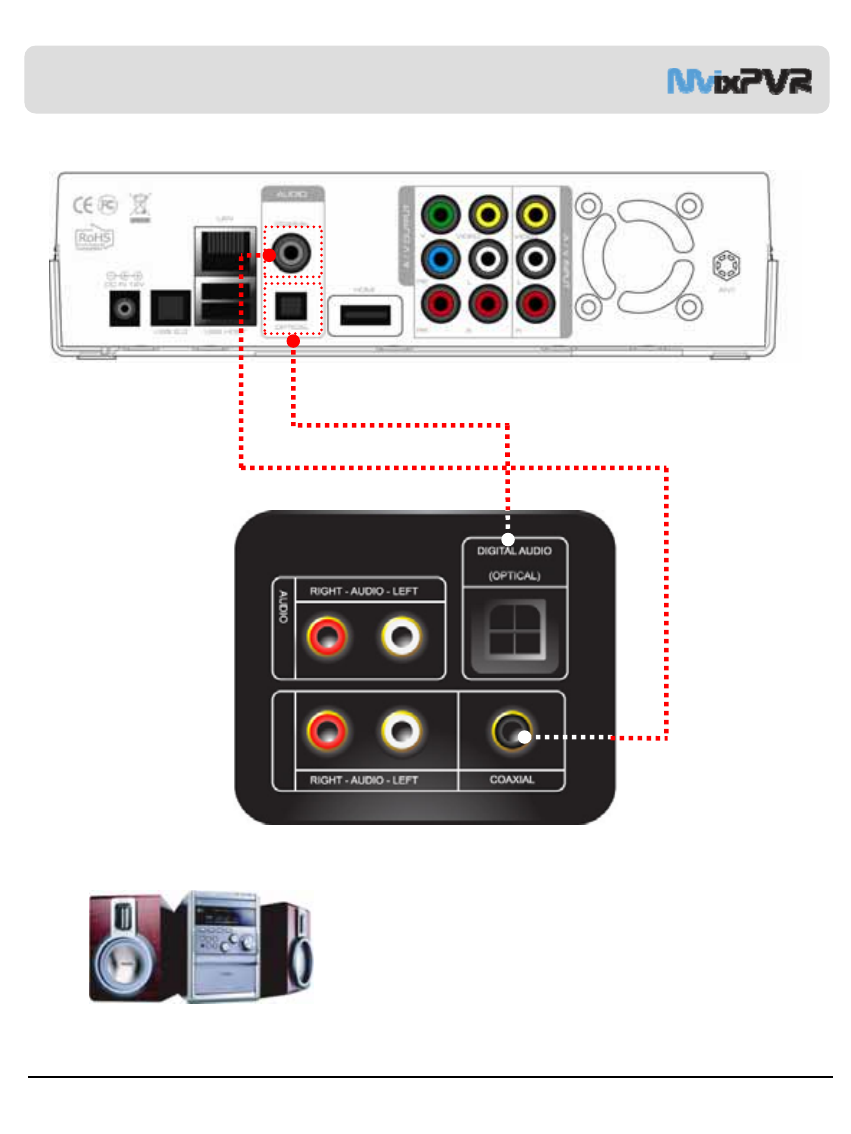
Unicorn Information System
Coaxial Cable Connection
You can enjoy high-quality sound 5.1CH if the audio device is an amplifier or a
receiver with coaxial cable input terminal. Connect coaxial cable to Coaxial of
Mvix as shown above. Then, connect amplifier or receiver to enjoy 5.1CH.
Optical Cable Connection
You can enjoy high-quality sound 5.1CH if the audio device is an amplifier or a
receiver with optical output cable input terminal. Connect optical cable to Optical,
the optical output terminal of Mvix as shown above. Then, connect amplifier or
receiver to enjoy 5.1CH.
Audio Output Connection
16
Connections
Unicorn Information System
17
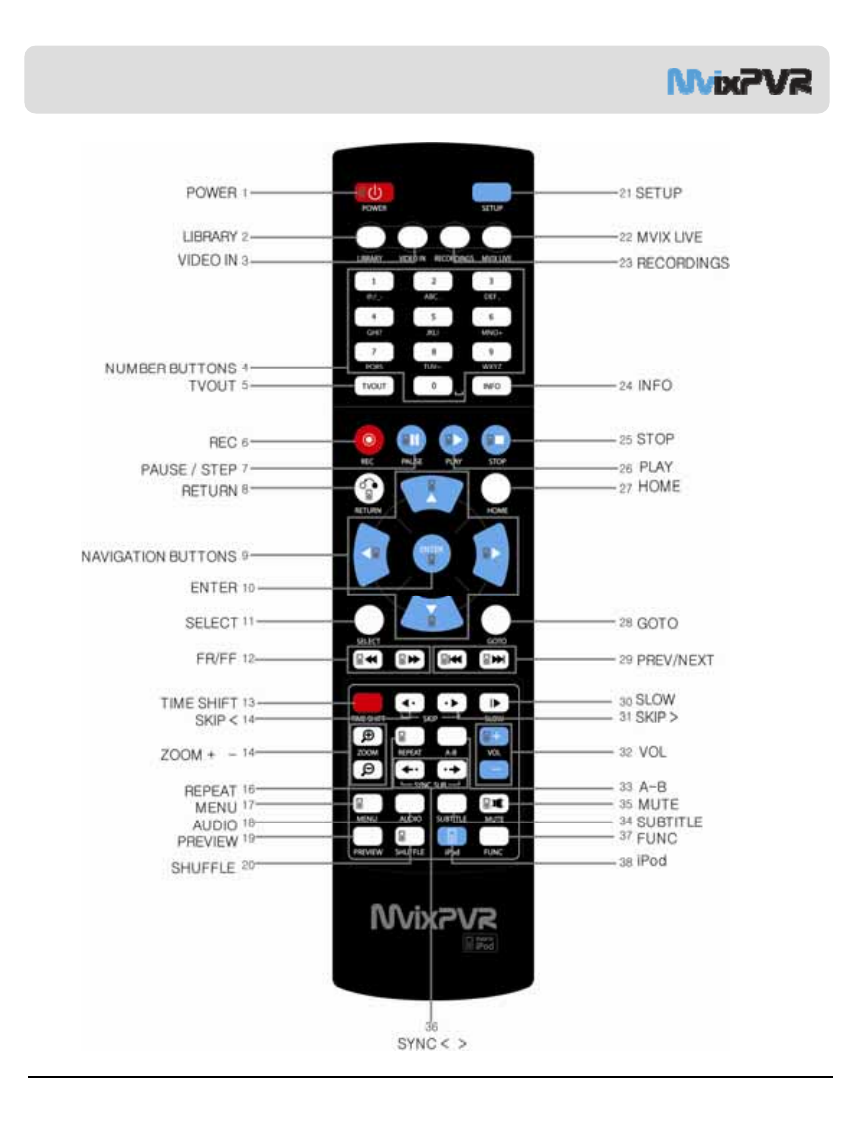
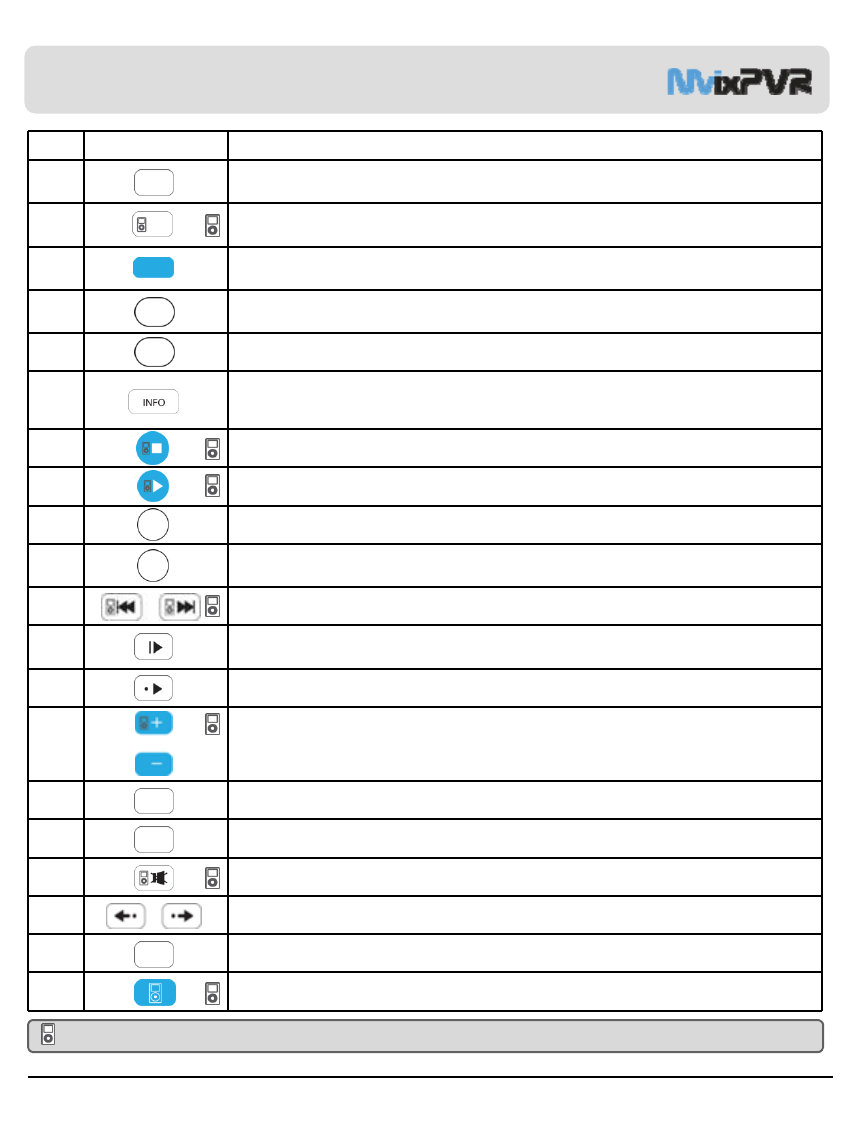
Remote Control Functions
Unicorn Information System
18
Remote Control Functions
No. Button Function
1 POWER: To turn on/ off power or stand-by mode
2 LIBRARY: Shortcut to LIBRARY menu
3 VIDEO IN: Shortcut to DIGITAL RECORDER menu
4~NUMBER BUTTON: To press buttons for numbers 0 ~ 9
5 TVOUT: Shortcut to HOME (menu) screen when playing DVD file
6REC: To start recording/ repetitive pressing for recording by one-touch recording (OTR) with the fixed
value of 30min/ 60min/ 90min/ 120min/ 180 min
7 TEMPORARY STOP: To stop screen temporarily/ repetitive pressing for moving screen per 1 frame
8 RETURN/ CANCEL: For returning
9 DIRECTION KEY: To move and select cursor
10 ENTER: To confirm selection/ play
11 SELECT: To select files to be copied when using copy function
12 F.B / F.F: 1.5x/2x/4x/8x/16x/32x speed, function available in mp3 as well
Sound output available in 2x speed
13 TIME SHIFT: Stop watching TV at any point and continue where you stopped at a later stage
14 SKIP <-: To go back to screen in play by 10 seconds
15
ZOOM + / - : To enlarge and reduce screen/ repetitive pressing for adjusting zooming +/ - percentage/
moving to position of enlarged output by using direction keys
Function available for use during film/ photo file play (2x/3x/4x/8x)
16 REPEAT: To repeat file in play or to repeat all media files in the corresponding folder
17 MENU: To change or set DVD file menus by moving to MENU screen during DVD(VOB) file play
18 AUDIO: TO change or select audio tracks of file in play
Unicorn Information System
Remote Control Functions
19
No. Button Function
19 PREVIEW: To turn on/ off preview screen automatically displayed in media play file search mode
20 Shuffle: To change play sequence to shuffle (for iPod only)
21 SETUP: Function available when playing media file or using menu’s in VIDEO IN screen
To display various setup screens
22 MVIXLIVE: Shortcut to MVIXLIVE menu
23 RECORDINGS: Shortcut to RECORDINGS menu
24
INFO: To display the current status
Function available while recording is in play/ repetitive pressing for displaying
network status/ to hide or display OSD of TIME SHIFT function
25 STOP: To stop file in play
26 PLAY: To play the selected file
27 HOME: To go to main screen or to display the projected main screen
28 GOTO: To select file in the same title or to execute shortcut to the already designated chapter position/
shortcut to the desired time position
29 PREV/NEXT: To move to previous file (list) or next file (list)
30 SLOW: Repetitive pressing for play in slow motion by 3/4x / 1/2x / 1/4x / 1/8x / 1/16x / 1x in sequence
31 SKIP ->: To advance screen in play by 30 seconds
32 VOL: To adjust volume
33 A-B: To set zone repetition
34 SUBTITLE: SUBTITLE: To change or select size of subtitle
35 MUTE: For mute function
36 SYNC <- / ->: To adjust sync of subtitle files played with film (100ms/ 0.1sec)
37 FUNC: To implement the function of ~
38 iPod: To convert remote control to iPod control mode/ repressing for returning to PVR mode
※Accessible buttons in iPod mode
Unicorn Information System
20
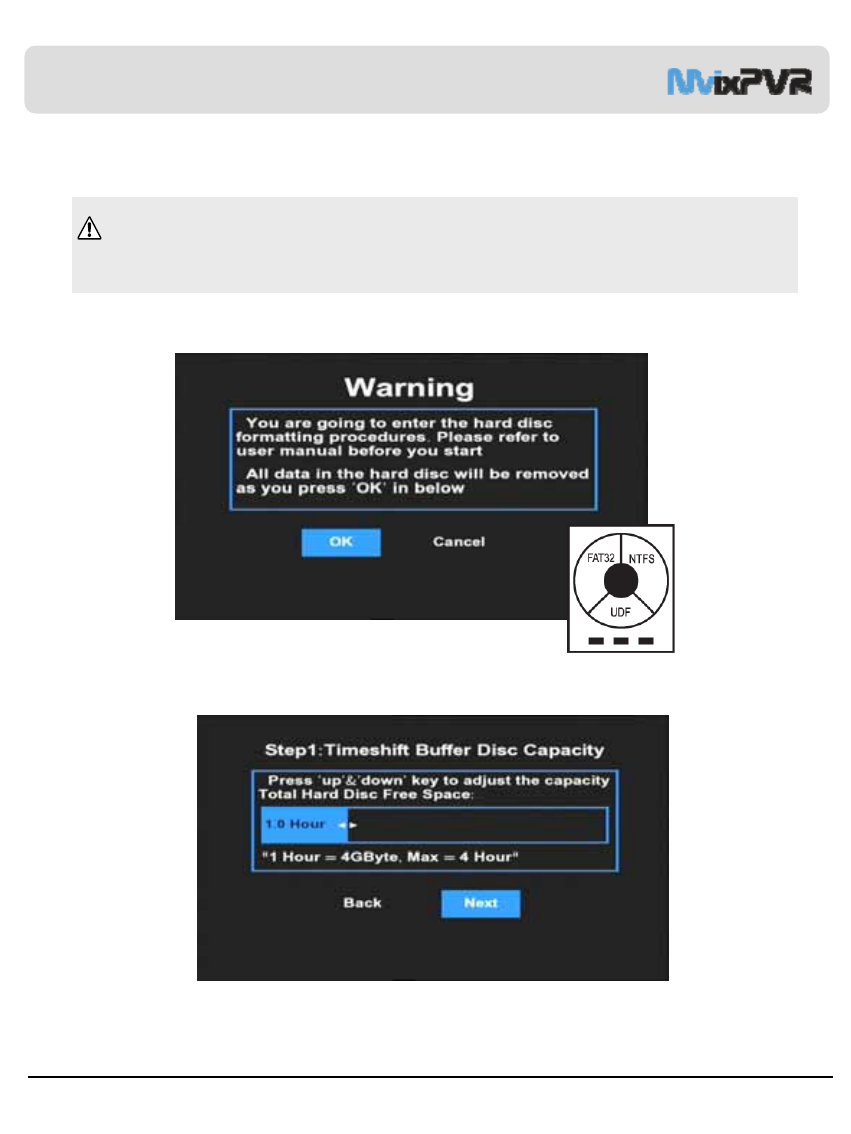
Chapter 1. PVR Setting
*주의 : 포맷을 진행하면 HDD에 저장된 모든 파일이 지워지며 복구가 불가능하므로 중요한 파일이 있을 경우 백업
하시기 바랍니다. 사용자 동의로 이루어지는 포맷이므로 부주의로 인한 손실은 책임지지 않습니다.
->HDMI를 연결하여 사용할 경우 해당화면이 보이지 않는 경우가 있습니다.이는 영상 출력방식이 TV와 일치되지 않아
보이지 않는 경우입니다. 화면이 출력되지 않을 경우 A/V 케이블을 이용하여 연결 하시면 화면을 보실 수 있습니다.
1)HDD Formatting
To use product, connect HDD and format it by using automatic format menu. (HDD formatted in Windows is formatted again.)
After mounting HDD in PVR, move to SETUP->SYSTEM menu. Select “HDD Format” menu to display submenus.
Note: Formatting erases all files saved in HDD and the files cannot be restored. Make sure to backup important files.
Format is carried out upon user’s consent. Therefore, we do not assume responsibility for loss caused by
negligence.
->When HDMI is connected, the screen may not be displayed. This is because the method of image output does not match
up with TV. If screen is not displayed, connect TV using A/V cable.
1. Select OK button and press ENTER in remote control.
2. The first stage of time shift is adjusted. You can set values by pressing up/ down keys in remote control. After setup,
select ‘Next’. Default: 1 hour/ Max. of 4 hours, file system UNIX (UDF)
Unicorn Information System
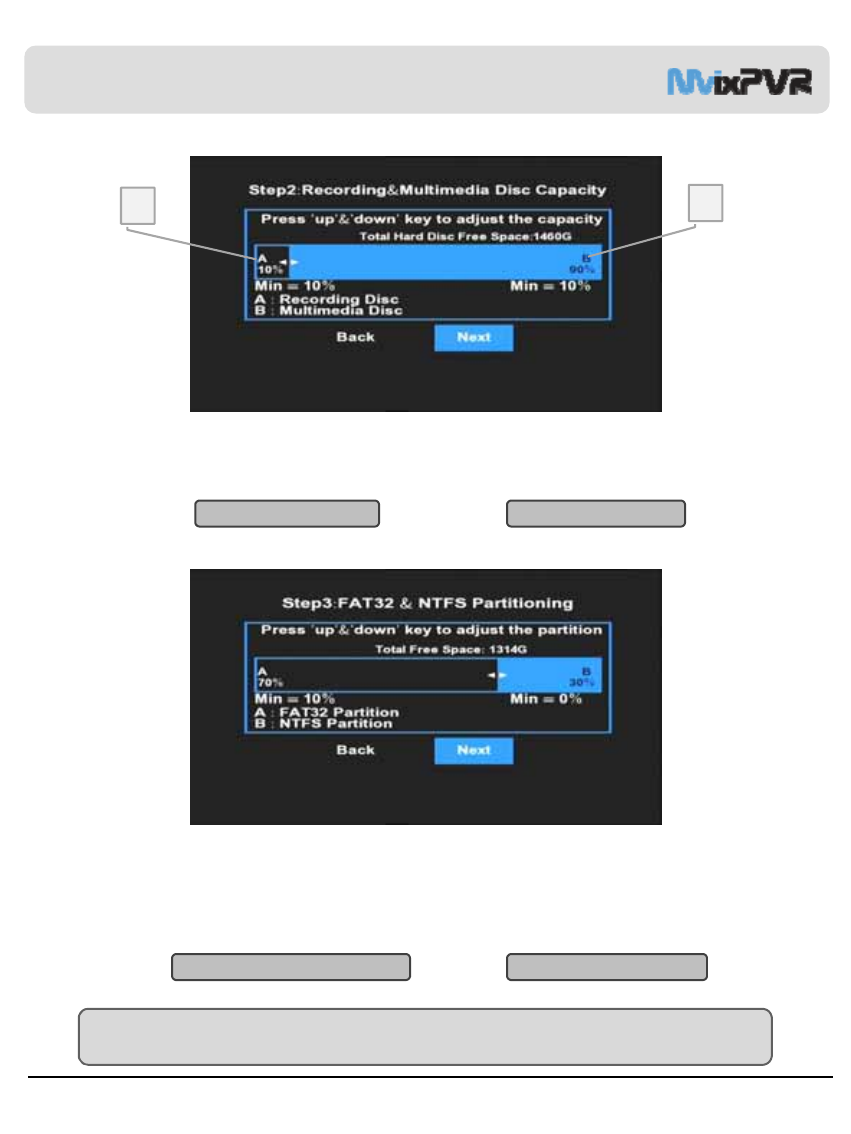
Chapter 1. PVR Setting
21
3. Adjust the second stage of multimedia and recording. Capacity allocated to multimedia is divided again in FAT32 and
NTFS, the next stage of Windows file system. After setup, select ‘Next’.
Default: 10% , Min.: 10% file system UNIX (UDF)
A: Recording disc space B: Multimedia space
4. Adjust the third stage of FAT32/ NTFS. In case of FAT32 partition, the minimum value is 10% or higher. For NTFS
partition, there is no restriction in minimum value allocation. Therefore, it can be allocated as 0%. After FAT32 and NTFS
partition is done, Copy Recordings Here, which is displayed after format completion, is FAT32 file system and Media
Library is NTFS file system. When NTFS is set as 0%, only HDD1 (FAT32) is displayed. After adjusting capacity, select
‘Next’. Default: 70%, FAT32 : Min. 10% NTFS : 0%
A : FAT32 Copy Recordings Here B : NTFS Media Library
TIP
In partition composition of Copy Recordings Here (FAT32), the recorded file is also used as the copy area.
Allocate sufficient capacity if intending to record and store high-capacity files.
AB
Unicorn Information System
22
Chapter 1. PVR Setting
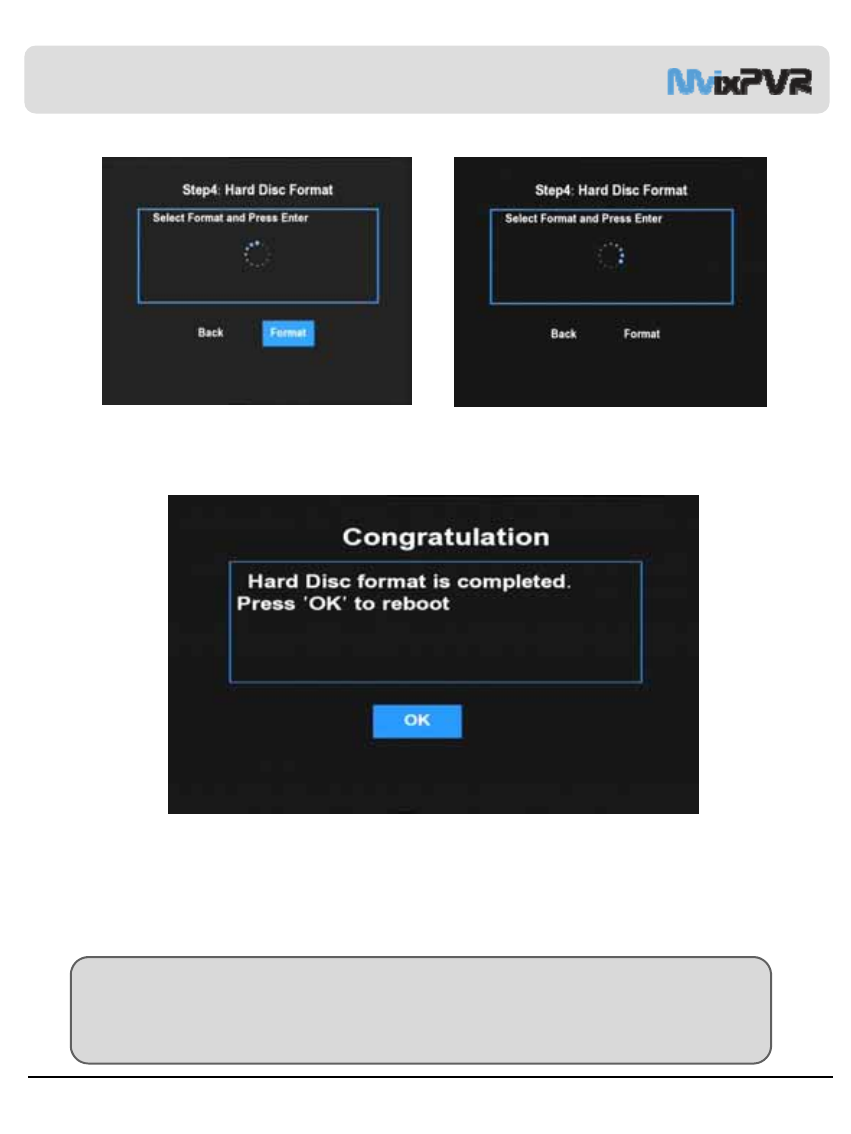
5. When setup is finished, select ‘Format’ and press ‘Enter’ to proceed formatting. Do not turn off or adjust power of
product while formatting is in progress. This may cause breakdown of HDD.
6. When message informing format completion is displayed, press ‘OK’. Rebooting is automatically carried out. When
rebooting is completed, HDD initialization is completed.
※Disc is divided into 2 partitions and each disc has the following uses and features.
Copy_Recordings_Here: This is where recorded files are extracted, File Manager is copied to and UPnP File Manager and
upload are executed. Copy is unable when a single file is of 2GB or more.
Media Library: When a single file is of 2GB or more, use the file by copying it to Media Library (NTFS). This is the area
where using of File Manager and UPnP functions is limited.

Unicorn Information System
23
Chapter 1. PVR Setting
2) Language/ Resolution/ Time Setting in Wizard
1. When HDD is formatted, initial setup screen is displayed as shown in the picture. Select the language used and press
OK.
2. Set current date and time by pressing up/ down button. Press OK.
TIP
Make sure to set time to be the same as current time in order for normal recording with record preset function of TIMER.
Unicorn Information System
Chapter 1. PVR Setting
24
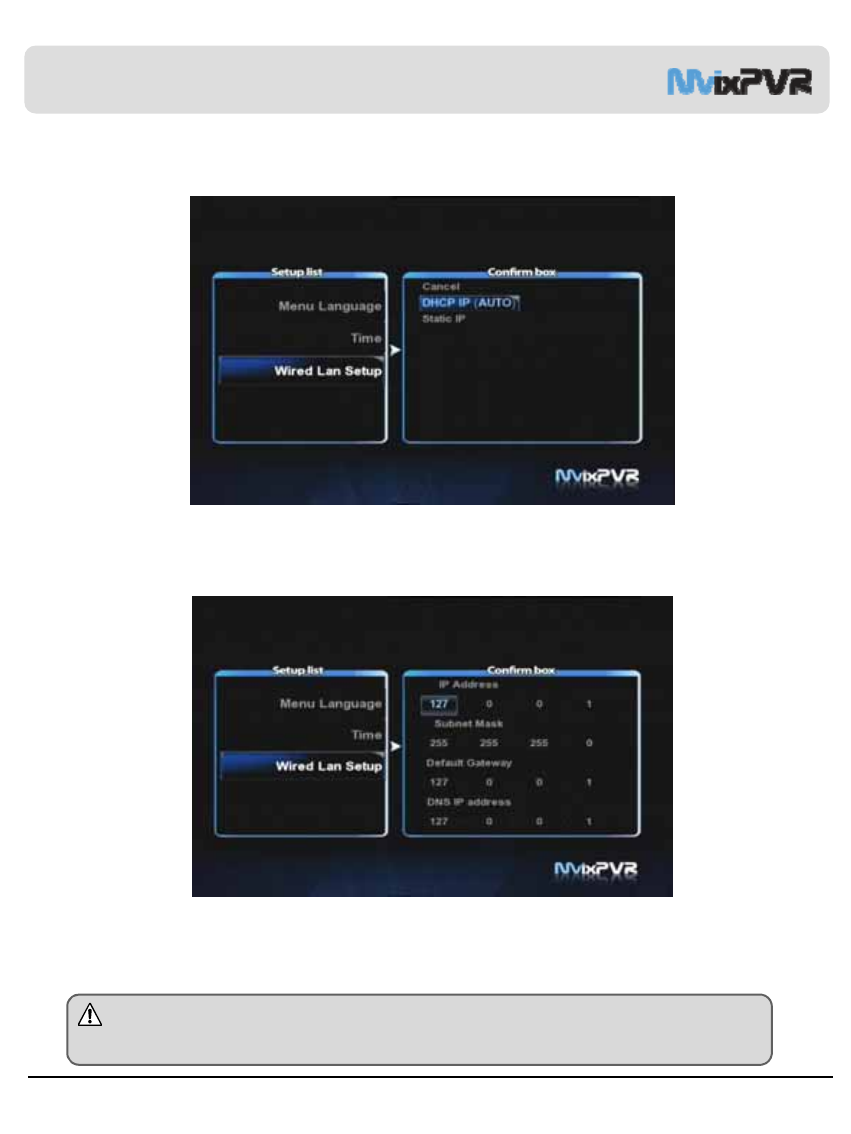
3) Network Setting in Start Wizard
1. Select the method to connect wired LAN to network. DHCP IP automatically allocates IP address.
2. To set static IP address and allocated them, make and save input by using number keys in remote control.
Note
Normal operation is not possible if setting the same IP as peripherals. Make sure to enter accurate IP address
within IP bandwidth that can be used in router.
Unicorn Information System
25
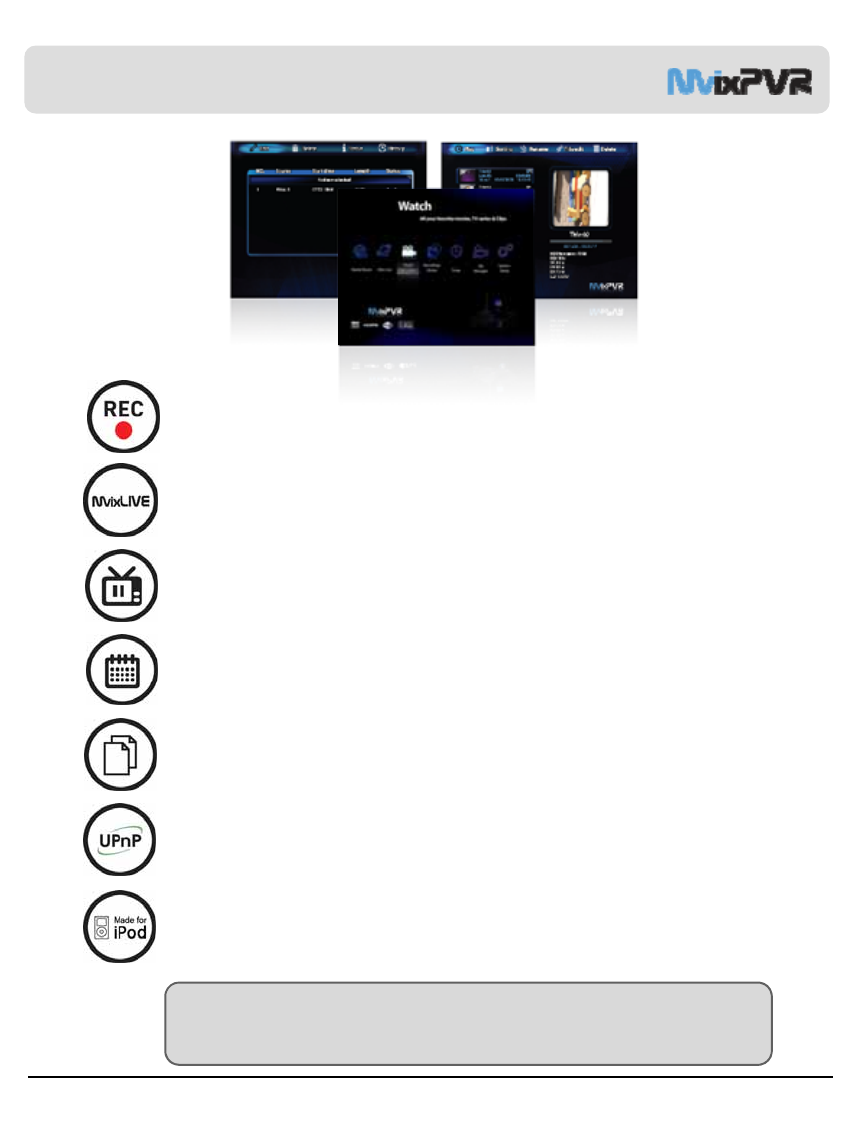
Summary of Main Menus
1. MEDIA LIBRARY
You can play media of various files, such as film, music and photograph, etc. connected to USB, HDD and NET
or enjoy high-resolution movies. Also, you can connect to and play share files in a computer that is connected
to network. MvixPVR also supports the functions of preview or to control storage devices connected to USB
host. In addition, you can play media file while recording is in progress. By connecting USB card reader to USB
host, various memory chips can be expanded for use. Digital camera and mobile phone, etc., which can be used
as mobile storage device, can be directly connected to play and copy media files.
(Function not available if HDD is not mounted)
2. MvixLIVE
Supporting online RSS, this function enables you to view movies, photos and weather information directly.
3. DIGITAL LIBRARY
Video input is directly displayed. Also, video content on the display can be recorded or processed for
time shift function. MvixPVR supports multi-threading function that enables you to use the MEDIA LIBRARY
menu by returning to the HOME screen while maintaining the recording status.
4. RECORDINGS LIBRARY
Recorded and saved media files can be viewed. This menus provides the basic editing functions, such as cut,
split, merge and extract file based on Windows file system.
5. TIMER
Set preset recording from VIDEO IN source. When unit is switched off the MvixPVR will automatically turn on
and begin recording. When recording is completed, it will be automatically turned off.
6. FILE MANAGER
Without the complication of having to copy files between storage devices by connecting them to your PC, you
can copy files using USB/ HDD/ NET from PC to HDD, from USB storage device to HDD or from MvixPVR to
network - connected PC.
7. SYSTEM SETUP
This function is used to make or change various system setups, such as menu language/ subtitle coding
method/ network/ TV output method and audio and video recording setup, etc. Settings can be changed while
file is being played. Setup is immediately applied.
8. iPod DOCKING (Expansion)
iPod TV-OUT function can be used. Recording and play control are possible while charging is in progress.
9. UPnP SERVER (Additional Function)
Using free DDNS, you can play or download all data by connecting to HDD mounted in PVR anywhere as long
as there is a local connection PC or PC with Internet connection.
Unicorn Information System
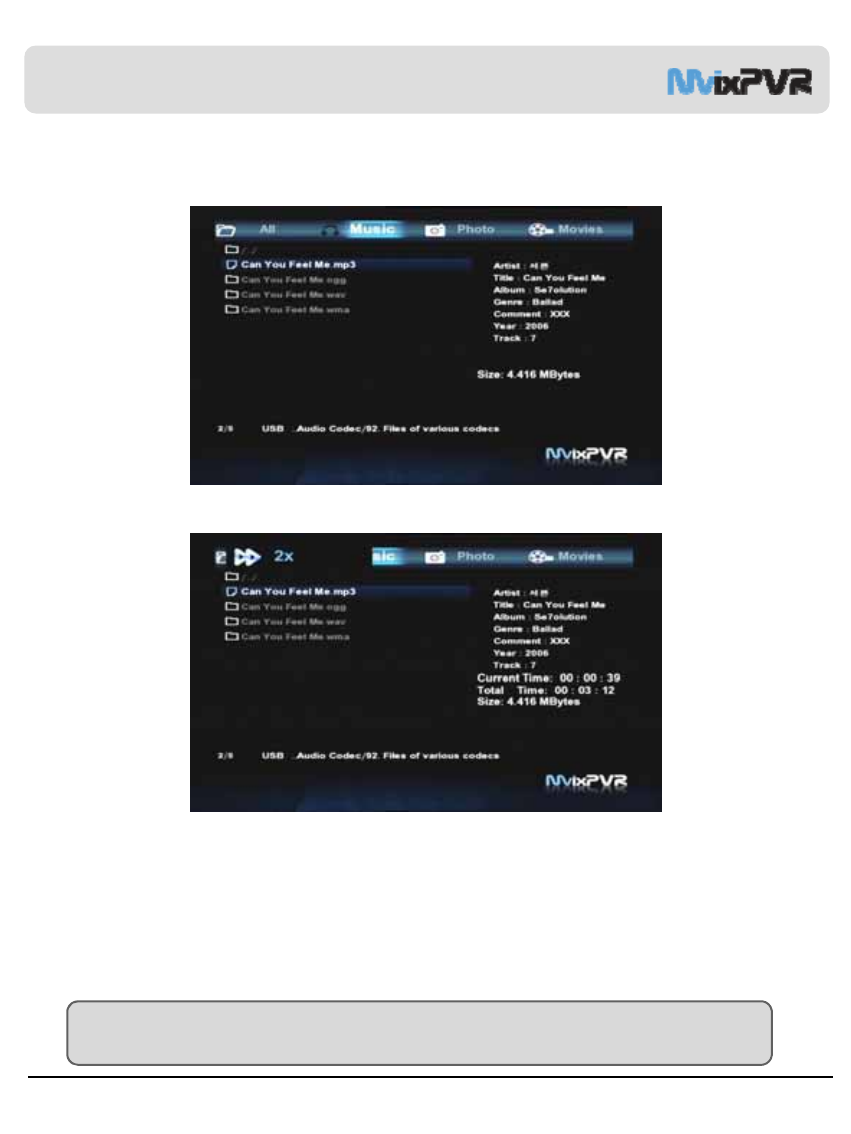
Music
This menu displays only the music files. In preview screen, file capacity and ID3TAG (V1) are displayed. You can
listen to music while experiencing the upgraded photo conversion effect.
TIP
Shortcut to MEDIA LIBRARY is possible from any menu by using LIBRARY quick button in remote control.
26
Chapter 2. Major Functions
1) MEDIA LIBRARY
1-1. Music
<Screen for Preview Display>
<Screen for Music Play and Speed Adjustment>

Unicorn Information System
Chapter 2. Major Functions
27
1-2. Photo
<Screen for Photo Preview> <Rotated Screen>
<Full Screen>
Photo
This menus displays only the photo files. Zooming function (2x/4x/6x/8x/16x/Fit) lets you expand photos and check their
locations. Using <Left/ Right> keys, you can instantly rotate vertically taken photos without having to modify them
(supporting BMP/ JPEG formats, progressive JPEG format not supported).
All photos in folder are automatically displayed in slide show. The interval of slide show can be adjusted as 2/ 5/ 10/ 30
Seconds or 1/2minutes. A variety of conversion effects are also available.
TIP
You can enjoy slide show with music and diverse effects by activating SETUP->SYSTEM -> MISC -> Transition Effect setup.
<Enlarged Screen>

Unicorn Information System
28
Chapter 2. Major Functions
1-3. Movie
<Movie Preview Screen>
<Preview Function Off>
Preview On/ Off Setup
In video list, preview setting is turned on as default. This results in preview loading time due to automatic preview setup
at moving of files. If you do not want this, make sure to turn off this setup. If not using preview function, file name can
be written with as many as approximately 70 letters.
TIP
Setup can be turned on/ off immediately by pressing Preview button in remote control.
Unicorn Information System
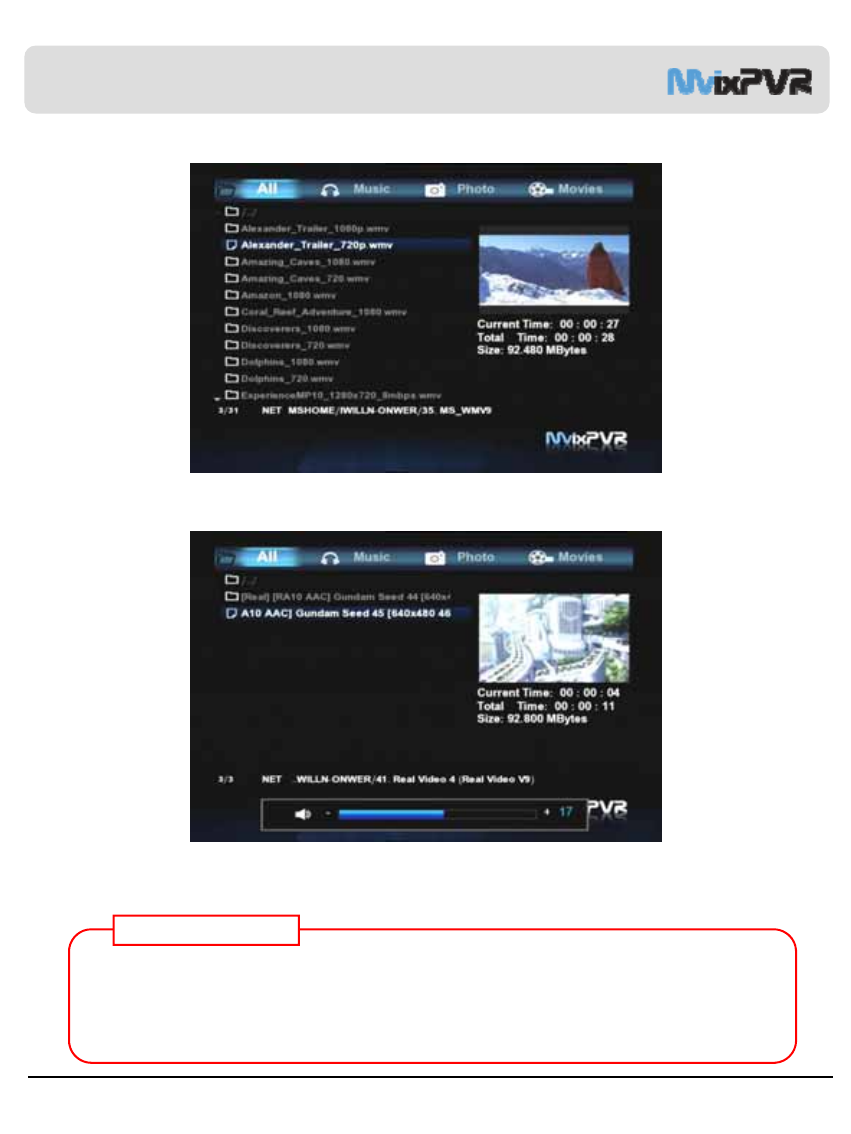
Movie
This menus displays only the movie files. Supporting quick preview function, this menus enables you to check before
playing files. You can change and apply setup by entering setup menu while various files (media file, etc.) are being
played.
< Screen for Movie Play >
Chapter 2. Major Functions
1-3. Movie
29
Unicorn Information System
Chapter 2. Major Functions
30
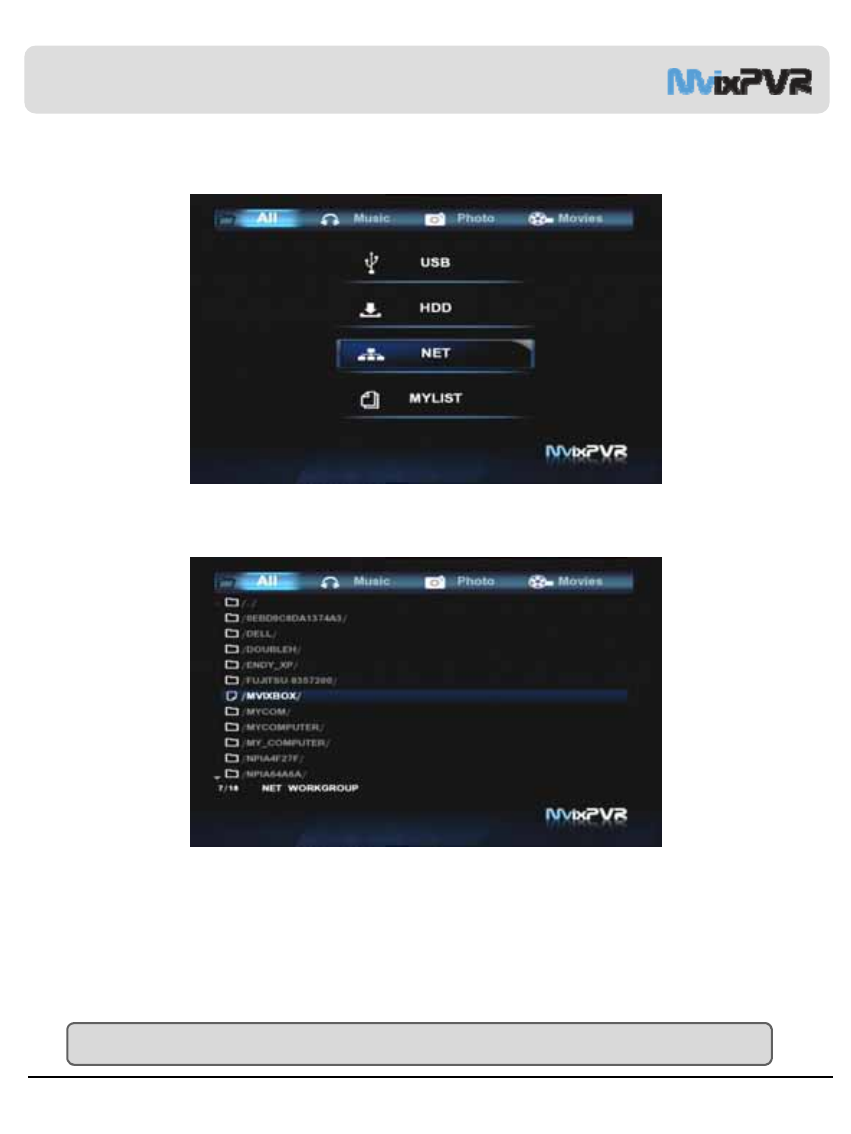
1-4. Network Share Folder and Using MvixFTS
1. Access net in the first screen of MEDIA LIBRARY.
2. Access net while network is being successfully connected to display network group name. Move to the position of shared
folder in PC and play media file through network streaming. To directly access PC installed with MvixFTS, select
My Neighbors and search shared folder to play media file.
※Refer to MvixFTS program installation in page 68.
Unicorn Information System
Chapter 2. Major Functions
31
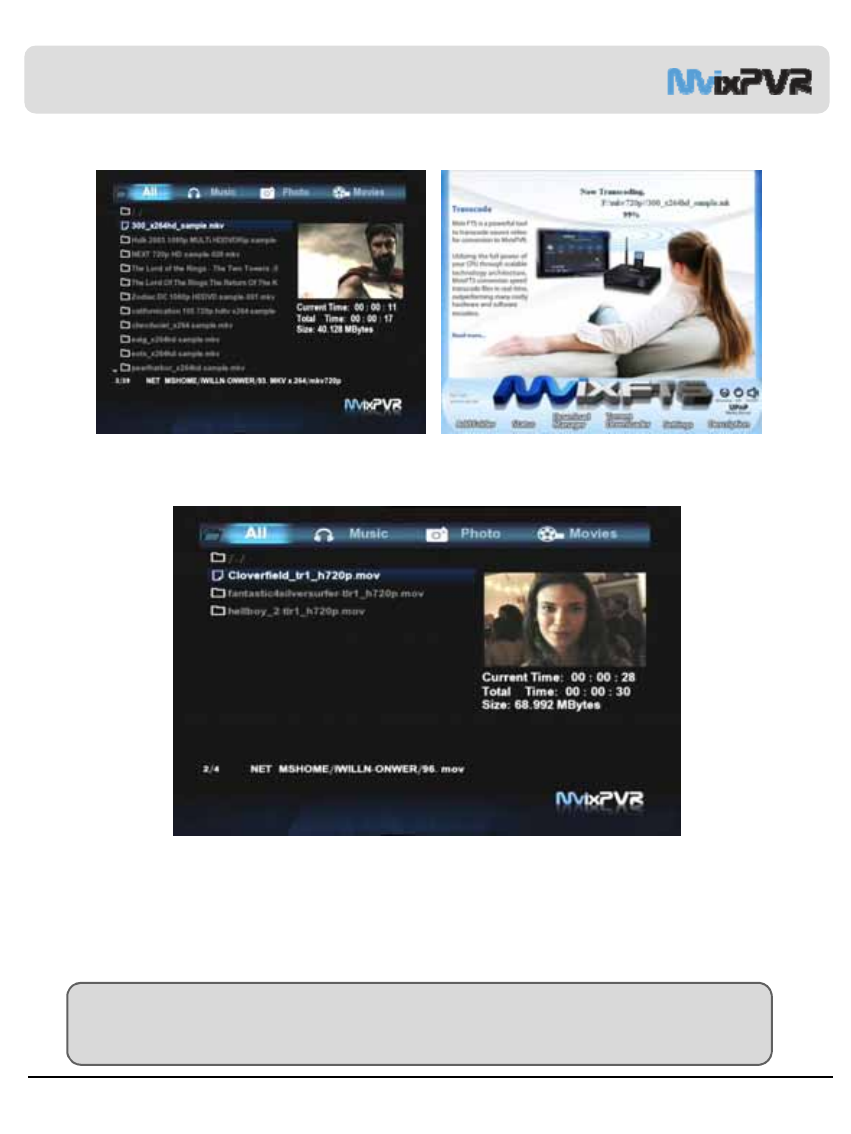
< MKV Preview Screen Using Mvix FTS >
<MOV Preview Screen Using MvixFTS>
TIP
If “The file you have requested cannot be displayed directly. Please use Mvix FTS installed in your PC.“ message is
displayed, install MvixFTS program in PC. In MvixPVR, play the movie located in PC.
Unicorn Information System
Chapter 2. Major Functions
32
<WMV Preview Screen Using MvixFTS >
<RMVB Preview Screen Using MvixFTS>
Using MvixFTS program included in product, you can enjoy watching movies that are not supported by self-play,
such as MKV/WMV/MOV and RMVB, etc. In case of MKV, self-play function is supported. However, in case of
HD level (x.264) MKV CODEC, play is only possible by using MvixFTS. Using MvixFTS requires a high CPU
use in the PC. Therefore, a high-spec PC lets you enjoy watching movies without buffering. Successful play of
720P level movie is possible. For video files of 1080P level that require high specifications, successful play may
not be possible in some PC environments. Unicorn Information System does not provide a guarantee for this.
※About MvixFTS Program
Unicorn Information System
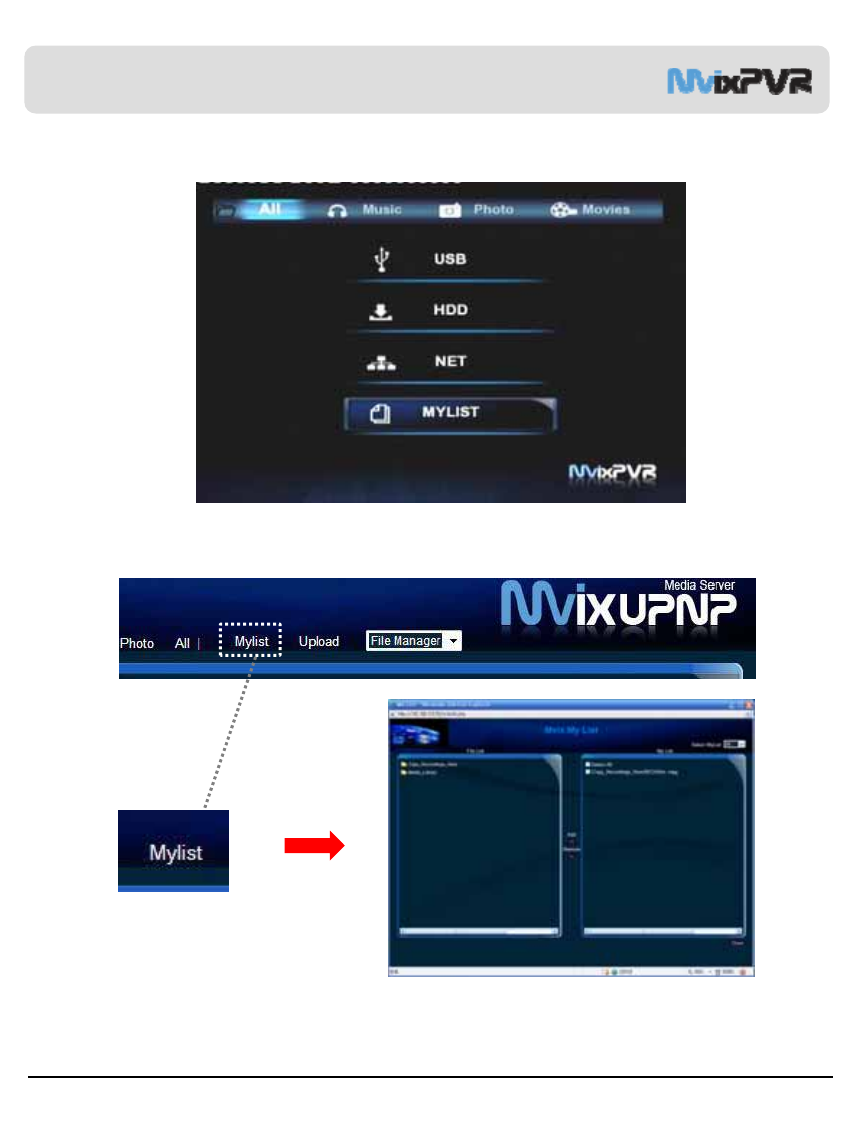
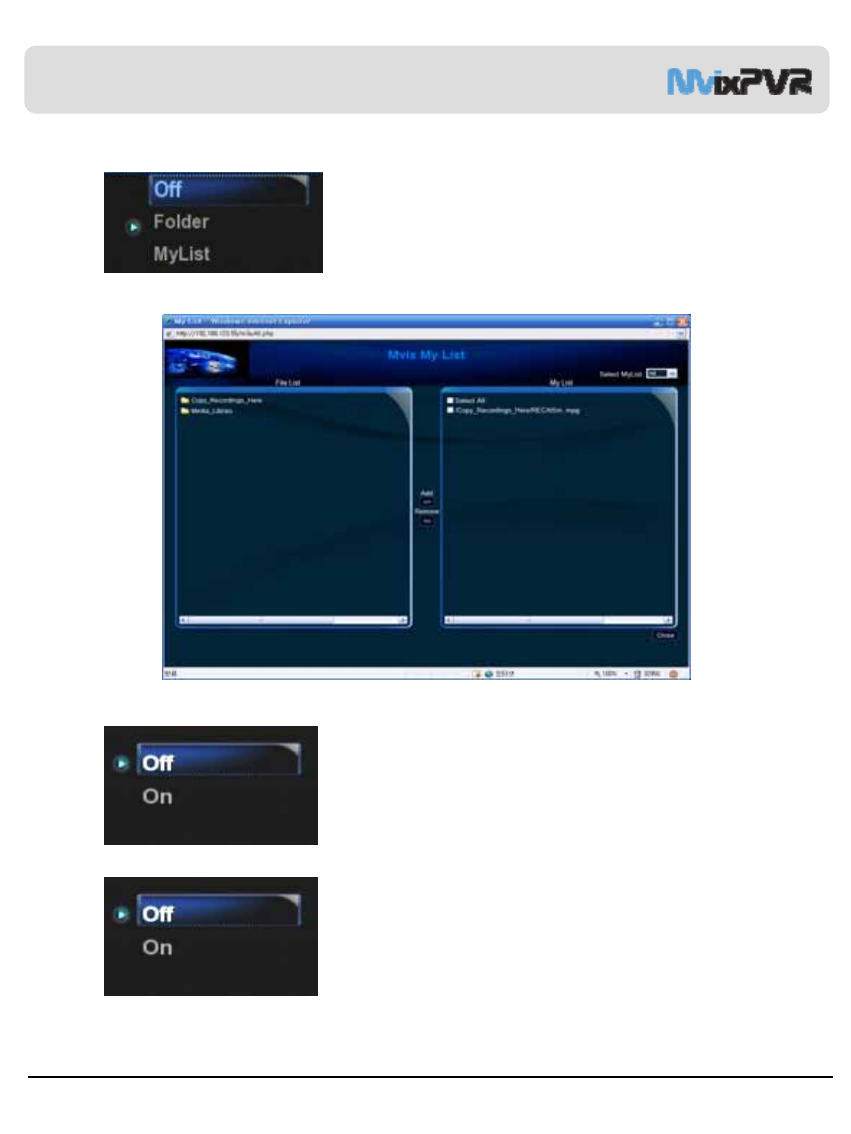
1. My List is used to designate the favorite video, photo and music files.
1-5. Using My List Functions
2. Connect to UPNP Media Server and click My List button. Then, select the file to be added to My List. My List moved can be
immediately checked in MvixPVR
33
※Refer to UPnP Media Server connection in page 53
Chapter 2. Major Functions

Unicorn Information System
34
Chapter 2. Major Functions
2) Digital Recorder
2-1. Video In Recording
<Input Signal Screen at Recording Time>
Select DIGITAL RECORDER menu to display the Video Input digital media. To record the desired part, press in remote
control to start recording. Each time the button is pressed, recording time is designated as 30/ 60/ 90/ 120/180/ 240 min./ off.
When recording starts, image of REC button is displayed at the top left-hand corner of screen.
TIP
Using VIDEO IN quick button in remote control, you can access shortcut function from any menu. This must be
in the state in which movie is being entered into Video In (input) terminal. Recording is not possible if the input signal
itself does not exist.
<Screen to Select Digital Recorder (Video In) in Main Menu>
Unicorn Information System
35
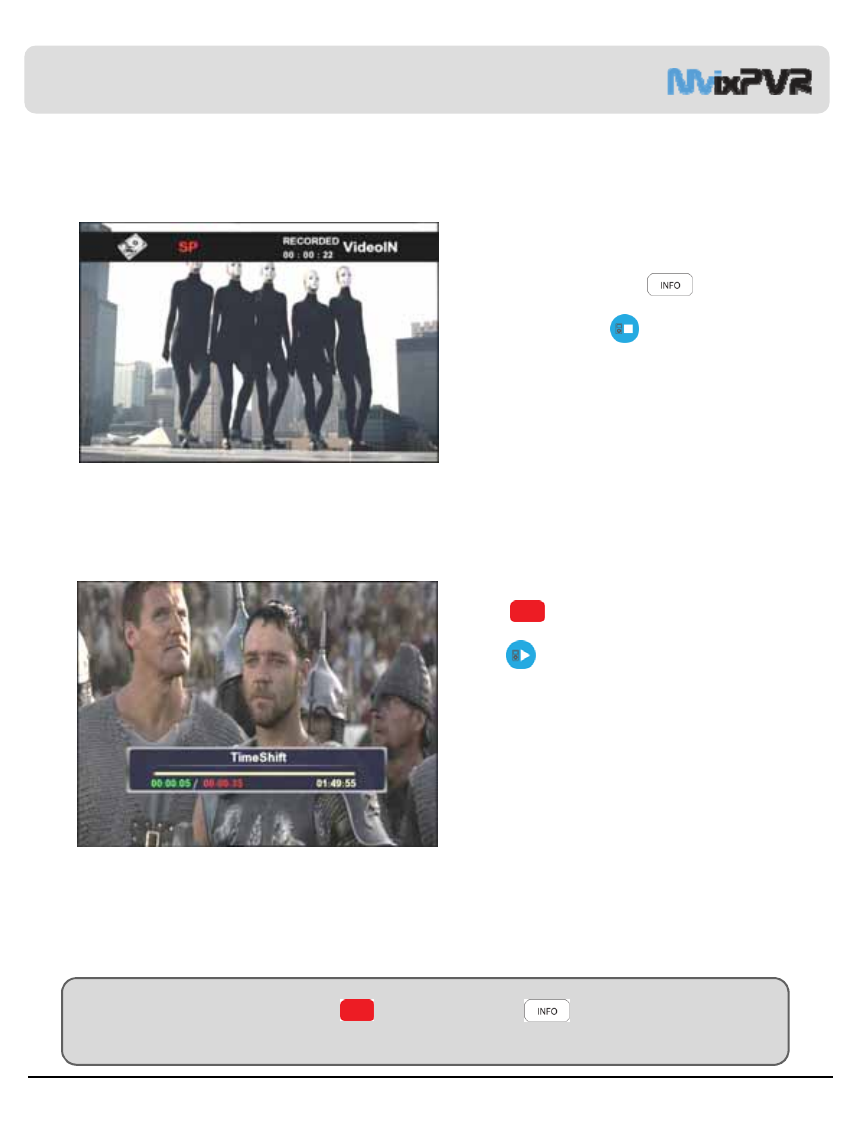
2-2. Usage of Recording
<Screen for Pressing INFO Button while Recording is in Progress>
2-3. Time Shift
TIP
You can hide/ show OSD in the status bar of TIME SHIFT by pressing INFO button.
Activate Setup -> Record -> Automatic Time Shift. With Digital Recorder menu, apply automatic time shift for
convenient use.
To check recording status, press INFO in remote
control and check save position, quality setting status and
recording progress.
To stop recording, press STOP in remote control.
Press TIME SHIFT button on remote control
to temporary stop live broadcasting.
Press PLAY button to continue playing the
movie.
Using TIME SHIFT function keys, slow motion/ rewind
and review/ fast view, etc. are possible.
Activate TIME SHIFT function from the beginning
Times indicated in examples
00:00:05= Indicating file playback time
00:00:35= Indicating the part saved with Time Shift
01:49:55= Total time shift time
<Time Shift Progressing Status>
Chapter 2. Major Functions
Unicorn Information System
36
3) Recordings Library
3-1. Play Recorded Title
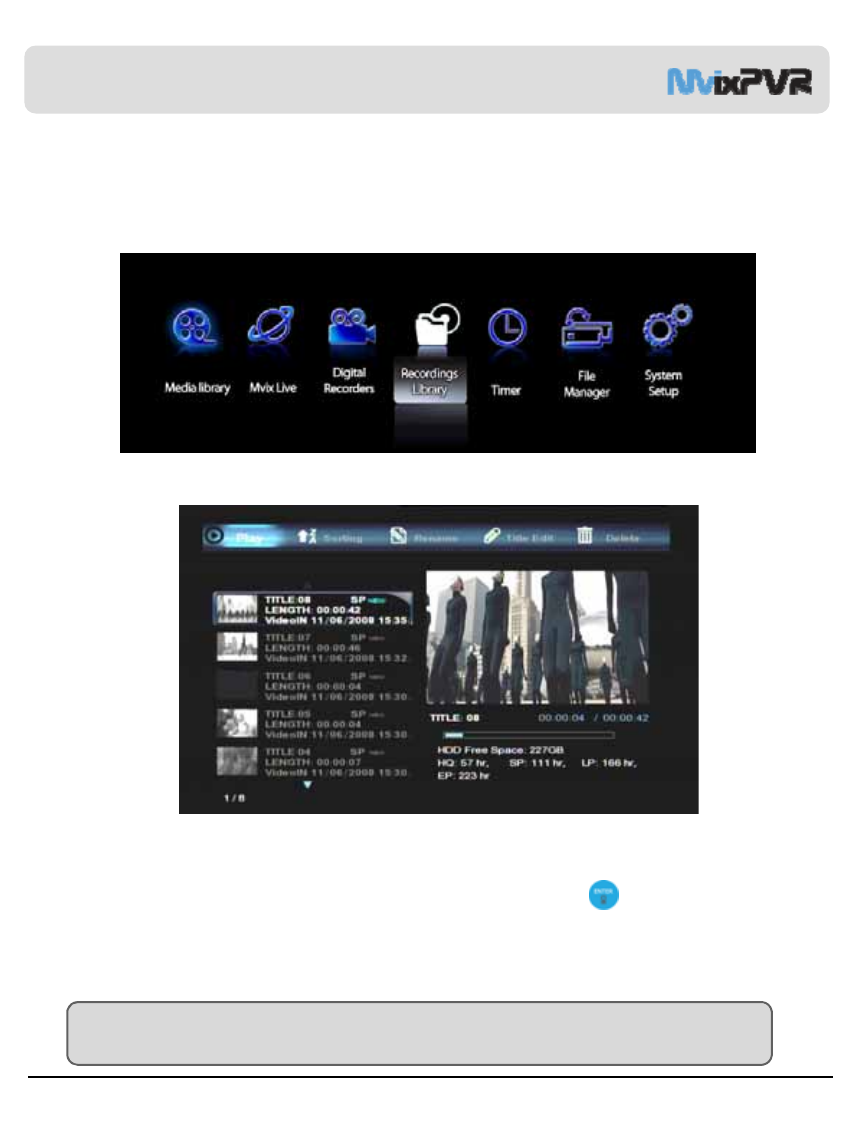
In Home screen, select RECORDINGS LIBRARY menu.
RECORDINGS LIBRARY menu displays the recorded and saved titles. Select a title and select medium in the left screen to
preview the title. Therefore, the saved screen can be checked instantly. In PLAY menu, press ENTER button to play the
selected title file. After activating recording, enjoy watching media file in MEDIA LIBRARY menu. Then, enter RECORDINGS
LIBRARY menu to play the recorded title from the beginning without stopping the recording status.
TIP
TIME SHIFT is not saved. However, with this method, TIME SHIFT function can be used while saving is simultaneously
carried out.
<Screen to Select Recordings Library in Main Menu>
<Screen to Preview Recorded Title>
Chapter 2. Major Functions
Unicorn Information System
<Screen for Playback Title Sorting Menu>
37
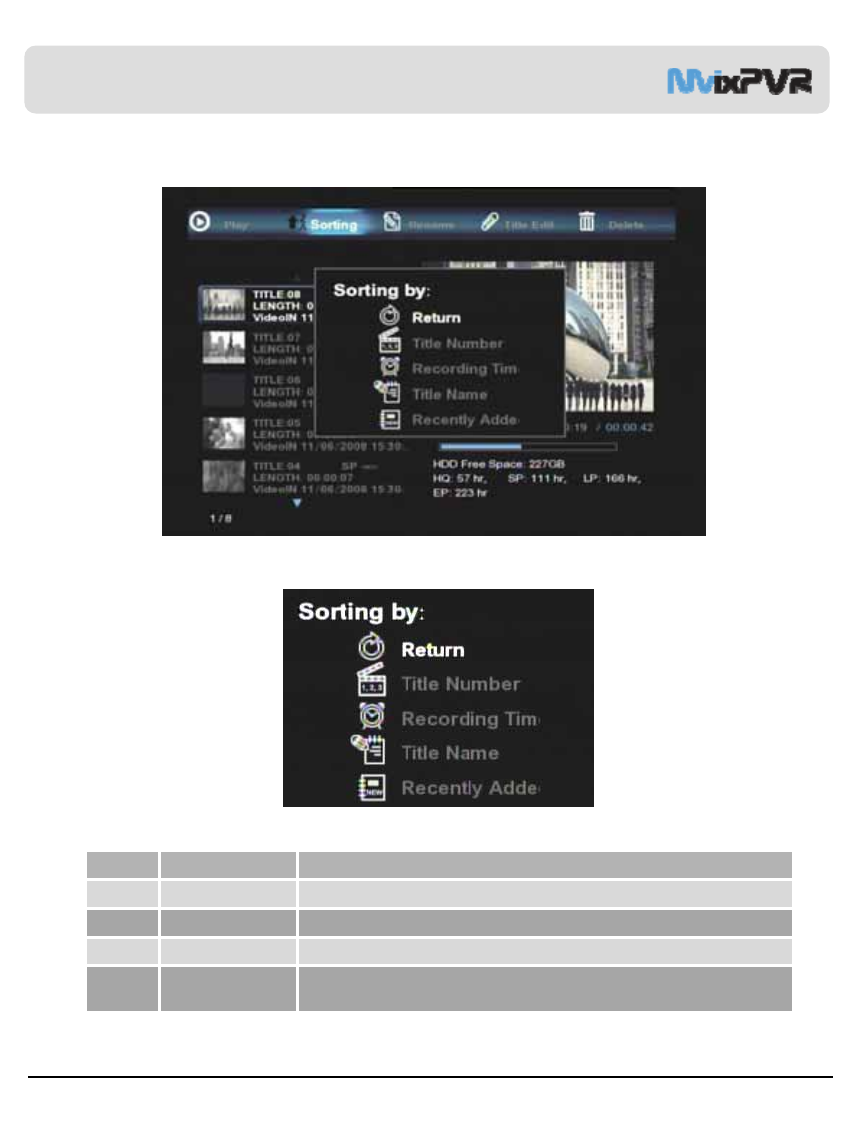
3-2. Sort Recorded Title
①
②
③
④
⑤
1 Return To return to the previous screen
2 Title Number To sort title according to title number, the order of recording
3 Recording Time To sort titles according to recording time
4 Title Name To sort titles according to title name
5 Recently Added
Title
To sort titles according to the recently added files
Chapter 2. Major Functions
Unicorn Information System
38
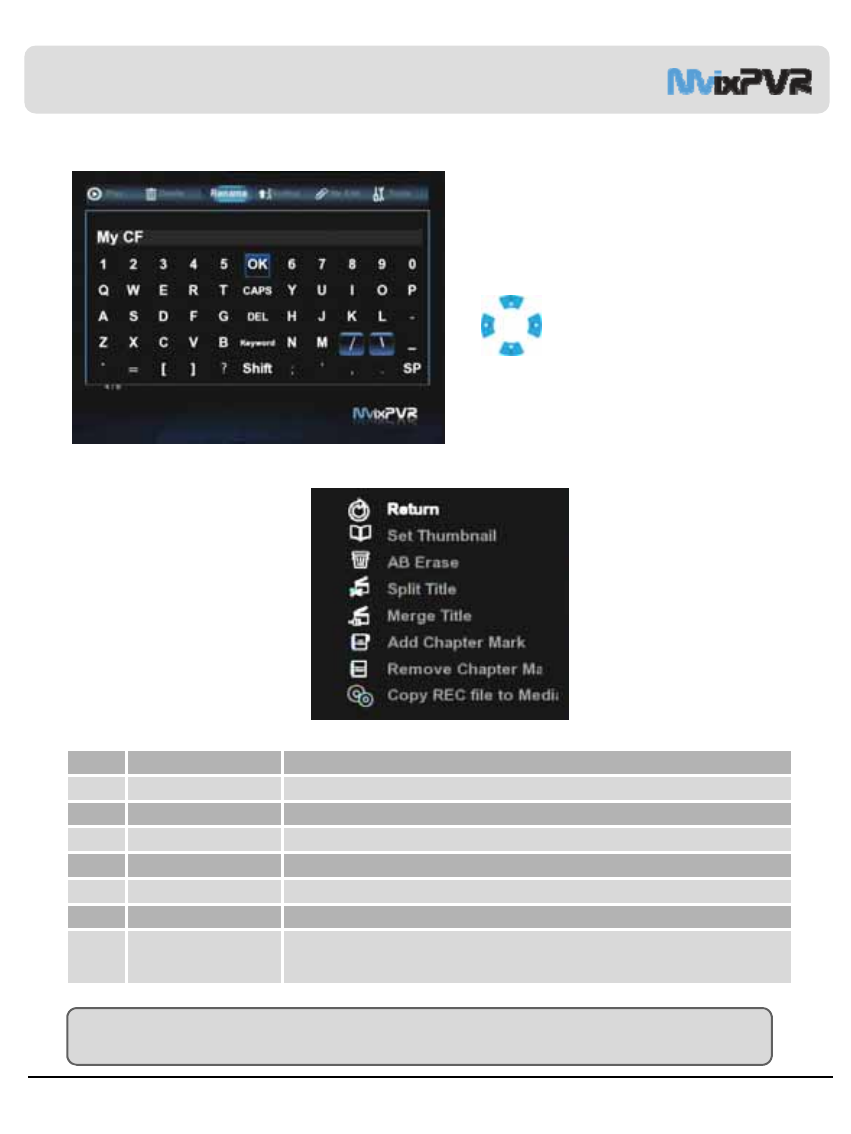
3-3. Change Name of Recorded Title
Name Change
Names of titles saved with input line and recording time as
default can be changed. Make selection by using
buttons of remote control. Then, press OK to
change title name.
3-4. Edit Recorded Title
TIP
As the basic position of file extraction, file is saved in MEDIA LIBRARY -> Copy Recordings Here disk.
①
②
③
④
⑤
⑥
⑦
⑧
1 Return To return to previous screen
2 Set Thumbnail To designate and set preview screen
3 A-B Erase To set and delete the desired zone of A and B
4 Split Title To set and delete the desired zone of A and B
5 Merge Title To merge the recently recorded title and the previous title
6 Add Chapter Mark To set the desired point in advance
7 Remove Chapter Mark To delete the set point
8 Copy REC file to
Media
To copy recorded file to record disk
When copying high-capacity file of 2GB or more, recorded file is automatically split and saved
per 2GB unit.
Chapter 2. Major Functions
Unicorn Information System
39
Thumbnail Setting
Set the parts displayed in preview screen. You must press PLAY button at start as it is in temporary stop status. Then select
Confirm and press ENTER button in remote control.
Cut A-B Zone
Set the desired points in the recorded file and delete the designated zone.
Designate starting point as SET A and ending point as SET B. Press OK to delete the designated A-B zone. The deleted part
cannot be restored. Therefore, accurately check the points before deletion by using rewind or fast forward function.
TIP
To accurately designate A-B zone, play file with SLOW button rather than PLAY. This way, you can designate the
zone more accurately.
Chapter 2. Major Functions
Unicorn Information System
40
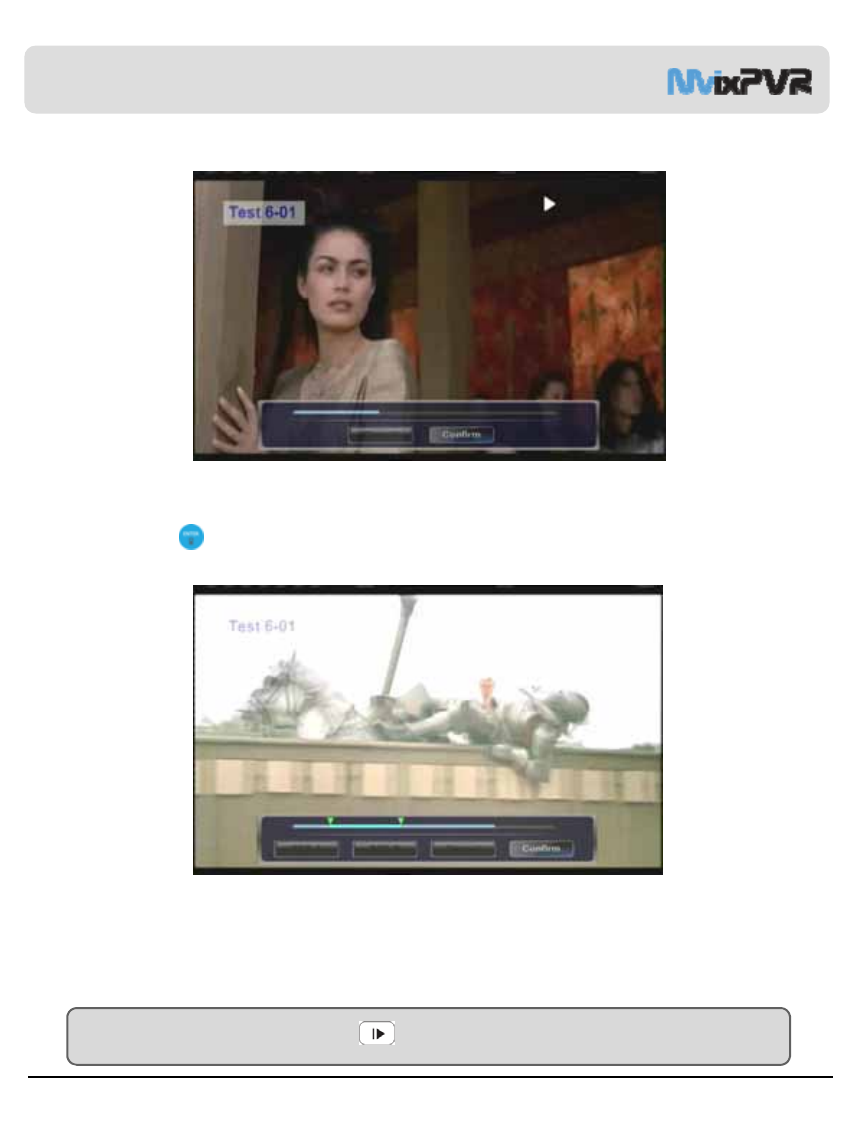
Split
A single recorded file is split into two. Move to the part for splitting by pressing PLAY button or using FR/FF
button forward function.
Then, Press OK. The point of split can be accurately designated by using SLOW button (3/4x / 1/2x / 1/4x / 1/8x / 1/16x/ 1x).
Merge
Two recorded titles are merged. The selected title is merged with the previous title. With a simple button control,
two titles can be merged into one to create a film of which a variety of frames are combined.
Chapter 2. Major Functions
Unicorn Information System
41
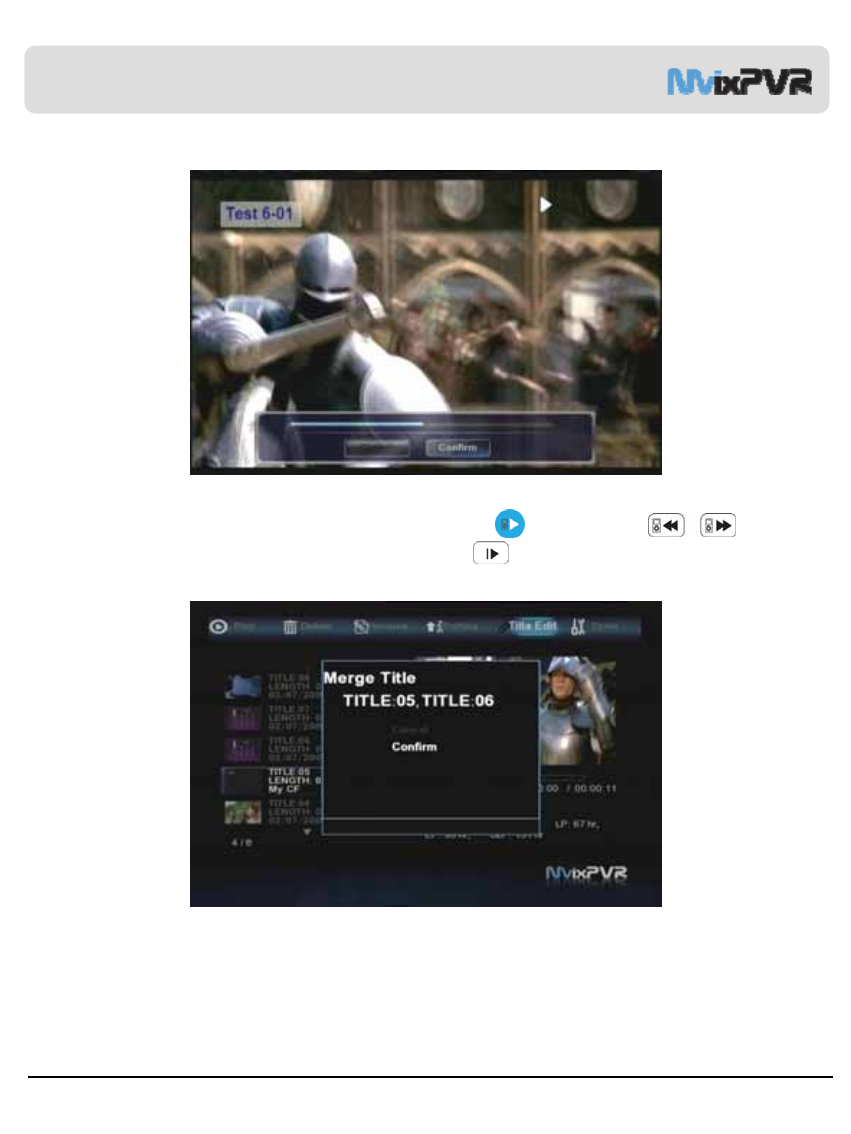
Chapter Designation/ Memory
Quick screen conversion is possible in play position by designating/ memorizing random position in recorded title. If
Using GOTO function, you can move immediately to the designated chapter position without having to memorize
play time.
Clear Chapter Designation/ Memory
This function is used to re-designate or delete the chapter for which random position has been designated/ memorized
in recorded title. Using rewind/ fast forward, etc. move to the required position and press DELETE to delete the
memorized chapter.
TIP
The part designated as chapter can be used when pressing GOTO button during play.
Chapter 2. Major Functions

Unicorn Information System
42
Copy to Record Disk
Recorded titles saved in UDF system are copied to Copy Recordings Here disk. Video and audio CODEC of the saved
file are encoded and saved as MPEGII.
3-5. Delete Recorded Title
Delete Recorded Title
Recorded titles are deleted. Place selection bar on the recorded title to delete. Then, move it in left/ right
direction to select DELETE menu. Deleted titles cannot be restored. If you are intending to increasing reserve space for recording
while leaving the recorded titles, it is recommended to delete titles after copying them to Copy Recordings Here partition.
TIP
To copy titles saved in RECORDINGS LIBRARY through connection to USB SLAVE in Windows OS, execute Copy to
Record Hard and connect the titles to USB SLAVE. Then, the files can be viewed in the hard disk in PVR.
Chapter 2. Major Functions
Unicorn Information System
Chapter 3. For Advanced Users
1) TIMER
43
Timer
Automatic booting is carried out to start recording on the date and time designated by preset recording function.
The time applied to scheduler is based on the time applied in MvixPVR. Therefore, before using product, set time
to be the same as actual time in SETUP -> SYSTEM -> TIME.
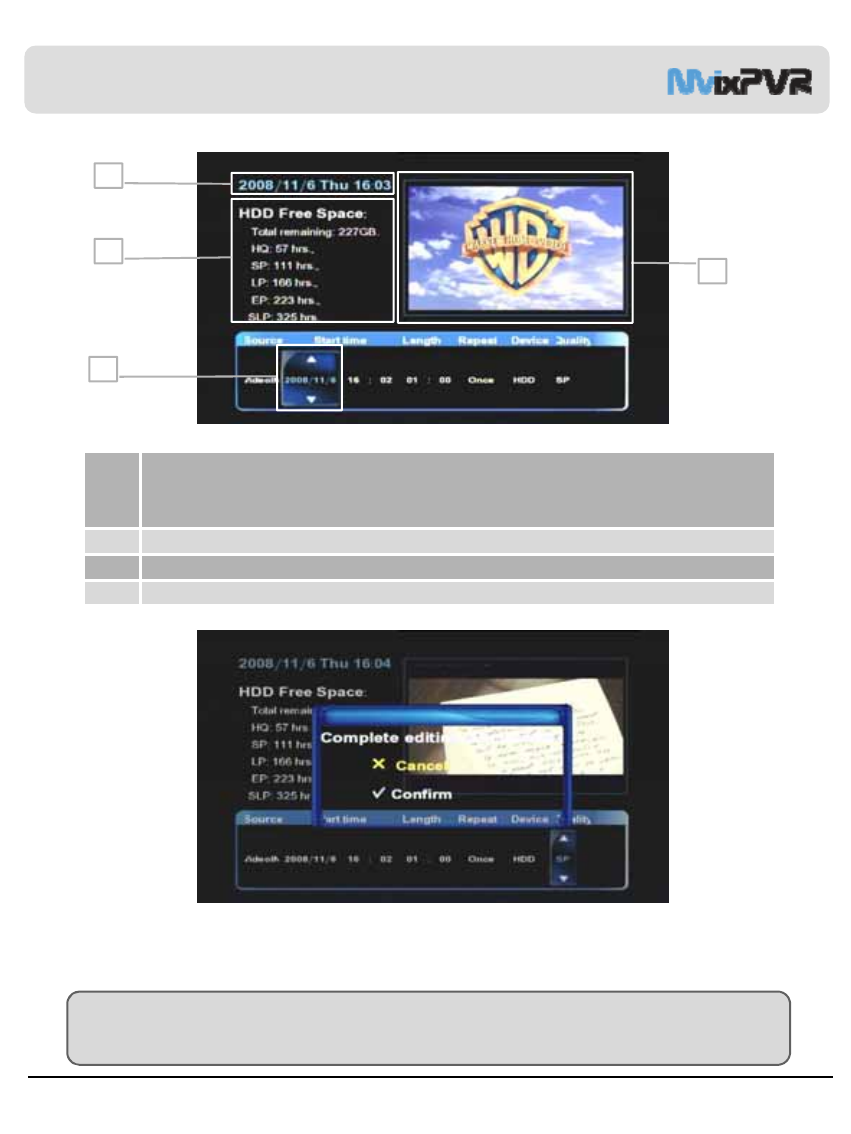
1-1. Add Preset Recording
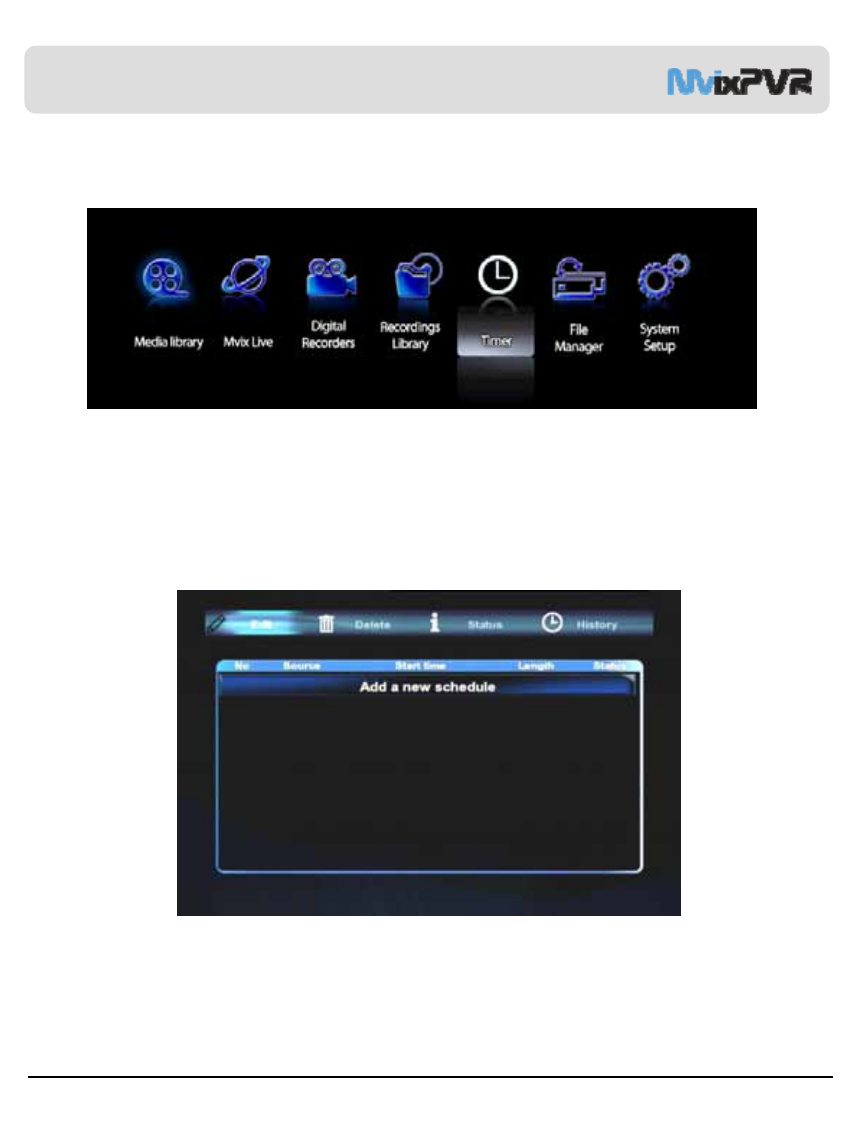
Preset Recording
In scheduler, press OK in Edit menu to display a window to preset time for recording.
Unicorn Information System
44
Finish up preset recording time setting and press OK. Then a window is displayed to ask you whether to add the designated
contents in scheduler. Select OK and apply the setting.
TIP
When preset recording schedule is saved and power is turned off, you will automatically enter standby mode.
Then, the middle and right LEDs in the main body of PVR simultaneously start blinking.
2
3
1
4
1 Screen to preset recording date and time is displayed. Preset recording date, time and recording
time are designated in order. It is not necessary to add/ modify the designation each time. Setting is repetitively
made in the order of once, daily, Monday ~ Friday, Monday ~ Saturday, Sunday, Monday, Tuesday, Wednesday,
Thursday, Friday and Saturday.
2 Shows the time set in MvixPVR.
3 Displays the reserve space of HDD as time according to quality type.
4 Shows the current input screen. (For details on quality type, refer to page 60)
Chapter 3. For Advanced Users
Unicorn Information System
45
1-2. Delete Timer
Delete Timer
Move to delete menu to find Select Menu in which you can delete the presetting selected from the preset list in scheduler and
menu window where you can delete all preset list. Press OK to use the function.
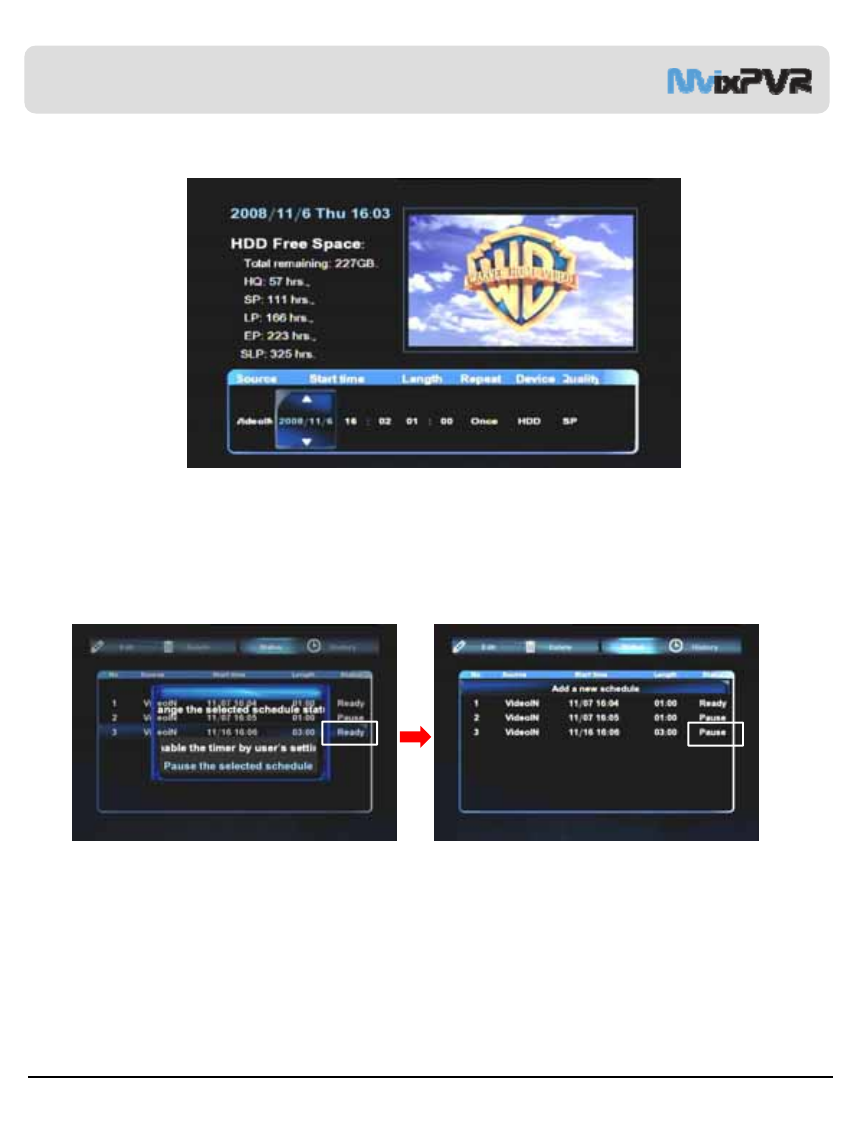
1-3. Timer Status Change
Timer Status Change
This function is used to temporarily stop the status of using the saved preset recording list or to change the status back to ‘use’.
To change the status of preset recording list, place cursor on the list to change and press OK button in remote control. When
status change window is displayed, select ‘use timer with user setup/ temporarily stop the selected schedule’ menu.
Chapter 3. For Advanced Users
Unicorn Information System
46
1-3. Timer History
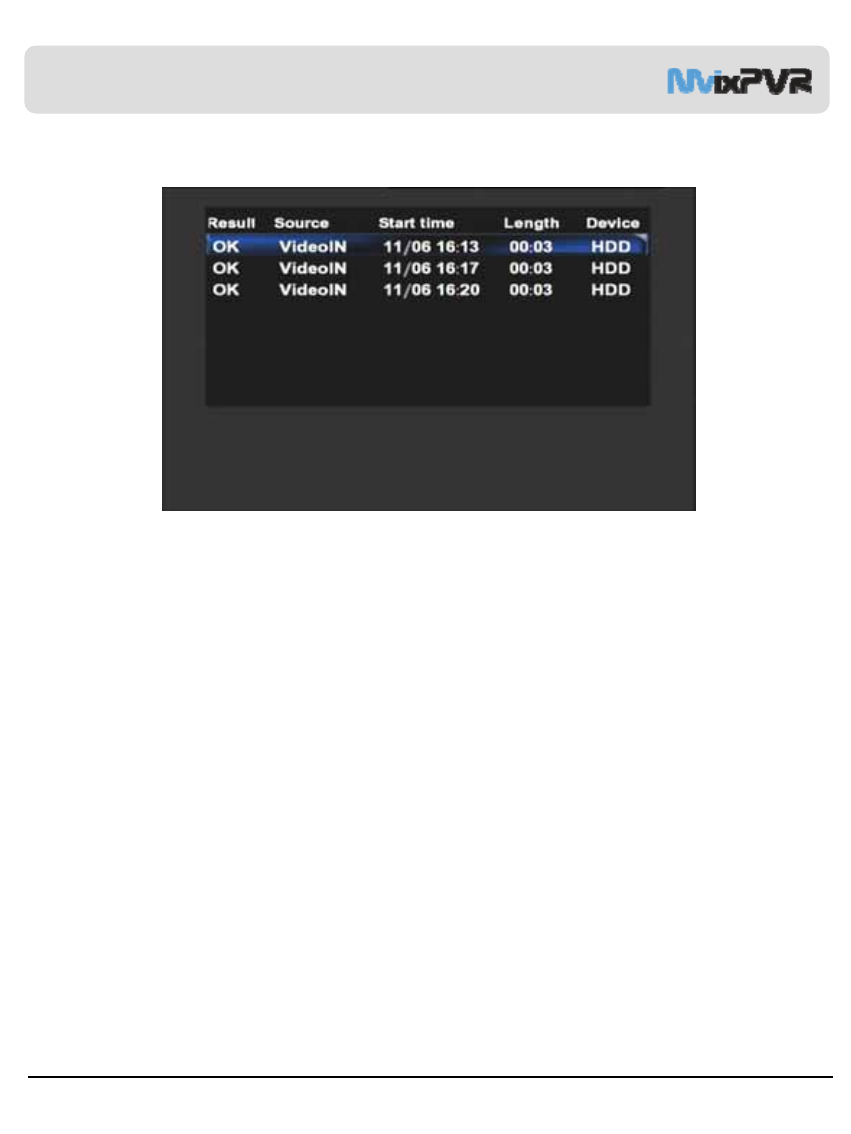
Timer History
This function is used to check the record scheduler menu. You can check the success status of schedules that have been
completed within the preset recording window. Success is indicated as OK and failure as Fail.
Chapter 3. For Advanced Users

Unicorn Information System
2) FILE MANAGER
47
1-1. Copy Function
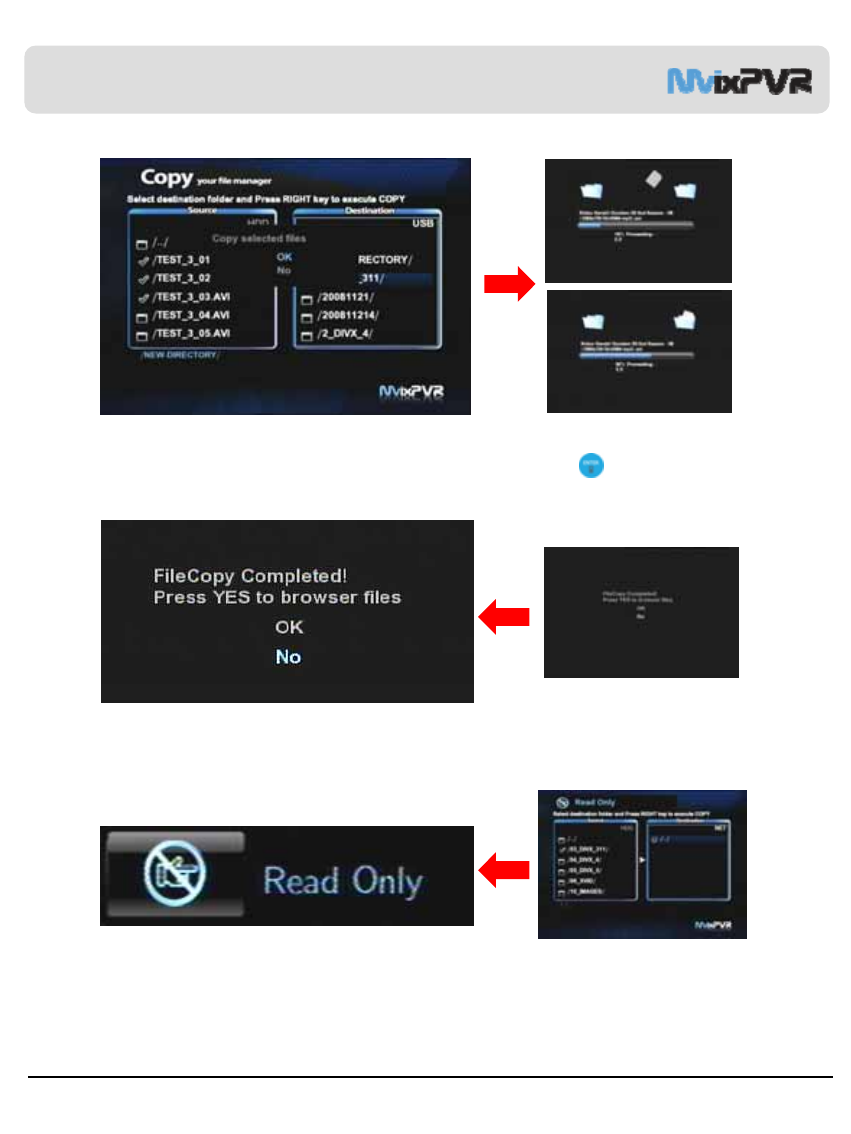
Copy
File is copied to either the storage device that is connected to MvixPVR or to a share folder on a network-connected PC. File
can be is copied both ways by using USB, HDD and NET.
This function enables you to use USB->HDD,NET / HDD-> USB, NET / NET -> USB, HDD.
Copy is not possible in Media Library file system among target disks (Copy Recordings Here (FAT32)/ Media Library (NTFS)).
Copy is possible to Copy Recordings Here disk. As for partition, copy is possible at present only to disk of FAT32 file system.
MvixPVR supports the function to conveniently copy files among USB/ HDD/ NET only with a remote control.
Firstly, search file to copy in source window screen. Place cursor over the file and press Select in remote control to select the
file. If a folder is selected, all files in the folder are copied. MvixPVR also supports the function to select and copy files from
various folder
TIP
Copy function can be used for all files in addition to video files. Two drives appear when accessing HDD mounted in
PVR. Each drive holds the file system of Media Library : NTFS/ Copy Recordings Here : FAT32.
Chapter 3. For Advanced Users
Unicorn Information System
48
Check the original file to copy as shown above. Then, select the “copy to” position. Press right direction key in remote
control to display a window asking for the status to proceed copy. Select OK and press ENTER in remote control.
When copy proceeds, the above screen is displayed.
When copy is completed, the above screen is displayed. If OK is selected, the screen will display the browse file menu.
If No is selected, you will be returned to the first screen for copy.
Refer to network setting in page 70 if the above message is displayed when attempting to copy files into a share folder of
a PC located on the network.
Chapter 3. For Advanced Users
Unicorn Information System
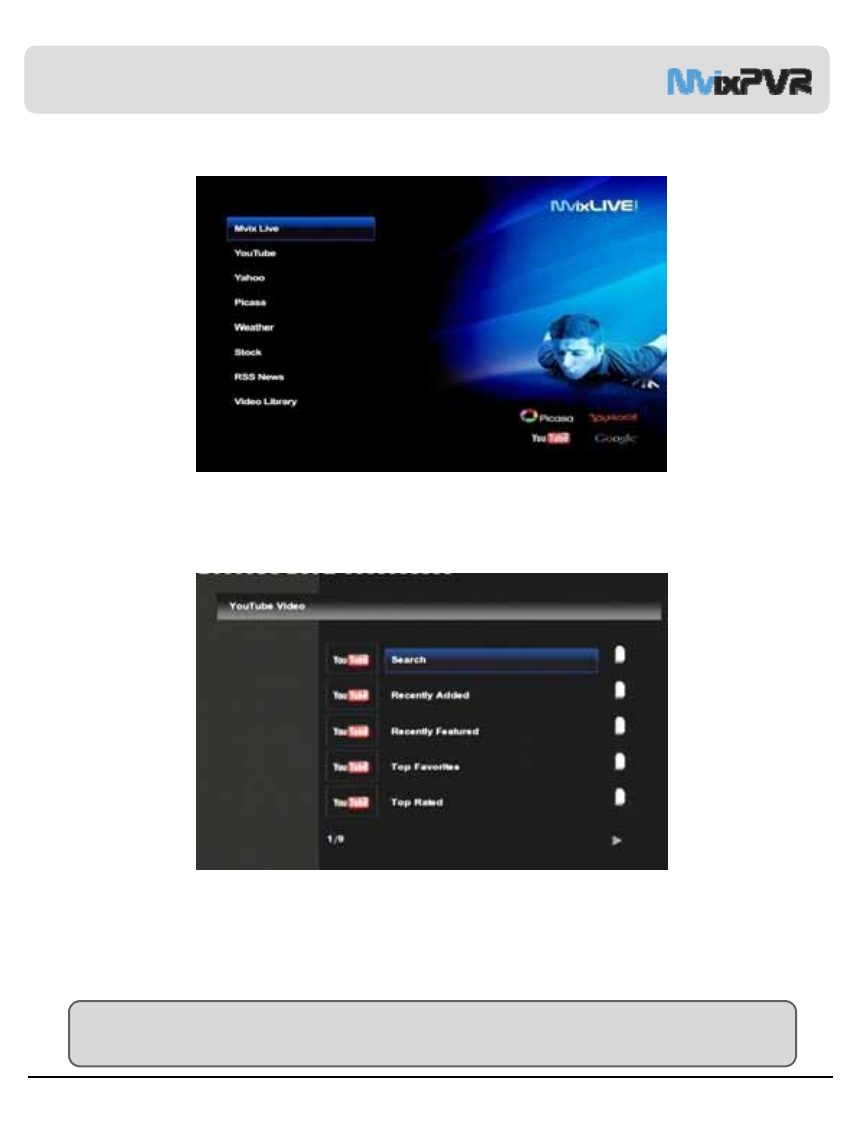
3) Mvix LIVE
49
What is Mvix Live?
Mvix Live supports real-time broadcasting streaming. Using online RSS, You can use popular film, digital photo and weather
functions. For user convenience, Mvix Live also supports search function to satisfy diverse tastes of users.
TIP
Connection may be disabled if link is not normal or blocked. MvixLIVE menu is subject to change according to
manufacturer’s conditions.
How to Use You Tube
Select You Tube in MvixLive. Search/ Recent contains 9 You Tube files, such as Added UCC/ Recommended UCC/ Favorite UCC/
Frequently Viewed UCC, etc.
Chapter 3. For Advanced Users
Unicorn Information System
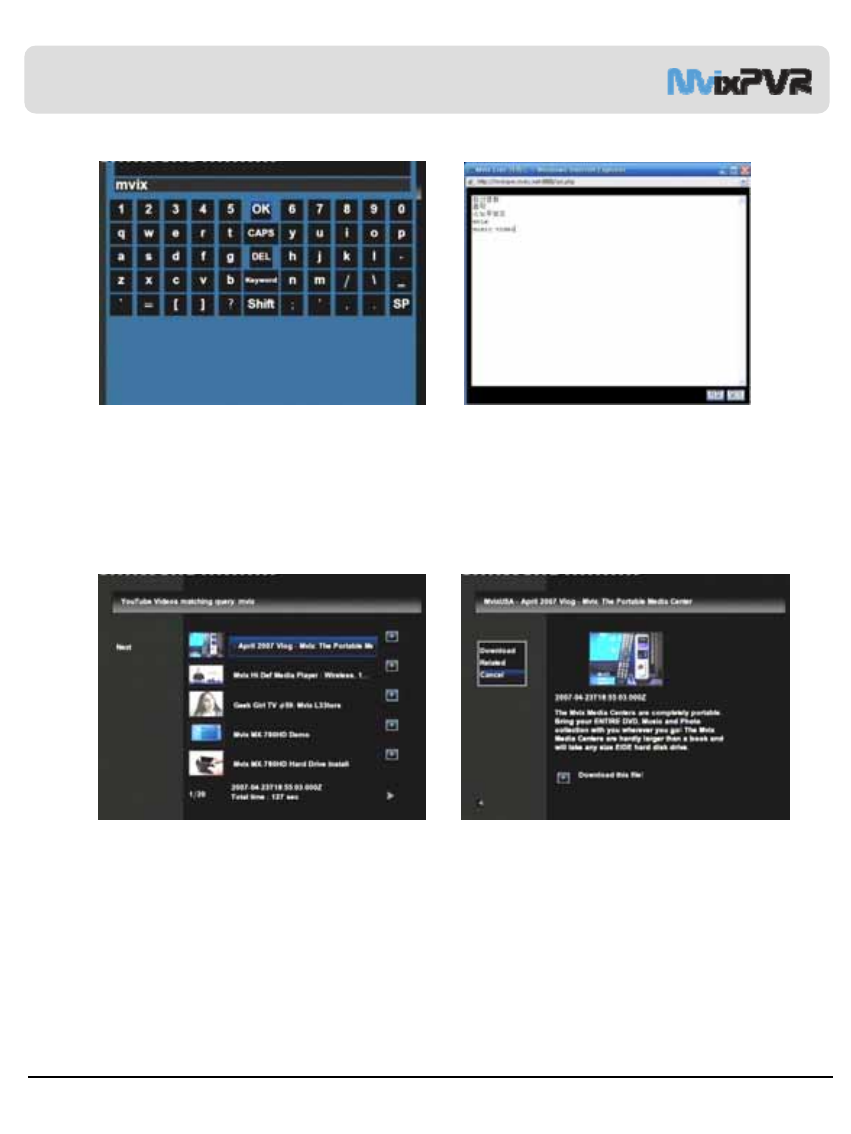
Search Video in You Tube
Select Search. When keyboard input window is displayed, search the desired file name. Or, the pre-defined contents can be
searched by using Keyword. Currently, only English input is supported in MvixLIVE. However, you can search files
conveniently asKeyword function processes inputs made in Korean and other languages.
<Screen for Keyboard Input> <Screen for Pre-defined Keyword>
<Screen for Search Results> <Screen for View Contents and Download>
Save and Play the Searched Movie File
Press > in the searched screen to view the selected contents. When selecting Download menu, the contents are saved in
MvixLIVE -> Video Library even without Internet connection.
50
Chapter 3. For Advanced Users

Unicorn Information System
<Screen for MvixLIVE Play> <Screen for Playback in Computer>
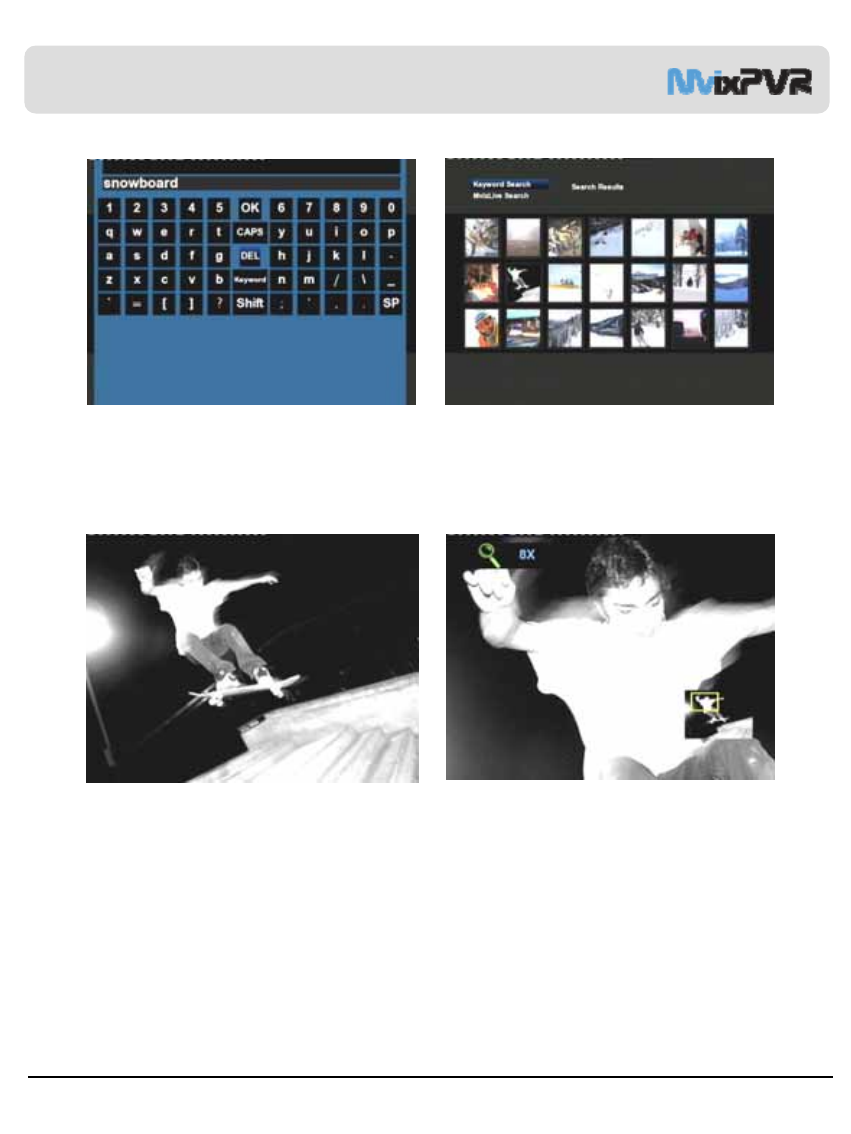
Using Picasa Function
<Screen to Select Picasa> <Selecting Search Keyword or ID Search>
What is Picasa Function?
This is the free album function provided in Goggle. You can register to the site and use the service free of charge. All images
registered in Picasa can be searched with keywords. Also, you can view your own albums by registering them in MvixLIVE. The
folder structure of Picasa is supported so that you can conveniently use this service.
51
1. Select search keyword or Picasa ID search in the menu displayed after selecting Picasa menu.
TIP
Select ID search and search MvixLive ID set as default to check the latest manual of MvixPVR.
Chapter 3. For Advanced Users
Unicorn Information System
<Screen for Search Keyword Input> <Screen Displaying the Searched Image>
<Image Screen Output> <Using Image Enlargement Function>
Slide and enlarged view functions let you view the searched images and photos uploaded into your own account.
When using the service after entering Picasa account, images can be searched in MvixLive only with open view setup.
Simultaneous use of photo slide show with background music is not supported in MvixLive status. This function is available only
in Media Library.
52
2. Enter the words to be searched in the screen keyboard and select OK. Wait for the searched screen.
Chapter 3. For Advanced Users
Unicorn Information System
http://192.168.123.37
53
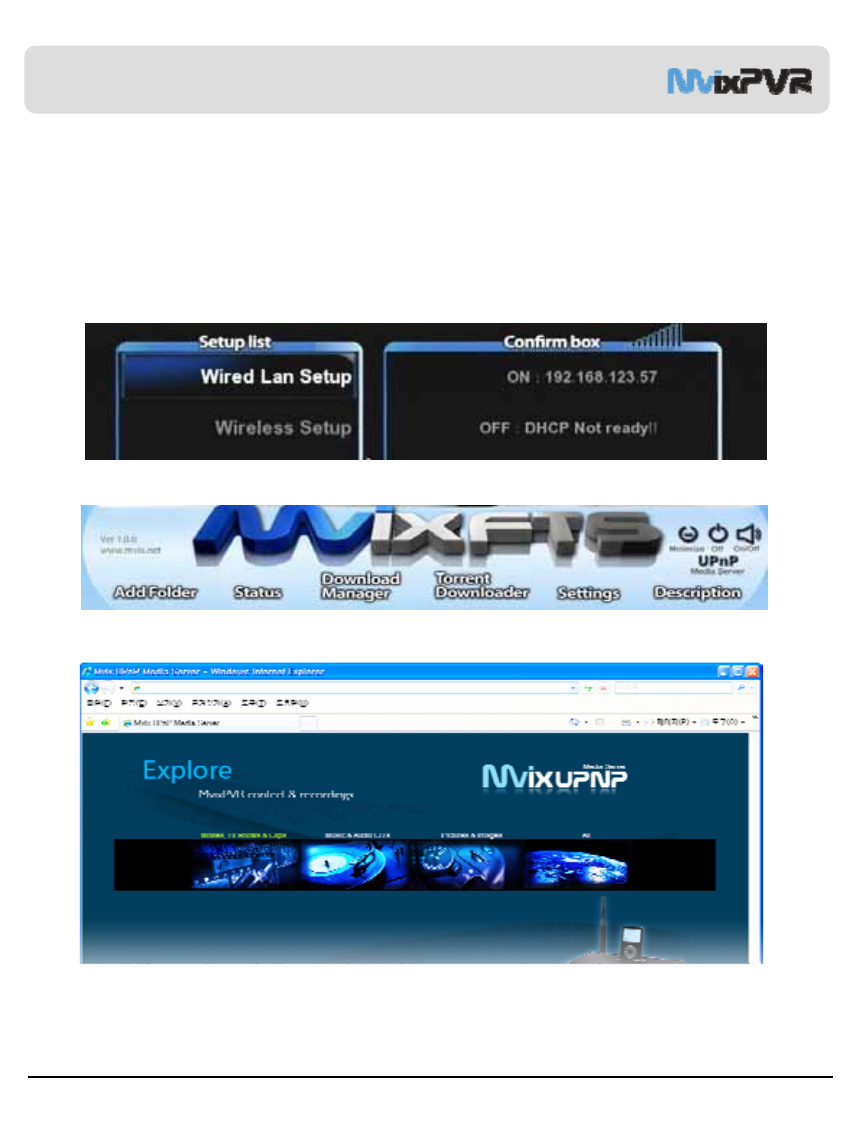
Using Mvix UPnP Media Server
SYSTEM SETUP-> MISC-> UPNP MEDIA SERVER -> ON
Activate Mvix PVR UPnP function through the above sequence.
In SYSTEM SETUP -> NETWORK, enter the allocated IP address for connection to MvixPVR UPnP Server.
By using the free DDNS of www.mvix.net, you can connect to the MvixPVR anywhere, anytime.
Default value of port number is 80. For port number of random value, up to 4-digit numeric combination can be used.
Sharer is required for connection from the outside (sharer sold separately).
4-1 UPnP to Connect
4) UPnP Media Server
1. Check the allocated IP address in System Setup => Network menu.
3. Enter the allocated IP address in the Internet browser address and connect to MvixUPnP page.
2. Or, execute MvixFTS program and click UPnP Media Server.
Chapter 3. For Advanced Users

Unicorn Information System
4. You can directly connect to MvixUPnP in the Windows as the intrinsic function of UPnP.
5. Check in My Computer => network or click Network in the background screen to display the icon shown above.
Click the icon to conveniently connect to UPnP page.
6. Check in My Computer => Network. Or, if it is not
shown in Network in the background screen, you
must activate ‘Display Icon for Network UPnP
Device’ menu. When UPnP function of XP is
activated, UPnP device is searched and displayed.
※Window is rebooted if necessary.
54
<Screen for Windows XP Network>
<Screen for Windows Vista Network>
Chapter 3. For Advanced Users
Unicorn Information System
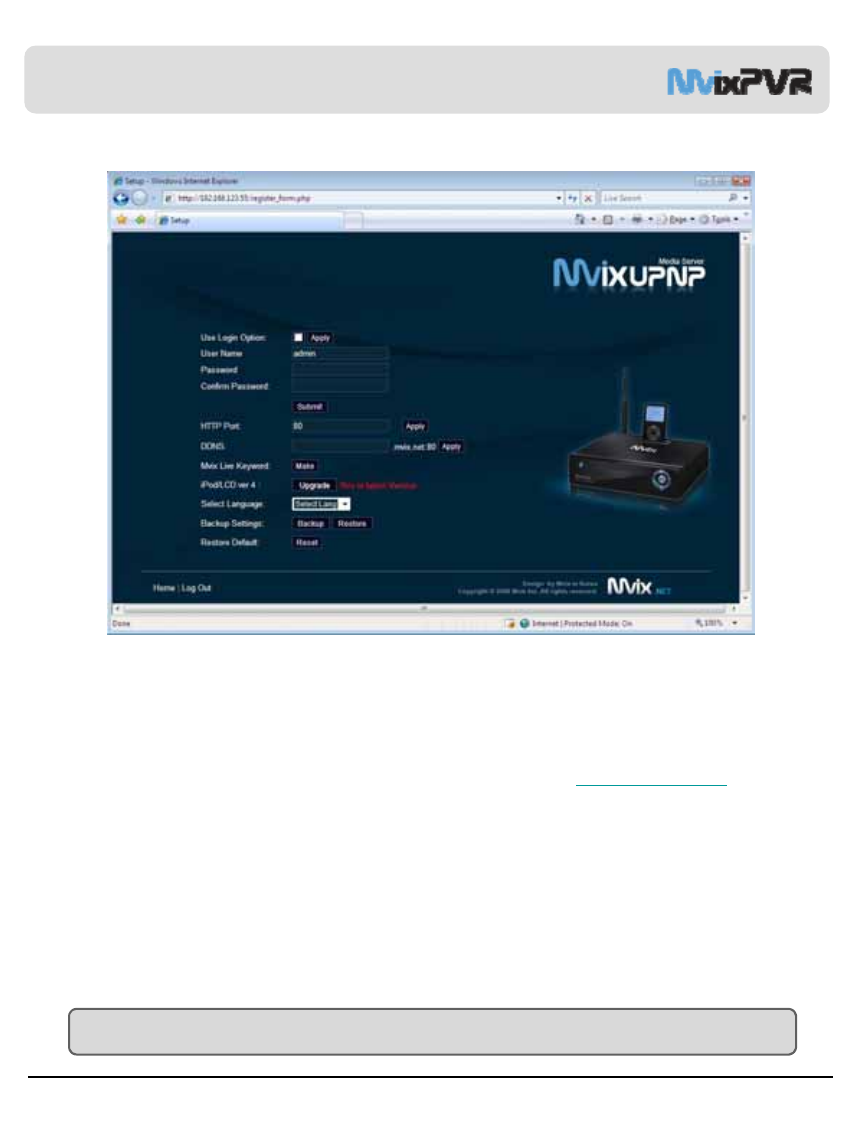
1. When connecting to setup page, you can randomly set HTTP port and DDNS address.
For DDNS, you can use addresses with the exception of the domain that is already occupying your own address.
2. After DDNS is set, change port number. Some communications companies restrict port number for external connection.
You can set port number within the usable HTTP port range of 80 ~ 90 and from 7000 to 9999.
Ex) Presuming MvixPVR IP: 192.168.123.37, Port No.: 8888 and DDNS: mvixpvr, activate setup by
connecting to sharer setup and entering 9999 port applied in UPnP and the IP of MvixPVR to port
forwarding function.
When all setups are successfully completed, you can connect to the address of ‘ Http://mvixpvr.mvix.net:8888’ from
outside. Details of port forwarding function may vary according to each sharer manufacturer. Please inquire the
manufacturer.
3. For the menu that uses login authorization, the status of using ID and password login method is displayed if connecting to
MvixPVR from inside or outside.
4. MvixLIVE Keyword: Languages and search keywords not supported of input in MvixLIVE are designated in advance for
convenient use.
5. iPod/ LCD Version: Compatibility to iPod products and LCD function firmware can be updated. When update exists,
this button is automatically activated. Just by clicking the button, update is automatically administered.
(This is online firmware update, therefore requires Internet connection.)
55
TIP. If you forget the ID and Password, do the following
Go to “SETUP” →“SYSTEM” → “Restore Default” in PVR menu and Power off. Then, UPnP will be reset .
Chapter 3. For Advanced Users
Unicorn Information System
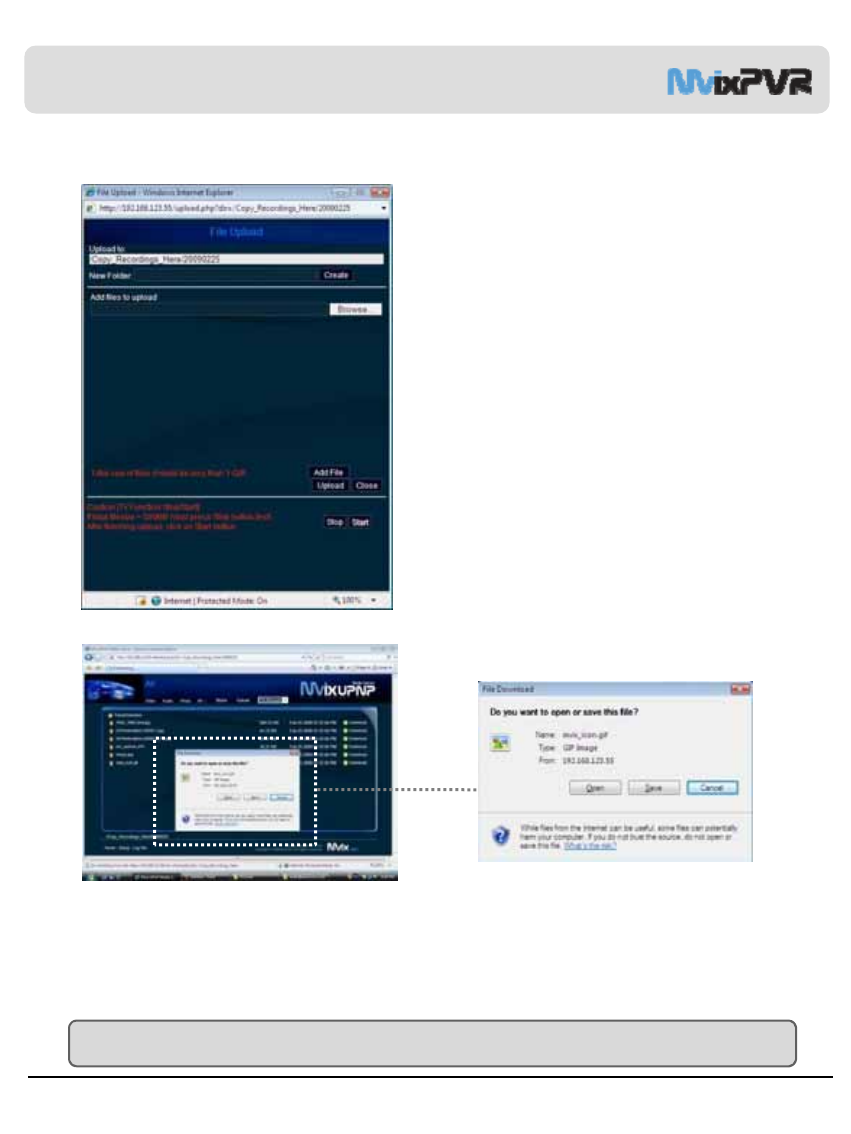
UPnP Upload
1.Connect to UPnP and click Copy_Recordings_Here disc.
2. Click Upload button displayed on screen.
3. Sequential uploading of up to 10 files is supported when uploading
a number of files at once.
Due to safety restriction, total size of the files uploaded
at the same time must not exceed 1GB.
※When converting to NAS Mode Only, video output is
suspended in MvixPVR. Therefore, TV screen does not
show anything. When converting to this mode, file up/
download function is slightly enhanced.
To upload a file of 500MB or more, upload is not
completed if not converting to NAS Mode Only. Make sure
to administer mode conversion.
To upload a file of 500MB or less, upload can be
completed without starting NAS Mode Only.
File Download
1. Connect to UPnP and move to the position of disc to download.
2. Click file name and downloading of the file is administered immediately.
Also, you can use the WMP/GOM/VLC applications in UPnP itself.
For stability of MvixPVR Media Player, maximum speed of up/ download must not exceed 1.4MB/s.
Note that UPnP File Manager function can only be used in FAT32 disc.
56
Chapter 3. For Advanced Users
4-3. File Upload & Download
Unicorn Information System
Chapter 4. Media Environment Setting
57
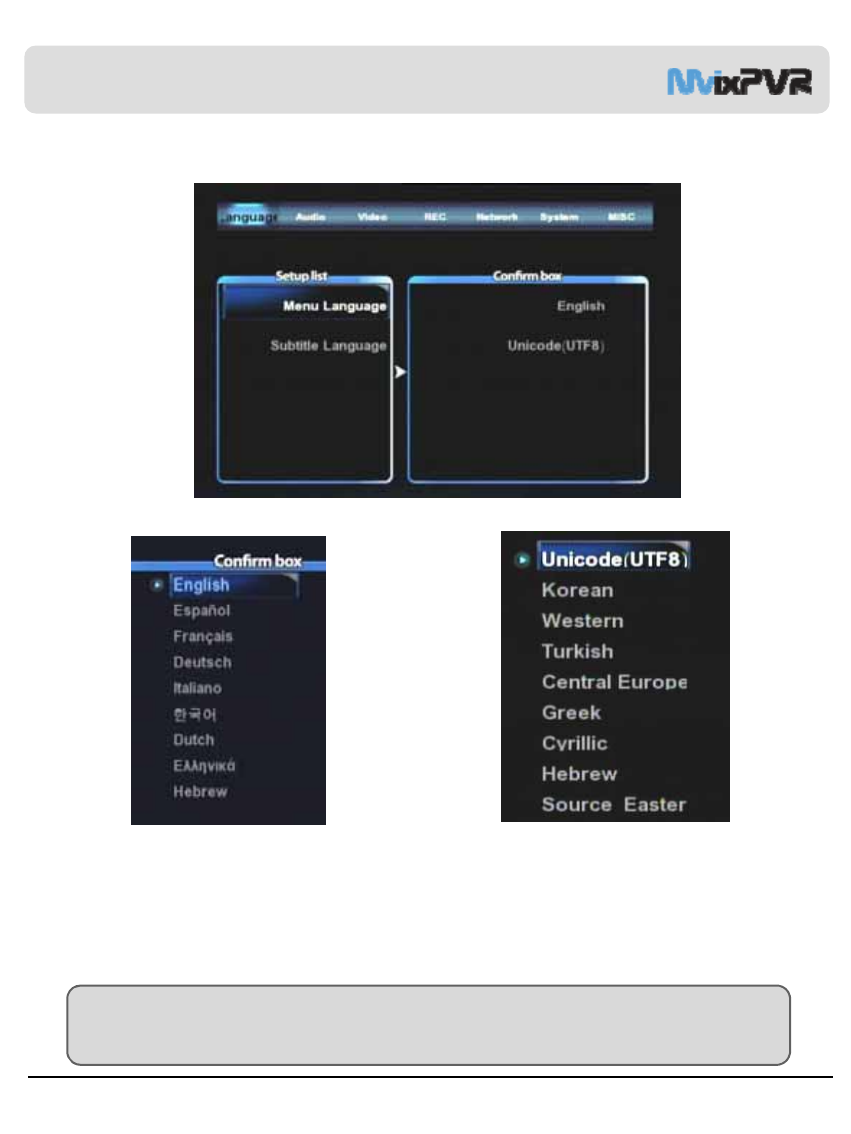
1) Language Setting
1. Menu Language
Language for menu is changed. Available
languages are English, Spanish, French,
German, Italian, Greek, Hebrew, Korean and
Dutch. The changed language is immediately
applied.
2.Text Encoding
Method of display to fetch subtitle file from computer
is changed.
Unicode(UTF8)/ Korean/ Western/ Turkish/ Central
European/ Greek/ Cyrillic/ Hebrew/ Source Eastern
are available.
TIP
Unicode, the industrial standard designed to consistently express and handle all letters of the world in a
computer, environment.
①
②
Unicorn Information System
58
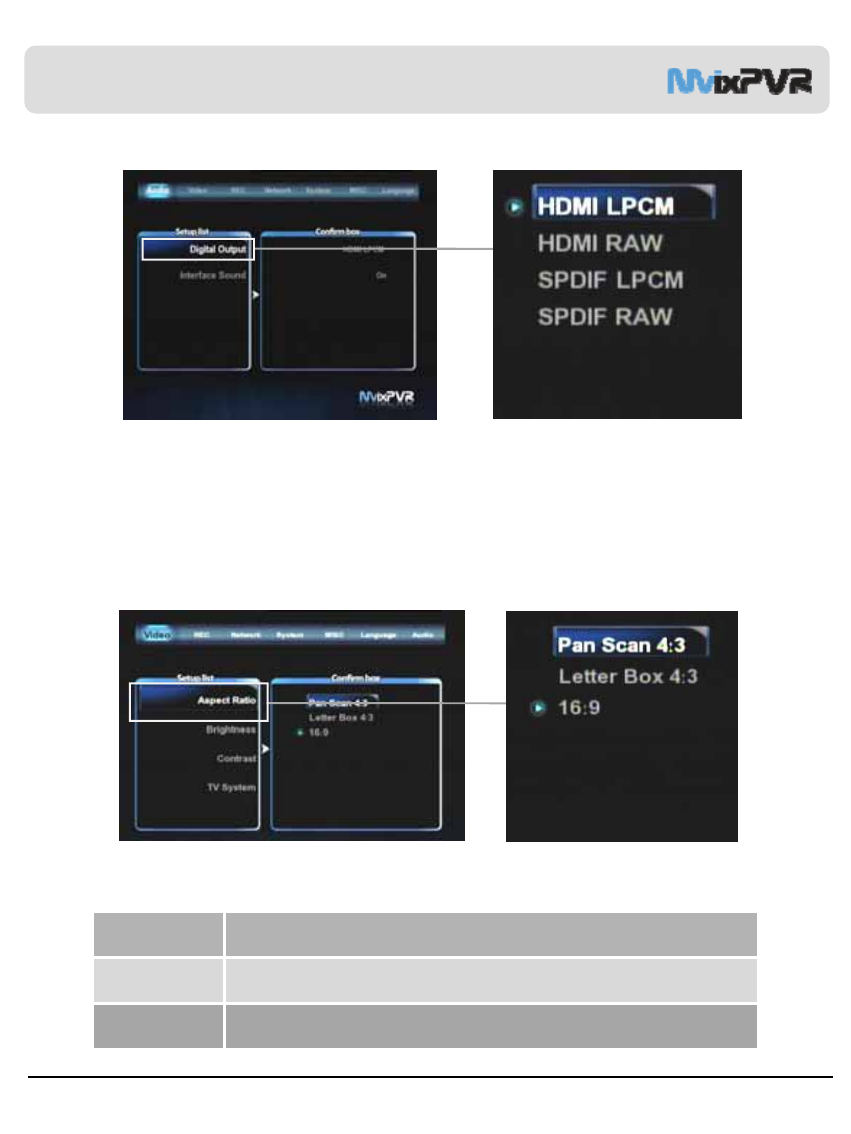
2) Audio Setting
Digital Audio Output
To output down-mixing option of DTS and Dolby5.1 to 2 channel stereo select HDMI/ SPDIF output as LPCM,
To output DTS and Dolby 5.1 select RAW HDMI/ SPDIF, connect coaxial or optical cable to amplifier/ receiver,
and it will decode the 5.1CH DTS/ Dolby digital output.
Effect sound
Sound effect for MvixPVR menus is set.
Aspect Ratio
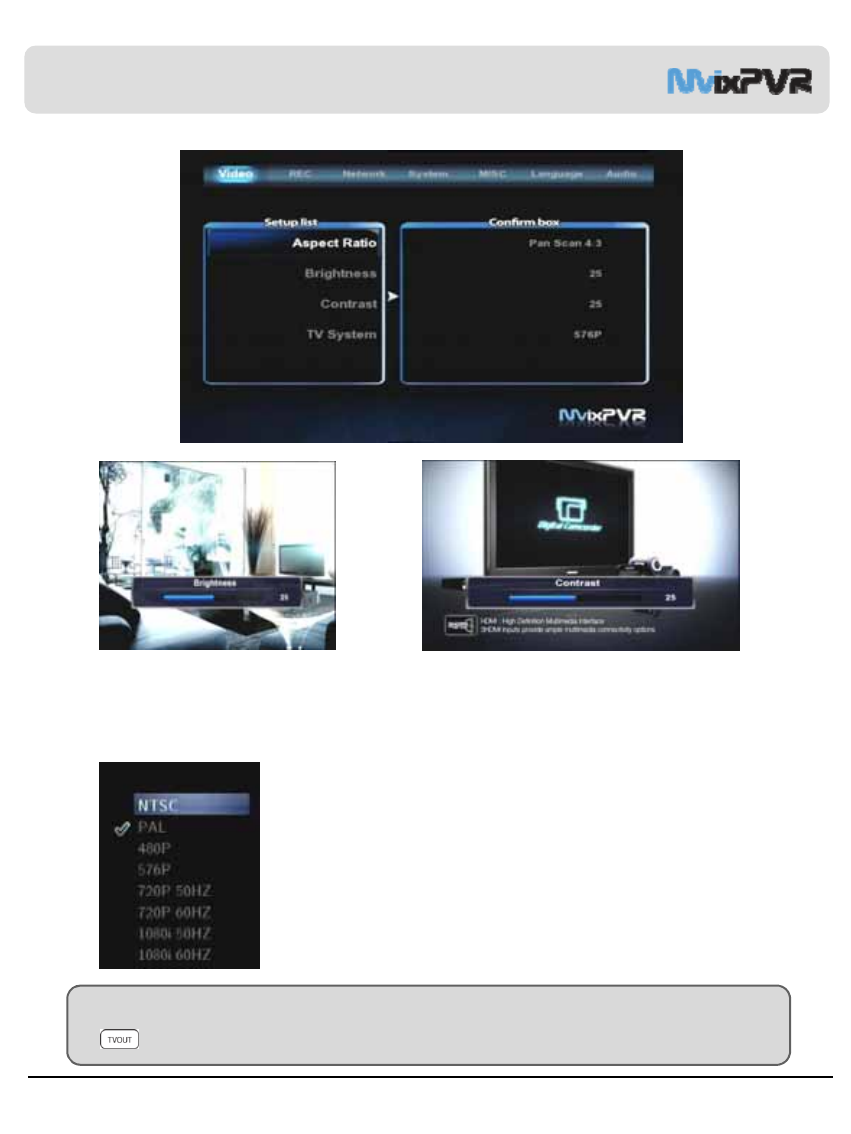
Screen ratio can be set to suit TV type. Setting is changed to Pan Scan 4:3/Letter Box 4:3/16:9.
3) Video Setting
PanScan 4:3 This ratio is used when aspect ratio of TV is 4:3. This setting is to show the film of 16:9
ratio by cutting it to 4:3 size.
LatterBox 4:3 This ratio is used when aspect ratio of TV is 4:3. This setting is to show the 16:9 film full
of screen in its original ratio.
16:9 This ratio is used when aspect ratio of TV is 16:9 to show film with the ratio of 16:9.
As of 4:3 ratio, this ratio shows the film full of screen.
Chapter 4. Media Environment Setting
Unicorn Information System
59
1. Brightness
Brightness of the displayed screen is adjusted.
While video is in play, press SETUP in remote
control. Brightness can be adjusted while
Video is in play.
2. Contrast
Contrast of the displayed screen is adjusted.
While video is in play, press SETUP button in remote control.
Contrast can be adjusted while video is in play.
3. TV System
Video output resolution is changed. PAL and NTSC modes are not compatible with
each other. Therefore, it must be adjusted to the TV in use. There is a function
that automatically adjusts output to TV system. Therefore, it is not necessary to
change PAL/ NTSC modes.
PAL Mode: 576P/720P 50Hz/1080i 50Hz
NTSC Mode: 480P/720P 60Hz/1080i 60Hz
Repeating TV – OUT with Remote Control
HDMI Connection: Repeating 480P (576P) -> 720P -> 1080i -> 480P… (automatic
PAL/ NTSC recognition)
Composite/ Component Connection: Repeating NTSC -> PAL -> 480P -> 576P -> 720P
-> 1080i -> NTSC…
TIP
Screen is not displays if selecting NTSC output mode in PAL system TV. In this case, repetitively press
TVOUT button in remote control to display screen or repetitively change output resolution.
①
②
③
④
Chapter 4. Media Environment Setting
Unicorn Information System
Recording Mode Average
Bitrates
(Video)
Resolution
(PAL) Resolution
(NTSC) Audio Format
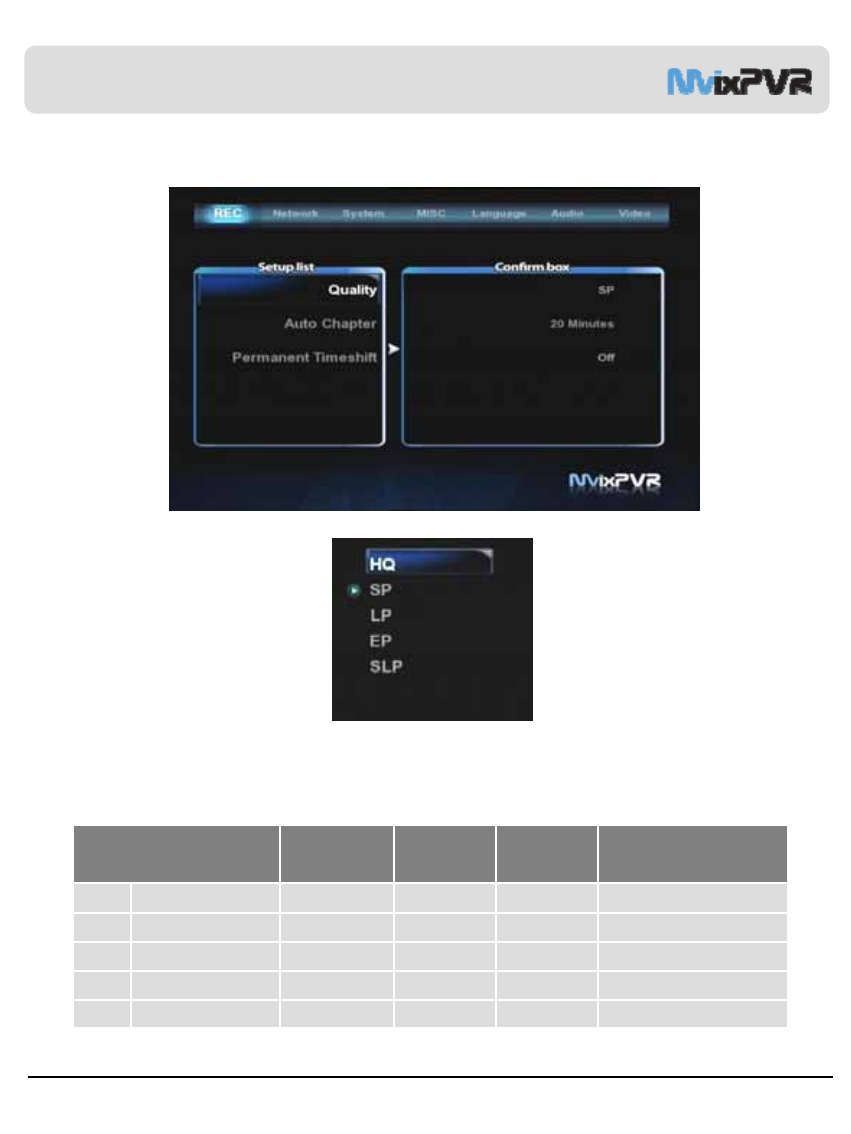
HQ High Quality 1,096 KB/s 720x576 720x480 48KHz stereo, 256Kbps
SP Standard Play 549 KB/s 720x576 720x480 48KHz stereo, 256Kbps
LP Long Play 355 KB/s 720x576 720x480 48KHz stereo, 256Kbps
EP Extended Play 257 KB/s 352x576 352x480 48KHz stereo, 256Kbps
SLP Super Long Play 178 KB/s 352x576 352x480 48KHz stereo, 192Kbps
60
Recording Quality
Quality of recording is designated.
For information on recording quality, refer to the table below. (Video CODEC: MPEG 2 , Audio CODEC : MPEG2, 2CH)
4) REC Setting
Chapter 4. Media Environment Setting
Unicorn Information System
61
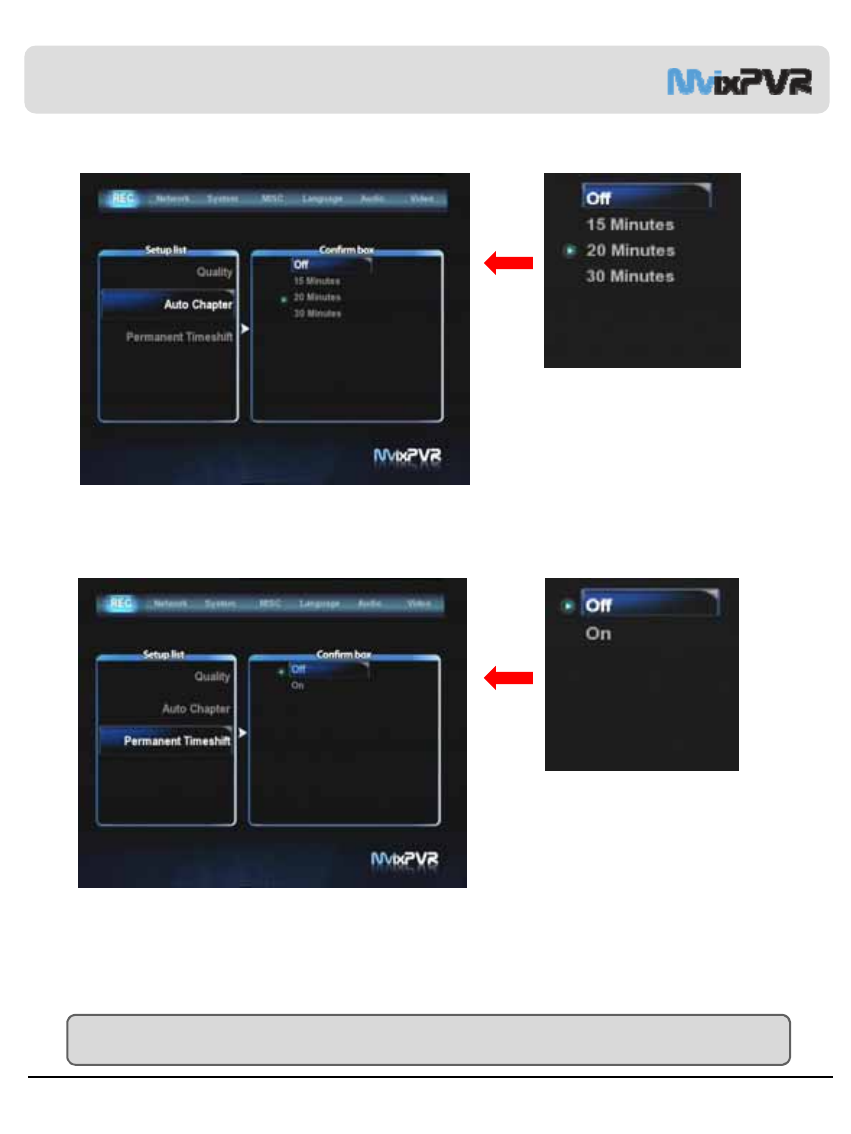
Permanent Time Shift
Status of permanent time
shift is set in using time
shift function.
Default: Off
Auto Chapter
Time of automatic chapter
use is designated.
※In case of USB device, only the file system of FAT32 is applicable.
Chapter 4. Media Environment Setting
Unicorn Information System
62
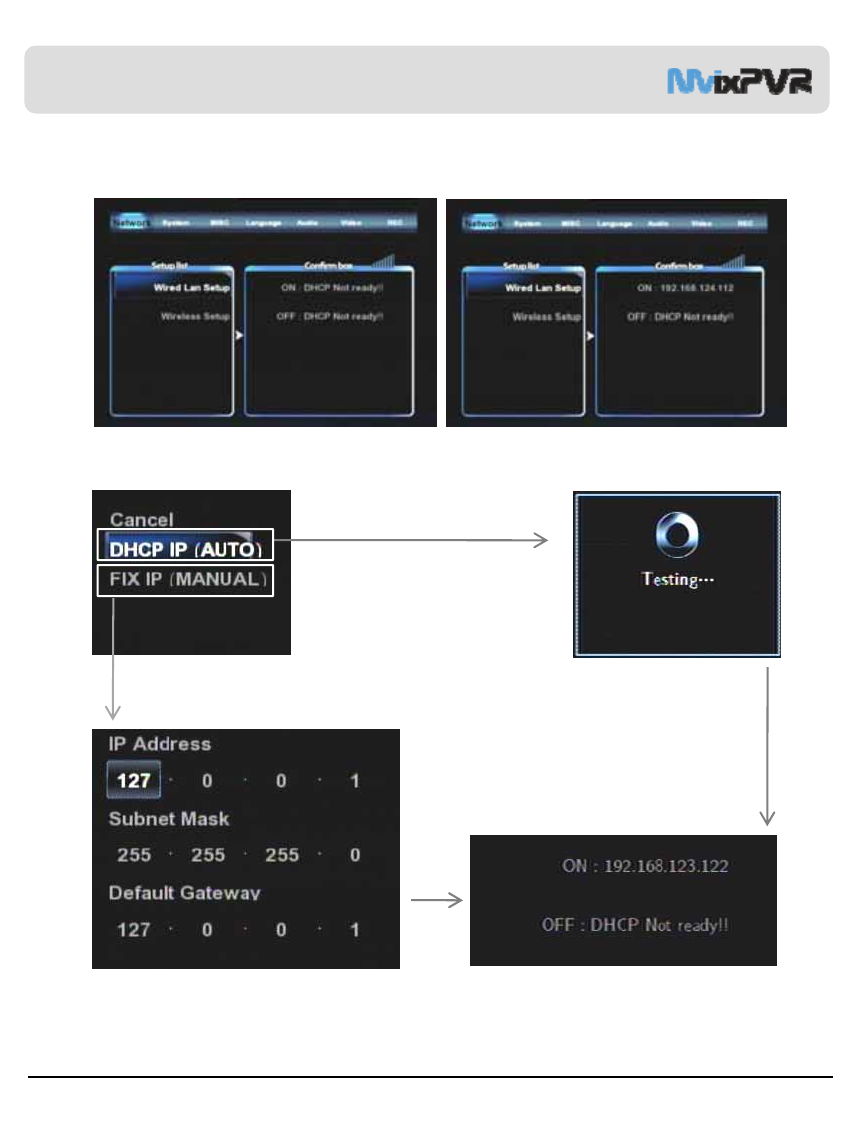
5) Network Setting
5-1. Wired Network Setting
<Wired Network Not Connected> <Wired Network Connected>
Automatic Allocation
Mode (DHCP)
When making connection
by using wired LAN, connection is
automatically made to network if
selecting automatic IP allocation.
Manual Static IP
This function is for using static IP or for manual connection.
When setting is completed, press
OK to attempt connection. Then,
network is connected.
If IP address is displayed as of the example on the
right, network connection is completed with IP
successfully received.
Chapter 4. Media Environment Setting
Unicorn Information System
63
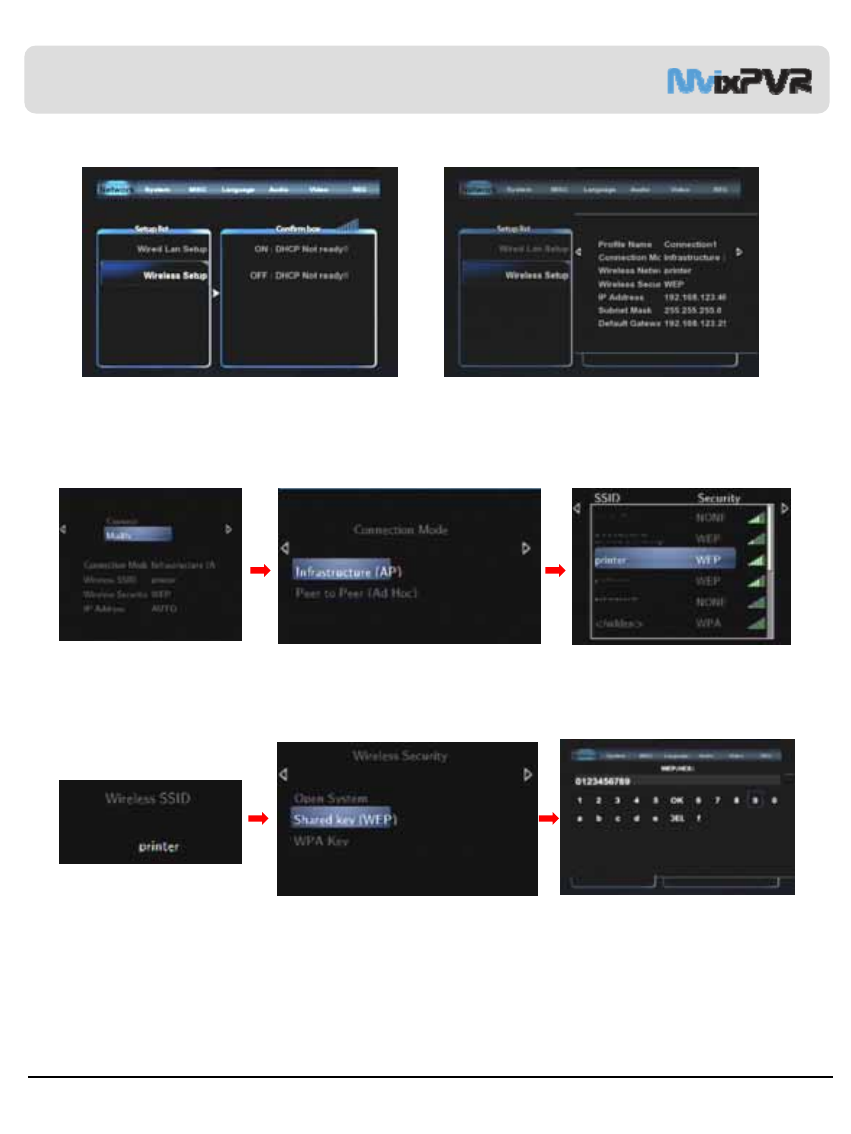
5-2. Wireless Network Setting
<Wireless Network Not Connected> <Wireless Network Connected>
The following are descriptions on the method of wireless network connection by searching signals.
To use wireless network, you need wired/ wireless sharer.
Select Modify and move to the
next step.
※Only WEP encrypted
connection is explained.
Select signal search mode.
Move to the next step.
When SSID for connection is displayed,
select it and move to the next step.
Check the selected SSID. Press OK
and move to the next step.
Select wireless security encryption.
WEP Auto (Open/Shared key) / WPA is supported.
When encryption input screen is
displayed, enter the accurate password and
press OK to attempt connection.
Chapter 4. Media Environment Setting
Unicorn Information System
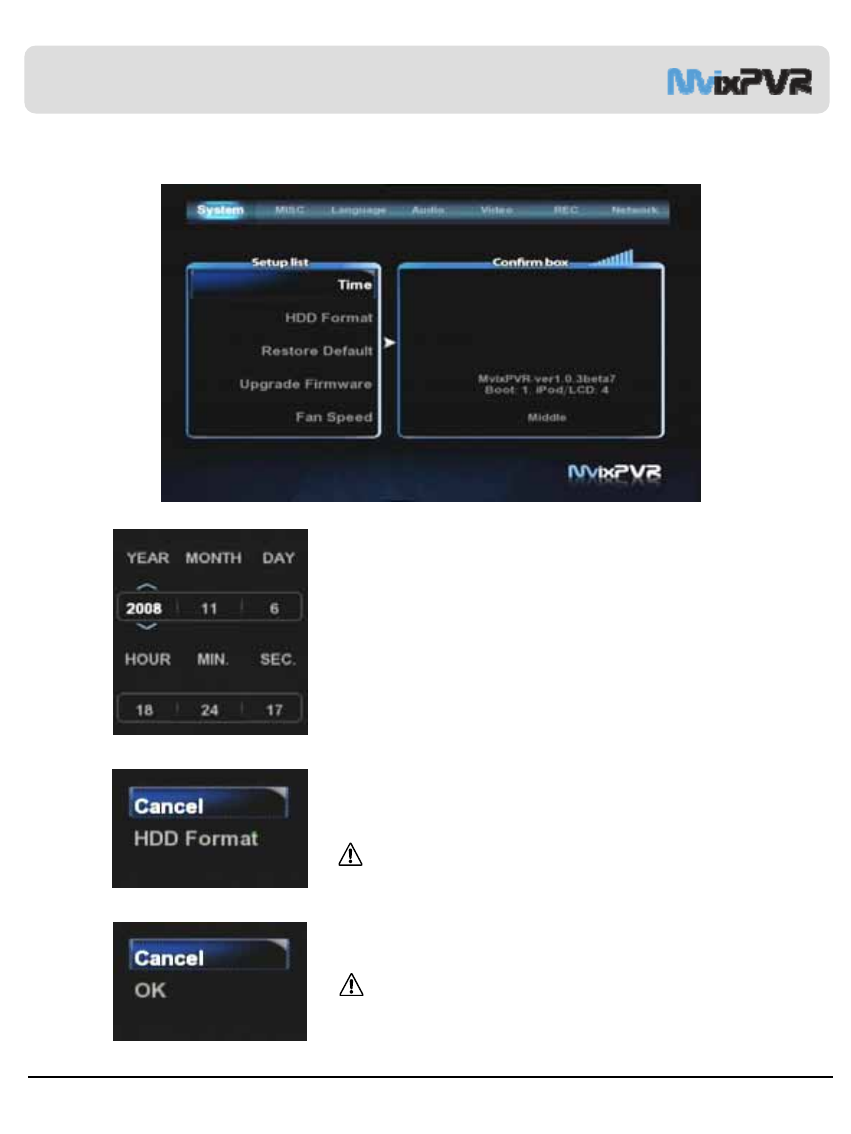
6) System Setting
1. Time
Set time of MvixPVR that serves as the basis of using TIMER function.
Using up/ down/ left/ right keys in remote control,
set year/ month/ day/ hour/ minute/ second.
Press OK to save the set values.
2. HDD Format
Manual format is enabled when installing hard disk for the first time or
replacing it.
Formatting erases all data in hard disk. Caution is required as the
erased data cannot be restored.
3. Restoring Default Value
All set values are restored to default.
Data in hard disk are not deleted or initialized.
To initialize HDD, use HDD Format menu.
64
①
②
③
④
⑤
Chapter 4. Media Environment Setting
Unicorn Information System
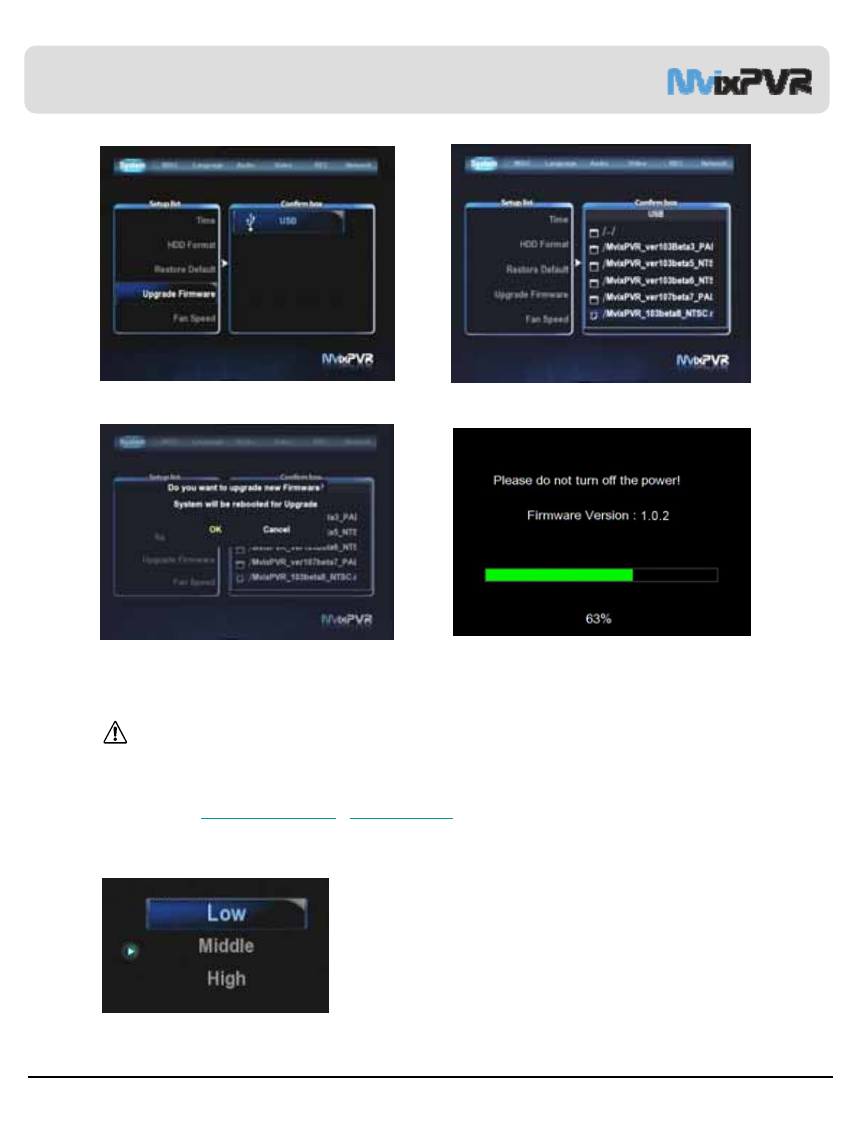
4. Check before Firmware Upgrade
To proceed with firmware update, all movies downloaded in MvixLIVE are deleted. You must backup or download
the movies again.
Also, the setup value of UPnP is changed to default value. So, use the UPnP setup backup menu.
Currently, firmware version is displayed and firmware update through USB storage device is possible.
Update is administered only when copying firmware to a root that is not located at the lower position of a folder in USB flash
memory (Ex.: D:\).
Visit our website (http://www.eunicorn.co.kr / http://www.mvix.net ) for more details on firmware download and update.
65
1. Select USB memory. 2. Select firmware update file in root.
3. Press OK to start firmware update without system
rebooting.
4. Firmware update begins.
5.Cooling Fan Speed Control
Cooling Fan Speed: Fan speed can be adjusted in 3 levels.
When ambient temperature is high, it may lead to lowering of speed or system
down. This function lets you adjust fan noise level and speed to suit the ambient
temperature..
Chapter 4. Media Environment Setting
Unicorn Information System
66
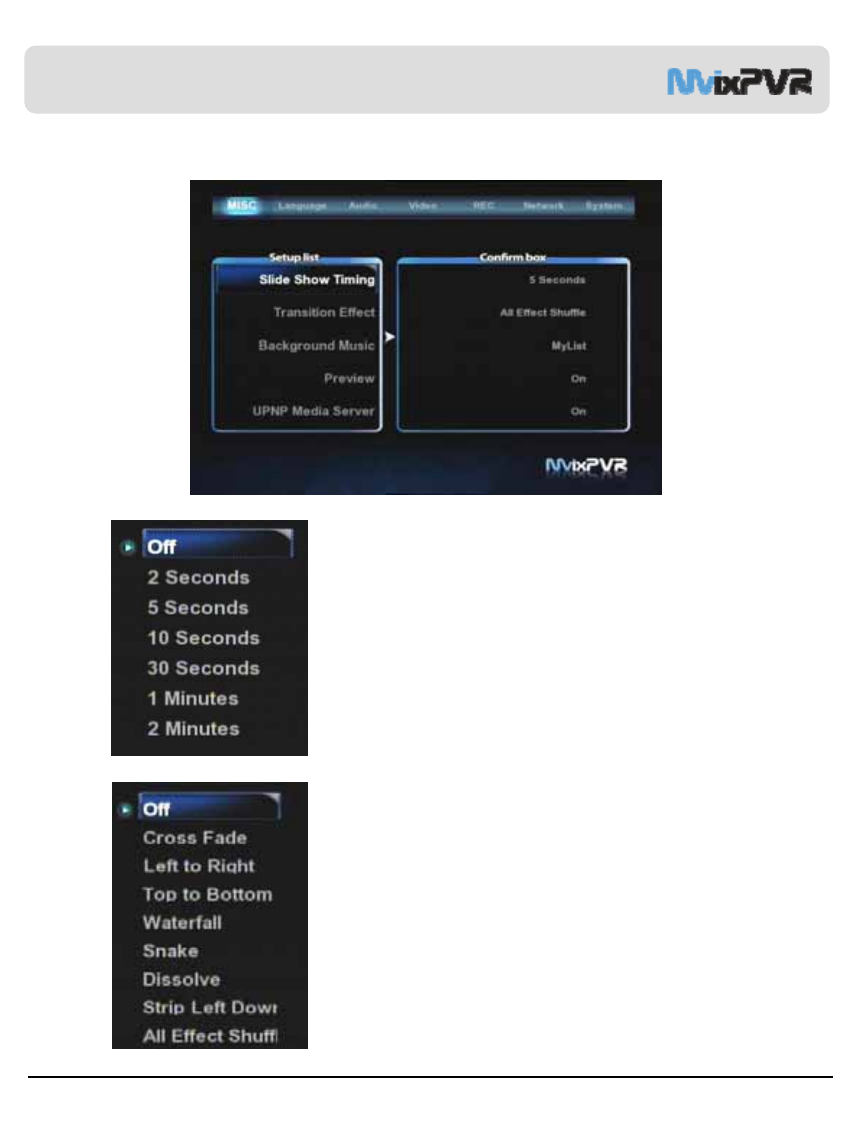
7) Other Settings
1.Slide Show Time
This is to set the time of which
display is produced and maintained when viewing photos.
Time can be designated as off/ 2sec/ 5sec/ 10sec/ 30sec/ 1min/ 2min.
2.Transition Effect
When viewing photos, transition effect to move to the next photo is
set. Total of 7 effects are available. All other randomly applied
effects are also supported.
①
②
③
④
⑤
Chapter 4. Media Environment Setting
Unicorn Information System
67
3.Background Music
Folder: the MP3 file automatically replays in the same folder of picture files
MyList: This function can be used by connecting to UPnP Media Server.
Music files listed as favorites in My List of Media Library are played
together with slide show.
4.Preview
In Media Play function, you can disable or enable preview function.
This is not applied in Playback menu. On/Off setting can be made by
using Preview key in remote control.
5.UPNP Media Server
UPnP server implementation is possible. You can play or download
HDD files by connecting with IP address of MvixPVR from local PC.
Chapter 4. Media Environment Setting
Unicorn Information System
68
Chapter 5. MvixFTS Use and Share
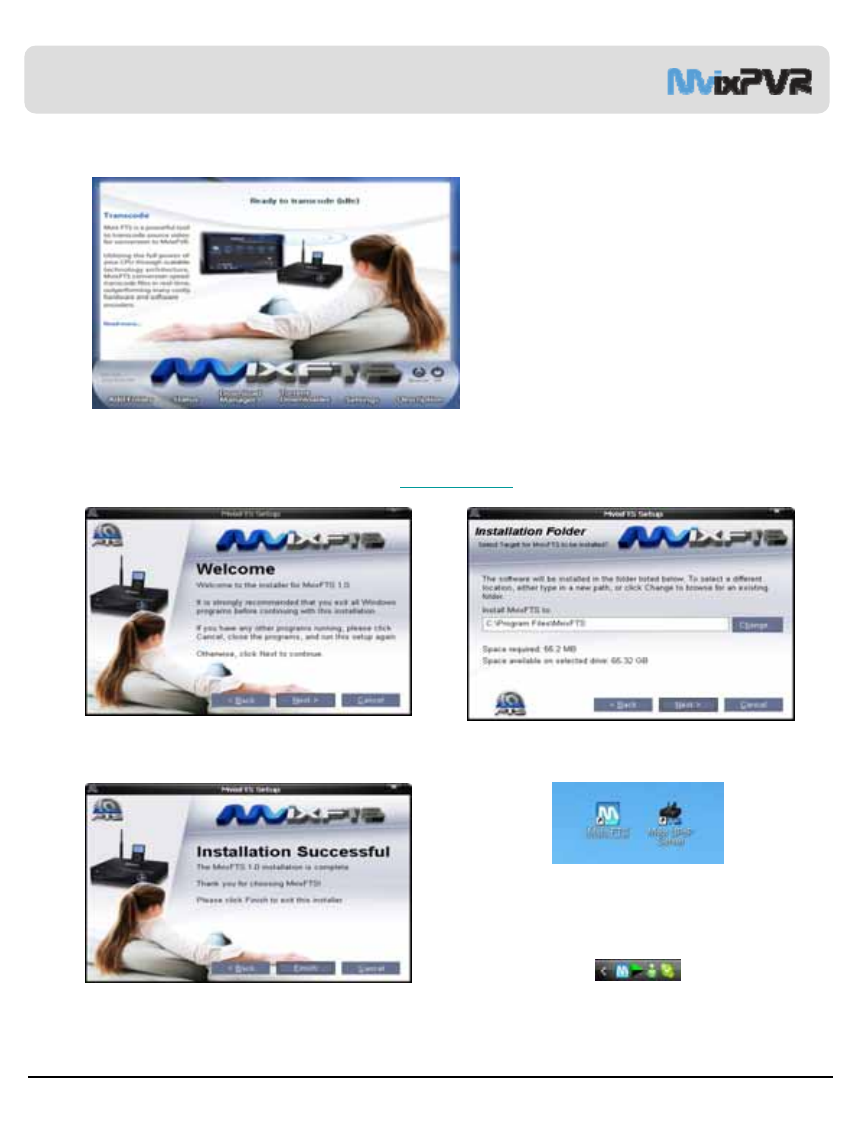
1) Mvix FTS Installation
What is Mvix FTS?
This program converts and transmits movies
made with a CODEC that is not supported in
MvixPVR into MPEG CODEC on a real-time basis.
MvixFTS enables to transcode the output of
movies in H.264/ WMV / MOV / RMVB / RM
mode. MvixFTS can be used only when it is
installed in a PC that is connected to the same
local network.
This function is limited to movie sources saved in PC
rather than H.264 files saved in HDD built inside
MvixPVR.
When the above screen appears, click Next.
Find Mvix FTS program in the CD enclosed in this product package and start installation.
Mvix FTS program can be downloaded in data room at http://www.mvix.net or http://www.eunicorn.co.kr
Screen to designate program installation route is displayed. Click Install.
Installation is completed. Program will be executed.
Shortcut Icon
Program is executed by icon on background screen
or in ‘Start -> Program -> Mvix FTS program group.
TaskBar Icon
Unicorn Information System
69
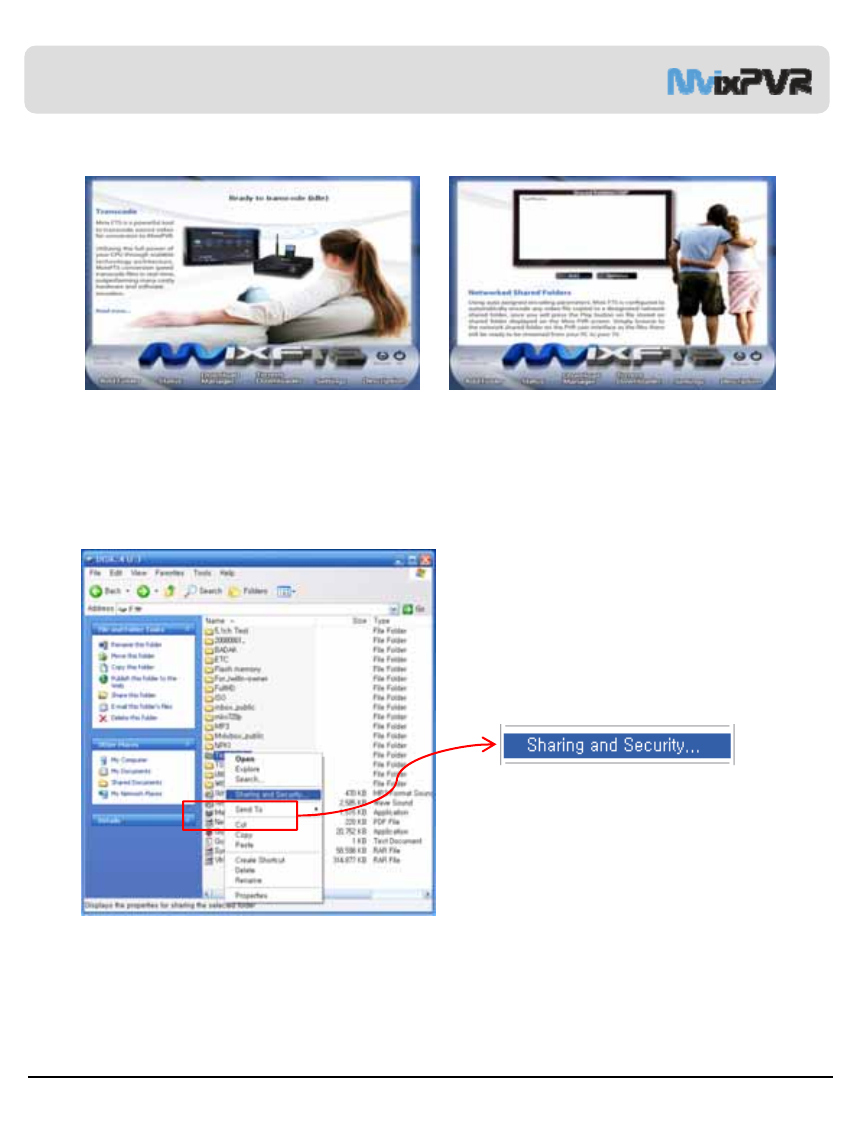
When running program, the above screen is displayed. Click Net Share Dialog to display the following screen. If share folders
exist in PC, the folders will be displayed in list. If the share folder added is not displayed, click Add and set the corresponding
folder. In some virus vaccines, firewall function disables streaming. Make sure to clear firewall before use.
2) Windows XP Share Folder Setting
First, you must share the folder that includes a movie
you intend to play by using MvixFTS server. This
Description is given based on Windows XP SP3.
As shown in the picture, select a folder and right-click
it to display a popup. Then, select the menu.
Chapter 5. MvixFTS Use and Share
Unicorn Information System
70
3) Change/ Give Power for Windows XP Share Folder (Copy Function)
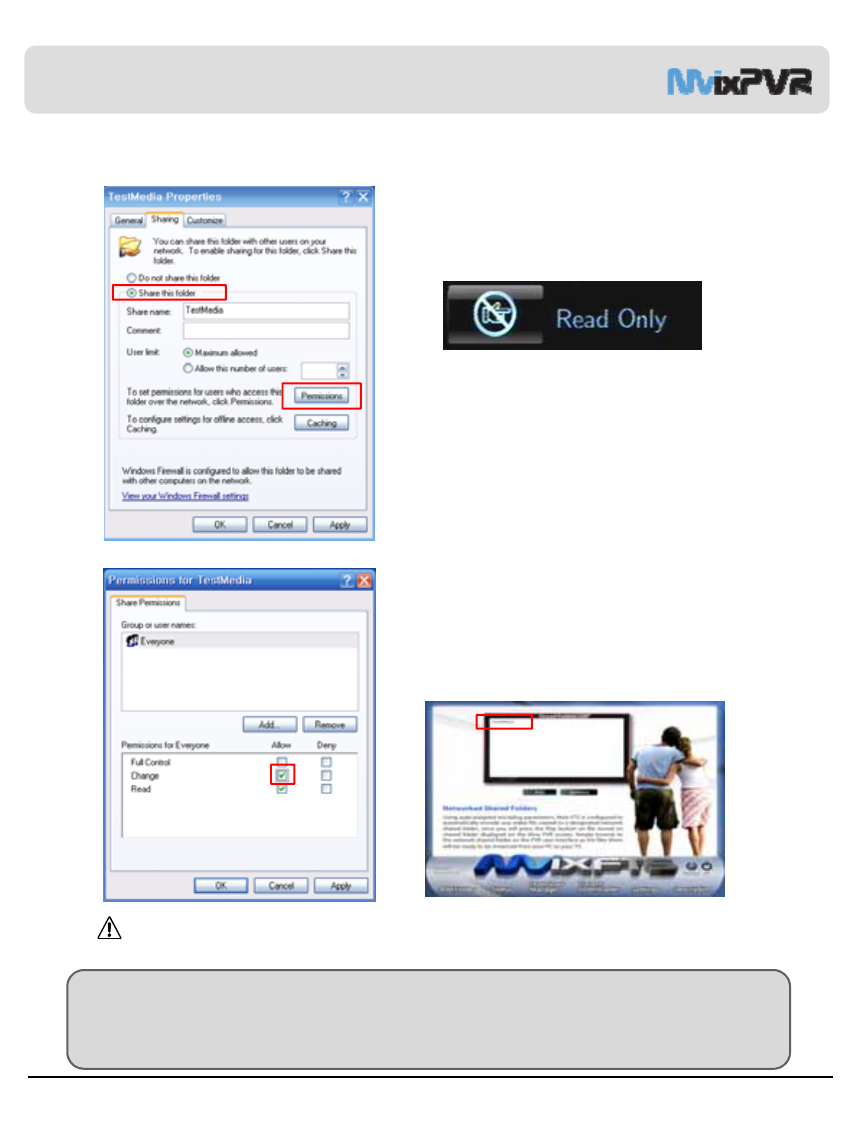
Share setting screen of folder registration info. is
displayed as of the following.
Check ‘share this folder in network’ and press OK.
<Ref. #1>
Check share attributes of share folder if ‘Read Only’ is
displayed as of the above when copying a file to the share
folder of NET PC using COPY function. Check ‘network
user can change my file’. Then, you can copy files to the
share folder of PC in network when using MvixPVR COPY
function.
※COPY function can be used not only for video files,
but also for all other files.
Run Mvix FTS program again and press OK in Net Share
Dialog menu. You will see that a folder designated of
network share setting is automatically added.
Video files of H.264/ WMV/ PMVB/ RM/ MOV mode
contained in a share folder registered in MvixFTS can be
played by streaming in MvixPVR.
MvixFTS program must be kept on in PC. Play will be
stopped if PC is turned off or program is closed.
MvixFTS program does not operate when playing CODEC supported by PVR in network. Therefore, it is not necessary
to execute the program. Run MvixFTS program when playing the movies of H.264/WMV/RMVB/MOV/RM, etc.
Note
For operation test of MvixFTS program, we guarantee operation in operation system with the latest security patch of
Windows XP SP3 and Vista SP1. In case PC specifications do not allow successful converting of H.264 movies or of
abnormal OS status, program operation may be disabled. We do not guarantee operation in these cases.
If program execution is not successful, install Microsoft Visual C++ or download the latest security patch.
Chapter 5. MvixFTS Use and Share
Unicorn Information System
71
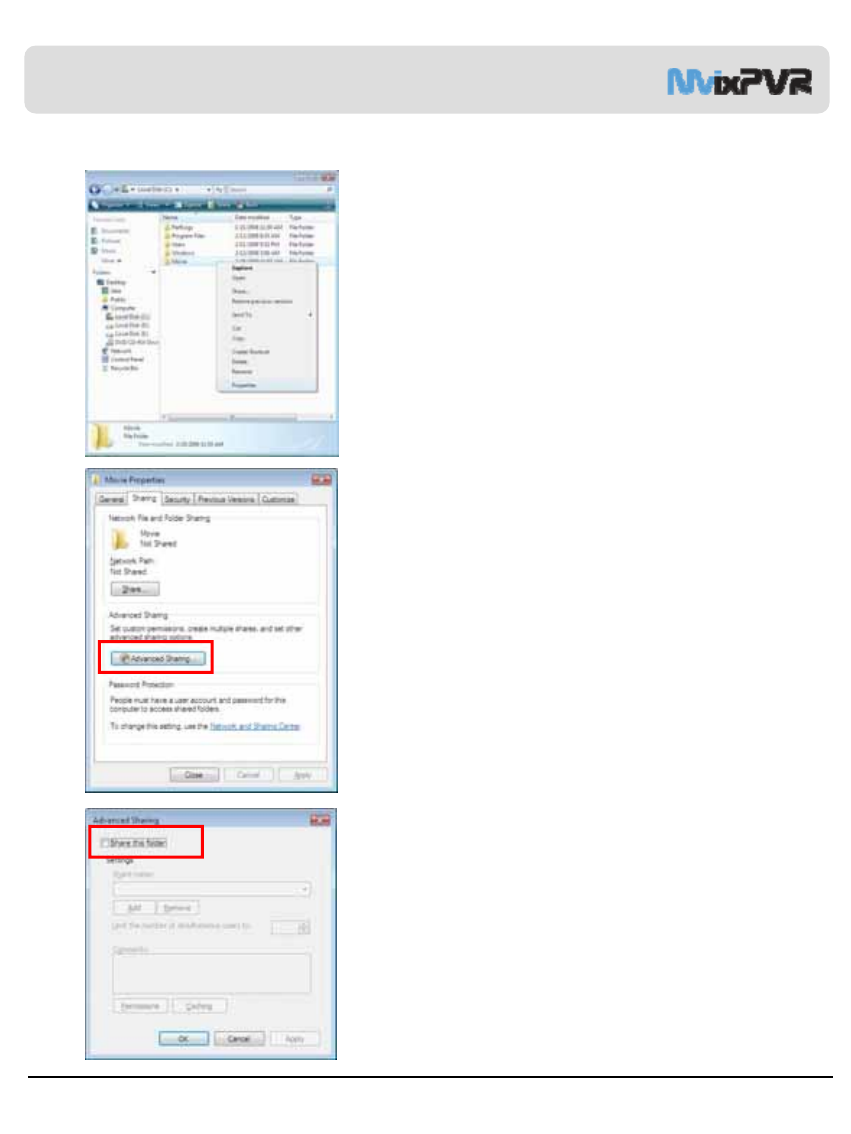
4) Windows Vista Share Folder Setting
Set and Apply Share Folder & Copy To Folder in Windows Vista
1. Select a folder in Windows Explorer to activate of the functions for
playing share folder using network and for copying files to in Windows
Vista. Right-click the folder. When popup is displayed, click ‘Properties’.
2. Click ‘advanced share’.
3. Click and check the selected share folder. Then, click power.
Chapter 5. MvixFTS Use and Share
Unicorn Information System
72
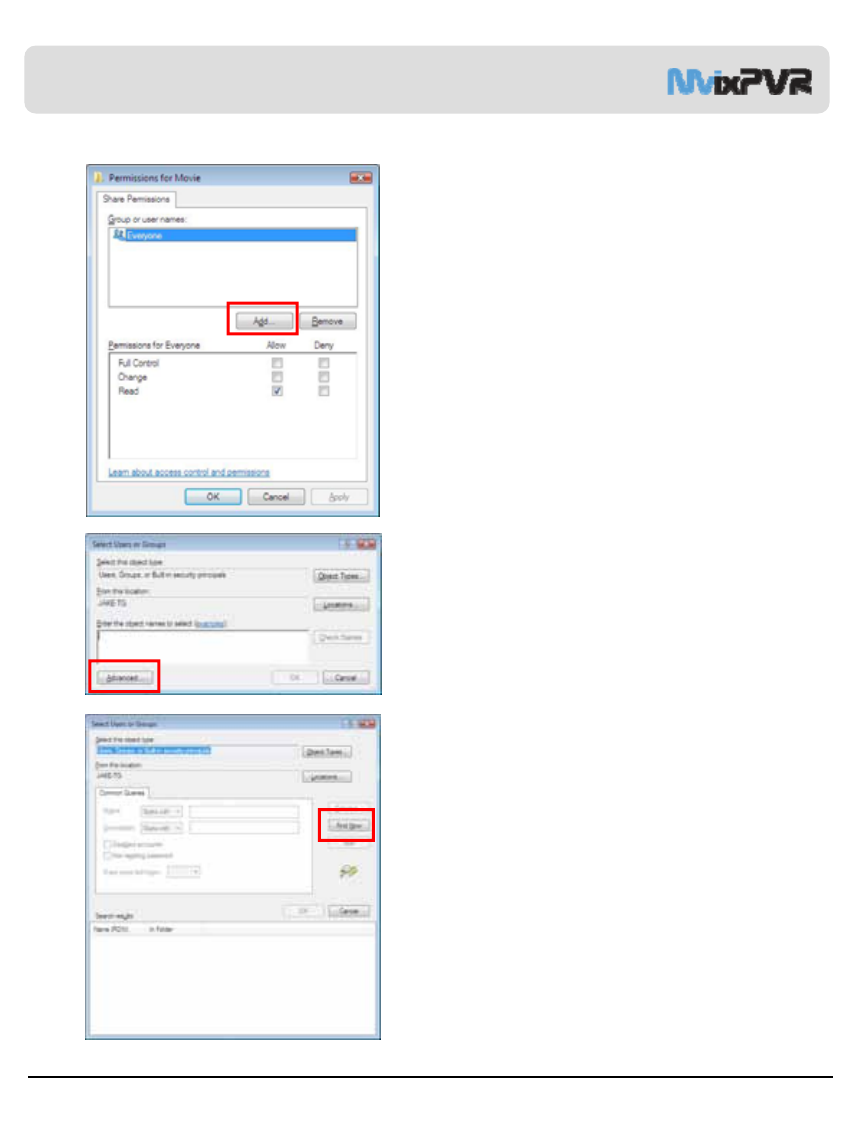
4. When a menu to set the power of use is displayed, you will see
that ‘everyone’ has been added as default. You need to register
‘Guest’ user here. Click ‘Add’.
5. When another window is displayed to add a user or group,
‘click ‘Advance’.
6. Click ‘Search Now’ marked in the picture.
Chapter 5. MvixFTS Use and Share
Unicorn Information System
73
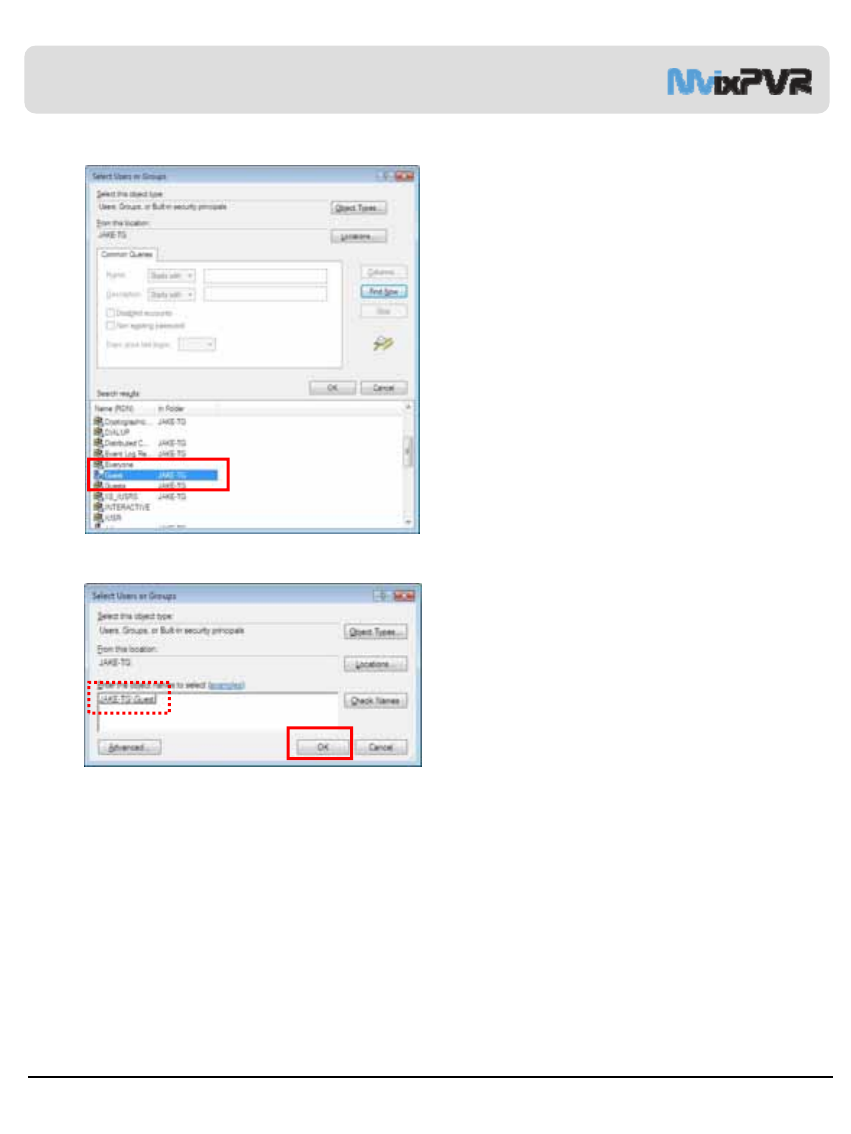
7. The list of search results shows ‘Guest’. Select it as
of the picture and either double-click it or click OK.
8. Check that ‘computer\Guest” has been added as of
the picture. Click OK.
Chapter 5. MvixFTS Use and Share
Unicorn Information System
74
5) Change/ Give Power for Windows Vista Share Folder (Copy Function)
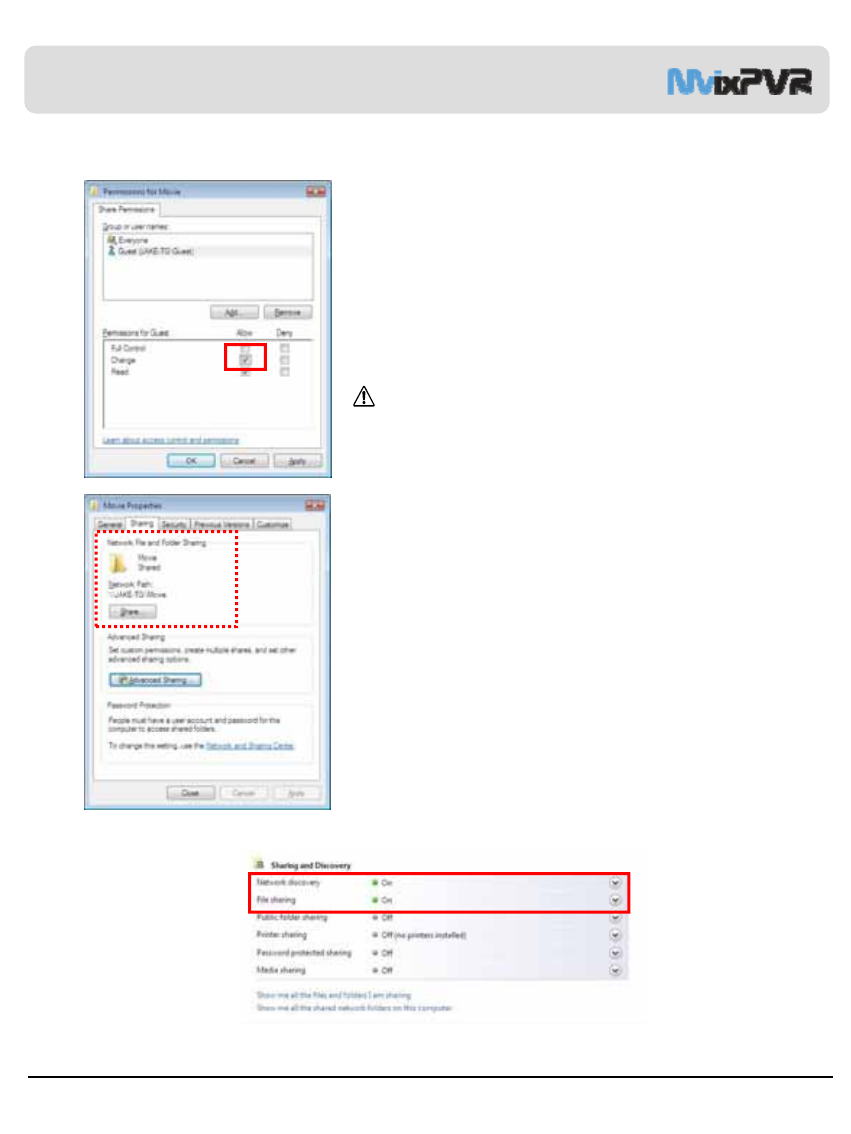
9. Check ‘Allow Change’ when guest account is added. When the
following screen is displayed, press OK. Checking ‘Allow Change’
enables you to copy files to the corresponding folder when using
COPY function. Do not check it if you only intend to play media files
through network share.
Caution is required as all users of the same network status can
access the folder and administer read/ modify/ write/ delete.
10. Press OK or Apply if the procedure up to No. 9 has been
successfully completed. Check if share folder has been added as
in the picture. Complete the process of giving power for share
folder in Windows Vista.
※If file is not visible in Windows Vista, check setups as of the following.
In Control Panel -> Network and Share Center, check setups for ‘Use File Sharing’ and ‘Not Password protected sharing’ as of theabove.
Chapter 5. MvixFTS Use and Share
Unicorn Information System
IPod Expanded Connection
System Requirements
iPod® compatibility
This product may not be compatible to all iPod models according to iPod firmware version and model.
※iPod is not included in product package. iPod is the trademark of Apple Inc. registered in the US and other countries.
※The following contents have been written based on iPod classic.
-Place iPod facing the same direction as the front of
PVR product. Connect iPod by using dock connector.
-This can be used as iPod® charger.
-Press iPod key on PVR power on/ off button on remote control to change mode to iPod
control. Here, LCD window displays ‘iPod’. This means that iPod mode conversion has
succeeded.
-Each time iPod button is pressed, reception of remote control alternates between
PVR and iPod.
-Press Play key in remote control to play MP3 against the background of movie or
photo slide.
-Photo files are displayed by TVOUT in iPod only when they are played in slide show by
pressing Play.
-Buttons are used when remote
control is converted to iPod mode.
※TVOUT function must be activated when playing movie and running photo slide function in
iPod so that they can be displayed through digital recorder screen of MvixPVR. Standard
menu screens, such as of file list, etc. displayed in iPod LCD window, are not displayed in
MvixPVR. Therefore, the screens are not displayed through TVOUT.
※To play mp3 only after connecting iPod to MvixPVR, sound signal is automatically transmitted
through MvixPVR. However, according to the media play devices connected, sound signal
may be blocked and not produced if there is no image signal.
Chapter 6. iPod Control
75
Unicorn Information System
76
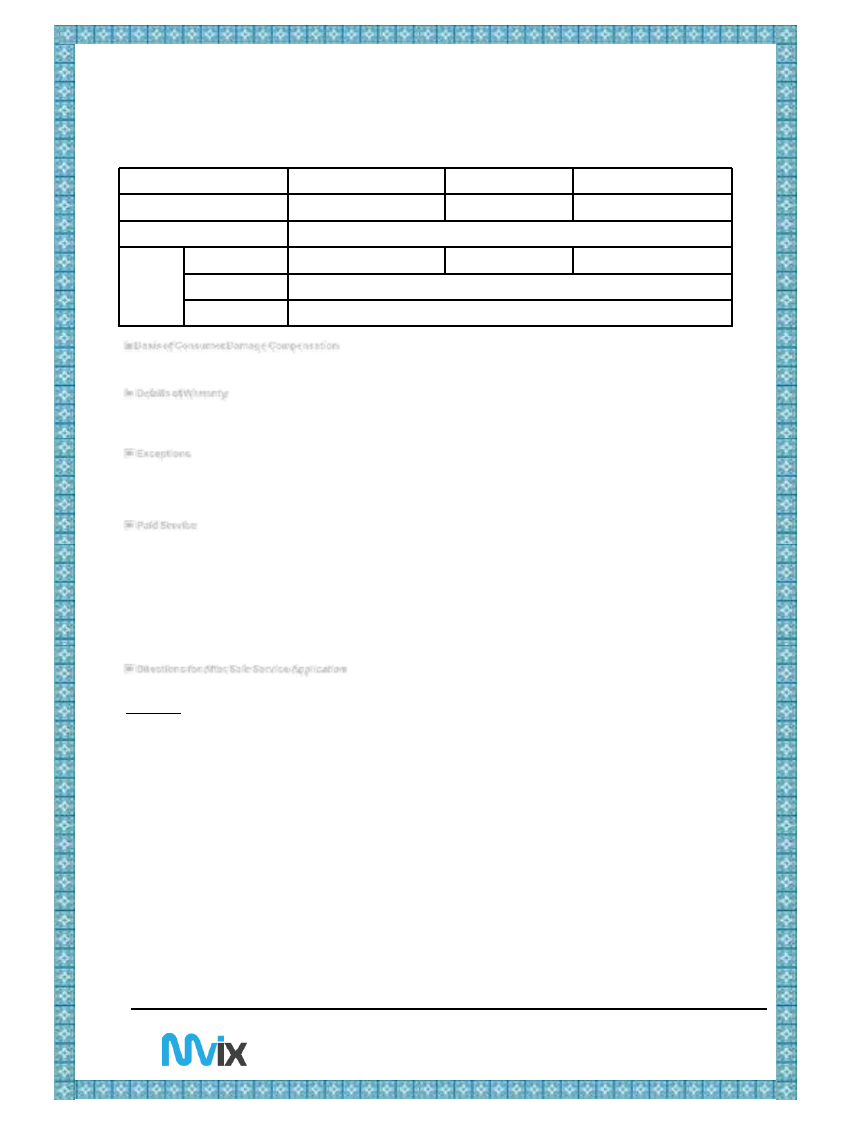
Product Name HD Multimedia Player Product Model MvixPVR
Manufacturing No. Date of Purchase
Place of Purchase
Name Tel.
E-mail
Address
Warranty
Warranty period of this product is calculated from the date of purchasing this product. Therefore, make sure to have the date of purchased
entered so that to receive service properly. Or, keep the receipt of purchase and submit it together with service application. In case it is impossible
to locate the date of purchase, warranty period is calculated from the day 2 months after the manufacturing date of this product.
Customer
Details
▣Basis of Consumer Damage Compensation
Consumer damage compensation for this product complies with regulations of consumer damage compensation announced by
the Ministry of Finance and Economy.
▣Details of Warranty
This product has been produced through strict quality control and inspection process. In case defects occur, you can receive free
after-sale service for 1 year after purchasing of this product. (However, service charge will incur if applicable even during warranty
period.) Present warranty card or receipt when requesting repair of this product.
▣Exceptions
Power adaptor, various cables and bags, batteries, user manual, installation CD and other accessories as well as hard disk not
sold by Unicorn Information System are excluded from the scope of warranty. Back up data in hard disk to prepare for loss.
Note that Unicorn Information System shall not be held liable for data loss caused by problems in use. Make sure to
back up hard disk contents at all times.
▣Paid Service
Service charge will apply in the following cases even during warranty period of this product.
- Breakdown due to user’s negligence in handling product
- Breakdown due to repair by persons other than the designated after-sale service staffs
- Natural calamities (fire, damage from sea wind, flood, lightning and others prescribed as natural calamities)
- Corrosion due to flooding or pollution by foreign substances
- Damage to product or functional defect due to dropping of product or impact
- Deformation of damage to outside of product due to organic solvents, such as thinner or benzene, etc.
- Breakdown due to random modification of the inside of product by user
- Breakdown due to using of peripherals, etc. not provided by Unicorn Information System
- Other cases acknowledged of the user’s negligence
▣Directions for After Sale Service Application
In principle, you must personally visit the head office or service branch. Under inevitable circumstances, you may use delivery
service provided that the cost of delivery service is paid by you.
FCC NOTE:
THE MANUFACTURER IS NOT RESPONSIBLE FOR ANY RADIO OR TV INTERFERENCE CAUSED BY UNAUTHORIZED
MODIFICATIONS TO THIS EQUIPMENT. SUCH MODIFICATIONS COULD VOID THE USER’S AUTHORITY TO OPERATE
THE EQUIPMENT.
This device complies with Part 15 of the FCC Rules.
Operation is subject to the following two conditions:
1. This device may not cause harmful interference, and
2. This device must accept any interference received,
including interference that may cause undesired operation.
RF Exposure Statement
To maintain compliance with FCC’s RF Exposure guidelines, This equipment should be installed and operated with minimum distance
between 20cm the radiator your body: Use only the supplied antenna.
This equipment has been tested and found to comply with the limits for a Class B digital device, pursuant to part 15 of the FCC Rules. Thes
e limits are designed to provide reasonable protection against harmful interference in a residential installation. This equipment generates, u
ses and can radiate radio frequency energy and, if not installed and used in accordance with the instructions, may cause harmful interferen
ce to radio communications. However, there is no guarantee that interference will not occur in a particular installation. If this equipment doe
s cause harmful interference to radio or television reception, which can be determined by turning the equipment off and on, the user is enco
uraged to try to correct the interference by one or more of the following measures:
—Reorient or relocate the receiving antenna.
—Increase the separation between the equipment and receiver.
—Connect the equipment into an outlet on a circuit different from that to which the receiver is connected.
—Consult the dealer or an experienced radio/TV technician for help
Address
Tel. | Fax
E-mail
Website
: Level 5 Wunbo Bldg., 226-16 Seokchon-dong, Songpa-gu, Seoul, Korea
: 1588-2713 | (02)420-2723
: George_lee@eunicorn.co.kr | unicorn@eunicorn.co.kr
: http://www.mvix.net