Uniden America UA1602 RADAR DETECTOR User Manual
Uniden America Corporation RADAR DETECTOR
User Manual
UNIDEN
LONG RANGE RADAR/LASER DETECTOR
BASIC USER’S MANUAL
&Zϳ
IN THE BOX:
xDFR7 radar detector
xCoiled 12V DC Power Cord with
RJ45 Connector
xWindshield Mounting Bracket
xHook and loop fastener tape
xSpare fuse for DC Power Cord
DISCLAIMER: Radar detectors are illegal in some states. Some states prohibit mounting
any object on your windshield. Check applicable law in your state and any state in
which you use the product l to verify that using and mounting a radar detector is
legal. Uniden radar detectors are not manufactured and/or sold with the intent to be
used for illegal purposes. Drive safely and exercise caution while using this product.
Do not change settings of the product while driving. Uniden expects consumer’s use
of these products to be in compliance with all local, state, and federal law. Uniden
expressly disclaims any liability arising out of or related to your use of this product.
This Basic User’s Manual provides instructions on installing and using the DFR7. It
contains basic information on how the keys operate. For more detailed information,
refer to the Detailed User’s Manual at the Uniden website: www.uniden.com
FEATURES
• Voice alert
• Displays radar band frequencies
• GPS for Red Light and Speed camera locations
• Advanced Ka filter
• Spectra I and IV undetectable
• Voice Alert.
• Signal Strength Meter displays Current Speed, Compass, Battery Voltage,
Altitude, and Clock.
Refer to the Detailed User’s Manual at the Uniden website: www.uniden.com
for a complete list and explanation of features.
INSTALL DFR7
WINDSHIELD
1. Attach the rubber cups to the bracket and push the bracket firmly onto the
windshield. Slide the unit onto the bracket.
2. Plug the power cord into the detector and plug the cigarette lighter
adapter into the vehicle’s cigarette lighter.
Release the bracket by pressing the Eject key.
DASHBOARD
1. Attach the unit to the dashboard using the hook and eye fastener tape.
2. Plug the power cord into the detector and plug the cigarette lighter
adapter into the vehicle’s cigarette lighter.
Pull the bracket from the dashboard, separating the hook and loop tape.
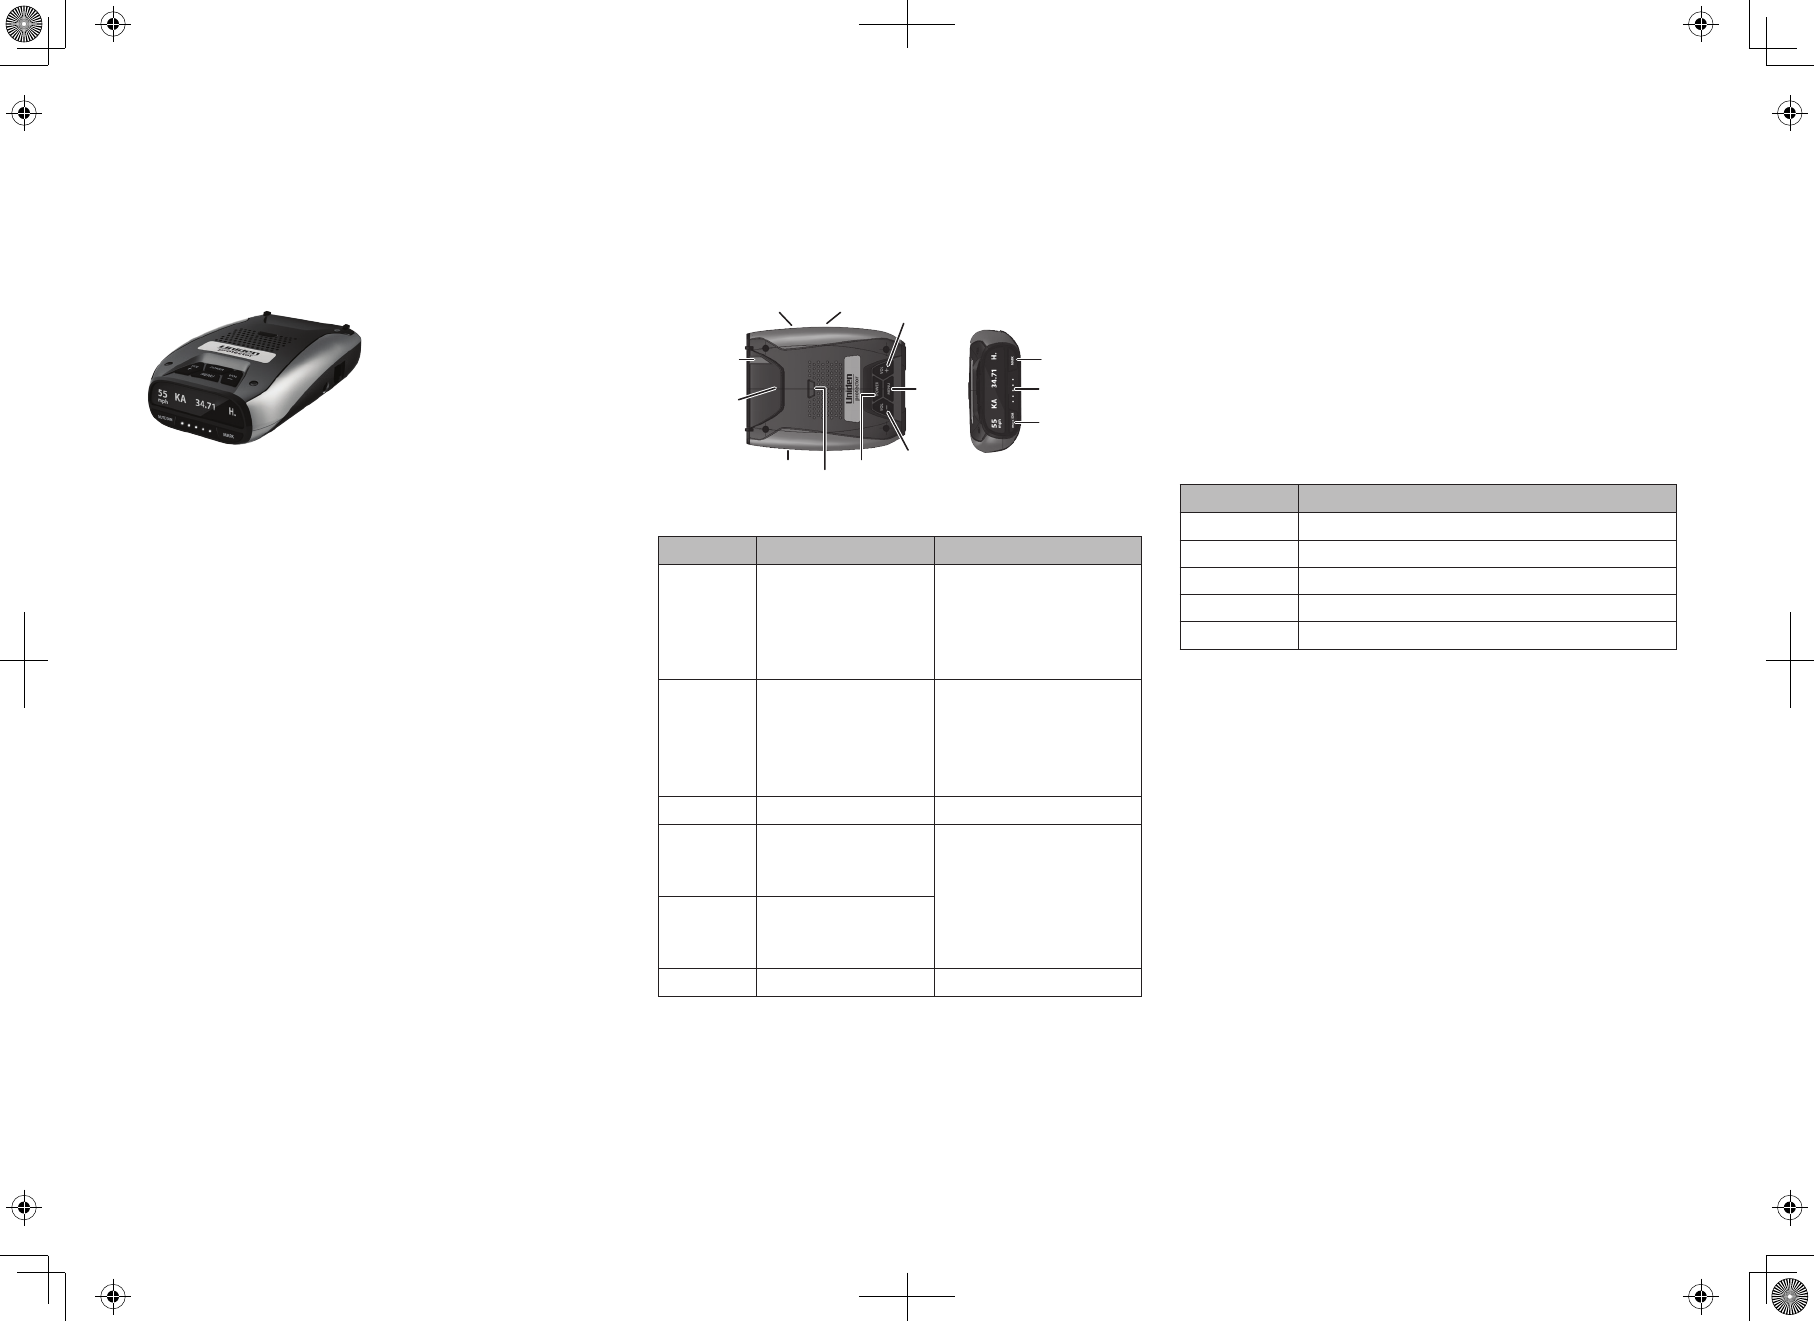
DFR7 OVERVIEW
KEYS
Keys on the unit let you adjust and mute the alert volume, dim the LCD
brightness and mark specific GPS locations where radar/Laser detection is
common. Press
MENU
to enter the Menu system and set up the unit to your
own specifications.
Audio
Jack
Power
Jack
POWER
VOL +
MENU
VOL −
USB Eject
Eagle
Eye
Latch
Slot
MUTE/DIM
MARK
Frequency
Strength
KEY PRESS TO... PRESS AND HOLD TO...
MUTE/DIM
MUTE
• MUTE on
• MUTE off
MUTE MEMORY
• Add
• Delete
DIM
• Bright
• Dim
• Dark
MARK
User Point *
• Add
• Delete
Error message displays/
sounds if memory full or
GPS error.
Delete all User Points.
POWER
Turn DFR7 on and off. NA
VOL +
• Turn volume up (6
levels).
• In Menus, go to next
item.
Press and hold both
VOL +
and
VOL –
to change modes
between HIGHWAY and CITY.
VOL –
• Turn volume down (6
levels).
• In Menus, go to previous
item.
MENU
Access the Menu system. Exit the Menu system.
* User Points are manually tagged GPS locations where radar detection is
normally located. For more information, refer to the online Detailed User
Manual at www.uniden.com.
MENU SYSTEM
Press
MENU
to access the Menu system. The screen displays the selection’s
current status. Use the following keys to navigate the menus:
x
MENU
: Change a setting (press and hold to exit the Menu system).
x
VOL +
: Go to the next Menu item.
x
VOL –
: Go to the previous Menu item.
Menu items commonly used for initial setup are:
xVoice (ON/OFF)
xX Band (ON/OFF)
xK Band (ON/OFF)
xKa Band (ON/OFF)
xPOP Filter (ON/OFF)
xScan Display (ON/OFF).
xDisplay (Tap
MENU
to cycle through Speed/Compass/Voltage/Altitude)
xSpeed Unit (mph or KM/h)
xAuto Mute (ON/OFF)
xBacklight (ON/OFF)
Refer to the online Detailed User’s Manual at www.uniden.com for specifics on
all Menu options.
NON-KEY ELEMENTS
ELEMENT WHAT IT DOES
Eagle Eye Provides a 360° monitoring radius.
USB Provides PC connection for data updates.
Audio Jack Plug in headset.
Eject Press to release the bracket latch.
Power Jack Plug the 12V Power Cord here.
BASIC OPERATIONS
This section details DFR7 basic operations. Refer to the online Detailed User’s
Manual at www.uniden.com for more complete details on all operations and
Menu options.
TURN ON
Press
POWER
. The unit turns on and runs through an initial self-check. It
displays the different bands and their settings and indicates whether or not GPS
is turned on.
The DFR7 turns on automatically when you start the car.
ADJUST VOLUME
Press
VOL +
to increase volume. The unit beeps, announces “Volume (0 - 6),”
and displays a number increase.
Press
VOL –
to decrease volume. The unit beeps, announces “Volume (0 - 6),”
and displays a number decrease.
MUTE VOLUME DURING ALERT
You can mute the alert volume during an alert. This is especially useful in
situations where the alert may be prolonged, such as at red lights.
Press
MUTE/DIM
during an audio alarm to mute it.
CHANGE THE LCD’S BRIGHTNESS
The backlight has three settings: BRIGHT, DIM, and DARK.
Issue 1, November 2014
Press and hold
MUTE/DIM
. The detector announces the brightnes level as it
changes to that level. Press and hold the keys again to move to the next level.
TURN BANDS ON/OFF
The DFR7 monitors X (HIGHWAY only), K, and Ka bands as well as Laser
transmissions.
CHANGE HIGHWAY TO CITY AND BACK
Press and hold both
VOL +
and
VOL –
for at least 2 seconds to alternate between
HIGHWAY and CITY setting.
MARK USER POINTS (RADAR/LASER SITE)
With the DFR7, you can mark geographical points where you commonly
encounter radar transmissions, These can be school zones, red-light cameras,
and places where police frequently monitor traffic. You can mark these points
so the detector will announce and sound an alert when you approach them.
When you are at the location, press
MARK
. The detector announces “User mark
logged” and sounds an alert tone. Now, when you approach these points, the
detector announces “Attention” and begins a distance countdown to the point
of marking.
Press and hold
MARK
at that location to delete that user point.
TROUBLESHOOTING
IF... TRY THIS...
No display or audio. Check the fuse in the plug. Replace if
necessary.
The unit alarms when the vehicle hits
bumps.
Check the connections. Be sure they
are all secure.
The unit alarms briefly in the same
location but no radar source was in view.
There may be a motion sensor or
house alarm in use within range.
The detector did not alert when a police
car was in view.
• The officer may not have radar/
laser units turned on.
• Check that the band are turned
on. Press MENU. If the band is
turned on, the LCD will show ON.
The car starts but the detector does not
turn on.
• Verify that the power cord is
securely connected to the unit
and inserted into the cigarette
lighter jack.
• Change the fuse in the power
cord. Unscrew the cigarette
lighter jack to access the fuse.
SPECIFICATIONS
Receiver Type: Antenna Type:
Radar Double Conversion
Superheterodyne
Self-Contained Antenna
Radar Linear Polarized
E-vector Vertical
Laser Pulsed Laser Signal
Receiver
Laser
Front
Convex Condenser
Lens
Frequency: Laser
Back
Concave
Condenser Lens
X 10.525 GHz Dimensions 110.00 mm (D) x
69.00 mm (W) x
29.50 mm (H)
K 24.150 GHz Weight 4.1 oz (115g)
Ka 33.400 - 36.000 GHz Operating
Temp.
-4° to +185° F
(Radar/Laser)
-20° to +85° C
(Radar/Laser)
Laser 800 nm - 1100 nm Storage Temp. -22° to +203° F
(Radar/Laser)
-30° to +95° C
(Radar/Laser)
Detector Type: Operating
Power Soure
DC 11.0 to 16.0 V
Radar Scanning Frequency
Discriminator
Laser Pulse Width
Discriminator
Alarm Type Beep (Detected Band
and Signal strength)
Storage Temp
(Radar/Laser).
-22° to +203° F
-30° to +95° C
Operating
Power Soure
DC 11.0 to 16.0 V
FCC/Industry Canada Information
FCC: AMWUA1602
ICC: 513C-UA1602
This device complies with part 15 of the FCC Rules. Operaon is subject to the
following two condions: (1) This device may not cause harmful interference,
and (2) this device must accept any interference received, including
interference that may cause undesired operaon.
Unauthorized changes or modicaons to this equipment may void compliance
with the FCC Rules. Any change or modicaon must be approved in wring
by Uniden. Changes or modicaons not approved by Uniden could void the
user’s authority to operate the equipment.
L’appareil est conforme aux normes d’Industrie Canada. Son fonconnement
est soumis aux deux condions suivantes : (1) Ce disposif ne doit pas causer
d’interférences et (2), il doit pouvoir accepter les interférences, incluant celles
pouvant nuire à son fonconnement normal.
Tous les changements apportés à cet appareil, s’ils ne sont pas expressément
approuvés par Uniden ou toute ulisaon de celui-ci d’une autre manière
que celle décrite dans ce guide peut annuler votre autorisaon de le faire
fonconner.
Limited Warranty
Keep your receipt! Proof of purchase is required for warranty service.
WARRANTOR: UNIDEN AMERICA CORP. (“Uniden”)
ELEMENTS OF WARRANTY: Uniden warrants, for one year, to the original retail
owner, this Uniden Product to be free from defects in materials and crasman-
ship with only the limitaons or exclusions set out below.
WARRANTY DURATION: This warranty to the original user shall terminate and
be of no further eect 12 months aer the date of original retail sale. The
warranty is invalid if the Product is (A) damaged or not maintained as reason-
able or necessary, (B) modied, altered, or used as part of any conversion
kits, subassemblies, or any conguraons not sold by Uniden, (C) improperly
installed, (D) serviced or repaired by someone other than an authorized
Uniden service center for a defect or malfuncon covered by this warranty, (E)
used in any conjuncon with equipment or parts or as part of any system not
manufactured by Uniden, or (F) installed or programmed by anyone other than
as detailed by the Operang Guide for this product.
STATEMENT OF REMEDY: In the event that the product does not conform to
this warranty at any me while this war-ranty is in eect, warrantor will repair
the defect and return it to you without charge for parts, service, or any other
cost (except shipping and handling) incurred by warrantor or its representa-
ves in connecon with the performance of this warranty. THE LIMITED WAR-
RANTY SET FORTH ABOVE IS THE SOLE AND ENTIRE WARRANTY PERTAINING
TO THE PRODUCT AND IS IN LIEU OF AND EXCLUDES ALL OTHER WARRANTIES
OF ANY NATURE WHATSOEVER, WHETHER EXPRESS, IMPLIED OR ARISING BY
OPERATION OF LAW, INCLUDING, BUT NOT LIMITED TO ANY IMPLIED WAR-
RANTIES OF MERCHANTABILITY OR FITNESS FOR A PARTICULAR PURPOSE. THIS
WARRANTY DOES NOT COVER OR PROVIDE FOR THE REIMBURSEMENT OR
PAYMENT OF INCIDENTAL OR CONSEQUENTIAL DAMAGES. Some states do not
allow this exclusion or limitaon of incidental or consequenal damages so the
above limitaon or exclusion may not apply to you.
LEGAL REMEDIES: This warranty gives you specic legal rights, and you may
also have other rights which vary from state to state. This warranty is void
outside the United States of America.
PROCEDURE FOR OBTAINING PERFORMANCE OF WARRANTY: If, aer following
the instrucons in this Operang Guide, you are certain that the Product is de-
fecve, pack the Product carefully (preferably in its original packaging). Include
evidence of original purchase and a note describing the defect that has caused
you to return it. The Product should be shipped freight prepaid, by traceable
means, or delivered, to warrantor at:
Uniden America Corporaon
C/O Saddle Creek
743 Henriea Creek Rd., Suite 100
Roanoke, TX 76262
(800) 297-1023, 8 a.m. to 4:30 p.m., Central, Monday through Friday
POP Mode is a trademark of MPH Industries, Inc.