Uniden America UP822 5.8GHz ISM BAND DIGITAL CORDLESS TELEPHONE User Manual USERS MANUAL
Uniden America Corporation 5.8GHz ISM BAND DIGITAL CORDLESS TELEPHONE USERS MANUAL
UserManual.wiki
>
Uniden America
>
UP822 User Manual
USERS MANUAL
Navigation menu
Upload a User Manual
Namespaces
Wiki Guide
HTML
PDF
Info
Views
User Manual
Discussion / Help
Navigation

![7Parts of the HandsetHeadset Jack CoverBeltclip HoleSpeakerphone Speaker and RingerHandset Battery CompartmentNew Message LEDHandset EarpieceLCD Display[menu/clear] key[]key (up)[ÀDVK@NH\WDONÀDVK[]key (phonebook)[*/tone] key[hold/int’com/xfer] key[redial/pause] key[select/ ]key (select/messages)[ ] key (caller ID)[]key (end call)[]key (down)[#] key (pound)[]key (speaker)Handset MicrophoneHandset Charging Contacts1.2.3.4.5.6.7.8.9.10.11.12.13.14.15.16.17.18.19.20.21.22.15678 151719202122101213142341116918](https://usermanual.wiki/Uniden-America/UP822/User-Guide-729899-Page-8.png)
![8Parts of the Answering System Base/Charger191821 3135 6 7 814 1516 174910112012BaseChargerBase speakerBase charging contactsBase microphoneMessage counter LEDvol keyvol key[greet] key (record/greeting)>¿QGKV@NH\¿QGKDQGVHW[on/off] key (answering system on/off)[]key (repeat)1.2.3.4.5.6.7.8.9.10.[]key (delete)[]key (skip)in use LED[]key (play/stop)charge LEDTEL LINE phone jackDC IN 9V power jackCharging contactscharge LEDDC IN 9V power jack11.12.13.14.15.16.17.18.19.20.](https://usermanual.wiki/Uniden-America/UP822/User-Guide-729899-Page-9.png)
![10The Standby ScreenWhen the phone is in standby, the handset display shows the following items:*CPFUGV0GY%+&Ringer status / Battery statusHandset bannerNumber of new Caller ID messages receivedUsing the Four-way Function KeyYour handset has a four-way function key that allows you to move thecursor or pointer on the display and access the most commonly usedfeatures at the touch of a button. By moving this key to the left, you openthe phonebook. Move the key to the right to access Caller ID information.To use this four-way key, place your thumb over the key on the handsetand move to the four positions to get the feel of how it moves andoperates.Using the Handset MenusTo open the menu, press [menu/clear] Select the option you want by pressing the four-way function key. This willmove the cursor; the option currently selected has a triangle beside it. Activate the selected option by pressing[select/ ]. To exit the menu and return to standby, press [ ].If you do not press a key within 30 seconds, the phone will time out and exit the menu. When setting the day andtime, the time-out period is extended to two minutes.View the phonebookFour-wayFunction KeyUpView the Caller IDDownView the phonebookFour-wayFunction KeyUpView the Caller IDDown](https://usermanual.wiki/Uniden-America/UP822/User-Guide-729899-Page-11.png)
![11Entering Text from Your HandsetYou can use the number keypad on your phone to enter text by referring to the letters printed on each numberNH\:KHQ\RXSUHVVWKHQXPEHUNH\LQDWH[WHQWU\¿HOGWKHSKRQHGLVSOD\VWKH¿UVWOHWWHUSULQWHGRQWKHQXPEHUkey. Press the number key twice to display the second letter and three times to display the third. Capital letters areGLVSOD\HG¿UVWWKHQORZHUFDVHOHWWHUVWKHQWKHQXPEHURQWKHNH\,IWZROHWWHUVLQDURZXVHWKHVDPHQXPEHUNH\HQWHUWKH¿UVWOHWWHUWKHQXVH[right] on the four-way function key tomove the cursor to the next position to enter the second letter. For example, to enter the word “Movies”:Press [6] once to enter M.Use [right] on the four-way functionkey to move the cursor to the right.Press [6] six times to enter o.Press [8] six times to enter v.Press [4] six times to enter i.Press [3]¿YHWLPHVWRHQWHUe.Press [7] eight times to enter s.Press [select/ ]to end your textentry.If you make a mistake while entering a name, use [left] or [right] on the four-way function key to move the cursor tothe incorrect character. Press [menu/clear] to erase the wrong character, and then enter the correct character. Todelete all characters, press and hold [menu/clear].1.2.3.4.5.6.7.8.](https://usermanual.wiki/Uniden-America/UP822/User-Guide-729899-Page-12.png)
![15Changing the Dial ModeYour phone can communicate with the telephone network in two different ways: tone dialing or pulse dialing. Thesedays, most phone networks use a method called tone dialing, so your phone comes programmed for tone dialing. Ifyour phone company uses pulse dialing, you will need to change your phone’s dial mode. If you don’t get a dial toneor can’t connect to the telephone network, please follow the steps below to modify your phone’s settings:Press [menu/clear]. Select the GLOBAL SETUP menu, and then theDIAL MODE submenu.Scroll []to select PULSE.Press [select/ ]<RXZLOOKHDUDFRQ¿UPDWLRQWRQHIf you ever need to change the dial mode back to tone dialing, follow the same procedure, but select TONE in step 2.Installing the Belt ClipLine up the holes on each side of the handset. To attach the belt clip, insert into the holes oneach side of the handset. Press down until it clicks.To remove the belt clip, pull either side of the belt clip to release the tabs from the holes.1.2.3.&KCN/QFG6QPG2WNUG&KCN/QFG6QPG2WNUG](https://usermanual.wiki/Uniden-America/UP822/User-Guide-729899-Page-16.png)
![16Basic SetupSelecting a LanguageYour phone supports two languages: English and Spanish for USA models or English and French for Canadianmodels. Once you select a language, the menus on the phone will display in that language. The default language isEnglish.Press [menu/clear]. Select the HANDSET SETUP menu, and thenthe HANDSETLANGUAGE submenu.Move the cursor to choose a language.for USA models: Choose ENGLISH or ESPAÑOL (Spanish).for Canadian models: Choose ENGLISH or FRANÇAIS (French).Press [select/ ]<RXZLOOKHDUDFRQ¿UPDWLRQWRQHActivating Personal RingYou can assign special ringer tones to anyone in your phonebook. Whenyour phone gets a call, it looks up the Caller ID information in your phonebook. If you’ve assigned a personal ringerto that number, the phone uses it so you know who is calling. To turn on personal ringing, follow these steps:Press [menu/clear]. Select the HANDSET SETUP menu, and then the PERSONAL RING submenu.Move the cursor to select ON or OFF.Press [select/ ]<RXZLOOKHDUDFRQ¿UPDWLRQWRQHActivating the Key Touch ToneKey Touch Tone is the tone your keypad makes when keys are pressed. You can turn this tone on or off.Press [menu/clear]. Select the HANDSET SETUP menu, and then the KEY TOUCH TONE submenu.Move the cursor to select ON or OFF.Press [select/ ]<RXZLOOKHDUDFRQ¿UPDWLRQWRQH1.2.3.1.2.3.1.2.3.*CPFUGV.CPIWCIG'PINKUJ'URC㩌QN*CPFUGV.CPIWCIG'PINKUJ'URC㩌QN*CPFUGV.CPIWCIG'PINKUJ(TCP㩟CKU*CPFUGV.CPIWCIG'PINKUJ(TCP㩟CKU](https://usermanual.wiki/Uniden-America/UP822/User-Guide-729899-Page-17.png)
![19Resetting Handsets,I\RXZDQWWRUHJLVWHUWKHKDQGVHWWRDGLIIHUHQWEDVHRUUHSODFHDKDQGVHWZLWKDQRWKHURQH\RXPXVW¿UVWFOHDUWKHregistration information from the base and the handset.Press and hold []and [#] for at least 5 seconds, until the SYSTEMRESET menu appears.Select the DEREGISTER HS submenu. WHICH HANDSET? appears inthe display.Use []and [ ] to select the handset ID you want to de-register, andthen press [select/ ]. DEREGISTER HS appears.:KHQWKHSKRQHDVNV\RXWRFRQ¿UPPRYHWKHFXUVRUWRVHOHFW<(6DQGWKHQSUHVV[select/ ]. You willKHDUDFRQ¿UPDWLRQWRQH1RWH 7KHKDQGVHW¿UVWFOHDUVLWUHJLVWUDWLRQLQIRUPDWLRQIURPWKHEDVHDQGWKHQGHOHWHVWKHOLQNWRWKHEDVHfrom its own memory. The handset will now display HANDSET NOT REGISTERED-PLACE HANDSET ON BASE TO REGISTER. SEE YOUR OWNER'S MANUAL FOR HELP. If the handset cannot contact the base, it will display UNAVAILABLE. If this happens, see Resetting the Handset Without the Base on page 52. For instructions on registering the handset, see page 18.1.2.3.4.9JKEJ*CPFUGV!*CPFUGV*CPFUGV9JKEJ*CPFUGV!*CPFUGV*CPFUGV](https://usermanual.wiki/Uniden-America/UP822/User-Guide-729899-Page-20.png)
![20Setting Up the PhonebookYour handset can store up to 70 names and numbers in your phonebook. When all the phonebook entries are full,you will hear a beep and MEMORY FULL appears. You cannot store any additional names and numbers unless youdelete some of the existing ones.You can also use the phonebook entries to store a group of numbers (up to 20 digits) that you may need to enteronce your call connects. This is referred to as chain dialing. See Chain Dialing from the Phonebook on page 27.Creating Phonebook EntriesTo store names and numbers in your phonebook, please follow these steps:When the phone is in standby mode, press [].To create a new phonebook entry, move the cursor to select NEW, andpress [select/ ]. EDIT NAME appears.Enter the name for this entry (EDIT NAME).Use the keypad to enter a name for this entry; the name can contain up to 16 characters. (See Entering Text from Your Handset on page 11 for instructions on entering text.) If you do not want to enter a name for this entry,your phone will store this entry as <NO NAME>. Press [select/ ]ZKHQ\RXDUH¿QLVKHGEnter the number for this entry (EDIT NUMBER).Once you have stored a name, EDIT NUMBER appears next. Use thenumber keypad to enter the phone number; the phone number can containup to 20 digits. If you need the phone to pause between digits when it’sdialing (for example, to enter an extension or an access code), press [redial/pause] to insert a two-second pause. You will see a P in the display. You canalso use more than one pause together if two seconds is not long enough.Each pause counts as one digit.1.2.3.4.'FKV0COG㨫'FKV0COG㨫'FKV0WODGT㨫'FKV0WODGT㨫](https://usermanual.wiki/Uniden-America/UP822/User-Guide-729899-Page-21.png)
![21Assign a personal ring tone for this entry (PERSONAL RING).You can attach a special ring tone to each phonebook entry; the phone willuse this ring tone when this person calls. Use []and [ ] to select one ofthe 20 different ring tone options (see Selecting a Ring Tone on page 24 fora complete list of ring tones). As you scroll through the tones, you will heara sample of each tone. When you hear the ring tone you want to use, press[select/ ]. If you do not want to use a personal ring tone for this phonebookentry, choose NO SELECTN; the phone will use your standard ring tonesetting.Finding a Phonebook EntryPress [ ] to open the phonebook, and then select DIAL/EDIT or press [ ] again. Phonebook entries are stored inalphabetical order. To scroll through the phonebook from A to Z, press []. To scroll trough the phonebook from Z toA press [].You can also use the letters on the number keys to jump to a name that starts with that letter. Press a number key([2] through [0]RQFHIRUWKH¿UVWOHWWHUWZLFHIRUWKHVHFRQGOHWWHUDQGVRRQ7KHSKRQHERRNMXPSVWRWKH¿UVWHQWU\that begins with the letter you entered; you can then use []and [ ] o scroll to other entries. For example, tosearch for an entry beginning with the letter M, press 6once.To close the phonebook, press []. During a call, press [ ] again instead of [ ] to close the phonebook.Editing an Existing Phonebook EntryWith the phone in standby, press [ ] to open the phonebook.Select DIAL/EDIT or press [ ] again.Find the entry you want to edit and press [select/ ].Follow the steps for Creating Phonebook Entries on page 20. If you do not wish to change the information at anystep, simply press [select/ ]to go to the next step.5.1.2.3.4.2GTUQPCN4KPI0Q5GNGEVP(NKEMGT2GTUQPCN4KPI0Q5GNGEVP(NKEMGT](https://usermanual.wiki/Uniden-America/UP822/User-Guide-729899-Page-22.png)
![22Storing Caller ID or Redial Numbers in the PhonebookYou can store Caller ID records or redial numbers in the phonebook so you can use them later. Go to the Caller ID orredial list and select the number you want to store. (If the Caller ID information did not include the number, then youwill not be able to store it.)When the phone is in standby, press []to open the Caller ID list or [redial/pause] to open the redial list.Use []and [ ] to scroll through the Caller ID records or redial numbers. When you come to the informationyou want to store, press [select/ ]. STORE/EDIT NAME appears.If the phone number is already stored in memory, you will hear a beep, and THIS DATA IS ALREADY STORED!appears in the display. The number will not be stored.Continue by following the steps for Creating Phonebook Entries on page 20.Deleting Phonebook EntriesYou can delete individual phonebook entries or delete all the phonebook entries at once.When the phone is in standby, press [].To delete a single phonebook entry, move the cursor to select DIAL/EDIT,and then press [select/ ]or press [ ] again.Find the phonebook entry you want to delete and press [menu/clear].DELETE ENTRY? appears in the display. Select YES, and then press[select/ ].<RXZLOOKHDUDFRQ¿UPDWLRQWRQHDQG'(/(7('DSSHDUVLQWKHGLVSOD\Deleting all the phonebook entries at onceWhen the phone is in standby, press [ ].Move the cursor to select DELETE ALL, and press [select/ ].DELETE ALL? appears in the display. Select YES and then press [select/ ]<RXZLOOKHDUDFRQ¿UPDWLRQWRQHand DELETED! appears in the display.1.2.3.1.2.3.4.5.1.2.3.2JQPGDQQM%QR[&GNGVG#NN2JQPGDQQM%QR[&GNGVG#NN](https://usermanual.wiki/Uniden-America/UP822/User-Guide-729899-Page-23.png)
![23Copying Phonebook Entries to Another HandsetIf you have more than one handset, you can transfer phonebook entries from one handset to another without havingto re-enter names and numbers. You can transfer one phonebook entry at a time or all phonebook entries at once.When the phone is in standby, press [].Move the cursor to select COPY, and then press [select/ ].Move the cursor to select the handset which you want to transfer the entries to and then press [select/ ].Move the cursor to select ONE MEMORY or ALL MEMORY, and then press [select/ ].If you select ALL MEMORY,ARE YOU SURE? appears on the displayscreen. Move the cursor to select YES, and then press [select/ ].,I\RXVHOHFW21(0(025<¿QGWKHSKRQHERRNHQWU\\RXZDQWWRWUDQVIHUand then press [select/ ].The phonebook entries will be transferred to the designated handset. Duringthe copy process, the receiving handset shows RECEIVING and the bannerof the sending handset.When the transfer is completed, DONE! appears on the handset.Note: If your phonebook contains 70 entries, you cannot store any new phonebook entries. You will hear a beep, and MEMORY FULL appears on the display. If the selected handset is out of range or data transfer is canceled, UNAVAILABLE appears in the display. Phonebook listings will not be transferred.1.2.3.4.5.6.7.8.%QR[2JQPGDQQM1PG/GOQT[#NN/GOQT[ZZ%QR[2JQPGDQQM1PG/GOQT[#NN/GOQT[ZZ](https://usermanual.wiki/Uniden-America/UP822/User-Guide-729899-Page-24.png)
![24Customizing Your PhoneSelecting a Ring Tone (Handset Only)You may choose from 4 melodies or 3 tones for your phone’s primary ring tone. Each station can use a differentringer tone or melody. The available ring tones are listed below:Melodies RingersFor Elise (ELISE) FlickerWe Wish You A Merry Christmas (MERRY-XMAS) ClatterAura Lee (AURA LEE) Wake UpStar Spangled Banner (STAR SPNGL)Press [menu/clear]. Select the HANDSET SETUP menu, and then theRINGER TONES submenu.Move the cursor to select a ring tone. As each ring tone is selected, you willhear a sample of the ring tone.When you hear the tone you want to use, press [select/ ]. You will hear aFRQ¿UPDWLRQWRQH1.2.3.4KPIGT6QPGU(NKEMGT%NCVVGT4KPIGT6QPGU(NKEMGT%NCVVGT](https://usermanual.wiki/Uniden-America/UP822/User-Guide-729899-Page-25.png)
![25Activating AutoTalk (Handset only)AutoTalk allows you to answer the phone simply by removing the handset from the cradle. You do not have to pressany buttons to answer the call.Press [menu/clear].Select the HANDSET SETUP menu, and then the AUTOTALK submenu.Select ON or OFF, and press [select/ ]<RXZLOOKHDUDFRQ¿UPDWLRQWRQHActivating Any Key Answer (Handset only)Any Key Answer allows you to answer the phone by pressing any key in the twelve-keypad.Press [menu/clear].Select the HANDSET SETUP menu, and then the ANY KEY ANSWERsubmenu.Select ON or OFF, and then press [select/ ]<RXZLOOKHDUDFRQ¿UPDWLRQtone.1.2.3.1.2.3.#WVQ6CNM1P1HH#WVQ6CNM1P1HH#P[-G[#PUYGT1P1HH#P[-G[#PUYGT1P1HH](https://usermanual.wiki/Uniden-America/UP822/User-Guide-729899-Page-26.png)
![26Using Your PhoneFrom a cordless handset From a handset speaker phoneMaking a callRemove the handset from the chargingcradle.Press [ÀDVK@.Listen for the dial tone.Dial the number.OR Remove the handset from the chargingcradle.Dial the number.Press [ÀDVK@.1.2.3.4.1.2.3.Remove the handset from the chargingcradle.Press [].Listen for the dial tone.Dial the number.OR Remove the handset from the chargingcradle.Dial the number.Press [].1.2.3.4.1.2.3.Answeringa callPick up the handset. (If AutoTalk is on, thephone will answer when you remove thehandset from the charging cradle.Press [ÀDVK@. (If Any Key Answer is on,you can also press any key on the twelve-number keypad.)1.2.Pick up the handset. (If AutoTalk is on, thephone will answer when you remove thehandset from the charging cradle.Press [].1.2.Hanging up Press []or return the handset to the cradle. Press [ ] or return the handset to the cradle.](https://usermanual.wiki/Uniden-America/UP822/User-Guide-729899-Page-27.png)
![27Making a Call from the PhonebookWhen the phone is in standby, press [ ] to open the phonebook.Move the cursor to select DIAL/EDIT, and then press [select/ ].Find the phonebook entry you want to call (see Finding a Phonebook Entry on page 21).Press [ÀDVK@ or [ ] to dial the number.Note: You can also press [ ÀDVK@ or [ ] before you open the phonebook. When you come to the phone number you want to dial, press [select/ ].Chain dialing from the PhonebookYou can use the phonebook entries to store a group of numbers (up to 20 digits) that you may need to enter onceyour call connects. Once the call has connected you will then do the following:Press []Use []or [ ] to select the phonebook entry you want to call.Press [select/ ]Switching to the Handset Speakerphone During a CallTo switch a normal call to the speakerphone, press [ ] on the handset. To switch from a speakerphone call to anormal call, press [].1.2.3.4.1.2.3.](https://usermanual.wiki/Uniden-America/UP822/User-Guide-729899-Page-28.png)
. The phone will show the number of newCaller ID records and the total number of stored records. Use []and [ ] to scroll through the list, or enter aOHWWHURQWKHNH\SDGWRMXPSWRWKH¿UVW&DOOHU,'QDPHWKDWVWDUWVZLWKWKDWOHWWHUMaking a Call from a Caller ID RecordWhen the phone is in standby, press [ ] to open the Caller ID list.Use []and [ ]WR¿QGWKH&DOOHU,'UHFRUG\RXZDQWWRGLDOTo add (or delete) a “1” to the beginning of the displayed phone number, press [*/tone].Press [ÀDVK@ or [ ] to dial the number.Note: You can also press [ ÀDVK@ or [ ] before you open the caller ID list. When you come to the phone number you want to dial, press [select/ ].1.2.3.4.](https://usermanual.wiki/Uniden-America/UP822/User-Guide-729899-Page-29.png)
![29Deleting Caller ID NumbersTo delete only one Caller ID number, go to the Caller ID list and select the number you want to delete. Press [menu/clear]:KHQWKHSKRQHDVNV\RXWRFRQ¿UPVHOHFW<(6To delete all the Caller ID numbers, go to the Caller ID list and press [menu/clear]. Select YES when asked if youwant to DELETE ALL.Note: When you delete a Caller ID number, you delete it permanently.Using Call WaitingIf you have Call Waiting service and a second call comes in when you are on the phone, a call waiting tone willsound. Press [ÀDVK@ on the handset or >ÀDVK@ on the base to accept the waiting call. There is a short pause, andthen you will hear the new caller. To return to the original caller, press [ÀDVK@ or >ÀDVK@.Note: You must subscribe through your telephone provider to receive Call Waiting services. Not all features are available in all areas.](https://usermanual.wiki/Uniden-America/UP822/User-Guide-729899-Page-30.png)
![30Redialing a NumberYou can quickly redial the last 3 numbers dialed on each handset.With the phone in standby, press the [redial/pause] to open the redial list.Use []and [ ] or [redial/pause] to scroll through the redial list.:KHQ\RX¿QGWKHQXPEHU\RXZDQWWRGLDOSUHVV[ÀDVK@ or [ ] on the handset to dial the number.1RWH ,IWKHQXPEHUH[FHHGVGLJLWVRQO\WKH¿UVWGLJLWVDUHUHWDLQHGLQUHGLDOPHPRU\• If the redial memory is empty, you will hear a beep.Deleting a Redial RecordIf you want to delete a phone number from the handset’s redial list, follow the steps below:With the phone in standby, press [redial/pause].Use []and [ ] to scroll through the redial list.:KHQ\RX¿QGWKHUHGLDOQXPEHU\RXZDQWWRGHOHWHSUHVV[menu/clear].Select YES, and press [select/ ]. The redial number is deleted.1.2.3.1.2.3.4.](https://usermanual.wiki/Uniden-America/UP822/User-Guide-729899-Page-31.png)
![31Adjusting the Ringer, Earpiece and Speaker VolumeAdjusting the Ringer VolumeYou can choose from three ringer volume settings on the handset (off, low, medium, and high) and four options (off,low, medium, and high) on the base. With the phone in standby, use []or [ ] to adjust the ringer volume.Adjusting the Earpiece VolumeYou can choose from six volume levels for the earpiece. To adjust the earpiece volume while on a call, press [ ] (tomake it louder) or [](to make it softer).Adjusting the Speaker VolumeHandset Speakerphone: You can choose from six volume levels for the handset speakerphone. To adjust thespeaker volume while on a call, press [](to make it louder) or [ ] (to make it softer).Base Speaker: You can choose from ten volume levels for the base speakerphone. To adjust the speaker volumewhile on a call, press [vol ](to make it louder) or [vol ](to make it softer).Adjusting the Audio Tone,I\RXDUHQ¶WVDWLV¿HGZLWKWKHDXGLRTXDOLW\RI\RXUSKRQH\RXFDQDGMXVWWKH$XGLR7RQHRIWKHHDUSLHFHZKLOHRQa call. Your phone gives you three audio tone options: low, natural and high; the default setting, Natural Tone, isrecommended for hearing aid users. Audio tone adjustments only apply to the earpiece, not the speakerphone.To adjust the audio tone:With the phone in talk mode, press [select/ ]to cycle through the three audio tone options.When the desired option appears on the display, stop.After two seconds, the displayed audio tone is set, and the display returns to normal.1.2.3.](https://usermanual.wiki/Uniden-America/UP822/User-Guide-729899-Page-32.png)
![32Using the Clarity Boost FeatureIf you encounter interference while using your phone, you can manually improve the sound by setting the claritybooster to on. This works only when the phone is in use, so while you are on a call:Press [menu/clear].Move the cursor to CLARITY BOOST, and then press [select/ ]. BOOST ON and B appear in the display.Use the same procedure to turn off clarity booster. BOOST OFF appears.Finding a Lost HandsetTo locate a misplaced handset, press >¿QGKV@ on the base (or >PXWH¿QGKV@ on the dual-keypad base) when thephone is in standby. All registered handsets will beep for 60 seconds, and PAGING appears on the handset display.To cancel paging, press >¿QGKV@ (>PXWH¿QGKV@) again or any key on the found handset.1.2.](https://usermanual.wiki/Uniden-America/UP822/User-Guide-729899-Page-33.png)
![33Using Conference and TransferConferencingIf you have more than one handset, up to three people can participate in a conference call. A three-way conferencecall consists of an outside line and two handsets. A four-way conference call consists of an outside line, the basespeaker phone, and two handsets. You can easily join a call already in progress.Press [ÀDVK@ or [ ] to join the call.To return to the party on hold, press [ÀDVK@ or [ ] on a handset. The phone will return to the holding party.Transferring a CallYou can transfer a call from one station to another.From the handsetDuring a call, press [hold/int’com/xfer].Use []or [ ] to select the station you want to transfer the call to, then press [select/ ]. Thecall will automatically be placed on hold, and a paging tone sounds. To cancel the transfer, press[ÀDVK@ or [ ].When another station accepts the transferred call, you will be disconnected. If you want to rejointhe call, press [ÀDVK@ again or [ ].1.2.3.Answering a Transferred CallWhen a station receives a call transfer, it sounds a paging tone; handsets also show the ID of the station that ispaging. To accept the call transfer:To answer the page and speak to the transferring station, press [ÀDVK@ or [hold/int’com/xfer] on the handset.To accept the call and speak to the caller, press [ÀDVK@ on the handset or [ ] on the base.When you accept the transferred call, the transferring station will be disconnected.2QO\WKH¿UVWVWDWLRQWRDQVZHUWKHWUDQVIHUSDJHZLOOEHFRQQHFWHGWRWKHFDOO,IWKHWUDQVIHUSDJHLVQRWSLFNHGXSwithin one minute, the operation will be canceled.1.2.1.2.3.](https://usermanual.wiki/Uniden-America/UP822/User-Guide-729899-Page-34.png)
![34Using Special FeaturesMuting the Ringer (One Call Only)While the phone is ringing, press [ ] on the handset or [ ] on the base to mute the ringer for this call. The phonewill ring again on the next call. (The handset must be off the cradle to mute the ringer.)Muting the MicrophoneMute turns off the microphone so the caller can’t hear you. This only works while you are on a call.From the handsetPress [menu/clear].Move the cursor to select MUTE and then press [select/ ]. MUTE ON and appear in thedisplay; remains while muting is on.To cancel muting, repeat the procedure, MUTE OFF appears.1.2.3.Privacy ModeIf you don’t want other stations to interrupt your call, turn on privacy mode. As long as your handset is in privacymode, other stations can’t join your call or make any calls of their own: their displays will show UNAVAILABLE.While on a call, press [menu/clear].Move the cursor to CALL PRIVACY, and then press [select/ ]. PRIVACY MODE ON and appear in the displayfor 2 seconds; the icon remains in the display as long as privacy mode is on.To turn privacy mode off, repeat the procedure listed above.1.2.](https://usermanual.wiki/Uniden-America/UP822/User-Guide-729899-Page-35.png)
![35Seven-Digit DialingIf you can make a local call by dialing only 7 digits (instead of 10), you can program your local area code in yourphone. Calls that come from within your area code will show only the 7-digit phone number; calls from outside yourarea code will show all 10 digits. To enter an area code, follow the steps below:Press [menu/clear]. Select the GLOBAL SETUP menu, and then the AREA CODE submenu.Use the number keypad ([0] through [9]) to enter a 3-digit area code. If an area code has already been stored, itappears in the display. Press [menu/clear] to delete the stored code, and then enter a new one.Press [select/ ]<RXZLOOKHDUDFRQ¿UPDWLRQWRQHUsing the IntercomYou can use the intercom to talk to another station without using the phone line.Making an Intercom PageFrom the handsetWith the phone in standby, press [hold/int’com/xfer].Use [ ] or [ ] to select the station you want to talk with, then press [select/ ]. Select ALL topage all other stations.To cancel the intercom page, press [].1.2.3.Note: Intercom paging will be canceled if any of the following things occur:— You receive an outside call or an intercom page while selecting the other handset.— You do not select a handset within 30 seconds.— The party does not answer the page within one minute.—The party is busy.—The party is out of range (UNAVAILABLE appears in the display).1.2.3.](https://usermanual.wiki/Uniden-America/UP822/User-Guide-729899-Page-36.png)
![36Answering an Intercom PageWhen the intercom page tone sounds, the display will show the ID of the station that is paging.Press [ÀDVK@ or [hold/int’com/xfer]. If AutoTalk is on, the handset will automatically answer the page whenyou remove the handset from the cradle.To hang up an intercom page from the handset, press [].Tone Dialing Switch OverIf your phone is set to pulse dialing, you can switch to tone dialing after the call connects. This feature is useful when\RXQHHGWRQHGLDOLQJWRXVHDXWRPDWHGPHQXV\VWHPVVXFKDVWHOHSKRQHEDQNWHOOHUVWHOHSKRQHSUHVFULSWLRQUH¿OOVcustomer support menus, etc. Make your call normally. Once your call connects, press [*/tone] on the handset. Anydigits you enter from then on will be sent with tone dialing. When this particular call ends, the phone automaticallyreturns to pulse dialing.See Changing the Dial Mode on page 15 for instructions on setting your phone for pulse or tone dialing.Installing the Optional HeadsetYour phone may be used with an optional headset. To use this feature, insertthe headset plug into the headset jack. Your phone is ready for hands-freeconversations. (Headsets may be purchased by calling the Uniden PartsDepartment. See back cover page for contact information.)1.2.](https://usermanual.wiki/Uniden-America/UP822/User-Guide-729899-Page-37.png)
![38Using the Answering System InterfaceHandset operationYou can use your handset to operate your answering system from anywhere in your home. When the phone is instandby, press [select/ ]on the handset to access the answering system. REMOTE ANSWERING MACHINEOPERATION appears on the handset display, and the system announces the number of new and old messages.Keep the following things in mind when you use your handset to access your answering system:You can enter a command at any time during announcements.$IWHUWKH¿UVWDQQRXQFHPHQW\RXKDYHVHFRQGVWRHQWHU\RXU¿UVWFRPPDQGEHIRUHWKHV\VWHPUHWXUQVWRstandby.If you receive a call, the remote operation is cancelled.If another station makes a call, the remote operation is cancelled.During the remote operation “ - -” appears on the base.Selecting the LanguageYou can select the language (for USA models: English and Spanish, for Canadian models: English and French) ofyour answering system announcements. The default system language is English.From the handsetPress [menu/clear]. Select ANSW. SETUP, and then the ANSW LANGUAGE submenu.Move the cursor to choose a language. for USA models: Choose ENGLISH or ESPAÑOL (Spanish). for Canadian models: Choose ENGLISH or FRANÇAIS (French).Press [select/ ]<RXZLOOKHDUDFRQ¿UPDWLRQWRQH1.2.3.•••••](https://usermanual.wiki/Uniden-America/UP822/User-Guide-729899-Page-39.png)
![39Setting the Number of RingsThe ring time setting allows you to set the number of rings the caller hears before your answering system plays theoutgoing message. You can set the ring time to answer after two, four, or six rings. If you enable the Toll Saver (TS)setting, the answering system picks up after two rings if you have new messages, and after four rings if there arenone. This way, if you make a long distance call to check your messages, you can hang up after the second ring toavoid long distance billing charges.From the handsetPress [menu/clear]. Select the ANSW. SETUP menu, and then the RING TIME submenu.Move the cursor to select a ring time (TOLL SAVER, 2 TIMES, 4 TIMES, or 6 TIMES).Press [select/ ]<RXZLOOKHDUDFRQ¿UPDWLRQWRQH1.2.3.Setting the Day & TimeIf you do not set the clock on your answering system, your messages may not have the correct time and day stamp.You can set the day and time from the handset or the base.From the handsetPress [menu/clear].Move the cursor to ANSW. SETUP and press [select/ ].Move the cursor to DAY & TIME and press [select/ ].Use []and [ ] to select the correct day, and press [select/ ].Use [ ] and [ ] to select the correct hour, and press [select/ ].Use []and [ ] to select the correct number of minutes, and press [select/ ].Use []and [ ] to select AM or PM, and press [select/ ]<RXKHDUDFRQ¿UPDWLRQWRQH1.2.3.4.5.6.7.](https://usermanual.wiki/Uniden-America/UP822/User-Guide-729899-Page-40.png)
![40Recording a Personal GreetingYour answering system comes with a pre-recorded outgoing message or greeting that plays when you receive acall: “Hello, no one is available to take your call. Please leave a message after the tone.” You can record your ownpersonal outgoing greeting. Your recorded greeting must be between two seconds and thirty seconds long.From the handsetPress and hold [greet].The system announces, “Record greeting.” Begin recording after the announcement.The message counter displays “- -”, then begins to count down 30 seconds.:KHQ\RX¿QLVKUHFRUGLQJSUHVV[greet], [set] or []<RXZLOOKHDUDFRQ¿UPDWLRQWRQHDQGyour recorded greeting plays back for you.1.2.3.Selecting a GreetingOnce you have recorded a personal greeting, the phone automatically switches to your personal greeting. You canalso switch back and forth between the pre-recorded greeting and your own greeting at any time from the base:With the phone in standby, press [greet]. The system plays the current greeting.To keep this greeting, do nothing.To switch to the other greeting, press [greet] while the system is playing the current greeting.Each time you press [greet], the system switches between the pre-recorded and the personal greeting. The lastgreeting you hear is used as the current greeting.1.2.3.4.](https://usermanual.wiki/Uniden-America/UP822/User-Guide-729899-Page-41.png)
![41Deleting Your Personal GreetingYou can delete your personal greeting from the base. You cannot delete the pre-recorded greeting.With the phone in standby, press [greet].While the personal greeting is playing, press [].The system announces “Greeting has been deleted,” and switches back to the pre-recorded greeting.Setting the Record Time (or Announce Only)You can choose how long callers have to record a message. Set the record time to “1 minute” or “4 minutes” to limitthe time for incoming messages. If you set the record time to “Announce only,” the answering system answers thecall but prevents callers from leaving a message.From the handsetPress [menu/clear]. Select the ANSW. SETUP menu, and then the RECORD TIME submenu.Move the cursor to select RECORD TIME (1 MINUTE, 4 MINUTES, orANNOUNCE ONLY).Press [select/ ]<RXZLOOKHDUDFRQ¿UPDWLRQWRQH1.2.3.While your answering system is set to Announce Only, the message counter LED on the base displays “A.” If youare using the prerecorded greeting, the system automatically switches to the following message: “Hello, no one isavailable to take your call. Please call again.” If you are using a personal greeting, the system continues to use thatgreeting.1.2.3.](https://usermanual.wiki/Uniden-America/UP822/User-Guide-729899-Page-42.png)
![42Activating the Message AlertThe message alert feature sounds a short alert tone every 15 seconds whenever you have a new message. To turnon the message alert:From the handsetPress [menu/clear]. Select the ANSW. SETUP menu, and then the MESSAGE ALERT submenu.Move the cursor to select ON or OFF.Press [select/ ]<RXZLOOKHDUDFRQ¿UPDWLRQWRQH1.2.3.Activating Call ScreeningYour phone allows you to listen to callers leaving you a message. This call screen feature can be turned on or off.From the handsetPress [menu/clear]. Select the ANSW. SETUP menu and then the CALL SCREEN submenu.Move the cursor to select ON or OFF.Press [select/ ]<RXZLOOKHDUDFRQ¿UPDWLRQWRQH1.2.3.6HWWLQJD6HFXULW\&RGHRU3HUVRQDO,GHQWL¿FDWLRQ1XPEHU3,1To play your messages from a remote location, you will need to enter a two-digit security code or Personal,GHQWL¿FDWLRQ1XPEHU3,17KHGHIDXOWVHFXULW\FRGHLVFrom the handsetPress [menu/clear]. Select the ANSW. SETUP menu, and then the SECURITY CODE submenu.Use the number keypad ([0] through [9]) to enter a two-digit security code (01-99).Press [select/ ]<RXZLOOKHDUDFRQ¿UPDWLRQWRQH1.2.3.](https://usermanual.wiki/Uniden-America/UP822/User-Guide-729899-Page-43.png)
![43Using the Answering SystemTurning Your Answering System On and OffFrom the base From the handsetTurning OnWith the phone in standby, press [on/off].The system announces “Answering Systemis on” and plays the current greeting.The message counter displays thenumber of messages stored in memory.,IWKHFRXQWHUÀDVKHVWKHQ\RXKDYHQHZmessages waiting.1.2.3.Press [menu/clear]. Select the ANSW.SETUP menu, and then theANSWERSETUP submenu.Move the cursor to select ON.Press [select/ ]. You will hear aFRQ¿UPDWLRQWRQH1.2.3.Turning OffWith the phone in standby, press [on/off].The phone announces “Answering Systemis off.”The message counter LED is no longerilluminated.1.2.3.Press [menu/clear]. Select the ANSW.SETUP menu, and then theANSWERSETUP submenu.Move the cursor to select OFF.Press [select/ ]. You will hear aFRQ¿UPDWLRQWRQH1.2.3.](https://usermanual.wiki/Uniden-America/UP822/User-Guide-729899-Page-44.png)
![44Reviewing MessagesThe base message counter displays the number of messages stored in memory. When you have new messages, thePHVVDJHFRXQWHUDQGWKHQHZPHVVDJH/('RQWKHKDQGVHWÀDVK7KHDQVZHULQJV\VWHPSOD\V\RXUQHZPHVVDJHV¿UVW$IWHU\RXOLVWHQWRDOORI\RXUQHZPHVVDJHV\RXFDQWKHQSOD\\RXUROGPHVVDJHV<RXFDQUHYLHZ\RXUmessages from the base or from the handset:From the base From the handsetPlayingmessagesPress []. The system announces thenumber of new and old messages. It announcesthe message number, plays the message, thenannounces the time and day it was received.Press [select/ ]. The system announces thenumber of new and old messages and thenplay your messages. After playing the message,the system announces the time and day thatmessage was received.Repeating amessagePress [ /select] once to go to the beginningof the current message. Press [/select]repeatedly to go back to a previous message.Press and hold [/select] to rewind throughthe current message.Press [/1] once to go to the beginning of thecurrent message. Press [/1] repeatedly to goback to a previous message.Skipping amessage Press [/select] to go to the beginning of thenext message. Press and hold [/select] tofast forward through the current message.Press [/3] to go to the beginning of the nextmessage.Deleting amessage While a message is playing, press []. Themessage is permanently deleted. While a message is playing, press [ /4]. Themessage is permanently deleted.Deleting allmessages While the phone is in standby, press []. WhenWKHV\VWHPDVNV\RXWRFRQ¿UPSUHVV[]again.All messages are permanently deleted.Not available.Ending themessagereviewPress []to stop the message playback andreturn to standby. Press [ /5] to stop the message playback.Press []to exit the system and return tostandby.](https://usermanual.wiki/Uniden-America/UP822/User-Guide-729899-Page-45.png)
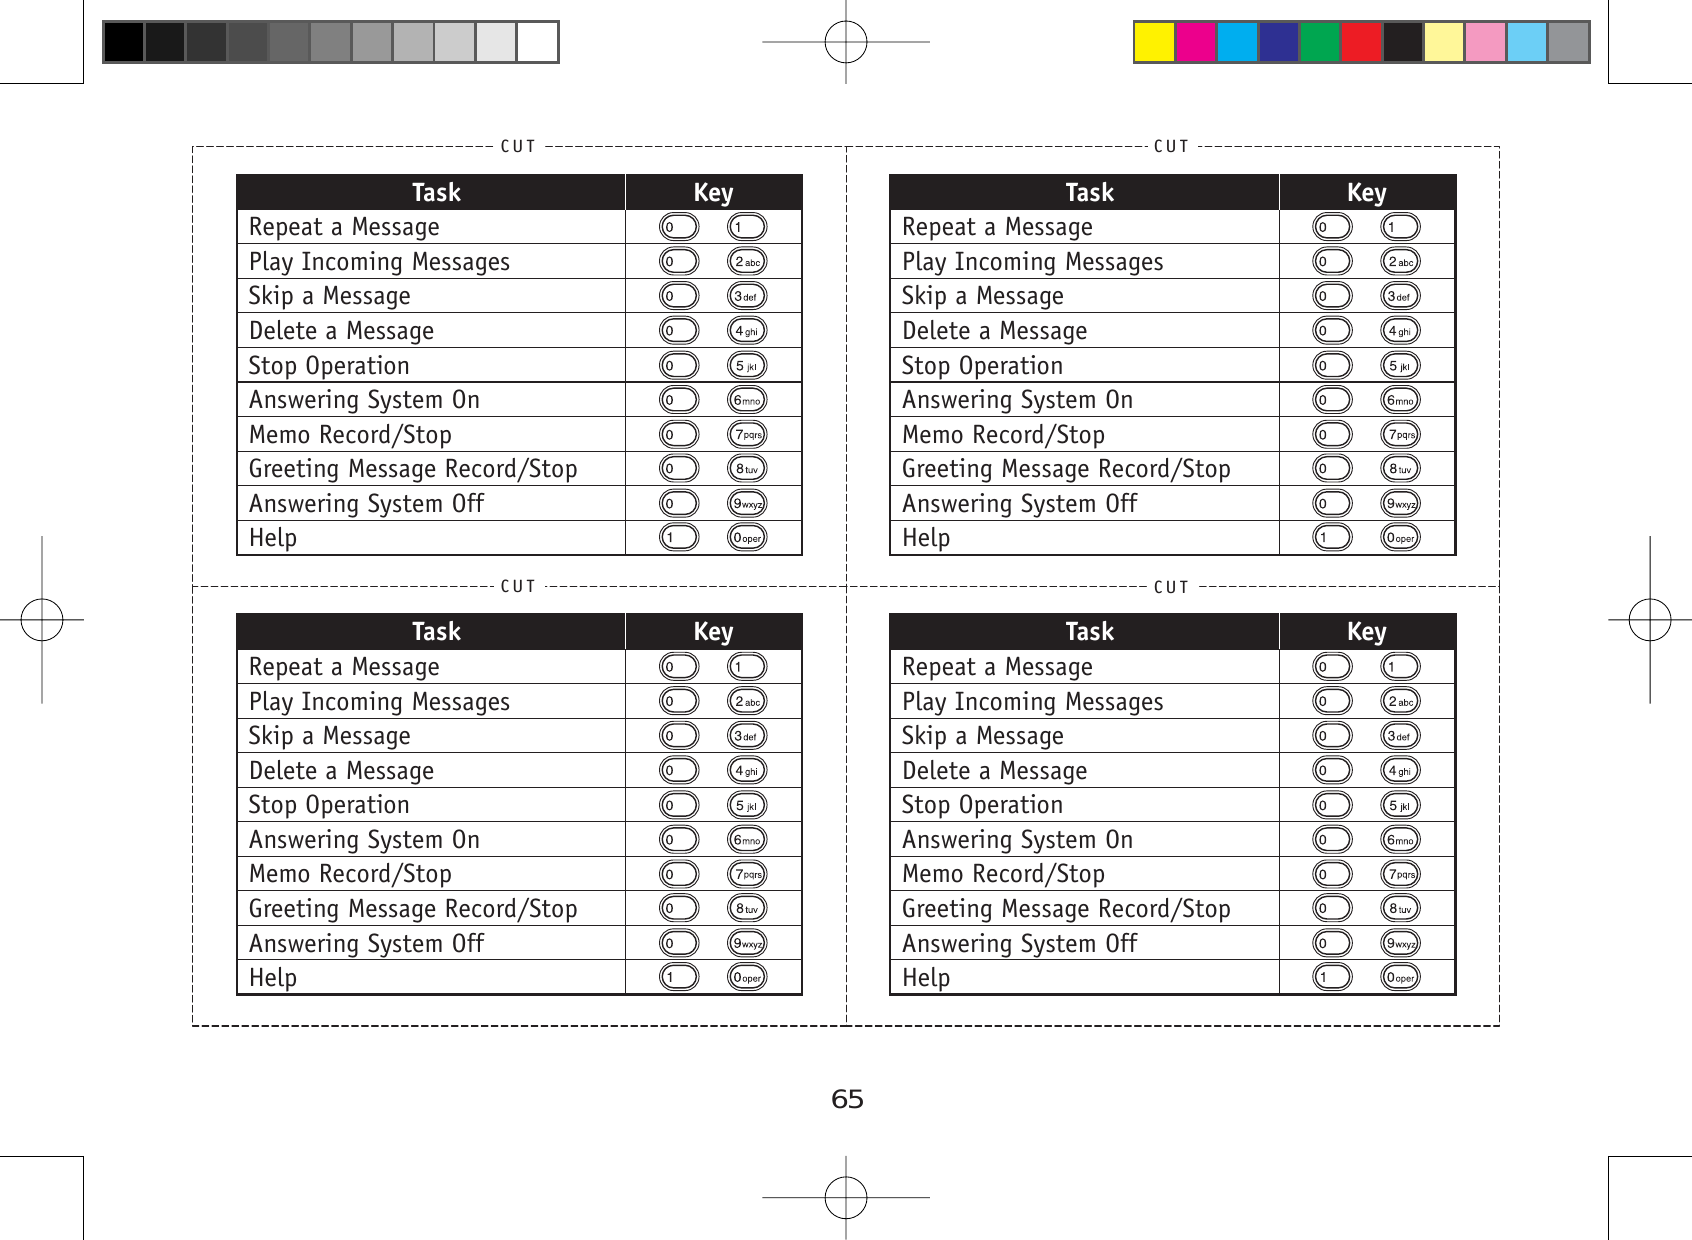
![45Screening CallsIf you activate the call screening feature, you can listen to callers leaving a message without answering the phone(see Activating Call Screening on page 42). You can always hear callers from the base speaker. To screen anincoming call from the handset:Press [select/ ]when the system is answering. If another handset is screening a call, you will hear a beep andyou will not be able to screen the call.To answer the call, press [ÀDVK@.To stop screening the call, press [].Turning Off the Message Alert ToneWhen all new messages are played back, the message alert tone will automatically deactivate. The tone will notdeactivate until all new messages are played back. To quickly turn off the tone, press any key on the base.Operating the Answering System While You Are Away from HomeYou can access your answering system while you are away from home to check, play, and delete messages, or evenrecord a new greeting message or turn your answering system on and off.To operate from a remote location, use any touch-tone telephone, and follow these steps:Call your telephone number and wait for the system to answer. If the answering system is off, it will answer afterabout 10 rings and sounds a series of beeps.During the greeting or the beeps (if answering system is off), press [0] and enter your security code/PIN withinWZRVHFRQGVVHH6HWWLQJD6HFXULW\&RGHRU3HUVRQDO,GHQWL¿FDWLRQ1XPEHU3,1RQSDJHThe answering system announces the current time and the number of messages stored in memory. You hear “Toplay incoming messages, press zero-two. For help, press one-zero” followed by a beep.(QWHUDUHPRWHFRPPDQGIURPWKHFKDUWEHORZ<RXKDYHVHFRQGVWRHQWHUWKH¿UVWFRPPDQGDIWHUWKH¿UVWcommand, you have two seconds to enter each command.•••1.2.3.4.](https://usermanual.wiki/Uniden-America/UP822/User-Guide-729899-Page-46.png)
![46Command Function Command Function[0] and [1] Repeat a message* [0] and [6] Answering system on[0] and [2] Play incoming messages [0] and [7] Memo record start/stop[0] and [3] Skip a message [0] and [8] Greeting message record start/stop[0] and [4] Delete a message [0] and [9] Answering system off[0] and [5] Stop operation [1] and [0] Help* If you press [0] then [1]LQWKH¿UVWIRXUVHFRQGVRIDPHVVDJHWKHV\VWHPVNLSVWRWKHSUHYLRXVPHVVDJHIf you press [0] then [1]DIWHUWKH¿UVWIRXUVHFRQGVRIDPHVVDJHWKHV\VWHPUHSHDWVWKHFXUUHQWmessage.:KHQ\RX¿QLVK\RXZLOOKHDULQWHUPLWWHQWEHHSVLQGLFDWLQJWKDWWKHV\VWHPLVLQWKHFRPPDQGZDLWLQJPRGHEnter another command from the chart within two seconds.Hang up to exit the system. The answering system automatically returns to its normal standby setting.5.6.](https://usermanual.wiki/Uniden-America/UP822/User-Guide-729899-Page-47.png)
![47Maintenance6SHFL¿FDWLRQVOperating Temperature Û&WRÛ&Û)WRÛ)AC Adapter Part Number Base: AD-800Charger: AD-0005Input Voltage Base: 120 V AC, 60 HzCharger: 120 V AC, 60 HzOutput Voltage Base: 9 V DC @ 350 mACharger: 9 V DC @ 210 mAPart Number BT-1004Battery Capacity 3.6 V DC @ 500 mAhPower FailuresDuring a power failure, you will not be able to make or receive calls with the phone. To avoid damage from anelectrical spike when the power comes back on, we recommend you unplug your phone during power outages.Battery LifeWith average use, your battery talk time will be approximately 7 hours and standby time will be approximately 10days. For optimum performance, be sure to return the handset to the cradle after each call. If the handset is left off ofthe base, the actual talk time duration will be reduced respective to the amount of time the handset is off the cradle.Note: Do not place the power cord where it creates a trip hazard or where it could become chafed and FUHDWHD¿UHRUHOHFWULFDOKD]DUG](https://usermanual.wiki/Uniden-America/UP822/User-Guide-729899-Page-48.png)
![50TroubleshootingResetting the HandsetYou may need to reset your handset in the following instances:When you want to change the digital security code.You lose a handset and purchase a new one.You get the message Registration Failed when you try to register the handset.You are unable to register any handsets to the base.When you register new handsets to the base, the handset IDs do not match. (For example, the handset registersas “Handset #4” but you only have two handsets.)When you are instructed to by one of Uniden’s call center representatives.Press and hold []and [#] for more than 5 seconds. Select DEREGISTER HS.Select the handset you want to reset, then press [select/ ].7KHSKRQHZLOODVN\RXWRFRQ¿UPWKHGHUHJLVWUDWLRQ6HOHFW<(67KHVHOHFWHGKDQGVHWZLOOFOHDULWVUHJLVWUDWLRQinformation from the base, and then delete the link to the base from its own memory.When the base information is deleted, the handset displays MODELS VARY! CHARGE HANDSET ON THEBASE FOR REGISTRATION OR REFER TO OWNER’S MANUAL.Re-register the handset to the base (see Registering Accessory Handsets on page 18).If the handset cannot contact the base, it will display UNAVAILABLE. Make sure the handset is in range of the baseand the base is connected to power.••••••1.2.3.4.5.](https://usermanual.wiki/Uniden-America/UP822/User-Guide-729899-Page-51.png)
![51Resetting the Handset Without the BaseIf your original base is not available for some reason (for example, it is lost or somehow incapacitated), you can stillreset the handset and use it with another base.Press and hold []and [#] for at least 5 seconds.Move the cursor to select REPLACING BASE and then press [select/ ]. REPLACE BASE appears.Move the cursor to select YES, and then press [select/ ]<RXKHDUDFRQ¿UPDWLRQWRQHDQGWKHKDQGVHWdeletes its own base information without contacting the base. The handset displays MODELS VARY! CHARGEHANDSET ON THE BASE FOR REGISTRATION OR REFER TO OWNER’S MANUAL.Register the handset to the new base (see Registering Accessory Handsets on page 18).Changing the Digital Security Code7KHGLJLWDOVHFXULW\FRGHLVDQLGHQWL¿FDWLRQFRGHXVHGWRFRQQHFWWKHKDQGVHWDQGWKHEDVH<RXUXQLWVKLSVIURPWKHmanufacturer with a preset security code. Resetting this code is not normally necessary. In the rare situation that yoususpect another cordless telephone is using the same security code or if you are instructed to change this code by amanufacturer’s Call Center Representative, you can change the code. To change the digital security code:Reset the handset (see Resetting the Handset on page 50).Re-register each handset (see Registering Accessory Handsets on page 18).Traveling Out of RangeDuring a call, if you move your handset too far from your base, noise may increase. If you pass the range limit of thebase, the handset will beep, display OUT OF RANGE, and then go to standby. The base will maintain the connectionfor 30 seconds after the handset goes out of range. If you move the handset back within range of the base within 30seconds, press [ÀDVK@ or [ ] to pick up the call again.1.2.3.4.1.2.](https://usermanual.wiki/Uniden-America/UP822/User-Guide-729899-Page-52.png)