Uniden America US207 TRAX438 User Manual AMWUS207 warning statements
Uniden America Corporation TRAX438 AMWUS207 warning statements
User Manual
P
a
g
e4
What Do I Do First?
M
ake sure everything is
OK
If
an
y
thin
g
listed here is missin
g
or dama
g
ed, call
C
ustomer
S
ervice
(
see back cover
f
or contact in
f
ormation
).
T
RAX4
36
O
R
TRAX4
38
G
P
S
N
A
VI
A
A
G
A
T
ION
D
EVI
CE
Th
e
p
arts
y
ou
’
ll use
m
ost often
are
i
n
l
ar
g
e
ty
pe
.
Connectors
f
or optional
accessories
are s
h
own
i
n
i
t
alics
.
Press the
p
ower
b
utton
to
t
u
rn
off
t
he screen;
the
de
v
ice
s
ta
y
s on an
d
c
an still give
di
r
ec
t
io
n
s
.
T
o
t
u
rn
t
he device
c
ompletely off, press the power button in and hold it for
t
hr
ee
seco
n
ds
.
Ź
Ź
Ź
Ź
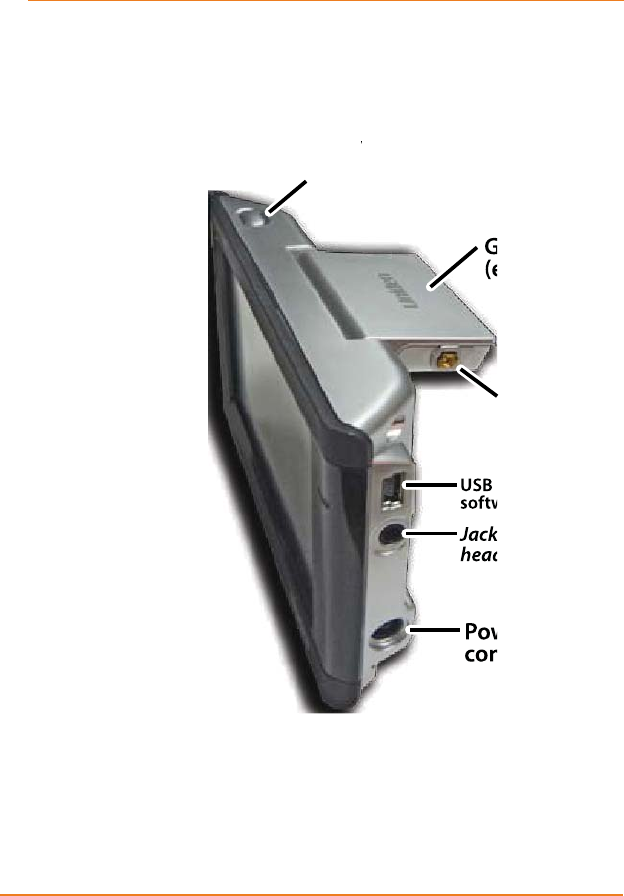
GPS antenna
(extended)
USB port for
software updates
Jack for external
headset
Connection
for external
antenna
Power
connection
Power button
GPS antenna
(extended)
USB port for
software updates
Jack for external
headset
Connection
for external
antenna
Power
connection
Power button
P
a
g
e
5
W
hat D
o
I D
o
First
?
W
IND
S
HIELD
M
O
U
N
T
The
de
v
ice
a
tt
aches
t
o t
h
e
b
rac
k
et
,
and the
suct
i
on cu
p
holds
t
he
m
ount in
y
our
wi
n
dshield
.
S
ome states
h
ave laws
aga
i
nst
p
utt
i
n
g
t
hi
n
g
s
i
n your car
’
s
wi
n
dshield
.
If
y
ou don’t
k
now the laws
for your state,
co
nt
ac
t t
he
RI¿
FHWKDWLVVXHVGULYHUV¶OLFHQFHV
I
f you do put the device in your windshield, don’t forget to
lock it up or take it with
y
ou when
y
ou leave
y
our car.
I
NC
LUDE
D
A
CCE
SS
O
R
IE
S
For information on other available accessories
,
see
page
XREF
.
Ź
Ź
Ź
Suction
latch
Bracket
lock
Suction
cup pull
tab
Bracket
Suction
cup
Adjustment
lock
Suction
latch
Bracket
lock
Suction
cup pull
tab
Bracket
Suction
cup
Adjustment
lock
Car power adapter
(12 Volt DC)
USB cable (for
map updates)
Adhesive
anchor disk
Car power adapter
(12 Volt DC)
USB cable (for
map updates)
Adhesive
anchor disk
P
a
g
e
6
W
hat D
o
I D
o
First
?
Pl
u
g
i
t
i
n
O
nl
y
use the power adapter that came with
y
our device.
A
n
y
other adapter mi
g
ht dama
g
e the device.
Wh
enever
i
t senses power com
i
ng
i
n, t
h
e
d
ev
i
ce turns
i
tsel
f
on and char
g
es the batter
y
.
A
s soon as the power stops
(f
or example, when
y
ou
unplug the adapter or turn off your car), the device
automaticall
y
shuts down. I
f
y
ou want it to sta
y
on, tap
an
y
where on the screen durin
g
the Shuttin
g
down
m
essage.
Y
ou can turn the device on or o
ff
an
y
time
y
ou want:
j
ust
p
ush the
p
ower button on to
p
of the device to turn it on,
a
n
d
h
o
l
d
th
e
bu
tt
o
n f
o
r thr
ee
seco
n
ds
t
o
t
u
rn it
o
ff.
Ź
Ź
Ź
Ź
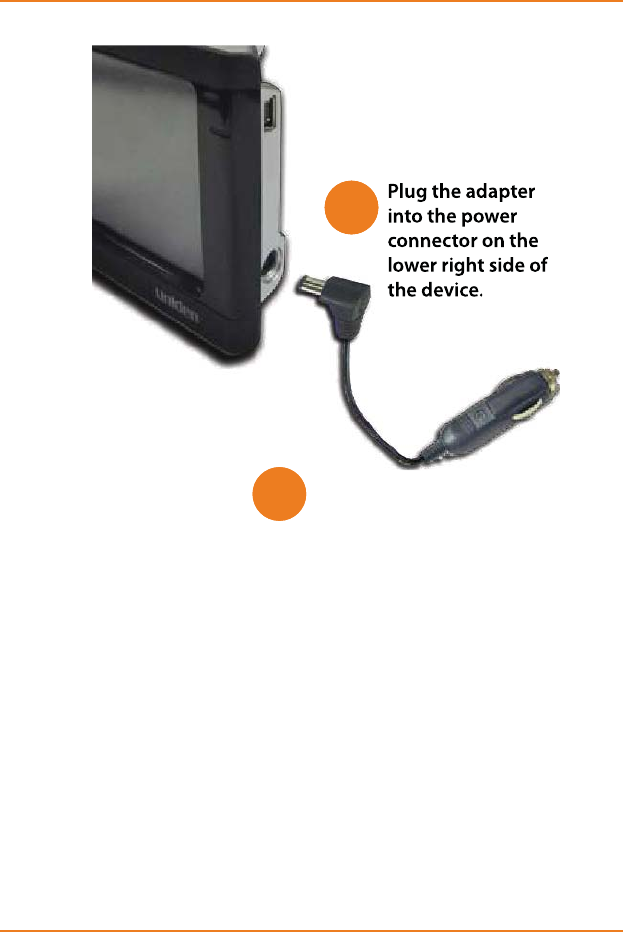
2Plug the other end into
your car’s cigarette lighter.
Plug the adapter
into the power
connector on the
lower right side of
the device.
1
2Plug the other end into
your car’s cigarette lighter.
Plug the adapter
into the power
connector on the
lower right side of
the device.
1
P
a
g
e 7
W
hat D
o
I D
o
First
?
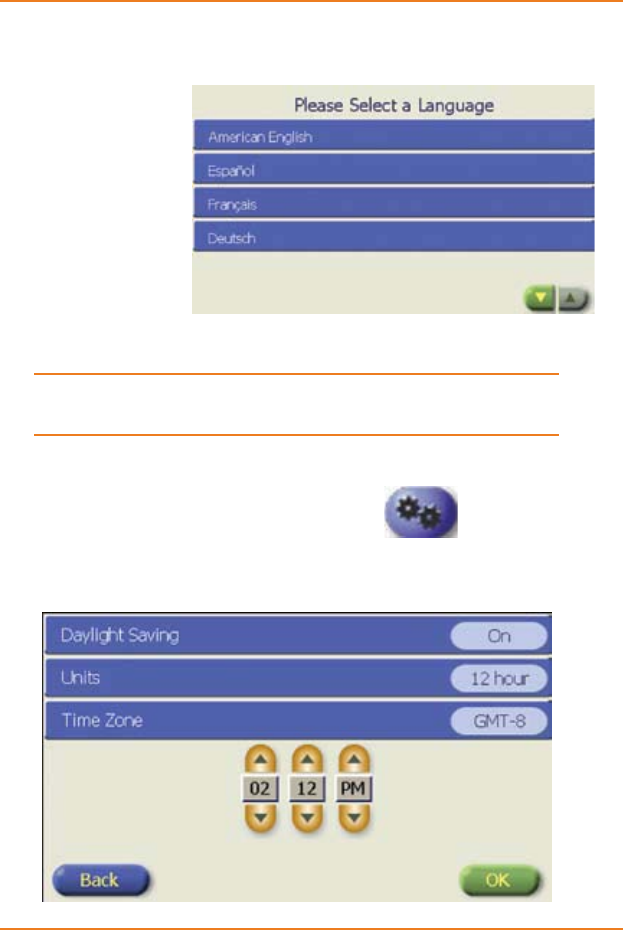
Choose
y
our default lan
g
ua
ge
7KH
¿
UVWWLPH
\
RXWXUQRQWKHGHYLFHLWDVNV
\
RXZKLFK
l
anguage you
wa
nt t
o
use
f
o
r
menus and voice
p
rom
p
ts. Ta
p
the
li
n
e
w
i
t
h
t
he
l
anu
g
ua
g
e
y
ou
w
ant to use, or ta
p
the
do
wn
a
rr
o
w t
o
see more choices.
T
he device will
u
se that language from now on.
Y
ou can always change the language later from the
S
ettin
g
smenu.
S
ee page
6
4
.
S
et your time pre
f
erence
s
F
rom t
h
e ma
i
n menu screen
,
se
l
ect
.
Select
L
AN
GU
A
G
E
AND
LO
CALE
a
n
d
t
he
n
S
ET
TIME
AND
TIME
Z
O
NE. This opens the
f
ollowin
g
screen.
1
)
2
)

Page 8
What Do I Do First?
Tap the button in the TIME ZONE¿HOGWRRSHQWKHSelect
a Time Zone screen. Tap anywhere on the world map to
use the time
zone for that
location.
Tap the +
arrow to zoom
in or the -
arrow to zoom
out.
Tap and drag
on the screen to move to a different part of the map.
Tap OKZKHQ\RX¶UH¿QLVKHG
Set daylight savings time.
If you want the device to automatically adjust the clock
for daylight savings time, tap the button in the DAYLIGHT
SAVING¿HOGXQWLOLWVKRZVAUTO.
If your area never uses daylight savings time, tap the
DAYLIGHT SAVING button until it shows OFF.
If you want to control the clock adjustment manually, use
ON when your area is observing daylight savings time
and OFF when your area is not.
Tap the button in the UNITS¿HOGWRVHWWKHWLPHIRUPDW
you want to use. Use 12 HR for twelve-hour (am/pm) time
or 24 HR for twenty-four-hour (military) time.
If necessary, use the arrows on the clock to adjust the
hours, minutes, and am/pm to show the current time.
Tap OKZKHQ\RX¶UH¿QLVKHGWKHQBACK to return to the
menu.
3)
Ź
Ź
Ź
4)
Ź
Ź
Ź
5)
6)
7)
Page 9
What Do I Do First?
Enter your home location
Next, enter the address you want to use as your “home”
location, that is, the place you travel to and from the most.
(This step isn’t actually required, so you can skip it if you
want. But the home feature is so useful that you’ll be glad
you entered it!)
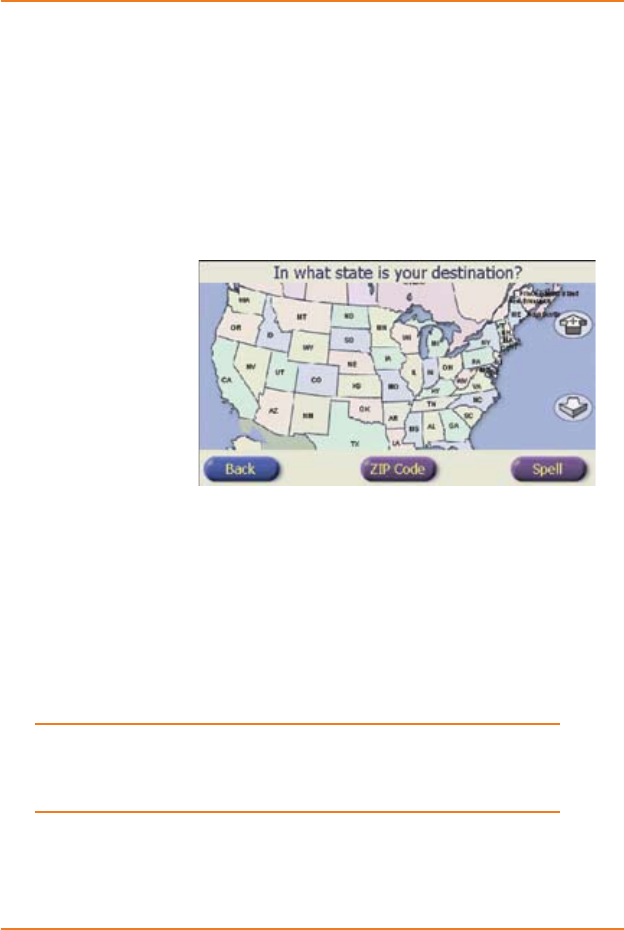
From the main menu, choose NAVIGATE TO ADDRESS.
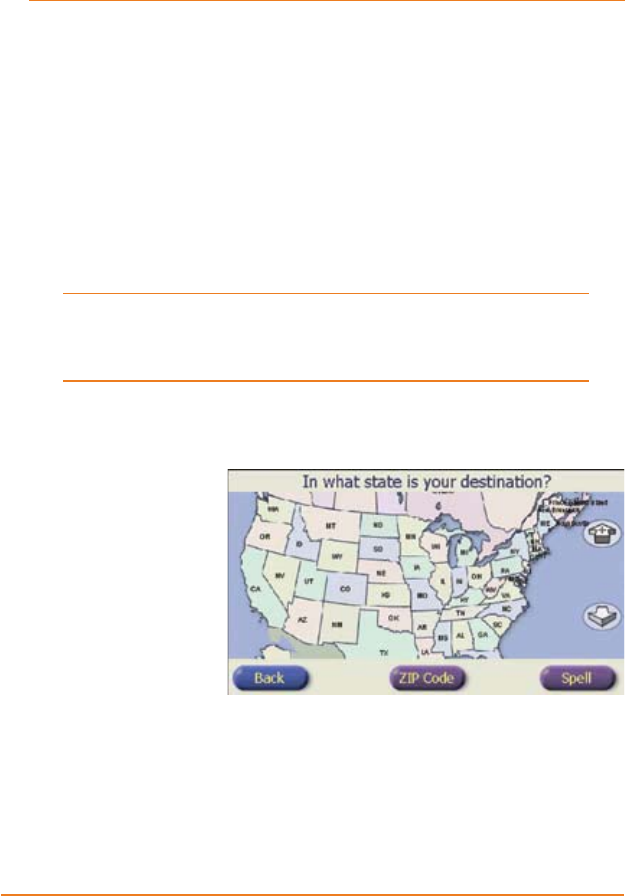
This opens the state selection screen:
Tap the state
where your
home location
is.
Tap the +
arrow to zoom
in or the -
arrow to zoom
out. Tap and
drag on the screen to move to a different part of the map.
If you want to choose the state by zip code, tap the ZIP
CODE button to enter your destination’s zip code. (This
takes you to the number keypad on the next page.)
If you want to choose the state by name, tap the SPELL
button to enter the name of the state. (This takes you
straight to the alphabet keypad on the next page.)
For the US, there are 53 available states: all 50
states, Puerto Rico, the US Virgin Islands, and the
District of Columbia.
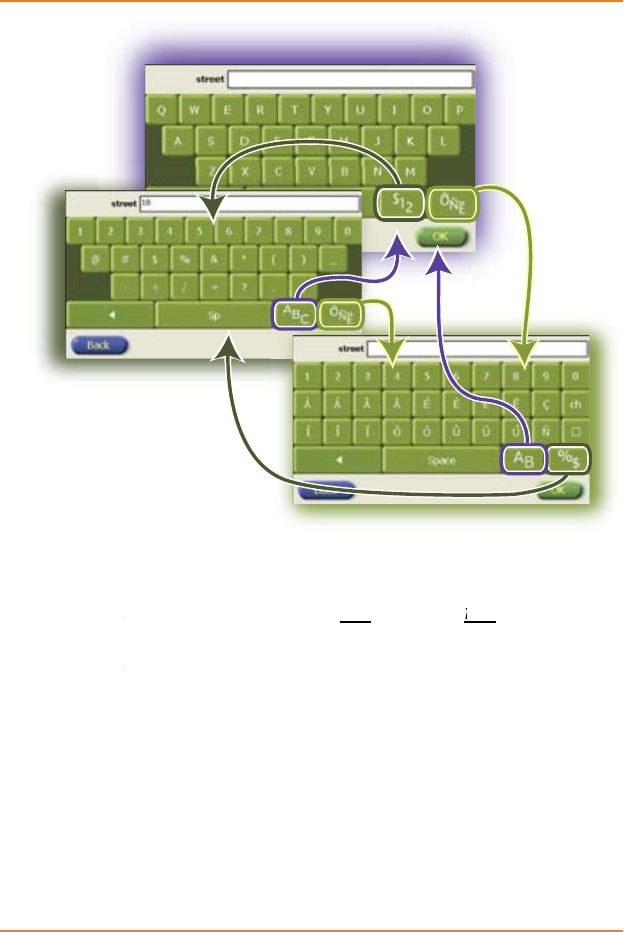
Use the aphabet keypad to enter the name of the city (or
unincorporated area) where your home location is. (You
don’t have to enter the whole name.)
1)
Ź
Ź
Ź
Ź
4)
P
a
g
e 10
W
hat D
o
I D
o
First
?
T
h
e
de
vi
ce
sea
r
c
h
es
fo
r n
a
m
es
th
a
t
i
n
clude
t
he
e
nt
e
r
ed
c
haracters. For example, if you choose Texas and enter
F
O
R
T
WKHGHYLFH¿QGV
T
T
C
om
fort
a
n
d
t
Wolf
fort
f
f
h
t
t
alon
g
with
n
ames t
h
at
b
eg
i
n w
i
t
h
FORT. If you enter a space after
F
O
R
T
WKHGHYLFH¿QGVQDPHVZKHUHWKRVHOHWWHUVDUH
TT
followed by a space (Fort Davis, Fort Worth, etc.)
If
y
ou need to t
y
pe a letter with an accent or diacritical
m
ark, ta
p
the
Ô
ÑË button to go to the symbol keypad.
If
y
ou need to t
y
pe a number or an
y
kind o
f
punctuation
m
ark, tap the
$
12 button to
g
o to the number ke
y
pad.
T
o go
b
ac
k
to t
h
e a
l
p
h
a
b
et
k
eypa
d
, tap t
h
e AB
C
bu
tt
o
n.
Tap the
OK
EXWWRQZKHQ
\
RXDUH
¿
QLVKHG
Ź
Ź
Ź
Ź
Ź
Page 11
What Do I Do First?
When you tap OK, the device shows the list of city names
that include the characters you entered. Tap the name of
the city you want, or tap the BACK button to go back and
make any changes.
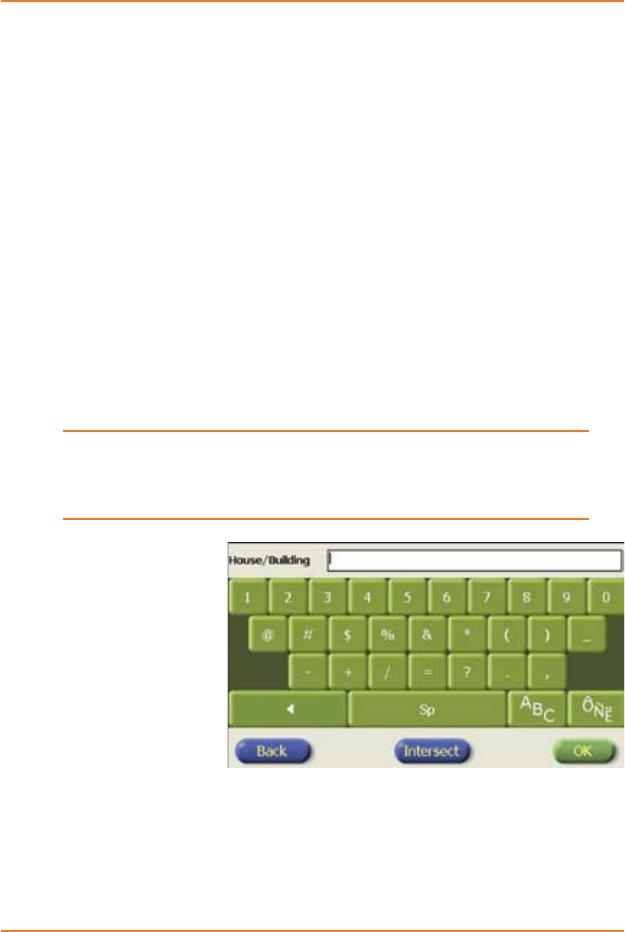
After you select the city, enter the street name the same
way you entered the city name. When the device shows
the list of streets, tap the name of the street you want.
Enter numbered streets as numerals plus
abbreviation (1ST, 2ND, 3RD, etc.) instead of
spelling out the word (First, Second, Third, etc.).
Enter the house or building number using the same
method you used to enter the city and the street name.
When you tap OK, the device searches for that building
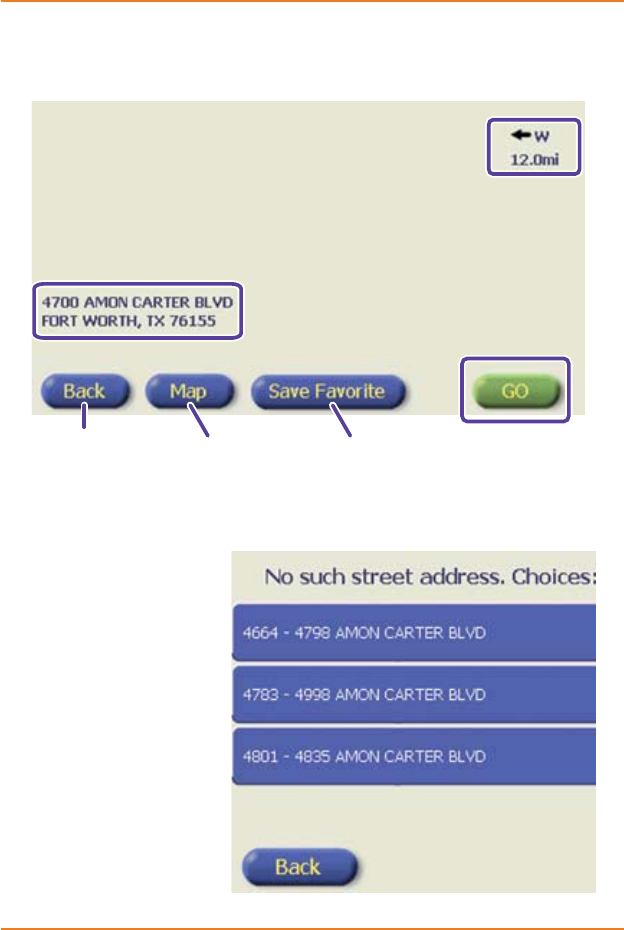
number and displays the &RQ¿UP'HVWLQDWLRQ screen.
,IWKHGHYLFHGRHVQ¶W¿QGWKHH[DFWDGGUHVV\RX
entered, it displays a list of valid address ranges. You
can select the address range or tap the back button
to re-enter the building number.
5)
6)
7)
Page 12
What Do I Do First?
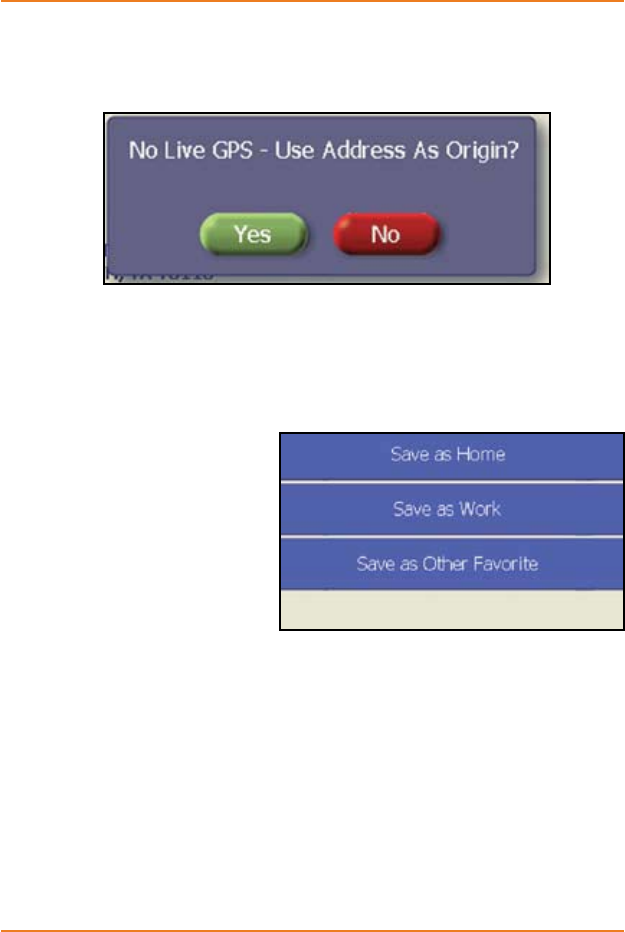
On the &RQ¿UP'HVWLQDWLRQscreen, tap the GO button.
If the device doesn’t have a lock on your location yet, it
displays the following message box:
Choose YES. The device shows the Map screen centered
on the location you just entered.
On the Map screen, tap the MENU button.
Tap MY LOCATIONS, then choose SAVE CURRENT
LOCATION.
Tap the top line,
SAVE AS HOME. The
GHYLFHFRQ¿UPVWKDW
it saved your new
home location, and
you’re done.
THE PAYOFF:
That probably seemed like a lot of work, but here’s why you
did it: On the main menu screen, tap MY LOCATIONS, then
GO HOME. The device plots a route from wherever you are
right now to your home location.
You can follow the same process to enter a “work” location,
too.
8)
9)
10)
11)
12)
P
a
g
e
1
3
W
hat D
o
I D
o
First
?
Get ac
q
uainted with the
M
a
p
screen
When the device
g
ets a lock on
y
our location, it
g
oes to the
M
a
p
screen (you’ll probably use this screen the most, so you
might want to spend a few minutes getting familiar with it):
W
H
A
T
D
O
T
H
E
M
A
P
I
CO
N
S
M
E
A
N
?
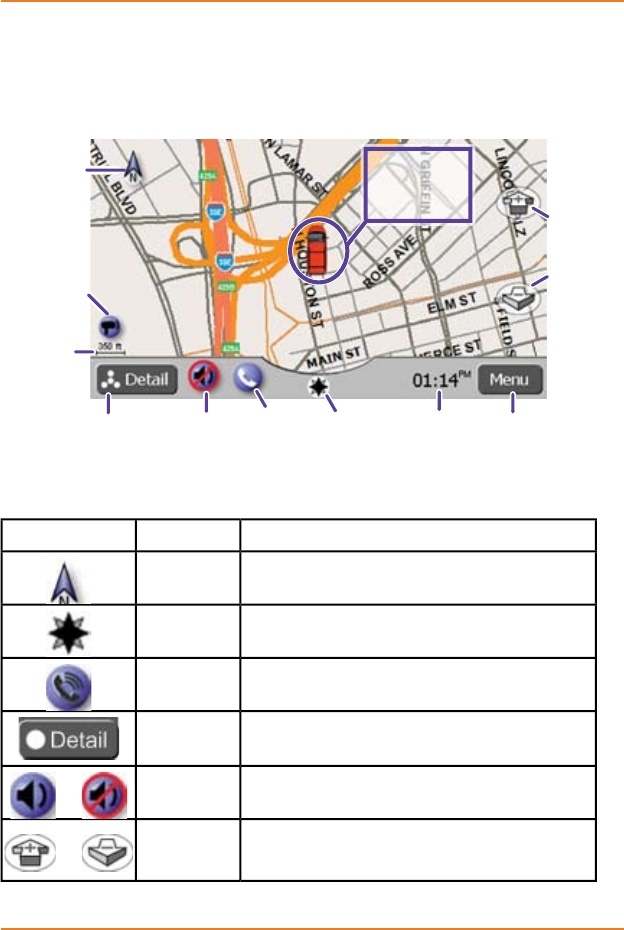
Ico
n
Na
m
e
T
a
p
i
t to..
.
C
om
p
ass
C
han
g
e
f
rom north up to headin
g
up view
(
in heading up view, the icon points north)
M
ap view
C
han
g
e
f
rom 3D to 2D view.
Ph
one
M
a
k
e a ca
ll
or c
h
ange p
h
one opt
i
ons
M
a
p
d
eta
il
C
hange the level of the map detail
or
M
ute
a
udio
M
ute t
h
e au
di
o or turn t
h
e au
di
o
b
ac
k
on.
or
+
(
plus
)
or
-
(minus)
Z
oom
i
n one ste
p
or zoom out one ste
p
.
Go to the
Menu
Car icon
(you are
here)
Compass
icon
Change
map view
Phone
icon
Change map
detail level
Time
Volume
icon
Radar icon
(not available
on all models)
Current
zoom
level
Zoom
in
Zoom
out
Go to the
Menu
Car icon
(you are
here)
Compass
icon
Change
map view
Phone
icon
Change map
detail level
Time
Volume
icon
Radar icon
(not available
on all models)
Current
zoom
level
Zoom
in
Zoom
out

Page 14
What Do I Do First?
ZOOMING IN AND OUT
There are 10 different
zoom levels, ranging
from ¼ inch = 100 ft
to ¼ inch = 10 miles.
Tap the + or – icon
to change the zoom
level one step.
When you’re at the
last available level,
the icons disappear.
CHANGING THE MAP VIEW AND HEADING
There are two different map views, two dimensional (2D) and
three dimensional (3D). Tap the MAP VIEW icon in the bottom
center of the mape to switch between these two views.
In addition to the two map views, you can change the
heading or the direction the map faces. Tap the COMPASS
icon in the upper right corner of the map to switch between
the two available headings:
North up North is at the top, just like on a standard paper map.
The cap icon turns to show the direction you are going.
The compass icon always points straight up.
•
•
•
Heaading
up
The direction you are going is at the top of the map.
The whole map turns to show the direction you’re going.
The compass icon turns to point north.
•
•
•
The two dimensions and the two headings combined give
you a total of four different views of the map:
Ź
Ź
Ź
10 mi
4 mi
2 mi
1 mi
½ mi
¼ mi
700 ft
350 ft
200 ft
100 ft
STREET
CITY
GREATER
METRO
AREA
Map scale
is based on
¼ inch
10 mi
4 mi
2 mi
1 mi
½ mi
¼ mi
700 ft
350 ft
200 ft
100 ft
STREET
CITY
GREATER
METRO
AREA
Map scale
is based on
¼ inch
Page 15
What Do I Do First?
North Up
2D
North Up
3D
Heading Up
2D
Heading Up
3D
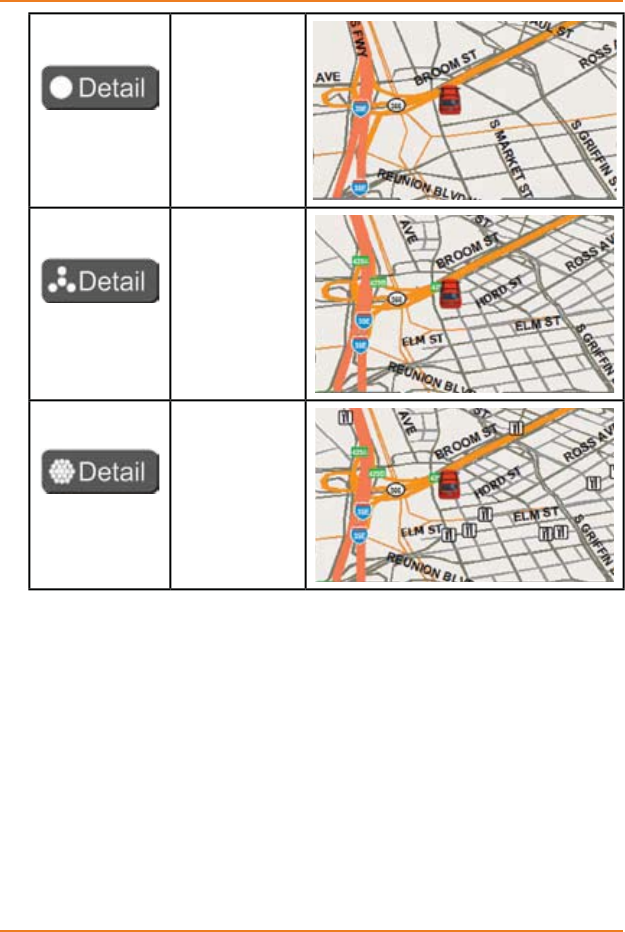
CHANGING THE MAP DETAIL LEVEL
The MAP DETAIL icon is at the bottom right corner of the
map. Tap this icon to change the level of detail the device
shows on the map.
P
a
g
e 1
6
W
hat D
o
I D
o
First
?
Low
d
eta
il
l
eve
l
Onl
y
displa
y
s
m
a
j
or arter
i
es,
controlled
access roads
,
area
f
eatures
,
an
d
t
h
e
curren
t
rou
t
e.
M
ed
i
u
m
deta
il
le
v
e
l
D
ispla
ys
ever
y
-thin
g
sho
wn
o
n t
he
l
ow
d
eta
il
l
eve
l
b
ut includes
res
i
de
nti
al
a
n
d
su
r
face
s
treets.
Hi
g
h
d
eta
il
l
eve
l
Di
sp
l
ay
s
every-thing
s
h
o
wn
o
n
the
m
ediu
m
d
eta
il
l
eve
l,
b
ut includes
se
l
ec
t
ed
P
O
I
ico
n
s
.
Wh
en you se
l
ect t
h
e
hi
g
h
d
eta
il
l
eve
l
, t
h
e
d
ev
i
ce
b
r
i
ngs up a
p
op-up dialo
g
ue askin
g
which points o
f
interest or P
O
I icons
y
ou want to see on the map. Tap the category o
f
P
O
I icons
y
ou want to see. (These category icons match the main
cate
g
or
i
es
y
ou see w
h
en
y
ou tap t
h
eP
O
INT
S
O
F
I
NTERE
ST
b
utton on the main menu.
)
G
et Ac
q
uainted with the Menu
S
cree
n
The other screen
y
ou’ll use a lot is the
M
en
u
screen.
U
nt
il
t
he device has a lock on
y
our location, it shows the M
e
n
u
screen
:
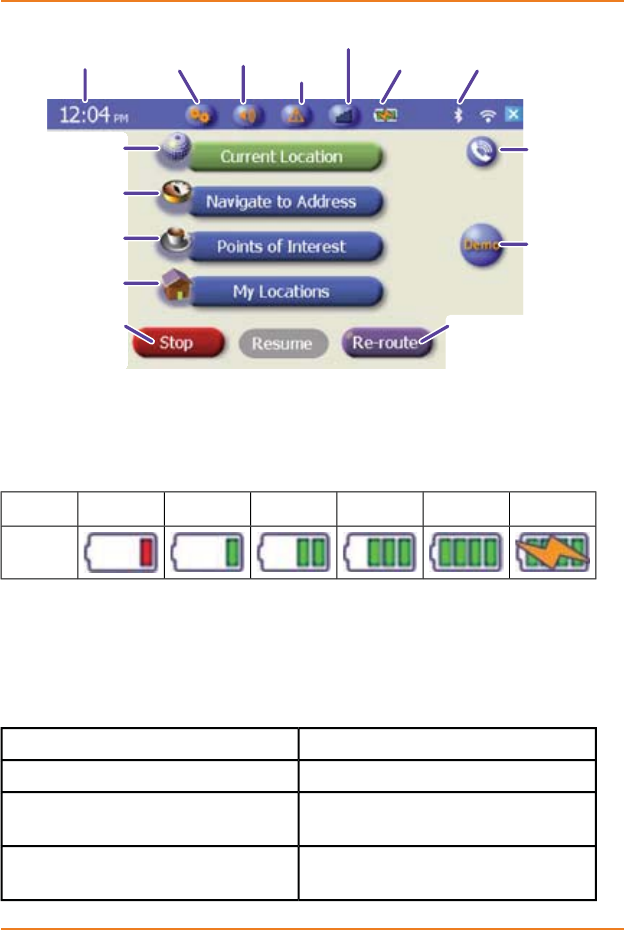
Pa
g
e
1
7
W
hat D
o
I D
o
First
?
B
ATT
E
R
Y
R
S
TAT
U
S
I
CON
T
he batter
y
status icon shows how much char
g
e is le
f
t in the
b
attery. If there’s a power input, the icon shows “charging”.
Status:
Critical
L
o
w
M
e
di
u
m
Hi
g
h
F
u
ll
Charging
I
co
n
:
G
etting more in
f
ormatio
n
T
his was enough information to get you started. If you want
t
o know more about the device and how to use it
,
see these
sections:
7R
¿
QGRXWPRUHDERXW
6
HHWKHVHFWLRQFDOOHG
E
nter
i
ng
d
est
i
nat
i
ons
E
ntering a new destination (p
2
5
)
5
R
e-us
i
n
g
a prev
i
ous
d
est
i
nat
i
on
C
hoosing a recent destination
(
p
3
4
)
4
C
ustomizin
g
the device
W
hat
O
ptions Do I Have
?
(
p
XREF)
Go to the
Map screen Phone
icon
Time
Volume/
brightness
button
Enter a new
destination
Use a POI as a
destination
Use an existing
destination
Stop the
current
route
Change the
options of the
current route
Test the
current
route
Battery
status Bluetooth
status
GPS
status
Settings
button
Trac
button
Go to the
Map screen Phone
icon
Time
Volume/
brightness
button
Enter a new
destination
Use a POI as a
destination
Use an existing
destination
Stop the
current
route
Change the
options of the
current route
Test the
current
route
Battery
status Bluetooth
status
GPS
status
Settings
button
Trac
button

Page 18
What Do I Do First?
7R¿QGRXWPRUHDERXW 6HHWKHVHFWLRQFDOOHG
Saving places to the favorites list Save as favorite (p 38)
Editing the favorites list Editing favorite locations (p 65)
Creating a route Plotting a route to the destination
(p 39)
Seeing a list of directions Reading the 0DQHXYHU/LVW
screen (p 44)
Adding waypoints to a route Adding waypoints (P 48)
Fixing a problem I have a question... (P 70)
Using a phone with my device
8VLQJWKHWUDI¿FIHDWXUH

Page 21
How Do I Put It in My Car?
Safety considerations
Don’t install any device where it will block your view
(including your mirrors!) while you’re driving.
.HHS\RXUDWWHQWLRQRQWKHURDG Don’t try to operate
or focus on any device while you’re driving. If you have
to concentrate on a device, pull off the road for a few
minutes.
Some states have rules about what kind of devices you
FDQDI¿[WR\RXUFDU¶VZLQGVKLHOGDQGZKHUHH[DFWO\\RX
can put them. If you’re not sure if there are any applicable
laws in your state, contact the state agency that issues
drivers’ licences.
It’s a good idea to take valuable items with you when you
leave you car—that includes GPS devices. If you can’t
take the device with you, lock it in the glove compartment
or hide it somewhere. And don’t forget to take down the
windshield mount: you don’t want to remind any potential
thieves that you might have some valuable mobile
electronics in the car.
Don’t leave the device in direct sunlight for a long
period of time or where the temperature could go above
140º F (60º C).
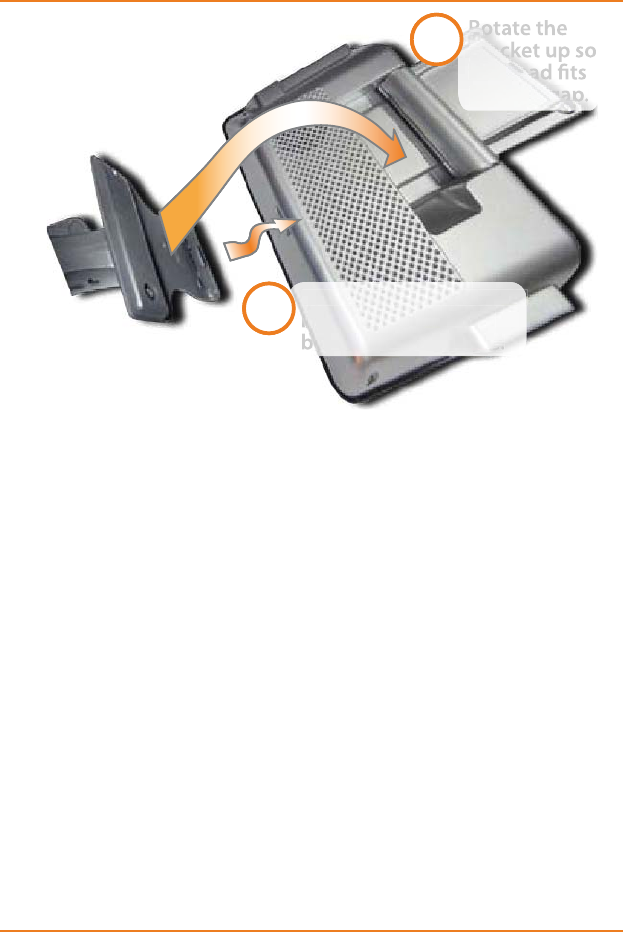
Attaching the windshield mount
Flip the GPS antenna up.
Press in on the bracket lock.
Insert the hook at the base of the bracket into the notch
on the bottom of the device.
Ź
Ź
Ź
Ź
1)
2)
3)
P
a
g
e
22
C
ha
p
ter Titl
e
5
RWDWHWKHEUDFNHWXSDQG
¿
WLWLQWRWKH
J
DSXQGHUWKH
GPS antenna.
L
et
g
o o
f
the bracket lock, and
g
entl
y
tu
g
on the
wi
n
dshield
m
ou
nt t
o
m
ake
su
r
e
t
he
de
v
ice
is
locked
i
nt
o
place.
A
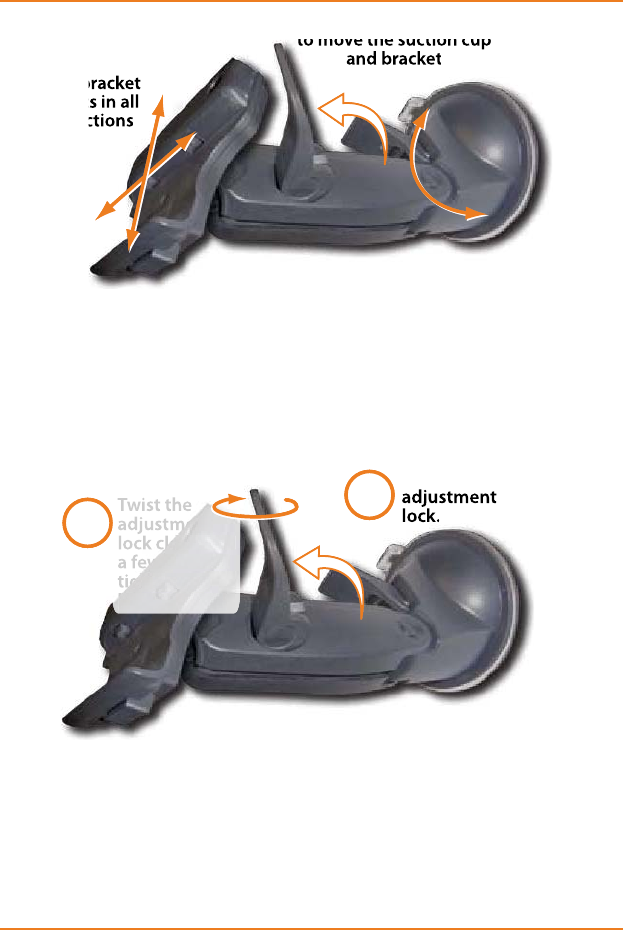
DJU
S
T
IN
G
T
HE
W
IND
S
HIELD
M
OUN
T
Th
e a
dj
ustment
l
oc
k
k
eeps
b
ot
h
t
h
e
b
rac
k
et an
d
t
h
e
suction cup locked into place. Li
f
t the ad
j
ustment lock to
change the position of the device.
T
he suction cup joint pivots front to back, and the bracket
j
oint pivots up, down, ri
g
ht and le
f
t, an
y
j
ust about an
g
le
in between.
A
n
gl
e t
h
e suct
i
on cup an
d
t
h
e
b
rac
k
et w
h
ere
y
ou want
t
hem, then push the ad
j
ustment lock back down to lock
t
he windshield mount into
p
osition.
4
)
5)
Ź
Ź
Ź
Insert the bracket hook
into the notch at the
bottom of the device.
Rotate the
bracket up so
the head ts
into the gap.
1
2
Insert the bracket hook
into the notch at the
bottom of the device.
Rh
Rotate the
bracket up so
the head ts
into the gap.
1
2
P
a
g
e
23
C
ha
p
ter Title
If
the bracket still moves too easil
y
a
f
ter
y
ou push the
adjustment lock down, you can tighten the bracket joint:
Remove the mount
f
rom
y
our windshield.
Lift the adjustment lock, and twist the lock handle
cl
oc
k
w
i
se two, ma
yb
e t
h
ree turns.
Flip the adjustment lock back down and see if the bracket
s
till moves. I
f
it does, repeat step 2.
I
f
the ad
j
ustment lock won’t
g
o back down, the bracket
j
oint is too tight. Twist the adjustment lock one or two
WXUQVFRXQWHUFORFNZLVHDQGWU
\
WR
À
LSLWGRZQD
J
DLQ
1
)
2)
3)
4)
The bracket
pivots in all
directions
Lift the adjustment lock
to move the suction cup
and bracket
The bracket
pivots in all
directions
Lift the adjustment lock
to move the suction cup
and bracket
Lift the
adjustment
lock.
Twist the
adjustment
lock clockwise
a few turns to
tighten the
bracket joint.
1
2
Lift the
adjustment
lock.
Twist the
adjustment
lock clockwise
a few turns to
tighten the
bracket joint.
1
2

P
a
g
e
2
4
C
ha
p
ter Titl
e
M
ount
i
n
g
on t
h
e w
i
n
d
s
hi
e
ld
M
ake sure the device does not block your view of the
r
oa
d
or
y
our m
i
rrors.
Once you decide where you want the device, hold the
s
uct
i
on cup
i
n t
h
at pos
i
t
i
on, t
h
en a
dj
ust t
h
e mount so you
h
a
v
e
th
e
bes
t vi
e
w
of
th
e
de
vi
ce
.
P
r
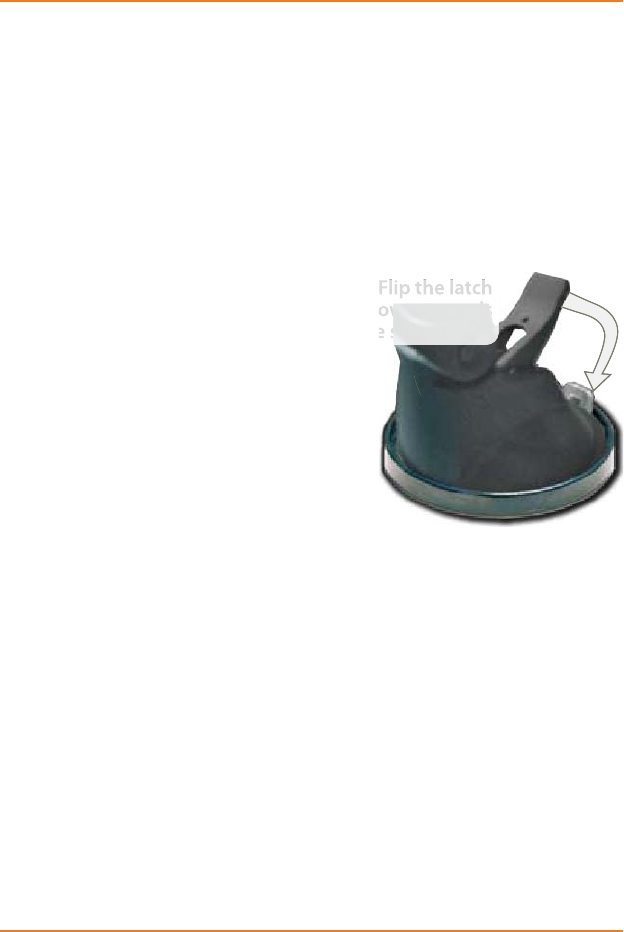
ess
t
he
suc
t
io
n
FXS
À
DWD
J
DLQVWWKH
wi
n
dshield
.
P
ush the suction
l
ock up
(
towards the
suction cup) until it
snaps into place.
Gently pull on the
mount to make sure
i
t
is
secu
r
e
.
I
f
you have trouble
g
ett
i
ng t
h
e suct
i
on cup
t
o
s
t
ick:
C
lean the s
p
ot with
a
n
a
mm
o
ni
a
-fr
ee
c
l
ea
n
se
r.
D
r
y
the spot completel
y
(
use a lint-
f
ree cloth, i
f
possible
)
.
0DNHVXUHWKHVSRWLVVPRRWKDQGÀDWVXFWLRQFXSVZRQ¶W
stick well on a curved or textured sur
f
ace
)
.
R
EMOVI
N
G
T
HE
W
I
ND
S
HIEL
D
M
OUN
T
When you release the suction latch, make sure
you’re
h
o
ldi
ng or some
h
ow support
i
ng t
h
e
d
ev
i
ce.
L
i
f
t the suction latch and use the plastic pull tab to pull the
s
uction cup off of the glass.
1)
2)
3)
Ź
Ź
Ź
Flip the suction
latch up to lock
the windshield
mount into place.
Flip the suction
latch up to lock
the windshield
mount into place.

Page 25
Chapter Title
0RXQWLQJRQDÀDWVXUIDFH
If you want to put the device somewhere other than your
windshield (or anywhere the suction cup won’t stick), you can
use the anchor disk. Once you glue the anchor disk down,
the windshield mount installs inside the disk just like it does
on glass.
When you’re deciding where to put the anchor disk, here are
some things to keep in mind:
The surface should be DVÀDWDVSRVVLEOH. If the disk
is upside down or at a sharp angle, it might not hold the
device’s weight.
The surface should be DVVPRRWKDVSRVVLEOH. If the
surface texture is too rough, the glue may not stick as
well.
The anchor disk will stick permanently on most
surfaces. If you try to remove the disk, you might
damage the surface.
Don’t peel off the red protective sheet until you’re ready
to install the disk. Once you expose the glue, you can’t
stop easily.
When you decide where you want to mount the disk, hold
the suction cup in that spot and set the angle and position
of the bracket (just like you would for mounting on your
windshield).
Clean the spot to remove any wax, grease, protecterants,
etc.
Carefully peel the protective sheet
from the bottom of the anchor disk to
expose the glue.
Ź
Ź
Ź
Ź
1)
2)
3)
P
a
g
e
26
C
ha
p
ter Titl
e
Hold the disk exactl
y
above the spot where
y
ou want
t
o glue it down. (Remember, the glue is designed to be
permanent!
)
3
UHVVWKHGLVN
¿
UPO
\
D
J
DLQVWWKHVXU
I
DFH3XVKGRZQ
along the edges, too, so that every part of the disk makes
g
ood contact with the sur
f
ace.
B
efore you install the windshield mount, gently tug on the
d
isk to make sure it
’
s secure.
3
UHVVWKHVXFWLRQFXS
À
D
W
into the anchor disk, then
push the suction latch down
(
towards the suction cup) to
l
ock it into place.
4
)
5)
6
)
7
)
Flip the latch
down towards
the suction cup
do
he
Flip the latch
down towards
the suction cup
Page 28
How Do I Get There?
There are three basic ways to tell the GPS device where you
want to go:
Enter a new address or intersection as your destination.
Pick your destination from the pre-programmed list of
Points of Interest (POI).
Pick your destination from the list of places you’ve been
to before.
Entering a new destination
If you followed the instructions for (QWHULQJ<RXU
Home Location starting on page 9, the process is
the same.
From the main menu, choose NAVIGATE TO ADDRESS.
This opens the state selection screen.
Tap the state
where your
destination is.
If you want to
choose the
state by name,
tap the SPELL
button to enter
the name of the
state. (This takes you straight to the alphabet keypad on
the next page.)
If you know the zip code or postal code of your
destination, you can tap the ZIP CODE button. (This
takes you to the number keypad so you can enter your
destination’s zip code.)
Ź
Ź
Ź
1)
Ź
Ź
Ź

P
a
g
e
29
Ho
w D
o
I
Ge
t Th
e
r
e
For the U
S,
there are 53 available states: all 50
states, Puerto Rico, the US Vir
g
in Islands, and the
D
istrict of Columbia.
U
se the aphabet keypad to enter the name of the city
(
or unincorporated area
)
where
y
our destination is.
(
You
d
on’t have to enter the whole name.)
T
h
e
de
vi
ce
sea
r
c
h
es
fo
r n
a
m
es
th
a
t
i
n
clude
t
he
e
nt
e
r
ed
characters. For example, if you choose Texas and enter
F
O
R
T
WKHGHYLFH¿QGV
T
T
C
om
fort
and
t
Wolf
fort
f
f
h
t
t
alon
g
with
n
ames t
h
at
b
eg
i
n w
i
t
h
F
ORT.
I
f you enter a space after
F
O
R
T
WKHGHYLFH¿QGVQDPHVZKHUHWKRVHOHWWHUVDUH
T
T
followed b
y
a space
(
Fort Davis, Fort Worth, etc.
)
4)
Ź
Page 30
How Do I Get There
If you need to type a letter with an accent or diacritical
mark, tap the ÔÑË button to go to the symbol keypad.
If you need to type a number or any kind of punctuation
mark, tap the $12 button to go to the number keypad.
To go back to the alphabet keypad, tap the ABC button.
Tap the OKEXWWRQZKHQ\RXDUH¿QLVKHG
When you tap OK, the device shows the list of city names
that include the characters you entered. Tap the name of
the city you want, or tap the BACK button to go back and
make any changes.
After you select the city, enter the street name the same
way you entered the city name. When the device shows
the list of streets, tap the name of the street you want.
Enter numbered streets as numerals plus
abbreviation (1ST, 2ND, 3RD, etc.) instead of
spelling out the word (First, Second, Third, etc.).
Enter the house
or building
number using
the same
method you
used to enter
the city and the
street name.
OR
If you want to
search for a corner or intersection, tap the INTERSECT
button at the bottom of the screen, then enter the name
of the cross street.
Ź
Ź
Ź
Ź
5)
6)
7)
Page 31
How Do I Get There
,IWKHGHYLFH¿QGVWKDWEXLOGLQJQXPEHURULQVWHUVHFWLRQLW
displays the &RQ¿UP'HVWLQDWLRQ screen. Choose the
option you want from the buttons on this screen:
If the device doesn’t
¿QGDPDWFKIRUWKH
building number, it
displays the available
address ranges. Tap
the line that contains
the building number
you want, or tap the
BACK button to go
back to the entry
screens.
If you’re entering an
intersection and the
8)
Plot a route to
this destination
from your current
location
Distance and direction
to this destination from
your current location.
Go back to the
entry screens and
make corrections
See this
destination
on the map
Add this destination
to your favorites list
Address of this
destination Plot a route to
this destination
from your current
location
Distance and direction
to this destination from
your current location.
Go back to the
entry screens and
make corrections
See this
destination
on the map
Add this destination
to your favorites list
Address of this
destination
Page 32
How Do I Get There
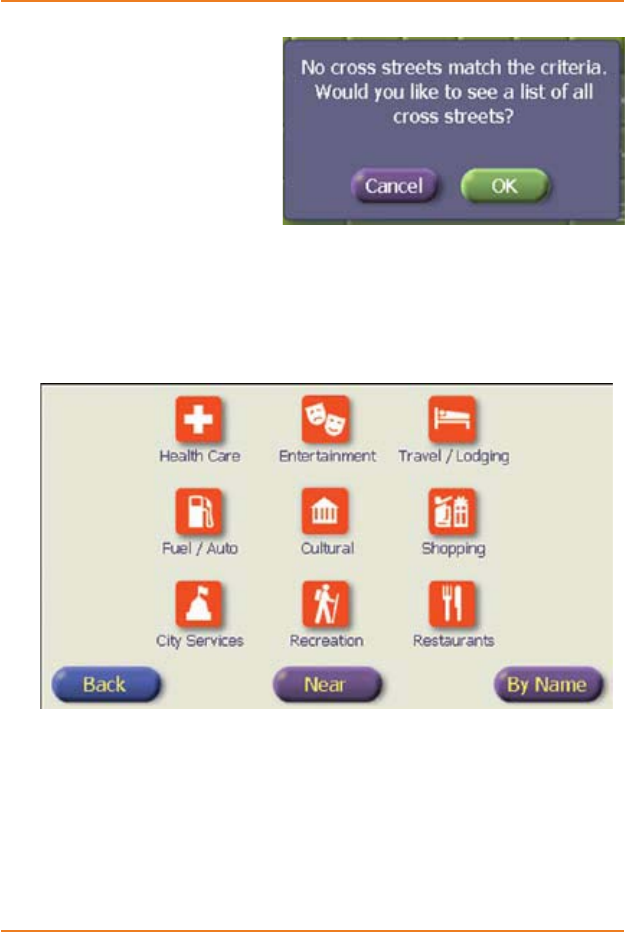
GHYLFHGRHVQ¶W¿QGDPDWFKIRUWKHFURVVVWUHHWLWGLVSOD\VDQ
error message.
To see all the streets
WKDWLQWHUVHFWWKH¿UVW
one (within the limits of
the city you selected),
tap OK; tap the CANCEL
button to go back to the
previous entry screen.
Choosing a POI as a Destination
From the main menu, choose POINTS OF INTEREST. This
opens the main POI category screen:
TO SEARCH BY CATEGORY
Tap the main category that best describes the POI you’re
searching for. The device opens the sub-category screen.
Tap the sub-category that best describes what you’re
searching for; use the UP and DOWN arrows to scroll
through multiple screens.
Ź
Ź

Page 33
How Do I Get There
The RESTAURANT category is divided into cuisine type;
VRPHFXLVLQHW\SHVDUHGLYLGHGDJDLQLQWRPRUHVSHFL¿F
types. For example, if you choose asian as the cuisine
W\SH\RXFDQWKHQFKRRVHDPRUHVSHFL¿FGHVFULRWLRQ
such as CHINESE,FILIPINO,INDIAN,INDONESIAN, etc.
After you pick the lowest division in a category, the device
shows the closest 20 POI that match your selection.
TO SEARCH BY NAME
If you know the name of the POI you want, you can tap
the BY NAME button in the bottom right corner of the
category screen.
The device goes to the aphabet keypad so you can enter
the name (or partial name) of the POI you are searching
for (see page XX).
Remember, you don’t have to enter the whole name:
the device searches for POI names that include
the characters you enter. For example, if you enter
MUSEWKHGHYLFH¿QGV32,ZLWKMuseum,Museo and
Amusement Park in the name.
When you tap OK, the device displays the 20 closest POI
items that include the letters you entered.
TO CHANGE THE SEARCH CENTER
By default, the device sorts POI by distance using your
current location as the center. To change the center point
used for the POI search, tap the NEAR button at the bottom
of the category screen.
Choose NEAR BY to search for POI near your current
location (the default).
If you are in an active route, choose NEAR DESTINATION
to search for POI near the route destination.
Ź
Ź
Ź
Ź
Ź
Ź
Ź
Ź
Page 34
How Do I Get There
Choose IN CITY to search for POI in a different city from
your current location. The device takes you to the state
selection screen, where you can enter the state and then
the city you want to search in (see page XX).
If you change the search center, the device remembers
the new center point until you change it. For example, if
you change the search center to another city, the next
time you search for POI, the device searches in that city.
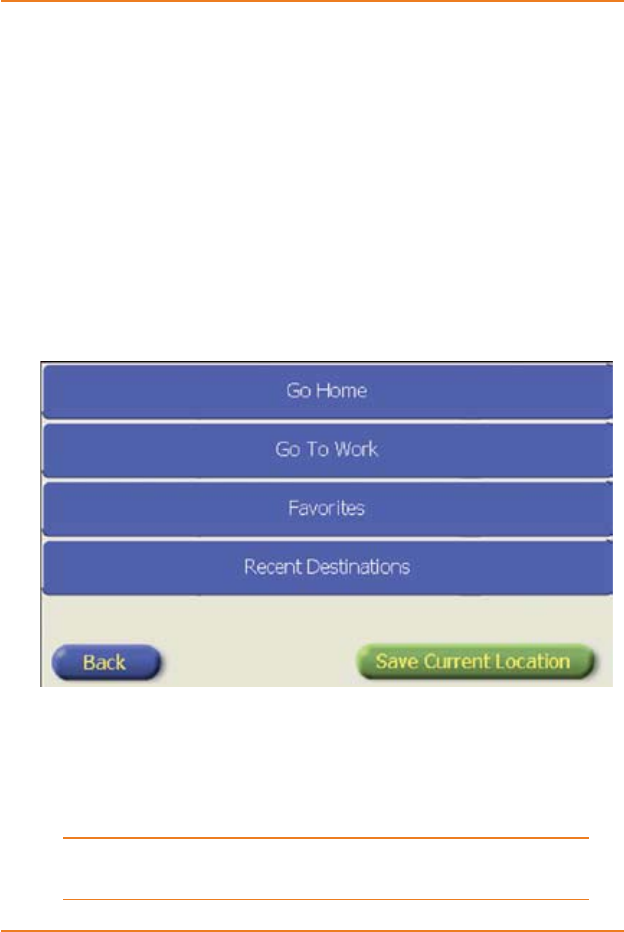
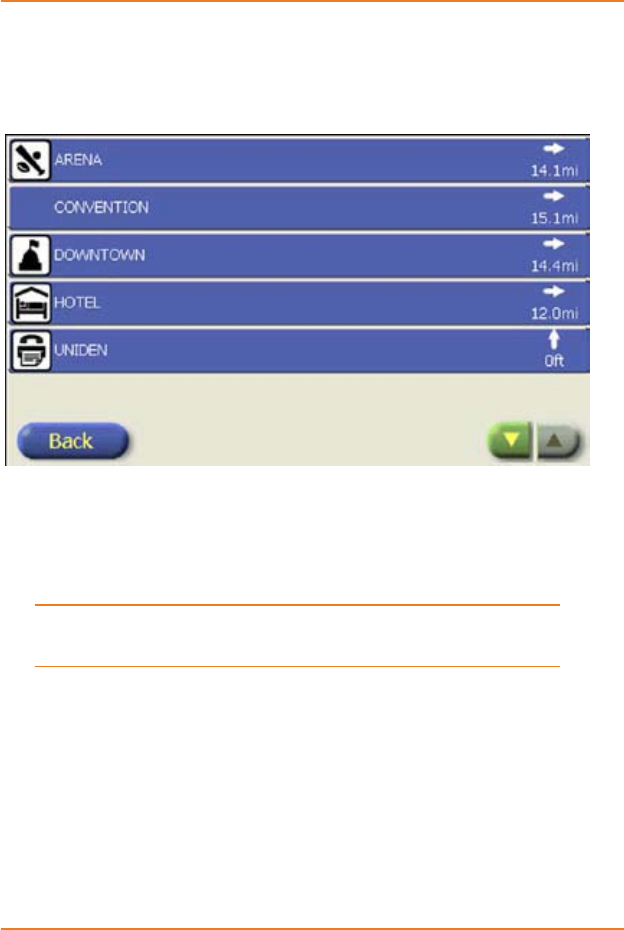
&KRRVLQJDGHVWLQDWLRQ\RX¶YHXVHGEHIRUH
From the main menu, choose MY LOCATIONS. Then, choose
the location from the following screen:
GOHOME OR GOTO WORK
Tap GO HOME to use your home location as the destination,
or GO TO WORK to use your work location as the destination.
the device goes directly to the &RQ¿UP'HVWLQDWLRQscreen.
These options are only available after you enter a
home or a work location.
Ź
Ź
Page 35
How Do I Get There
CHOOSING A FAVORITE LOCATION
You can save up to 20 locations to your favorites list, so you
can use them over and over again (like using speed dial on
your phone). Tap FAVORITES to open your favorites list.
Tap on the location you want to use for your destination. Use
the UP and DOWN arrow buttons to scroll through multiple
screens. When you make your selection, the device goes to
the &RQ¿UP'HVWLQDWLRQ screen.
FAVORITES is only available after you save at least
one favorite location.
CHOOSING A RECENT DESTINATION
The device saves the last 20 locations you enter so you can
retrieve them quickly. Tap RECENT DESTINATIONS to open
the list, then tap the location you want. The device goes to
the &RQ¿UP'HVWLQDWLRQ screen.
Page 36
How Do I Get There
Plotting a route to your destination
When you choose your destination, the device screen shows
the destination’s address (and name if it’s a POI) and the
distance and direction from your current location:
To plot a route to this destination with the default options:
Tap the GO button in the bottom left corner of the screen.
Tap the MAP
button to see
the destination
on the map,
then tap the go
button in the
bottom left
corner of the
map screen.
If this isn’t the right destinationt, tap the BACK button to
go back to the entry screens and make any corrections.
Ź
Ź
Ź
Plot a route to
this destination
from your current
location
Distance and direction
to this destination from
your current location.
Go back to the
entry screens and
make corrections
See this
destination
on the map
Add this destination
to your favorites list
Address of this
destination Plot a route to
this destination
from your current
location
Distance and direction
to this destination from
your current location.
Go back to the
entry screens and
make corrections
See this
destination
on the map
Add this destination
to your favorites list
Address of this
destination
P
a
g
e
37
Ho
w D
o
I
Ge
t Th
e
r
e
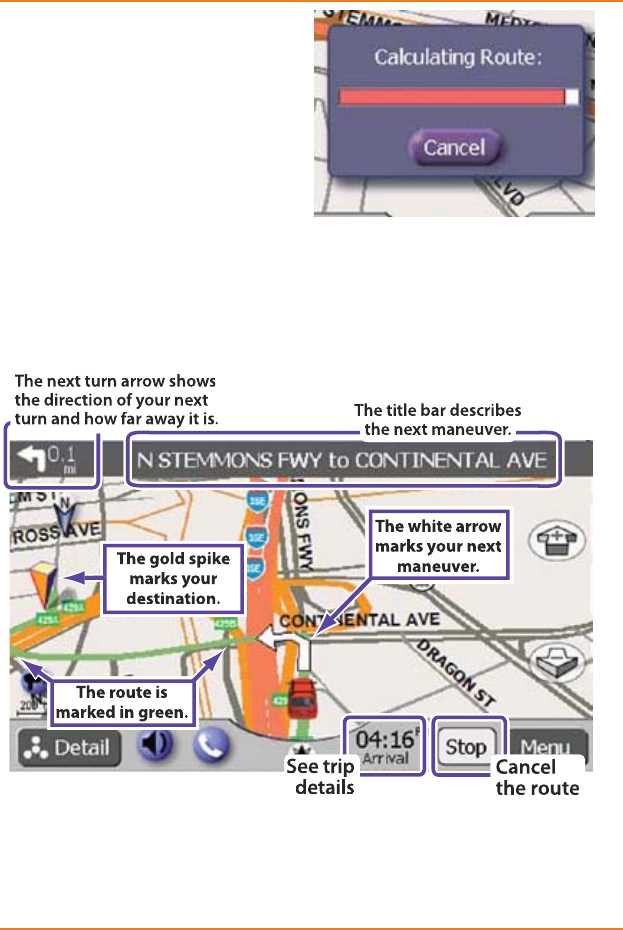
While it
’
s calculatin
g
the route,
t
he device shows dialog box
w
ith a progress bar. If you
w
ant to stop calculatin
g
this
r
oute, ta
p
the
C
AN
C
E
L
button.
Otherwise
,
wait until the device
¿
QLVKHVFDOFXODWLQ
J
WKHURXWH
b
efore you do anything else.
R
eading the Route
S
creen
s
:KHQLW
¿
QLVKHVFDOFXODWLQ
J
WKHURXWHWKHGHYLFHVZLWFKHVWR
t
he route screen. The route screen works just like the map
screen, but it has some additional information and o
p
tions:
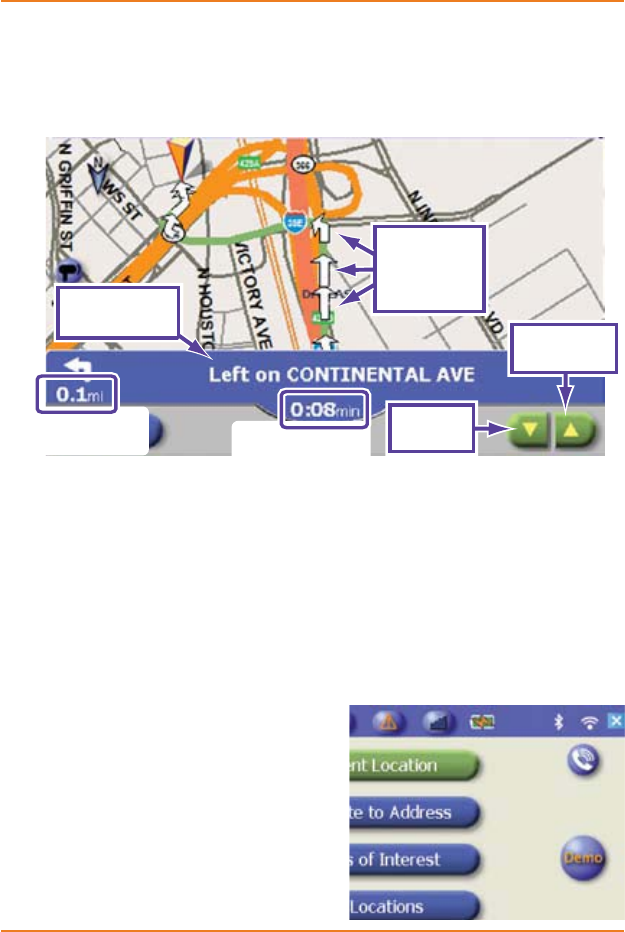
The street you should be driving on is marked in green.
Wh
en you get c
l
ose to t
h
e next maneuver, t
h
e w
hi
te
arrow appears on the route.
Ź
T
h
e w
h
ite arrow
The white arrow
m
ar
k
s
y
our next
marks your next
maneu
v
er.
maneuver.
The
n
e
x
t
tu
rn
a
rr
o
w
sho
w
s
The next turn arrow shows
n of your next
n of your next
the direction
the direction
w far away it is.
w far away it is.
turn and ho
turn and ho
s
s
T
T
The title bar describes
The title bar describes
the
n
e
x
t
m
a
n
eu
v
e
r
.
the next maneuver.
Th
e route is
The route is
m
ar
k
e
d
in green.
marked in green.
See tr
i
p
See trip
d
etai
l
s
details
C
ance
l
Cancel
th
e route
the route
Th
e go
ld
spi
k
e
The gold spike
m
ar
k
s
y
our
marks your
d
estination.
destination.

Page 38
How Do I Get There
Tap the STOP button to end the route.
Tap on the ARRIVAL time to see the trip detail screen.
Tap the title bar to see the maneuver list.
Tap the next turn arrow to see one maneuver at a time.
PAUSING THE ROUTE
If you tap the stop button on the route screen, you will
FDQFHOWKHURXWHFRPSOHWHO\. If you want to pause the route
so you can restart it later, tap the MENU button, and then tap
the red STOP button on the main Menu screen.
When you pause a route,
the RESUME button on
becomes active. Tap the
RESUME button to restart
the route.
SEEING DETAILS ABOUT YOUR TRIP
At any point during a route, tap the estimated ARRIVAL time
area to open the 7ULS'HWDLOV screen and get detailed
information about your trip.
Ź
Ź
Ź
Ź
Moving
Time
divided
by
Total
Time
Restart all
counters.
Restart maximum
speed counter.
Go back to the
route screen.
Total Distance
divided by
Total Time
Moving
Time
divided
by
Total
Time
Restart all
counters.
Restart maximum
speed counter.
Go back to the
route screen.
Total Distance
divided by
Total Time
Page 39
How Do I Get There
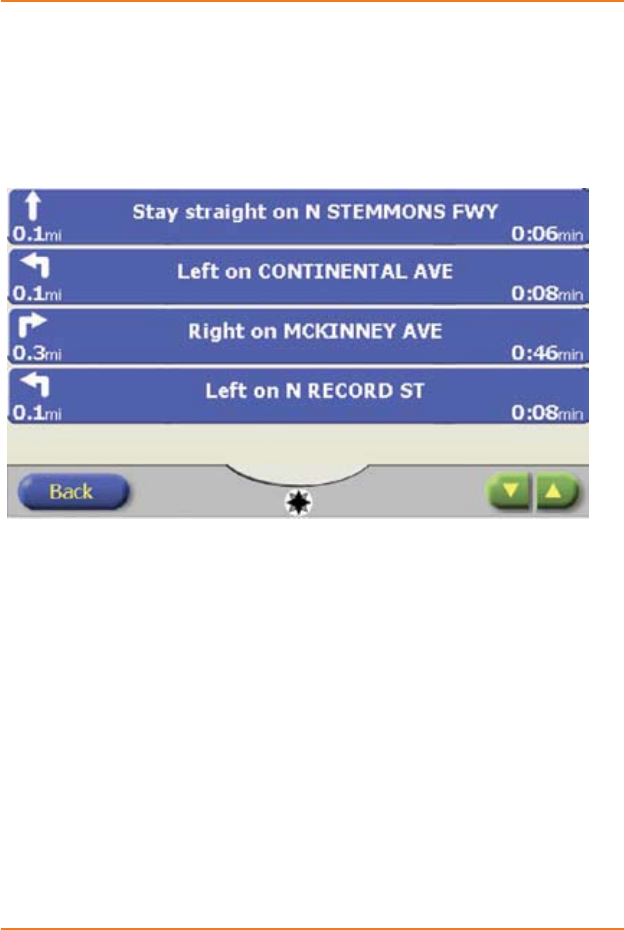
VIEWING THE MANEUVER LIST
The maneuver list is a complete set of directions for the
entire route. It shows all the information about every
maneuver you need to make: the name of the street you
need to turn on, the direction you need to go, and the
distance from the previous maneuver.
To get to the maneuver list, tap the title bar at the top of
the main route screen.
Use the MAP VIEW button to rotate through the three
available route views: the 2D map, the 3D map, and the
maneuver list.
Use the UP and DOWN arrows buttons to scroll through
multiple screens.
Tap the BACK button to go back to the previous screen.
Ź
Ź
Ź
Ź
Page 40
How Do I Get There
VIEWING THE ROUTE ONE MANEUVER AT A TIME
You can jump ahead in the route to see individual maneuvers
before you get there. You can even scroll through the whole
route one maneuver at a time.
From the main route screen, tap the next turn arrow to
see that maneuver up close.
From the manever list, tap on any individual maneuver to
jumpt to that maneuver.
As you pass this maneuver, the device automatically
switches back to the previous route view.
TESTING THE ROUTE
The device can show you a full
test run of the route, (including
all instructions and voice
prompts) at an accelerated
rate. From the main route
screen, tap the MENU button,
then the DEMO button.
Ź
Ź
Ź
Each white
arrow shows
an upcoming
maneuver.
Description of
this maneuver.
See next
maneuver
Distance to
this maneuver. Estimated time to
this maneuver.
See previous
maneuver
Each white
arrow shows
an upcoming
maneuver.
Description of
this maneuver.
See next
maneuver
Distance to
this maneuver. Estimated time to
this maneuver.
See previous
maneuver
Page 41
How Do I Get There
Avoiding roads on the route
You can tell the device to temporaily avoid particular types
of roads while a route is in progress. The device can
recalculate routes without using U-turns, highways, dirt
roads, toll roads, or ferries.
From the main route screen, tap the MENU button.
On the menu screen, tap the STOP button followed by the
RE-ROUTE button. This opens the Avoidances screen.
Tap the button on the FOR NEXT line to choose the
number of miles you want these temporary avoidance
settings to be in effect. Choose from 2, 5, or 10 miles.
For each type of road, tap the button at the end of the line
to set that road to AVOID (if you want to avoid that type)
or OK (if you don’t want to avoid that type).
When you have selected the road types to avoid, tap the
BACK button to go back to the menu.
On the menu screen, tap the RESUME button; the device
recalculates the route without the selected road types.
1)
2)
3)
4)
5)
6)
Page 42
How Do I Get There
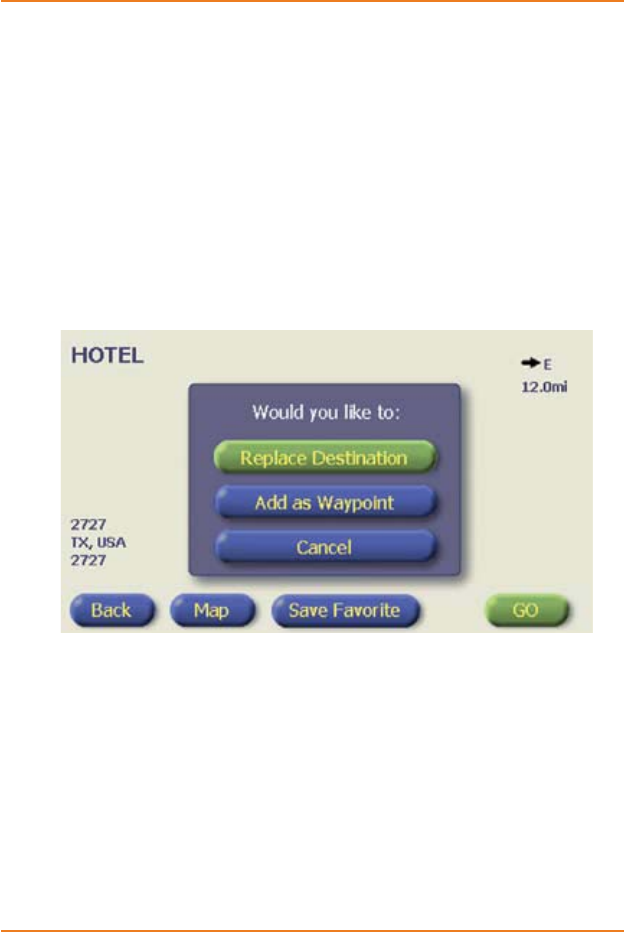
Adding waypoints
Once you have a route plotted, you can add waypoints, that
is, any place where you want to stop along the way:
Anytime during a route, tap the MENU button to go to the
Menu screen.
Find the location you want to set as a waypoint. You’ll
follow the exact same steps you normally use to set the
destination. When you come to the &RQ¿UP'HVWLQDWLRQ
screen, tap the GO button. the device asks what you want
to do with the new destination:
Tap the ADD AS WAYPOINT button to recalculate the
route with the new location as a waypoint.
,I\RXZDQWWRFKDQJH\RXU¿QDOGHVWLQDWLRQWDSWKH
REPLACE DESTINATION button.
Tap the CANCEL button to return to the &RQ¿UP
'HVWLQDWLRQ screen.
1)
2)
Ź
Ź
Ź
Page 43
How Do I Get There
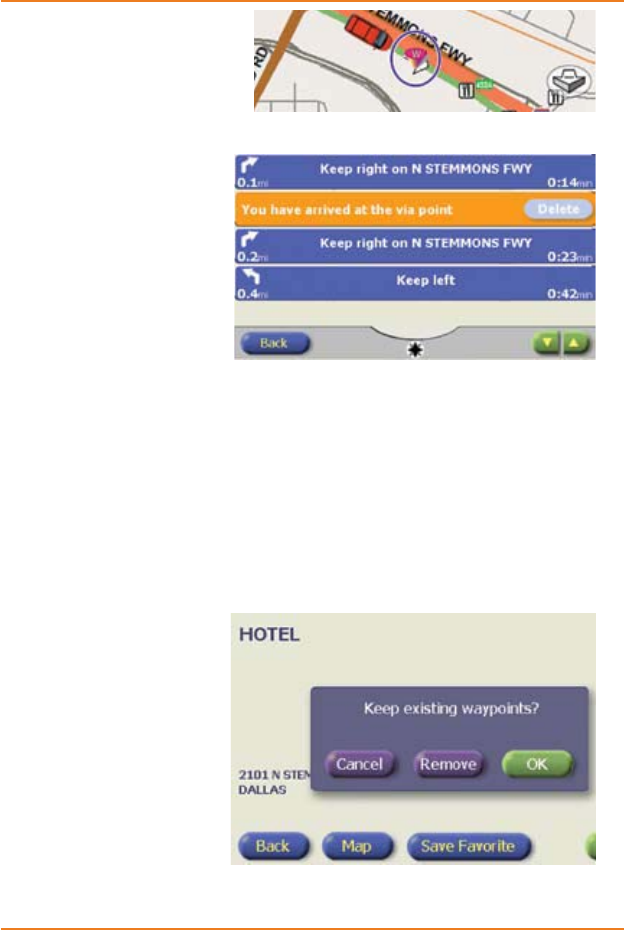
On the route screen,
the waypoint is
marked with a pink
cone with a W on the
top.
In the maneuver
list screen, the
waypoint line is
highlighted. Tap on
this line to jump to
the waypoint (just
like any other
maneuver.) If you
tap the DELETE
button, the device removes the waypoint and recalculates
the route.
ADDING MULTIPLE WAYPOINTS
You can add up to 10 waypoints to any route using the same
SURFHVV\RXXVHGWRDGGWKH¿UVWZD\SRLQWWhen you tap the
ADD WAYPOINT button, the device asks if you want to keep
the existing waypoints.
Tap the OK button
to add the new
waypoint to the
existing ones.
Tap the REMOVE
button to delete all
existing waypoints
and create this
new one.
Tap the CANCEL
button to return to the &RQ¿UP'HVWLQDWLRQVFUHHQ.
Ź
Ź
Ź
Ź
Ź

Page 44
How Do I Get There
When you add a new waypoint to a route, the device
displays all the waypoints on the route and asks where you
want to insert the new waypoint. Tap the line that you want to
insert the new waypoint in front of (that is, select the
waypoint that should come immediately after the new one).
$YRLGLQJ7UDI¿F3UREOHPV
7KH7UDI¿F0HVVDJH&KDQQHO70&SURYLGHVUHDOWLPH
GHWDLOHGWUDI¿FGDWDWRVSHFLDOO\HTXLSSHGUHFHLYHUV<RXU
TRAX device can receive and decode TMC broadcasts and
DOHUW\RXZKHQLWUHFHLYHVQRWLFHRIDWUDI¿FSUREOHP,WFDQ
also automatically change your current route to avoid any
WUDI¿FSUREOHPV
TMC service requires a subscription. Contact ?????
or go to www.?????.com for information about
getting or renewing a TMC subscription.
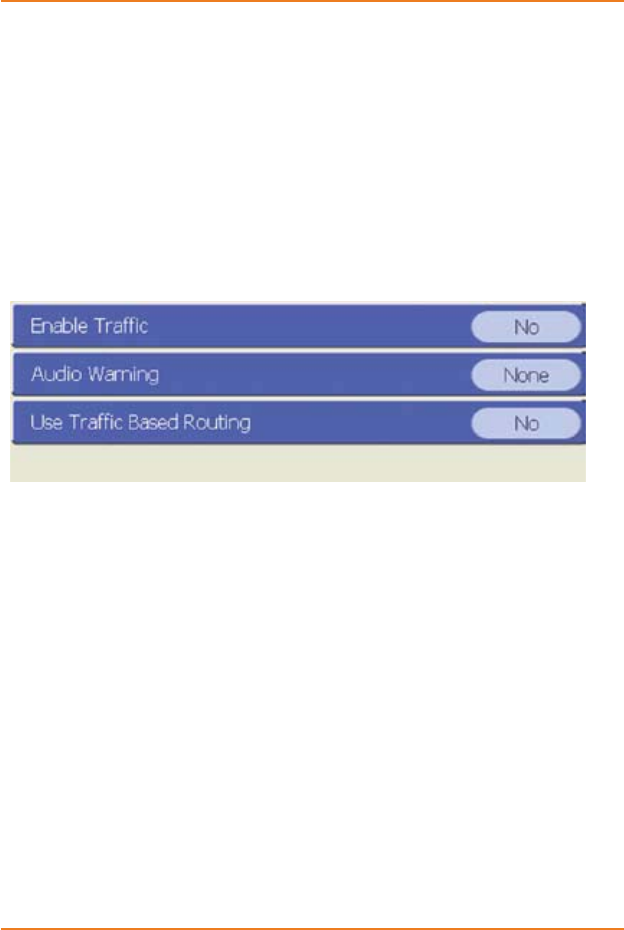
SETTING UP THE TRAFFIC RECEIVER
,QRUGHUWRVHWXSWKHWUDI¿FUHFHLYHU\RXZLOOQHHGWKH
IROORZLQJLQIRUPDWLRQIURP\RXUWUDI¿FVHUYLFHSURYLGHU
Page 45
How Do I Get There
Station???
Frequency??
PIN??
{Is there anywhere to input this information? Can I use my
XM TMC channel with the TRAX units? ??}
From the Menu screen, tap the SETTINGS button.
On the Settings screen, scroll down and select TRAFFIC.
7KLVRSHQVWKHWUDI¿FVHWWLQJVVFUHHQ
Tap the ENABLE TRAFFIC line until the button shows <HV.
,I\RXZDQWWKHGHYLFHWRDOHUW\RXZKHQWUDI¿FSUREOHPV
occur, tap the AUDIO WARNING line. Use Spoken if you
ZDQWWKHGHYLFHWRVD\³7UDI¿FDOHUWUHFHLYHG´^:+$7,6
THE TEXT HERE? DOES IT DEPEND ON TTS?}. Use
Tone if you want the device to sound an alert tone.
If you want the device to automatically change your route
WRDYRLGWUDI¿FSUREOHPVWDSWKHUSE TRAFFIC BASED
ROUTING line until the button shows <HV.
Tap the BACK button to return to the Menu screen.
Ź
Ź
Ź
1)
2)
3)
4)
5)
6)
Page 46
How Do I Get There
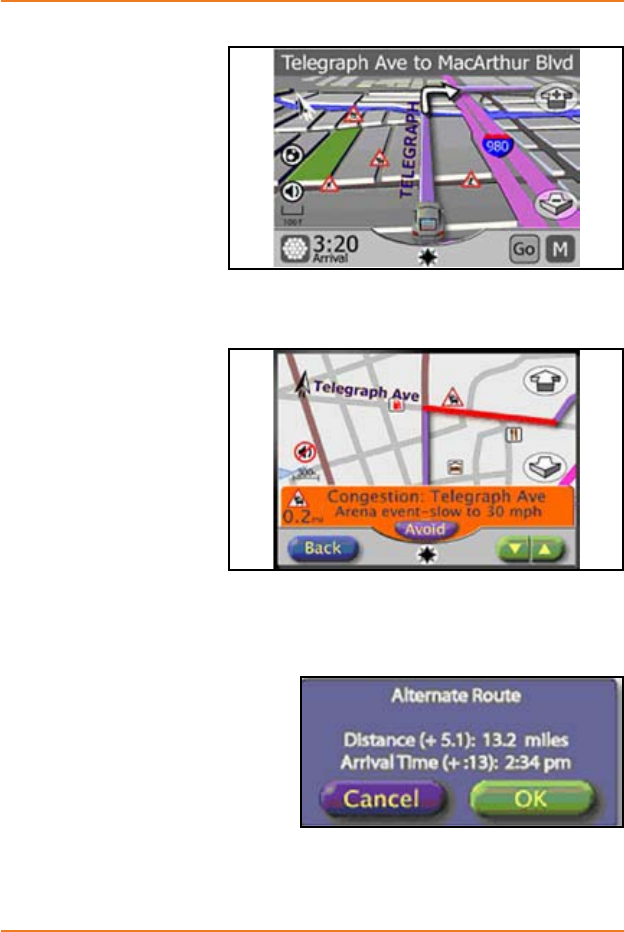
RECEIVING TRAFFIC ALERTS
When the device
receives notice of
DWUDI¿FLQFLGHQWLW
marks the location
on the map with a
red triangle icon. It
also sounds the
audio warning type
you selected on
WKHWUDI¿FVHWWLQJV
screen.
Tap on any incident
icon to see more
details about the
incident. If any
incidents affect
your current route,
the detail screen
includes the AVOID
button. Tap this
button to re-route
your trip and avoid
WKHWUDI¿FLQFLGHQW
When it recalculates your
route, the device displays
the $OWHUQDWH5RXWH
screen, which compares
the new distance and
estimated arrival time to
your original route. To
accept the alternate route,
tap OK, or tap CANCEL to remain on your current route.
P
a
g
e 48
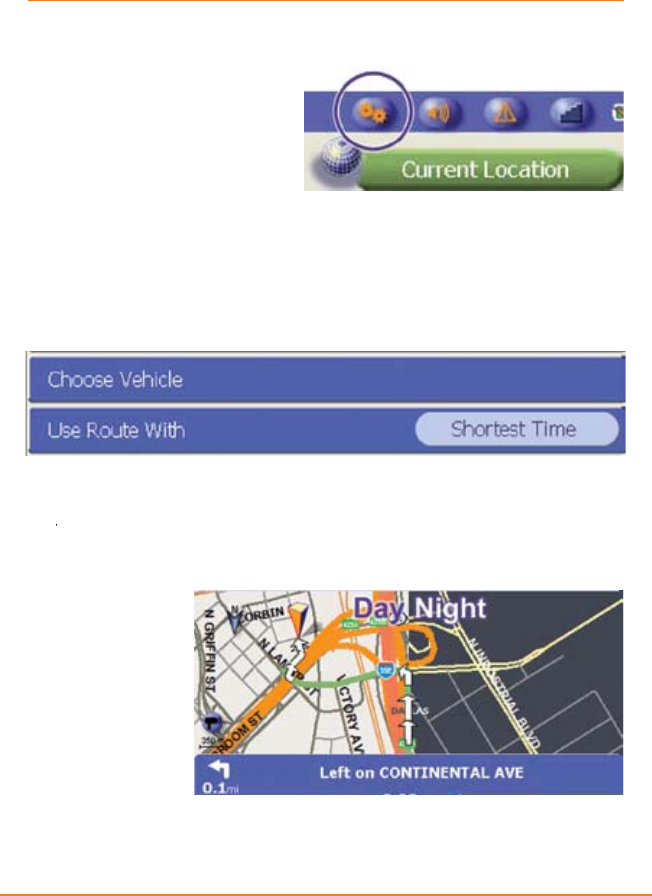
What Options Do I Have?
U
sing the Menu
S
creen
s
T
o custom
i
ze
y
our
d
ev
i
ce,
go to the
Me
n
u
screen and
t
a
p
t
h
e
S
ETTIN
GS
bu
tt
o
n
a
t
t
he top.
O
n the
S
ettings
screen, choose the menu
y
ou want to c
h
ange.
O
n each menu screen
,
i
f
a menu item line has a button on
t
he right side, tap on the line to rotate through the options for
t
hat menu item. If the menu item line does not have a button
,
t
appin
g
the line will open another screen.
Sy
ste
m
menu option
s
D
A
Y
A
A
/
N
I
G
H
T
CO
L
O
RS
Th
e map co
l
or automat
i
ca
ll
y a
dj
usts as t
h
e t
i
me c
h
anges
f
rom da
y
to
n
ight. I
f
you
w
ant t
h
e ma
p
to
r
e
m
ai
n
o
n
e
color all the
ti
me, c
h
oose
the
Day
or
y
Night
color
t
sche
m
e
he
r
e
.
L
eave t
hi
s opt
i
on at
Au
t
o
i
f
y
ou want the map to chan
g
e color
automatically.

Page 49
What Options Do I Have?
OTHER SYSTEM MENU OPTIONS
Touch Sounds
Choose whether the device makes a sound when
you touch the screen. Your options are On and Off
(default).
Dim Screen
After
Choose how long the device remains idle before it
dims the screen backlight. Your options are 15 sec, 30
sec, 1 min, 5 min, Never (default).
Auto Zoom en
Route
Choose whether the map zooms in when you
approach the next maneuver on a route. Your options
are On and Off (default).
Map Controls
On
Change which side of the map the zoom buttons are
on. Your options are Left and Right (default).
About See the software version and database edition.
Language & Locale menu options
Set Text
Language
Change the language used in the display: American
English (default), Espanol, Francais, Deutsh,
Nederlands, Italiano, and UK English.
Set Spoken
Language
Choose the language and voice used for instructions
during routes.
Normal voice options are USA English Female, USA
English Male, UK English Female, UK English Male,
Spanish Female, and Spanish Male.
Text to speech (TTS) options are JILL (USA English),
SAMANTHA (USA English), and TOM (USA English).
Distance Units
Choose whether to use the English (miles and feet)
or metric (Km) system for distance. The metric
system is default.
Set Time and
Time Zone
Change the time, choose the time zone, set daylight
savings time, and choose 12-hour or 24-hour time
format. See page XREF for instructions.
P
a
g
e5
0
W
hat O
p
tions Do I Have
?
5
RXWH
V
menu o
p
t
i
on
s
A
VOI
D
A
NC
E
S
The device can avoid usin
g
certain t
y
pes o
f
roads when it
ca
l
cu
l
ates routes.
Y
ou can te
ll
t
h
e
d
ev
i
ce to avo
id
U
-turns
Highways
Di
rt
Roads
Toll Roads
Fe
rr
ies
.
T
o
h
ave t
h
e
d
ev
i
ce avo
id
roa
d
t
y
pes on ever
y
route, set t
h
e
avoidance here. To avoid road types
f
or the current route
o
n
l
y, go to t
h
e
M
enu screen an
d
ta
p
t
h
e
RE
-
R
OU
T
E
bu
tt
o
n.
C
HOO
S
E
V
E
HI
C
L
E
C
hoose which car icon
y
ou want to see on the map:
Vehicle Picture
V
ehicle
P
icture
D
o
dg
e
Ca
r
a
v
a
n
Geo
m
e
tri
c
Hu
mm
e
r
H2
Fo
r
d
M
ustan
g
Porshe 91
1
Chevrolet
Silverado
Ź
Ź
Ź
Ź
Ź
P
a
g
e
5
1
W
hat O
p
tions Do I Have
?
O
T
HE
R
R
O
UTE
S
MEN
U
O
PT
I
ON
S
Use
R
oute
With
C
han
g
e the wa
y
the device calculates routes.
C
hoose
wh
e
th
e
r t
o
use
th
e
r
ou
t
e
with th
e
S
h
o
rt
es
t
d
i
s
t
a
n
ce
o
r
t
he Shortest time (default)
Atte
n
tio
n
T
one
C
hoose whether the device sounds a tone as
y
ou
g
et close to a maneuver. Your options are On and Off
(
default).
V
o
i
ce
P
rompt
i
n
g
C
hoose whether to hear the voice instructions during
r
outes. Your options are On and Off (default).
&
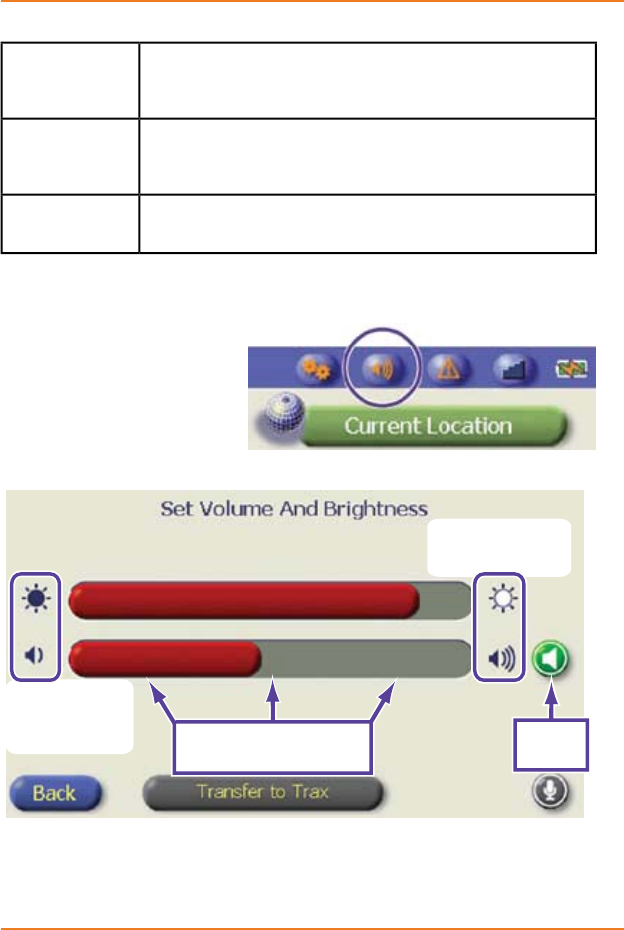
KDQJLQJWKHEULJKWQHVVDQGYROXP
H
A
t the top o
f
Menu
screen, ta
p
the
VOLUM
E
/
BRIGHTNESS
b
utton. This opens the
Set
V
o
l
u
m
e
a
n
d
%
U
L
J
K
WQHVV
sc
r
ee
n.
Tap anywhere on the bar
to jump to that setting.
Mute
audio
Tap the OFF
icons to decrease
the setting one
step at a time.
Tap the ON icons to
increase the setting
one step at a time.
(Brightness)
(Brightness)
(Volume)
(Volume)
Tap anywhere on the bar
to jump to that setting.
Mute
audio
Tap the OFF
icons to decrease
the setting one
step at a time.
Tap the ON icons to
increase the setting
one step at a time.
(Brightness)
(Brightness)
(Volume)
(Volume)
Page 52
What Options Do I Have?
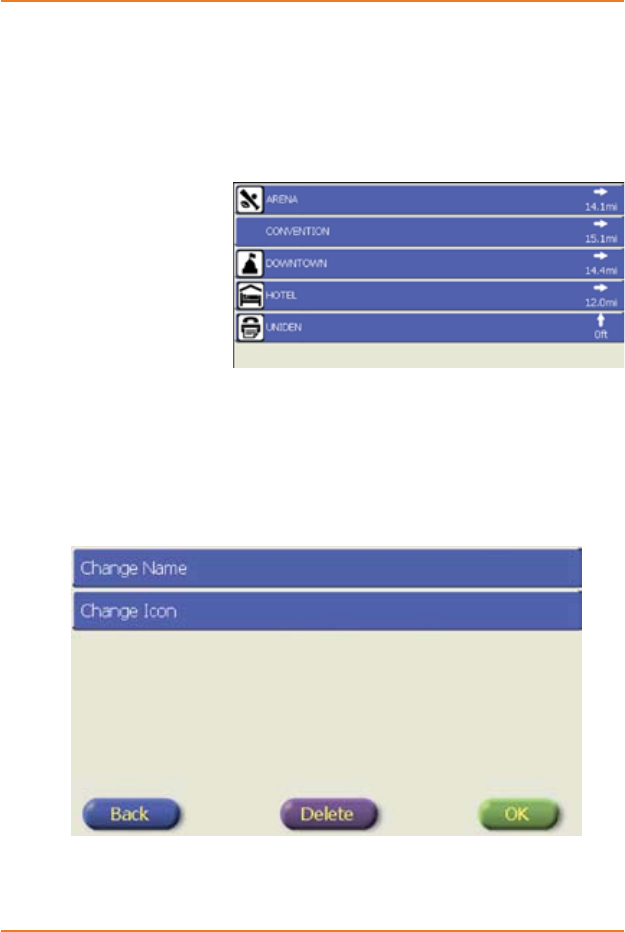
Editing favorite locations
Sometimes, after you’ve saved a favorite location, you want
to change the name or use a different icon.
From the main menu screen, select MY LOCATIONS and
then FAVORITES. This opens your list of favorites:
Tap on the
favorite you
want to change.
(Use the UP and
DOWN arrow
buttons to scroll
through multiple
screens.)
The device takes you to the &RQ¿UP'HVWLQDWLRQ
screen. Tap the SAVE FAVORITE button at the bottom.
The device takes you to the (GLW)DYRULWH screen. From
this screen, you have several options:
Tap the DELETE button to delete this location from your
list of favorites.
1)
2)
3)
4)
Ź
P
a
g
e5
3
W
hat O
p
tions Do I Have
?
Tap the
C
HAN
G
E
NAME
button to chan
g
e the name o
f
t
his location. This opens the alphabet keypad so you can
enter a new name.
T
a
p
O
K
ZKHQ
\
RX¶UH¿QLVKHG
Tap the
C
HAN
G
E
ICO
Nbutton to choose a new icon
f
or
thi
s
l
ocat
i
on.
Thi
s o
p
ens t
h
e
i
con se
l
ect
i
on screens.
Wh
en
y
ou p
i
c
k
a new
i
con, t
h
e
d
ev
i
ce
g
oes
b
ac
k
to t
h
e
(
G
L
W
)
D
Y
R
UL
WH
screen
.
:
KHQ\RX¶YH¿QLVKHGDOO\RXUFKDQJHVWDSWKH
OK
bu
tt
o
n
o
n th
e
bo
tt
o
m
of
th
e
(GL
W
)
DYRU
L
W
H
screen
.
Th
e
d
ev
i
ce goes
b
ac
k
to t
h
e
&
RQ
¿
UP'HVWLQDWLR
Q
screen. Tap the BA
CK
button to
g
et back to
y
our list o
f
f
a
v
o
rit
es.
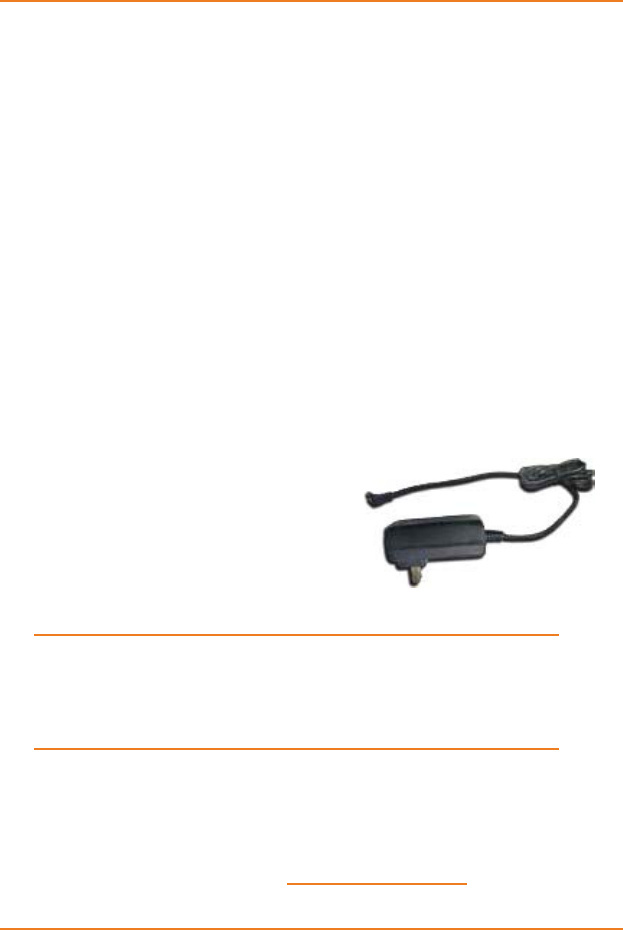
Accessory
O
ption
s
U
S
IN
G
A
N
I
N
D
OO
R
P
O
W
E
R
A
D
APT
E
R
I
f
y
ou use the device indoors o
f
ten,
y
ou might want to get an indoor or
AC
p
ower ada
p
ter. This ada
p
ter lets
y
ou plu
g
the device into a standard
120 V AC
p
ower outlet.
W
ith any electronic device, only use a power adapter
t
hat is made for that device. Usin
g
a different adapter
F
DQGDPDJHWKHGHYLFH
\
RXHYHQULVNVWDUWLQJD
¿
UH
or
g
ettin
g
a shock.
U
S
I
N
G
A
N
E
XT
E
R
NA
L
A
N
T
E
NNA
I
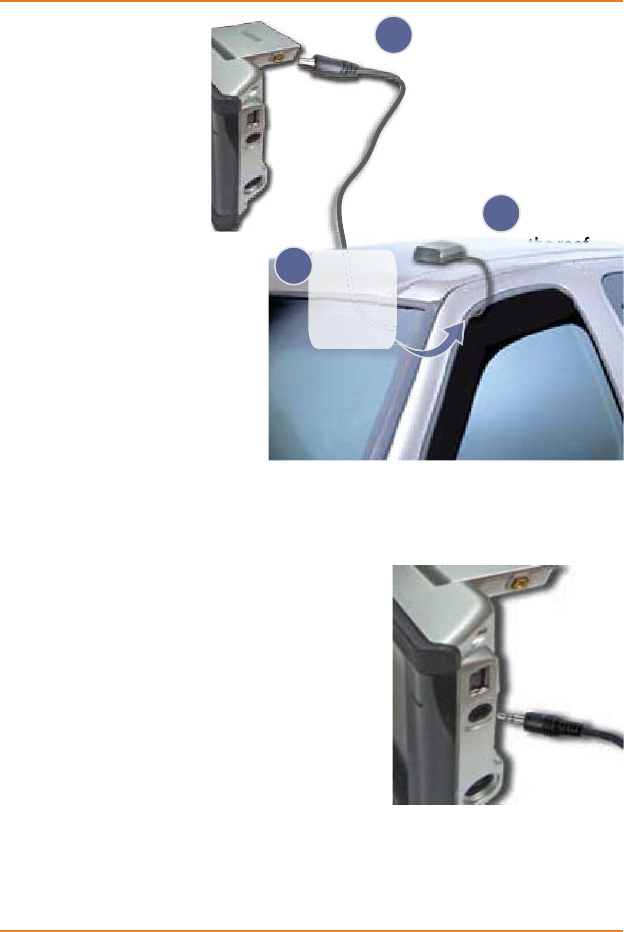
f
y
ou travel in a lot o
f
areas with weak satellite si
g
nals,
y
ou
mi
g
ht consider
g
ettin
g
an external
G
P
S
antenna. You can
g
et an external antenna from www.uniden.com
;
t
h
e
p
art
number
y
ou’ll want to order is
G
P
S
EXT4.
Ź
Ź
5
)
6
)
P
a
g
e5
4
W
hat O
p
tions Do I Have
?
To install the
external antenna,
j
ust
i
nsert t
h
e
antenna plu
g
into
t
he small gold
co
nn
ec
t
o
r
o
n t
he
b
uilt-in antenna.
The external
a
nt
e
nn
a
is
m
a
g
netic, so
y
ou
can stick it on the
o
utside of
y
our
car: the roo
f
usually works the
bes
t.
Ru
n t
he
antenna cable
t
hrough your
car’s o
p
en
w
indow
(
don’t slam it in the door!
)
.
U
S
IN
G
A
HE
A
D
S
E
T
Y
ou can use any standard 2.5 mm
audio headset with
y
our
G
P
S
d
evice. A headset ma
y
make it
eas
i
er to
h
ear t
h
e vo
i
ce
p
rom
p
ts on
a no
i
s
y
roa
d
.
J
ust connect the headset to the
externa
l
au
di
o
j
ac
k
on t
h
e r
i
g
h
t s
id
e
of
the device,
j
ust under the U
S
B
p
or
t
.
Connect the
external antenna
to the device.
Route the
cable
through
your car’s
window.
Attach the
antenna to
the roof.
1
2
3
Connect the
external antenna
to the device.
Route the
cable
through
your car’s
window.
Attach the
antenna to
the roof.
1
2
3
Page 55
How Do I Use My Bluetooth Phone?
If you have a mobile phone that supports Bluetooth
{PROFILES?? VERSION #?}, you can pair that phone with
your TRAX device and use the following features:
Use your device as a hands-free speakerphone.
Transfer calls from the device to the mobile phone.
Download your phonebook to your device.
Use your device as a telephone book and call any of the
XX million POI listed in the database.
Connecting to Your Bluetooth Phone
First, make sure your mobile phone is on and ready to
connect.
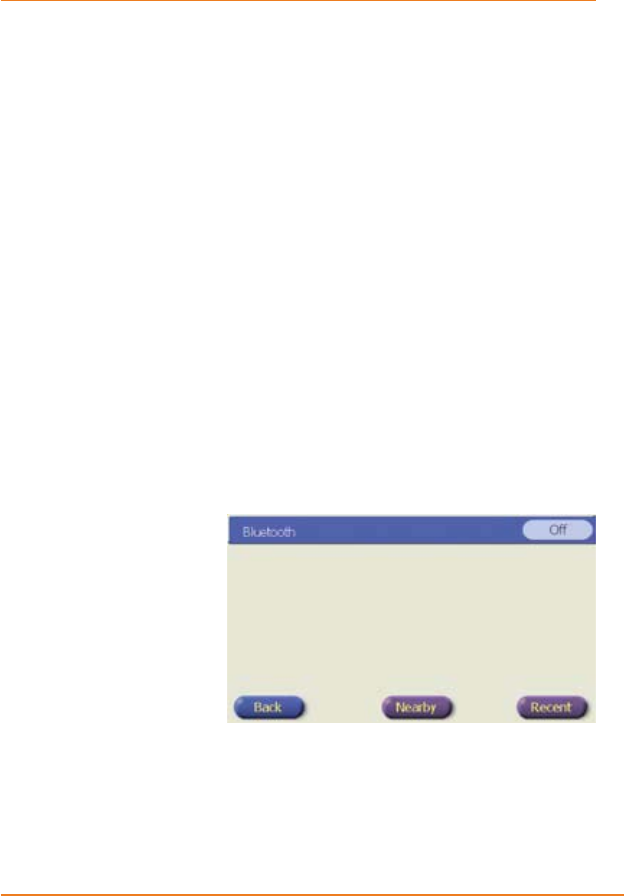
From your device’s Menu screen, tap the SETTINGS
button and then select BLUETOOTH.
On the Bluetooth Settings screen, set the BLUETOOTH
line to On. The
device searches
for any Bluetooth
phones within
range.
Tap the NEARBY
button to see an
alphabetical list of
phones the device
has found.
Ź
Ź
Ź
Ź
1)
2)
3)
4)
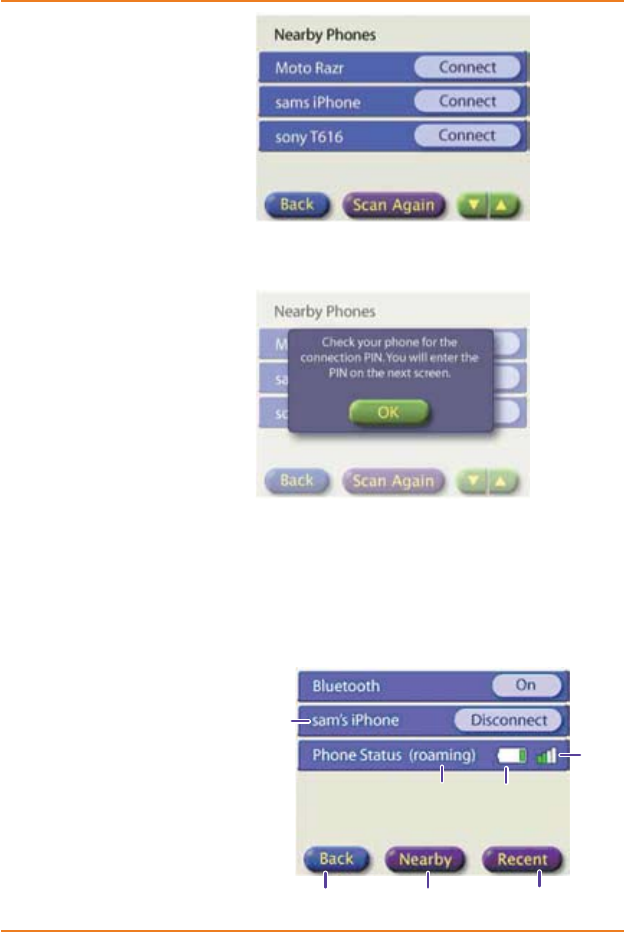
Page 56
How Do I Use My Bluetooth Phone?
Tap the name of
the phone you
want to connect to
your device. If you
don’t see the
phone you want,
tap the SCAN
AGAIN button to
have the device
do another search for Bluetooth phones.
When you select a
phone, the device
prompts you to
get your phone’s
PIN ready. Tap OK
ZKHQ\RXFRQ¿UP
the PIN needed to
connect to this
phone.
The device displays the number keypad. Enter your PIN
number on the keypad and tap OK.
If the PIN is correct, the device displays a message
FRQ¿UPLQJWKHFRQQHFWLRQWRWKHSKRQH,IWKH3,1LVQRW
correct, the device displays an error message.
The Bluetooth
Settings
screen now
includes status
information for
the currently-
connected
phone.
5)
6)
7)
8)
Currently
connected
phone
See all phones
in range.
See the last XX
paired phones.
Go back to the
settings screen.
Phone
network
status
Phone
battery
status
Phone
signal
status
Currently
connected
phone
See all phones
in range.
See the last XX
paired phones.
Go back to the
settings screen.
Phone
network
status
Phone
battery
status
Phone
signal
status
P
a
g
e5
7
H
ow Do I Use M
y
Bluetooth Phone
?
C
O
NNE
C
T
IN
G
T
O
A
DIFFE
R
EN
T
P
H
O
NE
To pair a different phone, make sure the is on and ready. Go
to
t
he
1
HDU
E
\
3K
RQH
V
screen, an
d
repeat t
h
e
C
onnecting
W
R
\
RXUSKRQ
H
process startin
g
with
S
tep 5.
R
E
-
CO
NNE
C
T
IN
G
T
O
A
R
E
C
EN
T
P
H
O
NE
T
o
p
a
i
r a w
i
t
h
a
recentl
y
-connected
p
hone, go to the
B
luetooth
S
ettings
s
creen and tap the
R
E
C
ENT button. The
d
ev
i
ce
di
sp
l
ays a
li
st
o
f
the XX most
recently-paired
ph
ones.
R
e
p
eat t
h
e
&RQQHFWLQJWR\RXUSKRQH
p
rocess
H
s
tartin
g
with
S
tep 5.
Using Your Bluetooth Phon
e
R
E
A
DIN
G
T
HE
P
HO
N
E
S
TAT
U
S
I
CON
S
The
PH
O
N
E
ico
n
appears on the
M
e
n
u
screen and
th
e ma
p
screen.
This icon displa
y
s
t
he current status
of
y
our phone:
I
con
Meanin
g
The phone
is paired and
pp
r
ea
dy
t
o use.
y
p
T
h
e
r
e
i
s
no
p
hone
connected.
p
The phone is
c
urren
tly
i
n
p
use.
Th
e
r
e
i
s
a
ca
ll
o
n h
o
l
d
o
r
a
c
all waitin
g
.
g
{QUESTIO
N
DeCarta man
u
discusses d
e
information f
r
Recent Phon
e
the only thing
can do with th
e
list is delete thi
it, then why is
What’s the poi
n
screen
?
Page 58
How Do I Use My Bluetooth Phone?
MAKING CALLS
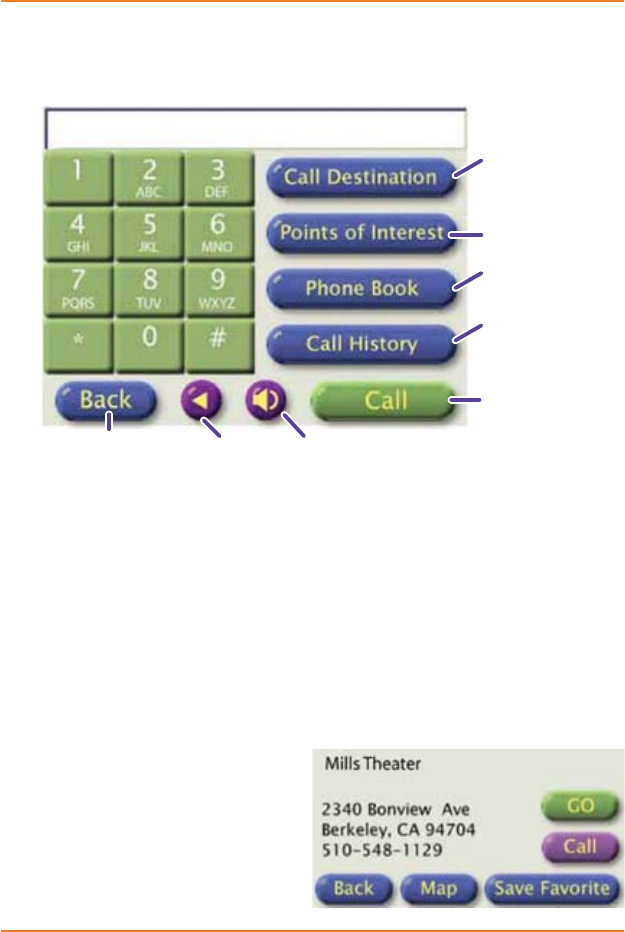
Tap the PHONE icon on the map screen or the Menu screen.
The device displays the 3KRQH.H\SDGscreen.
Dial the phone number on the number keypad, or select one
of the other options:
CALL DESTINATION: Call the phone number of the route
destination. If the destination is not a POI, tap this button
and then enter the phone number. Once you enter
the phone number, the device saves it with the route
information. {If it doesn’t, then what does this button do?}
POINTS OF INTEREST: When you tap this button, you can
search for a POI just
like you do when you’re
plotting a destination.
When you reach the
&RQ¿UP'HVWLQDWLRQ
screen, tap the CALL
button.
Ź
Ź
Change the
phone’s volume.
Dial the
displayed
number.
Go back to the
previous screen.
Call the
route
destination.
Call a POI.
Open the
phonebook.
Open the
call history
screen.
Back-
space Change the
phone’s volume.
Dial the
displayed
number.
Go back to the
previous screen.
Call the
route
destination.
Call a POI.
Open the
phonebook.
Open the
call history
screen.
Back-
space
Page 59
How Do I Use My Bluetooth Phone?
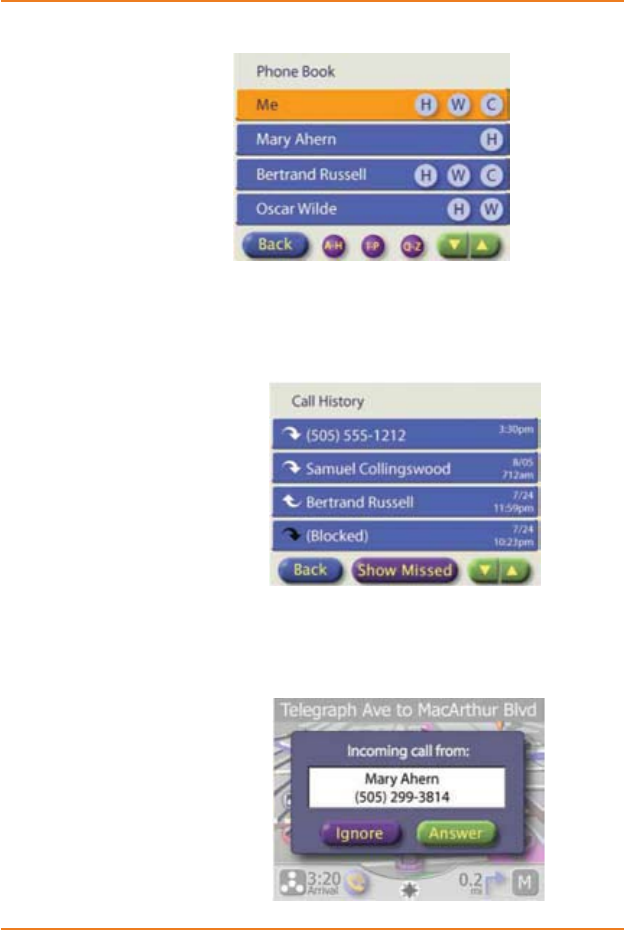
PHONE BOOK: When you pair your Bluetooth phone, the
device downloads
the phonebook
automatically. Tap
the PHONE BOOK
button to display
your phonebook
entries and their
available phone
numbers. Tap H to
call the home number, W for the work number, or C for
the cell/mobile number.
CALL HISTORY: Tap the call history button to see the last
XX outgoing and
incoming calls. Tap
the SHOW MISSED
button to see
incoming calls that
you didn’t answer.
Tap on any line to
dial the number
saved for that call.
ANSWERING INCOMING CALLS
When a call comes in on your mobile phone, the device
displays the name and
phone number of the
incoming call. Tap the
IGNORE button to
reject this call. Tap the
ANSWER button to
accept this call and
see more options.
Ź
Ź
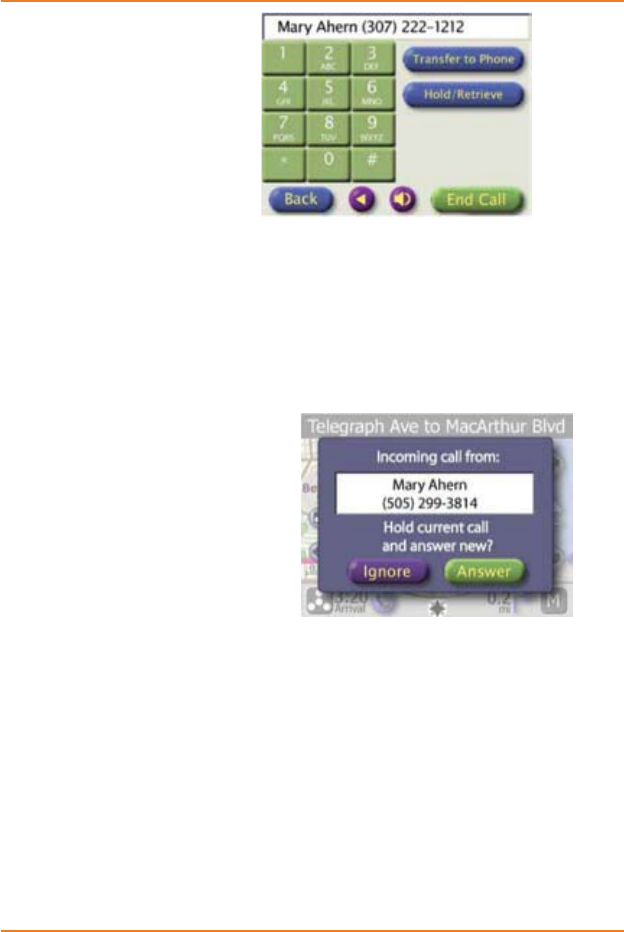
Page 60
How Do I Use My Bluetooth Phone?
Tap the
HOLD/RETRIEVE
button to place the
caller on hold.
Tap the END CALL
button to hang up.
After XX seconds, the
phone keypad times
out, and the device return to the previous screen. To bring up
the phone keypad again, tap the PHONE icon on the Menu
screen or map screen.
USING CALL WAITING
If a call comes in when you’re already on the phone, the
device displays the
call waitng screen.
Tap the IGNORE
button to reject the
waiting call and
continue speaking
to the original
caller.
Tap the ANSWER button to put the original call on hold
and speak to the new caller.
Tap the {DROP/ANSWER NEW} button to hang up the
original call and speak to the new caller.
After you accept the new call, tap the END CALL button to
hang up on the new caller and return to the original call.
Tap the {FLASH??} button to switch back to the original
caller without disconnecting the new call. accept this call and
see more options.
Ź
Ź
Ź
Ź
Ź

Page 61
How Do I Use My Bluetooth Phone?
TRANSFERRING A CALL TO YOUR PHONE
You can transfer calls back to your mobile phone. This
disconnects the phone audio from the device and mutes the
speaker and microphone.
:KHQDFDOO¿UVW
comes in, just tap the
TRANSFER TO PHONE
button on the phone
keypad to transfer the
FDOO7KHFRQ¿UPVWKDW
the phone is now
disconnected.
To transfer a call after the phone keypad times out:
Tap the phone icon to open the phone keypad.
On the phone keypad, tap the volume button. This opens
the 6HW9ROXPHDQG%ULJKWQHVV screen with the volume
controls for the phone audio.
Tap the TRANSFER
CALL TO PHONE
button to send the
call back to your
mobile phone. The
device displays
WKHFRQ¿UPDWLRQ
screen shown
above.
If you tap the VOLUME button from the Menu screen,
the 6HW9ROXPHDQG%ULJKWQHVVscreen will not
show the telephone audio controls.
1)
2)
3)
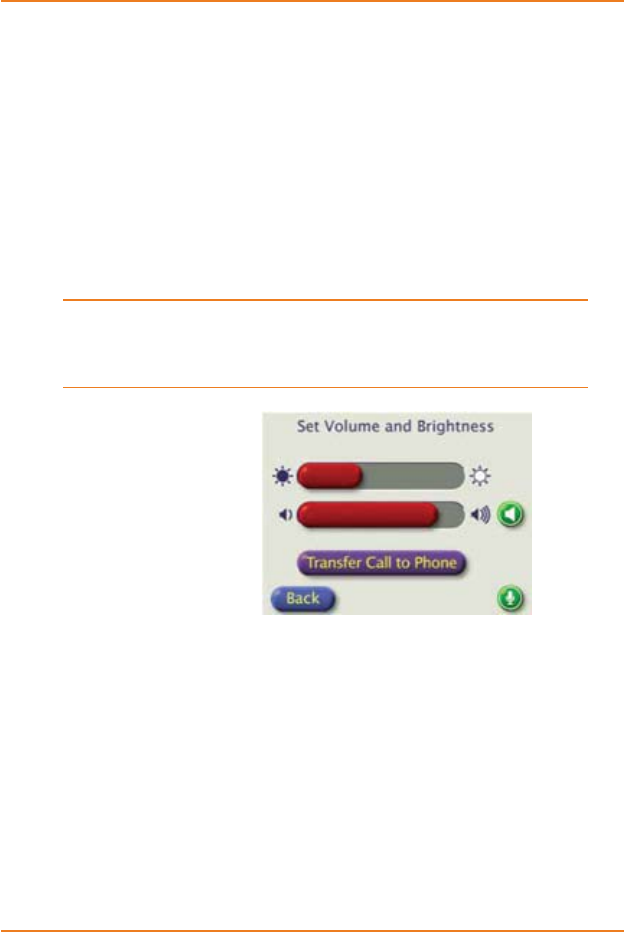
Page 62
How Do I Use My Bluetooth Phone?
CHANGING THE PHONE SPEAKER VOLUME
The device automatically mutes all voice prompts when you
are on a call; if you change the volume or mute the speaker,
it affects the phone audio only. The device returns to its usual
volume setting when you hang up.
Tap the phone icon to open the phone keypad.
On the phone keypad, tap the volume button. This opens
the 6HW9ROXPHDQG%ULJKWQHVV screen with the volume
controls for the phone audio.
If you tap the VOLUME button from the Menu screen,
the 6HW9ROXPHDQG%ULJKWQHVVscreen will not
show the telephone audio controls.
Tap on the sliding
bar to adjust the
volume (the same
way you do for the
device).
Tap the MUTE
AUDIO button to
mute the speaker
for the telephone. (Remember, this will not affect the
voice prompts after you hang up.)
MUTING THE MICROPHONE
To mute the telephone microphone, open the Set Volume
DQG%ULJKWQHVV screen with the telephone volume controls;
then, tap the PXWHPLFURSKRQH button in lower right hand
corner.
1)
2)
3)
4)

Page 80
What Else Do I Need to Know?
&
o
c
C
I
T
n
I
D
E
Regulatory information
US REGULATORY COMPLIANCE
FCC PART 15.105(b)
Note: This equipment has been tested and found to comply with the limits for
a Class B digital device, pursuant to part 15 of the FCC Rules. These limits
are designed to provide reasonable protection against harmful interference
in a residential installation. This equipment generates, uses and can radiate
radio frequency energy and, if not installed and used in accordance with the
instructions, may cause harmful interference to radio communications. However,
there is no guarantee that interference will not occur in a particular installation. If
this equipment does cause harmful interference to radio or television reception,
which can be determined by turning the equipment off and on, the user is
encouraged to try to correct the interference by one or more of the following
measures:
Reorient or relocate the receiving antenna.
Increase the separation between the equipment and receiver.
Connect the equipment into an outlet on a circuit different from that to which
the receiver is connected.
Consult the dealer or an experienced radio/TV technician for help.
FCC Part 15.19(a)(3)
This device complies with part 15 of the FCC Rules. Operation is subject to the
following two conditions: (1) This device may not cause harmful interference, and
(2) this device must accept any interference received, including interference that
may cause undesired operation.
FCC PART 15.21
•
•
•
•
TRAX425-430om_noANTHS.indb 11/26/2007 4:35:49 PM - 80 - (Cyan)TRAX425-430om_noANTHS.indb 11/26/2007 4:35:49 PM - 80 - (Magenta)TRAX425-430om_noANTHS.indb 11/26/2007 4:35:49 PM - 80 - (Yellow)TRAX425-430om_noANTHS.indb 11/26/2007 4:35:49 PM - 80 - (BlacK)
Page 81
What Else Do I Need to Know?
&KDQJHVRUPRGL¿FDWLRQVWRWKLVSURGXFWQRWH[SUHVVO\DSSURYHGE\8QLGHQRU
operation of this product in any way other than as detailed by the owner’s manual,
could void your authority to operate this product.
CANADIAN REGULATORY COMPLIANCE
ICES003, PARA 6.2
This Class B digital apparatus complies with Canadian ICES-003. Cet appareil
numerique de la classe B est conforme a la norme NMB-003 du Canada.
Important vehicle and product safety information
DRIVE SAFELY!
Do not install any device where it might block your driving veiw or mirrors.
Do not attempt to operate any device while you are driving a vehicle.
5HPDLQDOHUWWRDFWXDOURDGFRQGLWLRQVREH\DOOORFDOWUDI¿FODZVDQGSRVWHG
signs.
Do not use this product for any purpose where a failure of the product could
lead to harm to any person or property.
ELECTRICAL SAFETY WARNINGS
:DUQLQJ5LVNRI¿UHRUHOHFWULFVKRFNUHDGDQGIROORZDOO
instructions carefully!
THIS DEVICE IS NOT WATERPROOF. Do not immerse the device in water
or expose it to moisture.
Only use the power adapter that came with your device; use of any other
SRZHUDGDSWHUPLJKWGDPDJHWKHGHYLFHRUFUHDWHDVKRFNRU¿UHKD]DUG
•
•
•
•
•
•
TRAX425-430om_noANTHS.indb 11/26/2007 4:35:49 PM - 81 - (Cyan)TRAX425-430om_noANTHS.indb 11/26/2007 4:35:49 PM - 81 - (Magenta)TRAX425-430om_noANTHS.indb 11/26/2007 4:35:49 PM - 81 - (Yellow)TRAX425-430om_noANTHS.indb 11/26/2007 4:35:49 PM - 81 - (BlacK)