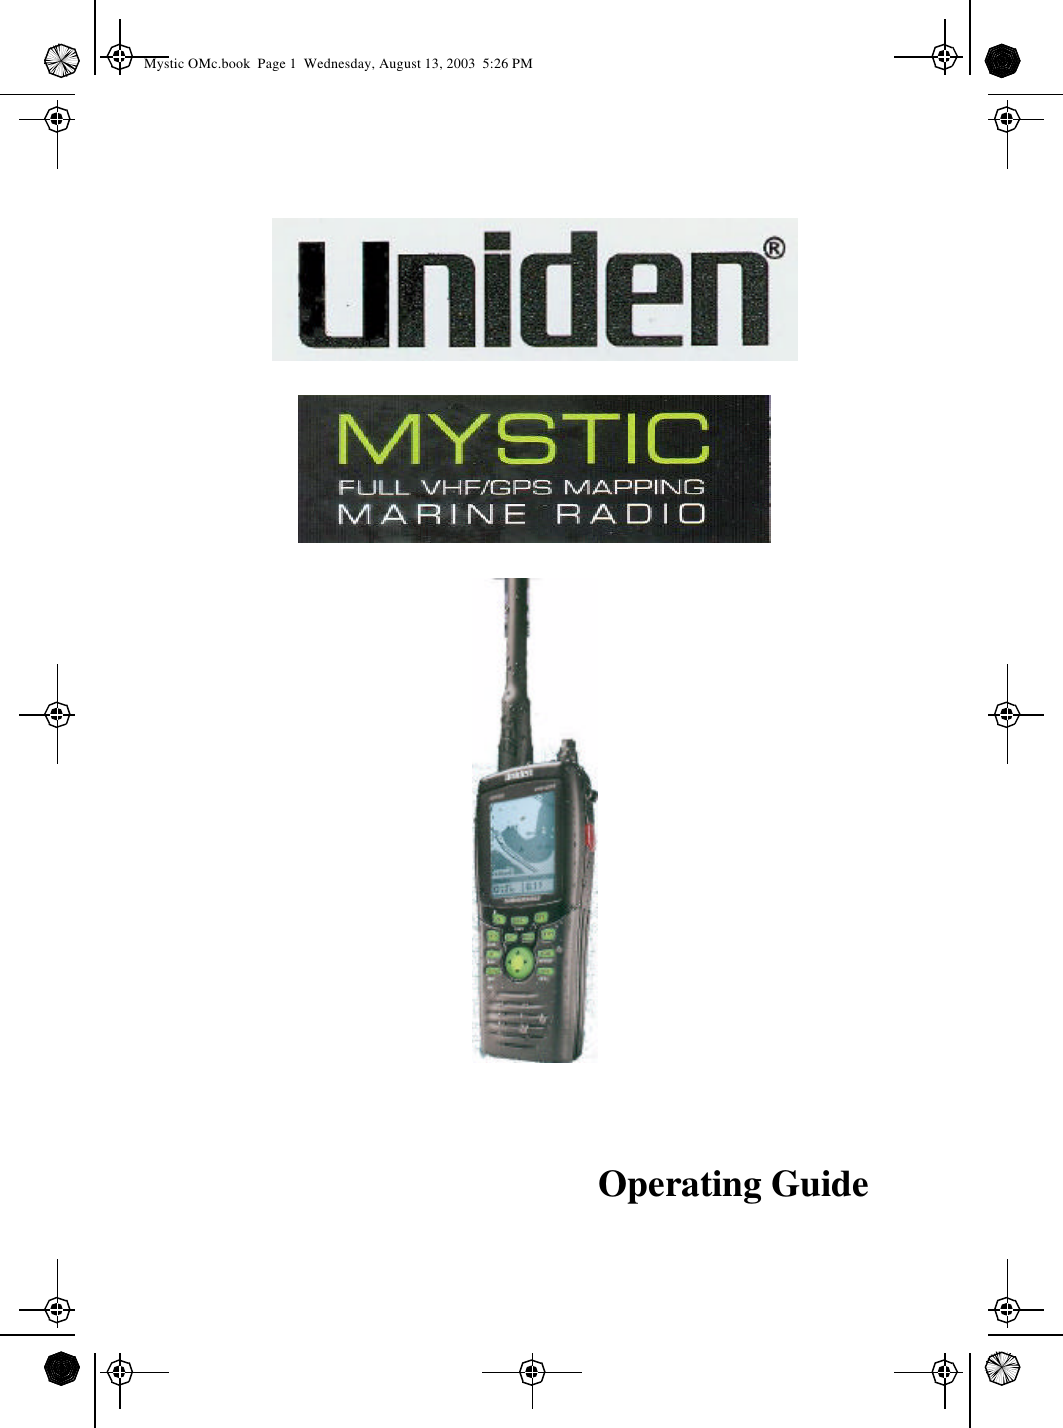
Uniden America UT890 Portable Marine VHF Transmitter with GPS User Manual Mystic OMc
Uniden America Corporation Portable Marine VHF Transmitter with GPS Mystic OMc
UserManual.wiki
>
Uniden America
>
UT890 User Manual
Owners Manual
Navigation menu
Upload a User Manual
Namespaces
Wiki Guide
HTML
PDF
Info
Views
User Manual
Discussion / Help
Navigation
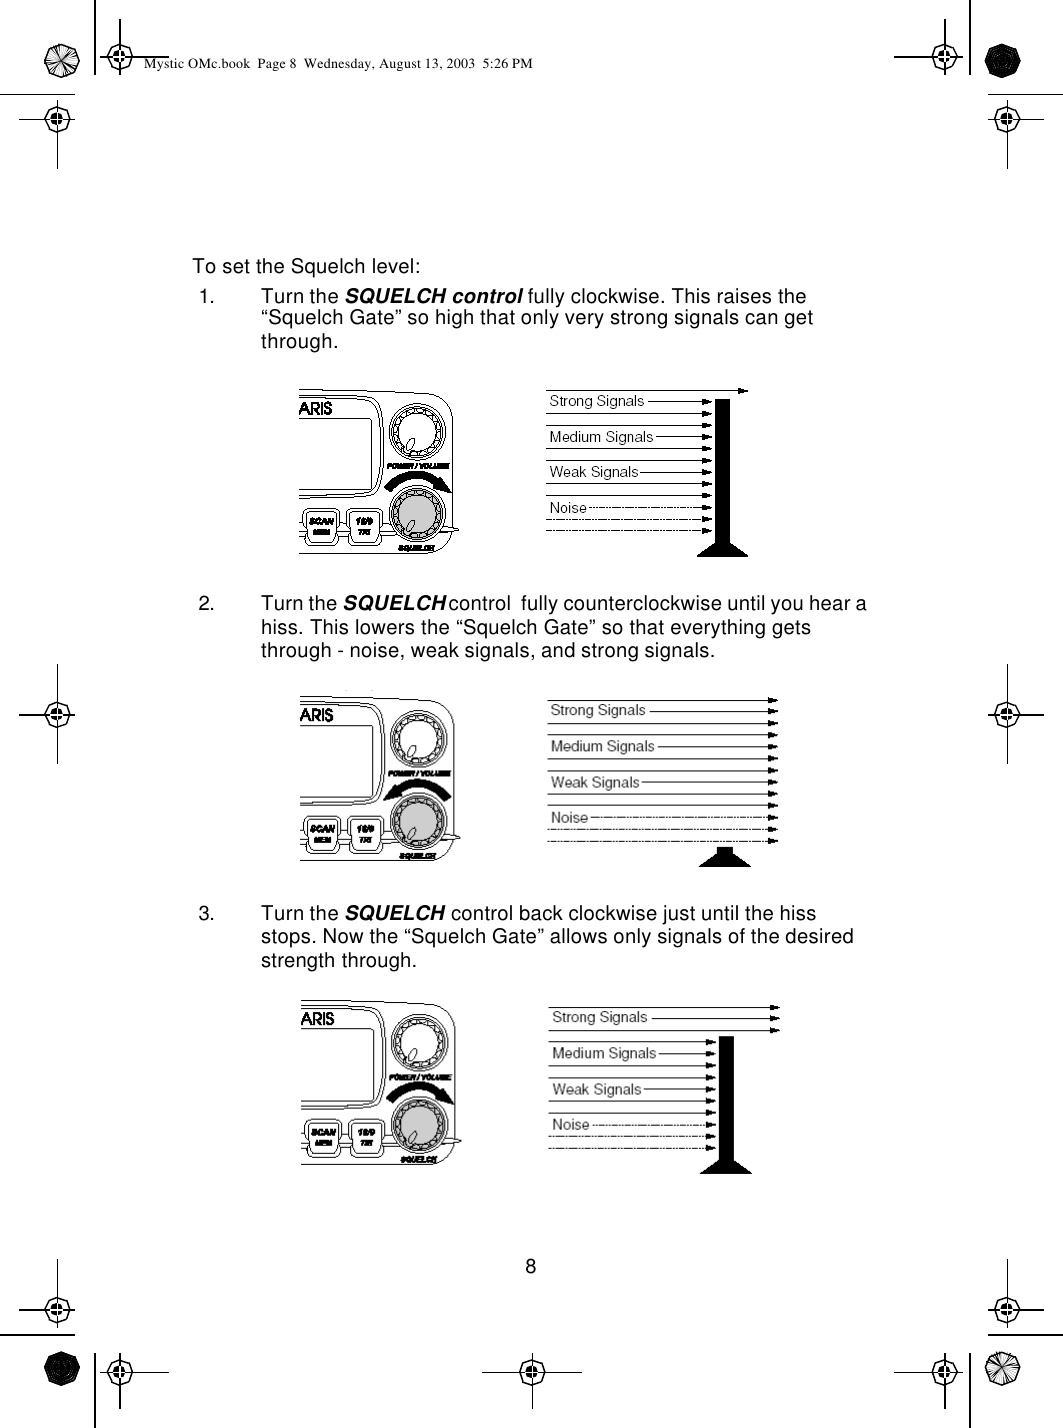
![7The Warning mesage remains displayed for 10 seconds. During that time, press the [ENTER] key to agree to the information on the screen.The display then changes to the default Channel and Navigation screen.Note: If you don’t press the [ENTER] key while the Warning message is displayed, you will not have the GPS available when you proceed to the Channel and Navigation screen. The message will read: “GPS Unavailable”.SquelchThe SQUELCH control allows you to set the “threshhold” at which signals can be heard. This allows you to determine how strong a signal must be before it “breaks squelch”. That is, how strong it must be before you can hear it. This keeps static and unwanted weak or distant signals from breaking into your desired conversations.Mystic OMc.book Page 7 Wednesday, August 13, 2003 5:26 PM](https://usermanual.wiki/Uniden-America/UT890/User-Guide-352612-Page-9.png)
![9Manual TuningTo manually select a channel, press the p cursor key to increase the channel number, or press the q cursir key to decrease the channel number. Communication channels are located on channel 01-28 and 60-88.Weather ChannelsWeather channels are located on channels 0-9. To select Weather Channels 0-9, press the [WX/ALERT] key. The radio will go to the last selected Weather Channel.Press the p cursor key or the q cursor key to select a different Weather Channel.To exit from Weather channels, press any of these keys: [DISTRESS], [SCAN/MEMORY], or [WX/ALERT]. The radio returns to the previous Marine channel.Instant Channel 16/channel 9 CommunicationsTo access instant Channel 16 or Channel 9 communications, press the [16/9/TRIPLE] key. You can access Channel 16 instantly while tuned to another channel. Press the [16/9/TRIPLE] key again to access Channel 9 communications. Press and release the [16/9/TRIPLE] key a third time to return to the channel selected prior to accessing instant Channel 16/Channel 9 commnunications.Mystic OMc.book Page 9 Wednesday, August 13, 2003 5:26 PM](https://usermanual.wiki/Uniden-America/UT890/User-Guide-352612-Page-11.png)
![10The display will indicate the selected channel.To cancel Channel 16/Channel 9 communications:lPress the [16/9/TRIPLE] key until the previous channel setting appears.--or--lPress any of the following keys: [DISTRESS], [p], [q],[SCAN/MEMORY], or [16/9/TRIPLE].Triple WatchTriple Watch monitors Channel 16, Channel 9, and the current Marine Channel or Weather Channel.To activate Triple Watch, press and hold the [16/9/TRIPLE] key for 2 seconds. TRIPLE appears on the display, indicating the Triple Watch mode is in effect.Mystic OMc.book Page 10 Wednesday, August 13, 2003 5:26 PM](https://usermanual.wiki/Uniden-America/UT890/User-Guide-352612-Page-12.png)
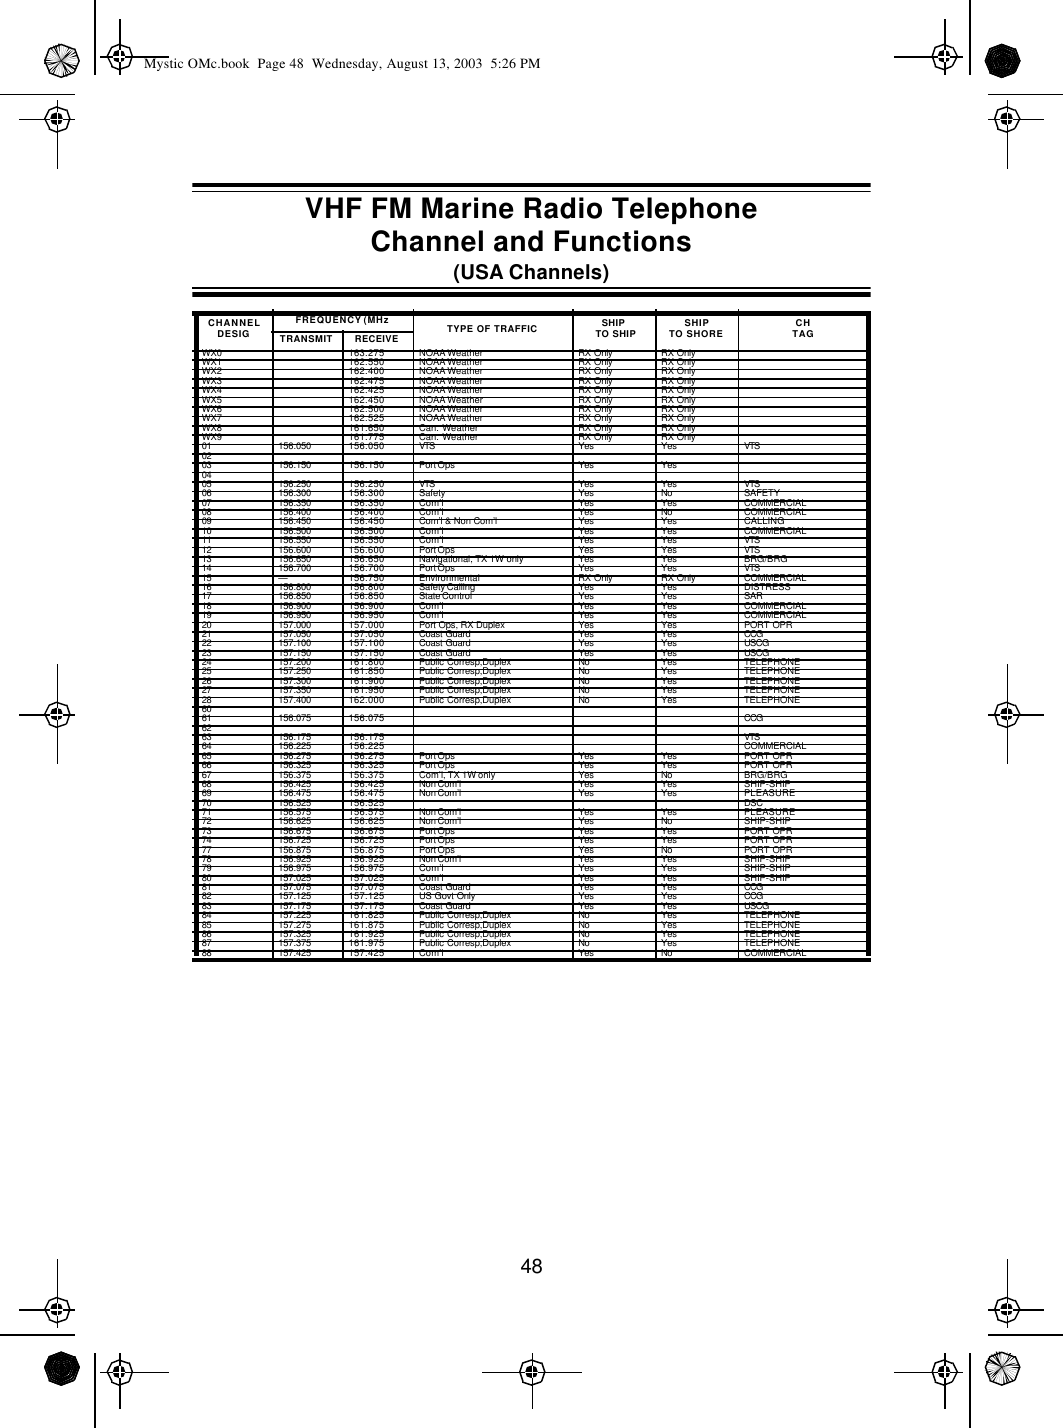
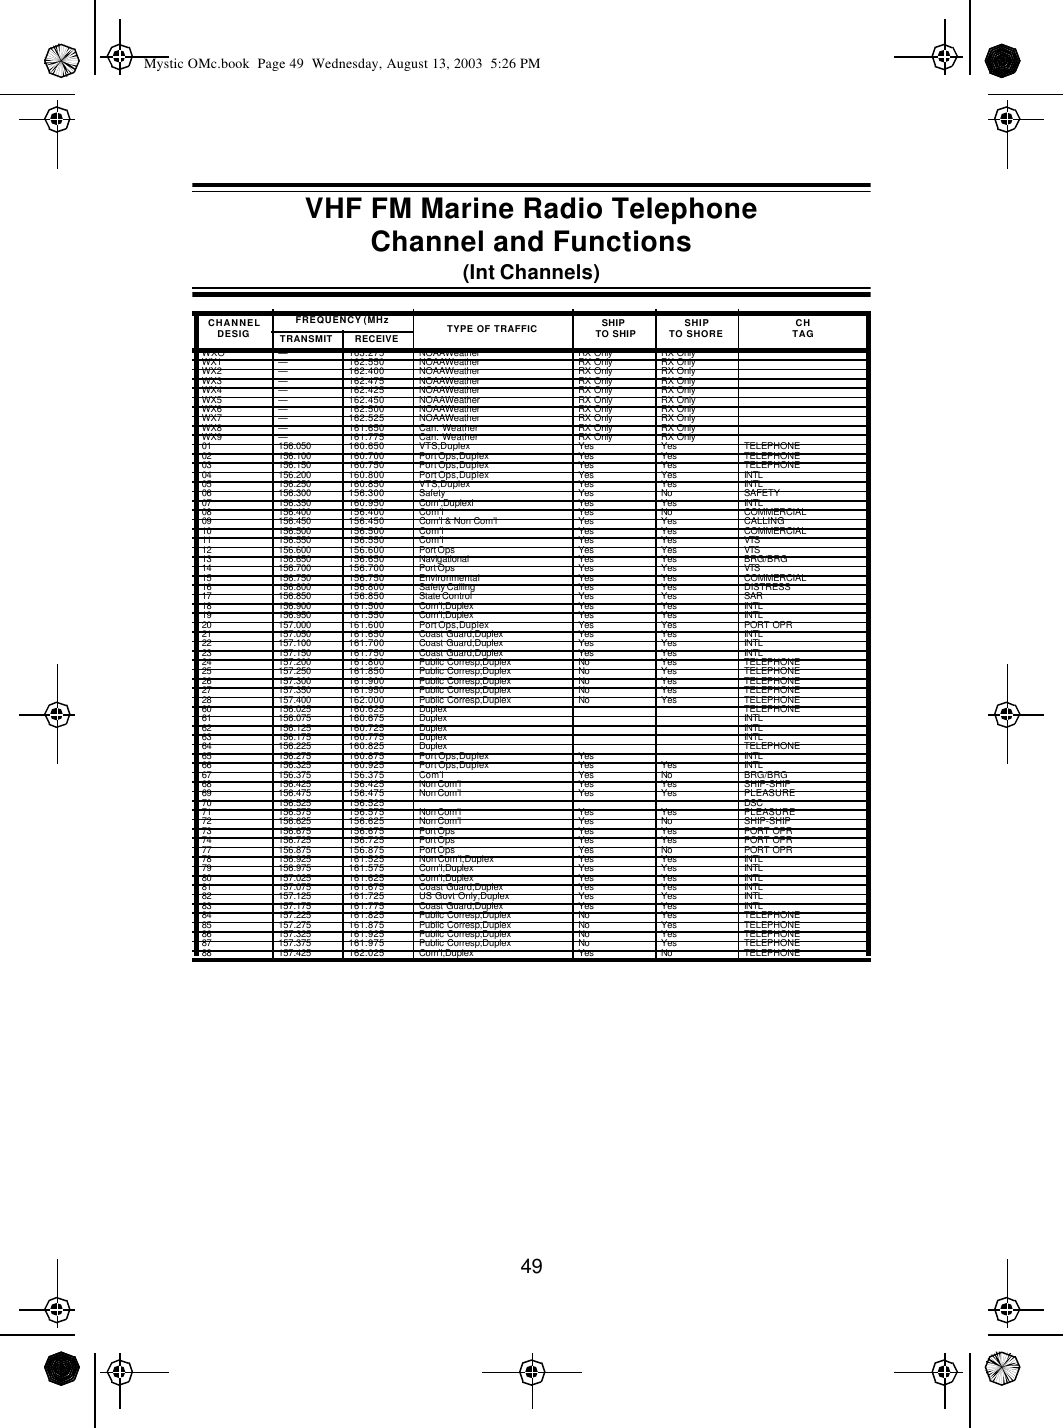
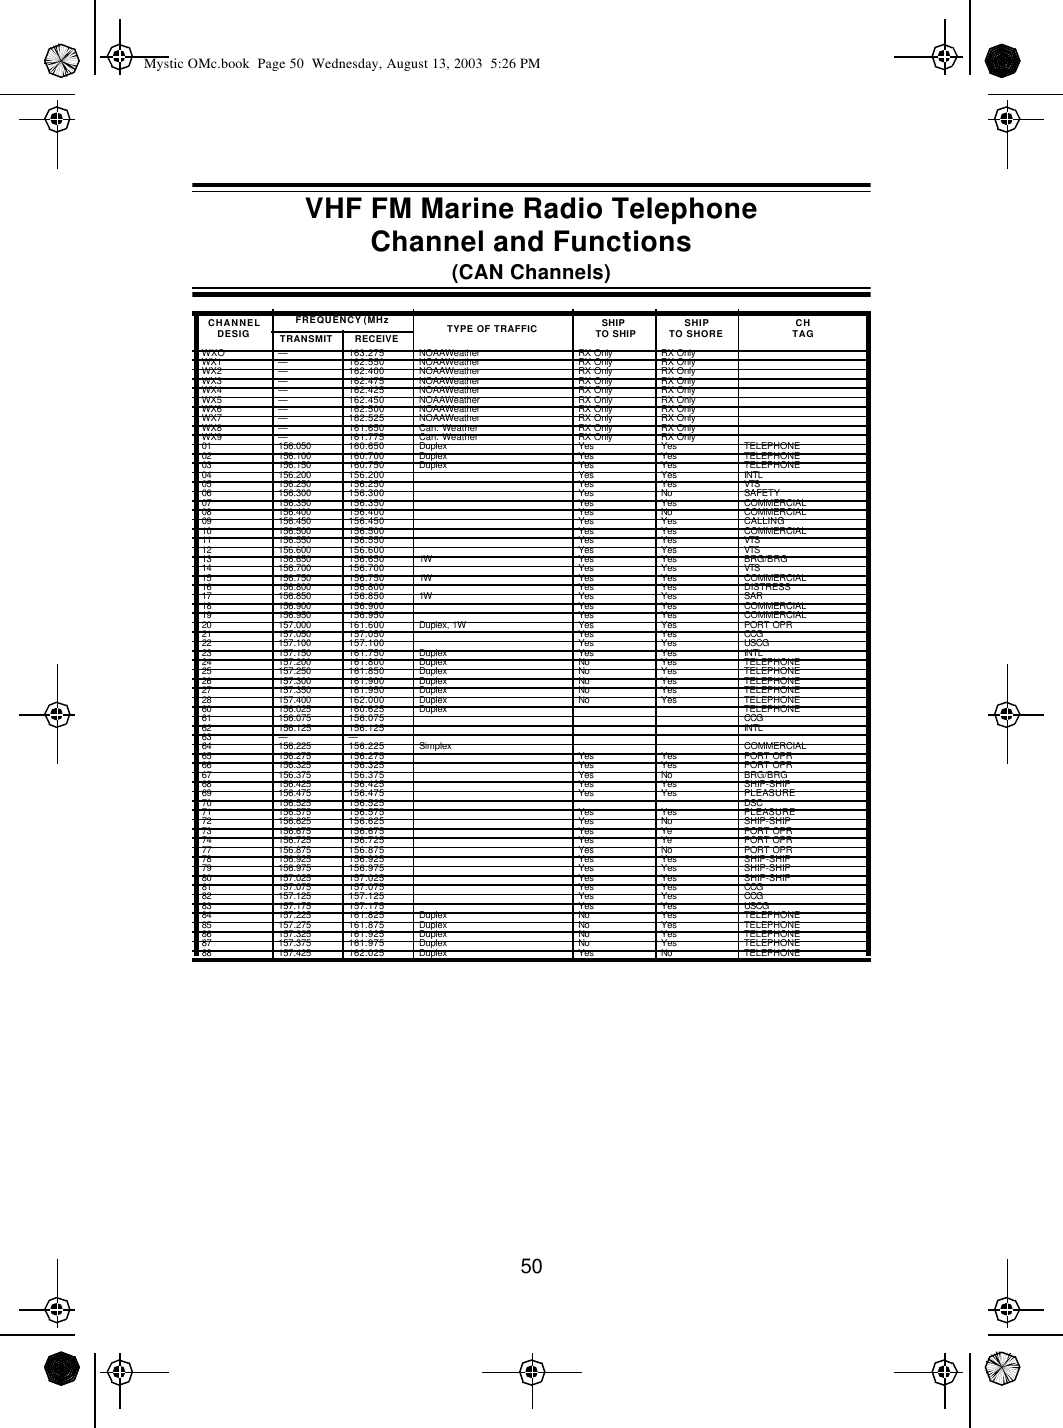
![11If a signal is received on either Channel 16 or Channel 9, the radio will change to that channel and remain until the signal ends.Note: While in Triple Watch mode, you can change the currently selected VHF channel using the PUSH – SELECT knob.A momentary press of the [16/9/TRIPLE] key interrupts Triple Watch mode and causes the radio to remain on channel 16. Pressing the [16/9/TRIPLE] key again causes the radio to remain on channel 9. To return to the Triple Watch mode, simply press the [16/9/TRIPLE] key again.To cancel the Triple Watch mode, press and hold the [16/9/TRIPLE] key for 2 seconds.TransmittingThe Mystic transmits on fifty-five marine frequencies and receives on eighty marine frequencies. Channel 70 of the USA, International, and Canadian frequencies, and channel 15, of the USA frequencies, and WX CH – are for receiving only. The Mystic transmits on channel 70 when sending DSC information. Your radio will not transmit on these channels. For your reference, a listing of all the available marine channels are located on pages 48, 49, and 50.Before transmitting, set theTX ouput:Caution: It is important to remember to use the 1W setting in port or for short range communications.Mystic OMc.book Page 11 Wednesday, August 13, 2003 5:26 PM](https://usermanual.wiki/Uniden-America/UT890/User-Guide-352612-Page-13.png)
![121. When you turn the Mystic On for the first time, the unit is automatically set to transmit at 5 watts (HI).2. Press the [1W/5WLOCK] key to change the transmitter output to 1 watt (LO).3. Press the [1W/5WLOCK] key again to change back to 5 watts (HI).Note: Each time the [1W/5WLOCK] key is pressed a short tone sounds. Certain channels are set as 1 watt (LO) channels. They are: 13 and 67 for the USA channels, and 13, 15, 17, and 20 for the CAN channels. When the channel is set as a LO power channel, you can transmit at 5 watts (HI) by pressing and holding the [1W/5WLOCK] key during the call.Marine Distress ProcedureSpeak slowly – clearly – calmly.1. Make sure your radio is On.2. Tune to Channel 16.3. Press the PTT button on the radio and say: "MAYDAY – MAYDAY – MAYDAY."4. Give your ship ID.5. Say "MAYDAY [your ship name]."6. Give your location: (what navigational aids or landmarks are near).7. State the nature of your distress.8. Give the number of persons aboard and the conditions of any injured.Mystic OMc.book Page 12 Wednesday, August 13, 2003 5:26 PM](https://usermanual.wiki/Uniden-America/UT890/User-Guide-352612-Page-14.png)
![139. Estimate present seaworthiness of your vessel10. Give a brief description of your vessel (meters, type, color, hull).11. Say: "I will be listening on Channel 16".12. End message by saying "THIS IS [your ship name or call sign] OVER."13. Release the PTT button and listen. Someone should answer. 14. If not, repeat call, beginning at Item 3 above.Instant Distress CallThis feature is used to transmit a Distress call with position information that may result in a quicker response.Note: You must set the user MMSI in order to send a Distress call. Refer to the Setup Section to set the MMSI.1. To transmit a Distress call, press and hold [DISTRESS] for 5 seconds. When the Distress screen appears, press p or q to select Yes or No. If you select No, the radio returns to the channel display screen.2. To transmit the call, select yes and press [ENTER] to send.3. The Distress call is transmitted and it waits for about 210 - 270 seconds. This is continued internally. After the Distress call has been sent, the Distress alert will sound every other second, and it also "shadow-watches" for a transmission between CH16 and CH70 until an acknowledgment signal is received from the Coast Guard shore station.4. To cancel the Distress call, press [?] .Advanced VHF OperationsAdvanced VHF Radio Operation is covered starting on page23.Mystic OMc.book Page 13 Wednesday, August 13, 2003 5:26 PM](https://usermanual.wiki/Uniden-America/UT890/User-Guide-352612-Page-15.png)

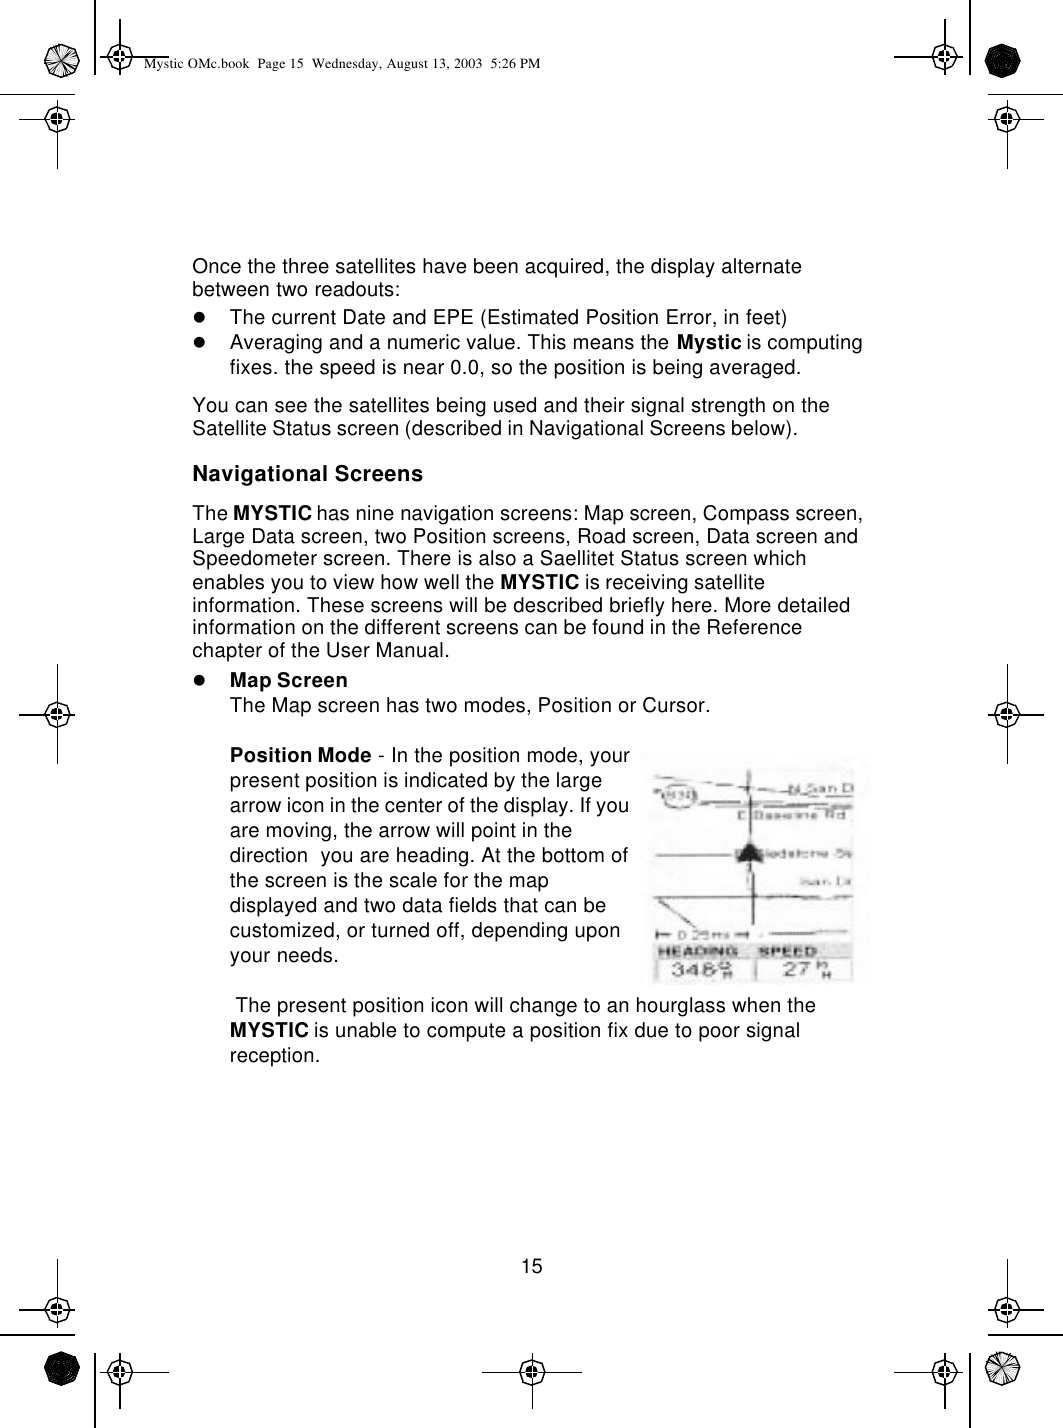
![16Cursor Mode - In the Cursor Mode, you are provided with a cursor that can be moved on the map. At the bottom of the display is the information for the position of the cursor relative to your present position. Also any points of interest that the cursor is over will be shown.To access the Cursor Mode, press any arrow on the keypad. A crosshair appears that can be moved with the arrow keys.To return to the Position Mode, press [ESC]. The cursor will disappear and the present position icon will appear centered on the map.lCompass ScreenThe Compass Screen is a handy to have at your fingertips while you are navigating. It is totally customizable to display the information that is useful to you. The lower portion of the Compass screen not only displays your heading in a graphical manner, but also displays the relationship of the sun, moon and your destination (if navigating on a route) to your heading.lLarge Data ScreenThe Large Data screen is similar to the Compass screen, with the compass removed to allow for large display of the navigation data. this screen is because the customizable information can be read even from a distance .Mystic OMc.book Page 16 Wednesday, August 13, 2003 5:26 PM](https://usermanual.wiki/Uniden-America/UT890/User-Guide-352612-Page-18.png)
![18lSpeedometer ScreenThe Speedometer screen displays your speed in a familiar graphical format. There are four additional data fields at the top of the display that can be customized to display the data that you need.The bottom of the screen contains a trip odometer that will record the distance travelled since the last time the odometer was reset.lSatellite Status ScreenThe Sat Status screen provides you with a graphical display of the satellites in view and which ones are being used to compute the navigation data. The bar graph shows the relative signal strength being received for each satellite. At the bottom of the display is a battery indicator that displays the remaining battery life.Accessing the Navigation ScreensThe [NAV] key and the [ESC] key are used to step through the various navigation screens. If you are viewing one of the Navigation screens, pressing [NAV] will take you to the next Navigation screen in the list and pressing [ESC] will take you to the previous Navigation screen. If you are not viewing one of the Navigation screens, pressing [NAV] will return you to the last Navigation screen viewed.NOTE: If you are inputting data, pressing [NAV] will return you to the last Navigation screen but your inputs will not be saved.Mystic OMc.book Page 18 Wednesday, August 13, 2003 5:26 PM](https://usermanual.wiki/Uniden-America/UT890/User-Guide-352612-Page-20.png)
![19WaypointsA waypoint is any position on the globe that you have saved into memory. The act of saving the waypoint is commonly called “Marking.” So when references are made to marking a waypoint, that simply means to save a position on the globe into memory.There are a number of ways you can save a waypoint. The most common are: saving your present position, entering the coordinates of a position or saving the position of the cursor while viewing the Map screen. These waypoints can then later be used to create routes or as the destination of a GOTO. (A GOTO is a single leg route that is defined as a route from your present position to any waypoint. You are here and you want to GOTO there.)Saving a WaypointSaving Your Present Position as a Waypoint - From any screen, press and hold [GOTO] for 2 seconds and the Mark screen is displayed. The “Save” button is highlighted and you can press [ENTER] to save the waypoint using the default name and icon. This will save your present position using a default name (WPTxxx) into memory, where xxx is a sequential number.To give more meaning to your waypoints, you can change the name and icon for each one. You can also add a text message to a waypoint These procedures are covered in the GPS Advanced Operation Section (page28).There is a limit to the number of waypoints you can store in the MYSTIC. The MYSTIC will store up to 500 user waypoints in memory. If you should ever get that many and need to input more, you will have to delete ones that you no longer need to make room.Using GOTO RoutesA GOTO route is simply a route with a start point (your present position) and a single destination point (a waypoint you select). All that is required to create a GOTO route is having the destination waypoint saved in memory. This waypoint can be one that you have saved earlier (which is Mystic OMc.book Page 19 Wednesday, August 13, 2003 5:26 PM](https://usermanual.wiki/Uniden-America/UT890/User-Guide-352612-Page-21.png)
![20stored in your User Waypoint List) or any of the landmarks that come with the MYSTIC in its built-in database.The uses for a GOTO route are endless. You could mark the location of your mooring location or launch location as home. You could also mark a hot fishing spot you found, and next season come back to the exact same spot.Creating a GOTO Route1. Press the [GOTO] button. That takes you to the GOTO database screen.2. Select the Waypoint Category.Use p and q to move the highlight through the list of waypoint categories. The first category in the list is “User” . These are all the waypoints you have already entered into your MYSTIC. The remaining categories are ones that have waypoints which have been preloaded into your MYSTIC and are stored in permanent memory.3. Select Find By.There are two options of “Find By”: Alphabetical and Nearest To. Selecting Alphabetical will display all the waypoints in the category you select in alphabetic order. Nearest To will display a list of the 20 waypoints nearest to your position or waypoint you select in order of their distance away.Use t or u to select the desired method.GOTO database screenMystic OMc.book Page 20 Wednesday, August 13, 2003 5:26 PM](https://usermanual.wiki/Uniden-America/UT890/User-Guide-352612-Page-22.png)
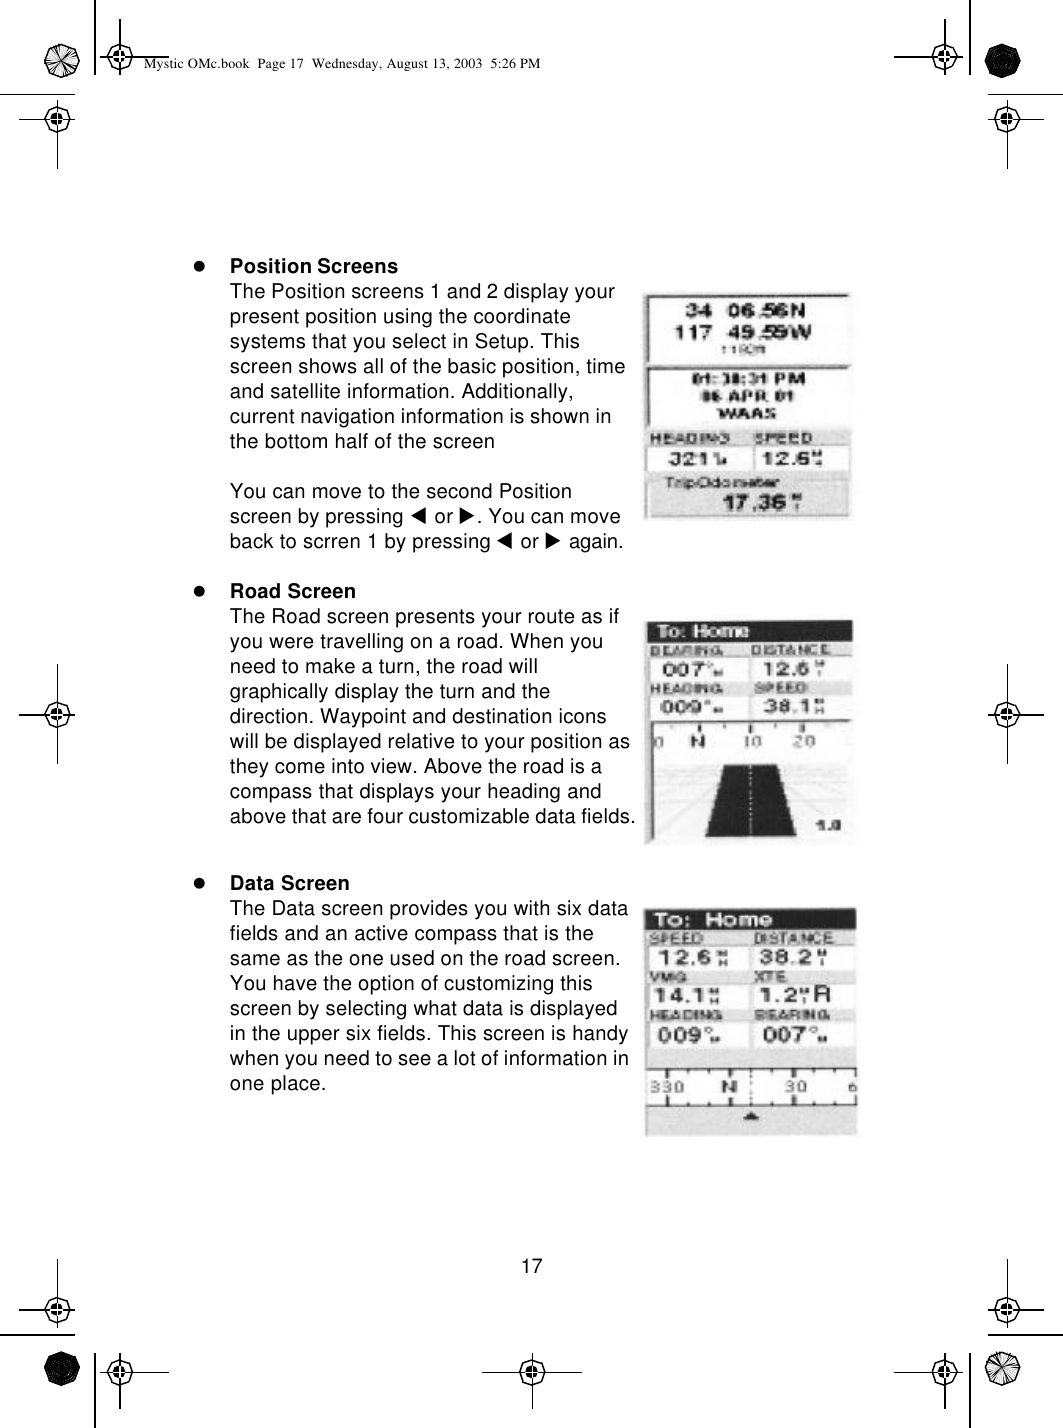
![214. To select the GOTO Destination Waypoint from the selected Category and Find By, press the [ENTER] key. A list of all the waypoints you have entered is displayed.5. Use p or q to highlight the desired destination. You’ll notice the bottomof the screen shows the Bearing and Distance to the highlighted destination. Press [ENTER].6. You are returned to the last NAV screen viewed with some noticeable changes. If you were viewing the Map screen, you will now notice a thick line which is a graphical plot of the GOTO you just created. For other NAV screens, the header bar changes to indicate that you are navigating to a destination. If you press [NAV] until you are viewing the Compass screen, the header bar now displays “To: (your destination)”, and all of the navigational information is displayed to provide you with the necessary details to get you to your destination.Note: You can select a GOTO Destination Waypoint from the other Categories. This is covered in the GPS Advanced Operation Section (page ).Navigating on a GOTO RouteThe MYSTIC has the tools you’ll need to navigate to your destination. You have the choice of three customizable screens that display the information that you need in the layout that you desire. You may find the compass screen perfect for you, or you may prefer the Large Data or Map screen. Press [NAV] until the navigation screen you want is displayed.If you selected the Map screen, you will see your position icon in the center of the screen with a line drawn for you on the map, graphically displaying the GOTO route.Note that this route is line of sight (LOS) or “as the crow flies.”List of waypointsMystic OMc.book Page 21 Wednesday, August 13, 2003 5:26 PM](https://usermanual.wiki/Uniden-America/UT890/User-Guide-352612-Page-23.png)
![23Digital Selective Calling (DSC)Digital Selective Calling has been chosen by the International Maritime Organization (IMO) as an international standard for establishing VHF, MF and HF radio calls. Digital Selective Calling has also been selected as part of the Global Maritime Distress and Safety System (GMDSS). This service will let you instantly send a Distress call with GPS position to the US Coast Guard and other vessels within range of the transmission. DSC will also let you initiate or receive distress, urgency, safety, position information and routine calls to or from another vessel outfitted with a DSC transceiver. See the Setup Section (page40) for instructions on how to setup the directory of names.To make a DSC Call, press [CALL/LIGHT]. That takes you to the DSC Menu. From there you can select several different Calls you can make: Individual Call, Group Call, All Ships Call, Position Request, Position Send, Standby,and Call Wait. They are described in the paragraphs below.Individual Call1. Select an open (unused) working Channel.2. Press [CALL/LIGHT].3. At the DSC Menu, use p and q to select Individual Call.Press [ENTER].4. At the Individual Call screen, use p and q to select the individual from the Directory.Note: You must have entries in your directory to make an Individual Call. See the Setup Section (page23.)5. Press [ENTER]. You will see the Attention screen. Use t or u to select Yes and press [ENTER] to make the call. Or, select No and press [ENTER] to cancel the call.Note: If you select No, you’ll be returned to the Individual Call screen.6. When you receive the individual acknowledgment successfully, the following screen appears, and both radios tune to the previously selected channel. You are now ready to transmit on that channel.- or -Advanced VHF Radio OperationsMystic OMc.book Page 23 Wednesday, August 13, 2003 5:26 PM](https://usermanual.wiki/Uniden-America/UT890/User-Guide-352612-Page-25.png)
![24If the called radio has been set to Standby Mode, the following screen appears.Group Call1. Select an open (unused) working Channel.2. Press [CALL/LIGHT].3. At the DSC Menu, use p and q to select Group Call.Press [ENTER].4. The Group MMSI code will appear.5. Press [ENTER]. You will see the Attention screen. Use t or u to select Yes and press [ENTER] to make the call. Or, select No and press [ENTER] to cancel the call.6. After you press [ENTER], the Mystic returns to the Channel Display screen.All Ships1. Select an open (unused) working Channel.2. Press [CALL/LIGHT].3. At the DSC Menu, use p and q to select All Ships.Press [ENTER].4. At the All Ships Call menu, use p and q to select Urgency, Safety,or Routine.5. Press [ENTER]. You will see the Attention screen. Use t or u to select Yes and press [ENTER] to make the call. Or, select No and press [ENTER] to cancel the call.Note:ROUTINE calls tune to the previously selected channel.When sending either an URGENCY or SAFETY message, all radios will automatically move to Channel 70 until all of the data is received.After selecting URGENCY or SAFETY ALL SHIPS call is transmitted, the MYSTIC will switch to Channel 16. You should wait a few minutes before transmitting the ALL SHIPS call information. Position RequestThis radio has the ability to request the position of an individual vessel that is registered in the DIRECTORY.1. Press [CALL/LIGHT].Mystic OMc.book Page 24 Wednesday, August 13, 2003 5:26 PM](https://usermanual.wiki/Uniden-America/UT890/User-Guide-352612-Page-26.png)
![252. At the DSC Menu, use p and q to select Position Request.Press [ENTER].3. At the Pos Request screen, use p and q to select the individual from the Directory taht you want the position of.Note: You must have entries in your directory to make a Position Request Call. See the Setup Section (page23.)4. Press [ENTER]. You will see the Attention screen. Use t or u to select Yes and press [ENTER] to make the call. Or, select No and press [ENTER] to cancel the call.5. If the Mystic does not detect an acknowledgment, the following screen appears.6. When the called vessel sends the position information, the following screen appears.Note: The requested radio must have the ability to transmit the position information (such as another MYSTIC radio).Position SendThis radio has the ability to send the position of your vessel to another vessel using a VHF marine radio equipped with DSC.1. Press [CALL/LIGHT].2. At the DSC Menu, use p and q to select Position Send.Press [ENTER].3. At the Position Send screen, use p and q to select the individual from the Directory you want to send your position to.Note: You must have entries in your directory to make an Individual Call. See the Setup Section (page23.)4. Press [ENTER]. You will see the Attention screen. Use t or u to select Yes and press [ENTER] to make the call. Or, select No and press [ENTER] to cancel the call.5. When the calling radio receives an acknowledgment, the following screen appears.StandbyThe DSC STANDBY function allows the MYSTIC to answer DSC calls with the UNATTENDED message, and record the calls for response at another time. When you set the MYSTIC to DSC STANDBY Mode, voice traffic may still be active on any chosen channel.1. Press [CALL/LIGHT].Mystic OMc.book Page 25 Wednesday, August 13, 2003 5:26 PM](https://usermanual.wiki/Uniden-America/UT890/User-Guide-352612-Page-27.png)
![262. At the DSC Menu, use p and q to select Standby.Press [ENTER].When an individual DSC call is received, the radio will respond with the UNATTENDED message when you can’t answer the call. The DSC call will be recorded into the radio’s Call Waiting Directory. Note: If you press any key on the radio, or press the PTT button, this feature will be canceled.Call WaitingIf you receive a call and do not answer within 5 minutes, or if the radio is set on DSC Standby, the call will be recorded. The DSC Call Waiting Directory records 10 received Distress calls, and records 20 Individual calls. Calls will be recorded while you are busy with other communications as long as the transmitter is not keyed at the time of the call. If the call is answered within 5 minutes the call will not be recorded. When a call is recorded, a message appears.1. Press [CALL/LIGHT].2. At the DSC Menu, use p and q to select Call Waiting.Press [ENTER].3. At the Call Wait Log, use p and q to select Distress or Individual. Press [ENTER].4. Depending on your choice in Step 3, you will see the recorded calls in the Call Wait Dstrs. list or the Call Wait Indiv. list.5. To see a call in either list, use p and q to select the call and press [ENTER].6. A Call Wait Log screen will appear and you can see the details of the call. The illustration on the right is an example of the Call Wait Log.Note: If a call has not been logged, the MYSTIC will beep and you will not be able to proceed to the next step.At this point, you can call back any of the radios displayed in the log.Geographical CallNote: The MYSTIC receives geographical calls only, sending geographical calls is not available in the MYSTIC radio.Mystic OMc.book Page 26 Wednesday, August 13, 2003 5:26 PM](https://usermanual.wiki/Uniden-America/UT890/User-Guide-352612-Page-28.png)
![28Modifying a Waypoint with a Custom Icon and NameThe above method is fine if you want to just save your position quickly, but it will be difficult to figure out later which waypoint this is from a list of waypoints named WPT001, WPT002, etc. For that reason, you may want to change the default name to one of your choosing. You can also select a different icon that will help you find the waypoint when you are using the map screen.To do this, press and hold [GOTO] for 2 seconds just like you did before. Use the UP/DOWN arrows and notice that the highlight moves from field to field and then back to “Save.”Highlight the Icon field using the UP/DOWN arrows and press [ENTER].The Icon Select window is displayed. Use the arrow keypad to move from one icon to another with the name of the icon displayed at the top. As a reference tool, all of the icons and their names are listed in the Reference Chapter of the User Manual. When you have highlighted the icon you want to use, press [ENTER].The cursor is now highlighting the Waypoint Name field. With the Name field highlighted, press [ENTER]. The input keyboard is displayed. The very top of the keyboard window shows you what field you are changing, in this case the Name field.You can now use the arrow keypad to select the character you wish to enter. With the character highlighted, press [ENTER] and the character is appended to the name you are entering and displayed in the field above the keys. (Note: waypoint names can be up to 8 characters in length.)When you have the name the way you want it, highlight “OK” and press [ENTER]. You are returned to the Mark screen with the new name displayed.Adding a Message to a WaypointYou can also add a message to waypoints you are creating. There is a memory limit however. You can save up to 500 user-entered waypoints in your Meridian but only 200 waypoint of those can have a message assigned to it.Adding a message to a waypoint can assist you in identifying the waypoint. If this was a waypoint for a friend’s house or business, you could add a phone number or any other information that you find useful.GPS Advanced OperationsMystic OMc.book Page 28 Wednesday, August 13, 2003 5:26 PM](https://usermanual.wiki/Uniden-America/UT890/User-Guide-352612-Page-30.png)
![29To add a message to a waypoint you are creating, highlight the Message field using the Up/Down arrows and press [ENTER].The same keyboard that was used in entering a name is presented allowing you to enter a message. Using the same technique, you can enter a message up to 30 characters in length.Use the Up/Down arrows to move the highlight through the list of waypoint categories. The first category in the list is “User” and these are all of the waypoints that you have entered into your Meridian receiver. The remaining categories are ones that have waypoints which have been preloaded into your Meridian and are stored in permanent memory. If you have the Meridian Marine, you will notice your list is considerably longer then the one shown here as you have additional marine waypoints preloaded into your Meridian.(For this example, select the “User” category.)Step 3: Select Find By.There are two options of “Find By”: Alphabetical and Nearest To. Selecting Alphabetical will display all the waypoints in the category you select in alphabetic order. Nearest To will display a list of the 20 waypoints nearest to your position or waypoint you select in order of their distance away. This could be used to display the waypoints that are closest to your present position or display the airports that are closest to any city you select. For the purpose of this basic opera-tion, only Alphabetical will be used. For details on Nearest To, see the Reference chapter in the User Manual.Use the Left/Right arrow until “Alphabetical” is displayed in the Find By field.Step 4: Select GOTO Destination Waypoint from the User Category.With “User” highlighted and “Alphabetical” in the Find By field, press [ENTER]. A list of all the waypoints you have entered is displayed.Use the Up/Down arrows to highlight the desired destination, in this case “Home”, and press [ENTER].You are returned to the last NAV screen viewed with some noticeable changes. If you are viewing the Map screen, you will now notice a thick line which is a graphical plot of the GOTO you just created. Other NAV screens, have changed the header bar to indicate that you are navigating to a destination. Press the NAV key until you are viewing the Compass Mystic OMc.book Page 29 Wednesday, August 13, 2003 5:26 PM](https://usermanual.wiki/Uniden-America/UT890/User-Guide-352612-Page-31.png)
![30screen. The header bar now displays “To: Home”. Now all of the navigational information displayed is to provide you with the necessary details to get you to your destination, in this case “Home”.Alternate Step 4: Select GOTO Destination Waypoint from Other Categories.As mentioned earlier, a GOTO can be to any waypoint in memory, either ones you have created or ones that have been loaded into the Meridian. When selecting waypoints other then “User”, you are first presented with the keyboard display. The reason for this is there can be thousands of waypoints in the list and using the conventional “scrolling” could take quite a bit of time. By using the keyboard, you will be able to shorten the time by going to a specific point in the list.(If you have been performing the keypresses as you are reading this, then you are probably viewing one of the NAV screens. In which case, you need to press [GOTO] to continue following along with the text. The first thing you will notice is an alert pop-up asking you if you want to clear the GOTO that is active. With “Yes” high-lighted, press [ENTER] to continue.)With “Cities” highlighted and “Alphabetical” in the Find By field, press [ENTER]. This is a slight variation of the keyboard you have already used. This time the “shift” and “backspace” keys have been replaced with “<-” (move cursor left) and “->” (move cursor right). What you want to do here is to begin typing the name of the city you are looking for.For example, suppose your destination was to be Los Angeles. Use the keypad to highlight the letter “L” and press [ENTER]. Notice how the name is changed to the first city stored in the Meridian’s memory that begins with the letter “L” and that the cursor has moved to the next letter in the city name. (You can move the cursor back if you made a mistake by highlighting the “<-” button on the keyboard and press [ENTER].)Since we are looking for Los Angeles, we need to highlight the “O” next and press [ENTER]. Then the “S” and press [ENTER].To add a space, highlight the “space bar” and press [ENTER]. (Also, you can use the “->” button to move the cursor to the right if you want to skip the letter the cursor is indicating.)You don’t need to spell out the entire word. The attempt here is to get close to the name so you won’t need to scroll very far during the next step. As a guide, entering the first five letters should be sufficient. When you are satisfied with what you have entered, highlight “OK” and press [ENTER].Mystic OMc.book Page 30 Wednesday, August 13, 2003 5:26 PM](https://usermanual.wiki/Uniden-America/UT890/User-Guide-352612-Page-32.png)
![31Tip: There is a hidden shortcut that replaces highlighting “OK” and pressing [ENTER]. When you are satisfied that you have narrowed the search down and want to proceed to the list, press the [IN] key.The list of all the waypoints for the category you selected, in this case cities, is displayed with the waypoint that was previously selected at the top of the list. Now just use the Up/Down arrows to highlight the waypoint you are looking for and press [ENTER].For this example, you would highlight Los Angeles, CA and press [ENTER]. The last viewed NAV screen is displayed and the Meridian will begin computing all of the necessary information needed to get you to your destination.Navigating on a GOTO RouteThe Meridian has the ability to provide you with the tools you’ll need to navigate to your destination. You have the choice of three customizable screens that display the information that you need in the layout that you desire. Hikers may find the compass screen perfect for them while boaters may prefer the Large Data or Map screen. For you, the Map screen may have all the information you’ll ever require.Press [NAV] until the navigation screen you want is displayed.If you selected the Map screen, you will see your position icon in the center of the screen with a line drawn for you on the map, graphically displaying the GOTO route.Note that this route is line of sight (LOS) or “as the crow flies.”The Meridian does not compute the route using streets and highways providing a turn-by-turn routing. You’ll find very quickly that you can easily use the roads and highways displayed on the Map screen and compare them to the displayed route and get to your destination quickly.This concludes the basic operation of the Magellan Meridian, but there is so much more. More detail on the mentioned functions, and information on the functions not mentioned can be found in the Reference chapter of the User Manual.GOTO routes are NOT saved in memory when the Meridian is turned off. If you are navigating on a GOTO route and you need to turn the Meridian off, you will need to reset the GOTO. Routes, however, are stored in memory. If you need to make a GOTO but expect to turn the Meridian off Mystic OMc.book Page 31 Wednesday, August 13, 2003 5:26 PM](https://usermanual.wiki/Uniden-America/UT890/User-Guide-352612-Page-33.png)
![32before arriving, you might consider making a 1-leg route using the route menu.Navigational ScreensSelecting NAV Screens — The [NAV] button provides a means of accessing the navigation screens. (Note: the sequence displayed is when all eight navigation screens are turned on. Screens turned off in Setup will not be displayed.)Returning to Last Viewed NAV Screen — Pressing the [NAV] button returns the Meridian to the last NAV Screen viewed.NAV(Note: if the NAV screen is pressed from a screen where data is being input, the data will not be saved.)Map Scale IndicatorProvides the scale for the map. The number displayed represents approximately 1/4 of the screen’s width. Scale can be changed with the IN and OUT buttons.Track HistoryDotted line on the map displays the history of where you have travelled since the last time you cleared the Track History (see Clear Memory in the Reference Chapter.)Data FleldsThese fields display navigational information for viewing on the Map screen. They are both customizable with 13 data types possible.Both of the data fields can be turned on or off allowing more viewable map area.Both features (customize and turning the data on/off) can be accessed from the MENU button.Cursor IconThe Cursor Icon pinpoints the location you have selected by using the arrow keys.Map Scale IndicatorMystic OMc.book Page 32 Wednesday, August 13, 2003 5:26 PM](https://usermanual.wiki/Uniden-America/UT890/User-Guide-352612-Page-34.png)
![33Provides the scale for the map. The number displayed represents approximately 1/4 of the screen’s width. Scale can be changed with the IN and OUT buttons.Waypoint NameWhenever the cursor is over a map object, the name of the map object is displayed, otherwise the word “cursor” appears. The data shown in the information block is the heading and distance from your present position to the cursor.Setting the Map Detail — The detail of the map can be set to highest, high, medium, low or lowest. This changes the zoom level that different map objects (cities, highways, labels, etc.) are displayed. If you have set a zoom level and the display is too cluttered, set the map detail to a lower level; conversely set it to a higher level to view more detail. The default is Medium.Customizing the Map DisplayThe Map screen can be customized for your individual needs and requirements. You can select what is being displayed on the map as well as what additional data will be presented at the bottom of the screen.Customization is broken into two parts; what items are displayed on the map and what data fields (if any) are displayed at the bottom of the screen.Selecting Map ItemsTurning On/Off Display Waypoints — Turns on or off the waypoints on the Map screen. Default is On.Turning On/Off Track Lines — As you move, your track history is normally displayed on the map screen represented by a dashed line. This function allows you to turn off or on these lines. Default is On.Turning On/Off Topographic Lines — [Available only if a map has been uploaded from a Magellan MapSend Topo for the United States CD-ROM] This function will hide all topo lines and topographic information. Default is On.Turning On/Off Displayed POI’s — [Available only if a map has been uploaded from a Magellan MapSend CD-ROM] Allows you to select which, if any, POIs that have been uploaded from a MapSend product to be displayed. Default is On.Mystic OMc.book Page 33 Wednesday, August 13, 2003 5:26 PM](https://usermanual.wiki/Uniden-America/UT890/User-Guide-352612-Page-35.png)
![34Globally Turn Map Items On/Off — If you have uploaded map data from a MapSend product, you will notice that the list of POIs can be extremely lengthy. To aide you in the customization of the display you can turn everything on or off globally.To turn off all map items, follow these instructions.After you have turned off all of the map items, you can go back and just select the POIs that you want to view. Please note that this function will also turn off waypoints, track lines and, if applicable, topo lines. Be sure to turn these back on if you want to see them.Inversely, to globally turn on all of the map items, follow the above steps but select “Mark All” instead of “Clear All”.Setting Up Map Data Fields — The following options are available ONLY if you are in the Position Mode of the Map screen. If you are in the cursor mode, press the [ESC] key and the display will snap back to the Position Mode with the arrow icon displaying your present postion. (If you are not clear on which mode you are in, the simpliest way to determine it is to see what cursor is displayed; an arrow indicates Position and a crosshair indicates Cursor. If you press the [ESC] key and the display changes to another NAV Screen you were in the Position Mode and you can press [NAV] to return to the map.Turning Map Info On/Off — This option allows you to turn on or off the information field that is displayed on the Map screen. Turning this off allows for more of the map to be displayed. Default is “Show Map Info”.When Map Info is hidden and the map is in the cursor mode, the bearing (BRG) and distance (DIS) to the cursor is shown in the bottom left corner of the map replacing the scale. (Note: if you have uploaded topographic information from Magellan’s MapSend Topo for the United States CD-ROM, the elevation at the cursor’s location is displayed, not the bearing and distance.) If the cursor happens to be on a map object, the name of the object is displayed.Selecting the Map Information — This function allows you to select what map information is displayed at the bottom of the screen.Note: If you select either Horizontal Profile or Terrain Projection and you do not have topographic information loaded a warning screen is displayed.Mystic OMc.book Page 34 Wednesday, August 13, 2003 5:26 PM](https://usermanual.wiki/Uniden-America/UT890/User-Guide-352612-Page-36.png)
![35Two Data Fields Description — This option displays two boxes at the bottom of the map that can display data that you choose. Displaying these data fields is the default for the Meridian.Possible Map Information OptionsTwo Data FieldsThis option displays two fields at the bottom of the display. These fields are customizable and can be set to any of 13 different data options.Street InfoThis option displays an information block at the bottom of the display showing the name of the street your present position or cursor is on. If in the cursor mode, the bearing and distance from your present position is displayed.Horizontal Profile(Available only with MapSend Topographic data loaded into the Meridian.) This displays an information box which graphically depicts the horizon in front of you. The displayed horizion is at the mark displayed on the display perpendicular to your track. Selecting this option automatically sets the display orientation to track up and works only in the Position Mode. Changing to the Cursor Mode will replace the horizontal profile with the cursor data.Terrain Projection(Available only with MapSend Topographic data loaded into the Meridian.) This displays an information box which graphically depicts the terrain in front of you. The displayed terrain is approximately from your present position to the edge of the display. Selecting this option automatically sets the display orientation to track up and works only in the Position Mode. Changing to the Cursor Mode will replace the horizontal profile with the cursor data.Changing the Data Fields — Allows you to change the data that is being displayed to 1 of 13 different data options (bearing, distance, speed, heading, VMG, CTS, ETA, ETE, XTE, turn, elevation, time, or date). Note: If you have selected Hide Map Info, this option will not be available in the menu. Also, you must have the Two Data Fields displayed on the Map screen to be able to customize them.Press [ESC] when you are done to leave the customize mode.Mystic OMc.book Page 35 Wednesday, August 13, 2003 5:26 PM](https://usermanual.wiki/Uniden-America/UT890/User-Guide-352612-Page-37.png)
![40When you turn the Mystic on for the first time, it is not set up. The basic radio operation is available (transmitting and receiving on Marine channels, and receiving WX channels. However, to use the advancd features of your Mystic, such as Digital Selective Calling, GPS mapping, and S.A.M.E. weather alerts, you need to enter data into the radio’s memory. This section covers setup of both the radio functions and the GPS functions.Using the Mystic keysYour Mystic has 11 keys and a four-way cursor. Of the 11 keys, 6 are dual-function. That is, you press that key to access one function, and you press and hold that key to access another.Example:Press [WX/ALERT] to change from the VHF Channels to the Weather Channels. Press and hold [WX/ALERT] to set the Weather Alert Mode.The cursor keys (pqtu) are used to: change Channels, alternate Navigation screens, and select itmes in the Menu screens.The [MENU] key isused to access the Menu screen. When you are at the Menu screen, use pqtu to select the next Menu, and press [ENTER]. That will take you to the next Menu, or the next selection to modify. To stop from selecting any item, press [ESC].NAV UnitsYou can select the units of measure that Meridian will use; Miles/Yards/MPH, Miles/Feet/MPH (default), Nautical Miles/Feet/Knots or Kilometers/Kilometers per hour.To change the Nav Units of Measure press [MENU]. Use the Up/Down arrows to highlight “Setup” and press [ENTER]. Use the Up/Down Arrows to highlight “NAV Units” and press [ENTER].Use the Up/Down arrows to highlight the unit of measure that you want and press [ENTER].Press [ESC] to return to the last screen viewed.Entering Channel numbers into Memory ScanYou can enter channels into Memory Scan for instant scanning at any time. When a channel is selected for Memory Scan, MEMORY appears on the LCD display. To enter a channel into Memory Scan, select the channel Mystic SetupMystic OMc.book Page 40 Wednesday, August 13, 2003 5:26 PM](https://usermanual.wiki/Uniden-America/UT890/User-Guide-352612-Page-42.png)
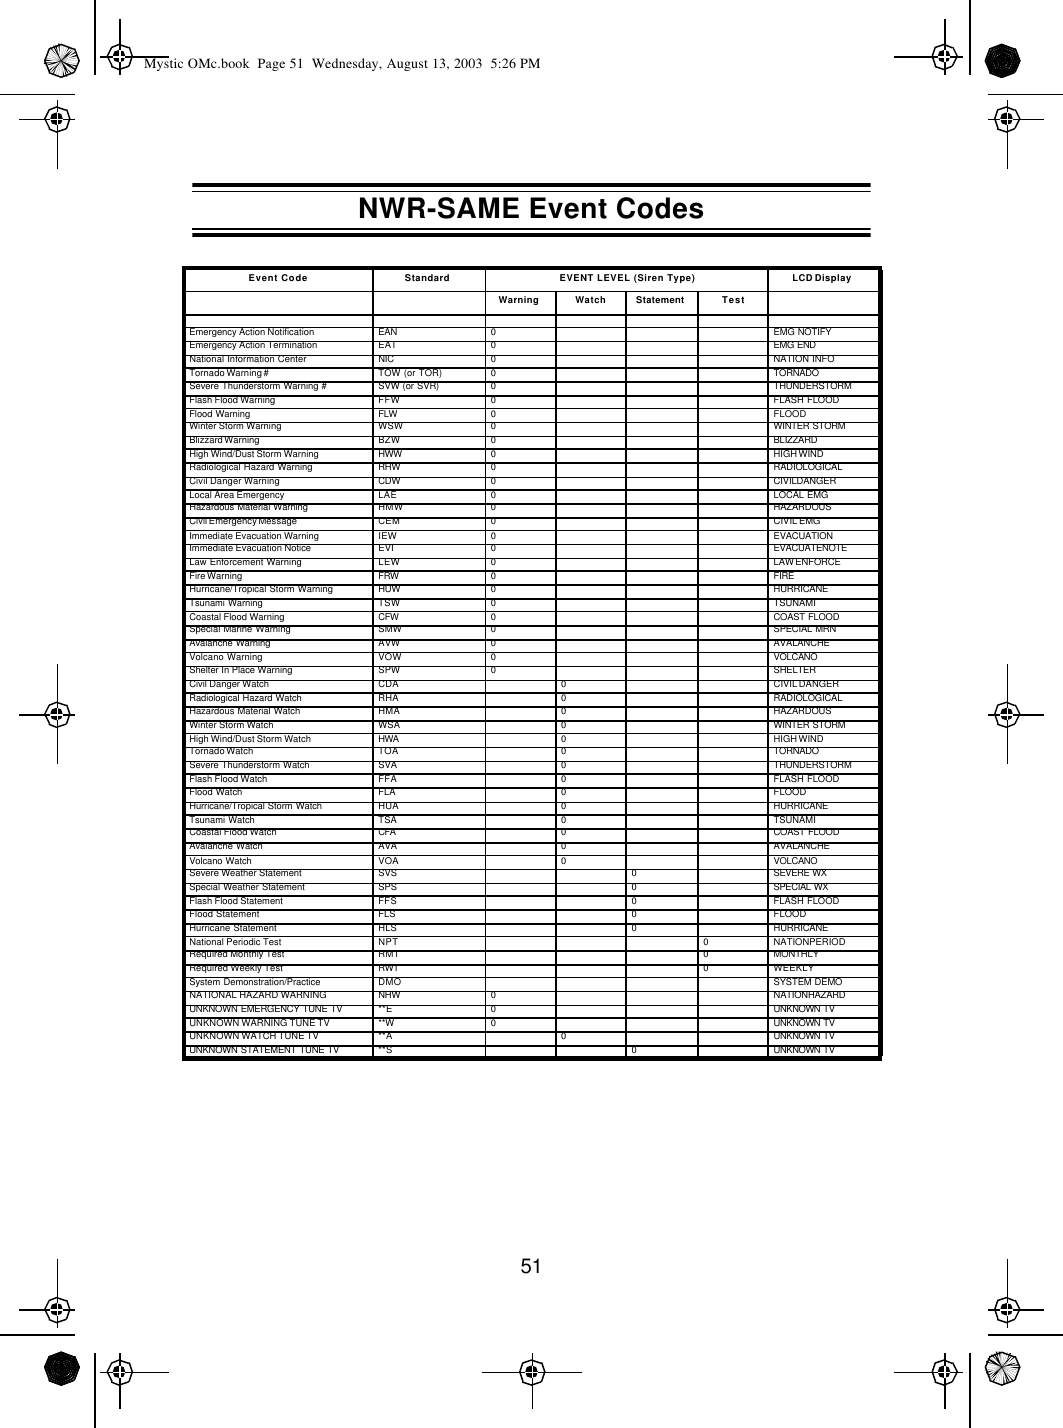
![41you want to store by pressing p or q, and then press and hold [SCAN/MEMORY] for 2 seconds. The channel is stored in Memory Scan and MEMORY appears on the LCD display.To cancel the channel in Memory, press and hold [SCAN/MEMORY] for 2 seconds and the MEMORY icon disappears.Note: The Memory channel can be set independently in 3 regional modes (USA, INT, and CAN). You cannot use this feature in WX mode or for channel 70.FIPSThe 6-digit Federal Information Processing System (FIPS) code established by the National Weather Service (NWS) identifies geographic areas in the United States. Programming FIPS codes are necessary to receive SAME alerts about weather occurring in a particular area. To obtain the FIPS code for a particular area contact the NWS toll free at 1-888-NWR-SAME (1-888-697-7263). Or visit their website: http://www.nws.noaa.gov/nwr/indexnw.htm. A list of event codes are located on page 70.To set FIPS code1.Press ENTER for 2 seconds.2.Press ENTER at VHF Menu, the VHF menu appears.3.Press ENTER.1.Press ENTER for 2 seconds.2.Press ENTER at VHF Menu, the VHF menu appears.3.Press ENTER at FIPS.4.Press ENTER at NEW, the following screen appears. 5.You can now enter the new FIPS code. Press s to increase and press t to decrease. The number will be entered when ENTER is pressed, and the blinking digit moves to the right. When you finished entering the last digit, the following confirmation screen appears. 6.Press ENTER and the MYSTIC returns to the following screenEDITIf you select a number to EDIT.Mystic OMc.book Page 41 Wednesday, August 13, 2003 5:26 PM](https://usermanual.wiki/Uniden-America/UT890/User-Guide-352612-Page-43.png)