Uniden America UT890 Portable Marine VHF Transmitter with GPS User Manual Mystic OMc
Uniden America Corporation Portable Marine VHF Transmitter with GPS Mystic OMc
Owners Manual
Operating Guide
Mystic OMc.book Page 1 Wednesday, August 13, 2003 5:26 PM
Maritime Radio Services Operation
Warning
For individuals requiring a license, such as commercial users, you should
obtain a license application from your nearest FCC field office.
This transmitter will operate on channels/frequencies that have
restricted use in the United States. The channel assignments include
frequencies assigned for exclusive use of the U.S. Coast Guard, use in
Canada, and use in international waters. Operation in these
frequencies without proper authorization is strictly forbidden. For
frequencies/channels that are currently for use in the U.S. without an
individual license, please contact the FCC Call Center at 1-888-CALL-
FCC.
Mystic OMc.book Page 2 Wednesday, August 13, 2003 5:26 PM

1
Included with your Mystic VHF/GPS Marine Radio. . . . . . . . . . . . . . . . . . . . . . . . . . . . . 2
Mystic Controls and Keys . . . . . . . . . . . . . . . . . . . . . . . . . . . . . . . . . . . . . . . . . . . . . . . . . 3
Channel and Navigation Screen . . . . . . . . . . . . . . . . . . . . . . . . . . . . . . . . . . . . . . . . . . . . . . . . . . . . 4
Mystic LCD Display . . . . . . . . . . . . . . . . . . . . . . . . . . . . . . . . . . . . . . . . . . . . . . . . . . . . . . 4
Features . . . . . . . . . . . . . . . . . . . . . . . . . . . . . . . . . . . . . . . . . . . . . . . . . . . . . . . . . . . . . . . . . . . . . . . 5
Introduction . . . . . . . . . . . . . . . . . . . . . . . . . . . . . . . . . . . . . . . . . . . . . . . . . . . . . . . . . . . . 5
Power On/Off . . . . . . . . . . . . . . . . . . . . . . . . . . . . . . . . . . . . . . . . . . . . . . . . . . . . . . . . . . . . . . . . . . . 6
Basic VHF Radio Operation. . . . . . . . . . . . . . . . . . . . . . . . . . . . . . . . . . . . . . . . . . . . . . . . 6
Squelch . . . . . . . . . . . . . . . . . . . . . . . . . . . . . . . . . . . . . . . . . . . . . . . . . . . . . . . . . . . . . . . . . . . . . . . 7
Manual Tuning . . . . . . . . . . . . . . . . . . . . . . . . . . . . . . . . . . . . . . . . . . . . . . . . . . . . . . . . . . . . . . . . . . 9
Weather Channels . . . . . . . . . . . . . . . . . . . . . . . . . . . . . . . . . . . . . . . . . . . . . . . . . . . . . . . . . . . . . . . 9
Instant Channel 16/channel 9 Communications . . . . . . . . . . . . . . . . . . . . . . . . . . . . . . . . . . . . . . . . 9
Triple Watch . . . . . . . . . . . . . . . . . . . . . . . . . . . . . . . . . . . . . . . . . . . . . . . . . . . . . . . . . . . . . . . . . . . 10
Transmitting . . . . . . . . . . . . . . . . . . . . . . . . . . . . . . . . . . . . . . . . . . . . . . . . . . . . . . . . . . . . . . . . . . . 11
Marine Distress Procedure . . . . . . . . . . . . . . . . . . . . . . . . . . . . . . . . . . . . . . . . . . . . . . . . . . . . . . . 12
Instant Distress Call . . . . . . . . . . . . . . . . . . . . . . . . . . . . . . . . . . . . . . . . . . . . . . . . . . . . . . . . . . . . . 13
Advanced VHF Operations . . . . . . . . . . . . . . . . . . . . . . . . . . . . . . . . . . . . . . . . . . . . . . . . . . . . . . . 13
Position Fix . . . . . . . . . . . . . . . . . . . . . . . . . . . . . . . . . . . . . . . . . . . . . . . . . . . . . . . . . . . . . . . . . . . 14
GPS Basic Operations . . . . . . . . . . . . . . . . . . . . . . . . . . . . . . . . . . . . . . . . . . . . . . . . . . . 14
Navigational Screens . . . . . . . . . . . . . . . . . . . . . . . . . . . . . . . . . . . . . . . . . . . . . . . . . . . . . . . . . . . . 15
Accessing the Navigation Screens . . . . . . . . . . . . . . . . . . . . . . . . . . . . . . . . . . . . . . . . . . . . . . . . . 18
Waypoints . . . . . . . . . . . . . . . . . . . . . . . . . . . . . . . . . . . . . . . . . . . . . . . . . . . . . . . . . . . . . . . . . . . . 19
Saving a Waypoint . . . . . . . . . . . . . . . . . . . . . . . . . . . . . . . . . . . . . . . . . . . . . . . . . . . . . . . . . . . . . . 19
Using GOTO Routes . . . . . . . . . . . . . . . . . . . . . . . . . . . . . . . . . . . . . . . . . . . . . . . . . . . . . . . . . . . . 19
Creating a GOTO Route . . . . . . . . . . . . . . . . . . . . . . . . . . . . . . . . . . . . . . . . . . . . . . . . . . . . . . . . . 20
Navigating on a GOTO Route . . . . . . . . . . . . . . . . . . . . . . . . . . . . . . . . . . . . . . . . . . . . . . . . . . . . . 21
Digital Selective Calling (DSC) . . . . . . . . . . . . . . . . . . . . . . . . . . . . . . . . . . . . . . . . . . . . . . . . . . . . 23
Advanced VHF Radio Operations . . . . . . . . . . . . . . . . . . . . . . . . . . . . . . . . . . . . . . . . . . 23
Modifying a Waypoint with a Custom Icon and Name . . . . . . . . . . . . . . . . . . . . . . . . . . . . . . . . . . . 28
Adding a Message to a Waypoint . . . . . . . . . . . . . . . . . . . . . . . . . . . . . . . . . . . . . . . . . . . . . . . . . . 28
GPS Advanced Operations . . . . . . . . . . . . . . . . . . . . . . . . . . . . . . . . . . . . . . . . . . . . . . . 28
Navigational Screens . . . . . . . . . . . . . . . . . . . . . . . . . . . . . . . . . . . . . . . . . . . . . . . . . . . . . . . . . . . . 32
Using the Mystic keys . . . . . . . . . . . . . . . . . . . . . . . . . . . . . . . . . . . . . . . . . . . . . . . . . . . . . . . . . . . 40
NAV Units . . . . . . . . . . . . . . . . . . . . . . . . . . . . . . . . . . . . . . . . . . . . . . . . . . . . . . . . . . . . . . . . . . . . 40
Entering Channel numbers into Memory Scan . . . . . . . . . . . . . . . . . . . . . . . . . . . . . . . . . . . . . . . . 40
Mystic Setup . . . . . . . . . . . . . . . . . . . . . . . . . . . . . . . . . . . . . . . . . . . . . . . . . . . . . . . . . . . 40
FIPS . . . . . . . . . . . . . . . . . . . . . . . . . . . . . . . . . . . . . . . . . . . . . . . . . . . . . . . . . . . . . . . . . . . . . . . . . 41
VHF FM Marine Radio Telephone Channel and Functions (USA Channels). . . . . . . . 48
VHF FM Marine Radio Telephone Channel and Functions (Int Channels) . . . . . . . . . 49
VHF FM Marine Radio Telephone Channel and Functions (CAN Channels) . . . . . . . 50
NWR-SAME Event Codes . . . . . . . . . . . . . . . . . . . . . . . . . . . . . . . . . . . . . . . . . . . . . . . . 51
Specifications . . . . . . . . . . . . . . . . . . . . . . . . . . . . . . . . . . . . . . . . . . . . . . . . . . . . . . . . . . 52
Troubleshooting. . . . . . . . . . . . . . . . . . . . . . . . . . . . . . . . . . . . . . . . . . . . . . . . . . . . . . . . 53
Care and Maintenance . . . . . . . . . . . . . . . . . . . . . . . . . . . . . . . . . . . . . . . . . . . . . . . . . . . 54
Contents
Mystic OMc.book Page 1 Wednesday, August 13, 2003 5:26 PM
2
If any of these items are missing or damaged, contact ????
Pictures and descriptions of items included with Maystic.
Included with your Mystic VHF/GPS Marine Radio
Mystic OMc.book Page 2 Wednesday, August 13, 2003 5:26 PM
3
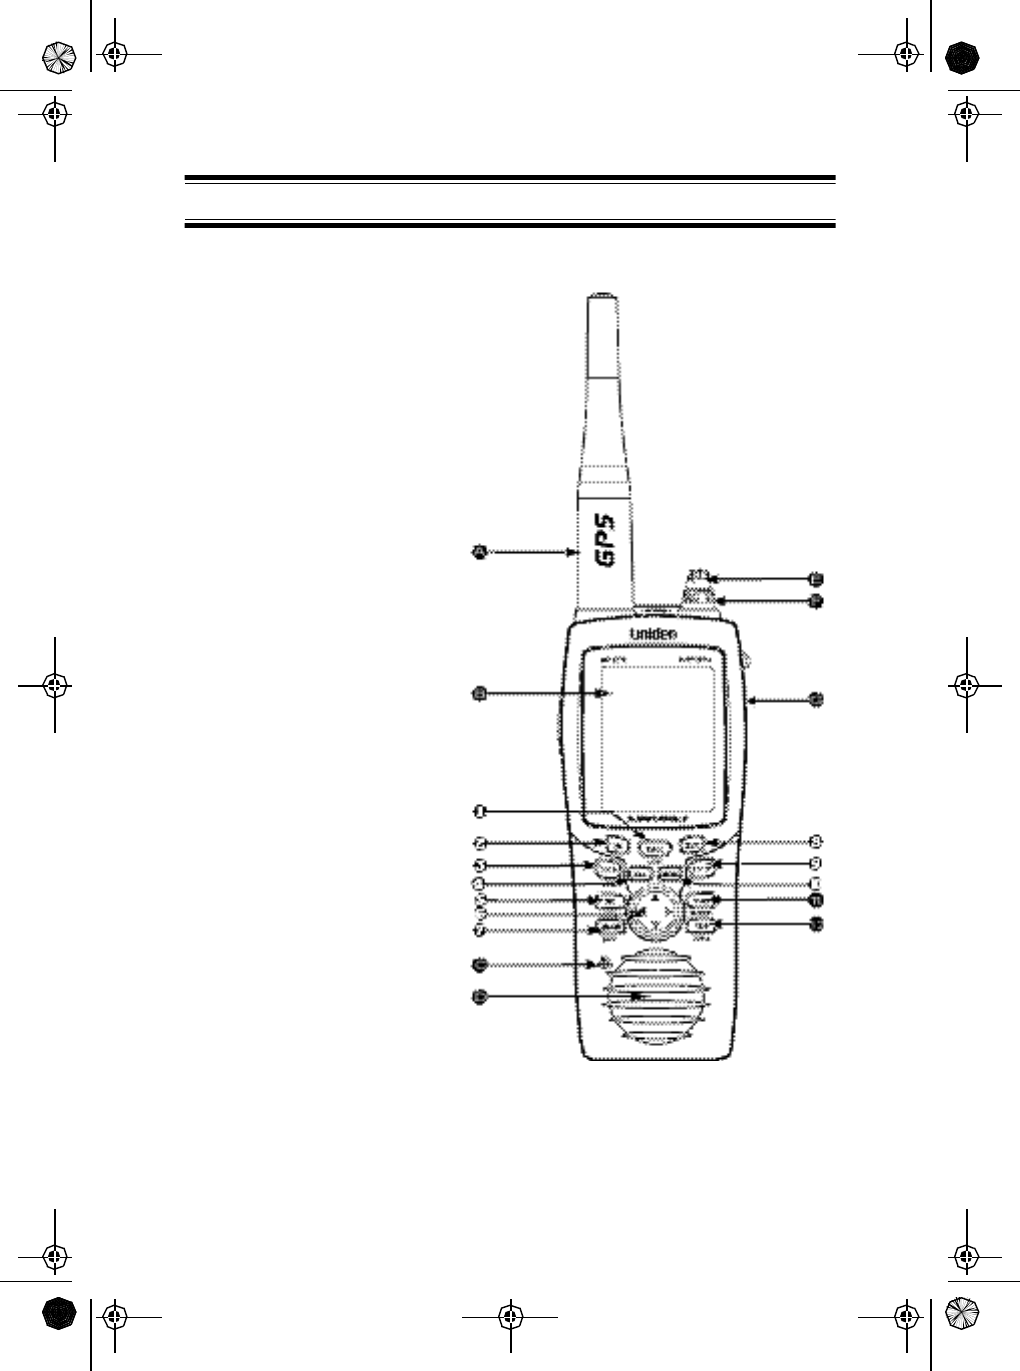
Controls
A. Antenna
B. LCD Display
C. Push-To-Talk button
D. Microphone
E. Speaker
F. On/Off/Volume control
G. Squelch control
H. DISTRESS button
Keys
1. CALL/LIGHT -Press to place a
Digital Selective Call.
Press and hold to turn on
Backlight.
2. IN - Press to zoom into a
Navigation Map.
3. GOTO/MARK - Press to create
a GOTO Route.
Press and hold to mark a
Waypoint.
4. ESC - Press to go back from a
Menu screen or a Navigation
screen.
5. WX/ALERT - Press to access
the Weather Channels.
Press and hold to turn Weather
Alert On or Off.
6. Cursor keys pqtu -
Press to move cursor up or
down on screens and maps.
7. 1W/5W/LOCK - Press to
change between 1 Watt and 5
Watt transmit power.
Press and hold to ????
8. OUT - Press to zoom out on a
Navigation Map.
9. ENTER - Press to accept
selection in any Menu screen.
10. MENU - Press to access Mystic
Menu screens.
11. SCAN/MEMORY - Press to
scan Channels stored in
memory.
Press and hold to enter
Channels into memory.
12. 16/9/TRIPLE - Press to access
instant Channel 16 or Channel
9 communications.
Press and hold to activate
Triple Watch Scan.
Mystic Controls and Keys
Mystic OMc.book Page 3 Wednesday, August 13, 2003 5:26 PM
4
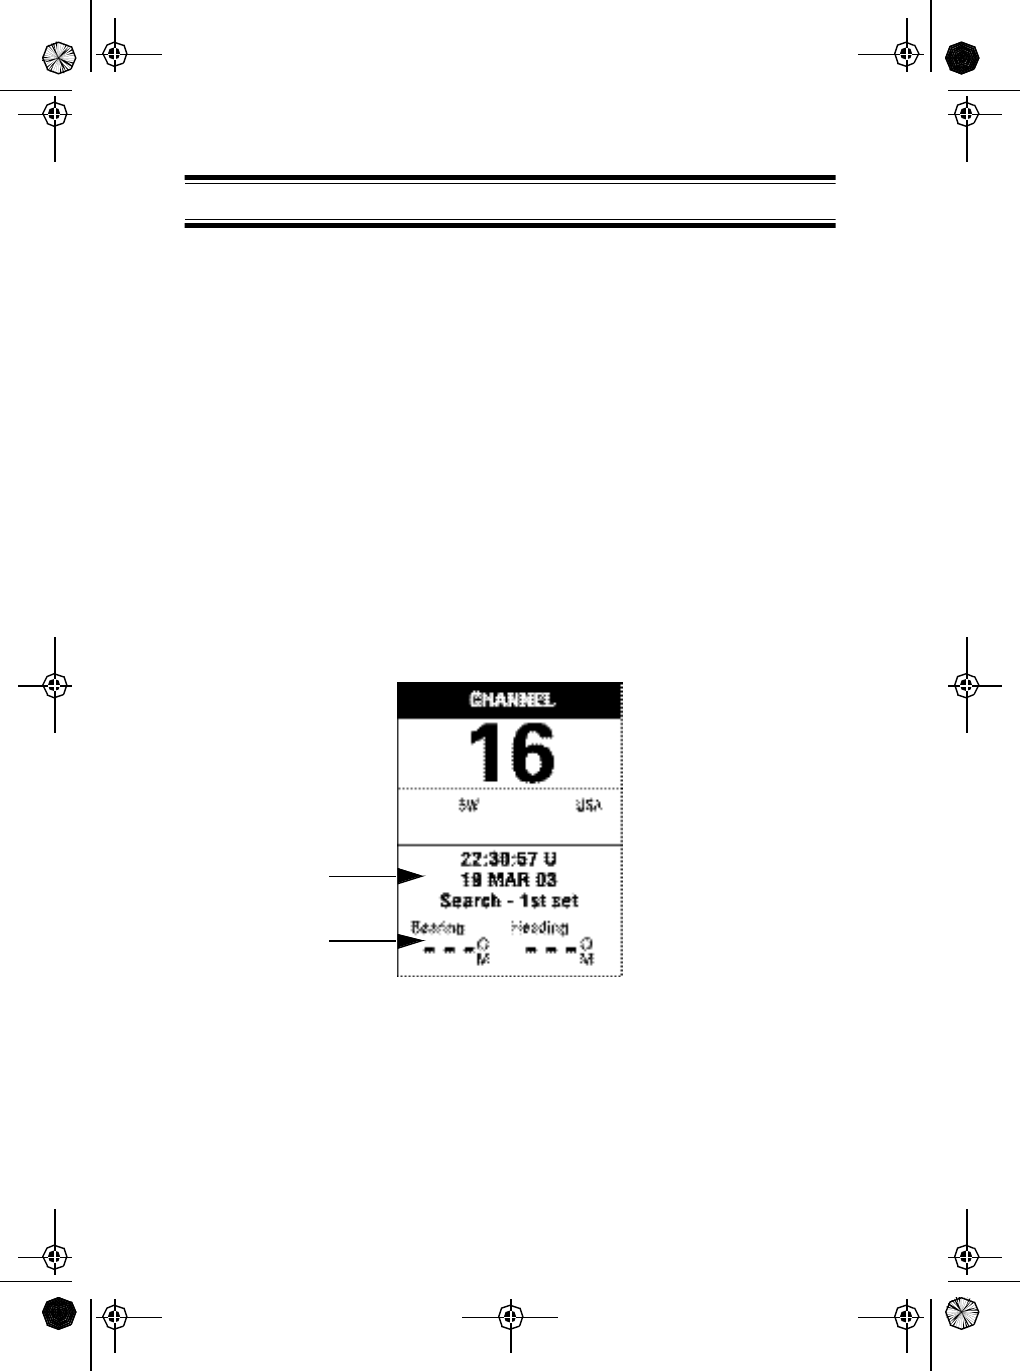
Channel and Navigation Screen
The default Channel and Navigation Screen has four main sections:
Channel display - displays the VHF radio channel selected. The
Mystic has Last Channel Memory. The radio memorizes the last
channel selected before you turn Off the radio. Example, if you turn
Off the MYSTIC on CH 16, the radio will be on that channel when
turned back On.
VHF radio mode - indicates the mode the radio is in (TX, WX, ALERT,
etc.)
GPS information - displays the date and time, and GPS information
such as: satellite being acquired, computing fixes, and Estimated
Position Error (EPE). This information is explained in the Basic GPS
Operation Section (page ).
Customizable data fields - These fields can be set to display data
from 13 different options, such as: bearing, distance, speed, etc.
Channel display
GPS information
Customizable
data fields
VHF radio mode
Mystic LCD Display
Mystic OMc.book Page 4 Wednesday, August 13, 2003 5:26 PM
5
Congratulations on your purchase of the Mystic full VHF/GPS Mapping
Marine Radio. The Mystic is designed with exacting standards to provide
reliability, long life, and outstanding performance.
Features
The included MapSend™ Streets and Destinations USA software
enhances the utility of your Mystic radio with greater mapping detail and
usefule information capabilities. Using the Dataport on your Drop-in
Charger, connected to a PC, you can upload data to your Mystic for any
region in the United States.
To get the most from your radio, please read this Operating Guide
thoroughly. This guide contains information about your radio, and the GPS
mapping capbilities.
If this is the first time you are using this Mystic, complete all the steps in
the Setup section (page )before attempting communications or GPS
usage.
lJIS7 Submersible lFull Screen Mapping
GPS
lTriple Watch Plus lLarge Data display
Screens
lMemory Scan lFull Navigation Screens
lDSC (Digital Selective
Calling
lCalling Party Position
Indication
lLithium-Ion Battery lCompass Screen
lDrop-in Charger with
Dataport
lS.A.M.E. WX
lSwivel Belt Clip lSatellite Status Screen
lAll USA, Canadian, &
International Marine
Channels
lPC Interface for Upload-
ing and Downloading
Map Information
Introduction
Mystic OMc.book Page 5 Wednesday, August 13, 2003 5:26 PM
6
Power On/Off
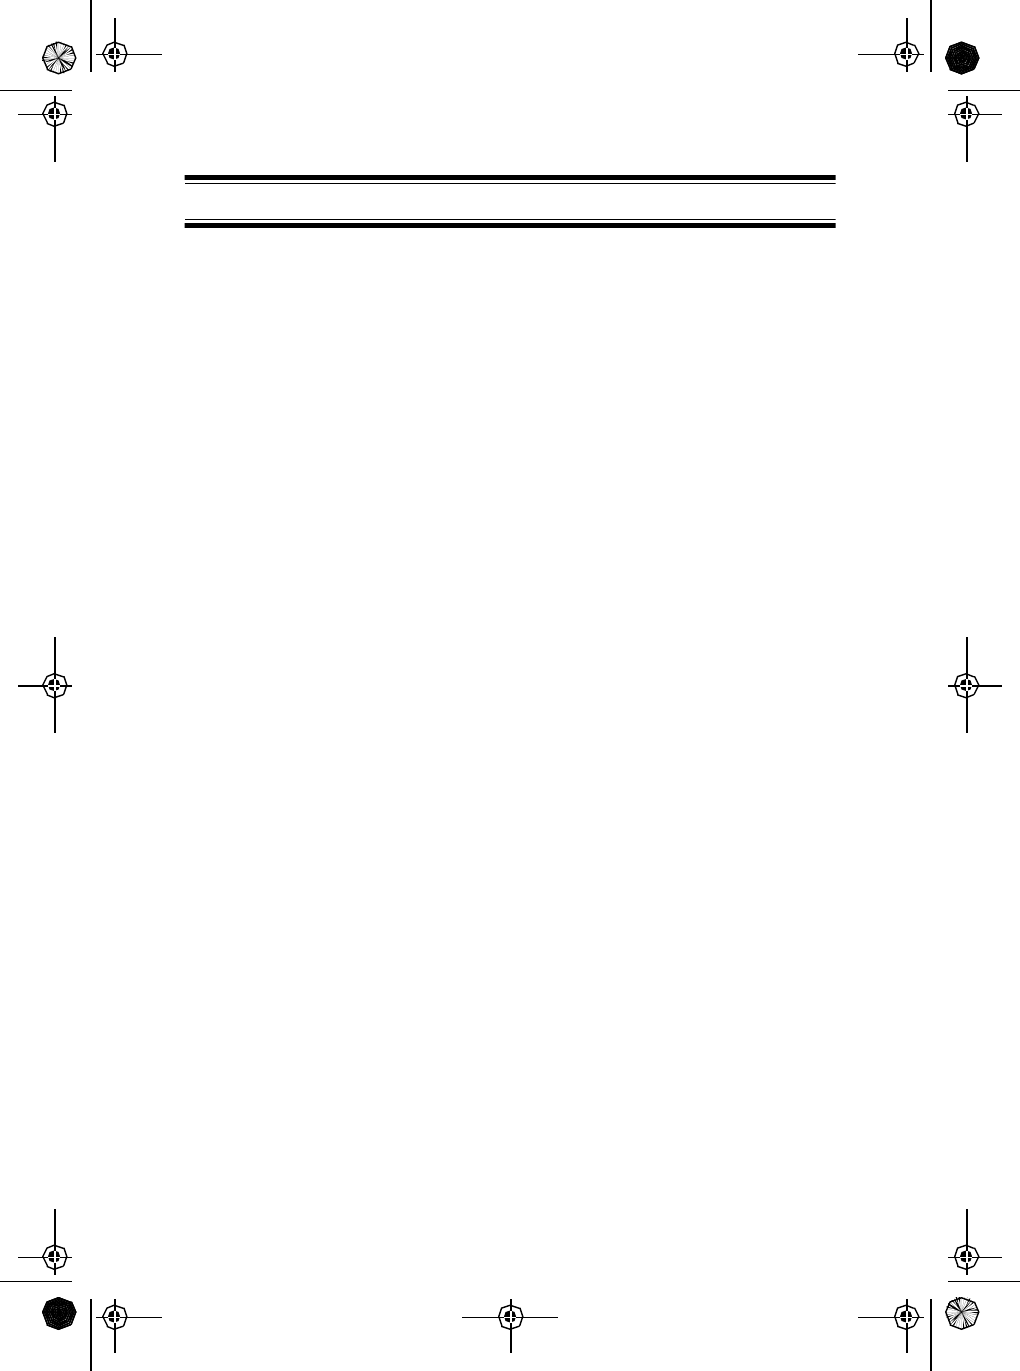
Turn the unit On by rotating the VOL control
clockwise.
Adjust the volume to a comfortable level.
When you turn the unit On, you will hear a beep and the following
message appears and remains on the display for 7 seconds.
After 7 seconds, the display changes to the Warning message:
Basic VHF Radio Operation
Mystic OMc.book Page 6 Wednesday, August 13, 2003 5:26 PM
7
The Warning mesage remains displayed for 10 seconds. During that time,
press the [ENTER] key to agree to the information on the screen.The
display then changes to the default Channel and Navigation screen.
Note: If you don’t press the [ENTER] key while the Warning message
is displayed, you will not have the GPS available when you
proceed to the Channel and Navigation screen. The message
will read: “GPS Unavailable”.
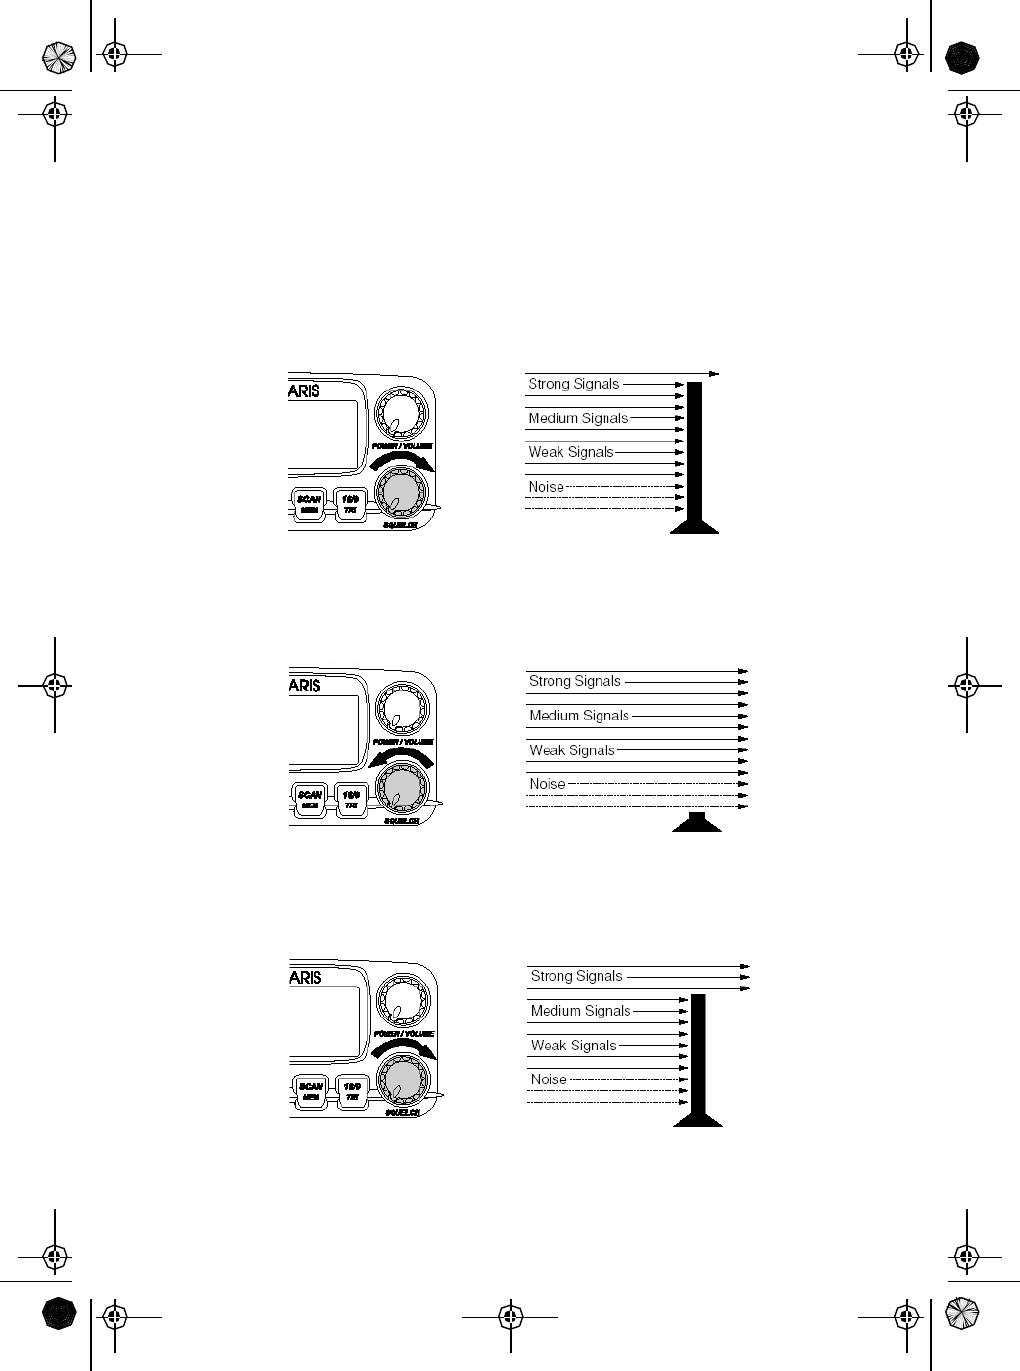
Squelch
The SQUELCH control allows you to set the “threshhold” at which signals
can be heard. This allows you to determine how strong a signal must be
before it “breaks squelch”. That is, how strong it must be before you can
hear it. This keeps static and unwanted weak or distant signals from
breaking into your desired conversations.
Mystic OMc.book Page 7 Wednesday, August 13, 2003 5:26 PM
8
To set the Squelch level:
1. Turn the SQUELCH control fully clockwise. This raises the
“Squelch Gate” so high that only very strong signals can get
through.
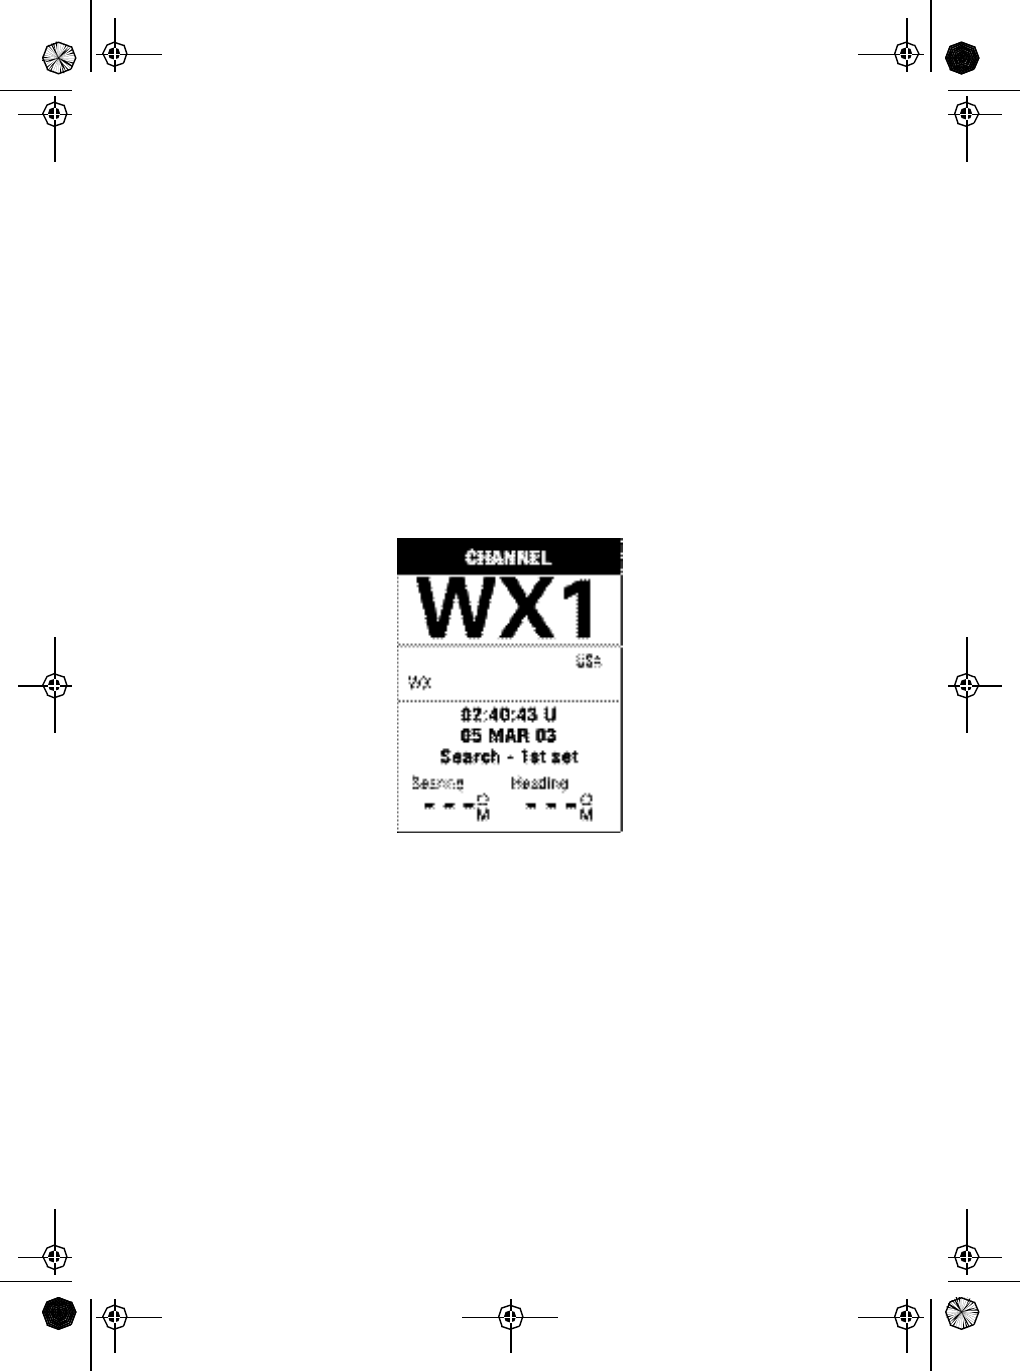
2. Turn the SQUELCH control fully counterclockwise until you hear a
hiss. This lowers the “Squelch Gate” so that everything gets
through - noise, weak signals, and strong signals.
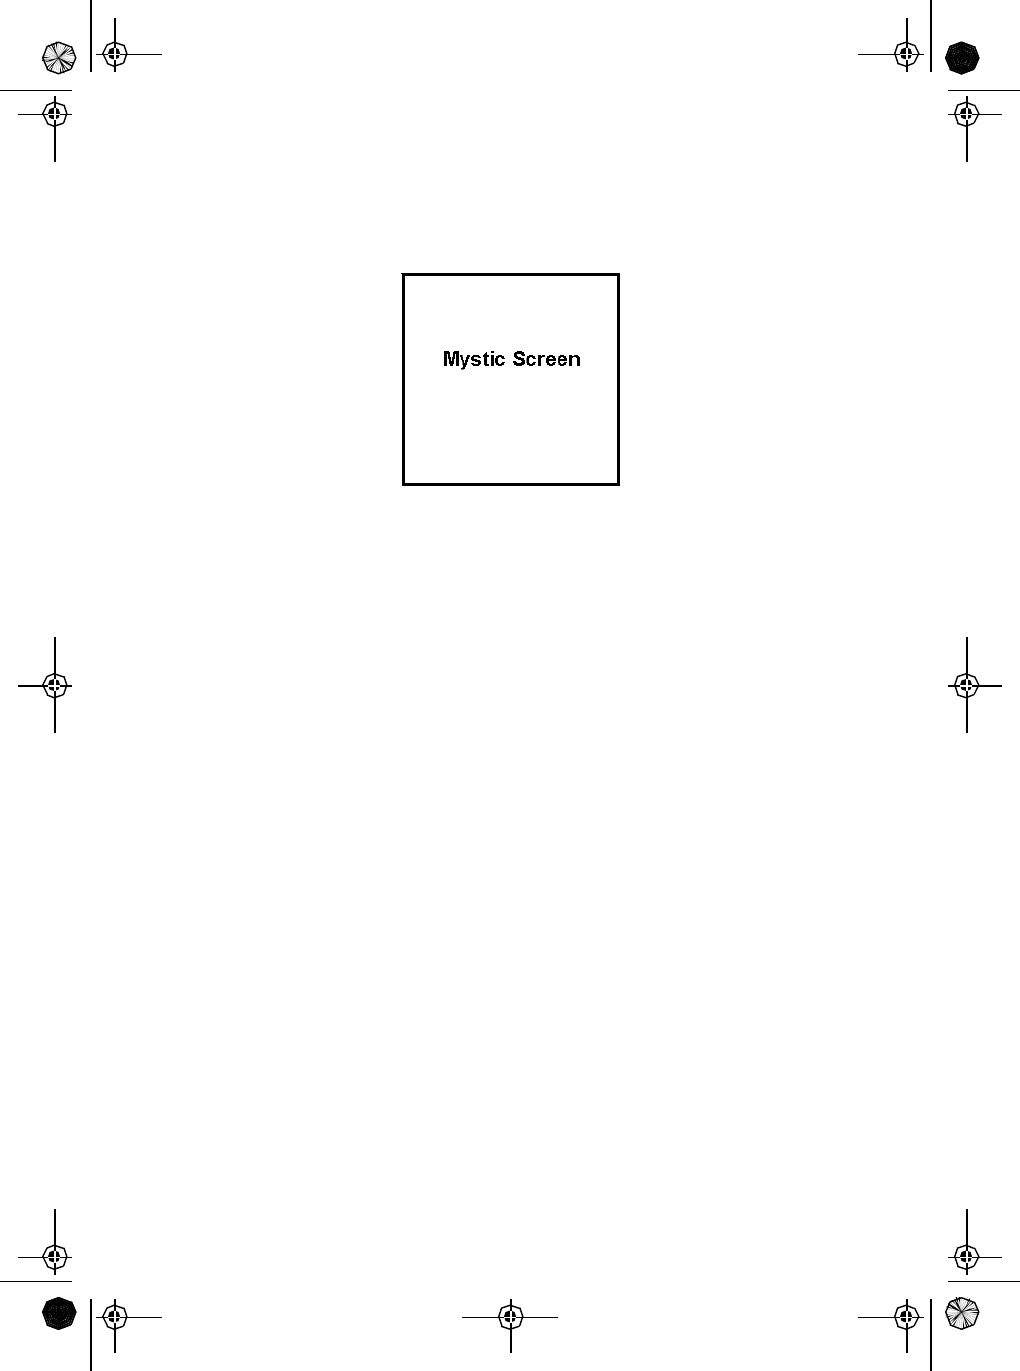
3. Turn the SQUELCH control back clockwise just until the hiss
stops. Now the “Squelch Gate” allows only signals of the desired
strength through.
Mystic OMc.book Page 8 Wednesday, August 13, 2003 5:26 PM
9
Manual Tuning
To manually select a channel, press the p cursor key to increase the
channel number, or press the q cursir key to decrease the channel
number. Communication channels are located on channel 01-28 and 60-
88.
Weather Channels
Weather channels are located on channels 0-9. To select Weather
Channels 0-9, press the [WX/ALERT] key. The radio will go to the last
selected Weather Channel.
Press the p cursor key or the q cursor key to select a different Weather
Channel.
To exit from Weather channels, press any of these keys: [DISTRESS],
[SCAN/MEMORY], or [WX/ALERT]. The radio returns to the previous
Marine channel.
Instant Channel 16/channel 9 Communications
To access instant Channel 16 or Channel 9 communications, press the
[16/9/TRIPLE] key. You can access Channel 16 instantly while tuned to
another channel. Press the [16/9/TRIPLE] key again to access Channel 9
communications. Press and release the [16/9/TRIPLE] key a third time to
return to the channel selected prior to accessing instant Channel 16/
Channel 9 commnunications.
Mystic OMc.book Page 9 Wednesday, August 13, 2003 5:26 PM

10
The display will indicate the selected channel.
To cancel Channel 16/Channel 9 communications:
lPress the [16/9/TRIPLE] key until the previous channel setting
appears.
--or--
lPress any of the following keys: [DISTRESS], [p], [q],
[SCAN/MEMORY], or [16/9/TRIPLE].
Triple Watch
Triple Watch monitors Channel 16, Channel 9, and the current Marine
Channel or Weather Channel.
To activate Triple Watch, press and hold the [16/9/TRIPLE] key for 2
seconds. TRIPLE appears on the display, indicating the Triple Watch
mode is in effect.
Mystic OMc.book Page 10 Wednesday, August 13, 2003 5:26 PM
11
If a signal is received on either Channel 16 or Channel 9, the radio will
change to that channel and remain until the signal ends.
Note: While in Triple Watch mode, you can change the currently
selected VHF channel using the PUSH – SELECT knob.
A momentary press of the [16/9/TRIPLE] key interrupts Triple
Watch mode and causes the radio to remain on channel 16.
Pressing the [16/9/TRIPLE] key again causes the radio to
remain on channel 9. To return to the Triple Watch mode,
simply press the [16/9/TRIPLE] key again.
To cancel the Triple Watch mode, press and hold the [16/9/TRIPLE] key
for 2 seconds.
Transmitting
The Mystic transmits on fifty-five marine frequencies and receives on
eighty marine frequencies. Channel 70 of the USA, International, and
Canadian frequencies, and channel 15, of the USA frequencies, and WX
CH – are for receiving only. The Mystic transmits on channel 70 when
sending DSC information. Your radio will not transmit on these channels.
For your reference, a listing of all the available marine channels are
located on pages 48, 49, and 50.
Before transmitting, set theTX ouput:
Caution: It is important to remember to use the 1W setting in port or for
short range communications.
Mystic OMc.book Page 11 Wednesday, August 13, 2003 5:26 PM
12
1. When you turn the Mystic On for the
first time, the unit is automatically set to
transmit at 5 watts (HI).
2. Press the [1W/5WLOCK] key to
change the transmitter output to 1 watt
(LO).
3. Press the [1W/5WLOCK] key again to
change back to 5 watts (HI).
Note: Each time the [1W/5WLOCK] key is pressed a short tone
sounds. Certain channels are set as 1 watt (LO) channels. They
are: 13 and 67 for the USA channels, and 13, 15, 17, and 20 for
the CAN channels. When the channel is set as a LO power
channel, you can transmit at 5 watts (HI) by pressing and
holding the [1W/5WLOCK] key during the call.
Marine Distress Procedure
Speak slowly – clearly – calmly.
1. Make sure your radio is On.
2. Tune to Channel 16.
3. Press the PTT button on the radio and say: "MAYDAY – MAYDAY
– MAYDAY."
4. Give your ship ID.
5. Say "MAYDAY [your ship name]."
6. Give your location: (what navigational aids or landmarks are near).
7. State the nature of your distress.
8. Give the number of persons aboard and the conditions of any
injured.
Mystic OMc.book Page 12 Wednesday, August 13, 2003 5:26 PM
13
9. Estimate present seaworthiness of your vessel
10. Give a brief description of your vessel (meters, type, color, hull).
11. Say: "I will be listening on Channel 16".
12. End message by saying "THIS IS [your ship name or call sign]
OVER."
13. Release the PTT button and listen. Someone should answer.
14. If not, repeat call, beginning at Item 3 above.
Instant Distress Call
This feature is used to transmit a Distress call with position information
that may result in a quicker response.
Note: You must set the user MMSI in order to send a Distress call.
Refer to the Setup Section to set the MMSI.
1. To transmit a Distress call, press and
hold [DISTRESS] for 5 seconds.
When the Distress screen appears,
press p or q to select Yes or No. If
you select No, the radio returns to the
channel display screen.
2. To transmit the call, select yes and
press [ENTER] to send.
3. The Distress call is transmitted and it
waits for about 210 - 270 seconds.
This is continued internally. After the
Distress call has been sent, the
Distress alert will sound every other
second, and it also "shadow-watches"
for a transmission between CH16 and CH70 until an
acknowledgment signal is received from the Coast Guard shore
station.
4. To cancel the Distress call, press [?] .
Advanced VHF Operations
Advanced VHF Radio Operation is covered starting on page23.
Mystic OMc.book Page 13 Wednesday, August 13, 2003 5:26 PM
14
Position Fix
Note: If this is the first time you are using the Mystic in GPS mode,
you must set up the GPS parameters. See the GPS Setup
Section () for the correct procedure.
Once the Mystic has been set up, you should automatically get a position
fix when you turn the radio on.
Because the Mystic gets the information it needs from satellites orbiting
the earth, the radio needs to have a relatively unobstructed view of the
sky. This allows the Mystic to choose from all satellites currently available.
If the view of the sky is poor due to large cliffs, mooring roofs, buildings,
heavy foliage or other obstructions, the satellite signals can be blocked
and the GPS receiver may take longer to compute a position fix.
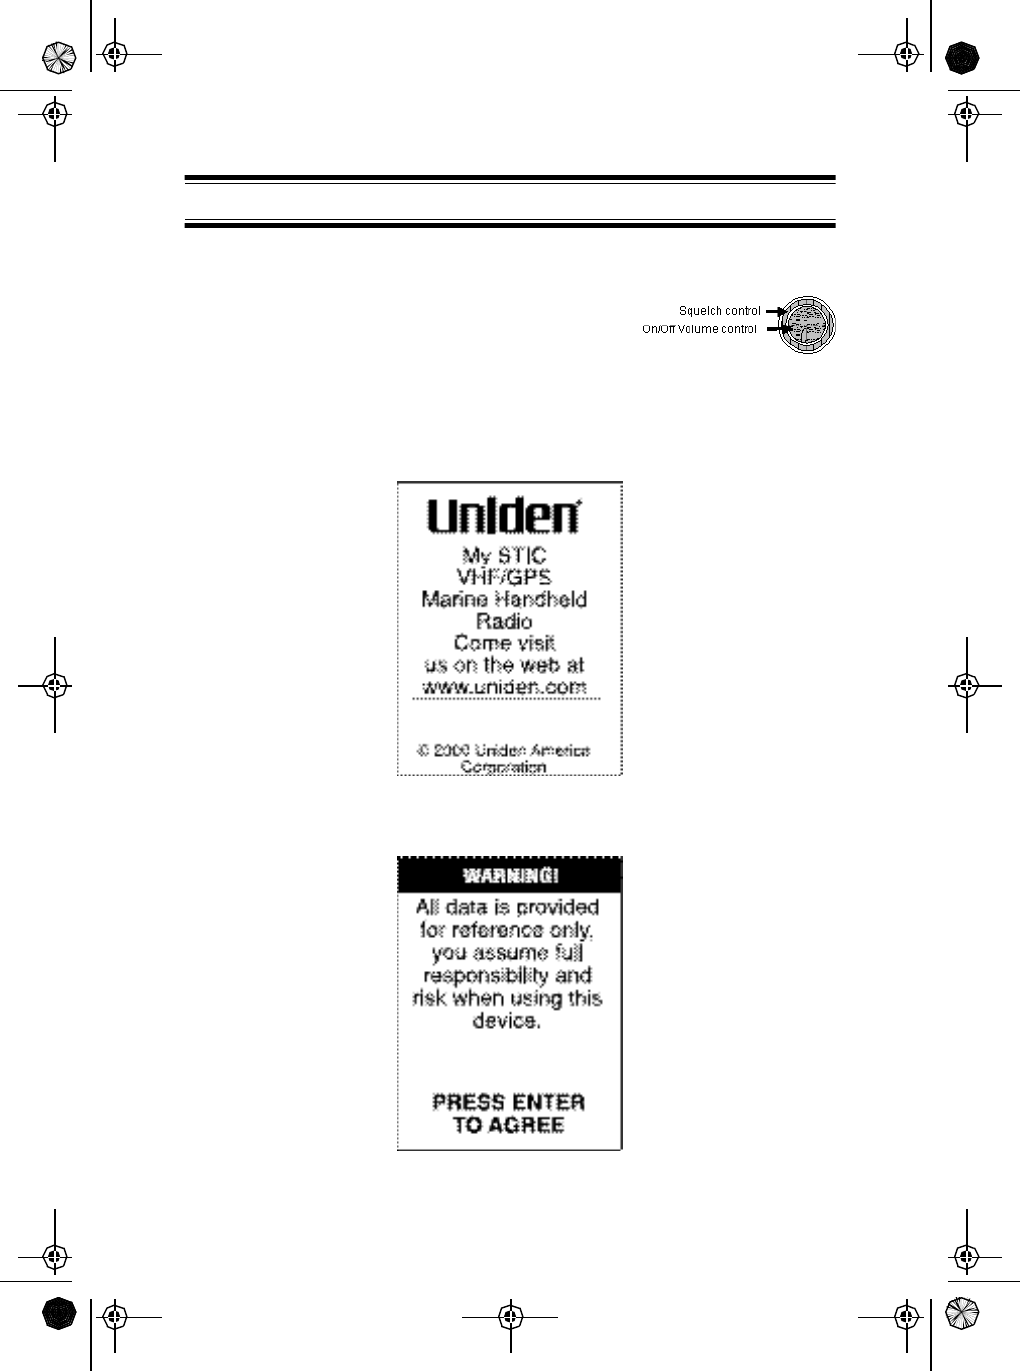
You will observe the acquisition of the satellites and other important
information on the default Channel and Navigation Screen that appears
after the power-up sequence.
The GPS Information display will display the current Date, and indicate the
progress of acquiring the staellites necessary to achieve a Position Fix.
The display will read Search - 1st sat, Search - 2nd sat, and
Search - 3rd sat.
GPS information
Customizable
data fields
GPS Basic Operations
Mystic OMc.book Page 14 Wednesday, August 13, 2003 5:26 PM
15
Once the three satellites have been acquired, the display alternate
between two readouts:
lThe current Date and EPE (Estimated Position Error, in feet)
lAveraging and a numeric value. This means the Mystic is computing
fixes. the speed is near 0.0, so the position is being averaged.
You can see the satellites being used and their signal strength on the
Satellite Status screen (described in Navigational Screens below).
Navigational Screens
The MYSTIC has nine navigation screens: Map screen, Compass screen,
Large Data screen, two Position screens, Road screen, Data screen and
Speedometer screen. There is also a Saellitet Status screen which
enables you to view how well the MYSTIC is receiving satellite
information. These screens will be described briefly here. More detailed
information on the different screens can be found in the Reference
chapter of the User Manual.
lMap Screen
The Map screen has two modes, Position or Cursor.
Position Mode - In the position mode, your
present position is indicated by the large
arrow icon in the center of the display. If you
are moving, the arrow will point in the
direction you are heading. At the bottom of
the screen is the scale for the map
displayed and two data fields that can be
customized, or turned off, depending upon
your needs.
The present position icon will change to an hourglass when the
MYSTIC is unable to compute a position fix due to poor signal
reception.
Mystic OMc.book Page 15 Wednesday, August 13, 2003 5:26 PM
16
Cursor Mode - In the Cursor Mode, you are
provided with a cursor that can be moved on
the map. At the bottom of the display is the
information for the position of the cursor
relative to your present position. Also any
points of interest that the cursor is over will
be shown.
To access the Cursor Mode, press any
arrow on the keypad. A crosshair appears
that can be moved with the arrow keys.
To return to the Position Mode, press [ESC]. The cursor will
disappear and the present position icon will appear centered on the
map.
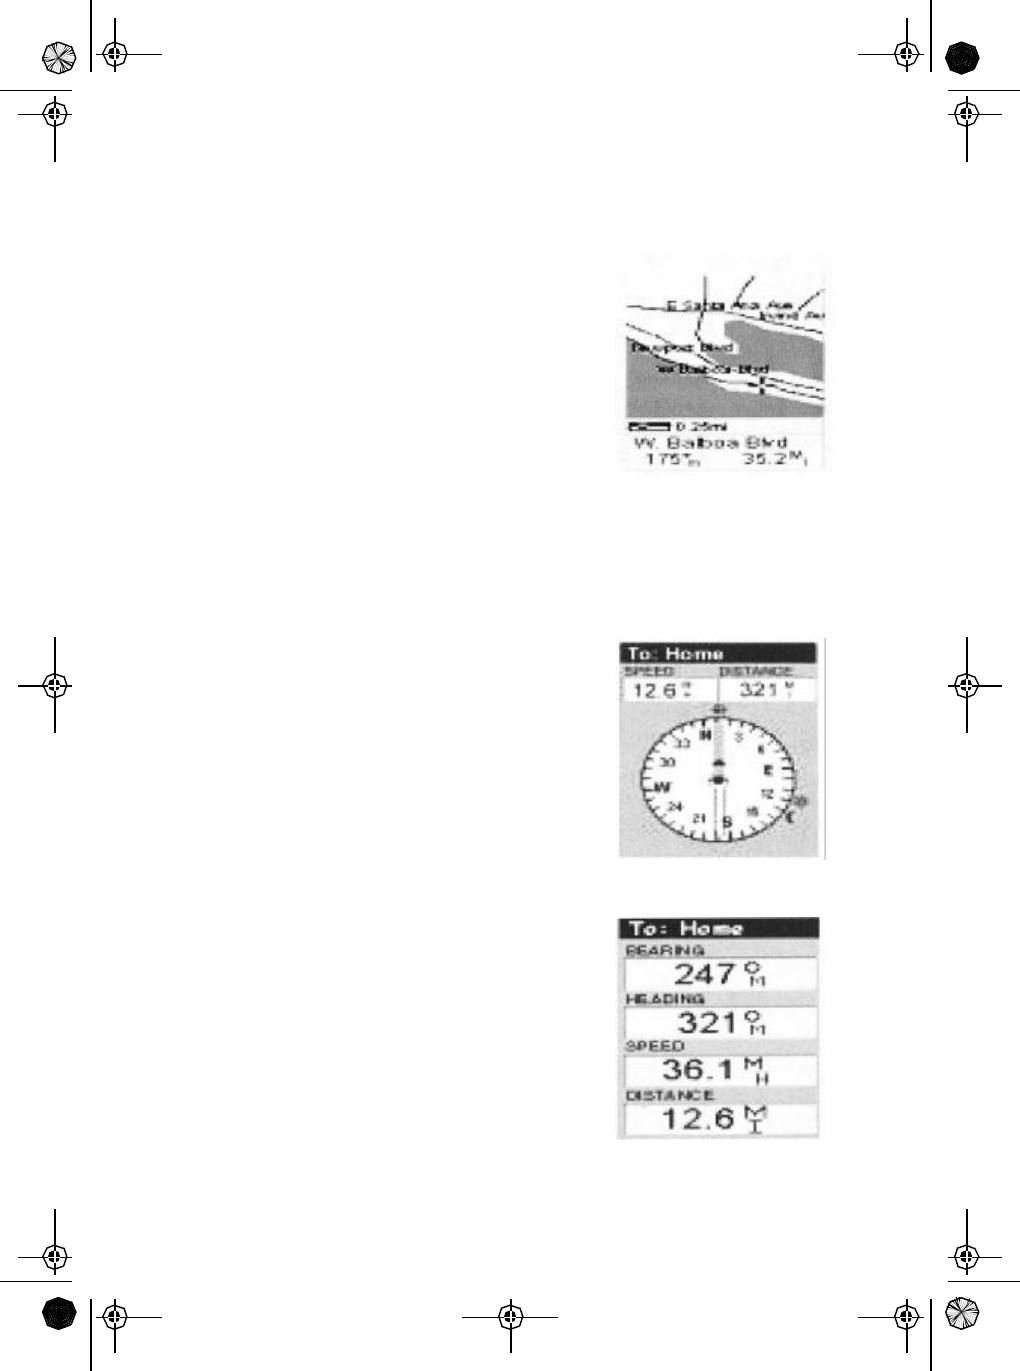
lCompass Screen
The Compass Screen is a handy to have at
your fingertips while you are navigating. It is
totally customizable to display the
information that is useful to you. The lower
portion of the Compass screen not only
displays your heading in a graphical
manner, but also displays the relationship of
the sun, moon and your destination (if
navigating on a route) to your heading.
lLarge Data Screen
The Large Data screen is similar to the
Compass screen, with the compass
removed to allow for large display of the
navigation data. this screen is because the
customizable information can be read even
from a distance .
Mystic OMc.book Page 16 Wednesday, August 13, 2003 5:26 PM
17
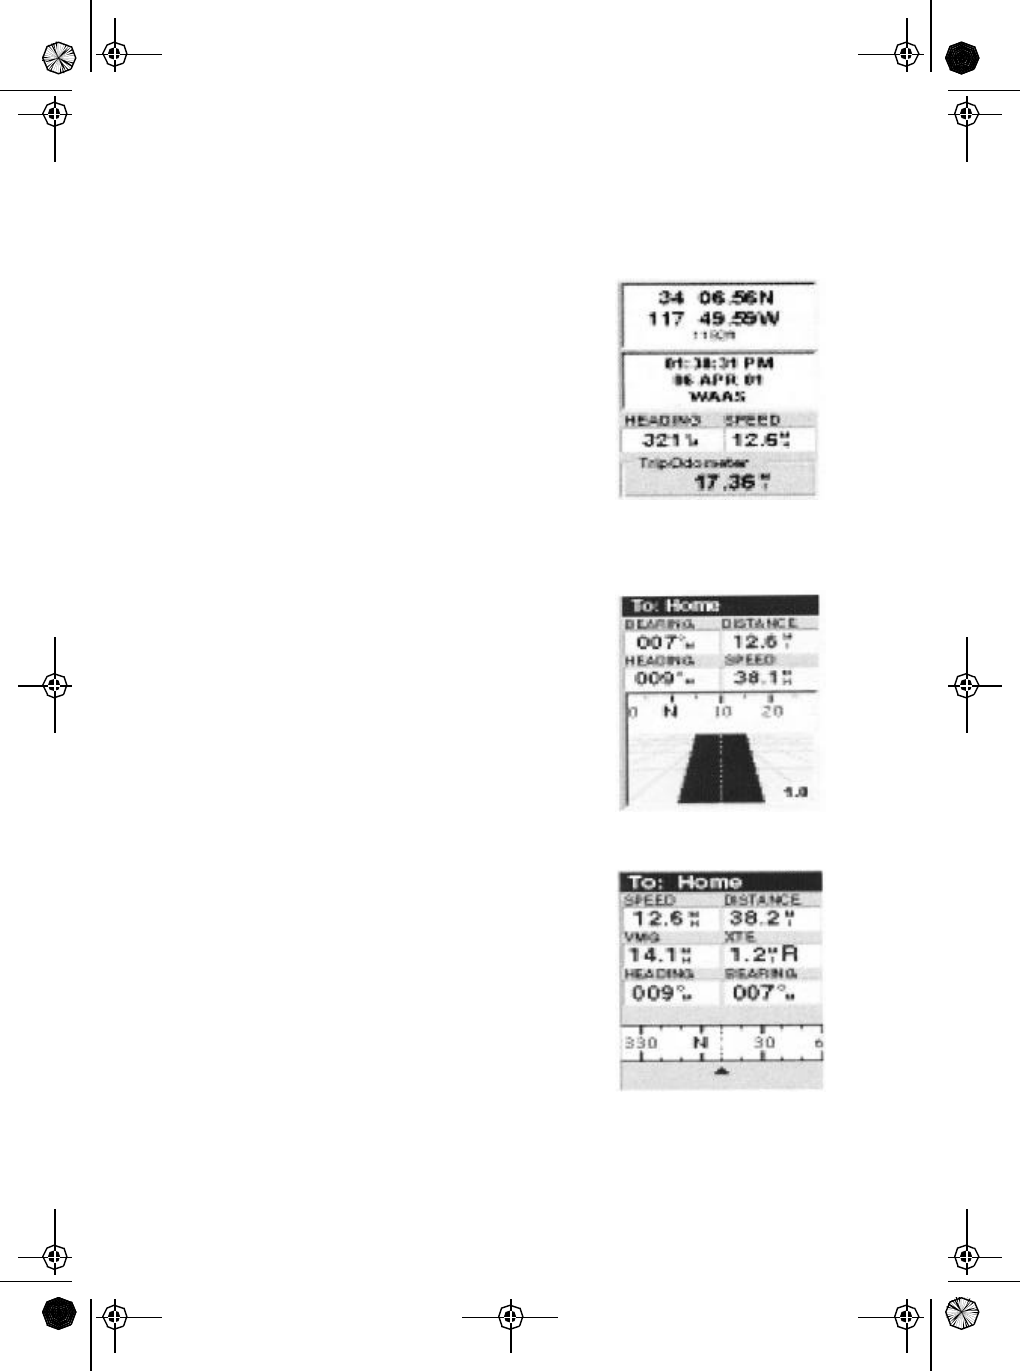
lPosition Screens
The Position screens 1 and 2 display your
present position using the coordinate
systems that you select in Setup. This
screen shows all of the basic position, time
and satellite information. Additionally,
current navigation information is shown in
the bottom half of the screen
You can move to the second Position
screen by pressing t or u. You can move
back to scrren 1 by pressing t or u again.
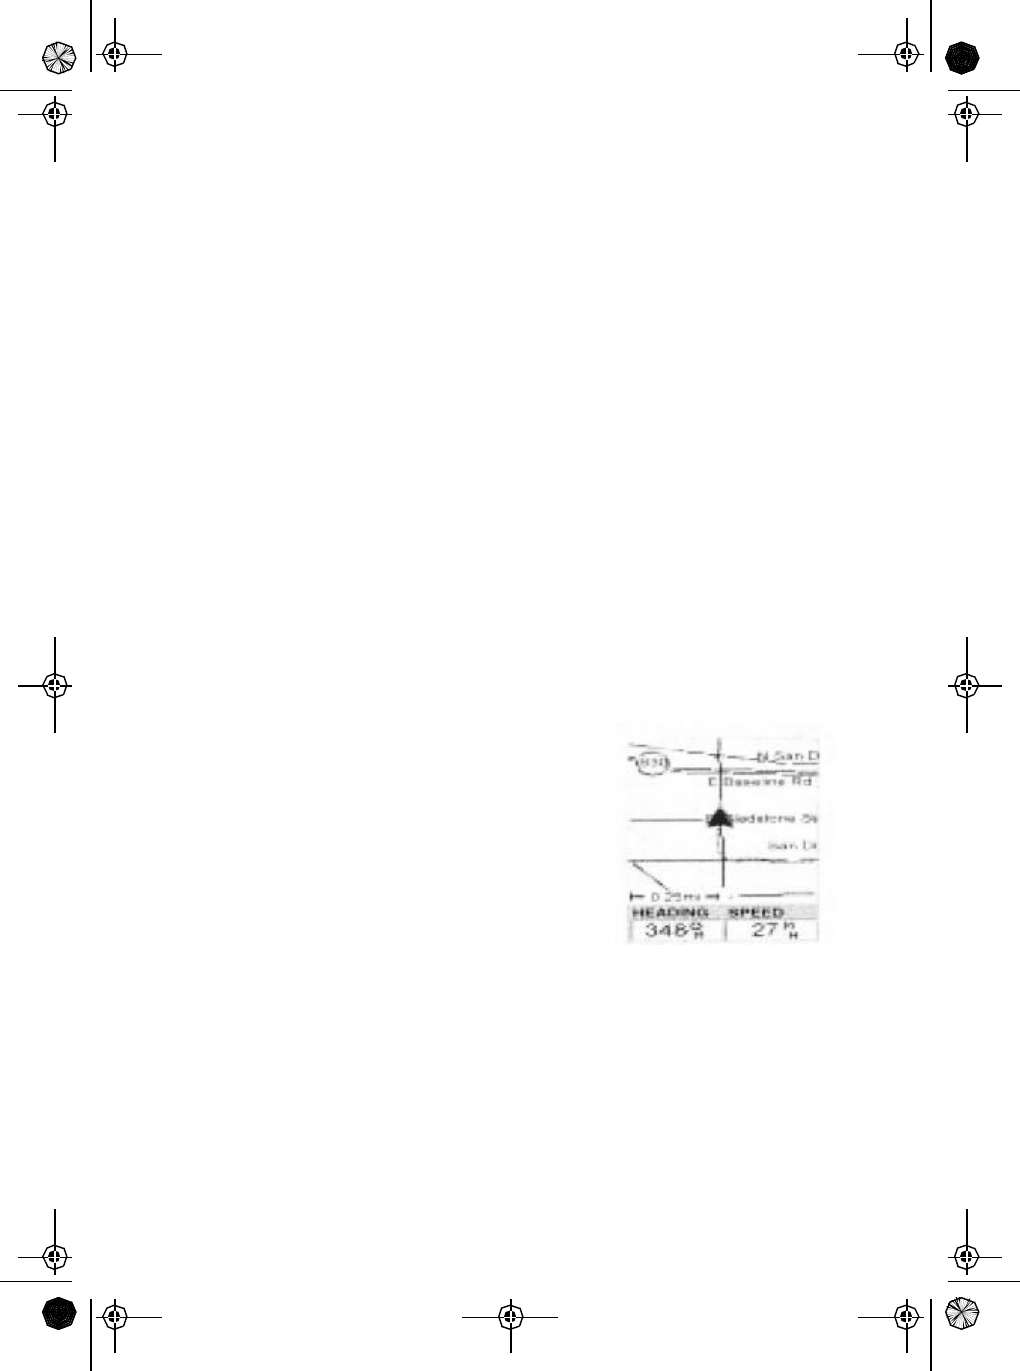
lRoad Screen
The Road screen presents your route as if
you were travelling on a road. When you
need to make a turn, the road will
graphically display the turn and the
direction. Waypoint and destination icons
will be displayed relative to your position as
they come into view. Above the road is a
compass that displays your heading and
above that are four customizable data fields.
lData Screen
The Data screen provides you with six data
fields and an active compass that is the
same as the one used on the road screen.
You have the option of customizing this
screen by selecting what data is displayed
in the upper six fields. This screen is handy
when you need to see a lot of information in
one place.
Mystic OMc.book Page 17 Wednesday, August 13, 2003 5:26 PM
18
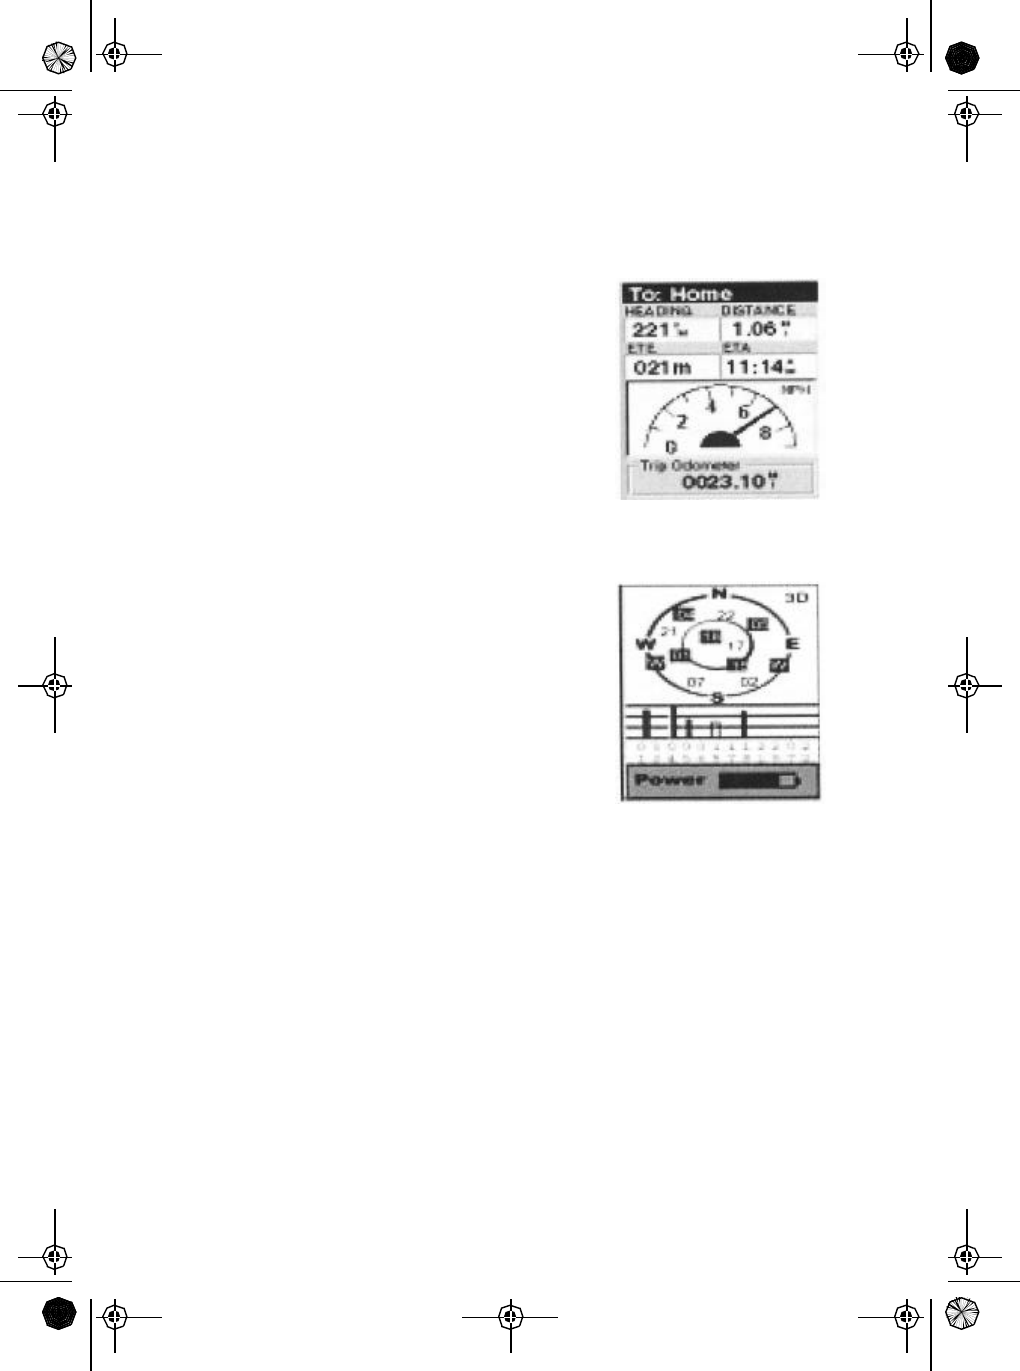
lSpeedometer Screen
The Speedometer screen displays your
speed in a familiar graphical format. There
are four additional data fields at the top of
the display that can be customized to
display the data that you need.
The bottom of the screen contains a trip
odometer that will record the distance
travelled since the last time the odometer
was reset.
lSatellite Status Screen
The Sat Status screen provides you with a
graphical display of the satellites in view
and which ones are being used to compute
the navigation data. The bar graph shows
the relative signal strength being received
for each satellite. At the bottom of the
display is a battery indicator that displays
the remaining battery life.
Accessing the Navigation Screens
The [NAV] key and the [ESC] key are used to step through the various
navigation screens. If you are viewing one of the Navigation screens,
pressing [NAV] will take you to the next Navigation screen in the list and
pressing [ESC] will take you to the previous Navigation screen. If you are
not viewing one of the Navigation screens, pressing [NAV] will return you
to the last Navigation screen viewed.
NOTE: If you are inputting data, pressing [NAV] will return you to the
last Navigation screen but your inputs will not be saved.
Mystic OMc.book Page 18 Wednesday, August 13, 2003 5:26 PM
19
Waypoints
A waypoint is any position on the globe that you have saved into memory.
The act of saving the waypoint is commonly called “Marking.” So when
references are made to marking a waypoint, that simply means to save a
position on the globe into memory.
There are a number of ways you can save a waypoint. The most common
are: saving your present position, entering the coordinates of a position or
saving the position of the cursor while viewing the Map screen. These
waypoints can then later be used to create routes or as the destination of
a GOTO. (A GOTO is a single leg route that is defined as a route from
your present position to any waypoint. You are here and you want to
GOTO there.)
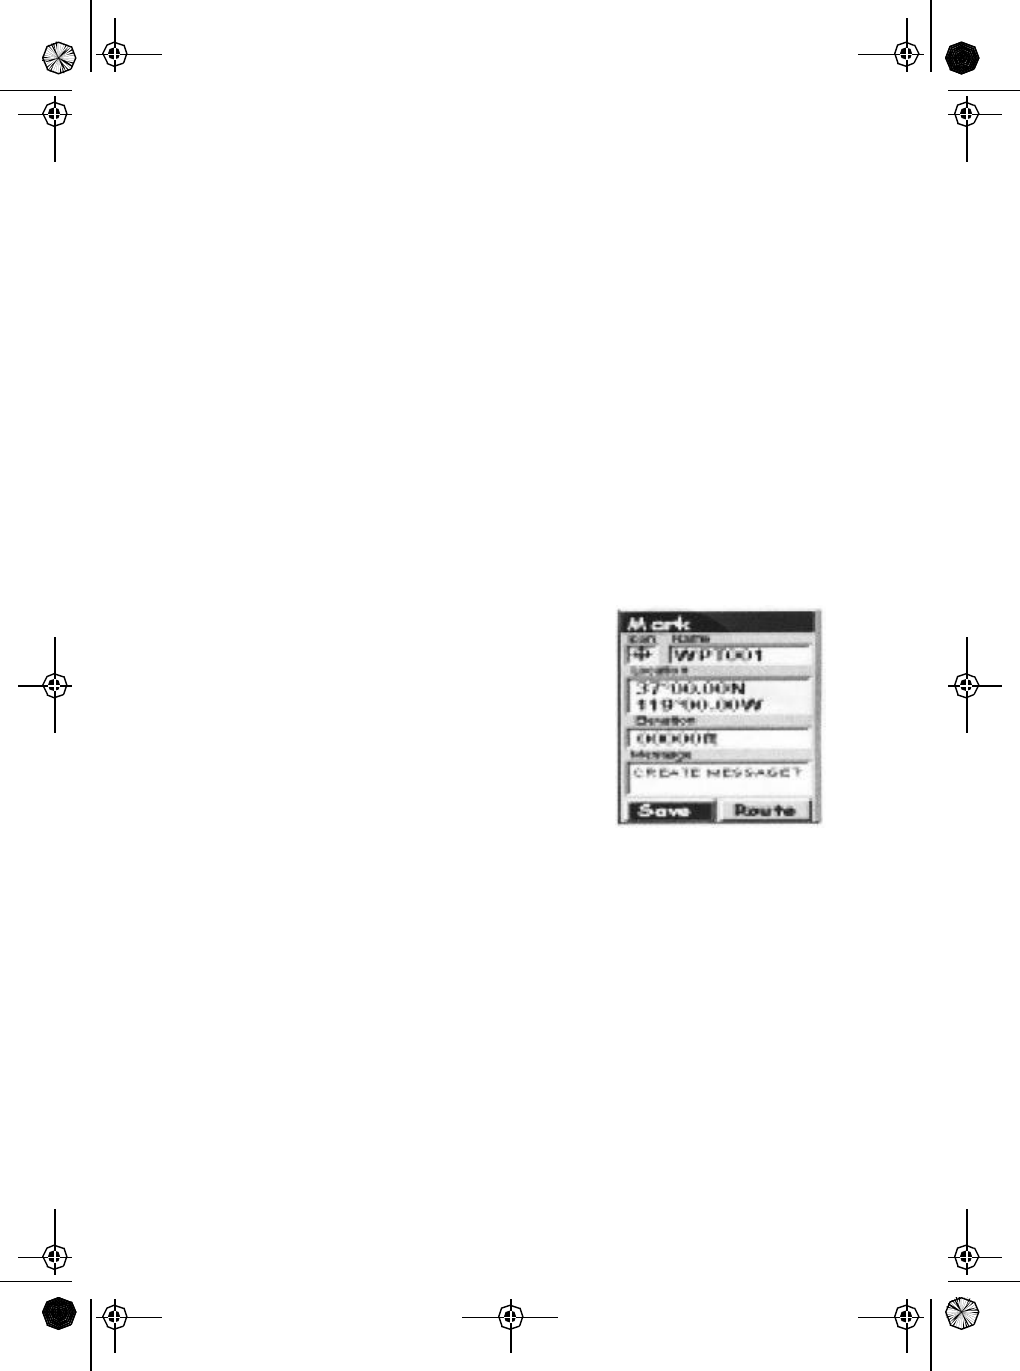
Saving a Waypoint
Saving Your Present Position as a Waypoint
- From any screen, press and hold [GOTO]
for 2 seconds and the Mark screen is
displayed. The “Save” button is highlighted
and you can press [ENTER] to save the
waypoint using the default name and icon.
This will save your present position using a
default name (WPTxxx) into memory, where
xxx is a sequential number.
To give more meaning to your waypoints, you can change the name
and icon for each one. You can also add a text message to a waypoint
These procedures are covered in the GPS Advanced Operation
Section (page28).
There is a limit to the number of waypoints you can store in the
MYSTIC. The MYSTIC will store up to 500 user waypoints in memory.
If you should ever get that many and need to input more, you will have
to delete ones that you no longer need to make room.
Using GOTO Routes
A GOTO route is simply a route with a start point (your present position)
and a single destination point (a waypoint you select). All that is required
to create a GOTO route is having the destination waypoint saved in
memory. This waypoint can be one that you have saved earlier (which is
Mystic OMc.book Page 19 Wednesday, August 13, 2003 5:26 PM
20
stored in your User Waypoint List) or any of the landmarks that come with
the MYSTIC in its built-in database.
The uses for a GOTO route are endless. You could mark the location of
your mooring location or launch location as home. You could also mark a
hot fishing spot you found, and next season come back to the exact same
spot.
Creating a GOTO Route
1. Press the [GOTO] button. That takes
you to the GOTO database screen.
2. Select the Waypoint Category.
Use p and q to move the highlight through the list of waypoint
categories. The first category in the list is “User” . These are all
the waypoints you have already entered into your MYSTIC. The
remaining categories are ones that have waypoints which have
been preloaded into your MYSTIC and are stored in permanent
memory.
3. Select Find By.
There are two options of “Find By”: Alphabetical and Nearest To.
Selecting Alphabetical will display all the waypoints in the
category you select in alphabetic order. Nearest To will display a
list of the 20 waypoints nearest to your position or waypoint you
select in order of their distance away.
Use t or u to select the desired method.
GOTO database
screen
Mystic OMc.book Page 20 Wednesday, August 13, 2003 5:26 PM
21
4. To select the GOTO Destination
Waypoint from the selected Category
and Find By, press the [ENTER] key. A
list of all the waypoints you have entered
is displayed.
5. Use p or q to highlight the desired destination. You’ll notice the
bottomof the screen shows the Bearing and Distance to the
highlighted destination. Press [ENTER].
6. You are returned to the last NAV screen viewed with some
noticeable changes. If you were viewing the Map screen, you will
now notice a thick line which is a graphical plot of the GOTO you
just created. For other NAV screens, the header bar changes to
indicate that you are navigating to a destination. If you press
[NAV] until you are viewing the Compass screen, the header bar
now displays “To: (your destination)”, and all of the navigational
information is displayed to provide you with the necessary details
to get you to your destination.
Note: You can select a GOTO Destination Waypoint from the other
Categories. This is covered in the GPS Advanced Operation
Section (page ).
Navigating on a GOTO Route
The MYSTIC has the tools you’ll need to navigate to your destination. You
have the choice of three customizable screens that display the information
that you need in the layout that you desire. You may find the compass
screen perfect for you, or you may prefer the Large Data or Map screen.
Press [NAV] until the navigation screen you want is displayed.
If you selected the Map screen, you will see your position icon in the
center of the screen with a line drawn for you on the map, graphically
displaying the GOTO route.
Note that this route is line of sight (LOS) or “as the crow flies.”
List of waypoints
Mystic OMc.book Page 21 Wednesday, August 13, 2003 5:26 PM
22
The MYSTIC does not compute the route avoiding hazards or connecting
waterways.
Important GOTO routes are not saved in memory when the MYSTIC is
turned off. If you are navigating on a GOTO route and you
need to turn the MYSTIC off, you will need to re-enter the
GOTO. However, Routes are stored in memory. If you need
a GOTO but expect to turn the MYSTIC off before arriving,
you might consider making a 1-leg Route using the Route
menu. This is covered in the GPS Advanced Operation
Section starting on page28.
Mystic OMc.book Page 22 Wednesday, August 13, 2003 5:26 PM

23
Digital Selective Calling (DSC)
Digital Selective Calling has been chosen by the International Maritime
Organization (IMO) as an international standard for establishing VHF, MF
and HF radio calls. Digital Selective Calling has also been selected as part
of the Global Maritime Distress and Safety System (GMDSS). This service
will let you instantly send a Distress call with GPS position to the US
Coast Guard and other vessels within range of the transmission.
DSC will also let you initiate or receive distress, urgency, safety, position
information and routine calls to or from another vessel outfitted with a
DSC transceiver. See the Setup Section (page40) for instructions on how
to setup the directory of names.
To make a DSC Call, press [CALL/LIGHT]. That takes you to the
DSC
Menu
. From there you can select several different Calls you can make:
Individual Call, Group Call, All Ships Call, Position Request, Position
Send, Standby,and Call Wait. They are described in the paragraphs
below.
Individual Call
1. Select an open (unused) working Channel.
2. Press [CALL/LIGHT].
3. At the
DSC Menu
, use p and q to select
Individual Call
.
Press [ENTER].
4. At the
Individual Call
screen, use p and q to select the
individual from the Directory.
Note: You must have entries in your directory to make an Individual
Call. See the Setup Section (page23.)
5. Press [ENTER]. You will see the
Attention
screen. Use t or u to
select
Yes
and press [ENTER] to make the call. Or, select
No
and
press [ENTER] to cancel the call.
Note: If you select No, you’ll be returned to the
Individual Call
screen.
6. When you receive the individual acknowledgment successfully,
the following screen appears, and both radios tune to the
previously selected channel. You are now ready to transmit on
that channel.
- or -
Advanced VHF Radio Operations
Mystic OMc.book Page 23 Wednesday, August 13, 2003 5:26 PM

24
If the called radio has been set to Standby Mode, the following
screen appears.
Group Call
1. Select an open (unused) working Channel.
2. Press [CALL/LIGHT].
3. At the
DSC Menu
, use p and q to select
Group Call
.
Press [ENTER].
4. The Group MMSI code will appear.
5. Press [ENTER]. You will see the
Attention
screen. Use t or u to
select
Yes
and press [ENTER] to make the call. Or, select
No
and
press [ENTER] to cancel the call.
6. After you press [ENTER], the Mystic returns to the Channel
Display screen.
All Ships
1. Select an open (unused) working Channel.
2. Press [CALL/LIGHT].
3. At the
DSC Menu
, use p and q to select
All Ships
.
Press [ENTER].
4. At the
All Ships Call
menu, use p and q to select
Urgency
,
Safety
,or
Routine
.
5. Press [ENTER]. You will see the
Attention
screen. Use t or u to
select
Yes
and press [ENTER] to make the call. Or, select
No
and
press [ENTER] to cancel the call.
Note:
ROUTINE
calls tune to the previously selected channel.
When sending either an
URGENCY
or
SAFETY
message, all
radios will automatically move to Channel 70 until all of the
data is received.
After selecting
URGENCY
or
SAFETY
ALL SHIPS call is
transmitted, the MYSTIC will switch to Channel 16. You
should wait a few minutes before transmitting the ALL SHIPS
call information.
Position Request
This radio has the ability to request the position of an individual vessel
that is registered in the DIRECTORY.
1. Press [CALL/LIGHT].
Mystic OMc.book Page 24 Wednesday, August 13, 2003 5:26 PM

25
2. At the
DSC Menu
, use p and q to select
Position Request
.
Press [ENTER].
3. At the
Pos Request
screen, use p and q to select the individual
from the Directory taht you want the position of.
Note: You must have entries in your directory to make a Position
Request Call. See the Setup Section (page23.)
4. Press [ENTER]. You will see the
Attention
screen. Use t or u to
select
Yes
and press [ENTER] to make the call. Or, select
No
and
press [ENTER] to cancel the call.
5. If the Mystic does not detect an acknowledgment, the following
screen appears.
6. When the called vessel sends the position information, the
following screen appears.
Note: The requested radio must have the ability to transmit the
position information (such as another MYSTIC radio).
Position Send
This radio has the ability to send the position of your vessel to another
vessel using a VHF marine radio equipped with DSC.
1. Press [CALL/LIGHT].
2. At the
DSC Menu
, use p and q to select
Position Send
.
Press [ENTER].
3. At the
Position Send
screen, use p and q to select the individual
from the Directory you want to send your position to.
Note: You must have entries in your directory to make an Individual
Call. See the Setup Section (page23.)
4. Press [ENTER]. You will see the
Attention
screen. Use t or u to
select
Yes
and press [ENTER] to make the call. Or, select
No
and
press [ENTER] to cancel the call.
5. When the calling radio receives an acknowledgment, the following
screen appears.
Standby
The DSC STANDBY function allows the MYSTIC to answer DSC calls
with the UNATTENDED message, and record the calls for response
at another time. When you set the MYSTIC to DSC STANDBY Mode,
voice traffic may still be active on any chosen channel.
1. Press [CALL/LIGHT].
Mystic OMc.book Page 25 Wednesday, August 13, 2003 5:26 PM

26
2. At the
DSC Menu
, use p and q to select
Standby
.
Press [ENTER].
When an individual DSC call is received, the radio will respond
with the UNATTENDED message when you can’t answer the call.
The DSC call will be recorded into the radio’s
Call Waiting
Directory.
Note: If you press any key on the radio, or press the PTT button,
this feature will be canceled.
Call Waiting
If you receive a call and do not answer within 5 minutes, or if the radio
is set on DSC Standby, the call will be recorded. The DSC
Call
Waiting
Directory records 10 received Distress calls, and records 20
Individual calls. Calls will be recorded while you are busy with other
communications as long as the transmitter is not keyed at the time of
the call. If the call is answered within 5 minutes the call will not be
recorded. When a call is recorded, a message appears.
1. Press [CALL/LIGHT].
2. At the
DSC Menu
, use p and q to select
Call Waiting
.
Press [ENTER].
3. At the
Call Wait Log
, use p and q to select
Distress
or
Individual
. Press [ENTER].
4. Depending on your choice in Step 3, you will see the recorded
calls in the
Call Wait Dstrs.
list or the
Call Wait Indiv.
list.
5. To see a call in either list, use p and q to select the call and
press [ENTER].
6. A
Call Wait Log
screen will appear and you can see the details of
the call. The illustration on the right is an example of the
Call Wait
Log
.
Note: If a call has not been logged, the MYSTIC will beep and you
will not be able to proceed to the next step.
At this point, you can call back any of the radios displayed in the log.
Geographical Call
Note: The MYSTIC receives geographical calls only, sending
geographical calls is not available in the MYSTIC radio.
Mystic OMc.book Page 26 Wednesday, August 13, 2003 5:26 PM

27
This function can receive the electric wave transmitted towards the
ship that is present in the domain specified from the call side. It also
indicates the time when the geographical call is received.
Mystic OMc.book Page 27 Wednesday, August 13, 2003 5:26 PM

28
Modifying a Waypoint with a Custom Icon and Name
The above method is fine if you want to just save your position quickly, but
it will be difficult to figure out later which waypoint this is from a list of
waypoints named WPT001, WPT002, etc. For that reason, you may want
to change the default name to one of your choosing. You can also select a
different icon that will help you find the waypoint when you are using the
map screen.
To do this, press and hold [GOTO] for 2 seconds just like you did before.
Use the UP/DOWN arrows and notice that the highlight moves from field
to field and then back to “Save.”
Highlight the Icon field using the UP/DOWN arrows and press [ENTER].
The Icon Select window is displayed. Use the arrow keypad to move from
one icon to another with the name of the icon displayed at the top. As a
reference tool, all of the icons and their names are listed in the Reference
Chapter of the User Manual. When you have highlighted the icon you
want to use, press [ENTER].
The cursor is now highlighting the Waypoint Name field. With the Name
field highlighted, press [ENTER]. The input keyboard is displayed. The
very top of the keyboard window shows you what field you are changing,
in this case the Name field.
You can now use the arrow keypad to select the character you wish to
enter. With the character highlighted, press [ENTER] and the character is
appended to the name you are entering and displayed in the field above
the keys. (Note: waypoint names can be up to 8 characters in length.)
When you have the name the way you want it, highlight “OK” and press
[ENTER]. You are returned to the Mark screen with the new name
displayed.
Adding a Message to a Waypoint
You can also add a message to waypoints you are creating. There is a
memory limit however. You can save up to 500 user-entered waypoints in
your Meridian but only 200 waypoint of those can have a message
assigned to it.
Adding a message to a waypoint can assist you in identifying the
waypoint. If this was a waypoint for a friend’s house or business, you
could add a phone number or any other information that you find useful.
GPS Advanced Operations
Mystic OMc.book Page 28 Wednesday, August 13, 2003 5:26 PM

29
To add a message to a waypoint you are creating, highlight the Message
field using the Up/Down arrows and press [ENTER].
The same keyboard that was used in entering a name is presented
allowing you to enter a message. Using the same technique, you can
enter a message up to 30 characters in length.
Use the Up/Down arrows to move the highlight through the list of waypoint
categories. The first category in the list is “User” and these are all of the
waypoints that you have entered into your Meridian receiver. The
remaining categories are ones that have waypoints which have been
preloaded into your Meridian and are stored in permanent memory. If you
have the Meridian Marine, you will notice your list is considerably longer
then the one shown here as you have additional marine waypoints
preloaded into your Meridian.
(For this example, select the “User” category.)
Step 3: Select Find By.
There are two options of “Find By”: Alphabetical and Nearest To.
Selecting Alphabetical will display all the waypoints in the category you
select in alphabetic order. Nearest To will display a list of the 20 waypoints
nearest to your position or waypoint you select in order of their distance
away. This could be used to display the waypoints that are closest to your
present position or display the airports that are closest to any city you
select. For the purpose of this basic opera-tion, only Alphabetical will be
used. For details on Nearest To, see the Reference chapter in the User
Manual.
Use the Left/Right arrow until “Alphabetical” is displayed in the Find By
field.
Step 4: Select GOTO Destination Waypoint from the User Category.
With “User” highlighted and “Alphabetical” in the Find By field, press
[ENTER]. A list of all the waypoints you have entered is displayed.
Use the Up/Down arrows to highlight the desired destination, in this case
“Home”, and press [ENTER].
You are returned to the last NAV screen viewed with some noticeable
changes. If you are viewing the Map screen, you will now notice a thick
line which is a graphical plot of the GOTO you just created. Other NAV
screens, have changed the header bar to indicate that you are navigating
to a destination. Press the NAV key until you are viewing the Compass
Mystic OMc.book Page 29 Wednesday, August 13, 2003 5:26 PM

30
screen. The header bar now displays “To: Home”. Now all of the
navigational information displayed is to provide you with the necessary
details to get you to your destination, in this case “Home”.
Alternate Step 4: Select GOTO Destination Waypoint from Other
Categories.
As mentioned earlier, a GOTO can be to any waypoint in memory, either
ones you have created or ones that have been loaded into the Meridian.
When selecting waypoints other then “User”, you are first presented with
the keyboard display. The reason for this is there can be thousands of
waypoints in the list and using the conventional “scrolling” could take quite
a bit of time. By using the keyboard, you will be able to shorten the time by
going to a specific point in the list.
(If you have been performing the keypresses as you are reading this, then
you are probably viewing one of the NAV screens. In which case, you
need to press [GOTO] to continue following along with the text. The first
thing you will notice is an alert pop-up asking you if you want to clear the
GOTO that is active. With “Yes” high-lighted, press [ENTER] to continue.)
With “Cities” highlighted and “Alphabetical” in the Find By field, press
[ENTER]. This is a slight variation of the keyboard you have already used.
This time the “shift” and “backspace” keys have been replaced with “<-”
(move cursor left) and “->” (move cursor right). What you want to do here
is to begin typing the name of the city you are looking for.
For example, suppose your destination was to be Los Angeles. Use the
keypad to highlight the letter “L” and press [ENTER]. Notice how the name
is changed to the first city stored in the Meridian’s memory that begins
with the letter “L” and that the cursor has moved to the next letter in the
city name. (You can move the cursor back if you made a mistake by
highlighting the “<-” button on the keyboard and press [ENTER].)
Since we are looking for Los Angeles, we need to highlight the “O” next
and press [ENTER]. Then the “S” and press [ENTER].
To add a space, highlight the “space bar” and press [ENTER]. (Also, you
can use the “->” button to move the cursor to the right if you want to skip
the letter the cursor is indicating.)
You don’t need to spell out the entire word. The attempt here is to get
close to the name so you won’t need to scroll very far during the next step.
As a guide, entering the first five letters should be sufficient. When you are
satisfied with what you have entered, highlight “OK” and press [ENTER].
Mystic OMc.book Page 30 Wednesday, August 13, 2003 5:26 PM

31
Tip: There is a hidden shortcut that replaces highlighting “OK” and
pressing [ENTER]. When you are satisfied that you have narrowed the
search down and want to proceed to the list, press the [IN] key.
The list of all the waypoints for the category you selected, in this case
cities, is displayed with the waypoint that was previously selected at the
top of the list. Now just use the Up/Down arrows to highlight the waypoint
you are looking for and press [ENTER].
For this example, you would highlight Los Angeles, CA and press
[ENTER]. The last viewed NAV screen is displayed and the Meridian will
begin computing all of the necessary information needed to get you to
your destination.
Navigating on a GOTO Route
The Meridian has the ability to provide you with the tools you’ll need to
navigate to your destination. You have the choice of three customizable
screens that display the information that you need in the layout that you
desire. Hikers may find the compass screen perfect for them while boaters
may prefer the Large Data or Map screen. For you, the Map screen may
have all the information you’ll ever require.
Press [NAV] until the navigation screen you want is displayed.
If you selected the Map screen, you will see your position icon in the
center of the screen with a line drawn for you on the map, graphically
displaying the GOTO route.
Note that this route is line of sight (LOS) or “as the crow flies.”
The Meridian does not compute the route using streets and highways
providing a turn-by-turn routing. You’ll find very quickly that you can easily
use the roads and highways displayed on the Map screen and compare
them to the displayed route and get to your destination quickly.
This concludes the basic operation of the Magellan Meridian, but there is
so much more. More detail on the mentioned functions, and information
on the functions not mentioned can be found in the Reference chapter of
the User Manual.
GOTO routes are NOT saved in memory when the Meridian is turned off.
If you are navigating on a GOTO route and you need to turn the Meridian
off, you will need to reset the GOTO. Routes, however, are stored in
memory. If you need to make a GOTO but expect to turn the Meridian off
Mystic OMc.book Page 31 Wednesday, August 13, 2003 5:26 PM

32
before arriving, you might consider making a 1-leg route using the route
menu.
Navigational Screens
Selecting NAV Screens — The [NAV] button provides a means of
accessing the navigation screens. (Note: the sequence displayed is when
all eight navigation screens are turned on. Screens turned off in Setup will
not be displayed.)
Returning to Last Viewed NAV Screen — Pressing the [NAV] button
returns the Meridian to the last NAV Screen viewed.
NAV
(Note: if the NAV screen is pressed from a screen where data is being
input, the data will not be saved.)
Map Scale Indicator
Provides the scale for the map. The number displayed represents
approximately 1/4 of the screen’s width. Scale can be changed with the
IN and OUT buttons.
Track History
Dotted line on the map displays the history of where you have travelled
since the last time you cleared the Track History (see Clear Memory in the
Reference Chapter.)
Data Flelds
These fields display navigational information for viewing on the Map
screen. They are both customizable with 13 data types possible.
Both of the data fields can be turned on or off allowing more viewable map
area.
Both features (customize and turning the data on/off) can be accessed
from the MENU button.
Cursor Icon
The Cursor Icon pinpoints the location you have selected by using the
arrow keys.
Map Scale Indicator
Mystic OMc.book Page 32 Wednesday, August 13, 2003 5:26 PM

33
Provides the scale for the map. The number displayed represents
approximately 1/4 of the screen’s width. Scale can be changed with the
IN and OUT buttons.
Waypoint Name
Whenever the cursor is over a map object, the name of the map object is
displayed, otherwise the word “cursor” appears. The data shown in the
information block is the heading and distance from your present position
to the cursor.
Setting the Map Detail — The detail of the map can be set to highest, high,
medium, low or lowest. This changes the zoom level that different map
objects (cities, highways, labels, etc.) are displayed. If you have set a
zoom level and the display is too cluttered, set the map detail to a lower
level; conversely set it to a higher level to view more detail. The default is
Medium.
Customizing the Map Display
The Map screen can be customized for your individual needs and
requirements. You can select what is being displayed on the map as well
as what additional data will be presented at the bottom of the screen.
Customization is broken into two parts; what items are displayed on the
map and what data fields (if any) are displayed at the bottom of the
screen.
Selecting Map Items
Turning On/Off Display Waypoints — Turns on or off the waypoints on the
Map screen. Default is On.
Turning On/Off Track Lines — As you move, your track history is normally
displayed on the map screen represented by a dashed line. This function
allows you to turn off or on these lines. Default is On.
Turning On/Off Topographic Lines — [Available only if a map has been
uploaded from a Magellan MapSend Topo for the United States CD-ROM]
This function will hide all topo lines and topographic information. Default is
On.
Turning On/Off Displayed POI’s — [Available only if a map has been
uploaded from a Magellan MapSend CD-ROM] Allows you to select
which, if any, POIs that have been uploaded from a MapSend product to
be displayed. Default is On.
Mystic OMc.book Page 33 Wednesday, August 13, 2003 5:26 PM

34
Globally Turn Map Items On/Off — If you have uploaded map data from a
MapSend product, you will notice that the list of POIs can be extremely
lengthy. To aide you in the customization of the display you can turn
everything on or off globally.
To turn off all map items, follow these instructions.
After you have turned off all of the map items, you can go back and just
select the POIs that you want to view. Please note that this function will
also turn off waypoints, track lines and, if applicable, topo lines. Be sure to
turn these back on if you want to see them.
Inversely, to globally turn on all of the map items, follow the above steps
but select “Mark All” instead of “Clear All”.
Setting Up Map Data Fields — The following options are available ONLY if
you are in the Position Mode of the Map screen. If you are in the cursor
mode, press the [ESC] key and the display will snap back to the Position
Mode with the arrow icon displaying your present postion. (If you are not
clear on which mode you are in, the simpliest way to determine it is to see
what cursor is displayed; an arrow indicates Position and a crosshair
indicates Cursor. If you press the [ESC] key and the display changes to
another NAV Screen you were in the Position Mode and you can press
[NAV] to return to the map.
Turning Map Info On/Off — This option allows you to turn on or off the
information field that is displayed on the Map screen. Turning this off
allows for more of the map to be displayed. Default is “Show Map Info”.
When Map Info is hidden and the map is in the cursor mode, the bearing
(BRG) and distance (DIS) to the cursor is shown in the bottom left corner
of the map replacing the scale. (Note: if you have uploaded topographic
information from Magellan’s MapSend Topo for the United States CD-
ROM, the elevation at the cursor’s location is displayed, not the bearing
and distance.) If the cursor happens to be on a map object, the name of
the object is displayed.
Selecting the Map Information — This function allows you to select what
map information is displayed at the bottom of the screen.
Note: If you select either Horizontal Profile or Terrain Projection and you
do not have topographic information loaded a warning screen is
displayed.
Mystic OMc.book Page 34 Wednesday, August 13, 2003 5:26 PM

35
Two Data Fields Description — This option displays two boxes at the
bottom of the map that can display data that you choose. Displaying these
data fields is the default for the Meridian.
Possible Map Information Options
Two Data Fields
This option displays two fields at the bottom of the display. These fields
are customizable and can be set to any of 13 different data options.
Street Info
This option displays an information block at the bottom of the display
showing the name of the street your present position or cursor is on. If in
the cursor mode, the bearing and distance from your present position is
displayed.
Horizontal Profile
(Available only with MapSend Topographic data loaded into the Meridian.)
This displays an information box which graphically depicts the horizon in
front of you. The displayed horizion is at the mark displayed on the display
perpendicular to your track. Selecting this option automatically sets the
display orientation to track up and works only in the Position Mode.
Changing to the Cursor Mode will replace the horizontal profile with the
cursor data.
Terrain Projection
(Available only with MapSend Topographic data loaded into the Meridian.)
This displays an information box which graphically depicts the terrain in
front of you. The displayed terrain is approximately from your present
position to the edge of the display. Selecting this option automatically sets
the display orientation to track up and works only in the Position Mode.
Changing to the Cursor Mode will replace the horizontal profile with the
cursor data.
Changing the Data Fields — Allows you to change the data that is being
displayed to 1 of 13 different data options (bearing, distance, speed,
heading, VMG, CTS, ETA, ETE, XTE, turn, elevation, time, or date). Note:
If you have selected Hide Map Info, this option will not be available in the
menu. Also, you must have the Two Data Fields displayed on the Map
screen to be able to customize them.
Press [ESC] when you are done to leave the customize mode.
Mystic OMc.book Page 35 Wednesday, August 13, 2003 5:26 PM

36
Street Information Description — This mode just displays the name of the
street close to your present position.
Horizontal Profile Description — (This function requires that map data has
been uploaded from Magellan MapSend Topo for the United States and
that your present position as well as the projected horizon falls within the
area uploaded.) This mode displays at the bottom of the Map screen a
graphical representation of the horizon at a fixed distance from your
present position. This fixed distance is equal to the map scale you have
selected for the Map screen, so as you zoom in or out, the horizon
displayed will change. In the Horizon Profile mode, you will also notice a
line projected out from your present position icon to a shorter
perpendicular line. The intersection of the two lines indicates the location
on the map where the horizon is being computed.
You should note that when you select Horizontal Profile, your Map
Orientation will change to “Track Up” so you may need to change that
when you are done viewing the horizontal profile. If you change
Orientation to something other then Track Up while viewing the Horizontal
Profile, the default Two Data Fields is displayed. Changing the Orientation
back to “Track Up” will revert back to the Horizontal Profile.
Available Data Options
Bearing This is the direction to your destination from your present position,
in degrees, from North.
Distance This is distance (measured in the Nav Units selected in Setup) to
your destination.
Speed This is the rate that you are travelling. The unit of measure is
selected in Setup - Nav Units.
Heading This is the direction you are moving (measured in degrees).
When the heading and bearing are the same, you are travelling on a direct
line to your destination.
VMG (Velocity Made Good). This is the speed that you are getting closer
to your destination. If the heading and bearing are the same, then VMG
will be the same as Speed since all of the speed that you are travelling is
being applied to arriving to your destination. However, if you are off
course, your VMG will be less than the speed that you are travelling.
CTS (Course To Steer). This is the angle that you need to turn to put you
back on course.
Mystic OMc.book Page 36 Wednesday, August 13, 2003 5:26 PM

37
ETA (Estimated Time of Arrival). This the local time that you will arrive at
your destination based on the rate of speed that you are moving to your
destination.
(See VMG.)
ETE (Estimated Time Enroute). This is how long, in time, that it will take
you to arrive at your destination based upon your present speed to the
destination.
XTE (Cross Track Error). XTE is the perpendicular distance from your
present position to the course line you should be on to go to your
destination.
Tur n This is the direction you need to turn to put you on the shortest
distance to your destination from your present position.
Elevation This is the distance above sea level that you are presently at.
Time Local time.
Date Current date.
Also, you must be zoomed in to a scale of 0.80 miles or closer for the
horizontal profile to be displayed. Zoom scales higher then 0.80 miles will
cause the data displayed to change to the Two Data Fields and will
change back to Horizontal Profile as you zoom in to 0.80 miles and below.
Terrain Projection Description — This feature allows you to view the
terrain directly ahead of you graphically. It is computed from your present
position and extends in a straight line to the top of your display.
This provides you with instantaneous information on what terrain
elevations are directly in front of you. Your present position and elevation
are indicated at the left side of the display. The maximum elevation for the
terrain ahead of you is displayed above the graph, next to the map scale
indicator. (This function requires that map data has been uploaded from
Magellan MapSend Topo for the United States and that your present
position as well as the projected horizon falls within the area uploaded.)
Like Horizontal Profile, you must be zoomed in to a scale of 0.80 miles or
closer for the projected terrain to be displayed. Zoom scales higher then
0.80 miles will cause the data displayed to change to the Two Data Fields
and will change back to Terrain Projection as you zoom in to 0.80 miles
and below.
You should note that when you select Terrain
Mystic OMc.book Page 37 Wednesday, August 13, 2003 5:26 PM

38
Projection your Map Orientation will change to “Track Up” so you may
need to change that when you are done viewing the projected terrain. If
you change Orientation to something other then Track Up while viewing
the Terrain Projection, the default Two Data Fields is displayed.
Changing the Orientation back to “Track Up” will revert back to the
projected terrain.
Changing the Map Orientation — You can change how the map is
orientated on the screen to either North Up, Course Up or Track Up.
Default is North Up.
North Up North is at the top of the screen.
Course Up The heading of the active leg of the active route is at the top of
the screen.If no route is active,North Up orientation is used until a route is
activated.
Track Up Your heading (i.e.,the direction you are travelling)is at the top of
the screen.
Selecting Primary Usage — The Meridian can be set to either Land or
Marine Usage. When in Land (default), the map displays land areas in
white and water areas as dark gray. For marine applications it may be
desirable to reverse the display, showing water as white and land as dark
gray. This will make reading some of the data information on the water
easier.
Selecting Track Mode — Allows you to set how often the Meridian stores
track points. Setting the mode to “OFF” stops the Meridian from saving
any new track points. In “Auto” or “Auto Detailed” mode, the Meridian uses
a method for track point storage that maximizes memory.
Using Auto, you will see more points on and near turns and less points on
straight stretches of the map. You also have the option of selecting fixed
iSetting the Track Mode to “OFF” will cause severe limitations to the ability
of your Meridian to create a backtrack route. The same temporary
waypoints used to create the displayed track are used to compute a
backtrack route. Therefore, it is highly recommended that you use the
“Auto” Track Mode whenever possible.
Auto vs. Auto Detailed. You will notice two of the options for the Track
Mode are Auto (default) and Auto Detailed. Basically, both options behave
the same. While your are travelling in a straight line, only a few track
points are taken, but as you turn, the Meridian increases the rate of track
Mystic OMc.book Page 38 Wednesday, August 13, 2003 5:26 PM

39
points. This allows for a good representation of your track with minimal
track points stored. Auto Detailed performs exactly the same as Auto, but
has the base rate of track points saved increased. This allows a more
detailed track then Auto to be taken, while at the same time saving
memory over a fixed rate.
The following is an overly simplified diagram of the three track rate
options. In most cases, Auto should meet all of your requirements but if
you want more detail on turns and still not clutter memory with excessive
track points, select Auto Detailed.
Mystic OMc.book Page 39 Wednesday, August 13, 2003 5:26 PM

40
When you turn the Mystic on for the first time, it is not set up. The basic
radio operation is available (transmitting and receiving on Marine
channels, and receiving WX channels. However, to use the advancd
features of your Mystic, such as Digital Selective Calling, GPS mapping,
and S.A.M.E. weather alerts, you need to enter data into the radio’s
memory. This section covers setup of both the radio functions and the
GPS functions.
Using the Mystic keys
Your Mystic has 11 keys and a four-way cursor. Of the 11 keys, 6 are
dual-function. That is, you press that key to access one function, and you
press and hold that key to access another.
Example:Press [WX/ALERT] to change from the VHF Channels to the
Weather Channels. Press and hold [WX/ALERT] to set the
Weather Alert Mode.
The cursor keys (pqtu) are used to: change Channels, alternate
Navigation screens, and select itmes in the Menu screens.
The [MENU] key isused to access the Menu screen. When you are at the
Menu screen, use pqtu to select the next Menu, and press [ENTER].
That will take you to the next Menu, or the next selection to modify. To
stop from selecting any item, press [ESC].
NAV Units
You can select the units of measure that Meridian will use; Miles/Yards/
MPH, Miles/Feet/MPH (default), Nautical Miles/Feet/Knots or Kilometers/
Kilometers per hour.
To change the Nav Units of Measure press [MENU]. Use the Up/Down
arrows to highlight “Setup” and press [ENTER]. Use the Up/Down Arrows
to highlight “NAV Units” and press [ENTER].
Use the Up/Down arrows to highlight the unit of measure that you want
and press [ENTER].
Press [ESC] to return to the last screen viewed.
Entering Channel numbers into Memory Scan
You can enter channels into Memory Scan for instant scanning at any
time. When a channel is selected for Memory Scan, MEMORY appears on
the LCD display. To enter a channel into Memory Scan, select the channel
Mystic Setup
Mystic OMc.book Page 40 Wednesday, August 13, 2003 5:26 PM

41
you want to store by pressing p or q, and then press and hold [SCAN/
MEMORY] for 2 seconds. The channel is stored in Memory Scan and
MEMORY appears on the LCD display.
To cancel the channel in Memory, press and hold [SCAN/MEMORY] for 2
seconds and the MEMORY icon disappears.
Note: The Memory channel can be set independently in 3 regional
modes (USA, INT, and CAN). You cannot use this feature in
WX mode or for channel 70.
FIPS
The 6-digit Federal Information Processing System (FIPS) code
established by the National Weather Service (NWS) identifies geographic
areas in the United States. Programming FIPS codes are necessary to
receive SAME alerts about weather occurring in a particular area. To
obtain the FIPS code for a particular area contact the NWS toll free at 1-
888-NWR-SAME (1-888-697-7263).
Or visit their website: http://www.nws.noaa.gov/nwr/indexnw.htm.
A list of event codes are located on page 70.
To set FIPS code
1.Press ENTER for 2 seconds.
2.Press ENTER at VHF Menu, the VHF menu appears.
3.Press ENTER.
1.Press ENTER for 2 seconds.
2.Press ENTER at VHF Menu, the VHF menu appears.
3.Press ENTER at FIPS.
4.Press ENTER at NEW, the following screen appears.
5.You can now enter the new FIPS code. Press s to increase and press t
to decrease. The number will be entered when ENTER is pressed, and
the blinking digit moves to the right. When you finished entering the last
digit, the following confirmation screen appears.
6.Press ENTER and the MYSTIC returns to the following screen
EDIT
If you select a number to EDIT.
Mystic OMc.book Page 41 Wednesday, August 13, 2003 5:26 PM

42
1.Press ENTER for 2 seconds.
2.Press ENTER at VHF Menu, the VHF menu appears.
3.Press ENTER at FIPS.
4.Press ENTER at the code that you want to edit.
5.Press ENTER at EDIT, the following screen appears.
6.You can now edit the FIPS code. Press s to increase and press t to
decrease. The number will be entered when ENTER is pressed, and the
blinking digit moves to the right.
7.When you finished editing the last digit, the following confirmation
screen appears.
8.Press ENTER and the MYSTIC returns to the following screen.
DELETE
If you select DELETE
1.Press ENTER for 2 seconds.
2.Press ENTER at VHF Menu, the VHF menu appears.
3.Press ENTER at FIPS.
4.Press ENTER at the code that you want to delete.
5.Press ENTER at DELETE, the following screen appears.
6.Press ENTER and the MYSTIC returns to the following screen.
USER MMSI
Federal MMSI's are issued by the National Telecommunications and
Information Administration. Non-Federal MMSI's are issued by the
Federal Communications Commission (FCC). You will need to obtain a
nine digit MMSI number and program it into the MYSTIC. The information
obtained from the application is useful to the U.S. Coast Guard to help in
search and rescue operations. To obtain an MMSI number, contact your
authorized Uniden dealer or visit one of the following websites: http://
wireless.fcc.gov/marine/fctsht14.html, www.boatus.com/mmsi/, or www./
maritel.usa.com/r-mmsi.htm
This portion of the SETUP menu will allow you to program an MMSI,
(Maritime Mobile Service Identity) for sending and receiving DSC calls.
Mystic OMc.book Page 42 Wednesday, August 13, 2003 5:26 PM

43
To set USER MMSI code
1.Press ENTER for 2 seconds.
2.Press ENTER at VHF Menu, the VHF menu appears.
3.Press t to select MMSI and press ENTER to confirm user MMSI code.
4.Press ENTER, the following screen appears.
5.You can now enter the USER MMSI code. Press s to increase and
press t to decrease. The number will be entered when ENTER is pressed,
and the blinking digit moves to the right.
6.After the final digit is entered, the confirmation screen appears.
Press ENTER.
Note:You can only program your Mystic twice with an MMSI number.
After that, send your Mystic to Uniden for factory service.
GROUP MMSI
1.Press ENTER for 2 seconds.
2.Press ENTER at VHF Menu, the VHF menu appears.
3.Press t to select MMSI, press t to select Group, and press ENTER.
4.Press ENTER, and the following screen appears.
5.You can now enter the GROUP MMSI code. Press s to increase and
press t to decrease. The number will be entered when ENTER is pressed,
and the blinking digit moves to the right.
6.After the final digit is entered, a confirmation screen appears.
Press ENTER and the MYSTIC returns to the following screen.
U.I.C
The Mystic can transmit and receive, USA, International, and Canada
frequencies. When you turn the Mystic On, USA channel mode is set as
the default.
1.Press ENTER for 2 seconds.
2.Press ENTER at VHF Menu, the VHF menu appears.
3.Press t to select U.I.C.
4.Press ENTER and the following screen appears.
Mystic OMc.book Page 43 Wednesday, August 13, 2003 5:26 PM
44
5.Press t to make your selection.
6.Press ENTER and the MYSTIC returns to the channel display screen.
Note:The MYSTIC radio remembers the last channel selected in each
mode. The first time you enter each mode, channel 16 will be the default
selected channel.
DIRECTORY
This function will allow you to send an individual call, etc. The Directory
function memorizes the name and number of 20 other vessels. The
following screen will allow you to setup an alphanumeric identity as well as
the corresponding MMSI number.
1.Press ENTER for 2 seconds.
2.Press ENTER at VHF Menu, the VHF menu appears.
3.Press ENTER at DIRECTORY, the DIRECTORY menu appears.
NEW
If you select NEW
1.Press ENTER for 2 seconds.
2.Press ENTER at VHF Menu, the VHF menu appears.
3.Press ENTER at DIRECTORY, the DIRECTORY menu appears.
4.Press ENTER at NEW, the following screen appears.
5.You can now enter the person’s name. Press s or t, and press ENTER
to choose the alphabet. The character will be entered when ENTER is
pressed.
6.After you enter the person’s name, you can enter their MMSI number.
Press s to increase and press t to decrease.
The number will be entered when ENTER is pressed, and the blinking
digit moves to the right.
7.After the directory data is entered, a confirmation screen appears.
8.Press ENTER and the MYSTIC returns to the following screen.
EDIT
If you select EDIT
Mystic OMc.book Page 44 Wednesday, August 13, 2003 5:26 PM

45
1.Press ENTER for 2 seconds.
2.Press ENTER at VHF Menu, the VHF menu appears.
3.Press ENTER at DIRECTORY, the DIRECTORY menu appears.
4.Press ENTER at the individual you want to edit.
5.Press ENTER at EDIT.
6.You can now enter the person’s name. Press s or t, and press ENTER
to choose the alphabet. The character will be entered when ENTER is
pressed.
7.After you edit the person’s name, you can edit the MMSI. Press s to
increase and press t to decrease..
The number will be entered when ENTER is pressed, and the blinking
digit moves to the right.
8.After the directory data is edited, a confirmation screen appears.
9.Press ENTER knob and the MYSTIC returns to the following screen.
DELETE
If you select DELETE
1.Press ENTER for 2 seconds.
2.Press ENTER at VHF Menu, the VHF menu appears.
3.Press ENTER at DIRECTORY, the DIRECTORY menu appears.
4.Press ENTER at the individual you want to delete.
5.Press ENTER at DELETE the following screen appears.
6.Press ENTER.
7.The MYSTIC returns to the following screen.
AUTO CHANNEL SWITCH
This feature is to allow you to disable the automatic channel change that
happens when receiving a DSC call. This feature is useful when engaged
in bridge – to – bridge or other safety related calls. When you have
completed these calls, all of the incoming DSC calls received are available
in the call log.
1.Press ENTER for 2 seconds.
Mystic OMc.book Page 45 Wednesday, August 13, 2003 5:26 PM

46
2.Press ENTER at VHF Menu, the VHF menu appears.
3.Press t to select Auto CH Switch.
4.Press ENTER, and the following screen appears.
5.If you want to change this mode to OFF, you can change it by pressing
t. (Default is set as ON.)
6.Press ENTER and the MYSTIC returns to the channel display screen.
POSITION REPLY
When the calling radio has requested the position information of the
MYSTIC radio, you can decide to transmit an acknowledgment
automatically or on a call by call basis.
1.Press ENTER for 2 seconds.
2.Press ENTER at VHF Menu, the VHF menu appears.
3.Press t to select Position Reply.
4.Press ENTER, and the following screen appears.
5.Press t to make your selection.
Example: AUTO
When the MYSTIC receives a position request, the following screen
appears.
Example: MANUAL
When the MYSTIC receives a position request, the following screen
appears. Press t to make your selection.
6.Press ENTER and the MYSTIC returns to the following screen.
Note:If the Mystic is set to MANUAL, you can select either REPLY or
CANCEL.
CH TAG
This feature allows you to name each marine channel.
1.Press ENTER for 2 seconds.
2.Press ENTER at VHF Menu, the VHF menu appears.
3.Press t to select U.I.C and press ENTER.
Mystic OMc.book Page 46 Wednesday, August 13, 2003 5:26 PM

47
4.Press ENTER, the following screen appears.
5.Press ENTER at the channel that you would like to EDIT or DELETE.
EDIT
If you select EDIT
1.Press ENTER for 2 seconds.
2.Press ENTER at VHF Menu, the VHF menu appears.
3.Press t to select U.I.C and press one of the selection to edit the CH
TAG.
4.Press ENTER, the following screen appears.
Press ENTER at the individual you want to edit.
5.Press ENTER at EDIT, the following screen appears.
6.You can edit the name. Press s or t to select the alphabet, numeric, or
symbols.
The character will be entered when ENTER is pressed, and the blinking
digit moves to the right.
7.Press ENTER.
8.The MYSTIC returns to the following screen.
DELETE
If you select DELETE
1.Press ENTER for 2 seconds.
2.Press ENTER at VHF Menu, the VHF menu appears.
3.Press t to select U.I.C and press one of the selection to edit the CH
TAG.
4.Press ENTER, the following screen appears.
5.Press ENTER at the channel you want to delete.
6.Press ENTER at DELETE.
7.Press ENTER.
8.The MYSTIC returns to the following screen.
Mystic OMc.book Page 47 Wednesday, August 13, 2003 5:26 PM

48
CHANNEL
DESIG
FREQUENCY (MHz TYPE OF TRAFFIC SHIP
TO SHIP SHIP
TO SHORE CH
TAG
TRANSMIT RECEIVE
WX0 163.275 NOAA Weather RX Only RX Only
WX1 162.550 NOAA Weather RX Only RX Only
WX2 162.400 NOAA Weather RX Only RX Only
WX3 162.475 NOAA Weather RX Only RX Only
WX4 162.425 NOAA Weather RX Only RX Only
WX5 162.450 NOAA Weather RX Only RX Only
WX6 162.500 NOAA Weather RX Only RX Only
WX7 162.525 NOAA Weather RX Only RX Only
WX8 161.650 Can. Weather RX Only RX Only
WX9 161.775 Can. Weather RX Only RX Only
01 156.050 156.050 VTS Yes Yes VTS
02
03 156.150 156.150 Port Ops Yes Yes
04
05 156.250 156.250 VTS Yes Yes VTS
06 156.300 156.300 Safety Yes No SAFETY
07 156.350 156.350 Com’l Yes Yes COMMERCIAL
08 156.400 156.400 Com’l Yes No COMMERCIAL
09 156.450 156.450 Com’l & Non Com’l Yes Yes CALLING
10 156.500 156.500 Com’l Yes Yes COMMERCIAL
11 156.550 156.550 Com’l Yes Yes VTS
12 156.600 156.600 Port Ops Yes Yes VTS
13 156.650 156.650 Navigational, TX 1W only Yes Yes BRG/BRG
14 156.700 156.700 Port Ops Yes Yes VTS
15 —156.750 Environmental RX Only RX Only COMMERCIAL
16 156.800 156.800 Safety Calling Yes Yes DISTRESS
17 156.850 156.850 State Control Yes Yes SAR
18 156.900 156.900 Com’l Yes Yes COMMERCIAL
19 156.950 156.950 Com’l Yes Yes COMMERCIAL
20 157.000 157.000 Port Ops, RX Duplex Yes Yes PORT OPR
21 157.050 157.050 Coast Guard Yes Yes CCG
22 157.100 157.100 Coast Guard Yes Yes USCG
23 157.150 157.150 Coast Guard Yes Yes USCG
24 157.200 161.800 Public Corresp,Duplex No Yes TELEPHONE
25 157.250 161.850 Public Corresp,Duplex No Yes TELEPHONE
26 157.300 161.900 Public Corresp,Duplex No Yes TELEPHONE
27 157.350 161.950 Public Corresp,Duplex No Yes TELEPHONE
28 157.400 162.000 Public Corresp,Duplex No Yes TELEPHONE
60
61 156.075 156.075 CCG
62
63 156.175 156.175 VTS
64 156.225 156.225 COMMERCIAL
65 156.275 156.275 Port Ops Yes Yes PORT OPR
66 156.325 156.325 Port Ops Yes Yes PORT OPR
67 156.375 156.375 Com’l, TX 1W only Yes No BRG/BRG
68 156.425 156.425 Non Com’l Yes Yes SHIP-SHIP
69 156.475 156.475 Non Com’l Yes Yes PLEASURE
70 156.525 156.525 DSC
71 156.575 156.575 Non Com’l Yes Yes PLEASURE
72 156.625 156.625 Non Com’l Yes No SHIP-SHIP
73 156.675 156.675 Port Ops Yes Yes PORT OPR
74 156.725 156.725 Port Ops Yes Yes PORT OPR
77 156.875 156.875 Port Ops Yes No PORT OPR
78 156.925 156.925 Non Com’l Yes Yes SHIP-SHIP
79 156.975 156.975 Com’l Yes Yes SHIP-SHIP
80 157.025 157.025 Com’l Yes Yes SHIP-SHIP
81 157.075 157.075 Coast Guard Yes Yes CCG
82 157.125 157.125 US Govt Only Yes Yes CCG
83 157.175 157.175 Coast Guard Yes Yes USCG
84 157.225 161.825 Public Corresp,Duplex No Yes TELEPHONE
85 157.275 161.875 Public Corresp,Duplex No Yes TELEPHONE
86 157.325 161.925 Public Corresp,Duplex No Yes TELEPHONE
87 157.375 161.975 Public Corresp,Duplex No Yes TELEPHONE
88 157.425 157.425 Com’l Yes No COMMERCIAL
VHF FM Marine Radio Telephone
Channel and Functions
(USA Channels)
Mystic OMc.book Page 48 Wednesday, August 13, 2003 5:26 PM
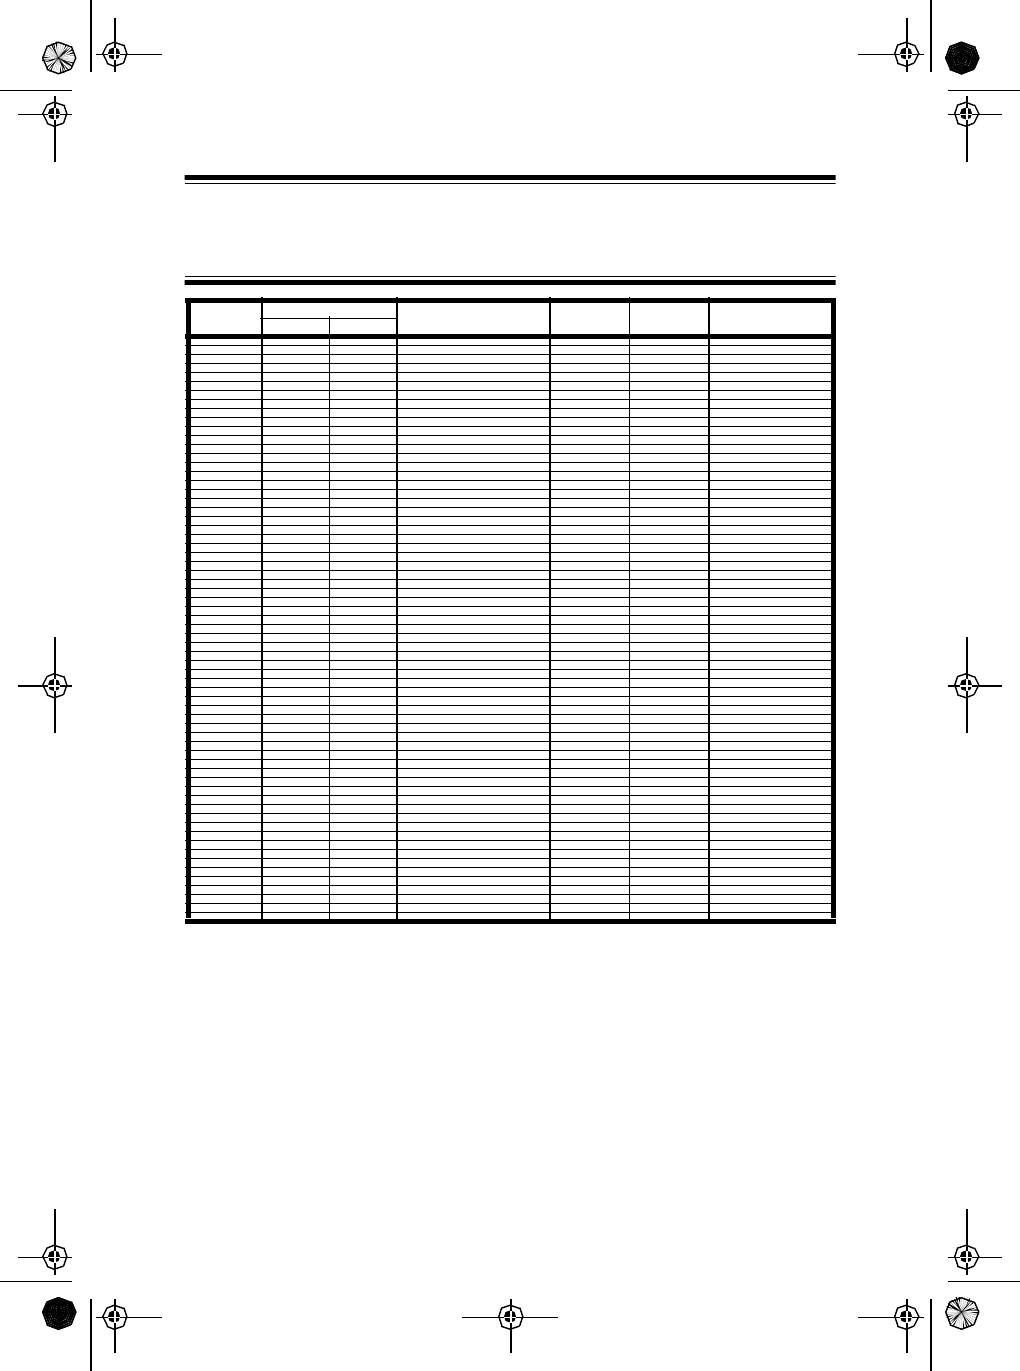
49
CHANNEL
DESIG
FREQUENCY (MHz TYPE OF TRAFFIC SHIP
TO SHIP SHIP
TO SHORE CH
TAG
TRANSMIT RECEIVE
WXO —163.275 NOAAWeather RX Only RX Only
WX1 — 162.550 NOAAWeather RX Only RX Only
WX2 — 162.400 NOAAWeather RX Only RX Only
WX3 — 162.475 NOAAWeather RX Only RX Only
WX4 — 162.425 NOAAWeather RX Only RX Only
WX5 — 162.450 NOAAWeather RX Only RX Only
WX6 — 162.500 NOAAWeather RX Only RX Only
WX7 — 162.525 NOAAWeather RX Only RX Only
WX8 — 161.650 Can. Weather RX Only RX Only
WX9 — 161.775 Can. Weather RX Only RX Only
01 156.050 160.650 VTS,Duplex Yes Yes TELEPHONE
02 156.100 160.700 Port Ops,Duplex Yes Yes TELEPHONE
03 156.150 160.750 Port Ops,Duplex Yes Yes TELEPHONE
04 156.200 160.800 Port Ops,Duplex Yes Yes INTL
05 156.250 160.850 VTS,Duplex Yes Yes INTL
06 156.300 156.300 Safety Yes No SAFETY
07 156.350 160.950 Com’,Duplexl Yes Yes INTL
08 156.400 156.400 Com’l Yes No COMMERCIAL
09 156.450 156.450 Com’l & Non Com’l Yes Yes CALLING
10 156.500 156.500 Com’l Yes Yes COMMERCIAL
11 156.550 156.550 Com’l Yes Yes VTS
12 156.600 156.600 Port Ops Yes Yes VTS
13 156.650 156.650 Navigational Yes Yes BRG/BRG
14 156.700 156.700 Port Ops Yes Yes VTS
15 156.750 156.750 Environmental Yes Yes COMMERCIAL
16 156.800 156.800 Safety Calling Yes Yes DISTRESS
17 156.850 156.850 State Control Yes Yes SAR
18 156.900 161.500 Com’l,Duplex Yes Yes INTL
19 156.950 161.550 Com’l,Duplex Yes Yes INTL
20 157.000 161.600 Port Ops,Duplex Yes Yes PORT OPR
21 157.050 161.650 Coast Guard,Duplex Yes Yes INTL
22 157.100 161.700 Coast Guard,Duplex Yes Yes INTL
23 157.150 161.750 Coast Guard,Duplex Yes Yes INTL
24 157.200 161.800 Public Corresp,Duplex No Yes TELEPHONE
25 157.250 161.850 Public Corresp,Duplex No Yes TELEPHONE
26 157.300 161.900 Public Corresp,Duplex No Yes TELEPHONE
27 157.350 161.950 Public Corresp,Duplex No Yes TELEPHONE
28 157.400 162.000 Public Corresp,Duplex No Yes TELEPHONE
60 156.025 160.625 Duplex TELEPHONE
61 156.075 160.675 Duplex INTL
62 156.125 160.725 Duplex INTL
63 156.175 160.775 Duplex INTL
64 156.225 160.825 Duplex TELEPHONE
65 156.275 160.875 Port Ops,Duplex Yes INTL
66 156.325 160.925 Port Ops,Duplex Yes Yes INTL
67 156.375 156.375 Com’l Yes No BRG/BRG
68 156.425 156.425 Non Com’l Yes Yes SHIP-SHIP
69 156.475 156.475 Non Com’l Yes Yes PLEASURE
70 156.525 156.525 DSC
71 156.575 156.575 Non Com’l Yes Yes PLEASURE
72 156.625 156.625 Non Com’l Yes No SHIP-SHIP
73 156.675 156.675 Port Ops Yes Yes PORT OPR
74 156.725 156.725 Port Ops Yes Yes PORT OPR
77 156.875 156.875 Port Ops Yes No PORT OPR
78 156.925 161.525 Non Com’l,Duplex Yes Yes INTL
79 156.975 161.575 Com’l,Duplex Yes Yes INTL
80 157.025 161.625 Com’l,Duplex Yes Yes INTL
81 157.075 161.675 Coast Guard,Duplex Yes Yes INTL
82 157.125 161.725 US Govt Only,Duplex Yes Yes INTL
83 157.175 161.775 Coast Guard,Duplex Yes Yes INTL
84 157.225 161.825 Public Corresp,Duplex No Yes TELEPHONE
85 157.275 161.875 Public Corresp,Duplex No Yes TELEPHONE
86 157.325 161.925 Public Corresp,Duplex No Yes TELEPHONE
87 157.375 161.975 Public Corresp,Duplex No Yes TELEPHONE
88 157.425 162.025 Com’l,Duplex Yes No TELEPHONE
VHF FM Marine Radio Telephone
Channel and Functions
(Int Channels)
Mystic OMc.book Page 49 Wednesday, August 13, 2003 5:26 PM
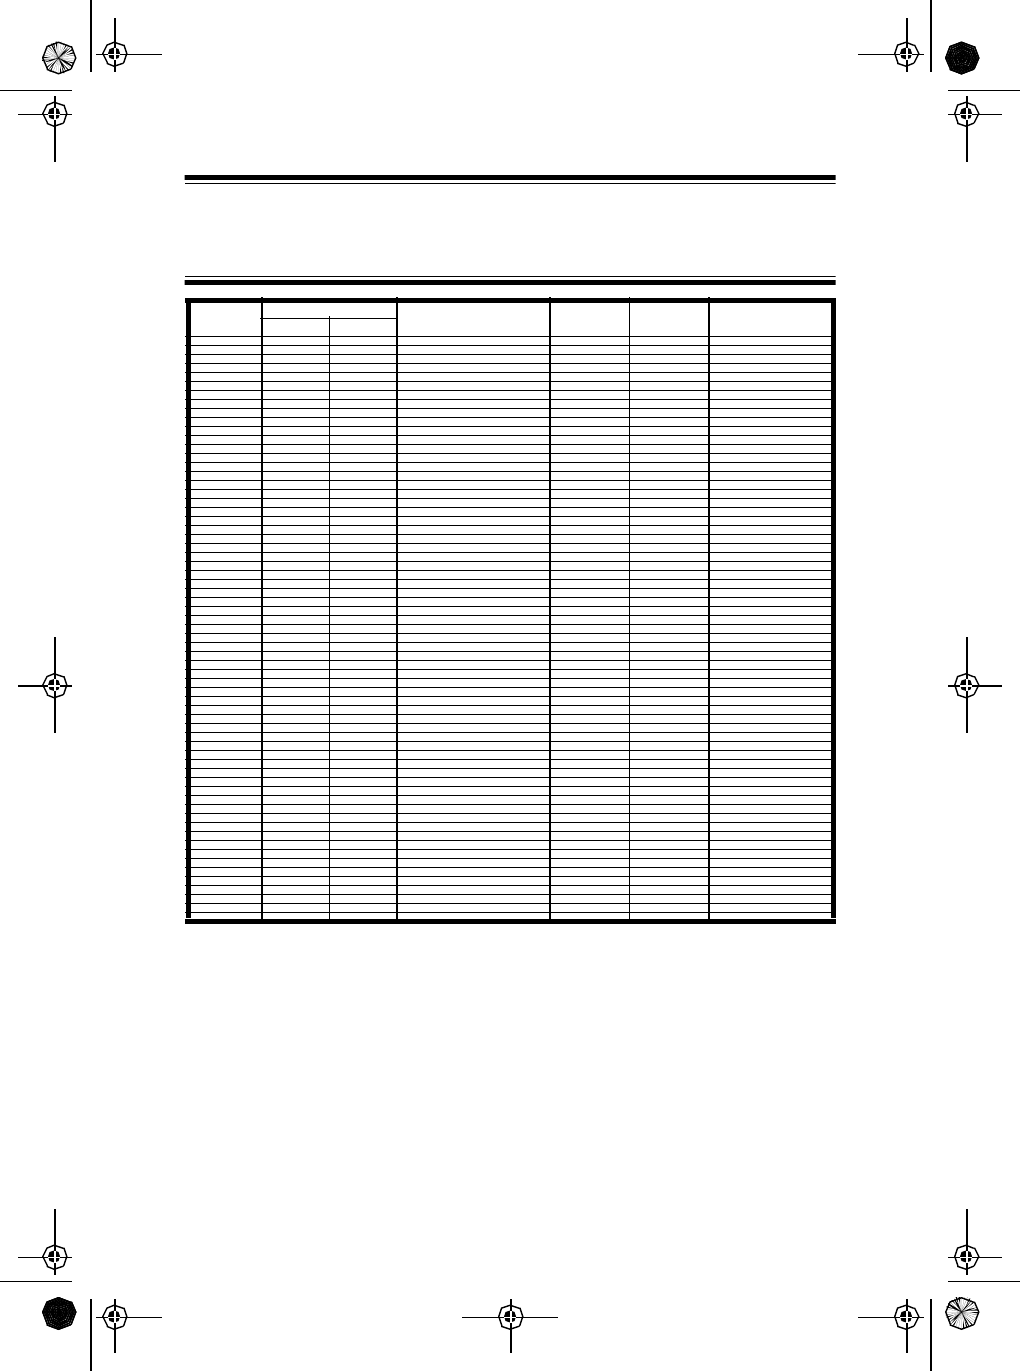
50
CHANNEL
DESIG
FREQUENCY (MHz TYPE OF TRAFFIC SHIP
TO SHIP SHIP
TO SHORE CH
TAG
TRANSMIT RECEIVE
WXO —163.275 NOAAWeather RX Only RX Only
WX1 — 162.550 NOAAWeather RX Only RX Only
WX2 — 162.400 NOAAWeather RX Only RX Only
WX3 — 162.475 NOAAWeather RX Only RX Only
WX4 — 162.425 NOAAWeather RX Only RX Only
WX5 — 162.450 NOAAWeather RX Only RX Only
WX6 — 162.500 NOAAWeather RX Only RX Only
WX7 — 162.525 NOAAWeather RX Only RX Only
WX8 — 161.650 Can. Weather RX Only RX Only
WX9 — 161.775 Can. Weather RX Only RX Only
01 156.050 160.650 Duplex Yes Yes TELEPHONE
02 156.100 160.700 Duplex Yes Yes TELEPHONE
03 156.150 160.750 Duplex Yes Yes TELEPHONE
04 156.200 156.200 Yes Yes INTL
05 156.250 156.250 Yes Yes VTS
06 156.300 156.300 Yes No SAFETY
07 156.350 156.350 Yes Yes COMMERCIAL
08 156.400 156.400 Yes No COMMERCIAL
09 156.450 156.450 Yes Yes CALLING
10 156.500 156.500 Yes Yes COMMERCIAL
11 156.550 156.550 Yes Yes VTS
12 156.600 156.600 Yes Yes VTS
13 156.650 156.650 1W Yes Yes BRG/BRG
14 156.700 156.700 Yes Yes VTS
15 156.750 156.750 1W Yes Yes COMMERCIAL
16 156.800 156.800 Yes Yes DISTRESS
17 156.850 156.850 1W Yes Yes SAR
18 156.900 156.900 Yes Yes COMMERCIAL
19 156.950 156.950 Yes Yes COMMERCIAL
20 157.000 161.600 Duplex, 1W Yes Yes PORT OPR
21 157.050 157.050 Yes Yes CCG
22 157.100 157.100 Yes Yes USCG
23 157.150 161.750 Duplex Yes Yes INTL
24 157.200 161.800 Duplex No Yes TELEPHONE
25 157.250 161.850 Duplex No Yes TELEPHONE
26 157.300 161.900 Duplex No Yes TELEPHONE
27 157.350 161.950 Duplex No Yes TELEPHONE
28 157.400 162.000 Duplex No Yes TELEPHONE
60 156.025 160.625 Duplex TELEPHONE
61 156.075 156.075 CCG
62 156.125 156.125 INTL
63 — —
64 156.225 156.225 Simplex COMMERCIAL
65 156.275 156.275 Yes Yes PORT OPR
66 156.325 156.325 Yes Yes PORT OPR
67 156.375 156.375 Yes No BRG/BRG
68 156.425 156.425 Yes Yes SHIP-SHIP
69 156.475 156.475 Yes Yes PLEASURE
70 156.525 156.525 DSC
71 156.575 156.575 Yes Yes PLEASURE
72 156.625 156.625 Yes No SHIP-SHIP
73 156.675 156.675 Yes Ye PORT OPR
74 156.725 156.725 Yes Ye PORT OPR
77 156.875 156.875 Yes No PORT OPR
78 156.925 156.925 Yes Yes SHIP-SHIP
79 156.975 156.975 Yes Yes SHIP-SHIP
80 157.025 157.025 Yes Yes SHIP-SHIP
81 157.075 157.075 Yes Yes CCG
82 157.125 157.125 Yes Yes CCG
83 157.175 157.175 Yes Yes USCG
84 157.225 161.825 Duplex No Yes TELEPHONE
85 157.275 161.875 Duplex No Yes TELEPHONE
86 157.325 161.925 Duplex No Yes TELEPHONE
87 157.375 161.975 Duplex No Yes TELEPHONE
88 157.425 162.025 Duplex Yes No TELEPHONE
VHF FM Marine Radio Telephone
Channel and Functions
(CAN Channels)
Mystic OMc.book Page 50 Wednesday, August 13, 2003 5:26 PM
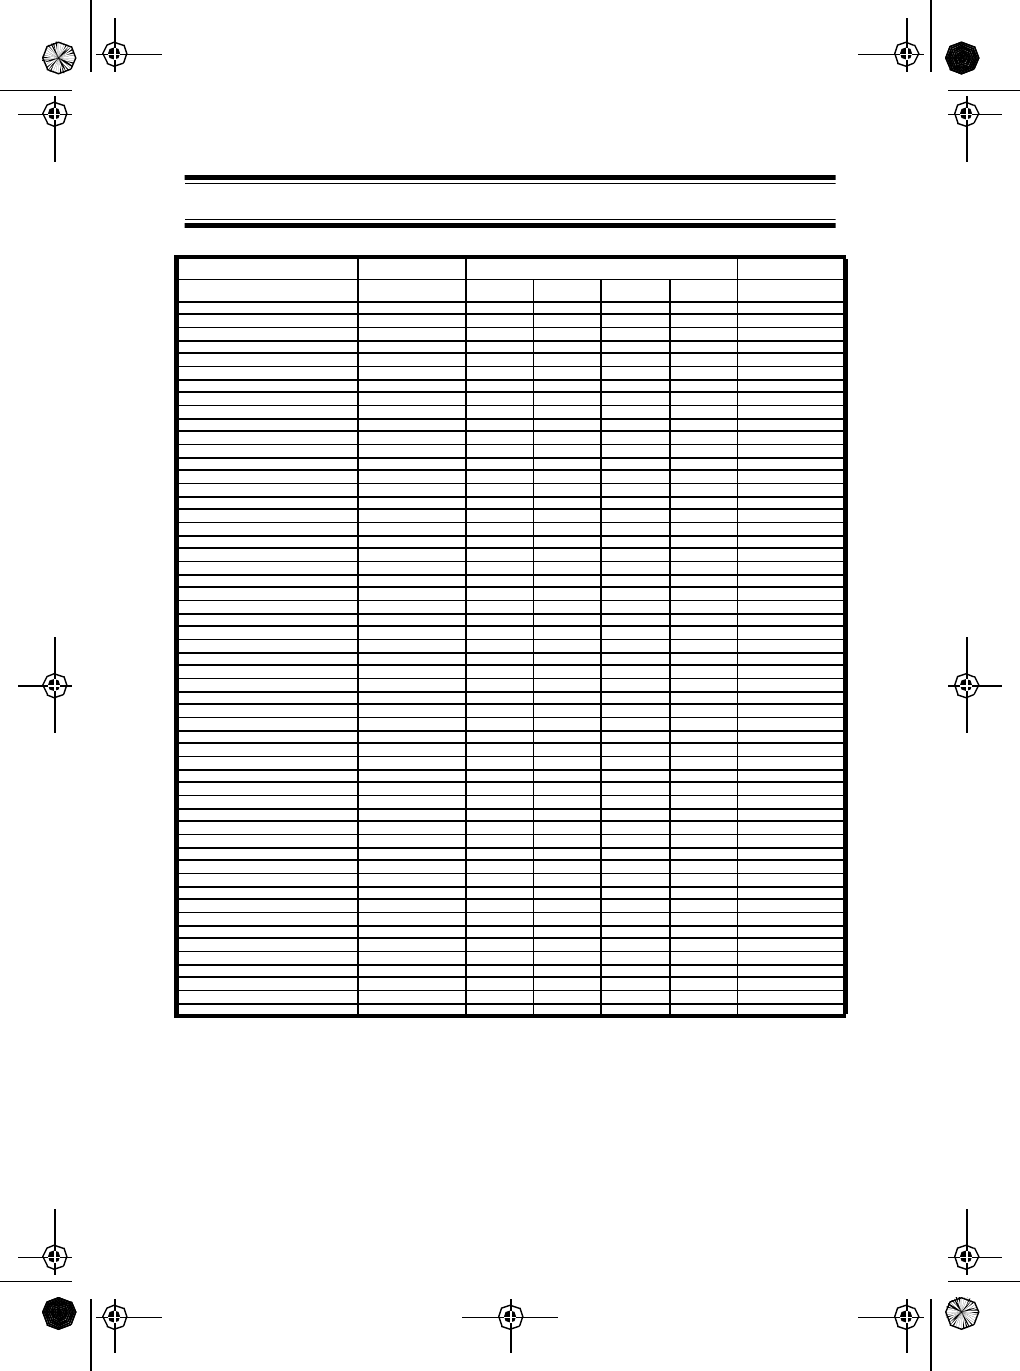
51
Event Code Standard EVENT LEVEL (Siren Type) LCD Display
Warning Watch Statement Test
Emergency Action Notification EAN 0EMG NOTIFY
Emergency Action Termination EAT 0EMG END
National Information Center NIC 0NATION INFO
Tornado Warning # TOW (or TOR) 0TORNADO
Severe Thunderstorm Warning # SVW (or SVR) 0THUNDERSTORM
Flash Flood Warning FFW 0FLASH FLOOD
Flood Warning FLW 0FLOOD
Winter Storm Warning WSW 0WINTER STORM
Blizzard Warning BZW 0BLIZZARD
High Wind/Dust Storm Warning HWW 0HIGH WIND
Radiological Hazard Warning RHW 0RADIOLOGICAL
Civil Danger Warning CDW 0CIVILDANGER
Local Area Emergency LAE 0LOCAL EMG
Hazardous Material Warning HMW 0HAZARDOUS
Civil Emergency Message CEM 0CIVIL EMG
Immediate Evacuation Warning IEW 0EVACUATION
Immediate Evacuation Notice EVI 0EVACUATENOTE
Law Enforcement Warning LEW 0LAW ENFORCE
Fire Warning FRW 0FIRE
Hurricane/Tropical Storm Warning HUW 0HURRICANE
Tsunami Warning TSW 0TSUNAMI
Coastal Flood Warning CFW 0COAST FLOOD
Special Marine Warning SMW 0SPECIAL MRN
Avalanche Warning AVW 0AVALANCHE
Volcano Warning VOW 0VOLCANO
Shelter In Place Warning SPW 0SHELTER
Civil Danger Watch CDA 0CIVIL DANGER
Radiological Hazard Watch RHA 0RADIOLOGICAL
Hazardous Material Watch HMA 0HAZARDOUS
Winter Storm Watch WSA 0WINTER STORM
High Wind/Dust Storm Watch HWA 0HIGH WIND
Tornado Watch TOA 0TORNADO
Severe Thunderstorm Watch SVA 0THUNDERSTORM
Flash Flood Watch FFA 0FLASH FLOOD
Flood Watch FLA 0FLOOD
Hurricane/Tropical Storm Watch HUA 0HURRICANE
Tsunami Watch TSA 0TSUNAMI
Coastal Flood Watch CFA 0COAST FLOOD
Avalanche Watch AVA 0AVALANCHE
Volcano Watch VOA 0VOLCANO
Severe Weather Statement SVS 0SEVERE WX
Special Weather Statement SPS 0SPECIAL WX
Flash Flood Statement FFS 0FLASH FLOOD
Flood Statement FLS 0FLOOD
Hurricane Statement HLS 0HURRICANE
National Periodic Test NPT 0NATIONPERIOD
Required Monthly Test RMT 0MONTHLY
Required Weekly Test RWT 0WEEKLY
System Demonstration/Practice DMO SYSTEM DEMO
NATIONAL HAZARD WARNING NHW 0NATIONHAZARD
UNKNOWN EMERGENCY TUNE TV **E 0UNKNOWN TV
UNKNOWN WARNING TUNE TV **W 0UNKNOWN TV
UNKNOWN WATCH TUNE TV **A 0UNKNOWN TV
UNKNOWN STATEMENT TUNE TV **S 0UNKNOWN TV
NWR-SAME Event Codes
Mystic OMc.book Page 51 Wednesday, August 13, 2003 5:26 PM

52
General
VHF Receiver
VHF Transmitter
GPS Performance
Channels :Transmit: 55
Receive: 80 Marine (all USA and Canadian} 10 Weather
Controls :On-Off/Volume, Squelch, PTT, DISTRESS
Keys :IN, CALL/LIGHT, OUT, GOTO/MARK, ESC, MENU,
ENTER, WX/ALERT, SCAN/MEMORY, 1W/5W/;LOCK, 16/
9/TRIPLE, and Cursor keys (pqt u )
Status Indicators :TX (Transmit), TRI (Triple Watch), HI (High), LO (Low),
USA, CAN, INT, ALT, MEM, WX and Channel Display
Channel Display :LCD (Full DotMatrix
2.2”H x 1.75”W (5.59cm x 4.4cm)
Connectors :Antenna (SMA type female)
Size :67/8 “H x 25/8”W x 13/8”D
Weight :
Antenna Impedance :50Ω
Housing :JIS7 Waterproof
Operating Temperature Range :Operating: 14°F to 140°F (-10°C to 60°C)
Storage: -4°F to 158°F (-20°C to 70°C)
Power Source :LiON /Alkaline batteris
Receiver Type :Dual Conversion Superheterodyne
Signal-to-Noise Ratioj :40 dB Nominal
Frequency Range :156 ~ 164 MHz
Receiver Sensitivity :0.25 µv at 12 dB SINAD
Audio Output Power :1 Watt
Frequency Range :156 ~ 158 MHz
Frequency Stability :±500Hz
Power Output :5 Watt, 1 Watt - selectible
Current Drain :1.3 Amps @ 5 Watts
600 Milliamps @ 1 Watt
Spurious Emissions :5W, -70 dBc
Modulation :FM ±5 KHz deviation
(FCC designator F3E)
Receiver :
Acquisition times
(under normal conditions) :
Accuracy :
Receiver :
Limits :
Specifications
Mystic OMc.book Page 52 Wednesday, August 13, 2003 5:26 PM
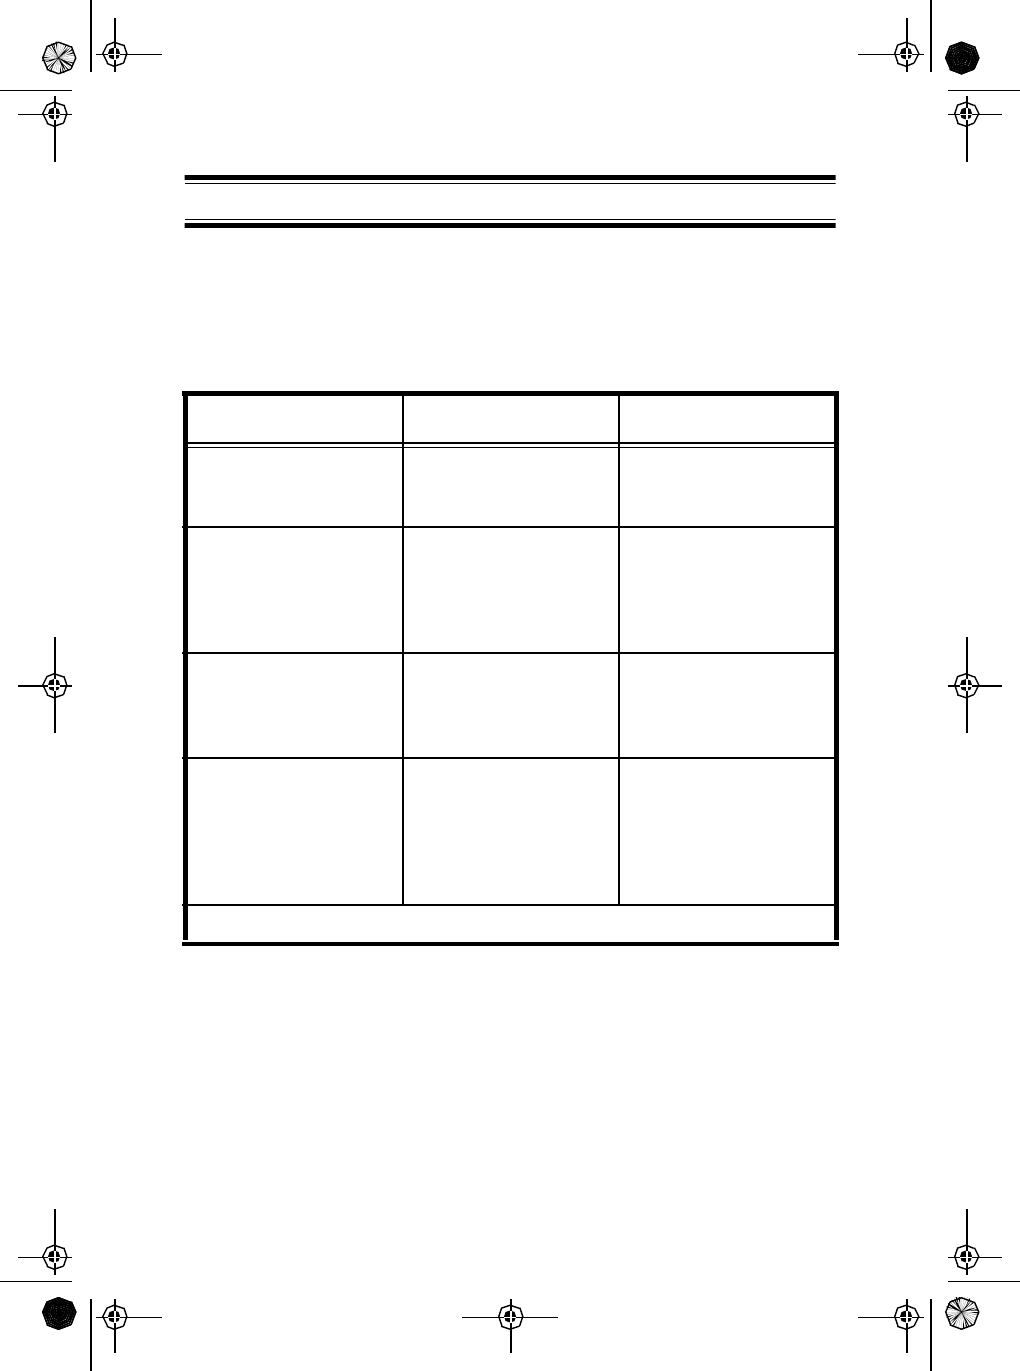
53
If the Mystic does not perform to your expectations, try the suggestions
listed below. If you cannot get satisfactory results, call the Uniden
Technical Support at (800) 586-0409, 8:00 a.m. to 5:00 p.m., Central
Standard Time, Monday through Friday.
Symptom Cause Remedy
Won’t power On. No or low voltage. Check for proper
voltage getting to the
radio.
When the PTT button is
pressed, the TX icon
appears and another
radio can hear a “click”
but no audio is heard.
Bad microphone
element.
Send the radio in for
repair.
While scanning, the
radio stops on a
particular channel all
the time.
A source of noise may
nearby.
Eliminate the source of
the noise or delete the
channel from the scan
memory.
There is noise on the
receiver that the
squelch will not
eliminate.
An external noise is
being generated by
some device nearby.
Either turn off the
offending device or
contact the
manufacturer regarding
FCC part 15
“unintentional radiation”.
Note: GPS troublshooting elements to be added in final draft.
Troubleshooting
Mystic OMc.book Page 53 Wednesday, August 13, 2003 5:26 PM

54
Your Mystic is a precision unit of electronic equipment and you should
treat it accordingly. Due to the rugged design, very little maintenance is
required. However, a few precautions should be observed:
lIf the antenna has been damaged, you should not transmit except in
the case of an emergency. A defective antenna may cause damage
to your radio.
lYou are responsible for continued FCC technical compliance of your
radio.
lYou are urged to arrange for periodic performance checks with your
Uniden Marine dealer.
Care and Maintenance
Mystic OMc.book Page 54 Wednesday, August 13, 2003 5:26 PM

FCC RF EXPOSURE INFORMATION
WARNING! Read this information before using the radio
In August 1996 the Federal Communications Commission (FCC) of the
United States with its action in Report and Order FCC 96-326 adopted
an updated safety standard for human exposure to radio frequency
electromagnetic energy emitted by FCC regulated transmitters.
Those guidelines are consistent with the safety standard previously set
by both U.S. and international standards bodies. The design of the radio
complies with the FCC guidelines and these international standards.
• Never allow children to operate the radio without adult
supervision and the knowledge of the following guidelines.
WARNING! It is up to the user to properly operate this radio
transmitter to insure safe operation. Please adhere
to the following:
Use only the supplied or an approved antenna. Unauthorized antennas,
modifications, or attachments could impair call quality, damage the
radio, or result in violation of FCC regulations.
Do not use the radio with a damaged antenna. If a damaged antenna
comes into contact with the skin, a minor burn may result. Please
contact your local dealer for a replacement antenna.
Body-worn Operation
This device was tested for typical body-worn operations using the
supplied belt-clip, which typically provides a space of 1 inch from the
body. To maintain compliance with FCC RF exposure requirements,
body-worn operations are restricted to the supplied belt-clip.
For hand-held operation, the radio should be held 1 inch from the user's
face. The use of accessories that do not satisfy these requirements may
not comply with FCC RF exposure requirements and should be
avoided. For more information about RF exposure, please visit the FCC
website at www.fcc.gov.
• When using an external speaker microphone, USE ONLY THE
UNIDEN MODEL HHVTA07. Use of any other accessory for
this purpose may invalidate your authority to operate this
device.
29
ATLANTIS250.QX 7/14/03 2:37 PM Page 29
Three Year Limited Warranty
WARRANTOR: UNIDEN AMERICA CORPORATION (“Uniden”)
ELEMENTS OF WARRANTY: Uniden warrants, for three years, to the original
retail owner, this Uniden Product to be free from defects in materials and
craftsmanship with only the limitations or exclusions set out below.
WARRANTY DURATION: This warranty to the original user shall terminate and
be of no further effect 36 months after the date of original retail sale. The warranty
is invalid if the Product is (A) damaged or not maintained as reasonable or
necessary, (B) modified, altered, or used as part of any conversion kits,
subassemblies, or any configurations not sold by Uniden, (C) improperly installed,
(D) serviced or repaired by someone other than an authorized Uniden service
center for a defect or malfunction covered by this warranty, (E) used in any
conjunction with equipment or parts or as part of any system not manufactured by
Uniden, or (F) installed or programmed by anyone other than as detailed by the
Operating Guide for this product.
STATEMENT OF REMEDY: In the event that the product does not conform to this
warranty at any time while this warranty is in effect, warrantor will repair the defect
and return it to you without charge for parts, service, or any other cost (except
shipping and handling) incurred by warrantor or its representatives in connection
with the performance of this warranty. THE LIMITED WARRANTY SET FORTH
ABOVE IS THE SOLE AND ENTIRE WARRANTY PERTAINING TO THE
PRODUCT AND IS IN LIEU OF AND EXCLUDES ALL OTHER WARRANTIES OF
ANY NATURE WHATSOEVER, WHETHER EXPRESS, IMPLIED OR ARISING
BY OPERATION OF LAW, INCLUDING, BUT NOT LIMITED TO ANY IMPLIED
WARRANTIES OF MERCHANTABILITY OR FITNESS FOR A PARTICULAR
PURPOSE. THIS WARRANTY DOES NOT COVER OR PROVIDE FOR THE
REIMBURSEMENT OR PAYMENT OF INCIDENTAL OR CONSEQUENTIAL
DAMAGES. Some states do not allow this exclusion or limitation of incidental or
consequential damages so the above limitation or exclusion may not apply to you.
LEGAL REMEDIES: This warranty gives you specific legal rights, and you may
also have other rights which vary from state to state. This warranty is void outside
the United States of America.
PROCEDURE FOR OBTAINING PERFORMANCE OF WARRANTY: If, after
following the instructions in this Operating Guide you are certain that the Product is
defective, pack the Product carefully (preferably in its original packaging). Include
evidence of original purchase and a note describing the defect that has caused
you to return it. The Product should be shipped freight prepaid, by traceable
means, or delivered, to warrantor at:
Uniden America Corporation
Parts and Service Division
4700 Amon Carter Blvd.
Ft. Worth, TX 76155
(800) 235-3874, 8 AM to 5 PM Central,
Monday through Friday
Mystic OMc.book Page 1 Wednesday, August 13, 2003 5:26 PM
Covered under one or more of thefollowing U.S.patents:
© 2003 Uniden America Corporation
All reights reserved
Printed in
Mystic OMc.book Page 2 Wednesday, August 13, 2003 5:26 PM