Unimo Technology UDM-240ZH ISM Band Near Field Communication User Manual UDM 240ZH Service Manual 140613
Unimo Technology Co., Ltd. ISM Band Near Field Communication UDM 240ZH Service Manual 140613
User Manual
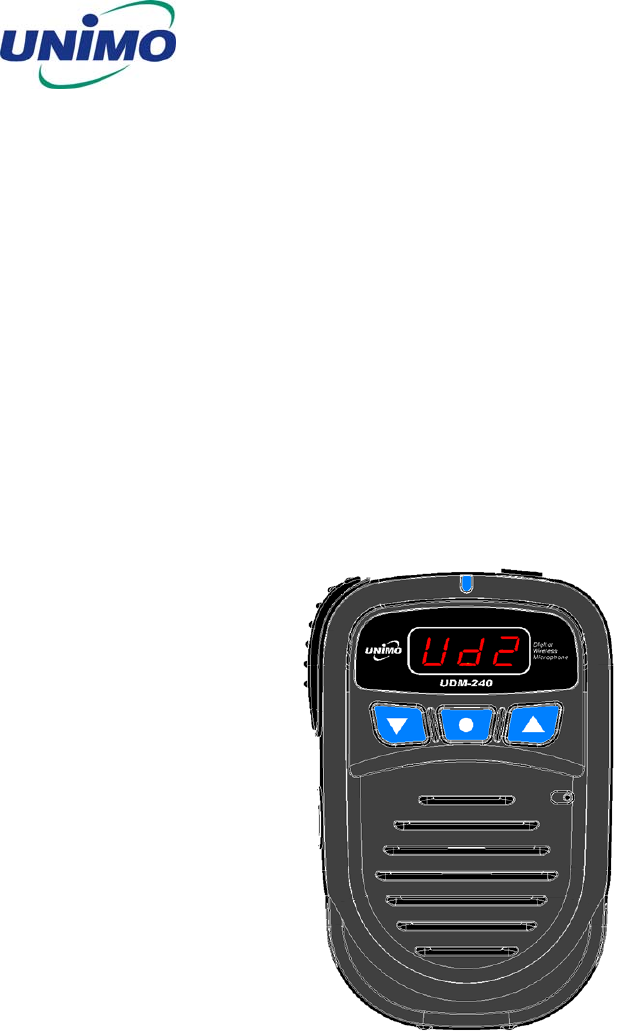
UDM-240ZBH,ZH
Service Manual

Maintenance Manual
UDM-240ZH/ZBH
2
※ BEFORE USING THIS
♣ Please read this manual in detail before using the device. (Please read and understand the
manual before using this equpment)
♣ Features can be subject to change or modify without any prior notice for its improvement of
performance (better performance)
♣ Copyright of this manual belongs to UNIMO Technology Co., Ltd., in a whole or in part authorized
copy or modify are prohibited.
♣ Pictures on this manual may differ from the actual products.
♣ Please contact our local agency or Unimo A/S division directly if you have any questions.
Maintenance Manual
UDM-240ZH/ZBH
3
Safety Precautions
This content is for user’s safety and property. Please read it and fully understand.
(Details affect to its performance and appearance)
Please use recommended voltage for input power supply voltage.
Battery, adapter, external ear-phones are designed to Unimo models. Using non-
Unimo goods can cause damage or malfunction to the product.
Please use communication purpose only.
Please do not disassemble or modify the product.
Damage or malfunction caused by those, won’t be repaired free of charge.
※ Avoid severe impact to the product.
※ Please keep avoid being exposed to direct sunlight or high temperatures and a lot of humidity
Maintenance Manual
UDM-240ZH/ZBH
4
Details affect to the operation of radios or other equipments.
Communication range can be shortened near the products using 2.4GHz due to interference of
electric wave.
(Microwave, Wi-Fi, Computer, other equipment using 2.4GHz,… etc.)
Turn off the radio on airplane. Please follow the instructions or rules when you
use it.
Please check whether can use or not before using the radio the due to electronic
effect.
Do not use the radios near electronic equipments such as Wi-Fi or computers.
Radios may does not work properly due to strong interference
※ Electromagnetic waves in a variety of electrical and electronic equipment occurs. The influence
of electromagnetic interference is generated. Distance calls can also be shortened remarkably.
Maintenance Manual
UDM-240ZH/ZBH
5
Safety Requirement
Please read the following information about safe and effective use of the product.
Keep your distance at least 1 inch(2.5cm) from your body when you use the
radios.
Make sure the regulations regarding the use of radio while driving, please do not
use the radios as much as possible while you drive.
Use additional accessories, such as earphones, for your safety.
Do not listen at very high volume. Your hearing may be affected.
For use in hazardous areas, only explosion-proof device must be used. Within
the hazardous areas, do not remove, exchange or charge/discharge the battery. If
an electrical spark pops up in hazardous areas, it can cause severe burns or
death.
Turn it off around the workplaces, causing an explosion of electromagnetic
behavior of the product.

Maintenance Manual
UDM-240ZH/ZBH
6
1 FEATURES
UDM-240ZH is designed to have light and durable structure and it provides a powerful sound.
It is the first product using 2.4GHz band developed in Korea and provides a clear digital sound.
UDM-240ZH is designed to provide adequate service for industrial products, public safety users.
It also provides clear digital radio communication between the UDM-240ZV and can be operated
with the existing VHF, UHF, TETRA vehicle and base station and can communicate remotely if it’s
interfaced with UDM-240ZV.
Clear 3FND Display
16 channels (#11~#26)
Perfect security. (AES 128bit)
1,150mAh built-in LI-ION battery pack
Group Call
SCAN
Group Scan
UDM-240ZH : 0:11~26, 1:11~15, 2:16~20, 3:21~26
UDM-240ZBH : 0:11~25, 1:11~15, 2:16~20, 3:21~25
Volume Control (up to 8 Level)
Ear-Phone Function
Cradle type of Charger
RX/TX while charging
Good design due to a built-in antenna
Designation of group ID up to 64,000
1 to N communication (per channel/ group ID)
IP67 (Waterproofed)

Maintenance Manual
UDM-240ZH/ZBH
7
2 COMPONENTS
2-1 Basic Components
Main Unit, Charger, User Manual, Power Cigar Jack
2-2 Optional Components
Ear-Phone
Wrist Strap
AC220/DC5V/500mA Adapter
Programming software
USB PC Programming cable
*** Components can be changed according to the request.
Maintenance Manual
UDM-240ZH/ZBH
8
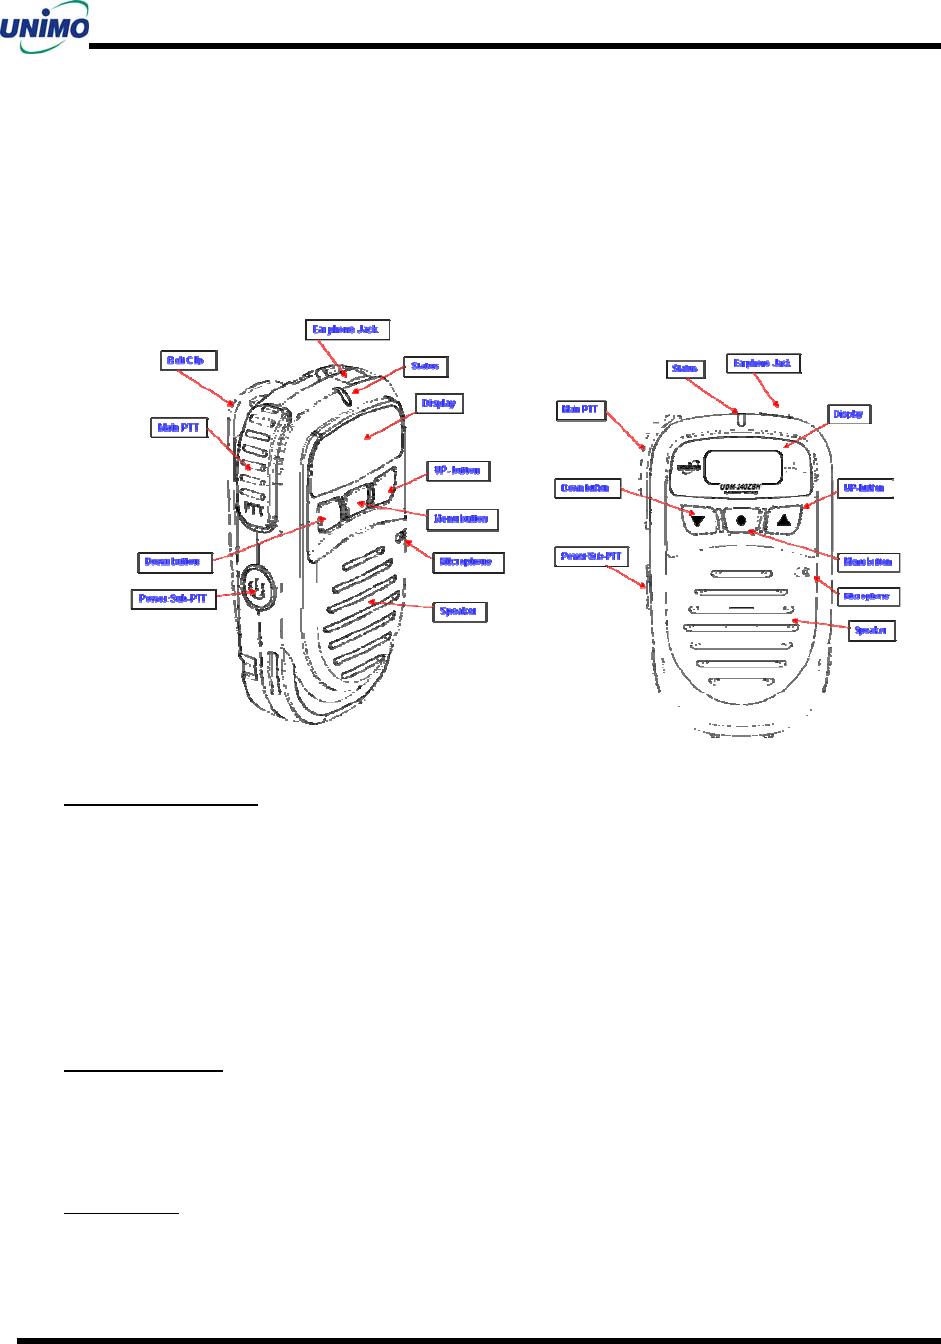
3 DESCRIPTION OF CONTROLS & INDICATORS
Detail operating instructions can be found in the next page.
3-1 Key and Button
Power On/Off button
Press the “power” button for more than 2 seconds then, the UDM is turned ON.
Press the “power” + “menu” button for more than 2 seconds then, the UDM is turned
OFF.
Depending on the application, the power button can be used as a PTT button or INT
button.
UP, Down button
Up/Down buttons are used for changing channels. The number of channels are
16(11Ch ~ 26CH) and it can be displayed C11~C26 or H11~H26.
Main-PTT
If you press this button, the UDM-240ZH will be transmission mode and if you release

Maintenance Manual
UDM-240ZH/ZBH
9
the button, the UDM-240ZH will be turned to standby mode.
Sub PTT
This function can be programmed to the power button on the side of the UDM. It is
used for transmission on a pre-programmed channel.
Menu button
It can be used to select and set user configurable features.
Earphone jack
The Earphone Jack on the top of the UDM will be used for interface with external
earphone.
The UDM-240ZH can be programmed by its PC program and programming cable.
3-2 Display
Status LED
The users can be recognized the current status by LED indicator on the top of the UDM.
The status indication will be as followings.
Red LED ON : Transmitting
Green LED ON : Receiving
Blue LED ON : Charging (LED will be OFF after completion of charging)
The UDM-240ZH can transmit and receive while charging.
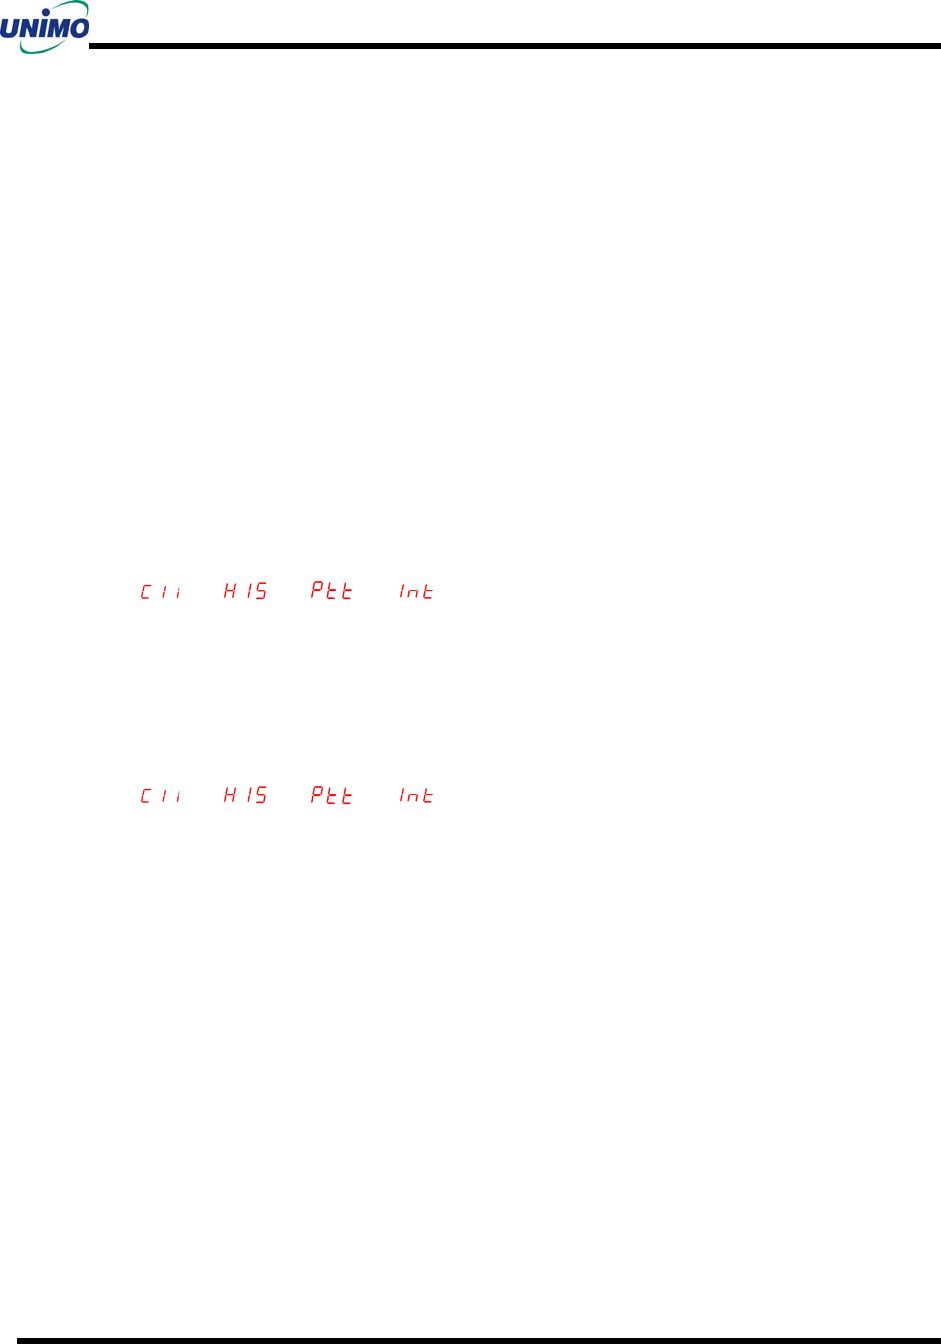
FND Display
Displays menu function through 3FND type LCD
Ptt : TX status using the C channel
Int : TX status using the H channel
Ud1 : Program version(1st)
Ud2 : Program version(2nd)

Maintenance Manual
UDM-240ZH/ZBH
10
OFF : Power OFF
Maintenance Manual
UDM-240ZH/ZBH
11
4 HOW TO USE
4-1 Power ON/OFF
Press the “power” button for more than 2 seconds then the UDM-240ZH is turned ON.
The device will not be turned on while charging.
Power can be on after 3 seconds if the device is separated from the cradle.
When the device is on, if you place it into the charging cradle, it is possible to use
on and on.
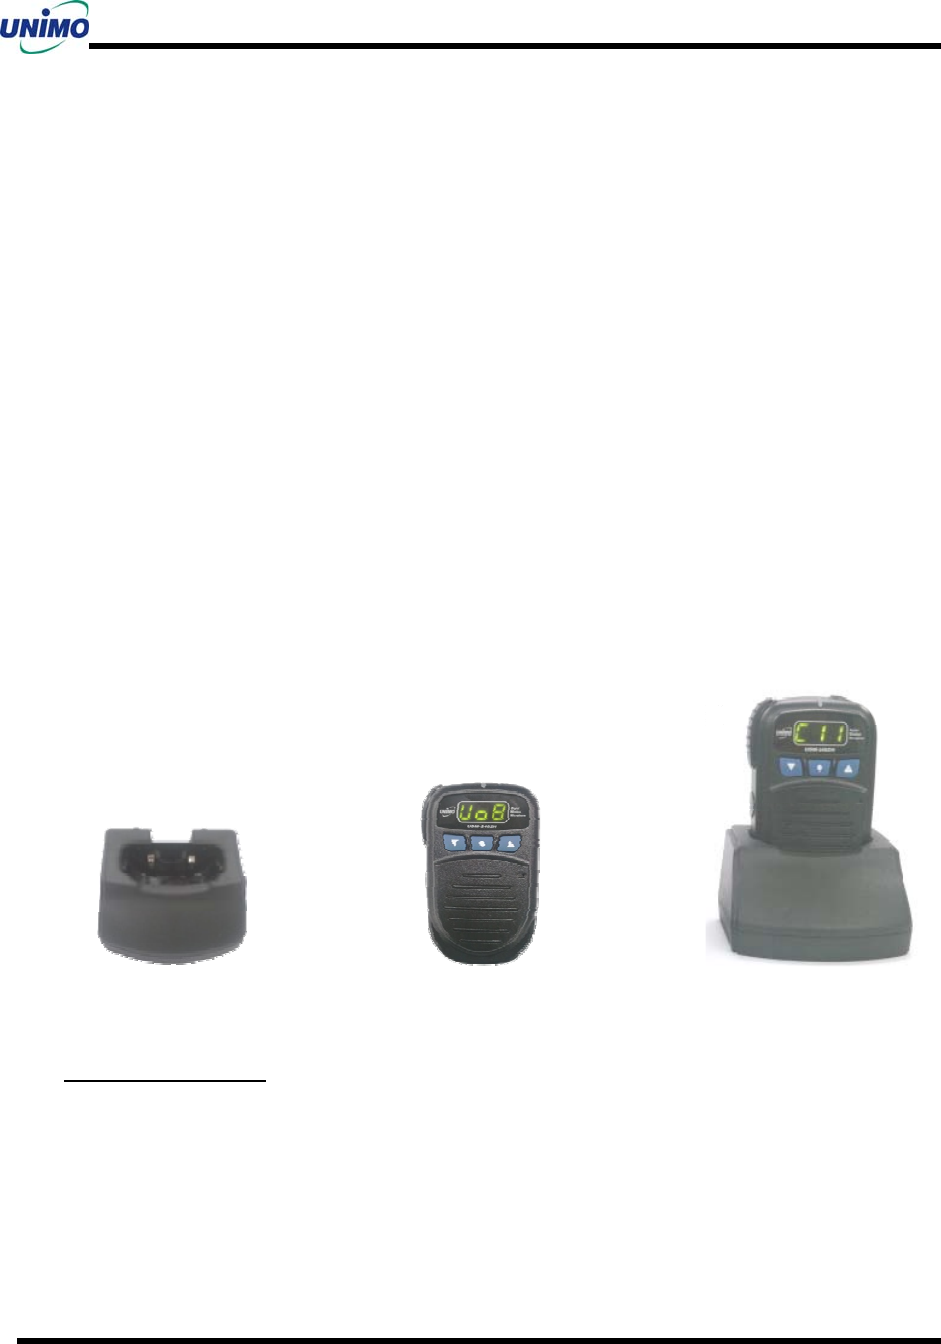
4-2 HOW TO CHARGE
The built-in Li-ion battery is safe and reliable to guarantee high-performance.
Batteries MUST be fully charged before use.
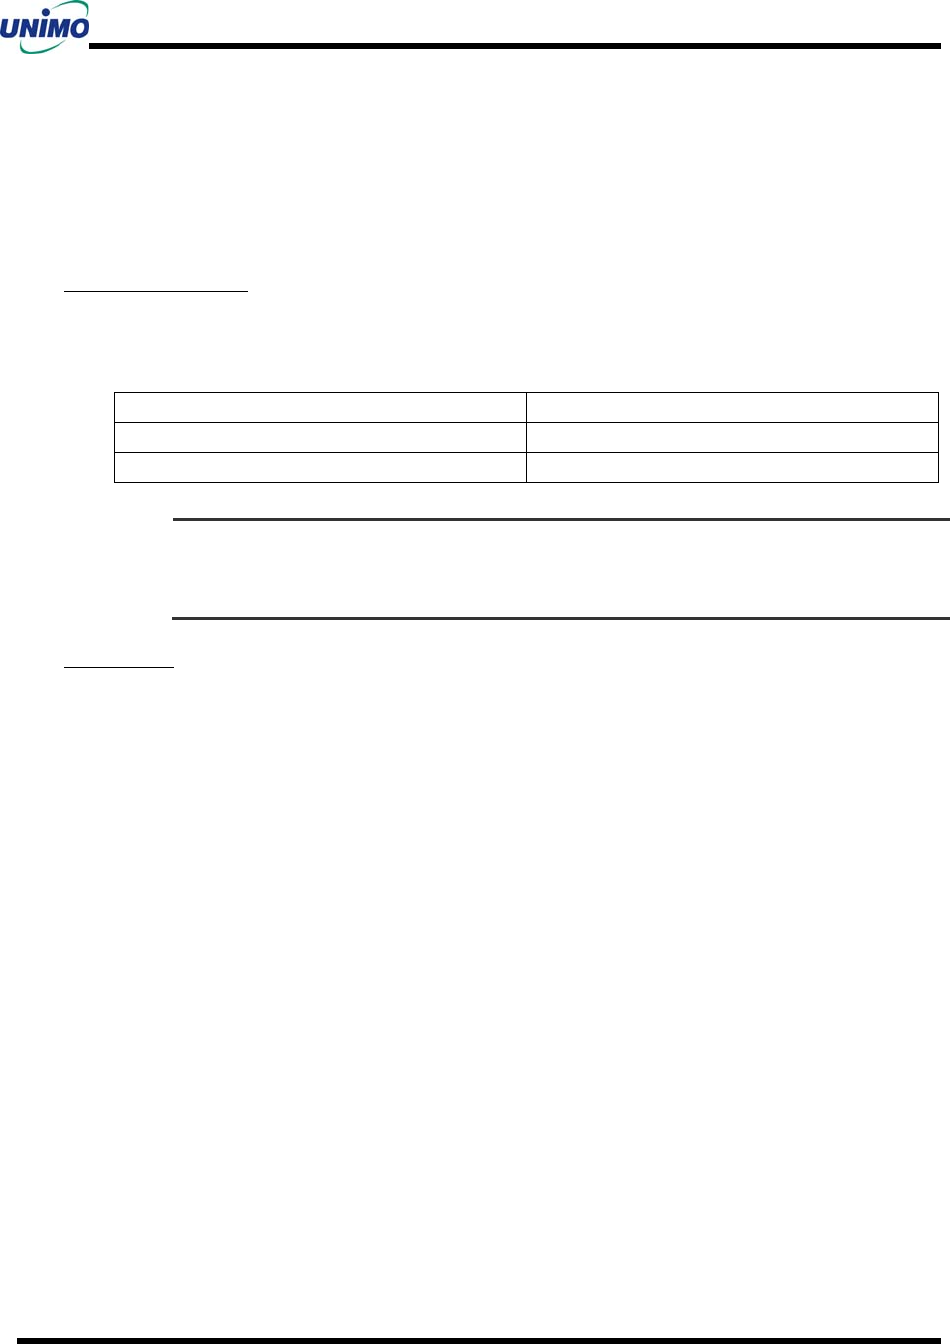
Charging cradle Terminal Charging
Battery charging time
Low battery voltage will shorten the talk range and will make the performance of radio
worse.
When Battery Charging is needed;
- After using the battery 4 ~5 hours the performance is seemed to be reduced.
Maintenance Manual
UDM-240ZH/ZBH
12
- Check the battery indicator using the “menu” button, and FND displayed as below.
E–F(100%), E–4(75%), E–3(50%), E–2(25%), E–E(Need to charge)
HOW TO CHARGE
UDM-240ZH input power is DC 1.5V, UDM-240ZBC input power is DC12V ~ 24V.
LED Indications of charger
Status LED
Charging Blue LED : ON
Fully charged Blue LED : OFF
☞
CAUTION
Battery charger used with UDM-240ZH must be supplied by UNIMO Technology
Co., Ltd
Other manufacturer’s can cause unexpected damage of the battery and terminal.
CAUTIONS
The UDM-240ZH is designed to be used with the supplied charging cradle only. In case of
all the problems or damages caused by use of other chargers, manufacturer will be free
from its responsibility of all the problems or damages.
DO NOT disassemble and short circuit because it may cause fire or explosion.
Be careful when the battery terminals touch the metal or conductor, it can damage to
your device or human body.
Never expose under direct sunlight and do not charge near fire.
Maintenance Manual
UDM-240ZH/ZBH
13
5 DESCRIPTION OF FUNCTION
5-1 POWER On/Off
Press the “power” button for more than 2 seconds then, the UDM is turned ON, a
“beep” sound is heard and “Ud1” or “Ud2” is displayed.
5-2 TRANSMIT
While pressing the “PTT” or “power” button for transmitting, the red LED will be on
and through the setup channel, you can communicate.
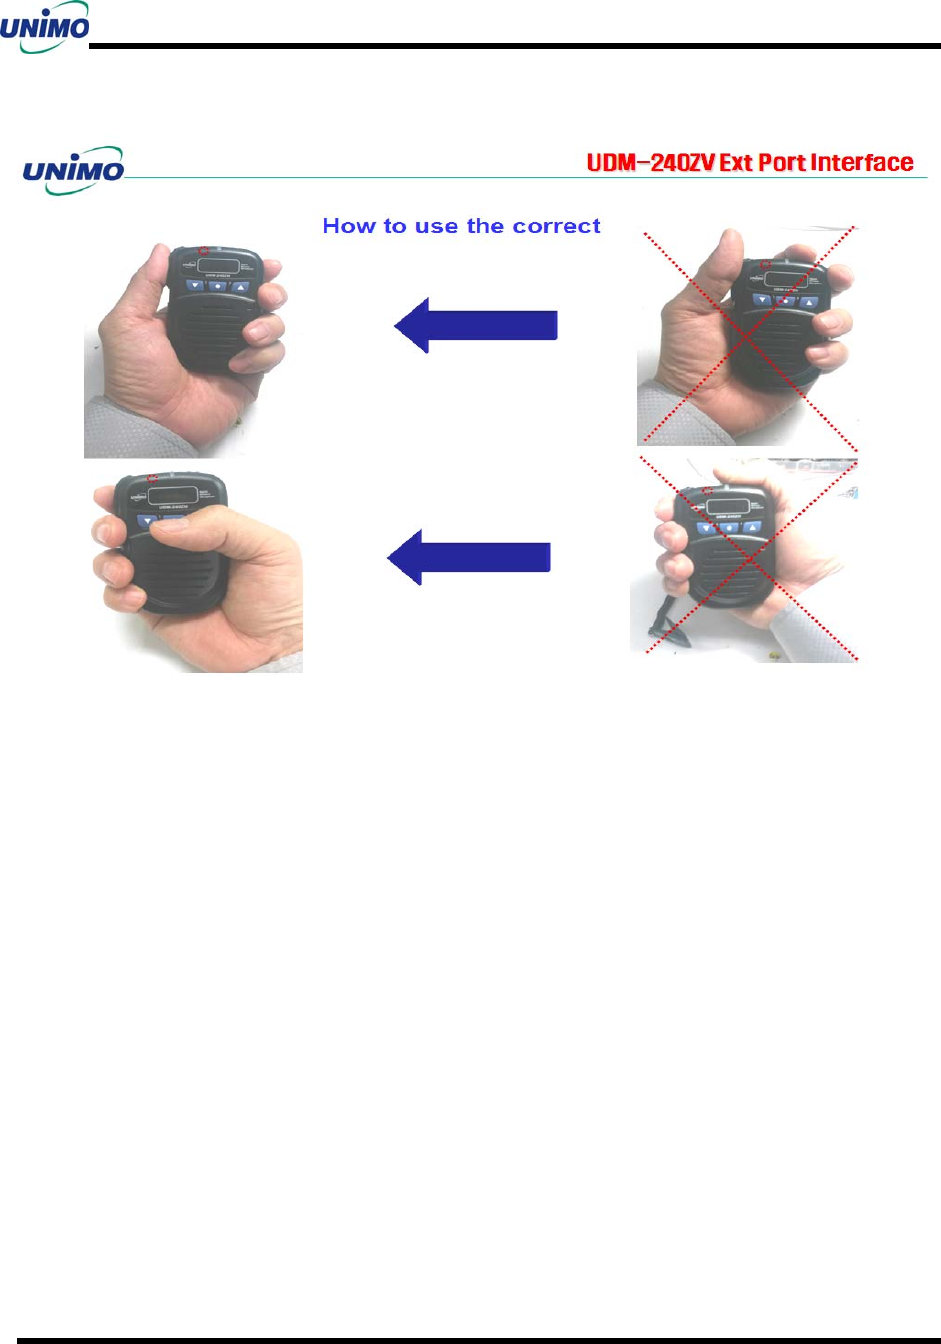
For the better sound quality, it is recommended to take 5~10cm away from your body.
According to the program versions FND can be displayed as follows.
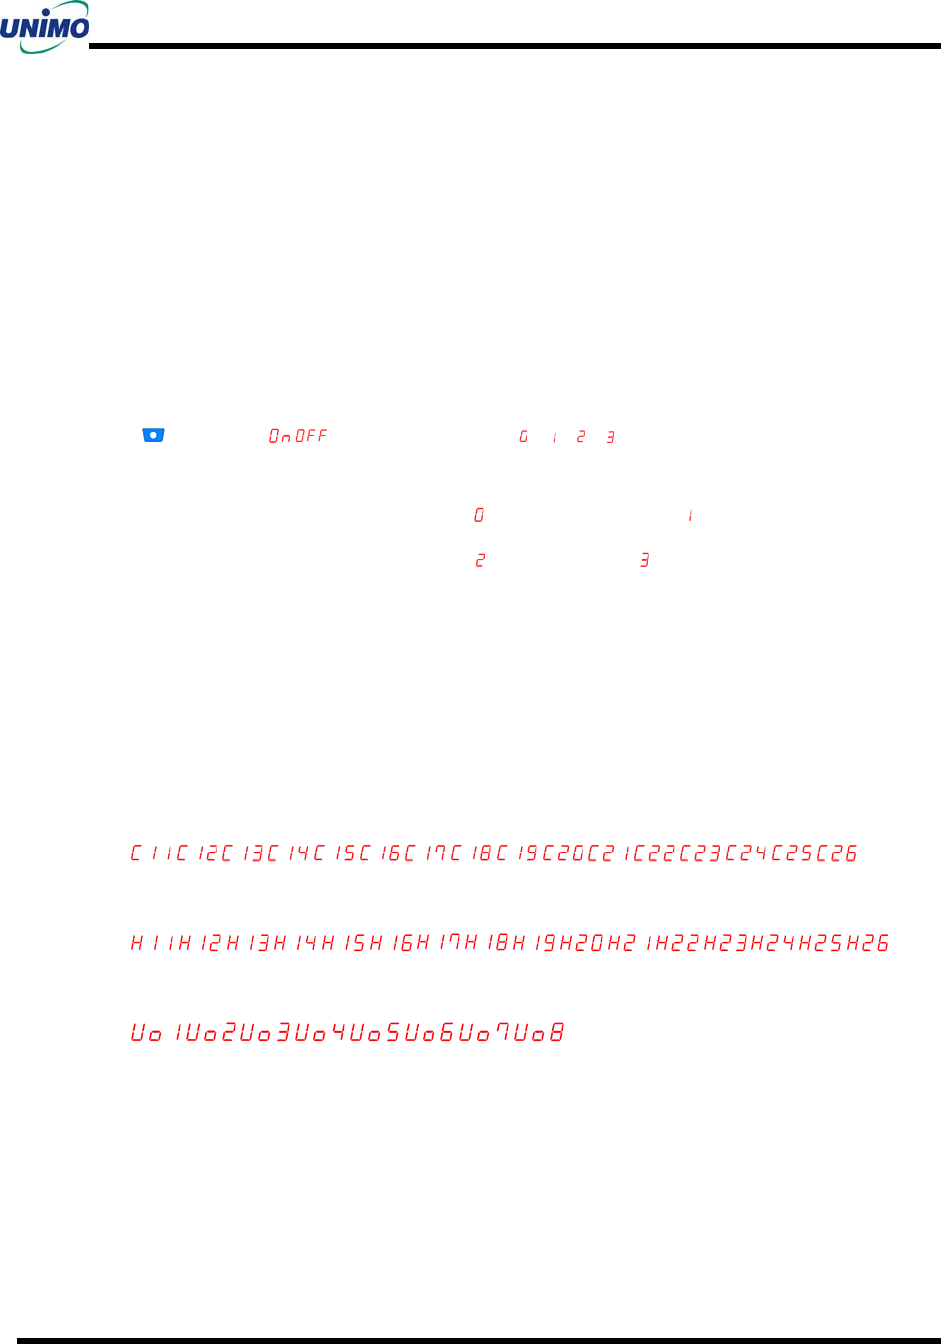
“”or ” ”or ” ”or” ”
5-3 RECEIVE
User can adjust the volume level (1~8 steps) by using Up/Down button while receiving.
According to the program versions FND can be displayed as follows.
“”or ” ”or ” ”or” ”
5-4 CHANGE THE CHANNEL
Enter into the menu mode by pressing menu button and press Up/Down button to
change the channels.
Whenever the channel is changed, a “beep” sound will be heard.
According to the option program source the channel menu will be changed.
UDM-240ZBH: use Up/Down button in the standby mode).
Main channel (PTT Button) : C11 C12 C13 C14 C15 C16 C17 C18 C19 C20 C21 C22 C23 C24
C25
Fixed channel (power button) : C26(fixed for transmit)
Maintenance Manual
UDM-240ZH/ZBH
14
UDM-240ZH: use Up/Down button in the menu mode (C channel ,H channel selectable)
Main channel (PTT Button) : C11 C12 C13 C14 C15 C16 C17 C18 C19 C20 C21 C22 C23 C24 C25
C26
Spare channel (Power Button) : H11 H12 H13 H14 H15 H16 H17 H18 H19 H20 H21 H22 H23 H24
H25 H26
5-5 SCAN
In the standby mode, enter into the menu mode then enable or disable SACN function.
Scan( ,) Scan Group ( )select press the PTT button to
save
SCAN group in the UDM-240ZBH: : ALL (11~25CH), : 11~15CH,
: 15~20CH, : 21~25CH
SCAN channels in the UDM-240ZH: 11CH ~ 26CH
5-6 FND DISPLAY
According to operational status FND shows following displays;
Main Channel: 16CH
, , , , , , , , , , , , , , ,
Sub channel: 16CH
, , , , , , , , , , , , , , ,
Volume display: 8 levels
, , , , , , ,
Maintenance Manual
UDM-240ZH/ZBH
15
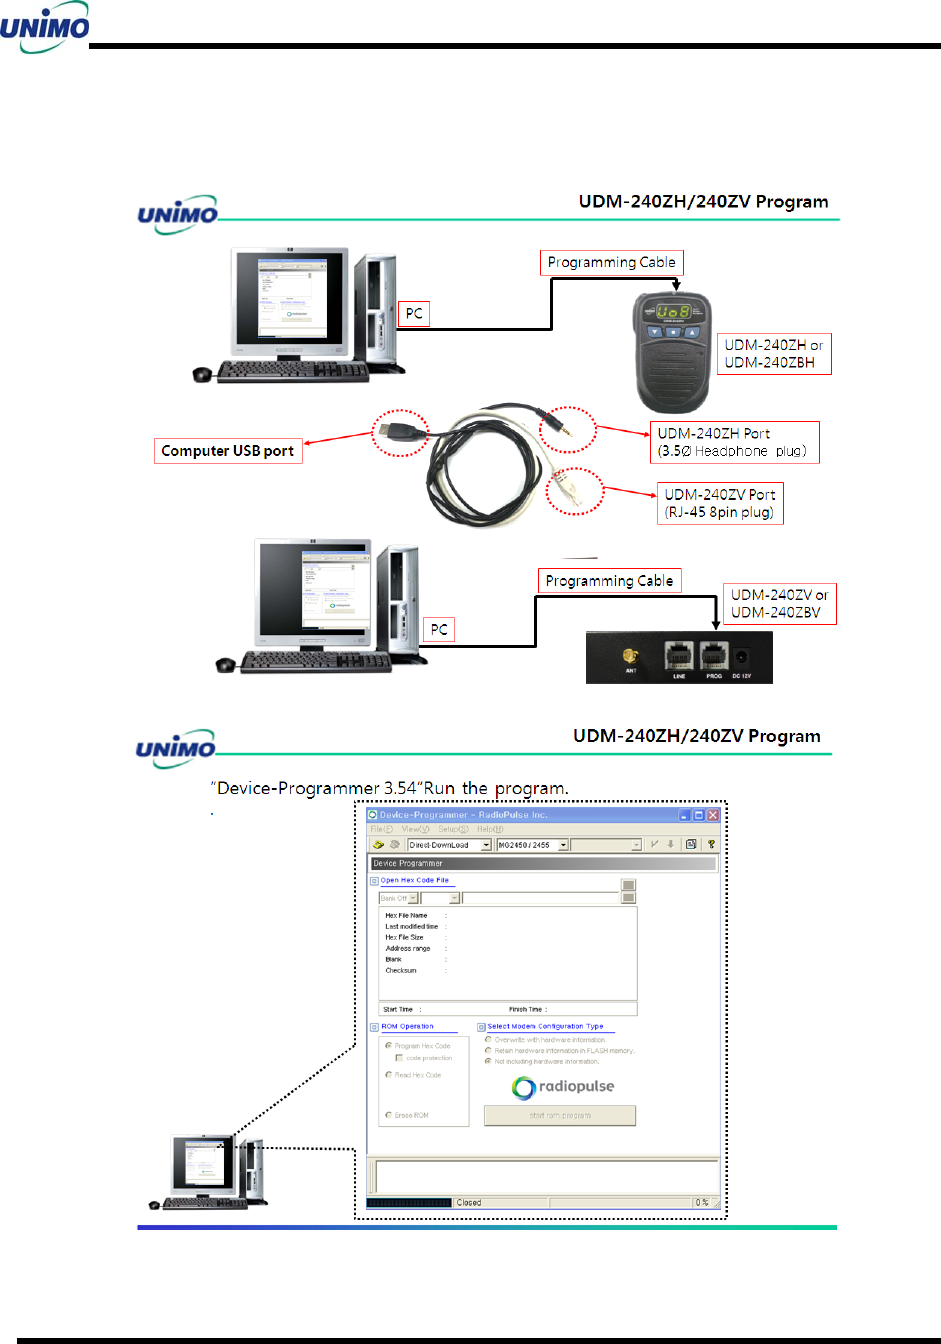
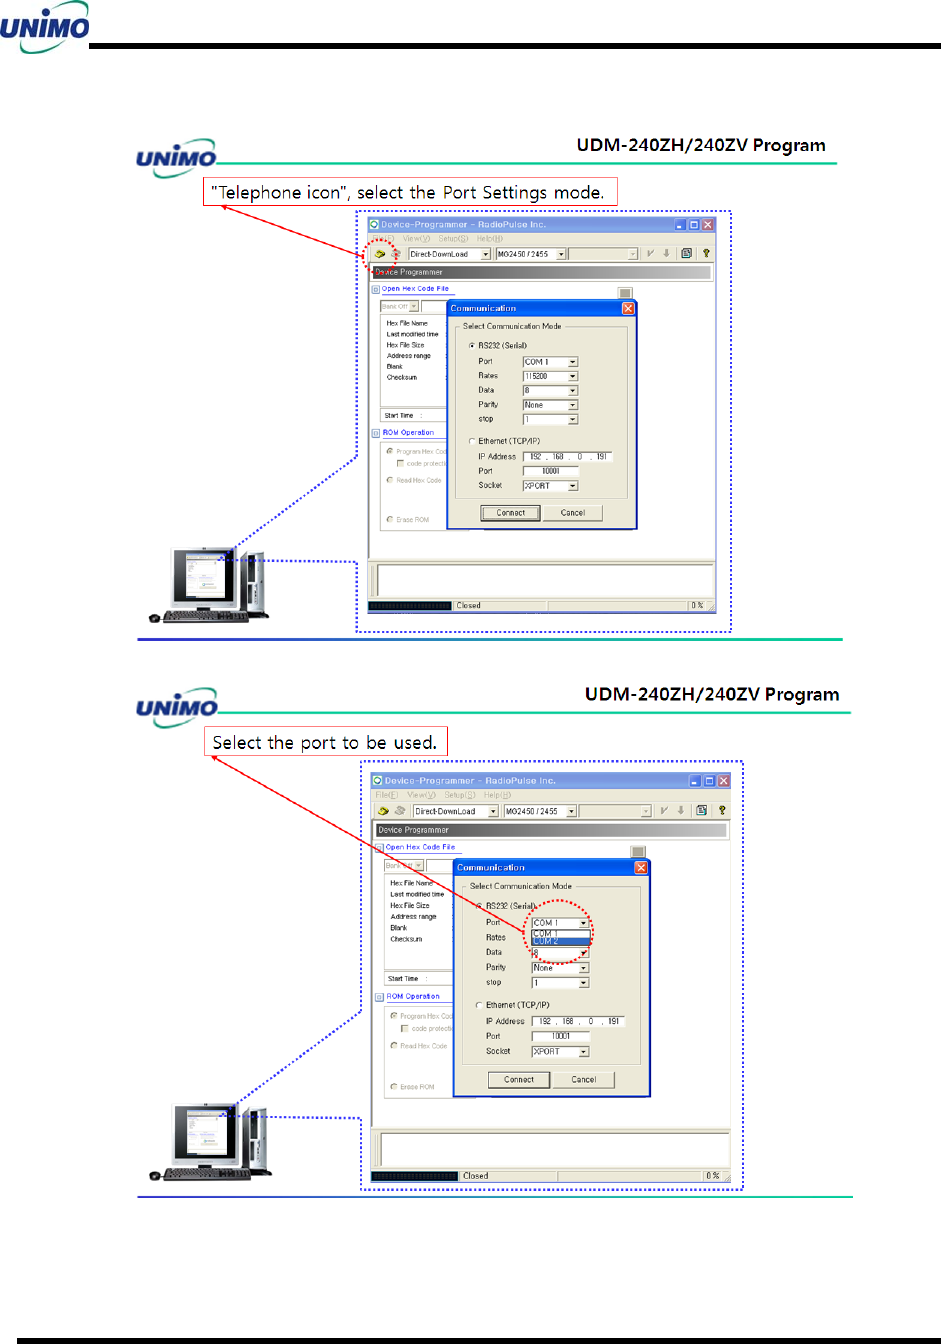
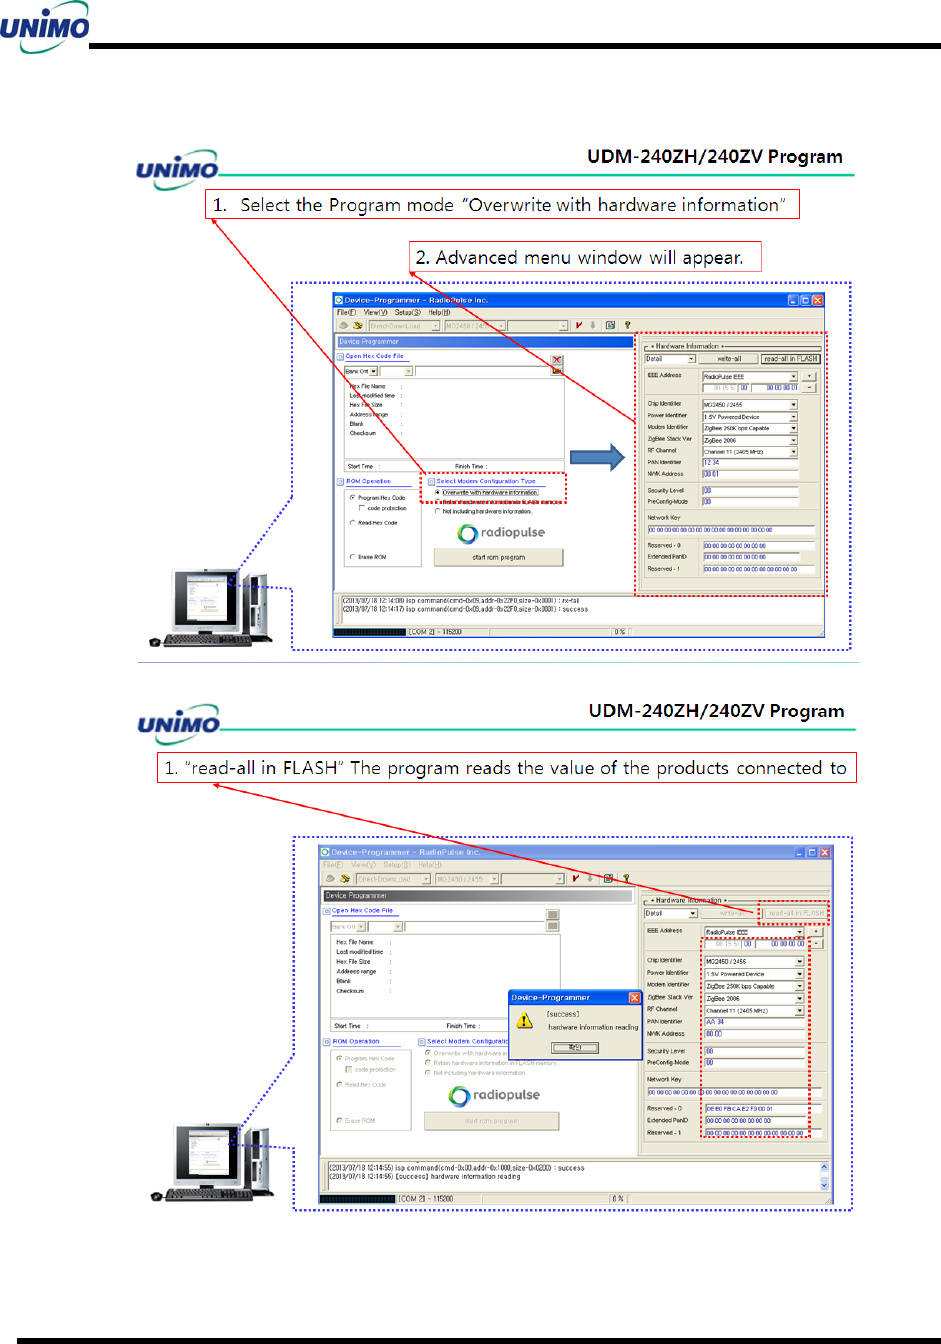
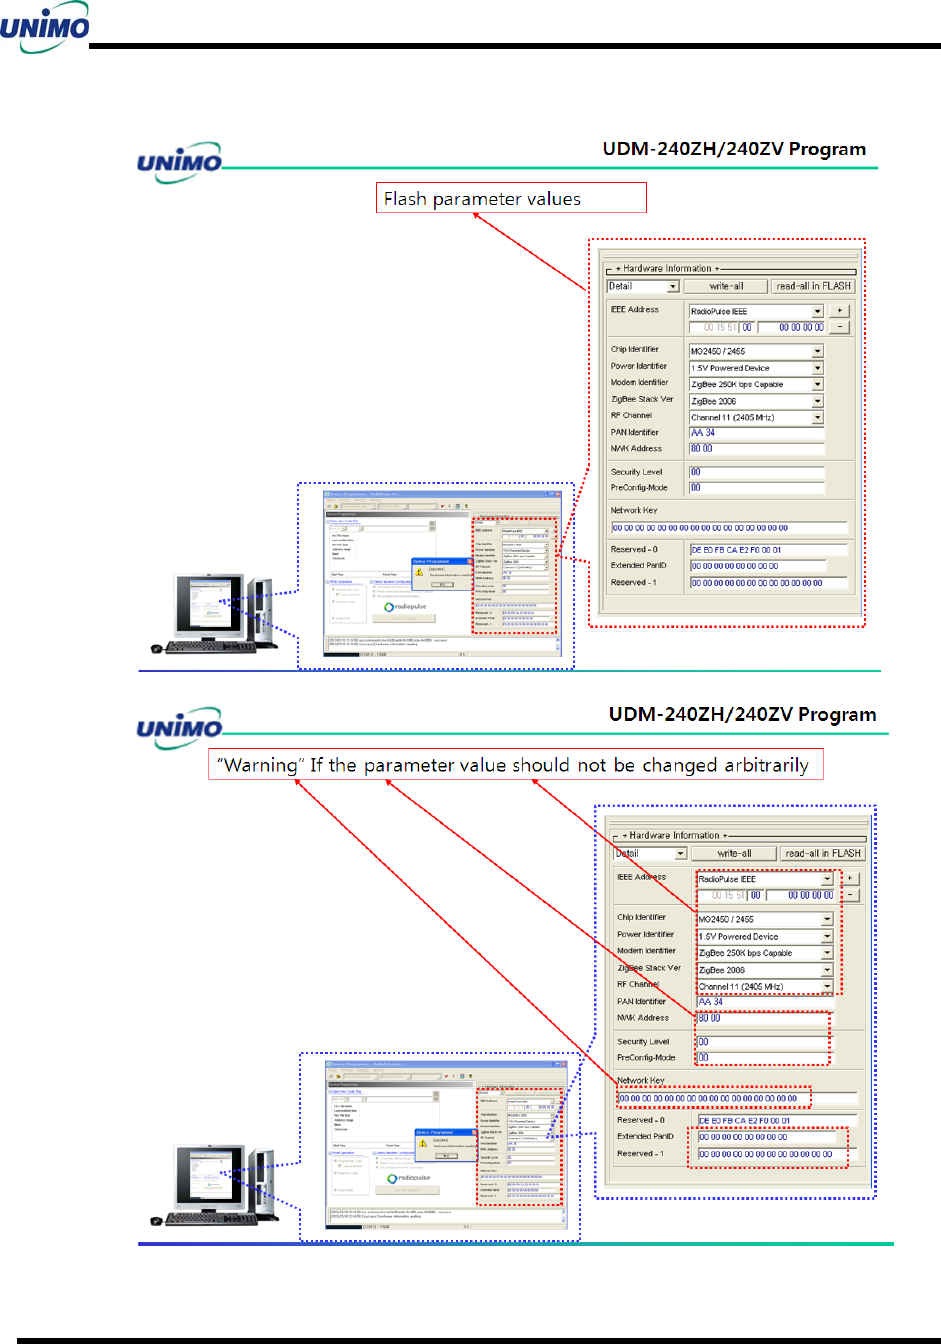
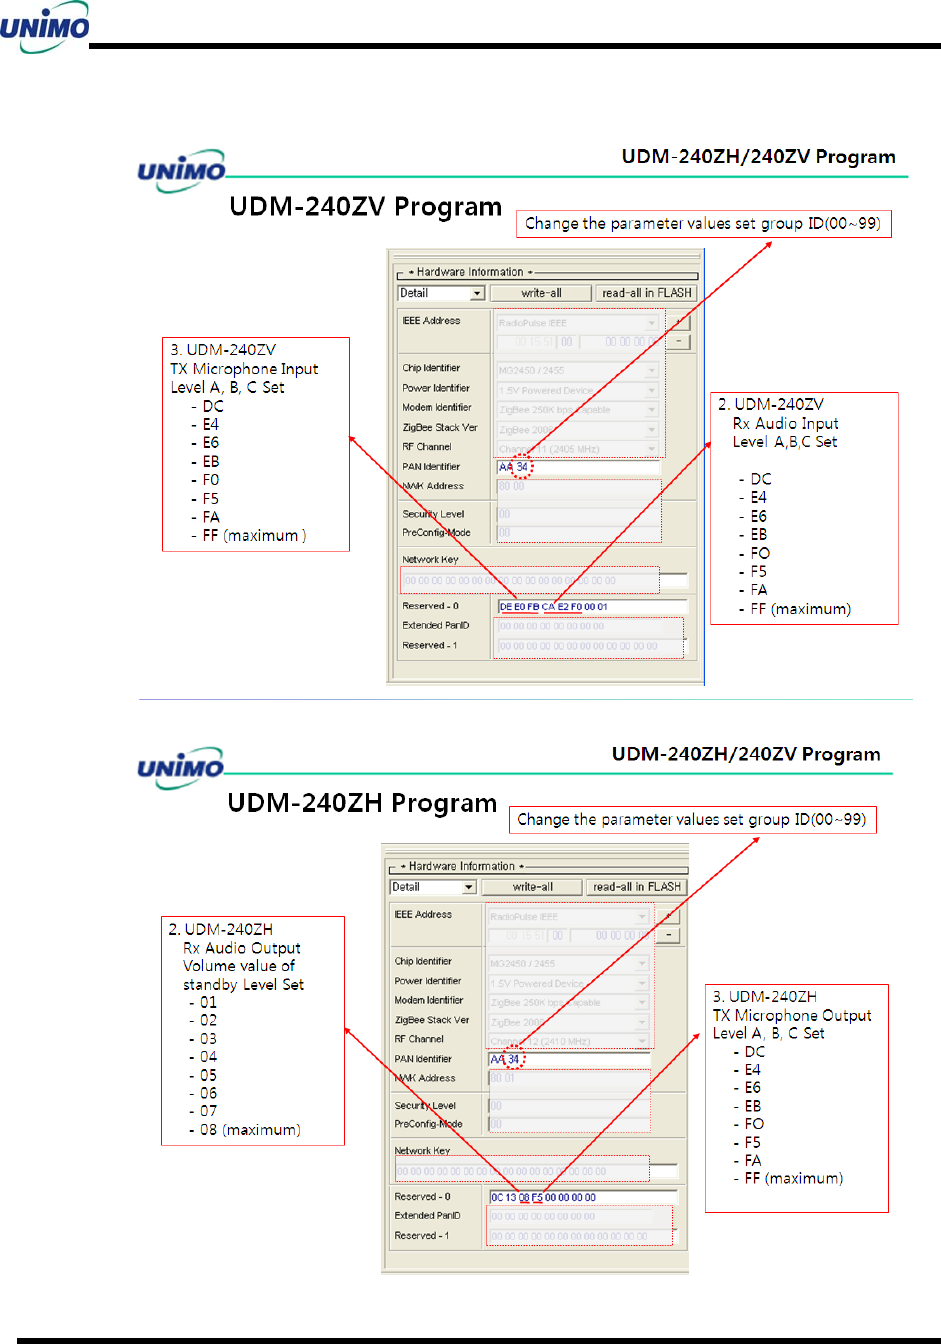
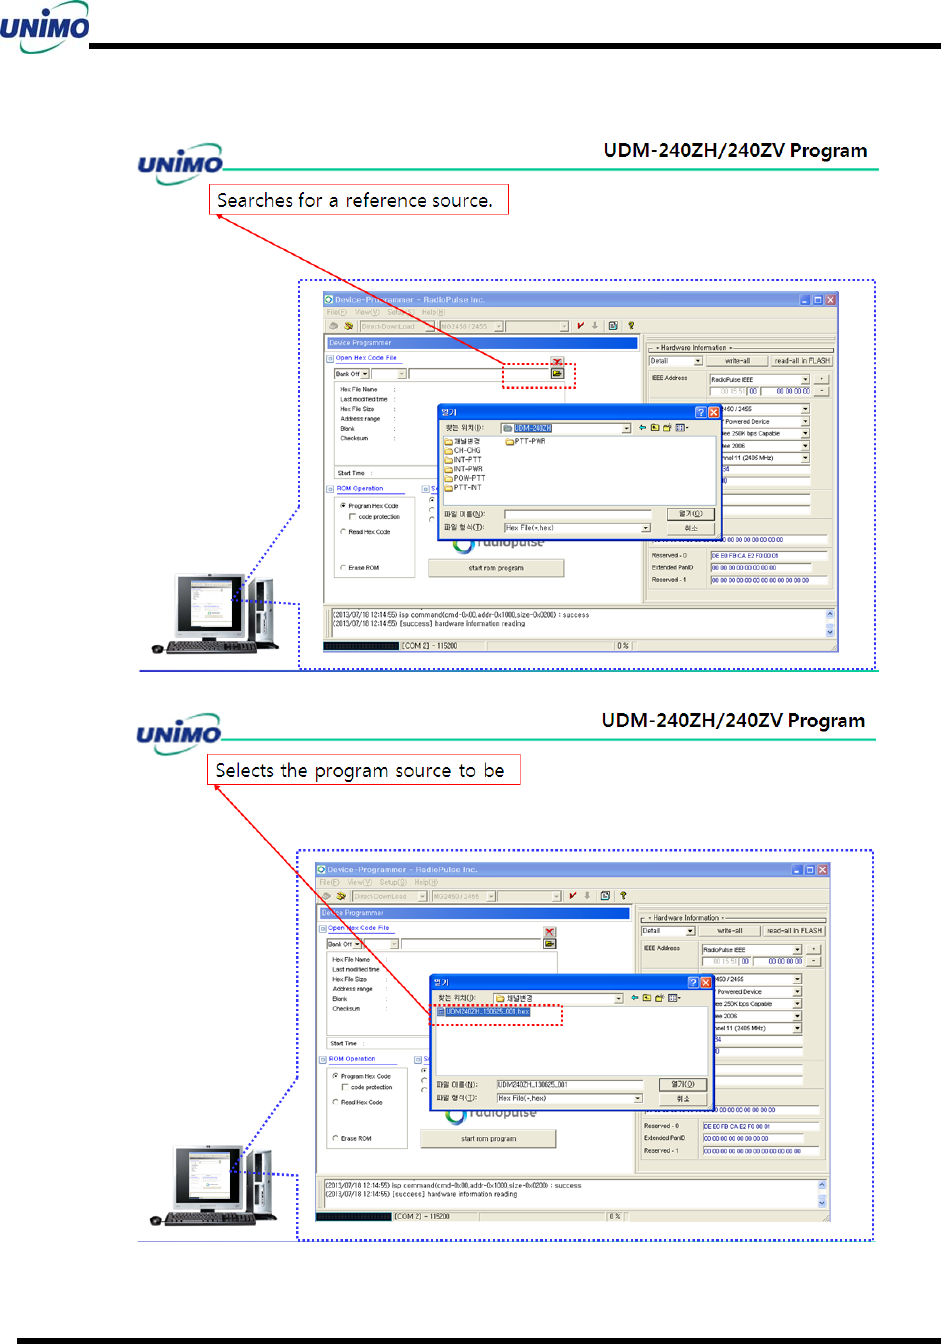
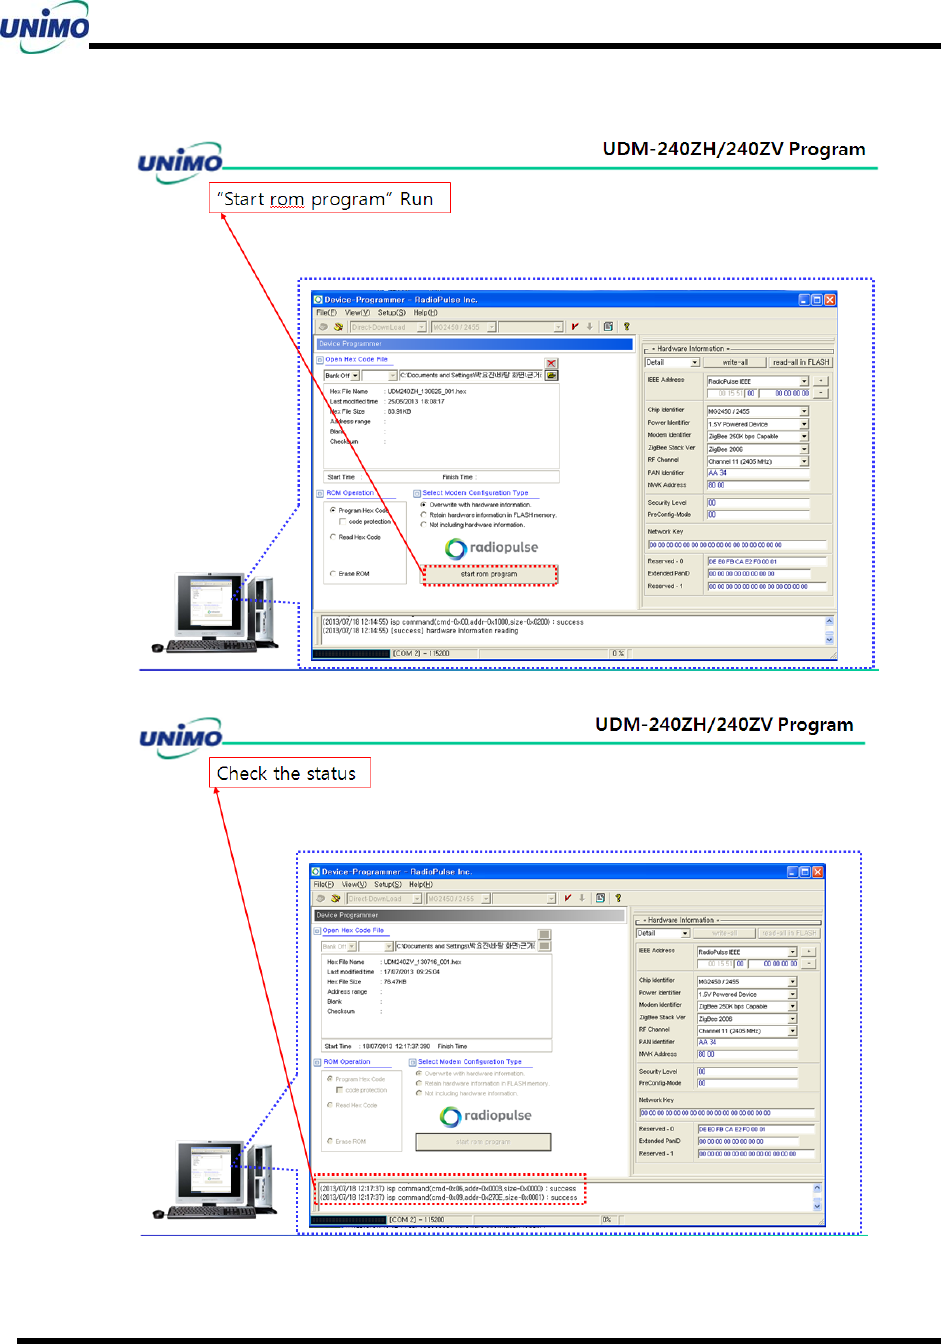
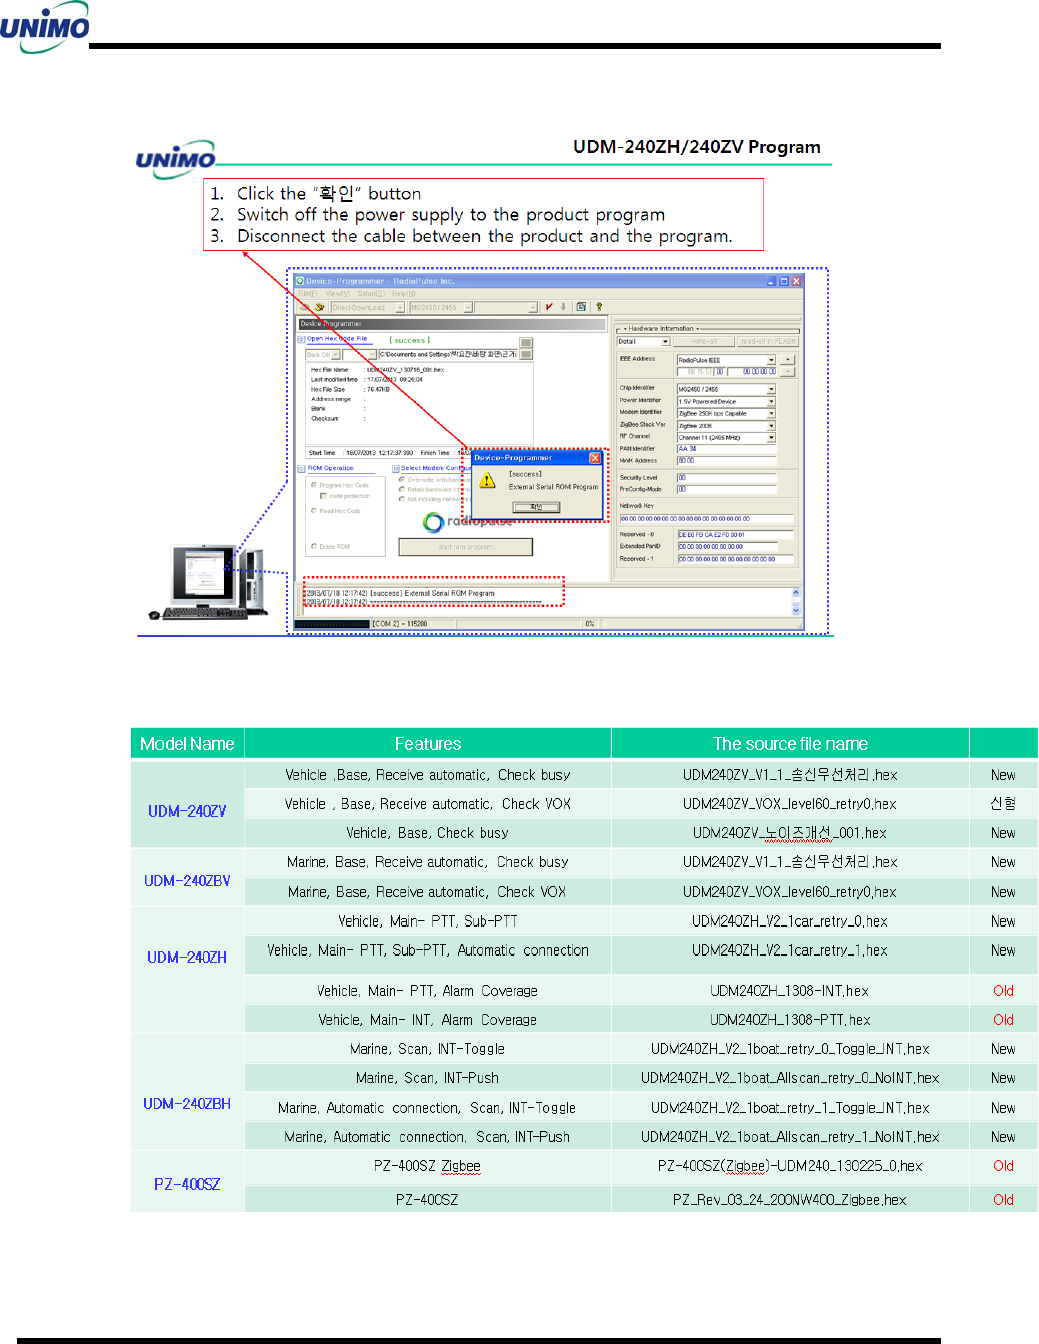
5-7 INSTALLATION FOR PC PROGRAM AND SETUP
Maintenance Manual
UDM-240ZH/ZBH
16
Maintenance Manual
UDM-240ZH/ZBH
17
Maintenance Manual
UDM-240ZH/ZBH
18
Maintenance Manual
UDM-240ZH/ZBH
19
Maintenance Manual
UDM-240ZH/ZBH
20
Maintenance Manual
UDM-240ZH/ZBH
21
Maintenance Manual
UDM-240ZH/ZBH
22
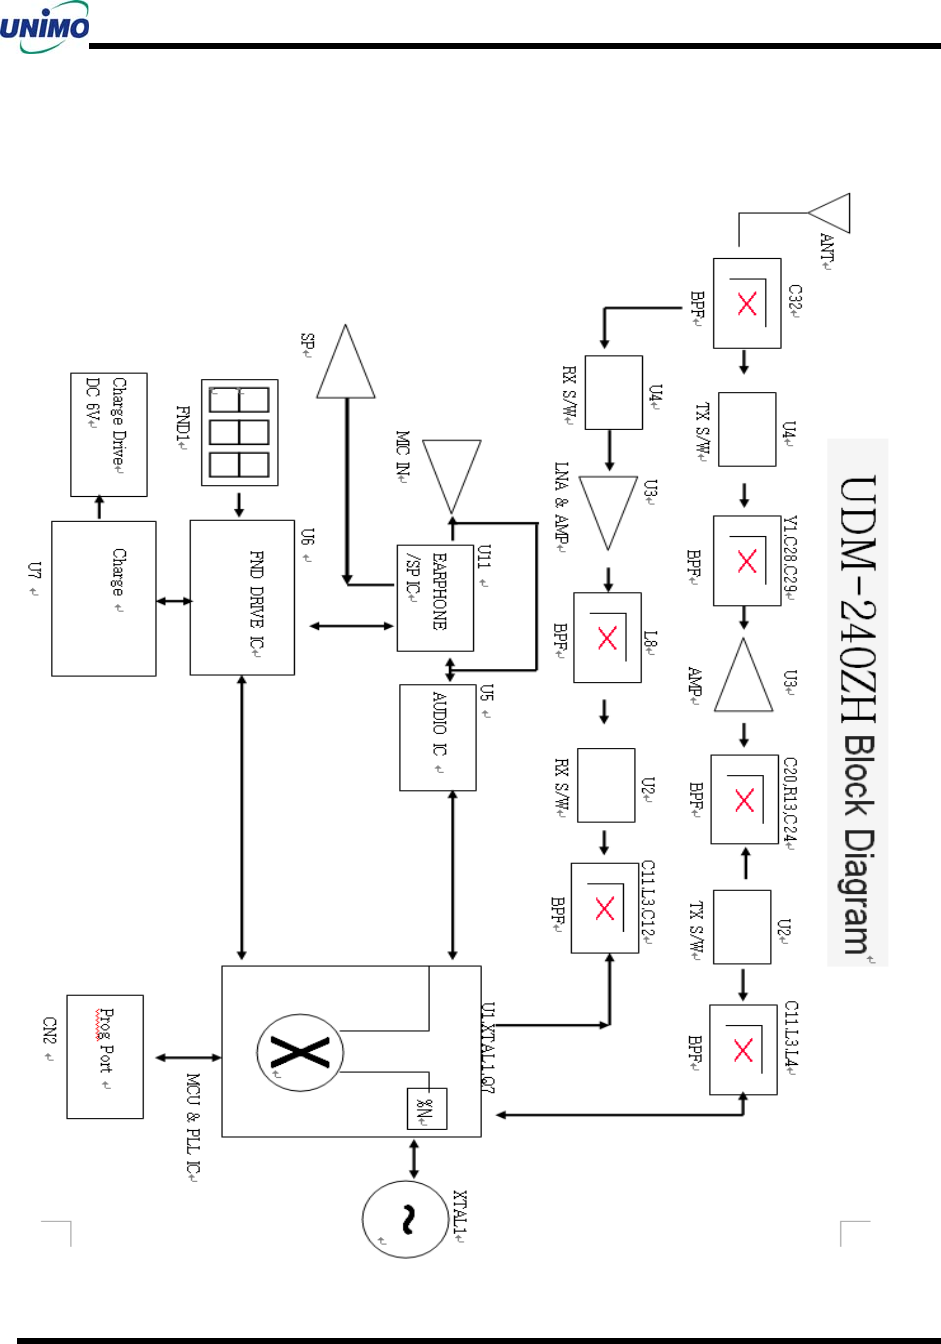
5-8 Functional differences between the version of the program
Please note that between the old and new version of the program, the UDM-240ZV[ZH]
are not compatible each other.
Maintenance Manual
UDM-240ZH/ZBH
23
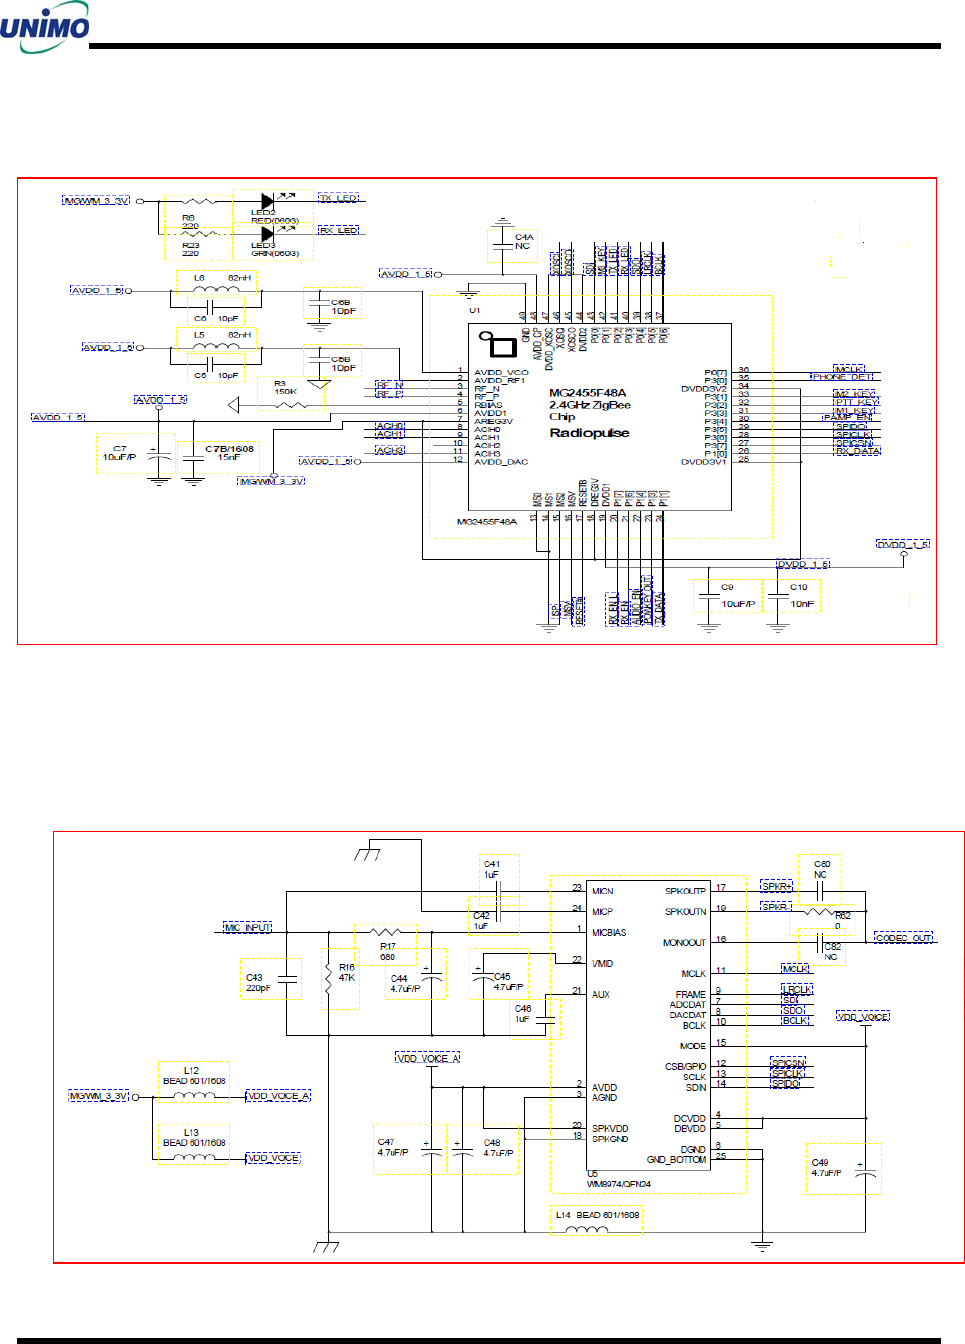
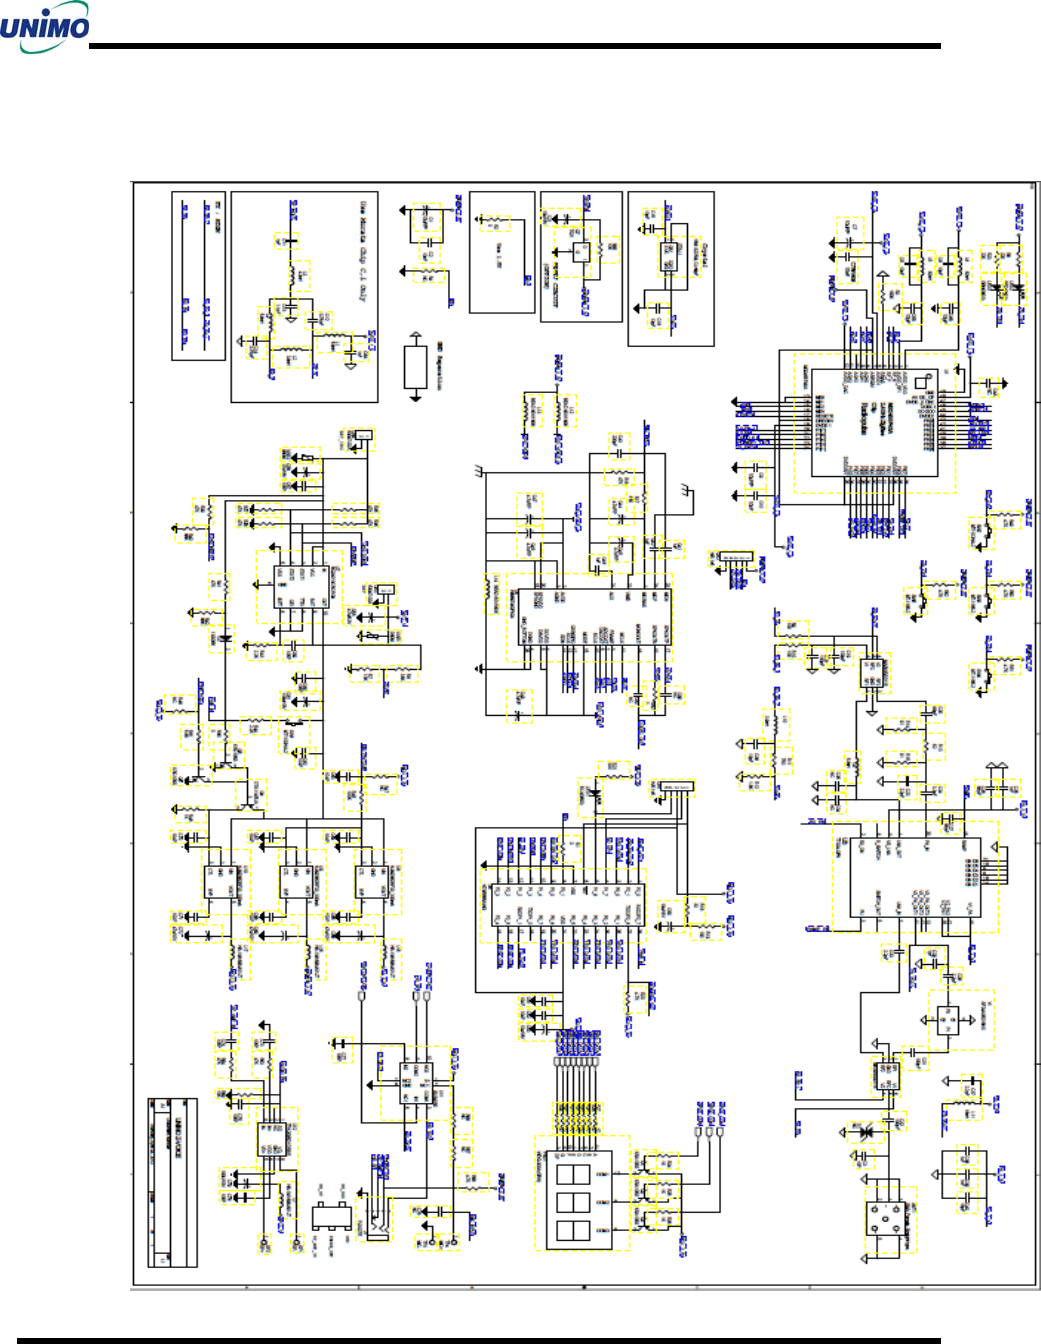
6 DESCRIPTION FOR CIRCUIT
Maintenance Manual
UDM-240ZH/ZBH
24
6-1 Wireless communication protocol chips (ISM 2.4Ghz)
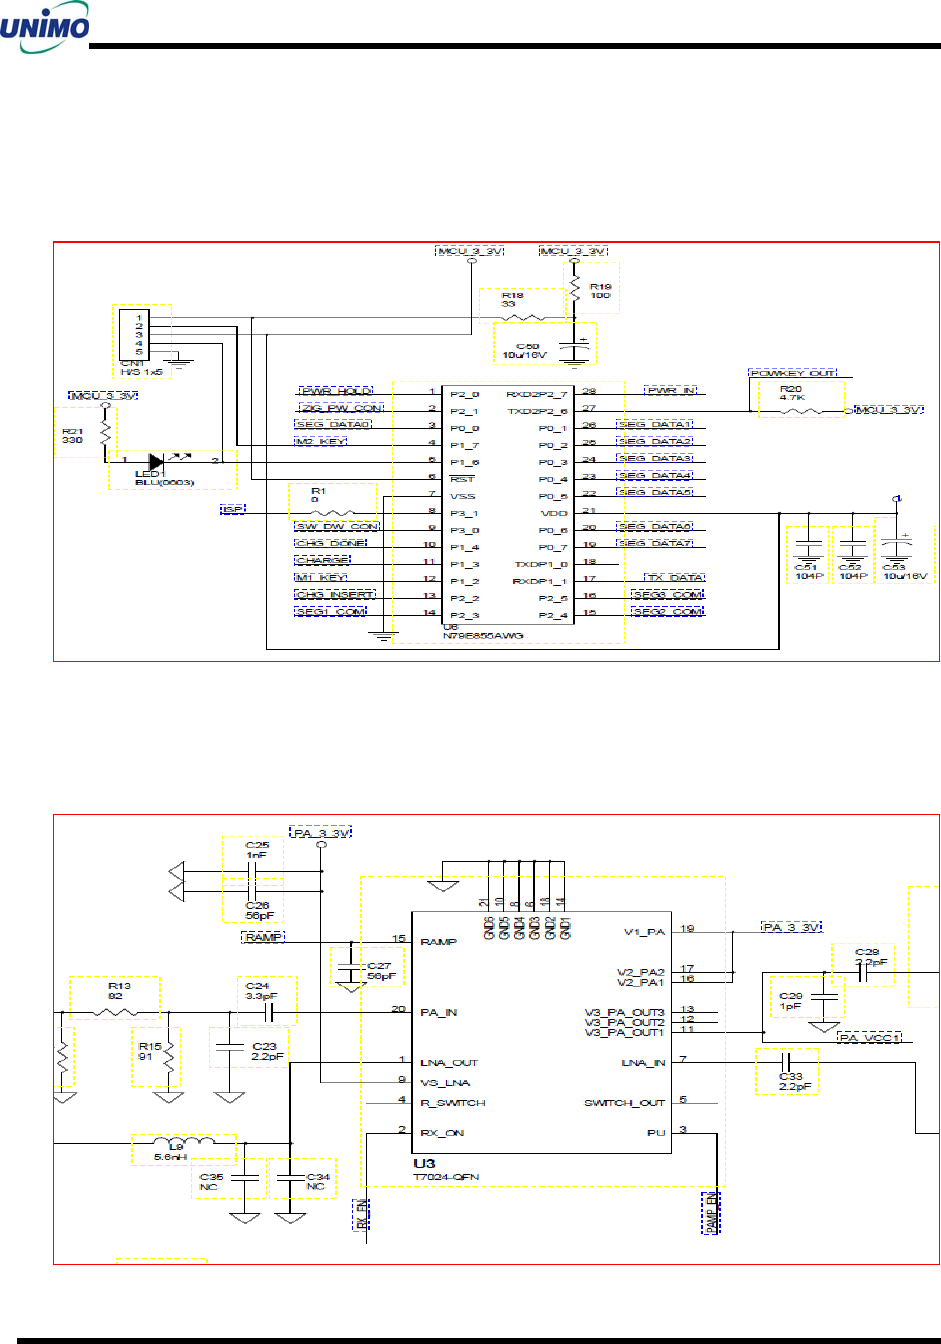
6-2 Digital voice signaling circuit
WM8974W
Maintenance Manual
UDM-240ZH/ZBH
25
6-3 Function control circuit
1Chip MCU N79855AWG
6-4 TX power/RX sensitivity AMP Circuit
U3 : T7024
Maintenance Manual
UDM-240ZH/ZBH
26
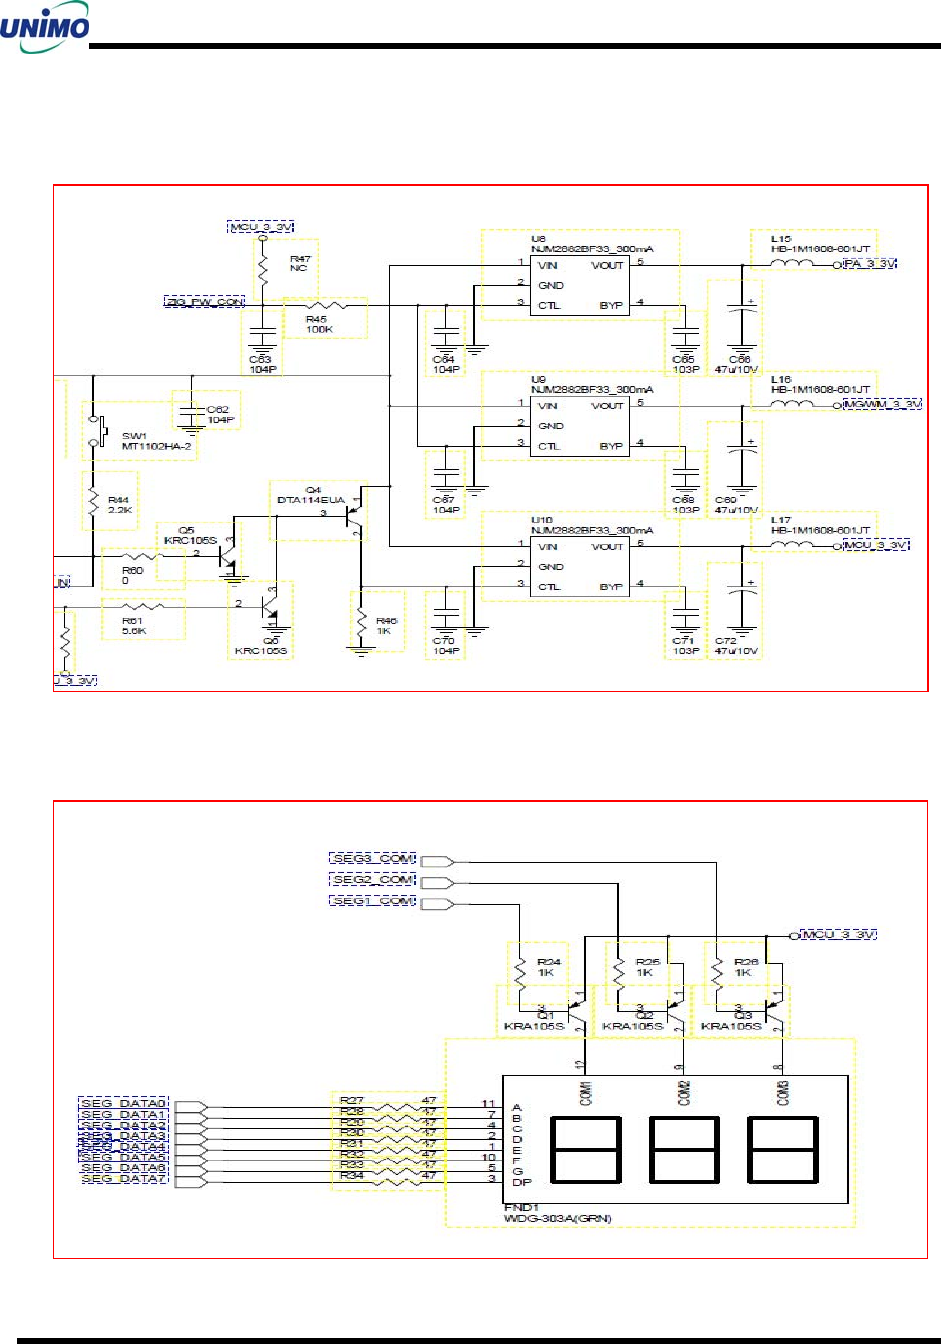
6-5 Power supply circuit
6-6 FND display Circuit
Maintenance Manual
UDM-240ZH/ZBH
27
6-7 FND display Circuit
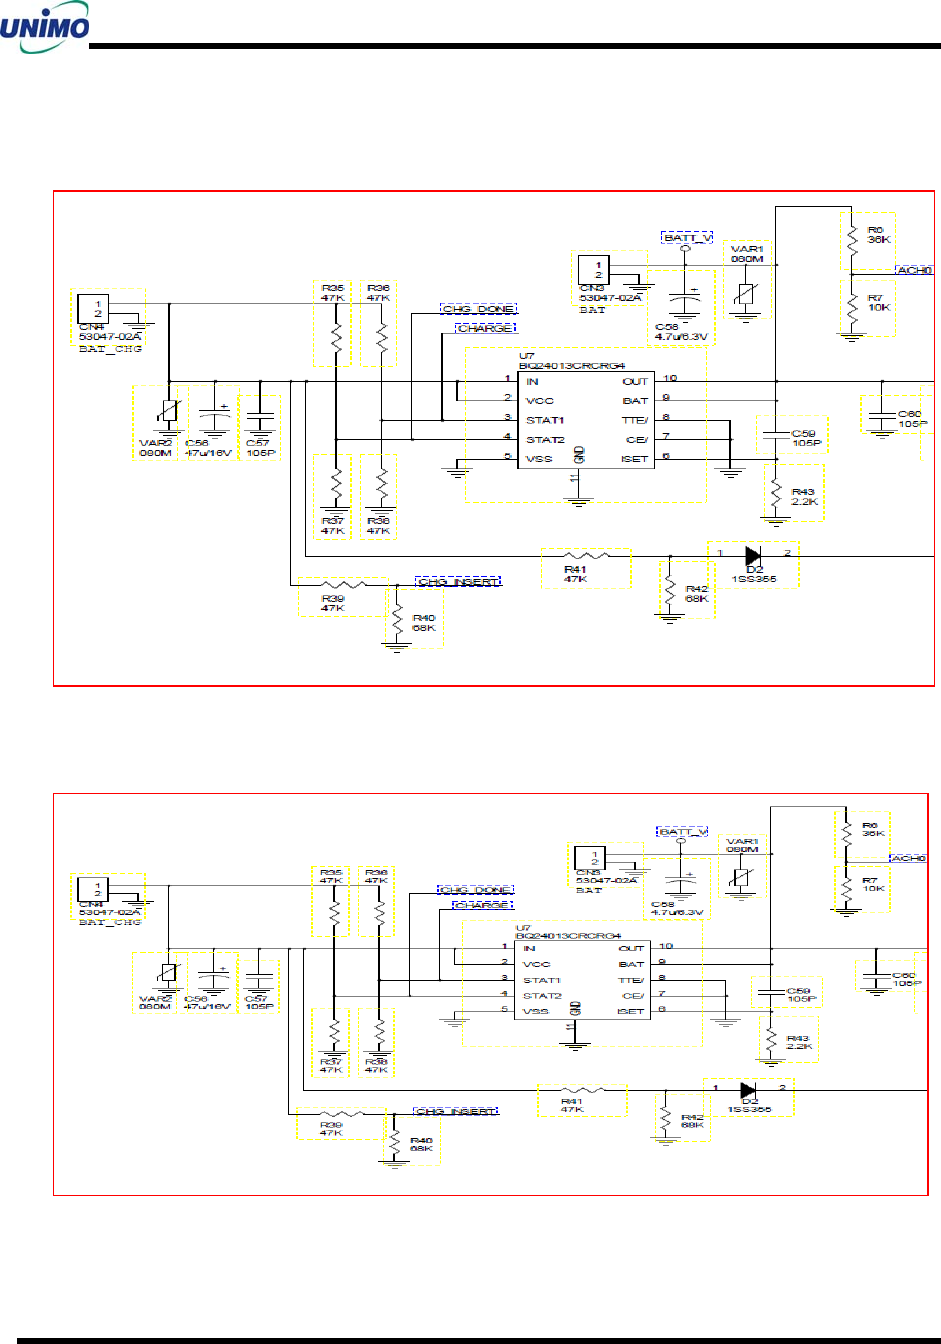
6-8 Battery charger circuit
Maintenance Manual
UDM-240ZH/ZBH
28
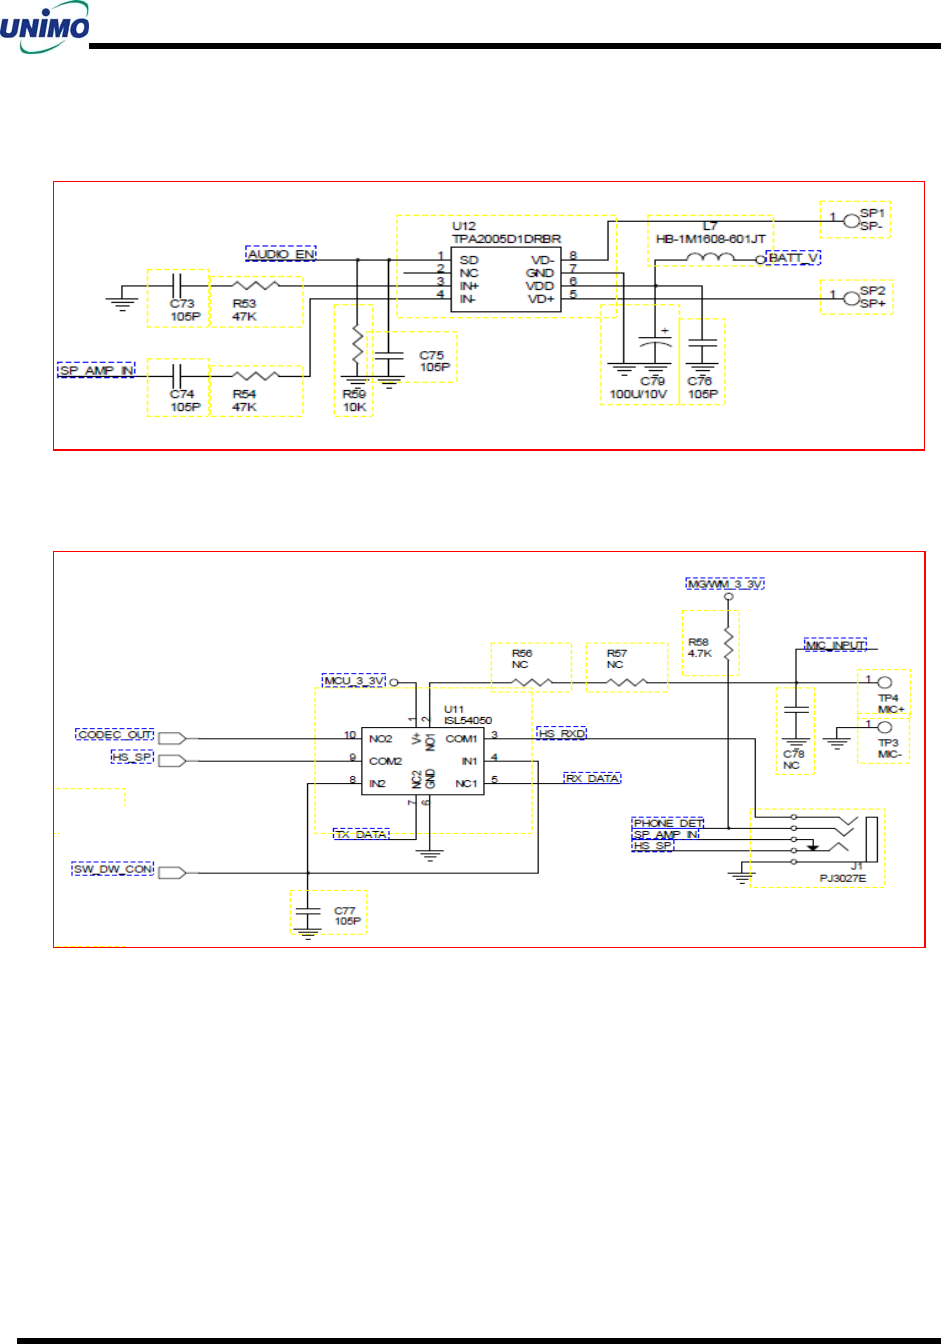
6-9 Audio AmP
6-10 Ear Phone circuit
Maintenance Manual
UDM-240ZH/ZBH
29
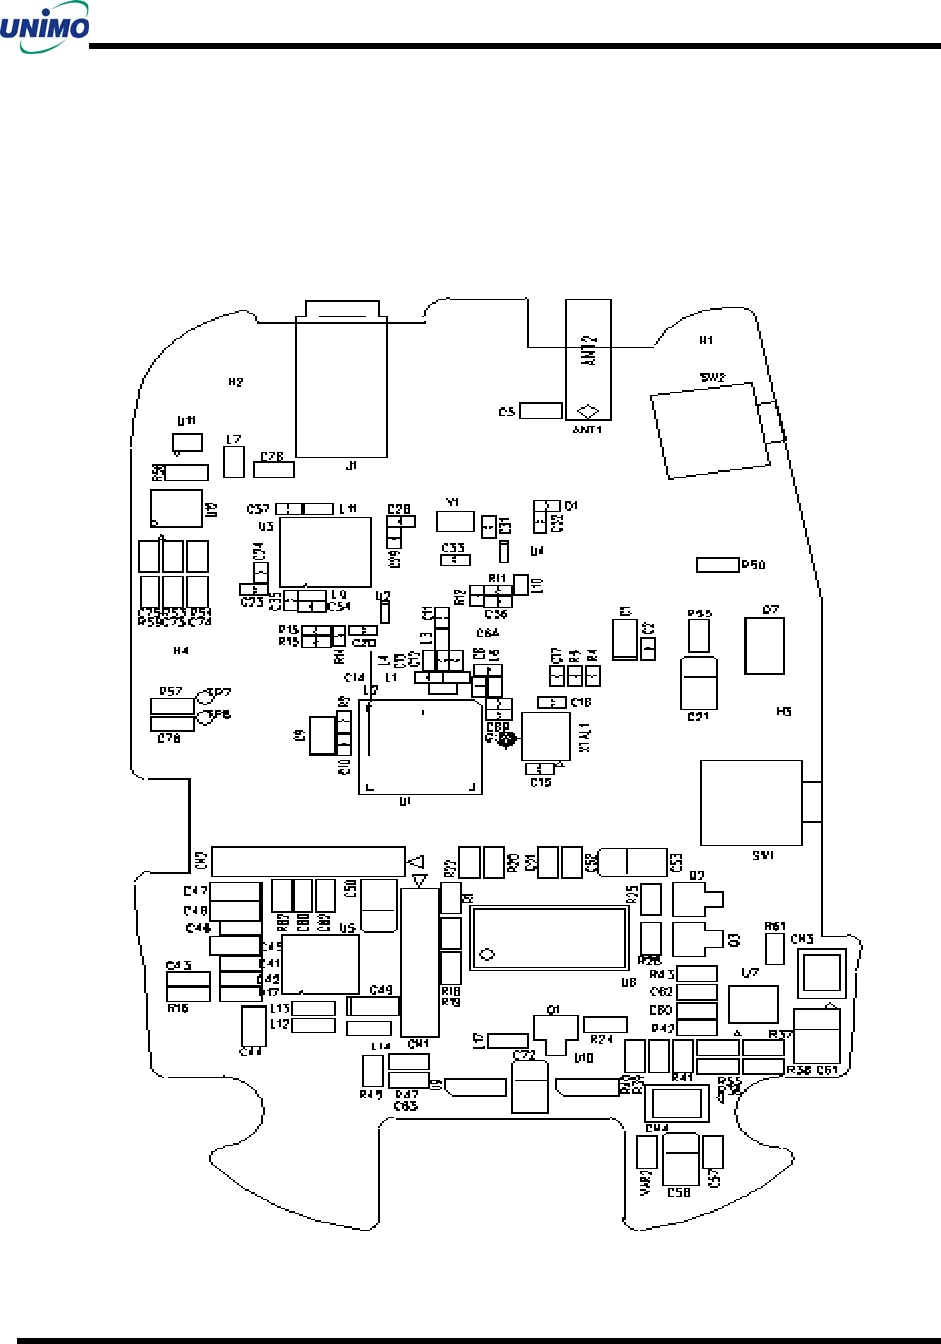
7 PCB MAP
7-1 TOP
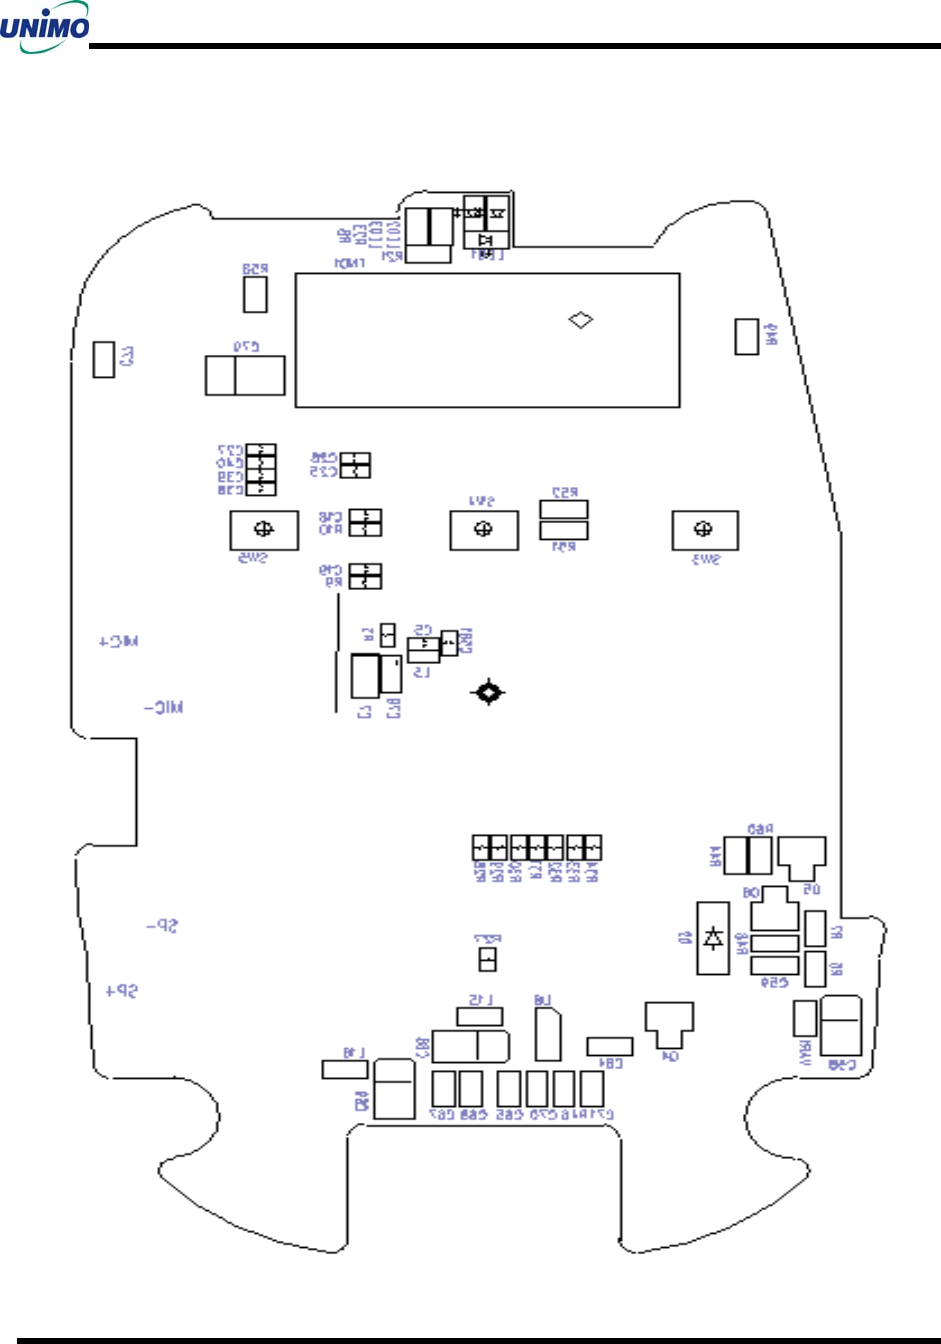
Maintenance Manual
UDM-240ZH/ZBH
30
7-2 BOTTOM
Maintenance Manual
UDM-240ZH/ZBH
31
7-3 Circuit Diagram
Maintenance Manual
UDM-240ZH/ZBH
32

Maintenance Manual
UDM-240ZH/ZBH
33
FCC Information to User
This equipment has been tested and found to comply with the limits for a Class B digital device,
pursuant to Part 15 of the FCC Rules. These limits are designed to provide reasonable
protection against harmful interference in a residential installation. This equipment generates,
uses and can radiate radio frequency energy and, if not installed and used in accordance with
the instructions, may cause harmful interference to radio communications. However, there is no
guarantee that interference will not occur in a particular installation. If this equipment does
cause harmful interference to radio or television reception, which can be determined by turning
the equipment off and on, the user is encouraged to try to correct the interference by one of the
following measures:
• Reorient or relocate the receiving antenna.
• Increase the separation between the equipment and receiver.
• Connect the equipment into an outlet on a circuit different from that to which the receiver is
con-nected.
• Consult the dealer or an experienced radio/TV technician for help.
Caution
Modifications not expressly approved by the party responsible for compliance could void the
user’s authority to operate the equipment.
FCC Compliance Information : This device complies with Part 15 of the FCC Rules.
Operation is subject to the following two conditions: (1) This device may not cause harmful
interference, and (2) this device must accept any interference received, including interference
that may cause undesired operation
IMPORTANT NOTE:
FCC RF Radiation Exposure Statement:
This equipment complies with FCC RF radiation exposure limits set forth for an uncontrolled
environment. This equipment should be installed and operated with a minimum distance of 20
centimeters between the radiator and your body.This transmitter must not be co-located or
operating in conjunction with any other antenna or transmitter.