Uniwell Systems WAITERPAD00001 Waiter Pad TX User Manual WaiterPad Manual
Uniwell Systems Waiter Pad TX WaiterPad Manual
Users Manual

Page 1
Contents
Page
1.0
1.0 1.0
1.0 WaiterPad Introduction
WaiterPad IntroductionWaiterPad Introduction
WaiterPad Introduction
3
33
3
2.0
2.0 2.0
2.0 WaiterPad Operation
WaiterPad OperationWaiterPad Operation
WaiterPad Operation
5
55
5
2.1 General Functions 5
2.2 Logging On 6
2.3 Adding Tables 6
2.4 Adding Item 7
2.5 Product Notes 8
2.6 Custom Products 8
2.7 Custom Messages 9
2.8 Reviewing Tables 10
2.9 Modifying an Order 10
2.10 Sending Tables 11
2.11 Table Transfer 12
2.12 Screen Appearance 12
2.13 Printing a Bill 13
2.14 Changing Product Groups 13
2.15 Deleting Tables 13
2.16 Managerial Logon 14
2.17 Product Price 15
2.18 System Messages 15
3.0
3.0 3.0
3.0 WaiterPad System Generator
WaiterPad System GeneratorWaiterPad System Generator
WaiterPad System Generator
17
1717
17
3.1 Introduction 17
3.2 File Menu 17
3.3 Table Layout Menu 18
3.4 Keyboard Layout Menu 19
3.5 Setup Menu 22
3.6 Menu Editor 36
3.7 Generate Menu 43
3.8 Send Menu 44
3.9 WaiterPad Downloading 44
4.0
4.0 4.0
4.0 WaiterPOS Functions
WaiterPOS FunctionsWaiterPOS Functions
WaiterPOS Functions
45
4545
45
4.1 Introduction 45
4.2 WaiterPOS Screen 45
4.3 General Operation 46
4.4 WaiterPOS Functions 47
4.5 Reporting 50

Page 2
5.0
5.0 5.0
5.0 System Maintenance
System MaintenanceSystem Maintenance
System Maintenance
53
5353
53
5.1 Daily Opening Procedure 53
5.2 Daily Closing Procedure 53
5.3 Recharging Batteries 53
5.4 WaiterPad Resets 54
5.5 Network Controller Maintenance 54
5.6 Printer Controller Maintenance 54
5.7 WaiterPad Maintenance 55
6.0
6.0 6.0
6.0 System Troubleshoot
System TroubleshootSystem Troubleshoot
System Troubleshooting
inging
ing
56
5656
56
6.1 Printers 56
6.2 WaiterPad Hand Held 56
6.3 WaiterPOS 57
6.4 POS System Generator 57
7.0
7.0 7.0
7.0 Index
IndexIndex
Index
58
5858
58
8.0
8.0 8.0
8.0 System Log
System LogSystem Log
System Log
60
6060
60
Page 3
WaiterPad Introduction
WaiterPad IntroductionWaiterPad Introduction
WaiterPad Introduction
System Components
The WaiterPad system is designed specifically for the hospitality industry providing unparalleled
functionality and simplicity. The main components of the WaiterPad system are described in the
following paragraphs.
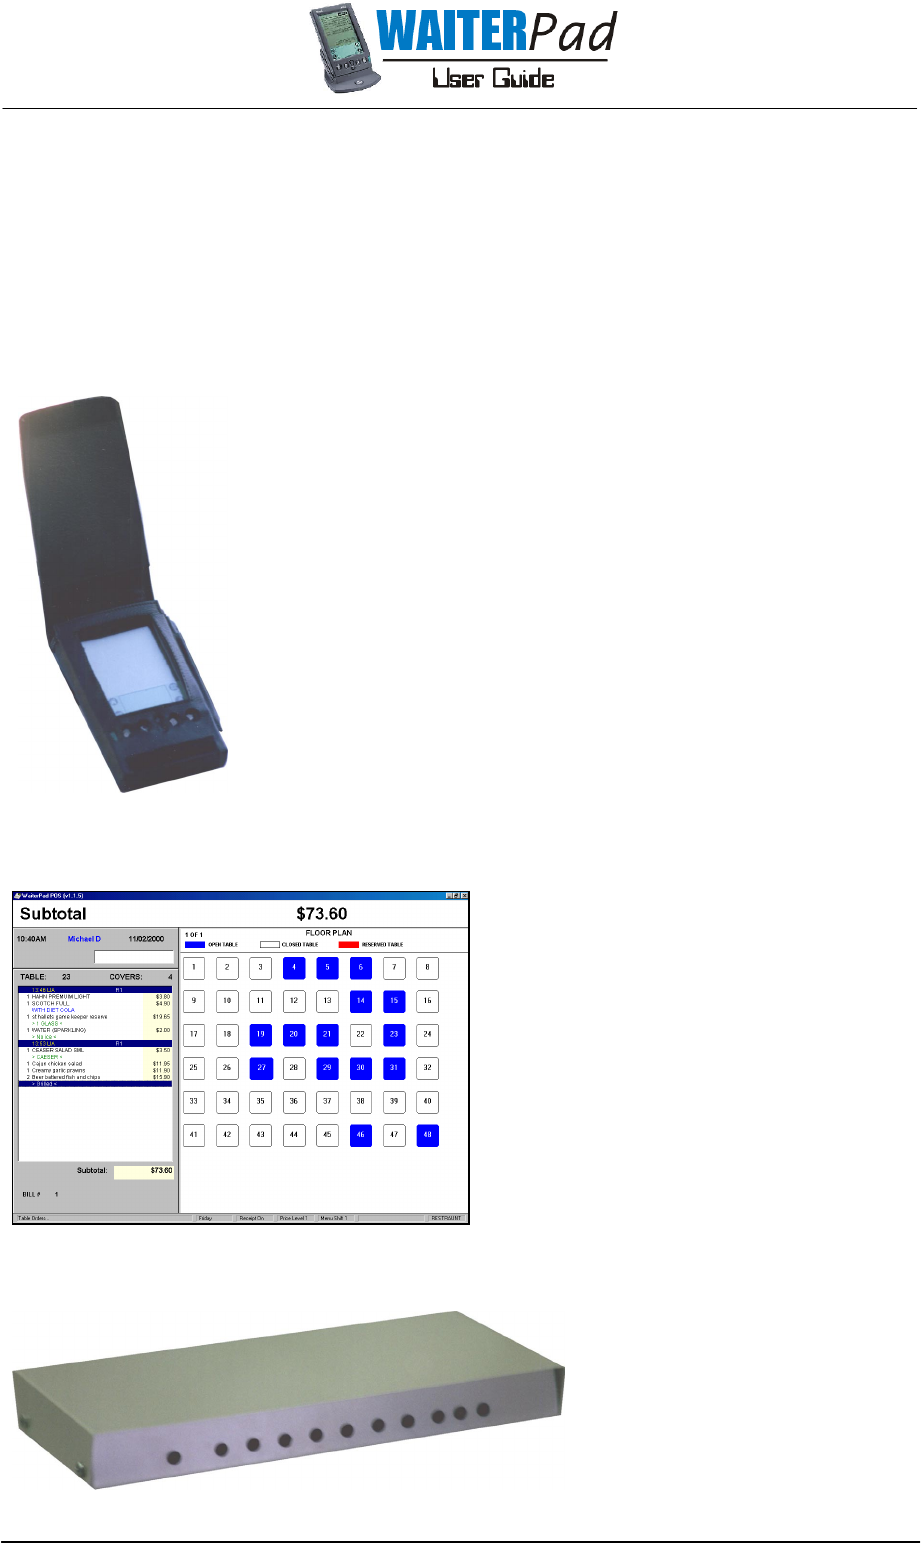
WaiterPad Hand Held
The hand held unit is the waiter’s best friend, compact, lightweight, simple
to use and easy to learn. The system enables the user to program the
operation of the WaiterPad to meet the individual needs of their
establishment.
The Menu Editor application is used to generate the WaiterPad menu and
allows the user to:
• prompt waiters through complex ordering processe,s such as
products which require the selection of side orders, condiments
and cooking degrees/instructions,
• prompt waiter’s to suggestive sell,
• select seat positions and allocate table numbers,
• attach explanatory notes to each product for the waiter to view,
rather than relying on waiters to remember specials of the day,
• perform table transfers,
• print customers bills and many other functions, all explained in the
proceeding sections of this manual.
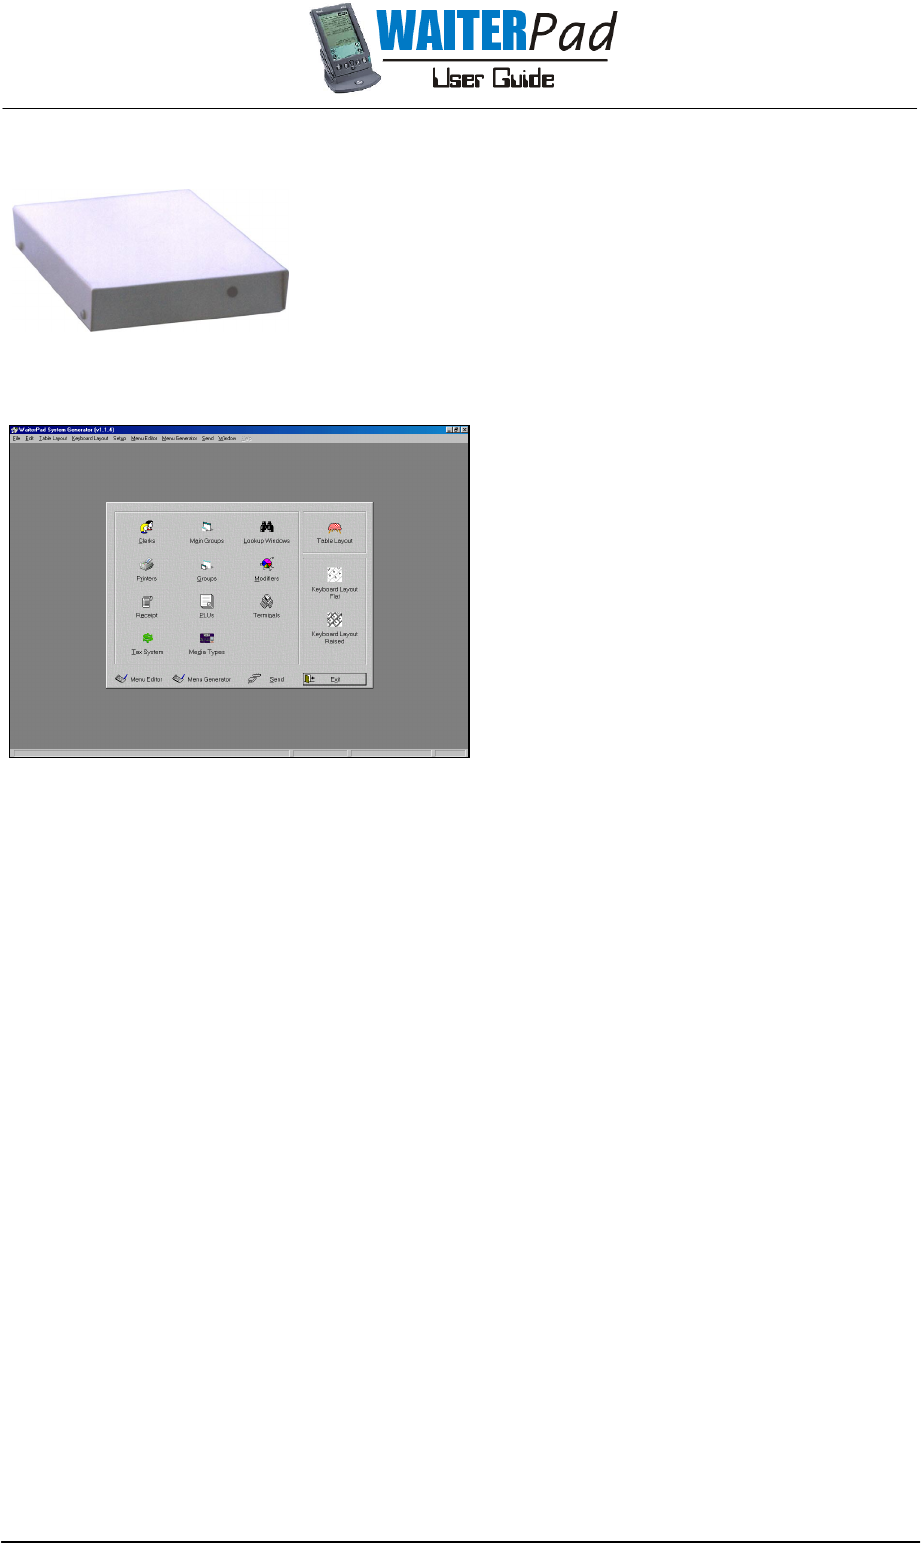
WaiterPOS
WaiterPOS is used to track table orders, print
bills, split bills, transfer tables, receive
payments, create reports and many other
functions. All functions require limited key
strokes which enables the user to operate the
WaiterPOS quickly and easily.
WaiterPOS provides a powerful alternative to
traditional ROM based POS terminals, providing
more on screen help the ability to operate in a
power blackout through the used of an
Uninterrupted Power Supply (UPS).
Network Controller
The network controller is the hub of
the system, it manages the flow of
all data from the radio frequency
receivers to the printer controller(s)
and the WaiterPOS.
Page 4
Printer Controller
The printer controller manages the printing queue of each printer,
formatting the order docket and rerouting order dockets if the
printer is out of paper or jammed.
WaiterPad System Generator
WaiterPad system generator is software used to
configure the operation of all components of
the system.
WaiterPad System Generator is a Windows
based system with much on-screen help to
enable the user to perform all tasks easily and
quickly.
Radio Frequency Receivers
The radio frequency receivers receive information from the hand held WaiterPad’s and transmit this
information to the Network Controller. Various types of radio frequency receiver housings are
available such as a camera dome or alarm sensor shell to enable the receivers to be blended into
the establishments décor.
WaiterPad Charger
The WaiterPad charger Is used to charge the batteries of the WaiterPad hand held units. A cable
from the charger simply plugs into the bottom of the WaiterPad and the charger indicates when the
charging is complete.

Page 5
WaiterPad Operation
WaiterPad OperationWaiterPad Operation
WaiterPad Operation
2.1 GENERAL FUNCTIONS
Turning the WaiterPad On/Off
To turn the WaiterPad on, press and hold the green power button located on the bottom left-hand
side of the WaiterPad for one second.
To turn the WaiterPad off, press the green power button quickly, do not hold down. The WaiterPad
screen will automatically turn off if not used for approximately 2 minutes.
Selecting an Item
An item is selected from the WaiterPad touch-screen using the point of the ‘Stylus Pen’ provided with
the WaiterPad to highlight that item on the screen. When an item is successfully selected that item
highlights and the WaiterPad emits a quick confirmation noise.
If the pen is not released from the screen above the intended item then the item will not be selected
as the WaiterPad assumes that a mistake has been made.
Scrolling
When a menu has more items than can fit onto one screen the WaiterPad adds a ‘Scroll Bar’ to the
right-hand side of the screen. The scroll bar can be used in a variety of ways to view items on the list
and operates in much the same way as a Microsoft Windows scroll bar.
Fig 2.1(a)
Fig 2.1(a)Fig 2.1(a)
Fig 2.1(a) Hand Held screen showing a scroll bar.
The position of the current page in the list is shown in dark black and the areas out of view are
shaded. Fig 2.1(a) shows that the user is at the top of the list because all shading is below the black
area.
To scroll down this list the user can either press the shaded area of the scroll bar, press the down
arrow at the bottom of the scroll bar or use the scroll down button on the WaiterPad (center button).
Returning to the WaiterPad Log-In Screen
If at any time a new waiter needs to logon to the WaiterPad they can return to
the log-in screen by pressing the WaiterPad button on the button right-hand side
as shown in Fig 2.1(b).
Up Arrow
Current Position of Page
(this page is at the top of the list)
Section Out of Display
(items which are not currently in view)
Down Arrow
Scroll Bar
Fig 2.1(b)
Page 6
2.2 LOGGING ON
1. From the main WaiterPad screen click on and then select a name from the drop
down list. After selecting a name press as shown in Fig 2.4(a).
Fig 2.4(a)
Fig 2.4(a)Fig 2.4(a)
Fig 2.4(a) Opening WaiterPad logon screen.
2. If Clerk PIN numbers are in use waiters will be asked to enter in their PIN on the Enter PIN pad, (as
shown in Fig 2.4(b)). Complete by selecting .
Fig 2.4(b) Clerk PIN number pad.
See section 3.6 Menu Editor - System Configuration for instructions on how to activate the use of
clerk PIN’s and section 3.5 Setup Menu - Clerks for instructions on adding clerks and modifying clerk
details.
2.3 ADDING TABLES
1. After logging on, a table can be added to the system by pressing which is located in the
bottom left-hand corner. This will open the Add Tables pad which looks similar to a calculator.
If the user wishes to cancel the addition of a table press the C
CC
C (Cancel) button, this will then
return the user to the Tables screen.
2. Use the digit buttons on the pad to enter the table number and finish by pressing .
Fig 2.5(a) The Add Table pad.
Select Name
List Box
Drop Down
Name List
Name List Scroll
Down Button
OK Button
Use Digit Buttons
to Enter Clerk PIN Number
Finish by Pressing the
OK Button
Back Key
(Clears the Last Digit Entered)
Clear Key
(Clears all Digits Entered)
Cancel Key
(Cancels the Log On)
Back Button
Clear Button
Cancel Button
Digits Entered
Digit Buttons
OK Button
Page 7
3. After entering the table number the WaiterPad may prompt for the number of covers. Enter the
number of covers as the table number was entered.
The WaiterPad will only prompt for the number of covers if the appropriate flag is set (see section 3.6
Menu Editor - System Configuration).
2.4 ADDING ITEMS
When the user has added the table they are ready to add items to the order. The WaiterPad will
proceed directly the main menu screen, from which point the user can navigate through the menus
by tapping the one required.
Fig 2.6(a) Main Menu screen.
To allocate an item to a particular seat of the table the seat position must be set before the item is
selected. This is done using the up and down arrows as shown in Fig 2.6(a). This function allows a
number between 1 and 99 to be selected.
Depending upon the specific menu design, the user may be prompted through one or several
screens after selecting a product for details such as cooking degree, sauces, side orders, etc. When
in a product screen an item is added by tapping that item with the tip of the stylus pen.
To go back to the previous menu, provided the user is not currently in the main menu, tap (Back
button) which is located in the bottom right-hand corner of the screen.
Table No of Time Battery
Number Covers Status
Seat No Current Seat No
Down Seat No Up
Button Allocated Button
Page 8
Fig 2.6(b) Menu navigation buttons.
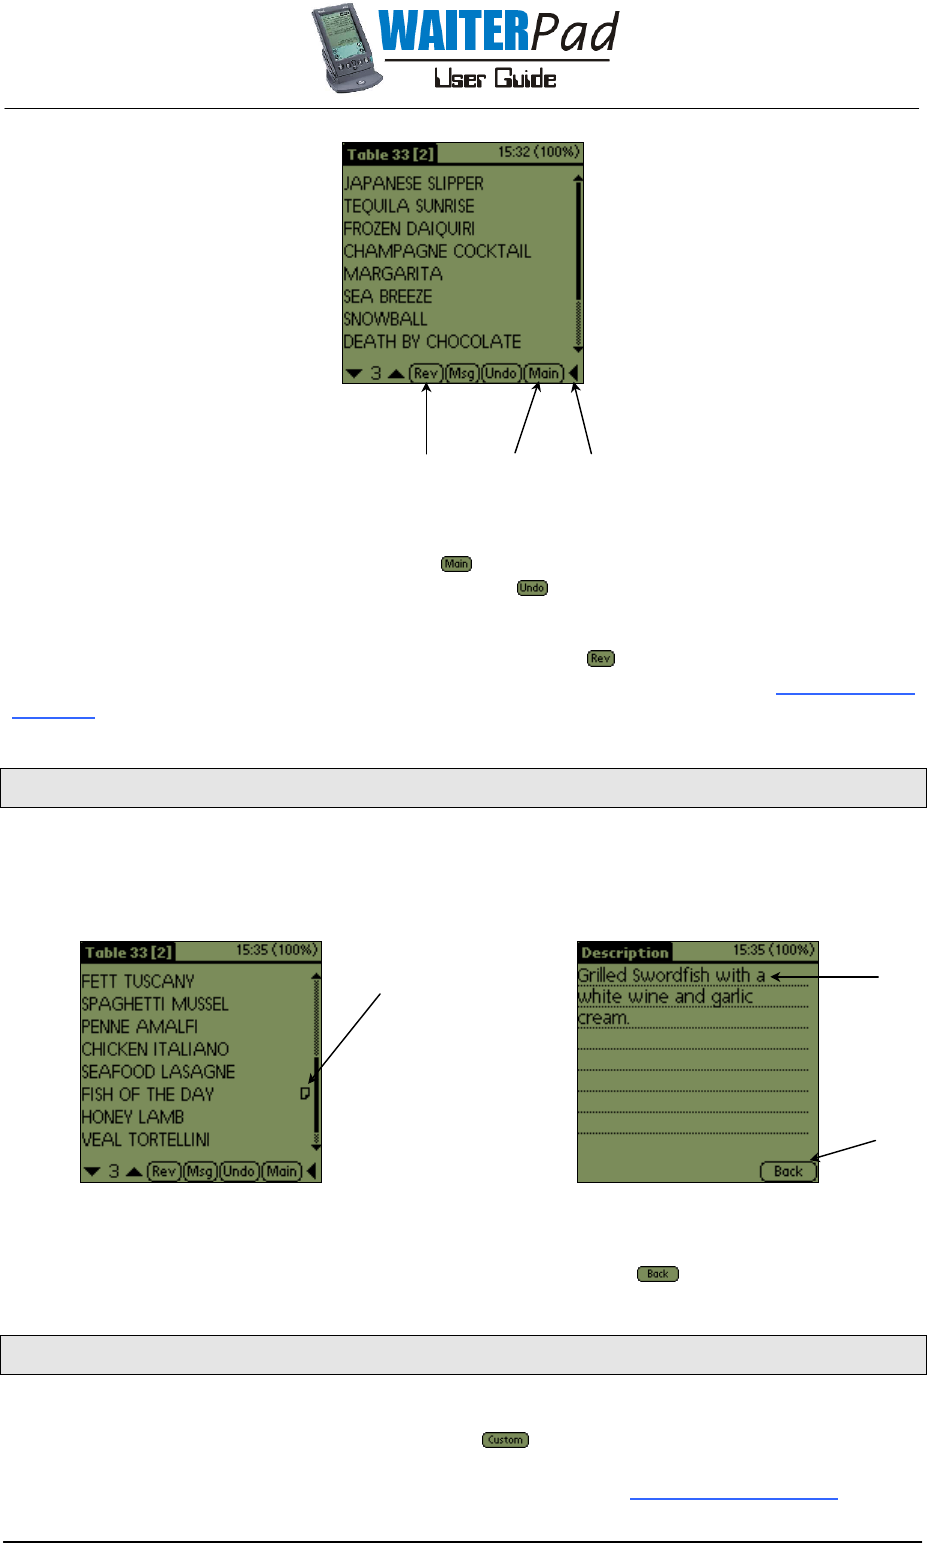
To get back to the Main Menu at any time tap which is located in the bottom right-hand corner
of the screen. The last action can be erased using the button. By pressing the undo button the
last action will be deleted.
The user may review the current order at anytime by tapping , this opens the Review Screen.
Products and order details can be altered in this screen which is explained in section 2.11 Modifying
an Order.
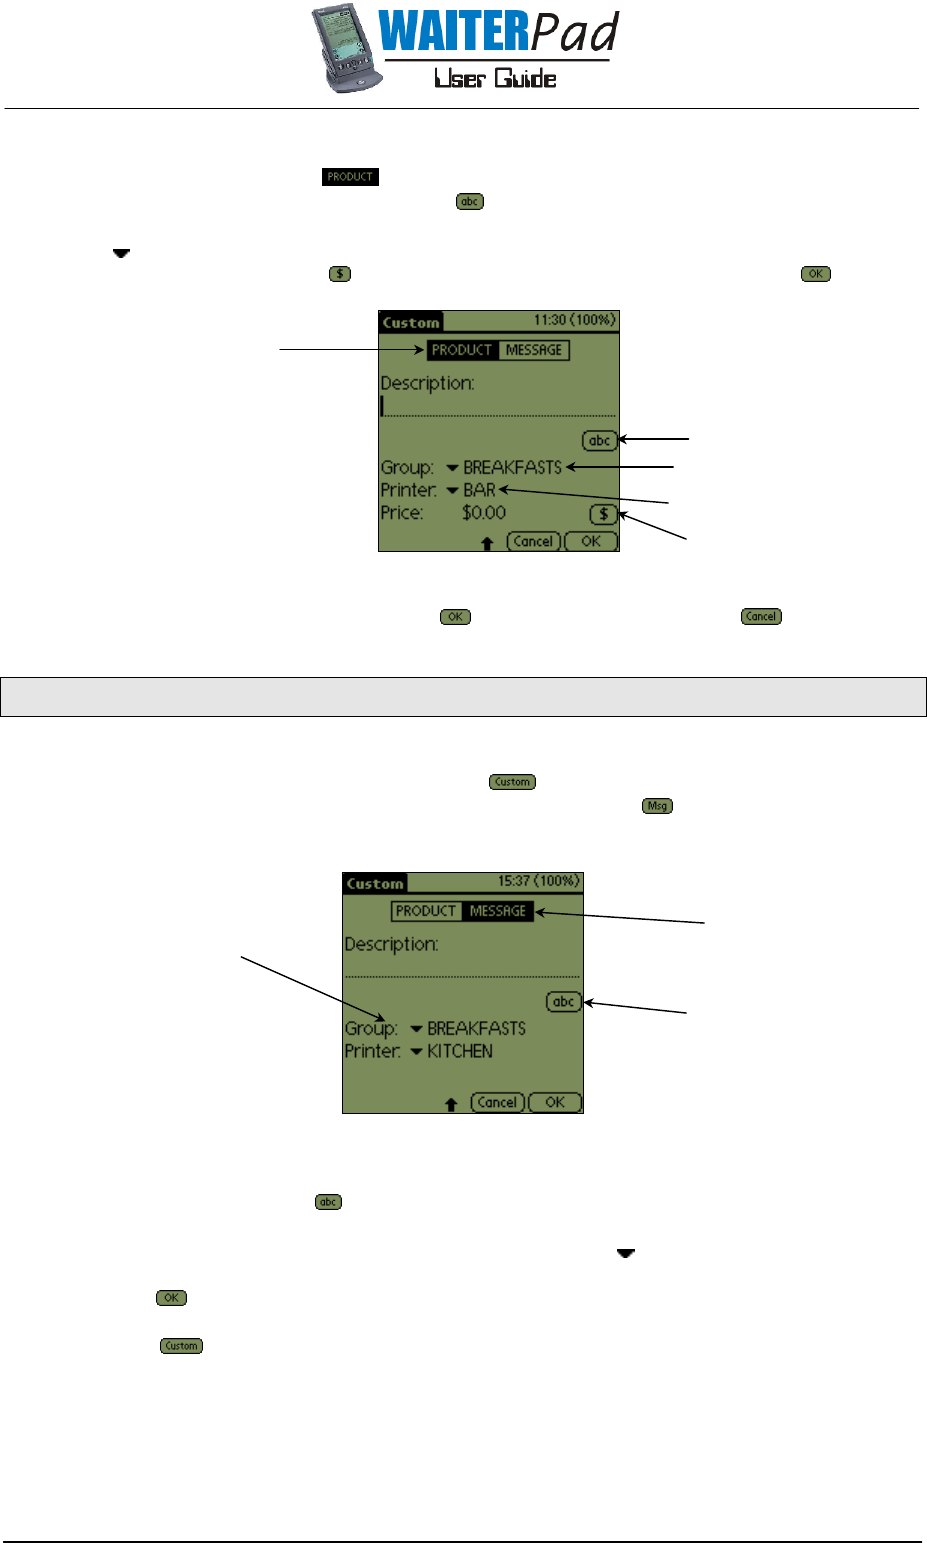
2.5 PRODUCT NOTES
Any product can have a note attached to it. Product notes are used to provide information to the
waiter. For example a note can be used to describe the days Chef’s Special rather than waiters
having to remember such items or they can be used to further describe a product.
Fig 2.7(a) Product note icon and product note screen.
To view a product note simply tap on the note icon, as shown in Fig 2.7(a), which will open the Note
Description, also shown in Fig 2.7(a). To exit the Note Description tap .
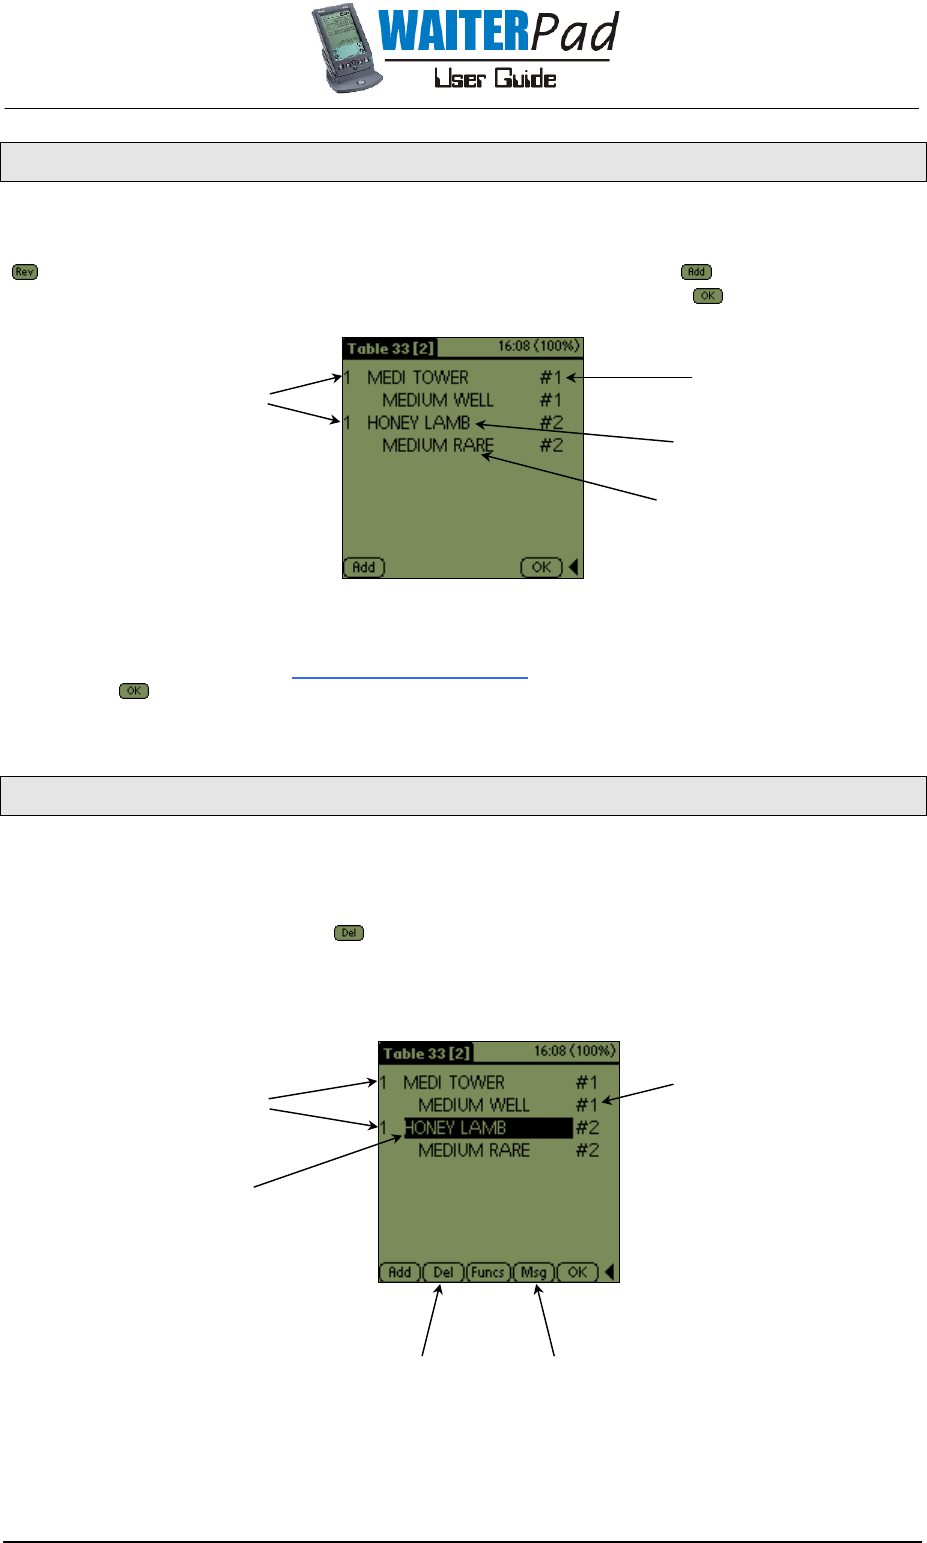
2.6 CUSTOM PRODUCTS
WaiterPad has the ability to add products that are not in the database, these are referred to as
“Custom Products”. To add a custom product tap in the main menu screen which will then
open the custom screen. From this form the user can add custom messages as well as products,
instructions on how to add a custom message are outlined in section 2.9 Custom Messages.
Review Main Back
Button Button Button
Product
Note Icon
Text
Description
Back
Button
Page 9
To order a custom product proceed as follows:
1. First use the stylus pen to select , highlighted in Fig 2.8(a).
2. Enter a description of the product by pressing and using the keyboard which appears.
3. The next step is to select a group and printer to send the product to. Do this by tapping on
Group , selecting the appropriate group and likewise for the printer.
4. Finally enter a price by tapping and entering the price (in cents), finish by tapping .
Fig 2.8(a) Custom product screen.
Once these steps have been completed select , to cancel at any stage press .
2.7 CUSTOM MESSAGES
WaiterPad has the ability to allow waiters to send custom messages to the preparation areas. This is
done from either the main menu screen by pressing or in the review screen by highlighting the
item to which a message needs to be attached and then pressing . This will open the custom
screen as shown in Fig 2.9(a).
Fig 2.9(a) The custom message screen.
Proceed as follows:
1. Enter a message by pressing which opens a screen keyboard, when completed press Done
on the keyboard.
2. Select a group to send the product to by tapping the Group and selecting the appropriate
group and likewise for the printer.
3. To finish tap .
When using the button from the main menu screen the message will be attached to the last
item ordered.
ABC Button
Group Drop Box
Printer Drop Box
Price Button
Product
Button
List Boxes
(press arrow head to open the
drop down box)
Message
Button
Alpha Keyboard
Button
Page 10
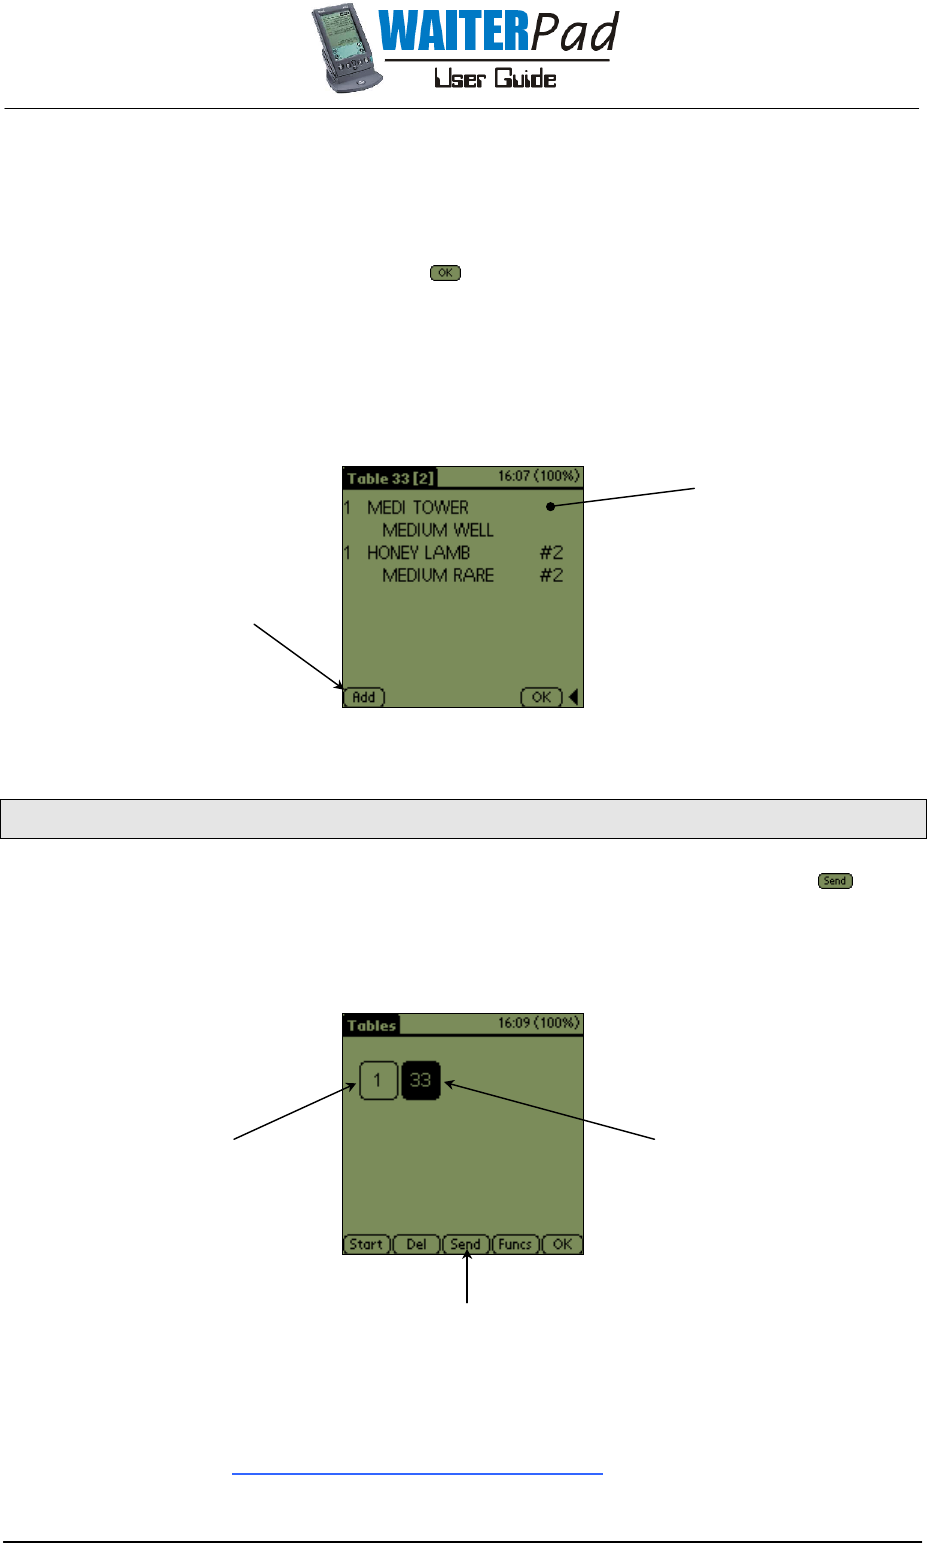
2.8 REVIEWING TABLES
The Review screen shows the order as it has been inputted allowing the waiter to confirm the order
with the customer before sending. The waiter can go to the Review screen at any time by pressing
. Items can be added to the order from the Review screen by pressing located in the bottom
left-hand corner of the screen. To proceed to the order sending stage, press .
Fig 2.11(a) Review order screen lists all the items selected.
Products can be deleted, quantities and seat positions changed in the Review screen which is
explained in the next section, 2.11 Modifying an Order. To review an order from the main menu
screen tap , located in the bottom right-hand corner of the screen to open the Review Table
screen.
2.9 MODIFYING AN ORDER
Deleting a Product
To delete an item from the order in the Review screen, highlight the item required to be deleted (as
shown in Fig 2.11(a)) and then press located in the bottom left-hand corner of the screen. This will
delete the item and all accompanying “Side Dishes/Condiments/Cooking Instructions/Messages”. If
an item has an ordered quantity greater than one then the WaiterPad will prompt the user to select
the number required to be deleted.
Fig 2.11(a) Example of a highlighted product on the revue screen.
(Note: If the “Save Orders” flag is set, an item that has already been sent can not be deleted, see
section 3.5 Setup Menu - System Configuration).
Seat Position
Product Description
Cooking Instruction
Quantity Ordered
Delete Message
Button Button
Quantity
Ordered
Item
Description
Seat Positions
Page 11
Changing the Quantity
The quantity ordered of an item is shown in front of the product description on the left-hand side of
the screen. To change the quantity of an item to be ordered in the Review screen, select the
quantity required to be changed by tapping on it and then entering the correct quantity into the
quantity pad which appears. Finish by pressing .
Modifying a Seat Number
To change the seat number highlight the seat number and change in the same manner as
described in the Changing the Quantity section. To add a seat number to an item select the blank
area to the right of the item description (as shown in Fig 2.11(b)) and enter the number in the same
manner.
Fig 2.11(b) Select the blank area where the seat number would
be located to insert a seat number.
2.10 SENDING TABLES
To send tables with unsent orders, go to the tables screen (shown Fig 2.12(a)) and tap . On a
successful send, and provided that the flags are set correctly (see section 3.5 Setup Menu - System
Configuration), the WaiterPad will emit an audio confirmation and the screen will invert black and
clear three times. If errors occur during the sending phase an error message will appear on the
screen, check section 2.20 System Messages section for a detailed description and instructions.
Fig 2.12(a) The tables screen showing sent and unsent orders.
A black table represents a table that contains orders which have not been sent, whereas a clear
table contains no unsent orders. Tables will only remain on the screen after sending if the
appropriate program flags are set, otherwise tables will leave the WaiterPad screen once sent
successfully (see section 3.5 Setup Menu - System Configuration).
Select this blank area to
allocate a seat number
Send Button
Sent Table
Sent Table Sent Table
Sent Table Unsent Table
Note that the buttons which were shown in
Fig 2.11(a) are not present because no
items have been highlighted on the list.
Page 12
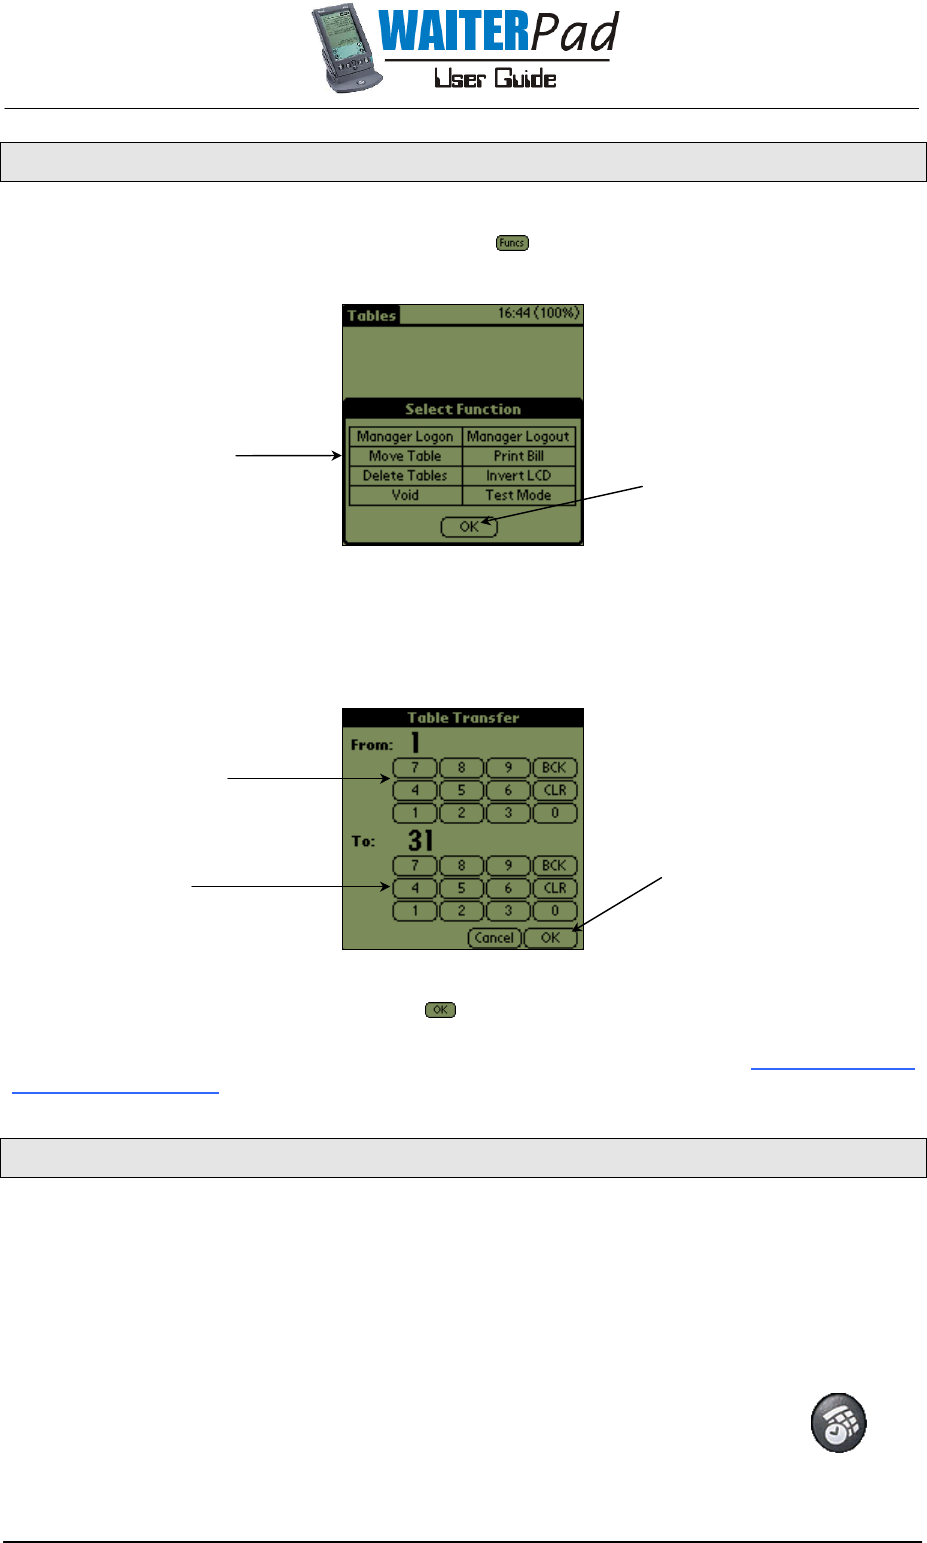
2.11 TABLE TRANSFER
WaiterPad allows the waiter to quickly transfer a tables order. To move the current orders from one
table to another go to the Tables screen and press . Select the Move Table function from the
function list.
Fig 2.13(a) Functions window.
This opens the Table Transfer screen (shown Fig 2.13(b)), which is slightly different to the other
number selection screens which have been explained so far. In the top section enter the number of
the table which is being transferred From
FromFrom
From
and in the bottom section enter the number of the table to
transfer the order To
ToTo
To.
Fig 2.13(b) Table transfer screen.
Once both numbers have been entered, tap . The WaiterPad will then prompt for confirmation of
the transfer between these two tables and send a message to the preparation areas advising of the
transfer. This function can be restricted to use by Management only, see section 3.5 Setup Menu -
System Configuration.
2.12 SCREEN APPEARANCE
Contrast
In some light conditions the screen contrast may need adjustment as the screen text appears
stretched or blurred. To alter the contrast turn the contrast dial located on the left-hand underside of
the WaiterPad.
Low Light
In low light situations the WaiterPad screen can be altered to improve viewing
performance. This is done by turning on the screen backlight which also inverts the
LCD. To turn on the screen backlight press the button shown in Fig 2.14(a), to turn
the backlight off press the same button again.
Move Table
Function
Enter the current table number
here
Enter the new
Table number here
Press OK to complete!
Pressing OK will exit the
Select Function window.
Fig 2.14(a)
Page 13
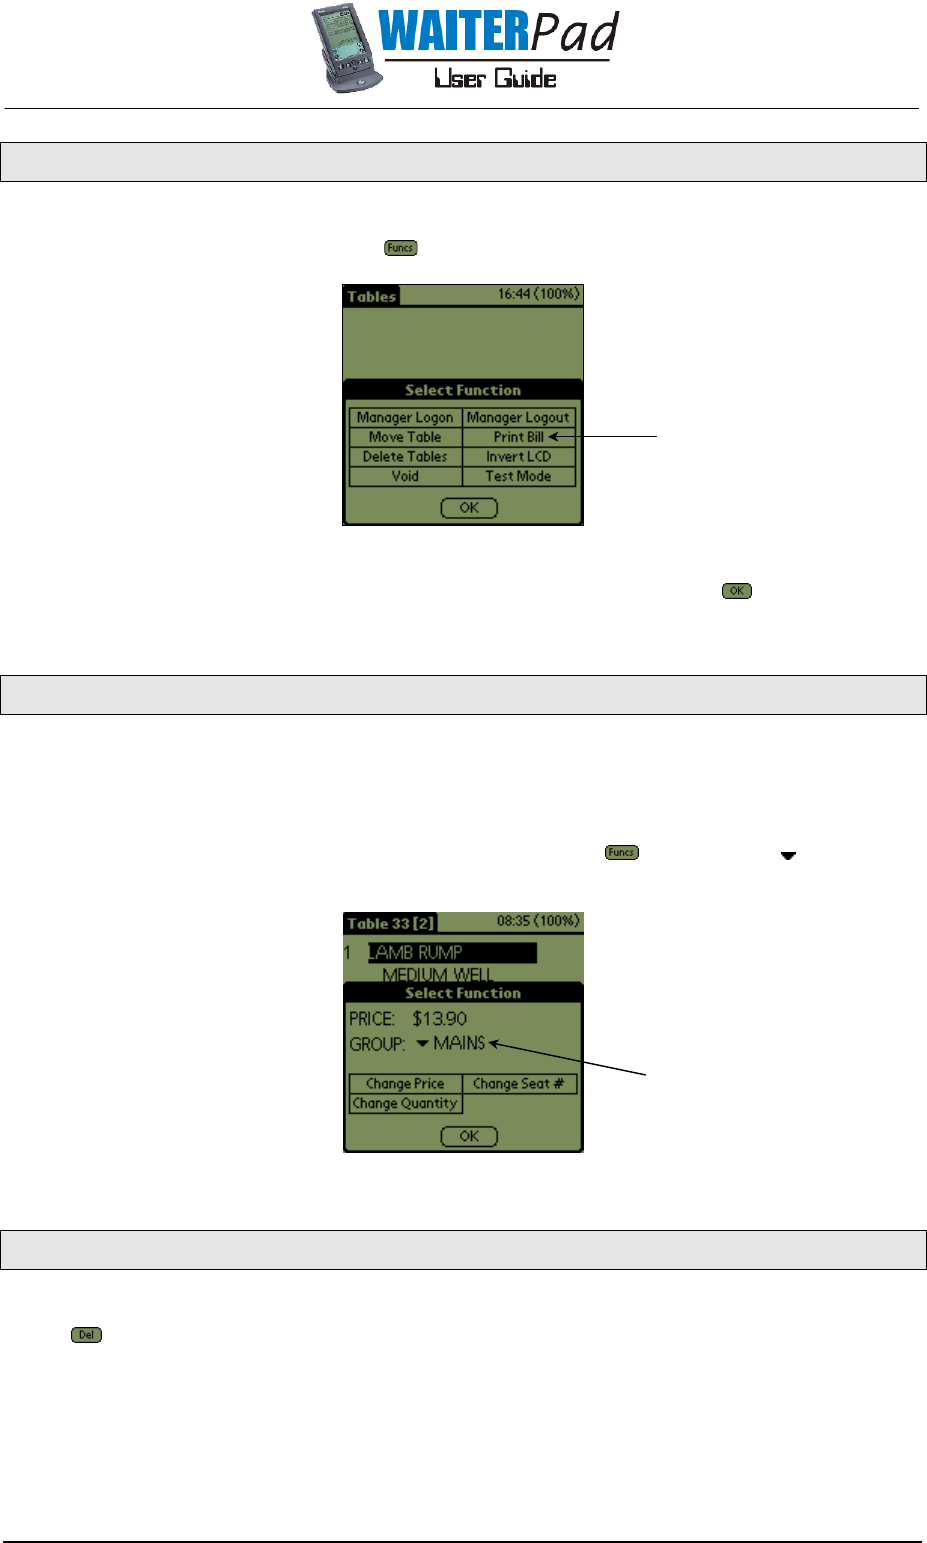
2.13 PRINTING A BILL
WaiterPad allows waiters to print a customers bill at the bill printer from the hand held unit. This is
done from the Tables screen by pressing and selecting the Print Bill option.
Fig 2.15(a) Functions window.
Enter the number of the table into the print bill pad and then finish by pressing . This will then print
the bill on the WaiterPOS bill receipt printer.
2.14 CHANGING PRODUCT GROUPS
The group of an item can be changed in the Review screen, so for example, an ENTREE can be
sent to the printers as a MAIN and therefore be displayed on the printer with the other Mains.
To do this, select the item to be changed by tapping on it, this will highlight the item and then
additional buttons will appear at the bottom of the screen. Select , tap on Group and change
the group as required.
Fig 2.16(a)
Fig 2.16(a)Fig 2.16(a)
Fig 2.16(a) Product functions screen.
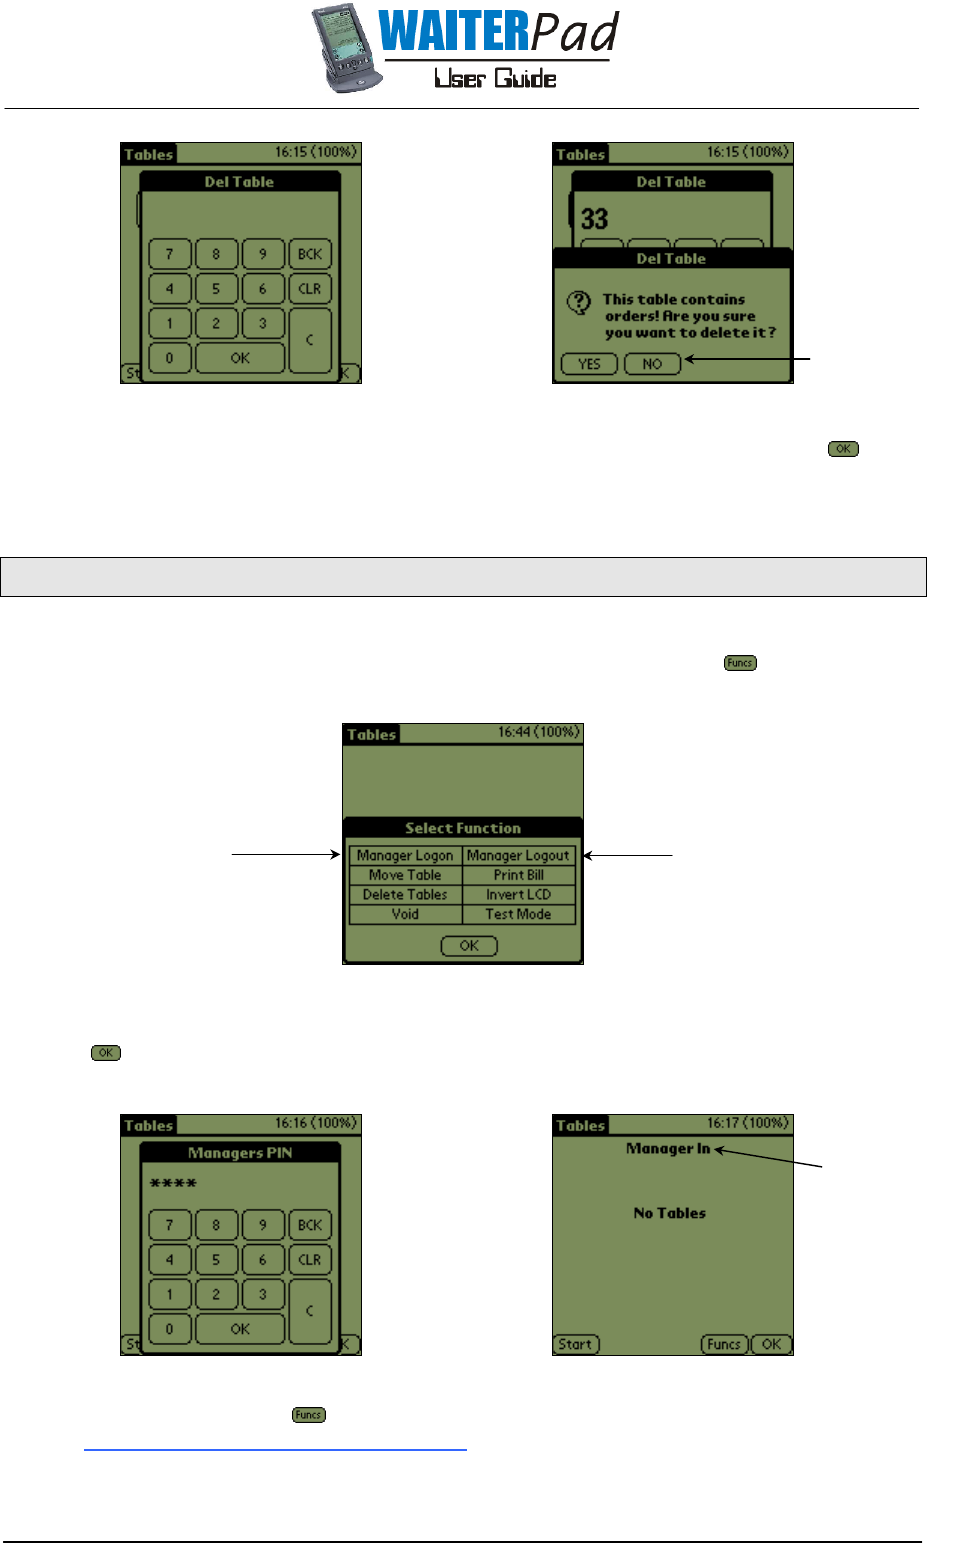
2.15 DELETING TABLES
Deletion of tables is completed much in the same way as tables are added. From the tables screen
select which opens the delete table pad. The Delete Table pad looks (shown in Fig 2.17(a)) and
operates the same as the add table pad.
Print Bill
Function
Group
Box
Page 14
Fig 2.17(a) The Delete Table pad and warning message.
Enter the table number to delete by tapping the appropriate digit buttons and then select . If the
table being deleted contains items, the user will be asked to confirm the action. Once confirmed
the table will no longer appear on the screen.
2.16 MANAGERIAL LOGON
WaiterPad allows certain functions to only be performed by Management and therefore the
Manager needs to logon to the system as the Manager. To do this select and then select
Managerial Logon from the list provided (shown in Fig 2.18(a)).
Fig 2.18(a) Manager Log on and log off functions
WaiterPad will prompt for the Managers PIN to be entered, enter the Managers PIN and finish by
pressing . If the correct PIN is entered then “Manager In” will appear at the top of the screen (as
shown in Fig 2.18(b)).
Fig 2.18(b) Manager login pad and logged in screen.
To log the Manager off press and then select Managerial Logout from the list provided. See
section 3.5 Setup Menu - System Configuration for instructions on how to change the Managers
PIN.
Press Yes to confirm, No to
abort the deletion.
Manager Log-On Manager Log-Off
Indicates that the
user is logged on as
the Manager
Page 15
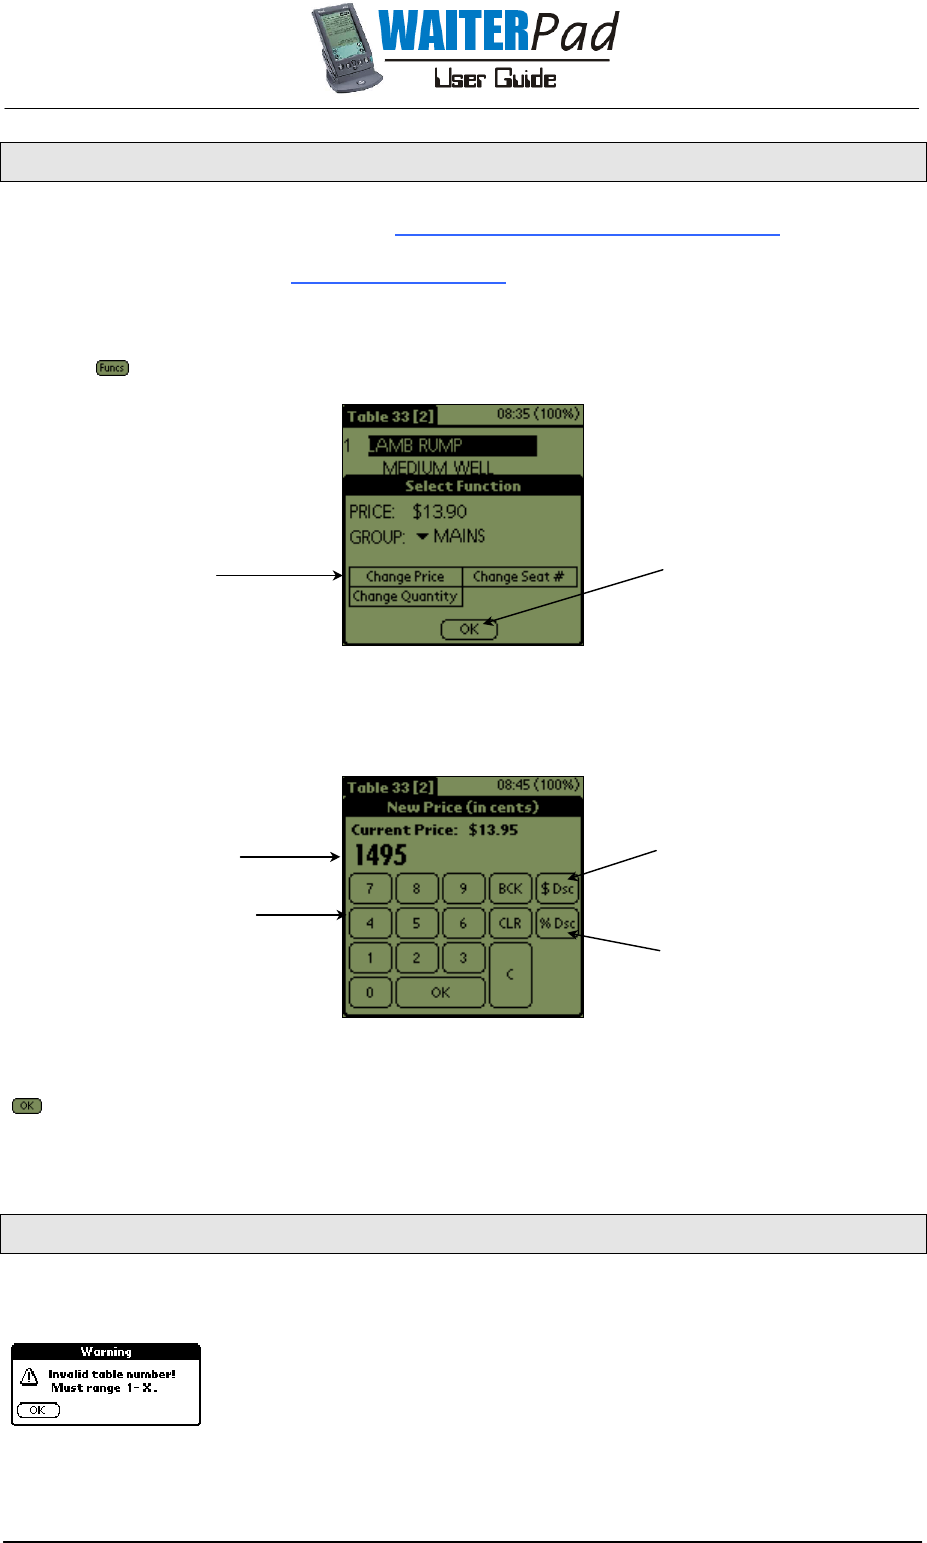
2.17 MODIFYING PRODUCT PRICE
If the appropriate flag is set (see section 3.5 Setup Menu - System Configuration) then only the
Manager may modify the price of a product and therefore the Manager must be logged in, this is
outlined in the previous section 2.18 Managerial Logon.
The price of a product can only be altered in the Review screen, to do so proceed as follows:
1. Highlight the product which will then add several other buttons to the screen.
2. Press and then select the Change Price function.
Fig 2.19(a) Product functions screen.
3. This will open the New Price pad (shown Fig 2.19(b)) which allows either a new dollar amount, a
dollar discount or a percentage discount to be entered.
Fig 2.19(b) New product price pad.
To enter a new dollar amount for the product, enter the price ignoring decimal places and press
. To enter a dollar discount, enter the amount of the discount, ignoring the decimal place, and
then press the $ Dsc button. To enter a percentage discount, enter the discount percentage and
then press the % Dsc button.
2.18 SYSTEM MESSAGES
Invalid Table Alert
This alert will appear if the user enters a Table number that is greater than the
maximum number allowed for.
Note: X will be replaced with the Maximum number, which is defined in the
WaiterPad Database.
Change Price
Function
New Price
Use the digit pad to
enter the new price
Dollar Discount
Button
Percentage
Discount Button
Select OK
button to exit
Page 16
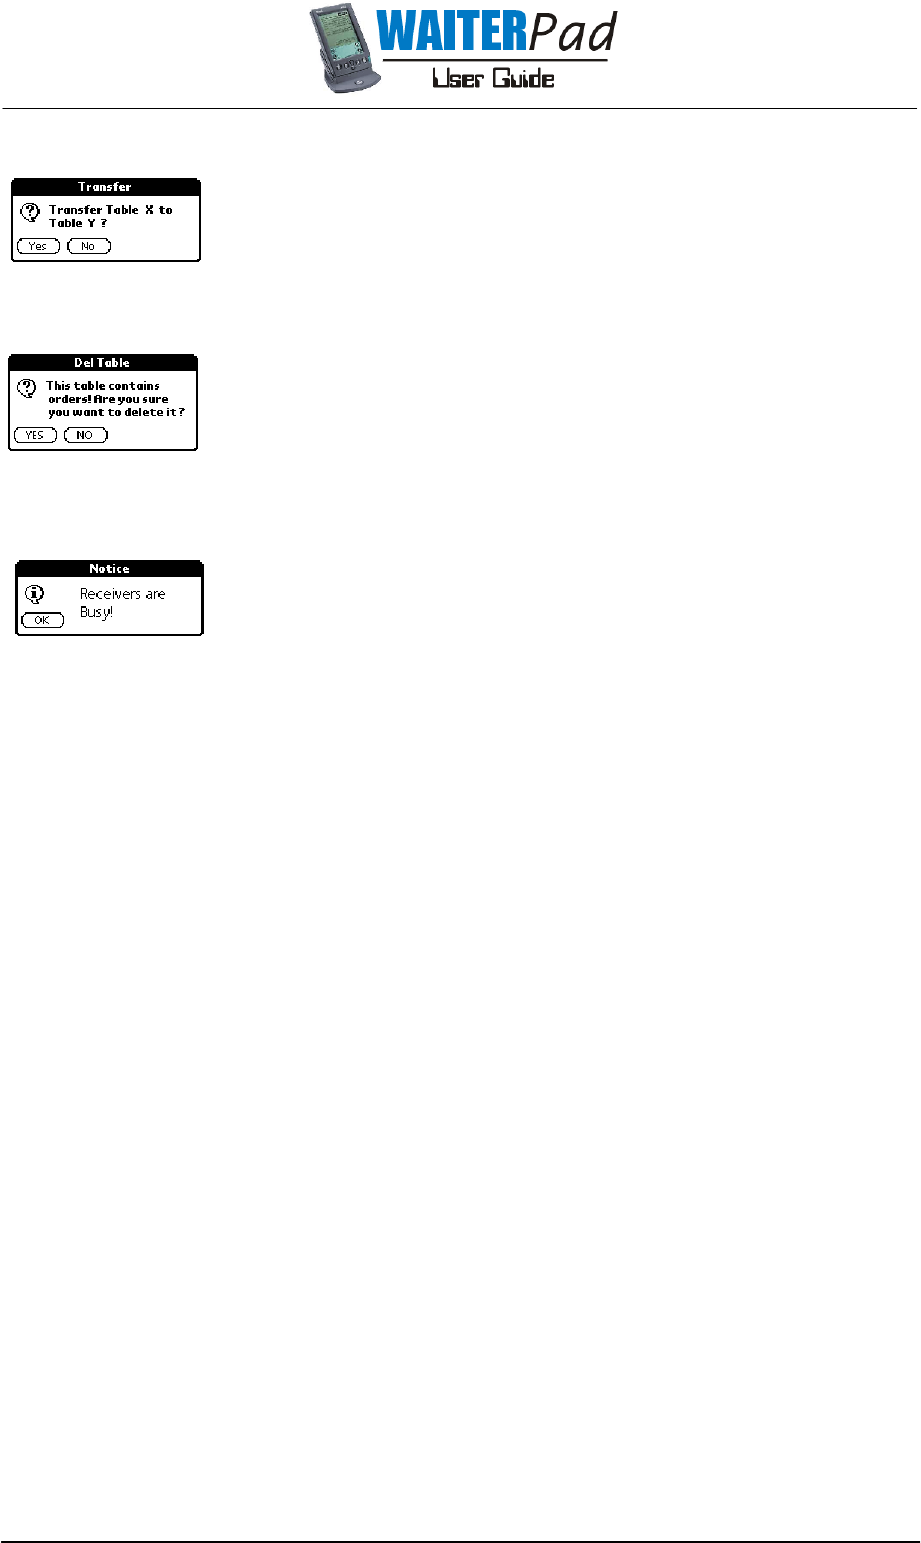
Transfer Table Alert
This alert will appear when the user selects two tables for transfer. Select Yes
to confirm, No to abort. Note: X is the table being transferred From, Y is the
table to transfer To.
Delete Table With Orders Alert
This alert will appear when the user attempts to Delete a table that contains
Orders. Select Yes to confirm, No to abort.
Receivers Busy Alert
This alert will appear when the user attempts to send an order whilst the
system is processing another, resend the order.
Page 17
WaiterPad System Generator
WaiterPad System GeneratorWaiterPad System Generator
WaiterPad System Generator
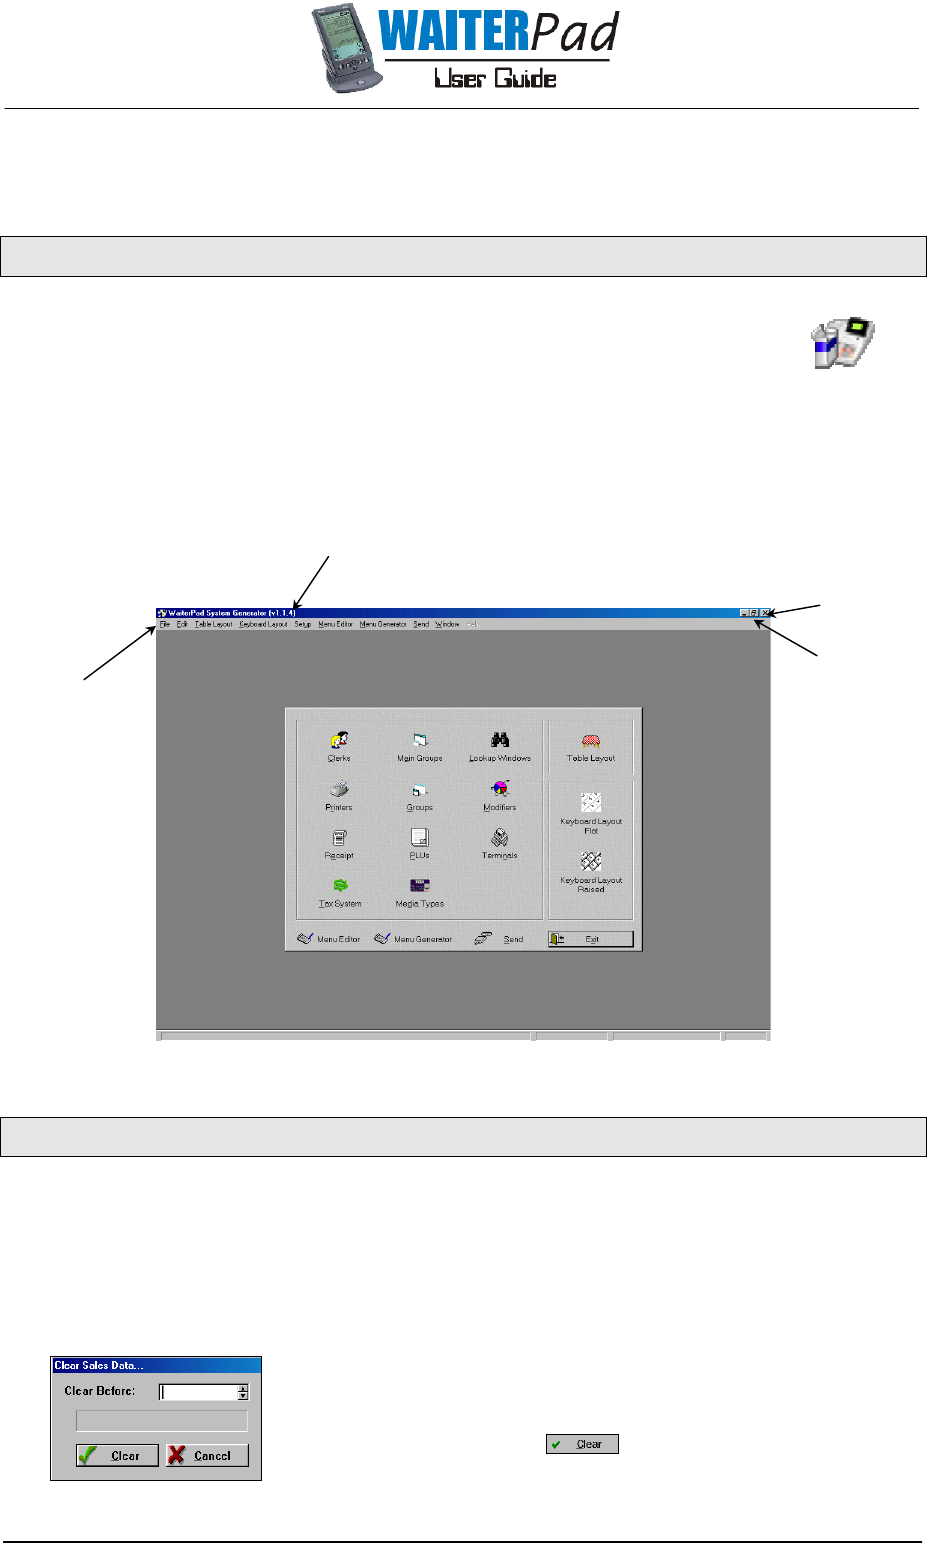
3.1 INTRODUCTION
WaiterPad System Generator is software used to configure and manage the
operation of the WaiterPad System. System Generator programs the WaiterPOS, the
hand held WaiterPads, Network Controller and Printer Controller. The System
Generator application is opened by double clicking on the WaiterPad System
Generator desktop icon, shown in Fig 3.1(a).
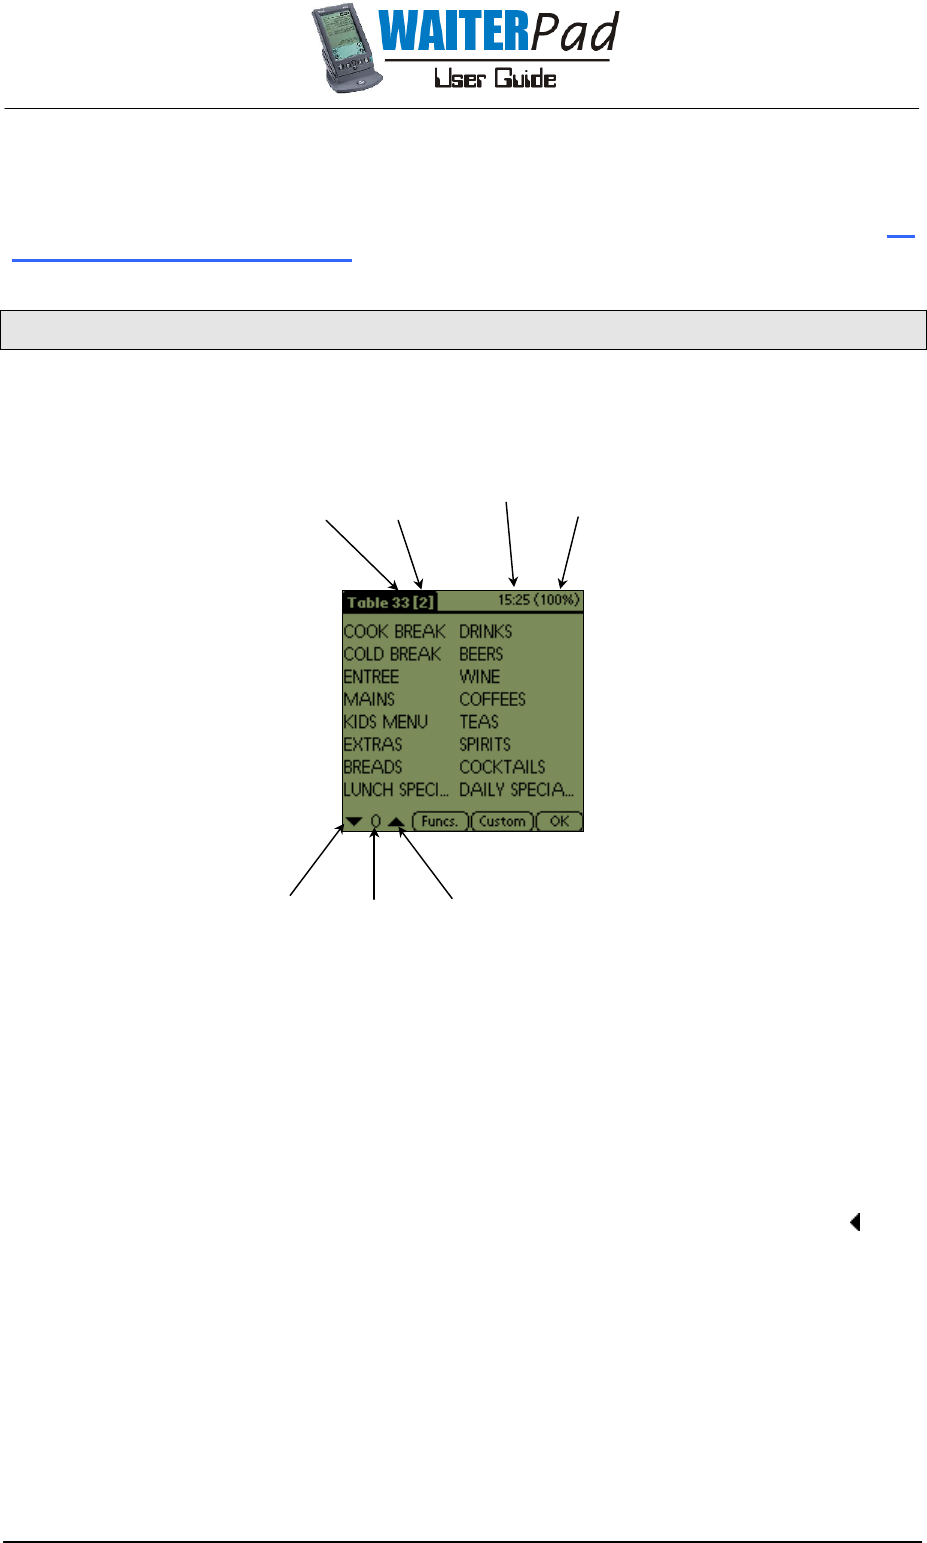
When opened the WaiterPad System Generator presents a “quick launch” facility as shown in Fig
3.1(b). The quick launch facility allows the user to open any of these commonly used menus by left
clicking once on the desired icon menu.
Fig 3.1(b) WaiterPad System Generator opening screen with quick launch facility.
3.2 FILE MENU
Registration
The Registration menu is not for use by end users, this information is entered by the dealer prior to
beginning operation, see Dealer for further information.
Clear Sales Data
This function is used to clear sales data from the system, such as
training sales prior to opening. Enter a date in the Clear Before
field (as shown in Fig 3.2(a)) using the computer keyboard in
DD/MM/YY format. Click to confirm and the system will
clear all sales prior
priorprior
prior to the date entered.
Menu Bar
Version Number
Close
Button
Maximize
Button
Fig 3.2(a) Clear Sales window.
Fig 3.1(a)
Page 18
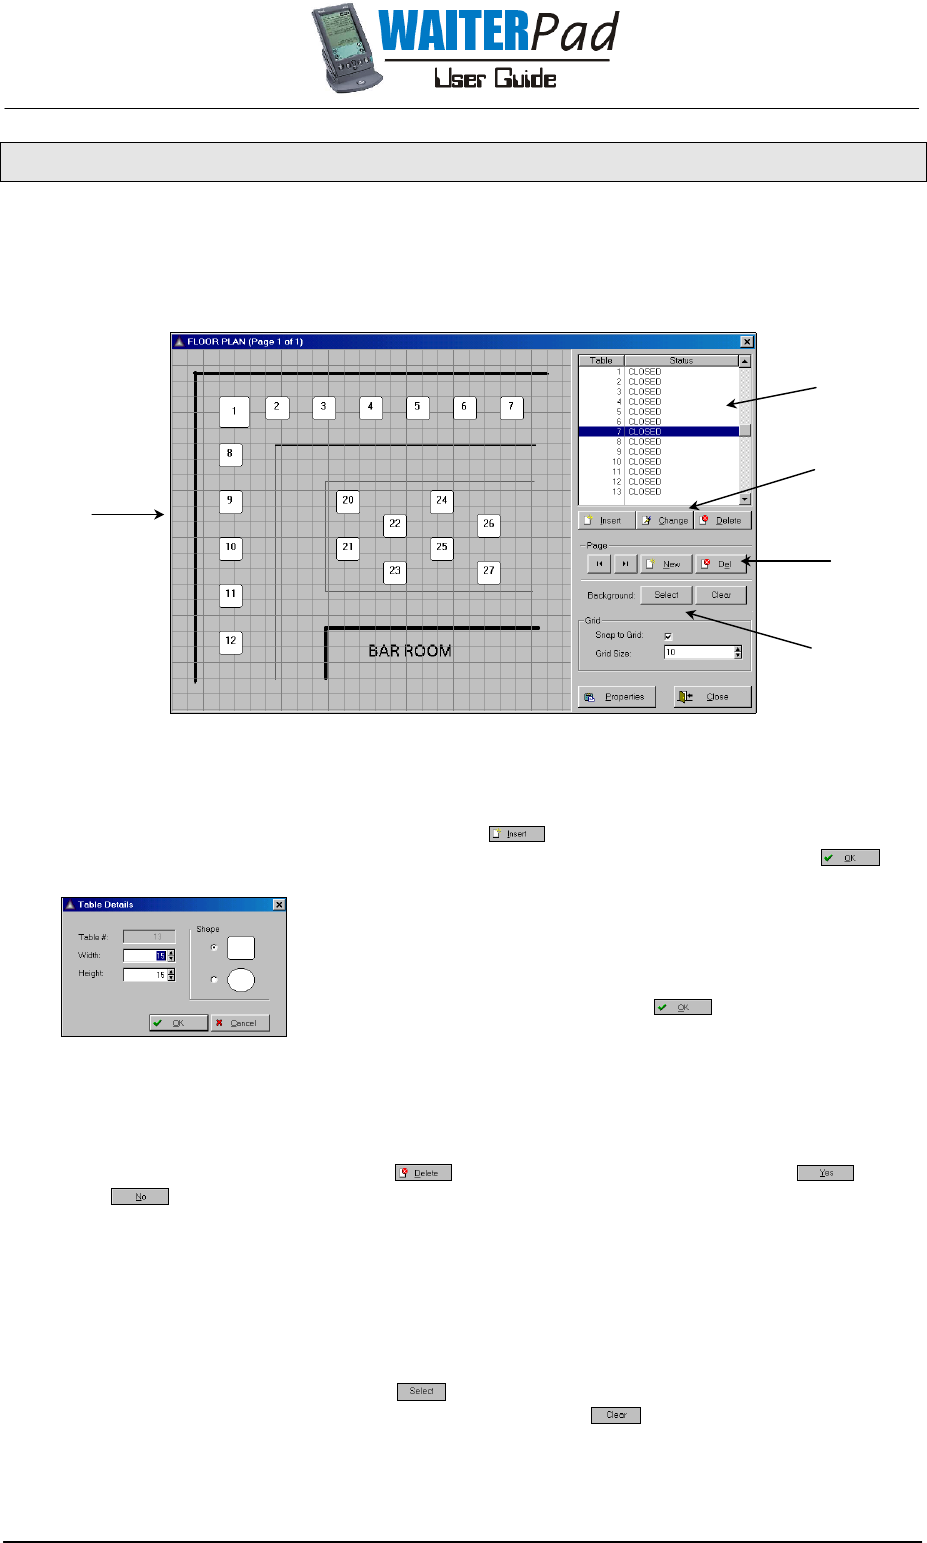
3.3 TABLE LAYOUT MENU
The table layout menu allows the user to setup the screen table layout. The system allows the user to
setup multiple pages of table layouts and arrange the tables on the screen as desired. The size and
shape of a table can be modified to represent the shape of the actual table and a bitmap image
can be imported as a background to represent the layout of the restaurant, as shown in Fig 3.3(a).
Fig 3.3(a) Table layout screen.
Adding a Table
Firstly create the table in the database by clicking . This opens the adding a table window
which automatically inserts the next available number in the Number field. To confirm click .
To add the table to the floor plan grid simply drag the table
from the database list and drop it onto the floor plan grid. This
will open the Table Details window (as shown in Fig 3.3(b))
which allows the user to set the shape and size of the table.
When finished confirm by clicking .
Deleting a Table
To delete a table, drag the table from the layout grid and drop it back in the database window. To
delete the table from the database click and confirm the deletion by clicking , abort
by clicking .
Grid Background
WaiterPad allows for a grid background in bitmap format to be inserted. This allows for a restaurants
floor plan to be inserted as a background and tables placed on the floor plan grid as they appear in
the restaurant.
The bitmap image is selected by clicking which will open a window to select the bitmap file
from. To clear the current background bitmap from the grid click .
Database
List/Window
Database
Buttons
Page
Buttons
Background
Buttons
Floor Plan
Grid
Fig 3.3(b) Table Details window.
Page 19
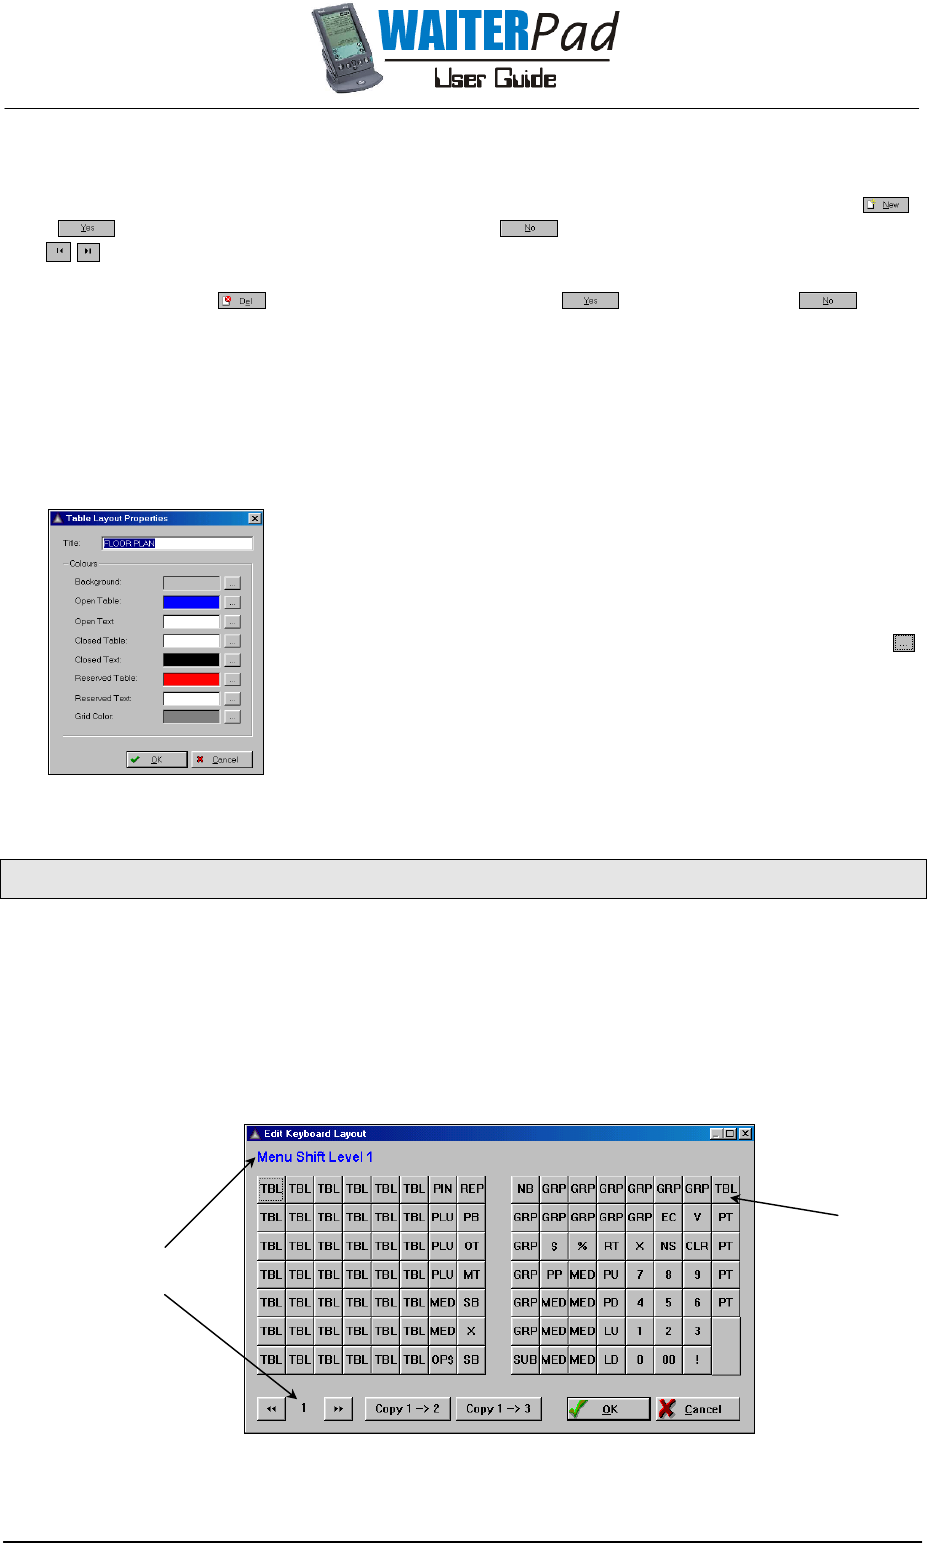
Multiple Pages
WaiterPad allows multiple pages of table layouts to be created. To create another page click ,
click to confirm the creation of another page, to abort. To move between pages use
the buttons.
To delete a page click , confirm the deletion by clicking or abort by clicking .
Grid Properties
Un-checking the “Snap to Grid” tick box removes the grid from the floor plan and the grid size field
sets the size of the grids.
Table Layout Properties
The table layout properties screen allows the user to setup the
screen colours as shown in Fig 3.3(c). To allocate a colour click
and select the desired colour from the colour window.
3.4 KEYBOARD LAYOUT MENU
The keyboard layout menu allows the user to set-up and modify the operation of the WaiterPOS
keyboard. WaiterPOS supports two types of programmable keyboards, those with raised keys and
those with flat keys. The WaiterPOS also allows the user the configure up to three keyboard menu
levels. To set-up or modify the keyboard layout the user should select their type of keyboard from the
keyboard layout menu.
Raised Keyboard
Fig 3.4(a) Raised key board layout screen.
Current
Menu shift
Level
Key
Allocated
Abbreviation
See key descriptions below
for explaination of
abbreviations
Fig 3.3(c) Table layout properties.
Page 20
Flat Keyboard
Fig 3.4(b) Flat keyboard layout screen.
The programming of the raised and flat keyboard is identical, the only differences are the layout of
the keys.
Modifying a Key
To modify a key proceed as follows:
1. Select the key using the left mouse button.
2. This opens the Select Key Properties
browse box as
shown in Fig 3.4(c).
3. Select the desired key type and confirm clicking .
Key types are explained in the following paragraphs.
Clear Key (CLR) Allocates the clear function. Ensure the key string field is clear.
Clerk Key (CLK) Acts as a clerk log on, log off key when allocated without a key
string. To allocate a clerk to a particular key (hard clerk) enter the
clerk number in the key string field.
Clerk P.I.N. Key (PIN) Used instead of the Clerk Key if Clerk P.I.N’s are in used, requires clerk
to enter their PIN to log onto the system. Ensure key string is clear.
Dollar Discount Key ($) Allocates the dollar discount function. If the key string is clear then
any amount can be entered. To allocate a fixed amount dollar
discount enter the amount in the key string field. Eg. $5 enter “500”
in the key string field.
Electronic Journal Key (EJ) Allocates the electronic journal function. Ensure the key string is
clear.
Enter Key Allocates the enter function. Ensure the key string field is clear. The
enter key is hard coded into flat keyboards.
Error Correct Key (EC) Allocates the error correct function. Ensure the key string field is clear.
Function Key (FMC) Not currently in use.
Last Receipt Key (LR) Not currently in use.
Line Down Key (LD) Allocates the line down function. Ensure the key string field is clear.
Line Up Key (LU) Allocates the line up function. Ensure the key string field is clear.
Lookup Window Key (LW) Allocates look-up windows (see section 3.5 SetUp Menu – Lookup
Windows). Insert the lookup window number into the key string field.
Fig 3.4(c) Select key properties screen.

Page 21
Media Key (MED) Allocates media keys. Insert the media number into the key string
field. If the media is not an exact tender (that is, change is required
to be calculated) then the “~” (tilde) character must be inserted in
front of the media number.
Menu Shift Key (MS) Allocates the menu shift function. Insert the menu shift level into the
key string field.
Move Table Key (MT) Allocates the move table function. Ensure the key string is clear.
Multiply Key (X) Allocates the multiply key. Ensure the key string field is clear.
New Balance Key (NB) Allocates the New Balance function. Ensure the key string is clear.
No Sale Key (NS) Allocates the no sale function. Ensure the key string field is clear.
Number Key Allocates a numerical digit key. Enter the desired number in the key
string field.
Open Price Key (OP$) Allocates the miscellaneous product function . Ensure the key string
is clear.
Open Tables Key (OT) Presents an Open Tables screen when pressed. Ensure the key string
is clear.
Page Down Key (PD) Allocates the page down function. Ensure the key string field is clear.
Page Up Key (PU) Allocates the page up function. Ensure the key string field is clear.
Paid Out Key (PO) Not currently in use.
Part Payment Key (PP) Allocates the Part Payment function. Ensure the key string is clear.
Percentage Disc (%) Allocates the percentage discount function. If the key string is clear
then any amount between 1 & 99% can be entered. To allocate a
fixed percentage discount, enter the amount in the key string field.
Eg. 5% enter “5” in the key string field.
PLU Key (PLU) If the key string is clear then the key acts as a universal PLU key to
allocate products to a bill by PLU code. To allocate a particular PLU
to a key (hard PLU) enter the PLU number in the key string field.
PLU Modifier Key (PM) Allocates the PLU modifier function. Enter the amount of the modifier
into the key string field. A PLU modifier can be used so that one key is
allocated to a product with a small and large size products. The
small product is assigned a PLU number of say 500 and the large
product is then assigned a PLU number of say 1500. The PLU modifier
is then set at 1000.
Preset Tender (PT) Allocates preset cash denominations. Insert the value of the
denomination in the key string field with a “~” (tilde) character in
front of the value. Eg. For $50 enter “~5000” in the key string field.
Price Change Key (PC) Not currently in use.
Price Level Key (PL) Allocates the price level function, enter the price level into the key
string field.
Print Bill Key (PB) Allocates the print bill function. Ensure the key string is clear.
Receipt Toggle Key (RT) Allocates the receipt on/off function. Ensure the key string field is
clear.
Refund Key (R) Allocates the refund function. Ensure the key string field is clear.
Report Key (REP) Allocates the report function key. Ensure the key string field is clear.
Seat Number Key (SN) Allocates the seat number function. Ensure the key string field is
clear.
Split Bill Key (SB) See section following Setting Up the Split Bill Series.
Subtotal Key (SUB) Allocates the sub total function. Ensure the key string field is clear.
Tab Key (TAB) Not currently in use.
Table Key (TBL) Acts as a table number key when allocated without a key string. To
allocate a table to a particular key enter the table number in the
key string field.
Table Modifier Key (TM) Allocates the table modifier function, enter the table modifier
number into the key string field.
Takeaway Mode Off (TOF) Not currently in use.
Takeaway Mode On (TON) Not currently in use.
Void Key (V) Allocates the void function. Ensure the key string field is clear.
Page 22
Setting Up the Split Bill Series
The three keys required to complete the split bill procedure as outlined in section 4.4 WaiterPOS
Functions are “Start Split Bill”, “Split Items” and “End Split Bill”. Setup these keys as follows:
Start Split Bill - Allocate Split Bill Key
Split Items - Allocate Multiply Key
End Split Bill - Allocate Split Bill Key
An Unsplit item key can also be set up which is allocated as a Clear key.
Menu Levels
Second and third keyboard menu levels are setup in exactly the same manner as described in
previous sections. To navigate between menu levels use the buttons. To copy the keys from
keyboard menu level one the level two left click , to copy level one to level three left click
.
3.5 SET-UP MENU
Configuration
Fig 3.5(aa) Configuration screen, users should only ever alter the float amount.
The Configuration screen is generally not for use by end users, however if the user wishes to alter the
till draw float amount then this is altered in the Configuration screen as shown in Fig 3.5(aa).
File Paths
No details on this screen should be altered by the user, refer to Dealer for further information.
Communications
No details on this screen should be altered by the user, refer to Dealer for further information.
Float Field
Page 23
Flags
Fig 3.5 (ba) POS System Flags screen.
POS System Flags Tab
The operation of each flag is described below:
Flag 1. Allows a negative subtotal from a refund to be finalised.
Flag 2. Allows the sale of zero priced PLU’s.
Flag 3. Allows a negative subtotal from a void to be finalised.
Flag 4. Allows the total discount entered to exceed the subtotal.
Flag 5. Enables the printing of orders to the network controller for orders sent from the
WaiterPOS.
Flag 6. Prints orders sent from the WaiterPOS on the receipt printer.
Flag 7. Sends message to the kitchen printer when a table is closed.
Flag 8. Sends flash reports to the printer instead of the screen.
Flag 9. Not in use.
Flag 10. Logs the clerk off the WaiterPOS after each transaction is completed.
Flag 11. Prompts the clerk to enter covers when starting a new table at the WaiterPOS.
Flag 12. Prompts the clerk to enter seat positions when entering an item at the WaiterPOS.
Flag 13. Activates Z1 level of reporting.
Flag 14. Activates Z2 level of reporting.
Flag 15. Activates Z3 level of reporting.
Flag 16. Currently not in use.
Flag 17. Currently not in use.
Flag 18. Currently not in use.
Flag 19. Displays all PLU descriptions in upper case.
Flag 20. Creates a new bill on an open table when starting the table on the hand held
WaiterPad’s.
Flag 21. Creates a audit file.
Flag 22. Summarizes items on the reports into sections by major groups.
Flag 23. Allows all clerks to cash off orders when operating in Bar mode.
Flag 24. Activate the use of the tax system.
Ticked = active
Un-ticked = inactive
Page 24
Fig 3.5(bb) Network Controller Flags screen.
Network Controller Flags
Operation of each flag is described below:
Flag 1. Activates use of a condensed header on the order printers. A condensed header
prints all header information in one abbreviated line.
Flag 2. Prints the number of covers on the preparation area order dockets.
Flag 3. Prints all text in uppercase.
Flag 4. Prints footers on preparation area order dockets where appropriate. The footer lists
whether there are orders from the same table at other preparation area printers.
Flag 5. Allows PLU descriptions over 16 characters in length to be condensed therefore
allowing a maximum of 32 characters.
Flag 6. Prints side order PLU descriptions in red on appropriate dot matrix printers.
Flag 7. Centers group names on order printouts.
Flag 8. Prints cashier dockets to the system back-up printer when the network controller is
off-line, always activate
always activatealways activate
always activate.
Flag 9. Prints the quantity on order printouts in large font.
Flag 10. Prints condiment PLU descriptions in red on appropriate dot matrix printers.
Flag 11. Prints cooking instruction PLU descriptions in red on appropriate dot matrix printers.
Flag 12. Prints custom waiter messages in red on appropriate dot matrix printers.
Flag 13. Prints custom waiter products in red on appropriate dot matrix printers.
Flag 14. Always prints PLU descriptions in condensed font format.
Flag 15. Prints each items PLU number on cashier dockets to allow quick re-entry using the
PLU number key.
Clerks
This section is used to setup clerk details and permissions.
Fig 3.5(ca) Clerks screen.
Lists clerks in
numerical order
Lists clerks in
alphabetical order
Switch between tabs by
clicking on the tab required
with the left mouse button
Page 25
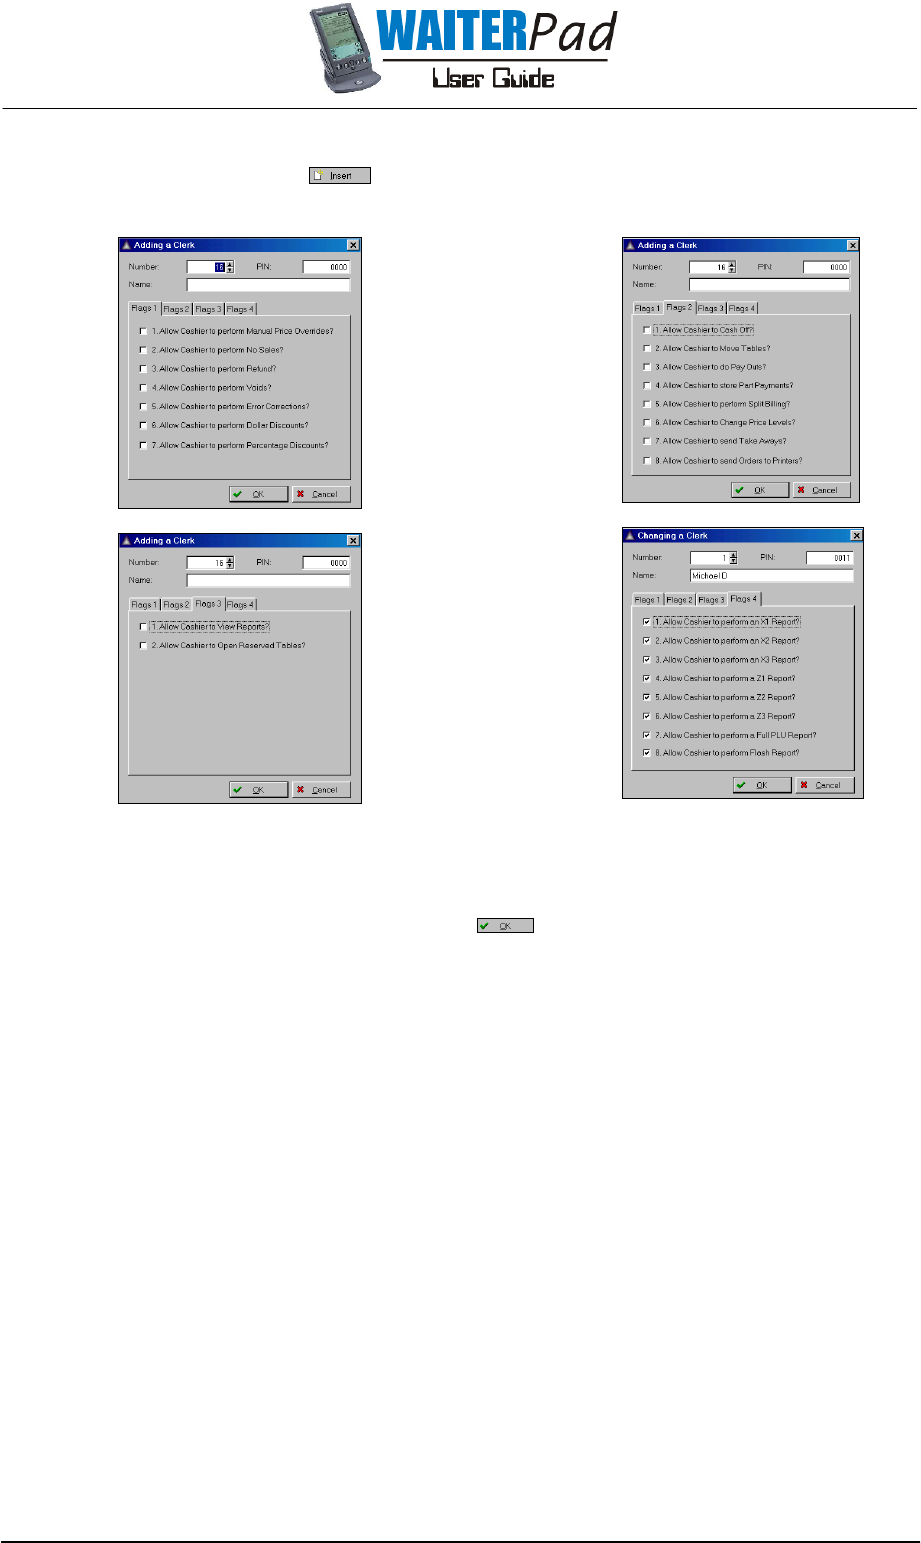
Adding a New Clerk
To add a new clerk click which opens the Insert a New Clerk screen which has four
clerk flag tabs as shown in Fig 3.5(cb).
Fig 3.5(cb) Various clerk flags give extensive WaiterPOS security control.
After entering a clerk number and description, allocate a clerk number PIN (if in use) using
the computer keyboard. Set the appropriate flags (as shown in Fig 3.5(cb)) which are
described below, and complete by clicking .
Flags 1
Flag 1. Not currently in use.
Flag 2. Allows clerk to perform a no sale function which opens the cash draw.
Flag 3. Allows the clerk to perform a refund function.
Flag 4. Allows the clerk to perform a void function.
Flag 5. Allows the clerk to perform an error correct.
Flag 6. Allows the clerk to perform a dollar discount.
Flag 7. Allows the clerk to perform a percentage discount.
Flags 2
Flag 1. Allows the clerk to cash off orders.
Flag 2. Allows the clerk to perform table transfers.
Flag 3. Allows the clerk to perform pay outs.
Flag 4. Allows the clerk to perform part payments.
Flag 5. Allows the clerk to perform split billing.
Flag 6. Allows the clerk to perform price level changes.
Flag 7. Allows the clerk to send Take Away Mode orders.
Flag 8. Allows the clerk to send orders from the WaiterPOS to the preparation area
printers.
Flags 3
Flag 1. Allows the clerk to open the reports function window.
Flag 2. Not in use.
Page 26
Flags 4
Flag 1. Allows the clerk to perform an X1 report.
Flag 2. Allows the clerk to perform an X2 report.
Flag 3. Allows the clerk to perform an X3 report.
Flag 4. Allows the clerk to perform an Z1 report.
Flag 5. Allows the clerk to perform an Z2 report.
Flag 6. Allows the clerk to perform an Z3 report.
Flag 7. Allows the clerk to perform a Full PLU report.
Flag 8. Allows the clerk to perform a Flash report.
Modifying Clerk Details
To modify the details of a Clerk, highlight the Clerk from the list and then click . After
modifying the details click to finish.
Deleting a Clerk
To delete a Clerk, highlight the Clerk from the list and then click . Confirm the deletion
by clicking , abort the deletion by clicking .
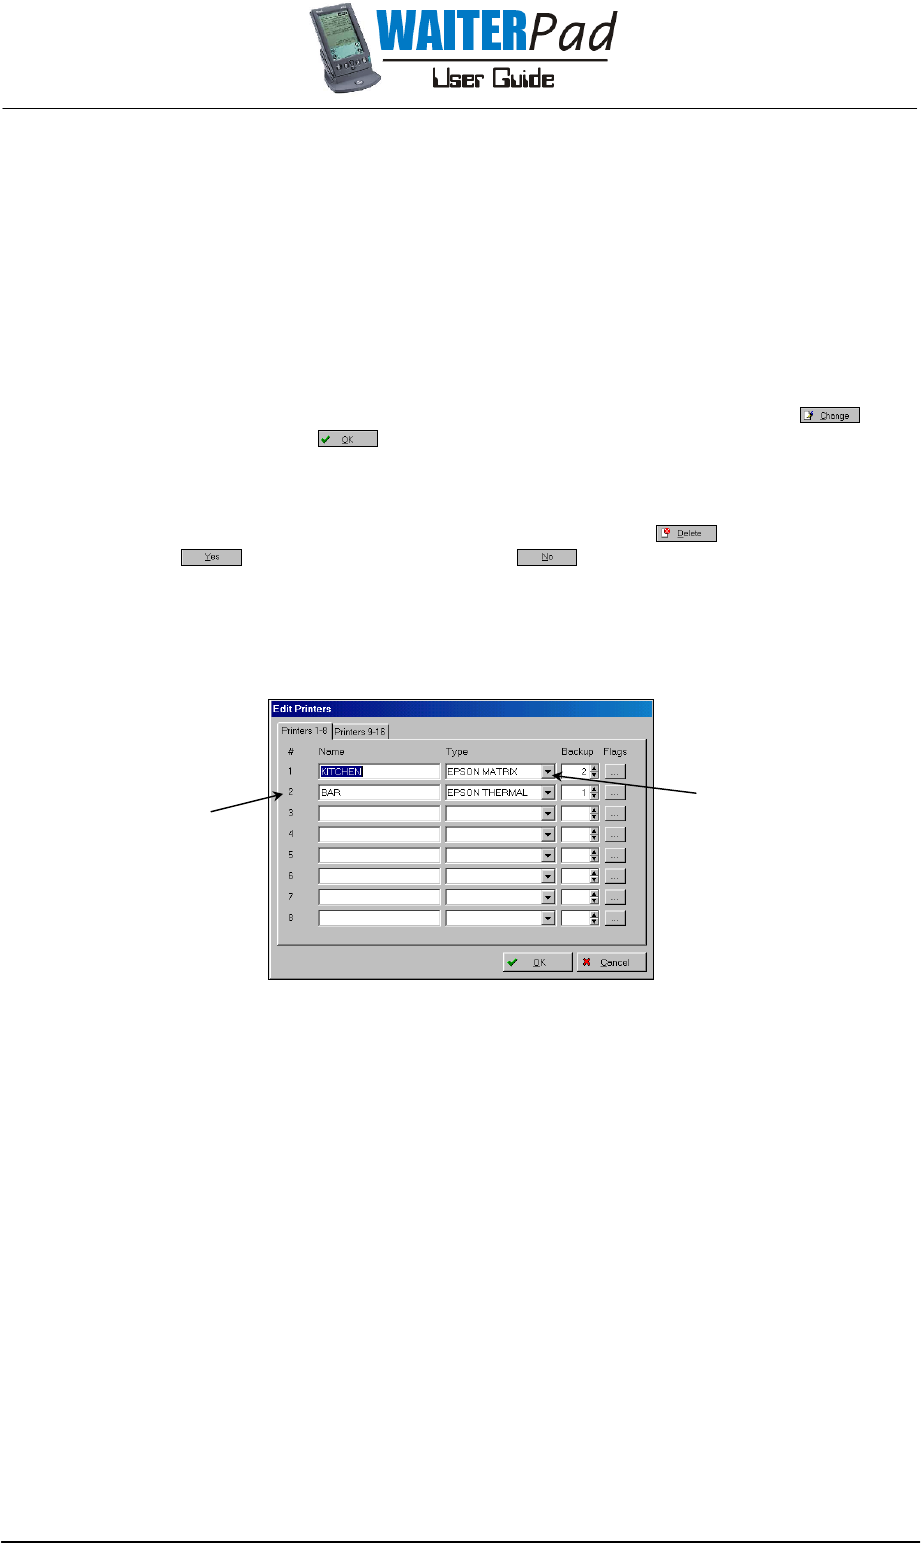
Printers
The printers section is used to set-up the preparation area order printers as shown in Fig 3.5(da).
Fig 3.5(da) Printers edit screen.
To add, modify or delete a printer simply highlight the field and add, modify or delete the details.
However users should not need to make any changes to details in this area, consult dealer before
proceeding.
Name A description of the printer.
Types Select from the list box. Open the list box by pressing the down arrow head.
Backup Used to set the printers backup printer in case of failure. The above example shows the
Kitchen Printer (Printer #1) has printer #2 as its backup and printer 2 has printer 1 as its
backup.
Flags Activates the printing of local documents to the printer.
Printer Number
Open the printer type list box
by clicking the left mouse
button on this down arrow head
Page 27
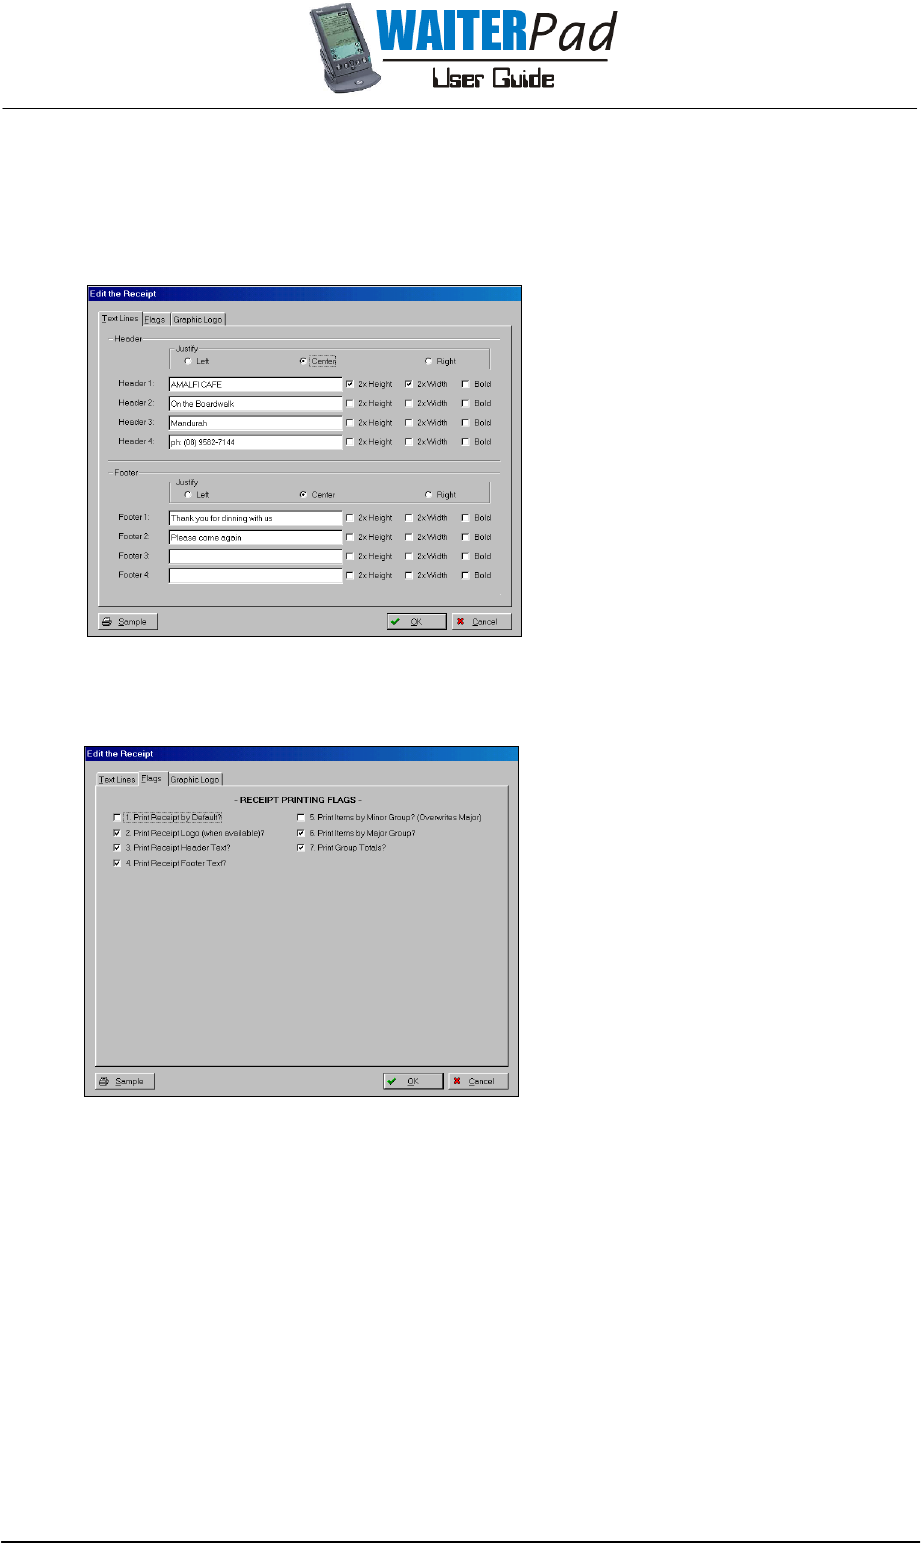
Receipt
This section configures the operation of the bill receipt which prints from the WaiterPOS.
Text Lines
The Text Lines
tab (as shown in Fig
3.5(ea)) gives the user four header lines
and four footer lines to enter any text.
Other general text editing functions
such as justification, double height,
double width and bold are activated
by checking the appropriate tick box
beside that line. Blank lines are not
printed unless text is entered in lines
which follow a blank field.
Flags
The second tab Flags (as shown in Fig
3.5(eb)) is used to control the operation
of the bill printer and each flag is
described in the following paragraph.
Flag 1. Sets the printer to be on by default. If it is on by default then the receipt print is
turned on when WaiterPOS is launched.
Flag 2. Activates the use of a graphic label.
Flag 3. Prints the header text as set-up in the Text Lines tab.
Flag 4. Prints the footer text as set-up in the Text Lines tab.
Flag 5. Groups products and prints them by group on the receipt. If this flag and flag 6
are both active then flag 5 overrides.
Flag 6. Groups products and prints them by major group on the receipt.
Flag 7. Prints the total cost and item count of each group at the end of each group
section.
Fig 3.5(ea) Text Lines tab of the Receipt screen.
Fig 3.5(eb) Receipt Flags screen.

Page 28
Graphic Logo
The Graphic Logo
tab allows the user to insert a bitmap file to create a graphic logo on the
receipt printout.
This is done by left clicking which opens a browse box to select a bitmap from. Once a
bitmap file is selected press the open button and the program will convert the file and
display the logo in the preview area. Finish by clicking .
The
button prints a sample printout at the receipt printer.
Fig 3.5(ec) Graphic logo screen.
Tax System
The system allows the user to establish four labeled tax levels in the Tax System
menu.
To setup a tax proceed as follows:
1. Insert a description for the tax in the Tax Label
field.
2. Insert the company tax number in the Company Tax
Number
field.
3. Setup the tax in the next available tax field by giving it a
description in the Label field and a percentage in the
Amount field.
4. Configure the tax flags as described in following
paragraphs.
5. Click to finish.
Flag 1. Shows tax total on Z reports.
Flag 2. Shows tax total on X reports.
Flag 3. Shows tax amounts on customer WaiterPOS receipts.
Flag 4. Shows the subtotal exclusive of tax on receipts.
Flag 5. Shows the company tax number on Z reports.
Flag 6. Shows the company tax number on X reports.
Flag 7. Shows the company tax number on customer receipts.
Preview
Area
Sample
Button
Select
Button
Fig 3.5(fa) Tax system screen, General tab.
Fig 3.5(fb) Tax system screen, Tax Flags
tab.
Page 29
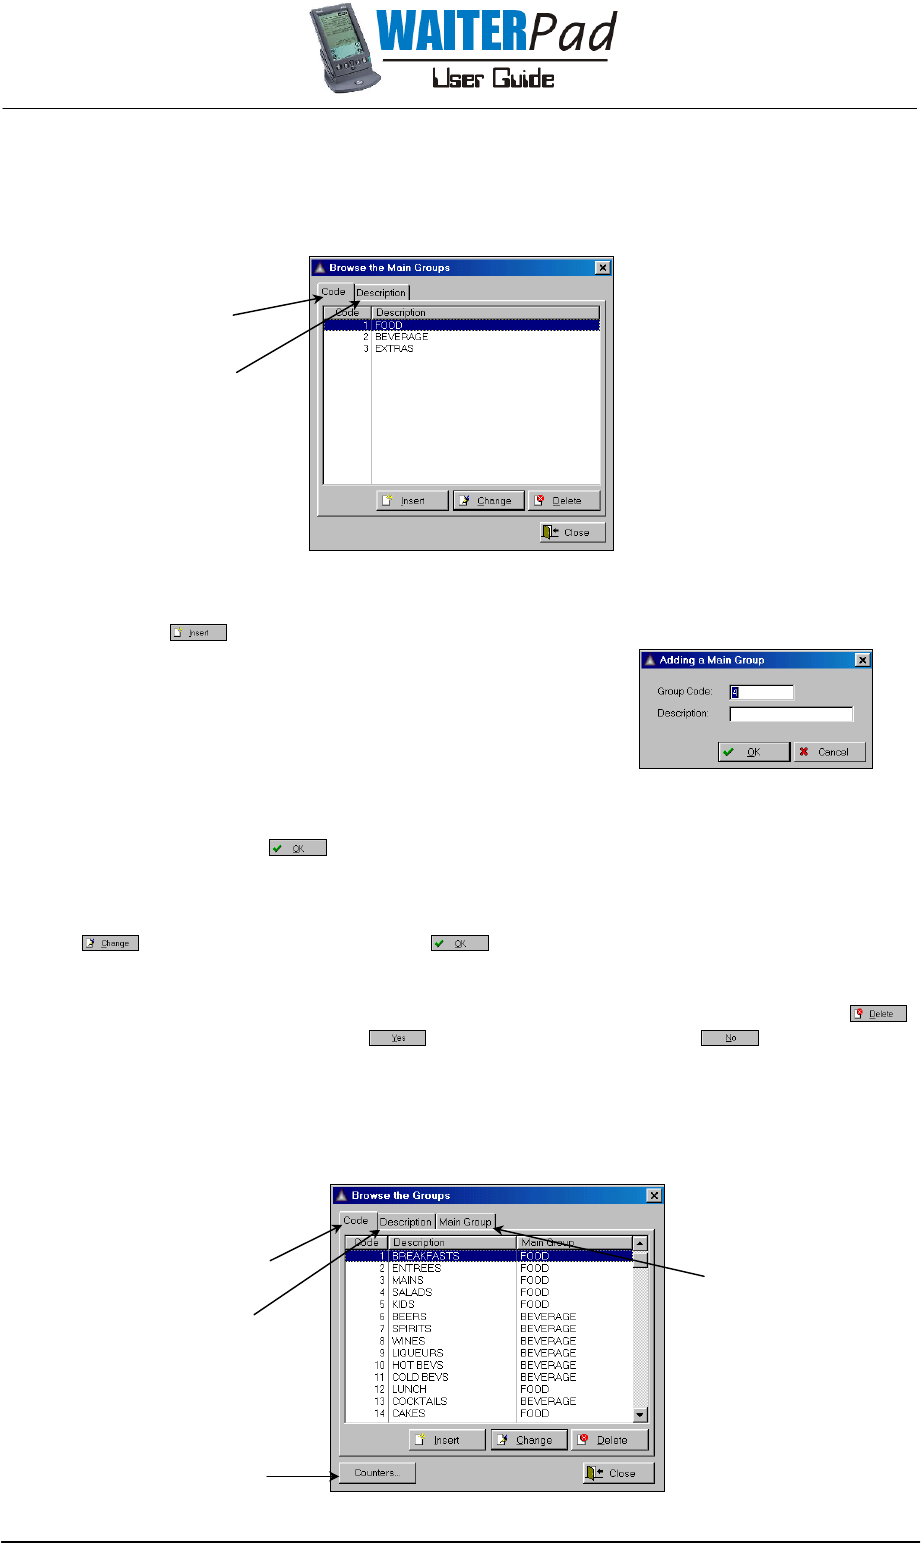
Main Groups
Main Groups are used to summarize information on reports and receipts. The common Main Groups
are food and beverage however up to 99 Main Groups can be created.
Fig 3.5(ga) Main groups screen.
Adding a Main Group
1. Click which opens the browse box shown in
Fig 3.5(gb).
2. Type a number for the new Main Group into the
Group Code
field. No two Main Groups may have
the same number and the next available number
will automatically be entered when the browse box
opens.
3. Enter a description for the Main Group in the
Description field.
4. Finish by clicking .
Modifying a Main Group
To modify the details of a Main Group, highlight the Main Group from the list and then click
. After modifying the details click to finish.
Deleting a Main Group
To delete a Main Group, highlight the Main Group from the list and then click .
Confirm the deletion by clicking , abort the deletion by clicking .
Note that the Main Group can not be deleted until it is unlinked from any groups and PLU
records.
Groups
Fig 3.5(ha) Groups screen.
Lists groups in
numerical order
Lists groups in
alphabetical order
Counter Button
Shows each group and the
main group to which they
are linked.
Lists the Main Groups in
numerical order
Lists the Main Groups in
alphabetical order
Fig 3.5(gb) Adding a Main Group
screen.
Page 30
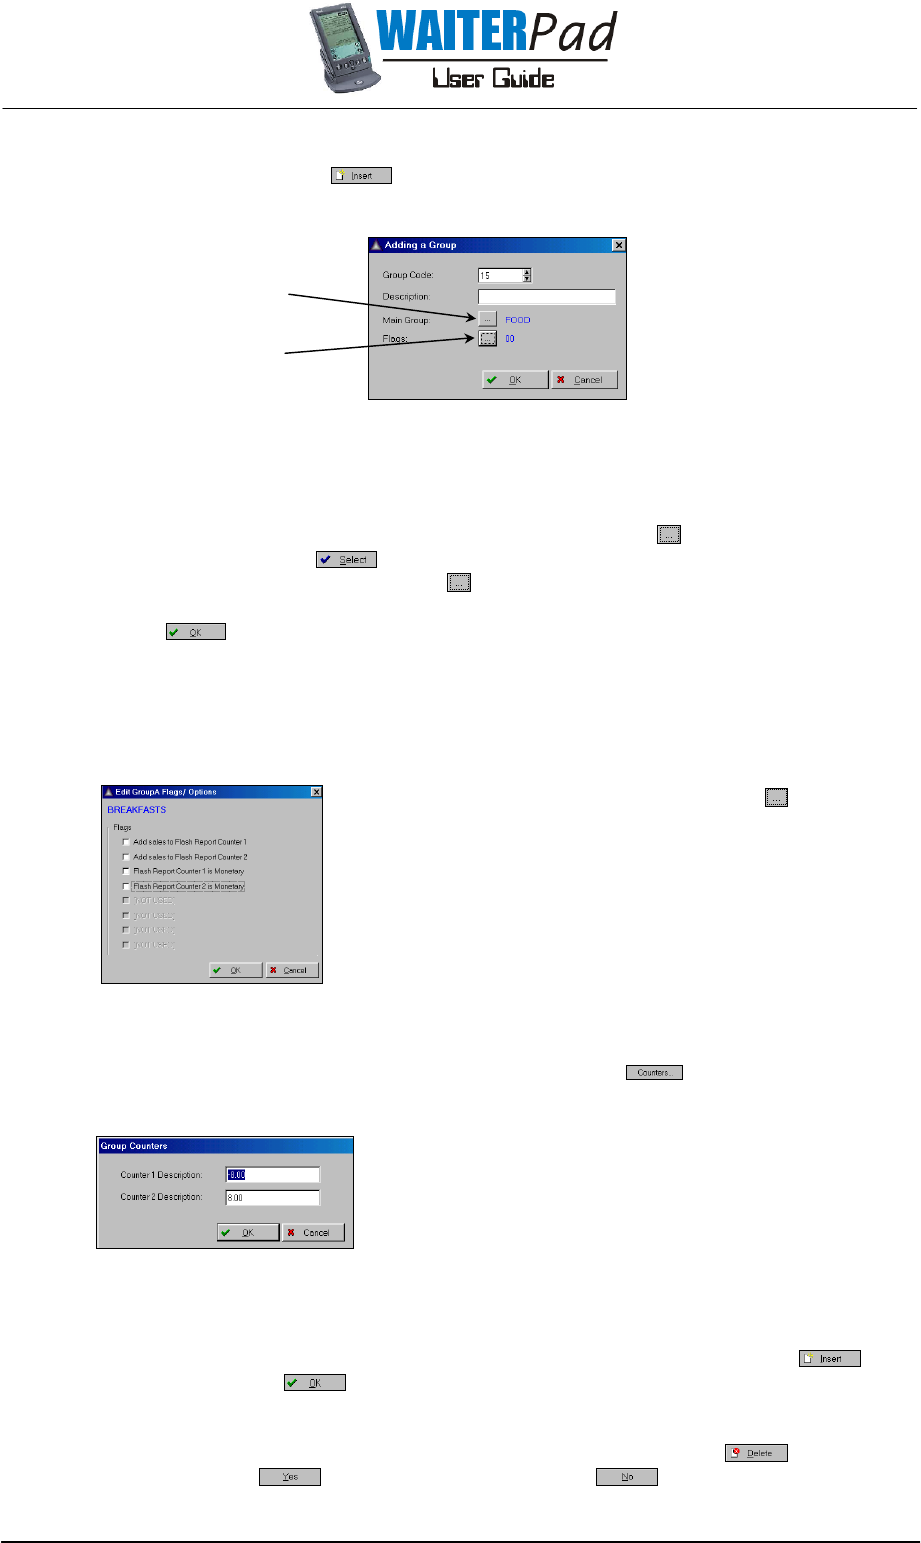
Adding a New Group
To insert a new group click which opens the Adding a Group
browse box (as shown
in Fig 3.5(hb)).
Fig 3.5(hb) Insert Group screen.
1. Enter a group number in the Group Code
field, no two groups may have the same
group number.
2. Enter a description in the Description
field.
3. Link the group to a Main Group by clicking the Main Group , highlight the Main Group
from the list and press .
4. Set the flags by pressing the Flag if counters are in use. Counters are described
further in the following paragraphs.
5. Click to finish.
Counters:
Counters enable the user to track sales of products within a group on the flash report. The
counter can also be setup to be monetary in nature, i.e. add products to the counter which
are over or under a certain dollar value.
To setup a group counter click the Flags
Flags Flags
Flags button when
inserting/modifying a group which will open the screen
shown in Fig 3.5(hc).
Select the counter to which the group will be linked, Counter
1 or 2, by left clicking on the appropriate tick box. If the
counter is to be monetary then left click on the
corresponding flag tick box.
Then descriptions for the group counter must be set, click which opens the Group
Counters dialogue box shown in Fig 3.5(hd).
If the counter is not monetary then enter a text
description, if the counter is monetary then a dollar value
must be entered. If a value of “8.00” is entered then all
products sold in that group that are over $8 will be
added to that flash counter. If “–8.00” is entered then all
products sold in that group that are under $8 will be
added to that flash counter.
Modifying a Group
To modify the details of a group, highlight the group from the list and then click . After
modifying details click to finish.
Deleting a Group
To delete a group, highlight the group from the list and then click . Confirm the
deletion by clicking , abort the deletion by clicking .
Main Group
Button
Flags Button
Fig 3.5(hd) Group counters description
screen.
Fig 3.5(hc) Groups flags screen.
Page 31
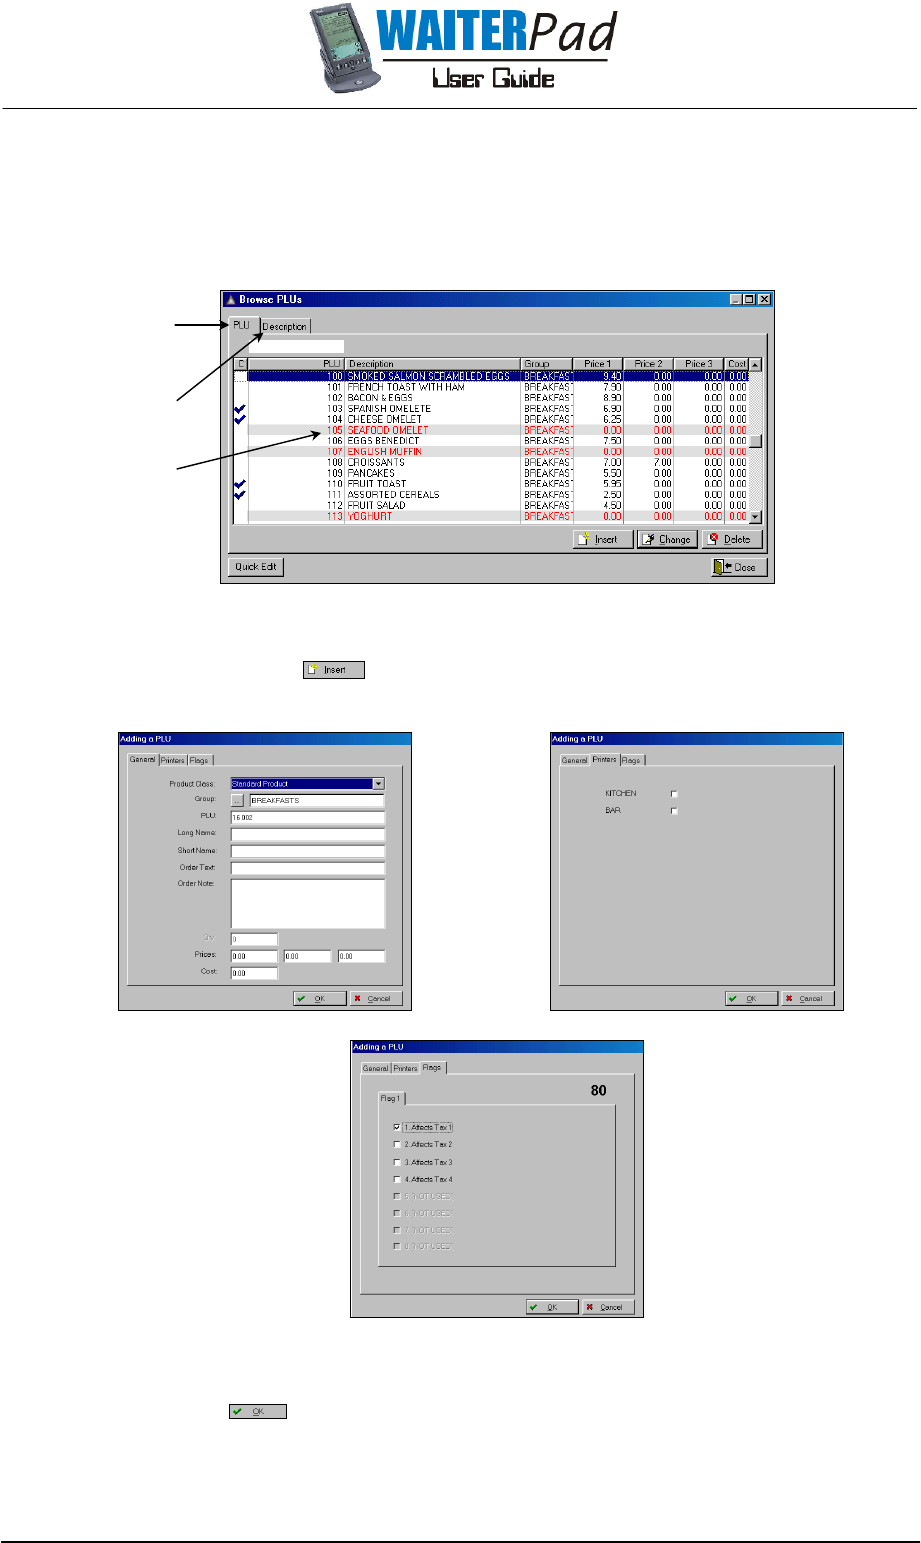
PLUs
Each product/item must have a PLU record and these files are set-up in the screen shown in Fig
3.5(ia). However if WaiterStock is in use then all additions or modifications to PLU records must be
made using this application (consult the WaiterStock manual for directions).
Fig 3.5(ia) Main PLU screen.
Adding a New PLU
To add a new PLU click which will then open the Add a PLU
browse box with three
tabs as shown in Fig 3.5(ib).
Fig 3.5(ib) Insert PLU record screens.
Set-up the PLU record by entering the necessary information into the fields provided and
finish by clicking . Each tab and field is described in following paragraphs.
General Tab
Lists PLUs in
numeric order
Lists PLUs in
alphabetic order
Red PLUs
indicate those
that have been
deleted
Page 32
Product Class: This allows the user to give the product one of five classifications:
1. Standard Product
2. Side Dish
3. Condiment
4. Cooking Instruction
5. Message.
Select from the product class list by clicking .
Group: Click
, select the desired group from the list and finish by clicking
. See section 3.5 Setup Menu - Groups
for instructions on setting
up groups.
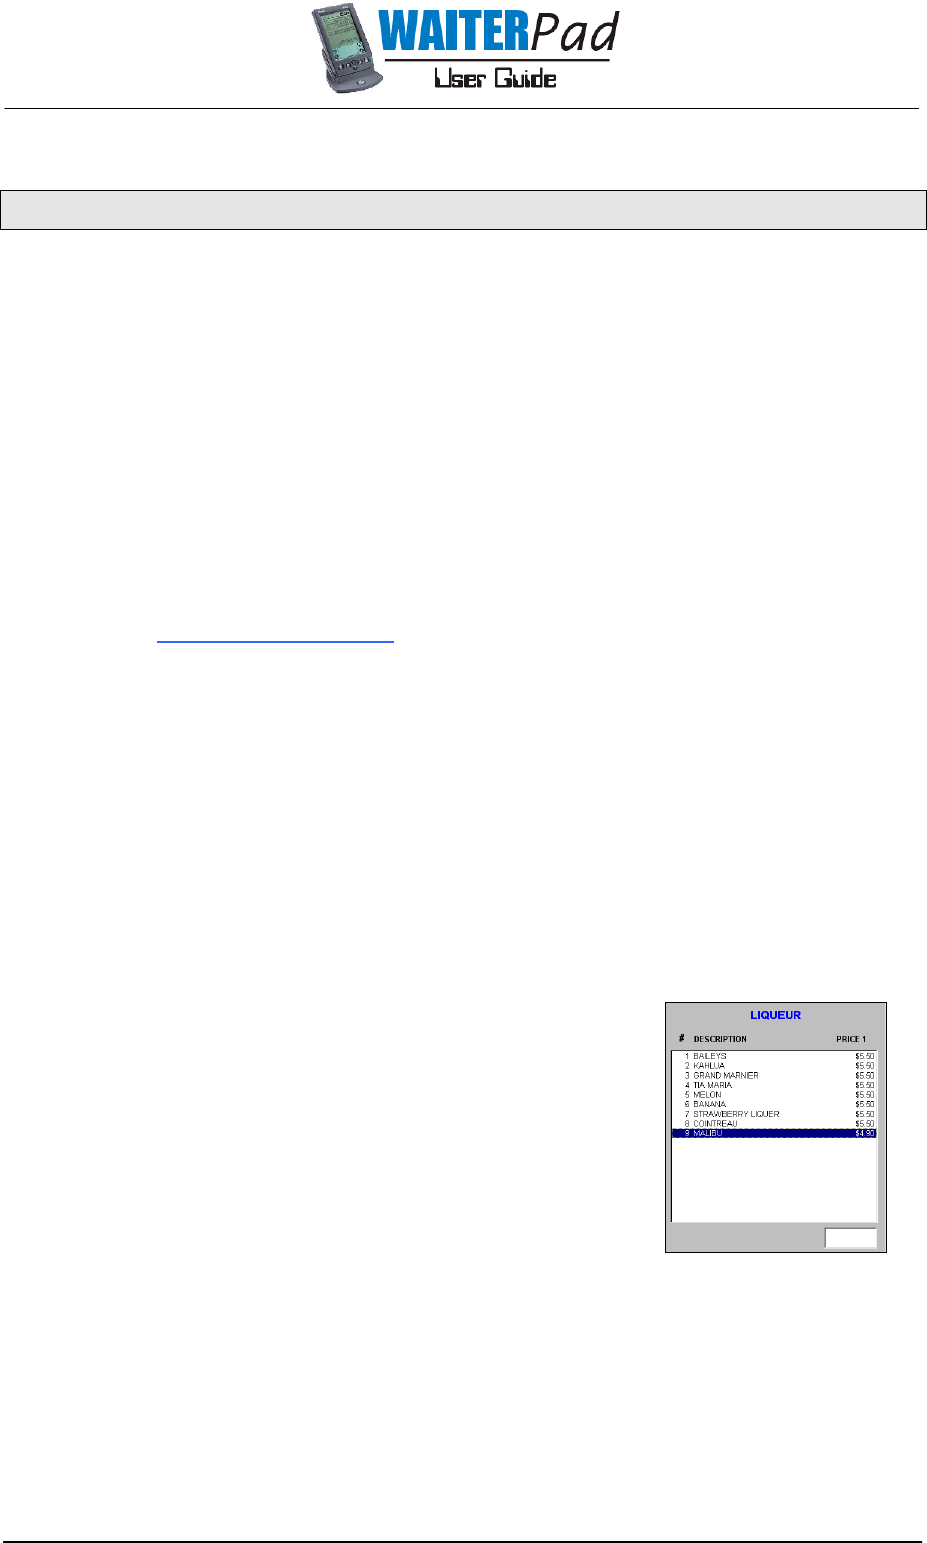
PLU: Enter the PLU number in this field.*
Long Name: This is the field to enter the name of the PLU record. The Long Name
description appears on the Bill Receipt and in look up windows on the
WaiterPOS.
Short Name: This is the field to enter the PLU description which appears on the title bar
of the WaiterPOS screen (see section 4.2 WaiterPOS Screen for an
illustration of title bar).
Order Text: This is the field to enter the PLU description which appears on the order
printouts and the review screen of the WaiterPad.
Order Note: This is the field to enter an order note. Order notes are described in
section 2.5 Product Notes.
Prices: The price fields allow the user to enter up to three price levels.
Cost: This is the field to enter the products cost.
Printers Tab
This screen lists the printers which are set-up (see section 3.5 Setup Menu - Printers for
instructions on how to set-up printers). Tick the printers which the product should print to and
then click to complete.
* When allocating PLU numbers it is recommended that a range of PLU numbers are
allocated to each group and that PLUs in a group are sequentially numbered. The range
of PLU numbers allocated to each group should include sufficient room for future
additional PLUs. PLU numbers can range between 1 and 65,000.
Flags Tab
This screen is used to set the tax flags for the PLU record. To activate the PLU record as
affecting a tax level left click on the tax level required. Finish by clicking .
Modifying a PLU
To modify the details of a PLU record, highlight the PLU from the list and click . After
modifying details click to finish.
Deleting a PLU
To delete a PLU record, highlight the PLU from the list and then click . Confirm the
deletion by clicking , abort the deletion by clicking .
Quick Edit
Quick edit allows the user to make quick editing changes to one or many PLU records. By
clicking
the Quick Edit PLUs browse box opens, to make a change to any detail of
any PLU simply double click on that detail and then type in the change. Finish by pressing
the Enter key on the keyboard.
Media Types
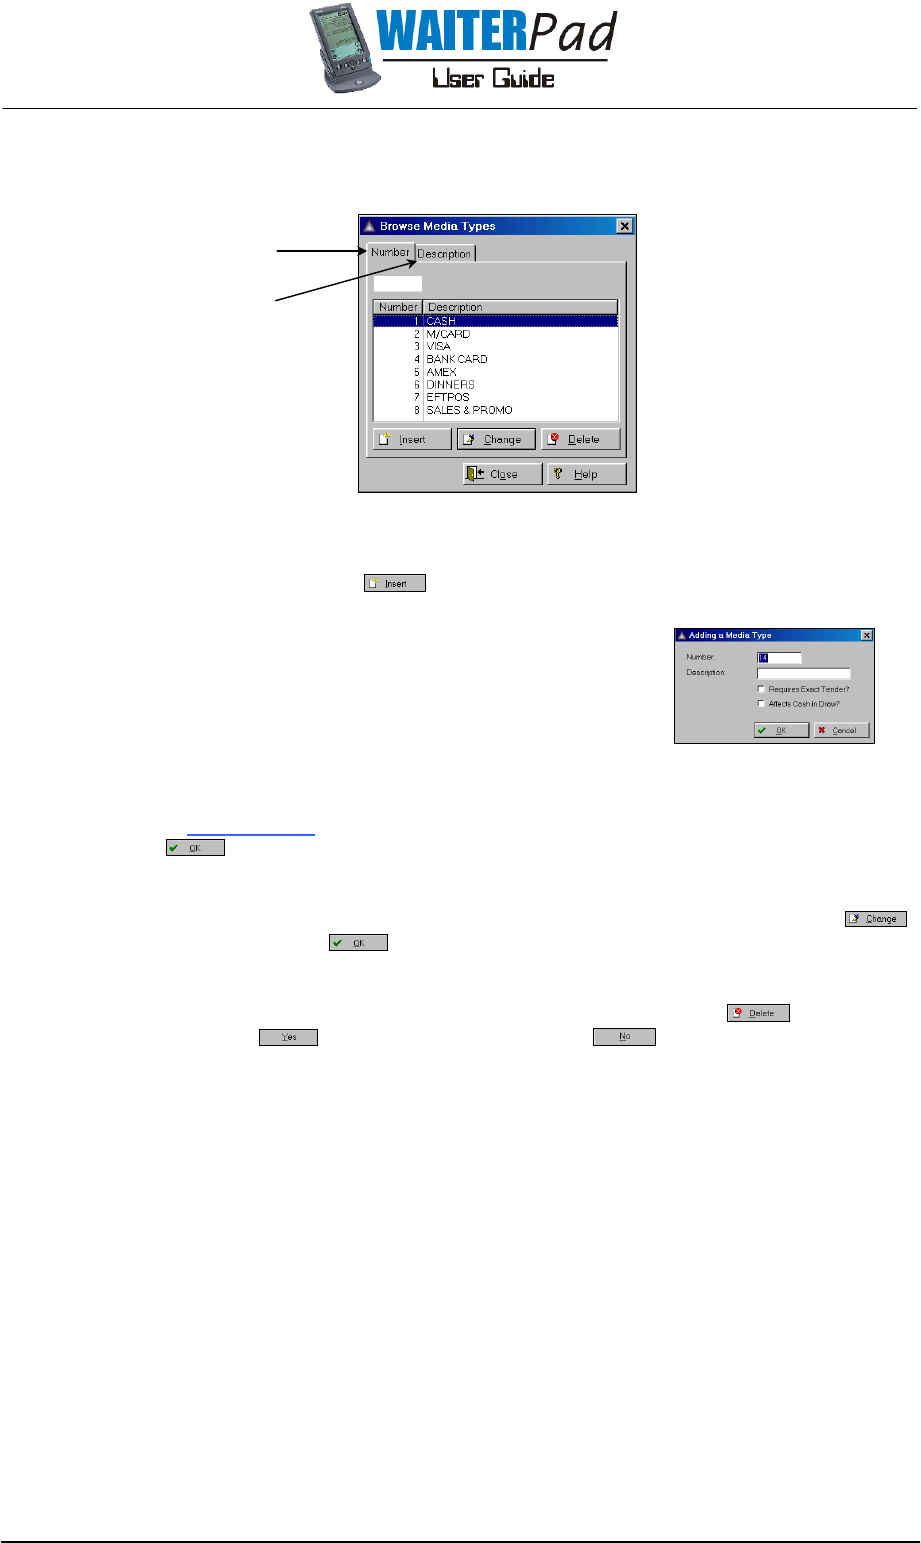
Page 33
Media types are the types of payment accepted and the WaiterPad system allows the user to setup
up to 99 medias.
Fig 3.5(ja) Browse Media types screen.
Adding a New Media
To add a new media type click and proceed as follows:
1. Enter a media number in the Number
field, no two
medias may have the same number.
2. Enter a description for the media in the Description
field.
3. Tick the Requires Exact Tender
check box if the
media requires exact tender (E.g. credit cards)
4. Tick the Affects Cash in Draw
(CID) check box if the
media affects the amount of cash in the till draw. The
CID is show on the bottom of the Flash Report (see
section 4.5 Reporting for further details of Flash Reports).
5. Click to finish.
Modifying a Media
To modify the details of a media, highlight the media from the list and then click .
After modifying details click
to finish.
Deleting a Media
To delete a media, highlight the media from the list and then click . Confirm the
deletion by clicking , abort the deletion by clicking .
Lists groups in
numerical order
Lists groups in
alphabetical order
Fig 3.5(jb) Insert new media screen.
Page 34
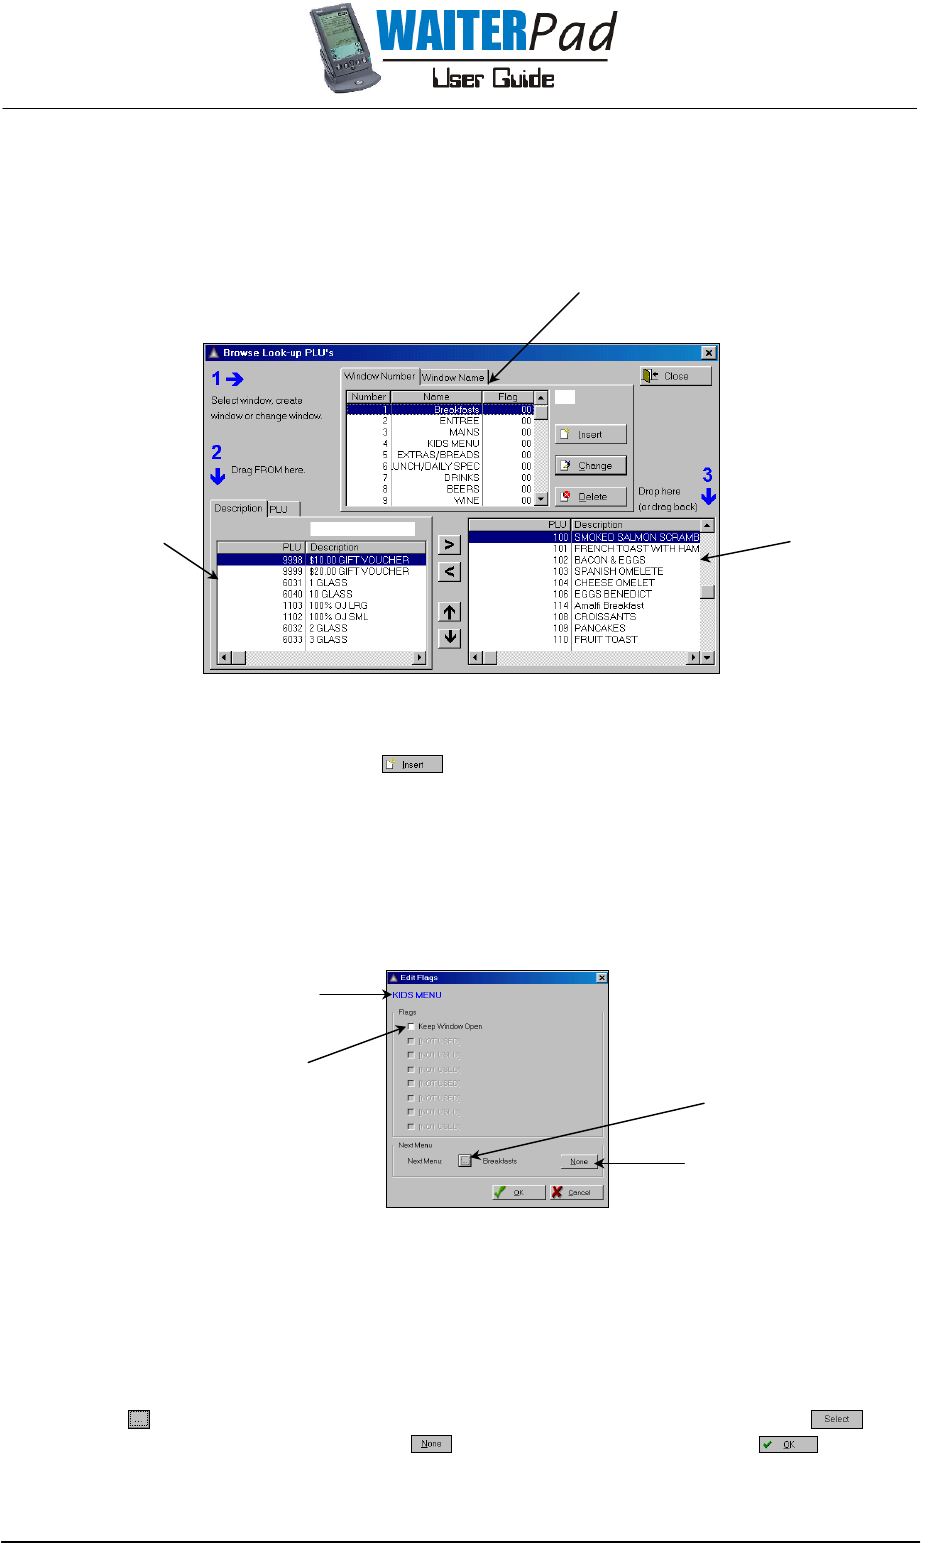
Lookup Windows
The Lookup Windows screen (shown in Fig 3.5(ka)) is used to set-up the WaiterPOS keyboard lookup
window keys.
Fig 3.5(ka) Lookup window screen.
Creating a Lookup Window
To create a lookup window click and then the system will automatically allocate the
next available window number to the Number
field. To proceed to the Name
field press the
tab key (located on the computer keyboard) and then enter a description for the lookup
window.
After entering a description set the flags by pressing the tab key again and then clicking the
Click Here
box which appears in the tab column. This will open the screen as shown in Fig
3.5(kb).
Fig 3.5(kb) Lookup window flags screen.
If the flag Keep Window Open
is not ticked then the lookup window will close after an item is
selected from the window. If it is ticked then the window will not close until the New Balance
key is pressed.
The Next Menu
section allows the user to setup the lookup window so that after an item is
selected from the window the system then automatically opens another window. To set this
click , select the desired lookup window from the list and then finish by clicking . If no
follow on menu is required then click . Finish setting the flags by clicking .
Lookup Window Key
Each llookup window key requires a number, name
and allows various flag to be set.
PLU Select Box
Select the PLU’s to in
the lookup window
from this box
PLUs Selected Box
Lists the PLUs select in the
lookup window
Name of Lookup Window
Keeps the lookup window
open after an item has been
selected Next Menu Box
No Next Menu Box
Page 35
Modifying PLUs in a Lookup Window
To transfer a PLU to the lookup window:
1. Select the required PLU from the PLU Select Box (as shown in Fig 3.5(ka)).
2. Transfer the item to the PLUs Selected Box by clicking . The PLU will be copied into
the PLUs Selected Box. The PLU can also be transferred by dragging and dropping.
To remove a PLU from the lookup window:
1. Select the PLU to be removed from the PLUs Selected Box (as shown in Fig 3.5(ka)).
2. Remove the item from the PLUs Selected Box by clicking . The PLU will then be
removed, it can also be removed by dragging and dropping it back into the PLU
Select Box.
To format the order in which PLUs appear in the lookup window, select the PLU to be moved
and then use the buttons to move the PLU up or down the list respectively.
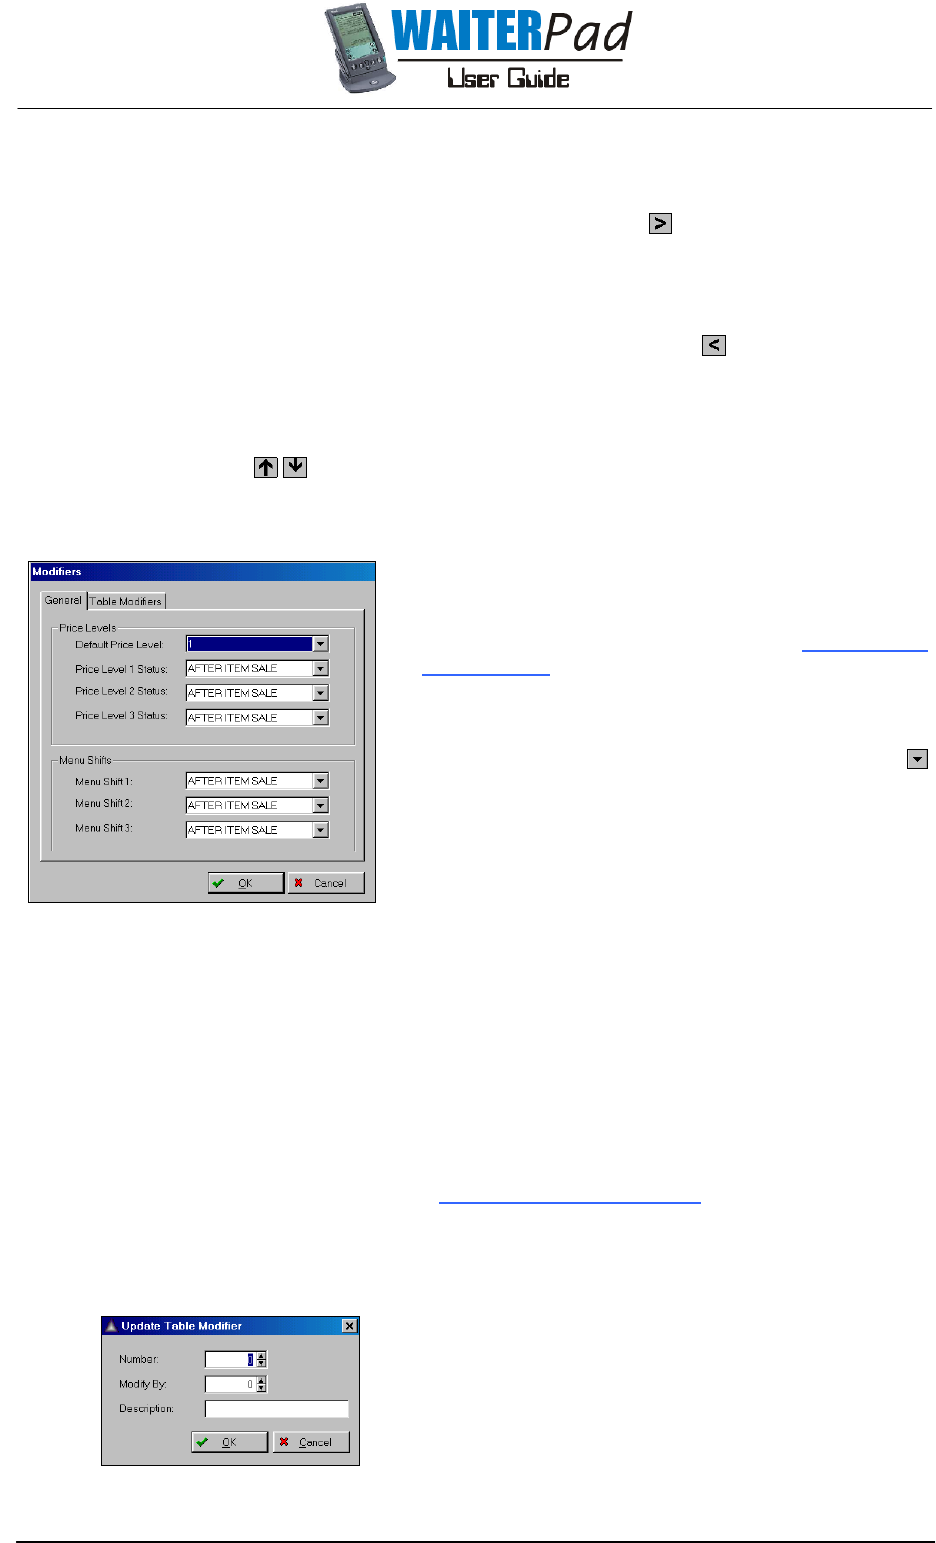
Modifiers
Price Level Modifiers
Each PLU record can have up to three price levels and
the user can alternate between these price levels using
the price shift key as described in section 3.4 Keyboard
Layout Menu. This section defines how the price shift
key operates.
The first field, Default Price Level, sets the default
(standard) price level. This is set by clicking on the
button and selecting the required price level from the
list.
The following fields, Price Level
1, 2 & 3 Status, define
how the WaiterPOS switches back to the default price
level after the Price Shift
key has been pressed. There
are three options:
After Item Sale The WaiterPOS reverts back to the default price level after a item has
been selected.
After Order Sale The WaiterPOS reverts back to the default price level after the
completion of the order.
After Next Change The WaiterPOS reverts back to the default price level when the Price
Shift
button is pressed again.
Menu Shifts
Menu shifts are described in section 3.4 Keyboard Layout Menu and this section defines
how the menu reverts back to the default level. The same three options as described in
previous paragraphs are available.
Table Modifiers
Table modifiers work in much the same manner as a PLU
modifier. By pressing the Table Modifier
key the system
adds the amount of the modifier to the table number key
pressed.
For example, If the table number key is Table 2 and the
amount of the modifier is 40, by pressing the Table
Modifier key then the Table 2 key, table 42 will be
opened.
Fig 3.5(la) Modifiers screen.
Fig 3.5(lb) Insert table modifier screen.
Page 36
To create a table modifier click which opens the screen shown in Fig 3.5(lb). Enter a
number for the modifier in the Number
field, enter the desired modify amount into the
Modify By
field and then enter a description into the Description
field. Finish by clicking
.
Terminals
The Terminals menu is not for use by end users, this information is entered by the dealer prior to
beginning operation, see Dealer for further information.
3.6 MENU EDITOR
Introduction
Menu Editor is a simple application used to program the menu/screen layout of the hand held
WaiterPad. Menu Editor also contains a Configuration section which defines the way the hand held
WaiterPad operates.
Planning a New Menu
Menu Editor allows the user to develop an extensive menu structure to guide waiters through
the ordering process. Menu Editor allows the user to add sub menus as well as products to
group products together and link sub-menus together to prompt waiters.
When creating a new menu from scratch it is most beneficial if a tree type flow diagram is
prepared prior to beginning programming. This allows the user to consider the sub-menu
structure, cooking prompts required, etc and greatly improves programming efficiency.
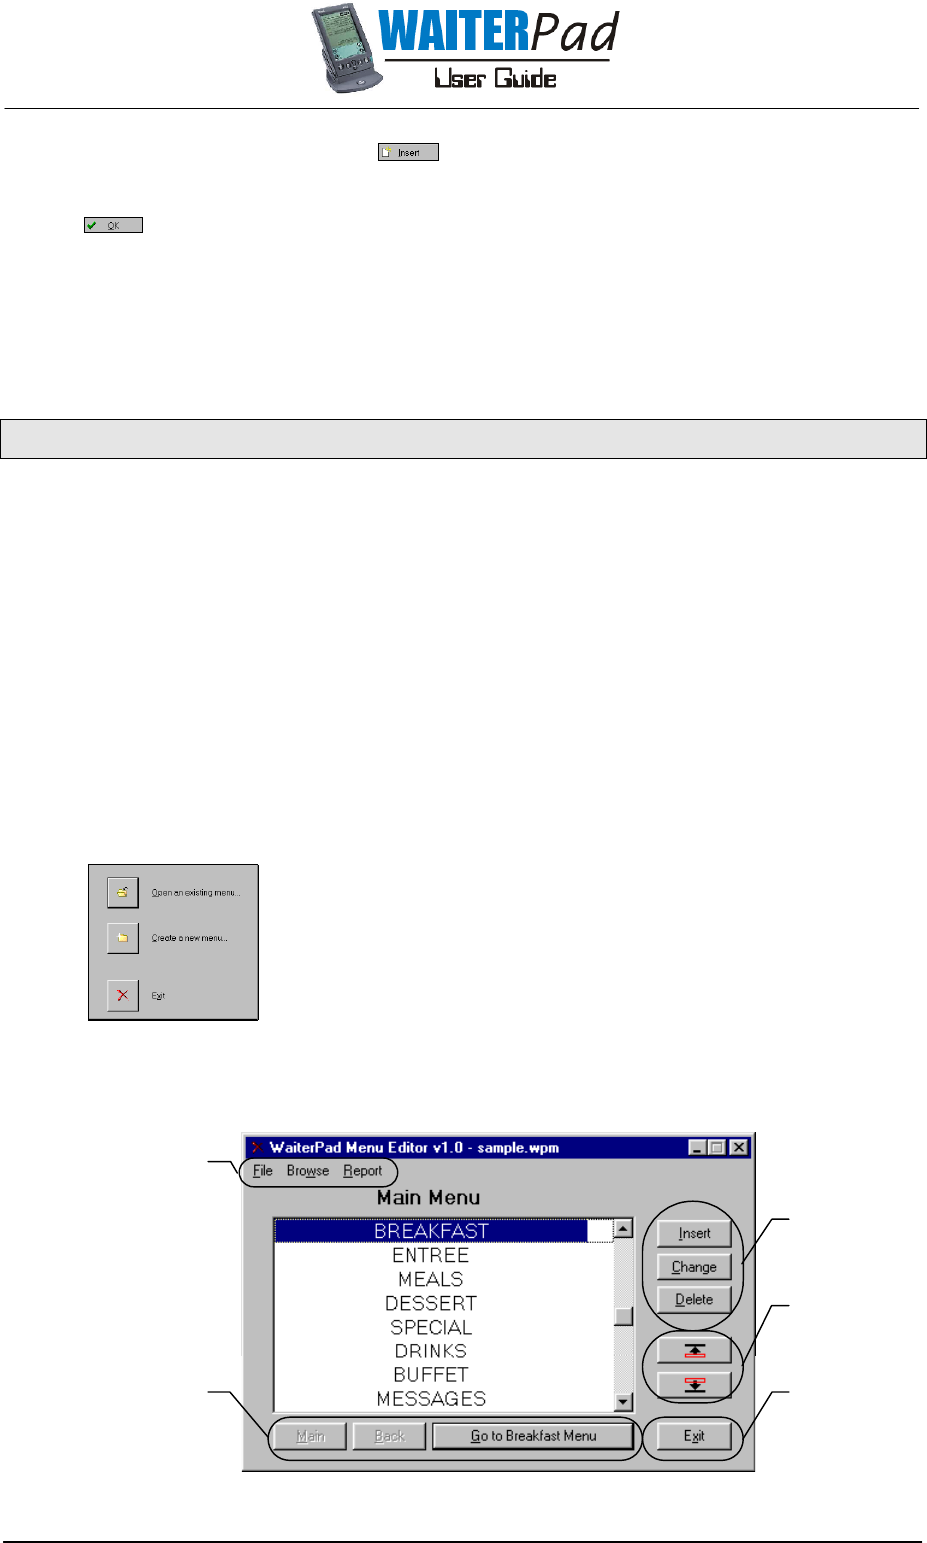
Starting Menu Editor
To open Menu Editor left click on Menu Editor from the Menu Bar
which will launch the application and then present the following
screen shown in Fig 3.6(aa).
This screen allows the user to open an existing menu, create a new
menu or to exit the program. A Menu Editor file has the file
extension “wpm
wpmwpm
wpm” which stands for W
WW
Waiter P
PP
Pad M
MM
Menu file.
Menu Editor Main Screen
3
4
5
2
1
Fig 3.6(ab) Menu Editor main screen.
Fig 3.6(aa) Menu Editor opening
screen.
Page 37
Fig 3.6(ab) shows the main WaiterPad Menu Editor screen. This screen shows the user a list of
the products/menus in the current main menu screen. The other controls are discussed in the
following paragraphs.
1 The menu bar is divided into three menus:
The File menu allows the user to manage multiple menu databases (via New, Open
and Save As), the Configure menu defines the WaiterPad operation and exit closes
Menu Editor.
The Browse menu lets the user view waiters, printers, PLUs & groups, and to create &
modify Menu Editor sub-menus.
The Report menu allows the user to print out a number of reports which are
explained in later sections.
2 These three navigation buttons make it easy to move around in the menu structure.
The Main button returns the user back to the Main Menu screen, the Back button
moves the user back to the previous menu visited, and the Go to … button sends
the user to the currently selected product’s next menu (sub-menu).
3 The Insert, Change and Delete buttons allow the user to add, modify and remove
products from the current menu.
4 These two buttons move the currently selected product up or down in the menu list.
5 This button exits the program.
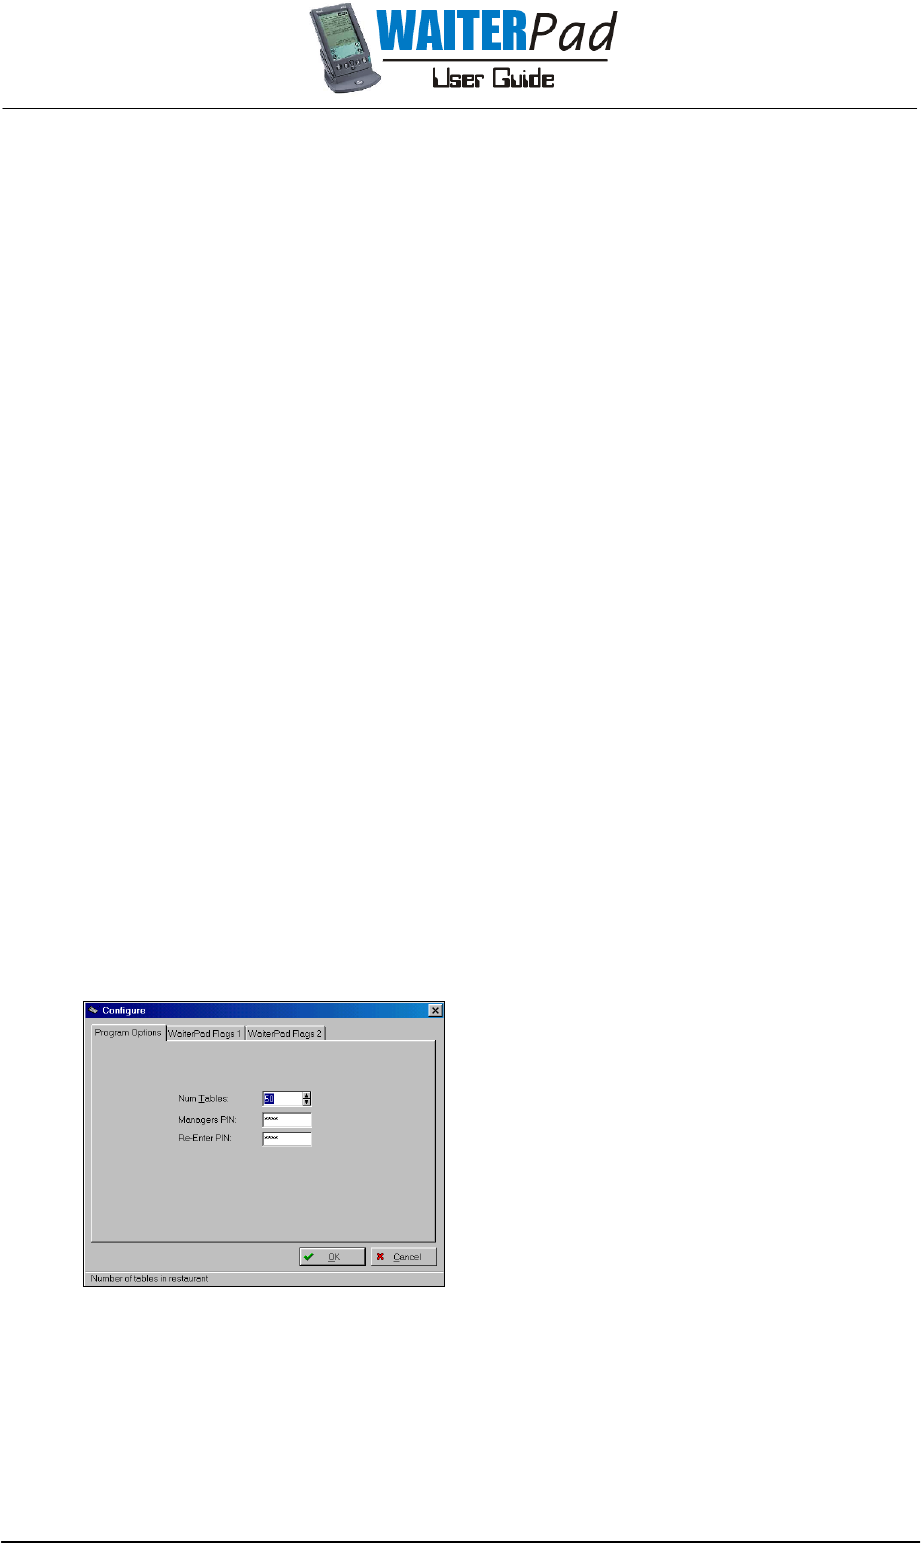
System Configuration
To configure the operation of the hand held WaiterPad select Configure from the File
menu which
opens the Configure
screen with three tabs as shown in Fig 3.6(ba).
Program Options
The program options screen is used to set the
highest table number* and the manager login
PIN. To change the Manager logon PIN, enter
the PIN in the Managers PIN
field and then re-
enter the same PIN in the Re-Enter PIN
field.
* Note that tables must be numbered
sequentially from one to the highest table
number entered in the above mentioned field.
Fig 3.6(ba) Program options screen.
Page 38
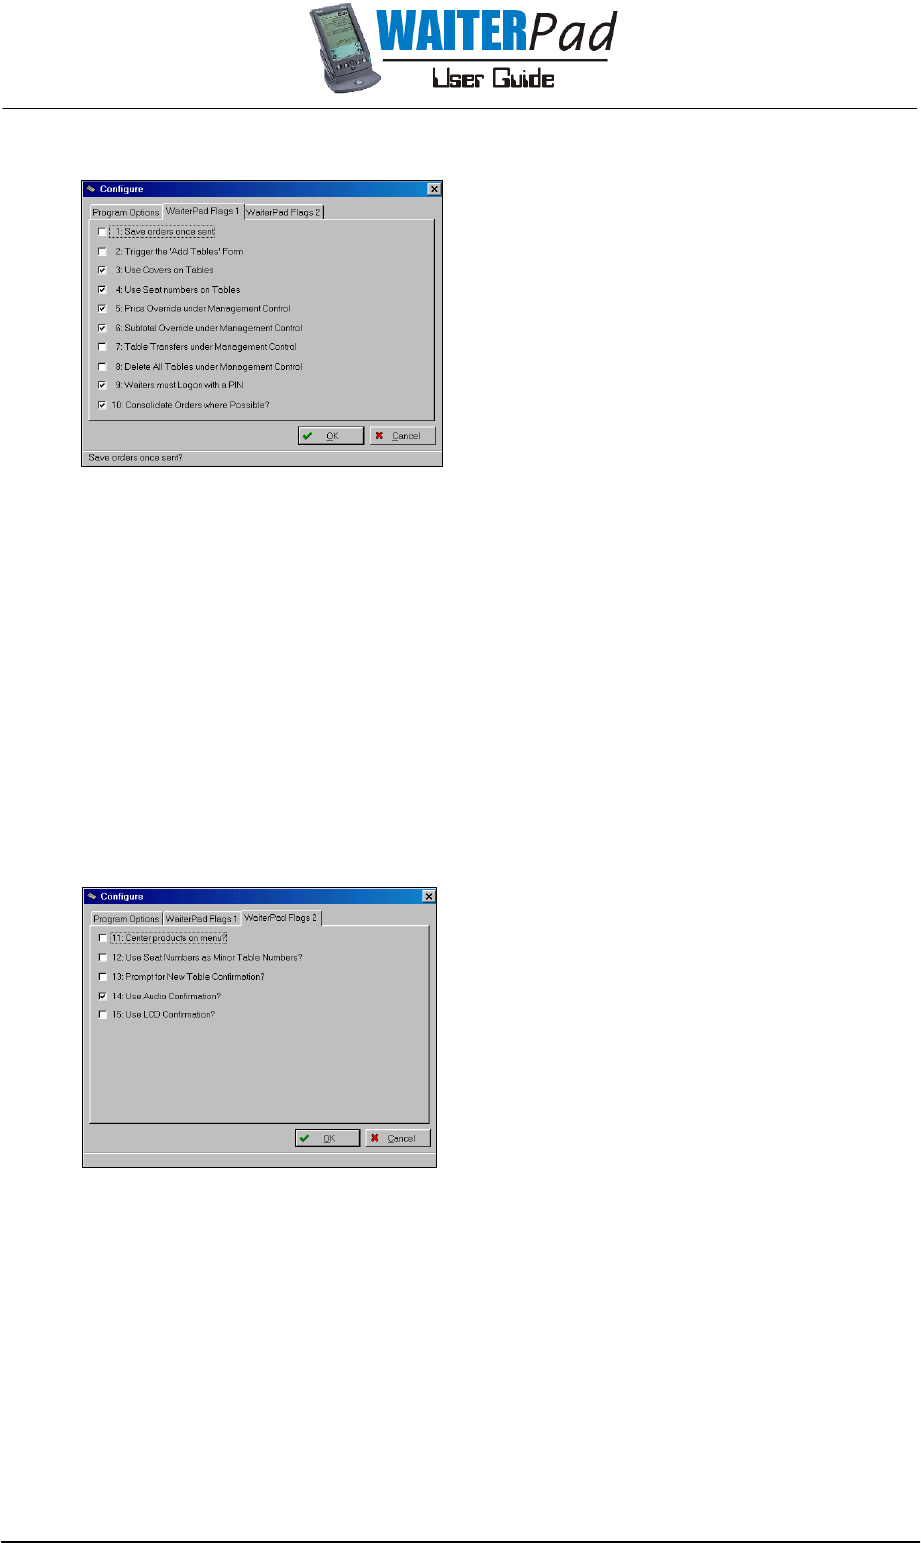
WaiterPad Flags 1 Tab
Flags are used to configure the operation of
the hand held WaiterPad. A flag is in use
when there is a tick in the box to the left of
the flag description. The operation of each
flag is described in the following paragraphs.
Flag 1. Keeps the tables order on the WaiterPad once sent.
Flag 2. Opens the Add Tables pad automatically when returning to the Tables screen.
Flag 3. Automatically prompts the waiter for the number of covers at a table after
entering the table number.
Flag 4. Places the seat position buttons on the WaiterPad screen.
Flag 5. Allows price overrides only to be performed when logged in as the Manager.
Flag 6. Allows subtotal overrides only to be performed when logged in as the Manager.
Flag 7. Allows table transfers only to be performed when logged in as the Manager.
Flag 8. Allows the deletion of all tables on the WaiterPad screen only to be performed
when logged in as the Manager.
Flag 9. Prompts waiters for a Personal Identification Number when logging on.
Flag 10. Consolidates multiple items ordered into one product listing with a multiple
quantity.
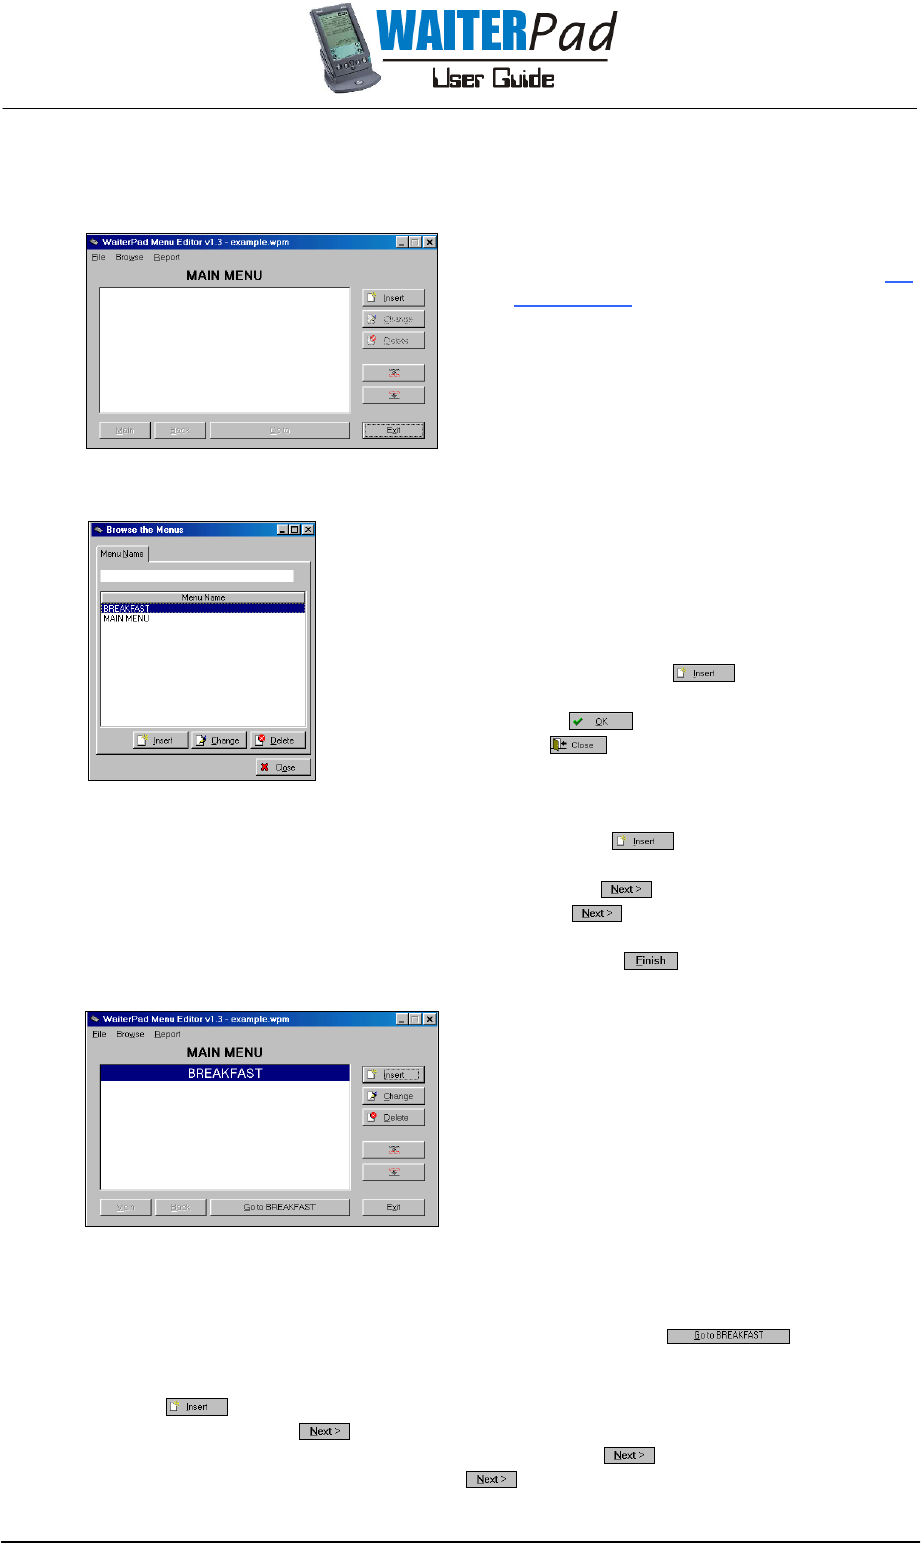
WaiterPad Flags 2 Tab
Fig 3.6(bc) WaiterPad Flags 2 screen.
The operation of each flag is as follows:
Flag 11. Centres the product description on the Waiterpad screen.
Flag 12. Prompts the seat number digit to automatically jump to the table number when
the seat number up button is pressed. This is used where two tables are joined to
indicate a seat position on one of the tables.
Flag 13. Prompts the waiter when starting an order for a table which is currently open
whether the order is a continuation of the existing bill or a new bill, therefore
creating a second bill providing flag 20 WaiterPOS System Flags is inactive.
Flag 14. Programs the WaiterPad to emit an audio confirmation when an order is
successfully sent.
Flag 15. Programs the WaiterPad to invert the LCD three times as a confirmation when an
order is successfully sent.
Fig 3.6(bb) WaiterPad Flag 1 screen.
Page 39
Adding an Item
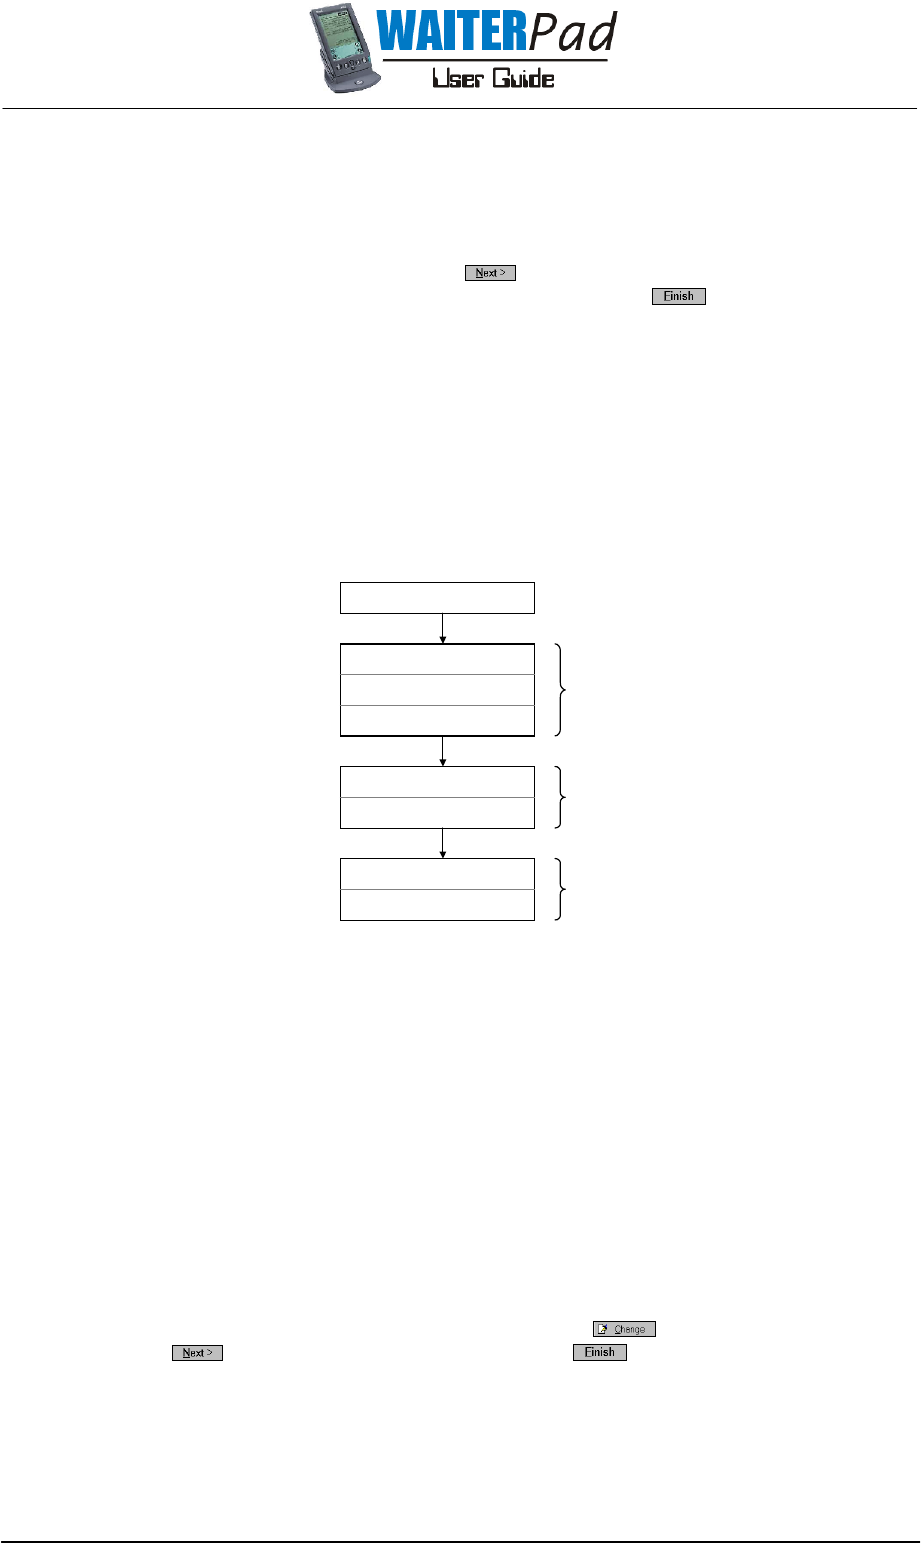
Creating Sub Menus
When waiters, printers and products have
been set-up (as described in section 3.5
Setup Menu), the starting point is a blank
main menu (as shown in Fig 3.6(ca))
To insert a sub-menu, for example a
“BREAKFAST” menu that brings up a list of all
breakfast products, a sub-menu needs to
be created.
To create the sub-menu click on the Browse
menu and
then select Menus
from the drop down list. This opens the
Browse the Menus box which is shown in Fig 3.6(cb).
To insert a new menu click and type in an
appropriate name for the sub-menu in the prompt box
which appears. Click once a description has been
entered and then once all required menus have
been entered.
To add the new sub-menu to the WaiterPad screen click which will open the Insert
Wizard, proceed as follows:
1. To insert the sub-menu created select Menu and click .
2. Select the desired sub-menu from the list and click again.
3. Finally the Insert Wizard prompts for an on screen description, use the description which
appears by default or type in a custom description, click to complete.
The “Breakfast” sub-menu will appear as shown
in Fig 3.6(cc). Note that the Menu Editor main
menu is split into two columns on the WaiterPad
screen, every second item from the list is shown
in the right-hand column.
To add products to the sub-menu proceed as follows:
1. Highlight the sub-menu (in this case Breakfast) and press the button which
will open the sub-menu. Note that the “Breakfast” text on the button will be replaced with
the name of the menu to which that item will go to.
2. Click which will open the Insert Wizard.
3. Select PLU and click .
4. Locate the desired PLU from the list, highlight and click .
5. Select the desired price level and click .
Fig 3.6(ca) Blank Menu Editor main menu.
Fig 3.6 (cb) Browse the menus screen.
Fig 3.6(cc) Menu editor main screen with the Breakfast
sub-menu inserted.
Page 40
6. The next screen prompts for which menu this PLU should go to. This function allows the
user to select which sub-menu will appear next after selecting the PLU item. So for
example if the user would like the WaiterPad to proceed to say the Main Meals sub-
menu after selecting an entrée then this is how it is set. This will be described in further
detail in the next section, Creating Complex Orders.
Select the desired sub-menu and click .
7. Enter the desired on screen description in the field and click .
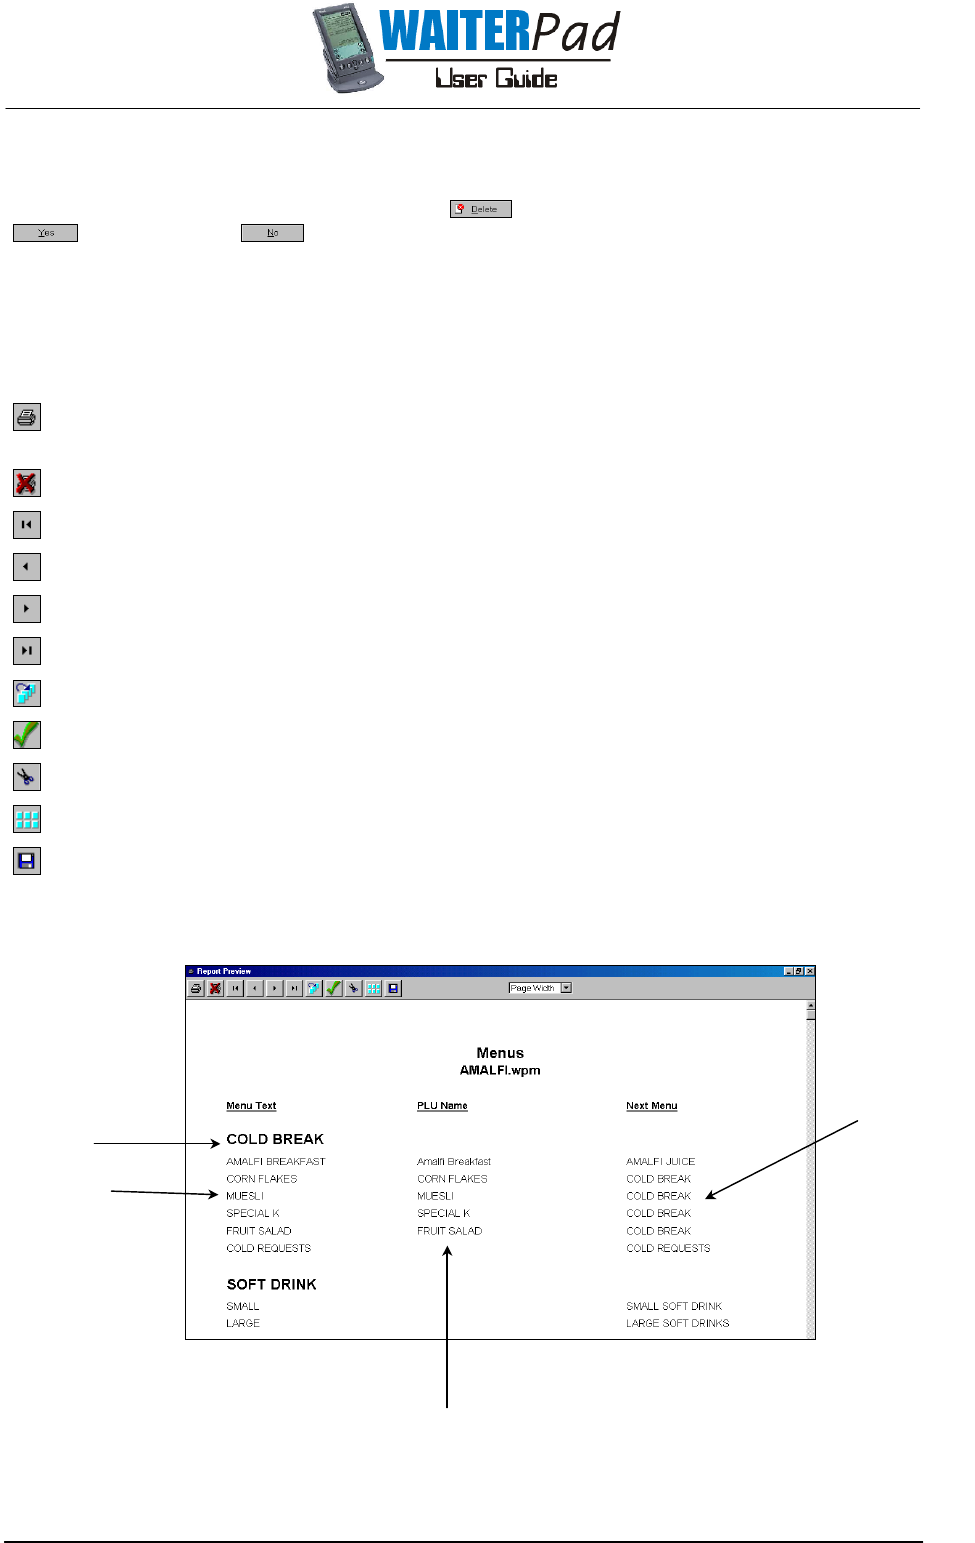
Creating Complex Orders
The user may want to create orders which prompt the waiter to select from available side
dishes, sauces and/or cooking instructions, etc.
The following example demonstrates this, a T-Bone Steak, which can be cooked either Rare,
Medium or Well Done and the customer can also choose from two side dishes (Baked
Potato or French Fries) and two salads (Greek Salad or Caesar Salad).
A flow diagram of what needs to be created is shown in Fig 3.6(cd).
T-BONE STEAK
BAKED POTATO
FRENCH FRIES
RARE
MEDIUM
WELL DONE
GREEK SALAD
CAESAR SALAD
Cooking Instruction
Side Dish
Side Dish
Fig 3.6(cd) Example of a complex ordering sequence.
Firstly, the required sub-menus and PLU records must be created as previously described. To
create this ordering sequence proceed as follows:
1. Proceed to insert the T-Bone Steak PLU into the desired menu as normal.
2. At the stage when the Insert Wizard requests which menu this product should go to then
select the “Cooking Instruction” sub-menu.
3. Once the insertion of the T-Bone Steak is complete then the cooking instruction PLUs must
be added to the sub-menu.
4. These items will then be linked to the Side Dish sub-menu and when inserting the PLUs
into this sub-menu these items will be linked to the Salads sub-menu.
5. The salads PLUs could either be linked back to the main menu or to the original sub-
menu (Eg. Grilled Products).
Changing an Item
To change the set-up of any item, highlight the item and click , proceed through the Insert
Wizard by clicking and complete the change by clicking .
Page 41
Deleting an Item
To delete an item highlight the item and click . Confirm the intention to delete by clicking
, abort by clicking .
Reports
Each report is explained in the following paragraphs and the report buttons are common to all
reports, these are described below:
Opens the Printer Options screen to enable the user to specify what parts of the report are sent
to the printer.
Exits the report without printing.
Takes the user to the first page of the report.
Takes the user back one page in the report.
Takes the user forward one page in the report.
Takes the user to the last page of the report.
Used to enter a specific page number of the report to go to.
Marks the page which allows the user to view or print marked pages only.
Deletes the current page from the report.
Displays marked pages.
Used to save the report to a specific location. Report is saved in text format.
Menus Report
Sub-Menu
Name
Products/other sub-
menus contained in
the sub-menu.
Sub-menu which
the product/sub-
menu go’s to next.
Product Name
If the PLU Name field
is blank then the item is a
another sub-menu.

Page 42
PLU’s Report
The PLU report lists each PLU record by Groups showing the PLU number, description, each
price level and the printer the PLU is to send to.
Integrity Violation Report
The Integrity Violation Report checks that all details required by the system have been
entered into the PLU record and flags any which have not with a red cross. When all PLU
records have been completed correctly then the Integrity Violation Report will say “Nothing to
Print”.
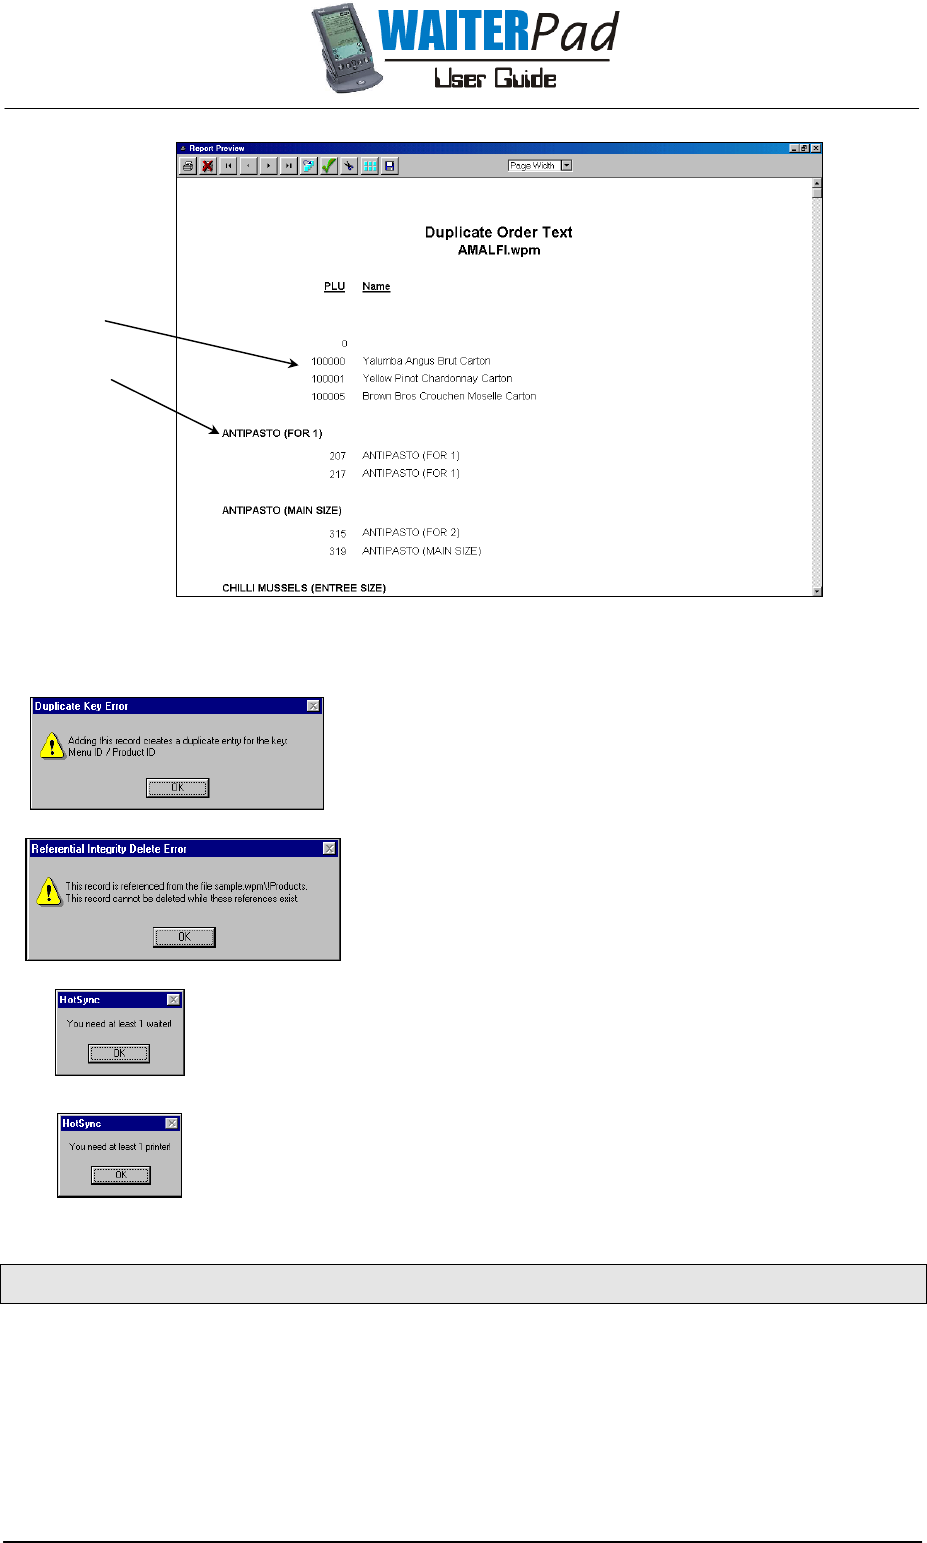
Duplicate Order Text Report
The Duplicate Order Text Report searches the PLU records for any duplicated order text and
any PLU records without order text.
Page 43
Error Messages
The user attempted to add a product to a menu
that already contains that product. You cannot have
the same product on the same menu more than
once.
The user attempted to delete a record that is
referenced by another record. For example, the
user attempted to delete a printer that is being
used by a product.
The program cannot download the menu database to a hand
held WaiterPad if there is not at least one waiter. Add some
waiters to the database.
The program cannot download the menu database to a hand
held WaiterPad if there is not at least one printer. Add some
printers to the database.
3.7 GENERATE MENU
The Generate Menu section creates files required by the system to send to the hand held
WaiterPad’s. The Menu is required to be generated after any changes have been made to the PLU
records, clerks, groups, printers or the Menu Editor files.
To generate a menu press the Menu Generator button and then double click on the menu file (those
with a “wpm” file extension) in the file list box which appears.
No Order Text
Order Text
Duplicated
Page 44
For instructions on downloading Menu Generator changes to the hand held WaiterPad’s see section
3.9 WaiterPad Downloading.
3.8 SEND MENU
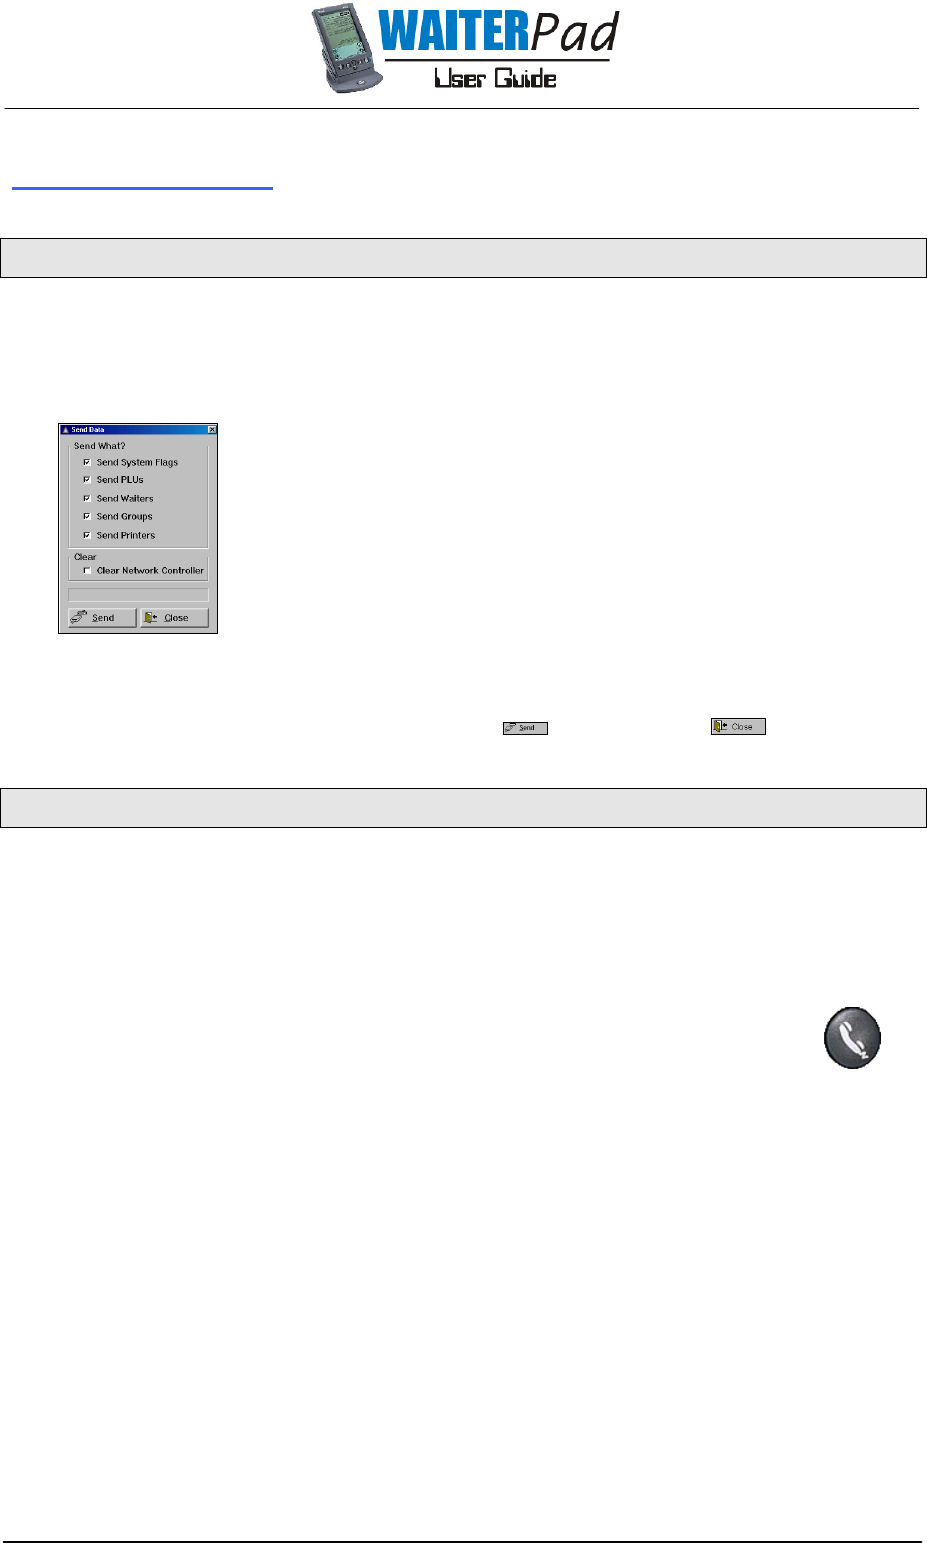
The Send menu is used to send details to the network controller. Whenever modifications or additions
are made to the PLU records, clerks, groups, system flags and printers then these changes must be
sent to the network controller.
The Send Data screen is used to send information from WaiterPad
System Generator to the Network Controller. To do this WaiterPOS must
be shut down as both share the computers communications port.
When opened the Send Data screen appears as shown in Fig 3.8(a)
with all send options ticked. The user can select which items will be sent
to the Network Controller by un-ticking those which are not required to
be sent.
The Clear Network Controller option clears all the information from the
network controller. Information can be sent to the Network Controller
after clearing by opening the Send
menu again and sending all data.
To proceed to send data to the network controller click , abort by clicking .
3.9 WAITERPAD DOWNLOADING
Whenever changes are made to the Menu Editor file, clerks, groups or printers sections then these
modifications must be downloaded to the hand held WaiterPad’s. Each WaiterPad has a single
alphabetical identifier, ie. A, B, C, therefore the WaiterPad System Generator creates a file for each
WaiterPad.
To download the Menu Editor file to a WaiterPad proceed as follows:
1. Plug the download cable into the bottom of the WaiterPad.
2. Ensure Hotsync Manager is running.
3. Select the appropriate WaiterPad download file from the Send Menu and press
OK on the dialogue box which opens.
4. Press the Download button on the WaiterPad as shown in Fig 3.9(a).
Fig 3.8(a) Send Data screen.
Fi
g
3.9(a)
Page 45
WaiterPOS Operation
WaiterPOS OperationWaiterPOS Operation
WaiterPOS Operation
4.1 INTRODUCTION
The hub of the WaiterPad system is the WaiterPOS which allows the user to track all customer
purchases as they are transmitted from the hand held WaiterPad’s. Once orders are transmitted from
the hand held WaiterPad’s the WaiterPOS complies the tables order ready to be printed out
immediately or cashed off. WaiterPOS is easy for users to learn requiring limited key touches to
access and finalize a tables bill.
4.2 WAITERPOS SCREEN
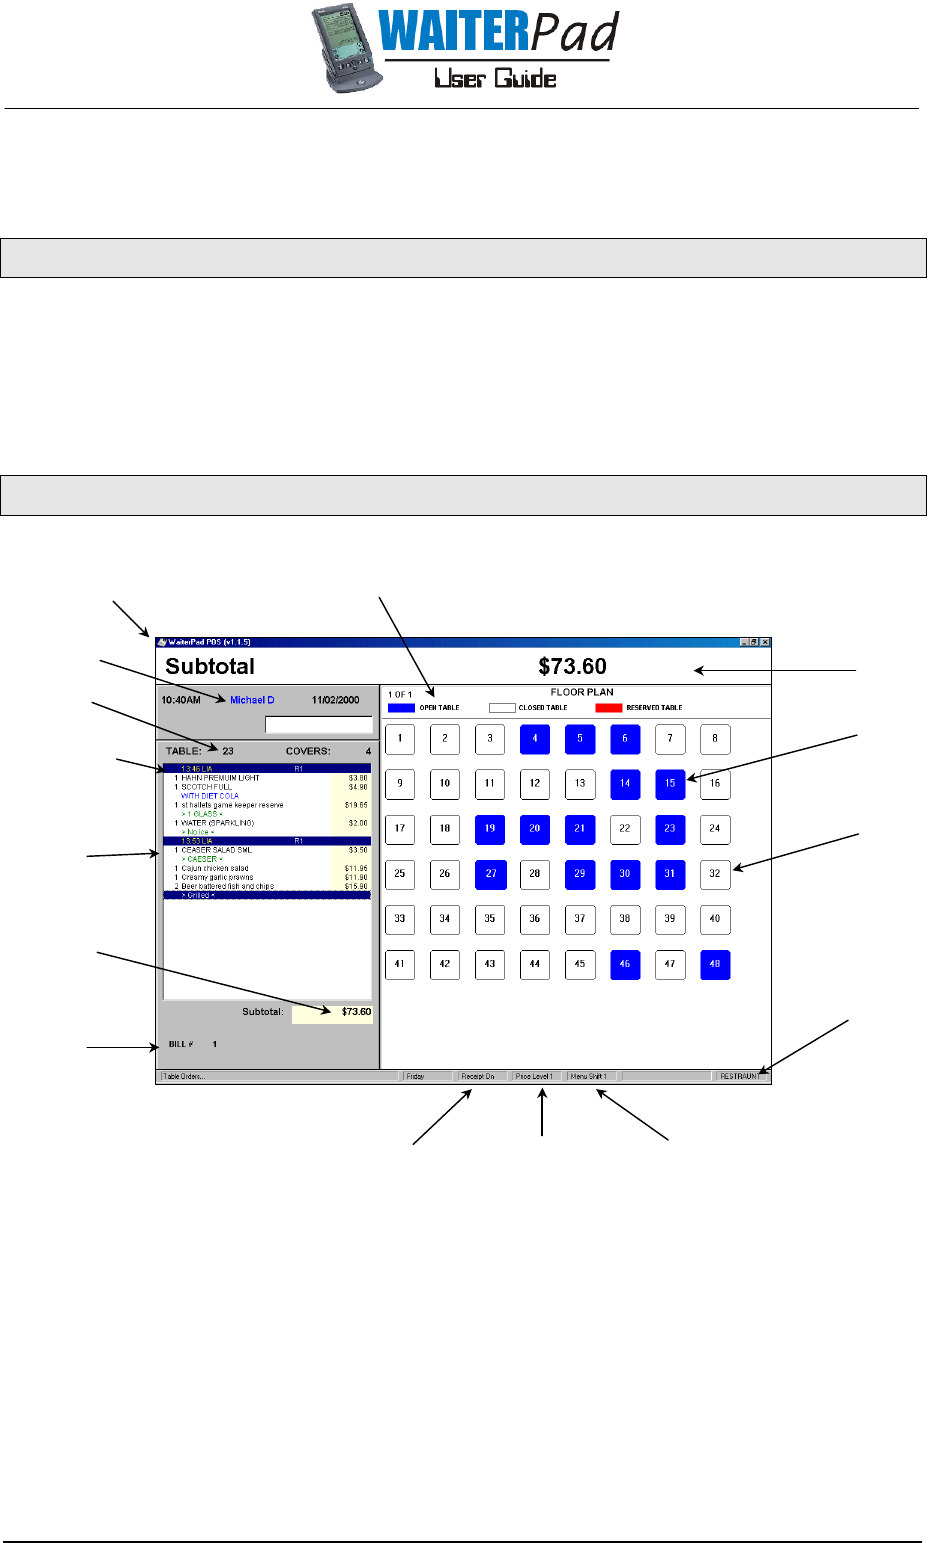
Fig 4.2(a) WaiterPOS screen.
The example WaiterPOS screen illustrated in Fig 4.2(a) shows a number of active tables and a bill
open on the left-hand side of the screen. The operation of WaiterPOS is discussed in following
sections however note that the user can only operate the WaiterPOS if the program is active,
indicated by a blue program bar at the top of the screen. If the program bar is gray then the
program is inactive, activate by clicking anywhere on the screen with the left mouse button.
Title Bar
Open Table
Closed
Table
Clerk Name
Table NO
Clerk who placed
order and time the
order was placed
Billed
Products
Sub Total
Receipt Price Level Menu Shift
Status Status Status
Program Bar Table Legend
Bill
Number
Operating
Mode
Page 46
4.3 GENERAL OPERATION
The procedure to open & view a table is as follows:
1. Log on.
2. Press the Table Number
key of the table number required to be opened.
3. The tables order(s) will be opened on the left-hand side of the screen as shown above in Fig
4.2(a).
4. To close the tables bill, press the New Balance
key.
If after pressing the Table Number
key the WaiterPOS asks the user to enter a “bill number” then this
means that there are multiple bills stored under that table. To open the first bill press the New
Balance
key, to open the second bill press the 2
digit key followed by the Enter
key, the third by
pressing the 3
digit key and so fourth.
To merge two bills stored under the same table number together, move one of the bills to another
table (closed table) and then move the bill back to its original table number. The WaiterPOS will ask
the user to confirm that they wish to merge the two bills together. Moving bills is described in further
detail in section 4.4 WaiterPOS Functions.
The procedure to add items to a tables bill from the WaiterPOS is as follows:
1. Log on.
2. Press the Table Number key of the table number required to be opened.
3. Add items by pressing the appropriate keys on the keyboard.
4. To close the tables bill, press the New Balance
key.
Items/products can be stored either directly to a keyboard key so that one key is only used to ring up
one product or a look-up window can be used to group a number of products under one key. If a
look-up windows are in use then when that key is pressed a box will open as shown in Fig 4.3(a).
To add an item either use the Line Up
and Line Down
(Page Up & Page Down) keys to highlight the
desired item or use the digit keys to enter the items corresponding list number and select by pressing
the Enter
key. To close the box without selecting an item, press the New Balance
key.
The procedure to enter payment from a customer is as follows:
1. Log on.
2. Press the Table Number key of the table number required to
be opened.
3. Press the Sub Total key.
4. Enter the tendered amount using the digit keys and then press
the appropriate media key (eg. Cash, Visa, AMEX, etc).
5. The change amount will be displayed in the title bar as
highlighted in Fig 4.2(a).
Preset tenders allows cash denominations such as $10, $20, $50 to be allocated directly to keys of
the WaiterPOS keyboard. If preset tenders are in used then after pressing the Sub Total
key the user
needs only to press the appropriate preset tender key for the cash denomination received.
Fig 4.3(a) Example of a WaiterPOS
lookup window.

Page 47
4.4 WAITERPOS FUNCTIONS
Logging On
The WaiterPOS can be set-up to allow clerks to log on to the system in three different ways. The first is
using hard clerk keys, where each clerk is allocated a key on the keyboard to log on with. The
second method uses a Clerk # key which prompts the clerk to enter their clerk number and the final
method uses a Clerk PIN # key which prompts the clerk to enter their PIN.
To log on and off using hard clerk keys:
1. Press the appropriate Clerk key to log on.
2. Log off by pressing the Clerk Log Off key.
When using a Clerk # key:
1. Press the Clerk # key.
2. Enter the appropriate clerk number using the digit keys and then press the Enter key.
3. Log off by pressing the Clerk # key.
When using Clerk PIN’s:
1. Press the Clerk PIN
key.
2. Enter the appropriate clerk PIN using the digit keys and then press the Enter key.
3. Log off by pressing the Clerk PIN key.
Correcting Items on a Bill
To remove an incorrect item on a bill, use the Line/
//
/Page Up and Down keys to highlight the item to
be removed and then press the Error Correct key.
Opening a New Table
To open a new table follow the same procedure as described in section 4.3 General Operation,
however the WaiterPOS will prompt the user to enter the number of covers, this is done using the digit
keys and confirmed by pressing the Enter key.
Entering Multiple Amounts
When adding items to a bill at the WaiterPOS multiple amounts can be entered by using the digit
keys and the X key. Eg. If the user wishes to enter four Crown Lager’s then they would press 4 X and
then the Crown Lager key.
Keyboard Levels
A second and third keyboard level can be programmed which means that a single key can perform
up to three functions (see section 3.4 Keyboard Layout Menu for further details). To move between
the first, second and third keyboard levels press the appropriate Menu Shift button, which works in
much the same way as the shift key on a computer keyboard. The method in which the keyboard
reverts back to the first level is set in section 3.5 Setup Menu - Modifiers.
Price Levels
WaiterPOS supports the use of three price levels per PLU record. This function is often used for
situations such as “happy hour” prices or public holiday prices and allows the user to revert between
these different price levels using Price Level Shift keys.

Page 48
To shift to the second or third price level press the Second Price Level or Third Price Level
key and
then select the required item(s). Note that the system will revert to the default price level as setup in
section 3.5 Setup Menu - Modifiers.
PLU Modifiers
PLU modifiers are commonly used where there a various sizes of a product. In this situation the PLUs
must be setup as described in section 3.4 Keyboard Layout Menu. To operate the PLU modifier
press the product button and then the required modifier key. For example, press the Coke key then
the Large Size PLU modifier key.
Table Modifiers
Table modifiers operate similarly to the PLU modifier, they allow a table key to access many different
table numbers. To use the table modifier press the Table Modifier key and then the required Table
key.
Printing Bills
To print a tables bill, log on to the system, open the table and then press the Print Bill
key. Receipts
will automatically print on tendering if the receipt function is turned on. The receipt can be turned off
by pressing the Receipt On/Off
key, the current status of the receipt is indicated on the WaiterPOS
screen as shown in Fig 4.2(a).
Discount
The WaiterPOS system can programmed to perform two types of discounts, percentage and dollar
value. To perform a percentage discount enter the percentage discount using the digit keys and
then press the % Disc key. Eg. To complete a 10% discount enter 1 0 and then press the %Disc key.
To perform a dollar discount enter in the dollar amount using the digit keys and then press the $ Disc
key. Eg. To complete a $5.00 discount enter 5 0 0 and then press the $ Disc key.
Voids
To void an item press the Void key and then enter the item/product as previously described in
section 4.3 General Operation.
Refunds
A refund can be performed in two ways, either a product refund or a cash amount refund. The
product refund method operates in exactly the same manner as the void function, press the Refund
key and then select the item/product required to be refunded.
To perform a cash amount refund enter the amount to be refunded using the digit keys, ignoring
decimal places, then press the Refund key. To perform a $20 refund press 2 0 0 0 Refund.
Split Bills
The WaiterPOS allows split billing to be performed with ease, allowing any single or numerous items to
be split from the main bill to a secondary bill. The procedure to complete a split bill is as follows:
1. Log on and open the table bill as previously outlined.
2. Start the split bill process by pressing the Start Split Bill key.
3. Select the items to be split by highlighting the item using the Line/
//
/Page Up
& Down
and then
pressing the Split Item
key.
4. When all items required to be transferred have been selected, press the End Split Bill
key.
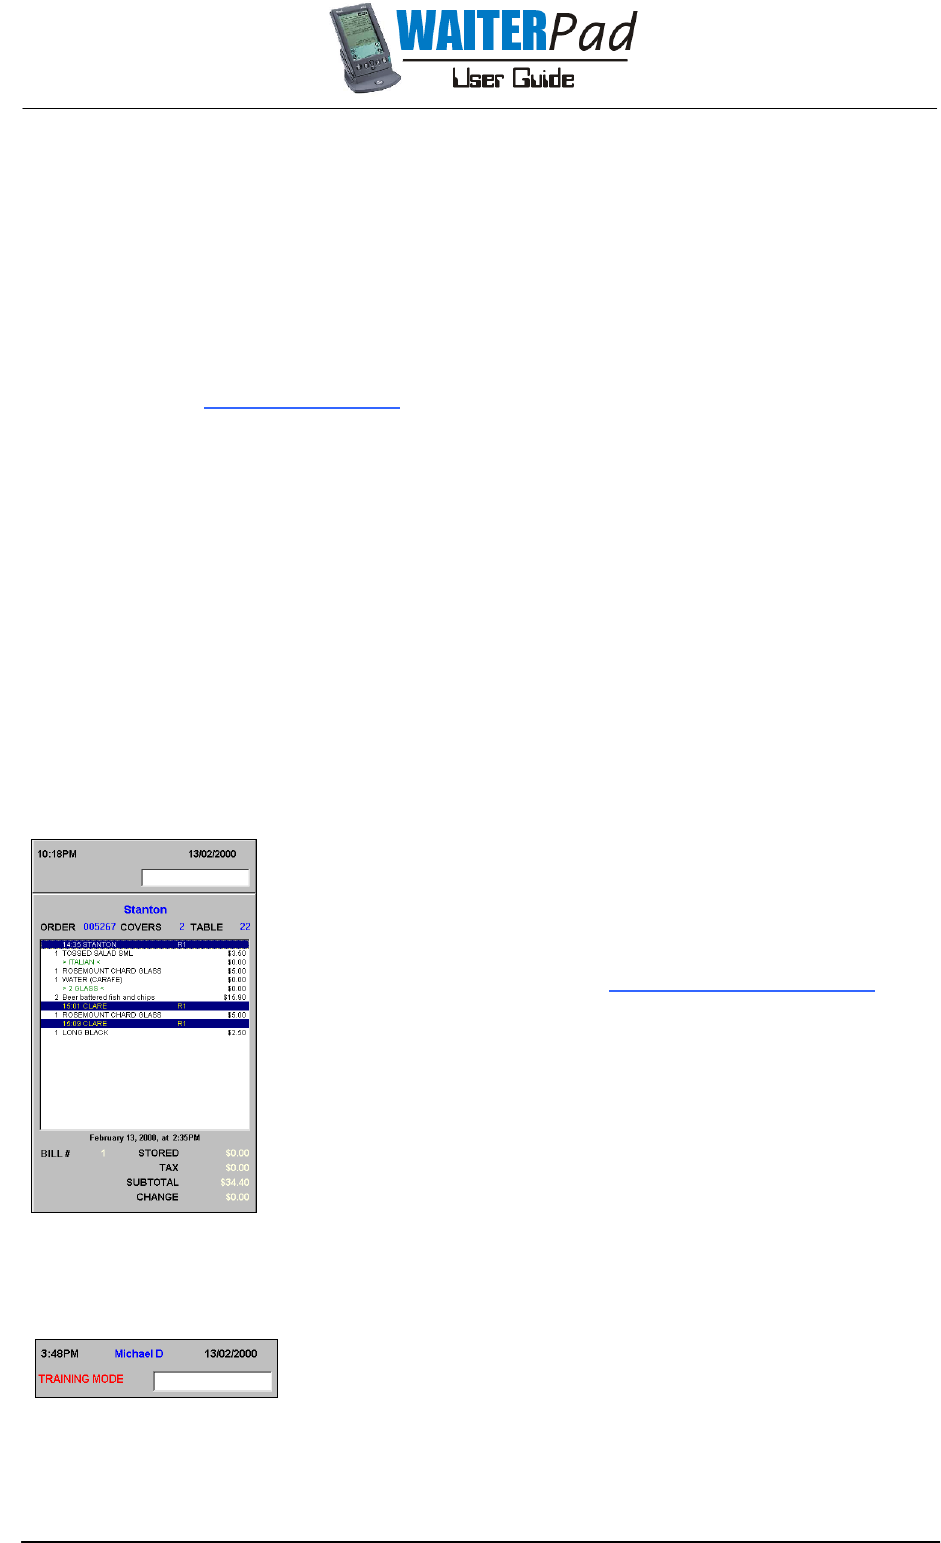
Page 49
If an item is selected incorrectly then highlight the item and press the Clear
key.
If the item to be transferred is a multiple quantity line (Eg. 3 x T-Bone Steak) and the user wishes to
transfer one T-Bone, then press the Split Item key twice. The WaiterPOS will then prompt the user to
enter the quantity of that item needs to be transferred, enter using the digit keys and confirm by
pressing the Enter key.
Moving Tables
The WaiterPad system allows tables to be moved from the hand held WaiterPad as previously
outlined in section 2.11 Table Transfers or from the WaiterPOS. To move a table at the WaiterPOS
log on and open the table as previously described, then press the Move Table
key. The WaiterPOS
will then ask the user to enter the table number to transfer the table to and then to confirm the
transfer.
If the WaiterPOS asks to confirm “merge tables” then the user is attempting to move the table to
another open table.
Part Payment
The part payment function allows the user to accept part customer payments, storing the amount
received and showing the amount left to be paid. To accept part payment from a table log on and
open the table bill as previously outlined. Enter the amount of the part payment received using the
digit keys (Eg. $20, enter “2000”) and press the appropriate media key. Then press the Part Payment
key when the system shows the short tender message, close the table by pressing the New Balance
key.
Electronic Journal
The electronic journal function allows the user to scroll through past
transactions for up to the last three days on the WaiterPOS screen. This
function can be used by allocating the Electronic Journal key to the
keyboard as outlined in section 3.4 Keyboard Layout Menu or by
entering the digits 9 9 9
and then pressing X.
By pressing the Electronic Journal
key or entering 9 9 9
the table
window opens on the left-hand side of the screen as shown in Fig
4.4(a). To scroll back through the electronic journal press the Page
Down
key, to scroll forward through the press the Page Up
key.
Training Mode
Training mode allows the user to train on WaiterPOS without
affecting the totals. To begin training mode press the digits 1 0 1
followed by X. “Training Mode” will appear in red text as shown in Fig
4.4(b). Training mode will continue to operate until turned off by the
user, to do this enter the digits 1 0 1
and then press X again.
Fig 4.4(a) Electronic journal
Fig 4.4(b) WaiterPOS training mode
message alert.
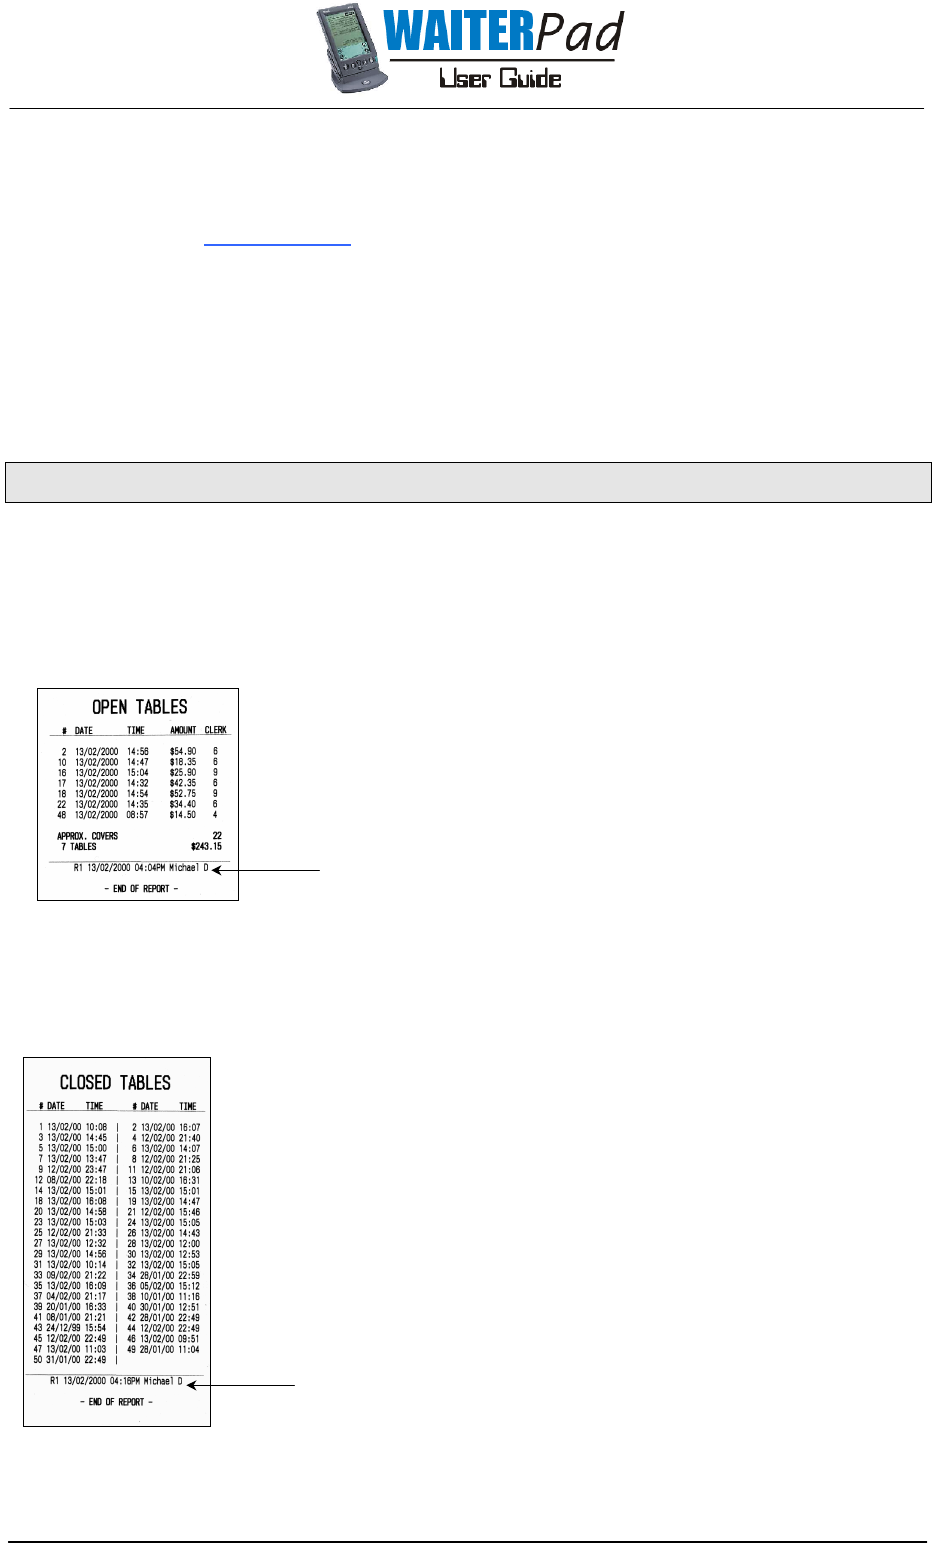
Page 50
WaiterPOS as a Ordering Station
WaiterPOS can also be setup to operate as an ordering station by setting flags and keys as previously
described in section 3.5 Setup Menu. Use of the WaiterPOS as an ordering station depends upon the
configuration of the flags however basic orders are entered as follows:
1. Logon to the WaiterPOS.
2. Press the appropriate table number button and then enter covers if requested using the digit
keys and then pressing Enter.
3. Enter the items using the keyboard product and group keys. Seat positions may be allocated if
the button is allocated to the keyboard.
4. When complete send the order to the printers by pressing the New Balance
key.
4.5 REPORTING
The WaiterPOS performs a variety of reports which are outlined in following sections. To print one of
these reports log on to the system, press the Report
key and then highlight the required report from
the list using the Line Up
& Down
keys or the digit keys, generate by pressing the Enter
key.
Open Tables Report
The open tables report presents a list of the current open tables showing
the date & time each was opened, the amount of the open table and
the clerk which opened the table.
The totals at the bottom of the report show the total number of covers
for all open tables and the total value of all tables.
This information indicates the following:
R1: ID of WaiterPOS where the report was produced.
13/02/2000: Date the report was produced.
04:04PM: Time the report was produced.
Michael D: Clerk who produced the report.
Closed Tables Report
The closed tables report details the date and time each table was last
closed other than those which are currently open.
This information indicates the following:
R1: ID of WaiterPOS where the report was produced.
13/02/2000: Date the report was produced.
04:16PM: Time the report was produced.
Michael D: Clerk who produced the report.
Fig 4.5(b) Example closed
tables report.
Fig 4.5(a) Example open tables
report.
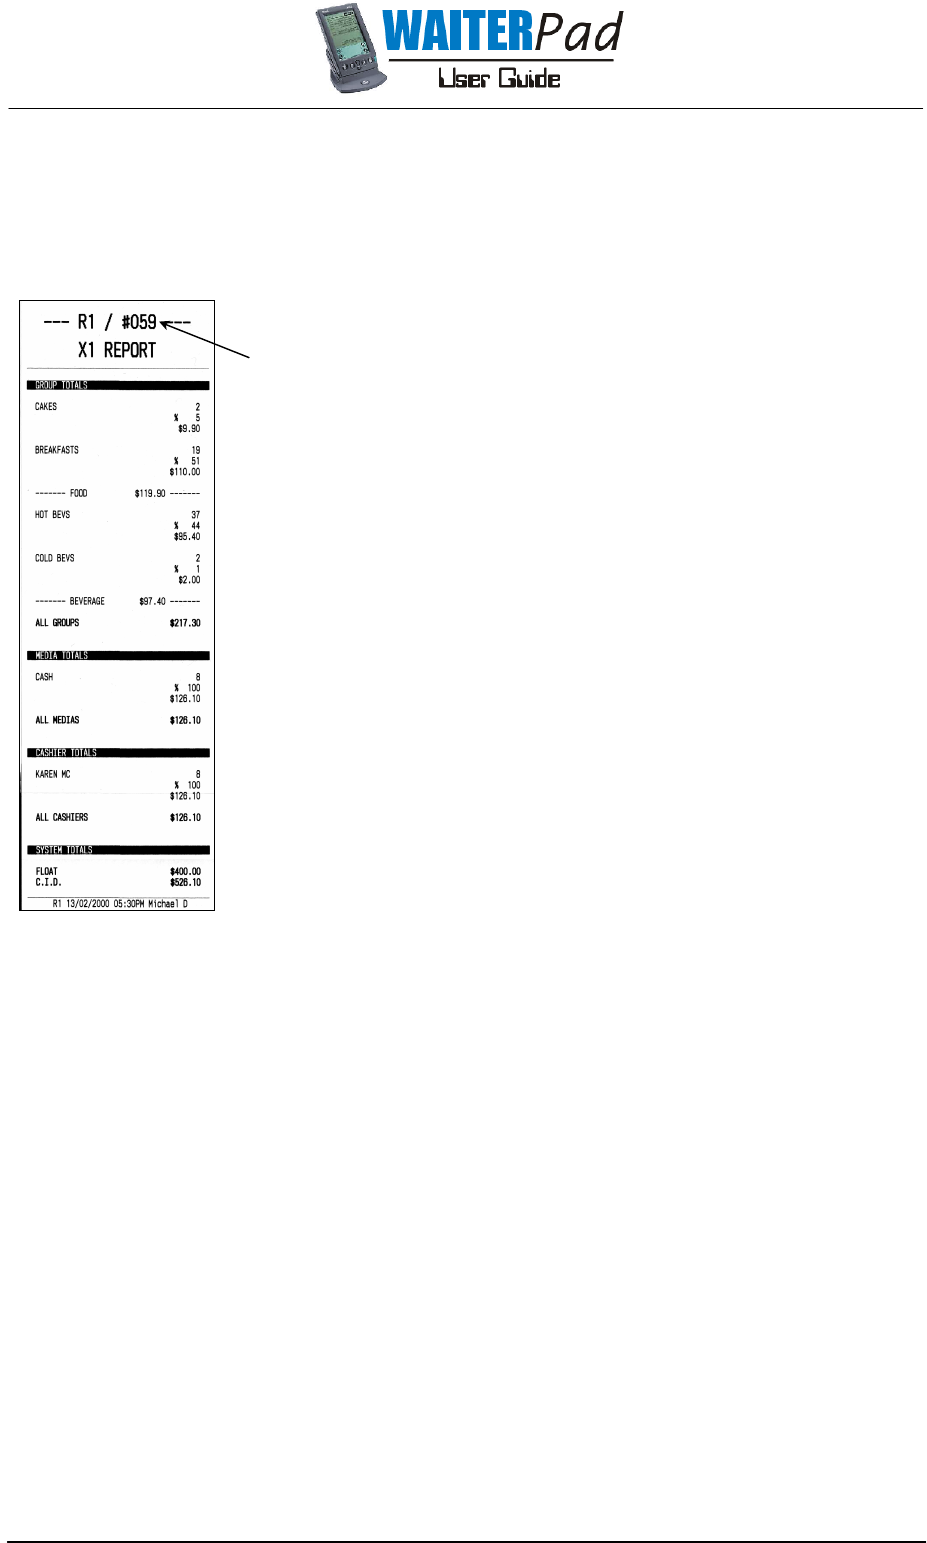
Page 51
Full X1 Report
The X1 report is a detailed management report which is one of three levels of reporting available.
The X series of reports (X1, X2 & X3) do not reset any WaiterPOS totals, the Z series of reports (Z1, Z2 &
Z3) clear each level when completed.
The information at the top of the report “--- R1 / #059 ---“ lists the terminal
ID of the WaiterPOS where the report was produced (R1) and the number
listed after this is a sequential number given to each report produced. This
number increases by one each time a report is completed and when it
reaches 999 the counter turns over to zero.
The Groups Totals
section lists product sales by groups showing the
number of items sold, the percentage of sales which the group has
accounted for and the total value of the groups sales.
Items add to the Group Totals
section when they are transmitted from
the hand held WaiterPad’s to the WaiterPOS.
The Media Totals
section lists the totals of each media received as shown
in the Group Totals
section. Medias are recorded when bills are finalized.
Cashier Totals
are a breakdown of the Clerks responsible for excepting
medias. The Cashier Details section lists the number of transactions
finalized by each clerk, the percentage of total medias accepted by that
clerk, the total value of medias excepted and the number of voids,
refunds, error corrects, discounts, no sales and paid outs performed by
the clerk (listed separately).
Full X2 & X3 Reports
The X2 and X3 Reports are the same as the X1 report in form however each represents a different
level of reporting. Generally level one is used for daily reporting, level two for weekly reporting and
level three for monthly reporting.
Full Z1, Z2 & Z3 Reports
Again the Z1, Z2 and Z3 are the same as the X1 report in form however the Z series of reporting
clears each total when performed, that is a Z1 Report clears level one reporting and so forth.
Generally level one is used for daily reporting, level two for weekly reporting and level three for
monthly reporting.
Full PLU Report
The Full PLU Report
lists the sales of all PLUs between any two dates as entered by the user. The
report lists the quantity sold and the total value of that item sold in the report. After selecting the Full
PLU Report
from the report list the WaiterPOS will prompt the user to enter a beginning date and an
ending date for the report.
Fig 4.5(c) Example X1 report.

Page 52
Flash Report
The Flash Report
lists the total of all medias received and counters since
the last Z1 Report was performed.
Fi
g
4.5
(
d
)
Flash re
p
ort.
Page 53
System Maintenance
System MaintenanceSystem Maintenance
System Maintenance
5.1 DAILY OPENING PROCEDURE
1. Turn on the computer and open the WaiterPOS application by double clicking the mouse on the
WaiterPOS Icon.
2. Turn on the printers and remove the WaiterPad’s from the charger.
3. Turn on all WaiterPad hand held units and check that the battery level is at 80% or more. (Note:
the WaiterPad will take approximately 30 seconds to correctly sense the battery level after a
number of events are completed.)
4. Check that the WaiterPOS keyboard is functioning by logging on and pressing the Table 1
key.
This should prompt for a number of covers which indicates that the keyboard is functioning
correctly. Press the New Balance
key to cancel.
5. Check that all the printers have enough paper.
6. Perform a printers test by pressing the keys 1 0 2 X
on the WaiterPOS keyboard. This should output
to all order printers a docket with four lines of print saying “Testing” in different fonts.
7. If this does not work check that the power is turned on to all printers and repeat the above test. If
the printers have power and did not output the test then reset the network controller and then
repeat the above test, see section 5.5 Network Controller for directions on performing a reset.
5.2 DAILY CLOSING PROCEDURE
1. Make sure all tables have been cleared and settled.
2. Press the Reports key and select the Z1 Report from the list. (see section 4.5 Reports)
3. Close down WaiterPOS by pressing the close key on the top right-hand corner of the screen.
4. Close down the computer and turn off the printers.
5. Plug all the hand held WaiterPad’s into the WaiterPad charger.
5.3 RECHARGING BATTERIES
To recharge the WaiterPad batteries simply insert one of the charger cables into the
charge/download port of the WaiterPad. Ensure that the green power LED light is on and that the red
charging LED light comes on when the charge cable is inserted into the WaiterPad. The red LED will
turn off when the WaiterPad has finished charging.
Battery Considerations
Included with the WaiterPad are rechargeable Ni-MH batteries, if for any reason these batteries are
replaced with non-rechargeable (alkaline) batteries then the WaiterPad must not be plugged into
the charger at any time. This will damage the unit and void any warranty.
If replacing batteries always do so when the WaiterPad is turned off, never remove the batteries whilst
the unit is turned on. When removing the batteries the built in backup of the WaiterPad maintains
memory for a period of up to one minute. Whenever removing batteries replace then immediately
and ensure that the batteries are installed as per the diagram on the interior of the battery
compartment. If the batteries are not installed correctly the data from the WaiterPad will be erased.
Rechargeable batteries will charge to a maximum charge of approximately 80 – 85% after and a
WaiterPad should be recharged when it reaches a battery status of approximately 30%.
Page 54
5.4 WAITERPAD RESETS
Initialization
In situations where the hand held WaiterPad is not responding the unit may require an initialization.
The initialization tells the WaiterPad to stop what its doing and all data in the WaiterPad is retained. To
perform an initialization unscrew the end of the stylus pen (those with metal shafts) or unfold a paper
clip and gently press the reset button inside the hole on the back of the WaiterPad.
RAM Clear
A RAM clear clears all data from the WaiterPad and should not be performed unless an initialization
has not solved the problem. To perform a RAM clear proceed as follows:
1. Hold down the power button on the front of the WaiterPad.
2. While holding the power button down, use the reset tip tool or an unfolded paper clip to gently
press the rest button.
3. Release the power button.
4. When a message appears on the WaiterPad screen warning that all data will be erased, do one
of the following:
Press the Scroll Up button on the front of the WaiterPad to complete the RAM clear and display
the digitizer screen.
Press any other button to perform an initialization.
5.5 NETWORK CONTROLLER MAINTENANCE
Performing a Reset
A reset of the Network Controller should only be performed if advised by the Dealer or in the
troubleshooting section. To perform a reset proceed as follows:
1. Ensure that waiters are not transmitting orders.
2. Use the tip of a pen or a small screw driver to press the reset button on the back of the Network
Controller next to the power cord. The reset button is mounted internally to ensure the button is
not pressed accidentally.
3. Once reset the Network Controller will search for each printer and radio frequency receiver and
indicates that it is complete when the red LED lights on the front start to sequentially flash again.
5.6 PRINTER MAINTENANCE
Performing a Reset
A reset of the Printer Controller should only be performed if advised by the Dealer or in the
troubleshooting section. To perform a reset proceed as follows:
1. Press the red reset button on the back of the Printer Controller. The red LED light on the front of
the Printer Controller will flash whilst completing.
2. The printer will print a report outlining the settings of the Printer Controller. When complete the red
LED light will stay on.

Page 55
5.7 WAITERPAD MAINTENANCE
Caring for the WaiterPad
The WaiterPad is designed to be rugged and reliable to provide years of trouble free service. Please
observe the following general tips when using the WaiterPad:
• Take care not to scratch the screen and keep it clean. Use the stylus pen supplied with the unit,
never use an actual pen or pencil or other sharp object on the surface of the screen.
• The WaiterPad is not waterproof and should not be exposed to rain or moisture.
• The WaiterPad touch-screen contains a glass element, do not drop the WaiterPad or subject it to
any strong impact.
• Protect the WaiterPad from temperature extremes and do not store the WaiterPad in any
location that is extremely dusty, damp or wet.
• Use a soft, damp cloth to clean the screen of the WaiterPad. If the surface of the WaiterPad
becomes soiled, clean it with a soft cloth moistened with a diluted widow cleaning solution.
Recalibration of Screen
The WaiterPad touch-screen may require re-calibration from time to time, to do this proceed as
follows:
1. Go to the Palm Pilot home screen by placing the tip of the stylus pen on the Graffiti Tablet area
at the bottom of the WaiterPad screen and then writing a straight line from this area to the main
WaiterPad screen.
2. Select the Welcome function from the home screen, the user may need to scroll down to home
list to find this function.
3. Complete the welcome as instructed on screen.
Page 56
System Troubleshooting
System TroubleshootingSystem Troubleshooting
System Troubleshooting
6.1 PRINTERS
Problem
Order Printer is not printing out
order dockets.
Paper feeds but the but nothing
prints when an order comes in.
Type on dockets is condensed or
squashed.
The bill printer is not printing
receipts from the WaiterPOS.
Printer has paper and is receiving
the order but nothing comes out.
Solution
• Is the printer turned on.
• Are any printer error lights on, see manufacturers
instructions for explanation of problem.
• Have any of the cables between the printer
controller and the printer dislodged.
• Reset the printer controller as described in
section 5.7 Printer Maintenance.
• Reset the network controller as described in
section 5.6 Network Controller Maintenance.
• Is the paper installed in the printer correctly, see
manufacturers instructions.
• Does the printer ribbon need to be replaced.
• The movement of paper through the printer is
being restricted. See manufacturers instructions
for correct method for paper installation.
• Is the receipt turned off, see section 4.4
WaiterPOS Functions for instructions on how to
turn the receipt on.
• Is the printer cable connected to both the printer
& computer.
• Paper jam, check paper.
6.2 WAITERPAD HAND HELD
Problem
The WaiterPad will not turn on.
After replacing the batteries with
new batteries the unit still gives a
battery low warning.
Solution
• Check the contrast control.
• Make sure the batteries are installed correctly.
• Perform an initialization as described in section
5.3 WaiterPad Resets.
• Replace the batteries
• It takes several minutes for the WaiterPad battery
gauge to accurately show the condition of the
batteries.
Page 57
Problem
The WaiterPad keeps turning itself
off.
The WaiterPad has frozen.
The screen of the WaiterPad is
blank or blurred.
The WaiterPad will not transmit an
order to the RF receiver.
Solution
• The WaiterPad is designed to turn itself off after a
period of inactivity.
• Perform an initialization as described in section
5.3 WaiterPad Resets.
• Change the contrast settings.
• Recharge the unit.
• Are you standing too far away from or too close
to the RF receiver.
• Are you holding the WaiterPad correctly and in
the direction of the RF receiver when transmitting.
• Is the network controller turned on.
• Are the batteries low, place the send cable into
the charge/download port at the bottom of the
WaiterPad.
6.3 WAITERPOS
Problem
WaiterPOS is not responding when
keys on the keyboard are pressed.
The bill printer is not printing
receipts from the WaiterPOS.
The system is printing cashier
dockets when orders are
transmitted.
Solution
• WaiterPOS is not active (shown by a gray
program bar at the top of the screen rather than
a blue bar). Use the mouse to click anywhere on
the screen to give the program focus.
• Is the receipt turned off, see section 4.4
WaiterPOS Functions for instructions on how to
turn the receipt on.
• WaiterPOS is not running, launch the application.
• The cable from the network controller to the
WaiterPOS computer has been dislodged.
6.4 POS SYSTEM GENERATOR
Problem
POS System Generator shows
warning messages when trying to
send information to the network
controller.
Solution
• WaiterPOS is using the communications port of
the computer, shut down WaiterPOS and retry.
• Is Hotsync Manager using the communications
port.

Page 58
Index
IndexIndex
Index
A
AA
A
Adding
AddingAdding
Adding
a group 30
a main group 29
a media 33
a new PLU 31
clerks 25
items to a tables bill at the WaiterPOS 46
items to the WaiterPad
7
tables to the WaiterPad 6
tables 18
B
BB
B
Batteries
BatteriesBatteries
Batteries
Recharging 53
Caring for the batteries 53
C
CC
C
Changing
ChangingChanging
Changing
a group 30
a lookup window 35
a main group 29
a media 33
a menu editor item 40
a PLU 32
an order on the WaiterPad 10
clerk details 26
printers 26
product prices on the WaiterPad
15
tax levels 28
the keyboard 20
the table layout 18
D
DD
D
Daily Procedures
Daily ProceduresDaily Procedures
Daily Procedures
Opening 53
Closing 53
Deleting
DeletingDeleting
Deleting
a group 30
a main group 29
a media 33
a menu editor item 41
a PLU 32
clerks 26
tables from the layout 18
tables from the WaiterPad 13
E &
E & E &
E & F
F F
F
G
GG
G
Generating a Menu 43
H
H H
H -
--
- L
L L
L
M
MM
M
Menu editor
Menu editorMenu editor
Menu editor
Changing a menu item 40
Creating a menu 39
Creating complex orders 40
Creating sub-menus 39
Deleting a menu item 41
Error messages 43
Generating a menu 43
Main screen
36
Planning a new menu 36
Reports 41
Setting the managers PIN 37
Starting menu editor 36
WaiterPad flags 38
Modifying
ModifyingModifying
Modifying
a group 30
a lookup window 35
a main group 29
a media 33
a PLU 32
clerk details 26
printers 26
tax levels 28
the keyboard 20
the table layout 18
A tables bill 47
an order on the WaiterPad 10
product prices on the WaiterPad 15
N
NN
N
Network controller
Network controllerNetwork controller
Network controller
Introduction 3
Resetting 54
O & P
O & PO & P
O & P
Printer controller
Printer controllerPrinter controller
Printer controller
Introduction 4
Resetting 54
Troubleshooting 56
Q & R
Q & RQ & R
Q & R

Page 59
S
SS
S
Sending Data to the:
Sending Data to the:Sending Data to the:
Sending Data to the:
Network controller 44
WaiterPads 44
Split Billing
Split BillingSplit Billing
Split Billing 22, 48
System Generator
System GeneratorSystem Generator
System Generator
Adding a group 30
Adding a main group 29
Adding a media 33
Adding a new PLU 31
Adding clerks 25
Adding tables 18
Clearing sales data 17
Counters 30
Creating a lookup window 34
Deleting a group 30
Deleting a main group 29
Deleting a media 33
Deleting a PLU 32
Deleting clerks 26
Deleting tables 18
Editing the receipt layout 27
Menu shifts 35
Modifying a group 30
Modifying a lookup window 35
Modifying a main group 29
Modifying a media 33
Modifying a PLU 32
Modifying clerk details 26
Modifying printers 26
Modifying tax levels 28
Modifying the keyboard 20
Modifying the table layout 18
Network controller flags 24
Price level modifiers 35
Table modifiers 35
Tax system 28
Troubleshooting 57
WaiterPOS flags 23
T
TT
T
Troubleshooting
TroubleshootingTroubleshooting
Troubleshooting
Printer 56
System Generator 57
WaiterPad 56
WaiterPOS 57
U & V
U & VU & V
U & V
W
WW
W
WaiterPad hand held
WaiterPad hand heldWaiterPad hand held
WaiterPad hand held
Adding items 7
Adding tables 6
Altering screen appearance 12
Caring for 55
Custom messages 9
Custom products 8
Deleting tables 13
Initialization 54
Logging on 6
Managerial logon 14
Modifying an order 10
Modifying product prices 15
Printing bills 13
Product notes 8
Returning to the logon screen 5
Reviewing orders 10
RAM clear 54
Screen calibration 55
Scrolling 5
Selecting an item 5
Sending orders 11
System Messages 15
Transferring tables 12
Troubleshooting 56
Turning on/off 5
WaiterPOS
WaiterPOSWaiterPOS
WaiterPOS
Adding items to a tables bill 46
Correcting items on a bill 47
Discounts 48
Electronic journal 49
Entering multiple amounts 47
Keyboard levels 47
Logging on 47
Main screen description 45
Moving tables 49
Opening a new table 47
Opening a tables bill 46
Part payments 49
PLU modifiers 48
Price levels 47
Printing bills 48
Processing a tables payment 46
Refunds 48
Reporting 50
Split billing 48
Table modifiers 48
Training mode 49
Troubleshooting 57
Voids 48
X Y Z
X Y ZX Y Z
X Y Z

Page 60
System Log
System LogSystem Log
System Log
Date: / / Time: am/pm
Items/Equip: .
Description:
Comments:
Date: / / Time: am/pm
Items/Equip: .
Description:
Comments:
Date: / / Time: am/pm
Items/Equip: .
Description:
Comments:

Page 61
Date: / / Time: am/pm
Items/Equip: .
Description:
Comments:
Date: / / Time: am/pm
Items/Equip: .
Description:
Comments:
Date: / / Time: am/pm
Items/Equip: .
Description:
Comments:

Page 62
Date: / / Time: am/pm
Items/Equip: .
Description:
Comments:
Date: / / Time: am/pm
Items/Equip: .
Description:
Comments:
Date: / / Time: am/pm
Items/Equip: .
Description:
Comments:

Page 63
Date: / / Time: am/pm
Items/Equip: .
Description:
Comments:
Date: / / Time: am/pm
Items/Equip: .
Description:
Comments:
Date: / / Time: am/pm
Items/Equip: .
Description:
Comments:

Page 64
Date: / / Time: am/pm
Items/Equip: .
Description:
Comments:
Date: / / Time: am/pm
Items/Equip: .
Description:
Comments:
Date: / / Time: am/pm
Items/Equip: .
Description:
Comments:

Page 65
Date: / / Time: am/pm
Items/Equip: .
Description:
Comments:
Date: / / Time: am/pm
Items/Equip: .
Description:
Comments:
Date: / / Time: am/pm
Items/Equip: .
Description:
Comments:

Page 66
Date: / / Time: am/pm
Items/Equip: .
Description:
Comments:
Date: / / Time: am/pm
Items/Equip: .
Description:
Comments:
Date: / / Time: am/pm
Items/Equip: .
Description:
Comments:

Page 67
Date: / / Time: am/pm
Items/Equip: .
Description:
Comments:
Date: / / Time: am/pm
Items/Equip: .
Description:
Comments:
Date: / / Time: am/pm
Items/Equip: .
Description:
Comments:

Page 68
Date: / / Time: am/pm
Items/Equip: .
Description:
Comments:
Date: / / Time: am/pm
Items/Equip: .
Description:
Comments:
Date: / / Time: am/pm
Items/Equip: .
Description:
Comments:

Page 69
Date: / / Time: am/pm
Items/Equip: .
Description:
Comments:
Date: / / Time: am/pm
Items/Equip: .
Description:
Comments:
Date: / / Time: am/pm
Items/Equip: .
Description:
Comments:

Page 70
Date: / / Time: am/pm
Items/Equip: .
Description:
Comments:
Date: / / Time: am/pm
Items/Equip: .
Description:
Comments:
Date: / / Time: am/pm
Items/Equip: .
Description:
Comments: