VTech Connect 6011N Flex Alphanumeric Pager User Manual
VTech Connect Limited Flex Alphanumeric Pager
User Manual

6011N 4-line Alphanumeric Display FLEX Pager
User Manual
Version 0.3
(ENGINEERING DEPARTMENT)
Document No.: C 3G 6011 UM 85 N 0000 001 1
Name Signature Date
Prepared by:
Approved by
Uncontrolled ( ) Controlled ( ) Copy No.:
a member of the group
Electronics Limited

Document History
Date Author Version Description of Changes
May 15, 98 Bili Cheung 0.0 Original release.
May 28, 98 Clara Ho 0.1 Contents amendment.
May 29, 98 Bili Cheung 0.2 Contents amendment and minor
modification.
Jan 7, 99 Bili Cheung 0.3 Adding the FCC statements.

Table of Contents
1. THE 6011N PAGER 4
1.1 Pager Overview 4
1.2 Status Icons 5
2. FEATURES OF 6011N 6
2.1 Memory Capacity 6
2.1.1 User Memory Bank 6
2.1.2 Personal Memory Bank 6
2.1.3 News Memory Bank 6
2.2 Operating Your Pager 7
3. PAGER OPERATION 8
3.1 Turning On the Pager 8
3.2 Turning Off the Pager 8
3.3 Handling Messages 9
3.3.1 Receiving and Reading Messages 9
3.3.2 Checking Unread Messages 9
3.3.3 Message Screening 10
3.3.4 Protecting and Unprotecting User Message 10
3.3.5 Copying Message 11
3.3.6 Deleting Messages from Memory 12
3.4 Function Setup Handling 13
3.4.1 Setting Alert Mode 13
3.4.2 Setting the Time and Date 13
3.4.3 Setting Auto On/Off Timer 14
3.4.4 Setting Silent Timer 15
3.4.5 Setting Appointment Alarm 15
3.4.6 Setting Personal Message Alarm 16
3.4.7 Setting News Message Alarm 17
3.4.8 Setting Message Display Duration 17
3.4.9 Melody Selection 18
3.4.10 Setting Unread Message Alarm Period 19
3.4.11 Key Beep 19
3.4.12 Setting Audio Alert Duration 20
3.4.13 Setting LCD Contrast Level 20
3.4.14 Setting Character Font Size 21
4. OTHER FEATURES 22
DATE OF ISSUE: 8-Jan-99 Page 4 of 24
DOC. NO.: C 3G 6011 UM 85 N 0000 001 1
VERSION 0.3 6011N 4-line Alphanumeric Display FLEX Pager User Manual
CIRKISYS ELECTRONICS LTD.
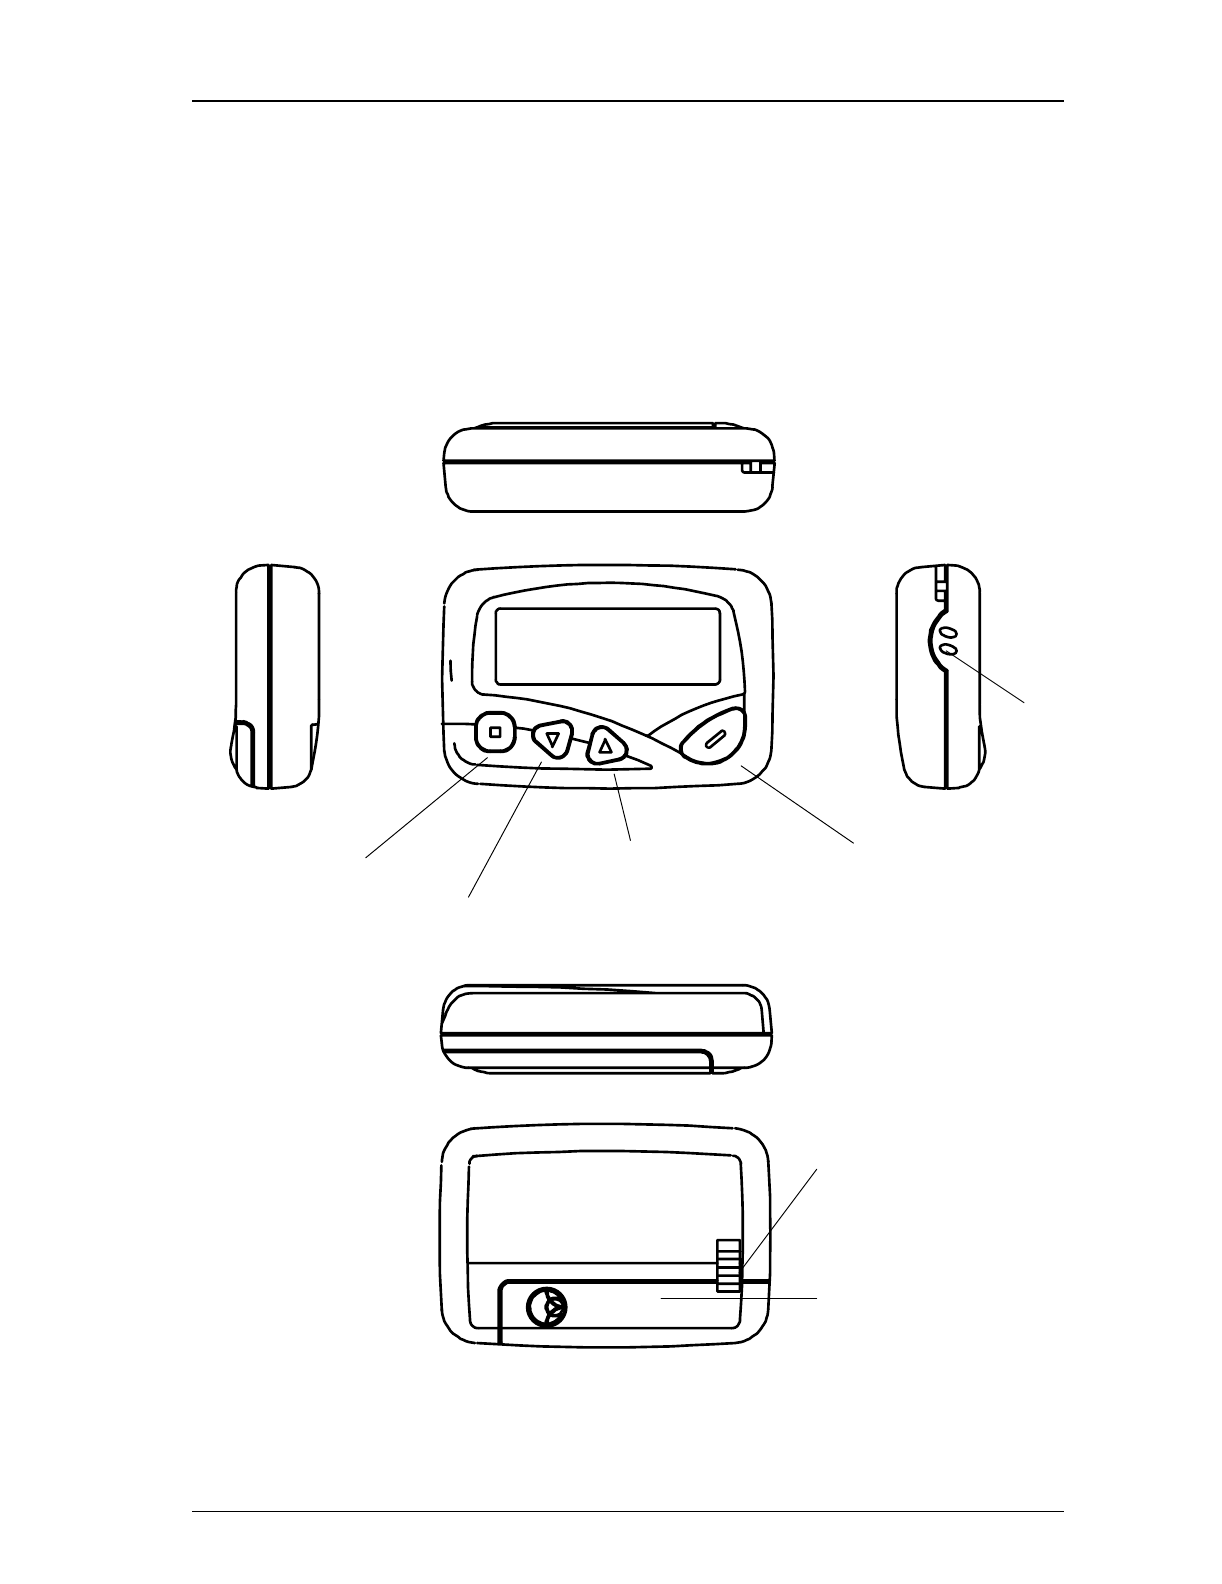
1. The 6011N Pager
1.1 Pager Overview
The two-dimensional views of the pager are shown below. The dimensions of
the pager are about 73.5mm(L) x 50mm(W) x 18.5mm(D).
Overview of the 6011N pager
Confirm / Power on /
Read / Left and right
direction key
Up / Read / Time
display key
Down / Read /
Time display key
Menu / Light /
Escape key
Top
Bottom
RightLeft
LCD screen
Front
Rear
Battery compartment
door lock
Battery compartment
door
Buzzer
outlet
DATE OF ISSUE: 8-Jan-99 Page 5 of 24
DOC. NO.: C 3G 6011 UM 85 N 0000 001 1
VERSION 0.3 6011N 4-line Alphanumeric Display FLEX Pager User Manual
CIRKISYS ELECTRONICS LTD.
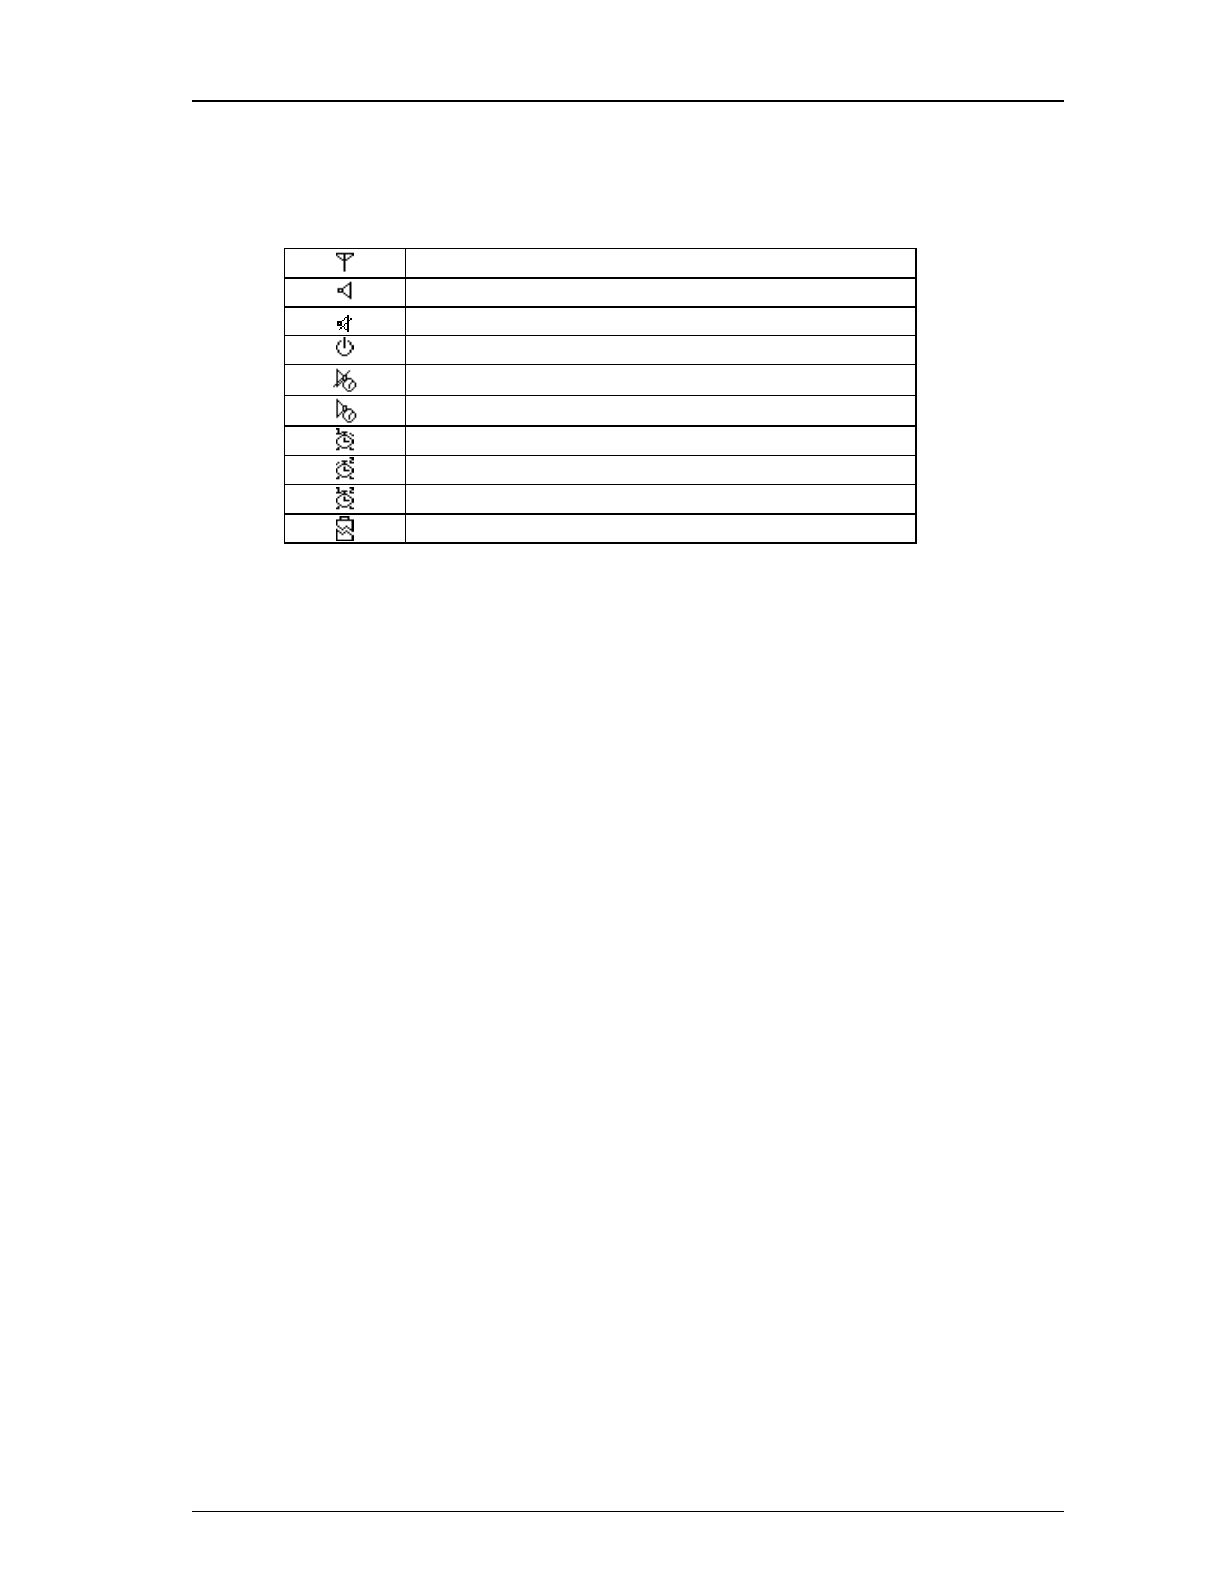
1.2 Status Icons
Out-of-Range
Audio Alert Mode Enabled
Vibration Alert Mode Enabled
Auto On/Off Timer Enabled
Silent reception function is set and activated
Silent reception function is set but inactivated
Alarm Clock 1 Enabled
Alarm Clock 2 Enabled
Alarm Clock 1 & 2 Enabled
Low battery indicator

DATE OF ISSUE: 8-Jan-99 Page 6 of 24
DOC. NO.: C 3G 6011 UM 85 N 0000 001 1
VERSION 0.3 6011N 4-line Alphanumeric Display FLEX Pager User Manual
CIRKISYS ELECTRONICS LTD.
2. Features of 6011N
2.1 Memory Capacity
One main feature of the 6011N pager is its large memory capacity. The memory
is partitioned into 3 memory banks for storing different types of messages - user
messages, personal messages and news messages.
2.1.1 User Memory Bank
A maximum of 40 user messages can be stored in the user memory bank. The
length of each message is limited by the maximum storage capacity, which is
5,000 characters.
Each message is assigned with a time stamp showing the receiving time and date
of the message. “ User Memory Full” message will be displayed if the user
memory bank is full.
When a new message is received and the memory bank is full, the oldest read
messages will be deleted automatically (in case if all messages are not yet read,
the pager will then delete the oldest unread one). Audio or vibration alert
together with a dynamic graph will be generated after a message has been
received.
2.1.2 Personal Memory Bank
The maximum capacity of the personal memory bank is 20 user messages. The
total storage capacity of personal memory bank is limited to 2,200 characters.
“ Personal Memory Full” message will be displayed when the memory bank is
full. User has to delete some old messages before new ones can be copied to the
personal memory bank.
2.1.3 News Memory Bank
There are 16 mailbox allocated with each user programmable address. The
maximum storage capacity for this bank is up to 23,500 characters and each
message can hold a maximum of 9,000 characters. Each news message is come
along with a time stamp and a corresponding maildrop number.

DATE OF ISSUE: 8-Jan-99 Page 7 of 24
DOC. NO.: C 3G 6011 UM 85 N 0000 001 1
VERSION 0.3 6011N 4-line Alphanumeric Display FLEX Pager User Manual
CIRKISYS ELECTRONICS LTD.
2.2 Operating Your Pager
The pull-down menus of 6011N work similarly as that of the MS Windows. All
pager functions are grouped into menus that give convenience for user to access
to each function. Use ( ) or ( ) to locate the highlight bar to the desired item
and press ( ) to confirm the selection. A dash line will appear in certain sub-
menus to indicate that the end of sub-menu has been reached.
DATE OF ISSUE: 8-Jan-99 Page 8 of 24
DOC. NO.: C 3G 6011 UM 85 N 0000 001 1
VERSION 0.3 6011N 4-line Alphanumeric Display FLEX Pager User Manual
CIRKISYS ELECTRONICS LTD.
3. Pager Operation
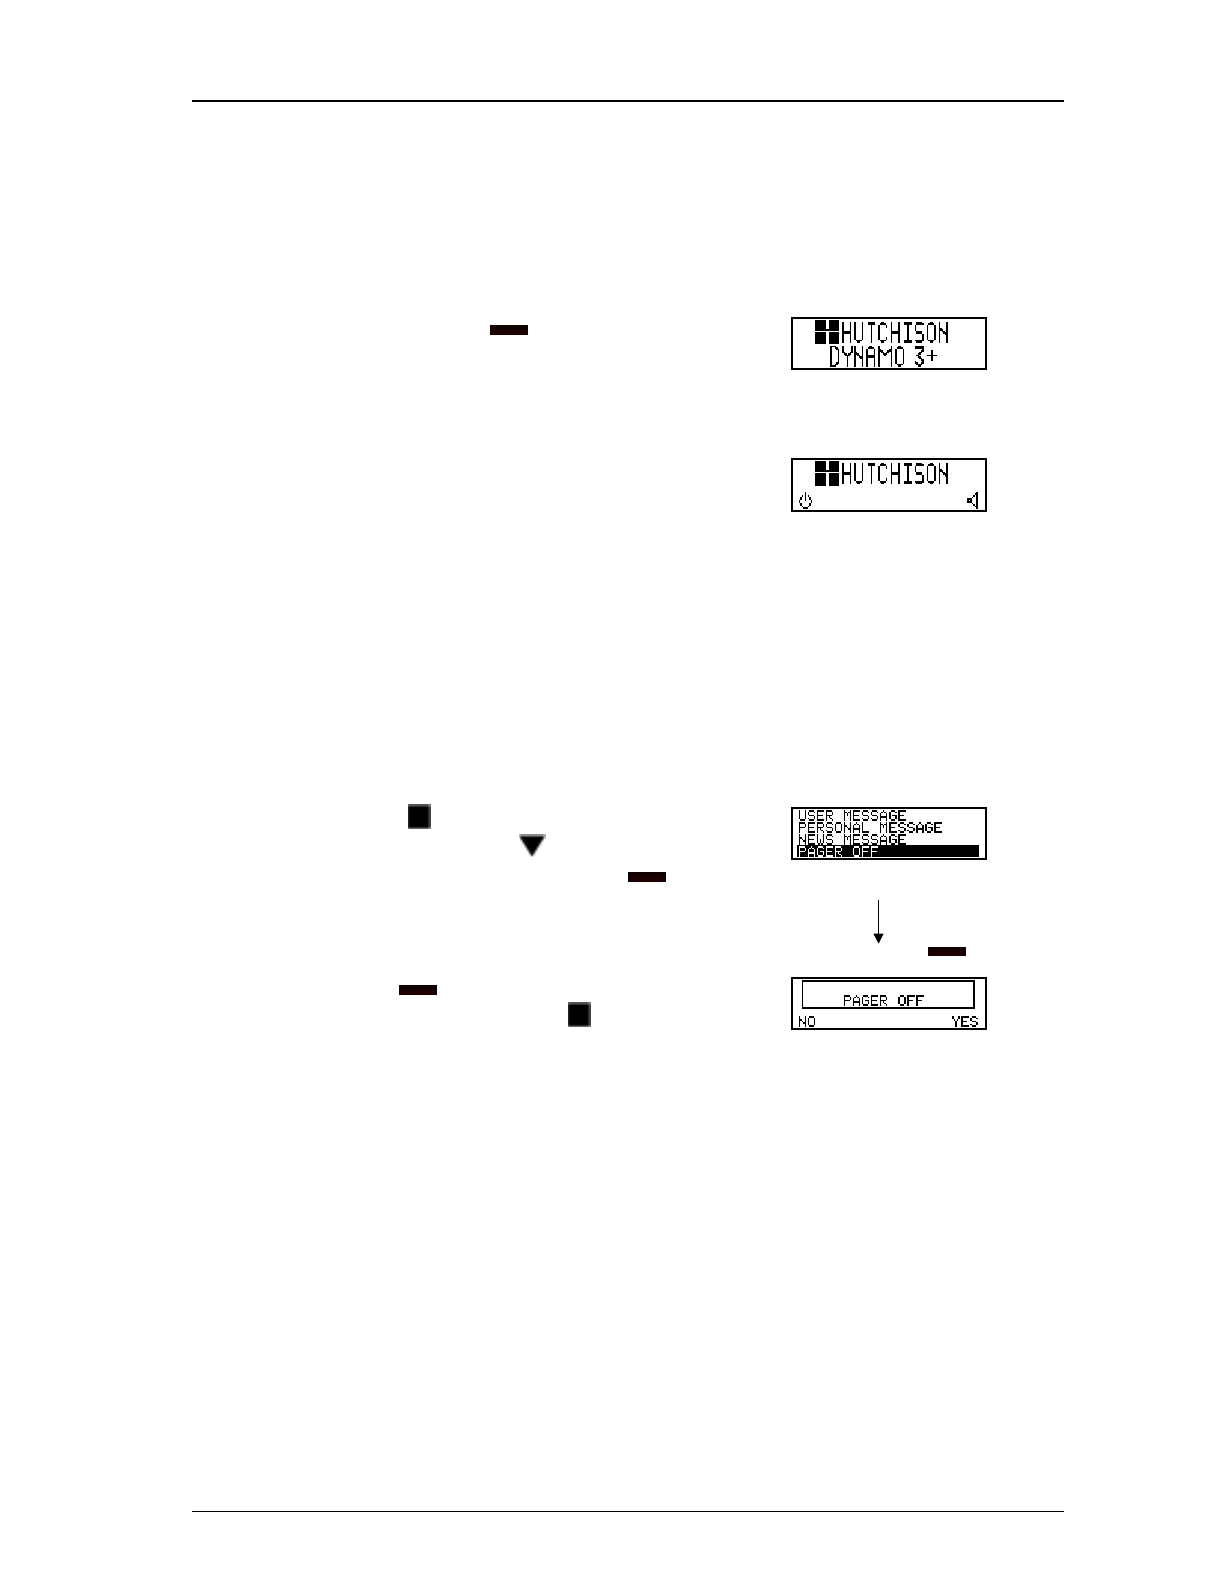
3.1 Turning On the Pager
1. Press and hold ( ) for 2 seconds
to turn on the pager. The paging
operator’ s name and the model
name will be displayed. Initial screen when pager is turned on
2. A 4-second audio or vibration alert
will be generated, depending on
which alert mode is selected. Press
any key to stop the alert. The pager
will then display the status screen.
Example of Pager Status Screen
3.2 Turning Off the Pager
1. Press ( ) to display the main
menu, then press ( ) to highlight
“ Pager Off” item and press ( )
to access the Pager Off
confirmation screen.
Main Menu
press ( )
2. Press ( ) under “ YES” to turn
off the pager or press “ ( )” under
“ NO” to abort the operation. Pager Off confirmation screen
DATE OF ISSUE: 8-Jan-99 Page 9 of 24
DOC. NO.: C 3G 6011 UM 85 N 0000 001 1
VERSION 0.3 6011N 4-line Alphanumeric Display FLEX Pager User Manual
CIRKISYS ELECTRONICS LTD.
3.3 Handling Messages
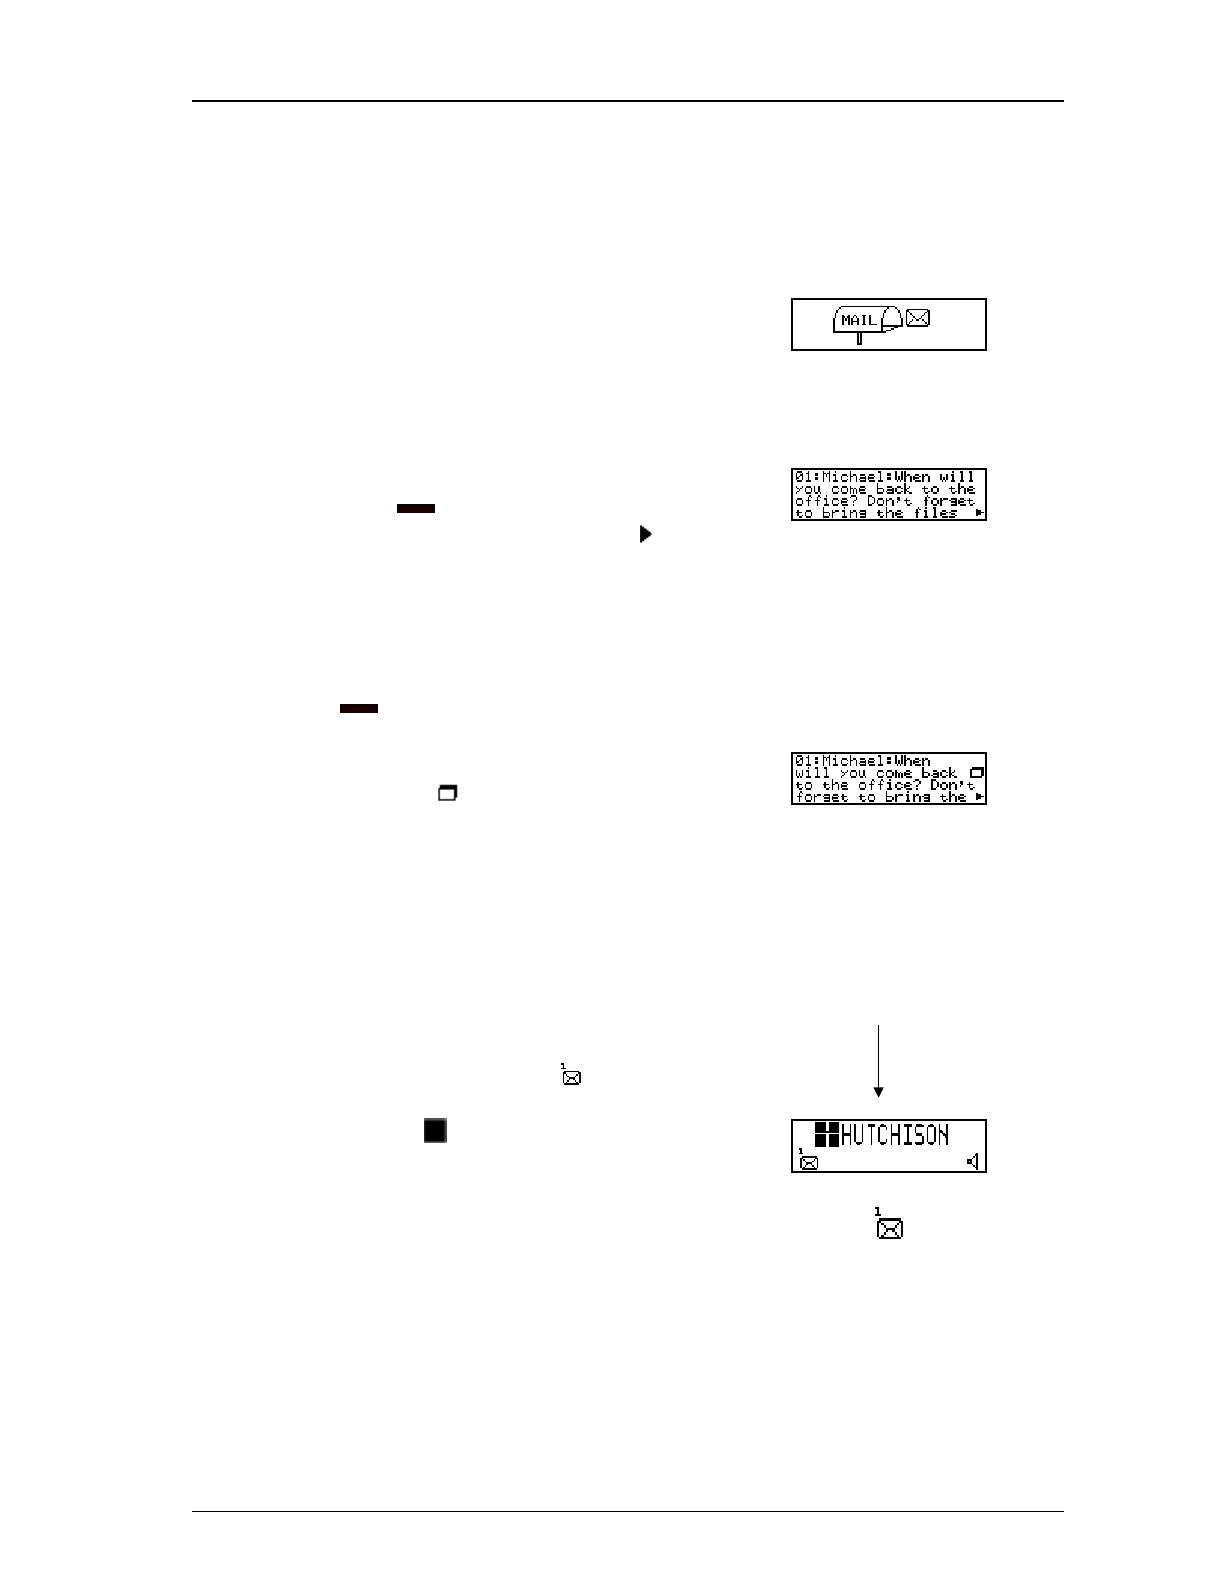
3.3.1 Receiving and Reading Messages
1. When a message is received, the
pager generates either an audio alert
or vibration alert and a notification
screen will be displayed
simultaneously.
Dynamic graph display on screen
when receiving call
2. Press any key to stop the alert, then
press ( ) to display the message
that you have received. A ‘ ’
symbol appears at the bottom right
corner of the screen indicates the
message is continued on next
screen. It will display
automatically or you can press
() to display the next screen.
Example of a message screen with
message continuation indicator
3. Note: If the message is a duplicate
one, the ‘ ’ icon will be shown
in the right of the screen. Example of a duplicate message
3.3.2 Checking Unread Messages
1. If user has any unread messages,
the pager would alert at
predetermined intervals and an
unread message icon ‘ ’ will be
displayed on the left when you have
pressed ( ) to display the status
screen.
Press ■ in
standby mode
2. The number on the icon indicates
the total number of unread
messages. ‘There is 1 unread message.’
DATE OF ISSUE: 8-Jan-99 Page 10 of 24
DOC. NO.: C 3G 6011 UM 85 N 0000 001 1
VERSION 0.3 6011N 4-line Alphanumeric Display FLEX Pager User Manual
CIRKISYS ELECTRONICS LTD.
3.3.3 Message Screening
If more than one message exists, press ( ) can display all messages in an
ascending order page by page. By pressing either ( ) or ( ) will display the
messages in an ascending or descending order respectively. User can also speed
up the scrolling rate of the first page of each message by press and hold these
keys.
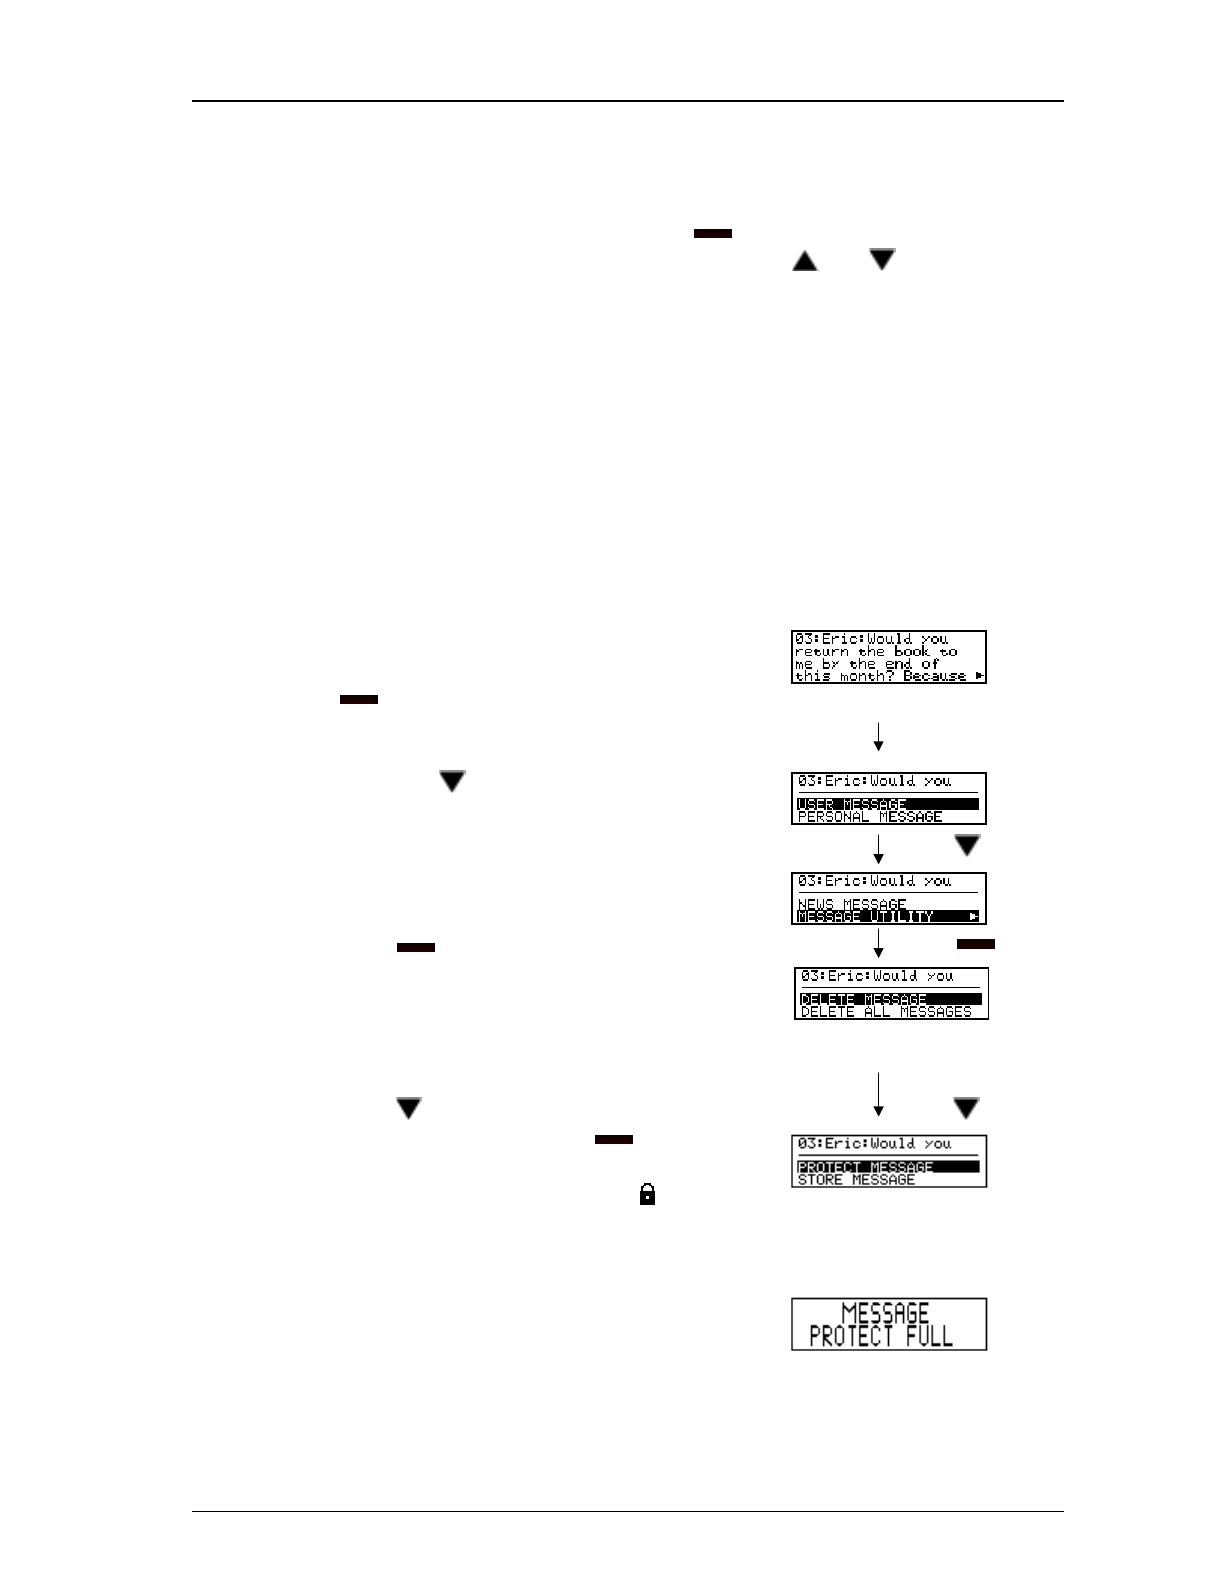
3.3.4 Protecting and Unprotecting User Message
Up to 20 user messages can be protected in memory, preventing them from
being replaced when memory is full.
To protect a message:
1. Select the message to be protected
(locked) by continuously pressing
(), then press (■) to invoke the
user memory bank sub-menu. Message to be protected
press (■)
2. Press ( ) to highlight
‘ MESSAGE UTILITY’ .
press ( )
3. Press ( ) to access the sub-menu
of Message Utility.
press ( )
Message Utility sub-menu screen
4. Press ( ) to highlight ‘ PROTECT
MESSAGE’ and press ( ) to
execute the function. If the
message is protected, the ‘ ’
icon will be shown at the right
corner of the screen.
press ( )
5. A warning message “ MESSAGE
PROTECT FULL” will be
displayed if the number of
protected messages has reached the
limit.

DATE OF ISSUE: 8-Jan-99 Page 11 of 24
DOC. NO.: C 3G 6011 UM 85 N 0000 001 1
VERSION 0.3 6011N 4-line Alphanumeric Display FLEX Pager User Manual
CIRKISYS ELECTRONICS LTD.
To unprotect a message:
1. Repeat above steps 1 to 3 to access to “ MESSAGE UTILITY” when you
have selected the message that you would like to unprotect.
2. Press ( ) to highlight “ UNPROTECT MESSAGE” and press ( ) to
confirm. ‘ ’ icon is no longer displayed.
3.3.5 Copying Message
You can store up to 20 user messages in the personal bank as personal notebook.
1. Select the message to be copied by
continuously pressing ( ).
Message to be copied
2. Press (■) to invoke the user
memory bank sub-menu then press
() to highlight “ MESSAGE
UTILITY” and press ( ) to
access the message utility sub-
menu.
press ( )
Message Utility sub-menu screen
3. Press ( ) to highlight “ STORE
MESSAGE” and press ( ) to
confirm storing (copying) the
message to personal bank.
press ( )
4. Note: A warning message
“ PERSONAL MEMORY FULL”
will be displayed if the personal
memory bank is full and copying
operation will be aborted.
DATE OF ISSUE: 8-Jan-99 Page 12 of 24
DOC. NO.: C 3G 6011 UM 85 N 0000 001 1
VERSION 0.3 6011N 4-line Alphanumeric Display FLEX Pager User Manual
CIRKISYS ELECTRONICS LTD.
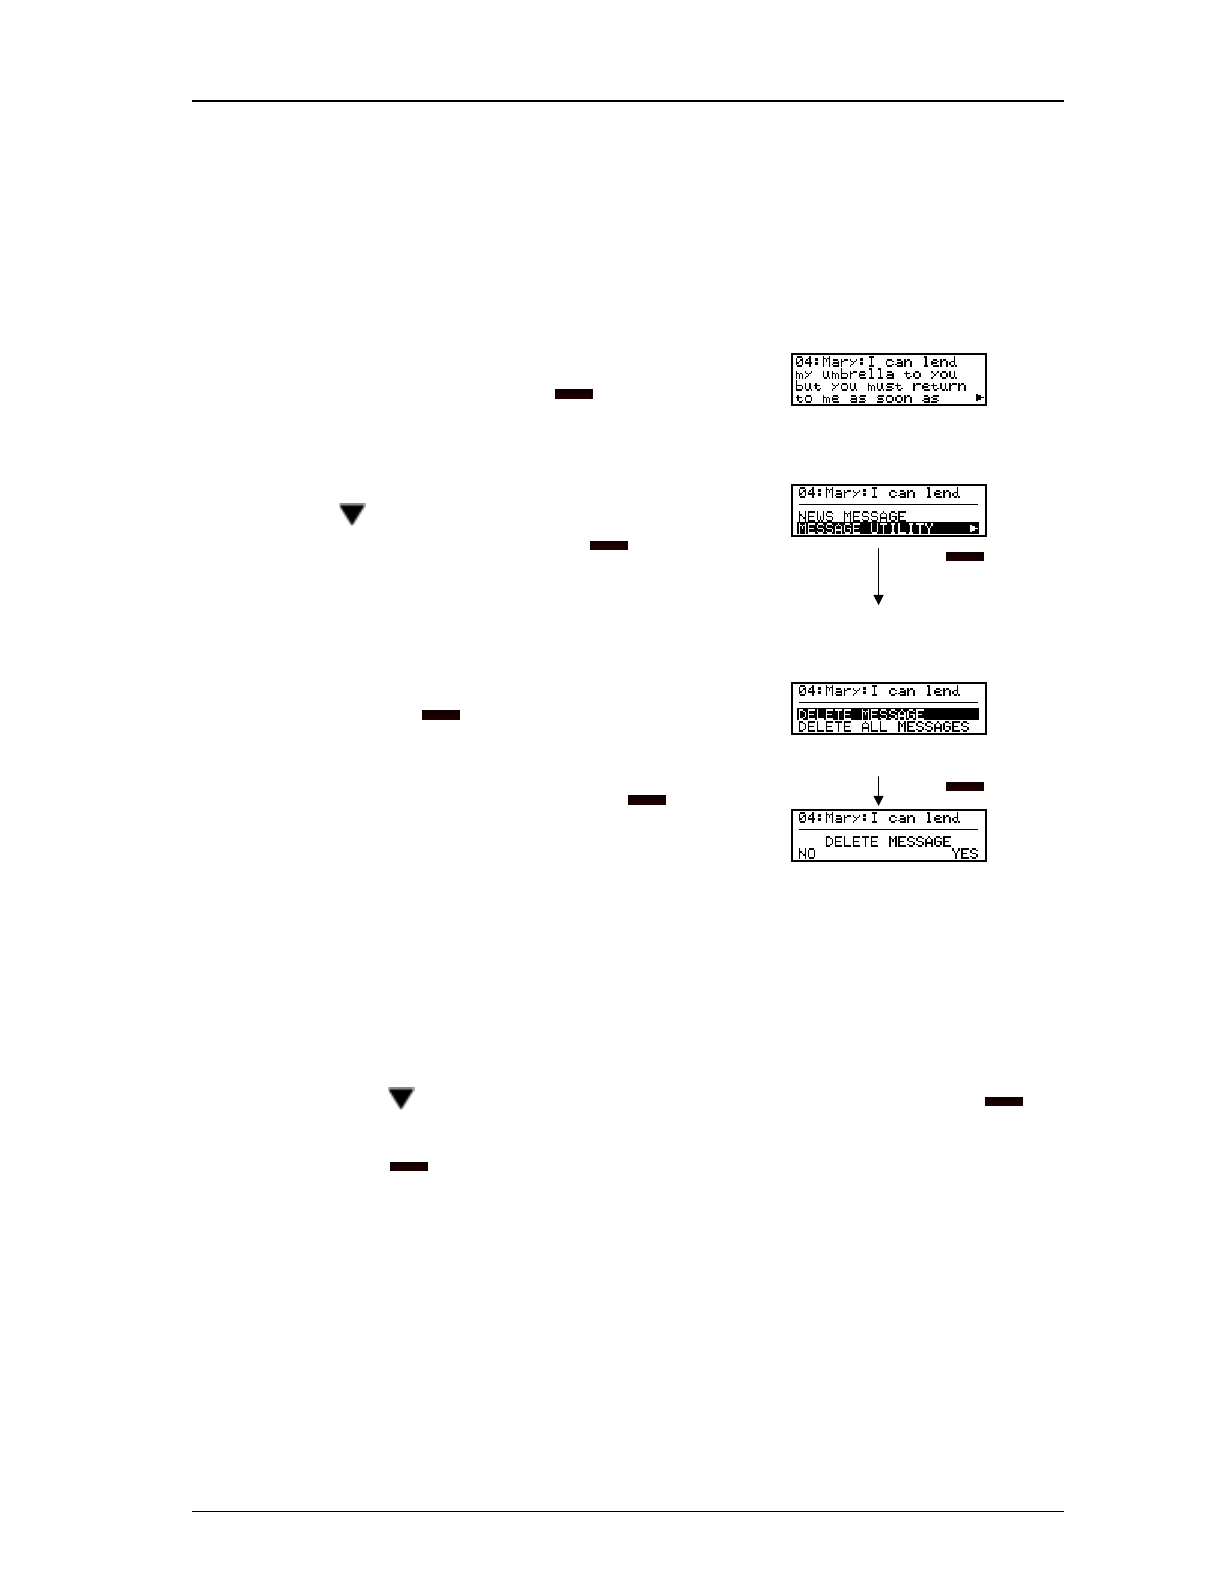
3.3.6 Deleting Messages from Memory
Messages in all memory banks can be deleted either individually or completely.
To delete individual message from user memory bank:
1. Select the message to be deleted by
continuously pressing ( ).
Message to be deleted
2. Press (■) to invoke the user
memory bank sub-menu and press
() to highlight “ MESSAGE
UTILITY” and press ( ) to
access the message utility sub-
menu.
press ( )
3. Press ( ) to access the
confirmation screen when
“ DELETE MESSAGE” item is
being highlighted. Press ( )
under ‘ YES’ to delete the
message or press (■) under ‘ NO’
to abort the operation.
Message Utility sub-menu screen
press ( )
Message deletion confirmation screen
To delete all messages in a user memory bank:
1. Repeat the above steps to access the “ MESSAGE UTILITY” sub-menu
screen.
2. Press ( ) to highlight “ DELETE ALL MESSAGES” and press ( ) to
access the confirmation screen.
3. Press ( ) under “ YES” to delete all messages in the memory bank or
press (■) under ‘ NO’ to abort the operation.
4. Note: “ NO USER MESSAGE” will be displayed to notify user that the
memory bank is empty. If you want to delete messages in other memory
banks, repeat the same process as above when accessing those banks.

DATE OF ISSUE: 8-Jan-99 Page 13 of 24
DOC. NO.: C 3G 6011 UM 85 N 0000 001 1
VERSION 0.3 6011N 4-line Alphanumeric Display FLEX Pager User Manual
CIRKISYS ELECTRONICS LTD.
3.4 Function Setup Handling
3.4.1
Setting Alert Mode
The alert can be set as either audible or silent (vibrate).
1. Press ( ) to display the main
menu, then press ( ) to highlight
“ ALERT-VIBRATE” (or
AUDIO” ) which depends on the
previous selected mode.
press ( ) to
change to audio mode
2. Press ( ) to toggle between audio or vibration alert mode. A short beep
will generate simultaneously while you selected the audio mode or it will
vibrate for 2 seconds if you select the silent mode. Press ( ) to confirm.
3. ‘ ’ icon is displayed on status screen if the pager is in the audio mode.
‘’ icon is displayed on status screen if the pager is in the silent mode.
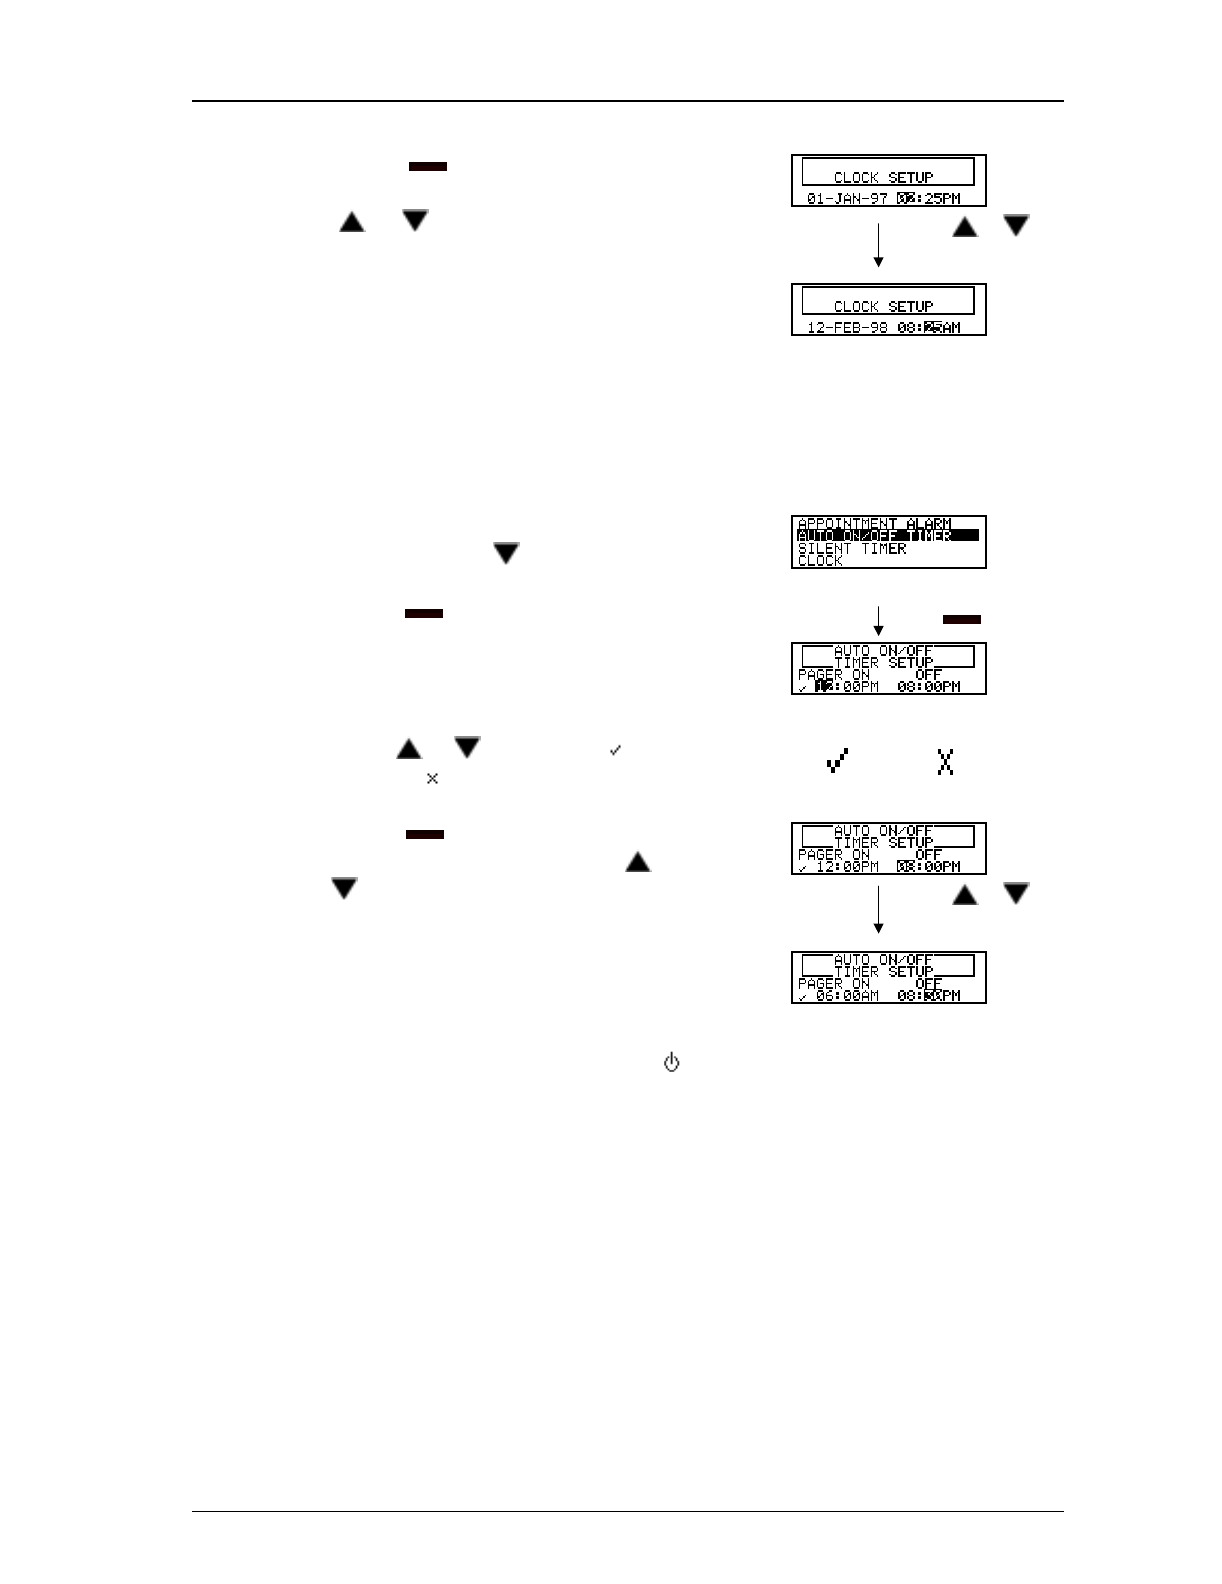
3.4.2 Setting the Time and Date
1. Press ( ) to display the main
menu, then press ( ) to highlight
“ ACCESSORIES” and press
() to access the sub-menu. press ( )
Accessories sub-menu screen
2. Press ( ) to highlight “ CLOCK”
and press ( ) to access the Clock
Setup screen.
press ( )
Clock Setup screen
DATE OF ISSUE: 8-Jan-99 Page 14 of 24
DOC. NO.: C 3G 6011 UM 85 N 0000 001 1
VERSION 0.3 6011N 4-line Alphanumeric Display FLEX Pager User Manual
CIRKISYS ELECTRONICS LTD.
3. Press ( ) to switch between
different fields, then press either
( or ) to adjust the date, time
field and hour mode respectively. press ( or ) to
adjust the date & time
4. Press (■) to activate the setting.
3.4.3 Setting Auto On/Off Timer
1. In the “ ACCESSORIES” sub-
menu, press ( ) to highlight
“ AUTO ON/OFF TIMER” and
press ( ) to access the Auto
On/Off Timer Setup screen.
Accessories sub-menu screen
press ( )
Auto On/Off Timer Setup screen
2. Press ( or ) to enable ‘ ’ or
disable ‘ ’ the timer setting. ‘’ or ‘ ’
3. Press ( ) to switch between
On/Off time field, then press ( or
) to adjust the on/off time. press ( or ) to
adjust the on/off time
4. Press (■) to activate the setting. ‘ ’ icon will display on pager to
indicate the auto timer setting is activated.
DATE OF ISSUE: 8-Jan-99 Page 15 of 24
DOC. NO.: C 3G 6011 UM 85 N 0000 001 1
VERSION 0.3 6011N 4-line Alphanumeric Display FLEX Pager User Manual
CIRKISYS ELECTRONICS LTD.
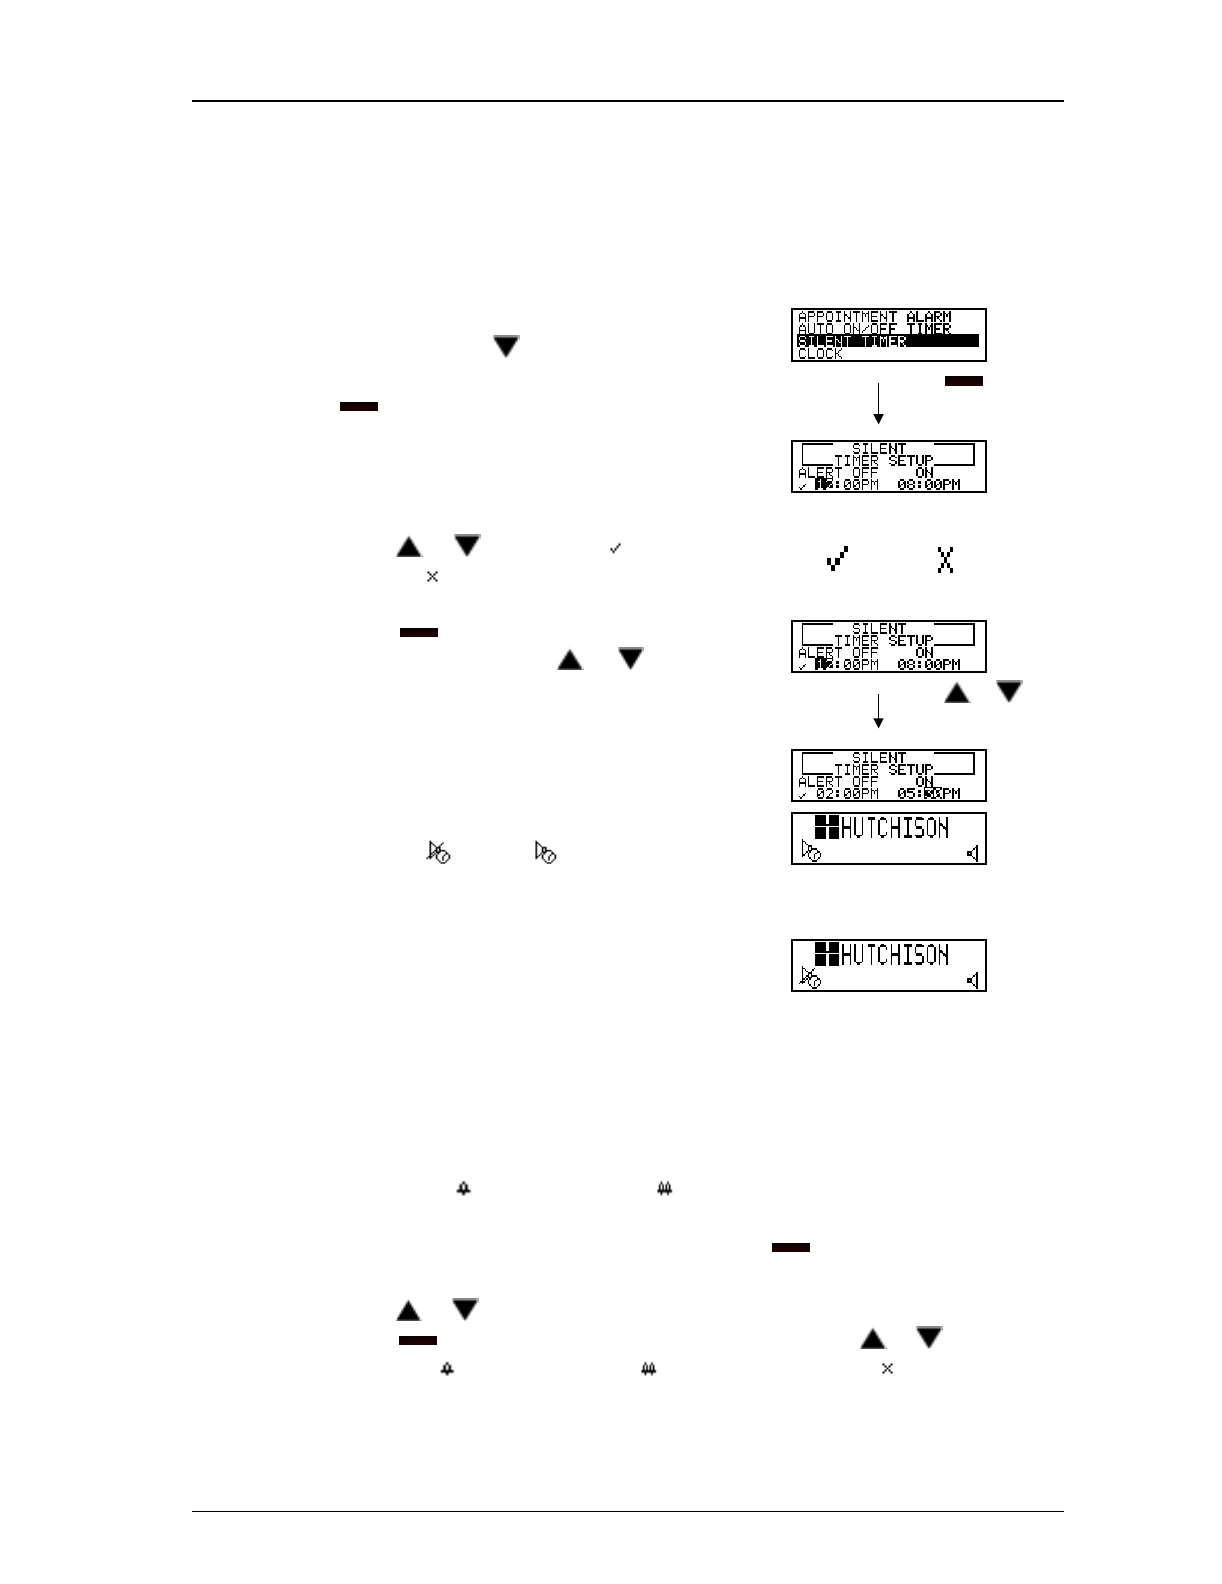
3.4.4 Setting Silent Timer
A built-in silent reception timer allows user to set a time range that no alert will
be generated when a message is being received.
1. In the “ ACCESSORIES” sub-
menu, press ( ) to highlight
“ SILLENT TIMER” and press
() to access the Silent Timer
Setup screen.
press ( )
Silent Timer Setup screen
2. Press ( or ) to enable ‘ ’ or
disable ‘ ’ the silent timer. ‘’ or ‘ ’
3. Press ( ) to switch between the
timer fields and press ( or ) to
adjust the silent on/off time. press ( or ) to
adjust the silent time
4. Press (■) to activate the setting.
Either ‘ ’ or ‘ ’ icon will
be displayed on screen to indicate
different period of silent
reception mode.
‘ Silent reception period is not yet reached…’
or
‘ It is now the silent reception period…’
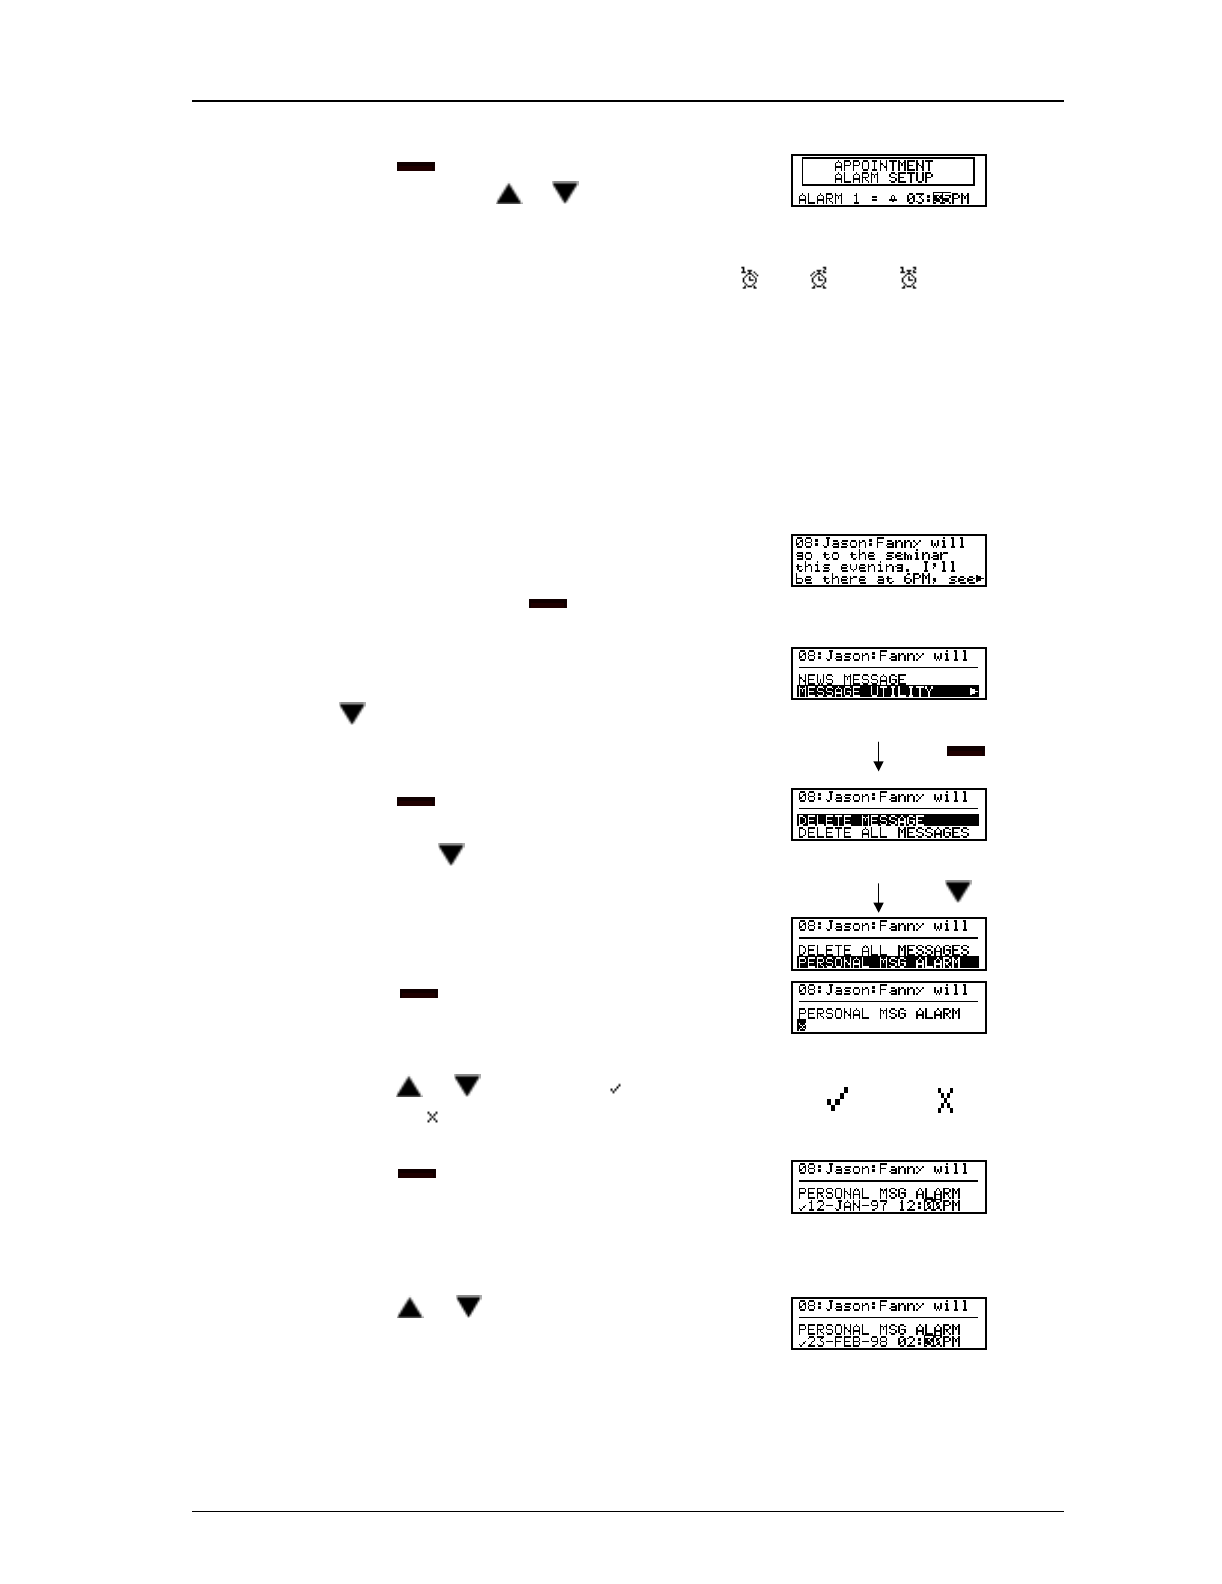
3.4.5 Setting Appointment Alarm
Two alarm clocks can be set in your pager. You can set each alarm to generate
either one-time ‘ ’ alarm or daily ‘ ’ alarm.
1. In the “ ACCESSORIES” sub-menu, press ( ) when “ APPOINTMENT
ALARM” is being highlighted to access the alarm setup screen.
2. Press ( or ) to select the alarm clock (either ‘ 1’ or ‘ 2’ or both), then
press ( ) to switch to the alarm mode field. Press ( or ) to enable
one-time ‘ ’ alarm or daily ‘ ’ alarm or disabled ‘ ’ the alarm.
DATE OF ISSUE: 8-Jan-99 Page 16 of 24
DOC. NO.: C 3G 6011 UM 85 N 0000 001 1
VERSION 0.3 6011N 4-line Alphanumeric Display FLEX Pager User Manual
CIRKISYS ELECTRONICS LTD.
3. Press ( ) to switch to the time
field, then press ( or ) to adjust
the time. Example of setting alarm 1
4. Press (■) to activate the setting. Either ‘ ’, ‘ ’ or ‘ ’ icon will be
displayed on status screen depends on your selection.
3.4.6 Setting Personal Message Alarm
Personal Message Alarm can be set to remind you of important personal
message:
1. In the personal memory bank,
select a message you wish to
remind by pressing ( ). Personal message to set alarm
2. Press (■) to invoke the personal
memory bank sub-menu and press
() to highlight “ MESSAGE
UTILITY” . Personal bank sub-menu
press ( )
3. Press ( ) to access the sub-menu
of “ MESSAGE UTILITY” , then
press ( ) to highlight
“ PERSONAL MSG ALARM” . Message Utility sub-menu screen
press ( )
4. Press ( ) to access the Personal
Alarm setup screen.
Personal Alarm setup screen
5. Press ( or ) to enable ‘ ’ or
disable ‘ ’ the personal alarm. ‘ ’ or ‘ ’
6. Press ( ) to switch between date
and time field.
7. Press ( or ) to adjust the alarm
date and time.
DATE OF ISSUE: 8-Jan-99 Page 17 of 24
DOC. NO.: C 3G 6011 UM 85 N 0000 001 1
VERSION 0.3 6011N 4-line Alphanumeric Display FLEX Pager User Manual
CIRKISYS ELECTRONICS LTD.
8. Press (■) to activate the setting.
‘’ icon will be displayed on the
right corner of the screen when
personal alarm has been set.
9. Note: ‘ ’ icon will not be displayed when the alarm time is over.
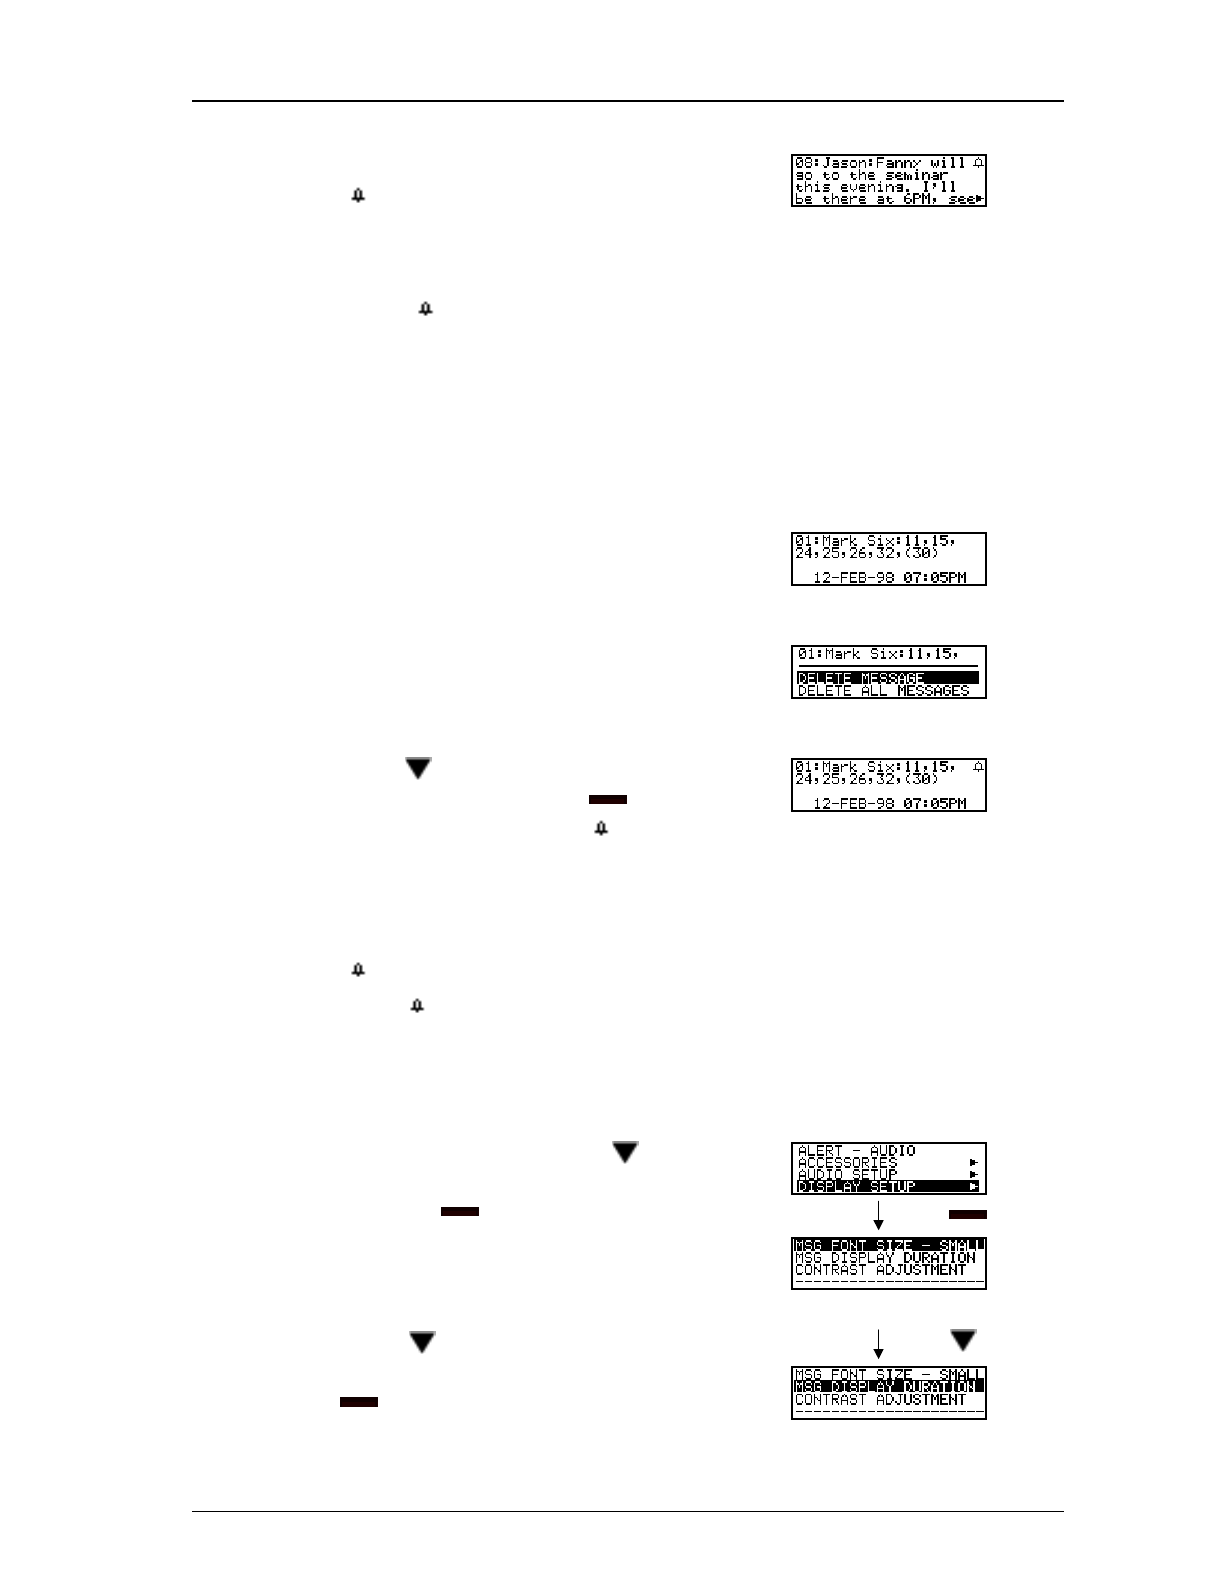
3.4.7 Setting News Message Alarm
User can set alarm in the news memory bank to remind him if there is any new
message received.
1. In the News Memory Bank, select
the news message that you want to
set alarm. News message to set alarm
2. Repeat the steps of 3.4.6 to access
the sub-menu of “ MESSAGE
UTILITY” . Message Utility sub-menu
3. Press ( ) to highlight “ NEWS
ALARM” and press ( ) to
enable the news alarm. ‘ ’ will
be displayed on screen when the
news alarm is being set.
News alarm has been set
4. To disable the news alarm, repeat the above steps such that the bell icon
‘’ is no longer display.
5. Note: ‘ ’ will not be displayed when the alarm time is over.
3.4.8 Setting Message Display Duration
1. In the main menu, press ( ) to
highlight “ DISPLAY SETUP”
and press ( ) to access the sub-
menu. press ( )
Display Setup sub-menu screen
2. Press ( ) to highlight “ MSG
DISPLAY DURATION” and press
() to access the Duration Setup
screen.
press ( )
DATE OF ISSUE: 8-Jan-99 Page 18 of 24
DOC. NO.: C 3G 6011 UM 85 N 0000 001 1
VERSION 0.3 6011N 4-line Alphanumeric Display FLEX Pager User Manual
CIRKISYS ELECTRONICS LTD.
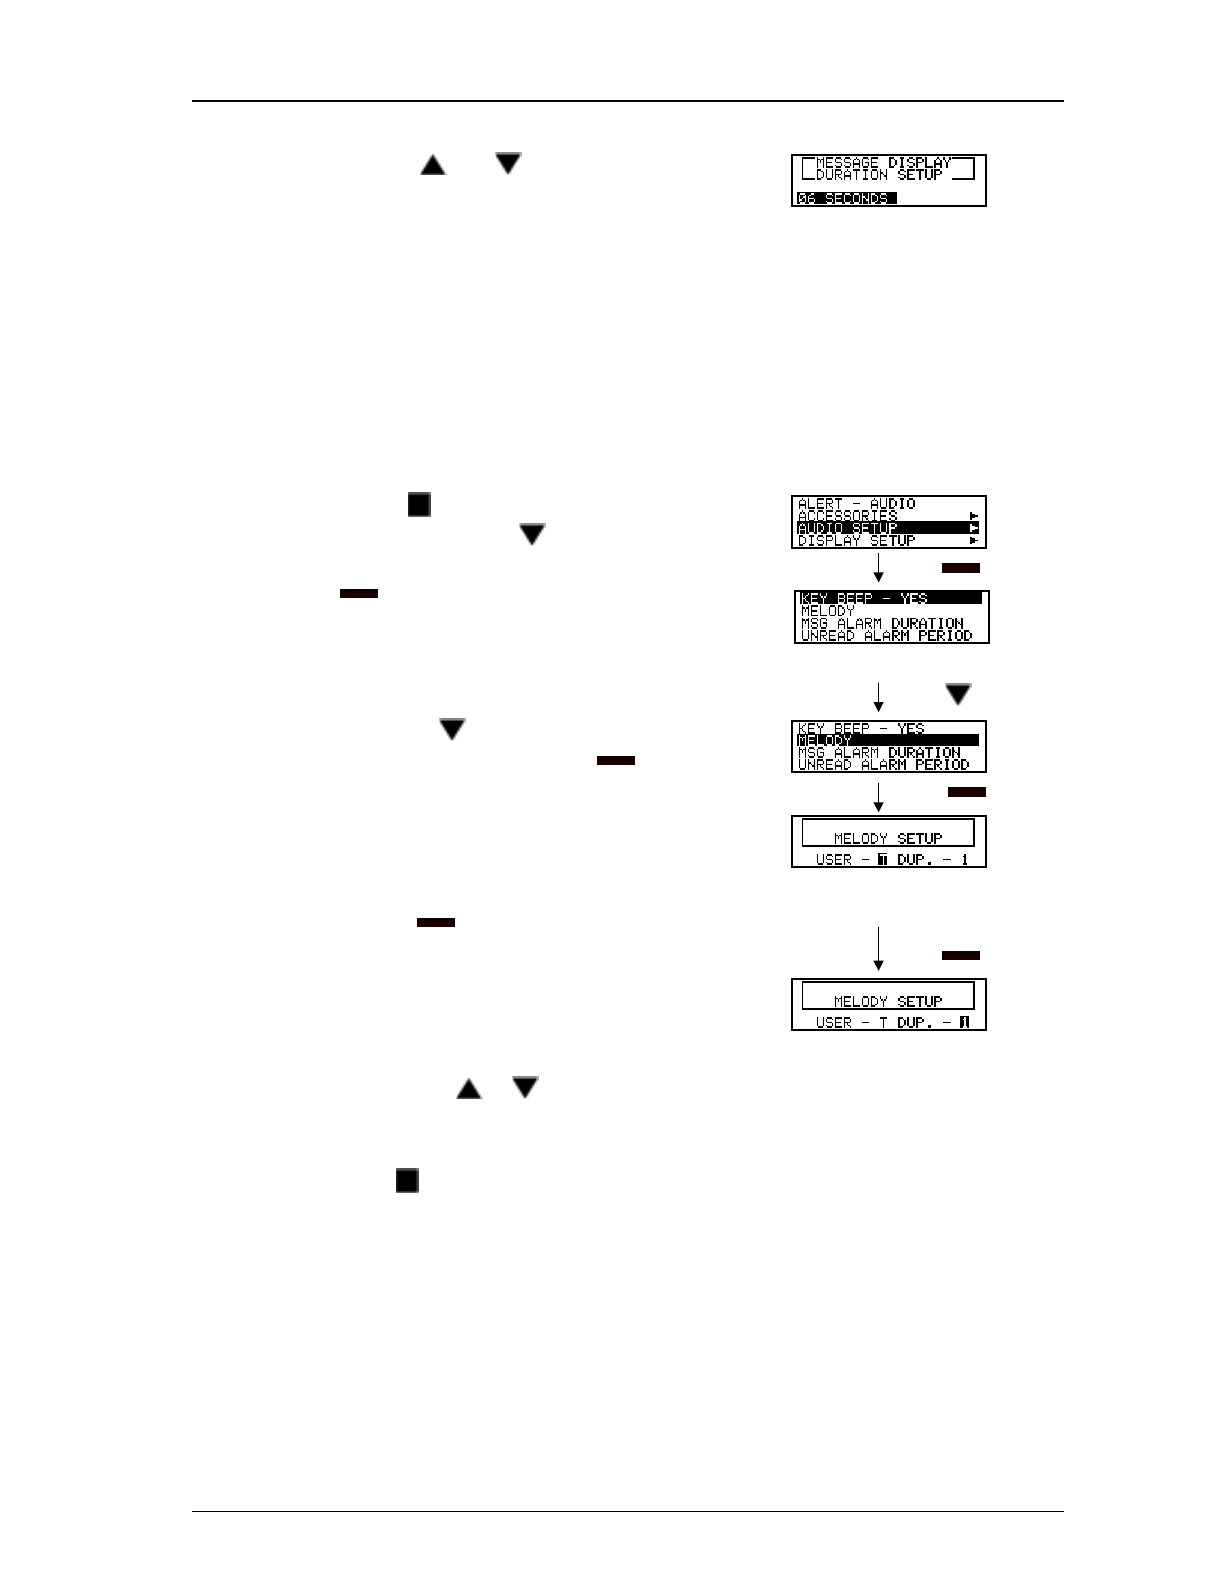
3. Press ( or ) to select the
choice of 6, 8, 10 or 12 seconds,
then press (■) to execute the
setting. Duration Setup screen
3.4.9 Melody Selection
Your pager has a standard beeping tone and eight pleasing melodies for
you to select and change the alert.
1. Press ( ) to display the main
menu, then press ( ) to highlight
“ AUDIO SETUP” and press
() to access the sub-menu. press ( )
Audio Setup sub-menu screen
press ( )
2. Press ( ) to highlight
“ MELODY” and press ( ) to
access melody setup screen. press ( )
Melody Setup screen
3. Press ( ) to move cursor
between two fields. press ( )
4. Press either ( or ) to select a melody or the standard beeping tone for
different call type. The selected melody or beep tone will be played
simultaneously while changing setting.
5. Press ( ) to activate the setting.
DATE OF ISSUE: 8-Jan-99 Page 19 of 24
DOC. NO.: C 3G 6011 UM 85 N 0000 001 1
VERSION 0.3 6011N 4-line Alphanumeric Display FLEX Pager User Manual
CIRKISYS ELECTRONICS LTD.
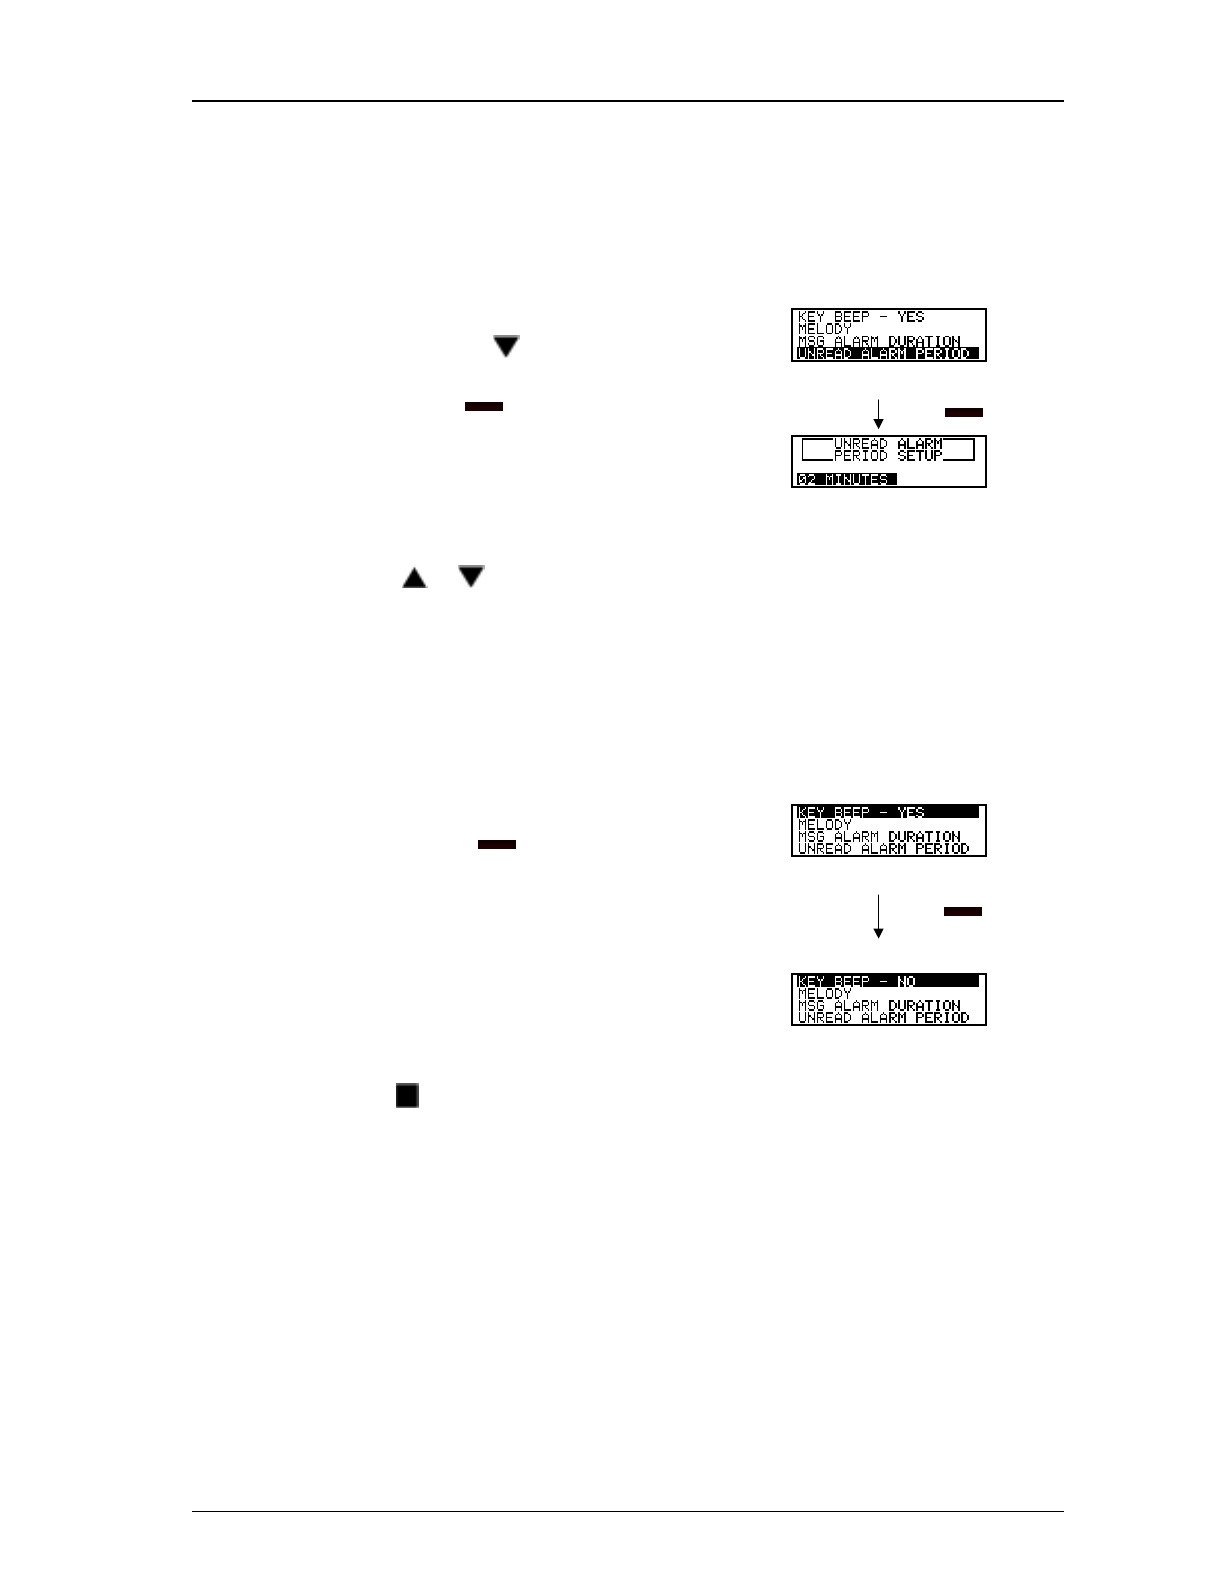
3.4.10 Setting Unread Message Alarm Period
The duration of message alarm can be adjusted by user. This function is
applicable to the standard beeping alert and vibration alert only.
1. In the “ AUDIO SETUP” sub-
menu, press ( ) to highlight
“ UNREAD ALARM PERIOD” ,
then press ( ) to access the
unread alarm setup screen.
Audio Setup sub-menu screen
press ( )
Unread Alarm Setup screen
2. Press ( or ) to select alarm period of 2, 3, 4, 5 minutes or disable the
setting, then press (■) to activate the setting.
3.4.11 Key Beep
A “ click” is emitted whenever a key is pressed when this feature is enabled.
1. In the “ AUDIO SETUP” sub-
menu, press ( ) when “ KEY
BEEP-YES (or NO)” is being
highlighted to enable or disable the
function.
audio setup sub-menu
press ( ) to
disable the key beep
2. “ KEY BEEP - NO’ would be
displayed if key beep function is
disabled.
3. Press ( ) to execute the setting.
Note: A short beep will be generated simultaneously when key beep is enabled.
DATE OF ISSUE: 8-Jan-99 Page 20 of 24
DOC. NO.: C 3G 6011 UM 85 N 0000 001 1
VERSION 0.3 6011N 4-line Alphanumeric Display FLEX Pager User Manual
CIRKISYS ELECTRONICS LTD.
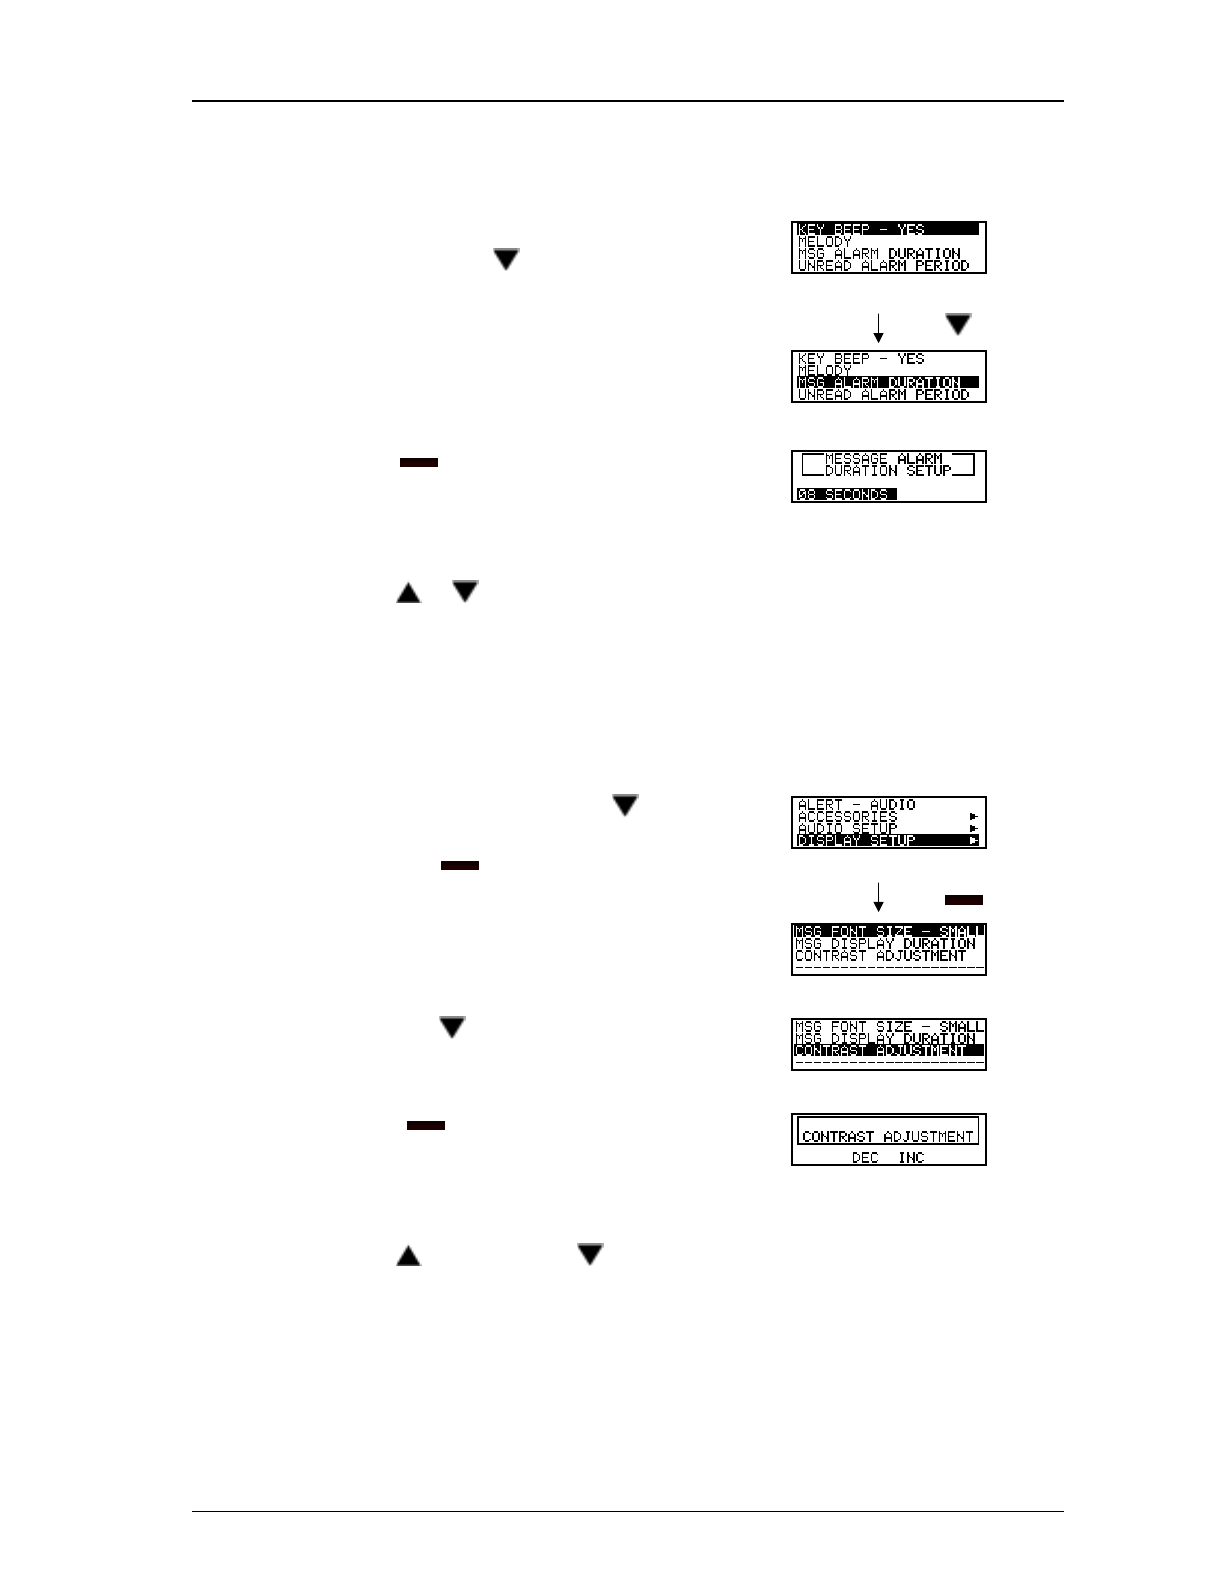
3.4.12 Setting Audio Alert Duration
1. In the “ AUDIO SETUP” sub-
menu, press ( ) to highlight
“ MSG ALARM DURATION” . Audio Setup sub-menu
press ( )
2. Press ( ) to access the message
alarm duration screen.
Message Alarm Duration Setup screen
3. Press ( or ) to select the choice of 2, 4, 6 or 8 seconds and press (■) to
execute the setting.
4. Note: This function only applies to standard beeping tone and vibration alert.
3.4.13 Setting LCD Contrast Level
1. In the main menu, press ( ) to
highlight “ DISPLAY SETUP”
and press ( ) to access the sub-
menu. Main Menu screen
press ( )
Display Setup sub-menu screen
2. Press ( ) to highlight
“ CONTRAST ADJUSTMENT” .
Display Setup sub-menu screen
3. Press ( ) to access the LCD
Contrast Adjustment screen.
LCD Contrast Adjustment screen
4. Press ( ) to increase or ( ) to decrease the LCD contrast level, then press
(■) to activate the setting.
DATE OF ISSUE: 8-Jan-99 Page 21 of 24
DOC. NO.: C 3G 6011 UM 85 N 0000 001 1
VERSION 0.3 6011N 4-line Alphanumeric Display FLEX Pager User Manual
CIRKISYS ELECTRONICS LTD.
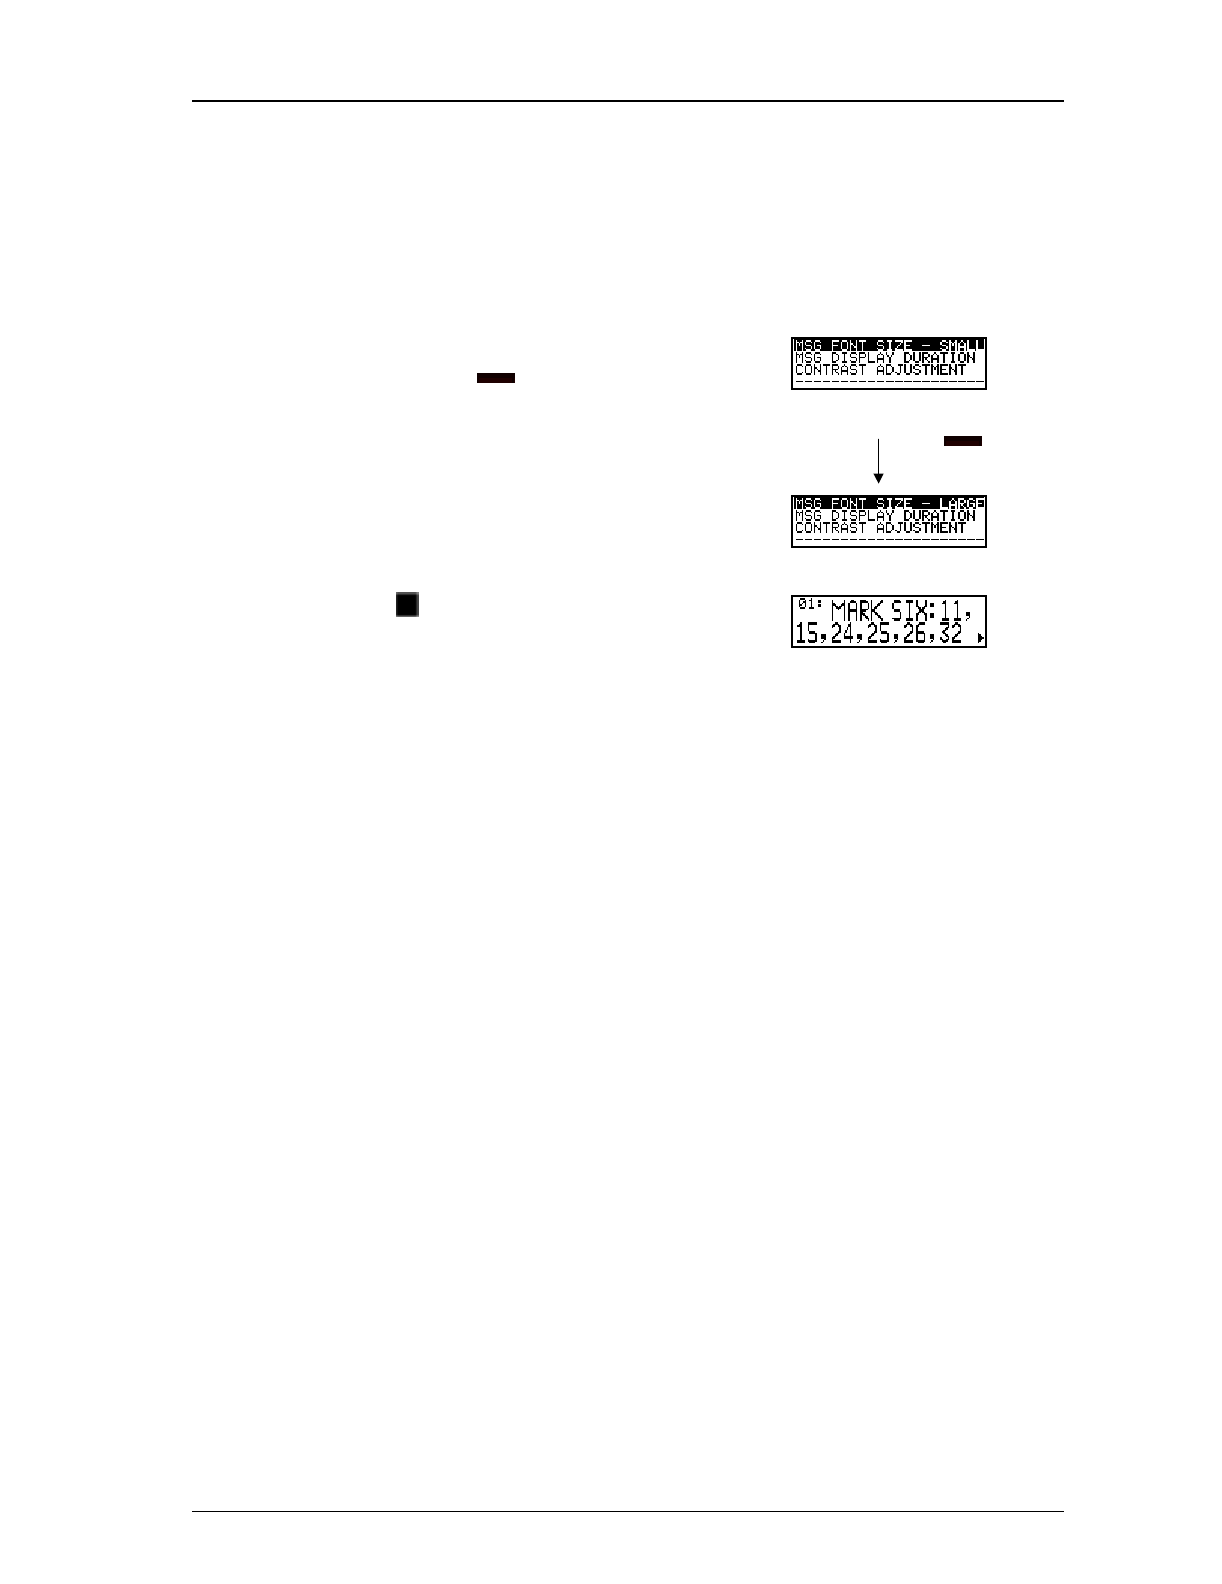
3.4.14 Setting Character Font Size
User can switch the font size from small to large or vice versa for his
convenience. It applies to all viewing modes of messages once the font size is
changed.
1. In the “ DISPLAY SETUP” sub-
menu, press ( ) when “ MSG
FONT SIZE - SMALL (or
LARGE)” is being highlighted to
toggle between small or large fonts.
Display Setup sub-menu screen
press ( ) to change
to large fonts
2. Press ( ) to execute the setting.
Example of large font size

DATE OF ISSUE: 8-Jan-99 Page 22 of 24
DOC. NO.: C 3G 6011 UM 85 N 0000 001 1
VERSION 0.3 6011N 4-line Alphanumeric Display FLEX Pager User Manual
CIRKISYS ELECTRONICS LTD.
4. OTHER FEATURES
Back-lighting: In dim conditions, the pager’ s back-light makes the screen easy to read.
The back-light can be turned on by holding ‘ ■’ for 2 seconds. If no other keys are
pressed, the back-light turns off automatically and returns to standby mode.
Time Stamp Indication: A time stamp is shown at the last line of each message.
Real-time Clock: The pager can display the real-time clock when user press either ‘ ▲’
or ‘ ▼’ in standby mode.
Low Battery Indication: In case of low battery, the pager will alert user by vibrating or
generating a long beeping signal and display the ‘ Battery Low’ screen. Alert can be
stopped by pressing any key and the ‘ ’ icon will be displayed in the status screen to
remind user.
1. To replace the battery:
2. Turn off the pager.
3. Unlock and open the battery compartment door, pick out the old battery.
4. Place the new ‘ AAA’ size battery with correct polarity.
5. Close and lock the battery compartment door.
6. Hold ( ) for 2 seconds to turn on your pager.
NOTE: New battery must be put into the battery slot within 5 minutes, otherwise all
settings and messages in the memory banks will be lost.
Battery Backup: All settings and messages will be retained when the pager is turned off.
This feature also applies to the situation of battery replacement for up to 5 minutes.
Key Beep: A short beep is generated whenever a key is pressed to notify user. This
feature can be enabled or disabled by user.
Word Wrapping: When the word size exceeds the remaining displayable area of a row,
the whole word will automatically shift to the next row. This feature is only applicable to
the messages shown in small fonts.
Service Area Indication: When the pager is out of service area, ‘ ’ will be displayed
in the pager to indicate that it is temporarily not able to receive any message. ‘ ’ will
be disappeared when user returns to the service coverage area.

DATE OF ISSUE: 8-Jan-99 Page 23 of 24
DOC. NO.: C 3G 6011 UM 85 N 0000 001 1
VERSION 0.3 6011N 4-line Alphanumeric Display FLEX Pager User Manual
CIRKISYS ELECTRONICS LTD.
Next Page Indication: The next page icon ‘ ’ will be shown at the lower right corner
of the LCD screen if part of the message is displayed on the next screen when user
viewing message.
Duplicate Message Indication: All duplicate user messages will be automatically
screened out. The ‘ ’ icon will be shown at the right of the LCD screen if the message
being viewed is a duplicate message.
Protected Message Indication: The lock icon ‘ ’ will be shown at the upper right
corner of the LCD screen if the user message being viewed has been protected. User can
protect up to 20 user messages.
Error Message Indication: When a message is not received completely, all erroneous
characters will be replaced by ‘ _’ (the underscore symbol). User has to contact the
operator to check the complete message.
Stay-in News Viewing: The pager is able to retain the latest news message viewed by
user. After the pager returns to standby mode, user can recall that message by pressing
any key.

DATE OF ISSUE: 8-Jan-99 Page 24 of 24
DOC. NO.: C 3G 6011 UM 85 N 0000 001 1
VERSION 0.3 6011N 4-line Alphanumeric Display FLEX Pager User Manual
CIRKISYS ELECTRONICS LTD.
Warning: Changes or modifications to this unit not expressly approved by the party
responsible for compliance could void the user’ s authority to operate the equipment.
NOTE: This equipment has been tested and found to comply with the limits for a Class B
digital device, pursuant to Part 15 of the FCC Rules. These limits are designed to provide
reasonable protection against harmful interference in a residential installation. This
equipment generates, uses and can radiate radio frequency energy and, if not installed and
used in accordance with the instructions, may cause harmful interference to radio
communications.
However, there is no guarantee that interference will not occur in a particular installation.
If this equipment does cause harmful interference to radio or television reception, which
can be determined by turning the equipment off and on, the user is encouraged to try to
correct the interference by one or more of the following measures:
• Reorient or relocate the receiving antenna.
• Increase the separation between the equipment and receiver.
• Connect the equipment into an outlet on a circuit different from that to which the
receiver is needed.
• Consult the dealer or an experienced radio/TV technician for help.
This device complies with Part 15 of the FCC Rules. Operation is subject to the
following two conditions: (1) this device may not cause harmful interference, and (2) this
device must accept any interference received, including interference that may cause
undesired operation.
- END -