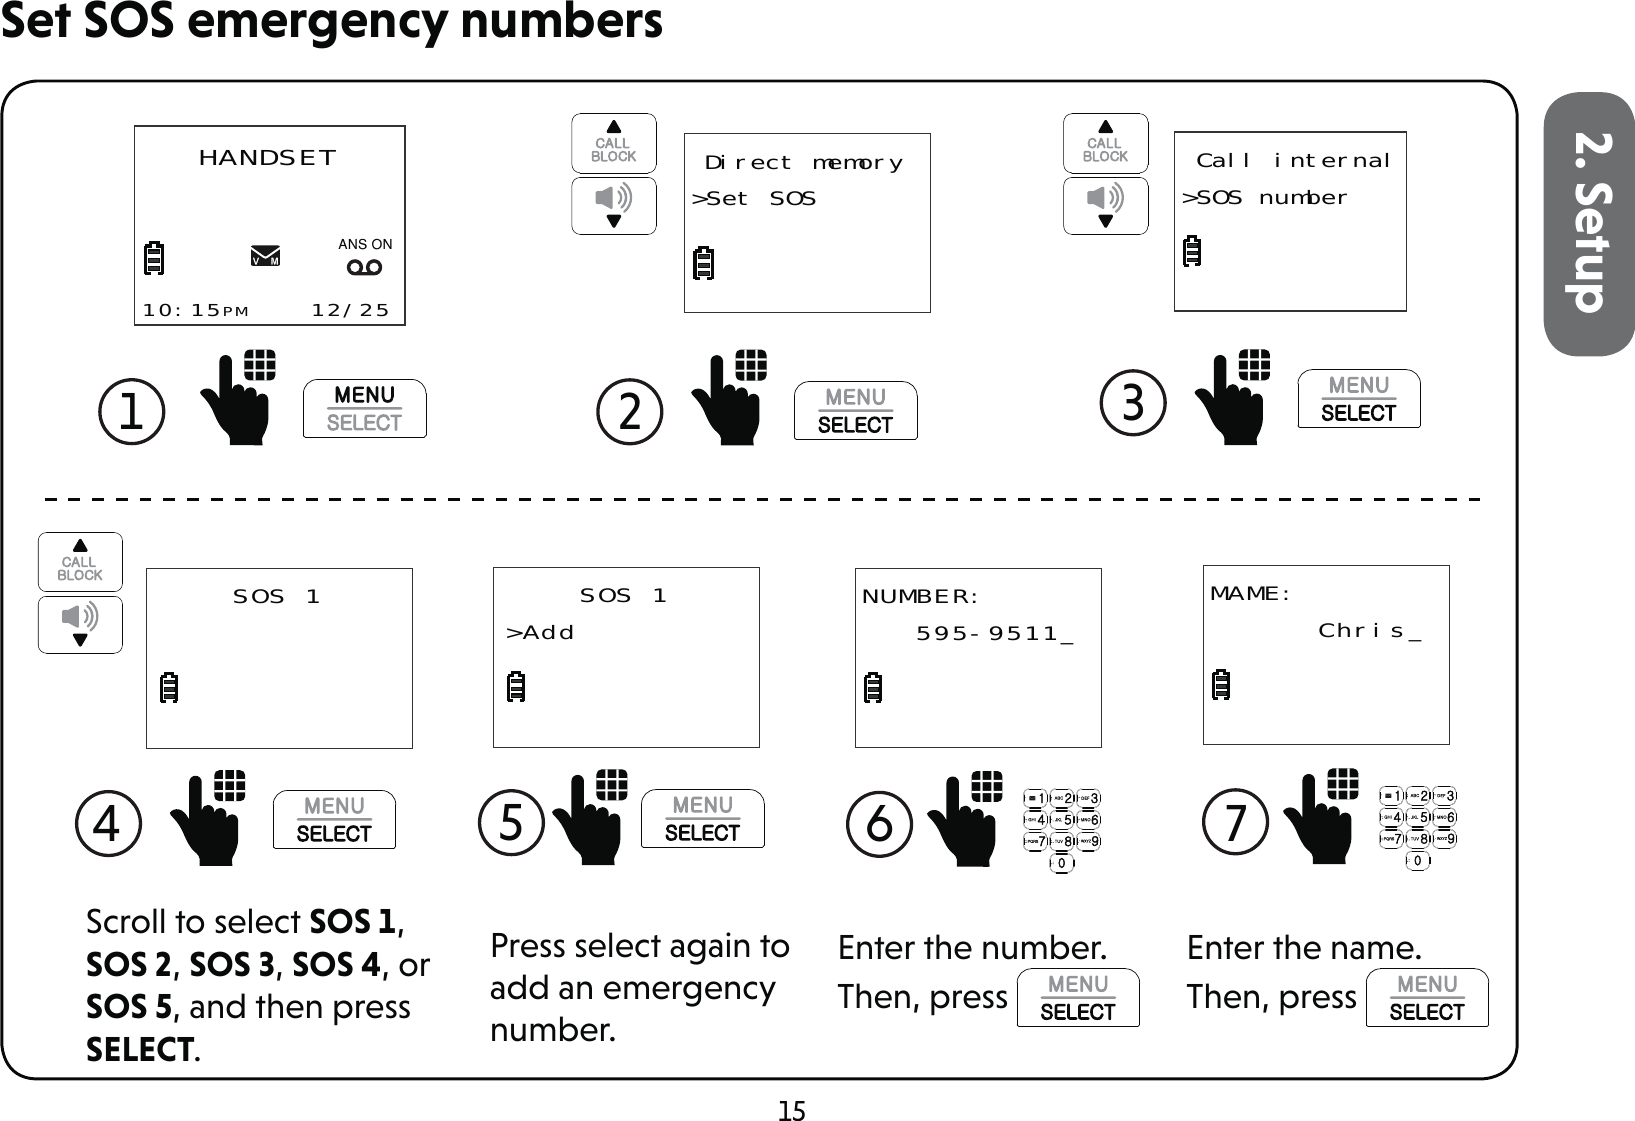
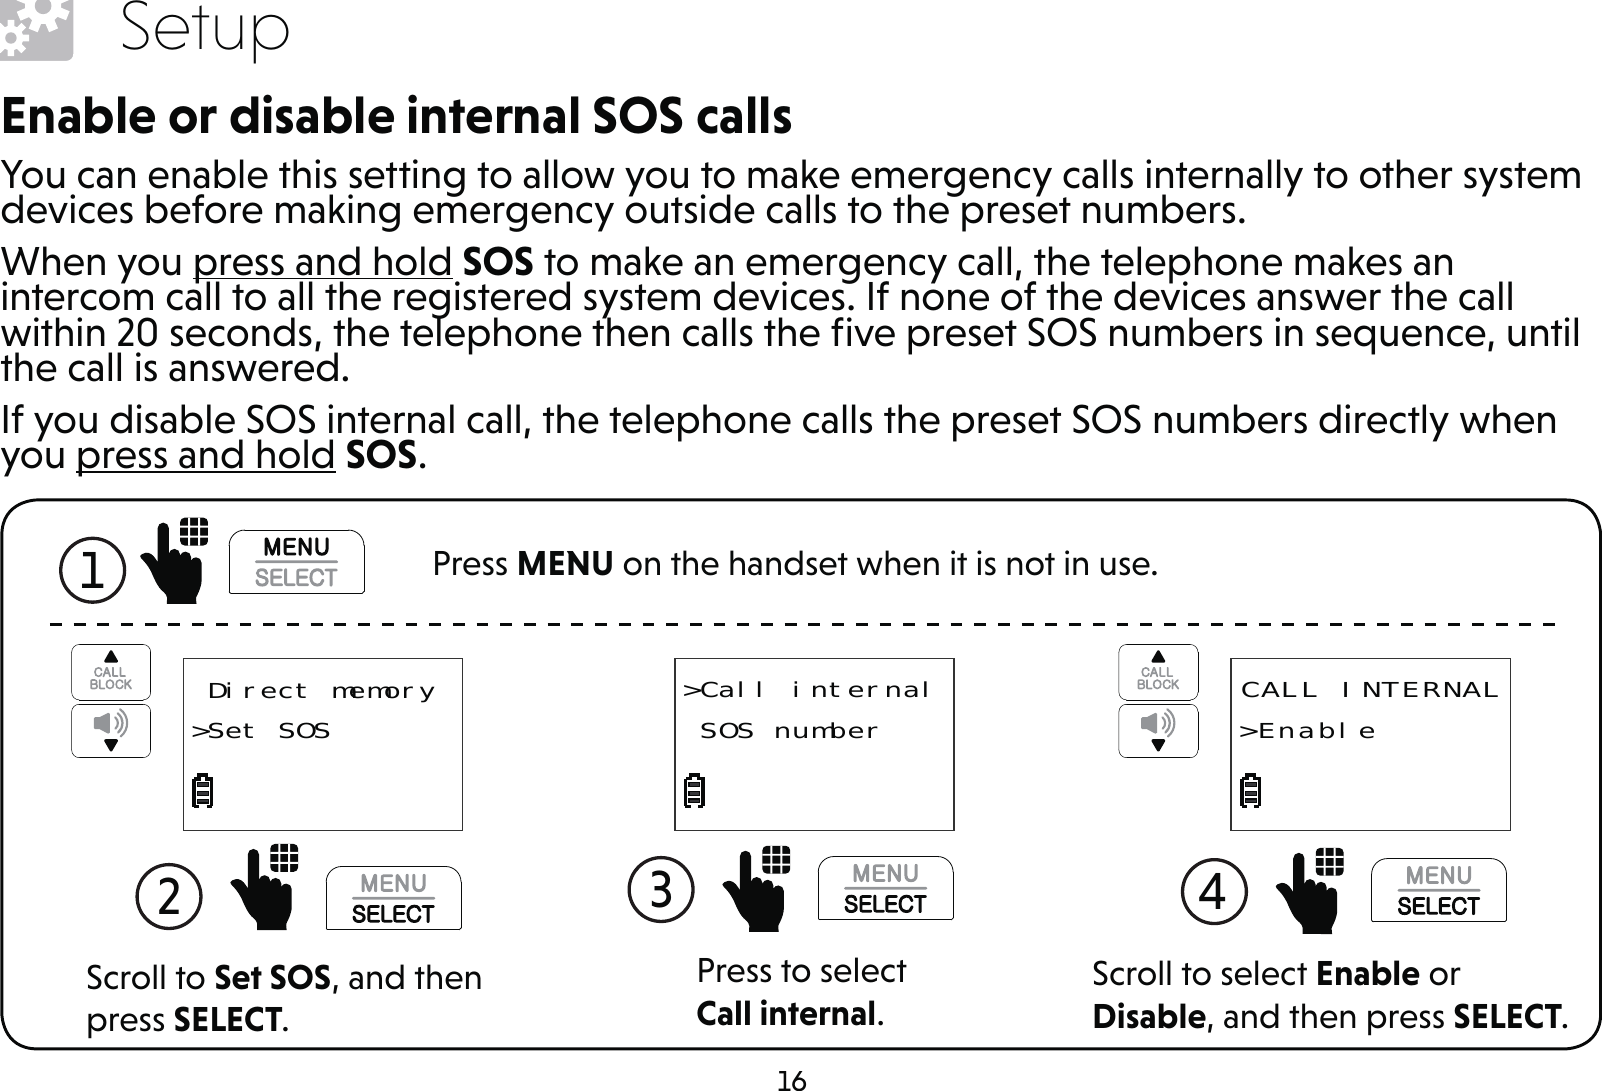
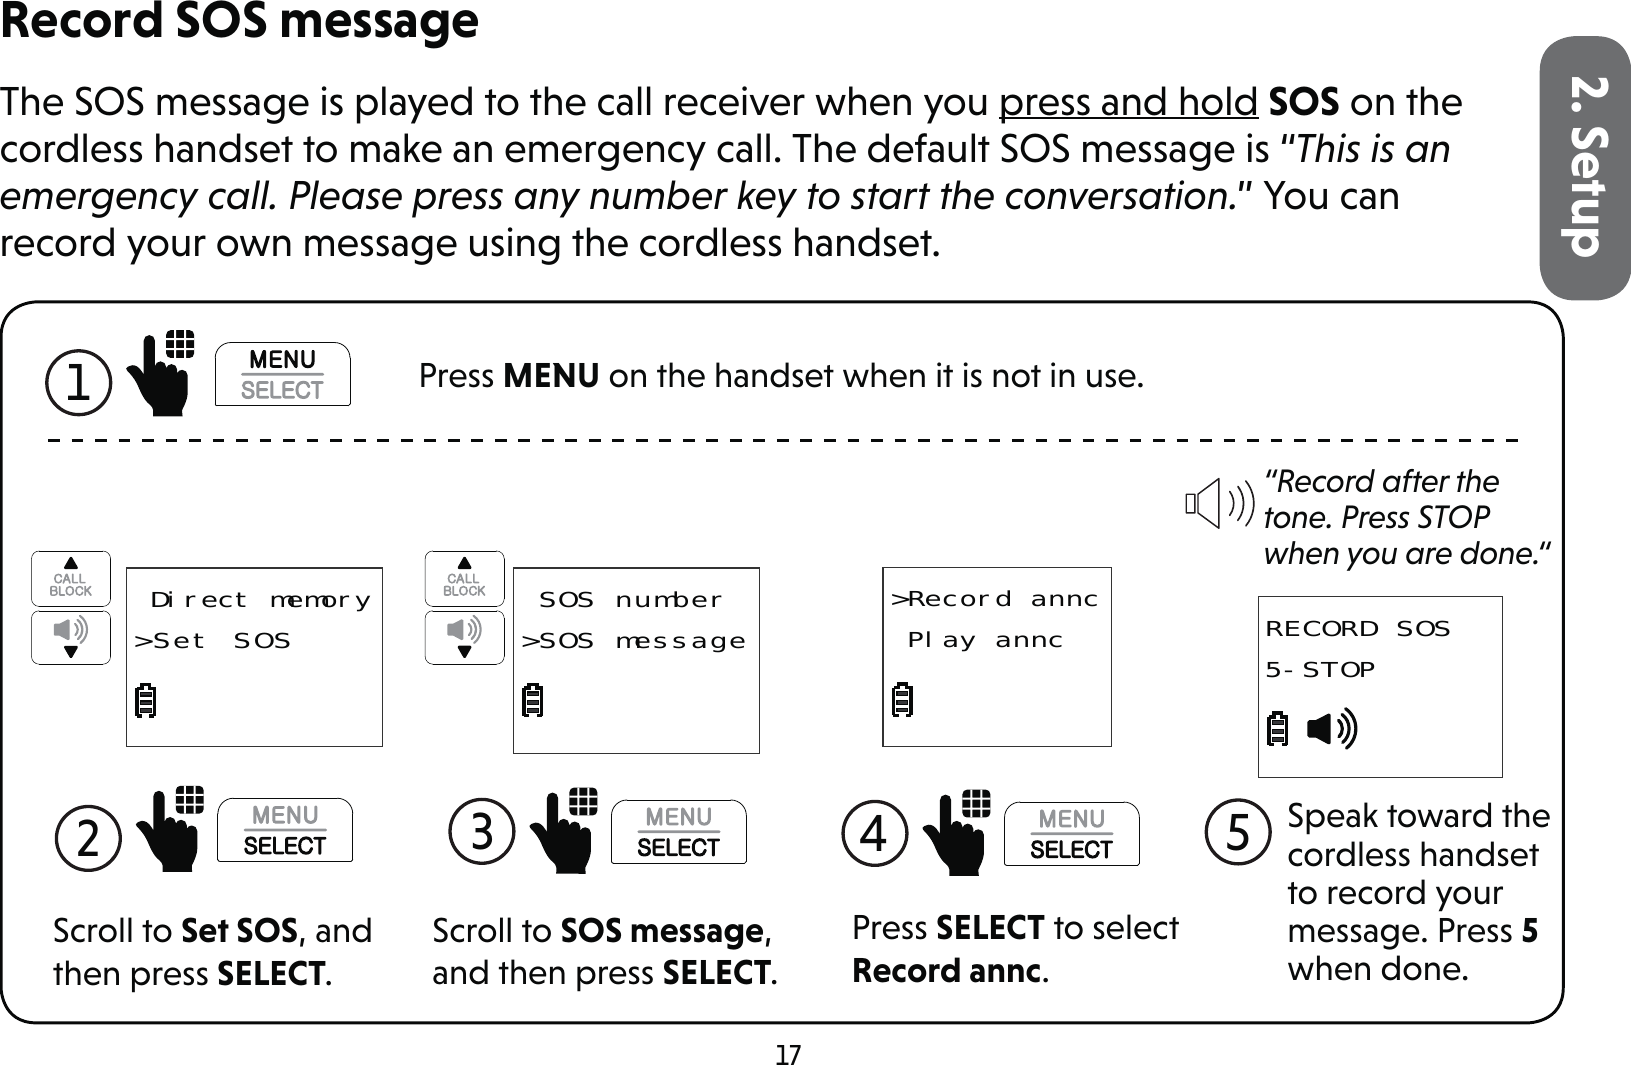
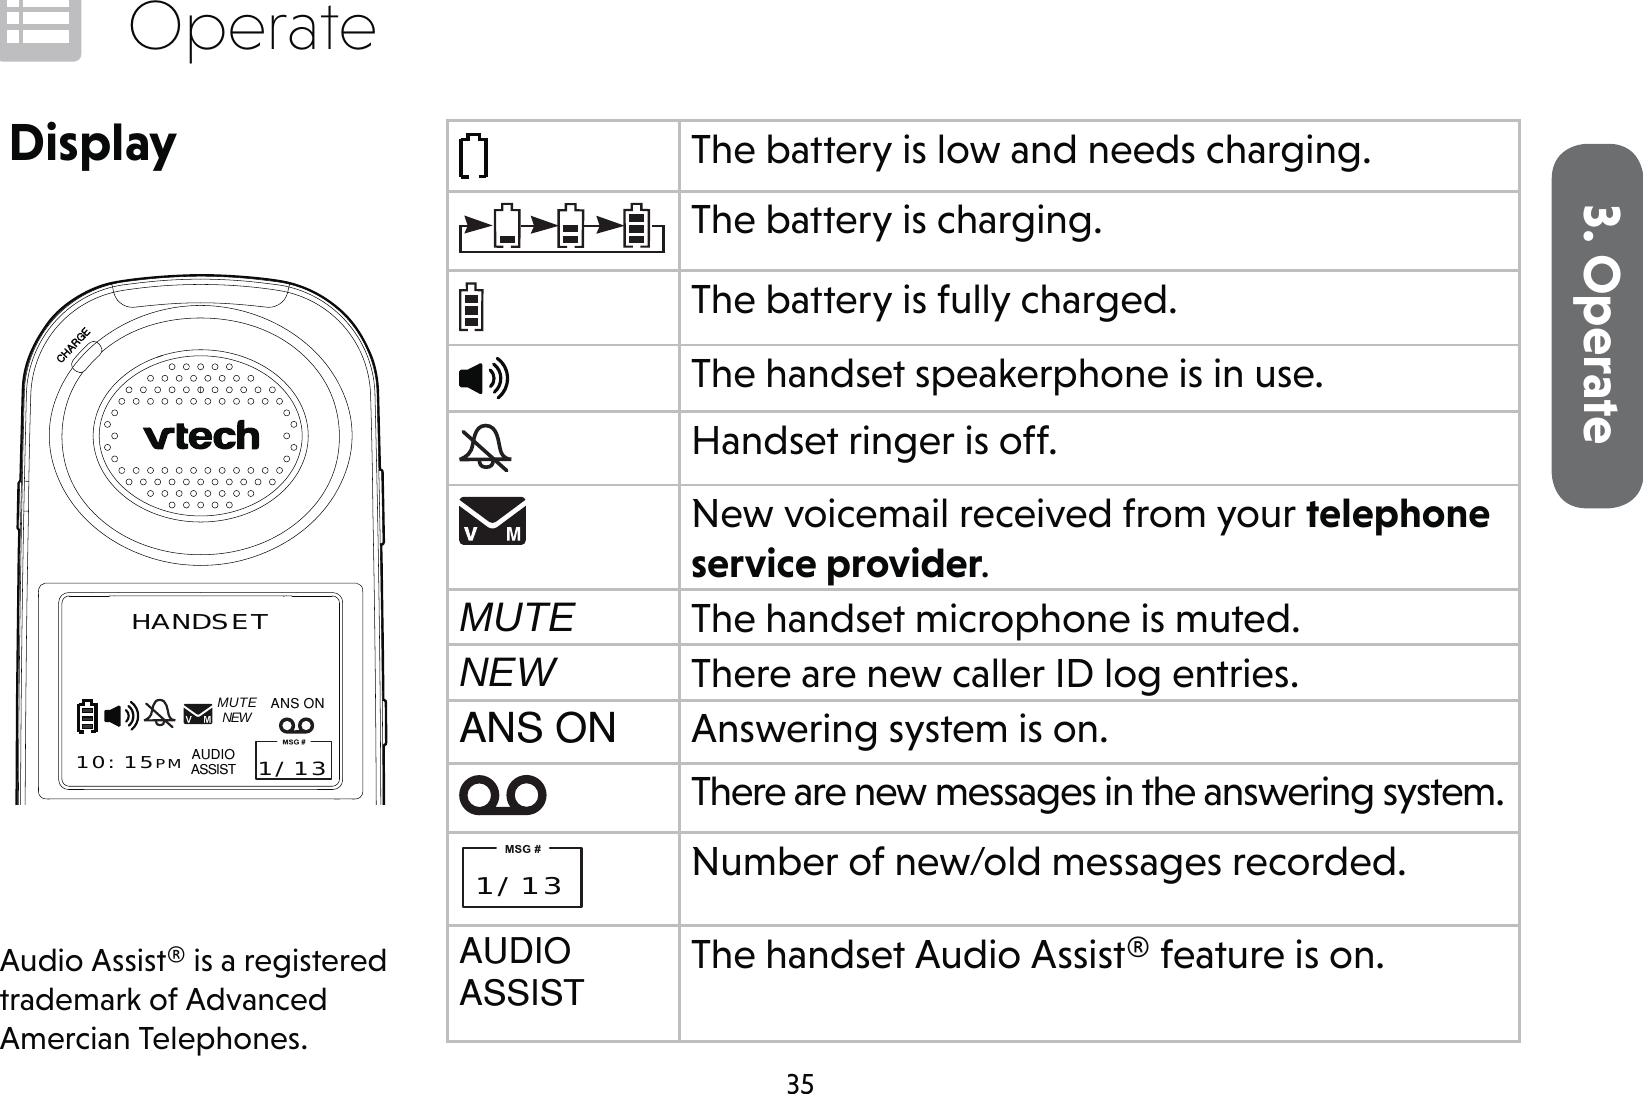
VTech Telecommunications 80-0824-00 Amplified Cordless Answering System with Big Buttons and Display - Base Unit User Manual SN5127 QSG V1 20180730 APPROVAL

VTech Telecommunications Ltd Amplified Cordless Answering System with Big Buttons and Display - Base Unit SN5127 QSG V1 20180730 APPROVAL

User Manual

Go to www.vtechphones.com to register your product for enhanced warranty support and latest VTech product news.Quick start guide%&SN5127 Amplified Cordless Answering System with Big Buttons and Display
Congratulationson purchasing your new VTech product. Before using this telephone, please read Important safety instructions.This quick start guide provides you with basic installation and use instructions. A limited set of features are described in abbreviated form. Please refer to the online user’s manual for a full set of installation and operation instructions at www.vtechphones.com.Telephones identified with this logo have reduced noise and interference when used with most T-coil equipped hearing aids and cochlear implants. The TIA-1083 Compliant Logo is a trademark of the Telecommunications Industry Association. Used under license.TCompatible withHearing Aid T-CoilTIA-1083The ENERGY STAR® program (www.energystar.gov) recognizes and encourages the use of products that save energy and help protect our environment. We are proud to mark this product with the ENERGY STAR® label indicating it meets the latest energy efficiency guidelines.
Table of contentsWhat’s in the box  1Connect and install  2Connect the telephone base  2Install the battery  3Charge the battery  4Battery backup mode  5Mount the telephone base (optional) 6Setup 8Date and time  8Voice guide to set Smart call blocker 10Voice guide to set answering system 12SOS emergency call  13Photo speed dial  19LCD language  23Talking digits  24Key tone  25Caller ID announce on/off  26Use caller ID to automatically  set date and time  27Voicemail number  28Clear voicemail indicator  29Home area code  30Dial mode  31Alarm reminder and melody  32Operate 35Display 35Make a call  36Answer a call  36End a call  37Speakerphone 37Volume 37Make SOS emergency call  38
Temporary ringer silencing  39Call waiting  39Redial 40Photo/memory speed dial  40Temporary tone dialing  41Audio Assist® 41Equalizer 42Find handset  42Join a call in progress  43Intercom 44Call transfer using Intercom  46Phonebook 48Add a phonebook entry  48Review phonebook entry  50Dial a phonebook entry  51Delete a phonebook entry  51Save a redial entry to the phonebook 52Edit a phonebook entry  53Caller ID  54Review caller ID log entry  54Save a caller ID log entry  to the phonebook  55Dial a caller ID log entry  56Delete a caller ID log entry  56Smart call blocker*  57Call categories  58Set Smart call blocker on/off  60Set welcome calls  61Set welcome calls  63Set unwelcome calls  65Control calls without  numbers 67Control uncategorized calls  68Screen calls without  numbers 69
Screen uncategorized calls  70Add a screened number to the allow list or block list  71Option while on a call  71Answering system  72About the built-in answering system and voicemail service  72Built-in answering system VS Voicemail service  72Set number of rings  74Message playback  76Skip a message  77Repeat the playing message  77Play the previous message  78Delete a message  78Delete all messages  79Remote access  80Set remote access code  81Additional devices  82Add and register expansion handset 82Add and register photo  speed dial handset  83Device setup  84Audio doorbell  86Test device signal strength  98Device monitoring  100Deregister handsets  101Limited warranty  102Technical specifications  104
1What’s in the boxImportant safety informationQuick start guide IntroducingSmart call blocker
2Connect and installConnect the telephone baseIf you subscribe to digital subscriber line (DSL)  high-speed Internet service through your telephone line, make sure you connect a DSL filter (not included) to the telephone wall jack.231
31. Connect and install12Install the battery•  Use only the rechargeable batteries provided or replacement batteries (model BT205662).•  Do not use other alkaline, manganese or Ni-Cd batteries, nor other non-rechargeable batteries for operating the cordless handset. They may cause failure or malfunction of the handset or the telephone system.•  Charge the batteries provided with this product only in accordance with the instructions and limitations specified in this quick start guide.•  If the handset will not be used for a long time, disconnect and remove the batteries to prevent possible leakage.
4Connect and installCharge the battery12 hrs
51. Connect and installBattery backup modeWhen there is a power failure, all handsets display Put HS on base to power base and Out of range OR No pwr at base alternately. Put a charged handset in the telephone base to back up the telephone base power for some basic phone operations for a short period of time. During this period, you cannot use the answering system.When a handset is put in the telephone base, it displays Powering base... Don’t pick up. At this time, use other handsets for some basic phone operations. You may use the handset which is put in the telephone base for making or answering calls via the handset speakerphone, but do not pick up the handset while using it.
6Connect and installMount the telephone base (optional)BA12
71. Connect and install34
8SetupDate and timeAfter you install your telephone or power returns following a power outage and battery depletion, the handset will prompt you to set the date and time, and to configure the Smart call blocker and answering system through the voice guides.Follow the steps below to set the date and time. For example, if the date is  31 December, 2018, and the time is 10:59 PM:When the handset prompts you to set the date and time...1  Enter the month (MM), day (DD), and year (YY).MM/DD/YY01/01/182  Press SELECT.MM/DD/YY12/31/183  Enter the hour (HH) and minute (MM).HH:MM12:00 AM
92. SetupIf you subscribe to caller ID service, the day, month and time are set automatically with each incoming call.- OR -When the handset is not in use:1. Press MENU.2. Press   or   to scroll to Set date/time.3. Press SELECT, and then follow the Date and time steps to set the date and time.  Make sure you set the date and time including the year correctly; otherwise the answering system does not announce the correct day of the week for your recorded messages time stamp.4  Press any number key to toggle between AM or PM.HH:MM10:59 AM Ringers>Set date/time5  Press SELECT.HH:MM10:59 PM
10SetupVoice guide to set Smart call blockerAfter the date and time setting is done or skipped, the cordless handset then prompts if you want to set Smart call blocker. For more details on Smart call blocker, see page 57.You can follow the voice guide to set your telephone system to allow or to screen all incoming calls, or to screen calls that do not display a phone number.When the handset prompts you to set Smart call blocker via voice guide...“Hello! This voice guide will assist you with the basic setup of Smart call blocker...“Listen to the instructions and then choose one of the options.1  2  Press SELECT.Voice guide setSmart call blk?
112. SetupOn the cordless handset:Press 1 if you want to screen calls with telephone numbers that are not saved in your Phonebook, Allow list or Star name list;Press 2 if you only want to screen calls that do not display a phone number; orPress 3 if you do not want to screen calls, and want to allow all incoming calls to get through. •  If you select option 1 to screen calls, we recommend that you add the phone numbers of your family members and friends, and desired businesses to your Phonebook (see page 48) or Allow list (see page 61), or add their names to the Star name list (see page 62). This will avoid Smart call blocker to screen their calls.• Read the Introducing Smart call blocker leaflet provided in your package to learn how to set up your Smart call blocker.
12SetupVoice guide to set answering systemAfter the Smart call blocker setting is done or skipped, the handset will then prompt if you want to set up the answering system.This feature assists you to do the basic setup of the answering system. You can follow the voice guide to record your own announcement, set the number of rings and the message alert tone.When the handset prompts you to set up the answering system via voice guide...Set up your answering system by inputting the designated numbers as instructed in the voice guide.1  2  Press SELECT.“This voice guide will assist you with the basic setup of your answering system.“Voice guide to set up Ans sys?
132. SetupThe SOS button on the cordless handset lets you quickly call other system devices or call preset external numbers for help in an emergency.You need to set the SOS numbers before you can make external SOS calls. You can preset up to five SOS numbers.If you have purchased and registered a Wearable home SOS pendant (SN7022) to your telephone system, the SOS pendant will function as same as the SOS button of the cordless handset.•  To ensure proper operation, the telephone system must be installed according to the installation instructions on page 2 to page 4. To verify that the telephone system is operating properly and can successfully make emergency calls to the preset numbers, the telephone system must be tested immediately after installation, and periodically thereafter, according to the setup instructions on page 15 to page 18, and the operations on page 38.•  The telephone system cannot make an emergency call when other equipment (telephone, answering system, computer modem, etc.) connected to the same phone line is in use.•  Do not solely rely on the SOS button on the cordless handset, or the Wearable home SOS pendant (SN7022, purchased separately), for getting help in case of emergency. The functionality of the SOS emergency call is dependent on the phone settings and network availability. •  We recommend you set all the five SOS numbers to maximize the possibility of receiving response from others when you make an emergency call.SOS emergency call
14SetupHow does SOS emergency call work?•  To make an emergency call, press and hold SOS on the right side of the cordless handset for three seconds. The telephone base announces “Emergency mode is activated“ and the cordless handset screen shows SOS mode. The telephone then calls the preset SOS numbers in sequence until the call is answered. - You can enable internal SOS calls (see page 16). The telephone makes intercom calls to all the registered system devices when you press and hold SOS. If none of the devices answer the call in 20 seconds, the telephone then calls the preset SOS numbers in sequence until the call is answered. - If you disable internal SOS calls, the telephone calls the preset SOS numbers directly when you  press and hold SOS on the cordless handset.•  When the call is answered, the call receiver hears an SOS message. You can record your own message or use the default message (see page 17).•  The SOS message played by the telephone asks the SOS call receiver to respond by pressing a number key. After the call receiver presses a number key, you can then talk to the call receiver.•  When the SOS emergency call is answered by answering machine or voicemail, the call will be terminated after 60 seconds. The telephone then dials the next SOS number in sequence.•  When none of the preset SOS numbers answer, the telephone re-calls the preset SOS numbers in sequence until the call is answered. The telephone will call all the preset SOS numbers for 3 times before aborting the operation when none of the calls are answered.
152. SetupSet SOS emergency numbers2   Direct memory>Set SOSScroll to select SOS 1, SOS 2, SOS 3, SOS 4, or SOS 5, and then press SELECT.4  SOS 13  Call internal>SOS numberHANDSET10:15PM    12/25$16211  5 SOS 1>AddPress select again to add an emergency number.NUMBER:   595-9511_6  Enter the number.Then, press 7  MAME:      Chris_Enter the name.Then, press
16SetupEnable or disable internal SOS callsYou can enable this setting to allow you to make emergency calls internally to other system devices before making emergency outside calls to the preset numbers.When you press and hold SOS to make an emergency call, the telephone makes an intercom call to all the registered system devices. If none of the devices answer the call within 20 seconds, the telephone then calls the five preset SOS numbers in sequence, until the call is answered.If you disable SOS internal call, the telephone calls the preset SOS numbers directly when you press and hold SOS.Press to select Call internal.3 >Call internal SOS numberScroll to select Enable or Disable, and then press SELECT.4  CALL INTERNAL>EnableScroll to Set SOS, and then press SELECT.2   Direct memory>Set SOS1  Press MENU on the handset when it is not in use.
172. SetupRecord SOS messageThe SOS message is played to the call receiver when you press and hold SOS on the cordless handset to make an emergency call. The default SOS message is “This is an emergency call. Please press any number key to start the conversation.” You can record your own message using the cordless handset.Scroll to Set SOS, and then press SELECT.2   Direct memory>Set SOSScroll to SOS message, and then press SELECT.3  SOS number>SOS messagePress SELECT to select Record annc.>Record annc Play annc4  “Record after the tone. Press STOP when you are done.“Speak toward the cordless handset to record your message. Press 5 when done.5RECORD SOS5-STOP1  Press MENU on the handset when it is not in use.
18Setup •  Make sure your recorded SOS message includes your name, the SOS message, and a request to the far-end caller on pressing any number key to start the conversation.1  Press MENU on the handset when it is not in use.Scroll to SOS message, and then press SELECT.3  SOS number>SOS messageScroll to select Play annc or Reset annc, and then press SELECT twice.4   Play annc>Reset anncPlay or reset SOS messageScroll to Set SOS, and then press SELECT.2   Direct memory>Set SOS
192. Setupzsv~Photo speed dialThere are four photo speed dial memory keys 1 to 4 on the telephone base, and four direct memory keys M1 to M4 on the cordless handset.You can store the telephone numbers you wish to quick dial to the photo speed dial keys. When you set the four photo speed dial keys 1, 2, 3 and 4 on the telephone base, the same numbers will also automatically set in the M1, M2, M3 and M4 keys on the cordless handset.•  We recommend you store at least two contacts that you may need to call them more often or immediately to photo speed dial keys 1 and 2.
20SetupStore a photo speed dial entry:1  Press MENU when the handset is not in use.Scroll to Direct memory, and then press SELECT.2  Intercom>Direct memoryScroll to select M1, M2, M3, or M4, and then press SELECT.3 M1Photo speed dialPress SELECT again to add the speed dial number.4 M1>Add
212. SetupEnter the phone number, and then press SELECT.5 NUMBER:595-9511_ •  To store another photo speed dial entry, repeat the steps.Enter the name, and then press SELECT to save.6 NAME: Chris_
22SetupInsert photos for speed dial keys:You can insert photos into the photo speed dial compartments, or write the contact names on the photo speed dial cards. The telephone base is shipped with protective stickers covering the photo speed dial compartments. Remove the protective sticker before use. 1.  Remove the photo speed dial compartment cover and take out the photo speed dial card.2.  Use the photo speed dial card as a tool to crop your desired photo.3.  Slide the cropped photo into the photo speed dial compartment. Then, insert the photo speed dial compartment cover back to the compartment.Photo speed dial22.5mm22.4mm
232. SetupLCD languageYou can select your handset’s display language (English, French or Spanish).1  Press MENU when the handset is not in use.Scroll to Settings, and then press SELECT.2  Set date/time>SettingsPress SELECT to select LCD language.3 >LCD language Voicemail #Scroll to highlight English, Français or Español, and then press SELECT.4  LCD LANGUAGE>EnglishPress SELECT to confirm.5 Set English as LCD language?
24SetupTalking digitsYou can choose whether the digits are to be announced whenever you press the number keys.Scroll to select On or Off, and then press SELECT.3 TALKING DIGITS>OnScroll to Talking digits, and then press SELECT.2  Reminder>Talking digits1  Press MENU when the handset is not in use.
252. SetupKey toneThe cordless handset is set to beep with each key press. You can adjust the key tone volume or turn it off. If you turn off the key tone, there are no beeps when you press keys.Scroll to Settings, and then press SELECT.2  Set date/time>SettingsScroll to Key tone, and then press SELECT.3  Clr voicemail>Key toneScroll to select the desired volume or Off, and then press SELECT.4 KEY TONE1  Press MENU when the handset is not in use.Scroll to select the desired volume or Off, and then press SELECT.5 KEY TONEOff
26SetupCaller ID announce on/offThe caller ID announce feature lets you know who’s calling without having to look at the display. When you have an incoming call, the handset and/or base speaks “Call from...” and the name of the caller based on the phonebook or caller ID information. The default setting is On.Scroll to select On or Off, and then press SELECT.3 CALLER ID ANNC>OnScroll to Caller ID annc, and then press SELECT.2  Talking digits>Caller ID annc  •  To use the caller ID announce feature, you must subscribe to caller ID service from your telephone service provider.1  Press MENU when the handset is not in use.
272. SetupUse caller ID to automatically set date and timeIf you subscribe to caller ID service, you can choose to set the date and time for each incoming call by the caller ID information automatically. The default setting is On.1  Press MENU when the handset is not in use.Scroll to Settings, and then press SELECT.2  Set date/time>SettingsScroll to Dial mode, and then press SELECT.3  Key tone>CID time syncScroll to select Touch-tone or Pulse, and then press SELECT.4 CID TIME SYNC>On
28SetupVoicemail numberIf you subscribe to a voicemail service offered by your telephone service provider, you can save your voicemail number to   for quick access.Press and hold 1 when the handset is not in use.1 HANDSET10:15PM    12/25$1621Enter the voicemail access number provided by your telephone service provider (up to 30 digits).2  VOICEMAIL # _Press SELECT.3  VOICEMAIL # 5959511_Press and hold 1.To retrieve voicemails from your telephone service provider:
292. SetupClear voicemail indicatorUse this feature when the telephone indicates that there is new voicemail but there are none. This feature only turns off the indicators, New voicemail and  . It does not delete your voicemail messages. As long as you have new voicemail messages, your telephone service provider continues to send the signal to turn on the indicators.1  Press MENU when the handset is not in use.Scroll to Settings, and then press SELECT.2  Set date/time>SettingsScroll to Clr voicemail, and then press SELECT.3  Voicemail #>Clr voicemailPress SELECT to confirm.4 Reset Voicemail Indicator?
30SetupHome area codeYou can program your home area code so that when you receive or dial a call within your local area, only seven digits are shown or dialed, and the telephone number is automatically stored without the area code in the caller ID log.1  Press MENU when the handset is not in use.Scroll to Settings, and then press SELECT.2  Set date/time>SettingsScroll to Home area code, and then press SELECT.3  CID time sync>Home area codeEnter a three-digit home area code.4 HOME AREA CODE          ___Press SELECT.5 HOME AREA CODE          100
312. SetupDial modeThe dial mode is preset to touch-tone dialing. If you have pulse (rotary) service, you need to change the dial mode to pulse dialing before using the telephone.1  Press MENU when the handset is not in use.Scroll to Settings, and then press SELECT.2  Set date/time>SettingsScroll to Dial mode, and then press SELECT.3  Home area code>Dial modeScroll to select Touch-tone or Pulse, and then press SELECT.4 DIAL MODE>Touch-tone
32SetupAlarm reminder and melodyYou can set alarm reminders that remind you at the time intervals you have set.Scroll to select from Reminder 1 to Reminder 10, and then press SELECT.3 REMINDER>Reminder 1Scroll to Reminder, and then press SELECT.2  Set SOS>Reminder1  Press MENU when the handset is not in use.Press SELECT. 4 REMINDER 1>On/Off
332. SetupAlarm reminder and melodyScroll to select one of the following, and then press SELECT.Once; Daily; Mon. to Fri.; or Sat. to Sun.   HH:MM12:00 AM6 Enter the hour (HH) and minute (MM). Then, press any number key to change between AM and PM.7  Press SELECT.   HH:MM10:59 PMScroll to On and then press SELECT. 5  ON/OFF>On8 FREQUENCY>Once •  When the set reminder alarm time is due, the alarm will not ring if the telephone is in use.•  The cordless handset rings for 30 seconds when the alarm time is due.•  Press any key on the handset to stop the alarm when ringing.
34SetupAlarm reminder and melodyYou can also select the alarm reminder melody. •  A reminder you have previously set up is added with an asterisk (*) after the name, for example, Reminder 1 *.Scroll to select the desired reminder, and then press SELECT.3 REMINDER>Reminder 1 *Scroll to Reminder, and then press SELECT.2  Set SOS>Reminder1  Press MENU when the handset is not in use.MELODY>MelodyScroll to Melody, and then press SELECT. 4 MELODY>Tone 1Scroll to the desired melody, and then press SELECT. 5 
353. OperateDisplay The battery is low and needs charging.The battery is charging.The battery is fully charged.The handset speakerphone is in use.Handset ringer is off.New voicemail received from your telephone service provider.MUTE The handset microphone is muted.NEW There are new caller ID log entries.$1621 Answering system is on.There are new messages in the answering system.1/13 Number of new/old messages recorded.$8',2$66,67The handset Audio Assist® feature is on.Audio Assist® is a registered trademark of Advanced Amercian Telephones.OperateHANDSET10:15PM $8',2$66,67MUTENEW$16211/13
36OperateMake a call2 Dial the phone number.Answer a call1    - OR -  Press TALK or   on the handset.  - OR -   - OR - Press TALK,   or any dialing keys on the handset.-------------------- OR -----------------Press   on the telephone base.
373. OperateEnd a callPress OFF on the handset.-OR-Place the handset in the handset charger.SpeakerphonePress   on the handset or telephone base.Volume------ OR ------Slide the VOL control on the cordless handset or on the telephone base:•  to adjust the speaker volume level when on a call; or •  to adjust the ringer volume when the telephone is ringing.•  For hearing protection, do not put the handset near your ear when the telephone is ringing. Loud ringer sound may damage your hearing. Adjust the volume to lower the ringer sound if you find it too loud.UpDownOn the telephone base:On the  cordless handset:
38OperatePress and hold SOS/AUDIO ASSIST on the cordless handset for 3 seconds. The telephone base announces, “Emergency mode is activated“, and then starts calling the preset SOS numbers.•  If you have enabled internal SOS call, the telephone calls other system devices when you press and hold SOS/AUDIO ASSIST. When no one answers the internal SOS call in 20 seconds, the telephone then calls the preset SOS numbers. See page 13 for details.Make SOS emergency call-------------------------- OR -----------------------------If you have purchased and registered a Wearable home SOS pendant (SN7022), press the dial key   on the SOS pendant.     SOSYou can cancel an SOS emergency call within 20 seconds:• Press TALK, CANCEL or SOS/AUDIO ASSIST on the handset; or• Press    on the telephone base; or• Press the CANCEL key on the back of the SOS pendant.“This is an emergency call. Please press any number key to start the conversation.“•  When the emergency call is answered, the telephone plays the SOS message (see page 17) to the call receiver, asking the receiver to respond by pressing a number key on his/her phone.•  After the call receiver presses a number key, you can then start a conversation with the call receiver.• The SOS  button on the cordless handset functions as Audio Assist button when on a call or listening to a message or announcement.
393. OperateTemporary ringer silencingWhen the telephone is ringing, you can temporarily silence the ringer without disconnecting the call. The next call rings normally at the preset volume.      - OR -  Press MUTE or CANCEL on the handset.When the telephone is ringing:Call waitingWhen you subscribe to call waiting service from your telephone service provider, you hear an alert tone if there is an incoming call while you are already on a call.• Press FLASH on the handset or telephone base to put the current call on hold and take the new call.• Press FLASH at any time to switch back and forth between calls.- OR -   When on a call using the cordless handset.When on a call using the telephone base speakerphone.
40OperatePhoto/memory speed dialIf you have set any of the four photo speed dial keys on the telephone base or any of the four memory speed dial keys on the cordless handset, you can press the keys to quickly dial the preset number.The telephone base and the handset share the memory speed dial numbers.For details on setting photo/memory speed dial, see page 19. Press a photo speed dial key on the telephone base to call. Press M1, M2, M3 or M4 on the handset to call.RedialThe last 10 numbers dialed (up to 30 digits) are stored in the cordless handset.1 Press and hold REDIAL, and then press   or   to browse the redial entries when the handset is not in use.2 To redial, press TALK on the handset.REDIAL  #1/10     595-9511
413. OperateTemporary tone dialingIf you have pulse (rotary) service only, you can switch from pulse to touch-tone dialing temporarily during a call. This is useful if you need to send touch-tone signals to access your telephone banking or long distance services.1 When on a call, press TONE* on the handset.2 Enter the number you wish to dial. The telephone sends touch-tone signals. It automatically returns to pulse dialing mode after you end the call.Audio Assist®The Audio Assist feature enhances the clarity and loudness of your caller’s voice on the cordless/corded handset earpiece when you are on a call, or listening to a message or an announcement.Turn on/off Audio Assist: When on a call or listening to a message or an announcement:• Press AUDIO ASSIST on the cordless handset to turn on.•  Press again to turn off.
42OperateFind handsetTo find your misplaced cordless handset, press PAGE on the telephone base to make intercom paging to the handset. If you have two or more handsets, the telephone makes paging to all handsets.To stop the paging tone:• Press OFF on the cordless handset; or• Press PAGE on the telephone base.EqualizerThe equalizer on the cordless handset enable you to change the quality of the audio for both handset earpiece and speakerphone to best suit your hearing. The default setting is Natural.Change the equalizer setting:When on a call:• Slide the EQ button to toggle among Treble, Natural and Bass.TrebleBassNatural
433. OperateJoin a call in progressIf you have two or more handsets, when you are already on an outside call with the cordless handset or the telephone base, the other handset or the telephone base can join the call. You can share an outside call with up to four devices.To join a call with the cordless handset:Press TALK or   on the handset. - OR - To join a call with the telephone base:     To exit the call:• Press OFF or place the handset in the telephone base; or• Press on the telephone base.
44OperateIntercomYou can use the intercom feature for conversations between the telephone base and the cordless handset. If you have two or more cordless handsets, you can make intercom calls one handset to another or to the telephone base.1  Press MENU when the handset is not in use.HANDSET10:15PM    12/25$1621CallingbaseScroll to Intercom, and then press SELECT.2  Caller ID log>IntercomMake intercom call using the cordless handset:•  If you have other registered devices or have two or more handsets, choose the device to call. INTERCOM TO:>HANDSET 2
453. Operate>Handset 1 Handset 2•  If you have other registered devices or have two or more handsets, choose the device to call.•  To answer the intercom call on the destination device, press TALK,or any dialing keys on the handset, or press on the telephone base.
46OperateCall transfer using IntercomUse the intercom feature to transfer an outside call using the cordless handset. If you have two or more handsets, you can also share an outside call with another handset or the telephone base.Press SELECT to select Intercom.2 >Intercom PhonebookWhen the destination device picks up, the outside call is put on hold. Then, you have the following options:•  Transfer the call;•  Share the call; or•  End the call.Intercom1  When on a call with your cordless handset, press MENU.
473. OperatePress SELECT to select Transfer. The call is transferred to the destination device.4 >Transfer Share call3  Press MENU.Transfer call: Share call:Scroll to Share call, and then press SELECT to let the destination device join you on the outside call in a three-way conversation.4  Transfer>Share call3  Press MENU.End call:Press TALK to end the intercom call and continue the outside call with your handset.3  Press TALK.OR OR
48PhonebookAdd a phonebook entryThe phonebook can store up to 50 entries, which are shared by all handsets. Each entry may consist of a telephone number with up to 30 digits, and a name with up to 15 characters.1 Enter the phone number when the handset is not in use.HANDSET10:15PM    12/25$16212 Press MENU.     595-9511_Edit the number if needed.3 EDIT NUMBER     595-9511_
494. Phonebook- OR -1. Press MENU on the cordless handset when the telephone is not in use.2. Scroll to Phonebook, and then press SELECT.3. Scroll to Add contact, and then press SELECT.4.  Enter the phone number, and then press SELECT.5.  Enter the name, and then press SELECT.5 Enter the nameENTER NAME_Press SELECT.6 ENTER NAME    Mike Smith_Press SELECT.4 EDIT NUMBER 800-595-9511_
50PhonebookReview phonebook entry1  Press MENU when the handset is not in use.Scroll to Phonebook, and then press SELECT. Smart call blk>Phonebook2 Press SELECT to select Review.>Review Add contact3  4 Mike Smith800-595-9511Scroll to browse through the entries.
514. PhonebookDial a phonebook entryReview the phonebook entries, and when your desired entry shows on the handset screen:Press TALK on the handset.    Mike Smith800-595-9511Delete a phonebook entryReview the phonebook entries, and when your desired entry shows on the handset screen:Press DELETE.1 Mike Smith800-595-9511Press SELECT to delete.2 Mike SmithDelete contact?
52PhonebookSave a redial entry to the phonebook1 Press and hold REDIAL when the cordless handset is not in use.Enter the name.ENTER NAME_4 Edit the phone number if needed, and then press SELECT.3 EDIT NUMBER 800-595-9511_2 REDIAL  #1/10     595-9511Scroll to browse through the redial list. When your desired entry displays, press MENU.Press SELECT to save.ENTER NAMEMike Smith_5 
534. Phonebook Edit a phonebook entryReview the phonebook entries, and when your desired entry shows on the handset screen:2 Edit the number.EDIT NUMBER 800-595-9511_1 Mike Smith595-951109:15PM    11/30NEW$1621Press SELECT.3 Press SELECT.EDIT NUMBER     595-9511_Edit the name.EDIT NAMEMike Smith_4 Press SELECT to save.EDIT NAMEMike Smiths_5 
54Caller IDReview caller ID log entryIf you subscribe to caller ID service, information about each caller appears after the first or second ring.The caller ID log stores up to 50 entries. Each entry has up to 24 digits for the phone number and 15 characters for the name.1   Press MENU when the cordless handset is not in use.Press SELECT to select Review.3 >Review Del all callsScroll to browse through the entries.4 Mike Smith595-951109:15PM    11/30NEW$1621Scroll to Caller ID log, and then press SELECT.2  Phonebook>Caller ID log
555. Caller IDSave a caller ID log entry to the phonebookWhen your desired caller ID log entry shows on the handset screen:Press SELECT.2    SAVE TO>Phonebook3 Edit the number if necessary.EDIT NUMBER     595-9511_1 Mike Smith595-951109:15PM    11/30NEW$1621Press MENU.4 Press SELECT.EDIT NUMBER 800-595-9511_Edit the name if necessary.EDIT NAMEMike Smith_5 Press SELECT to save.EDIT NAMEMike Smiths_6 
56Caller IDDelete a caller ID log entryDial a caller ID log entryReview the caller ID log entries, and when your desired entry shows on the handset screen:Press TALK or   on the handset.   - OR - Mike Smith595-951109:15PM    11/30NEW$1621Review the caller ID log entries, and when your desired entry shows on the handset screen:Press DELETE on the handset.Mike Smith595-951109:15PM    11/30NEW$1621
576. Smart call blockerSmart call blocker*If you have subscribed to caller ID service, then you can use the Smart call blocker feature to screen incoming calls.Smart call blocker is on, once you install your telephone. It allows all incoming calls to get through and ring by default. You can change the Smart call blocker settings to screen incoming calls.With call screening active, Smart call blocker screens and filters all incoming calls from numbers or names that are not yet saved in your directory, allow list, block list, or star name list. You can easily add incoming phone numbers to your allow list and block list. This allows you to build up your lists of allowed and blocked numbers, and Smart call blocker will know how to deal with these calls when they come in again.Read the Introducing Smart call blocker leaflet provided in your package to learn how to set up your Smart call blocker. * Includes licenced Qaltel™ technology.Qaltel™ is a trademark of Truecall Group Limited.
58Smart call blockerCall categoriesCalls are classified into four categories. Smart call blocker handles the calls in the following ways:Call category Call controlWelcome calls•  Numbers saved in allow list.•  Numbers saved in phonebook.•  Numbers not found in block list.•  Names saved in star name list.AllowThe telephone rings when there is an incoming call with number saved in your allow list or phonebook, but not in your block list. Robocalls with caller names saved in your star name list will also ring.Unwelcome calls•  Numbers saved in block list.BlockThe telephone does not ring when there is an incoming call with number saved in your block list, and the call will be rejected.
596. Smart call blockerCall category Call controlCalls without numbers•  Numbers that are “out of area” or set to “Private“.Uncategorized calls•  With absent caller ID number. •  Numbers not found in directory.•  Numbers not found in allow list.•  Numbers not found in block list.•  Caller ID names not found in star name list.Option 1: Screening with caller nameIf you have selected this option, the telephone plays the screening announcement, and then ask the caller to say his/her name before the call rings on your telephone. You will then hear the caller’s name announced if you have turned on the caller ID announce feature. Then, you can decide whether to accept or reject the call, or to forward the call to the answering system.Option 2: Screening without caller nameIf you have selected this option, the telephone plays the screening announcement, and then ask the caller to press the pound key (#) before the call rings on your telephone. You can then answer the call.Option 3: Allow (default settings)The telephone allows the calls to get through and ring. The caller’s number will not be saved to the allow list.Option 4: Answering systemIf you have selected this option, the telephone forwards the calls to the answering system without ringing.Option 5: BlockIf you have selected this option, the telephone rejects the calls with block announcement without ringing. The caller’s number will not be saved to the block list.
60Smart call blockerSet Smart call blocker on/offPress SELECT to select SCB On/Off.2 >SCB On/Off Block list1 Press CALL BLOCK when the handset is not in use.HANDSET10:15PM    12/25$1621Scroll to On or Off, and then press SELECT.3 SCB ON/OFF>On
616. Smart call blockerSet welcome callsAdd allow list entryAdd numbers to the allow list that you want to allow their calls to get through to you. The allow list stores up to 200 numbers.1  Press CALL BLOCK when the handset is not in use.Scroll to Add new entry, and then press SELECT.3  Review>Add new entryScroll to Allow list, and then press SELECT.2  Block list>Allow listEnter the phone number and name, and then press SELECT to save.4  ENTER NUMBER     595-9511_ENTER NAMEMike Smith_
62Smart call blockerSet welcome callsAdd star name entryAdd names (up to 15 characters) of organizations like schools, medical offices, and pharmacies that use robocalls to communicate important information to you. Their calls will get through to you. The star name list stores up to 10 names.Scroll to Add new entry, and then press SELECT.3  Review>Add new entryScroll to Star name list, and then press SELECT.2  Allow list>Star name list ENTER NAMEBayriver ElemenEnter the name, and then press SELECT to save.4 1  Press CALL BLOCK when the handset is not in use.
636. Smart call blockerSave a caller ID log to the allow listSet welcome callsScroll to Allow list, and then press SELECT.5 SAVE TO>Allow list1. Press MENU when the handset is not in use.2. Scroll to Caller ID log, and then press SELECT.3. Press SELECT to select Review.Review the caller ID log entries:Edit the phone number and name if necessary, and then press SELECT to save.6  EDIT NUMBER     595-9511_EDIT NAMEMike Smith_4 Mike Smith595-951109:15PM    11/30NEW$1621Browse through the entries. When the desired entry displays, press MENU.
64Smart call blockerSet welcome callsSave a caller ID log to the star name list1. Press MENU when the handset is not in use.2. Scroll to Caller ID log, and then press SELECT.3. Press SELECT to select Review.Review the caller ID log entries:Scroll to Star name list, and then press SELECT.5 SAVE TO>Star name list4 Mike Smith595-951109:15PM    11/30NEW$1621Browse through the entries. When the desired entry displays, press MENU.Press SELECT to save.6 Star this name?Bayriver Elemen
656. Smart call blockerSet unwelcome callsAdd block list entryAdd numbers to the block list that you want to prevent their calls from ringing through. The block list stores up to 1,000 entries.1  Press CALL BLOCK when the handset is not in use.Scroll to Add new entry, and then press SELECT.3  Review>Add new entryScroll to Block list, and then press SELECT.2  SCB On/Off>Block listEnter the phone number and name, and then press SELECT to save.4  ENTER NUMBER     595-9511_ENTER NAMESalesman_
66Smart call blockerSet unwelcome callsSave a caller ID log to the block list1. Press MENU when the handset is not in use.2. Scroll to Caller ID log, and then press SELECT.3. Press SELECT to select Review.Review the caller ID log entries:Scroll to Block list, and then press SELECT.5 SAVE TO>Block list4 Direct Sales595-951109:15PM    11/30NEW$1621Browse through the entries. When the desired entry displays, press MENU.Edit the phone number and name if necessary, and then press SELECT to save.4  EDIT NUMBER     595-9511_EDIT NAMESalesman_
676. Smart call blockerControl calls without numbersUse this setting to control “out of area” calls or calls with numbers that are set to “Private”. You can choose to allow or reject these calls directly. You can also choose to screen them with or without learning the callers’ names before you decide whether to answer or reject these calls. Moreover, you can forward these calls to the answering system.Scroll to select Screening, Allow, Answering sys or Block, and then press SELECT. CALLS W/O NUM>Screening3  Star name list>Calls w/o numScroll to Calls w/o num, and then press SELECT.2 If you select Screening, scroll to select w/Caller name or w/o Caller name, and then press SELECT.SCREENING>w/ Caller name4 1 Press CALL BLOCK when the handset is not in use.
68Smart call blockerControl uncategorized callsUse this setting to control calls with numbers that are not in your phonebook, allow list or block list, or have no caller ID number display.  You can choose to allow or reject these calls directly. You can also choose to screen them with or without learning the callers’ names before you decide whether to answer or reject these calls. Moreover, you can forward these calls to the answering system.Scroll to Uncategorized, and then press SELECT.2  Calls w/o num>UncategorizedScroll to select Screening, Allow, Answering sys or Block, and then press SELECT.3  UNCATEGORIZED>ScreeningIf you select Screening, scroll to select w/Caller name or w/o Caller name, and then press SELECT when done.4 SCREENING>w/ Caller name1  Press CALL BLOCK when the handset is not in use.
696. Smart call blockerScreen calls without numbersIf Smart call blocker is on, and you have set to screen calls without numbers and ask for caller’s name, the telephone will not ring when receiving calls without numbers. It plays the screening announcement to the caller and asks the caller to respond before putting the call through to you.Smart call blkScreening...10:15PM    12/25The telephone is playing the screening announcement to the caller.Screened callPRIVATE CALLER10:15PM    12/25After screening, the telephone rings. Press TALK or   to pick up the call.1 25After you pick up the call, the telephone announces: “To answer the call, press 1. To send this call to the answering system, press 4. To repeat these options, press * ”.2  25• Press 1 to answer the call;• Press 4 to send it to the answering system; or• Press OFF to hang up.
70Smart call blockerScreen uncategorized callsIf Smart call blocker is on, and you have set to screen uncategorized calls and ask for caller’s name, the telephone will not ring when receiving the calls. It plays the screening announcement to the caller and asks the caller to respond before putting the call through to you.Smart call blkScreening...10:15PM    12/25The telephone is playing the screening announcement to the caller.After you pick up the call, the telephone announces: “To answer the call, press 1. To answer and always allow this number, press 2. To block this number, press 3. To send this call to the answering system, press 4. To repeat these options, press *”.2  25 25• Press 1 to answer the call;• Press 2 to answer and always allow this number;• Press 3 or CALL BLOCK to block the call; or• Press 4 to send it to the answering system; or• Press OFF to hang up.Screened call888-883-244510:15PM    12/25After screening, the telephone rings. Press TALK or   to pick up the call.1 25
716. Smart call blockerAdd a screened number to the allow list or block listWhen the telephone announces the screening options after you pick up a screened call: “To answer the call, press 1. To answer and always allow this number, press 2. To block this number, press 3. To send this call to the answering system, press 4. To repeat these options, press *”.Add a screened number to the allow listPress 2 to answer the call. The telephone will add the current number to the allow list.25Add a screened number to the block listPress 3 or CALL BLOCK to block the call. The telephone will add the current number to the block list.Option while on a callWhen you are on a call and speaking to the caller, and you do not want to continue the call, you can end the call with block announcement and add the number to the block list.1.  During a call, press CALL BLOCK.2. Press SELECT to end the call.    - OR -
72Answering systemAbout the built-in answering system and voicemail serviceFor message recording, your telephone has a built-in answering system, and it also supports voicemail service offered by your telephone service provider (subscription is required, and fee may apply).Built-in answering system VS Voicemail serviceBuilt-in answering system Voicemail serviceSupported by Telephone system Telephone service providerSubscription No YesFees No May applyAnswer incoming calls•  After 4 rings by default.•  It can be changed via handset menu.•  Usually after 2 rings.•  It can be changed by contacting your telephone service provider.
737. Answering systemBuilt-in answering system Voicemail serviceStorage Telephone base Server or SystemDisplay new messages•  Handset -  XX New messages•  Handset -   and New voicemailRetrieve messages• Press   on the telephone base; OR• Press MENU, and then select Play messages on the handset; OR•  Access remotely with an access code.•  Press and hold   on the dialpad, and enter an access number and/or passcode from your telephone service provider.
74Answering systemSet number of ringsYou can set your answering system to answer calls at least two rings earlier than your voicemail service. For example, if your voicemail service answers after six rings, set your answering system to answer after four rings. Thus, if you are on a call, or if the answering system is busy recording a message and you receive another call, the second caller can leave a voicemail message.1 Press MENU when the handset is not in use.HANDSET10:15PM    12/25$1621Scroll to Answering sys, and then press SELECT.2  Play messages>Answering sys
757. Answering systemSet number of ringsScroll to Ans sys setup, and then press SELECT.3  Voice guide>Ans sys setupScroll to # of rings, and then press SELECT.4  Call screening># of ringsSelect 6, 5, 4, 3, 2 or Toll saver, and then press SELECT.5   # OF RINGS>4 •  If you select Toll saver, the answering system answers a call after two rings when you have new messages, and after four rings when there are no new messages. This feature allows you to check for new messages and avoid paying long distance charges when calling from out of your local area.
76Answering systemMessage playbackOn the telephone base:- OR -On the cordless handset:1 Press MENU when the handset is not in use.HANDSET10:15PM    12/25$1621Press SELECT to select Play messages.2 >Play messages Answering sysWhile playing back a message on the telephone base, you can press   to reduce the playback speed.
777. Answering systemSkip a message Repeat the playing messageOn the cordless handset: On the telephone base:- OR -On the cordless handset:If you are using the cordless handset to play messages, you can skip a message.
78Answering systemPlay the previous message-------------------- OR ----------------------On the telephone base:1 2 Press REPEAT twice.1 On the cordless handset:2 Press 4 twice.Delete a messageOn the telephone base:- OR -On the cordless handset:When message is playing:
797. Answering systemDelete all messagesOn the cordless handset:Scroll to Delete all old, then press SELECT.3  Announcement>Delete all old2 Scroll to Answering sys, then press SELECT. Play messages>Answering sys1  Press MENU when the handset is not in use.Press SELECT again to confirm.4  Delete all  old messages?On the telephone base:1 2 Press CALL BLOCK/DELETE twice.
80Answering systemRemote accessYou can reach your answering system remotely by dialing your home telephone number from any touch-tone telephone. A two-digit security code is required. The preset code is 19. You can set the code from 00 to 99.To access your answering system remotely, dial your telephone number from any touch-tone telephone.1When the system plays your answering system announcement, “Hello. Please leave a message after the tone.“, enter the two-digit security code.2Enter one of the remote commands.3Command Description1Play all messages.2Play only new messages.3Delete the current message (during playback).33 Delete all old messages.4Repeat the current message (during playback).5Stop.*5 Hear a list of remote commands.6Skip to the next message (during playback).*7 Record a new announcement.8End the call.0Turn the answering system on or off.
817. Answering systemSet remote access codeYou can set your own remote access code from 00 to 99.1   Press MENU when the handset is not in use.Enter a two-digit number, and then press SELECT to save.5  REMOTE CODE 19Scroll to Answering sys, and then press SELECT.2   Play messages>Answering sysScroll to Ans sys setup, and then press SELECT.3  Voice guide>Ans sys setupScroll to Remote code, and then press SELECT.4   # of rings>Remote code6  REMOTE CODE 99
82Additional devicesAdd and register expansion handsetYou can add new cordless handsets (SN5107, purchased separately) to expand your telephone system. Your telephone base supports a maximum of four cordless handsets. Additional handsets are assigned with numbers in sequential order.Charge the new handset without interruption for at least 30 minutes before registering it to the telephone base. After charged, each expansion handset displays To register HS, see manual. HANDSET 2Registered Registering...Please waitWhen the registration is successful, the handset displays HANDSET X Registered.1 When the telephone is not in use, press and hold PAGE on the telephone base for about five seconds until the visual ringer indicator light turns on. Release PAGE.2Place the handset in the telephone base to register.
838. Additional devicesAdd and register photo speed dial handsetYou can add a new photo speed dial handset (SN5307, purchased separately) to your telephone system. The SN5307 cordless photo speed dial handset lets you quickly dial one of the four preset numbers by just pressing the photo speed dial key.If you have already set the photo speed dial keys 1, 2, 3 and 4 on the telephone base, the same numbers will be automatically set for the dial keys of your newly registered photo speed dial handset.You can register a maximum of four cordless handsets.For registration and detailed operations, read the user’s manual of your new photo speed dial handset provided in your package.You need to register your new photo speed dial handset to the telephone base before use.1  When the telephone is not in use, press and hold PAGE on the telephone base for about five seconds until the visual ringer indicator light turns on. Release PAGE.2Put the handset on its charger to begin registration. The handset CHARGE light alternates red and green quickly to indicate the registration is in progress.
84Additional devicesDevice setupYou can add VTech compatible Cordless audio doorbell, ULE Cordless remote ringer and ULE Wearable home SOS pendant (SN7021, SN7014 and SN7022, all purchased separately) to your telephone system.The Cordless audio doorbell (SN7021) helps you get notified at your telephone system upon visitors’ arrival. When a visitor presses the Audio doorbell, both the base and the handset will play the chime tone, and you can then answer the doorbell call and talk to the visitor at your door with the handset or base. For operation instructions, refer to page 86 to page 97.VTech compatible ULE devices             The ULE Cordless remote ringer (SN7014) works as an extra ringer and/or flashing lights in addition to your handset and base. It lets you hear and see more clearly when there is an incoming call.The ULE Wearable home SOS pendant (SN7022) function as same as the SOS button of your cordless handset. It acts as a handy pendant to let you quickly call the preset SOS numbers for help in an emergency, even when your telephone is beyond your reach. For detailed setups and operations, refer to Set SOS emergency call section on page 13 to page 18, and Make SOS emergency call section on page 38.  •  You can add a maximum of two Cordless audio doorbells and 30 compatible ULE devices to your telephone base.
858. Additional devicesAdd and register a new device1  When the telephone is not in use, press and hold PAGE on the telephone base for about five seconds until the visual ringer indicator light turns on. Release PAGE.Press and hold the pair button   on the right side of the remote ringer until the green LED light on the front flashes, then release the button. When registration is successful, the green LED light becomes steady on, and then the base beeps once. Remote ringerPress and hold CANCEL on the back of the SOS pendant until the LED light on the front flashes, then release the button. When registration is successful, the LED light turns off, and then the base beeps once.SOS pendantPress and hold the pair button on the back of the audio doorbell until the chime button LED light flashes, then release the button. When registration is successful, the chime button LED light becomes steady on, and then the base beeps once.Audio doorbell2•  You need to register your newly purchased devices to the telephone base before use.•  Make sure the new devices are powered on with batteries or AC power before registering them to the telephone base.
86Additional devicesIf you have purchased and registered an Cordless audio doorbell (SN7021) to the telephone base, the Doorbell sub-menu option appears in the Set device menu of the cordless handset. You can set up your Cordless audio doorbell, for example, set the chime volume and tone, and divert doorbell calls to a preset number. You can also record doorbell calls.Audio doorbellSet chime volumeScroll to Set device, and then press SELECT.1   Settings>Set device(Model SN7021 , purchased separately)Scroll to Doorbell, and then press SELECT.2  Check signal>DoorbellPress   on the handset when it is not in use.
878. Additional devicesPress SELECT to select Chime.3 >Chime Record DB callPress SELECT again to select Chime volume.4     CHIME>Chime volumeScroll to select from Volume 1 to Volume 5, or select Off, and then press SELECT.5 CHIME VOLUME>Volume 5
88Additional devicesSet chime tone1   Press MENU when the handset is not in use.Scroll to Set device, and then press SELECT.1   Settings>Set deviceScroll to Doorbell, and then press SELECT.2  Check signal>DoorbellAudio doorbell(Model SN7021 , purchased separately)
898. Additional devicesPress SELECT to select Chime.3 >Chime Record DB callPress SELECT again to select Chime tone.4     CHIME>Chime toneScroll to select from Tone 1 to Tone 5, or select Off, and then press SELECT.5 CHIME TONE>Tone 1
90Additional devicesAnswer a doorbell call Decline a doorbell callAudio doorbell (Model SN7021 , purchased separately)When a visitor presses your audio doorbell, all your devices chime and the handset screen show Doorbell X is ringing.When the chime tone is ringing, press OFF on the handset.Using a cordless handset:Press TALK on a cordless handset to answer.Using a cordless handset:Press   on the telephone base.   Using the telephone base:DOORBELL 1is ringingSpeak toDOORBELL 1 •  After you press TALK on the cordless handset to answer the doorbell, the handset screen displays Speak to DOORBELL X. You can then talk with the visitor at your door.
918. Additional devicesYou can record conversations between you at the telephone and the visitor at your door, after you answer the doorbell call with the telephone.Record doorbell call1   Press MENU on the handset when it is not in use.Scroll to Doorbell, and then press SELECT.3  Check signal>DoorbellScroll to Set device, and then press SELECT.2   Settings>Set deviceScroll to Record DB call and press SELECT. Then, scroll to On and press SELECT. Chime>Record DB call4  •  Recorded doorbell calls are stored as voice messages. See Message playback section on page 76 to retrieve your doorbell call conversations.
92Additional devicesSet call divert numberAudio doorbell (Model SN7021 , purchased separately)You can divert all doorbell calls to a preset external number, or decline a doorbell call and forward the doorbell call to the preset external number.Scroll to Doorbell, and then press SELECT.3  Check signal>DoorbellScroll to Set device, and then press SELECT.2   Settings>Set device  Record DB call>Dbell divertScroll to Dbell divert, and then press SELECT.4 1   Press MENU on the handset when it is not in use.
938. Additional devicesScroll to Preset number, and then press SELECT. 5  Divert mode>Preset numberEnter the destination number.6 PRESENT NUMBER            _ When a visitor presses the doorbell and the doorbell call is diverted to the preset number, the call receiver of the preset number hears the message “This is a diverted call from doorbell. Please press any number key to start the conversation.“ You can also set the telephone to record all doorbell call conversations. See Record doorbell call on page 91.Press SELECT to save.7 PRESENT NUMBER    595-9511_
94Additional devicesSet auto call divert to preset numberScroll to Doorbell, and then press SELECT.3   Check signal>DoorbellScroll to Set device, and then press SELECT.2   Settings>Set deviceAudio doorbell (Model SN7021 , purchased separately)You can set your audio doorbell to divert all doorbell calls to the preset external number when visitors press the doorbell.1   Press MENU on the handset when it is not in use.
958. Additional devicesScroll to Auto divert, and then press SELECT.DIVERT MODE>Auto divert6  Scroll to Dbell divert, and then press SELECT. Record DB call>Dbell divert4  Press SELECT to select Divert mode.>Divert mode Preset number5   To cancel all call diverts to the preset number:1.  Repeat from step 1 to step 5.2.  Then, at step 6, scroll to Off and then press SELECT.
96Additional devicesSet declined call divert to preset numberYou can also set up call divert to the preset number, only when you press OFF on your handset to decline the doorbell call.Audio doorbell (Model SN7021 , purchased separately)Scroll to Doorbell, and then press SELECT.3   Check signal>DoorbellScroll to Set device, and then press SELECT.2   Settings>Set device1   Press MENU on the handset when it is not in use.
978. Additional devicesScroll to Decline divert, and then press SELECT.DIVERT MODE>Decline divert6   To cancel all call diverts to the preset number:1.  Repeat from step 1 to step 5.2.  Then, at step 6, scroll to Off and then press SELECT.Scroll to Dbell divert, and then press SELECT. Record DB call>Dbell divert4  Press SELECT to select Divert mode.>Divert mode Preset number5  
98Additional devicesTest device signal strengthBefore you mount any of your devices (SN7014/SN7021/SN7022, all puchased separately), follow the instructions below to check the signal strength between the device and the telephone base. Make sure you mount the device in a location where the signal strength is good.1   Press MENU on the handset when it is not in use.Scroll to Set device, and then press SELECT.2  Settings>Set deviceScroll to select the desired device, and then press SELECT.4   DEVICES>DOORBELL 1Press SELECT to select Check signal.3 >Check signal Doorbell
998. Additional devicesGood signal5When the handset displays Good signal, press SELECT to confirm.•  If the handset displays No signal or Weak signal, check your device and make sure it is powered on, or select another location nearer to the telephone base.When the handset displays Awaiting signal:  DEVICES>DOORBELL 1  AwaitingsignalPress the chime button on the audio doorbell.- OR -   DEVICES>PENDANT 3  AwaitingsignalPress the CANCEL button on the audio doorbell. For remote ringer, the telephone checks the signal automatically after selecting the RINGER X on the handset.  DEVICES>RINGER 2  Awaitingsignal
100Additional devicesDevice monitoringView device statusIf there are additional devices registered to the telephone base, the names of the registered devices appear in the Devices menu of the cordless handset.You can view the current status of each of the registered devices and check whether they are active, inactive, or with low battery.Scroll to Devices, and then press SELECT.1  Set device>DevicesScroll to the desire device, and press SELECT.2    DEVICES>DOORBELL 13 Press SELECT to select Status and view the current status of the device.>Status Log  DOORBELL 1  LOW BATTPress   on the handset when it is not in use.
1018. Additional devicesDeregister handsetsIf you want to replace a cordless handset, you must deregister all the handsets, and then individually register each handset to the telephone base. •  You hear a confirmation tone when the deregistration process completes. It takes about 10 seconds to complete the deregistration.1  When the telephone is not in use, press and hold PAGE on the telephone base for about five seconds until the visual ringer indicator light turns on.Keep holding PAGE until the visual ringer indicator light begins to flash. Release PAGE.2  Immediately press PAGE again while the light is still flashing.
102Limited warrantyWhat does this limited warranty cover?The manufacturer of this VTech Product warrants to the holder of a valid proof of purchase (“Consumer” or “you”) that the Product and all accessories provided in the sales package (“Product”) are free from defects in material and workmanship, pursuant to the following terms and conditions, when installed and used normally and in accordance with the Product operating instructions. This limited warranty extends only to the Consumer for Products purchased and used in the United States of America and Canada.What will VTech do if the Product is not free from defects in materials and workmanship during the limited warranty period (“Materially Defective Product”)?During the limited warranty period, VTech’s authorized service representative will repair or replace at VTech’s option, without charge, a Materially Defective Product. If we repair the Product, we may use new or refurbished replacement parts. If we choose to replace the Product, we may replace it with a new or refurbished Product of the same or similar design. We will retain defective parts, modules, or equipment. Repair or replacement of the Product, at VTech’s option, is your exclusive remedy. VTech will return the repaired or replacement Products to you in working condition. You should expect the repair or replacement to take approximately 30 days.How long is the limited warranty period?The limited warranty period for the Product extends for ONE (1) YEAR from the date of purchase. If VTech repairs or replaces a Materially Defective Product under the terms of this limited warranty, this limited warranty also applies to the repaired or replacement Product for a period of either (a) 90 days from the date the repaired or replacement Product is shipped to you or (b) the time remaining on the original one-year warranty; whichever is longer.What is not covered by this limited warranty?This limited warranty does not cover:1.  Product that has been subjected to misuse, accident, shipping or other physical damage, improper installation, abnormal operation or handling, neglect, inundation, fire, water or other liquid intrusion; 2.  Product that has been damaged due to repair, alteration or modification by anyone other than an authorized service representative of VTech; 3.  Product to the extent that the problem experienced is caused by signal conditions, network reliability, or cable or antenna systems; 4.  Product to the extent that the problem is caused by use with non-VTech accessories; 5.  Product whose warranty/quality stickers, product serial number plates or electronic serial numbers have been removed, altered or rendered illegible; 6.  Product purchased, used, serviced, or shipped for repair from outside the United States of America or Canada, or used for commercial or institutional purposes (including but not limited to Products used for rental purposes); 7.  Product returned without a valid proof of purchase (see item 2 below); or8.  Charges for installation or set up, adjustment of customer controls, and installation or repair of systems outside the unit.
103How do you get warranty service?To obtain warranty service in the USA, please visit our website at www.vtechphones.com or call 1 (800) 595-9511. In Canada, go to  www.vtechcanada.com or call 1 (800) 267-7377.NOTE: Before calling for service, please review the user’s manual - a check of the Product’s controls and features may save you a service call.Except as provided by applicable law, you assume the risk of loss or damage during transit and transportation and are responsible for delivery or handling charges incurred in the transport of the Product(s) to the service location. VTech will return repaired or replaced Product under this limited warranty. Transportation, delivery or handling charges are prepaid. VTech assumes no risk for damage or loss of the Product in transit. If the Product failure is not covered by this limited warranty, or proof of purchase does not meet the terms of this limited warranty, VTech will notify you and will request that you authorize the cost of repair prior to any further repair activity. You must pay for the cost of repair and return shipping costs for the repair of Products that are not covered by this limited warranty.What must you return with the Product to get warranty service?1.  Return the entire original package and contents including the Product to the VTech service location along with a description of the malfunction or difficulty; and2.  Include a “valid proof of purchase” (sales receipt) identifying the Product purchased (Product model) and the date of purchase or receipt; and3.  Provide your name, complete and correct mailing address, and telephone number.Other limitationsThis warranty is the complete and exclusive agreement between you and VTech. It supersedes all other written or oral communications related to this Product. VTech provides no other warranties for this Product. The warranty exclusively describes all of VTech’s responsibilities regarding the Product. There are no other express warranties. No one is authorized to make modifications to this limited warranty and you should not rely on any such modification.State/Provincial Law Rights: This warranty gives you specific legal rights, and you may also have other rights, which vary from state to state or province to province.Limitations: Implied warranties, including those of fitness for a particular purpose and merchantability (an unwritten warranty that the Product is fit for ordinary use) are limited to one year from the date of purchase. Some states/provinces do not allow limitations on how long an implied warranty lasts, so the above limitation may not apply to you. In no event shall VTech be liable for any indirect, special, incidental, consequential, or similar damages (including, but not limited to lost profits or revenue, inability to use the Product or other associated equipment, the cost of substitute equipment, and claims by third parties) resulting from the use of this Product. Some states/provinces do not allow the exclusion or limitation of incidental or consequential damages, so the above limitation or exclusion may not apply to you.Please retain your original sales receipt as proof of purchase
Technical specificationsFrequency control Crystal controlled PLL synthesizerTransmit frequency Handset: 1921.536-1928.448 MHzTelephone base: 1921.536-1928.448 MHzChannels 5Nominal effective range Maximum power allowed by FCC and IC. Actual operating range may vary according to environmental conditions at the time of use.Power requirement Handset: 1.2V, 500mAh, 3 x AAA Ni-MH batteryTelephone base: 6V DC @ 800mAMemory Phonebook: 50 memory locations; up to 30 digits and 15 charactersCaller ID log: 50 memory locations; up to 24 digits and 15 charactersCall block: 1000 entriesSpecifications are subject to change without notice.© 2018 VTech Communications, Inc.All rights reserved. 07/18. SN5127_QSG_V1.0Document order number: 96-012159-010-100

Navigation menu