VTech Telecommunications 80-5412-00 Cordless Telephone Base User Manual ATT 5865CIB d1
VTech Telecommunications Ltd Cordless Telephone Base ATT 5865CIB d1
Contents
- 1. Manual Part 1A
- 2. Manual Part 1B
- 3. Manual Part 2
- 4. Manual Part 3
- 5. CIB Part 1
Manual Part 2
19
Handset Phonebook
18
Handset
Phonebook
Memory capacity
There are separate phonebook directories in the hand-
set and the base. Each phonebook can store up to 50
entries. Each entry can contain a number up to 32 digits,
and a name up to 15 letters long. In the handset phone-
book you can also select a picture to be displayed with
each entry. A convenient search feature can help you
find and dial numbers quickly (see page 20).
Timeouts and error tones
If you pause for too long while making an entry the
Phonebook will time out and you will have to begin
again.
If all memory locations are in use, an error tone will
sound when you attempt to enter a new number. This
means the memory is full, and you will not be able to
store a new number until you delete an existing one.
Phonebook
1
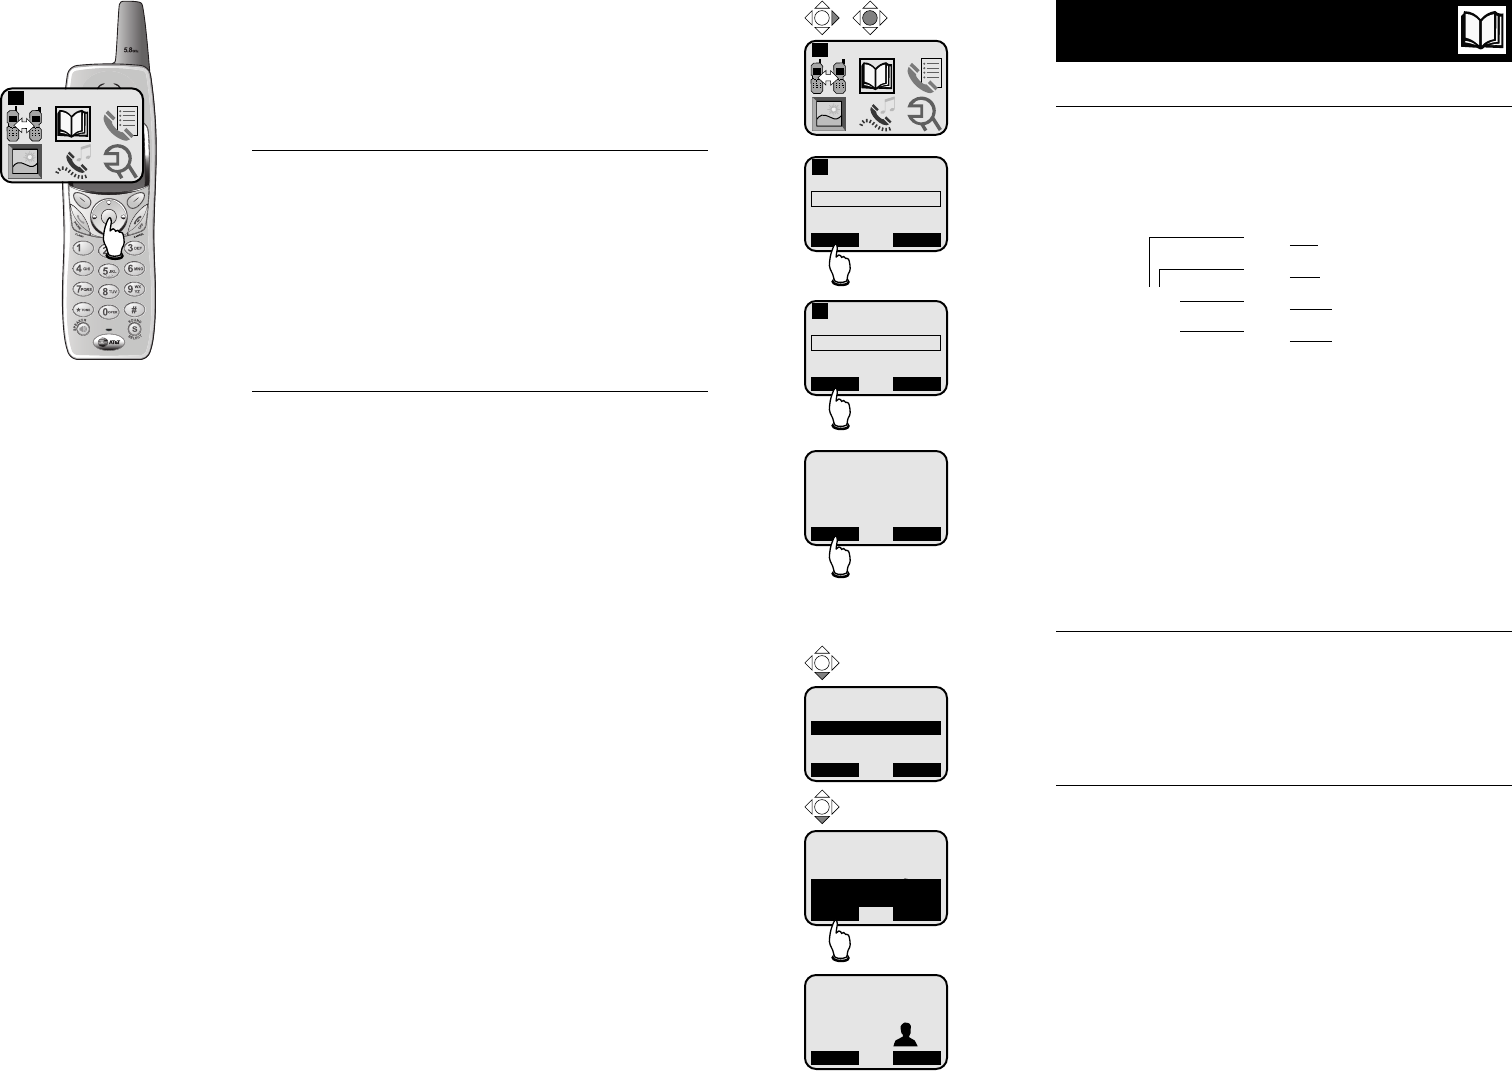
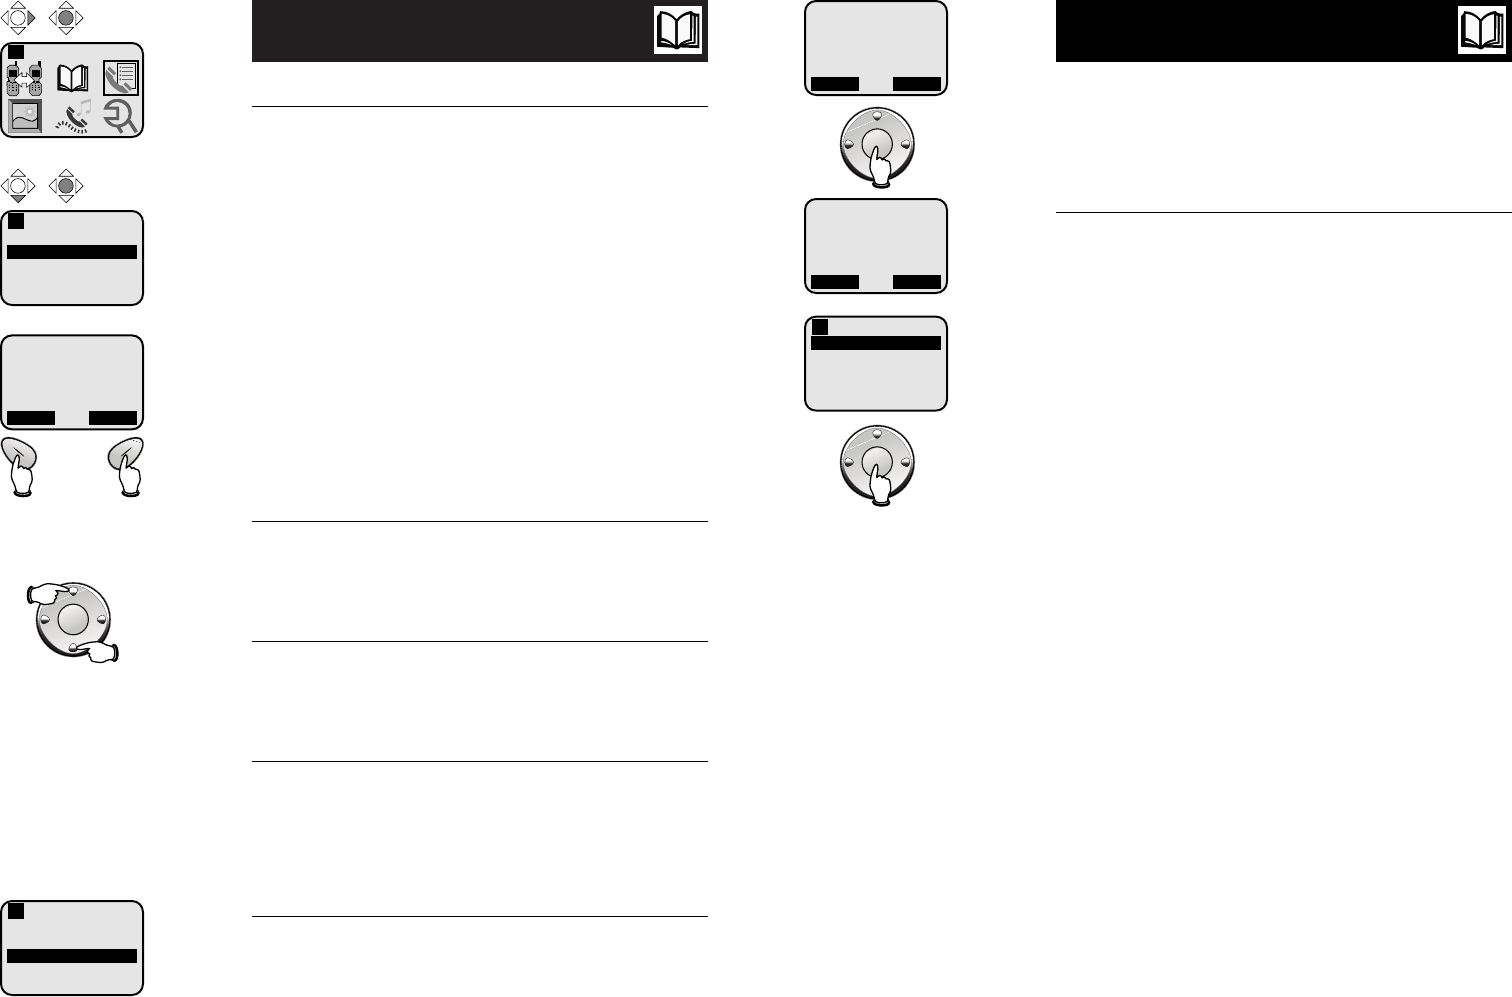
New phonebook entries
To enter a name
Press dial pad buttons once for the first letter, twice for
the second, three times for the third. Continue for
lower-case letters. To enter a number, continue press-
ing the button until the number appears.
The cursor moves to the right when you press another
dial pad button or the >button. Press >twice to
enter a space. When the name is complete, press OK.
• Press <to erase letters if you make a mistake.
• Press 1repeatedly to enter an ampersand (&),
apostrophe ('), comma (,) hyphen (-), period (.), or
pound sign (#).
To enter a number
Use the dial pad to enter up to 32 digits. When the
number is complete, press OK.
• Press <to erase numbers if you make a mistake.
Customizing entries
Press Vto choose a distinctive RINGER (see page 15).
If you have Caller ID service, the ringer you assign will
alert you when this person calls.
Press Vagain to insert a PICTURE into this entry (see
page 14).
Press once to enter “A” (4 times for “a”)
Press twice to enter “B” (5 times for “b”)
Press 3 times to enter “C” (6 times for “c”)
Press 7 times to enter “2”
2
Phonebook
1
Select Phonebook
Phonebook
Enter Name:
Pat Johnson
OK <—
1
Phonebook
Enter Number:
123-555-6789
OK <—
1
Pat Johnson
123-555-6789
Ringer: <Default >
Picture: <[none] >
SAVE <—
Press SAVE to complete entry,
or down arrow to customize
entry with ringer or picture
Pat Johnson
123-555-6789
Ringer: Melody 1
Picture: <[none] >
SAVE <—
Pat Johnson
123-555-6789
Ringer: Melody 1
Picture:
SAVE <—
Pat Johnson
123-555-6789
Ringer: Melody 1
Picture:
EDIT NEW
21
Handset Phonebook
20
Handset Phonebook
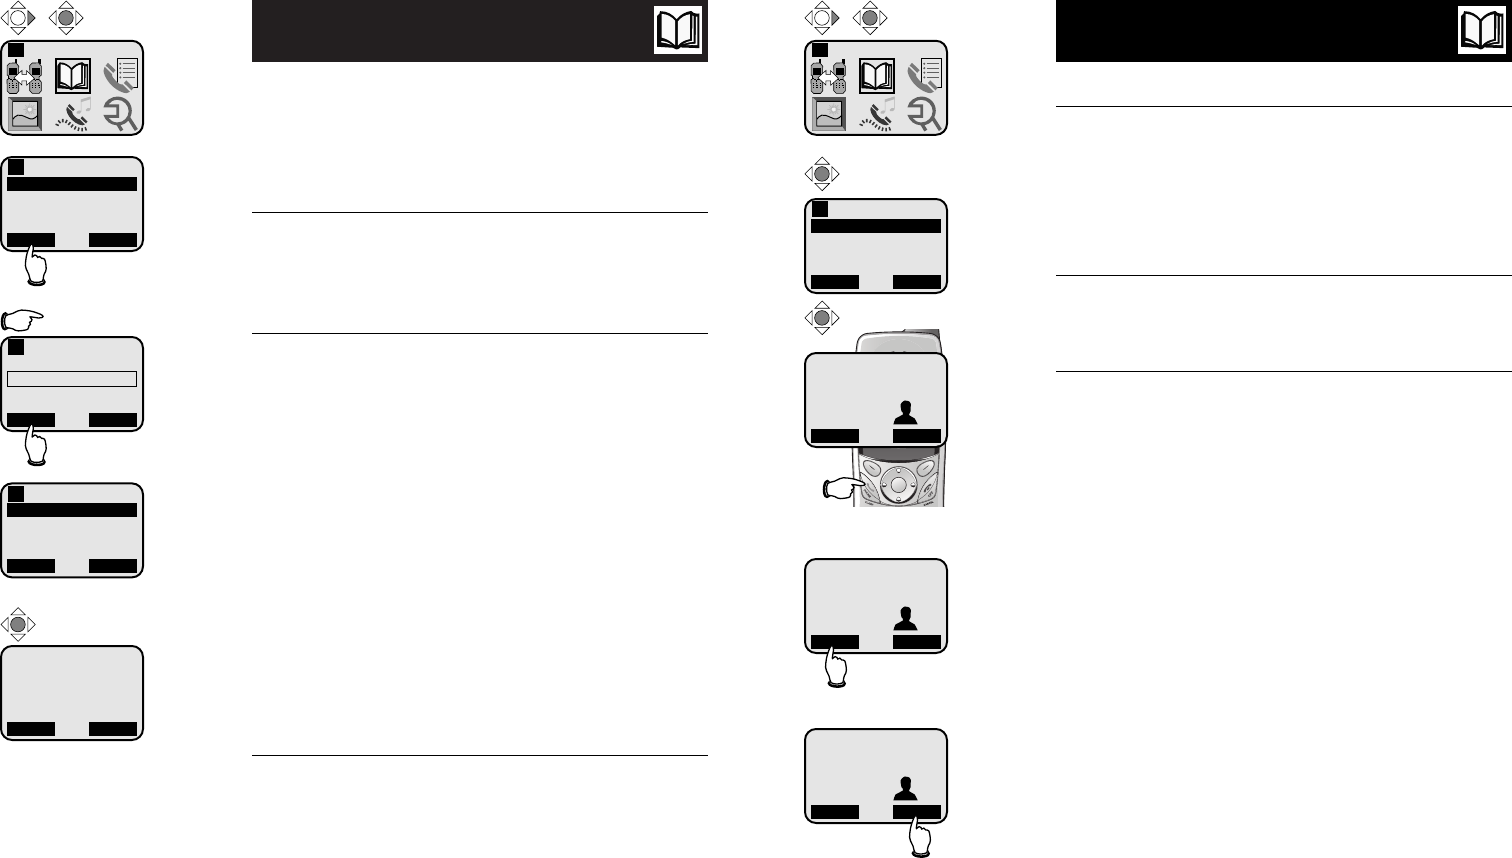
Phonebook search
You can use the up/down arrows to browse through
the phonebook, or search to find a specific entry. You
can press CANCEL at any time to exit the directory.
To browse through the directory
To browse, press ^or Vto scroll through all
entries one by one.
To search alphabetically
To shorten your search, press FIND, then use the tele-
phone dial pad to enter the first letter of a name. When
you press OK, the first name beginning with that letter
will be displayed.
Press dial pad buttons once for the first letter, twice for
the second, three times for the third, as shown below.
2
........................Find names beginning with “A”
22
..............Find names beginning with “B”
222
......Find names beginning with “C”
3
........................Find names beginning with “D”
33
..............Find names beginning with “E”
333
......Find names beginning with “F”
To call a displayed number
When you find the entry you want, press PHONE (or
SPEAKER) to dial. Or press EDIT to modify the entry
(see next page).
Intercom
1
Select Phonebook
Phonebook
Alice
Bob
Chris
Deborah
FIND NEW
1 of 37
1
Phonebook
Search For:
J
OK <—
1
5
Phonebook
Jack
Jennifer
John
Kristen
FIND NEW
8 of 37
1
To dial, edit or delete entries
To edit a listing
When any phonebook entry is displayed, press EDIT to
modify the entry. You can change the name, number,
distinct ringer setting or picture by following the steps
on page 19.
To dial a number
Press PHONE (or SPEAKER) to dial the displayed number.
To delete an entry
Press DELETE to delete the displayed entry from the
phonebook. Once deleted an entry cannot be
recovered.
Jack
123-555-4321
Ringer: <Default >
Picture: <[none] >
EDIT DELETE
8 of 37
Intercom
1
Select Phonebook
Phonebook
Alice
Bob
Chris
Deborah
FIND NEW
1 of 37
1
ALICE
555-4321
Ringer: Melody 1
Picture:
EDIT DELETE
1 of 37
Press EDIT to change entry
ALICE
555-4321
Ringer: Melody 1
Picture:
EDIT DELETE
1 of 37
Press DELETE to delete entry
ALICE
555-4321
Ringer: Melody 1
Picture:
EDIT DELETE
1 of 37
Press PHONE to dial entry
23
Base Phonebook
22
Base Phonebook
Memory capacity
There are separate phonebook directories in the hand-
set and the base. Each phonebook can store up to 50
entries. Each entry can contain a number up to 32 digits,
and a name up to 15 letters long. A convenient search
feature can help you find and dial numbers quickly (see
page 24).
Timeouts and error tones
If you pause for too long while making an entry the
Phonebook will time out and you will have to begin
again.
If all memory locations are in use, an error tone will
sound when you attempt to enter a new number. This
means the memory is full, and you will not be able to
store a new number until you delete an existing one.
REDIAL MENU MEM
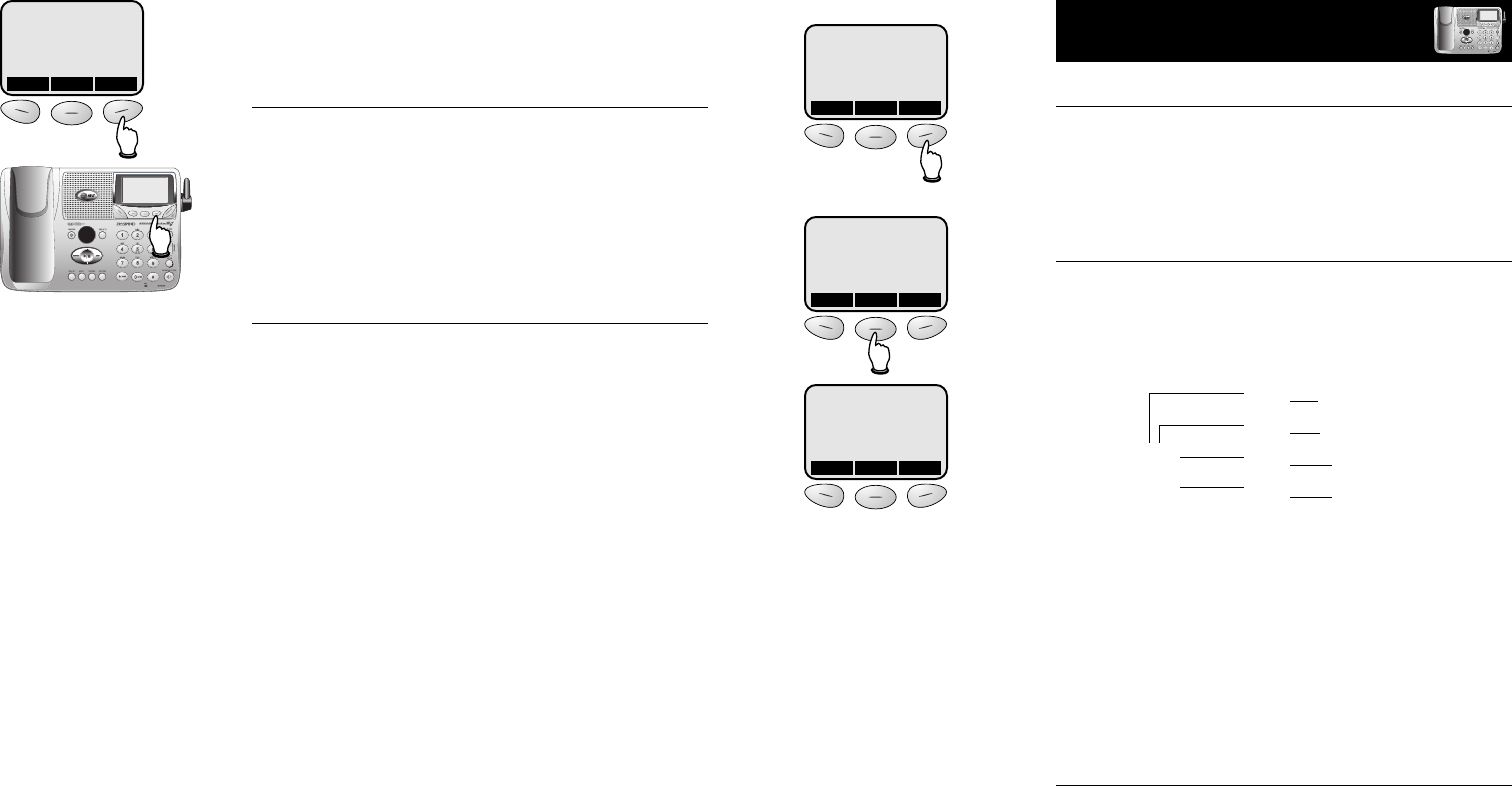
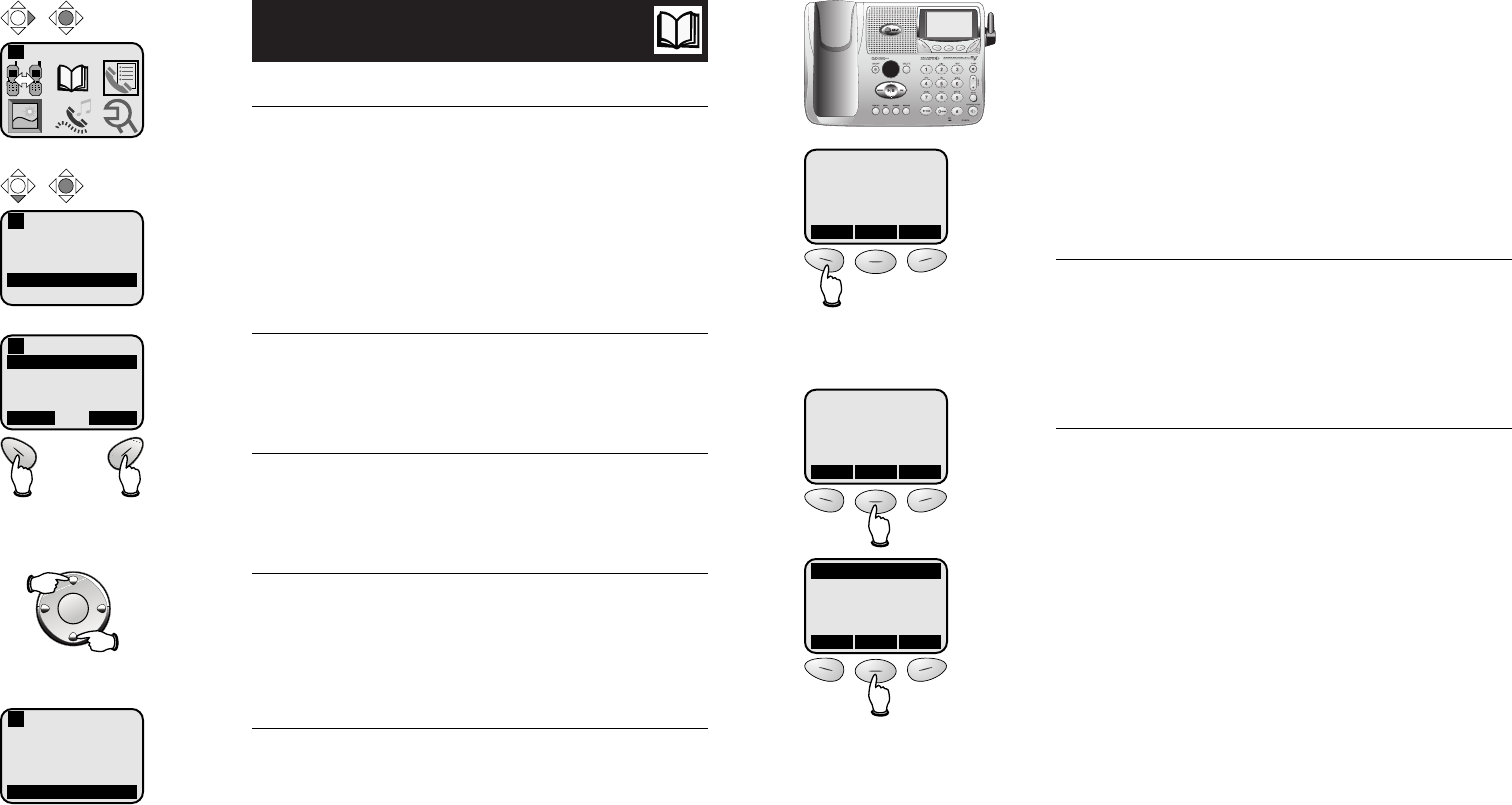
New phonebook entries
To enter a number
Use the dial pad to enter up to 32 digits. When the
number is complete, press MEM.
• Press CLEAR to erase numbers if you make a mistake.
To enter a name
Press dial pad buttons once for the first letter, twice for
the second, three times for the third. Continue for
lower-case letters. To enter a number, continue press-
ing the button until the number appears.
The cursor moves to the right when you press another
dial pad button or the >button. Press >twice to
enter a space. When the name is complete, press SAVE.
• Press CLEAR to erase letters if you make a mistake.
• Press 1repeatedly to enter an ampersand (&),
apostrophe ('), comma (,) hyphen (-), period (.), or
pound sign (#).
Storing the entry
Press SAVE to store your new phonebook entry. To
change it later, see page 25.
Press once to enter “A” (4 times for “a”)
Press twice to enter “B” (5 times for “b”)
Press 3 times to enter “C” (6 times for “c”)
Press 7 times to enter “2”
2
555-1234
PAUSE MENU MEM
ENTER NAME
PAT WILLIAMS
CLEAR SAVE
>
ENTRY HAS BEEN
STORED!
CLEAR SAVE
>
Enter number, then press MEM
Enter name, then press SAVE
25
Base Phonebook
24
Base Phonebook
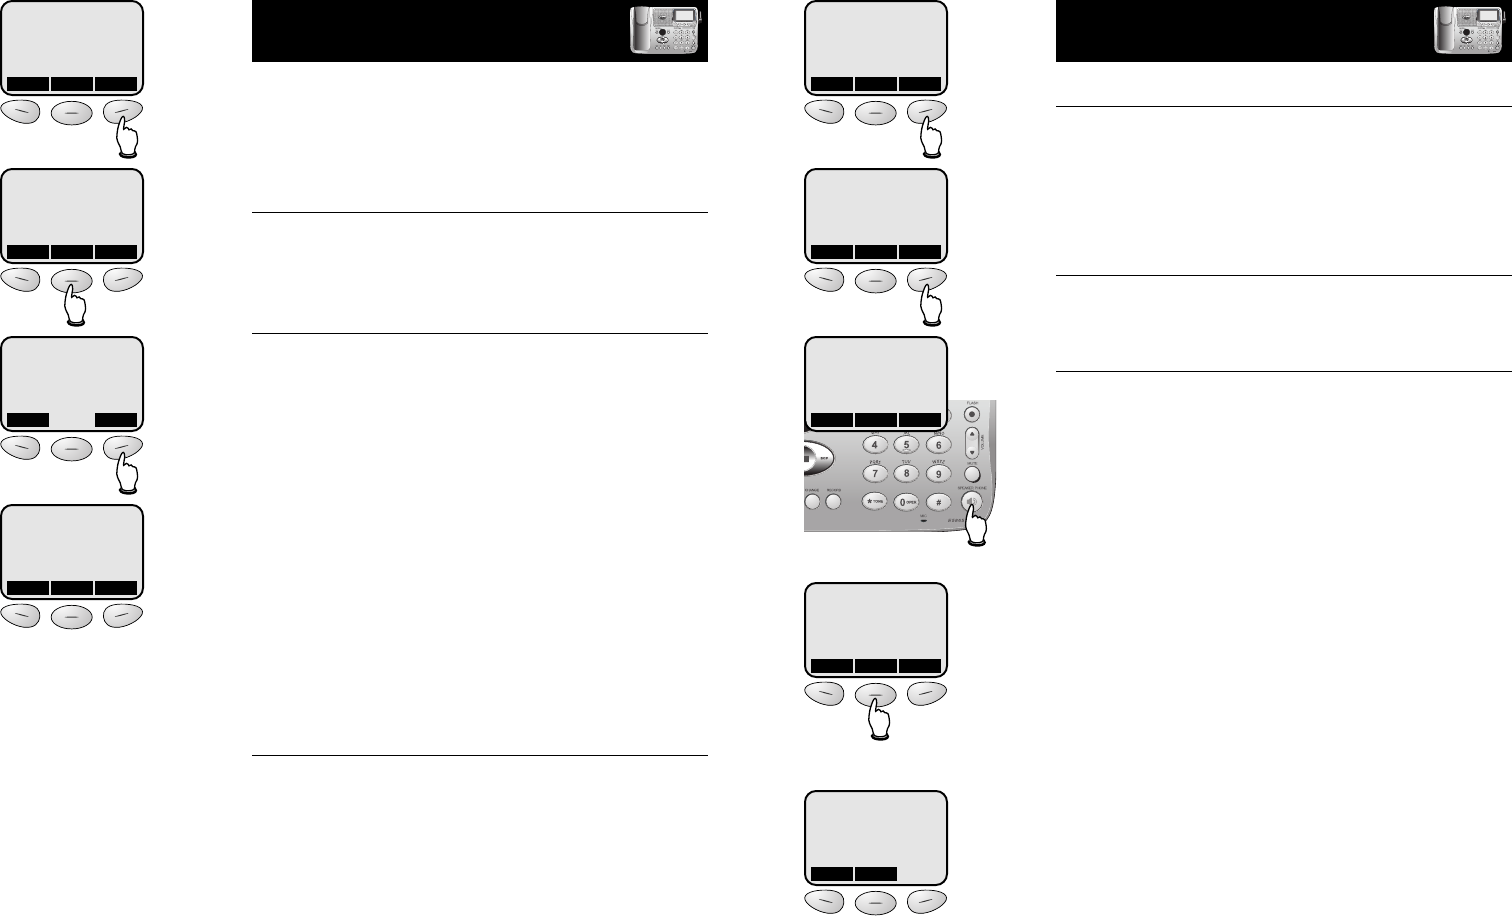
Phonebook search
You can use the up/down arrows to browse through
the phonebook, or search to find a specific entry. Press
and hold CLEAR at any time to exit the directory.
To browse through the directory
To browse, press ^or Vto scroll through all
entries one by one.
To search alphabetically
To shorten your search, press FIND, then use the tele-
phone dial pad to enter the first letter of a name. When
you press FIND again, the first name beginning with that
letter will be displayed.
Press dial pad buttons once for the first letter, twice for
the second, three times for the third, as shown below.
2
........................Find names beginning with “A”
22
..............Find names beginning with “B”
222
......Find names beginning with “C”
3
........................Find names beginning with “D”
33
..............Find names beginning with “E”
333
......Find names beginning with “F”
To call a displayed number
When you find the entry you want, press SPEAKER-
PHONE to dial. Or press EDIT to modify the entry (see
next page).
PAUSE MENU MEM
^
FIND
V
JACK
123-555-1234
^
EDIT
V
SEARCH FOR
J
CLEAR FIND
Use up/down arrow keys to
search for next/previous names
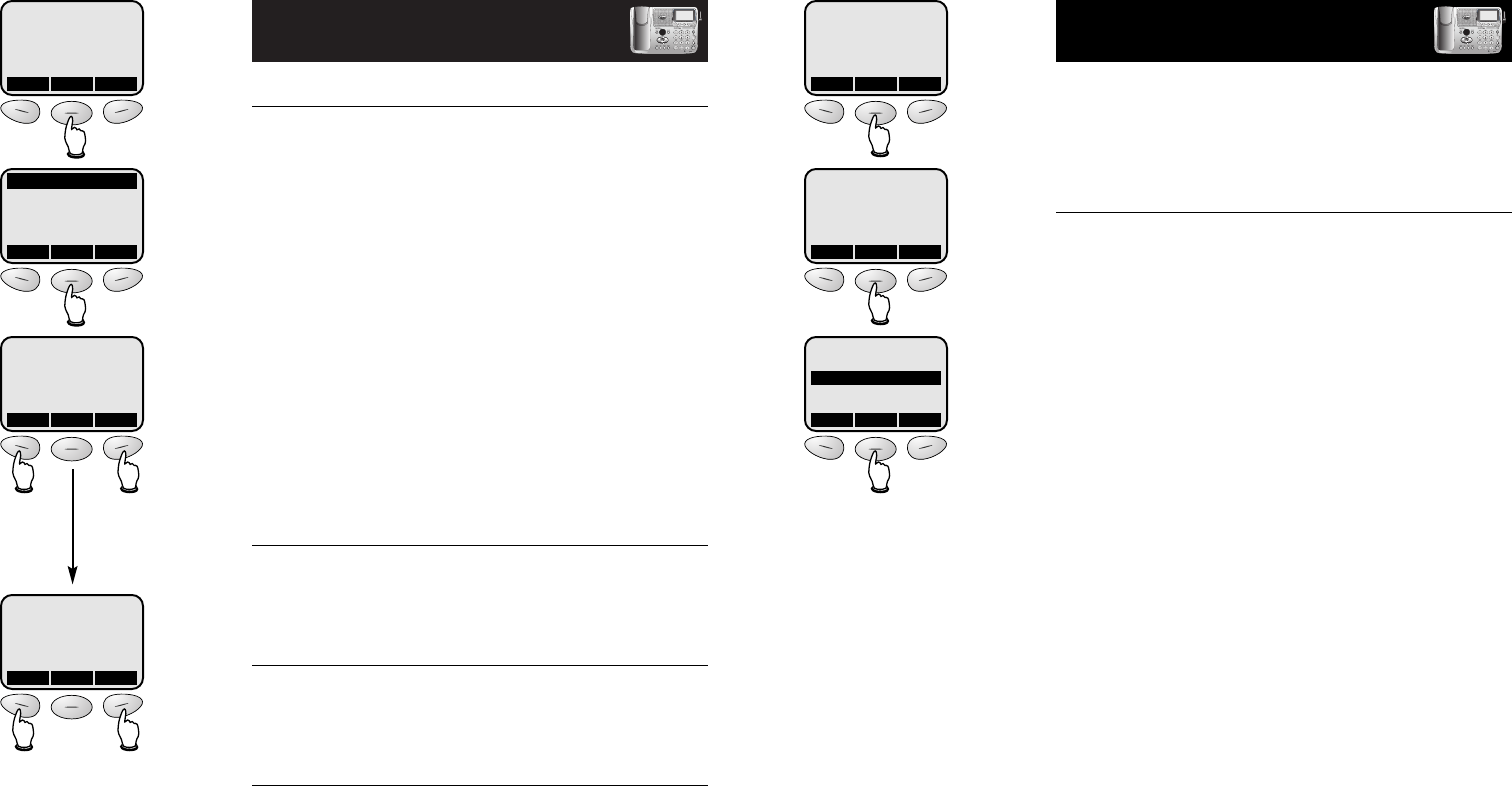
To dial, edit or delete entries
To edit a listing
When any phonebook entry is displayed, press EDIT. At
the next screen, press EDIT again, then choose NAME
or NUMBER. You can change the name or number by
following the steps on page 23.
To dial a number
Press SPEAKERPHONE to dial the displayed number.
To delete an entry
At the Edit menu, press DEL to delete the displayed
entry from the phonebook. Once deleted an entry can-
not be recovered.
Press EDIT to modify or delete
Press SPEAKERPHONE to dial entry
PAUSE MENU MEM
^
FIND
V
ALLISON
555-4321
^
EDIT
V
ALLISON
555-4321
^
EDIT
V
Press
DEL
to delete entry
Press
EDIT
to change entry
Press
NAME
to change name
Press
NUMBER
to change number
ALLISON
555-4321
DEL EDIT
27
Handset Calls Log
26
Calls Log
1
Handset Calls Log
The Calls Log keeps track of calls you’ve made and
received, and even lets you check voice messages from
your handset.
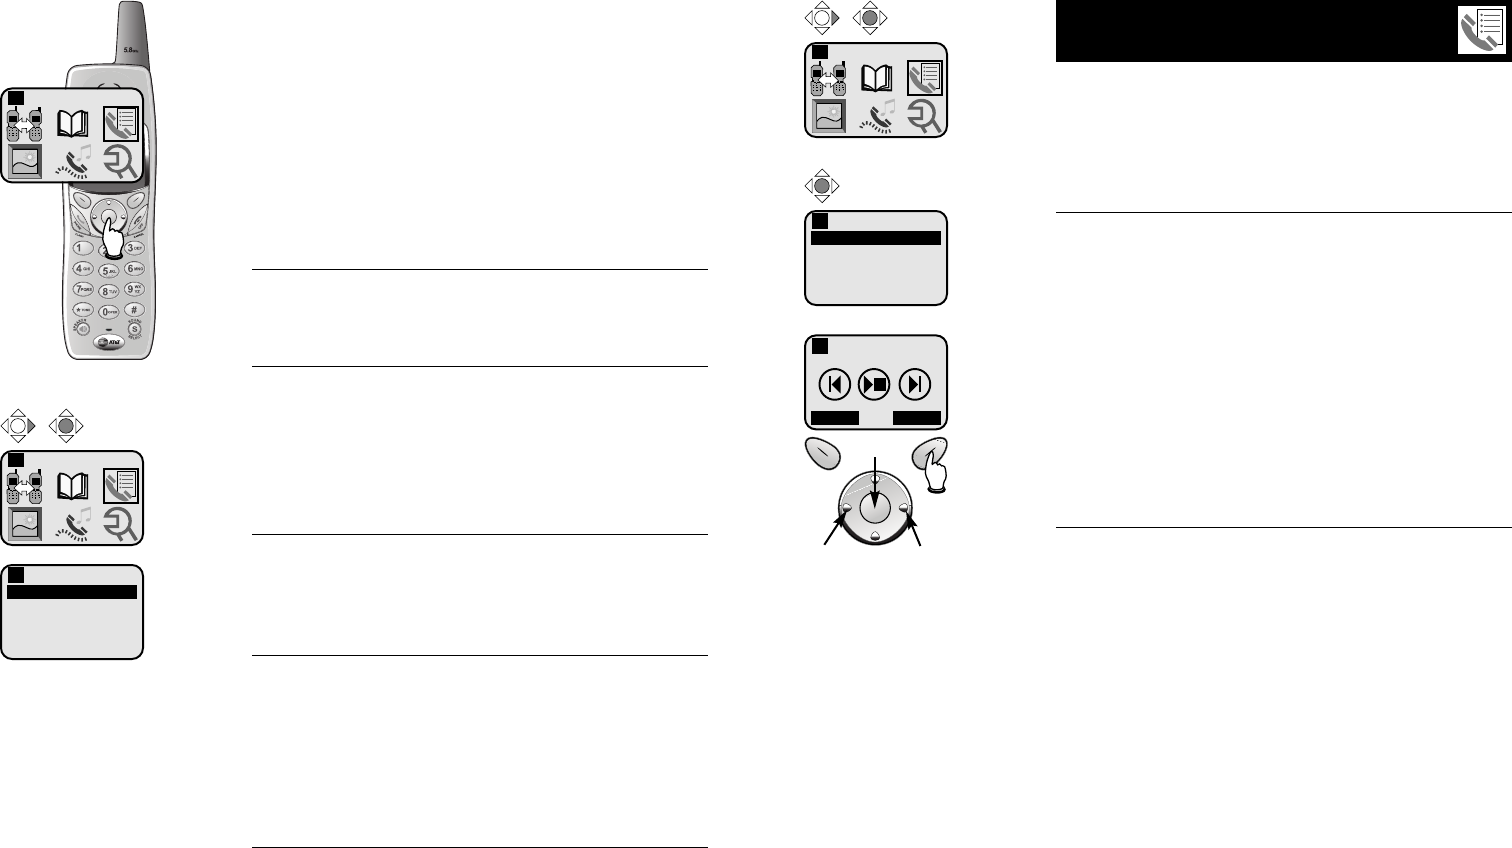
Use the joystick controls to select Calls Log, then make
a selection from the list displayed:
Review Messages (see next page)
Play or delete voice messages.
Review CID Log (see page 28)
If you have Caller ID service, you can review the CID
Log to find out who has called, return the call without
dialing, or transfer the caller’s name and number into
your phone directory.
Clear CID Log (see page 28)
Use this command to delete all entries in your Caller
ID Log.
Review Redial (see page 30)
This screen shows a list of the most recent 10 numbers
you’ve dialed. You can review the CID Log to find out
who has called, return the call without dialing, or trans-
fer the caller’s name and number into your phone
directory.
Clear Redial (see page 30)
Use this command to delete all recently called numbers
from your Redial list.
Calls Log
Review Messages
Review CID Log
Clear CID Log
Review Redial
Clear Redial
1
Calls Log
1
Select Calls Log
Review voice messages
At this menu you can use your handset to hear voice
messages callers have left in your base answering system
(see pages 35-43).
Playback options
At the Messages screen, use the joystick to control
message playback:
• Press the center button to start or stop playback.
• Press <to repeat the message currently playing
• Press >to skip forward to the next message.
To delete a message, press DELETE while the message
is playing.
Press EXIT to halt playback and exit the Messages menu.
Announcements
• When playback begins, you will hear the number of
messages in the mailbox selected.
• Before each message, you will hear the day and time
it was received.
• After the last message, you will hear “End of mes-
sages.” If the system has less than 5 minutes of
recording time left, you will hear time remaining.
Calls Log
Review Messages
Review CID Log
Clear CID Log
Review Redial
Clear Redial
1
Calls Log
1
Select Calls Log
Messages
EXIT DELETE
1
Repeat Skip
Play/Stop
Delete
29
Handset Calls Log
28
Handset Calls Log
To review your call log
How Caller ID works
If you subscribe to Caller ID service provided by your
local phone company, information about each caller will
be displayed after the first ring.
Information about the last 90 incoming calls is stored in
your call log. You can review the call log to find out
who has called, return the call without dialing, or trans-
fer the caller’s name and number into your phone
directory.
Calls are displayed in reverse order (most recent first).
When the call log is full, the oldest entry is deleted to
make room for new incoming call information.
If you answer a call before the information appears on
the screen, it will not be saved in your call log.
To review your Caller ID log
The most recent call is displayed first. Use the joystick
buttons to scroll through the list as shown at left.
To return a call
Press PHONE (or SPEAKER) to call the person currently
displayed (see page 29 for important dialing options).
To save or delete an entry
Press SAVE to copy the displayed information into your
phonebook (see page 19).
Press DELETE to delete this entry from your CID log.
To delete all entries
To clear the Caller ID log of all entries, return to the
Calls Log menu, then use the joystick controls to scroll
down and select CLEAR CID LOG.
Calls Log
Review Messages
Review CID Log
Clear CID Log
Review Redial
Clear Redial
1
Calls Log
1
Select Calls Log
Chris Thompson
123-555-6789
11:29 AM Oct. 20
SAVE DELETE
1 of 32
Save entry in
phonebook
Delete entry
To dial a call log entry
When any Caller ID screen is displayed, press PHONE
(or SPEAKER) to dial the number exactly as it appears
on the screen.
Dialing options
Caller ID numbers may appear with an area code that
may not be required for local calls. If the number
displayed is not in the correct format, you can change
how it is dialed.
Press the middle joystick button to see a list of dialing
options. Press Vor ^to select the option you want.
To dial it, press the middle joystick button again.
Chris Thompson
123-555-6789
11:29 AM Oct. 20
SAVE DELETE
1 of 32
Chris Thompson
123-555-6789
11:29 AM Oct. 20
SAVE DELETE
1 of 32
Dial Options
1-123-555-6789
555-6789
1
Select desired option,
then press to dial
Calls Log
Review Messages
Review CID Log
Clear CID Log
Review Redial
Clear Redial
1
Display previous entry
Display next entry
3130
Handset Calls Log
To review your redial log
About the redial memory
You can review the redial log to see what numbers
you’ve recently called, redial, or copy the number into
your phonebook.
The handset remembers the last 10 numbers you call.
Each time you make a call the oldest entry is deleted to
make room for a new one.
To review your redial log
The most recent call is displayed first. Use the joystick
buttons to scroll through the list as shown at left.
To redial a call
Press PHONE (or SPEAKER) to redial the number
currently displayed.
To save or delete an entry
Press SAVE to copy the highlighted number into your
phonebook (see page 19).
Press DELETE to delete this entry from your redial log.
To delete all entries
To clear the redial log of all entries, return to the Calls
Log menu, then use the joystick controls to scroll down
and select CLEAR REDIAL.
Calls Log
Review Messages
Review CID Log
Clear CID Log
Review Redial
Clear Redial
1
Calls Log
1
Select Calls Log
123-555-6789
555-1234
123-555-4321
555-4321
SAVE DELETE
1 of 10
Display previous entry
Save entry in
phonebook
Delete entry
Redial
1
Display next entry
Calls Log
Review Messages
Review CID Log
Clear CID Log
Review Redial
Clear Redial
1
Base CID & Redial
The memory in the telephone base keeps track of calls
you’ve made and received. Use the softkeys beneath
the display screen to select REDIAL (for a list of
outgoing calls) or MENU, then CALLS LOG (for a list of
incoming calls).
Calls Log (see page 32)
If you have Caller ID service, you can review the Calls
Log to find out who has called, return the call without
dialing, or transfer the caller’s name and number into
your phone directory.
Review Redial (see page 34)
This screen shows a list of the most recent 10 numbers
you’ve dialed. You can review the CID Log to find out
who has called, return the call without dialing, or trans-
fer the caller’s name and number into your phone
directory.
REDIAL MENU MEM
REDIAL MENU MEM
CALLS LOG
BASE SETTINGS
DISPLAY BASE-ID
^
OK
V
Display redial log
Display calls log
33
Base Calls Log & Redial
32
Base Calls Log & Redial
To review your call log
How Caller ID works
If you subscribe to Caller ID service provided by your
local phone company, information about each caller will
be displayed after the first ring.
Information about the last 90 incoming calls is stored in
your call log. You can review the call log to find out
who has called, return the call without dialing, or trans-
fer the caller’s name and number into your phone
directory.
Each incoming call is numbered (number 1 is always the
most recent). When the call log is full, the oldest call
information is deleted to make room for new incoming
call information.
If you answer a call before the information appears on
the screen, it will not be saved in your call log.
To review your call log
The most recent call is displayed first. Use the arrow
buttons to scroll through the list as shown at left.
To return a call
Press SPEAKERPHONE to call the person currently
displayed (see page 33 for important dialing options).
To save or delete an entry
Press SAVE to copy the displayed information into your
phonebook (see page 23).
Press DELETE to choose an option. Select THIS to
delete the entry displayed, or ALL to clear the Caller ID
log of all entries.
REDIAL MENU MEM
CALLS LOG
BASE SETTINGS
DISPLAY BASE-ID
REDIAL MENU MEM
Chris Thompson
123-555-6789
11:29 AM Oct. 20 #01
^
CID
V
Chris Thompson
123-555-6789
11:29 AM Oct. 20 #01
DEL OPT # SAVE
Display
previous
entry
Display
next
entry
Save entry in
phonebook
Delete entry
(or all entries)
To dial a call log entry
When any Caller ID screen is displayed, press
SPEAKERPHONE to dial the number exactly as it
appears on the screen.
Dialing options
Caller ID numbers may appear with an area code that
may not be required for local calls. If the number
displayed is not in the correct format, you can change
how it is dialed.
Select CID, then OPT # to see a list of dialing options.
Press Vor ^to highlight the option you want, then
press DIAL.
Chris Thompson
123-555-6789
11:29 AM Oct. 20 #01
^
CID
V
Chris Thompson
123-555-6789
11:29 AM Oct. 20 #01
DEL OPT # SAVE
1-123-555-6789
555-6789
^
DIAL
V
Select desired option,
then press to dial
35
Answering System
Operation
Message capacity
The answering system can record up to 99
messages, depending on how long each message is.
Individual messages can be up to 4 minutes long, but
total maximum recording time for all mailboxes is 15
minutes. Messages will remain available for replay until
you delete them.
Handset access
In addition to the features described in this section, you
can also use your handset to review or delete messages
(see page 27).
14
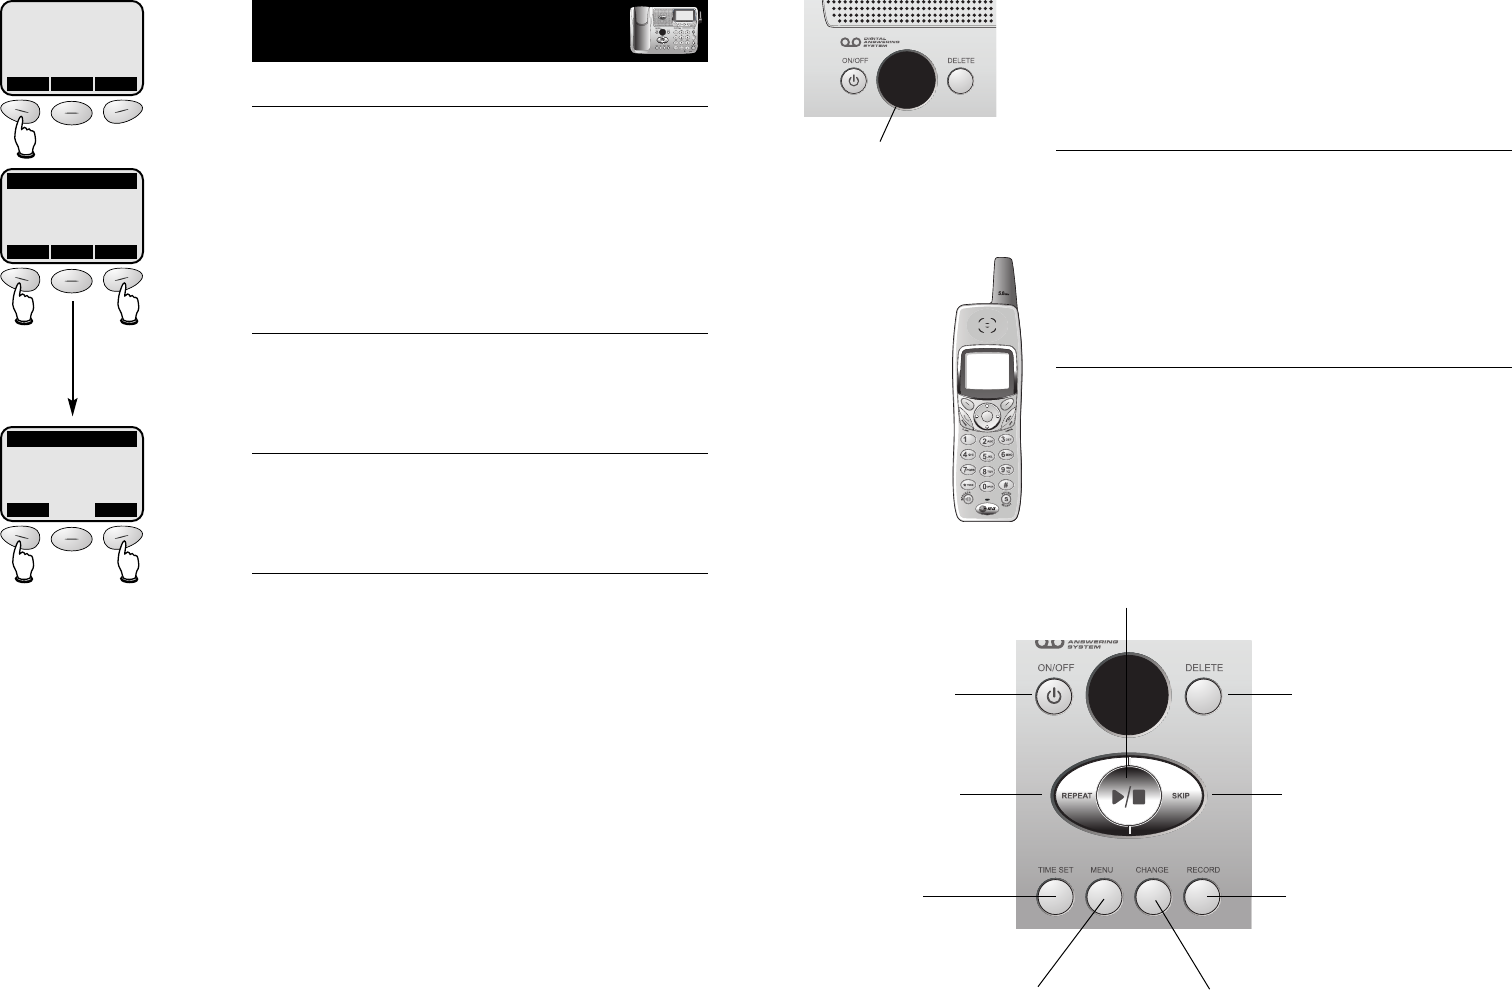
Call counter
Number of messages waiting
(or, during playback, message
number currently playing)
Press repeatedly to hear
feature options (see page 39)
Press to select or change a
feature option (see page 39)
Press to set clock
(see page 36)
Press to record memo (see page 41)
or outgoing announcement (page 37)
Press to delete message
(see page 40)
Press to repeat message;
hold to slow playback
(see page 40)
Press to skip message;
hold to speed up playback
(see page 40)
Press to start or stop message
playback (see page 40)
Press to turn answering
system on or off
34
Base Calls Log & Redial
To review your redial log
About the redial memory
You can review the redial log to see what numbers
you’ve recently called, redial, or copy the number into
your phonebook.
The handset remembers the last 10 numbers you call.
Each time you make a call the oldest entry is deleted to
make room for a new one.
To review your redial log
The most recent call is displayed first. Use the arrow
keys to scroll through the list as shown at left.
To redial a call
Press SPEAKERPHONE to redial the number currently
displayed.
To save or delete an entry
Press SAVE to copy the highlighted number into your
phonebook (see page 23).
Press DELETE to delete this entry from your redial log.
REDIAL MENU MEM
123-555-6789
555-1234
123-555-4321
^
SELECT
V
123-555-6789
555-1234
123-555-4321
ERASE SAVE
Display
previous
entry
Display
next
entry
Delete entry Save entry in
phonebook
37
Answering System Operation
36
Answering System Operation
Outgoing announcements
Outgoing announcements are the messages callers hear
when calls are answered by the answering system.
The phone is pre-programmed with an announcement
that answers calls with “Hello. Please leave a message
after the tone.” You can use this announcement, or
replace it with a recording of your own voice.
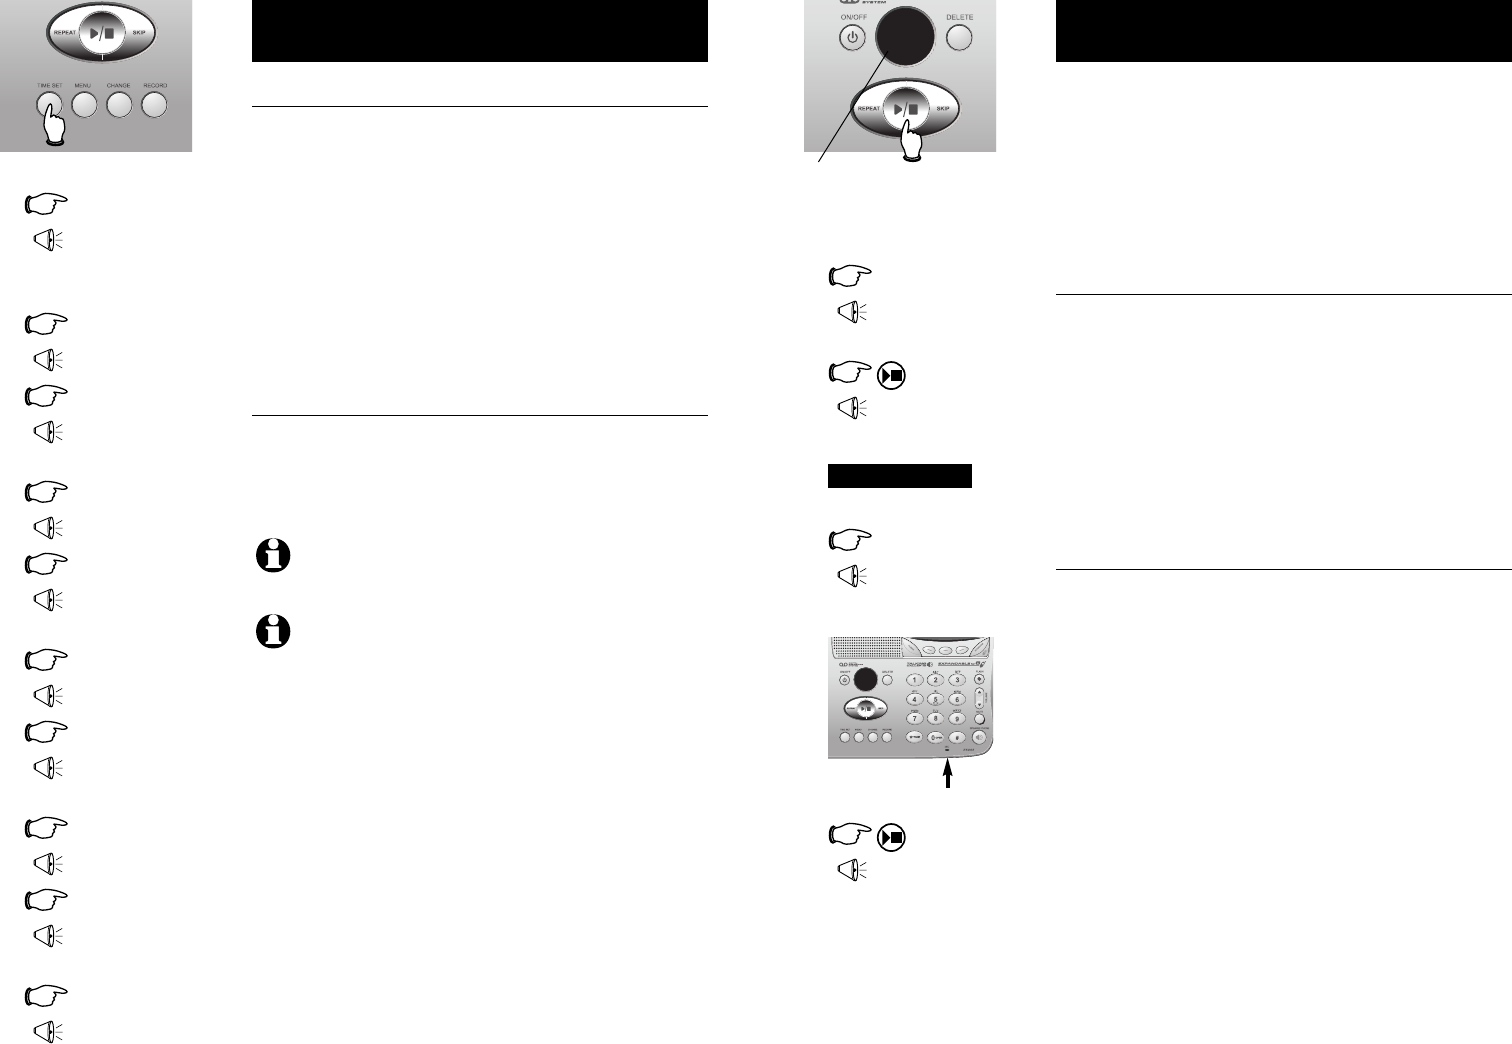
To record your outgoing announcement
Press MENU until you hear “Change announcement.”
Then press RECORD and begin speaking after you hear
“Now recording.” Speak facing the telephone base from
about 9 inches away.
Elapsed time (in seconds) will be shown in the message
window as you record. You can record an announce-
ment up to 90 seconds long. Announcements less than 3
seconds long will not be recorded.
To delete your outgoing announcement
Press MENU until you hear “Change announcement,”
then press PLAY to begin playback. Press DELETE during
playback to delete your announcement.
When your announcement is deleted, calls will be
answered with the pre-programmed announcement
described above.
1MENU
“Change
announcement”
2
(Plays announcement
previously recorded)
2RECORD
“Now recording...”
3
4
(Announcement is
played back)
Speak into microphone
Microphone
Or
12
Elapsed
recording time
(seconds)
Day and time announcements
To set day and time
Before playing each message, the answering system
announces the day and time the message was received.
Before using the answering system, you should follow
the steps at left to set the day and time, so messages
are dated correctly.
The system uses voice prompts to guide you. Each time
you press CHANGE, the day, hour, minute or year
advances by one. When you hear the correct setting,
press TIME SET to move to the next setting.
To check day and time
You can press TIME SET at any time to hear the
current day and time without changing it.
1TIME SET
“Friday, 10:07 am, 2003”
8TIME SET
“2003”
10 @TIME SET
“Monday, 2:26 pm, 2004”
“To change clock,
press Time Set”
2TIME SET
“Friday”
3CHANGE
“Monday”
Press until correct day is spoken
4TIME SET
“10 am”
5CHANGE
“2 pm”
Press until correct hour is spoken
6TIME SET
“07”
7CHANGE
“26”
9@CHANGE
“2004”
Press until correct minute is spoken
Press until correct year is spoken
NOTE:
Press and hold
CHANGE
to advance the minute or year by 10.
NOTE:
You can choose to set the time manually, or you can allow it to
be set automatically with incoming Caller ID information. The time will be set
automatically only if you subscribe to Caller ID service provided by your local
telephone company (see page 5).
Press to stop
recording