VTech Telecommunications 80-6470-00 1.9GHZ CORDLESS PHONE- BASE UNIT User Manual USERS MANUAL 1
VTech Telecommunications Ltd 1.9GHZ CORDLESS PHONE- BASE UNIT USERS MANUAL 1
Contents
- 1. USERS MANUAL 1
- 2. USERS MANUAL 2
USERS MANUAL 1
User’s manual
TL7610/TL7611
DECT 6.0 cordless headset

Congratulations
on your purchase
of this AT&T product.
Before using this AT&T product, please
read the Important safety information
on pages 46-49 of this manual.
Please thoroughly read this user’s
manual for all the feature operations
and troubleshooting information necessary
to install and operate your new
AT&T product. You can also visit our
website at www.telephones.att.com or call
1 (800) 222-3111.
In Canada, dial 1 (866) 288-4268.
Model #: TL7610 (Headset and headset base)
TL7611 (Headset, headset base and handset lifter)
Type: DECT 6.0 cordless headset
Serial # :
Purchase date :
Place of purchase :
Both the model and serial number of your AT&T product can be
found on the bottom of the headset base.
Save your sales receipt and original packaging in case it is
necessary to return your telephone for warranty service.
The ENERGY STARR program (www.energystar.gov) recognizes
and encourages the use of products that save energy and
help protect our environment. We are proud to mark this
product with the ENERGY STARR label indicating it meets the
latest energy efficiency guidelines.
© 2008 Advanced American Telephones. All rights reserved.
AT&T and the AT&T logo are trademarks of AT&T Intellectual Property II, L.P. d/b/a
AT&T Intellectual Property licensed to Advanced American Telephones.
Printed in China.
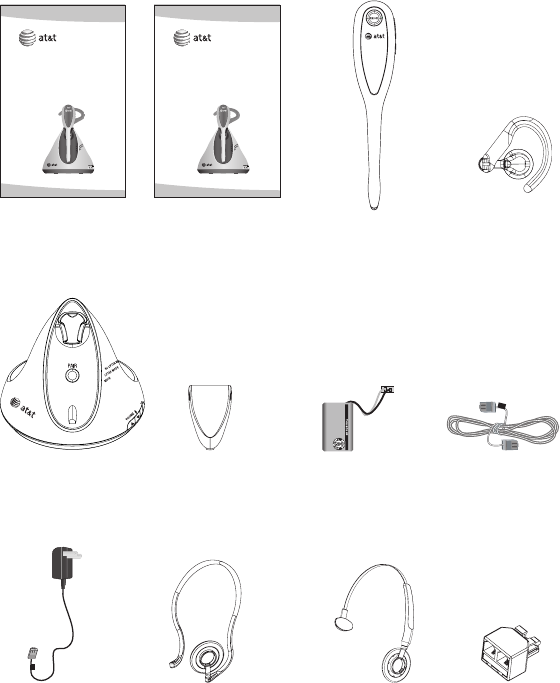
Headset base Battery for
headset
Cordless headset
Telephone line cords
(2-conductor)
User's manual Quick start guide
Headset base
power adapter
Over-the-ear hook
User’s manual
TL7610/TL7611
DECT 6.0 cordless
headset
Quick start guide
TL7610/TL7611
DECT 6.0 cordless
headset
Behind-the-neckband Over-the-headband
Parts checklist - TL7610
Check to make sure the headset package includes the following
items:
Line splitter
Battery compartment
cover
Battery Pack
BT191545
3.7V 260mAh Li-ion Polymer
WARNING: DO NOT BURN
OR DISASSEMBLE OR
PUNCTURE BATTERIES
MADE IN CHINA
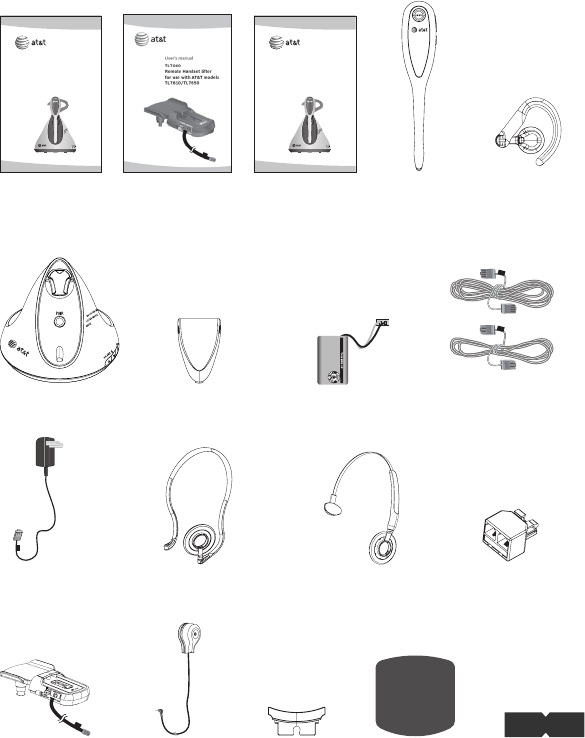
Headset base Battery for
headset
Cordless
headset
Telephone line cords
(4-conductor and
2-conductor)
TL7610/7611
User's manual
TL7610/7611
Quick start guide
Headset base
power adapter
Over-the-ear hook
User’s manual
TL7610/TL7611
DECT 6.0 cordless
headset
Quick start guide
TL7610/TL7611
DECT 6.0 cordless
headset
Behind-the-neckband Over-the-headband
Parts checklist - TL7611
Check to make sure the headset package includes the following
items:
Line splitter
Battery compartment
cover
Battery Pack
BT191545
3.7V 260mAh Li-ion Polymer
WARNING: DO NOT BURN
OR DISASSEMBLE OR
PUNCTURE BATTERIES
MADE IN CHINA
Remote handset
lifter
Ring detector
TL7000 User's
manual
Large lifter pad Anti-slip pad Color label
(light blue)

User’s manual
TL7610/TL7611
DECT 6.0 cordless headset
Getting started
Quick reference guide
headset ......................................1
headset base ...........................2
Installation preparation ............4
Headset base installation ........5
Battery installation .................. 10
Battery charging ....................... 11
Headset attachments ...................12
Operation
Headset base settings ........... 20
Headset operation ................... 21
Options while on calls ........... 24
Alert tones ..........................................27
Indicator lights..................................28
Registration and
de-registration
Adding and registering
headset ................................ 30
Replacing a headset ............... 32
Maintenance and
Troubleshooting
Troubleshooting ........................ 34
Important safety
information ............................ 46
Maintenance................................ 50
Appendix A
FCC Part 68 and ACTA........... 51
Appendix B
FCC Part 15 ................................. 54
Appendix C
Limited warranty ....................... 56
Technical specifications ........ 60
Index
Index ............................................... 61
Table of contents
1
Getting started
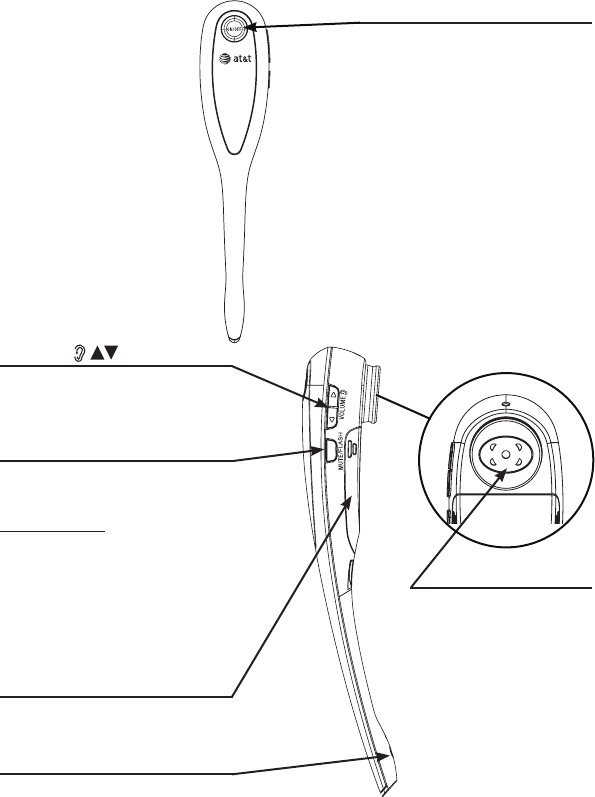
Quick reference guide - headset
ON/OFF
Press to make, answer and end
a call.
The light is on when the headset
is charging in the headset base.
The light flashes when you are
on a call or when there is an
incoming call (page 28).
VOLUME
Press the volume key on the
side of the headset to adjust the
listening volume when on a call.
MUTE/FLASH
Press to mute the microphone
during a call (page 26).
Press and hold to receive call
waiting during a call (page 25).
Press to mute the ring tone in
the earpiece when there is an
incoming call.
Battery cover
Open to install or replace the
battery.
Microphone
EARPIECE
2
Getting started
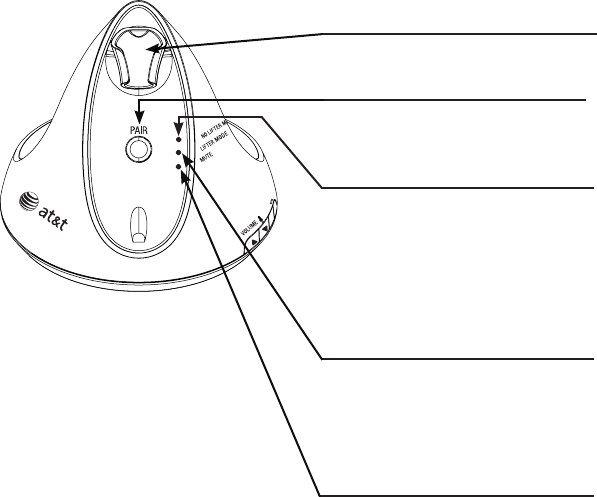
Quick reference guide - headset base
Charging cradle
Insert the headset here for charging.
PAIR
Press to register or de-register the
headset.
NO LIFTER MODE light
On when NO LIFTER MODE is selected.
Flashes while on a call or another
telephone is in use on the same line.
Flashes quickly when there is an
incoming call.
LIFTER MODE light
On when the LIFTER MODE is selected.
Flashes while on a call.
Flashes quickly when there is an
incoming call.
MUTE light
On when the call is muted.
3
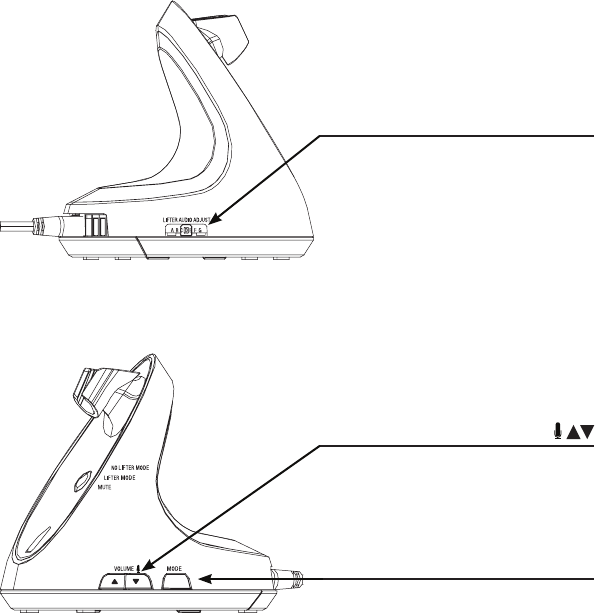
Getting started
VOLUME
Press the volume keys on the side of
the headset base to adjust the speaking
volume when on a call.
MODE
Press to choose between the NO
LIFTER or LIFTER MODE when
the headset is not in use. The
corresponding light will come on (see
page 20).
LIFTER AUDIO ADJUST
Adjust the switch to choose the best
headset audio quality when using a
handset lifter. (See the handset lifter
user's manual for more information.
You may download the manual at
www.telephones.att.com.)
Quick reference guide - headset base

4
Getting started
Avoid placing the headset base too close to:
• Communication devices such as: television sets, VCRs, or other
cordless telephones.
• Excessive heat sources.
• Noise sources such as a window with traffic outside, motors,
microwave ovens, refrigerators, or fluorescent lighting.
• Excessive dust sources such as a workshop or garage.
• Excessive moisture.
• Extremely low temperature.
• Mechanical vibration or shock such as on top of the washing
machine or work bench.
Installation preparation
See pages 10-11
for easy instructions.
You must install and
charge the battery before
using the headset. STOP!
If you subscribe to high-speed Internet service (Digital Subscriber
Line - DSL) through your telephone lines, you must install a DSL
filter between the telephone line cord and the telephone wall jack.
The filter will prevent noise and caller ID problems caused by DSL
interference. Please contact your DSL service provider for more
information about DSL filters.
For customer service or product information, visit our website at
www.telephones.att.com or call 1 (800) 222-3111. In
Canada, dial 1 (866) 288-4268.
5
Getting started
Headset base installation
IMPORTANT: If you purchased model TL7611, see the TL7000
handset lifter manual for installation instructions.
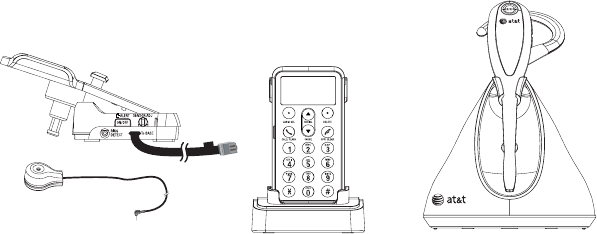
Optional accessories
It is recommended that you install a handset lifter (model TL7000)
and/or a dial pad (model TL7601) with your headset. The following
optional accessories are compatible with your headset and base:
The TL7000 is a handset lifter with ring detector.
The TL7601 is a dial pad that allows you to dial numbers and
place calls without being near your telephone. The dial pad will
also allow you to use the headset as a stand-alone product
without needing a connection to a telephone.
The TL7600 is an expansion headset (up to two headsets can be
used with the headset base).
Visit our website www.telephones.att.com for more
information about these products or to download user manuals.
•
•
•
TL7000 TL7601 TL7600
6
Getting started
Headset base installation
If you are installing the headset base with neither the lifter nor the
dial pad, there are two installation options:
Option 1: You may use the headset as a stand-alone product without
a phone.
You will only be able to receive calls. If you want to
make calls, an accessory dial pad (model TL7601, sold
separately) is required.
The headset base and headset do not have an external
ringer. When you receive calls, the headset earpiece
will play ring tone. If you have telephones connected to
the same telephone line as the headset base, you can
rely on the ringers of those telephones to alert you to
incoming calls.
-OR-
Option 2: You may use the headset with a corded or cordless phone.
If you subscribe to high-speed Internet service (Digital Subscriber
Line - DSL) through your telephone lines, you must install a DSL
filter between the telephone base and the telephone wall jack.
The filter will prevent noise and caller ID problems caused by DSL
interference. Please contact your DSL service provider for more
information about DSL filters.
•
•
7
Getting started
Headset base installation
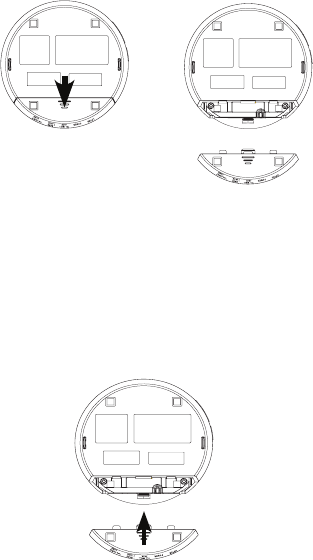
Before installing the headset base:
Remove the rear bottom piece of the headset base by pushing it
away from the base (as shown in Figure 1).
Install the headset base as shown on the following pages.
After completing installation option 1 or 2:
Slide the rear bottom piece towards the base until it clicks into
place (as shown in Figure 2).
Figure 1
Figure 2
8
Getting started
Headset base installation
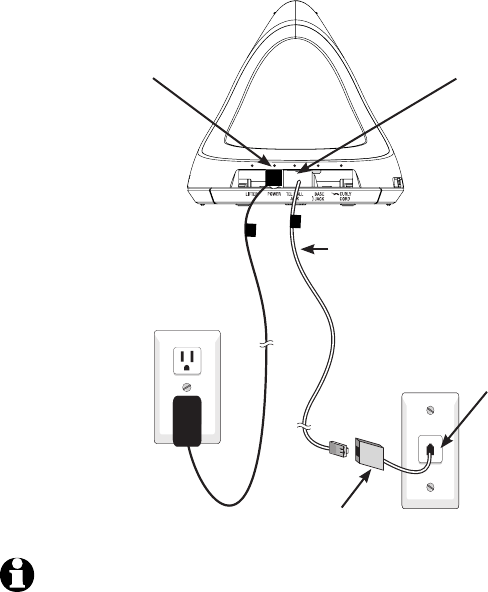
Option 1: Headset base stand-alone installation (TL7610)
With this installation, you can receive calls only.
NOTE: For more information about the accessory dial pad (model TL7601), visit
our website www.telephones.att.com.
1. Plug the small end of
the headset base power
adapter into the POWER
jack (green dot) at the
back of the headset base.
2. Plug one end of the
telephone line cord into
the TEL WALL JACK (red
dot) at the back of the
headset base.
DSL filter (not included)
required if you have DSL
high-speed Internet service.
Telephone
line cord
3. Plug the other end
of the telephone
line cord into a
telephone jack.
4. Plug the headset
base power adapter
into an electrical
outlet not controlled
by a wall switch.
9
Getting started
Headset base installation
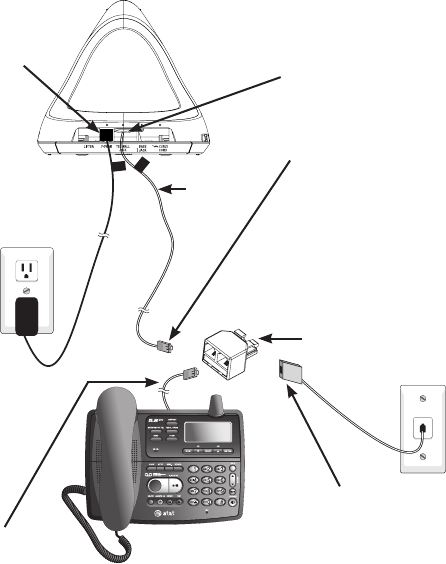
Option 2: Headset base with corded or cordless phone (any
brand) installation (TL7610)
With this installation, you can make and receive calls using the
corded or cordless phone.
1. Plug the small end
of the headset
base power
adapter into the
POWER jack
(green dot) at
the back of the
headset base.
2. Plug one end of the
telephone line cord into
the TEL WALL JACK (red
dot) at the back of the
headset base.
DSL filter (not
included), required
if you have DSL
high-speed Internet
service.
Telephone
line cord
3. Plug the other end of
the telephone line cord
connected into the line
splitter.
6. Plug the headset
base power adapter
into an electrical
outlet not controlled
by a wall switch.
Line splitter
Corded or cordless
phone
5. Connect another
telephone line cord
between the corded
phone and the line
splitter.
4. Plug the line splitter
into the telephone wall
jack (or DSL filter if
you subscribe to DSL
internet service).
10
Getting started
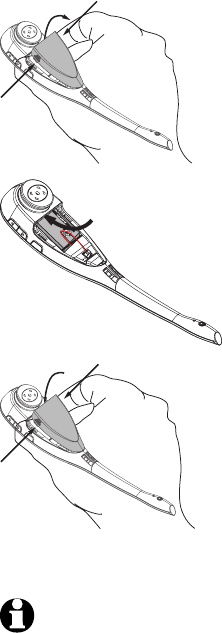
Battery installation
Install the battery as shown below. After installing the battery,
you may be able to make and receive short calls. For optimal
performance, charge the headset battery for at least six hours
before use. When not in use, recharge the headset by returning it
to the headset base.
1. Press in on both sides of the
battery compartment cover and
lift the cover up and off.
2. Insert the battery into the battery
compartment.
3. Push the battery plug into the
connector inside the compartment
and lay the wires flat on top of
the battery.
4. Insert the tab on the bottom of
the battery cover into the battery
compartment. Press down gently
on the battery cover until it snaps
into place.
Battery Pack
BT191545
3.7V 260mAh Li-ion Polymer
WARNING: DO NOT BURN
OR DISASSEMBLE OR
PUNCTURE BATTERIES
MADE IN CHINA
NOTE: Remove the ear hook from the headset (see page 14) before battery
replacement.