VTech Telecommunications 80-7009-00 1.9GHz CORDLESS PHONE User Manual revised manual
VTech Telecommunications Ltd 1.9GHz CORDLESS PHONE revised manual
Users Manual
User’s manual
www.vtechphones.com
Model: DS6151
Congratulations
on purchasing your new VTech product. Before using this telephone, please
read the Important safety instructions on page 72 of this manual.
This manual has all the feature operations and troubleshooting necessary
to install and operate your new VTech telephone. Please review this manual
thoroughly to ensure proper installation and operation of this innovative and
feature rich VTech product. For support, shopping, and everything new at
VTech, visit our website at www.vtechphones.com.
The ENERGY STAR® program (www.energystar.gov) recognizes
and encourages the use of products that save energy and help
protect our environment. We are proud to mark this product with
the ENERGY STAR® label indicating it meets the latest energy
GHſEKGPE[IWKFGNKPGU
T
Compatible with
Hearing Aid T-Coil
TIA-1083
6GNGRJQPGUKFGPVKſGFYKVJVJKUNQIQJCXGTGFWEGFPQKUGCPF
interference when used with most T-coil equipped hearing aids and
cochlear implants. The TIA-1083 Compliant Logo is a trademark of
the Telecommunications Industry Association. Used under license.
Table of contents
ii
Getting started .........................1
Parts checklist............................1
Telephone base and charger
installation ...............................2
Battery installation and
charging ..................................3
Installation options .....................4
Tabletop to wall mount
installation ..............................4
Wall mount to tabletop
installation ...............................5
Handset layout ...........................6
Telephone base layout ...............7
Telephone settings ..................8
Ringer volume (handset)............8
Ringer tone.................................8
Key tone .....................................8
LCD language ............................9
Set date/time ..............................9
Clear voicemail...........................10
Home area code.........................10
Answering system settings ....11
Answering system set up ...........11
Number of rings..........................11
Remote code .............................11
Message alert tone.....................11
Announcement ...........................12
Play your announcement ..........12
Record your own
announcement .......................12
Delete your announcement ........12
Telephone operation................13
Make a call ................................13
Predial a call...............................13
Answer a call ..............................13
End a call....................................13
Speakerphone............................13
Volume .......................................13
Mute ...........................................14
Ringer mute................................14
Call waiting .................................14
Find handset...............................14
Chain dialing...............................15
Multiple handset use ..................16
Intercom .....................................16
Answer an incoming call
during an intercom call............16
Share an outside call..................17
Directory.....................................18
Store a directory entry................19
Character chart ..........................20
Search the directory...................21
Alphabetical search....................21
Dial a directory entry ..................21
Edit a directory entry ..................22
Delete from the directory............22
About caller ID............................23
Call log .......................................24
Missed calls indicator ................24
Review the call log ....................25
Make a call log entry ready
to dial ......................................25
Dial a call log entry ....................26
Save a call log entry to the
directory ..................................26
Delete from the call log ..............26
Call log display screen
messages................................27
Redial list....................................27
Dial a redial entry .......................27
Delete from redial.......................27
Answering system operation...28
Answering system and
voicemail .................................28
Message capacity ......................28
Turn the answering system
on or off...................................29
Call screening ............................29
Call intercept ..............................29
Telephone base ringer volume...29
New message indication ............30
Message playback .....................30
Delete all messages...................31
iii
Table of contents
Record and play memos ............31
Record a memo..........................31
Message window displays..........32
Remote access ..........................33
Appendix...................................34
Handset display screen
messages................................34
Handset and telephone base
indicators ................................36
Battery........................................37
Expand your telephone system...38
Add and register a handset
(optional) .................................38
Replace a handset .....................39
Troubleshooting..........................40
Important safety instructions......46
Operating range .........................47
Maintenance...............................47
About cordless telephones.........48
The RBRC® seal.........................48
Warranty.....................................49
FCC, ACTA and IC regulations ...51
6GEJPKECNURGEKſECVKQPU .............53
Index ..........................................54
1
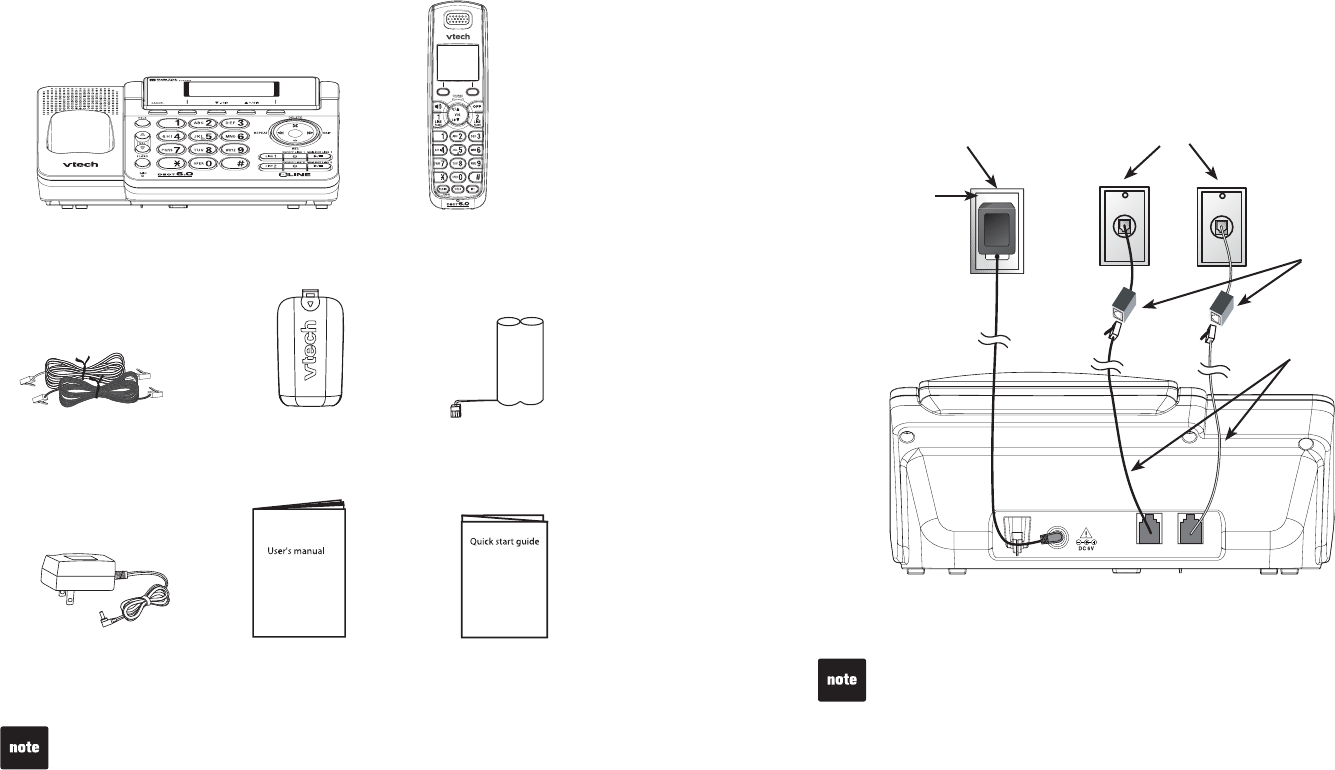
Telephone line cords
Parts checklist
Your telephone contains the following items. Save your sales receipt and
original packaging in the event warranty service is necessary.
Quick start guide
Telephone base
Telephone base
power adapter User’s manual
To purchase replacement batteries or power adapters, visit our website at
www.vtechphones.com or call 1 (800) 595-9511.
Getting started
Handset
Battery
Battery compartment cover
2
Telephone base installation
Install the telephone base and charger(s) as shown below.
Make sure that the electrical outlet is not controlled by a wall switch.
If you subscribe to digital subscriber line (DSL) high-speed Internet service
through your telephone line, you must install a &5.ſNVGTDGVYGGPVJG
VGNGRJQPGNKPGEQTFCPFVJGVGNGRJQPGYCNNLCEM6JGſNVGTRTGXGPVUPQKUGCPF
caller ID problems caused by DSL interference. Contact your DSL service
RTQXKFGTHQTOQTGKPHQTOCVKQPCDQWV&5.ſNVGTU
Use only the power adapters supplied with this product. To order a
replacement, visit our website at www.vtechphones.com or call
1 (800) 595-9511.
The power adapters are intended to be correctly oriented in a vertical or
ƀQQTOQWPVRQUKVKQP6JGRTQPIUCTGPQVFGUKIPGFVQJQNFVJGRNWIKPRNCEGKH
it is plugged into a ceiling or an under-the-table/cabinet outlet.
•
•
Getting started
LINE 2LINE 1/L1+L2
Use Only
Supplied Adapter
Telephone
wall jack
Telephone base
power adapter
Electrical outlet
not controlled by
a wall switch If you have DSL
high-speed
Internet service,
C&5.ſNVGTPQV
included) is
required.
Telephone base
Telephone line
cord
3
Getting started
If the handset will not be used for a long time, disconnect and remove the
battery to prevent any possible leakage.
To purchase replacement battery, visit our website at www.vtechphones.com or
call 1 (800) 595-9511.
•
•
13
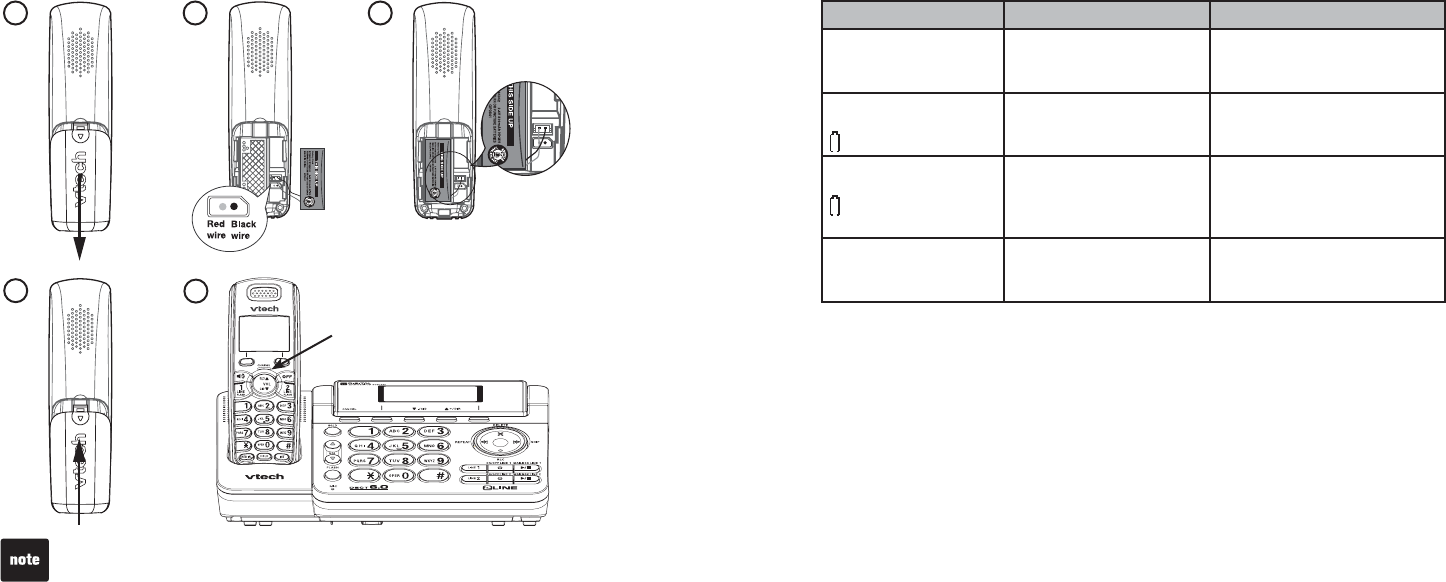
Battery installation
Install the battery as shown below.
If the battery compartment cover is on the handset, press on the triangular
tab and slide the cover to remove.
Plug the battery connector securely into the socket inside the handset
battery compartment, matching the color-coded label.
Place the battery with the label THIS SIDE UP facing up and the wires
inside the battery compartment.
#NKIPVJGEQXGTƀCVCICKPUVVJGDCVVGT[EQORCTVOGPVVJGPUNKFGKVVQYCTFU
the center of the handset until it clicks into place.
Charge the handset by placing it in the telephone base or charger. The
CHARGE light is on when the handset charges.
1.
2.
3.
4.
5.
2
45
CHARGE light
4
Getting started
Battery charging
Once you have installed the battery, the screen indicates the battery status
(see the table below). If necessary, place the handset inthe telephone
base to charge the battery. For best performance, keep the handset in teh
telephone base when not in use. The battery is fully charged after 16 hours of
continuous charging. See the table on page 77 for battery operating times.
If the screen is blank, you need to charge the handset without interruption for
at least 10 minutes to give the handset enough charge to use the telephone
for a short time. The handset beeps and shows Low battery. If you are on a
call in low battery mode, the handset beeps every minutes.
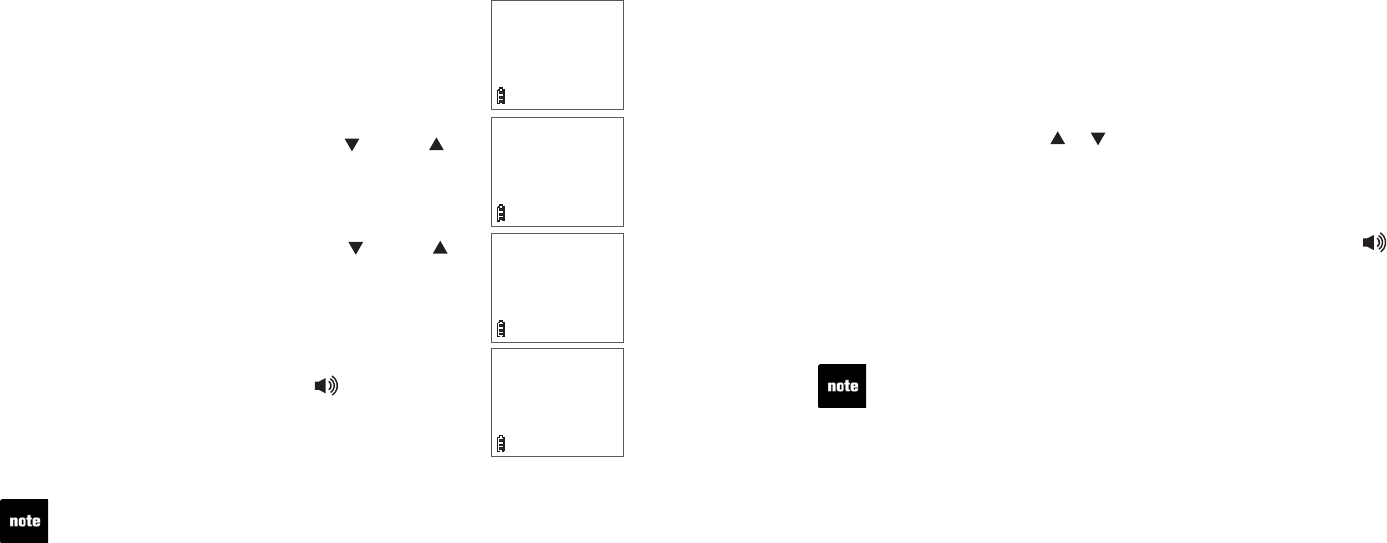
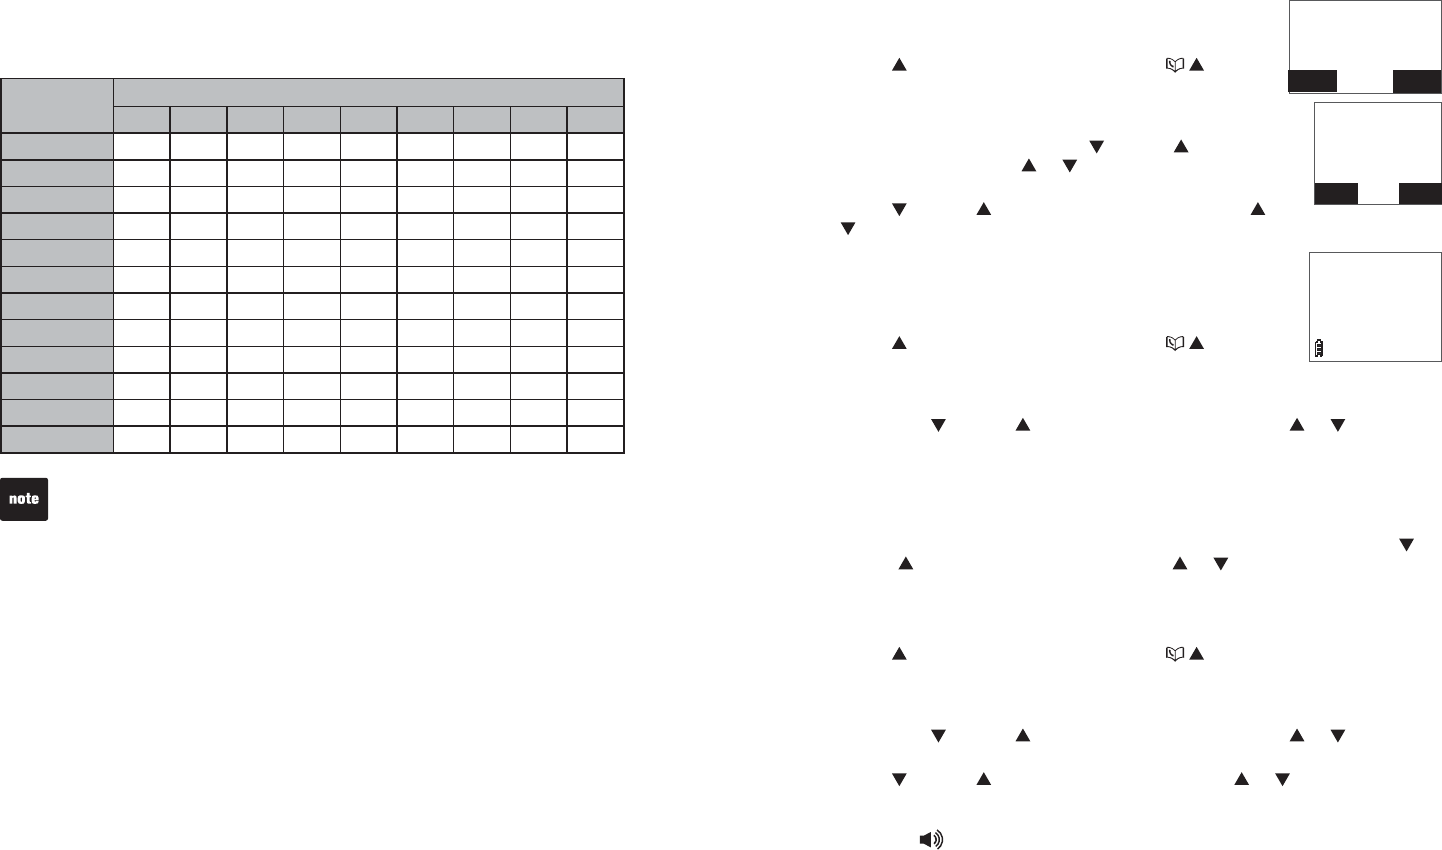
The following table summarizes the battery charge indicators and actions to
take.
Battery indicators Battery status Action
The screen is blank. Battery has no charge
and the handset cannot
be used.
Charge without interruption
until the screen shows Low
battery (at least 10 minutes).
The screen shows
Place in charger and
ƀCUJGU
Battery has very little
charge and the handset
cannot be used.
Charge without interruption
until the screen shows Low
battery (about four minutes).
The screen shows
Low battery,
ƀCUJGUCPFVJG
handset beeps.
Battery has enough
charge to be used for a
short time.
Charge without interruption
until the screen shows
HANDSET X (about one hour).
The screen shows
HANDSET X.
Battery is charged. To keep the battery charged,
place it in the telephone base
when not in use.
5
Getting started
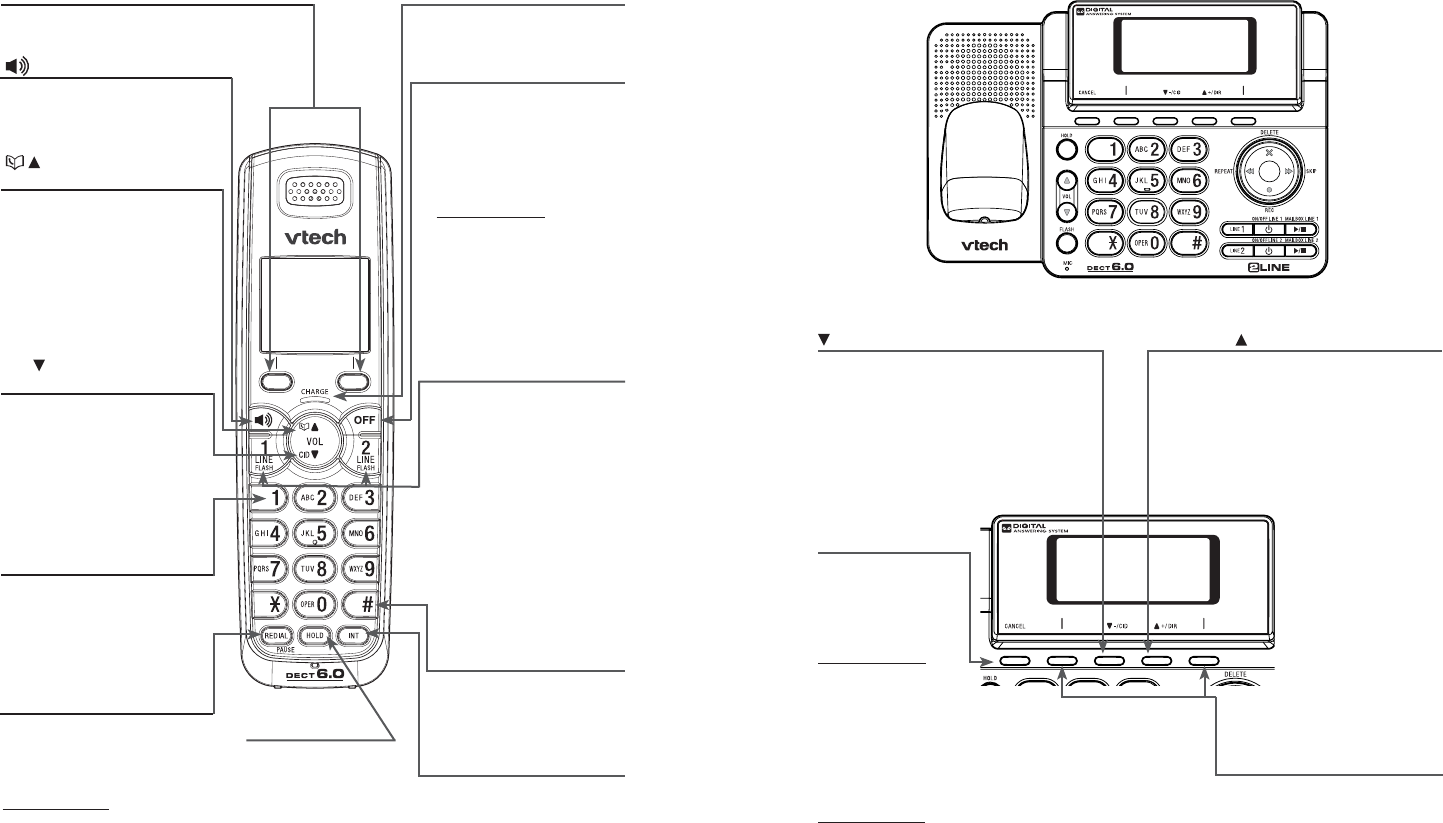
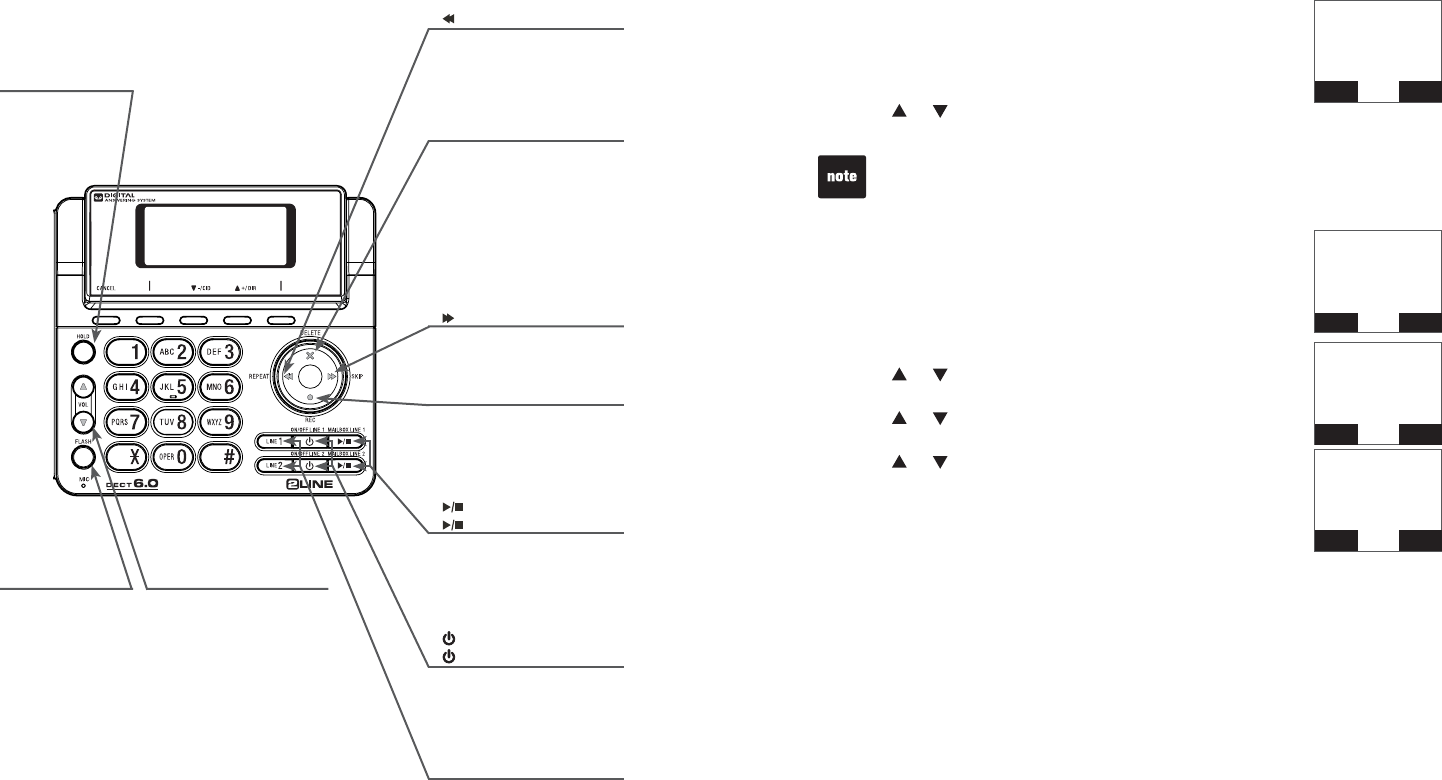
Handset layoutHandset layout
Softkeys (2)
Press to select a menu item displayed
above the key.
CHARGE light
On when the handset is
charging in the telephone
base (page 3).
/ VOL
(Directory/volume)
Press to enter the directory
when the telephone is not
in use (page 37).
While in a menu, press to
scroll up.
During a call, press to
increase the listening
volume (page 30).
(Speakerphone)
Press to switch between
speakerphone and handset
(page 30).
1 LINE/FLASH,
2 LINE/FLASH
Press 1 LINE/FLASH
to make or answer a
call on line 1. During a
call, press to receive an
incoming call on line 1
when you receive a call
waiting alert (page 29).
Press 2 LINE/FLASH
to make or answer a
call on line 2. During a
call, press to receive an
incoming call on line 2
when you receive a call
waiting alert (page 29).
OFF
During a call, press to
hang up (page 29).
While the handset is
ringing, press to silence
the ringer temporarily
(page 29).
Press and hold while the
telephone is not in use
to erase the missed calls
indicator (page 48).
During programming,
press to exit without
making changes.
CID / VOL
(caller ID/volume)
Press to review the call log
when the telephone is not
in use (page 48).
While in a menu, press to
scroll down.
During a call, press to
decrease the listening
volume (page 30).
1
While reviewing a call log
entry, press repeatedly to
add or remove 1 in front
of the telephone number
before dialing or saving it
in the directory (page 48).
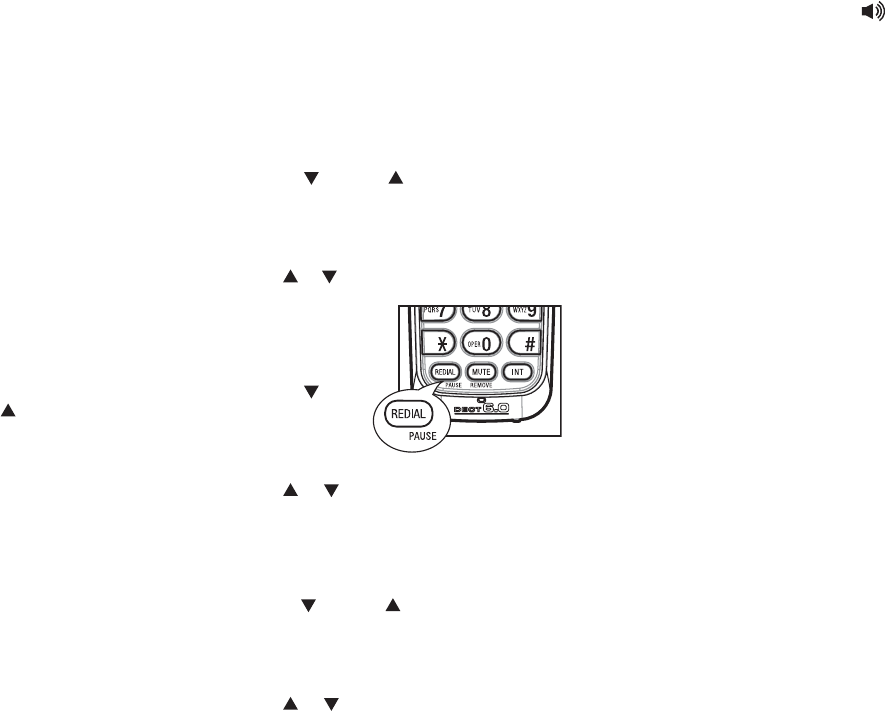
REDIAL/PAUSE
Press to review the redial
list (page 33).
While dialing or entering
numbers into the directory,
press and hold to insert a
dialing pause (page 40).
#
Press repeatedly to show
other dialing options when
reviewing a call log entry
(page 48).
INT (intercom)
Press to initiate an
intercom conversation or
transfer a call (page 35).
HOLD
Press to put a call
on hold (page 35).
6
Getting started
Telephone base layout
Softkeys (4)
Press to select a menu item
displayed above the key.
CANCEL
While the telephone
base is ringing,
press to silence the
ringer temporarily
(page 29).
Press and hold
while the telephone
is not in use to
erase the missed
calls indicator
(page 48).
While in a menu,
press to exit without
making changes or
press and hold to
return to idle mode.
-/CID (volume/caller ID)
During a call, press to
decrease the listening
volume (page 30).
While in a menu, press to
scroll down.
Press to review the call log
when the telephone is not in
use (page 48).
+/DIR (volume/Directory)
During a call, press to
increase the listening
volume (page 30).
While in a menu, press to
scroll up.
Press to enter the directory
when the telephone is not in
use (page 37).
7
Getting started
Telephone base layout
X/DELETE
Press to delete the
message currently
playing (page 47).
When the phone is not
in use, press twice to
delete all previously
reviewed messages
(page 54).
/SKIP
Press to skip to the next
message (page 47).
/REPEAT
Press to repeat a
message or press twice
to play the previous
message (page 47).
•/REC
Press to record a memo,
a telephone conversation
(page ??), or an outgoing
announcement (page ??)
/MAILBOX LINE 1,
/MAILBOX LINE 2
Press to start or stop
message playback in the
mailbox line 1 or line 2
(page 63).
/ ON/OFF LINE 1,
/ ON/OFF LINE 2
Press to turn the
answering machine of
line 1 or line 2 on or off
(page 63).
LINE 1, LINE 2
Press to make or answer
a call on line 1 or line 2
(page 63).
HOLD
Press to put
a call on hold
(page 47).
VOL
Press to adjust the
speakerphone volume
(if speakerphone is
on), message playback
volume (during
playback), or telephone
base volume (when on
a call).
FLASH
During a call,
press to receive
an incoming call
if you subscribe
to call waiting
(page 47).
8
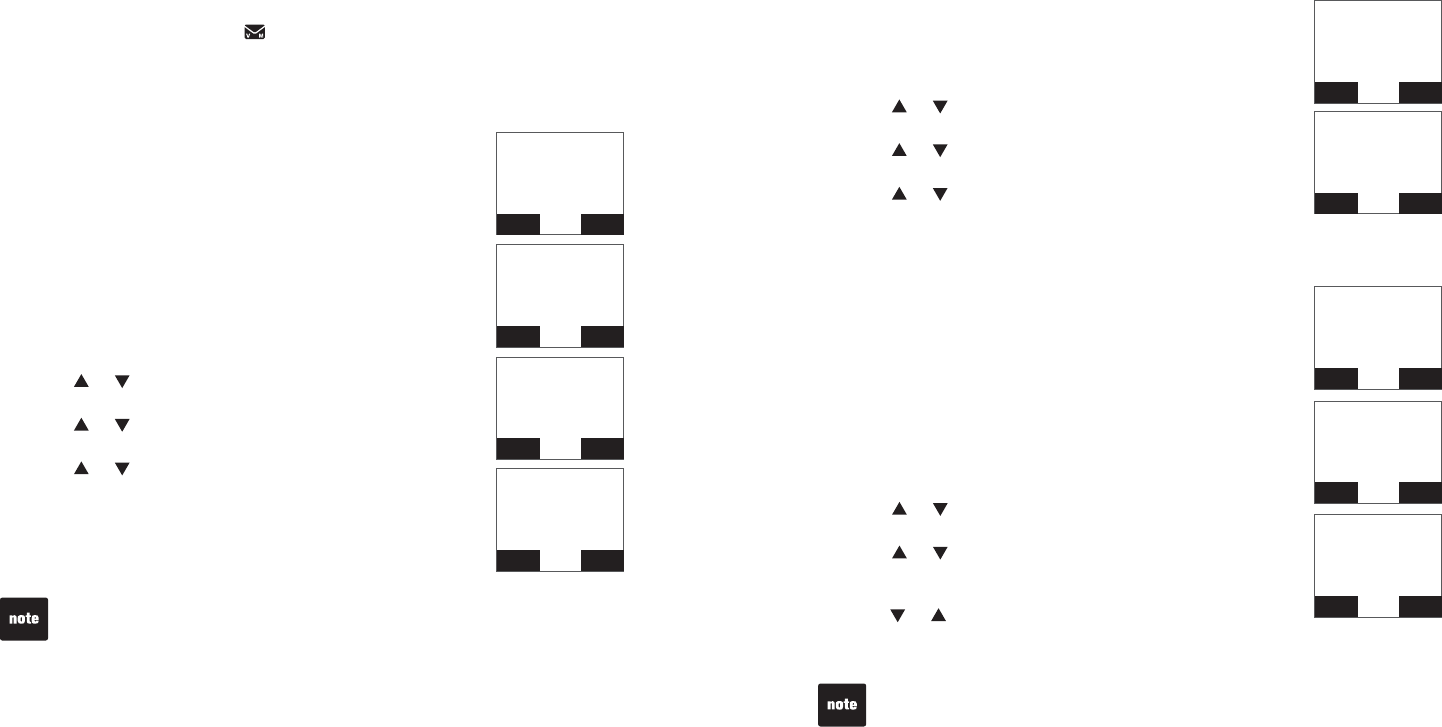
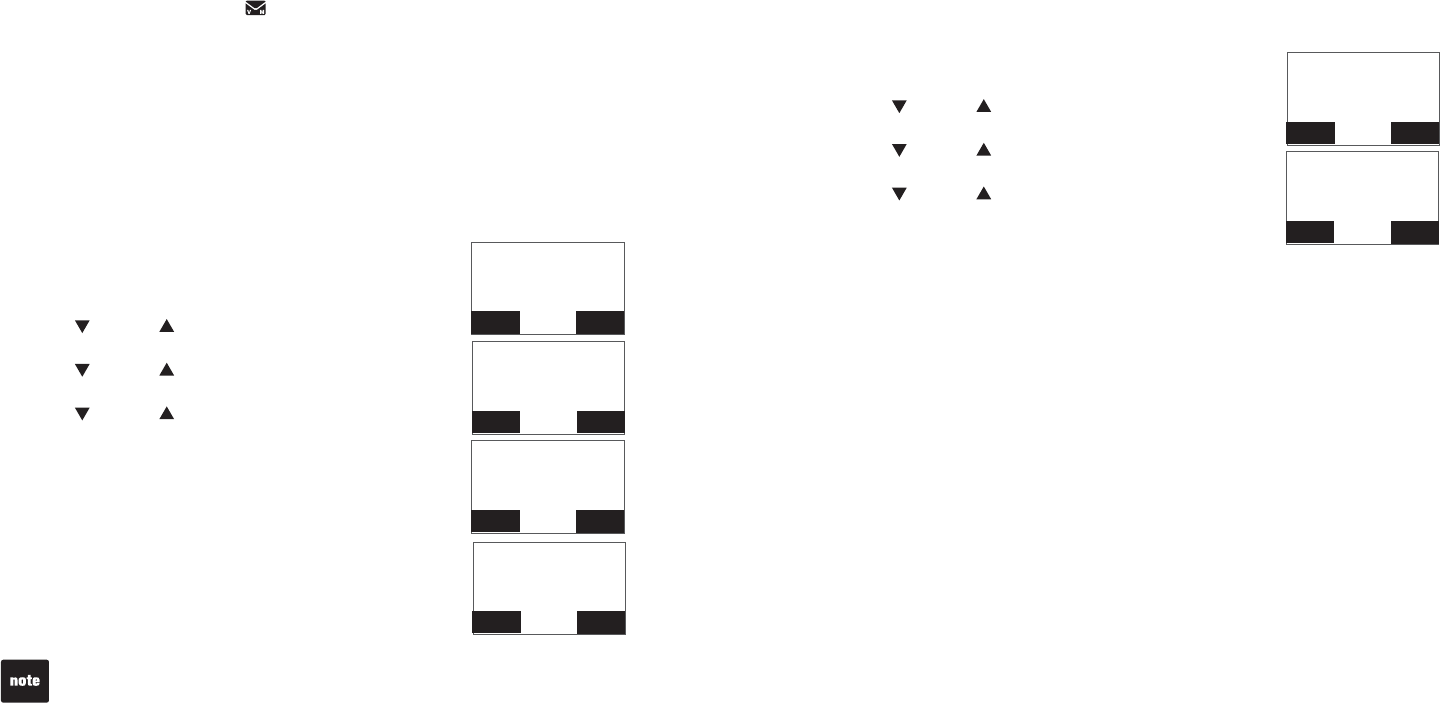
Handset settings
LCD Language
You can select English, Français or Español to be used in all
screen displays.
To select a langugage:
Press the MENU softkey to show the menu when the
handset is not in use.
Press or to select >Settings, then press the OK
softkey.
Press or to select >LCD Language,then press the
OK softkey.
Press or to chosse from English,Français or
Español. Press the SET softkey to save or press the
BACK softkey to exit to previous menu.
1.
2.
3.
4.
Settings
In the Settings menu, you can change and edit the handset
settings of language, voicemail indicator, key tone, speaker
button, set date and time, and home area code.
Press the MENU softkey to show the menu when the
handset is not in use.
Press or to scroll to the item to be changed.
Press the OK softkey to select the highlighted item.
1.
2.
3.
Handset 1
12:45am 03/31
MENU
To cancel an operation, press the BACK softkey to previous menu or exit the
menu display, press OFF.
Directory
Call Log
Ringers
>Settings
BACK OK
SETTINGS
>LCD Language
Clr Voicemail
Key Tone
BACK OK
BACK SET
LCD Language
>English
Francais
Espanol
,
~
9
Handset settings
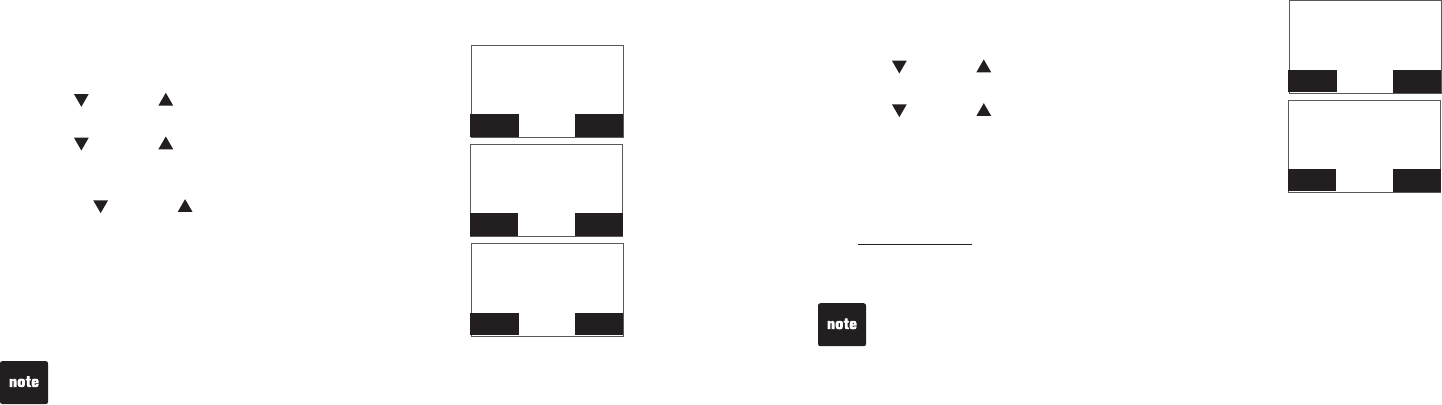
Clear Voicemail Indicator
If you subscribe to voicemail service offered by your telephone service
provider, New Voicemail and appear on both the handset and telephone
base when you have new voicemail messages. Contact your telephone
service provider for more information and assistance about using your
voicemail service.
After you have listened to all new voicemail messages, the indicators on both
the handset and telephone base turn off automatically.
Use the Clear Voicemail Indicator feature when the
telephone incorrectly indicates that there is new voicemail
(for example, when you have accessed your voicemail
while away from home). Clearing the voicemail waiting
indicator only turns off the indicators; it does not delete your
voicemail messages. As long as you have new voicemail
messages, your telephone service provider continues to
send the signal to turn on the indicators.
To manually turn off these indicators:
Press the MENU softkey to show the menu when the
handset is not in use.
Press or to select >Settings, then press the
OK softkey.
Press or to select >Clr Voicemail Indicator,then
press the OK softkey.
Press or to choose from Line1,Line 2, or Line 1 &
2, then press the SET softkey. The screen shows Turn
Off Indicator?
Press the YES softkeyVQEQPſTOQTRTGUUVJGNO softkey
to exit to the previous menu.
1.
2.
3.
4.
5.
Your telephone service provider might alert you of new messages with a
stutter (broken) dial tone. Contact your service provider for details.
Voicemail is different from answering system messages recorded in your
answering system. For more information about the difference, see page 52.
•
•
Directory
Call Log
Ringers
>Settings
BACK OK
SETTINGS
>Clr Voicemail
Key Tone
Speaker Button
BACK OK
Clear Voicemail
Indicator:
>Line 1
Line 2
BACK SET
Turn Off
Indicator?
YES NO
10
Handset settings
Key Tone
You can turn the Key Tone feature on or off.
To change the settings:
Press the MENU softkey to show the menu when the
handset is not in use.
Press or to select >Settings, then press the OK
softkey.
Press or to select >Key Tone,then press the OK
softkey.
Press or to choose ON or OFF, then press the SET
softkey to save or press the BACK softkey to exit to the
previous menu.
1.
2.
3.
4.
SETTINGS
Clr Voicemail
>Key Tone
Speaker Button
BACK OK
KEY TONE
>On
OFF
BACK SET
Set date/time
The answering system announces the day and time of the
message prior to playing it. Before using the answering
system, set the date and time as follows. If you subscribe
to caller ID service, the day, month and time are set
automatically with each incoming call. However, the
year must be correct so that the day of the week can be
calculated from the caller ID information.
To adjust the date and time:
Press the MENU softkey to show the menu when the
handset is not in use.
Press or to select >Settings, then press the OK
softkey.
Press or to select >Set Date/Time, then press the
OK softkey.
Press the dialing keys (0-9) to enter a two-digit number or
press or until the screen displays the correct value.
Press the OK softkey to advance.
Repeat step 3 until the date and time are set.
1.
2.
3.
4.
5.
If the date and time are not set, the system announces, “Time and day not
set,” before each message plays.
SETTINGS
Speaker Button
>Set Date/Time
Home Area Code
BACK OK
SET DATE
03/31/09
NEXT
SET TIME
03:18 AM
NEXT
11
Handset settings
Home Area Code
If you dial local calls using only seven digits (area code not required), you can
program your home area code. So that when you receive a call within your
local area, the telephone number is automatically stored without the area
code in the call log.
To set the Home Area Code:
Press the MENU softkey to show the menu when the
handset is not in use.
Press or to select >Settings, then press the
OK softkey.
Press or to select >Home Area Code, then press
the OK softkey. The stored home area code appears
YKVJVJGNCUVFKIKVƀCUJKPI
Use the dialing keys to enter the desired home area code.
Press the BKSP softkey to delete a digit.
Press and hold the BKSP softkey to delete the entire
entry.
5. Press the SETUQHVMG[VQEQPſTO
1.
2.
3.
4.
•
•
If, in the future, your telephone service provider requires you to dial the area
code when making a local call, or, if you move to a location that requires it,
delete the home area code you have already programmed following the steps
above. After you have deleted the home area code, _ _ _ will appear in the
display.
SETTINGS
Speaker Button
Set Date/Time
>Home Area Code
BACK OK
HOME AREA CODE
800
BKSP SET
12
Handset settings
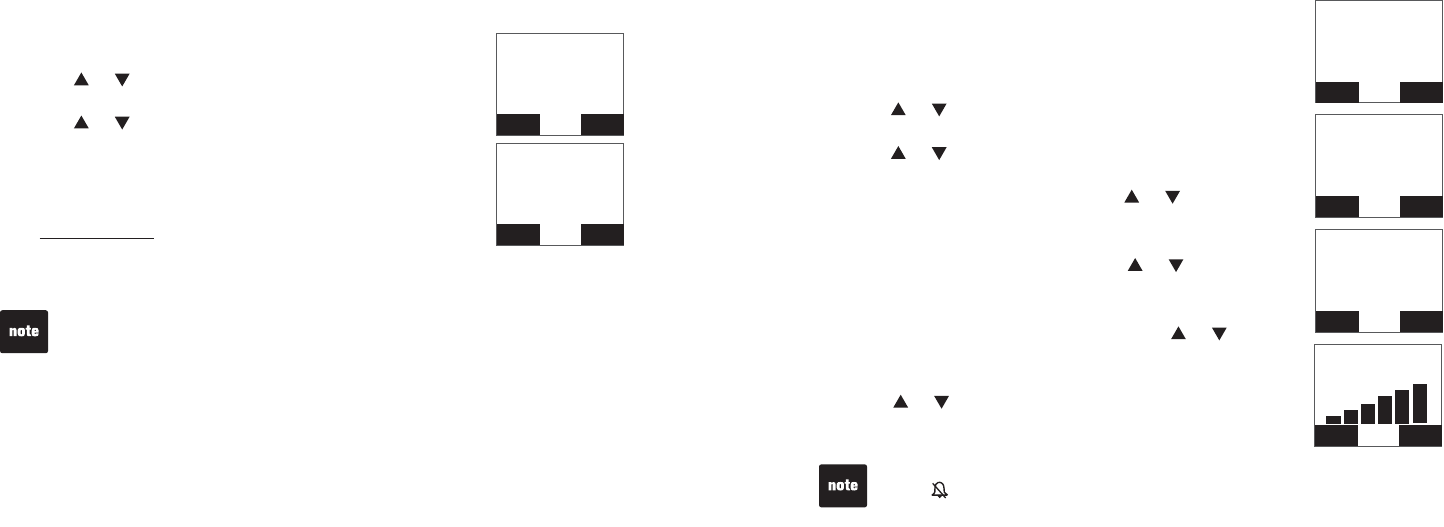
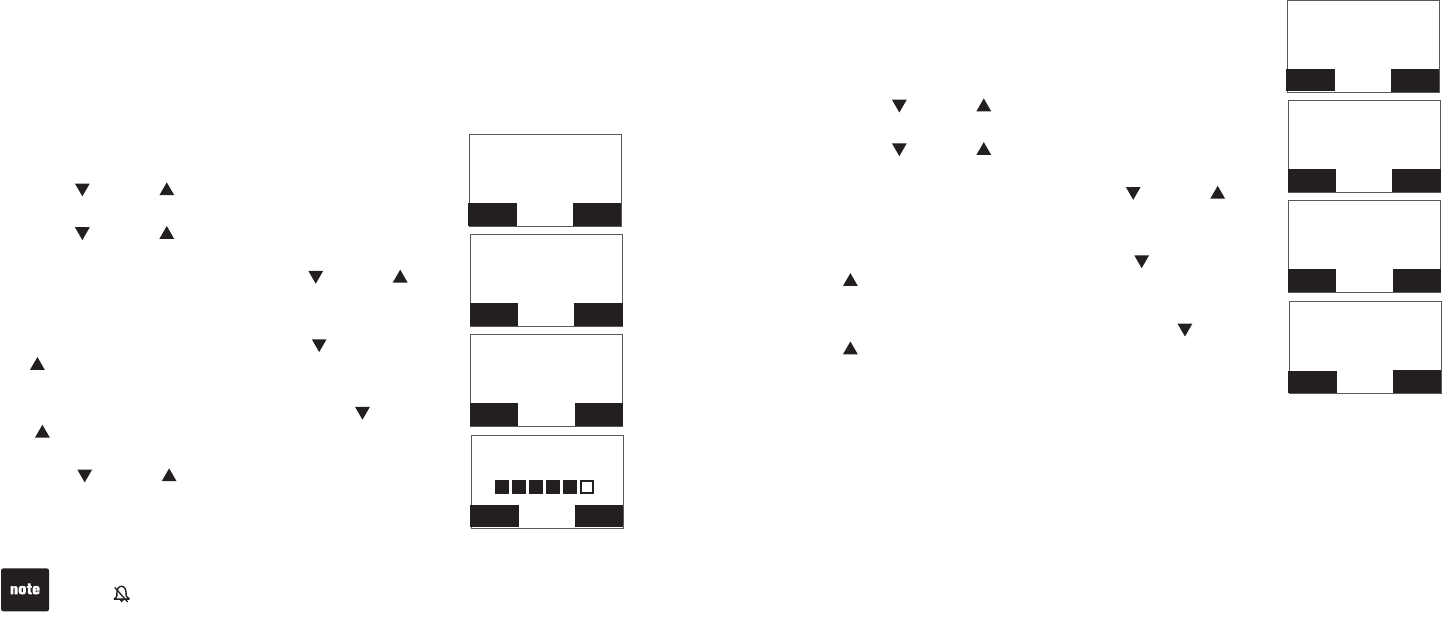
Ringer Volume
You can adjust the ringer volume or turn the ringer off.
To adjust the handset ringer volume:
Press the MENU softkey to show the menu when the
handset is not in use.
Press or to select >Ringers, then press the OK
softkey.
Press or to select >Ringer Volume, then press the
OK softkey.
To set the volume for Line 1, press or to choose
Line 1.
-OR-
To set the volume for Line 2, press or to choose
Line 2.
-OR-
To set the volume for Lines 1 & 2, press or to
choose Lines 1 & 2.
Then press the OK softkey.
5. Press or to adjust the volume. A sample of each
ringer volume plays as you scroll through the choices.
6. Press the SET softkey VQEQPſTO[QWTUGNGEVKQP
1.
2.
3.
4.
Answering Sys
Directory
Call Log
>Ringers
BACK OK
RINGER VOLUME
>Line 1
Line 2
Lines 1 & 2
BACK OK
RINGERS
>Ringer Volume
Ringer Melody
BACK OK
Setting the volume to the lowest level turns off the ringer. A ringer off
icon appears.
See page 53 to set the telephone base ringer volume.
•
•
Ringers
In the Ringers menu, you can adjust the ringer volume and select the ringer
melody of each telephone line.
LINE 1 RINGER
OFF SET
13
Handset settings
Ringer Melody
You can select the ringer melody.
To change the handset ringer melody:
Press the MENU softkey to show the menu when the
handset is not in use.
Press or to select >Ringers, then press the OK
softkey.
Press or to select >Ringer Melody, then press the
OK softkey.
To set the melody for Line 1, press or to choose
Line 1.
-OR-
To set the melody for Line 2, press or to choose
Line 2.
-OR-
To set the melody for Lines 1 & 2, press or to
choose Lines 1 & 2.
Then press the OK softkey.
5. Press the SET softkey VQEQPſTOor press the BACK
softkey to exit to the previous menu.
1.
2.
3.
4.
Answering Sys
Directory
Call Log
>Ringers
BACK OK
RINGER MELODY
2
BACK SET
RINGER MELODY
Line 1
Line 2
Lines 1 & 2
BACK OK
RINGERS
Ringer Volume
>Ringer Melody
BACK OK
14
Telephone base settingsTelephone
Settings
In the Settings menu, you can change and edit the
telephone base settings of language, voicemail indicator,
key tone, set date and time, and home area code.
Press the MENU softkey to show the menu when the
telephone bse is not in use.
Press -/CID or +/DIR to scroll to the item to be changed.
Press the OK softkey to select the highlighted item.
1.
2.
3.
MENU
12:45am 03/31
To cancel an operation, press the BACK softkey to previous menu or press
CANCEL to exit the menu display.
LCD Language
You can select English, Français or Español to be used in
all screen displays.
To select a langugage:
Press the MENU softkey to show the menu when the
telephone base is not in use.
Press -/CID or +/DIR to select >Settings, then
press the OK softkey.
Press -/CID or +/DIR to select >LCD Language,
then press the OK softkey.
Press -/CID or +/DIR to choose from English,
Françaois or Español, then press the SET softkey
to save or press the BACK softkey to exit to previous
menu.
1.
2.
3.
4.
SETTINGS
>LCD Language
Clr Voicemail
BACK OK
Call Log
Ringers
>Settings
BACK OK
,
LCD LANGUAGE
>English
Francais
BACK SET
15
Telephone base settings
Clear Voicemail Indicator
If you subscribe to voicemail service offered by your telephone service
provider, New Voicemail and appear on both the handset and telephone
base when you have new voicemail messages. Contact your telephone
service provider for more information and assistance about using your
voicemail service.
After you have listened to all new voicemail messages, the indicators on both
the handset and telephone base turn off automatically.
Use the clear voicemail feature when the telephone incorrectly indicates that
there is new voicemail (for example, when you have accessed your voicemail
while away from home). Clearing the voicemail waiting indicator only turns off
the indicators; it does not delete your voicemail messages. As long as you
have new voicemail messages, your telephone service provider continues to
send the signal to turn on the indicators.
To manually turn off these indicators:
Press the MENU softkey to show the menu when the
telephone base is not in use.
Press -/CID or +/DIR to select >Settings, then
press the OK softkey.
Press -/CID or +/DIR to select >Clr Voicemail
Indicator, then press the OK softkey.
Press -/CID or +/DIR to choose from Line1,Line
2, or Line 1 & 2, then press the SET softkey. The LCD
screen shows TURN OFF INDICATOR?
Press the YES softkeyVQEQPſTOQTRTGUUVJGNO
softkey to exit to the previous menu.
1.
2.
3.
4.
5.
Your telephone service provider might alert you of new messages with a
stutter (broken) dial tone. Contact your service provider for details.
Voicemail is different from answering system messages recorded in your
answering system. For more information about the difference, see page 52.
•
•
SETTINGS
LCD Language
>Clr Voicemail
BACK OK
Call Log
Ringers
>Settings
BACK OK
CLEAR INDICATOR
>Line 1
Line 2
BACK SET
Turn Off
Indicator?
YES NO
16
Telephone base settings
Key Tone
You can turn the Key Tone feature on or off.
To change the settings:
Press the MENU softkey to show the menu when the
telephone base is not in use.
Press -/CID or +/DIR to select >Settings, then
press the OK softkey.
Press -/CID or +/DIR to select >Key Tone,then
press the OK softkey.
Press -/CID or +/DIR to choose ON or OFF, then
press the SET softkey to save or press the BACK
softkey to exit to the previous menu.
1.
2.
3.
4.
SETTINGS
Clr Voicemail
>Key Tone
BACK OK
KEY TONE
>ON
OFF
BACK SET
17
Telephone base settings
Set Date/Time
The answering system announces the day and time of the message prior
to playing it. Before using the answering system, set the date and time as
follows. If you subscribe to caller ID service, the day, month and time are set
automatically with each incoming call. However, the year must be correct so
that the day of the week can be calculated from the caller ID information.
To adjust the date and time:
Press the MENU softkey to show the menu when the
telephone base is not in use.
Press -/CID or +/DIR to select >Settings, then
press the OK softkey.
Press -/CID or +/DIR to select >Set Date/Time,
then press the OK softkey.
Press the dialing keys (0-9) to enter a two-digit number
or press -/CID or +/DIR until the screen displays
the correct value. Press the SET softkey to advance.
Repeat step 3 until the date and time are set.
1.
2.
3.
4.
5.
If the date and time are not set, the system announces, “Time and day not
set,” before each message plays.
SETTINGS
Key Tone
>Set Date/Time
BACK OK
SET DATE
03/31/09
MM/DD/YY
SET
SET TIME
03:18 AM
SET
18
Telephone base settings
Home Area Code
If you dial local calls using only seven digits (area code not required), you can
program your home area code so that when you receive a call within your
local area, the telephone number is automatically stored without the area
code in the call log.
To set the Home Area Code:
Press the MENU softkey to show the menu when the
telephone base is not in use.
Press -/CID or +/DIR to select >Settings, then
press the OK softkey.
Press -/CID or +/DIR to select >Home Area Code,
then press the OK softkey. The stored home area code
CRRGCTUYKVJVJGNCUVFKIKVƀCUJKPI
Use the dialing keys to enter the desired home area
code.
Press the BKSP softkey to delete a digit.
Press and hold the BKSP softkey to delete the entire entry.
5. Press the SETUQHVMG[VQEQPſTO
1.
2.
3.
4.
•
•
If, in the future, your telephone service provider requires you to dial the area
code when making a local call, or, if you move to a location that requires it,
delete the home area code you have already programmed following the steps
above. After you have deleted the home area code, _ _ _ will appear in the
display.
SETTINGS
Set Date/Time
>Home Area Code
BACK OK
HOME AREA CODE
800
BKSP SET
19
Telephone base settings
Telephone
Ringer Volume
You can adjust the ringer volume or turn the ringer off.
To adjust the telephone base ringer volume:
Press the MENU softkey to show the menu when the
telephone base is not in use.
Press -/CID or +/DIR to select >Ringers, then
press the OK softkey.
Press -/CID or +/DIR to select >Ringer Volume,
then press the OK softkey.
To set the volume for Line 1, press -/CID or +/DIR
to choose Line 1.
-OR-
To set the volume for Line 2, press -/CID or
+/DIR to choose Line 2.
-OR-
To set the volume for Lines 1 & 2, press -/CID or
+/DIR to choose Lines 1 & 2.
Then press the OK softkey.
5. Press -/CID or +/DIR to adjust the volume. A
sample of each ringer volume plays as you scroll
through the choices.
6. Press the SET softkey VQEQPſTO[QWTUGNGEVKQP
1.
2.
3.
4.
Setting the volume to the lowest level turns off the ringer. A ringer off
icon appears.
See page 53 to set the telephone base ringer volume.
•
•
Ringers
In the Ringers menu, you can adjust the ringer volume and select the ringer
tone of each telephone line.
Directory
Call Log
>Ringers
BACK OK
RINGERS
>Ringer Volume
Ringer Tone
BACK OK
RINGERS VOLUME
>Line 1
Line 2
BACK OK
RINGERS VOLUME
OFF SET
20
Telephone base settings
Ringer Melody
You can select the ringer melody.
To change the telephone base ringer melody:
Press the MENU softkey to show the menu when the
telephone base is not in use.
Press -/CID or +/DIR to select >Ringers, then
press the OK softkey.
Press -/CID or +/DIR to select >Ringer Melody,
then press the OK softkey.
To set the melody for Line 1, press -/CID or +/DIR
to choose Line 1.
-OR-
To set the melody for Line 2, press -/CID or
+/DIR to choose Line 2.
-OR-
To set the melody for Lines 1 & 2, press -/CID or
+/DIR to choose Lines 1 & 2.
Then press the OK softkey.
5. Press the SET softkey VQEQPſTOor press the BACK
softkey to exit to the previous menu.
1.
2.
3.
4.
Directory
Call Log
>Ringers
BACK OK
RINGERS
>Ringer Volume
Ringer Melody
BACK OK
RINGERS MELODY
>Line 1
Line 2
BACK OK
RINGERS MELODY
>Tone 1
Tone 2
BACK SET
21
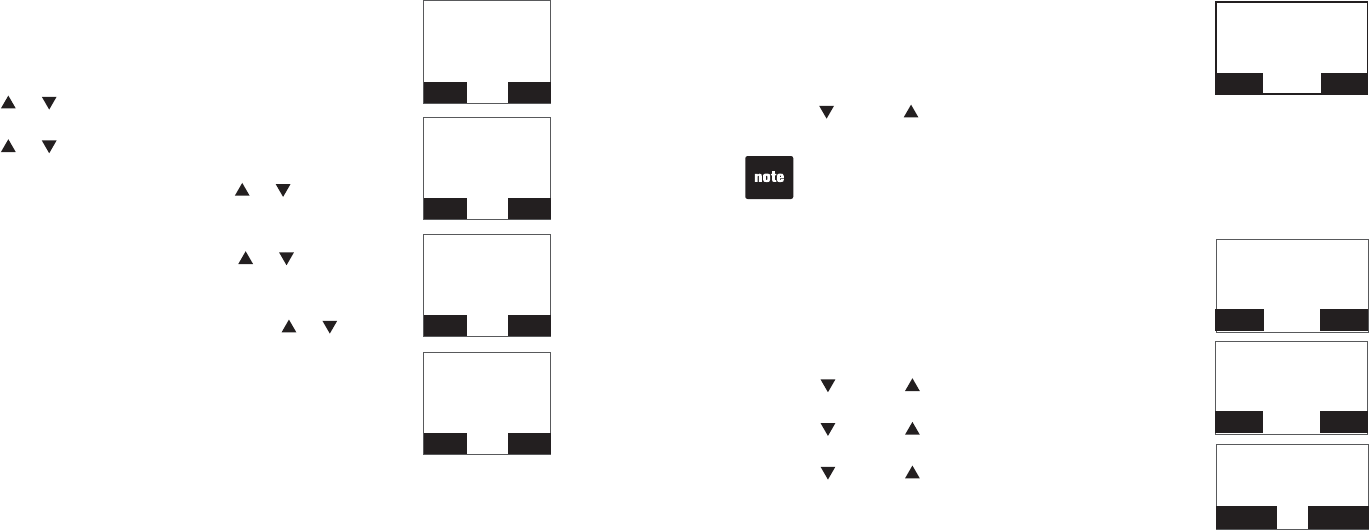
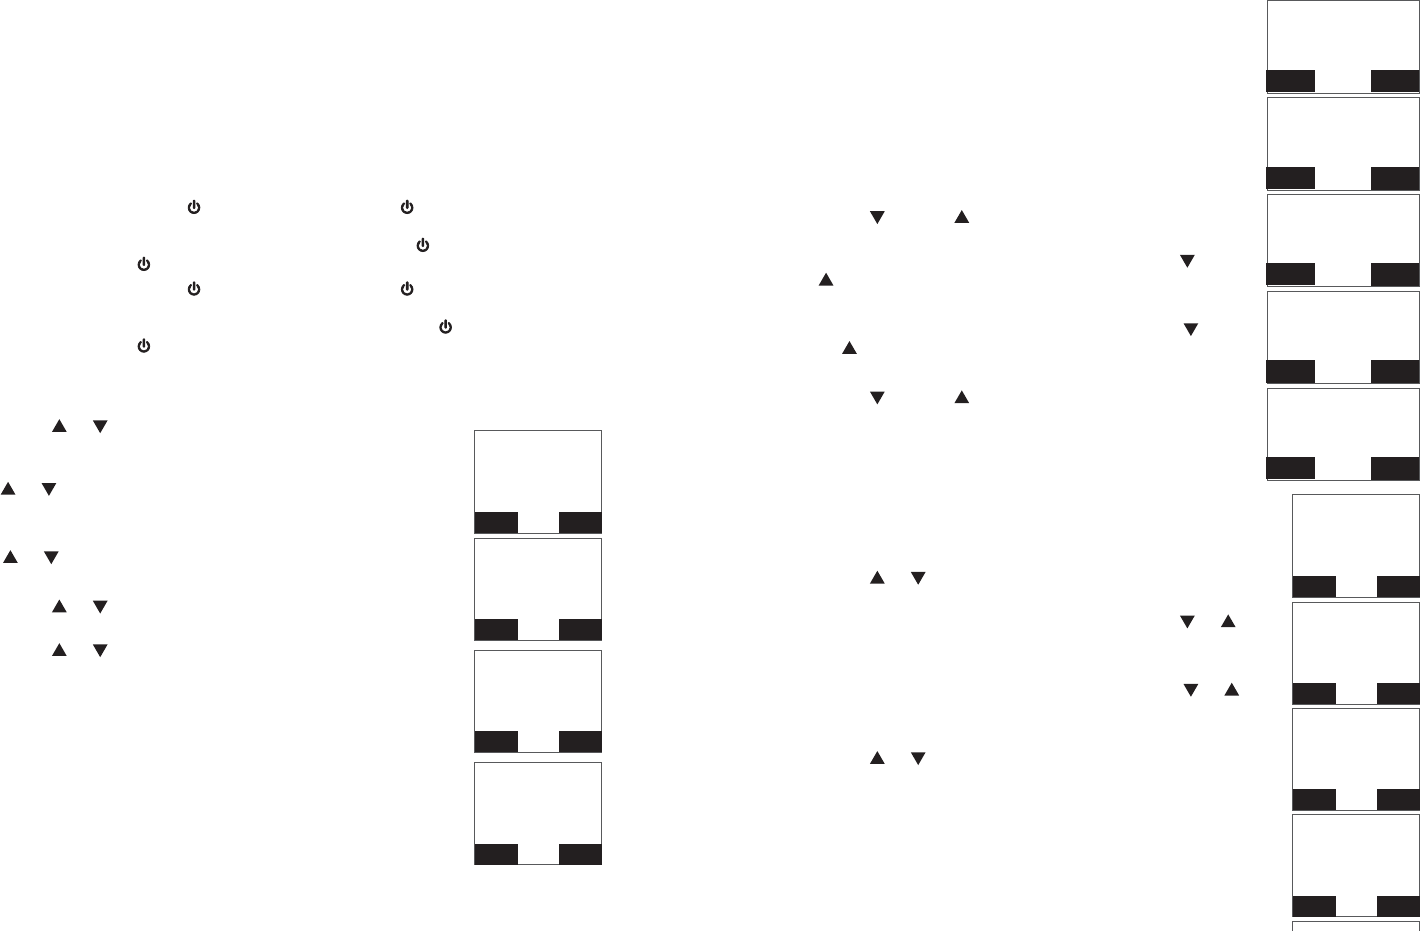
Answering system set up
For each telephone line, you can change the settings of the answering
system in the Ans Sys Setup with either your handset or telephone base.
Answer ON/OFF
You must turn on the answering system for answering and recording
messages.
To turn the answering system on or off :
Using the telephone base:
Press ON/OFF LINE 1/ and/or ON/OFF LINE 2/ to turn on the
answering system. The LCD screen will display Mailbox 1 is On and/or
Mailbox 2 is On respectively. The ON/OFF LINE 1/ light and/or
ON/OFF LINE 2/ light will be on respectively.
Press ON/OFF LINE 1/ and/or ON/OFF LINE 2/ to turn off the
answering system. The LCD screen will display Mailbox 1 is Off and/
or Mailbox 2 is Off respectively. The ON/OFF LINE 1/ light and/or
ON/OFF LINE 2/ light will be off respectively.
Using the handset:
Press the MENU softkey to show the menu when the handset is not in use.
Press or to select >Answering Sys, then press the
OK softkey.
To turn on or off the answering system of Line 1, press
or to select >Line 1.
-OR-
To turn on of off the answering system of Line 2, press
or to select >Line 2.
Then press the OK softkey.
Press or to select >Ans Sys Setup, then press the
OK softkey.
Press or to select >ON or >OFF, then press the SET
softkey.
The screen will display the Ans ON 1 icon or the Ans ON
2 icon when the answering system of Line 1 or Line 2 is
turned on respectively. The Ans ON 1 icon or the Ans ON
2 will disappear when the answering system of Line 1 or
Line 2 is turned off respectively.
The screen will display the Ans On 12 icon when the
answering systems of both Line 1 and Line 2 are turned
on. The Ans On 12 icon will disappear when both
answering systems are turned off.
1.
2.
1.
2.
3.
4.
5.
6.
7.
Answering
>Answering Sys
Directory
Call Log
Ringers
BACK OK
ANSWERING SYS
>Line 1
Line 2
BACK OK
LINE 1 SETUP
>Answer ON/OFF
Announcement
Call Screening
BACK OK
ANSWER ON/OFF
>ON
OFF
BACK SET
22
Answering System Settings
Announcement
The telephone is preset with a greeting that answers calls
with
“Hello, please leave a message after the tone.”
You
may use this preset announcement, or replace it with
your own.
Play your announcement
Using the telephone base:
Press the MENU softkey when the telephone base is
not in use.
Press -/CID or +/DIR to select >Answering Sys,
then press the OK softkey.
To play your announcement on Line 1, press -/CID or
+/DIR to select >Line 1.
-OR-
To play your announcement on Line 2,press -/CID
or +/DIR to select >Line 2.
Then press the OK softkey.
Press -/CID or +/DIR to select >Announcement,
then press the OK softkey.
The telephone base announces,
“To play, press 2. To
record, press 7.”
Press 2 to play or press the BACK
softkey to exit to the previous menu.
Using the handset:
Press the MENU softkey to show the menu when the
handset is not in use.
Press or to select >Answering Sys, then press the
OK softkey.
To play your announcement on Line 1, press or to
select >Line 1.
-OR-
To play your announcement on Line 2,press or to
select >Line 2
Then press the OK softkey.
Press or to select >Announcement, then press the
OK softkey.
The handset announces,
“To play, press 2. To record,
press 7.”
Press 2 to play or press the BACK softkey to
exit to the previous menu.
1.
2.
3.
4.
5.
1.
2.
3.
4.
5.
>Answering Sys
BACK MENU
ANSWERING SYS
>Line 1
Line 2
BACK OK
>Announcement
Call Screening
# of Rings
BACK OK
Announcement
2-Play 3-Delete
7-record
BACK
Announcement
Playback
DEL STOP
>Answering Sys
Directory
Call Log
Ringers
BACK OK
ANSWERING SYS
>Line 1
Line 2
BACK OK
LINE 1 SETUP
Answer ON/OFF
>Announcement
Call Screening
BACK OK
ANNOUNCEMENT
2-Play
3-Delete
7-Record
BACK OK
23
Answering System Settings
Record your own announcement
Using the telephone base:
Press the MENU softkey when the telephone base is not in use.
Press -/CID or +/DIR to select >Answering Sys,
then press the OK softkey.
To record on Line 1, press -/CID or +/DIR to
select >Line 1. Then press the OK softkey.
-OR-
To record on Line 2, press -/CID or +/DIR to
select >Line 2. Then press the OK softkey.
Press -/CID or +/DIR to select >Announcement,
then press the OK softkey.
The telephone base announces,
“To play, press 2. To
record, press 7.”
Press 7 to record or press the
BACK softkey to exit to the previous menu.
The telephone base announces, “
“Record after the
tone. Press 5 when you are done.”
After the tone, speak
towards the microphone MIC of the telephone base.
Press 5 or the STOPUQHVMG[YJGPſPKUJGF
The answering system automatically plays back
the newly recorded announcement. Press 5 to stop
the playback at anytime; 2 to replay the recorded
announcement; or 7 to record again if desired.
Using the handset:
Press the MENU softkey to show the menu when the handset is not in use.
Press or to select >Answering Sys, then press the OK softkey.
To record on Line 1, press or to select >Line 1.
-OR-
To record on Line 2, press or to select >Line 2.
Then press the OK softkey.
Press or to select >Announcement, then press the OK softkey.
The handset announces,
“To play, press 2. To record, press 7.”
Press 7 to
record or press the BACK softkey to exit to the previous menu.
The handset announces, “
“Record after the tone. Press 5 when you are
done.”
After the tone, speak towards the microphone of the handset.
Press 5 or the STOPUQHVMG[YJGPſPKUJGF
The answering system automatically plays back the newly recorded
announcement. Press 5 to stop the playback at anytime; 2 to replay the
recorded announcement; or 7 to record again if desired.
1.
2.
3.
4.
5.
6.
7.
1.
2.
3.
4.
5.
6.
7.
Your announcement can be up to 90 seconds in length.
Announcements shorter than two seconds will not be recorded.
•
•
ANSWERING SYS
>Line 1
Line 2
BACK OK
>Announcement
Call Screening
# of Rings
BACK OK
Announcement
2-Play 3-Delete
7-record
BACK
Recording
Announcement...
STOP
24
Answering System Settings
Delete your announcement
Using the telephone base:
Press the MENU softkey when the telephone base is
not in use.
Press -/CID or +/DIR to select >Answering Sys,
then press the OK softkey.
To delete your announcement on Line 1, press
-/CID or +/DIR to select >Line 1.
-OR-
To delete your announcement on Line 2, press
-/CID or +/DIR to select >Line 2.
Then press the OK softkey.
Press -/CID or +/DIR to select >Announcement,
then press the OK softkey.
The telephone base announces,
“To play, press 2. To
record, press 7.”
Press 3to delete your own recorded
announcement.
Using the handset:
Press the MENU softkey to show the menu when the
handset is not in use.
Press or to select >Answering Sys, then press the OK softkey.
To delete your announcement on Line 1, press or to select >Line 1.
-OR-
To delete your announcement of Line 2, press or to select >Line 2.
Then press the OK softkey.
Press or to select >Announcement, then press the OK softkey.
The handset announces,
“To play, press 2. To record, press 7.”
Press 3 to
delete your own recorded announcement.
To delete the your own recorded announcement of Line 2, select >Line 2
in step 3, then press the OK softkey. Repeat step 4 and step 5.
1.
2.
3.
4.
5.
1.
2.
3.
4.
5.
6.
When your announcement is deleted, calls are answered with the preset
announcement.
>Answering Sys
BACK MENU
ANSWERING SYS
>Line 1
Line 2
BACK OK
Call Screening
>Announcement
# of Rings
BACK OK
Announcement
2-Play 3-Delete
7-record
BACK
25
Answering System Settings
Call Screening
Call Screening allows you to hear the annoncement and
the incoming message when a call comes. You have to
make sure the call screening feature and the answering
system are both turned on. You may turn this feature on
or off with either your handset or telephone base. Unless
you change it, the call screening feature is set to on.
To change the setting:
Using the telephone base:
Press the MENU softkey when the telephone base is
not in use.
Press -/CID or +/DIR to select >Answering Sys,
then press the OK softkey.
To turn on or off the call screening of Line 1, press
-/CID or +/DIR to select >Line 1.
-OR-
To turn on or off the call screening of Line 2, press
-/CID or +/DIR to select >Line 2.
Then press the OK softkey.
Press -/CID or +/DIR to select >Call Screening,
then press the OK softkey.
Press -/CID or +/DIR to select >ON or >OFF, then
press the SETUQHVMG[VQEQPſTO[QWTUGVVKPIQTRTGUU
the BACK softkey to exit to the previous menu without
making any changes.
Using the handset:
Press the MENU softkey to show the menu when the
handset is not in use.
Press or to select >Answering Sys, then press the
OK softkey.
To turn on or off the call screening of Line 2, press
or to select >Line 1.
-OR-
To turn on or off the call screening of Line 2, press
or to select >Line 2.
Then press the OK softkey.
Press or to select >Call Screening, then press the
OK softkey.
Press or to select >ON or >OFF, then press the SET
UQHVMG[VQEQPſTO[QWTUGVVKPIQTRTGUUBACK softkey to
exit to the previous menu without making any changes.
1.
2.
3.
4.
5.
1.
2.
3.
4.
5.
>Answering Sys
BACK MENU
ANSWERING SYS
>Line 1
Line 2
BACK OK
Announcement
>Call Screening
# of Rings
BACK OK
Call Screening
>ON
OFF
BACK SET
>Answering Sys
Directory
Call Log
Ringers
BACK OK
ANSWERING SYS
>Line 1
Line 2
BACK OK
LINE 1 SETUP
Answer ON/OFF
Announcement
>Call Screening
BACK OK
CALL SCREENING
>ON
OFF
BACK OK
26
Answering System Settings
Number of rings
You can choose from two, four, or six rings; or toll saver. With toll saver
selected, the answering system answers after two rings when you have new
messages, and after four rings when you have no new
messages. This enables you to check for new messages
and avoid paying unnecessary long distance charges if
you are calling from out of your local area.
To change the setting:
Using the telephone base:
Press the MENU softkey when the telephone base is
not in use.
Press -/CID or +/DIR to select >Answering Sys,
then press the OK softkey.
To change the setting on Line1, press -/CID or
+/DIR to select >Line 1.
-OR-
To change the settng on Line 2, press -/CID or
+/DIR to select >Line 2.
Then press the OK softkey.
Press -/CID or +/DIR to select >#of Rings, then
press the OK softkey.
Press -/CID or +/DIR to select >2, >4 , >6, or >Toll
Saver, then press the SETUQHVMG[VQEQPſTO[QWTUGVVKPI
or press the BACK softkey to exit to the previous menu
without making any changes.
Using the handset:
Press the MENU softkey to show the menu when the
handset is not in use.
Press or to select >Answering Sys, then press the
OK softkey.
To change the setting on Line1, press or to select
>Line 1.
-OR-
To change the settng on Line 2, press or to select
>Line 2.
Then press the OK softkey. then press the OK softkey.
Press or to select ># of Rings, then press the OK
softkey.
Press or to select >2, >4 , >6, or >Toll Saver, then
press the SETUQHVMG[VQEQPſTO[QWTUGVVKPIQTRTGUU
BACK softkey to exit to the previous menu without
making any changes.
1.
2.
3.
4.
5.
1.
2.
3.
4.
5.
>Answering Sys
BACK MENU
ANSWERING SYS
>Line 1
Line 2
BACK OK
>Call Screening
Announcement
# of Rings
BACK OK
# of RINGS
>2
4
BACK SET
>Answering Sys
Directory
Call Log
Ringers
BACK OK
ANSWERING SYS
>Line 1
Line 2
BACK OK
LINE 1 SETUP
Call Screening
Announcement
># of Rings
BACK OK
# of RINGS
>2
4
6
BACK SET
27
Answering System Settings
Remote code
A two-digit security code is required to access the answering system
remotely from any touch tone telephone. The preset code
is 19. You can set the code from 10 to 99.
To change the setting:
Using the telephone base:
Press the MENU softkey when the telephone base is
not in use.
Press -/CID or +/DIR to select >Answering Sys,
then press the OK softkey.
To change the setting on Line 1, press -/CID or
+/DIR to select >Line 1.
-OR-
To change the setting on Line 2, press -/CID or
+/DIR to select >Line 1.
Then press the OK softkey.
Press -/CID or +/DIR to select >Remote Code,
then press the OK softkey.
Press
-/CID or +/DIR
to select from 10 to 99, then
press
the SETUQHVMG[VQEQPſTO[QWTUGVVKPIQTRTGUU
the BACK softkey to exit to the previous menu without
making any changes.
Using the handset:
Press the MENU softkey to show the menu when the
handset is not in use.
Press or to select >Answering Sys, then press the
OK softkey.
To change the setting on Line 1, press or to select
>Line 1.
-OR-
To change the setting on Line 2, press or to select
>Line 2.
Then press the OK softkey.
Press or to select >Remote Code, then press the
OK softkey.
Press or to select
from 10 to 99, then press
the SET
UQHVMG[VQEQPſTO[QWTUGVVKPIQTRTGUUVJGBACK softkey
to exit to the previous menu without making any changes.
1.
2.
3.
4.
5.
1.
2.
3.
4.
5.
>Answering Sys
BACK MENU
ANSWERING SYS
>Line 1
Line 2
BACK OK
# of Rings
>Remote Code
Msg Alert Tone
BACK OK
REMOTE CODE
__
BACK SET
>Answering Sys
Directory
Call Log
Ringers
BACK OK
ANSWERING SYS
>Line 1
Line 2
BACK OK
LINE 1 SETUP
# of Rings
>Remote Code
Msg Alert Tone
BACK OK
REMOTE CODE
__
BACK SET
28
Answering System Settings
The answering system must be turned on for the message
alert tone to function.
Message Alert Tone
This telephone can beep every 10 seconds to alert you of new messages
from the telephone base. The tone stops when all new messages have been
reviewed.
To turn the Message Alert Tone ON or OFF:
Using the telephone base:
Press the MENU softkey when the telephone base is
not in use.
Press -/CID or +/DIR to select >Answering Sys,
then press the OK softkey.
To change the setting on Line 1, press -/CID or
+/DIR to select >Line 1.
-OR-
To change the setting on Line 2, press -/CID or
+/DIR to select >Line 2.
Then press the OK softkey.
Press -/CID or +/DIR to select >Msg Alert Tone,
then press the OK softkey.
Press -/CID or +/DIR to select >ON or >OFF, then
press
the SETUQHVMG[VQEQPſTO[QWTUGVVKPIQTRTGUU
the BACK softkey to exit to the previous menu without
making any changes.
Using the handset:
Press the MENU softkey to show the menu when the
handset is not in use.
Press or to select >Answering Sys, then press the
OK softkey.
To change the setting on Line 1, press or to select
>Line 1,
-OR-
To change the setting on Line 2, press or to select
>Line 2.
Then press the OK softkey.
Press or to select >Msg Alert Tone, then press the
OK softkey.
Press or to select >ON or >OFF,
then press
the SET
UQHVMG[VQEQPſTO[QWTUGVVKPIQTRTGUUVJGBACK softkey
to exit to the previous menu without making any changes.
1.
2.
3.
1.
2.
1.
2.
3.
4.
5.
>Answering Sys
BACK MENU
ANSWERING SYS
>Line 1
Line 2
BACK OK
# of Rings
>Remote Code
Msg Alert Tone
BACK OK
MSG ALERT TONE
>ON
OFF
BACK SET
>Answering Sys
Directory
Call Log
Ringers
BACK OK
ANSWERING SYS
>Line 1
Line 2
BACK OK
LINE 1 SETUP
# of Rings
Remote Code
>Msg Alert Tone
BACK OK
MSG ALERT TONE
>ON
OFF
BACK SET
29
Make, answer or end a call
Using the telephone base:
To make a call:
Press LINE 1 or LINE 2, then enter the telephone number.
To predial a call:
Enter the telephone number, then press LINE 1 or LINE 2.
To answer a call:
Press LINE 1 or LINE 2 to answer.
To end a call:
Press LINE 1 or LINE 2.
Using the handset:
To make a call:
Press 1 LINE/FLASH,2 LINE/FLASH,or . Then enter the telephone
number.
To predial a call:
Enter the telephone number, then press 1 LINE/FLASH,2 LINE/FLASH,
or .
To answer a call:
Press 1 LINE/FLASH,2 LINE/FLASH,or .
To end a call:
Press OFF, 1 LINE/FLASH,2 LINE/FLASH or return the handset to the
telephone base to hang up.
•
•
•
•
•
•
•
•
The screen shows the elapsed time as you talk (in hours, minutes and
seconds).
When predialing (preview numbers before dialing), press CANCEL on the
telephone base or OFF on the handset to backspace and delete; press the
PAUSE softkey on the telephone base or press and hold REDIAL/PAUSE on
the handset to insert a dialing pause (a p appears).
•
•
Telephone operation
30
Telephone operation
Call waiting
When you subscribe to call waiting service from your telephone service
provider, you hear an alert tone if there is an incoming call while you are on
another call.
Press FLASH on the telephone base or 1 LINE/FLASH, 2 LINE/FLASH on
the handset to put your current call on hold and take the new call.
Press FLASH on the telephone base or 1 LINE/FLASH, 2 LINE/FLASH at
any time to switch back and forth between calls.
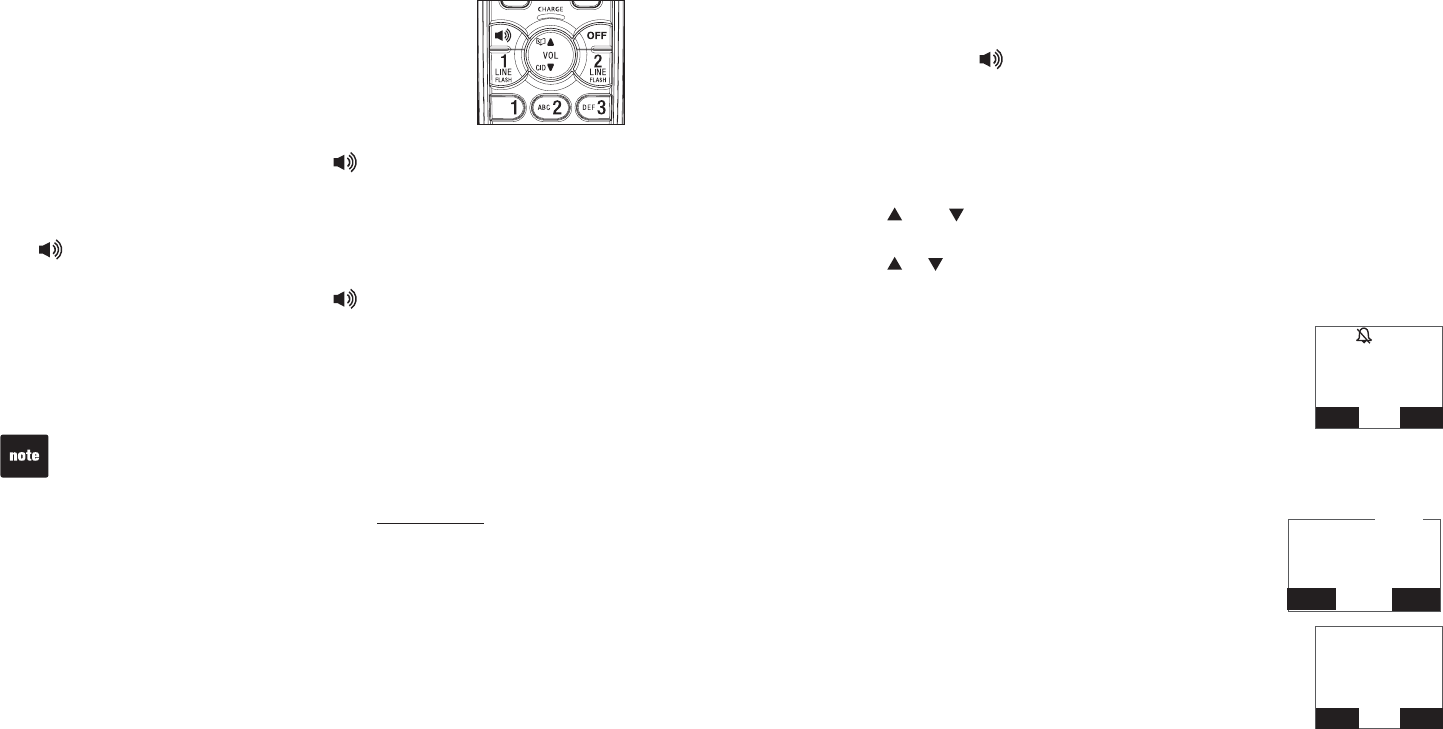
Handset Speakerphone
During a call, press to switch between speakerphone and normal
handset use.
Volume
During a call, press you may adjust the listening volume on the telephone
base or handset.
To adjust the listening volume of the telephone base:
Press VOL on the telephone base while on a call.
To adjust the listening volume of the handset:
Press or on the handset while on a call.
Silence the ringer
When the telephone is ringing, you may temporarily silence
the ringer of the handset without disconnecting the call. The
next call rings normall at the present volume.
To silence the ringer of hte handset when there is an
incoming call:
Press OFF on the handset and RINGER MUTE appears.
Mute
The mute function enables you to turn off the microphone. You can hear the
caller, but the caller cannot hear you.
To mute a call on the telephone base or on the
handset:
Press the MUTE softkey to turn off the microphone.
The screen shows MUTED for a few seconds and
MUTE appears until the mute function is turned off.
To un-mute a call on the telephone base or on the
handset:
Press the MUTE sofekey to resume the conversation. The
screen temporarily shows MICROPHONE ON.
•
•
•
•
•
•
•
MUTE
>Answering Sys
Directory
Call Log
Ringers
BACK OK
BACK SET
MUTE
RINGER MUTE
BACK OK
31
Telephone operation
Hold
When you place a call on hold, the telephone base or handset that places the
call on hold beeps every 30 seconds for 15 minutes unless there is a call on
another line. After 15 minutes, the telephone base or handset that placed the
call on hold will ring for 30 seconds, and if the call is not answered, the call
on hold will automatically disconnect.
To place a call on hold on the telephone base or handset:
Press HOLD on the telephone base or handset.
L1) ON HOLD appears on the screen while you are on
a call on LINE 1.
L2) ON HOLD appears on the screen while you are on
a call on LINE 2.
To resume a call on hold on the telephone base or handset:
On the telephone base, press the corresponding line
button (LINE 1 or LINE 2) to resume call.
On the handset, press the corresponding line button
(1 LINE/FLASH,2 LINE/FLASH) to resume call.
Handset locator
6JKUHGCVWTGJGNRU[QWſPFCOKURNCEGFJCPFUGV
To start paging:
Press the MENU softkey when the telephone base is not
in use.
Press -/CID or +/DIR to select >Page ALL HS,
then press the OK softkey on the telephone base. The
telephone base shows Paging all Handsets and the
handset shows ** Paging **.
To end paging:
Press the STOP softkey or CANCEL on the telephone base.
-OR-
Press FLASH, or any dialing keys (0-9,#,*) on the telephone base.
•
•
•
•
1.
2.
•
•
L1) ON HOLD
12:45pm 12/31
REDL MENU
Handset 1
L1) ON HOLD
BACK OK
Call Log
Intercom
>Page ALL HS
Ringers
BACK OK
32
Telephone operation
Chain dialing
Use this feature to initiate a dialing sequence from numbers stored in the
directory, call log or redial while you are on a call.
Chain dialing can be useful if you wish to access other numbers (such as
bank account information or access codes) from the directory, call log or
redial list.
To access a number in the directory while on a call:
Press the MENU softkey and then press -/CID or +/DIR on the
telephone base or press or on the handset to select >Directory.
Press the MENU softkey again and scroll to the desired entry by pressing
-/CID or +/DIR on the telephone base or press or on the handset.
Press the MENU softkey to dial the displayed number.
To access a number in the call log while on a call:
Press the MENU softkey and then press -/CID or +/DIR on the
telephone base or press or on the handset to select >Call Log.
Press the MENU softkey again and scroll to the desired entry by pressing
-/CID or +/DIR on the telephone base or press or on the handset.
Press the MENU softkey to dial the displayed number.
To access the last number on the redial list while on a call:
On the telephone base, press the MENU softkey and then press -/CID
or +/DIR to select >Redial Last #. Press the MENU softkey to dial the
displayed number.
-OR-
On the handset, press REDIAL/PAUSE to dial. Press REDIAL/PAUSE again
within two seconds to cancel the chain dialing.
1.
2.
3.
1.
2.
3.
•
•
You cannot edit a directory entry while on a call. For more details about the
directory, see page 39.
You cannot copy a call log entry into the directory while on a call. For more
details about call log, see page 46.
If you press REDIAL/PAUSE on the handset while on a call, you can only
view the most recent call, and you cannot erase the entry. For more details
about the redial memory, see page 33.
Press and hold CANCEL on the telephone base or OFF on the handset to
exit redial, directory or call log when you are on a call.
•
•
•
•
33
Telephone operation
Redial list
6JGVGNGRJQPGUVQTGUVJGſXGOQUVTGEGPVN[FKCNGFPWODGTU
9JGPVJGTGCTGCNTGCF[ſXGGPVTKGUVJGQNFGUVGPVT[KUFGNGVGFVQOCMG
room for the new entry.
Entries are shown in reverse chronological order.
Press the REDL softkey on the telephone base or REDIAL/PAUSE on the
handset to browse the redial list.
Dial a redial entry
Using the telephone base:
Press the REDL softkey and then press -/CID or +/DIR to browse the
number.
Press the DIAL softkey to call.
Using the handset:
Press REDIAL/PAUSE and then press or to browse the number.
Press the DIAL softkey to call.
Save a redial entry to the directory
Using the telephone base:
Press the REDL softkey and then press -/CID
or +/DIR to browse the number.
Press the SAVE softkey to save.
Using the handset:
Press REDIAL/PAUSE and then press or to browse the number.
Press the SAVE softkey to save.
Delete a redial entry to the directory
Using the telephone base:
Press
the REDL softkey and
then press
-/CID or +/DIR
to browse the
number.
Press the DEL softkey to delete the selected entry.
Using the handset:
Press REDIAL/PAUSE and then press or to browse the number.
Press the SAVE softkey to save.
•
•
•
1.
2.
1.
2.
1.
2.
1.
2.
1.
2.
1.
2.
34
Telephone operation
Multiple handset use
You can use up to 4 system handsets at a time on an outside call. If a
handset is already on a call on line 1 or line 2 and you would like to join the
call, press , or 1 LINE/FLASH or 2 LINE/FLASH respectively on another
handset to join the call.
To end the call, press OFF or place the handset in the telephone base or
charger. The call will not be terminated until all handsets hang up.
You can buy additional expansion handsets (model DS6101) for this
telephone base. You can register up to 12 handsets to the telephone base.
The first nine handsets that you register are named HANDSETS 1-9. Use
the handset number to intercom and transfer calls. Although the names
for handsets 10-12 appear in their displays as 10-12, when you intercom
or transfer to one of them, you must use *0 for HANDSET 10,*1 for
HANDSET 11, and *2 for HANDSET 12.

35
Telephone operation
Intercom
You may use the intercom feature for conversation between telephone base
and any system handset.
At the telephone base:
Press the MENU softkey when the telephone base is not in use.
Press
-/CID or +/DIR
to select >Intercom.
If you have a one-handset system, the telephone
base screen shows CALLING HANDSET.
If you have more than one handset, the telephone
base screen
shows INTERCOM TO: .
Press
-/CID
or +/DIR
to select your desired handset number and then press the OK
softkey. The screen shows CALLING HANDSET X
.
The desired handset rings and its screen shows BASE IS CALLING.
To answer the intercom call on the desired handset, press 1 LINE/FLASH,
2 LINE/FLASH,,INT, or any dialing keys (0-9, #, *). Both telephone base
and the handset now show INTERCOM.
To end an intercom call, press CANCEL.
From the handset:
Press INT on your handset when not in use.
If you have a one-handset system, your screen shows
CALLING BASE.
If you have more than one handset, your screen shows
INTERCOM TO:. Press or to select BASE or
HANDSET X and then press the OK softkey. The screen
shows CALLING BASE or CALLING HANDSET X.
The telephone base or other handset rings and its screen shows either
HANDSET IS CALLING or HANDSET X IS CALLING.
To answer the intercom call, press LINE 1,LINE 2, or any dialing keys
(0-9,#,*) on the telephone base or press 1 LINE/FLASH,2 LINE/FLASH,
,INT, or any dialing keys (0-9,#,*) on the handset. Both telephone
base and the handset or both handsets now show INTERCOM.
To end an intercom call, press INT,OFF, or place the handset back in the
telephone base or charger.
1.
2.
•
•
3.
4.
1.
•
•
2.
3.
You can cancel the intercom call before it is answered by pressing OFF/CLEAR or
INT on your originating handset.
If the other handset does not answer the intercom call within 100 seconds, is in
the directory or call log, or is out of range, your originating handset screen shows
UNABLE TO CALL TRY AGAIN and returns to idle mode.
Press OFF/CLEAR or MUTE/REMOVE on the other handset to temporarily silence the
intercom ringer.
You can use a maximum of four handsets at a time. When two handsets are used on
an intercom call, use two other system handsets for an outside call.
•
•
•
•
INTERCOM TO:
Handset 1
Handset 2
OK
INTERCOM TO:
Base
Handset 2
Handset 3
BACK OK
36
Telephone operation
Answer an incoming call during an intercom call
If you receive an incoming outside call during an intercom call, there will be
an alert tone.
At the telephone base:
To answer the call, press LINE 1 or LINE 2 . The intercom call ends
automatically.
To end the intercom call without answering the incoming call, press the
CANCEL softkey.
From the handset:
To answer the call, press
1 LINE/FLASH,2 LINE/FLASH, or . The intercom
call ends automatically.
To end the intercom call without answering the incoming call, press OFF.
•
•
•
•
37
Telephone operation
Share an outside call
You can call the telephone base or another system handset
to join an outside call. That call continues even if you hang
up.
At the telephone base:
During a call, press HOLD to put the outside call on hold.
Press the MENU softkey and then press
-/CID or
+/DIR
to select >Intercom.
If you have an one-handset system, the telephone base
screen shows CALLING HANDSET.
If you have more than one handset, the telephone base
screen
shows INTERCOM TO:.
Press
-/CID or
+/DIR
to select your desired handset number and then
press the OK softkey. The screen shows CALLING
HANDSET X
.
The desired handset rings and its screen shows BASE
IS CALLING.
To answer the intercom call on the desired handset,
press 1 LINE/FLASH,2 LINE/FLASH, , INT, or any
dialing keys (0-9, #, *). Both telephone base and the
desired system handset now show INTERCOM and the
outside call is still on hold. You can now have a private
conversation between the telephone base and the
desired system handset.
From this intercom call, you have the following options:
You can let the desired system handset join you on the outside call in a
three-way conversation. At the same time, press LINE 1 or LINE 2 on
the telephone base and press 1 LINE/FLASH or 2 LINE/FLASH
respectively on the desired system handset.
You can transfer the call. Press CANCEL on the telephone base. Your
screen shows CALL TRANSFERED. The other handset is automatically
connected to the outside call.
You can alternate between the outside call (OUTSIDE CALL appears
on the screen) and the intercom call (INTERCOM appears on the
screen). Press FLASH repeatedly on the telephone base.
The person on the desired handset can leave the intercom call by
pressing OFF or placing the handset back in the charger. The outside
call continues with the telephone base.
1.
2.
•
•
3.
4.
•
•
•
•
CALLING
HANDSET X
HANDSET X
IS CALLING
INTERCOM
TRANSFER TO:
If you want to cancel an intercom call and reconnect to the outside call
before the desired handset answers, press CANCEL, LINE 1, or LINE 2 on
your telephone base.
If the desired handset does not answer the intercom call within 100 seconds,
is in the directory or call log, or is out of range, your telephone base screen
shows UNABLE TO CALL TRY AGAIN and reconnects to the outside call
automatically.
•
•
38
Telephone operation
From the handset:
During a call, press HOLD or INT. The outside call is put on hold.
If you have an one-handset system, your handset screen shows
CALLING BASE. The telephone base rings and its screen shows
HANDSET IS CALLING.
If you have more than one handset, your handset screen shows
TRANSFER TO:.
Press or to select your desired handset number
or the telephone base, and then press the OK softkey. The handset
screen then shows CALLING BASE or CALLING HANDSET X.
The desired handset or telehone base rings and its screen shows
HANDSET X IS CALLING.
To answer the intercom call, press 1 LINE/FLASH,2 LINE/FLASH, , INT,
or any dialing keys (0-9, #, *) on the desired handset or LINE 1,LINE 2,
or any dialing keys (0-9,#,*) on the telephone base. The outside call is
still on hold and both the telehphone base and the desired handset now
show INTERCOM. You can now have a private conversation between the
system handsets or the telephone base and the handset.
From this intercom call, you have the following options:
You can let the desired system handset or telephone base join you
on the outside call in a three-way conversation. At the same time,
press 1 LINE/FLASH or 2 LINE/FLASH on the originating handset, and
respectively press 1 LINE/FLASH or 2 LINE/FLASH on the desired system
handset or press LINE 1 or LINE 2 on the telephone base.
You can transfer the call. Press OFF your originating handset. Your
handset screen shows CALL TRANSFERED. The other handset is
automatically connected to the outside call.
You can alternate between the outside call (OUTSIDE CALL appears
on the screen) and the intercom call (INTERCOM appears on the
screen). Press INT repeatedly on your originating handset.
The other person can leave the intercom call by pressing OFF or placing
the other handset back in the charger or press CANCEL on the
telephone base. The outside call continues with the original system
handset.
1.
•
•
2.
3.
•
•
•
•
If you want to cancel an intercom call and reconnect to the outside call
before the other handset answers, press
1 LINE/FLASH,2 LINE/FLASH,
or INT on your originating handset.
If the desired handset or telephone base does not answer the intercom
call within 100 seconds, is in the directory or call log, or is out of range,
your originating handset screen shows UNABLE TO CALL TRY AGAIN and
reconnects to the outside call automatically.
•
•
39
Telephone operation
Directory
The directory can store up to 50 entries with up to 30 digits
for each phone number and 15 characters for each name.
Directory entries are shared by all system handsets and
telephone base. Any additions, deletions or edits made on
one handset or telephone base affect the directory on all
handsets.
When there are no records in the directory, the screen
shows DIRECTORY EMPTY.
When the directory is full and you try to save an entry, the
screen shows LIST FULL.
If you try to save a number already stored in the directory,
the screen shows ALREADY SAVED.
Only one handset or telephone base can review the
directory at a time. If a handset tries to enter the directory
while another handset is already in it, NOT AVAILABLE
AT THIS TIME appears.
•
•
•
•
•
DIRECTORY EMPTY
LIST FULL
ALREADY SAVED
ELIZABETH JONES
800123456789123
456789123456789
40
Telephone operation
Create a new directory entry
From the telephone base or the handset:
Use the following steps to store an entry in the directory.
Press +/DIR on the telephone base or on the
handset when it is not in use.
-OR-
Press the MENU softkey when the telephone base
or handset is not in use. Press -/CID or +/DIR on
the telephone base or or on the handset to select
>DIRECTORY and then press the OK softkey.
Press -/CID or +/DIR on the telephone base or
or on the handset to select >Add Contact, then
press the OK softkey. The screen shows ENTER
NUMBER.
Use the dialing keys to enter the number.
Press CANCEL on the telephone base or press
OFF on the handset to backspace and erase a digit.
Press and hold CANCEL on the telephone base or
press and hold OFF on the handset to erase the
entire entry.
Press -/CID on the telephone base or on the
handset to move the cursor to the left. Press +/DIR
on the telephone base or on the handset to the right.
Press the PAUS softkey on the telephone base or
press and hold REDIAL/PAUSE on the handset to insert
a dialing pause (a p appears).
- OR-
Copy a number from the redial list by pressing the REDL
softkey on the telephone base and then press -/CID or
+/DIR to browse the number. Press the SAVE softkey
to save. Or press , or REDIAL/PAUSE on the handset
to select a number and then press the MENU softkey to
copy the number.
Press the SAVE softkey to move to the name. The screen
shows ENTER NAME.
Use the dialing keys (see page 41) to enter the name.
Press CANCEL on the telpehone base or press OFF
on the handset to backspace and erase a character.
Press and hold CANCEL on the telephone base or
press and hold on the handset to erase the entire entry.
Press -/CID on the telephone base or on the
handset to move the cursor to the left. Press +/DIR
on the telephone base or on the handset to the right.
Press the SAVE softkey on the telephone base or handset to save.
1.
2.
3.
•
•
•
•
4.
5.
•
•
•
6.
Answering Sys
>Directory
Call Log
BACK MENU
Answering Sys
>Directory
Call Log
Ringers
BACK OK
DIRECTORY
Review
>Add Contact
BACK OK
DIRECTORY
Review
>Add Contact
BACK OK
ENTER NUMBER
_
BKSP SAVE
ENTER NUMBER
_
PAUS SAVE
ENTER NAME
_
PAUS SAVE
ENTER NAME
_
BKSP SAVE
41
Telephone operation
Character chart
Use the dial pad and the chart below to enter a name (up to 15 characters).
Each press of a particular key causes the characters to be displayed in the
following order:
Number key Characters by number of key presses
123456789
11# ,,-.&
2ABC2abc
3DEF3de f
4GHI 4gh i
5JKL5 j k l
6MNO 6mn o
7PQRS7 p q r s
8TUV8 t u v
9WX Y Z 9 w x y z
00
**?! / ()@
#space
9JGPGPVGTKPICPCOGKPVJGFKTGEVQT[VJGſTUVNGVVGTQHGCEJYQTFKU
automatically capitalized.
42
Telephone operation
Review the directory
From the telephone base or the handset:
Entries are sorted alphabetically. To search the directory:
Press +/DIR on the telephone base or on the
handset when it is not in use.
-OR-
Press the MENU softkey when the telephone base
or handset is not in use. Press -/CID or +/DIR on
the telephone base or or on the handset to select
>DIRECTORY and then press the MENU softkey twice.
Press -/CID or +/DIR on the telephone base or or
on the handset to browse.
Alphabetical search
From the telephone base or the handset:
To start an alphabetical search:
Press +/DIR on the telephone base or on the
handset when it is not in use.
-OR-
Press the MENU softkey when the telephone base or handset is not in
use. Press -/CID or +/DIR on the telephone base or or on the
handset to select >DIRECTORY and then press the MENU softkey twice.
Use the dialing keys to enter the letters associated with the name. For
example, if you have name entries Jenny, Kristen and Linda in your
directory, press 5,-.QPEGVQſPF,GPP[VYKEGVQſPF-TKUVGPQTVJTGG
VKOGUVQſPF.KPFC+HVJGTGKUPQPCOGGPVT[OCVEJKPI[QWTUGCTEJVJG
next closest match in alphabetical order appears. If necessary, press -/
CID or +/DIR on the telephone base or or on the handset to browse.
Dial a directory entry
From the telephone base or the handset:
Press +/DIR on the telephone base or on the handset when it is not
in use.
-OR-
Press the MENU softkey when the telephone base or handset is not in
use. Press -/CID or +/DIR on the telephone base or or on the
handset to select >DIRECTORY and then press the MENU softkey twice.
Press -/CID or +/DIR on the telephone base, or on the handset, or
use the alphabetical search to browse.
Press LINE 1 or LINE 2 on the telephone base, or 1 LINE/FLASH,2 LINE/
FLASH, or on the handset.
1.
2.
1.
2.
1.
2.
3.
VTECH
595-9511
DIRECTORY
>Review
Add Contact
BACK OK
DIRECTORY
>Review
Add Contact
BACK OK
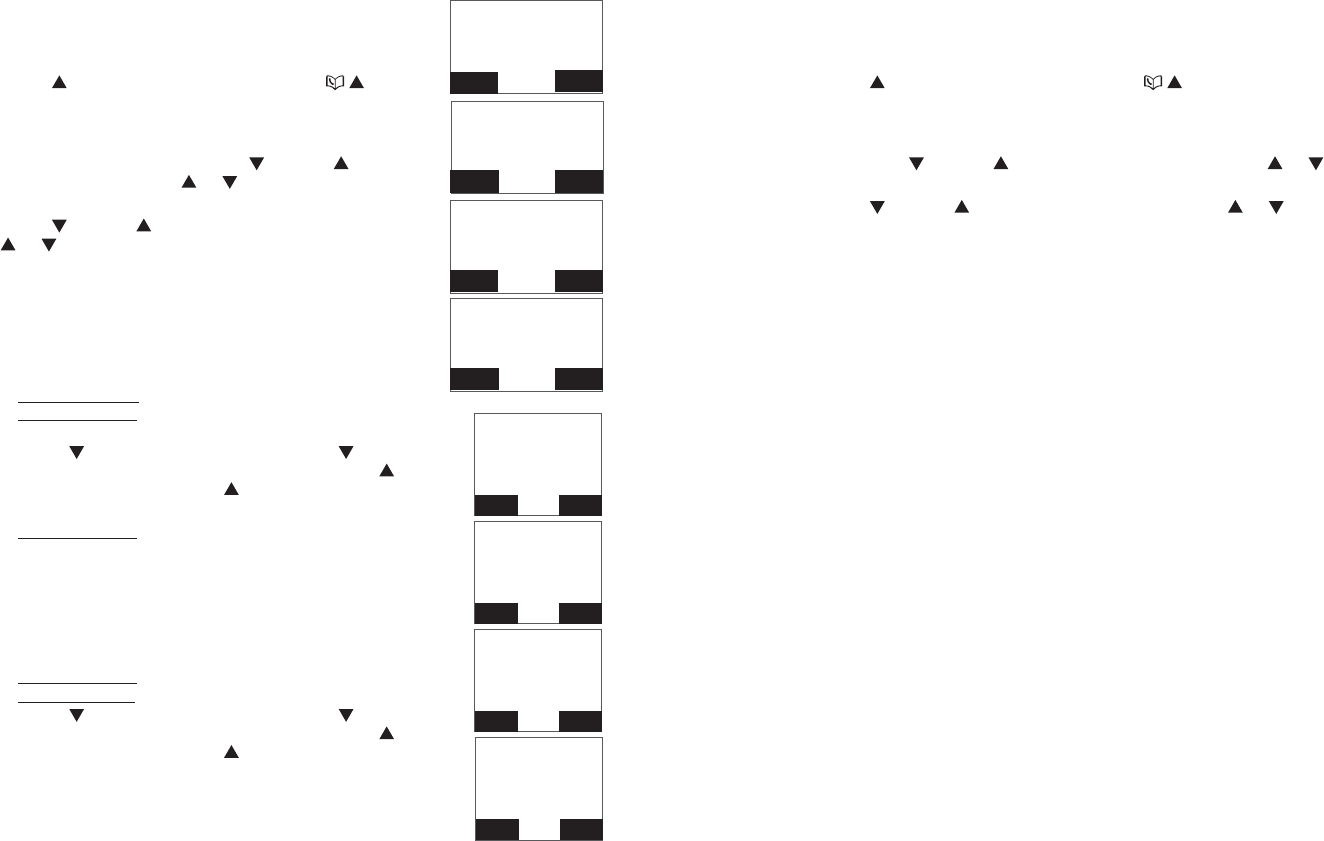
43
Telephone operation
Edit a directory entry
From the telephone base or the handset:
Use the following steps to edit an entry in the directory.
Press +/DIR on the telephone base or on the
handset when it is not in use.
-OR-
Press the MENU softkey when the telephone base
or handset is not in use. Press -/CID or +/DIR on
the telephone base or or on the handset to select
>DIRECTORY and then press the OK softkey twice.
Press -/CID or +/DIR on the telephone base or
or on the handset, or use the alphabetical search
to browse (see page 37).
Press the EDIT softkey to select an entry. The screen
shows EDIT NUMBER.
Use the dialing keys to edit the number.
Press CANCEL on the telephone base or press
OFF on the handset to backspace and erase a digit.
Press and hold CANCEL on the telephone base or
press and hold OFF on the handset to erase the
entire entry.
Press -/CID on the telephone base or on the
handset to move the cursor to the left. Press +/DIR
on the telephone base or on the handset to the right.
Press the PAUS softkey on the telephone base or
press and hold REDIAL/PAUSE on the handset to insert
a dialing pause (a p appears).
Press the NEXT softkey to move to the name. The
screen shows EDIT NAME.
Use the dialing keys (see page 41) to edit the name.
Press CANCEL on the telpehone base or press OFF
on the handset to backspace and erase a character.
Press and hold CANCEL on the telephone base or
press and hold on the handset to erase the entire entry.
Press -/CID on the telephone base or on the
handset to move the cursor to the left. Press +/DIR
on the telephone base or on the handset to the right.
Press the SAVE softkey on the telephone base or
JCPFUGVVQEQPſTO
1.
2.
3.
4.
•
•
•
•
5.
6.
•
•
•
7.
Answering Sys
>Directory
Call Log
BACK MENU
Answering Sys
>Directory
Call Log
Ringers
BACK OK
DIRECTORY
>Review
Add Contact
BACK OK
DIRECTORY
>Review
Add Contact
BACK OK
EDIT NUMBER
_
BKSP NEXT
EDIT NUMBER
_
PAUS NEXT
EDIT NAME
_
PAUS SAVE
EDIT NAME
_
BKSP SAVE
44
Telephone operation
Delete a directory entry
From the telephone base or the handset:
Use the following steps to delete an entry in the directory.
Press +/DIR on the telephone base or on the handset when it is not
in use.
-OR-
Press the MENU softkey when the telephone base or handset is not in
use. Press -/CID or +/DIR on the telephone base or or on the
handset to select >DIRECTORY and then press the OK softkey twice.
Press -/CID or +/DIR on the telephone base or or on the handset,
or use the alphabetical search to browse.
Press the DEL softkey to remove the selected entry.
1.
2.
3.
45
Telephone operation
About caller ID
This product supports caller ID services provided by most local telephone
service companies. Depending on your service subscription, you may see
the caller’s number, or the caller’s name and number that are sent by the
VGNGRJQPGUGTXKEGRTQXKFGTCHVGTVJGſTUVQTUGEQPFTKPI%CNNGT+&CNNQYU[QW
to see the name, number, date and time of calls.
Caller ID with call waiting lets you see the name and telephone number of the
caller before answering the telephone, even while on another call.
It may be necessary to change your telephone service to use this feature.
Contact your telephone service provider if:
You have both caller ID and call waiting, but as separate services (you may
need to combine these services).
You have only caller ID service, or only call waiting service.
You do not subscribe to caller ID or call waiting services.
There are fees associated with caller ID services. In addition, services may
not be available in all areas.
This product can provide information only if both you and the caller are
in areas offering caller ID service and if both telephone companies use
compatible equipment. The time and date are sent by the telephone service
provider along with the call information.
You can use this product with regular caller ID service, or you can use this
product’s other features without subscribing to either caller ID or combined
caller ID with call waiting service.
•
•
•
46
Telephone operation
Caller ID History [previously named as Call log]
If you subscribe to caller ID service, information about each caller will appear
CHVGTVJGſTUVQTUGEQPFTKPI+H[QWCPUYGTCECNNDGHQTGVJGECNNGTKPHQTOCVKQP
appears on the screen, it will not be saved in the call log.
The call log stores up to 50 entries. Each entry has up to 24 digits for the
phone number and 15 characters for the name. If the phone number has
more than 15 digits, only the last 15 digits appear. If the name has more
VJCPEJCTCEVGTUQPN[VJGſTUVEJCTCEVGTUCTGUJQYPCPFUCXGFKPVJG
call log.
You can review, redial, and copy an entry into the directory.
Entries appear in reverse chronological order.
When the call log is full, the oldest entry is deleted to
make room for new incoming call information.
XX MISSED CALL(S) shows when there are new call log
entries (including missed and unreviewed calls).
CALL LOG EMPTY shows when there are no records in
the call log.
Only one handset can review the call log at a time. If a
handset tries to enter the call log while another handset is
already in it, NOT AVAILABLE AT THIS TIME appears.
•
•
•
•
•
•
•
The caller ID information may not be available for every incoming call. The
callers may intentionally block their names and/or telephone numbers.
For call log entries with numbers between 16 and 24 digits, in order to view
the entire number, you must save the entry to the directory (see page 49).
If the phone number has more than 24 digits, it will not be saved or shown in
the call log.
•
•
•
HANDSET X
XX MISSED CALLS
6:21am 12/25
CALL LOG EMPTY
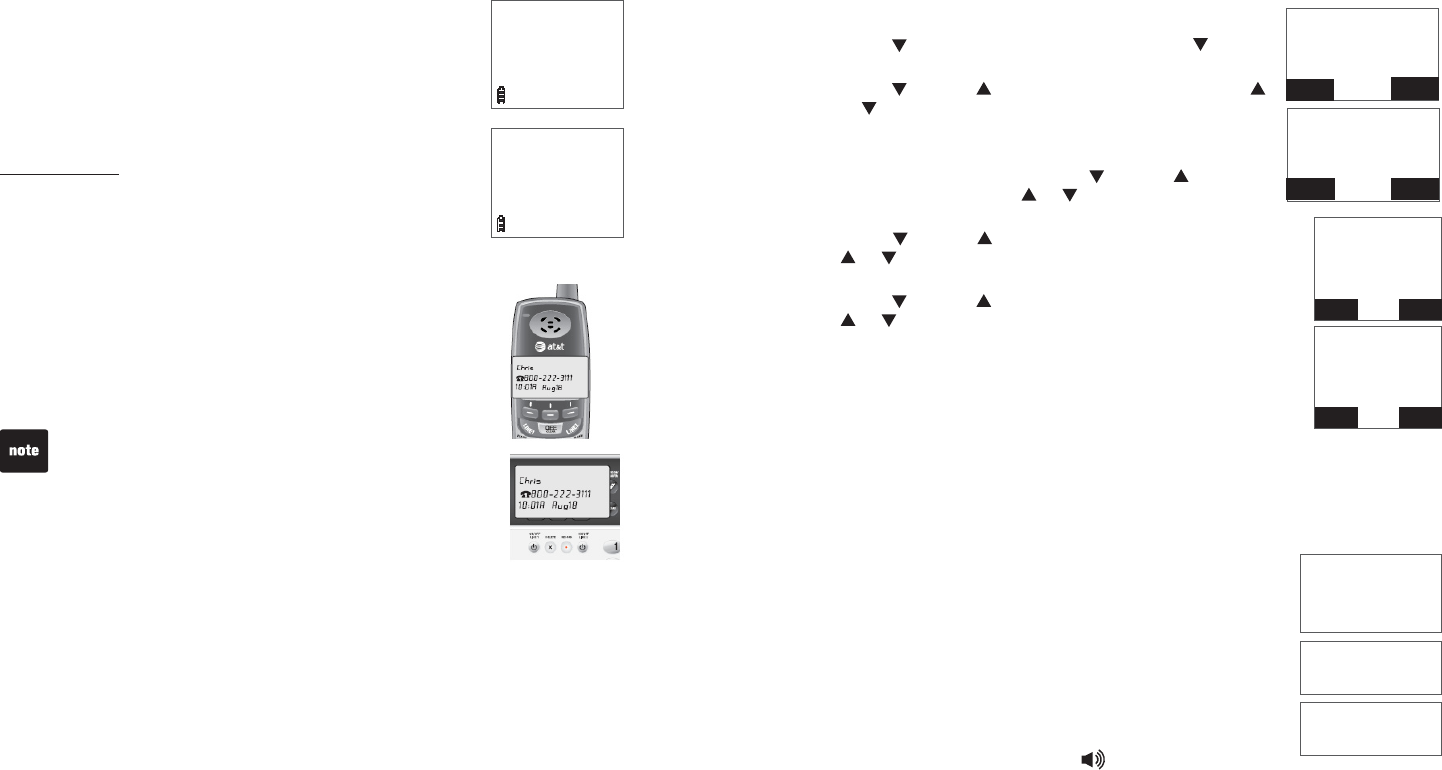
47
Telephone operation
Missed calls indicator
When there are unreviewed calls in the call log, the handset
shows XX MISSED CALL(S).
Each time you review a call log entry marked NEW, the
number of missed calls decreases by one.
When you have reviewed all the missed calls, the missed
calls indicator no longer shows.
If you do not want to review the missed calls one by one,
press and hold OFF/CLEAR to erase the missed calls
indicator. All the entries are then considered old and kept in
the call log.
Memory match
If the incoming telephone number matches exactly a
telephone number in your directory, the name that appears
on the screen will match the corresponding name in your
directory.
For example, if Christine Smith calls, her name will appear as
Chris if this is how you entered it into your directory.
HANDSET X
XX MISSED CALLS
6:11am 12/25
VTECH
595-9511
6:21am 12/25
NEW
The number shown by yoru caller ID will be in the format sent
by the phone company. The phone company usually delivers
ten-digit phone numbers (area code plus phone number). If
the telephone number of the caller does not exactly match a
number in your directory, the name will appear as delivered
by the phone company. For example if the phone company
includes the area code and the directory number does not,
the name will appear as delivered by the phone company.
48
Telephone operation
Review the call log
From the telephone base or the handset:
Press -/CID on the telephone base or CID on the
handset when it is not in use.
Press -/CID or +/DIR on the telephone base or
or on the handset to browse through the call log.
-OR-
Press the MENU softkey when the telephone base
or handset is not in use. Press -/CID or +/DIR on
the telephone base or or on the handset to select
>CALL LOG and then press the MENU softkey.
Press
-/CID or +/DIR on the telephone base or
or on the handset to
select >REVIEW, then press
the OK softkey.
Press -/CID or +/DIR on the telephone base or
or on the handset to browse through the call log.
The name (if available), telephone number, date and
time of all incoming calls are shown on the screen.
You hear a double beep when the list reaches the
beginning or end of the call log.
Make a call log entry ready to dial
Although the call log entries received have 10 digits (the area code plus the
seven-digit number), in some areas, you might need to dial only the seven
digits, 1 plus the seven digits, or 1 plus the area code plus the seven digits.
You can change the number of digits that you dial from the call log and store
to the directory.
While reviewing the call log, press # repeatedly to show
different dialing options for local and long distance
numbers before dialing or saving the telephone number in
the directory.
Press 1 repeatedly if you need to add or remove 1 in front
of the telephone number before dialing or saving it in the
directory.
When the number is shown in the correct format for
dialing, press LINE 1 or LINE 2 on the telephone base, or
1 LINE/FLASH,2 LINE/FLASH, or on the handset to call
the number.
1.
2.
1.
2.
3.
•
•
800-595-9511
1-800-595-9511
595-9511
1-595-9511
800-595-9511
1-800-595-9511
595-9511
1-595-9511
Answering Sys
Directory
>Call Log
BACK MENU
Answering Sys
Directory
>Call Log
Ringers
BACK OK
CALL LOG
>Review
Del All Calls
BACK OK
CALL LOG
>Review
Del All Calls
BACK OK
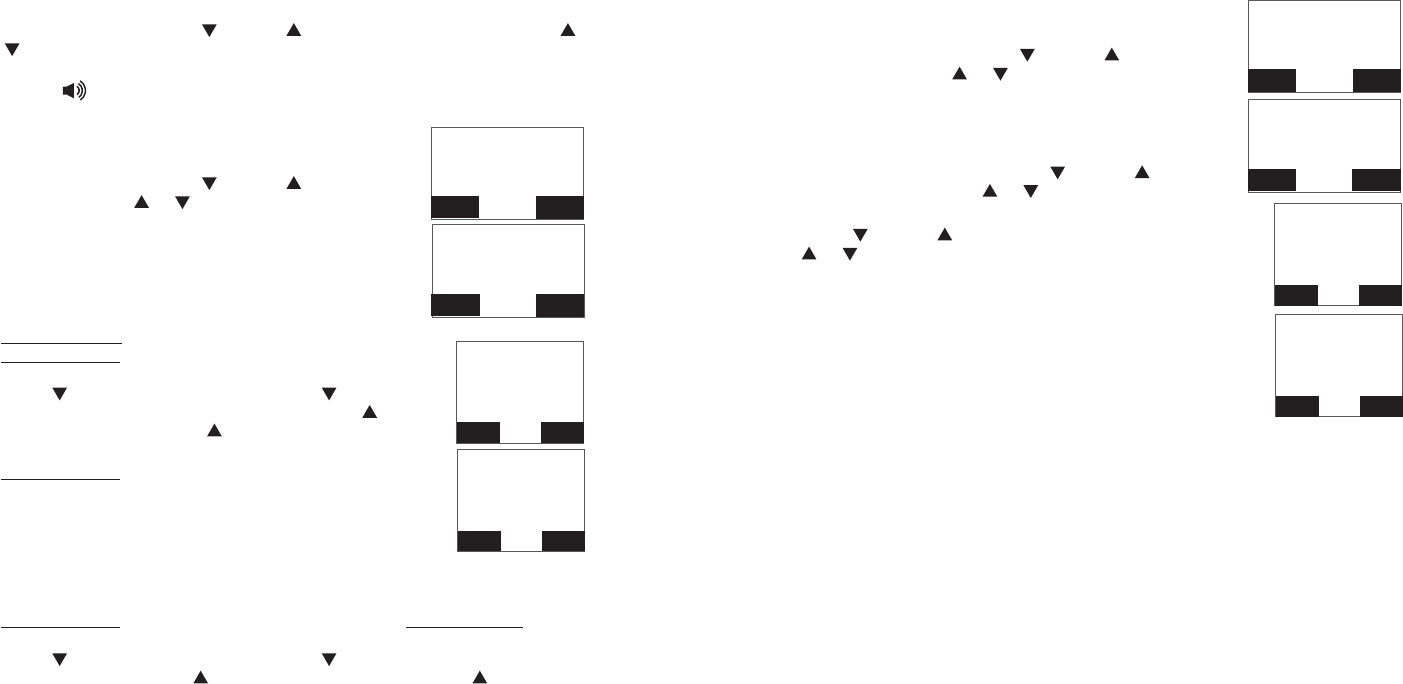
49
Telephone operation
Dial a call log entry
From the telephone base or the handset:
When in the call log, press -/CID or +/DIR on the telephone base or
or on the handset to browse.
Press LINE 1 or LINE 2 on the telephone base, or 1 LINE/FLASH,2 LINE/
FLASH, or on the handset to dial the entry.
Save a call log entry to the directory:
From the telephone base or the handset:
When in the call log, press -/CID or +/DIR on the
telephone base or or on the handset to browse.
Press the SAVE softkey to the selected entry. The
screen displays EDIT NUMBER.
Use the dialing keys to edit the number.
Press CANCEL on the telephone base or press
OFF on the handset to backspace and erase a digit.
Press and hold CANCEL on the telephone base or
press and hold OFF on the handset to erase the
entire entry.
Press -/CID on the telephone base or on the
handset to move the cursor to the left. Press +/DIR
on the telephone base or on the handset to the right.
Press the PAUS softkey on the telephone base or
press and hold REDIAL/PAUSE on the handset to insert
a dialing pause (a p appears).
Press the NEXT softkey to move to the name. The
screen displays EDIT NAME.
Use the dialing keys (see page 41) to edit the name.
Press CANCEL on the telpehone base or press OFF on the handset to
backspace and erase a character.
Press and hold CANCEL on the telephone base or press and hold on the
handset to erase the entire entry.
Press -/CID on the telephone base or on the handset to move the
cursor to the left. Press +/DIR on the telephone base or on the
handset to the right.
Press the SAVE softkey on the telephone base or handset to save.
If the entry is already saved in the directory, the telephone base or
handset shows ALREADY SAVED.
If there is no caller ID information, the telephone base or handset shows
UNABLE TO SAVE.
1.
2.
1.
2.
3.
•
•
•
•
4.
5.
•
•
•
6.
•
•
EDIT NUMBER
_
BKSP NEXT
EDIT NUMBER
_
PAUS NEXT
EDIT NAME
_
PAUS SAVE
EDIT NAME
_
BKSP SAVE
50
Telephone operation
Delete from the call log
From the telephone base or the handset:
To delete one entry:
When in the call log, press -/CID or +/DIR on the
telephone base or or on the handset to browse.
Press the DEL softkey to delete the selected entry.
To delete all entries:
Press the MENU softkey when the telephone base
or handset is not in use. Press -/CID or +/DIR on
the telephone base or or on the handset to select
>CALL LOG and then press the MENU softkey.
Press -/CID or +/DIR on the telephone base or
or on the handset to select >DEL ALL CALLS, then
press the OK softkey.
The screen shows DELETE ALL CALLS?. Press the
YES softkey to delete.
1.
2.
1.
2.
3.
CALL LOG
>Review
Del All Calls
BACK OK
CALL LOG
>Review
Del All Calls
BACK OK
DELETE ALL
CALLS
YES NO
DELETE ALL
CALLS
YES NO
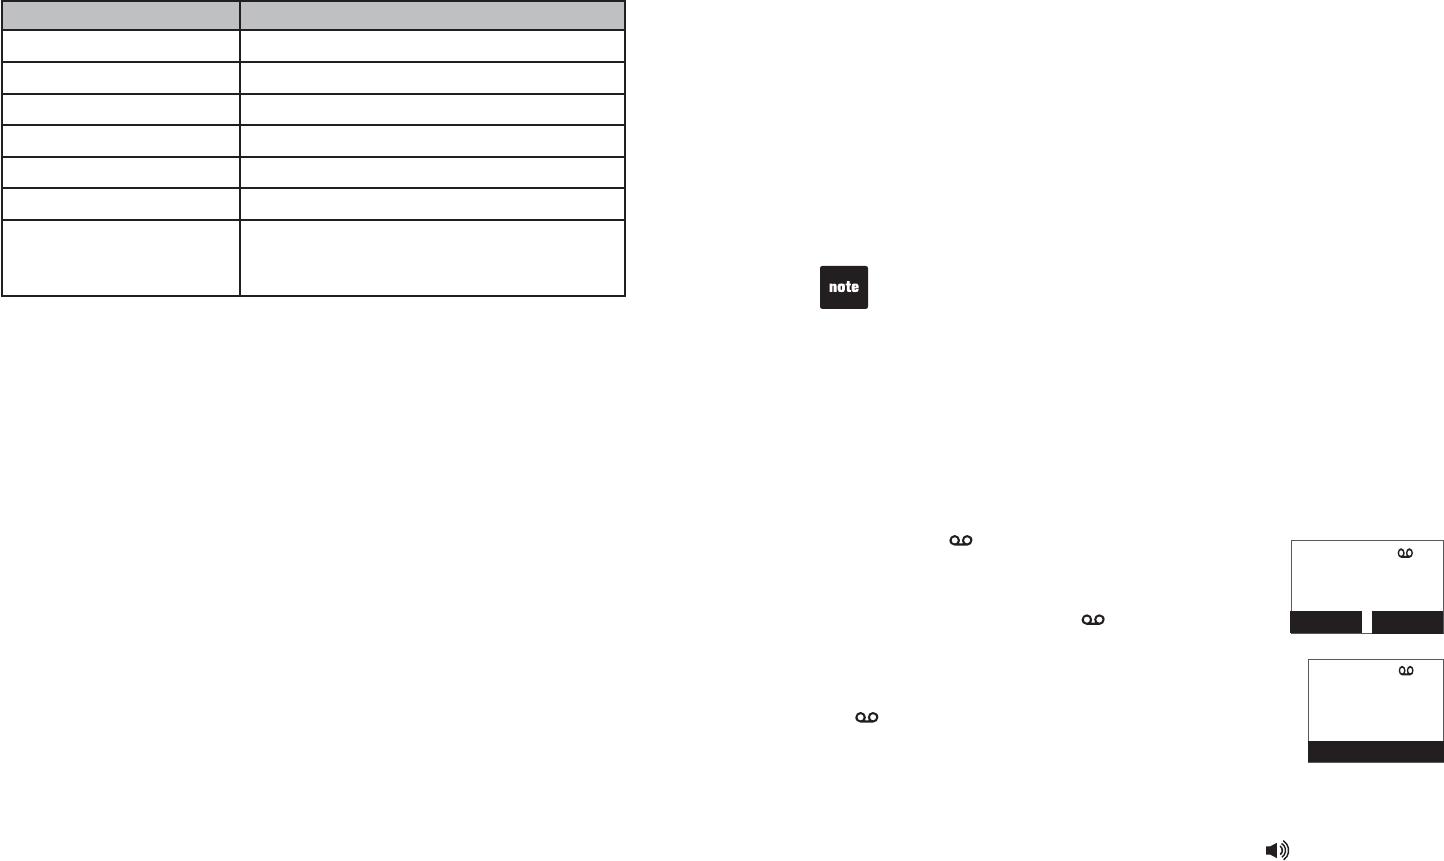
51
Telephone operation
Call log display screen messages
Displays When
PRIVATE NAME The caller is blocking the name.
PRIVATE NUMBER The caller is blocking the telephone number.
PRIVATE CALLER The caller is blocking the name and number.
UNKNOWN NAME This caller’s name is unavailable.
UNKNOWN NUMBER This caller’s number is unavailable.
UNKNOWN CALLER No information is available about this caller.
LONG DISTANCE
OR
L(before the caller’s number)
It is a long distance call.
52
Answering system operation
Answering system and voicemail
Your telephone has both a digital answering system and voicemail indication.
Most telephone companies offer voicemail service (fees may apply). Your
telephone’s answering system and voicemail indication are independent
features. Each alerts you to new messages differently. For more information
on the voicemail indicators, see page 22. To listen to your voicemail, follow the
instructions provided by your voicemail service provider. To listen to messages
recorded on your digital answering system, see page 47.
If you subscribe to a voicemail service through your telephone service
provider, you can use your telephone answering system and voicemail
together. If you are on a call, or the answering system is busy and you
receive another call, the second caller can leave a voicemail message. Set
your answering system to answer calls at least two rings earlier than your
voicemail is set to answer. For example, set your voicemail to answer calls
after six rings and set your answering system to answer after four rings.
Message capacity
The answering system of Line 1 and Line 2 can each record and store up to
99 messages. Each message can be up to four minutes in length. The total
storage capacity of each telephone line for the announcement, messages
and memos is approximately 14 minutes. The actual recording time depends
on individual message characteristics. Messages remain available for replay
until you delete them.
New message indication
When there are new messages on the answering system of Line 1,L1) X
New Msgs and 1 will be displayed on the screen of
the telephone base and handset. MAILBOX LINE 1
lights on the telephone base.
When there are new messages on the answering system
of Line 2,L2) X New Msgs and 2 will be displayed on
the screen of the telephone base and handset. MAILBOX
LINE 2 lights on the telephone base.
When there are new messages on the answering system of
both Line 1 and Line 2,L1) X new Msgs,L2) X New msgs
and 12 will be displayed on the screen of the telephone
base and handset. MAILBOX LINE 1 and MAILBOX LINE
2 light on the telephone base.
Call intercept
If you want to talk to the caller who is recording a message on Line 1 or
Line 2, press the corresponding line button (LINE 1 or LINE 2) on the
telephone base or 1 LINE/FLASH,2 LINE/FLASH, or on the handset.
Some telephone service providers program the delay before answering calls
in seconds instead of rings; in this case, allow six seconds per ring when
determining the appropriate setting.
Answering system operation
L1) 1 New Msg
L2) 3 New Msgs
12:45pm 12/31
REDIAL MENU
1
2
Handset 1
L1) 1 New Msg
L2) 3 New Msgs
12:45pm 12/31
BACK OK
1
2
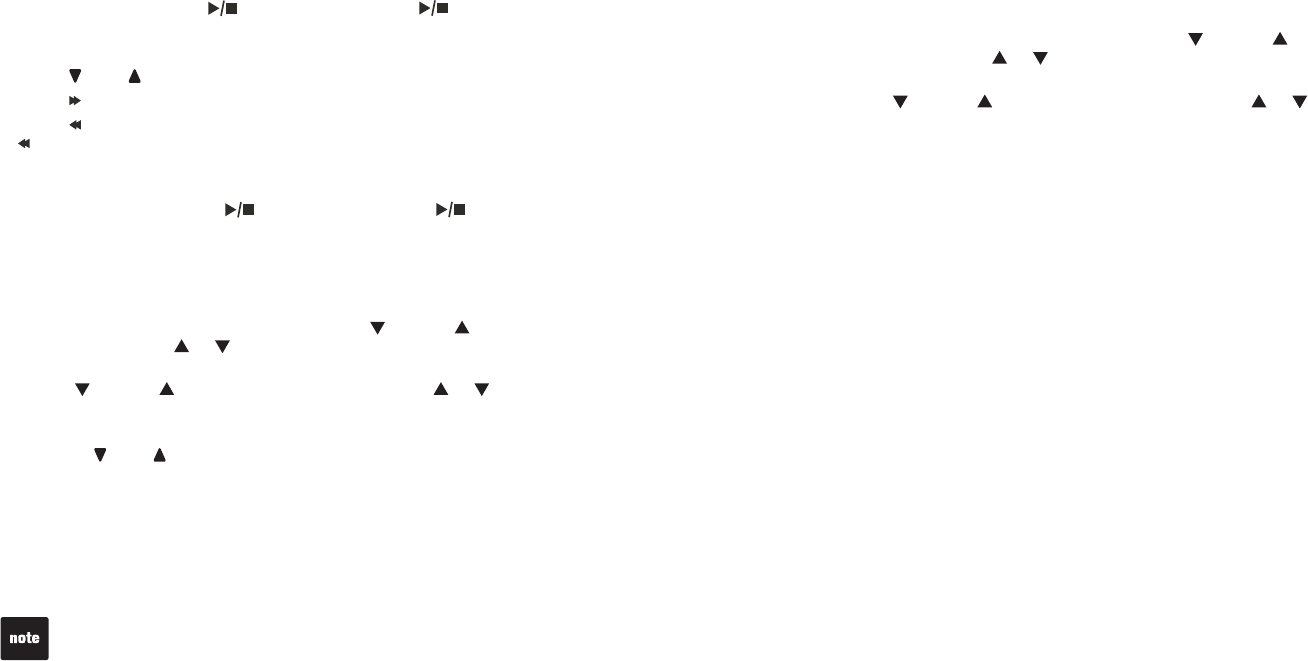
53
Answering system operation
Message playback
If you have new messages, the telephone plays only the new messages
QNFGUVſTUV+HVJGTGCTGPQPGYOGUUCIGUVJGVGNGRJQPGRNC[UDCEMCNN
OGUUCIGUQNFGUVſTUV
When playback begins, you hear the total number of messages followed by
the day and time of the message. After the last message, the telephone
announces,
“End of messages.”
To play messages with the telephone base:
Press MAILBOX LINE 1/ or MAILBOX LINE 2/ to listen to messages
on Line 1 or Line 2 respectively.
Options during playback:
Press VOL to adjust the speaker volume.
Press /SKIP to skip to the next message.
Press /REPEAT to repeat the message currently playing. Press
/REPEAT twice to listen to the previous message.
Press X/DELETE to delete the current message. The system advances
to the next message.
Press MAILBOX LINE 1/ or MAILBOX LINE 2/ to stop listening
to messages on Line 1 or Line 2 respectively.
To play messages with the telephone base or handset:
Press the MENU softkey when the telephone base or handset is not
in use.
Press the SELECT softkey and then press -/CID or +/DIR on the
telephone base or or on the handset to select >Mailbox 1 or
>Mailbox 2. Press the SELECT softkey again.
Press -/CID or +/DIR on the telephone base or or on the handset
to select >Play Msgs. Then press the SELECT softkey.
Options during playback:
Press VOL to adjust the speaker volume.
Press 6 to skip to the next message.
Press 4 to repeat the message currently playing. Press 4 twice to listen
to the previous message.
Press 3 to delete the current message. The system advances to the
next message.
Press 5 to stop.
•
•
•
•
•
1.
2.
3.
•
•
•
•
•
9JGPVJGCPUYGTKPIU[UVGOJCUNGUUVJCPſXGOKPWVGUQHTGEQTFKPIVKOG
left, the remaining time is announced.
When FCPFPWODGTQHOGUUCIGUCTGƀCUJKPIKPVJGOGUUCIGYKPFQYVJG
memory is full. Delete some messages to make room for more.
You can only delete old messages, which are messages you have played.
•
•
•
54
Answering system operation
Delete all messages
To delete all messages with the telephone base:
Press X/DELETE when the phone is not in use. The telephone announces,
“To delete all old messages, press DELETE again.” Press X/DELETE again.
All previously reviewed messages are erased and the telephone announces,
“All old messages deleted!”
To delete all messages with a handset:
Press the MENU softkey when the telephone base or handset is not
in use.
Press the SELECT softkey and then press -/CID or +/DIR on the
telephone base or or on the handset to select >Mailbox 1 or
>Mailbox 2.
Press -/CID or +/DIR on the telephone base or or on the handset
to select >Del all old, then press the SELECT softkey.
The handset shows Delete all old messages? Press the YES softkey to
EQPſTO[QWTUGNGEVKQP
1.
2.
3.
4.
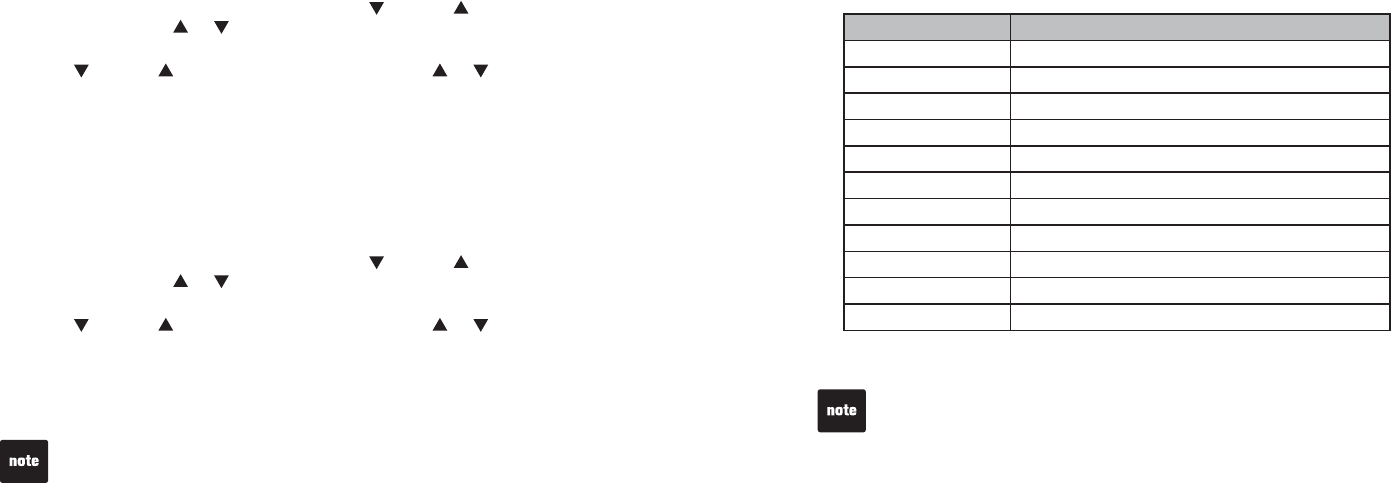
55
Answering system operation
Record and play memos
Memos are your own recorded messages used as reminders for yourself
or others who uses the same answering system. You can record your own
memos using the telephone base or handset. Playback and delete them in
the same way as incoming messages.
Record a memo with the telephone base:
Press REC on the telephone base while the telephone base is not in use.
Press the SELECT softkey and then press -/CID or +/DIR on the
telephone base or or on the handset to select >Mailbox 1 or
>Mailbox 2.
Press -/CID or +/DIR on the telephone base or or on the handset
to select >Record Memo, then press the SELECT softkey.
The handset announces,
“Record after the tone. Press 5 when you are
done.”
After the tone, speak towards the microphone of the handset.
Press 5YJGPſPKUJGFTGEQTFKPI6JGJCPFUGVCPPQWPEGU
“Recorded.”
Record a memo with the telephone or handset:
Press the MENU softkey when the telephone base or handset is not
in use.
Press the SELECT softkey and then press -/CID or +/DIR on the
telephone base or or on the handset to select >Mailbox 1 or
>Mailbox 2.
Press -/CID or +/DIR on the telephone base or or on the handset
to select >Record Memo, then press the SELECT softkey.
The handset announces,
“Record after the tone. Press 5 when you are
done.”
After the tone, speak towards the microphone of the handset.
Press 5YJGPſPKUJGFTGEQTFKPI6JGJCPFUGVCPPQWPEGU
“Recorded.”
1.
2.
3.
4.
5.
1.
2.
3.
4.
5.
“Memory is full,” is announced if you record a memo when the memory is
full.
Each memo can be up to four minutes in length.
Memos shorter than one second are not recorded.
•
•
•
56
Answering system operation
If you do not press any key after you enter the remote access code, all new
messages play. If there are no new messages, all old messages play.
Once the new messages have played, the telephone announces the help
menu options. If you do not press any key within 20 seconds, the remote
access call automatically disconnects.
When the answering system is turned off, the telephone answers after 10
rings, and announces, “Please enter your remote access code.”
•
•
•
Remote access
A two-digit security code is required to access the answering system
remotely from any touch tone telephone. The preset code is 19; see
Remote code on page 21 to change the code.
Dial your telephone number from any touch tone telephone.
When the system plays your announcement, enter the two-digit
security code.
You can also enter one of the following remote commands.
Hang up or press 8 to end the call.
1.
2.
3.
4.
Command Function
1Play all messages.
2Play only new messages.
3Delete the current message (during playback).
33 Delete all messages.
4Repeat the current message (during playback).
5Stop.
*5 Hear a list of remote commands.
6Skip to the next message (during playback).
*7 Record a new announcement.
8End the call.
0Turn the answering system on or off.

57
Telephone base and handset display screen messages
ALREADY SAVED The telephone number entered is already
stored in the directory.
BASE IS CALLING Telephone bse is calling.
CALL LOG EMPTY There are no call log entries.
CALLING HANDSET X
(for models with three or more handsets)
CALLING OTHER HANDSET
(for models with two handsets)
CALLING BASE
Calling another handset or telephone
base.
CONNECTING... The cordless handset is searching for the
telephone base.
CHARGING The handset is recharging.
DIRECTORY EMPTY There are no directory entries.
ENDED You have just ended a call.
HANDSET X IS CALLING
(for models with three or more handsets)
OTHER HANDSET IS CALLING
(for models with two handsets)
Another system handset is calling.
INCOMING CALL There is an incoming call.
INT REQUIRES TWO HANDSETS Two handsets are required for an
intercom call.
INTERCOM The handset is on an intercom call.
INTERCOM ENDED You have just ended an intercom call.
L1) IN USE Line 1 is in use.
L2) IN USE Line 2 is in use.
LINE 1 INCOMING CALL There is an incoming call on line 1.
LINE 2 INCOMING CALL There is an incoming call on line 2.
LIST FULL The directory is full.
LOW BATTERY The battery needs to be recharged.
MICROPHONE ON MUTE is turned off and the person on the
other end can hear you.
Appendix
58
Appendix
Telephone base and handset display screen messages
MUTED You have turned off the handset
microphone. The other party cannot hear
you, but you can hear the other party.
NEW VOICEMAIL There are new voicemail messages from
your telephone service provider.
NO LINE There is no telephone line connected.
NO SIGNAL, CALL ENDED
Communication between the handset and
telephone base is lost during a call.
NOT AVAILABLE
AT THIS TIME
One handset is already viewing the call
log or directory, while another handset
attempts to review it.
OUTSIDE CALL Connected to the external call during call
transfer.
**PAGING** The cordless handset locator is activated.
PHONE The handset is on a call.
PLACE IN CHARGER The battery is very low. Place the handset
in the telephone base or charger for
recharging.
RINGER MUTE The ringer is muted temporarily during an
incoming call.
SAVED Your selection has been saved.
SPEAKER The handset speakerphone is in use.
UNABLE TO CALL
TRY AGAIN
You have attempted to make an intercom
call, but the handset you are calling is in
the directory, in the call log, out of range
or on an outside call.
UNABLE TO SAVE You are attempting to save a caller ID
entry with no name or number.
XX MISSED CALLS There are unreviewed calls in your call
log.
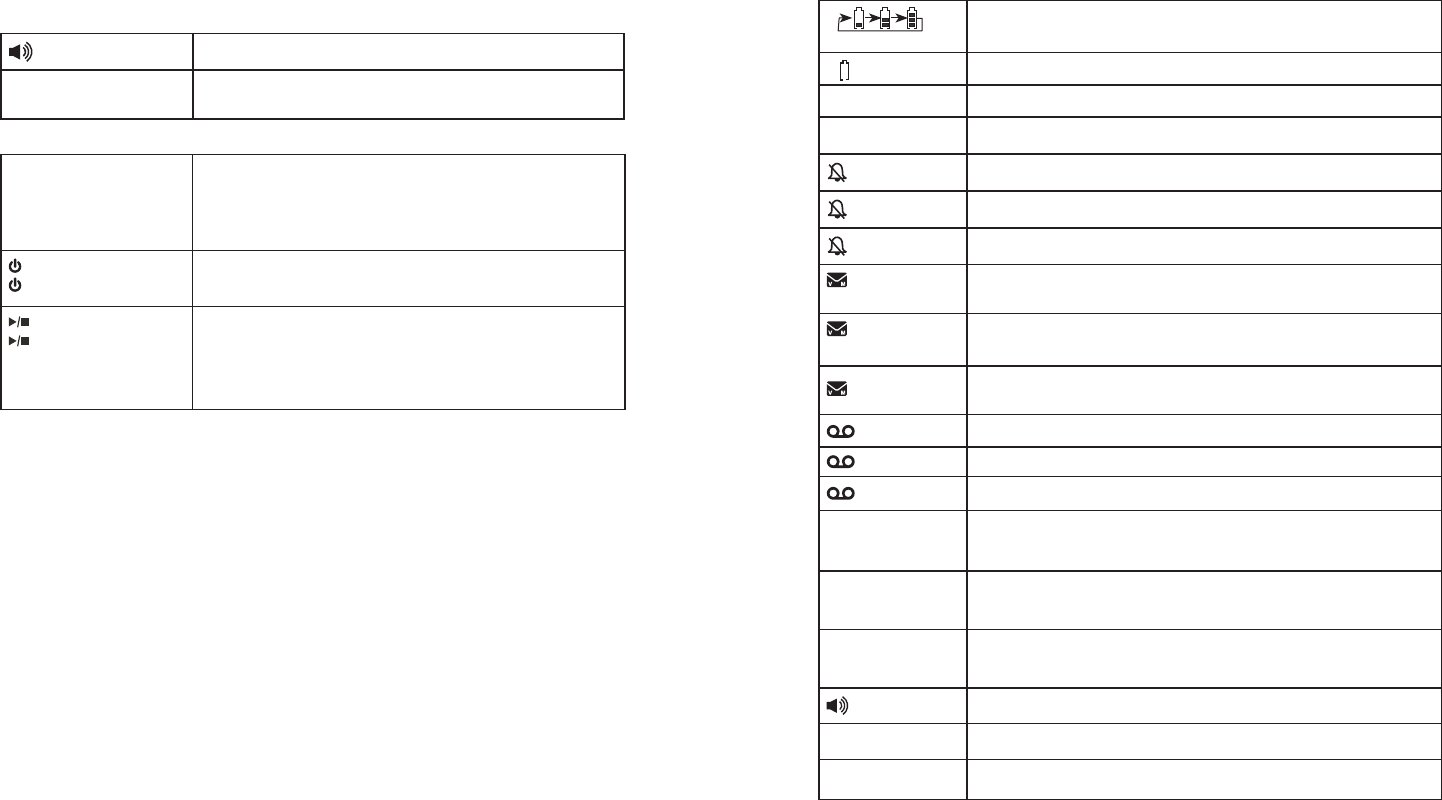
59
Appendix
Handset and telephone base indicator lights
Handset lights
On when the handset speakerphone is in use.
CHARGE On when the handset is charging in the telephone
base.
Telephone base lights
LINE 1, LINE 2 On when the line is in use.
Flashes fast when there is an incoming call or
another handset sharing the same line is in use.
Flashes slow when a call is on hold.
/ ON/OFF LINE 1,
/ ON/OFF LINE 2
On when the answering system is turned on.
Off when the answering system is turned off.
/MAILBOX LINE 1,
/MAILBOX LINE 2
Flashes when there are new messgaes in the
mailbox.
On when there are old messages in the mailbox.
Off when there is no message in the mailbox.
60
Appendix
Handset battery is charging (animated displayed).
Becomes solid when the battery is fully charged.
Flashes when the battery is low and needs charging.
Line 1 is in use.
Line 2 is in use.
1Handset ringer of line 1 is turned off.
2Handset ringer of line 1 is turned off.
Handset ringers of line 1 and line 2 are turned off.
1New voicemail received on line 1 from the telephone
service provider.
2New voicemail received on line 2 from the telephone
service provider.
1
2New voicemail received on line 1 and line 2 from the
telephone service provider.
1New answering system message(s) on line 1.
2New answering system message(s) on line 1.
New answering system messages on line 1 and line 2.
ANS1
ON
Answering system of line 1 is turned on.
ANS
ON 2
Answering system of line 2 is turned on.
ANS
ON
Answering systems of line 1 and line 2 are turned on.
Speakerphone is in use.
NEW New missed call(s) in call log.
MUTE Microphone is muted.
Handset screen icons
1
2
1
2
1
2
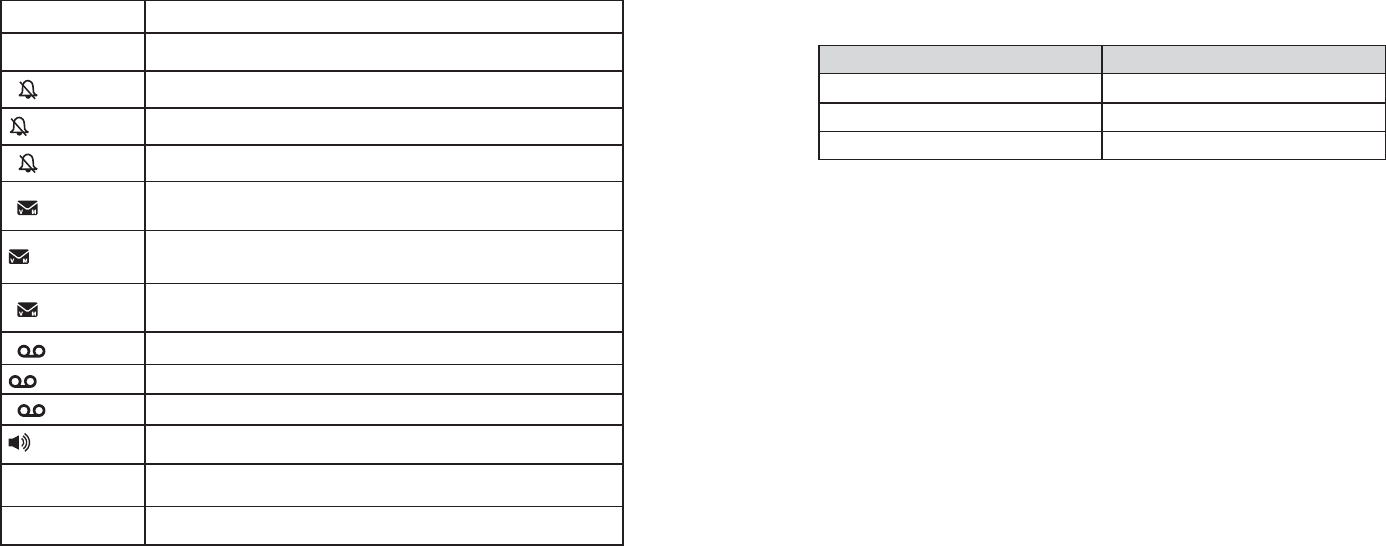
61
Appendix
Telephone base screen icons
Line 1 is in use.
Line 1 is in use.
1Handset ringer of line 1 is turned off.
2Handset ringer of line 1 is turned off.
1 2 Handset ringers of line 1 and line 2 are turned off.
1New voicemail received on line 1 from the telephone
service provider.
2New voicemail received on line 2 from the telephone
service provider.
1 2 New voicemail received on line 1 and line 2 from the
telephone service provider.
1New answering system message(s) on line 1.
2New answering system message(s) on line 1.
1 2 New answering system messages on line 1 and line 2.
Speakerphone is in use.
NEW New missed call(s) in call log.
MUTE Microphone is muted.
62
Appendix
Battery
It takes up to 16 hours for the battery to be fully charged. When it is fully charged, you can
expect the following performance:
Operation Operating time
While in handset use (talking*) Up to 10 hours
While in speakerphone mode (talking*) Up to seven hours
While not in use (standby**) Up to 10 days
*Operating times vary depending on your actual use and the age of the battery.
**Handset is not charging or in use.
The battery needs charging when:
A new battery is installed in the handset.
The handset beeps every minute while on a call.
The handset beeps and Low battery displays on the handset.
Place in charger displays on the handset.
A battery is properly installed and the screen is blank.
CAUTION:
6QTGFWEGVJGTKUMQHſTGQTKPLWT[TGCFCPFHQNNQYVJGUGKPUVTWEVKQPU
Use only the battery(ies) provided or equivalent. To order a replacement, visit our website at
www.vtechphones.com or call 1 (800) 595-9511.
&QPQVFKURQUGQHVJGDCVVGT[KGUKPCſTG%JGEMYKVJNQECNYCUVGOCPCIGOGPVEQFGUHQT
special disposal instructions.
Do not open or mutilate the battery(ies). Released electrolyte is corrosive and may cause burns
or injury to the eyes or skin. The electrolyte may be toxic if swallowed.
Exercise care in handling batteries in order not to create a short circuit with conductive materials.
%JCTIGVJGDCVVGT[KGURTQXKFGFYKVJQTKFGPVKſGFHQTWUGYKVJVJKURTQFWEVQPN[KPCEEQTFCPEG
YKVJVJGKPUVTWEVKQPUCPFNKOKVCVKQPUURGEKſGFKPVJKUOCPWCN
Observe proper polarity orientation between the battery and metallic contacts.
6QRTGXGPVſTGQTUJQEMJC\CTFFQPQVGZRQUGVJKURTQFWEVVQYCVGTQTCP[V[RGQHOQKUVWTG
•
•
•
•
•
•
•
•
•
•
•
•
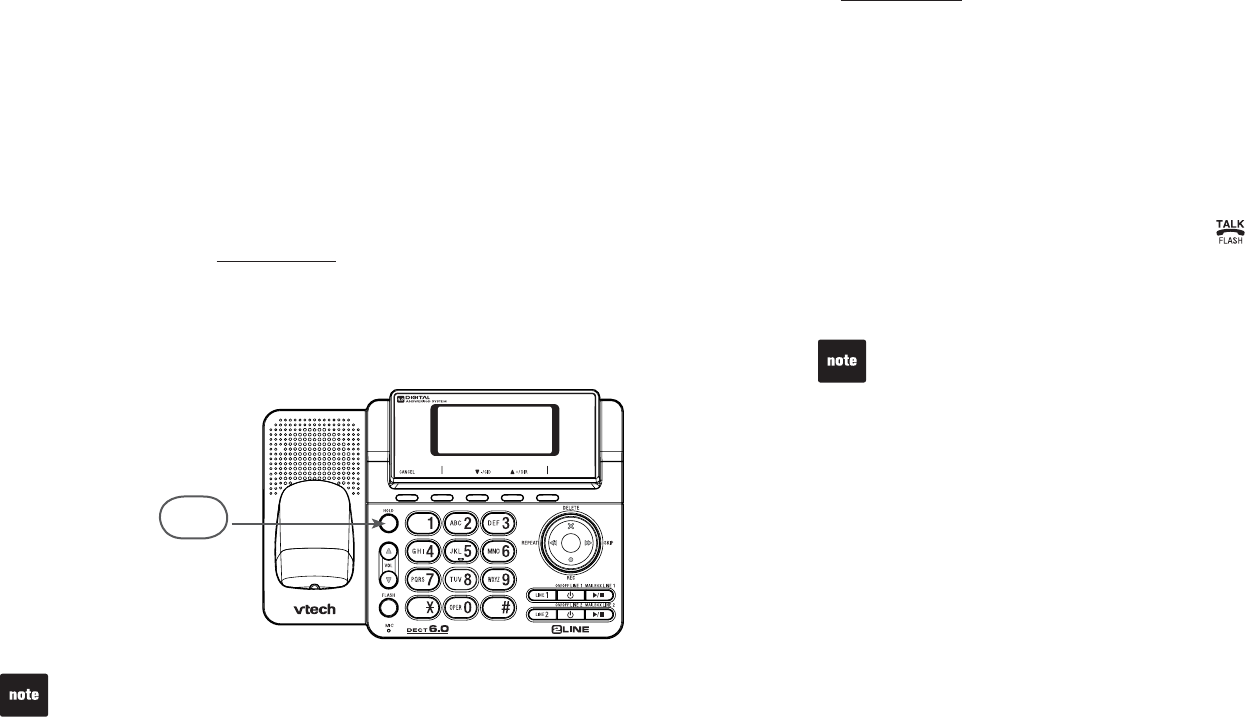
63
Appendix
Expand your telephone system
The handsets provided with your telephone system are pre-registered. Each
handset is assigned a number that shows on the handset display. Additional
handsets registered to the telephone system are assigned in sequential
order. For instance, if the telephone system already has HANDSET 1, the
new registered handset is assigned HANDSET 2. This telephone system
accommodates up to 12 handsets.
Add and register a handset (optional)
You can add new handsets (DS6101, purchased separately) to your
telephone system, but each handset must be registered with the telephone
DCUGDGHQTGWUG9JGPſTUVRWTEJCUGFGCEJGZRCPUKQPJCPFUGVUJQYU
NOT REGISTERED. You may need to charge the handset before
registering to the telephone base. For more details on battery charging, see
the table on page 3.
To register a handset:
Place the unregistered handset in the telephone base. If Press [HS LOC]
on BASE for 4 sec. does not appear on the handset screen after a few
seconds, remove the handset and place it in the telephone base again.
On the telephone base, press and hold HOLD for about four seconds until
the telephone base displays REGISTERING HANDSET. The handset
shows HANDSET REGISTERING... and it takes up to 60 seconds to
complete the registration. The handset shows HANDSET X REGISTERED
(X represents the handset number assigned) and you hear a beep when
the registration completes.
1.
2.
If the registration fails, the handset shows NOT REGISTERED. To reset the
handset, remove the handset from the telephone base and place it back in.
Try the registration process again.
You cannot register a handset if any other system handset is in use.
•
•
HOLD
64
Appendix
Replace a handset
If you want to replace a handset or re-assign the designated handset number
of a registered handset, you must de-register all the handsets and then
individually register each handset.
To make de-registration easier, read all of the instructions on this page before
you begin. To de-register all handsets:
Press and hold FIND HANDSET on the telephone base for about 10
seconds (until the IN USE light on the telephone base turns on and starts
VQƀCUJVJGPTGNGCUGFIND HANDSET.
Press and release FIND HANDSET again. You must press
FIND HANDSET while the IN USENKIJVKUUVKNNƀCUJKPI6JGIN USE light
ƀCUJGUHQTCRRTQZKOCVGN[UGXGPUGEQPFU
All system handsets show CONNECTING... The de-registration process
takes about 10 seconds to complete. All handsets show
NOT REGISTERED when the de-registration completes.
If de-registration fails, you might need to reset the telephone and try again.
To reset:
Pick up the registered handset and then press .
Press OFF/CLEAR and place the handset back in the telephone base.
-OR-
Unplug the power from the telephone base, then plug it back in.
1.
2.
3.
1.
2.
1.
You cannot de-register a handset if any system handset is in use.
65
Appendix
Troubleshooting
+H[QWJCXGFKHſEWNV[YKVJ[QWTVGNGRJQPGRNGCUGVT[VJGUWIIGUVKQPUDGNQY
For Customer Service, visit our website at www.vtechphones.com, or call
1 (800) 595-9511; in Canada, call 1 (800) 267-7377.
My telephone does not work at all.
Make sure the battery is installed and charged correctly (page 3). For optimum daily
performance, return the handset to the telephone base or charger after use.
Make sure the power adapter is securely plugged into an outlet not controlled by a
wall switch.
/CMGUWTGVJGVGNGRJQPGNKPGEQTFKURNWIIGFſTON[KPVQVJGVGNGRJQPGDCUGCPFVJG
telephone wall jack.
Unplug the electrical power to the telephone base. Wait for approximately 15
seconds, then plug it back in. Allow up to one minute for the cordless handset and
telephone base to synchronize.
Charge the battery in the handset for up to 16 hours.
If the battery is completely depleted, it can take up to 10 minutes to charge the
handset before LOW BATTERY appears on the screen (page 3).
Remove and re-insert the battery. If that still does not work, it might be necessary to
purchase a new battery.
Disconnect the telephone base from the telephone wall jack and plug in a working
telephone. If the other telephone does not work, the problem is probably in the
wiring or the local service. Call the telephone service provider.
LOW BATTERY shows on screen.
Place the handset in the telephone base or charger for recharging.
Remove and re-install the battery and use it until fully depleted, then recharge the
handset in the telephone base or charger for up to 16 hours.
If the above measures do not correct the problem, replace the battery.
The battery does not charge in the handset or the handset battery does
not accept charge.
Make sure the handset is placed in the telephone base or charger correctly. The
CHARGE light on the handset should be on.
Remove and reinstall the battery, then charge for up to 16 hours.
If the handset is in the telephone base or charger but the CHARGE light on the
handset is not on, refer to The CHARGE light is off in this section.
If the battery is completely depleted, it can take up to 10 minutes to charge the
handset before LOW BATTERY appears on the screen (page 3).
Purchase a new battery. Refer to the Battery section (page 62).
•
•
•
•
•
•
•
•
•
•
•
•
•
•
•
•
66
Appendix
Troubleshooting
The CHARGE light is off.
Clean the charging contacts on the handset and telephone base each month with a
pencil eraser or a dry non-abrasive fabric.
Make sure the power adapter and telephone line cord are plugged in correctly and
securely.
Unplug the power adapter. Wait for 15 seconds before plugging it back in. Allow up
to one minute for the handset and telephone base to reset.
There is no dial tone.
First, try all the above suggestions.
Move the handset closer to the telephone base. It might be out of range.
The telephone line cord might be malfunctioning. Install a new telephone line cord.
Disconnect the telephone base from the telephone wall jack and connect a different
telephone. If there is no dial tone on this telephone either, the problem is in your
wiring or local service. Contact your telephone service provider.
The telephone does not ring when there is an incoming call.
Make sure the handset ringer volume is not set to the lowest level (page 20) and the
telephone base ringer volume is not set to zero (page 53).
Make sure the telephone line cord and power adapter are plugged in properly
(page 2).
The handset might be too far from the telephone base. Move it closer to the
telephone base.
There might be too many extension phones on the telephone line to allow all of them
to ring simultaneously. Unplug some of them.
If the other telephones in your home are having the same problem, the problem is
in the wiring or local service. Contact the telephone service provider (charges may
apply).
Other electronic products can cause interference to your cordless telephone. Install
your telephone as far away as possible from electronic devices such as: wireless
routers, radios, cellular telephones, digital telephones, intercoms, room monitors,
televisions, VCRs, personal computers, kitchen appliances, and other cordless
telephones.
Test a working telephone at the telephone wall jack. If another telephone has the
same problem, the problem is in the telephone wall jack. Contact your telephone
service provider (charges may apply).
The telephone line cord might be malfunctioning. Install a new telephone line cord.
Re-install the battery and place the handset in the telephone base or charger.
Wait for the handset to synchronize with the telephone base. Allow up to one minute
for this to take place.
•
•
•
•
•
•
•
•
•
•
•
•
•
•
•
•
•
67
Appendix
Troubleshooting
I cannot dial out.
First, try all the above suggestions.
Make sure there is a dial tone before dialing. It is normal if the handset takes a
second or two to synchronize with the telephone before producing a dial tone. Wait
an extra second before dialing.
If the other telephones in your home are having the same problem, the problem is
in the wiring or local service. Contact your telephone service provider (charges may
apply).
Eliminate any background noise. Mute the cordless handset before dialing, or dial
from another room in your home with less background noise.
My handset beeps and is not performing normally.
Make sure the power cord is securely plugged into the telephone base. Plug the
telephone base into a different working electrical outlet not controlled by a wall switch.
Move the handset closer to the telephone base. It might be out of range.
Reset the telephone base by unplugging the electrical power to the base. Wait for 15
seconds and plug it back in again. Allow up to one minute for the cordless handset
and the telephone base to synchronize.
Other electronic products can cause interference to your cordless telephone. Install
your telephone as far away from these electronic devices as possible: wireless
routers, radios, radio towers, pager towers, cellular telephones, intercoms, room
monitors, televisions, personal computers, kitchen appliances and other cordless
telephones.
There is interference during a telephone conversation.
My calls fade out when I am using the cordless handset.
The handset might be out of range. Move it closer to the telephone base.
If you subscribe to high-speed Internet service (digital subscriber line - DSL) through
[QWTVGNGRJQPGNKPGU[QWOWUVKPUVCNNC&5.ſNVGTDGVYGGPVJGVGNGRJQPGDCUGCPF
VJGVGNGRJQPGYCNNLCEM6JGſNVGTRTGXGPVUPQKUGCPFECNNGT+&RTQDNGOUECWUGFD[
DSL interference. Contact your DSL service provider for more information about
&5.ſNVGTU
Appliances or other cordless telephones plugged into the same circuit as the
telephone base can cause interference. Try moving the appliance or telephone base
to another outlet.
Other electronic products can cause interference to your cordless telephone. Install
your telephone as far away as possible from the following electronic devices: wireless
routers, radios, radio towers, pager towers, cellular telephones, digital telephones,
intercoms, room monitors, televisions, VCRs, personal computers, kitchen appliances,
and other cordless telephones.
If your telephone is plugged in with a modem or a surge protector, plug the telephone
(or modem/surge protector) into a different location. If this doesn’t solve the problem,
re-locate your telephone or modem farther apart from each other, or use a different
•
•
•
•
•
•
•
•
•
•
•
•
•
68
Appendix
Troubleshooting
surge protector.
The location of your telephone base can impact the performance of your cordless
phone. For better reception, install the telephone base in a centralized location within
[QWTJQOGQTQHſEGCYC[HTQOYCNNUQTQVJGTQDUVTWEVKQPU+POCP[GPXKTQPOGPVU
elevating the telephone base improves overall performance.
Disconnect the telephone base from the telephone wall jack and plug in a corded
telephone. If calls are still not clear, the problem is probably in the wiring or local
service. Contact your local service company (charges may apply).
If the other telephones in your home are having the same problem, the problem is
in the wiring or local service. Contact the telephone service provider (charges may
apply).
I hear other calls when using the telephone.
Disconnect the telephone base from the telephone wall jack. Plug in a different
telephone. If you still hear other calls, the problem is probably in the wiring or local
service. Call your telephone service provider.
I hear noise on the cordless handset and the keys do not work.
Make sure the telephone line cord is plugged in securely.
My caller ID features are not working properly.
Caller ID is a subscription service. You must subscribe to this service from your
telephone service provider for this feature to work on your telephone.
The caller might not be calling from an area which supports caller ID.
Both you and the caller’s telephone service providers must use equipment
compatible with the caller ID service.
6JGECNNGT+&KPHQTOCVKQPUJQYUCHVGTVJGſTUVQTUGEQPFTKPI
If you subscribe to high-speed Internet service (digital subscriber line - DSL) through
[QWTVGNGRJQPGNKPGU[QWOWUVKPUVCNNC&5.ſNVGTDGVYGGPVJGVGNGRJQPGDCUGCPF
VJGVGNGRJQPGYCNNLCEM6JGſNVGTRTGXGPVUPQKUGCPFECNNGT+&RTQDNGOUECWUGFD[
DSL interference. Contact your DSL service provider for more information about
&5.ſNVGTU
The telephone does not receive caller ID or the telephone does not
show caller ID during call waiting.
Make sure you subscribe to caller ID with call waiting features provided by the
telephone service providers.
The caller might not be calling from an area which supports caller ID.
Both you and the caller’s telephone service providers must use equipment
compatible with caller ID service.
If you subscribe to high-speed Internet service (digital subscriber line - DSL) through
[QWTVGNGRJQPGNKPGU[QWOWUVKPUVCNNC&5.ſNVGTDGVYGGPVJGVGNGRJQPGDCUGCPF
VJGVGNGRJQPGYCNNLCEM6JGſNVGTRTGXGPVUPQKUGCPFECNNGT+&RTQDNGOUECWUGFD[
DSL interference. Contact your DSL service provider for more information about
&5.ſNVGTU
•
•
•
•
•
•
•
•
•
•
•
•
•
•

69
Appendix
Troubleshooting
Caller ID entries do not match the numbers I need to dial.
Caller ID service delivers 10 digits (the area code plus the seven-digits number). If
you need to dial something other 10 digits, see page 48 for instructions on changing
the number.
If you dial seven digits for local calls you might want to use the Home area code
feature (page 22).
CONNECTING... shows in the handset screen.
The handset might be out of range. Move it closer to the telephone base.
Make sure the power cord is securely plugged into the telephone base. Use a
working electrical outlet not controlled by a wall switch.
Reset your telephone by unplugging the power adapter from the telephone base.
Disconnect the battery from the cordless handset. Wait for 15 seconds, then plug
in the power adapter and re-install the battery. Place the handset in the telephone
base and allow up to one minute for the handset and telephone base to synchronize.
Other electronic products might prevent your handset and telephone base from
communicating with each other. Install your telephone base as far away from
these electronic devices as possible: wireless routers, radios, cellular telephones,
intercoms, room monitors, televisions, personal computers, kitchen appliances and
other cordless telephones.
The answering system does not answer after the number of rings that I
programmed it.
Make sure the answering system is on. When the answering system is on, the
ANS ON/OFF light on the telephone base should be lit and ANS ON should show
on the handset.
If toll saver is selected, the number of rings changes to two when there are new
messages waiting (page 21).
If the memory is full or if the answering system is off, the answering system answers
after 10 rings.
In some cases, the answering system is affected by the ringing system used by the
telephone service provider.
The outgoing announcement is not clear.
When recording the announcement, make sure you speak in a normal tone of voice
towards the microphone of the handset.
Make sure there is no background noise when recording.
•
•
•
•
•
•
•
•
•
•
•
•
70
Appendix
Troubleshooting
6JGOGUUCIGUQPVJGCPUYGTKPIU[UVGOCTGXGT[FKHſEWNVVQJGCT
Press VOL on the telephone base or handset to increase the speaker volume.on the telephone base or handset to increase the speaker volume.
The answering system does not record messages.
Make sure the answering system is on.
When the answering machine memory is full, it does not record new messages until
some old messages are deleted.
The messages on the answering system are incomplete.
If a caller leaves a very long message, part of it might be lost when the answering
system disconnects the call after four minutes.
If the memory on the answering system becomes full during a message, the
answering system stops recording and disconnects the call.
If the caller’s voice is very soft, the answering system might stop recording and
disconnect the call.
The answering system does not respond to remote commands.
Make sure your remote code is correct (page 11).
Make sure you are calling from a touch-tone telephone. When dialing a number,
there should be tones. If there are clicks, then it is not a touch-tone telephone and
cannot activate the answering system.
The answering system might not detect the remote access code when your
announcement is playing. Wait until the announcement is over before entering
the code.
There might be interference on the telephone line you are using. Press the dial pad
MG[UſTON[YJGPFKCNKPI
Common cures for electronic equipment.
If the telephone is not responding normally, put the cordless handset in the
telephone base. If it does not respond, try the following (in the order listed):
Disconnect the power to the telephone base.
Disconnect the battery on the cordless handset.
Wait a few minutes before connecting power to the telephone base.
Re-install the battery and place the cordless handset in the telephone base
or charger.
Wait for the cordless handset to synchronize with the telephone base. Allow up to
one minute for this to take place.
•
•
•
•
•
•
•
•
•
•
•
•
•
•
•
•
71
Appendix
Important safety information
Precautions for users of implanted cardiac pacemakers
Cardiac pacemakers (applies only to digital cordless telephones):
Wireless Technology Research, LLC (WTR), an independent research
entity, led a multidisciplinary evaluation of the interference between protable
wireless telephones and implanted cardiac pacemakers. Supported by the
U.S. Food and Drug Administration, WTR recommends to physicians that:
Pacemaker patients
Should keep wireless telephones at least six inches from the pacemaker.
Should NOT place wireless telephones directly over the pacemaker, such
as in a breast pocket, when it is turned ON.
Should use the wireless telephone at the ear opposite the pacemaker.
WTR evaluation did not identify any risk to bystanders with pacemakers from
other persons using wireless telephones.
Especially about telephone answering systems
Two-way recording: This unit does not sound warning beeps to inform
the other party that the call is being recorded. To ensure that you are in
compliance with any federal or state regulations regarding recording a
telephone call, you should start the recording process and then inform the
other party that you are recording the conversation.
SAVE THESE INSTRUCTIONS
•
•
•
72
Appendix
Important safety instructions
When using your telephone equipment, basic safety precautions should always be followed to
TGFWEGVJGTKUMQHſTGGNGEVTKEUJQEMCPFKPLWT[KPENWFKPIVJGHQNNQYKPI
Read and understand all instructions.
Follow all warnings and instructions marked on the product.
Unplug this product from the wall outlet before cleaning. Do not use liquid or aerosol cleaners.
Use a damp cloth for cleaning.
Do not use this product near water.
Do not place this product on an unstable table, shelf, stand or other unstable surfaces.
Slots and openings in the back or bottom of the telephone base and handset are provided for
ventilation. To protect them from overheating, these openings must not be blocked by placing
the product on a soft surface such as a bed, sofa or rug. This product should never be placed
near or over a radiator or heat register. This product should not be placed in any area where
proper ventilation is not provided.
This product should be operated only from the type of power source indicated on the marking
label. If you are not sure of the type of power supply in your home, consult your dealer or local
power company.
Do not allow anything to rest on the power cord. Do not install this product where the cord may
be walked on.
Never push objects of any kind into this product through the slots in the telephone base or
handset because they may touch dangerous voltage points or create a short circuit. Never spill
liquid of any kind on the product.
To reduce the risk of electric shock, do not disassemble this product, but take it to an
authorized service facility. Opening or removing parts of the telephone base or handset other
VJCPURGEKſGFCEEGUUFQQTUOC[GZRQUG[QWVQFCPIGTQWUXQNVCIGUQTQVJGTTKUMU+PEQTTGEV
reassembling can cause electric shock when the product is subsequently used.
Do not overload wall outlets and extension cords.
Unplug this product from the wall outlet and refer servicing to an authorized service facility
under the following conditions:
When the power supply cord or plug is damaged or frayed.
If liquid has been spilled onto the product.
If the product has been exposed to rain or water.
If the product does not operate normally by following the operating instructions. Adjust only
those controls that are covered by the operation instructions. Improper adjustment of other
controls may result in damage and often requires extensive work by an authorized technician
to restore the product to normal operation.
If the product has been dropped and the telephone base and/or handset has been damaged.
If the product exhibits a distinct change in performance.
Avoid using a telephone (other than cordless) during an electrical storm. There is a remote risk
of electric shock from lightning.
Do not use the telephone to report a gas leak in the vicinity of the leak.
Only put the handset of your telephone next to your ear when it is in normal talk mode.
6JGRQYGTCFCRVGTUCTGKPVGPFGFVQDGEQTTGEVN[QTKGPVGFKPCXGTVKECNQTƀQQTOQWPVRQUKVKQP
The prongs are not designed to hold the plug in place if it is plugged into a ceiling or an under-
the-table/cabinet outlet.
SAVE THESE INSTRUCTIONS
1.
2.
3.
4.
5.
6.
7.
8.
9.
10.
11.
12.
A.
B.
C.
D.
E.
F.
13.
14.
15.
16.

73
Appendix
Operating range
This cordless telephone operates with the maximum power allowed by the Federal Communications
Commission (FCC). Even so, this handset and telephone base can communicate over only a certain
distance - which can vary with the locations of the telephone base and handset, the weather, and the
NC[QWVQH[QWTJQOGQTQHſEG
When the handset is out of range, the handset displays CONNECTING...
If there is a call while the handset is out of range, it might not ring, or if it does ring, the call might not
connect well when you press . Move closer to the telephone base, then press to answer
the call.
If the handset moves out of range during a telephone conversation, there might be interference.
To improve reception, move closer to the telephone base.
Maintenance
Taking care of your telephone
Your cordless telephone contains sophisticated electronic parts, so it must be treated with care.
Avoid rough treatment
Place the handset down gently. Save the original packing materials to protect your telephone if
you ever need to ship it.
Avoid water
Your telephone can be damaged if it gets wet. Do not use the handset outdoors in the rain, or
handle it with wet hands. Do not install the telephone base near a sink, bathtub or shower.
Electrical storms
Electrical storms can sometimes cause power surges harmful to electronic equipment. For your
own safety, take caution when using electrical appliances during storms.
Cleaning your telephone
Your telephone has a durable plastic casing that should retain its luster for many years. Clean
it only with a soft cloth slightly dampened with water or a mild soap. Do not use excess water or
cleaning solvents of any kind.
Remember that electrical appliances can cause serious injury if used when you are wet or standing
in the water. If the telephone base should fall into the water, DO NOT RETRIEVE IT UNTIL YOU
UNPLUG THE POWER CORD AND TELEPHONE LINE CORD FROM THE WALL. Then remove
the telephone by the unplugged cords.
74
Appendix
About cordless telephones
Privacy: The same features that make a cordless telephone convenient create some
limitations. Telephone calls are transmitted between the telephone base and the cordless
handset by radio waves, so there is a possibility that the cordless telephone conversations
could be intercepted by radio receiving equipment within range of the cordless handset. For this
reason, you should not think of cordless telephone conversations as being as private as those
on corded telephones.
Electrical power: The telephone base of this cordless telephone must be connected to a
working electrical outlet. The electrical outlet should not be controlled by a wall switch. Calls
cannot be made from the cordless handset if the telephone base is unplugged or switched off,
or if the electrical power is interrupted.
Potential TV interference: Some cordless telephones operate at frequencies that may cause
interference to televisions and VCRs. To minimize or prevent such interference, do not place
the telephone base of the cordless telephone near or on top of a TV or VCR. If interference is
experienced, moving the cordless telephone farther away from the TV or VCR often reduces or
eliminates the interference.
Rechargeable batteries: Exercise care in handling batteries in order not to create a short
circuit with conducting material such as rings, bracelets, and keys. The battery or conductor
may overheat and cause harm. Observe proper polarity between the battery and the battery
charger.
Nickel-metal hydride rechargeable batteries: Dispose of these batteries in a safe manner.
Do not burn or puncture the battery. Like other batteries of this type, if burned or punctured,
they could release caustic material which could cause injury.
•
•
•
•
•
The RBRC® seal
The RBRC® seal on the nickel-metal hydride battery indicates that VTech Communications, Inc. is
voluntarily participating in an industry program to collect and recycle these batteries at the end of
their useful lives, when taken out of service within the United States and Canada.
The RBRC® program provides a convenient alternative to placing used nickel-metal hydride
batteries into the trash or municipal waste, which may be illegal in your area.
VTech’s participation in RBRC®makes it easy for you to drop off the spent battery at local retailers
participating in the RBRC® program or at authorized VTech product service centers. Please call
1-800-8-BATTERYTM for information on Ni-MH battery recycling and disposal bans/restrictions
in your area. VTech’s involvement in this program is part of its commitment to protecting our
environment and conserving natural resources.
RBRC® is a registered trademark of Rechargeable Battery Recycling Corporation.
75
Appendix
Warranty
What does this limited warranty cover?
The manufacturer of this VTech Product warrants to the holder of a valid proof of purchase
(“Consumer” or “you”) that the Product and all accessories provided in the sales package
(“Product”) are free from defects in material and workmanship, pursuant to the following terms
and conditions, when installed and used normally and in accordance with the Product operating
instructions. This limited warranty extends only to the Consumer for Products purchased and used
in the United States of America and Canada.
What will VTech do if the Product is not free from defects in materials and workmanship
during the limited warranty period (“Materially Defective Product”)?
During the limited warranty period, VTech’s authorized service representative will repair or replace
at VTech’s option, without charge, a Materially Defective Product. If we repair the Product, we may
use new or refurbished replacement parts. If we choose to replace the Product, we may replace
it with a new or refurbished Product of the same or similar design. We will retain defective parts,
modules, or equipment. Repair or replacement of the Product, at VTech’s option, is your exclusive
remedy. VTech will return the repaired or replacement Products to you in working condition. You
should expect the repair or replacement to take approximately 30 days.
How long is the limited warranty period?
The limited warranty period for the Product extends for ONE (1) YEAR from the date of purchase.
If VTech repairs or replaces a Materially Defective Product under the terms of this limited warranty,
this limited warranty also applies to the repaired or replacement Product for a period of either (a) 90
days from the date the repaired or replacement Product is shipped to you or (b) the time remaining
on the original one-year warranty; whichever is longer.
What is not covered by this limited warranty?
This limited warranty does not cover:
1. Product that has been subjected to misuse, accident, shipping or other physical damage,
KORTQRGTKPUVCNNCVKQPCDPQTOCNQRGTCVKQPQTJCPFNKPIPGINGEVKPWPFCVKQPſTGYCVGTQTQVJGT
liquid intrusion; or
2TQFWEVVJCVJCUDGGPFCOCIGFFWGVQTGRCKTCNVGTCVKQPQTOQFKſECVKQPD[CP[QPGQVJGTVJCP
an authorized service representative of VTech; or
3. Product to the extent that the problem experienced is caused by signal conditions, network
reliability, or cable or antenna systems; or
4. Product to the extent that the problem is caused by use with non-VTech accessories; or
5. Product whose warranty/quality stickers, product serial number plates or electronic serial
numbers have been removed, altered or rendered illegible; or
6. Product purchased, used, serviced, or shipped for repair from outside the United States of
America or Canada, or used for commercial or institutional purposes (including but not limited
to Products used for rental purposes); or
7. Product returned without a valid proof of purchase (see item 2 below); or
8. Charges for installation or set up, adjustment of customer controls, and installation or repair of
systems outside the unit.
76
Appendix
How do you get warranty service?
To obtain warranty service in the United States of America, please call 1 (800) 595-9511. In
Canada, please call 1 (800) 267-7377. NOTE: Before calling for service, please review the user’s
manual - a check of the Product’s controls and features may save you a service call.
Except as provided by applicable law, you assume the risk of loss or damage during transit and
transportation and are responsible for delivery or handling charges incurred in the transport of
the Product(s) to the service location. VTech will return repaired or replaced Product under this
limited warranty. Transportation, delivery or handling charges are prepaid. VTech assumes no
risk for damage or loss of the Product in transit. If the Product failure is not covered by this limited
warranty, or proof of purchase does not meet the terms of this limited warranty, VTech will notify
you and will request that you authorize the cost of repair prior to any further repair activity. You
must pay for the cost of repair and return shipping costs for the repair of Products that are not
covered by this limited warranty.
What must you return with the Product to get warranty service?
Return the entire original package and contents including the Product to the VTech service
NQECVKQPCNQPIYKVJCFGUETKRVKQPQHVJGOCNHWPEVKQPQTFKHſEWNV[CPF
Include a “valid proof of purchase” (sales receipt) identifying the Product purchased (Product
model) and the date of purchase or receipt; and
3. Provide your name, complete and correct mailing address, and telephone number.
Other Limitations
This warranty is the complete and exclusive agreement between you and VTech. It supersedes all
other written or oral communications related to this Product. VTech provides no other warranties
for this Product. The warranty exclusively describes all of VTech’s responsibilities regarding the
2TQFWEV6JGTGCTGPQQVJGTGZRTGUUYCTTCPVKGU0QQPGKUCWVJQTK\GFVQOCMGOQFKſECVKQPUVQVJKU
NKOKVGFYCTTCPV[CPF[QWUJQWNFPQVTGN[QPCP[UWEJOQFKſECVKQP
5VCVG2TQXKPEKCN.CY4KIJVU6JKUYCTTCPV[IKXGU[QWURGEKſENGICNTKIJVUCPF[QWOC[CNUQJCXG
other rights, which vary from state to state or province to province.
.KOKVCVKQPU+ORNKGFYCTTCPVKGUKPENWFKPIVJQUGQHſVPGUUHQTCRCTVKEWNCTRWTRQUGCPF
OGTEJCPVCDKNKV[CPWPYTKVVGPYCTTCPV[VJCVVJG2TQFWEVKUſVHQTQTFKPCT[WUGCTGNKOKVGFVQQPG
year from the date of purchase. Some states/provinces do not allow limitations on how long an
implied warranty lasts, so the above limitation may not apply to you. In no event shall VTech be
liable for any indirect, special, incidental, consequential, or similar damages (including, but not
NKOKVGFVQNQUVRTQſVUQTTGXGPWGKPCDKNKV[VQWUGVJG2TQFWEVQTQVJGTCUUQEKCVGFGSWKROGPVVJG
cost of substitute equipment, and claims by third parties) resulting from the use of this Product.
Some states/provinces do not allow the exclusion or limitation of incidental or consequential
damages, so the above limitation or exclusion may not apply to you.
Please retain your original sales receipt as proof of purchase.
1.
2.
77
Appendix
FCC, ACTA and IC regulations
FCC Part 15
This equipment has been tested and found to comply with the requirements for a Class B digital
device under Part 15 of the Federal Communications Commission (FCC) rules. These requirements
are intended to provide reasonable protection against harmful interference in a residential
installation. This equipment generates, uses and can radiate radio frequency energy and, if not
installed and used in accordance with the instructions, may cause harmful interference to radio
communications. However, there is no guarantee that interference will not occur in a particular
installation. If this equipment does cause harmful interference to radio or television reception, which
can be determined by turning the equipment off and on, the user is encouraged to try to correct the
interference by one or more of the following measures:
Reorient or relocate the receiving antenna.
Increase the separation between the equipment and receiver.
Connect the equipment into an outlet on a circuit different from that to which the receiver is
connected.
Consult the dealer or an experienced radio/TV technician for help.
%JCPIGUQTOQFKſECVKQPUVQVJKUGSWKROGPVPQVGZRTGUUN[CRRTQXGFD[VJGRCTV[TGURQPUKDNGHQT
compliance could void the user’s authority to operate the equipment.
This device complies with Part 15 of the FCC rules. Operation is subject to the following two
conditions: (1) this device may not cause harmful interference, and (2) this device must accept any
interference received, including interference that may cause undesired operation. Privacy of com-
munications may not be ensured when using this telephone.
To ensure safety of users, the FCC has established criteria for the amount of radio frequency energy
that can be safely absorbed by a user or bystander according to the intended usage of the product.
This product has been tested and found to comply with the FCC criteria. The handset may be safely
held against the ear of the user. The telephone base shall be installed and used such that parts of
the user’s body other than the hands are maintained at a distance of approximately 20 cm (8 inches)
or more.
This Class B digital apparatus complies with Canadian ICES-003.
FCC Part 68 and ACTA
This equipment complies with Part 68 of the FCC rules and with technical requirements adopted by
the Administrative Council for Terminal Attachments (ACTA). The label on the back or bottom of this
GSWKROGPVEQPVCKPUCOQPIQVJGTVJKPIUCRTQFWEVKFGPVKſGTKPVJGHQTOCV75###'36::::
6JKUKFGPVKſGTOWUVDGRTQXKFGFVQ[QWTVGNGRJQPGUGTXKEGRTQXKFGTWRQPTGSWGUV
The plug and jack used to connect this equipment to premises wiring and the telephone network
must comply with applicable Part 68 rules and technical requirements adopted by ACTA. A compliant
telephone cord and modular plug is provided with this product. It is designed to be connected to a
compatible modular jack that is also compliant. An RJ11 jack should normally be used for connecting
to a single line and an RJ14 jack for two lines. See Installation Instructions in the user’s manual.
The Ringer Equivalence Number (REN) is used to determine how many devices you may connect
to your telephone line and still have them ring when you are called. The REN for this product is
GPEQFGFCUVJGVJCPFVJEJCTCEVGTUHQNNQYKPIVJG75KPVJGRTQFWEVKFGPVKſGTGIKHKU
VJG4'0KU+POQUVDWVPQVCNNCTGCUVJGUWOQHCNN4'0UUJQWNFDGſXGQTNGUU(QTOQTG
information, please contact your telephone service provider.
This equipment may not be used with Party Lines. If you have specially wired alarm dialing
equipment connected to your telephone line, ensure the connection of this equipment does not
disable your alarm equipment. If you have questions about what will disable alarm equipment,
EQPUWNV[QWTVGNGRJQPGUGTXKEGRTQXKFGTQTCSWCNKſGFKPUVCNNGT
If this equipment is malfunctioning, it must be unplugged from the modular jack until the problem has
been corrected. Repairs to this telephone equipment can only be made by the manufacturer or its
authorized agents. For repair procedures, follow the instructions outlined under the Limited Warranty.
•
•
•
•
78
Appendix
If this equipment is causing harm to the telephone network, the telephone service provider may
temporarily discontinue your telephone service. The telephone service provider is required to notify
[QWDGHQTGKPVGTTWRVKPIUGTXKEG+HCFXCPEGPQVKEGKUPQVRTCEVKECN[QWYKNNDGPQVKſGFCUUQQPCU
possible. You will be given the opportunity to correct the problem and the telephone service provider
KUTGSWKTGFVQKPHQTO[QWQH[QWTTKIJVVQſNGCEQORNCKPVYKVJVJG(%%;QWTVGNGRJQPGUGTXKEG
provider may make changes in its facilities, equipment, operation, or procedures that could affect
the proper functioning of this product. The telephone service provider is required to notify you if such
changes are planned.
If this product is equipped with a corded or cordless handset, it is hearing aid compatible.
If this product has memory dialing locations, you may choose to store emergency telephone numbers
GIRQNKEGſTGOGFKECNKPVJGUGNQECVKQPU+H[QWFQUVQTGQTVGUVGOGTIGPE[PWODGTURNGCUG
4GOCKPQPVJGNKPGCPFDTKGƀ[GZRNCKPVJGTGCUQPHQTVJGECNNDGHQTGJCPIKPIWR
Perform such activities in off-peak hours, such as early morning or late evening.
Industry Canada
Operation is subject to the following two conditions: (1) this device may not cause harmful
interference, and (2) this device must accept any interference, including interference that may cause
undesired operation.
6JGVGTOŎŏ+%ŎŏDGHQTGVJGEGTVKſECVKQPTGIKUVTCVKQPPWODGTQPN[UKIPKſGUVJCVVJG+PFWUVT[%CPCFC
VGEJPKECNURGEKſECVKQPUYGTGOGV
The Ringer Equivalence Number (REN) for this terminal equipment is 0.1. The REN is an
indication of the maximum number of devices allowed to be connected to a telephone interface.
The termination on an interface may consist of any combination of devices subject only to the
TGSWKTGOGPVVJCVVJGUWOQHVJG4'0UQHCNNVJGFGXKEGUFQGUPQVGZEGGFſXG
6JKURTQFWEVOGGVUVJGCRRNKECDNG+PFWUVT[%CPCFCVGEJPKECNURGEKſECVKQPU

79
Appendix
Frequency
control
Crystal controlled PLL synthesizer
Transmit
frequency
Handset: 1921.536-1928.448 MHz
Telephone base: 1921.536-1928.448 MHz
Channels 5
Nominal
effective range
Maximum power allowed by FCC and IC. Actual operating range
might vary according to environmental conditions at the time of
use.
Size Handset: 6.38 X 1.85 X 1.23 in (162.00 X 47.00 X 31.20 mm)
Telephone base: 5.88 X 4.21 X 2.06 in (149.30 X 107.00 X 52.40 mm)
Charger: 3.13 X 3.67 X 1.85 in (79.60 X 93.30 X 47.00 mm)
Weight Handset: 4.62oz (131.00g) (including battery)
Telephone base: 7.09oz (201.00g)
Charger: 2.31oz (65.40g)
Power
requirements
Handset: 2.4V 500mAh Ni-MH battery
Telephone base: 6V DC @ 400mA
Charger: 6V AC @ 300mA
Memory Handset directory: 50 memory locations;
up to 30 digits and 15 characters
Handset call log: 50 memory locations;
up to 24 digits and 15 characters
6GEJPKECNURGEKſECVKQPU
8.48 X 5.44 X 3.68 in
(
215.50 X 138.30 X 93.50 mm
)
600mA
80
Index
A
Add a handset 38
Alphabetical search 21
Announcement 12
Answer a call 13
Answer an incoming call during an
intercom call 16
Answering system 28
B
Battery 3,37
C
Caller ID 23
Call intercept 29
Call log 24
Call log display screen messages 27
Call screening 29
Call waiting 14
Chain dialing 15
Character chart 20
Charging 3
Clear voicemail 10
D
Date and time 9
Delete announcement 12
Delete answering system messages 31
Delete from redial 27
Delete from the call log 26
Delete from the directory 22
Dial a call log entry 26
Dial a directory entry 21
Dial a redial entry 27
Dialing pause 19,22,26
Directory 18
&5.ſNVGT2
E
Edit a directory entry 22
End a call 13
Expand your telephone system 38
F
Find handset 14
H
Handset display screen messages 34
Handset icons 36
Handset layout 6
Handset lights 36
Home area code 10
I
Important safety instructions 46
Intercom 16
K
Key tone 8
L
Language 9
M
Maintenance 47
Make a call 13
Make a call log entry ready to dial 25
Message alert tone 11
Message capacity 28
Message playback 30
Message window displays 32
Missed calls indicator 24
Multiple handset use 16
Mute 14
N
New message indication 30
Number of rings 11
O
Operating range 47
P
Parts checklist 1
Phonebook 18
Play announcement 12
Predial a call 13

81
Index
R
Record and play memos 31
Record announcement 12
Redial list 27
Register a handset 38
Remote access 33
Remote code 11
Replace a handset 39
Review the call log 25
Ringer mute 14
Ringer tone 8
Ringer volume 8
S
Save a call log entry to the directory 26
Search the directory 21
Share an outside call 17
Speakerphone 13
Store a directory entry 19
Store from redial 19
T
6GEJPKECNURGEKſECVKQPU53
Telephone base installation 2
Telephone base layout 7
Telephone base lights 36
Telephone base ringer volume 29
Troubleshooting 40
Turn the answering system on or off 29
V
Voicemail 10
Volume 8,13,29
W
Wall mounting 4
Warranty 49
VTECH TELECOMMUNICATIONS LTD.
A member of THE VTECH GROUP OF COMPANIES.
Distributed in the U.S.A. by VTech Communications, Inc. Beaverton, Oregon 97008
Distributed in Canada by VTech Technologies Canada, Ltd., Richmond, B.C. V6W 1L5
Copyright © 2009 for VTECH TELECOMMUNICATIONS LTD.
Printed in China.
91-002462-010-100