VTech Telecommunications 80-8047-00 1.9GHz Cordless Phone User Manual 14 Dec 2010 LS647X X CIB V1 20101214
VTech Telecommunications Ltd 1.9GHz Cordless Phone 14 Dec 2010 LS647X X CIB V1 20101214
UserManual.wiki
>
VTech Telecommunications
>
80 8047 00 User Manual
Users Manual
Navigation menu
Upload a User Manual
Namespaces
Wiki Guide
HTML
PDF
Info
Views
User Manual
Discussion / Help
Navigation

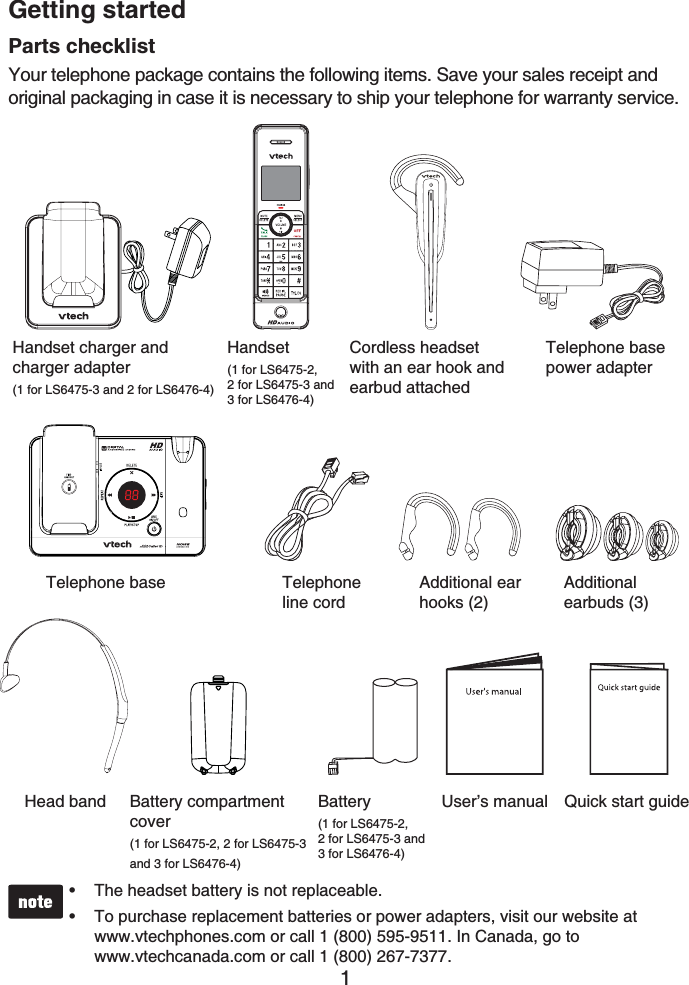
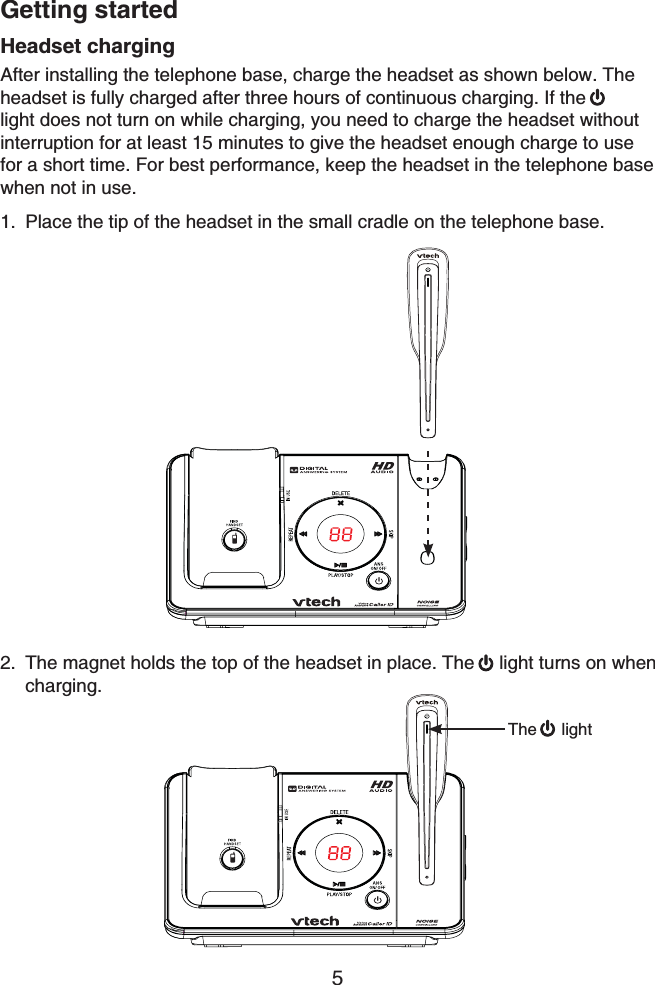
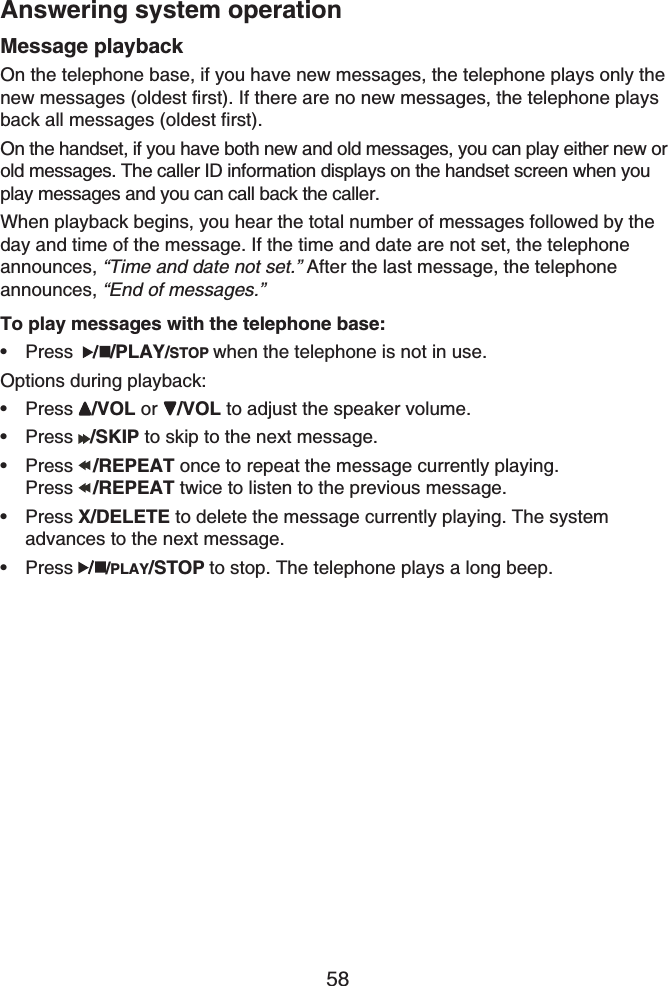
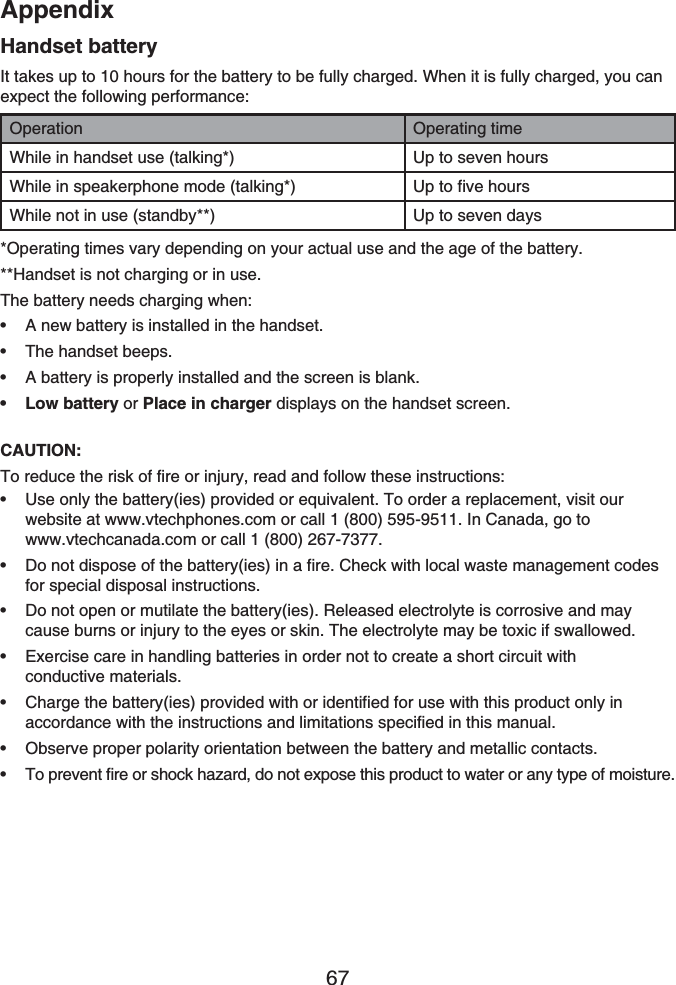
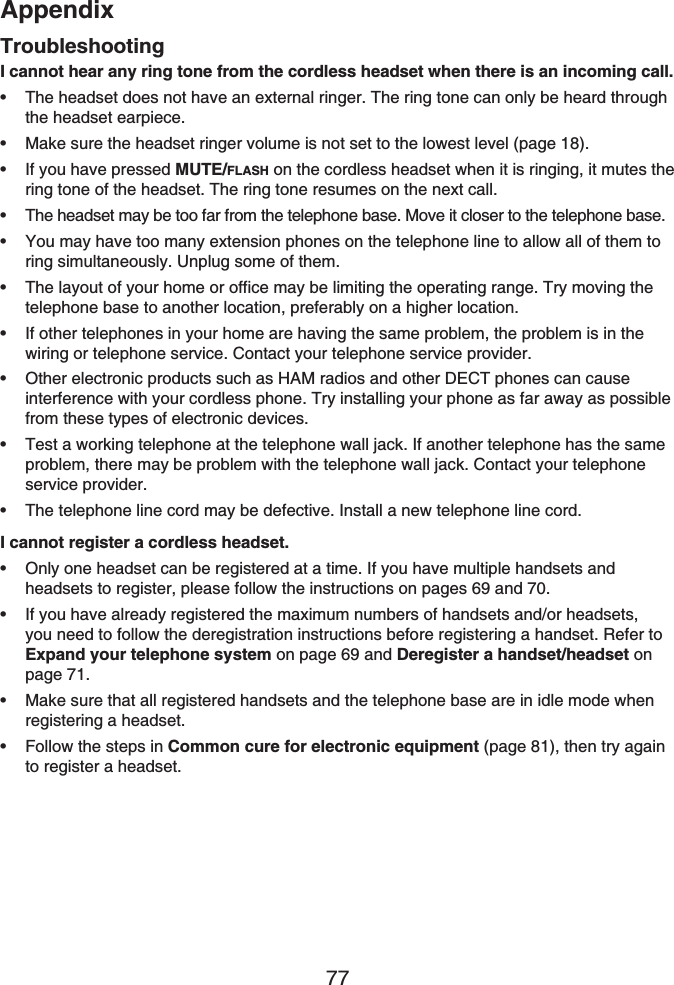
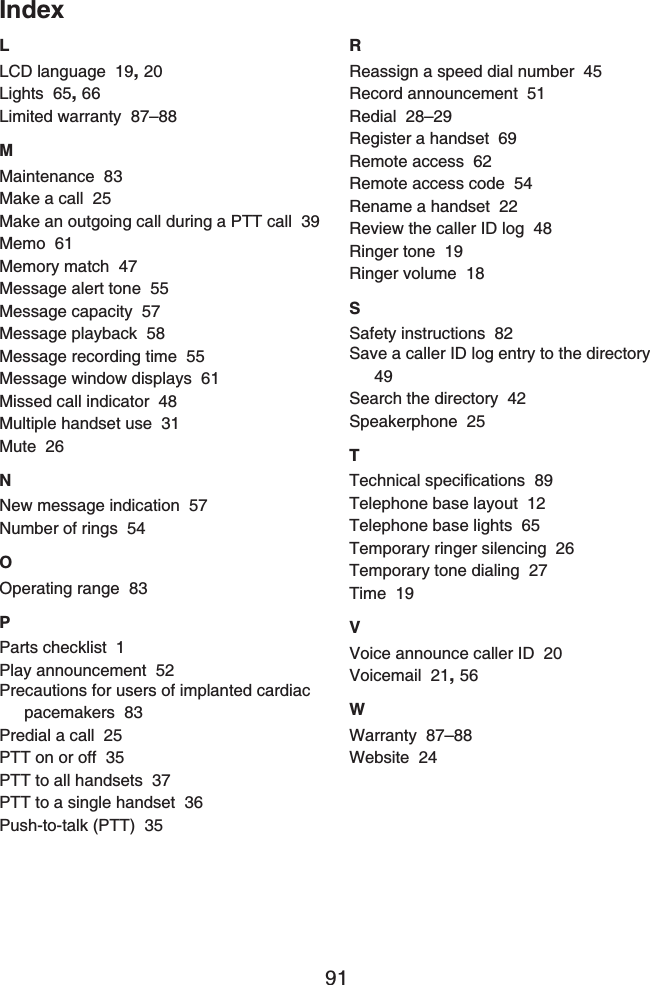
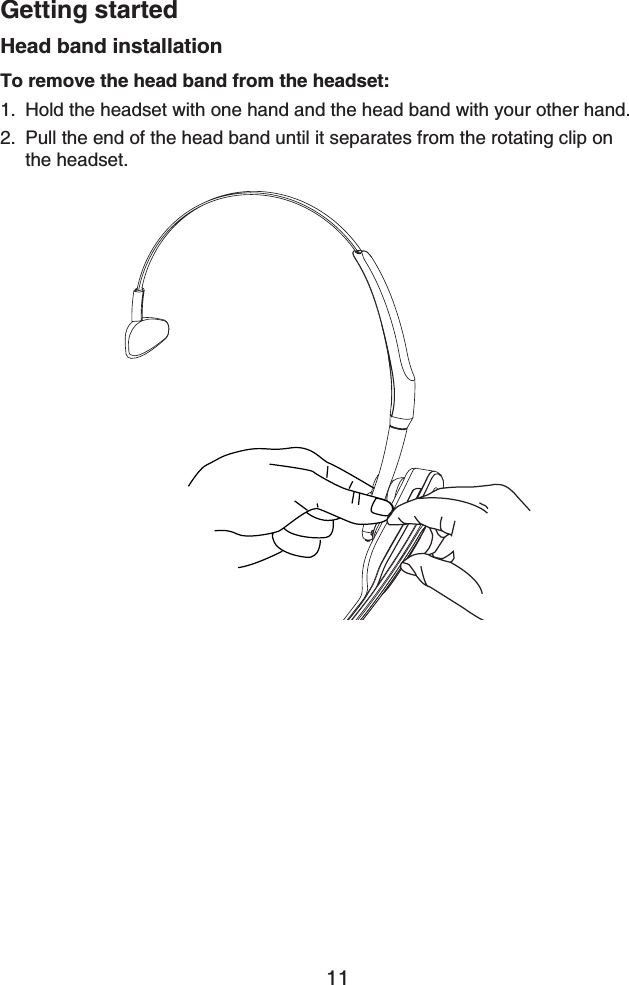
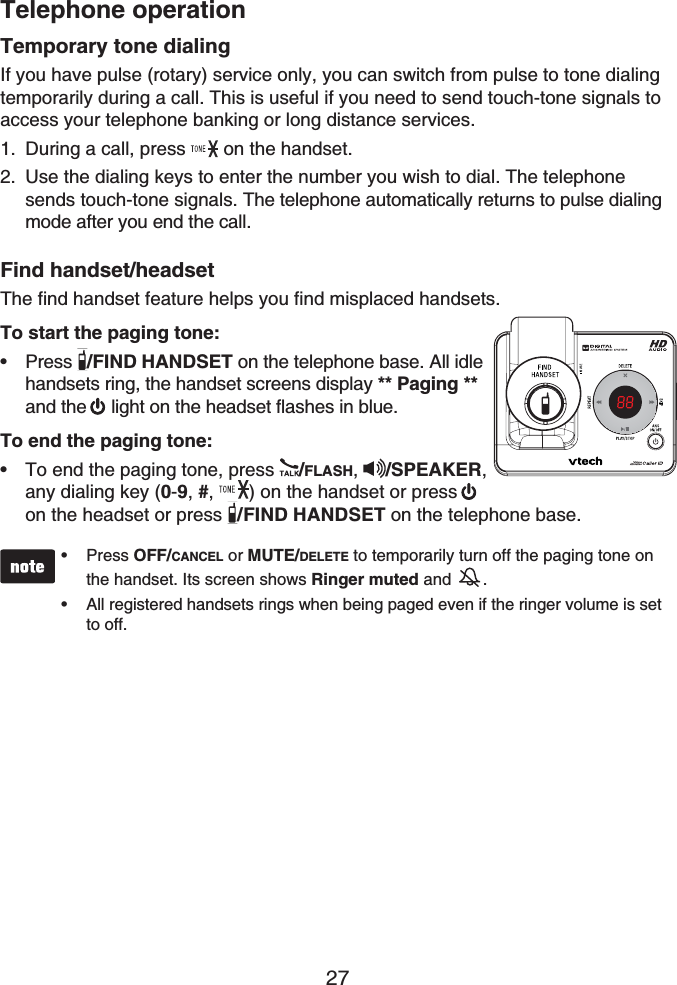
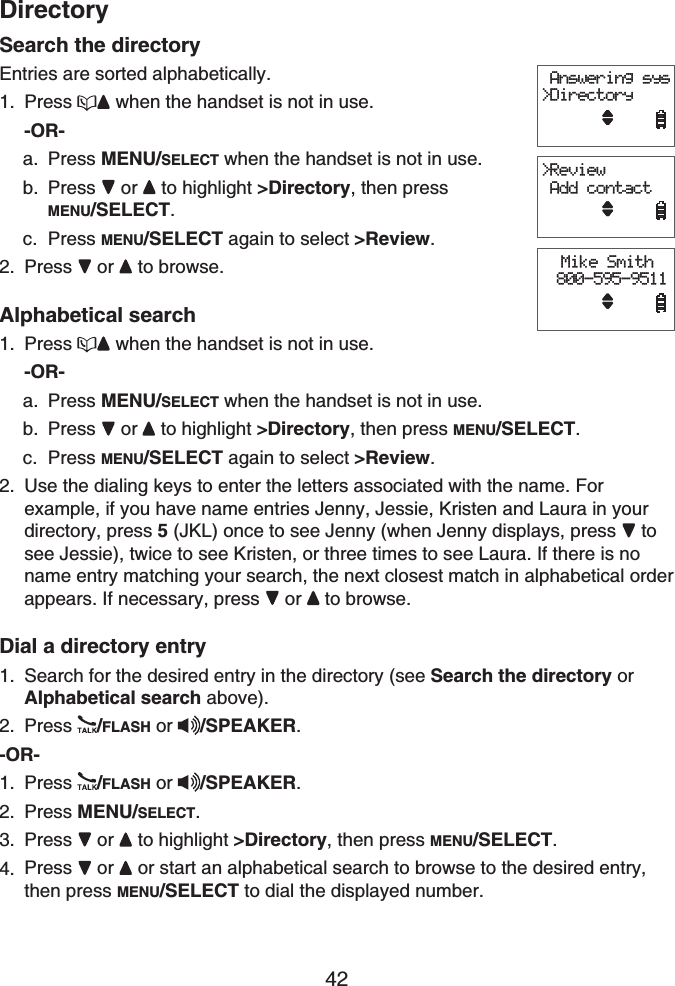
![Getting started9Ear hook installationTo attach the ear hook to the headset:Remove any headset attachment (earbud excluded) connected to the headset.Choose an appropriate ear hook.Insert the ear hook [A] into the rotating clip [B] on the headset until it clicks into place.1.2.3.Hook the headset on your right ear. Adjust the angle of the headset until the microphone is pointing towards your mouth. Firmly grip the earpiece with one hand whenever adjusting the headset microphone up or down.4.[B][A]](https://usermanual.wiki/VTech-Telecommunications/80-8047-00/User-Guide-1395388-Page-13.png)
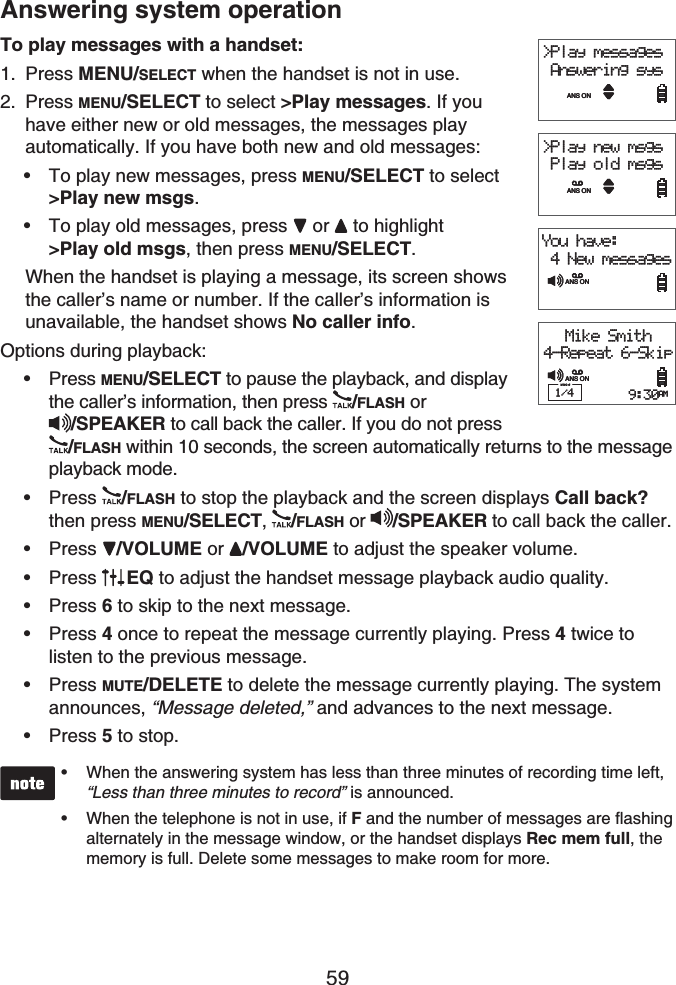
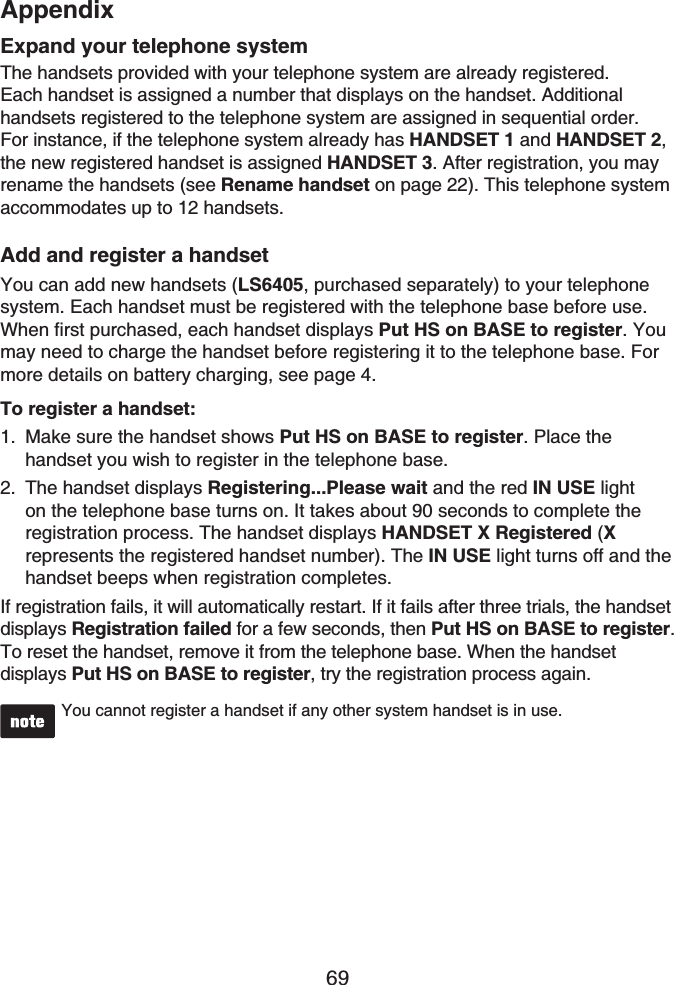
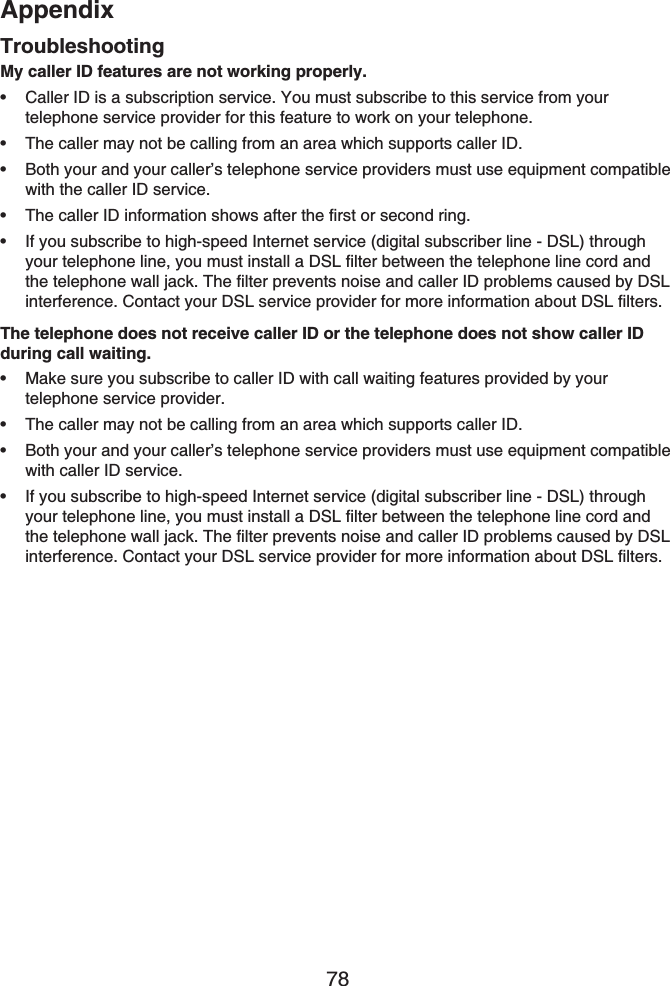
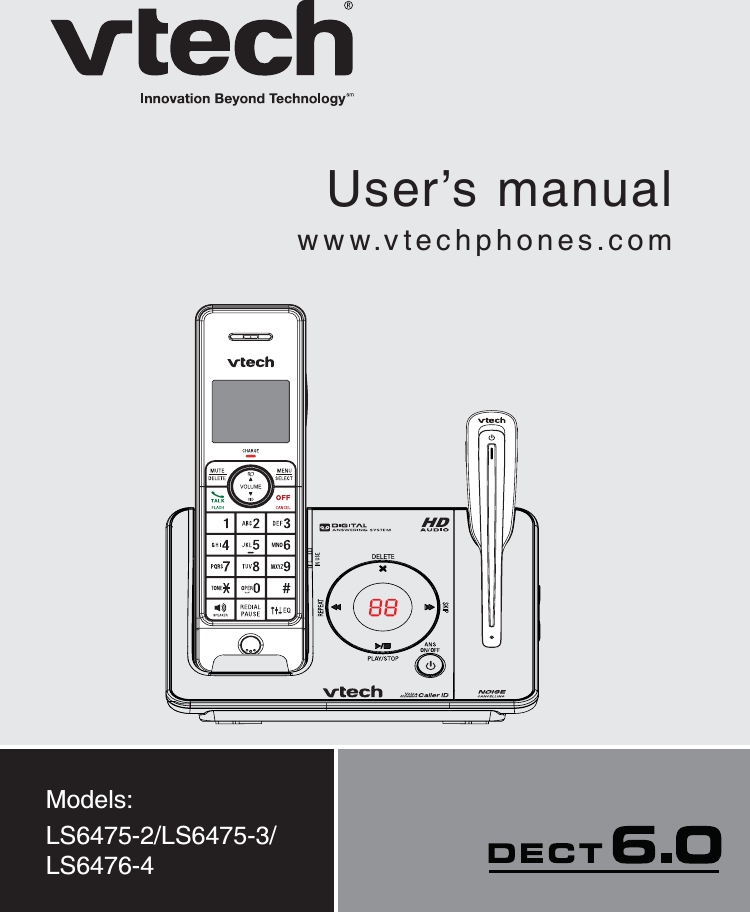
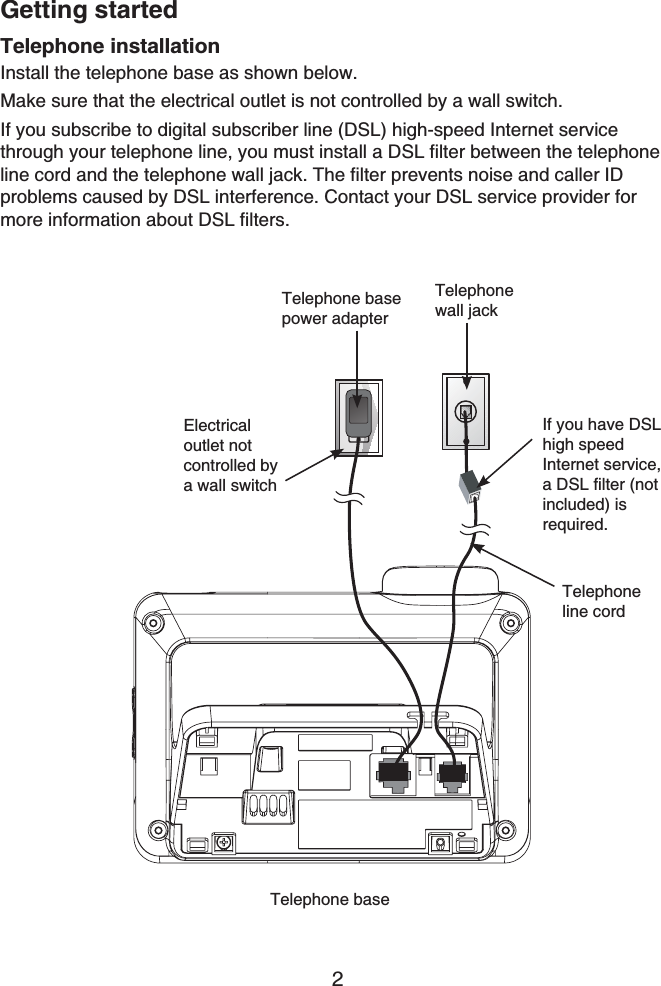
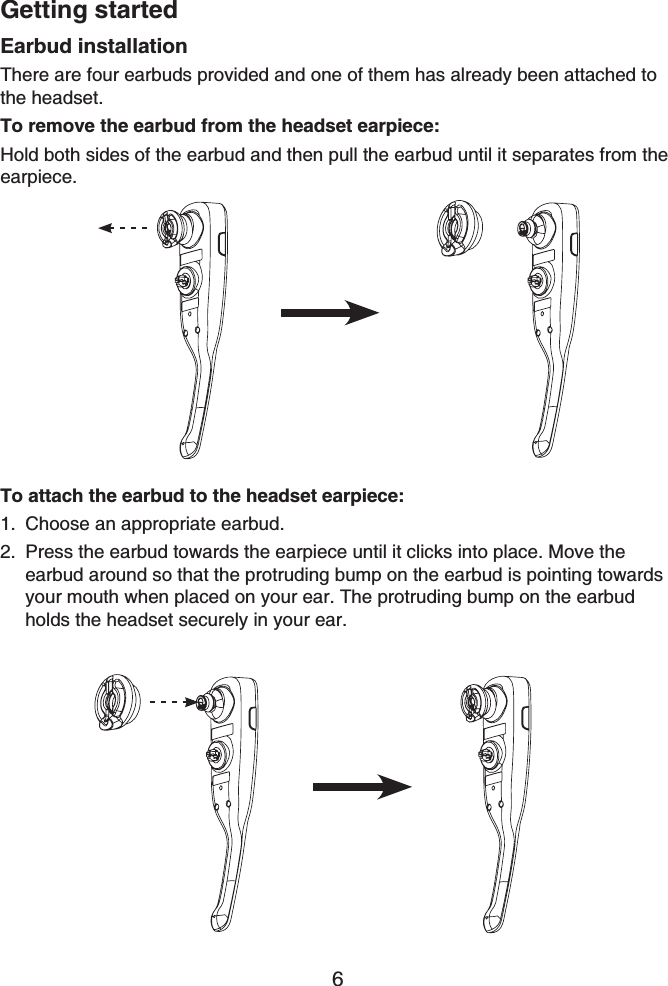
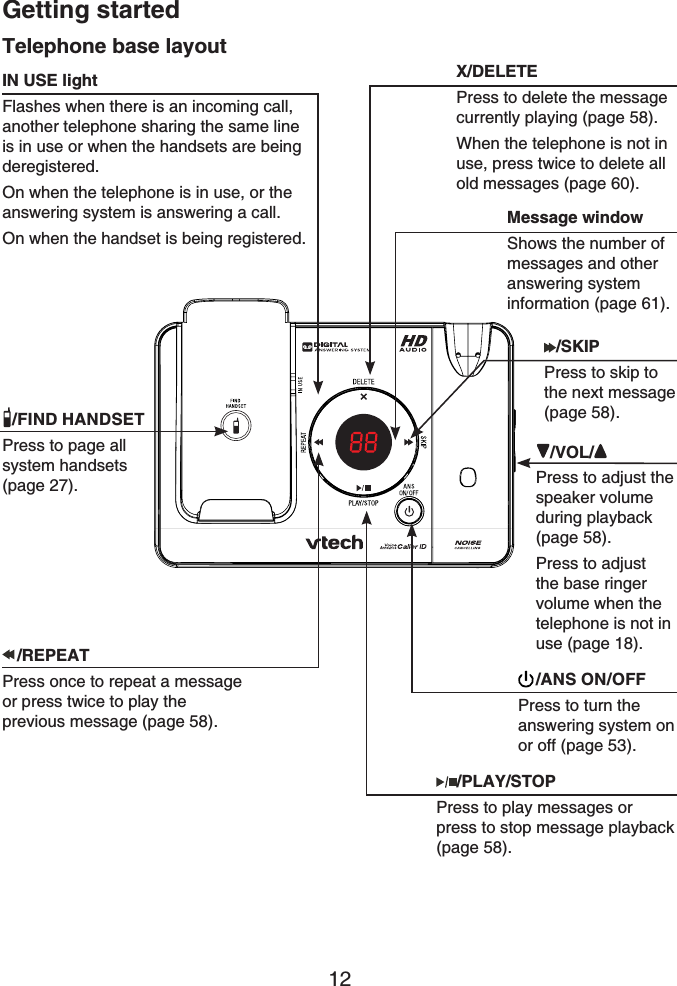
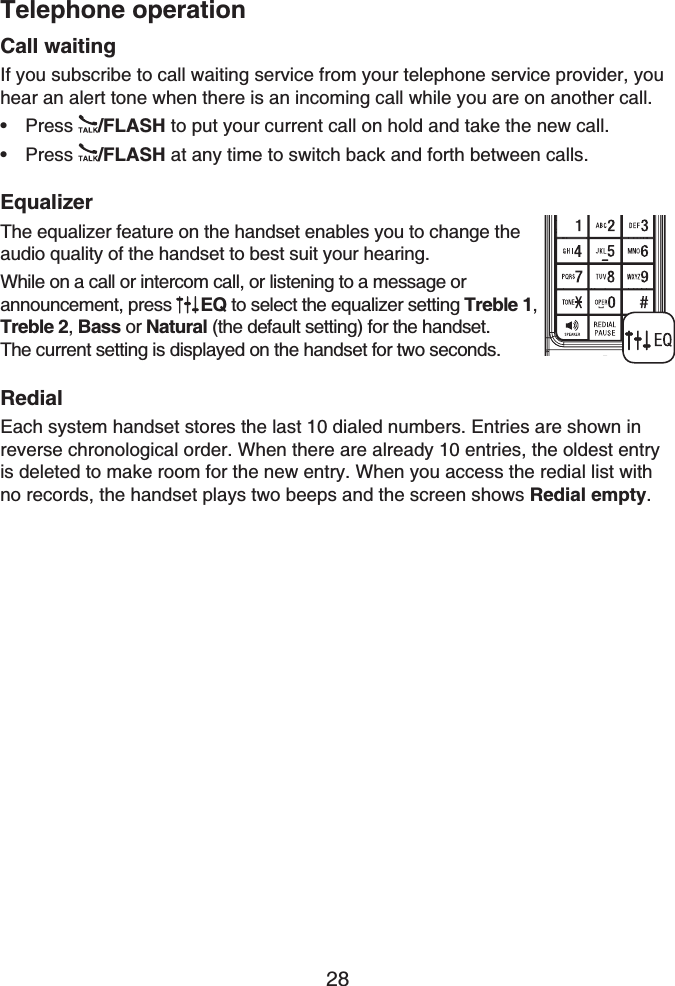
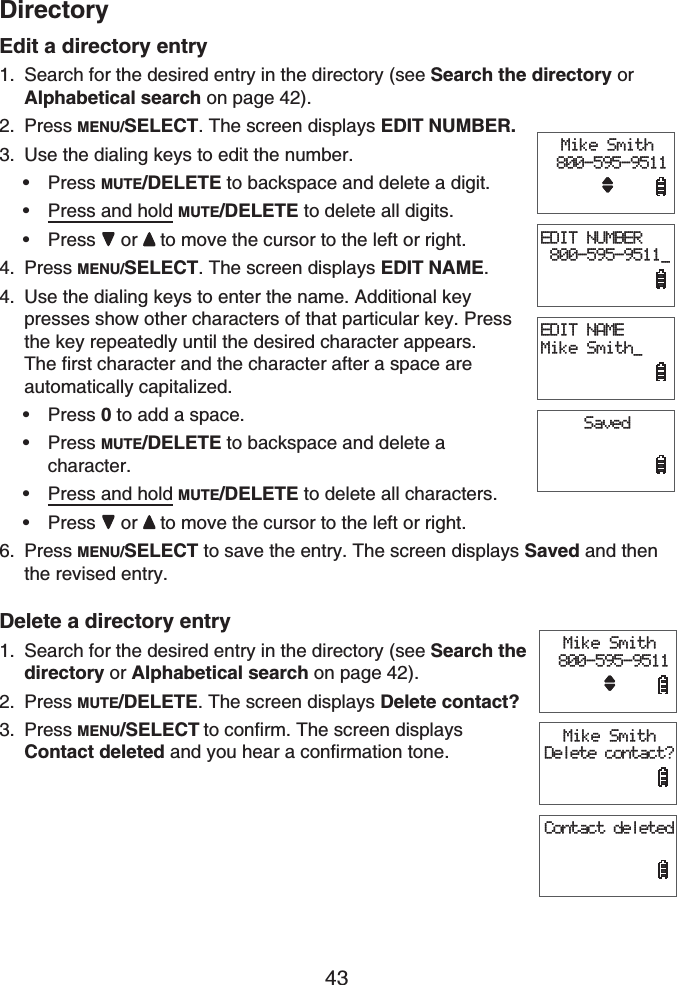
![Getting started10Head band installationTo attach the head band to the headset:Remove any headset attachment (earbud excluded) currently connected to the headset.To wear the headset on your right ear, insert the end [A] of the head band into the rotating clip [B] on the headset until it clicks into place.1.2.To wear on your left ear, hold the headset on one hand and the head band with your other hand. Rotate the head band within the rotating clip on the headset.Adjust the head band to fit your head. Adjust and rotate the angle of the headset until the microphone is pointing towards your mouth. Firmly grip the earpiece with one hand whenever adjusting the headset microphone up or down.3.[B][A]](https://usermanual.wiki/VTech-Telecommunications/80-8047-00/User-Guide-1395388-Page-14.png)
![36Multiple handset usePTT to a single handsetYou have two ways to begin a PTT call:If you have two handsets, press and hold PUSH TO TALK when the handset is not in use.If you have more than two handsets, press PUSH TO TALK when the handset is not in use. Then use the dialing keys to enter a handset number (1-9 for handsets 1-9, and 0 for handset 10, and 1 for handset 11 or and 2for handset 12), or press or to scroll to the desired handset. Then press MENU/SELECT or PUSH TO TALK to create the push-to-talk session.Your handset displays Connecting to HANDSET X... for a few seconds. When the connection is made, both the originating and the destination handsetsdisplay Press and hold [PTT] to talk and beep once.Press and hold PUSH TO TALK on your handset. A chirp indicates your microphone is on. Speak towards the handset. Your voice is broadcast to the destination handset. While you are speaking, your handset displays PTT To handset X(Xrepresents the destination handset).Release PUSH TO TALK after speaking. Both handsets beep once again. After the handsets beep, you can press and hold PUSH TO TALK to continue speaking or the destination handset can respond (see Answer a PTT call on page 38).Press OFF/CANCEL to end the PTT call. The handset displays Push to talk Ended for a few seconds.-OR-Place the handset in the telephone base or charger to end the PTT call.After PUSH TO TALK is released, the PTT call remains open for a short time. If no one presses PUSH TO TALK within 10 seconds, the PTT call ends automatically.1.••2.3.4.](https://usermanual.wiki/VTech-Telecommunications/80-8047-00/User-Guide-1395388-Page-40.png)
![37Multiple handset usePTT to all handsetsWhen you have two to five registered handsets, PTT supports one-to-all calls (one-to-four maximum). However, when you have six or more registered handsets, PTT supports a maximum of one-to-three calls. The first four registered handsets will be able to use this feature. Other handsets can only use PTT for one-to-one calls.To begin a PTT-to-all call:Press and hold PUSH TO TALK when the handset is not in use.If you have more than two handsets, press PUSH TO TALK when the handset is not in use. Press and #,or or to highlight >All handsetsthen press MENU/SELECT or PUSH TO TALK.Your handset displays Connecting to all handsets... for a few seconds. When the connection is made, all handsets display Press and hold [PTT] to talk and beep once.Press and hold PUSH TO TALK on your handset. A chirp indicates your microphone is on. Speak towards the handset. Your voice is broadcast to all destination handsets.While you are speaking, your handset displays PTT To handset: X(Xrepresents the destination handset).Release PUSH TO TALK after speaking. Both handsets beep once again. After the handsets beep, you can press and hold PUSH TO TALK to speakagain or the destination handsets can respond (see Answer a PTT call on page 38).Press OFF/CANCEL to end the PTT call. The handset displays Push to talk Ended for a few seconds.-OR-Place the handset in the telephone base or charger to end the PTT call.After PUSH TO TALK is released, the PTT call session remains open for a short time. If no one presses PUSH TO TALK within 10 seconds, the PTT call sessionends automatically.1.••2.3.4.](https://usermanual.wiki/VTech-Telecommunications/80-8047-00/User-Guide-1395388-Page-41.png)
![38Multiple handset useAnswer a PTT callYou can respond to a PTT call whenever the speakerphone light is off, as described below.When your handset receives a PTT call, the handset beeps and the screen displays Press and hold [PTT] to talk.When the other party is speaking, your speakerphone light is on, and your handset displays PTT From HS X To HS Y to (X represents the originatinghandset and Y represents the destination handset; a maximum of four handset numbers appear).When your speakerphone light is off and the screen displays Press and hold [PTT] to talk, press and hold PUSH TO TALK on your handset. You will hear a chirp. Speak towards the handset.While you are speaking, your handset displays PTT To handset: X (Xrepresents the handset numbers of one or more destination handsets; a maximum of four handset numbers appear).Your voice is broadcast to all destination handsets.After speaking, release PUSH TO TALK. Your handset will beep. After the beep, if your speakerphone light is off, you can press and hold PUSH TO TALK to speak again or the destination handset can respond.Change a one-to-one PTT call to intercom callYou can convert a one-to-one PTT session to an intercom call.When your handset displays Press and hold [PTT] to talk, pressMENU/SELECT. The screen displays >Intercom.Press MENU/SELECT.If you have two handsets, your handset displays Calling other handset.The destination handset temporarily displays Push to talk Ended and then Other handset is calling.If you have more than two handsets, your handset displays CallingHANDSET Y (Y represents the destination handset). The destinationhandset temporarily displays Push to talk Ended and then HANDSET X is calling (X represents the originating handset).On the destination handset, press /FLASH,/SPEAKER or any dialing key (0-9,#or ) to answer the intercom call. Both handsets now display Intercom.To end the intercom call, press OFF/CANCEL or place the handset in the telephone base or charger. Both screens display Intercom ended.1.2.3.••1.2.••3.4.](https://usermanual.wiki/VTech-Telecommunications/80-8047-00/User-Guide-1395388-Page-42.png)


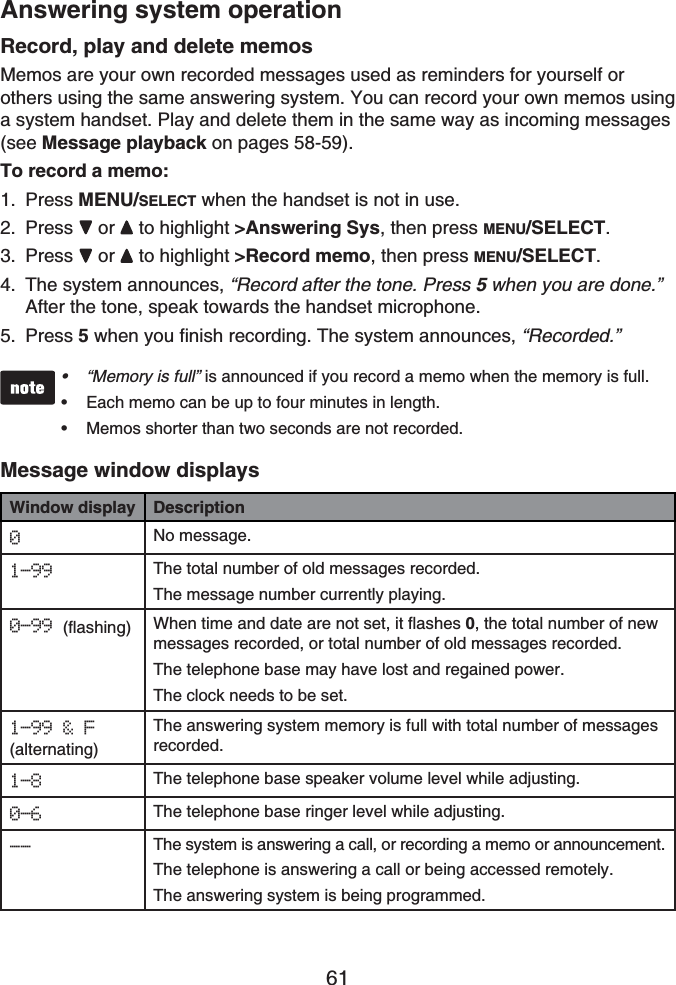
![57Answering system operationMessage capacityThe answering system can record and store up to 99 messages. The recording time of each message depends on the message length you set (see Messagerecording time on page 55). The total storage capacity for the announcement, messages and memos is approximately 14 minutes. The actual recording time depends on individual message characteristics. Messages remain available for replay until you delete them.New message indicationThe message window on the telephone base flashes and XX New messages displays on the handset when there are new answering system messages.If the message alert tone is turned on, the telephone base beeps every 10 seconds when there are messages that have not been reviewed.Call screeningCall screening at the telephone base:If the answering system and call screening are on (see Call screening on page 53), the announcement and the incoming message broadcast at the telephone base while the call is answered by the answering system.Options while a message is being recorded:Press /VOL or /VOL on the telephone base to adjust the call screening volume. Press /PLAY/STOP to temporarily silence the call screening.Press /PLAY/STOP or /VOL to temporarily turn on the call screening if call screening is set to off.Call screening at the handset:If the answering system is on and your answering system is recording a message, your handset shows To screen call, press [SELECT]. Press MENU/SELECT to screen the call on your handset and the screen displays the caller ID information. If you do not subscribe to caller ID service, the handset shows Screening...The call screening setting does not affect the call screening on the handset.Call interceptIf you want to talk to the person whose message is being recorded, press /FLASH on the handset.•••](https://usermanual.wiki/VTech-Telecommunications/80-8047-00/User-Guide-1395388-Page-61.png)