VTech Telecommunications 80-9854-00 1.9GHz Digital Modulation Cordless Phone with Caller ID and Digital Answering Machine User Manual EL52X65 CIB i1 1 20140127 APPROVAL
VTech Telecommunications Ltd 1.9GHz Digital Modulation Cordless Phone with Caller ID and Digital Answering Machine EL52X65 CIB i1 1 20140127 APPROVAL
Contents
- 1. User Manual
- 2. User manual Part 1
- 3. User manual Part 2
User Manual
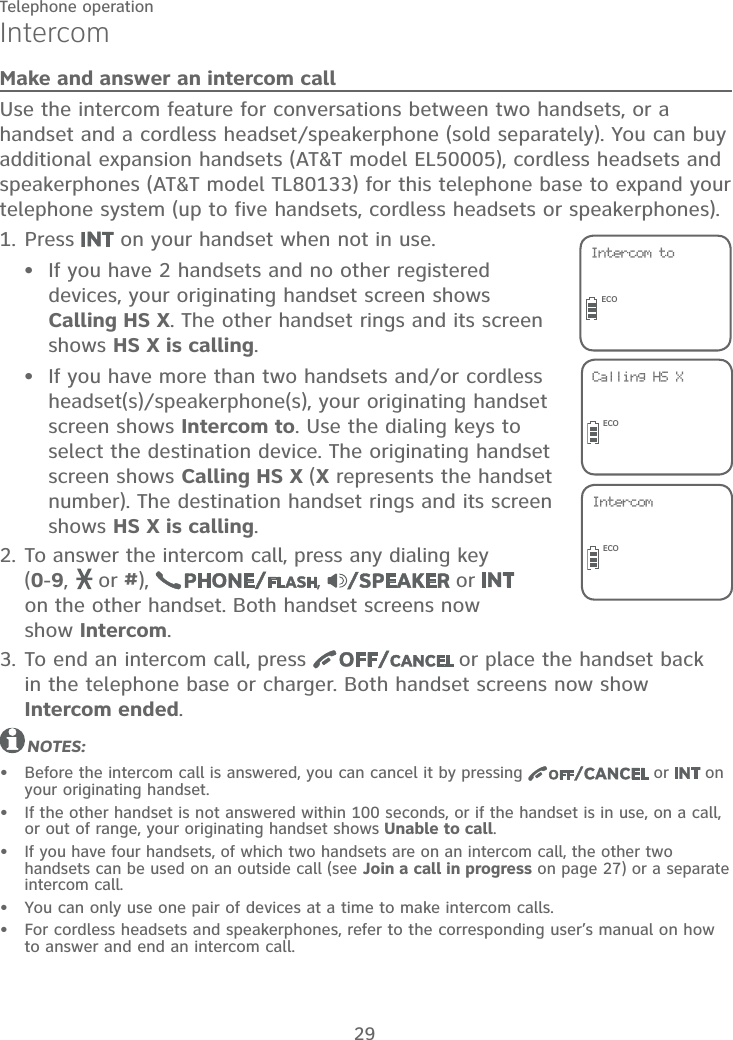
![19Telephone settingsHandset settingsQUIET modeWhen QUIET mode is turned on, the telephone silences all sounds during the set period of time (1-12 hours). However, the handset locator paging tone and any sound-generating operations initiated by users, such as making calls using the speakerphone or setting ringer volume, will sound as normal. After you turn on QUIET mode, this feature activates immediately and the answering system turns on automatically. When QUIET mode is on, the answering system takes calls and records messages without broadcasting them.To turn QUIET mode on:1. Press and hold in idle mode to enter the QUIET mode setting screen. The screen shows Quiet: _ _ hours [1-12].2. Use the dialing keys to enter the desired number of hours (1-12) you would like to turn on QUIET mode, then press . Your screen briefly shows Quiet mode on.To turn QUIET mode off:While QUIET mode is on, press and hold . The screen shows Quiet mode off briefly and then returns to idle.NOTES:If you change the base ringer, handset ringer, ringer volume, or key tone when QUIET mode is on, the sample plays but the feature is still muted after saving the setting.After QUIET mode is turned off or the set period of time has expired, all muted features will be activated again.When QUIET mode is on, the handset does not ring when there is an incoming intercom call, but the handset which initiates the intercom call does have the calling tone as normal. ••••](https://usermanual.wiki/VTech-Telecommunications/80-9854-00.User-Manual/User-Guide-2527403-Page-25.png)
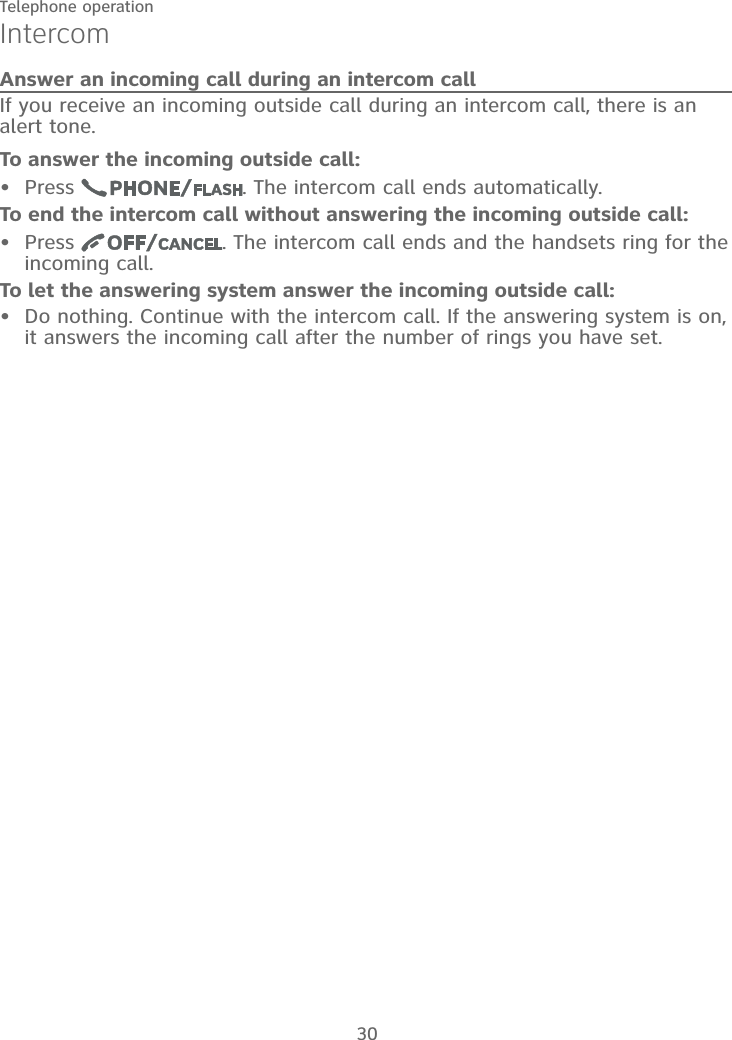
![52Answering system settingsUse the answering system menu in the handset to turn the answering system on or off or change the settings for the outgoing announcement, call screening, number of rings, remote access code and the message alert tone.AnnouncementThe announcement is the greeting callers hear when calls are answered by the answering system.The telephone has a default announcement, “Hello. Please leave a message after the tone.” You can use this announcement, or record your own announcement.You can record an announcement up to 90 seconds. The system does not record any announcement shorter than 2 seconds.To play the current announcement:Press in idle mode.Press or to scroll to Answering sys, then press .Press to select Announcement. The system announces, “To play, press 2. To record, press 7.”Press 2 to play the current announcement from the speakerphone.Press to increase or press to decrease the message playback volume.Press to switch between speakerphone and handset.1.2.3.4.••Answering sysECOAnnouncementECOPlay Del Rec[2] [3] [7]ECOAnswering system](https://usermanual.wiki/VTech-Telecommunications/80-9854-00.User-Manual/User-Guide-2527403-Page-58.png)
![53Answering systemAnswering system settingsTo record a new announcement:Press in idle mode.Press or to scroll to Answering sys, then press .Press to select Announcement. The system announces, “To play, press 2. To record, press 7.”Press 7. The system announces “Record after the tone. Press 5 when you are done.”Face the handset and speak towards the microphone to record your announcement.Press 5 when you finish the recording. The handset plays back the recorded announcement.NOTE: If the answering system memory is full, when you press 7 in Step 4, the answering system announces, “Memory is full.” You must delete some messages before you can record a new announcement. Refer to Message playback on pages 64-66.To delete your announcement:Press in idle mode.Press or to scroll to Answering sys, then press .Press to select Announcement. The system announces, “To play, press 2. To record, press 7.”Press 2 to play the current announcement from the speakerphone.Press 3 during playback to delete your recorded announcement. The system announces, “Announcement deleted.”If your announcement is deleted, calls are answered with the default announcement, “Hello. Please leave a message after the tone.”1.2.3.4.5.6.1.2.3.4.5.Recording... Stop [5]ECO](https://usermanual.wiki/VTech-Telecommunications/80-9854-00.User-Manual/User-Guide-2527403-Page-59.png)
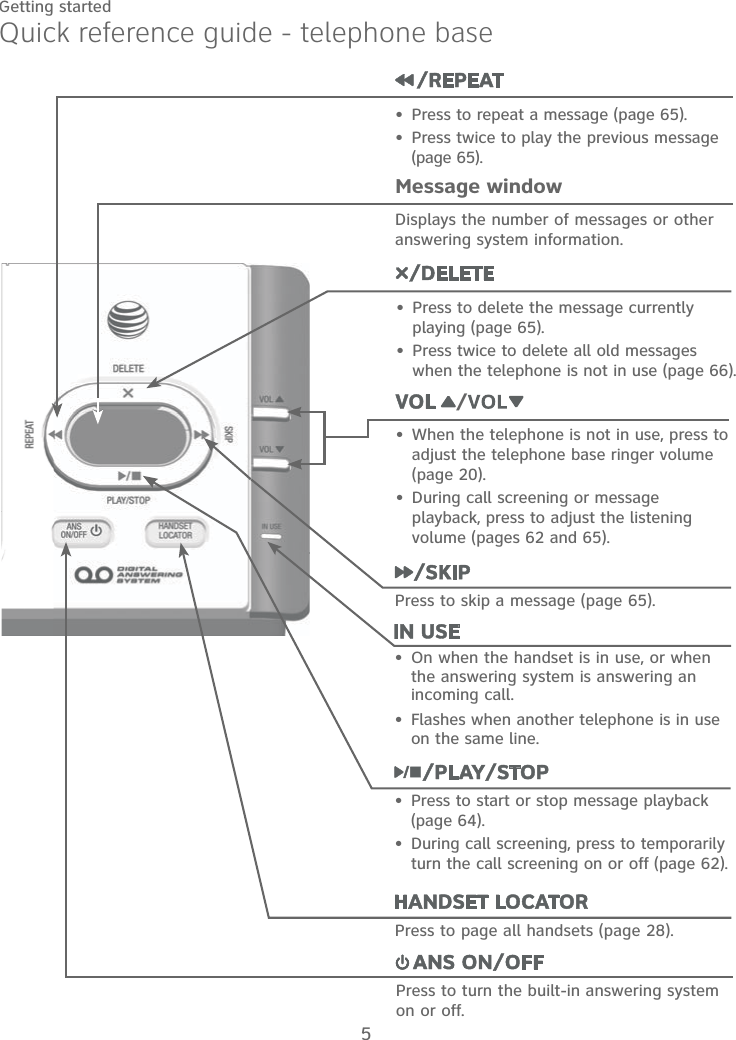
![62Answering systemAnswering system overviewCall screeningCall screening at the base:If the answering system and call screening are on, the announcement and the incoming message can be broadcast at the telephone base when a call arrives.You can turn call screening on or off using the handset (see Call screening on page 56). When call screening is off, you can temporarily turn on the call screening by pressing or on the telephone base. The call screening will automatically be off for the next incoming call.If call screening is on and you want to silence the telephone base while it is recording messages, press on the telephone base. The call screening will be on for the next incoming call.Call screening at the handset:If the answering system is turned on, when there is an incoming call and it is answered by the answering system, the handset screen shows To screen call, press [SELECT]. By pressing , you can screen the call at the handset.](https://usermanual.wiki/VTech-Telecommunications/80-9854-00.User-Manual/User-Guide-2527403-Page-68.png)
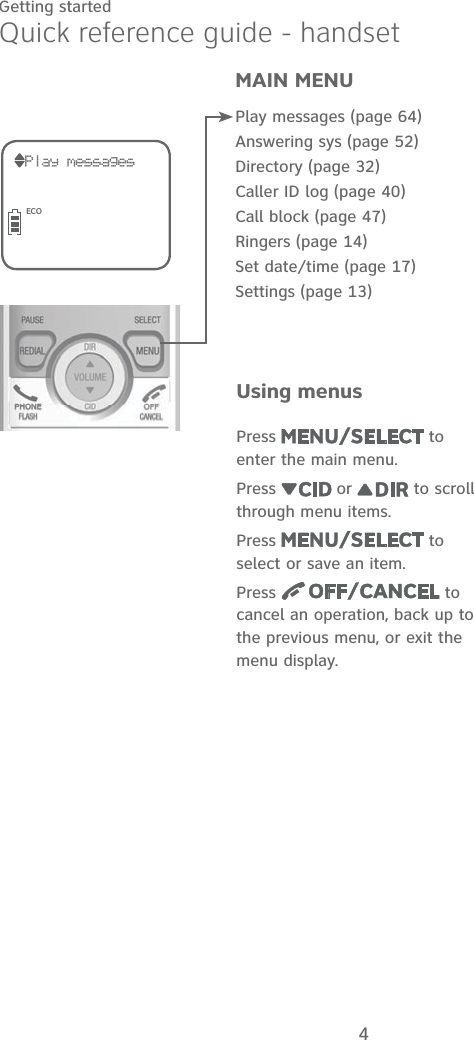
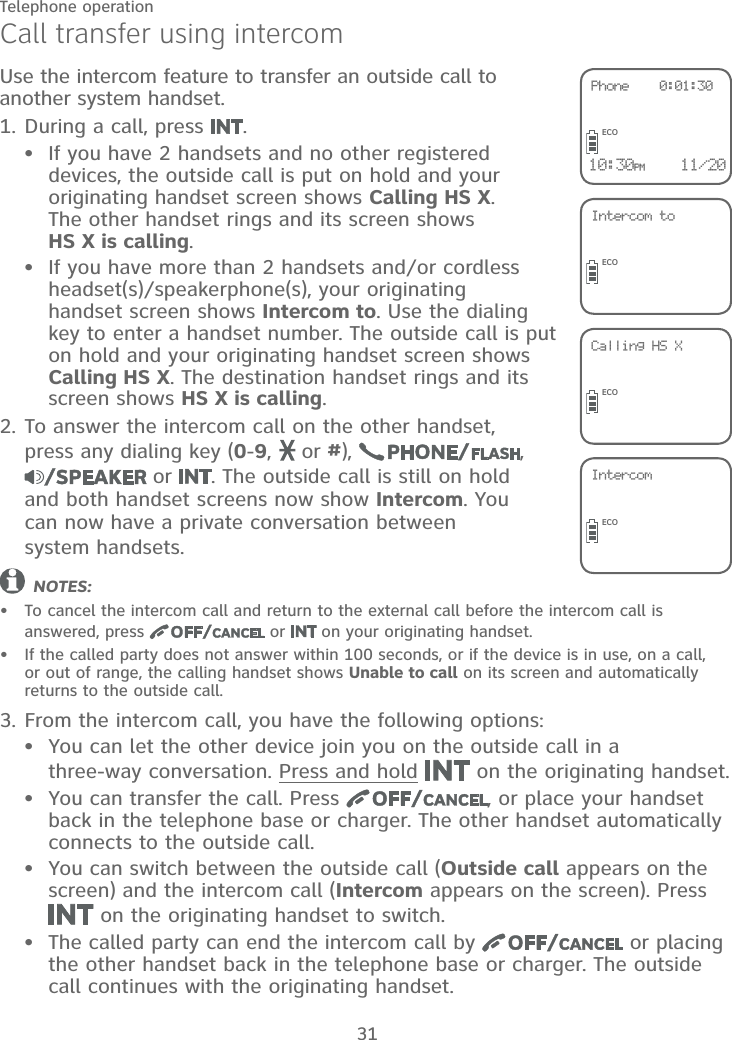
![64Answering systemMessage playbackYou can listen to messages at the telephone base or on a cordless handset. When playback begins, the total number of messages is announced. Before each message, you hear the day and time of the recording. If the date and time are not set, you hear, “Time and date not set,” before playback. After the last message, you hear, “End of messages.” If the recording time is less than three minutes, you hear, “Less than three minutes to record,” (see Message capacity on page 61).To listen to messages at the telephone base:Press on the telephone base to listen to the messages.The system announces the number of messages, then begins playback. The message sequence is shown on the message window.Press to stop the playback.NOTE: If there are no messages in the answering system, the system announces, “You have no message.” when you attempt to listen to messages.To listen to messages at the handset:Press when the handset is in idle mode.Press to select Play messages.The system announces the number of messages, then begins playback. The message sequence is shown on the handset’s screen.Press to stop the playback.NOTE: If there are no messages in the answering system, the handset shows No message and announces, “You have no message.” when you attempt to listen to messages.1.2.3.1.2.3.4.Play messagesECO 16 New 06 OldECORepeat Del Skip [4] [3] [6]ECO10:30PM 10/16MSG #](https://usermanual.wiki/VTech-Telecommunications/80-9854-00.User-Manual/User-Guide-2527403-Page-70.png)
![67Answering systemRecording and playing memosMemos are your own recorded messages used as reminders for yourself or others using the same answering system. Play and delete them in the same way as incoming messages.Record a memoPress when in idle mode to enter the main menu.Press or to scroll to Answering sys, then press .Press or to scroll to Record memo.Press . The system announces, “Record after the tone. Press 5 when you are done.”Speak towards the microphone on the handset after a long beep. You can record a memo up to 3 minutes. Memos shorter than 2 seconds are not recorded.Press 5 to stop recording. The system announces “Recorded”.Play back memosMemos are stored as messages. See Message playback on pages 64-66 for instructions on playback and deletion.1.2.3.4.5.6.Recording... Stop [5]ECO](https://usermanual.wiki/VTech-Telecommunications/80-9854-00.User-Manual/User-Guide-2527403-Page-73.png)
![76AppendixHandset display screen messagesNumber repeated The telephone number you have entered is already stored in the directory.Out of range or no pwr at base The handset has lost communication with the telephone base.Outside call You switched to an external call during an intercom call. Paging The telephone base is paging all handsets.Phone The handset is on a call.Put in charger The battery is very low. The handset should be placed in the telephone base or charger.Quiet mode off The quiet mode is turned off.Quiet mode on The quiet mode is turned on.Rec mem low The answering system has less than 3 minutes to record.Rec mem full The answering system memory is full.Ringer muted The ringer is muted temporarily during an incoming call.Speaker The handset speakerphone is in use.To register HS......see manual The handset is not registered to any telephone base.To screen callpress [SELECT]The system is recording a message. Press SELECT to screen a call on a handset.Unable to callIntercom failed.You try to join a call when there are already four handsets on that call.You try to make a call when the handset is out of range.•••Unable to save You cannot save a caller ID log entry to the directory without a number.XX missed calls There are XX new calls in the caller ID log.XX new messages There are XX new messages in the answering system.](https://usermanual.wiki/VTech-Telecommunications/80-9854-00.User-Manual/User-Guide-2527403-Page-82.png)