Vantage Controls AP2RL AP2 Series lighting control devices User Manual Exhibit 8
Vantage Controls Inc. AP2 Series lighting control devices Exhibit 8
Exhibit 8
V A N T A G E® Installation
1061 SOUTH 800 EAST • OREM, UTAH 84097 • TELEPHONE 801.229.2800 • FACSIMILE 801.224.0355 • www.vantagecontrols.com
Overview
The Vantage AccentPoint Dimmer II connects to the Vantage
Control System through RadioLink®. It enables a lamp and other
similar type loads to be controlled by a keypad, timed event, IR
button, etc. It has two loads and one button for each load with
default programming to allow for local control whether it is
communicating with the Vantage system or not.
Specifications
Description Specification
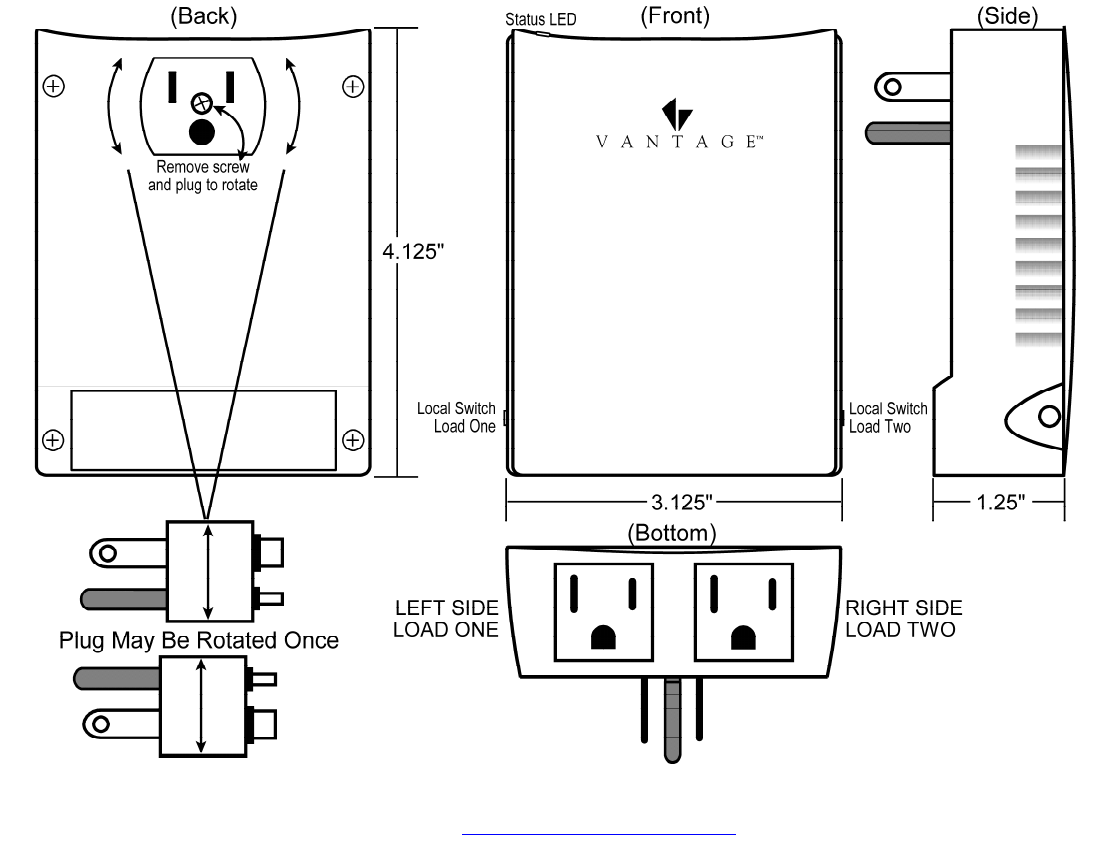
Dimensions, HWD 4.125” x 3.125” x 1.25”
107.95mm x 79.37mm x 31.75mm
Weight 5.5 oz - 156g
Mounting Plugs into standard 120VAC Outlet
Voltage 120V, 60Hz
Max. Current per Load 2.5A Each Load
Max. Watts Per Load 300W@120V
Lightning / Surge
Protection High Voltage meets IEEE C62.41 (6000V & 3000A)
Low Voltage meets ITU-T K.20
Station Equivalent 1 RadioLink Station
Ambient Operating
Temperature 32 - 95°F -or- 0 - 35°C
Ambient Operating
Humidity 5 - 95% non-condensing
LED Indicator Status
Load Types incandescent or low voltage magnetic fixtures only
UL and CUL Listed Yes
FCC Yes
System Requirements
This station is compatible with InFusion Design Center Systems.
For new projects it is recommended that firmware and software
be kept to the most current release.
Installation
Installation of Vantage products should be performed or
supervised by a Certified Vantage Installer.
1. Make sure the lamp to be controlled is turned ON.
2. Plug the lamp into the load 1 or load 2 outlet on the bottom
of the AccentPoint.
3. Plug the AccentPoint into the bottom receptacle of a power
outlet. Notice the plug of the AccentPoint Dimmer II Station
may be rotated 180°. If the GND prong on the outlet is UP,
rotate the plug as illustrated so the Load Outlets are facing
down (recommended).
4. The lamp is now ready to be controlled by the Vantage
system.
Steps to Rotate the Outlet
The plug should only be rotated once. Only rotate when
necessary as described in step 3 above.
1. Use a precision grade Phillips #1 screw driver to remove
the screw from the plug assembly of the station.
2. Pull the plug assembly out by hand and rotate it 180°
3. Reinsert the plug by hand. Line it up and press it in until
the face of the plug assembly is flush with the case.
4. Fasten the plug assembly with the screw removed in
step 1.
5. Do not over tighten.
Station Set Up in Design Center Software
1. Select the room
2. Click on Vantage Objects in the Object Explorer and
expand Stations, RadioLink.
3. From the list of stations double click on the AccentPoint
Dimmer II station to place it in the room.
4. In the Object Editor, name the station and make sure it is
on the correct RadioLink bus port.
Configuration
RadioLink stations need to be configured to associate which
physical station goes with the station in software. When the
station is initially powered-up, the Status LED will blink three
times followed by a pause - this means the station is powered
correctly but not yet on the network. Before uploading the file to
the Vantage system, do the following:
1. In Design Center with the AccentPoint Dimmer II
highlighted, in the Object Editor click in the Serial Number
section
2. Manually type in the serial number of the AccentPoint
Dimmer II station. enter the serial number for each
RadioLink
3. Repeat for each AccentPoint Dimmer II station
4. TIP: The serial number of each station is located on a
permanent sticker on the station. Record this number for
easy reference when programming in Design Center.
5. When the InFusion System is programmed, the Main
Controller will add all RadioLink stations that it has serial
numbers for. This may take several minutes depending on
the number of RadioLink stations on the network.
6. The Status LED will blink steadily when logged on to the
network.
Device Operation
The AccentPoint Dimmer II is designed to be controlled from a
separate keypad, timed event or other control on the Vantage
System. It also has a button for local control of each load. The
button operates with default programming whether or not the
device is communicating with the Vantage System. The default
programming is shown in the table below:
Button
Action Load Operation
Single
Press The load toggles between off and the learned level (default is 100%). The
turn on ramp time is 1.5 second and the turn off fade time is 5 seconds.
Double
Press The load ramps to 100% in 1 second. The second press must be within 1
second of the first press.
Press
and Hold
After a one second delay the load will ramp in the opposite direction from the
last press and hold. If the load reaches 0 or 100% it will reverse direction.
When the button is released the current load level will be saved as the new
learned level for that button. The cycle time is 5 seconds from 0-100%.
When power is restored from a power outage the device will
return the loads to the last load level. This will occur whether or
not the Dimmer is connected to a system.
Local Control
The AccentPoint Dimmer II also has a feature that allows the
lamp to be turned on from the switch on the lamp itself. If the
lamp is being controlled by the AccentPoint Dimmer II and it is
currently in the “off” state, turn the switch on the lamp, to the “off”
position and then back to the “on” position. This will cause the
AccentPoint Dimmer II to turn the lamp on at the learned level
and report the status change to the Vantage Main Controller.
This feature can be disabled in Design Center by checking the
Disable Manual box.
Reset
Configuration data is stored locally so that it will continue to
operate correctly if communication with the system is lost. This
information includes: LED properties, load profile, last load level,
and default learn levels. To reset this information to the factory
RadioLink®
AccentPoint Dimmer II
—
APDIM
default, unplug the device, press and hold both buttons in and
plug it in while holding the buttons down. After a reset the load
profile will be Default, the learn levels will be 100%, the load will
be off, and other settings will be at factory default.
Note: If the Station Load was changed to RELAY* this Process
will change it back to DIM. Make sure it is back on-line with the
Main Controller before testing button or relay load operation.
*CAUTION: The station is shipped in “DIMMING MODE”. To
change the default mode to RELAY change the Power Profile to
Relay in Software. The Relay Mode change will not take place
until the system is programmed and the RF station is on line. A
motor should not be connected to the AccentPoint Dimmer
station, instead use the AccentPoint Relay station.
Diagnostic Information
A red Status LED is located on top of the device. The Status
LED blinks evenly or flashes 2, 3, or 4 times followed by a pause
to indicate status information.
Off: The station is not powered. A line voltage connection has
not been made or the line feed breaker is off.
One Even blink: Station is operating correctly and is configured.
Two blinks: Station should be reset. See Reset above.
Three blinks: Station is not added to the network. Verify that its
serial number has been programmed into the Main Controller
and that the station is within 100 Feet of the RFE1000.
Four blinks: Lamp Dimmer problem. Please contact the factory.
FCC Compliance Information:
FCC ID: PII-AP2RL
IC: 3505A-AP2RL
The enclosed device complies with Part 15 of the FCC Rules.
Operation is subject to the following two conditions: (1) This
device may not cause harmful interference, and (2) this device
must accept any interference received, including interference
that may cause undesired operation.
NOTE: This equipment has been tested and found to comply
with the limits for a Class B digital device, pursuant to Part 15 of
the FCC Rules. These limits are designed to provide reasonable
protection against harmful interference in a residential
installation. This equipment generates uses and can radiate
radio frequency energy and, if not installed and used in
accordance with the instructions, may cause harmful interference
to radio communications. However, there is no guarantee that
interference will not occur in a particular installation. If this
equipment does cause harmful interference to radio or television
reception, which can be determined by turning the equipment off
and on, the user is encouraged to try to correct the interference
by one or more of the following measures:
-- Reorient or relocate the receiving antenna.
-- Increase the separation between the equipment and receiver.
-- Connect the equipment into an outlet on a circuit different from
that to which the receiver is connected.
-- Consult the dealer or an experienced radio/TV technician for
help.
Changes or modifications to this product not expressly approved
by Vantage Controls could void the user’s authority to operate
this product.
39524 / InFusion compatible Warranty at: http://www.vantagecontrols.com/warranty ©Vantage Controls
V A N T A G E® Installation
1061 SOUTH 800 EAST • OREM, UTAH 84097 • TELEPHONE 801.229.2800 • FACSIMILE 801.224.0355 • www.vantagecontrols.com
Overview
The Vantage AccentPoint Relay II connects to the Vantage
Control System through RadioLink®. It enables an appliance to
be controlled by a keypad, timed event, IR button, etc. It has two
loads and one button for each load with default programming to
allow for local control of the appliance whether the station is
communicating with the Vantage system or not.
Specifications
Description Specification
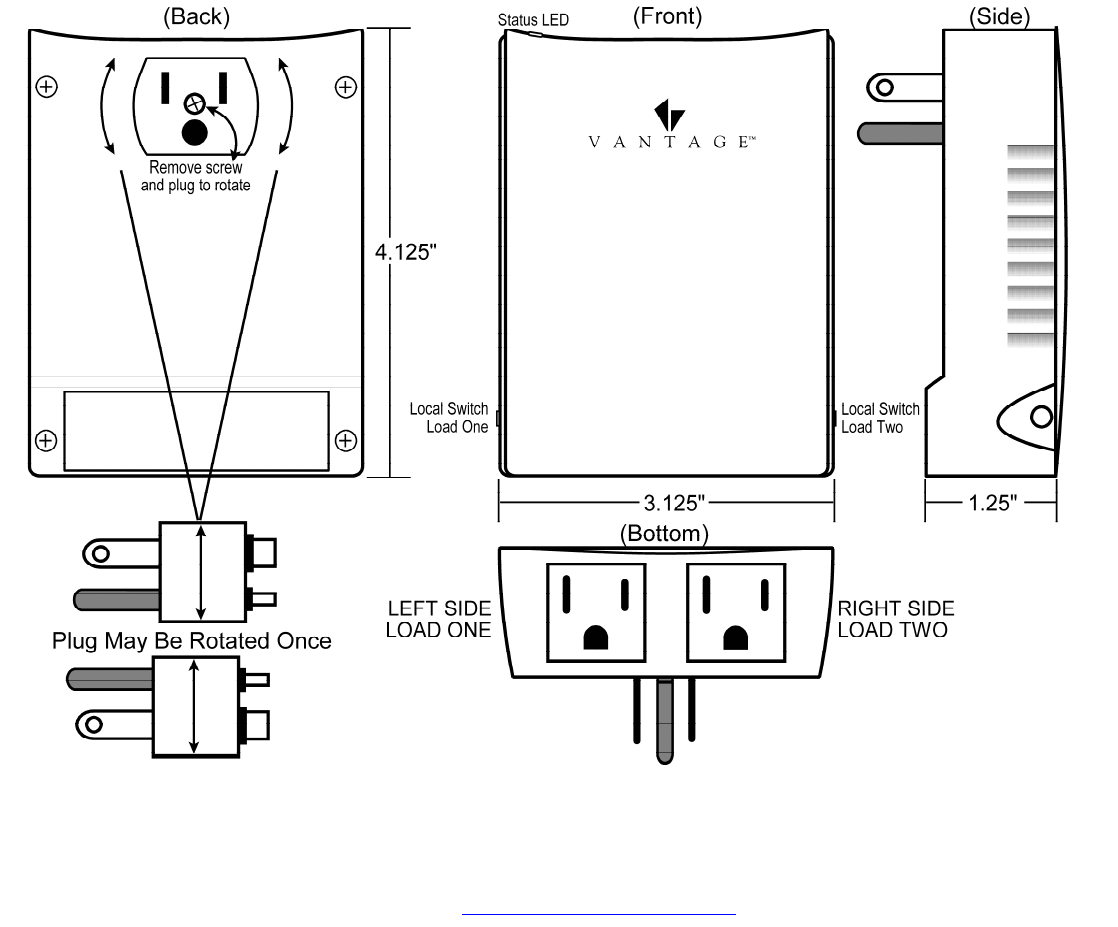
Dimensions, HWD 4.125” x 3.125” x 1.25”
107.95mm x 79.37mm x 31.75mm
Weight 5.8 oz - 164g
Mounting Plugs into standard 120VAC Outlet
Voltage 120V, 60Hz
Max. Load
• 16A (shared between both outlets) for General
Purpose AC, Magnetic Low-Voltage, and resistive
loads, i.e., if one outlet is using the full 16A limit, the
other outlet must not be used.
• 1 Horsepower (16A) for motor loads
• 8A per outlet (16A total) for incandescent loads
Lightning / Surge
Protection High Voltage meets IEEE C62.41 (6000V & 3000A)
Low Voltage meets ITU-T K.20
Station Equivalent 1 RadioLink Station
Ambient Operating
Temperature 32 - 95°F -or- 0 - 35°C
Ambient Operating
Humidity 5 - 95% non-condensing
LED Indicator Status
Load Types General purpose AC, magnetic Low-voltage, and resistive
loads, motor loads, incandescent loads
UL and CUL Listed Yes
FCC Yes
System Requirements
This station is compatible with InFusion Design Center Systems.
For new projects it is recommended that firmware and software
be kept to the most current release.
Installation
Installation of Vantage products should be performed or
supervised by a Certified Vantage Installer.
1. Make sure the appliance to be controlled is turned OFF.
2. Plug the appliance into the load 1 or load 2 outlet on the
bottom of the AccentPoint.
3. Plug the AccentPoint into the bottom receptacle of a power
outlet. Notice the plug of the AccentPoint Relay II Station
may be rotated 180°. If the GND prong on the outlet is UP,
rotate the plug as illustrated so the Load Outlets are facing
down (recommended).
4. Turn the appliance switch to ON
5. It is now ready to be controlled by the Vantage system.
Steps to Rotate the Outlet
The plug should only be rotated once. Only rotate when
necessary as described in step 3 above.
1. Use a precision grade Phillips #1 screw driver to remove
the screw from the plug assembly of the station.
2. Pull the plug assembly out by hand and rotate it 180°
3. Reinsert the plug by hand. Line it up and press it in until
the face of the plug assembly is flush with the case.
4. Fasten the plug assembly with the screw removed in
step 1.
5. Do not over tighten.
Station Set Up in Design Center Software
1. Select the room
2. Click on Vantage Objects in the Object Explorer and
expand Stations, RadioLink.
3. From the list of stations double click on the AccentPoint
Relay II station to place it in the room.
4. In the Object Editor, name the station and make sure it is
on the correct RadioLink bus port.
Configuration
RadioLink stations need to be configured to associate which
physical station goes with the station in software. When the
station is initially powered-up, the Status LED will blink three
times followed by a pause - this means the station is powered
correctly but not yet on the network. Before uploading the file to
the Vantage system, do the following:
1. In Design Center with the AccentPoint Relay II highlighted,
in the Object Editor click in the Serial Number section
2. Manually type in the serial number of the AccentPoint
Dimmer II station. enter the serial number for each
RadioLink
3. Repeat for each AccentPoint Relay II station
4. TIP: The serial number of each station is located on a
permanent sticker on the station. Record this number for
easy reference when programming in Design Center.
5. When the InFusion System is programmed, the Main
Controller will add all RadioLink stations that it has serial
numbers for. This may take several minutes depending on
the number of RadioLink stations on the network.
6. The Status LED will blink steadily when logged on to the
network.
Device Operation
The AccentPoint Relay II is designed to be controlled from a
separate keypad, timed event or other control on the Vantage
System. It also has a button for local control of each load. The
buttons operate with default programming whether or not the
device is communicating with the Vantage System. Pressing the
buttons toggle the loads on and off.
When power is restored from a power outage the device will
return the load to the last load state. This will occur whether or
not the station is connected to a system.
Reset
The device stores the configuration data locally so that it will
continue to operate correctly if communication with the system is
lost. To reset this information to the factory default, unplug the
device, press and hold both buttons in and plug it in while
holding the buttons down. After a reset the load will be off, and
other settings will be at factory default.
Note: Make sure it is back on-line with the Master Controller
before testing button or load operation.
RadioLink®
AccentPoint Relay II
—
APREL
Diagnostic Information
A red Status LED is located on top of the device. The Status
LED blinks evenly or flashes 2, 3, or 4 times followed by a pause
to indicate status information.
Off: The station is not powered. A line voltage connection has
not been made or the line feed breaker is off.
One Even blink: Station is operating correctly and is configured.
Two blinks: Station should be reset. See Reset above.
Three blinks: Station is not added to the network. Verify that its
serial number has been programmed into the Main Controller
using QLink and that the station is within 100 Feet of the
RFE1000.
Four blinks: AccentPoint Relay II problem. Please contact the
factory.
FCC Compliance Information:
FCC ID: PII-AP2RL
IC: 3505A-AP2RL
The enclosed device complies with Part 15 of the FCC Rules.
Operation is subject to the following two conditions: (1) This
device may not cause harmful interference, and (2) this device
must accept any interference received, including interference
that may cause undesired operation.
NOTE: This equipment has been tested and found to comply
with the limits for a Class B digital device, pursuant to Part 15 of
the FCC Rules. These limits are designed to provide reasonable
protection against harmful interference in a residential
installation. This equipment generates uses and can radiate
radio frequency energy and, if not installed and used in
accordance with the instructions, may cause harmful interference
to radio communications. However, there is no guarantee that
interference will not occur in a particular installation. If this
equipment does cause harmful interference to radio or television
reception, which can be determined by turning the equipment off
and on, the user is encouraged to try to correct the interference
by one or more of the following measures:
-- Reorient or relocate the receiving antenna.
-- Increase the separation between the equipment and receiver.
-- Connect the equipment into an outlet on a circuit different from
that to which the receiver is connected.
-- Consult the dealer or an experienced radio/TV technician for
help.
Changes or modifications to this product not expressly approved
by Vantage Controls could void the user’s authority to operate
this product.
39493 / InFusion compatible Warranty at: http://www.vantagecontrols.com/warranty ©Vantage Controls