Vantec 7 1 Channel Pcie Sound Card Ugts110 Users Manual Volari V3 Graphics Accelerator
UGTS110 to the manual d4908f18-4ec6-4d28-80ee-ce7bac44930b
2015-02-03
: Vantec Vantec-7-1-Channel-Pcie-Sound-Card-Ugts110-Users-Manual-457512 vantec-7-1-channel-pcie-sound-card-ugts110-users-manual-457512 vantec pdf
Open the PDF directly: View PDF ![]() .
.
Page Count: 8

7.1 Channel PCIe Sound Card
User Manual
Model: UGT-S110
All brand names and trademarks are properties of their respective owners.
www.vantecusa.com

UGT‐S110 Page2
Features
z Full-duplex playback and recording
z Full-duplex 8CH DAC/2CH ADC
z Support 48/44.1 KHz sampling rate for both playback and
recording
z Supports the latest Dolby® Digital EX and DTS ES 6.1/7.1
CH DVD soundtrack playback
z DirectSound™ 3 HW acceleration
z Compliant with PCI Express Base Specification 1.0a
z ACPI compliant power down management
z Support Windows® 2000/XP/2003/Vista/7 (32/64 bit)
System Requirements
z PCI Express-enabled system with an available PCI Express slot
z Windows® 2000/XP/2003/Vista/7 (32/64 bit)
z DirectX 8.1 above is required
Package Contents
z Vantec 7.1 Channel PCIe Sound Card x 1
z Mini-DIN To 3.5mm Port ( fan-out cable) x 1

UGT‐S110 Page3
z Installation Guide x 1
z Driver CD x 1
* User’s Manual Is on Driver CD
Note: Contents may vary depending on the market/country.
Hardware Installation
1. Turn off the computer, Unplug the power cord.
2. Open the computer case. Check with your computer
manufacturer if you need additional instructions. Remove any old
third-party sound cards or the metal PCIe slot bracket.
3. Insert the sound card into a blank PCIe slot. Make sure that all of
its pins are touching the PCIe slot’s contacts.
4. Check the sound card is inserted into the PCIe slot firmly, and
secure it with a screw.
5. Close the case. Plug in the power cord and other cables.
6. Connect the Mini-DIN to 3.5mm fan-out cable bundled in this
package and use for 8-channel line output jack.
Software Installation
For Windows® 2000/ XP/2003/Vista/7 (32/64 bit)

UGT‐S110 Page4
1. Start your PC, place the Driver CD into the CD-ROM drive.
Click the Start button on the taskbar and click Run. Type
“D:\UGT-S110\2000_XP_2003_Vista_7\Setup.exe”.
(Assuming you have placed the CD in CD-ROM drive labeled as
D).
2. Follow any on-screen instructions to complete the software
installation.
3. Restart your system.
4. Once you have rebooted the computer, this 7.1 Channel PCIe
Sound card is ready to be used.
Physical Connections
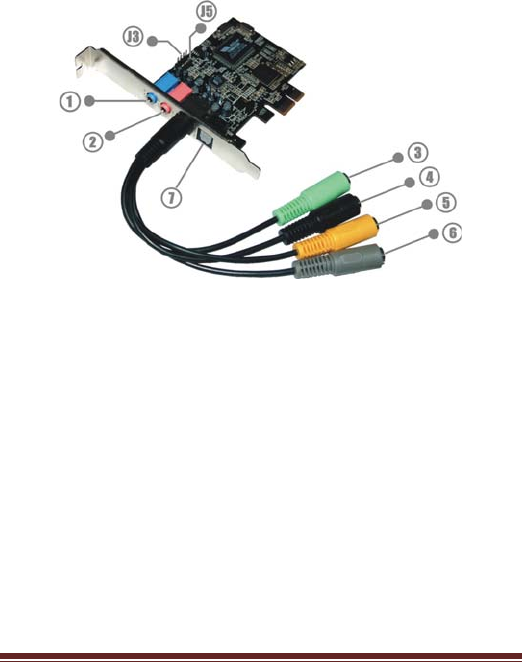
The rear panel of this 7.1 Channel PCIe Sound Card has the following
jacks:
1. Line In (blue): Connect to tape/CD/DVD player, or other audio
sources for output mixing and/or recording
2. MIC In (pink): Connect to microphone
3. Line Out (green): Connect to headphone or amplifying speakers.
In 4-channel, 6-channel, and 8-channnel configurations, the
function of this port becomes Front Speaker Out
4. Rear-Speaker/Surround-Speaker (black): Connect to Rear
speakers while 4/6/8 channel speaker mode is enabled (via
external amplifier)
UGT‐S110 Page5

UGT‐S110 Page6
5. Center/Subwoofer (orange): Connect to center/subwoofer
speakers while 6/8 channel speaker mode is enabled (via external
amplifier)
6. Back-Speaker (gray): Connect to back speakers while 8 channel
speaker mode is enabled (via external amplifier)
7. S/PDIF Out: Connect to digital input of external audio device
via an optical S/PDIF cable
Please refer to the audio configuration table below for the function of
the audio ports in 2, 4, 6, 8-channel configuration.

Port 2-channel 4-channel
(*)
6-channel 8-channel
Green Line Out Front
Speaker
Front
Speaker
Front
Speaker
Black - Rear
Speaker
Rear
Speaker
Rear
Speaker
Orange - - Center
/Subwoofer
Center
/Subwoofer
Gray - - - Back
Speaker
(*) 4-Channel mode is not available on Vista/7 (32/64 bit)
In addition to the rear panel jacks, this 7.1 Channel PCIe Sound Card
also has the following internal connection:
The Function
J3 Analog CD/IN Port(Signals: L-G-G-R)
J5 Analog CD/IN Port(Signals: G-R-G-L)

UGT‐S110 Page8
Warranty
The Vantec 7.1 Channel PCIe Sound Card comes with a 1 year
limited warranty(90 day parts). If your unit becomes defective within
that time frame, please go to www.vantecusa.com for information on
how to receive warranty exchange or repair. Cosmetic defects and
missing parts are not covered under this warranty. Please check the
contents of the unit to make sure you received all parts. Also, check for
any cosmetic flaws. If any parts are missing or if there are cosmetic
defects, please contact the retailer from which you purchased the unit
immediately and ask for a replacement.
Vantec Thermal Technologies
www.vantecusa.com
