Verifone OMNI3600D Point of Sale Terminal User Manual
VeriFone Inc Point of Sale Terminal
Verifone >
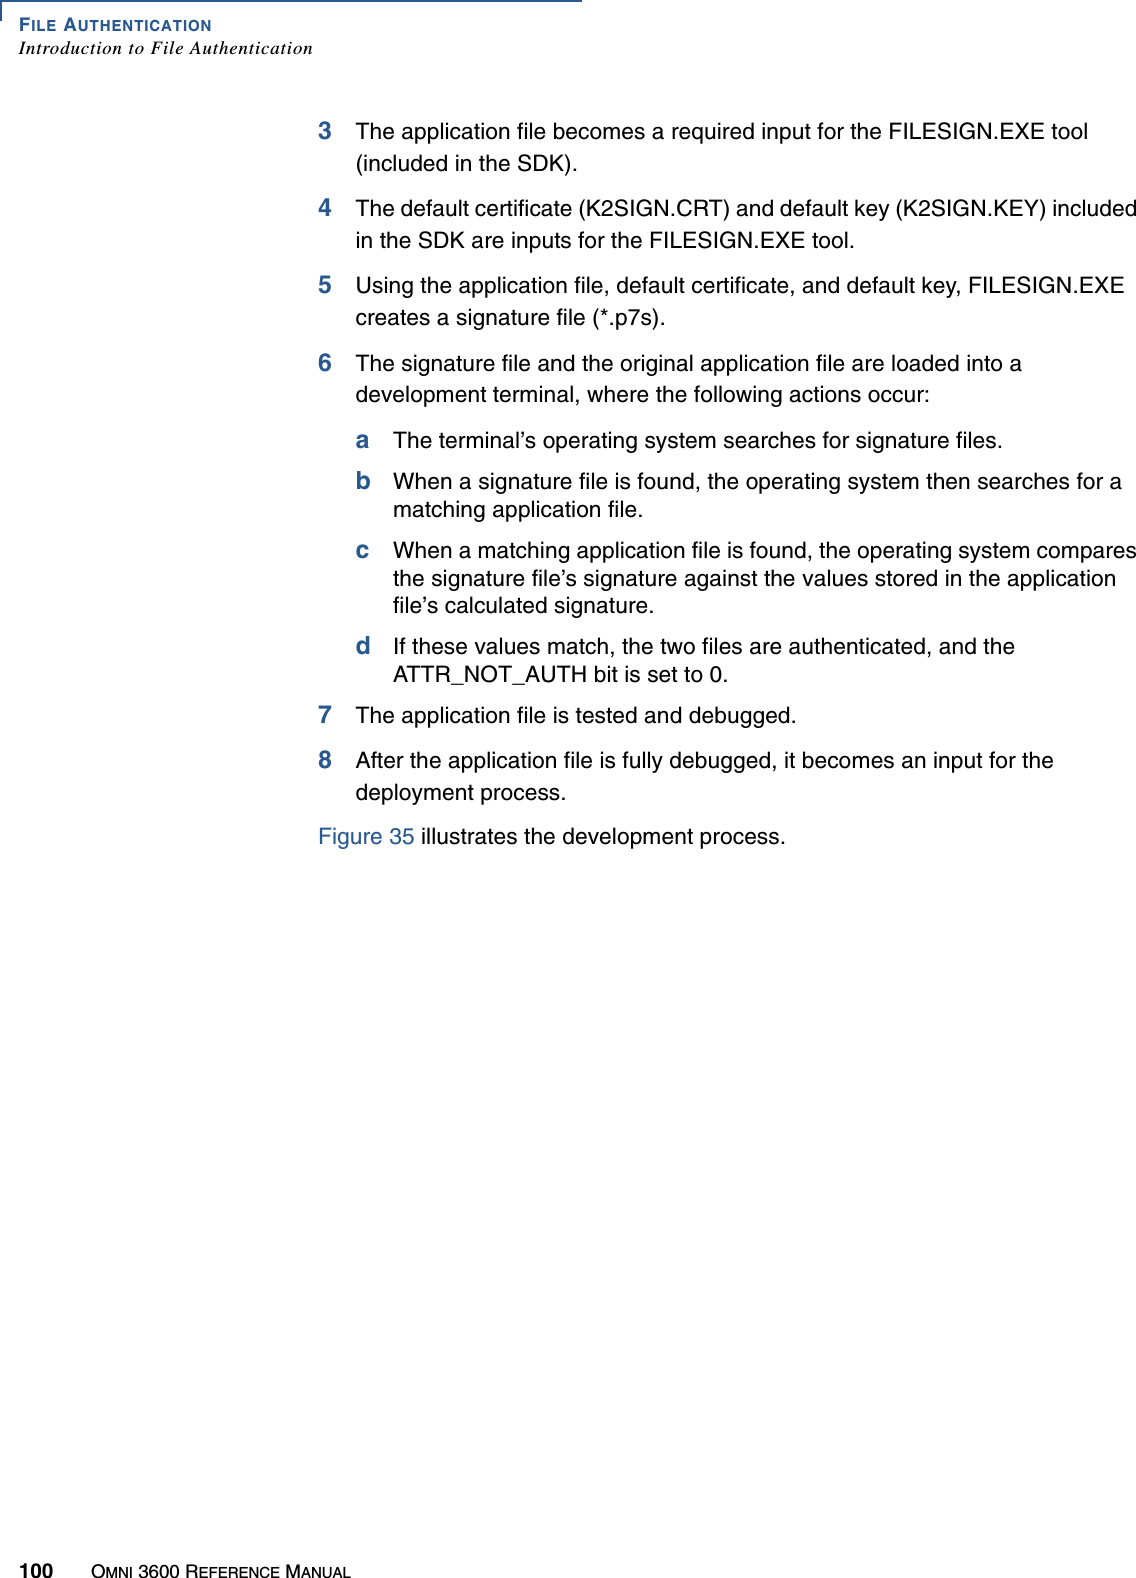
Contents
- 1. User Manual Part I
- 2. User Manual Part II
- 3. User Manual Part III
- 4. User Manual Part IV
- 5. User Manual Part V
User Manual Part III
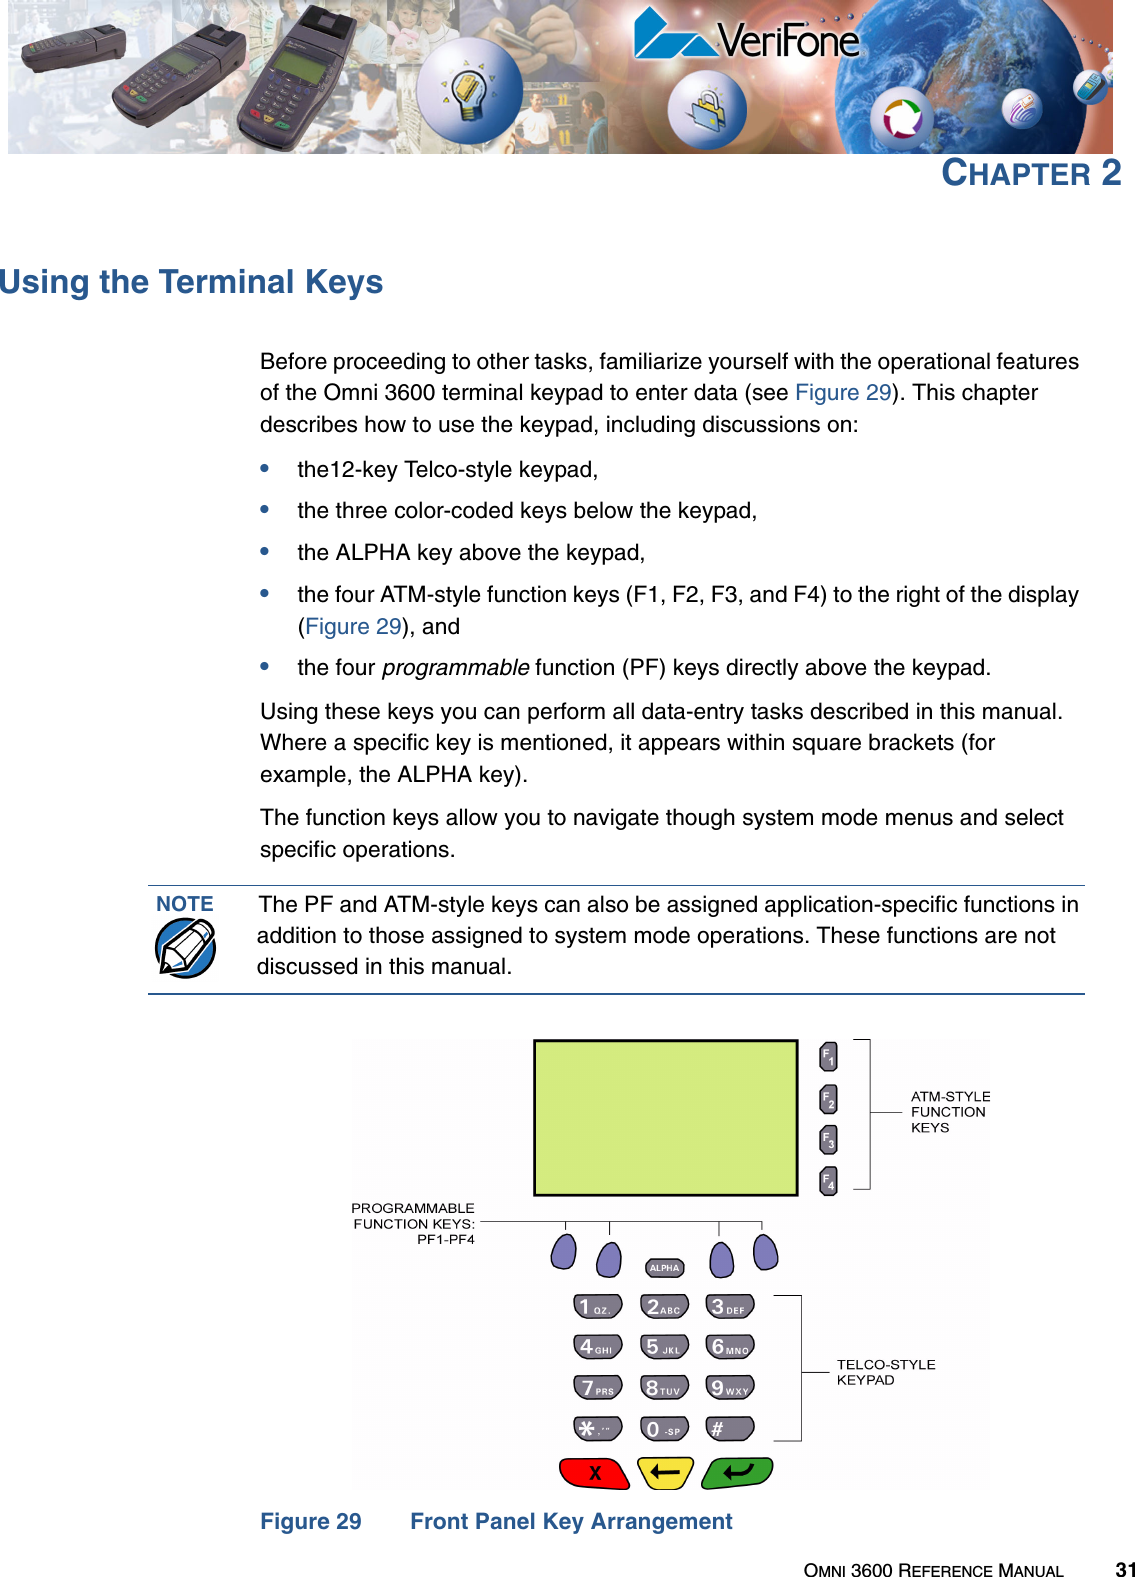
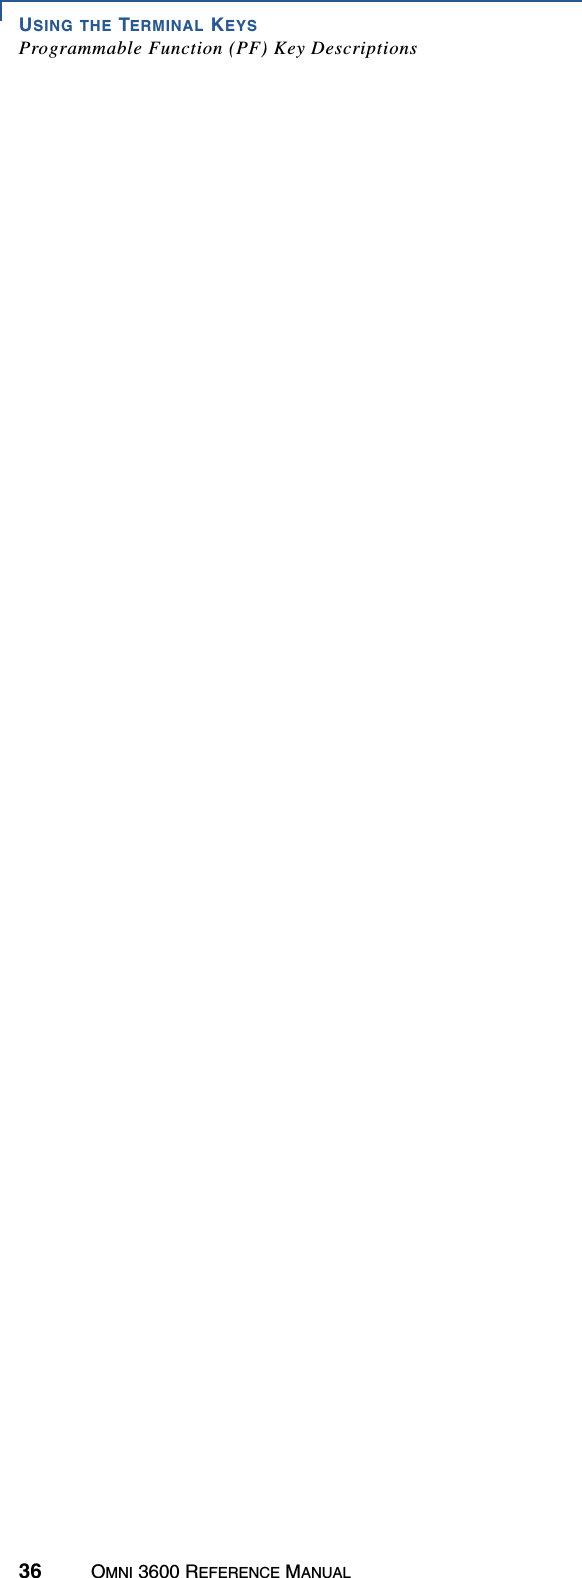
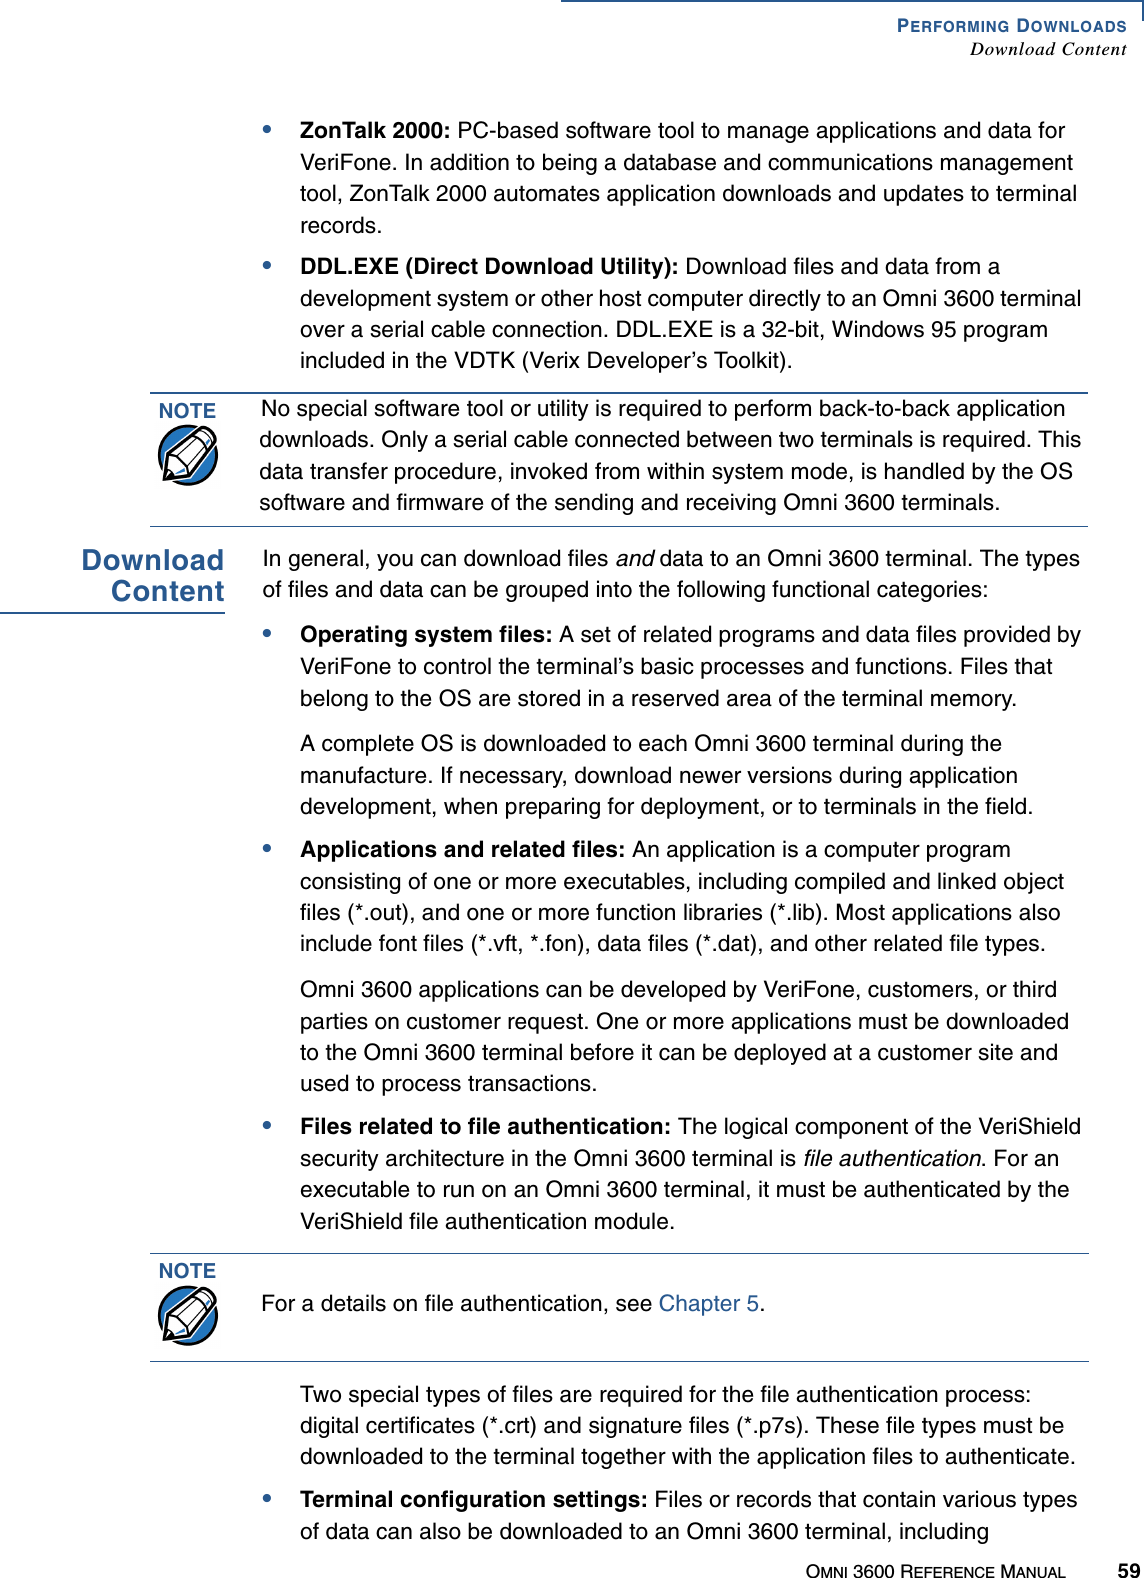
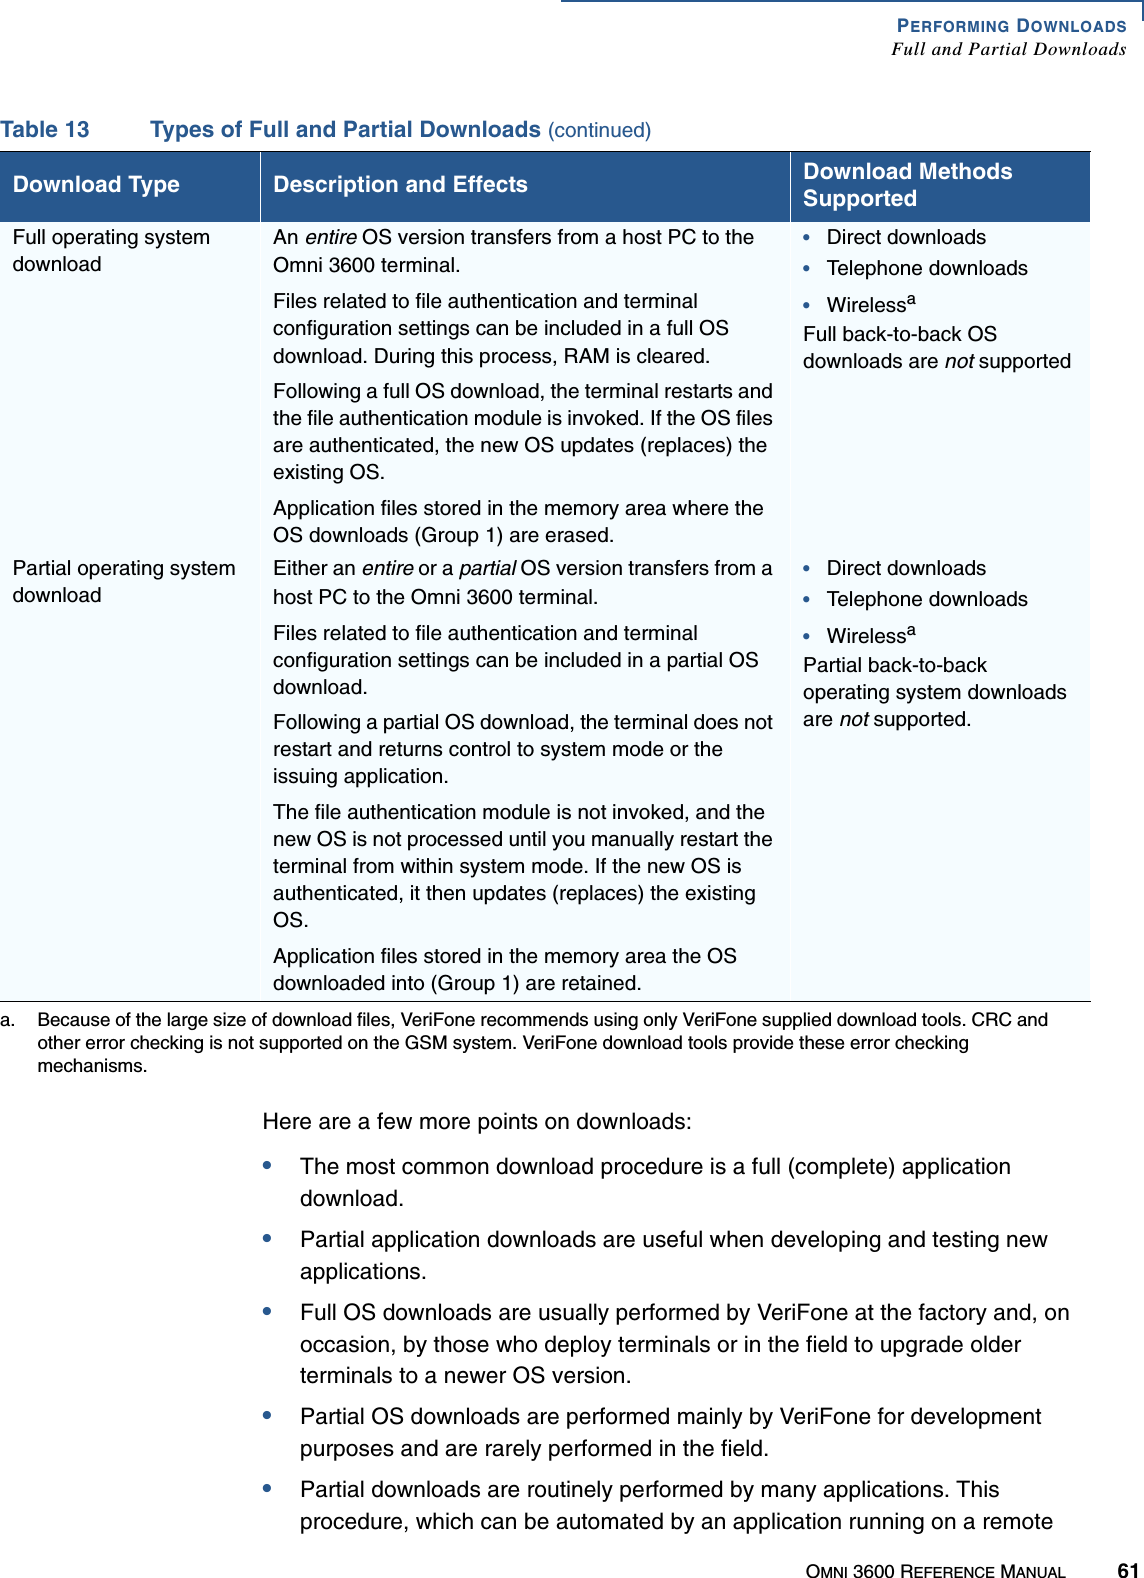
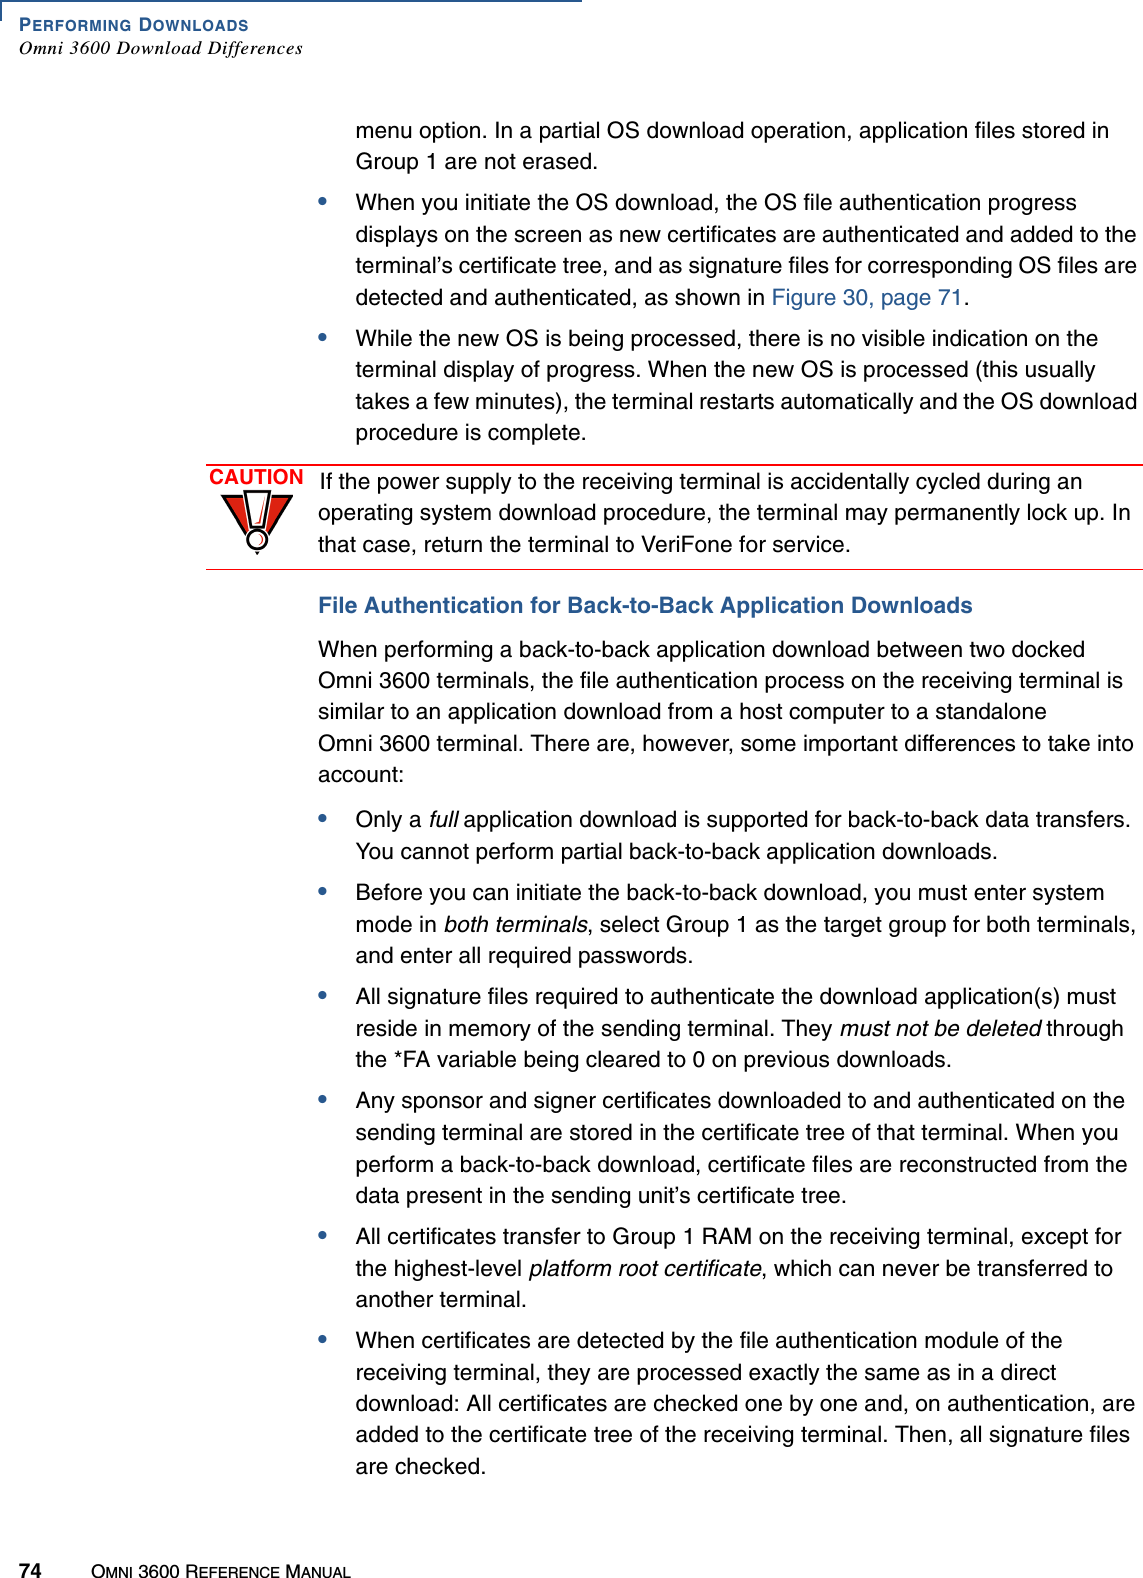
![USING THE TERMINAL KEYSThe Keypad34 OMNI 3600 REFERENCE MANUALIf two or more characters display on the Omni 3600 screen, pressing ALPHA changes the last character on the line to the next letter, number, or symbol in the key sequence. For example:Tabl e 2 provides additional examples of how to use the ALPHA key to select ASCII characters from the 12-key Telco-style keypad.Tabl e 3 lists all the ASCII characters you can type using the ALPHA key and the Telco keypad.Current display: A5C*2ALPHA A5C*AALPHA A5C*BALPHA A5C*CALPHA A5C*2Table 2 Example ALPHA Key EntriesDesired Character Press Keys2 2A2 ALPHAS7 ALPHA ALPHA ALPHA!# ALPHASpace 0 ALPHA ALPHAComma (,) * ALPHAPlus sign (+) 0 ALPHA ALPHA ALPHATable 3 Using ALPHA and the 12-Key KeypadKey to PressWithout Pressing ALPHAPress ALPHAOne TimePress ALPHATwo TimesPress ALPHA Three Times1 QZ. 1 Q Z .2 ABC 2 A B C3 DEF 3 D E F4 GHI 4 G H I5 JKL 5 J K L6 MNO 6 M N O7 PRS 7 P R S8 TUV 8 T U V9 WXY 9 W X Y0 -SP 0 – [space] +* ,’ ” * , ‘ “#aa. The # key also supports four additional characters: (=), (&), (/), and (%). To enter =, press # once, then ALPHA four times. To enter &, press # once, then ALPHA five times. To enter /, press # once, then ALPHA six times. To enter %, press # once, then ALPHA seven times. # ! : @](https://usermanual.wiki/Verifone/OMNI3600D.User-Manual-Part-III/User-Guide-370919-Page-4.png)

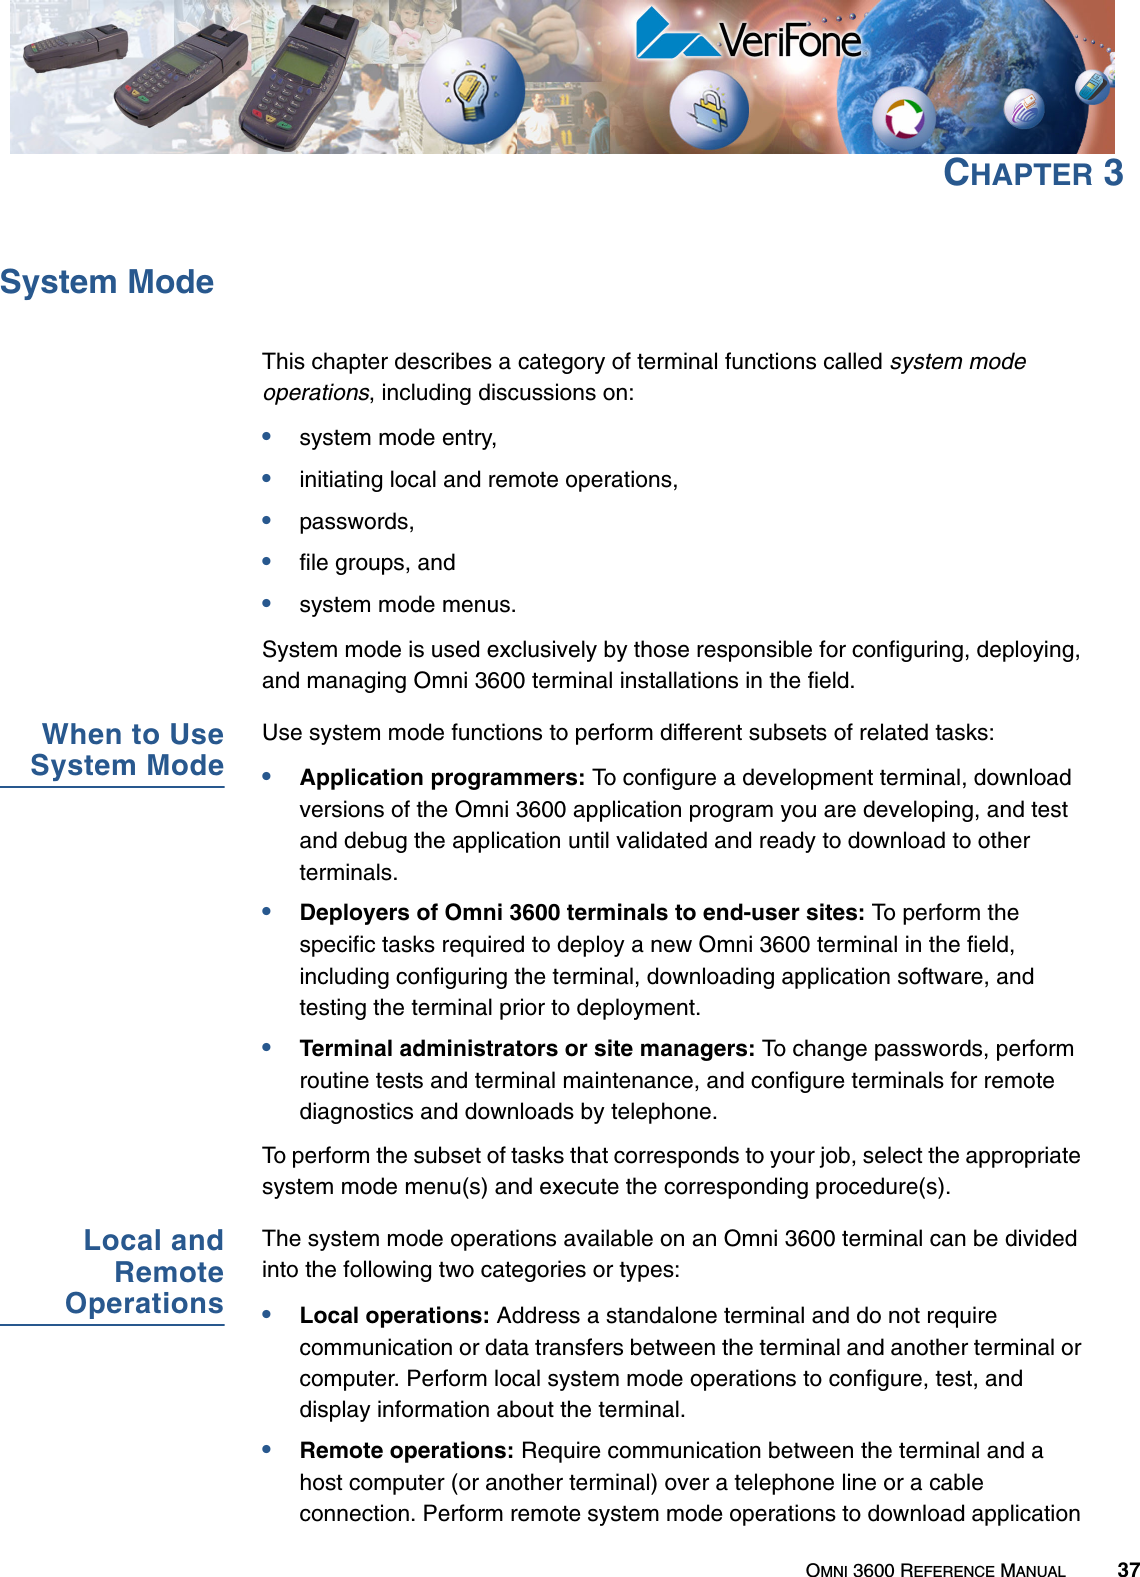
![SYSTEM MODEVerifying Terminal Status38 OMNI 3600 REFERENCE MANUALsoftware to the terminal, upload software from one terminal to another, and perform diagnostics over a telephone line.This chapter contains descriptions on how to perform local system mode operations. For information performing remote operations, such as downloads, refer to Chapter 4.VerifyingTerminalStatusThe Omni 3600 terminal you are working with may or may not have an application program running on it. After you have set up the terminal (Chapter 1) and the terminal is turned on, use the following guidelines to verify terminal status regarding software and current operating mode:•If no application program is loaded into terminal RAM or flash, the message DOWNLOAD NEEDED appears on the display. From this point, press F2 and F4 to enter system mode and perform the required download.•If an application program is loaded into terminal RAM or flash, an application-specific application prompt appears. The application is running and the terminal is in normal mode. If all installation steps are complete, the terminal can process transactions.EnteringSystem ModeTo prevent the unauthorized use of system mode menus, the Omni 3600 terminal firmware requires a system password each time you enter system mode. The default, factory set system password is “Z66831.” Use the following key sequence to enter this password:1 ALPHA ALPHA 6 6 8 3 1 [↵] After entering the correct password, the terminal enters system mode and displays the first system mode main menu, SYS MODE MENU 1. You can now toggle through all seven system mode main menus. File Groups The Omni 3600 operating system implements a file system in volatile, battery-backed RAM and non-volatile flash memory. Files are assigned to one of 15 groups for access control. Groups are similar to directories on a computer in that different applications can be stored in separate file groups, just like different computer applications can be stored in separate directories. Groups are referred to as Group n or GIDn throughout this manual.Each group is protected by a separate password, and each has a separates CONFIG.SYS file. The following rules apply to the Omni 3600 file group system:NOTE It is recommended to enter system mode only on system startup or terminal restart. If you enter system mode while an application is running, system mode suspends the application and takes control of the display and keyboard. The application idles in the background, but no longer accepts user inputs. You cannot return to the application during that session, only after a restart. In addition, an application running in the background may deny access to certain system mode functions.](https://usermanual.wiki/Verifone/OMNI3600D.User-Manual-Part-III/User-Guide-370919-Page-8.png)
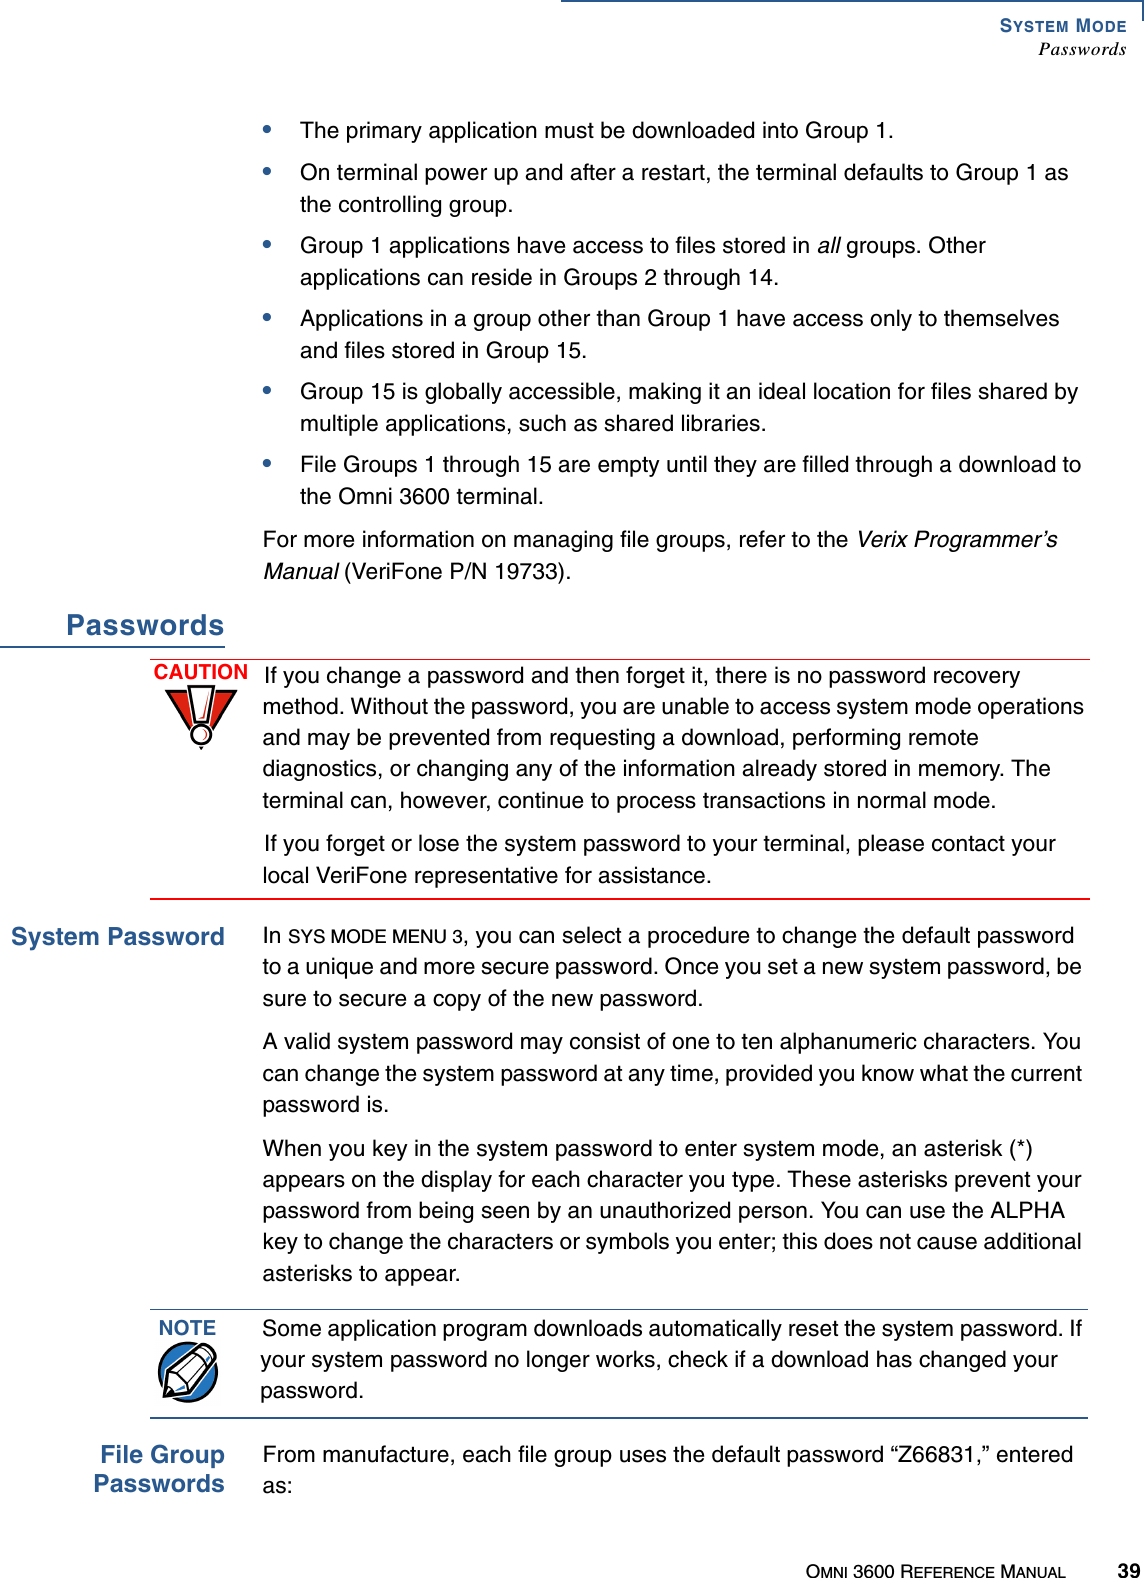
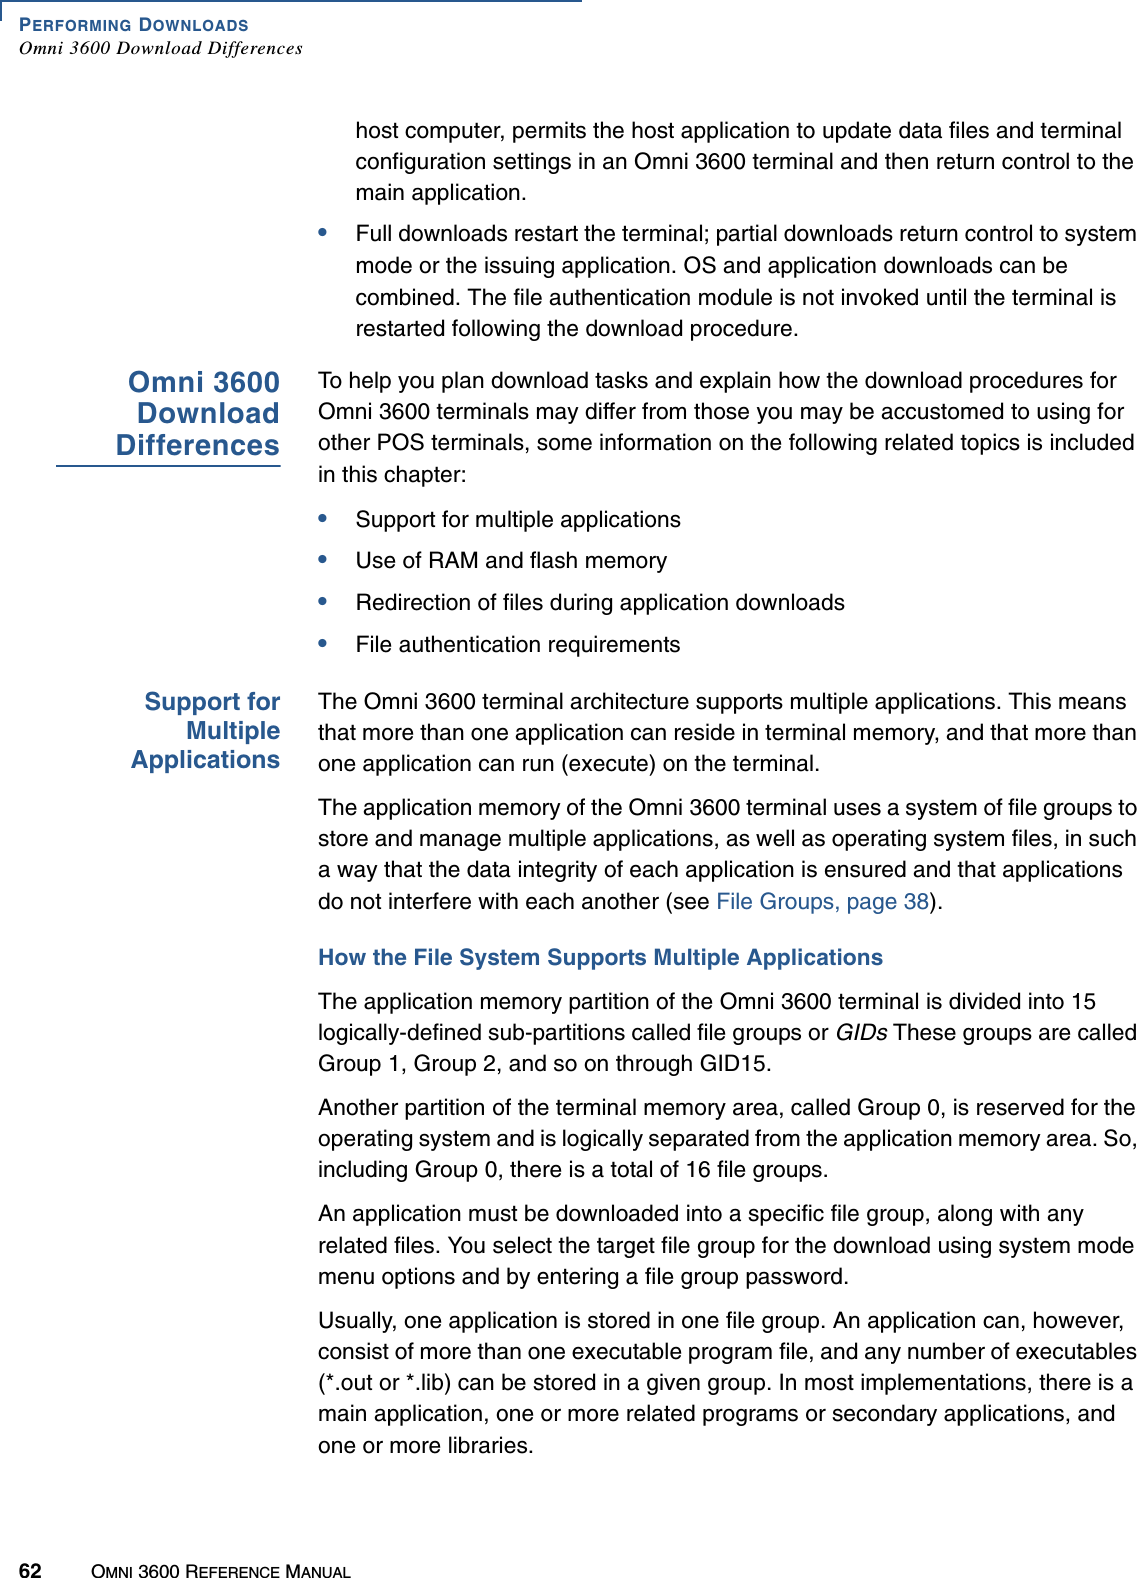
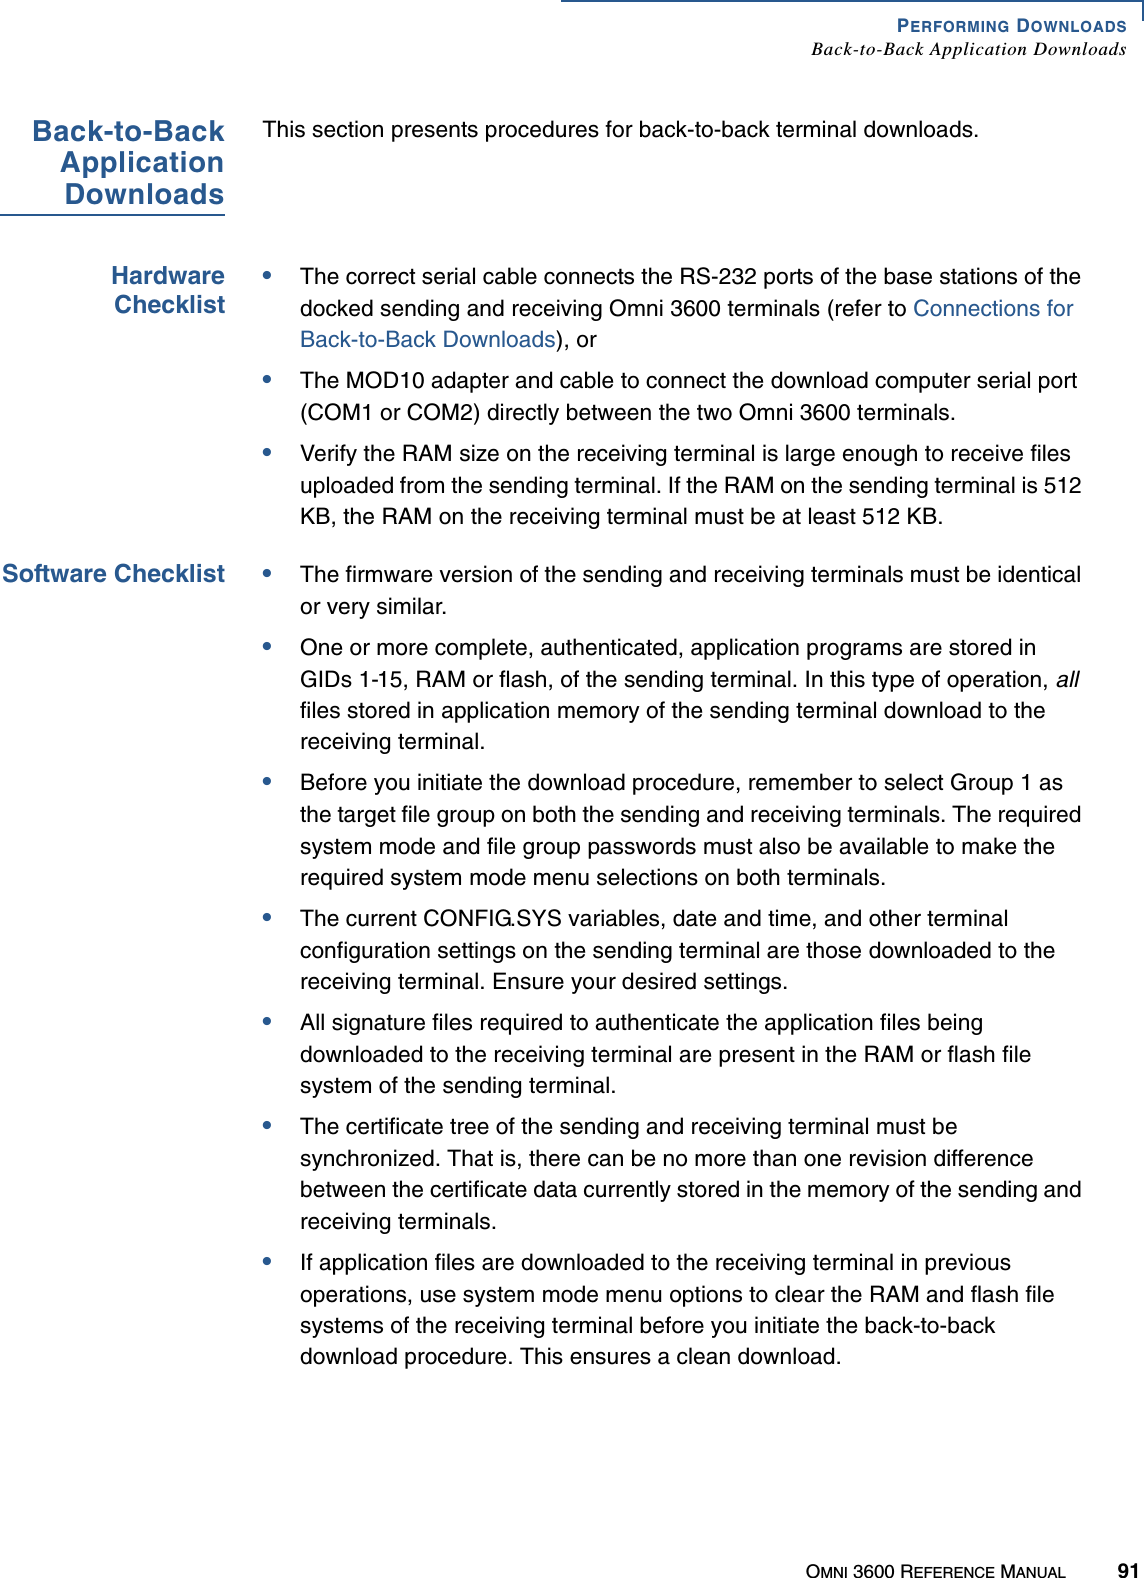
![SYSTEM MODESystem Mode Menus40 OMNI 3600 REFERENCE MANUAL1 ALPHA ALPHA 6 6 8 3 1, and press [↵]System ModeMenusThe seven main system mode menus are listed in Table 4. On successful entry of the system password, SYS MODE MENU 1 appears. To return to a previous menu, press the PF1 key (below the up arrow). To go to the next menu, press the PF2 key (below the down arrow). To return to the main system mode menu and cancel any changes, press the cancel key.Each menu has items to select; sometimes these items contain submenus or a series of prompts. When prompted to enter alphabetic or special characters, use the procedure described in Chapter 2.When performing downloads or operations that change or clear files, the password for each file group is required. The password is only required once per session per file group.NOTE This default password is the same as the password for system mode entry, which is set in the CONFIG.SYS entry *SMPW.Table 4 System Mode MenusSYS MODE MENU 1CONTRAST F2CLOCK F3RESTART F4↓SYS MODE MENU 2DOWNLOAD F2RAM FILES F3FLASH FILES F4↑↓SYS MODE MENU 3CONFIG INFO F2EDIT F3PASSWORDS F4↑↓SYS MODE MENU 4REMOTE DIAGS F2ERROR LOG F3DEBUGGER F4↑↓SYS MODE MENU 5SCREEN DIAG F2KEYBOARD DIAG F3MAG CARD DIAG F4↑↓SYS MODE MENU 6IPP DIAG F2IPP KEYLOAD F3PRINTER DIAG F4↑↓SYS MODE MENU 7BATTERY STATUS F2↑](https://usermanual.wiki/Verifone/OMNI3600D.User-Manual-Part-III/User-Guide-370919-Page-10.png)
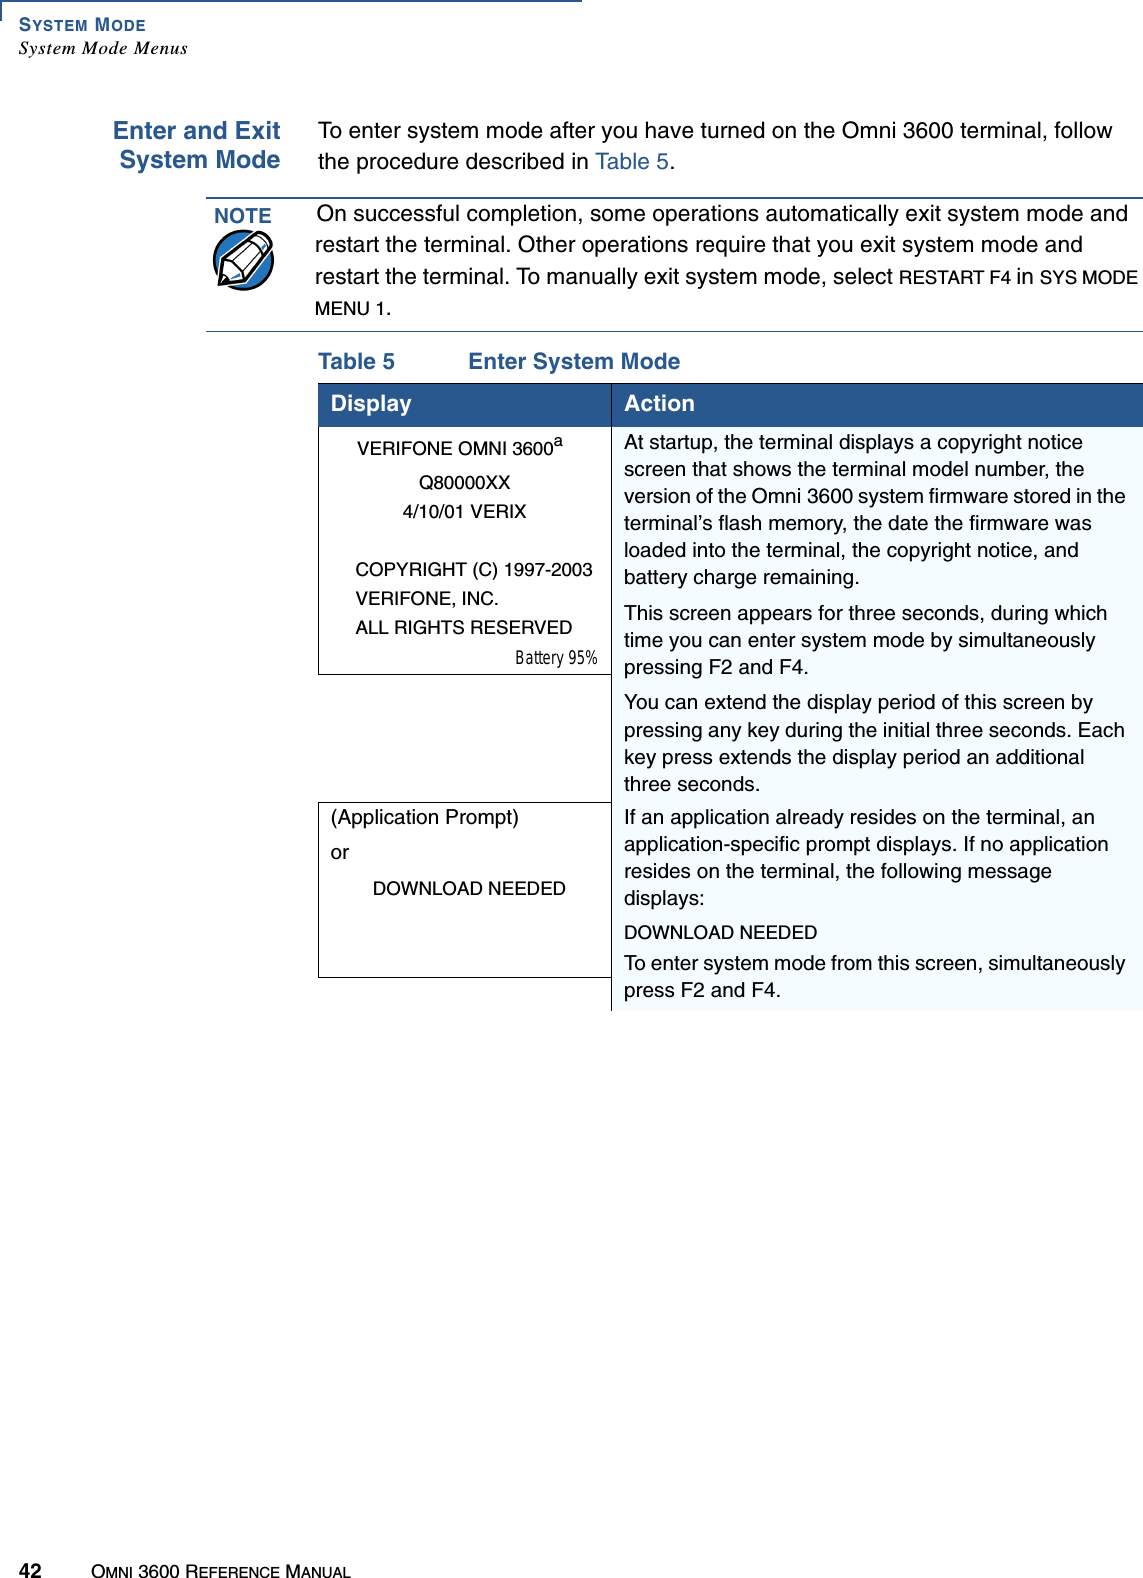
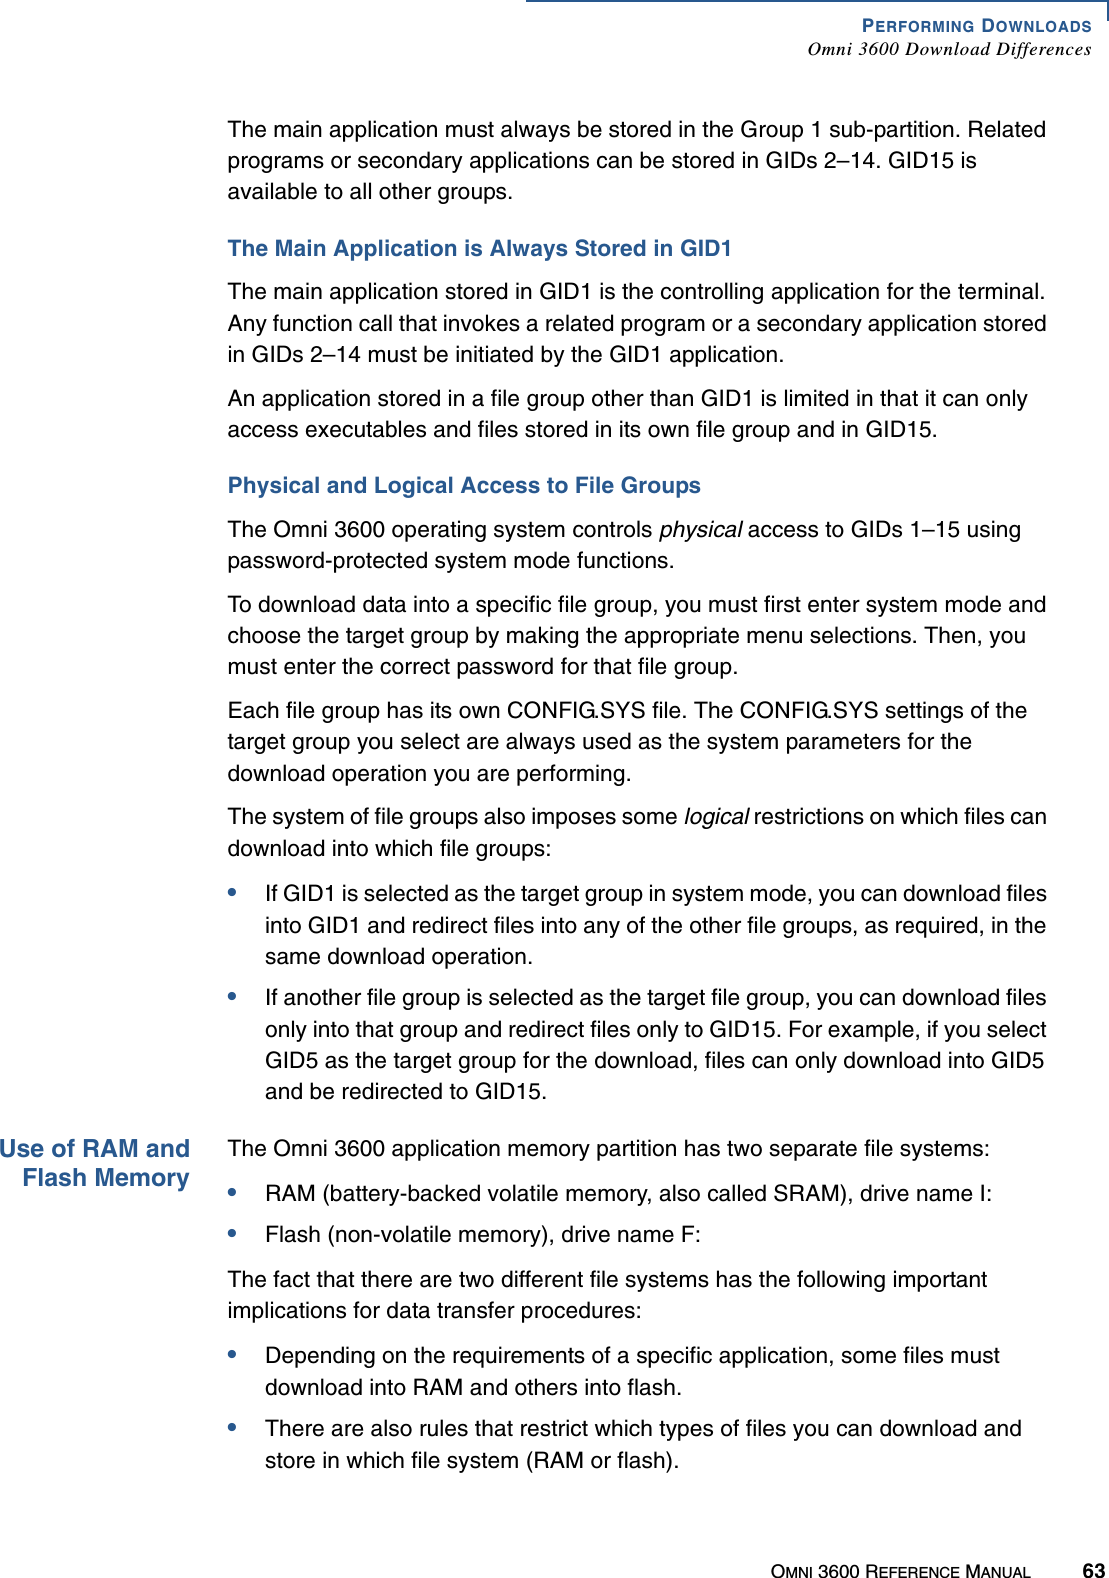
![SYSTEM MODESystem Mode MenusOMNI 3600 REFERENCE MANUAL 43System ModeMenu 1In this menu you can adjust the display contrast, set the terminal clock, and exit system mode.SYSTEM MODE ENTRYPASSWORD-------------------If an application prompt appeared in Step 2 and you chose to enter system mode you are prompted to type the system password. If DOWNLOAD NEEDED appeared in Step 2, use the default password “Z66831.” This password is entered as: 1 ALPHA ALPHA 6 6 8 3 1, and press [↵]Use the backspace [←] key to delete the entry and correct any mistakes. If you enter an incorrect password, the terminal exits the SYSTEM MODE ENTRY screen. Verify your password and re-enter it.To quit this operation and return to the application prompt or DOWNLOAD NEEDED screen, press the cancel key.SYS MODE MENU 1CONTRAST F2CLOCK F3RESTART F4↓SYS MODE MENU 1 is the first menu to display. To toggle through to the other six menus, press the PF2 key or [↵] until you reach the desired menu.a. May have the letter G for GSM radio, P for GPRS radio, or C for CDMA radio.Table 5 Enter System Mode (continued)Display ActionTable 6 System Mode Menu 1Display ActionSYS MODE MENU 1CONTRAST F2CLOCK F3RESTART F4↓To adjust the display contrast, select CONTRAST F2. To set the date and time, select CLOCK F3.To restart the terminal, select RESTART F4.To toggle to system mode menu 2, press PF2 or [↵].CONTRAST F2SYS MODE CONTRASTCONTRAST UP F2CONTRAST DOWN F3↑Select CONTRAST UP F2 to increase display contrast or CONTRAST DOWN F3 to decrease display contrast. To return to the main menu and save your changes, press [↵].](https://usermanual.wiki/Verifone/OMNI3600D.User-Manual-Part-III/User-Guide-370919-Page-13.png)
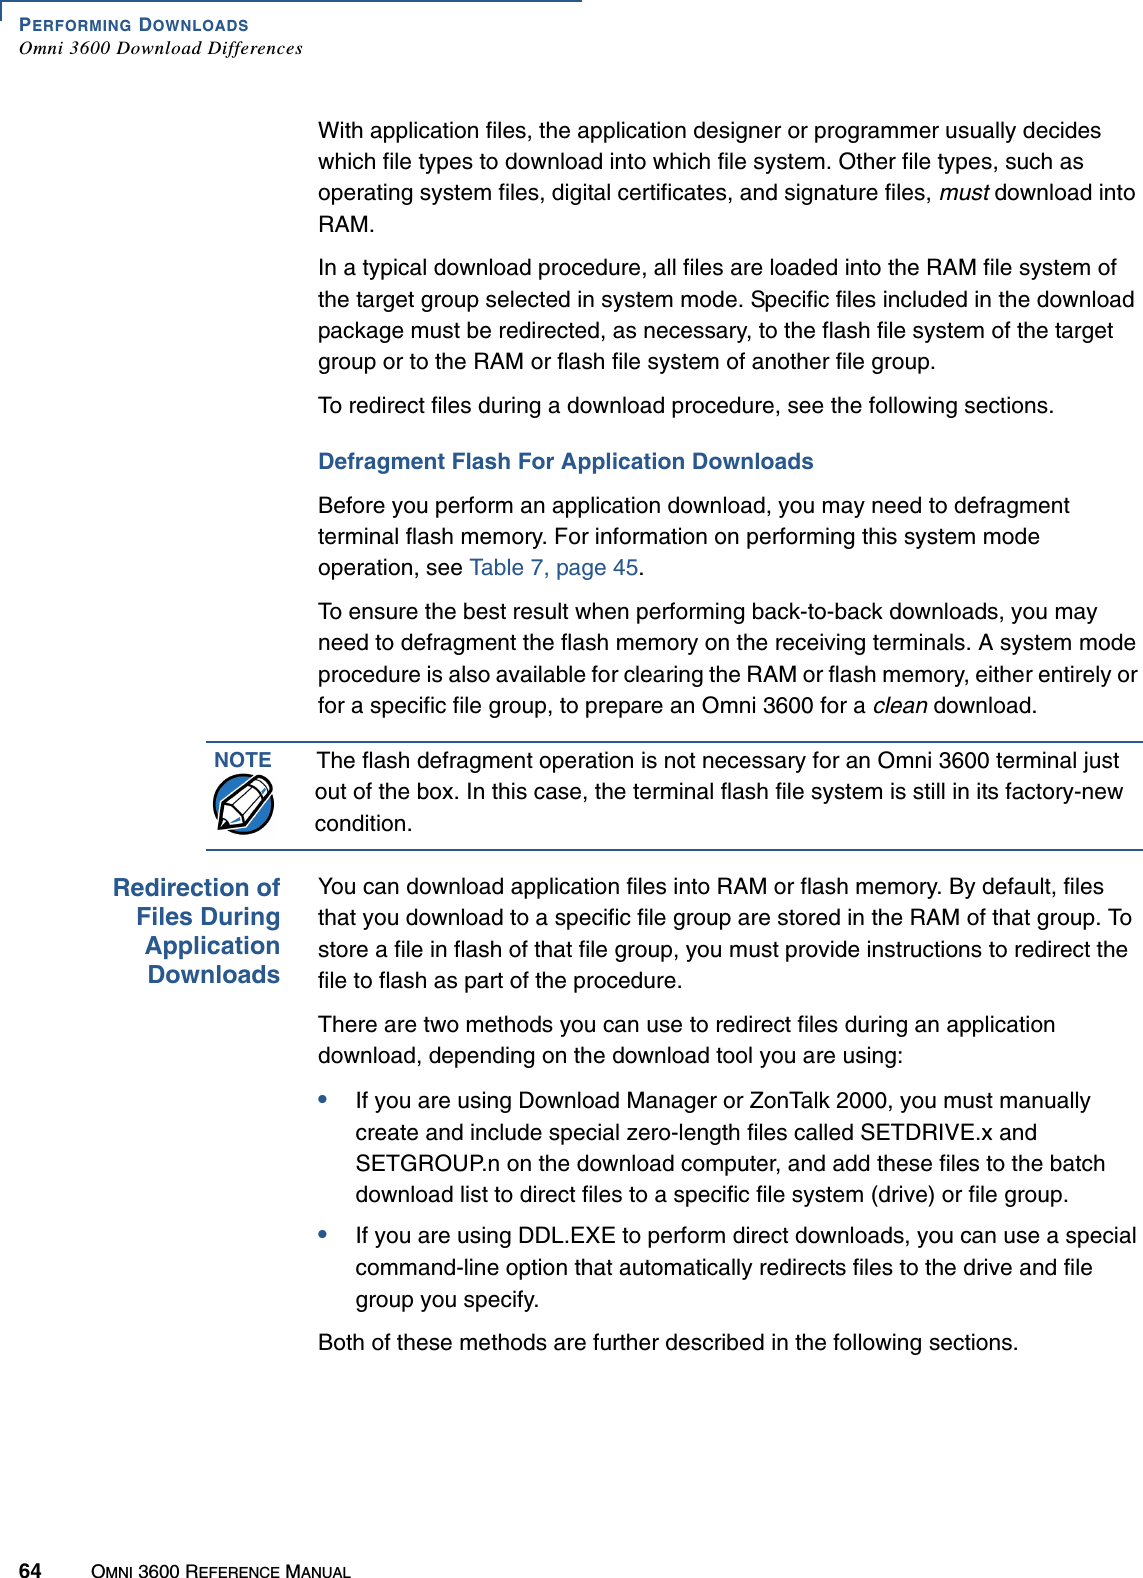
![SYSTEM MODESystem Mode MenusOMNI 3600 REFERENCE MANUAL 45You cannot perform download, clear, and defragment operations if you entered system mode while an application is running. If you see the message APPLICATION ALREADY RUNNING, PLEASE RESTART, press the cancel key and restart the terminal from system mode menu 1. When you see the copyright notice screen, enter system mode within 3 seconds (before the application begins).Table 7 System Mode Menu 2Display ActionSYS MODE MENU 2DOWNLOAD F2RAM FILES F3FLASH FILES F4↑↓To download an application to your terminal, select DOWNLOAD F2. To clear RAM files, select RAM FILES F3. To clear flash files, select FLASH FILES F4.To return to the previous system mode menu, press the PF1 key.To return immediately to SYS MODE MENU 1, or to quit any operation within this menu, press the cancel key. To toggle to SYS MODE MENU 3, press the PF2 key or [↵].DOWNLOAD F2SYS MODE FILEFILE GROUP _1Type the number of the file group (1 for the primary application; between 1–15 for other applications) to perform the download. (Refer to Chapter 4 for detailed download instructions and information.)After you type a file group number, press [↵]. SYSTEM MODE FILEGROUP NN PASSWORD-----------------To continue, enter the required password. If you enter an incorrect password, the following message appears:SYS MODE PASSWORDPLEASE TRY AGAINPress [↵]. Verify your password and re-enter it.SYS MODE DOWNLOADFULL F3PARTIAL F4↑For a full download, select FULL F3. For a partial download, select PARTIAL F4. (Refer to Chapter 4 for detailed download instructions and information.)To return to the main menu, press the PF1 key.SYS MODE DOWNLOADMODEM F2COM1 F3WIRELESS F4↑↓Select a download mode: MODEM F2, COM1 F3, or WIRELESS F4.To return to the main menu without saving your selection, press the cancel key. SYS MODE DOWNLOAD***-------DOWNLOADING NOWThe terminal is ready to receive a download. During the download, a line of asterisks appears that shows percentage of completion. Each asterisk equals approximately 10% of the download.You can cancel a download by pressing the cancel key during the download; doing so restarts your terminal.](https://usermanual.wiki/Verifone/OMNI3600D.User-Manual-Part-III/User-Guide-370919-Page-15.png)
![SYSTEM MODESystem Mode Menus46 OMNI 3600 REFERENCE MANUALRAM FILES F3SYS MODE RAMCLEAR GROUP _1 F2CLEAR ALL FILES F3To clear a file group’s RAM files, type the file group number (1–15) and press F2. To correct a mistake, press [←] to delete the number, and type a new entry.CONFIG.SYS protected records that begin with * or # are retained when you clear a RAM file group.To clear the RAM of all file groups, select CLEAR ALL FILES F3. This operation also clears the CONFIG.SYS files from all groups except Group 1. Records that begin with * or # in Group 1 are retained.Note: If you have not previously entered a group’s password in this session, the terminal prompts for the group’s password prior to clearing that group’s RAM files.SYSTEM MODE FILEGROUP NN PASSWORD-----------------To continue, enter the required password. If you enter an incorrect password, the following message appears:SYS MODE PASSWORDPLEASE TRY AGAINPress [↵]. Verify your password and re-enter it.SYS MODE CONFIRMCANCEL F3CONFIRM F4To cancel the operation, select CANCEL F3.To continue the operation, select CONFIRM F4. After the operation is complete, you return to the main menu.FLASH FILES F4SYS MODE FLASHCLEAR GROUP _1 F2CLEAR ALL FILESF3DEFRAG 0 F4To clear a file group’s flash files, type the file group number (1–15) and press F2. To correct a mistake, press [←] to delete the number, and type a new entry.To clear the flash files of all file groups, press F3. If you have not previously entered a group’s password in this session, the terminal prompts you for the group’s password prior to clearing that group’s flash files.CAUTION! Clearing all flash files erases the application program from your terminal. A new application download is then required.To defragment flash files, press F4, then skip to SYS MODE CONFIRM of this procedure.The number displayed beside DEFRAG is the total amount of space, in bytes, to reclaim in the defrag operation.Table 7 System Mode Menu 2 (continued)Display Action](https://usermanual.wiki/Verifone/OMNI3600D.User-Manual-Part-III/User-Guide-370919-Page-16.png)
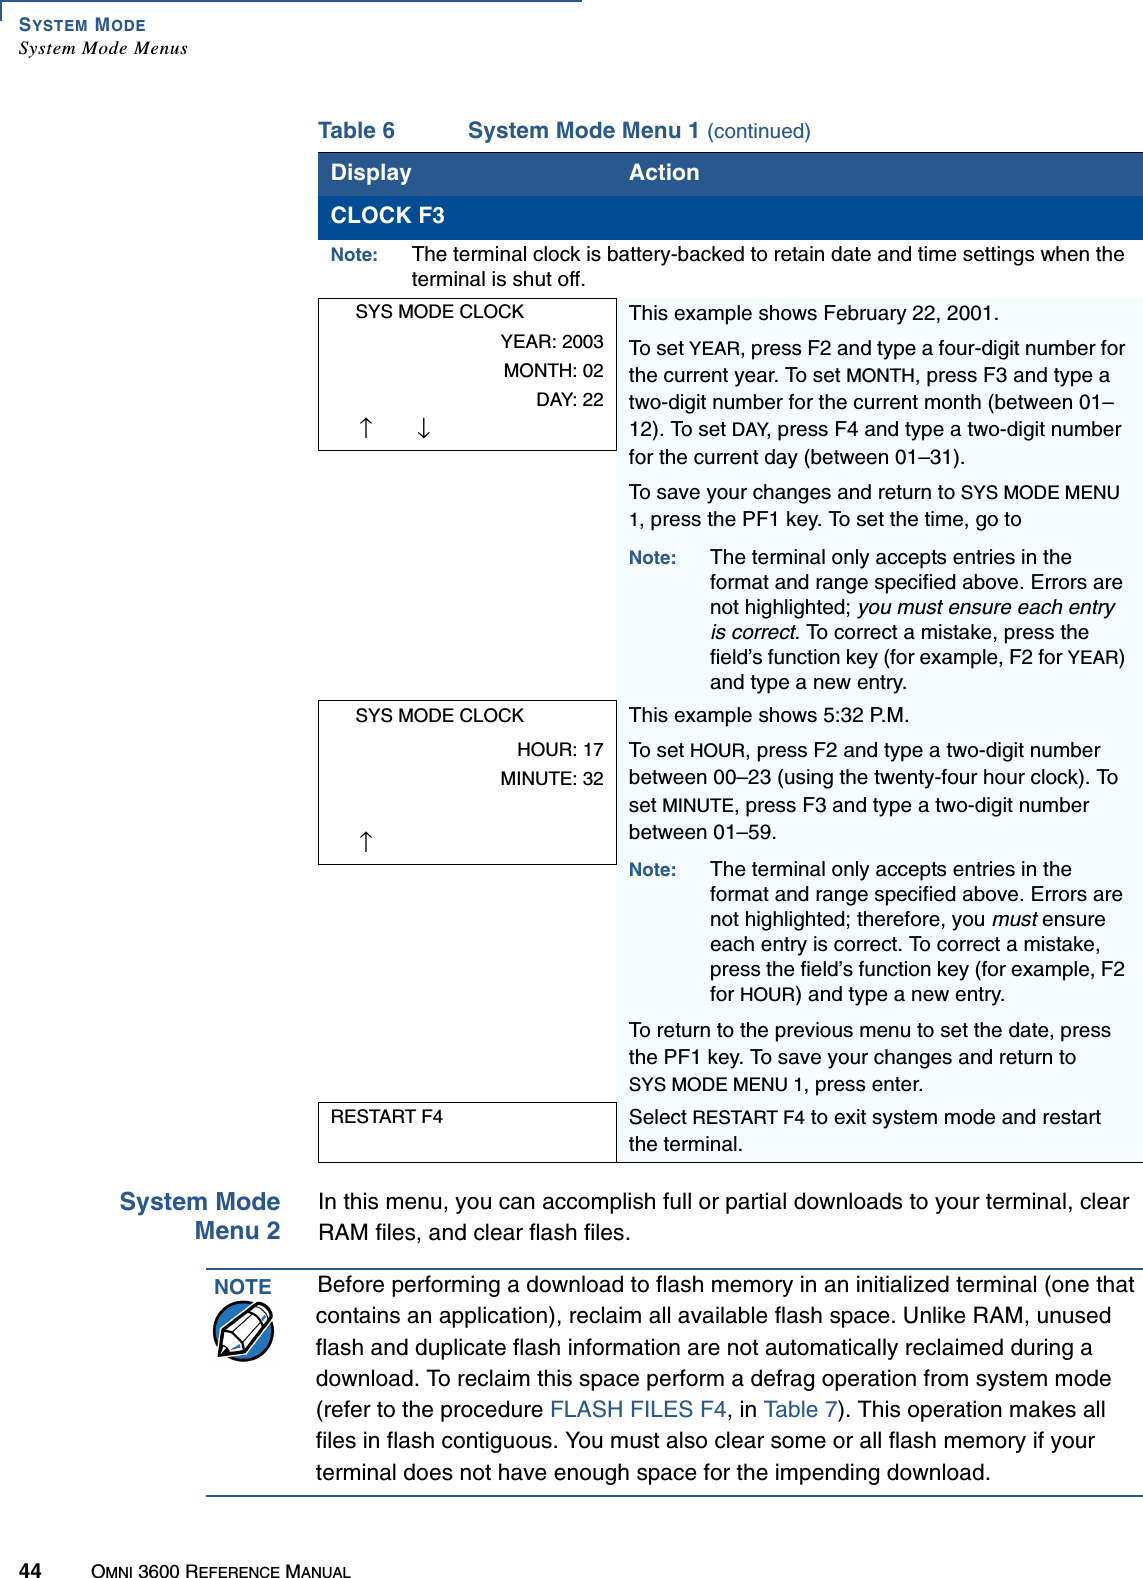
![SYSTEM MODESystem Mode MenusOMNI 3600 REFERENCE MANUAL 47System ModeMenu 3In this menu, you can view terminal configuration information, edit the CONFIG.SYS or another keyed file, and change system mode and file group passwords.SYSTEM MODE FILEGROUP NN PASSWORD-----------------To continue, enter the required password. If you enter an incorrect password, the following message appears:SYS MODE PASSWORDPLEASE TRY AGAINPress [↵]. Verify your password and re-enter it.SYS MODE CONFIRMCANCEL F3CONFIRM F4To cancel the operation, select CANCEL F3. To continue the operation, select CONFIRM F4. After the operation is completed, you are returned to the main SYS MODE MENU 2 screen.If you selected DEFRAG in SYS MODE FLASH and select CONFIRM F4 here, you are taken to SYS MODE DEFRAG.SYS MODE CLEARCLEARING FLASHPLEASE WAITThis operation may take a few seconds. If you have cleared all flash files, the terminal displays DOWNLOAD NEEDED on restart.If after clearing selected flash files you experience difficulties with your application, you may have accidentally deleted a flash file that the CONFIG.SYS file in File Group 1 uses. This type of error usually generates the error message RUN FAILED when trying to execute the application; you must restore the required File Group 1 flash file.SYS MODE DEFRAGRECLAIMING FLASHPLEASE WAITThis message indicates the flash files are being defragmented; this operation may take a few seconds.On successful completion, the terminal automatically restarts.Table 7 System Mode Menu 2 (continued)Display ActionNOTE Some application program downloads automatically reset the system password.](https://usermanual.wiki/Verifone/OMNI3600D.User-Manual-Part-III/User-Guide-370919-Page-17.png)
![SYSTEM MODESystem Mode Menus48 OMNI 3600 REFERENCE MANUALTable 8 System Mode Menu 3Display ActionSYS MODE MENU 3CONFIG INFO F2EDIT F3PASSWORDS F4↑↓To view terminal configuration information, select CONFIG INFO F2. To edit the CONFIG.SYS or another keyed file, or to set the country code for your terminal’s modem, select EDIT F3. (For more information, refer to the Edit Keyed Files section that follows this main menu description.)To change the system mode and file group passwords, select PASSWORDS F4. The file groups and system mode all use a default password that is pre-set at the factory: Z66831. It is entered as:1 ALPHA ALPHA 6 6 8 3 1 and press [↵]. To return to the previous system mode menu, press the PF1 key.To return immediately to SYS MODE MENU 1, or to quit any operation within this menu, press the cancel key.To toggle to the system mode menu 4, press the PF2 key or [↵].CONFIG INFO F2SYS MODE CONFRAM FILES 3INUSE 728AVAIL 481056FLASH FILES 0INUSE 0AVAIL 786424↓This screen shows the number of kilobytes in use and that available for RAM and flash.To continue, press the PF2 key.SYS MODE CONFRAM 512FLASH 1024SERNO K2-0001PTID 12000000PART P096-100-02VERS A↑↓This screen shows configuration information specific to your terminal:•Total kilobytes of RAM memory •Total kilobytes of flash memory •Serial number•Permanent terminal identification number (PTID)•Terminal part number•Terminal hardware version numberYour terminal’s screen may vary depending on your terminal’s model and the operating system version installed.To return to the previous menu, press the PF1 key; to continue, press the PF2 key.](https://usermanual.wiki/Verifone/OMNI3600D.User-Manual-Part-III/User-Guide-370919-Page-18.png)
![SYSTEM MODESystem Mode MenusOMNI 3600 REFERENCE MANUAL 49SYS MODE CONFMODL OMNI3600CTRY USKEYPAD 0DISPLAY 128064MAG RDR 0PRINTER 1↑This screen shows additional configuration information specific to your terminal:•Model number•Country of manufacture•Keypad type (0 = Telco, 1 = calculator, 2 = Singapore)•Display unit type•Magnetic stripe card reader type•Whether or not a thermal printer is integrated into the terminal (where 0 = No, 1 = Yes)To return to the previous menu, select the PF1 key; to continue, select the PF2 key.To return to the main menu, press the cancel key.SYS MODE CONFPINPAD 0LIFE 73525RSET971117023334RCNT 29MODEM CTRY?↑This screen shows additional configuration information specific to your terminal:•Whether or not a PIN pad device is integrated into the terminal (where 0 = No, 1 = Yes)•Number of seconds the terminal has run (LIFE)•Last reset date and time, in YYMMDDHHMMSS format (where YY = year, MM = month, DD = day, HH = hour, MM = minute, and SS = second)•Number of times the terminal has been reset (RCNT)•Modem country code (not applicable on this model)To return to the previous menu, select the PF1 key; to return to the main menu, press the cancel key.EDIT F3SYS MODE FILEFILE GROUP _1To search for keyed records in a particular file group, type the appropriate group number and press [↵].If you cannot locate a particular keyed record, it may be stored in another file group. To search for keyed records in another file group, return to the main menu by pressing the cancel key, then type the appropriate group number and press [↵].To correct a mistake, press [←] to delete the number, and type the new entry.SYSTEM MODE FILEGROUP NN PASSWORD-----------------To continue, enter the required password. If you enter an incorrect password, the following message appears:SYS MODE PASSWORDPLEASE TRY AGAINPress [↵]. Verify your password and re-enter it.Table 8 System Mode Menu 3 (continued)Display Action](https://usermanual.wiki/Verifone/OMNI3600D.User-Manual-Part-III/User-Guide-370919-Page-19.png)
![SYSTEM MODESystem Mode Menus50 OMNI 3600 REFERENCE MANUALSYS MODE EDITFILE CONFIG.SYS_To edit the CONFIG.SYS file, press [↵].Note: In this menu, you can create a new keyed file or edit an existing one. First, use [←] to clear any previous key name from the display. Then, type the key name, press [↵], and skip to the SYS MODE EDIT VALUE screen below.SYS MODE EDITKEY(KEY NAME)---------------------------------To create or search for a keyed record, use [←] to clear any previous key name from the display. Then, type the key name, press [↵], and skip to Step 5b of this procedure.To scroll through the search keys, press [↵], or use the PF1 or PF2 keys to scroll the up and down respectively, as needed.To scroll through keyed records, press either the PF3 or the PF4 key, below the Left and Right arrows respectively, as needed.SYS MODE EDIT(KEY NAME) KEY F2(KEY VALUE)VALUE F3↑↓ ←→To scroll through the search keys, press [↵]. Or use the PF1 or PF2 keys to scroll the up and down respectively, as needed.To manually enter another key name, select KEY F2 and use [←] to clear the previous key name from the display. Then, type the appropriate key name and press [↵].To scroll through the displayed key value, press either the PF3 or the PF4 key, below the Left and Right arrows respectively, as needed.To edit a key value, select VALUE F3 and proceed to the next step. SYS MODE EDITVALUE(Value)-----------------------------------------To create or edit a key value, use [←] to clear any previous key value from the display. Then, type the new key value and press [↵]. SYS MODE EDIT(Key name) KEY F2(Key value)VALUE F3↑↓ ←→To exit SYS MODE EDIT after completing your edit operations, press the cancel key twice.Table 8 System Mode Menu 3 (continued)Display Action](https://usermanual.wiki/Verifone/OMNI3600D.User-Manual-Part-III/User-Guide-370919-Page-20.png)
![SYSTEM MODESystem Mode MenusOMNI 3600 REFERENCE MANUAL 51PASSWORDS F4SYS MODE PASSWORDFILE GROUP _1 F2SYS MODE ENTRY F3To change the password of File Group 1, select FILE GROUP _1 F2. Then, go to SYSTEM MODE FILE GROUP NN PASSWORD below.To change the password of another file group, type the appropriate file group number and press F2. Then, go to SYSTEM MODE FILE GROUP NN PASSWORD below.To correct a mistake, press [←] to delete the number, and type the new entry.To change the system password, select SYS MODE ENTRY F3. Then, skip to SYS MODE PASSWORD NEW below.Note: Some application program downloads automatically reset the system mode password.SYSTEM MODE FILEGROUP NN PASSWORD----------------Type the current password for the selected file group and press [↵].If you enter an incorrect password, the following message appears:SYS MODE PASSWORDPLEASE TRY AGAINPress [↵]. Verify your password and re-enter it.SYS MODE PASSWORDNEW----------------------Type the new password and press [↵]. To correct a mistake, press [←] to delete the number, and then type the new entry.SYS MODE PASSWORDAGAIN--------------------The terminal requests that you verify the new password. Retype the new password and press [↵].SYS MODE PASSWORDPASSWORD CHANGEDThe new password is now in effect. To exit this screen, press [↵]. You are returned to the main menu.Table 8 System Mode Menu 3 (continued)Display Action](https://usermanual.wiki/Verifone/OMNI3600D.User-Manual-Part-III/User-Guide-370919-Page-21.png)
![SYSTEM MODESystem Mode Menus52 OMNI 3600 REFERENCE MANUALEdit Keyed Files A keyed file is a collection of individual records, which contain ASCII data and are identified by unique search keys. You can edit the ASCII data directly from the terminal keypad using the terminal’s built-in keyed file editor. Each record has two parts: a key name and a key value. The search key is a variable-length string, or key name, that identifies the record. The information assigned to the search key is contained in a separate variable-length string, or key value.For example, in CONFIG.SYS, the ZonTalk key for the application serial ID number is *ZT. The value for the key is the actual application ID number. By entering *ZT using the editor, the terminal can quickly locate the application serial ID number. You can also use [↵] to scroll through the search keys instead of entering the characters *ZT through the keypad.CONFIG.SYS: Protected and Non-protected RecordsThe concept of protected and non-protected records applies only to the CONFIG.SYS files in your terminal. Protected records are those with search keys beginning with an asterisk (*) or a pound symbol (#). Prior to a download, the recommended procedure is to clear RAM files. Protected records in the File Group 1 CONFIG.SYS file are retained in a full application download and when RAM is cleared. Non-protected records are all other CONFIG.SYS files, and records of other files. These records are deleted when RAM is cleared.Editing CONFIG.SYS with an External EditorYou can create and edit the CONFIG.SYS files of Omni 3600 applications through an IBM PC-compatible computer when you download files to the terminal. For more information on editing an application’s CONFIG.SYS file, refer to the ZonTalk 2000® Reference Manual, the Verix Programmer’s Manual, or contact your local VeriFone representative.For more information about using VeriCentre Download Management Module in client-server installations, please contact your local VeriFone representative.System ModeMenu 4In this menu you can view the error log and perform application debugging operations.NOTE When entering any password, an asterisk (*) appears on the display for each character you type. These asterisks prevent your password from being seen by an unauthorized person. Pressing the ALPHA key changes the characters or symbols you enter, but ALPHA does not cause additional asterisks to appear. Secure a copy of every password to ensure it is not forgotten or lost.NOTE For a complete list of the ASCII characters supported by the Omni 3600, as well as their decimal and hexadecimal equivalents, please refer to Appendix B.](https://usermanual.wiki/Verifone/OMNI3600D.User-Manual-Part-III/User-Guide-370919-Page-22.png)
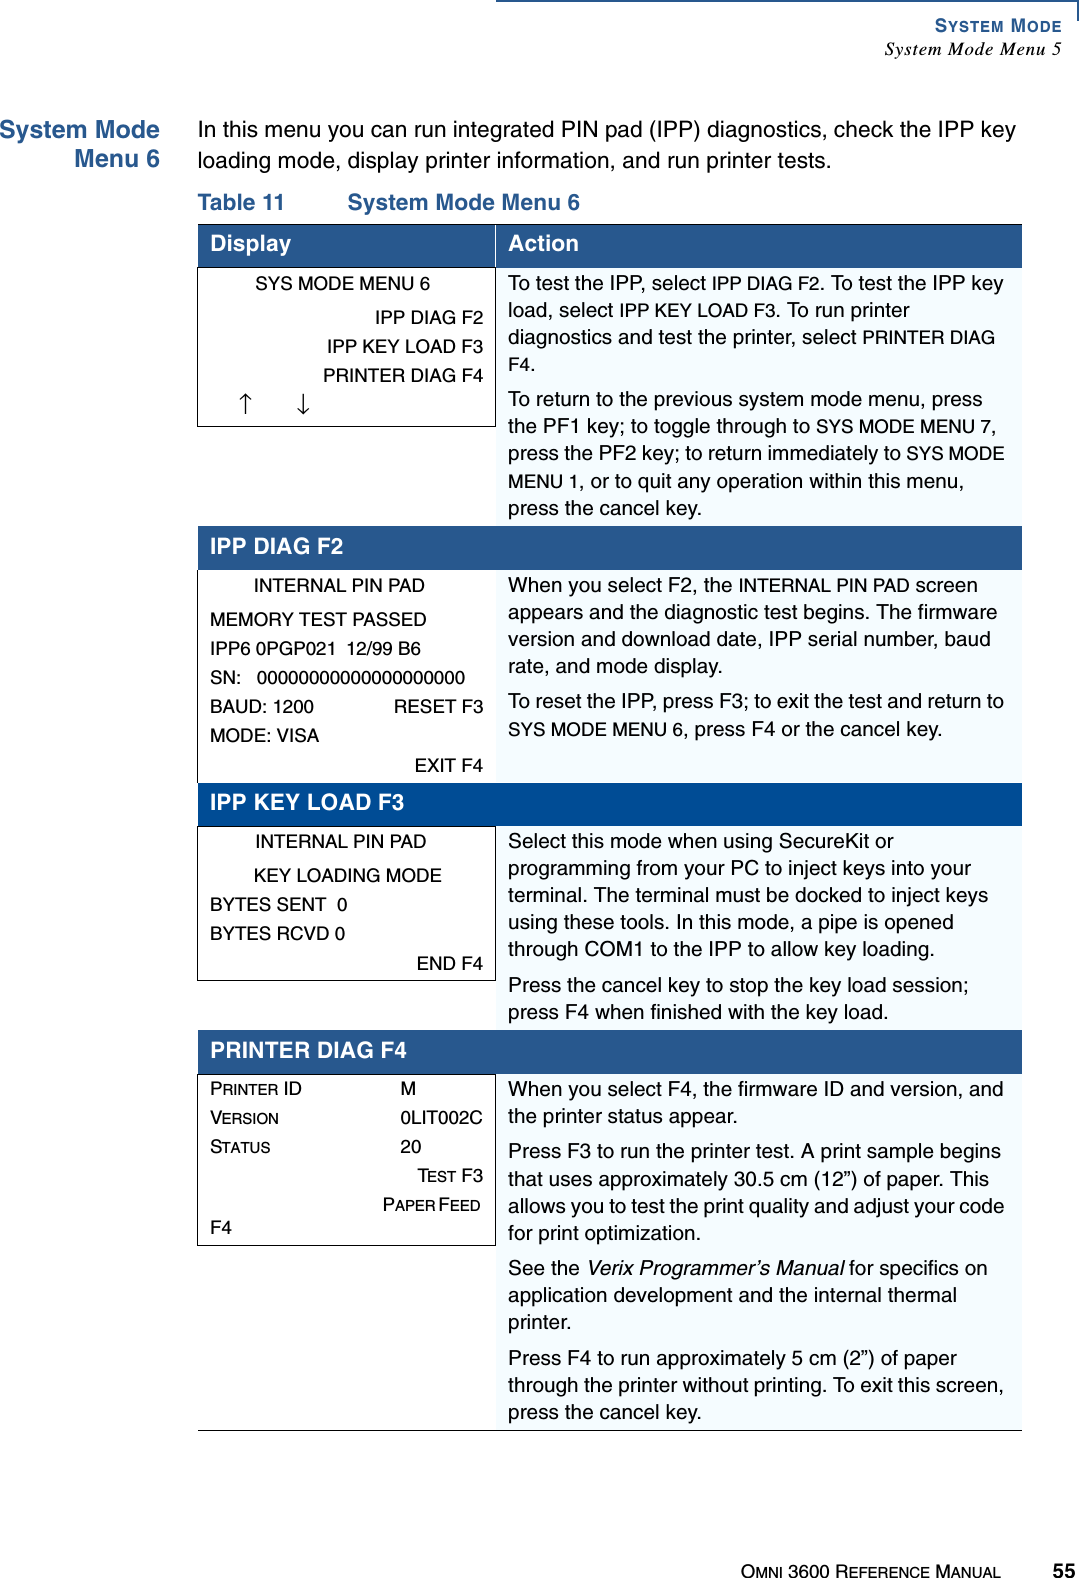
![SYSTEM MODESystem Mode MenusOMNI 3600 REFERENCE MANUAL 53Table 9 System Mode Menu 4Display ActionSYS MODE MENU 4REMOTE DIAGS F2ERROR LOG F3DEBUGGER F4↑↓REMOTE DIAGS: This function is reserved for future use with TMM.To return to the previous system mode menu, press the PF1 key; to return immediately to SYS MODE MENU 1, or to quit any operation within this menu, press the cancel key; to move to the next system mode menu, press the PF2 key or [↵].ERROR LOG F3SYS MODE ERR LOGTYPE 0000FRAME 00800698008002BAF100000200A00000↑↓The error log screens display internal diagnostic information about the most recent unrecoverable software error. If you report a terminal problem, you may be asked to provide this information.This first screen displays the following:TYPE (Error Type)FRAME (Stack Frame)After making any notations, press the PF2 key to view additional error log information.SYS MODE ERR LOGUSP 2491ED57TCB 00000000TIME 010329053144↑This screen displays the following:USP (User Stack Pointer)TCB (Task Control Block)TIME (binary-coded, decimal system, clock time of the error in the format yymmddhhmmss, where yy = year, mm = month, dd = day, hh = hour, mm = minute, and ss = second)After taking desired notes, press the PF1 key to view the previous screen or press the cancel key to return to the main menu. DEBUGGER F4DEBUGGER F4: This selection starts the application program’s debug monitor, if installed, on the selected file group. The Verix Operating System Programmer’s Manual fully documents debug operations. For more information on debugging your terminal, contact your terminal supplier.](https://usermanual.wiki/Verifone/OMNI3600D.User-Manual-Part-III/User-Guide-370919-Page-23.png)
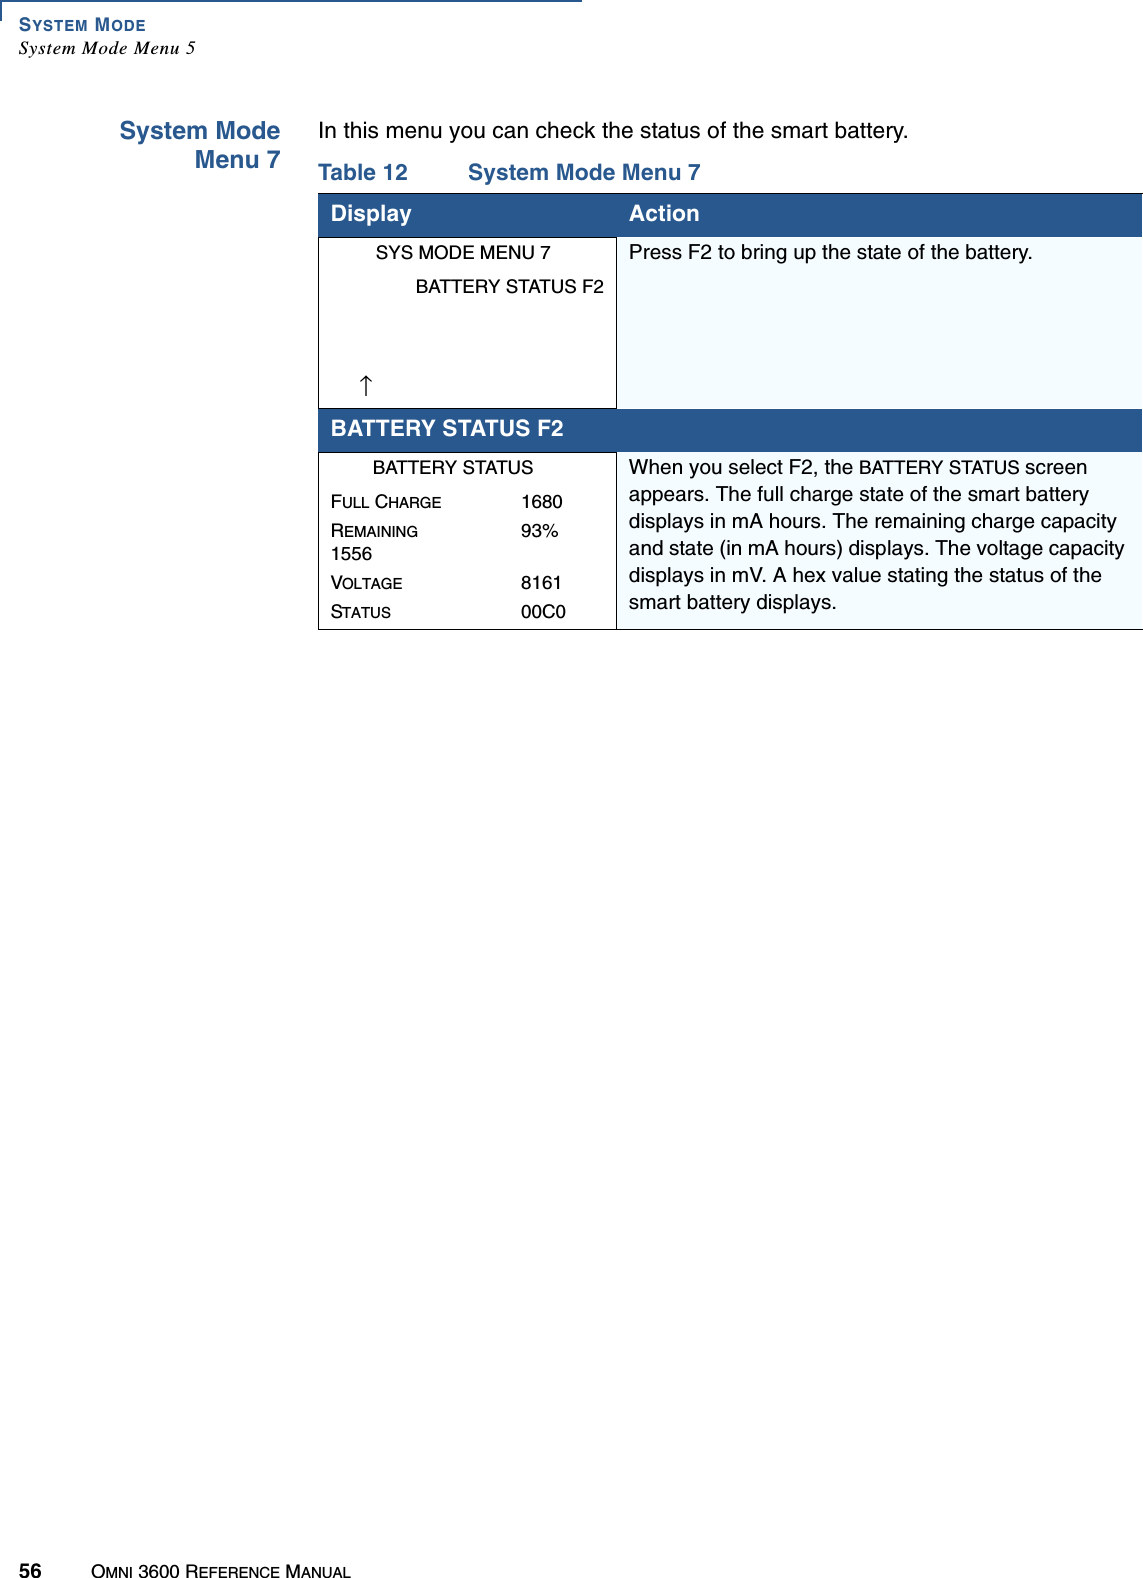
![SYSTEM MODESystem Mode Menu 554 OMNI 3600 REFERENCE MANUALSystem ModeMenu 5In this menu you can test the display panel, keyboard, and magnetic stripe card reader.Table 10 System Mode Menu 5Display ActionSYS MODE MENU 5SCREEN DIAG F2KEYBOARD DIAG F3MAG CARD DIAG F4↑↓To test the display panel, select SCREEN DIAG F2. To test the keyboard, select KEYBOARD DIAG F3. To test the magnetic card reader, select MAG CARD DIAG F4.To return to the previous system mode menu, press the PF1 key; to toggle through to SYS MODE MENU 6, press the PF2 key; to return immediately to SYS MODE MENU 1, or to quit any operation within this menu, press the cancel key.SCREEN DIAG F2When you select F2, you should see a completely dark screen. Press [↵] to completely clear the screen.To stop the test and return to the main menu, press the cancel key.KEYBOARD DIAG F3SYS MODE KBD TESTKEYCODE NNThis screen displays the decimal ASCII keycode for each key you press. The value displayed corresponds to the actual key pressed. Other values assigned to keys (for example, “Q”, “Z”, and “.” are assigned to [1]) are software dependent.To test the keyboard, press some keys and check that they match their ASCII keycodes (for example, [1] displays keycode 31). For more ASCII keycodes, refer to the ASCII table in Appendix B.To stop the test and return to the main menu, press either the cancel key or [↵].MAG CARD DIAG F4SYS MODE TRK 1:VALID DATATRK 2:VALID DATATRK 3:VALID DATATo test the magnetic-stripe card reader, swipe a magnetic-stripe card through it.A successful test displays VALID DATA for each track that read valid data. An error generates one of the following error messages for each track with an error:NO DATANO STARTNO ENDLRC ERRPARITY ERRREVERSE ENDFor more information about magnetic card error messages, refer to the Verix Programmer’s Manual. To stop the test and return to the main menu, press the cancel key.](https://usermanual.wiki/Verifone/OMNI3600D.User-Manual-Part-III/User-Guide-370919-Page-24.png)


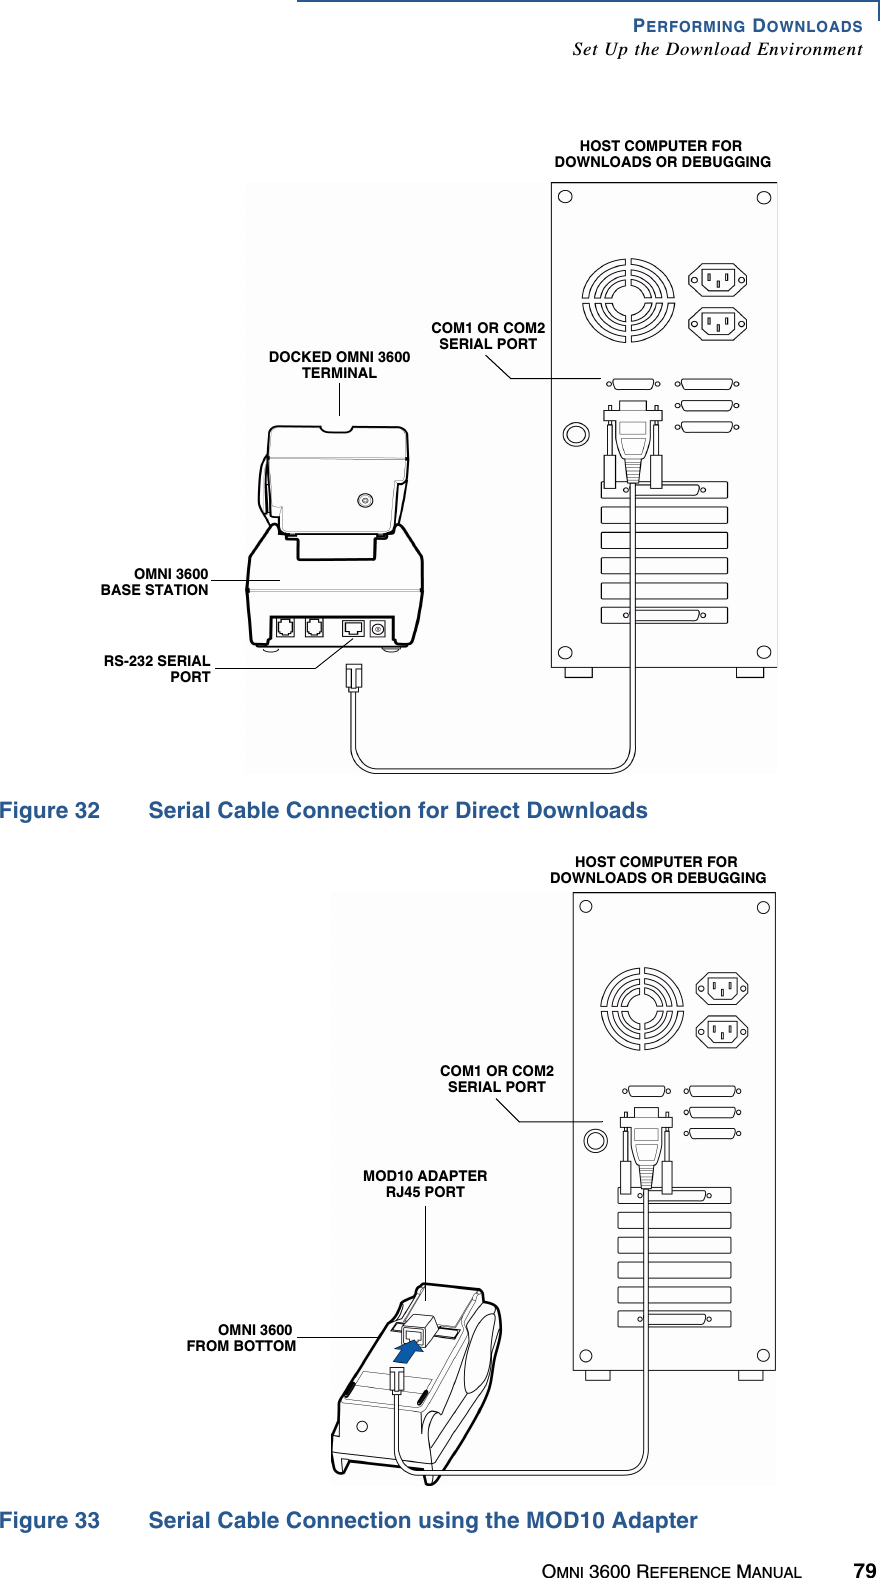
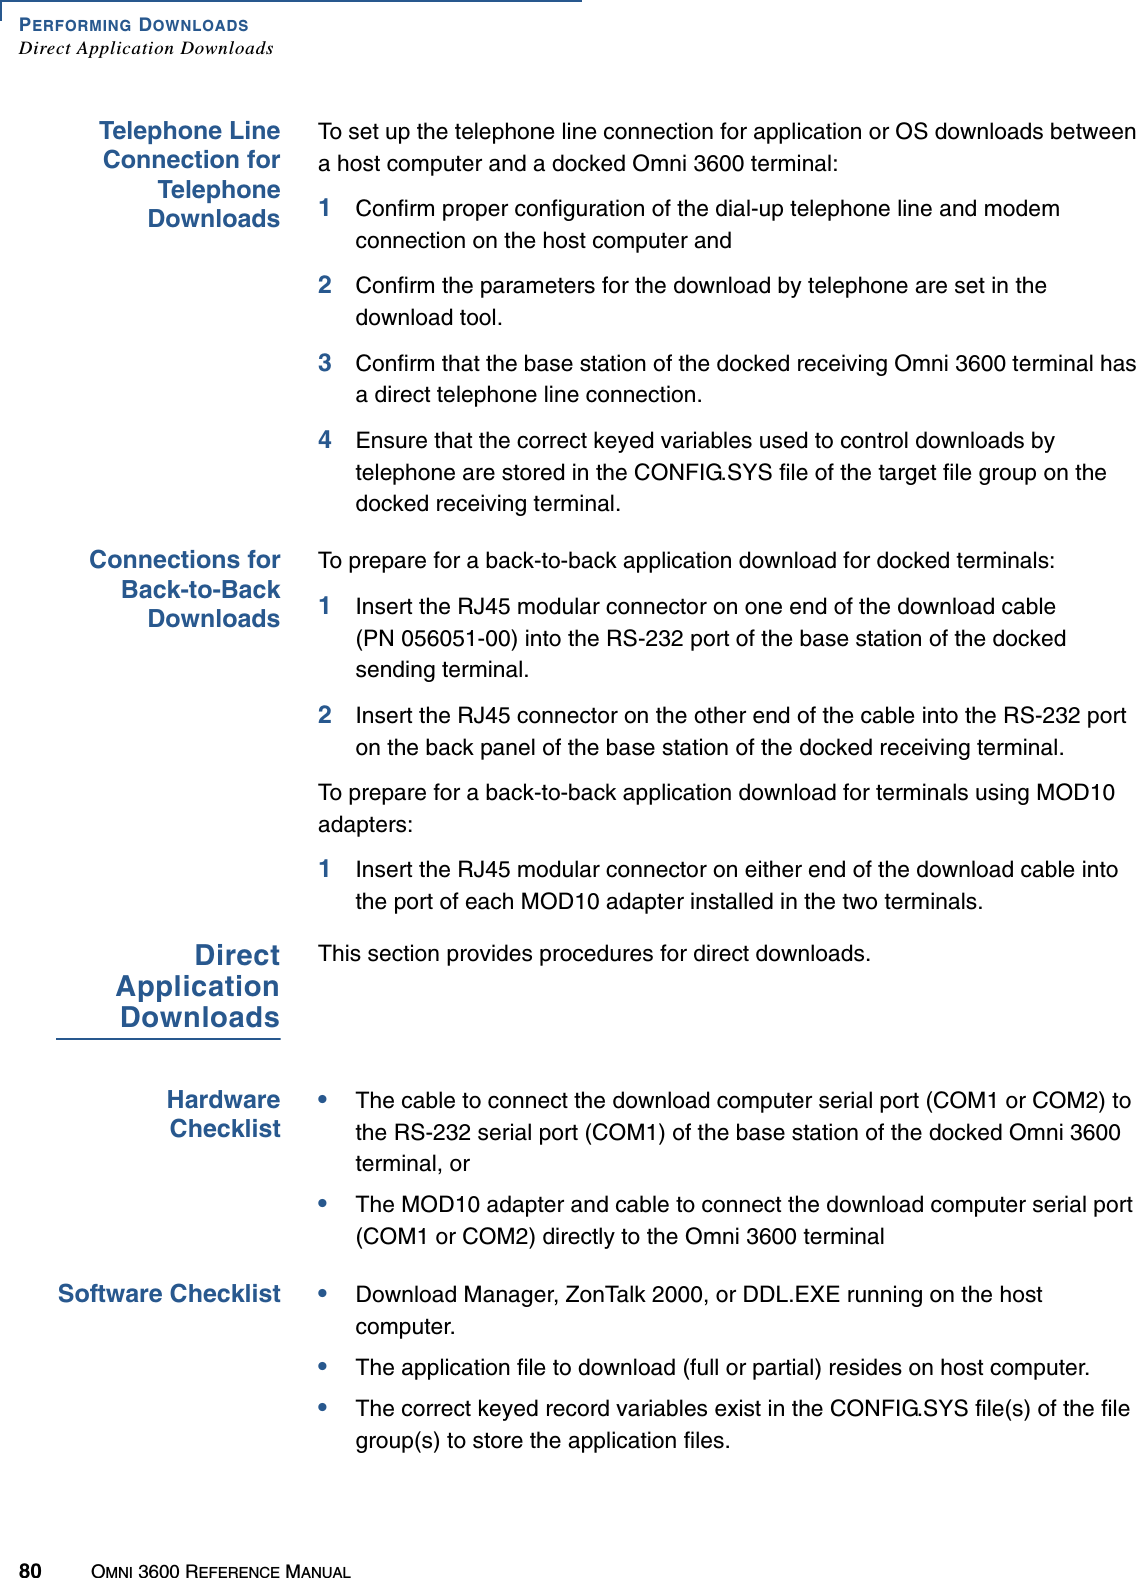
![PERFORMING DOWNLOADSDirect Application Downloads82 OMNI 3600 REFERENCE MANUALSteps described in the Action column are performed directly on the docked Omni 3600 terminal. Notes provided in this column indicate and explain actions you must perform on the host computer.NOTE The five steps listed in Table 15 are required for all download and upload procedures. In each of the following procedural tables, step numbering starts at 1 to indicate the unique steps of the specific download method. In subsequent procedures, only the method-specific steps are documented; the five steps in Table 14 are assumed to be completed.Table 14 Common Steps to Start a DownloadStep Display Action1VERIFONE OMNIQ80000XX01/10/01 K2 *K2*COPYRIGHT (C) 1997-2003VERIFONE, INC.ALL RIGHTS RESERVEDWhen the terminal restarts, a copyright screen displays that shows the version of Omni 3600 system firmware stored in the terminal’s flash EPROM, the date the firmware was loaded into the terminal, and the copyright.This screen displays for three seconds, during which time you can enter system mode by simultaneously pressing F2 and F4.To extend the display period of this screen, press any key during the initial three seconds. Each key press extends the display period an additional three seconds.2(Application Prompt)orDOWNLOAD NEEDEDIf an application already exists on the receiving terminal, the application starts and the application prompt displays. Otherwise, the DOWNLOAD NEEDED message displays. To enter system mode, simultaneously press F2 and F4.3SYSTEM MODE ENTRYPASSWORD-------------------Enter the system mode password. If an application already resides on the terminal, a unique system mode password may already exist. In this case, type that password and press enter to confirm your entry.If DOWNLOAD NEEDED displayed in step 2, enter the default password, “Z66831”. To type this password on the keypad, enter: 1 ALPHA ALPHA 6 6 8 3 1, and then press enter.If you enter an incorrect password, the message, PLEASE TRY AGAIN displays. Reenter the password.To correct a typing mistake, press [←] to delete the entry, and retype your entry. To end the password entry session and return to the display shown in Step 2, press the cancel key.](https://usermanual.wiki/Verifone/OMNI3600D.User-Manual-Part-III/User-Guide-370919-Page-52.png)

![PERFORMING DOWNLOADSBack-to-Back Application DownloadsOMNI 3600 REFERENCE MANUAL 934Initiate the file transfer on the PC.5From SYS MODE MENU 2 on the Gold terminal, select either a full or a partial download.The PC transfers files to the Gold terminal.Download Application Files to Target Terminal1Configure a Gold terminal for an application download operation to a deployment terminal:•If the *FA variable (if present in the application) is set to 1, you can reset it to 0. For more information on the *FA variable, refer to the Verix Programmer’s Manual (PN 19733).•Ensure the download is exactly what you want your Target terminals to receive.•Ensure that previously authenticated files are not changed prior to the file transfer operation.2Configure the docked Target terminal to receive an application download from the Gold terminal:•From SYS MODE MENU 2, set Group 1 and the COM1 port to receive the file transfer.3Connect a cable between the RS-232 serial ports of the base stations of the docked Gold and Target terminals, or between the MOD10-equipped Gold and Target terminals.4From any system mode menu on the Gold terminal, press [*] and enter the GID1 password to initiate the file transfer.5From SYS MODE MENU 2 on the deployment terminal, select either a full or a partial download. The Gold terminal begins to transfer files to the Target terminal.Figure 34 illustrates these two phases and how they relate to each other.](https://usermanual.wiki/Verifone/OMNI3600D.User-Manual-Part-III/User-Guide-370919-Page-63.png)

![PERFORMING DOWNLOADSBack-to-Back Application DownloadsOMNI 3600 REFERENCE MANUAL 95•There is enough memory in the Target terminal to complete the download.•You are performing a full download.NOTE The Target terminal does not display an error message if there is not enough memory to complete the download. However, the Gold terminal displays DOWNLOAD INCOMPLETE before returning to SYS MODE MENU 2.Table 18 Back-to-Back Application Download ProcedureStep Gold Terminal Target Terminal1Connect a MOD10 cable (P/N 05651-XX) between the RS-232 ports of the base stations. Dock each terminal and allow each terminal to boot up. After boot up, the Target terminal displays DOWNLOAD NEEDED.2Press F2+F4 to enter system mode.3Enter system mode password (factory default is 1 ALPHA ALPHA 6 6 8 3 1a) and press the enter key.4Press the ↓ key (PF2) to access the SYS MODE MENU 2 screen.5Press the * (asterisk) key and press the Enter [↵] key. You are prompted to reenter the system mode password.UPLOADING NOW displays.Press F2, DOWNLOAD, to enter download mode.6Press enter key at the next SYS MODE DOWNLOAD screen to select FILE GROUP_1 (default displayed) as the target file group. 7Press F3, FULL, at the next SYS MODE DOWNLOAD screen. Full downloads are required in back-to-back downloads.8Select F3 (COM1) at next SYS MODE DOWNLOAD screen. DOWNLOADING NOW displays.Both terminals display a status indicator, where each dash represents a 10% increment of the download. Ensure that the Gold terminal displays UPLOAD COMPLETE before returning to SYS MODE MENU 2. This is when the Gold terminal might display an error message if problems occurred during the download process. The Target terminal begins to validate all files loaded. Allow the Target terminal to complete file authentication and reboot the terminal. The Gold terminal is ready to perform another download. An application-specific menu displays after the Target terminal completes the reboot.a. Z66831; 1 ALPHA ALPHA = the character, Z.](https://usermanual.wiki/Verifone/OMNI3600D.User-Manual-Part-III/User-Guide-370919-Page-65.png)