VeryKool USA I800 GSM/GPRS/EDGE/WCDMA/HSDPA Hand hold Phone User Manual i800 User Manual V0 1 5 FCC
VeryKool USA Inc GSM/GPRS/EDGE/WCDMA/HSDPA Hand hold Phone i800 User Manual V0 1 5 FCC
Contents
- 1. User Manual V0 1 5 FCC
- 2. i800 User Manual V0 1 5 FCC
i800 User Manual V0 1 5 FCC
1
About this Guide
About this guide
This User’s Guide provides you with condensed information about how to
use your phone. To quickly learn the basics for your phone, please refer
to “Quick Start Guide”.
A
n introduction to operation
To access function menu, this guide shows the path in following way:
Operate through: Main Menu Æ Messages.
This case shows: In the standby mode, press centre key; the phone
displays main menu, you choose [Messages] to highlight it; Press centre
key to open message menu.
A
n introduction to phone interface
To describe phone interface, this guide shows in following way:
[ ] Main Menu interface display
<> Buttom
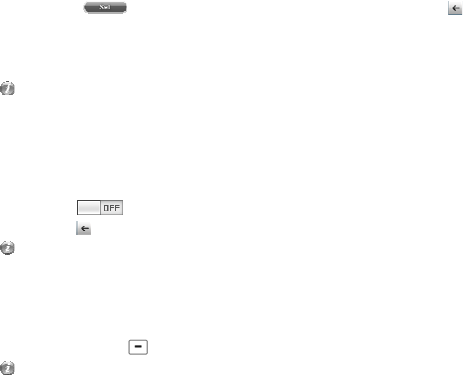
About the instruction icons
Following instruction icons appears to provide special information:
Indicates that you need to pay careful attention.
A service or feature requires network service or registered
service support. Contact your network service provider for more
information.
2
Contents
Your phone.............................................................4
Front view ................................................4
Side view .................................................4
Back view ................................................5
Top...........................................................5
What’s in your package............................5
SIM card and battery ...............................6
Power on or off ........................................8
Display and keys......................................9
Input method..........................................10
Access Main functions menu ................. 11
Customize your phone...........................13
Quick start guide ..................................................16
Calls.......................................................16
Messages ..............................................20
Contacts.................................................22
Camera..................................................23
My music ...............................................24
My files ..................................................25
Browser .................................................25
3
Connections...........................................26
Function menu .....................................................29
STK........................................................29
My pictures ............................................29
Messages ..............................................30
My files ..................................................36
Multimedia .............................................38
Tools ......................................................43
My music ...............................................45
Calendar ................................................48
Games ...................................................49
GPS.......................................................49
My links..................................................51
Settings.................................................. 51
Voicemail ...............................................57
Contacts.................................................58
Recent ...................................................60
Browser .................................................61
Problems and solutions........................................66
Health and safety.................................................69
Declaration of conformity......错误!未定义书签。
4
Your phone
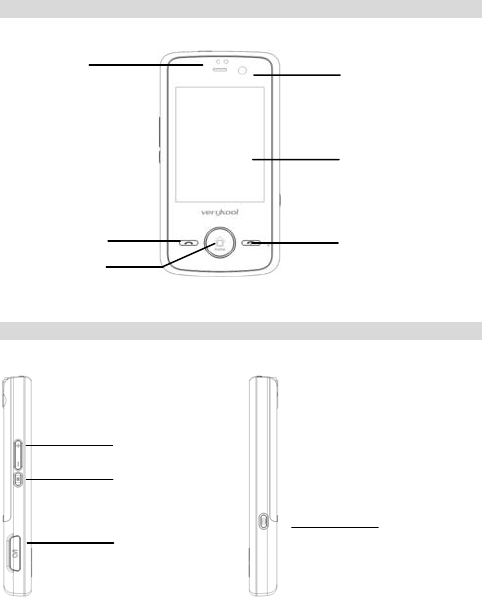
Front view
Side view
Earpiece
Volume key
Lock key
Home key
Send key
Secondary
camera lens
Display
End key
Charger connector/
USB connection
Take picture
Record video
5
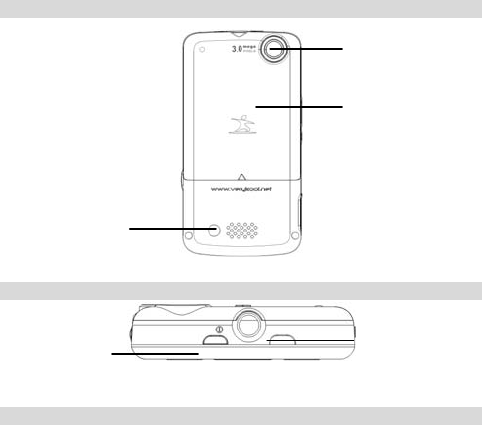
Back view
Top
What’s in your package
z 20pin USB Cable+ Interchangable USB charger : 1pcs
z Stereo headset: 1pcs
z Battery 1100mAh: 1pcs
z User manual: 1pcs
z Warranty card: 1pcs
z Composite AV cable: 1pcs
Speaker
Main camera
lens
Battery cover
Power key 3.5mm jack

6
Get started
SIM card and battery
When you subscribe to a cellular network, you receive a plug-in
Subscriber Identity Module card (SIM card), loaded with your
subscription details, your Personal Identification Number (PIN), and
available optional services.
For availability and information on using SIM card service, contact your
SIM card vendor or network service provider.
If your phone supported SIM LOCK function, when you use unauthorized
SIM card, phone can not be registered to the network. Please contact
your SIM card vendor.
If you need 3G network service, you may buy and use Universal
Subscriber Identity Module card (USIM card).
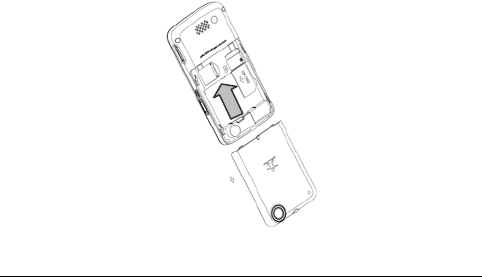
Insert the SIM card and battery
Switch off your phone and ensure the charger is disconnected to the
phone.
1. Make the phone faced down and push the battery cover towards
the phone bottom.
2. Slide the battery cover open and lift it off.
3. Make sure that the gold-colored contacts on the SIM card are face
down and insert the SIM card.
4. Install the battery with the metal contacts downward and suited.
5. Push the battery cover back to the position.
7
Charge the battery
When the battery is low, a warning tone sounds, the low battery message
displays, the empty battery icon blinks, and some features of the phone
may be disabled.
If the battery level becomes too low, the phone automatically turns off.
Recharge your battery.
When charging, the battery icon in the up right of the phone screen
flashes. When the phone is completely charged, the battery-full symbol in
the up right of the phone screen appears. When charging with the phone
switched off, the screen displays charging status and promotion icon of
completion. It may take 2.5 hours until the battery icon indicates that the
battery is fully charged.
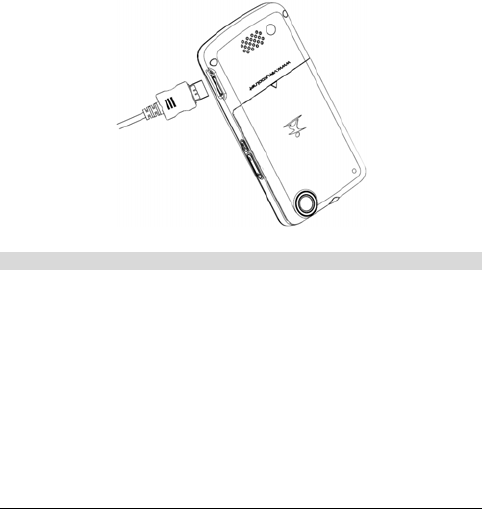
1. Open the rubber closure.
2. Plug the charger into the phone with the metal material upward.
3. Remove the charger from the phone gently.
4. Close the rubber closure.
8
Power on or off
Before switching on the phone, make sure the phone is charged and the
SIM card is in the phone.
When switching on the phone without a SIM card inserted in the phone,
the screen displays a request for inserting SIM card. In this status, the
phone only support emergency calls. You can input emergency numbers
and press <Voice call> to call.
The phone can be switched on during charging. When the phone
displays startup information, the phone can be switched on.
If the phone automatically turns off because of low battery level, startup
information may be displayed after several minutes of charging.
Switch on
1. Press and hold Power key on top for 2 seconds.
2. If necessary, enter the lock code/PIN, and press confirm key to
verify.
3. When you power on the phone for the first time, the screen displays
default standby picture. If the phone is not powered on for the first
time, the screen displays custom standby picture.
4. To set your phone, refer to “Function menu - Settings”.
9
When you switch on the phone, it may recognize the SIM card
provider and configure the correct text message and network settings
automatically. If not, contact your service provider for the correct settings.
Switch off
1. Press and hold Power key on top for 4 seconds.
2. After animation showed, the phone is switched off.
If the phone is switched off, all features are not available except the
alarm alert and charge.
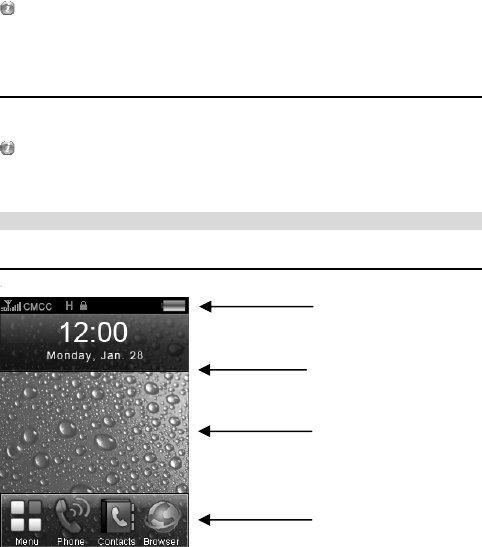
Display and keys
Display
z Status indicator: Displays phone status: signal status, battery
status, message status, in-coming calls, profile status, function
status and inserted external equipments.
z Standby information: Name of service provider, date and day, time,
a.m. or p.m. (12H).
Standby information
Wallpaper
Function indicator
Status indicator
10
z Wallpaper: Default wallpaper.
z Softkey function indicator: Mainmenu,Phone,Contacts,Browser。
Press function key to enter.
Keys
Power key: Open or close handset
Volume key: handset volume adjust
Screen lock key: Press 2 secs on idle to lock screen
Mainmenu key: Back to mainmenu directly in function operation process
Camera key: Capture on camera and camcoder process
Send key: Accept voice/video call
End key: End voice/video call
Except above key,handset control by screen finger touch mainly.
Input method
Handset support English and symbol input.
Input method support multiple-press English enter and association input.
Input method support number enter,symbol and dial pad enter.
Use multiple-press input
According to the order of letter in a key, press for respective times, and
input the letter.
1. On text enter status.Example: create a new text message.
2. If you need enter “Phone”, please click once, twice,
third time, twice, twice.
3. Click highlight to switch capital,the enter staus is capital now. If
need to normail, still click to retrieve normal status.
4. Click to switch number enter status.
5. Click to switch symbol keypad, and use to turn to
select symbol which you need.
Use association input
Association input is a predictive text input mode based on a built-in
11
dictionary to recognize letters in most common use. So you can enter
any letter with a single key press no matter how the required letter is
located to a key.
1. On text enter status.Example: create a new text message.
2. If you need enter “Phone”, please click , , ,
, in a sequence.
3. Please select text which you need in screen. If there is not exist on
current screen, click arrow key in text selection area to find.
4. Click highlight to switch capital,the enter staus is capital now. If
need to normail, still click to retrieve normal status.
5. Click highlight to open association input. If you need retrieve
normal style, please click it again.
6. Click to switch number enter status.
7. Click to switch symbol keypad, and use to turn to
select symbol which you need.
Access Main functions menu
In standby mode, press click mainmenu key or select menu on idle
screen to enter Main functions menu.
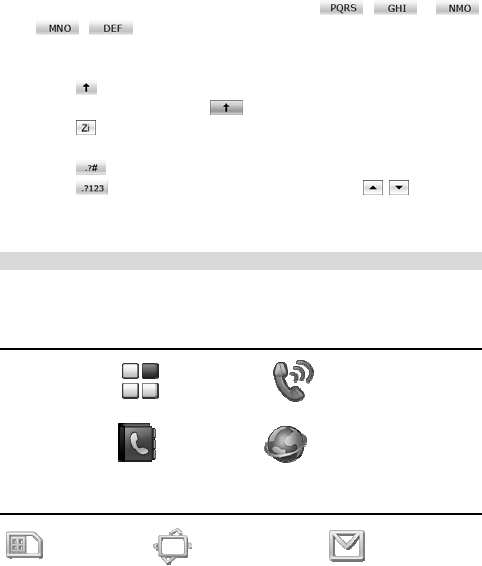
Quick menu
Mainmenu Phone
Contacts Browser
Mainmenu menu
STK My pictures Message
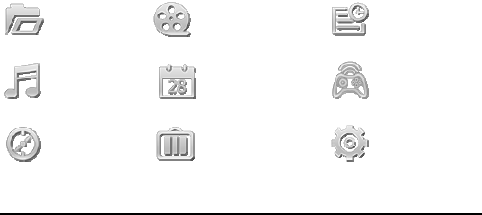
12
My files Multimieda Tools
My music Calendar Games
GPS My links Settings
Function catalog
Mainmenu
STK
My pictures
Message
Text message
Multimedia
Email
My files
Multimedia
Camera
Recorder
Radio
TV out
Tools
Alarm
Calculator
World time
My music
Music player
Video player
Calendar
Games
13
GPS
My links
Settings
Sound
Display
Language
Time and date
Data transfer
Memory status
Call setting
Network
Security
Connection
Java
Reset
Contacts
Phone
Keypad
Recent
Voicemail
Browser
Customize your phone
Customize your phone, including display settings, ring tone settings,
language settings, date and time settings, shortcuts settings, phone lock
settings.
Display setting
Operate through: Main menu Æ Settings Æ Display.
Select wallpaper
Operate through: Main menu Æ Settings Æ Display Æ Wallpaper.
Select wallpaper entry, press to enter my stuff, open the folder, select
the file you want to use as wallpaper, press to save and set as
14
wallpaper, the phone will return to setting interface.
Display time and date in screen
Operate through: Main menu Æ Settings Æ Display Æ Time, date.
Select clock display or date display entry, slide to switch display.
After setting, press quit and save settings.
Select your mainmenu style
Operate through: Main menu Æ Settings Æ Display Æ Mainmenu display
style.
Select mainmenu style and press to save and quit.
Adjust brightness of display
Operate through: Main menu Æ Settings Æ Display Æ Brightness.
Press and slide to adjust display brightness and press to save and
quit.
Ring tone settings
Operate through: Main menu Æ Settings Æ Sound.
Click and select an applicable profile in sound list, press to enter
option settings. Options for ringtone settings in a profile including: Voice
call ring, Video call ring, Volume, Message alert, Email alert, Calendar
alert, Vibrating alert, Key tone.
In the setting option menu, click and select item which you need change.
As to ringtone settings, press to enter my stuff, select the file you want
to set as your ringtone. As to the switching key setting, slide to
switch on or off. After setting, click to save and quit. Press to
launch the profile which you want.
Language settings
Operate through: Main menu Æ Settings Æ Language.
Select language you want and click to save and quit.
Date and time settings
Operate through: Main menu Æ Settings Æ Time and date.
Use to date and time options, slide scroll to set time and date in order,
15
use to set format of time and date; After selection, click to save
and quit.
Slide to enable or disable summer time.
Phone lock
You can protect the phone against unauthorized use with a phone lock.
The phone will require a lock code to switch on or unlock. The original
lock code is 0000.
Change lock code
Operate through: Main menu Æ Settings Æ Security settings Æ Change
phone code.
Input old lock code and new lock code, click to save and quit.
Switch on phone lock
Operate through: Main menu Æ Settings Æ Security settings Æ Phone
lock.
Slide to switch on. Input lock code to enable or disable phone
lock function.
Input the original lock code 0000 when you switch on the lock for the first
time or when the lock code is not changed.

16
Quick start guide
Calls
When the phone is power on, the phone will automatically select the
main network. If the main network is out of reach, you can use other
networks; however, your network service provider shall have protocol
with the network you want to choose. This is also called roam.
When the sign of your network service provider displays in the screen,
you can make or answer calls.
The information icon on the up left screen shows the strength of your
network signal. When the signal is weak, the quality of calls would be
affected. The quality of calls is quite affected by obstacles so move in a
small distance could effectively promote the signal strength and quality of
your calls.
Make calls
Normal dial
1. In standby mode, click and select to enable dial keypad.
Then input phone number in keypad.
2. Press to make the call.
3. Click <Voice call> or Send key after phone number inputed, initiate
voice call.
4. To end the call, click <End call> or End key.
To make an international call, repeatedly click to input +
instead of international access number, and then input country code,
area code, and phone number. Click to clear incorrect numbers.
To dial an extension number, input the switchboard number, click
several times, input P, and then input the extension number. Click
to clear incorrect numbers.
Make calls from recent call log
1. In phone function, click or press send key on idle to open
recents.
17
2. Select a contact number.
3. Click contact to make the call.
Make calls from contacts
1. In standby mode, select <Contacts>.
2. Select a contact number, or input the name of a contact for speed
search, then click contact which choose to calling.
Speed dial
Before using speed dialing, you need to assign a number key to a
contact phone number.
1. Idle Æ Contacts Æ New Æ Speed dial.
2. Select a number key as a speed dial key.
3. Press to input the desired number. After set, press to
quit and save settings.
4. In standby mode, press and hold the assigned speed dial key for a
few seconds to call the contact phone number assigned to the key.
If set double-digit speed dial, please short click the first digit, the long
press the second, until voice call initiate.
Call Barring
1. Operate through: Main menu Æ Settings Æ Call settings Æ Call
barring.
2. Select a type of barring.
3. Slide to open options, select “On”.
4. Click to save and quit.
This function need to be supported by the network.
Emergency Calls
The phone support international emergency calls, such as 112, 911, etc.
If the phone is within the network of UMTS or GSM, these numbers can
be dialed no matter with SIM card in or not. Just input the emergency
number and press to call.
Some countries or areas may set other numbers as emergency calls
so the network provider may store other emergency call numbers in your
SIM card.
18
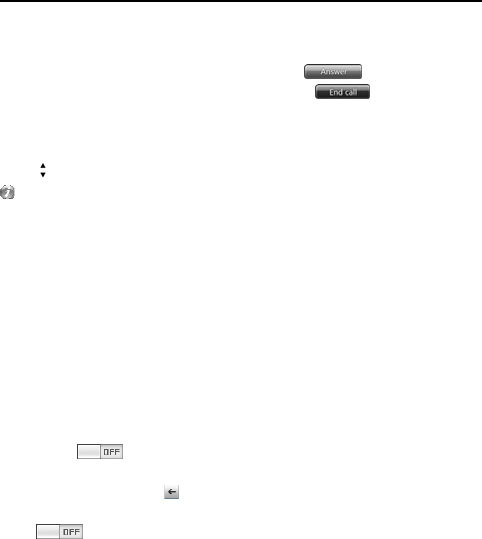
A
nswer a call
Normal answer
When your phone receives a call, the phone rings or vibrates; the screen
displays a symbol for the call.
1. When you receive a incoming call, click to accept.
2. End or reject call, please click end key or .
3. You can use earphone key to answer through earphone if the
earphone or Bluetooth earphone are connected to your phone.
4. During the call, you can control the volume through the side keys
.
Do not hold the device near your ear when the loudspeaker is in use,
because that may damage your hearing.
Missed Calls
1. Information of missed calls will be displayed in standby interface.
2. Press missed calls information to view infomtion. In missed call log
you can press missed call to calling, or enter missed call details to
make a call.
3. To view call logs, operate through: Phone Æ Recent Æ Missed
Calls.
Divert calls
1. Operate through: Main menu Æ Settings Æ Call settings Æ Call
divert Æ Voice call/Video call.
2. Select “All calls”/”If busy”/”If not answered”/”If not available”.
3. Slide to open options menu, select “On”, and input forward
number.
5. After setting, Click to save and quit.
4. To cancel divert, select divert type which you want cancel, and slide
to open option menu to select “off”.
Call waiting
Call waiting requires network service support. You may subscribe the
network service first.
1. Operate through: Main menu Æ Settings Æ Call settings Æ Call
waiting Æ On.
19
2. After the call waiting feature switched on, a new call during the
present call will be displayed in the screen and alerted by short
tone.
This function need to be supported by the network.
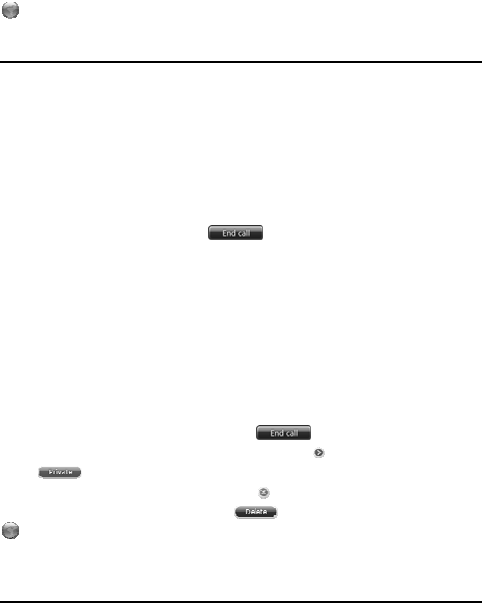
Multi-party call
The multi-party call requires network service support. You may subscribe
the network service first. For more information, contact your network
service provider.
Making a second call
1. During a call, select <Add> on secreen, input another contact
number, and make the call, or input the contact number directly to
make a new call.
2. To switch between the two calls, select “Swap”.
3. To end a active call, click .
Answering a second call
1. During a call, press send key to answer a second call. When the
second call is put through, the first call is put on hold.
2. To end a second call, click <Reject>.
Conference call
Conference call can be launched by putting through current call and held
call. When the conference call is in held, maximum 6 participants can be
put through or add.
1. In more than two calls, Click <Merger> create conference call.
2. To end the conference call, click to end conference call.
3. To talk separately, click conference call into member list, click
to separate.
4. To end talk with one party, press in conference call member and
select the number and press .
Conference call may be charged extra. Contact your network
provider for more information.
V
ideo calls
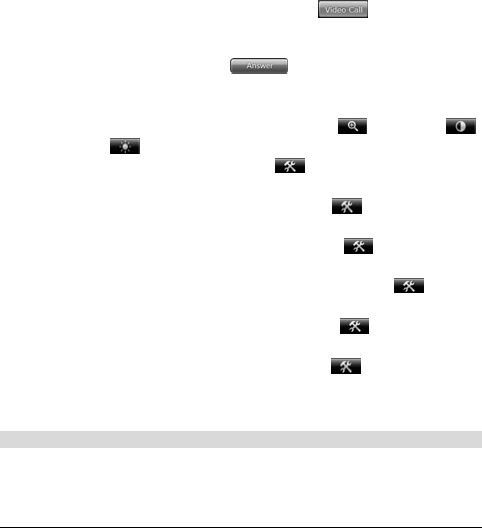
20
To be able to make a video call, you and the called party need to register
for 3G services and you must be within coverage of 3G network. When
the 3G symbol displays in the screen you can make or answer video
calls.
1. In dial keypad, input phone number; click to make a video
call.
2. To answer video calls, press or send key. Answering is as
usual.
3. During a video call, press button on bottom to open image options
menu; the image options include: focus- , contrast- ,
brightness- .
4. To turn on or turn off mute, press to open options to select
“Mute”; press <Hide> to save setting and quit .
5. To turn on or turn off loudspeaker, press to open options;
select “Speaker”; press <Hide> to save setting and quit.
6. To hide your own image in your screen, press to open options;
select <Hide> on setting area; press <Hide> to save and quit.
7. If you do not want to send your video image, press to open
options; Select <Block>; press <Hide> to save and quit.
8. If you want to adjust your video quality, press to open options;
Select <Qulity>; press <Hide> to save and quit.
9. If you want to swap camera type, press to open options;
Select <Switch>; press <Hide> to save and quit.
Messages
The phone supports multiple message services. Contact your network
service provider for subscription or consultation of available services.
Text message
A Short message (SMS) includes simple text information.
Set text message options through: Main menu Æ Messages Æ Settings
Æ Text message.

21
The number of message center, delivery reports, period of validity and
default type are provided by service provider. It is usually set in SIM card
and it automatically displays in the setting interface.
Multimedia messages
The multimedia message requires network service support. You and your
contacts must subscribe MMS service first.
A Multimedia message (MMS) can contain text and other types of file
such as images, photos, sound clips, or video clips.
Set multimedia message options through: Main menu Æ Messages Æ
Settings Æ Multimedia settings.
Setup relevant options according to the information provided by service
providers for: MMS center life time, Priority, Receive mode, Delivery size,
Reception size. Delivery report, Profile settings.
Email
The Email requires network service support. You and your contacts must
subscribe Email service first.
An Email can contain text and other types of file such as images, photos,
sound clips, or video clips.
If you want to use the same Email address as in computer, contact Email
service provider for settings or refer to Email settings in your computer
for relevant information. Through path: Main menu Æ Messages Æ
Settings Æ Email you can setup Email options, including: Account name,
My address, My name, User name, Password, Receive server, Send
server, Receive port, Send port, Auth type, Data account. Furthermore,
you can choose advanced settings according to your necessity, including:
Revert include content, Receiving settings, Send copy, Auto receive,
Actual.
Receive and view messages
When your phone receives a message, it rings or vibrates, and the
screen displays message symbol.
22
1. When a new message indication displays, press unread message
area to view message.
2. To view message through inbox, operate through: Main menu Æ
Messages Æ Inbox.
3. Slide screen to select message entry.
4. Press selected message to vew details.
5. To delete message, in message list press <Edit> to open and press
mark delete, then press to confirm delete.
Create and send messages
1. Text message and multimedia message operate through: Main
menu Æ Messages Æ New Æ Text message/ Multimedia.
2. Email creation operate through: Main menu Æ Messages Æ Email
Æ Other Æ New.
3. Input message content.
4. Click recipient to input phone number.
5. When creating MMS, click editing entries, press to edit selected
entry or add an attachment.
6. To send to more recipients, move text cursor to ‘;” back, then input
other phone numbers.
7. To select recipient from contacts, click at recipients entry to
choose from contacts.
8. To send copy or send blind copy of MMS and Email, click left
at recipients entry to add.
Using Email need to set Email account firstly.
Contacts
You can store and inquire contacts information in your phone or USIM
card. Phone contacts can store multiple items of contacts information and
USIM card contacts can store contact name and phone number.
Add a contact
1. Operate through: Main menu Æ Contacts.
23
2. Click to create new contact.
3. Click and edit each fields, input other desired information.
4. After finishing input of all information, click to save and quit.
Create new contact auto store in phone.
Search a contact
1. Operate through: Main menu Æ Contacts.
2. Slide screen up or down to search a contact and phone number in
initial alphabetic order.
Camera
Use camera to take photos or record videos.
Take photo
1. Operate through: Main menu Æ Multimedia Æ Camera.
2. Aim the lens at the subject, it will auto focus, and click to take
a photo and display in the screen.
3. If you are not satisfied with the photo, click to open album and
select to delete.
4. click to return to viewfinder and the phone automatically saves
the photo in the album.
5. You can switch phone horizontal to recording.
6. To exit, press home key to return main menu.
Record videos
1. Operate through: Main menu Æ Camera.
2. Click and open video interface.
3. Press to start recording video.
4. Press to switch camera.
5. During recording, click to pause recording. Click end
recording.
6. To view videos, click to open “Video album”, click to play video
you want to view.
24
7. You can switch phone horizontal to recording.
8. To exit, press home key to return main menu.
If you try to use the camera in intense light, the screen may display
blank and the image may be distorted.
My music
Your media player supports audio and video files, the detailed file format
can be: AMR, AAC, MP3, WAV, IMY, MID, MIDI, MMF, 3GP, 3G2, 3GPP,
MP4.
Edit playlist
1. Operate through: Main menu Æ My music Æ Playlist.
2. Click <Edit> into playlist edit screen.
3. Click to enter my stuff for add new playlist. Select music file to
add.
4. Click <Done> to save playlist settings.
Play media file
1. Operate through: Main menu Æ My music.
2. In media player, if the playlist is not empty, click playlist directly to
enter playlist details. Then select <Shuffle> or one media file begin
to play.
3. In media player, click to play the previous or next file.
4. To pause playing, in media player, click to stop playing. To fast
forward and rewind the file, press and hold for a few
seconds.
5. In media player, click to open playlist.
6. In playlist, click <Now playing> to open media player and play last
time media.
7. To setup volume and process, slide process bar left and right.
8. Select to edit and play video.
25
My files
Use my stuff to process files stored in your phone or memory card, such
as pictures, videos, music, ring tones, games, and applications.
You can delete, rename files.
If all memory is in use, you cannot save new file until you delete some
files.
V
iew files
1. Operate through: Main menu Æ My files.
2. Click and select folder, including: “T-Flash”, “Sounds”, “Videos”,
“Applications”, “Others”. Click folder list of bottom on screen.
3. Slide screen to view document list, click file and open selected file.
Delete files
1. Operate through: Main menu Æ My files.
2. Select folder, including: “T-Flash”, “Sounds”, “Videos”,
“Applications”, “Others”. Select and click folder to access folder list.
3. Click <Edit> on title to enter manage list of files.
4. Click to mark file which you want delete, then click to
delete files.
Browser
Use web, you can read news, search on web, and browse the web, etc.
To use the web browser, you need to consult service provider about
setting up the access point and browser.
Set the web connection
Data account settings
1. Operate through: Main menu Æ Settings Æ Connection Æ Data
account.
2. Click <New> to create data account.
3. Input account name, APN, authorization type, user name, password,
and click <Save> to save account settings.
26
Browse the web
1. Operate through: Idle Æ Browser.
2. Browser auto launch default homepage.
3. Click address field,to input the web address and press <Go> to visit
the web.
4. Click to add bookmark.
5. When the web is connected, silde finger to scroll the page, click
links or launch corresponding function.
6. During viewing web pages, select , and you can implement
relevant operations, including: save page, save items, clear cookies
and clear cache.
7. During viewing web pages, select , and you can view favorites,
history, web alert or saved pages.
8. During viewing web pages, click to refresh the page.
9. During viewing web pages, click to view last or next webpage.
10. During viewing web pages to extend webpage view, you can rotate
phone to horzonal.
11. During viewing web pages, you can rotate finger with circle deasil to
zoom in page, and reduce with anticlockwise for zoom out.
Connections
Your phone supports Bluetooth and USB connection to other devices.
Any anonymous messages may damage your phone or PC. To ensure
phone security, please: Inactivate the Bluetooth when it is not in use;
Cautiously receive unsorted Bluetooth file or MMS; Do not install
unsorted programs; Download ring tones and games on reliable web
sites.
Bluetooth wireless connection
Use Bluetooth wireless, you can connect the phone wirelessly to other
compatible Bluetooth devices. Compatible devices include: mobile phone,
computer, earphone, and car-use suits, etc.

27
Make sure if there is restriction by local law or regulation on the use of
Bluetooth. If restricted, deactivate Bluetooth please.
Bluetooth technology allows free wireless connections within a range of
10 meters and no obstacles between the devices.
The tolerable Bluetooth data size will be adjusted by the phone according
to local restrictions, therefore the upper limit of distance between devices
may be different.
Bluetooth connection
1. Operate through: Main menu Æ Settings Æ Connection Æ
Bluetooth.
2. Slide , to activate Bluetooth.
3. When Bluetooth was activated, it will auto searching device. The
phone will search other Bluetooth devices in the valid area and
display in the devices list.
4. Select the Bluetooth device you want to connect. Click to confirm
the connection.
5. If necessary input the compatible passcode. If input passcode is
compatible to the passcode of waited Bluetooth device, the
Bluetooth devices will be connected.
6. Click , to setup device visibility, dial up, and device name.
Press <Save> to save Bluetooth settings.
Transmit data via Bluetooth
1. Click device which you select, it will open the applied program in
which the file you want to transmit is stored. For instance, to send
an image, open [My stuff].
2. Select the file you want to send.
3. If the device requires pairing, input the compatible passcode.
4. After connected, the device will display the prompting of data
transmission.
Pair devices
To pair devices means identity verification. To pair devices, both parties
supporting Bluetooth should reach assent on the passcode and input the
identical passcode in respective devices.

28
1. Before pairing, create your own passcode (1- 16 digits), and agree
with the user of the other device to use the same code.
2. When Buletooth wsa active, available devices will be searched and
listed in the screen; select the device you want to connect; input
compatible passcode; if passcode correct, the symbol of successful
paired devices appears.
3. After pairing, you can define the connected device as authorized
device, and thus, the phone will not require you a confirmation for
connecting the device again.
USB connection
You can transfer data via USB connection from your phone to a
compatible computer.
When data is transferring, do not disconnect the USB cable from the
phone or computer, otherwise the memory card may be damaged.
USB connection
1. Operate through: Main menu Æ Settings Æ Connection Æ USB.
2. Select connection type, including: PC Synchronization, USB, Dial
up. Click item which you select to confirm connection type.
3. Connect the phone to devices with USB port, such as computer.
4. When a request list to start the flash disc will be prompted on the
display, and select USB sever type to confirm starting.
29
Function menu
To access in menu, click on idle sreen. All menu function introduction
as below:
STK
To use STK function, you need a SIM/USIM card supporting SIM applied
tools and providing services such as entertainment, mobile IM, weather
report, etc.
To enter STK menu, press home key in standby mode and select [SAT] in
the main menu.
My pictures
You can via camera or picture album to browse image in your phone.
View picture list
1. Operate through: Main menu Æ My picture.
2. Slide screen and view picture thumbnail in your phone.
3. You can also view picture from <Camera> photo album.
View picture
1. Operate through: Main menu Æ My picture.
2. Click picture to picture detail screen.
Funciton for picture detail:
z Picture manage: Click to open picture manage option
menu. You can use this picture to email photo, set as
wallpaper, assign to contact thumbnail and rename.
z View previous/next: Click to turn to picture
previous or next. Or you can slide left/ right screen to move
picture for previous or next view.
z View as full screen: To view full screen picture, click or
touch photo area once. Retrieve normal view, touch photo

30
area once again.
z Zoom in/out: Press picture area you can rotate finger with
circle deasil to zoom in picture, and reduce with
anticlockwise for zoom out.
z Picture delete: Click to delete current picture.
z Picutre rotate: During detail picture view, rotate your phone
to horizontal with view mode change.
Messages
Use the Messages menu to send and receive text messages, multimedia
messages, and Emails.
Before sending or receiving messages, you may need to do the
following:
1. Insert a SIM/USIM card.
2. Within wireless network service range and the network service
supports messaging features.
3. Define the network access point settings on the phone.
4. Define text message settings on the phone.
5. Define multimedia message settings on the phone.
6. Define Email account settings on the phone.
The device may recognize the SIM/USIM card provider and automatically
configure some of the message settings. If not, you may need to define
the settings manually, or contact your service provider/network operator
to configure the settings.
Messages menu displays different types of folders as:
New: Create and edit a new text message/Multimedia.
Inbox: Received messages are saved in Inbox.
Email: Email management, include create new Email, received Email,
Email drafts, outbox, sent box and Email setting.
Outbox: Messages failed to send are saved in Outbox.
Sentbox: Copies of sent messages are saved in Sentbox.
Draftbox: Draft messages are saved in Draftbox.
Templates: Preset templates are saved in your phone.
31
Create and send message
Create and send a text message.
1. Operate through: Main menu Æ Messages Æ New Æ Text
message.
2. Input message content.
3. After creating the message, click <To> field to input recipients’
number, or press to select the number from contacts. Then click
<Send> to send message.
4. To save the created message in draftbox, click <Cancel> to select.
Create and send an multimedia message
1. Operate through: Main menu Æ Messages Æ New Æ Multimedia.
2. In MMS editing mode, select subject to input the subject.
3. In MMS editing mode, select text to input message content.
4. In MMS editing, select image or video, press to open option
menu and click <Add object>, select the images, audio or video
clips and attachment you want to add in the message.
5. To delete the object, press to open option menu and click
<Object list>, and select object you want delete.
6. To add MMS content, press to open option menu and click
<Add page>.
7. To preview MMS, press to open option menu and click
<Preview>
8. To save the created message in draftbox, click <Cancel> and select
save to draft.
9. Input recipient number or press to select recipient number from
contacts.
10. To change outgoing mode, click and select <Add CC> or <Add
BCC>.
11. After selecting contact and outgoing mode, click <Send> to send
the MMS.
Write and send Email
1. Operate through: Main menu Æ Messages Æ Email Æ Account Æ
32
New.
2. In Email mode, select subject to input subject.
3. In Email mode, select text to input text.
4. In Email mode, select attachment, press to open stuff to select.
5. To delete the attachment, press to open option menu and click
<attachment list>, and select attachement you want delete.
6. To save the created Email in draftbox, click <Cancel> and select
save to draft.
7. Input recipient number or press to select recipient number from
contacts.
8. To send to many, select the recipient, and input other contact
number.
9. To change outgoing mode, input CC/BCC.
10. After selecting contact and outgoing mode, press <Send> to send
the Email.
Delivery reports
The delivery reports shows about the status of the sent messages.
Delivery reports
1. Operate through: Main menu Æ Messages Æ Settings Æ Text
message/Multimedia.
2. As to the text message, select <Delivery reports> and switch on the
entry for status reports.
3. As to the MMS, directly switch on delivery reports.
4. Press to save the setting.
View received messages
View received text messages
1. Operate through: Main menu Æ Messages Æ Inbox.
2. Messages are listed in time order. Slide to scroll the list and search
for the message you want.
3. Press message subject to view message content.
4. In message content, click <Manage> to open message option
33
menu.
5. To delete mesaage, click <Edit> in message inbox screen.
Options menu for viewing text message content:
z Reply: Reply to current text message.
z Forward: Forward current text message. The editing
interface contains the original message text.
z Voice call: Make a voice call to the message sender.
z Video call: Make a video call to the message sender.
z Use details: Exract number from message to create new
contact, add existing contact, and make voice/video call.
z Cancel: Exit option menu.
View received multimedia message
1. Operate through: Main menu Æ Messages Æ Inbox.
2. The messages are listed in time order. Slide to scroll the list and
search for the multimedia message you want.
3. Press message subject to view the message content.
4. To delete mesaage, click <Edit> in message inbox screen.
Options menu for viewing complete multimedia content:
z Reply: Reply to the addresser.
z Reply all: Reply to all addressers.
z Forward: Forward current MMS message to other contact.
z Voice call: Make a voice call to the addresser number.
z Video call: Make a video call to the address number.
z View mode: View MMS in the order of date/subject.
z Use details: If sender is a Email address, the menu will be
shown. Exract number from message to create new contact,
add existing contact.
z Save object: Save message object to phone.
z Cancel: Exit option menu.
View received Email
1. Operate through: Main menu Æ Messages Æ Email Æ Account Æ
Inbox.
2. The messages are listed in time order. Slide to scroll the list and

34
search for the MMS message you want.
3. Press Email subject to view the Email content.
4. To delete Email, click <Edit> in message inbox screen.
Options menu for viewing complete Email content:
z Reply: Reply to addresser of current Email.
z Reply all: Reply to all addressers and addresses copied to.
z Forward: Forward the Email to other contact.
z Use details: Exract number and Email from message to
create new contact, add existing contact., and make
voice/video call.
z Save attachment: Save attachement from Email to phone.
z Cancel: Exit option menu.
View/Edit drafts
View/Edit text/multimedia drafts
1. Operate through: Main menu Æ Messages Æ Draftbox.
2. The messages are listed in time order. Slide to scroll the list and
search for the message you want.
3. To continue editing, select the draft entry, and directly edit
message.
4. After finishing editing, input recipient number, or select from recent
recipients/contacts and send.
5. To delete message, click <Edit> in message draft list screen.
View/Edit Email drafts
1. Operate through: Main menu Æ Messages Æ Email Æ Accout Æ
Drafts.
2. The Emails are listed in time order. Slide to scroll the list and search
for the Email you want.
3. To continue editing, select the draft entry, and directly edit Email.
4. After finishing editing, input recipient number, or select from recent
recipients/contacts and send.
5. To delete Email, click <Edit> in Email draft list screen.

35
View unsent messages
View unsent text/multimedia messages
1. Operate through: Main menu Æ Messages Æ Outbox.
2. The messages are listed in time order. Slide to scroll the list and
search for the message you want.
3. Press unsent message to view in detail.
4. To delete unsent message, click <Edit> in message list screen.
5. To resent message, access to message detail screen to click
<Resend>.
View unsent unsent Email
1. Operate through: Main menu Æ Messages Æ Email Æ Accout Æ
Outbox.
2. The Emails are listed in time order. Slide to scroll the list and
search for the Email you want.
3. Press unsent Email to view in detail.
4. To delete unsent Email, click <Edit> in Email ist screen.
5. To resent Email, access to Email detail screen to click <Resend>.
View sent messages
View sent text/multimedia messages
1. Operate through: Main menu Æ Messages Æ Sent.
2. The messages are listed in time order. Slide to scroll the list and
search for the message you want.
3. Press unsent message to view in detail.
4. To delete unsent message, click <Edit> message list screen.
5. To forwad unsent message, click <Forward> in details
View sent Email
1. Operate through: Main menu Æ Messages Æ Sent.
2. The messages are listed in time order. Slide to scroll the list and
search for the message you want.
3. Press unsent message to view in detail.
4. To delete unsent message, click <Edit> message list screen.
5. To forwad unsent message, click <Forward> in details.

36
Message settings
Define the settings according to different type of message.
Text message settings
1. Operate through: Main menu Æ Messages Æ Settings Æ Text
message.
2. Slide to select setting items, input the message center account,
period of validity, network selection or delivery reports.
Multimedia settings
1. Operate through: Main menu Æ Messages Æ Settings Æ
Multimedia settings.
2. Slide to select setting items, input MMS center life time, priority,
rdelivery report, delivery size, reception size, and profile settings.
Email settings
1. Operate through: Main menu Æ Messages Æ Settings Æ Email Æ
Account.
2. Click <Edit> into account management list.
3. Click into setting items, input account name, my address, my
name, user name, passwords, receive server, send server, received
port, send port, and data account.
My files
My files support operation on audio, video, and java files.
In my files, you can operate files, such as copying or moving files.
As to the downloaded files in the phone, you can use only after acquiring
license information such as CEKs since they are processed by digital
right management (DRM). DRM files will request you whether to buy the
copy right again or others according to the term of validity when you use
them as wallpaper or ring tone.
View files
1. Operate through: My files Æ T-Flash/Sounds/Videos/Application-
s/Others.
37
2. Slide screen to select and open the folder.
3. Click file and view.
Operate the file
1. Operate through: Main menu Æ My files Æ T-Flash/Sounds/Vid
eos/Applications/Others.
2. If T-flash insered in phone, click <Format> to format T-flash ca
-rd.
3. Press <Edit> to accece in edit screen. In edit screen, user can
rename and delete files.
4. To rename file, click file name area to access into name input
screen.
5. To delete file, click to mark tag, press to delete file, and
click to cancel delete tag.
Install applications
1. Operate through: Main menu Æ My files.
2. Find JAVA application and click item which you want to install.
3. When installing applications, the screen displays the progress. If
the game of the same edition has been installed on the phone, the
phone requests for a confirmation of installing.
4. After finishing installation, the phone requests for a launch. Press
‘Yes’ and the phone start to launch the application program.
To run installed application or game, you can find them in Game
menu.
Use the Quickoffice applications
1. Operate through: Main menu Æ Applications Æ Quickoffice.
2. To view a list of Word, Excel, and PowerPoint documents, scroll
screen and select the Microsoft Office files to open office viewer.
Funtion for office viewer:
Content serch: Click to search content in whole file. If enable search,
click to find content. Click to disable search function.
Full screen view: Click to switch view mode full or normal.
Go to page: Click page display field to enter page number which you
want to turn.
38
z Page controller: Click to go to previous or next page.
Click to go to the first or last page.
z Page zoom in/out: Slide finger deasil on content view area
with 90 degree circle to zoom in, rightabout zoom out.
z Rotate: Rotate phone with 90 degree to switch horizontal
view mode.
z Office viewer setting: Define display mode and
recomposition with office viewer.
Multimedia
Camera
You can use camera function to take photos or record videos.
Do not take photo or record video if not permitted by the involved party or
it involves privacy.
Do not take photo where it is forbidden.
Photos and video clips taken by the camera are saved in JPG format,
3GP format, MP4 format, or 3G2 format in the phone.
Take photos
1. Operate through: Main menu Æ Multimedia Æ Camera.
2. Use the phone screen as viewfinder, press or camera key to
take a photo of the object, the photo will be saved in the default
folder and auto return to viewfinder.
3. If you want to view or operate the saved photos, in capture mode
click to access in photo album.
4. If you do not want to save the photo, in capture mode or in my
album mode to click to delete.
5. To take a photo of yourself, in capture mode click to switch sub
sensor.
6. To use countdown, in capture mode click and select
<Countdown>.
7. To set up effects, in capture mode click and select <Effect>.
8. To set up camera parameters, such as shutter sound, quality, image

39
size, white balance, anti-banding, save location, photo default
name. In capture mode click to operation.
9. To exit camera, press <End> key to back previous.
Function for the capture mode:
z To camcorder: Switch to video camera mode.
z Photo album: To switch to album folder. The default folder to
save photos.
z Capture: To shoot the view with photos.
z Sub sensor: To switch the camera lens for current use,
including the main camera lens and secondary camera lens.
z Focus: To zoom in and out for photos. The default zoom
value is 0.
z Night mode: Open, Close. The default night mode is Close.
z Brightness: Adjust photos brightness level. The default
value is 0.
z Settings: To set up the countdown, effect, shutter sound,
quality, image size, white balance, anti-banding, photo
default name.
9 Countdown: The self-timer has four modes of close/3
seconds/5 seconds/10 seconds. The default
self-timer is not activated.
9 Effect: Adjust five special effects for the photos:
close/black and white/negative/sepia/aqua. The
default effect is not activated.
9 Shutter sound: Sound 1/Sound 2/Sound 3. The
default sound is Sound 1.
9 Quality: High, Middle, Low. The default quality is
“Middle”.
9 Image size: The default image size is 240X320.
9 White balance: Auto, Tungsten, Fluorescence,
Daylight, Cloudy. The default white balance is Auto.
9 Anti-banding: 50Hz, 60Hz. The default anti-banding is
50 Hz.

40
9 Photo default name: Image.
9 Save location: The storage where the photo will be
saved: phone/memory card. The default storage is
the phone.
Record videos
1. Operate through: Main menu Æ Multimedia Æ Camera.
2. Click and switch to camcorder.
3. Use the phone screen as viewfinder, press or camera key to
record video, press to pause, and press to end recording.
The video will be saved in the default folder.
4. To view or operate the saved videos, in video mode click to
access in vide album.
5. To record your own image, in video mode click to switch sub
senseor.
6. To set up video color, in video mode click to select <Effect>.
7. To set up video camera parameters, such as effect, quality, image
size, white balance, record sound, video type, record time limit,
anti-banding, save location, video default name, in video mode click
to operation.
8. To exit camcoder, press <End> key to back previous.
Function menu for the video mode:
z To camera: To switch to photo mode.
z Video album: To switch to videos folder in my stuff where
recorded video is saved as default.
z Record: To shoot the view with photos.
z Sub sensor: To switch the camera lens for current use,
including the main camera lens and secondary camera lens.
z Focus: To zoom in and out for photos. The default zoom
value is 0.
z Night mode: Open, Close. The default night mode is Close.
z Brightness: Adjust photos brightness level. The default
value is 0.

41
z Settings: To set up effect, quality, image size, white balance,
record sound, video type, record time limit, anti-banding,
save location, video default name.
9 Effect: Adjust five special effects for the photos:
close/black and white/negative/sepia/aqua. The
default effect is close.
9 Quality: High, Middle, Low. The default quality is
Middle.
9 Image size: 176X144,128X96. The default image
size is 176X144.
9 White balance: Auto, Tungsten, Fluorescent, Daylight,
and Cloudy day. The default white balance is Auto.
9 Record sound: Open, Close. The default record
sound is Open.
9 Video type: 3gp,mp4, 3g2. The default video type is
mp4.
9 Record time limit: 1minute, 5minutes, 15minutes,
60minutes. The default time limit is 60minutes.
9 Anti-Banding: 50Hz, 60Hz. The default anti-banding is
50Hz.
9 Video default name: Video.
9 Save location: The storage where the photo will be
saved: phone/memory card. The default storage is
the phone.
Recorder
The phone supports voice recording.
1. Operate through: Main menu Æ Multimedia Æ Recorder.
2. To start recording, press in voice recorder.
3. To end recording, press to pause and press to stop.
4. Click access to my files video folder to play current recorded
file.
5. To set recoder, click <Set>on left top. Set the place to save
42
recorded file, default file name, and time limit for recording.
6. To exit recorder, press <End> key to back previous.
Radio
The FM radio depends on an antenna other than the wireless device
antenna. A compatible headset or enhancement needs to be attached to
the device for the FM radio to function properly.
Warning: Listen to music at a moderate level. Continuous exposure to
high volume may damage your hearing. Do not hold the device near your
ear when the loudspeaker is in use, because the volume may be
extremely loud.
Operation through: Maine menu Æ Multimedia Æ Radio.
Search radio frequencies
1. Search manually: To start the search manually, select block and
hold on frequency bar, then slide left or right to change the radio
frequency in 0.05 MHz steps.
2. Auto search: Click to start auto search.
3. Location search: Click frequency input filed on screen, and enter
the frequency you want.
Save radio frequencies with channel
1. To save a frequency channel, click on radio screen and input
channel name.
2. To switch channel on radio, click or to go to previous or
next.
3. To edit channel list, click <Channel> on radio screen. You can view,
rename and delete channel.
Listen to the radio
Select Menu > Media > Radio. To scroll to the desired frequency, hold
and slide block on frequency bar. To select a radio channel, briefly click
. To adjust the volume, slide the volume bar on bottom.
Function for list to the radio:
z Switch off: Click to turn off the radio.
z Add channel: Click to save the currently new channel.
43
z Channel list: To select the list of saved channels.
z Search all frequencies: To automatically and maully search
the available frequencies at your location.
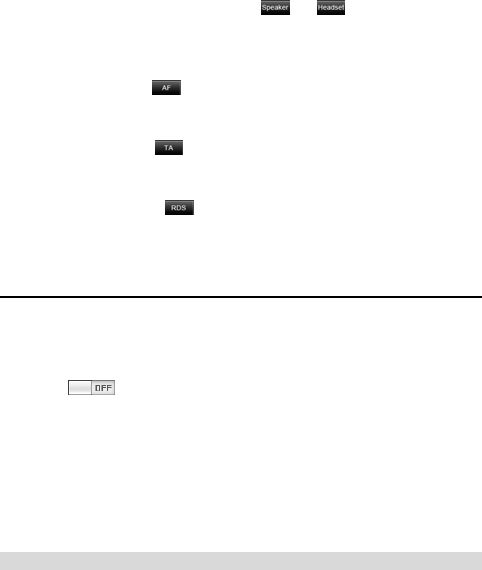
z Handset & Speaker: Click or to listen to the radio
using the loudspeaker or headset. Keep the headset
connected to the device. The lead of the headset functions
as the radio antenna.
z AF: Click to enable or disable.AF. AF will auto search
and location better frequency when the frequency signals
turn to low.
z TA: Click to enable or disable AF. When you can’t
receive frequency signal in different place, enable TA
function to auto search same type channel.
z RDS: Click to enable or disable RDS. Enable RDS, it
can receive channel name, frequency, programmer name
information on current radio screen.
TV out
Your phone can output phone screen to TV through a s-video calbe. You
can apply this function to exhibition, business meeting or product
presentation, ect.
Operate through: Main menu Æ Multimedia.
1. Slide to active on TV out.
2. When screen show “Please insert connect table” window, then insert
s-video with RCA port to TV’s RCA port.
3. After cable connect, please swich your TV to video. You will see
phone picuture on your TV.
4. Now you can control your phone on TV, include make/receive call,
message, etc.
5. To stop TV out, please pull out connect cable.
Tools
Tools include: Alarm, Calculator, Recorder, World time, Contact manager.
To use tools menu, press centre key in standby mode and select [Tools]
44
to enter main functions menu.
Alarm
You can set alarm for specific time or set circled alarms for specific
period. The alarm feature is available in silent profile or switched off
status.
Switch on alarm
1. Operate through: Main menu Æ Tools Æ Alarm.
2. The phone supports setting 3 alarms separately, slide screen to
select the alarm mode you want, and click alarm title to enter alarm
settings interface.
3. After setting, click to save and back.
4. When the alarm is turned off, slide to activate the alarm.
Calculator
This phone supports simple calculations, including addition, subtraction,
multiplication, division, memory calculation, negation.
The calculator supports 10 digits input space including decimal point,
operand and result.
Calculation
1. Operate through: Main menu Æ Tools Æ Calculator.
2. To general operate, input: left operand Æ operation symbol
(addition, subtraction, multiplication, division) Æ right operand Æ
equal sign.
3. To continuously operate, use the result after equal sign as the first
operand and go on to input operation symbol and next operand.
4. The calculator operates in accordance with the input order. The
result is displayed in the input area.
Function menu for calculator:
z MS: This operational symbol is a memory operation
character as well as MR and MC. This operation character is
a command to save the number, i.e. save the current
operand or result to memory. It does not function as
45
operation so it will not damage the currently displayed
content. Note: It cannot save multiple data. The previously
saved data will be replaced by the newly saved one. The
saved date can be used repeatedly.
z MR: This operational symbol is a memory operation
character as well as MS and MC. This operation character is
a command to call out the saved number and display in
proper place as the current input operand. If there is input
operand, it will be replaced by the called out data. After
calling out, the data in memory will not change. If you
continue to edit after calling out, the input content will
replace the original data. Note: If no data in memory, this
key is invalid.
World time
The phone supports displaying of different time zones.
Add new city time
1. Operate through: Main menu Æ Tools Æ World time.
2. Press <Edit> and click to add new city time. Input the initial part
of the city name to search, and scroll the list for selected city which
you need.
3. Click <Save> to add city name date and time to user data list.
4. To set local time, click <As local> to confirm the city which is
viewing by user currently as your local time of the phone.
Deletel city time
To delete existent city time, in world time list click <Edit>, and press
mark delete tag. Then click to delete.
My music
My music is Media player supports audio and video playback. It plays
audio/video files in the playlist in order. User can edit playlist, add
audio/video to playlist, equalizer, and download.
46
Playlist
Create a playlist
1. Operate through: Main menu Æ My music Æ Playlist.
2. Open my music screen, select and open playlist which you
need.
3. Click <Edit> access in edit screen, click to select media file from
my files, click <Done> to save selected file.
Delete file in playlist
1. Operate through: Main menu Æ My music Æ Playlist.
2. Click <Edit> on playlist screen, and press to mark delete tag.
3. Click to delete playlist which you need.
Rename playlist
1. Operate through: Main menu Æ My music.
2. Click <Edit> on playlist screen, and press playlist name which you
need to rename. Input new name and click <save> to back.
Play audio/video
1. Operate through: Main menu Æ My music Æ Playlist.
2. In media player, click playlist and select play mode to start playing
media files.
3. In tracklist, press <Shuffle> to play media files random (Video
playlist not include shuffle function). If click nowplay, it will open
media player. Click media file name, it will play from this file.
4. In playing mode, hold to fast previous/next playing, use
to pause.
Function for playing mode:
z Play in background: Click to play in background.
z Play mode: Media player have 5 playmode. Click icon to
swith current play mode.
No shuffle
Ranking
shuffle
Loop
Loop once

47
z Full screen (only when playing video): Click <Full screen>,
during video playing, the panel can be hidden.
z Volume: Move the finger on the volume bar to change the
volume.
z Fast/backward: Move the finger on the progress bar to go
fast or backward.
Song tracklist
1. Operate through: Main menu Æ My music Æ Song.
2. Open my music screen, click on bottom to auto loading all audio
files from phone.
3. Click <Shuffle> or audio files to start playing.
Video tracklist
1. Operate through: Main menu Æ My music Æ Video.
2. Open my music screen, click on bottom to auto loading all video
fies from phone.
3. Click <Shuffle> or audio files to start playing.
Equalizer
1. Operate through: Main menu Æ My music Æ Equalizer.
2. Open my music screen, click on bottom to select equalizer
mode.
3. To edit each equalizer mode, click <Edit> to access in edit screen.
4. To create equalizer mode, click to add in edit screen. User
defined equalizer can be deleted.
5. Click <Done> to save settings.
Download
1. Operate through: Main menu Æ My music Æ Download.
2. Open my music screen, click on bottom to access in download
screen.
3. To download media file from Internet, input the website and click

48
<Go> on keypad to link and download.
Calendar
You can save anniversary, appointments, and memos in calendar.
The phone alerts you relevant events and assists you in schedule
arrangement.
After accessing calendar, the present date will be distinctly displayed in
the month view. You can click <Month> <Day> <List> to swith view
mode.
Function for calendar:
z New event: Create new entry on selected date. Click to
add new event.
z Month view: Click <Month> to view the detailed schedule in
that month.
z Today view: Click <Day> to view the detailed schedule in
that day.
z List view: Click <List> to view the details schedule in that
week.
z To certain date: Selected and click day which you want.
Event entries
Create event entry
1. Operate through: Main menu Æ Calendar.
2. Select the date in calendar.
3. Click to create event management of that day.
4. Input event title, start date, start time, end date, end time, alert,
repeat alarm, etc.
5. Click <Save> to save new events.
Delete event
1. Operate through: Main menu Æ Calendar.
2. Select the date on which the event is created.
3. Press the event item to access in details of events.
4. Click <Edit> to event edit screen, select <Delete> and confirm to
49
delete.
Games
The phone supports multiple JAVA applications. You can download
games from the network and install them on your phone.
To use network download and online application, consult your network
service provider for relevant information.
Only install and use applications and other software from sources that
offer adequate security and protection against harmful software.
Start the applications
1. Operate through: Main menu Æ Game.
2. Slide screen to scroll the application which need be activated.
3. Click game to startup.
4. Press <End> key to end the current application.
Delete the applications
1. Operate through: Main menu Æ Game.
2. Click <Edit> to game edit screen.
3. Mark to the game which you want to delete and click to
confirm.
GPS
To start the GPS data application, operate through: Main menu Æ
Applications Æ GPS.
Navigation
Route guidance shows the straightest route and the shortest distance to
the destination. Any obstacles, such as buildings and natural obstacles,
are ignored. Differences in altitude are not taken into account when
calculating the distance. Route guidance is active only when you move.
Function for navigation:
z : Displays such information as North Arrow (the red
50
point is for the North), time, the number of satellites
(different colors of the number stands for different meanings:
red for no location, yellow for the unstable location and the
white for the stable location) and electric quantity of the cells.
Stroke the icon for displaying the present satellite state.
z / : Used for zooming in the scale of the maps. In this
navigation system, the range of scaling is 25m to 5m.
z : It is the option for the present site, the user can choose
“Set as Destination”,“Return to the Present Site”, “Store in
the Address Book”, “Set as Starting Point”, “Facilities
around”, “Send Navigation Short Message” and “Screen
Rotation”.
z : It can conduct the switch between the map location and
the present sites, being equivalent with “Return to the
Present Site” in .
z : It is for the Facilities around, being equivalent with
“Facilities around” in .
z : It means being stored in the address book, being
equivalent with “Store in the Address Book” in .
z : It indicates being set as the starting point, being equivalent with
“Set as Starting Point” in .
z : It is being set as the destination, being equivalent with “Set as
Destination” in .
z : It means entering into the Main Menu. It include “Destination
Query”, “Facilities around”, “Short Message Navigation”,
“My Favorites”, “Setup”, “Satellite State”, “Transportation
Query” and “Exit”.
Trip distance
On navigation screen, click to set start place, then click or
select <Set destination> to activate trip distance calculation. The
calculated values remain on the display. You can also use GPS
mainmenu <Desination search> to location your destination.
The trip meter has limited accuracy, and rounding errors may occur.
51
Accuracy can also be affected by availability and quality of GPS signals.
My links
Use My links to link website which appointment in your phone, you can
view streaming video.
Operate through: Main menu Æ My links.
1. Select and click website logo which you want.
2. After selected, it will auto connect to website.
3. View and select video on website, it will auto open streaming player
to downloading and play.
Function for My links:
z Play/Pause: Click or to pause or play current video
streaming.
z Stop: Click to stop current video streaming. During
streaming loading, if you click stop, it will reload from begin.
z Volume adjust: Hold and slide volume bar with left or right to
adjust volume.
Settings
You can define and modify various settings of your phone.
Do not change the settings preset by your network service provider.
Sound
You can adjust and customize the ring tones in different profiles.
1. Operate through: Main menu Æ Settings Æ Sound.
2. Slide screen to select a profile you want to set, Click to open the
setting interface.
3. Slide screen to scroll the settings list, select a setting type to set.
4. After setting, click to save.
5. When returns to sound list, click to launch that profile.
Standard profile settings:
z Voice call ring: Select a ring tone for voice calls.

52
z Video call ring: Select a ring tone for video calls.
z Volume: Select the volume level of the ring tone.
z Message alert: Select a tone for received text messages.
z Email alert: Select a tone for received Emails.
z Calendar alert: Select a tone for calendar event.
z Vibrating alert: Select whether to vibrate when receiving a
call.
z Key tone: Set the keypad tones on or off.
Display
1. Operate through: Main menu Æ Settings Æ Display.
2. Slide screen to select a setting mode, press centre key to open the
setting interface.
3. Slide screen to scroll the settings list, select a setting type to set.
4. After setting, click to save.
Display settings:
z Wallpaper: Set the standby image for the screen. Settings
include wallpaper.
z Date and time display: Idle date and time display setting.
z Mainmenu style: Define the mainmenu style for interface.
The phone supports 2 modes of mainmenu.
z Brightness: Set the brightness of the screen.
Language
1. Operate through: Main menu Æ Settings Æ Language.
2. Slide screen to select a setting mode, press centre key to open the
setting interface.
3. Slide screen to scroll the settings list, select a setting type to set.
4. After setting, click to save.
5. Language: Select a language to display.
Time and date
1. Operate through: Main menu Æ Settings Æ Time and date.

53
2. Slide screen to select a setting mode, select an item to open the
setting interface.
3. Slide screen to scroll the settings list, select a setting type to set.
4. After setting, click to save.
5. Time and date: Define the time, date, time format, date format, and
summer time.
Data transfer
1. Operate through: Main menu Æ Settings Æ Data transfer.
2. Slide screen to view data transfer infomation, click <Reset> to reset
all information.
3. After setting, click to save.
4. Data transfer:Total sent and total received.
Memory status
1. Operate through: Main menu Æ Settings Æ Memeory status.
2. Slide screen to view a memory status mode, select an item to open
for details.
3. Slide screen to scroll the settings list, select a setting type to set.
4. Click to back previous menu.
5. Memory status: Contact, messages, sevent , my files.
Call settings
1. Operate through: Main menu Æ Settings Æ Call settings.
2. Slide screen to select a setting mode and open to the setting
interface.
3. Slide sreen to scroll the settings list, select a setting type to set.
4. After setting, click to save.
Call settings:
z Phone number: Sending your caller ID or not, it need to be
supported by the network.
z Call waiting: Select active to be notified of a new incoming
call while you have a call in progress or switch between the

54
two calls. This function need to be supported by the
network.
z Auto redial: Select on to redial the number if it fails. Your
phone makes a maximum of 10 attempts to connect the call.
z Call divert: Divert the incoming voice call/video call to
another number you assigned or your voicemail/videomail.
z Call barring: Set the limits of making and answering calls,
including: All outgoing calls, International calls, International
but home, All incoming calls, Abroad incoming, and Cancel
all barring. This function need to be supported by the
network.
z Call time: Click <Reset> to clear counter. Call time include
infomatin for last time, all dialed call, all received call, all
dialed video, all received video.
z Call cost: You can reset or define configurations for cost. It
include reset cost and call cost setting.
Call cost setting need to PIN2 verify, please contact to you network
services to get more information.
Network
Define the connection of you phone to network.
1. Operate through: Main menu Æ Settings Æ Network.
2. Slide screen to select a setting mode and open the setting
interface.
3. Slide screen to scroll the settings list, select a setting type to set.
Network settings:
z Network mode: Select the mode of connection to network.
The phone supports Auto/GSM/WCDMA mode.
z Search mode: Select the mode of your phone searching for
network, including: auto and manual.
Security
Set passwords of phone lock and USIM card to prevent unauthorized

55
use.
Phone lock, USIM card password support 4 to 8 digits of numbers
excluding other characters. The original phone lock code is “0000”.
If you enter an incorrect PIN code three times, your SIM/USIM card is
blocked.
To unblock it, you need to enter your PUK code. The PUK code is
supplied by your network service provider.
If you enter an incorrect PUK code ten times, your SIM/USIM card is
scraped.
1. Operate through: Main menu Æ Settings Æ Security.
2. Slide screen to select a setting mode and open the setting
interface.
3. Slide screen to scroll the settings list, select a setting type to set.
4. After setting, click to save.
Security settings:
z Phone lock: When phone lock is enabled, you must enter
the phone lock code each time the phone is switched on.
z PIN lock: When PIN check is enabled, the phone requires
your PIN each time it is switched on.
z Change phone code: Change your phone lock code.
z Change PIN: Change your PIN code.
Connection
Define the Bluetooth and USB connection and manage the data account.
Operate through: Main menu Æ Settings Æ Connection.
Connection settings options:
z Bluetooth: Switch on or off Bluetooth feature, search for
Bluetooth device, and define Bluetooth settings.
z USB: Launch PC synchronization, flash disk, or modem.
z Data account: Define the data account settings.
Bluetooth
Operate through: Main menu Æ Settings Æ Connection Æ Bluetooth Æ
Settings Æ Select following settings to define:
56
z Visibility: Show or hide the phone to other Bluetooth
devices.
z Dial up: Switch on or off the dial up mode.
z Device name: Enter a name for the phone.
Bluetooth connection
1. Operate through: Main menu Æ Settings Æ Connection Æ
Bluetooth.
2. Slide , to activate Bluetooth.
3. When Bluetooth was activated, it will auto searching device. The
phone will search other Bluetooth devices in the valid area and
display in the devices list.
4. Select the Bluetooth device you want to connect. Click to confirm
the connection.
5. If necessary input the compatible passcode. If input passcode is
compatible to the passcode of waited Bluetooth device, the
Bluetooth devices will be connected.
USB connection
1. Operate through: Main menu Æ Settings Æ Connection Æ USB Æ
PC sync/USB/Dial up.
2. Connect the phone and devices with USB port, such as computer.
3. When the phone requests whether to launch flash disc, PC
synchronization, or mode, select one to confirm.
PC synchronization and modem need PC TOOLS supported. Please
download and install it on website [Client supply URL]. The software
includes help information for synchronization and modem launch.
Connecting phone to computer
1. Download and install PC tools with your phone.
2. Make sure your phone is turned on and connected to the computer
via USB cable.
3. Start your PC tools application on your computer.
When the installation is done, you can synchronize information or
browse the internet on a computer using the phone as a modem.
Data account settings
57
1. Operate through: Main menu Æ Settings Æ Connection Æ Data
account.
2. Click <Edt> and select a data account to view account information,
including: account name, access point, authorization type, user
name, and password.
3. To create a new data account, in account edit screen click to
create account, input account settings configuration, and press
<Save> to save.
4. To edit a new data account, in account edit screen and select a
account which you need to modify.
5. To delete a exsiting data account, in account edit screen, click
to mark delete tag and press to delete.
Java
Define JAVA APN to connect network for download. To setting APN, it
includes connection mode and data account selection.
Reset
Reset specific: reset settings only. User data e.g. contacts, messages,
my stuff will not be deleted.
Reset all: reset the phone to the original mode. User data e.g. contacts,
messages, my stuff will be deleted.
You may lose content that was in the phone at purchase.
1. Operate through: Main menu Æ Settings Æ Reset Æ Reset
specific/Reset all.
2. Enter the phone lock code. The original phone lock code is “0000”.
3. Click to Confirm.
4. After resetting, your phone returns to standby mode.
Voicemail
You can receive voicemail alert from network. Please contact your
network service to setting the voicemail number.
Voicemail settings

58
1. Operate through: Main menu Æ Phone Æ Voicemail.
2. Click <Voicemail call back> to send call back to voicemail center.
3. Click <Voicemail number> to set voicmail center number.
4. Slide to enable voicemail reminder.
Contacts
Manage all of your contact information, such as phone numbers and
addresses; add a personal ring tone and a thumbnail image to a contact;
send business card to contact.
To access in contact menu, click in standby mode.
You can save contact information in your phone or USIM card.
Use contact
Add contact
1. Operate through: Main menu Æ Contacts.
2. Click to create contact.
3. Set contact information. To store information in the phone’s memory,
information includes name, number, Email, URL, ring tone, image,
notes, speed dial; To store information in the USIM card,
information includes name, number.
Function for adding contact:
z Save: Save currently set contact information.
z Add number: Two options including phone number editing
and selection of number type.
Find a contact
The contact entries are listed in alphabetical order in default. The phone
supports searching a contact name by inputting initial part of the name or
the whole name.
1. Operate through: Idle Æ Contacts.
2. To search a name, input the initial of the contact’s name. Slide
screen to scroll the list. You can find the name and phone number
of the contact you want in the contracts list.
Function for contacts:

59
z Call: Click number item to make a voice call to selected
contact.
z View: Click number item to vew details.
z New: Add new contact entry and detail.
z Edit: Delete and copy between USIM and phone for current
contact.
View contacts
View details for selected contact.
1. Operate through: Idle Æ Contacts.
2. Click number item which you selected to view contact details.
Function for view contacts:
z Call: Make a voice/video call to selected contact.
z Send Email: Click Email to create a new Email editing.
z URL: Click URL to open browser and connect.
z Send message: Write text message/multimedia message to
the contact.
Edit contacts
Reedit the information of existed contacts.
1. Operate through: Idle Æ Contacts.
2. Slide screen to scroll the list and select the contact entry.
3. Click <Edit> to contact editing screen.
4. If the contact information is saved in phone, you can edit name,
number, group, email, URL, ring tone, image, notes; if the contact
information is saved in USIM card, you can edit name and number.
Delete contacts
Delete the contact information one by one or in batches.
1. Operate through: Idle Æ Contacts.
2. Click <Edit> in contact list to access in management screen.
3. To delete a contact , click to mark delete tag, and press
on tag item to confirm delete.
4. Click <Clear> to clean all contact list.
5. After manage, click <Done> to back.
60
Copy contacts
Copy contact between USIM and phone in contact editing screen.
1. Operate through: Idle Æ Contacts.
2. Click <Edit> in contact list to access in management screen.
3. To copy a contact between USIM and phone, click for select
contact to show copy option menu. Select copy mode to curreny
contact to phone or USIM.
Relevant features for contacts
Set speed dail
1. Idle Æ Contacts Æ New Æ Speed dial.
2. Select a number key as a speed dial key.
3. Press to input the desired number. After set, press to
quit and save settings.
Function for speed dial set:
z Set new speed dial: Set new speed dial number for current
contact.
z Cange existing speed dial: Change speed dial number for
current contact.
z Delete speed dial: Click <Edit> on speed dial setting screen,
and select speed dial number which you want to delete and
click delete tag to confirm.
Recent
Use this menu to view the calls you have dialed, received, or missed and
relevant information.
To access this menu, click in standby mode and select in the
phone screen.
Missed calls: This menu displays the most recent calls you did not
answer.
Dialed calls: This menu displays the most recent calls you dialed.
Received calls: This menu displays the most recent calls you have

61
received.
All calls: This menu displays all call logs including missed calls, dialed
calls, and received calls.
Recent
1. Operate through: Idle Æ Phone Æ Call logs Æ Missed calls/Dialed
calls/Received calls/All calls.
2. Slide screen to scroll call records.
Function for call log view:
z Call: Make a voice to selected record.
z Clear: Clean all records in list.
z View record details: Click to view record details.
View call log details
1. Operate through: Idle Æ Phone Æ Call logs Æ Missed calls/Dialed
calls/Received calls/All calls.
2. Click to view record details which you selected.
Function for call log details:
z Call: Make a voice/video to selected record.
z Send message: Send text message/multimedia message to
current record.
z Create new contact: Save the number to contact, if the
record is not save in contact.
z Add to existing contact: Add the number to existing contact
for number item replace or add.
Browser
The Wireless Application Protocol (WAP) browser on your phone allows
you to access the wireless web. From the wireless web, you can access
up-to-date information and a wide variety of media connect, such as
games, wall papers, ring tones, and music files.
To access this menu, click key in standby menu.
Only install and use applications and other software from sources that

62
offer adequate security and protection against harmful software.
You can download files that cannot be displayed on the websites, such
as ring tones, images, operator logos, themes, and videos clips. The
downloaded content will be saved in respective application programs in
the device. To download an item, scroll to it, and press centre key. Select
proper items to purchase, such as “Purchase”; carefully read all the
information provided. To continue the download, select “Accept”. To
cancel the download, select ‘Cancel’. You may not copy, edit, transfer or
send some images, music files (including ring tones) and other
multimedia files protected by digital rights.
Before you browse, make sure you have:
1. SIM/USIM card inserted.
2. Wireless service which supports browsing.
3. Data account set.
4. Network connection set.
Web page
Homepage
Default homepage is the homepage of network provider. You can access
through main menu link.
1. Operate through: Idle Æ Browser.
2. Click to connect homepage.
3. Click to exit browser.
Input a URL address
Enter a URL address manually and visit.
1. Operate through: Idle Æ Browser.
2. Enter a URL address on browser screen input field.
3. After input, click <Go> on keypad to confirm connection.
Reload the web
1. Operate through: Idle Æ Browser.
2. Click to reload website.
Save bookmark
1. Operate through: Idle Æ Browser.

63
2. Click to save bookmark for current website.
View website
1. Operate through: Idle Æ Browser.
2. Click to last or next website.
3. During viewing web pages to extend webpage view, you can rotate
phone to horzonal.
4. During viewing web pages, you can rotate finger with circle deasil to
enlarge page, and reduce with anticlockwise.
Tools
Clear record while visiting web
1. Operate through: Idle Æ Browser.
2. Click to open tools option menu. Select clear item which you
want: Clear cache, Clear COOKIES.
3. Click <Cancel> to hide option menu.
Save items of the web page
1. Operate through: Idle Æ Browser.
2. Click to open tools option menu and select <Save items>.
3. The webpage will display the downloadable items.
4. Click selected items to download and auto save in my files related
folder.
Save pages of the web page
1. Operate through: Idle Æ Browser.
2. Click to open tools option menu and select <Save this page>.
3. This page will auto save in browser.
Go to
Bookmarks
Use this menu to save URL addresses in order to quickly access web
pages.
Adding a bookmark
64
You can set the current page as bookmark and you can add bookmarks
through main menu.
1. Operate through: Idle Æ Browser Æ Go to
2. When viewing, Click to auto save bookmark for current website.
Accessing a bookmarked page
1. Operate through: Idle Æ Browser Æ Go to.
2. Click to open option menu and select <Favorites>, then look
for required bookmark.
3. Press centre key to connect and visit the bookmark.
4. To delete bookmark, in favorites screen click <Edit> and confirm
delete.
5. To rename bookmark name, in favorites screen click <Edit> and
press the name twhich you need to modify screen.
History
You can visit the recently viewed web pages. Select the address in the
history list and visit the page.
View historical web page
1. Operate through: Main menu Æ Browser Æ Go to.
2. Select <History> with option menu.
3. To delete historical web page, click <Edit> into editing screen and
mark tag to delete.
Web alert
View web alert
1. Operate through: Main menu Æ Browser Æ Go to.
2. Select <web alert> with option menu.
3. Click alert message to connect.
4. To delete web alert, click <Edit> into editing screen and mark tag to
delete.
Saved pages
Save pages

65
1. Operate through: Main menu Æ Browser Æ Go to.
2. Select <Saved page> with option menu.
3. To delete saved page, click <Edit> into editing screen and mark tag
to delete.
Browser settings
Set the display, security and authentication of browser.
Operate through: Idle Æ Browser Æ Advanced.
Configuration
1. Operate through: Idle Æ Browser Æ Advanced Æ Configuration
2. Click to add new configuration, the setting item include profile
name, homepage, connection mode and data account.
3. After setting, click <Done> to save.
Preferences
1. Operate through: Idle Æ Browser Æ Advanced Æ Preferences
2. Prefeneces setting include script, animation, image and sound.
3. After setting, click to save.
Http settings
1. Operate through: Idle Æ Browser Æ Advanced Æ Http settings
2. Http settings include cache mode, cookie mode, refresh and popup.
3. After setting, click to save.
View certificate information
1. Operate through: Idle Æ Browser Æ Advanced Æ Certificate.
1. Select current certificate or root certificate folder and view the
certificate list in the selected folders.
2. Select certificate item and view in detail.
Some Internet service requires authentication certificate saved in the
phone, such as online bank. Your phone may be preset with some
certificates and you can also download new authentication certificates.
About
1. Operate through: Idle Æ Browser Æ Advanced Æ About
2. It will show browser software version information.

66
Problems and solutions
To save the time and expense of an unnecessary service call, perform
the simple checks in this section before contacting a service
professional.
Y
our phone cannot be switched on
z Be sure that you press and hold the power key for more than 1
second.
z Be sure that the battery is well connected to your phone. Remove
the battery, reinstall the battery, and restart your phone.
z If power is exhausted, recharge the battery.
When switch on your phone, the following messages may appear
z Enter phone lock code. The automatic locking function has been
enabled. You must enter the phone’s lock code before you can use
the phone.
z Enter PIN code. The PIN check feature is enabled. Every time the
phone is switched on, the PIN has to be entered; (If you are using
your phone for the first time, you must enter the PIN code supplied
with the USIM card).
z Enter PUK code. The PIN code has been entered incorrectly three
times, and the SIM card is now blocked. Enter the PUK supplied
by your network service provider.
USIM card error
z USIM card is contaminated. Clear the metal contact on the USIM
card with clean cloth.
z USIM card is not properly placed. Install the USIM card according
to the user’s guide.
z USIM card is damaged. Contact your network service provider.
Network failure

67
z You may be in a weak signal area. Move and try again.
z You are out of network service coverage.
z USIM card is invalid. Contact your network service provider.
Y
ou have entered a number but it was not dialed
z Be sure that you have press the dial key.
z Be sure that you are blocked for defaulting.
z Be sure your USIM card is valid.
z Be sure that you have not set outgoing call barring.
z Be sure that you have not set fixed dialing.
The quality of your call is poor
z Check the volume.
z You are in a weak signal area, such as nearing tall building or in
the basement where radio cannot be efficiently transferred.
z You are using your phone in communication busy period, such as
commuting period when the lines are too busy to put through.
Y
our correspondent cannot reach you
z Be sure that your phone is switched on and connected to network.
z Be sure that you are not blocked for defaulting.
z Be sure that your USIM card is valid.
z Be sure that you have not set incoming call barring.
Y
our correspondent cannot hear you speaking
z Be sure that you have switched on the microphone.
z Be sure that you are holding the phone close enough to your
mouth.
The standby duration is too short
z The standby duration is related to the network settings. You may in
a weak signal area. If your phone cannot receive signals, the
phone will continue to send signal to search base station and

68
consume power, which shortens the standby duration. Use your
phone in stronger signal area or switch off temporarily.
z Your battery need to be changed.
The battery does not charge properly
z Be sure the plug is well connected.
z Wipe the charging contacts both on the phone and on the battery
with a clean soft cloth.
z When charging in an environment below 0 or above ℃45 , ℃
change your charging environment.
z Change the battery or charger which is damaged.
If the above guidelines do not help you to solve the problem, take note of
the model and serial numbers of your phone, your warranty details, and a
clear description of the problem. Then contact your local after-sales
service.

69
Health and safety
Batteries
Never use a charger or battery that is damaged in any way.
Properly use the battery. Do not short-circuit the battery, which may
damage the battery, cause heat or cause fire.
Do not dispose of batteries in high temperature of in a fire as they may
explode.
Return the waste battery to the dealer or appointed recycle places. Do
not dispose as household waste.
Battery charging time depends on the remaining battery charge, the type
of battery, and the charger used. The battery can be charged and
discharged hundreds of times, but it will gradually wear out. When the
operation time is noticeably shorter than normal, it is time to by a new
battery.
Use only original or approved chargers and batteries.
Unplug the charger from the electrical plug and the device when not in
use.
Do not charge overtime, which will damage the battery and shorten its
life.
Leaving the battery in extreme hot or cold places will reduce the capacity
of the battery. Cool down or heat up the temperature to normal level
(Li-ion batteries are particularly affected by temperatures below 0 ).℃
Road safety
Your wireless phone gives you the powerful ability to communicate by
voice, almost anywhere, anytime. Therefore, the user must uphold some
important responsibility hereof.
When you are driving, driving is your first responsibility. When using your
wireless phone while driving, be more alert and follow local regulations.
Understand the wireless phone and features, such as speed dial and
redial which can assist you make a call more conveniently but not disturb
your driving.

70
Use hand-free set if possible. Any hand-free accessories may promote
the convenience and safety for using wireless phone.
Place your phone where is easy to access and do not requires you to
move your eyesight. If receiving a call in inconvenient moment, use
voicemail to answer as possible.
Tell your correspondent that you are driving. Hang up in traffic jam or bad
weather. Rain, rain with snow, snow, ice, and traffic jam may be
dangerous.
Air bag, brake, speed control system, and fuel injection shall not be
influenced by radio transmitting. If you have foresaid problem, contact
your car dealer.
Switch off your mobile phone when fueling. The condition can also be
applied to where use dual-way radio equipment. Do not put your phone
with inflammable and explosive substances. Internal spark may cause
flaming.
Switch off the mobile phone before the plane taking off. To prevent
interference to communication system in the plane, never use a phone
during flight. Using a phone before the plane taking off should be allowed
by the crew and in accordance with safety regulations.
Be sure that your phone will be automatically switched on by alarm
during flight.
Operating environment
Remember to follow any special regulations in force in the area you are
in, and always switch off your phone whenever it is forbidden to use it, or
it may cause danger.
When connecting the phone or any accessory to another device, read its
user’s guide for detailed safety instructions. Do not connect incompatible
products.
It is recommended that the equipment should only be used in the normal
operating position (held to your ear with the antenna pointing over your
shoulder) for your satisfactory operation of the equipment and for the
safety of personnel.

71
Do not expose the equipment to temperature below -10℃ or above 50 .℃
Electronic devices
Most electronic equipment is shielded from radio frequency signals.
Consult the manufacturer for relevant information.
Pacemakers: Maintain a minimum distance of 6 inches (15cm) between
a wireless phone and a pacemaker; do not put your phone in the pocket
near the chest; use the ear far from the pacemaker to reduce the
possible interference. If you have any reason to suspect that interference
is taking place, switch off your phone immediately.
Hearing aids: Some digital wireless phones may interfere with some
hearing aids. In the event of such interference, you may consult your
hearing aid manufacturer.
Other medical devices: If you use any other personal medical devices,
consult the manufacturer of your device to determine if it is adequately
shielded from external RF energy. Your physician may be able to assist
you in obtaining this information. Switch off your phone in health care
facilities when regulations posted in these areas instruct you to do so.
Vehicles: RF signals may affect improperly installed or inadequately
shielded electronic systems in motor vehicles. Check with the
manufacturer.
Emergency calls
This phone, like any wireless phone, operates using radio signals, which
cannot guarantee connection in all conditions. Therefore, you should
never rely solely on any wireless phone for essential communications like
medical emergencies.
To make or receive calls, the phone must be switched on and in a service
area with adequate signal strength.
To make an emergency call, enter the local emergency number in
standby mode and press <Send> to call.
Other important safety information

72
z Use original or approved accessories. Any unproved accessory
may affect the performance of the phone, damage your phone, or
even cause personnel danger.
z Wireless phone sends out electromagnetic field. Do not put the
phone near magnetic storage media such as computer disk.
Neighboring electric appliances such as TV, phone, radio receiver
and PC may affect the use of your phone and the performance.
z Do not connect the phone to an incompatible device.
z Only qualified personnel should service the phone or install the
phone in a vehicle.
Care and maintenance
z Your phone is a product of superior design and craftsmanship and
should be treated with care. The suggestions below will allow you
to enjoy this product for many years.
z Keep your phone out of small children and pets. They may
accidentally damage the phone or choke on small parts.
z Keep the phone dry and avoid liquids that corrode the phone.
z Do not use the phone with a wet hand, which may cause an
electric shock.
z Do not stare the phone in hot areas, which can shorten the life of
electronic devices, damage batteries, or melt accessories.
z Do not stare the phone in cold areas. When the phone warms up
to its normal operating temperature, moisture can form inside the
phone, which may damage the phone’s electronic circuit boards.
z Do not expose your phone in hot sun which may heat your phone.
z Do not place your phone near inflammable liquids, gas or
explosive substances.
z Do not drop or knock the phone. Rough handling can break
internal circuit boards.
z When cleaning the phone, use humid or anti-static cloth. Do not
use dry or static cloth. Do not use chemicals such as cleaning
solvents to clean the surface. Switch off the phone first and then

73
do the cleaning.
z Do not paint the phone. Paint can prevent proper operation.
z If your phone has a flash, do not use it too close to the eyes. This
may cause damage to eyes.
z When the phone or battery gets wet and the label in the phone was
damaged, phone repairs are no longer guaranteed by the
manufacturer’s warranty, even if the warranty for your phone has
not expired.
Declaration of Conformity
This equipment has been tested and found to comply with the limits for a
Class B digital device, pursuant to Part 15 of the FCC Rules. These limits
are designed to provide reasonable protection installation. This
equipment generates, uses and can radiate radio frequency energy and,
if not installed and used in accordance with the instructions, may cause
harmful interference to radio communications. However, there is no
guarantee that interference will not occur in a particular installation. If this
equipment does cause harmful interference to radio or television
reception, which can be determined by turning the equipment off and on,
the user is encouraged to try to correct the interference by one or more of
the following measures:
-- Reorient or relocate the receiving antenna.
-- Increase the separation between the equipment and receiver.
-- Connect the equipment into an outlet on a circuit different from that to
which the receiver is connected.
Any changes or modifications not expressly approved by the party
responsible for compliance could void the user’s authority to operate the
equipment.
This device complies with part 15 of the FCC Rules. Operation is subject
to the following two conditions:
(1) This device may not cause harmful interference, and (2) this device
74
must accept any interference received, including interference that may
cause undesired operation.
THIS MOBILE PHONE MEETS THE INTERNATIONAL
RECOMMENDATIONS FOR EXPOSURE TO
RADIO WAVES
Your mobile phone is a radio transmitter and receiver. It is designed and
manufactured not to exceed the limits for exposure to radio frequency
(RF) energy defined by the international standards. These
recommendations have been established by the International
Commission on Non-Ionizing Radiation Protection (ICNIRP) and, the
Institute of Electrical and Electronics Engineers (IEEE) that forecast a
substantial safety margin for assuring the protection of all persons,
regardless of age and health.
The exposure recommendations for mobile phones use a measurement
unit known as the Specific Absorption Rate (SAR). The SAR limit
recommended by the ICNIRP for the mobile phones used by the general
public is 2.0W/kg averaged over ten grams of tissue and, is 1,6W/kg
averaged over one gram of tissue by IEEE Std 1528 for the head.
Tests for SAR have been conducted using recommended operating
positions with the mobile phone transmitting at its highest certified power
level in all tested frequency bands. Although the SAR is determined at
the highest certified power level, the actual SAR levels of the mobile
phone while operating are generally below the maximum SAR value.
This is because the phone is designed to operate at multiple power levels
so as to use only the power required to reach the network. In general, the
closer you are to a base station antenna, the lower the power output.
While there may be differences between the SAR levels of various
phones and at various positions, they all meet the international protection
standards for exposure to radio waves.
The highest SAR value for this model phone when tested was 1.19W/kg
at ear and 0.899 W/kg for use close to the body..
For limiting the radio waves exposure, it is recommended to reduce the
75
mobile phone call duration or to use a headset. The purpose of those
precautions is to take the mobile phone away from the head and the
body.
For body worn operation, this phone has been tested and meets FCC RF
exposure guidelines when used whit an accessory that contains no metal
and that positions the handset a minimum of 1.5cm from the body. Use of
other accessories may not ensure compliance with FCC RF exposure
guidelines.