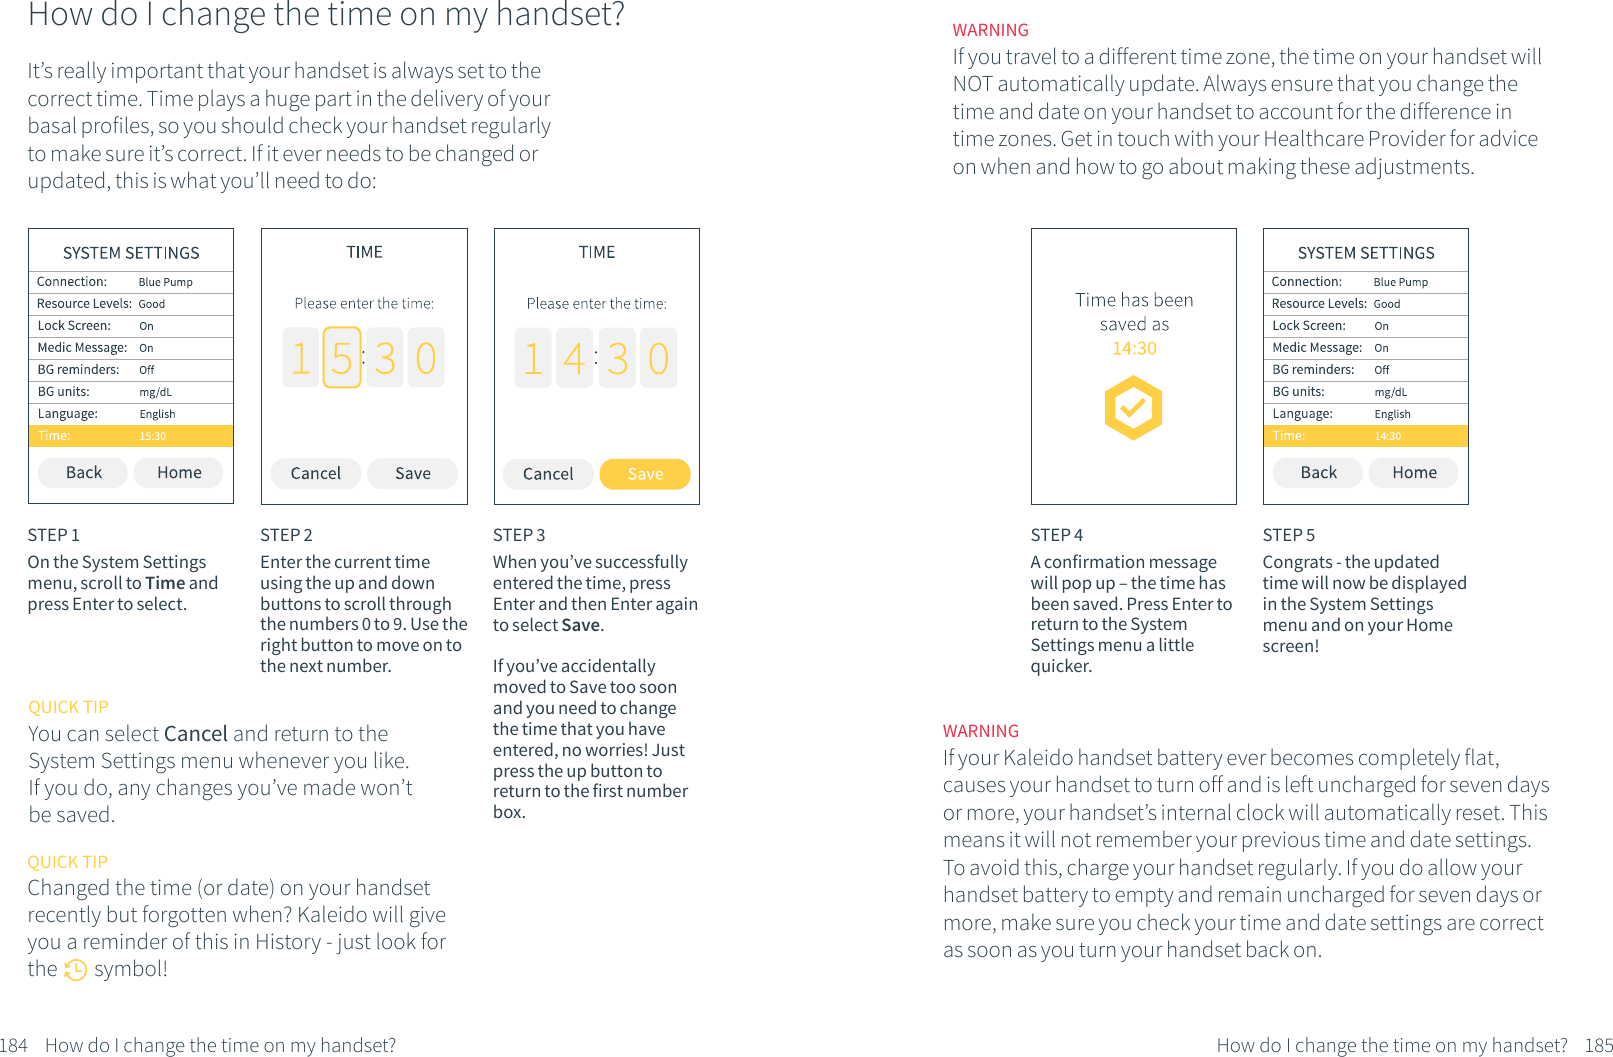
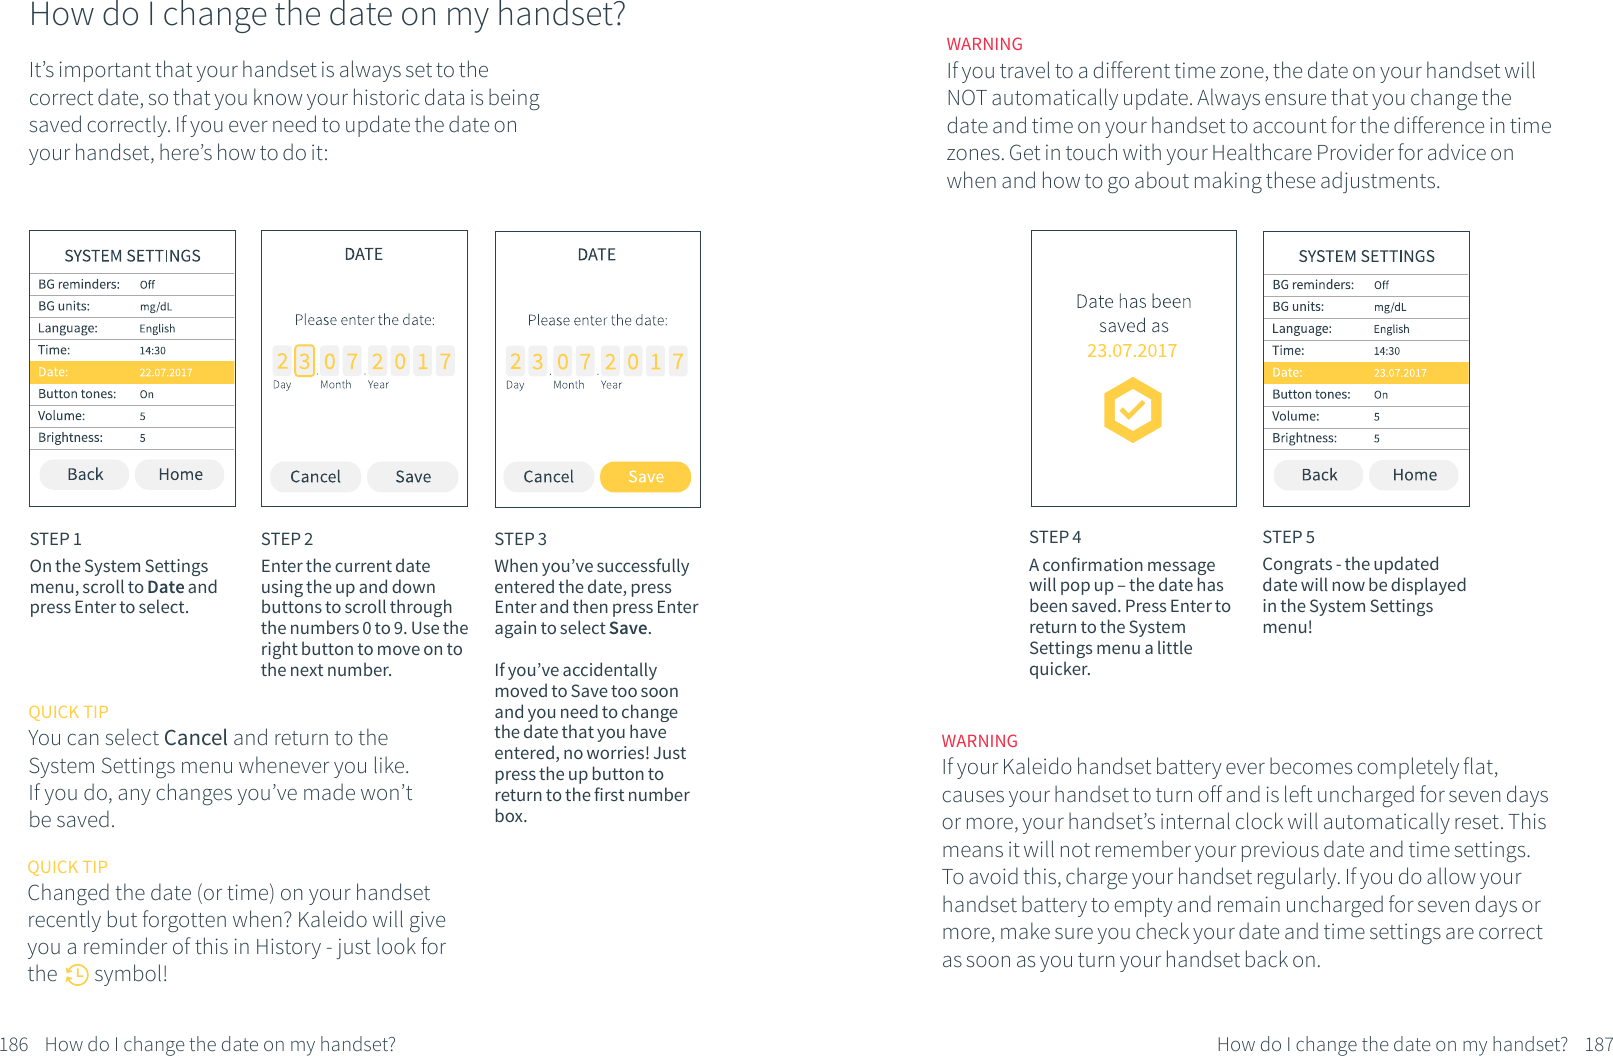
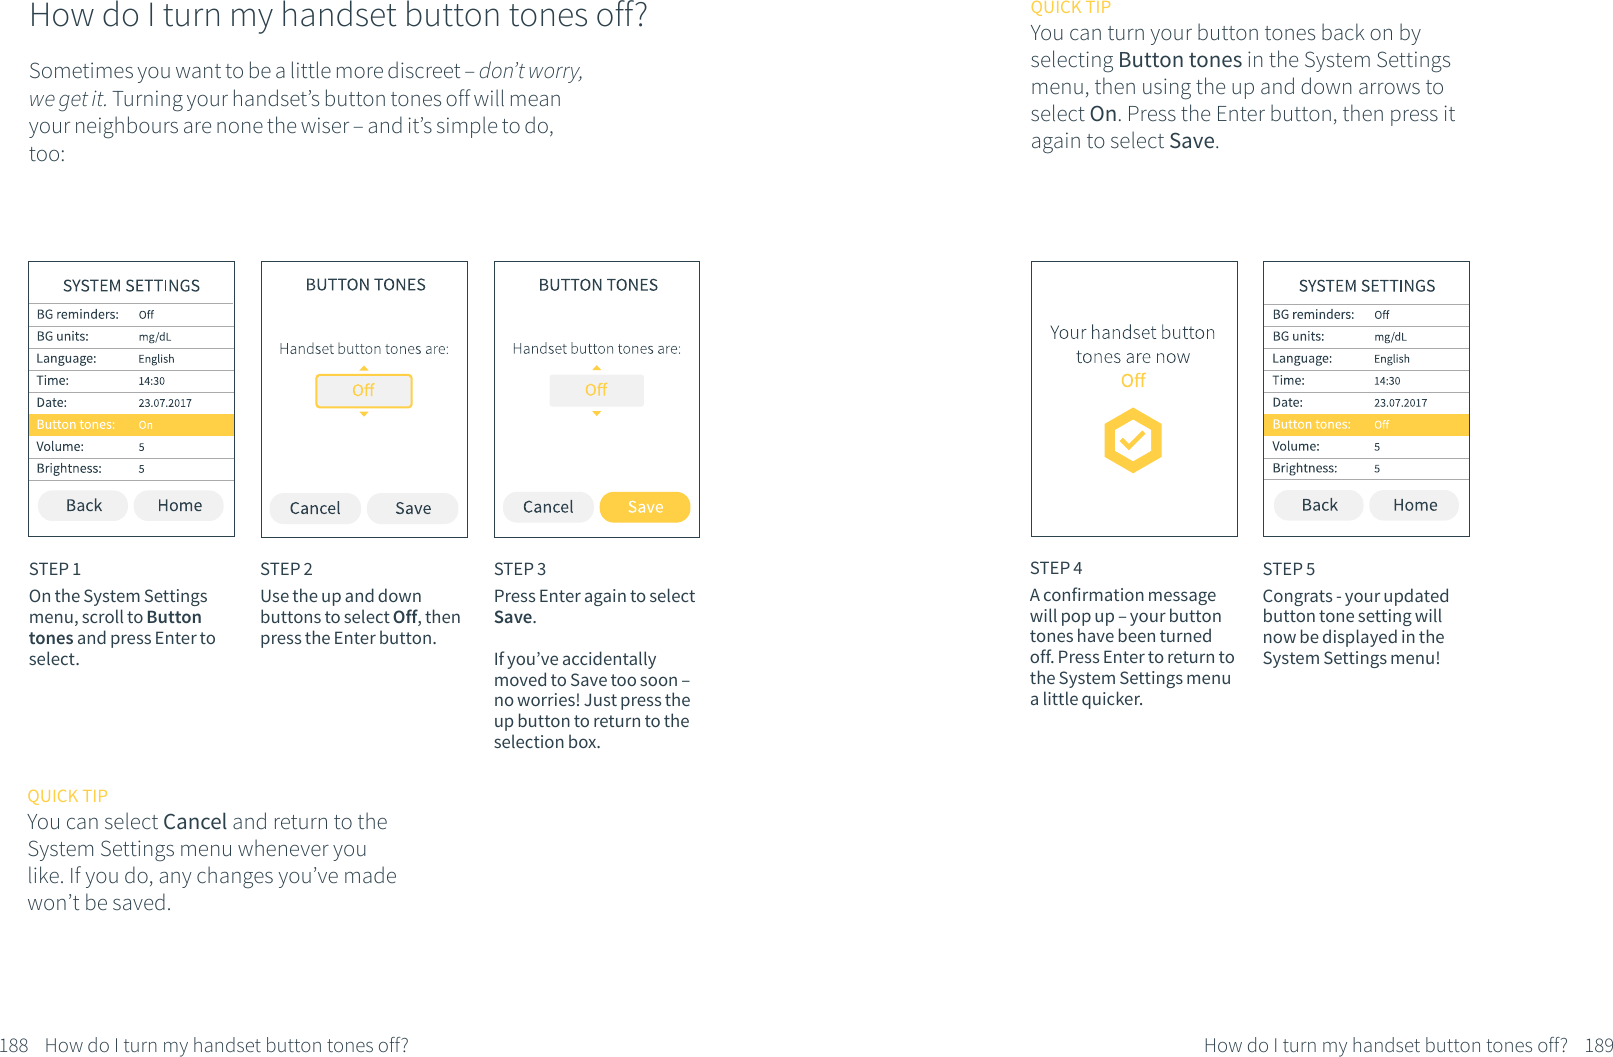
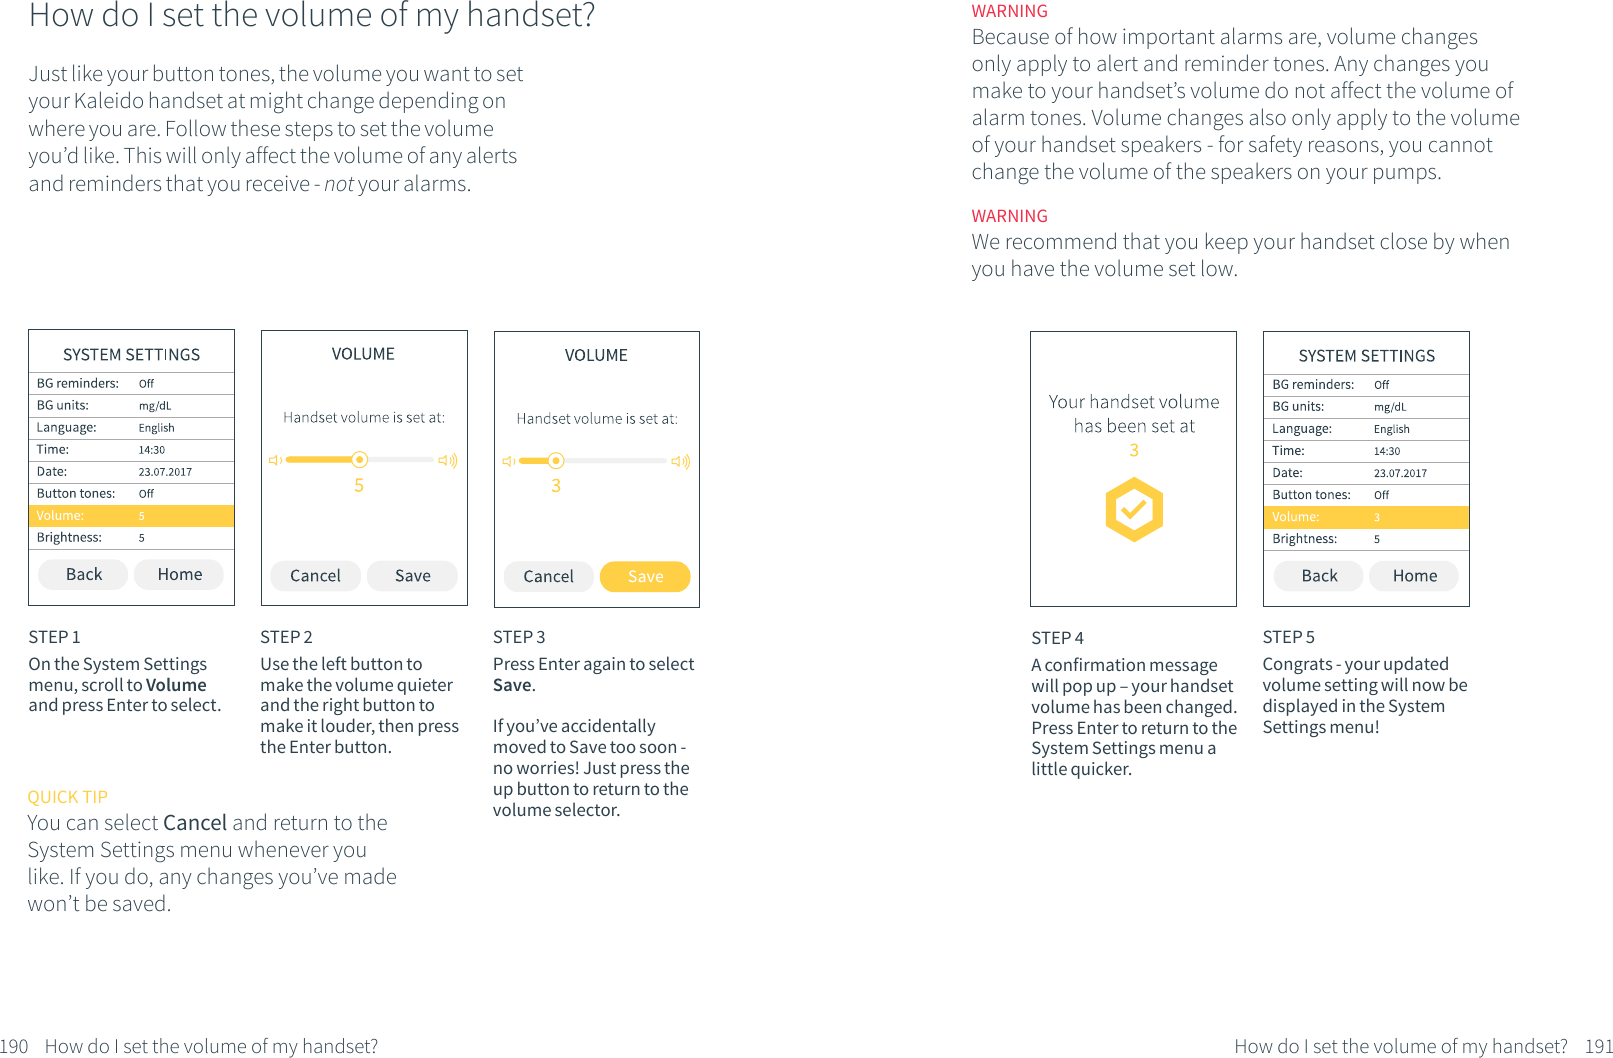
ViCentra B V 300099 Kaleido Insulin Infusion Pump using BLE User Manual

ViCentra B.V Kaleido Insulin Infusion Pump using BLE

User Manual

Guidebook
®
Table of contentsWelcome3        Hello!4        Our icons8        Kaleido’s intended use 8        System overview9        Contraindications9        Requirements for use10      General warnings & precautions12      Additional supplies14      Taking your first steps16       Your Starter Kit18       Your Top-up KitsGetting to know your Kaleido26       Handy hints for your handset30       Powering up your pump40       Connecting your pump and handset52       Wearing your Kaleido pump and infusion setBasal70      What does basal mean?72      Creating a basal profile78      Editing your basal profiles90      Temporary basal rates Bolus98       What’s a bolus?100    Kaleidoculator110    Quick Bolus113    Extended BolusBlood Glucose123   Entering BG readingsMenu129    Insulin on Board132    History136    Personal Info160    System Settings Status147    Pausing your pump202    Stopping your pump204    Restarting your pumpAlerts & Alarms211    What are alerts and alarms?212    Alerts214    Pump alarms216    Handset alarmsLooking after your Kaleido 222    Looking after your KaleidoFAQs229    FAQsTechnical information234    Technical specifications242    FCC warning statement243    How to contact Kaleido’s manufacturer243    About your Kaleido Guidebook244    Warranty
Quick questionsNeed to jump to a section quickly? Here’s a list of where to find all of the quick questions that we use.Getting to know your Kaleido22    How do I charge my handset?24    And how do I charge my pumps?26    How do I turn my handset on and off?31    How do I fill my insulin cartridge with insulin?38    Now that my insulin cartridge is ready, how do I put it in my pump?40    How do I connect my pump and handset?44    Why do I need to prime my cannula?44    Do I always need to prime my cannula?45    If I have to remove an insulin cartridge, can I put it back into my pump?50    What if I don’t want to start pumping straight away?51    What if I don’t want to connect my handset to a pump straight away?53    Where can I wear infusion sets?54    How do I put an infusion set on?58    How do I wear my pump?62    How do I take my pump off?Basal70    What does basal mean?71    I’ve just turned my handset on for the first time, where do I start?72    How do I create a basal profile?75    Help – I need to check which basal profile I’m currently pumping!76    How do I change to a different basal profile?78    How do I modify a basal profile?81    How do I rename a basal profile?84    How do I duplicate a basal profile?88    How do I delete a basal profile?91    How do I set a temporary basal rate?94    Can I stop a temporary basal rate once it’s started?Bolus98     What’s a bolus?101   How do I use Kaleidoculator?106   What do the numbers that make up Kaleidoculator’s calculation mean?108   What happens if Kaleidoculator’s recommended bolus is a negative number?110   How do I deliver a Quick Bolus?113   How do I deliver an Extended Bolus?118   Can I stop a bolus if I change my mind?Blood Glucose123   How do I enter a BG reading?Menu129   What is Insulin on Board?131   How do I check my Insulin on Board?132   How do I review my History?136   How do I review my Personal Info?138   How do I enter my name?140   How do I enter my age?142   How do I enter my gender?144   How do I enter my height?146   How do I enter my weight?148   How do I enter my Target BG?150   What are insulin to carb ratios?151   How do I enter my insulin to carb ratios?154   What are insulin to BG ratios?155   How do I enter my insulin to BG ratios?158   How do I enter my insulin activity time?160   How do I review my System Settings?162   How do I check if my handset is connected to a pump?163   Can I force my handset to disconnect from a pump?166   How do I check how full my insulin cartridge and batteries are?167   What do all the Resource Level icons mean?168   What’s Lock Screen and how do I save a new passcode?172   What’s a Medic Message and how do I turn it on?176   How do I turn my Medic Message off?178   What are BG reminders and how do I turn them off?180   How do I change the unit of measurement I record my BG readings in?182   How do I change my handset’s language?
184   How do I change the time on my handset?186   How do I change the date on my handset?188   How do I turn my handset button tones off?190   How do I set the volume of my handset?192   How do I set the brightness of my handset screen?Status     198   How do I pause my pump?200   How do I unpause my pump?202   How do I stop my pump?204   How do I restart my pump?Alerts & Alarms211   What is an alert?211   What is an alarm?212   When will I get an alert?214   When will I get a pump alarm?216   When will I get a handset alarm?Looking after your Kaleido222   Should I clean my Kaleido products?223   How should I store my Kaleido products?224   What do I do if I need to dispose of my Kaleido products?225   Where can I get replacement Kaleido products?FAQs229   How often should I take a BG reading?229   Can I wear my pump during exercise?230   Can I wear my pump if I go swimming?230   Can I wear my pump at high altitudes231   Can I wear my pump on aeroplanes?
Welcome
Can we tell you something? We’re so excited that you’ve picked us, and we can’t wait to get to know you better. Whether these are your first steps into insulin pumping or you’re a seasoned pump-pro, we’re here to make sure your transition to Kaleido is simple. Right from the off, it’s important to us that you spend less time thinking and worrying, and more time having fun.You’ll find everything you need to get started in your Starter Kit, and soon you’ll be receiving regular special deliveries of all the items you’ll need for the weeks ahead too – no ordering, no hassle, straight to your door. If at any point you need our help, have a suggestion or just fancy a chat, you can give our Kaleido Care team a call - we love to talk!Hello!Welcome to Kaleido- it’s nice to meet you3
Kaleidoculator Insulin on Board recommendationKaleidoculator BG recommendationKaleidoculator Food recommendationBasal Basal profileQuick BolusExtendedBolusMenu StatusHandset is connected to a pumpHandset isnot connected to a pumpTemporarybasal rateBolus stoppedBlood GlucoseInsulin cartridgeNew pumpdetectedReminder Handset batterychargingRight buttonLeft buttonInstructions start on previous pageInstructions continue on following pageSuccess! Info saved orsetting turned onInfo deleted, setting turned off or Lock Screen passcodes don’t matchUpbuttonDown buttonEnter buttonOur iconsNo, not our favourite celebrities...this is just a quick guide to all of the icons you’ll find on your Kaleido handset and in this Guidebook.Pump has been stoppedAlarm AlertBrightnessVolume4 5Insulin on BoardTime or date changes savedBolus
Resource level iconsInsulin cartridgePump batteryPump battery in Alert modeHandset battery in Alert modeHandset batteryInsulin cartridge in Alert modeInsulin cartridge in Alarm mode6SymbolsAny symbols we’ve used on your Kaleido products and their labelling are intended to be internationally recognised, but just in case you don’t know what they mean, here’s the full rundown:Details of the manufacturerSingle use -do not re-useFollow the operating instructionsUse by dateModel or part numberDo not use if the packaging is damagedLot number or batch numberWarning or precautions to takeBF applied partSterilised using irradiationDate of manufactureSerial numberRadio communicationWEEE waste disposalSterilised using ethylene oxideKeep dry DC supplyFamily IDnumber7FCC markPrescription required
System overviewWe designed the products in your Starter Kit and Top-up Kit to be used together in perfect harmony. You’ll need items from both of these kits to use your Kaleido pumps. The products team up to provide you with a system that is capable of delivering pre-programmed basal rates and boluses. Your insulin travels from your insulin cartridge to your infusion set via a small pump working with two check valves. These two check valves separate you from your insulin, so if anything stops working, the insulin in your insulin cartridge will remain there. Your Kaleido is designed to be safe to use, but if you break or damage any of your Kaleido-supplied products it’s important that you remove your pump and insulin cartridge straight away, stop using your Kaleido system and contact Kaleido Care for help. We’ve tried our best to make life with Kaleido blend seamlessly with life in the real world, and sometimes, real life means splashing around (or, on more troublesome days, dropping your pump in the bath or down the loo!), so your Kaleido pumps can be immersed in water up to 1m deep for up to an hour. Your handset, charging dock, connection cable and power adaptor aren’t waterproof - a little cleaning fluid is fine, but otherwise please make sure you keep these products safe and dry.Other than cleaning and charging your pumps and handset, there are no serviceable parts to your Kaleido system.Kaleido is an insulin pump system intended to be used by adults of 22 years and over for the continuous subcutaneous delivery of programmable basal profiles and programmed boluses of U100 rapid-acting insulin.Kaleido is intended to be used by those who require insulin to treat diabetes mellitus in the home healthcare environment, after they have received training and been deemed competent to use the system unsupervised. As the pump is worn on the body and delivers drug continuously, the system may be operated outside of the home environment. However, it is not intended for use in the more controlled environment found within hospitals and clinics.Kaleido’s intended use89ContraindicationsThere are a few things that might mean Kaleido isn’t suitable for you. Kaleido isn’t intended for anyone who isn’t willing or able to:•  Learn about and maintain good self-management of their diabetes •  Participate in insulin pump training and keep in regular contact with their Healthcare Provider •  Understand and use insulin doses correctly •  Hear Kaleido’s alerts and alarms and read the Kaleido handset screen •  Commit to performing at least four BG tests every dayRequirements for useTo use Kaleido, you must:•  Have insulin-dependent diabetes •  Be able to understand and perform all of the instructions provided by Kaleido •  Be willing to use Kaleido products according to the provided instructionsUnfortunately, if you’re not able to satisfy all of these requirements, then Kaleido isn’t quite right for you - we’re really sorry!
General warnings & precautionsBefore using your Kaleido, you must make sure that you’ve been appropriately trained in how to use it by a Kaleido trainer. Using Kaleido incorrectly (including failure to follow the instructions taught in Kaleido Training and outlined in this Guidebook) may lead to serious injury or even death. Instead of delivering both long-acting and rapid-acting insulin (like you might have previously done if using multiple daily injections to manage your diabetes), Kaleido only delivers U100 rapid-acting insulin.  You must only use U100 rapid-acting insulin with the Kaleido system and must never, ever mix insulin types for use in your pump. Using a lesser or greater concentration or a mix of insulins can result in serious health consequences.Kaleido is designed to deliver insulin reliably, but in order to prevent DKA (diabetic ketoacidosis) or very high blood glucose levels, you must always be prepared to inject insulin incase insulin delivery from your Kaleido is interrupted for any reason. You can find out more about the supplies that you’ll need for this in the Additional supplies section of this Guidebook.To find out more about using Kaleido when swimming, spending time at high altitiudes or travelling by airplane, turn to the FAQs section of this Guidebook.10 11WARNINGUsing accessories that have not been supplied by ViCentra BV as part of your Kaleido system may result in increased emissions or decreased immunity. Using alternative parts and accessories from other suppliers could also damage your pump and will invalidate your warranty.WARNINGYour USB cable could pose a strangulation risk. Do not place this near or around a person’s neck and keep out of reach of children.WARNINGDo not make any modifications to your Kaleido products. Attempting to modify Kaleido products will invalidate your warranty and could cause harm.WARNINGDo not use your pump or handset near a magnetic field. If you do, your pump and handset could be damaged. This includes any storage with magnetic clasps, MRI, X-ray and CT scanners. You should pause or stop your pump, remove it from your body and store it safely if you need to enter areas containing any of these devices.WARNINGDo not use your pump when there are flammable gases present.WARNINGIf you lose or break your Kaleido pump or handset, remove the system from your body immediately and use an alternative form of therapy until you have received a new pump or handset, or your pump or handset has been found or repaired.
Additional suppliesWe know that nobody likes to be weighed down with bags full of stuff, but it’s really important that you always carry everything you need to monitor your blood glucose levels, as well as an alternative way to give yourself insulin, just in case something happens to your Kaleido. You should keep all these items with you and let your friends, family and anyone else that you spend lots of time with (perhaps your teacher or the people you work with) know where you keep it.Here’s what your kit should include:  •   A spare Kaleido insulin cartridge and charged Kaleido           pump  •   Your Kaleido connection cable and power adaptor, so that           you can charge your handset if you need to  •   Your favourite hypo treatment   •   BG test strips and your BG meter  •   A lancing device and lancets  •   Ketone monitoring supplies  •   Rapid-acting insulin and an injection device with needles           (your Healthcare Provider will be able to help you with           dosing instructions)12
Taking your first stepsEverybody ready? Let’s do this! To get you started on Kaleido, a member of our team will deliver your Starter Kit and very first Top-up Kit. You may have cracked both open straight away (who’d blame you?) but just in case you haven’t, here’s what you should find in each box:Starter KitTop-up KitWARNINGUnfortunately, Kaleido isn’t able to provide you with the U100 insulin you’ll need to use your pump. For this, you should contact your Healthcare Provider who’ll be able to help. Your Kaleido pump and insulin cartridges are only approved for use with Humalog® and NovoRapid® U100 insulins.WARNINGPlease make sure your kits contain everything listed before you get started. If there’s anything missing, give us a call at Kaleido Care straight away.WARNINGIf the packaging of any of your supplies is damaged in any way, please don’t use them. Damaged packaging means that we can’t guarantee the sterility of the products. Please contact Kaleido Care and we’ll make a plan to send you replacements as soon as possible.Kaleido handsetx 1Kaleido pumps x 2Guidebook x 1Power adaptorx 1Charging dock x 1Connection cable x 1Insulin cartridgesx 10Syringesx 10Needlesx 10Infusion setsx 10Alcohol wipesx 10Body patchesx 10Pump patchesx 10Inserterx 114 Your Starter Kit 15Your Top-up Kit
InserterThis nifty piece of kit will help you insert your infusion sets quickly and easily. Hold on to it to help make sure infusion set change days are a real breeze!      ButtonIntroducing KaleidoStarter Kit – Everything you need to get startedGuidebookYou’re reading it! You can use this Guidebook to learn more about the functions your Kaleido pump offers, as well as a refresher if you ever need to jog your memory. Kaleido pumpsTA-DA! These are your shiny new Kaleido pumps! Because Kaleido pumps are reusable, we’re sending you two, so that you’ll always have one to wear and one charged and ready to go.Kaleido handsetGive it up for your Kaleido handset! The handset is what you’ll use to speak to your pump and tell it what you’d like it to do. Your handset will only talk to one pump at a time, using a special wireless connection. Your handset can also help you keep track of the insulin deliveries you give, as well as any blood glucose readings you take.It’s also where you’ll be able to quickly check the important details, like how much insulin is left in your insulin cartridge and how much power there is in your pump and handset batteries - just one quick glance and you can get back to recharging your own!Charging dockTogether with the connection cable and power adaptor, this is what you’ll use to charge your pumps. It’ll help you make sure they’re always fully charged and ready for action.Connection cableUse this cable to connect your power adaptor to either your Kaleido handset or your charging dock - whichever you need to charge next. WARNINGYour connection cable should only be used with your Kaleido charging dock and power adaptor to charge your Kaleido pumps and handset. You shouldn’t try to connect your Kaleido products to any other devices using your connection cable.Power adaptorOnce you’ve positioned your connection cable, you’ll need your power adaptor to plug into your electrical outlet and start charging.21215 64Power buttonScreenNavigation buttons (up, down, left, right)Enter buttonMicro USB portSpeaker213316 17What’s in your Starter Kit?What’s in your Starter Kit?12123456Here’s where your insulin cartridges will go!Groove for insulin cartridge tubingCharging status lightMicro USB portContact pins12311
Top-up Kits – Everything you need to keep you pumpingBody & pump patchesLast but by no means least, these patches will help you wear your Kaleido pump. The body patch goes on your body and the pump patch is the part that sticks to your pump.You’ll need to change these patches every time you change your pump, insulin cartridge and infusion set, so – are you sensing a theme here!? – you’ll use one new body patch and one new pump patch at least once every three days.Alcohol wipesReady for a new infusion set? Use an alcohol wipe to make sure your skin is ultra clean first.Infusion setThe infusion set is the bit that connects your Kaleido pump to your body. It’s small but powerful! It uses a little needle and tube and, just like your pump and insulin cartridge, you’ll need to change it at least once every three days. Kaleido infusion set needles come in two sizes, 6 mm and 9 mm, so you can choose the size that works best for you.Syringes & needlesOur syringes and needles fit together and are used to fill your insulin cartridges with insulin. You’ll need one syringe and one needle for every new cartridge you prepare - that’s one of each at least once every three days.Kaleido insulin cartridgeThis little thing is where you’ll put all the insulin you’ll need for up to three days of pumping. You can choose from two lengths of tubing because we’re cool like that - go for 5cm or 30cm. Just let us know which you’d prefer.Hole 1Hole 2Insulin cartridge connectorPlastic tabPaper backing (with sticky patch underneath)Needle, including cannula tubePlastic capPlastic cap tabs2119What’s in your Top-up Kits?31234123567Filling cradle catchInsulin cartridge tubingFilling cradle12364754418 What’s in your Top-up Kits?
Getting to knowyour Kaleido
Getting to know your KaleidoSo you’ve got everything you need to start pumping, but what’s next? It’s easy! First, you need to:QUICK TIPYou can send your handset to sleep at any time by briefly pressing the Power button. This will help you save your handset battery. You can wake it up again at any time just by pressing the Power button.First things first!• Remove your pumps and handset from their packaging• Charge your handset• Charge the pump you would like to use firstLet’s charge! How do I charge my handset?STEP 1Start by connecting your power adaptor and connection cable. Do this by inserting the larger end of the connection cable into the USB port at the bottom of the power adaptor.STEP 2Next, insert the smaller end of the connection cable into your handset’s micro USB port.STEP 3Finally, plug your power adaptor into an easily accessible electrical outlet and then switch the power on. You’ll see a charging icon on your handset screen. Congratulations, you’re charging!STEP 4If you are charging your handset for the very first time or recharging it after draining the battery right down to empty, we recommend that you charge it for at least two hours.You can always check how charged your handset is by scrolling to Resource Levels in the System Settings menu - even while your handset is charging!QUICK TIPMake sure you keep an eye on your handset battery and recharge it at a convenient time for you. Remember, you should always keep your handset within reach in case you need to adjust your insulin delivery, even when it’s on charge.WARNINGYou must only use the supplied charging system to charge your Kaleido handset.22 23How do I charge my handset?How do I charge my handset?WARNINGIf your Kaleido handset battery ever becomes completely flat, causes your handset to turn off and is left uncharged for seven days or more, your handset’s internal clock will automatically reset. See How do I change the time on my handset? and How do I change the date on my handset? for more details.QUICK TIP Charging your handset will automatically turn it on, even if it was previously turned off. You won’t be able to turn your handset off while it’s being charged.
And how do I charge my pumps?WARNINGThe supplied charging dock is the only device that can be used to charge your Kaleido pumps.STEP 1First, detach your connection cable from your handset, then insert the connection cable into the micro USB port on your charging dock.STEP 2Check there isn’t an insulin cartridge already in the pump you want to charge (if there is one there, remove it!). Then, click your pump into place on the charging dock.STEP 3Plug your power adaptor into an easily accessible electrical outlet and then switch on the power. The charging status light on the charging dock will shine orange to let you know that charging has started.WARNINGIf the charging status light on the charging dock does not glow orange when your pump is connected and the power supply is switched on, the pump is not being charged. Try an alternative power supply first, and then contact Kaleido Care if you continue to experience difficulties.WARNINGYou should always connect the connection cable to the power adaptor and charging dock or handset BEFORE you plug the power adaptor into an electrical outlet. Switching on the power should always be the last thing you do. Once you’ve finished charging, you should switch off the power and remove the power adaptor from the electrical outlet before starting to use either the pump or your handset.STEP 4Once your pump is fully charged, the charging status light on the dock will change from orange to green. Your pump is now ready to use!If your pump has been on charge for more than two hours and the charging status light hasn’t changed  from orange to green, give Kaleido Care a call.QUICK TIPYou’ll wear each of your Kaleido pumps for up to three days at a time. Once you’ve removed a pump, it’s a good idea to get into the habit of charging it as soon as you can, so that it’s ready for the next time you need it. No one likes a pump with an empty battery, right?24 25And how do I charge my pumps?And how do I charge my pumps?WARNINGBefore attaching a pump to the charging dock, you must make sure you’ve removed any insulin cartridges.WARNINGIf the charging status light on the charging dock glows red, an error has occurred. Unplug the power adaptor from the electrical outlet and try disconnecting and reconnecting the connection cable. If that doesn’t resolve the problem, call Kaleido Care for help.
Handy hints for your handsetOnce your handset is charged, it’s time to turn it on and start exploring!STEP 1To turn your handset on, just press and hold the Power button for two seconds. STEP 3Turning on your new handset for the first time? You’ll be greeted by a welcome message suggesting that youcreate your very first basal profile. You’ll need to enter a basal profile in order to start pumping, so this is the perfect place to start!See I’ve just turned on my handset for the first time, where do I start? for more info.STEP 4If it’s not the first time you’ve turned on your handset, pressing the Power button will take you straight to the Home screen.STEP 5If you ever want to turn your handset off, press and hold the Power button for two seconds. How do I turn my handset on and off?26 27How do I turn my handset on and off?How do I turn my handset on and off?WARNINGTurning off your handset will not automatically turn off your pump - if you turn your handset off without pausing or stopping your Kaleido pump first, your pump will continue to deliver your current basal profile and any programmed boluses.STEP 6You’ll be asked to confirm that you want to turn your handset off, and it’s simple - just select Yes if you do. If you decide not to turn off your handset, just scroll left to No and press the Enter button.STEP 2Your handset will ask you to enter your passcode. If you haven’t already saved your own passcode, you can enter the default passcode instead: To find out how to save your own passcode, check out What’s Lock Screen and how do I save a new passcode?. You should save your own passcode as soon as possible.
Navigating your Kaleido handsetWe designed your handset to be as simple to use as possible.Your Home screen is divided into five sections, each of which leads you to a different menu. At the top, you’ll also see handy details like the time and how full your insulin cartridge, pump and handset batteries are.BASALOnce you’re pumping, your Basal section will show the basal rate you are currently receiving. If you need to change or review your basal profile, just navigate to Basal and select it by pressing the Enter button.BOLUSYour Bolus section shows you the details of the last bolus you delivered – that’s the date, time and the amount of insulin you got. When you need to deliver your next bolus, navigate to Bolus using the buttons and press Enter.BLOOD GLUCOSEIf you’d like to enter a blood glucose  reading, navigate to Blood Glucose and press Enter. Once you’ve done this, the Blood Glucose section will display your last BG reading, along with the date and time, making it easy for you to keep track.MENUIf you’d like to check your current Insulin on Board, take a look at your History, or check or update your personal information or system settings, you’ll need to navigate to Menu and press Enter.STATUSIt’s also really easy to pause, stop and restart your pump. Just navigate to Status, press Enter and go from there.EnterQUICK TIPAside from moving you around your handset, the navigation buttons play their own roles on other screens too. You’ll use the up and down buttons to scroll through numbers and letters when entering details like your name and date of birth, and then right and left to move back and forth between the different letter and number boxes. The Enter button is used to confirm all your decisions and to move you on to any next steps.QUICK TIPWhen you receive confirmation messages from your handset, you have two options: either wait for them to time out automatically (this’ll take a few seconds), or you can just press Enter to continue a little quicker.WARNINGPlease be aware that when no button has been pressed for a few seconds, your handset screen will go to sleep. Just press the Power or Enter button to wake it back up.28 29Navigating your Kaleido handsetNavigating your Kaleido handsetBUTTONSYou can navigate around your Kaleido handset simply by using the up, down, left, right and Enter buttons. INSULIN CARTRIDGEPUMP BATTERYHANDSET BATTERYTIME
Powering up your pump• 1 x fully charged Kaleido pump• 1 x pouch-packaged insulin cartridge• 1 x syringe• 1 x needle• 1 x body patch• 1 x pump patch• 1 x infusion set• Your Kaleido inserter• Your vial of U100 insulinSo, now you’ve got to know your handset and you’ve charged  your first pump, it’s time to learn how to get it ready for action. How do I fill my insulin cartridge with insulin?Filling your insulin cartridge properly is really important, so find a clean, flat surface and make sure everything you need is within easy reach. When you’re ready, follow these steps:STEP 1Remove your insulin cartridge from its packaging.WARNINGMake sure you take a good look at your insulin cartridge pouch when you pick an insulin cartridge to use. If you see any signs of damage, or if the expiration date has passed, please don’t use the cartridge. Instead, dispose of the insulin cartridge appropriately and select another.STEP 3Remove your syringe from its packaging. WARNINGNever prefill your insulin cartridges. You should only fill an insulin cartridge just before you want to insert it into your pump.30 31How do I fill my insulin cartridge with insulin?Powering up your pumpSTEP 2Place the insulin cartridge on a flat surface so that the numbers 1 and 2 are facing towards you.You’ll need:You’ll need to start by filling up an insulin cartridge with insulin. We’ll walk you through this on the next few pages, but here’s a list of all the bits that you’ll need. It might help to get everything lined up and ready to go before you start - your Top-up Kit will come in handy for this part!
STEP 4Without moving the plunger, push the pointy end of the syringe firmly into Hole 1 so that it fits securely into the filling cradle. STEP 5Holding the syringe in place with one hand, use the other to carefully pull the plunger all the way up to the top of the syringe. This will remove any excess air from your insulin cartridge.STEP 7Next, remove your needle from its packaging. No need to remove the needle cap just yet!STEP 8Push the needle (with its cap still attached) onto the pointy end of the syringe until the two are securely connected.32 33How do I fill my insulin cartridge with insulin?How do I fill my insulin cartridge with insulin?STEP 6Now, remove your syringe from Hole 1 and push the plunger back towards the pointy end of the syringe.STEP 9Remove the needle cap from the needle.WARNINGWhen pulling the plunger to the top of the syringe, you should feel some resistance - as though pulling the plunger up is quite difficult. If you don't and the plunger pulls up without any effort, call Kaleido Care before using the insulin cartridge.
STEP 10Using both hands, hold your vial of U100 rapid acting insulin upside down and carefully insert theend of your needle into the vial.STEP 12Take your insulin cartridge and gently place the needle into Hole 2. Carefully push down the plunger, filling the cartridge with insulin. 34 35How do I fill my insulin cartridge with insulin?How do I fill my insulin cartridge with insulin?STEP 11Pull back your plunger until you have just over 2.5 ml of insulin in your syringe. Push the plunger back to meet the 2.5 ml mark to get rid of any air that might have crept into the syringe. Once you have 2.5 ml of insulin in yoursyringe and you’ve gotten rid of any air bubbles, remove the needle from the vial.12WARNINGYou must only use U100 rapid acting insulin with the Kaleido system and must never, ever mix insulin types for use in your pump.WARNINGAlways ensure your insulin cartridge is clean and dry before filling it with insulin. Fill the insulin cartridge at room temperature, using room temperature insulin. Never fill an insulin cartridge with cold insulin.QUICK TIPIf you see a small bubble inside your filled insulin cartridge, don’t worry. The cartridge will make sure the bubble doesn’t get into your insulin stream.STEP 13Remove the needle from the insulin cartridge and replace the needle cap. Twist and pull the needle from the syringe and dispose of both parts responsibly.QUICK TIPYou should always make sure that your filled syringe is as free of air bubbles as possible. But, if there are some small, champagne bubble-sized bubbles that you just can’t get rid of, you might find that turning the syringe upside down (so that the needle is pointing to the floor) and giving it a gentle tap with your finger will help these small air bubbles collect together and travel to the top of the syringe, away from the needle. This will help make sure that they stay in the syringe and don’t travel into your insulin cartridge – win!You’ll know that your insulin cartridge is fullwhen you see insulin coming out of Hole 1. Your insulin cartridge is now fully filled and primed.
STEP 15Ta-da! Your insulin cartridge is now fully filled, primed and ready to use!STEP 14Next, you’ll need to remove your insulin cartridge from the filling cradle. First, hold your insulin cartridge in one hand and use the other to push the coloured part of the insulin cartridge further into the filling cradle. This will unhook the plastic tab from the filling cradle’s catch and you can then remove this part of your insulin cartridge from the filling cradle.36 37How do I fill my insulin cartridge with insulin?How do I fill my insulin cartridge with insulin?WARNINGKaleido insulin cartridges cannot be reused. At the end of use, please remove the insulin cartridge from your pump and dispose of it appropriately. Insulin cartridges cannot be re-sterilised and reusing one could adversely affect your health.WARNINGAlways follow the insulin manufacturer’s instructions regarding storage and use of insulin, and always double check the expiration date of your insulin before you use it. If your insulin has passed its expiration date, discard and dispose of it according to the instructions provided by the insulin manufacturer. WARNINGDon’t reuse your syringes or needles - doing so may contaminate your insulin and lead to infection. Once you’ve used a needle and syringe once, always dispose of them responsibly, straight away. We recommend always using a sharps bin.WARNINGYour insulin cartridge should always be completely full before you start using it.Once that’s done, turn the filling cradle over and gently squeeze the tabs on either side of your insulin cartridge connector to unclip it. The filling cradle can now be responsibly disposed of.
Now that my insulin cartridge is ready,how do I put it in my pump?We’ve made sure that getting your insulin cartridge into your pump is really easy, but it’s always important that you take care and pay attention - especially if it’s your first time!STEP 1Check that your handset is turned on, that the screen is awake and that it’s within range of the pump you’re about to use.STEP 2Place your prepared insulin cartridge onto a clean surface. Make sure the plastic tab is flat against the surface and then use the plastic tab to hold the insulin cartridge in place. STEP 3With the colourful shell facing upwards, take your fully charged pump and place it on top of your insulin cartridge. Line it up with the plastic tab.STEP 4Carefully push your pump onto your insulin cartridge until you hear it click into place. There you have it – your insulin cartridge is in!QUICK TIPInserting an insulin cartridge into a pump will turn your pump on. To let you know it has detected the inserted insulin cartridge, your pump will beep twice. Your handset, on the other hand, can only detect that an insulin cartridge has been inserted into your pump if it is turned on and if its screen is awake - if it is, after a few seconds it will also beep twice. As well as confirming that your pump and handset are ready to connect, the beeps also let you know that your pump and handset alarm systems are working properly. If you don’t hear them, first check that your handset is turned on and that the screen is awake. If that doesn’t help, give Kaleido Care a call.WARNINGYour Kaleido pumps will dispense a small amount of insulin when you insert a new insulin cartridge. For your safety, you must never insert or remove an insulin cartridge while wearing your Kaleido pump or if it is connected to your current infusion set.WARNING If you have any reason to believe your insulin cartridge may have leaked, we recommend you stop using it and replace it immediately.38 39How do I put my insulin cartridge in my pump?How do I put my insulin cartridge in my pump?
Good news - your pump and handset can tell when you’ve inserted a new insulin cartridge into your pump (see Now that my insulin cartridge is ready, how do I put it in my pump?) and, when this happens, your handset will automatically start walking you through the steps you’ll need to take to start pumping. Here’s what’ll happen next:QUICK TIPUnless you are preparing a pump and insulin cartridge for the very first time, you’ll need to make sure you’ve stopped the pump you were most recently using first. Remove and dispose of the insulin cartridge appropriately, then put your old STEP 1Once it recognises you’ve inserted a new insulin cartridge into your pump, your handset will show a message confirming that a pump has been detected. Make sure the pump name on your handset matches the pump you’re trying to start. When you are ready, press the Enter button to select Connect.STEP 2Your handset will ask if you have used a new, fully filled insulin cartridge. Select Yes if this is correct (if not, see If I have to remove an insulin cartridge, can I then put it back into my pump?).STEP 3Next, a message will pop up to remind you to prepare and apply  your pump (See How do I wear my pump?). This message will time out after a few seconds, but you can press Enter to jump to the next screen a little quicker.QUICK TIPYour pumps are named after their colour – if you have a purple pump, its pump name will be Purple Pump. A turquoise pump will be your Turquoise Pump. See what we’ve done there? We’re pretty proud of that one.40 41Connecting your pump and handsetConnecting your pump and handsetHow do I connect my pump to my handset and start pumping?STEP 4Your handset will now ask you if your infusion set is new and if you would like to prime your cannula. You have three options to choose from:• If you have a new infusion set with a 6mm cannula that you would like to prime, press Enter to select Yes, 6 mm.• If you have a new infusion set with a 9mm cannula that you would like to prime, scroll down to Yes, 9 mm, then press Enter to select it.• If you do not want to prime your new infusion set’s cannula or if you are not using a new infusion set, just press the left button to scroll to No and press Enter to select it. If you select No, you’ll just be asked if you’re ready to start pumping and your handset will help you through the next steps. You can find out more about priming your cannula by checking out Why do I need to prime my cannula?QUICK TIPDon’t panic! Your handset screen must be awake in order for connection to start automatically. If your handset is asleep when you insert an insulin cartridge into your pump, connection won’t start until your handset has been woken up again.pump on charge. This is important because your handset will not be able to acknowledge a new connection if it’s still paired to the last pump you were using.
STEP 8The Home screen will now display your new pump details. Snazzy!WARNINGTo start pumping you’ll need at least one basal profile saved to your handset. If you insert an insulin cartridge into your pump without having any saved basal profiles, your handset won’t be able to acknowledge the pump.STEP 6Your cannula will start to be primed as soon as you select Yes. On your handset, you’ll be able to see a countdown - sit tight, it doesn’t take long!STEP 7Once priming has completed, your handset will confirm that pumping has started. You can let the confirmation message time out after a few seconds, or press Enter to jump back to the Home screen a little quicker.QUICK TIPIf you’ve changed your mind, just press the left button to scroll to No. Press Enter to select it – your handset will confirm that your cannula won’t be primed and that your pump is stopped, and then you’ll be taken back to the Home screen.STEP 5If you chose Yes, 6 mm or Yes, 9 mm you’ll now be asked if you’re ready to prime your cannula and start pumping. Are you wearing your prepared pump and infusion set and ready to go? Great! Select Yes again. Your handset will stay on this screen for as long as you need it to if you’d like a little extra time to apply everything, so make sure you don’t select Yes until you really are wearing your pump and infusion set and are ready to start receiving insulin!42 43Connecting your pump and handsetConnecting your pump and handset
Why do I need to prime my cannula?You don’t need to prime your Kaleido insulin cartridge, so you might be wondering why you need to prime your infusion set’s cannula. Well, when you fill your insulin cartridge, it isn’t connected to your infusion set, so your cartridge can only prime as far as the end of the insulin cartridge connector. When you start wearing your pump and connect  it to a new infusion set, your cannula (the small piece of tubing that enters your body) won’t contain any insulin. This means that when you start pumping, the insulin delivered will need to fill the cannula before it really starts being delivered to you. And that means you could be waiting for insulin for a little longer than you’d planned. You can avoid this though by priming your cannula – all it means is that an extra bit of insulin will be delivered to fill your new cannula quickly, so that normal insulin delivery can start almost straight away. How much insulin do you need to deliver to prime your cannula? Don’t worry, we’ve worked that out for you! All you need to do is tell your handset which size cannula you’re currently using - 6mm or 9mm.Do I always need to prime my cannula?Almost always, yes. But if you’re only changing your insulin cartridge and not your infusion set too, then you won’t need to prime your cannula because it will already be full.If I have to remove an insulin cartridge, can I put it back into my pump?Sometimes, you might need to remove an insulin cartridge from your pump because of an alarm, an alert or for some other reason. If this happens and you want to reinsert the cartridge later to carry on using it, here’s what you’ll need to do. You can also follow these steps if you need to change your infusion set but not your insulin cartridge:STEP 1Before you remove or reinsert your insulin cartridge, first make sure you’ve either paused or stopped your Kaleido pump and that you have separated your pump from your infusion set (see How do I take my pump off?).STEP 2When you’re ready, reinsert the insulin cartridge into your pump. Your handset will showa message confirming that it’sdetected your pump again. Make sure the pump name on your handset matches the pump you want to use, then press the Enter button to select Connect.STEP 3Your handset will ask if you have used a new, fully filled insulin cartridge. This time, you’ll need to scroll left to No and then press the Enter button to select.45Can I remove an insulin cartridge and put it back in my pump?44 Why do I need to prime my cannula?
WARNINGYour Kaleido pumps will dispense a small amount of insulin when you insert a new insulin cartridge. For your safety, you must never insert or remove an insulin cartridge while wearing your Kaleido pump or if it’s connected to your current infusion set.STEP 4Your handset will ask if this is the insulin cartridge you were last using. If it is, select Yes.If it’s not the cartridge you were last using, select No. You won’t be able to reuse the insulin cartridge and your handset will talk you through what to do next.STEP 5A message will pop up to remind you to prepare and apply your pump – this message will time out after a few seconds, but you can press Enter to jump to the next screen a little quicker.See How do I wear my pump? for a reminder of how to prepare and apply your pump.WARNINGYou must not reuse old insulin cartridges in your Kaleido pumps. It’s important that you only use newly prepared insulin cartridges or an insulin cartridge that has been removed from your pump temporarily and then immediately reinserted. If you try to use an old insulin cartridge, your handset will not allow you to start pumping and will ask you to prepare and insert a new cartridge.46 47Can I remove an insulin cartridge and put it back in my pump?Can I remove an insulin cartridge and put it back in my pump?STEP 6Your handset will now ask you if your infusion set is new and if you would like to prime your cannula. You have three options to choose from:• If you have a new infusion set with a 6mm cannula that you’d like to prime, press Enter to select Yes, 6 mm.• If you have a new infusion set with a 9mm cannula that you’d like to prime, scroll down to Yes, 9 mm, then press Enter to select it.• If you don’t want to prime your new infusion set’s cannula or if you’re not using a new infusion set, just press the left button to scroll to No, then press Enter to select it. If you select No, you’ll be asked if you’re ready to start pumping and your handset will then guide you through the next steps. You can find out more about priming your cannula by checking out Why do I need to prime my cannula?QUICK TIPYou may need to replace your pump and bodypatches after you’ve reinserted an insulin cartridge. See How do I wear my pump? for a reminder of how to do this.
STEP 7If you chose Yes, 6 mm or Yes 9 mm, you’ll now be asked if you’re ready to prime your cannula and start pumping. Are you wearing your prepared pump and infusion set and ready to go? Great! Select Yes again. Don’t select Yes until you’re wearing your pump and infusion set and ready to start receiving insulin. Your handset will stay on this screen for as long as you need it to.QUICK TIPIf you’ve changed your mind, just press the left button to scroll to No. Press Enter to select it – your handset will confirm that your cannula won’t be primed and that your pump is stopped, and then you’ll be taken back to the Home screen.STEP 9Once priming has completed, pumping will automatically start and your handset will confirm this for you. Press Enter to jump back to the Home screen a little quicker.STEP 10The Home screen will continue to display your pump’s details.STEP 8Your cannula will start to be primed as soon as you select Yes. On your handset, you’ll see a priming countdown.48 49Can I remove an insulin cartridge and put it back in my pump?Can I remove an insulin cartridge and put it back in my pump?
What if I don’t want to start pumping straight away?STEP 1When your handset asks you if you’re ready to prime your cannula and start pumping (or just whether you’re ready to start pumping if you’ve chosen not to prime your cannula), don’t select Yes. Instead, scroll left and press Enter to select No. WARNINGWhen your pump is in Stop mode, your handset and pump will stay connected but your pump will not deliver any insulin at all. The Bolus menu will be inaccessible from your Home screen and you’ll also be unable to set a temporary basal rate. STEP 2Later, when you’re ready to start pumping,  just go to the Status menu and select Start pumping to get going (see How do I restart my pump?). You’ll be given another chance to prime your cannula at this point too.51What if I don’t want to start pumping straight away?What if I don’t want to connect my handset to a pump straight away?You can choose to postpone connecting your handset and pump. All you have to do is select Ignore when your handset confirms that it has detected a new pump.When you’re ready to start a connection, just reinsert your insulin cartridge into your pump and follow the instructions on screen.There might come a time when you insert an insulin cartridge into your pump, but you’re not ready to start pumping straight away. That’s fine! Here’s what you’ll need to do:Your pump will then enter Stop mode. Easy!50 What if I don’t want to start pumping straight away?
WARNINGIt’s important that you only use the infusion sets supplied with your Top-up Kit. Using alternatives may adversely affect your Kaleido’s performance.Right, infusion sets at the ready!Ready to start wearing your pump and infusion set? Excellent! Here’s how to safely and securely attach and remove them.Once you get the hang of it, putting on an infusion set is quick and easy. Firstly, it’s really important that you only ever place your infusion sets on suitable parts of your body – these are the wobblier areas with a bit more fatty tissue! The pictures on the following page will help you work out exactly where these are, but your Healthcare Provider will be able to help you with this too. Wearing your Kaleido pumpand infusion set52 53Where can I wear infusion sets?Where can I wear infusion sets?Where can I wear infusion sets?You can wear an infusion set on any of the areas highlighted in green. Take your pick!
54 55How do I put an infusion set on?How do I put an infusion set on?How do I put an infusion set on?STEP 1This bit’s easy - start by washing your hands thoroughly. STEP 2Next, ensure that the area where you want to position your infusion set is clean – wipe over it with an alcohol wipe, then allow your skin to dry. It works best if you choose an area where your clothing won’t rub against your infusion set.STEP 3Remove the paper lid on your infusion set’s packaging.STEP 5With your infusion set still in its packaging, place it on a flat surface. Then, press the button on the top of your inserter to make sure it’s ready to use, and line your inserter up with the top of your infusion set. STEP 4Remove the protective circle of plastic that’s sitting on top of your infusion set.STEP 6Holding your infusion set’s packaging in place with one hand, use the other to firmly push your inserter onto the top of your infusion set. Push down until you hear the infusion set click into your inserter.STEP 7Lift your inserter out of the infusion set packaging. Be careful not to touch the needle – it’s important that it stays sterile!STEP 8Next, peel the paper backing off the sticky part of the infusion set. Try not to touch the sticky area underneath the paper as it could affect how well the infusion set sticks to your skin.STEP 9Place your inserter on the area of your body where you’d like to wear your infusion set. Use your other hand to hold your skin taut. Remember, you can use the gap in the base of your inserter as a guide for where your insulin cartridge will connect to your infusion set. STEP 10When your inserter is in the right place, take a deep breath and firmly press the button at the top of your inserter. This will push the infusion set into your body – you may feel a small sting, but it will only last a moment.You can do this by matching up the shape of the infusion set with the imprint in the bottom of your inserter or – even easier! – making sure the gap in the base of the inserter sits above the tabs on the infusion set’s plastic cap.This can help you get your infusion set in the right place for where you want to wear your pump.
56 How do I put an infusion set on?WARNINGIt’s important to dispose of your needle appropriately. We recommend always using a sharps bin.WARNINGYou need to make  sure your infusion set stays clean. Keep an eye on this - if it becomes dirty, you may need to change it early, before its maximum of three days of use have come to an end.WARNINGIt’s important to make sure you rotate your sites whenever you change your infusion set. This will help you avoid developing scar tissue. Scar tissue can disturb the flow of insulin into your body and may limit your ability to absorb it properly in the future.WARNINGWhen you apply your infusion set, bear in mind the length of your insulin cartridge’s tubing. Make sure you position it close to where you want to wear your pump. The tubing should always be slack, never pulled tight. Some important reminders...STEP 12Gently rub the material around the edge of your infusion set to make sure it’s sticking to your skin properly. If it’s peeling at this stage, it’s unlikely that it will last for three full days of wear, so you might choose to remove it now and try again with another one – it’s up to you. But, if it’s feeling nice and secure, then your infusion set is ready to go!STEP 13Now you just need to sort out your inserter. Carefully remove the plastic cap by holding onto the tabs to lift it out of the inserter. STEP 14Make sure you dispose of the needle appropriately.STEP 15Last but not least, don’t forget to keep your inserter safe, ready for next time!STEP 11Now that’s done, you can remove your inserter. Make sure you pull your inserter away from your body in a straight line, without twisting it, so that you don’t damage the infusion set’s cannula. Your infusion set will be securely stuck to your body and the plastic cap and needle will be inside your inserter. Put your inserter to one side for now, but be careful of the needle!57How do I put an infusion set on?WARNINGWhen preparing to apply a new infusion set, make sure you check the infusion set’s packaging and the infusion set itself for damage first. You must not use an infusion set if you see any signs of damage, or if the infusion set’s expiration date has passed. Instead, select a different infusion set and contact Kaleido Care at a time that’s convenient for you.
WARNINGIt’s best to make sure that the back of your pump is clean and dry before you attach a pump patch. It’ll ensure a better bond between the patch and pump, and prevent your pump from coming loose over time.STEP 2Peel off the paper backing that covers the back of your pump patch. This will reveal the patch adhesive. QUICK TIPKeep your fingers away from the sticky areas – touching them could make them less sticky.STEP 4Next, take your body patch. Without removing its paper backing, stick your body patch to your pump patch by pressing together the fuzzy hexagon shapes on each of the patches. Try and make sure your body patch lines up neatly with your pump. 58 59How do I wear my pump?How do I wear my pump?STEP 1Keeping in mind the location of your infusion set and the length of your insulin cartridge tubing, decide where you’d like to wear your pump. Use an alcohol wipe to gently clean the area and then allow your skin to dry naturally.How do I wear my pump?Now that you’ve positioned your infusion set, it’s time to put on your pump! In your Top-up Kit, you’ll find your body patches and pump patches - you’ll need one of each every time you change your pump. The two connect together and help keep your pump securely in place for the time you spend together.STEP 3Stick the bottom of the pump patch to the bottom of your pump, so it covers the insulin cartridge and the fuzzy hexagon shape faces outwards.
STEP 5Next, being careful to support the weight of your pump, clip the connector at the end of your insulin cartridge tubing into your infusion set. You’ll know it’s secure when you hear the two distinct clicks as the right and left hand sides connect.STEP 6Holding onto your pump, peel off the paper backing from the top of your body patch.STEP 7Place your pump where you’d like to wear it – the sticky side of your body patch’s adhesive should now be touching your skin. Be careful not to stretch or kink your insulin cartridge’s tubing.STEP 8With your pump now in place, gently smooth down the edges of your body patch to make sure it’s stuck securely. And you’re done!WARNINGIf you ever start to feel uncomfortable while wearing your pump, pause or stop pumping and remove it. Only reattach and resume pumping once you feel comfortable. Blood glucose levels should be closely monitored while you are disconnected from your QUICK TIPIf you choose to pause and remove your pump for a short period of time, just remember to close the protective cover on your infusion set.QUICK TIPOnce you’ve smoothed down the edges of your body patch, try not to play with it too much, especially during the first hour of wear. This will make sure it has stuck securely, ready for action!60 61How do I wear my pump?How do I wear my pump?pump and also when you reconnect to it. Make sure you use alternative insulin therapy methods if required and consult your Healthcare Provider as soon as possible.
How do I take my pump off?There are two reasons why you might want to take off your pump:• If you’ve paused it and want to remove it temporarily • If you’re ready to swap over to your other Kaleido pumpTo remove your pump while it’s pausedSTEP 1Get started by washing your hands thoroughly.STEP 2Next, follow How do I pause my pump? to put your pump on pause.STEP 3Gently squeeze the tabs on the side of your insulin cartridge connector to unclip it from your infusion set - your pump and infusion set are now separated.STEP 4Close the protective cover on your infusion set.STEP 5You can now take your pump off easily by lifting it away from your body patch.If you’re planning to put the pump back on soon, just leave your body patch in place. STEP 6When you’re ready to put your pump back on, reconnect your insulin cartridge connector to your infusion set and reattach your pump – simple!For help with unpausing your pump, see How do I unpause my pump?62 63How do I take my pump off?How do I take my pump off?
Removing your pump and infusion set at the end of useSTEP 1Get started by washing your hands thoroughly.STEP 2Next, follow How do I stop my pump? to stop your pump.STEP 3Once your pump is stopped, gently squeeze the tabs on the side of your insulin cartridge connector to unclip it from your infusion set - your pump and infusion set are now separated.STEP 4You can now take your pump off easily by lifting it away from your body patch.STEP 5Once that’s done, gently remove the body patch from your skin and the pump patch from the back of your pump.64 65How do I take my pump off?How do I take my pump off?WARNINGPump and body patches are designed to be worn for a maximum of three days only. It is not advisable to reuse patches as they may lose their adhesive, which could result in your pump becoming detached.
STEP 6Take the insulin cartridge out of your pump.STEP 7Finally, it’s time to remove your infusion set. Peel a little of the adhesive away from your skin and then continue to peel away the whole infusion set – after a few days use, it will have lost a little of its stickiness, but take care not to pull it too hard. You might find this bit easier if you hold your skin taut with your spare hand.STEP 8Dispose of your infusion set, insulin cartridge, body and pump patches appropriately and then wash your hands again. STEP 10You’re now ready toprepare your next insulin cartridge and pump!QUICK TIPIf you’re removing your pump and infusion set at the end of use so that you can swap over to your other pump, make sure that you remove the old insulin cartridge from the pump you were just using first, before you try and connect your handset to your new pump. This is important because your handset won’t be able to acknowledge a new connection if it’s still paired to the last pump you were using.66 67STEP 9Make sure you recharge your pump as soon as you can, so it’s ready to go the next time you need it!How do I take my pump off?How do I take my pump off?
Basal
Remind me, what does basal mean again? The Basal section of your Home screen is there to helpfully link you to all of Kaleido’s functions related to your basal insulin. Instead of giving yourself one dose of long acting insulin every 24 hours, your pump delivers a pre-programmed, continuous dose of insulin throughout the day and night. This continuous dose is called a basal. As you choose the amount in advance, it doesn’t take into account the food you eat or the activities you take part in. It works in the background, keeping things steady.A basal is programmed hour-by-hour in 24 hour chunks. This hourly rate is known as your basal rate and each pre-programmed 24 hour period is known as a basal profile.QUICK TIPWe all live very different lives, so this means that the amount of insulin we need can be very different too. That’s why it’s best to talk to your Healthcare Provider about the delivery of insulin that suits you best before you start creating basal profiles on your Kaleido handset.I’ve just turned my handset on for the first time, where do I start?Creating your own basal profiles using your Kaleido handset is pretty straightforward – ready to get cracking?STEP 1When your handset turns on and you’ve entered the default passcode, you’ll be prompted to create your first basal profile. Just press the Enter button to select Create basal profile.STEP 2You’ll be taken straight to the Create new profile screen. From here, follow How do I create a basal profile?  from Step 3 onwards.71Where do I start?QUICK TIPDon’t forget - the default passcode for your handset is . You should save your own passcode as soon as possible - see What’s Lock Screen and how do I save a new passcode?.
How do I create a basal profile?STEP 1On the Home screen, scroll to Basal and press Enter to select.STEP 2Scroll to and select Create new profile.STEP 3Press the left and right buttons to scroll between each hourly segment. You have all 24 hours of the day to play with! Press the up and down buttons to select the basal rate you want for each hour. Below the basal profile graph, you’ll see details of the hour you’re currently setting, along with the rate that you are entering.You can set basal rates in increments as tiny as 0.05 units of insulin! The smallest basal rate you can set for an hour is 0.05 units, the largest is 5 units.STEP 4When you’ve entered a basal rate for each hour and you’re happy that your new basal profile is ready, press the Enter button. Press Enter again to select Next.If you want to return to the basal profile graph before you select Next, just press the up button.STEP 5Next up, it’s time to enter a name for your new basal profile. Get creative! Call us crazy, but we like descriptive names like Weekday or Weekend – but who are we to tell you what to do? Use the up and down buttons to scroll to the letter or number you want to use. Press the right button to move onto the next letter or enter a space. To scroll through the alphabet quickly, just press and hold the up or down button.QUICK TIPYou can change your mind and stop creating the basal profile at any point in the process by selecting Cancel.QUICK TIPYou might not want to deliver the same amount of insulin on every single day of the week and that’s why Kaleido can help you create lots of different basal profiles – up to seven! See How do I change to a different basal profile? for help with this.QUICK TIPTo avoid confusion, it’s a good idea to give all of your basal profiles a completely unique name.STEP 6When you’re happy with the name, press Enter and then select Save.72 73How do I create a basal profile? How do I create a basal profile?
STEP 7Your handset will confirm that your basal profile has been saved. Hooray! Press Enter to return to the Home screen a little quicker.    QUICK TIPYour handset can store up to seven basal profiles at a time. If you’ve filled your basal profile memory, you’ll need to delete a basal profile before you can create a new one. See How do I delete a basal profile? for more info.Help – I need to check which basal profile I’m currently pumping!STEP 1On the Home screen, scroll to Basal and press Enter to select.STEP 2Scroll to and select View current profile.STEP 3Your handset will show you the basal profile that you’re currently pumping. Use the left and right buttons to scroll through the hourly basal rates. Press Enter and then Enter again to select Back and go back to the Basal menu.74 75How do I check which basal profile I’m pumping?QUICK TIPIf you’re creating your very first basal profile, it will automatically be set as the default basal profile for pumping.How do I create a basal profile?
How do I change to a different basal profile?STEP 1On the Home screen, scroll to Basal and press Enter to select.STEP 2Scroll to and select Change profile.STEP 3Your handset will show you a list of your saved basal profiles. Scroll to the one you’d like to change to and then press the Enter button.You won’t be able to select the basal profile that you’re currently running!STEP 4Press Enter to select Accept.STEP 5Press Enter again to Deliver the new basal profile.STEP 6A confirmation message will pop up - press Enter to return to the Home screen a little quicker.76 77How do I change to a different basal profile? How do I change to a different basal profile?QUICK TIPRunning a temporary basal rate? You won’t be able to change to a different basal profile while your temporary basal rate is still going, so you’ll either have to stop your temporary basal rate first or just wait until it’s finished to make your change.
Editing your basal profilesOver time, you may want to tweak your basal profiles to make them even better. Let’s take a look at all the changes you can make.How do I modify a basal profile?Need to adjust a basal profile? No problem! Just follow these steps:STEP 1On the Home screen, scroll to Basal and press Enter to select.STEP 2Scroll to and select Edit profile.STEP 3Scroll to and select the profile you’d like to modify.You can’t edit the basal profile that your pump is currently pumping, so you won’t be able to select it from this list of saved basal profiles.STEP 4Select Modify profile.78 79How do I modify a basal profile? How do I modify a basal profile?STEP 5The profile you’ve selected will pop up on your handset. Press the left and right buttons to scroll between the hourly segments. Then, just like when you first created your basal profile, you can press the up and down buttons to increase or decrease any of the basal rate amounts.QUICK TIPYou can select Cancel and return to the Edit profile menu whenever you like. If you do, any changes you’ve made won’t be saved and your basal profile will remain unchanged.
STEP 7A confirmation message will pop up – your changes have been saved! Press Enter to return to the Home screen a little quicker.80 81How do I rename a basal profile?How do I rename a basal profile?Changing the name of a basal profile is really simple! Just follow these steps:STEP 1On the Home screen, scroll to Basal and press Enter to select.STEP 2Scroll to and select Edit profile.STEP 3Scroll to and select the profile you’d like to rename.You can’t rename the basal profile that your pump is currently pumping, and so you won’t be able to select it from this list of saved basal profiles. STEP 6When you’re happy with the modifications you’ve made, press Enter and then Enter again to select Save. How do I modify a basal profile?
STEP 4Select Rename profile.82 83How do I rename a basal profile? How do I rename a basal profile?STEP 5The profile you’ve selected will appear on your handset. Use the left, right, up and down buttons to scroll through the letters and change your profile’s name.STEP 6When you are happy with the new name (hey, take your time - it’s a difficult decision, we know!), press Enter and then Enter again to select Save.STEP 7A confirmation message will pop up – your profile name has been changed! Press Enter to return to the Home screen a little quicker.QUICK TIPYou can select Cancel and return to the Edit profile menu whenever you like. If you do, any changes you’ve made won’t be saved and the name of your basal profile will remain unchanged.
How do I duplicate a basal profile?Started going to the gym on a Thursday evening? Nice work! Or out for brunch every Sunday? Lucky you! Duplicating a basal profile is a great time-saver if you want to create a new basal profile that’s similar to one you already have. Here’s how it’s done:STEP 1On the Home screen, scroll to Basal and press Enter to select.STEP 2Scroll to and select Edit profile.STEP 3Scroll to and select the profile you’d like to duplicate.You can’t duplicate the basal profile that your pump is currently pumping, so you won’t be able to select it from this list of saved basal profiles.STEP 4Select Duplicate profile.84 85How do I duplicate a basal profile? How do I duplicate a basal profile?
STEP 7A confirmation messagewill pop up – your profile has been duplicated! Press Enter to return to the Home screen a little quicker.QUICK TIPYour handset can store up to seven basal profiles at a time. If you’ve filled your basal profile memory, you’ll need to delete a basal profile before you can create a new one. See How do I delete a basal profile? for more info.86 87STEP 5The profile you’ve selected will pop up on your handset. Use the left, right, up and down buttons to scroll through the letters and create a new name. STEP 6When you’re happy with your new name, press Enter and then Enter again to select Save.  QUICK TIPYou can select Cancel and return to the Edit profile menu whenever you like. If you do, any changes you’ve made won’t be saved and your basal profile won’t be duplicated. How do I duplicate a basal profile? How do I duplicate a basal profile?
How do I delete a basal profile?After you and Kaleido have been friends for a while, you might find that you’ve created a basal profile you never actually use. Hey, no hard feelings - these things happen! You can delete basal profiles by following these five easy steps:STEP 1On the Home screen, scroll to Basal and press Enter to select.STEP 2Scroll to and select Delete profile.STEP 3On your list of saved basal profiles, scroll to and select the one that you don’t need anymore.You can’t delete the basal profile that your pump is currently pumping, so you won’t be able to select it from this list of saved basal profiles.WARNINGDeleting a basal profile is final! Once a profile has been deleted, you won’t be able to get it back.QUICK TIPYou can select Cancel and return to the Delete profile menu whenever you like. If you do, any changes you’ve made won’t be saved and your basal profile won’t be deleted. STEP 4Select Delete.STEP 5A confirmation message will pop up – your profile has been deleted! Press Enter to return to the Home screen a little quicker.88 89How do I delete a basal profile? How do I delete a basal profile?QUICK TIPYour handset can store up to seven basal profiles at a time. If you’ve filled your basal profile memory, you’ll need to delete a basal profile before you can create a new one.
Setting a temporary basal rate lets you increase or decrease your current basal profile by a specified percentage for a set period of time. This can be helpful if you decide to go for a run on the spur of the moment (wow, you’re impressive!), or decide to skip your usual Friday spin class (no worries - you’re only human). Your Healthcare Provider can help with lots more advice on when to use a temporary basal rate.How do I set a temporary basal rate?If you want to temporarily change the amount of insulin you’re receiving, you’ll need to set a temporary basal rate. Your temporary basal rate can last for as little as half an hour and as long as 24 hours!STEP 1On the Home screen, scroll to Basal and press Enter to select.STEP 2Press Enter again to select Set temporary basal rate.STEP 3Start by setting the percentage of your current basal profile that you’d like to receive. Press the left and right buttons to scroll through the number boxes and the up and down buttons to increase or decrease the percentage. You can choose a minimum of 0% right up to a maximum of 200%. Once you’re happy with the percentage, press the Enter button.Temporary basal rates 91How do I set a temporary basal rate?
STEP 5Press the Enter button to select Next.If you’ve accidentally moved to Next too soon and you’d still like to change the details of your temporary basal rate, just press the up button to return to the percentage settings.STEP 6Your handset will now show you details of the temporary basal rate that you’ve asked to set. If the details are correct and you’d like to start your temporary basal rate immediately, press Enter to select Deliver. If you’ve changed your mind or want to make any last minute adjustments, just scroll left and press Enter to select Cancel.STEP 7Your temporary basal rate will start as soon as you select Deliver. A confirmation will pop up  – press Enter to return to the Home screen a little quicker.STEP 4Next, set the amount of time you’d like your temporary basal rate to run for. Again, use the left and right buttons to scroll through the number boxes and the up and down buttons to increase or decrease the amount of time. You can choose a minimum of 0.5 hours right through to a maximum of 24 hours. Once you’re happy with the amount of time you’ve chosen, press the Enter button again.STEP 8To help you keep track, the Basal section of the Home screen will show you your temporary basal rate details for as long as the temporary basal rate is running – pretty cool, right? This way, you’ll always know where you’re at.QUICK TIPYou can select Cancel and return to the Basal menu whenever you like. If you do, a temporary basal rate will not be set and your insulin delivery will stay the same.92 93How do I set a temporary basal rate? How do I set a temporary basal rate?QUICK TIPJust so you know - you can’t switch to a different basal profile while you’re running a temporary basal rate. When you are, you won’t be able to access Change profile from the Basal menu and so you’ll either need to stop your temporary basal rate first, or just wait until it’s come to an end.
Can I stop a temporary basal rate once it’s started?Yes, of course! Here’s how:STEP 1On the Home screen, scroll to Basal and press Enter to select.STEP 2Press Enter again to select Stop temporary basal rate.STEP 3Select Stop rate by pressing Enter.Alternatively, you can scroll left and press Enter to select Continue rate. Your temporary basal rate will continue to deliver just as it was doing before.STEP 4Your temporary basal rate will stop as soon as you select Stop rate and your pump will start delivering your full basal rate again. Your handset will confirm this for you – press Enter to select Understood and return to the Home screen.STEP 5Your Home screen will update to show details of the basal rate that is now being delivered.WARNINGIf you stop a temporary basal rate, it can only affect the delivery of insulin that you are due to receive from that moment on. It will NOT increase or decrease the amount of insulin that may have been delivered before your temporary basal rate was stopped.94 95Can I stop a temporary basal rate? Can I stop a temporary basal rate?QUICK TIPA quick heads up! You can’t switch to a different basal profile while you’re running a temporary basal rate. When you are, you won’t be able to access Change profile from the Basal menu and so you’ll either need to stop your temporary basal rate first, or just wait until it’s finished.
Bolus
What’s a bolus?A bolus is a single dose of insulin. It’s usually given when you eat, occasionally when you drink and sometimes  to help reduce your blood glucose (or BG) level. You can choose the size of the  bolus you give and exactly when you give it, so life can go on uninterrupted – no hassle! To access all things bolus, just go to the Bolus section of your Home screen.Honestly, we get it - if you’re sitting down to enjoy a meal with family, or maybe you’re out celebrating with some friends - the last thing you want to do is spend a long time giving yourself the insulin you need. We’ve made sure that giving a bolus is as quick and simple as it can possibly be, so you can get it sorted and carry on with the fun stuff!You can give two different types of bolus using Kaleido:QUICK BOLUSIf you choose a Quick Bolus, your bolus will be delivered all at once.EXTENDED BOLUSAn Extended Bolus allows you to deliver part of your bolus right away, and then the rest of it over a period of time – the length of which you’ll set yourself.If you need some help, your Healthcare Provider will be able to advise you on when to use each of these two methods.Fancy a bit more help working out how much insulin to bolus? Just use Kaleidoculator!99What’s a bolus?
What on earth isKaleidoculator!?Kaleidoculator is a bit of a boffin... Kaleido’s very own calculator! Get your tongue around the name and you’ll soon discover that Kaleidoculator exists to help take some of the guesswork out of delivering a bolus. Not sure what affect the food you’re about to eat will have? Or just trying to figure out what will get you back to your Target BG? Fear not – Kaleidoculator is your man! Just fill in the numbers and it’ll do the rest - who knows, it could be your new best friend when it comes to figuring out how much insulin to bolus!Kaleidoculator uses a few important stats to put together its recommendation for your perfect bolus. It doesn’t just factor in the meal you’ve grabbed on the go, but also your current BG reading and how much insulin you already have at work in your body (if you want it to). It knows the BG level you’re aiming for (your Target BG) and it calculates the amount of insulin you’ll need to bolus to get back to that level. Clever, huh?Once you’ve got your recommendation, you can choose whether you want to deliver it as either a Quick Bolus or an Extended Bolus. And if you want to tweak Kaleidoculator’s recommendation a little? No problem, you can do that too!How do I use Kaleidoculator?STEP 1On the Home screen, scroll to Bolus and press Enter to select.STEP 2Press Enter again to select Kaleidoculator.101How do I use Kaleidoculator?QUICK TIPYou’ll only be able to access Kaleidoculator from the Bolus menu if you’ve already worked with your Healthcare Provider to set a Target BG, insulin activity time, insulin to carb and insulin to BG ratios (see How do I enter my Target BG?, How do I enter my insulin activity time?, How do I enter my insulin to carb ratios? and How do I enter my insulin to BG ratios?).
STEP 3First, you’ll need to enter the amount of grams of carbohydrate in the food that you’re about to eat. Press the left and right buttons to scroll through the number boxes and press the up and down buttons to increase or decrease the number of carbs you have. Once you’ve set the correct amount, press the Enter button.Not eating, but still keen to use Kaleidoculator to help correct your BG? No problem, just leave the number boxes at zero and press the Enter button.STEP 4Press the Enter button again to select Next.If you’ve accidentally moved to Next too soon and you still want to change the carb details, no worries! Just press the up button to the number boxes.STEP 5Next, you’ll need to enter your current BG reading. Use your BG meter to take a reading, then, just like before, press the left and right buttons on your handset to scroll through the number boxes and the up and down buttons to increase and decrease the numbers. When you’ve entered your BG correctly, press the Enter button.Don’t want to enter a BG reading? That’s fine – if you’ve told Kaleidoculator what you’re eating but don’t want to enter a BG reading, just leave the number boxes empty and press the Enter button.STEP 6Press the Enter button again to select Next. If you’ve accidentally moved to Next too soon and you need to change the BG reading you’ve entered, just press the up button to return to the BG reading.QUICK TIPOnce you select Next, the BG reading you’ve entered will be saved in History and will appear in the BG section of your Home screen. Cool, huh?QUICK TIPIf you need to change the unit of measurement for your BG readings, head to System Settings in the Menu section first (see How do I change the unit of measurement I record my BG readings in?). WARNING Always check for ketones if your BG reading is excessively high. If ketones are present, treat according to the advice given to you by your Healthcare Provider.STEP 7Finally, Kaleidoculator will show you your current Insulin on Board (that’s how many units of insulin are still active in your body). You can choose whether or not you want to include your Insulin on Board in your Kaleidoculator calculation - just press the Enter button to select Yes.Alternatively, if you don’t want to include your Insulin on Board you can press the left button to scroll to No and then press Enter to select that instead.102 How do I use Kaleidoculator? 103How do I use Kaleidoculator?
• To deliver the recommendation as a Quick Bolus, just press Enter. Your handset will take you to the Quick Bolus entry screen, where your recommendation will be ready and waiting for you. Next, just follow along from Step 4 of How do I deliver a Quick Bolus? You can also change the recommendation a little first, using the up, down, left and right buttons to adjust the amount of insulin to be delivered. • If you’d like to deliver the recommendation as an Extended Bolus instead, press the down button to select Extended Bolus and then press Enter to select it. This time, your handset will take you to the Extended Bolus entry screen and Kaleidoculator’s recommendation will be set as the total bolus amount. Just follow along from Step 4 of How do I deliver an Extended Bolus? to set up and deliver your bolus. If you’d like to change the recommendation a little first, use the up, down, left and right buttons to adjust the total amount of insulin to be delivered. • Alternatively, if you decide you don’t want to deliver a bolus after all, just scroll left and press Enter to select Cancel and go back to the Bolus menu instead.QUICK TIP You can select Cancel and return to the Bolus menu whenever you like. If you do, Kaleidoculator will just save its brainpower for the next time!QUICK TIPKaleidoculator’s calculation might not always result in a positive number for the number of units of insulin in its recommended bolus. See What happens if Kaleidoculator’s recommended bolus is a negative number? to find out what to do if it recommends a negative number.QUICK TIPIf you’ve decided not to enter an amount for Food or BG, or chosen not to include your Insulin on Board, these things won’t be included in your calculation. Instead, you’ll see a dash where the suggested amounts of insulin would normally be.WARNINGNever attempt to change your personal Target BG, insulin activity time, insulin to carb and insulin to BG ratios without the guidance and support of your Healthcare Provider.QUICK TIPTo use Kaleidoculator, you’ll need to make sure your handset knows your Target BG, your personal insulin activity time and your insulin to carb and insulin to BG ratios – these are all part of your Personal Info (see How do I enter my Target BG?, How do I enter my insulin to carb ratios?, How do I enter my insulin to BG ratios? and How do I enter my insulin activity time?). You must always work with your Healthcare Provider to determine and set these amounts.WARNINGKaleido can only calculate Insulin on Board based on the insulin which it knows it has delivered – it cannot track insulin delivered via any other method (such as insulin pens). If you have recently used an alternative method of insulin delivery and then attempt to use either Kaleidoculator or Insulin on Board to assist your diabetes management, you must bear this important fact in mind.STEP 8Kaleidoculator will now show you details of its recommended bolus. You have three options to choose from:104 How do I use Kaleidoculator? 105How do I use Kaleidoculator?
What do the numbers that make up Kaleidoculator’s calculation mean?Well, we’re glad you asked! Yes, Kaleidoculator will do the hard work for you, so you don’t have to think about the numbers running in the background, but knowing what they mean may just help you make choices that make you happier.So, without further ado...FOODThis bit here is your Food number. Using the number of grams of carbohydrate that you’ve just entered, plus the insulin to carb ratios that you’ve already set with your HealthcareProvider, Kaleidoculator calculates the amount of insulin you’ll need to balance out the carbs you’re about to eat and keep your BG level where it is. So, if you’re at 180 mg/dL, it’ll calculate the insulin you’ll need to keep you at 180 mg/dL. If you’re at 70 mg/dL, it’ll (you guessed it!) calculate how much you’ll need to stay at 70 mg/dL. So, if you’re eating something, your Food number will always be positive. If you’re not eating, you’ll see a dash here, not a number, to show that Food isn’t being taken into account.BGWith the insulin in your Food number only working to keep your BG level balanced, if your starting BG is already a bit too high, you may need to deliver extra insulin to bring it back to your Target BG. Just like for Food, Kaleidoculator uses the BG reading you’ve just entered, plus the insulin to BG ratios you’ve set with your Healthcare Provider, to calculate your BG number. This is the amount of insulin Kaleidoculator thinks you’ll need to take your BG level to the Target BG reading that you’ve pre-set. So, if your Target BG is 108 mg/dL and your current BG reading is 180 mg/dL, your BG number will be positive, because you’ll need some extra insulin to lower it to your target. But, if your current BG reading is 70 mg/dL, the number will be negative, because you’ll need less insulin, not more, to raise your BG back to your Target BG of 108 mg/dL. And, if you choose not to enter a BG reading at all, the number will be replaced with a dash.INSULIN ON BOARDLast up, your Insulin on Board number. Kaleidoculator uses the insulin activity time you’ve set with your Healthcare Provider, plus its in depth knowledge of all the boluses you’ve previously delivered, to work out what adjustment needs to be made to its recommendation to account for the insulin that might already be at work in your body.So, if you already have 2 units of active insulin when you’re using Kaleidoculator and you choose to include Insulin on Board, your Insulin on Board number will be -2 units. In fact, if you ever have any insulin still active in your body, your Insulin on Board number will be negative, if you choose to include it. If you don’t have any active insulin on board, the number will be zero, and if you choose not to include your Insulin on Board in your calculation, you’ll see a dash here instead. You can find out more about Insulin on Board by looking up How do I check my Insulin on Board?.KALEIDOCULATOR’S RECOMMENDED BOLUSFor its final trick, Kaleidoculator takes your Food, BG and Insulin on Board numbers and puts them all together to give you its recommended bolus amount. In the example here, you can see that a Food number of + 5.00 units, a BG number of + 2.35 units and an Insulin on Board number of - 1.60 units total up to a recommended bolus of 5.75 units (5.00 + 2.35 - 1.60 = 5.75). And that’s why we think Kaleidoculator is pretty handy!106 107What do the numbers that make up Kaleidoculator’s calculation mean? What do the numbers that make up Kaleidoculator’s calculation mean?
What happens if Kaleidoculator’s recommended bolus is a negative number?Depending on the time of day and the combination of what you’re eating, how far away from your Target BG you are and how much active insulin on board you already have, Kaleidoculator’s recommended boluses will be different every time you use Kaleidoculator.Sometimes, Kaleidoculator may even come up with a negative amount of insulin as its recommended bolus for you – say, if you’re not eating (or not eating very much carbohydrate) and if your BG is already below your Target BG. In that instance, you don’t need more insulin, you actually need less!But, just like you can’t take out any insulin you’ve already delivered, you can’t give a negative bolus! So, here’s what will happen if you receive a negative number as your recommended bolus.STEP 1Having followed steps 1 to 7 of How do I use Kaleidoculator?, you’ll arrive at Kaleidoculator’s recommended bolus calculation. This time though, you’ll see that the bolus recommendation is a negative number.STEP 2The simplest thing to do if you spot a negative number as your recommended bolus is just to scroll left to Cancel and press Enter to select Cancel and go back to the Bolus menu.STEP 3If you don’t spot that the recommended bolus is a negative number though, don’t worry, your handset will help you out! If you select either Quick Bolus or Extended Bolus when your recommended bolus is a negative number, your handset will pop up with a quick reminder to tell you that giving a bolus isn’t the best thing to do at this time. Press Enter to select Home and return to the Home screen. 108 109What happens if Kaleidoculator’s recommended bolus is a negative number? What happens if Kaleidoculator’s recommended bolus is a negative number?QUICK TIPIf you don’t agree with Kaleidoculator’s recommendation and would still like to deliver a bolus, you can do this by selecting either Quick Bolus or Extended Bolus from the Bolus menu instead.
How do I deliver a Quick Bolus?STEP 1On the Home screen, scroll to Bolus and press Enter to select.STEP 2Scroll to and select Quick Bolus.STEP 3First, you’ll need to set the amount of insulin that you’d like to deliver in your Quick Bolus. Press the left and right buttons to scroll through the number boxes and press the up and down buttons to increase or decrease the amount of insulin you want to deliver. Once you’ve set the correct amount, press the Enter button.STEP 4Press the Enter button to select Next.If you’ve accidentally moved to Next too soon and you still want to change the details of your Quick Bolus, no worries! Just press the up button to return to the insulin boxes.QUICK TIPThe bolus amount will automatically default to 01.00 unit.QUICK TIPThe smallest bolus you can set is 0.05 units. The largest is 20 units.QUICK TIPYou can select Cancel and return to the Bolus menu whenever you like. If you do, a Quick Bolus won’t be set and your insulin delivery will remain unchanged.How do I deliver a Quick Bolus? How do I deliver a Quick Bolus?STEP 5Your handset will now show you details of the Quick Bolus you’d like to give. If the details are correct and you want to start your Quick Bolus, just press Enter to select Deliver. If you’ve changed your mind or want to make a last minute adjustment, just scroll left and press Enter to select Cancel.110 111
STEP 6Your Quick Bolus will start as soon as you select Deliver. If you have turned off BG reminders, you’ll now see a message to confirm delivery has started. Press Enter to return to the Home screen a little quicker.If your BG reminders are turned on, your handset will confirm that your Quick Bolus delivery has started. It’ll also ask you if you’d like to set a reminder to check your BGin 1.5 hours time - just press Enter to select Yes. If you don’t want to set a reminder this time, you can scroll left and then press Enter to select No instead.STEP 7To help you keep track, the Bolus section on your Home screen will show your Quick Bolus delivery counting down (just make sure your handset is in range). Once you’ve received all of your Quick Bolus, the Bolus section will update to show you the details of the last bolus given – that’s exactly how much insulin you received and when you received it.How do I deliver an Extended Bolus?STEP 1On the Home screen, scroll to Bolus and press Enter to select.STEP 2This time, scroll to and select Extended Bolus.QUICK TIPIf you choose to set a reminder to check your BG 1.5 hours after your bolus has been started, the reminder will pop up on your handset screen and your handset will sound a reminder tone. Once you’ve read and understood the reminder, just press the Enter button. QUICK TIPYou can turn BG reminders on or off in System Settings. See What are BG reminders and how do I turn them off? for more details. How do I deliver a Quick Bolus? How do I deliver an Extended Bolus?112 113
STEP 4Next, set the amount of insulin that you’d like to deliver immediately. Just like before, press the left and right buttons to scroll through the number boxes and press the up and down buttons to increase or decrease the amount of insulin. Once you’re happy that you’ve set the correct amount, press the Enter button.STEP 5Press the Enter button to select Next.If you’ve accidentally moved to Next too soon and you still want to change the details of your Extended Bolus, no worries! Just press the up button to return to the Total bolus boxes. STEP 6Finally, choose the amount of time you’d like to extend the second part of your bolus for. Use the left and right buttons to scroll between the number boxes and the up and down buttons to increase or decrease the time period - you can extend delivery over as little as 0.5 hours and as long as 9.5 hours. When you’re happy with the time you’ve set, press the Enter button.QUICK TIPBased on the total bolus and the amount of insulin you have chosen to deliver immediately, your Kaleido handset will calculate how much of your bolus will be delivered over the time period you’ve chosen.114 115How do I deliver an Extended Bolus? How do I deliver an Extended Bolus?STEP 3On the Extended Bolus screen, set the total amount of insulin you’d like to deliver using the left and right buttons to scroll through the number boxes. Press the up and down buttons to increase or decrease the amount of insulin. Once you’re happy that you’ve set the correct amount, press the Enter button.QUICK TIPThe total bolus amount will automatically default to 01.00 unit.QUICK TIPThe total amount of insulin you give in an Extended Bolus cannot be higher than 20 units. The minimum amount of bolus that you can deliver immediately is 0.05 units, and the maximum is 19.95 units.
STEP 8Your handset will now show you the details of the Extended Bolus that will be delivered. If the details are correct and you want to start your Extended Bolus, press Enter to select Deliver. If you’ve changed your mind or want to make any last minute adjustments, just scroll left and press Enter to select Cancel.STEP 9Your Extended Bolus will start as soon as you select Deliver.If you have turned off BG reminders, you’ll now see a message to confirm delivery has started. Press Enter to return to the Home screen a little quicker.If your BG reminders are turned on, your handset will confirm that your Extended Bolus delivery has started. It’ll also ask you if you’d like to set a reminder to check your BG in 1.5 hours time - just press Enter to select Yes. If you don’t want to set a reminder this time, you can scroll left and then press Enter to select No instead. STEP 10To help you keep track, the Bolus section of your Home screen will show you your Extended Bolus delivery counting down (you just need to make sure your handset is in range). Once you’ve received all of your Extended Bolus, the Bolus section will update to show you the details of the last bolus given – that’s how much insulin you received and when you received it.  QUICK TIPIf you choose to set a reminder to check your BG 1.5 hours after your bolus has been started, the reminder will pop up on your handset screen and your handset will sound a reminder tone. Once you’ve read and understood the reminder, just press the Enter button. STEP 7Press the Enter button again to select Next. Alternatively, if you’ve moved to Next too soon, just press the up button to return to the time selection box or, if you’ve changed your mind, you can scroll left and press Enter to select Cancel and go back to the previous screen.QUICK TIPYou can select Cancel and return to the Bolus menu whenever you like. If you do, an Extended Bolus won’t be set and your insulin delivery will remain unchanged.How do I deliver an Extended Bolus? How do I deliver an Extended Bolus?116 117QUICK TIPYou can turn BG reminders on or off in System Settings. See What are BG reminders and how do I turn them off? for more details.
Can I stop a bolus if I change my mind?Of course. We’d always recommend making sure your bolus details are spot on before you choose to deliver, but we know that sometimes things can change quickly. If you need to stop a Quick or Extended Bolus, just follow these steps:STEP 1On the Home screen, scroll to and select Bolus.STEP 2Your handset will show you a countdown of how much of your bolus is yet to be delivered. To stop the remaining bolus, press Enter to select Yes.STEP 3You will be asked to confirm that you’d like to stop your bolus. To do this, press Enter to select Stop bolus. Alternatively, you can scroll left and press Enter to Continue bolus. Your bolus delivery will continue unaffected.STEP 4Your bolus delivery will stop as soon as you select Stop bolus and your handset will confirm this for you – press Enter to select Understood and return to the Home screen. STEP 5Your Home screen will update and show you details of the amount of bolus (if any) that was delivered before your bolus was stopped.WARNINGStopping a bolus will only stop the delivery of any remaining insulin from the bolus you set. It will NOT remove any insulin that may already have been delivered to your body before the bolus was stopped.Can I stop a bolus? Can I stop a bolus?118 119
Blood Glucose
Blood GlucoseOk, so inputting your blood glucose readings into your Kaleido handset might not directly affect your insulin delivery, but we think it’s still definitely worth doing. With these extra details in the same place as your basal and bolus information, you could make better decisions more quickly, saving you precious time later on. Plus, it’s really simple to do – so why not give it a whirl?How do I enter a BG reading?123How do I enter a BG reading?STEP 1Use your BG meter to take a BG reading.STEP 2On the Home screen, scroll to BG and press Enter to select.QUICK TIPSpeak to your Healthcare Provider to find out how to get a BG meter that works for you. They’ll also be able to give you tips on how to get the most from it.QUICK TIPIf you need to change the unit of measurement for your BG readings, head to System Settings in the Menu  section first (see How do I  change the unit of measurement I record my BG readings in?).
QUICK TIPYou can select Cancel and return to the Home screen whenever you like. If you do, your BG reading won’t be saved on your handset.WARNINGAlways check for ketones if your BG reading is excessively high. If ketones are present, treat according to the advice given to you by your Healthcare Provider.STEP 5A confirmation message will appear – your BG reading has been saved. Press Enter to select Understood and return to the Home screen. STEP 6Congrats - your BG reading will now appear in the BG section of your Home screen.124 125How do I enter a BG reading?STEP 4When you’ve entered your BG correctly, press the Enter button. Press the Enter button again to select Save.If you’ve accidentally moved to Save too soon and you need to change the BG reading you’ve entered, just press the up button to return to the BG reading.STEP 3If you have saved a Target BG in Personal Info, the BG reading will automatically default to your Target BG when you start to enter it. If you’re not quite on target (let’s face it, it doesn’t always work out that way!), enter your latest BG reading by using the left and right buttons to scroll through the number boxes and the up and down buttons to increase and decrease the numbers.How do I enter a BG reading?
Menu
The Menu section of your Home screen will take you to your Insulin on Board, History, Personal Info and System Settings.MenuInsulin on BoardInsulin can be a tricky old thing to figure out – no sooner do you get your head around your basal profiles and how many units should be in your breakfast Quick Bolus, then someone asks if you’ve thought about your Insulin on Board. Sheesh!But, Insulin on Board is really pretty useful. Why? Well, when you deliver a bolus, the insulin that you deliver can take a little while to get going – in fact, insulin can still be having an effect on your BG levels for quite a few hours after you’ve delivered it! Just because it’s been a while since you delivered your lunchtime bolus, it doesn’t mean that all that insulin will have been used up. In fact, some of your last bolus might not even have started working yet and your BG levels could still be on the way down. So, if you’re about to bolus for your mid-afternoon pick-me-up, bolusing without factoring in the insulin that’s already active in your body may mean you actually deliver more insulin than you really need, which could cause your BG to get a bit too low. And, anything that can help avoid that particular rollercoaster has got to be a good thing, right?129What is Insulin on Board?
WARNINGKaleido can only calculate Insulin on Board based on the insulin which it knows it has delivered – it cannot track insulin delivered via any other method (such as insulin pens). If you have recently used an alternative method of insulin delivery and then attempt to use either Insulin on Board or Kaleidoculator to assist your diabetes management, you must bear this important fact in mind.130 What is Insulin on Board?So, how does it work? Well, Kaleido remembers all of the boluses that you’ve delivered and, based on the amount of time you’ve said insulin stays active in your body (the insulin activity time that you can set with the help of your Healthcare Provider – see How do I enter my insulin activity time?), it’s able to calculate how much insulin is still active in your body at any given time. You can check this figure whenever you want... and it’ll also be used whenever you use Kaleidoculator to figure out a bolus.131How do I check my Insulin on Board?How do I check my Insulin on Board?STEP 1On the Home screen, scroll to Menu and press Enter to select.STEP 2Press Enter again to select Insulin on Board.STEP 3Your handset will now show you your Insulin on Board. You can review the number for as long as you like – when you’re done, just press Enter to select Back and return to the Menu menu.QUICK TIPKaleido works out your Insulin on Board using the insulin activity time that you’ve set in Personal Info. So, if you haven’t set an insulin activity time, you won’t be able to access Insulin on Board from the Menu menu. Setting an insulin activity time is easy, but must always be done with the guidance and support of your Healthcare Provider - to find out more, see How do I enter my insulin activity time?QUICK TIPAs well as needing to be connected to a pump, your handset needs to be in range of the pump you’re currently using in order to show you your Insulin on Board. If you try to check Insulin on Board when you’re not connected to a pump or if your handset is out of range of your pump, you won’t be able to access Insulin on Board from the Menu menu (if you’re checking your Insulin on Board at the point your handset and pump go out of range of each other, the Insulin on Board number will disappear and it’ll be replaced by a dash). To make Insulin on Board accessible again, make sure your handset is connected to a pump and - if your handset and pump are out of range - move them closer together. Now you’ll be able to check Insulin on Board again - just give your handset a moment to crunch the numbers!
QUICK TIPHistory will record when a pump is changed, started, paused, stopped or disconnected. It also takes note of any temporary basal rates that are set, the amount of carbs you’ve entered into Kaleidoculator, as well as any recommendations that Kaleidoculator makes and any Quick and Extended Boluses that are delivered (whether or not you’ve used Kaleidoculator to deliver them). It can also show you when you changed your insulin cartridge, primed a cannula, swapped your basal profile, saved a BG reading, changed the date or time, or updated your Personal Info or System Settings, plus any alarms or alerts that you might have received. Last but not least, it’ll keep a record of your total daily dose of insulin each day. It’s a big job, but someone’s gotta do it!132 How do I review my History?HistoryWe know that life gets busy and, sometimes, keeping track of what’s happened and when can be hard. That’s where History will come in handy. Here, you’ll find a record of everything that’s happened over the last week of using your Kaleido.133How do I review my History?STEP 1On the Home screen, scroll to Menu and press Enter to select.STEP 2Scroll to and select History.STEP 3Scroll to the day you’d like to review  and then press Enter to select it.How do I review my History?
134 How do I review my History?QUICK TIPYou can review the current day, plus the previous seven days of Kaleido activity.STEP 4Use the up and down buttons to read through everything that happened on that day.STEP 5When you’re done, just scroll down to get to the Home button. Press Enter to select it and you’ll be whizzed back to the Home screen. Alternatively, from Home, scroll left to Back and press Enter to return to the History menu.QUICK TIPHere’s a trick! You can also quickly jump to the Home screen by pressing Enter twice from anywhere on the list of events.135How do I review my History?QUICK TIPSometimes it can be handy to see exactly how much insulin you’ve received over the course of a day. Good news – History keeps a note of your total daily dose every single day! It’ll always be one of the very last events to appear in your History at the end of each day – in fact, to make sure the total daily dose is totally accurate, your Kaleido’s scheduled to calculate the information at 23:59 – and not a minute sooner! If the event is ever missing from History, make sure your handset and pump are in range, give them some time to crunch the numbers, and then check again – your handset needs up-to-date information from the pump you’re currently using to calculate your total daily dose, something it can’t do if your pump is not in range.
To make getting to know Kaleido as smooth a process as possible, we’ll personalise your handset with as much information as we can before we even deliver it to you (we pride ourselves on our top knotch service and knowing a little bit about you helps us on this front). In case you ever want to add to or change any of these important details though, or if you want to enter the details that will allow you to start using Kaleidoculator, this section will talk you through everything you need to know about Personal Info. Personal InfoHow do I review my Personal Info? STEP 1On the Home screen, scroll to Menu and press Enter to select.STEP 2Scroll to and select Personal Info.136 How do I review my Personal Info?STEP 3On the Personal Info menu, use the up and down buttons to read through all of your saved details.STEP 4When you’ve finished, scroll all the way down to Home. Press Enter to select it and you’ll be whizzed back to the Home screen. Alternatively, from Home, scroll left to Back and press Enter to go back to Menu.137How do I review my Personal Info?
How do I enter my name?STEP 1Now this is important – how else will we know what to call you!? On the Personal Info menu, simply scroll to Name and press Enter to select.STEP 2Enter your name using the up and down buttons to scroll through the alphabet. The right button will help you move on to the next letter or add a space. When you’re done press Enter. QUICK TIPYou can select Cancel and return to the Personal Info menu whenever you like. If you do, any changes you’ve made won’t be saved.STEP 3When you’re ready to save your name, press Enter again to select Save. If you’ve accidentally moved to Save too soon and you need to change the name you’ve entered, no worries! Just press the up button to return to the first letter box.138 How do I enter my name?STEP 4A confirmation message will pop up – your name has been saved. Press Enter to return to the Personal Info menu a little quicker.STEP 5Congrats - your name will now show up in the Personal Info menu!139How do I enter my name?
How do I enter my age?STEP 1On the Personal Info menu, scroll to Age and press Enter to select.STEP 2Enter your date of birth using the up and down buttons to scroll through the numbers 0 to 9. Use the right button to move on to the next number. Once you’ve successfully entered the day you made it into the world (what a day that was!), press Enter.STEP 3When you’re ready to save your date of birth, press Enter again to select Save.If you’ve accidentally moved to Save too soon and you need to change the date of birth you’ve entered, no worries! Just press the up button to return to the first number box.QUICK TIPYou can select Cancel and return to the Personal Info menu whenever you like. If you do, any changes you’ve made won’t be saved.140 How do I enter my age?STEP 4A confirmation message will appear – your date of birth has been saved. Press Enter to return to the Personal Info menu a little quicker.STEP 5Congrats - your handset will now use your date of birth to display your age in the Personal Info menu! If the age that shows is incorrect, check your handset’s date settings (see How do I change the date on my handset?).141How do I enter my age?
How do I enter my gender?STEP 1On the Personal Info menu, scroll to Gender and press Enter to select.STEP 2Use the up and down buttons to select your gender, then press the Enter button. QUICK TIPYou can select Cancel and return to the Personal Info menu whenever you like. If you do, any changes you’ve made won’t be saved.STEP 3Press the Enter button again to select Save. If you’ve accidentally moved to Save too soon and you need to change the gender you’ve entered, no worries! Just press the up button to return to the selection box.142 How do I enter my gender?STEP 4A confirmation message will pop up – your gender has been saved. Press Enter to return to the Personal Info menu a little quicker.STEP 5Congrats - your gender will now show up in the Personal Info menu!143How do I enter my gender?
How do I enter my height?STEP 1On the Personal Info menu, scroll to Height and press Enter to select.STEP 2Use the up and down buttons to select either cm or ft & in, then press the Enter button.STEP 3Next, enter your height using the up and down buttons to scroll through the numbers 0 to 9. The right button will help you move on to the next number. When you’ve successfully entered your height, press Enter.QUICK TIPYou can select Cancel and return to the Personal Info menu whenever you like. If you do, any changes you’ve made won’t be saved.144 How do I enter my height?STEP 5A confirmation message will pop up – your height has been saved. Press Enter to return to the Personal Info menu a little quicker.STEP 6Congrats - your height will now be displayed in the Personal Info menu!STEP 4When you’re ready, press Enter again to select Save. If you’ve accidentally moved to Save too soon and you need to change the height you’ve entered, no worries! Just press the up button to go back to the unit of measurement selection box.145How do I enter my height?
How do I enter my weight?STEP 1On the Personal Info menu, scroll to Weight and press Enter to select.STEP 2Use the up and down buttons to select either st & lbs, lbs or kg, then press the Enter button.STEP 3Next, enter your weight using the up and down buttons to scroll through the numbers 0 to 9. The right button will help you move on to the next number. When you’ve successfully entered your weight, press Enter.146 How do I enter my weight?QUICK TIPYou can select Cancel and return to the Personal Info menu whenever you like. If you do, any changes you’ve made won’t be saved.STEP 5A confirmation message will pop up – your weight has been saved. Press Enter to return to the Personal Info menu a little quicker.STEP 6Congrats - your weight will now be displayed in the Personal Info menu!STEP 4When you’re ready, press Enter again to select Save. If you’ve accidentally moved to Save too soon and you need to change the weight you’ve entered, no worries! Just press the up button to go back to the unit of measurement selection box.147How do I enter my weight?
How do I enter my Target BG?STEP 1On the Personal Info menu, scroll to Target BG and press Enter to select.STEP 2Enter your Target BG using the up and down buttons to scroll through the numbers 0 to 9. Use the right button to move on to the next number.Once you’ve successfully entered your Target BG, press Enter.STEP 3When you’re ready, press Enter again to select Save.If you’ve accidentally moved to Save too soon and you need to change the Target BG you’ve entered, no worries! Just press the up button to go back to the first number box.148 How do I enter my Target BG?QUICK TIPYou can select Cancel and return to the Personal Info menu whenever you like. If you do, any changes you’ve made won’t be saved.QUICK TIPTarget BG is an important Kaleidoculator setting! To find outmore about Kaleidoculator, why not take a look at How do I use Kaleidoculator?QUICK TIPEntering a Target BG can help to keep youfocused when life gets busy. We suggest you have a chat to your Healthcare Provider to decide what your Target BG should be before you enter it into your Kaleido handset.STEP 4A confirmation message will pop up – your Target BG has been saved. Press Enter to return to the Personal Info menu a little quicker.STEP 5Congrats - your Target BG will now be displayed in the Personal Info menu!149How do I enter my Target BG?QUICK TIPNeed to change the unit of measurement you’re using? You can do that in your System Settings - see How do I change the unit of measurement I record my BG readings in?
150 What are insulin to carb ratios?What are insulin to carb ratios?Insulin to carb ratios describe exactly how powerful each unit of insulin is over the carbohydrates that you eat. Put simply, it tells you how many grams of carbohydrate 1 unit of insulin will cover (or balance out). So, if you have an insulin to carb ratio of 10 grams/U, it means your body needs 1 unit of insulin to balance out every 10g of carbs that you eat. That means you’d need 7 units of insulin to balance out a meal containing 70g of carbs, keeping your BG level from increasing.And – just to keep things interesting! – not only are insulin to carb ratios really individual, but most people will also have a different insulin to carb ratio depending on what time of day it is. So, Kaleido allows you to save a different ratio for every hour of the day, which means that you, together with your Healthcare Provider, can tailor them as much as you need to.QUICK TIPYou might have already guessed, but if your BG level is already higher than your Target BG, you might not be satisfied by just balancing out the carbs you’re eating -  you might want to bring your BG back down to target too. That’s where Kaleidoculator can help to make sense of insulin to carb and insulin to BG ratios! Take a look at How do I use Kaleidoculator? to find out more.How do I enter my insulin to carb ratios?STEP 1On the Personal Info menu, scroll to Insulin to carb and press Enter to select.STEP 2You can set a different ratio for every hour of the day. Press the left and right buttons to scroll between each hourly segment and then press the up and down buttons to select the ratio you want for each hour. Below the insulin to carb ratio graph you’ll see details of the hour you’re currently setting, along with the ratio that you are entering. If you’re setting a ratio of 9.9 grams/U or less, you can set the ratio in increments of 0.1 grams/U. For any ratios of 10 grams/U or more, the increments change to 1 gram/U. The smallest insulin to carb ratio you can set for an hour is 0.1 grams/U and the largest is 99 grams/U.151How do I enter my insulin to carb ratios?WARNINGYour insulin to carb ratios must always be set and amended with the help of your Healthcare Provider. Never attempt to change your insulin to carb ratios without the guidance and support of your Healthcare Provider.
152 How do I enter my insulin to carb ratios?STEP 3Once you’ve entered an insulin to carb ratio for each hour and you’re happy with your updates, press the Enter button. Press Enter again to select Save. If you want to return to the graph before you select Save, just press the up button. Or, if you’ve changed your mind completely, scroll left to Cancel and press Enter to select it.QUICK TIPKaleidoculator needs a complete set of insulin to carb ratios to be able to work - one for each hour of the day. So you won’t be able to select Save if you haven’t entered all 24 insulin to carb ratios. You won’t be able to access Kaleidoculator from the Bolus menu if you haven’t set your insulin to carb ratios either.STEP 5Congrats - your insulin to carb ratios will now show up in the Personal Info menu! Your handset will always display your current insulin to carb ratio.153How do I enter my insulin to carb ratios?STEP 4A confirmation message will appear – your insulin to carb ratios have been saved. Press Enter to return to the Personal Info menu a little quicker.QUICK TIPYou can select Cancel and return to the Personal Info menu whenever you like. If you do, any changes you’ve made won’t be saved.
What are insulin to BG ratios?154What are insulin to BG ratios?Insulin to BG ratios tell you exactly how much of an effect 1 unit of insulin will have on your BG level. For example, an insulin to BG ratio of 36 mg/dL/U, means that every unit of insulin that you deliver lowers your BG by 36 mg/dL – so, if your BG is at 180 mg/dL and you want to get back to your Target BG of 108 mg/dL, you’d need to lower your BG by 72 mg/dL, which would take 2 units of insulin. Annnnnd, relax...Just to keep you on your toes, insulin to BG ratios are different for everyone and can even change depending on the time of day. That’s no problem though - Kaleido lets you save a different ratio for each hour of the day, so that you and your Healthcare Provider can work together to set the ratios that work especially for you.QUICK TIPIf you’re also having something to eat, any insulin you deliver will act to balance out the carbs you’re eating first, rather than lowering a BG level that’s too high. That’s where Kaleidoculator can helpmake sense of insulin to BG and insulin to carb ratios! Take a look at How do I use Kaleidoculator? to find out more.QUICK TIPNeed to change the unit of measurement you’re using for your insulin to BG ratios? You can do that in System Settings – see How do I change the unit of measurement I record my BG readings in?How do I enter my insulin to BG ratios?STEP 1On the Personal Info menu, scroll to Insulin to BG and press Enter to select.STEP 2You now need to set a ratio for each hour of the day. Press the left and right buttons to scroll between hourly segments and the up and down buttons to select the ratio you’d like for each hour. Below the insulin to BG ratio graph you’ll see details of the hour you’re currently setting, along with the ratio that you are entering. If you’re working in mg/dL/U, the smallest ratio you can set is 2 mg/dL/U and the largest is 400 mg/dL/U, in increments of 1 mg/dL/U. If you are working in mmol/L/U, the smallest insulin to BG ratio you can set for an hour is 0.1 mmol/L/U and the largest is 22.2 mmol/L/U, in increments of 0.1 mmol/L/U. How do I enter my insulin to BG ratios? 155WARNINGYour insulin to BG ratios must always be set and amended with the help of your Healthcare Provider. Never attempt to change your insulin to BG ratios without the guidance and support of your Healthcare Provider.
How do I enter my insulin to BG ratios?156STEP 3Once you’ve entered an insulin to BG ratio for every hour and you’re happy with your updates, press the Enter button. Press Enter again to select Save. If you want to return to the graph before you select Save, just press the up button. Or, if you’ve changed your mind completely, scroll left to Cancel and press Enter to select it.QUICK TIPKaleidoculator needs a complete set of insulin to BG ratios to be able to work - one for each hour of the day. So you won't be able to select Save if you haven't entered all 24 insulin to BG ratios. You won't be able to access Kaleidoculator from the Bolus menu if you haven't set your insulin to BG ratios either.STEP 5Congrats - your insulin to BG ratios will now show up in the Personal Info menu! Your handset will always display your current insulin to BG ratio.QUICK TIPYou can select Cancel and return to the Personal Info menu whenever you like. If you do, any changes you’ve made won’t be saved.How do I enter my insulin to BG ratios? 157STEP 4A confirmation message will appear – your insulin to BG ratios have been saved. Press Enter to return to the Personal Info menu a little quicker.
How do I enter my insulin activity time?STEP 1On the Personal Info menu, scroll to Insulin activity and press Enter to select.STEP 2Now, enter your insulin activity time. Use the left and right buttons to scroll between the number boxes and the up and down buttons to scroll to the correct time – it can be as short as 2 hours and as long as 8. Once you’ve set the correct time, press the Enter button.STEP 3Press the Enter button again to select Save.If you’ve accidentally moved to Save too soon and you need to change the insulin activity time you’ve entered, no worries! Just press the up button to go back to the selection box.How do I enter my insulin activity time?158Your insulin activity time is the amount of time that any insulin you’ve received stays active in your body - and on your BG. Here’s how to set your activity time:STEP 4A confirmation message will pop up – your insulin activity time has been saved. Press Enter to return to the Personal Info menu a little quicker.STEP 5Congrats – your insulin activity time will now be displayed in the Personal Info menu!QUICK TIPInsulin activity time is an important Kaleidoculator setting! To find out more about Kaleidoculator, why not take a look at How do I use Kaleidoculator?WARNINGYour insulin activity time must always be set and amended with the help of your Healthcare Provider. Never attempt to change your insulin activity time without the guidance and support of your Healthcare Provider.How do I enter my insulin activity time? 159QUICK TIPKaleido uses your personal insulin activity time to help calculate Insulin on Board. So, if you haven’t set an insulin activity time, you won’t be able to access Insulin on Board from the Menu menu, or Kaleidoculator from the Bolus menu either.
System SettingsJust like Personal Info, your Kaleido handset’s System Settings will be preloaded before it’s delivered to you. But in case you need to change anything, this section covers everything you’ll ever need to know to help you review and change your System Settings.How do I review my System Settings? STEP 1On the Home screen, scroll to Menu and press Enter to select.STEP 2Scroll to and select System Settings.160 How do I review my System Settings?STEP 3On the System Settings menu, use the up and down buttons to read through your saved details.STEP 4Once you’ve finished, scroll all the way down to Home. Press Enter to select it and you’ll be returned to the Home screen. Alternatively, from Home, scroll left to Back and press Enter to return to Menu.161How do I review my System Settings?
How do I check if my handset is connected to a pump?Your handset will connect to your Kaleido pumps wirelessly. If you ever want to double check if your handset is connected to a pump and, if it is, which one, you can do that in System Settings in one simple step:STEP 1On the System Settings menu, scroll to Connection. If your handset is connected to a pump, the pump’s name will be displayed. If it is not currently connected, the Connection section will be empty. 162 How do I check if my handset is connected to a pump?QUICK TIPYour pumps are named after their colour - if you have a purple pump, its name will be Purple Pump. Nice and simple!Can I force my handset to disconnect from a pump?The connection between your handset and the pump you’re using is really important – it keeps your pump pumping, allows you to change your basal and deliver boluses, and makes sure that your handset has all the information it needs to keep your Insulin on Board and Resource Levels up-to-date.So, you should always allow your handset and pump to disconnect properly - your handset will automatically disconnect from a pump when you stop it and then remove the insulin cartridge. This usually happens at the end of three days of pumping, or sooner if you change your pump more frequently. But, we understand that exceptional circumstances can crop up every now and then. There may be a time when Kaleido Care asks you to force your handset to disconnect from your pump, using the force disconnect feature. They will talk you through the steps you need to take, but you can also follow along with them here too (just turn over to the following page).WARNINGForcing your handset to disconnect from your pump will stop your ability to control that pump. However, the disconnected pump might continue to administer any pre-programmed insulin deliveries. In order to ensure your safety, you must always remove the insulin cartridge from any pumps that you are not using, straight away. To re-establish a connection with a pump, insert an insulin cartridge and follow the instructions on your handset.163Can I force my handset to disconnect from a pump?WARNINGYou should only force your handset to disconnect from a pump when instructed to do so by Kaleido Care.WARNINGWhen a pump and handset disconnect properly, the pump delivers important information about Insulin on Board, your total daily dose of insulin and Kaleido’s Resource Levels to your handset. If you force your handset to disconnect from a pump, this information will NOT be delivered to your handset and will be permanently lost, even if you reconnect to the pump or connect to another pump in the future. So, after force disconnecting, remember that your Insulin on Board may not include any boluses delivered prior to the forced disconnect - you should be mindful of this for the amount of time that your insulin activity time is set to. In History, your total daily dose of insulin for that day may also be missing some information and so could also be inaccurate.
STEP 2Press the right button to scroll to Force disconnect and press Enter to select.If you decide you don’t want to force your handset to disconnect after all, select Back. This will take you back to the System Settings menu and your handset will stay connected to your current pump.STEP 3If you choose to continue with the forced disconnect, you will be asked one last time to confirm that you definitely want to disconnect. Press Enter to select Accept and disconnect. Alternatively, if you decide you no longer want to disconnect, just scroll left and press Enter to select Cancel.QUICK TIPYou will only be able to force your handset to disconnect from a pump if the two are already wirelessly connected.164 Can I force my handset to disconnect from a pump?STEP 1On the System Settings menu, scroll to Connection and press Enter to select.STEP 5The Connection section of the System Settings menu will now be empty. You won’t be able to access the Bolus section of your Home screen or set a temporary basal rate until you connect a new pump.STEP 4A confirmation message will pop up – your handset has been disconnected from your pump. Press Enter to return to the System Settings menu a little quicker.165Can I force my handset to disconnect from a pump?
How do I check how full my insulin cartridge and batteries are? You can always check how full your insulin cartridge, pump and handset batteries are by looking at the icons at the top of your Home screen. But sometimes you need a little more in-depth info, right? Just follow these steps to uncover more:STEP 1On the System Settings menu, scroll to Resource Levels and press Enter to select.STEP 2The Resource Levels screen will show you the following:• How many units of insulin      are left in your insulin    cartridge (rounded down to       the nearest full unit)• How much power is left in    your pump battery    (as a percentage)• How much power is left in       your handset battery    (as a percentage)Once you have the information you need, press Enter to select Back and return to the System Settings menu.166 How do I check my Resource Levels? 167How do I check my Resource Levels?Insulin cartridgePump batteryPump battery in Alert modeHandset battery in Alert modeHandset batteryInsulin cartridge in Alert modeInsulin cartridge in Alarm modeIf your insulin cartridge or either of your batteries are low enough to have triggered an alert or an alarm, you’ll also see this in the icons on your Home and Resource Levels screens. This is what the Resource Level icons mean:What do all the Resource Level icons mean?QUICK TIPIf you check your Resource Levels when your handset is not connected to a pump, you’ll only be able to see the handset battery icon and information.QUICK TIPIf you’ve had an alarm to say your pump battery is empty, the alarm will automatically disconnect your pump from your handset.
What’s Lock Screen and how do I save a new passcode?Lock Screen helps keep your handset extra secure! Whenever you switch your handset on or wake it up, you’ll be asked to enter a passcode to unlock it. If you enter the wrong passcode, your handset won’t unlock, but don’t worry, you’ll be able to have another go at getting it right. Your handset will come to you with a default passcode set (), but you should save your own (memorable!) passcode as soon as you can. You can also change your passcode whenever you like. Follow the steps on the next pages to see how you do it.STEP 1On the System Settings menu, scroll to Lock Screen and press Enter to select.STEP 2Use the up, down, left and right buttons to set a four button passcode. Make sure it’s something you’ll remember! Press the Enter button, then enter your new passcode again to confirm the sequence. Press Enter again to move to Next and again one last time to select it. If you’ve accidentally moved to Next too soon and you need to change the passcode you’ve entered, no worries! Just press the up button and re-enter your new passcode.168 What’s Lock Screen and how do I save a new passcode? 169What’s Lock Screen and how do I save a new passcode?QUICK TIPUnlike some other Kaleido features, you can’t turn Lock Screen off. So don’t panic or worry that something’s missing - it’s not!QUICK TIPYou won't be able to gain access to you handset until you enter the correct passcode, so if you ever forget it, just call Kaleido Care and we'll help you reset it.QUICK TIPYou can select Cancel and return to the System Settings menu whenever you like. If you do, any changes you’ve made won’t be saved.
170 171What’s Lock Screen and how do I save a new passcode?What’s Lock Screen and how do I save a new passcode?STEP 4A confirmation message will pop up – your new passcode has been saved. Press Enter to return to the System Settings menu a little quicker.STEP 5That’s it - you’re done! You’ll need to use your new passcode to unlock your handset from now on.  When you do, you’ll either be taken to your Home screen or to the screen you were on last. STEP 3Your handset will confirm the passcode you’re about to save. If you’re happy for this to happen, press the Enter button to select Save.Alternatively, scroll left and press Enter to select Cancel and return to the previous screen.QUICK TIPIf you ever want tochange your passcode,just select Lock Screen in the System Settings menu, then follow these steps again to save a new passcode.
What’s a Medic Message and how do I turn it on?A bit like a piece of Medic ID jewellery, setting a Medic Message on your Kaleido handset gives you the opportunity to share important details with people who might need to know who you are and what’s going on in an emergency. For extra peace of mind, this is how you save and turn on your Medic Message so people can view it - it will show up whenever your handset is woken up.STEP 1On the System Settings menu, scroll to Medic Message and press Enter to select.STEP 2Use the up and down buttons to select On, then press the Enter button. STEP 3Press the Enter button again to select Next.172 How do I turn my Medic Message on?STEP 4Start by entering the name of your emergency contact using the up and down buttons to scroll through the alphabet. You can use the right button to move on to the next letter, or to add a space. Once you’ve entered a name, press the Enter button.QUICK TIPYou can select Cancel and return to the System Settings menu whenever you like. If you do, any changes you’ve made won’t be saved.STEP 5Next, use the up, down, right and left buttons to enter your emergency contact’s telephone number (up and  down will help you scroll through the numbers 0 to 9, right and left will help you move between number boxes). Once you’ve entered the phone number, press the Enter button to move to Next.173How do I turn my Medic Message on?
STEP 7Your handset will now show you a preview of your Medic Message. Like it? Good! Press Enter to select Save. Alternatively, scroll left and press Enter to select Cancel, then edit your message.STEP 8A confirmation message will pop up – your Medic Message has been saved and turned on. Press Enter to return to the System Settings menu a little quicker.STEP 9Congrats - your updated Medic Message status will now be displayed in the System Settings menu!QUICK TIPIf you ever want to change your Medic Message, just turn the setting off, and then turn it back on again. Go back to the start of this section and follow the steps to save your new details.174 How do I turn my Medic Message on? 175How do I turn my Medic Message on?STEP 6Press Enter again to select Next.If you’ve accidentally moved to Next too soon and you need to change your emergency contact’s details, no worries! Just press the up button to return to the first letter box.
STEP 3If you’re sure you want to turn off your Medic Message, press the Enter button once more to select Save. Alternatively, scroll left and press Enter to select Cancel.STEP 4A confirmation message will pop up - your Medic Message has been turned off and deleted. Press Enter to return to the System Settings menu a little quicker.STEP 5Your updated Medic Message status will now be displayed in the System Settings menu.176 How do I turn my Medic Message off? 177How do I turn my Medic Message off?How do I turn my Medic Message off?Should you want to, you can turn your Medic Message off at any time - and really quickly too! STEP 1On the System Settings menu, scroll to Medic Message and press Enter to select. STEP 2Use the up and down buttons to select Off, then press the Enter button. Press enter again to select Next.WARNINGTurning off your Medic Message will delete your message and your emergency contact details. You will have to enter them again if you ever turn your Medic Message back on.
What are BG reminders and how do I turn them off?We’re not going to try and teach our granny how to suck eggs - we know you know that if you deliver a bolus it’s because you want it to have an effect on your BG. But we also know that sometimes remembering to check just how much of an effect (or not!) a bolus has had can be...well, easy to forget. So, Kaleido gives you the option to set yourself a reminder to do a BG test an hour and half after you started delivering a bolus, just as an extra help. Don’t like or want the reminders? No problem! They’re easy to turn off - just follow these steps:STEP 1On the System Settings menu, scroll to BG reminders and press Enter to select.STEP 2Use the up and down buttons to select Off, then press the Enter button.STEP 3Press Enter again to select Save.If you’ve accidentally moved to Save too soon – no worries! Just press the up button to return to the selection box.What are BG reminders and how do I turn them off?QUICK TIPYou can select Cancel and return to the System Settings menu whenever you like. If you do, any changes you’ve made won’t be saved.QUICK TIPYou can turn your BG reminders back on by selecting BG reminders in the System Settings menu, then using the up and down arrows to select On. Press the Enter button, then press it again to select Save.STEP 4A confirmation message will pop up – your BG reminders have been turned off. Press Enter to return to the System Settings menu a little quicker.STEP 5Congrats - your updated BG reminders setting will now be displayed in the System Settings menu!What are BG reminders and how do I turn them off?178 179
How do I change the unit of measurement I record my BG readings in?We recommend that you only ever use the unit of measurement you’re used to to record your BG readings, but if you ever need to change the unit of measurement that your Kaleido handset uses, it is possible. Your Healthcare Provider will be able to give you more advice as to whether you’d benefit from changing the units of measurement that you use.STEP 1On the System Settings menu, scroll to BG units and press Enter to select.STEP 2Use the up and down buttons to select the unit of measurement that you want to use. Press the Enter button. STEP 3Press Enter again to select Save. If you’ve accidentally moved to Save too soon and you need to change the unit of measurement you’ve selected, no worries! Just press the up button to return to the selection box.180 How do I change my BG unit of measurement?WARNINGNever change the BG unit of measurement on your Kaleido handset without first consulting your Healthcare Provider.STEP 4Your handset will confirm the unit of measurement selection you’re about to make – if you’re still happy to make the change, press the Enter button again to select Save.Alternatively, scroll left and press Enter to select Cancel and return to the previous screen.STEP 5A confirmation message will pop up – your units of measurement have been changed. Press Enter to return to the System Settings menu a little quicker.STEP 6Congrats - your updated BG unit setting will now be displayed in the System Settings menu!QUICK TIPYou can select Cancel and return to the System Settings menu whenever you like. If you do, any changes you’ve made won’t be saved.181How do I change my BG unit of measurement?
How do I change my handset’s language?We’d recommend that you only ever use your Kaleido handset in your native language. In case of emergencies, it’s really important that you’re able to completely understand the language that is being used to communicate your pump information to you. If you do ever need to change your handset’s language though, here’s how you do it:STEP 1On the System Settings menu, scroll to Language and press Enter to select.STEP 2Use the up and down buttons to scroll through the language options. Press Enter to select your preferred language. QUICK TIPYou can select Cancel and return to the System Settings menu whenever you like. If you do, any changes you’ve made won’t be saved.STEP 3Next, press Enter again to select Save. If you’ve accidentally moved to Save too soon and you need to change the language selected, no worries! Just press the up button to return to the selection box.182 How do I change my handset’s language?STEP 4Your handset will confirm the language selection that you are about to make – if you’re still happy to make the change, press the Enter button again to select Save.Alternatively, scroll left and press Enter to select Cancel and return to the previous screen.STEP 5A confirmation message will pop up – your handset language has been changed. Press Enter to return to the System Settings menu a little quicker.STEP 6Congrats - your updated language setting will now be displayed in the System Settings menu! You’ll also notice that your handset language has changed!WARNINGYou should only ever change your language settings if it’s absolutely necessary for the safe continuation of your insulin therapy.183How do I change my handset’s language?
How do I change the time on my handset?It’s really important that your handset is always set to the correct time. Time plays a huge part in the delivery of your basal profiles, so you should check your handset regularly to make sure it’s correct. If it ever needs to be changed or updated, this is what you’ll need to do:STEP 1On the System Settings menu, scroll to Time and press Enter to select.STEP 2Enter the current time using the up and down buttons to scroll through the numbers 0 to 9. Use the right button to move on to the next number. STEP 3When you’ve successfully entered the time, press Enter and then Enter again to select Save.If you’ve accidentally moved to Save too soon and you need to change the time that you have entered, no worries! Just press the up button to return to the first number box.184 How do I change the time on my handset?QUICK TIPYou can select Cancel and return to the System Settings menu whenever you like. If you do, any changes you’ve made won’t be saved.QUICK TIPChanged the time (or date) on your handset recently but forgotten when? Kaleido will give you a reminder of this in History - just look for the        symbol!STEP 4A confirmation message will pop up – the time has been saved. Press Enter to return to the System Settings menu a little quicker.STEP 5Congrats - the updated time will now be displayed in the System Settings menu and on your Home screen!WARNINGIf your Kaleido handset battery ever becomes completely flat, causes your handset to turn off and is left uncharged for seven days or more, your handset’s internal clock will automatically reset. This means it will not remember your previous time and date settings. To avoid this, charge your handset regularly. If you do allow your handset battery to empty and remain uncharged for seven days or more, make sure you check your time and date settings are correct as soon as you turn your handset back on.WARNINGIf you travel to a different time zone, the time on your handset will NOT automatically update. Always ensure that you change the time and date on your handset to account for the difference in time zones. Get in touch with your Healthcare Provider for advice on when and how to go about making these adjustments.185How do I change the time on my handset?
How do I change the date on my handset?It’s important that your handset is always set to the correct date, so that you know your historic data is being saved correctly. If you ever need to update the date on your handset, here’s how to do it:STEP 1On the System Settings menu, scroll to Date and press Enter to select.STEP 2Enter the current date using the up and down buttons to scroll through the numbers 0 to 9. Use the right button to move on to the next number. STEP 3When you’ve successfully entered the date, press Enter and then press Enter again to select Save.If you’ve accidentally moved to Save too soon and you need to change the date that you have entered, no worries! Just press the up button to return to the first number box.186 How do I change the date on my handset?QUICK TIPYou can select Cancel and return to the System Settings menu whenever you like. If you do, any changes you’ve made won’t be saved.QUICK TIPChanged the date (or time) on your handsetrecently but forgotten when? Kaleido will give you a reminder of this in History - just look for the        symbol!STEP 4A confirmation message will pop up – the date has been saved. Press Enter to return to the System Settings menu a little quicker.STEP 5Congrats - the updated date will now be displayed in the System Settings menu!187How do I change the date on my handset?WARNINGIf you travel to a different time zone, the date on your handset will NOT automatically update. Always ensure that you change the date and time on your handset to account for the difference in time zones. Get in touch with your Healthcare Provider for advice on when and how to go about making these adjustments.WARNINGIf your Kaleido handset battery ever becomes completely flat, causes your handset to turn off and is left uncharged for seven days or more, your handset’s internal clock will automatically reset. This means it will not remember your previous date and time settings. To avoid this, charge your handset regularly. If you do allow your handset battery to empty and remain uncharged for seven days or more, make sure you check your date and time settings are correct as soon as you turn your handset back on.
How do I turn my handset button tones off?Sometimes you want to be a little more discreet – don’t worry, we get it. Turning your handset’s button tones off will mean your neighbours are none the wiser – and it’s simple to do, too:STEP 1On the System Settings menu, scroll to Button tones and press Enter to select.STEP 2Use the up and down buttons to select Off, then press the Enter button. QUICK TIPYou can select Cancel and return to the System Settings menu whenever you like. If you do, any changes you’ve made won’t be saved.STEP 3Press Enter again to select Save. If you’ve accidentally moved to Save too soon – no worries! Just press the up button to return to the selection box.188 How do I turn my handset button tones off?STEP 4A confirmation message will pop up – your button tones have been turned off. Press Enter to return to the System Settings menu a little quicker.STEP 5Congrats - your updated button tone setting will now be displayed in the System Settings menu!QUICK TIPYou can turn your button tones back on by selecting Button tones in the System Settings menu, then using the up and down arrows to select On. Press the Enter button, then press it again to select Save.189How do I turn my handset button tones off?
How do I set the volume of my handset?Just like your button tones, the volume you want to set your Kaleido handset at might change depending on where you are. Follow these steps to set the volume you’d like. This will only affect the volume of any alerts and reminders that you receive - not your alarms. STEP 1On the System Settings menu, scroll to Volume and press Enter to select.STEP 2Use the left button to make the volume quieter and the right button to make it louder, then press the Enter button. 190 How do I set the volume of my handset?STEP 3Press Enter again to select Save. If you’ve accidentally moved to Save too soon - no worries! Just press the up button to return to the volume selector.QUICK TIPYou can select Cancel and return to the System Settings menu whenever you like. If you do, any changes you’ve made won’t be saved.STEP 4A confirmation message will pop up – your handset volume has been changed. Press Enter to return to the System Settings menu a little quicker.STEP 5Congrats - your updated volume setting will now be displayed in the System Settings menu!191How do I set the volume of my handset?WARNINGWe recommend that you keep your handset close by when you have the volume set low.WARNINGBecause of how important alarms are, volume changes only apply to alert and reminder tones. Any changes you make to your handset’s volume do not affect the volume of alarm tones. Volume changes also only apply to the volume of your handset speakers - for safety reasons, you cannot change the volume of the speakers on your pumps.
How do I set the brightness of my handset screen?On a holiday in the sun or curled up watching TV?There are a few factors that could mean you might find it useful to adjust the brightness of your handset screen. Here’s how to do it:STEP 1On the System Settings menu, scroll to Brightness and press Enter to select.STEP 2Use the left button to make the screen less bright and the right button to make it brighter, then press the Enter button. STEP 3Press Enter again to select Save. If you’ve accidentally moved to Save too soon – no worries! Just press the up button to return to the brightness selector.192 How do I set the brightness of my handset screen?QUICK TIPYou can select Cancel and return to the System Settings menu whenever you like. If you do, any changes you’ve made won’t be saved.STEP 4A confirmation message will pop up – the brightness of your handset screen has been changed. Press Enter to return to the System Settings menu a little quicker.STEP 5Congrats - your updated brightness setting will now be displayed in the System Settings menu!193How do I set the brightness of my handset screen?QUICK TIPHere’s something to bear in mind - the brighter your handset screen, the more battery power your handset will use!
Status
You’ll need to access the Status section of your Kaleido handset when you want to pause, stop or restart the pump you’re using. StatusPausing your pumpKaleido pumps are some of the smallest, niftiest pumps around, and they’re made to fit into almost all situations. But if you’re jumping in the shower, trying on new clothes or going for a swim, you might just want to take a break. So, to give you back complete flexibility, you can choose to pause and remove your pump at any time. The best bit? Your handset will keep track of how much insulin you’ve missed while your pump is paused, so that you can make an informed decision about your insulin delivery when you’re ready to get going again.197Pausing your pump
How do I pause my pump?STEP 1On the Home screen, scroll to Status and press Enter to select.STEP 2Scroll to and select Pause pumping.STEP 3Your handset will ask you if you want to pause pumping. Just press the Enter button to select Yes.QUICK TIPChanged your mind? Just press the left button to scroll to No. Press Enter toselect it and return to the Status menu.198 How do I pause my pump?STEP 4Easy! Your pump is now paused and insulin delivery has been stopped. On your handset, you’ll be able to keep track of how much basal insulin you’re missing out on. WARNINGYou won’t be able to access any of your handset’s other functions while your pump is paused.WARNINGIf you choose to take your pump off while it is paused, it’s important to remember to close the protective cover on your infusion set.WARNINGYou won’t receive any insulin at all while your pump is paused.199How do I pause my pump?
How do I unpause my pump?STEP 1When you’re ready to restart your paused pump, take note of how much insulin you’ve missed and press the Enter button to select Continue pumping.QUICK TIPAlternatively, you can press the left buttonto scroll to Stop pumping. If you select Stop pumping, your handset will enter Stop mode. See How do I stop my pump? for more details about Stop mode.STEP 2Your handset will ask you to confirm that you are ready to start pumping. Select Yes by pressing Enter.200 How do I unpause my pump?STEP 3A confirmation message will pop up – your pump has unpaused and your insulin delivery has been restarted! Press Enter to return to the Home screen a little quicker.WARNINGYour handset only keeps track of the insulin you’ve missed for information purposes. It will NOT automatically deliver the insulin you have missed when you unpause your pump.WARNINGYou should speak to your Healthcare Provider for advice on when to pause your pump and the action you need to take when you later decide to unpause it.WARNINGYou should always take a BG reading when you start to pump after a break in your insulin delivery. This will help you make informed decisions about your immediate insulin requirements. 201How do I unpause my pump?STEP 4Next, take a BG reading and, using the information your handset has given you about the insulin you missed, decide whether or not to deliver a bolus to top your insulin levels back up.
How do I stop my pump?You can also stop your pump from the Status menu. Stopping your pump should always be your very first step when you’re preparing to remove your pump.This is especially important if you’re getting ready to swap pumps. Once you’ve followed the steps here, you can find out more about removing your pumps and infusion sets by checking out How do I take my pump off?STEP 1On the Home screen, scroll to Status and press Enter to select.STEP 2Scroll to and select Stop pumping.STEP 3Your handset will ask you if you’d like to stop pumping. Press the Enter button to select Yes.QUICK TIPDecided you don’t want to stop your pump after all? Just press the left button to scroll to No. Press Enter to select it and return to the Status menu.202 How do I stop my pump?STEP 4A confirmation message will pop up - your pump has been stopped and you are no longer receiving any insulin. Press Enter to return to the System Settings menu a little quicker. STEP 5Your Home screen will update to show that your pump is in Stop mode.WARNINGWhen your pump is in Stop mode, your handset and pump will stay wirelessly connected, but your pump will not deliver any insulin and will not track how much insulin you’ve missed. You won’t be able to reach the Bolus menu from your Home screen and you won’t be able to set a temporary basal rate either.203How do I stop my pump?
How do I restart my pump?When your pump is in Stop mode, your handset and pump will stay connected to each other. This means you can choose to start pumping again whenever you like – your pump will just restart the same basal profile you were using when you stopped it.Restarting your pump is easy. You can also follow these steps if you need to start your pump after choosing not to immediately start pumping when you connected your pump to your handset.STEP 1On the Home screen, scroll to Status and press Enter to select.STEP 2When you’re in Stop mode, the only option in your Status menu will be Start pumping – press Enter to select it.204 How do I restart my pump?STEP 3Just in case you’re using a new infusion set, your handset will now give you another chance to prime your cannula. There are three options for you to choose from:• If you’d like to prime a new infusion set with a 6 mm cannula, press Enter to select Yes, 6 mm. If you do, you’ll be asked if you’re ready to prime your cannula and start pumping, and your handset will walk you through what to do next.• If you’d like to prime a new infusion set with a 9 mm cannula, scroll down to Yes, 9 mm, then press Enter to select it. If you do, you’ll be asked if you’re ready to prime your cannula and start pumping, and your handset will walk you through what to do next.205How do I restart my pump?• Or, if you don’t want to prime your new infusion set’s cannula or if you’re not using a new infusion set, just press the left button to scroll to No and press Enter to select it. You can find out more about priming your cannula by checking out Why do I need to prime my cannula?
STEP 4If you chose No, your handset will now ask you if you’d like to start pumping. Press the Enter button to select Yes.Make sure you don’t select Yes until you’re wearing your pump and infusion set and ready to start receiving insulin. Your handset will stay on this screen for as long as you need it to.STEP 5A confirmation message will pop up – your pump has been started. Your handset will show you the basal profile it’s currently running. You can press the Enter button to jump to the Home screen a little quicker.QUICK TIPIf you’ve changed your mind, just press the left button to scroll to No. Press Enter to select it and then return to the Status menu.206 How do I restart my pump?WARNINGYou should always take a BG reading when you start to pump after a break in your insulin delivery. This will help you make informed decisions about your immediate insulin requirements. STEP 6Your Home screen will update to show you all your pumpingdetails.STEP 7Next, take a BG reading to make sure you’re happy withyour current insulin delivery.207How do I restart my pump?
Alerts & Alarms
Sometimes, life throws us curveballs. Rest assured, if Kaleido thinks something isn’t quite going to plan, it’ll sound an alert or an alarm to let you know.As long as it’s within range, your handset will also display a message to let you know and give you a bit more information too.Alerts & AlarmsWhat is an alert?What is an alarm?You’ll receive an alert if your pump wants to warn you about something that’s important but not urgent yet. It’s a bit of an advance heads up, kind of like a “Hey man, just so you know...”.The alert tone is two short beeps which will sound from your pump. When your handset is in range, it will also sound the alert tone and give you an alert message that’ll pop up on your handset, explaining what the alert is for. Once you’ve read and understood the reason for the alert, press the Enter button to select Alert understood – you’ll be taken back to the screen you were on last.Alarms only occur if something serious is going on. There are two types of alarms – those that affect your pump and those that only affect your handset. Pump alarms will automatically stop your pump and put it into Stop mode. Handset alarms won’t stop your pump, but they will cause your handset to turn off. Whichever alarm you get, you’ll need to give it your full attention, stat.The alarm tone for a pump alarm is a continuous series of beeps which will sound from your pump. When it is in range, your handset will also sound the alarm tone and show an alarm message, giving you more details about what’s going on. For a handset alarm, the alarm tone is the same, but it only sounds from your handset (never from your pump). You’ll also get an alarm message on your handset if you have a handset alarm.Once you’ve read and understood the message, press Enter to select Alarm understood. If it’s a pump alarm, you’ll then be taken straight to the Home screen. If it’s a handset alarm, selecting Alarm understood will turn your handset off.WARNINGAlerts and alarms will interrupt any other actions that you might be running on your Kaleido handset. Your handset will always prioritise an alarm over an alert.WARNINGPump alarms will immediately stop your pump and put it into Stop mode. Once you’ve sorted the issue that caused the alarm, you will need to restart your pump (see How do I restart my pump?) to get it going again. You can also check out How do I stop my pump? for more details about Stop mode. 211What are alerts and alarms?WARNINGHandset alarms will turn your handset off, but will not stop your pump. It will continue to pump and deliver all programmed insulin as planned. However, you will need to resolve the issue with your handset before you can continue using it to programme or change your insulin delivery.
When will I get an alert?You’ll get an alert if:You should charge your handset as soon as possible. You can keep an eye on how low your handset battery is by checking your Resource Levels in System Settings.You’ll first receive this alert when you have just 25% of your handset battery remaining, then again at 10% and at 5% too.If you receive this alert, it’s important to start keeping an eye on your pump battery. You’ll need to make sure everything you need to replace your pump is nearby, so that if your current pump battery hits empty, you can change everything over quickly. Again, you can keep a check on how low your pump battery is by checking your Resource Levels in System Settings.You’ll first receive this alert when your pump battery has 25% of its power remaining, then again at 10% and 5% capacity.If you have less than 50 units left in your insulin cartridge, the basal profile you’re running and any boluses you deliver could empty your insulin cartridge pretty quickly. When you get this alert, you’ll need to keep a close eye on your insulin cartridge levels and make sure everything you need to replace your insulin cartridge is nearby, just in case. Just like with your handset and pump batteries, you can see how full your insulin cartridge is by checking your Resource Levels in System Settings.To keep you in the loop, you’ll receive this alert when you have 50 units of insulin left in your insulin cartridge, and then again at 25 units and 5 units too.212 When will I get an alert?• Your handset battery       is getting low• Your pump battery    is getting low• Your insulin cartridge     is getting lowInsulin cartridges can be used for up to three days before they must be replaced.  Once you’ve received this alert, you’ll have twelve hours until your insulin cartridge expires – and your infusion set too if you started using them at the same time. Sometimes it might not be possible to replace your insulin cartridge straight away, and so on those occasions you’ll get this alert once or, if needed, twice more (after 6 hours and after 10 hours). But, you should always try to replace your insulin cartridge, pump and (if it’s also three days old) your infusion set as soon as possible after getting the first alert - so make sure you keep everything you’ll need to do this close by.If this alert pops up, try whatever you were doing again (you could also try moving your handset closer to your pump too). If that doesn’t work, give Kaleido Care a call and we can help you work out what’s going on.213When will I get an alert?• You’ve been using the       same insulin cartridge     for three days• There is a       communication  error        between your    handset and pump
You’ll get a pump alarm if:Your pump battery is empty and your pump has been stopped and disconnected from your handset. You need to replace your pump straight away, swapping it for your other, fully charged Kaleido pump. It’s important to charge the pump you’ve removed as soon as possible, so that it’s ready to use when you next need it.You’ve used up all of your insulin, so you’ll need to remove your existing insulin cartridge and replace it with a new, filled cartridge. While you’re at it, you should change your Kaleido pump, and also your infusion set if you’ve been using the same one for three days too.You’ve been using your insulin cartridge for too long and you’ll need to replace it with a new, filled cartridge before you can restart your pump. If you started using your current pump and infusion set at the same time as your old insulin cartridge, you should replace them now too. 214 When will I get a pump alarm?When will I get a pump alarm?• Your pump battery    is empty• Your insulin  cartridge       is empty• The insulin cartridge    you’re using has    expiredInsulin blockages (sometimes known as occlusions) can be caused by problems with either your infusion set or insulin cartridge. Have a look to see if your insulin cartridge tubing is twisted or kinked, and if so, straighten it out. If not, you’ll need to unclip your insulin cartridge connector from your infusion set and replace your infusion set and insulin cartridge before restarting your pump. If the problem persists, remove your Kaleido pump and infusion set. For now, switch to an alternative method of insulin delivery and call Kaleido Care for help.If you receive this alarm, give Kaleido Care a call. We’ll do all we can to get you back up and running quickly, but if we can’t, you’ll need to swap to your other Kaleido pump while we work out what’s up. Can’t call Kaleido Care straight away? Just switch to your other Kaleido pump and then call us when you can.WARNINGIf you get an insulin blockage alarm, you may not have received all of the insulin you expected. Should this happen, make sure to check your blood glucose levels and act accordingly.215When will I get a pump alarm?• Your pump has an     insulin blockage• There’s a problem      with your Kaleido      pumpWARNINGIf you receive an insulin blockage alarm and can detect the cause (for example, a kink in the insulin cartridge tubing), it’s important to remember that rectifying the problem to restart the flow of insulin may result in the delivery of a small and unexpected amount of insulin. To avoid this, it is therefore important to always disconnect your insulin cartridge and infusion set before releasing any insulin blockages.
You’ll get a handset alarm if:When will I get a handset alarm?• Your handset battery    is empty• There’s a problem      with your Kaleido      handsetIf you get this alarm, you’ll need to charge your handset as soon as possible. Once your handset is charged, you’ll be able to continue using it as normal. To avoid emptying your handset battery in the future, you can keep an eye on how full it is by checking your Resource Levels in System Settings.If you receive this alarm, you’ll need to give Kaleido Care a call. We’ll help you work out what’s happened and get you back up and running quickly. Can’t call Kaleido Care straight away? Don’t worry, your pump will continue delivering insulin as planned, but you should give us a call as soon as you can. In the meantime, if you don’t want to use your Kaleido pump without your handset, just unclip your insulin cartridge connector from your infusion set and remove your pump (see How do I take my pump off?). Then, remove your insulin cartridge from your pump – this will stop your pump from pumping. 216 When will I get a handset alarm?WARNINGIf your Kaleido handset battery ever becomes completely flat, causes your handset to turn off and is left uncharged for seven days or more, your handset’s internal clock will automatically reset. This means it will not remember your previous time and date settings. To avoid this, charge your handset regularly. If you do allow your handset battery to empty and remain uncharged for seven days or more, make sure you check your time and date settings are correct as soon as you turn your handset back on.217When will I get a handset alarm?
PrecautionsYour Kaleido pump will let you know straight away if there’s an issue that needs your attention. But in very exceptional circumstances, there may be times when your pump and handset can’t detect that there’s a problem. You need knowledge to help you make decisions should a problem crop up, so you should make sure you always test your blood glucose levels at least four times a day while you’re using an insulin pump. If you ever have an unexpected blood glucose level, check your Kaleido pump, handset, insulin cartridge and infusion set for signs of damage. There is also always a small chance that you may have missed an alert or alarm, so it’s a good idea to double-check your History too. If in doubt, keep an alternative insulin delivery system on standby, just in case, and call Kaleido Care for help. If you feel unwell or you’re measuring extremely high or low blood glucose levels, always call your Healthcare Provider for advice.218 PrecautionsWARNINGIt is important that you always act responsibly when administering the insulin you require and especially if you receive a pump or handset alarm or an alert while using Kaleido. If an alarm causes your pump to stop or your handset to turn off, blood glucose levels should be closely monitored while the issue is resolved and also when normal insulin delivery is resumed. Make sure you always have access to an alternative method of insulin therapy.WARNINGIf you’re not sure how to react to an alert or alarm, please stop using your Kaleido pump and switch to an alternative form of insulin therapy.
Looking after your Kaleido
Let’s be real - your Kaleido pump deserves the best! So let’s make sure all of your Kaleido products stay in tiptop condition, ok? OK!Looking after your KaleidoShould I clean my Kaleido products?Yes! We recommend that you take five minutes to clean your Kaleido pumps, handset, charging dock and inserter at least once a week. Here’s how you do it:STEP 1Dab a little bit of pH neutral detergent onto a clean, dry cloth.STEP 2Using your cloth, gently wipe your pumps, handset, charging dock and inserter. Remove any dirt or glue residues that might have built up thanks to your body and pump patches.STEP 3Before you finish, make sure you’ve wiped away any detergent residue and then, if necessary, pat your products dry with a cloth.WARNINGNever wet or submerge your handset or charging dock.WARNINGMake sure your handset’s micro USB port and charging dock’s contact pins never come into contact with liquids.WARNINGNever attempt to clean any of your Kaleido products while they are plugged into a power source.QUICK TIPMost liquid soaps and baby shampoos are pH neutral!222 Should I clean my Kaleido products?How should I store my Kaleido products?Keep your Kaleido products in a safe place where you know you’ll be able to access them whenever you might need to. Your handset and pumps should be stored in the same environmental conditions that they operate in. These are:Minimum41°F15%TemperatureNon-condensing humidityMaximum98.6°F93%As for your insulin cartridges, once you’ve filled them with insulin, the safest thing to do is refer to the storage advice for the insulin your Healthcare Provider has given you. However, it’s important to remember that once you’ve filled an insulin cartridge, you should start using it as soon as possible.223How should I store my Kaleido products?WARNINGYou shouldn’t use any of the items in your Top-up Kit (including your insulin cartridges) if their individual packaging is damaged in any way. They can no longer be considered sterile and could be unsafe to use.WARNINGPlease check all your supplies and parts  for damage before you use them. If any component is damaged in any way, please contact Kaleido Care.WARNINGStoring your insulin cartridges in direct sunlight or at temperatures above 98.6°F could affect the quality of the product.WARNINGDo not store your handset or pumps alongside any hard or sharp objects. Doing so could damage the screen and buttons of your handset, as well as the contact pins of your pumps.WARNINGDon’t remove an insulin cartridge from its pouch until you’re ready to start using it.
224 How can I dispose of my Kaleido products?What do I do if I need to dispose of my Kaleido products?Pumps, handset, charging dock and inserterWhen it’s time to dispose of your Kaleido pumps, handset, charging dock or inserter, you can return them to us at the following address and we’ll take care of them for you:ViCentra BVKanaalweg 17 b23526 KL UtrechtNetherlandsTop-up Kit contentsThe items in your Top-up Kit should only be used once and then disposed of in an appropriate way. We recommend that you always use a sharps bin. QUICK TIPYour Healthcare Provider will be able to advise you on how to dispose of medicines that you no longer need, as well as items that have been contaminated with medicine. You should also contact your local authority for advice on the proper method of disposal of biohazardous material.WARNINGNever dispose of sharp objects without either using a sharps bin, or safely covering them with the appropriate protective caps. 225Where can I get replacement Kaleido products?Where can I get replacement Kaleido products?We’ll automatically send you a brand new Top-up Kit before you use everything from your current kit. Cool, right? This way you shouldn’t need to worry about replacing or ordering your infusion sets, insulin cartridges, pump and body patches, needles, syringes and alcohol wipes.Of course, if you need an extra top-up, want to change what you receive, or you need to update your delivery address, just call Kaleido Care and we’ll take care of it! The Kaleido Care team will also be ready and waiting to help you if you ever need a replacement pump, handset, charging dock, connection cable or inserter.WARNINGYou must only use productssupplied by ViCentra BV with your Kaleido pumps and handset. Using alternative parts from other suppliers could damage your pump and will invalidate your warranty.WARNINGYou must only use U100 insulin with your Kaleido pumps.
FAQs
Now you’ve got your pump and handset up and running, you’ve set some basal profiles and know how to program a bolus with your eyes closed, it’s time for Kaleido to get onwith doing its thing and you to get on with doing yours!We’ve racked our brains to think of any questions that might pop up, and - to save you time that you’d probably prefer to spend elsewhere - we’ve answered them all for you in this chapter. If you have any other queries, Kaleido Care is always here for you, and you might also want to get some advice from your Healthcare Provider.FAQsChecking your blood glucose levels often is the safest and most effective way to make sure your insulin delivery plan cuts the mustard. It’ll help to keep you aware of any potential highs or lows before they start to get in your way. It’s important that you take a BG reading to check your blood glucose levels at least four times a day - once when you wake up, and then once again before eating your lunch, dinner and before you go to sleep. You might also want to take a BG reading about 1.5 hours after delivering a bolus, before any particularly filling snacks, when your pump is paused or stopped (and when you restart it) and also after changing your insulin cartridge and infusion set. Any information that all this gives you can help you to plan your next steps.QUICK TIPSome sports and exercises can be pretty energetic – we designed your Kaleido products with real life in mind, but we recommend never putting them – or you! – at unnecessary risk.QUICK TIPIf you remove your pump for any length of time, the most important thing to remember is to check your blood glucose levels more frequently. This can help you to avoid any unexpected changes and can come in handy with catching any highs or lows early too.WARNINGYou should always talk to your Healthcare Provider for advice on exercising and new exercise regimes.229FAQsHow often should I take a BG reading?WARNINGIf you notice that your blood glucose levels are high or that you need more insulin than is normal or expected, it could mean that the insulin cartridge and infusion set you are using may be damaged. You should change your insulin cartridge and infusion set as soon as you can, and then check your blood glucose levels regularly. You might also want to consult your Healthcare Provider.Can I wear my pump during exercise? It’s completely up to you! We designed your Kaleido pump to be worn during all sorts of physical activities, so keeping it on and continuing your insulin delivery should fit right in. It could make controlling your BGs during exercise a bit easier too! But if you feel more comfortable taking your pump off, no worries! Just pause your pump and put it somewhere safe. When you’ve finished your exercise, take a BG reading, put your pump back on and unpause it.
Yes and no. A little dip? No sweat! But your Kaleido pump can’t function in water deeper than 1 metre. If you’re planning on swimming or diving deeper than that, you’ll need to pause and remove your pump first. About to jump into a bath or shower? The water depth shouldn’t be a problem, but you will need to keep an eye on the water temperature. We advise that you pause and remove your pump first, rather than expose it (and your insulin!) to high temperatures.One more thing to remember – being in the water might mean you’ll miss any alerts or alarms that your pump might give out, so just be careful and keep this in mind while you swim or bathe.In normal temperatures, your Kaleido pump can operate at altitudes of up to 3048 metres (that’s 10,000 ft). However, extreme altitude, temperatures or atmospheric conditions may affect your pump’s performance, so keep this in mind, take care and always have other means of insulin therapy with you when doing any activities at extreme altitudes or temperatures.Oh, and send us a photo while you’re up there!230 FAQsWhat about water? Can I wear my pump if I go swimming? Or if I’m in the bath?WARNINGYour pump is not suitable for use while scuba diving or when using high diving boards.WARNINGYour pump is not suitable for use in hot tubs – extreme temperatures can adversely affect your insulin.WARNINGIf your pump has been dropped, make sure you examine it carefully for cracks or signs of damage before you take part in any water-based activities.WARNINGNever expose your Kaleido handset or charging dock to water.What about high altitudes?Yes, you can! Aeroplane cabins are pressurised, so your pump will continue to deliver your insulin while you’re up in the air – no trouble. Most airlines will ask you turn your electronic appliances off during take-off and landing, but Kaleido uses a low energy wireless connection to connect your pump to your handset, so you shouldn’t have any issues at all – in fact, most airlines won’t even bat an eyelid. Airline restrictions can change over time though, so you might want to contact your airline in advance to check their specific guidelines.Airport security checks can sometimes be a bit more tricky. But don’t worry - if you’re prepared, they can be hassle-free. It’s a good idea to ask your Healthcare Provider for a letter to confirm that you’re wearing your Kaleido and carrying insulin for medical purposes. When it’s time to go through the security scanners, the scanners won’t cause your pump or handset any damage, though you might want to pause and remove your pump and send it though the hand luggage scanner instead – but that’s completely up to you. Again, this is something that you can have a chat to your airline about in advance if you want to. When you travel, it pays to be prepared, so make sure you take plenty of supplies with you, as well as another form of insulin therapy, just in case.Hmm, you’ve got us there... we’re gonna need some time to think that through!231FAQsI need a holiday! Can I wear my pump on aeroplanes?WARNINGIf you travel to a different time zone, the time and date on your handset will NOT automatically update. Always ensure that you change the time and date on your handset to account for the difference in time zones. Get in touch with your Healthcare Provider for advice on when and how to go about making these adjustments.WARNINGPlease consult your Healthcare Provider for more information about insulin therapy when travelling.Would you rather fight one horse-sized duck or a hundred duck-sized horses?
Technicalinformation
Technical information234 Technical informationTechnical specificationsPrepare to be wowed! Here’s what your Kaleido is capable of:SpecificationOperational and storage temperature rangeOperational and storage humidity rangeOperational and storage pressure rangeDimensionsWeightIngress protectionBatteriesBattery lifeService lifeAlarm volumeWireless radioWireless frequencyDelivery accuracyMaximum infusion pressure at occlusionMaximum time to occlusion alarmBolus volume generated at occlusionMaximum delivery under single fault conditionCharger power inputCharger power outputSystem memoryAdministration sets were used for all tests performed under EN60601-2-24Description41 - 98.6°F15 - 93% RH non-condensing0.7 - 1.06 barPump: 12.5 mm x 50 mm x 35 mmHandset: 9 mm x 107 mm x 50 mmCharging dock: 15 mm x 60 mm x 70 mmPump: 19 gHandset: 60 gCharging dock: 13 gPump: IP68 (dustproof and waterproof up to 1m                   for up to 1 hour)Handset: Keep dryCharging dock: Keep dryPump: 260 mAh rechargeable lithium polymerHandset: 550 mAh rechargeable lithium polymerPump: Over 3 days on a full chargeHandset: Approximately 2 days at typical usage                          on a full chargePump: 4 years’ useHandset: 4 years’ use> 50 dBBluetooth® Low EnergyClass 3 transmitter with a peak power of 1 mW2.4 GHz±5% in all operating conditions1 bar1 hour at a basal rate of 1 U/hr 20 hours at a basal rate of 0.05 U/hr< 0.5 U0.05 U100 - 240 V ac,  50/60 Hz5V dcThe system memory is retained for 30 days following  switch offKaleido insulin cartridge (long)235Technical informationPump accuracyTypical insulin delivery accuracy for the Kaleido pump. Tested according to IEC 60601-2-24 at a basal rate of 1 U/hr, showing an overall error of -1.0%.WARNINGThe accuracy of your system is dependent upon it being used correctly and in accordance with your training and the instructions for use provided in the Kaleido Guidebook.
Guidance and Manufacturer's Declaration – Electromagnetic EmissionsKaleido is intended for use in the electromagnetic environment specified below. Any customer or user of the Kaleido system should ensure that it is only used in conditions such as these.Emissions test CompliancelevelElectromagnetic environment — guidanceRF Emissions CISPR 11 Group 2 The Kaleido system MUST emit electro-magnetic energy in order to perform its intended function. Nearby electronic equipment may be affected.RF emissions CISPR 11 Class B The Kaleido system is suitable for use in all establishments, including domestic establishments and those directly connected to the public low-voltage power supply network that supplies buildings used for domestic purposes.Harmonic emissions IEC 61000-3-2Class BVoltage fluctuations / flicker emissions IEC 61000-3-3Complies236 Technical informationGuidance and Manufacturer's Declaration – Electromagnetic ImmunityKaleido is intended for use in the electromagnetic environment specified below. Any customer or user of the Kaleido system should ensure that it is only used in conditions such as these.Immunity test IEC 60601 test levelCompliance levelElectromagnetic environment — guidanceElectrostatic discharge (ESD)IEC 61000-4-28 kV contact15 kV air8 kV contact15 kV airFloors should be wood, concrete or ceramic tile. If floors are covered with synthetic material, the relative humidity should be at least 30 %.Electrical fast transient/burstIEC 61000-4-4± 2 kV for power supply lines± 1 kV for input/output linesKaleido is suitable for use in all establishments, including domestic establishments and those directly connected to the public low voltage power supply network that supplies buildings used for domestic purposes.SurgeIEC 61000-4-5± 1 kV line(s) to line(s)± 2 kV line(s) to earthVoltage dips, short interruptions and voltage variations on power supply input linesIEC 61000-4-11<5 % UT(>95 % dip in UT) for 0,5 cycle40 % UT(80 % dip in UT) for 5 cycles70% UT(30 % dip in UT) for 25 cycles<5 % UT (>95 % dip in UT) for 5sPower frequency (50/60 Hz)magnetic fieldIEC 61000-4-8If wireless communications are adversely affected by electromagnetic interference, move the handset and pump closer together or move to a different location.NOTE: UT is the a.c. mains voltage prior to application of the test level.237± 2 kV for power supply lines± 1 kV for input/output lines± 1 kV line(s) to line(s)± 2 kV line(s) to earthKaleido is suitable for use in all establishments, including domestic establishments and those directly connected to the public low voltage power supply network that supplies buildings used for domestic purposes.Kaleido is suitable for use in all establishments, including domestic establishments and those directly connected to the public low voltage power supply network that supplies buildings used for domestic purposes.3 A/m 0.3 A/mTechnical information
Guidance and Manufacturer's Declaration – Electromagnetic ImmunityKaleido is intended for use in the electromagnetic environment specified below. Any customer or user of the Kaleido system should ensure that it is only used in conditions such as these.Immunity testIEC 60601 test levelCompliance levelElectromagnetic environment — guidancePortable and mobile RF communications equipment should be used no closer to any part of the Kaleido system including cables, than the recommended separation distance calculated from the equation applicable to the frequency of the transmitter.Recommended separation distance:Conducted RF IEC 61000-4-63 Vrms150 kHz to 80 MHzRadiated RFIEC 61000-4-33 V/m80 MHz to 2.5 GHz10 V/mWhere P is the maximum output power rating of the transmitter in watts (W) according to the transmitter manufacturer and d is the recommended separation distance in metres (m).Field strengths from fixed RF transmitters, as determined by an electromagnetic site survey a, should be less than the compliance level in each frequency range b. Interference may occur in the vicinity of equipment marked with the following symbol:238Pd = 0.35Pd = 0.780 MHz to 800 MHz800 MHz to 2.5 GHzRecommended separation distance:Not applicable Not applicableTechnical informationNOTE 1:  At 80 MHz and 800 MHz, the higher frequency range applies.NOTE 2:  These guidelines may not apply in all situations. Electromagnetic propagation is    affected by absorption.a Field strengths from fixed transmitters, such as base stations for radio (cellular/cordless) telephones and land mobile radios, amateur radio. AM and FM radio broadcast and TV broadcast cannot be predicted theoretically with accuracy. To assess the electromagnetic environment due to fixed RF transmitters, an electromagnetic site survey should be considered. If the measured field strength in the location in which the Kaleido system is used exceeds the applicable RF compliance level above, the Kaleido system should be observed to verify normal operation. If abnormal performance is observed, additional measures may be necessary, such as re-orienting or relocating the Kaleido system.b Over the frequency range 150 kHz to 80 MHz, field strengths should be less than 3 V/m.239Technical information
Recommended separation distances between portable and mobile RF communications equipment and KaleidoKaleido is intended for use in an electromagnetic environment in which radiated RF disturbances are controlled. The customer or user of the Kaleido system can help prevent electromagnetic interference by maintaining a minimum distance between portable and mobile RF communications equipment (transmitters) and their Kaleido system, as recommended below according to the maximum output power of the communications equipment.For transmitters rated at a maximum output power not listed above, the recommendedseparation distance d in metres (m) can be estimated using the equation applicable to the frequency of the transmitter, where P is the maximum output power rating of the transmitter in watts (W) according to the transmitter manufacturer.NOTE 1:  At 80 MHz and 800 MHz. the separation distance for the higher frequency      range applies.NOTE 2:  These guidelines may not apply in all situations. Electromagnetic   propagation is affected by absorption and reflection from structures,   objects and people.Rated maximum output power of transmitter inWSeparation distance according to frequency of transmitter in m150 kHz to 80 MHz 80 MHz to 800 MHz 800 MHz to 2.5 GHz0.010.11101002400.12 0.04 0.070.37 0.11 0.221.17 0.35 0.703.70 1.11 2.2111.70 3.50 7.00d = 1.17 Pd = 0.35 Pd = 0.7 PTechnical informationDeclarations and statements241Medical electrical equipment needs special precautions regarding EMC and needs to be put into service according to the EMC information provided in this document. Kaleido contains a radio transmitter and receiver intended to be worn on your body. It is designed not to exceed the limits for exposure to radio waves (radio frequency electromagentic fields) recommended by the international commission on non-ionising radiation protection (ICNIRP). These limits include a substantial safety margin designed to assure the safety of all persons, regardless of age and health. The radio wave exposure guidelines use a unit of measurement known as the Specific Absorption Rate, or SAR. The SAR limit for a body worn mobile device is 2  W/kg. Kaleido uses a low powered standard technology for radio communication operating in the frequency band from 2.402 to  2.48 GHz. Due to the very low output power (typically 0.35 mW), the radio wave exposure from Kaleido is far below the established limits.Other radio equipment may interfere with your Kaleido system, even if that other equipment complies with CISPR emission requirements. Radio devices should be kept at least d (as calculated in the tables) away from Kaleido. Each of your Kaleido products has a unique serial number which helps us identify important information like when it was made. For your Kaleido pumps and handset, this information also includes details of the version of Kaleido software your products run on. This information is securely held for you by ViCentra.Technical information
242 Technical informationHow to contact Kaleido’s manufacturerManufacturer:             ViCentra BVAddress:             Kanaalweg 17 b2              3526 KL Utrecht              NetherlandsTelephone:             +31 (0) 88 3232 871Email:               Kaleido@ViCentra.comWebsite:             www.ViCentra.com About your Kaleido GuidebookDocument number:    100233-01Issue date:            October 31, 2017Print date:            XXX243Kaleido®, Kaleido Care® and ViCentra® are registered trademarks of ViCentra BV.The Bluetooth® word mark and logos are registered trademarks owned by the Bluetooth SIG, Inc. and any use of such marks by ViCentra BV is under license. Other trademarks and trade names are those of their respective owners. Humalog® is a registered trademark of Eli Lilly and Company.NovoRapid® is a registered trademark of Novo Nordisk A/S.Trademark informationTechnical informationFCC warning statement •  This device complies with Part 15 of the FCC Rules. Operation is  subject to the following two conditions:  1) This device may not cause harmful interference, and 2) This device must accept any interference received, including         interference that may cause undesired operation. •  This equipment complies with FCC radiation exposure limits set forth for an uncontrolled environment. End users must follow the specific operating instructions for satisfying RF exposure compliance.  This transmitter must not be co-located or operating in conjunction with any other antenna or transmitter. •  Changes or modifications not expressly approved by the party  responsible for compliance could void the user’s authority to  operate the equipment.
WarrantyHardware warrantyIn addition to the user’s rights under applicable mandatory law ViCentra® B.V. (“ViCentra®”) warrants the Kaleido® Hardware against defects in materials and workmanship for the period of 4 (four) years from the original date of shipment of the Hardware to the original end user (the “Warranty Period”). During the Warranty Period, ViCentra® will replace any defective Kaleido® Hardware, subject to the conditions and exclusions stated herein. Throughout this warranty the words “Kaleido® Hardware” shall comprise a Kaleido® insulin pump, a Kaleido® handset, a Kaleido® infusion set inserter, a Kaleido® insulin pump charging dock, a Kaleido® connection cable and a Kaleido® power adaptor as supplied in the Kaleido® Starter Kit. The term “Hardware” shall mean one or more items of Kaleido® Hardware.If, during the warranty period, the Hardware should fail because of a defect in material or workmanship, the faulty item may be returned to ViCentra® and ViCentra® will, at its discretion, either repair or replace the same Hardware with a new or recertified Hardware, at ViCentra®’s, option, without charge to the end user. In certain circumstances and at its sole discretion, ViCentra® may instead elect to refund all or a portion of the purchase price of the Hardware to the end user.Freight and transportation charges, where applicable, incurred in shipping Hardware to be repaired or replaced under this limited warranty will be paid by ViCentra®. In the event Hardware is replaced or repaired under this warranty, the Warranty Period shall not be extended. In the event ViCentra® elects to provide replacement Hardware prior to receipt of the original Hardware, you must return your original Hardware to ViCentra® upon receiving the replacement Hardware. In the event it is not returned, this warranty shall be void and the user will not be entitled to future Hardware replacement or repairs.The warranty is valid only if Kaleido® Hardware is used in accordance with ViCentra® instructions and will not apply to the following:• damage resulting from changes or modifications made to the Kaleido® Hardware by the user or third persons after the date of manufacture;• use with other than approved software and modifications to the Kaleido® software;• damage results from service or repairs performed to any part of the Kaleido® Hardware by any person or entity other than ViCentra® and its authorised representatives;• if a non-Kaleido® insulin cartridge is used with the Kaleido® Hardware;• if a non-Kaleido® infusion set is used with the Kaleido® Hardware;• damage results from a force majeure or other event beyond the reasonable control of ViCentra®; 244 Technical information• damage results from negligence or improper use, including but not limited to improper storage, physical abuse or use outside the ranges specified in the technical data such as excess altitude or humidity; or• cosmetic damage or ‘wear and tear’ including but not limited to scratches not effecting functionality.This limited warranty extends only to the original end user and is not transferable. Any sale, rental or other transfer or use of the Kaleido® Hardware covered by this warranty to or by a user other than the original end user shall cause this warranty to immediately terminate. This warranty only applies to the Kaleido® Hardware as defined above and not to other products or accessories.The remedies provided for in this warranty are the exclusive remedies available in the event of any breach hereof. Except for such remedies, ViCentra®, its suppliers, and its distributors shall not, to the extent permitted by law, be liable for any losses, liabilities, claims, or damages of any kind or nature whatsoever, including, without limitation, any indirect, consequential, incidental, or special damages caused by or arising from a defect of the Hardware.Save as expressly set forth in this limited warranty, all other warranties, expressed or implied, are excluded, including the warranties of merchantability and fitness for a particular purpose.Infusion set and insulin cartridge warrantyIn addition to the user’s rights under applicable mandatory law ViCentra® B.V. (“ViCentra®”) warrants the Kaleido® insulin cartridge and infusion set against defects in materials and workmanship for the period 3 (three) days after the individual insulin cartridge/infusion set sterile packaging has been opened, not to exceed 6 (six) months from the original date of shipment of the insulin cartridge or infusion set to the original end user (the “Warranty Period”). During the Warranty Period, ViCentra® will replace any defective Kaleido® insulin cartridge or infusion set, subject to the conditions and exclusions stated herein. The warranty is valid only if the insulin cartridges and infusion sets are used in accordance with the ViCentra® instructions and will not apply:• if the insulin cartridge or infusion set has been used for more than a single-time use by a single end-user;• if damage results during the improper opening of the sterile package not in conformance with the procedures outlined in the associated instructions for use;• if the sterile package is compromised while in the control of the user by any means other than purposeful opening by the user at the time of intended product use;• if damage results from changes or modifications made to the insulin cartridge or infusion set by the user or third persons after the date of manufacture;245Technical information
• if a non-Kaleido® infusion set inserter is used with the Kaleido® infusion set and insulin cartridge• if damage results from service or repairs performed to any part of the insulin cartridge or infusion set by any person or entity other than ViCentra®;• if damage is caused by use of the insulin cartridge or infusion set with any non-Kaleido® insulin pump;• if damage results from a force majeure or other event beyond the control of ViCentra®; or• if damage results from negligence or improper use, including but not limited to improper storage or physical abuse such as dropping or otherwise.This limited warranty extends only to the original end user and is not transferable. Any sale, rental or other transfer or use of the Kaleido® insulin cartridges and infusion sets covered by this warranty to or by a user other than the original end user shall cause this warranty to immediately terminate. This warranty only applies to the Kaleido® insulin cartridges and infusion sets as defined above and not to other products or accessories.The remedies provided for in this warranty are the exclusive remedies available in the event of any breach hereof. Except for such remedies, ViCentra®, its suppliers, and its distributors shall not, to the extent permitted by law, be liable for any losses, liabilities, claims, or damages of any kind or nature whatsoever, including, without limitation, any indirect, consequential, incidental, or special damages caused by or arising from a defect of the insulin cartridges or infusion sets.Save as expressly set forth in this limited warranty, all other warranties, expressed or implied, are excluded, including the warranties of merchantability and fitness for a particular purpose.Consumables warrantyIn addition to the user’s rights under applicable mandatory law ViCentra® B.V. (“ViCentra®”) warrants the Kaleido® Consumables against defects in materials and workmanship for the period of 6 (six) months from the original date of shipment of the Consumables to the original end user (the “Warranty Period”). During the Warranty Period, ViCentra® will replace any defective Kaleido® Consumables, subject to the conditions and exclusions stated herein. Throughout this warranty the words “Kaleido® Consumables” shall include syringes, needles, body patches, pump patches and alcohol wipes supplied by ViCentra®.If a defect exists, ViCentra®, at its option and to the extent permitted by law will either:1) repair the product at no charge using new or refurbished parts;2) exchange the product with a functionally equivalent product that is new or refurbished; or3) refund the original purchase price. 246 Technical informationThis warranty is available only to the original end user and excludes damage resulting from abuse, accident, modifications or other causes that are not defects in materials and workmanship. The remedies provided for in this warranty are the exclusive remedies available in the event of any breach hereof. Except for such remedies, ViCentra®, its suppliers, and its distributors shall not, to the extent permitted by law, be liable for any losses, liabilities, claims, or damages of any kind or nature whatsoever, including, without limitation, any indirect, consequential, incidental, or special damages caused by or arising from a defect of the consumables.Save as expressly set forth in this limited warranty, all other warranties, expressed or implied, are excluded, including the warranties of merchantability and fitness for a particular purpose.247Technical information
Guidebook

Navigation menu